36
SIT-209 Program Intelligence Operations SIT-209 Cognos Reports User’s Guide March 2017

SIT-209 Program
Intelligence Operations
SIT-209 Cognos Reports User’s Guide March 2017
SIT-209 Cognos Reports User’s Guide
i
C O N T E N T S
Introduction ............................................................................................................................................. 1
Getting Started ......................................................................................................................................... 1
SIT-209 Application Menu Bar ........................................................................................................................ 1
IBM Cognos Connection screen - Public Folders tab ....................................................................................... 2
Working with the IBM Cognos Connection toolbar ........................................................................................ 2
To refresh User’s report listing: ....................................................................................................................... 2
To change the view of User’s current session: ................................................................................................ 3
Working with the Cognos Action toolbar ........................................................................................................ 4
Setting up User’s personal computer for Cognos .......................................................................................... 4
To set User’s default time zone ....................................................................................................................... 4
Running COGNOS Reports for SIT-209 ........................................................................................................... 5
Completing report parameters for Standard reports ...................................................................................... 5
Running Standard reports .............................................................................................................................. 5
To run a Standard Report and save it as a Report View: ................................................................................. 5
Organizing and Viewing Report Output ...................................................................................................... 7
To view report details along with report name: ............................................................................................. 7
To create a new folder for organizing User’s reports:..................................................................................... 9
To move a report to a different folder: ........................................................................................................... 9
To change the order of User’s report listing: ................................................................................................ 10
Working with Standard reports .................................................................................................................... 11
To access Standard reports: .......................................................................................................................... 11
To run a Standard report saved in My Folders: ............................................................................................. 11
To set report parameters for a Standard report saved as a Report View in My Folders: ............................. 11
To set the default output format for User’s report: ...................................................................................... 13
Managing Report Output ........................................................................................................................ 13
Scheduling a Report View ............................................................................................................................. 13
To schedule a single report to run on a regular basis: .................................................................................. 14
To edit a schedule: ........................................................................................................................................ 15
To disable a schedule: ................................................................................................................................... 15
To schedule multiple reports to run on a regular basis: ............................................................................... 15
To email a single scheduled report: .............................................................................................................. 18
To email multiple scheduled reports:............................................................................................................ 20
To change report to another format of User’s choice: ................................................................................. 22

ii
Saving a report to User’s personal computer .............................................................................................. 22
To save a report to User’s personal computer in PDF: .................................................................................. 22
To save a report to User’s personal computer in Excel: ................................................................................ 23
Printing and emailing a report...................................................................................................................... 23
Appendix A: 209 Reports ....................................................................................................................... A-1
Appendix B: SIT Reports .........................................................................................................................B-1
Appendix C: Example Report 1 - View/Print a current 209 ....................................................................... C-1
Appendix D: Example Report 2 - View/Print a previous 209 .................................................................... D-1
Appendix E: Example Report 3 - View/Print a detailed wildfire activity situation report ........................... E-1

SIT-209 Cognos Reports User’s Guide
1
Introduction
This guide explains how to run and schedule reports available in the Situation Report and ICS-209 Applications (SIT-209). Topics in this guide include:
Getting Started
Running IBM® Cognos® Reports for SIT-209
Organizing and Viewing Report Output
Managing Report Output
SIT-209 uses the Cognos business intelligence application to retrieve reports in the SIT-209 applications. To view or print reports, users can select from a list of established reports. These include detailed and summary reports. Examples include completed 209 forms, wildfire activity situation reports, and a range of other reports using either SIT-209 information, or a combination of the two. Users select from a common set of steps and filters to produce a report. See Appendices A and B for a list of all SIT-209 reports.
Getting Started
Users must request an account and receive account access before they can run SIT-209 reports. Either Reports or Data Entry account roles will allow the user to run reports. See the Interagency Situation (SIT) Report User’s Guide (2016) or ICS-209 User’s Guide (2016) for more information.
SIT-209 Application Menu Bar
The SIT-209 Application has four tabs on the menu bar:
Home: Select this tab to logon and logoff of the SIT-209 Application portal.
209: The 209 tab has two choices: Data Entry and Reports. Select Data Entry to create or update an ICS-209. Select Reports to run an ICS-209 Report.
SIT Report: The SIT Report tab has two choices: Data Entry and Reports. Select Data Entry to enter SIT information. Select Reports to run a SIT Report.
Tools: This tab is for users with manager level roles only. Select this tab to manage user accounts,
associate units with dispatch centers, monitor IRWIN log entries, and manage other system maintenance tasks.

2
There are two distinct toolbars that may display on screen, including:
• IBM Cognos Connection toolbar
• Cognos Action toolbar
IBM Cognos Connection screen - Public Folders tab
Working with the IBM Cognos Connection toolbar
After selecting Reports from the 209 or SIT Report tab, the browser opens a new window and displays the IBM Cognos Connection toolbar. The icons and drop-down arrows function in the same way as in other web-based applications.
The following screen capture shows some of the common elements and terminology on the IBM Cognos Connection toolbar as displayed on the SIT Reports folder.
To refresh User’s report listing:
• On the IBM Cognos Connection toolbar, click the Refresh icon.

3
To change the view of User’s current session:
To change the default view for all Cognos sessions see, “Changing User’s default view preference,” in
the section, “Setting up User’s personal computer for Cognos,” later in this guide.
1. On the IBM Cognos Connection toolbar, click the List View icon to view the Standard reports as a list.
2. Click the Details View icon to view the details of the Standard reports. This provides a description of the folder or report.
4
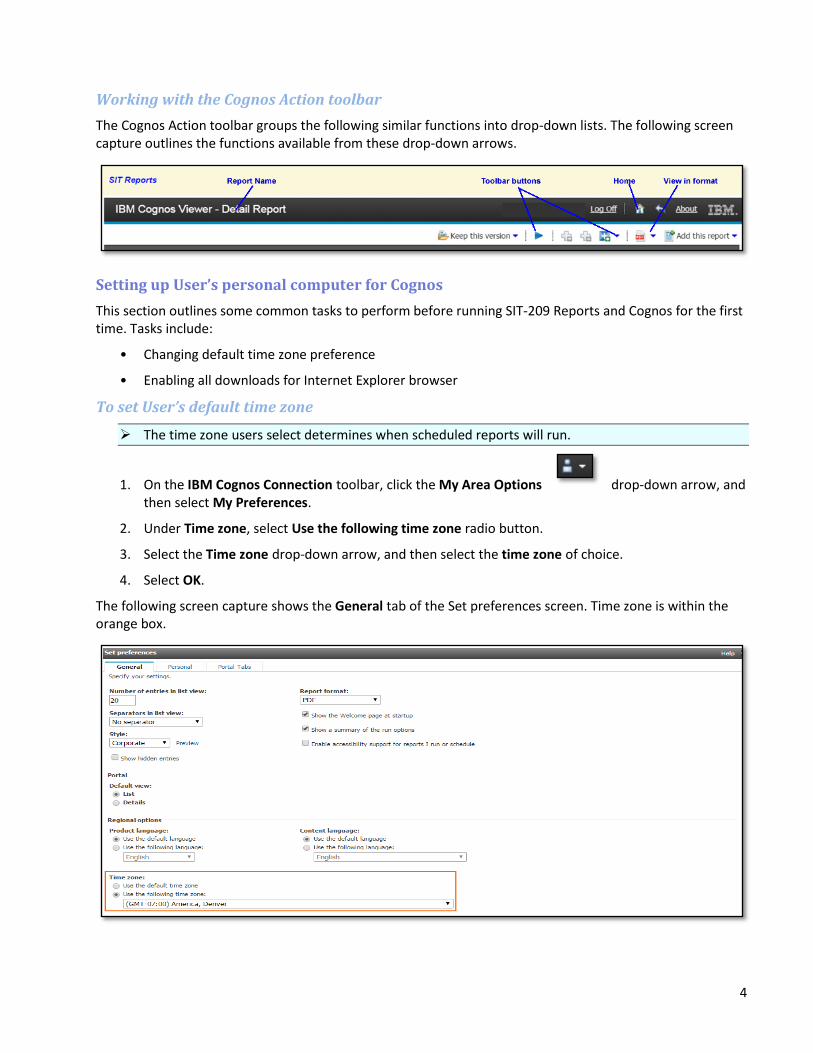
Working with the Cognos Action toolbar
The Cognos Action toolbar groups the following similar functions into drop-down lists. The following screen capture outlines the functions available from these drop-down arrows.
Setting up User’s personal computer for Cognos
This section outlines some common tasks to perform before running SIT-209 Reports and Cognos for the first time. Tasks include:
• Changing default time zone preference
• Enabling all downloads for Internet Explorer browser
To set User’s default time zone
The time zone users select determines when scheduled reports will run.
1. On the IBM Cognos Connection toolbar, click the My Area Options drop-down arrow, and then select My Preferences.
2. Under Time zone, select Use the following time zone radio button.
3. Select the Time zone drop-down arrow, and then select the time zone of choice.
4. Select OK.
The following screen capture shows the General tab of the Set preferences screen. Time zone is within the orange box.
5
Running COGNOS Reports for SIT-209
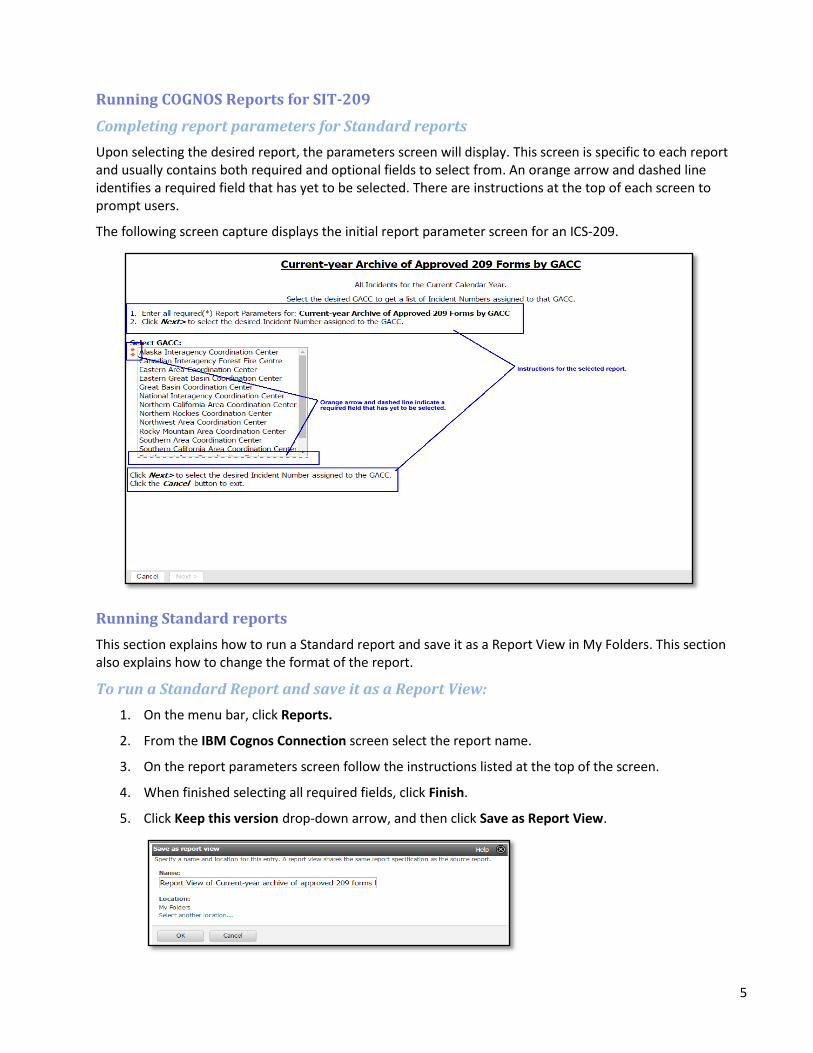
Completing report parameters for Standard reports
Upon selecting the desired report, the parameters screen will display. This screen is specific to each report and usually contains both required and optional fields to select from. An orange arrow and dashed line identifies a required field that has yet to be selected. There are instructions at the top of each screen to prompt users.
The following screen capture displays the initial report parameter screen for an ICS-209.
Running Standard reports
This section explains how to run a Standard report and save it as a Report View in My Folders. This section also explains how to change the format of the report.
To run a Standard Report and save it as a Report View:
1. On the menu bar, click Reports.
2. From the IBM Cognos Connection screen select the report name.
3. On the report parameters screen follow the instructions listed at the top of the screen.
4. When finished selecting all required fields, click Finish.
5. Click Keep this version drop-down arrow, and then click Save as Report View.

6
6. On the Save as report view screen, type the report name in the Name text box.
7. User’s cannot save to the Public Folders, under Location click Select My Folders
8. Click OK.
The screen capture below shows a sample report parameters screen for a Wildland Incident Situation – Summary Report.
The following screen capture shows the resulting report. Use the drop-down arrow to Keep this version of the report.

7
The following screen capture is an example Save as Report View screen for a Standard report.
Under Location select or verify Select My Folders
Click OK
Rename report if desired, click OK
Organizing and Viewing Report Output
This section explains how to perform the following:
View available reports by list or by details
Create a new folder in My Folders
• Move a report to another folder in My Folders
• Change the order of the report listing in My Folders.
To view report details along with report name:
1. On the IBM Cognos Connection toolbar, click My Area Options, and click My Preferences.
The initial setting for the Portal-Default view is “List.” Select the “List View” option to view a list of
available reports. Select the “Details View” option to view available reports along with brief descriptions.

8
2. As shown below, under Default view on the General tab, click Details.
3. Click OK.
The following screen capture shows a detail view of reports available in the 209 Reports folder.

9
The following screen capture shows a detail view of reports available in the SIT Reports folder.
To create a new folder for organizing User’s reports:
1. On the IBM Cognos Connection toolbar, click New Folder icon.
2. On the New Folder Wizard screen, complete the following text boxes:
Name
Description
Screen tip
3. If not already selected under Location, click Select My Folders, and then click Finish.
To move a report to a different folder:
This action may only originate from within My Folders.
1. Click the More… link that corresponds to the report of choice.
2. On the Perform an action screen, click the Move icon or Move… link.
3. On the Select a location screen, click to select the destination folder, and click OK.
Reviewing the screen captures on the following page, clicking Cognos > My Folders will take the user to the second screen where it is possible to select a specific folder.

10
To change the order of User’s report listing:
1. In My Folders, click the Order icon on the IBM Cognos Connection toolbar.
2. On the Order folders and entries screen under Folders-Shown in default order, click to select one or more folder(s) to change the order of, and then click the Add button.
Each folder is added to the bottom of the Shown first column.
3. Under Entries-Shown in default order, click to select one or more reports(s) to change the order of, and then click the Add button.
4. Click the following buttons (one at a time) to change the order of folders and entries as desired, and then click OK.
Add
Remove
Add all
Remove all

11
The following screen capture shows the Order folders and entries screen.
Working with Standard reports
This section explains tasks specific to working with Standard reports that are available in SIT-209. Topics include:
Completing report parameters for Standard reports
Running Standard reports.
To access Standard reports:
To access Standard reports, click the 209 or SIT Report tab and select Reports. The Standard reports for selected application will appear.
To run a Standard report saved in My Folders:
On the My Folders tab, click the report name of choice. As long as users have set their default report values the report will automatically run when selected.
To set report parameters for a Standard report saved as a Report View in My Folders:
Follow these instructions if users would like a report to run the same way each time, without having to reset report parameters each time.
1. On the My Folders tab, click the Set Properties icon corresponding with the desired report.
2. On the General tab, set Run history and Report output versions based on user’s needs.
3. On the Report tab, under Prompt values, deselect Prompt for values and select Set. The report parameters screen appears.
4. Complete the report parameters and click Finish.

12
5. The report will load in Cognos Viewer. From this point forward, when the user selects the report it will run with the pre-set parameters.
The following screen capture shows the General tab screen. The red box indicates the Run history and Report output versions selection.
The following screen capture shows the Report tab screen. The box indicates the Prompt values section.

13
To set the default output format for User’s report:
1. On the IBM Cognos Connection toolbar, select the My Folders tab.
2. On the My Folders tab, click the Set properties icon for that Report View.
3. On the Set properties screen, select the Report tab.
4. Under Report options, select the Override the default values check box.
5. Under Format, click to select the report format of user’s choice. The screen capture below shows the available options.
To accept the default format (HTML) for the report, Users may skip this step.
6. To be prompted for values each time the report is run, select the Prompt for values check box.
7. When finished selecting all required values, click OK.
Managing Report Output
Scheduling a Report View
This section explains how to schedule a Report View from My Folders. Users have the following options for scheduling a Report View:
By Day
By Week
By Month
By Year
By Trigger

14
Determine how often the report is realistically needed before scheduling a report. Remember that
scheduling a report to run too frequently ties up the system, which impacts all others trying to run their reports.
To schedule a single report to run on a regular basis:
1. Run the Standard report of choice, and then save to My Folders.
2. Click the My Folders tab, and then click the Schedule icon for the desired report, shown in the screen capture below.
3. On the Schedule screen, click to select the Frequency tab of choice, as shown below.
Select By Day, By Week, By Month, By Year, or By Trigger
Enter Daily Frequency (Every xx Minute(s)/Hour(s)) between certain timeframes if the user wants the report multiple times a day. It is not recommended to run any report more than once every 2 hours.
Select Start date and time
4. Select Override the default values under Options, shown below.

15
Choose output Formats, shown below.
5. Under Prompt values, click Override default values, and then click the Set link, shown below.
6. On the Report Parameters screen, complete the value(s) for the report and click Finish.
7. On the Schedule screen, complete the information as appropriate for the Frequency selected, and click OK.
To edit a schedule:
1. On the My Folders tab, click the Schedule link that corresponds to the report of choice.
2. On the Schedule screen, change the information as appropriate for that screen, and click OK.
To disable a schedule:
1. On the My Folders tab, click the Schedule link that corresponds to the report of choice.
2. On the Schedule screen, select the Disable the schedule check box, and click OK.
To schedule multiple reports to run on a regular basis:
This task may be done from either the Public Folders tab or the My Folders tab.
Saved schedules appear on user’s My Folders tab.
1. From either the Public Folders or My Folders tab, click the New Job icon.
2. On the New job wizard screen, complete the following information:
Name
Description
Screen tip

16
3. Select My Folders under Location, as shown above. Click Next >.
4. On the Select the steps - New job wizard screen, click Add, shown below.
5. On the New job wizard screen, select the check boxes that correspond to the reports to be scheduled, and then click the Add arrow button shown below.
Use the following pathways to select 209 and SIT reports from the Public Folders
Cognos > Public Folders > FAMWEB Data Warehouse > SIT-209 > 209 Reports Cognos > Public Folders > FAMWEB Data Warehouse > SIT-209 > SIT Reports

17
6. When finished adding all the reports users want to schedule, click OK.
7. On the New job wizard screen shown below, select the check boxes that correspond to the reports
users want to schedule, set the Options and prompt values for each report as appropriate.
8. Under Submission of steps, select the option of user’s choice, and click Next >.
9. On the Select an action - job screen shown below, select Save and schedule, and click Finish.
10. On the Schedule screen, select one of the Frequency tabs.
By Day
By Week
By Month
By Year
Select Start date and time, and Daily Frequency if more than once a day. Then Click OK
18
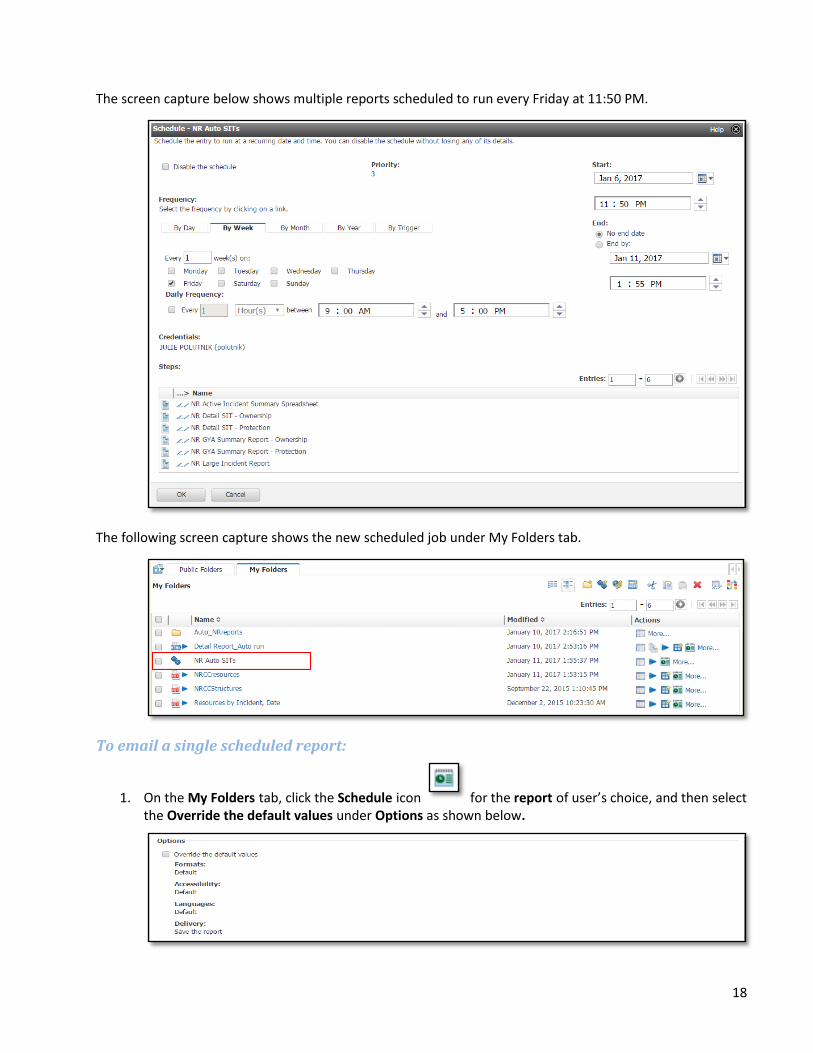
The screen capture below shows multiple reports scheduled to run every Friday at 11:50 PM.
The following screen capture shows the new scheduled job under My Folders tab.
To email a single scheduled report:
1. On the My Folders tab, click the Schedule icon for the report of user’s choice, and then select the Override the default values under Options as shown below.

19
2. Select the report delivery Format (if other than default HTML).
3. Under Delivery, select the Send a link to the report by email, and click Edit the options link.
4. On the Set the email options screen shown below, complete the following information as appropriate.
To
Cc
Subject
Body
Separate email addresses using a semi-colon and no spaces. Use the sample format: name1@service
provider1.com;name2@service provider2.gov; and so on.
5. Uncheck Include a link to the report, user’s without appropriate SIT-209 access won’t be able to access the report.
6. Select Attach the report, click OK.
7. On the Schedule screen, complete the remaining information as appropriate, and click OK.

20
To email multiple scheduled reports:
To print multiple scheduled reports, users must first save them to their personal computer.
1. On the My Folders tab, click the Set properties icon that corresponds to the scheduled group of reports of user’s choice.
2. On the Set properties screen, select the Job tab as shown below.
3. Under Default for all steps, click to select the Set link, shown above.
4. On the Select default options screen, click to select the Report options link shown below.
5. Select Specify default values for all the reports of this job shown below.

21
6. Select desired report delivery Formats, as shown below.
7. Under Delivery, select the appropriate Save the report, print it, or send an email option.
8. Select Send the report by email, and click Edit the email options.
9. On the Set the email options screen shown below, complete the following information as appropriate, click Attach the report, and click OK.
To
Cc
Subject
Body
Separate email addresses using a semicolon and no spaces. Use the sample format: name1@service
provider1.com;name2@service provider2.gov; and so on.
22
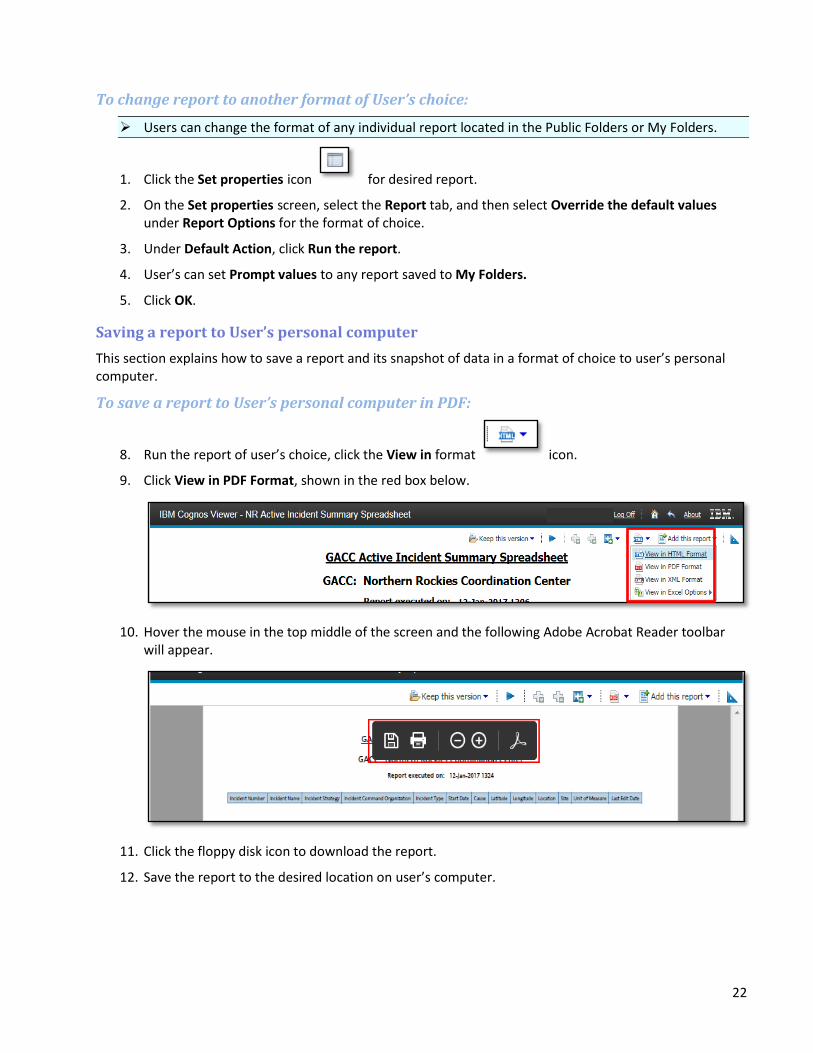
To change report to another format of User’s choice:
Users can change the format of any individual report located in the Public Folders or My Folders.
1. Click the Set properties icon for desired report.
2. On the Set properties screen, select the Report tab, and then select Override the default values under Report Options for the format of choice.
3. Under Default Action, click Run the report.
4. User’s can set Prompt values to any report saved to My Folders.
5. Click OK.
Saving a report to User’s personal computer
This section explains how to save a report and its snapshot of data in a format of choice to user’s personal computer.
To save a report to User’s personal computer in PDF:
8. Run the report of user’s choice, click the View in format icon.
9. Click View in PDF Format, shown in the red box below.
10. Hover the mouse in the top middle of the screen and the following Adobe Acrobat Reader toolbar will appear.
11. Click the floppy disk icon to download the report.
12. Save the report to the desired location on user’s computer.

23
To save a report to User’s personal computer in Excel:
1. Run the report of user’s choice, click the View in format icon.
2. Click View in Excel Options and select Excel format, shown in the red box below.
3. A pop-up message will appear at the bottom of the page as shown below, select desired option:
Open
Save
Save As
Save and open
Printing and emailing a report
Once users have the report saved in the format of choice, use the appropriate application software to perform a wide variety of tasks, including:
Opening the report
Printing the report
Emailing the report

SIT-209 Cognos Reports User’s Guide
A-1
Appendix A: 209 Reports
Briefing Summary for selected current approved 209 forms by GACC
Select current single or multiple 209s for a short briefing summary of incident activity. Incidents with a status of Initial or Update or Incidents marked as Final today are available.
Briefing Summary with Significant Events and Remarks for selected current approved 209 forms by GACC
Select current single or multiple 209s for a medium briefing summary of incident activity. Incidents with a status of Initial or Update or Incidents marked as Final today are available.
Current GACC Incident Overview Spreadsheet
GACC-level incident overview spreadsheet of active approved incidents for a user-specified GACC.
Current single approved 209 forms by GACC
Create/print an ICS-209 report for an Active approved incident with a status of Initial or Update, or an approved incident marked as Final today.
Current-year archive of approved 209 forms by GACC
Create/print an ICS-209 report for any incident within the current calendar year.
GACC Active Incident Summary Spreadsheet
Summarizes all Active incidents and those incidents marked Final today for a user-specified GACC.
GACC ICS-209 Priority Report Spreadsheet
User-prioritized summarization of all Active incidents and those incidents marked Final today for a user-specified GACC
GACC YTD Incident Summary Spreadsheet
Summarizes all Approved incidents YTD for a user-specified GACC.
Incident Change Summary
Run the Current Approved Incident 209 Reports by GACC for Activity Change. Select from Incidents with a status of Initial or Update or Incidents marked as Final today.
Land Management Unit Summary Spreadsheet
Creates a summary spreadsheet of ICS-209's for a given Incident Type (or All), GACC, and Land Management Unit.
Multiple current approved 209 forms by GACC
Create/print multiple ICS-209 reports for Active approved incidents with a status of Initial or Update, or an approved incident marked as Final today.
National GACC Report of Active Wildfires
Lists all Active wildfire incidents sorted by GACC, State, Unit ID, and Incident Name.
Significant Incident Summary Spreadsheet by GACC

A-2
Summary spreadsheet of active approved incidents for a user-specified GACC. Summarizes those incidents involving 100+ acres or an IMT Type of 1 or 2.
SIT-209 Cognos Reports User’s Guide
B-1
Appendix B: SIT Reports
Detail and Summary report Schedule folder
Folder containing Detailed, GACC Fire Danger, Large Incident, Planned RX, Summary and Special Area Reports than can be scheduled for most current report.
National IMSR folder
Folder containing all the SIT National IMSR Reports, including the "AutoSIT" Report.
National PAO Reports folder
Folder containing all the SIT National PAO Reports.
National Weekly Fire Activity folder
Folder containing all the SIT National Weekly Fire Activity reports.
Special Area Reports folder
Folder containing all SIT Special Area Reports.
Detail Report
Wildland Incident Situation - Detailed Report. Report can be run for any combination of Geographic Area, Dispatch Office (including "Select All"), Protection/Ownership, and Select/Significant Large Incidents (ICS-209's) on a specified Report Date.
GACC Fire Danger Report
GACC Fire Danger Report - Lists all Units within a specified GACC that are in High, Very High, or Extreme fire danger on a specified Report Date.
GACC On-call Report
GACC On-call Report - Lists on-call information for Dispatch Offices within a specified GACC on a specified Report Date.
Large Incident Report
Large Incident Report. Report can be run for any combination of Geographic Area, Dispatch Office (including "Select All"), Protection/Ownership, and Select/Significant Large Incidents (ICS-209's) on a specified Report Date.
Planned Rx Report
Planned Rx Fire Report - Lists information about Rx burns within a specified GACC or single Dispatch Office within a GACC on a specified Report Date.
Summary Report
Wildland Incident Situation - Summary Report. Report can be run for any combination of Geographic Area, Dispatch Office (including "Select All"), Protection/Ownership, and Select/Significant Large Incidents (ICS-209's) for a specified Report Date.

D-1
Appendix C: Example Report 1 - View/Print a current 209
1. On the menu bar, click 209, click Reports.
2. Click Current single approved 209 forms by GACC.
Tip: If list of reports does not appear, click IBM Cognos Connection Refresh icon and screen should
refresh.
3. Select the GACC (Geographic Area Coordination Center) where incident occurred. Click Next > on the bottom of the screen.

D-2
4. Select the incident in the Select ICS-209 box. A reference table appears listing all active incidents. Click Finish. The most recent 209 (initial, update or final) is generated in the default html format.
Tip: For past 209’s, run the report Current-year archive of approved 209 forms by GACC (see
example 2)
5. To print, select the View toolbar icon drop-down, select View in PDF Format.
Tip: Reports can be generated in any of the above formats.
6. Print pdf. The pdf tool menu appears near the top of the document.
7. Click the printer icon to print.
Tip: For printing tips or troubleshooting, see Troubleshooting in Online SIT-209 User Guide, hyperlink
https://gacc.nifc.gov/predictive_services/intelligence/niop/programs/sit_209/Help/index.htm Tip: If the pdf menu does not appear, hover near the top of the document to make it reappear.

E-1
Appendix D: Example Report 2 - View/Print a previous 209
1. On the menu bar, click 209, click Reports.
2. Click Current-year archive of approved 209 forms by GACC.
Tip: If list of reports does not appear, click IBM Cognos Connection Refresh icon and screen should
refresh.
3. Select the GACC (Geographic Area Coordination Center) where incident occurred. Click Next on the bottom of the screen.

E-2
4. Select the incident in the Select Incident Number box, click Next >.
5. Select the desired ICS-209 from the Select the ICS-209 box. Users may select multiple 209s by holding down the Ctrl key. Click Finish.
10. To print, select the View toolbar icon dropdown, select View in PDF Format.
6. Print pdf. The pdf tool menu appears near the top of the document.
7. Click the printer icon to print.
Tip: For printing tips or troubleshooting, see Troubleshooting in Online SIT-209 User Guide, hyperlink
https://gacc.nifc.gov/predictive_services/intelligence/niop/programs/sit_209/Help/index.htm Tip: If the pdf menu does not appear, hover near the top of the document to make it reappear.

E-1
Appendix E: Example Report 3 - View/Print a detailed wildfire activity situation report
1. On the menu bar, click SIT Report, click Reports.
11. Click Detail Report.
12. Enter all required report parameters – ICS 209, Report Date, Protection or Ownership, and Geographic Area. Click Next.

E-2
8. For GACC Detailed Reports select the default <Select All>. Otherwise select desired Dispatch Office and click Next.
13. Select ICS-209s. When the Significant option was chosen on page one, ICS-209s are auto-selected. Click Finish to view the report.
14. To print, select the View toolbar icon dropdown, select View in PDF Format.
9. Print pdf. The pdf tool menu appears near the top of the document.
10. Click the printer icon to print.
Tip: For printing tips or troubleshooting, see Troubleshooting in Online SIT-209 User Guide, hyperlink
https://gacc.nifc.gov/predictive_services/intelligence/niop/programs/sit_209/Help/index.htm Tip: If the pdf menu does not appear, hover near the top of the document to make it reappear


