146
Large‐Scale Structures Laboratory (LSSL) NEES@UNR S S I I T T E E S S A A F F E E T T Y Y P P L L A A N N September 2011

Large‐Scale Structures Laboratory (LSSL)
NEES@UNR
SSIITTEE SSAAFFEETTYY PPLLAANN
September 2011

NEES@UNR – Site Safety Plan rev. 2.5

NEES@UNR – Site Safety Plan rev. 2.5
Revision History
Revision # Date Description
0 7/20/2004
1 10/15/2008
‐Added multiple sections per Risk Consultants Inc. initial evaluation ‐Added reference to UNR ‐ EH&S websites in some of the revised sections
2 5/10/2009
‐Add a detailed Accident Analysis section ‐Added detailed Job hazard Analysis section ‐Added Blood Borne Pathogens section ‐Add revision history
2.1 6/28/2010
Added details on working in confined space
2.5 9/26/2011
Added details on compressed gas Added hand tools section Added Appendix E: proper use of hand tools

NEES@UNR – Site Safety Plan rev. 2.5

NEES@UNR – Site Safety Plan rev. 2.5
EMERGENCYPHONENUMBERSandQUICKREFERENCEGUIDE
Emergency Number 9‐911 (on‐campus)
Non‐emergency service calls for Reno Police (775) 334‐2121
University Police (775) 334‐COPS [2677]
University Police Main Office (Non‐Emergency) (775) 784‐4013 Office Hours: 8 a.m. to 5 p.m.
Reno Police Department ‐ Non‐Emergency Dispatch: (775) 334‐2121
Sparks Police ‐ Non‐Emergency Dispatch: (775) 353‐2231
Student Heath Center (775) 784‐6598
Environmental Health & Safety (EH&S): For support related to urgent events involving lab materials or environmental releases call
(775) 327‐5040
Facilities Services: Broken pipes, hazards, etc. Staff on‐call evenings and weekends
‐ (775) 784‐8020
Working in the LSSL is a potentially hazardous experience. With the right precautions, it is possible to manage hazards and avoid injuries. It is the responsibility of the user to:
Inform coworkers/staff when performing hazardous tasks and assist them in gathering the necessary protective equipment if they are to remain in the work area;
Secure the work area to prevent any injury to visitors, observers or tour groups; and
Keep visitors a safe distance from the work area. Upon your arrival to your jobsite in the LSSL:
STOP: assess your surroundings; LOOK: for hazards and hazard conditions; LISTEN: investigate sounds that are not typical to your jobsite.
Always ask: “Where are the danger zones?” and “Is this the safest way to do this?” We often create unique and often one‐of‐a‐kind situations, therefore, the dangers we are exposed to are not uniform. Always question your assumptions.
1. Try to eliminate risk/hazard 2. Use safeguarding applications 3. Use signage to warn others 4. Perform safety training 5. Use personal protection
A. In Case of an Injury A primary purpose of this plan is to provide information on how to avoid injuries. However, if an injury should occur in the Large‐Scale Structures Laboratory (LSSL): 1) First Aid kits are available just outside the LSSL Control Room. 2) An emergency eye wash kit is available just outside the LSSL Control Room.

NEES@UNR – Site Safety Plan rev. 2.5
3) Utilize the following Emergency Response If an employee is injured or ill from a work‐related accident and the employee or the active supervisor in the LSSL believes that the condition needs emergency medical treatment, immediately call 911. Always err on the side of caution. If there is any question about the severity of an injury, call 911. If an employee wants 911 called even though the injury may not appear serious, make the call. If immediate or urgent care is needed, it is suggested that the injured person go to the Specialty Health Clinic. It is located at 350 West Sixth Street, Suite 2D in Reno, which is across the street from St. Mary’s Hospital. They do not need an appointment to access medical care at the Specialty Health Clinic. The injured person should tell that they are an employee of the university system. They will have the injured person complete a form necessary to initiate the workers’ compensation claim. The Specialty Health Clinic is open from Monday through Friday from 8‐5. If care is needed after hours or it is an emergency, the injured person can go to any hospital including Renown, St. Mary’s or Northern Nevada Regional 4) Urgent Care If the employee needs immediate medical treatment, but it is not a medical emergency, arrange to transport the employee to the nearest urgent care facility. If the injury is minor and only requires first aid treatment, provide first aid. The employee has a right to seek medical treatment if they wish. If the employee declines medical treatment, and the active supervisor in the LSSL strongly feels that medical treatment is necessary, the supervisor may direct the employee to obtain medical treatment. 5) Reporting Report the injury to acting LSSL supervisor as soon as possible and complete a C‐1 form (Notice of Injury or Occupational Disease). The form is available in Lab Manager’s office. Have the acting supervisor review and sign the C‐1 form and fax it to the BCN Workers' Compensation Office. The form DOES NOT need to be filled out before seeking medical attention. B. In Case of Chemical Spill 1) Small spills that do not immediately threaten waterways, wildlife, or humans, should be
contained by LSSL staff. A spill of a known substance that can be wiped up with one rag or paper towel is ok to handle on your own. For anything bigger call your supervisor. No chemical waste (including oily rags) can go in the trash or sink.
2) Larger spills should be viewed with caution. Take care to warn others in the immediate area of the danger. Contain the spill, if possible, using spill absorbent pads, booms and granular oil absorbent particulates stored in a blue bin down stairs and call the appropriate number listed above.
For further information refer to the “Spill prevention & emergency provision plan” Specific guidance on chemical and radiological hazards can be found in the UNR Chemical Hygiene Plan and UNR Radiation Safety Manual, respectively. Copies of these manuals are available in the LSSL Control Room.

NEES@UNR – Site Safety Plan rev. 2.5
TABLE OF CONTENTS
I ‐ Administrative Safety Plan Elements …………………………………………………………………………. 1 1. Introduction …………………………………..………………………………………………………………….. 1 2. Laboratory Hours ………………………………………………………………………………..…………….. 1 3. Safety Statement ……………………………………………………………………………………………….. 2 4. Statement of Responsibility ……………………………………………………………………………….. 3 4.1. Site Safety Officer ……………………………………………………………………………….. 3 4.2. All Employees, Visitors and Guests ………………………………………………………. 3 4.3. Rights of Laboratory Personnel ……………………………………………………………. 3 5. Laboratory Visitors …………………………………………………………………………………………….. 4 6. Training ……………………………………………………………………………………………………………… 4 7. Safety during Testing …………………………………………………………………………………………. 4 8. Accident Analysis, investigation and record keeping …………………………………………. 5 8.1. Accident Analysis ………………………………………………………………………………… 5 8.2. Reporting Requirements …………………………………………………………………….. 5 8.3. Investigation Process ………………………………………………………………………….. 5 8.4. Filing the Proper Paper Work ……………………………………………………………… 6 9. Safety Meetings ………………………………………………………………………………………………… 6 10. Hazard Communication …………………………………………………………………………………… 6 11. Emergency Response Plan ……………………………………………………………………………….. 7 12. Employee Participation ……………………………………………………………………………………. 7 13. Job Hazard Analysis Plan …………………………………………………………………………………. 7 14. OSHA Action Plan …………………………………………………………………………………………….. 8 15. Remedial Action ………………………………………………………………………………………………. 9 16. Safety Rule Enforcement …………………………………………………………………………………. 9 17. Safety Rules …………………………………………………………………………………………………….. 9 18. Self Audits, Self Inspections ……………………………………………………………………………… 10 19. Safety Staffing ………………………………………………………………………………………………….. 11 II ‐ Universal OSHA‐Mandated Safety Plan Elements ……………………………………………………… 12 1. Blood Borne Pathogen Control ………………………………………………………………………….. 12 1.1. First Aid ………………………………………………………………………………………………. 12 1.1.1. Wounds ……………………………………………………………………………….. 12 1.1.2 Treating bleeding …………………………………………………................... 12 1.1.3. Avoiding infection ………………………………………………………………… 13 2. Safe Handling of Chemical Hazards ……………………………………………………………………. 13 3. Fire and Life Safety ……………………………………………………………………………………………. 15 4. Lockout/Tagout …………………………………………………………………………………………………. 16 5. Personal Protective Equipment ………………………………………………………………………….. 17

NEES@UNR – Site Safety Plan rev. 2.5
III ‐ Conditional OSHA‐Mandated Safety Plan Elements …………………………………………………. 19 1. Compressed Gasses …………………………………………………………………………………………… 19 2. Confined Spaces ………………………………………………………………………………………………… 20 3. Elevated Work …………………………………………………………………………………………………… 21 3.1. Ladders ……………………………………………………………………………………………….. 21 4. Flammables Storage ………………………………………………………………………………………….. 22 5. Equipment Operating Manuals ………………………………………………………………………….. 22 6. Forklifts ……………………………………………………………………………………………………………… 22 6.1. Safe Forklift Operation Rules ……………………………………………………………….. 23 7. Heavy Equipment ………………………………………………………………………………………………. 25 8. Manual Lifting ……………………………………………………………………………………………………. 25 8.1. Best Practices for Lifting ……………………………………………………………………… 25 9. Mechanical Lifting ……………………………………………………………………………………………… 26 10. Machine Guarding ……………………………………………………………………………………………. 27 11. Noise Exposure ………………………………………………………………………………………………… 28 12. Powered Platforms and Vehicle Mounted Work Platforms / Teloscoping Boom Lift ………………………………………………………………………………………………….. 28 13. Power Tools; Fixed and Portable ……………………………………………………………………… 29 14. Hand Tools ………………………………………………………………………………………………………. 32 15. Radiation …………………………………………………………………………………………………………. 32 16. Remote Operations ………………………………………………………………………………………….. 33 17. Respirators ………………………………………………………………………………………………………. 33 18. Scaffolding ……………………………………………………………………………………………………….. 33 19. Temperature Stress …………………………………………………………………………………………. 33 20. Vehicle Exposure ……………………………………………………………………………………………… 35 21. Welding Safety ………………………………………………………………………………………………… 35 Appendix A: Supervisor Accident Investigation Report ……………………………………………….. 39Appendix B: NEES@UNR Self Inspection Checklist ………………………………………………………. 42Appendix C: Personal Protective Equipment (PPE) ……………………………………………………… 43Appendix D: Proper Use of Power Tools and Lab Equipment Activities …………….…………. 46Appendix E: Proper Use of Hand Tools ……………………………………………….………………………. 53

ManagementCommitmenttoSafety As Director I confirm the commitment of the Large‐Scale Structures Laboratory to the safety, health and well‐being of all personnel including faculty, staff, students, and visitors, working in, or visiting the Laboratory. This commitment is in accordance with the campus‐wide safety policies of the University of Nevada Reno an excerpt of which is reproduced below:
“It is a goal of the University of Nevada, Reno, to ensure safe and healthy learning, research, work entertainment, and student living environments for faculty, staff, students and visitors. In support of this policy, the University gives high administrative priority, applies appropriate financial support, and provides professional expertise in the ongoing effort to eliminate or reduce facility and operational hazards that could threaten the health and safety of persons, property or the environment. Along with the highest quality of teaching, research and community service, safety of individuals and protection of the environment are core values of this institution.”
Ian Buckle Professor and Director, Large‐Scale Structures Laboratory
Department of Civil and Environmental Engineering
University of Nevada, Reno/258 Reno, Nevada 89557-0152
(775) 784-6937 office (775) 784-1390 fax

NEES@UNR – Site Safety Plan rev. 2.5 1
I‐AdministrativeSafetyPlanElements
1. INTRODUCTION The Large Scale Structures Laboratory (LSSL) at the University of Nevada, Reno (UNR) includes three biaxial, multiple‐shake‐tables and one 6 Degree‐of‐Freedom shake table which are suitable for conducting research on long, spatially distributed, structural and geotechnical systems. The facility is also capable of testing conventional structural and non‐structural systems by using the tables in large‐table‐mode, and operating them as a single unit. The laboratory also includes a large number if independent actuators that are capable of testing a large array of experimental configurations of various loading conditions. The University of Nevada, Reno – NEES Shake‐Table Equipment site is funded in part by the George E. Brown, Jr. Network for Earthquake Engineering Simulation (NEES) Program of the National Science Foundation under Award Number CMS‐0086624. A Laboratory User is any person working in the Lab on a research project or service‐to‐industry project. It also includes any contractor who may be in the Lab servicing or installing equipment. All Users have a responsibility to know and follow the rules and procedures provided in this document. In this document the term “Laboratory Personnel” and “Safety Staff” refers to the following people:
• Laboratory Director, Ian Buckle (Office is SEM 111) • NEES Site Co‐PI, David Sanders (Office is SEM 110) • NEES Site Operations Manager, Sherif Elfass (Office is SEM 124C) • Senior Laboratory Manager and Safety Officer, Patrick Laplace (Office is HREL
105A) • Research Engineer, Robert Nelson (Office is HREL 105B); and • Development Technicians include Chad Lyttle and Todd Lyttle (Office is HREL
105B) The document also refers to the Active Supervisor. In general, this will be Patrick Laplace. If Patrick Laplace is not available then progression of responsibility will be Robert Nelson, then Chad Lyttle, then Todd Lyttle then Sherif Elfass, then Ian Buckle and then David Sanders. The first available person on the list must be contacted in case of an incident or inspection. In all cases, Site Operations Manager, Sherif Elfass, should be contacted and notified. 2. LABORATORY HOURS Laboratory hours are 7:30 am to 4:30 pm, Monday through Friday, except official university holidays. All work is to stop at 4:00 pm to allow ample time for cleanup. Any user wishing to work after hours, on weekends, or official holidays, must check out a key and get all work pre‐

NEES@UNR – Site Safety Plan rev. 2.5 2
approved by Lab Personnel. There must always be more than one person working in the Lab at all times, including after hours, unless the activity has been designated 'low risk' by Lab Personnel. 3. SAFETY STATEMENT The Large Scale Structures Laboratory (LSSL) is a unique work environment with multiple hazards. Laboratory safety has traditionally been synonymous with chemical safety; however, true laboratory safety is achieved only when all hazards in the laboratory environment are considered. Laboratory safety is much more than a written safety manual and regulations; it is a daily work philosophy that is incorporated into all laboratory activities. Laboratory safety entails identifying and understanding the hazards present in the laboratory, assessing risks associated with those hazards, managing risk through the use of safe work practices and preplanning emergency response actions. The University of Nevada, Reno requires all university personnel including faculty, staff, students and visitors to follow safe working procedures. The UNR Office of Environmental, Health and Safety (EH&S) is the department principally responsible for assisting in the implementation of University workplace health and safety principles and policies. All NEES@UNR personnel are required to comply with UNR EH&S policies and regulations. In addition to the policies and regulations set forth by UNR EH&S, the NEES@UNR Site Safety Plan has been developed to manage laboratory risks so as to permit cutting edge laboratory research while ensuring the health and safety of personnel (including faculty, staff, student, contract employees and visitors). The NEES@UNR Safety Plan is intended to establish a framework for identifying and mitigating workplace hazards, while addressing legal requirements for a formal, written Injury and Illness Prevention Program. This Safety Plan was developed for students, faculty, staff and/or visitors using the George E. Brown, Jr. Network for Earthquake Engineering Simulation (NEES) facility at the University of Nevada, Reno (NEES@UNR). This plan is intended to be a supplement to the UNR EH&S Handbook for all users of NEES@UNR lab facilities. Note that prior to engaging in any activities involving NEES@UNR resources, users must complete a safety orientation session provided by LSSL staff in addition to review of this Safety Plan. In addition, users must sign a form verifying that they have received the safety orientation and understood the material contained in the safety documents. All safety documents are available on line at http://nees.unr.edu. Hard copies of the safety documents and the signed forms will be kept on site in the office of the Lab Manager/Site Safety Officer (HREL 105A).

NEES@UNR – Site Safety Plan rev. 2.5 3
4. STATEMENT OF RESPONSIBILITY 4.1. Site Safety Officer The Safety Officer has the primary authority and responsibility to develop and ensure implementation of a safety plan to ensure the health and safety of the faculty, staff, students, and other visitors to the NEES@UNR Site. This is accomplished by performing the following tasks:
• Analyze work procedures to identify potential hazards and then implement measures to eliminate or control those hazards.
• Communicate work place hazards and safety policies to employees and visitors. • Establish and enforce safe operating procedures for job tasks. • Ensure that Material Safety Data Sheets (MSDS) are present for chemicals used in
the department. • Provide proper safety equipment and personal protective equipment to
employees. • Report work‐related fires, accidents, injuries, near accidents, illnesses, property
damage, and unusual occurrences to both EH&S and the Office of Insurance & Risk Management.
• Encourage prompt reporting of health and safety problems without fear of reprisal.
• Serve as a liaison with EH&S and other campus safety resources on issues the department cannot resolve
• Maintain copies of safety briefing minutes and other safety‐related records • Review self‐audits conducted using the NEES@UNR Safety Self‐Audit Checklist on
an annual basis to asses both compliance with, and effectiveness of the NEES@UNR Safety Plan.
4.2. All Employees, Visitors and Guests Every employee, student, or other person authorized to conduct NEES@UNR activities has the responsibility to comply with all University EH&S and LSSL policies, rules and procedures. These responsibilities include:
1) All safety, health, rules, policies, regulations, procedures and directions will be followed 2) All hazardous conditions will be reported to facility staff 3) Protective equipment will be worn as required 4) No personnel will operate equipment or conduct any procedure without proper training
and authorization 5) All job related injuries or illnesses are to be promptly reported to facility staff. Prompt
and appropriate medical treatment will be sought. 4.3. Rights of Laboratory Personnel Lab Personnel have the right to stop, alter, or refuse any task or operation of any piece of equipment that is being performed by any Lab User.

NEES@UNR – Site Safety Plan rev. 2.5 4
5. LABORATORY VISITORS All visitors must be accompanied by a University host such as a member of the University Administration, Deans Office, Engineering Faculty, Mackay School of Mines, Seismology Laboratory, and Nevada Bureau of Mines. Active research students may also act as hosts. Advance notice of any visit should be given to Lab Personnel, whenever possible. Host must notify Lab Personnel as soon as visit begins. Visitors are not recommended in the basement and only with the express approval of Lab Personnel on each occasion. Keep visitors away from congested areas, especially on test days. Advise visitors of all safety hazards in the Lab. There is no limit to the overall size of a group, but for safety reasons and because the acoustics in the Lab are poor, large groups should be divided into smaller ones with a guide for each group. 6. TRAINING No employee is permitted to operate any piece of equipment without having received the appropriate training. Training in the use of equipment and certain tasks is, for the most part, given by your supervisor. No employee (or student) is permitted to use equipment or materials without training and appropriate documentation. Do not exceed your individual comfort level, if you are unsure of yourself or are not certain of the hazards and proper procedures associated with your tasks – get help from a qualified person. Lab tools and equipment require careful attention. The safety orientation is mandatory for any visitor working in the lab. All Users must attend a safety meeting at the beginning of their project. This meeting will be held for undergraduate and graduate students at the beginning of each semester and in late May for summer projects. 7. SAFETY DURING TESTING During Testing, barriers are to be implemented around hazardous areas. All personnel and visitors are to be informed by lab staff of the situation and how to proceed safely. When green lights are on the main laboratory hydraulic system is pressurized. When amber lights are on, the individual hydraulic systems are active, and can begin motion at any time. When red lights are flashing destructive testing is in progress. During Amber and/or red warnings, do not approach any hydraulic line, shake table, actuator, or test specimen; maintain a minimum of 10‐ft perimeter unless approved by Lab Personnel. All other project work may be limited by Lab Personnel on a test day.

NEES@UNR – Site Safety Plan rev. 2.5 5
8. ACCIDENT ANALYSIS, INVESTIGATION AND RECORD KEEPING 8.1. Accident Analysis The lab manager will keep a safety log. The safety log will include all injuries, property damage incidents, environmental incidents and near misses. Supervisors will investigate all accidents, injuries, occupational illnesses, and near‐miss incidents to identify causal factors or hazards. Appropriate repairs or procedural changes will be implemented promptly by supervisors and followed up to mitigate identified hazards. 8.2. Reporting Requirements The site adheres to Nevada System of Higher Education (NSHE) Workers’ Compensation Policies and Procedures for incident reporting. A copy of the document is available in the Laboratory Manager’s office and/or at http://www.bcn‐nshe.org/downloads/workerscomp/NSHEWCPolicy.7‐11‐07.pdf. For additional information contact BCN‐ Workers’ Compensation at 784‐4394 Serious occupational injuries, illnesses or exposures to hazardous substances must be reported to NSHE BCN (Business Center North) no later than 8 hours after they become known to the supervisors. Supervisors should call the UNR Injury Reporting Hotline immediately after notification at 775‐784‐4394. Supervisors will need to state the name of the injured employee, a brief summary of the incident, the injuries obtained by the employee, and a number where the reporting supervisor can be reached. EH&S will contact OSHA if necessary. Supervisors are responsible for conducting the accident investigation with the assistance of BCN 8.3. Investigation Process After each accident, an investigation and review of the accident will be conducted by the Laboratory Manager. The goal of the investigation is to determine:
1) what UNSAFE CONDITIONS contributed to the accident 2) what UNSAFE ACTS contributed to the accident 3) what MANAGEMENT OR PROGRAM FAILURES caused or contributed to the accident 4) what corrective actions should be taken to prevent a reoccurrence, and 5) what specifically s/he has already done to carry out this corrective action
The investigation will be completed in writing by the acting supervisor in charge at the time of the accident, with review by Laboratory Manager and Laboratory Director. The Incident Report Form (must be filled out for each incident and then a copy is kept by the Laboratory Manager and the Laboratory Director. This should be done within 2 days of the incident. The form is provided in Appendix A and available for download at www.bcn‐nshe.org/downloads/workerscomp/SupervisorAccidentInvestigationReport.pdf Within one week of the incident, a meeting shall occur between the Laboratory Manager, the Operations Manager and the Laboratory Director to determine if any corrective actions are necessary to promote safety and prevent future incidents. The Incident Response Form shall be filed with the Laboratory Manager, the Operations Manager and the Laboratory Director within

NEES@UNR – Site Safety Plan rev. 2.5 6
2 weeks of the incident. A copy shall also be presented to the people involved in the incident. The same form (provided in Appendix A) shall be used. All completed accident investigation forms with the supervisor’s signature should be turned to the BCN office. 8.4. Filing the Proper Paper Work To ensure timely filing of Workers’ Compensation claims, employees must notify supervisors immediately of an injury. The Supervisor must then complete their respective portions of the UNR Employee claim form for Workers’ Compensation Benefits (refer to page 12 of the Worker’s Compensation Policies and Procedures Manual) Forms are available from the HR website at http://www.unr.edu/hr/forms/documents/Workers_Compensation/c‐1.MR.pdf. 9. SAFETY MEETINGS Managers and supervisors will provide time at weekly staff meetings to review safety topics. Safety meetings are intended to: emphasize the importance of completing a task safely, to discuss newly identified hazards or accidents, to analyze historical accident trends to predict and prevent future accidents. Status reports will be given on safety inspections, hazard mitigation projects, accident investigation results, and previous employee suggestions. Attendance and topics of discussion shall be recorded. 10. HAZARD COMMUNICATION The site adheres to UNR EH&S written hazard communication program which can be downloaded at http://www.ehs.unr.edu/Website/LinkClick.aspx?fileticket=BUIx0CYS1yo%3d&tabid=61&mid=484. The goals of Hazard Communication are to:
a. Help ensure a healthy and safe work experience at NEES@UNR, b. Reduce the risks involved in working with hazard materials, c. Provide vital information to employees about the hazards of substances in the
workplace, d. Reduce the incidence and cost of illness and injury resulting from hazardous substances, e. Encourage the use of substances which are less toxic, and f. Encourage a reduction in the volume of hazardous substance.
A site specific industrial chemical inventory is also maintained by LSSL staff and is located in the front page of the MSDS binder. Note that no laboratory grade chemicals are stored at this site.

NEES@UNR – Site Safety Plan rev. 2.5 7
11. EMERGENCY RESPONSE PLAN Planning ahead for disasters is critical for being able to recover safely and quickly. Understand and know the location and proper use of fire extinguishers, fire alarms, emergency exits, telephones, eyewash fountains and safety showers. It is the responsibility of the Site Safety Office to provide for periodic training of staff members and periodic practice and drills. Personnel should be prepared to respond safely to the following:
• Fire or evacuation alarm; • Accidental spills or release of radioactive, chemical or other toxic materials; • Injury of a co‐worker; • Earthquake; and • Other natural or man‐made disaster.
UNR EH&S has developed an emergency response plan for all University Employees, and other visitors and participants on site. The plan is available for download at http://www.unr.edu/emergency/guide/. Copies of the plan can be obtained from the Safety Officer or by contacting the EH&S office at (775) 327‐5040. All staff and visitors at the site will comply with the emergency response plan as directed by EH&S. 12. EMPLOYEE PARTICIPATION The safety practices described in this plan apply to all University personnel who are working and utilizing the NEES@UNR facility equipment, including faculty, staff, students and visitors, and require everyone to follow safe working practices and procedures. All full time on site personnel will attend a weekly safety briefing where any issues and problems the previous week are discussed, and solutions implemented where appropriate. At the same meeting, all personnel are alerted to activities that may present new safety concerns. Any staff member is authorized to immediately stop all operations should any practices be deemed unsafe. Resumption of activity will occur only when concerns are addressed and only with the explicit approval from facility staff or director. Employees can help with inspections, investigations, hazard analysis, and safety. Employees are highly encouraged to provide safety suggestions to any of the laboratory staff and faculty. 13. JOB HAZARD ANALYSIS PLAN Where appropriate, a formal Job Hazard Analysis (JHA) should be done. However, personal protective equipment should always be used to protect workers from hazards, with or without formal JHA.

NEES@UNR – Site Safety Plan rev. 2.5 8
The Job Hazards Analysis process consists of: 1. Identifying Workers for whom a JHA will be completed; 2. Identifying the scope of the Work to which the JHA will apply; 3. Collecting Work‐related data to enable identification of tasks, hazards, and controls
making up the work; 4. Preparing a Hazards Profile consisting of the tasks, hazards and controls; 5. Holding a JHA Development Work Session between the Worker and Safety Officer to
discuss, modify (if necessary) and validate the Hazards Profile. The EH&S maintains a comprehensive job hazard analysis catalogue (called Job Safety Analysis) that can be found at (http://www.ehs.unr.edu/website/ProgramAreas/OccupationalSafety/FacilitiesJSAListing/tabid/241/Default.aspx). Specific job hazards identified at the site are listed below.
Hazard Response
Overhead crane operation All personnel in the vicinity will wear hardhat
Overhead crane accident Operators must be trained and all personnel must wear hardhats
Chemicals, dust, dirt, grease, heat, cold Use appropriate PPE
Loud noises from power tools/equipment/other
Wear ear protection
Operating power tools, Use appropriate PPE
Entanglement with a machine or rotating or moving part
No loose clothing, long hair tied back
Flammable, ingestion, chemical burns Hazardous materials stored in cabinets
Accidental chemical exposure MSDS Sheets available
Forklift accident/injury Must be trained and certified annually
Other heavy equipment accident/injury Only trained and certified operators allowed
LSSL manlift accident Operators must be trained. Hardhats are not required.
Electrocution hazard GFI, inspections of electrical wiring with respect to contact with water
More specific JHAs shall be discussed during the safety orientation if needed 14. OSHA ACTION PLAN The University EH&S will act as a liaison with all regulatory agencies inspecting campus facilities. NEES@UNR staff should immediately contact the Safety Officer, Operations Manager or PI if contacted by OSHA compliance officer. If no one is available, staff member should contact EH&S hotline at (775) 327‐5040 for instructions. Additional EH&S contacts can be found at the EH&S web site

NEES@UNR – Site Safety Plan rev. 2.5 9
(http://www.ehs.unr.edu/website/AboutUs/StaffContacts/tabid/55/Default.aspx). NEES@UNR staff should not respond to OSHA questions or requests directly. 15. REMEDIAL ACTION Any identified safety hazard will receive immediate attention from site staff. If necessary, all work will cease until the hazard has been remediated. The hazard will be discussed at the weekly meeting, and if the solution is temporary, a permanent solution will be determined and implemented. Weekly updates on the progress will occur and logged in the weekly minutes until corrective action has taken place. 16. SAFETY RULE ENFORCEMENT NEES@UNR expects all faculty and staff to abide by established workplace safety rules and regulations. These rules and regulations follow federal, state and UNR rules and regulations governing workplace safety. Members of the NEES@UNR community are expected to conduct themselves with due care at all times, and to abide by established workplace safety rules and regulations. It is the responsibility of all members of the NEES@UNR community to enforce safety rules and regulations. Violation of safety rules and regulations is a serious offense and may endanger the life of the violator and the lives of others. Employees and supervisors will be held accountable for violations and action may be taken which includes, but is not limited to:
1. Written and/or (documented) verbal warnings for minor violations. 2. Evaluation of the need for (re)training. 3. Further action for flagrant or repeated violations.
17. SAFETY RULES Safety orientation for all personnel is required before participation in any work at the Large Scale Structures Laboratory (LSSL) or any subsequent facility. Documentation verifying receipt of LSSL safety and cleanliness rules is required from all personnel upon orientation completion. General Facility Safety
a. Authorized personnel only b. No horseplay c. Rules must be followed at all times d. Use appropriate PPE and clothing while operating the following:
i. Hardhat (when operating crane) ii. Power tools and some hand tools

NEES@UNR – Site Safety Plan rev. 2.5 10
iii. Welders and cutting torches iv. Any other items warranting the use of PPE
e. Steel toe work boots are required while performing any work in the LSSL f. Training is required for ALL LSSL power tools and equipment
Hazardous Materials
a. Hazardous materials are to be kept in appropriate cabinets b. MSDS sheets are available for all hazardous materials with the safety officer
Operation of LSSL heavy equipment
a. Forklift operation – operators must be trained by EH&S program and have the certificate on file with the safety officer
b. Overhead crane operation – operators must complete LSSL training program and pass a written exam. Note: hard hats are mandatory while near a crane in operation.
c. Man Lift Operation ‐ operators must be personally trained buy LSSL staff and must be on record as a qualified operator with the safety officer
Facility Cleanliness
a. Attention to overall facility cleanliness promotes environmental awareness which is directly related to everyone’s safety!
Electrocution Hazard
a. Whenever electrical cords are used, frequent self inspection is required to ensure they are not in contact with water or other potential shorting hazards
18. SELF AUDITS, SELF INSPECTIONS UNR EH&S performs biannual safety inspection/audit of the LSSL and surrounding grounds, as well as yearly fire code enforcement. A record of any violations is made available to the LSSL Director and staff. Any areas identified as needing attention are brought up during the weekly safety meeting. Results of the biannually walk through and safety inspection/audit are logged and kept with Site Safety Officer and can be made available upon request. On a monthly basis, the designated safety officer will conduct or assign staff to conduct a self inspection. These inspections will evaluate the condition of all forklifts and cranes according to manufactures recommendations, and will ensure inspection logs are current. All power tools and pertinent hand tools will be inspected according to individual tool safety guidelines and the LSSL hydraulic system will be inspected for leaks and damaged components. A general review will also be performed at this time to insure the LSSL is generally clean, free of tripping hazards, and free of any project specific hazards. Lab Staff should always be on the lookout for any safety hazards in addition to those stated here. The self inspection form is shown in Appendix B. The self inspection form will be updated regularly whenever new items are identified. The completed self inspection checklists will be kept on file by the Lab Manager / Site Safety Officer.

NEES@UNR – Site Safety Plan rev. 2.5 11
No less than twice annually the Lab Director or the Operations Manager will meet with the Safety Officer to evaluate thoroughness of record keeping in regards to inspections, certifications, accident reporting. 19. SAFETY STAFFING EH&S is in charge of and oversees the University laboratory safety committee which includes LSSL. The LSSL Facility Laboratory Manager, Patrick Laplace, is the designated Safety Officer. The Safety Officer is responsible for maintaining the safety records at the facility. The following records and documents specific to the facility are kept on site:
site safety plan
signed forms for recipients of safety orientation
log of trainee on special equipment
signed waivers for any non UNR visiting personnel who are involved in work at the site
monthly self inspection forms
safety walkthrough forms forklift safety training checklist

NEES@UNR – Site Safety Plan rev. 2.5 12
II‐UniversalOSHA‐MandatedSafetyPlanElements
1. BLOOD BORNE PATHOGEN CONTROL No work with human blood products occurs at this facility. In the event human body fluids require clean up due to an injury, only trained personnel are allowed to clean up spills with approved clean up kits. If no trained personnel are present, secure the area and notify the University EH&S department for instructions. You are responsible for keeping your immediate work area clean and sanitary. If you become aware of needs beyond general housekeeping, report your concern to your supervisor. All equipment and working surfaces must be cleaned and decontaminated using sanitizing cleanser after contact with blood or OPIM. If you get blood or other potentially infectious materials in your eyes, nose, mouth, or on broken skin:
1) Immediately flood the exposed area with water and clean any wound with soap and water or a skin disinfectant if available.
2) Report this immediately to your supervisor. 3) Seek immediate medical attention at the UNR Medical Center.
More information regarding UNR policies for blood borne pathogens exposure guidelines can be found at the following link: http://www.hhs.unr.edu/osn/docs/Blood_Borne_Pathogen_Exposure_Guidelines.doc 1.1. First Aid This section will familiarize you with guidelines for treatment of minor injuries and for the application of first‐aid for more serious injuries in the period of time before professional medical staff are able to treat the injured person 1.1.1. Wounds A wound is caused when a tissue in our body is torn or cut. Types of wounds:
• Incised wounds caused by sharp instruments. These wounds bleed extensively. • Contused wounds caused by crushing. These wounds look bruised. • Lacerated wounds caused by rough surfaces. These wounds bleed less. Wounds
pose two dangers, namely bleeding and infection. 1.1.2 Treating bleeding
a. Press the sides of the wound together. b. Raise the injured part of the body above the heart (only if fracture is not suspected).

NEES@UNR – Site Safety Plan rev. 2.5 13
c. With your palm, gently press a pad bigger than wound until bleeding reduces. d. If bleeding continues, add new pads without removing original pad. e. Bandage firmly but not too tightly.
1.1.3. Avoiding infection
a. The first aid provider must wash own hands thoroughly with soap and water. b. External wounds should be cleaned thoroughly with potable water and should be
dried with sterile gauze. c. Wound should be covered with sterile or dry sterile gauze and bandaged once
bleeding is controlled d. Cotton should not be allowed to be in direct contact with wound. e. Antiseptic cream applied to a wound should not be mixed with water.
2. SAFE HANDLING OF CHEMICAL HAZARDS Chemical Hazards are of utmost concern at the LSSL, both in terms of the health of the employee and the preservation of the environment. A minor spill such as a very small quantity of hydraulic oil should be contained and then reported to your supervisor. Containment includes installation of appropriate barricades to prevent slip‐and‐fall injuries. Inform other employees so that they are not at risk from exposure to the spill. Be familiar with the location of absorbent materials available in the lab to aid in containing minor spills. DO NOT ORDER OR BRING ANY CHEMICAL into the lab without first consulting with lab personnel. You will need to get a copy of the MSDS for our review prior to ordering. Getting rid of unwanted chemicals is very expensive, difficult and time consuming this is a burden you will be responsible for. Protection: Always wear the appropriate protection for the material you are working with. Material Safety Data Sheet ‐ Material Safety Data Sheets (MSDS) for all of the chemicals in use are stored in HREL Building, Room 105 ‐ outside of the control room. Your supervisor can train you on the proper use of MSDS’s and help answer questions. Become familiar with the hazards for each chemical: exposure limits, symptoms of exposure, and necessary protective equipment for use when handling the particular chemical. Only partial information is given below for each chemical in use at the lab. Your supervisor may specify additional protection for your specific applications. The MSDS should be reviewed with each new shipment of chemicals. LSSL staff is responsible for labeling any unmarked chemical containers according to OSHA standards. Monitoring and Prevention ‐ A trained permanent employee is appointed monitor the general conditions and usage. His/Her job is to check for problems. Inform your supervisor of any problems, or in a situation which requires it, call the Environmental Health & Safety at (775) 327‐5040. No employee shall ever use equipment or materials with which he/she is not comfortable. This also means paying attention to your own body and taking symptoms of any exposure seriously. Report any symptoms‐of‐exposure (from any lab chemicals) to the person in charge and promptly discontinue work with suspect chemicals. If symptoms start after work hours, seek medical attention and notify Active Supervisor the next day.

NEES@UNR – Site Safety Plan rev. 2.5 14
Solvents, Flammables, Combustibles ‐ Solvents, Flammables, and Combustibles all present inhalation hazards as well as flammability hazards. All flammables (higher risk of explosion than combustibles) should be stored in the steel cabinet in outside of the Control Room. All solvents and combustibles should be purchased in small enough quantities to be easily and properly stored.
Acetone ‐ Acetone is used to clean steel before gauging. It is extremely volatile, meaning it generates fumes that are both toxic and may impair mental faculties. It can also be absorbed through the skin. Advise other employees in the area when using acetone. Keep cap on the can when not actually pouring the chemical. Return can to the proper cabinet after use. Protection: Nitrile gloves required. Adequate ventilation required. Organic vapor respirator recommended safety glasses or goggles are always required Propane ‐ Propane (forklift fuel) is a flammable compressed with explosive properties. Assure the valve is closed when not in use. Use with caution and keep away from an ignition source. When propane is burned, carbon monoxide is produced. Protection: Adequate ventilation required Hydrocarbon based solvents ‐ Solvents used to clean steel and other equipment at the lab. Consult with lab staff before you purchase and use this class of solvents. Fumes are toxic. As always, Read the MSDS. Protection: Nitrile gloves required. Organic vapor respirator recommended. Safety glasses are required.
Oils and Lubricants ‐ Lubricants are necessary to keep equipment in safe operating condition. In particular, we use motor oil, common grease, low hazard hydraulic oil, special weight oils, and anti‐seize coatings for tools and equipment. The most important thing is to avoid spills and excessive contact with skin. There is a drum for recycling used motor and hydraulic oil. Contact your supervisor for an explanation of how to use this resource. Read the labeling. Protection: Nitrile gloves recommended. Safety Glasses are required Cement & Grout ‐ Unmixed cement and grout are corrosive fine powers. They are most corrosive when in contact with water. Most often when dealing with cement and grout you will be using a bagged, pre‐mixed product. Cement products can irritate respiratory tissues when inhaled. It is crucial that you wear your particulate respirator while batching and mixing. Dry powder or wet grout and cement can burn your skin (chronic and acute exposure can be very damaging to your skin and respiratory tract). For this reason it is important that you have adequate coverage – coveralls, rubber boots and nitrile gloves and particulate respirator. Please note that latex gloves do not protect against cement. The cured mix poses greatly reduced health risks. Extended handling of cured cement products, debris, blocks etc is corrosive as well as abrasive to unprotected hands. NEVER STORE POWERS ABOVE FACE LEVEL (bags, bins, boxes and tubs can be stacked up to a height of 4 feet above the ground). Protection: Nitrile gloves or leather gloves, long sleeved clothing (coveralls), particulate respirator, and safety goggles are required.

NEES@UNR – Site Safety Plan rev. 2.5 15
Wet grout and wet concrete are hazardous wastes. Clean up concrete‐soiled equipment only in the designated outdoor area. Never dump or clean up mixed or un‐mixed materials into a sink or outside drain. As well as contaminating the water draining into the river, cement products will damage pipes. Once concrete is dry it has no safety or environmental hazards and can be discarded as ordinary trash. Admixtures ‐ Admixtures are naturally ‐or chemically‐ produced additives to cement mixes. Some of the admixtures cause the cement hardening process to speed up or slow down and others cause the cement to set harder or softer than what would result from a normal mix. Many of the admixtures are not toxic, but care should be taken when dealing with them. Some admixtures are corrosive and can cause respiratory irritation if inhaled and skin and eyes irritation if there is contact. Also avoid getting the materials on your clothes. Wear particulate mask, safety goggles and nitrile gloves. If you have questions about these materials please contact a lab staff person and read the MSDS. Protection: Nitrile gloves and long sleeved clothing (coveralls), particulate respirator, and safety goggles are required. Epoxy ‐ We use a variety of thermo‐plastics for the gluing of instrumentation as well as in some structural applications. Nitrile gloves and safety glasses should be worn at all times when using this material. Also provide adequate ventilation. Epoxy purchased from a hardware store is commonly listed as a skin sensitizer and eye irritant. However, there many industrial types of epoxy ALWAYS read labels. In case of contact with skin, wash thoroughly with water and soap. Contact your physician if irritation or rash develops. Consult MSDS for further information. Even if you are familiar with a particular product, manufacturers periodically change the labeling: READ the package and consult the appropriate MSDS. Watch for changes. Protection: Nitrile gloves and safety glasses are recommended. Laboratory Dust ‐ Although Lab Dust is largely seen as a nuisance, significant problems may arise with short and long‐term exposure. Over the short term, exposure may cause dry eyes, sneezing, and other similar dust‐related problems. Over the long term, lung problems can arise such as silicosis, a lung disease linked to the intake of rock dust (silica) into the lungs. The proper way to avoid these hazards is to wear particulate respirator. Protection: Particulate respirator recommended. If possible use a vacuum over a broom when cleaning the floor . 3. FIRE AND LIFE SAFETY As a general rule, UNR does not expect its employees to fight fires. Just sound the alarm – pull the fire alarm or call 911(9‐911 from on campus) – and get out of the building as quickly as possible and report to your group’s emergency assembly area. Do not re‐enter the building until you have been notified by the authorities to do so. The purpose of the Fire Extinguisher Safety Program is the inform employees with the general principles of Fire Extinguisher use and the hazards involved with incipient stage fire fighting. The facility has posted safety maps denoting first aid stations, exit routes, fire extinguisher

NEES@UNR – Site Safety Plan rev. 2.5 16
locations, and special hazard areas. The facility is routinely inspected by the City of Reno Fire Marshall for compliance. More details are provided in the Fire Extinguisher Safety Program Handbook that is available in the Laboratory Manager Office and for download from EH&S web site at http://www.ehs.unr.edu/Website/LinkClick.aspx?fileticket=1A4gkqEjyhY%3d&tabid=61&mid=987. 4. LOCKOUT/TAGOUT The site adheres to the EH&S lock out/tag out policy as detailed at their website (http://www.ehs.unr.edu/Website/LinkClick.aspx?fileticket=%2bA9%2fBBM%2f77c%3d&tabid=61&mid=898). The purpose of the Lockout/Tagout (LOTO) Program is to ensure specific practices and procedures to safeguard employees from the unexpected activation or startup of machinery and equipment, or the release of hazardous energy during service or maintenance activities. This program requires that a trained, authorized employee turns off and disconnects the machinery or equipment from the energy source(s) before performing service or maintenance. Site has tagouts and emergency stop switches that are engaged when needed for personnel safety when personnel are working in or near the vicinity of major equipment. All facility staff will be trained on lockout/tagout procedures. The safety officer or a designated authorized staff member will be in charge of tagouts and emergency stop switches when service is required. The following sequence of procedures will be followed during lockout or tagout:
1.1 Notify all employees within the immediate affected area that a lockout or tagout is going to be utilized and the reason why
1.2 If the equipment is operating, shut it down by the normal stopping procedure 1.3 Operate the switch, valve, or other energy isolating device(s) so that the
equipment is isolated from its energy source(s) 1.4 Lockout and/or tagout the energy isolating devices with assigned individual
lock(s) or tag(s) i. Lockout devices and tagout devices are to indicate the identity of the
employee applying the device(s) ii. Following the application of lockout or tagout devices, all potentially
hazardous stored or residual energy shall be relieved, disconnected, restrained, or otherwise rendered safe
1.5 At this point the equipment is considered to be locked or tagged out 1.6 If lockout is the energy control method utilized, the authorized employee is to
keep the key in his/her possession for the duration of the lockout period Before lockout/tagout devices are removed and energy is restored to the equipment, the following steps shall be taken by the employee:

NEES@UNR – Site Safety Plan rev. 2.5 17
1. Inspect the work area to ensure that non essential items have been removed and ensure that machine or equipment components are operationally intact
2. Check the work area to ensure that all employees have been safely positioned or removed
3. Before lockout or tagout devices are removed and before the equipment is energized, affected employees in the immediate area shall be notified that the lockout or tagout device will be removed
5. PERSONAL PROTECTIVE EQUIPMENT Laboratory personnel are required to use Personal Protective Equipment (PPE), when warranted. PPE is selected and used to protect laboratory personnel from hazards and potential hazards that are likely to be encountered. PPE includes all clothing and work accessories. PPE should not be used as a substitute for engineering, work practices and/or administrative controls to protect personnel from laboratory hazards. Details are given in the Personal Protective Equipment Program which is available in the Laboratory Manager Office and at http://www.ehs.unr.edu/Website/LinkClick.aspx?fileticket=ychEDPQczJ4%3d&tabid=61&mid=922 Prior to conducting work requiring the use of personal protective equipment, employees and users shall be trained to know:
• When PPE is necessary • What type is necessary • Employee PPE comfort & fit considerations • How to properly use and wear the PPE • What are the limitations of the PPE • Proper care, maintenance, useful life, and disposal of the PPE
The site maintains the following PPE:
gloves (including chemical resistant gloves)
Hardhat
Safety glasses with side shield Hearing protection Respiratory protection (Dusk masks) Goggles Harness for heights
Hardhats must be worn when
overhead crane operations
working underneath large specimens on the shake tables
whenever conditions warrant as directed by facility staff Protective clothing will be worn whenever conditions warrant. Protective clothing includes leather gloves, chemical resistant gloves, safety shoes, safety glasses, dust masks, goggles.

NEES@UNR – Site Safety Plan rev. 2.5 18
Eye and ear protection must be used when operating shop equipment. Dust masks should also be utilized if conditions warrant. There are many specific laboratory practices that require the use of PPE; these are covered during the safety orientation. Appendix C provides more information on the PPE and their proper use. PPE shall be inspected, cleaned, and maintained at regular intervals so that PPE provides the requisite protection.

NEES@UNR – Site Safety Plan rev. 2.5 19
III‐ConditionalOSHA‐MandatedSafetyPlanElements
1. COMPRESSED GASSES Safety is critical when handling compressed gasses whether used in the process of welding, cutting, or as a fuel source for forklift operations. University EH&S policy and procedures for handling compresses gas cylinders at the facility are outlined at http://www.ehs.unr.edu/Website/LinkClick.aspx?fileticket=eCEmXdN9QdA%3d&tabid=61&mid=870. All personnel who handle any compressed gas cylinders must be trained in the hazards and operation of high‐pressure gas cylinders. This training must include storage, handling procedures, protection of the valves (valve caps or valve protectors), security and tagging / labeling of the cylinders (full or empty), and the authority to move or access any compress gas cylinders. Combustible Materials Separation ‐ Cylinder storage and use locations must be kept clear of all weeds, grass, brush, and trash, as well as any other combustible materials, for a minimum distance of 5 m (15 ft) from all cylinders. Exception: an approved noncombustible barrier, cabinet, or hood may be used instead. Cylinder Transportation ‐ Only standard DOT cylinders will be used for transporting compressed gas. Personnel who are trained to use compressed gases may use standard cylinder carts to transport cylinders within buildings and between adjoining buildings. Carts are preferred, but cylinders weighing 11 kg (25 lb) or less may be hand‐carried. Valve‐protection caps and plugs must be in place during movement of cylinders. Lecture bottles and other cylinders without protective caps must be transported in standard shipping crates, or an equivalent container. Gas cylinders must be transported between non‐adjoining buildings by a person properly trained, licensed, and equipped to transport gas cylinders. Cylinder Position ‐ Gas cylinders must be stored in a (valve end up) upright position, which includes conditions where the cylinder is inclined as much as 45 degrees from the vertical. Exceptions include cylinders designed for use in a horizontal position, and cylinders with non‐liquefied compressed gas that have a water volume less than 5 L (0.18 cf or 1.3 gal). Cylinder Securing ‐ Gas cylinders must be secured to prevent falling due to accidental contact, vibration, or earthquakes. Cylinders must be secured in one of the following ways:
a. By a noncombustible, two‐point restraint system (e.g., chains) that secures the cylinder at the top and bottom one‐third portions. Exception: cylinders less than 1 m (3 ft) tall require only one restraining point.
b. By a noncombustible rack, framework, cabinet, approved strapping device, secured cylinder cart, or other assembly that prevents the cylinder from falling.
Cylinder Valves, Caps, and Plugs ‐ Gas cylinders designed to have valve‐protection caps and valve‐outlet caps and plugs must have these devices in place. Exception: when the cylinder is in

NEES@UNR – Site Safety Plan rev. 2.5 20
use or being serviced. Gas cylinder valves must have a handwheel, spindle key, or other approved control handle on the valve stem while the cylinder is in use. Cylinder valves should be opened slowly. Cylinder valves seat in both the closed and open position and are likely to leak unless left in the fully open or fully closed position. Unauthorized Cylinder Modification or Use ‐ All labels, markings, and tags provided on the gas cylinder by the manufacturer must be maintained in good condition. Gas cylinder parts must not be modified, tampered with, obstructed, removed, repaired, or painted by the gas user. Empty Cylinders ‐ Gas cylinders should be left with residual pressure (i.e., typically 200 kPa or 30 psi) to prevent contamination of cylinder contents. Cylinders considered to be empty should be handled with the same precautions as cylinders filled with gas because so‐called “empty” cylinders still contain residual gas and pressure. Empty gas cylinders must be labeled “Empty.” Cylinder Changing ‐ Two people must be present during hazardous gas purge and cylinder change procedures. Reconnected gas fittings must be checked for leaks using a leak‐detection fluid or other approved method. Cylinder Temperature Control ‐ Gas cylinders should be stored in the shade and must not be exposed to temperatures exceeding 50°C (125°F). 2. CONFINED SPACES Work in confined spaces presents unusual and severe hazards to a sizable portion of the maintenance work force. Common tasks, such as welding, use of solvents and adhesives, live electrical work, or painting can quickly become lethal in a confined space. OSHA defines a confined space as a space that has the three following characteristics:
1. Is large enough and configured such that an employee can enter and perform work;∙ 2. Has limited or restricted openings for entry and exit; and 3. Is not designed for continuous employee occupancy.
A confined space is further defined as a space that meets both of the following conditions:∙ 1. •Existing ventilation is insufficient to remove dangerous air contaminants and/or
correct oxygen deficiency; and 2. Access to or exit from the space is difficult.
Although LSSL facilities do not include any confined space as defined by OSHA, lab personnel may be required to engage in projects where field work is mandated and equipment installation in confined space is necessary. UNR EH&S coordinates the campus Confined Space Entry Program. This responsibility entails providing technical consultation and guidance for testing and monitoring confined space environments, controlling potential hazards in confined spaces (such as ignition sources, electrical and machinery lockout, purging and temporary ventilation), providing employee training about potential hazards, and cooperating with the campus Fire Department in rescue procedures. Testing and training requirements may be delegated to other departments that have EH&S‐approved confined space entry programs and required

NEES@UNR – Site Safety Plan rev. 2.5 21
instrumentation. All lab personnel engaged in activities which require working in confined space shall receive proper training through UNR EH&S. Copies of training certificates shall be retained by the lab safety officer. 3. ELEVATED WORK In the LSSL, there is often a need to work at elevations. The Fall Protection Plan clearly identifies general fall hazards and specifies the appropriate methods to control those hazards. The personnel using the fall protection systems will be trained in the use, inspection, and limitations of the equipment before being utilized. Details about Fall Protection Program is available in the Laboratory Manager Office and for download at http://www.ehs.unr.edu/Website/LinkClick.aspx?fileticket=p%2fFQ%2fRTg7BU%3d&tabid=61&mid=980. Scaffolds should be erected, moved, dismantled or altered only under the supervision of the Acting Supervisor. Lab specific fall hazards vary as the laboratory is reconfigured on a weekly basis. Fall protection is absolutely required when working on any surface above OSHA mandated limit, including but not limited to:
a. Reaction blocks b. Test specimens c. Shake table actuator covers d. Snorkel man lift
Personnel and visitors are required to complete fall restrain training from qualified lab staff before working at elevation in the LSSL. Personnel can protect themselves from falls by going through proper ladder safety and by using the following restraining devices:
a. Movable chain railings b. Harness and lanyard c. Mobile working platforms
3.1. Ladders Safety hazards in the use of ladders can be substantially reduced by observing certain basic safety precautions as noted below:
• Painters' stepladders longer than 3.7 m (12 ft) must not be used. • Wood ladders must not be painted. • Ladders must be stored to prevent weathering, blistering, or cracking. • All metal ladders must be legibly marked with signs reading "Caution ‐ Do not use
around electrical equipment." • Portable straight and extension ladders must be equipped with slip‐resistant shoes. • Straight or extension ladders must be placed against a support at an angle such that
the distance from the ladder base to the base of the support is one‐fourth the working length of the ladder.
• Lash straight or extension ladders when used for access to high places. • Face ladders when ascending or descending. • Do not use a ladder as a scaffold.

NEES@UNR – Site Safety Plan rev. 2.5 22
• Do not place a ladder in front of a doorway, unless the door is blocked open, locked, or guarded.
• Do not place ladders on boxes or unstable bases to obtain additional height. • Do not climb higher than the second step from the top of a ladder. • Ladders with broken rungs or missing steps must not be used. • Inspect all ladders before use. • Report any defective ladders to your supervisor. • Supervisors must ensure that any ladder reported as defective or unsafe is removed
from service. • The use of a safety harness and lanyards is recommended when working higher than
8 ft. on a ladder or other high place. Details about Ladder Safety Program is available in the Laboratory Manager Office and for download at http://www.ehs.unr.edu/Website/LinkClick.aspx?fileticket=iBXJZQ9BHrs%3d&tabid=61&mid=981 4. FLAMMABLES STORAGE Flammable materials will be handled and stored at the facility per MSDS specifications. Training shall be provided to all staff, students and visitors who will work with any of these materials. Training shall cover the hazards of these materials and the appropriate use of containers when transferring into or through the site. Flammable storage cabinets are clearly marked and easily accessible for containers that are not being used at the active work site. The authority to use or move any flammable liquids at this facility rests with the Laboratory Manager or the Development Technicians. 5. EQUIPMENT OPERATING MANUALS All equipment is to be operated in accordance with the manufacturer’s instructions, as specified in the equipment’s operating manual. Copies of operating manuals must be kept with each piece of equipment in the NEES facility. Each person intending to use any equipment in the NEES facility must attend a safety training session. No equipment can be operated without specific authorization based on evidence of past training (e.g. valid operator’s certification) or training provided on site. 6. FORKLIFTS Operation of forklifts and other powered industrial trucks is restricted to trained personnel who have completed the required training. Only Lab Personnel may use the Large Forklift ('Bertha'). Only users who have been trained and certified by EH&S may use the Small Forklifts after familiarization with lab specific equipment. Training includes a combination of formal

NEES@UNR – Site Safety Plan rev. 2.5 23
instruction, demonstrations and practical exercises performed by the trainee, and an evaluation of the operators' performance. Practical exercises must be performed under the direct supervision of trainers. For information regarding forklift certification policies and training classes, contact the UNR EH&S Hotline at (775) 327‐5040 or on the web at http://webapps.ehs.unr.edu/traininglibrary/. A training program consists of the following elements and materials:
a. Operating instructions, warnings and precautions for type of truck b. Similarities and differences to automobiles c. Control and instrumentation location and use d. Engine or motor operation e. Steering and maneuvering f. Visibility g. Fork and attachment limitations and use h. Vehicle capacity i. Vehicle stability j. Vehicle inspection and maintenance k. Refueling or charging batteries l. Operating limitations m. Other operating instructions, warnings or precautions listed in the operator’s
manual The Small Forklifts shall not be used in the basement, except by Lab Personnel. When operating the lift inside the labs, ventilation fans must be turned on, as needed, to minimize exposure to carbon monoxide and to prevent any buildup of carbon monoxide gases in the confined space areas. The LP gas must be shut off when the Forklift is not in use. Use caution when operating the all forklifts around hydraulic actuators, controllers, data acquisition systems or hydraulic lines. Personnel approved for using a lift basket will need to wear fall protection equipment. Each forklift is inspected before each use and is formally inspected weekly by laboratory staff. Inspections assess the visible hydraulic lines and fittings, as referenced in the inspection sheet. Maintenance is performed by a certified forklift mechanic at intervals specific to each piece of equipment. Records of inspections and maintenance are available with the Laboratory Manager. The three diesel forklifts are refueled by a petroleum distributor and fuel for the propane forklift is stored and transported by LSSL staff according to Section III, Subsection 1. Operator must use appropriate PPE equipment when changing out the forklift propane tank. 6.1. Safe Forklift Operation Rules The following rules apply to all use of forklifts and other Powered Industrial Trucks (PITs) at the Lab:
Only authorized, trained personnel shall operate lift trucks.
Before use, a visual inspection must be made to ensure that horn, lights, brakes, tires, gas supply, hydraulic lines, etc. are in safe working condition. Employees shall not operate an unsafe forklift or PIT at any time.

NEES@UNR – Site Safety Plan rev. 2.5 24
Fill fuel tanks out of doors while engine is off.
Do not exceed the safe load capacity of a forklift or PIT at any time. Do not counterweight a forklift to increase lifting capacity.
Operators shall drive with both hands on the steering wheel. Horseplay is prohibited.
No person shall ride as a passenger on a forklift or PIT or on the load being carried.
A forklift or PIT will not be used to elevate a platform or pallet with persons on it, except work platforms especially designed for this purpose. Work platforms must have standard guard rails, and must be securely fastened to the forks.
No person shall stand or walk under elevated forks.
Operators should avoid making jerky starts, quick turns, or sudden stops. The operator will not use reverse as a brake.
Forklifts or PITs should be driven on the right side of the road or aisle way.
Operators shall cross railroad tracks diagonally whenever possible.
Forklifts or PITs shall be operated at a safe speed with due regard for traffic and conditions. Maximum speed limits: inside buildings, 5 mph; outside buildings in work areas, 7 mph; on roads, 10 mph.
Slow down on wet and slippery surfaces and at cross aisles or locations where vision is obstructed.
Operators entering a building or nearing a blind corner shall make their approach at reduced speed. Sound horn and proceed carefully.
Standard arm signals will be used at all times.
Operators shall give pedestrians the right of way at all times.
Operators shall not drive toward any person who is in front of a fixed object or wall.
Operators shall not overtake and pass another forklift or PIT traveling in the same direction, at intersections, blind spots, or hazardous locations.
Operators should not put their fingers, arms, or legs between the uprights of the mast, or beyond the contour of the forklift or PIT.
When the forklift is not carrying a load, the operator shall travel with the forks as low as possible. When carrying a load, it should be carried as low as possible (consistent with safe operation, 2 to 6 inches above the surface.)
Forks should always be placed under the load as far as possible.
No load should be moved unless it is absolutely safe and secure.
The operator's view should not be obstructed by the load. In the event of a high load, the forklift or PIT will be driven backward.
Operators shall look in the direction of travel.
The forks should not be operated while the forklift is traveling.
On a downgrade, the load shall be last, and the forks raised only enough to clear the surface.
On an upgrade, the load shall be first, and the forks raised only enough to clear the surface.
Use extra care when handling long lengths of bar stock, pipe, or other materials.
Avoid sharp or fast end swing.

NEES@UNR – Site Safety Plan rev. 2.5 25
Compressed gas cylinders shall be moved only in special pallets designed for this purpose.
When unloading trucks or trailers, the brakes on the vehicle will be set (locked).
Forklifts or PITs must be safely parked when not in use. The controls shall be neutralized, power shut off, brakes set, and the forks left in a down position flat on the surface, and not obstructing walkways or aisles.
A forklift or PIT shall not be left on an incline unless it is safely parked and the wheels blocked.
7. HEAVY EQUIPMENT The site does not own any heavy equipment. When situations require use of heavy equipment, the work is either contracted out, or equipment is rented. Equipment most often rented includes shooting boom forklifts, cherry pickers, scissor lifts, and bobcats. In the case of rented equipment, prior to any use, a thorough review of the operation and safety manuals is done. Only UNR staff and students are authorized to operate rental equipment, and only after approval from an experienced LSSL staff member who has reviewed the equipment documents. 8. MANUAL LIFTING Manual material handling involves lifting, lowering, and carrying objects. If ergonomics principles are ignored, stresses on the muscles, joints, and disks in the back can eventually lead to or aggravate a work related musculoskeletal disorder (WRMSD). For objects that are too heavy (in excess of 100 lbs) or bulky for safe manual handling by employees, mechanical lifting devices must be used for lifting and moving. The EH&S provides training and training videos for proper back care and how to lift properly. Check EH&S training library at http://webapps.ehs.unr.edu/traininglibrary/.for the next available training session. 8.1. Best Practices for Lifting
1. Assess the situation. i. How far will you have to carry the load? Is the path clear? ii. Once the load is lifted, will it block your view? iii. Can the load be broken down into smaller parts? iv. Should you wear gloves to get a better grip?
2. Size up the load. v. Test the weight by lifting or sliding one corner. If it is too heavy or awkward,
STOP! vi. Can you use a mechanical lift or hand truck?

NEES@UNR – Site Safety Plan rev. 2.5 26
vii. Can you lift the load safely, or is it a two‐ or more person lift? If you doubt you can lift the load safely, ask for help.
3. Use good lifting techniques.
viii. Get close to the load with your feet shoulder‐width apart. ix. Get a good handhold, and pull the load close to you x. Bend at your knees and hips, keep the inward curve in your back, and lift
with your legs. xi. If you need to lean forward, support your upper body weight with one hand.
Shown in Figures 1a&b: Improved work practices and work layouts that can help reduce risk for work related injuries.
Fig. 1a Bend the knees and hips instead of the low back. Fig. 2b Store heavier loads between knee
and shoulder height. Very heavy loads (50 lbs. or more) should be stored where they won't have to be manually lifted. Lighter and less frequently moved items should be placed on higher shelves.
A more detailed guidelines and illustration on Lifting Techniques can be found at http://www.bcn‐nshe.org/downloads/workerscomp/ProperLifting1‐28‐03_000.pdf. 9. MECHANICAL LIFTING Crane and hoist safety operations and procedures are detailed at the EH&S website http://www.ehs.unr.edu/Website/LinkClick.aspx?fileticket=vKIY%2fJhGz7k%3d&tabid=61&mid=899. Forklift use and safety is addressed in the forklift section of the document. Site specific operation of the LSSL overhead crane requires training by an experienced and authorized staff member to be designated by the Site Safety Officer. Simultaneous use of both cranes is not allowed unless specifically approved by Lab Personnel. Heavy and/or large items are to be

NEES@UNR – Site Safety Plan rev. 2.5 27
craned only by Lab Personnel. All lifting equipment at the site is inspected and certified annually. Load ratings are clearly marked and visible to the operator. Cranes shall not be left unattended while still attached to a specimen or test fixture. Avoid crane use above hydraulic actuators, controllers, data acquisition systems or hydraulic lines. Prior to and after lifting operations, lifting cables and sling will be inspected for wear as well as monthly as part of the self inspection audit. Any defects in rigging shall be immediately reported to Laboratory Manager. Slings will be stored and maintained in good condition. All personnel operating a crane or hoist, participating in the lift or within 15 feet of the vertical plane of the load, where the under carriage of the bridge is more than 12 feet from the ground, must wear ANSI‐approved hard hats. 10. MACHINE GUARDING It is the Safety Officer’s responsibility to ensure that machine tool and machine equipment guarding is adequate. Never remove factory‐installed guards unless they are designed to be removed for a particular operation, and equivalent means of protection are used (e.g., table saw guards are removed for fence cuts; when appropriate, push sticks are used). Guard all reasonably accessible points of operation, pinch and nip points, rotating parts, and flying chip or spark hazards that may expose an employee to injury. In general, guarding prevents inadvertent contact with these hazards. Guarding may be achieved by one or more methods, such as isolation, barriers, shields, devices, or distance. At this site, there are several machines that may need safety guarding, including but not limited to:
a. Shake table systems b. Actuator and ram systems c. Stationary power tools
Large moving systems such as shake tables and actuator systems require the use of barriers. It is the responsibility of LSSL staff to place these barriers at a distance deemed safe by the safety officer before testing may proceed. These systems also have programmable electronic interlocks that are set based on the parameters of each test. It is LSSL standard operating procedure to check and set these limits prior to running equipment. Hazardous hydraulic system components have permanent guarding in place. Stationary power tools located in the lab include those listed in Section III, Subsection 13. All of these tools have original manufacturer’s guarding in place and are maintained according to manufacturer’s specifications.

NEES@UNR – Site Safety Plan rev. 2.5 28
11. NOISE EXPOSURE Whenever noise exceeds the mandated “action level” (85 decibels or above) measured on the A scale (dBA) over a time weighted average of 8 hours, the facility will immediately initiate a hearing conversation program. The first level of defense is for all exposed personnel to don protective hearing equipment. Equipment at the facility includes formable ear plugs and ear muffs. It is recommended that protective equipment be used during operation of many shop tools and hand tools. More information on Hearing Conservation Program can be found with the Lab Manager or can be downloaded at http://www.ehs.unr.edu/Website/LinkClick.aspx?fileticket=kh2AS107IJo%3d&tabid=61&mid=992). 12. POWERED PLATFORMS AND VEHICLE MOUNTED WORK PLATFORMS / TELOSCOPING
BOOM LIFT Only authorized persons are allowed to operate any such machinery. The authority to operate any powered equipment at this facility shall be determined by a the Laboratory Manager who will assess and document the operators ability to handle the equipment efficiently and safely. Under the circumstances of the piece of equipment and this laboratory, signals are not considered necessary since the operator is located inside the moving basket. In all efforts to reduce accidents, operators are required to use a safety harness while working at elevation. However, in the event of an equipment failure, cranes can be used in conjunction with a bosun’s chair to reach the stranded operator. In the event of an emergency rescue, call 911 and prepare to assist emergency personnel. Before the boom lift is used, the Laboratory Safety Officer must review the circumstances to ensure proper use of equipment and approve its use. Proper use of equipment must be within the parameters of the vehicle’s manufacturer manual. Operating Conditions ‐ Extensible boom work platform must be operated under the following conditions:
a. Two operators must be present at all times. One operator must be present on the work platform and the other stationed on the ground to assist in the operation and perform any emergency duties.
b. This unit must be inspected prior to each shift's use and must not be operated if found to be unsafe.
c. All personnel occupying the work platform must wear an approved safety harness and lanyard properly attached to the equipment.
d. Unless recommended for such use by the manufacturer, no extensible boom work platforms are to be used on an inclined surface. This equipment shall be used inside the LSSL on level ground.
e. Unit must have upper and lower control devices.

NEES@UNR – Site Safety Plan rev. 2.5 29
Identification ‐ The following must be displayed on all work platforms in a permanent manner: a. Special warnings, cautions, or restrictions necessary for safe operation. b. Make, model, and manufacturer's name and address. c. Rated work load capacity. d. Maximum platform height. e. Instructions to study operating manual. f. Chart, schematic, or scale showing capacities of all combinations in their operating
positions and cautions or restrictions, or both, regarding operation of all alternate configurations or combinations of alternate configurations.
Inspections
a. Daily Inspection: Units must be inspected prior to each shift's use. Inspections must include all items recommended by the manufacturer's manual.
b. Preventive Maintenance: All maintenance on this piece of equipment is performed by a licensed mechanic at intervals no longer than recommended in the manufacturer's manual.
13. POWER TOOLS; FIXED AND PORTABLE The use of power tools should be limited to personnel who demonstrated a knowledge of the safe use of the equipment and who have been specifically authorized. The authority to operate any powered equipment at this facility shall be determined by the Laboratory Manager who will assess and document the operators ability to handle the equipment efficiently and safely. The following is a list of tools at the site:
Type Description Manufacture
Fixed Drill press Vulcan
Bench Grinder Reliant
Bench Grinder Delta
Milling Drill Press Jet
Lathe Jet
Lathe Monarch
Band Saw Jet Continued on next page

NEES@UNR – Site Safety Plan rev. 2.5 30
Portable Cordless Drill Dewalt
Cordless Hammer Drill Dewalt
Chop Saw Black & Decker
Small Hammer Drill Bosch
Large Hammer Drill Bosch
Portable Band Saw Milwaukee
Small Mag Drill Jancy
Large Mag Drill Jancy
Power Drill Milwaukee
4" Grinder Makita
6" Grinder Hitachi
Sawzal Milwaukee
Reciprocating Saw Bosch
Orbital Sander Dewalt
Orbital Sander Porter Cable
Circular Saw Skillsaw
Circular Saw Craftsman
For further operation, maintenance, and safety procedures, refer to Appendix D. Inspection and Maintenance ‐ Machine tools, machine equipment, and power tools should be routinely inspected to verify that they are not damaged, that the controls function as designed, and that all guarding and shields are securely installed and adjustable. Servicing, including cleaning, lubrication, preventive maintenance, and adjustment of machine equipment and machine tools can help prevent performance and safety problems. Only qualified technicians or qualified vendors are permitted to service equipment. Service equipment only when all electrical, hydraulic, compressed air, and stored energy sources are secured in accordance with Lockout/Tagout requirements. General Safety Rules for Use/Maintenance of Power Tools, Machine Tools and Machine Equipment ‐ The following general rules apply to the use and/or maintenance of machine tools and machine equipment, regardless of their location.
a. Permit only qualified personnel who have necessary skills, through experience and/or training, to operate or maintain machine tools or machine equipment.
b. Equip all machine tools, power tools, and machine equipment with all required guarding, and prohibit (lock and tag) their operation unless such guarding is in place and fully functional.
c. Operate/maintain machine tools, and machine equipment in accordance with the manufacturer’s requirements, and the requirements of this section.
d. Anchor and electrically wire all machinery and machine equipment designed by the manufacturer to be stationary. Only qualified electricians are permitted to install and remove wiring for hardwired shop machinery and machine equipment. Machine tools and machine equipment designed to be electrically connected by cord and plug are not subject to this requirement.

NEES@UNR – Site Safety Plan rev. 2.5 31
e. Permit only qualified personnel or vendors to repair or otherwise service machine tools or equipment.
f. Only operate machine tools when a second person is within sight or earshot of the tool user. This is an essential requirement in the case of personnel who get caught in machinery or suffer traumatic injuries. The second person need not be qualified to operate the equipment but does need to know how to turn off the equipment and how to call for emergency assistance. This second person must also agree ahead of time to perform such duties should the need arise. Establish a check‐in and check‐out protocol.
g. Ensure that all machine and tool guards are installed in place, in good working order, properly adjusted, and most importantly, used for their intended purpose. This includes the use of chip shields for any drilling or cutting operations.
h. Wear (at a minimum) safety glasses with side shields while in the vicinity of operating machine tools. This applies both to workers and to visitors. Wear face shields or goggles as required by work authorization for specific operations.
i. Wear substantial closed‐toe footwear of sturdy construction, made of leather or other heavy, solvent‐resistant material. Wear approved safety shoes when there is a risk of crushing or piercing. Prohibit personnel, including visitors, from entering the work area with sandals or open‐toed shoes.
j. Wear appropriate clothing. k. Wear hearing protection and/or respiratory protection as required by work
authorization for operations that generate harmful noise, or airborne emissions. Contact the Industrial Hygiene Group for assistance in determining which operations require such protection.
l. Do not use audio equipment that obstructs the ear canal (e.g., iPods) or cell phone Bluetooth headsets while operating machine or power tools. Such devices distract the operator and can prevent him or her from hearing sounds that could provide warning of an unusual operating condition or someone calling out for assistance.
m. Prohibit personnel under the age of 18 from operating any machine or power tools. n. Tie back or otherwise secure long hair; cuff or roll up long sleeves, and remove or tape
down loose jewelry when working with rotating machinery. o. Do not prepare or consume food or beverages in areas where hazardous materials
(including oils, solvents, chemicals, cuttings, filings, and sawdust) are handled or generated. Designate a food and drink preparation/consumption area, if necessary, in an area that is kept free of hazardous materials at all times.
p. Where applicable, secure and clamp down work pieces in work‐holding devices and machines, preventing the work from being lifted or dislodged.
q. Use appropriate push sticks or other approved methods as indicated in the work authorization to keep hands and fingers well away from moving or rotating cutters, blades, and other points of operation.
r. Turn off the machine before using a brush or wooden dowel (not hands!) to remove chips from the machining area. Chips are not only very sharp but can be hot and can snag.
s. Maintain good housekeeping. Work is not complete until cleanup is done. Debris, coolants, and lubricants put workers at risk of cuts or slipping, and can be a skin irritant.

NEES@UNR – Site Safety Plan rev. 2.5 32
Clean up the work area with a broom, brush, and dustpan, and clean up all spills with absorbents and/or degreasers. Avoid using compressed air to blow chips off machinery. Not only is this a hazard to the eyes, it forces material into the precision inner workings of the machine and often distributes coolant, oil, and chips over a larger area. Clean up the machine and sweep the floor area of any remaining chips.
14. HAND TOOLS Hand tools are tools that are powered manually. Hand tools include anything from axes to wrenches. The greatest hazards posed by hand tools result from misuse and improper maintenance. Some examples include the following:
If a chisel is used as a screwdriver, the tip of the chisel may break and fly off, hitting the user or other employees.
If a wooden handle on a tool, such as a hammer or an axe, is loose, splintered, or cracked, the head of the tool may fly off and strike the user or other employees.
If the jaws of a wrench are sprung, the wrench might slip.
If impact tools such as chisels, wedges, or drift pins have mushroomed heads, the heads might shatter on impact, sending sharp fragments flying toward the user or other employees.
All hand tools will be kept in a safe operating condition. Lab personnel shall not permit the use of unsafe hand tools. Students will be trained in the proper use and handling of hand tools. Staff and students, when using saw blades, knives, or other tools, should direct the tools away from aisle areas and away from other students working in close proximity. Knives and scissors must be sharp; dull tools can cause more hazards than sharp ones. Cracked saw blades must be removed from service. Wrenches must not be used when jaws are sprung to the point that slippage occurs. Impact tools such as drift pins, wedges, and chisels must be kept free of mushroomed heads. The wooden handles of tools must not be splintered. Iron or steel hand tools may produce sparks that can be an ignition source around flammable substances. Where this hazard exists, spark‐resistant tools made of non‐ferrous materials should be used where flammable gases, highly volatile liquids, and other explosive substances are stored or used. For further operation, maintenance, and safety procedures, refer to Appendix E. 15. RADIATION Not applicable to this site. No isotope use is planned at the facility. EH&S regulates all isotope work at the University.

NEES@UNR – Site Safety Plan rev. 2.5 33
16. REMOTE OPERATIONS Not applicable. 17. RESPIRATORS Should the site and EH&S determine that a respirator is required for a specific activity, EH&S will oversee medical clearance, training and fit test. If excessive dust is present, dust masks will be used by all affected workers. (http://www.ehs.unr.edu/Website/LinkClick.aspx?fileticket=SBX4%2bnaONyY%3d&tabid=61&mid=862) 18. SCAFFOLDING Although, the site uses scaffolding to attach instruments only and is not intended to hold any personnel, any landing, stair platform, or balcony more than 48” above a surface must have guard rails 36” high, and intermediate rail and a toe rail. A scaffold competent person shall supervise the erection, alteration, moving, or dismantling of scaffolding. Scaffolding shall be constructed in conformance with manufacturers’ requirements. The installation should be on a solid surface, plumb and secured to a solid structure; the scaffold and, if needed, scaffold walk surface should be solid and constructed from materials specifically designed for that purpose. For more information, check Scaffolding JHA/JSA at http://www.ehs.unr.edu/website/ProgramAreas/OccupationalSafety/FacilitiesJSAListing/Welding/tabid/250/Default.aspx 19. TEMPERATURE STRESS Self‐awareness is one of the key steps to reducing heat‐related disorders. Although, the site maintains a reasonable level of inside temperatures for personnel, should any site personnel experience temperature/heat stress, they should immediately cease the activity and seek proper remediation. Supervisors should consider a worker’s physical condition when determining heat stress conditions. Obesity, lack of conditioning, medical conditions, use of medications, pregnancy, and inadequate rest can increase susceptibility to heat stress even in indoor office environments. Activity cannot resume until facility staff have evaluated the situation and put controls in place to prevent excess exposure.

NEES@UNR – Site Safety Plan rev. 2.5 34
Additional industrial hygiene practices and administrative and engineering controls are listed below.
1. Wear lightweight, light colored, loose clothing that allows free movement of cool dry air over the skin’s surface to allow the removal of heat from the body by evaporation. Evaporation of sweat from the skin is the body’s predominant heat removal system.
2. Drink plenty of chilled hydrating fluids such as water or commercial hydrating fluids to prevent dehydration. Since thirst is not a sufficient indicator of fluid replacement, workers are encouraged to drink about 1 cup of cool water every 15 to 20 minutes during heat stress conditions.
3. To increase evaporation and cooling of the skin, use general ventilation or fans for spot cooling.
4. Work demands should be made lighter by taking frequent breaks in a cooler area, completing them over a longer time period, and setting the work pace with the least heat‐tolerant worker in mind.
5. Heavy workloads should be scheduled during cooler times of the day (i.e., early morning).
6. Employees should report to Health Services if they feel they are suffering from the onset of a heat‐related disorder. In emergency situations, call 911.
Below is a table listing symptoms of heat stress and actions that should be taken.
Disorder Health Effects, Signs & Symptoms
Fainting Also called Heat Syncope, is a temporary condition occurring in un‐acclimated workers. Blood pools in the extremities rather than returning to the heart to be pumped to the brain. Workers usually recover after lying down briefly. After recovery, moving around will help prevent further fainting.
Heat Cramps
Temporary conditions characterized by painful muscle spasms of the arms, legs, or abdomen during or after work. Reversible with prompt treatment. Cramps are caused when a person sweats and drinks water, but does not replenish salts (electrolytes) lost in the sweat. Treatment consists of rest, drinking electrolyte fluids or water contain ¼ tablespoon of table salt per quart, and removal from further heat exposure.
Heat Exhaustion or Heat Stress
Heat‐induced illness that can cause serious injury. It occurs in workers who do not replace fluids and electrolytes lost through sweating. Symptoms include tiredness, weakness, thirst, and dizziness, with occasional headache, nausea, vomiting, diarrhea, and fainting. The skin is clammy and moist, complexion pale or flushed. Body temperature is normal or slightly high. Treatment includes rest, drinking balanced electrolyte fluids, and removal from further heat exposure. Employee should report to UNR Medical Center for observation and possible treatment.
continued on next page

NEES@UNR – Site Safety Plan rev. 2.5 35
Heat Stroke
Heat stroke may be fatal unless promptly and adequately treated. Caused by a failure of the body perspiration mechanism resulting in accelerating rise in body core temperature. Symptoms include confusion, loss of consciousness, convulsions and coma. The skin is hot and dry, temperature is 104‐106° F, pulse is rapid, and blood pressure falls. Call 9‐911 immediately. The victim’s body temperature must be lowered as quickly as possible. Applying damp, cool towels, or ice packs to armpits, elbows, wrists, or backs of knees may help. Stay with the victim until medical help arrives
Heat Rash Also known as prickly heat, occurs in hot, humid environments where sweat cannot easily evaporate from the skin. A temporary, discomforting rash develops. Can be prevented and treated by resting in a cool place and regularly bathing and drying the skin.
20. VEHICLE EXPOSURE The site does not own a vehicle, but uses a vehicle owned by the Department of Civil and Environmental Engineering. It is the responsibility of the department to regulate the use of the vehicle. The vehicle shall only be used for authorized official business and driven by qualified and authorized personnel in a safe and courteous manner. Smoking in the vehicle is strictly prohibited. The vehicle shall not be used for private use. Drivers must be an employee of the University. 21. WELDING SAFETY Policy ‐ Employees performing cutting and welding operations (commonly referred to as “hot
work”), as well as their supervisors, are required to be suitably trained in the safe operation of
the equipment used. Outside contractors and service personnel are expected to follow all
OSHA requirements.
Purpose ‐ Potential health, safety, and property hazards result from the fumes, gases, sparks,
hot metal and radiant energy produced during hot work. The purpose of this policy is to
prevent any fires or injury that may result from hot work processes, and to comply with OSHA
regulations (29 CFR 1910.Subpart Q; 29 CFR 1926 Subpart J; 29 CFR 1926.350‐354).
Safety Requirements ‐ Prior to hot work being performed, several tasks must be completed.
This includes, but is not limited to: Isolating the HVAC system for interior work, posting the hot
work permit in a highly visible area, identifying and removing any fire hazards in the work area,
and covering sprinkler heads and smoke or heat detectors to prevent accidental triggering. Proper personal protective equipment (PPE) must be in use while performing hot work. This
includes welding helmets, gloves, jackets, etc.

NEES@UNR – Site Safety Plan rev. 2.5 36
General Arc Welding Safety a. Before starting any arc welding operation, a complete inspection of the welder should
be made. b. Read all warning labels and instructions manuals. c. Remove all potential fire hazards from the welding area. d. Always have a fire extinguisher ready for immediate use. e. Equip welding machines with power disconnect switches which can be shut off quickly. f. The power to the machine should be disconnected before making repairs. g. Proper grounding of welding machines is essential. h. Electrode holders should not be used if they have loose cable connections, defective
jaws, or poor insulation. i. An arc should not be struck if someone without proper eye protection is nearby.
Personal Protective Equipment
a. Infrared radiation is a cause of retinal burning and cataracts. Protect your eyes and face with a welding helmet properly fitted and with the proper grade of filter plate.
b. Protect your body from welding spatter and arc flash with protective clothing. Such as:
i. Woolen clothing ii. Flame‐proof apron iii. Gloves iv. Properly fitted clothing that is not frayed or worn. v. Shirts should have long sleeves. vi. Trousers should be straight‐legged and covering shoes when arc welding. vii. Fire resistant cape or shoulder covers are needed for overhead work.
c. Check protective clothing equipment before each use to make sure it is in good condition.
d. Keep clothes free of grease and oil.
Proper Ventilation ‐ Be sure there is adequate ventilation available when welding in confined areas or where there are barriers to air movement. Natural drafts, fans and positioning of the head can help keep fumes away from the welder's face. Ventilation is sufficient if:
a. The room or welding area contains at least 10,000 cubic feet for each welder. b. The ceiling height is not less than 16 feet. c. Cross ventilation is not blocked by partitions, equipment, or other structural barriers. d. Welding is not done in a confined space.
If these space requirements are not met then the area needs to be equipped with mechanical ventilating equipment that exhausts at least 2000 cfm of air for each welder, except where local exhaust hoods or booths, or air‐line respirators are used.

NEES@UNR – Site Safety Plan rev. 2.5 37
Avoiding Electrical Shock ‐ Electrical shock can kill. To prevent electrical shock: a. Use well insulated electrode holders and cables. b. Make sure welding cables are dry and free of grease and oil. c. Keep welding cables away from power supply cables. d. Wear dry hole‐free gloves. e. Clothing should also be dry. f. Insulate the welder from the ground by using dry insulation, such as a rubber mat or dry
wood. g. Ground frames of welding units. h. Never change electrodes with bare hands or wet gloves.

NEES@UNR – Site Safety Plan rev. 2.5 38
Appendices

NEES@UNR – Site Safety Plan rev. 2.5 39
Appendix A: Supervisor Accident Investigation Report
www.bcn‐nshe.org/downloads/workerscomp/SupervisorAccidentInvestigationReport.pdf

NEES@UNR – Site Safety Plan rev. 2.5 40

NEES@UNR – Site Safety Plan rev. 2.5 41

NEES@UNR – Site Safety Plan rev. 2.5 42
Appendix B: NEES@UNR Self Inspection Checklist
Name: Date:
High
Speed
Low Sp
eed
High
Speed
Low Sp
eed
High
Speed
Low Sp
eed
High
Speed
Low Sp
eed
High
Speed
Low Sp
eed
High
Speed
Low Sp
eed
High
Speed
Low Sp
eed
High
Speed
Low Sp
eed
ABFo
rklifts
Brake
s / Fluid Le
vel
E‐Brake O
peratio
n
Engin
e Oil Le
vel
Hydrau
lic Oil Le
vel
Trans O
il Level
Coolan
t Level
Lights / G
auges
Belts
Batte
ry / Cab
le
Hydrau
lic Hoses
Lift Chain
Lift Bearin
gs
All O
ther Lift C
omponen
ts
Steering O
peratio
n
Throttle O
peratio
n
Propan
e System
Water Sep
arator
Drain
Air Tan
k
Roll O
ver P
rotectio
n
Main
tenan
ce Due?
CatKomHY 1HY 2
Drill P
ress
Ben
ch Grin
der
Chop Saw
Dag Jack
Vacu
um 1
Vacu
um 2
Vacu
um 3
Tools Sto
red Correctly
Power C
ords In
Trays
Tensa B
arriers Where
Necessary
Table C
hain
s
Check Fo
r Oil Leaks/Sp
ills
Project Safety Fram
es
Gen
eral Project C
leanliness
Clean
Walkw
ays
Exposed
Bars/R
ods
First Aid Kits Sto
cked
PPE O
rganized
and Sto
cked
Chem
icals and Flam
mab
les Stored
Properly
Safety Inspection Check List (Check All Shaded Boxes)
All Power Cords
General Safe
tyPower To
ols
North
Cran
es
Main Auxiliary
Travel Hoist
DownUpDownUp Straps
Slings
All other Power tools are locked in a cage or keyed, and must be
inspected every time upon their use.
WestEastSouth
All Crane Rigging
Hooks
Shackle
s
Contro
ller Operatio
n

NEES@UNR – Site Safety Plan rev. 2.5 43
Appendix C: Personal Protective Equipment (PPE) Listed below are general types of PPE and situations in which they should be implemented. There are many specific laboratory practices that require the use of PPE; these are covered in individual training documents for all LSSL equipment and tools, which are available in the Laboratory Manager Office. Gloves ‐ Gloves are essential to many tasks in the laboratory. They can protect the hands from cuts, heat, chemicals, and abrasion. There are three main types of gloves used in the LSSL: Leather or canvas work gloves, impermeable nitrile gloves and heavy lined insulating gloves.
Leather or Canvas Work Gloves ‐ Leather gloves are worn when performing tasks requiring the use of a shovel or broom or similar tool, material handling, rigging, driving the forklift, and a variety of other tasks. They will prevent cuts, blisters, abrasion and reduce pinching of the hands. Be careful to select a pair that fits properly and is durable enough for the task. Many employees use leather gloves for hot applications, when the temperature is not so hot as to require heat gloves, e.g. welding, cutting, heat‐treating, etc. Nitrile Gloves‐Nitrile Gloves are chemically resistant as well as impermeable to water. They are absolutely required when there is a chance of skin coming in contact with acetone, xylene, kerosene, oils and other hydrocarbon based liquids or strain gauging chemicals. They may also provide comfort when wet cutting and grinding, as well as mixing or using cement products. Many employees like to wear a pair of Nitrile Gloves under a pair of Leather Gloves when seeking protection from abrasion and cold water. Insulating Gloves ‐ Heat Gloves are necessary when handling extremely hot steel or other hot materials. They provide excellent insulation from hot, dry surfaces, but provide very poor protection from liquids, and greatly limit dexterity.
Respiratory Protection ‐ It is important to note that respirators serve to reduce the exposure to specific hazards but they do not eliminate them. There are three basic types of respiratory protection used in the Labs: Dust Mask, Particulate Respirator, and Organic Vapor Respirator. Dust masks are used voluntarily when performing some tasks. Situations which require the use of a disposable particulate respirator include grinding and mixing grout or concrete. The organic vapor respirator is used voluntarily for comfort when using chemicals with offensive odors. If a respirator is essential to your work, you must get fitted and tested by EH&S personnel. A respirator is a mask with a NIOSH rating. Some respirators are reusable and require cleaning and maintenance. Please consult the Laboratory Manager to obtain proper documentation and care procedures.
Dust Mask ‐ A dust, or “nuisance” mask is a passive filter which traps dust particles by the wearer’s breathing action. It is effective only in low‐hazard situations. It is not

NEES@UNR – Site Safety Plan rev. 2.5 44
effective against any chemical mists or fumes nor will it provide any protection from ultra fine dusts. Particulate Respirator ‐ The particulate respirator is a more snug version of the dust mask constructed of better filtering materials. Use this one when sweeping or working with cement, grout or fly ash, or when the dust mask is insufficient. These masks all must be sized and fitted to your face; they all have a NIOSH rating printed on the straps and/or the mask. Look for a “N or P95” or better. Organic Vapor Respirator ‐ The organic vapor respirator contains particulate pre‐filter for specified dusts and mists and a charcoal filter (other types are also specified) to clean the air you breathe. Primarily, it is used to filter fumes from hydrocarbon‐based solvents (such as mineral spirits etc.) and while gluing with non‐water‐based glues or when using many paints esp. spray paints.
Hearing Protection ‐ There are many situations for which hearing protection is recommended in the lab. Much of our equipment and tools make enough noise to require hearing protection. Many variables, such as an individual’s ear shape or the type of noise being protected against, can lower the actual protection offered by a device by as much as 8dB. There are two basic types of hearing protection: in the earplugs and over‐the‐ear muffs.
Plugs ‐ Plugs are rolled into a narrow cylinder and then inserted into the ear. Take care that your hands are clean and do not re‐use earplugs more than for a day or two to prevent ear infection. The advantages of earplugs are that they permit the employee to wear other protection such as glasses, a hat, or a dust mask easily whereas earmuffs do not. In addition, they generally provide more hearing protection in terms of their NRR (Noise Reduction Rating) than do earmuffs. They can, however, cause some wearers discomfort. Muffs ‐ Ear muffs are useful when the employee cannot use plugs and/or where other protection is not necessary, for instance, going to get someone for a phone call or to answer a question. They are not generally recommended for longer term use. If you only use muffs, be sure you know the rating, proper use, and upkeep procedures.
Eye/Face Protection ‐ Eye and face protection is necessary when using compressed air devices, any power tools, any cutting tools, hammers, and anywhere else where objects might be flying or chipping. There are three types of protection discussed here: safety glasses, safety goggles, and face mask.
Safety Glasses ‐ Safety Glasses are plastic glasses with shatter resistant lenses. They must be stamped with a “Z87” mark to be NIOSH compliant. Safety glasses are worn for many of our operations at the lab. Prescription glasses are not sufficient to protect against injury from flying objects and are not considered adequate protection unless

NEES@UNR – Site Safety Plan rev. 2.5 45
they have the Z87 stamp and the side shields have not been removed. If your work requires use of safety glasses, be sure others in your vicinity are also protected. Safety Goggles‐ The protection safety goggles provide surpasses that of safety glasses. Safety goggles fit close to the face and have a plastic flange to form a seal around the eyes. Many goggles will protect against wet debris or chemicals splashing into the eyes. Some workers, especially those with prescription glasses, should choose to use goggles instead of safety glasses because of their comfort and efficiency. A NIOSH “Z87” stamp must be on the goggles used in the labs. Face Shield ‐ A Face Shield is a shatter resistant lens that covers the whole face much like a welder’s visor in shape. It is useful for sawing and essential for some grinding applications and should be used along with safety glasses or goggles. Safety glasses/goggles are primary protection, a face shield is secondary –protection to be worn over the primary protection.
Coveralls ‐ Coveralls are a helpful personal protection device. They are not required for any operation, although it is required that employees wear long sleeves and pants when working with hot materials grinding or wet concrete, and coveralls are the most convenient way to do this without ruining personal clothing. They may also give limited protection against chemical splashes. Foot, Head & Knee Protection ‐ Rubber boots are can be made available in the lab for wet or oily operations such as cutting, hydraulic plumbing, washing tools, or mixing concrete. Generally, the heavier the work, the heavier the shoe. Leather, steel toed boots or shoes are required for all lab work. Special protectors can be purchased for welding, cutting or to provide metatarsal protection. Hardhats are always worn in any environment where anyone is working above you and when you are performing any kind of work that could result in a head injury from falling debris, tools rigging etc. Knee protection is very important if you will be kneeling for extended periods of time or for activities like tying steel.

NEES@UNR – Site Safety Plan rev. 2.5 46
Appendix D: Proper Use of Power Tools and Lab Equipment Activities Grinder Wheels, Abrasives & Diamond Blades ‐ Diamond blades and bits, cut‐off wheels and grinding wheels are a chemical hazard and as such are supplied with an MSDS. The main concern is the matrix used to hold the blades together or to bond the abrasives to the blade. When cutting or grinding, a potentially hazardous dust is created. If possible, use a wet cutting method, meaning that water is used to cool the blade and in addition minimize the amount of dust created. For protection, wear a dust mask or particulate respirator when cutting or grinding metals and concrete or cleaning grout in addition to the other protection equipment listed in the physical hazards section of this manual. Cutting and grinding is to be done outside whenever possible. It is important to cover your skin to prevent grinding particles from embedding in your skin. Always wear Safety Glasses and hearing protection. Physical Hazards / Physical Operations ‐ There are numerous pieces of equipment and tasks which may constitute a physical hazard. Never operate any equipment or perform any task with which you are not trained and familiar. Protection: Always wear the appropriate protection for the equipment you are working with. Drilling ‐ Drilling is a safe operation when certain guidelines are followed. For hand‐held and portable drills before each use inspect the electrical cords for unbroken insulation and insure that a grounding plug is in place. Double insulated tools will have no grounding plug. Cords must be kept out of water and must be the correct gauge for the tool and length used. Check the MSDS on cutting materials for chemical hazard information. It is essential to the success of your operation to learn to identify cutting tool defects: the bits must be properly sharpened with the correct geometry for the material you wish to machine. Protection: Safety glasses and leather gloves are required. Hearing protection is recommended. Dust mask is optional for metals. With dry drilling nonmetals, a particulate respirator is recommended. Appropriate boots and clothing for the task and conditions.
Rotary Hammers ‐ These are extremely versatile tools for drilling and chipping concrete and scrapping. They are high toque, heavy tools. Match the speed to the task. Start with a slow speed to center the bit. Bits can and will bind when they hit rebar BE SURE the tool is properly braced to avoid injury to your limbs. Do not attempt to force the bit through rebar, if you cannot reposition the hole, you must use a special rebar cutter. Handheld Cordless Drills – These drills are to be use for light duty application, and are available upon special request only. Use should be limited to screw driving, small fastener assembly, and drilling holes smaller than 3/8” in soft material. Handheld Power Drill – This drill is used for medium duty applications, and is the only drill you should use to with a mixing wand for mixing grout. Be sure to properly protect the drill body and controls from the grout mix. Always thoroughly clean after each use.

NEES@UNR – Site Safety Plan rev. 2.5 47
Saw Cutting ‐ Cutting can be a physically hazardous operation at the lab. For all saws except the stationary saws, electrical cords must be inspected to verify unbroken insulation and proper grounding before use. Also insure that cords are kept out of reach of water and the cutting blade. Be sure to use appropriate extension cord gauge for the tool and the distance. Inspect all saws and blades before using. Look for proper functioning and placement of guards and make sure blades are not bent or chipped. If cutting generates dust, wear a particulate respirator. Check the MSDS to answer questions regarding the materials to be cut and dust generated by the cutting blades or wheels. Protection: Safety glasses are required. Hearing protection and dusk mask is recommended.
Reciprocating Saw ‐ There are a huge variety of blade types and configurations for this tool. The blade may be reversed to allow difficult access cuts. Jig‐saw type blades are available for this saw. Cuts with this saw can get extremely hot. It is very easy to pinch the blade with this tool. Be ready for this saw to kick‐back, correctly position your hands and elbows to safely absorb this motion. Abrasive Chop Saw ‐ Do not use this saw inside the lab. Sparks from your cut can fly 30 feet; take the appropriate measures. Be sure your work is properly clamped. This is the saw of choice for cutting: rebar, all‐thread and steel cables. Protect yourself from the noise, dust and sparks. Check the abrasive wheel for damage or cracks: replace damaged wheels. When you trigger this tool stay to the side of the abrasive wheel until the wheel comes up to speed. Follow this rule for using ANY tool that uses abrasive wheels of any type. Portable Band Saw – This tool is fairly heavy and awkward, but useful for quick cuts on material that cannot be positioned in a chop saw. This tool is for metal only. Be sure the reaction bar is against the work piece and the bladed is not when beginning a cut. Also, great care must be taken to insure the blade is not binding in the cut. Circular Saw – Used commonly for cutting form boards, frames and plywood sheeting, this tool is preferably for use outside. It is to be used on wood only for straight cuts. Be especially mindful of the proximity of the power cord to the blade, and be sure the blade depth setting is not such that it will impact the ground or working surface.
Lathes & Mills ‐ To master the use of these tools requires professional vocational school and usually an apprenticeship of some kind. Both lathes and mills have many functions and moving parts usually with three ranges of motion: the X, Y, & Z axis. The power to these machines is turned off when setting up and fixing the work and when changing cutters. These machines need to be kept clean and the work area needs to be kept clean and dry. They are specifically for the scheduled use of Lab Staff only. Protection: Proper Shoes and clothing required . Cement & Grout Mixing ‐ Cement mixing and grouting includes: batching, mixing, pouring, finishing, filling molds, curing, and de‐molding. Batching is the weighing or measuring and assembling of the dry ingredients. This is a dusty activity. Mixing is a short but intense process.

NEES@UNR – Site Safety Plan rev. 2.5 48
In most cases there is very little time to remove the mix (from the mixer or from the container or bucket) before it sets. Work crews must work very quickly while shoveling, pouring or troweling the wet mix. Always be aware of your body mechanics. Choose tools that fit your hand and shovels that match your height and arm length. Do not lift things that are too heavy for you; instead, get help from co‐workers. Whenever possible use carts for transporting buckets or containers, take breaks as needed, and remember to bend from the knees. Grouting and cement mixing is a messy process. The bagged mix is extremely fine grained and irritating to your eyes, nose, mouth, throat and lungs; you'll need to wear a particular respirator. The rocks and sand in aggregate based mixes are also very dusty. Since wet concrete is corrosive take care to avoid touching it or getting it on your skin or in your eyes. Always wear nitrile gloves, goggles, and coveralls. Wet cement and grout are harmful and dangerous to the environment. There are specific cleanup procedures to prevent concrete and grout from flowing into sinks or drains. Be sure to do all washing outside at wastewater collection tubs or create a berm using sandbags to prevent any mix from going into any storm drains. It is illegal and irresponsible to allow discharge into storm drains. Once concrete or grout is completely dry, it is no longer considered hazardous and thrown away as regular trash. Unused materials must never be stored above face height. Protection: Nitrile or leather gloves required as per job. Particulate mask is required when batching and mixing. Safety goggles required when mixing and pouring. Hearing protection recommended as per job. Hard Hat recommended as per job conditions.
Concrete Mixers ‐ Only those who are experience and authorized should operate a concrete mixer. One person should be standing at the controller at all times. This is to insure that someone will be able to shut down the mixer in case of emergency. Do NOT touch the controller box unless instructed to do so by the mixer operator. Hard hats, nitrile gloves and ear protection are required at all times. Watch for moving parts and never attempt to catch falling barrels when they are full. When the mixing and placing is complete, clean the mixer, tools, containers and return them to their proper stations. Batching & mixing small quantities ‐ All the materials begin on the ground. Be aware of the dusty nature of all the materials. The cement and grout bags have a certain weight, (if used sand and aggregates will have to be weighed or measured) and liquid ingredients are measured proportional to your mix quantities. Be fully cognizant of your capabilities and proper physical mechanics when lifting, mixing, pouring, shoveling and trowelling. When making smaller batches, you may not necessarily use an entire grout or cement bag, so make sure that you properly open the bag so that it is easily resealed. Make every effort to minimize the dust. Once your pour is complete, you should immediately begin your clean up. It is critical clean up when your mix still in a plastic or at least uncured state so that you can minimize dust in or around the lab. Use water as needed taking note of the previous cautions. Unused materials must be restocked and NEVER stored above face height.
Oxygen Acetylene Cutting & Welding ‐ Only professionally trained personal should ever use these tools and equipment. These tools require proper vocational education for safe, efficient

NEES@UNR – Site Safety Plan rev. 2.5 49
operation. This means you must demonstrate a working knowledge of safety and operation to use these tools. Compressed gasses, carbon monoxide, material handling, fire protection, leak detection and many more all are health and safety issues hazard. Acetylene bottles are to remain in the upright position. When transporting compressed gasses, all hoses and gauges must be removed from bottles or tanks. Protection: Safety glasses are required as primary protection. Under #5 or better lens goggles for torch work. Special clothing and shoes required leather heat‐gloves required. Determine what type of respirator (and if this protection is needed) for the material or conditions. Whenever possible, mechanically extract fumes and dust. Discontinue use if you develop any signs of carbon monoxide exposure such as headache, nausea or light headedness. Have a fire watch if needed. NEVER attempt to use these tools in confined space without the proper permits and protocol. It is a basic requirement to purge the lines and gauges after use and to stand to one side (of the gauges) when pressurizing. Fuel gasses will never be stored with accelerants (empty or full). Bottles will be secured with two chains (empty or full) and tagged ‘E’ or ‘F’ with chalk. Be sure the area of operations is properly secured at all times when. Never begin without proper and appropriate communication with other employees and others in your area. Pre‐stressing Tendons ‐ The process of pre‐stressing (steel cable, rods or “tendons”) develops forces sometimes exceeding 100kips per rod. If a tendon breaks with these forces fully applied (vertically) the tendon will likely shoot through the roof of the lab or it will hit the bridge crane or framing members of the lab. Extreme caution is used during this process. The tendons are to be examined for defects if they are new or used. Be sure that no one is in the line of force when pre‐stressing. Double check the calculations for the size rod you are using and be sure you are well within the safety factors. Be sure you are using the appropriately sized jack and that the hydraulic lines and fittings are in good condition. The jack pressures can reach 10,000psi. If oil is ever gets injected under your skin: this is a MEDICAL EMERGENCY: seek critical care. Be 100% confident that you have received enough training and have signed off on the appropriate training forms. The tools and jack must be properly supported when you are working overhead. Remember to stay out of the line of force when pre‐stressing the tendons. Use appropriate lubricants and tools to tighten and loosen the nuts when stressing and un‐stressing. Watch for pinch points. Be sure the chair is bearing fully on the plate. Protection: Hardhats, Safety glasses, and steel toed shoes required. Welding & Welding Machines ‐ To master the use of these tools requires professional vocational school and usually some sort of apprenticeship program. In general: use a fire‐watch if necessary, be sure the smoke and fumes you generate are properly extracted, safety glasses are your primary protection and your helmet is secondary. Safety glasses also provide a measure of flash protection. Appropriate respiratory protection may need to be worn. If you are in a hardhat area be sure to use welders hardhat Never get between the arc and the ground i.e. if you are welding on top of a large plate, you must insulate yourself from the plate. Never weld in a confined space without a permit. Welding in a non‐permit space automatically turns it into a permit‐required space. Always erect arc protection in your work area. Never weld on top

NEES@UNR – Site Safety Plan rev. 2.5 50
of drums. Protection: Welders gloves, clothing, helmet, shoes, safety glasses, respirator and extensive skills training required. Hydraulic Wrench & Torque Multiplier ‐ The training for the hydraulic wrench is to protect both the operator as well as this very expensive tool. Use the same cautions as for the pre‐stressing jacks. Before the hands on training you will read the manual. The head of the wrench articulates in several directions and the danger of being caught in a pinch‐point is therefore increased: stay alert and vigilant. Be sure the socket is fully engaged with the fastener after each cycle. Protection: Safety glasses required. Gloves recommended
Torque multiplier ‐ This gear driven tool is actuated using a calibrated torque wrench and has a reaction bar that must be securely placed so as not to slip and injure the operator or damage the tool. The operating instructions will be read prior to the hands on training. If the square drive should fail (as it may do by design at maximum levels) be sure another one gets ordered BEFORE you install the spare and continue. To prevent a potentially serious injury: review the warnings in the manual each time you use this tool. Torque wrench ‐ This tool is for accurate loading and is not a general purpose wrench. You will only use this tool after you have been trained and only for setting torque values. Use of socket extensions and angle adaptors will change your torque values. !?!
Testing Machines ‐ Most of the testing equipment at the lab requires extensive training in the software and hardware involved. They operate on programs with servo‐hydraulic actuators (this means they can kill you without warning if you are not careful). Take care that hands and body parts are never in the direct path of any active component. The computer could malfunction and cause a serious injury. When more than one person is working with a particular machine, one person is in charge and keeps the other employees aware of the machine’s state. Everyone must know where the others are in relation to the danger zones. Construction of Specimens ‐ Construction trades and builders safety should be specifically addressed as part of the planning process of each project. The degree of your involvement will determine the requisite training protocol. One of the leading causes of serious injuries on the job are falls from ladders, scaffolds and platforms, followed closely by material handling injuries and injuries from falling objects, sharp objects and slips and trips (very often caused by dirty and disorganized job sites). Efficiency is greatly increased and the incidence of injuries is greatly reduced, by keeping the site clean and organized on a daily basis. Concrete Blocks ‐Loading the specimens often requires the use of pre‐made concrete blocks. The weight is marked on the side of these blocks. The condition of the rigging anchors needs to be determined before moving the blocks with the crane. Rigging will be done only by trained/skilled and experienced employees.

NEES@UNR – Site Safety Plan rev. 2.5 51
Lead ‐ Loading the specimens often requires the use of lead ingots, bars and billets. Lead handling requires EH&S training as per university requirements in addition to the material handling training received in the lab. Scaffolds ‐ Any landing, stair platform, or balcony more than 48” above a surface must have guard rails 36” high, and intermediate rail and a toe rail. Experience professionals will erect scaffolding on a solid surface. The installation should be plumb and secured to a solid structure; the scaffold and scaffold walk surface should be solid and constructed from materials specifically designed for that purpose. Ladders ‐ There are many types of ladders used in the labs. Often, the least understood is the extension ladder: you will be trained how to place this ladder at the correct angle. Defective ladders will be repaired or thrown away. In general, an extension ladder should be extended 3’ above the landing point (such as the top edge of a test specimen) and then secured tightly to the landing area. Only one person is permitted on a ladder at a time. Tools and materials should not be carried up a ladder, use a rope, properly tied to the tools or materials and hoist them up. Forklift ‐ Only Lab Personnel may use the Large Forklift ('Bertha'). Only Users who have been trained and certified by EH&S may use the Small Forklifts after familiarization with lab specific equipment. The Small Forklifts shall not be used in the basement, except by Lab Personnel. When operating the lift inside the labs, ventilation fans must be turned on, as needed, to minimize exposure to carbon monoxide and to prevent any buildup of carbon monoxide gases in the confined space areas. The LP gas must be shut off each time after the Forklift is operated. Use caution when operating the all forklifts around hydraulic actuators, controllers, data acquisition systems or hydraulic lines. Personnel approved for using a lift basket will need to wear fall protection equipment. Each forklift is inspected before each use and is formally inspected weekly by laboratory staff. Inspections assess the visible hydraulic lines and fittings, as referenced in the inspection sheet. Maintenance is performed by a certified forklift mechanic at intervals specific to each piece of equipment. Records of inspections and maintenance are available with the Laboratory Manager. The three diesel forklifts are refueled by a petroleum distributor and fuel for the propane forklift is stored and transported by LSSL staff according to Section VII, Subsection F. Air Compressors / Air Tools ‐ The various air tools and the use of high pressure compressed air presents potential hazards. Check the pressure rating of tools prior to use. Check to ensure all fittings, hoses, tanks, and quick disconnects are in good order. Be sure you know where the emergency shut off is. When using ¾” or larger hoses, many connectors require a pin to secure the connections (some must be lashed together) be sure you know how to properly connect the style you are using. Understand how to properly oil and inspect tools and lines for damage or malfunction. Protection: Safety Glasses required. Hearing Protection recommended/required as per job.

NEES@UNR – Site Safety Plan rev. 2.5 52
Air hoses ‐ All air hoses must not leak and must have undamaged fittings. If you cannot release or connect hoses by hand, find someone who is more familiar with the type of fittings being used to assist you. Never use pliers or wrenches with these connections. When setting up your job, always lay out your hoses in a manner that minimizes tripping hazards. After each use (and absolutely at the end of each day) carefully wrap up the hoses into 1’ dia. coils and hang them up (keep them off the ground). Die grinders and high speed air tools ‐ These tools require lower pressure than our system pressure: always use regulator to step down the line pressure. These tools operate at 10‐50,000rpm thus, can be very hazardous if damaged. Always inspect the tool housing and tooling for any sign of damage and to be sure fittings and connections are secure. If seals are ruptured, housings cracked etc. Do Not Use. Tag all damaged tools and notify the person who can initiate the repair/replacement process.
Hydraulic Actuators ‐ The hydraulic actuators in the labs come in many sizes. The plumbing is sophisticated and the installation is seldom easy or straight forward. Experienced professional lab personnel will direct the installation, service, plumbing and operation. The installation lead persons will most often need experience and expertise in many aspects of the lab operations. Pry bars & Sledgehammers ‐ Pry bars and sledgehammers are used to both assemble and disassemble, for alignment as well as for demolition. Inspect the integrity of their blades and handle‐head connections before use. Their misuse can hurt other employees and can cause chips to fly into the eyes. You will be instructed on how to move your body correctly when you swing a heavy hammer to prevent the hammer from ever deflecting into your body or legs. Protection: Safety Glasses required. Leather Gloves recommended.

NEES@UNR – Site Safety Plan rev. 2.5 53
Appendix E: Proper Use of Hand Tools

NEES@UNR – Site Safety Plan rev. 2.5 54

NEES@UNR – Site Safety Plan rev. 2.5 55

NEES@UNR – Site Safety Plan rev. 2.5 56

NEES@UNR – Site Safety Plan rev. 2.5 57

NEES@UNR – Site Safety Plan rev. 2.5 58

NEES@UNR – Site Safety Plan rev. 2.5 59

NEES@UNR – Site Safety Plan rev. 2.5 60

NEES@UNR – Site Safety Plan rev. 2.5 61

NEES@UNR – Site Safety Plan rev. 2.5 62

NEES@UNR – Site Safety Plan rev. 2.5 63

NEES@UNR – Site Safety Plan rev. 2.5 64

NEES@UNR – Site Safety Plan rev. 2.5 65

NEES@UNR – Site Safety Plan rev. 2.5 66

NEES@UNR – Site Safety Plan rev. 2.5 67

NEES@UNR – Site Safety Plan rev. 2.5 68

NEES@UNR – Site Safety Plan rev. 2.5 69

NEES@UNR – Site Safety Plan rev. 2.5 70

NEES@UNR – Site Safety Plan rev. 2.5 71

NEES@UNR – Site Safety Plan rev. 2.5 72

NEES@UNR – Site Safety Plan rev. 2.5 73

NEES@UNR – Site Safety Plan rev. 2.5 74

NEES@UNR – Site Safety Plan rev. 2.5 75

NEES@UNR – Site Safety Plan rev. 2.5 76

NEES@UNR – Site Safety Plan rev. 2.5 77

NEES@UNR – Site Safety Plan rev. 2.5 78

NEES@UNR – Site Safety Plan rev. 2.5 79

NEES@UNR – Site Safety Plan rev. 2.5 80

NEES@UNR – Site Safety Plan rev. 2.5 81

NEES@UNR – Site Safety Plan rev. 2.5 82

NEES@UNR – Site Safety Plan rev. 2.5 83

NEES@UNR – Site Safety Plan rev. 2.5 84

NEES@UNR – Site Safety Plan rev. 2.5 85

NEES@UNR – Site Safety Plan rev. 2.5 86

NEES@UNR – Site Safety Plan rev. 2.5 87

NEES@UNR – Site Safety Plan rev. 2.5 88

NEES@UNR – Site Safety Plan rev. 2.5 89

NEES@UNR – Site Safety Plan rev. 2.5 90

NEES@UNR – Site Safety Plan rev. 2.5 91

NEES@UNR – Site Safety Plan rev. 2.5 92

NEES@UNR – Site Safety Plan rev. 2.5 93

NEES@UNR – Site Safety Plan rev. 2.5 94

NEES@UNR – Site Safety Plan rev. 2.5 95

NEES@UNR – Site Safety Plan rev. 2.5 96

NEES@UNR – Site Safety Plan rev. 2.5 97

NEES@UNR – Site Safety Plan rev. 2.5 98

NEES@UNR – Site Safety Plan rev. 2.5 99

NEES@UNR – Site Safety Plan rev. 2.5 100

NEES@UNR – Site Safety Plan rev. 2.5 101

NEES@UNR – Site Safety Plan rev. 2.5 102
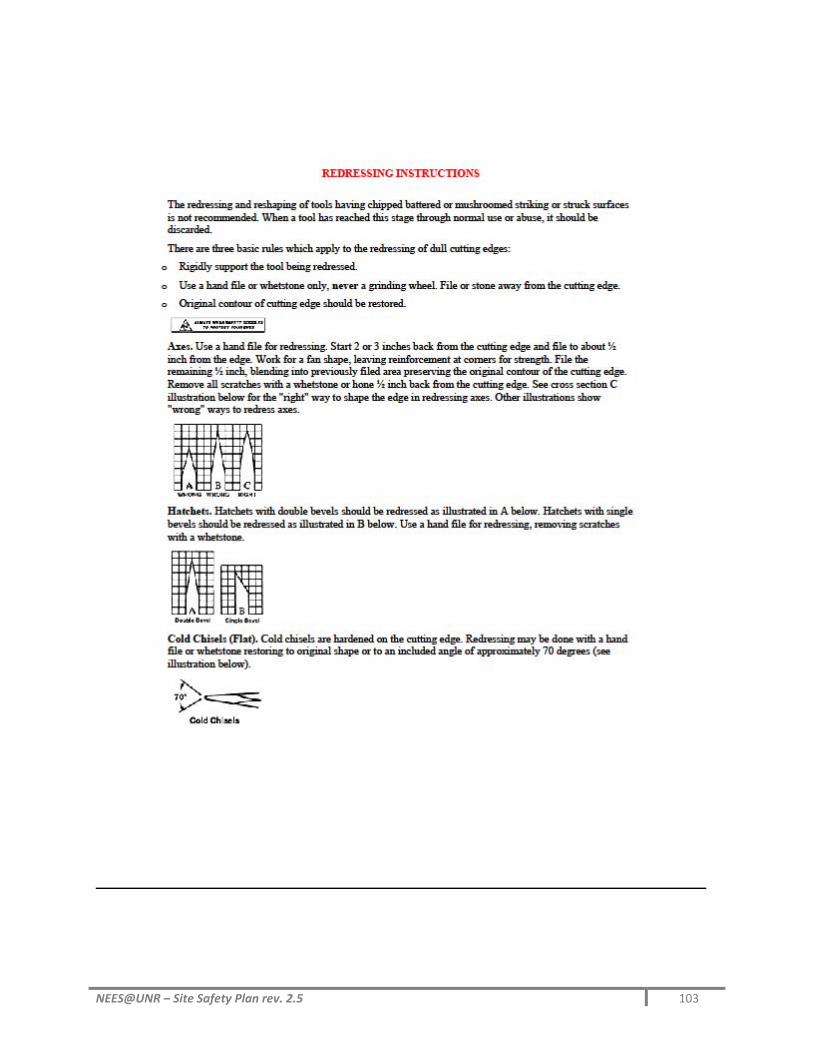
NEES@UNR – Site Safety Plan rev. 2.5 103

NEES@UNR – Site Safety Plan rev. 2.5 104

NEES@UNR – Site Safety Plan rev. 2.5 105

NEES@UNR – Site Safety Plan rev. 2.5 106

NEES@UNR – Site Safety Plan rev. 2.5 107

NEES@UNR – Site Safety Plan rev. 2.5 108

NEES@UNR – Site Safety Plan rev. 2.5 109

NEES@UNR – Site Safety Plan rev. 2.5 110

NEES@UNR – Site Safety Plan rev. 2.5 111

NEES@UNR – Site Safety Plan rev. 2.5 112

NEES@UNR – Site Safety Plan rev. 2.5 113

NEES@UNR – Site Safety Plan rev. 2.5 114

NEES@UNR – Site Safety Plan rev. 2.5 115

NEES@UNR – Site Safety Plan rev. 2.5 116

NEES@UNR – Site Safety Plan rev. 2.5 117

NEES@UNR – Site Safety Plan rev. 2.5 118

NEES@UNR – Site Safety Plan rev. 2.5 119

NEES@UNR – Site Safety Plan rev. 2.5 120

NEES@UNR – Site Safety Plan rev. 2.5 121

NEES@UNR – Site Safety Plan rev. 2.5 122

NEES@UNR – Site Safety Plan rev. 2.5 123

NEES@UNR – Site Safety Plan rev. 2.5 124

NEES@UNR – Site Safety Plan rev. 2.5 125

NEES@UNR – Site Safety Plan rev. 2.5 126

NEES@UNR – Site Safety Plan rev. 2.5 127

NEES@UNR – Site Safety Plan rev. 2.5 128

NEES@UNR – Site Safety Plan rev. 2.5 129

NEES@UNR – Site Safety Plan rev. 2.5 130

NEES@UNR – Site Safety Plan rev. 2.5 131

NEES@UNR – Site Safety Plan rev. 2.5 132

NEES@UNR – Site Safety Plan rev. 2.5 133

NEES@UNR – Site Safety Plan rev. 2.5 134

NEES@UNR – Site Safety Plan rev. 2.5 135

NEES@UNR – Site Safety Plan rev. 2.5 136

NEES@UNR – Site Safety Plan rev. 2.5 137


