132
User Reference Guide SiteLINK™ Version 7.0 Dydacomp 11D Commerce Way Totowa, New Jersey 07512-1154 (800) 858-3666 Sales (973) 237-0300 SiteLINK Support www.dydacomp.com

User Reference Guide
SiteLINK™
Version 7.0
Dydacomp11D Commerce Way
Totowa, New Jersey 07512-1154
(800) 858-3666Sales
(973) 237-0300SiteLINK Support
www.dydacomp.com

Copyright
The SiteLINK software and its documentation are protected by both United States copy-right law and international treaty provisions. You may not copy the SiteLINK software or the SiteLINK documentation for any reason except for archival purposes, and by express written permission from Dydacomp Development Corporation.
Multichannel Order Manager, and SiteLINK are registered trademarks of Dydacomp Development Corp.Microsoft,Windows, Internent Information Server, FrontPage,are registered trademarks of Microsoft, Inc.VeriSign is a registered trademark of VeriSign, Inc.Thawte is a registered trademark of Thawte, Inc.Go Daddy is a registered trademark of GoDaddy.com, Inc.Dreamweaver is a registered trademark of Adobe Systems, Inc.Google, Google Base, Google Checkout, and Google Analytics, are registered trademarks of Google, Inc.Plug’n Pay is a registered trademark of Plug and Pay Technologies, Inc.PayPal is a regestered trademark of PayPal Inc.AllTheWeb and Yahoo! are registered trademarks of Yahoo! Inc.AOL Search is a registered trademark of AOL, LLC.MSN is a registered trademark of Microsoft, Inc.HotBot is a registered trademark of Lycos, Inc.LiveJournal is a registered trademark of LiveJournal, Inc.Netconcepts.com is a registered trademark of Internet Concepts, LLC.Sitesolutions.com is a registered trademark of Online Fulfilment Corp.WebTrends is a registered trademark of WebTrends Inc.Engine Ready is a registered trademark Engine Ready, Inc.Websidestory is a registered trademark of Websidestory, Inc.Hitslink is a registered trademark of Net Applications, Inc.DeepMetrix is a registered trademark of DeepMetrix Corp.LivePerson is a registered trademark of LivePerson, Inc.
Version 7.0November 2011

Table of Contents
SiteLINK User Reference Guide 3
Table of ContentsIntroduction 1
About This Guide 1
Features 3
Basic Operation 6
Store Design Options 7
Getting Help 7
Chapter 1 System Requirements, Installation and Host-ing 9
System Requirements 9
Installation 10
Hosting Options for Your Store 10
URL Activity Reporting Considerations 12
Chapter 2 Setting Up Departments and Products in M.O.M. 13
Setting Up Departments 13
Setting Up Product Information 16
Establishing Restricted Shipping Areas 30
Establishing Special Selling Prices 32
Setting Up the Specials Page 35
Chapter 3 Setting up Order Payment Options 37
Table of Contents
4 SiteLINK User Reference Guide
Setting Up Credit Card Options for Shoppers 37
Setting up e-Check Option for Shoppers 39
Setting up PayPal Option for Shoppers 39
Payment Gateway Error Notification 40
Setting up Google Checkout Payments for Shoppers 40
Setting Up a Points and Rewards Program 42
Setting Up Gift Card Redemption 45
Setting Up Gift Certificate Redemption 46
Setting Up buySAFE 48
Chapter 4 Setting Up Other Store Information in M.O.M. 49
Setting Up Store Preferences 49
Additional Customer Payment Options 51
Setting Up Shipping Options for Shoppers 51
Setting Up Advertising Source Codes for Hyperlinks 53
Setting Up Catalog Selection Options for Information Requests 54
Setting Up Order Promotions 55
Creating Order and Shipment Acknowledgment E-Mails 58
Chapter 5 Creating Your Store 61
Step 1—URL Setup 62
Step 2—Publishing Store Data from M.O.M. 63

Table of Contents
SiteLINK User Reference Guide 5
Step 3—Making a Hypertext Link to Your Store 68
Step 4—Preparing and Loading Custom Graphics 69
Step 5—Selecting Store Settings 70
Step 6—Creating Store Style 74
Step 7—Setting Up Store Text Pages 79
Step 8—Maintain Marketing/SEO Information 79
Step 9 - Reporting 81
Step 10—Using Google Analytics 82
Step 11—Using LivePerson Chat Software 83
Chapter 6 Using SiteLINK on a Daily Basis 86
Closing/Opening the Store for Business 86
Downloading Orders and Information Requests into M.O.M. 86
90
Reporting on Orders and Store Activity 91
Order Information in M.O.M. 93
Managing Customer and Order Information 95
Tracking Email Advertising Campaigns 100
Chapter 7 Customizing Your Store 102
How SiteLINK and Active Server Pages and XML Work Together 102
Making Changes to Store Pages 103
Creating Custom Hypertext Links To Your Store 104

Table of Contents
6 SiteLINK User Reference Guide
List of Selected SiteLINK Store Pages 106
Making Changes to the Order Confirmation E-mail 108
Chapter 8 Tips for Web Marketing 110
Web Site Content — Information and Commerce 110
Making Your Web Site Work For You 110
Site Architecture 111
Getting Customers to Find You 111
Creating a Google Base Account 117

Introduction
SiteLINK User Reference Guide 7
Introduction
Welcome to SiteLINK! The complete electronic commerce solution that creates and manages a Web store entirely from your Multichannel Order Manager software. Packed with over 100 powerful features, SiteLINK is designed to make your web store professional-looking, easy to maintain and best of all - able to generate orders for your business 24 hours a day!
Throughout this guide, there will be references to specific chapters and sections of the M.O.M. Setup Guide and Reference Guide. To obtain copies of these guides, log on to the M.O.M. Online Technical Support Site at http://www.dydacomp.com/support/login.asp.
About This GuideThis Guide covers the installation, set up and use of SiteLINK. The Guide is divided into eight chapters.
IntroductionThis is the chapter that you are reading now. It explains how this Guide is organized and provides an overview of the operation and use of SiteLINK.
Chapter 1—System Requirements, Installation and Hosting This chapter explains what software and hardware you need to run SiteLINK and what steps must be taken for installation and setup. It also details your store hosting options and additional considerations.
Chapter 2—Setting Up Departments and Products in M.O.M.This chapter explains how to set up the departments, products and the “specials” page for your store in Multichannel Order Manager.
Chapter 3—Setting up Order Payment OptionsThis chapter explains how to set up the various payment options that you can make available to your shoppers.

About This Guide
8 SiteLINK User Reference Guide
Chapter 4—Setting Up Other Store Information in M.O.M.This chapter explains how to set up the other store information in M.O.M., including your general store preferences, customer shipping options, order promotions, advertising source keys for profit reporting, catalogs for customer information requests, and customer order acknowledgment e-mails.
Chapter 5—Creating Your StoreThis chapter explains how to actually create your store step by step. It explains transferring M.O.M. store information your store, selecting store design options, and enabling special features.
Chapter 6—Using SiteLINK on a Daily BasisThis chapter explains how to access the Administrative Options screen to download orders and information requests from SiteLINK into M.O.M. using the 1-Click Download feature. The chapter explains the various reports available on the Administrative Options screen, as well as how to upload customer and order information to SiteLINK.
Chapter 7—Customizing Your StoreThis chapter explains how SiteLINK, ASP and XML work together and how to modify the SiteLINK Active Server Pages using Microsoft’s FrontPage or Adobe’s Dreamweaver. It also explains how to create custom hypertext links to the component ASP pages in your store. Finally, the chapter provides a complete list of the major SiteLINK files including their ASP file name and a full description.
Chapter 8—Tips for Web MarketingThis chapter explains how to list your commerce site most effectively with search engines to enable potential customers to find your on-line store.

Introduction
SiteLINK User Reference Guide 9
FeaturesSiteLINK provides a full complement of standard Web store features including:
Secure Commerce using Secure Socket Layer technology
Store Directory, Departments, and Sub-Departments
Store Specials Page
Product Search
Product Display
Customer Shopping Basket
Customer Checkout
Customer Information Request for Catalog or Brochure
Complete Store Design Using a Customizable Template
In addition to these standard features, the dynamic connection between your Multichannel Order Manager software and your SiteLINK store enables many more advanced features not available with any other Web commerce solution, including:
Direct order downloads into the M.O.M. database.
Special quantity pricing levels for items set up in M.O.M. are applied
automatically. In addition, your customer can view the special
prices before adding the item to their shopping basket.
Order Promotion that are created in M.O.M. can be used for web
orders.
Mix & Match pricing discounts for items set up in M.O.M. are
applied automatically.
Size/Color variations for an item set up in M.O.M. are available for
viewing and selection while in the shopping basket mode.
Product availability updates direct from the M.O.M. stock file.
M.O.M. Selling Tools (Cross-Sell, Up-Sell, and Substitute) can be set
up for each item and displayed for the customer in their shopping

Features
10 SiteLINK User Reference Guide
basket.
Applicable shipping charges for each shipping method are
automatically added to the customer order at check-out using the
M.O.M. Automatic Shipping Calculations Module (ASCM). Shipping
methods in M.O.M. can be flagged as “Available on the Web” to
enable or disable certain methods for use by Web shoppers.
Product Shipping Area Restrictions.
Line item specific custom information, such as monogramming, can
be flagged as “required” for an item when selected by a shopper.
Applicable sales taxes set up in M.O.M. are automatically added at
check-out based on customer shipping address.
Credit Card Merchant Accounts set up in M.O.M. can be flagged as
“Available on the Web” to enable or disable cards for use by Web
shoppers.
Alternate payment methods including C.O.D. and open invoice on
terms.
Automatic assignment of M.O.M. Source Key for each order based
on a URL (Universal Resource Locator) hyperlink from another site.
Customer ID registration for order status and special product
pricing.
Automatic recognition of repeat customers using “cookies” to
welcome them back on subsequent visits.
Shopper-defined greeting messages for gift orders.
Product Search by Stock Number
Product Search based on Advanced Search Criteria using up to four
user-defined fields.
Show Custom Information in the Basket
Show Description Line 2 (Size/Color) in the Basket
Quick Order Form

Introduction
SiteLINK User Reference Guide 11
Email Page to a Friend
Instant Email Order Confirmation with Order Details
Email Forgotten Password
Ship Order Hold Date per Order
Shipping Calculator to Estimate Shipping Costs on the Basket Page
Login or Register Visitor after Basket Page Option
Email Address and Password Login
View Larger Image to View Product Details
Visitor Logout Button
Ability to Sort the Search Results by Price
Alt Tags link to Product Title
Site Map Page links to Departments List
Wish List
Edit HTML Code
Display Item Image in the Basket
Box Calculations for Shipping Costs
Multiple Ship-To Addresses
Quantity Pricing for Different Line Items across Multiple Ship-To
Addresses
Product-Specific Shipping Methods with Error Checking
Charge Shipping for Drop-Ship Products
Authorize.net Credit Card Pre-Authorization with CID
Authorize.net eCheck payments
Paypal Payments
Points & Rewards
View Order Status Online for both Online and Offline Orders
Ability to Log in to Web Store without registering, using only a
password supplied by M.O.M. location

Basic Operation
12 SiteLINK User Reference Guide
"How Did You Hear About Us?” drop-down list links to Source Keys
in M.O.M.
Purchase Order Number field imported with orders for customers
with Open Invoice Terms
Product-Specific Hold Date
Reviewing Order History displays Ship-To Address
Recognition of Credit Card Type based on Credit Card Number
Packing Information will show items and tracking number linked to
carrier site.
USPS Inter and Intra Zones with all classes
Ability to change Buttons
Alphabetize Size/Color Products
Coupon Redemption
Due date for out-of-stock products
Subscribe or un-subscribe to mail or email
Administrative Options reporting for number of visitors per source/
URL, orders, etc.
Choose whether or not to “ship ahead” on orders containing both
in-stock and backordered items.
Basic OperationSiteLINK uses the databases in Multichannel Order Manager to manage the content of your Web store. This includes stock item information, shipping methods, credit card merchant accounts and advertising source keys. It also utilizes the Import/Export Module (IEM) option as the means to seamlessly download orders from SiteLINK directly into the Multichannel Order Manager customer and order databases.
The Full Web Site Hosting option for SiteLINK is designed to operate without requiring you to own a server. Your Web store resides on a Dydacomp Web server at a secure location in New Jersey. You connect to your store “remotely” using M.O.M. to upload product information

Introduction
SiteLINK User Reference Guide 13
and customer order status to your store and download information requests and new orders to Multichannel Order Manager. A monthly licensing and usage fee covers the cost of hosting your store at our location, regular SiteLINK Support and emergency 24/7 SiteLINK Support.
Because your store and your M.O.M. databases are not “on-line,” your customers shopping in your Web store do not have access to actual inventory availability information or other “real time” information such as order ship date, etc. However, order status and product availability information can be uploaded to your store as often as you like, with uninterrupted access to your website.
For security reasons, the SiteLINK administration page has a twenty minute time out. Be mindful of this when making changes. If you will be walking away from the computer, be sure to save your work and refresh the page when you return to log back in.
Store Design OptionsSiteLINK uses a basic page design for each of the primary store pages, including the store directory, departments and sub-departments, specials page, the product display pages, checkout page, and shopping basket. A browser-based store designer wizard walks you through a series of steps to select store design options, including page formats, text and background colors, store banners, navigational buttons, and store logo.
You can also use a web editor to further customize the format or layout of your store pages. SiteLINK supports modification of the store pages, however a good working knowledge of HTML is recommended before considering this type of additional customization.
Finally, SiteLINK Design Services can provide a variety of design and customization options. For more information navigate to http://www.dydacomp.com/sitelink/customservices.asp.
Getting HelpFor SiteLINK users, the SiteLINK Support Team is ready to assist you during your initial store setup on Dydacomp’s servers. They also insure that your store is operating correctly on a daily basis. The best way to contact the SiteLINK Support Team is via telephone at (973)

Getting Help
14 SiteLINK User Reference Guide
237-0300 or via email at [email protected].
For off-hours emergency 24/7 SiteLINK support, please call (973) 237-0300. Your call will be forwarded to a support technician for assistance.

Chapter 1 System Requirements, Installation and Hosting
SiteLINK User Reference Guide 15
Chapter 1
System Requirements, Installation and Hosting This chapter provides information about the specific system requirements, installation procedures, hosting options and URL reporting considerations for SiteLINK.
System RequirementsThe following are the system requirements for using SiteLINK:
M.O.M. for Windows Version 7.1 or higher
Windows XP, Vista, or 7
M.O.M. Order Import/Export Module (IEM) for importing orders
from your store into M.O.M.
M.O.M. Automatic Shipping Calculation Module (ASCM) to calculate
shipping costs for customers
M.O.M. ICCAS for credit card and eCheck authorization
(recommended)
Web browser to access your Store Administrative Options screen for
uploads of store data and order downloads from your store on the
Dydacomp server
Any type of Internet connection at 56 or higher, (broadband
connection highly recommended)
HTML Editor such as Microsoft’s FrontPage or Adobe’s
Dreamweaver, required for publishing web pages outside of
SiteLINK if Dydacomp is hosting your entire web site for you or for
customizing your store. See Hosting Options for Your Store on
page 16.

Installation
16 SiteLINK User Reference Guide
InstallationIf you purchased SiteLINK with M.O.M., no installation is necessary. However, if you purchased SiteLINK separately, follow these steps:
1. Have one user log into the Multichannel Order Manager program.On M.O.M.’s Main Menu Bar,
Click on: HelpAbout M.O.M.
2. Select the UPDATE OPTIONS button. You will receive a confirmation message stating that the options have been set. Exit M.O.M. and re-enter for the changes to take effect.
3. From the Dydacomp Web site, download and install the latest program update for your version of Multichannel Order Manager. M.O.M. users can use the Auto Update Feature,
Click on: HelpMOM Auto Update
Hosting Options for Your StoreThere are four options available for Dydacomp to host your site.
Store Only HostingIf you already have a Web site with a registered domain name, this option may best suit your needs. Using Store Only Hosting, you simply place a hypertext link on your existing Web site (“Visit Our Store”, for example) and when that link is selected by a visitor to your site, that visitor is brought to your store on Dydacomp’s server.
Full Web Site HostingIf you do not currently have a Web site or if you have one and want to move it, you may elect to have Dydacomp host your entire Web site (both the store portion and “information only” portion) on its server. If you choose this option you need to have Microsoft’s FrontPage or Macromedia’s Dreamweaver with FrontPage extensions (the extensions are offered on the Macromedia website free of charge) to publish the “information” portion of your Web site to Dydacomp’s server.

Chapter 1 System Requirements, Installation and Hosting
SiteLINK User Reference Guide 17
To have Dydacomp host your entire Web site, you also need to obtain a registered domain name (or address) and a SSL Certificate for your Web site prior to publishing your store. Contact a domain name registrar such as Network Solutions (www.networksolutions.com), Go Daddy (www.godaddy.com), or Register.com (www.register.com) to register a domain name.
SSL CertificateAn SSL (Secure Sockets Layer) Certificate, is an encryption protocol used to transmit and receive sensitive information over the internet. When important data such as credit card information is sent using a site with a SSL certificate, the information is broken down into a complex code that only the receiving party can decrypt. This prevents hackers and online eavesdroppers from obtaining address or credit card information.
For your SSL Certificate, contact Verisign (www.verisign.com), Thawte (www.thawte.com) or Go Daddy (www.godaddy.com). SSL Certificates should have 128 bit encryption and IIS 6.x for Windows. Dydacomp SiteLINK Administrator can assist you in providing any additional technical information.
SiteLINK’s Basket OnlyIf you prefer to simply plug SiteLINK’s basket to your current site, that is also possible. All you need is a little script that is added to your current site that will add items to the SiteLINK basket when the ‘Add to Cart’ button is selected. You will get the same advantages of using SiteLINK: Importing orders directly into M.O.M., publishing order status and customer history, taxes, shipping charges, pricing levels, cross-sells/up-sells, etc.
While the SiteLINK basket resides on our server, the main site can reside at any location, giving you extra flexibility and control.
24/7 Order Status ModuleBuilt on the SiteLINK Platform, the 24/7 Order Status module will allow non-SiteLINK stores to publish 3 month’s worth of Customer and Order Status data to the web, where their customers can log in (using email address and password from M.O.M.) to access it.
Order status will show Web Confirmation numbers, Status of the order,

URL Activity Reporting Considerations
18 SiteLINK User Reference Guide
Order Detail, Bill-to address, Ship-to address, last 4 digits of credit card, shipping method, tracking number (clickable to UPS or FedEx). This feature includes the line item status as well as the status of the entire order.
URL Activity Reporting ConsiderationsDepending on your selection of hosting option, you should be aware of the following considerations in regards to your ability to utilize the SiteLINK URL (Universal Resource Locator) Activity Report to track the origin of “hits” to your store. For more information about the URL Activity Report, see URL Activity on page 98 in this Guide.
Full Web Site Hosting —Although all commerce transactions on the Dydacomp server are secured through the use of a SSL Certificate, to utilize the URL Activity Report to track origins of hits, you must purchase your own SSL Certificate (from VeriSign or another provider). If you choose not to purchase your own SSL Certificate, the URL Activity Report shows all hits originating from your own domain instead of their true point of origin. For this reason, we strongly suggest that you obtain your own SSL Certificate from any of the suggested vendors listed on page 17 of this Guide.
Store Only/ Basket Only Hosting —Because all initial hits to your store are made through the hyperlink from your own domain, the SiteLINK URL Activity Report shows all hits coming from one point of origin — your domain. To track URL references to your domain, some other referrer analysis system apart from SiteLINK is needed.

Chapter 2 Setting Up Departments and Products in M.O.M.
SiteLINK User Reference Guide 19
Chapter 2
Setting Up Departments and Products in M.O.M.This chapter provides detailed instructions on setting up departments, products and the “specials” page for your store in Multichannel Order Manager.
Setting Up DepartmentsDepartments enable you to organize your products into groups that SiteLINK uses to display product listings for your customer by product category. This information will appear in your Web store as the SITE MAP. You can have as many levels (sub-departments) of departments as you need.
To access the Maintain Departments screen,
1. From M.O.M.’s Main Menu,
Click on: OptionsSiteLINKMaintain Departments
The Maintain Departments screen is displayed.
MaintainDepartments

Setting Up Departments
20 SiteLINK User Reference Guide
2. Use the Find field to search through the list of departments.3. Optionally, check the option Make New Departments Top Level
Departments. This option will create any new departments as main departments instead of a sub-department.
4. Select and complete the applicable tasks as follows.
Creating a New Department1. Select the NEW DEPARTMENT button to display the Department
Information screen.
2. Enter the Department Name. 3. If the department is a sub-department of another department, use
the drop-down Sub-Department Of list to select the “parent” department.
4. If the department is to be included in the list of departments on the Store Directory page, check the Show Department in Store Directory check box.
5. SiteLINK enable you to set up image files for your store’s departments. Typically this image is one of the images of a product in the department, although you might have a special image representing the entire department.
To select an image for the department,
Click on:
next to the Department Image field. File type must be JPG or GIF.
DepartmentInformation

Chapter 2 Setting Up Departments and Products in M.O.M.
SiteLINK User Reference Guide 21
æ Note: For more detailed image specifications, see the Setting Up Product Information section.
6. Optionally, enter a Department Description. This field accepts HTML code, or you can use the HTML Editor.
7. Select the SAVE button when you are finished.
Modifying or Deleting a Department1. To edit or change a department, highlight the department in the list
on the Maintain Departments screen and select the MODIFY DEPARTMENT button to display the Department Information screen (see previous page).
2. Make your changes and select the SAVE button when finished.3. To delete a department, highlight the department in the list on the
Maintain Departments screen and select the DELETE DEPARTMENT button. M.O.M. advises that if there are products associated with the department, the associations will also be deleted.
Arranging the Order of DepartmentsSiteLINK enables you to establish the listing order of departments on the Web store’s Site Map.
On the Maintain Departments screen (see screen earlier in this section),
1. Use the large “up” arrow button to the left of the list to move a department further up in the list.
2. Use the large “down” arrow button to the left of the list to move a department further down in the list.
æ Note: You cannot move a lower level department above or below a higher level department in the list.
Adding, Removing or Arranging Products in Departments1. Highlight the department in the list on the Maintain Departments
screen (see screen earlier in this section) and select the EDIT PRODUCT LIST button to display the Product List screen.

Setting Up Product Information
22 SiteLINK User Reference Guide
2. To add a new product to the department, select the ADD button and enter the Stock Number for the product. If you do not know the stock number, press the À key for lookup.
æ Note: Only those products that have been set up as “Available on the Web” in the Maintain Stock Items function can be added.
3. To remove a product from the list, highlight the product in the list and select the DELETE button.
4. To arrange the order of products as they are listed in the department, use your mouse to click on the box to the left of the product in the list and “drag and drop” the product to the new position in the list.
5. When you are finished, select the CLOSE button.
Setting Up Product InformationSiteLINK uses product information directly from your M.O.M. system—special discount selling prices (see the note below), special product attributes like size/color, fractional quantities, etc.—it’s all maintained in the Stock Maintenance function of your M.O.M. software. The additional product information required when using SiteLINK is used only to control the way in which your customer “views” the item in your on-line store.
ProductList

Chapter 2 Setting Up Departments and Products in M.O.M.
SiteLINK User Reference Guide 23
In fact, if you already have your business set up in M.O.M. and are adding SiteLINK to your M.O.M. system, you’ll be ready to sell on the web very quickly just by completing a few new information fields for each of the stock items you want to include in your web store.
ç Warning: Avoid using any special characters or symbols as part of your stock number such as quotation marks, parentheses, less-than symbol, etc. Including them may cause SiteLINK to improperly function.
æ Note: In SiteLINK, any special pricing for items based on sale date and/or quantity will apply to any customer in your store, whether they are a new customer or a repeat registered customer. Pricing based on customer type or customer number will only apply on orders for repeat customers.
è Hint: For stock items having Size/Color, the data in Description Line 2 will appear as an option on the drop-down menu of the product detail page. See following example.
To access the product information for SiteLINK,
1. On M.O.M.’s Main Menu Bar,
Click on: ProductMaintain Stock Item
The Stock Item Lookup screen is displayed.
2. Select the desired stock item.
Size/ColorItemin M.O.M.andWeb Store

Setting Up Product Information
24 SiteLINK User Reference Guide
The Stock Item Information screen is displayed.
3. Select the SiteLINK tab.4. To have the product available in your SiteLINK store, check the
Product Available on the Internet box.5. Complete or edit the information in each of the four sub-tabs. Refer
to the corresponding procedures that follow.
Entering Product Description InformationSelect the Description sub-tab (see the screen on the previous page) to define the descriptive information for the item as it appears in your store.
1. Select a Product Title for the item to be used in your store. Check the radio button for Use Main Description to use the
regular title description of the product that is set up for the item in the Stock Item Information screen.
Check the radio button next to the blank box to enter a different product title for use only in your SiteLINK store.
2. Enter a Meta Tag Product Title, for more information see Meta Tags on page 122
3. Enter a Short Description to be used in your store on the product listing pages and/or product specials page.
4. Select a Full Description for the product page itself. Check the radio button Use Extended Information, to use any text
description for the product that is set up in the Extended Info tab
Stock ItemInformation

Chapter 2 Setting Up Departments and Products in M.O.M.
SiteLINK User Reference Guide 25
in the Stock Item Information screen.
æ Note: Any image that may be set up on the Extended Info tab has no effect or use in your SiteLINK store.
Check the radio button next to the blank box to enter a different full description of the product for use only in your store.
è Hint: You can use HTML code to change the appearance of the text in the Short or Full Description fields above. You can do this by either using the HTML editor provided for the description fields, or by simply inserting HTML code right in the text for line breaks, bolding, font size or color, etc. For instance, insert: <BR> for a line break. <I> and </I> to begin and end italics text. <B> and </B> to begin and end bold text.
You can also insert HTML-coded Hyperlinks to take shoppers to other parts of your Web site or SiteLINK store. See Creating Custom Hypertext Links To Your Store on page 110, for more information about Hyperlinks.
5. Optionally use the Availability field to enter additional information detailing the amount of time an item takes to ship or additional promotional information.
Entering Department InformationSelect the Department sub-tab to view or edit the departments and sub-departments in which the product is included. A product can be included in as many departments as you want. You can enter items ONLY into the lowest level department.
1. To add a product to a department, click on the corresponding check box to check the selection.
2. To remove a product from a department, click on the check box to un-check the selection.
æ Note: New departments are created using the Maintain Departments function. (See Setting Up Departments on page 19 earlier in this chapter.) In addition to adding or removing products as above, you can also add or remove products from within the Maintain Departments function as well.
Depending on your preference, you can skip the task of Entering

Setting Up Product Information
26 SiteLINK User Reference Guide
Department Information for each individual item and complete this task for all items as you set up your departments.
Entering Selling Tool InformationTo increase sales, you may want to have your site make alternative or additional product suggestions to your customers based on the selection of a certain stock item.
Using Selling Tools from M.O.M.There are four types of product selling tools that M.O.M. lets you set up for an item, However you cannot use there are restrictions for a few of the selling tools when utilized in SiteLINK.
Substitute Item - an alternative item that is suggested whenever the item is unavailable. This cannot be used along with an Upsell Item Tool.
Up-Sell Item - an alternative item that is suggested because it is “better” than the item. This cannot be used with a Substitute Item Tool.
è Hint: Since Substitutes and Up-Sells behave the same on SiteLINK, only one can be used. Substitutes should be used when a product has been discontinued and must be phased out, otherwise an Up-Sell should be used.
Cross-Sell Item - one or more items that are suggested because they are “related” to the item as accessories or extra items.
Promotional Item -This cannot be used in SiteLINK.
In those cases where more than one selling tool is set up for an item, M.O.M. prioritizes Up-Sells ahead of Promotion, followed by Substitutes and Cross-Sells. Cross-Sells are only displayed if the proceeding Up-Sell and/or Substitute is declined. A special Selling Tools Report allows you to report on the activity and use of each special type of item.
æ Note: When importing orders, if there is a mandatory substitution for an item, the item will be substituted and there will be an entry on the Exception Report showing the information about the substitution.
To set up any one of the selling tools for a stock item,

Chapter 2 Setting Up Departments and Products in M.O.M.
SiteLINK User Reference Guide 27
1. Click on the General tab in the Stock Item Information screen.
2. In the screen section titled, Cross-Sell, Up-Sell, Substitute, Promote Items, use the pull-down menu to select “Add a New Selling Tool”, and press the ADD button to display the Edit Cross-Sell, Up-Sell, Substitute Item or Promotional Product screen.
To edit or delete an existing entry, select the entry using the pull-down menu and press the EDIT button to display the Edit Cross-Sell, Up-Sell, Substitute Item or Promotional Product screen.
3. Use the pull-down to select the Type of Selling Tool.
General Tab
Edit Substitute,Cross-Sell,Up-Sell,PromotionalProduct

Setting Up Product Information
28 SiteLINK User Reference Guide
4. Enter or lookup the Stock Number for the item that is being associated as a Cross-Sell, Up-Sell, or Substitute.
æ Note: The Allow Lookup Option cannot be used on SiteLINK. The customer is required to select the recommended item or reject the offer.
5. Optionally, enter a Description for Report to be printed on the Selling Tools Activity Report.
6. Select the SiteLINK Availability to determine whether the selling tool will be available only on SiteLINK, for both SiteLINK and M.O.M., or just M.O.M. orders.
7. Use the Display Condition check boxes to select under what condition and/or within what date range you want the prompt displayed to your order entry operator. For those conditions where the customer has no choice but to accept the alternate item, select the Substitute is Mandatory option.
8. When complete, select SAVE to exit. To delete a selling tool, press the DELETE button.
æ Note: To create a selling tool for a stock item with size/color, in the General tab, in the screen section titled, Cross-Sell, Up-Sell, Substitute, Promote Items, use the pull-down menu to select “Copy To All Size Color Variations.” When prompted to “Default all size/color variations to the selling tools,” select the YES button.
Special SiteLINK Only Selling Tools1. Select the SiteLINK tab.2. Select the Selling Tools sub-tab to set up cross-sell, up-sell,
comparative selling price, shopper customizing options, and special key word searches for the item. All fields on this screen are optional.

Chapter 2 Setting Up Departments and Products in M.O.M.
SiteLINK User Reference Guide 29
3. If you want to offer an up-sell product for the item, enter the stock code in the Up-Sell Product field or press the F2 key to look it up.
4. Enter a corresponding sales message for the up-sell product in the Up-Sell Message field. The up-sell product and message will be automatically suggested to the customer on the “Basket” page of your store.
5. If you want to offer a cross-sell product for the item, enter the stock code in the Cross-Sell Product field or press the F2 key to look it up.
6. Enter a corresponding sales message for the cross-sell product in the Cross-Sell Message field. The cross-sell product and message will be automatically suggested to the customer on the “Basket” page of your store.
ç Warning! The option to display these SiteLINK exclusive Cross-Sell and Up-Sell tools is enabled upon request. Contact SiteLINK Support for more information, [email protected]
7. Enter a Comparative Selling Price to be displayed for the item. This price is typically used to show your customer that the normal retail selling price of your product is less than the price offered by your competition.
8. Check the Custom Information for Product box (for monogramming, for example), and enter a prompt in the Prompt for Custom Information field (“Monogram With”, for example.) Your shopper will be automatically prompted to enter the custom information when the product is “added” to their basket.
Stock ItemSiteLINKSelling Tools Tab

Setting Up Product Information
30 SiteLINK User Reference Guide
9. Enter additional search words in the Keyword List for Product Search to expand the search possibilities for your store customers beyond the Product Title and Description fields on the Description sub-tab. For instance, if you sell books, you might enter the author, publisher, ISBN, etc. These words will be used when the customer selects the SEARCH button. They will also be used by SiteLINK as your Meta Keywords on the product detail page.
Entering Image InformationSelect the Image sub-tab to set up store image file name and path.
Image file name and path cannot exceed 50 characters and spaces cannot be used in the name or path. When designating an image path, do not place any images in the MOMWIN\SITELINK\SENTDATA directory. Also, remember that although images are optional in SiteLINK, if a customer selects a product without an image, the message “Image Not Available” is displayed. It is also possible to post a transparent GIF image (for clients not using product images) upon request.
è Hint: The standard optimized image size is 72 dpi (dots or pixels per inch). If you are using the same images for your Web site as you do for your catalog, be sure they are optimized for the Web and saved as Websafe or WebReady images.
1. Use the SELECT button next to the Full Image field to select the path and file name for the full image of the product to be used on
Stock ItemSiteLINKImages Tab

Chapter 2 Setting Up Departments and Products in M.O.M.
SiteLINK User Reference Guide 31
the actual product page for the item. File type must be JPG or GIF, the suggested image size limit is 350 pixels wide with no limit for the height. Use the VIEW button to display an image already selected.
2. Use the SELECT button next to the Thumbnail Image field to select the path and file name for the image of the product to be used on the product listing pages and/or the “specials” page of your store. File type must be JPG or GIF. Use the VIEW button to display an image already selected.
æ Note: Because a thumbnail image is usually displayed with many other images, it must be a small file to enable it to be opened quickly in your customer’s browser. Suggested images sizes are 60 x 60, 90 x 90, or 110 x 110 pixels. If no separate thumbnail image is specified, the full image is used as a default.
3. In the Additional Images section, follow the same criteria as the Full Image. These additional images are linked by a button on the product page titled VIEW ADDITIONAL IMAGES.
4. You may also create an additional image that is larger than the others, perfect for displaying items in great detail. This will be displayed in a pop-up window as a "zoom" image, with a link on the product page titled VIEW LARGE IMAGE. Using the first 10 characters of the stock number, name the image itemnumber-large.jpg and upload the image to SiteLINK from the images folder. For example, if the stock item is named E-SKATES, the image should be named E-SKATES-large.jpg
æ Note: For Size/Color items the item number is only the first 10 characters of the stock number. Do not include the size/color.
5. When all information is complete, select the SAVE button, or proceed directly to the Miscellaneous tab to enter the item’s optional Advanced Search Criteria, described in the following section.
Entering Google Base Information1. The Brand field allows you to enter the brand name of the item.2. Select the Condition of the item from the pre-defined list.3. Optionally, enter an Expiration Date to remove the item from the
listing after the date is reached.
æ Note: If the Expiration Date is left blank, the listing will automatically expire 30 days after the date the item was last published.

Setting Up Product Information
32 SiteLINK User Reference Guide
4. Enter a Product Type for the item. See the Google Product Type list (http://base.google.com/base/product_types.html) for examples.
5. Enter a Google Base Description to be used when sending data to Google Base.
Check the radio button Use Extended Information, to use any text description for the product that is set up in the Extended Info tab in the Stock Item Information screen.
Check the radio button next to the blank box to write a separate full description for the product to send to Google Base.
M.O.M. contains all of the required fields to be able to publish items to Google Base.
æ Note: You must first set up a Google Base account to use this feature. See Chapter 8 for further instructions. Additionally, Google Base descriptions cannot contain any HTML. SiteLINK will also use this description as a Meta Description on the Product Details Page.
Entering Advanced Search CriteriaThis feature allows visitors to perform a precise search for a product on your website based on four advanced search criteria of your choosing.
æ Note: Before using this feature, you must first set up the names of the four custom fields in the Maintain > System Information > Global Parameters > Miscellaneous tab.
Select the stock item’s Miscellaneous tab.
Stock ItemMisc.Tab

Chapter 2 Setting Up Departments and Products in M.O.M.
SiteLINK User Reference Guide 33
1. For each of the four Advanced Search Criteria, enter a word that fits each category. This will help visitors find the item more easily on your website. For example, we may enter the word ‘football’ as the Sport for the C-FT-JR stock item. In our SiteLINK store, under Search, when Sport is selected and the word ‘Football’ is entered, “C-FT-JR” will appear in the results window.
æ Note: The Advanced Search Criteria is also an excellent way of grouping similar items together on your website-!
Complex Item Attribute SetupMany products afford customers the opportunity to customize and personalize them to suit the customer’s various needs and tastes. M.O.M. allows you to provide customers with a variety of choices complex enough to address all of the customer’s wants, while still making it easy to take the order in the system. Each individual option or combination of options can be directly associated to a specific sku. These options or “Attributes” can also be used to record custom information for use when fulfilling the order.
æ Note: The Attribute functionality can only be used for items that are designated as Size/Color Items.
1. From the Stock Item Lookup screen, select an existing Size/Color item or create a new one.
AdvancedSearch for ‘football’

Setting Up Product Information
34 SiteLINK User Reference Guide
2. Select the Attributes tab.
3. Check the option Enable Product Attributes.
Creating Attributes1. In the Attributes section, Select the ADD button.2. This will display the Add/Edit Attribute Screen.
3. Enter a code to identify this attribute.
Stock ItemAttributes Tab
Add/Edit Attribute Screen

Chapter 2 Setting Up Departments and Products in M.O.M.
SiteLINK User Reference Guide 35
4. Enter a name for the attribute. This will be used as the label for the attribute when it is listed in the order entry screen.
5. Select the Attribute Type.Text Entry- This field allows you enter custom information for an
item within this Size/Color matrix. In the Validation field, select an option to restrict entry in this field that would be invalid for the type of data you are expecting. The Field Length specifies the number of characters allowed in the field.
Drop Down Selection & Radio Button Selection- These options allow you to enter values that can be directly assigned to specific items in the size/color matrix. To enable this option, check the This Attribute' s Value Is Part Of The Sku Link option.
Creating MappingsOnce the Attributes have been created, the attributes that are part of the SKU Link must be mapped to those specific size/color items.
1. In the Mappings section, select the Create Mapping button.This will display the Attribute Mapping Screen.
2. Choose the radio button and drop-down menu options that you wish to link with this item.
Map Creation Screen

Establishing Restricted Shipping Areas
36 SiteLINK User Reference Guide
Establishing Restricted Shipping AreasDue to many factors such as seasonal weather, delivery times, and local laws; some items cannot be shipped to specific locations. Using the Restricted Shipping Area feature you can designate what areas an item will not be shipped to and the dates in which this restriction will be in place.
Single Product Restriction Setup1. Select the Inventory tab in the Stock Item Information screen.2. Select Add to create a new restriction or select an existing
restriction and choose Edit to change the restriction options or Remove to delete the restriction.
æ Note: When editing an existing restriction, you cannot change the restriction’s area.
The Edit Product Restricted Shipping Area screen is displayed.
3. Starting from the Country Tab, click on the check box column next to the location name to check the restricted area. Locations can be restricted down to specific ZIP codes.
4. In the Date Restriction Rules section, choose one of the following:No Date Restriction- This option will not allow the item to be
placed on an order where the shipping destination is in a restricted area.
Restricted only from- This option gives you the ability to specify the dates in which the restriction is in place. You must then
ProductRestrictedShipping Area

Chapter 2 Setting Up Departments and Products in M.O.M.
SiteLINK User Reference Guide 37
designate whether the item can be placed on an order during the restriction time, or if the item is allowed to be sold but not shipped until the specified number of days.
æ Note: A product with the No Date Restriction option selected will prevent a customer from placing the order. If product is restricted, but within a date range, the order will import with the appropriate shipment hold date.
5. Choose Save to return to the Inventory tab.
Product Class Restriction SetupProducts that are setup with the same Product Classification Codes can have Restricted Shipping Areas applied to all of them at once.
1. From the Main M.O.M. Screen,
Click On: ProductMaintain Product Class Shipping Region Restrictions
The Product Classification Restricted Shipping Area Maintenance screen is displayed.
2. Choose a Product Classification Code from the drop down menu. Then select Add to create a new restriction or select an existing restriction and choose Edit to change the restriction options or Remove to delete the restriction.
ProductClassificationShipping Area Restriction
Establishing Special Selling Prices
38 SiteLINK User Reference Guide
æ Note: When editing an existing restriction, you cannot change the restriction’s area nor the Product Classification Code it is assigned to.
The Edit Product Restricted Shipping Area screen is displayed.
3. Starting from the Country Tab, click on the check box column next to the location name to check the restricted area. Locations can be restricted down to specific ZIP codes.
4. In the Date Restriction Rules section, choose one of the following:No Date Restriction- This option will not allow the item to be
placed on an order where the shipping destination is in a restricted area.
Restricted only from- This option gives you the ability to specify the dates in which the restriction is in place. You must then designate whether the item can be placed on an order during the restriction time, or if the item is allowed to be sold but not shipped until the specified number of days.
æ Note: A product with the No Date Restriction option selected will prevent a customer from placing the order. If product is restricted, but within a date range, the order will import with the appropriate shipment hold date.
5. Choose Save to return to the maintenance screen.
Establishing Special Selling PricesIn addition to a “regular” selling price for the item, you can publish special selling unit prices, discounts or “cost plus” basis prices based on quantity purchased, advertising source key, catalog code, customer type, customer number, order total, and sale date. These special prices will display on your product page, with a graphic that strikes through your normal retail selling price.
To set up selling prices for the item,

Chapter 2 Setting Up Departments and Products in M.O.M.
SiteLINK User Reference Guide 39
1. Select the Pricing tab on the Stock Item Information screen.
2. Enter the regular selling price of the item in the Normal Retail Selling Price field.
3. The Maximum Discount Allowed field allows you to limit the discount percentage for the item. During order entry, an order clerk will be informed when the discount percentage entered exceeds the Maximum Discount Allowed, it must then be reentered with a lower discount.
4. Optionally, enter a Mix & Match code for the item. For information on setting up these codes, see Setting Up Product Mix & Match Codes in Chapter 2 of the M.O.M. Setup Guide.
5. Optionally, check the Selling Price option, then choose an option that will limit how selling prices can be altered on an order.
Cannot go below $____- This option allows you specify a dollar amount that an item cannot be discounted below.
____% above the current unit cost basis- This option allows you to enter a percentage over the Current Unit Cost Basis that an item cannot be discounted below. For instance, if the Current Unit Cost Basis is $8.00, and the limit is set at 15% Above the Current Unit Cost Basis, then the item cannot be sold below $9.20
$___ above the unit cost basis- This option allows you to enter an dollar amount over the Current Unit Cost Basis that an item cannot be discounted below.
6. To set up a Special Situation Price, select the NEW button to display
Stock ItemPricing Tab

Establishing Special Selling Prices
40 SiteLINK User Reference Guide
the Special Price Information screen.
7. The Seq # field is assigned by M.O.M. as you set up each special situation price. However, this number can be changed by you to tell M.O.M. in what order a series of special prices should be applied. This is especially important in those cases where more than one special price applies to a customer purchase. For instance, if a customer is eligible for a “customer type code” price and also a “minimum quantity” price, M.O.M. has to know whether to apply the type code price first and then the quantity price or vice versa. To make sure that this occurs, special prices should be sequenced from most general situation to most specific.
8. Select a Method of Pricing for the special price; Unit Price with an optional Discount or a Cost Plus pricing based on your unit cost or last price paid for the item.
9. Select the Qualifier for the Price based on one or more of the Customer and/or Order special price qualifiers.
10. In the Sitelink tab, Use the PRICE LEVEL drop down to designate if the price level is for Web Orders Only, Non Web Orders Only, or Both.
è Hint: To prominently display a discounted price, create a special price where the only qualifier is a minimum quantity of 1. This will list a special “Red Tag” sales price on your product page.
Stock ItemSpecial PriceInformation

Chapter 2 Setting Up Departments and Products in M.O.M.
SiteLINK User Reference Guide 41
See AlsoMultichannel Order Manager HelpFor information about SeeSpecial Selling Prices Stock Maintenance-Pricing
Setting Up the Specials PageThe Specials Page is a page that consists of a unique display of select products. It is typically the page of those products that you want to promote above all of your other products. A list of your first 10 specials is displayed on the right-hand side of your home page. The specials page can be set up to be the first page a customer sees when they visit your store. See Setting Up Store Preferences in Chapter 4.
To set up the Specials Page,
1. From M.O.M.’s Main Menu,
Click on: OptionsSiteLINKMaintain Specials
The Maintain Specials screen is displayed.
2. To add a new product to the Specials Page, select the ADD button and enter the Stock Number for the product. If you do not know the stock number, press the F2 key for lookup.
æ Note: Only those products that have been set up as “Available on the Web” in the Maintain Stock Items function can be added.
MaintainSpecials

Setting Up the Specials Page
42 SiteLINK User Reference Guide
3. To remove a product from the Specials Page, highlight the product in the list and select the DELETE button.
4. To arrange the order of products as they are listed on the Specials Page, use your mouse to click on the box to the left of the product in the list and “drag and drop” the product to the new position in the list.
5. When you are finished, select the CLOSE button.

Chapter 3 Setting up Order Payment Options
SiteLINK User Reference Guide 43
Chapter 3
Setting up Order Payment OptionsThis chapter provides detailed instructions on setting up various payment options for shoppers on your SiteLINK site. The Credit Card, eCheck, and PayPal options require you to setup your account in M.O.M. For more information contact the Dydacomp Payment Processing Department at (800) 858-3666 x235 or email [email protected].
Setting Up Credit Card Options for ShoppersUsing M.O.M.’s Credit Card Merchant Account Information screen, you can decide which credit card types or card merchant accounts you want to offer your shoppers.
1. On M.O.M.’s Main Menu Bar,
Click on: MaintainAccounting InformationCredit Card Merchant Accounts
The Credit Card Merchant Lookup screen is displayed.
2. Select the desired credit card to display the Credit Card Merchant Account Information screen.

Setting Up Credit Card Options for Shoppers
44 SiteLINK User Reference Guide
3. Check the Card Type is Available on Web box to set up the selected credit card as an option for your shoppers.
4. Select the SAVE button.5. Login to the admin page of your SiteLINK store.(ex.
www.yourstore.com/admin.asp).6. Under the Settings section on the top menu, click Payment
Settings.7. Find the option Accept CC Payments through MOM/Sitelink
Gateway.
8. Choose Yes to begin accepting credit cards through your store, optionally choose Yes under the CVV Mandatory option. This will require customers to enter their card verification code when paying for an order.
Credit CardMerchantAccountInformation
SiteLINKAdmin PagePayment Settings

Chapter 3 Setting up Order Payment Options
SiteLINK User Reference Guide 45
9. Click the APPLY button to save your changes.
Setting up e-Check Option for ShoppersIf you have an Authorize.net eCheck account, you can now accept eChecks for your SiteLINK orders. For more information on obtaining an eCheck account, send an email to [email protected].
æ Note: The eCheck option is only for Authorize.net users,
To setup your store to accept eCheck;
1. Login to the admin page of your SiteLINK store.(ex. www.yourstore.com/admin.asp).
2. Under the Settings section on the top menu, click Payment Setting.3. Under the Store Setting section, find the option Accept E-Check
through MOM/Sitelink Gateway.
4. Choose Yes to begin eChecks through your store5. Click the APPLY button to save your changes.
Setting up PayPal Option for ShoppersSiteLINK allows you to accept PayPal payments. During checkout, customers are routed to the PayPal account screen, where they can login to their accounts, pay for their orders, and are sent back to your site upon completion. You will first need to obtain a PayPal account, simply send a request to [email protected]. Once your account is setup;
1. Login to the admin page of your SiteLINK store.(ex. www.yourstore.com/admin.asp).
SiteLINKAdmin Page

Payment Gateway Error Notification
46 SiteLINK User Reference Guide
2. Under the Settings section on the top menu, click Payment Settings.
3. Find the option Accept PayPal.4. Choose Yes.5. Click the APPLY button to save your changes.
Payment Gateway Error NotificationIn the event that your site cannot communicate with the Payment Gateway temporarily, SiteLINK will confirm the order and can send you a notification via email that this issue has occurred. To specify the email address for this notification;
1. Login to the admin page of your SiteLINK store.(ex. www.yourstore.com/admin.asp).
2. Under the Settings section on the top menu, click Payment Settings.
3. Find the option Email addr for Gateway Error Notification, then enter the email address.
4. Choose Yes.5. Click the APPLY button to save your changes.
Setting up Google Checkout Payments for ShoppersGoogle Checkout can be used as an optional payment method for your store. Simply navigate to http://checkout.google.com/sell/ to get more information or create a Google Merchant Account.
Once your account is created,
1. Log into your Google Merchant Account at https://www.google.com/accounts/Login
2. Once logged in,
Click On: Settings TabIntegration Option

Chapter 3 Setting up Order Payment Options
SiteLINK User Reference Guide 47
3. Check the option My company will only post digitally signed carts.
4. API callback URL: https://www.yourstore.com/ResponseHandler.asp
æ Note: The callback URL must point to https.
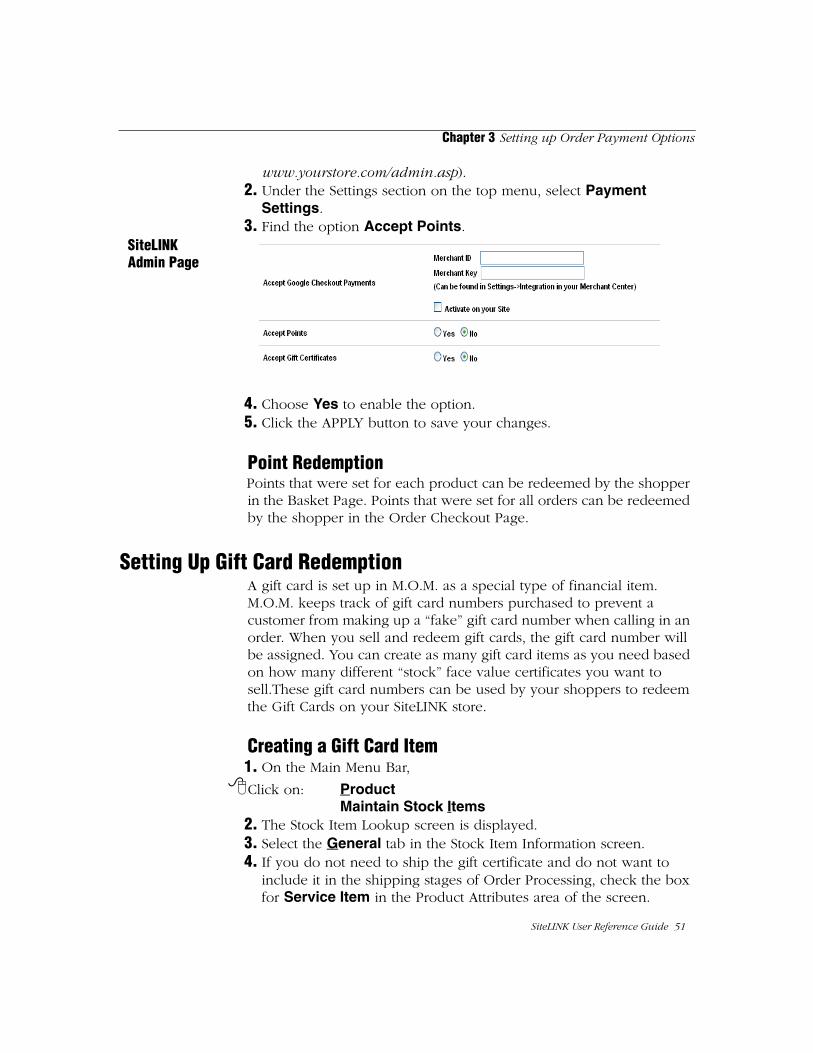
5. Select the Callback Method: XML6. Take note of your Google Merchant ID and Google merchant key7. Login to the admin page of your SiteLINK store.(ex.
www.yourstore.com/admin.asp).8. Under the Settings section on the top menu, click Payment
Settings.9. Find the option Accept Google Checkout Payments
.
10. Enter the Merchant ID and Merchant Key that you obtained from your Google Merchant Account.
11. Choose Activate on your Site to enable the option.12. Click the APPLY button to save your changes.
Google CheckoutIntegration Settings Page
SiteLINKAdmin Page

Setting Up a Points and Rewards Program
48 SiteLINK User Reference Guide
13. Return to M.O.M. and update your shipping methods to include a Google Description and Default Charge. See Setting Up Shipping Options for Shoppers on page 57 for more information
ç Warning! Google Checkout will be disabled on the following types orders:
Orders with multiple shipping destinations.Orders containing fractional item quantities.
ç Warning! The following features will be disabled when the Google Checkout payment option is selected:
The ability to redeem points earned using the Points & Rewards feature.
The ability to redeem Gift Certificates.14. When importing orders through a flat file provided by your SiteLINK
Store. You must follow the procedure specified in Downloading and Importing Orders on page 94 to import the Google Checkout Orders correctly. Using the Download Orders from SiteLINK option will automatically recognize the Google Checkout Payments
15. Once you begin accepting Google Checkout payments on your SiteLINK store, these orders must be approved in M.O.M. For more information, see the section Completing Google Checkout Payments During Order Entry within the Entering Order Payment Information section of Chapter 2 in the M.O.M. Reference Guide.
Setting Up a Points and Rewards ProgramAs a means of encouraging your customers to purchase more, M.O.M. enables you to set up a points and rewards program based on previous product purchases. These accumulated points can be redeemed by customers on your SiteLINK store. They must log into their accounts in your store to have the points available.
To set up a points and rewards program,
1. On the Main Menu Bar,
Click on: MaintainSystem InformationGlobal Parameters
The Global Parameters Maintenance screen is displayed.

Chapter 3 Setting up Order Payment Options
SiteLINK User Reference Guide 49
2. Select the Accounting tab.
3. Check the box for Use Points/Rewards.4. Determine how points are to be accumulated by customers.To allow points to be accumulated by total dollars spent, select 1 Point for Every $__ of Merchandise Purchased and enter the dollar value.
To allow points to be accumulated only for certain products purchased, select Points As Established For Each Product. You must set up the earned point values for each product in the Maintain Stock Item function. See the additional procedure below.
5. Determine how points are to be redeemed by customers.To allow points to be redeemed as a credit on order total on a future order, select 1 Point = $___ Off The Order Total and enter the dollar value.
To allow points only to be used as a credit when purchasing certain products, select Can Only Be Used To Buy Designated Products. You must set up the redemption point values for each product in the Maintain Stock Item function. See the additional procedure below.
æ Note: Points applied to the order total create a journal entry. Points applied to the item change the item price.
6. Optionally, if you are using the M.O.M. G/L interface, and have selected to redeem points based on order total in Step 5, you can
AccountingTab

Setting Up a Points and Rewards Program
50 SiteLINK User Reference Guide
select the G/L sub-account to post redeemed points. Use the pull-down menu for Post Redemptions to the following Payment Adjustments Sub Account to make your selection.
Establishing Point Values for Products1. On the Main Menu Bar,
Click on: ProductMaintain Stock Items
The Stock Item Lookup screen is displayed.
2. For an existing item, use the lookup screen to find and select the item and display the Stock Item Information screen. For a new item, select the NEW button to display the Stock Item Information screen.
3. On the Stock Item Information screen, select the Misc tab.
4. To set up the earned point value for the product, enter the value in the Points Received When Purchased ___ field.
5. To set up the redeemed point value for purchasing the product, check the box for and enter the value in the Use ___ Points to Buy This Product field.
6. When you are finished, select SAVE.
Admin Page Setting for Points and RewardsOnce your Points & Rewards system has been setup,
1. Login to the admin page of your SiteLINK store.(ex.
MiscellaneousTab
Chapter 3 Setting up Order Payment Options
SiteLINK User Reference Guide 51
www.yourstore.com/admin.asp).2. Under the Settings section on the top menu, select Payment
Settings.3. Find the option Accept Points.
4. Choose Yes to enable the option.5. Click the APPLY button to save your changes.
Point RedemptionPoints that were set for each product can be redeemed by the shopper in the Basket Page. Points that were set for all orders can be redeemed by the shopper in the Order Checkout Page.
Setting Up Gift Card RedemptionA gift card is set up in M.O.M. as a special type of financial item. M.O.M. keeps track of gift card numbers purchased to prevent a customer from making up a “fake” gift card number when calling in an order. When you sell and redeem gift cards, the gift card number will be assigned. You can create as many gift card items as you need based on how many different “stock” face value certificates you want to sell.These gift card numbers can be used by your shoppers to redeem the Gift Cards on your SiteLINK store.
Creating a Gift Card Item1. On the Main Menu Bar,
Click on: ProductMaintain Stock Items
2. The Stock Item Lookup screen is displayed.3. Select the General tab in the Stock Item Information screen. 4. If you do not need to ship the gift certificate and do not want to
include it in the shipping stages of Order Processing, check the box for Service Item in the Product Attributes area of the screen.
SiteLINKAdmin Page

Setting Up Gift Certificate Redemption
52 SiteLINK User Reference Guide
æ Note: Only eGift cards will publish to SiteLINK.
5. Set up the other information for the certificate just as you would for any other new item, completing all of the regular information on any/all of the Stock Item Information screen tabs.
æ Note: You may enter a cost for the gift cards on the Supplier tab.
6. Select the SAVE button when you are finished.
Admin Page Settings for Gift CardsOnce your Gift Card Products have been setup and published,
1. Login to the admin page of your SiteLINK store.(ex. www.yourstore.com/admin.asp).
2. Under the Settings section, select Payment Settings.3. Find the option Accept Gift Cards.
4. Choose Yes to enable the option.5. Click the APPLY button to save your changes.
Gift Card RedemptionDuring the Basket Checkout Process, the shopper will have a tabbed list of payment options. The shopper can select REDEEM GIFT CARD and enter the Gift Card Number.
è Hint: SiteLINK also allows you to Invoice a customer or accept COD Payments. For more information see Additional Customer Payment Options on page 57.
Setting Up Gift Certificate RedemptionA gift certificate is set up in M.O.M. as a special type of financial item with a serialized inventory to prevent a customer from making up a “fake” gift certificate number when calling in an order. When you sell
SiteLINKAdmin Page

Chapter 3 Setting up Order Payment Options
SiteLINK User Reference Guide 53
and redeem gift certificates, M.O.M. automatically takes care of issuing the unique serial number for you. You can create as many gift certificate items as you need based on how many different “stock” face value certificates you want to sell.These serial numbers can be used by your shoppers to redeem the Gift Certificates on your SiteLINK store.
Creating a Gift Certificate Item1. On the Main Menu Bar,
Click on: ProductMaintain Stock Items
2. The Stock Item Lookup screen is displayed.3. Select the General tab in the Stock Item Information screen. 4. If you do not need to ship the gift certificate and do not want to
include it in the shipping stages of Order Processing, check the box for Service Item in the Product Attributes area of the screen.
5. Set up the other information for the certificate just as you would for any other new item, completing all of the regular information on any/all of the Stock Item Information screen tabs.
æ Note: Because you don’t purchase gift certificates from a supplier, you do not have to set up any information in the Supplier tab.
6. Select the SAVE button when you are finished.
Admin Page Settings for Gift CertificatesOnce your Gift Certificate Products have been setup and published,
1. Login to the admin page of your SiteLINK store.(ex. www.yourstore.com/admin.asp).
2. Under the Settings section, select Payment Settings.3. Find the option Accept Gift Certificates.
4. Choose Yes to enable the option.5. Click the APPLY button to save your changes.
SiteLINKAdmin Page

Setting Up buySAFE
54 SiteLINK User Reference Guide
Gift Certificate RedemptionDuring the Basket Checkout Process, the shopper will have a tabbed list of payment options. The shopper can select REDEEM GIFT CERTIFICATE and enter the Gift Certificate Number.
è Hint: SiteLINK also allows you to Invoice a customer or accept COD Payments. For more information see Additional Customer Payment Options on page 57.
Setting Up buySAFEbuySAFE is a third party service available so SiteLINK users with a 30-day free trial. The service is designed to increase consumer confidence by showing the merchant has been inspected, monitored, and guaranteed by buySAFE resulting in increased website conversions, better customer satisfaction, improved brand loyalty, and expanded profitability.
To sign up for the 30 day trial,
1. Login to the admin page of your SiteLINK store.(ex. www.yourstore.com/admin.asp).
2. Under the Miscellaneous top menu, select Add buySAFE.3. Click Enable Free Trial and enter your E-Mail address.4. Next, under the Settings top menu, select Payment Settings and click
yes next to Increase your sales with buySAFE. 5. The buySAFE seal will now be in the bottom-right corner of every
page of the site, and on the product detail page
è Hint: buySAFE is not a payment method. It is a way to show your customers you are a safe vendor to purchase from.

Chapter 4 Setting Up Other Store Information in M.O.M.
SiteLINK User Reference Guide 55
Chapter 4
Setting Up Other Store Information in M.O.M.This chapter provides detailed instructions on setting up other store information in M.O.M., including your general store preferences, customer shipping options, credit card payment options, advertising source keys for profit reporting, catalogs for customer information requests, and customer order acknowledgment e-mails. In addition, this chapter also provides instructions on setting up the M.O.M. Import/Export Module for use with SiteLINK.
Setting Up Store PreferencesStore preferences indicate the directory for any custom images or HTML code in your store, as well as additional payment options.
To access the SiteLINK Store Preferences screen,
1. From M.O.M.’s Main Menu,
Click on: OptionsSiteLINKMaintain Store Preferences
The Maintain Store Preferences screen is displayed.
æ Note: The items in the shaded area are no longer applicable to the latest version of SiteLINK. This screen is maintained for older versions of SiteLINK. For the latest SiteLINK software, these controls are now managed on the Administrative Options page of your Web site, reviewed in Chapter 5 of this Guide.

Setting Up Store Preferences
56 SiteLINK User Reference Guide
2. Select the path to your Custom and Graphic Files folder.
Directory for Custom Graphics and Files Anything that is put in this directory is uploaded to your store site during the store publishing process. When selecting a directory, do not use the \SITELINK\IMAGES directory in the MOMWIN folder or any other folder within the MOMWIN folder.
The directory can be used for any/all of the following:
Custom sets of buttons and banners. (See Chapter 5 of this Guide for specifications)
Your Company logo. (See Chapter 5 of this Guide for details) Any additional images for your website.Special documents (HTML, text or PDF format only) that are
referenced as hypertext links from product descriptions.
MaintainStorePreferences

Chapter 4 Setting Up Other Store Information in M.O.M.
SiteLINK User Reference Guide 57
Additional Customer Payment OptionsBesides electronic payments, you can also offer your customers the option of paying for their order C.O.D. and/or with terms on an open invoice. Only repeat web customers having a SiteLINK password and established terms in Multichannel Order Manager can log into the Web store and have the ability to select the Allow Terms payment option. A space is provided to enter an optional Purchase Order number.
To enable C.O.D. Payments, check the box to Allow COD.To enable open invoicing, check the box to Allow Terms.
Setting Up Shipping Options for ShoppersM.O.M. enables you to select what shipping methods you want to offer your customers in your store.
æ Note: For SiteLINK to calculate correct shipping costs, any product that is selected for your store in M.O.M. must have a shipping weight entered in the Maintain Stock Item function. Also, all zones and rate entries must be made for any shipping method used in your store.
1. On M.O.M.’s Main Menu Bar,
Click on: MaintainShipping InformationShipping Methods
The Shipping Method Lookup screen is displayed.
2. Select the desired shipping method to display the Shipping Methods Maintenance screen.

Setting Up Shipping Options for Shoppers
58 SiteLINK User Reference Guide
æ Note: If comparative shipping methods are used, they both must be available on the web and published to your SiteLINK store.
3. To include the shipping method as an option for your shoppers, check the Shipping Method is Available on the Web box. Whatever customer shipping charges have been set up for the shipping method are applied to each shopper’s order based on order weight, number of items, destination, etc.
Google CheckoutFor SiteLINK Users that utilize Google Checkout as a payment method for their customers they must make certain shipping methods available to shoppers using Google Checkout.
æ Note: You must have at least one shipping method available for Google Checkout and it is highly recommended that you have no more than 5.
1. Enter Carrier and Service Information for this method in the Description field. Shoppers will see this information when selecting a method.
2. Google Checkout is required to communicate with your SiteLINK store to determine the charges for any given order. If this communication fails, the customer will be charged the value entered in the Default Charge for shipping.
ShippingMethodsMaintenance

Chapter 4 Setting Up Other Store Information in M.O.M.
SiteLINK User Reference Guide 59
Setting Up Advertising Source Codes for HyperlinksM.O.M. allows you to associate M.O.M. advertising source codes with URL (Universal Resource Locator) referrers to include hyperlinks (search engine results, Web banner ads, free mentions on other sites, etc.) in your normal source code profit reporting through M.O.M.
æ Note: Depending upon hosting option selected, Service Version users may or may not be able to report on URL hyperlinks. Refer to URL Activity Reporting Considerations in Chapter 1. For those users who are unable to report on URLs, it is not necessary to complete this setup step in M.O.M.
1. From M.O.M.’s Main Menu,
Click on: MaintainAdvertising InformationSource Keys
The Source Key Lookup screen is displayed.
2. Select the source key to display the Source Key Information screen.
3. Enter a Title/Description. This field will populate the “How Did You Hear About Us?” drop-down menu when customers place an order on the Web site.
4. Enter the URL address of the referring site in the Internet URL Referrer field.
Source KeyInformation

Setting Up Catalog Selection Options for Information Requests
60 SiteLINK User Reference Guide
è Hint: To track individual pages within a site enter the unique URL with the http:// down to the page level, like http://www.yoursite.com/page1 and http:// www.yoursite.com/page2. If that level of tracking is not necessary, you can set up just one source key with the referrer entry such as www.yoursite.com. In these cases, do not enter the http://.
æ Note: The Internet URL Referrer field is required in order for the Source Key to be published to your website.
5. Select the SAVE button.6. To add a new source code, select the NEW button on the Source
Key Lookup screen to display the Source Key Information screen.7. Complete the fields as required.8. Select the SAVE button when you have finished.
Setting Up Catalog Selection Options for Information RequestsSiteLINK enables you to specify which (if any) of your catalogs or brochures a customer may request when visiting the Information Request page in your store or Web site.
1. From M.O.M.’s Main Menu,
Click on: MaintainAdvertising InformationCatalog Codes
The Catalog Code Lookup screen is displayed.

Chapter 4 Setting Up Other Store Information in M.O.M.
SiteLINK User Reference Guide 61
2. Select the catalog to display the Catalog Information screen.
3. Check the Catalog is Available on Web box to set up the selected catalog as an selection option for information request.
4. Select the SAVE button.
Setting Up Order PromotionsSiteLINK allows you to use your existing order promotions in M.O.M. or you can create promotions that are exclusive to your SiteLINK store.
To setup Order Promotions,
1. On the Main Menu Bar,
Click on: MaintainAdvertising InformationOrder Promotions
CatalogInformation

Setting Up Order Promotions
62 SiteLINK User Reference Guide
The Order Promotions Information screen is displayed.
è Hint: To move a promotion either up or down on the list, select it and click the arrows on the left of the screen. Order Promotions should be listed by qualifications, from General to Specific.
2. To change an existing order promotion, select it from the list and choose EDIT. For a new promotion, select the NEW button.
The Order Promotion Detail Information Screen is displayed.
3. For a new promotion, enter the Code and a Description.
OrderPromotionInformation
OrderPromotionDetailInformation

Chapter 4 Setting Up Other Store Information in M.O.M.
SiteLINK User Reference Guide 63
4. Optionally check the Apply this promotion in addition to other discounts to allow this promotion to apply along with a product or customer discount.
5. In the Apply This Promotion drop down menu, choose either:To All orders when it Qualifies- Applies this promotion to any order
that qualifies for it.
æ Note: The following two options will require the customer to create an account on your store, or log into an existing account.
Only on the first order of the Billing Customer- Limits this promotion to first time customers only.
Only once per Billing Customer- This option restricts the application of this order promotion to one per billing customer.
6. In the Pricing tab, various promotional pricing options are displayed.
Apply Discount of __% directly to all products for orders totalling over $___-This option will apply a flat percentage discount to each item on an order with a merchandise total that exceeds the specified amount.
$___ off orders over $___- This option will apply the specified discount for orders that exceed an entered amount.
Automatically add product _______ to the order- This option allows you to specify a promotional product to add to the qualifying orders. The Product Notation field can be used to enter a message that will appear on the invoice. Check the option Apply a special selling price to the product to give the promotional product either a special price or percentage discount.
Automatically add free ____ qty of product _______ when minimum order of $____ and maximum order of $___ is met.- This option allows you to add a specific quantity of the entered product, when the order amount is between the specified amounts.
Apply Discount Of ____ % For Net Merchandise Total Range.- This selection will give a discount on the item subtotal. This differs from the discount in the first option because this discount is applied on the total price of the items on the order instead of each individual item price.
7. In the Customer tab, the order promotion can be setup to allow customer type codes or an RFM value to trigger an order promotion. You can create an order promotion exclusively to one customer,
Type In: the customer’s number in the Customer Number field.
8. In the Order tab, the order promotion can be setup to allow order attributes to trigger an order promotion. You can also specify the

Creating Order and Shipment Acknowledgment E-Mails
64 SiteLINK User Reference Guide
start and end dates for this promotion. Use the Optional Message to appear on the Invoice to enter a message that will display below the order totals on an invoice.
9. In the Shipping tab, you can optionally setup flat rate shipping amount for orders that qualify for this promotion. You can also specify which shipping method you wish to use for this order.
ç Warning! If a shipping method is specified in the order promotion, all boxes in the order must ship with the same shipping code to qualify or the discounted rate.
10. In the SiteLINK tab, SiteLINK users can check the option This promotion is available on SiteLINK to publish this promotion to their SiteLINK store for internet orders.
Creating Order and Shipment Acknowledgment E-MailsSiteLINK is designed to automatically send out an Order Acknowledgment email to your customer when the order is placed. However, M.O.M. can also be set up to automatically send a separate e-mail acknowledging receipt of the order when the order is imported into M.O.M. and another separate e-mail when the order is shipped to the customer. The M.O.M. Customer Notices function is used to create these e-mails.
Creating an Order Acknowledgment E-MailThe order acknowledgment e-mail is sent when the order is imported into M.O.M. using the Import/Export Module.
To create an order acknowledgment e-mail,
1. Create (or edit) an order acknowledgment letter using the Maintain Customer Notice function in M.O.M. Optionally, use key words to specify order information. See the section entitled, Setting Up Custom Form Letters in Chapter 3 of the M.O.M. User Reference Guide for instructions.
2. From M.O.M.’s Main Menu,
Click on: OptionsOrder Import/Export ModuleDefine Settings

Chapter 4 Setting Up Other Store Information in M.O.M.
SiteLINK User Reference Guide 65
The Import/Export Module Default Settings screen is displayed.
3. Use the drop down menu in the Notice to Send field to select the notice written in Step 1.
4. Check the box for E-Mail.5. Optionally, enter a subject header for the e-mail in the Subject
Header for E-Mail or Fax field.6. Select SAVE to exit.
Creating a Shipment Acknowledgment E-MailThe shipment acknowledgment e-mail is generated when an order is processed for shipment in M.O.M. during Stage 11 - Shipping of the Order Processing function. It is actually “sent” in the very next run of Order Processing during Stage 7 - Customer Notices.
To create a shipment acknowledgment e-mail,
1. Create (or edit) a shipment acknowledgment letter using the Maintain Customer Notice function in M.O.M. See the section entitled, Setting Up Custom Form Letters in Chapter 3 of the M.O.M. Setup Guide for instructions. Optionally, use the special shipment information key words:
%%SHIPALL to include shipping tracking number, ship date, etc. for all order parts (including back orders).
%%SHIPMENT to include shipping tracking number, ship date, etc.
Import/ExportModuleDefine Settings

Creating Order and Shipment Acknowledgment E-Mails
66 SiteLINK User Reference Guide
for only the order part actually being shipped%%SHIPORDER to include a list of the items being shipped. %%SHIPTRACK to include the same information as %%SHIPMENT
along with a link to the carrier’s package tracking web page.%%SHIPTRACKALL includes the same information as %%SHIPALL
along with a link to the carrier’s package tracking web page.2. From M.O.M.’s Main Menu,
Click on: MaintainSystem InformationGlobal Parameters
Select the Notices tab, then the Shipping subtab.
3. Use the drop down menu in the Notice to Send field to select the notice written in Step 1.
4. Check the box for E-Mail.5. Optionally, enter a subject header for the e-mail in the Subject
Header for E-Mail or Fax field.6. Select SAVE to exit.
Notices Tab

Chapter 5 Creating Your Store
SiteLINK User Reference Guide 67
Chapter 5
Creating Your StoreThis chapter provides instructions for creating and updating your store. It includes information on creating custom graphics and using the store design options to create a special look for your store.
Below are the basic steps needed to create your store.
Step 1—URL Setup
Step 2—Publishing Store Data from M.O.M.
Step 3—Making a Hypertext Link to Your Store
Step 4—Preparing and Loading Custom Graphics
Step 5—Selecting Store Settings
Step 7—Setting Up Store Text Pages
Step 8—Maintain Marketing/SEO Information
The Maintain Rewrite URL Flag setting gives you control to enable
the URL Rewrite feature. By default, a specific product would have a
URL that includes the HTML code that is enabling your site to
display that specific product, e.g. “http://www.siteLINKstore.com/
prodinfo.asp?number=STOCKNO”. The URL Rewrite feature will
automatically change that address to “http://siteLINKstore.com/
descriptionfrommom/productinfo/STOCKNO”, thus simplifying the
address and also utilizing the description that you entered for your
product in M.O.M. This increases your chances of high page
ranking on major search engines. All existing links to your site from
other websites will continue to function, the original URL’s are still
intact so no redirecting is required.
The Maintain Rewrite URL Flag setting gives you control to enable

Step 1—URL Setup
68 SiteLINK User Reference Guide
the URL Rewrite feature. By default, a specific product would have a
URL that includes the HTML code that is enabling your site to
display that specific product, e.g. “http://www.siteLINKstore.com/
prodinfo.asp?number=STOCKNO”. The URL Rewrite feature will
automatically change that address to “http://siteLINKstore.com/
descriptionfrommom/productinfo/STOCKNO”, thus simplifying the
address and also utilizing the description that you entered for your
product in M.O.M. This increases your chances of high page
ranking on major search engines. All existing links to your site from
other websites will continue to function, the original URL’s are still
intact so no redirecting is required.
Step 11—Using LivePerson Chat Software
Step 1—URL SetupFor Users with Multiple SiteLINK stores, you can setup and maintain multiple stores from a single M.O.M. company.
1. From M.O.M.’s Main Menu,
Click on: OptionsSiteLINKPublish Store Data
The MOM URL Lookup screen is displayed.
2. Select NEW to create a new URL.

Chapter 5 Creating Your Store
SiteLINK User Reference Guide 69
The URL Maintenance screen is displayed.
3. Enter your store information in the fields provided
ç Warning! When entering the URL of your store, do not enter the “http://”.
Step 2—Publishing Store Data from M.O.M.With SiteLINK, you must send files from M.O.M.’s database files to Dydacomp’s servers. This is accomplished in one easy step using the Store Publisher screen in M.O.M.
Publishing the Store FilesThis is the procedure that needs to be followed when you first create your store, and every time you want to update any information in the store, such as new products, new prices, specials, etc.
1. From M.O.M.’s Main Menu,
Click on: OptionsSiteLINKPublish Store Data
URL Maintenance

Step 2—Publishing Store Data from M.O.M.
70 SiteLINK User Reference Guide
The SiteLINK Store Publisher screen is displayed.
2. Select the Web Service Settings tab. 3. Select the Use a Secure Connection checkbox to enable a secure
connection for enhanced security.4. Optionally, change the default number of records M.O.M. sends on
each connection for the Stock File and Other Files. This option limits the number of files sent using a single connection. For example, if you select to limit the Stock File to 100, M.O.M. will connect, send 100 files, connect again and send the next 100 files until all are completely sent.
5. Optionally, select the Check for Invalid Characters Before Sending Data checkbox to activate a scan for invalid characters in your files. When this box is selected, any attempted publication of invalid data (such as ASCII characters) will fail and not affect the functionality of your Web store.
6. Enter the URL for your SiteLINK store in the URL for your store https:// field or select an existing URL from the drop down menu, see Step 1—URL Setup on page 68 for more information.
æ Note: Do not include the http:// or https:// part of the URL in this field.
7. Enter your Admin Login ID.8. Enter your Admin Password.9. Select the SiteLINK tab.The SiteLINK tab is displayed.
Store PublisherScreen

Chapter 5 Creating Your Store
SiteLINK User Reference Guide 71
10. Use the check boxes to select the files to be uploaded to your store. (See Descriptions in the next section). It is best to select only the information that has changed since the last time you published to make the process more efficient. If you are using the screen for the first time, to create a new SiteLINK store or you need to change everything in your store, use the ALL FILES and SEND COMPLETE FILES - NOT JUST CHANGES SINCE LAST UPDATE options to include all the files.
11. After making your selections, click the UPDATE SITELINK button to begin the publishing process. A message is displayed indicating whether or not the process was successful.
12. When the files have been transferred, select the CLOSE button or choose the Google Base Data Feed tab to upload a list of your products to Google. See Google Base Data Feed which follows.
æ Note: The speed of transmission is determined by the speed of your Internet connection.
13. Use your Web browser to access your store to review your new store or updated changes.
SiteLINKTab

Step 2—Publishing Store Data from M.O.M.
72 SiteLINK User Reference Guide
Description of OptionsPRODUCT DESCRIPTIONS, PRICING AND DEPARTMENTS - For those products that you select as "Available on the Web," all of the information that you set up on the SiteLINK tab as well as the pricing information set up on the Pricing tab in the Stock Maintenance function. Optionally you can check one or more of the features below;
TRANSFER IN-STOCK ITEMS ONLY- upload only information on items that have available inventory. This option does not affect items that are setup as Drop Ship or Composite Items, which usually do not have inventory.
TRANSFER DISCONTINUED ITEMS- upload products that have been flagged as Discontinued. This will enable you to sell the remaining inventory on your SiteLINK store.
æ Note: Items that are discontinued will be sold on SiteLINK until the inventory is depleted, after which the customer will only have the option to add the product to a wish list if the wish list feature is enabled, see page 78 for more information.
TRANSFER # OF UNITS THAT CAN BE ASSEMBLED- this option will publish the current inventory for any composite item that you have pre-assembled using the Assemble Kits function in M.O.M. For more information, see Setting Up Special Types of Items in Chapter 3 of the M.O.M. Setup Guide.
DO NOT SEND EXTENDED INFO TO SITELINK- to speed up the process of publishing item information to your SiteLINK store, check this option to prevent the extended description information for each product from being published up to your store.
PRODUCT, DEPARTMENT AND IMAGES - Uploads all product and department images as well as any image or HTM file stored in the Custom Image directory for your SiteLINK store.
CUSTOMER AND ORDER STATUS INFORMATION - Uploads information for any customer with a password in the SiteLINK password field, including customer type (for special pricing), customer account information (terms) and order status information.
SALES TAX RATES - The sales tax rates setup in the Sales Tax Maintenance function.

Chapter 5 Creating Your Store
SiteLINK User Reference Guide 73
CREDIT CARD MERCHANT ACCOUNTS - The merchant accounts (credit card payment methods) that you setup in the Merchant Account Maintenance function and select as "Available on the Web."
SHIPPING METHODS AND CUSTOMER CHARGES - For those shipping methods that you select as "Available on the Web," and the customer shipping charges as defined in the Shipping Method Maintenance function.
æ Note: If you do not have the Automatic Shipping Calculations Module installed with your M.O.M. system, your SiteLINK store cannot calculate shipping charges for your on-line customer.
SHIPPING RATES AND ZONES - Your shipping costs and zone information for those shipping methods that you select as "Available on the Web." You should only use this option if you add a new shipping method or make one "Available" that was previously not available. You should also use this if you made changes to the Rates or Zones tables in the Shipping Method Maintenance function or you have installed a Dydacomp-supplied carrier rate update to your M.O.M. System.
æ Note: If you do not have the Automatic Shipping Calculations Module installed with your M.O.M. system, this option will not function properly.
ADVERTISING SOURCE KEYS, CATALOGS AND PROMOTIONS- For those source keys for which you enter a URL REFERRER in the Source Key Maintenance function. SiteLINK automatically translates the URL Referrer for orders and/or prospects on your Web store into a M.O.M.-defined Source Key for use in the Source Key reports. This also applies to any/all catalogs that you want to make available for customers to select on the Request for Information page of your store. Finally, any order promotions that designated as available on the web will be published in this stage.
ENHANCED ORDER TRACKING - Enables customers to track order status, billing and shipping information, tracking numbers, etc. for both SiteLINK and M.O.M. orders.
Google Base Data FeedThis option allows you to check and send a listing of your products to Google Base. This will include your products when a product search is
Step 3—Making a Hypertext Link to Your Store
74 SiteLINK User Reference Guide
performed through Google.
The information sent to Google is the information set up on the stock item Google Base tab.
æ Note: You must have an account set up with GoogleBase before using this feature. For information on setting up an account, see Creating a Google Base Account on page 123.
After your account is activated and your stock items have been set up with Google Base Descriptions (See Entering Product Description Information on page 24), perform the following steps to send the data feed:
1. From M.O.M.’s Main Menu,
Click on: OptionsSiteLINKPublish Store Data
Select the Google Base Data Feed tab.
2. Enter your User ID.3. Enter your Password.4. Enter your Filename. SiteLINK will use this filename as a basis for
creating a text file that will later be sent back to GoogleBase containing a listing of your products. For example, if GoogleBase assigns you a Filename called millionaire, SiteLINK will create a file named millionaire.txt in your momwin folder. Once this file is sent, your products will be “searchable” in a Google Product Search.
5. Optionally, check the Do not send items with zero units to Google checkbox to avoid sending items with no units available for sale in M.O.M.
6. Select the Send Data Feed button.
Step 3—Making a Hypertext Link to Your StoreHow you set up the hypertext link to your store depends on whether you are using Full Web Hosting or Store Only Hosting and on whether or not you have purchased your own SSL Certificate.
A SSL Certificate is a system of encryption that makes it possible for shoppers and visitors to do business and share information on your Web site without worrying about exposing confidential information,

Chapter 5 Creating Your Store
SiteLINK User Reference Guide 75
such as credit card numbers.
For Full Web Hosting with your own SSL Certificate, the hypertext link to the store is: www.domainname.comWhere “domainname” is the domain name of your SiteLINK store.
For Store Only Hosting and Full Web Hosting using Dydacomp’s SSL Certificate, the hypertext link to the store is: www.mailordercentral.com/nameWhere “name” is a user assigned name.
æ Note: For information about creating other links to your store, see Creating Custom Hypertext Links To Your Store on page 110.
Step 4—Preparing and Loading Custom GraphicsIn the Step 6—Creating Store Style, you can select from several “in-house” sets of buttons or have them created by a graphic artist to Dydacomp’s specifications. Custom designed buttons and a company logo/banner need to be created as their own files that are sized to the required dimensions and named using the file names in the tables that follow. The files must saved as GIF files.
When complete, all custom graphics images must be placed in the Custom Graphics directory identified in the Maintain Store Preferences screen. See Setting Up Store Preferences on page 55.
Buttons
File Name Descriptionbtn-addgiftmessage The Add Gift Message button on the Basket
Page.btn-addtoaddressbk The Add to Address Book button in the
Customer’s Address Book Page.btn-buy.gif The buy button for each product.btn-buynow.gif The Buy Now button on the Checkout Page.
This button submits the order.btn-completeorder.gif The Complete Order button on the Receipt
Page. This button closes the session and starts a new order.
btn-continue.gif The Continue button on the Checkout Page.btn-continueshopping.gif The Continue Shopping button on the
Checkout Page.btn-emptybasket.gif The Empty Basket button on the Basket
Page.

Step 5—Selecting Store Settings
76 SiteLINK User Reference Guide
Company Banner You will assign the name on the Admin page, and the width can be no longer than 780 pixels wide.
Step 5—Selecting Store SettingsStore Settings also allows you to customize the checkout process that your customers will experience when completing an order on your store.
1. Login to the admin page of your SiteLINK store.(ex. www.yourstore.com/admin.asp).
btn-proceedtocheckout.gif The Proceed To Checkout button on the Basket Page.
btn-placeneworder.gif The Place New Order button on the Order Receipt Page.
btn-register.gif The Register button is on the Register/Login Pages.
btn-reset.gif The Reset button on any form.btn-shiptomultiple The Ship To Multiple Addresses button on
the Basket Page.btn-updateaddress The Update Address button in the
Customer’s Address Book Page. btn-updatebasket.gif The Update Basket button on the Basket
Page.

Chapter 5 Creating Your Store
SiteLINK User Reference Guide 77
2. On the top menu find the Settings menu.
3. In the Account Settings section, the admin password can be changed by following the on screen instructions. The admin email address may also be updated. This email address is used for the Retrieve Admin Password function.
4. In the Cart Checkout Setting section, you can configure the following options:
REGISTER / LOGIN BEFORE CHECKOUT - Select YES if you want the customer to Login (if the customer has already Registered) or Register for your Store before checkout; otherwise choose NO if you don' t want the customer to Login or Register at checkout.
ENABLE LIVE INVENTORY UPDATE- This option will allow SiteLINK to utilize the inventory count received from the last published product information from M.O.M., thus allowing SiteLINK to prevent orders for items that have run out of units available for sale.
SHIPPING METHOD DISPLAY- Choose the criteria that you wish to sort your shipping methods on, then select the order in which they should appear.
DEFAULT SHIPPING METHOD- Select the shipping method you wish to have selected by default when a shopper is on the checkout screen.
HIDE SHIPPING METHOD- This option enables you to select which shipping methods should be displayed to the shoppers on your SiteLINK Store.
5. In the Page Settings section, the following options are available:SHOW SIDE NAV ON CHECKOUT PAGES- Choose to display the
Departments and Account Info menu during the checkout pages.LEFT SIDE NAV WIDTH- Select the width of the Departments and
Settings Menu

Step 5—Selecting Store Settings
78 SiteLINK User Reference Guide
Account Info menus, in pixels.COMPANY LOGO - Enter the name of the company logo image for
you store (you do not need to specify a path to the image). The image will be uploaded from the location you specified in the Maintain Store Preferences screen. Size Limit is 780 pixels wide.
6. The Customer Management Settings section lists the following options:
ENABLE WISH LIST- This option will keep a wish list of items that the customer specifies for purchase at a later time. The customer can view this list and purchase from it at any time. Select YES to enable the Wish List, NO to disable this feature.
ALLOW MULTI SHIP TO (For Multiple Ship-to Addresses)- This option will allow the customer to ship items to multiple recipients within a single order.
CREATE PROSPECT UPON REGISTRATION- This option will automatically generate a catalog request for visitors when they register in your store if YES is selected; otherwise choose NO if you prefer the visitor to request a catalog on their own.
ENABLE CUSTOMER’S ADDRESS CHANGE- This option allows registered customers to change their address information before placing an order. When an order is placed and imported into M.O.M., the customer’s address information is automatically updated.For more information see Customer Address and Password Changes on page 101.
BILL-TO FPHONE FIELD REQUIRED - This options requires the bill-to phone number be entered before submitting the order.
7. The Product Search Settings gives you these options:USE ADVANCED SEARCH- Select to allow the shoppers on your
SiteLINK store to use the Advanced Search criteria that has been preset in M.O.M. See Entering Advanced Search Criteria on page 32 for more information.
SEARCHABLE FIELDS- Choose the Stock Item criteria that can be used for searches on your store.
8. In the Product Display Settings section, use these options to customize the Product Listings Page and the Product Detail Page.
PRODUCTS PER PAGE- Enter the number of products you want to have on a page. Also choose if you would like a list view or grid view for the products. The list view displays one product per row. The grid view displays multiple products per row. If you choose grid view, you can define how many products will show per row.
PRODUCT THUMBNAIL SIZE- Enter the size of the Product Thumbnail images (in pixels). This is the restriction on the size of

Chapter 5 Creating Your Store
SiteLINK User Reference Guide 79
the image. Smaller or larger images will be resized to fit this restriction. (Leave this field blank if you do not want SiteLINK to resize the images.)
DISPLAY IN STOCK / OUT OF STOCK- Select YES if you want the In Stock / Out of Stock for a product to be displayed on your store; otherwise select NO.
DISPLAY DUE DATES FOR OUT OF STOCK- If the Display In Stock / Out of Stock option is set to YES, then you can include the due date for the out of stock items by selecting YES; otherwise select NO and the due date will not be shown.
DISPLAY COMPARE AT PRICE - Select YES if you want the Compare at Price for a product to be displayed; otherwise select NO.
ALLOW BUYING FROM PRODUCT LISTING PAGE - Select YES if you want customers to be able to purchase products from the Product Listing Page; otherwise select NO and the customers can only buy the item from the Product Detail Page.
ENABLE PRODUCT REVIEWS - Select YES if you want customers to be able to review products, so other shoppers can see reviews of products.
ENABLE RECENTLY VIEWED PRODUCTS - Select YES if you would like shoppers to be able to view the products they have recently viewed
DISPLAY MIN/MAX PRICE ON PRODUCT LISTING PAGE - Select YES if you would like to display the min/max price on the product listing page.
DISPLAY PRODUCT SPECIFIC SHIPIPNG CHARGE ON PRODUCT DETAILS PAGE - Select YES if you would like to display any product specific shipping charge set up in M.O.M. to display.
DISPLAY BEST SELLERS ON HOME PAGE - Select YES for to display a best sellers section on the home page and choose how many products to display.
9. In the Home Page Featured Products Display Settings you can select an existing department to act as a Featured Products product listing to be displayed on the home page.
DEPARTMENT FOR ‘FEATURED PROUDUCTS’ - Choose the department to be used for the Featured Products to display.
PRODUCT DISPLAY OPTION - Select how the products should display, with a list view, or grid view. If using the grid view, define how many products per grid.
TOTAL PRODUCTS TO DISPLAY - Choose how many products of the selected department to display.

Step 6—Creating Store Style
80 SiteLINK User Reference Guide
10. In the Departments section, you can customize the way your Departments are viewed.
NUMBER OF DEPARTMENTS PER ROW- Enter the number of Departments across the screen (row).
DEPARTMENT THUMBNAIL SIZE- Enter the size of the Department Thumbnail images (in pixels). This is the restriction on the size of the image. Smaller or larger images will be resized to fit this restriction. (Leave this field blank if you do not want SiteLINK to resize the images.)
11. In the Store Status section, you can choose to close/open the store.
Step 6—Creating Store StyleThe Design menu gives you options to customize the look of your SiteLINK Store.
1. Login to the admin page of your SiteLINK store.(ex. www.yourstore.com/admin.asp).
2. The Main Admin Page is displayed. On the top is the Design menu..
3. In the Color/Buttons Settings section, select an attractive background color or image and button combination to give your store a unique look.
SITE BGCOLOR - Choose the background color for your store by entering the color value in this field or by using the pop-up color picker.
SITE BGIMAGE - Enter the name of the background image for you store (you do not need to specify a path to the image). The image will tile in the background of your store. The image will be uploaded from the location you specified in the Maintain Store Preferences screen.
BUTTONS- select one of the button templates to use on your site, or you may also upload your own button templates if you prefer.
Design Menu

Chapter 5 Creating Your Store
SiteLINK User Reference Guide 81
4. In the Top Navigation Style Settings section, the following options can be configured:
Top Nav Background Color - Choose the top nav background color by entering the color value in this field or by using the pop-up color picker, or choose a background image.
Top Nav Links - This is the top row that contains Home, About us, Account Login, Testimonials, Quick Order, Wish List, Privacy Policy, Contact Us and Faq.
Font Color - Choose the text color by entering the color value in this field or by using the pop-up color picker.
Font Size - Choose the size for the font that you will be using. Font Face - Choose the font you wish to use (Arial, Times Roman,
Courier, Verdana or specify your own font).
æ Note: If you specify your own font, a customer visiting your store will need to have that font installed; otherwise, the font will display in their default font for their browser.
Font Weight - Choose to have the text Bold or Non Bold.Link - Choose to have the link text Underline or No Underline.On Hover - Choose to have the link text Underline or No Underline
when the mouse cursor hovers over the link.Top Nav Text - This second row from the top that contains SubTotal, Qty in Basket and Search.
Font Color - Choose the text color by entering the color value in this field or by using the pop-up color picker.
Font Size - Choose the size for the font that you will be using. Font Face - Choose the font you wish to use (Arial, Times Roman,
Courier, Verdana or specify your own font). Font Weight - Choose to have the text Bold or Non Bold.
ç Optionally, select RESTORE DYDACOMP TOP NAV STYLE SHEET to return the store to the default settings.
5. In the Side Navigation Style Settings section, the following options can be configured:
Side Nav Background Color - Choose the side nav background color by entering the color value in this field or by using the pop-up color picker.
Side Nav Text - Departments and Account Information.

Step 6—Creating Store Style
82 SiteLINK User Reference Guide
Font Color - Choose the text color by entering the color value in this field or by using the pop-up color picker.
Font Size - Choose the size for the font that you will be using. Font Face - Choose the font you wish to use (Arial, Times Roman,
Courier, Verdana or specify your own font). Font Weight - Choose to have the text Bold or Non Bold.Font Weight - Choose to have the text Bold or Non Bold.
Side Nav Links - All other links in the side navigation besides the header text such as department names.
Side Nav Links - All other links in the side navigation besides the header text such as department names.
Font Color - Choose the text color by entering the color value in this field or by using the pop-up color picker.
Font Size - Choose the size for the font that you will be using. Font Face - Choose the font you wish to use (Arial, Times Roman,
Courier, Verdana or specify your own font).Font Weight - Choose to have the text Bold or Non Bold.Link - Choose to have the link text Underline or No Underline.On Hover - Choose to have the link text Underline or No Underline
when the mouse cursor hovers over the link.•Optionally, select RESTORE DYDACOMP SIDE NAV STYLE
SHEET to return the store to the default settings.
6. In the All Page Style section, the following options can be configured:
Background Color - Choose the browsing page background color by entering the color value in this field or by using the pop-up color picker.
Page Title - All other links.
Font Color - Choose the text color by entering the color value in this field or by using the pop-up color picker.
Font Size - Choose the size for the font that you will be using. Font Face - Choose the font you wish to use (Arial, Times Roman,
Courier, Verdana or specify your own font). Font Weight - Choose to have the text Bold or Non Bold.Background Color - Choose the background color of all your
browsing pages by entering the color value in this field or by using the pop-up color picker.

Chapter 5 Creating Your Store
SiteLINK User Reference Guide 83
Table Header - Departments and Account Information.
Font Color - Choose the text color by entering the color value in this field or by using the pop-up color picker.
Font Size - Choose the size for the font that you will be using. Font Face - Choose the font you wish to use (Arial, Times Roman,
Courier, Verdana or specify your own font). Font Weight - Choose to have the text Bold or Non Bold.Background Color - Choose the background color of your table
headers by entering the color value in this field or by using the pop-up color picker.
Alternating Row 1 Color - Choose the alternating row 1 color by entering the color value in this field or by using the pop-up color picker.
Alternating Row 2 Color - Choose the alternating row 2 color by entering the color value in this field or by using the pop-up color picker.
Active Links
Font Color - Choose the text color by entering the color value in this field or by using the pop-up color picker.
Font Size - Choose the size for the font that you will be using. Font Face - Choose the font you wish to use (Arial, Times Roman,
Courier, Verdana or specify your own font). Font Weight - Choose to have the text Bold or Non Bold.Link - Choose to have the link text Underline or No Underline.Text
Font Color - Choose the text color by entering the color value in this field or by using the pop-up color picker.
Font Size - Choose the size for the font that you will be using. Font Face - Choose the font you wish to use (Arial, Times Roman,
Courier, Verdana or specify your own font). Font Weight - Choose to have the text Bold or Non Bold.
Product Title
Font Color - Choose the text color by entering the color value in this field or by using the pop-up color picker.
Font Size - Choose the size for the font that you will be using.

Step 7—Setting Up Store Text Pages
84 SiteLINK User Reference Guide
Font Face - Choose the font you wish to use (Arial, Times Roman, Courier, Verdana or specify your own font).
Font Weight - Choose to have the text Bold or Non Bold.Product Price
Font Color - Choose the text color by entering the color value in this field or by using the pop-up color picker.
Font Size - Choose the size for the font that you will be using. Font Face - Choose the font you wish to use (Arial, Times Roman,
Courier, Verdana or specify your own font). Font Weight - Choose to have the text Bold or Non Bold.Comparative Price
Font Color - Choose the text color by entering the color value in this field or by using the pop-up color picker.
Font Size - Choose the size for the font that you will be using. Font Face - Choose the font you wish to use (Arial, Times Roman,
Courier, Verdana or specify your own font). Font Weight - Choose to have the text Bold or Non Bold.Font Weight - Choose to have the text Bold or Non Bold.
•Optionally, select RESTORE DYDACOMP STYLE SHEET to
return the store to the default settings.
7. In the Maintain Store Text Pages Style section, a custom look for your store pages can be created. This screen will allow you to select any of the following pages/sections to make changes:
Footer TextHome About UsContact UsPrivacy Policy TestimonialsHelpReturnsTerms & Conditions
Step 7—Setting Up Store Text Pages1. Click the store text page you would like to edit. 2. The following screen will display.

Chapter 5 Creating Your Store
SiteLINK User Reference Guide 85
3. Enter plain text or HTML in this field to be displayed on this page. You can use the HTML Editor we have provided to easily convert plain text to HTML.
4. Select the UPDATE STORE TEXT PAGE button to save the changes that you have made to your store.
è Hints:
When copy/pasting HTML code from a html editor into the area for the information pages, remember you only use the code between the BODY tags (<BODY>... </BODY>). Do not copy any code before or after the BODY tags. Also, do not copy the body tags themselves, only the code between them.
When creating images for SiteLINK, DO NOT name your images with spaces. Use an underscore ( _ ) or a dash ( - ) between words in the name of an image.
When referencing an image, be sure to reference it to its location on the Web server, e.g., images/site.jpeg
If you specify your own font, a customer visiting your store will need to have that font installed; otherwise, the font will display in their default font for their browser.
Step 8—Maintain Marketing/SEO InformationThe Marketing/SEO menu gives you options to customize the look of your SiteLINK Store.
1. Login to the admin page of your SiteLINK store.(ex. www.yourstore.com/admin.asp).
2. The Main Admin Page is displayed. On the top is the Marketing/SEO menu.
Maintain Store Text Pages

Step 8—Maintain Marketing/SEO Information
86 SiteLINK User Reference Guide
3. Select the option Maintain Store Meta Tags4. Select an existing Department Code from the list. For instructions on
setting up a department code, see Setting Up Departments on page 19.
The following screen is displayed.
5. Enter the Department Details in the fields. For more information on Meta Tags, see Meta Tags on page 122.
6. The Maintain Robots.txt File section gives you control over this optional file that resides in the root folder of the website and informs a search engine robot/spider/crawler of what pages should
Misc AdminMenu
GenerateMetaTag

Chapter 5 Creating Your Store
SiteLINK User Reference Guide 87
or should not be indexed.
7. The Maintain Rewrite URL Flag setting gives you control to enable the URL Rewrite feature. By default, a specific product would have a URL that includes the HTML code that is enabling your site to display that specific product, e.g. “http://www.siteLINKstore.com/prodinfo.asp?number=STOCKNO”. The URL Rewrite feature will automatically change that address to “http://siteLINKstore.com/descriptionfrommom/productinfo/STOCKNO”, thus simplifying the address and also utilizing the description that you entered for your product in M.O.M. This increases your chances of high page ranking on major search engines. All existing links to your site from other websites will continue to function, the original URL’s are still intact so no redirecting is required.
8. The Maintain 301-Redirects is a redirect of one URL to another URL. A URL redirect with an HTTP response code of 301 is a permanent redirect, indicating to search engines that the previous URL has permanently moved to the new URL and that the search engine should update its index with the new URL. Any search engine index history or page ranking for the old URL will be retained under the new URL. This is especially useful if moving from a different e-commerce platform to SiteLINK.
Step 9 - ReportingThe Reports menu gives you options to customize the look of your SiteLINK Store.
1. Login to the admin page of your SiteLINK store.(ex. www.yourstore.com/admin.asp).
2. The Main Admin Page is displayed. On the top is the Reports
Maintain Robots.txt File

Step 10—Using Google Analytics
88 SiteLINK User Reference Guide
menu.
The Reports menu has reports to see new orders, orders by month or year, referrals by URL, shoppers by day, catalog request history, email campaign, wishlists, and abandoned cart customers. These reports are explored in Chapter 6 of this book.
Step 10—Using Google AnalyticsAlthough SiteLINK offers a number of reports to obtain a greater level of detail regarding the traffic on your site, its origin, and its actions while on your site, Google Analytics is the recommended tool. To read more about Google Analytics and to obtain an account for this free tool, navigate to “http://www.google.com/analytics/”. After your account is created you can use the Add Google Analytics option to link your account to your SiteLINK store.
1. Login to the admin page of your SiteLINK store.(ex. www.yourstore.com/admin.asp).
2. Under the Miscellaneous section on the top menu, click Add Google Analytics.
The Add Google Analytics screen is displayed.
Reports Menu
Add Google Anayltics

Chapter 5 Creating Your Store
SiteLINK User Reference Guide 89
3. Enter your Google Analytics Account number and the Company Name you used when registering your site.
4. Click the APPLY button when finished.
Step 11—Using LivePerson Chat SoftwareA possible downside to Web Commerce is that customers are left alone to browse for products and complete the transaction, leaving the customer without an easy way to ask for help when necessary. Providing a customer service number on your site may cause many customers to simply circumvent your site and put the burden on your call center. With the chat feature from LivePerson, your customers can simply click on a link and request assistance. Using the LivePerson software, your Reps can respond to customer inquiries, monitor and send messages to customers that are currently browsing, and even open a web browser and guide the customer through your website.
For more information on the features of LivePerson, go to http://solutions.liveperson.com.
To enable the LivePerson features on your SiteLINK Store,
1. Login to the admin page of your SiteLINK store.(ex. www.yourstore.com/admin.asp).
2. Under the Miscellaneous section on the top menu, click Add LivePerson Chat.
The Add Live Person Chat screen is displayed.
Add LivePerson Chat

Step 11—Using LivePerson Chat Software
90 SiteLINK User Reference Guide
3. This screen allows you to create a demo account that you can easily convert into a Live Account by choosing Click here to sign up for Live Person.
4. Once registered, a link will appear allowing you to download and install the LivePerson chat software.
5. Choose ON for the LIVE PERSON ACTIVATION ON YOUR SITE option to display the Live Chat links throughout your SiteLINK store.

Chapter 5 Creating Your Store
SiteLINK User Reference Guide 91
This page left blank intentionally.

Closing/Opening the Store for Business
92 SiteLINK User Reference Guide
Chapter 6
Using SiteLINK on a Daily BasisThis chapter covers the day to day operations involved in using SiteLINK in conjunction with M.O.M, including viewing and down-loading orders and information requests, reporting on order and store activity, and uploading customer and order information to your store.
Closing/Opening the Store for BusinessA click of a button can open or close your store.
Access your Administrative Options screen, using your Web browser and the Login ID and Password that you obtained from your SiteLINK Administrator. On the top menu bar, use the Settings menu to choose Store Status.
1. If the status is “Open,” click on the words Store is Open (Close Store) to change the status to “Closed.”
2. If the status is “Closed,” click on the words Store is Closed (Open Store) to open your store for business.
Downloading Orders and Information Requests into M.O.M.
Preparing for DownloadPrior to downloading your orders and information requests into M.O.M., you may wish to view them online, and if necessary, delete any invalid orders and/or information requests.
Viewing New Orders
AdministrativeOptions Screen

Chapter 6 Using SiteLINK on a Daily Basis
SiteLINK User Reference Guide 93
View your new orders to ensure that the orders you are downloading are valid orders.
From the Administrative Options screen,
1. By default, all new orders and catalog requests will be displayed on the main Administrative Options screen. However, if you are navigating between various pages, this information can be accessed by select the New Orders/Catalog Requests option under the Reports section.
2. To view a particular order for that day, click on the desired order number under Order.
æ Note: The order number shown above is the “Web Confirmation Number” the customer receives after the order is placed. This order number will also become the alternate order number when the order is imported into M.O.M.
The Order Detail screen is displayed.
æ Note: The Order Entry Date To Assign field in M.O.M. does not pertain to SiteLINK, since SiteLINK date stamps each order when placed by your Web shoppers.
3. If a “bad” or invalid order is found, select the DELETE THIS ORDER button on the lower right to eliminate it.
4. Use your browser’s BACK button to return to the Administrative Options screen when you are finished.
New OrdersDetails

Downloading Orders and Information Requests into M.O.M.
94 SiteLINK User Reference Guide
Viewing New Information RequestsAn info request is a person who used your Request Catalog page in your SiteLINK store to request literature or a catalog from you. (See Chapter 7 for instructions on creating a link to this special page from your Web site.) When you download info requests to M.O.M. and import them, they are entered into the M.O.M. database as prospects.
Like your new orders, new info requests should be viewed prior to downloading them into M.O.M.
1. Select the New Orders/Catalog Requests option under the Reports section.
2. To view a particular catalog request for that day, click on the desired name under New Catalog Requests.
The Information Detail screen is displayed.
3. If a “bad” or invalid request is found, select the DELETE THIS REQUEST button on the upper left to eliminate it.
4. Use your browser’s BACK button to return to the Administrative Options screen when you are finished.
Downloading and Importing Orders
1-Click Download To use the 1-Click Download, follow these steps:
1. From the main M.O.M. screen, select Options > SiteLINK > Download New Orders.
InformationRequestDetails

Chapter 6 Using SiteLINK on a Daily Basis
SiteLINK User Reference Guide 95
2. Enter the URL for your store https:// (ex. www.mydomain.com/mystore). Once this field has been entered, it will not have to be entered again.
3. Enter your Admin Login ID. Once this field has been entered, it will not have to be entered again.
4. Enter your Admin Password.5. M.O.M. will process the request and then download any new orders
using an SSL connection.6. After the new orders have been downloaded, M.O.M. will open the
Import/Export Module for you to preview or process the orders.
æ Note: If you select Cancel on the Import/Export screen, the orders will not be processed, but can be downloaded again from SiteLINK. Also, you will still have the option to go to the Admin page to download these orders.
Alternate Method for ImportingAlthough the 1-Click method for importing is preferred, you can also import your orders and info requests from SiteLINK to M.O.M. using these alternate methods.
Automatic Import MethodUsing the Automatic Import function of the Import/Export Module, you can automatically retrieve your orders from SiteLINK. This function gives you the added benefit
1. From M.O.M.’s main menu,
Click on: OptionsOrder Import/Export ModuleDefine Settings
2. Check the option Auto Import File Path and enter a path. If you are not using the Auto Import feature, you can enter a path of C:\.
3. Check the option Automatically download new orders from SiteLINK.
4. Optionally, you can check the Synchronize Inventory with SiteLINK option. This will match the inventory in SiteLINK with the inventory in M.O.M.
5. Choose save, then from M.O.M.’s main menu,
Click on: OptionsOrder Import/Export ModuleAutomatic Import
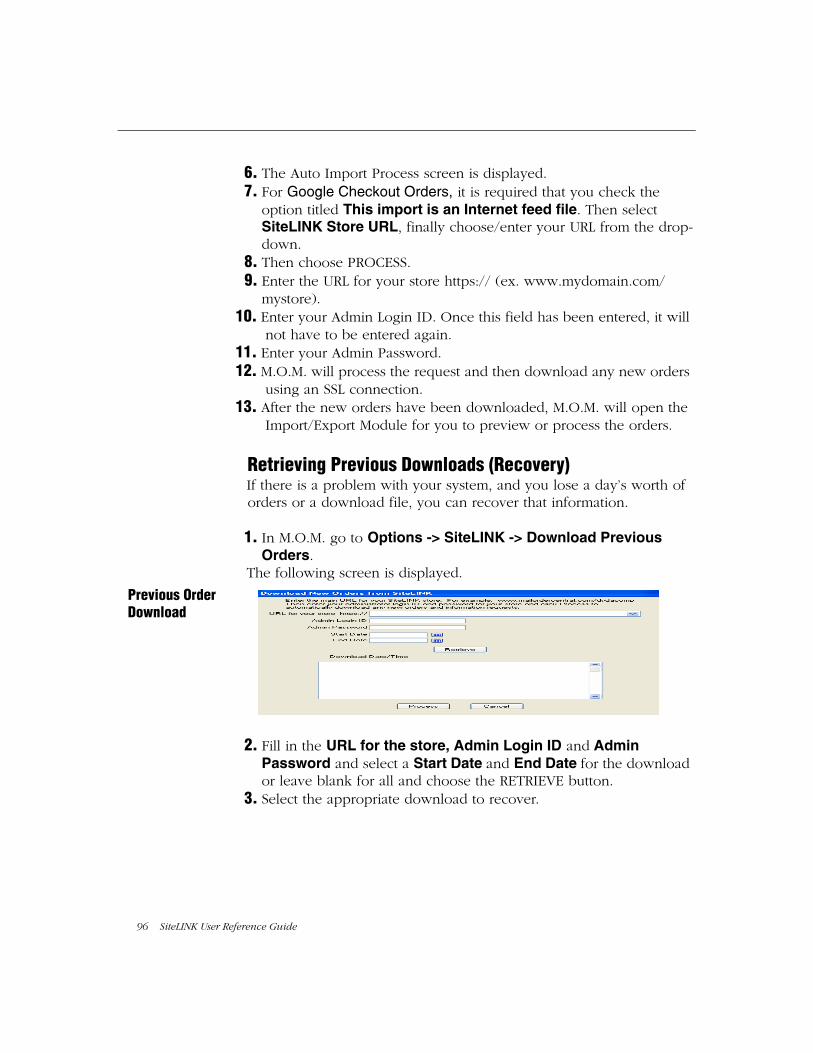
96 SiteLINK User Reference Guide
6. The Auto Import Process screen is displayed.7. For Google Checkout Orders, it is required that you check the
option titled This import is an Internet feed file. Then select SiteLINK Store URL, finally choose/enter your URL from the drop-down.
8. Then choose PROCESS.9. Enter the URL for your store https:// (ex. www.mydomain.com/
mystore). 10. Enter your Admin Login ID. Once this field has been entered, it will
not have to be entered again.11. Enter your Admin Password.12. M.O.M. will process the request and then download any new orders
using an SSL connection.13. After the new orders have been downloaded, M.O.M. will open the
Import/Export Module for you to preview or process the orders.
Retrieving Previous Downloads (Recovery)If there is a problem with your system, and you lose a day’s worth of orders or a download file, you can recover that information.
1. In M.O.M. go to Options -> SiteLINK -> Download Previous Orders.
The following screen is displayed.
2. Fill in the URL for the store, Admin Login ID and Admin Password and select a Start Date and End Date for the download or leave blank for all and choose the RETRIEVE button.
3. Select the appropriate download to recover.
Previous OrderDownload

Chapter 6 Using SiteLINK on a Daily Basis
SiteLINK User Reference Guide 97
Reporting on Orders and Store ActivityThe Administrative Options Screen lets you study order and customer activity with several different reports.
Orders by MonthUsing the Administrative Options Screen, you can look at your orders for a given month.
1. To view the orders by month, select the Orders By Month option under the Reports section.
The Orders by Month screen is displayed.
2. Click on the desired month for more detailed information.The orders for that particular month are displayed.
3. To view the orders for a particular day during the month, click on the desired day.
The orders for that day are displayed and once again you can select the desired order number to view the details of a specific order.
Orders by YearViewing your orders by year provides you with the total number of orders and the total dollar value for each year listed.
1. To view the orders for a particular year, select the Orders By Yearoption under the Reports section.
Ordersby Month
Ordersby Day
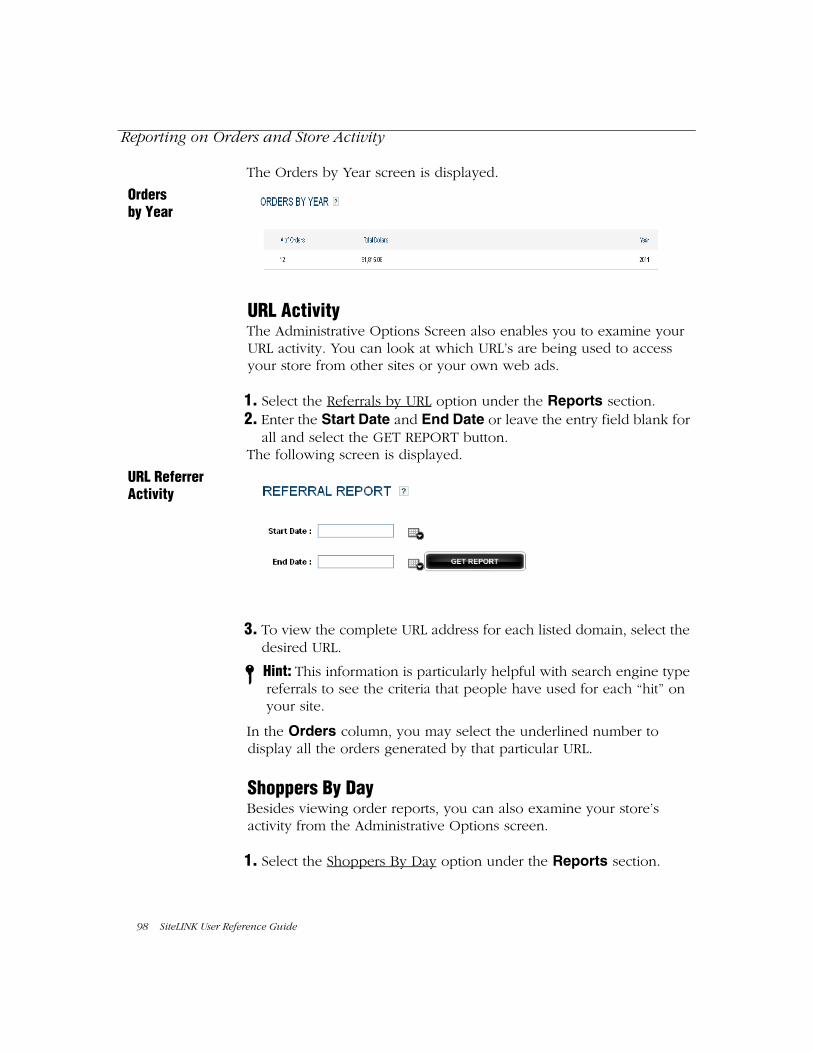
Reporting on Orders and Store Activity
98 SiteLINK User Reference Guide
The Orders by Year screen is displayed.
URL ActivityThe Administrative Options Screen also enables you to examine your URL activity. You can look at which URL’s are being used to access your store from other sites or your own web ads.
1. Select the Referrals by URL option under the Reports section.2. Enter the Start Date and End Date or leave the entry field blank for
all and select the GET REPORT button.The following screen is displayed.
3. To view the complete URL address for each listed domain, select the desired URL.
è Hint: This information is particularly helpful with search engine type referrals to see the criteria that people have used for each “hit” on your site.
In the Orders column, you may select the underlined number to display all the orders generated by that particular URL.
Shoppers By DayBesides viewing order reports, you can also examine your store’s activity from the Administrative Options screen.
1. Select the Shoppers By Day option under the Reports section.
Ordersby Year
URL ReferrerActivity

Chapter 6 Using SiteLINK on a Daily Basis
SiteLINK User Reference Guide 99
The following screen is displayed.
2. Enter the Start Date and End Date select the GET REPORT button.
Catalog Request HistoryThe Administrative Option screen can display a report detailing the requests for catalogs that have been placed on your site.
1. Select the Catalog Requests option under the Reports section.The following screen is displayed.
2. Enter the Start Date and End Date or leave the entry field blank for all and select the GET REPORT button.
Order Information in M.O.M.The SiteLINK order checkout page allows customers to specify any special requirements they may have with regards to the manner in which their orders are filled and shipped.
Order Hold DateThe Order hold date will prevent the order from being processed in
Shoppers By Day
Report DateScreen

Order Information in M.O.M.
100 SiteLINK User Reference Guide
M.O.M. until the date is reached.
Special InstructionsSpecial Instructions entered in a SiteLINK Order will appear in the Order Memo field in the Sales Information Tab of the M.O.M. Order.
This Information will then print on the Packing Slip/Invoice when the order is processed.
Shipping InstructionsShipping Instructions entered in a SiteLINK Order will appear in the Fulfilment Instructions in the Instructions/Notes tab of the M.O.M. order. This will print on the pick ticket when the order is processed.
Order Hold Date
Special and ShippingInstructions

Chapter 6 Using SiteLINK on a Daily Basis
SiteLINK User Reference Guide 101
Managing Customer and Order Information
Uploading New Customer and Order Information to SiteLINKAny changes in customer and order information in M.O.M. must be uploaded back into SiteLINK. This includes changes to a customer’s name and address, terms or credit limit for open invoicing and customer type codes for special discounts in your store. It also includes changes or updates to order status information such as order ship date or back orders for an order previously entered. Because SiteLINK automatically recognizes a repeat shopper, this order information is used to provide on-line updates for each customer in the Order Status page of your Web store.
To upload new customer and order information, follow the procedure detailed in Chapter 5 of this Guide. On the SiteLINK Store Publisher screen, select the option for “Customer and Order Status Information.”
How often you perform this upload procedure is your decision, but once-a-day after your final order processing cycle in M.O.M. is a good rule to follow.
Customer Address and Password ChangesSiteLINK gives you the option to allow a registered customer to change his or her address and password. These changes will update the customer’s information in M.O.M. once a new order is downloaded for this customer.

Managing Customer and Order Information
102 SiteLINK User Reference Guide
To enable this option:
1. Login to the admin page of your SiteLINK store.(ex. www.yourstore.com/admin.asp).
2. Under the Settings section on the top menu, click Customer Management Settings.
3. Find the option Enable Customer’s Address Change.4. Choose Yes then click the Apply button.
SiteLINKCustomer Information Screen
SiteLINKAdmin Page

Chapter 6 Using SiteLINK on a Daily Basis
SiteLINK User Reference Guide 103
Purge Customer DataSimilar to how your M.O.M. system operates, your SiteLINK store keeps a database of a customer address information and order history.
To permanently delete a specific customer record:
1. Login to the admin page of your SiteLINK store.(ex. www.yourstore.com/admin.asp).
2. Under the Miscellaneous section on the top menu, click Purge Customer Data.
The Purge Customer page is displayed.
3. Use the Last Name or Email Address fields to find a specific customer. Select Get Customer to display the results.
.
4. To export the list, check the customers on the list that you wish to appear in the export file.
5. Use the checkboxes within the red export section to select the fields
SiteLINKAdmin Page
Purge Customer Page

Managing Customer and Order Information
104 SiteLINK User Reference Guide
you wish to appear in your file.
View and Export Wish ListsWith the Wish List option enabled (See Step 5—Selecting Store Settings on page 76 for more information), customers can create a list of items that they would like to purchase from your website in a future date.
To view and export this list:
1. Login to the admin page of your SiteLINK store.(ex. www.yourstore.com/admin.asp).
2. Under the Reports section on the top menu, click View Wish Lists.
The Wish List page is displayed.
3. Use the fields to find a specific customer’s wish list. Select Process to display the results.
4. Hover your mouse pointer over or click on the customer’s name to display a list of the items that are on the wish list.
SiteLINKAdmin Page

Chapter 6 Using SiteLINK on a Daily Basis
SiteLINK User Reference Guide 105
5. To export the list, check the customers on the list that you wish to appear in the export file.
6. Use the checkboxes within the red export section to select the fields you wish to appear in your file.
7. Select Export Current List to create the file. SiteLINK will create a Comma Delimited file named wishlist.csv.
View Abandoned Cart CustomersYour SiteLINK store can record the address and order information of customers that were in the process of placing an order in your store, but leave your site and abandon their shopping carts.
To view and export this list:
1. Login to the admin page of your SiteLINK store.(ex. www.yourstore.com/admin.asp).
2. Under the Reports section on the top menu, click View Abandoned
Customer Wish List Page

Tracking Email Advertising Campaigns
106 SiteLINK User Reference Guide
Cart Customers.
The Abandoned Cart Customers page is displayed.
3. Use the date fields to narrow the list. Select Process to display the results.
4. To export the list, check the customers on the list that you wish to appear in the export file.
5. Use the checkboxes within the red export section to select the fields you wish to appear in your file.
6. Select Export Current List to create the file. SiteLINK will create a Comma Delimited file named abndcartlist.csv.
Tracking Email Advertising CampaignsUsing the email campaign feature, you can view the rate of response to your advertising emails by associating the url that you use in your email to a source key you have setup in M.O.M. Once the shopper navigates to the SiteLINK generated hyperlink, SiteLINK will display
SiteLINKAdmin Page
Customer Abandoned Cart Customers Page

Chapter 6 Using SiteLINK on a Daily Basis
SiteLINK User Reference Guide 107
that session in the Email Campaign Report.
To create an Email Campaign link:
1. Login to the admin page of your SiteLINK store.(ex. www.yourstore.com/admin.asp).
2. Under the Miscellaneous section on the top menu, click Create Email Campaign Link.
3. Select the Source Key published from M.O.M.4. Enter the URL that you would like the shoppers to land on. This can
either be a page created for this specific advertisement or simply your home page.
5. Click the GENERATE LINK button.6. SiteLINK will provide a link that you can copy and paste into your
email.7. To view the Email Campaign Report,
Click On: Email Campaign Report from the Reports section.
Email Campaign Page

How SiteLINK and Active Server Pages and XML Work Together
108 SiteLINK User Reference Guide
Chapter 7
Customizing Your StoreThis chapter explains how SiteLINK uses Active Server Pages (ASP) and how those pages can be customized. This chapter also provides instructions for creating custom hypertext links to pages in your store.
How SiteLINK and Active Server Pages and XML Work TogetherSiteLINK consists of a set of Active Server Page (ASP) documents along with a server component which handles requests for information from the documents. ASP documents are just like standard HTML documents with the additional feature of being able to bring together both dynamic data and static text. In the case of SiteLINK, the ASP documents are the actual store pages that a shopper sees during the shopping process. The store directory, department list, product display, shopping basket, etc. are each an individual ASP document. The data on these pages consists of information returned from the M.O.M. databases about products, shipping methods, sales taxes, customers, etc. Microsoft’s Internet Information Server (IIS) is responsible for bringing together the documents and information requests made to SiteLINK for information.
When ASP requests information from the Web server, it must first communicate the request through a Common Object Module (COM), never directly with the SiteLINK databases. Once the request is processed, SiteLINK sends back the data directly to ASP in an XML stream, which then gets stored on the local machine.
XML (eXtensible Markup Language) is designed to structure, store and send information. While XML is a markup language like HTML, it is not a replacement for it. XML and HTML each have their own function on a site. HTML is designed to display data and focuses on how the data looks to the shopper; XML describes the data and focuses on what the data is.
SiteLINK information requests take the form of a function call from within an ASP document (store page). In some cases this call might be for a piece of information, such as a product description or price. In

Chapter 7 Customizing Your Store
SiteLINK User Reference Guide 109
other cases the information request function might pass information or perform some activity, such as when a product is added to the user’s shopping basket, or the customer’s name and address is recorded. This second type of use is typically done in response to some action taken by the shopper, such as clicking on a button or image.
Since each shopper is individually tracked by SiteLINK, information about the shopper is accumulated rather than lost from page to page when using traditional HTML documents. SiteLINK keeps track of the contents of each shopper’s basket, the last product viewed, etc. This makes the use of SiteLINK functions quite flexible. The information requests can be positioned differently on the page to vary the appearance of a store page. Store pages can be called in different ways. As an example, your store might use a traditional approach where a shopper is first taken to a product information page before being allowed to order a product. You might also call a SiteLINK function to directly add an item to the shoppers basket without going to the product information store page. Microsoft’s FrontPage and Adobe’s Dreamweaver can be used to edit ASP documents. It allows viewing and editing of an ASP document containing both static content and SiteLINK function calls.
Making Changes to Store PagesUpon request, your site can be setup to allow you to manually change certain aspects of your site or to add a few pages. It is important to keep in mind that SiteLINK support can only help you with changes to your site either made by your admin page, by M.O.M. or by custom work done by Dydacomp.
The types of changes that you can make to pages include the following:
Page Text — The Dydacomp-provided wording on a page.Layout or Format — The position on the page of the various
components, for example on the product page, the product picture, product description, price, etc.
Function Calls - You may want to insert or delete changes to the SiteLINK function calls on a store page, or you may want to create an entirely new page from scratch.

Creating Custom Hypertext Links To Your Store
110 SiteLINK User Reference Guide
Using an Editor to Modify a PageIn most cases, for text and general page layout or format changes, a standard web editor like Microsoft’s FrontPage or Adobe’s Dreamweaver can be used to open and edit any of the store pages. Contact SiteLINK support to have your site setup to allow your web editor access to your site’s pages.
For more complicated changes to SiteLINK function calls, scripts, or in cases where new function calls are needed, Dydacomp requests that you contact the SiteLINK Design Department via telephone at (800) 858-3666 x 260 or via email at [email protected] since complex functionality needs to be written into the store’s COM object.
æ Note: When using FrontPage, it is advised that the view format marks be set on. This can be found on the menu under View. Be sure that a check mark appears next to the entry “Format Marks.” Once set, small images will identify those spots on the page where a SiteLINK information request or script exists. Double clicking on one of these format marks will reveal the script or SiteLINK Information Request..
æ Note: It is a good idea to save copies of the original store pages before beginning any modification.
Creating Custom Hypertext Links To Your StoreVery often, you may want to take shoppers to specific store locations from your Web site or other Web sites, bypassing the normal flow of pages in a given template. This type of special navigation can be accomplished by using the following “go-to” hypertext links.
Go-To Product PageUse this hypertext link if you want to offer a product special on a non-store page or create a product “ad” on somebody else’s Web site. This hypertext link takes a shopper directly to a specific product.
For Service Version with store-only hostingwww.mailordercentral.com/name/prodinfo.asp?number=yyyy
where:name is the store id assigned to your store yyyy is the stock number you wish to show.

Chapter 7 Customizing Your Store
SiteLINK User Reference Guide 111
For all otherswww.YourDomainName.com/Prodinfo.asp?number=yyyy
where: yyyy is the stock number you wish to show.
Go-To Product Listing PageUse this hypertext link to show a list of products for a given department.
For Service Version with store-only hostingwww.mailordercentral.com/name/Products.asp?dept=yyyy
where: name is the store id assigned to your store yyyy is the department number you wish to show.
For all otherswww.YourDomainName.com/Products.asp?dept=yyyy
where: yyy is the department number you wish to show
æ Note: Department numbers are displayed in the Maintain Departments function. See Setting Up Departments in Chapter 2.
Go-To Information Request PageUse this hypertext link to go to the information request screen to enable your Web shopper to enter their name and address for a catalog or brochure to be sent.
For store-only hostingwww.mailordercentral.com/name/InfoRequest.ASP
where: name is the store id assigned to your store.
For all otherswww.YourDomainName.com/InfoRequest.asp
Go-To Order Status (Customer Service) PageUse this hypertext link to go to the customer service page to enable customers to inquire about order status or account status. www.YourDomainName.com/Statuslogin.asp

List of Selected SiteLINK Store Pages
112 SiteLINK User Reference Guide
For store-only hostingwww.mailordercentral.com/name/Statuslogin.asp
where: name is the store id assigned to your store.
For all otherswww.YourDomainName.com/Statuslogin.asp.
List of Selected SiteLINK Store PagesThis section provides the.ASP file name and a full description of selected store pages in alphabetical order.
File Name Descriptionaboutus.asp About Us contentsadditem.asp Will add item to cartAddNewAddressBook.asp Adds new address to the Address Bookaddress.asp List of addresses from your Address Book AddToAddressBook.asp Adds new address to the Address Bookaddtocart.asp Adds item from Wish List to cartadmindeleteorder.asp Deletes an orderadmindeletepros.asp Deletes a prospectadminexpired.asp Support expiredadminrefurl.asp Orders, shoppers, referral URL report.adminrefurlone.asp Details report for a single URLadminrefurlonedet.asp Breakdown of orders for a single URLadminshoppers.asp Shoppers by Day reportadminstore.asp Open and close Sitelink Storebasket.asp Displays cart contentsBestseller.asp Displays best selling itemscalender.js Date Picker (No ability to pick past dates)calender_old.js Date Picker (Ability to pick past dates, available in admin section)checkout.asp Checkout - Paymentclosed.asp Displays Store is Closedcontactus.asp Contact Us contentscookiedisabled.asp Displays cookies are disabledcookieerror.asp Displays cookies are disabledcusterror.asp Displays billing/shipping missing information errorcustinfo.asp Billing/shipping entrydefault.asp First pagedeleteerror.asp Displays error in deleting an order/prospectdeletesuccess.asp Displays success in deleting an order/prospectdepartments.asp Displays Department listingdetailorder.asp Details of Sitelink/MOM order

Chapter 7 Customizing Your Store
SiteLINK User Reference Guide 113
display_results.asp Displays products when entered through Quick Order and has size/color
download.asp Download ordersdownloadold.asp Previous DownloadEditAddressBook.asp Edit Address BookeditcustomInfo.asp Edit Address BookEditGiftMessage.asp Edit Gift Messageemailpassword.asp Login Password is emailedemptybasket.asp Displays cart is emptyestimate_shipping.asp Estimates shipping costfaq.asp Display FAQ contentsfirsttimeregister.asp RegistrationgetauthnetInfo.asp Get Authnet informationInclude/AdminBackground.asp
Background for admin section
Include/adminfooter.asp Footer for admin sectionInclude/adminside_nav.asp
Right Side Nav for admin section
Include/AdminTop_nav.asp
Top Nav for admin section
Include/BottomLinks.asp Bottom links on the siteInclude/side_nav.asp Side navigation for Site (Usually top level departments)Include /Top_nav.asp Top Nav for Siteinfodetail.asp Details of Prospectinforequest.asp Catalog/Prospect entry pageitemadd.asp Adds items to the cartlearnmore.asp Displays information on where to find CID Number on credit cardloggedIn.asp Displays Login informationlogin.asp Login/Registeroptions.asp First page in admin sectionorderdays.asp Orders by Day reportorderdetail.asp Order Detail (admin section)ordererror.asp Displays order error information (if something is wrong on
checkout page)ordermonth.asp Details Orders by Month reportOrdersByMonth.asp Orders by Month reportOrdersByYear.asp Orders by Year Reportsprint-multiship.asp Printable receipt (When multiship to feature)print-no-multiship.asp Printable receipt (When no multiship to feature)privacy.asp Displays Privacy Contentsprodinfo.asp Displays Product Detail informationproductalt.asp Displays Upsell Product Detail informationproducts.asp Displays Product Listingproserror.asp Displays Error (error on registration, catalog request)Quick_order.asp Quick Order formquick_ordererror.asp Quick Order error

Making Changes to the Order Confirmation E-mail
114 SiteLINK User Reference Guide
Making Changes to the Order Confirmation E-mail1. Login to the admin page of your SiteLINK store.(ex.
www.yourstore.com/admin.asp).2. Under the Miscellaneous section on the top menu, click Maintain
Order Confirmation Email Text.In the text box you can edit the static content of the order confirmation e-mail that is sent to customers after they’ve completed an order on your SiteLINK store. HTML code is not supported. The dynamic content, such as item and order details, can’t be edited. If further edits are needed, contact the SiteLINK support team at [email protected].
receipt.asp Receiptrepeatorder.asp Repeat an existing ordersearchprods.asp Displays product listing from searchSelectAddress.asp Select an address to the cartselectshipping.asp Display Shipping options with costSiteMap.asp Site Mapspecials.asp Displays Specialsstatuslogin.asp Login for Order Statusstatusoforders.asp Displays customer’s previously placed orders testimonials.asp Displays Testimonials contentsUpdateaddress.asp Updates Address Bookupdatebasket.asp Updates Basketupdatewishlist.asp Updates Wish Listverifyshopper.asp Verifies login informationwishlist.asp Display Wish List

Chapter 7 Customizing Your Store
SiteLINK User Reference Guide 115
This page left blank intentionally.

Web Site Content — Information and Commerce
116 SiteLINK User Reference Guide
Chapter 8
Tips for Web MarketingThe Web today is a valuable resource of products, services and information for consumers and one of the most powerful and cost- effective marketing tools available for your business. The intent of this chapter is to help you find the best way to market your overall Web site while making special suggestions and recommendations considering your use of the SiteLINK program.
Web Site Content — Information and CommerceThere are two major “content” sections of most commercial Web sites.
Information—this portion of your site is your company’s brochure. It tells people who you are and what you do, but does not sell them anything. The “information only” portion is created by you using an ordinary Web editor like Microsoft’s FrontPage.
Commerce—this portion of your site is your store or catalog. It shows your customers your products and special pricing, and “checks out” your customer with shipping, sales tax and payment information. The commerce portion of your site can be createdentirely for you by SiteLINK.
Both sections can be “tied together” for visitors with hypertext links.
Making Your Web Site Work For YouA Web site is only as powerful as the traffic it generates. If your site is attracting the wrong type of visitor or if the site is not generating any visitors at all, your site will not be successful. With this in mind, it is crucial to start the promotion of your Web site by including your Web address (URL) in all of your marketing materials—catalogs, advertisements, invoices, letterhead, etc.
Another way to generate leads is by establishing links from other third party sites to your site, including free mentions on other sites and paid banner ads.

Chapter 8 Tips for Web Marketing
SiteLINK User Reference Guide 117
Site ArchitectureThe way links are set up within your Web site is extremely important. The site’s navigation should be logical and intuitive enough so that the average person can find what they are looking for. Text links are better than image links, but if image links are used, it is recommended to include text within the Alt tags for those images.
Site Map and Breadcrumb Navigation are also very beneficial in helping “spiders” navigate the deeper parts of your Web site. Each page should have 200-250 words of text, but at the very minimum, make sure that amount appears on your homepage.
Additionally, having links on your homepage to different items on your site will help spiders find those items quickly. Always use relevant keywords in the hyperlink text, and avoid using “click here” for the text itself.
Getting Customers to Find YouYou should start noticing “hits” or visitors to your site about 2-8 weeks after you first submit your URL to be included in a search engine’s directory. “How” you list your site is just as important as “where” you list your site. Although each search engine uses different information from your site to determine how your site will be referenced, most search for domain name first and “first-page” content second.
Domain NamesWhen applying for a domain name, you should probably try to register your company’s name, i.e., http://www.yourcompany.com. The logic here being if a search engine user types in your company’s name as a keyword during their search, your site will be referenced as a very close match. If your company’s name is not available (somebody has already registered it), then try to register for another name that uses terminology that your customer may use when trying to find you, for instance, one of your company’s product names.
There are several companies that can register your domain name for you. Contact your SiteLINK Administrator for additional information. Typically, there is a renewable fee charged for each name registration.

Getting Customers to Find You
118 SiteLINK User Reference Guide
Search EnginesSearch engines are special Web sites that act as information directories of the Web. Every day they help thousands of individuals locate the specific Web sites that contain the information, products or services they need. By visiting a search engine and typing in a keyword, or string of keywords, “Web surfers” get an on screen listing of hypertext links to Web sites that best fit the criteria of the search.
There are two types of search engine services: paid and free of charge. Whichever you choose, the success of your site heavily depends on how well you are represented among the major search engines including: Google (www.google.com), Yahoo! - (www.yahoo.com), MSN (www.msn.com), Ask (www.ask.com), AllTheWeb (www.alltheweb.com), AOL Search (aolsearch.aol.com or search.aol.com), and HotBot (www.hotbot.com).
Let’s examine the top three search engines, see how often they are used and how they operate.
Google - 62% of U.S. Searches*Yahoo! - 21% of U.S. Searches*MSN - 8.5% of U.S. Searches**At the time of this writing. Numbers will vary with time.
It’s important to note that although each search engine manages heavy traffic, there are major differences in the way Yahoo and MSN function when compared to Google. Both Yahoo and MSN are very straightforward; they list and rank your Web site based upon the relevance of your site’s keywords in relation to the item being searched.Google, on the other hand, is completely different; it lists and ranks your site based upon a PageRank score using an internal, proprietary calculation algorithm in addition to your site’s keywords and site architecture. Sites with a higher PageRank get “crawled” earlier, faster and deeper by Google. Google will be discussed at length in this chapter.
Search Engine Optimization (SEO) Tips In order to increase your site’s visibility in search engines you must utilize all of the available item information fields in M.O.M. The more detail you can provide regarding your products, the more likely a search engine will display your site on a search results page.

Chapter 8 Tips for Web Marketing
SiteLINK User Reference Guide 119
M.O.M. Data SuggestionsAdd Descriptions to your Departments.Use the Short Description field in your stock items. Use the Product Keywords field in your stock items.Add Google Base Product Descriptions- obtain a free Google Base
account, then use the Google Base Description field for each stock item. Post all of the entered information to Google.
è Hint: Users who do not wish to post data to Google Base should still utilize the Google Base Descriptions fields. This information is also read by search engine spiders and can help increase the likelihood of your product being listed on a search engine results page.
Make your Thumbnail Images a uniform size- Use square dimensions and keep the file size between 2-6 KB.
It is recommended that your images are not wider than 250 pixels.
SiteLINK Site SuggestionsAdd relevant text, images (with alt and title tags), and links (to
specific products) on your site’s home page to help with search engine spidering.
Generate a Google/Yahoo sitemap from the admin page of your SiteLINK store once the store has gone live then submit that sitemap to Google and Yahoo.
Keep in mind that search engines cannot read Java or Flash, relevant product information should be kept in HTML.
GoogleBuilding your site with search engine optimization in mind and submitting your site isn’t quite enough to achieve big results with Google.
A major part of the Google riddle concerns the previously mentioned PageRank system. PageRank is determined by too many factors to list, but there are a few major things that can effect it. The biggest factor involved in determining a site’s PageRank is how many sites on the Internet link to your site. Every link to your site counts as a validation that your site is important and relevant; therefore, it is of the utmost importance to increase the amount of websites that link to your site. This can be done many ways, but here are some pointers:

Getting Customers to Find You
120 SiteLINK User Reference Guide
To Increase Links on the InternetCreate a blog (Web log) for yourself. Blogs tend to get spidered
well, and since you can control the content, you can include information about your company and add links to your site(s) or specific products on your site. Keep the content fresh, and you’ll keep the spiders coming back often. You can get a free blog from http://www.blogger.com/ or http://www.livejournal.com/ among others.
Post on other peoples’ Blogs, Forums or Bulletin Boards. If you actively post to these sites, don’t try to “sell” to the other visitors. It is better to legitimately participate in the conversations, especially for sites in your industry, and put your website link in your signature. That way, you’ll add to the amount of links to your site without getting banned by the website or search engines.
Have your friends put a link to your site in the “Links” section of their Web sites.
Work out deals with your suppliers, vendors, etc., to put a link to your site on their site as a “Corporate Partner.”
è Hint: Links from sites with a higher PageRank are better than sites having a lower PageRank.
A useful tool in determining the PageRank of the site you are visiting is the Google Toolbar (available at http://toolbar.google.com). You can also find your Web store’s PageRank by finding your site on Google Directory (http://directory.google.com). If you site isn’t listed at the bottom of the page, select “Submit a Site.” You’ll be taken to the Open Directory Project (http://dmoz.org/about.html) to submit it.
Some tools you can use to check the link popularity of your site are:
http://www.netconcepts.com/linkcheckhttp://www.netconcepts.com/productcheck Key in your site’s URL
and a page name used in SiteLINK. (prodinfo.asp, products.asp or departments.asp are the best ones to check.)
http://sitesolutions.com/webtools.asp?F=Form&T+WSLC Web Site Link Checker examines all the links in your web site to your graphics, web site links, web page links and form calls. http://www.sitesolutions.com/webtools.asp?F=Form&T=SERC Search Engine Position Checker provides the actual position your Web site appears for a particular keyword or key phrase.

Chapter 8 Tips for Web Marketing
SiteLINK User Reference Guide 121
http://www.sitesolutions.com/webtools.asp?F=Form&T=SELCSearch Engine Checker, scans to see if your site is listed in the top search engines.
Things to Avoid“Link Farms,” FFA (Free For All) sites or Link Exchange services.
These are frowned upon by many search engines, and could even cause your site to be excluded from searches.
Doorway Pages that serve no purpose other than driving spiders to your website.
Spamming your URL on Web Blogs, Forums, or Bulletin Boards. If you post simply to get your URL listed in many sites, you will most likely get banned by that particular site and your posts will be removed.
How to RegisterTo submit your site to the search engines directly, use the following links:
http://google.com/addurl/?hl=en&continue=/addurl
https://login.yahoo.com/config/login?.src=srch&.done=http://submit.search.yahoo.com/free/request
http://search.msn.com/docs/submit.aspx?FORM=WSDD2
As mentioned earlier, it’s extremely important to get your site listed on Google Directory. Follow the directions of this guide to submit your site for Google’s Open Directory Project.
Finally, it is important to know that some search engines overlook the content on your site and just reference the information you submit when you register. In fact, in many cases this information supersedes all site content. Be sure to read the directions of each search engine before you submit and make sure that your registration information is as complete as possible.
Other Search CriteriaIn addition to domain and first page content, there are several other ways that a search engine may find you.

Getting Customers to Find You
122 SiteLINK User Reference Guide
Copy ContentIn addition to your first page of copy, many search engines “spider,” or search through your entire site. Having keywords embedded in the copy throughout your site can help your main URL get referenced, and make search engines link to other pages in your site.
Meta TagsMeta tags are words or phrases that are embedded within the code of your sites’ pages, but invisible to the casual visitor. Many search engines reference these tags with or instead of page content. For information on entering Meta Tags through your Admin Page see Step 8—Maintain Marketing/SEO Information on page 85.
Meta Title TagsWithout a doubt, the Meta Title tag is the most important tag in your entire Web site. Here are some guidelines for their setup.
Try not to exceed 100 letters and spaces.Use your keywords in your Meta Title tag.Place your most important keywords first.Do not use ALL CAPS in your Meta tags.
Other TagsIn addition to the Meta Title tag, there are two other types of Meta tags that can improve your search engine submissions.
Keywords – A listing of words or word phrases that describe your site, company, products, departments, etc. Try not to exceed 40 keywords.
Descriptions – One or two complete sentences that briefly describe your site, company, products, departments, etc.
Special Consideration for Web Sites Hosted by DydacompFor those SiteLINK users who have their entire Web site hosted by Dydacomp (not just the store portion), there is an important consideration to be made with your default page. This is the page that a visitor “hits” when they first link to your domain.
Home Page NameDEFAULT.ASP is the name that must be used for your home page.

Chapter 8 Tips for Web Marketing
SiteLINK User Reference Guide 123
Creating a Google Base AccountGoogle Base is a free service provided by Google designed to connect customers looking for a specific product with the Internet Retailers selling the product. Using the SiteLINK Publishing screen detailed in Chapter 5, you can post information about your products and make these details available for searching in Google Product search engines.
1. Register for an account with GoogleIf you have not already done so, you must first make a Google account. You must use this URL: https://www.google.com/accounts/NewAccount
Fill out your personal information and read their Terms of Service. Once you have completed the registration process, click the accept button, and your new account will be created.
2. Register a Bulk Upload file with Google BaseIn your web browser, go to http://base.google.com, and select the "Data feed" link.
From here, we need to register a new Data Feed with Google.
Google requires you to Register a file with them before it can be submitted to Google Base. Click New Data Feed and select the target country, format, and data feed filename. Remember this filename, as this will be the name of the file we will be creating from within M.O.M.
Google BaseAccount CreationScreen

Creating a Google Base Account
124 SiteLINK User Reference Guide
Enter the required information and click "Save changes" to proceed.
CategoriesYou must also select an "Item type" for the items that you will be selling on Google Base. Google provides you with the option of choosing from a pre-defined list, or creating your own custom item type. Either is acceptable for Bulk upload registration.
Naming your fileYou must give your bulk upload a filename on this page. It is very important that you remember the filename that you choose, as this will be the name of the file that is generated from within M.O.M.
æ Note: Google will automatically reject names such as "Sample.txt" "test.txt" and other filenames that imply that the items within are sample items.
After you are finished on this page, click "Register bulk upload file and continue to Formatting instructions." to proceed.
The next page specifies how to format your file for submission to Google Base. It is irrelevant, because M.O.M. generates this file automatically when you publish the Data Feed.
Google BaseData FeedScreen

Chapter 8 Tips for Web Marketing
SiteLINK User Reference Guide 125
Scroll to the bottom and click “I' m done formatting my file, continue to upload"
Once you have successfully registered a Bulk upload file, you will be brought back to the Bulk Uploads page. Now, we need to register for FTP access with the Google Base Servers.
3. Getting FTP Access to Google' s ServersThis is the most important and most overlooked step in the Bulk Upload process. You must explicitly request FTP access from Google before you will be able to publish to their FTP site.
The following URL: http://base.google.com/support/bin/answer.py?answer=40051 explains how to get FTP access to ftp://uploads.google.com. After registering for FTP access, it takes anywhere between 15 minutes to several hours for the account to become active. They will not notify you when it becomes active, you must simply check up on it periodically.
When you have successfully registered for FTP access, you will see the following information on the right hand side of the screen with your unique Login ID.
When your account is completely setup review the SiteLINK Publishing screen detailed in Chapter 5 to publish your information
Google BaseFTP Info

Creating a Google Base Account
126 SiteLINK User Reference Guide

AAbandoned Cart 105Active Server Pages (ASP)
list of ASP files used in a store 112Advanced Search
product setup 32Advertising Source Keys 59Attributes 33Authorize.net
credit card setup 43echeck setup 45error notification 46
Automatic Import 95BBackground Color and Image Settings 80Buttons
custom 80standard 75
CCatalog
setting up 60Chat Feature 89Close Store 92Company Logo 78Credit Card Types
setup 43Customer
purging 103uploading new information to store 101
Customer Noticeorder acknowledgement 64shipment acknowledgement 65
Customer’s Address Change 78DDeleting Customers 103Department

arranging order 21arranging products 21images for 20modifying or deleting 21setting up 19
Department Page Settingdepartments per row 79thumbnail size 79
Ee-Check 45Email Advertising Campaigns 106FFeatures 9–12GGateway Error Notification 46Getting Help 13Gift Certificates 51, 52, 54Google Analytics 88Google Base
data feed 73product info 31publishing 73
Google Checkoutpayment setup 46shipping setup 58
Graphicsbuttons 75, 80company logo 78custom directory for 56preparing and loading 75
HHosting Options 16–18HTML
hints for store text pages 85Hypertext Link
creating custom 110

for source codes 59to your store 74
IImporting
1-click download 94alternate method 95–??automatic import 95
Information Requestsdownloading into M.O.M. 92viewing new 94
Installation 16LLive Inventory Update 77LivePerson 89MMaintain Store Meta Tags 85Meta Tag
definition 122tips 122
Mix & Match 39Multiple Shipping Addresses 78OOpen Store 92Operation 12Order Promotions 61–??Orders
24/7 order status module 17downloading into M.O.M. 92–??email acknowledgments 64retrieve previous download 96uploading status to store 73viewing new 92–93
PPayment Options 43, 57PayPal 45Plug’n Pay

credit card setup 43error notification 46
Points and Rewards Program 48Preferences 55–56Pricing 38Product
advanced search 32comparative selling price 29custom information for 29departments 19–22descriptions for store 24–32images 30–31key words for search 32–33selling tools 26setting up 22–26size/color considerations 23specials page 41–42
Products Page Settingallow buying from 79display comparative selling price 79display in stock / out of stock 79product thumbnail size 78products per page 78
Products Page Settingsdisplay due dates 79
Publishingstore data from M.O.M. 69–??
RRegister / Login Before Checkout 77Reports (Store Activity)
catalog request history 99new orders/info requests 92–94orders by month 97–??orders by year 97–98referrals by URL 98–??shoppers by day 98–??

Retrieve Previous Download 96SSearch Engine
utilization 118–121Search Engine Optimization 118Selling Tools 26Shipment
email acknowledgements 65–66Shipping Methods
setting up 57–??Source Key
email campaigns 106Source Keys
setting up for hyperlinks 59Specials Page
setting up 41–42SSL Certificate 17Stock Item
attribute setup 33mix & match pricing 39point/reward values 50selling prices 38special selling prices 38
Storecatalog options for info requests 60credit card options 43–44customizing 108–112departments 19–22design options overview 13directory for custom graphics and files 56downloading orders and info requests 92–??features 9–12hosting options 16–18payment options 43, 57preferences 55–57products 22–33

recovering previous downloads 96–??shipping options 57–??specials page 41–42
Store Pageediting 109–110, 114–??text maintenance ??–85
Store Settingcompany logo 78create prospect upon registration 78multiple ship-to addresses 78register / login before checkout 77wish list 78
Style Sheetall browsing pages ??–82all page style 82–??side nav style 81–??top nav style 80–81
System Requirements 15UURL Maintenance 68URL Referrers
associating with M.O.M. source keys 59–60reporting considerations 18
WWish List
enabling 78viewing 104
XXML 108


