1 Gary Ledbetter 2016 334 270-1234 basic notes 101.doc Sizing Balloons Sizing rounds Using a card board or foam board sheet cut a square hole the size that you need. Round balloon are measured from side to side. (the diameter of the balloon) For inside I blow up a 11” balloon and size it down to 10,5” For outside I blow up an 11” and size it down to 10” 10” square hole Push balloon through hole while letting the air out Using a slide and size (a ruler with two adjustable uprights) Set the two uprights to the size you need and pull the inflated balloon through while letting the air out to size the balloon.
Transcript
1 Gary Ledbetter 2016 334 270-1234 basic notes 101.doc
Sizing Balloons
Sizing rounds
Using a card board or foam board sheet cut a square hole the size that you need. Round balloon are
measured from side to side. (the diameter of the balloon)
For inside I blow up a 11” balloon and size it down to 10,5”
For outside I blow up an 11” and size it down to 10”
10” square hole
Push balloon through hole while letting the air out
Using a slide and size (a ruler with two adjustable uprights)
Set the two uprights to the size you need and pull the inflated balloon through while letting the air out
to size the balloon.
2 Gary Ledbetter 2016 334 270-1234 basic notes 101.doc
Sizing LOL’s
Using the slide and size
LOL’s are measured from tip to tail. Place the tail of the balloon against the upright and let air out until it
fits between the two uprights.
From this
Tail Tip
To this
When tying the LOL’s I always tie tip to tail. When tying them wrap the tip around the tail twice before
tying’ This will make it easier to untie and helps from making small tears in the LOL while tying.
3 Gary Ledbetter 2016 334 270-1234 basic notes 101.doc
Regular (garland) Columns
Blow up and size two balloons and tie them together making a duplet. Make another duplet and twist it
into the other duplet making a quad.
50 lb fishing line
Tie a quad to the fishing line
Place the second quad next to the first one and give it a quarter turn so it nests on top of the first quad.
Now wrap the fish line around the center of the second quad in a figure 8 manner. Continue adding
quad until the desired length is achieved. Columns need to be supported. See page 14 for the column
framework.
4 Gary Ledbetter 2016 334 270-1234 basic notes 101.doc
By making a long garland it is possible to make arches. The arches will need support. This is done my
using the arch frame.
See page 14 - 15 on arch framework.
5 Gary Ledbetter 2016 334 270-1234 basic notes 101.doc
Arches of a different color
Use the pattern on the right to make each column. The patter keeps repeating.
Double Spiral Pattern Alternating Pattern
Arrow Pattern Cross Over Pattern
6 Gary Ledbetter 2016 334 270-1234 basic notes 101.doc
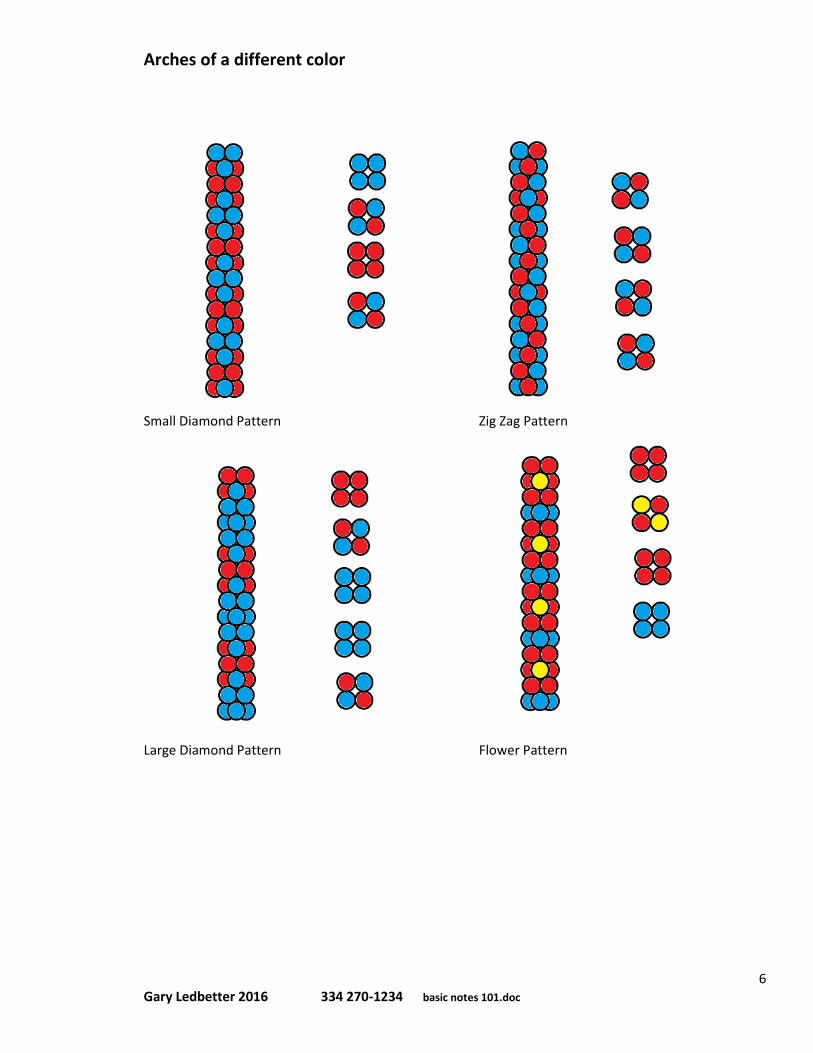
Arches of a different color
Small Diamond Pattern Zig Zag Pattern
Large Diamond Pattern Flower Pattern
7 Gary Ledbetter 2016 334 270-1234 basic notes 101.doc
Alternating Square Pack Columns
Using two difference sizes of quad you can a make a different kind of column.
This type of column allows you to make a much flatter wall than using regular columns.
NOTES
8 Gary Ledbetter 2016 334 270-1234 basic notes 101.doc
Duplet Square Packing
The balloons for this garland have to be sized perfectly.
You make duplets and you tie one duplet on the fish line and you gentle push the next duplet into place
so it nests into the first duplet. Wrap the second duplet with the fish line. Repeat.
This garland does not have a pretty beginning or end.
Once the process is understood you will find that you can actually twist the balloons into quads and
square pack them making the process even faster.
NOTES
9 Gary Ledbetter 2016 334 270-1234 basic notes 101.doc
Walls
Regular 4 pack garland (balloons all the same size)
Walls can be held together with 2 paper clips and a rubber band or tied together with modeling
balloons.
Hook paper clips to fishing line to tie
the columns together
10 Gary Ledbetter 2016 334 270-1234 basic notes 101.doc
Alternating Square Pack Wall
Alternating sized quads
11 Gary Ledbetter 2016 334 270-1234 basic notes 101.doc
Duplet Square Packed Wall
12 Gary Ledbetter 2016 334 270-1234 basic notes 101.doc
My bases are made from ¾ “plywood. Each base is approximately 2 feet by 2 feet.
You can get 8 bases from a standard sheet of plywood.
I paint them black and use a ¾ flange fastened to the center of the base with bolts using nuts and
washers to fasten them on. All materials can be found at HOME Depot or similar stores.
13 Gary Ledbetter 2016 334 270-1234 basic notes 101.doc
These are the bolts, nuts, and washers I use. For each base you will need 4 bolts,4 washers, 4 nuts
14 Gary Ledbetter 2016 334 270-1234 basic notes 101.doc
I use these to screw into the flange. For columns you can use an 18” nipple and
use a length of ½ “EMT electrical conduit for my upright.
How to make a base for a column or an arch.
½ electrical conduit
Cut conduit to the length needed.
¾ X 18 black pipe nipple
3/4 pipe flange
Plywood base
15 Gary Ledbetter 2016 334 270-1234 basic notes 101.doc
For Arches I use ¾ PVC pipe from the electrical department. For my standard arch I use two pieces.
On one of the nipples I screw a ¾ PVC adapter.
2 - 10 ft pieces of ¾ PVC pipe connected together for arch.
PVC Pipe Hub
For arch use 18” piece of ½ conduit
PVC adapter
This makes a nice arch big enough for two people to walk through.
16 Gary Ledbetter 2016 334 270-1234 basic notes 101.doc
LOL Walls (Weaving with balloons)
Straight weave wall
17 Gary Ledbetter 2016 334 270-1234 basic notes 101.doc
LOL Walls (Weaving with balloons)
Cross Weave
18 Gary Ledbetter 2016 334 270-1234 basic notes 101.doc
Inflate the LOL with helium and tie the balloon tip to tail. Weight the balloons on each end with a water
weight wrapped in Mylar paper. Or use a brick covered with paper.
Using the template, you can design your wall before you build it. Use colored
pencils crayons or use Microsoft paint.
19 Gary Ledbetter 2016 334 270-1234 basic notes 101.doc
Templates
Use these to template to design your arch. You can copy and paste this arch from this document to