Section 1: Introduction Section 2: Campaigns Section 3: Missions Campaign Set-Up 4 Mission Set-Up 5 Determine Situation 7 Game Table Layout 9 Formation Map 11 Spaces & Boxes 12 Elements 13 Map 1 14 Move 15 Return 17 Escort 18 Arrives/Exits Escort: 18 Stations 19 Actions 19 Moves 20 Peel Off 20 Aerial Combat 21 Damage 44 Hit 45 Pass Through 46 Collision 47 Ride the Tail 47 No Ammo & Jam 47 Recovery 24 Blast 25 Flak 27 Cohesion Check 30 Approach 33 Mode 35 Maneuver 35 Collision 38 Attack Advantage 39 Attack Procedure 41 Attack Cards 43 Attack Results 44 Event Text 52 Continuing Fire 49 Break Away 53 Fate 55 Tallying Points (VP, EP, OP) 56 Staffel Bonuses 57 Stickers and Credits 58 Staffel Erosion (back cover) 59 Index - back of Advanced Rule Book Experten, and Green Pilots 57 Section 4: Mission Tally Skies Above the Reich Breaking the Combat Box Rule Book Jeremy White & Mark Aasted designed by
Transcript
Section 1: Introduction
Section 2: Campaigns
Section 3: Missions
Campaign Set-Up4
Mission Set-Up5
Determine Situation7
Game Table Layout9
Formation Map11
Spaces & Boxes12
Elements13
Map 114
Move15
Return17
Escort18
Arrives/ExitsEscort:18
Stations19
Actions19
Moves20
Peel Off20
Aerial Combat21
Damage44
Hit45
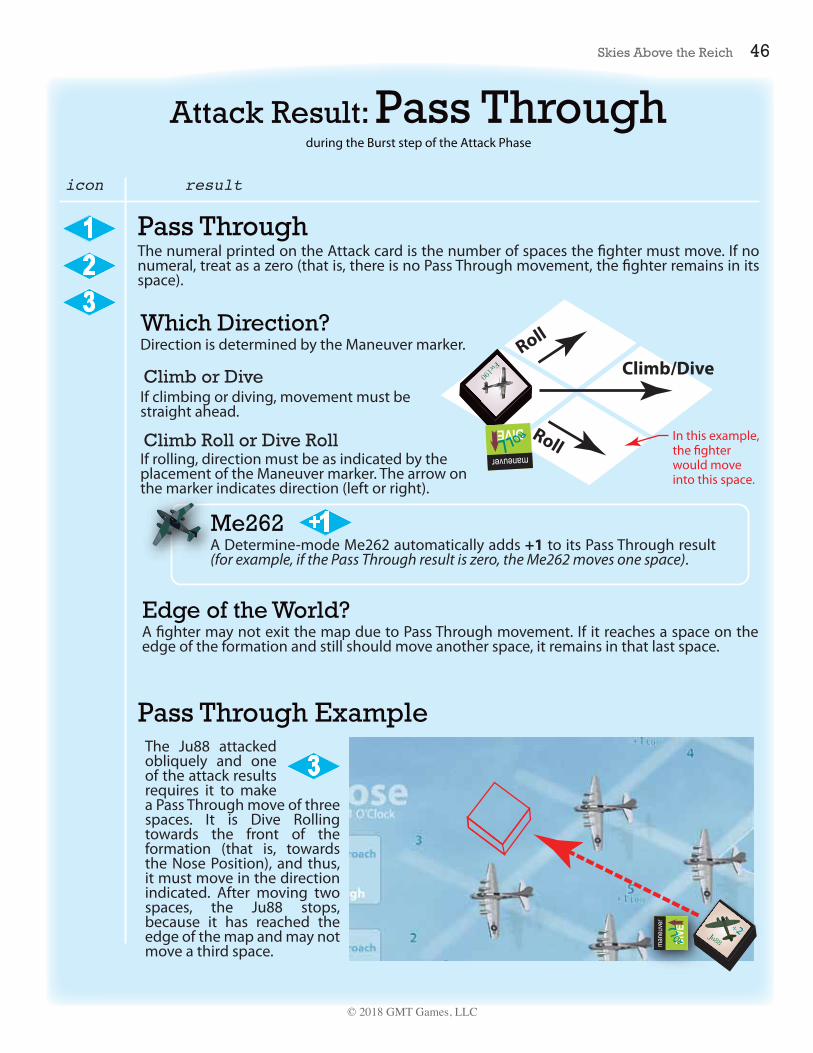
Pass Through46
Collision47
Ride the Tail47
No Ammo & Jam47
Recovery24
Blast25
Flak27
Cohesion Check30
Approach33
Mode35
Maneuver35
Collision38
Attack Advantage39
Attack Procedure41
Attack Cards 43
Attack Results44
Event Text52
Continuing Fire49
Break Away53
Fate55
Tallying Points (VP, EP, OP)56
Staffel Bonuses57
Stickers and Credits58
Staffel Erosion (back cover)59Index - back of Advanced Rule Book
Experten, and Green Pilots57
Section 4: Mission Tally
Skies Above the ReichBreaking the Combat Box
Rule Book Jeremy White & Mark Aasteddesigned by
Skies Above the Reich is a solitaire game depicting a Luftwa�e squadron (called a sta�el) of Bf109s struggling to deter and destroy the relentless daylight raids over Germany during World War Two. The player’s individual aircraft, each represented by a stickered block, must confront the mighty combat box formation of the United States Army Air Force, a deadly terrain of B-17 Flying Fortresses. The game is a broad strokes depiction that presents the arc of the desperate air war. Beginning in 1942 and ending in 1945, Skies Above the Reich follows that trajectory in a series of Missions strung together to make a Campaign. Each Mission will take you a half hour or more to play, while a Campaign can last anywhere between 6 to 60 Missions.
Two Players? You may also play this as an (un)cooperative game. Players each command a sta�el of �ghters and simulta-neously attack the same formation of bombers. See Section Two of the Advanced Rule Book.
CampaignsSkies Above the Reich is played as a Campaign. A Short Campaign is but one “Season” of Missions, while a Full Campaign could encompass all seven Seasons. You must knock bombers out of formation, or destroy them outright, in order to make an impact on the enemy’s assault from the sky. You must also keep your pilots alive. Campaign types are explained on p. 25 of the Situation Manual, and the Victory Schedule is printed on the back cover of that manual.
Basic Game and Advanced GameThe Basic Game presents the challenge of breaking up the combat box. Your goal is to knock bombers out of formation, or destroy them outright. The Advanced Game adds another segment called “pursuit” where you despatch �ghters to chase after and intercept bombers knocked out of the formation. This makes the Advanced Game more challenging, and rules for the Advanced Game can be found in the Advanced Rule Book.
MissionsThe play of the game is the Mission. You use the Mission Set-Up Table and the Operations Menu on the Bi-Fold Player Aid to establish the conditions of the Mission, and then use the Situa-tion Manual to set up the formation map. Altogether set-up takes about �ve minutes, unless you linger over decisions (it will naturally take longer your �rst time out). As your sta�el gains experience, measured in Experience Points (EP), you will have some in�uence over these starting conditions, giving you decisions to make and prolonging set-up time. Set-up is not something that happens before the game starts. If you are setting up, the game has begun.
On a Mission you will catch the American formation as it is either inbound towards its target or outbound as it speeds home to bases in England or Italy. You will have several Mission Turns to send your �ghters into and through the formation attempting to disrupt it by damaging individual B-17s, until you reach the �ight limit and must end the Mission. The enemy’s formation may have its “little friends” accompanying it, an escort of deadly �ghters making your task much harder.
FormationsThe four maps (two 17x22 and two 22x34) included with the game depict B-17 heavy bombers, the dreaded Flying Fortress, organized in a formation called a combat box. Devised in 1942 after much trial and error, the combat box was intended to make the bevy of armament carried by individual bombers even more deadly by allowing one bomber to support another with covering �re. Luftwa�e pilots that learned skills tangling with French, British, and Russian �ghters and light and medium bombers, found that the combat box was a nightmarish gaunt-let. Taken as a whole, the maps portray a chronological sequence of technological and organizational development.
Map 1 depicts two sample experimental formations prior to the development of the combat box. The B-17 saw action in Europe as early as 1941 – the British used it in small numbers, working out many of its kinks in battle against the Luftwa�e. The 1942 Season can loosely be considered to depict some of those early actions as well as early attempts by the United States to formulate the rudiments of the combat box. The bombers in these formations can be considered to be the B-17E and B-17F, lightly armed by the standards of 1943.
Compared to Map 1, Map 2 demonstrates the e�ectiveness of the combat box formation. Bombers are organized into “elements” of three B-17s arranged in a �ying triangle, or “vee”,
each element positioned with bombers at staggered altitudes. On-board gunners command the airspace within their element and between elements.
Map 3 expands the combat box in order to show the USAAF’s growth during 1943. (Hermann Göring dismissed published �gures of American manufacturing output as so much “blu�”.) The “terrain” of the bomber formation becomes deadlier with each map because the B-17 itself was armed with more guns (even American escort pilots preferred to stay at a safe distance). Bomber crews, especially the pilots, got better at maintaining formation, also contributing to the increasing e�ectiveness of the combat box.
As dangerous as Map 3 is, Map 4 presents a genuinely lethal terrain. The B-17G was armed with a third gun turret mounted under the nose, a “chin turret” intended to punish Luftwa�e pilots attacking head on. The formation by 1944 had become a cauldron of spraying tracers. It is worth noting, however, that the map only depicts part of a larger group of combat boxes. By 1944 a “formation” might consist of 1,000 B-17s, each capable of dropping its payload on your cities below.
Bf 109The game presents you with an oversized sta�el of Messer-schmitt Bf109 �ghters. The challenge in the Full Campaign is to keep your sta�el a viable �ghting force, using it to deliver severe harm to the formations of bombers. You are the roof over Fortress Europe.
Designed and developed in the 1930s, the Bf109 began World War Two as the king of �ghters. Equal or better than anything French or British engineers and manufacturers initially o�ered, piloted by some of the best trained and most skilled �iers in Europe, it assisted the Wehrmacht’s lightning victories early in the con�ict. Equipped with satisfactory armament at the war’s start, it initially proved inadequate against the B-17. Later models would increase that armament to include heavier caliber guns, but confronted with the deadly combat box in early 1943, the Bf109 was augmented even more with all manner of adjustments and modi�cations (called “attach-ments” in this game). Its pilots devised unusual tactics, too. They dropped fused bombs on the combat box to try to score a direct hit on a B-17, or, failing that, shatter the integrity of the formation. Infantry rockets were attached under the wing or fuselage: �red at a safe distance, they exploded with such a blast that, even if individual bombers were unscathed, the shock forced pilots to veer and swerve, degrading the formation’s cohesion. To answer the increasing lethality of the bomber formations and their arsenal of .50 caliber guns, the Bf109 was sti�ened in places with a layer of armor.
All these modi�cations made the �ghter particularly suited to battling the heavy bomber, but, as you may �nd, they also made the Bf109 a lame duck for U.S. escort �ghters.
Auxiliary Fighters
Getting Started
You don’t need to read this Rule Book to learn the game. Peruse the Tri-Fold Player Aid. It will explain the components and some basic concepts. Then follow the on the Bi-Fold Player Aid for the Basic Game, and start playing. Refer to this Rule Book as needed.
STICKERS: See p. 58 to apply stickers to blocks.
Although the Bf109 was the most numerous machine in Germany’s air arsenal, the Luftwa�e confronted the bomber formations with a variety of other aircraft types (called “auxilia-ries” in this game). Like your Bf109s, they too can be armed with cannon, bombs, and rockets, enhancing your attack.
The Bf110, a twin-engined heavy �ghter is available, as is its later incarnation, the Me410. Originally intended as a long-range �ghter, the Bf110 proved inadequate against British Spit�res and Hurricanes: Adolf Galland referred to it as the only �ghter that itself needed an escort. The Ju88 was a level bomber but saw action as a night�ghter combatting British raids in the dark, commandeered during the day to �ght the American formations. They will prove particularly vulnerable to escorts, however, so use them carefully. The Fw190 appears in this game as an auxiliary as well, a most e�ective improve-ment on the Bf109, especially at 15,000 feet or less. At the very high altitudes traversed by the B-17 formation, however, the Fw190’s performance was impaired. Although it is a better weapon against the enemy escorts, it is no better than a Bf109 against the combat box.
Had it gone into production earlier, the Me262 might have changed the air war. Powered by a jet engine, it was faster than any machine in the air. It, too, is at your disposal later in the war, but you may �nd it more useful against escorts than bombers.
#A page number in Rule Bookreference to player aid cards
InstructionsG
Two Dice (ten sided,one red, one black)
CampaignSECTION TWO
The criteria to win (or lose) a Campaign is explained on p. 25 of the Situation Manual. The Victory Schedule is printed on the back cover of that Manual.
Glossary...
CAMPAIGNA sequence of Missions played one after the other. Short Campaign = one Season you win, or lose, or fall somewhere between Medium Campaign = at least one Season but could last several Seasons keep at it until you win or lose, there is no in between Full Campaign = multiple Seasons until you win four of them, or lose just one
SEASONA sequence of Missions played one after the other, depicting a period of the war (for example, “early 1943”). A Season is either six or ten Missions long, as indicated by the Mis-sion Set-Up Table on the Bi-Fold Player Aid
MISSIONTakes place on the formation map, lasting 1-12 Mission Turns, until you reach the “�ight limit.” During a Mission you use your �ghters to knock down bombers depicted on that map.
FIGHTEREither a Bf109 or some other aircraft listed on the Operations Menu. Each Bf109 is a pilot in your sta�el; the other aircraft are also “�ghters” for the purpose of these rules.
Although a sta�el was likely to conduct hundreds of “missions” in any of the Seasons depicted in this game, scrambling into the air more than once a day when the action was particularly desperate, Skies Above the Reich condenses that action in order to present an impression of that bloody history. Here we reduce the life (and probable death) of a sta�el into a game box.
We only present a part of that “life.” A sta�el would have endured a variety of missions, not just bomber-busting attacks like those depicted here. We kindly ask the player to suspend disbelief just a little and forget about missions to intercept enemy escorts or missions to protect ground-attack bombers, or other mission types that would have occupied your sta�el from time to time. For those enthusiasts who demand to see the eroding e�ects those missions would have had on his sta�el, they are welcome to partake of the Sta�el Erosion Table. You can �nd it on the back of this Rule Book. It is intended to be used after tallying points at the conclusion of each Mission, but if you choose to use it for your campaign, know this: it will make your cam-paign harder. The Luftwa�e lost the war, the ceiling over the Reich caved in, and over the course of a prolonged campaign the results of the Sta�el Erosion Table makes that fact clear.
i
J
The game does not ask you to worry about those other pilots, they are merely assets temporarily requisitioned to work with you on a Mission. However, there are consequences to Operation Points and Sta�el Experience Points for losing those other aircraft (see. p. 56).
The Full Campaign must start in the 1942 Season, but a Short or Medium Campaign may start in any Season. Use the Mission Set-Up Table’s leftmost column on the Bi-Fold Player Aid as a menu to select a starting Season.
Pilot Roster
Select a Season
Start a new Pilot Roster by taking a sheet from the pad. The Mission Set-Up Table (on the player aid) indicates how many experte (ace) and green pilots you begin with (the remainder are veterans, or “non-green,” the default pilot in this game, neither an ace nor green).
Staffel LogStart a new Sta�el Log for the Campaign (Sta�el Logs are printed on the other side of the Pilot Roster sheet).
Experte: If one or more pilots start experte, assign them to names on the Pilot Roster, noting each pilot’s skills in the Experte skill column. Skills may be selected by you, or if you prefer, select them randomly. The e�ect of each skill is noted on the roster, and also explained on p. 57 of this Rule Book.
Green: If one or more pilots start green, assign them to the Pilot Roster, noting each pilot’s penalty in the Green Penalty column of the roster. Penalties may be selected by you, or if you prefer, select them randomly. They are explained on p. 57 of this Rule Book.
Dahl has the Erratic green penalty
Clade has accumulated3 Experience Points (EP)(pilots start a Campaignwith zero EP)
If Dahl is killed, write the name ofhis replacement in this space(replacements are automatically green,and must be assigned a green penalty);To make it easy to identify, start thereplacement name with the same �rst letteras the name of the replaced pilot.
Mission 1
Short Campaign: 1943 Lateuse this space to note how many
bombers are knocked out of formation(fallen) or destroyed; or for other notes
Adameit has the Timing experte skill
Bauer has the Aim experte skill
starting in the 1942 Seasonmeans you begin with
six Experten (experte, or “ace”, pilots)the Season lasts 6 Missions
Use the Mission Set-Up Table on the Bi-Fold Player Aid to establish the starting conditions of the Mission. Work left to right across the table, rolling a die as necessary, to determine the map to use, the mission type, the number of Operations Points (OP) you have to spend, and the presence or absence of escort and its composition and timing.
a. Map
Mission Set-Up Table
Roll a die to determine the forma-tion map you must use for this Mission (Map 1, 2, 3, or 4).
b. Mission TypeRoll a die to determine the mission type: Inbound, Near Target, or Out-bound. The mission type determines the row you must use for determin-ing the number of OP you have to spend and the presence of escort.
Determine the following in order:
Rolled a 4, use Map 1.1
1 2 3 4
Rolled a 7, it is an Outbound Mission.2Rolled an 8, get six OP, to be spent before checking for escort. (If two players, each gets 3 OP.) In 1942, the only available �ghter is the Bf109 and there are no attachments available. So, the player selects six Bf109s.
3
Rolled a 5, the bombers are defended by light escort, which enters on Mission Turn 5 (Spit�res).
4
4 7 8 5
c. Operations Points (OP)?Roll a die and look up the number rolled in the OP column of the table. The result will be the number of Operations Points (OP) you may spend for this Mission. You may not save OP for a later Mission.
Spend Operations Points Before determining escort (step d below), spend OP using the Operations Menu printed on the Bi-Fold Player Aid. That menu indicates each �ghter (Bf109 and/or auxiliary) and attachment available during the present Season, as well as their cost in OP. Only �ghters and attachments you purchase now may be used on the Mission, even if you used those �ghters/attachments on a previous Mission.
Bf109s: These �ghters represent the pilots of your Pilot Roster, and are available in every Season. They cost 1 OP each. In the two player game, each player gets 2 Bf109s for free each Mission.
Auxiliary Fighters: These represent �ghters and light bombers that may augment your sta�el. Their cost varies. Bf110s, Me410s, and Ju88s are “requisitioned” individually or in groups of three or four (that is, spend 1 OP to get 3 or 4 of them, as indicated on the Operations Menu). Not all types are available every Season (see the Operations Menu).
Attachments: These represent equipment augmenting your �ghters. They either cost 1 OP each or 1 or 2 OP for a group, as indicated on the Operations Menu. More than one type may be attached. For example, a �ghter may have armor and rockets at the same time. There are limits to what can be attached to a single �ghter, however, and those limits are indicated on the Operations Menu. Attachment markers are provided, and you may place them on your �ghter blocks or set them nearby. Usually, it is easy to remember which �ghters have attachments, and there are a variety of ways to use the markers to help you remember: for example, you can place them on your Pilot Roster as a reminder, or make a note on the Sta�el Log or Pilot Roster.
d. EscortFinally, use the rightmost section of the Mission Set-Up Table and roll a die to determine the presence of escort defending the bomber formation. “None” means there is no escort. Apply all results, deciphered as follows (also noted at the bottom margin of the Mission Set-Up Table):
Escort Set-UpPlace the Escort markers in their stations on the Escort Display (do this now or when scheduled to arrive, player’s choice). Deter-mine which station(s) by rolling a die and consulting the Escort Set-Up Table printed on the Escort Display.
Heavy Escort: The formation is escorted by a large contingent of enemy �ght-ers. Use all seven Escort markers.
Light Escort: The formation is escorted by a modest contingent of enemy �ghters. Use only �ve Escort markers, selected randomly. Do not look at the numeric side of the Escort markers when selecting them.
Arrival/Exit Turn: The number indicates the Mission Turn that the escort either arrives or exits (p. 18). If an Inbound or Near Target Mission the number represents the turn that the escort exits (escort is not present on Mission Turns after exit). If Outbound it is the turn that the escort arrives (escort is not present on Mission Turns prior to arrival). If no number, escort has already arrived and will not exit (except as an aerial combat result, p. 23, but this a�ects only 1 Escort marker).
H
L
#
P-51 Mustangs: The escort is comprised of P-51 Mustangs. Use only those Escort markers. This is the most lethal escort to your �ghters.
m
P-47 Thunderbolts: The escort is comprised of P-47 Thunderbolts. Use only those Escort markers.
p
Spitfires: The escort is comprised of Supermarine Spit�res. Use only those Escort markers.
s
P-38 Lightnings: The escort is comprised of twin-engine P-38 Lightnings. Use only those Escort markers. This is the least lethal escort to your �ghters, but it is still quite dangerous.
t
When determining any of the above (steps a through d), instead of accepting the result of the die roll, you may spend 7 Sta�el Experience Points (EP) in order to select the result, overriding the die roll. Note the expenditure on your Sta�el Log. Note: you start a Campaign with zero EP.
If two players, each starts with the amount of TP indicated (as above). Do not split the amount between players. Each player gets their own TP marker.
Two Players
Determine SituationAfter you perform the steps of Mission Set-Up (map, mission type, OP available, spend OP, and escort), use the Situation Manual to con�gure the formation map. Open the manual to the correct map and mission type. Unlike use of the Mission Set-Up Table, the order in which you use the manual is not important. You must determine the following information, by rolling a die for each item.
Situation Manual
Roll a die to determine if some of the bombers in the formation are already damaged. The number rolled determines the damage pattern to use. Draw a Damage marker or markers as indicated by the pattern, and place them on the appropriate bomber(s). Check for Cata-strophic E�ect immediately (p. 44) and replace with a Fallen or Destroyed marker as appro-priate (you do not earn EP or VP). In some cases, none of the bombers will be damaged.
Pre-Existing Damage
Roll a die to determine if the formation is part of a larger formation of bombers �ying just o� the edge of the formation map. Place an Anchored marker in each position box indi-cated. A space with an Anchored marker is impassable to �ghters (that is, a �ghter may not move into or through it). Escorts may enter or move out of an anchored box. Once an Anchored marker is placed in the box, it remains there for the entire Mission, and its pres-ence may increase the Lethal Level of some spaces on the formation map (as noted on the formation map itself ).
Anchored Status
Roll a die to determine the position of the sun. Place the large Sun marker in the position box indicated. If “none,” do not place the Sun marker. For the sun’s e�ect, see p. 45 (Out of the Sun).Contrails (Maps 3 & 4 only): If the sun is present, roll a die to determine if contrails are also present. If they are, you may enter your �ghters in the Tail/Level box (instead of a Low box), AND skip the �rst Escort Phase of the Mission. You can only skip the �rst Escort Phase if ALL �ghters enter Tail/Level (doing this costs 1 TP). Luftwa�e pilots sometimes used the contrails streaming behind high-altitude heavy bombers as camou�age.
Sun Position
Roll a die to determine the number of Tactical Points (TP) you start the Mission with. Place the TP marker on the Turn Track, and use it as a means of remembering how many TP you have (or use pencil and paper, or just remember how much you have). Unless playing Advanced Rules, you will not get any more TP during the Mission (Regroup, Adv. Rules p. 8).
Tactical Points (TP)
Roll a die to determine the last turn of the Mission (it ends at the conclusion of the Flight Limit Turn). Place the Flight Limit marker on the appropriate space of the Turn Track as a reminder. The Mission will end earlier than the Flight Limit Turn if no �ghters remain in play before then. “In play” means on the formation map.
Flight Limit
Instead of accepting the result of a die roll (when using the Situation Manual) you may spend 7 Sta�el Experience Points (EP) in order to override the result. Note the expenditure on your Sta�el Log.
Pre-Existing Damage: Rolled a 1. Two Damage markers, placed as instructed.
Anchored Status: Rolled a 7. Place an Anchored marker in the Level and Low boxes of the Flank Position.
1
1
1
2
1
2
2
3
Sun: Rolled a 2. Place Sun marker in the High box of the Nose Position. Then checked for contrails, rolling another 2, so no contrails.
3
3 3
Tactical Points: Rolled a 6. Three TP. If two players, each gets three TP.
4
4
Flight Limit: Rolled a 2. Used a Sta�el Command to override that sorry result, costing 7 Sta�el EP. Selected a Flight Limit of 12 (the equivalent of rolling a 10).
When you are ready to start a Mission, your gaming table should look something like this:
Damage markersin a bowl or big cup
Hit/Proximity markersin a small bowl, or cup
Card decks inconvenient location(s)
Escort markers (if any) are placed in stations on the Escort Display, as determined by the Escort Set-Up Table printed on the Display itself.
Flight Limit and TP markers are placed on the Turn Track in spaces determined by the Situation Manual. If two players, each gets his own pair of TP markers.
When you enter �ghters onto the forma-tion map during the �rst Move Phase, you must place them in LOW altitude boxes of one or more positions (Nose, Flanks, Tail; but not in Approach Boxes). You decide where. On Maps 3 and 4, if contrails are present, you may pay 1 TP to enter ALL �ghters Tail/Level instead.
Missions happen on the formation map, and the map you must use is determined during Mission Set-Up (see p. 5). Missions involve you in decisions about how your �ghters will attack the bomber formation.
A Mission starts on Turn 1 using the �ghters and attachments you “purchased” during set-up. They will enter during the �rst Move Phase. They may “enter” in any position on the formation map (Nose, Flank, Tail), but only enter Low altitude boxes, but not Approach Boxes or Return or Evasive Return Boxes. (There is an exception for contrails on Maps 3 and 4, see p. 7 - Sun Position.) Entering is the only action �ghters may take during the �rst Move Phase.The bit where airplanes take o�, climb, communicate with radar control stations, evade sweeps of enemy escorts, is not depicted in this game. We fast forward to the moment of interception with the bomber formation. If you’re starting with a low Flight Limit or only one or two Tactical Points, that’s because your �ghters endured their share of trials and tribulations on the way to the formation map, or were given very little notice before scrambling.
This section is organized chronologically, following the Mission Sequence of Play.
Mission Abort?You may cancel the play of a Mission prior to Mission Turn 1. Note the Mission on the Sta�el Log by writing “abort” and moving on to the next Mission by performing set-up again. In other words, the aborted Mission counts (you earned zero VP and EP, but at least you didn’t lose any �ghters). Once Turn 1 starts, you can’t abort, but you can end the Mission by exiting all your �ghters (p. 15 & 17).
Mission Delay?You may delay entering by paying 1 TP per turn of delay. See p. 15 Delay Entry. The purpose of delaying entry is to avoid escort that will soon exit.
Mission Ends?The Mission ends when the Mission Turn marker reaches the Flight Limit marker’s space on the Turn Track (it ends at the CONCLUSION of the turn). It can also end earlier, when you no longer have at least one �ghter (Bf109 or auxiliary) on the formation map. If this condition occurs in the middle of a turn, do NOT �nish the turn. In either case, unused TP are forfeited (they may not be saved for the next Mission). If a �ghter still has a Hit marker on it when the Mission ends, perform Recovery. Once the Mission ends, resolve the fate of �ghters in Fate Boxes (p. 55), and then tally VP and EP, if you have not done so already (p. 56).
Mission
SECTION THREE
Outline of the Mission Sequence of Play
Starting a Mission
Move Fighters enter, exit, or move from one box on the periphery of the formation map to another.
Fighters shift from a Return Box to a High/Low Position Box, or from an Evasive Return to a Return Box.
Skip this phase unless escort markers are present, or arrive this turn.
Check each hit �ghter to determine if the hit is trivial or severe.
Fire rockets, drop bombs, and Ju88/Me410 may �re cannon; then, if Near Target, check for �ak.
Check each element for cohesion.
ReturnEscort
RecoveryBlast & Flak
CohesionSkip this phase unless one or more �ghters are in an Approach Box. There are several steps to this phase.See the Bi-Fold Player Aid.Start a new turn.
You can keep Advantage markers here for convenience, or keep them nearby. They are likely to be used repeatedly during the Mission (pp. 39-40).
Formation Map
SPACE
FLANK POSITION (2 to 4 o’clock)
FLANK POSITION (8 to 10 o’clock)
NOSE POSITION (11 to 1 o’clock)
TAIL POSITION (5 to 7 o’clock)
ATTACK ADVANTAGE POSITIONS
ELEMENT
HIGH BOMBING BOXMaps 2-4 only
one bomber isin this space.
Fighters may only enter this box as a result of aerial combat against enemy escorts. There is no other way for them to enter this box. Escorts, however, may enter this box during the Escort Phase as a result of a Station Check (p. 19(. The Station Check results of ”box with most �ghters” and “box with least �ghters” could send Escort markers here.
DOGFIGHT BOX
Nose, Flank, and Tail Position Boxes represent space on the periphery of the bomber formation, and out of range of its armament.
The only �ghters that may enter this box are those with bomb attachments.
RETURN BOXFighters break away herewhen DIVING if inDetermined mode.
EVASIVE RETURNFighters break away herewhen DIVING if inEvasive mode.
Altitude relative to thebomber(s).
APPROACH BOXES
Two bombers arein this space, and
its Lethal Level is 2.
EDGE SPACEThis space does nothave a bomber in it.
Its Lethal Level isnormally 2, but if anAnchored marker is
in the Nose Position,it increases to 3.
A space is rated forits LETHAL LEVEL.Example: 2
Each bomber occupiesfour spaces.
A SPACE is in the formation of bombers. Bombers were armed with up to twelve .50 caliber guns facing many directions. Spaces are therefore dangerous, and each is rated for its “Lethal Level” (p. 13). If a space does not have a Lethal Level printed on the map, it is not a space (�ghters can only be in spaces or boxes). A �ghter can only get into a space from an Approach Box, and only during the Attack Phase (p. 33).
A BOX is outside the bomber formation. Boxes are safe from bombers, but not from enemy escorts. Boxes are linked to each other by arrows or notes, and �ghters may move across links to other boxes (p. 15). Escort markers may move from a box to an adjacent box, but only if a �ghter is in the adjacent box (p. 20).
There are six elements on Map 3 (shown here), and each has 9 spaces
and 3 bombers. On Map 4 there are 7 elements and some of them have 4
bombers.
OVERLAPPING SPACE
Elements
Lethal Level
ELEMENTS
(but if �ghter is at high altitude, the Lethal Level is 4)
This number is a mea-sure of how dangerous the space is to your �ghters. The higher the number the more lethal the space.
Lethal Level 4
Lethal Level 3
Blue Numbers
ELEMENT
ELEMENTELEMENT
ELEMENT
ELEMENTELEMENT
On Maps 3 and 4, some elements overlap. The space of overlap is considered to be in EITHER element. Thus, when a �ghter is in that space, you must decide which element’s Attack advantages (p. 39) and Lethal Level deductions for degraded element cohesion (p. 41) apply to that space. A Detonation marker (p. 25 & 31) in that space a�ects one or the other element (your choice).
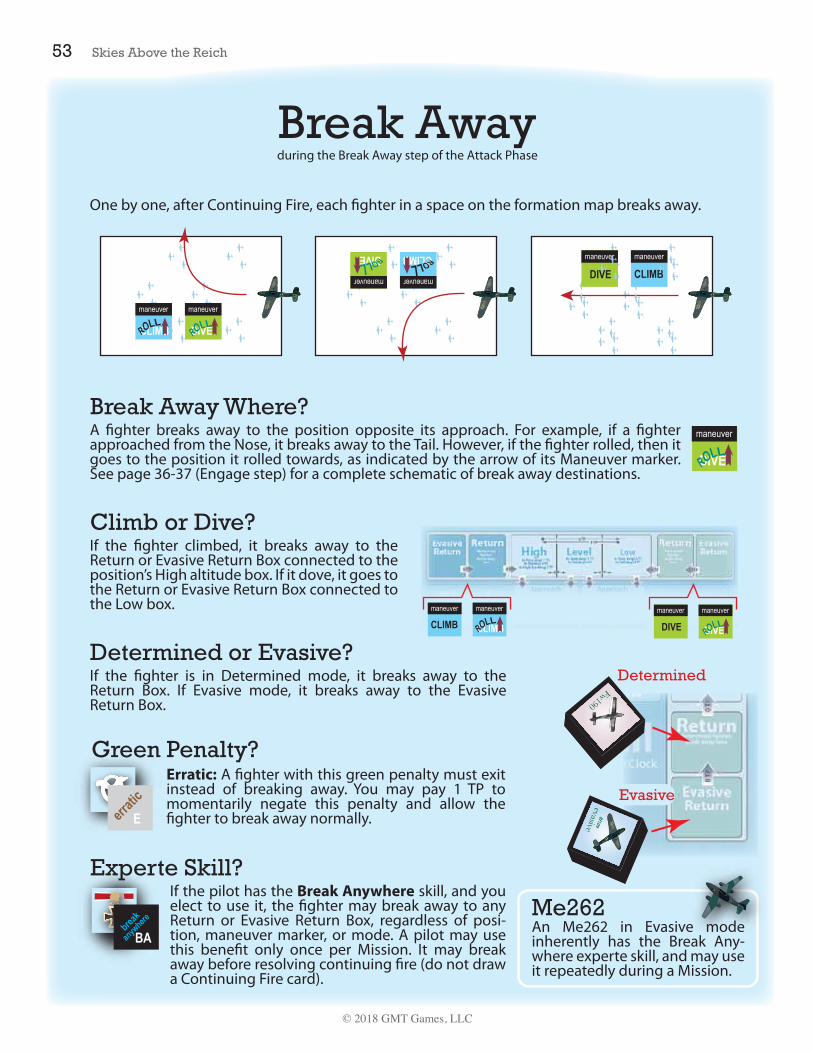
during Burst and Break Away steps of the Attack Phase
Unlike the other formation maps, Map 1 depicts two bomber formations (A and B). When playing this map use only one of them. To determine which formation to use, roll a die. If the number rolled is EVEN, use Formation A. If ODD, use Formation B. Ignore the other formation during this Mission.
Two Formations
The two formations on Map 1 are each comprised of a single irregularly shaped element. All spaces depicted in the formation belong to that element, and no space is outside the element.
One Element
Rockets and bombs may not be used when playing a Mission on Map 1. These weapons were useful in destabilizing large bomber formations, but the mini-formations depicted on this map are too small for e�ective use of those weapons.
Rockets & Bombs
Regardless of which formation you use, all four sets of position boxes are in play (Nose, Tail, and both Flanks).
What Moves?Each �ghter in a High, Level, or Low position may move, and so may �ghters in the High Bombing Box. Fighters not yet in play may also move (see Entering, below). No other �ghter may move during this phase of the turn.
Hit Fighters?Fighters with Hit markers may NOT move. They may not exit.
Me262The ONLY Approach Box an Me262 may enter is Tail/Low.
Return Boxes?Fighters in Return or Evasive Return Boxes may NOT move.
One Box to Another BoxFighters may move from one box to another, following either an arrow or the instructions of a note printed in the �ghter’s box. Some moves cost Tactical Points (TP), as indi-cated by the arrow or the note.
EnteringFighters enter on Mission Turn 1. Entering costs zero TP. Organize them into one or more groups and place them in one or more Low boxes in one or more positions. They may not be placed in an Approach Box on their turn of entry. Contrails: On Maps 3 and 4, if contrails are present, you may spend 1 TP to enter ALL �ghters in the Tail/Level Position Box. Doing this allows you to skip the �rst Escort Phase of the Mission.
Delay Entering?At your discretion, you may delay entry of some or all �ghters. To do so, spend 1 TP per turn of delay (regardless of the number of �ghters delayed). If you delay entry of ALL �ghters, move the Turn marker up the Turn Track and start the Mission on the turn of entry.
ExitingA �ghter may use its move to exit the map. It costs nothing to do this, simply remove the �ghter from play. Exited �ghters may not return to play later in the Mission. Exiting is considered a move.
TP Costs and GroupsMovement is free, unless noted on the map. Pay the Tactical Point (TP) cost for movement immediately. Pay for each GROUP of �ghters that move, not for each �ghter individu-ally. A group is any number of �ghters that start the Move Phase in the same box and move together to the same destination. If a group has but one �ghter in it, then that lone �ghter is considered a group. If a group splits to move to two or more destinations, treat each as a separate group, one per destination.
Moveduring the Move Phase
Fighters in these boxes may Move
exception
ANCHOREDBoxes with Anchored markers may NOT be moved into or through by �ghters.
exception
ESCORTBoxes with Escort markers MAY be moved into or through by �ghters. Fighters may NOT move to Escort Stations on the Escort Display, nor may they move to the Dog�ght Box.
Entering �ghters may be placed in the Low box,but not in any other box in the Flank Position
Fighter in the Flank/Low Position Box moves into the Low Approach Box. It eludes the enemy escort and will attack the formation this turn.
1
Bauer spends 1 TP to move from the Flank/Low to the Flank/High Position Box. Moving through enemy escort is allowed. This gives Bauer altitude advantage when the P-38 inevitably chases him during the Escort Phase.
2
Fighter in the Flank/Level Position Box will remain where it is. It does not have to move.
1
Bauer will move from the Flank/Level Position Box to the Nose/ Level Position Box. This costs 1 TP, which the player pays immedi-ately. Had both �ghters moved there, the cost would still be 1 TP (because the cost is per group, not per individual �ghter).
2
Fighter is in the Return Box, so it is not allowed to move. It also has a Hit marker, so even if it were in the Flank/Low Position Box with Bauer, that marker prohibits move-ment (but it would not prevent Bauer from moving, because the Hit marker is not attached to Bauer).
What Returns?Each �ghter in a Return or Evasive Return Box MUST return or exit. The only exception are Hit �ghters (that is, �ghters with Hit markers).
Return Where?Each returning �ghter shifts to an adjacent box, following the direction of the arrow connecting the two boxes.
Mode?A �ghter’s mode has no relevance during this phase.
Anchored?If the box a �ghter would shift to is anchored (that is, it has an Anchored marker in it), the �ghter must exit.Exit?
Instead of returning, a �ghter may exit. Remove the exiting �ghter from play (it may not return to play during the Mission).
Pursuit?Advanced Rule: A �ghter in a Return or Evasive Return Box may NOT pursue (Adv. Rule Book p. 4).
“Return” simulates a �ghter’s trajectory back to the airspace represented by the positions surrounding the bomber formation. A returning pilot is racing back to make another run at the bombers, but those bombers are not standing still. They too are moving. If hit, a �ghter’s return is delayed as the pilot checks the condition of his aircraft, as best he can, or is recovering from the shock of taking the hit, momentarily disoriented. Evasive Return means the pilot took care to keep as much distance between his aircraft and the formation. Arcing back into position takes more time.
Hit Fighters?Fighters with Hit markers do NOT return. They remain where they are during the Return Phase. They may not exit. During the Recovery Phase, the �ghter will either be moved to the Fate Box (and its Hit marker returned to the cup), or it will lose its Hit marker and remain in play, allowed to return and move normally (see p. 24).
Returnduring the Return Phase
Fighter shifts to the Return BoxFighter shifts to the Low box
ESCORTAn Escort marker has no relevance during this phase. If a �ghter returns (that is, shifts) into a box with an Escort marker, it does so. Of course, during the Escort Phase, that escort will attack the �ghter. Maybe exiting during the Return Phase is a better choice?
Arrives?During an Outbound Mission, escorts may “arrive” (which means the Escort markers are placed in escort stations on the Escort Display on the turn of arrival). Escort arrival was deter-mined during Mission Set-Up (see p. 6). If escorts arrive this turn, they do so at the very start of the Escort Phase. Perform Escort Station Checks on the turn of arrival.
When escorts are present, Escort markers will start on the Escort Display (on the O�-Map Panel). Escort markers will start in one or more escort stations (Above Trailing, Forward, Below Trailing). Each Escort Phase, you will check each station occupied by an Escort marker, by rolling a die and applying the result in the appropriate Station Check Table. That is how Escort markers will move from one station to the next, and to boxes on the formation map. Fighters are not allowed on the Escort Display.
Exits?During an Inbound or Near Target Mission, escorts may “exit.” Escort exit was determined during Mission Set-Up (see p. 6). If escorts exit this turn, remove all Escort markers from play at the very start of the Escort Phase (even those in the Dog�ght Box; �ghters in that box also exit). An individual Escort marker might also exit due to a result of aerial combat (in which case you remove only that Escort marker from play). Aerial combat is explained on page 21.
Escort Arrives or Exitsduring the Escort Phase
During a Mission, you can expect Escort markers to move among the three Escort Stations, and from those stations to the various boxes of the formation map. The most dangerous station is Above Trailing, a vantage from which enemy pilots can see the entire combat box. But keep in mind that the game allows you to watch only a fraction of the air battle. There are other bombers nearby as well as other Luftwa�e �ghters, so if it seems an Escort marker is just sitting there doing nothing, it may be because their attention is elsewhere. It could also mean that they are low on ammunition, low on fuel, are following orders, or their pilots simply do not see your aircraft. It’s a big chaotic moving battle�eld and maybe somebody besides you screwed up for a change.
Action SequenceDuring the Escort Phase, each Escort marker on the formation map will either remain in place or move to an adjacent box (for example, from Nose/Level to the Nose Approach Box). Their movement is mandatory when triggered (see “Escort Moves” p. 20). Then, check each escort station that has an Escort marker in it. An Escort marker in an escort station will move only as dictated by the Station Check Table, and only one Escort marker in each station will move each Escort Phase (the extra Escort markers in a station, if any, remain where they are until the next Escort Phase). At the end of the Escort Phase, an Escort marker in a box with a �ghter, attacks that �ghter. After resolving aerial combat, Escort markers on the formation map may peel o� (p. 20).
Escort MarkersLight Escort is represented by �ve Escort markers and Heavy Escort by seven markers. Until an Escort marker is involved in aerial combat, it should remain face up (that is, the picture of the airplanes should be visible, not the other side). The point of keeping it face up is to hide the numeral on the other side of the marker, representing the actual number of enemy planes repre-sented by the marker. Once a marker is �ipped over, it may remain that way.
Escort Actionsduring the Escort Phase
keep hidden
StationsThe three escort stations (Above Trailing, Forward, Below Trailing) represent space just beyond the perim-iter of the formation, but in close proximity to the four positions (Nose, Flanks, Tail). Fighters may never enter an Escort Station. Your job is clear: Attack the bombers. Tangling with escort is some other Sta�elkapitän’s job.
Escort Station CheckDuring the Escort Phase, check each station that has at least one Escort marker. Do this after moving Escort markers to adjacent boxes on the formation map. No Escort marker should move more than once during an Escort Phase.
Anchored?Unlike �ghters, Escort markers may move to a box with an Anchored marker.
Box With Most or Least Fighters?The Above Trailing Station has two potentially ambiguous results, requiring the Escort marker to move to the “box with most �ghters,” or “least” �ghters. What happens if two or more boxes are tied for “the most” or “the least”? In those cases, you are free to choose which of the tied boxes the Escort marker moves to. In the case of “least” �ghters, there must be at least one �ghter in the box to qualify as “least.” Note that the Dog�ght Box may qualify for “most” or “least,” which means the Escort marker may move to that box and join another Escort marker there, reinforcing it.
PROCEDURE: To check the station, roll a die. Each station has a table printed next to it. The number rolled deter-mines the action that one Escort marker takes at that station. Check a station only once per Escort Phase, regardless of how many Escort markers are in that station.
Escort Stationsduring the Escort Phase
Escort Check example: you roll a 5, so one Escort marker moves to the formation map (it is placed in the Nose/Level Position Box). Had you rolled an 8, the marker would have moved to the Below Trailing Escort Station.
After resolving aerial combat, a box with two or more Escort markers will lose one of those markers to the Below Trailing Escort Station. Place one of the Escort markers from the overstacked box to Below Trailing on the Escort Display.
However, if the overstacked box is adjacent to a box with one or more �ght-ers, or is in the same box with one or more �ghters, the Escort marker will remain where it is (it does NOT peel o� to the Below Trailing Station).
Escort Returns to Station
Escort Peels Offduring the Escort Phase
choose which box the escort moves to each Escort marker moves escort moves into �ghter’s box
Adjacent to Fighter?An Escort marker that starts the Escort Phase in a box adjacent to a �ghter (that is, adjacent to a box occupied by a �ghter), will automatically move into the �ghter’s box and initiate aerial combat (unless the escort’s own box is also occupied by a �ghter – see “Fighter’s Box?” above). Aerial combat is resolved at the end of the Escort Phase. If more than one Escort marker is in the box, only one moves to the �ghter’s box (the other one stays where it is, regardless of the number of �ghters in the adjacent box).
If two boxes, each with a �ghter, are adjacent to an Escort marker, select which box the Escort marker moves into (player’s choice). If there is a second Escort marker in the box, it moves into the other box occupied by �ghters. It too initiates aerial combat.
Escort marker stays one Escort marker stays the other moves
Fighter’s Box?An Escort marker that starts the Escort Phase in a box with one or more �ghters, MUST remain in that box. Resolve aerial combat at the end of the Escort Phase for each box shared by escorts and �ghters.
Even if an adjacent box has �ghters in it, the escort will remain in its box as long as it is occupied by at least one �ghter. However, if two Escort markers share a box with �ghters, one MUST move to an adja-cent box if it too is occupied by one or more �ghters.
Escort AttacksAerial combat only takes place during the Escort Phase, and only at the end of that phase after Escort mark-ers have had a chance to move. Resolve combat in each box shared by �ghters and Escort markers, one box at a time. If more than one Escort marker, or more than one �ghter, is in the box, they all participate in the combat. Results a�ect all involved �ghters but only one involved Escort marker (see Results on p. 23).
Aerial Combat TableResolve aerial combat by rolling a die and using that number to �nd a result on the Aerial Combat Table. The table is organized by �ghter type ( for example, Bf109) and escort type (e.g., Spit�re). Use the �ghter type corresponding to the �ghters in the box, and the escort type of the Escort marker.
Mixed Fighter Types?If more than one type of �ghter is in the box, choose one type. Generally, �ghters higher up the table will do better than those lower down, with the exception of the Me262 (it is the best against escorts).Example: two Bf109s and one Me262 share a box with a P-51 Escort marker; the player may select either the Bf109 row or the Me262 row of the Aerial Combat Table.
Aerial Combatduring the Escort Phase
FightersHIGHER
thanEscort?*
MoreFighters
thanEscort?**
YES
NO
Yes DDD
Dx
1
NoYes
No
Fw190
evasive
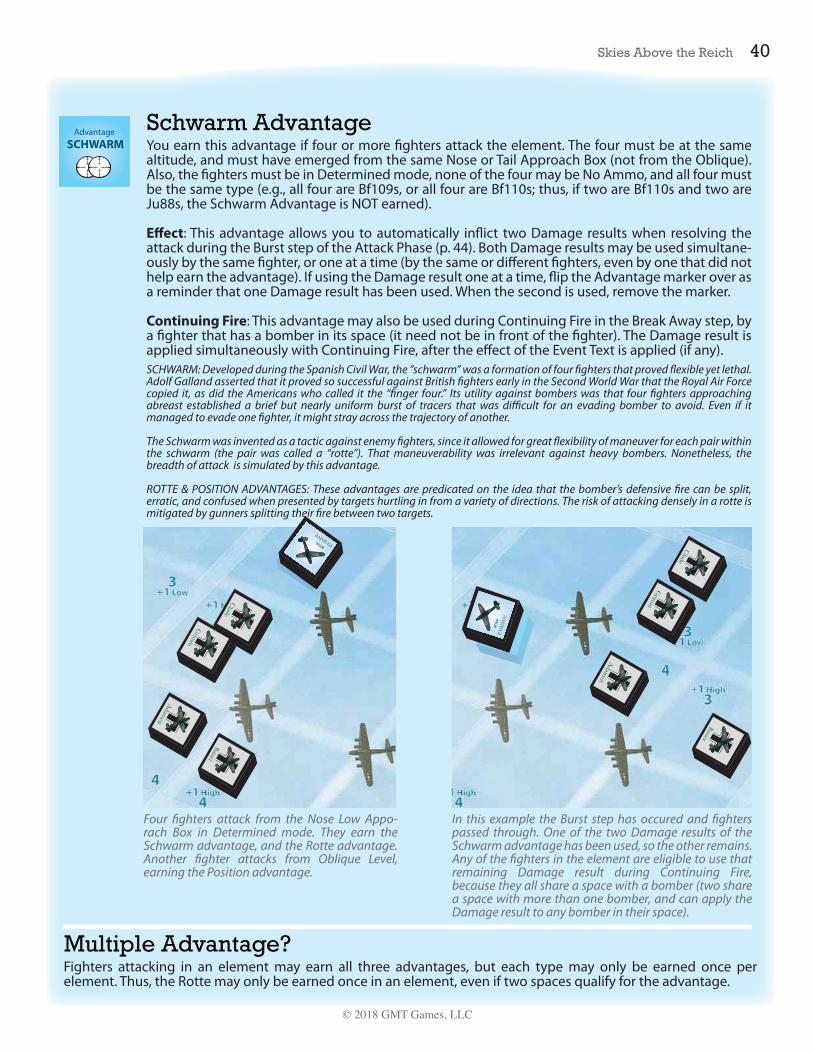
Advantage in Aerial Combatduring the Escort Phase
Two QuestionsEach row of the Aerial Combat Table is subdivided by the answers to two important questions. Answer those questions to �nd the exact row to use for determining the combat’s outcome.
Me262 EXCEPTION: If one or more Me262 �ghters are involved in the aerial combat and you select the Me262 Table, ignore the two questions. Modi�ers for attachments still apply.
Q1) Fighter is Higher?The �rst, or leftmost question, is whether your �ghters enjoy an altitude advantage. This is determined by how the �ghter or escort moved into the box, from above or below, initiating combat. If neither �ghter nor escort is higher, the answer is “no,” the �ghter is not higher. If even one �ghter in a box is not higher, the answer is “no.”
Fighter is higher? Answer: “no”Evasive Return and Return Boxes
do not have relative altitudes, so the�ghter can’t be considered higher.
Cases: The answer is “no” if the Escort marker moved into the �ghter’s box from a higher altitude (for example, it moved from a Level box to the Low box, or from a Return Box to a Low box), or if it moved from the Above Trailing Station into the �ghter’s box this turn.
If the Escort marker started the Mission Turn in the box with the �ghter(s), then the �ghter is not higher (the answer is “no”). The escort is not higher either, but that just means the �ghter does not enjoy an advantage.If the �ghter(s) moved into the Escort marker’s box during the Move Phase of the current Mission Turn, from a higher altitude box, then the �ghter is indeed higher than the escorts (the answer is “yes”). Likewise, if the Escort marker moved into the �ghter’s box from a lower altitude box (from Low to Level, or Level to High), then the answer is “yes.”
Q2) More Fighters than Escort?The other question has to do with numerical superiority. Are there more �ghters in the box than escort?
Count the number of �ghters in the box and compare to the number printed on the back of the Escort marker. If more than one Escort marker, add their numbers and use the sum. Unless the number of �ghters exceeds the Escort number, the answer is “no.” Altitude advantage is more bene�cial than a preponderance of numbers.
Fighter is higher? Answer: “no.”Neither moved.
Fighter is higher? Answer: “yes.”Fighter moved from Level to Low.
More �ghters than escorts? Answer: “yes”More �ghters than escorts? Answer: “no”
subtract from the die roll; these are cumulative:
-1 each
Modifiers
Resolving Aerial Combatduring the Escort Phase
ModifiersAs noted on the Aerial Combat Table, the die roll used to resolve aerial combat may be modi�ed nega-tively. If any �ghters have these attachments or markers, subtract one from the die roll (for each). The modi�ers are cumulative, so if a �ghter has a Cannon attachment and a Hit marker, subtract two from the die roll. If three �ghters each have a Bomb attachment, subtract three from the die roll. No matter how many subtractions there may be, the number rolled can never fall below 1.
Each green penaltyalso counts as anegative modi�er.
E
Fighter is higher? Answer: “no”A �ghter and escort started the Mission Turn in the box together; a �ghter
moved in from a higher altitude (during the Move Phase) and an Escort marker moved in from a lower altitude (during the Escort Phase). Not all
�ghters are higher than escorts, so the �ghters do not enjoy an advantage.
ResultAfter rolling the die and subtracting modi�ers (if any), look up the result in the appropriate row of the Aerial Combat Table. The result is given as one or two letters, which can be deciphered by the legend printed below the table. They are explained here in alphabetical order:
B – Break OffAll �ghters involved in the combat exit, and one Escort marker exits (others remain in the box, UNLESS it is the Dog�ght Box in which case they all exit). By the time �ghters emerged from the brief battle against escorts, the formation of bombers was far away...
D – DogfightPlace the �ghter(s) and an Escort marker in the Dog�ght Box, and keep them together as a group. They remain in that box until the next Escort Phase, when aerial combat is resolved again (�ghters are not higher in that next combat). If more than one Escort marker, place only one in the Dog�ght Box (choose one). Dog�ghting �ghters may do nothing until the next Escort Phase (if this is the last Mission Turn, resolve aerial combat before the Tally Phase).
NUMERICAL SUPERIORITY EXCEPTION: If the number of �ghters exceeds the Escort number used to resolve the combat, the excess �ghters may remain in the box where the aerial combat was resolved.Example: Three �ghters are in a box with an Escort marker with a ‘2’ Escort number. Only two of the �ghters must be transferred to the Dog�ght Box (although all three may be transferred if the player prefers).
Multiple Groups: If another combat puts another group in the Dog�ght Box, keep the groups in the Dog�ght Box separate, resolving combat next turn for each group separately. ESCORT EXIT: If escorts are scheduled to exit at the start of the next Escort Phase, do not perform aerial combat. Instead, �ghters exit too.
e – Fighter earns a “kill”One of the escorts is shot down by your �ghter(s). Assign an Experience Point (1EP) to a pilot in the box where the aerial combat took place (if more than one is in the box, assign the EP randomly). The sta�el does not earn EP.
R – ReturnFighters got the better of the escort. The Escort marker exits (if more than one is involved in the combat, only one exits, the rest remain in the box). Your �ghters break away to the Evasive Return Box (Tail/Low).
Example: Two Bf109s are in combat with a Spit�re marker with the number 4 (four Spit�res). One of the �ghters has a Rockets attachment (modi�er of negative one). Your �ghters are not higher and they do not have numerical superority. You roll a 1, modi�ed to a 0 (a modi�ed result of zero or less is treated as a 1). The result is “Dx,” read as a “D” and an “x.”
x – Fighter DestroyedOne �ghter is shot down by the escorts. Select the �ghter randomly. Note: this result is not a “hit,” it is a “destroyed” result, and can’t be negated by the Luck experte skill (or anything else). Roll a die to deter-mine the pilot’s fate (but only do so if a Bf109, not for an auxiliary). Add +2 if the �ghter has the Armor attachment. Check the result on the table under the Aerial Combat Table. If he bails out, the pilot earns 1 EP. If wounded, place the �ghter in the Wounded Box on the O�-Map Panel (he also earns 1 EP). If an auxil-iary, deduct 1 OP during set-up for the next Mission.Lone Fighter? If this result destroys the only �ghter in the combat, convert the other result to S. For example, convert a Dx to an Sx.
S – ScatteredFighters are dispersed by the escorts, and exit (remove �ghters from play). Place the Escort marker on the Escort Display in the Below Trailing Station (if more than one, only one Escort marker is placed there, the rest remain in the box where the aerial combat happened; if it happened in the Dog�ght Box, the rest exit).
Check Hit FightersEach �ghter with a Hit marker must be checked during the Recovery Phase. To make a check, select a �ghter and its Hit marker, and roll a die. If the �ghter has more than one Hit marker, select any one of them and resolve the check before checking its next Hit marker.
A Hit marker takes away a �ghter’s ability to Return (p. 17) and Move (p. 15), and that includes exiting or pursuing (pursuit is an Advanced Game rule), but a Hit marker does not restrict or in�uence the actions you may take with a �ghter in an Approach Box or in a space on the formation map. The reason for this delayed e�ect is the rapidity of a �ghter’s attack. Skies Above the Reich slows down the action to make the game playable, but from a pilot’s point of view, making a run on the bomber formation takes but a blink of an eye. That is, from the pilot’s point of view, there is no delay, all of the steps of the Attack Phase are compressed into a prolonged and terrifying moment.
Less Than?Compare the number rolled on the die to the number printed on the Hit marker. If less than the printed number, the hit is serious. If equal to or greater than the printed number, the hit is trivial.
TrivialIf the hit is trivial, put the Hit marker back in the cup. There is no other e�ect. If the �ghter has another Hit marker, check it by repeating the procedure.
SeriousIf the hit is serious, put the �ghter in the Fate Box correspond-ing to the hit type. The �ghter must remain in that box until the Mission is completed, at which time you will determine its fate (p. 55). The Hit marker (and any others still on the �ghter) must be placed back in the cup immediately.
Hit Type & Fate BoxesThe O�-Map Panel has a number of Fate Boxes, each corre-sponding to a type of hit. Each Hit marker is printed with the name of its hit type: Cockpit, Elevator, Engine, Fuel, Fuselage, Rudder, and Wing.
The player decides to check the Fuselage marker �rst. He rolls a 6, which is higher than the ‘3’ printed on the marker, so the Hit is trivial. He puts the Hit marker back in the cup.
He checks the Fuel marker next. He rolls a 7, which is higher than the ‘5’ printed on the marker. It too is trivial, so it goes back in the cup.
But let’s say the �rst die rolled a 2 instead. The hit would have been severe, which means the �ghter would be immediately placed in the Fuselage Box on the O�-Map Panel (its Fate Box). The two Hit markers would then have been put back in the cup.
Releasing Bombs/Firing RocketsBombs and rockets are released only during the Blast & Flak Phase: bombs from the High Bombing Box, rockets from the Tail/Level Position Box (not the Approach Box).
Ju88/Me410 CANNON (Long Range)During the Blast & Flak Phase, if in the Tail/Level Position Box, each Ju88 and Me410 with a Cannon attachment may make a long-range attack. It must target the rearmost bomber of the rearmost element (it may not �re rockets in the same phase). “Rearmost” means closest to the Tail Position, and if more than one bomber seems to qualify, the Ju88 or Me410 may target any of those qualifying bombers. What constitutes rearmost may change as bombers fall out of formation.
Step 1a. AimWhen dropping bombs or �ring rockets, aim for an element, not a speci�c bomber or space. Place a Target marker in the element. Do this for each Bomb and/or Rockets marker before you perform blast location. If aiming a bomb, you must also make a Release Bomb Check, due to bombing unreliability (Step 1b). You don’t need to do this for rockets.
Bombs Rockets
Step 1b. Release Bomb Check: After placing all Target markers, make a Release Bomb Check for each bomb released. Follow the directions printed on the Tri-Fold Player Aid Card (Step 1b). Do this for each �ghter that releases bombs. If the result is “Miss,” remove the Target marker. The bomb either fell through the formation and exploded harmlessly or exploded before reaching the formation. Step 2. Blast Location: For each Target marker, one Target marker at a time, roll two dice (a red die and a black die). Note which die rolled a higher number and locate the corresponding space on the Blast Location diagram printed on the Tri-Fold Player Aid Card (”doubles” automatically miss). Shift the Target marker to that space on the formation map, �ip it so that the marker is Detonation side face up, and immediately perform Step 3 (Blast E�ect) before locating the next Target marker. It is possible for a Target marker to “fall o�” the map due to the result on the diagram, or to detonate in an adjacent element. If it is shifted to a space outside all elements, remove the marker.Step 3. Blast Effect: Use the lesser die rolled in Step 2 to determine the result on the Blast Table (also printed on the Tri-Fold Player Aid Card). After applying the result, if any, leave the Detonation marker on the map and resolve Step 2 again for the next Target marker. Detonation markers remain on the map until the conclusion of the Cohesion Phase (they will degrade the element’s cohesion, p. 31).
Blastduring the Blast & Flak Phase
For a brief time the Luftwa�e experimented with dropping bombs onto B-17 formations. Bombs may be released only by a �ghter in the High Bombing Box on the map (possible
only on Maps 2, 3, and 4). Only a �ghter with a Bomb attachment may do this. Once released, remove the Bomb marker.
A variety of rockets were used by the Luftwa�e, but this game depicts them generically. Unlike Bomb markers, once �red, turn the Rockets marker over to its “�red” side (it will continue to serve as a nega-
tive modi�er during aerial combat against escort, p. 22). Rockets may only be released in the Tail/Level Position Box, and only by a �ghter with the Rockets attachment.
Place the Target marker anywhere in the Element.
evasive
+1
cannon
Attack Procedure: Select a �ghter and roll two dice. If the red die is higher than the black die, the bomber su�ers a Damage result (draw two Damage markers and select one). If the red die is not higher, it misses. If either die rolls a ‘1’, or if the dice roll the same number (that is, you roll doubles), the Ju88 or Me410 becomes No Ammo (p. 47). NOTE: Damage and No Ammo are the only results possible in a long-range attack.
EP & VP: If a bomber is Fallen or Destroyed due to the blast e�ect, the Sta�el earns EP and VP,but individual pilots do NOT earn EP. For EP, see the Pilot Roster or p. 56; for VP, see the back of theSituation Manual.
Note the number rolled on the lesser die, and locate the immediate e�ect on the Blast Table. (Leave the Detonation marker in place until the end of the Cohesion Phase; it will degrade cohe-sion during that phase.) Immediate e�ects of the blast apply only to a bomber in the Detona-tion marker’s space. If no bomber is in the space, there is no immediate blast e�ect (that is, no damage to or destruction of a bomber; do not draw any Damage marker(s)).
The player places a Target/Detonation marker in the element, Target side up. A �ghter with a Rockets attachment is �ring.
They roll two dice (one red, the other black). A Red 8 and a black 7. The red die is higher so they �ip the marker over to its Detonation side, moving it to the Blast space (as dictated by the diagram on the player aid).The “lesser die” was the black die, and it is a 7. The player uses that number to determine the immediate Blast E�ect on the Blast Table, which tells them the bomber in the Blast space su�ers 2 Damage markers. They draw the Damage markers immediately from the cup, resolving their catastrophic e�ects (neither e�ect was triggered), and �ipping them to show their Damage numbers face up. The player completes the rocket attack by leaving the Detonation marker in the space.
Blast Effectduring the Blast & Flak Phase
Blast Exampleduring the Blast & Flak Phase
BLAST TABLE
1 Bomber Destroyed and 1 other bomber su�ers 1 Damage marker.
1 to 3 Damage markers (place on one bomber).
die
immediatee�ect
results:
9
X
X
,,
875-61-4
no damage
1
1
2
3
2
38
7
this is the “lesser” die(because 7 is less than 8)
this is the “greater” die(because 8 is greater than 7)
Near TargetFlak only occurs during a Near Target Mission, and only at the end of the Blast & Flak Phase.
“Flak” refers to ordnance �red from the ground, in this case, by Luftwa�e gunners striving to knock down bombers. Flak can indeed damage bombers, but it can also hit �ghters in Approach Boxes (you’ve been warned).
Advanced Rules: Flak does not occur on the pursuit map.
Resolving FlakAt the end of each Blast & Flak Phase, resolve �ak by determining where the �ak attack happens in the formation (that is, where ordnance explodes). Then, apply Damage to bombers (if any), and Hits to �ghters (if any). Use the Near Target page in the Situation Manual corresponding to the formation map.
Destroyed Bombers?If a �ak attack results in a fallen or destroyed bomber (that is, a Fallen or Destroyed marker is placed on the map due to �ak), you earn 1 Victory Point (unless playing the Advanced Game, in which case you earn 1 VP only if it is Destroyed). EP is not earned for �ak.
Flak ResultVisually locate the bombers damaged by the attack by noting the location of the Damage icon . Draw a Damage marker for each bomber damaged by the attack, and resolve its catastrophic e�ect immedi-ately (if any). For Damage, see p. 44.
If a Hit icon is in an Approach, and a �ghter is in one of the Approach Boxes corresponding to that position, it is hit by the �ak attack (draw a Hit marker, see p. 45). Only one �ghter may be hit in each posi-tion marked by an icon. If more than one �ghter is eligible to be hit, because more than one is in one or more Approach Boxes in that position, choose one �ghter to su�er the hit (or select randomly).
Flak LocationFind the page in the Situation Manual (it is the same page you used to set-up the formation map). For example, if this is a Near Target Mission on Map 3, go to page 15 and 16 of the Situation Manual.
Flakduring the Blast & Flak Phase
7
Experte LuckA pilot with an experte skill of Luck may use it to cancel the �ak Hit.
Green PanicIf hit by �ak, a pilot with this green penalty must immedi-ately exit (check for Recovery immediately).
Next, roll a die (do this every Mission Turn, at the end of the Blast & Flak Phase). Use the number rolled to �nd the “window,” a numbered box, in the Situation Manual. In this example, if you roll a 7, �nd the window numbered .
Bombers: Two bombers are damaged. The player draws a Damage marker for each.
Fighters: Three �ghters are in Approach Boxes in the Tail Position. The player selects one of them to be hit. He draws a Hit marker and places it on the Me410. There is no immediate e�ect, the hit may prove trivial. For now, the Me410 can still attack a bomber during the Attack Phase.
The player rolls a die for one of the Damage markers he just placed, to determine if its catastrophic e�ect is triggered. If he rolls a 9 or a 10, it is, and the bomber will fall out of the formation (see Damage on p. 44).
Bombers: Two bombers are damaged by �ak. The player draws a Damage marker for each and places it on the corresponding bombers.
In order to check for a catstrophic e�ect, the player immediately rolls another die for each marker, starting with the Engine damage. They roll a 7, so the bomber falls out of formation.
1
1
2
1
2
3
3
The player puts the Damage marker back in the cup and places a Fallen marker on the bomber. If they were playing the Advanced Game, they would place the Damage marker on the current space of the Turn Track instead of putting it back in the cup.
Now the player checks for the Wing damage. If they roll an 8 or higher the bomber explodes, but they roll a 6, and so �ips the Damage marker over, ending the �ak attack for this turn.4
The �ghter is not hit because it is not in an Approach Box.5
Markers?Check the cohesion of each element that has one or more markers.
Less Than?Roll a die and compare the number rolled to the number of markers in the element. If the number rolled is less than the number of markers, cohesion degrades. If equal to or higher than the number of markers, cohesion remains the same or improves (see p. 31). If the element only has a single marker, there is no need to roll (the result is “Improves”).
Degrades?An element must be in one of three states: good order, loose (bad), or kaputt (very bad). When kaputt, there is a chance that one of its bombers will fall out of formation. The e�ect of a degrade result depends on the state the element is in at the moment the check is conducted, as follows:
CohesionBombers were not easy to �y, especially in formation, and especially when harassed by �ak and �ghters. Cohesion is a measure of the formation’s integrity, and the unit of measure is the element.
What Kind of Markers?Count every marker except Maneuver and Attack Advantage markers (they should not be on the formation map during the Cohesion Phase anyway).
Cohesion Checkduring the Cohesion Phase
Element is... E�ect...
If the element is neither loose nor kaputt, it becomes loose; place a Cohesion marker on its Loose side. (There is no “good order” marker; good order is the default state of an element.)
If already loose, the element becomes kaputt. Flip the marker to its Kaputt side.
If already kaputt, one bomber falls out of formation (select the bomber with the most Damage markers and place a Fallen marker on it; if two or more have the same number of Damage markers, or none have Damage markers at all, select randomly; return its Damage markers to the cup). Then, �ip the Kaputt marker over (the element’s state improves to loose). If a bomber is fallen, the Sta�el earns 1 EP, and 2 VP if an Inbound Mission (or 1 VP if not).
Improves (or stays the same)?If the Cohesion Check does not result in “degrade,” then cohesion either remains the same or improves. The result depends on the state the element is in when the check is made, as follows:
No Bombers?If there are no bombers in an element (because they are all fallen or destroyed), the element is automatically and permanently kaputt.
The formation map is a static two dimensional representation of a potentially dynamic three dimensional space. If not closed up entirely, holes in a combat box can at least be considered to narrow as bomber pilots maneuver closer to other elements for protection. Thus, even when all bombers have been shot out of an element, it may still be lethal to your �ghters because other bombers are nearby in adjacent elements.
Leader Shift (Optional Rule)During the Cohesion Phase, when the forwardmost bomber of an element is either fallen or destroyed, one of the remaining bombers in the element takes its place. Select the bomber with the least number of Damage markers and shift it to the fallen/destroyed bomber, and shift the Fallen/Destroyed marker to the selected bomber.
Detonations: Cohesion Automatically DegradesAfter completing the Cohesion Check, each Detonation marker in an element has an additional e�ect. (Detonation markers are generated by rockets and/or bombs; see p.25). Each Detonation marker degrades the element’s cohesion one level (from good order to loose, or from loose to kaputt). If already kaputt, one bomber becomes fallen (�ip the Cohesion marker to its Loose side, then select the bomber with the most Damage markers and place a Fallen marker on it; return the Damage markers to the cup).
Remove Markers?After all Cohesion Checks are complete, remove Proximity and Detonation markers (put Proximity markers back in the cup).
Element is... E�ect...
If good order, there is no e�ect. The element remains in good order. (There is no “good order” marker; good order is the default state of an element.)
If the element is loose, there is no e�ect, the element remains loose. (It does not improve to good order.) Once loose, an element will never return to good order.
If the element is kaputt, the element’s cohesion improves to loose. Flip the Kaputt marker to show its Loose side.
The element has �ve markers and the player rolls a 3, so cohesion degrades.
The element is already loose, so it must degrade to kaputt. The player �ips the marker to show its Kaputt side face up.
1
1
2
2
Removed
Removed
Removed
43
There are 2 Detonation markers in the element. One of them degrades the element’s cohesion and since it is already kaputt, one bomber becomes fallen. The Kaputt marker is �ipped over to show its Loose side face up. The player earns 1 Sta�el EP and 1 VP (it is an Outbound Mission).
3
The second Detonation marker degrades the element yet again. The Loose marker is �ipped over (again) and the element’s cohesion is now kaputt.
4
The two Detonation markers and the Proximity marker are removed (the Proximity marker is put back in the cup while the Detonation markers are set aside for later use).
Fighters in Approach Boxes must be placed into spaces on the formation map.
How Many at a Time?Up to six �ghters may leave an Approach Box (or Boxes) at the same time (this is called a “wave”). If you have more than six in your Approach Box (or Boxes), shift them to the formation in waves (maximum six �ghters in each wave; the remainder wait for the next wave). Fighters comprising a wave may come from di�erent Approach Boxes.
Place Where?
Nose
Oblique
Tail
Place each approaching �ghter in any space with a bomber, so that it is oriented to attack the bomber. More than one �ghter may be placed in the same space. Even when emerging from the same Approach Box, �ghters need not be placed in the same space or element. Orientation is dependent on the �ghter’s Approach Box, as follows:
A �ghter approaching from the Nose must be placed in a space in front of a bomber. It will attack that bomber.
A �ghter approaching from the Tail must be placed in a space behind a bomber. It will attack that bomber.
A �ghter approaching from the Oblique must be placed in a space to the side of a bomber. It will attack that bomber.
Out of the Sun?If a �ghter leaves an Approach Box connected to the Sun marker, it earns the Out of the Sun advantage (p. 45).
Altitude?The �ghter’s altitude is relative to the bomber it is attacking, and is determined by the Approach Box it came from: High, Level, or Low. For example, if the �ghter was moved from the High Approach Box, the �ghter’s altitude is “high” relative to the bomber. If it is hard to remember a �ghter’s altitude, place blocks under the �ghter, as follows:
A �ghter’s block has two sides, each representing its mode of attack: Deter-mined and Evasive. Whichever side you choose to be face up is the �ghter’s mode. Mode can be thought to represent a number of things, but foremost is how close to the target a pilot intends to be when he pulls the trigger.
ZealA �ghter whose pilot has this green penalty must be in Deter-mined mode.
Determined �ghters are more
dangerous to bombers.
Evasive �ghters have less to fear
from bombers.
Changing ModeA �ghter’s mode is chosen at the beginning of the Engage step of the Attack Phase, and may not be changed during a later step. The only exception is when the Event Text of an Attack Card forces you to change a �ghter’s mode.Mode is only meaningful during the Attack Phase, Steps 7B through 7C (Engage, Burst, and Break Away). A �ghter’s mode is irrelevant during the rest of the Mission Turn.
Modeduring the Engage step of the Attack Phase
Select ManeuverEach �ghter in a space on the formation map must have a maneuver selected for it. Use the Maneuver marker as a reminder of your selection, or just remember the �ghter’s maneuver. The maneuver you select will in�uence what happens during the Break Away step of the Attack Phase, p. 53 (also see pp. 36-37).
Climb or Dive?A maneuver must be either a climb or a dive. Climbing means the �ghter will ascend away from the formation after its burst, while diving means it will descend away. Thus, climbing means it will break away towards the High box while diving means it will head for the Low box.
Roll?Besides climbing or diving, a �ghter may also roll. This allows the �ghter to turn as it breaks away rather than continue in a straight direction.
Direction?
Climb or Dive Roll
The maneuver determines the �ghter’s destination when it Breaks Away: Nose, Flank, or Tail. Break away happens during the Break Away step of the Attack Phase.
If not rolling, the �ghter will break away to the position opposite its approach. For example, if approaching from a Nose Approach Box, it will break away to the Tail.
If rolling, the �ghter will break away to the position to the left or right of its approach, depending on which direction it rolls towards. For example, if approaching from a Nose Approach Box and rolling to the right, it will go to the 8 to 10 o’clock Flank. Use the arrow on the marker to indicate direction of the roll.
Maneuverduring the Engage step of the Attack Phase
In this example, the fighter
approaching from the Tail will dive roll to the Flank
Collision?During the Engage step, after mode has been selected, perform a Collision Check for each space that has two or more �ghters in it. To perform the check, draw a Proximity marker and place it on one of the �ghters in the space. Apply the result. During the Burst step, some Attack cards may impose a Collision Check as well, in which case you must also draw a Prox-imity marker and place it on the �ghter. Collision is possible only in a SPACE, not in a BOX.
Altitude?Ignore di�erences in altitude. That is, a Collision Check is triggered by �ght-ers sharing the same SPACE even when they are at di�erent altitudes.
Collision Check Results
Collision! If a collision occurs, roll another die. The result depends on the number rolled, even or odd:
EVEN If the number rolled is EVEN, the �ghter collides into the bomber. The �ghter is destroyed (no bail out). Draw four Damage markers and place them on the bomber (check for catastrophic e�ects, p.44).
ODD If the number rolled is ODD, the �ghter crashes into another �ghter (both are destroyed, no bail out). If there is no other �ghter in the space, it crashes into another �ghter in the element (select randomly if more than one). If there is no other �ghter in the element, it collides into the bomber after all (treat as an EVEN result). If there is no bomber in the element, the �ghter is struck by debris and is destroyed (no bail out).
Collision check is triggered: draw aProximity marker and place it on one ofthe �ghters.
Collisionduring the Engage and Burst steps of the Attack Phase;
does not apply to the pursuit map
C
No Collision: There is no additional e�ect. If the �ghter is Evasive mode, put the Proximity marker back in the cup. If Determined, leave the marker in the element (it will in�uence the Cohesion Check during the Cohesion Phase, p. 30).
Escape: You have a choice: Either pay the TP cost noted on the Proximity marker, or don’t pay it. If you pay the cost, the �ghter immediately breaks away to the Tail Position (place it in either Return Box). If you do not pay, the �ghter exits instead. In either case, if the �ghter is Evasive mode, put the Proximity marker back in the cup. If it is in Determined mode, leave the marker in the element (it will in�uence the Cohesion Check during the Cohesion Phase, p. 30).
Hit: If the �ghter is Evasive mode, treat as No Collision (put the Proximity marker back in the cup). If Determined, �ip the Proximity marker over and attach it to the �ghter as a Hit marker: you may immedi-ately use a pilot’s Luck experte skill, Attack Advantage, or the Out of the Sun advantage, if you have any, to remove the Hit marker as per p. 45 (put the Hit marker back in the cup).
Impact? If the �ghter is Evasive mode, treat as No Collision (put the Proximity marker back in the cup). If Determined, immediately roll a die. If the number rolled is less than the number printed on the Prox-imity marker, a collision occurs (see below). A collision cannot be cancelled by Luck experte skill or anything else. If equal to or higher, the collision is avoided. Regardless of the die roll, leave the Proxim-ity marker anywhere in the element; it will in�uence the Cohesion Check during the Cohesion Phase.
Veer: If the �ghter is Evasive mode, treat as No Collision (put the Proximity marker back in the cup). If Determined, roll a die. If the number rolled is less than the number of �ghters in the ELEMENT, treat as a Hit result (�ip the Proximity marker over and apply it as a Hit marker; you may immediately use the pilot’s Luck experte skill, Attack or the Out of the Sun advantage, if you have any of them, to remove the marker). If equal to or higher, ALL �ghters in the Proximity marker’s SPACE break away to the Tail Position (place them in either Return Box; they don’t have to go to the same box). Then, leave the Prox-imity marker anywhere in the element; it will in�uence the Cohesion Check during the Cohesion Phase.
No Bomber? If there is no bomber in the space where the Collision Check was triggered, select a bomber in the element. If the space is outside an element, or there is no bomber in the element (they are all fallen or destroyed), treat as an automatic ODD result.
Check for Attack AdvantageAt the end of the Engage step (after Collision Checks), check to see if your �ghters earn Attack advantage. Check each element where �ghters are present. An advantage is particular to its element, which means an Attack advantage may only be used in the element where it was earned. A �ghter does not take an advantage with it if it leaves the element during the Burst step of the Attack Phase (by passing through), but a �ghter that enters the element may use advantages in the newly entered element (if they haven’t already been used). For each advantage earned, place the appropriate Advantage marker in the element as a reminder, and remove it when the advantage is used. Remove all unused Advantage markers at the end of the Mission Turn.
Rotte AdvantageYou earn this advantage if at least one space in the element is occupied by two or more �ghters. The �ghters must be in the same space, at the same altitude, and must have emerged from the same Approach Box. Also, the �ghters must be in Determined mode, and they must be the same type (e.g., both are Bf109s, or both are Bf110s).
E�ect: This advantage allows you to cancel one Hit during the Burst step or during Continuing Fire in the Break Away step. It need not be used on the two (or more) �ght-ers that earned this advantage; it may be used to cancel a Hit applied to another �ghter in the element. Remove the Advantage marker when the advantage is used.
Position AdvantageYou earn this advantage if at least two �ghters attack the element from di�erent positions and di�erent altitudes. The �ghters need not be in the same space, nor must they attack the same bomber.
E�ect: This advantage allows you to cancel one Hit during the Burst step or during Continuing Fire in the Break Away step. It need not be used on the two (or more) �ghters that earned this advantage; it may be used to cancel a Hit applied to another �ghter in the element. Remove the Advantage marker when the advantage is used.
Attack Advantagecheck for advantage during the Engage step of the Attack Phase;
use Advantages during the Burst or Break Away steps (for Attack Procedure, see p. 41);Attack advantage also applies to Pursuit (Advanced Rules)
two or more positions and altitudes;Position advantage earned
two or more positions and altitudes;Position advantage earned
two altitudes but only one position;Position advantage NOT earned
two positions but only one altitude;Position advantage NOT earned
two Determine mode �ghters from the same Approach Box in the same space;
Multiple Advantage?Fighters attacking in an element may earn all three advantages, but each type may only be earned once per element. Thus, the Rotte may only be earned once in an element, even if two spaces qualify for the advantage.
Four �ghters attack from the Nose Low Appo-rach Box in Determined mode. They earn the Schwarm advantage, and the Rotte advantage. Another �ghter attacks from Oblique Level, earning the Position advantage.
In this example the Burst step has occured and �ghters passed through. One of the two Damage results of the Schwarm advantage has been used, so the other remains. Any of the �ghters in the element are eligible to use that remaining Damage result during Continuing Fire, because they all share a space with a bomber (two share a space with more than one bomber, and can apply the Damage result to any bomber in their space).
Schwarm AdvantageYou earn this advantage if four or more �ghters attack the element. The four must be at the same altitude, and must have emerged from the same Nose or Tail Approach Box (not from the Oblique). Also, the �ghters must be in Determined mode, none of the four may be No Ammo, and all four must be the same type (e.g., all four are Bf109s, or all four are Bf110s; thus, if two are Bf110s and two are Ju88s, the Schwarm Advantage is NOT earned).
E�ect: This advantage allows you to automatically in�ict two Damage results when resolving the attack during the Burst step of the Attack Phase (p. 44). Both Damage results may be used simultane-ously by the same �ghter, or one at a time (by the same or di�erent �ghters, even by one that did not help earn the advantage). If using the Damage result one at a time, �ip the Advantage marker over as a reminder that one Damage result has been used. When the second is used, remove the marker.
Continuing Fire: This advantage may also be used during Continuing Fire in the Break Away step, by a �ghter that has a bomber in its space (it need not be in front of the �ghter). The Damage result is applied simultaneously with Continuing Fire, after the e�ect of the Event Text is applied (if any).SCHWARM: Developed during the Spanish Civil War, the “schwarm” was a formation of four �ghters that proved �exible yet lethal. Adolf Galland asserted that it proved so successful against British �ghters early in the Second World War that the Royal Air Force copied it, as did the Americans who called it the “�nger four.” Its utility against bombers was that four �ghters approaching abreast established a brief but nearly uniform burst of tracers that was di�cult for an evading bomber to avoid. Even if it managed to evade one �ghter, it might stray across the trajectory of another.
The Schwarm was invented as a tactic against enemy �ghters, since it allowed for great �exibility of maneuver for each pair within the schwarm (the pair was called a “rotte”). That maneuverability was irrelevant against heavy bombers. Nonetheless, the breadth of attack is simulated by this advantage.
ROTTE & POSITION ADVANTAGES: These advantages are predicated on the idea that the bomber’s defensive �re can be split, erratic, and confused when presented by targets hurtling in from a variety of directions. The risk of attacking densely in a rotte is mitigated by gunners splitting their �re between two targets.
A �ghter must attack the bomber in front of it. If there is no bomber (because another �ghter knocked it out of formation or destroyed it), go through with the attack anyway and apply all results except Damage (see No Bomber?, p. 43).
Lethal Level?Each space on the formation map is rated for its lethality to a �ghter.Locate the blue number in the space; that is the space’s Lethal Level.
The bomber formation was designed to create a 360 degree �eld of covering �re, and the Lethal Level is a crude estimation of the danger posed by that �eld to a �ghter. Each B-17 was armed with as many as twelve .50 caliber guns facing a variety of directions, including two or more revolving turrets. As bombers took damage, fell out of formation, or were destroyed, the ability to mutually support fellow bombers became weaker. Game Terminol-ogy: Fallen and Destroyed refer to a speci�c bomber within an element, while Loose and Kaputt refer to the element within a formation.
Modifying the Lethal Level?A space’s Lethal Level is modi�ed by several factors, each modi�cation noted as a numeral preceded by either a minus or plus sign. A minus sign indicates a deduction to the Lethal Level while a plus sign indicates an increase. If the Lethal Level is reduced below zero, treat it as zero, and if increased beyond �ve, treat as �ve. Deductions are good for your �ghters; increases are bad.
Missing BombersA bomber occupies four spaces, and when a bomber falls out of formation or is destroyed, those four spaces become less lethal. The Lethal Level of those spaces is reduced by 1, as noted on the marker.
Degrading CohesionA Loose or Kaputt marker applies to every space of its element, decreasing the Lethal Level of each space by 1 or 2, as indicated by the marker.
MachinesSome auxiliary �ghters (Ju88s, Bf110s, Me262s, Me410s) modify the Lethal Level of their space, as noted on the auxiliary �ghter sticker, but this modi�cation applies only to itself. For example, if a Ju88 in Determined mode is in a space, it increases the Lethal Level of that space by 2, but that increase applies only to the Ju88, not to another �ghter in its space.
CumulativeThere is no limit to the number of modi�cations to the Lethal Level. For example, a space with a Fallen bomber (-1 Lethal Level) in a Loose element (-1 Lethal Level) has a cumulative deduction of -2.
Resolve your �ghters’ attacks, one �ghter at a time. Each �ghter in a space on the formation map MUST attack. Fight-ers in boxes may not attack during the Burst and Break Away steps.
Attack Procedure: Lethal Levelduring the Burst and Break Away steps of the Attack Phase
Lethal Level is 2it can be modified
decreases the Lethal Level by 1
the Fallen marker projects its -1 deductionto all four spaces
-1
-1
-1
-1-1
-1
-1
-1
-1
-1
-1
-1
-1
decreases the Lethal Level by 2
increases theLethal Level by 2
this Loose marker projects its -1deduction to every space of the Element
Lethal Level Exampleduring the Burst step of the Attack Phase
1
2
The Bf109 approaches from the Nose Position and is in a space with a Lethal Level of 3. The Fallen marker reduces that level to 2, and the Kaputt marker, applying to every space in the element, reduces it by another 2.
Thus, the Lethal Level for the Bf109 is zero.
The Ju88 approaches from the Oblique. Its space has a Lethal Level of 3, but if at High altitude (which it is), that level is increased to 4, as noted on the formation map. Because it is in Deter-mined mode, the Ju88 increases the Lethal Level by 2, raising it to 6 (yikes!). But the Kaputt marker reduces it by 2.
Thus, the modi�ed Lethal Level for the Ju88’s attack is 4.
1
2
Assuming the player elects to resolve the Bf109’s attack �rst, what happens if the Bf109’s attack forces its target to fall out of formation? Does the Ju88 still attack? Yes. If the �rst attack’s results require a Fallen or Destroyed marker be placed on the bomber, the player would still resolve the Ju88’s attack. The Lethal Level would be reduced by 1, because of the new marker, and an Oblique Attack card would be drawn. All results would apply, except Damage results on the bomber. (See. p. 43, “No Bomber?”)
Once you determine the Lethal Level (explained on p. 41), draw an Attack card and apply the results, if any.
Attack CardDraw an Attack card from the deck corresponding to the �ghter’s position (Nose, Oblique, or Tail). After applying the results, discard the card.
No Bomber?If there is no bomber to attack (because another �ghter just destroyed it or knocked it out of formation), include the Fallen/Destroyed marker’s Lethal Level deduction and draw an Attack card. Apply all results except Damage.
The most reliable way to do damage to a bomber was to �re on it from the rear, but that was also the easiest way to receive harm from the bomber’s gunners.
Reading the Attack Card
AltitudeThe Attack card is organized according to the �ghter’s altitude relative to the bomber (High, Level, Low; or in the case of oblique attacks, High and Low). Use the row corresponding to the �ghter’s altitude.
ModeEach Altitude row is subdivided into two sections. Use the upper section if the �ghter is in Determined mode, and use the lower (blue) section if the �ghter is in Evasive mode.
ResultsCross-index row and column to �nd the results of the attack (that is, cross-index altitude and mode with the lethal level). If the cell is empty, the attack had no e�ect (there is no result except that the attack has been resolved). In most cases there is an e�ect to either the �ghter or the bomber, or both. When there is more than one result indicated, apply them all in any order (unless noted otherwise). The e�ect of each type of result is explained on pages 44-47.
Attack Cardsduring the Burst step of the Attack Phase
Altitude (High, Level, or Low) Determined Mode (upper section of each row)Use this section if the �ghter is Determined.
Evasive Mode (lower section of each row)Use this section if the �ghter is Evasive.
Lethal Level (0-5) Use the column corresponding to theLethal Level of the �ghter’s space,modi�ed by the factors noted on p. 41.If modi�cations reduce the Lethal Levelbelow zero, use the zero column, and ifgreater than 5, use the 5 column.
Attack Result: Damageduring the Burst and Break Away steps of the Attack Phase,
and during the Blast & Flak Phase
Schwarm Advantage?If you earned the Schwarm Attack advantage, you may use it to add one or two Damage results to the results indicated by the Attack card. Once both are used, remove the marker.
Timing: If the pilot has the Timing experte skill, and you choose to use it, add a Damage result to the results indicated by the Attack card. This pilot may use this skill only once each Mission, and only if the �ghter is in Determined mode.
resulticon
Damage
Accumulated Damage
For each Damage result, randomly draw a Damage marker from the cup. Place the marker on or next to the bomber. It may have an imme-diate and catastrophic e�ect: roll a die and compare the number rolled to the Catastrophe Number printed on the front of the marker. If you roll EQUAL TO OR HIGHER than that number, the catastrophic e�ect is triggered (destroyed or fallen, apply the appropriate marker). If less than the number, it does not take e�ect (�ip the Damage marker over and leave it on the bomber).
Experte?Aim: Draw two Damage markers instead of one if your pilot has the Aim experte skill and you choose to use it (the skill may only be used once per Mission). Apply both Damage markers (each counts as a separate Damage result).
Cannon?If the �ghter is armed with Cannon, draw two Damage mark-ers instead of one. Do this for each Damage result. Look at both markers (you may look at the front and back) and select one to apply (put the other back in the cup). This is a perma-nent bene�t of the cannon and may be used every attack.
The moment that the Damage numbers on all of a bomber’s Damage markers add to 10 or more, the bomber is destroyed (place a Destroyed marker on the bomber and return the Damage markers to its cup). VP is earned.
If the e�ect is Destroyed, place a Destroyed marker on the bomber and return its Damage markers to the cup. You earn VP (see the back of the Situation Manual for the VP chart).
If the e�ect is Fallen, the bomber falls out of the formation. Place a Fallen marker on the bomber and return its Damage markers to the cup. If playing the Advanced Game, place the bomber’s Damage markers on the current space on the Turn Track (the bomber can be intercepted during Pursuit, see Advanced Rule Book, p. 4).
If the catastrophic e�ect was NOT triggered (this is the most common result), �ip the Damage marker over and leave it next to the bomber.
CatastropheNumber
Destroyed
Fallen
this letter is used only when playing Advanced Game (p. 6; it applies only to the pursuit map)
In the Advanced Game, this only applies tothe formation map, not to the pursuit map(see Advanced Rule Book, p. 3).
Attack Result: Hitduring the Burst and Break Away steps of the Attack Phase,
and as a result of �ak during the Blast & Flak Phase
resulticon
HitFor each Hit result on a �ghter, attach a randomly drawn Hit marker to the �ghter (place the marker on the �ghter block, or keep it next to it). Each marker represents damage to the �ghter.
You won’t know right away if the hit is trivial or severe (you’ll know during the Recovery Phase), but the marker will tell you where the aircraft is hit (cockpit, wing, etc.). When a Hit marker is attached to a �ghter, there is no other immediate e�ect to su�ering a hit while in a space on the formation map. Once the Attack Phase is over, however, Hit �ghters may not move during the Move Phase, nor may they return during the Return Phase. Nor may they exit. To add insult to injury, they su�er an adverse modi�er during aerial combat with escorts.
cancels 1 Hit
Hit marker
Hit Cancelled?
Out of the Sun
There are a variety of ways to cancel a Hit result:
If the �ghter approached from an Approach Box connected to a position box containing the Sun marker, it bene�ts from the Out of the Sun advantage.
This advantage cancels one Hit if the �ghter is in Evasive mode; if in Determined mode, roll an EVEN number on one die to cancel the Hit. If you roll ODD, it does not cancel the Hit and the advantage is not used. Remove the Advantage marker if the Hit is cancelled. You must make the decision to use this advantage before drawing a Hit marker.
If the �ghter does not use its Out of the Sun advantage by the conclusion of the Break Away step, remove the Out of the Sun marker.
LuckA pilot with the Luck experte skill may cancel one Hit result. It may only be used once per Mission. If you choose to use it, make the decision before drawing the Hit marker.
Each of these markers allows you to cancel one Hit, but you must make that decision before drawing the Hit marker. Any �ghter in the element may use it. Remove the marker when you use it.
Attack Advantage
Fighter approachesout of the sun; placean Out of the Sunmarker on the fighter.
cancels 1 Hit if Evasive; if Determined,roll an EVEN number on one die to cancel the Hit
Attack Result: Pass Throughduring the Burst step of the Attack Phase
resulticon
Pass Through
Pass Through Example
The numeral printed on the Attack card is the number of spaces the �ghter must move. If no numeral, treat as a zero (that is, there is no Pass Through movement, the �ghter remains in its space).
Which Direction?
Climb or Dive
Climb Roll or Dive Roll
Direction is determined by the Maneuver marker.
If climbing or diving, movement must be straight ahead.
If rolling, direction must be as indicated by the placement of the Maneuver marker. The arrow on the marker indicates direction (left or right).
In this example,the �ghterwould moveinto this space.
Climb/DiveRoll
Roll
Edge of the World?A �ghter may not exit the map due to Pass Through movement. If it reaches a space on the edge of the formation and still should move another space, it remains in that last space.
Me262A Determine-mode Me262 automatically adds +1 to its Pass Through result (for example, if the Pass Through result is zero, the Me262 moves one space).
The Ju88 attacked obliquely and one of the attack results requires it to make a Pass Through move of three spaces. It is Dive Rolling towards the front of the formation (that is, towards the Nose Position), and thus, it must move in the direction indicated. After moving two spaces, the Ju88 stops, because it has reached the edge of the map and may not move a third space.
Other Attack Resultsduring the Burst step of the Attack Phase
resulticon
CollisionMake a Collision Check (that means drawing a Proximity marker and placing it on the �ghter, and apply the result; see p. 38).
Make this check even if the bomber is destroyed by Damage or attacking a bomber that was already fallen or destroyed by another �ghter’s attack. Why? The collision may happen with debris and not just another intact aircraft.
Riding the TailAfter applying all other results of the attack, the �ghter must either attack again immediately, or drop back to the Tail Position.
Attacking Again: Draw another Attack card and apply the results. If one of the results is “Riding the Tail,” the �ghter may attack yet again or drop back to the Tail Position.
Drop Back to the Tail Position: Place the �ghter in the Level Box of the Tail Position. Doing this allows the �ghter to skip Continuing Fire.
Note: a �ghter that drops back is NOT placed in the Approach Box, it is placed in the Tail/Level Position Box.
No AmmoAfter applying all other results, place a No Ammo marker on the �ghter as an attachment (or make a note on the Pilot Roster, or just remember). For the remainder of this Mission, the �ghter is incapable of producing a Damage result on a bomber, and it su�ers a -1 modi�er in aerial combat against escorts. If a pilot with the Timing experte skill is No Ammo, he may not use his skill. Note: A �ghter with a No Ammo attachment may attack. Any Damage result it garners is cancelled, but all other results apply.
JamAfter applying all other results, place a Jam marker on the �ghter as an attachment (or just remember that its guns are jammed). For the remainder of this Mission, when the �ghter scores a Damage result on a bomber, roll a die: if the number rolled is EVEN, apply the Damage result normally. If ODD, the Damage result is cancelled.
No Bomber? A �ghter resolving an attack against a bomber that has just fallen or been destroyed due to another �ghter’s attack, is a�ected by a No Ammo result (see. p. 43, No Bomber?). Schwarm Advantage? You may not earn the Schwarm advantage if one of the �ghters qualifying for that advantage is No Ammo (see p. 40).Jam? A Jam result has no e�ect on a No Ammo �ghter.
No Ammo? If a �ghter with a Jam marker garners a No Ammo result, �ip the marker over. The �ghter is now No Ammo. But look on the bright side: at least it isn’t Jammed!
No Bomber? A �ghter resolving an attack against a bomber that has just fallen or been destroyed due to another’s �ghter’s attack, is a�ected by a Jam result (see. p. 43, No Bomber?).
To the dismay of many a �ghter pilot in the unfriendly skies above Europe, it was not unusual to experience weapons malfunction, including the jamming of machine guns or momentarily inoperable cannon.
The player decides to resolve Maack’s oblique attack �rst. His space has a Lethal Level of 1 but the element’s cohe-sion is loose, lowering the Lethal Level to zero. He draws an Oblique Attack card and �nds the result under the zero column and the “Low” row (because the Bf109’s altitude relative to the bomber is Low). He �nds the result in the upper section of that row because the �ghter is in Determined mode.
Results: Maack damages the bomber, and so one Damage marker is drawn and placed on the bomber’s image on the formation map. It’s an engine hit with a Catastrophe Number of 5, so the player immediately rolls a die. He rolls a 7, which triggers the catastrophic e�ect and the bomber falls out of formation. A Fallen marker is placed on the bomber. Maack then moves one space forward (the �ghter moves straight ahead because the Maneuver marker is Climb).
1
The player now resolves the attack of the Evasive mode �ghter attacking from the Nose. Its space’s Lethal Level is 2, and with the element’s loose cohesion, it is reduced to 1. He draws a Nose Attack card and �nds the result under the 1 column and the “Level” row.
3
4
4
4
3
3
2
2
1
Attack Exampleduring the Burst step of the Attack Phase
results
Maack earns1EP for knockingthe bomber out offormation, and sodoes the Staffel.And VP is earnedtoo.
7
Results: The �ghter is Hit, but instead of drawing a Hit marker, the player elects to use the Position advantage to cancel the Hit (he removes the Advantage marker). Had the �ghter been in Deter-mined mode, he could have used the pilot’s Timing experte skill to damage the bomber. The player immediately makes a Collision Check to satisfy the ‘C’ result. It is a “No Impact” marker, so there is no e�ect. Since the �ghter is in Evasive mode, the Proximity marker is returned to the cup. Had the �ghter been in Determined mode, that marker would stay in the element.Pass Through: The �ghter moves forward two spaces to satisfy the Pass Through result on the Attack card.
Select a �ghter in a space on the formation map, and draw a Continuing Fire card for it. Flip the card over and read the Event Text (do this �rst, following its directions), then check to see if the �ghter is Hit by locating the result in the Continuing Fire Table printed on that card. You must do this for every �ghter in a space on the formation map, one at a time (one card per �ghter).
Each Continuing Fire card has text printed below the Continuing Fire Table. Follow the directions of that text. In most cases, the directions apply only under speci�c circum-stances (and those circumstances are indicated in the Event Text itself ). If those circum-stances do not apply, ignore the text. If the directions allow you to “skip” Continuing Fire, ignore the result in the Continuing Fire Table.
Event Text
Reading the Continuing Fire Card
Lethal Level ModificationsThe Lethal Level can be modi�ed by all the same factors that modify it during an attack (during the Burst step of the Attack Phase, explained on p. 41). In addition to those, the Continuing Fire card itself may modify the Lethal Level, if the �ghter’s Maneuver marker corresponds to that shown on the card. Not all cards modify the Lethal Level.
Continuing Fire TableAfter applying the Event Text, if the �ghter is still in a space on the formation map (that is, the Event Text has not allowed it to Break Away or exit before resolving Continuing Fire), use the table to determine if the �ghter is Hit as it �ies out of the bomber forma-tion. Only two results are possible, either the �ghter is Hit, or it is not Hit (actually, there is a third possibility: the �ghter may su�er more than one Hit). Locate the result in the column corresponding to the Lethal Level, and the row corresponding to the �ghter’s mode. If Determined, use the upper row, and if Evasive use the bottom row (blue). Hits may be cancelled by Luck experte skill, Attack and/or Out of the Sun advantage (p. 45).
Me262An Evasive mode Me262 skips Continuing Fire and Breaks Away instead (do not draw a Continuing Fire card).
Continuing Fireduring the Break Away step of the Attack Phase;; does not apply to the pursuit map (Adv. Game Rules)
Event Text
Determined ModeUse this row if the �ghter is Determined.
Evasive ModeUse this row if the �ghter is Evasive.
this icon means the �ghteris Hit
Lethal Level (0-5) Use the column corresponding to theLethal Level of the �ghter’s space,modi�ed by the factors noted on p. 41.If modi�cations reduce the Lethal Levelbelow zero, use the zero column, and ifgreater than 5, use the 5 column.
Continuing Fire Table
=
this card indicates that if the �ghter’s maneuver is Climb or Climb
Roll, the Lethal Level is increased (+1 if Climb Roll, and +2 if Climb)
45
52
41
Fall Away
This experte skill allows you to Break Away at the start of the Break Away step. If you use it, don’t draw a Continuing Fire card (p. 57).
If you have advan-tages with these icons, you can use them to cancel a Hit during Continuing Fire (p. 45).
The player decides to resolve Continu-ing Fire against Maack �rst. He draws a Continuing Fire card and notes that the Event Text does not apply. Had he drawn this card for the other Bf109, which is diving, it would have applied (and because that �ghter is already in Evasive mode, it would have exited, removing it from play for the rest of this Mission!).
Result: The Lethal Level in Maack’s space is 4, but because Maack is Low altitude that is increased to 5. But the Fallen marker lowers that level by 1 and the Loose marker lowers it again by 1. Thus, the Lethal Level is 3, and so the player locates the result in the upper row of the 3 column and �nds that Maack is not hit.
1
The player now resolves the Continuing Fire on the other �ghter. He draws a card and then rolls a die (because he is directed to do so by the Event Text). He rolls a 7, which is an odd number, and so the �ghter is hit by debris. He draws a Hit marker from the cup, a Wing hit, and places it on the �ghter.
4
43
2
2
3
1
Continuing Fire Example 1during the Burst step of the Attack Phase
7
Result: Now the player determines the Lethal Level. The �ghter is at Level altitude, so the Lethal Level for the space is 3, and he lowers that by 1 because the element is loose. Thus, he locates the result in the 2 column on the table, and because the �ghter is in Evasive mode, the result is a Hit. He draws another Hit marker from the cup (the �ghter’s fuel line is hit).
CLIMBIf climbing or climbrolling, Break Awayto Tail position.
Continuing Fire
012345
+2+1
Slow Climb
DIVE
maneuver
Continuing Fire
012345
Hard RollIf dive rolling, skipContinuing Fire.
ElementLoose
-1
R1
Maack
bomberFallen
-1
winghit
5
DIVE
maneuver CLIMB
maneuver
ROTTEAdvantage
Anchor
ed
The player draws a Continuing Fire card for Loos. The Event Text is “Slow Climb,” and it applies because the �ghter is climb rolling. Thus, the Lethal Level is increased by 1.
Resolving Continuing Fire, the Lethal Level printed in the space is 2, modi�ed to a 3 because of the Event Text, so the player must use the 3 column. He does not bene�t from the Loose marker because Loos is no longer in that element. Had there been a Cohesion marker in the element he is currently in, he would have used it.
Result: Loos su�ers a Hit. The player can’t cancel the Hit by using the Rotte advantage, because Loos is no longer in the element where it was earned (he passed through 3 spaces). The player draws a Hit marker and places it on Loos, and then Loos breaks away to the Tail Return Box (High).
1
2
2
2
1
1
Continuing Fire Example 2during the Burst step of the Attack Phase
Maack’s turn. The player draws a card, “Hard Roll.” The Event Text applies because Maack’s maneuver is dive roll, so the �ghter skips Continuing Fire and breaks away to the Tail Return Box (Low).Had Maack not dive rolled: The Lethal Level in the space is 2, modi�ed to a 3 because the Tail position is anchored (that position box is not shown, but in this example it is anchored). The element is loose, however, so that would have decreased the Lethal Level by 1, back down to 2. This would have meant Maack su�ered a Hit, except the Rotte advantage would have cancelled that Hit, had the player elected to use it.
Event Textduring the Break Away step of the Attack Phase
We hope the directions printed on the Continuing Fire cards are self-explanatory, but in case confusion arises, a more elaborate explanation is provided here.
Friendly FireThis Event Text automatically applies. Roll a die. If the number rolled is an EVEN number (such as a 2 or a 6), draw a Damage marker and place it on the nearest bomber. If more than one bomber quali�es as nearest, choose one of them. Check for catastrophic e�ect in the normal way (explained on page 44). If the number rolled is ODD, skip Continuing Fire (the �ghter breaks away in the confusion).
If a bomber is fallen due to friendly �re, you earn 1 sta�el EP, and 1 or 2 VP depending on the Mission Type (2 VP if Inbound) (zero VP if playing the Advanced Game). If destroyed, you earn 2 EP and 1 or 2 VP. If two players, only the player who drew the card gets EP and VP.
Into the SunThe Event Text applies only if the �ghter’s Maneuver is Climb or Climb Rolling, and the �ghter is about to Break Away to the position that has the Sun marker in it. If there is no Sun marker on the formation map, this Event Text does not apply even if the �ghter is climbing or climb rolling. If this Event Text applies, the �ghter skips Continuing Fire.
Lucky ShotThis applies only if the pilot has one or more experte skills. Even if all the pilot’s experte skill(s) have been used already this Mission, this Event Text applies. If, at the moment this card is drawn, the �ghter is in a space with a bomber, that bomber is Damaged by the �ghter. That is, if the �ghter is in one of the four spaces occupied by a bomber, the Damage is in�icted. The bomber does not have to be in front of the �ghter. Draw a Damage marker and place it on the bomber, and check for catastrophic e�ect. Treat this as a normal Damage result, which means that Cannon attachments and the Aim experte skill can be applied.
Hard RollThis applies only if the �ghter’s Maneuver marker is Dive Roll. The �ghter breaks away immediately and skips Continuing Fire.
Pull AwayThis Event Text applies only if the �ghter’s Maneuver marker is Climb or Climb Roll. After applying results on the Continuing Fire Table, draw another card. Ignore the Event Text of that card but apply any Continuing Fire results.
Slow ClimbThis Event Text applies only if the �ghter’s Maneuver marker is Climb or Climb Roll. The Lethal Level is increased by 1 if Climb Rolling, and by 2 if Climbing. Also, the �ghter must break away to the Tail Position (high). Mode still applies when determin-ing where the �ghter breaks away to: if Evasive mode, the �ghter must be placed in the Evasive Return Box, or the Return Box if in Determined mode.
BouncedThis Event Text applies after Continuing Fire and only if the �ghter’s Maneuver marker is Dive or Dive Roll. If an Escort marker is in the Below Trailing station, it attacks the �ghter. Immediately perform aerial combat (p. 21). If the result is Dog�ght, place the �ghter and Escort marker into the Dog�ght box (if the �ghter is destroyed, however, convert the D result to an S result. If the �ghter does not exit due to Aerial Combat Table results, it may exit or break away to the Evasive Return Box in the Tail Position. If the Escort marker does not exit, return it to the Below Trailing station.
Fall AwayThe Event Text of this card applies only if the �ghter’s maneuver is Dive. If in Determined mode, the �ghter switches to Evasive mode (before Continuing Fire). It must break away to the Evasive Return Box. If already in Evasive mode when this card is drawn, the �ghter skips Continuing Fire and breaks away immediately.
DebrisThis Event Text automatically applies. Roll a die. If the number rolled is an EVEN number, draw a Damage marker and place it on the nearest bomber. If more than one bomber quali�es as nearest, choose one of them. Check for catastrophic e�ect in the normal way (explained on page 44). If the number is ODD, place a Hit marker on the �ghter. This Hit may not be cancelled.
If a bomber is fallen due to debris, you earn 1 sta�el EP, and 1 or 2 VP depending on the Mission Type (2 VP if Inbound) (zero VP if playing the Advanced Game). If destroyed, you earn 2 EP and 1 or 2 VP. If two players, only the player who drew the card gets EP and VP.
The sky is �lled with bits and pieces of metal. There are fragments blasted away from bombers, and from �ghters. A crewman’s tool box might be torn out from his bomber. Empty casings from a .50 caliber belt of ammo whistle through the air after a gunner expends the whole nine yards...
Engine SputterThis Event Text applies only if the �ghter’s Maneuver marker is Climb or Climb Rolling. The �ghter exits instead of breaking away (it is still attacked by Continuing Fire). You may choose to have the �ghter Break Away normally, instead of exiting, by spending 1 Tactical Point.
ConfusedThis Event Text applies only if the pilot has a green penalty. After resolving Continuing Fire, and regardless of the result of Continuing Fire, you must spend 1 Tactical Point. If you do not have a TP to spend (because you currently have zero TP), the �ghter is Hit (place a randomly drawn Hit marker on it). This Hit may be not be cancelled by an Attack advantage, and there is no way to avoid spending 1TP if you have at least 1TP to spend.
Notice the Hit pattern on the Continuing Fire Table. Your pilot may not be the only confused actor on this �ying stage.
One by one, after Continuing Fire, each �ghter in a space on the formation map breaks away.
Break Away Where?A �ghter breaks away to the position opposite its approach. For example, if a �ghter approached from the Nose, it breaks away to the Tail. However, if the �ghter rolled, then it goes to the position it rolled towards, as indicated by the arrow of its Maneuver marker. See page 36-37 (Engage step) for a complete schematic of break away destinations.
Climb or Dive?If the �ghter climbed, it breaks away to the Return or Evasive Return Box connected to the position’s High altitude box. If it dove, it goes to the Return or Evasive Return Box connected to the Low box.
Determined or Evasive?Determined
Evasive
If the �ghter is in Determined mode, it breaks away to the Return Box. If Evasive mode, it breaks away to the Evasive Return Box.
Green Penalty?Erratic: A �ghter with this green penalty must exit instead of breaking away. You may pay 1 TP to momentarily negate this penalty and allow the �ghter to break away normally.
An Me262 in Evasive mode inherently has the Break Any-where experte skill, and may use it repeatedly during a Mission.
Experte Skill?
Me262If the pilot has the Break Anywhere skill, and you elect to use it, the �ghter may break away to any Return or Evasive Return Box, regardless of posi-tion, maneuver marker, or mode. A pilot may use this bene�t only once per Mission. It may break away before resolving continuing �re (do not draw a Continuing Fire card).
When a Mission ends, determine what happened to �ghters that were sent to the Fate Boxes.
If the Mission ended with one or more Hit markers still on �ghters, perform Recovery.
If it ends and a �ghter is still in the Dog�ght Box with an Escort marker, resolve Aerial Combat.
Then, tally the number of Victory Points (VP) earned, Experience Points earned (EP) by your Sta�el and its individual pilots (on your Pilot Roster), and note any Operations Points (OP) that must be deducted due to the loss of auxiliary �ghters.
Two Players: Each player keeps track of their points separately, using their own Pilot Roster and Sta�el Log.
WoundedPlace Wounded Fighters here. At the start of each subsequent Mission, you may attempt to recover each wounded pilot. Roll a die for each: Recovery is successful if you roll a 9-10. Any other result means the pilot remains wounded. You may instead replace the pilot.
cockpithit
4
Fate
LandsThis result earns the pilot 1 EP and the pilot is available to participate in the next Mission.
Bail Out? Crash, Fire, ExplodeIf this result happens to an auxiliary �ghter, deduct 1 EP from the Sta�el and 1 OP from the next Mission during Mission Set-Up. If a Bf109 crashes, catches �re, or explodes, roll another die to determine the pilot’s fate (add +2 for the Engine, Cockpit, or Fuel Fate Box if the �ghter has the Armor attachment):
Bail Out: YesThe Pilot successfully bails out. He earns 1 EP and may participate in the next Mission.
Replacement PilotIf a pilot dies or is wounded, you may replace him (and in the case of a wounded pilot, you relinquish the option to return him; see “Wounded” above). Cross the name of the dead or wounded pilot from your Pilot Roster. Invent a name for the replacement and write it in the space under the deceased or wounded pilot’s name. Determine the replacement’s green penalty (choose, or determine randomly).
We recommend inventing a name that starts with the same �rst letter as the pilot you are replacing. It will make identi�cation easier as you proceed with the Campaign.
Replacing a Replacement? A replacement pilot may NOT be replaced. For the purpose of determining available pilots, an “available pilot” is one that is not in the Wounded Box nor has it been crossed o� your roster (see the back of the Situation Manual).
WoundedThe pilot is wounded. He earns 1 EP but is not necessarily available for the next Mission. Place the �ghter in the Wounded Box (on the o�-map panel). At the start of each Mission, you may check for the return of the wounded pilot (”return” means he can leave the box). Check by rolling a die: if the number rolled is a 9 or 10, the pilot returns and may participate in the Mission (and every Mission there-after). Any other number rolled means the pilot remains wounded (and thus, unavailable). You may replace him, but if you do so you may no longer attempt to return him. A pilot that remains wounded may be checked for return at the start of every Mission (and this may continue inde�nitely throughout the game).
Check Each FighterEach �ghter in a Fate Box must be checked. Do so by rolling a die and noting the number rolled on the table printed in the Fate Box to get the result. With the exception of “Lands,” all results require a second die roll. If the pilot earns an EP, it is awarded only to him, not to the Sta�el.Armor: If the �ghter has the Armor attachment, add +2 to the number rolled when checking the Cockpit, Engine, or Fuel Fate Boxes. This modi�er also applies to Bail Out checks.
Bail Out: NoThe Pilot does not bail out. He is dead. Cross his name from the Pilot Roster.
Example: A Bf109 ends a Mission with a serious Cockpit hit and is in the Cockpit Fate Box. You roll a die – a 9 – and so the pilot safely lands. Had you rolled a 1, the �ghter would have exploded, and you would have rolled a second die – a 6 –
learning that the pilot is now dead. He could not bail out in time to save himself. However, if the �ghter had the Armor attachment, the 1 would have been increased to a 3, which meant the aircraft was on �re. The second roll would have been increased to an 8, which would have meant the pilot bailed out but must be placed in the Wounded Box.
Experience Points (EP): StaffelNote on your Sta�el Log EP earned for the Mission. You should do this during the Mission itself. Sta�el EP can be earned during any phase. Sta�el EP are used to pay for Sta�el Commands during set-up (pp.6-7).
You earn 1 EP for each bomber forced out of the formation (Fallen), and 2 EP for each bomber destroyed.
DEDUCTION: For each auxiliary �ghter destroyed during the mission (by escorts, or failed to garner a Lands result on the Fate Box Table), you must deduct 1 EP.
A pilot earns 1 EP for each bomber he forces out of the formation (Fallen), and 2 EP for each bomber he destroys. For the pilot to earn the EP, the event must have been a DIRECT and IMMEDIATE result of that pilot’s actions.
Experience Points (EP): Pilot
1 EP 2 EP
1 EP 2 EP
Note on your Pilot Roster each pilot’s EP earned for the Mission. This should be done during the Mission itself, since it may be di�cult to remember each pilot’s actions. A pilot may earn EP only during the Attack Phase, Escort Phase, or Pursuit (if playing the Advanced Game).
A pilot also earns 1 EP if he survives a Fate Box (that is, if the Fate Box Table result is Lands, Bail Out ”Yes”, or Wounded).
EP during Blast & Flak Phase?During the Blast procedure, e�ects of rockets and bombs earn the Sta�el EP (if the result is Fallen or Destroyed), but individual pilots do NOT earn EP. No EP are awarded for Fallen or Destroyed results from �ak (but you earn VP).
Victory Points (VP)The back of the Situation Manual has a VP chart. See “Winning and Losing” on page 25 of that manual.
Operations Points Deduction (OP)For each auxiliary �ghter destroyed during the Mission (by escort, or failed to land), you must deduct 1 OP during Mission Set-Up when you play the next Mission.
Tactical Points (TP)Leftover TP is forfeited, not saved (but if playing the Advanced Game, it is forfeited after Pursuit, when the Mission is completely over).
EP for Escorts?A pilot also earns 1 EP for each “e” result in aerial combat that the pilot earned. Only one pilot may earn an EP for a single aerial combat. However, no Sta�el EP is earned.
For example, a �ghter’s attack results in a Damage marker being placed on a bomber, and the catastrophic e�ect is triggered, forcing the bomber to fall out of formation. Thus, the pilot earns 1 EP.
Another example: A �ghter’s attack results in 4 Damage points, and a second �ghter adds another 4 Damage points. On a subse-quent attack a third �ghter adds 2 more Damage points, destroying the bomber. Only the third �ghter earns the 2 EP.
Staffel CommandsEarning Staffel CommandsSta�el Commands are earned by accumulating Sta�el Experience Points (EP). Record EP on your Sta�el Log.
Experten, and Green PilotsExperte Skills
Me262
Green Penalties
Timing: Automatically Damage a bomber during the Burst step of the Attack Phase (p. 44). The �ghter must be in Determined mode to use this skill.
Aim: When the �ghter’s attack scores a Damage result, draw 2 Damage markers instead of 1. Each counts as a separate Damage result (apply both of them). If the �ghter is equiped with Cannon, draw two Damage markers for the �rst result (apply one marker), and then another two for the second Damage result (again apply one).
Luck:Cancel 1 Hit (Burst step of the Attack Phase, or Blast & Flak Phase, see p. 45). Does not cancel an x result in aerial combat.
Break Anywhere: Instead of passing through, the �ghter may immediately break away to any Return or Evasive Return Box, regardless of mode and Maneuver marker (see p. 53). Do this BEFORE drawing a Continuing Fire card.
Erratic: When performing Break Away (p. 53), spend 1 TP. If you can’t spend 1 TP, or choose not to spend it, the �ghter immedi-ately exits (remove it from play).
Zeal: The �ghter must be in Determined mode (p. 35).
An Evasive mode Me262 inherently enjoys the Break Anywhere experte skill, and may use it repeatedly during a Mission.
Panic: When Hit, the �ghter immediately exits. Perform recovery immediately (for Recovery, see p. 24).
A replacement pilot automatically starts with a green penalty. You may select it, or, select it randomly. During the course of the game, a penalty may be removed by spend-ing three of the pilot’s EP. Unlike experte skills that can only be used once per Mission, penalties must be used whenever applicable.
Staffel Command CostsYou may use one or more Sta�el Commands during Mission Set-Up. When using the Mission Set-Up Table (player aid folder), each command costs 7 EP. When using the Situation Manual, each command costs 7 EP. You may take as many commands as you can pay for in EP.
Effect of a Staffel CommandA Sta�el Command allows you to make a selection to override the roll of a die. For example, after rolling a die to determine the Mission Type, you note that the result is “Outbound.” Not liking the result, you spend 7 EP and select “Inbound”.
Each skill costs 5 EP to earn (deduct the EP from the pilot’s total on the Pilot Roster; that pilot may not also
have a Green penalty). Once earned, the skill is permanent and may be used every Mission. Each skill may be used once during a Mission. A pilot may earn more than one skill, and may earn the same skill more than once. For example, a pilot with the Luck skill may spend 5 EP to earn it again, allowing him to use that skill twice every Mission.
CREDITSDesigners: Jeremy (Jerry) White & Mark AastedPlaytesting, Proo�ng, and Counsel: Mark Aasted, SamSheikh, Hans Korting, Mike McClellan, Rick McKown,Troy Nichols, Swati Chattopadhyay, Jason Crain.
Component Design & Art (except box): Jeremy White
Art Director, Cover Art & Package Design: Rodger B. MacGowan
Production Coordination: Tony Curtis
Publishers: Tony Curtis, Rodger MacGowan, Andy Lewis, Gene Billingsley, Mark Simonitch
Stickers are organized by type:Bf109, Fw190, Bf110, Me262, Me410.
Two stickers go on each block, a Determined mode sticker on the front and an Evasive mode sticker on the back.
There are two color groups, useful when playing the two-player version of the game. All blocks are used when playing solitaire.
Use of the Sta�el Erosion Table is optional. It is predicated on the idea that your sta�el is doing more than attacking bomber formations, and the table is intended to present the e�ects of those other actions. The sta�el may be attacked on the ground, or it may perform an escort �ight of its own, or any number of other possibilities. Although this table will not tell you what those actions were, or what exactly has happened, continued use of the table will paint a slowly evolving picture of the Luftwa�e under siege. Use of this table makes your campaign more challenging.
Procedure: Roll a die after completing a Mission, and apply the result indicated in the Sta�el Erosion Table. If you won the previous Season, add +1 to your die roll. If you aborted the previous Mission, subtract -1 to your die roll. Two Players: Each player uses the table after each Mission, each rolling his own die and applying his own result.
Losing a Pilot: If the result calls for you to lose a pilot, you MUST cross a pilot of your choice o� your Pilot Roster. If that pilot was a replacement, he may not be replaced (as per the pilot replacement rule explained on p. 55). Replacement pilots are green, unless indicated otherwise.
Sta�el Erosion Table
Sta�el Erosion
1or less
+1 if you won the previous Season; -1 if you aborted the previous Mission
1942-1943 early 1943 mid & late 1944-1945
Pilot Transferredlose one pilot; you may
replace him with a non-green pilot
Pilot Killedlose one pilot; you may
replace him with a non-green pilot
Pilot Woundedlose one pilot to the Wounded Box
Air�eld Transfernext Mission deduct 2 OP
(if OP is reduced to zero, abort Mission)
Logistical Problemnext Mission you start with 1 TP
maximum
Logistical Problemnext Mission you start with 2 TP
maximum
Pilot Killedlose one pilot
Pilot Killedlose one pilot
Pilot Woundedlose one pilot to the Wounded Box
Logistical Problemnext Mission you start with 1 TP
maximum
Sta�el is Scatterednext Mission deduct 2 OP
(if OP is reduced to zero, abort Mission), and you may not use auxiliary �ghters
Logistical Problemnext Mission you start with 1 TPmaximum, and you may not use
auxiliary �ghters
Logistical Problemnext Mission you start with 2 TP max.
Pilot Woundedlose one pilot to the Wounded Box
Air�eld Attackednext Mission deduct 4 OP
(if OP is reduced to zero, abort Mission)
Pilot Woundedlose one pilot to the Wounded Box
Air�eld Attackednext Mission deduct 4 OP
(if OP is reduced to zero, abort Mission)
Logistical Problemnext Mission you start with 2 TP max.
Sta�el is Scatterednext Mission deduct 4 OP
(if OP is reduced to zero, abort Mission);you may not use auxiliary �ghters
earn 1 Sta�el EP
Air�eld Attackednext Mission deduct 4 OP
(if OP is reduced to zero, abort Mission)
one pilot earns 1 EP one pilot earns 1 EP
earn 1 Sta�el EP
one pilot earns 1 EPand you get +2 OP next Mission
one pilot earns 1 EPand you get +1 OP next Mission
Pilot Laudedone pilot with experte skillmay not �y next Mission
one pilot earns 2 EPand you get +2 OP next Mission