www.jeld-wen.co.uk IMPORTANT You can only assemble these door configurations by using the frame provided. Your warranty will be invalid if other alternatives are used. All loads are taken by the top track to ensure smooth, light operation and long life. Prior to installing this doorset, inspect for damage and do not proceed to fit if any noticeable damage or defect is evident. This doorset should be stored in a dry flat location before installation. CAUTION This product needs to be installed by a competent tradesperson with assistance. Two people are required to carry out the installation, as some components are heavy. The outer frame requires fixing to the supporting structure above the opening. The opening MUST be capable of carrying the load of the doorset in all conditions. Doors must not be trimmed. SLIDING WARDROBE SYSTEM FITTING & FIXING GUIDELINES
Transcript
www.jeld-wen.co.uk
IMPORTANT You can only assemble these door configurations by using the frame provided. Your warranty will be invalid if other alternatives are used.
All loads are taken by the top track to ensure smooth, light operation and long life. Prior to installing this doorset, inspect for damage and do not proceed to fit if any noticeable damage or defect is evident. This doorset should be stored in a dry flat location before installation.
CAUTION This product needs to be installed by a competent tradesperson with assistance. Two people are required to carry out the installation, as some components are heavy.
The outer frame requires fixing to the supporting structure above the opening.
The opening MUST be capable of carrying the load of the doorset in all conditions.
• 3 metre tape• Mallet• Wood hand saw• Metal Hacksaw
Components
2 3
Pack contents
Materials required• 70mm fixings (frame to wall)• 25mm fixings (jambs to head)• Wood glue / grab adhesive• Pins
Metal door hangers
FrontBack
Plastic door stops
Plastic door guides
MDF Jambsx2
MDF Head
MDF Track Cover
Top Track
Door configurations & sizes1
Opening Height Opening Width No. of Doors Door Width
2056mm 1258mm 2 610mm
2056mm 1410mm 2 686mm
2056mm 1562mm 2 762mm
2056mm 1714mm 2 838mm
2056mm 1848mm 3 610mm
2056mm 2076mm 3 686mm
2056mm 2304mm 3 762mm
Trimming frame head, cover, architrave and track2
Depending on which width you have ordered some widths require slight adjustments. See the table below which guides you through this process.
Opening Width Head LengthTrack Cover
LengthTop Architrave
LengthHead, Cover & Architrave Trim Track Length Track Trim
1258mm 1224mm 1199mm 1224mm - 1200mm -
1410mm 1528mm 1503mm 1528mm 152mm 1500mm 150mm
1562mm 1528mm 1503mm 1528mm - 1500mm -
1714mm 1814mm 1789mm 1814mm 134mm 1800mm 146mm
1848mm 1814mm 1789mm 1814mm - 1800mm 12mm
2076mm 2270mm 2245mm 2270mm 228mm 2400mm 384mm
2304mm 2270mm 2245mm 2270mm - 2400mm 156mm
When trimming the length of the top architrave measure the under side length.
Mitre Cut Length
Fitting the track3
Opening Width
No of Doors
MDF Jamb
MDF Head
MDF Track Cover Track
MDF Architrave
Top
MDF Architrave
Sides
Metal Door
Hangers
Plastic Door Stops
Plastic Door
Guides
1258mm 2 2 x 2051mm 1 x 1224mm 1 x 1199mm 1 x 1200mm 1 x 1224mm 2 x 2039mm 4 1 3
1410mm 2 2 x 2051mm 1 x 1528mm 1 x 1503mm 1 x 1500mm 1 x 1528mm 2 x 2039mm 4 1 3
1562mm 2 2 x 2051mm 1 x 1528mm 1 x 1503mm 1 x 1500mm 1 x 1528mm 2 x 2039mm 4 1 3
1714mm 2 2 x 2051mm 1 x 1814mm 1 x 1789mm 1 x 1800mm 1 x 1814mm 2 x 2039mm 4 1 3
1848mm 3 2 x 2051mm 1 x 1814mm 1 x 1789mm 1 x 1800mm 1 x 1814mm 2 x 2039mm 6 2 6
2076mm 3 2 x 2051mm 1 x 2270mm 1 x 2245mm 1 x 2400mm 1 x 2270mm 2 x 2039mm 6 2 6
2304mm 3 2 x 2051mm 1 x 2270mm 1 x 2245mm 1 x 2400mm 1 x 2270mm 2 x 2039mm 6 2 6
OPENING
OPENING
20mm
20mm20mm
20mm
Top x 1
Sides x 2
MDF Architraves
Once the components have been cut to size in step 2, lay the MDF head on the floor with the locating groove facing up. Place the MDF stop in the locating groove to use as guide to sit the track flush up to.
Secure into the head with 25mm length screws at either end of the track and one in the centre for configurations over 1800mm wide.
20mm
SLIDING WARDROBE SYSTEM FITTING & FIXING GUIDELINES
Frame installation – MDF Jambs5
Using a 2mm wood drill bit, drill pilot holes through the jambs as shown in the diagram. Using the appropriate 70mm fixings depending on your opening, screw through and fix the frame in to place.
+ / - 5mmMax tolerance
300m
mce
ntre
300m
m
300mm
centre300m
m
Frame installation – MDF Head6Using a 2mm wood drill bit, make pilot holes through the holes in the track into the MDF head.
Using appropriate 70mm fixings dependent on your opening, screw through the pre-drilled holes into your opening.
Repeat until the track is firmly in place
Fixing door hangers7
2 Door
3 Door
Depending on your opening size you will have to repeat these steps as necessary. ie 3 doors.
a. Take the front door hanger. Measure and mark 50mm from the door edge to the outer edge of the hinge.
Using screws provided screw to the face of the door ensuring that all 3 screws are used in the configuration shown in the diagram.
b. Take the back door hanger. Mark and measure 50mm from the door edge to the outer edge of the hinge.
Using screws provided screw to the face of the door ensuring that all 3 screws are used in the configuration shown in the diagram.
Plastic door stops are provided to ensure safety & to prevent finger traps. These are fixed to the back of the doors inside your wardrobe system so are not visable from the outside.
Measure and mark 650mm from the top edge of the door and 75mm from the side edge.
Position doorstops as shown in the diagram & repeat as necessary depending on your configuration. 25mm
75mm
4
5
50 50
50mm
50mm 50mm
50mm
Front Back
Fixing plastic door stops8
Frame assembly4
Using a 2mm wood drill bit, make pilot holes through the top of the MDF head into each of the MDF jambs.
Fix MDF head & MDF jambs together using 25mm wood screws making sure they are firmly fixed in place.
SLIDING WARDROBE SYSTEM FITTING & FIXING GUIDELINES
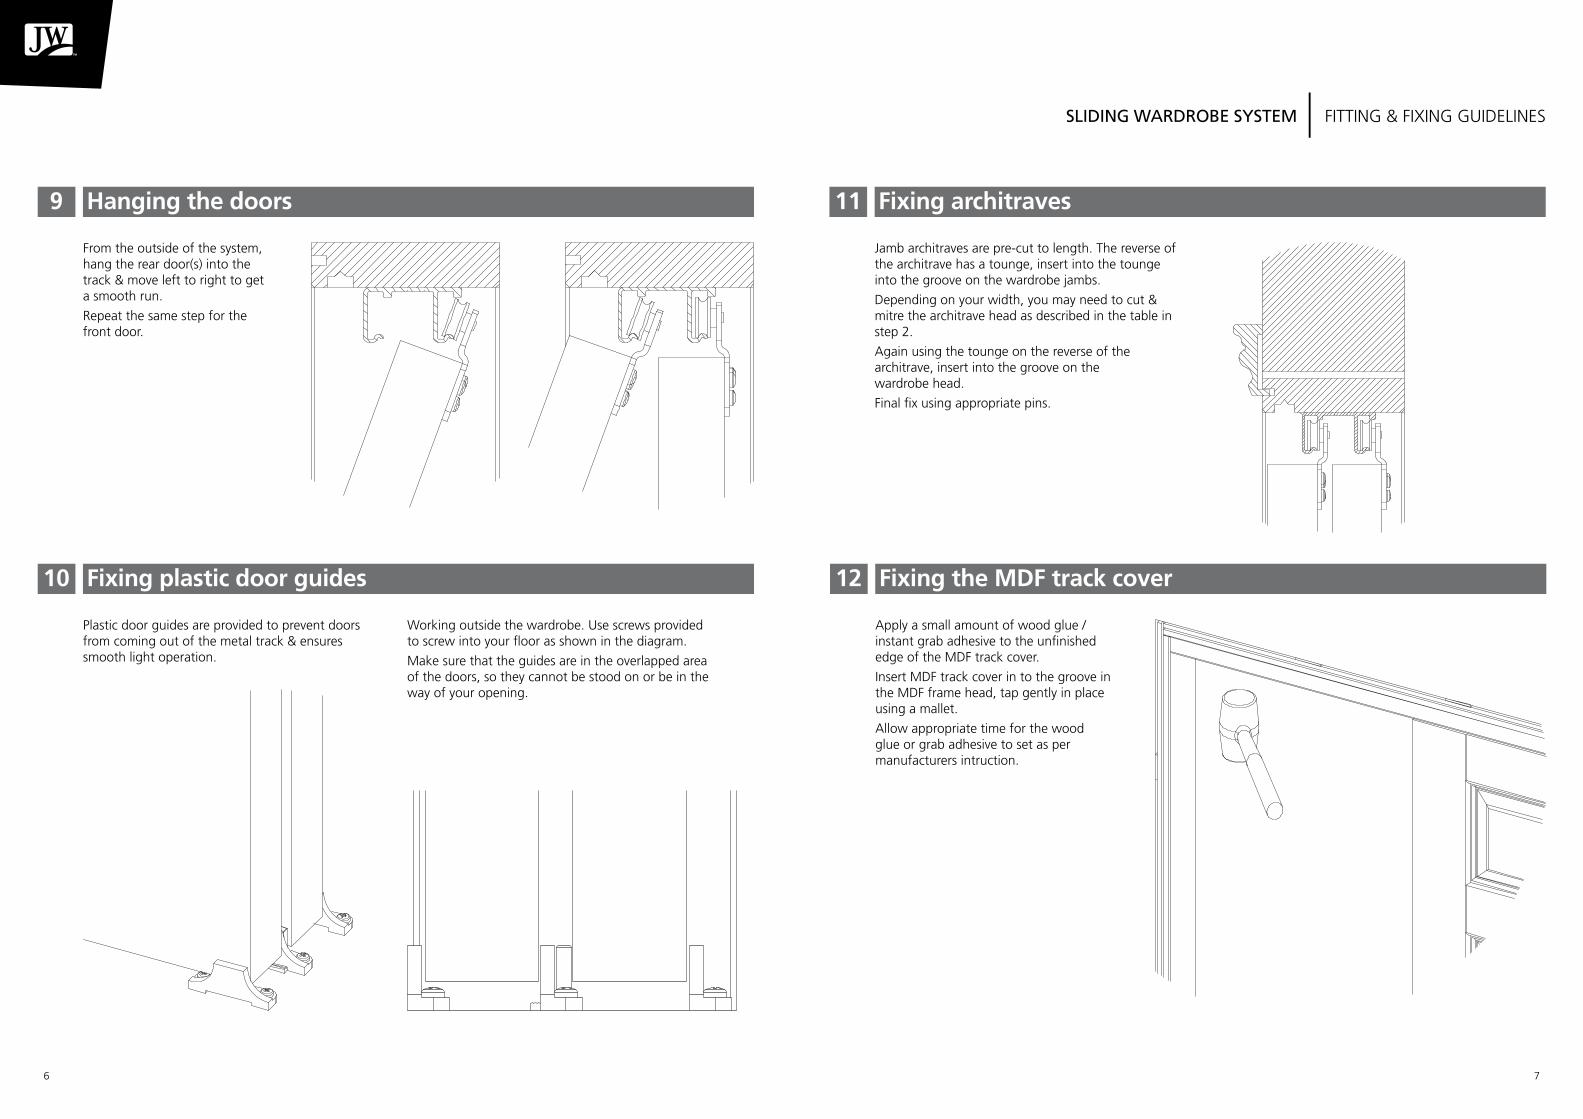
Hanging the doors9
From the outside of the system, hang the rear door(s) into the track & move left to right to get a smooth run.
Repeat the same step for the front door.
Fixing the MDF track cover12
Apply a small amount of wood glue / instant grab adhesive to the unfinished edge of the MDF track cover.
Insert MDF track cover in to the groove in the MDF frame head, tap gently in place using a mallet.
Allow appropriate time for the wood glue or grab adhesive to set as per manufacturers intruction.
Fixing architraves 11
Jamb architraves are pre-cut to length. The reverse of the architrave has a tounge, insert into the tounge into the groove on the wardrobe jambs.
Depending on your width, you may need to cut & mitre the architrave head as described in the table in step 2.
Again using the tounge on the reverse of the architrave, insert into the groove on the wardrobe head.
Final fix using appropriate pins.
6 7
Fixing plastic door guides10
Plastic door guides are provided to prevent doors from coming out of the metal track & ensures smooth light operation.
Working outside the wardrobe. Use screws provided to screw into your floor as shown in the diagram.
Make sure that the guides are in the overlapped area of the doors, so they cannot be stood on or be in the way of your opening.
SLIDING WARDROBE SYSTEM FITTING & FIXING GUIDELINES