42
1 Smart Terminal by Merchant Operating Guide User guide
1
Smart Terminal by
Merchant Operating Guide
User guide

2
3
The Merchant Operating Guide forms part of your Merchant Agreement, so
please read it carefully and keep it in a safe place for future reference. If you
have any questions about our service or this guide, please contact us directly
on the number below.
First Data Customer Service Centre: 24/7
+372 626 4777

3
About Smart Terminal
Smart Terminal is a payment solution that makes it possible for any merchant
to accept card payments anywhere.
The solution is available for both businesses and individuals who have an
agreement with a bank for payment card acceptance services.
The Solution consists of a free app ”Smart Terminal by First Data” for your
Android device as well as the D200 Card Reader device.
What is the D200 Card Reader?
The D200 Card Reader is a pocket size, stylish designed payment card
acceptance hardware device that connects to the payment app “Smart
Terminal by First Data” which runs on the Android operating system smart
device via a Bluetooth connection.
The D200 Card Reader is in line with payment Card Security Industry (PCI)
standards and has valid Visa, MasterCard and American Express
certifications.
The D200 Card Reader accepts magnetic stripe, smart card contactless Visa,
Visa Electron, MasterCard, Maestro, and American Express debit, credit and
business card transactions. Chip transactions are verified by the customer’s
PIN entry on the D200 Card Reader keyboard.

4
The D200 Card Reader has a built-in battery that can be charging either via
USB cable or through the dock. A fully charged battery will keep the D200
Card Reader running for up to 8 hours or for up to 200 transactions.

5
Preconditions that must be met to permit the use of Smart Terminal
You should sign an Agreement with the Bank for card acceptance and
terminal rent services;
After signing an agreement with your bank, the First Data service team will
contact you and will agree the time and date for Smart Terminal delivery
Smart Terminal account credentials from First Data will be delivered by
email and SMS, indicated in the payment card acceptance contract
You should possess an Android Smartphone or tablet with an Internet
connection and Bluetooth which will be paired with the D200 Card Reader.
You should read the chapter “General information for card payment
acceptance” at the end of this manual;

6
1. Turn ON/OFF button
2. Magnetic strip card reader
3. USB slot for recharge cable
4. Chip card reader
5. Keypad touch buttons
6. Display
7. Main menu button
D200 terminal keypad - touch buttons
To navigate through your D200 device, the main function buttons are:
X Cancels the entry (CANCEL button)
O Approves the entry (ENTER button)
< Deletes the entry

7
How to get started with Smart Terminal?
1. Download the Smart Terminal app
Open Google Play application on your smartphone or tablet and search for
“Smart Terminal”:
STEP 1
Results will be presented for apps. Find First Data’s app with the
icon.
STEP 2
Tap the application and then the Install button. The Installer will prompt you
for permission, press the accept button and the installation will continue.
STEP 3
Once the download and installation are complete, you can tap the Open
button in the Play Store listing, or tap the icon from the notification tray to
open your app. Alternatively, the app will be accessible by tapping the Apps
icon at the bottom of your home screen, if an icon hasn’t already been put on
your home screen.

8
2. Charge your D200 card reader
Charge the D200 card reader by connecting the provided USB cable with a
USB source (e.g. your computer).
The D200 card reader displays the Battery Power status as a number of bars.
There are number of factors that can affect the rate of battery drainage, for
example:
The length of time off the charger
The time before sleep mode is activated
The time between transactions
Please check the battery status prior to initiating any action on the terminal.
Should it indicate 'very low' (no bars) or 'no power' you should recharge the
battery.
Do not use any other external cables other than the specified and/or supplied
ones. Ensure that the cable is properly routed to prevent damage or
accidental contact. This device is intended for use when supplied with power
from a low voltage external power supply.

9
3. Login to your Smart Terminal account
STEP 1
Log in to the app with the credentials
provided by First Data by email and SMS.
If you haven’t received any, please call
the First Data Customer Service Center.
STEP 2
During the first log in, you will be asked to
change your initial password to a new one.
Additionally the application will ask
permission to use device storage.

10
4. Connect the D200 card reader with your
smartphone
Follow your mobile phone or tablet instructions to ensure that your
smartphone or tablet is connected to a WiFi or mobile network and the mobile
data is switched on.
Follow your mobile phone or tablet instructions to switch on Bluetooth, if
necessary please turn the Bluetooth connection off and on again to refresh
nearby device list.
STEP 1
Switch on the card reader by pressing the [1] ON/OFF power button on the
top-right of the device.

11
STEP 2
D200 Card Reader will display “No link with Application”, press the top-left
button. In the opened Menu select BLUETOOTH and press the ENTER button
[O]
STEP 3
Select PAIR and press the ENTER button [O]. Check your smartphone or
tablet, the wait until the pairing request appears both on the
smartphone/tablet and on the D200 card reader screen. Check that the
pairing code on your smartphone/tablet screen matches the pairing code on
the D200 card reader screen. If the smartphone/tablet fails to find the
terminal, please repeat the searching step, sometimes restarting the
terminal and the smartphone/tablet can solve this issue.
STEP 4
Press YES on both devices to confirm the connection on both devices
STEP 5
Now open the Smart Terminal app, login and wait for 10−20 seconds until all
three connection indicators are green and the D200 Card Reader shows
“READY” on the screen. If the connection fails, please close the application
completely, after 10−15 seconds open the application and log in again.
Now you are all set and can start accepting card payments.

12

13
5. How to connect a smartphone to the D200 Card
Reader if the devices are already paired?
Simply switch on the D200 Card Reader with the top-right power button.
Open the Smart Terminal application and login.
It will take up to 20 seconds until the D200 card reader connects to your
smartphone/tablet. When the connection is completed, the D200 Card
Reader shows “READY” on the screen.

14
How to make card payments?
There are two ways to accept card payment on Smart Terminal: Quick Sales
and Basket Sales
1. How to accept payment using Quick Sales?
This is the fastest and simplest way to accept card payments with your Smart
Terminal.
Note: By using this function you will not be able to use your product Catalog,
nor create a Basket to add, calculate and review the products or services you
sell. The Quick Sales function is programmed to accept only card payments.
To perform Quick Sales follow these steps:
STEP 1
Select the Quick Sales function on the main menu
STEP 2
Enter the amount for the transaction (in EUR) on your
smartphone/tablet and tap on PAYMENT.
STEP 3
Hand over the D200 Card Reader to the customer and ask
him/her to tap the contactless device, insert the chip card
or swipe the magnetic stripe card and then enter the PIN
code.

15
When cardholder signature is required, please ask cardholder to sign on
mobile device screen. Proceed with [Continue] button and compare
signature on mobile device screen and cardholders card, press the
corresponding button [Yes]/[No].
STEP 4
Check the Smart Terminal application screen (on your
mobile or tablet) and ensure that the payment is
approved.
STEP 5
Tell the customer that a transaction receipt in digital
format is available, ask if customer wants a digital
receipt. Tap the RECEIPT button on your
smartphone/tablet. Ask the customer to provide an email
address. Enter the customer data and tap the button to send a digital receipt.
You can also print the receipt if your smartphone is
connected to an external printer that supports AirPrint.
By pressing OPEN RECEIPT and through the SAVE button
you can initiate the external Printer app.

16
A copy of the receipt will always be stored and you can open it anytime with
the TRANSACTION function on the main app Menu.

17
2. How to accept payment using Basket Sales?
Basket Sales allows you to be more organized in your daily sales operations.
With this function you can add your products from your product Catalog and
set quantities that automatically calculate the total amount for payment. It
also makes it easier to keep track of all your sales thereafter.
With Basket sales you can process both card payments and cash payments.
To accept payment with Basket Sales do the following steps:
STEP 1
Select the Basket Sales function on the main menu.
STEP 2
Tap the [+] button and choose the product the
client wants to purchase.
STEP 3
Set the product quantity and price as required.
STEP 4
Repeat steps 1 and 2 until all products are added.
The tap the START PAYMENT button.

18
STEP 5
Select the payment method your customer prefers
– Cash or Card Payment.
STEP 6
For card payments, hand over the D200 Card
Reader to the customer and ask him/her to tap the
contactless device, insert a chip card or swipe a
magnetic stripe card and then enter the PIN code.
If cardholder’s signature is required, please ask
cardholder to sign on mobile device screen. Proceed with [Continue] button
and compare signature on mobile device screen and cardholders card, press
the corresponding button [Yes]/[No]

19
STEP 7
Check the Smart Terminal application screen (on your mobile or tablet) and
ensure that the payment is approved.

20
STEP 8
Tell your customer that a transaction receipt in
digital format is available, ask if the customer
would like to receive a digital receipt. Tap the
RECEIPT button on your smartphone/tablet. Ask
customer to provide an email address. Enter the
customer data and tap the button to send a digital
receipt.
You can also print the receipt if your smartphone
is connected to an external printer that supports AirPrint. By pressing OPEN
RECEIPT and through the SAVE button you can initiate the external Printer
app.
If the customer refuses to provide an email address but still requests a
transaction receipt, please write the transaction details manually on a paper
receipt.

21
3. What to do if a card transaction is declined?
If the payment is declined, you should not provide goods/services to the
customer, as the payment could not be completed. Tell the customer that the
transaction was declined and ask the customer to pay with another card or
by other means (cash).
Please have reference to the most frequent decline codes below.
01 Decline. The customer’s bank (Card Issuer) has indicated that there is a
problem with the card. Ask the cardholder to pay with a different card or in
cash and recommend the customer to contact the bank.
02 Decline. The customer’s bank (Card Issuer) has indicated that there is a
problem with the card. Ask the cardholder to pay with a different card or in
cash, and recommend the customer to contact their bank. It is strongly
advised that the customer should call the First Data Customer Service center
to clarify the reason as to why the card was declined.
04 Pick–up card.
41 Pick–up, lost card
43 Pick–up, stolen card
Inform the cardholder that customer’s bank (Card Issuer) has declined the
transaction and instructed you to retain the card that the cardholder has not
paid for the purchase, ask the cardholder to pay with another card or in cash

22
and that you will not return the card to the cardholder. Retain the card only if
it is safe to do so.
05 Decline. The customer’s bank (Card Issuer) indicated that there is a
problem with the card. Ask the cardholder to pay with a different card or in
cash.
58 Acquirer not supported by switch. Record the card type. Ask the
cardholder to pay with a different card or in cash. Contact the bank with
which you have a contract for card acquisition and inform them that you were
unable to process a transaction with the specific card type.
51 Decline, insufficient funds. Inform the cardholder that he does not have
sufficient funds in his/her card account to complete the purchase. Ask the
cardholder to pay with another card or in cash.
57 Transaction not allowed. Inform the cardholder that the transaction
cannot be completed because Card Issuer has not authorized the transaction
with this particular card, recommend the cardholder to contact bank. Ask the
cardholder to pay with another card or in cash.
61 Decline, Transaction limit exceeded. Inform the cardholder that the
transaction cannot be completed because the credit limit on the card would
be exceeded, recommend the cardholder to contact the bank. Ask the
cardholder to pay with another card or in cash.

23
75 Decline, blocked PIN. Ask cardholder to pay with a different card or in
cash and recommend the customer to contact the bank. It is strongly advised
to call the First Data Customer Service center and request Code 10
authorization
91 Card issuer unavailable.
92 Cannot route transaction
96 System error
There is a technical problem with the authorization systems. Ask the
cardholder to pay with a different card. If transactions cannot be processed
with any card, call the First Data Customer Service center and act according
to given instructions. You may attempt to reprocess the transaction later.
Z3 Communication error, CE Communication error,
LC Communication error, TO Communication error, ND Communication error
Reboot the terminal and try to reprocess the transaction. If the error recurs,
check the internet connection to your smartphone/tablet. If the internet
connections is OK, contact the First Data Customer Service Center and report
the problem.
If the terminal shows other response codes that are not listed above and you
are not sure about the transaction outcome, please contact the First Data
Customer Service Center.

24
How to cancel a transaction?
If you:
have charged your customer for
the wrong amount
the customer returns purchased
goods/rejects service before you
have sent the transaction to the
bank

25
STEP 1
Tap on TRANSACTIONS press TRANSACTION;
STEP 2
Tap on the first icon (the current day)

26
STEP 3
Find the transaction you want to cancel and tap on transaction
STEP 4
Tap CANCEL TRANSACTION button

27
How to create products in Catalog?
You are able to create a product CATALOG that contains all the different
products or services that you sell or provide. This accelerates the sales
process, by using the Basket Sales method.
You can group similar products together in folders - Category. Give your
Category an appropriate name and add as many products as you wish.
To add products or categories, please follow the steps below:
STEP 1
Tap CATALOG in the main menu. Tap the
[+] button. Then select the product or
product category name you want to create.
28
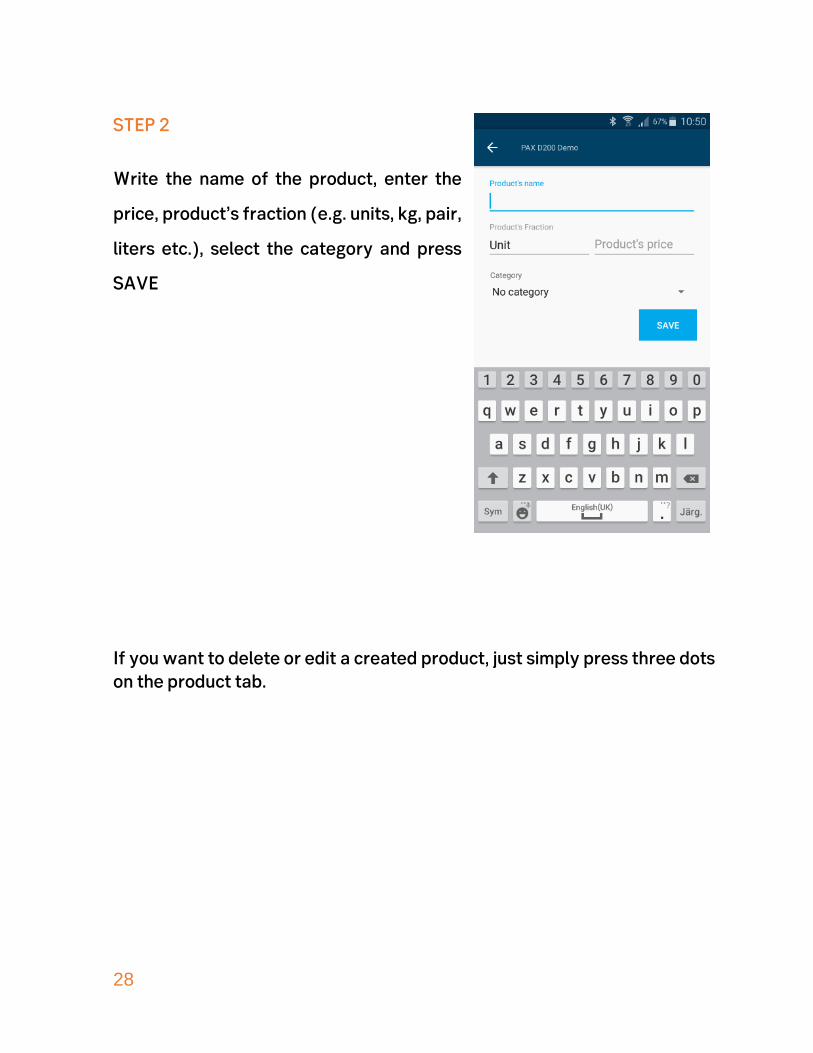
STEP 2
Write the name of the product, enter the
price, product’s fraction (e.g. units, kg, pair,
liters etc.), select the category and press
SAVE
If you want to delete or edit a created product, just simply press three dots on the product tab.

29
How to view the transactions which have been made?
You can view all the transactions you have processed in the Smart Terminal
application. This gives you a quick overview of your sales totals, as well as
declined and canceled transactions made with card payments and cash.
In the transactions history you will find receipts, transaction details, an
indication of the location where a sale was made, which products were sold
and which transactions were cancelled and all recently processed
transactions.
STEP 1
Tap on TRANSACTIONS in the main menu.
The Smart Terminal Application will present
a list by settlement days with a transaction
summary, including total transaction
numbers and the total sales value of card and
cash payments.

30
STEP 2
Tap the business day you want to review. The Smart Terminal application will
present all the transactions on that specific day. You can filter the list for your
needs.
STEP 3
To view the details of a transaction, tap on a particular transaction and on the
pop-up menu tap on the button DETAILS.

31
STEP 4
To view the transaction receipt, tap on
a particular transaction and in the pop-
up menu tap on the button Receipt

32
How to send transactions to the Bank for settlement?
You should send transactions to the bank once in every 24 hours for
settlement at the bank. You will normally receive funds into your account on
the next business day after the day you sent a transaction for settlement.
STEP 1
Tap SEND TRANSACTIONS in the main menu
and you will see the list of sent transactions
STEP 2
To send a transaction to the bank tap the
SEND TRANSACTIONS button at the bottom
of the screen.
STEP 3
Wait while the transaction is sent – a
confirmation message will appear on the
Smart Terminal application
(smartphone/tablet screen)

33
Your transactions are automatically saved, so you are able to send or print
the transactions report file if your smartphone is connected to an external
printer that supports AirPrint. By opening the sent transaction report and
pressing the SAVE button you will initiate any external app from your list of
further actions.
You can also set up a date and time to automatically send transactions to the
Bank for payment in the app SETTINGS by pressing AUTOMATIC
TRANSACTION SENDING.

34
What is an Easy login PIN code?
Using the Smart Terminal throughout the day with your Username and
Password credentials could be cumbersome. An easier login procedure is the
PIN-based authentication to your Smart Terminal app. This security and easy
usability feature allows you to quickly login to your account by typing a 4 digit
authentication pin.
You can enable Easy login in app
SETTINGS.
35
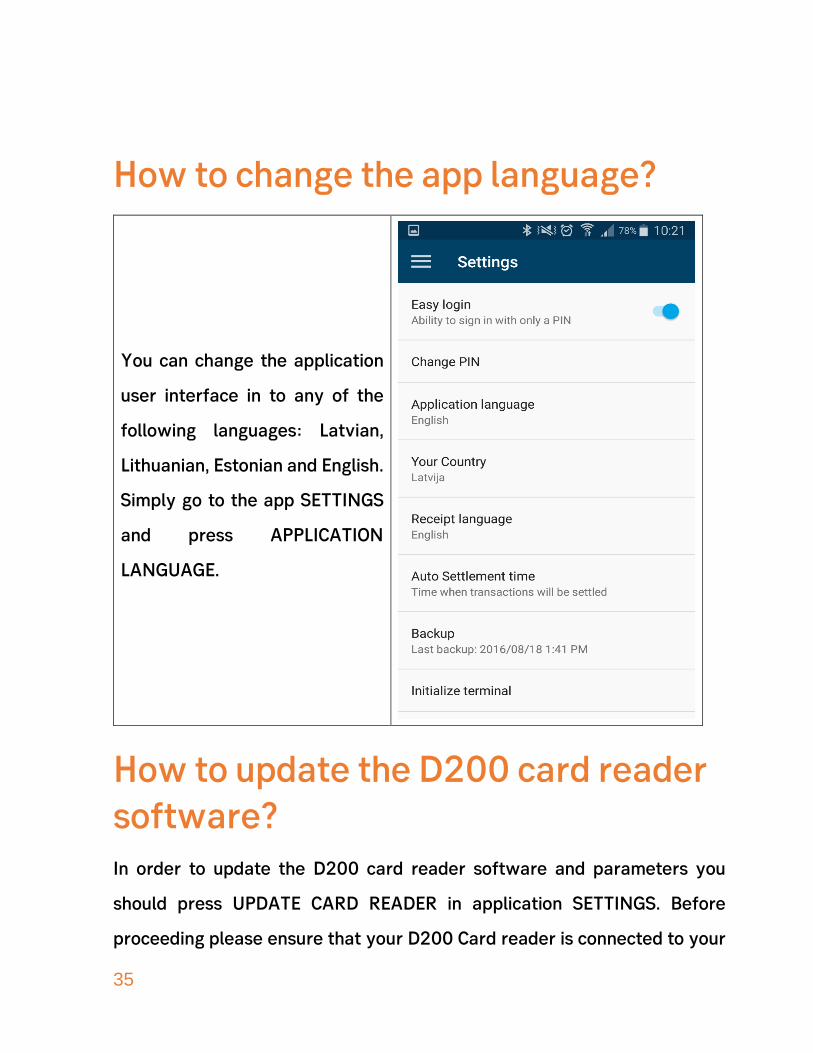
How to change the app language?
You can change the application
user interface in to any of the
following languages: Latvian,
Lithuanian, Estonian and English.
Simply go to the app SETTINGS
and press APPLICATION
LANGUAGE.
How to update the D200 card reader software? In order to update the D200 card reader software and parameters you
should press UPDATE CARD READER in application SETTINGS. Before
proceeding please ensure that your D200 Card reader is connected to your

36
application. Also please ensure that all transactions processed on that day
have been sent to the bank before updating.
What to do if I have changed my
smartphone?
If you have changed your
smartphone or re-installed the
Smart Terminal app for other
reasons, please login to your
account and press the BACKUP
button in application SETTINGS.
This will download all your
transaction history and the product
catalog from the Smart Terminal
server.

37
What to do if I have forgotten my
password? If you have forgotten your Smart Terminal account password, please call the
First Data Customer Service Center. We will ask several security questions
for authentication and we will send you an initial password by SMS.
What to do if I have forgotten my PIN
code? If you have forgotten your Smart Terminal PIN code, please login using your
original credentials (username and password). Then you can change your
PIN code in application SETTINGS. .
Safety and Maintenance The D200 Card Reader complies with the same security requirements as
the card acceptance terminals in regular retail stores.
The Smart Terminal application stores no card data. The D200 Card Reader
deals with all the card data – encrypts the data and sends it directly to the
First Data processing center – compliant with the Payment Card Industry
Data Security Requirements.
If your D200 Card Reader goes missing, is stolen or has been replaced –
immediately contact the First Data Customer Service Center.

38
Please keep your D200 Card Reader general safely instructions:
Use only the provided AC adapter. There might be a risk of explosion and fire or other device damage if other adapters are used.
Never expose your D200 Card Reader to extreme temperatures. There is a risk of explosion and fire. Switch off the D200 Card Reader immediately if it starts to emit smoke, unusual odors or noises and contact First Data technical support.
You shall not attempt to repair the D200 Card Reader. The D200 Card Reader may be repaired only by First Data service specialists.
Do not allow foreign matter to fall into the D200 Card Reader. Penetration of foreign objects may lead to fire or shock.
Only operate your D200 Card Reader with the accessories supplied. The use of other accessories may lead to malfunction.
Do not expose the D200 Card Reader to extreme weather conditions such as rain, hail, strong sunlight or snow.
Do not insert any objects that do not meet the specified purpose into the openings on the casing or the card slots of the D200 Card Reader. This will cause damage to the card reader.
Keep D200 Card Reader out of reach of children to prevent swallowing of any parts by children, causing injury to children or others, or damage to the objects themselves.
The D200 Card Reader does not contain any serviceable parts. By opening the D200 Card Reader you render the warranty null and void.
Do not drop, knock or shake the device. Rough handling will render D200 Card Reader inoperable and will render the warranty null and void.
Safety information for the battery pack
Only use the provided battery pack. Do not expose the battery pack to temperatures below -20°C or above 70°C. Never short-circuit the battery terminals – there is a risk of explosion!
Only use the provided charger. Do not apply pressure to the battery. Do not disassemble, puncture or damage the battery.

39
Maintenance
Do not use harsh chemicals, cleaning solvents, or strong detergents to clean the device. Do not use compressed air to clean the unit or its components or to remove dust. Make sure that you do not scratch the touch screen surface. Make sure that you keep the charging contacts clean.
IMPORTANT! GENERAL
INFORMATION FOR CARD PAYMENT
ACCEPTANCE 1. The card number, the card expiration date and the cardholder name are confidential
information which must be adequately protected. The cardholder data is processed by
Card Reader – a secure device which must also must be protected and maintained.
Detailed requirements on the necessary safeguards are available at the internet
resource: https://www.pcisecuritystandards.org/security_standards/pci_dss.shtml
2. A merchant is strictly forbidden to discriminate against customers. Every customer is
serviced, regardless of their age, gender, or nationality in accordance with the
requirements of these rules, laws, regulations and other relevant documents.
3. A contract between a merchant and the bank about payment card acceptance may set
specific and/or additional requirements that must be complied by a merchant to identify
the cardholder and/or the transaction. A merchant should develop internal procedures
reflecting these requirements and make them available to all relevant staff and ensure
that these requirements are fulfilled.
4. If the bank or First Data employees make requests to the company for documents (email,
fax, letter, etc.), this indicates that the customer has disputed the transaction. The
response to these requests must be fulfilled within a specified time, providing all
requested information in a format of the highest possible quality, otherwise the company

40
may suffer a financial penalty. Incoming document requests and responses to them shall
be registered in the company’s records. The requirements specified in paragraph 1 of the
Provisions shall be observed.
5. If you are suspicious about a card or a cardholder at any time during a transaction you
must call the First Data Customer Support Center and request a Code 10 authorization.
A Code 10 authorization request alerts the card issuer to suspicious activity —
without alerting the customer. During a Code 10 call, you may be asked for transaction
details. Your call will be transferred to the card issuer's special operator who will
provide instructions on any necessary action.
When the operator picks up, say, "I have a code 10 Authorization Request," and then
follow these steps:
Stay calm to avoid alarming the person who presented the card.
Keep the card in question in hand to address any questions with respect to it.
Answer the operator's questions in a normal tone, with a simple "yes" or "no."
Follow the operator's instructions.
For your staff's safety, do not, under any circumstances, confront or try to apprehend
the customer.
If it becomes necessary to notify the police, the operator will do so while youwait on
the line.
6. In cases where the representatives of the State Police are conducting a criminal investi-
gation which has been initiated due to a suspected unlawful use of payment cards, and
the State Police have arrivd at the company in order to remove the terminal receipts as
material evidence:
a) request the representatives of the police to provide copies of removed terminal
receipts ;
b) store the copies of any thus provided receipts together with the Police Act in the
records department of the Company.
7. If video surveillance (CCTV) systems are in operation in a merchant’s premises, ensure
that at the time when the cardholder enters a PIN code, the PIN entry device is not
captured by CCTV.

41
8. Submit the recovered cards together with the Transaction receipts and / or Code 10
authorization check codes to First Data Latvia (Riga, 37 Dzirnavu Street, LV–1010), in
person or by sending by registered mail (in this case, add a brief description of the event
and provide your contact information).
9. Submit the recovered cards to the nearest branch of the bank with which the contract of
card acceptance is concluded.
10. Check the payment card in accordance with the “Payment Card verification rules”. This
requirement does not apply when the customer pays with a contactless device.
11. Perform the Transaction. Make sure that the Transaction has been approved and the
authorization code is present on the receipt. Ensure that the amount of the Transaction
which is printed on the receipt corresponds to the actual purchase amount.
12. If the D200 Card Reader promptsterminal instructs you to take a handwritten signature
from a cardholder:, please write the transaction details on paper and request the
cardholder to sign it.
13. If everything is correct, return the payment card to the customer.

42
For any queries and for further information, please contact
First Data Customer Service Centre: 24/7
+372 626 4777
© 2016 First Data Corporation. All Rights Reserved. All trademarks, service marks, and trade names referenced in this material are the property of their respective owners


