83
1 Soap Making

1
Soap Making

2
Table of Contents
What is Soap? 4-5
How Does Soap Work? 6-8
Differences between Hand-Made and Commercial Soap 9-10
The History of Soap-Making 11-12
Tips for Beginners 13
Basic Ingredients 14-17
Deciding on a Recipe 18-19
Equipment 20-22
Precautions for Working with Lye 23-25
The Cold-Process Soap-Making Method 26-35
Other Soap-Making Methods 36-41
Making Liquid Soap 42-43
Stick Blenders vs. Hand-Stirring 44
Superfatting 45-46
Batch Codes 47
Types of Soap-Making Oils 48-53
Properties of Fatty Acids 54
Natural Colorants 55-57

3
Other Soap-Coloring Options 58-59
Sample Recipes 60-62
Common Problems and Solutions 63-65
Scenting Your Soap 65-68
Selling Your Product 69
Packaging and Presentation 70-72
Where to Sell Your Soap 73-74
FDA Regulation of Soap 75
Liability 76-78
Glossary 79-83

4
What is Soap?
Soap is an anionic surfactant which, when mixed with water, is useful for
washing and cleaning. It can be made in either bar or liquid forms. In terms of
chemistry, soap is a sodium or potassium salt, which is formed via the chemical
reaction between an acid and a base. This reaction is commonly known as
neutralization. The oils or fats used in the soap-making process combine with
sodium hydroxide, or lye, in a process known as saponification. The fats are
hydrolyzed by the lye, yielding fatty acids and glycerol. Today, traditional soaps are
often replaced with synthetic detergents, or other surfactants.
The fats and oils used to make soap are made up of triglycerides. A
triglyceride is a molecule that contains three fatty acid molecules, which are attached
to one molecule of glycerin. The other major component of soap, lye, is an alkali; or
a base (the opposite of an acid, on the pH scale). There are two major types of lye:
sodium hydroxide (NaOH, caustic soda, or potash), and potassium hydroxide (KOH,
or caustic potash). Sodium
hydroxide is the one typically
used when making solid
soap bars; potassium
hydroxide makes much
softer soap, and is
sometimes utilized for
making liquid soaps, or
shaving cream. The lye
reacts with the triglycerides
in the fat or oil molecules,
and the fatty acids are
released from the glycerin,
and bind to the lye

5
molecules. Both the alkali and the acids are neutralized. The byproducts of this
reaction are a salt (soap) and glycerin. When the process is complete, there will be
a ratio of approximately three soap molecules to every molecule of glycerin. Put
another way, glycerin makes up approximately 25% of the finished product that
results from the saponification process.

6
How Does Soap Work?
Soap acts as an emulsifier, meaning that it allows one substance to be
dissolved into another, into which it would not dissolve otherwise. Soil contains
grease and oil, which are not water-soluble; however, soap attaches itself to the
grease molecules, loosens them, and allows them to dissolve in water, and be rinsed
away.
There are three types of energy which must be present in order for soap to
work well: chemical energy, thermal energy, and kinetic energy. The chemical
energy is provided by the soap, and allows soil that can’t be removed with just water
to be loosened from the soiled surface, and suspended within the soap molecules.
Thermal energy is provided by using warm or hot water. The third type, kinetic
energy, is created by movement – washing machine agitation, or old-fashioned
elbow grease. If any of these elements are missing, the cleansing process will not
be as effective; for example, soaking soiled clothing in soapy water, without
scrubbing or agitating it, will not get it as clean as if it were put in the washer.
Similarly, attempting to remove soil with only water, and no soap, is likely to be

7
ineffective.
Soap molecules have two ends; one is a carboxylate, and the other is a
hydrocarbon chain. The carboxylate end of the molecule is hydrophilic (“hydro”
meaning water, “philic” meaning attracted to), while the hydrocarbon chain is
hydrophobic (meaning repelled by water). Nearly all substances are either
hydrophilic or hydrophobic; anything that will dissolve in water is considered
hydrophilic. Anything that won’t, is considered hydrophobic. Naturally, oil and water
don’t mix, because oil molecules are hydrophobic. Most soil contains some variety
of oil, which means that it will not dissolve in water without the help of an emulsifier,
such as soap. The hydrophilic end of the soap molecules allows the soap to be
water-soluble, despite the oils contained in it. The hydrophobic end is the portion
that allows the soap to grab onto the grease molecules. Grease normally adheres to
skin and clothing; however, the hydrophobic ends of the soap molecules form
micelles, or tiny clusters, which surround the grease molecules. The grease is held
by the hydrophobic end, while the hydrophilic end allows the suspended grease
particles to be rinsed away with clean water.
Water hardness is a factor that greatly impacts the efficacy of soap. Hard
water refers to water that has an overabundance of minerals, such as calcium, iron,
manganese, or magnesium. When the soap is used, some of the soap molecules
attach themselves to these minerals, instead of to the soil that is supposed to be
cleansed. This creates a twofold problem; there are fewer soap molecules available
for cleaning, and the molecules that react with the minerals create a hard scum on
fabrics, skin, or other surfaces. Because most soap molecules are fairly similar, and
not very versatile, many commercial soaps now use synthetic surfactants or
detergents, which, because of their chemical composition, can be engineered to be
effective in a variety of conditions. The downfall of synthetic detergents, however, is
that they can be harsh and drying to skin – imagine washing your whole body with
dishwashing liquid, or glass cleaner. It works well on your kitchen or bathroom

8
surfaces, but you wouldn’t want it all over you. This is why many commercially-made
soaps are drying to the skin; they are engineered to work in hard-water conditions,
which means that they are more harsh than plain soap.

9
The Differences Between Hand-Made
and Commercial Soap
For obvious reasons, handmade
soap will result in a greater degree of
customization for the soap-maker, and the
consumer. Hand-made soaps are often
more gentle on the skin than commercially
manufactured cleansers. Mass-produced
soap sometimes utilizes oleochemicals,
derived from fats and oils; other soaps
contain petrochemicals, which are derived from oil and fossil fuels. Many people
begin making their own soap because they don’t like the idea of using
petrochemicals to clean themselves, or because of the environmental impact of
these chemicals.
Glycerin is a by-product of the soap-making process typically favored by
commercial soap-makers, known as the full-boiled method; the glycerin is typically
removed after the process is completed, and sold as a valuable humectant, or
moisturizer. When the glycerin is removed, in commercial soaps, the result is a pure
detergent, which can be drying or irritating to the skin. With the glycerin still in the
soap, it stays naturally moisturizing, and is also less likely to crack and fall apart than
commercial soaps. Also, for those who make their own soaps, processes like
superfatting, or adding certain skin-friendly ingredients, can yield a result that is not
as harsh as commercial soaps, for sensitive or chronically dry skin.
Making soap by hand can be an interesting and fun hobby, but it is also great
for those who find that commercial soaps are too harsh, or those who want to utilize
scents or ingredients that are often not found in the usual store-bought soaps. In
addition, natural ingredients are barely used in commercial soap-making, and while
they are better for the environment, they also tend to yield a higher quality of product
10
than synthetic detergents and processes. So, for those who are concerned about
the environment, or the effects that synthetic detergents may have on themselves
and their loved ones, soap-making can be a highly satisfying experience.
11
The History of Soap-Making
The earliest record of a soap recipe dates back to 2200 B.C.E. The recipe
called for water, alkali and cassia oil, and was written on a Babylonian clay tablet.
There is also evidence that the ancient Egyptians bathed regularly, and used a soap-
like substance made from animal and vegetable fats, and alkaline salts. By the
900s, soap-making was common in Spain and Italy, and by the 1200s, also in
France. In that era, soap typically consisted of goat tallow and lye made from beech
wood ash. Unfortunately, because it was difficult and costly to make, its usage was
not widespread until the 18th and 19th centuries. The chemical nature of soap, and
how it works, was also discovered around this time.
In the early twentieth century, soap was typically made at home, using pig
lard, or cow tallow, that was leftover from butchering or cooking meat. The lye was
made by combining ashes leftover from fires with water, in an ash hopper. The ash
hopper was kept in a shed, or other space where it was protected from precipitation;
ashes were added periodically, and when water was poured through them, it leached
the lye from the ashes. The resultant lye water was then collected, and saved for
use in soap. To determine if the
lye was fit for use, the soap-
maker would float an egg or
potato in the lye; if the object
floated with a portion the size of
a modern-day quarter above the
surface of the lye, then the lye
was good. If it was too strong,
water was added to dilute it; too
weak, and it was boiled down to
the correct strength.
After the lye was ready,
12
the fats had to be prepared for use; this was done by rendering the fats, to remove
any impurities, or meat tissue still present in the lard or tallow. Rendering prevented
the fats from becoming rancid. (While soap made from rancid fats works just as well,
it doesn’t smell very nice.) To render the fats, they were added to a large cooking
kettle, and an amount of water equal to the amount of fat being rendered was added.
The mixture was then boiled until all the fats were melted. More water was added,
and the mixture was allowed to cool overnight. By the next day, the fat had all
floated to the top, and solidified. The impurities that were in the fat were heavier
than the fat itself, and floated in the water underneath. The now pure fat was
skimmed off the surface, and stored for use. When the fat and lye were mixed, they
produced a brown, jelly-like soap, which was kept in a barrel, and ladled out as
needed. Hard bars of soap could be made by adding salt to the mixture to solidify it;
however, soft soap worked just as well as hard, and because salt was expensive,
and in short supply, the soft soap was typically used instead. Solid soap was usually
made only by soap-makers, and was scented with various oils, and sold by the
pound to wealthy town and city folk.
However, during World War I, animal fat, like many other resources, was in
short supply, because most available resources had to go to the troops. While
searching for an alternative material, it was discovered that a variety of vegetable
and plant-based oils were useful for the soap-making process. Not only were the
vegetable oils useful during the shortage, but it was found that the vegetable oils
were actually superior to animal fat for making soap. The soap produced was of a
finer quality, and the vegetable oils were more readily absorbed by the skin than
animal fat. Also, animal fat can clog pores, and aggravate certain skin conditions.
In later years, mass production made soap-making more efficient, and the
quality produced was more uniform. However, the customization of soaps was lost,
and the end result, for reasons discussed earlier, was not always as skin-friendly.
13
Tips for Beginners
Soap-making
is a delicate process.
The ingredients used
must be of a high
quality, and the
manner in which they
are mixed cannot be
haphazard or
careless. Think of it
like cooking. If the
ingredients you use are not of a high quality, but you follow the recipe exactly, you
will have a less than ideal result. Similarly, if you have the highest quality ingredients
available, but instead of following the recipe, you just throw them all together, you
will probably not have the result you were hoping for – and the ingredients will be
wasted. The best method for soap-making is, first, to ensure the quality of the
ingredients you want to use. Second, choose a tried and tested formula, which has
worked well for others. Modify the formula only if you know what the results will be,
and have a reason for doing so; each step is vitally important, and if not followed
precisely, will not yield the desired result. The ingredients should be measured
accurately, and in proper proportion, to ensure a quality product. Third, be aware of
what you are doing, and why you are doing it. It is important to understand the
importance of each step, and to be diligent about not leaving anything out. Finally,
choose the technique that works best for you. There are many different techniques,
each of which requires different ingredients, and produces a slightly different result.
The technique you use will be determined by what you want your product to look,
smell, and feel like.

14
Basic Ingredients
Fats and oils
The fats and oils used in soap can be derived from either animal or vegetable
fat. For example, sodium tallowate is a common soap-making ingredient, derived
from rendered beef fat; tallow, bacon grease, lard, or any other type of animal fat can
also be used. Palm, corn, canola, and olive are all common ingredients for
vegetable-based soaps. Typically, soaps made from vegetable oils are softer than
those made with animal fat.
The most useful oils for soap-making are fixed oils – oils that can be raised to
a high temperature without evaporating. Essential oils typically have to be added at
trace, because they tend to evaporate at a much lower temperature. Fixed oils
include a variety of base oils, such as olive, palm and coconut oils.
There are two types of fats used for soap-making: saturated fats and
unsaturated fats. Saturated fats make a hard soap. They commonly come in a solid

15
form and must be melted prior to use;
cocoa and shea butters are good
examples of saturated fats.
Unsaturated fats, like some vegetable
oils, come in a liquid form, and are
commonly used to make liquid soap.
To use these fats to make bar soap,
they must be mixed with saturated fat;
the more saturated fat you use, the
harder the bar will be.
Lye
Historically, lye (also called sodium hydroxide, potash, or caustic soda) was
hand-extracted from wood ashes. It is now commonly found in many hardware and
grocery stores. It is the ingredient that hydrolyzes the oils or fats, and turns them
into soap.
Water
The minerals and other additives in tap water make it less than ideal for soap-
making. Therefore, it is best to use distilled, bottled, or spring water.
Fragrances and Other Additives
There are two types of scent oils: essential oils and fragrance oils. Fragrance
oils are man-made and contain alcohol, so they are typically avoided; the alcohol
and other chemicals in the oil may be drying or irritating to the skin, and cause
unforeseen problems with the saponification process, or ruin the soap mixture
altogether. Essential oils are more costly, and sometimes more difficult to find;
however, a smaller amount is required (usually only a drop or two) and they retain
their scent better because they are undiluted. Research oils thoroughly before use;

16
some can be irritating to skin, or even toxic. Also, different amounts are required for
different oils, because some will overpower others if the same amount is used for all.
(See the Scenting Your Soap section for a more detailed explanation of scents.)
Avoid potpourri, candle scent oils and other strong, commercially-made
fragrances, as they often contain harsh chemicals that can be irritating to the skin as
well. Whole or crushed herbs can also be used, but they will not give their full
benefits in a first batch of soap; if you use herbs, the best thing to do is to rebatch
the soap later, to extract the full benefit from the herbs (see Rebatching, under Soap-
Making Processes).
Colorants
Colorants can be purchased at a soap-making supply store. There are also
various other natural ingredients that you can use to color soap. For example,
powdered clay can be used to color your soap pink, pastel green, or beige; it is also
a great additive for soap intended for oily or acne-prone skin, because it will absorb
oil from the skin without drying the skin excessively, or damaging it. Cocoa powder
or tea can be used to turn the soap a deep, rich brown (cocoa powder will, of course,
make the soap smell like chocolate). Paprika will give your soap a deep reddish
color, and yellow can be achieved by using saffron, annatto seeds, or turmeric. A
deep, rich purple can be achieved using ratanjot. (See Table 3 for a more complete
list of natural soap colorants.)
Avoid using fabric dyes, hair dyes,
candle colorants, or paints to color your
soap; even if they are labeled as “non-toxic,”
they are not safe to have in contact with skin
for prolonged periods, and they may dye
your skin. Some sources say that crayons
can be added to soap for coloration, as long
as they are made of stearic acid (most

17
crayons made now are), but there is some debate on this topic; it is probably best to
err on the side of caution, and avoid using them.
Preservatives Depending on the oils used in the recipe, the resultant soap can be prone to
spoilage. Various preservatives can be utilized, such as vitamins E, C, and A, which
are also great for your skin. These vitamins can be found in various oils (see Table
1).
Other Additives
Sand or pumice can be added to the soap, to make it exfoliating. Also, some
metals, such as titanium, silver, nickel, or aluminum can be added for antibacterial
properties, and to make the soap bright white.

18
Deciding on a Recipe
There are a variety of soap recipes available to choose from, and it is of
course possible to create your own. The recipe you use will depend on the qualities
you want your final product to possess; do you want a hard soap, or soft? Do you
want a soap that will work well in cold or hard water? Are you making soap for
sensitive skin? Some oils are more readily absorbed into the skin than others, and
each oil that can be used for soap-
making has different properties. A
similar choice must be made when
using lye; it comes in granular and
flake forms, and different types of
lye can be used for different
soaps. For instance, sodium
hydroxide lye is usually used for
solid soap, whereas potassium
hydroxide lye is commonly used
for liquid soaps and shaving
cream.
Whatever recipe you
choose, or create, make sure that
you measure the ingredients in
correct proportions, and add them
at the proper times. It is generally best to weigh the lye and oils using a kitchen
scale, instead of measuring them with measuring spoons or cups, because different
materials have different densities, and volume measurements can be inaccurate.
Also, it is important to use a lye calculator to determine the amount of lye needed for
your recipe. Using the calculator, you can adjust the amount of lye you want to use
based on the amount of fat you want leftover in your soap. The lye will only saponify

19
a certain amount of oil, so to have more oils leftover, use less lye, or vice versa.
Soap with an excess fat level above 5% will moisturize skin better, and make it feel
softer, than one with less than 5%; however, some people might feel that the soap
with 5% or more excess fat level leaves their skin feeling greasy. An important
consideration when calculating the amount of lye to use is, of course, skin type;
when making soap for dry skin, you would want the excess fat level to be closer to
5%, but if the soap is being made for individuals with greasy skin, less than 5% will
produce a cleaner feeling.
20
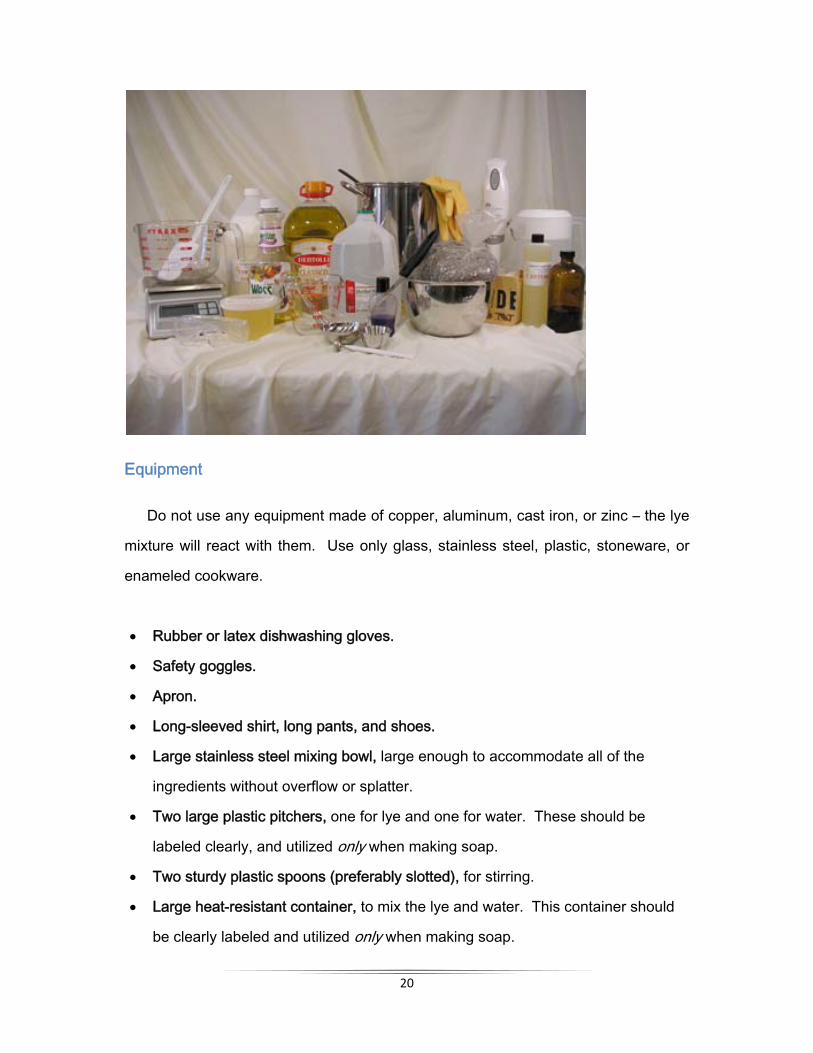
Equipment
Do not use any equipment made of copper, aluminum, cast iron, or zinc – the lye
mixture will react with them. Use only glass, stainless steel, plastic, stoneware, or
enameled cookware.
• Rubber or latex dishwashing gloves.
• Safety goggles.
• Apron.
• Long-sleeved shirt, long pants, and shoes.
• Large stainless steel mixing bowl, large enough to accommodate all of the
ingredients without overflow or splatter.
• Two large plastic pitchers, one for lye and one for water. These should be
labeled clearly, and utilized only when making soap.
• Two sturdy plastic spoons (preferably slotted), for stirring.
• Large heat-resistant container, to mix the lye and water. This container should
be clearly labeled and utilized only when making soap.

21
• A large glass bowl or plastic pitcher, to hold the base oils after measuring, and
before they are added to the lye mixture.
• Measuring cups or spoons, to measure essential oils and other additives.
• Ladle, for taking a bit of the soap mixture to blend with the additives.
• Miscellaneous bowls and spoons, to hold additives after they are measured, and
before they are added to mixture.
• Tablecloth, newspaper or trash bags to cover your work area, and make it easier
to clean up spills.
• Stainless steel or enameled pot for heating the base oils.
• Two glass or stainless steel thermometers – one for the lye and water mixture,
and one for the oils. Candy or meat thermometers work well.
• Vinegar, to neutralize lye spills.
• Soap molds – can be almost anything you like.
• Pot holders/oven mitts.
• Plastic spatulas.
• Digital scale, accurate to 1 gram, or 0.1 ounces. The accuracy of the scale is
important, because it will be used to measure all of your ingredients, including
liquids.
• Old blankets/towels, for insulating the molds during cooling.
• Wax paper, or butcher’s paper, for lining molds.
• Stick blender – optional, but makes stirring faster and easier.
• Paper towels or rags to clean up spills.
Make sure you have all of your equipment assembled, and ready to go, before
beginning the soap-making process. Pausing during the process to run to the store
won’t be an option, as you will ruin a batch of batter by doing so; a big part of the
soap-making process is good timing, and saponification will continue with or without
you being there. Also, when you are finished making your soap, be sure to clean

22
your materials and work area thoroughly. The soap should always be made in an
area with good ventilation; if you are concerned about the ventilation of your work
space, or if at any time you feel dizzy, light-headed, or have a sore throat, get some
fresh air immediately. The best place to make soap is outdoors – ventilation is not a
concern, and cleanup is much easier. Always, always keep children and pets away
from your soap-making materials and equipment.
Precaut
Lye
T
precauti
when w
opening
the lid is
deliques
that it h
dissolve
that it w
these te
for long,
L
prevent
children
releases
respirato
so keep
– skin, fu
rinse it c
B
products
opener.
drain op
which yo
tions for W
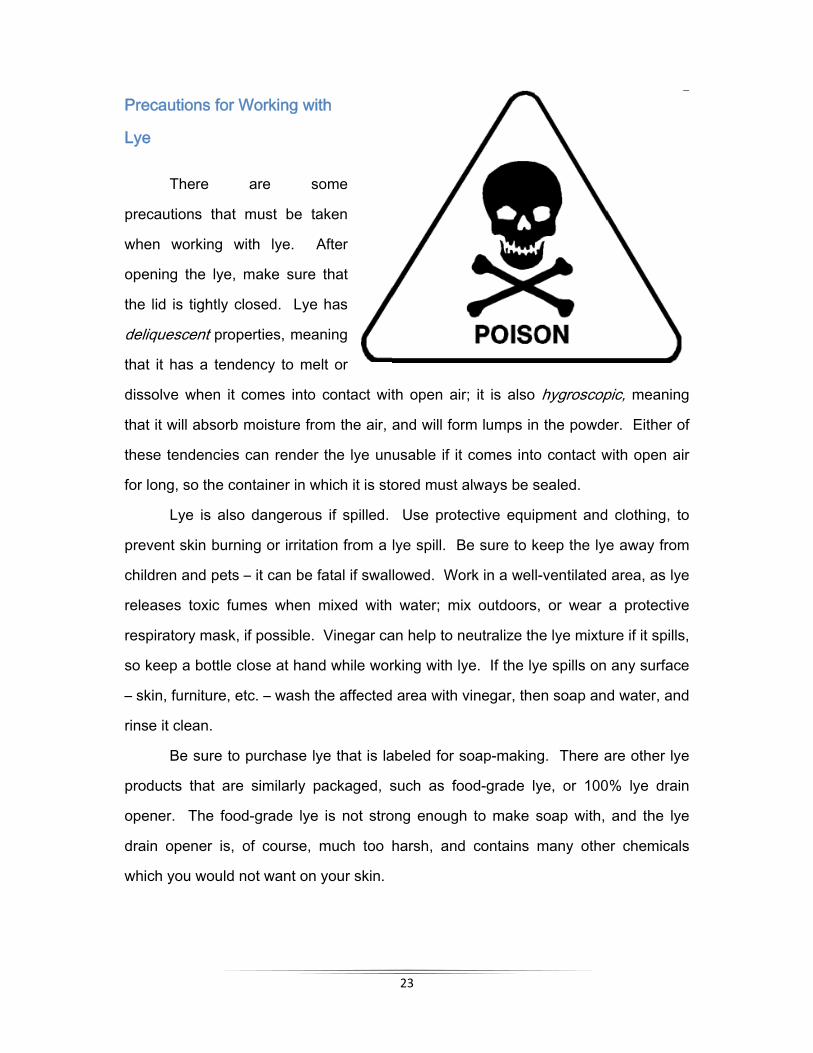
There
ons that m
working wit
the lye, m
s tightly clo
scent prope
as a tende
e when it co
ill absorb m
endencies c
so the con
ye is also
skin burnin
and pets –
s toxic fum
ory mask, if
a bottle clo
urniture, etc
clean.
Be sure to p
s that are
The food
pener is, o
ou would no
Working wit
are so
must be ta
th lye. A
make sure
osed. Lye
erties, mean
ency to me
omes into
moisture fro
can render
ntainer in w
dangerous
ng or irritati
– it can be f
mes when m
f possible.
ose at hand
c. – wash th
purchase ly
similarly p
-grade lye
of course, m
ot want on
th
ome
aken
After
that
has
ning
lt or
contact wit
om the air,
the lye un
hich it is sto
s if spilled.
ion from a
fatal if swal
mixed with
Vinegar ca
d while wor
he affected
ye that is la
ackaged, s
is not stro
much too
your skin.
23
th open air
and will for
usable if it
ored must a
Use prote
lye spill. B
lowed. Wo
water; mix
an help to n
rking with ly
area with v
abeled for s
such as fo
ong enough
harsh, and
r; it is also
rm lumps in
comes into
always be s
ective equi
Be sure to k
ork in a wel
x outdoors
neutralize th
ye. If the ly
vinegar, the
soap-makin
ood-grade l
h to make
d contains
hygroscop
n the powde
o contact w
sealed.
pment and
keep the lye
l-ventilated
s, or wear
he lye mixtu
ye spills on
en soap an
ng. There a
ye, or 100
soap with,
many othe
pic, meanin
er. Either o
with open a
d clothing, t
e away from
area, as ly
a protectiv
ure if it spills
any surfac
d water, an
are other ly
0% lye dra
and the ly
er chemica
ng
of
air
to
m
ye
ve
s,
ce
nd
ye
in
ye
ls

24
There are some materials
which should never come into
contact with lye. Do not use any
container, or heating vessel, made
of aluminum, brass, bronze,
chromium, iron, magnesium, zinc,
or anything coated with Teflon. If
the lye comes into contact with
any of these materials, it will react
with them to produce hydrogen
gas, which is extremely flammable, and explosive. Also, the lye should never come
into contact with sugar; this mixture will produce poisonous carbon monoxide gas.
Materials that are suitable for contact with lye, at room temperature, are: high-density
polyethylene (HDPE), polypropylene (PP), polyvinyl chloride (PVC), silicon rubber,
stainless steel, glass, and porcelain. Stainless steel is the best material for heating
vessels, as it can withstand elevated temperatures. Plastics may soften at higher
temperatures, so unless the plastic has already been tested, glass or stainless steel
are the best materials for mixing containers.
Because lye is a corrosive material, any amount of it that you order or
purchase will most likely come with a material safety data sheet, or MSDS. This
sheet will list:
• Manufacturer or vendor information
• Chemical composition
• Hazards and potential health effects
• First aid measures
• Fire fighting measures
• Spill measures
• Handling and storage
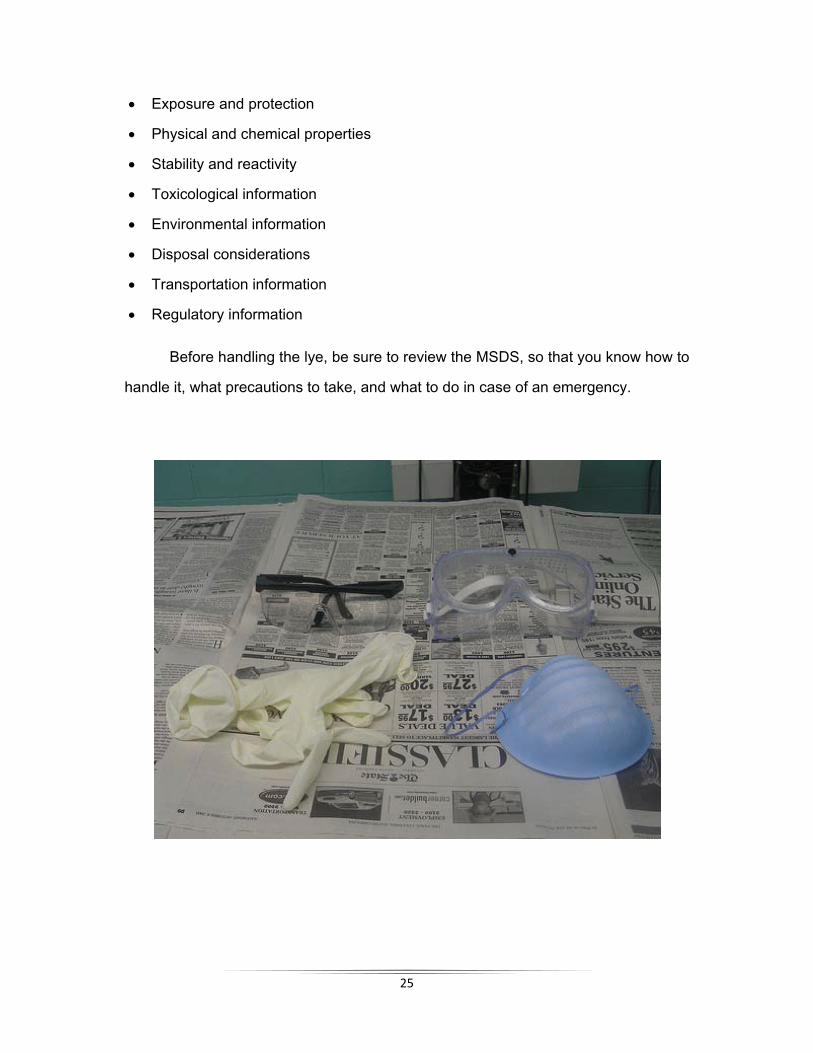
25
• Exposure and protection
• Physical and chemical properties
• Stability and reactivity
• Toxicological information
• Environmental information
• Disposal considerations
• Transportation information
• Regulatory information
Before handling the lye, be sure to review the MSDS, so that you know how to
handle it, what precautions to take, and what to do in case of an emergency.

The Co
T
With the
than oth
that go
methods
are mixe
Step 1:
equipme
F
good id
sleeved
goggles
and glo
and burn
ruin clot
skin fee
are usi
essentia
trash ba
Step 2:
D
mold, an
Candy o
tube or
ld-Process
This method
e cold-proce
her method
into your s
s. The cold
ed, no addit
Don protec
ent
For making
dea to we
shirt, lo
, an apro
ves. Lye
n skin, and
thing and
el greasy; a
ng additiv
al oils can i
ag, or newsp
Prepare mo
Determine w
nd the soap
or gelatin m
PVC pipe w
s Soap-Ma
d is favored
ess method
ds, you hav
oap, and it
d-process m
tional heat
ctive
soap, it is a
ar a long
ong pants
on, shoes
will irritate
the oils wil
make you
also, if you
es, certain
rritate your
paper, to m
olds
which molds
p you make
molds will m
will suffice
aking Meth
d most com
d, the soap
ve complete
t is easier f
method is so
is added to
a
-
,
,
e
ll
r
u
n
r skin in larg
make cleanu
s you want
e can look a
make intrica
(the soap c
26
hod
mmonly by
is made fr
e control o
for beginne
o named be
o the batter
ge quantitie
up easier.
t to use; alm
as plain or a
ately design
can be rem
y those who
rom scratch
over the qu
ers than the
ecause afte
.
es. Protect
most anythi
as decorate
ned soaps,
moved in a
o make so
h. While it
uality of the
e warm- or
er the lye, w
t your work
ing can be
ed as the m
, but even
cylinder an
ap by hand
takes longe
e ingredient
hot-proces
water and fa
k area with
utilized as
mold you use
a cardboar
nd sliced int
d.
er
ts
ss
at
a
a
e.
rd
to
27
bars). Cardboard milk and juice containers are great for making plain, square soap,
because they are coated with wax, and the solidified soap can be easily removed. If
you want to use an untreated cardboard or wooden box, the soap can be cut into
squares when it is removed. Line the mold with wax paper, so that the soap can be
easily removed after it has set. (If you are using a non-porous material, such as
glass or plastic, you may be able to simply grease the mold with cooking spray, and
avoid the lining procedure, if you like.) Make sure that you have enough molds
prepared to accommodate all of the soap mix – you don’t want to be scavenging for
more molds while the soap is beginning to set in the kettle.
Step 3: Measure your ingredients
To accurately measure the fat and lye amounts you’ll need, look up the
saponification value of the fats being used in the soap. The saponification value of a
fat is the amount of lye required to saponify a given amount of that type of fat or oil.
In the cold-process method, measurements must be exact in order to ensure full
neutralization of the lye and fats. This step is vitally important. Incorrect
measurements will result in excess lye, which can cause burning and irritation of the
skin, or excess fats, which will leave skin feeling greasy. Often, soap makers will
use a formulation that allows for some excess fat, but that depends on the
preferences of the soap-maker, and the type of skin for which the soap is intended.
Each fat or oil has its own unique saponification value, so always check
before measuring your lye. The saponification value given can also differ for different
types of lye (sodium hydroxide, or potassium hydroxide), so it is important to know
which type of lye is being referenced with this value.

28
Measure oils and water using a measuring cup, placed on the digital scale.
The scale should also be used to measure the lye powder. (Don’t forget to “zero” the
scale – measure the container’s weight first, and then set that weight as zero. This
way you won’t have to make any calculations to deduct the container’s weight, or
accidentally include the weight of the container in your measurements.)
Step 4: Prepare the lye mixture
Dissolve the measured amount in cold (preferably refrigerated) water. Pour
the lye into the water, a little bit at a time, and stirring constantly. Always add the lye
to the water, never the other way around. If water is poured onto lye, it will form a
crust on the surface; the lye underneath will continue to react as more water is
added, and eventually, so much pressure will build up that the lye underneath will
erupt through the crust, spraying lye powder, hot steam, and fumes everywhere.
As the lye is added to the water, the water will become very hot; when lye
mixes with water, it creates an exothermic reaction, meaning that the chemical
reaction between lye and water releases a lot of heat during the process. (Dissolving
the lye will also release fumes, which appear as a mist or vapor; these fumes contain
molecules of lye, and must not be inhaled.) Use a thermometer to monitor the
temperature of the
solution while mixing; it
should not exceed 190°F.
If the mixture gets any
hotter, it may begin to boil
over. If the lye mixture is
getting too hot, try
submerging the container
in a larger container of ice
water. As a preventative

29
measure, if you are going to be mixing a large quantity of lye, use refrigerated or ice
water to mix the lye solution. Continue stirring until the mixture is clear, and all of the
lye has been completely dissolved. Once all of the lye has been dissolved in the
water, allow the water to sit and cool until it is 100-110°F.
Step 5: Heat the fats
As the lye mixture is cooling, the fats must be heated. Be very careful while
heating the oils; each oil has a flash point – a temperature at which it will ignite – and
some are lower than others, so the oils must be heated very gently. Use a stainless-
steel pot on low-heat, and stir often. If using a microwave to heat the oils, heat the
oils in a microwave-safe container. Heat on high power for one minute, and then
continue to microwave in 20-second increments, testing with a thermometer each
time. If the fats used are liquid, then they must be heated to approximately 100-
110°F, to match the temperature of the lye mixture. If the fats are saturated enough
they will be solid at room temperature, so they will have to be melted; this will most
likely mean heating the fats past 110°F, then allowing them to cool to the proper
temperature. (Regardless of which method you use to heat the oils, check the lye
mixture’s temperature as you go; this way you can determine whether the fats need
to be heated more, to match the lye mixture.) When measuring the temperature of
the mixtures, be sure to keep the thermometer floating somewhere in the middle of
the mixture; if the thermometer is placed on the bottom of the container, it will give
you an inaccurate reading.
Step 6: Mix the fat and lye
Once both the fat and lye mixtures are at 100-110°F, they can be combined.
Pour the lye mixture into the fat, slowly and steadily, stirring it in small, rapid circles
as you pour.

30
Step 7: Stir
After the ingredients are combined, they must be stirred. If stirring by hand,
the mixture must be stirred for 5 minutes, and then allowed to set for 15. This pattern
is repeated for up to 3 hours; the amount of stirring required will vary based upon the
recipe. A stick blender is more convenient, and speeds up the process substantially;
the mixture will only need to be blended for about 30 minutes, instead of being
stirred for 3 hours. Use caution with a stick blender, however. If the mixture is
stirred too long, it may have air bubbles in it. Also, the stick blender stirs the mixture
so quickly that by the time the mixture is fully stirred, it is still raw, and may not have
reached trace yet. If that happens, stir occasionally, by hand, until it starts to trace.
Step 8: Trace stage
Trace refers to the viscosity of the mixture as it is stirred; the term “trace”
originated from a method of testing the soap mixture. Take a spoonful and drizzle it
across the top of the mixture; if it remains visible, or leaves a trace, for a few
seconds before blending back into the mix, then the mixture has begun to trace.
Light trace refers to mixture that has just begun to thicken, whereas medium trace
and heavy trace refer to a mixture that is thicker and more difficult to stir. (Some
recipes will take longer to trace than others; humidity and temperature also affect
tracing times. If the mixture doesn’t trace as quickly as it should, don’t worry; keep
stirring, and it will eventually.) Most additives, such as superfatting oils, herbs or
colorants, will be added at the trace stage; once the soap mixture has reached this
stage, the lye and fats are about 80-90% saponified, meaning that anything added to
the mixture will not be significantly affected by the saponification process.
Depending on the ingredients, they may be added at light, medium, or heavy trace.
Measure out the essential oils, colorants, or any other additives you plan to use in a

31
separate bowl. Mix a spoonful of the soap mixture with the additives. When it is
well-blended, add it to the soap mix, stirring slowly and steadily as you pour.
Step 9: Pour into molds
At the end of the trace stage, the soap mixture is poured into the molds, and
allowed to set for 18-48 hours; saponification takes place during this period of time.
If the soap becomes too solid to stir, or pour easily, it has reached the point of seize;
saponification has progressed so far that the soap has begun to solidify. The soap
must be poured into the molds before it reaches this stage; if you notice the soap
getting increasingly hard to stir, it must
be poured into the molds as quickly as
possible.
Step 10: Insulate the molds, and allow
to set
The molds should be wrapped
in towels or blankets, to retain as
much of the mixture’s heat as
possible. If the soap turns transparent
during the molding stage, it means that
the soap mixture has overheated in the mold. If this happens, unwrap the molds,
and put them someplace a bit cooler. The soap should return to its normal opacity.
The soap may have lost its scent, due to the essential oils or other additives having
been “cooked” by the soap’s high temperature; it may also have a hard rind, but this
should only be noticeable if the soap is cut. Other than these flaws, the soap is still
perfectly usable.

32
If you notice your soap developing a light coating of white powder while in the
mold, it means that the soap is reacting with the air. To avoid this problem, seal the
soap while it is in the mold. The
white powder will be highly
acidic, and irritating to the skin,
so it must be rinsed or trimmed
from the soap. If the mold is
airtight, this problem should not
occur; however, monitor the
soap closely, as sealing it off
from the air may also cause it to
overheat.
After being poured into the mold, the soap should turn slightly darker in the
middle, continue to get hotter, and have some bubbles rising to the surface. This is
an indication that proper saponification is taking place. Once the neutralization
process begins to slow, the soap should return to a normal, uniform color. If the
soap is poured into a mold that is too small, or is not insulated properly (or if it cooled
too much during tracing) you may not see these signs of neutralization taking place,
and caution should be used with the soap, as it may be greasy, or have an excess of
lye.
If you notice, within the first 24 hours of the molding stage, that the mold is no
longer warm to the touch, or the soap fails to harden, there may be a problem with
the mixture. If your measurements were off, then the saponification process may
have failed. If you’re sure that the measurements were correct, then pour the soap
into a pot and heat it on the stove, until it reaches approximately 130°F. Then pour it
back into the molds. If the soap still doesn’t solidify normally, then you may have to
discard the batch.

33
Step 11: Remove the
soap from the molds
Once the one- to
two-day molding process
is completed, the soap is
firm enough to be
removed from the mold
and cut. Be sure to use
gloves when you remove
the soap from the mold, because the lye may still burn your skin. If you lined the
mold with cellophane or wax paper, it should be fairly easy to get the soap to
release; if not, try putting the mold in the freezer for a while. The cold will cause the
soap to contract, and it can be removed much more easily, but if you used
colorant in the soap, it may fade a bit.
Step 12: Curing the soap
After they are removed from the mold, the bars should be placed on wax
paper, and left in a cool, dry place for 2 to 6 weeks, to cure and harden. The actual
curing time required will depend upon the recipe, because the initial water content of
the mixture will vary depending upon the ingredients used.

34
Step 13: Test the pH of your soap
Before using your soap, test a
bar for pH level. This is an important
step; even veteran soap-makers test
their soap before using it, because
mistakes are always possible, and a
single batch with a lye content that is too
high can have dire consequences
(chemical burns, etc.). You can test the
pH of the soap using a chemical called
phenolphthalein; this chemical turns fuchsia, or pink, if the pH is too high. Un-
reacted lye is a very alkaline substance, meaning that it has a pH of 14; water has a
pH of 7, and most of the oils you will use have a pH of 0-2. The pH of soap that will
be used on skin should be between 7 and 9.5; if the drop of phenolphthalein stays
clear, or very pale pink, then the soap is safe to be used on skin. If it turns a deep
pink, the soap should not be used on skin, but is safe to use for household cleaning,
dishes, or laundry.
You can also test the pH of your soap using a pH test strip, such as the ones
commonly used for aquarium water. Mix one gram of the soap with 100ml of room-
temperature water – the water should be
just enough to dissolve the soap in,
because if there is too much water it will
give a false pH reading. (Also, test the
pH of the water beforehand, and make
sure that it is a neutral 7.) Use the strip
to test the solution, following the
directions on the strip.
There is a third method to test for

35
lye content, if you don’t have the materials available for the other tests. Touch your
tongue to the bar of soap, or touch the bar with a wet fingertip and touch the fingertip
to your tongue. If your tongue tingles, or you experience a pinching or burning
sensation, then there is still too much un-reacted lye in the soap. This test can be
somewhat dangerous; your tongue can get burned if the lye content of the soap is
very high. Also, you won’t be able to get more than a very general idea of how much
lye is in the soap, so this test isn’t highly recommended.
Step 14: Storing your soap
If your soap is satisfactory, and you want to keep it, be sure to store it in a
cool, dry place, out of direct sunlight. Label each bar clearly with the batch code, so
that you will be able to quickly reference what is in each bar, when it was made, etc.
Your memory is good now, but after a few months go by, and you have made
several batches, it may become difficult to distinguish one bar from another.
36
Other Soap-Making Methods
The basic process for making bars of solid soap is similar for each technique,
but there are variations depending on the method used by the soap-maker. In all
processes, the oil or fat is heated; saturated fats are heated much more than
unsaturated, because they must be melted before being allowed to cool. Lye and
water are mixed to achieve the desired consistency, and then the ingredients are
mixed together. The mixture then has to be stirred. The mixture is poured into a
mold, and allowed to set, typically for 24-48 hours. The bars continue to harden for
another 3 to 8 weeks,
depending on the
ingredients used.
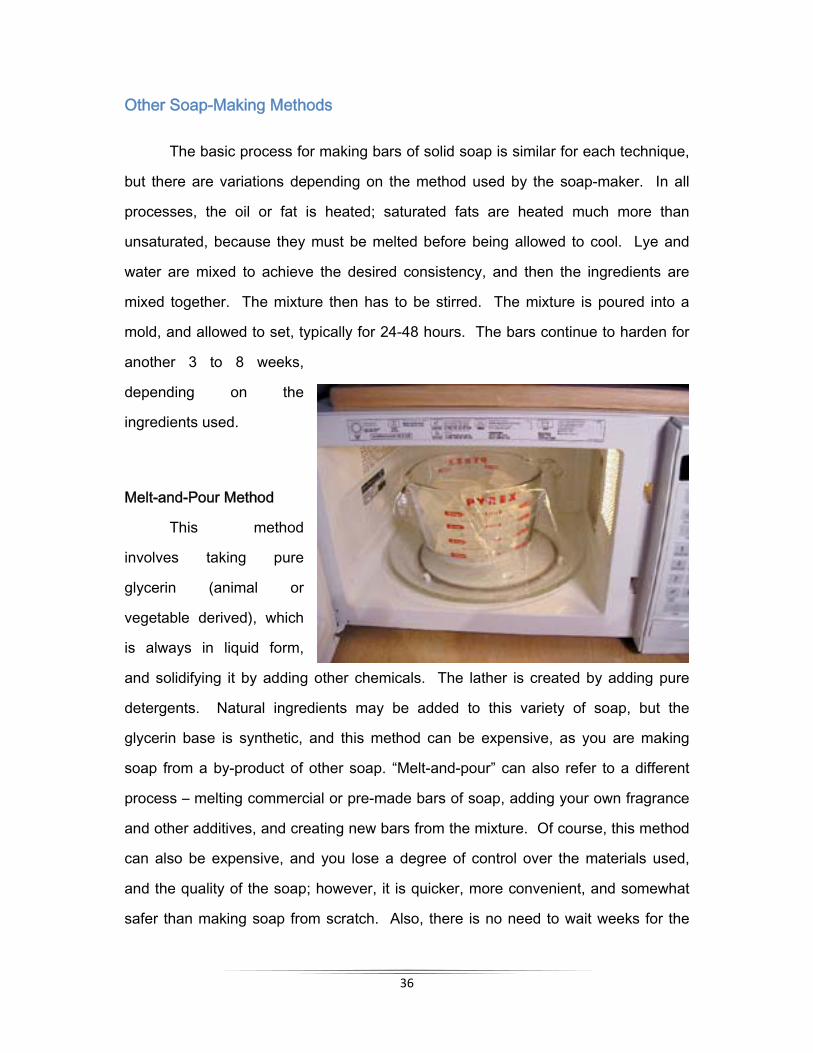
Melt-and-Pour Method
This method
involves taking pure
glycerin (animal or
vegetable derived), which
is always in liquid form,
and solidifying it by adding other chemicals. The lather is created by adding pure
detergents. Natural ingredients may be added to this variety of soap, but the
glycerin base is synthetic, and this method can be expensive, as you are making
soap from a by-product of other soap. “Melt-and-pour” can also refer to a different
process – melting commercial or pre-made bars of soap, adding your own fragrance
and other additives, and creating new bars from the mixture. Of course, this method
can also be expensive, and you lose a degree of control over the materials used,
and the quality of the soap; however, it is quicker, more convenient, and somewhat
safer than making soap from scratch. Also, there is no need to wait weeks for the

37
soap to cure; the bars are ready to use as soon as they cool and harden. Bars of
fragrance- and dye-free soap base can be purchased from many craft and soap
supply stores. (You could also try to find some variety of unscented, additive-free
soap in a grocery or health-and-beauty store.) The bars are melted in a microwave
or double-boiler; if melting in a microwave, use 1 cup of grated soap to ¼ cup water.
Microwave, using medium heat and stirring regularly, until the soap is completely
melted and the water has evaporated. Once the soap is melted, you can add your
own additives. The mixture only needs to be stirred until it is well-blended; there is
no trace stage, since the soap was already saponified before you purchased it.
Once the additives are blended with the soap, it can be poured into molds. Once it
has cooled and hardened,
it is ready for use.
Rebatching
Rebatching refers
to the process of melting
soap scraps, or chunks of
soap base, and remolding
them. Rebatching is
useful if you have soaps that are warped, or otherwise aesthetically flawed, but still
usable; it also helps to extract the full medicinal or beautifying benefits from any
herbs you have added to soap. The fresher the soap is, the better, because the
longer it cures, the less moisture it contains, and the harder it is to melt. As with the
melt-and-pour method, as soon as the soap hardens and cools, it is ready to use.
To rebatch soap, cut the soap you intend to melt into small chunks, or use a
cheese grater. Mix the soap chunks or gratings with milk or water; the general rule is
to use one cup of milk or water for every pound of soap. For soap that is made with
olive oil, or animal fat, use ½ cup of milk or water. (For soap that has cured for one

38
week or less, use half of the above measurements.) Cover the pot, and let the soap
soften in the milk or water for 1-2 hours, stirring it approximately every 30 minutes.
If melting the soap in the oven, mix it with the milk or water in a stainless
steel, enameled or glass pot. Put your oven on its lowest setting – make sure it is no
higher than 170°F. Put the soap in the oven, and stir it every 15 minutes. The soap
should take approximately one hour to melt. If using the crock-pot method, set the
crock-pot to low, and stir at the same intervals. The soap should take about the
same amount of time to melt, or maybe a little longer.
Once the soap is melted, add your desired essential oils, colorants, herbs, or
superfatting oils. Mix the batter thoroughly; you may want to utilize a hand blender,
or stick blender, to mix the batter smoothly and quickly. After mixing, pour the batter
into molds, and allow it to set for 24-48 hours. When the soap is removed from the
molds, cut it into bars. The soap is safe to use as soon as it is cut, but it is best to
allow the soap to cure for about a week before using it.
Semi-Boiled, or Hot-Process, Method
The hot-process method differs from cold-process in that external heat is
applied after the fats and oils are mixed together. Instead of allowing saponification
to take place during the molding stage – which takes a long time – saponification
takes place before the soap is molded. The hot-process method was commonly
used when the purity of the lye soap-makers were able to obtain was in question.
Also, if you want to use a natural lye solution, such as potash, instead of 100% lye,
hot-process is the best method to employ. This is because the hot-process method
requires less exact measurements than the cold-process method, because
saponification is “forced” instead of taking place on its own. Therefore, it is
unnecessary to know the exact concentration of lye in the mixture, so less than pure
lye can be used.

39
In the hot-process method, the mixture is heated over a double-boiler, or in a
crock-pot, during the trace stage, and the soap is, quite literally, “cooked” to achieve
more rapid neutralization. The crock-pot method is the easiest because the
temperature is easily regulated, and the soap is less likely to burn. The amount of
soap you can make will vary based on the size of your crock-pot, but ideally, you
want the crock-pot to be about half full. Any less, and the soap may burn; any more,
and it may boil over if the temperature is too high. The ideal temperature will vary
based on the oils you use, and by each individual crock-pot. Just like stoves, some
operate at a higher temperature
than others. If you are unsure
of the temperature at which
your crock-pot operates, use a
meat thermometer to test the
mixture. It should be between
176-212°F, or just below
boiling. The soap should be
completely saponified in 15-20
minutes. For experienced
soap-makers, it is possible to
tell when saponification has
completed by tasting the soap
(it shouldn’t make your tongue tingle, or burn), or by determining visually when the
soap has reached a gel texture, characteristic of complete saponification. It is also
possible to determine whether saponification has completed by testing the pH of the
soap.
Unlike cold-process soap, hot-process soap can be used immediately after it
has cooled and hardened, because it should be completely neutralized already;
therefore, there is no curing time necessary. However, it is still a good idea to cure

40
the soap, instead of using it right away, because the soap may still be soft or spongy,
and may not lather properly, or last as long.
Warm-Process (or Oven Hot-Process) Method
The warm-process method is, as you may guess, somewhere between the
cold-process and hot-process methods. Instead of insulating the soap with blankets
while it is in the molding stage, or boiling it to achieve faster saponification, the filled
soap molds are heated in an oven.
To begin oven hot-process (OHP) soap, you can use any hot- or cold-process
soap recipe. Turn your oven to its lowest possible setting – no more than 170°F. As
with cold-process soap, mix the lye and water, heat the fats, and combine when they
are at approximately the same temperature. Stir the batter until it achieves a
medium to thick trace. Be sure to use a large pot, such as a stainless-steel stockpot,
so that the soap mix doesn’t boil over in the oven. If it does, it’s messy, but not a
huge problem; the soap will smoke and smell bad, but it shouldn’t catch fire. Take
out the soap, clean up the mess, and continue cooking it. (The pause in cooking will
not cause any problems with the soap, for this method.)
At this point, place the mixture in the oven, and “cook” it at 160°F for
approximately 10 to 20 minutes. (The exact cook time will vary, depending on your
batch size, and oven.) Turn off the heat, and leave the pot in the oven, with the door
closed, for approximately one hour. After this time has passed, test the soap’s pH to
see if it has completely saponified. If not, put the soap back in the oven for 15
minutes, and test again. If it is ready, add your essential oils or other additives, stir
the batter thoroughly, and pour it into the molds. Once the mold has cooled, the
soap can be removed and cut. Though it is completely saponified at this point, the
bars still need to cure and harden for 2-3 days before use, as with hot-process or
rebatched soap.
41
Full-Boiled Method
This method is typically favored by commercial soap-makers. All ingredients
are added at once, in a large container, and heated to cause saponification.
Glycerin is a by-product created via this method. The glycerin is typically removed
by commercial soap-makers, and sold; however, your soap, with the glycerin still in
it, will be naturally more moisturizing and skin-conditioning than commercial bars.
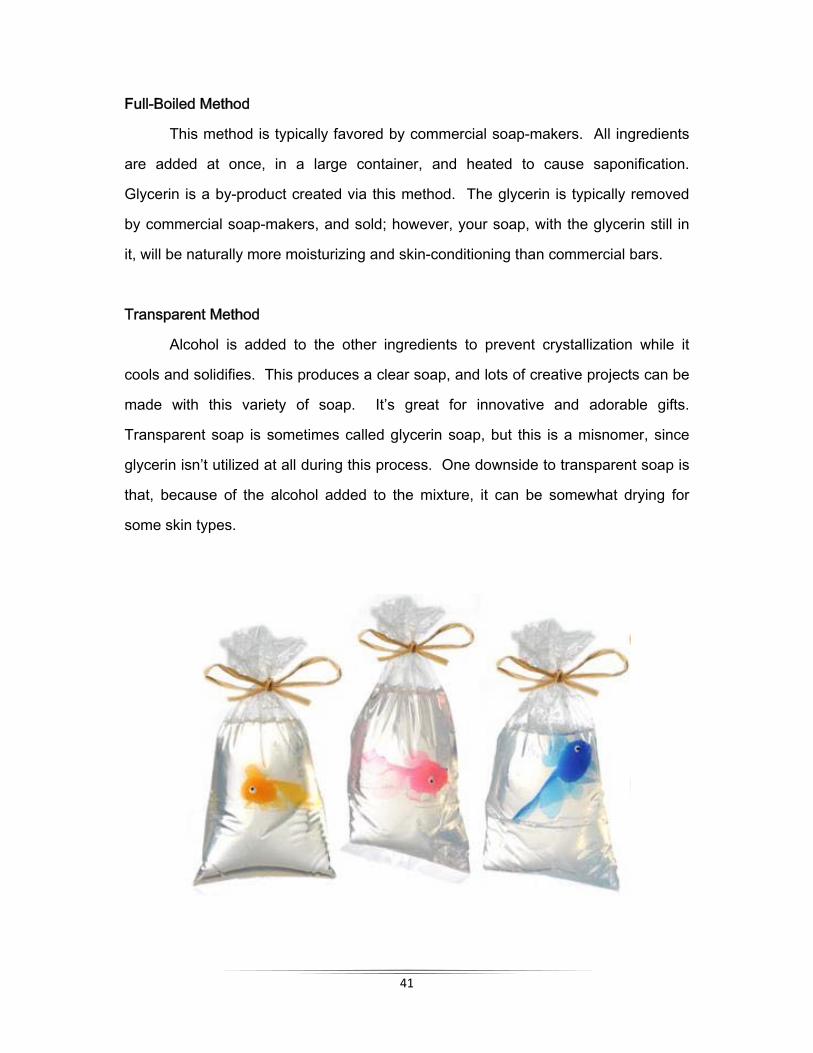
Transparent Method
Alcohol is added to the other ingredients to prevent crystallization while it
cools and solidifies. This produces a clear soap, and lots of creative projects can be
made with this variety of soap. It’s great for innovative and adorable gifts.
Transparent soap is sometimes called glycerin soap, but this is a misnomer, since
glycerin isn’t utilized at all during this process. One downside to transparent soap is
that, because of the alcohol added to the mixture, it can be somewhat drying for
some skin types.

42
Making Liquid Soap
When making liquid soap, different
ingredients are required than those you
would use for solid soap. There are two
processes for making good liquid soap.
One process is quite similar to the cold-
process method for making solid bars;
however, instead of curing your soap
after removing it from the molds, it should
be cut up into small pieces, or grated.
Making liquid soap is easier if the solid
bars are made from an oil that results in a
softer soap, such as canola oil. (See Table 1.) Also, try using potassium hydroxide
lye for liquid soap, instead of sodium hydroxide; it makes softer bars, so the process
of making liquid soap from the bars is easier. The pieces can then be melted with
water in a double-boiler; the ratio should be one cup of soap to three cups of water.
Heat on medium, and stir regularly until soap is melted. (If there are chunks that
won’t melt, simply remove them from the mixture.) If the melted soap is too viscous,
add more water until the mixture achieves the desired consistency.
The other way to make liquid soap is to make it via the hot-process method.
Mix the oils and lye as you would for cold-process soap; it may take a very long time
to trace, so be patient. When it does trace, it may be a little thinner than regular
cold-process soap. Cook it in a crock-pot, or over a double-boiler, for 3 to 4 hours,
stirring every half hour. It will go through many stages; at its final stage, it will be
translucent and creamy. To check and see if the soap has cooked long enough, mix
one ounce of the soap with two ounces of boiling water. If the mixture is milky, or
very cloudy, once the soap has dissolved, it needs to cook longer. (If cooking the
43
soap longer doesn’t make it clearer, one of the ingredients may have been measured
incorrectly.) If it is clear, or only slightly cloudy, then the soap should be ready.
Liquid soap can be prone to spoilage, so glycerin or another oil containing
vitamin A, C or E should be added to help preserve it. Store your liquid soap in a
pump, or flip-top bottle, to further guard against spoilage. Use the soap within 6 to 8
months, and dispose of it if it becomes cloudy, or smells rancid.
44
Stick Blenders vs. Hand Stirring
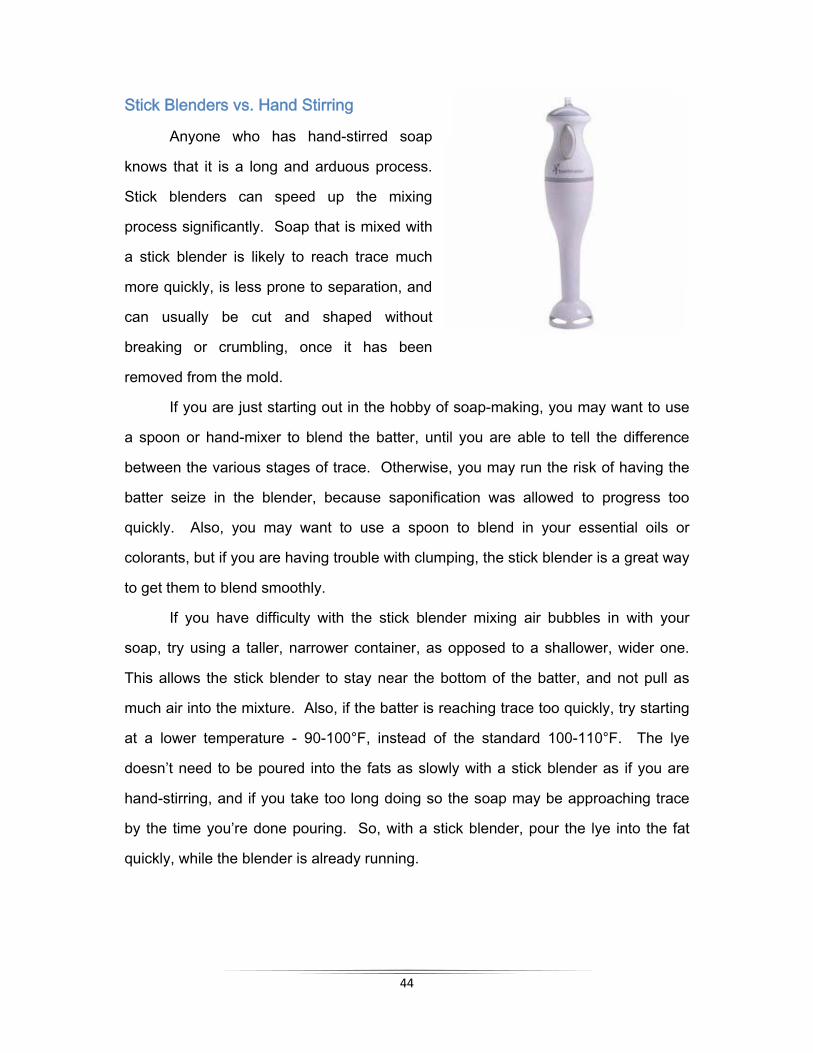
Anyone who has hand-stirred soap
knows that it is a long and arduous process.
Stick blenders can speed up the mixing
process significantly. Soap that is mixed with
a stick blender is likely to reach trace much
more quickly, is less prone to separation, and
can usually be cut and shaped without
breaking or crumbling, once it has been
removed from the mold.
If you are just starting out in the hobby of soap-making, you may want to use
a spoon or hand-mixer to blend the batter, until you are able to tell the difference
between the various stages of trace. Otherwise, you may run the risk of having the
batter seize in the blender, because saponification was allowed to progress too
quickly. Also, you may want to use a spoon to blend in your essential oils or
colorants, but if you are having trouble with clumping, the stick blender is a great way
to get them to blend smoothly.
If you have difficulty with the stick blender mixing air bubbles in with your
soap, try using a taller, narrower container, as opposed to a shallower, wider one.
This allows the stick blender to stay near the bottom of the batter, and not pull as
much air into the mixture. Also, if the batter is reaching trace too quickly, try starting
at a lower temperature - 90-100°F, instead of the standard 100-110°F. The lye
doesn’t need to be poured into the fats as slowly with a stick blender as if you are
hand-stirring, and if you take too long doing so the soap may be approaching trace
by the time you’re done pouring. So, with a stick blender, pour the lye into the fat
quickly, while the blender is already running.

45
Superfatting
For those with
sensitive or dry skin, a
process known as
superfatting can result in
an even more luxurious
and moisturizing soap.
Superfatted soap
contains, as it sounds,
more fat than other soaps, which makes it less harsh on skin; however, if too much
fat is used, it can leave users with a greasy feel to their skin after it is rinsed away.
Superfatting can be accomplished by, obviously, adding extra fat to the soap; this
would take place during the trace stage, after saponification, so that the superfatting
oils do not interact with the lye. Another superfatting process, known as superfat
discounting, or lye discounting, accomplishes the same ratio of fats to lye, by adding
the same amount of fat, but less lye. Superfatting by adding extra oil after
saponification allows the soap-maker to have greater control over the amount of oils
left in the soap. For example, if you use a mixture of 95% olive oil and 5% cocoa
butter as your base, and calculate the lye for 5% excess fat level, the 5% leftover will
be a mixture of olive oil and cocoa butter; it may be all olive oil, all cocoa butter, or
any mixture in between. Therefore, if you want to use cocoa butter for superfatting,
and you want to be assured that the leftover oil is all cocoa butter, your best bet is to
use all olive oil, with a lye calculation for 1% excess fat level, and add the cocoa
butter during the trace stage. This way you know that the final product contains 1%
olive oil and 5% cocoa butter.
Adding the oil at the trace stage also keeps the oil in its natural state,
unaffected by the lye and providing instant nourishment to the skin when used.
When adding oil during the trace stage, use an amount of lye calculated to yield 1%

46
excess fat; otherwise, the soap will be too oily, because in addition to the oil you add
it will have excess fat from the depleted amount of lye during saponification. Also,
when calculating the amount of lye needed, be sure not to include the oil you plan to
add during trace.
47
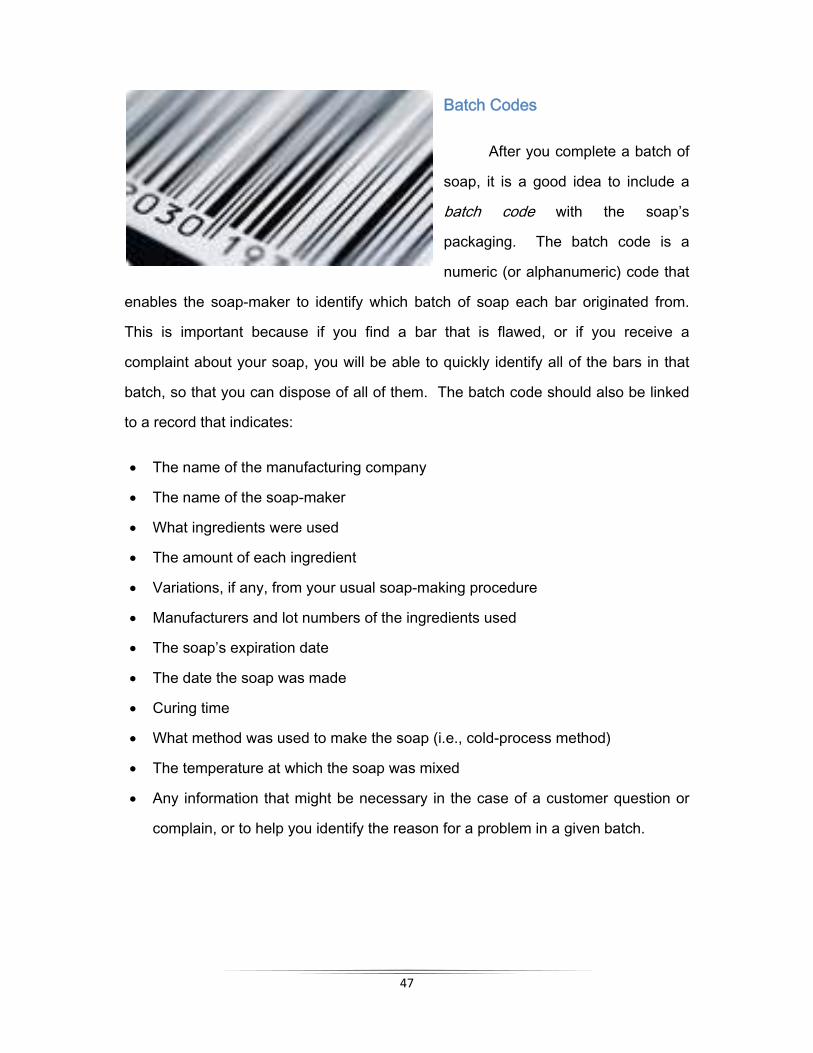
Batch Codes
After you complete a batch of
soap, it is a good idea to include a
batch code with the soap’s
packaging. The batch code is a
numeric (or alphanumeric) code that
enables the soap-maker to identify which batch of soap each bar originated from.
This is important because if you find a bar that is flawed, or if you receive a
complaint about your soap, you will be able to quickly identify all of the bars in that
batch, so that you can dispose of all of them. The batch code should also be linked
to a record that indicates:
• The name of the manufacturing company
• The name of the soap-maker
• What ingredients were used
• The amount of each ingredient
• Variations, if any, from your usual soap-making procedure
• Manufacturers and lot numbers of the ingredients used
• The soap’s expiration date
• The date the soap was made
• Curing time
• What method was used to make the soap (i.e., cold-process method)
• The temperature at which the soap was mixed
• Any information that might be necessary in the case of a customer question or
complain, or to help you identify the reason for a problem in a given batch.

48
Types of Soap-Making Oils
There are a variety of oils that can be used in the soap-making process. Each
oil has different properties, making the saponification process a bit different for each,
and resulting in different qualities in the soap produced. Each oil must also be used
in a slightly different quantity. Oils indicated for use at the trace stage are
superfatting oils, and should not be taken into consideration when calculating lye
content for your recipe.
Table 1
Oil Properties Amount Used When Added
Aloe Vera Liquid/Gel
Soothing and healing Up to 10% in addition to base
Trace
Apricot Kernel Oil Good moisturizer; helps soften skin
1-2 ounces per pound of fats
Trace
Avocado Oil Preservative/antioxidant; great moisturizer; contains vitamins A, B, D, E, and lecithin; good for baby soap, and beneficial for dry or wrinkled skin
Up to 30% of base
Base oil
Beeswax Makes a harder bar of soap; contains a high percentage of unsaponifiables; skin protectant, often used in lip balms and hand salve
1 ounce per pound of soap
Base oil
Calendula Oil Heals a variety of skin damage
1 2/3 tablespoons per 5 pounds of soap at trace, or
Trace/base oil

49
up to 20% as base
Canola Oil Less saturated, can be slow to saponify; needs to be mixed with other saturated fats/oils; can be used in place of more expensive oils
Up to 50% of base
Base oil
Carrot Oil Preservative; contains vitamin A
Up to 10% of base
Base oil
Castor Oil Moisturizing; produces a hard soap
Up to 30% of base
Base oil
Cocoa Butter Makes soap harder; excellent skin softener and lubricant; has a natural chocolate scent
1 ounce per pound of fats at trace, or 15% of base
Trace/base oil
Coconut Oil Makes great lather, but can be drying to skin if too high a percentage of base oils; will make a very hard white soap; saturated fat
20-30% of base Base oil
Cottonseed Oil Produces think and lasting lather; has emollient properties; can be vulnerable to spoilage depending on the season
Up to 25% of base
Base oil
Emu Oil Helps draw other oils into the skin, increasing their efficacy
1 ounce per pound of soap
Trace
Evening Primrose Oil
Helps skin defend against infection or
2 tablespoons per 5 pounds of soap
Trace

50
inflammation; not recommended for oily complexions
Grapefruit Seed Oil
Preservative; antioxidant; contains vitamin C
Up to 10% of base
Base oil
Hazelnut Oil Moisturizing; highly unsaturated
Up to 20% of base
Base oil
Hemp Oil Often used in lotions; excellent moisturizer
2 tablespoons per pound of fats
Trace
Honey Not an oil, but an additive; helps retain moisture on skin’s surface
2 tablespoons per pound of fats
Trace
Jojoba Oil Often used in shampoos; moisturizing; has antibacterial properties
2 tablespoons per pound of fats
Trace
Kukui Nut Oil Quickly absorbed by skin; great for moisturizing after sun exposure; offers relief for eczema, psoriasis, and acne
2 tablespoons per 5 pounds of fats, added at trace; or, 10-20% of base
Trace/base oil
Lard Made from pig fat; cheap, easily obtainable; makes a white, lathery bar of soap; without other oils, can be soft and not work well in cold water
Up to 70% of base
Base oil
Macadamia Oil Slightly expensive; long shelf life; great skin
1 ounce per pound of soap
Trace

51
conditioner Mango Butter Great moisturizer 5% added at
trace; or, up to 15% of base
Trace/base oil
Monoi/Monoi de Tahiti Oil
Made from coconuts; can be expensive; great moisturizer
Up to 60% of base
Base oil
Neem Oil Can treat a variety of skin disorders, such as dandruff
Up to 40% of base
Base oil
Olive Oil Excellent base oil; avoid extra virgin, the lower the grade the better; moisturizes and softens skin; very mild
Up to 100% of base
Base oil
Palm Kernel Oil Has most of the same qualities as palm oil; lathers well, makes a hard soap
20-30% of base Base oil
Palm Oil (Vegetable Tallow)
Makes hard soap; mild; good substitute for tallow in all-vegetable soaps; soothes and moisturizes dry skin
20-30% of base Base oil
Peanut Oil Preservative; long-lasting lather; highly unsaturated, prone to spoilage; contains vitamin E
Up to 20% of base
Base oil
Safflower Oil Unsaturated oil; moisturizing
20-60% of base Base oil
Sesame Seed Oil Said to be good for psoriasis, eczema,
Up to 10% in addition to base
Base oil

52
rheumatism, and arthritis; moisturizing; strong nutty scent; makes a soft bar unless used in conjunction with other, more saturated oils
Shea Butter Lots of substances that don’t interact with lye, and stay in soap to nourish skin
1 2/3 tablespoons per 5 pounds of fats, added at trace, or up to 20% of base
Trace/base oil
Soybean Oil/Vegetable Shortening
Cheap, readily available; produces mild, stable lather; makes hard soap
Up to 50% of base
Base oil
Sunflower Oil Preservative; less expensive alternative to olive oil; contains vitamin E; less saturated oil, must be mixed with more saturated oils; can make soap take longer to trace and harden
15-20% of base Base oil
Sweet Almond Oil Great moisturizer; makes a stable lather
1 ounce per pound of fats
Trace
Vitamin E Oil Preservative; antioxidant; great for skin
Up to 10% in addition to base
Trace
Wheat Germ Oil Preservative; thick, antioxidant; rich in vitamin E; nourishes dry skin; soothing for skin conditions such as
1 ounce per pound of fats
Trace

53
psoriasis and eczema; prevents and reduces scarring and stretch marks; keep refrigerated

54
Properties of Fatty Acids
Each oil is composed of fatty acids, and each type of fatty acid has certain
properties. Below is a list of terms that you may see, used to describe oils, or the
fatty acids contained therein. Knowing what each term means can help you to
determine which oils to use, based on the percentage of each type of fatty acid each
one contains.
Table 2
Type of Fatty Acid Properties Examples of oils containing it
Lauric Makes a hard bar, with rich lather
Coconut oil, palm kernel oil
Linoleic Skin-conditioning Grapeseed oil, hemp oil Myristic Makes a hard bar, with
rich lather Coconut oil, palm kernel oil, tallow
Oleic Skin-conditioning Hazelnut oil, olive oil, sweet almond oil
Palmitic Makes a hard bar, with stable lather
Palm oil, tallow, cocoa butter
Ricinoleic Skin-conditioning; makes rich, stable lather
Castor oil
Stearic Makes a hard bar, with stable lather
Cocoa butter, mango butter, shea butter
55
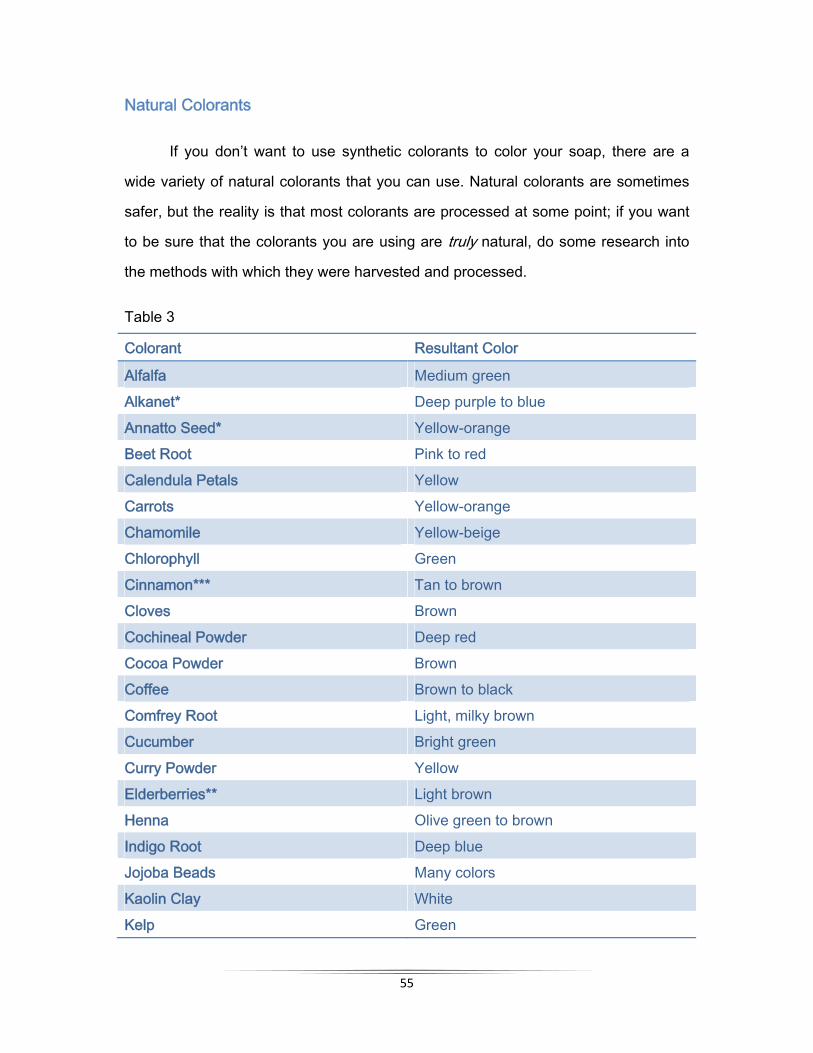
Natural Colorants
If you don’t want to use synthetic colorants to color your soap, there are a
wide variety of natural colorants that you can use. Natural colorants are sometimes
safer, but the reality is that most colorants are processed at some point; if you want
to be sure that the colorants you are using are truly natural, do some research into
the methods with which they were harvested and processed.
Table 3
Colorant Resultant Color
Alfalfa Medium green Alkanet* Deep purple to blue Annatto Seed* Yellow-orange Beet Root Pink to red Calendula Petals Yellow Carrots Yellow-orange Chamomile Yellow-beige Chlorophyll Green Cinnamon*** Tan to brown Cloves Brown Cochineal Powder Deep red Cocoa Powder Brown Coffee Brown to black Comfrey Root Light, milky brown Cucumber Bright green Curry Powder Yellow Elderberries** Light brown Henna Olive green to brown Indigo Root Deep blue Jojoba Beads Many colors Kaolin Clay White Kelp Green
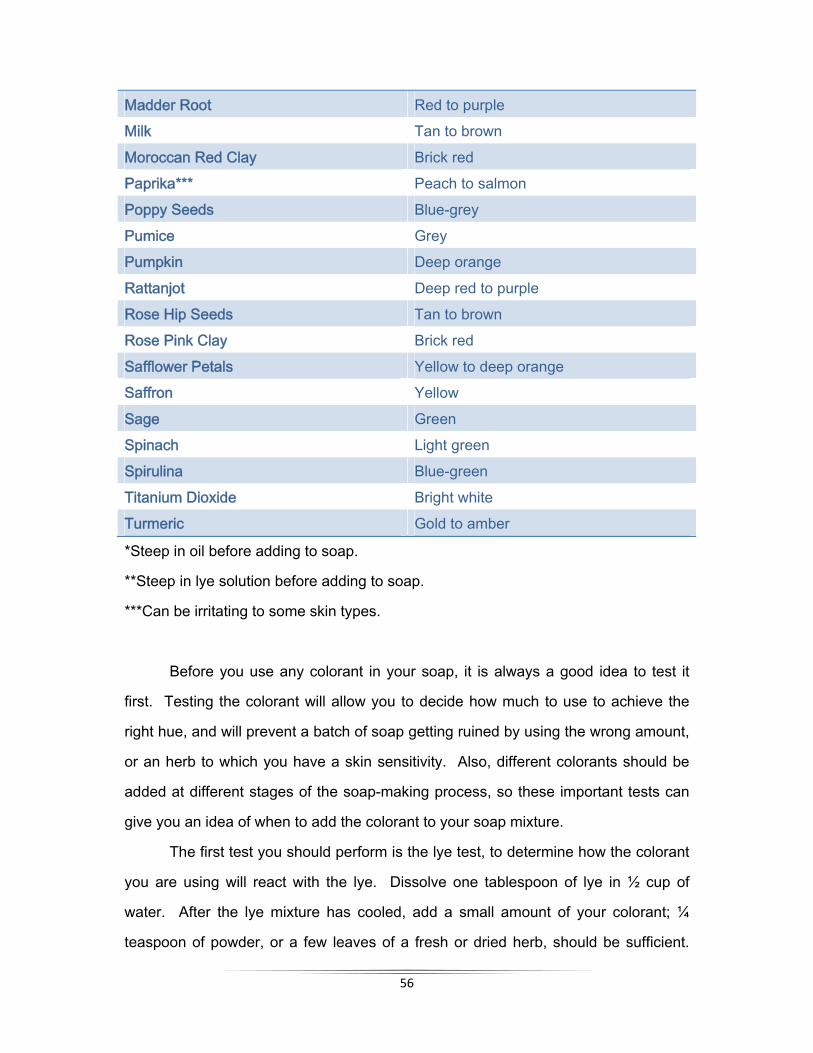
56
Madder Root Red to purple Milk Tan to brown Moroccan Red Clay Brick red Paprika*** Peach to salmon Poppy Seeds Blue-grey Pumice Grey Pumpkin Deep orange Rattanjot Deep red to purple Rose Hip Seeds Tan to brown Rose Pink Clay Brick red Safflower Petals Yellow to deep orange Saffron Yellow Sage Green Spinach Light green Spirulina Blue-green Titanium Dioxide Bright white Turmeric Gold to amber
*Steep in oil before adding to soap.
**Steep in lye solution before adding to soap.
***Can be irritating to some skin types.
Before you use any colorant in your soap, it is always a good idea to test it
first. Testing the colorant will allow you to decide how much to use to achieve the
right hue, and will prevent a batch of soap getting ruined by using the wrong amount,
or an herb to which you have a skin sensitivity. Also, different colorants should be
added at different stages of the soap-making process, so these important tests can
give you an idea of when to add the colorant to your soap mixture.
The first test you should perform is the lye test, to determine how the colorant
you are using will react with the lye. Dissolve one tablespoon of lye in ½ cup of
water. After the lye mixture has cooled, add a small amount of your colorant; ¼
teaspoon of powder, or a few leaves of a fresh or dried herb, should be sufficient.

57
Take note of what happens to the mixture after a few minutes, an hour, and 24
hours.
If you like the results of the lye test, move on to the oil test. Heat up about 4
ounces of oil – be sure to use whatever oil you plan on using in your recipe, so that
the results will be accurate. Add the colorant as you did with the lye mixture, and
check the solution at the same intervals.
If you like the way the colorant reacted with both the lye and the oil, then it
might be time to move on to testing the colorant in a small batch of soap. If the
colorant reacted better with the lye, then add it to the lye-water mixture, before it is
mixed with the oils. If the colorant
reacted better with the oils, then add
it to the base oils, or add it at trace.
As always, take note of how much
you used, when it was added, and
what the results were; this way, you’ll
be able to duplicate the results, or
make any necessary changes.

58
Other Soap-Coloring Options
If the natural colorants don’t work for you, or are too expensive or
unpredictable, there are a variety of synthetic colorants that can be used. Pigments,
micas, and FD&C colorants are some of these.
Pigments are colorants that were originally mined, but now, due to FDA
regulations, are manufactured in laboratories. Many natural oxides contain toxic
materials, so the FDA chose to approve only synthetic colorants for use in soaps and
cosmetics. The synthetically made pigments have the same molecular structure as
the natural ones, but they have a low enough concentration of toxic metals that they
are considered “safe” by the FDA. Pigments tend to be pretty stable, and the color
that they will impart to your soap is
predictable. The liquids are extremely
easy to use, but the powders must be
mixed with liquid before they are added
to the soap batter, and they may clump.
The easiest way to liquefy the colorant
powder is to put a tiny bit of rubbing
alcohol into a bowl – ¼ teaspoon is
probably enough – and then add some powder. Mix until all of the powder has
dissolved in the alcohol. Mix the solution into the soap batter at the correct stage; if
the batter is not your desired hue, mix more colorant solution. Another method of
mixing the powdered colorant is to combine it with liquid glycerin, in a ratio of 2 parts
glycerin to 1 part colorant powder. (The advantage of the liquid colorants is that this
process is unnecessary; the colorant can be added, one drop at a time, until the
soap has achieved the desired hue.)
FD&C colorants are also manufactured in a laboratory. By way of
comparison, they are easier to use than many pigments, and provide a much wider
range of colors. There is some debate over the safety of FD&C colorants, because

59
in the past, the FDA has recalled some of these colorants due to safety concerns.
However, this fear is, most likely, unfounded. FD&C colorants are in almost all of the
processed foods we eat, so the miniscule amount that is in soap is not really cause
for concern. FD&C colorants are inexpensive, and very easy to use; they are great
for use in melt-and-pour soap, but they don’t usually remain stable in cold-process
soap, due to its high alkalinity.
Micas are a combination of natural and synthetic materials. The micas
themselves are natural material; after they are mined, they are then coated with
FD&C colorants, or pigments, to provide them with color. Shimmery micas are
normally used to give color to makeup, but can be used for soap as well. Because of
their metallic sheen, micas can only display their color by reflecting light; therefore,
they work best in translucent soaps. They blend very smoothly, but a larger amount
is required than if you were coloring the soap with other colorants. Micas also look
nice in cold-process soap, but because some of them are coated with FD&C
colorants, they should be tested before use.
When the colorant you used transfers unintentionally, and alters the look of
the intended design, this is referred to as bleeding, or color migration. This usually
occurs in melt-and-pour soaps, because water is mixed with the soap base to melt it,
and many colorants are water-soluble. Therefore, if you want to make a soap that,
instead of being a solid color, has a pattern or design, your best bet is to use
colorants that are oil-soluble; another
option is to use colorants that aren’t
soluble, and color the soap via
dispersion (meaning that the particles
are suspended throughout the soap,
instead of being dissolved in it).
Oxides and most micas will color
soap without bleeding.

60
Sample Recipes
Basic Soap Recipe
For Normal to Oily Skin
Ingredients:
• 598g coconut oil
• 296g vegetable shortening
• 30g beeswax
• 58g avocado oil
• 150g lye (6% discount)
• 368ml distilled water
Mix the lye and water, and set aside. Heat the avocado and coconut oils, vegetable
shortening, and beeswax to approximately 110°F. When both mixtures are at the
proper temperature, mix them together. It should take about 15 minutes for the
mixture to trace. When it does, pour it into the molds, and allow it to set for 24 hours.
After removing it from the molds, allow it to cure for approximately 3 weeks before
packaging/using the bars.
Olive and Palm Soap
For Sensitive or Dry Skin
Ingredients:
• 680g olive oil
• 302g palm oil
• 18g beeswax
• 128g lye (6% discount)
• 374ml distilled water

61
Mix the lye and water, and set aside. Heat the olive and palm oils and beeswax to
approximately 110°F. When both mixtures are at the proper temperature, mix them
together. It should take about 25 minutes for the mixture to trace. When it does,
pour it into the molds, and allow it to set for 24 hours. After removing it from the
molds, allow it to cure for approximately 4 weeks before packaging/using the bars.
Lavender Soap
Ingredients:
• 6.8oz palm oil
• 10.2 oz. coconut oil • 1.7 oz cocoa butter • 10.2 oz. olive oil • 1.7 oz. castor oil • 3.4 oz. sunflower oil • 4.9 oz. lye • 11.3 oz. of water • 2 tablespoons of lightly ground lavender buds • .4 oz. orange essential oil • .4 oz. patchouli essential oil • .8 oz. lavender essential oil
Mix the lye and water, and set aside. Heat the base oils to approximately 110°F.
When both mixtures are at the proper temperature, mix them together. It should take
about 25 minutes for the mixture to trace. When it does, add the essential oils and
lavender buds, and mix thoroughly; pour the batter into the molds, and allow it to set
for 24 hours. After removing it from the molds, allow it to cure for approximately 4
weeks before packaging/using the bars.

62
Basic All-Vegetable Soap
Ingredients:
• 28 oz. coconut oil
• 24 oz. olive oil
• 30 oz. vegetable shortening
• 12 oz. lye
• 32 oz. distilled water
• 1.5 to 4 oz. essential oils/fragrance
Mix the lye and water, and set aside. Heat the base oils to approximately 110°F (can
be anywhere between 95°F and 120°F). When both mixtures are at the proper
temperature, mix them together. It should take about 25 minutes for the mixture to
trace. When it does, add the essential oils, and mix thoroughly; pour the batter into
the molds, and allow it to set for 24 hours. After removing it from the molds, allow it
to cure for approximately 4 weeks before packaging/using the bars.
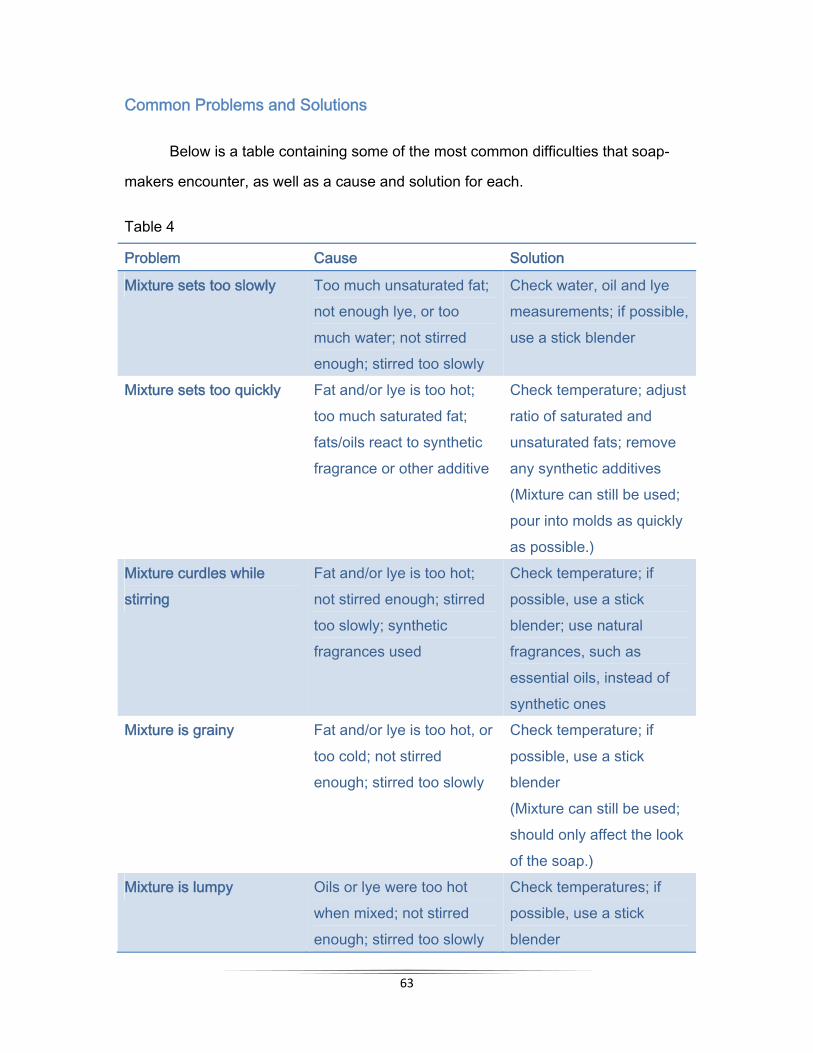
63
Common Problems and Solutions
Below is a table containing some of the most common difficulties that soap-
makers encounter, as well as a cause and solution for each.
Table 4
Problem Cause Solution
Mixture sets too slowly Too much unsaturated fat; not enough lye, or too much water; not stirred enough; stirred too slowly
Check water, oil and lye measurements; if possible, use a stick blender
Mixture sets too quickly Fat and/or lye is too hot; too much saturated fat; fats/oils react to synthetic fragrance or other additive
Check temperature; adjust ratio of saturated and unsaturated fats; remove any synthetic additives (Mixture can still be used; pour into molds as quickly as possible.)
Mixture curdles while stirring
Fat and/or lye is too hot; not stirred enough; stirred too slowly; synthetic fragrances used
Check temperature; if possible, use a stick blender; use natural fragrances, such as essential oils, instead of synthetic ones
Mixture is grainy Fat and/or lye is too hot, or too cold; not stirred enough; stirred too slowly
Check temperature; if possible, use a stick blender (Mixture can still be used; should only affect the look of the soap.)
Mixture is lumpy Oils or lye were too hot when mixed; not stirred enough; stirred too slowly
Check temperatures; if possible, use a stick blender

64
(Soap most likely will be unusable; check after removing from mold.)
Soap won’t trace Not enough lye; too much water; wrong temperature; not stirred enough; stirred too slowly; too high percentage of unsaturated fats in base oil
Check water, oil and lye measurements; check temperature; if possible, use a stick blender; adjust ratio of unsaturated and saturated fats
Layer of oil forms on soap as it cools
Too much fat; not enough lye
Check fat and lye measurements (Soap may still be usable; if it is caustic, or doesn’t lather well, discard it)
Soap separates in mold Not enough lye; not boiled long enough; not stirred enough; stirred too slowly
Check lye measurements; if possible, use a stick blender
Soap leaks clear liquid when cut, or pockets of powdered lye are present
Too much lye; not stirred enough; stirred too slowly
Check lye measurements; if possible, use a stick blender (Soap may still be usable after washing away excess lye, but it is safer to discard the bars)
Soap is soft or spongy Not enough lye; too much water; too much unsaturated fat
Check lye and water measurements; adjust ratio of unsaturated and saturated fats (Soap may be usable after an additional 2-3 weeks of curing; if it is still soft, discard it)
Soap is hard or brittle Too much lye; too much dry ingredients; traced too
Discard; check lye measurements for next

65
long batch; ensure proper tracing time; if possible, use a stick blender
Soap smells rancid Poor quality fat; too much fat; not enough lye
Check lye and fat measurements
Air bubbles in soap Stirred too long Stir by hand, instead of using a stick blender (Soap is still usable)
Mottled/spotted soap Not stirred enough; stirred too slowly; temperature fluctuations during molding
If possible, use a stick blender; stabilizing temperature during molding phase (Soap is still usable)
White powder on cured soap
Hard water; lye not dissolved properly; reaction with air
Use distilled or bottled water; heat water to proper temperature before dissolving lye; seal molding containers (If there is a large quantity of powder, soap is unusable, and must be discarded)
Warped soap Drying conditions not consistent
Dry on a rack, and do not disturb (Soap is still usable; if desired, whittle the soap down, or cut it up for rebatching)
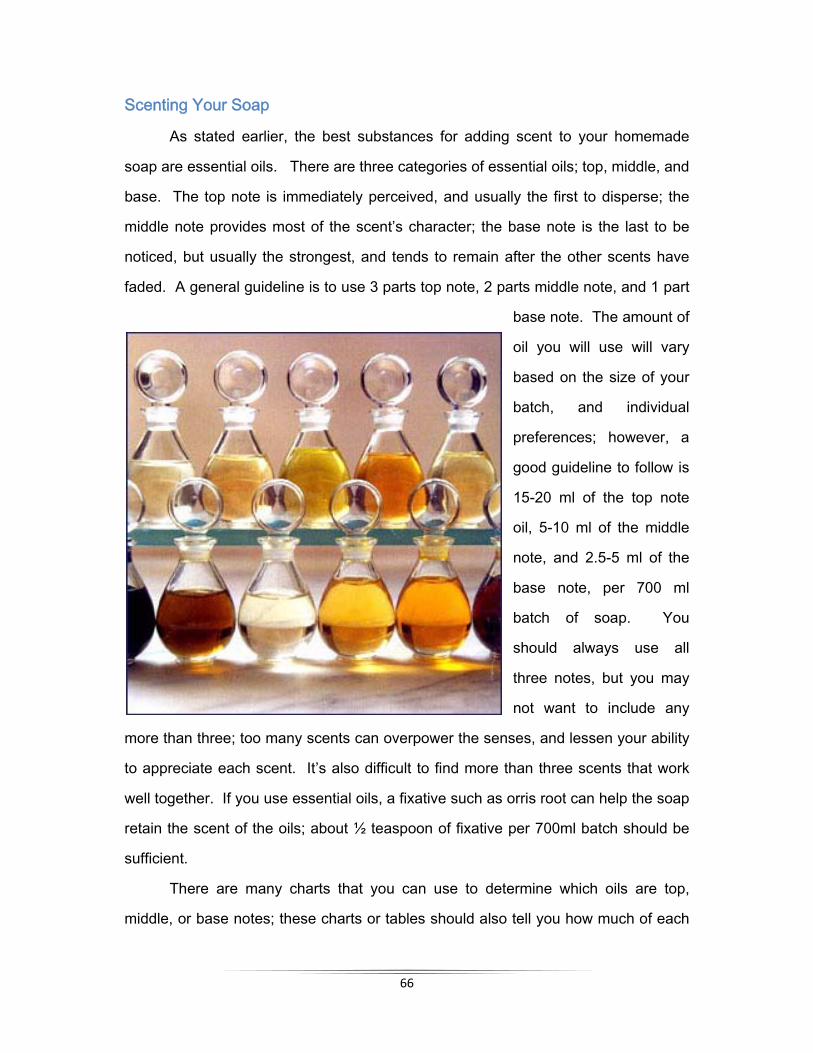
66
Scenting Your Soap
As stated earlier, the best substances for adding scent to your homemade
soap are essential oils. There are three categories of essential oils; top, middle, and
base. The top note is immediately perceived, and usually the first to disperse; the
middle note provides most of the scent’s character; the base note is the last to be
noticed, but usually the strongest, and tends to remain after the other scents have
faded. A general guideline is to use 3 parts top note, 2 parts middle note, and 1 part
base note. The amount of
oil you will use will vary
based on the size of your
batch, and individual
preferences; however, a
good guideline to follow is
15-20 ml of the top note
oil, 5-10 ml of the middle
note, and 2.5-5 ml of the
base note, per 700 ml
batch of soap. You
should always use all
three notes, but you may
not want to include any
more than three; too many scents can overpower the senses, and lessen your ability
to appreciate each scent. It’s also difficult to find more than three scents that work
well together. If you use essential oils, a fixative such as orris root can help the soap
retain the scent of the oils; about ½ teaspoon of fixative per 700ml batch should be
sufficient.
There are many charts that you can use to determine which oils are top,
middle, or base notes; these charts or tables should also tell you how much of each

67
scent to use. However, your personal scent preference may differ from the
recommendations in the charts. The best way to test a scent that you think you’d
like is to gather the essential oils, and test them in a jar, or other container. Dip one
end of a clean cotton swab in each jar of oil (be sure to use a different swab for each
oil, to avoid contamination), and put the swabs into a glass jar. Cover the jar, and
check it after a few minutes, a few hours, and 24 hours. Be sure to take notes on
what you notice – which scent dissipated first, whether one scent overpowered
another, et cetera.
The swab test will give you an idea of whether you like the scents, and how
they blend together. However, to really get a feel for how the scents will interact
when the proper amounts of all three are included, you would have to blend them in
the correct proportions. Mix the three oils in the correct ratio, but use very small
amounts; for example, your recipe calls for 1 tablespoon of oil A, 1 ½ tablespoons of
oil B, and 3 tablespoons of oil C. For the test, use 2 drops of oil A, 3 drops of oil B,
and 6 drops of oil C. (As with the swab test, be sure to use a different pipette for
each oil.) This way, you can avoid wasting the oil, if you decide that you don’t like
the proportional blend. Blend the small amounts of oil together in a glass jar, and
check it at the same intervals as the swab test. After 24 hours, the oil blend should
smell about the same as it will in the soap. If you are testing more than one scent
combination, it may help to have some coffee grounds handy – sniffing the coffee
grounds will cleanse your scent receptors in between each test, so you will get a
more accurate idea of each scent.
If you are having trouble getting your soap to retain its scent, there are several
tricks you can try. If you are following the 100-110°F rule for mixing the fat and lye,
try mixing them together at a slightly lower temperature. The temperature of the
mixtures can be as low as 85°F; as long as the mixtures are within 10°F of one
another, they can be mixed, and the soap will still be fine. Also, the soap does not
necessarily have to be insulated during the molding process, and many soaps aren’t.

68
You can try doing the same with your soap, if you’re having trouble getting your
scent to stick – although, depending on the recipe, it may not produce the desired
result.
If you normally make soap using the cold-process method, you can try the
hot-process method. Unlike the cold-process method, the hot-process method
saponifies the soap before it goes into the mold, so when the essential oils are
added, they won’t react with the already neutralized lye. If you are using ground
herbs, pumice, or other solid additives, soak them in your essential oil blend before
adding them to the soap; they will release the essential oils slowly, and make the
scent last longer.
Beware of citrus oils; these can cause the soap mix to curdle, and should be
used in very small amounts, if at all. Also, citrus oils (and other top-note oils) have a
tendency to disperse sooner, because they have a lower evaporation point than
other, heartier oils. If you want to use citrus oils in your soap, add them at trace,
instead of in the base oil, so they won’t adversely affect the soap-making process. If
there is a scent you love that is prone to disappearing quickly, try using another,
similar scent that sticks around longer. Also, always use top, middle and base notes;
even if you only want a single scent, use other scents that are similar or
complementary, so that the scent will have more staying power.
The best time to mix your essential oils is as the soap batter is beginning to
thicken, but before it has reached the trace stage. If you mix the essential oils any
earlier, some of the oil will evaporate, because the oils are highly volatile. So, mix
them just before you are about to use them. Also, use a spoon to mix the essential
oils with the batter, instead of a stick blender; a stick blender can cause the soap
mixture to seize, at which point you’ll be unable to pour the soap into molds.

69
Selling Your Product
Many amateur soap-makers begin making soap simply because it is a fun and
rewarding hobby. Others, however, hope to turn their hobby into a source of income.
For stay-at-home moms, those who are unemployed or cannot work, or even for
those who want a part-time income, soap-making can be a great idea. With a few
hours’ work, you can turn a minimal investment in equipment and ingredients into a
product that is potentially worth a great deal of money. It is possible to turn a profit
selling soap, but it is not as simple as making the soap and exchanging it for money.
There are lots of factors to take into account, if you want your soap to stand out
against the
competition, and
actually turn a profit.
One of the
benefits of starting a
soap-making
business is that,
unlike a lot of other
entrepreneurial
ventures, the startup
costs are quite low. The basic ingredients – lye, water, and fats – are cheap, and so
is most of the equipment. In fact, most of the equipment is stuff that you probably
already have in your home. So, you can make a good (if plain) bar of soap for a very
low price. The expensive part is the additives – essential oils, herbs, et cetera. If
you want to turn a profit on your soap, you are going to have to shop carefully, and
try to obtain the highest-quality ingredients for the lowest possible price. Otherwise,
the price of your soap will be too high, and people will be unlikely to buy it.

70
Packaging and Presentation
Once your soap is completed, you’ll want to package it to reflect the care,
effort and pride that you put into your product. Hand-made soap is more expensive
than mass-produced brands, and with good reason; the ingredients are of a higher
quality, the results are superior, and it takes longer to make. However, to compete
with the mass-produced soaps, your packaging needs to reflect all of the reasons
that spending the extra money on your soap is worthwhile to the buyer.
With each soap, you’ll want to include a tag with your company’s logo, name
and contact information (or just
your own), as well as a detailed
list of ingredients in the soap, the
properties of the herbs or oils
contained within it, et cetera.
You want to convince the buyer
to purchase your soap for the
first time, and provide them with
enough information to purchase
from you again if they like your
product. You can have tags
printed for you, if you want to
make them really fancy, but it is just as easy (and much cheaper) to make them at
home. Buy white or colored card stock (stiff, heavy-weight printing paper) at any
office supply store, and print your logo or text in a repeating grid pattern on the page.
Cut them with straight scissors, or, to make interesting patterns, use fabric scissors
to make just about any shape you’d like. Use a hole-punch to make a hole in one
corner, and attach them to your soaps with ribbon, yarn, embroidery floss, or any
other decorative string. To make stickers, you can purchase sheets of sticker paper

71
that are pre-cut (intended for address labels or gift tags), or solid pages that you can
cut to any size and shape you’d like.
If your soaps are scented, you’ll want to choose a packaging that allows the
buyer to smell it, to determine if they like the scent, and if it is strong enough. A
good way to do this is to wrap the soap in a cloth mesh bag, which protects the soap
from coming into contact with other bars, while allowing the consumer to smell and
see it. The packaging can be an actual cloth bag, though that will be expensive;
your best bet is to buy a large quantity of mesh cloth, and to cut it into squares or
circles yourself. Then you can tie the top with a ribbon, string, or any decorative
material you like. A small paper tag can be tied to the top of the bag, or placed
inside; you’ll most likely want to include the tag on the outside of the bag, so that
buyers have any information necessary to convince them to purchase from you for
the first time, and so that they know what the soap contains, and what it will do for
their skin.
If the soap is molded into bars (and especially if you want to show off the color
of the soap), you can wrap a square of paper or cardboard around the soap, leaving
a bit of soap exposed on either end; this will allow buyers to see the soap’s color and
texture. If the soaps are created in a candy mold, and you want to show off the
shape or detail on the surface, you could package the soaps in a mesh bag. You
might also want to wrap them in clear cellophane, and seal them with a sticker on the
bottom. If your soap is in plain bars, there are a variety of ways to make it look more
exciting. You can wrap your soaps in colored gift wrap, or patterned printing paper;
be sure to wrap it in wax paper first, though, to avoid discoloration of the soap or
paper.
If you want to make soaps as gifts, or sell them as custom orders, then your
packaging, and even the soap itself, can be even more elaborate. You can create
monogrammed soaps, by using a mold that will create a raised letter on the surface
of the soap; to make this soap even more striking, you can place the molded bar in

72
another mold, with the raised letter resting on the bottom. Pour soap of another
color around the already molded and monogrammed bar; the second soap will fill in
the gaps, and coat the first bar. So, for example, you could have a bar of deep
purple soap, with a white “A” on the surface, or vice versa. You can also create
soaps that have a custom tag, for weddings, anniversaries, christenings, or any other
special event; for these, you may want to put names, birthdays, dates, or any other
information that will help people remember their special day. Scented soaps in cloth
bags are often a good choice for these types of mementos, since the soap will, most
likely, not be used, except as a sachet or decoration.

73
Where to Sell Your Soap
One of the easiest and most cost-effective ways to sell your soap is at craft
fairs, flea markets, farmers’ markets, or other festivals. Tables at these types of
events are generally fairly cheap, and people go there expecting to spend money.
Therefore, if your soap isn’t ludicrously over-priced, odds are pretty good that
someone will consider it a low-cost luxury; people like things that are hand-made, it
is a nice alternative to mass-produced soaps, and they make very nice, but cost-
effective, gifts.
If you don’t have the time to go to craft fairs to sell your product, and can’t find
anyone to go in your stead,
there are other options to
sell your soap. You can try
selling your soap online,
through stores like eBay or
Amazon. These retailers will
take a cut of your profits,
though, and you are
competing with all of the
other people who are trying
to do the same thing you are, which will drive down your prices. If you want to sell
your soap without anyone taking a percentage of the sale price, you can try creating
your own web store. The disadvantage of doing it this way is that you will not
generate a fraction of the traffic that huge websites like eBay get every day. Also, if
you want to use search engines like Bing or Google to bring traffic to your site, you
will need to place bids with them, in order to have your business appear as a
featured result, or near the top of the list.
You can sell it wholesale to retailers, but you will probably get less profit,
since you will be selling it to them for a much lower price than what they will charge
74
the public. Another option is consignment shops, which operate on a similar, but
slightly different, principle; when selling your soap to a retailer, they pay you the
wholesale price upfront, then attempt to sell your product. If the product doesn’t sell,
they lose the money, not you – but, they probably won’t buy from you again.
Consignment shops, on the other hand, pay you as your product sells; they take a
percentage of the sale price, but it is not as high as the chunk that larger retailers will
take. The disadvantage of selling in a consignment shop is that, if the soap doesn’t
sell, you and the shop lose money. Also, there is typically a limited amount of time
that a consignment shop will keep your merchandise on its shelves.

75
FDA Regulation of Soap
In the United States, the Food and Drug Administration (FDA) does not
regulate soap. However, their definition of “soap” is very narrow. In order for your
soap to be considered as such by the FDA, it must consist of alkali, fatty acids, and
water, and very little else. Also, the only claim that you can make, regarding your
soap, is that it cleanses the body. That’s it. Melt-and-pour, hot- and cold-process
soaps all fall into this category, as long as no claims are made regarding what the
soap can do. If, however, you say that your soap moisturizes, soothes dry skin,
helps prevent wrinkles, etc., then it is defined, by the FDA, as a cosmetic and, as
such, is subject to being regulated by the FDA. If you say that it is intended to treat
skin conditions, such as eczema or psoriasis, then it is considered a drug, and is
also subject to FDA regulation. The FDA does not require ingredient labels on
soaps, but consumers appreciate this information; also, if you keep a separate list of
what each ingredient can do, consumers will be able to tell what your soap can do,
without you making any claims on the label.

76
Liability
Many entrepreneurs research the creation and marketing of their product, but
some forget one important detail: liability. In today’s litigious society, there is no way
to safeguard yourself against being sued. However, there are ways that you can
protect your personal assets, in case of a lawsuit.
Many business owners believe that their homeowner’s insurance will cover
them in case of a lawsuit. This is not usually the case. Some policies will cover a
small amount of business property (up to $2,500, usually), but even these won’t
cover lawsuits. If someone sues you for any reason, you are personally liable for not
only damages awarded in the suit, but also any lawyer’s fees and court fees incurred
by both parties. Even if you win the suit, you will still be responsible for your own
lawyer’s fees. A good business insurance policy will include liability coverage, so
that you will not be personally responsible for any such costs that are incurred.
However, make sure you understand any limitations on your policy – for example,
the cap on settlement payouts, or the number of settlements the policy will cover
over a set period of time.
Lawsuits are not the only liability to consider when starting your own business.
What happens if the store you are selling your product in catches fire, and you lose
thousands of dollars’ worth of merchandise? What if your home is robbed and all of
your equipment is stolen? The average business insurance policy will include
property insurance, which will not only pay for your lost property and equipment, but
will also cover your lost wages while you are unable to make your product. (Some of
these policies, however, only cover your property while it is on-premises; be sure to
check your policy to see if it covers your property while at a craft show or retailer. If
not, many companies have policy extensions that you can purchase to ensure
coverage.) Some policies cover 100% of the income you were generating prior to
your loss, while others cover only a portion, so be sure to ask about your loss of
income coverage.

77
Aside from the advantages of having your property and equipment protected,
your business insurance offers protection to any retailers that sell your product. In
fact, many retailers and craft shows will request – and in some cases, require – proof
of insurance before they allow you to sell your product there. Having business
insurance signals to the retailer with whom you do business that you are serious
about your business, and about protecting your assets, which may make them more
likely to do business with you.
The cost of a business insurance policy can vary greatly. Be sure to update
your coverage based on the amount of property that you have; the cost of the policy
is based on the amount of coverage you need. You won’t want to pay extra for a
policy that is too large for your needs, if you downsize; at the same time, your policy
may not be large enough after a major purchase. Also, check the types of losses
that are covered in the policy. Some policies will cover fire, but not theft; there are
very few policies which cover earthquake or flood damage, and it usually costs extra.
Ask about your deductible – the amount that you are responsible to pay, before the
insurance company covers anything. Policies with a higher deductible are usually
cheaper, because the insurance company has a smaller chance of actually having to
pay out; however, remember that you are taking a risk, because any money you
save on the premium is money that you may have to pay to cover your own costs, if
your loss falls below the deductible amount.
If your annual sales are low, or if you are selling only to people that you know,
then you may choose not to have business insurance. It is entirely your decision
whether investing in business insurance is right for you. However, it is important to
note that, while your premium may seem like a waste of money if nothing happens,
you will be very glad to have that policy if something does happen.
It is generally a good idea to maintain a customer complaint file, to keep track
of any complaints you happen to receive. Track the customer who complained, the
complaint date, what the complaint was, and what you did to resolve the complaint.
78
If you are utilizing a batch code system, you can look up the specific batch the
customer is complaining about, and find out if you did anything out of the ordinary
with that particular batch. The batch notes will help you determine what went wrong,
and, if necessary, dispose of the defective batch to prevent any further issues.
(Keeping track of your complaints, and what you do to resolve them, will also help in
case of a lawsuit, or other action against your company.)

79
Glossary
Additive – Any ingredient that is not part of the soap itself. Anything in your soap
other than lye, water and oil, is considered an additive. This includes any materials
you add at trace, as well as any unsaponified oils that are present after the
neutralization process has occurred.
Alkali – A base, or substance with a pH between 7 and 14.
Antioxidant – A substance that prevents oxidation, or spoilage.
Batch Code – A numeric (or alphanumeric) code that helps the soap-maker identify
all of the soaps from a given batch, and any pertinent information about that batch.
Batch Code Sheet – A record, linked to the batch code, which contains any and all
pertinent information about a batch of soap; what it contains, who made it, etc.
Caustic – An adjective used to describe a corrosive substance, which damages
organic material or tissue on contact. Lye is caustic, and should be handled with
great care.
Cold-Process Method – Method of soap-making in which no external heat is added
to the soap batter after it is mixed. Saponification takes place while the soap is
molding.
Deliquescent – Adjective used to describe a material that is prone to dissolve or melt
when in contact with open air.
Detergent – A chemical that acts in a manner similar to soap, but is synthetically
made.
Emulsifier – A substance that allows one material to dissolve into another, immiscible
material.

80
Essential oil – A volatile oil which is extracted from plant matter by distillation,
expression, or chemical solvents.
Exothermic – Characterized by a release of heat; often used to describe chemical
reactions in which heat is a byproduct.
Fatty Acids – Compounds found in fat molecules; primarily responsible for soap’s lathering,
hardness, and conditioning characteristics.
Fixatives – Substances used to slow the process of evaporation; commonly used in
conjunction with essential oils.
Fixed oil – An oil which can be raised to a high temperature without evaporating.
Flash point – The lowest temperature at which a substance, or its vapors, will ignite,
in the presence of a source of ignition.
Fragrance oils – Blends of synthetic aromatic chemicals, diluted with a carrier such
as alcohol, propylene glycol, vegetable oil or mineral oil.
Full-Boiled Method – Method of soap-making most commonly favored by commercial
soap-makers. All ingredients are combined at once, and cooked until saponification
is complete.
Gel Phase – An early stage of the saponification process, when the soap mixture
temporarily becomes a clear gel; the mixture later returns to its original opacity and
thickness. Not all soap recipes will have a gel phase.
Glycerin – A thick, sticky, clear substance that is a byproduct of the soap-making
process. Very moisturizing, and a great skin conditioner.
Hard Water – Water that has an overabundance of minerals. Commonly leaves
mineral deposits on surfaces, and reduces the effectiveness of surfactants.
81
Hot-Process Method – Method of soap-making in which the batter is “cooked” after
the lye, water and oils are mixed together. Saponification takes place after the trace
stage, while the mixture is heated.
Humectant – Moisturizer.
Hydrophilic – Attracted to water. Water, and substances that can be dissolved in it,
are hydrophilic.
Hydrophobic – Repelled by water. Oil, and substances that can be dissolved in it,
are hydrophobic.
Hygroscopic – An adjective used to describe a material that has a tendency to
absorb moisture from the air.
Immiscible – A substance into which a material cannot dissolve.
Lye – Sodium hydroxide (NaOH) or potassium hydroxide (KOH). Sodium hydroxide
makes hard soap; potassium hydroxide makes softer soap, and is typically used to
make liquid soap or shaving cream.
Lye discount – The process of withholding a percentage of the lye needed to
saponify the fats from the soap mixture. For example, a 5% lye discount means that
only 95% of the amount of lye necessary to neutralize all of the oils is actually used.
Also called superfat discounting.
Material Safety Data Sheet (MSDS) – Contains important handling and safety
information for the given material. Always review the MSDS before working with a
new material.
Melt-and-Pour Process – A method of soap-making in which premade soap base is
used to make soap. The soap-maker melts the soap base, adds his or her own

82
additives, and remolds the bars. Easy and safe, but little control over ingredient
quality, and can be expensive.
Micelles – Clusters of molecules that surround and suspend another. Soap
molecules form micelles to surround and suspend grease particles.
Oleochemicals – Chemicals derived from fats and oils.
Petrochemicals – Chemicals derived from fossil fuels.
pH – Scale used to measure the acidity or alkalinity of a substance. The pH of a
substance can range from 0, for very acidic materials, to 14 for alkaline (or basic)
substances, with 7 being neutral.
pH Tongue Test – Quick test to determine pH level of soap.
Phenolphthalein – A reagent that can be used to detect high levels of pH. This
chemical is clear, and will turn pink if it comes into contact with a substance that has
a pH over 7; the darker the pink, the higher the pH.
Potassium Hydroxide – KOH; also called potash, caustic potash, potash lye, and
potassium hydrate. Commonly used to make liquid soaps.
Rebatching (Rebatch Process) – Method of soap-making in which previously made
soap is melted and remixed to form new bars.
Saponification – Refers to the chemical process in which lye and oils are combined,
and neutralize one another, forming soap.
Saponification Value (SAP value) – The number of milligrams of lye required to
completely saponify one gram of a specific fat.
Saturated Fats – Fats that are solid at room temperature. These fats make a very
hard bar of soap, and must be melted before use.

83
Seize – The phase of cold-process or hot-process soap-making when saponification
is complete, and the batter begins to solidify, and becomes too thick to mix or pour
into a mold. The soap must be molded before this phase.
Soap – Anionic surfactant. Technically a salt, produced via the chemical reaction
between lye and fat.
Sodium Hydroxide – NaOH; also called lye, ascarite, caustic soda, soda ash, soda lye,
sodium hydrate, and white caustic. Commonly used to make solid soaps.
Sodium Tallowate – Rendered beef tallow.
Superfatting – Soap-making process in which fats or oils are added to the soap
mixture in excess of what is needed to completely saponify the lye.
Trace – The point, during cold- or hot-process soap-making, when the batter
becomes noticeably thicker. When a spoonful of batter, drizzled across the surface
of the mixture, leaves a visible trace, the trace stage has begun. At this point, the
saponification process is 80-90% complete.
Triglycerides – Compound present in fats and oils; made up of three fatty acids,
attached to a glycerin. When it reacts with lye, it yields soap and glycerin.
Unsaturated Fats – Fats that are liquid at room temperature. Must be combined with
saturated fats to create a hard bar of soap. Can be used to make liquid soap.
Volatile – Adjective used to describe materials (such as essential oils) that become a
vapor at relatively low temperatures.
Warm-Process Method – Method of soap-making in which the filled soap molds are
saponified in an oven, instead of being boiled (hot-process method) or saponifying in
the molds (cold-process method).

![Untitled-2 [msdoleofzc.com]msdoleofzc.com/images/msd_global_fzc_brochure_oleo... · This anionic surfactant is used as an active ingredient to formulate powder detergent. The performance](https://static.documents.pub/doc/80x56/5ecda5c61676b15e5e3f528a/untitled-2-this-anionic-surfactant-is-used-as-an-active-ingredient-to-formulate.jpg)


