Más consejos para la instalación...........................................................................................21
Další instalační tipy................................................................................................................22
Yderligere tips til installationen ............................................................................................23
Norwegan title .....................................................................................................................24
Swedish title .........................................................................................................................25
Finnish title ..........................................................................................................................26
(*)
I. Collector Assembly
SolarVenti ® www.solarventi.com
1
I. Collector Assembly
SV3 & SV7
[mm] SV3 SV7
I 524 704
II 704 1004
III 262 320 IV 175 175
V 240 460 PV Cell
303x180 6 W
350x350 12 W
PV
-cel
l
I. Collector Assembly
SolarVenti ® www.solarventi.com
2
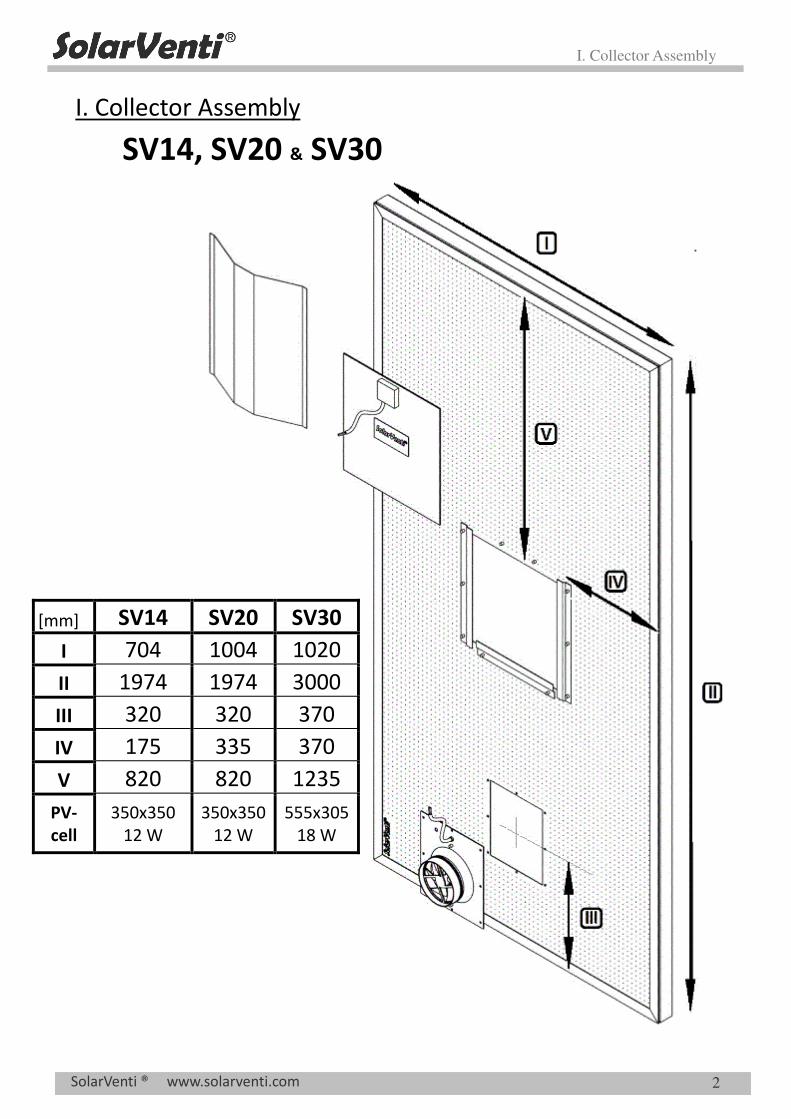
I. Collector Assembly
SV14, SV20 & SV30
[mm] SV14 SV20 SV30
I 704 1004 1020
II 1974 1974 3000
III 320 320 370
IV 175 335 370
V 820 820 1235
PV-cell
350x350 12 W
350x350 12 W
555x305 18 W
II. Wall Mounting Kit
SolarVenti ® www.solarventi.com
3
II. Wall Mounting Kit
II. Wall Mounting Kit
SolarVenti ® www.solarventi.com
4
1
[mm] I II III IV
SV3 262 420 600 536
SV7 320 600 900 716
SV14 320 600 1800 716
SV20 320 800 1800 1016
SV30 375 800 2800 1032
II. Wall Mounting Kit
SolarVenti ® www.solarventi.com
5
2
II. Wall Mounting Kit
SolarVenti ® www.solarventi.com
6
3
(*)
III. Angle Wall Mounting Kit
SolarVenti ® www.solarventi.com
7
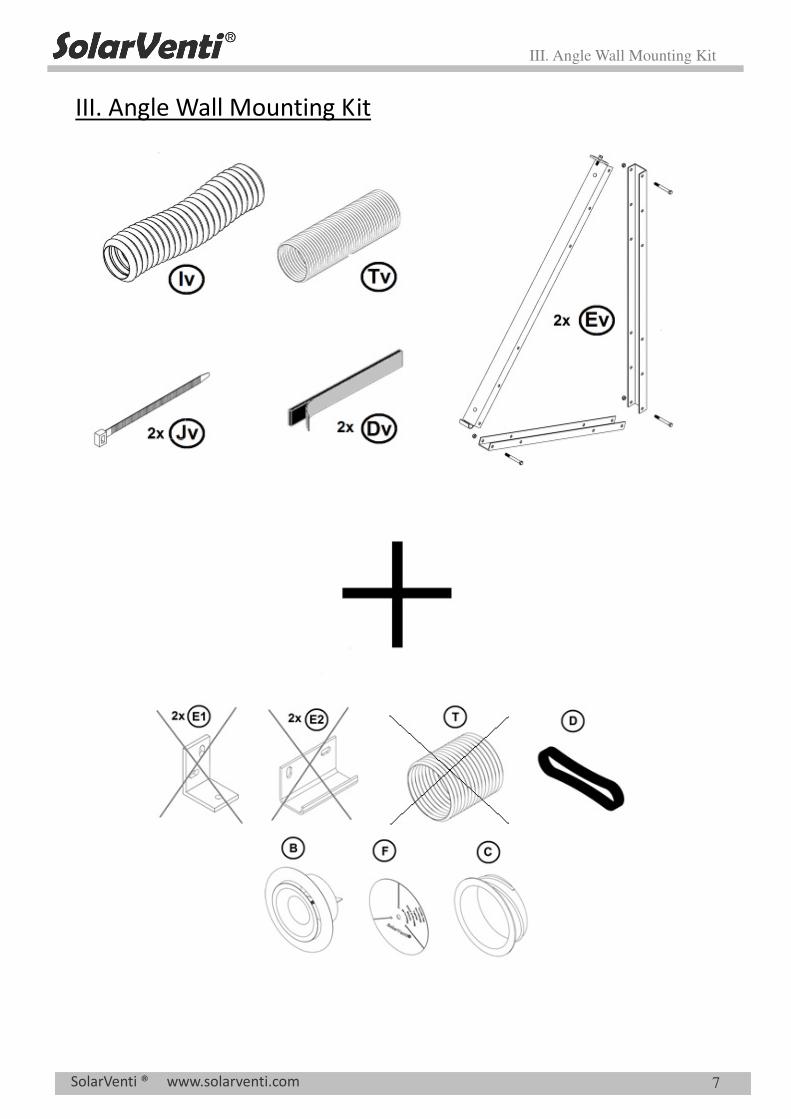
III. Angle Wall Mounting Kit
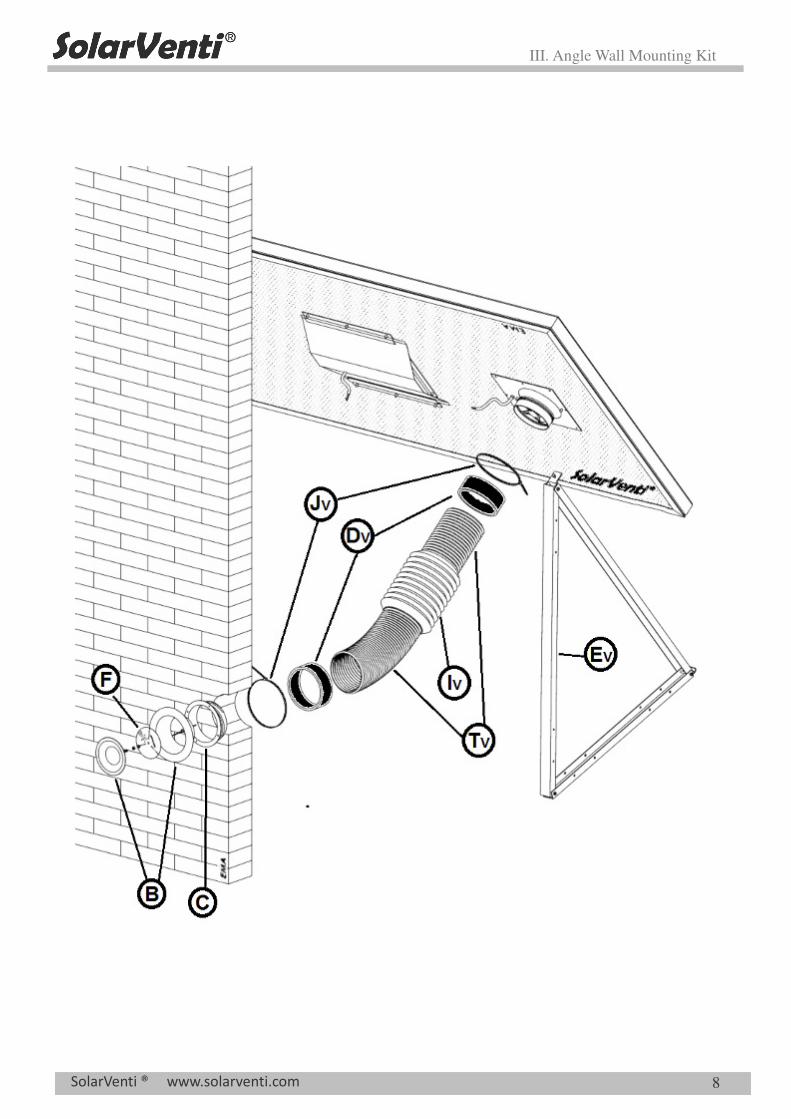
III. Angle Wall Mounting Kit
SolarVenti ® www.solarventi.com
8
III.I Stand Assembly
SolarVenti ® www.solarventi.com
9
III.I Stand Assembly
III.I Stand Assembly
SolarVenti ® www.solarventi.com
10
SV7-14 SV20-30 y 20° 28°
Option 1
Option 2 (*)
III.I Stand Assembly
SolarVenti ® www.solarventi.com
11
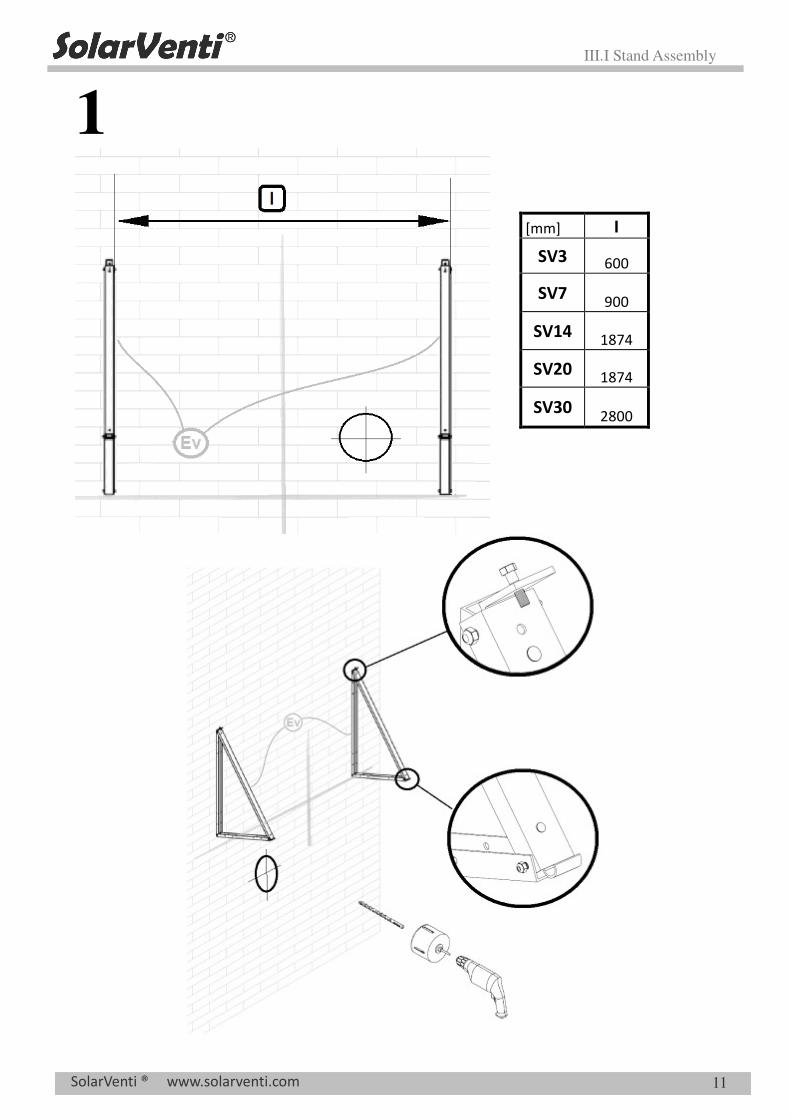
1
[mm] I
SV3 600
SV7 900
SV14 1874
SV20 1874
SV30 2800
III.I Stand Assembly
SolarVenti ® www.solarventi.com
12
2
III.I Stand Assembly
SolarVenti ® www.solarventi.com
13
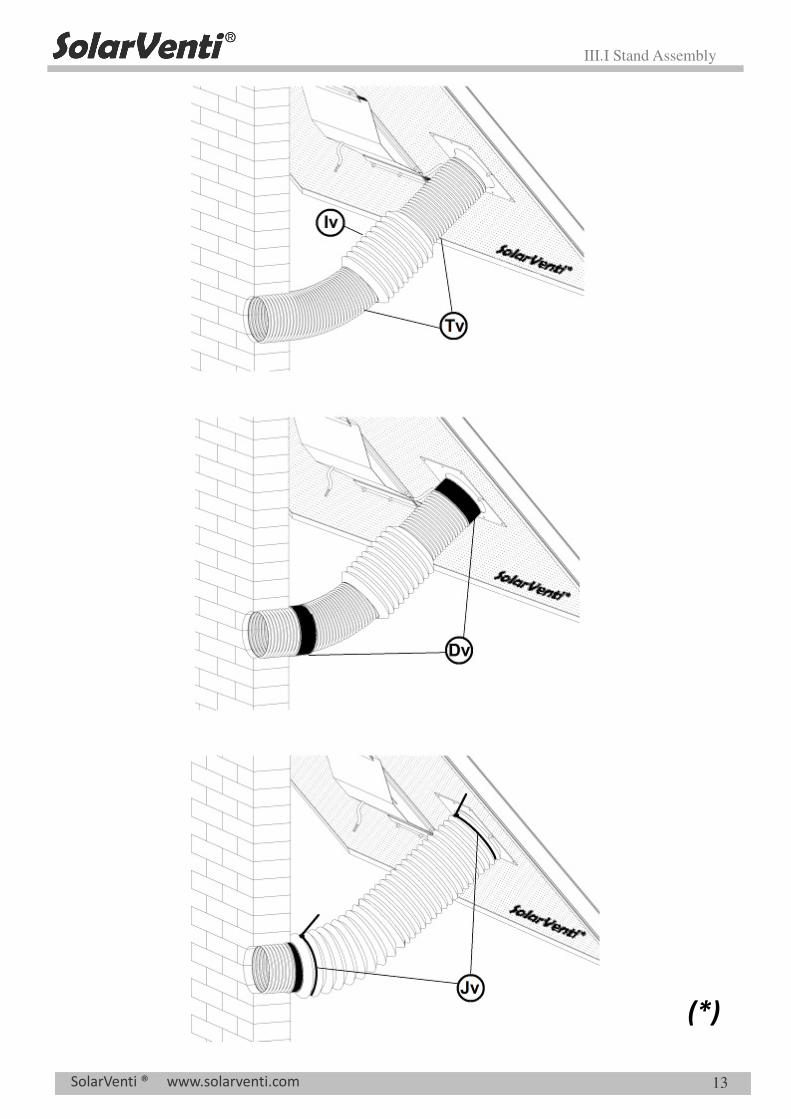
(*)
III.I Stand Assembly
SolarVenti ® www.solarventi.com
14
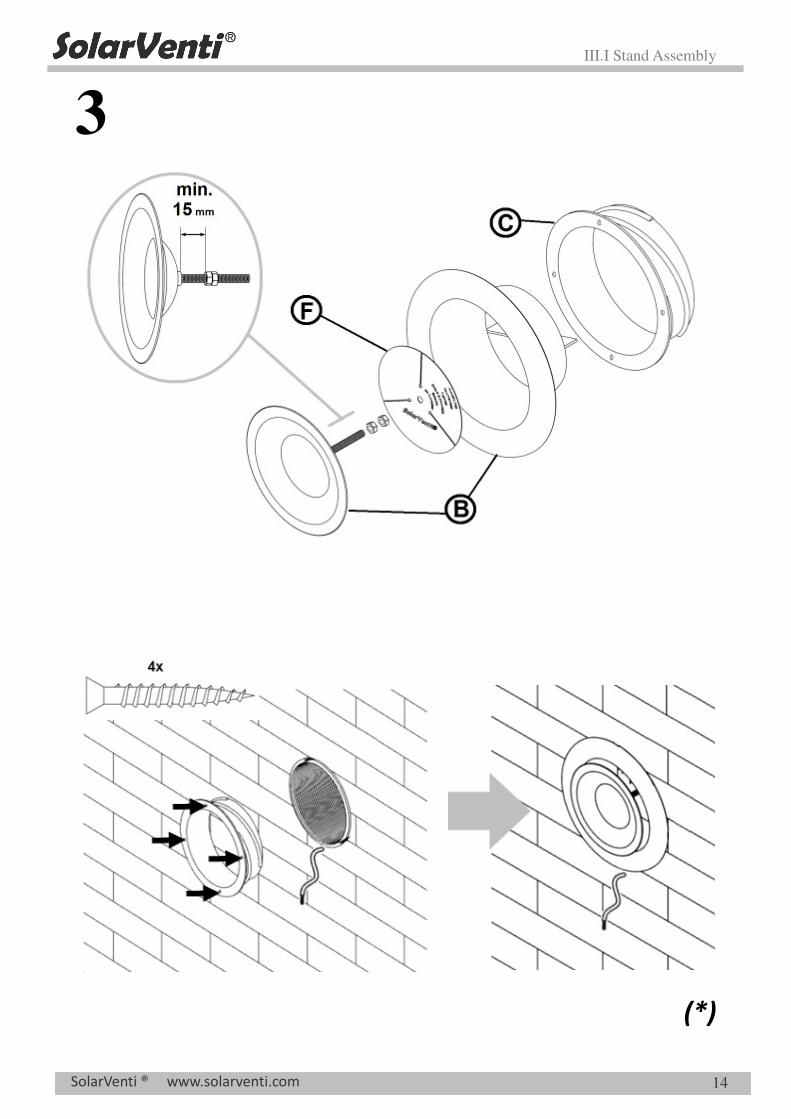
3
(*)
IV. Ventilation Kit
SolarVenti ® www.solarventi.com
15
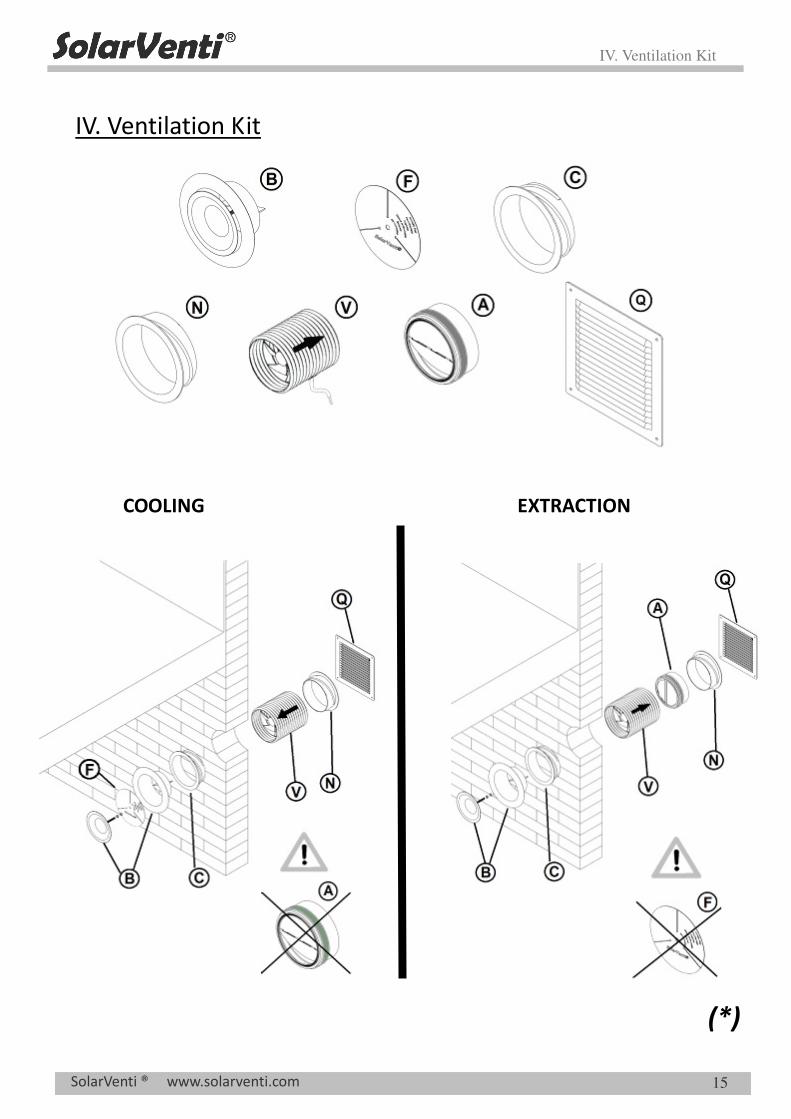
IV. Ventilation Kit
COOLING EXTRACTION
(*)
V. Switch
SolarVenti ® www.solarventi.com
16
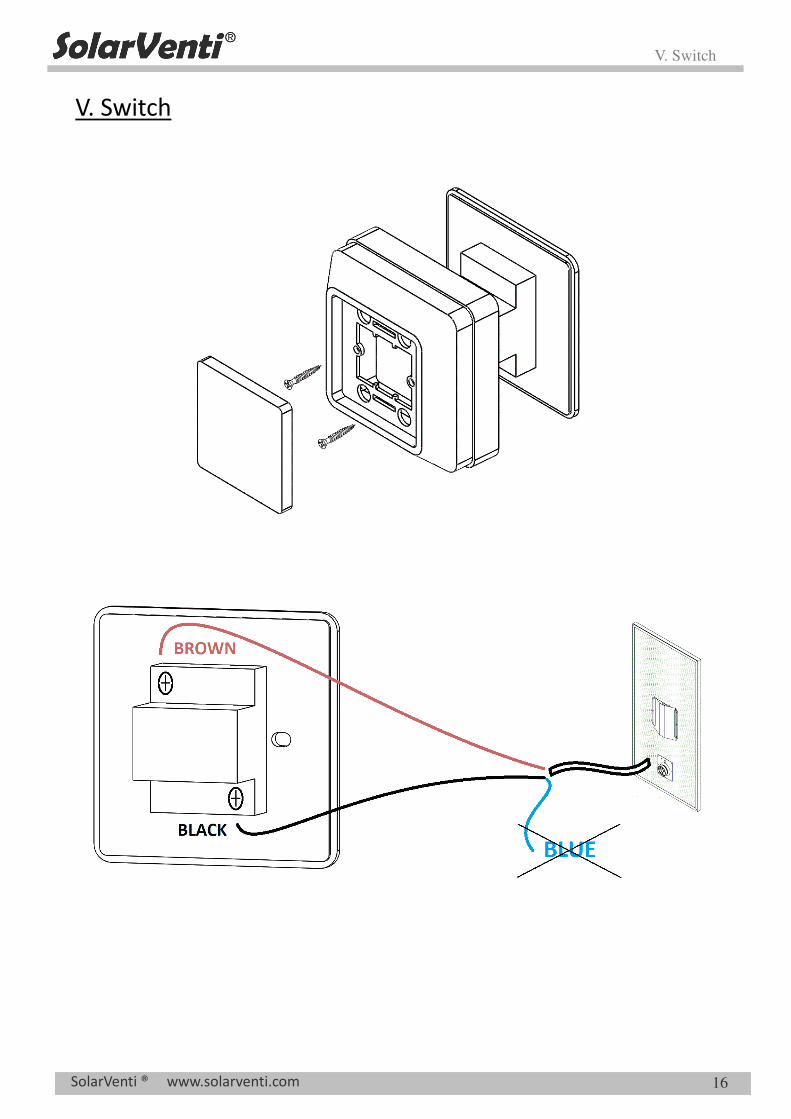
V. Switch
VI. Regulator
SolarVenti ® www.solarventi.com
17
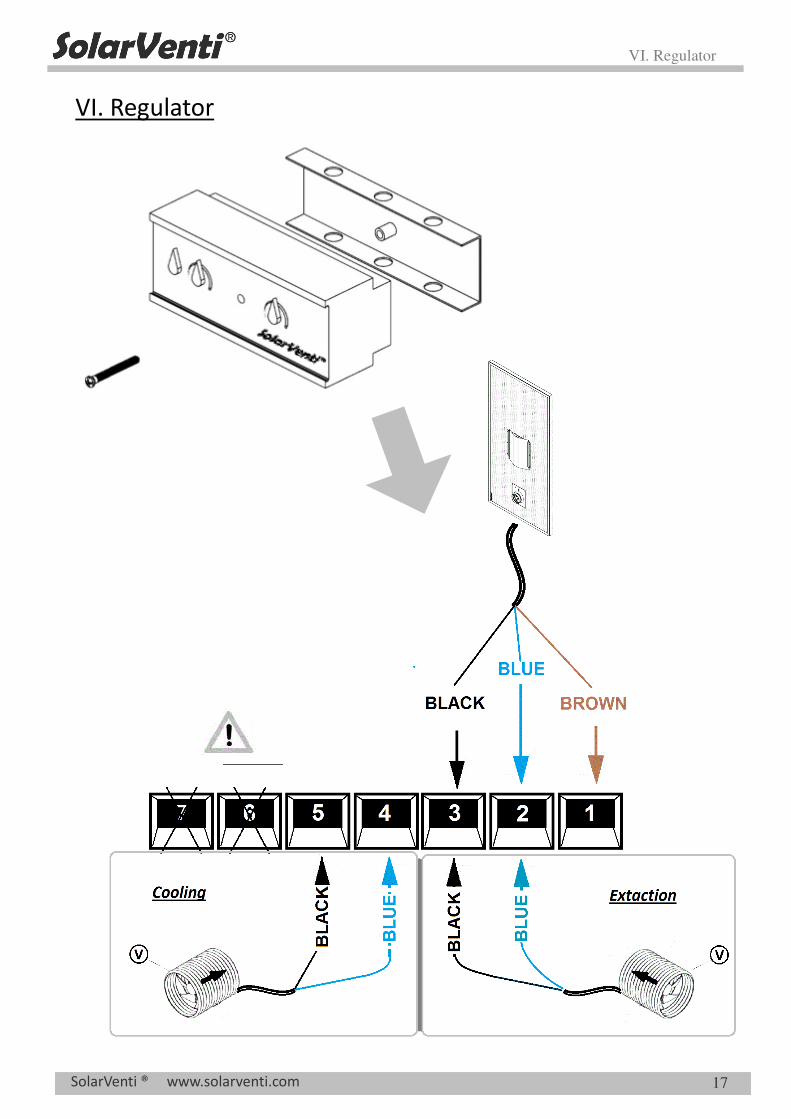
VI. Regulator
VII. Further installation tips
SolarVenti ® www.solarventi.com
18
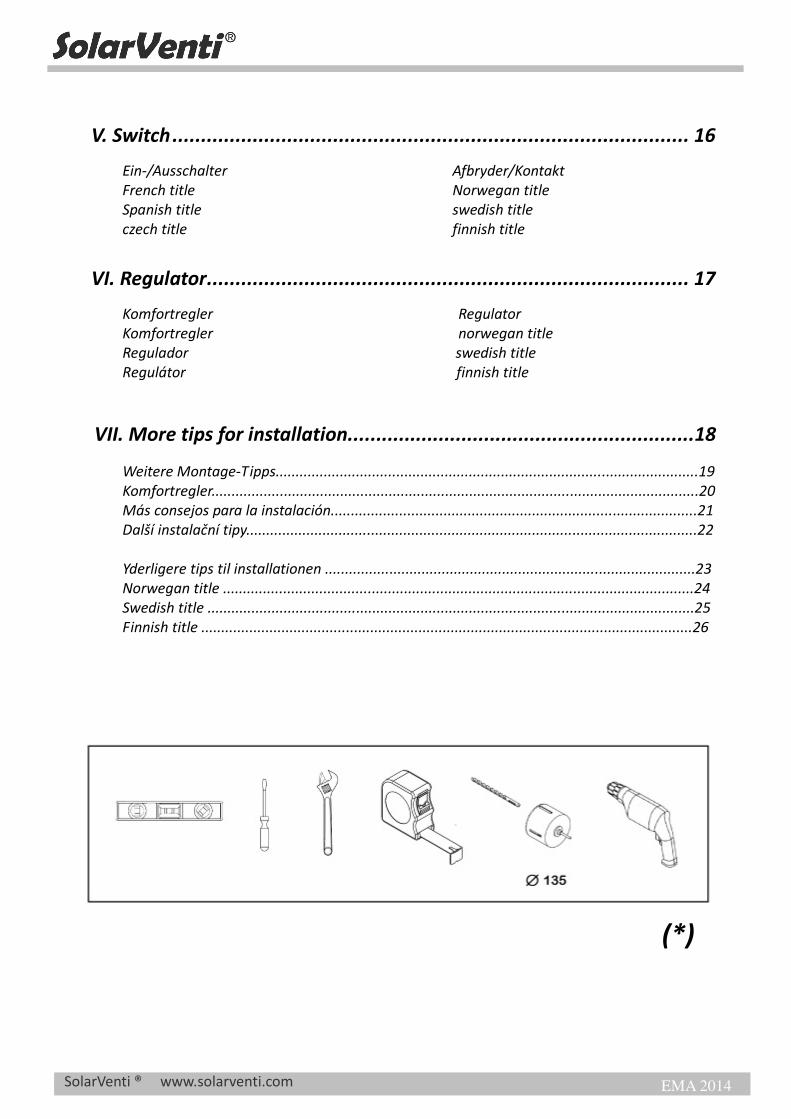
TOOLS
p. 6, 14, 15 p. 10 p. 11 p. 15
Installation manual More tips for installation
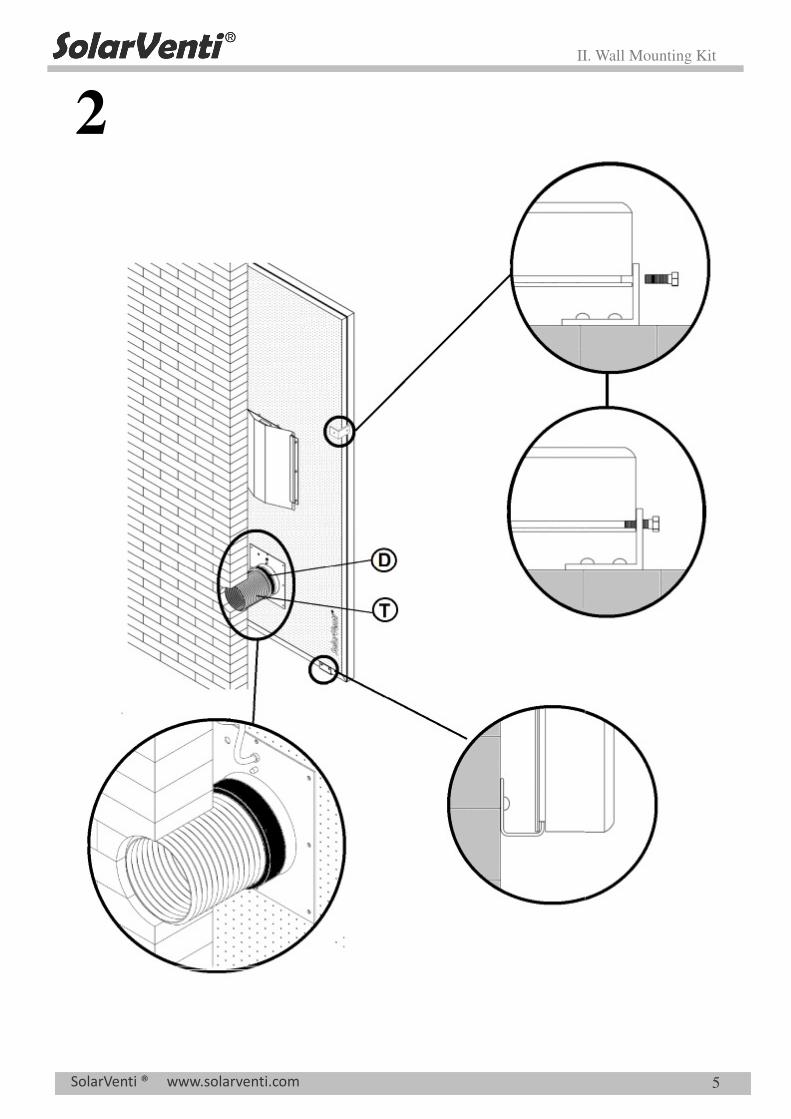
Optimal Inblow: If the building is sealed, you need an extraction. If there is some natural ventilation via cracks etc. you do not need an extra extraction fan. If possible the air inlet should be installed in the driest room and the outlet in the most humid room in the building – otherwise you risk spreading the humid air throughout the entire building. Drilling through walls can be challenging and the tools needed to make the hole will depend on the material of the wall. Contact your local SolarVenti installer for further advice regarding the drilling and the installation. The hole: Take care not to drill into cables etc. The optimal diameter of the hole is Ø133 mm on the inside and Ø140 mm on the outside. It is possible to use a Ø135 mm both inside and outside. Screws: Screws for the wall are not provided. Cable: The cable of the Solar Air Collector may either go through the hole of the air inlet or a separate 6-8 mm hole may be drilled in the position desired. Stands: Drill two holes in each rack and mount them to the wall with suitable screws. The plastic strips (Jv) are to be tightened around the flexible hose (Iv) approximately in the middle of the armaflex fitting (Dv). “COOLING” is used to blow external non-preheated air into the building and “EXTRACTION” helps the air flow of the SV-system.
VII. Further installation tips
SolarVenti ® www.solarventi.com
19
ALLGEMEINES
WERKZEUG
S. 6, 14, 15 S. 10 S. 13 S. 17
Installationsanleitung für SolarVenti Standard Modell Weitere Montage-Tipps
Optimale Luftverteilung: Bei einem undichten Gebäude ist ein Absaugset/ Druckventil nicht nötig. In einem dichten Gebäude muss jedoch eine Entlüftung (Absaugset/Druckventil) installiert werden. Der Lufteinlass muss möglichst immer in dem trockensten Raum platziert werden und die Entlüftung immer im feuchtesten Raum. Das Loch: Welche Werkzeuge für die Bohrung durch eine Wand benötigt werden, hängt von der Beschaffenheit ab. Die Bohrung kann sich als schwierig erweisen. Sind Sie unsicher bezüglich der Bohrung oder Installation eines SolarVentis, ist die Installation durch einen SolarVenti Fachbetrieb durchzuführen. Stellen Sie sicher, dass Sie nicht in Kabel u.Ä. bohren. Der optimale Durchmesser des Loches im Innenraum beträgt Ø133 mm und an der Außenwand Ø140 mm. Haben Sie nur einen Bohraufsatz, können Sie stattdessen Ø135 mm sowohl für den Innen- und Außenbereich benutzen. Schrauben: Wir liefern keine Schrauben für die Wand mit. Kabelführung: Das Kabel des Warmluftkollektors kann entweder durch das Loch der Zuluft geführt werden oder durch ein separates Loch Ø 6-8 mm. Wandgestelle: Bohren Sie zwei Löcher in die jeweiligen Wandgestelle und befestigen Sie die Gestelle mit passenden Schrauben. Befestigen Sie Die Kabelbinder (JV) um den Luftschlauch (Iv) mittig auf dem Armaflex-Streifen (DV). ”COOLING” (Die Kühlfunktion) kann ab einer gewissen Raumtemperatur unerwärmte Außenluft in das Gebäude einblasen. ”EXTRACTION” (Die Absaugfunktion) hilft die optimale Luftverteilung im Gebäude zu schaffen.
VII. Further installation tips
SolarVenti ® www.solarventi.com
20
INTRO TOOLS
p. 6, 12, 18, 20 p. 8 p. 8, 14 p. 10
Basement Installation manual Further Installation Tips
Blow into dry room: As far as possible the air inlet must always be installed in the most dry room and the outlet in the room containing most humidity. In this way you don´t risk the humid air to spread through the entire basement. K vs. Standard: All measurements in this manual are fitting to the SolarVenti (K) models. The measurements DO NOT fit to the standard SolarVenti air collectors (SV14, SV20, SV30). The wall of the basement: It can be challenging to drill through the wall of a basement. Furthermore the tools, which are needed, depend on the consistency of the wall. E.g. you can risk loose insulation in the cavity dam, which you have to secure before drilling. Contact your local SolarVenti installer for further advices regarding the drilling and installation of a SolarVenti. The hole: Make sure that you don´t drill into cables etc. The centre of the air inlet must be minimum 100 mm below the ceiling. The optimal diameter of the indoor hole is Ø133 mm and Ø140 mm for the outdoor hole. If you only have one drilling bit, you can use Ø140 mm for both the indoor and outdoor hole. Screws: We don´t provide screws for mounting the air collector to the wall. Cable: The cable of the Solar Air Collector can either go through the hole of the air inlet – as shown above – or can be drilled as a separate 6-8 mm hole, which can be placed wherever you like. Insulation: Insulation of the pipe is needed. Get the insulation in a building supply store or buy an insulation matt and aluminium cover from SolarVenti. Stands: Drill two holes in every stand and mount them to the wall with screws fitting to the construction of the wall. Angle: Find the referencepoint which indicates the place of the fan on the Solar Air Collector. Mark the triangle on the wall. The gray triangle is the possible area, where the air inlet hole will be placed. The drilling can be made within this area. (If an Extra Extension Kit is used as an add on the max. length of the triangle will be 2010 mm instead of 1010 mm) If you use the whole length of the pipe G, you need to drill the hole on the bottom line. Whereas you drill a hole inside the grey field, you need to cut the pipe.
VII. Further installation tips
SolarVenti ® www.solarventi.com
21
INTRO TOOLS
p. 6, 12, 18 p. 9, 14 p. 15 p. 17 p. 11, 17
p. 19
SV-Standar Manual de instalación Más consejos para la instalación
Entrada de aire: En la medida de lo posible, la entrada de aire siempre debe estar instalada en el cuarto más seco y la salida en la sala que contiene más humedad. Taladrar en la pared o tejado puede ser un reto. Las herramientas necesarias dependen de la consistencia de la pared/tejado. Póngase en contacto con su instalador SolarVenti local para obtener más consejos en cuanto a la perforación Perforación: Asegúrese de que NO HAY cables ni tuberias en la zona a perforar. El diámetro óptimo para el agujero es; interior Ø133 mm y exterior Ø140 mm. Si sólo tiene un kit de perforación, puede utilizar Ø135 mm para el interiory exterior. Tornillos: Los tornillos solo se proporcionanpara el montaje de collector en un tejado. Con estructura de madera. Cable: El cable del colector puede o bien ir por el orificio de entrada de aire o puede ser perforado en el lugar mas conveniente, como un agujero de 6.8 mm. Soportes: perforar dos agujeros para cada soporte y montar con tornillos y tacos adecuados para la pared/tejado. Tejado ondulado: Use las almohadillas de presión (X2). Evite goteras: la entrada de aire (W) debe estar perfectamente acoplado al tejado y sin burbujas. Su parte superior debe ir cubierta por la teja de arriva. Los bordes laterales deben terminar en una ola subducente. Puede que haya que cortar (W) para que sus bordes laterales coincidan con una ola subducente. Tejados sin ondulacion: Use las almohadillas de presion (X1). Evite goteras: Antes de fijar la entrada de aire (W) al tejado, poner pegamento en su parte trasera (en el marco de la cinta blanca). La entrada de aire (W) debe estar fijada al tejado en no mas de 2-5 min. sin burbujas. Una vez (W) ha sido fijada en la posicion correcta, poner pegamento alrededor de todo el borde para sellarlo aun mejor. Cableado impermeabilizado: Pasar el cable entre el aislamiento flexible (Iv) y el aluflex (T) e introducirlo a través de un pequeño agujero hecho en la entrada de aire (W). Este agujero debe quedar cubierto por Iv al final de la instalación. Deje una parte del cable (5-10 cm) salir de la manguera flexible cerca del colector de aire, para que el agua pueda drenar desde el cable. Por ultimo ponga pegamento alrededor del cableado en la entrada de aire (W), para impermiavilizar el pequeño agujero. Coloque el accesorio Armaflex (Dv) alrededor de la tubería Aluflex y el cable – recuerde que el aislamiento flexible debe cubrir el cableado y agujeroen (W). Las bridas (Jv) son para ser apretado alrededor del aislamiento flexible (Iv) aproximadamente en el centro del accesorio Armaflex (Dv). “COOLING” Introduce aire fresco exterior en el recinto “EXTRACTION” Extrae el aire del recinto (ayudando a la entrada de aire caliente)-
VII. Further installation tips
SolarVenti ® www.solarventi.com
22
ÚVOD POMŮCKY
str. 6, 12, 18, 20 str. 8 str. 8, 14 str. 10
Suterén – instalační manuál Další instalační tipy
Přívod vzduchu do místnosti: Je-li to možné, přívod vzduchu musí vždy být instalován v nejsušší místnosti a odvod vzduchu v místnosti s největší vlhkostí. Tímto způsobem zabráníte riziku šíření vlhkého vzduchu po celém suterénu. K vs. Standard: Všechny rozměry v tomto manuálu jsou přizpůsobeny pro SolarVenti (K) modely. Rozměry Neodpovídají standardním vzduchovým kolektorům (SV14, SV20, SV30). Stěna suterénu: Vrtání skrz suterénní stěnu může být náročné. Kromě toho, potřebné nářadí závisí na tuhosti stěny suterénu. Například, může dojít k riziku poškození izolace při vrtání, proto musí být izolace zabezpečena před vrtáním stěny. Kontaktuje Vašeho instalatéra ze SolarVenti pro bližší informace ohledně vrtání a instalace produktu SolarVenti. Otvor: Ubezpečte se, že v místě vrtání nejsou žádné kabely. Střed přívodu vzduchu musí být posazen minimálně 100mm pod stropem. Optimální průměr otvoru uvnitř suterénu je Ø133 mm a Ø140 mm pro venkovní otvor. Pokud máte pouze jednu vrtací jednotku, můžete použít průměr Ø140 mm pro vnitřní i vnější otvor. Šrouby: Neposkytujeme šrouby pro montáž vzduchových kolektorů do stěny. Kabel: Kabel vzduchového kolektorů může být buď zaveden otvorem přívodu vzduchu – ukázáno výše – nebo můžete pro kabel vyvrtat další otvor o průměru 6-8mm, tento otvor můžete být umístěn libovolně. Izolace: Je potřebná izolace roury. Izolaci můžete zakoupit v prodejně domácích potřeb anebo zakupte izolační podložku a hliníkový kryt od SolarVenti. Podpory: Vyvrtejte otvor v každé podpoře a namontujte je do stěny pomocí šroubů, které odpovídají konstrukci stěny. Úhel: Najděte referenční bod , který označuje místo ventilator na solárním vzduchovém kolektoru. Označte trojúhelník na stěnu. Šedý trojúhelník značí možný prostor, kde může být otvor vzduchového přívodu umístěn. Vrtání může být provedeno v této oblasti. (Pokud Extra rozšířená sada je použita jako doplněk na maximální délku trojúhelníku 2010mm namísto 1010mm. Pokud použijete celou délku roury G, potřebujete vyvrtat otvor ve spodní linii. Zatímco vrtáte otvor uvnitř šedého trojúhelníku, musíte délku roury zkrátit.
VII. Further installation tips
SolarVenti ® www.solarventi.com
23
INTRO VÆRKTØJ
s. 6, 14, 15 s. 10 s. 13 s. 17
Standard Installationsvejledning Yderligere tips til installationen
Optimal luftflow. Ved en utæt bygning er der ikke behov for en udsugning/ trykventil. Installer dog en ventil til luftudstrømning i en meget tæt bygning. Indblæsningen skal så vidt muligt ske i bygningens tørreste rum og udsugningen fra det fugtigste rum – ellers risikerer man at presse fugten ud i resten af bygningen. Hullet: At bore et hul gennem væggen kan være vanskeligt. Dertil kommer, at værktøjet, der skal bruges til at lave hullet, afhænger af murens beskaffenhed. Få råd og vejledning hos din lokale SolarVenti installatør, hvis du er i tvivl om installationen. Sørg for, at der ikke er nogen ledninger, stikkontakter e.l., hvor boringen skal foretages. Den optimale diameter af hullet er Ø133 mm på indersiden og Ø140 mm på ydersiden. I tilfælde af, at du kun har en borekrone, kan du dog bruge Ø135 mm til både det indvendige og udvendige hul. Skruer: Skruer til fastgørelse i væggen følger ikke med. Kabel: Luftsolfangerens kabel kan enten føres igennem indblæsningshullet eller der kan bores et separat 6-8 mm hul, som placeres efter ønske. Stativer: Følg først instruktioner på s. 11. Bor så to huller i hver af de lange aluminiumsstænger (Ev3) og fastgør dem med passende skruer på væggen. Saml først herefter stativerne færdig på væggen. Plaststripsene (Jv) skal strammes rundt om flexslangen (Iv) ca. midt på (Dv). ”COOLING” (køling-systemet) kan blæse uopvarmet udendørsluft ind i bygningen og ”EXTRACTION” (udsugningen) hjælper med at skabe den optimale luftflow.
VII. Further installation tips
SolarVenti ® www.solarventi.com
24
INTRO TOOLS
p. 6, 12, 18, 20 p. 8 p. 8, 14 p. 10
Kælder Installationsvejledning Yderligere tips til installationen
Blæs ind i det tørre rum. Indblæsningen skal så vidt muligt ske i det tørreste rum og udsugning fra det fugtigste rum i kælderen – ellers risikerer man at presse fugten ud i kældervæggene. K vs. Standard: Alle mål – angivet i denne montagevejledning – gælder for SolarVenti (K) kældermodeller. Målene dækker IKKE vores standard SolarVenti luftsolfangere (SV14, SV20, SV30). Kældervægge kan være vanskelige at bore i og værktøjet, der skal bruges til at foretage boringen afhænger af murens beskaffenhed. Du kan bl.a. risikere, at der er løs isolering i hulmuren, som du skal sikre yderligere. Få råd og vejledning hos din lokale SolarVenti installatør, hvis du er i tvivl om installationen. Hullet: Sørg for, at der ikke er nogen ledninger, stikkontakter e.l., hvor boringen skal foretages. Indblæsningshullets centrum skal være mindst 100 mm under kælderens loftshøjde. Den optimale diameter af hullet er Ø133 mm på indersiden og Ø140 mm på ydersiden. I tilfælde af, at du kun har en borekrone, kan du dog bruge Ø140 mm til både det indvendige og udvendige hul. Skruer: Skruer til fastgørelse i væggen følger ikke med. Kabel: Luftsolfangerens kabel kan enten føres igennem indblæsningshullet, som vist ovenfor, eller der kan bores et separat 6-8 mm hul, som placeres efter ønske. Isolering: Isolering af røret er nødvendig. Tilkøb af isoleringsmåtte og aluinddækning muligt. Stativer: Bor to huller i hvert stativ og fastgør med passende skruer. Vinkel: Find punktet som svarer til luftsolfangerens studs. Tegn trianglen op på væggen. Den grå markerede triangel er det mulige område for indblæsningshullets placering. Boringen kan foretages indenfor dette område. (Er der tilkøbt et kælderforlængersæt, bliver max længden 2010 mm i stedet for 1010 mm) Bruger du hele længden af røret G skal du bore hullet et sted på den nederste linje. Borer du et hul indenfor det grå markerede felt, vil du blive nød til at skære røret til.
VII. Further installation tips
SolarVenti ® www.solarventi.com
25
INTRO TOOLS
p. 6, 12, 18, 20 p. 8 p. 8, 14 p. 10
Basement Installation manual Further Installation Tips
Blow into dry room: As far as possible the air inlet must always be installed in the most dry room and the outlet in the room containing most humidity. In this way you don´t risk the humid air to spread through the entire basement. K vs. Standard: All measurements in this manual are fitting to the SolarVenti (K) models. The measurements DO NOT fit to the standard SolarVenti air collectors (SV14, SV20, SV30). The wall of the basement: It can be challenging to drill through the wall of a basement. Furthermore the tools, which are needed, depend on the consistency of the wall. E.g. you can risk loose insulation in the cavity dam, which you have to secure before drilling. Contact your local SolarVenti installer for further advices regarding the drilling and installation of a SolarVenti. The hole: Make sure that you don´t drill into cables etc. The centre of the air inlet must be minimum 100 mm below the ceiling. The optimal diameter of the indoor hole is Ø133 mm and Ø140 mm for the outdoor hole. If you only have one drilling bit, you can use Ø140 mm for both the indoor and outdoor hole. Screws: We don´t provide screws for mounting the air collector to the wall. Cable: The cable of the Solar Air Collector can either go through the hole of the air inlet – as shown above – or can be drilled as a separate 6-8 mm hole, which can be placed wherever you like. Insulation: Insulation of the pipe is needed. Get the insulation in a building supply store or buy an insulation matt and aluminium cover from SolarVenti. Stands: Drill two holes in every stand and mount them to the wall with screws fitting to the construction of the wall. Angle: Find the reference point which indicates the place of the fan on the Solar Air Collector. Mark the triangle on the wall. The gray triangle is the possible area, where the air inlet hole will be placed. The drilling can be made within this area. (If an Extra Extension Kit is used as an add on the max. length of the triangle will be 2010 mm instead of 1010 mm) If you use the whole length of the pipe G, you need to drill the hole on the bottom line. Whereas you drill a hole inside the grey field, you need to cut the pipe.
VII. Further installation tips
SolarVenti ® www.solarventi.com
26
INTRO TOOLS
p. 6, 12, 18, 20 p. 8 p. 8, 14 p. 10
Basement Installation manual Further Installation Tips
Blow into dry room: As far as possible the air inlet must always be installed in the most dry room and the outlet in the room containing most humidity. In this way you don´t risk the humid air to spread through the entire basement. K vs. Standard: All measurements in this manual are fitting to the SolarVenti (K) models. The measurements DO NOT fit to the standard SolarVenti air collectors (SV14, SV20, SV30). The wall of the basement: It can be challenging to drill through the wall of a basement. Furthermore the tools, which are needed, depend on the consistency of the wall. E.g. you can risk loose insulation in the cavity dam, which you have to secure before drilling. Contact your local SolarVenti installer for further advices regarding the drilling and installation of a SolarVenti. The hole: Make sure that you don´t drill into cables etc. The centre of the air inlet must be minimum 100 mm below the ceiling. The optimal diameter of the indoor hole is Ø133 mm and Ø140 mm for the outdoor hole. If you only have one drilling bit, you can use Ø140 mm for both the indoor and outdoor hole. Screws: We don´t provide screws for mounting the air collector to the wall. Cable: The cable of the Solar Air Collector can either go through the hole of the air inlet – as shown above – or can be drilled as a separate 6-8 mm hole, which can be placed wherever you like. Insulation: Insulation of the pipe is needed. Get the insulation in a building supply store or buy an insulation matt and aluminium cover from SolarVenti. Stands: Drill two holes in every stand and mount them to the wall with screws fitting to the construction of the wall. Angle: Find the reference point which indicates the place of the fan on the Solar Air Collector. Mark the triangle on the wall. The gray triangle is the possible area, where the air inlet hole will be placed. The drilling can be made within this area. (If an Extra Extension Kit is used as an add on the max. length of the triangle will be 2010 mm instead of 1010 mm) If you use the whole length of the pipe G, you need to drill the hole on the bottom line. Whereas you drill a hole inside the grey field, you need to cut the pipe.
SolarVenti® provides a healthy indoor climate in your basement
Avoid humidity Avoid stale smell
Avoid mould and fungus
Produced in Denmark SolarVenti A/S Fabriksvej 8 DK - 8881 Thorsø Tlf. +45 8696 6700 www.solarventi.dk / www.solarventi.com


![[sv] Validity date from LAND Marocko 00258 [SV] SECTION … · 2020. 5. 22. · 1 / 35 LAND [SV] SECTION Marocko Fiskeriprodukter [sv] Validity date from 10/08/2007 [sv] Date of publication](https://static.documents.pub/doc/80x56/5fbce723db71870cc10035f6/sv-validity-date-from-land-marocko-00258-sv-section-2020-5-22-1-35-land.jpg)


