For the most current Installation Instructions, please visit www.solatube.com/instructions Solatube International, Inc. | 2210 Oak Ridge Way | Vista, CA 92081-8341 | www.solatube.com | T: 888.SOLATUBE
6 Daylight Dimmer Junction Box with Strain Relief (2) Pre-Installed
(1)
7
Daylight Dimmer Screw and Fastener Kit
a. Junction Box Mounting Screw#12 X 1/2 in (12 mm) (3)
b. Nylon Spacer (1)
88
UL Listed Class 2 Transformer 24VAC, Rated 96VA, or 24VAC, Rated 20VA *Sold Separately by Solatube Int. or Equivalent Sourced Locally Note: Read all Instructions to Choose Appropriate Transformer.
(1)
Additional Materials and Tools
1 Screw Gun with Phillips #2 Screw Drive Bit
2 Precision Screwdrivers Slotted 2.5M & 1.8M
3 Rivet Gun
4 Junction Box 4 in (100 mm) X 4 in (100 mm) X 1-1/2 (38 mm) with Ground Bonding Screw. Note: Required for Transformer Mounting and Connection.
For the most current Installation Instructions, please visit www.solatube.com/instructions Solatube International, Inc. | 2210 Oak Ridge Way | Vista, CA 92081-8341 | www.solatube.com | T: 888.SOLATUBE
These instructions are a step-by-step guide for the installation of a Solatube Daylighting System in the following conditions. For other roof types,
please contact your Solatube International representative for additional information.
Built Up Flat Roof - Single Ply/Membrane - Asphalt Shingle - Low/No Pitched - Pitched - Prefabricated Curbs - Metal Roof Panels
Please refer to the installation tips for the appropriate product below:
Do not proceed with the installation until you have read the entire instructions, including these warnings. (Use of materials or methods not authorized by Solatube International will result in an invalid warranty.)
Solatube International, Inc. (seller) assumes no responsibility or obligation whatsoever for the failure of an architect, contractor, installer, or building owner to comply with all applicable laws, ordinances, building codes, electrical codes, energy codes, fire and safety codes and requirements, roof warranties and adequate safety precautions. Installation of this product should be attempted only by individuals skilled in the use of the tools and equipment necessary for installation. Protect yourself and all persons and property during installation. If you have any doubt concerning your competence or expertise, consult a qualified expert before proceeding.
Install at your own risk! Solatube product installations may be dangerous and include the potential for death, personal injury and property damage. The hazardous conditions include but are not limited to the following:
During installation, the Solatube Daylighting System’s reflective tubes may focus sunlight, causing intense heat or fire. Remove protective film
only after the parts have been installed. Prior to and during installation, do not leave tubes in contact with combustible materials or unattended,
especially near direct sunlight. Avoid skin burns. Do not leave debris from installation process unattended. Scrap from tubing and foil tape are highly reflective and if left unattended can focus
sunlight and can cause intense heat or fire. Clean up all unused material and trash and store or discard in proper covered locations.
Solatube Daylighting System and Solar Star products may have sharp edges. Always wear leather or canvas gloves while handling and installing
products.
Solatube product installations require climbing and working at dangerous heights, including on ladders, scaffolding, roofs and in attic spaces.
Risk of death, personal injury and property damage may result from a fall, or from falling objects. Use extreme caution to minimize risk of accidental
injury, including, but not limited to the following procedures:
Clear area below your work space of all people, animals and other items.
Avoid working on surfaces that are slippery or wet. Use foot-wear with excellent traction.
Use only strong, well supported ladders.
Work only in calm dry weather. When in the attic, ensure that your weight is supported at all times with structurally sound framing; drywall material is not designed to
carry a person’s weight.
To reduce the risk of fire, electric shock, and personal injury, basic safety precautions should always be followed when using electric tools,
including always wearing safety goggles or other suitable eye protection, and ensuring work area is clear of all electrical wires, gas pipes, water pipes,
and other obstacles.
When working in the attic or other dusty areas, use of a mask or respirator is recommended to avoid lung irritation. Attic spaces may be dark,
confined, and subject to extreme temperatures. Beware of sharp protruding objects. Do not attempt installation without having someone within
range of your voice or close enough to come to your aid if necessary.
Solatube products are not designed to withstand the weight of a person, tools or other objects. Walking or placing objects on the system could
cause personal injury and property damage. If the product is damaged, the structural capacity may be weakened; therefore the system should be
repaired immediately. For safe installation and use, do not deviate from these installation instructions.
Additional support is recommended for long vertical and all horizontal tube runs. Review local building requirements and consult with
appropriate building code official for proper material and placement of additional support. Avoid galvanic reaction (corrosion) if dissimilar metals
are used.
Electrical Components Before installing, servicing, or cleaning unit, switch power off at service panel and lock service panel to prevent power from becoming switched on
accidentally. When the service disconnecting means cannot be locked, securely fasten a prominent warning device such as a tag to the service
panel.
Re-Roofing Solatube products require special care if removed for re-roofing. In order to ensure proper removal and re-installation, please contact your
Solatube International representative.
For the most current Installation Instructions, please visit www.solatube.com/instructions Solatube International, Inc. | 2210 Oak Ridge Way | Vista, CA 92081-8341 | www.solatube.com | T: 888.SOLATUBE
Allow 1/2 hour (30 min) for the installation excluding curb fabrication, particularly if this is your first installation. During the day, turn off all the lights in the room to see how much natural light comes in through the windows, and determine the best position for the
Solatube Daylighting System. To light a specific area, place the system over the area, not in the center of the room. This will prevent the desired area
from being shaded by tall objects in the room. Measure the distance from curb to diffuser level. If you don’t have enough tubing, contact your Solatube International representative for additional
tubing.
Avoid roof locations shaded by trees, ridges and chimneys, or near water channels or valleys. Also avoid roof areas with obstructions such as fire
sprinklers, HVAC equipment, gas, water or drain pipes, air ducts or flues and make sure that the roof is adequate to endure an installation without
damaging its waterproofing properties or weakening the building structure.
All adhesives and seals are recommended to be applied to a clean and dry surface at a minimum of 70°F (21°C) for maximum performance. For installations where high levels of soot or debris may be present it may be necessary to use foil tape to seal all joints and tube seams to prevent
excess debris from entering the tubing.
It is recommended to use foil tape to seal all joints and tube seams for installations in cold climates or where humid conditions may be present in
order to prevent warm or moist air from entering the tubing.
Uninstalled product that is stored and exposed to excessive heat and or humidity can experience damage. Store product prior to installation in a cool
dry place.
Daylight Dimmer Installation Tips
Please follow all local municipal and building code requirements prior to making electrical connections. WARNING: To avoid risk of fire or electric shock do not connect high voltage to the power input terminal on the Solatube 0-10v Daylight Dimmer.
CAUTION: To avoid damage to the Daylight Dimmer Circuit Board use only a 9V battery to manually operate dampers. See Optional Step on page
8. General Circuit Limitations: (2) Solatube Daylight Dimmers per 20VA transformer and (8) Solatube Daylight Dimmers per 96VA transformer.
Max cable length between units 40 ft (12.19 m), aggregate control cable length not to exceed 2,110 ft (643 m).
Ensure Placement of Daylight Dimmer Junction Box is uniform for all units in installation for ease of wire connection and for best aesthetics. For ease of wire connection to terminal blocks do not strip wire more than 3/16”.
Good ground connection is critical to proper operation of this system. Ensure that ground connections are properly and securely bonded to terminal
blocks to reduce risk of noise and ensure proper functionality of system. Segregate power and signal cables entering into junction box to avoid crossover noise. Also, cross the control lines and the power lines
perpendicular inside junction box to avoid noise. (See diagram on page 8, 9, and 10)
Avoid bumping capacitors on PCB (Printed Circuit Board) to reduce risk of damage. If capacitors are bumped and become loose, replace entire junction box as improper functionality of Daylight Dimmers is highly probable.
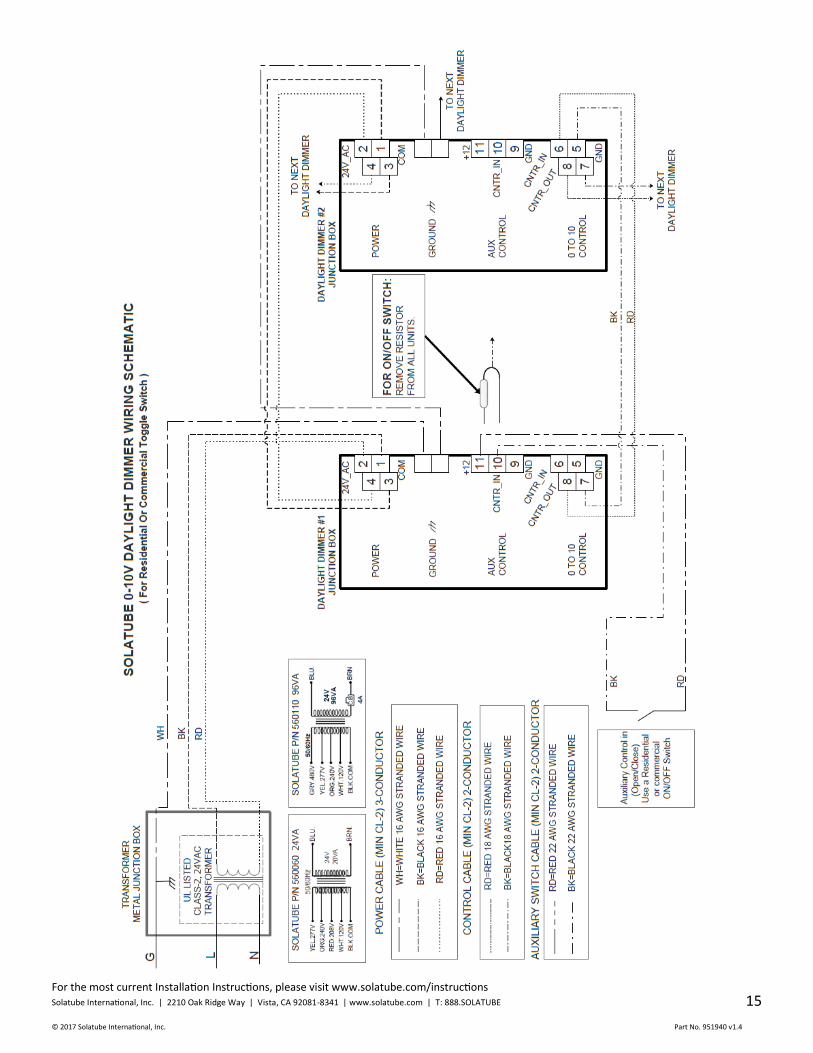
When connecting to 0-10V Current Sinking Lighting Controllers, Keep resistor in Aux CNTR Terminal on first unit in control circuit series. Remove
resistor from all subsequent units. When connecting to 0-10V Current Sourcing Lighting Controllers, Remove resistor in Aux CNTR Terminal on all units.
When connecting to Open/Close operation to standard wall switch remove resistor from Aux CNTR Terminal on all units.
When connecting to dimming wall control remove resistor from Aux CNTR Terminal on all units.
Important Sourcing Notes The Solatube 0-10v Daylight Dimmer is a daylight actuator. It is important to source controls for an actuator rather
than a dimmer. The Solatube 0-10v Daylight Dimmer does not have a load to control. When sourcing controls to use with the Solatube
0-10v Daylight Dimmer, it is best to source a controller that is dimming only and does not have an internal/external relay or load control.
If using controls that are equipped with an internal/external relay or load control, it is important to cap off this feature as it will not be used.
Troubleshooting
For the most current Installation Instructions, please visit www.solatube.com/instructions Solatube International, Inc. | 2210 Oak Ridge Way | Vista, CA 92081-8341 | www.solatube.com | T: 888.SOLATUBE
Check line voltage wire connections to Lighting Controller and Transformer
Check low voltage power and control wire connections to terminal blocks.
Daylight Dimmer(s) do not open or close completely
Lighting Control System Trim
Trim is not correctly set on lighting control wall switch. See control manufacturer's specification for adjusting trim.
Obstruction Remove Dome & Diffuser to inspect for obstruction inside tube preventing dampers from opening or closing completely. Remove all obstructions.
Wire/Connection Issue
Check wire connections to ensure all line, neutral, ground cables are connected correctly .
One or more Daylight Dimmer(s) in series oscillate without change in lighting
control command
Wiring/Connection Issue
Ensure that transformer is connected directly to Supply Line. Do not connect transformer to Lighting Controller load circuit relay .
Review and test the first functioning Daylight Dimmer in series prior to the oscillating unit. Check all wires are properly connected. Ensure all strands are in terminal blocks; no strands are loose or protruding from terminal connection. Once finished move on to the next Daylight Dimmer in series and repeat process. Test each Daylight Dimmer before moving on.
Check wire connections at controller to ensure all line, neutral, ground and load are connected correctly.
Wiring-Grounding Connection
Check ground connections at transformer Junction Box and at ground terminals at each successive unit.
Damaged component on PCB
Using Mutimeter, check for AC Voltage between (+ & -) pins on CNTR IN and CNTR OUT terminals. If >0.05VAC, review Printed Circuit Board (PCB) to see whether any components have been compromised (during installation). If Capacitors or Terminal Blocks are loose or missing, replace entire J-Box.
Units make "humming" sound after moving from position A to position B.
Wiring-Grounding Connection
Make sure ground wire is attached to a known good earth ground.
Check all board to board ground connections.
Last unit not as open as first unit or all units not at same
position.
Wiring Connection & Cable Length
Make sure you have properly attached signal wires from unit to unit. Check In & Out assignments and polarity.
Make sure you have not exceeded maximum distance from either, unit to unit, or source to unit.
Units closest to power transformer open faster than
units farther from transformer.
Transformer Quantity May have exceeded the maximum number of units recommended for Daylight Dimmer Model or Transformer VA Rating.
Sparking or flaming in Dimmer Control Board
Line voltage connected to Daylight
Dimmer inputs
If it is determined that line voltage has been so connected and energized, all Dimmer Controllers may be compromised and must be replaced.
For the most current Installation Instructions, please visit www.solatube.com/instructions Solatube International, Inc. | 2210 Oak Ridge Way | Vista, CA 92081-8341 | www.solatube.com | T: 888.SOLATUBE
Assemble Transition Tubes Align pre-punched holes and install rivets.
1
Install Transition Tube
2 Assemble Tube Belt and Install
3
Remove Protective Liner
b
Use rivet gun to fasten
c
Refer to step 3 in the main set of M74 DS instructions (949990) for tab lock connection.
Note: Follow Steps 2 Through 4 in Main Set of SkyVault Installation Instructions (P/N: 949990) Prior to Installing the Daylight Dimmer.
Place Tube Belt at
a
a
Install Daylight Dimmer Ring 4
Align tabs on Daylight Dimmer Ring with notches on Transition Tube.
b
c
d
NOTE: Daylight Dimmer fins have been removed to show detail.
c
NOTE: Transition Tube fits inside of Day-light Dimmer Ring.
NOTE: Use care to ensure location of Daylight Dimmer Junction Box will be uniform for all units installed.
For the most current Installation Instructions, please visit www.solatube.com/instructions Solatube International, Inc. | 2210 Oak Ridge Way | Vista, CA 92081-8341 | www.solatube.com | T: 888.SOLATUBE
Install Transition Tube to Daylight Dimmer Ring Align tabs on Daylight Dimmer Ring with notches on Transition Tube.
5 Fasten Transition Tubes to Daylight Dimmer Ring
6
Use rivet gun to fasten 2 rivets (4 total) to each side of Daylight Dimmer Ring.
Align seams on Transition Tubes to ensure Tab Locks remain aligned
Apply Foil Tape Secure Daylight Dimmer Ring to Transition Tubes using foil tape. 7
8 Remove and Rotate Completed Assembly
Foil Tape
Install Assembled Unit into Roof Curb.
9 Continue assembly from below.
10
Note: If daylight is desired in space prior to electrical connections, remove Installation Retainer Clip and allow Daylight Dimmer dampers to open. Then replace Installation Retainer Clip.
For the most current Installation Instructions, please visit www.solatube.com/instructions Solatube International, Inc. | 2210 Oak Ridge Way | Vista, CA 92081-8341 | www.solatube.com | T: 888.SOLATUBE
The Following Instructions Should Only Be Performed By A Licensed Electrician
Note: Please follow all local municipal and building code requirements prior to making electrical connections.
Option 1 Install 24VAC, Rated 20VA Transformer and Connect Power (Max 2 Daylight Dimmers) Connect wires with appropriate voltage connection. Junction Box Provided by Others
a
b
Supply Line Line Voltage
Metal Junction Box (Provided by Others)
Transformer
Make appropriate wire connections for supply voltage.
Cap all unused wires.
Note: Installation shown with Solatube supplied Transformer. If sourcing transformer from others please follow wiring instructions provided from transformer manufacturer.
Power
Make appropriate wire connections for power cable:
Red
Black
Whit
Ground Ensure good bond to Earth Ground.
Ground
c
11 Option 2 Install 24VAC, Rated 96VA Transformer and Connect Power (Max 8 Daylight Dimmers) Connect wires with appropriate voltage connection. Junction Box Provided by Others
a
b
Supply Line Line Voltage
Metal Junction Box (Provided by Others)
Transformer
Make appropriate wire connections for supply voltage.
Cap all unused wires. Power
Make appropriate wire connections for power cable:
Red
Black
Whit
Ground Ensure good bond to Earth Ground.
Ground
c
Determine Appropriate Transformer 11
20VA 96VA
2 8
Maximum Daylight Dimmer Unit QTY / Transformer
Transformer
Max QTY
Warning: Risk of fire or electric shock. Do not connect line voltage to the low voltage side of the transformer. Do not connect high voltage to input terminal (power) on Solatube Daylight Dimmer.
For the most current Installation Instructions, please visit www.solatube.com/instructions Solatube International, Inc. | 2210 Oak Ridge Way | Vista, CA 92081-8341 | www.solatube.com | T: 888.SOLATUBE
The Following Instructions Should Only Be Performed By A Licensed Electrician
Note: Please follow all local municipal and building code requirements prior to making electrical connections.
Remove Junction Box Cover
12
a
b
Secure Junction Box using
Install Junction Box to Daylight Dimmer Ring Ensure Daylight Dimmer Dampers are returned to the full closed position before replacing junction box.
15
c
Install Spacer on back side of Daylight Dimmer Junction Box 13
14 Remove Retainer Clip Remove Retainer clip and ensure Daylight Dimmer Dampers are returned to the full closed position.
Spacer
Retainer Clip
9V Battery
Optional Step
Test Point Terminals
Note: If it is necessary to open the Daylight Dimmer Dampers prior to electrical connection, Use only a 9V battery to operate Dampers. A larger power battery or power supply will damage the PCB board.
Only use a 9V battery to prevent damage to PCB.
For the most current Installation Instructions, please visit www.solatube.com/instructions Solatube International, Inc. | 2210 Oak Ridge Way | Vista, CA 92081-8341 | www.solatube.com | T: 888.SOLATUBE
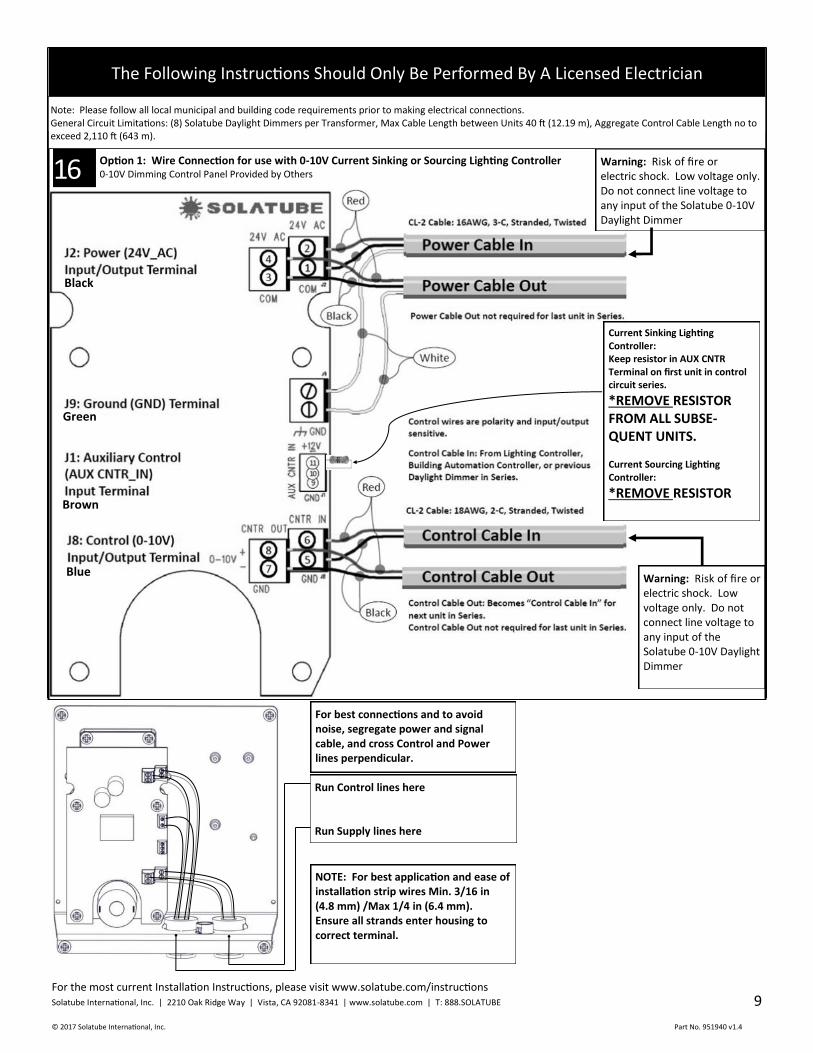
Option 1: Wire Connection for use with 0-10V Current Sinking or Sourcing Lighting Controller 0-10V Dimming Control Panel Provided by Others
The Following Instructions Should Only Be Performed By A Licensed Electrician
Note: Please follow all local municipal and building code requirements prior to making electrical connections. General Circuit Limitations: (8) Solatube Daylight Dimmers per Transformer, Max Cable Length between Units 40 ft (12.19 m), Aggregate Control Cable Length no to exceed 2,110 ft (643 m).
16
Run Control lines here Run Supply lines here
NOTE: For best application and ease of installation strip wires Min. 3/16 in (4.8 mm) /Max 1/4 in (6.4 mm). Ensure all strands enter housing to correct terminal.
For best connections and to avoid noise, segregate power and signal cable, and cross Control and Power lines perpendicular.
Black
Green
Brown
Blue
Current Sinking Lighting Controller: Keep resistor in AUX CNTR Terminal on first unit in control circuit series.
*REMOVE RESISTOR FROM ALL SUBSE-QUENT UNITS. Current Sourcing Lighting Controller:
*REMOVE RESISTOR
Warning: Risk of fire or electric shock. Low voltage only. Do not connect line voltage to any input of the Solatube 0-10V Daylight Dimmer
Warning: Risk of fire or electric shock. Low voltage only. Do not connect line voltage to any input of the Solatube 0-10V Daylight Dimmer
For the most current Installation Instructions, please visit www.solatube.com/instructions Solatube International, Inc. | 2210 Oak Ridge Way | Vista, CA 92081-8341 | www.solatube.com | T: 888.SOLATUBE
Option 2: Wire Connection for Open/ Close Operation Only Connecting to Standard Wall Switch Wall Switch Provided by Others. 16
The Following Instructions Should Only Be Performed By A Licensed Electrician
Run Control lines here Run Supply lines here
Note: Please follow all local municipal and building code requirements prior to making electrical connections. General Circuit Limitations: (8) Solatube Daylight Dimmers per Transformer, Max Cable Length between Units 40 ft (12.19 m), Aggregate Control Cable Length no to exceed 2,110 ft (643 m).
Remove Resistor from AUX CNTR Terminal on all units
Black
Green
Brown
Blue
NOTE: For best application and ease of installation strip wires Min. 3/16 in (4.8 mm) /Max 1/4 in (6.4 mm). Ensure all strands enter housing to correct terminal.
For best connections and to avoid noise, segregate power and signal cable, and cross Control and Power lines perpendicular.
22
Warning: Risk of fire or electric shock. Low voltage only. Do not connect line voltage to any input of the Solatube 0-10V Daylight Dimmer
Warning: Risk of fire or electric shock. Low voltage only. Do not connect line voltage to any input of the Solatube 0-10V Daylight Dimmer
For the most current Installation Instructions, please visit www.solatube.com/instructions Solatube International, Inc. | 2210 Oak Ridge Way | Vista, CA 92081-8341 | www.solatube.com | T: 888.SOLATUBE
17 Return to Main Set of SkyVault Installation Instruc-tions (P/N: 949990) for Additional Tube, Diffuser or Amplifier Attachment
For the most current Installation Instructions, please visit www.solatube.com/instructions Solatube International, Inc. | 2210 Oak Ridge Way | Vista, CA 92081-8341 | www.solatube.com | T: 888.SOLATUBE
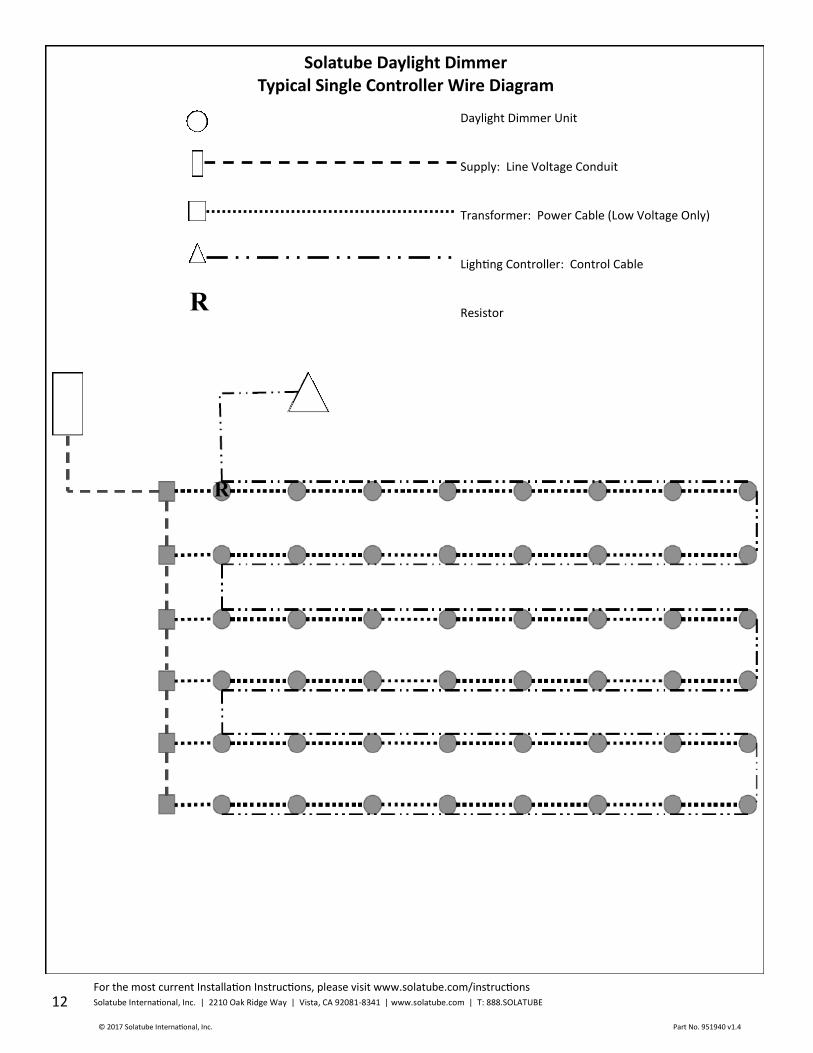
Solatube Daylight Dimmer Typical Single Controller Wire Diagram
Daylight Dimmer Unit Supply: Line Voltage Conduit Transformer: Power Cable (Low Voltage Only) Lighting Controller: Control Cable Resistor
For the most current Installation Instructions, please visit www.solatube.com/instructions Solatube International, Inc. | 2210 Oak Ridge Way | Vista, CA 92081-8341 | www.solatube.com | T: 888.SOLATUBE
Solatube Daylight Dimmer Typical Two (2) Controller Wire Diagram
R
Daylight Dimmer Unit Supply: Line Voltage Conduit Transformer: Power Cable (Low Voltage Only) Lighting Controller: Control Cable Resistor
R
R
For the most current Installation Instructions, please visit www.solatube.com/instructions Solatube International, Inc. | 2210 Oak Ridge Way | Vista, CA 92081-8341 | www.solatube.com | T: 888.SOLATUBE
For the most current Installation Instructions, please visit www.solatube.com/instructions Solatube International, Inc. | 2210 Oak Ridge Way | Vista, CA 92081-8341 | www.solatube.com | T: 888.SOLATUBE