12
1 Pearl City High School | Waipahu High School Department of Education VTC Distance Learning Pilot Project
| Date post: | 10-Apr-2017 |
| Category: |
Documents |
| Upload: | doug-blagriff |
| View: | 78 times |
| Download: | 5 times |

1
Pearl City High School | Waipahu High School
Department of Education
VTC Distance Learning Pilot Project

2
Contents Equipment You Will Use ............................................................................................................................... 3
Operational Modes ....................................................................................................................................... 3
Dial Plan ........................................................................................................................................................ 3
Important Tips ............................................................................................................................................... 3
Set Up the Room ........................................................................................................................................... 4
Stand Alone Mode ........................................................................................................................................ 5
VTC Modes .................................................................................................................................................... 6
Teach Mode .............................................................................................................................................. 7
Learn Mode ............................................................................................................................................... 8
TOGGLE between Teach and Learn Modes .................................................................................................. 8
TOGGLE between Classrooms in Learn Mode .............................................................................................. 9
Managing the Camera Preset Views ............................................................................................................. 9
Presentation Mode View ............................................................................................................................ 10
Adjusting the Camera ................................................................................................................................. 11
Secondary Camera .................................................................................................................................. 11
Primary Camera ...................................................................................................................................... 11
Adjusting the Camera Automatically or Manually .................................................................................. 11
Classroom Etiquette .................................................................................................................................... 11
Quick Set up Checklist ................................................................................................................................. 12
Resources .................................................................................................................................................... 12

3
Equipment You Will Use Each room is outfitted with the same hardware equipment. The equipment you’ll handle to modify the
rooms operability and/or functionality is shown below. A good way to remember when and how to use
each piece of hardware is – Front Row Panel is used to “set-up” the room, whereas the Touch Pad is
used to “manage” your room, the view the other classrooms sees, and making calls.
Front Row Panel w/ HDMI input, USB, and VGA output Cisco C-series Touch Pad
Operational Modes 1. SA (Stand Alone) – allows you to use the room with Projector 1 (Promethean board) or a
combination with Projector 1 and Projector 2 – not participating in Distance Learning.
2. VTC (Video Teleconference) – allows you the ability to participate in the Distance Learning as
either a Teacher (Teach mode) or as a learning classroom (Learn mode). You can TOGGLE
between Teach and Learn Modes, page 8.
Dial Plan This is the current plan for dialing between the schools and rooms. These are saved under your
Favorites on the Touch Pad. This is subject to change based on any network changes or schools that join
the Distance Learning effort. Your TC will be able to maintain this user guide and/or Dial Plan.
Campus Room Address
WHS V102 10.72.132.11
WHS V104 10.72.132.12
PCHS Library 10.72.4.11
PCHS C104 10.72.4.12
Important Tips Always connect your PC or laptop device to the Front Row solution via VGA or HDMI before
pressing any buttons on the Front Row panel and Touch Pad.
When you initially connect the VGA and/or USB cables to your laptop and the audio airs from
the Projector 1 (Promethean board) speakers instead of the entire classroom speakers, your
driver settings reverted back to default. You will need to change the driver settings for your
4
playback device. To do this, right click on the Speaker button on the bottom right tray, select
Playback devices, and select Headphone. Click Apply and Ok.
Volume buttons? The Front Row panel manages the volume in the entire room – only use these
buttons to increase or decrease volume. The Touch Pad unit volume setting should remain at
50% at all times.
To utilize the interactive functionality of the Promethean board and pens in a Distance Learning
Teacher mode, you must connect your device to the Front Row panel VGA, Audio and USB
cables.
Front Row panel and Promethean boards are known to fall into a sleep mode when no activity
has taken place in a while. Simply tap the Front Row panel or your laptop device to wake it
(them) up.
When connecting an Apple MAC device, you’ll need to modify the resolution for best
presentation and audio. The best supported VGA input signal to push video into the DOE
Distance Learning system is 1024x768 @ 60 hz. The supported HDMI output signals are 480i,
480p, 576i, 576p, 720p, 1080i, and 1080p.
When toggling between a PC laptop connected to HDMI and a MAC connected to VGA, you may
encounter a display issue with the MAC. Sometimes is doesn’t automatically detect the external
connection. This is a known MAC issue with this solution. To resolve, simply double-check the
resolution setting by clicking on “Detect Display” button to bring the 1024x768 @ 60 hz back
online.
MAC laptops and displaying Power Point Presentations. A known issue for MAC users displaying
Power Point Presentation is to always present from Slide Show > “Set At Mirror Show” and
“From Current Slide”. DO NOT use Slide Show > Presenter View button as this will cause the
screen to go blank. This issue is not affiliated with PC laptops; only with MACs.
Set Up the Room Setting up the room is critical and you should allow about 5 minutes before beginning your classroom.
It’s also important to note that this system is considered a “push-and wait”. The system needs to
determine which source is being requested and push instructions to it. In some rare occasions, you may
need to press the same button twice. Please don’t be in a hurry and simply keep pushing buttons
because a function didn’t instantaneously occur. If you press too many buttons too quickly, you may
end up with a black blank screen. If this occurs, please call your Technical Coordinator (TC).

5
Step 1: At the Front Row Panel – Main Menu shown above, let’s turn on both the Projector 1
(Promethean board) and Projector 2.
A. Press the SCR Down button to bring the projector 2 screen down.
B. Press PJ2 ON button to turn on Projector 2 (for the screen you previously
brought down).
C. Press PJ1 ON button to turn on Projector 1 which is also known as the
Promethean board. The Promethean projector takes a little longer to warm up
(turn on) than Projector 2, please be patient.
Notes: The PJ1 OFF (twice when prompted on the screen) and PJ2 OFF (once) buttons
are to turn off either of the two projectors.
Step 2: Determine how you wish to use the room – as Stand Alone or as a VTC.
Stand Alone Mode The Stand Alone mode provides flexibility for the teacher to turn on/off projectors not in use. To utilize
the room for their students any way they desire – just the instructiveness of Projector 1 (the
Promethean board) or both projectors.
Step 3: After pressing the Stand Alone button, you are presented with the following screen:
The top row provides options of how you wish to present data on Projector 1, and the
bottom row allows you options to present data on Projector 2. You have the ability to

6
connect multiple devices (e.g., one laptop to Projector 1 using VGA and another to
Projector 2 using HDMI).
Step 4: Connect your device using VGA or HDMI cables.
Step 5: Associate your device to the projector and screen.
Projector Buttons Action
PROJ 1 VGA Connect VGA and audio cables to your device to display on Projector 1.
PROJ 1 HDMI Connect HDMI cable to your device to display on Projector 1.
PROJ 2 VGA Connect VGA and audio cables to your device to display on Projector 2.
PROJ 2 HDMI Connect HDMI cable to your device to display on Projector 2.
Note: If you connect your device AFTER pressing the associated button(s), you will
simply have to press the button(s) again to notify the system which connection and
projector you are using.
VTC Modes VTC mode offers the ability to participate in the Distance Learning functionality as either a Teacher or
Learning classroom. You can interchange between the options without disconnecting. Note: If you
were in Learn mode, you will need to press the Home button to return the main menu in order to
perform Step 3 below.
Step 3: After pressing the VTC button, you are presented with the following screen:
Step 4: Ensure the Touch Pad is awake. If you have a black screen, tap it anywhere to wake it
up.

7
Teach Mode In this mode, you will see your laptop material on Projector 1 and your classroom on Projector 2.
Once a call has been established, Projector 1 will display your laptop material and Projector 2
will display the distance classroom, self-view of your classroom and your material in a Brady
bunch box view.
Step 5: Press the Teach button.
Step 6: With your laptop already connected, select how you wish to display your
material by pressing either VGA or HDMI buttons.
Button Action
VGA Connect VGA and audio cables to your device to display on Projector 1.
HDMI Connect HDMI cable to your device to display on Projector 1.
Step 7: Now that the room is setup and you’ve connected your device(s), it’s time to
invite a distance learning classroom. Pull out the Touch Pad device (sample
shown below).
Step 8: Under Favorites is a preset of available Schools/Rooms to call. Tap on
school/room, and then press the green Call button. The schools are defaulted
to Auto-Answer. An answered call will resemble the following screen sample.

8
Step 9: To add another Distance Learning Classroom, press the Add button and follow
Step 8.
Repeat Step 9 to add up to a total of 4 classrooms (including you).
To disconnect a call, press the red End button.
Step 10: Manage what the Distance Classroom will see by using either the Preset Views
(page 9) or Presentation mode (page 10).
Learn Mode In this mode, Projector 1 and 2 will display the standard screen (with wave image) until a
connected call is received. The screens will then display the status of the VTC (such as Teacher
Presentation or Preset view, self-view, classroom, etc.). Note: If you were in Teach mode, you
will need to press the Home button to return the main menu in order to perform Step 5
below.
Step 5: Press the Learn button.
Step 6: You’re all set and ready, please wait for the Teacher classroom to contact you.
Your room is automatically set to answer.
TOGGLE between Teach and Learn Modes Switching between Teach and Learn modes while using the Promethean board (Projector 1) is one
option of distance learning. Switching between Teach and Learn mode allows each TEACH room to
utilize the interactive functionality of the Promethean board (Projector 1). Note: If you were in Learn
mode, you will need to press the Home button to return the main menu in order to switch to Teach
mode.
If you initially setup in Teach mode, you would simply press the Learn button on the Front Row
Panel, and press the Learn Preset on the Touch Pad. Your screens will automatically adjust.
9
If you were initially setup in Learn mode, you would connect your device, press the Teach button,
press the button to identify which method you connected (VGA or HDMI) on the Front Row Panel.
Press the camera Preset mode on the Touch Pad. Your screens will adjust.
TOGGLE between Classrooms in Learn Mode Another advanced mode is to set both rooms in Learn mode to permit the exchange of training
materials between rooms, but NO interactive functionality of the Promethean board (Projector 1). To
utilize this mode, do the following:
A. Connect your laptop via VGA or HDMI.
B. Both classrooms press the Learn button on the Front Row Panel, and press which connection
button.
C. Press the “Presentation” button on the Touch Pad, and then PC. Reference Presentation Mode View
section, page 10 for more details.
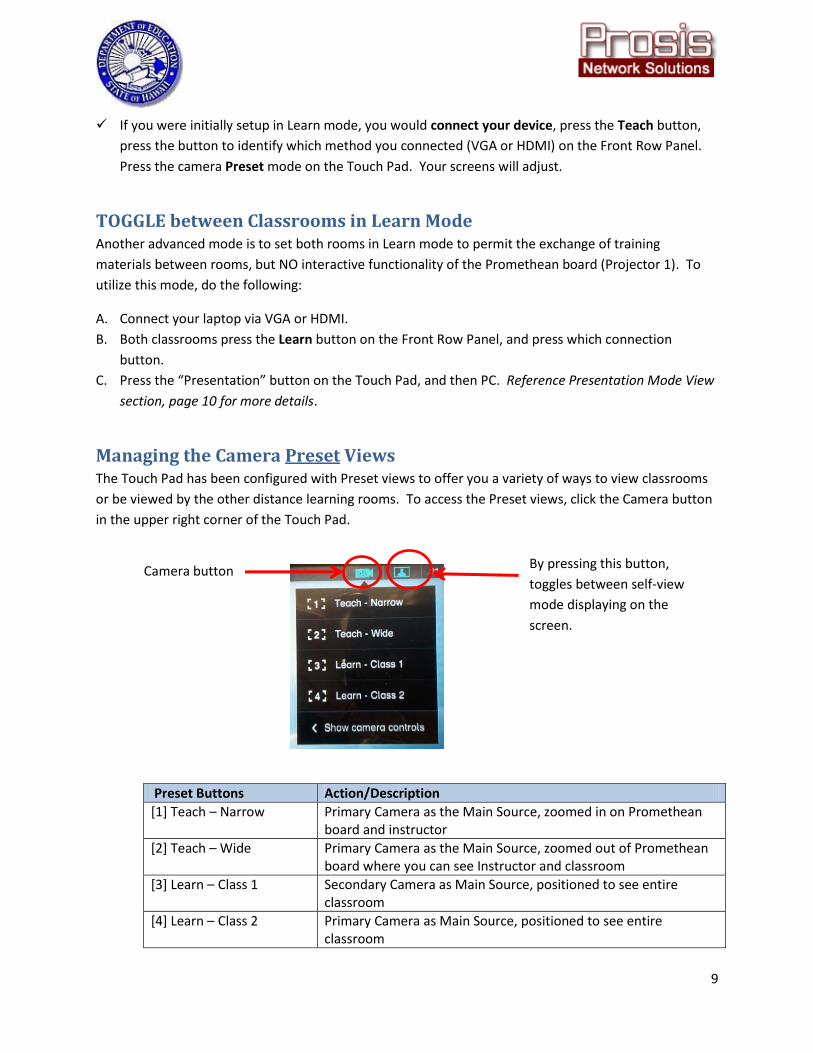
Managing the Camera Preset Views The Touch Pad has been configured with Preset views to offer you a variety of ways to view classrooms
or be viewed by the other distance learning rooms. To access the Preset views, click the Camera button
in the upper right corner of the Touch Pad.
Preset Buttons Action/Description
[1] Teach – Narrow Primary Camera as the Main Source, zoomed in on Promethean board and instructor
[2] Teach – Wide Primary Camera as the Main Source, zoomed out of Promethean board where you can see Instructor and classroom
[3] Learn – Class 1 Secondary Camera as Main Source, positioned to see entire classroom
[4] Learn – Class 2 Primary Camera as Main Source, positioned to see entire classroom
By pressing this button,
toggles between self-view
mode displaying on the
screen.
Camera button

10
Presentation Mode View The Presentation Mode is simply another method of displaying your material. Material is presented on
both Projector 1 and Projector 2 but in different views. Let’s take a look at those.
Teach mode – Projector 1 is FULL screen view, and Projector 2 will have the Brady bunch views
(basically what the Distance Learning classroom will see).
Learn mode – both screens will see the Brady bunch views.
A. Ensure your laptop is connected.
B. Press the Presentation button on the Touch Pad.
C. You are presented with two options: “PC” or “Secondary Camera”. You can slide between these
options by moving your finger left or right to see those options.
I. PC option – displays your material on Projector 1 in FULL screen view, and Projector 2 in
Brady bunch view. NOTE: This is the OPTION most recommended.
II. Secondary Camera options – displays NO material, just classroom view and self-view.
NOTE: This is an optional function, if you wanted to use.
D. To stop displaying, press the Stop Presenting button.
Presentation button
11
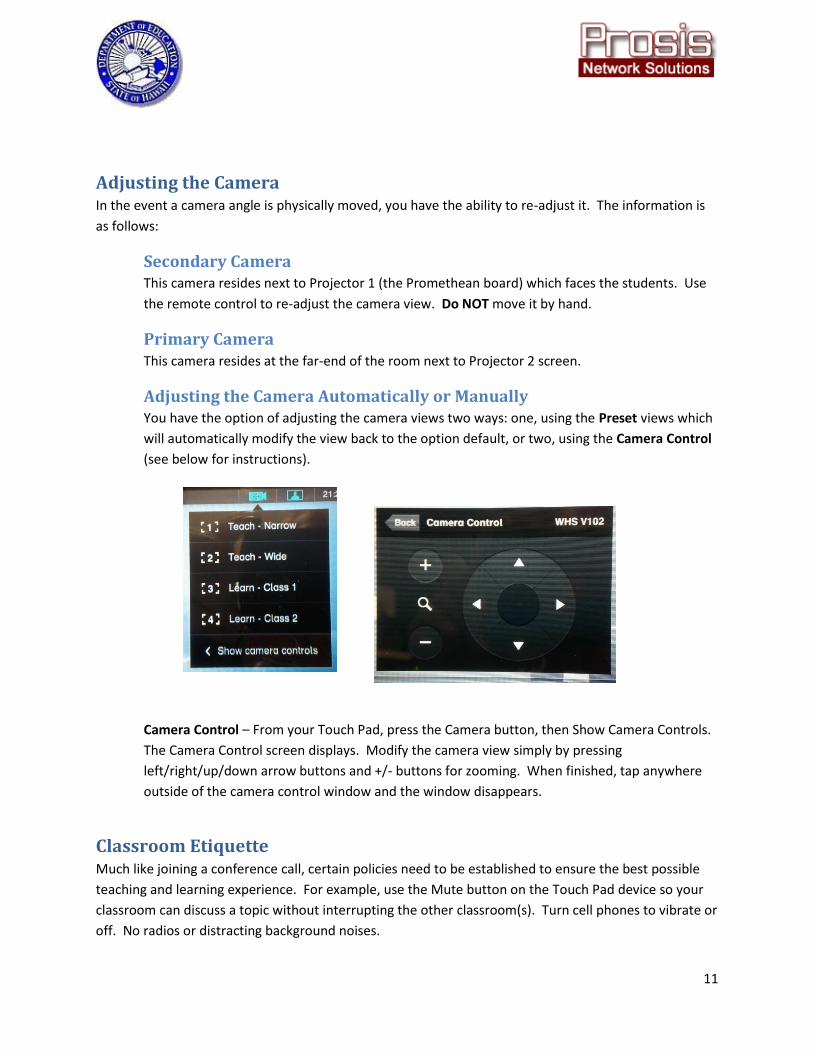
Adjusting the Camera In the event a camera angle is physically moved, you have the ability to re-adjust it. The information is
as follows:
Secondary Camera This camera resides next to Projector 1 (the Promethean board) which faces the students. Use
the remote control to re-adjust the camera view. Do NOT move it by hand.
Primary Camera This camera resides at the far-end of the room next to Projector 2 screen.
Adjusting the Camera Automatically or Manually You have the option of adjusting the camera views two ways: one, using the Preset views which
will automatically modify the view back to the option default, or two, using the Camera Control
(see below for instructions).
Camera Control – From your Touch Pad, press the Camera button, then Show Camera Controls.
The Camera Control screen displays. Modify the camera view simply by pressing
left/right/up/down arrow buttons and +/- buttons for zooming. When finished, tap anywhere
outside of the camera control window and the window disappears.
Classroom Etiquette Much like joining a conference call, certain policies need to be established to ensure the best possible
teaching and learning experience. For example, use the Mute button on the Touch Pad device so your
classroom can discuss a topic without interrupting the other classroom(s). Turn cell phones to vibrate or
off. No radios or distracting background noises.

12
Quick Set up Checklist
Teach mode: To Learn mode:
1. Ensure both projectors are ON and projector screen is down.
1. Ensure desired projector is ON and projector screen is down, if needed.
2. Ensure Touch Pad is on. If black screen, tap anywhere to wake it up.
2. Ensure Touch Pad is on. If black screen, tap anywhere to wake it up.
3. Select “VTC” on Front Row 3. Select “VTC” on Front Row
4. Select “Teach” on Front Row 4. Select “Learn” on Front Row
5. Connect your device based on your desired input option.
5. Wait for “Teaching room to call – your room will automatically answer.
6. Select “VGA” or “HDMI” to choose your computer input
6. Select the camera in the upper right corner of the Touch Pad
7. Call Distant end user using the Touch Pad 7. Select desire “Learn” Preset, page 9
8. Select the camera in the upper right corner of the Touch Pad
9. Select desire “Teach” Preset, page 9
Resources Additional supporting documentation can prove helpful:
Cisco C-40 Codec User Manual
Cisco C-40 Quick Reference Guide
IAAK ActivClassroom Orientation Manual (Promethean)
Activeexpression2 Startup Guide (Promethean)
Learner Response Systems (Promethean)


