28
SOMFY MOTORISATION FLOW CHARTS PRODUCT INFORMATION MANUAL SECTION: 7K SOMFY MOTORISATION FLOW CHARTS

SOMFY MOTORISATION FLOW CHARTS
PRODUCT INFORMATION MANUALSECTION: 7K SOMFY MOTORISATION FLOW CHARTS

ISSUE DATE: AUG 2018 ORIGINATOR: SKILTEC REPLACES ISSUE DATE: NIL APPROVED BY: A.GARNICA PAGE 3
PRODUCT INFORMATION MANUALSECTION: 7K SOMFY MOTORISATION FLOW CHARTS
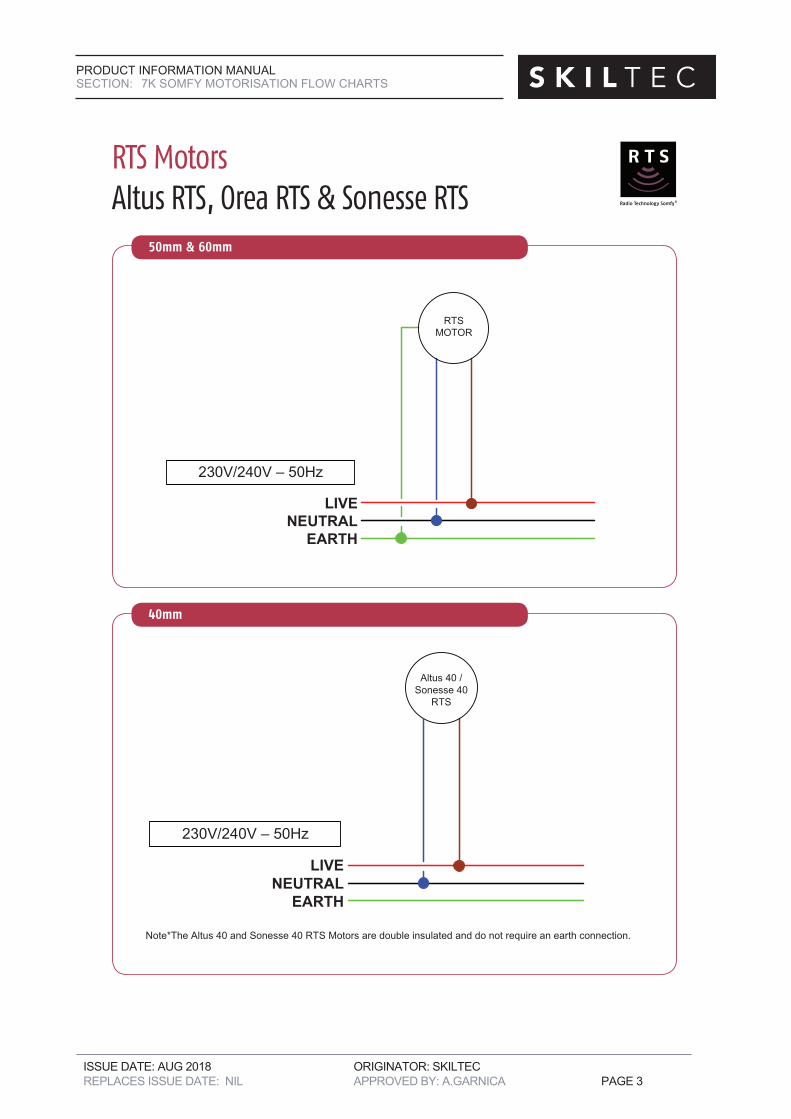
RTS MotorsAltus RTS, Orea RTS & Sonesse RTS
LIVENEUTRALEARTH
230V/240V – 50Hz
RTSMOTOR
50mm & 60mm
40mm
11
ISSUE DATE: AUG 2018 ORIGINATOR: SKILTEC REPLACES ISSUE DATE: NIL APPROVED BY: A.GARNICA PAGE 4
PRODUCT INFORMATION MANUALSECTION: 7K SOMFY MOTORISATION FLOW CHARTS
© copyright SOMFY Pty. Limited 2015 14
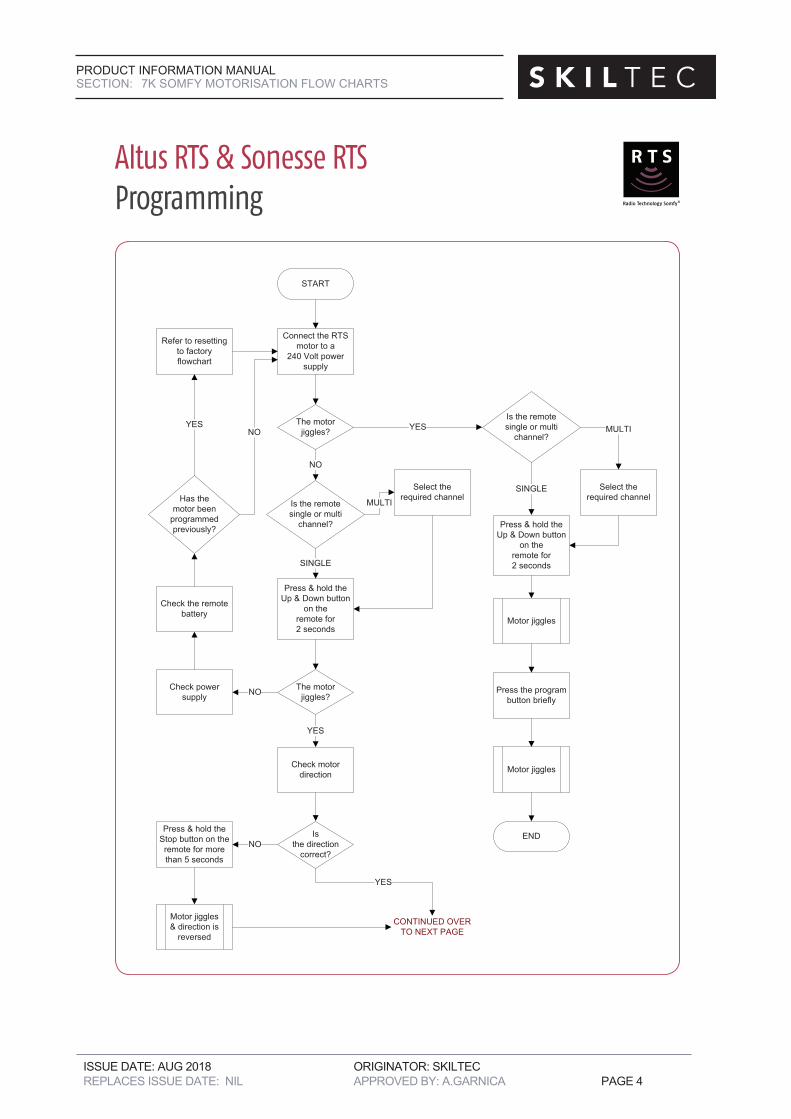
Altus RTS & Sonesse RTSProgramming
ISSUE DATE: AUG 2018 ORIGINATOR: SKILTEC REPLACES ISSUE DATE: NIL APPROVED BY: A.GARNICA PAGE 5
PRODUCT INFORMATION MANUALSECTION: 7K SOMFY MOTORISATION FLOW CHARTS
15
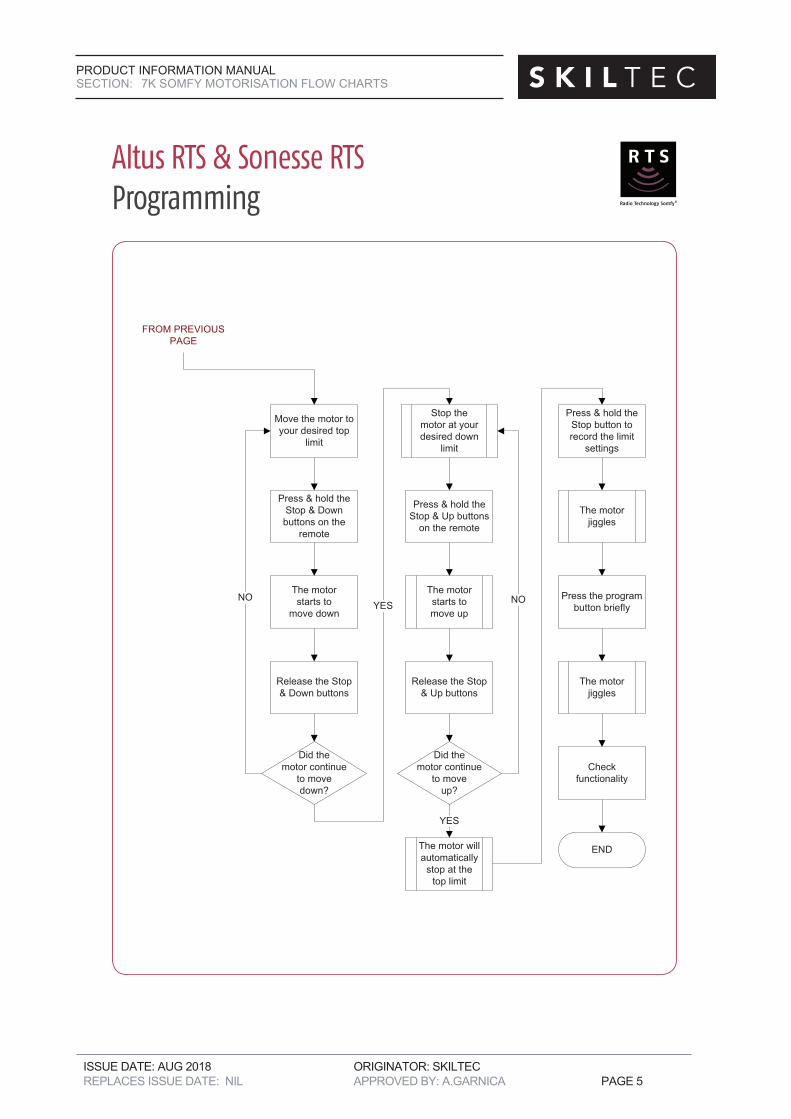
Altus RTS & Sonesse RTSProgramming
ISSUE DATE: AUG 2018 ORIGINATOR: SKILTEC REPLACES ISSUE DATE: NIL APPROVED BY: A.GARNICA PAGE 6
PRODUCT INFORMATION MANUALSECTION: 7K SOMFY MOTORISATION FLOW CHARTS
17
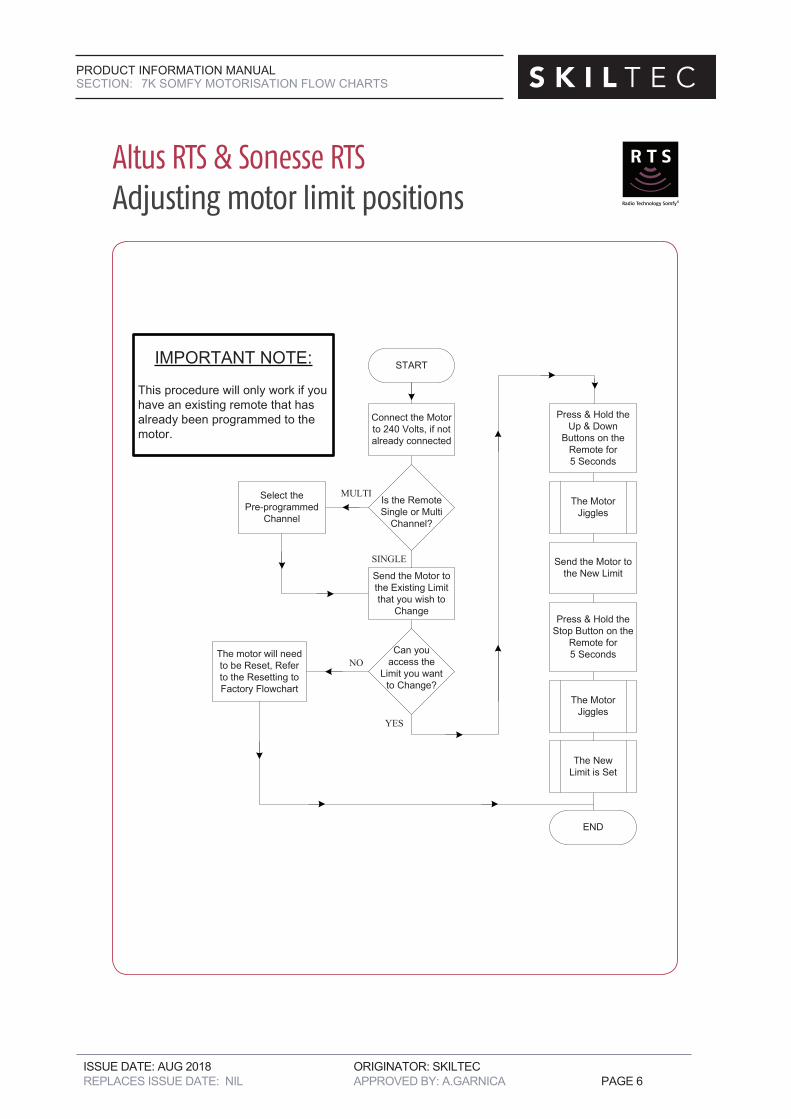
Altus RTS & Sonesse RTSAdjusting motor limit positions

ISSUE DATE: AUG 2018 ORIGINATOR: SKILTEC REPLACES ISSUE DATE: NIL APPROVED BY: A.GARNICA PAGE 7
PRODUCT INFORMATION MANUALSECTION: 7K SOMFY MOTORISATION FLOW CHARTS
19
RTS Motors"My" position programming
START
Connect the RTSMotor to a
240 Volt PowerSupply
NO
MULTI
SINGLE
Select theRequired Channel
Is the RemoteSingle or Multi
Channel ?
Use the Up andDown Buttons tosend the motor to
the requiredposition
Stop the motor atthe desired “my”
position
Press & Hold the“my” Button on the
Remote for 5seconds
The MotorJiggles
END
CheckFunctionality
my
ISSUE DATE: AUG 2018 ORIGINATOR: SKILTEC REPLACES ISSUE DATE: NIL APPROVED BY: A.GARNICA PAGE 8
PRODUCT INFORMATION MANUALSECTION: 7K SOMFY MOTORISATION FLOW CHARTS
21
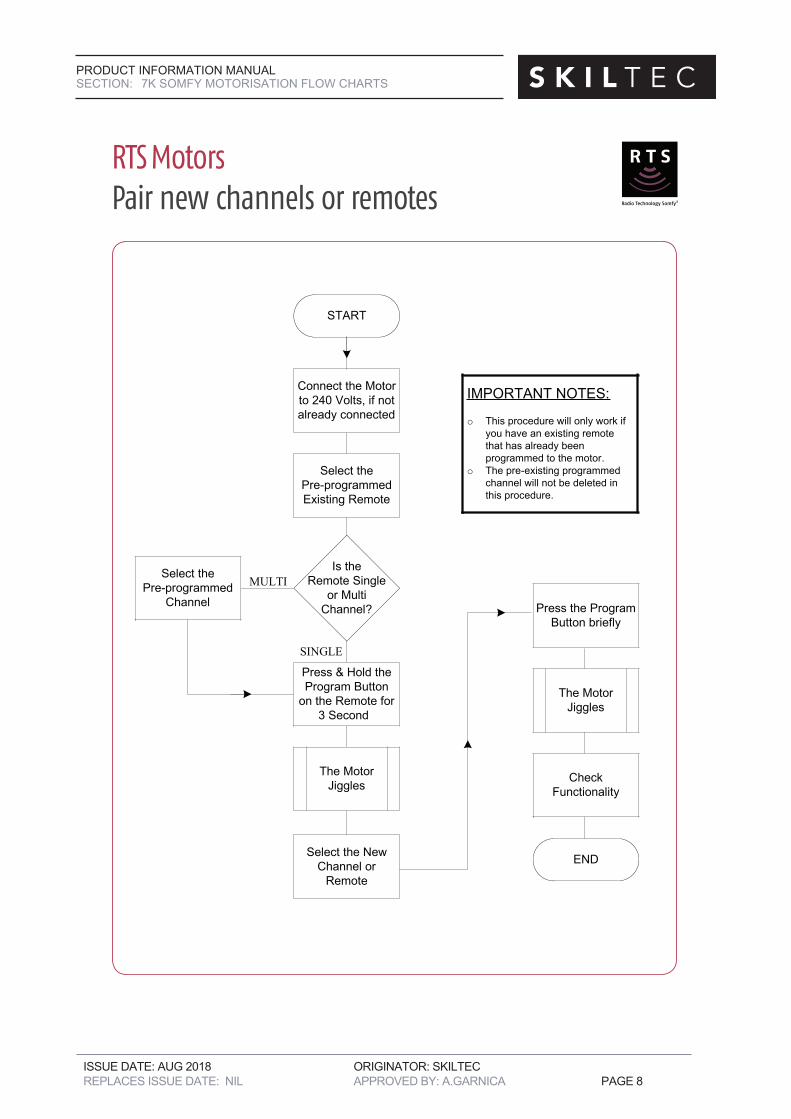
RTS MotorsPair new channels or remotes
The MotorJiggles
END
START
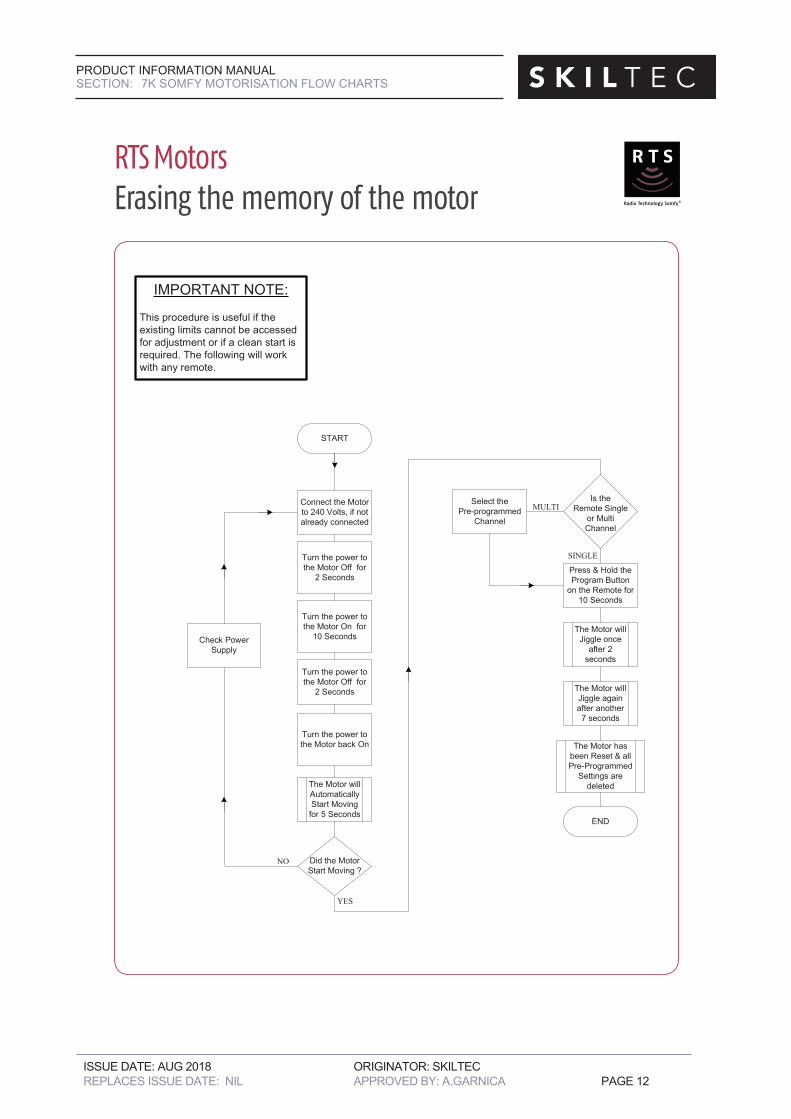
Connect the Motorto 240 Volts, if notalready connected
IMPORTANT NOTES:
o This procedure will only work ifyou have an existing remotethat has already beenprogrammed to the motor.
o The pre-existing programmedchannel will not be deleted inthis procedure.
Is theRemote Single
or MultiChannel?
MULTISelect the
Pre-programmedChannel
Press & Hold theProgram Button
on the Remote for3 Second
SINGLE
Select the NewChannel or
Remote
Select thePre-programmedExisting Remote
Press the ProgramButton briefly
The MotorJiggles
CheckFunctionality
ISSUE DATE: AUG 2018 ORIGINATOR: SKILTEC REPLACES ISSUE DATE: NIL APPROVED BY: A.GARNICA PAGE 9
PRODUCT INFORMATION MANUALSECTION: 7K SOMFY MOTORISATION FLOW CHARTS
© copyright SOMFY Pty. Limited 2015 22
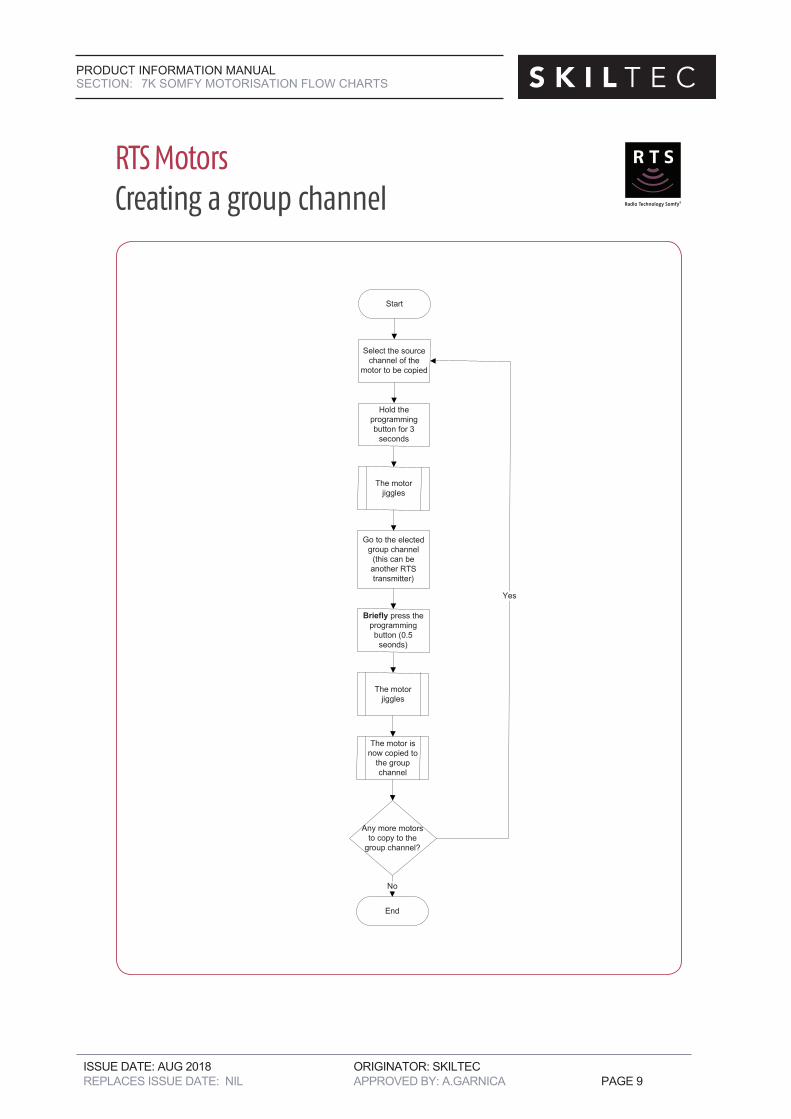
RTS MotorsCreating a group channel
Start
Any more motors to copy to the
group channel?
Select the source channel of the
motor to be copied
End
No
Creating a group channel on a RTS remote
Go to the elected group channel
(this can be another RTS transmitter)
Hold the programming button for 3
seconds
The motor jiggles
Briefly press the programming button (0.5
seonds)
The motor jiggles
The motor is now copied to
the group channel
Yes
ISSUE DATE: AUG 2018 ORIGINATOR: SKILTEC REPLACES ISSUE DATE: NIL APPROVED BY: A.GARNICA PAGE 10
PRODUCT INFORMATION MANUALSECTION: 7K SOMFY MOTORISATION FLOW CHARTS
© copyright SOMFY Pty. Limited 2015 24
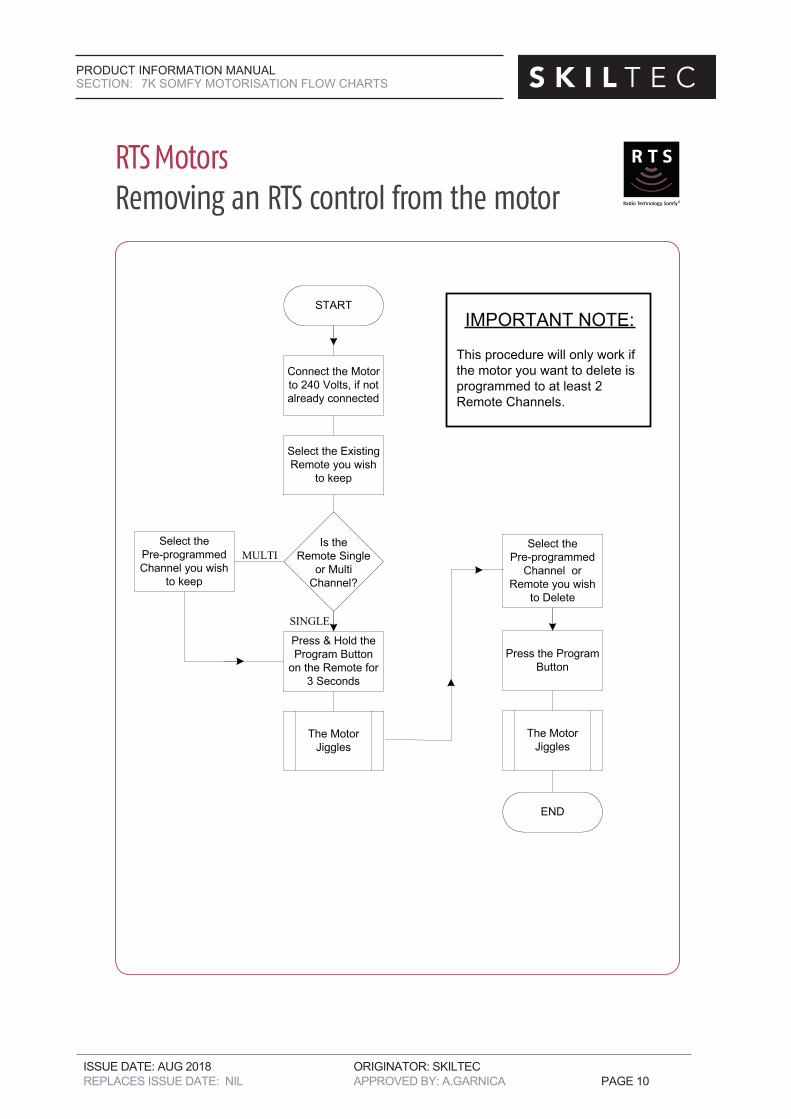
RTS MotorsRemoving an RTS control from the motor
The MotorJiggles
START
Connect the Motorto 240 Volts, if notalready connected
IMPORTANT NOTE:
This procedure will only work ifthe motor you want to delete isprogrammed to at least 2Remote Channels.
Is theRemote Single
or MultiChannel?
MULTISelect the
Pre-programmedChannel you wish
to keep
Press & Hold theProgram Button
on the Remote for3 Seconds
SINGLE
Select the ExistingRemote you wish
to keep
END
Press the ProgramButton
The MotorJiggles
Select thePre-programmed
Channel orRemote you wish
to Delete
ISSUE DATE: AUG 2018 ORIGINATOR: SKILTEC REPLACES ISSUE DATE: NIL APPROVED BY: A.GARNICA PAGE 11
PRODUCT INFORMATION MANUALSECTION: 7K SOMFY MOTORISATION FLOW CHARTS
© copyright SOMFY Pty. Limited 2015 26
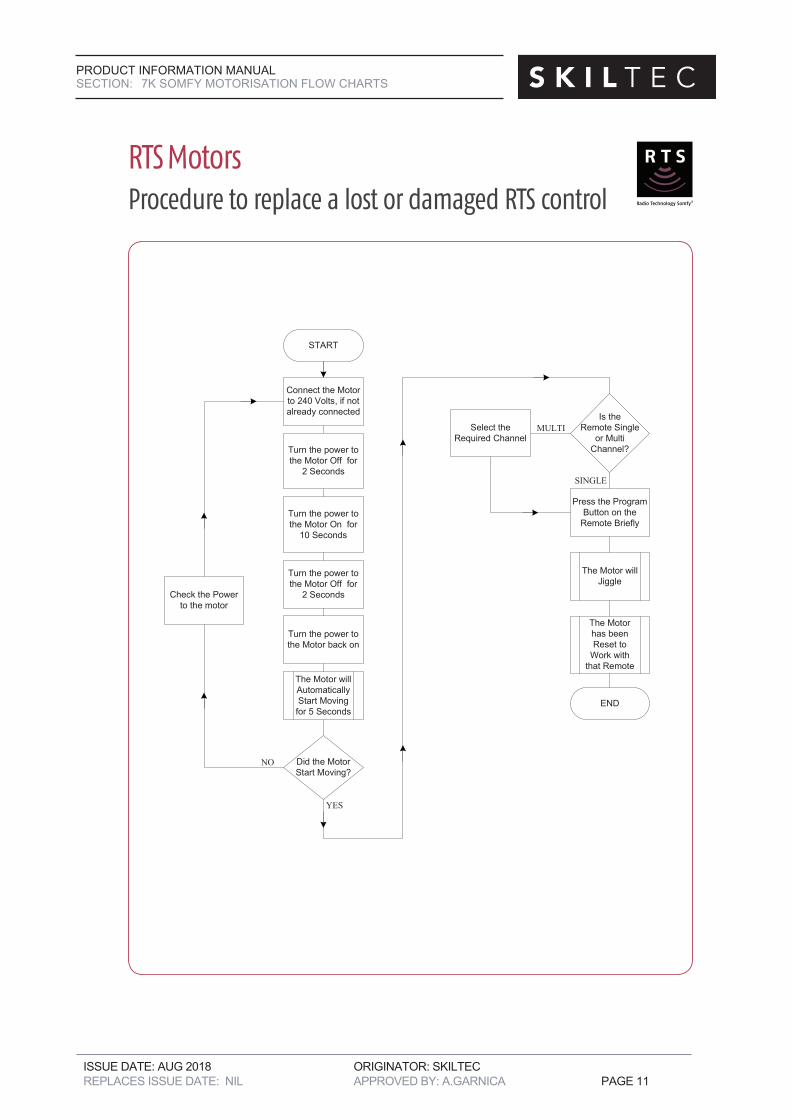
RTS MotorsProcedure to replace a lost or damaged RTS control
or
ISSUE DATE: AUG 2018 ORIGINATOR: SKILTEC REPLACES ISSUE DATE: NIL APPROVED BY: A.GARNICA PAGE 12
PRODUCT INFORMATION MANUALSECTION: 7K SOMFY MOTORISATION FLOW CHARTS
© copyright SOMFY Pty. Limited 2015 28
RTS MotorsErasing the memory of the motor
© c
opyr
igh
t SO
MFY
Pty
. Li
mit
ed 2
010
RTS MotorsErasing the memory of the Motor Flow Chart
29
ISSUE DATE: AUG 2018 ORIGINATOR: SKILTEC REPLACES ISSUE DATE: NIL APPROVED BY: A.GARNICA PAGE 13
PRODUCT INFORMATION MANUALSECTION: 7K SOMFY MOTORISATION FLOW CHARTS
29
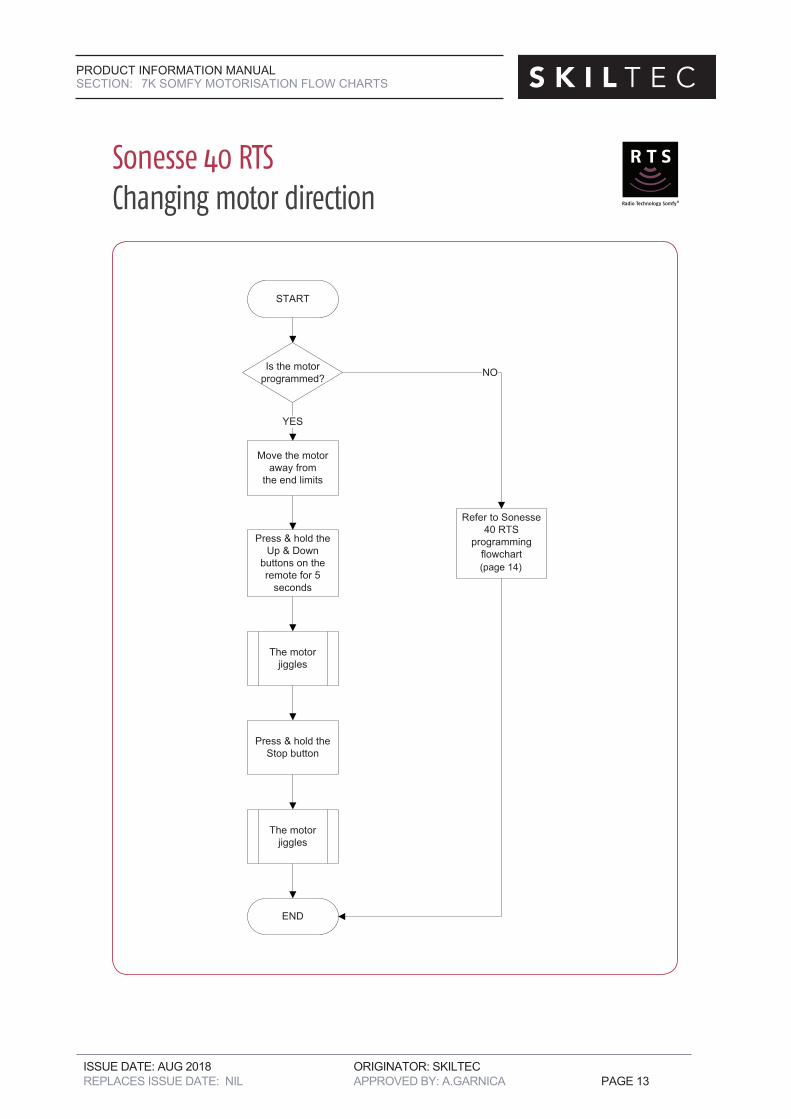
Sonesse 40 RTSChanging motor direction
(page 14)
ISSUE DATE: AUG 2018 ORIGINATOR: SKILTEC REPLACES ISSUE DATE: NIL APPROVED BY: A.GARNICA PAGE 14
PRODUCT INFORMATION MANUALSECTION: 7K SOMFY MOTORISATION FLOW CHARTS
© copyright SOMFY Pty. Limited 2015 30
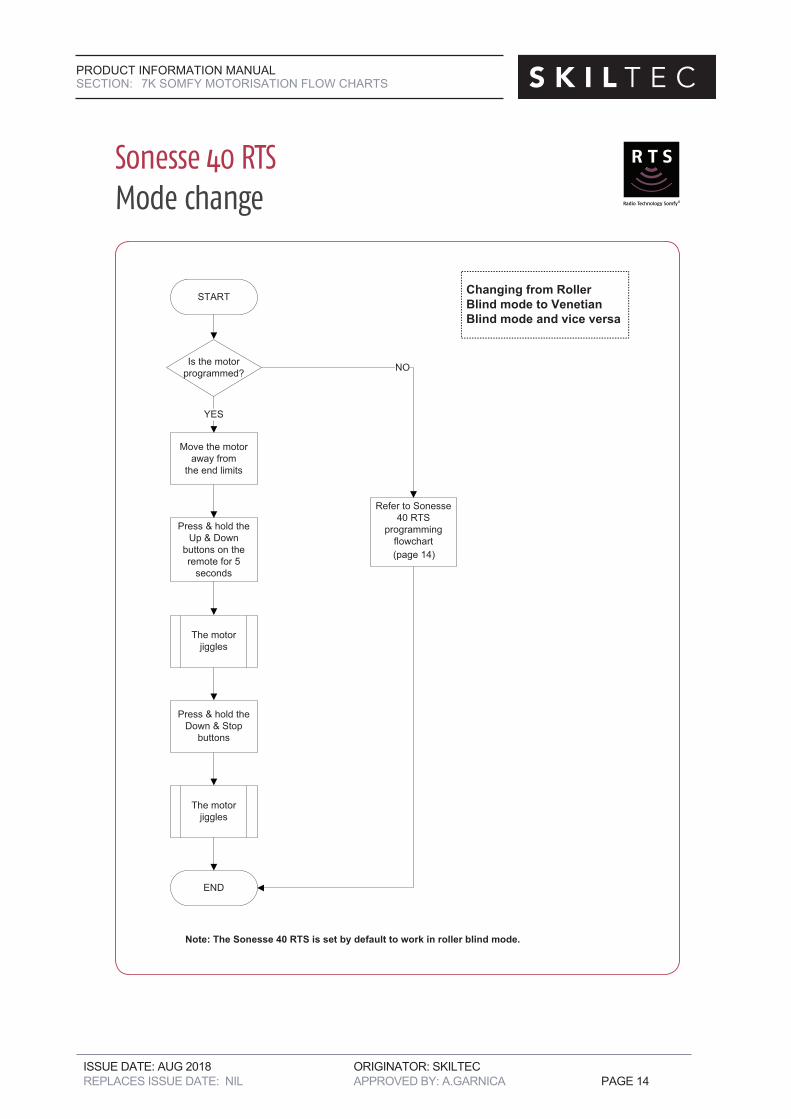
Sonesse 40 RTSMode change
(page 14)
ISSUE DATE: AUG 2018 ORIGINATOR: SKILTEC REPLACES ISSUE DATE: NIL APPROVED BY: A.GARNICA PAGE 15
PRODUCT INFORMATION MANUALSECTION: 7K SOMFY MOTORISATION FLOW CHARTS
31
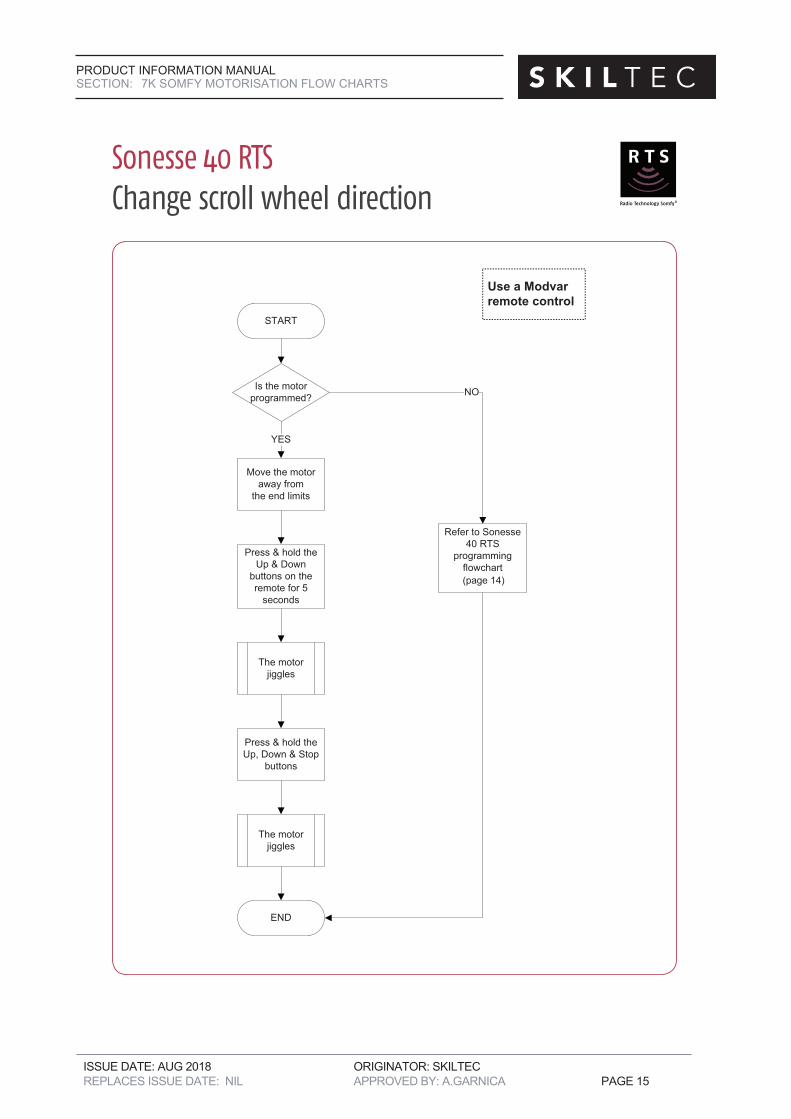
Sonesse 40 RTSChange scroll wheel direction
(page 14)
ISSUE DATE: AUG 2018 ORIGINATOR: SKILTEC REPLACES ISSUE DATE: NIL APPROVED BY: A.GARNICA PAGE 16
PRODUCT INFORMATION MANUALSECTION: 7K SOMFY MOTORISATION FLOW CHARTS
© copyright SOMFY Pty. Limited 2015 32
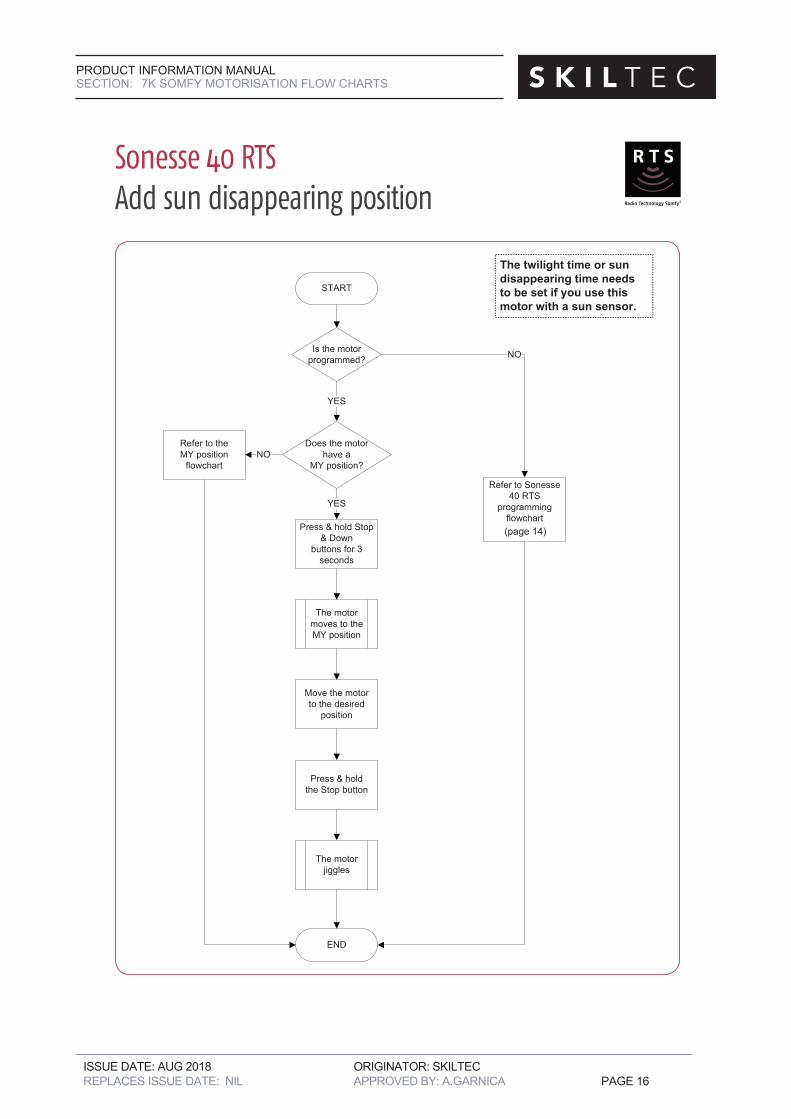
Sonesse 40 RTSAdd sun disappearing position
(page 14)
ISSUE DATE: AUG 2018 ORIGINATOR: SKILTEC REPLACES ISSUE DATE: NIL APPROVED BY: A.GARNICA PAGE 17
PRODUCT INFORMATION MANUALSECTION: 7K SOMFY MOTORISATION FLOW CHARTS
33
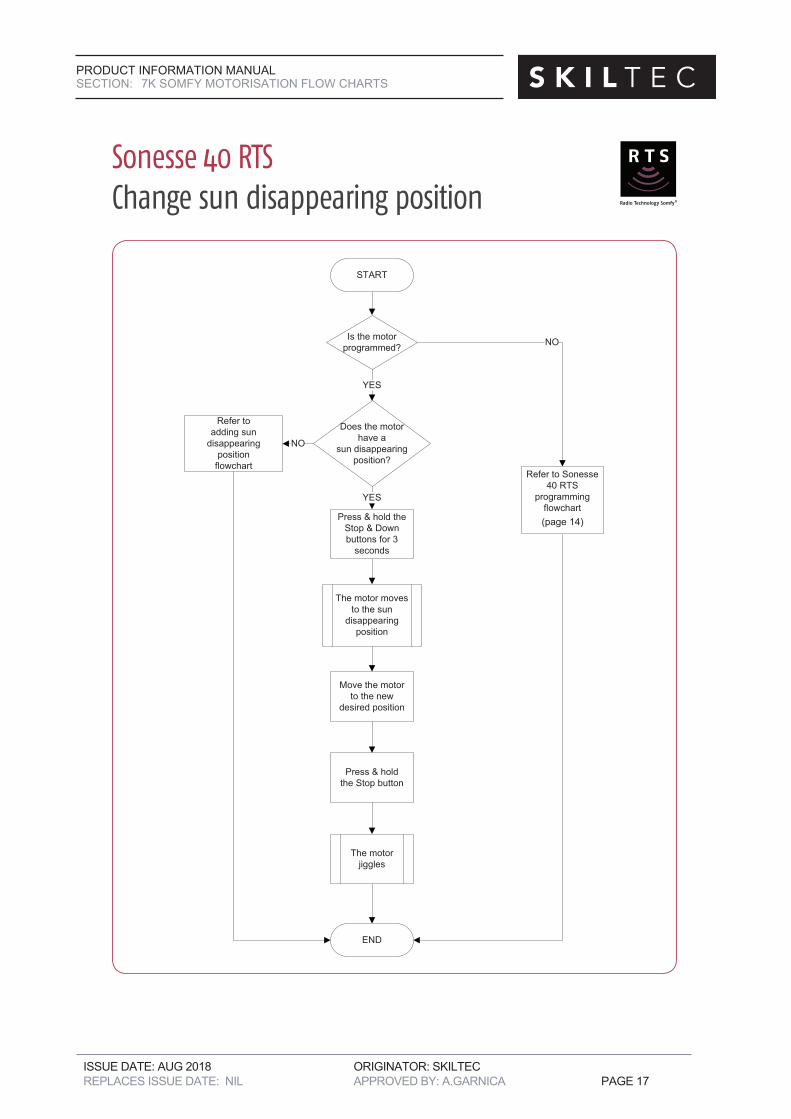
Sonesse 40 RTSChange sun disappearing position
(page 14)
ISSUE DATE: AUG 2018 ORIGINATOR: SKILTEC REPLACES ISSUE DATE: NIL APPROVED BY: A.GARNICA PAGE 18
PRODUCT INFORMATION MANUALSECTION: 7K SOMFY MOTORISATION FLOW CHARTS
© copyright SOMFY Pty. Limited 2015 34
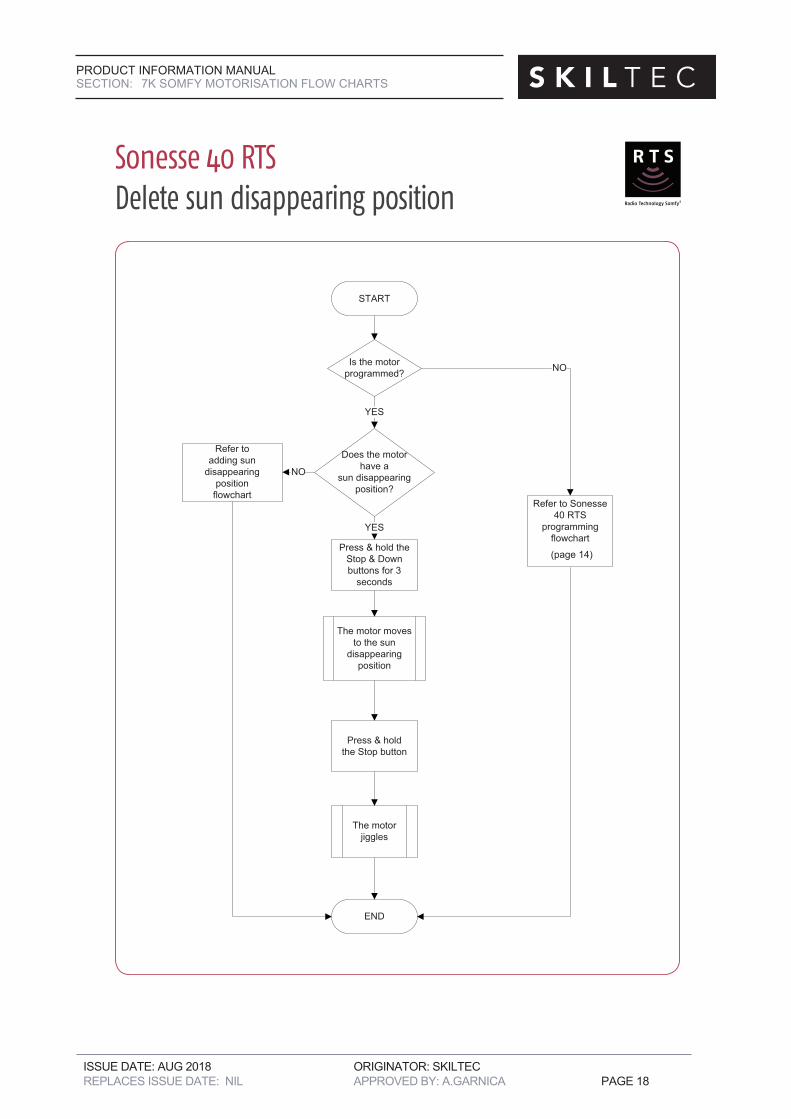
Sonesse 40 RTSDelete sun disappearing position
(page 14)
ISSUE DATE: AUG 2018 ORIGINATOR: SKILTEC REPLACES ISSUE DATE: NIL APPROVED BY: A.GARNICA PAGE 19
PRODUCT INFORMATION MANUALSECTION: 7K SOMFY MOTORISATION FLOW CHARTS
© copyright SOMFY Pty. Limited 2015 42
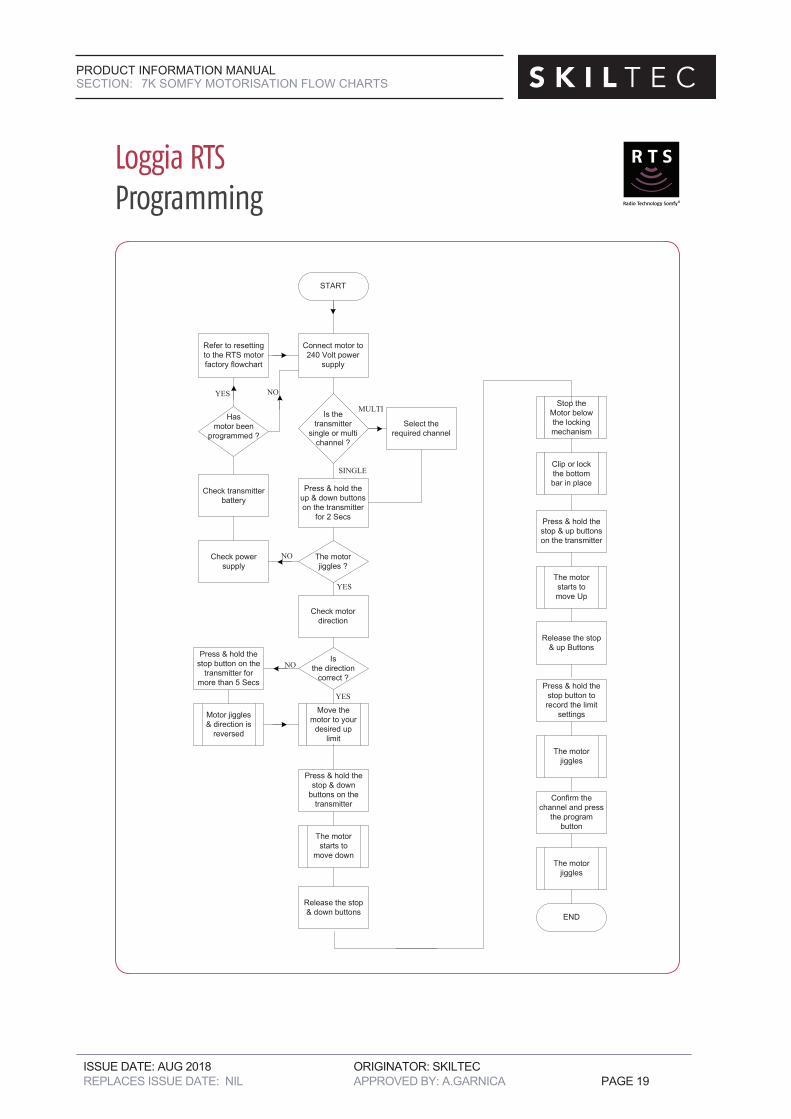
Loggia RTSProgramming
START
Connect motor to 240 Volt power
supply
Refer to resetting to the RTS motor factory flowchart
Check transmitter battery
NO
Has motor been
programmed ?
MULTI
SINGLE
Select the required channel
Is the transmitter
single or multi channel ?
Press & hold the up & down buttons on the transmitter
for 2 Secs
The motor jiggles ?
Check power supply
NO
Check motor direction
Isthe direction
correct ?
Press & hold the stop button on the
transmitter for more than 5 Secs
NO
Motor jiggles & direction is
reversed
Move the motor to your
desired up limit
YES
YES NO
YES
Release the stop & down buttons
Press & hold the stop & down
buttons on the transmitter
The motor starts to
move down
END
Stop the Motor below the locking mechanism
Press & hold the stop & up buttons on the transmitter
Release the stop & up Buttons
The motor starts to move Up
Press & hold the stop button to record the limit
settings
The motor jiggles
Confirm the channel and press
the program button
The motor jiggles
Clip or lock the bottom bar in place
Loggia RTS
ISSUE DATE: AUG 2018 ORIGINATOR: SKILTEC REPLACES ISSUE DATE: NIL APPROVED BY: A.GARNICA PAGE 20
PRODUCT INFORMATION MANUALSECTION: 7K SOMFY MOTORISATION FLOW CHARTS
© copyright SOMFY Pty. Limited 2015 46
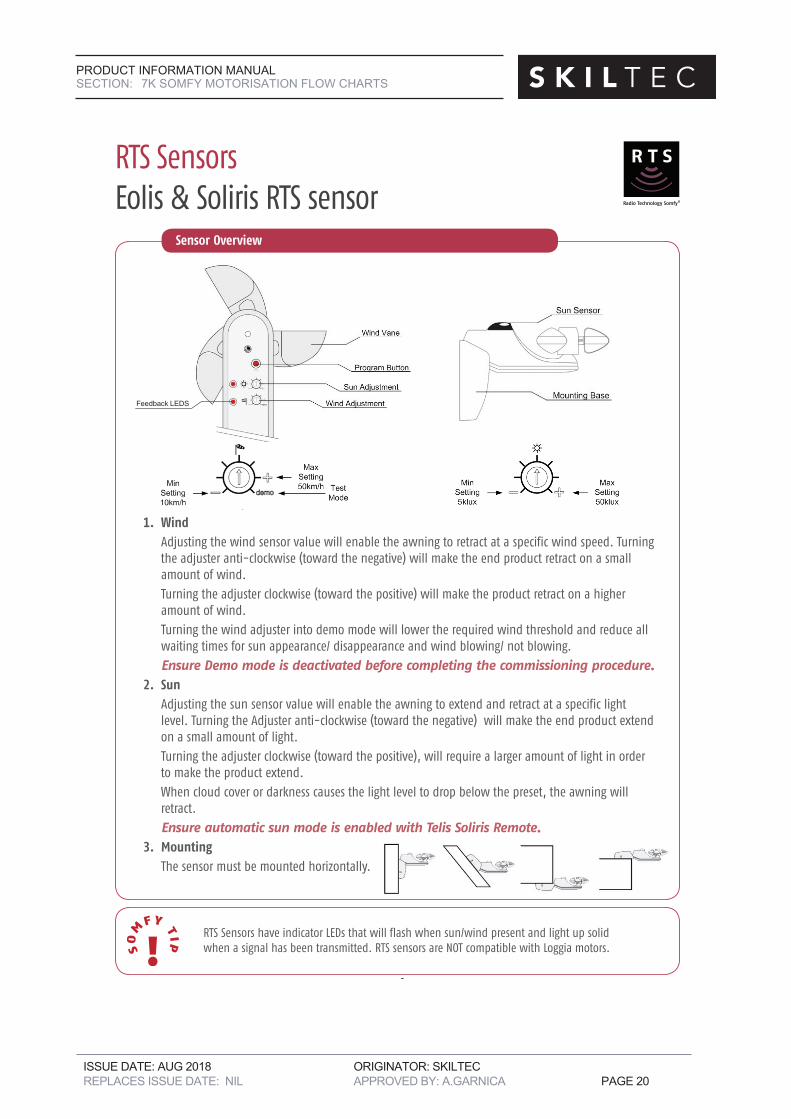
RTS SensorsEolis & Soliris RTS sensor
1. Wind Adjusting the wind sensor value will enable the awning to retract at a specific wind speed. Turning
the adjuster anti-clockwise (toward the negative) will make the end product retract on a small amount of wind.
Turning the adjuster clockwise (toward the positive) will make the product retract on a higher amount of wind.
Turning the wind adjuster into demo mode will lower the required wind threshold and reduce all waiting times for sun appearance/ disappearance and wind blowing/ not blowing.
Ensure Demo mode is deactivated before completing the commissioning procedure.2. Sun Adjusting the sun sensor value will enable the awning to extend and retract at a specific light
level. Turning the Adjuster anti-clockwise (toward the negative) will make the end product extend on a small amount of light.
Turning the adjuster clockwise (toward the positive), will require a larger amount of light in order to make the product extend.
When cloud cover or darkness causes the light level to drop below the preset, the awning will retract.
Ensure automatic sun mode is enabled with Telis Soliris Remote.3. Mounting The sensor must be mounted horizontally.
Sensor Overview
Feedback LEDS
RTS Sensors have indicator LEDs that will flash when sun/wind present and light up solid when a signal has been transmitted. RTS sensors are NOT compatible with Loggia motors.

ISSUE DATE: AUG 2018 ORIGINATOR: SKILTEC REPLACES ISSUE DATE: NIL APPROVED BY: A.GARNICA PAGE 21
PRODUCT INFORMATION MANUALSECTION: 7K SOMFY MOTORISATION FLOW CHARTS
47
RTS SensorsEolis & Soliris RTS sensor wiring diagram
Note: Soliris Sensor RTS has a black "cap" on the top most extremity
SOLIRIS/EOLISRTS SENSOR
ISSUE DATE: AUG 2018 ORIGINATOR: SKILTEC REPLACES ISSUE DATE: NIL APPROVED BY: A.GARNICA PAGE 22
PRODUCT INFORMATION MANUALSECTION: 7K SOMFY MOTORISATION FLOW CHARTS
© copyright SOMFY Pty. Limited 2015 48
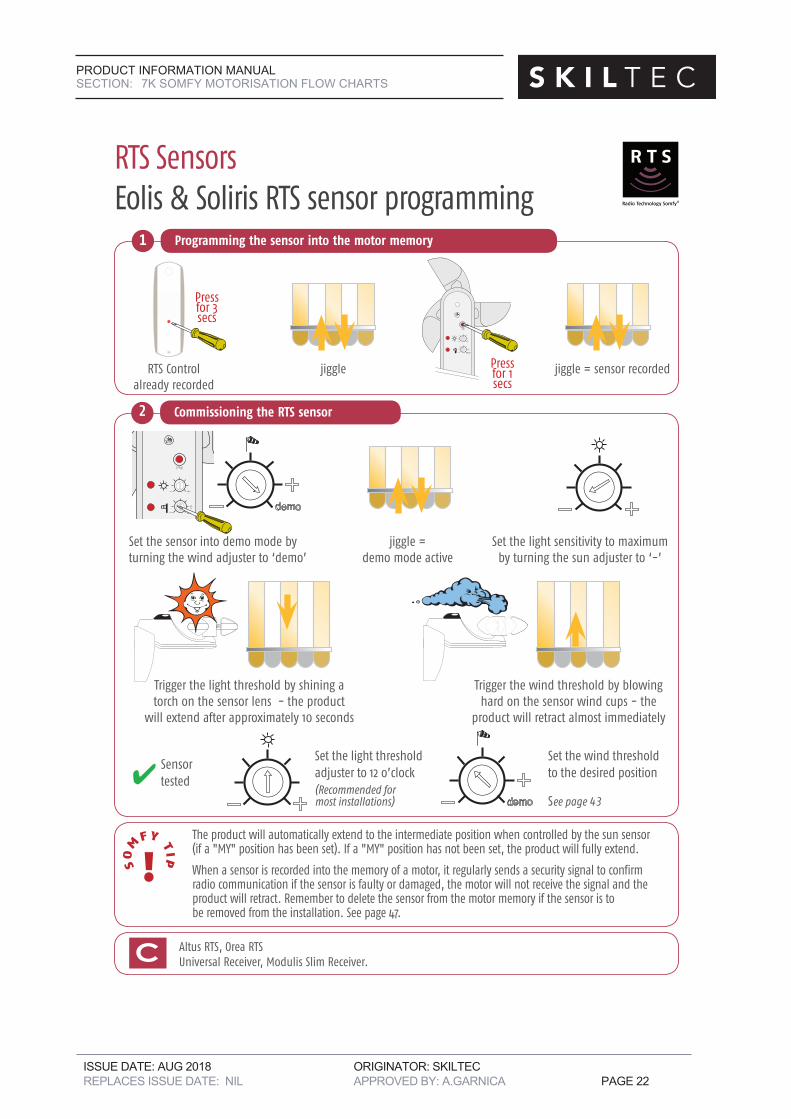
RTS SensorsEolis & Soliris RTS sensor programming
1 Programming the sensor into the motor memory
prog
Press for 1 secs
Press for 3 secs
RTS Control jiggle jiggle = sensor recorded already recorded
2 Commissioning the RTS sensor
The product will automatically extend to the intermediate position when controlled by the sun sensor (if a "MY" position has been set). If a "MY" position has not been set, the product will fully extend.
When a sensor is recorded into the memory of a motor, it regularly sends a security signal to confirm radio communication if the sensor is faulty or damaged, the motor will not receive the signal and the product will retract. Remember to delete the sensor from the motor memory if the sensor is to be removed from the installation. See page 47.
Set the sensor into demo mode by jiggle = Set the light sensitivity to maximumturning the wind adjuster to ‘demo’ demo mode active by turning the sun adjuster to ‘-’
prog
Trigger the light threshold by shining a Trigger the wind threshold by blowing torch on the sensor lens - the product hard on the sensor wind cups - the will extend after approximately 10 seconds product will retract almost immediately
Set the light threshold Set the wind threshold adjuster to 12 o’clock to the desired position(Recommended for most installations) See page 43
Sensor tested
Altus RTS, Orea RTS Universal Receiver, Modulis Slim Receiver.C
ISSUE DATE: AUG 2018 ORIGINATOR: SKILTEC REPLACES ISSUE DATE: NIL APPROVED BY: A.GARNICA PAGE 23
PRODUCT INFORMATION MANUALSECTION: 7K SOMFY MOTORISATION FLOW CHARTS
49
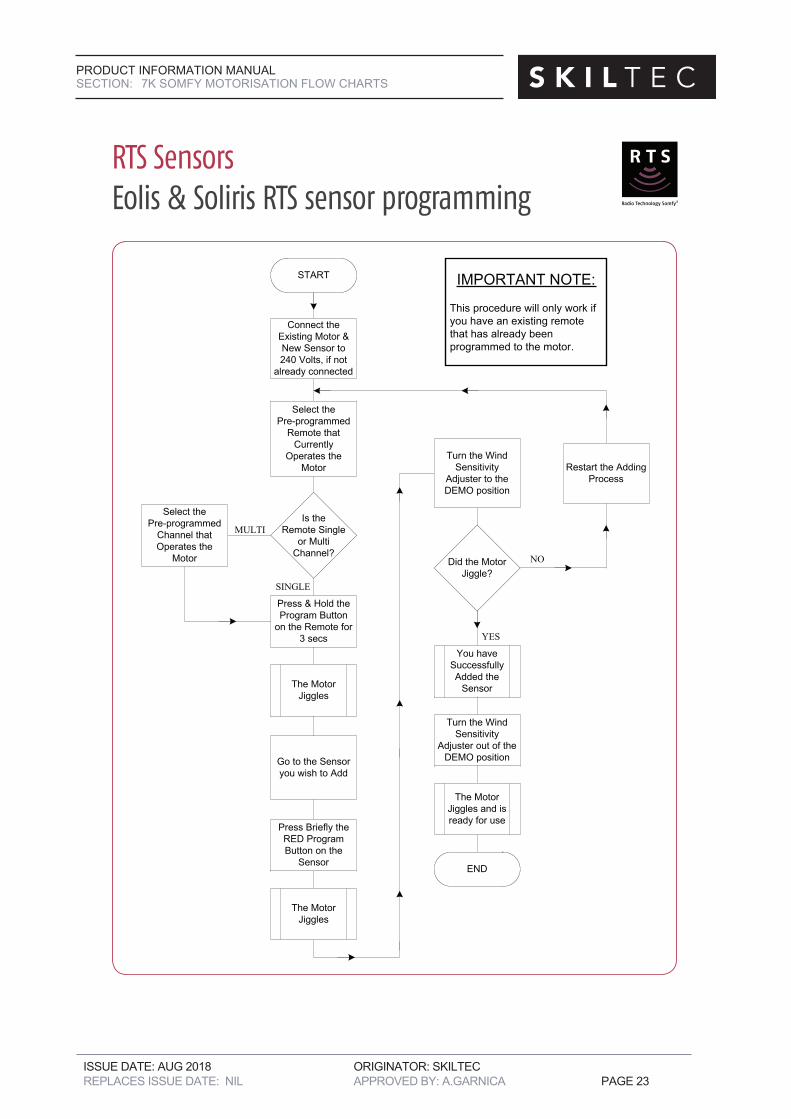
RTS SensorsEolis & Soliris RTS sensor programming
IMPORTANT NOTE:
This procedure will only work ifyou have an existing remotethat has already beenprogrammed to the motor.
The MotorJiggles
START
Connect theExisting Motor &New Sensor to240 Volts, if not
already connected
Is theRemote Single
or MultiChannel?
MULTI
Select thePre-programmed
Channel thatOperates the
Motor
Press & Hold theProgram Button
on the Remote for3 secs
SINGLE
Select thePre-programmed
Remote thatCurrently
Operates theMotor
Press Briefly theRED ProgramButton on the
Sensor
The MotorJiggles
Go to the Sensoryou wish to Add
Turn the WindSensitivity
Adjuster to theDEMO position
Did the MotorJiggle?
NO
YES
You haveSuccessfullyAdded the
Sensor
Restart the AddingProcess
Turn the WindSensitivity
Adjuster out of theDEMO position
END
The MotorJiggles and isready for use
ISSUE DATE: AUG 2018 ORIGINATOR: SKILTEC REPLACES ISSUE DATE: NIL APPROVED BY: A.GARNICA PAGE 24
PRODUCT INFORMATION MANUALSECTION: 7K SOMFY MOTORISATION FLOW CHARTS
© copyright SOMFY Pty. Limited 2015 50
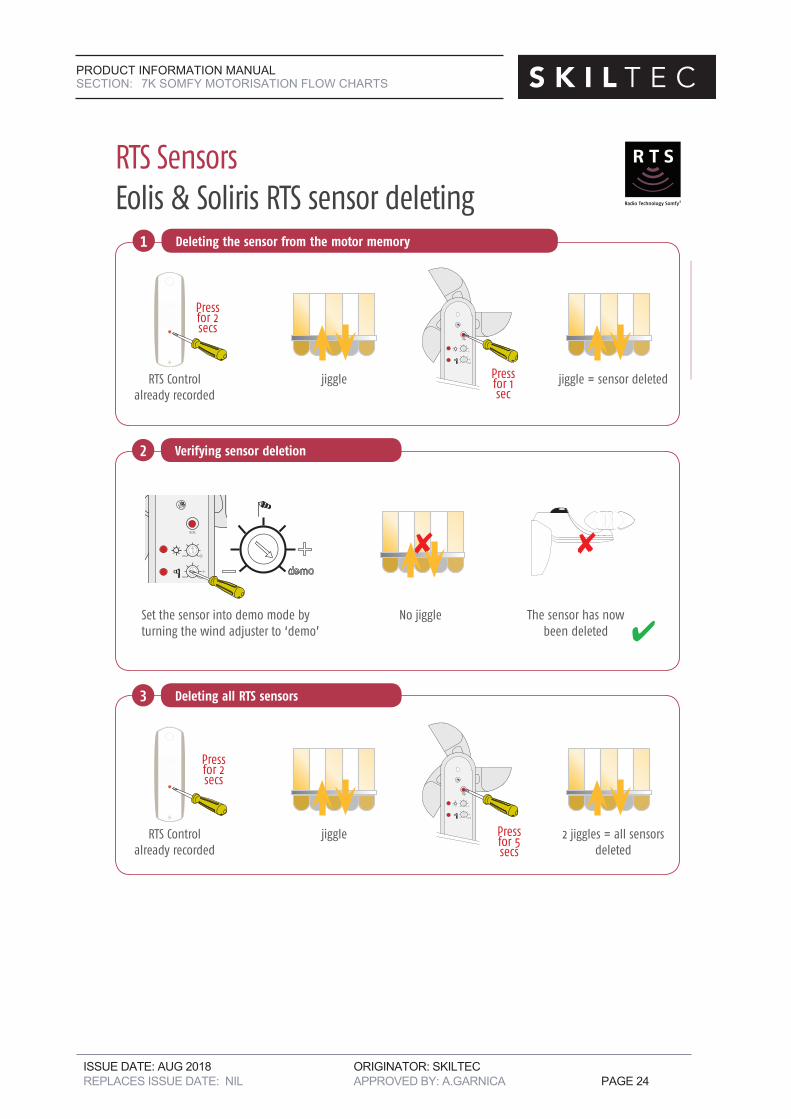
RTS SensorsEolis & Soliris RTS sensor deleting
1 Deleting the sensor from the motor memory
prog
Press for 1 sec
Press for 2 secs
RTS Control jiggle jiggle = sensor deleted already recorded
prog
Press for 5 secs
Press for 2 secs
RTS Control jiggle 2 jiggles = all sensors already recorded deleted
3 Deleting all RTS sensors
2 Verifying sensor deletion
Set the sensor into demo mode by No jiggle The sensor has nowturning the wind adjuster to ‘demo’ been deleted
prog
ISSUE DATE: AUG 2018 ORIGINATOR: SKILTEC REPLACES ISSUE DATE: NIL APPROVED BY: A.GARNICA PAGE 25
PRODUCT INFORMATION MANUALSECTION: 7K SOMFY MOTORISATION FLOW CHARTS
51
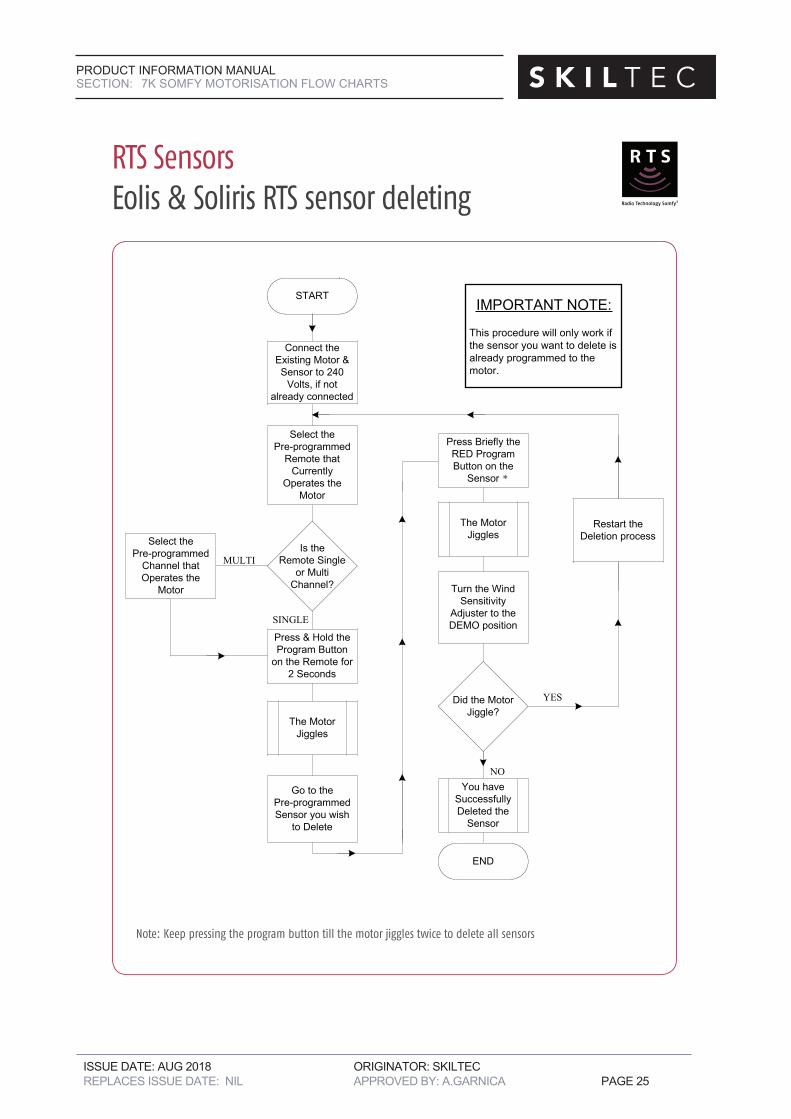
RTS SensorsEolis & Soliris RTS sensor deleting
IMPORTANT NOTE:
This procedure will only work ifthe sensor you want to delete isalready programmed to themotor.
The MotorJiggles
START
Connect theExisting Motor &Sensor to 240
Volts, if notalready connected
Is theRemote Single
or MultiChannel?
MULTI
Select thePre-programmed
Channel thatOperates the
Motor
Press & Hold theProgram Button
on the Remote for2 Seconds
SINGLE
Select thePre-programmed
Remote thatCurrently
Operates theMotor
The MotorJiggles
Go to thePre-programmedSensor you wish
to Delete
END
Turn the WindSensitivity
Adjuster to theDEMO position
Did the MotorJiggle?
YES
NO
You haveSuccessfullyDeleted the
Sensor
Restart theDeletion process
Press Briefly theRED ProgramButton on the
Sensor
Note: Keep pressing the program button till the motor jiggles twice to delete all sensors
*
ISSUE DATE: AUG 2018 ORIGINATOR: SKILTEC REPLACES ISSUE DATE: NIL APPROVED BY: A.GARNICA PAGE 26
PRODUCT INFORMATION MANUALSECTION: 7K SOMFY MOTORISATION FLOW CHARTS
© copyright SOMFY Pty. Limited 2015 56
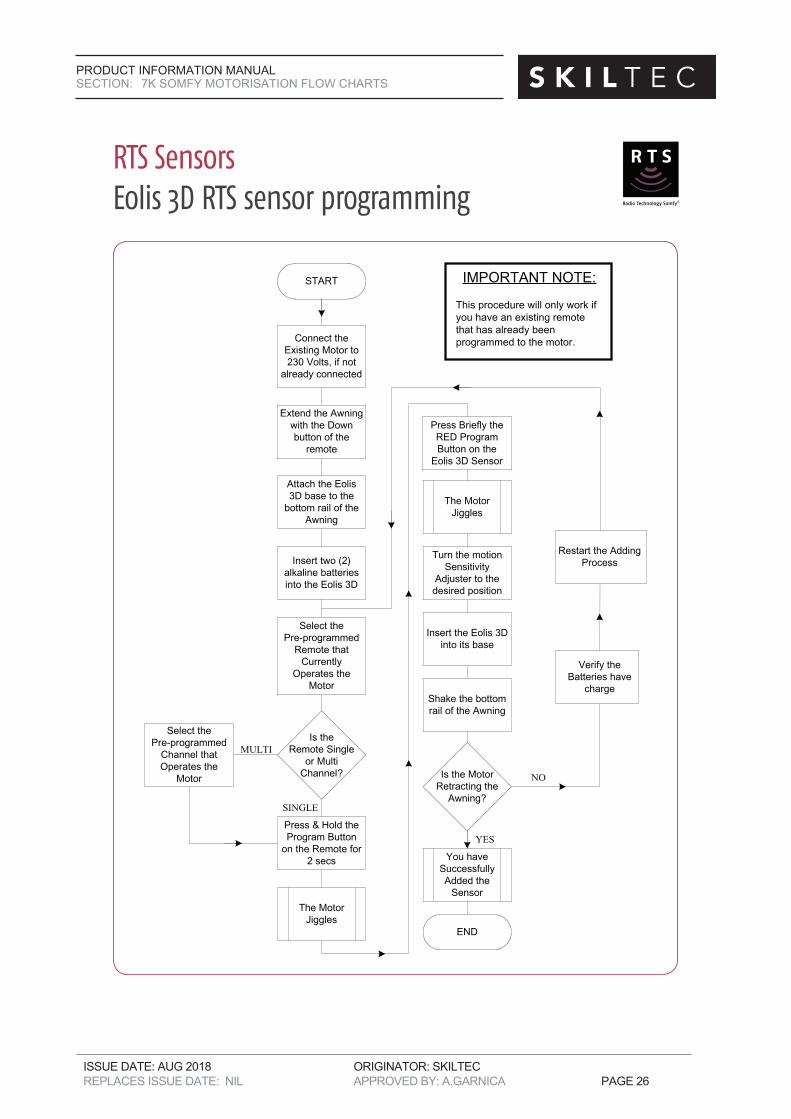
RTS SensorsEolis 3D RTS sensor programming
IMPORTANT NOTE:
This procedure will only work ifyou have an existing remotethat has already beenprogrammed to the motor.
The MotorJiggles
START
Connect theExisting Motor to230 Volts, if not
already connected
Is theRemote Single
or MultiChannel?
MULTI
Select thePre-programmed
Channel thatOperates the
Motor
Press & Hold theProgram Button
on the Remote for2 secs
SINGLE
Select thePre-programmed
Remote thatCurrently
Operates theMotor
Press Briefly theRED ProgramButton on the
Eolis 3D Sensor
The MotorJiggles
Turn the motionSensitivity
Adjuster to thedesired position
Is the MotorRetracting the
Awning?
NO
YES
You haveSuccessfullyAdded the
Sensor
END
Insert two (2)alkaline batteriesinto the Eolis 3D
Insert the Eolis 3Dinto its base
Attach the Eolis3D base to the
bottom rail of theAwning
Extend the Awningwith the Downbutton of the
remote
Shake the bottomrail of the Awning
Verify theBatteries have
charge
Restart the AddingProcess
ISSUE DATE: AUG 2018 ORIGINATOR: SKILTEC REPLACES ISSUE DATE: NIL APPROVED BY: A.GARNICA PAGE 27
PRODUCT INFORMATION MANUALSECTION: 7K SOMFY MOTORISATION FLOW CHARTS
© copyright SOMFY Pty. Limited 2015 58
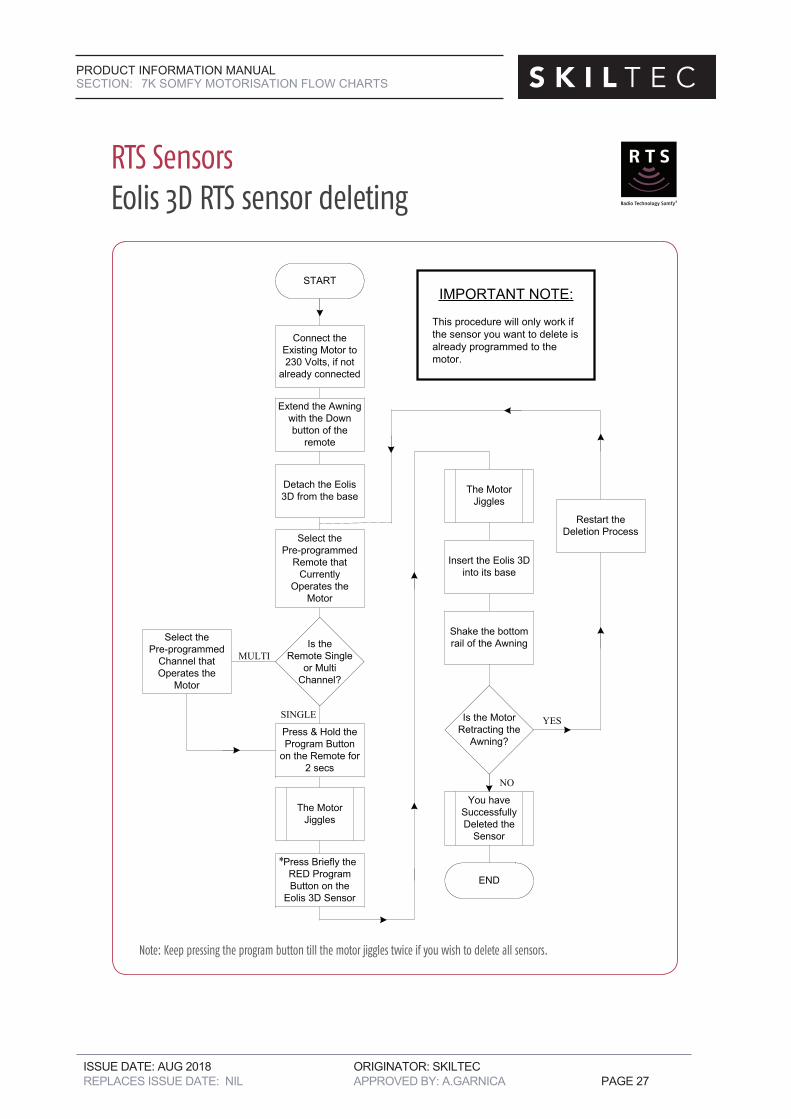
RTS SensorsEolis 3D RTS sensor deleting
IMPORTANT NOTE:
This procedure will only work ifthe sensor you want to delete isalready programmed to themotor.
The MotorJiggles
START
Connect theExisting Motor to230 Volts, if not
already connected
Is theRemote Single
or MultiChannel?
MULTI
Select thePre-programmed
Channel thatOperates the
Motor
Press & Hold theProgram Button
on the Remote for2 secs
SINGLE
Select thePre-programmed
Remote thatCurrently
Operates theMotor
Press Briefly theRED ProgramButton on the
Eolis 3D Sensor
The MotorJiggles
Is the MotorRetracting the
Awning?
YES
NO
You haveSuccessfullyDeleted the
Sensor
END
Insert the Eolis 3Dinto its base
Detach the Eolis3D from the base
Extend the Awningwith the Downbutton of the
remote
Shake the bottomrail of the Awning
Restart theDeletion Process
Note: Keep pressing the program button till the motor jiggles twice if you wish to delete all sensors.
*
ISSUE DATE: AUG 2018 ORIGINATOR: SKILTEC REPLACES ISSUE DATE: NIL APPROVED BY: A.GARNICA PAGE 28
PRODUCT INFORMATION MANUALSECTION: 7K SOMFY MOTORISATION FLOW CHARTS
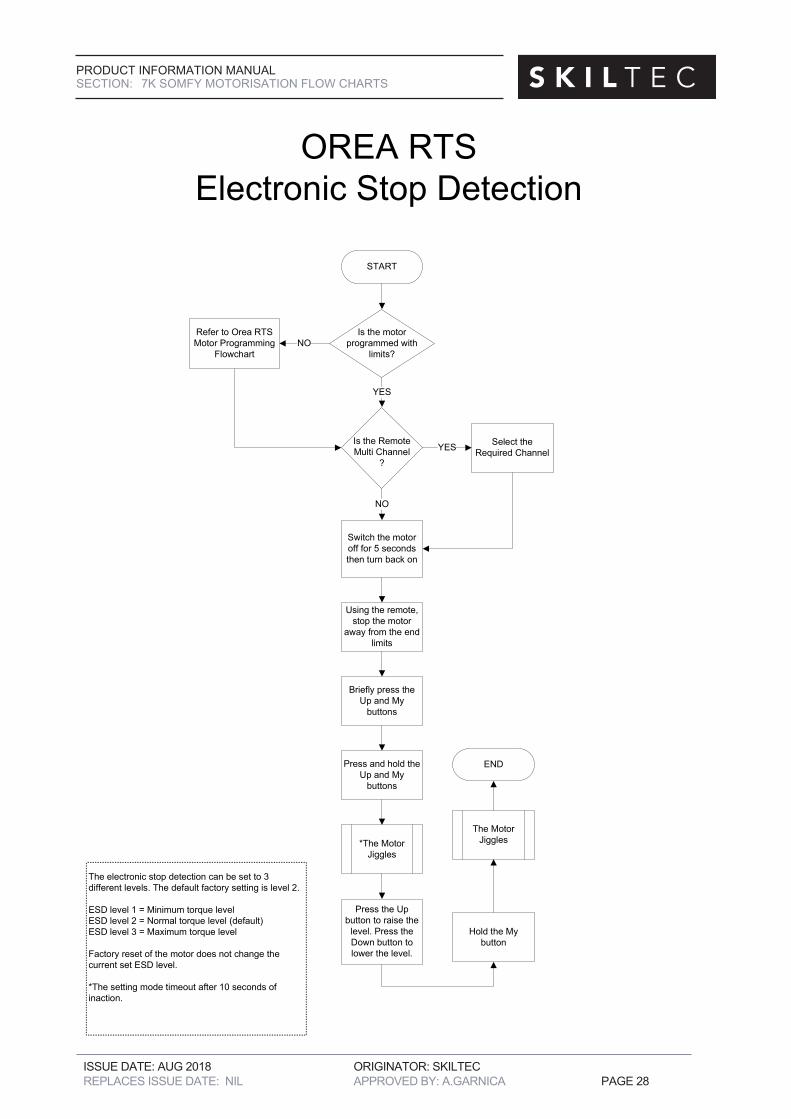
OREA RTSElectronic Stop Detection
The electronic stop detection can be set to 3 different levels. The default factory setting is level 2.
ESD level 1 = Minimum torque levelESD level 2 = Normal torque level (default)ESD level 3 = Maximum torque level
Factory reset of the motor does not change the current set ESD level.
*The setting mode timeout after 10 seconds of inaction.
START
Is the motor programmed with
limits?
Is the Remote Multi Channel
?
Select the Required Channel
Switch the motor off for 5 seconds then turn back on
Using the remote, stop the motor
away from the end limits
*The Motor Jiggles
Press the Up button to raise the
level. Press the Down button to lower the level.
END
Refer to Orea RTS Motor Programming
Flowchart
NO
YES
YES
NO
Briefly press the Up and My
buttons
Press and hold the Up and My
buttons
Hold the My button
The Motor Jiggles
© Somfy Pty Limited, May 201531/3/2015 V1.0


