92


2
Source: Project Learning Tree K-8 Activity Guide: page 243
chapter 8/27/56 9:33 AM Page 2

TOOLS USED IN FORESTRY
Biltmore stick – Clinometer – Diameter Tape – Increment Borer – Wedge Prism
Throughout history, the need for measurement has been a necessity for each civilization. Incommerce, trade, and other contacts between societies, the need for a common frame of referencebecame essential to bring harmony to interactions. The universal acceptance of given units ofmeasurement resulted in a common ground, and avoided dissension and misunderstanding.
In the early evolvement of standards, arbitrary and simplified references were used. In Biblicaltimes, the no longer familiar cubit was an often-used measurement. It was defined as the distancefrom the elbow to a person’s middle finger. Inches were determined by the width of a person’sthumb. According to the World Book Encyclopedia, “The foot measurement began in ancienttimes based on the length of the human foot. By the Middle Ages, the foot as defined by differentEuropean countries ranged from 10 to 20 inches. In 1305, England set the foot equal to 12 inches,where 1 inch equaled the length of 3 grains of barley dry and round.”1 [King Edward I (Longshanks),son of Henry III, ruled from 1272–1307.] Weight continues to be determined in Britain by a unit of14 pounds called a “stone.” The origin of this is, of course, an early stone selected as the arbitraryunit.
The flaw in this system is apparent; the differences in items selected as standards would vary.
In an attempt to standardize forestry methods and measurements, tools and practices were developedwhich became the universal common reference for all foresters. In the first three of the followingactivities, students are asked to use measurement techniques in situations which they have notpreviously encountered. For example, people have not always had tapes to measure distance. Earliestmethods used the length of one’s own stride or pace as a unit of measure. Today, foresters still usetheir pace when cruising timber or determining the height of trees in the field. However, theydetermine the length of their pace to standardize their work in the field. The length of their pace isused as an aid to determine the height of a tree. Other activities give students an opportunity to workfirst hand with tools and practices used by foresters.
Earliest methods for measuring the height of trees used what we recognize today as simpletrigonometric functions. For example, to measure height, it has been recorded that some groups ofNative Americans would walk away from an object (and facing away from it) until they could sightthe top of the object while holding their ankles and viewing through their legs. When the top wasjust visible through their crotch, they turned around and paced the distance back to the object. Thedistance they paced was equal to the height of the object, assuming that the angle formed by thissighting is equal to 45 degrees.2
The purpose of this segment is to acquaint the student with the specialized tools and measurementpractices employed by foresters in collecting forest data. In addition to the primary purpose ofmaking the students familiar with the names, form, function, and purpose of each tool, these
3
chapter 8/27/56 9:33 AM Page 3

activities are designed to reinforce and make relevant for students basic skills and values that theyhave learned or are now learning.
The emphasis placed on the tools activities is for “hands-on” employment of skills and practices,which add not only to the student’s skill level but also to the integration of the skills as a relevant andvalued part of their functioning.
The opportunity to exercise skills in different situations provide a series of “teachable moments” thatattract students.
1. The World Book Encyclopedia, 1996 Edition, Volume 7, p. 3522. “Trees as a Crop,” in Our Wonderful World, Aims Education Foundation, Fresno, CA, pp. 17–26
4
chapter 8/27/56 9:33 AM Page 4

ACTIVITY 1EARLY MEASUREMENTS
A. Set the stageHow many students have ever heard the phrase “thishorse is 15 hands high?” Before there were standard-ized measuring tools like rulers and tape measures,people determined the height of horses by countinghow many times the width of their hands would gofrom the ground to the top of the horse. As the stu-dents will discover, it was not a truly accurate meas-urement since people’s hands vary in size, but it wasan early effort to have a uniform system of measure-ment. The use of the term “hands” (with an assignedstandardized value) continues to be used as a meas-urement for horses.
B. Procedure1. Divide students into groups of five.2. Distribute Student Worksheet 1 and yardstick or
meter stick to each group.3. Using yardsticks have each student measure:
a. their hand span with their fingers stretchedout as far as possible;
b. the distance from the tip of their nose to the tip of their thumb;c. their arm span;d. their cubit (elbow to middle finger).
4. Have students determine the group average of each measurement.5. Collect the yardsticks.6. Using only the information that they have gathered in step 3, have each group determine the
following:a. the length of the classroom;b. the length of one side of their desk;c. the height of the classroom door;d. the height of the classroom ceiling.
7. Redistribute the yardsticks and have each group measure 6 a., b., c., and d. again.8. In a discussion ask each group:
a. What was the length of the classroom in step 6? Step 7?b. What was the length of the side of the desk in step 6? Step 7?c. What was the height of the classroom door in step 6? Step 7?d. What was the height of the classroom ceiling in step 6? Step 7?e. What are some of the difficulties they encountered in making these measurements?f. Did everyone have the same hand span? Arm span? Cubit?g. Did the yardstick make the measurements more consistent?
5
Subjects:Math, Science, Social Studies
Objectives:1. Students will determine their own
individual measurements using twomethods: (1) individual criteria,(2) standardized measuring devices
2. Students will realize that differentresults occur from individual criteria andstandardized norms
3. Students will examine the possibleeconomic and societal implications ofnon-standardized criteria.
Skills:Measuring, estimating and predicting,inference, recording data, interpreting data,addition, subtraction, multiplication,circle/diameter concepts
Materials:♦ Yard stick or meter stick for each group♦ Student Worksheet 1 (Appendix A)
chapter 8/27/56 9:33 AM Page 5

h. If you were selling cloth in a fabric store, would you allow customers to use the earlymethod of determining yards by measuring a length of cloth from the tip of their nose tothe tip of their thumb? Why or why not?
9. Take students outdoors to a pre-selected tree. Ask them to work in groups and again use theyardstick to:a. measure the circumference of the trunk; (Note: The circumference is defined as the distance
around the trunk.)b. measure the height of the tree;c. compare results;d. Ask why there were significant differences in the results. (Note: The trunk of a tree is
smaller as you move up – therefore the circumference will vary depending upon where onthe trunk the measurement is made.)
ACTIVITY 2THE NATIVE AMERICAN METHOD OF
MEASURING TREE HEIGHT
Procedure:1. Have the students stand with their back against
the tree.2. Have them walk away from the tree, stopping at
intervals to bend over and sight the tree bylooking through their legs while holding theirankles.
3. When the top is just visible through their crotch,they will turn around, and walk back to the treewhile counting the number of steps they have totake to return. The distance paced is assumed tobe equal to the height of the tree.
4. Compare the results of each group and discussdifficulties and the accuracy of the method.(Inaccuracies will result from the fact that eachperson’s pace varies and the angle of view mayvary from 45 degrees.
5. Have students determine their pace (Activity 4).
Activity 2 is adapted from: “Trees as a Crop,” in Our Wonderful World, Aims Education Foundation, Fresno, CA
6
Subjects:Math, Social Studies
Objectives:1. Students will become aware of the
cultural diversity that can be examinedthrough the use of methods used inearlier/different societies.
2. Students will realize that group resultsreflect multiple influences and factors.
3. Student will compare/contrast the resultsof each group.
Skills:Visualization, measurement, addition,multiplication, comparison, contrasting,tabulation.
Materials:♦ Student Worksheet 2 (Appendix A)
chapter 8/27/56 9:33 AM Page 6

ACTIVITY 3USING A PERSON OF KNOWN
HEIGHT TO MEASURE A TREE
Procedure:1. Stand a person whose height is known against the
tree that the students are measuring.2. In order to calculate the number of “persons” to
the top of the tree, you’ll need a pencil or otherstraight object.
3. Move away from the tree until the pencil, when itis held at arm’s length, fits exactly the length ofthe person against the tree.
4. Multiply the number of pencil lengths from theground to the top of the tree by the actual heightof the person standing against the tree.
5. Have students compare this height calculation tothe height calculations in activities 1, 2, and 3.
6. Explain that if a forester knows the height of atree and the diameter of a tree he/she candetermine how many board feet a tree will yield.
The diameter of a circle is a straight line passing through the center of a circle. The diameter of atree is a straight line passing through the center of the circle formed by the trunk.
7. Ask students the following:a. Why is it important to know the size of trees? (Trees are an extremely valuable crop with
many uses. Economically, they are valued in terms of board feet of lumber. A board foot is aboard 1 inch thick, 12 inches wide, and 12 inches long.)
b. How can foresters and loggers be more accurate than the methods described above in deter-mining the size of trees and therefore the economic value of trees? (By using specializedtools and practices designed for accurate measurement.)
Activity 3 is adapted from: “Trees as a Crop,” in Our Wonderful World, Aims Education Foundation, Fresno, CA
7
Subjects:Math, Economics, Science
Objectives:1. Students will become aware of the cultur-
al diversity that can be examined throughthe use of methods used in earlier/differ-ent societies.
2. Students will realize that group resultsreflect multiple influences and factors.
3. Student will compare/contrast the resultsof each group.
Skills:Tabulation, calculation, inference, deductivereasoning, systematic processing
Materials:♦ Student Worksheet 2 (Appendix A)♦ Pencil or other straight object.
chapter 8/27/56 9:33 AM Page 7

ACTIVITY 4LEARN YOUR PACE
A. PreparationPlace a stake in the ground or make a mark on thesidewalk with chalk using a long tape measure, makeanother stake or mark 100 feet from the first mark.Be sure to measure in a straight line on relativelylevel ground. Make one course for each five people toreduce delays.
B. Procedure1. Distribute Student Worksheets 3 and 4.2. Refer to the stakes: The distance from the first to
the last stake is 100 feet.3. Walk an even, normal step all the way down, then
all the way back.4. Count the total number of steps you take on the
way down and on the way back.5. Using Student Worksheet 3, determine the length
of your step.6. Repeat steps 1–4. Use Student Worksheet 4 and
determine the length of your pace.7. In a discussion, ask:
a. What is your length of step? Your pace?b. How did you determine your length of step?
Your pace?c. How many steps would you have to take to go
100 feet?d. What might make it difficult for a forester to
determine the number of steps between onepoint and another?
Activity 4 is adapted from: “Activity: Measure the Length of Your Step,” in Measuring, in Investigating YourEnvironment, USDA Forest Service, Odgen, UT.
8
Subjects:Math, Science
Objectives:1. The student will learn that relatively
accurate measurements of distance can bemade without measuring tapes.
2. The student will be able to determine thedistance between two points by countingthe number of steps or paces takenbetween the two points.
3. The student will be able to walk apredetermined distance to locate a givenpoint.
4. The student will be able to compute thelength of his/her average step given apre-measured 100-foot distance.
5. The student will be able to compute thelength of his/her average pace (2 steps)given a pre-measured 100 foot distance.
6. The student will be able to use pacing tomeasure tree height.
Skills:Measurement, computation, recording data,interpreting data
Materials:♦ Chalk or wooden stakes (two stakes per
course)♦ Bright colored paper/ribbon♦ 100 ft. tape measure or 100 ft. pre-
measured rope or clothes line♦ Student Worksheet 3 (Appendix A)♦ Student Worksheet 4 (Appendix A)
chapter 8/27/56 9:33 AM Page 8

ACTIVITY 5“TOOLING ON” THROUGH THE CD
Procedure:1. Have the students play the tools section of the
Forestry CD.2. Ask them which tools are used to estimate:
a. The height of trees? (Biltmore Stick(hypsometer) and the Clinometer.)
b. The diameter? (Biltmore Stick and Diametertape.)
c. The age of the tree? (Increment Borer)d. The volume of timber in a stand of trees?
(Wedge Prism)3. Have a local forester demonstrate examples of
each tool mentioned. (Contact your state’sNRCE coordinator for information on availablepersonnel.)
ACTIVITY 6MAKE A BILTMORE STICK
Procedure:1. Cut out the Biltmore Stick pattern on Student
Worksheets 5a and 5b.2. Glue pattern together according to directions.3. Glue side one and side two to opposite sides of a
yardstick or heavy strip of cardboard.4. Use the Biltmore Sticks in Activity 7.
Note: Side 2 of the Biltmore Stick is a hypsometer (adevice for measuring height). For purposes of theseactivities, the term Biltmore stick will be usedgenerically.
Activity 6 is adapted from: “Trees as a Crop,” in Our Wonderful World, Aims Education Foundation, Fresno, CA
9
Subjects:Math, Science, Language Arts
Objectives:1. Students will recognize that there are
specialized tools used in the forest.2. Students will identify different tools used
in forestry.3. Students will identify the specific
purposes of individual forestry tools.
Skills:Measurement, reading, interpretation
Materials:♦ Forestry CD
Subjects:Math, Art
Objectives:1. Students will identify and construct a
specialized forestry tool.
Skills:Dexterity, following directions
Materials:♦ Student Worksheet 5a (Appendix A)♦ Student Worksheet 5b (Appendix A)♦ Yardstick
chapter 8/27/56 9:33 AM Page 9

ACTIVITY 7USING THE BILTMORE STICK TO
ESTIMATE THE BOARD FEETIN A TREE
Divide the students into groups of five and designatea tree for them to measure with their Biltmore Sticksas follows:A. Determining the diameter of the tree:■ Historically, the diameter measurement wastaken at breast height and therefore was known asthe DBH (diameter breast height). Just as handspans vary, breast height varies from person toperson.■ To standardize their measurements, forestersdetermined that this measurement would always bemade at 4.5 feet above the ground.
1. Have the students hold their Biltmore stick(Side 1) sideways against the tree, at arms length,4.5 feet above the ground and 25 inches from theeye.
2. They should shift the stick right or left until thezero end of the stick coincides with the left edgeof the tree trunk.
3. Have them read the diameter figure that coincideswith the right edge of the tree trunk withoutmoving their head.
4. For accuracy, take a second measurement on adifferent side of the tree by moving around thetrunk approximately 90 degrees.
B. Determining the height of the tree:■ For standardization, height measurements are taken at a distance of 66 ft. from the tree. (OneGunther chain or surveyors tape (used by forestry workers) equals 66 ft.) The Biltmore stickhas been calibrated so that if you stand 66 ft. away an accurate height can be determined. (In theabsence of a Gunther chain, a 66 ft. rope will suffice.)
1. Have the students stand 66 feet from the tree while holding their Biltmore stick vertically atarms length and shoulder height with side B facing them. Line up the bottom of the stickwith the base of the tree. Count the number of logs illustrated on the stick. The logs illustratedon the stick are 16 ft. logs. (Note: It is important not to move the stick when taking ameasurement, therefore, tilt your head back slightly so that it does not have to move when read-ing from ground to top of tree.
Note: A forester standing in a forest often has to estimate the top of the tree if it is not easily seen.)
10
Subjects:Math, Science, Economics
Objectives:1. Students will recognize the importance of
specialized tools to determine forestmeasurements.
2. Students will compile data gathered frompersonal use of forestry tools.
3. Students will demonstrate the use of theBiltmore stick.
4. Students will employ multiplemeasurement techniques.
5. Students will equate measurable productwith economic impact.
6. Students will read conversion charts toreclassify results.
Skills:Measuring, estimating, inferring, tabulating,calculating, converting, reading conversioncharts, comparing/contrasting, reachingeconomic conclusions from raw data
Materials:♦ Biltmore Stick♦ Gunther Chain or 66 ff. rope♦ Student Worksheet 6 (Appendix A)♦ Using the Biltmore Stick to Measure
Diameter (Appendix B)♦ Using the Biltmore Stick to Measure
Height (Appendix B)♦ Board Feet Conversion Chart (Appendix
B)
chapter 8/27/56 9:33 AM Page 10

C. Determining the number of board feet in the tree:1. Make a second height measurement. This time, instead of measuring from the ground to the top
of the tree, measure from the stump height to the cutoff point in the top. The cutoff diameterwill vary with locality, with product being produced, and with excessive limbs, but is usuallybetween 4–10 inches. The minimum diameter log that can be used in the sawmill determinesthe cutoff diameter. The height is the merchantable height of the tree. Merchantable heightrefers to the length of commercially usable tree.
2. Use the Board Feet Conversion Chart in Appendix B to find board feet in the tree.
Note: The conversion chart takes into consideration the sawdust that is lost in typical sawing meth-ods. The sawdust may be used for animal bedding, fuel, etc.
3. Ask: Why is it necessary to use the merchantable height to determine the number of board feet?
4. Solve the following problem:How many trees like the one measured in Step C would it take to build three average U. S.homes?
Note: An average U. S. home contains approximately 16,900 board feet of lumber in the structuralportions of the house.3
Note: If you refer to the Forestry CD Activity Guide cover, you will see a forester demonstrating thecorrect technique to determine DBH with a Biltmore Stick. She is holding the stick with an out-stretched arm (25 inches from her eye) at approximately 41/2 feet above the ground.
3. Facts and Figures U.S. Forests 1995, American Forest & Paper Association, Washington, DC.
11
chapter 8/27/56 9:33 AM Page 11

ACTIVITY 8MAKE A CLINOMETER
Procedure:1. Fold a piece of heavy A4 (cardstock) paper in
half lengthwise, as shown.2. Draw a quadrant with radius of 10 cm and center
at A as shown in diagram, mark every 5 degreesaround the quadrant starting at B, and label thepoints.
3. Carefully attach a 20 cm length of cotton string atA so that it hangs freely.
4. Tie a small weight (washer) to the end of thestring.
5. Use the clinometer in Activity 9.
ACTIVITY 9“INTRIGUING TRIG”
FIND THE THREE TALLEST TREESON THE SCHOOL GROUNDS USING
A CLINOMETER
Procedure:1. Divide students into pairs and give them a copy
of Student Worksheet 7.2. Have students observe all of the trees on the
school yard and estimate which three trees aretallest.
3. Measure the height of selected trees as follows:a. Have one student stand far enough from the
tree so that he/she can clearly see its top.b. Using the paper clinometer, have the students
determine the angle of elevation betweenhis/her eye level and the top of the tree asfollows:
(1) Point the end with the weight towards the tree.(2) Sight along the top edge of the paper and angle the clinometer up or down until you are
looking at the very top of the tree.
12
Subjects:Math, Art
Objectives:1. Students will construct a forestry tool2. Students will accurately plot measurement
points
Skills:Measurement, following directions
Materials:♦ Cardstock paper (heavy A4)♦ Rulers♦ Protractors♦ Cotton string♦ Small washers♦ Diagram for making a clinometer
(Appendix B)
Subjects:Math, Science
Objectives:1. Students will measure trees using a
clinometer2. Students will employ formulae and
computations to collect data
Skills:Interpreting charts, using math formulae,observation, estimation, recording data,determining angle of elevation
Materials:♦ Clinometer♦ Tangent chart♦ Student Worksheet 7 (Appendix A)
chapter 8/27/56 9:33 AM Page 12

(3) Hold the clinometer steady. Have your partner record the number where the weightedstring crosses the scale on the clinometer. This number represents the angle of elevation.
(4) Use the clinometer conversion chart in Appendix B to find the tangent of the angle of eleva-tion.
c. Using the pace method, have the partner measure the distance from the tree to where the stu-dent holding the clinometer is standing.
d. Using the information gathered in a, b, and c, determine the height of the three trees using thefollowing formula:
tree height = (tangent of angle of elevation × your distance from the tree) + your height
ACTIVITY 10CHAMPION TREE FINDERS
A. Set the stage.Explain to the students that there is a NationalRegistry of Big Trees and that most states alsomaintain a Big Tree List. The same criteria areused by all states to measure the trees which theynominate for consideration as Big Trees. Trees arejudged as big trees if they earn the highest numberof points for their species. The three measurementswhich are considered in determining a tree’s totalpoints are:
(1) the Circumference, (2) the Height, and (3)the Average Crown Spread.
B. Procedure1. Select a tree or trees on the school yard or nearby
street to be measured by groups of students.2. Measure the Circumference of selected tree
This measurement is also known as CBH(Circumference at Breast Height.) Thismeasurement is made in inches at a point on thetree trunk 4.5 feet above the ground. If a treeis growing on a slope, the 4.5 foot point isdetermined from a point on the uphill side of thetree. The tree must have a single trunk for at
least 4.5 feet to be considered a single tree. If abnormal swelling on the trunk prevents themeasurement being taken at 4.5 feet, then the measurement should be taken at a point lower onthe trunk where the measurement will reflect the normal size of the tree. The height at whichthe measurement is taken should be noted. The measurement may be taken with a tape measureor a forester’s diameter tape.
13
Subjects:Math, Science, Language Arts
Objectives:1. Students will compare, contrast, and
evaluate trees in their area2. Students will employ math processes to
determine selected tree measurements3. Students will research comparative
species’ measurements4. Students will demonstrate mastery of
forestry tools [Biltmore Stick, Clinometer,Diameter Tape (optional)]
Skills:Observation, measurement, evaluation,comparison, research, estimation, recordingdata, determining angle of elevation
Materials:♦ Copy of state’s big tree information or the
National Registry of Big Trees♦ Biltmore Stick♦ Clinometer♦ Diameter tape or non-stretching rope♦ Tangent chart♦ Student Worksheet 8 (Appendix A)♦ Big tree measurements diagram
(Appendix B)♦ Graph paper (optional)
chapter 8/27/56 9:33 AM Page 13

One point is given for each inch of circumference.
a. Wrap a tape measure around the tree trunk at a point 4.5 feet above the ground. Record themeasurement on Student Worksheet 8.
b. If a tape measure is not available, a non-stretching rope or cord may be used as follows:(1) Use a non-stretching rope or cord;(2) Lay the rope flat;(3) Wrap the rope around the tree;(4) Measure the length of the rope in inches, using a yardstick as a guide;(5) Note the measurement- this is the circumference of the tree.c. A forester’s diameter tape may be used to measure the circumference. It is a special
measuring device used by foresters that has the inches expanded by the constant pi. pi =3.14. The formula for determining the circumference using a diameter tape is as follows:
Circumference = pi × Diameteror
C = pi × D
(1) Wrap the diameter tape around the tree at a height of 4.5 feet above the ground.(2) Note the measurement- this is the diameter.(3) Multiply the measurement by 3.14 (pi) – this is the circumference of the tree.(4) Sample problem:
A diameter tape wrapped around an oak tree at 4.5 ft. above the ground indicates a diameter of11.5 inches. What is the circumference of the tree?
Solution:
C = pi × DC = 3.14 × 11.5 inchesC = 36.11 inches
3. Measure the height of selected treeTo determine champion trees, the height is measured from the ground line to the highest pointdetermined from the uphill side. The measurement may be taken with a Biltmore Stick or aclinometer.
One point is given for each foot of height.
4. Measure the average crown spread of selected treeTo determine this finding, two measurements are taken at the outer edges (drip line) of thespreading crown. Measurements are recorded in feet at the widest point of crown spread,and then recorded at the narrowest point of crown spread. These two measurements are thenaveraged together and divided by two to get the average crown spread.
14
chapter 8/27/56 9:33 AM Page 14

One-fourth of a point is given for each one foot of average crown spread (or one point foreach four feet of spread.)
5. Determine the total point value,Add the points from all three measurements together. A co-champion tree is named if a tree iswithin five points of the champion.
6. American Forests formula to determine if a tree is a champion:Total points = Circumference (inches) + height (feet) + 25% of average Crown spread
7. Three other items are needed to complete the Big Tree nomination. They are:(1) The landowner’s name and address.(2) The nominator’s name and address.(3) The exact location of the tree.
8. Nominations for a Big Tree may be sent to:Your State Forest ServiceStreetCity, State, Zip
9. Optional Math Activity: Have the students graph the results of their calculations. They maygraph total point values, or results of each of the three individual measurement components.
Information for “Activity 10: Champion Tree Finders” was adapted from the following sources:
Big Trees of Delaware, First Edition, 1995, Delaware Department of Agriculture Forest Service;Newlon, Charles J., “Gentle Giants,” Outdoor Delaware, Winter 1995, pp. 4–9.
ASSESSMENT ACTIVITYTOOLS USED IN FORESTRY SECTION
Give the students copies of Student Worksheet 8. Ask the students to locate and record informationon five trees of their choice. Remind them that they may discover a champion tree through theirfindings. If students are uncertain as to the species of the trees they select, ask them to askpermission of the owner to take a leaf to be identified. If permission is denied, ask the studentsto draw the leaf and note any characteristics of the tree (bark, color, etc.) which will aid inidentification. Remind the students that accurately recording the location of the tree will enablethe measurements to be verified, and positive identification to be made.
15
chapter 8/27/56 9:33 AM Page 15

16
Source: The Woodland Steward, p. 15
chapter 8/27/56 9:33 AM Page 16

18
chapter 8/27/56 9:33 AM Page 18

TREE IDENTIFICATION
Trees are the largest and some of the most impressive plants in the world. But it is not only theirsize, but their age, shape, dominance in their community, beauty of flowers, fruits, or leaves, andpotential uses by man that inspire a feeling of wonder and excitement in all of us. … To learn theiridentity, relationships, life history, habitats, and distribution adds to the appreciation of thesegiants of the plant kingdom.1
The development of a universally accepted system for identifying trees has eliminated the languagebarriers and resulted in more effective communication among scientists. A significant benefit of thenaming and classification of trees has been the opportunity to research and explore the origins andmethods of the various individuals and countries who contributed to this system.
The features used in tree identification are leaves, bark, twigs, flowers, fruits, habitat, and taste oraroma. The leaves are the most recognizable feature, and the easiest aid to identification.Because of the advantage in using leaves in identification, the key presented in the Forestry CDis a summer key.
The hands-on opportunity presented by the collection (when possible) and identification ofleaves enables the teacher to reinforce valuable skills that are transferable and multi-disciplinary.Classification and grouping enable students to sharpen their observation and discriminationskills. The actual identification of trees lends credence to discussions of pollution, environmentalethics, land use, and other environmental concerns.
Students should be guided to achieve mastery of the use of a key to identify tree species. Thestudent should be introduced to keys that are of various formats, so that they are able to followthe layout of any key with which they come in contact. It is essential that the students are familiarwith the accepted botanical naming of trees and the rationale for the practice. This naming processeliminates the language barrier, and ensures a universal frame of reference. Students should alsobe familiar with the terminology used in the description and classification of trees.
The following activities are designed to accompany the topics found in the Tree Identificationsection on the Forestry CD. Also, in Appendix C there is a tree list that contains the following:
Trees Identified on the Forestry CD Summer Key;Envirothon Tree Identification List;4-H Tree Identification List.
1. Hardin, James W., et al., Textbook of Dendrology, p1.
19
chapter 8/27/56 9:33 AM Page 19
TREE IDENTIFICATION
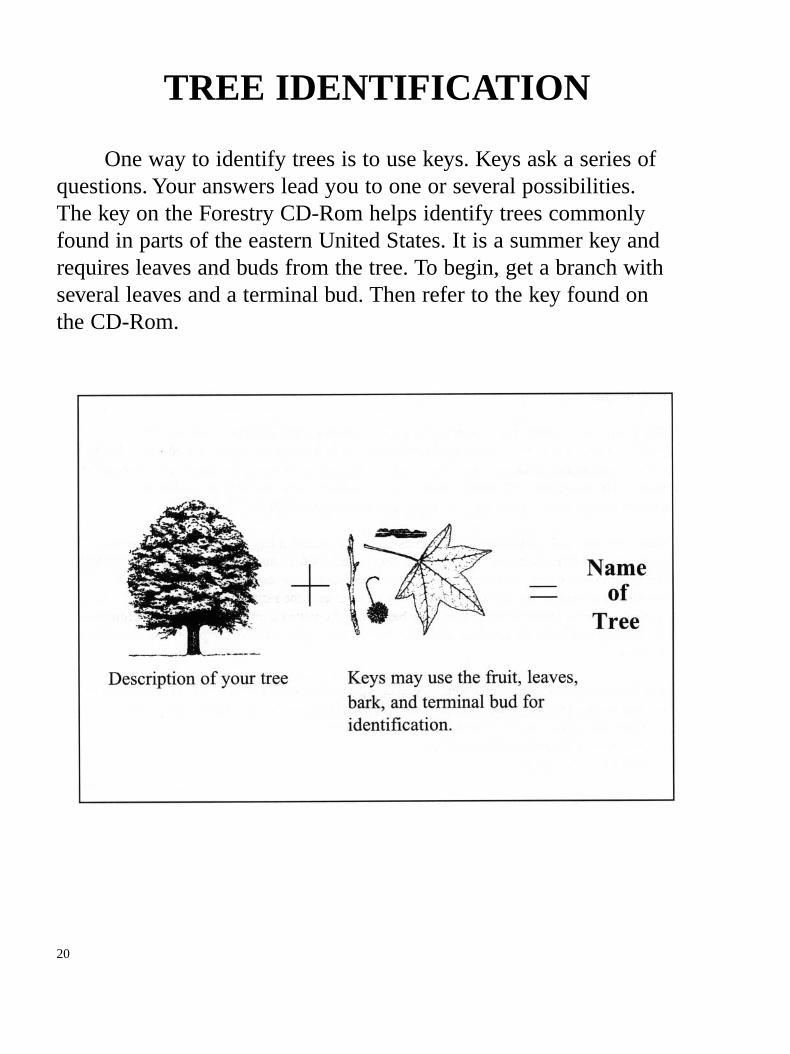
One way to identify trees is to use keys. Keys ask a series ofquestions. Your answers lead you to one or several possibilities.The key on the Forestry CD-Rom helps identify trees commonlyfound in parts of the eastern United States. It is a summer key andrequires leaves and buds from the tree. To begin, get a branch withseveral leaves and a terminal bud. Then refer to the key found onthe CD-Rom.
20
chapter 8/27/56 9:33 AM Page 20

ACTIVITY 1USING A SUMMER KEY
Preparation:1. Pre-key the school yard or nearby community to
find and map trees identified by the summer keyon the Forestry CD.
2. Have students bring leaves from home. If no treesor leaves are readily available, consider fieldtrips, library books, or contact the local forester’soffice for pictures of leaves. Also, it is possible touse the Tree Concentration leaf pages found inAppendix B.
Procedure:1. Discuss why it is important to be able to
identify trees.2. Give each student copies of Student
Worksheet 9.3. Divide the class into four groups.4. Give each group an equal number of leaves or
leaf pictures to identify using the summer key onthe CD. If they bring in a leaf that is not identi-fied on the CD, have them use other availablekeys.
5. Have students sketch each identified leaf and write its common and scientific name on StudentWorksheet 9.
6. On a separate sheet, have them list two uses for each tree identified.7. Have groups exchange pictures and continue to use the CD until each group has successfully
identified and sketched each leaf picture.8. Have student groups take their sketches and Student Worksheet 10 into the school yard or
nearby community to identify pre-selected trees. Or send students on an in-school scavengerhunt and have them identify hanging leaf collections in halls.
9. Have students research their state tree. Is it on the CD?10. Have students draw a picture of their state tree. Identify with common and scientific (botanical)
names.
21
Subjects:Science, Art
Objectives:1. Students will learn the reasons for the use
of universally accepted scientific namesfor trees.
2. Students will master the procedures foruse of key to identify leaves.
3. Students will learn to discriminatebetween different identifyingcharacteristics of trees.
4. Students will learn (and spell correctly)the common and scientific names of thetrees listed in the Forestry CD.
5. Students will determine the different usesof individual species of trees.
Skills: verifying, analyzing, comparing,contrasting, identifying, evaluating,classifying, categorizing, identifying attributes.
Materials:♦ Forestry CD♦ Student Worksheet 9 (Appendix A)♦ Student Worksheet 10 (Appendix A)
chapter 8/27/56 9:33 AM Page 21

ACTIVITY 2INSTANT TREE TRAIL
Procedure:1. The purpose of this activity is to reinforce tree
identification. This activity may take place insideor outdoors.
2. Divide students into teams of six to eight.Each team is responsible for constructing onetrail.
3. Students construct a “trail” by outlining an areawith the yarn.
4. Using the clothespins, they then attach pictures ofleaves (if indoors) to the trail and add questionmarks OR attach cards to leaves (outdoors) andadd question marks at different points along the“trail.”
5. The other teams follow the trail and identifythe leaves by attaching the index card with thecorrect botanical and common names.
6. Each team can follow every trail and identify allof the leaves represented.
ACTIVITY 3TREE CONCENTRATION
Procedure:1. Have students cut out the squares of (a) leaf
pictures, (b) identifying characteristics of trees,(c) common names, and (d) scientific names.Squares may be pasted to index cards to makethem more durable.
2. Students then place the squares face down asfollows:
— Two rows of leaf picture squares only;
— All other squares placed in as many randomlymixed rows as necessary.
22
Subject:Science
Objectives:1. Students will learn to discriminate
between different identifyingcharacteristics of trees.
2. Students will reinforce tree identificationskills.
Skills: analyzing, representing, comparing,contrasting, evaluating, classifying,categorizing, identifying attributes andcomponents.
Materials:♦ Yarn or rope (full skein or at least 100 feet
of rope)♦ Clothes pins♦ Index cards with question mark-?♦ Index cards with the common and
botanical names of trees represented in theForestry CD
♦ Pictures of leaves (indoors)♦ Area with a variety of tree species
(outdoors)
Subject:Science
Objectives:1. Students will match names,
characteristics, and uses of trees withpictures of leaves
2. Students will reinforce tree identificationskills
Skills: evaluating, comparing, contrasting,categorizing, identifying attributes andcomponents, verifying, analyzing, classifying.
Materials: for each group♦ 1 set of Tree Concentration sheets
(Appendix B)♦ Scissors♦ 3 by 5 index cards (optional)
chapter 8/27/56 9:33 AM Page 22

3. Each player, in turn, is to pick one leaf picture square and try to match the leaf with either ofthe following squares:
common name;identifying characteristic; orthe scientific (botanical) name.
4. If there is not a match, the student replaces the squares face down in rows and the next studenthas a turn.
5. If the student matches the leaf to the common name, he puts the pair in his pile and has scoredone point for the match, and the next student takes a turn.
6. If the student matches the leaf to the scientific name or the identifying characteristic of thetree, the puts the pair in his pile and has scored two points for the match, and the next studenttakes a turn.
7. In the second round and subsequent rounds, each student again chooses one leaf picture squareand tries to match it. If he does not match the new leaf picture square, but does select a squarethat matches an existing pair in his pile, he adds the match to his pile and scores accordingly. Itis possible to score 5 points for each leaf picture by accumulating a full set of squares for each:
(Leaf + common name + identifying characteristic of tree + scientific name = 5 points)1 point 2 points 2 points
8. If all leaf picture squares have been matched at least once, the game continues until allremaining squares have been matched and added to students’ piles.
9. Students total their points to determine the winner.
23
chapter 8/27/56 9:33 AM Page 23

ACTIVITY 4LEAF PRINTS
Part I: Cloth Dyeing
Procedure:1. For best results, be sure that leaves collected are
fairly fresh and green.2. Have each student select leaves which he then
identifies by their common and botanicalnames.
3. Place several layers of newspaper on a flatboard.
4. Spread the cloth, right side up, on the newspaper.5. Place the leaves on the cloth in the desired
pattern.6. Put waxed paper over the leaves and tape the
edges carefully.7. Use the hammer to pound the leaves until the leaf
pattern has been transferred to the cloth. Theprocess will result in the leaf’s chlorophyllleaving a design or “print” on the cloth.
8. If the leaf design does not imprint evenly,crumble up another leaf, dip it in water, and useit to fill in the imprinted areas.
9. Use the fabric pen to write the common andbotanical names under each leaf.
10. To help retain the natural colors, the finishedproduct may be soaked in one of the followingsolutions:
1/2 cup of salt added to 2 gallons of water andsoaked for ten minutes.
OR
3 tablespoons of baking soda added to 1 gallonof water and soaked for ten minutes.
11. Rinse the fabric in clean, cold water and air dry it away from direct sunlight.12. Optional: Social Studies/Language Arts extension activity.
Have students research how Native Americans and early settlers dyed and decorated their cloth-ing with natural dyes and objects from nature. The use of walnuts and other forestproducts as a source of dyes, and the use of feathers, etc., as decoration can be explored.
24
Subjects:Science, Social Studies
Objectives:1. Students will select and identify, by
common and scientific names, a leaf oftheir choice.
2. Student will recognize the inherent beautyof an object of nature as a decorative item.
3. Students will recognize the chemicalproperties of salt and baking soda asfixatives.
4. Students will research botanical factsabout selected leaves.
Skills: Classifying, identifying attributesand components, analyzing, organizing,researching
Materials:♦ flat-headed hammers♦ masking tape♦ plywood or other hard surface boards♦ newspapers♦ waxed paper♦ fabric pen♦ tee shirt or pieces of cloth on which to
print (100% cotton works best).♦ tree leaves (tulip poplar, red or white oaks
work well)♦ construction or other heavy – weight
paper♦ stamp pad
chapter 8/27/56 9:33 AM Page 24

Part II: Stationery
Procedure:1. Have each student “buy” one leaf. As the “price” of purchase of the leaf, they must provide one
fact about their leaf.2. Have the student ink the leaf on the stamp pad, and impress the leaf on the paper in the position
of their choice.3. They then write the fact about the leaf at the bottom of the page.4. Extension Activity:
Have students follow steps 1–3 using twigs.
ASSESSMENT ACTIVITY 1TREE IDENTIFICATION SECTION
CLASS LEAF COLLECTION
Procedure:1. Have each group of students be responsible for
collecting a minimum of 15 different leaves dur-ing their travels and bring them into class.
2. Have students identify the leaves using theForestry CD summer key.
3. If the leaf is not identified using the Forestry CD,use additional keys and field guides.
4. Discuss the linguistic and cultural roots of thewords and terms used in tree identification.
5. Have the students press and mount the leaves.Instructions for mounting are on page 26.
6. Display the class leaf collection in the schoollibrary.
7. Have students research the accomplishments ofone of the following botanists/naturalists:
George Engelmann (1809–1884)David Douglas (1798–1894)Robert Fortune (1812–1860)Johann Georg Gmelin (1709–1755)William Jackson Hooker (1785–1865)Richard Maack (1825–1886)Pierre Magnol (1638–1715)Thomas Nutall (1784–1859)Jean Robin (1550–1629)Vespasien Robin (1579–1662)Charles Sprague Sargent (1841–1927).David Thomas (1776–1859)Thomas Albert Williams (1865–1900)
25
Subject:Science, Language Arts, Social Studies
Objectives:1. Students will select and identify by
common botanical names the leaves oftheir choice.
2. Students will mount and identifyspecimen by approved botanicalmethods.
3. Students will acquainted with the range ofspecies in their selected areas.
4. Students will employ the Forestry CDSummer Key to identify leaves.
5. Students will become familiar with otherkeys and reference materials as needed toidentify leaves.
Skills: evaluating, comparing, contrasting,categorizing, identifying attributes andcomponents, verifying, analyzing, classifying,and researching.
Materials:♦ Forestry CD♦ Street identification keys and field guides
as available♦ Plant press (if unavailable, use large
telephone books, or catalogues, or otherlarge book)
♦ Newspaper sheets♦ Leaf mounting sheets (Appendix B)♦ Glue♦ Paper and writing materials♦ Leaf Mounting Sheet and Botanical
Collection Procedures (Appendix B)♦ Student Worksheet 11
chapter 8/27/56 9:33 AM Page 25

a. Using Student Worksheet 11 have them map routes traveled by the botanist while doingresearch.
b. Have them identify two plants discovered by their botanist and locate the discovery on themap.
8. Extension activity: Define the term restoration forestry and have the students research areas intheir state where a restoration project may be proposed, or in process.
9. For closure, discuss with the students the following:■ Leaves exhibit certain characteristics that allow the species of the tree to be identified.■ Identification keys are a systematic way to examine tree, and especially leaf, characteristics
and identify the species.■ There are specialized terms and characteristics used in tree identification.■ There is a universally accepted system of naming trees, which uses a Latin botanical name,
and eliminates a language problem and provides a world-wide frame of reference.■ There is certain information that accompanies a specimen in a leaf collection.■ There are procedures to be followed to insure a properly collected, preserved, and mounted
leaf collection.■ There are “Environmental Ethics” to be followed when collecting leaves or engaging in any
outdoor activity.■ Trees have aesthetic, environmental, historical, and economic value. Discuss with students
some of the trees which have historical and cultural significance in our country’s history,especially those native to their state.
26
Method A.1. Decide where on the mounting sheet the leaf is to be placed. Try to be as artistic as possible.2. When mounting leaves, always turn one leaf upside down so that both sides are visible.3. Brush glue (60% white glue to 40% water) on the surface of the leaves.4. Place leaves on mounting sheet in pre-determined position.
Method B.1. Follow steps 1 and 2 above.2. Spread glue evenly on a washable surface.3. Lay leaves on glue and press down to ensure glue coverage.4. Lift leaves up gently and place on mounting sheet.
chapter 8/27/56 9:33 AM Page 26

TREE IDENTIFICATION SECTIONASSESSMENT ACTIVITY 2
TREE TRAILS
Procedure:1. Review the sample tree trail (Appendix B) with
the class.2. Divide the class into groups and have each group
select a public area in which they will design andinterpret a tree trail.
3. Each tree trail should have a minimum of 12different tree species.
4. Have each group work with computers (ifpossible) or by hand, to design a tree trailbrochure which should contain the followinginformation:♦ Common and scientific names of each tree;♦ Identifying characteristics of each tree;♦ Interesting facts about each tree;♦ Precise location of each tree;♦ Map (complete with legend) of the tree walk.
5. Place copies of completed brochure(s) in theschool library for use by other students.
6. (Optional) Send copies of brochures to appropri-ate state, county, or municipal agency so that theymay be shared with the public.
27
Subjects:Math, Science, Geography, Language Arts, Art
Objectives:1. Students will interpret a public area and
identify, by common and scientific names,the trees on that site.
2. Students will provide identifying charac-teristics and interesting facts about theirselected trees.
3. Students will present their material inwell-written grammatically correct for-mats.
4. Students will employ appropriate geo-graphic and statistical information to cre-ate their map.
5. Students will utilize appropriate art andgraphic techniques to create theirbrochure.
Skills: Identifying, classifying, identifyingattributes and characteristics, team building,researching, mapping, and writing
Materials:♦ Forestry CD♦ art supplies♦ field guides and keys♦ sample Tree Trail (Appendix B)
chapter 8/27/56 9:33 AM Page 27

Source: The Woodland Steward, p. 61
30
chapter 8/27/56 9:33 AM Page 30

FOREST MANAGEMENT PRACTICES
The United States has 731 million acres of forestland that make up about one third of the totalland base. Everyone uses and benefits from forest products each and every day of their lives.Forests are a resource which offers many benefits: wood products and byproducts, food, cleanwater, air quality, erosion prevention, noise abatement, habitat (human and wildlife), energyconservation, recreation, and aesthetics. Much of the world’s population depends on the forest forfuel for heating and cooking.
Old growth forests, though important for some species of wildlife, recreation, and aesthetics, donot offer the same environmental benefits as second growth forests. Second growth forestsgrow more rapidly and offer a broader range of benefits in the long run. In this more activegrowth, second growth forests produce more oxygen and take in more carbon dioxide than oldgrowth forests, thus benefiting air quality more. Second growth forests absorb more nutrientsthan old growth forests, thus purifying water more completely. Second growth forests provide awider variety of wildlife habitats and are often managed for the many wood products needed bysociety.
Through use of the Forest Management Practices section on the Forestry CD and thisaccompanying activity guide, the student will be introduced to various forest managementpractices, terminology, and systems which encompass the methods used to manage forests tomaximize their benefits and promote a conservation and stewardship land use ethic.
Silviculture is that part of forest management that deals primarily with the biological aspects ofgrowing trees. Social, economic, and philosophical considerations are also involved. Thecontext of forest management always involves multiple, sometimes competing, needs andecological awareness. The purposes of the following activities are to give students theopportunity to (1) compare a well managed forest with a poorly managed one, (2) examine waysnatural and man-made change in the plant community relate to desired goals and resources, (3)become better stewards of our future forests, and (4) better understand our connections to thenatural world.
Silviculture has been practiced for hundreds of years. Forests are constantly growing andchanging, passing through several stages such as: new, static, growing, old, changing, or dying.Forest managers attempt to imitate nature by creating conditions that also may occur naturally inthe forest. Through acquaintance with some of these forestry practices, it is hoped that thestudent will be led to realize the necessity of planning, and the effectiveness of educatedresponses for sustaining forests. The multiple benefits of forests – economic, environmental,recreational, and numerous others – are protected, renewed, and enriched through sustainableforest management.
Sometimes wind, fire, ice storms, or infestations by insects or disease can severely damage or evenkill a forest in a short time. When the forest regrows, the new trees are all about the same age, even
31
chapter 8/27/56 9:33 AM Page 31

though size may vary with growth rates. This type of forest is called “even-aged.” A forest maygrow for many years with only small groups or individual trees dying. This provides open spacesthat soon will be filled by young trees. These forests are called “unevenaged.”
Different cutting practices (management practices) are used to imitate nature’s methods of regener-ating a forest:
Even-agedClear-cutting: the removal of all trees larger than one inch in diameter from a specific area.Shelterwood cutting: 40–60% of the trees are removed, allowing new trees to becomeestablished in partial sunlight, under the shelter of the remaining older trees. Once the new treeshave gotten established, the removal of the remaining older trees may take place. Seed treecutting: removal of most of the trees in one cut, leaving a few, well distributed, good seedproducers over the area.
Uneven-agedGroup selection: small groups of trees are cut in selected areas. This creates openings forregeneration of trees that require partial sunlight.
Individual tree selection: trees of various sizes, dispersed throughout the forest, are individuallyselected for cutting. This creates small openings for the establishment of shade-tolerant species.
Some trees that grow best in an even-aged forest, because of their need for direct sunlight areAspen, Black Cherry, Oak, Hickory, Douglas-fir, White Pine, Red Pine, Loblolly Pine, andLodgepole Pine.
Some trees that thrive in the shaded environment of an uneven-aged forest are Maple and Beech.(Some coniferous trees that may be found in the understory of an uneven-aged forest are BalsamFir, White Cedar and Hemlock.)
Each type of forest provides differing wildlife habitat. Different birds and animals are found in thedifferent forests.1
Not all forests are “in the woods.” In urban communities, trees also have many values. Thesevalues may be aesthetic, social, historic, or environmental. Trees have been of aesthetic importanceto people since the earliest civilizations. The term “urban forestry” is relatively new (Jorgensen,1970). However, certain practices and disciplines that make up the field of urban forestry havebeen long established and valued.
Urban and community foresters specialize in managing the many acres of forests that grow in andaround metropolitan communities. They pay close attention to factors that affect those forests, suchas limited growing space, polluted air, lack of water, poor soil quality, utility line maintenance, andvandalism. Tree selection is a critical part of urban and community forest management. A forestermust be knowledgeable about which trees can withstand the various stresses and limitations presentin the urban environment.
32
chapter 8/27/56 9:33 AM Page 32

Urban and community foresters may work with real estate developers to save existing trees, and withmunicipal governments in establishing tree boards or commissions. Urban and community forestersmay be trained in traditional forestry schools or may come from other disciplines, such as horticul-ture or landscape architecture.
1. “Silviculture: A Forest Gem,” in Spruce Up America, Teacher Assistance Packet Grades K-6, AdirondackTeacher Center.
33
chapter 8/27/56 9:33 AM Page 33

Source: Project Learning Tree K-8 Activity Guide: p. 251
34
chapter 8/27/56 9:33 AM Page 34

ACTIVITY 1FORESTRY CD/FORESTER’S
VISIT
Procedure:1. Discuss the benefits of forests with the class. Ask
them how they personally benefit from forests.Discuss silviculture with the class.
2. Divide students into groups and have them playthe Management Practices section on the ForestryCD.
3. Contact your local forester. Invite them to yourclassroom to discuss forest management. Let theforester know that your students are researchingeven-aged and uneven-aged forest management.If possible, they may be able to accompany yourclass to sites in your area where forest manage-ment practices have been used.
35
Subjects:Science, English, Art, Geography, SocialStudies, Career Exploration
Objectives:1. Students will be challenged by the many
decisions involved in the management ofnatural resources.
2. Students will describe the forest as amanageable natural resource and identifythe process as silviculture.
3. Students will describe purposes or goalsin managing a forest.
4. Students will compare managed forestswith ones that are natural (unmanaged) orpoorly managed.
5. Students will be able to identify generalmanagement approaches by whichforests and tree stands are renewed orestablished.
6. Students will learn the dynamics of aforest system.
7. Students will learn how they areconnected to the forest/natural resources.
8. Students will learn how to seek the factsbefore making decisions.
Skills: Observing, discussing, evaluating,researching, interpreting, predicting,comparing and contrasting, formulatingquestions, identifying relationships andpatterns, identifying attributes and componentsMaterials:♦ Forestry CD
chapter 8/27/56 9:33 AM Page 35

ACTIVITY 2LOOKING AT FOREST STANDS
Procedure:1. Divide students into groups.2. Discuss well and poorly managed stands of trees.3. Give each group a copy of the pictures of the
well managed and poorly managed stand of treesor make transparencies of the pictures to beshown to the class.
4. If possible, take students outside to a nearbywoods or stand of trees and ask them to compareit to the stands in the pictures.
5. Ask questions to focus students on comparingstand characteristics. Example: “How does itcompare with the characteristics we discussed ina well managed stand of trees?
6. Have the students write and/or draw theirobservations in their journal as a data recordingactivity.
7. Have the students review the “ForestManagement Practices” section of the ForestryCD. Ask students to respond to the followingquestions using their information in the CD.Write the questions on the board.a. What tree characteristics do you see in these
pictures that represent good management ofthe forests for a specific purpose?
b. Can multiple benefits be achieved?c. What characteristics do you observe in this
stand that may be important to manage for thepotential use of these trees for (1) aestheticpurposes (2) diversity of wildlife,(3) manufacturing construction lumber, and(4) other purposes?
d. What would a forester need to do to maintainsuch a forest?
e. What silvicultural practices might a foresterincorporate to help produce the best possibleforest for a specific purpose?
Activity 2 is adapted from: “Managing Our Forest Resources,” in Natural Resources Education Series,USDA Forest Service.
36
Subjects:Science, Language Arts
Objectives:1. Students will be challenged by the many
decisions involved in the management ofnatural resources.
2. Students will describe the forest as amanageable natural resource and identifythe process as silviculture.
3. Students will describe purposes or goalsin managing a forest.
4. Students will compare well managedforests with ones that are poorly managed.
5. Students will be able to identify a wellmanaged area and contrast it to a poorlymanaged area.
6. Students will be able to identify generalmanagement approaches by whichforests and tree stands are renewed orestablished.
7. Students will learn the dynamics of a for-est system.
8. Students will learn how they are connect-ed to the forest/natural resources.
9. Students will learn how to seek the factsbefore making decisions.
Skills: Observing, predicting, comparing andcontrasting, classifying and categorizing,identifying attributes and components,interpreting, composing, formulatingquestions, team building, problem solving, factfinding.
Materials:♦ Forestry CD♦ Picture of Well Managed Stand of Trees
(Appendix B)♦ Picture of Poorly Managed Stand of Trees
(Appendix B)♦ Student journal♦ Question list for board (see procedure)
chapter 8/27/56 9:33 AM Page 36

ACTIVITY 3MANAGEMENT DECISIONS
Procedure:Students can do the following individually or incooperative groups:1. Have students review the Forestry CD and choose
a forest management technique that they wouldlike to illustrate using a poster or diorama.
2. Once they have decided, hand out the materialsthey will need and allow them ample time tocomplete their project. (You may choose toassign different techniques, to ensure that all arerepresented.)Students can paint the toilet paper rolls andpaper towel rolls brown or cover them withbrown construction paper to make tree trunks.These can be cut to different sizes for trees andtree stumps. The leaves or needles can be madefrom green construction paper that has been cutinto the desired shapes and attached to the top ofthe “trunk.” Students can use the clay to hold the“trees” and “stumps” onto a piece of cardboard.
3. After they have completed their projects,they will write a short report about the forestmanagement technique that they chose toillustrate. Some questions they may want toanswer are:a. Which silviculture technique did you choose?b. Describe what the forest manager did to this
site.c. Which type of trees grow best in your
managed area?d. What do you perceive as the long term
benefits of the forest management techniquethat you chose to illustrate?
4. Have students give an oral report to the class,using their illustration and their written report.
5. Discuss all of the finished projects with theclass. Review all of the silviculture techniques,and discuss the benefits to the forest habitat.
37
Subjects:Science, Art, Language Arts
Objectives:1. Students will be challenged by the many
decisions involved in the management ofnatural resources.
2. Students will describe the forest as amanageable natural resource and identifythe process as silviculture.
3. Students will describe purposes or goalsin managing a forest.
4. Students will compare well managedforests with ones that are natural(unmanaged) or poorly managed.
5. Students will be able to identify a wellmanaged area and contrast it to a poorlymanaged area.
6. Students will be able to identify generalmanagement approaches by whichforests and tree stands are renewed orestablished.
7. Students will learn the dynamics of aforest system.
8. Students will learn how they areconnected to the forest/natural resources.
9. Students will learn how to seek the factsbefore making decisions
Skills: Analyzing, classifying and categoriz-ing, comparing and contrasting, composing,interpreting, representing, projecting futureneeds, team building, problem solving.
Materials:♦ Forestry CD♦ Brown construction paper♦ Green construction paper♦ Toilet paper or paper towel rolls (empty,
of course!)♦ Clay♦ Cardboard (for base of diorama)♦ Poster board♦ Scissors♦ Markers/crayons/paint♦ Glue/paste
chapter 8/27/56 9:33 AM Page 37

Extensions:1. Invite a local forester to class and have him/her listen to the oral reports.2. Contact your local Soil and Water Conservation District office to have someone come to your
class to discuss the soil of forest sites and how it relates to the silviculture technique that ischosen.
3. Contact a wildlife biologist or naturalist. Ask them to come to your classroom to discuss thewildlife that will benefit in each type of managed forest.
4. Display finished projects in the school library, town library, local forestry office, local soilconservation district office or any other location where the students’ work would be visible tothe community.
ACTIVITY 4MANAGING THE URBAN AND COMMUNITY FOREST – TREE
INVENTORY
Preparation:1. Gather materials for class: measuring equipment,
maps, Forestry CD, tree identification keys.2. Secure permission from village/school/landown-
ers as needed.3. Review Forestry CD Summer Key use and data
collection skills (tree measurement, pace, etc.) inForestry CD Tools Section prior to field work.
4. This would be an ideal time to ask your stateurban and community forestry program toprovide a speaker to describe the process actuallyused in your region.
5. Contact your country or municipality and inquireabout a section of the city, your neighborhood, ora park that needs a comprehensive or updatedinventory. Ask them what information shouldbe in the inventory (address, feet in fromcurb/highway, height, diameter or circumference,crown spread, etc.).
6. Discuss the benefits of the community forest.Why is it important?
Procedure:1. Have students research types of trees native
to their state and adapted to the area beinginventoried. Identify trees that are best suited tothe area the students are to survey.
38
Subjects:Science, Math, Social Studies
Objectives:1. Students will be able to identify tree
species using a key.2. Students will be able to measure/calculate
tree diameter and height.3. Students will be able to record tree data
using charts, graphs, and tables.4. Students will better understand field skills
necessary in forest resource management.5. Students will understand the concepts
behind forest resource management.6. Students will be able to draw maps and
understand mapping.
Skills: Interpreting, comparing andcontrasting, generalizing, evaluating,classifying, categorizing, identifying attributesand components.
Materials♦ Forestry CD♦ Sample Inventory Sheet (Appendix B)
street keys and identification guides♦ Maps of inventory area (school grounds,
village streets)♦ Measurement equipment (tape measure,
diameter tape, Biltmore Stick, etc.)♦ Clipboards (optional)♦ Paper♦ Pencils
chapter 8/27/56 9:33 AM Page 38

2. Have students review information to be collected and have the class develop a data collectionsheet. (See sample in Appendix B, but have students develop a format themselves.)
3. Organize class into data collection teams according to inventory area, supervision needs, andmaterials/equipment limitations.
4. Conduct inventory field work collecting all data necessary (address, distance from curb orstreet, distance from corner, species, diameter, height, etc.)
5. Create inventory maps and compile appropriate data using charts, tables, graphs or anycombination thereof.
6. Optional:a. Have students research information on how to assess the general health/condition of trees.b. For trees found to be in serious trouble, have students use information gathered in Activity
1 and include in their report recommendations for replacement trees.
ASSESSMENT ACTIVITYFOREST MANAGEMENT PRACTICES SECTION
Have students construct a report containing findings, evaluations, and recommendations gathered inSteps 1,2,3, and 4 of Activity 4 above. Have students submit this report to the appropriate school,civic, or government authority.
39
chapter 8/27/56 9:33 AM Page 39

Source: Evergreen Magazine Forest Facts Book: p. 22–23
40
chapter 8/27/56 9:33 AM Page 40

Source: The Woodland Steward, p. 25.
42
chapter 8/27/56 9:33 AM Page 42

FROM TREES TO LUMBER AND FUEL
We are all consumers of the commodity, wood, which comes from trees. Wood is consumed inmany ways, e.g., fuel for heat and cooking, framing for houses, furniture, pulp for paper, etc. Morethan 3.4 billion cubic meters of wood are extracted from the world’s forests and woodlands eachyear, roughly half for fuel and half for lumber, plywood, paper and other industrial products.1
Good forest management practices have ensured that there are more trees available in the UnitedStates today than there were in 1850. The September 1992 Journal of Forestry stated: … onereason we cut trees is that each American uses the equivalent of a 100-foot tree each year. To getsome idea of how many trees we have grown and used since 1900, start with 76 million peopleliving in the United States in 1900. By 1990, we had grown to more than 250 million people. So,from 1900 to 1990, we grew and used the equivalent of 14 billion 100-foot trees. And, because ofgood forest practices, America’s beautiful green forests are the envy of the world. We still havemore than two-thirds of the forestland we had when Columbus discovered the New World.2
Consumers have a responsibility to continue to use wisely the natural resources available to themand thereby help ensure the continued abundance of trees and all of the goods and environmentalbenefits (wildlife habitat, clean water, clean air, and aesthetics) derived from forests.
Lumber, plywood, paper and other industrial products:The Trees to Lumber section on the Forestry CD explains the steps in the process of producinglumber, beginning with removal from the forest to production at the sawmill. Students will have anopportunity to become knowledgeable about the natural, capital, and human resources necessary toproduce lumber and other industrial products. Lumber and other industrial products are goods(wares, merchandise) produced by many industries for human use.
Businesses (producers) use natural, capital, and human resources to make goods or performservices that society values. Natural resources are the raw materials used in production like plants,animals, soil, water and minerals. Some are renewable and some are non-renewable. Humanresources include both the labor that makes the product or performs the service, and theentrepreneur who organizes the production process. Capital resources are the tools that are used tomake the goods (factories and machines) or transport them (trucks and ships). Capital resourceshave changed significantly through time. We are all producers and consumers in society. Everyproducer depends upon other workers to be able to make a living. Consumers are the users ofgoods and services, and we are all consumers.
Fuel and heat:In 1875, wood supplied 75% of the energy needs in the United States. Wood was replaced by coalin the early 1900’s. By 1946, oil and gas provided the bulk (70%) of the nation’s energyrequirement. In the United States, the use of wood as a fuel has enjoyed a rebirth in popularityever since the oil shortages of the 1970’s. The use of wood as a fuel increased 45% during theperiod of 1975 to 1980. In some countries around the world, wood still is, and probably willremain, the main source of fuel for cooking and heating.
43
chapter 8/27/56 9:33 AM Page 43

In the United States, people have returned to using wood as a fuel for many of the same reasonspeople in other countries have always used wood, namely, other fuel sources are unavailable,nonrenewable, or are too expensive. In this unit, your students will explore the use of wood as afuel. They will specifically discover the characteristics, advantages, and disadvantages of fuelwood.
Pound for pound all wood produces about the same amount of heat energy. A pound of dryhardwood will produce about 8600 B.T.U.s of heat energy when burned. Because of high resincontent some conifer wood may produce slightly over 9000 B.TU.s. Most hardwoods and sometropical woods are denser than conifers, and on a volume basis contain more heat value.3
Although the Forestry CD does not directly address the use of timber as a fuel, an activityinvolving this aspect has been included to facilitate student understanding of processing and usageof wood as a renewable source of energy.
1. Postel, Sandra and Ryan, John C., “Reforming Forestry” in State of the World 1991 A Worldwatch Institute Reporton Progress Toward a Sustainable Society, pp. 75–76.
2. “Trees the Renewable Resource That Benefits Both People and the Environment,” in Journal of Forestry, September1992, p. 12.
3. Wood Used for Fuel And Heat Curriculum for Middle School Social Science, Florida Ag in the Classroom, Inc.
44
chapter 8/27/56 9:33 AM Page 44

ACTIVITY 1LOOKING AT RESOURCES
A CAPITAL IDEA
Procedure1. Discuss natural, capital, and human resources
with the students. Help them realize the differ-ence between renewable and non-renewable.
2. Have students play the Trees to Lumber Sectionon the Forestry CD.
3. Have the student imagine he/she is going to thelumber yard to purchase lumber to frame a house.
4. Have the student list the steps in the process fromtree to lumber and identify the resources used ineach of the following steps:
Step one: In the forestStep two: From the forest to the sawmillStep three: At the sawmillStep four: At the lumber yard
5. For each step, have the students identify the following resources used:
Natural Resources: Renewable, Non-renewableCapital ResourcesHuman Resources
6. Have students individually or in groups research and write a report on one of the following:a. The student imagines he/she is going to the lumber yard to purchase lumber to frame a
house in the year 1850 in their home state or territory.b. The student is a lone woodsman who builds a home on the Colonial frontier in the year
1750.c. Have students check on the price of wood vs. steel 2 by 4’s at their local lumberyard.
Discuss the properties of wood and steel in terms of renewability, recycling, the toolsneeded, and energy costs of extraction and manufacturing.
7. Have the students list the steps from tree to lumber and identify the resources used in each step.8. Ask them the following questions:
a. Have the natural resources changed over time? Explain.b. Have the capital resources changed over time? Explain.c. What other changes did they discover? Explain.
45
Subjects:Economics, Sociology, Social Studies,Science, Language Arts
Objectives:1. Students will define natural, capital, and
human resources.2. Students will distinguish between renew-
able and non-renewable resources.3. Students will trace the process of the
transformation of a tree to lumber.4. Students will identify the resources in the
transformation of a tree to lumber.
Skills:Defining, processing, analyzing, evaluating,predicting, classifying, identifying attributes,researching, writing
Materials:♦ Forestry CD♦ Pencil and paper
chapter 8/27/56 9:33 AM Page 45

ACTIVITY 2FIELD TRIP TO A SAWMILL
Procedure1. Before the trip have the students review the Trees
to Lumber Section of the Forestry CD andbecome familiar with the names and uses of themachinery and tools used in the sawmill.
2. At the sawmill, and later in class, havestudents chart–either in words and pictures or acombination of the two—the process that beginswith the felling of a tree and ends with thepurchase of a board by a consumer:
Sale of treesMethods/result of harvestingProcedures used in the millUse of by-products (bark, sawdust, etc.)Sale of product to wholesalers/retailers
ACTIVITY 3MILLS APART
Procedure:1. Give students a list of the names and addresses of
local sawmills.2. Have students locate each sawmill on the state
map.3. Have students write (individually, or as groups) to
one sawmill owner and ask the following:a. How long the sawmill has been in
existence?b. How long the present owner has been
involved with the sawmill?c. The primary species processed in the
sawmill?d. The primary source of the sawmill’s trees—
geographic area, company land, or fromFederal, state or private land?
e. The primary purchasers of the sawmill’sprimary product (lumber) and secondaryproducts (bark, sawdust).
f. Changes from past years in consumers, usesof sawmill products, sources of trees, andmachinery/methods of the sawmill.
46
Subjects:Language Arts, Social Studies, Economics
Objectives:1. Students will observe the process of
transforming trees into lumber.2. Students will identify the human, capital,
and natural resources used in this process.3. Students will observe the collection and
proposed use of the by-products of thesawmill process.
Skills: Observing, categorizing, interpretingdata, evaluating
Materials:♦ Sawmill♦ Permission slips
Subjects:Language Arts, Social Studies, Economics,Geography
Objectives:1. Students will research the raw materials,
methods, products, and resourcesemployed in their local sawmill.
2. Students will compare and contrast theraw materials, methods, products, etc. of asawmill in another USDA Forest Serviceregion.
Skills: Writing, evaluating, comparing,categorizing
Materials:♦ Forestry CD♦ Paper, pens, envelopes, stamps♦ Addresses of local sawmill owners♦ USDA Forest Service regional informa-
tion (Appendix B)
chapter 8/27/56 9:33 AM Page 46

4. Give students the following information:♦ USDA Forest Service regional information (Appendix B)
5. Have students write (individually, or as groups) to sawmill owners in other USDA ForestService regions and ask the same questions as in Procedure 3, above. Note: The teachermay want to assign regions to individuals or groups to be sure that a good cross section ofinformation will be gathered.
6. Have individual students or groups compare information gathered in steps 3 and 5 above.7. As a section assessment activity, have students (individually or in groups) present findings to
the class.
ACTIVITY 4NATIVE WOOD
Procedure:1. Define the term native wood.2. Have students research trees on the Forestry CDsummer key and list those that are native to theirarea.3. Research differences in the wood producedby five native trees and the products commonlymanufactured from those trees.
47
Subjects:Science, Language Arts
Objectives:1. Students will reinforce tree identification
skills.2. Students will understand the differing uses
of trees.3. Students will utilize research procedures.4. Students will define the term native
species.
Skills:Comparing, contrasting, analyzing,researching
Materials:♦ Forestry CD♦ Tree identification guides and keys
chapter 8/27/56 9:33 AM Page 47

ACTIVITY 5NON-NATIVE WOOD
The Princess Tree (Paulownia tomentosa)
Procedure:1. Have the students research this fascinating tree.2. Ask them to determine when it was introduced
into this country and its country or region oforigin.
3. Have the students write a report on whateconomic, social, and cultural values are placedon this tree in the United States and in thecountry(ies) of origin?
4. Ask them to determine where the major easternshipping port for this product located?(Hockessin, Delaware)
ACTIVITY 6USING WOOD AS A FUEL
Procedure:1. Lead the class into a discussion about using wood
as a fuel by having the students list all currentenergy sources. Remember – electric energyoriginates with nuclear, coal, oil, wind, solar,water, or gas power.
2. Ask if any of the students use wood in theirhomes.
3. Ask the students to assume they have only woodto use as a fuel. In small groups have studentsdiscuss how this would affect their lives. Samplediscussion follows:
I. Why do we need energy?a. To cook withb. To heat our homesc. To make our cars god. To cool our homese. To operate machinery and factoriesf. To light our homes, schools, etc.
48
Subjects:Language Arts, Economics, Geography, SocialStudies
Objectives:1. Students will follow the economic impact
of the timber industry.2. Students will examine the global
involvement of trade.3. Students will research economic and
social factors affecting goods.
Skills: evaluation, analyzing, researching,writing, comparing, contrasting
Materials:Tree identification guides and keys
Subjects:Science, Social Studies, Math, Economics
Objectives:1. Students will understand the meaning of
density.2. Students will contrast present and
changed life styles.3. Students will realize the effect of
technology on their lives.4. Students will examine the extent of
various sources of pollution.
Skills:Comparing, contrasting, debating, evaluating,research, writing
Materials:♦ Wood samples
chapter 8/27/56 9:33 AM Page 48

II. What sources of energy do we use?a. Oilb. Coalc. Natural gasd. Solare. Woodf. Nuclearg. Windh. Water
III. Do any of you use wood as a fuel in your home: What does it do?a. heats our homeb. cooks food, boil water
IV. Why do you use wood?a. May have a plentiful supplyb. Is pleasant to smell, (see aesthetic)
V. If wood were the only source of energy, imagine differences in your home. Think aboutyour house, and take out all the gas and electric appliances, replacing them with a fireplace,woodstove, and wood furnace. How would this change your life?a. You would spend time finding and cutting wood.b. Time would be needed for chopping and splitting wood.c. To cook with, you would need to build a fire beforehand. You cannot instantly
“turn on” a fire.d. “c” also applies to heating.e. Fires must be tended – wood added and fire stoked.
These are the tasks that pioneers in this country had to perform. It took a lot of time,every day, all year, to maintain their wood supply. People still use wood as a fuel inmany countries today. And it is as important to them today as it was to the pioneers ofour nation.
VI. What are advantages of using wood as a fuel?a. We use less oil, coal, (fossil fuels) which are non-renewable resources.b. We use a renewable resource which is less polluting. We can always plant trees.c. There is wood available for use as fuel, which otherwise would be wasted (by-product
of the timber industry and land development.)
4. Have students bring in pieces of wood that can be used as fuel. Discuss the merits of each.5. Have students locate sources of wood in the community both free and for sale.6. Have students write an essay on wood as a fuel and how and where it could be used in our
society to reduce the amount of fossil fuels we consume.
49
chapter 8/27/56 9:33 AM Page 49

7. Wood density:a. Have students research (library or Internet) the wood density of the following trees: Ash,Black Tupelo, Black Willow, Eastern Cottonwood, Northern Red Oak, Quaking Aspen, RedMaple, Shagbark Hickory, Southern Red Oak, Sassafras, Sugar Maple, Sycamore, White Birch,White Oak, Yellow (Tulip) Poplar, and rank the trees as to their energy value for fuel and heat.
Note: Density is defined as the quantity of something per unit volume, unit area, or unit length.A Density of Trees and Heat Produced chart listing the density of the above trees is included inAppendix B for the teacher.
8. Using the wood samples brought into class, or lumber samples from saw mills or lumber yards,have the students develop a laboratory activity which demonstrates the differences in density ofvarious woods.
9. Following laboratory safety precautions, have students use a calorimeter in science laboratoryto measure the differences in heat potential of the different wood samples.
10. Have students discuss the generation of “greenhouse gases” from wood burning, as opposed tofossil fuel burning.
ASSESSMENT ACTIVITYTREES TO LUMBER AND FUEL SECTION
The combination of field trips and evaluations, correspondence with mill owners, research andreports will serve as a cumulative evaluation instrument for this section.
50
chapter 8/27/56 9:33 AM Page 50

Student Worksheet 1 Early Measurements Group No.
Hand span Arm span Nose to thumb CubitStudent 1 ____________ ____________ ______________ ____________Student 2 ____________ ____________ ______________ ____________Student 3 ____________ ____________ ______________ ____________Student 4 ____________ ____________ ______________ ____________Student 5 ____________ ____________ ______________ ____________
Average ____________ ____________ ______________ ____________
Length of Side of Door Ceilingclassroom desk height height
Student 1 ____________ ____________ ______________ ____________Student 2 ____________ ____________ ______________ ____________Student 3 ____________ ____________ ______________ ____________Student 4 ____________ ____________ ______________ ____________Student 5 ____________ ____________ ______________ ____________
Average ____________ ____________ ______________ ____________
Using Yardstick:
Length of Side of Door Ceilingclassroom desk height height
Student 1 ____________ ____________ ______________ ____________Student 2 ____________ ____________ ______________ ____________Student 3 ____________ ____________ ______________ ____________Student 4 ____________ ____________ ______________ ____________Student 5 ____________ ____________ ______________ ____________
Average ____________ ____________ ______________ ____________
Circumference Height ofof trunk tree
Student 1 ____________ ____________Student 2 ____________ ____________Student 3 ____________ ____________Student 4 ____________ ____________Student 5 ____________ ____________
Average ____________ ____________
53
chapter 8/27/56 9:33 AM Page 53

Student Worksheet 2 Group No. ________
Native American Method of Measuring Tree Height
Number of steps Estimated heightto tree of tree
Student 1 ____________ ____________Student 2 ____________ ____________Student 3 ____________ ____________Student 4 ____________ ____________Student 5 ____________ ____________
Average ____________ ____________
Using a person of known height to determine the height of a tree
Height of person standing at tree _____________________
Number of pencil lengths to top:
Student 1 ____________Student 2 ____________Student 3 ____________Student 4 ____________Student 5 ____________
Average ____________
Estimated height of tree ___________________
54
chapter 8/27/56 9:33 AM Page 54

Student Worksheet 3 NAME ______________________DETERMINE LENGTH OF STEP
55
Procedure:
Walk 2 times (in a normal step) the distance marked off. Record number of stepsyou took each time.
Number of steps 1st time
Number of steps 2nd time
Total steps (A).
Total number of feet in distance walked (B)
÷ =(B) (A) (C)(total distance (total steps (number of feetwalked) taken) in each step)
chapter 8/27/56 9:33 AM Page 55

Student Worksheet 4 NAME ______________________DETERMINE LENGTH OF PACE
56
A pace is two steps. To calculate the length of your pace, measure out a dis-tance of 200 feet on the ground. At your normal walking speed, walk the dis-tance several times. As you walk, count the number of paces you take to go200 feet. Walk the distance four times, and take an average of the last two orthree attempts. If you start out walking on your right foot, count the numberof times that you step with your left foot. Most adults have a pace of about 5feet.
Procedure:
Walk 4 times (in a normal step) the distance marked off. Record number of pacesyou took each time.
Number of paces 1st time
Number of paces 2nd time
Total steps (A)
Total number of feet in distance walked (B)
÷ =(B) (A) (C)(total distance (total paces (number of feetwalked) taken) in each step)
NOTE: Round the length of your pace to the nearest half foot: 4′, 41/2′, 5′, 51/2′
chapter 8/27/56 9:33 AM Page 56
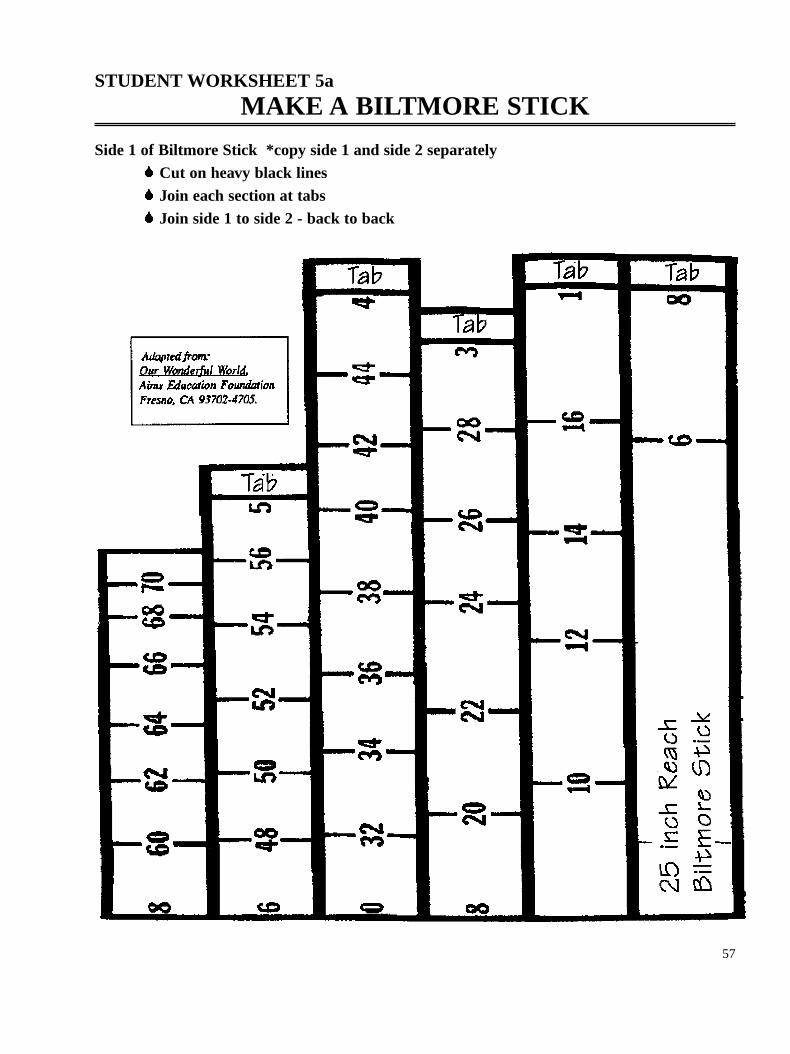
STUDENT WORKSHEET 5a
MAKE A BILTMORE STICK
Side 1 of Biltmore Stick *copy side 1 and side 2 separatelyCut on heavy black linesJoin each section at tabsJoin side 1 to side 2 - back to back
57
chapter 8/27/56 9:33 AM Page 57

STUDENT WORKSHEET 5b
MAKE A BILTMORE STICK
Side 2 of Biltmore Stick (Hypsometer)Cut on heavy black linesJoin each section at tabsJoin side 1 to side 2 - back to back *attach to sheet of cardboard/yardstick
58
chapter 8/27/56 9:33 AM Page 58

Student Worksheet 6 Group No. ________
Tolling on through the CD
a. Diameter of the tree:
Measurement 1 Measurement 2 AverageStudent 1 _____________ _____________ ____________Student 2 _____________ _____________ ____________Student 3 _____________ _____________ ____________Student 4 _____________ _____________ ____________Student 5 _____________ _____________ ____________
Group Average _____________ _____________ ____________
b. Height of the tree:
Number of 16 foot logs in tree Height of treeStudent 1 _____________ _____________Student 2 _____________ _____________Student 3 _____________ _____________Student 4 _____________ _____________Student 5 _____________ _____________
Group Average _____________ _____________
c. Merchantable height of the tree:
Number of 16 foot logs in tree Merchantable height of treeStudent 1 _____________ _____________Student 2 _____________ _____________Student 3 _____________ _____________Student 4 _____________ _____________Student 5 _____________ _____________
Group Average _____________ _____________Number of board feet
in the tree _____________ _____________
Solve the problem:How many trees like the one measured in step c would it take to build three average U.S. homes?Note: An average U. S. home contains approximately 16,900 board feet of lumber for the structuralportions of the house.
Answer: __________________
59
chapter 8/27/56 9:33 AM Page 59

Student Worksheet 7 Name(s) ________
USING A CLINOMETER
Tree number 1:
Angle of elevation __________
Tangent of angle of elevation __________
Number of paces fromtree to clinometer __________
Number of feet fromtree to clinometer __________
Height of tree __________
Tree number 2:
Angle of elevation __________
Tangent of angle of elevation __________
Number of paces fromtree to clinometer __________
Number of feet fromtree to clinometer __________
Height of tree __________
Tree number 3:
Angle of elevation __________
Tangent of angle of elevation __________
Number of paces fromtree to clinometer __________
Number of feet fromtree to clinometer __________
Height of tree __________
60
chapter 8/27/56 9:33 AM Page 60

STUDENT WORKSHEET 8Big Tree Worksheet Date: ____________
61
Your Name: ____________________________________ Home Phone: __________
Address: __________________________________________
City: ______________________ State: _________ Zip: _______
School District: ________________________________________
School: _______________________________________________
Teacher’s Name: __________________________________________ Grade: _________
Tree’s common name: ________________________________
Tree’s scientific name: ________________________________
Tree’s location: _________________________________________________________
Land owner’s name and address: ____________________________________________________________________________________________________________________
A. Circumference (inches): ___________________
B. Estimated height (feet): ___________________
C. Crown spread (feet): _____________________
D. Divide answer to C by 4: ______________
♦ Fill in the blanks with the answers to the lettered questions.
+ + =
(A) (B) (D) (point total)This answer is the point total for your tree.
♦♦ If the point total of your Big Tree is equal to or greater than the point total of thesame species (type) listed in your state’s big tree registry or the National Registry ofBig Trees, send a copy of this completed worksheet to the NRCE Coordinator at yourState Forestry Office.
chapter 8/27/56 9:33 AM Page 61

Stud
ent
Wor
kshe
et 9
Nam
e__
____
____
____
____
____
____
____
____
____
_
Gro
up n
umbe
r__
____
____
____
_
Usi
ng a
sum
mer
key
62
Lea
f nu
mbe
r __
____
____
Lea
f nu
mbe
r __
____
____
__
Com
mon
Nam
e __
____
____
____
____
____
____
____
____
____
____
Com
mon
Nam
e __
____
____
____
____
____
____
____
____
____
__
Scie
ntif
ic N
ame
____
____
____
____
____
____
____
____
____
____
__Sc
ient
ific
Nam
e __
____
____
____
____
____
____
____
____
____
__
Lea
f nu
mbe
r __
____
____
Lea
f nu
mbe
r __
____
____
Com
mon
Nam
e __
____
____
____
____
____
____
____
____
____
____
Com
mon
Nam
e __
____
____
____
____
____
____
____
____
____
__
chapter 8/27/56 9:33 AM Page 62

Student Worksheet 10 Name ______________________ Group number ________
Using a Summer Key
Station 1 _____________________________ Station 8 ____________________________
Common Name _______________________ Common Name _______________________
Scientific Name _______________________ Scientific Name _______________________
Station 2 ____________________________ Station 9 ____________________________
Common Name _______________________ Common Name _______________________
Scientific Name _______________________ Scientific Name _______________________
Station 3 ____________________________ Station 10 ___________________________
Common Name _______________________ Common Name _______________________
Scientific Name _______________________ Scientific Name _______________________
Station 4 ____________________________ Station 11 ___________________________
Common Name _______________________ Common Name _______________________
Scientific Name _______________________ Scientific Name _______________________
Station 5 ____________________________ Station 12 ___________________________
Common Name _______________________ Common Name _______________________
Scientific Name _______________________ Scientific Name _______________________
Station 6 ____________________________ Station 13 ___________________________
Common Name _______________________ Common Name _______________________
Scientific Name _______________________ Scientific Name _______________________
Station 7 ____________________________ Station 14 ___________________________
Common Name _______________________ Common Name _______________________
Scientific Name _______________________ Scientific Name _______________________
63
chapter 8/27/56 9:33 AM Page 63

Station 15 ___________________________ Station 22 ___________________________
Common Name _______________________ Common Name _______________________
Scientific Name _______________________ Scientific Name _______________________
Station 16 ___________________________ Station 23 ___________________________
Common Name _______________________ Common Name _______________________
Scientific Name _______________________ Scientific Name _______________________
Station 17 ___________________________ Station 24 ___________________________
Common Name _______________________ Common Name _______________________
Scientific Name _______________________ Scientific Name _______________________
Station 18 ___________________________ Station 25 ___________________________
Common Name _______________________ Common Name _______________________
Scientific Name _______________________ Scientific Name _______________________
Station 19 Station 26 ___________________________
Common Name _______________________ Common Name _______________________
Scientific Name _______________________ Scientific Name _______________________
Station 20 ___________________________ Station 27 ___________________________
Common Name _______________________ Common Name _______________________
Scientific Name _______________________ Scientific Name _______________________
Station 21 ___________________________ Station 28 ___________________________
Common Name _______________________ Common Name _______________________
Scientific Name _______________________ Scientific Name _______________________
64
chapter 8/27/56 9:33 AM Page 64

Stud
ent
Wor
kshe
et 1
1 N
ame
____
____
____
____
____
____
____
_
Map
the
Rou
te
65
chapter 8/27/56 9:33 AM Page 65

66
chapter 8/27/56 9:33 AM Page 66
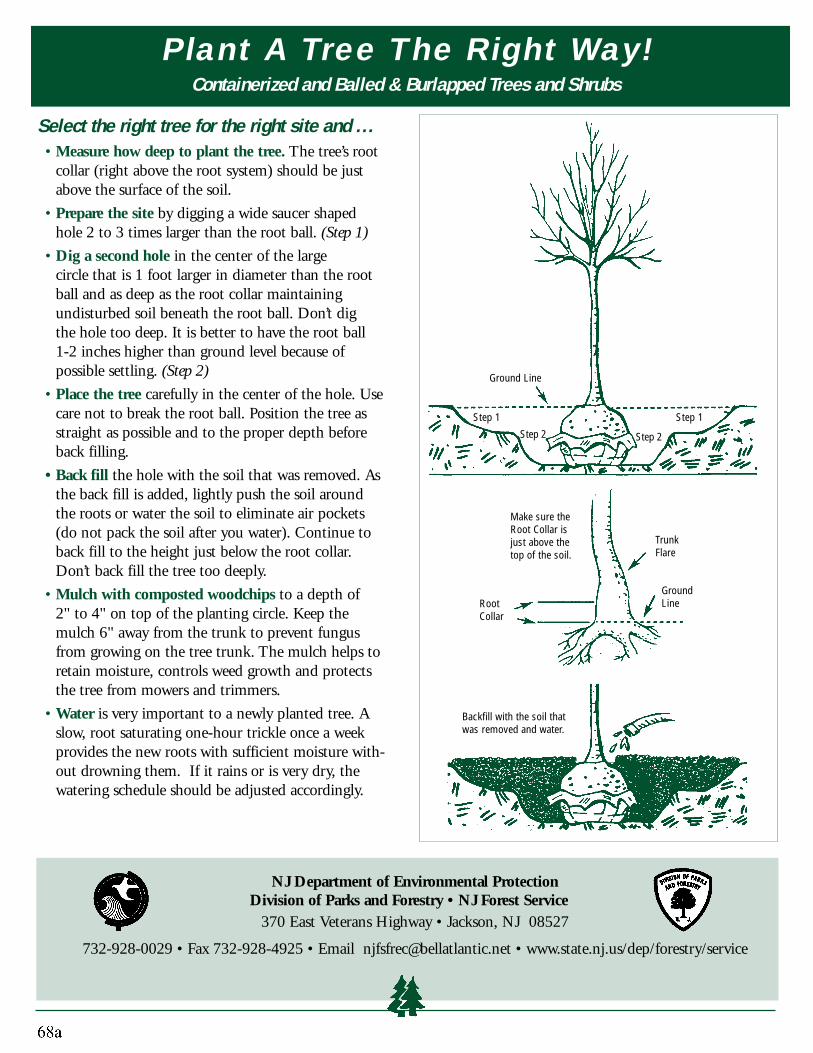
Plant A Tree The Right Way!Containerized and Balled & Burlapped Trees and Shrubs
Select the right tree for the right site and ...• Measure how deep to plant the tree. The tree’s root
collar (right above the root system) should be just above the surface of the soil.
• Prepare the site by digging a wide saucer shaped hole 2 to 3 times larger than the root ball. (Step 1)
• Dig a second hole in the center of the large circle that is 1 foot larger in diameter than the root ball and as deep as the root collar maintaining undisturbed soil beneath the root ball. Don’t dig the hole too deep. It is better to have the root ball 1-2 inches higher than ground level because of possible settling. (Step 2)
• Place the tree carefully in the center of the hole. Use care not to break the root ball. Position the tree as straight as possible and to the proper depth before back filling.
• Back fill the hole with the soil that was removed. As the back fill is added, lightly push the soil around the roots or water the soil to eliminate air pockets (do not pack the soil after you water). Continue to back fill to the height just below the root collar. Don’t back fill the tree too deeply.
• Mulch with composted woodchips to a depth of 2" to 4" on top of the planting circle. Keep the mulch 6" away from the trunk to prevent fungus from growing on the tree trunk. The mulch helps to retain moisture, controls weed growth and protects the tree from mowers and trimmers.
• Water is very important to a newly planted tree. A slow, root saturating one-hour trickle once a week provides the new roots with sufficient moisture with-out drowning them. If it rains or is very dry, the watering schedule should be adjusted accordingly.
TrunkFlare
GroundLine
Ground Line
Make sure theRoot Collar isjust above thetop of the soil.
NJ Department of Environmental Protection Division of Parks and Forestry • NJ Forest Service
370 East Veterans Highway • Jackson, NJ 08527
732-928-0029 • Fax 732-928-4925 • Email [email protected] • www.state.nj.us/dep/forestry/service
Backfill with the soil thatwas removed and water.
RootCollar
Step 1
Step 2
Step 1
Step 2

Tree Planting DetailUse this simple guide to help you plant your next tree.
Clear of branchesbelow 6 ft.
2" to 4" mulch of shreddedbark or composted wood chips or root mulch.
Wider planting holeif soil is compacted.
Good native soil or topsoil.Rootball on undisturbed soil.
Remove or fold down top portion of burlap. Cut the top & sides off wire basket.
Keep mulch 6" away from root collar.
Main trunk planted straight. Checkfrom two directions 90° apart.
Remove transit -trunk guard.
Single straight-trunk to 9 ft. height.
Wire should br taught but allowfor slight trunk movement.
Plant Trees! Bring Life to Your Community!
Plant Trees!Bring Life to Your Community!
2" x 2" hardwood stakes, ifneeded, placed outside ofplanting hole.

Illustration courtesy of John Riley
69
chapter 8/27/56 9:33 AM Page 69

Illustration courtesy of John Riley
70
chapter 8/27/56 9:34 AM Page 70

BILTMORE STICK BOARD FEET CONVERSION CHART
71
VOLUME (board feet) BY NUMBER OF USABLE 16-FOOT LOGSTREE
DIAMETER
IN INCHES 1 11/2 2 21/2 3 31/2 4 41/2 5
10′′ 36 48 59 66 7311′′ 46 61 76 86 9612′′ 56 74 92 106 120 128 13713′′ 67 90 112 130 147 158 16414′′ 78 105 132 153 174 187 200
15′′ 92 124 156 182 208 225 24216′′ 106 143 180 210 241 263 28517′′ 121 164 206 242 278 304 33018′′ 136 184 233 274 314 344 37419′′ 154 209 264 311 358 392 42720′′ 171 234 296 348 401 440 480 511 542
21′′ 191 262 332 391 450 496 542 579 61622′′ 211 290 368 434 500 552 603 647 69123′′ 231 318 404 478 552 608 663 714 76624′′ 251 346 441 523 605 664 723 782 84025′′ 275 380 484 574 665 732 800 865 930
26′′ 299 414 528 626 723 801 877 949 1,02127′′ 323 448 572 680 788 870 952 1,032 1,11128′′ 347 482 616 733 850 938 1,027 1,114 1,20129′′ 375 521 667 794 920 1,016 1,112 1,210 1,30830′′ 403 560 718 854 991 1,094 1,198 1,368 1,415
31′′ 432 602 772 921 1,070 1,184 1,299 1,412 1,52632′′ 462 644 826 988 1,149 1,274 1,400 1,518 1,63733′′ 492 686 880 1,053 1,236 1,360 1,495 1,622 1,75034′′ 521 728 934 1,119 1,304 1,417 1,500 1,727 1,86435′′ 555 776 998 1,196 1,394 1,548 1,702 1,851 2,000
36′′ 589 826 1,063 1,274 1,485 1,650 1,814 1,974 2,13537′′ 622 873 1,121 1,351 1,578 1,752 1,936 2,099 2,27238′′ 656 921 1,186 1,428 1,670 1,854 2,038 2,224 2,41039′′ 694 976 1,258 1,514 1,769 1,968 2,166 2,359 2,552
Gross volume of tree, International 1/4 inch rule, form class 78.
chapter 8/27/56 9:34 AM Page 71

TANGENT CHARTFOR DETERMINING THE ANGLE OF ELEVATION
Angle Angle Angle
72
1° .0175 31° .6009 61° 1.80402° .0349 32° .6249 62° 1.88073° .0524 33° .6494 63° 1.96264° .0699 34° .6745 64° 2.05035° .0875 35° .7002 65° 2.14456° .1051 36° .7265 66° 2.24607° .1228 37° .7536 67° 2.35598° .1405 38° .7813 68° 2.47519° .1584 39° .8098 69° 2.6015
10° .1763 40° .8391 70° 2.741511° .1944 41° .8093 71° 2.904212° .2126 42° .9004 72° 3.077713° .2309 43° .9325 73° 3.270914° .2493 44° .9657 74° 3.487415° .2679 45° 1 75° 3.732116° .2867 46° 1.0355 76° 4.010817° .3057 47° 1.0724 77° 4.331518° .3249 48° 1.1106 78° 4.704619° .3443 49° 1.1504 79° 5.144620° .3640 50° 1.1918 80° 5.612321° .3839 51° 1.2349 81° 6.313822° .4040 52° 1.2799 82° 7.115423° .4245 53° 1.3270 83° 8.144324° .4452 54° 1.3764 84° 9.514425° .4663 55° 1.4281 85° 11.430126° .4877 56° 1.4826 86° 14.300727° .5095 57° 1.5399 87° 19.081128° .5317 58° 1.6003 88° 28.636329° .5543 59° 1.6643 89° 57.290030° .5714 60° 1.7321 90° undetermined
chapter 8/27/56 9:34 AM Page 72

1. Fold a piece of heavy A4 (cardstock) paper in half lengthwise, as shown.
2. Draw a quadrant with radius of 10 cm and center at A as shown in diagram.
3. Mark every 5 degrees around the quadrant starting at B, and label the points.
4. Carefully attach a 20 cm length of cotton string at A so that it hangs freely.
5. Tie a small weight (washer) to the end of the string.
73
chapter 8/27/56 9:34 AM Page 73
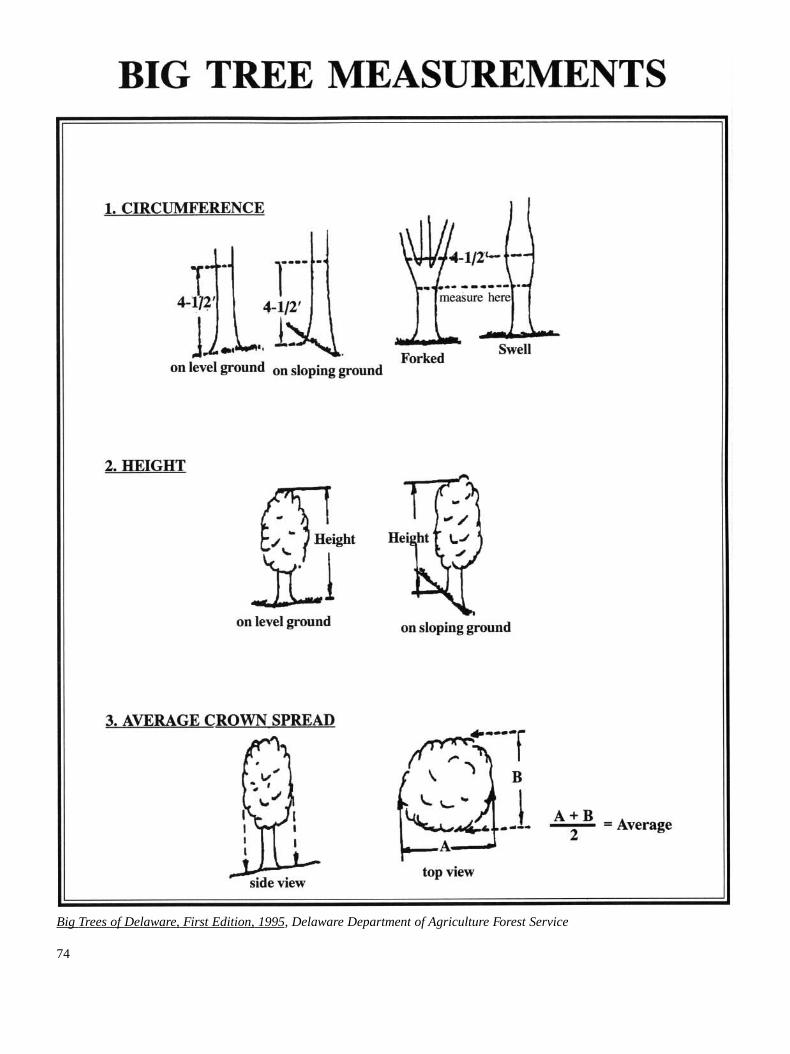
Big Trees of Delaware, First Edition, 1995, Delaware Department of Agriculture Forest Service
74
chapter 8/27/56 9:34 AM Page 74

TREE CONCENTRATION – LEAF Page 1
These are not to scale. Refer to a field guide to trees for measurements.
75
Primary graphics source: Iowa Project Learning Tree, Iowa DNR.Other contributors: Barbara Newlon, Jennie M. Turner.
chapter 8/27/56 9:34 AM Page 75

TREE CONCENTRATION — LEAF Page 2
These are not to scale. Refer to a field guide to trees for measurements.
76
Primary graphics source: Iowa Project Learning Tree, Iowa DNR.Other contributors: Barbara Newlon, Jennie M. Turner.
chapter 8/27/56 9:34 AM Page 76

TREE CONCENTRATION — COMMON NAME Page 1
77
American Atlantic WhiteBasswood Cedar Butternut Osage Orange
American Holly White Oak Eastern Cottonwood Pin Oak
AmericanBlack Cherry White Ash White Pine Staghorn Sumac
Yellow PoplarAmerican Chestnut Ohio Buckeye Hawthorn (Tulip Tree)
Black Oak Red Oak Black Birch Red Maple
American Hornbeam Eastern Hemlock Mountain Laurel Sassafras
49. 50. 51. 52.
53. 54. 55. 56.
57. 58. 59. 60.
61. 62. 63. 64.
65. 66. 67. 68.
69. 70. 71. 72.
chapter 8/27/56 9:34 AM Page 77

TREE CONCENTRATION — COMMON NAME Page 2
78
Black Locust Sycamore Catalpa Paulownia
Black Walnut Cucumber Magnolia Eucalyptus Eastern Redbud
Virginia Pine Shagbark Hickory Hackberry American Beech
Box Elder Eastern Red Cedar Honey Locust Weeping Willow
Sugar Maple Slippery Elm Loblolly Pine Striped Maple
Choke Cherry Dogwood Norway Spruce Blackgum
73. 74. 75. 76.
77. 78. 79. 80.
81. 82. 83. 84.
85. 86. 87. 88.
89. 90. 91. 92.
93. 94. 95. 96.
chapter 8/27/56 9:34 AM Page 78

Leaves 3–5 inches long withsmooth margins (edges);
thorns are straight and 1/2inch in length
Leaves: 5–7 sharply pointedlobes; wide, deep sinuses(rounded at the bottom).Wood: requires special
handling in drying; tends tosplit and check.
Leaves with 5 or morelobes, coarse teeth; fruit is
a v-shaped samara(helicopter); under side of
leaf is light colored.
Tallest of broad leaved treesin the Eastern U. S.
Leaves, 3–6 inches long,square-lobed; Flowers areyellow-green and orange,
resembling tulips.
Leaves: 3–5 lobes; coarselytoothed margins; 2–6 inches
long. Fruit: paired,v-shaped samaras on
drooping stems.
Leaves: No lobes; 1lobe (like a mitten);
or 3 lobes
11–17 leaflets; one leafletis usually at the end;
inside the twig, pith isdark chocolate brown and
is chambered.
Small branches are whiteor yellow; buds are sticky;
leaf coarsely toothed.
Needles in bundles of 5,2–4 inches long; soft to
the touch.
Leaf margin (edge) iscoarsely doubly toothed;
thorns not branched.
1–6 inch short pointedleaves; leaves doubletoothed; twigs have
aromatic (wintergreen)odor.
Small tree or shrub.Leaves: 2–5 inches.
Found mainly onmountain and hill slopes.
Grows only in a narrowcoastal belt 50–130
miles wide, from Maineto Florida, and westward
to Mississippi.
Rounded lobes; 7–9lobes; acorn is mostly
round like a ball with asmooth cap
Leaves: Smooth darkgreen upper surface; pale
light green to whitishunderside. Wood: Very
popular for baseballbats.
5 leaflets arranged likefingers on a hand; fruitis a spiny, leathery seedcovering with one seed
Pointed lobes; 7–11loves; leaf is green
below; acorn cap doesnot extend up the acorn.
Leaves: Evergreen; flat,round-tipped needles1/3–2/3 inches long;
two pale lines on lowersurface. Cones: Roughly
oval, 1/2–3/4inches long.
TREE CONCENTRATIONIDENTIFYING CHRACTERISTICS Page 1
79
Leaves are 4–7 incheslong, heart shaped; buds
are red-brown
Leaves:Prickly, evergreen; 2–4 inch-
es. Fruit:red berries. Wood: ivory
white.
Midrib often hairy; fringedbeneath. Valuable for lumber
(distinctive light to darkreddish brown color, often
has beautiful grain patterns).
Leaves: Variable in form, 7toothed lobes (sometimes 5)
taper from a broad base;rounded sinuses; glossyabove, hairless beneath.
Leaves have sandpaperfeel; leaves 4–6 inches long,hairy below; buds are brown;twigs are reddish brown and
tend to droop
Bark is smooth, thin,and blue grey; nut is in
spike-like clusters.
97. 98. 99. 100.
101. 102. 103. 104.
105. 106. 107. 108.
109. 110. 111. 112.
113. 114. 115. 116.
117. 118. 119. 120.
Information sources: Newlon, Charles J., Dendrology Lectures, Delaware State UniversityImportant Forest Trees of the Eastern United States, USDA Forest ServicePetrides, George A., Peterson Field Guides Eastern Trees
chapter 8/27/56 9:34 AM Page 79

TREE CONCENTRATIONIDENTIFYING CHARACTERISTICS Page 2
80
Very large, paired, heartshaped leaves. Non-native
tree imported from theOrient where the wood is
highly valued.
Heart-shaped leaves 2–6inches long; hairless orslightly hairy beneath.
Elliptic (egg shaped),coarsely toothed leaves;
smooth grey bark.
Believed to have grown inthe urban forest of ancient
Babylon.
Leaves opposite, 3 longpointed lobes, doubly
toothed, hairless, paler greenbeneath.
Leaves: Shiny, egg shaped,leathery. Bark: blocky like
alligator hide.
Large leaves 8–12 inches,heart-shaped; fruit is long,
skinny 8–20 inch pod
Native to Australia.Widely planted
in California. Verysusceptible to fire becauseof highly aromatic leaves
and shedding bark.
Leaves: Symmetricallyoval, 2 1/2–3 1/2 inches
long, sharply toothedmargins. Bark has warty
growths or ridges.
Leaves: 7–8 inches,pinnately and bipinnatelycompound. Thorns: 2–3inches long, branched,
attached to stemand twigs.
Needles in clusters of 3;needles 6–9 inches long;
needles dull and lightgreen.
Sharp needles are 1/2–1inch long; needles aredark green; branches
appear to droop; cone is4–7 inches long.
Leaves have 3–5 lobes,margins (edges) coarsely
toothed/fruit is a hairy ballof seeds; bark is scaly,leaves are very large.
Leaves: large 5–10 incheslong; thin; smooth edged;
often wavy edged; eggshaped; shiny, yellowishgreen on upper surface,
paler below.
5 leaflets; entire leaf 7–14inches long; bark smoothwhen young and shaggy
when older.
Leaves are dark green;leaves are both awl-andscale-like; cone is dark
blue and berry-like.
Leaves have sandpaperfeel; leaves 5–7 inches
long, very rough above andhairy below; twigs are grey
and grow upwards.
Leaves 3–6 inches long;veins run parallel to leaf
margin (edge); middle veincontains fine strands when
pulled apart.
1/2 inch long spines at theleaf base
15–23 leaflets; leaflet atend is small or missing;inside twig is chambered
and tan in color.
2–3 inch needles inclusters of two;
3 leaflets; twigs havewhitish powdery coating;fruit is a double samara
(helicopter).
Leaves with 5 lobes,margin (edge) is smooth;fruit is a u-shaped samara
(helicopter)
Leaf is finely toothed withoutward curved teeth;leaves are thin; fruit isin red clusters; bark isbrownish and smooth.
121. 122. 123. 124.
125. 126. 127. 128.
129. 130. 131. 132.
133. 134. 135. 136.
137. 138. 139. 140.
141. 142. 143. 144.
Information sources: Newlon, Charles J., Dendrology Lectures, Delaware State UniversityImportant Forest Trees of the Eastern United States, USDA Forest ServicePetrides, George A., Peterson Field Guides Eastern Trees
chapter 8/27/56 9:34 AM Page 80

TREE CONCENTRATION — SCIENTIFIC NAME Page 1
81
Tilia americana Chamaecyparis Juglans cinerea Maclura pomiferathyoides
Ilex opaca Quercus alba Populus deltoides Quercus palustris
Prunus serotina Fraxinus americana Pinus strobus Rhus typhina
Castanea dentata Aesculus glabra Crataegus Liriodendrontulipifera
Quercus velutina Quercus rubra Betula lenta Acer rubrum
Carpinus caroliniana Tsuga canadensis Kalmia latifolia Sassafras albidum
145. 146. 147. 148.
149. 150. 151. 152.
153. 154. 155. 156.
157. 158. 159. 160.
161. 162. 163. 154.
165. 166. 167. 168.
chapter 8/27/56 9:34 AM Page 81

TREE CONCENTRATION — SCIENTIFIC NAME Page 2
82
Robinia Platanus Catalpa speciosa Paulowniapseudoacacia occidentalis tomentosa
Juglans nigra Magnolia acuminata Eucalyptus globulus Cercis canadensis
Pinus virginiana Carya ovata Celtis occidentalis Fagus grandifolia
Acer negundo Juniperus virginiana Gleditsia triacanthos Salix babylonica
Acer saccharum Ulmus rubra Pinus taeda Acer pennsylvanicum
Prunus virginiana Cornus florida Picea abies Nyssa sylvatica
169. 170. 171. 172.
173. 174. 175. 176.
177. 178. 179. 180.
181. 182. 183. 184.
185. 186. 187. 188.
189. 190. 191. 192.
chapter 8/27/56 9:34 AM Page 82

LEAF COLLECTION WORKSHEET
Common name
Scientific name
Family County, State
Site information
Collector Coll.# month/day/year
83
chapter 8/27/56 9:34 AM Page 83
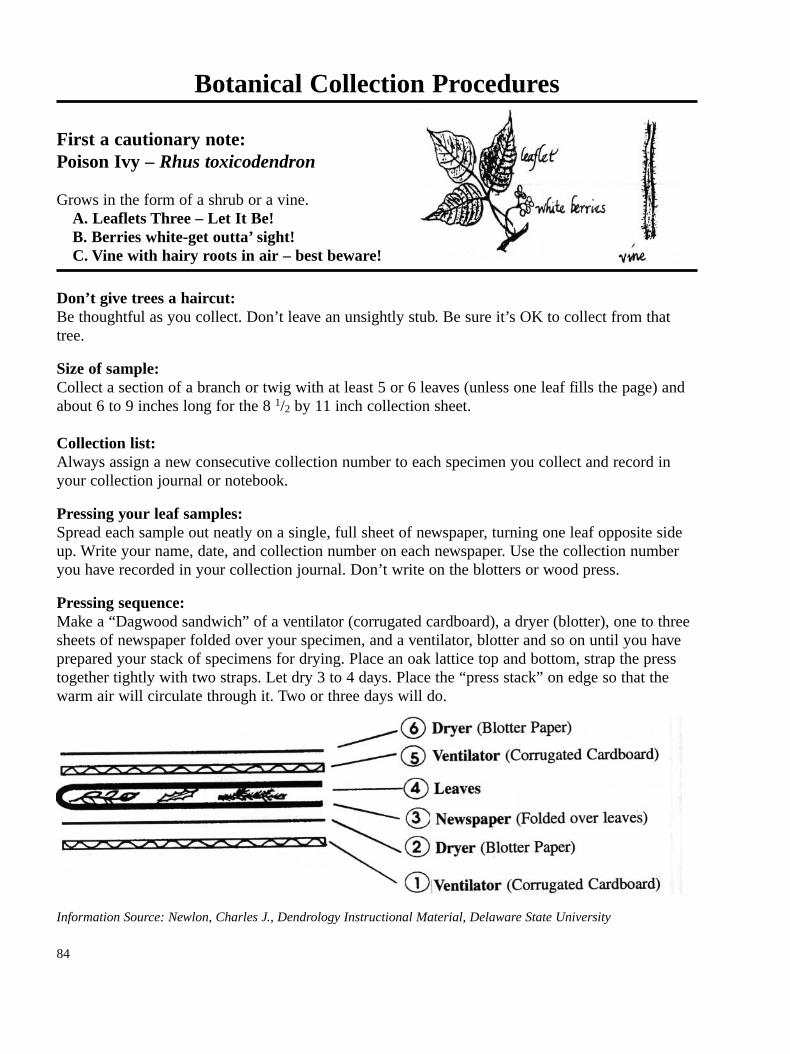
Botanical Collection Procedures
First a cautionary note:Poison Ivy – Rhus toxicodendron
Grows in the form of a shrub or a vine.A. Leaflets Three – Let It Be!B. Berries white-get outta’ sight!C. Vine with hairy roots in air – best beware!
Don’t give trees a haircut:Be thoughtful as you collect. Don’t leave an unsightly stub. Be sure it’s OK to collect from thattree.
Size of sample:Collect a section of a branch or twig with at least 5 or 6 leaves (unless one leaf fills the page) andabout 6 to 9 inches long for the 8 1/2 by 11 inch collection sheet.
Collection list:Always assign a new consecutive collection number to each specimen you collect and record inyour collection journal or notebook.
Pressing your leaf samples:Spread each sample out neatly on a single, full sheet of newspaper, turning one leaf opposite sideup. Write your name, date, and collection number on each newspaper. Use the collection numberyou have recorded in your collection journal. Don’t write on the blotters or wood press.
Pressing sequence:Make a “Dagwood sandwich” of a ventilator (corrugated cardboard), a dryer (blotter), one to threesheets of newspaper folded over your specimen, and a ventilator, blotter and so on until you haveprepared your stack of specimens for drying. Place an oak lattice top and bottom, strap the presstogether tightly with two straps. Let dry 3 to 4 days. Place the “press stack” on edge so that thewarm air will circulate through it. Two or three days will do.
Information Source: Newlon, Charles J., Dendrology Instructional Material, Delaware State University
84
chapter 8/27/56 9:34 AM Page 84

85
chapter 8/27/56 9:34 AM Page 85

Source: The Woodland Steward, p. 164
86
chapter 8/27/56 9:34 AM Page 86

Source: The Woodland Steward, p. 66
87
chapter 8/27/56 9:34 AM Page 87
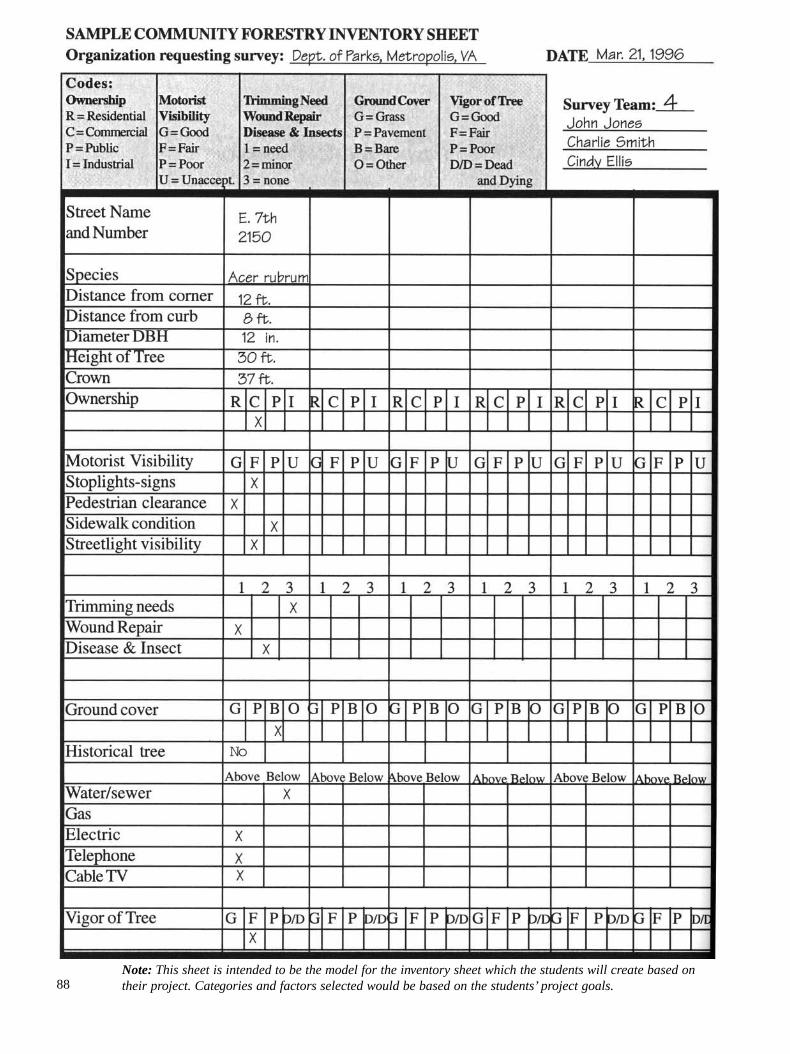
Note: This sheet is intended to be the model for the inventory sheet which the students will create based ontheir project. Categories and factors selected would be based on the students’ project goals.88
chapter 8/27/56 9:34 AM Page 88
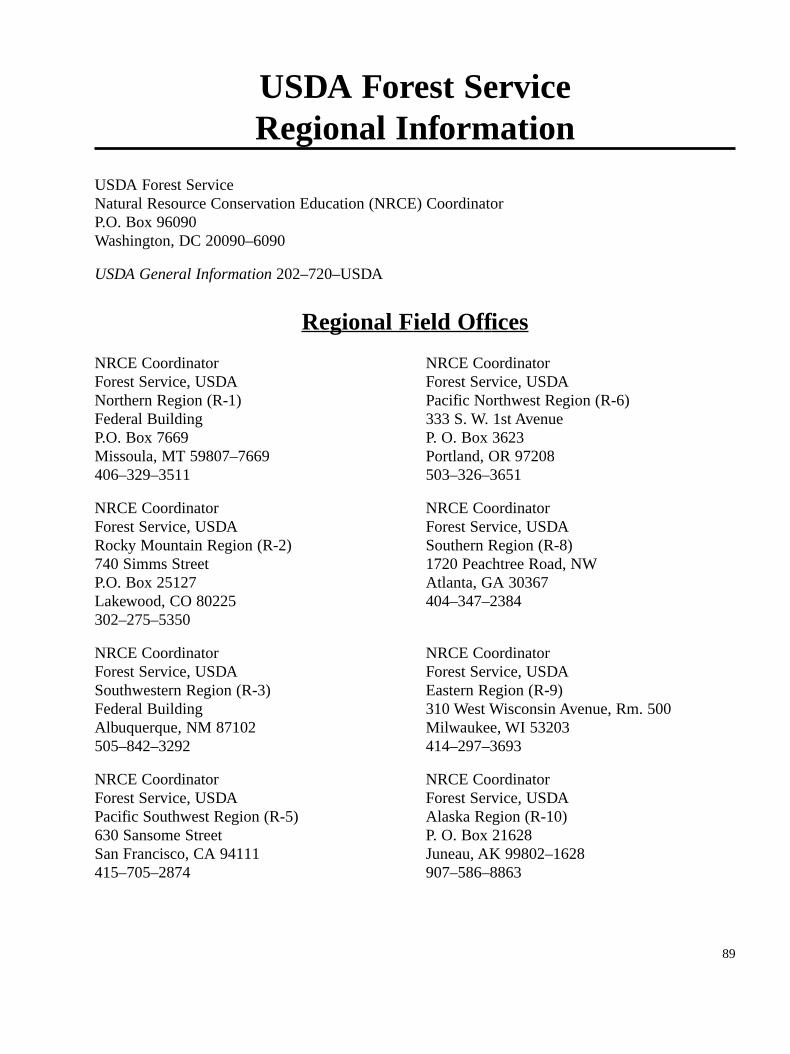
USDA Forest ServiceRegional Information
USDA Forest ServiceNatural Resource Conservation Education (NRCE) CoordinatorP.O. Box 96090Washington, DC 20090–6090
USDA General Information 202–720–USDA
Regional Field Offices
NRCE Coordinator NRCE CoordinatorForest Service, USDA Forest Service, USDANorthern Region (R-1) Pacific Northwest Region (R-6)Federal Building 333 S. W. 1st AvenueP.O. Box 7669 P. O. Box 3623Missoula, MT 59807–7669 Portland, OR 97208406–329–3511 503–326–3651
NRCE Coordinator NRCE CoordinatorForest Service, USDA Forest Service, USDARocky Mountain Region (R-2) Southern Region (R-8)740 Simms Street 1720 Peachtree Road, NWP.O. Box 25127 Atlanta, GA 30367Lakewood, CO 80225 404–347–2384302–275–5350
NRCE Coordinator NRCE CoordinatorForest Service, USDA Forest Service, USDASouthwestern Region (R-3) Eastern Region (R-9)Federal Building 310 West Wisconsin Avenue, Rm. 500Albuquerque, NM 87102 Milwaukee, WI 53203505–842–3292 414–297–3693
NRCE Coordinator NRCE CoordinatorForest Service, USDA Forest Service, USDAPacific Southwest Region (R-5) Alaska Region (R-10)630 Sansome Street P. O. Box 21628San Francisco, CA 94111 Juneau, AK 99802–1628415–705–2874 907–586–8863
89
chapter 8/27/56 9:34 AM Page 89

DENSITY OF TREES AND HEAT PRODUCED
An air-dried cord of these woods produces the equivalent in heat of anywhere from 121 gallons offuel oil for fir, up to 219 gallons for hickory.
90
Species Relative Density BTU/Cord
HARDWOODSShagbark Hickory .72 32,800,000Black Locust .69 31,400,000White Oak .68 31,000,000Bitternut Hickory .66 30,000,000Chestnut Oak .66 30,000,000American Beech .64 29,100,000Laurel Oak .63 28,700,000Northern Red Oak .63 28,700,000Rock Elm .63 28,700,000Sugar Maple .63 28,700,000Yellow Birch .62 28,200,000White Ash .60 27,300,000Southern Red Oak .59 26,900,000Black Walnut .55 25,000,000Oregon Ash .55 25,000,000White Birch .55 25,000,000Black Tupelo .50 22,800,000American Sycamore .49 22,300,000Silver Maple .47 21,400,000Sassafras .46 21,000,000Yellow Poplar .42 19,000,000Red Alder .41 18,600,000Eastern Cottonwood .40 18,200,000Black Willow .39 17,800,000Quaking Aspen .38 17,300,000
SOFTWOODSTamarack .53 24,100,000Western Larch .52 23,700,000Douglas-Fir .48 21,900,000Bald Cypress .46 21,000,000Red Pine .46 21,000,000Hemlock .45 20,500,000Cedar .44 20,000,000Fir .43 19,600,000Pine .41 18,600,000Spruce .40 18,200,000
Source: “Firewood: How and What to Buy,” in Back Home, Fall 1992, p. 62
chapter 8/27/56 9:34 AM Page 90

National Science Education Standards
TOOLS USED IN FORESTRY
Content StandardsUnifying concepts and processes in science.
*Systems, order, and organization.*Evidence, models, and explanation.*Change, constancy and measurement.
Science as Inquiry.*Abilities necessary to do scientific inquiry.*Understanding about scientific inquiry.
Physical Science.*Properties and changes of properties in matter.*Motions and forces.
Life Science.*Structure and function in living systems.
Science and Technology.*Abilities of technological design.*Understanding about science and technology.
Science in Personal and Social Perspectives.*Science and technology in society.*Science and technology in local, national, and global challenges.
History and Nature of Science Standards.*Science as a human endeavor.*Nature of scientific knowledge.*Historical perspectives.
Assessment StandardsAssessment Standard AAssessments must be consistent with the decisions they are designed to inform.
*Assessments are deliberately designed.*Assessments have explicitly stated purposes.*The relationship between the decisions and the data is clear.*Assessment procedures are internally consistent.
Assessment Standard BAchievement and opportunity to learn science must be assessed.
*Achievement data collected focus on the science content that is most important forstudents to learn.
*Opportunity-to-learn data collected focus on the most powerful indicators.*Equal attention must be given to the assessment of opportunity to learn and theassessment of student achievement.
97
chapter 8/27/56 9:34 AM Page 97
Assessment Standard CThe technical quality of the data collected is well matched to the decisions and actions takenon the basis of their interpretation.
*The feature that is claimed to be measured is actually measured.*Assessment tasks are authentic.*An individual student’s performance is similar on two or more tasks that claim tomeasure the same aspect of student achievement.
*Students have adequate opportunity to demonstrate their achievements.*Assessment tasks and methods of presenting them provide data that are sufficientlystable to lead to the same decisions if used at different times.
Assessment Standard DAssessment practices must be fair.
*Assessment tasks must be set in a variety of contexts, be engaging to students withdifferent interests and experiences, and must not assume the perspective or experience ofa particular gender, racial, or ethnic group.
Assessment Standard EThe inferences made from assessments about student achievement and opportunity to learnmust be sound.
*When making inferences from assessment data about student achievement andopportunity to learn science, explicit reference needs to be made to the assumptions onwhich the inferences are based.
TREE IDENTIFICATION
Content StandardsUnifying concepts and processes in science.
*Systems, order, and organization.*Evidence, models, and explanation.*Change, constancy and measurement.
Science as Inquiry.*Abilities necessary to do scientific inquiry.*Understanding about scientific inquiry.
Physical Science Standards.*Properties and changes of properties in matter.
Life Science Standards.*Structure and function in living systems.*Populations and ecosystems*Diversity and adaptations of organisms*Interdependence of organisms*Matter, energy, and organization in living systems
Science in Personal and Social Perspectives.*Science and technology in society.*Science and technology in local, national, and global challenges.
98
chapter 8/27/56 9:34 AM Page 98

History and Nature of Science Standards.*Science as a human endeavor.*Nature of scientific knowledge.*Historical perspectives.
Assessment StandardsAssessment Standard AAssessments must be consistent with the decisions they are designed to inform.
*Assessments are deliberately designed.*Assessments have explicitly stated purposes.*The relationship between the decisions and the data is clear.*Assessment procedures are internally consistent.
Assessment Standard BAchievement and opportunity to learn science must be assessed.
*Achievement data collected focus on the science content that is most important forstudents to learn.
*Opportunity-to-learn data collected focus on the most powerful indicators.*Equal attention must be given to the assessment of opportunity to learn and theassessment of student achievement.
Assessment Standard CThe technical quality of the data collected is well matched to the decisions and actions takenon the basis of their interpretation.
*The feature that is claimed to be measured is actually measured.*Assessment tasks are authentic.*An individual student’s performance is similar on two or more tasks that claim tomeasure the same aspect of student achievement.
*Students have adequate opportunity to demonstrate their achievements.*Assessment tasks and methods of presenting them provide data that are sufficientlystable to lead to the same decisions if used at different times.
Assessment Standard DAssessment practices must be fair.
*Assessment tasks must be set in a variety of contexts, be engaging to students withdifferent interests and experiences, and must not assume the perspective or experience ofa particular gender, racial, or ethnic group.
Assessment Standard EThe inferences made from assessments about student achievement and opportunity to learnmust be sound.
*When making inferences from assessment data about student achievement and theopportunity to learn science, explicit reference needs to be made to the assumptions onwhich the inferences are based.
99
chapter 8/27/56 9:34 AM Page 99

FOREST MANAGEMENTContent StandardsUnifying concepts and processes in science.
*Systems, order, and organization.*Evidence, models, and explanation.*Change, constancy and measurement.*Evolution and equilibrium.
Science as Inquiry.*Abilities necessary to do scientific inquiry.*Understanding about scientific inquiry.
Physical Science Standards.*Properties and changes of properties in matter.
Life Science Standards.*Structure and function in living systems.*Populations and ecosystems.*Diversity and adaptations of organisms.*Interdependence of organisms.*Matter, energy, and organization in living systems.
Science in Personal and Social Perspectives.*Science and technology in society.*Science and technology in local, national, and global challenges.
History and Nature of Science Standards.*Science as a human endeavor.*Nature of scientific knowledge.*Historical perspectives.
Assessment StandardsAssessment Standard AAssessments must be consistent with the decisions they are designed to inform.
*Assessments are deliberately designed.*Assessments have explicitly stated purposes.*The relationship between the decisions and the data is clear.*Assessment procedures are internally consistent.
Assessment Standard BAchievement and opportunity to learn science must be assessed.
*Achievement data collected focus on the science content that is most important forstudents to learn.
*Opportunity-to-learn data collected focus on the most powerful indicators.*Equal attention must be given to the assessment of opportunity to learn and theassessment of student achievement.
Assessment Standard CThe technical quality of the data collected is well matched to the decisions and actions takenon the basis of their interpretation.
*The feature that is claimed to be measured is actually measured.*Assessment tasks are authentic.
100
chapter 8/27/56 9:34 AM Page 100

*An individual student’s performance is similar on two or more tasks that claim tomeasure the same aspect of student achievement.
*Students have adequate opportunity to demonstrate their achievements.*Assessment tasks and methods of presenting them provide data that are sufficientlystable to lead to the same decisions if used at different times.
Assessment Standard DAssessment practices must be fair.
*Assessment tasks must be set in a variety of contexts, be engaging to students with dif-ferent interests and experiences, and must not assume the perspective or experience of aparticular gender, racial, or ethnic group.
Assessment Standard EThe inferences made from assessments about student achievement and opportunity to learnmust be sound.
*When making inferences from assessment data about student achievement and opportuni-ty to learn science, explicit reference needs to be made to the assumptions on which theinferences are based.
FROM TREES TO LUMBER AND FUEL
Content StandardsUnifying concepts and processes in science.
*Systems, order, and organization.*Evidence, models, and explanation.*Change, constancy and measurement.*Form and Function.
Science as Inquiry.*Abilities necessary to do scientific inquiry.*Understanding about scientific inquiry.
Physical Science Standards.*Properties and changes of properties in matter.*Motions and forces.
Life Science Standards.*Structure and function in living systems.
Science and Technology Standards.*Abilities of technological design.*Understanding about science and technology.
Science in Personal and Social Perspectives.*Science and technology in society.*Science and technology in local, national, and global challenges.*Natural hazards.*Risks and benefits.*Environmental quality.*Natural and human-induced hazards.
101
chapter 8/27/56 9:34 AM Page 101

History and Nature of Science Standards.*Science as a human endeavor.*Nature of scientific knowledge.*Historical perspectives.
Assessment StandardsAssessment Standard AAssessments must be consistent with the decisions they are designed to inform.
*Assessments are deliberately designed.*Assessments have explicitly stated purposes.
*The relationship between the decisions and the data is clear.
*Assessment procedures are internally consistent.
Assessment Standard BAchievement and opportunity to learn science must be assessed.
*Achievement data collected focus on the science content that is most important forstudents to learn.
*Opportunity-to-learn data collected focus on the most powerful indicators.*Equal attention must be given to the assessment of opportunity to learn and theassessment of student achievement.
Assessment Standard CThe technical quality of the data collected is well matched to the decisions and actions takenon the basis of their interpretation.
*The feature that is claimed to be measured is actually measured.*Assessment tasks are authentic.*An individual student’s performance is similar on two or more tasks that claim tomeasure the same aspect of student achievement.
*Students have adequate opportunity to demonstrate their achievements.*Assessment tasks and methods of presenting them provide data that are sufficientlystable to lead to the same decisions if used at different times.
Assessment Standard DAssessment practices must be fair.
*Assessment tasks must be set in a variety of contexts, be engaging to students withdifferent interests and experiences, and must not assume the perspective or experience ofa particular gender, racial, or ethnic group.
102
chapter 8/27/56 9:34 AM Page 102

Assessment Standard EThe inferences made from assessments about student achievement and opportunity to learnmust be sound.
*When making inferences from assessment data about student achievement andopportunity to learn science, explicit reference needs to be made to the assumptions onwhich the inferences are based.
National Science Research Council, National Science Education Standards, National Academy Press,
Washington, DC. 1996.
103
chapter 8/27/56 9:34 AM Page 103


