Page 1
7/25/2019 SQLworkshopPart1-using MS SQL Server Management Studio.pdf
http://slidepdf.com/reader/full/sqlworkshoppart1-using-ms-sql-server-management-studiopdf 1/14
ACY4006 - SQL Workshop 1 Page 1 of 14
ACY4006 - SQL Workshop 1:
Using Microsoft SQL Server 2008 R2 Management Studio
1. What is Microsoft SQL Server
It is a relational database server for people to store and retrieve data.
The latest version of Microsoft SQL Server is Microsoft SQL Server 2014.
2. Versions of Microsoft SQL Server 2008 R2
There are at least 6 mainstream versions of Microsoft SQL Server 2008 R2 to provide different
functions to different types of users, they are:
Datacenter
Enterprise
Standard
Web
Workgroup
Express
Among these 6 mainstream versions, Express version is free to download but only supports with
10GB storage per each database. This version is normally used for teaching and learning, program
developing and testing.
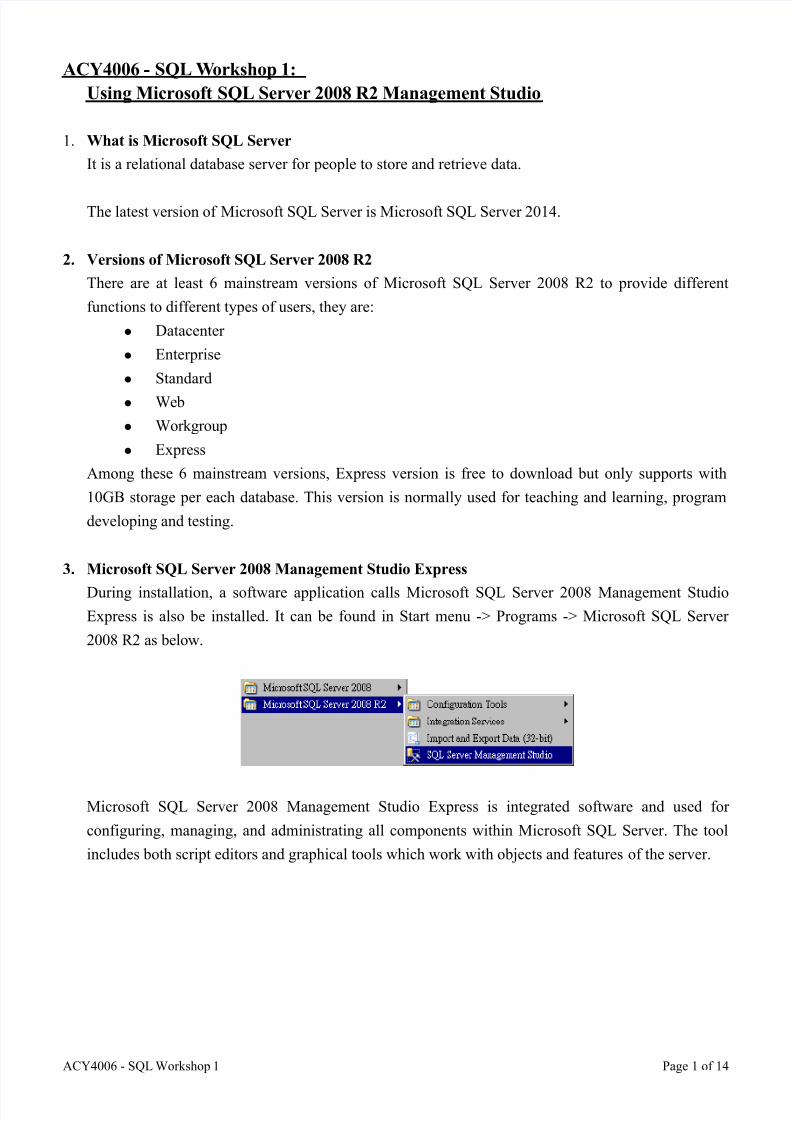
3. Microsoft SQL Server 2008 Management Studio Express
During installation, a software application calls Microsoft SQL Server 2008 Management Studio
Express is also be installed. It can be found in Start menu -> Programs -> Microsoft SQL Server
2008 R2 as below.
Microsoft SQL Server 2008 Management Studio Express is integrated software and used for
configuring, managing, and administrating all components within Microsoft SQL Server. The tool
includes both script editors and graphical tools which work with objects and features of the server.
Page 2
7/25/2019 SQLworkshopPart1-using MS SQL Server Management Studio.pdf
http://slidepdf.com/reader/full/sqlworkshoppart1-using-ms-sql-server-management-studiopdf 2/14
ACY4006 - SQL Workshop 1 Page 2 of 14
4. Start using Microsoft SQL Server 2008 R2 Management Studio
Click on “Start” button, select “Programs” -> “Microsoft SQL Server 2008 R2” -> “SQL Server
Management Studio”. Connection screen prompts as below:
Enter the following information in the connection screen:
[Server type]: Database Engine
[Server name]: COMPUTERA\ SQLEXPRESS {default}
Computer name Instance name (SQL server name)[Authentication]: SQL Server Authentication
[Login]: student
[Password]: Test123 {case sensitive}
Click on “Connect” button to log-in to the SQL Server.
5. Object Explorer
Object Explorer lists out most of the actions you can perform in SQL server.
Page 3
7/25/2019 SQLworkshopPart1-using MS SQL Server Management Studio.pdf
http://slidepdf.com/reader/full/sqlworkshoppart1-using-ms-sql-server-management-studiopdf 3/14
ACY4006 - SQL Workshop 1 Page 3 of 14
6. Create a New Database
No demo or blank database is found in a newly installed SQL Server environment. We have to create
one by ourselves.
To create a new database, right click “Databases” folder in Object Explorer, select “ New Database”.
Enter the following information for the new database:[Database name]: AdventureWorks (no space between “ Adventure” and “ Works” )
Click on “OK ” to create a new database.
Page 4
7/25/2019 SQLworkshopPart1-using MS SQL Server Management Studio.pdf
http://slidepdf.com/reader/full/sqlworkshoppart1-using-ms-sql-server-management-studiopdf 4/14
ACY4006 - SQL Workshop 1 Page 4 of 14
The newly created database “AdventureWorks” is shown under the folder of “Databases” as below:
Page 5
7/25/2019 SQLworkshopPart1-using MS SQL Server Management Studio.pdf
http://slidepdf.com/reader/full/sqlworkshoppart1-using-ms-sql-server-management-studiopdf 5/14
ACY4006 - SQL Workshop 1 Page 5 of 14
7. Restore a Database
Download the file AdventureWorks.zip from eCampus, unzip it in V drive and proceed the
following restore procedures in SQL Server Management Studio:
Step 1: Right click on the database “AdventureWorks”, select Tasks -> Restore -> Database
Step 2: In the section of “Source for restore”, select “From device:” and click on the “…” button
Page 6
7/25/2019 SQLworkshopPart1-using MS SQL Server Management Studio.pdf
http://slidepdf.com/reader/full/sqlworkshoppart1-using-ms-sql-server-management-studiopdf 6/14
ACY4006 - SQL Workshop 1 Page 6 of 14
Step 3: In the screen of Specify Backup, press the “Add” button and select the unzipped backup
file “AdventureWorks.bak ” in V drive.
Press “OK ” button to proceed next step.
Step 4: Select the check box of the selected backup file as below.
Step 5: Go to “Options” page, select the option of “Overwrite the existing database (WITH
REPLACE) under the section of Restore options.
Click on “OK ” button to proceed data restore procedures.
Page 7
7/25/2019 SQLworkshopPart1-using MS SQL Server Management Studio.pdf
http://slidepdf.com/reader/full/sqlworkshoppart1-using-ms-sql-server-management-studiopdf 7/14
ACY4006 - SQL Workshop 1 Page 7 of 14
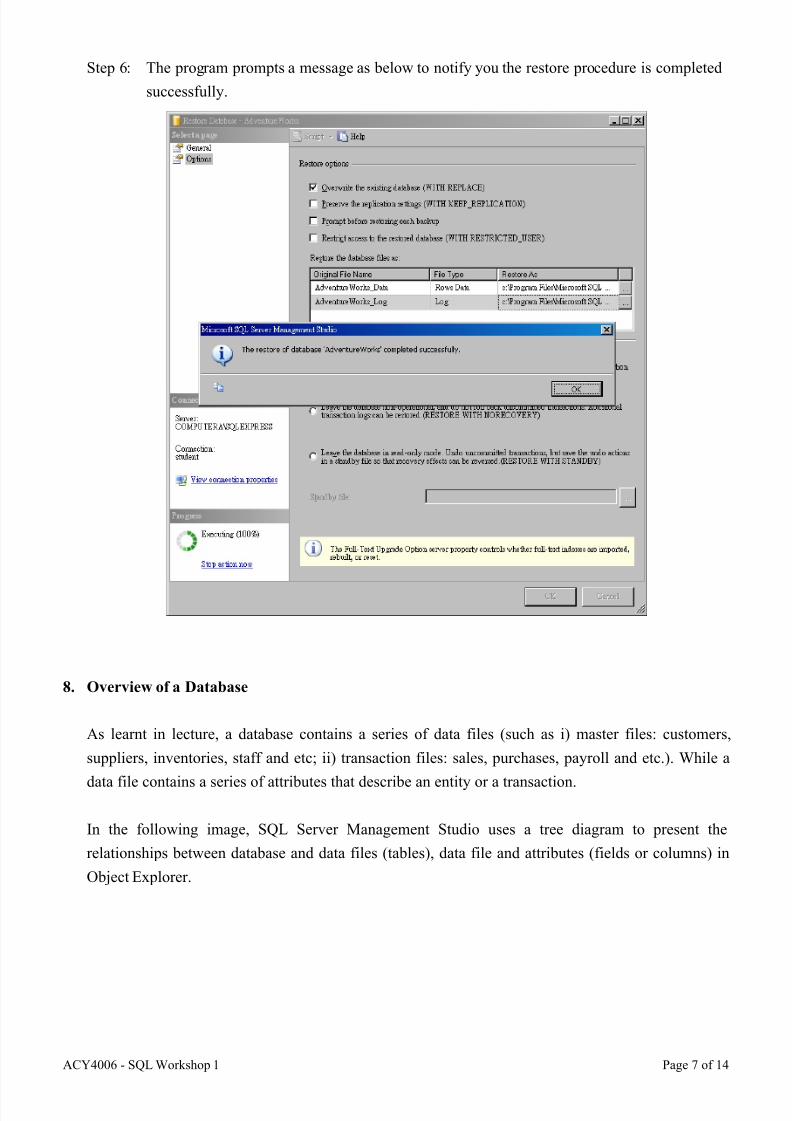
Step 6: The program prompts a message as below to notify you the restore procedure is completed
successfully.
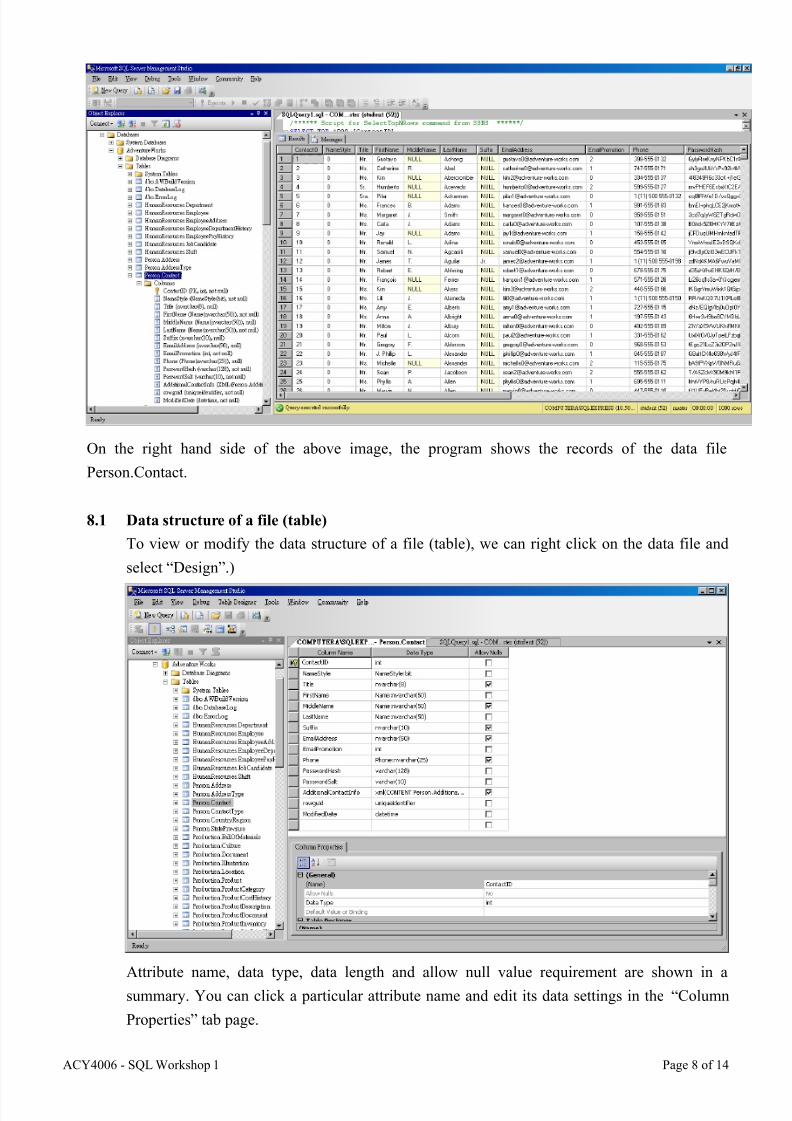
8. Overview of a Database
As learnt in lecture, a database contains a series of data files (such as i) master files: customers,
suppliers, inventories, staff and etc; ii) transaction files: sales, purchases, payroll and etc.). While a
data file contains a series of attributes that describe an entity or a transaction.
In the following image, SQL Server Management Studio uses a tree diagram to present the
relationships between database and data files (tables), data file and attributes (fields or columns) in
Object Explorer.
Page 8
7/25/2019 SQLworkshopPart1-using MS SQL Server Management Studio.pdf
http://slidepdf.com/reader/full/sqlworkshoppart1-using-ms-sql-server-management-studiopdf 8/14
ACY4006 - SQL Workshop 1 Page 8 of 14
On the right hand side of the above image, the program shows the records of the data file
Person.Contact.
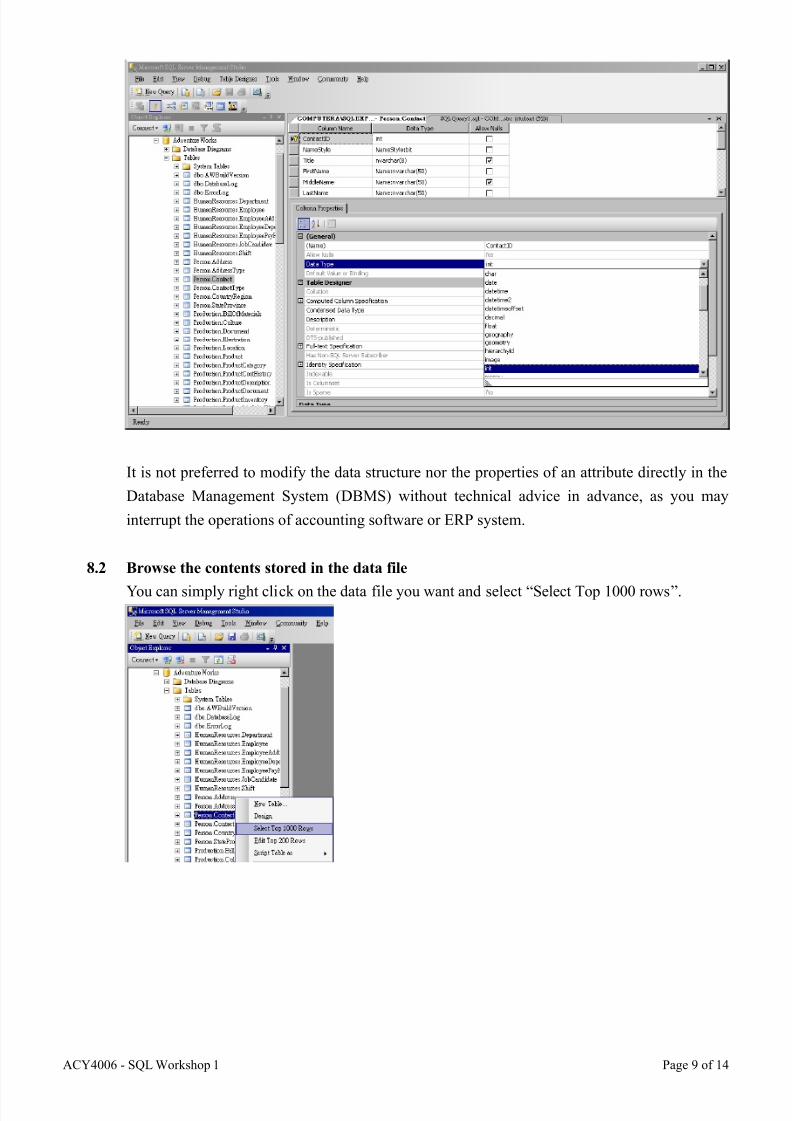
8.1 Data structure of a file (table)
To view or modify the data structure of a file (table), we can right click on the data file and
select “Design”.)
Attribute name, data type, data length and allow null value requirement are shown in a
summary. You can click a particular attribute name and edit its data settings in the “Column
Properties” tab page.
Page 9
7/25/2019 SQLworkshopPart1-using MS SQL Server Management Studio.pdf
http://slidepdf.com/reader/full/sqlworkshoppart1-using-ms-sql-server-management-studiopdf 9/14
ACY4006 - SQL Workshop 1 Page 9 of 14
It is not preferred to modify the data structure nor the properties of an attribute directly in the
Database Management System (DBMS) without technical advice in advance, as you may
interrupt the operations of accounting software or ERP system.
8.2 Browse the contents stored in the data file
You can simply right click on the data file you want and select “Select Top 1000 rows”.
Page 10
7/25/2019 SQLworkshopPart1-using MS SQL Server Management Studio.pdf
http://slidepdf.com/reader/full/sqlworkshoppart1-using-ms-sql-server-management-studiopdf 10/14
ACY4006 - SQL Workshop 1 Page 10 of 14
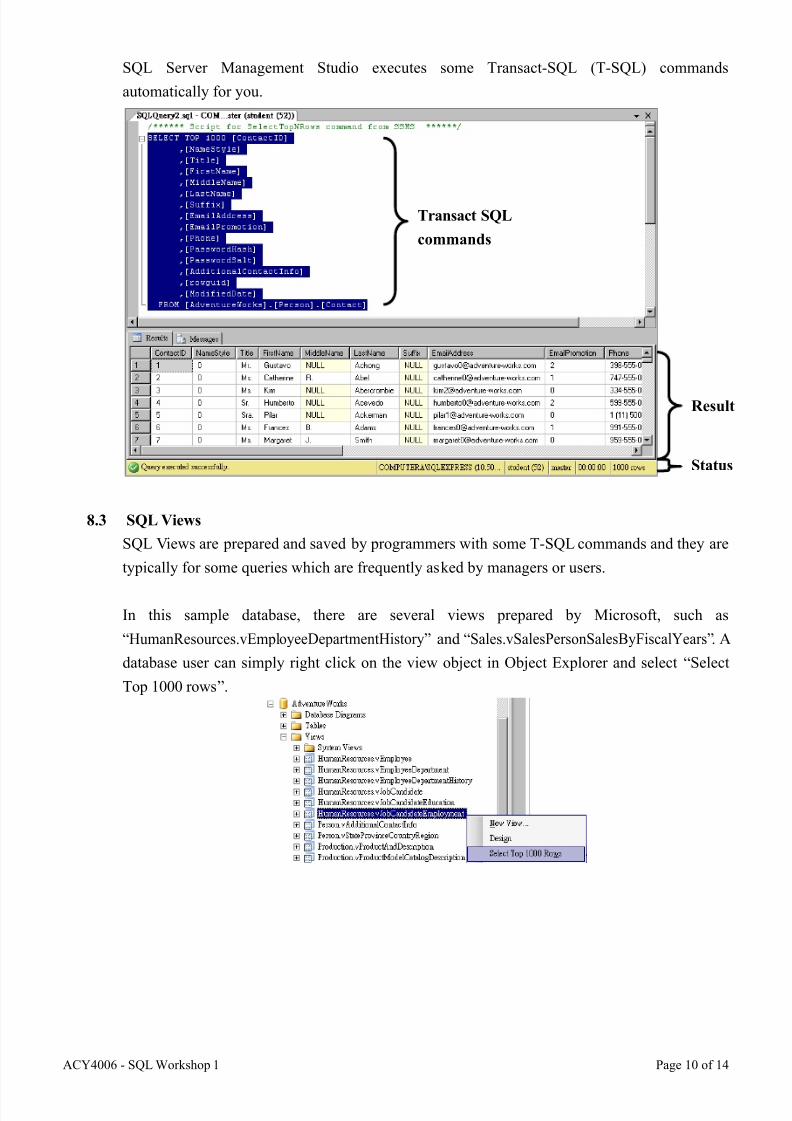
SQL Server Management Studio executes some Transact-SQL (T-SQL) commands
automatically for you.
8.3 SQL Views
SQL Views are prepared and saved by programmers with some T-SQL commands and they are
typically for some queries which are frequently asked by managers or users.
In this sample database, there are several views prepared by Microsoft, such as
“HumanResources.vEmployeeDepartmentHistory” and “Sales.vSalesPersonSalesByFiscalYears”. A
database user can simply right click on the view object in Object Explorer and select “Select
Top 1000 rows”.
Transact SQL
commands
Result
Status
Page 11
7/25/2019 SQLworkshopPart1-using MS SQL Server Management Studio.pdf
http://slidepdf.com/reader/full/sqlworkshoppart1-using-ms-sql-server-management-studiopdf 11/14
ACY4006 - SQL Workshop 1 Page 11 of 14
8.4 Database Diagrams
As Microsoft SQL Server is a relational database, most of data files in the database should be
linked with at least one data file. A new programmer or database administrator can use this
function to ask the SQL Server Management Studio to prepare a relationship chart, as well as a
database diagram, among all or partial data files in a particular database.
To browse a database diagram, double click on an existing database diagram “dbo.diagram_0”.
Page 12
7/25/2019 SQLworkshopPart1-using MS SQL Server Management Studio.pdf
http://slidepdf.com/reader/full/sqlworkshoppart1-using-ms-sql-server-management-studiopdf 12/14
ACY4006 - SQL Workshop 1 Page 12 of 14
8.5 Security of a Database
Securing database is one of the two important tasks to be performed by a database
administrator (DBA). The other is backup database.
In SQL Server Management Studio, you can:
i) control which database user(s) can access a particular database;
ii)
assign user role and related user rights within a database; and
iii) encrypt data and database by using a passphrase, keys or a certificate.
9. Backup a Database
To perform a backup for a particular database, right click on the name of a database (such as
AdventureWorks) and select Tasks -> Backup.
Page 13
7/25/2019 SQLworkshopPart1-using MS SQL Server Management Studio.pdf
http://slidepdf.com/reader/full/sqlworkshoppart1-using-ms-sql-server-management-studiopdf 13/14
ACY4006 - SQL Workshop 1 Page 13 of 14
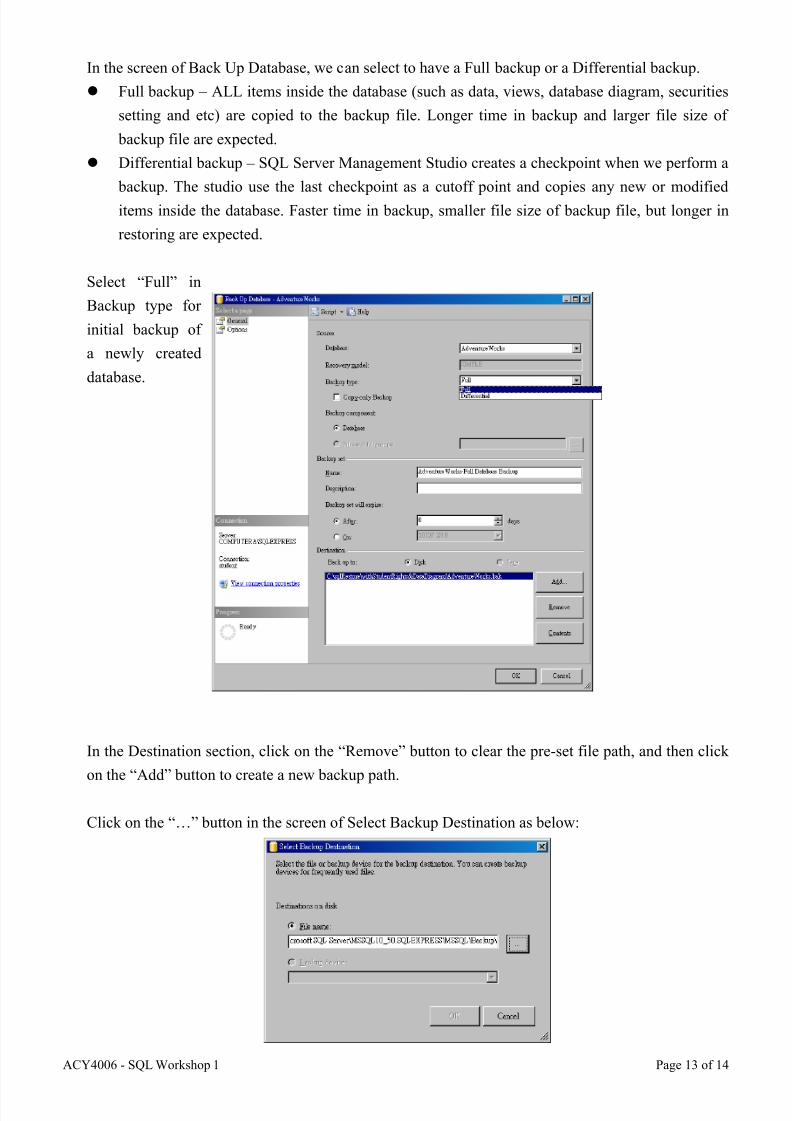
In the screen of Back Up Database, we can select to have a Full backup or a Differential backup.
Full backup – ALL items inside the database (such as data, views, database diagram, securities
setting and etc) are copied to the backup file. Longer time in backup and larger file size of
backup file are expected.
Differential backup – SQL Server Management Studio creates a checkpoint when we perform a
backup. The studio use the last checkpoint as a cutoff point and copies any new or modified
items inside the database. Faster time in backup, smaller file size of backup file, but longer in
restoring are expected.
Select “Full” in
Backup type for
initial backup of
a newly created
database.
In the Destination section, click on the “Remove” button to clear the pre-set file path, and then click
on the “Add” button to create a new backup path.
Click on the “…” button in the screen of Select Backup Destination as below:
Page 14
7/25/2019 SQLworkshopPart1-using MS SQL Server Management Studio.pdf
http://slidepdf.com/reader/full/sqlworkshoppart1-using-ms-sql-server-management-studiopdf 14/14
ACY4006 - SQL Workshop 1 Page 14 of 14
Create a new folder “sqlBackup” in V drive and select this folder as the backup destination.
In the field of File name, type the file name with the following pattern:
[Name of Database]-[Date]-[Version].bak
Click on “OK ” button to start the backup procedure.
The Studio prompts a notification message as below when the backup completed successfully.
Normally, we should zip the backup file for easy storage and transfer.
(167 MB in BAK file vs 31 MB in ZIP file)