24
1 | Page SSL/TLS Communication in OpenEdge Author: Kumar Navneet Version 0.4 27 March 2017

1 | P a g e
SSL/TLS Communication in OpenEdge
Author: Kumar Navneet
Version 0.4
27 March 2017
2 | P a g e
Contents 1. What is SSL/TLS? .................................................................................................................................................... 3
2. SSL/TLS in OpenEdge applicationS ......................................................................................................................... 3
3. Scope of this whitepaper ....................................................................................................................................... 3
4. General SSL/TLS concepts ...................................................................................................................................... 4
SSL/TLS Handshake ................................................................................................................................................ 4
SSL Protocol and Cipher Suites .............................................................................................................................. 5
Digital Certificate ................................................................................................................................................... 6
5. Creating a Digital Certificate .................................................................................................................................. 7
Generating Public/Private Key Pair ........................................................................................................................ 7
Signing the Certificate............................................................................................................................................ 7
Combining a CA issued digital certificate with the private key (for a server) ........................................................ 8
Importing the ROOT CA certificate in Client Cert Store (for clients) ..................................................................... 9
6. SSL Vendors in OpenEdge .................................................................................................................................... 10
7. Cipher Suite Names used for Configuration in OpenEdge ................................................................................... 11
8. SSL protocols and Default/supported ciphers used in OpenEdge CLIENT SERVER components ......................... 12
Changing the default protocol and ciphers for OpenEdge Server Components.................................................. 13
Changing the default protocol and ciphers for OpenEdge Client Components................................................... 14
Changing the default protocol and ciphers for Adapters and OpenEdge Management ..................................... 15
12. OpenEdge and known vulnerabilities ................................................................................................................ 15
13. Enabling and configuring SSL For Server components ....................................................................................... 15
OpenEdge AppServer ........................................................................................................................................... 16
OpenEdge Database ............................................................................................................................................ 16
Progress Application Server for OpenEdge .......................................................................................................... 17
14. Configuring OpenEdge Clients For SSL communication ..................................................................................... 19
ABL Client ............................................................................................................................................................. 19
Java OpenClient ................................................................................................................................................... 20
.NET OpenClient ................................................................................................................................................... 20
Browser ................................................................................................................................................................ 21
15. Debugging Tools ................................................................................................................................................ 23

3 | P a g e
1. WHAT IS SSL/TLS?
Transport Layer Security (TLS) and its predecessor, Secure Sockets Layer (SSL), both of which are frequently
referred to as SSL, are cryptographic protocols that provide communications security over a computer network.
SSL is a communication protocol used when a high degree of peer authenticity and encryption (scrambling) of data
is necessary. Additionally, SSL enables servers on either end of a connection to identify and authenticate (prove)
their identity. This enables secure communication effectively preventing the interception and tampering of
sensitive data. That is why, SSL is the network protocol used by, for example, banks or other financial institutions
to transfer credit card or user account information.
2. SSL/TLS IN OPENEDGE APPLICATIONS
You can use SSL/TLS communication between OpenEdge clients and servers, including Progress WebClient to
communicate with OpenEdge as well as non OpenEdge application. You can also use SSL with HTTP (Hyper Text
Transfer Protocol). When the two are used together, the resultant protocol is referred to as HTTPS, that is HTTP
with added security.
SSL entails overheads when compared to unencrypted Transmission Control Protocol (TCP) connections.
Establishing an SSL connection is a complex process in which initially there is an exchange of ten or more
messages, some of which are highly encrypted. These messages are small, and the exchanges take place relatively
quickly. However, when these numbers are multiplied by a significant number of application users, the
application’s performance is affected.
So, it is a best practice to use SSL/TLS only when necessary within an application. Typically, you will not implement
SSL throughout your application. A good example of limited implementation of SSL is Amazon.com. You could
spend hours on this web site and never get to see the use of SSL (notice that only HTTP is used in the URL). Only
when you are in the act of finalizing a purchase and relaying your personal or credit card information, does the
protocol switch to HTTPS. At that point, only a tiny amount of data is exchanged, effectively curbing overheads for
the Amazon servers.
3. SCOPE OF THIS WHITEPAPER
Should you choose to implement SSL/TLS in your application, you must understand various aspects of
communication such as protocols, ciphers, and digital certificates that you will need to configure. In recent years,
there have been several security vulnerabilities reported in the industry as a result of which, there has been a need
to switch to newer and more secure SSL/TLS versions. Consequently, you now need to configure SSL/TLS more
than you did in the past, and the configuration steps can be complex if not well understood.
Thus, this whitepaper aims to help you understand how to configure OpenEdge clients and servers to use SSL/TLS
communication to mitigate the known vulnerabilities.

4 | P a g e
Note: It is recommended that you refer to the OpenEdge documentation for configuration details.
4. GENERAL SSL/TLS CONCEPTS
This section touches on some general and important concepts of SSL/TLS communication. They are not specific to
OpenEdge. The concepts form the foundation for effectively configuring your SSL/TLS communication channels. If
you are familiar with these terms and concepts, you may skip this section.
SSL/TLS Handshake SSL communication begins with a handshake routine that first establishes a TCP/IP connection. There is an
exchange between a client and a server of about ten messages after which the communication is deemed to be
secure. This exchange of messages is the SSL/TLS andshake process.
Though an explanation of the entire SSL/TLS handshake process is not in the scope of this whitepaper, it is
recommended that you understand the salient points of this process. The following diagram shows a simplified
SSL/TLS handshake process.
Public Key Infrastructure (PKI) or Asymmetric Key Cryptography
The initial exchange of messages between a client and a server is based on Public Key Infrastructure (PKI)
cryptography using assymetric key. PKI uses a pair of mathematically related keys known as public and private keys
(that are not identical, therefore asymmetric). The public key is a shared key whereas the private key is known
only to the party that generates the key. A client can encrypt a message using the server’s public key, and then the
server can decrypt the message using its private key. PKI is considered secure, but it slows down the
encryption/decryption process. It is thus used for transporting of a session key which is a shared secret between a
client and the server once the SSL session is established. There are a number of algorithms that use PKI for
encryption/decryption, such as RSA, DH w/RSA, and ECDHE.
5 | P a g e
Symmetric Key cryptography
Once the SSL session is established, message exchange is based on the session key, a symmetric key, rather than a
PKI key, that is a shared secret between the client and the server. The encryption/decrytion process is faster using
symmetric key cryptography. It must be ensured that the symmetric key is not compromised. The handshake
process ensures that the same session key is generated by both client and server separately using a pre-master
secret (which is exchanged securely using PKI). Thus the handshake process ensures the safety of the session key.
Common examples of algorithms using symmetric key cryptography are AES and RC4.
Hashing and message integrity
After a SSL/TLS session is established, the messages exchanged between the client and server contains a Message
Authentication Code (MAC) generated using a hashing process. The result of a hashing process is a unique hash
code which, unlike PKI or symmetric cryptography, cannot be decrypted to obtain the original message. Hashing is
important to ensure message integrity. Common hashing algorithms are MD5, and the SHA and SHA2 family.
SSL Protocol and Cipher Suites The initial exchange of messages that happens between a client and a server during the SSL handshake include the
SSL protocol version and cipher suites. The SSL protocol version can be SSLv3 TLSv1, TLSv1.0, or TLSv1.2.
SSLv3 is the older SSL protocol version and is considered vulnerable to many security vulnerabilities such as
POODLE and BEAST. TLSv1.2 is the latest (at the point of writing this paper) protocol and is considered safe against
most known security vulnerabilities.
The cipher suites represent a set of algorithms used during the process of SSL/TLS communication. It contains the
following information:
Protocol (SSL/TLS)
Key Exchange Algorithm (such as, RSA, DH, ECDH, ECDHE)
Authentication Algorithm (such as, RSA, DSA, ECDSA)
Data Encryption Algorithm (such as, AES, RC4, 3DES)
MAC Algorithm (such as, SHA, MD5, SHA2 family)
There are more than 200 cipher suites. A cipher suite follows the following format:
Protocol_Kx_[Au]_WITH_Enc_[Bits]_Mac
Kx = Key-exchange algorithm, e. g., RSA and Diffie-Hellman (DH/DHE), Kerberos (KRB5), Pre-Shared Key
(PSK).
Au = Authentication algorithm. RSA is commonly used for key authentication.
Enc = Symmetric encryption algorithm, e.g., DES, 3DES, AES, and RC4.
Bits = Effective symmetric encryption key size in bits.
MAC = Hashing algorithm used for TLS/SSL data-packet integrity and authentication checks, e.g., SHA,
MD5.

6 | P a g e
The following is an anatomy of a typical cipher suite:
Digital Certificate A digital certificate is like an Identity card for an application (mostly server applications) over a network. Digital
certificates are issued by a Certificate Authority (CA) that is trusted for providing vouching services. A digital
certificate may be issued by an intermediate CA which in turn may be issued by another CA. Digital certificates are
verified using a chain of trust. The trust anchor for the digital certificate is the ROOT certificate authority.
Every digital certificate should ideally be signed by an issuing CA. A digital certificate could, however, be a self-
signed certificates. Self-Signed certificates should be used in the development phase and are not recommended for
production use. The only digital certificate that can be self-signed is the ROOT CA’s digital certificate.
A digital certificate contains:
A public key
The identity of the certificate owner
The identity of the Certificate Authority (CA)
OpenEdge provides tools that you can use to generate the digital certificate for your client/server application.
Host Name Verification
Apart from the standard SSL handshake, OpenEdge Clients can optionally perform Host Name Verification to validate the server. OpenEdge verifies the host name against the Common Name listed in the server’s digital certificate. If that does not match, the client returns an authentication error (9991) as part of the handshake and then terminates the connection. OpenEdge provides a means to disable Host Name Verification, for example, in an ABL Client you can supply ”-nohostverify” as a connection parameter to disable Host Name Verification.
7 | P a g e
5. CREATING A DIGITAL CERTIFICATE
When you decide to make your server SSL/TLS enabled, it is very important that you create a server’s digital
certificate and get it signed by a CA that is trusted by the clients it intends to interact with. What follows are the
steps to create a digital certificate.
Generating public/private key pair OpenEdge ships a utility called pkiutil in DLC/bin. Use this utility to generate a new private/public-key pair and a
corresponding public-key certificate request (suitable for submission to a CA).
NOTE: OpenEdge ships pscpki.cnf in the DLC/keys/policy folder that is used by pkiutil as the policy file for
generating digital certificates.
Use the following command:
proenv> pkiutil -keysize <keysize> -newreq <alias>
NOTE: The above command will prompt you for a password. Remember this password as it will be needed when
configuring the keyAliasPassword of your AppServer and other servers.
You can use the above command to generate the following entries in DLC\keys\requests:
1. alias.pk1 – private key
2. alias.pk10 – public key + information about your organization. This serves as a Certificate Signing Request
(CSR) that needs to be submitted to a CA (certificate authority). This uses the Public Key Cryptography
Standards (PKCS) #10 specification, the most common request format.
While running the above command, you will be required to enter the details of your organization as the Distinguished Name (DN). The DN includes details like the country, state, location, organization, organization unit, and the Common Name (CN) of your organization. The CN of your organization is the fully qualified domain name of the Web Server that will receive the certificate.
You can verify the subject and signature algorithm, and validate if they match the data you supplied either in the command line or policy file by using the following command:
proenv> sslc req -text -in %DLC%\keys\requests\alias.pk10 -noout
NOTE: OpenEdge ships an OpenSSL (an open-source implementation of the SSl and TLS protocols) binary (sslc) to
run OpenSSL commands in case you require additional or advanced options.
Signing the Certificate You can submit the CSR generated by using alias.pk10 to a CA (like Semantic Verisign, DigiCert, GlobalSign, or
GoDaddy) who will charge you a fee for vouching your public key (contained in the CSR). The CA will sign your
server certificate with its private key. Often, you may find that the CSR of your organization is signed by an
intermediate CA, whose server certificate is signed by a ROOT CA. Such certificates are known as chained
certificates. ROOT CA is a widely-trusted body and its server certificate is a self-signed certificate. A self-signed
certificate is one where you sign your server certificate with your own private key.

8 | P a g e
As said earlier, for production scenarios you should use a CA signed certificate, not a self-signed certificate.
For testing your server set-up:
1. You can create a self-signed server certificate, or you can create your own private CA to sign the server
certificate.
2. Also, there are several public free CA’s which can be used to sign your CSR. These can be used for testing,
for example, http://getacert.com/signacert.html.
Create a Self-Signed certificate
As stated, a self-signed certificate is where you sign the CSR with your own private key. In OpenEdge, use the
following command to generate a self-signed certificate:
proenv>sslc x509 -req -days <days> -in <path of alias.pk10> -signkey <path of alias.pk1> -out <path of
signed .cer file>
Create a ROOT CA and sign your own server certificate
A ROOT CA certificate is a self-signed certificate that you can generate using the OpenSSL utility. (Refer to the OpenSSL documentation for instructions). Also, you may use your genrootca script to generate a ROOT CA certificate on a UNIX machine. This script is just for your reference; it is recommended that you create a ROOT CA certificate on your own using OpenSSL.
If rootCA.cer is the ROOT CA certificate and rootCA.pk1 is the private key of the ROOT CA you generated, you can sign your CSR using the following command.
Proenv> sslc ca -cert $DLC/keys/requests/rootCA.cer -in $DLC/keys/requests/alias.pk10 -keyfile
$DLC/keys/requests/rootCA.pk1 -days 365 -md sha256 -out $DLC/keys/requests/alias.cer
Combining a CA issued digital certificate with the private key (for a server) Once you obtain a CA-issued SSL server digital (public-key) certificate, you need to pair it with the pkiutil -newreq
generated private key identified by the specified alias name (alias), and then place the pair in the key store as a
new entry identified by the alias. You can do this using the pkiutil -import option.
Note: This function prompts for the password used to generate the public-key certificate request for this entry.
Before you combine the CA signed certificate with the private key, set up a folder structure for the new entries as
follows for UNIX:
a. Create a new directory named “newcerts” in DLC/keys: proenv> mkdir $DLC/keys/newcerts
b. Create an index.txt and serial file inside DLC/keys: proenv> touch $DLC/keys/serial
c. Open this file in any editor and enter 01 and then save the file. touch $DLC/keys/index.txt
Note: You can use equivalent DOS commands for Windows.
You can then use the following command to generate a Privacy-enhanced Electronic Mail (PEM) file that contains
the server’s private key and the CA-issued SSL server digital (public-key) certificate. PEM is a container format that
was originally associated with securing email, and is described in Network Working Group Request For Comment

9 | P a g e
(RFC) 1421 through 1424. Assuming the CA-signed SSL certificate is copied in DLC/keys/requests as alias.cer, the
command is as follows:
proenv> pkiutil -import alias $DLC/keys/requests/alias.cer
Use the following command to check if the alias is listed:
Proenv> pkiutil -list alias
There must be an alias.pem created inside %DLC%\keys folder now.
Optionally you may view the server’s .pem using:
proenv> pkiutil -print pugDemo
Note: If subject and issuer are the same, the certificate would be self-signed.
Note: OpenEdge ships a default certificate with the alias name default_server. While configuring an SSL-enabled
AppServer, if no keyAlias is provided, default_server is used as the server certificate.
Importing the ROOT CA certificate in Client Cert Store (for clients) The client for your server can be an ABL client, Java, or .NET OpenClient application, Web Services Adapter (WSA),
AppServer Internet Adapter (AIA), or a browser. The client must be able to validate the entire chain of trust when
connecting to a server.
A certificate store (cert store) is a storage space where certificates, Certificate Revocation Lists (CRLs), and
Certificate Trust Lists (CTLs) are stored. It is typically a permanent storage such as a folder structure on disk, but
could also be in memory.
When a server presents its certificate to the client, the client must have the ROOT CA certificate imported in its
cert store in to validate the entire chain.
For ABL Clients
OpenEdge provides the certutil tool to import the CA certificate into the OpenEdge cert store (DLC/certs). Here is
the syntax of the certutil command:
proenv>certutil -import <path of the CA certificate>
When you run this command, the following message is displayed:
Importing trusted certificate to alias name: xxxx
And you will find a xxxx.0 file in the $DLC/certs location.
Note: The alias name is based on how OpenSSL certificate lookup is coded so that it can perform the certificate
chain validation process. A file system directory is logically equivalent to a keystore, and the .0 hashed filename is
used as the index to find a certificate. So rather than opening every .pem file in the directory and reading its
subject name field to see if it is the one it is looking for to validate, it hashes the issuer name, appends .0, and looks
for the exact file.
For Java OpenClient Applications
You may set the certificate store to DLC/cert by using the RunTimeProperties class:

10 | P a g e
RunTimeProperties.setCertificateStore(certStore)
You may also import the CA certificate file to $DLC/certs/pscerts.jar using the procertm utility.
Note: The CA certificate file to be imported in psccerts.jar must have a .pem extension. You then use
RunTimeProperties.setCertificateStore(<path to psccerts.jar>) to specify the cert store path.
For .NET OpenClient Application
You can import the ROOT certificate from the Certificate Authority using mmc.exe:
a. Click Start, type mmc in the Search programs and files box, and then press ENTER.
b. On the File menu, click Add/Remove Snap-in.
c. Under Available snap-ins, double-click Certificates.
d. Select Computer account, and then click Next.
e. Select Local computer, and then click Finish and then click OK.
f. To save this console, click Save on the File menu, and provide a name.
g. Expand Certificates (Local Computer).
h. Right-click Trusted Root Certificate Authorities > All Tasks > Import.
i. Click Next.
j. At the Certificate Import Wizard click Next, browse to %DLC%\keys\requests\workshopCA.cer,
and click Next -> Next and Finish.
6. SSL VENDORS IN OPENEDGE
There is more than one SSL/TLS 3rd party vendor library used in OpenEdge. This is important to know as it directly
impacts the cipher suite names that are discussed in next section.
The following components use the OpenSSL SSL library:
OpenEdge ABL Applications (GUI, Character, AppServer, WebSpeed Client)

11 | P a g e
OpenEdge RDBM (SQL, ABL, DataServer)
AppServer Agent
WebSpeed Messenger
ODBC
The following components use the RSA BSAFE SSL Library:
AppServer Broker
Java OpenClients
Sonic ESB and Generic JMS Adapter
WSA, REST, AIA
The following components use the Java JSSE distribution:
OpenEdge Management
PAS for OpenEdge
JDBC
The following component uses the Microsoft SSL implementation:
.NET OpenClient
7. CIPHER SUITE NAMES USED FOR CONFIGURATION IN OPENEDGE
As there are several SSL vendors used in OpenEdge, the cipher suite names used for configuration purposes are
abbreviated names as shown in the below table. The fully qualified name may differ from one vendor to another.
Note: The names shown in red are weak ciphers and are vulnerable to many known SSL/TLS attacks. Their use is
strongly discouraged.
OE Cipher Suite Name Fully Qualified Name
AES256-SHA256 TLS_RSA_WITH_AES_256_CBC_SHA256
DHE-RSA-AES128-GCM-SHA256 TLS_DHE_RSA_WITH_AES_128_GCM_SHA256
AES128-GCM-SHA256 TLS_RSA_WITH_AES_128_GCM_SHA256
DHE-RSA-AES128-SHA256 TLS_DHE_RSA_WITH_AES_128_CBC_SHA256
ADH-AES128-GCM-SHA256 TLS_DH_anon_WITH_AES_128_GCM_SHA256
DHE-RSA-AES256-SHA256 TLS_RSA_WITH_AES_256_GCM_SHA256
AES256-GCM-SHA384 TLS_RSA_WITH_AES_256_GCM_SHA384
DHE-RSA-AES256-GCM-SHA384 TLS_DHE_RSA_WITH_AES_256_GCM_SHA384
ADH-AES256-GCM-SHA384 TLS_ADH_WITH_AES_256_GCM_SHA384
AES128-SHA TLS_RSA_WITH_AES_128_CBC_SHA
RC4-SHA SSL_RSA_WITH_RC4_128_SHA
RC4-MD5 SSL_RSA_WITH_RC4_128_MD5

12 | P a g e
8. SSL PROTOCOLS AND DEFAULT/SUPPORTED CIPHERS USED IN OPENEDGE CLIENT SERVER
COMPONENTS
Every OpenEdge release has its client and server components start with a set of SSL/TLS protocol and ciphers. In
this section, we refer to them as Default SSL protocols and Default SSL ciphers respectively.
In addition to default SSL protocol and ciphers, each OpenEdge release supports additional list of protocols and
ciphers which are supported but not enabled by default. In this section, we refer to them as Supported SSL
protocols and Supported SSL ciphers.
The following table provides a list of default SSL/TLS protocol and ciphers used for each OpenEdge version, along
with the set of protocols that are supported but are not enabled by default. For example, OpenEdge 11.7 server
components start with TLSv1.2 and a list of SSL ciphers like AES128-SHA256, AES128-GCM-SHA256 etc. (listed
under Default SSL Ciphers list). However, there are other protocols and ciphers that are supported and server
components must be configured to start with these protocols and ciphers. This configuration settings are
explained later under section 10.
NOTE: Refer to OE documentation for actual list of protocol and ciphers. The list below may not may not be
comprehensive and may be latest only at the point of creating this whitepaper.)
Table 8. 1: Default and Supported SSL/TLS protocols and Ciphers in OpenEdge Server components:
OE Version Default SSL Protocols
Supported SSL Protocols
Default SSL Ciphers Supported SSL Ciphers
11.7 TLSv1.2 TLSv1.2 TLSv1.1 TLSv1 SSLv3
AES128-SHA256, AES128-GCM-SHA256, AES256-SHA256, DHE-RSA-AES256-SHA256, DHE-RSA-AES128-GCM-SHA256, DHE-RSA-AES128-SHA256
AES128-SHA256, AES128-GCM-SHA256, AES256-SHA256, DHE-RSA-AES256-SHA256, DHE-RSA-AES128-GCM-SHA256, DHE-RSA-AES128-SHA256, AES256-GCM-SHA384, DHE-RSA-AES256-GCM-SHA384, ADH-AES256-GCM-SHA384, AES128-SHA, RC4-SHA, RC4-MD5
11.6.x TLSv1.2 TLSv1.2 TLSv1.1 TLSv1 SSLv3
AES128-SHA256, AES128-GCM-SHA256, AES256-SHA256, DHE-RSA-AES256-SHA256, DHE-RSA-AES128-GCM-SHA256, DHE-RSA-AES128-SHA256
AES128-SHA256, AES128-GCM-SHA256, AES256-SHA256, DHE-RSA-AES256-SHA256, DHE-RSA-AES128-GCM-SHA256, DHE-RSA-AES128-SHA256, AES256-GCM-SHA384, DHE-RSA-AES256-GCM-SHA384, ADH-AES256-GCM-SHA384, AES128-SHA, RC4-SHA, RC4-MD5
11.5.1 TLSv1 TLSv1 AES128-SHA AES128-SHA,

13 | P a g e
SSLv3 RC4-SHA, RC4-MD5
11.4.0 (Latest HF) 11.3.3 (Latest HF) 10.2B08 (Latest HF)
TLSv1 SSLv3 SSLv2
TLSv1 SSLv3 SSLv2
RC4-SHA, RC4-MD5
AES128-SHA, RC4-SHA, RC4-MD5
Table 8. 2: Default and Supported SSL/TLS protocols and Ciphers in OpenEdge Client components:
OE Version Default SSL Protocols
Supported SSL Protocols
Default SSL ciphers Supported SSL ciphers
11.7 TLSv1.2 TLSv1.2 TLSv.1.1 TLSv1 SSLv3
AES128-SHA256, AES128-GCM-SHA256, AES256-SHA256, DHE-RSA-AES256-SHA256, DHE-RSA-AES128-GCM-SHA256, DHE-RSA-AES128-SHA256
AES128-SHA256, AES128-GCM-SHA256, AES256-SHA256, DHE-RSA-AES256-SHA256, DHE-RSA-AES128-GCM-SHA256, DHE-RSA-AES128-SHA256, AES256-GCM-SHA384, DHE-RSA-AES256-GCM-SHA384, ADH-AES256-GCM-SHA384, AES128-SHA, RC4-SHA, RC4-MD5, DES-CBC3-SHA, DES-CBC-SHA
11.6.x TLSv1.2 TLSv1.2 TLSv.1.1 TLSv1 SSLv3
AES128-SHA256, AES128-GCM-SHA256, AES256-SHA256, DHE-RSA-AES256-SHA256, DHE-RSA-AES128-GCM-SHA256, DHE-RSA-AES128-SHA256
AES128-SHA256, AES128-GCM-SHA256, AES256-SHA256, DHE-RSA-AES256-SHA256, DHE-RSA-AES128-GCM-SHA256, DHE-RSA-AES128-SHA256, AES256-GCM-SHA384, DHE-RSA-AES256-GCM-SHA384, ADH-AES256-GCM-SHA384, AES128-SHA, RC4-SHA, RC4-MD5, DES-CBC3-SHA, DES-CBC-SHA
11.5.1 TLSv1 TLSv1 SSLv3
AES128-SHA AES128-SHA, RC4-SHA, RC4-MD5, DES-CBC3-SHA, DES-CBC-SHA
11.4.0 (Latest HF) 11.3.3 (Latest HF) 102b08 (Latest HF)
TLSv1 SSLv3 SSLv2
TLSv1 SSLv3 SSLv2
RC4-SHA, RC4-MD5
AES128-SHA, RC4-SHA, RC4-MD5, DES-CBC3-SHA, DES-CBC-SHA
Changing the default protocol and ciphers for OpenEdge Server Components
Servers How to Change Protocol and Ciphers Comments
AppServer / WebSpeed Broker
Environment Variables: PSC_SSLSERVER_PROTOCOLS PSC_SSLSERVER_CIPHERS
Set the environment variable as follows in the Environment variable section of the ubroker.properties file. [Environment.<Broker Name>] PSC_SSLSERVER_PROTOCOLS=TLSv1.1,SSLv3

14 | P a g e
Servers How to Change Protocol and Ciphers Comments
PSC_SSLSERVER_CIPHERS=AES128-SHA, RC4-MD5
OpenEdge Database
Environment Variables: PSC_SSLSERVER_PROTOCOLS PSC_SSLSERVER_CIPHERS
Set these environment variables before starting the database in SSL mode.
OpenEdge SQL
Environment Variables: PSC_SSLSERVER_PROTOCOLS PSC_SQL_SSLSERVER_CIPHERS
OE SQL uses same environment variable as others for SSL protocol change but different environment variable for ciphers.
PAS for OE Properties: psc.as.https.protocol psc.as.https.ciphers
Use tcman utility to configure the following properties: tcman config psc.as.https.protocol=TLSv1 tcman config psc.as.https.ciphers=AES128-SHA256
PDSOE Properties: defaultHttpProtocol configuredCipherSuites
Set these properties in: dlc\oeide\eclipse\plugins\com.openedge.pdt.debug.core_11.x.x.00\clientProtocols.properties.
Dataserver Environment Variables: PSC_SSLSERVER_PROTOCOLS PSC_SSLSERVER_CIPHERS
Set these environment variables before starting the database in SSL mode to set ciphers and protocols other than the default.
Use the environment variable or properties as described in above table to configure the server components to use
protocols or ciphers that are supported but are not the default protocol or ciphers.
Changing the default protocol and ciphers for OpenEdge Client Components
Clients How to Change Protocol and Ciphers Comments
ABL Connection parameters: -sslprotocols, -sslciphers
Set these as connection parameters to OE AppServer or any external Web Server.
ABL (SOAP out) Connection parameters: -sslWSDLProtocols, -sslWSDLCiphers, -sslSOAPProtocols, -sslSOAPCiphers
Set these as connection parameters to external SOAP services.
Java Open Client
Session properties: PROGRESS.Session.sslprotocols PROGRESS.Session.sslciphers
Set these as Java System property to Java client process. For example, -DPROGRESS.Session.sslprotocols=TLSv1.2 -DPROGRESS.Session.sslciphers=AES128-SHA256
.NET Open Client
Session properties: PROGRESS.Session.sslprotocols PROGRESS.Session.sslciphers
Set these properties in the application config file.
AppServer Agent Environment Variables: PSC_SSLCLIENT_PROTOCOLS PSC_SSLCLIENT_CIPHERS
AppServer agent as client to DB uses the environment variable in the ubroker.properties file to change default configuration of protocol and ciphers.

15 | P a g e
Use the environment variable or properties as described in above table to configure the OpenEdge client
components to use protocols or ciphers that are supported but are not the default protocol or ciphers.
Changing the default protocol and ciphers for Adapters and OpenEdge Management
Components How to Change Protocol and Ciphers
Comments
1. REST Adapter 2. WSA 3. AIA 4. WebSpeed Messengers (cgiip, wsapi)
PSC_SSLCLIENT_PROTOCOLS PSC_SSLCLIENT_CIPHERS
Set this environment variable before stating the web server in which AIA, WSA, REST, and Messengers are configured.
OEM - Jetty Web Server
SSLEnabledProtocols SSLEnabledCipherSuites
Set these in the $DLC/properties/fathom.properties file.
OpenEdge Management - ActiveMQ transport connector for remote monitoring.
enabledProtocols enabledCipherSuites
Set these in the $DLC/properties/management.properties file.
Use the environment variable or properties as described in above table to configure the OpenEdge Adapter
components to use protocols or ciphers that are supported but are not the default protocol or ciphers.
12. OPENEDGE AND KNOWN VULNERABILITIES
OpenEdge 11.5.1 and the latest hotfixes for 11.4.0, 11.3.3, and 102B08 mitigate the following vulnerabilities:
SSL POODLE
FREAK
CRIME
BREACH
RC4 attack
OpenEdge 11.6 and above mitigates most of the known vulnerabilities like:
TLS POODLE
SSL POODLE
FREAK (no export ciphers)
CRIME (No TLS compression)
BREACH (No HTTP compression)
RC4 attack
BEAST
A detailed description of these vulnerabilities can be found on the Internet and is out of the scope of this paper.
13. ENABLING AND CONFIGURING SSL FOR SERVER COMPONENTS
16 | P a g e
OpenEdge AppServer To enable SSL for your AppServer or WebSpeed broker, configure the following in the [UBroker.AS.xxxx] section of
the ubroker.properties file:
sslEnabled=1 to enable SSL connection
keyAlias=<alias> of the server certificate (.pem) that you generated in section 5
Note: If you do not provide the alias name, the default server certificate “default_server” is used.
keyAliasPassword=<password> used to generate the digital certificate using pkiutil -newreq command
explained in section 5
Note: If you do not want to provide the password in clear text, you may use the genpassword utility to
generate a hashed password, and then you can then specify the keyAliasPassword as oech1::xxxx where
xxxx is the output of genpassword utility.
If you wish to specify a supported SSL protocol or cipher, you can do so by adding environment variables as
explained in section 10. The environment variables need to be set in the Environment variable section of the
ubroker.properties file as:
[Environment.<Broker Name>] PSC_SSLSERVER_PROTOCOLS=TLSv1.1,SSLv3 PSC_SSLSERVER_CIPHERS=AES128-SHA,RC4-MD5
You may alternatively use OpenEdge Explorer (OEE) or OpenEdge Management (OEM) to create an SSL-enabled
AppServer by selecting the Enable SSL Connection checkbox and providing an alias name and password under the
SSL tab.
SSL Logging in OpenEdge AppServer
The AppServer broker uses the RSA BSAFE SSL library for SSL communication. Hence, to get SSL logging from the
AppServer broker you need to specify the RSA SSL logging (discussed in troubleshooting section later) as jvmArgs in
the [UBroker.AS.xxxx] section of the ubroker.properties file.
The AppServer agent uses OpenSSL, and to get SSL logs from the Agent processes, you need to add following
environment variable in the Environment section of your broker in the ubroker.properties file:
SSLSYS_DEBUG_LOGGING=<value between 1 to 5>
Since the agent acts as a server, it creates a log named cert.server.log in the OpenEdge WRKDIR.
OpenEdge Database To start the database in SSL-enabled mode, add an -ssl option while you proserve your database using the
following command:
proserve <db-name> -S <port> -H <host> -ssl
It starts the database in SSL mode, and uses default_server as the server certificate. You can provide a digital
certificate that you created by using -keyalias and -keyaliaspasswd:
17 | P a g e
proserve <db-name> -S <port> -H <host> -ssl -keyalias <alias> -keyaliaspasswd <hashed password>
NOTE: The hashed password that is supplied to keyaliaspasswd can be generated using the genpassword utility.
For example:
proenv> genpassword -password pugws
The genpassword is used to encrypt the password so OpenEdge does not pass the password as clear text in the
command line. Use the above generated password for the -keyaliaspasswd.
If you want to specify a supported SSL protocol or cipher, add the environment variables as explained in section 10.
The environment variables (PSC_SSLSERVER_PROTOCOLS and PSC_SSLSERVER_CIPHERS) are set in the shell from
where the proserve command is run.
SSL Logging in the Database
As the database uses OpenSSL, you need to set SSLSYS_DEBUG_LOGGING before you proserve the database. The
SSL logs for database broker are dumped to the cert.server.log file.
Progress Application Server for OpenEdge
All Progress Application Server (PAS) for OpenEdge instances are preconfigured with default HTTPS settings.
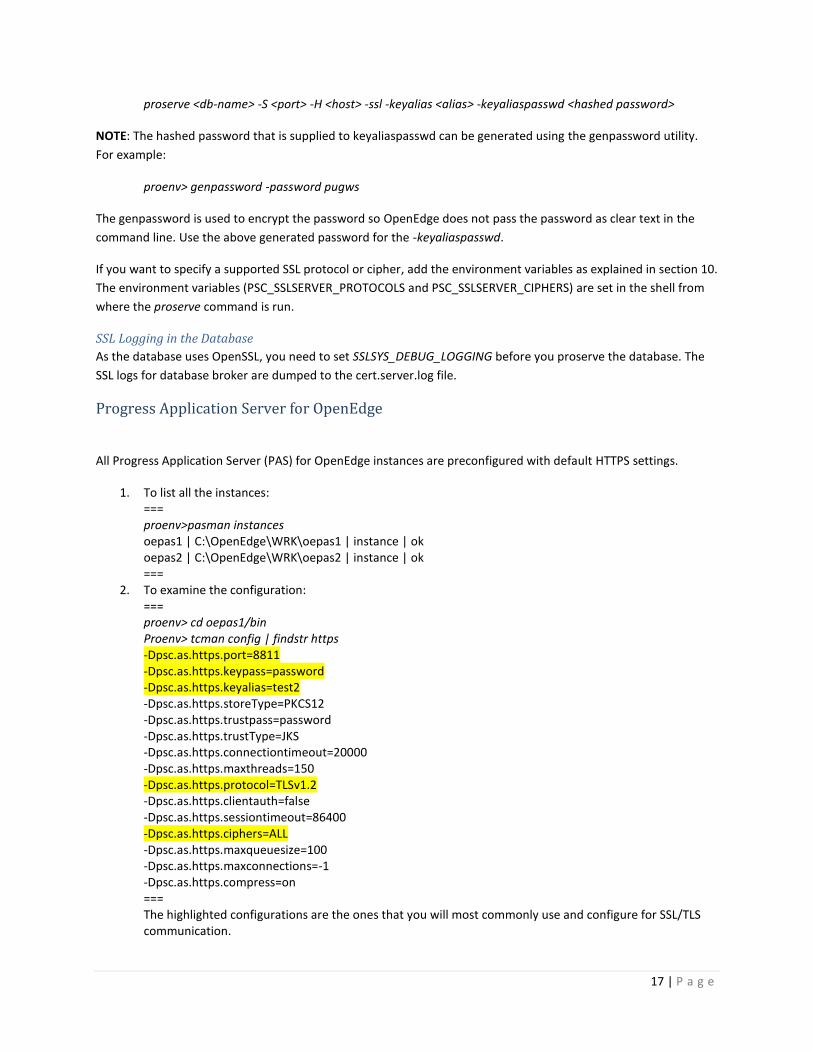
1. To list all the instances: === proenv>pasman instances oepas1 | C:\OpenEdge\WRK\oepas1 | instance | ok oepas2 | C:\OpenEdge\WRK\oepas2 | instance | ok ===
2. To examine the configuration: === proenv> cd oepas1/bin Proenv> tcman config | findstr https -Dpsc.as.https.port=8811 -Dpsc.as.https.keypass=password -Dpsc.as.https.keyalias=test2 -Dpsc.as.https.storeType=PKCS12 -Dpsc.as.https.trustpass=password -Dpsc.as.https.trustType=JKS -Dpsc.as.https.connectiontimeout=20000 -Dpsc.as.https.maxthreads=150 -Dpsc.as.https.protocol=TLSv1.2 -Dpsc.as.https.clientauth=false -Dpsc.as.https.sessiontimeout=86400 -Dpsc.as.https.ciphers=ALL -Dpsc.as.https.maxqueuesize=100 -Dpsc.as.https.maxconnections=-1 -Dpsc.as.https.compress=on === The highlighted configurations are the ones that you will most commonly use and configure for SSL/TLS communication.

18 | P a g e
3. You can change any of the configurations using the tcman config command.
The keyalias that PAS for OpenEdge uses must be either of type JKS (Java KeyStore) or PKCS12 (Public-Key
Cryptography Standards #12).
Starting with OpenEdge 11.7.0, pkiutil has been enhanced to export the server certificate (.pem) in PKCS12 format:
pkiutil -exportp12 -alias <alias-name> -p12file <p12file-path>
You can copy the exported P12 file to $WRKDIR/<instance>/conf/ tomcat-keystore.p12. Then, run the tcman config
commands to configure the keyalias and keypass with the values you provided while generating the certificate
using the pkiutil -newreq command.
Note: Restart PAS for OpenEdge for these changes to take effect.
proenv> tcman config psc.as.https.keyalias=<alias>
proenv> tcman config psc.as.https.keypass=<password>
Enabling Client Authentication for PAS for OpenEdge
As described in the SSL/TLS process described in Section 4, the server presents its digital certificate to the client during the ServerHello message exchange. However, a server can be configured such that it requires the client to possess a Public Key Certificate (PKC). If you specify client authentication, the web server authenticates the client using the client’s public key certificate. This is known as HTTPS client authentication, and is a secure method of authentication than either basic or form-based authentication. It uses HTTP over SSL (HTTPS), in which the server authenticates the client using the client’s Public Key Certificate (PKC).
To enable client authentication for PAS for OpenEdge, follow these steps:
1. Import the client certificate to the tomcat trustStore.
You can use Java’s Keytool utility to import the client certificate. For example, say the client certificate clientCert.cer, is present in $DLC/keys/requests, and you have a PAS for OpenEdge instance named “oepas1”, use the keytool command as below:
=========
keytool -importcert -alias clientcertalias -file $DLC/keys/requests/clientCert.cer -keystore
$WRKDIR/oepas1/conf/tomcat-certstore.jks -storepass password –noprompt
=========
2. Set psc.as.https.clientauth to true. If you change the trust password, you will need to modify
psc.as.https.trustpass as well. You can use tcman config command to do so.
=========
tcman config psc.as.https.clientauth=true tcman config psc.as.https.trustpass=<password> =========
Note: You may find that by default psc.as.https.trustType is JKS. Java keytool is recommended for use with the JKS
format. You may change it to PKCS if required. You will then need to use OpenSSL to import the client certificate to
the tomcat truststore.
19 | P a g e
14. CONFIGURING OPENEDGE CLIENTS FOR SSL COMMUNICATION
ABL Client For ABL Clients to connect to an SSL-enabled server, you need to provide the hostname and port as part of
CONNECT() method. If you wish to provide a non-default SSL protocol and cipher, you can do so using:
-sslprotocols -sslciphers
Note: The value provided supersedes the default SSL protocol and cipher, or those set using PSC_SSLCLIENT_PROTOCOLS or PSC_SSLCLIENT_CIPHERS environment variables. If the ABL Client wants to connect to a WSDL or SOAP service that is SSL-enabled, the protocol and ciphers can be specified using: To connect to a WSDL service:
-sslWSDLProtocols -sslWSDLCiphers
To connect to a SOAP service: -sslSOAPProtocols -sslSOAPCiphers
The ABL client uses $DLC/certs as its certificate (cert) store. The ABL client uses OpenSSL, so to get SSL logs related to the ABL client communicating to an SSL Server, you need
to set the following environment variable:
SSLSYS_DEBUG_LOGGING=<value between 1 to 5>
This creates a log named cert.client.log in the OpenEdge WRKDIR.
Client Authentication
Client authentication is explained in Section 13. Since OpenEdge 11.4, ABL clients can connect to a server
configured for client authentication. You can use the following parameters in the ABL CONNECT() method to
enable your ABL client to connect to a Web Service that requires the client to send its digital certificate.
-WSDLAuth ssl|basic
Set this to ssl to enable client authentication for WSDL access. If you set it to basic, the connect method ignores
client authentication for WSDL access.
-WSDLKeyFile filename | target-database
Set only if -WSDLAuth parameter is set to ssl. The location of the client certificate in PEM format. If you do not
specify an absolute path of the client certificate file, the connection operation searches the $DLC/keys folder for
the client-certificate-file-name.pem file.
-WSDLKeyPwd password

20 | P a g e
The SSL client certificate password in clear text (typically not recommended) or encoded format.
-sslAuth Authentication-type
Set this to ssl to enable client authentication for SOAP access. If you set it to basic, the connect method ignores
client authentication for SOAP access.
-sslKeyFile filename | target-database
The location of the client certificate. If you do not specify an absolute path of the client certificate file, the
connection operation searches the $DLC/keys folder for the client-certificate-file-name.pem file. This option must
be set only if -sslAuth parameter is set to ssl.
-sslKeyPwd password
The SSL client certificate password in clear text (typically not recommended) or encoded format.
Java OpenClient Refer to Section 11 for connection options. Here is a sample Java OpenClient program that connects to a SSL-enabled AppServer. You can change the SSL protocols and ciphers using the following Java system variables:
PROGRESS.Session.sslprotocols PROGRESS.Session.sslciphers
You can alternatively use setters on RunTimeProperties as shown in the following program:
================== String certStore = "C:/Progress/OpenEdge/certs/psccerts.jar"; RunTimeProperties.setCertificateStore(certStore); RunTimeProperties.setNoHostVerify(true); RunTimeProperties.setSessionModel(1); RunTimeProperties.setSslVersions("TLSv1.2"); RunTimeProperties.setSslCiphers("AES128-SHA256"); OpenAppObject appObj = null; Connection conn = new Connection("https://localhost:8811/apsv", "", "", ""); conn.setSessionModel(0); m_AppObject1 = new OpenAppObject(conn, ""); ParamArray paramArray = new ParamArray(2); String name = "Alice"; String msg = null; paramArray.addCharacter(0, name, ParamArrayMode.INPUT); paramArray.addCharacter(1, msg, ParamArrayMode.OUTPUT); appObj.runProc("hello.p",paramArray); System.out.println(m_ParamArray.getOutputParameter(1)); ==================
.NET OpenClient

21 | P a g e
Refer to Section 11 for connection options such as:
PROGRESS.Session.sslprotocols PROGRESS.Session.sslciphers
These needs to be set in the application config file.
Browser You may be using a web browser to connect to your PAS for OpenEdge or REST Services. In case your server is
configured for client authentication, you may see the following error when you hit a secured URL:
ERR_BAD_SSL_CLIENT_AUTH_CERT
This is because the server is configured to demand clients to present their certificates. The browser must then send a certificate to PAS for OpenEdge. Use the following these steps to configure the browser:
To import a certificate in the browser:
a. Open the Chrome browser.
Note: You can use any other browser, but the below steps are for Chrome. Other browsers have almost similar step.
b. Go to Settings > Show Advanced Settings. c. Scroll down to the HTTPS/SSL section. d. Click Manage Certificates.

22 | P a g e
e. Click Import… ->Next and browse $DLC/keys/requests. Ensure you choose All Files (*.*) in the
browse Window:
f. Select a client certificate (say clientCert.p12, located in $DLC/keys/requests). g. Click Next and enter the password in the window when prompted. h. Click Next and import the clientCert.p12:

23 | P a g e
15. DEBUGGING TOOLS
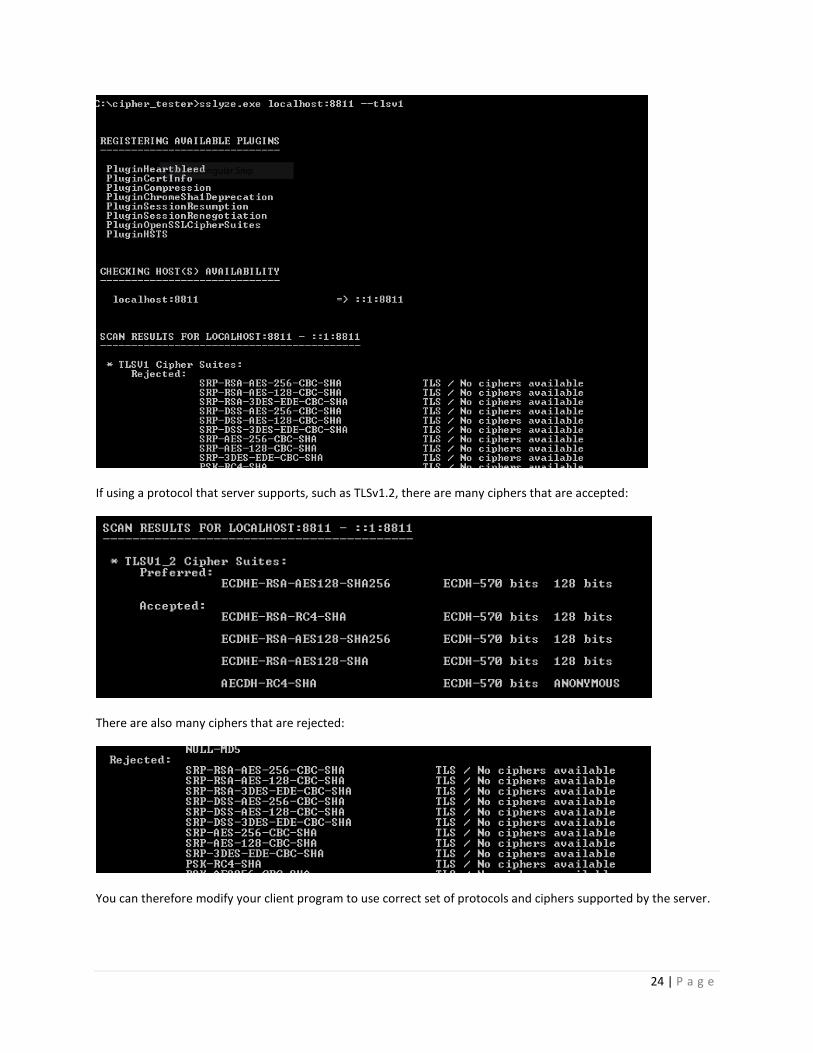
There are many tools available to debug a client and a server connection. sslyze (https://github.com/nabla-
c0d3/sslyze/releases) is an Open Source analyzer and helps to troubleshoot mismatched protocol and ciphers
between the client and the server. You may also use OpenSSL s_client and s_server to test your client and server
configuration. The format for using sslyze is:
sslyze.exe <HOST>:<PORT> --<PROTOCOL>
HOST is the hostname of the SSL server.
PORT is the port of the SSL server.
PROTOCOL is the list of protocols that is provided to check if the server accepts specified protocols.
The values, for example can be “--sslv2, --sslv3, --tlsv1, --tlsv1_1, --tlsv1_2”. If you see rejected for the
mentioned protocol, that means that the server will not accept the specified protocol.
For example:
Sslyze.exe localhost:8811 --tlsv1
The following screenshot shows that for all TLSv1 and supported cipher combinations, the connection is rejected:
24 | P a g e
If using a protocol that server supports, such as TLSv1.2, there are many ciphers that are accepted:
There are also many ciphers that are rejected:
You can therefore modify your client program to use correct set of protocols and ciphers supported by the server.


