Page 1
Question Exam Portal
DECLARATION
I hereby declare that, the project report entitled “QUESTION EXAM
PORTAL” In ROBOTUTOR is original and one has been carried out by me as a
student of B-TECH. in, ST.MARY’S COLLEGE OF ENGINEERING AND
TECHONOLOGY, and submitted for partial fulfillment of the requirement for the
award of degree of “B-TECH” for the academic year 2007 – 2011. .
Date:
Place: SIGNATURE OF THE HOD
-1-
Page 2
Question Exam Portal
DECLARATION
I hereby declare that, the project report entitled “QUESTION EXAM
PORTAL” In ROBOTUTOR is original and one has been carried out by me as a
student of B-TECH. in, ST.MARY’S COLLEGE OF ENGINEERING AND
TECHONOLOGY, and submitted for partial fulfillment of the requirement for the
award of degree of “B-TECH” for the academic year 2007 – 2011. .
Date:
Place: SIGNATURE OF THE STUDENT
-2-
Page 3
Question Exam Portal
1. INTRODUCTION
1.1. PURPOSE:
The challenge of automatically generating questions from reading materials for
educational practice and assessment. Our approach is to over generate questions. We use
manually written rules to perform a sequence of general purpose syntactic
transformations (e.g., subject-auxiliary inversion) to turn declarative sentences into
questions. The top-ranked questions could be filtered and revised by educators, or given
directly to students for practice. Here we restrict our investigation to questions about
factual information in texts.
The purpose of dynamic question generator is to take online test in an
efficient manner and no time wasting for checking the paper. The main objective of
Question generator is to efficiently evaluate the candidate thoroughly through a fully
automated system that not only saves lot of time but also gives fast results.
Question Generation (QG) is the task of generating reasonable questions from a
text. It is a relatively new research topic and has its potential usage in intelligent tutoring
systems and closed-domain question answering systems. Current approaches include
template or syntax based methods.
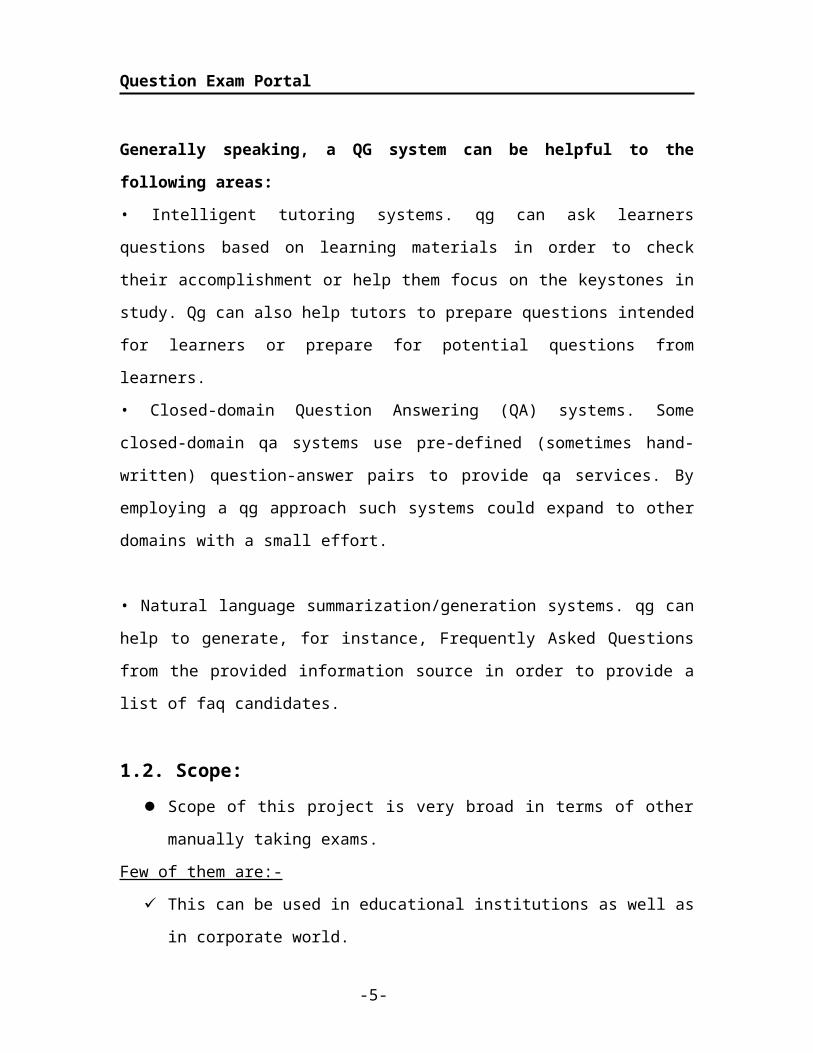
Generally speaking, a QG system can be helpful to the following areas:
• Intelligent tutoring systems. qg can ask learners questions based on learning materials in
order to check their accomplishment or help them focus on the keystones in study. Qg
can also help tutors to prepare questions intended for learners or prepare for potential
questions from learners.
• Closed-domain Question Answering (QA) systems. Some closed-domain qa systems
use pre-defined (sometimes hand-written) question-answer pairs to provide qa services.
-3-
Page 4
Question Exam Portal
By employing a qg approach such systems could expand to other domains with a small
effort.
• Natural language summarization/generation systems. qg can help to generate, for
instance, Frequently Asked Questions from the provided information source in order to
provide a list of faq candidates.
1.2. Scope:
Scope of this project is very broad in terms of other manually taking exams.
Few of them are:-
This can be used in educational institutions as well as in corporate world.
Can be used anywhere any time as it is a web based application (user location
doesn’t matter).
No restriction that examiner has to be present when the candidate takes the test
1.3. Module:
The dynamic question generator portal creating for taking online test has the following
stages:
Registration
Login
Generate Test
Reports
Registration:
For writing the test, the user has to register in the site with their valid information.
After the registration, the user can login into the site and can access the test.
Login:
There is a quality login window because this is more secure than other login
forms as in a normal login window there are multiple logins available so that more than
one person can access to test with there individual login. But in this project there is only
one login id i.e. administrator id and password by which a person enter the site. Hence it
is more secure and reliable than previously used on-line test examination.
-4-
Page 5
Question Exam Portal
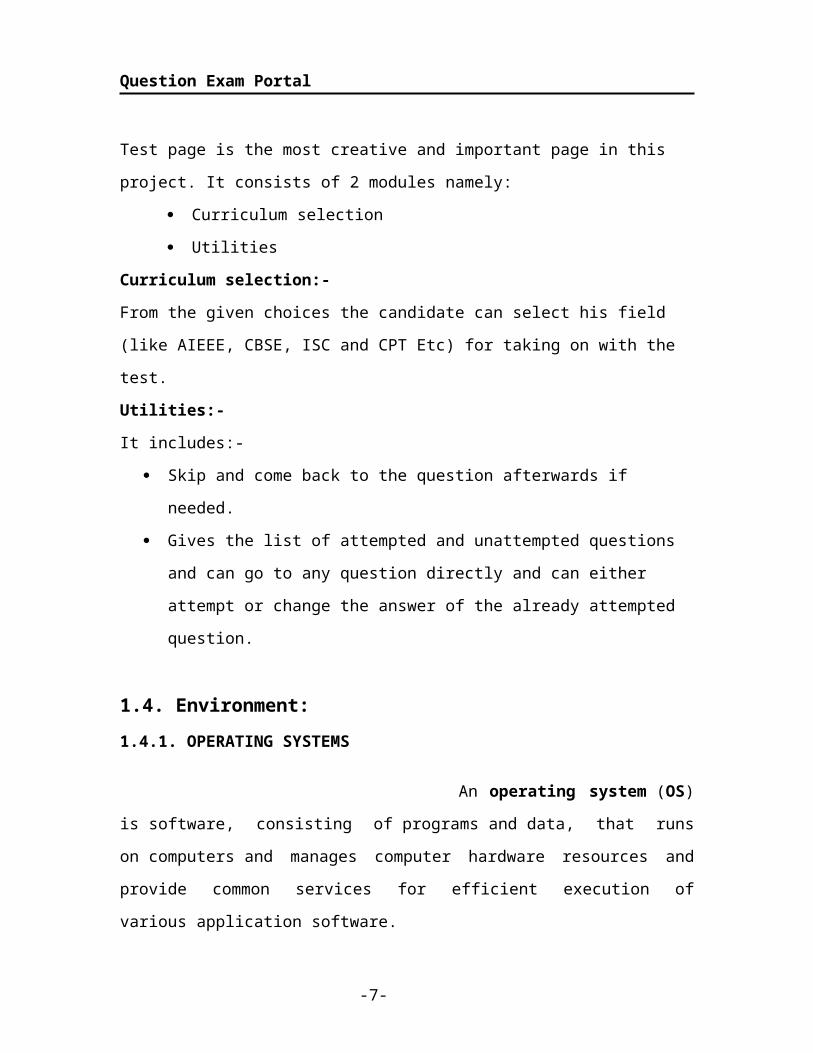
Generate Test:
Test page is the most creative and important page in this project. It consists of 2 modules
namely:
Curriculum selection
Utilities
Curriculum selection:-
From the given choices the candidate can select his field (like AIEEE, CBSE, ISC and
CPT Etc) for taking on with the test.
Utilities:-
It includes:-
Skip and come back to the question afterwards if needed.
Gives the list of attempted and unattempted questions and can go to any question
directly and can either attempt or change the answer of the already attempted
question.
1.4. Environment:
1.4.1. OPERATING SYSTEMS
An operating system (OS) is software, consisting of programs and data,
that runs on computers and manages computer hardware resources and provide common
services for efficient execution of various application software.
For hardware functions such as input and output and memory
allocation, the operating system acts as an intermediary between application programs
and the computer hardware, although the application code is usually executed directly
by the hardware and will frequently call the OS or be interrupted by it. Operating
systems are found on almost any device that contains a computer from cellular
phones and video game consoles to supercomputers and web servers.
Examples: Some of popular modern operating systems for personal computers are
Linux/GNU, Mac OS X, and Microsoft Windows.
WINDOWS OPERATING SYSTEMS
-5-
Page 6
Question Exam Portal
Microsoft has taken two separate approaches with the Windows operating
system: one is suited for home users while the other is intended for the IT professional.
The dual approach has resulted in home editions having more functionality in the way of
multimedia support. However, Microsoft home-based operating systems tend to have less
functionality in regard to security and networking. The professional versions for the
server environment are limited in multimedia features but offer enhanced networking
capability and security.
WINDOWS NT:
The Windows NT operating system was released in July of 1993. This
version was based on a new kernel and it was considered to be the first designed for a
professional platform. NT was later upgraded to function as a home user operating
system with the release of Windows XP.
WINDOWS 95:
In August of 1995, Windows 95 was released. This operating system
offered a consumer solution with significant changes to the user interface that also
utilized preemptive multitasking. Windows 95 was introduced to replace version 3.1 and
Windows for Workgroups as well as MS-DOS. The first Microsoft operating system to
use the plug and play system, Windows 95 revolutionized the desktop platform and
achieved mass popularity.
WINDOWS 98:
Next up was Windows 98, released in June of 1998. This operating system
was criticized for being slower and less reliable than version 95. Many of those issues
were addressed a year later with the unveiling of Windows 98 Second Edition
Microsoft continued their line of professional operating systems with
Windows 2000 in February of 2000. The consumer version was released as Windows ME
in September of that year. ME integrated several new technologies, most notably the
Universal Plug and Play.
-6-
Page 7
Question Exam Portal
WINDOWS XP:
Windows XP was released in October 2001. This version was based on the
NT kernel and managed to retain the extreme functionality of its home-based
predecessors. XP was widely embraced by the public and came in two different editions:
Home and Professional. The Home Edition provided exceptionable multimedia support
while the Professional edition offered excellent security and networking capabilities. XP
has since been succeeded by Vista but support will continue through April of 2009.
The Microsoft operating system received a tremendous upgrade with
Windows Vista on January 30, 2007. This version includes several new features with an
emphasis on security. Vista offers an improved shell design and user interface along with
numerous technical modifications. Despite its functionality, Windows Vista has received
criticism.
WINDOWS-7:
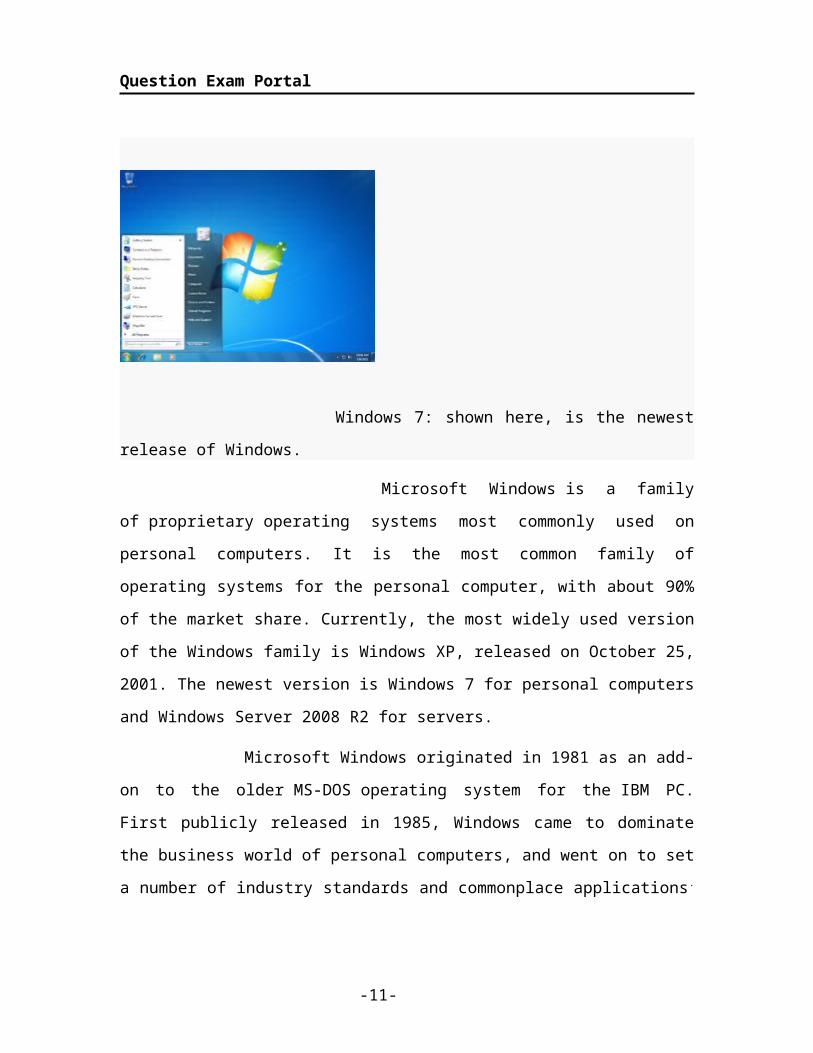
Windows 7: shown here, is the newest release of Windows.
Microsoft Windows is a family of proprietary operating systems most
commonly used on personal computers. It is the most common family of operating
systems for the personal computer, with about 90% of the market share. Currently, the
most widely used version of the Windows family is Windows XP, released on October
25, 2001. The newest version is Windows 7 for personal computers and Windows Server
2008 R2 for servers.
-7-
Page 8
Question Exam Portal
Microsoft Windows originated in 1981 as an add-on to the older MS-
DOS operating system for the IBM PC. First publicly released in 1985, Windows came to
dominate the business world of personal computers, and went on to set a number of
industry standards and commonplace applications. Beginning with Windows XP, all
modern versions are based on the Windows NT kernel.
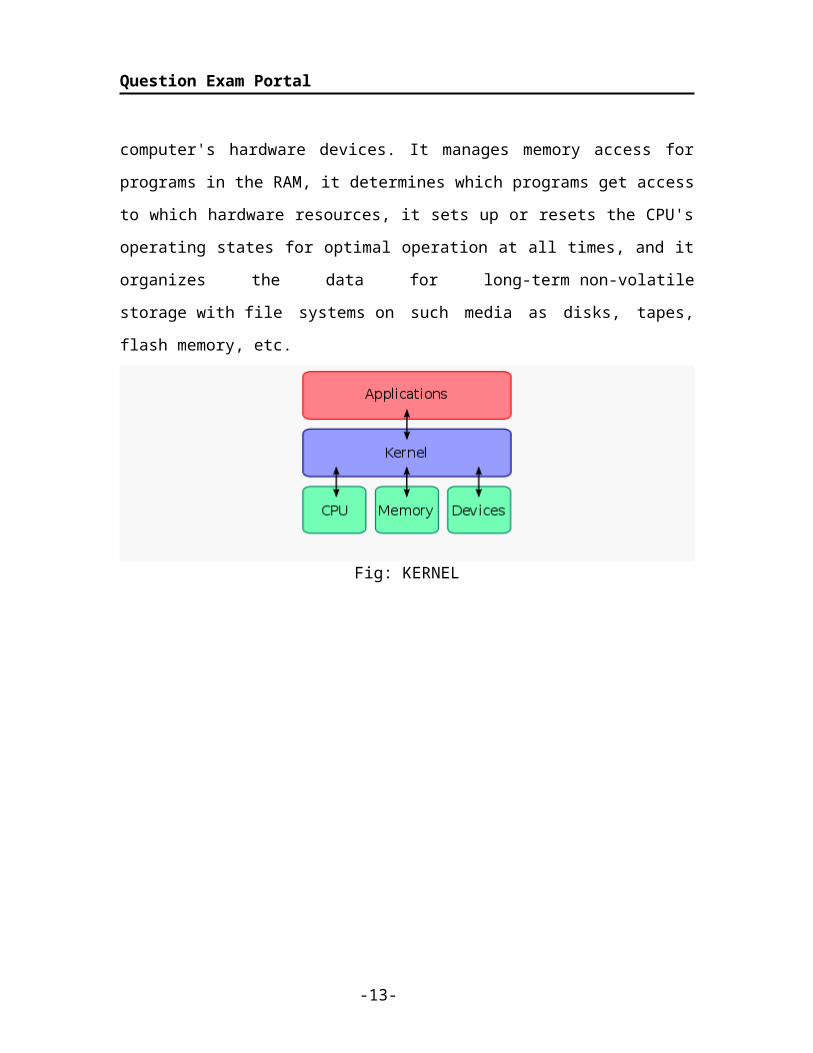
1.4.2. KERNEL:
The kernel is a program that constitutes the central core of a
computer operating system. It has complete control over everything that occurs in the
system. A kernel can be contrasted with a shell (such as bash, csh or ksh in Unix-
like operating systems), which is the outermost part of an operating system and a
program that interacts with user commands.
The kernel itself does not interact directly with the user, but rather
interacts with the shell and other programs as well as with the hardware devices on the
system, including the processor i.e., memory and disk drives. The kernel is the first part
of the operating system to load into memory during booting (i.e., system startup), and it
remains there for the entire duration of the computer session because its services are
required continuously.
Thus it is important for it to be as small as possible while still providing
all the essential services needed by the other parts of the operating system and by the
various application programs. The firmware and device drivers, the operating system
provides the most basic level of control over all of the computer's hardware devices. It
manages memory access for programs in the RAM, it determines which programs get
access to which hardware resources, it sets up or resets the CPU's operating states for
optimal operation at all times, and it organizes the data for long-term non-volatile
storage with file systems on such media as disks, tapes, flash memory, etc.
-8-
Page 9
Question Exam Portal
Fig: KERNEL
2. SYSTEM ANALYSIS
2.1 Existing System:
-9-
Page 10
Question Exam Portal
The whole process of assigning test and evaluating their scores after the test, was
done manually till date. Processing the test paper i.e. checking and distributing respective
scores used to take time when the software was not installed.
2.1.1. Drawbacks:
The current system is very time consuming.
It is very difficult to analyze the exam manually.
To take exam of more candidates more invigilators are required but no need of
Invigilator in case of on line exam.
Results are not precise as calculation and evaluations are done manually.
The chances of paper leakage are more in current system as compared to proposed
system.
Result processing takes more time as it is done manually
2.2. Proposed System:
The dynamic question generation portal created for taking online test has following
features:
In comparison to the present system the proposed system will be less time
consuming and is more efficient.
Analysis will be very easy in proposed system as it is automated
Result will be very precise and accurate and will be declared in very short span of
time because calculation and evaluations are done by the simulator itself.
The proposed system is very secure as no chances of leakage of question paper as
it is dependent on the administrator only.
The logs of appeared candidates and their marks are stored and can be backup for
future use.
2.3 Architecture Analysis:
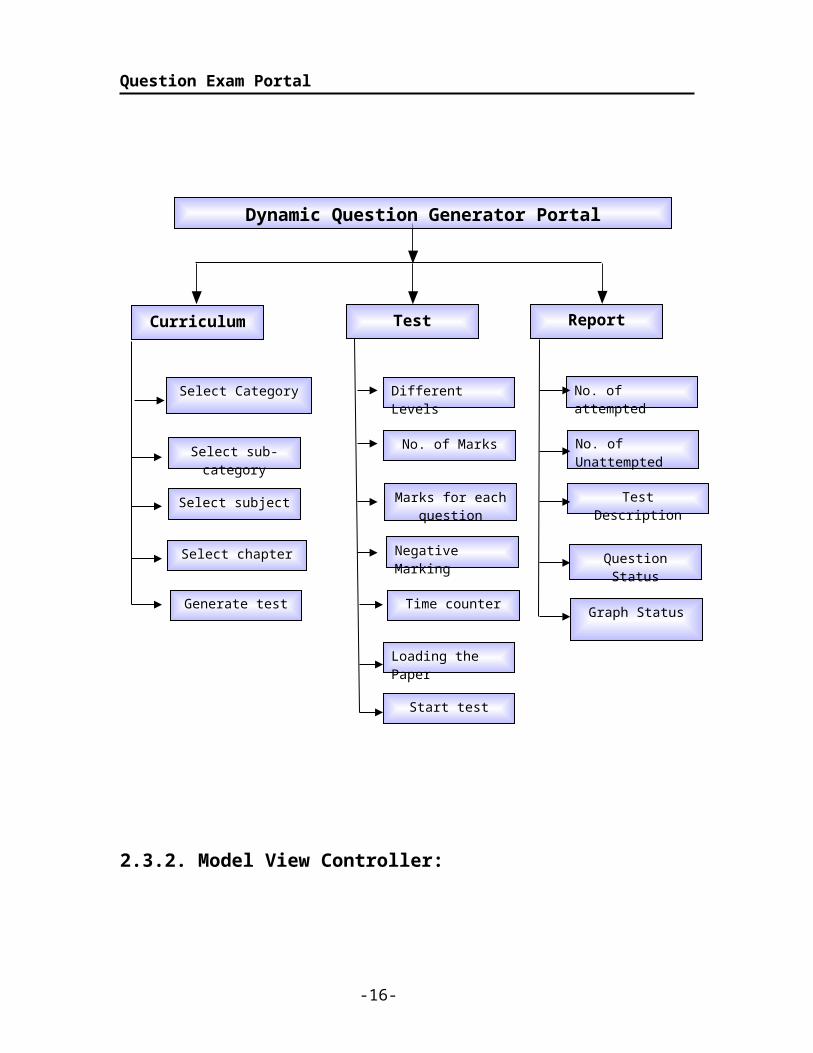
2.3.1. Hierarchical Model:
-10-
Page 11
Question Exam Portal
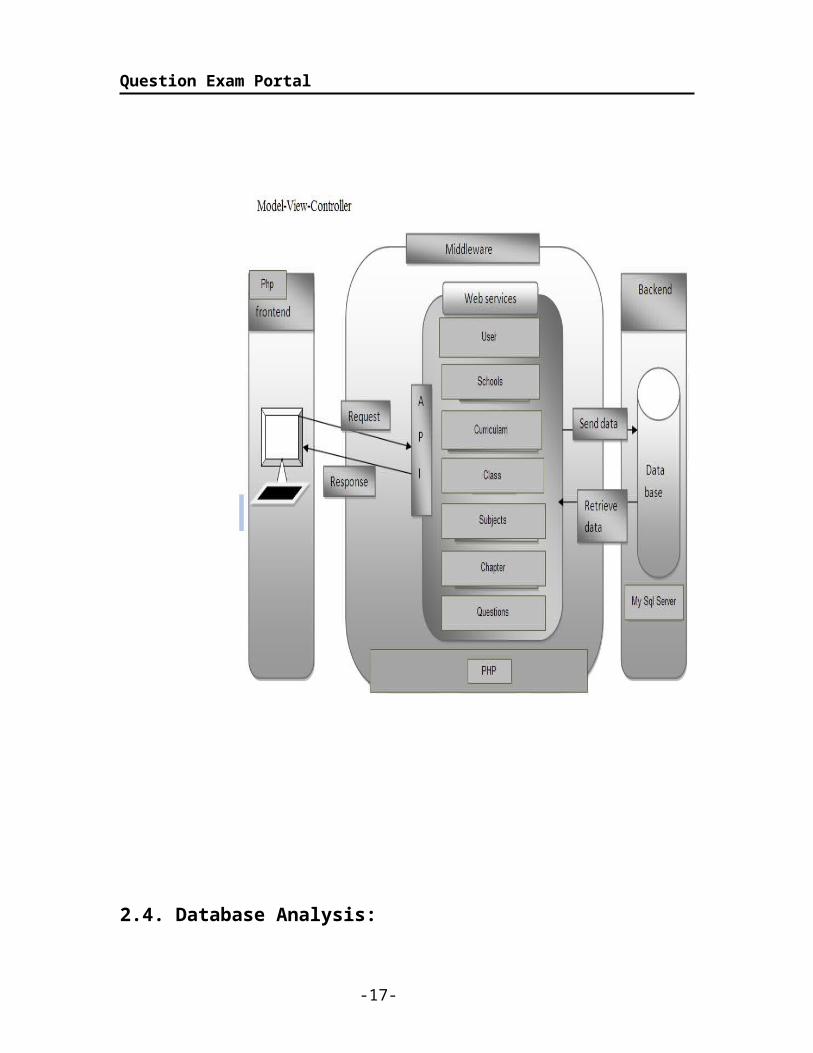
2.3.2. Model View Controller:
-11-
ReportCurriculum
Dynamic Question Generator Portal
No. of attempted
No. of Unattempted
Test Description
Graph Status
Question Status
Select Category
Select sub-category
Select subject
Generate test
Select chapter
Test
Different Levels
No. of Marks
Marks for each question
Time counter
Negative Marking
Loading the Paper
Start test
Page 12
Question Exam Portal
2.4. Database Analysis:
-12-
Page 13
Question Exam Portal
Database design is an important place in designing a system. During this phase care
should be taken to avoid redundancy of information storing into a database, since it leads
to wastage of memory space.
2.4.1. Normalization Techniques:
Normalization is a process of simplifying the relationship between data elements
in a record. Through normalization a collection of data in a records structure is replaced
by successive record structures that are simpler and more predictable and therefore more
manageable.
First Normal Form
A relation is said to be in first normal form if the values in the relation are atomic
for every attribute in the relation .By this we mean simply that no attribute value can be a
set of values or as it sometimes expressed, a repeating group.
Second Normal Form
A relation is said to be in second normal form if it is in first normal form and it should
satisfy any one of the following rules.
Primary key is a not a composite primary key
No non-key attribute is fully functionally dependent on full set of primary key
Third Normal Form
A relation is said to be in third normal form if it is in second normal form and if their
exits no transitive dependencies
Transitive Dependency
If two non-key attributes depends on each other as well as on the primary key then they
are said to be transitively dependent. the above normalization principles where applied to
decompose the data in multiple tables there by making the data to be maintained in a
consistent state.
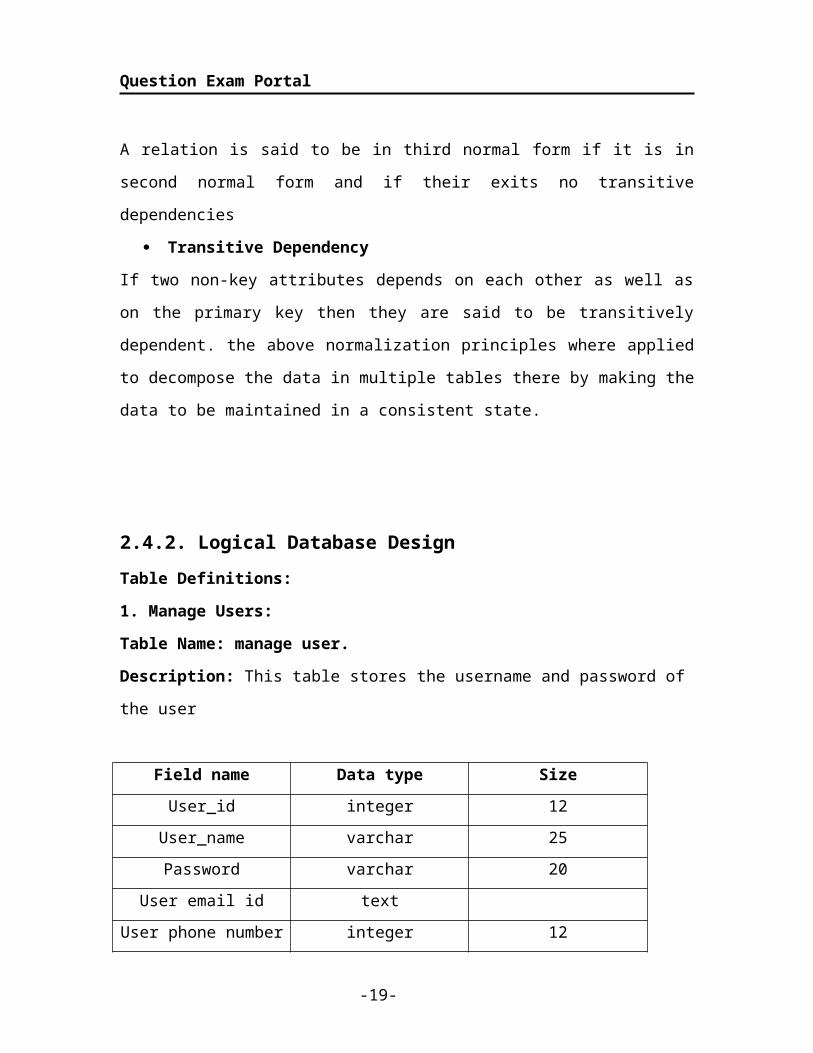
2.4.2. Logical Database Design
Table Definitions:
1. Manage Users:
-13-
Page 14
Question Exam Portal
Table Name: manage user.
Description: This table stores the username and password of the user
Field name Data type Size
User_id integer 12
User_name varchar 25
Password varchar 20
User email id text
User phone number integer 12
User address text
2. Manage Schools:
Table Name: manage school
Description: This table stores the school name, school location, email id of the user
Field Name Data Type Size
School_id int 10
School_Name text 20
School_location text 20
Curriculum_id int 10
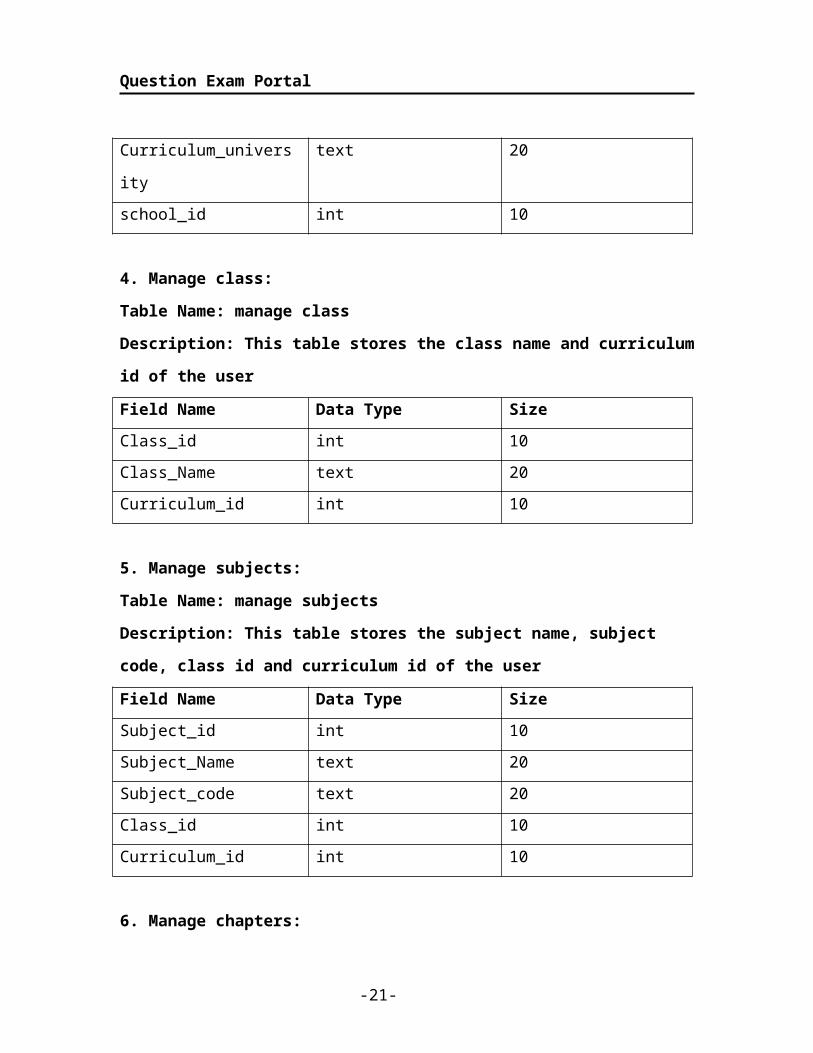
3. Manage curriculum:
Table Name: manage curriculum
Description: This table stores the curriculum name and Curriculum University of
the user
-14-
Page 15
Question Exam Portal
Field Name Data Type Size
Curriculum_id int 10
Curriculum_Name text 20
Curriculum_university text 20
school_id int 10
4. Manage class:
Table Name: manage class
Description: This table stores the class name and curriculum id of the user
Field Name Data Type Size
Class_id int 10
Class_Name text 20
Curriculum_id int 10
5. Manage subjects:
Table Name: manage subjects
Description: This table stores the subject name, subject code, class id and
curriculum id of the user
Field Name Data Type Size
Subject_id int 10
Subject_Name text 20
Subject_code text 20
Class_id int 10
Curriculum_id int 10
6. Manage chapters:
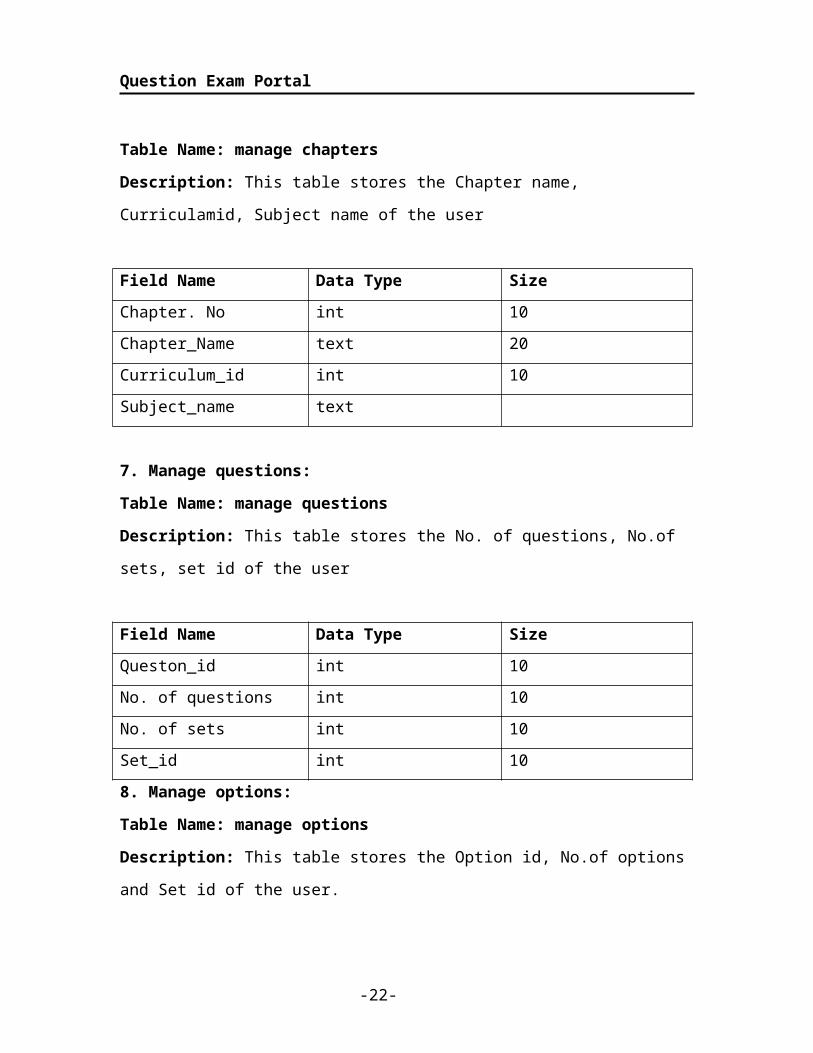
Table Name: manage chapters
Description: This table stores the Chapter name, Curriculamid, Subject name of the user
Field Name Data Type Size
-15-
Page 16
Question Exam Portal
Chapter. No int 10
Chapter_Name text 20
Curriculum_id int 10
Subject_name text
7. Manage questions:
Table Name: manage questions
Description: This table stores the No. of questions, No.of sets, set id of the user
Field Name Data Type Size
Queston_id int 10
No. of questions int 10
No. of sets int 10
Set_id int 10
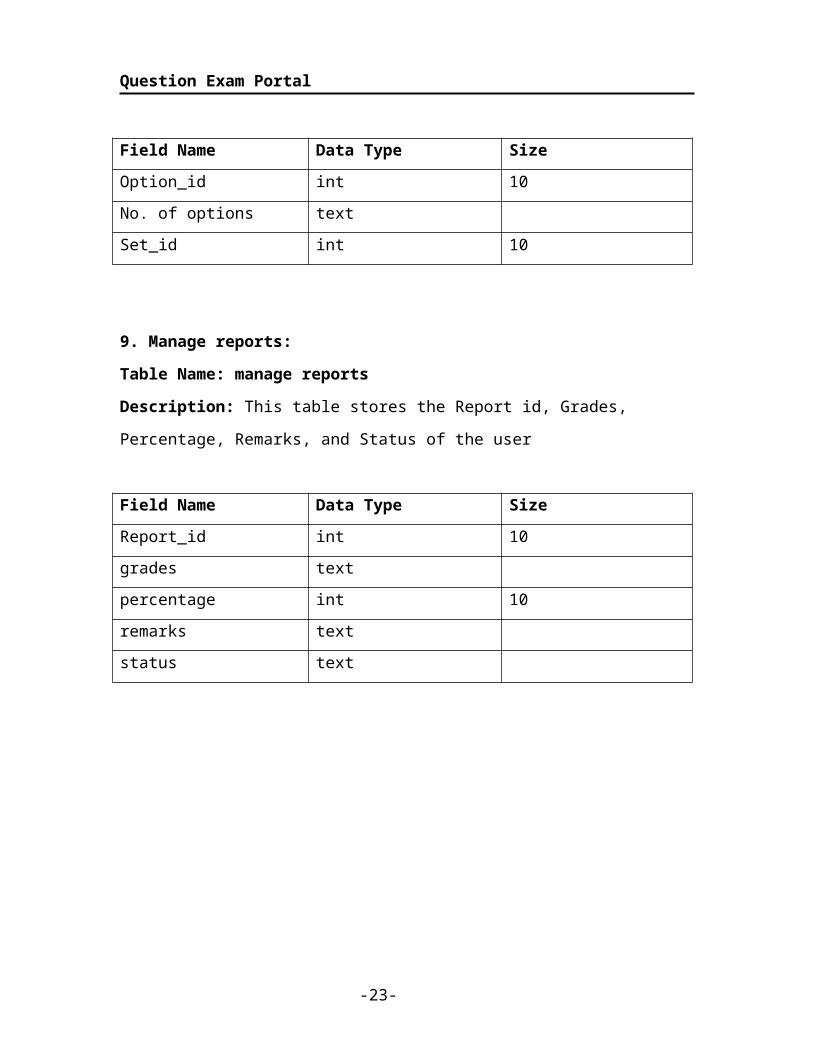
8. Manage options:
Table Name: manage options
Description: This table stores the Option id, No.of options and Set id of the user.
Field Name Data Type Size
Option_id int 10
No. of options text
Set_id int 10
9. Manage reports:
Table Name: manage reports
Description: This table stores the Report id, Grades, Percentage, Remarks, and Status of
the user
Field Name Data Type Size
-16-
Page 17
Question Exam Portal
Report_id int 10
grades text
percentage int 10
remarks text
status text
3. FEASABILITY REPORT
3.1. ECONOMIC FEASIBILITY
Economic analysis is most frequently used for evaluation of the effectiveness of
the system. More commonly knows as cost/benefit analysis the procedure is to determine
the benefit and saving that are expected from a system and compare them with costs,
decisions is made to design and implement the system.
-17-
Page 18
Question Exam Portal
This part of feasibility study gives the top management the economic justification
for the new system. This is an important input to the management the management,
because very often the top management does not like to get confounded by the various
technicalities that bound to be associated with a project of this kind. A simple economic
analysis that gives the actual comparison of costs and benefits is much more meaningful
in such cases.
In the system, the organization is most satisfied by economic feasibility. Because,
if the organization implements this system, it need not require any additional hardware
resources as well as it will be saving lot of time.
3.2. TECHNICAL FEASIBILITY
Technical feasibility centers on the existing manual system of the test
management process and to what extent it can support the system. According to
feasibility analysis procedure the technical feasibility of the system is analyzed and the
technical requirements such as software facilities, procedure, inputs are identified. It is
also one of the important phases of the system development activities.
The system offers greater levels of user friendliness combined with greater
Processing speed. Therefore, the cost of maintenance can be reduced. Since, processing
speed is very high and the work is reduced in the maintenance point of view management
convince that the project is operationally feasible.
4. SYSTEM CONFIGURATON
The selection of hardware is very important in the existence and proper working
of any software. When selecting hardware, the size and requirements are also important.
4.1. Software Requirements:
Operating system : Windows XP or any latest version of windows
Web Browser : Mozilla Firefox or any browser
-18-
Page 19
Question Exam Portal
Front- End : PHP
Back- End : MS SQL SERVER 2008 EXPRESS
Project will be done in PHP as front end and MySQL as back end.
4.2. Hardware Requirements:
Processor : INTEL Pentium 4
RAM : 512MB
Hard Disk Drive : 40GB
5. SELECTED SOFTWARE DETAILS
5.1. PHP:
Since the Internet is packed with millions of acronyms, PHP is another
one! PHP stands for PHP: Hypertext Preprocessor. Yes, the acronym is recursive and for
the purposes of this class, we will just call it “PHP.”
PHP is a server-side scripting language and is very similar to C, Java, and
Perl. PHP allows the Programmer to dynamically generate content, instead of statically
like regular ‘ol’ HTML. This tutorial will cover uses of PHP from simple data processing
of forms to parsing a page for relevant information.
-19-
Page 20
Question Exam Portal
PHP Hosts:
Free webhosting services with PHP exist, but a function like sending e-mail
is probably disabled. Stanford (fortunately) provides limited PHP support sufficient
enough for the scope of this course
Introduction to PHP: WHY PHP?
Currently the main alternatives to PHP are
• ASP Active Server Pages
• JSP Java Server Pages
• CFML Cold Fusion Markup Language
ASP is proprietary belonging to Microsoft and requires MS server in order
to run. ASP allows you to combine HTML, Vbscript, JavaScript and reusable Active X
components to create dynamic web pages. ASP is costly to implement due to the reliance
on MS products. It is slower to execute than PHP, ASP has a steeper learning curve
especially for first time web developers. ASP can run on a Linux server using Apache
and “Chill soft ASP” but is generally limited to Windows 2000 servers.
JSP has both commercial and open source versions. JSP is not very
popular with Internet service providers and they usually charge an additional fee for this
service. JSP is more difficult to learn, however the syntax is similar to PHP & JavaScript.
There are different versions of JSP that vary in speed, stability and quality.
ColdFusion MX is a proprietary technology belonging to Macromedia. It
is tag based like HTML so it is easy to learn. Because it is similar to HTML it can
sometimes be difficult to identify server side code from client side code.
PHP is free, nonproprietary and more than 6 million web sites use PHP. It
is the second most popular scripting language and its use is growing faster than any other
scripting language. Based on search engine popularity PHP’s growth per year is 4694%
compared to ASP growth of 278%.
PHP is available on approx 40% of all Apache Servers. PHP is suited to
development of ecommerce sites and a wide range of database connectivity. PHP runs on
UNIX, Windows and Mac platforms. PHP can also be used to create shockwave, PDF
files and parse XML. PHP was developed so it could be to inserted directly into HTML
documents.
-20-
Page 21
Question Exam Portal
Embedding PHP into HTML includes:
1) Quicker response time
2) Improved security
3) Transparency to the end user
PHP language syntax is borrowed from C with elements of Perl, C++ and Java.
PHP is also integrates easily with MySQL which is a free non-proprietary
database. MySQL can be used to create large powerful databases and because it is
free is often favored by non-profit organizations.
Introduction to PHP4:
PHP is a server side HTML embedded scripting language that allows you to
make web sites dynamic, connect to databases, process forms and adds many other
features to your web site.
Before you create web pages with PHP you need to the following items:
1) Install a server on your computer e.g. Microsoft IIs, Apache or Omnipro
2) Download, install and configure PHP (it’s free)
3) You will require an Internet account that supports PHP
4) If you plan to work with MySQL you ISP will need to offer this feature (MySQL is
free, but MySQL hosting usually is not) – you can test your database locally
Since MS IIs server comes with Windows OS, we will be using this server, you can use
any server but each server requires its own setup and configuration. Also if you put more
than one server on your computer make sure they are not running simultaneously. On a
good day server installation and PHP installation takes about 15 minutes. On a bad day it
can take quite a bit longer.
Steps:
1) Install MS IIs as directed – find the folder Inetpub\wwwroot and place a simple html
file into the folder with a message for testing. Make sure its on. Control
panel>Administrative tools>Personal web server. You may wish to make a shortcut to the
file on your desktop.
<Html>
<Head>
-21-
Page 22
Question Exam Portal
<Title>Test</title>
<Body>
<Center><h1>your server is working</h1></center>
</body>
</html>
Save the file in the folder Inetpub/wwwroot and name it test.html
Open your browser and load the file by typing in:
http://localhost/test.html
c:\Inetpub\wwwroot\test.html
http:// 192.168.1.103/test.html
2) Go to www.php.net>downloads>find or the latest version of PHP and download PHP
4.3.4 installer [1,043Kb] (CGI only, MySQL support built-in, packaged as Windows
installer to install and configure PHP, and automatically configure IIS, PWS and Xitami,
with manual configuration for other servers. N.B. no external extensions included) you
should turn the IIs server off before installing, and then turn back on after you installed
PHP.
3) Test whether or not PHP is working creates a small file and save it inside the www
root folder inside Inetpub.
Use Note page create the PHP test file
<? Php
Phpinfo ();
?>
Save as test.php or phpinfo.php then using your browser: type in the
URLhttp://localhost/php.info ();
If PHP is working you will see a screen with PHP version 4.3 and all of its
features – if you don’t, check that the server is on, uninstall and install PHP again.
4) Finally you need to configure the php.ini file stored in your c:\WINNT folder go to
this folder and select show all files>view as a list (not your WINNT folder may be on a
-22-
Page 23
Question Exam Portal
drive other than C :\). Double click on the php.ini file or load the file into notepad. This
file configures php and its settings. You should read it at least once to know what is in
there but to start you need to modify 3 settings on your computer. Use Notepad find
feature to locate these lines of code.
a) Cgi.force_redirect=0; (set to 0 i.e. false is required to work on IIs)
b) Error reporting = E_ALL change to
Error reporting = E_ALL &~ (E_NOTICE | E_USER_NOTICE);
If you don’t do this when you create forms you will get undefined variable errors
c) Register_globals = On
(or = 1) you will read this is a security risk, which is true if you used your
machine for a server on the Internet but if you are only using if for testing don’t worry.
You need to do this so you don’t get undefined variables with forms).
We will download, install and configure MySQL at a later time.
Another possible problem that could arise on some machines is that you
must turn the file permission for www.root file on. Right click on the folder>properties>
make sure the file sharing is turned on.
On some machines at SAIT the IIS files are on the machine inside I386
folder. Also make sure if Apache is on the machine it is turned off.
The following are some advantages of using someone else’s Web environment:
It’s easier than setting up your own: You just copy your Web pages onto the
other party’s computer, and that’s it. You don’t need to install any software or
hardware or resolve any computer problems. Someone else handles that for you.
Less technical skill is required: You need to understand only Web languages,
such as HTML and PHP. You don’t need to know about Internet connections,
Web servers, computer administration, and other technical things. Some people
are very interested in these things, but some are not.
The advantages of running your own Web environment are as follows:
-23-
Page 24
Question Exam Portal
Control: You get to make all the decisions. You can set up the Web environment
the way that works best for you.
Access: You can access the computer whenever you want to work on your Web
site.
Stability: You know the Web site will be there as long as you need it. You won’t
wake up one morning to discover that your Web hosting company has gone out of
business and you have two days to move your site.
Security: Because you control the Web environment, you are the only person
who needs to access the computer. You can keep it under lock and key. When you
use a Web hosting company, other people have access to the computer, and one of
them may be a bad guy who’s after your secrets.
PHP has many features designed specifically for use in Web sites, including the
following:
Interact with HTML forms: PHP can display an HTML form and process the
information that the user types in.
Communicate with databases: PHP can interact with databases to store
information from the user or retrieve information that is displayed to the user.
Generate secure Web pages: PHP allows the developer to create secure Web
pages that require users to enter a valid username and password before seeing the
Web page content.
PHP features make these and many other Web page tasks easy. PHP is only
server-side, meaning it can’t interact directly with the user’s computer. That means PHP
can’t initiate actions based on the status of the user’s computer, such as mouse actions or
screen size. Therefore, PHP alone can’t produce some popular effects, such as navigation
menus that drop down or change color. On the other hand, JavaScript, a client-side
scripting language, can’t access the server, limiting its possibilities. For example, you
can’t use JavaScript to store data on the server or retrieve data from the server. But wait!
You don’t have to choose. You can use JavaScript and PHP together to produce Web
pages that neither can produce alone. See Chapter 11 for details on using JavaScript and
PHP together.
-24-
Page 25
Question Exam Portal
5.2. HTML:
HTML, which stands for Hypertext Markup Language, is the predominant
markup language for web pages. HTML is the basic building-blocks of webpage.
HTML is written in the form of HTML elements consisting of tags,
enclosed in angle brackets (like <html>), within the web page content. HTML tags
normally come in pairs like <h1> and </h1>. The first tag in a pair is the start tag, the
second tag is the end tag (they are also called opening tags and closing tags).
The purpose of a web browser is to read HTML documents and compose
them into visual or audible web pages. The browser does not display the HTML tags, but
uses the tags to interpret the content of the page.
HTML elements form the building blocks of all websites. HTML allows
images and objects to be embedded and can be used to create interactive forms. It
provides a means to create structured documents by denoting structural semantics for text
such as headings, paragraphs, lists, links, quotes and other items. It can embed scripts in
languages such as JavaScript which affect the behavior of HTML WebPages.
Web browsers can also refer to Cascading Style Sheets (CSS) to define the
appearance and layout of text and other material. The W3C, maintainer of both the
HTML and the CSS standards, encourages the use of CSS over explicitly presentational
HTML markup.
MARKUP:
HTML markup consists of several key components, including elements
(and their attributes), character-based data types, character references and entity
references. Another important component is the document type declaration, which
triggers standards mode rendering.
-25-
Page 26
Question Exam Portal
The Hello world program, a common computer program employed for
comparing programming languages, scripting languages and markup languages is made
of 9 lines of code although in HTML newlines are optional:
Example:
<! doctype html>
<Html>
<Head>
<Title>Hello HTML</title>
</head>
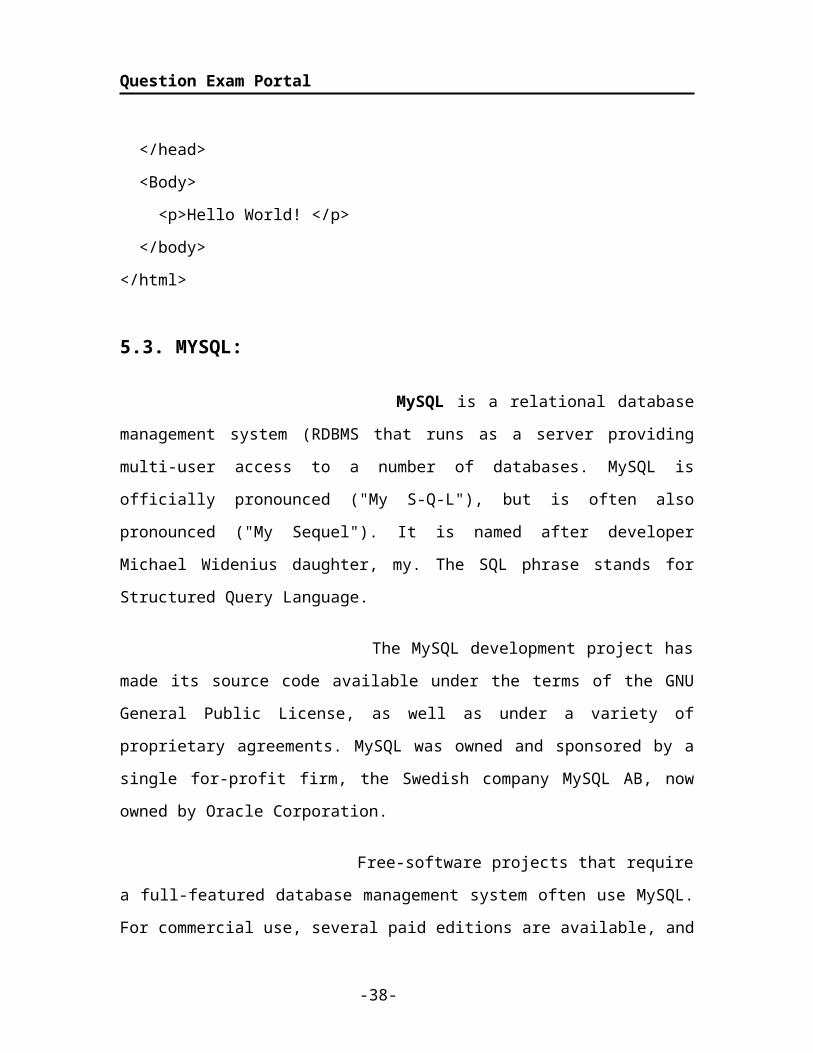
<Body>
<p>Hello World! </p>
</body>
</html>
5.3. MYSQL:
MySQL is a relational database management system (RDBMS that runs as
a server providing multi-user access to a number of databases. MySQL is officially
pronounced ("My S-Q-L"), but is often also pronounced ("My Sequel"). It is named after
developer Michael Widenius daughter, my. The SQL phrase stands for Structured Query
Language.
The MySQL development project has made its source code available under
the terms of the GNU General Public License, as well as under a variety of proprietary
agreements. MySQL was owned and sponsored by a single for-profit firm, the Swedish
company MySQL AB, now owned by Oracle Corporation.
Free-software projects that require a full-featured database management
system often use MySQL. For commercial use, several paid editions are available, and
offer additional functionality. Some free software project examples: Joomla, Word Press,
MyBB, phpBB, Drupal and other software built on the LAMP software stack. MySQL is
-26-
Page 27
Question Exam Portal
also used in many high-profile, large-scale World Wide Web products, including
Wikipedia, Google (though not for searches) and Face book.
USE:
MySQL is a popular choice of database for use in web applications, and is
a central component of the widely used LAMP web application software stack—LAMP
is an acronym for "Linux, Apache, MySQL, and Perl/PHP/Python".
PLATFORMS AND INTERFACES:
MySQL is written in C and C++. Its SQL parser is written in yacc, and a
home-brewed lexical analyzer named sql_lex.cc.
MySQL works on many different system platforms, including AIX, BSDi,
FreeBSD, HP-UX, eComStation, i5/OS, IRIX, Linux, Mac OS X, Microsoft Windows,
NetBSD, Novell NetWare, OpenBSD, Open Solaris, OS/2 Warp, QNX, Solaris,
Symbian, SunOS, SCO Open Server, SCO UnixWare, Sanos and Tru64. A port of
MySQL to OpenVMS also exists.
Many programming languages with language-specific APIs include
libraries for accessing MySQL databases. These include MySQL Connector/Net for
integration with Microsoft's Visual Studio (languages such as C# and VB are most
commonly used) and the ODBC driver for Java. In addition, an ODBC interface called
MyODBC allows additional programming languages that support the ODBC interface to
communicate with a MySQL database, such as ASP or ColdFusion.
The HTSQL - URL based query method also ships with a MySQL adapter,
allowing direct interaction between a MySQL database and any web client via structured
URLs. The MySQL server and official libraries are mostly implemented in ANSI
C/ANSI C++.
-27-
Page 28
Question Exam Portal
Fig: MYSQL
DEPLOYMENT:
MySQL can be built and installed manually from source code, but this
can be tedious so it is more commonly installed from a binary package unless special
customizations are required. On most Linux distributions the package management
system can download and install MySQL with minimal effort, though further
configuration is often required to adjust security and optimization settings.
Though MySQL began as a low-end alternative to more powerful
proprietary databases, it has gradually evolved to support higher-scale needs as well. It is
still most commonly used in small to medium scale single-server deployments, either as a
component in a LAMP based web application or as a standalone database server. Much
of MySQL's appeal originates in its relative simplicity and ease of use, which is enabled
by an ecosystem of open source tools such as phpMyAdmin.
In the medium range, MySQL can be scaled by deploying it on more
powerful hardware, such as a multi-processor server with gigabytes of memory. There are
however limits to how far performance can scale on a single server, so on larger scales,
and multi-server MySQL deployments are required to provide improved performance and
reliability. A typical high-end configuration can include a powerful master database
which handles data write operations and is replicated to multiple slaves that handle all
read operations.
-28-
Page 29
Question Exam Portal
The master server synchronizes continually with its slaves so in the event of
failure a slave can be promoted to become the new master, minimizing downtime.
Further improvements in performance can be achieved by caching the results from
database queries in memory using memcached, or breaking down a database into smaller
chunks called shards which can be spread across a number of distributed server clusters.
COMMAND LINE:
MySQL ships with a suite of command-line tools for tasks such as querying
the database, backing up data, inspecting status, performing common tasks such as
creating a database, and many more. A variety of third-party command-line tools is also
available, including Maatkit, which is written in Perl.
FORKS OF MYSQL:
Drizzle – a fork targeted at the web-infrastructure and cloud computing markets.
The developers of the product describe it as a "smaller, slimmer and (hopefully)
faster version of MySQL". As such is planned to have many common MySQL
features stripped out, including stored procedures, query cache, prepared
statements, views, and triggers.
MariaDB – a community-developed branch of the MySQL database, the impetus
being the community maintenance of its free status under GPL as opposed to any
uncertainty of MySQL license status under its current ownership by Oracle. The
intent also being to maintain high fidelity with MySQL, ensuring a "drop-in"
replacement capability with library binary equivalency and exacting matching
with MySQL APIs and commands. It includes the XtraDB storage engine as a
replacement for InnoDB.
Percona Server – a fork that includes the XtraDB storage engine. It is an
enhanced version of MySQL that is fully compatible, and deviates as little as
possible from it, while still providing beneficial new features, better performance,
and improved instrumentation for analysis of performance and usage.
-29-
Page 30
Question Exam Portal
Our Delta– is best characterized as a source of binaries compiled with various
patches, including patches from MariaDB, Percona, and Google.
Solution Stack In computing, a solution stack is a set of software subsystems or
components needed to deliver a fully functional solution, e.g. a product or service.
5.4. DATABASE ENGINE
A database engine (or "storage engine") is the underlying software
component that a database management system (DBMS) uses to create, read, update and
delete (CRUD) data from a database. Most database management systems include their
own Application Programming Interface (API) that allows the user to interact with their
underlying engine without going through the user interface of the DBMS.
Many of the modern DBMS supports multiple database engines within the
same database. For example, MySQL supports InnoDB as well as MyISAM
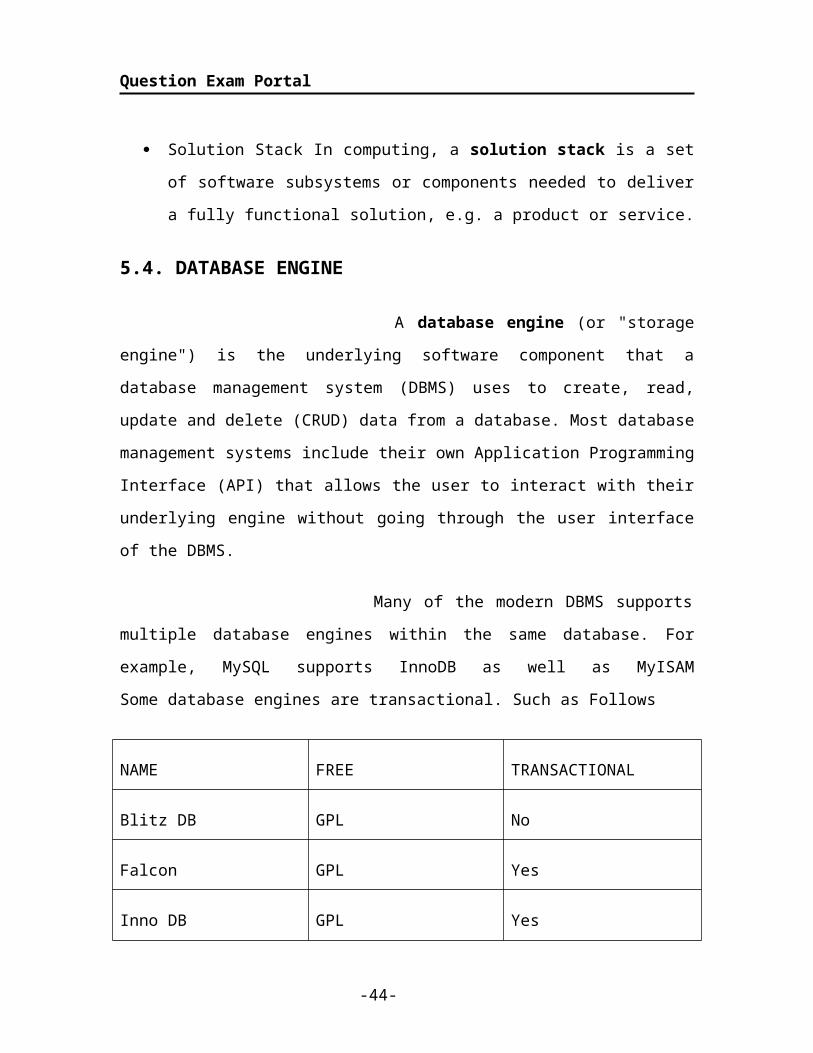
Some database engines are transactional. Such as Follows
NAME FREE TRANSACTIONAL
Blitz DB GPL No
Falcon GPL Yes
Inno DB GPL Yes
Maria GPL No
MyISAM GPL No
Xtra DB GPL Yes
Fig: Database Engines
-30-
Page 31
Question Exam Portal
INNO DB:
InnoDB is the default storage engine for MySQL as of MySQL 5.5. It
provides the standard ACID-compliant transaction features, along with foreign key
support (Declarative Referential Integrity). It is included as standard in most binaries
distributed by MySQL AB, the exception being some OEM versions.
InnoDB became a product of Oracle Corporation after their acquisition of
Innobase Oy in October 2005. The software is dual licensed; it is distributed under the
GNU General Public License, but can also be licensed to parties wishing to combine
InnoDB in proprietary software.
MYISAM:
MyISAM was the default storage engine for the MySQL relational
database management system versions prior to 5.5.It is based on the older ISAM code but
has many useful extensions. The major deficiency of MyISAM is the absence of
transactions support. Versions of MySQL 5.5 and greater have switched to the InnoDB
engine to ensure referential integrity constraints, and higher concurrency.
Each MyISAM table is stored on disk in three files. The files have names
that begin with the table name and have an extension to indicate the file type. MySQL
uses a .frm file to store the definition of the table, but this file is not a part of the
MyISAM engine, instead it is a part of the server. The data file has a .MYD (MYData)
extension. The index file has a .MYI (MY Index) extension.
ISAM:
ISAM stands for Indexed Sequential Access Method, a method for
indexing data for fast retrieval. ISAM was originally developed by IBM for mainframe
computers. Today the term is used for several related concepts:
Specifically, the IBM ISAM product and the algorithm it employs.
-31-
Page 32
Question Exam Portal
A database system where an application developer directly uses an Application
Programming Interface to search indexes in order to locate records in data files. In
contrast, a relational database uses a query optimizer which automatically selects
indexes.
An indexing algorithm that allows both sequential and keyed access to data. Most
databases now use some variation of the B-Tree for this purpose, although the
original IBM ISAM and VSAM implementations did not do so.
Most generally, any index for a database. Indexes are used by almost all
databases, both relational and otherwise.
-32-
Page 33
Question Exam Portal
6. SYSTEM DESIGN
6.1. UML Diagrams
The Unified Modeling Language (UML) is the industry-standard modeling
language used for specifying, visualizing, constructing and documenting the artifacts of a
software system. The UML is also effective for modeling business and other Non-
software systems.
One of the major goals of UML is to present a common modeling language that all
developers can use. It is a language whose vocabulary and rules focus on the conceptual
and physical representation of the system.
The UML uses Diagram to represent different views of the system being modeled.
The purpose of diagram is to present a set of modeled elements, which are rendered as
shapes and connectors.
Every complex system is best approached through a small set of nearly
independent views of a model; No single viewer is sufficient. Every model may be
expressed at different levels of fidelity. The best models are connected to reality.
The UML defines nine graphical diagrams:
1. Class Diagram
2. Object Diagram
3. Use-Case Diagram
4. Sequence Diagram
5. Collaboration Diagram
6. Statechart Diagram
7. Activity Diagram
8. Component Diagram
9. Deployment Diagram
-33-
Page 34
Question Exam Portal
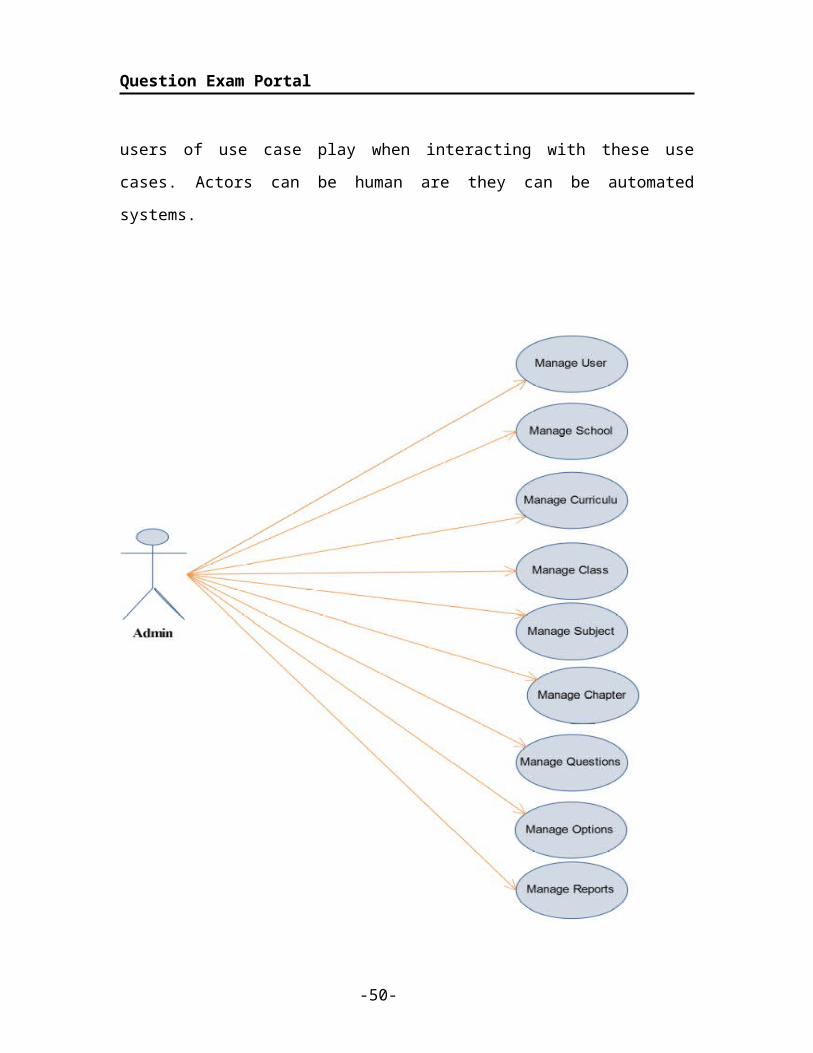
6.1.1 Use case diagrams:
A use case is a description of a set of sequences of actions, including variants that a
system performs to yield an observable result of value to an actor.
A use case involves the interaction of actors and the system. An actor represents a
coherent set of roles that users of use case play when interacting with these use cases.
Actors can be human are they can be automated systems.
-34-
Page 35
Question Exam Portal
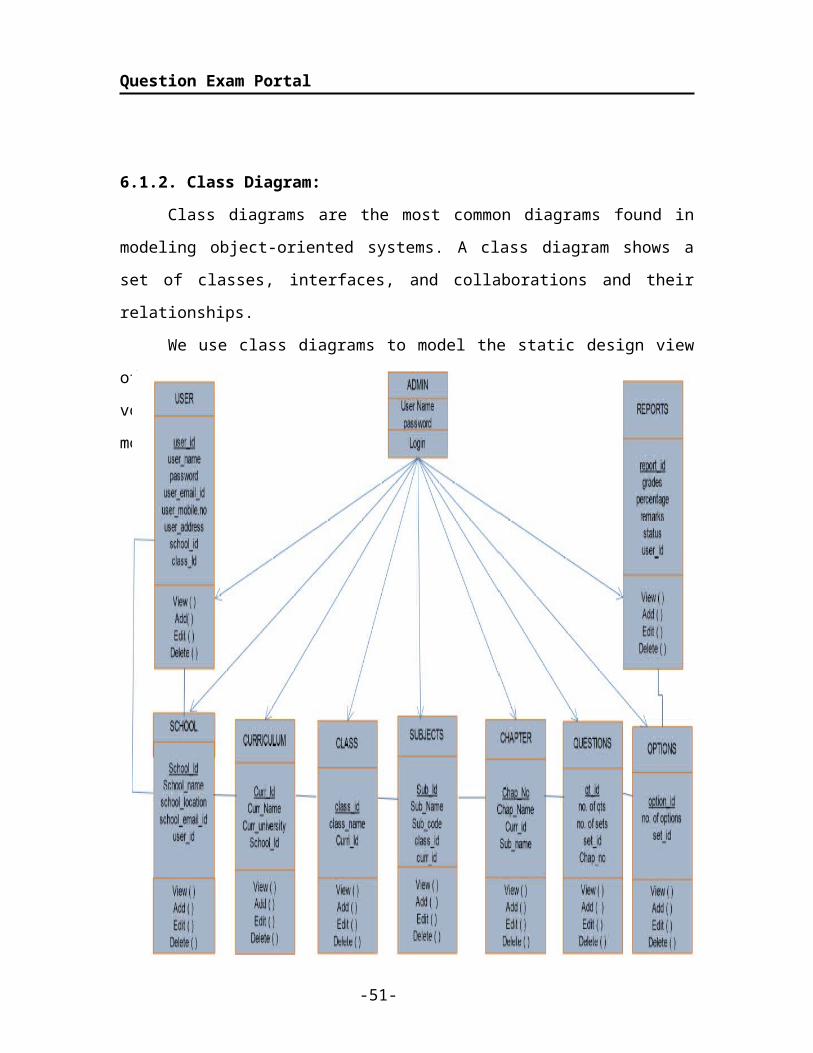
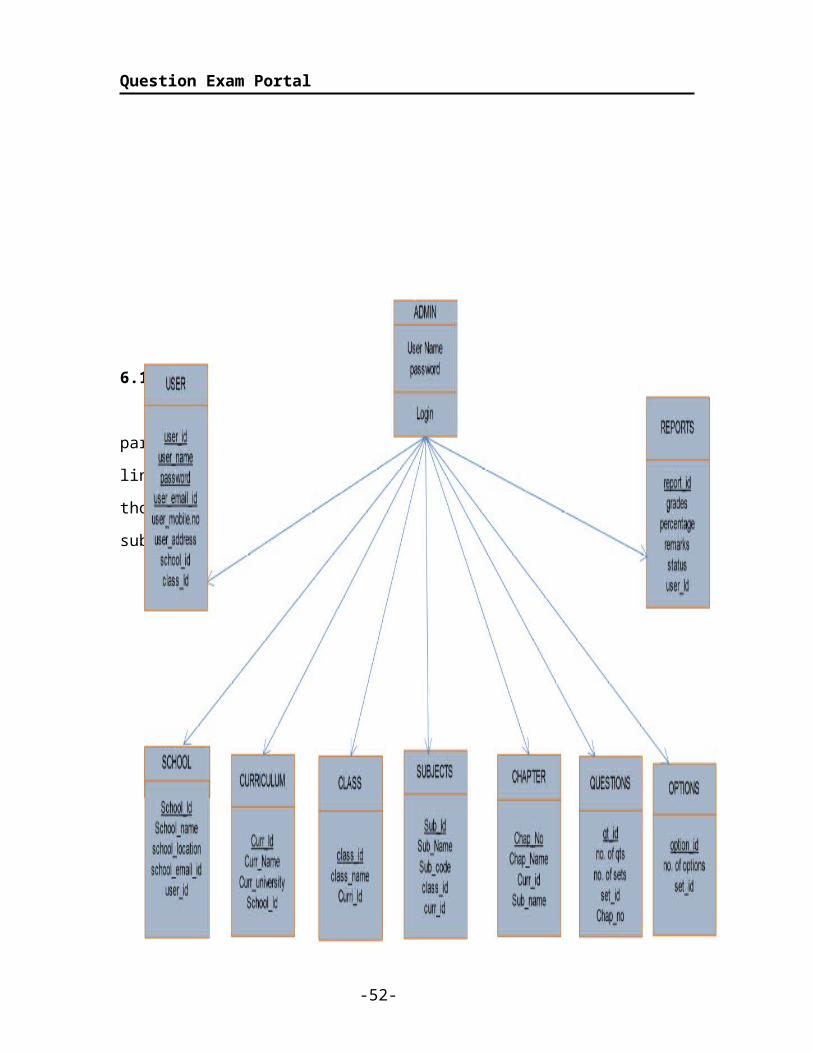
6.1.2. Class Diagram:
Class diagrams are the most common diagrams found in modeling object-oriented
systems. A class diagram shows a set of classes, interfaces, and collaborations and their
relationships.
We use class diagrams to model the static design view of a system. For the most
part, this involves modeling the vocabulary of the system, modeling collaborations, or
modeling schemas.
6.1.3. Object Diagram:
-35-
Page 36
Question Exam Portal
An Object diagram focuses on some particular set of object instances
and attributes, and the links between the instances. Here there are nine objects those are
admin, users, schools, curriculum, class, subjects, chapter, questions, options, reports.
6.1.5.Sequence Diagram:
An interaction diagram shows an interaction, consisting of a set of objects and
their relationships, including the messages that may be dispatched among them. A
-36-
Page 37
Question Exam Portal
sequence diagram is an interaction diagram that emphasizes the time ordering of
messages. Graphically, a sequence diagram is a table that shows objects arranged along
the X axis and messages, ordered in increasing time, along the Y axis.
6.1.5. Collaboration Diagram:
A collaboration diagram is an interaction diagram that emphasizes the
structural organization of the objects that send and receive messages. Graphically, a
collaboration diagram is a collection of vertices and arcs.
-37-
Page 38
Question Exam Portal
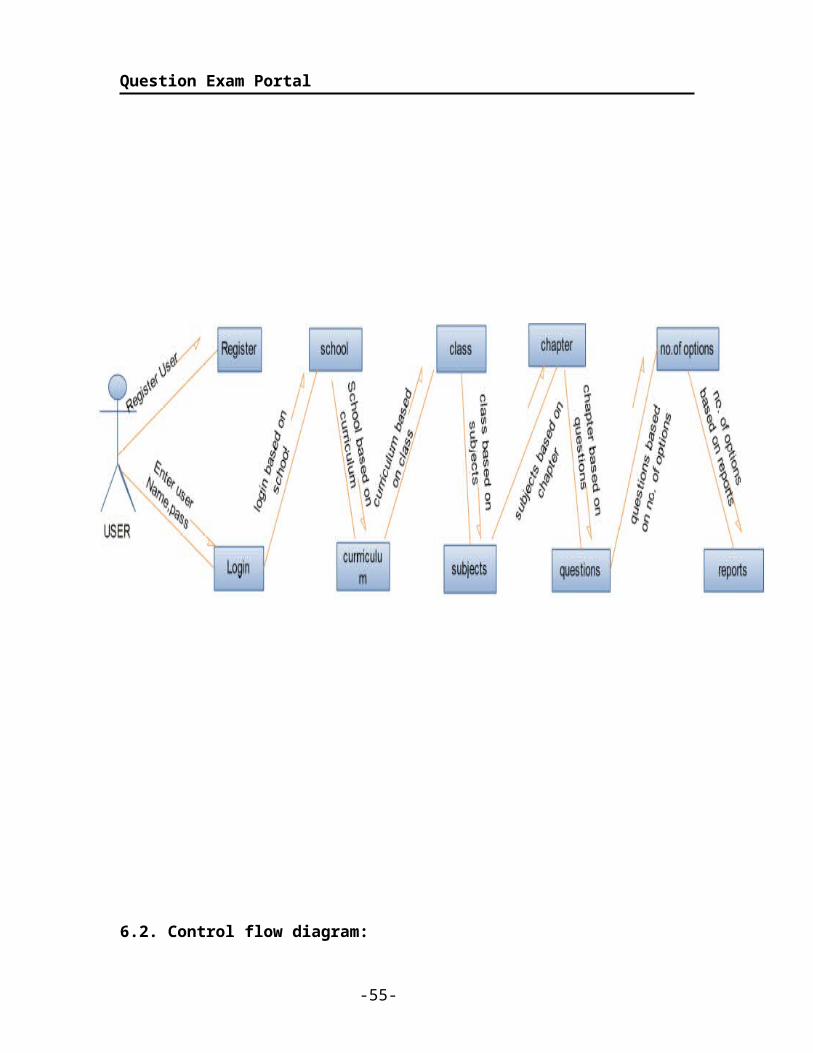
6.2. Control flow diagram:
A control flow diagram (CFD) is a diagram to describe the control flow of
a business process, process or program. A control flow diagram can consist of a
subdivision to show sequential steps, with if-then-else conditions, repetition, and/or case
conditions.
-38-
Page 39
Question Exam Portal
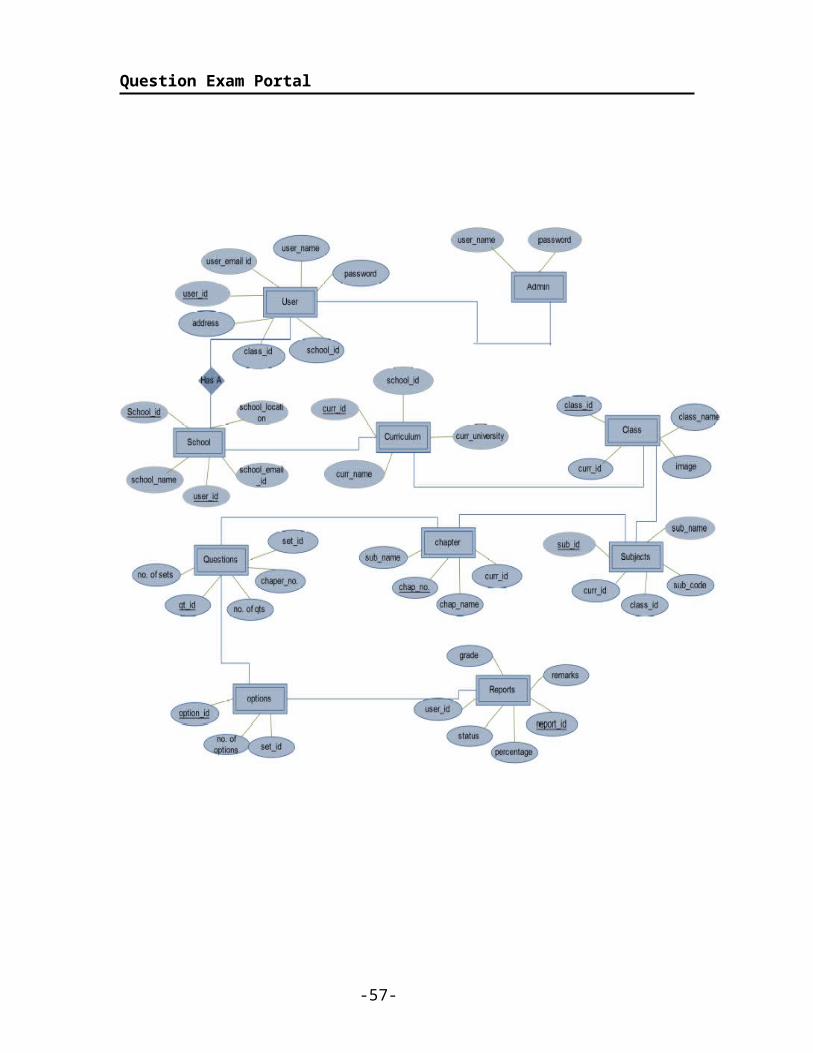
6.3. ER-diagram:
-39-
Page 40
Question Exam Portal
6.4 DATA FLOW DIAGRAMS
A data flow diagram is graphical tool used to describe and analyze
movement of data through a system. These are the central tool and the basis from which
the other components are developed. The transformation of data from input to output,
may be described logically and independently of physical components associated with the
system. These are known as the logical data flow diagrams.
The physical data flow diagrams show the actual implements and movement of
data between people, departments and workstations. A full description of a system
actually consists of a set of data flow diagrams. Using two familiar notations Yourdon,
-40-
Page 41
Question Exam Portal
Gane and Sarson notation develops the data flow diagrams. Each component in a DFD is
labeled with a descriptive name. Process is further identified with a number that will be
used for identification purpose.
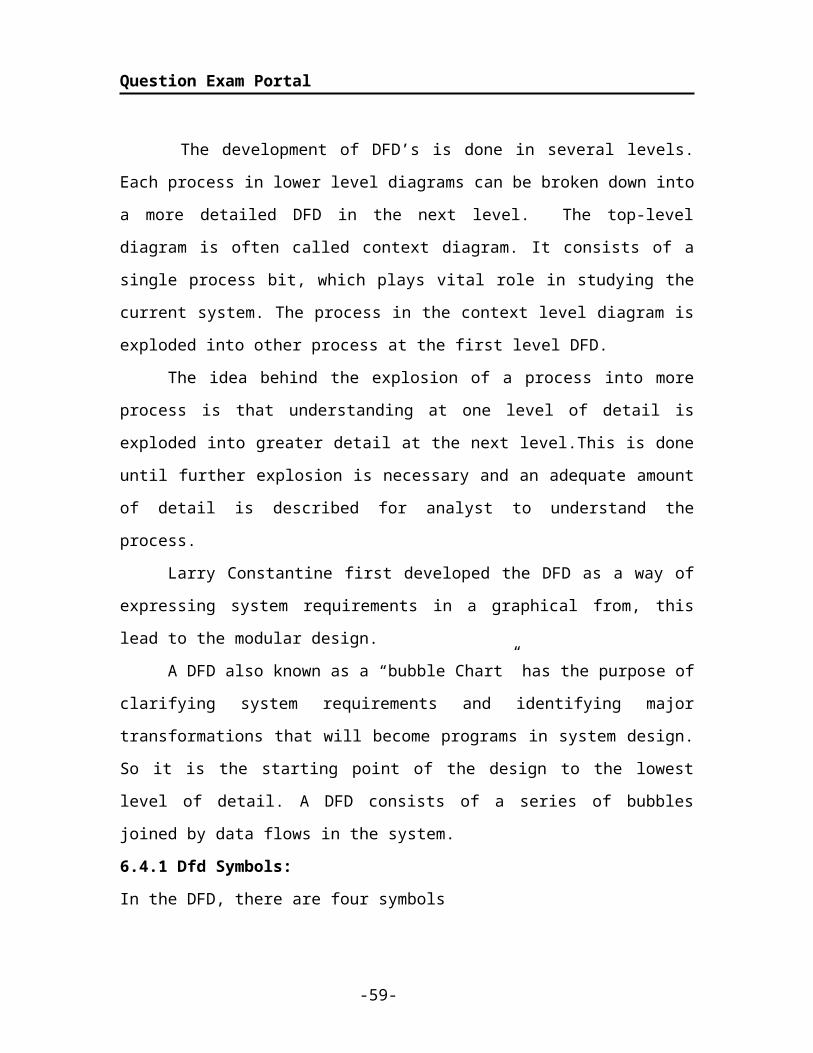
The development of DFD’s is done in several levels. Each process in lower level
diagrams can be broken down into a more detailed DFD in the next level. The top-level
diagram is often called context diagram. It consists of a single process bit, which plays
vital role in studying the current system. The process in the context level diagram is
exploded into other process at the first level DFD.
The idea behind the explosion of a process into more process is that
understanding at one level of detail is exploded into greater detail at the next level.This is
done until further explosion is necessary and an adequate amount of detail is described
for analyst to understand the process.
Larry Constantine first developed the DFD as a way of expressing system
requirements in a graphical from, this lead to the modular design.
A DFD also known as a “bubble Chart” has the purpose of clarifying system
requirements and identifying major transformations that will become programs in system
design. So it is the starting point of the design to the lowest level of detail. A DFD
consists of a series of bubbles joined by data flows in the system.
6.4.1 Dfd Symbols:
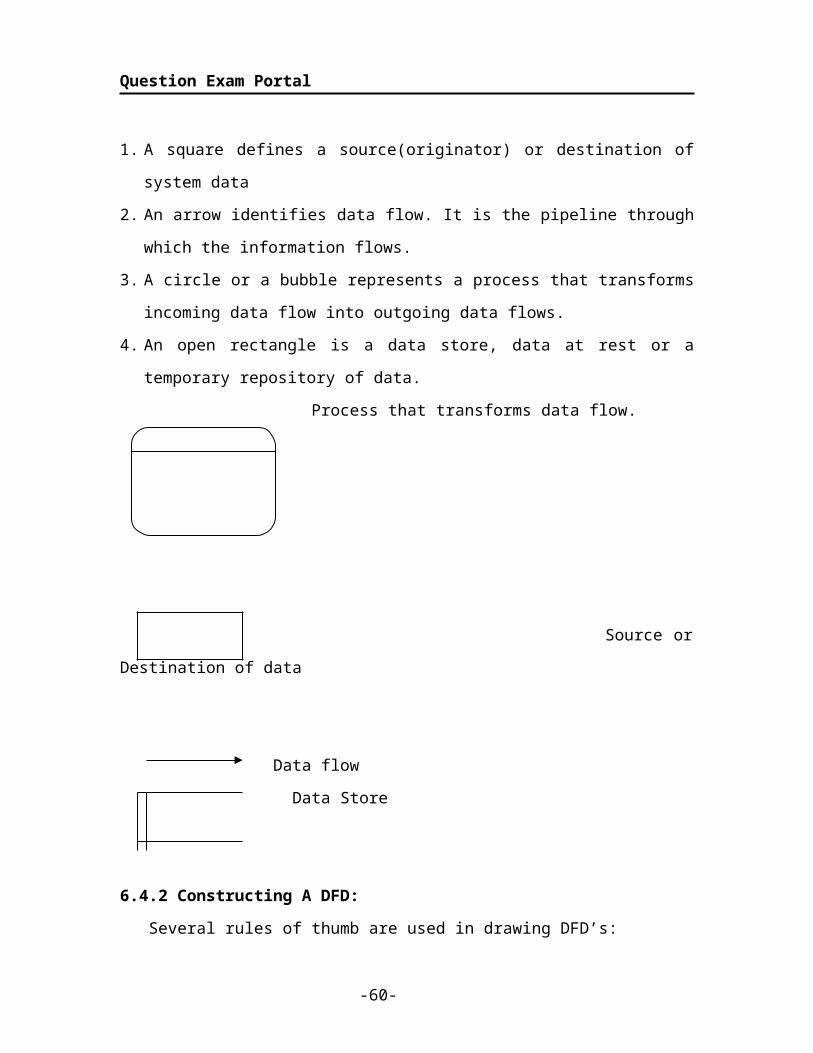
In the DFD, there are four symbols
1. A square defines a source(originator) or destination of system data
2. An arrow identifies data flow. It is the pipeline through which the information flows.
3. A circle or a bubble represents a process that transforms incoming data flow into
outgoing data flows.
4. An open rectangle is a data store, data at rest or a temporary repository of data.
Process that transforms data flow.
-41-
Page 42
Question Exam Portal
Source or Destination of data
Data flow
Data Store
6.4.2 Constructing A DFD:
Several rules of thumb are used in drawing DFD’s:
1. Process should be named and numbered for an easy reference. Each name should be
representative of the process.
2. The direction of flow is from top to bottom and from left to right. Data traditionally
flow from source to the destination although they may flow back to the source.One
way to indicate this is to draw long flow line back to a source.An alternative way is to
repeat the source symbol as a destination.Since it is used more than once in the DFD
it is marked with a short diagonal.
3. When a process is exploded into lower level details,they are numbered.
4. The names of data stores and destinations are written in capital letters. Process and
dataflow names have the first letter of each work capitalized.
Salient Features Of Dfd’s
1. The DFD shows flow of data but no control loops and decisions are controlled but
considerations do not appear on a DFD.
2. The DFD does not indicate the time factor involved in any process whether the
dataflows take place daily,weekly, monthly or yearly.
3. The sequence of events is not brought out on the DFD.
6.4.3. TYPES OF DATA FLOW DIAGRAMS
1. Current Physical
-42-
Page 43
Question Exam Portal
2. Current Logical
3. New Logical
4. New Physical
CURRENT PHYSICAL:
In Current Physical DFD process label include the name of people or their
positions or the names of computer systems that might provide some of the overall
system-processing. Label includes an identification of the technology used to process the
data. Similarly data flows and data stores are often labels with the names of the actual
physical media on which data are stored such as file folders, computer files, business
forms or computer tapes.
CURRENT LOGICAL:
The physical aspects at the system are removed as much as possible so that the
current system is reduced to its essence to the data and the processors that transform them
regardless of actual physical form.
NEW LOGICAL:
This is exactly like a current logical model. If the user is completely happy with
the functionality of the current system but had problems with how it was implemented
typically through the new logical model, will differ from current logical model while
having additional functions, absolute function removal and inefficient flows recognized.
NEW PHYSICAL:
The new physical represents only the physical implementation of the new system.
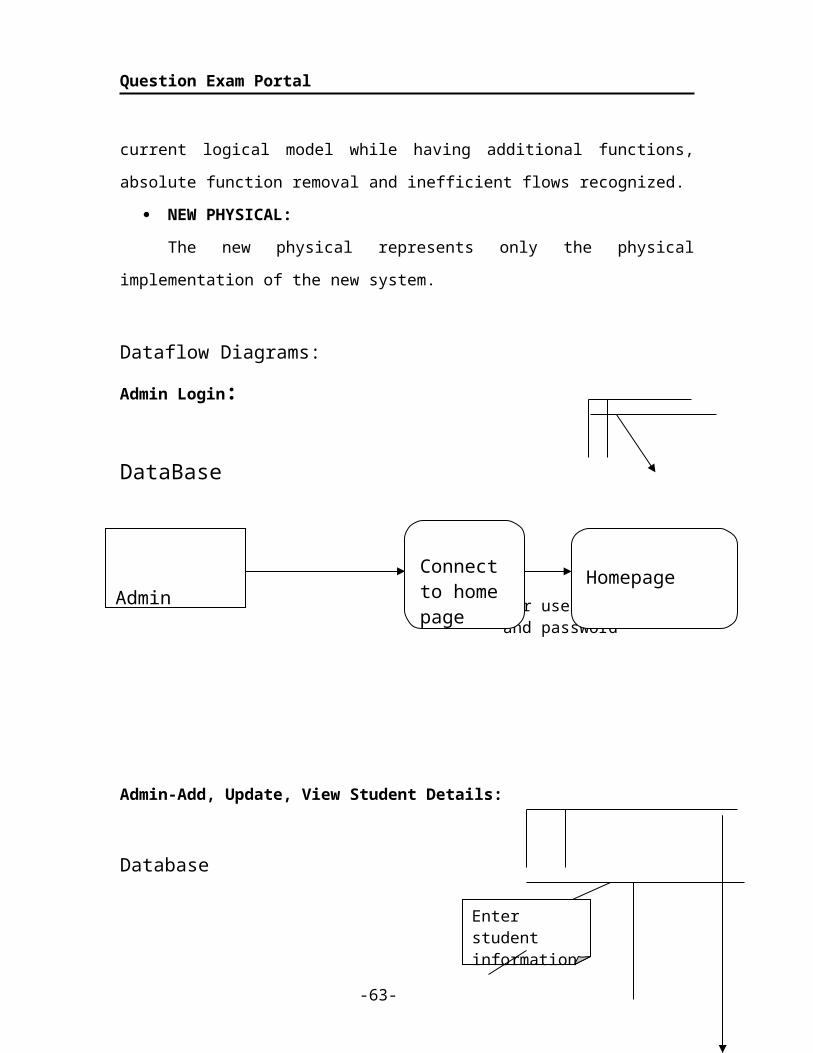
Dataflow Diagrams:
Admin Login:
DataBase
Enter username
-43-
Admin Connect to home page
Homepage
Page 44
Question Exam Portal
and password
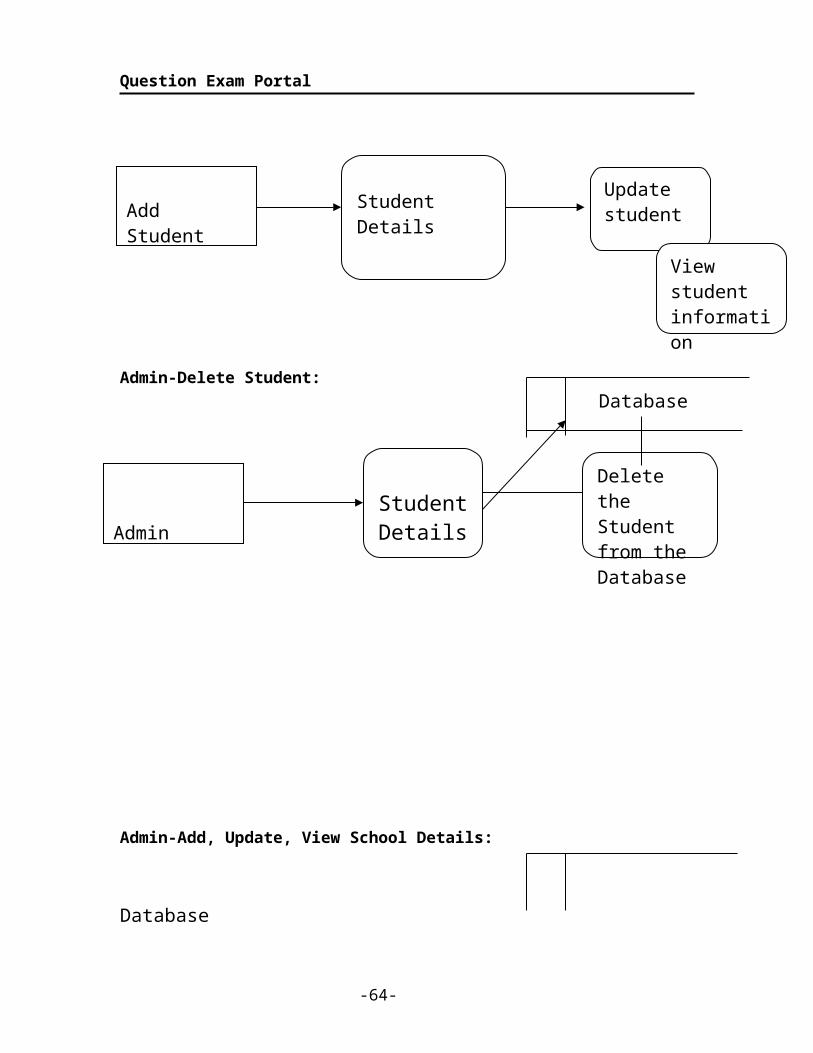
Admin-Add, Update, View Student Details:
Database
Admin-Delete Student:Database
Admin-Add, Update, View School Details:
-44-
Add Student Student Details Update student
Enter student information
View student information
Admin StudentDetails
Delete the Student from the Database
Page 45
Question Exam Portal
Database
Admin-Delete School
Database
Admin-Add, Update, View Curriculum Details:
Database
-45-
Add school School Details
Updateschool
Enter school information
View School information
Admin
SchoolDetails
Delete the School from the Database
Enter Curriculum information
Page 46
Question Exam Portal
Admin-Delete Curriculum:
Database
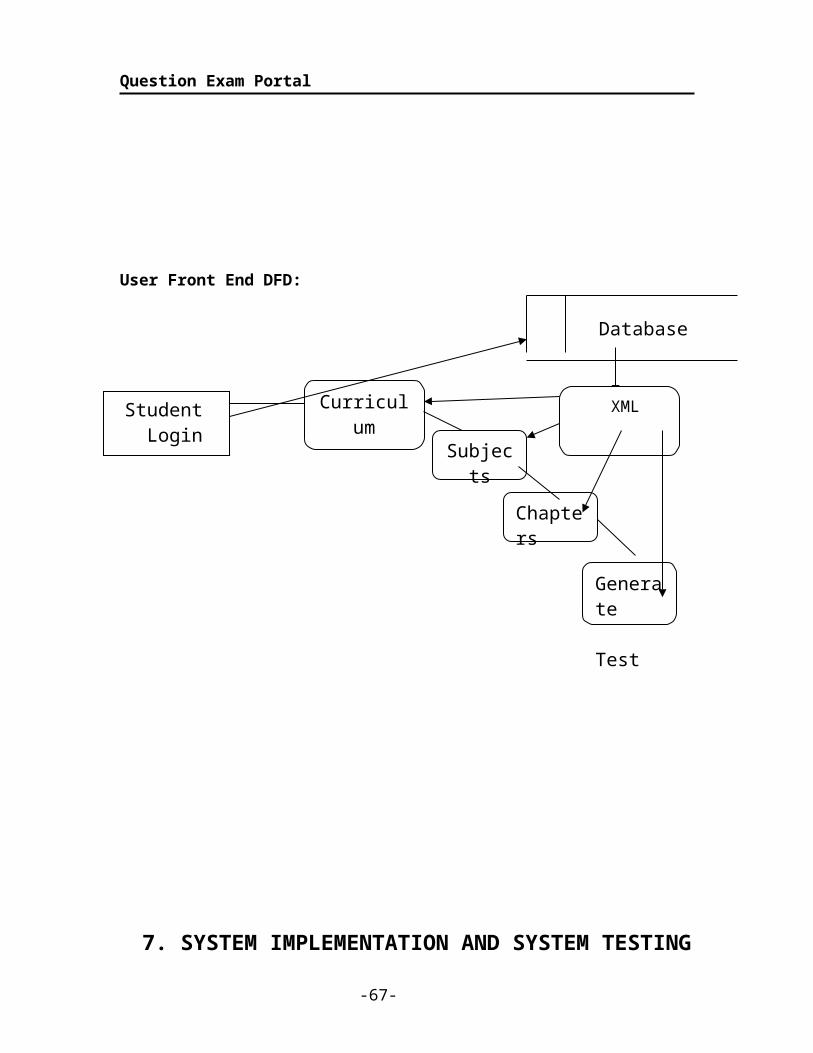
User Front End DFD:
Database
-46-
Student Login
Curriculum
Subjects
Chapters
XML
Add Curriculum
Curriculum Details
UpdateCurriculum
View curriculum information
Admin
Curriculum Details
Delete the curriculum from the Database
Page 47
Question Exam Portal
7. SYSTEM IMPLEMENTATION AND SYSTEM TESTING
7.1 System Implementation:
7.1.1. Front End Code:
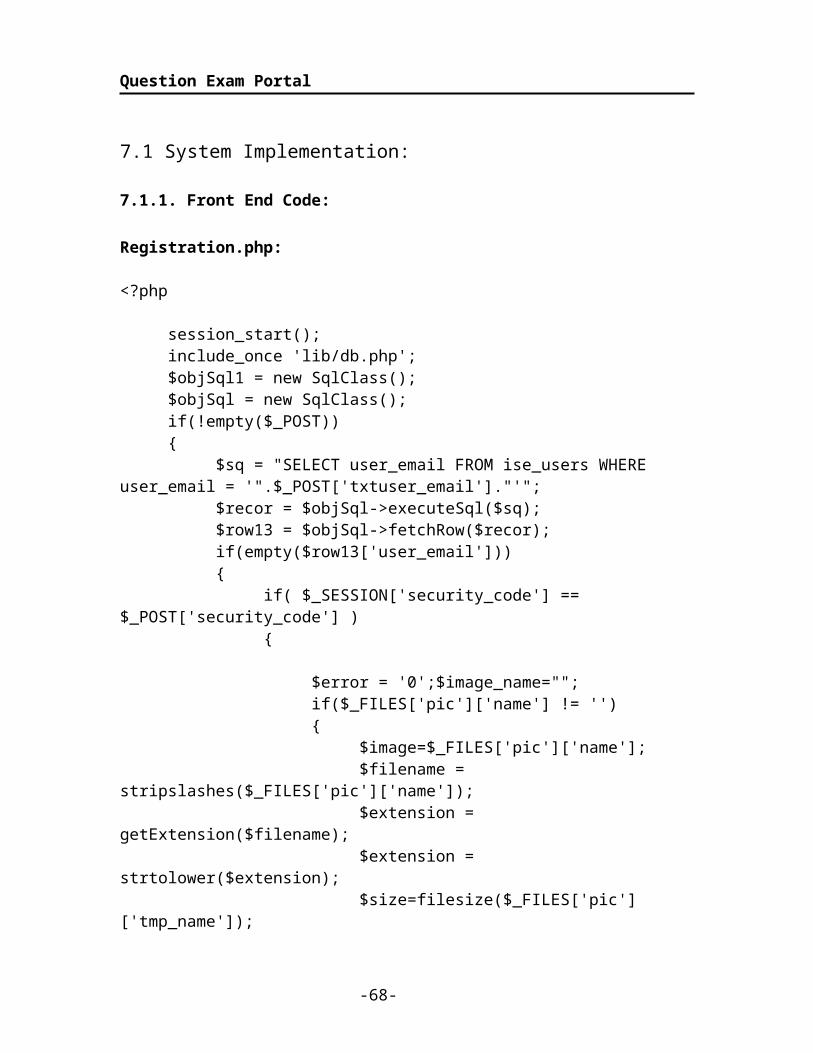
Registration.php:
<?php
session_start();include_once 'lib/db.php';$objSql1 = new SqlClass();$objSql = new SqlClass();if(!empty($_POST)){
$sq = "SELECT user_email FROM ise_users WHERE user_email = '".$_POST['txtuser_email']."'";
$recor = $objSql->executeSql($sq);$row13 = $objSql->fetchRow($recor);if(empty($row13['user_email'])){
if( $_SESSION['security_code'] == $_POST['security_code'] ){
$error = '0';$image_name="";
-47-
Generate Test
Page 48
Question Exam Portal
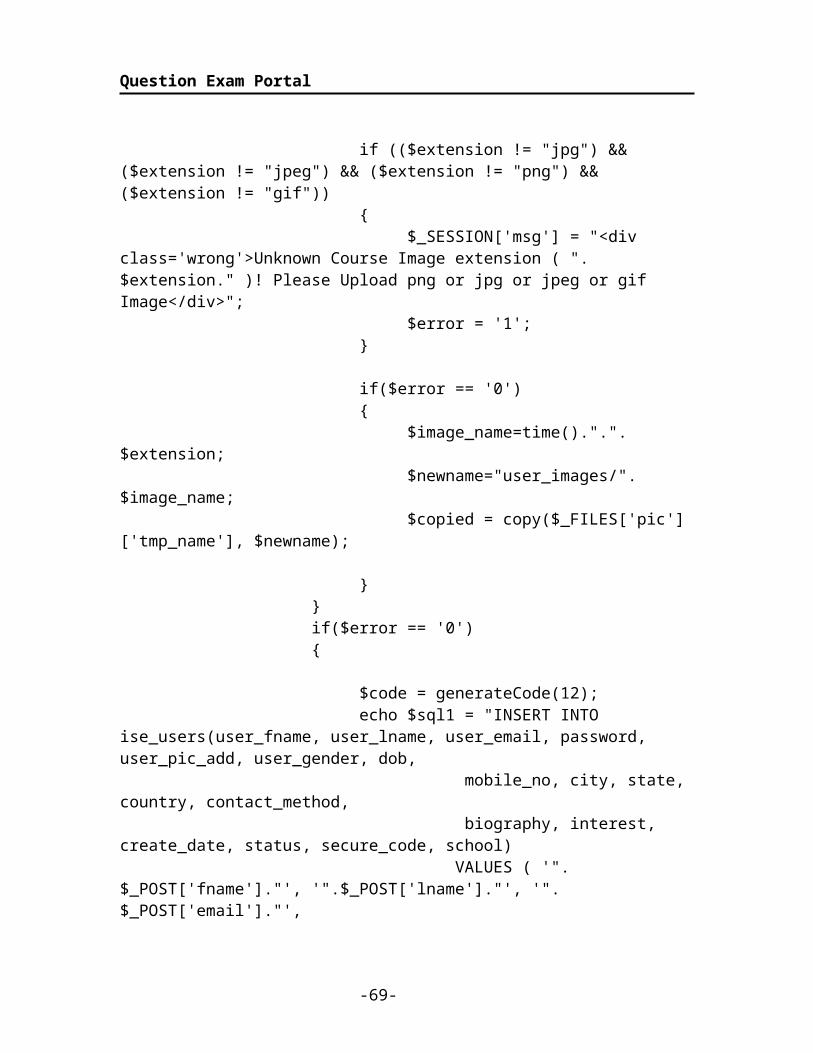
if($_FILES['pic']['name'] != ''){
$image=$_FILES['pic']['name'];$filename = stripslashes($_FILES['pic']['name']);$extension = getExtension($filename);$extension = strtolower($extension);$size=filesize($_FILES['pic']['tmp_name']);if (($extension != "jpg") && ($extension != "jpeg")
&& ($extension != "png") && ($extension != "gif")) {
$_SESSION['msg'] = "<div class='wrong'>Unknown Course Image extension ( ".$extension." )! Please Upload png or jpg or jpeg or gif Image</div>";
$error = '1';}
if($error == '0'){
$image_name=time().".".$extension;$newname="user_images/".$image_name;$copied = copy($_FILES['pic']['tmp_name'],
$newname);
}}if($error == '0'){
$code = generateCode(12);echo $sql1 = "INSERT INTO
ise_users(user_fname, user_lname, user_email, password, user_pic_add, user_gender, dob,
mobile_no, city, state, country, contact_method,
biography, interest, create_date, status, secure_code, school)
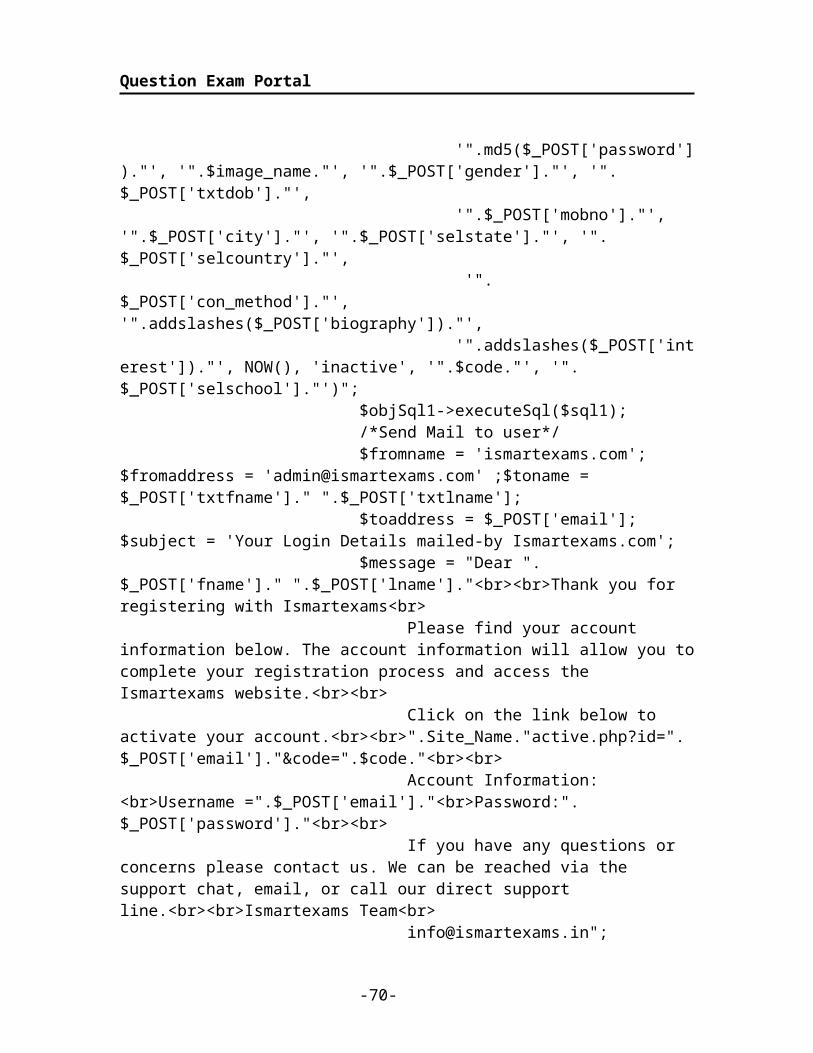
VALUES ( '".$_POST['fname']."', '".$_POST['lname']."', '".$_POST['email']."',
'".md5($_POST['password'])."', '".$image_name."', '".$_POST['gender']."', '".$_POST['txtdob']."',
'".$_POST['mobno']."', '".$_POST['city']."', '".$_POST['selstate']."', '".$_POST['selcountry']."',
'".$_POST['con_method']."', '".addslashes($_POST['biography'])."',
'".addslashes($_POST['interest'])."', NOW(), 'inactive', '".$code."', '".$_POST['selschool']."')";
-48-
Page 49
Question Exam Portal
$objSql1->executeSql($sql1);/*Send Mail to user*/$fromname = 'ismartexams.com';$fromaddress =
'[email protected] ' ;$toname = $_POST['txtfname']." ".$_POST['txtlname'];$toaddress = $_POST['email'];$subject = 'Your
Login Details mailed-by Ismartexams.com';$message = "Dear ".$_POST['fname']." ".
$_POST['lname']."<br><br>Thank you for registering with Ismartexams<br>Please find your account information below.
The account information will allow you to complete your registration process and access the Ismartexams website.<br><br>
Click on the link below to activate your account.<br><br>".Site_Name."active.php?id=".$_POST['email']."&code=".$code."<br><br>
Account Information: <br>Username =".$_POST['email']."<br>Password:".$_POST['password']."<br><br>
If you have any questions or concerns please contact us. We can be reached via the support chat, email, or call our direct support line.<br><br>Ismartexams Team<br>
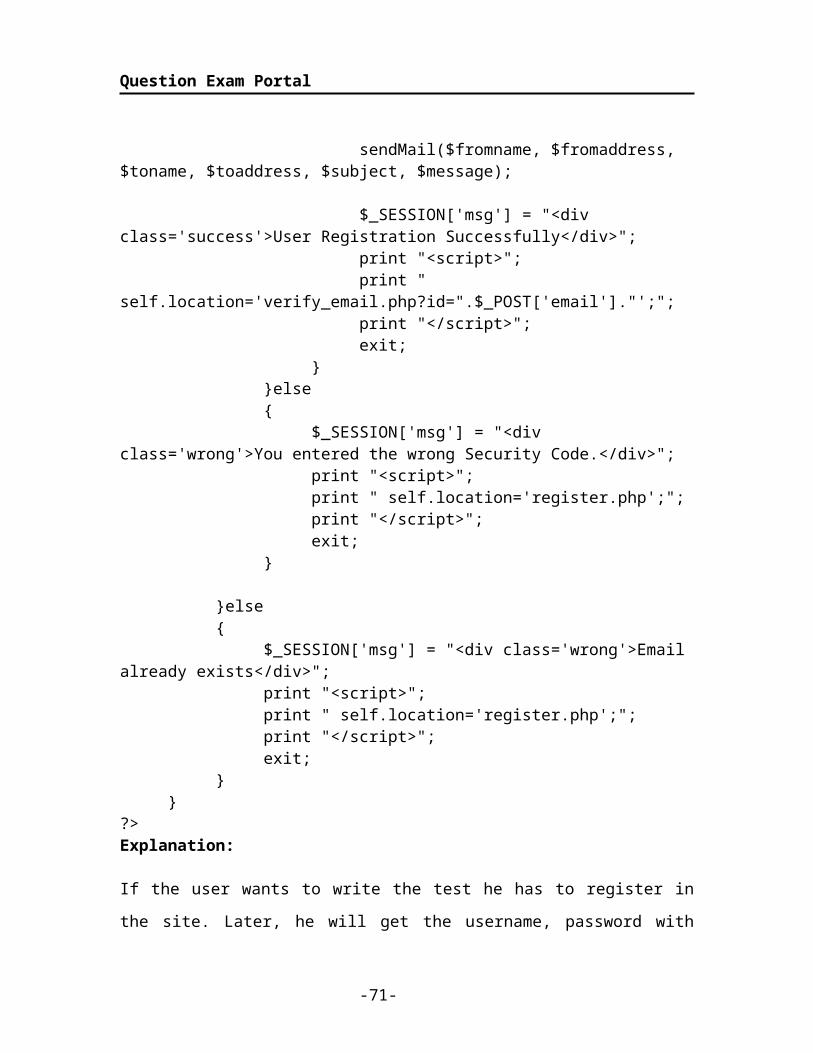
[email protected] ";sendMail($fromname, $fromaddress, $toname,
$toaddress, $subject, $message);
$_SESSION['msg'] = "<div class='success'>User Registration Successfully</div>";
print "<script>";print " self.location='verify_email.php?id=".
$_POST['email']."';";print "</script>"; exit;
}}else{
$_SESSION['msg'] = "<div class='wrong'>You entered the wrong Security Code.</div>";
print "<script>";print " self.location='register.php';";print "</script>"; exit;
}
}else{
$_SESSION['msg'] = "<div class='wrong'>Email already exists</div>";
print "<script>";
-49-
Page 50
Question Exam Portal
print " self.location='register.php';";print "</script>"; exit;
}}
?>Explanation:
If the user wants to write the test he has to register in the site. Later, he will get the
username, password with that particular username and password the user can login to the
site.
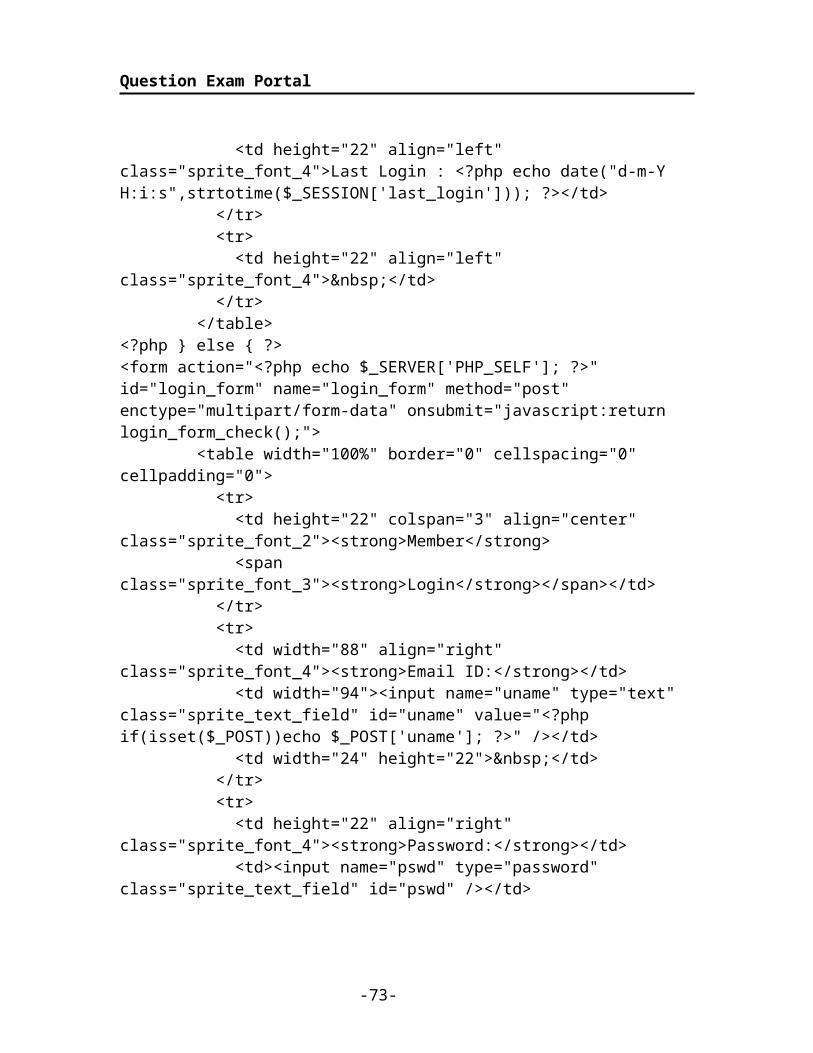
Login.php
<? Phpif(isset($_SESSION['user_id']) && $_SESSION['user_id']!=''){?><table width="100%" border="0" cellspacing="0" cellpadding="0"> <tr> <td height="22" align="left" class="sprite_font_3">Welcome <strong><?php echo $_SESSION['user_name']; ?></strong>,</td> </tr> <tr> <td height="22" align="left" class="sprite_font_4"><span class="sprite_font_5"><a href="my_profile.php" class="sprite_font_4" style="text-decoration:none;"><strong>My Profile</strong></a> | <a href="javascript:void();" class="sprite_font_4" style="text-decoration:none;" onclick="loadwindow('edit_profile.php','800','500')"><strong>Edit Profile</strong></a></span></td> </tr> <tr> <td height="22" align="left" class="sprite_font_4"><span class="sprite_font_5"><a href="javascript:void();" class="sprite_font_4" style="text-decoration:none;" onclick="loadwindow('change_pswd.php','400','250')"><strong>Change Password</strong></a> | <a href="logout.php" class="sprite_font_4" style="text-decoration:none;"><strong>Logout</strong></a></span></td> </tr> <tr> <td height="22" align="left" class="sprite_font_4">Last Login : <?php echo date("d-m-Y H:i:s",strtotime($_SESSION['last_login'])); ?></td> </tr> <tr> <td height="22" align="left" class="sprite_font_4"> </td>
-50-
Page 51
Question Exam Portal
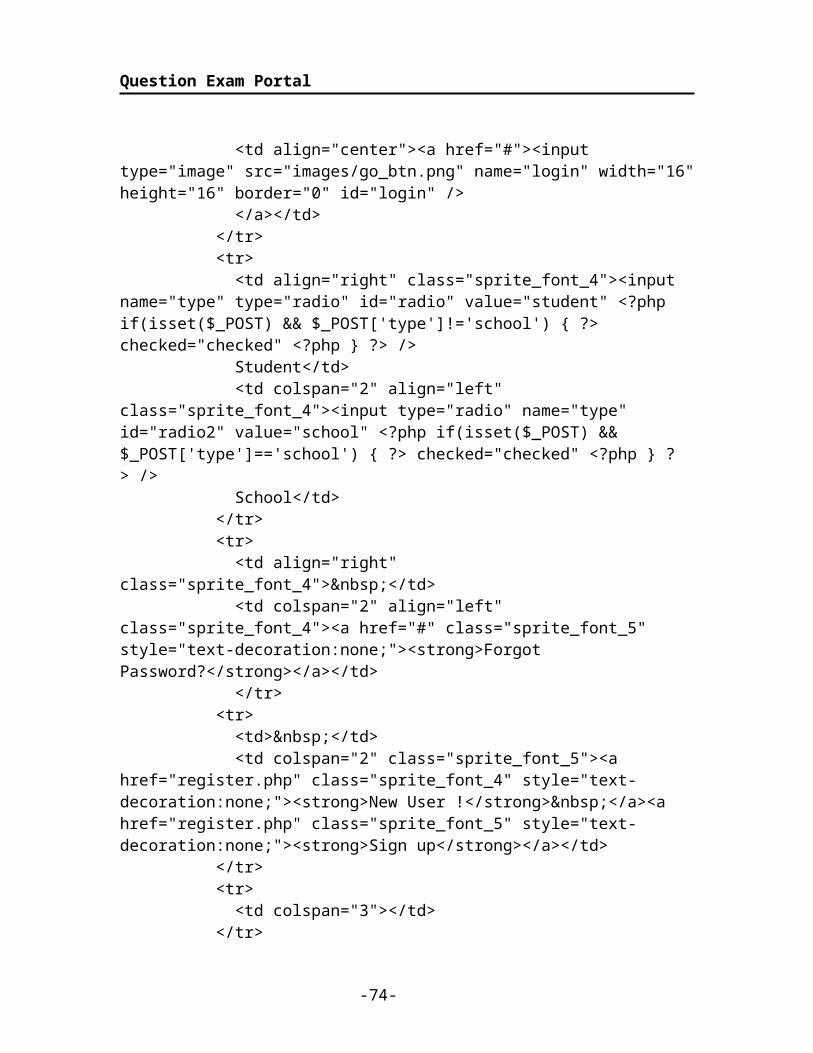
</tr> </table><?php } else { ?><form action="<?php echo $_SERVER['PHP_SELF']; ?>" id="login_form" name="login_form" method="post" enctype="multipart/form-data" onsubmit="javascript:return login_form_check();"> <table width="100%" border="0" cellspacing="0" cellpadding="0"> <tr> <td height="22" colspan="3" align="center" class="sprite_font_2"><strong>Member</strong> <span class="sprite_font_3"><strong>Login</strong></span></td> </tr> <tr> <td width="88" align="right" class="sprite_font_4"><strong>Email ID:</strong></td> <td width="94"><input name="uname" type="text" class="sprite_text_field" id="uname" value="<?php if(isset($_POST))echo $_POST['uname']; ?>" /></td> <td width="24" height="22"> </td> </tr> <tr> <td height="22" align="right" class="sprite_font_4"><strong>Password:</strong></td> <td><input name="pswd" type="password" class="sprite_text_field" id="pswd" /></td> <td align="center"><a href="#"><input type="image" src="images/go_btn.png" name="login" width="16" height="16" border="0" id="login" /> </a></td> </tr> <tr> <td align="right" class="sprite_font_4"><input name="type" type="radio" id="radio" value="student" <?php if(isset($_POST) && $_POST['type']!='school') { ?> checked="checked" <?php } ?> /> Student</td> <td colspan="2" align="left" class="sprite_font_4"><input type="radio" name="type" id="radio2" value="school" <?php if(isset($_POST) && $_POST['type']=='school') { ?> checked="checked" <?php } ?> /> School</td> </tr> <tr> <td align="right" class="sprite_font_4"> </td> <td colspan="2" align="left" class="sprite_font_4"><a href="#" class="sprite_font_5" style="text-decoration:none;"><strong>Forgot Password?</strong></a></td> </tr> <tr> <td> </td>
-51-
Page 52
Question Exam Portal
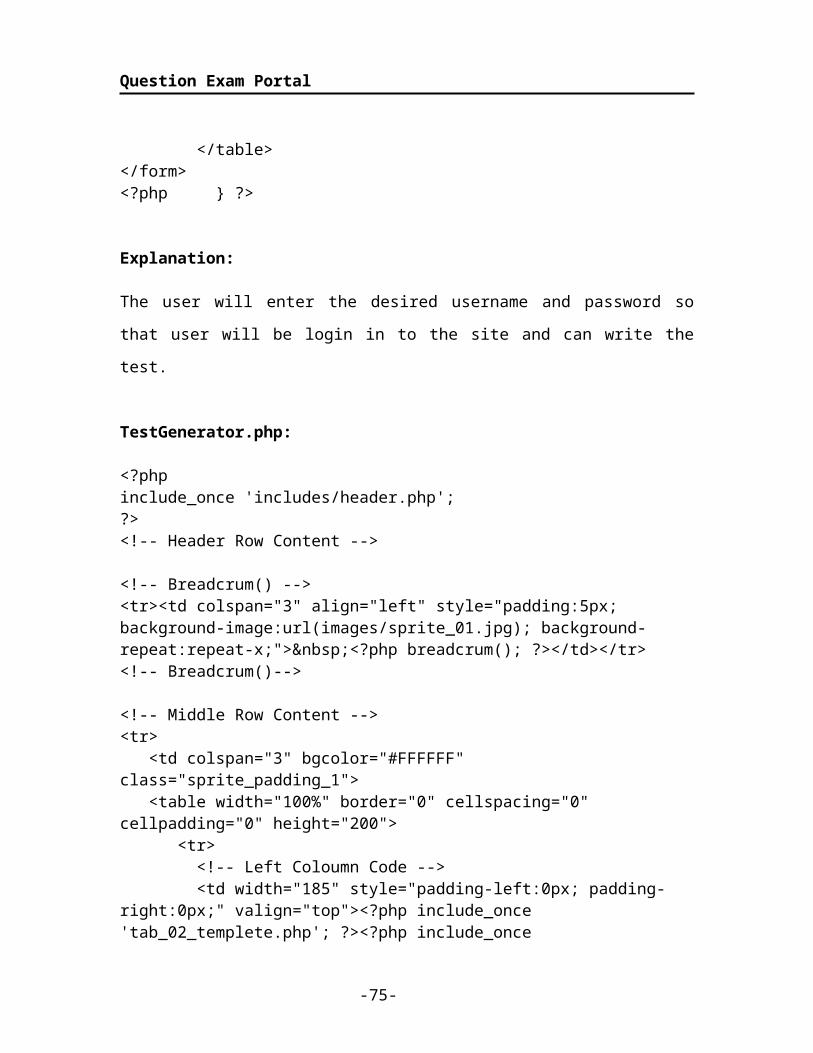
<td colspan="2" class="sprite_font_5"><a href="register.php" class="sprite_font_4" style="text-decoration:none;"><strong>New User !</strong> </a><a href="register.php" class="sprite_font_5" style="text-decoration:none;"><strong>Sign up</strong></a></td> </tr> <tr> <td colspan="3"></td> </tr> </table></form><?php } ?>
Explanation:
The user will enter the desired username and password so that user will be login in to the
site and can write the test.
TestGenerator.php:
<?phpinclude_once 'includes/header.php';?><!-- Header Row Content -->
<!-- Breadcrum() --><tr><td colspan="3" align="left" style="padding:5px; background-image:url(images/sprite_01.jpg); background-repeat:repeat-x;"> <?php breadcrum(); ?></td></tr><!-- Breadcrum()-->
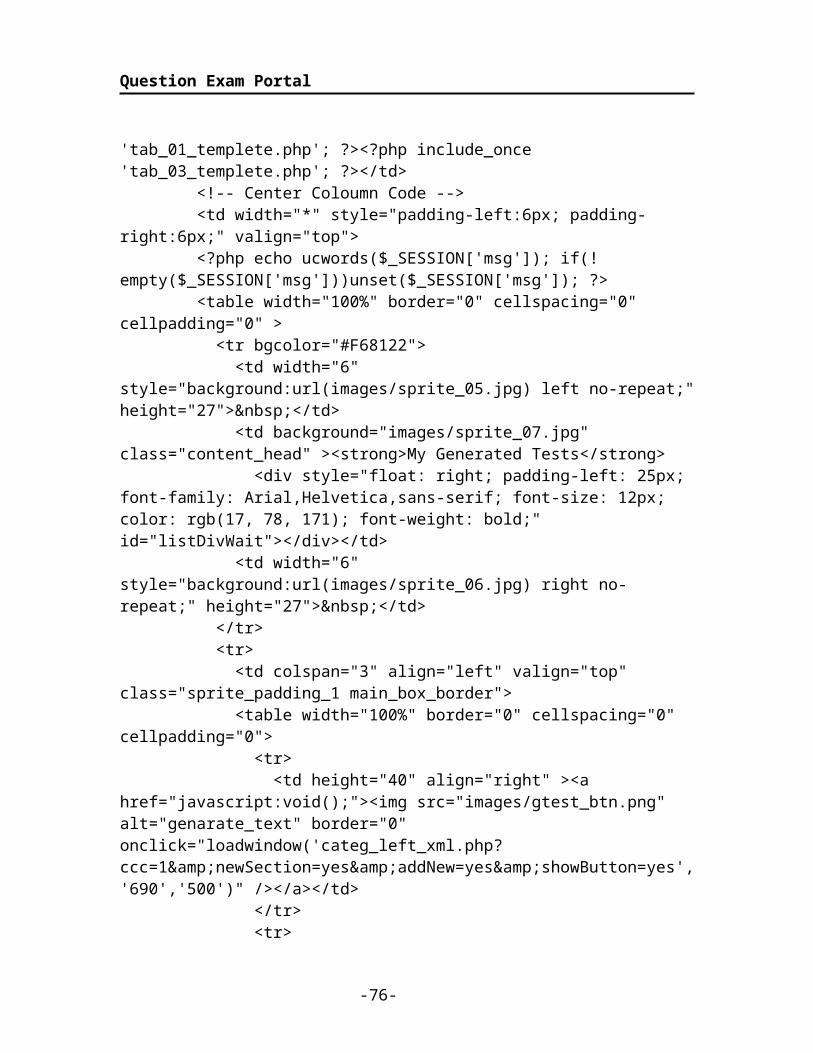
<!-- Middle Row Content --><tr> <td colspan="3" bgcolor="#FFFFFF" class="sprite_padding_1"> <table width="100%" border="0" cellspacing="0" cellpadding="0" height="200"> <tr> <!-- Left Coloumn Code --> <td width="185" style="padding-left:0px; padding-right:0px;" valign="top"><?php include_once 'tab_02_templete.php'; ?><?php include_once 'tab_01_templete.php'; ?><?php include_once 'tab_03_templete.php'; ?></td> <!-- Center Coloumn Code --> <td width="*" style="padding-left:6px; padding-right:6px;" valign="top"> <?php echo ucwords($_SESSION['msg']); if(!empty($_SESSION['msg']))unset($_SESSION['msg']); ?>
-52-
Page 53
Question Exam Portal
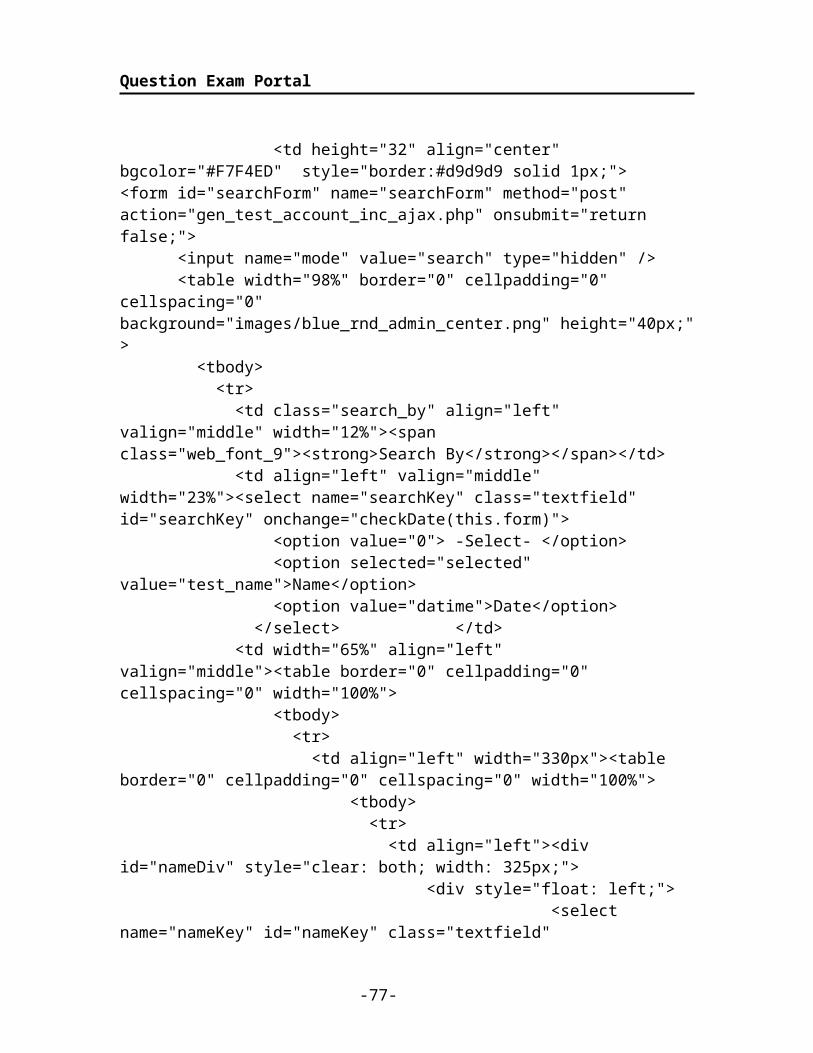
<table width="100%" border="0" cellspacing="0" cellpadding="0" > <tr bgcolor="#F68122"> <td width="6" style="background:url(images/sprite_05.jpg) left no-repeat;" height="27"> </td> <td background="images/sprite_07.jpg" class="content_head" ><strong>My Generated Tests</strong> <div style="float: right; padding-left: 25px; font-family: Arial,Helvetica,sans-serif; font-size: 12px; color: rgb(17, 78, 171); font-weight: bold;" id="listDivWait"></div></td> <td width="6" style="background:url(images/sprite_06.jpg) right no-repeat;" height="27"> </td> </tr> <tr> <td colspan="3" align="left" valign="top" class="sprite_padding_1 main_box_border"> <table width="100%" border="0" cellspacing="0" cellpadding="0"> <tr> <td height="40" align="right" ><a href="javascript:void();"><img src="images/gtest_btn.png" alt="genarate_text" border="0" onclick="loadwindow('categ_left_xml.php?ccc=1&newSection=yes&addNew=yes&showButton=yes','690','500')" /></a></td> </tr> <tr> <td height="32" align="center" bgcolor="#F7F4ED" style="border:#d9d9d9 solid 1px;"><form id="searchForm" name="searchForm" method="post" action="gen_test_account_inc_ajax.php" onsubmit="return false;"> <input name="mode" value="search" type="hidden" /> <table width="98%" border="0" cellpadding="0" cellspacing="0" background="images/blue_rnd_admin_center.png" height="40px;" > <tbody> <tr> <td class="search_by" align="left" valign="middle" width="12%"><span class="web_font_9"><strong>Search By</strong></span></td> <td align="left" valign="middle" width="23%"><select name="searchKey" class="textfield" id="searchKey" onchange="checkDate(this.form)"> <option value="0"> -Select- </option> <option selected="selected" value="test_name">Name</option> <option value="datime">Date</option> </select> </td> <td width="65%" align="left" valign="middle"><table border="0" cellpadding="0" cellspacing="0" width="100%"> <tbody> <tr>
-53-
Page 54
Question Exam Portal
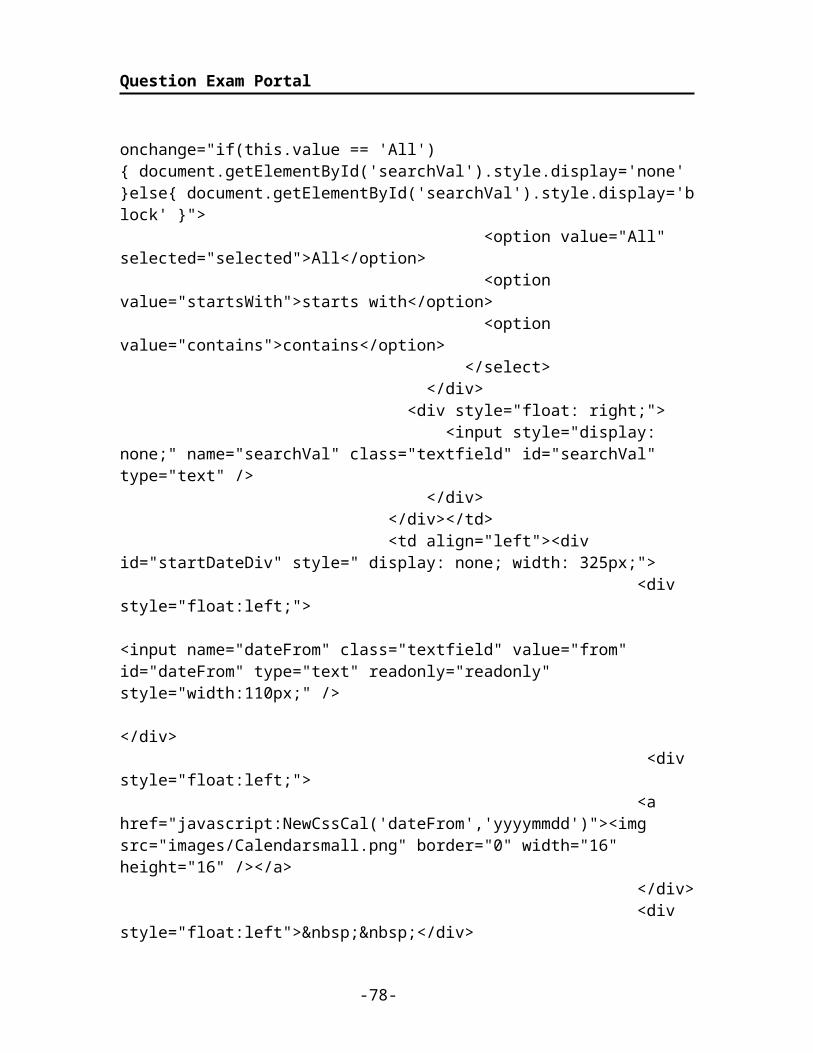
<td align="left" width="330px"><table border="0" cellpadding="0" cellspacing="0" width="100%"> <tbody> <tr> <td align="left"><div id="nameDiv" style="clear: both; width: 325px;"> <div style="float: left;">
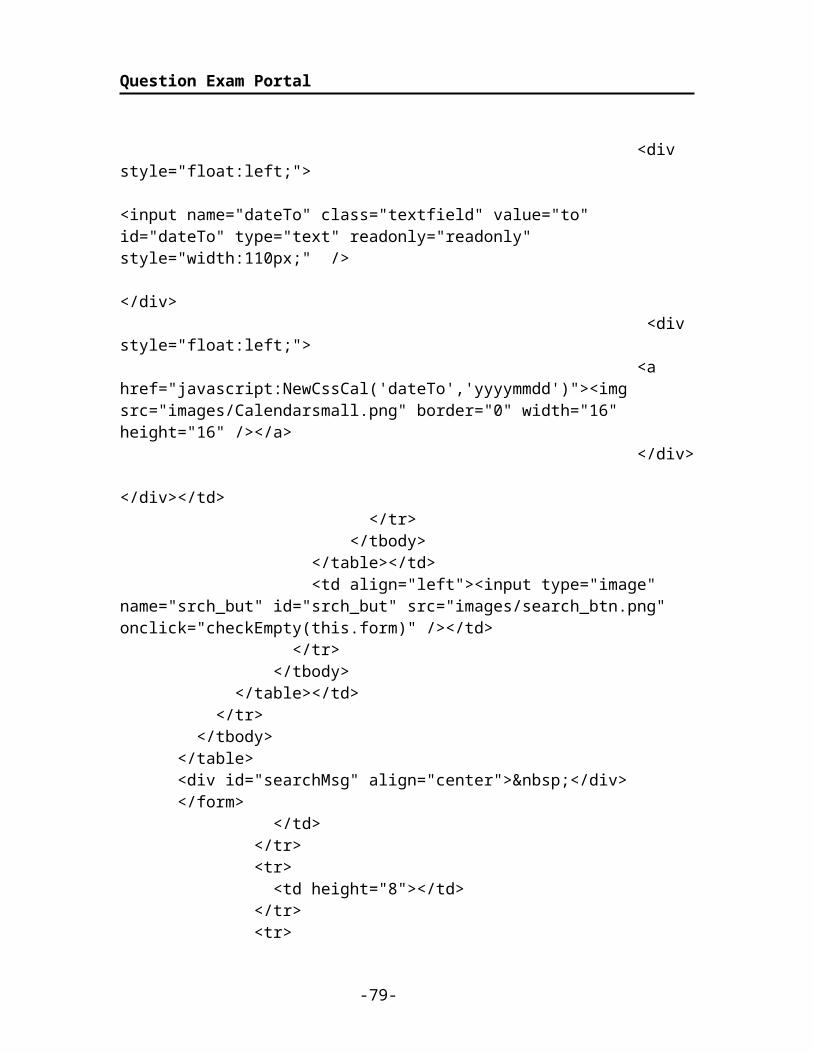
<select name="nameKey" id="nameKey" class="textfield" onchange="if(this.value == 'All'){ document.getElementById('searchVal').style.display='none' }else{ document.getElementById('searchVal').style.display='block' }"> <option value="All" selected="selected">All</option> <option value="startsWith">starts with</option> <option value="contains">contains</option> </select> </div> <div style="float: right;"> <input style="display: none;" name="searchVal" class="textfield" id="searchVal" type="text" /> </div> </div></td> <td align="left"><div id="startDateDiv" style=" display: none; width: 325px;"> <div style="float:left;"> <input name="dateFrom" class="textfield" value="from" id="dateFrom" type="text" readonly="readonly" style="width:110px;" /> </div> <div style="float:left;"> <a href="javascript:NewCssCal('dateFrom','yyyymmdd')"><img src="images/Calendarsmall.png" border="0" width="16" height="16" /></a> </div> <div style="float:left"> </div> <div style="float:left;"> <input name="dateTo" class="textfield" value="to" id="dateTo" type="text" readonly="readonly" style="width:110px;" /> </div> <div style="float:left;"> <a href="javascript:NewCssCal('dateTo','yyyymmdd')"><img src="images/Calendarsmall.png" border="0" width="16" height="16" /></a> </div> </div></td> </tr> </tbody> </table></td>
-54-
Page 55
Question Exam Portal
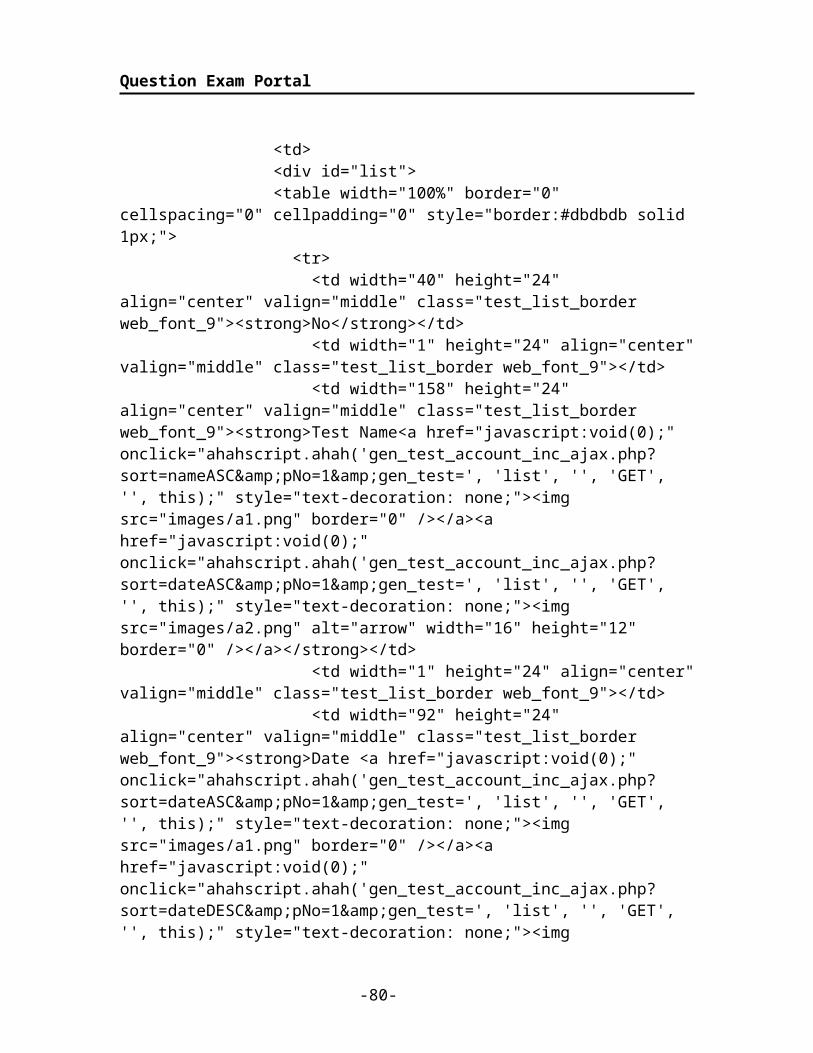
<td align="left"><input type="image" name="srch_but" id="srch_but" src="images/search_btn.png" onclick="checkEmpty(this.form)" /></td> </tr> </tbody> </table></td> </tr> </tbody> </table> <div id="searchMsg" align="center"> </div> </form> </td> </tr> <tr> <td height="8"></td> </tr> <tr> <td> <div id="list"> <table width="100%" border="0" cellspacing="0" cellpadding="0" style="border:#dbdbdb solid 1px;"> <tr> <td width="40" height="24" align="center" valign="middle" class="test_list_border web_font_9"><strong>No</strong></td> <td width="1" height="24" align="center" valign="middle" class="test_list_border web_font_9"></td> <td width="158" height="24" align="center" valign="middle" class="test_list_border web_font_9"><strong>Test Name<a href="javascript:void(0);" onclick="ahahscript.ahah('gen_test_account_inc_ajax.php?sort=nameASC&pNo=1&gen_test=', 'list', '', 'GET', '', this);" style="text-decoration: none;"><img src="images/a1.png" border="0" /></a><a href="javascript:void(0);" onclick="ahahscript.ahah('gen_test_account_inc_ajax.php?sort=dateASC&pNo=1&gen_test=', 'list', '', 'GET', '', this);" style="text-decoration: none;"><img src="images/a2.png" alt="arrow" width="16" height="12" border="0" /></a></strong></td> <td width="1" height="24" align="center" valign="middle" class="test_list_border web_font_9"></td> <td width="92" height="24" align="center" valign="middle" class="test_list_border web_font_9"><strong>Date <a href="javascript:void(0);" onclick="ahahscript.ahah('gen_test_account_inc_ajax.php?sort=dateASC&pNo=1&gen_test=', 'list', '', 'GET', '', this);" style="text-decoration: none;"><img src="images/a1.png" border="0" /></a><a href="javascript:void(0);" onclick="ahahscript.ahah('gen_test_account_inc_ajax.php?sort=dateDESC&pNo=1&gen_test=', 'list', '', 'GET', '', this);" style="text-decoration: none;"><img src="images/a2.png" alt="arrow" width="16" height="12" border="0" /></a></strong></td>
-55-
Page 56
Question Exam Portal
<td width="1" height="24" align="center" valign="middle" class="test_list_border web_font_9"></td> <td width="117" height="24" align="center" valign="middle" class="test_list_border web_font_9"><strong>Questions</strong></td> <td width="1" height="24" align="center" valign="middle" class="test_list_border web_font_9"></td> <td width="95" height="24" align="center" valign="middle" class="test_list_border web_font_9"><strong>Time (min)</strong></td> <td width="1" height="24" align="center" valign="middle" class="test_list_border web_font_9"></td> <td height="24" align="center" valign="middle" class="test_list_border web_font_9"><strong>Actions</strong></td> </tr> <?php
$objsql = new SqlClass();$sort='sort=dateDESC';$qry="select * from test_tests where user_id=".$_SESSION['user_id']." order by created_date DESC";// $rs=$objsql->executeSql($qry);
$pagination_key = new pagination_key;$pagination_key->createPaging($qry,5);$bagsize=$pagination_key->recordsize();$allpages=$pagination_key->pages;
if(isset($_REQUEST['page']) && $_REQUEST['page']!='')$cpg=$_REQUEST['page'];
else$cpg=1;
$url='gen_test_account_inc_ajax.php?'.$sort;
$i=1;while($row=mysql_fetch_object($pagination_key->resultpage)){/* echo '<pre>';
print_r($row);echo '</pre>';
*/if($i%2==0)
$bg='blue_bg_admin';else
$bg='grey_bg_admin';
?>
-56-
Page 57
Question Exam Portal
<tr> <td height="30" align="center" valign="middle" class="web_font_9 test_list_border"><?php echo $i; ?></td> <td align="center" valign="middle" class="web_font_9 test_list_border"></td> <td align="center" valign="middle" class="web_font_9 test_list_border"><div id="<?php echo $row->test_id; ?>" onmouseover="ShowEditIcon(this.id,1)" onmouseout="ShowEditIcon(this.id,0)" style="cursor: default; position: relative; margin-left:3px;"> <div id="divName<?php echo $row->test_id; ?>" style="float: left;" title="<?php echo $row->test_name; ?>"><?php echo $row->test_name; ?></div> <div id="divIcon<?php echo $row->test_id; ?>" style="display: none; float: left;"><a onclick='javascript:ShowTestNameDiv("<?php echo $row->test_id; ?>","<?php echo $row->test_name; ?>");' style="cursor: pointer; text-decoration:none;"> <img src="images/edit.gif" border="0" /></a></div> </div></td> <td align="left" valign="middle" class="web_font_9 test_list_border"></td> <td align="center" valign="middle" class="web_font_9 test_list_border"><?php echo date("M d, Y",strtotime($row->created_date)); ?></td> <td align="center" valign="middle" class="web_font_9 test_list_border"></td> <td align="center" valign="middle" class="web_font_9 test_list_border"><?php echo $row->numques; ?></td> <td align="center" valign="middle" class="web_font_9 test_list_border"></td> <td align="center" valign="middle" class="web_font_9 test_list_border"><?php echo $row->testtime; ?></td> <td align="center" valign="middle" class="web_font_9 test_list_border"></td> <td width="112" align="center" valign="middle" class="web_font_9 test_list_border"><div style="padding-top: 2px; text-align:center" id="1t"><img src="images/aa33.png" align="absmiddle" /> <?php if($row->status==0) { ?> <a href="Generate.php?testids=<?php echo $row->test_id; ?>gen&section=0&paidTest=0&qno=<?php echo $row->numques; ?>&type=new" title="Take Test" class="web_font_9"><strong>Take Test</strong></a> <?php } else { ?> <a href="Generate.php?testids=<?php echo $row->test_id; ?>gen&section=0&paidTest=1&qno=<?php echo $row->numques; ?>&type=view" title="View Test" class="web_font_9"><strong>View Result</strong></a> <?php } ?> </div></td> </tr> <?php
-57-
Page 58
Question Exam Portal
$i++;} ?> <tr > <td valign="middle" align="right" colspan="11" height="32"><?php echo ajax_pagination($allpages,$cpg,$url,'list'); ?></td> </tr> </table> </div> </td> </tr> </table></td> </tr> </table> </td> <!-- Right Coloumn Code --> <td width="0" style="padding-left:0px; padding-right:0px;" valign="top"></td> </tr> </table></td></tr>
Explanation:
After the user login into the site he will generate the test by using the above code.
7.1.2. BACKEND
Manage user:
When we click on manage user we will get the data about user information
User.php:
<table width="90%" align="center" border="0" cellpadding="0" cellspacing="0"> <tr> <td>
<table width="90%" align="center" border="0" cellpadding="0" cellspacing="0"> <tr> <td colspan="2" class="h2" height="30"><span class="ph"><strong>Manage Users</strong></span></td> </tr>
-58-
Page 59
Question Exam Portal
<tr> <td colspan="2" align="right" height="25"><a href="home.php?opt=amu">Add User </a></td> </tr> </table> <table class="borderlistings" summary="List of threads" width="100%" cellpadding="3" cellspacing="0" border="1">
<thead> <tr> <td class="listingheadings" width="29%" align="center" height="35">User Name </td> <td class="listingheadings" width="23%" align="center">User Email id </td> <td width="25%" align="center" class="listingheadings"><strong>user mobile no </strong></td> <td class="listingheadings" width="23%" align="center" nowrap="nowrap">user address </td> <td class="listingheadings" width="23%" align="center" nowrap="nowrap">options </td>
</tr> </thead> <tbody>
//starting fetching values from database// <?php
$host = "localhost";$user = "root" ;$pwd = "";$db = "dynamic";
mysql_connect($host,$user,$pwd) or die("sorry could not connect");
mysql_select_db($db) or die ("could not select db");
$query = "select * from manage_user";
$res = mysql_query($query);
while($obj = mysql_fetch_object($res))
{?>
<tr> <td><?php echo $obj->user_name ?> </td>
-59-
Page 60
Question Exam Portal
<td><?php echo $obj->user_email_id ?></td> <td><?php echo $obj->user_mobile_no ?></td>
<td><?php echo $obj->user_adress ?></td>
<td class="tr2" align="center" nowrap="nowrap"> <a href="home.php?opt=emu&id=<?php echo $obj->user_id?>"> <imgsrc="images/edit.gif" border="0"></a><a href="delete/deleteuser.php?id=<?php echo $obj->user_id?>"><img src="images/delete.gif" border="0"></a></td> <?php } ?></tr>
//ending of fetch values from db// </tbody> </table> <table width="100%" border="0" cellpadding="3" cellspacing="0"> <tbody>
<tr valign="middle"> <td colspan="4" class="pagesnum" height="31" align='center'> </td>
</tr> </tbody></table></td>
Explanation:
In the above code we are displaying the user table which contained fields are
same as in database also. Here we also written code for fetching updated values form
database and at a time it displays to user.
Add manage user:
If we want to add a new user, then we click on link add user, it will move to add
user form.
Add_user.php:
<html><head><tr><td>
-60-
Page 61
Question Exam Portal
<table class="pagesnum" align="center" border="0" cellpadding="0" cellspacing="0" width="100%"> <tbody><tr valign="middle"> <td height="20"><p><strong>Manage user </strong></p> <p> </p></td> </tr>
<tr> <td colspan="2" class="h2" height="30"><strong>Add user </strong></td> </tr><form action="add/addusers.php" method="POST"><table border="1" align="center"><tr><td width="217"><p>uname <input type="text" name="uname" /></p> <p> </p></td></tr><tr><td><p>pwd <input type="password" name="pwd" /></p> <p> </p></td></tr><tr><td><p>Emailid <input type="text" name="ueid" /></p> <p> </p></td></tr><tr><td><p>mobile no. <input type="text" name="mobileno"></p> <p> </p></td></tr><tr><td><p>address <input type="text" name="uaddr" /></p> <p> </p></td></tr><tr><td><input type="submit" value="submit"/></td></tr></table></form></head></html>
Explanation:
In the above code i.e add_users.php contained various fields of user information and
action page refers to adduser.php.
Addusers.php:
<?php
-61-
Page 62
Question Exam Portal
$name=$_POST['uname'];
$pwd=md5('*',$_POST['pwd']);
$email=$_POST['ueid'];
$mobile=$_POST['mobileno'];
$addr=$_POST['uaddr'];
$host="localhost";
$user="root";
$pd="";
$db="dynamic";
mysql_connect($host,$user,$pd) or die("db is not connected");
mysql_select_db($db) or die("db not selected");
$sql="insert into manage_user values ('','$name','$pwd','$email',$mobile,'$addr','','')";
mysql_query($sql) or die("sorry not inserted");
mysql_close();
header("location:home.php?opt=mu");
?>
Explanation:
In the above code we are connecting to database and at a time we are inserting values into
database
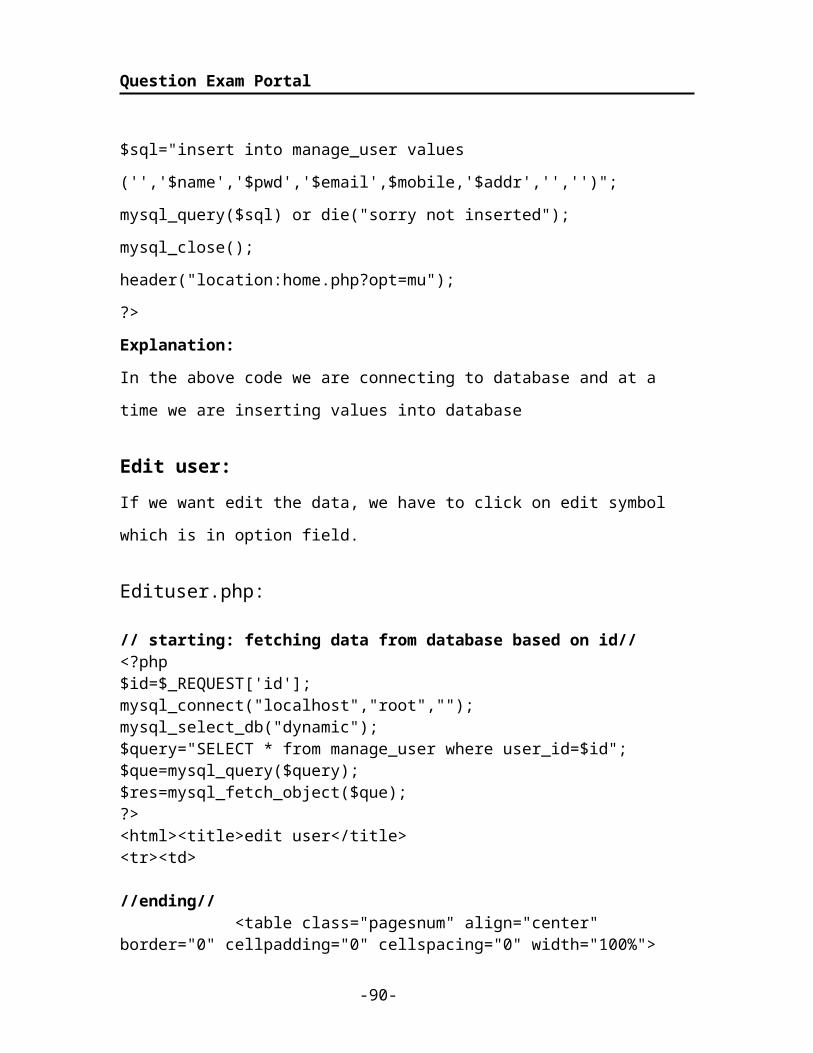
Edit user:
If we want edit the data, we have to click on edit symbol which is in option field.
Edituser.php:
// starting: fetching data from database based on id//<?php$id=$_REQUEST['id'];mysql_connect("localhost","root","");mysql_select_db("dynamic");$query="SELECT * from manage_user where user_id=$id";$que=mysql_query($query);$res=mysql_fetch_object($que);?><html><title>edit user</title>
-62-
Page 63
Question Exam Portal
<tr><td>
//ending// <table class="pagesnum" align="center" border="0" cellpadding="0" cellspacing="0" width="100%"> <tbody><tr valign="middle"> <td height="20"><p><strong>Manage user </strong></p> <p> </p></td> </tr>
<tr> <td colspan="2" class="h2" height="30"><strong>Edit user</strong></td> </tr>
<head><form action="pages/edit/edit_users.php" method="POST"><input type="hidden" name="id" value="<?php echo $id;?>">
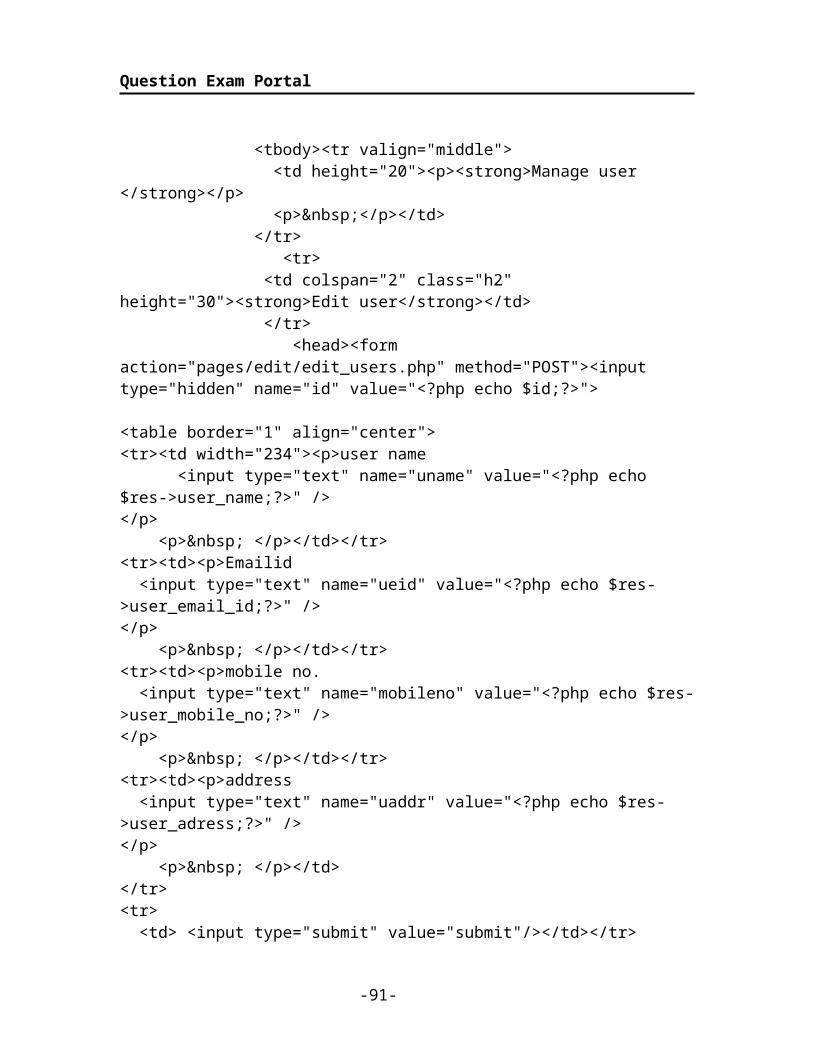
<table border="1" align="center"><tr><td width="234"><p>user name <input type="text" name="uname" value="<?php echo $res->user_name;?>" /></p> <p> </p></td></tr><tr><td><p>Emailid <input type="text" name="ueid" value="<?php echo $res->user_email_id;?>" /></p> <p> </p></td></tr><tr><td><p>mobile no. <input type="text" name="mobileno" value="<?php echo $res->user_mobile_no;?>" /></p> <p> </p></td></tr><tr><td><p>address <input type="text" name="uaddr" value="<?php echo $res->user_adress;?>" /></p> <p> </p></td></tr><tr> <td> <input type="submit" value="submit"/></td></tr></table></form></html>
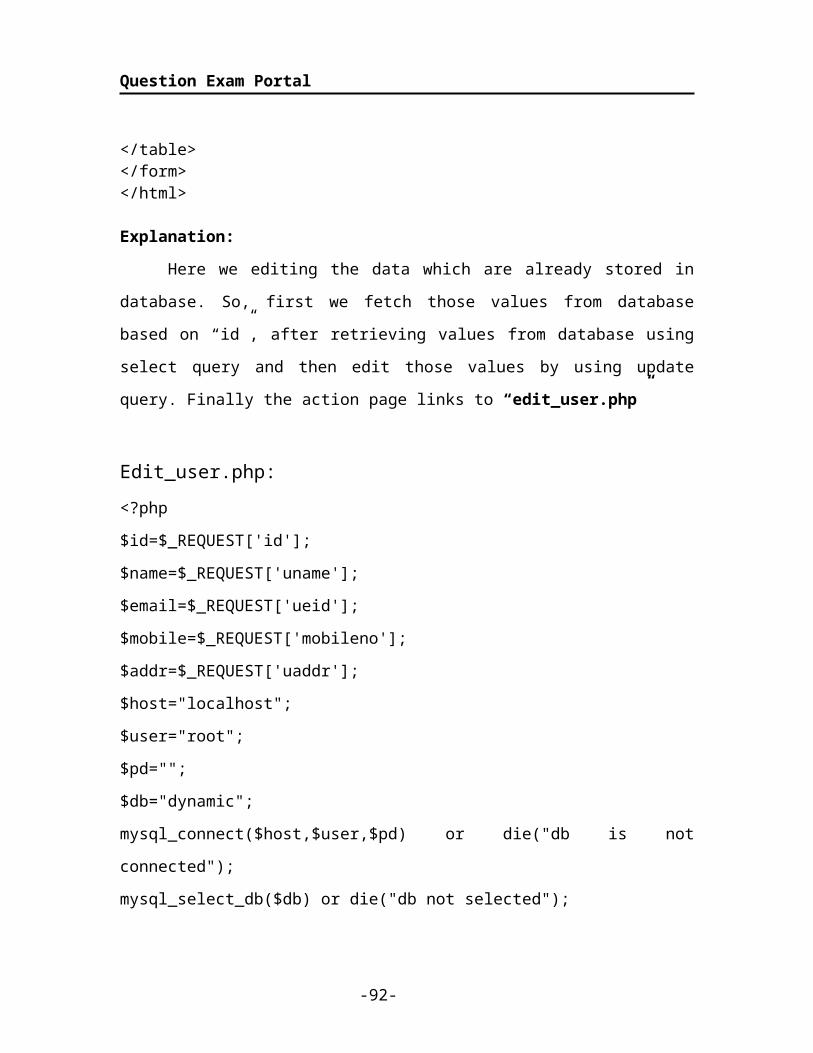
Explanation:
Here we editing the data which are already stored in database. So, first we fetch
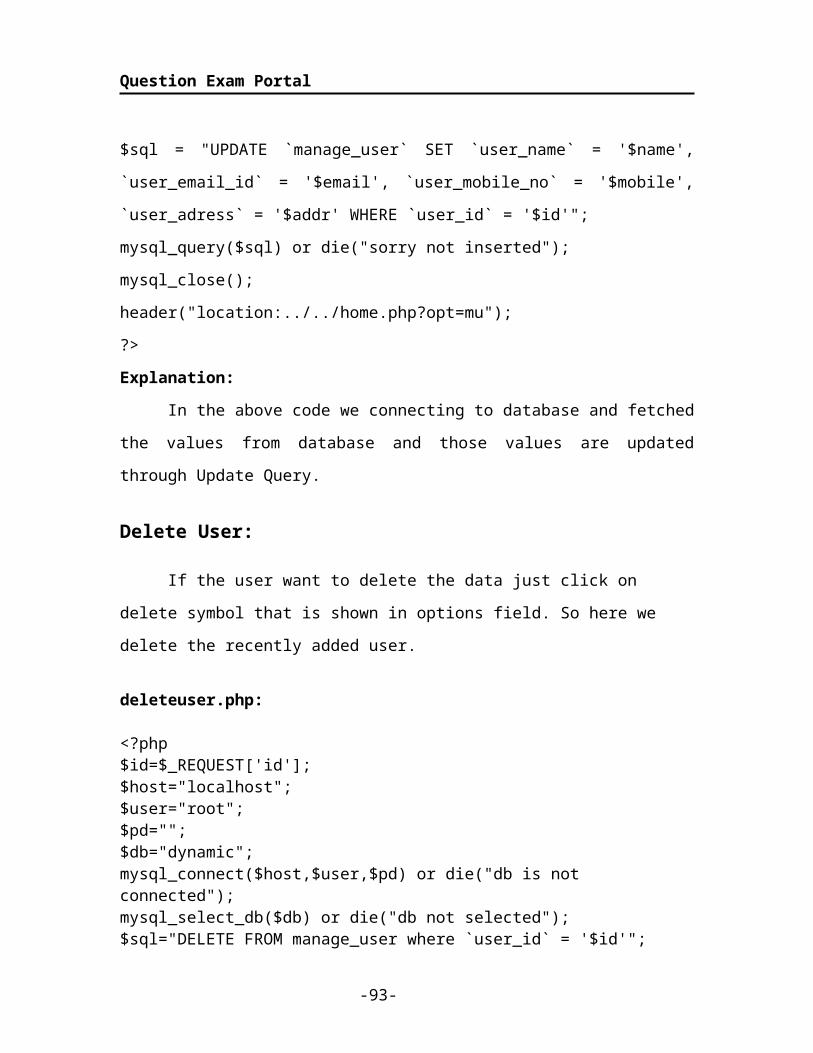
those values from database based on “id”, after retrieving values from database using
select query and then edit those values by using update query. Finally the action page
links to “edit_user.php”
-63-
Page 64
Question Exam Portal
Edit_user.php:
<?php
$id=$_REQUEST['id'];
$name=$_REQUEST['uname'];
$email=$_REQUEST['ueid'];
$mobile=$_REQUEST['mobileno'];
$addr=$_REQUEST['uaddr'];
$host="localhost";
$user="root";
$pd="";
$db="dynamic";
mysql_connect($host,$user,$pd) or die("db is not connected");
mysql_select_db($db) or die("db not selected");
$sql = "UPDATE `manage_user` SET `user_name` = '$name', `user_email_id` = '$email',
`user_mobile_no` = '$mobile', `user_adress` = '$addr' WHERE `user_id` = '$id'";
mysql_query($sql) or die("sorry not inserted");
mysql_close();
header("location:../../home.php?opt=mu");
?>
Explanation:
In the above code we connecting to database and fetched the values from database
and those values are updated through Update Query.
Delete User:
If the user want to delete the data just click on delete symbol that is shown in
options field. So here we delete the recently added user.
deleteuser.php:
<?php$id=$_REQUEST['id'];
-64-
Page 65
Question Exam Portal
$host="localhost";$user="root";$pd="";$db="dynamic";mysql_connect($host,$user,$pd) or die("db is not connected");mysql_select_db($db) or die("db not selected");$sql="DELETE FROM manage_user where `user_id` = '$id'";//echo"$sql";mysql_query($sql) or die("sorry not inserted");mysql_close();header("location:../home.php?opt=mu");?>
Explanation:
In the above code we are using delete query based on id we delete the respected values.
7.2. TESTING:
Testing is a process to show the correctness of the program. Testing is needed to
show completeness, t improve the quality of the software and to provide the maintenance
aid. Some testing standards are therefore necessary reduce the testing costs and operation
time.
Testing software extends throughout the coding phase and it represents the
ultimate review of configurations, design and coding. Based on the way the software
reacts to these testing, we can decide whether the configuration that has been built is
study or not. All components of an application are tested, as the failure to do so many
results in a series of bugs after the software is put to use.
7.2.1 BLACK BOX TESTING
Black box testing also called behavioral testing, focuses on the functional
requirements of software. This testing approach enables the software engineer to derive
the input conditions that will fully exercise all requirements for a program. Blackbox
testing attempts to find the errors like
Incorrect or missing functions
Interface errors
Errors in data structures or external database access
-65-
Page 66
Question Exam Portal
Behavior or performance errors
Initialization and termination errors
In Black box testing software is exercised over a full range of inputs and outputs are
observed for correctness.
7.2.2 WHITE BOX TESTING
Whitebox testing is also called Glassbox testing is a test case design control;
structure of the procedural design to derive test cases using Whitebox testing method, the
software engineer can derive the test cases that guarantee that all independent paths
within the module have been exercised at least once. Exercise all logic decisions on their
true or false sides. Execute all loops at their boundaries and within their operational
bounds. Exercise internal data structure to ensure their validity.
7.2.3 SOFTWARE TESTING STRATEGIES
Testing involves
Unit testing
Integration testing
Acceptance testing
The first level of test is unit testing. The purpose of unit testing is to ensure that each
program is fully tested.
The second step is integration testing. In this individual program units or programs are
integrated and tested as a complete system to ensure that the software requirements are
met.
Acceptance Testing involves planning and the execution of various types of tests in order
to demonstrate that the implemented software system satisfies the requirements. Finally
our project meets the requirements after going through all the levels of testing.
7.2.4 TESTING THE APPLICATION
Application should be thoroughly tested before releasing it into the market.
Testing will show if the application is delivering the expected results. In this case we
have given some wrong values to the application so that we can counter the errors
-66-
Page 67
Question Exam Portal
produced by the application in such a case. Next topic is test cases, where 10 test cases
are considered and checked if the test results are positive or not.
7.2.4.1 TEST CASES (FRONT END)
Test case no
Test case name
Input Actual value Expected value
Test result
1 Login Username and password is blank
Provide username and password
Provide username and password
No error
2 Curriculum Selecting curriculum based on user requirements
Select the curriculum and check whether it is related to the school id
Select the curriculum and check whether it is related to the school id
No error
3 Subjects Based on the curriculum the subjects are displayed and select the subject
Details of the selected subject are provided
Details of the selected subject are provided
No error
4 Chapters Select the chapter based on the subjects
Details of the selected chapter are
Details of the selected chapter are
No error
-67-
Page 68
Question Exam Portal
provided provided5 Questions Select the
questions based on the chapter
The no. of questions for the selected chapter is displayed
The no. of questions for the selected chapter is displayed
No error
6 Options Select the options as for the user requirement
Selected options are displayed for the questions
Selected options are displayed for the questions
No error
7 Generate test Loading the paper from database and displayed to user
Question paper will bedisplayed to user
Question paper will bedisplayed to user
No error
8 Report Status of the testWill be displayed
User performance will be shown as graph
User performance will be shown as graph
No error
Table 7.2.4.1.1
7.2.4.2 TEST CASES(BACK END):
Test case no
Test case name
Input Actual value Expected value
Test result
1 Admin Login Username and
password is
blank
Provide name and password
Provide name and password
No error
2 Add users The user fields are left blank
User details are being provided
User details are being provided
No error
3 Edit users Filled user fields are displayed
Edit the required fields
Edit the required fields
No error
4 Delete users User records Delete the user record
Delete the user record
No error
5 Add curriculum
The curriculum fields are left blank
Curriculum details are being provided
Curriculum details are being provided
No error
6 Edit curriculum
Filled curriculum fields are displayed
Edit the required fields
Edit the required fields
No error
-68-
Page 69
Question Exam Portal
7 Delete curriculum
Curriculum details of the users
Delete the Curriculum from the database
Delete the Curriculum from the database
No error
8Add class The class field is
left blankBased on the school we add classes
Based on the school we add classes
No error
9 Edit class Class details are displayed
Edit the field based on the requirement
Edit the field based on the requirement
No error
10 Delete class Class details Delete the class
Delete the class
No error
11 Add subject The subject field is left blank
Subjects are added based on the curriculum
Subjects are added based on the curriculum
No error
12 Edit subject Subject details are displayed
Edit the subject field based on the requirement
Edit the subject field based on the requirement
No error
13 Delete subject
Subject details Delete the subject from the database
Delete the subject from the database
No error
14 Add chapter The chapter field is left blank
Based on the subject we add the chapter
Based on the subject we add the chapter
No error
15 Edit chapter Chapter details are displayed
Edit this field based on the chapter
Edit this field based on the chapter
No error
16Delete chapter
Chapter details Delete the chapter corresponding to the subject
Delete the chapter corresponding to the subject
No error
17 Add questions
The questions field is left blank
Based on the chapter the questions are prepared
Based on the chapter the questions are prepared
No error
18 Edit questions
Questions details are displayed
Edit the questions based on the requirements
Edit the questions based on the requirements
No error
19 Delete questions
Questions details Delete the questions
Delete the questions
No error
-69-
Page 70
Question Exam Portal
from database from database20 Add report The report field
is left blankBased on the test the reports are added
Based on the test the reports are added
No error
21 Edit reports reports details are displayed
Edit the reports field based on the requirement
Edit the reports field based on the requirement
No error
22 Delete reports report details Delete the reports from the database
Delete the reports from the database
No error
8. SCREEN SHOTS
8.1. FRONT END SCREEN:
8.1.1. LOGIN SCREEN:
This is login page for front end.
-70-
Page 71
Question Exam Portal
After user has entered username and password the below page will be displayed.
-71-
Page 72
Question Exam Portal
8.1.2. GENERATED TEST:
After user had selected test generator the below page will be displayed.
-72-
Page 73
Question Exam Portal
8.1.3. CHOOSE CATEGORY:
After click on test generate button we will get below screen. Here we have to select the
category or sub-category.
-73-
Page 74
Question Exam Portal
8.1.4. CHOOSE SUB-CATEGORY:
In the above screen we select category here we have to select the sub category.
-74-
Page 75
Question Exam Portal
8.1.5. CHOOSE CHAPTER:
Here we will select the chapter name and then go for customize test button.
-75-
Page 76
Question Exam Portal
8.1.6. GENERATE TEST:
After clicking on customize test the below screen will be displayed.
-76-
Page 77
Question Exam Portal
GENERATE TEST:
Here we choosing the difficulty level and choose the no. of questions.
-77-
Page 78
Question Exam Portal
8.1.7. TEST SUMMARY
After choosing the difficulty level, no. of questions we have to click on next button the
below screen will be displayed.
-78-
Page 79
Question Exam Portal
8.1.8. TAKE TEST:
After clicking on the Generate test the below screen will be displayed.
-79-
Page 80
Question Exam Portal
8.1.9. TEST DETAILS:
After click on the take test the below screen will be displayed.
-80-
Page 81
Question Exam Portal
8.1.10. GENERATING QUESTION PAPER:
After loading the test paper the questions will be displayed as follows.
-81-
Page 82
Question Exam Portal
8.1.11. TEST DESCRIPTION:
After completion of questions the below report will be displayed.
-82-
Page 83
Question Exam Portal
8.1.12. TEST STATUS:
The below screen will tell about the Test description details.
-83-
Page 84
Question Exam Portal
8.2 BACKEND SCREENS
8.2.1. LOGIN SCREEN:
The below screen is the login screen of the backend
-84-
Page 85
Question Exam Portal
Here we have to enter the username and password
-85-
Page 86
Question Exam Portal
8.2.2. MANAGE USER:
After click on the user the below screen will be displayed
8.2.3. SEARCH BY SCHOOL:
After choosing the school the below screen will be displayed
-86-
Page 87
Question Exam Portal
8.2.4. ADD USERS:
The below screen is used to add the username in to the manage user
8.2.5. UPDATED USER:
After selecting the desired username for the deleting the below screen will be displayed
-87-
Page 88
Question Exam Portal
8.2.6. DELETE USER:
After deleting the user from the manage user the below screen will be displayed
8.2.7. MANAGE SCREEN:
After clicking on the Test Engine the below screen will be displayed which is related to
the courses
8.2.8. MANAGE CHAPTERS:
-88-
Page 89
Question Exam Portal
After clicking on the chapters the below screen will be displayed
8.2.9. MANAGE QUESTIONS:
After clicking on the manage questions it will directly add the questions
8.2.10. MANAGE CURRICULUM:
After clicking on the Test engine options we will get the curriculum screen as follows
-89-
Page 90
Question Exam Portal
8.2.11. MANAGE SUBJECTS:
After clicking on the manage subjects the below screen will be displayed
8.2.12. MANAGE GRADES:
After clicking on the manage grades the below screen will be displayed
-90-
Page 91
Question Exam Portal
8.2.13. MANAGE TESTS:
-91-
Page 92
Question Exam Portal
After clicking on the manage tests the below screen will be displayed
8.2.14. MANAGE SCHOOLS:
After clicking on the manage schools the below screen will be displayed
-92-
Page 93
Question Exam Portal
8.2.15. LOG OUT SCREEN:
If we click on logout symbol it will display below screen.
9. CONCLUSION
Although most team’s questions scored higher than their answers, we do not
take this to mean the asking task is easier. Our difficulty guidelines lead students to avoid
complex questions requiring inference based on multiple propositions. The design of the
project encouraged students to try to “trick” other teams’ systems by forming reasonable,
even easy questions.
FUTURE ENHANCEMENT:
Scope of this project is very broad in terms of other manually taking exams.
Few of them are:-
This can be used in educational institutions as well as in corporate world.
Can be used anywhere any time as it is a web based application (user location
doesn’t matter).
No restriction that examiner has to be present when the candidate takes the test.
-93-