41
!"#$%&’#() *+"’+,-&./ Standard Nominal Ledger June 2011 Version 6.3 HansaWorld Ltd.
| Date post: | 25-May-2018 |
| Category: |
Documents |
| Upload: | dinhkhuong |
| View: | 214 times |
| Download: | 0 times |

!"#$%&'#()
*+"'+,-&./
Standard Nominal Ledger
June 2011 Version 6.3
HansaWorld Ltd.

Table of Content
Introduction............................................................................................................................................3Installing Standard Nominal Ledger Application...............................................................................................................3Starting the application for the first time............................................................................................................................3Demo Company.................................................................................................................................................................3New Installation..................................................................................................................................................................3Import Backup....................................................................................................................................................................4Master Control Panel..........................................................................................................................................................4
Working with records...............................................................................................................................................6Registers.............................................................................................................................................................................6
Attachments and Personal Desktop........................................................................................................................9Attachments........................................................................................................................................................................9Personal Desktop.............................................................................................................................................................10Organizing Items in your Personal Desktop - Archives ..................................................................................................10
Settings to Configure for the Initial Setup...............................................................................................................12Company Info ..................................................................................................................................................................12Setting up a Fiscal Year....................................................................................................................................................12Persons.............................................................................................................................................................................13Reporting Periods.............................................................................................................................................................13
Introduction to Bookkeeping...................................................................................................................................15Bookkeeping.....................................................................................................................................................................15Chart of accounts.............................................................................................................................................................15The five types of accounts................................................................................................................................................15Basic elements and fundamental equation.....................................................................................................................16Debit & Credit...................................................................................................................................................................16
Working with Standard Nominal Ledger ................................................................................................................18Setting up the VAT Codes................................................................................................................................................18Accounts...........................................................................................................................................................................18Entering an Account.........................................................................................................................................................19Deleting Accounts ...........................................................................................................................................................19Printing the Chart of Accounts.........................................................................................................................................19Entering Transactions.......................................................................................................................................................20Automatic Balance Function ...........................................................................................................................................22Correcting Transactions ..................................................................................................................................................22Entering a Budget.............................................................................................................................................................23Setting up of the Balance Sheet and Profit & Loss reports.............................................................................................25Deleting a row from the Balance Sheet...........................................................................................................................28Printing a Balance Sheet..................................................................................................................................................29Profit & Loss Report..........................................................................................................................................................29Locking Periods................................................................................................................................................................30
Year-end Procedures...............................................................................................................................................31
Reports.....................................................................................................................................................................35Correction List...................................................................................................................................................................35Nominal Ledger................................................................................................................................................................35Balance sheet...................................................................................................................................................................36Profit & Loss......................................................................................................................................................................36Transaction Journal..........................................................................................................................................................37VAT Report........................................................................................................................................................................37
Export.......................................................................................................................................................................39Imports..............................................................................................................................................................................39
Imports, backing up and restoring procedures......................................................................................................40Imports..............................................................................................................................................................................40Backing up and restoring the database...........................................................................................................................40
1/40

INTRODUCTION
Installing Standard Nominal Ledger ApplicationThe application can found on App Store, the main category Business. The application is installed by clicking the 'Buy' button.
The application is supplied as an automatic installation package: once downloaded from the App Store, the installation process starts. The application is installed into your Applications folder. The next step is to launch the application for the first time.
Starting the application for the first timeStandard Nominal Ledger is installed to you Applications folder. Start the application by double clicking the Application icon.
The Welcome window will be displayed. In this window you can choose how do you want to start working. With Demo Company in order to securely test different functions or with an empty database to start entering your own data.
Demo CompanyIf you choose the Demo Company option, you can login with the User SJ and no password. You can test and practice functions with this demo.
New InstallationIf you select the New Installation button, the 'Create a new Company' window will appear on screen.
Enter your company details in the upper section.
The information in the lower section will be used to create an User Account for yourself. You must
2/40

enter your Name and a Signature before you can progress to the next step, but the other information is optional. The Signature is the ID code that you will use to log in.
When the window is complete, click the [Create] button in the bottom right-hand corner of the window. The Master Control panel will appear.
Import BackupClick this button if you have already been using a Standard product before and you need to import a back-up file to a new database.
An Import dialogue window will be opened, you'll need to specify the backup file you want to import.
Master Control PanelOnce you have logged in, the Master Control Panel will be displayed.
The Master Control is your main tool palette. This is where you can open different registers, settings, documents and reports.
You can open the Master Control panel, or bring it to the front, at any time using the -M keyboard⌘ shortcut.
3/40

4/40

WORKING WITH RECORDS
RegistersStandard Nominal Ledger by HansaWorld contains a number of registers in which information of a particular type is stored. For example, information about Accounts is stored in the Accounts register, while information about Nominal Ledger transactions is stored in the Transactions register.
You can open the registers by using the buttons in the Master Control panel. Keyboard shortcut to open registers are -⌘ number key (1, 2, 3 etc.).
Browse Windows
When you open a register, a browse window will open, listing all the existing records in the register.
For example, if you click the [Transactions] button in the Master Control panel, the window that opens is a browse window, entitled 'Transactions: Browse'. This window lists all the transactions in the register:
In all browse windows you may sort the transactions in each column by clicking on the headings. To reverse any sort, simply click once again on the column heading. You can also scroll down the list with the scroll bars. Finally, you can search for a record by entering a keyword in the field in the top right-hand corner. Standard Nominal Ledger will search for the first record matching the keyword in the highlighted column.
Record Windows
You will use record windows to enter, view and edit individual records. All data entry will be made in windows of this type. Shown below is a Transaction in a record window:
5/40

All record windows feature the following buttons:
[New] Keyboard shortcut: -N⌘
Click this button to save the current record and to close it. A new blank record will then be opened for data entry.
[Duplicate] Keyboard shortcut: -Y⌘
Click this button to save the current record and to create a copy of it. The original record will be closed and the new copy opened. In many cases, the new record will contain the current date, not the date of the copied record.
[Cancel]
If you have not saved the current record (i.e. the window title is 'New'), click this button to cancel the data entry process and to close the record window. The record will not be saved. If you have previously saved the current record (i.e. the window title is 'Update'), click this button to discard all changes made since it was last saved. In this case, the record window will not be closed.
[Save] Keyboard shortcut: Shift-Enter
This button saves all changes to the current record but does not close it.
6/40
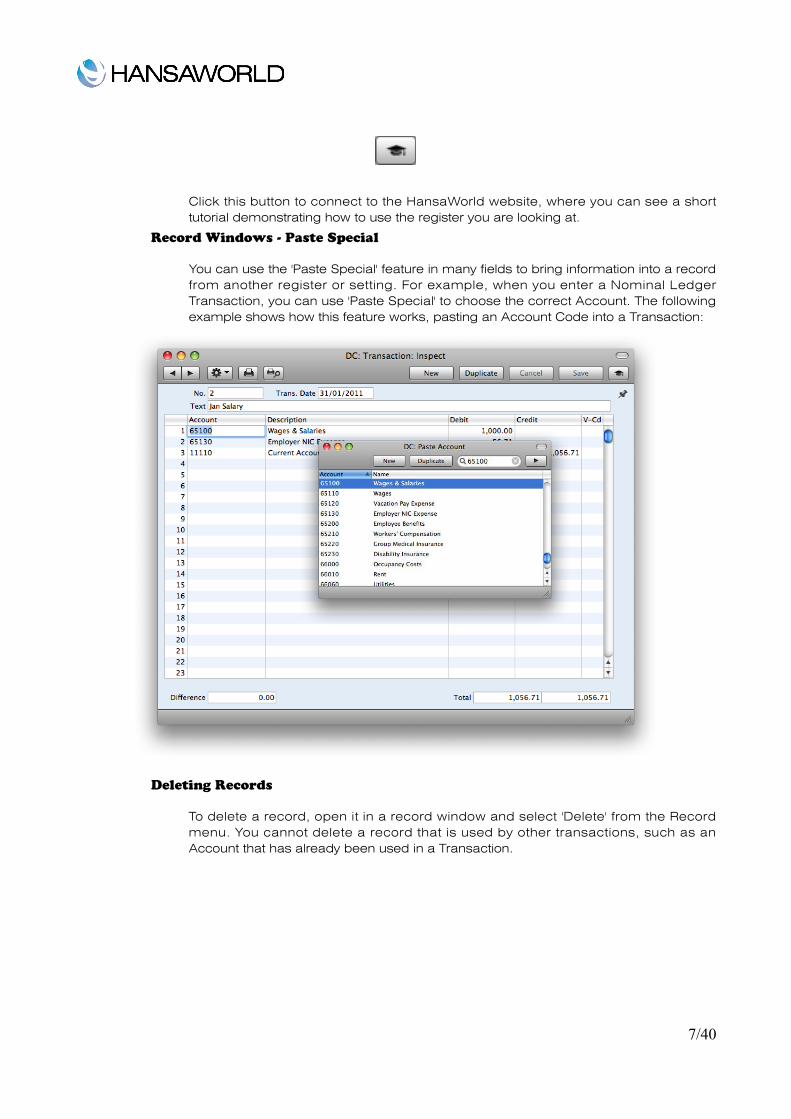
Click this button to connect to the HansaWorld website, where you can see a short tutorial demonstrating how to use the register you are looking at.
Record Windows - Paste Special
You can use the 'Paste Special' feature in many fields to bring information into a record from another register or setting. For example, when you enter a Nominal Ledger Transaction, you can use 'Paste Special' to choose the correct Account. The following example shows how this feature works, pasting an Account Code into a Transaction:
Deleting Records
To delete a record, open it in a record window and select 'Delete' from the Record menu. You cannot delete a record that is used by other transactions, such as an Account that has already been used in a Transaction.
7/40

ATTACHMENTS AND PERSONAL DESKTOP
AttachmentsYou can connect files, notes or other records to any record in Books Standard Invoicing. These connected objects are known as "Attachments".
All record windows contain an [Attachments] button in the top right-hand corner:
If a record has at least one Attachment, the button has a different icon:
Click this button to work with Attachments. A list of objects currently attached to the record is opened. This list has its own Operations drop-down menu, which contains the functions necessary to attach, view and remove Attachments:
You must save a record at least once before you can add any Attachments. You can attach the following items to records of all kinds:
Files
Open the list of attachments and choose 'Attach File' from the Operations menu. A standard 'Open File' dialog window will open, allowing you to locate the file that you need.
Notes
Open the list of attachments and choose 'Create Note' from the Operations menu. A window will open, where you can type in your note/enter a Comment (the text that will identify the note in the list of Attachments).
Records
You can attach a record to another record by dragging it from its browse window onto the [Attachments] button of the other record. If the record is already open, drag its [Attachments] button onto the [Attachments] button of the other record.
Reports
To attach a report to a record, first print the report to screen. The Button Bar of the report window contains an [Attachments] button: drag this to the [Attachments] button of the record.
To open or read an Attachment, double-click it in the list of Attachments or select 'Open Record' from the Operations menu. If the Attachment is a file, double-click it to save it to your hard disk or use 'Open Record' to open it in the relevant application.
To remove an Attachment of any kind from a record, highlight it in the list of Attachments and select 'Clear' from the Edit menu.
8/40
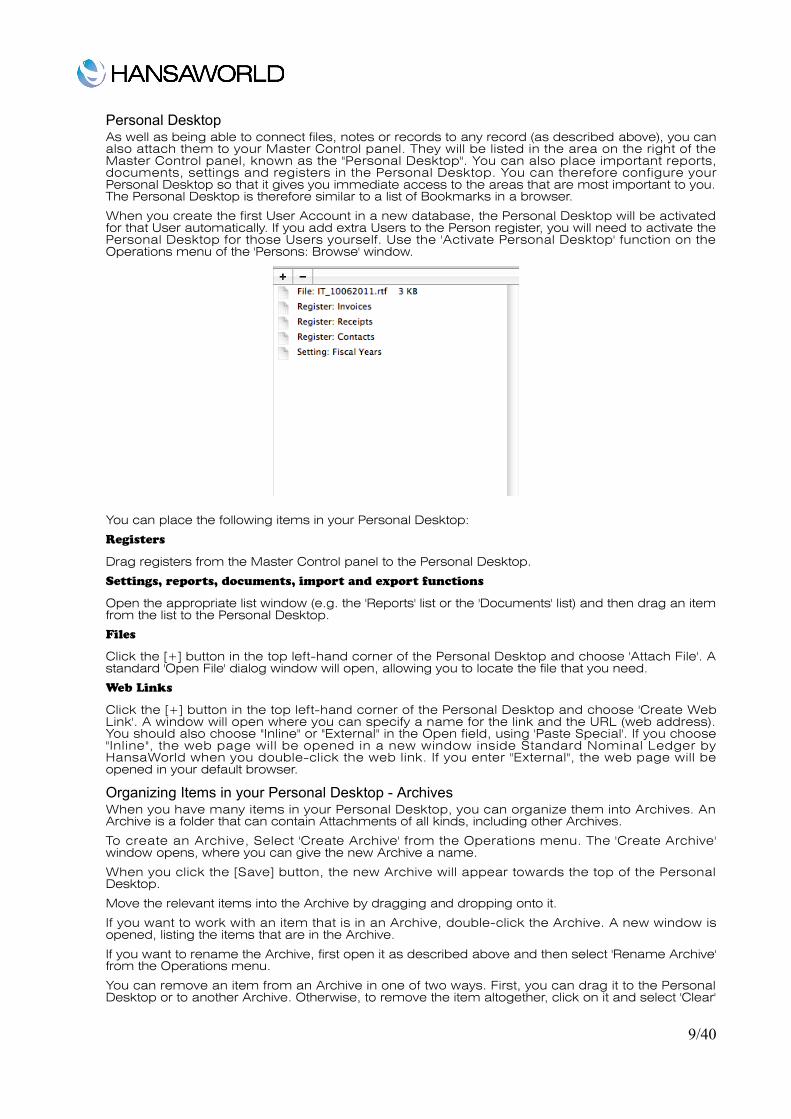
Personal DesktopAs well as being able to connect files, notes or records to any record (as described above), you can also attach them to your Master Control panel. They will be listed in the area on the right of the Master Control panel, known as the "Personal Desktop". You can also place important reports, documents, settings and registers in the Personal Desktop. You can therefore configure your Personal Desktop so that it gives you immediate access to the areas that are most important to you. The Personal Desktop is therefore similar to a list of Bookmarks in a browser.
When you create the first User Account in a new database, the Personal Desktop will be activated for that User automatically. If you add extra Users to the Person register, you will need to activate the Personal Desktop for those Users yourself. Use the 'Activate Personal Desktop' function on the Operations menu of the 'Persons: Browse' window.
You can place the following items in your Personal Desktop:
Registers
Drag registers from the Master Control panel to the Personal Desktop.
Settings, reports, documents, import and export functions
Open the appropriate list window (e.g. the 'Reports' list or the 'Documents' list) and then drag an item from the list to the Personal Desktop.
Files
Click the [+] button in the top left-hand corner of the Personal Desktop and choose 'Attach File'. A standard 'Open File' dialog window will open, allowing you to locate the file that you need.
Web Links
Click the [+] button in the top left-hand corner of the Personal Desktop and choose 'Create Web Link'. A window will open where you can specify a name for the link and the URL (web address). You should also choose "Inline" or "External" in the Open field, using 'Paste Special'. If you choose "Inline", the web page will be opened in a new window inside Standard Nominal Ledger by HansaWorld when you double-click the web link. If you enter "External", the web page will be opened in your default browser.
Organizing Items in your Personal Desktop - Archives When you have many items in your Personal Desktop, you can organize them into Archives. An Archive is a folder that can contain Attachments of all kinds, including other Archives.
To create an Archive, Select 'Create Archive' from the Operations menu. The 'Create Archive' window opens, where you can give the new Archive a name.
When you click the [Save] button, the new Archive will appear towards the top of the Personal Desktop.
Move the relevant items into the Archive by dragging and dropping onto it.
If you want to work with an item that is in an Archive, double-click the Archive. A new window is opened, listing the items that are in the Archive.
If you want to rename the Archive, first open it as described above and then select 'Rename Archive' from the Operations menu.
You can remove an item from an Archive in one of two ways. First, you can drag it to the Personal Desktop or to another Archive. Otherwise, to remove the item altogether, click on it and select 'Clear'
9/40

from the Edit menu or – button on top of Personal Desktop.
To remove an Archive, click on it in the Personal Desktop and select 'Clear' from the Edit menu. You can only remove empty Archives. To empty an Archive, you must remove its contents item by item as described above.
10/40

SETTINGS TO CONFIGURE FOR THE INITIAL SETUP
Company Info Enter your company address and other information as appropriate:
Make sure that everything is correct, as this information will be printed on your documents and reports (e.g. the Balance Sheet).
Click the button marked "Reg.No." towards the top centre of the window to see the other important fields in this setting. Here you can enter your company registration number and VAT Number.
Save the details in the Company Info setting by clicking the [Save] button in the top right-hand corner of the window. The window will be closed.
Setting up a Fiscal YearStandard Nominal Ledger by HansaWorld uses a multi-year database. This means that Transactions, Invoices, etc. from several years are stored in the same database. Closing balances for all balance sheet accounts at the end of one fiscal year are automatically converted into opening balances for the beginning of the next. You must define fiscal years for this to work. To set up fiscal year, follow below steps:
11/40

1. Click on the [Settings] icon and double-click on 'Fiscal Years'.
2. In 'Code column' enter a code for the relevant fiscal year (eg. 2011). This Code will be used as a prefix for Transactions entered directly to the Transaction register in the Nominal Ledger.
3. Specify fiscal year in 'Start' and 'End' columns (eg. start 01/01/2011, and end 12/31/2011).
4. Click the [Save] button to save changes and close the window.
Note that you can define several fiscal years at the same time. Each year must have a Code, and the period can be between 6 and 18 months in duration. Also, Fiscal Years should always be listed in chronological order as shown in the illustration. You cannot insert new Fiscal Years at the top of the list, or remove old Fiscal Years. You should not make any changes to a Fiscal Year once a transaction has been posted.
You cannot post a transaction whose date does not fall in a Fiscal Year as defined in this setting. With this in mind, it is recommended that you only add Fiscal Years one at a time as you need them. This will help prevent accidentally saving transactions in future years.
PersonsThis setting holds information about Persons, i.e. Employees.
To enter a new record, click [New] in the Button Bar or use the -N keyboard shortcut. Alternatively,⌘ highlight a Person similar to the one you want to enter and click [Duplicate] on the Button Bar.
The 'Person: New' window is opened, empty if you clicked [New] or containing a duplicate of the highlighted Person.
Enter the Person's initials to be used when logging on, or to identify the Person from elsewhere in the system.
Personal ID: In countries where personal identity cards are carried, enter the Person's ID number from their card here.
Reporting PeriodsThis setting allows you to name and define certain time periods. These should be the periods that you will commonly use when producing reports: using 'Paste Special' from the Period field of a report specification window will bring up a list of the Report Periods entered using this setting. For example, if you want to produce monthly reports you should define each month in the setting.
12/40
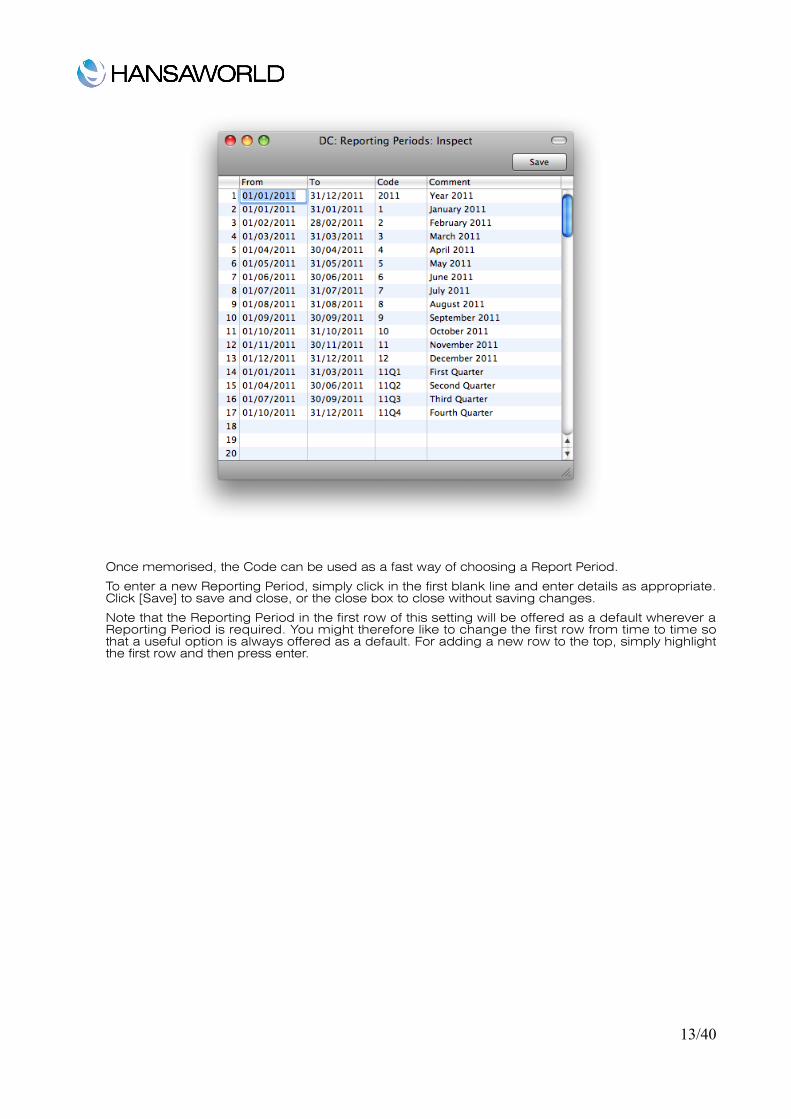
Once memorised, the Code can be used as a fast way of choosing a Report Period.
To enter a new Reporting Period, simply click in the first blank line and enter details as appropriate. Click [Save] to save and close, or the close box to close without saving changes.
Note that the Reporting Period in the first row of this setting will be offered as a default wherever a Reporting Period is required. You might therefore like to change the first row from time to time so that a useful option is always offered as a default. For adding a new row to the top, simply highlight the first row and then press enter.
13/40
INTRODUCTION TO BOOKKEEPING
Profit is the main reason for starting a business and how this profit is reached needs to be measured. For this purpose you will need economical and financial information. To satisfy this necessity, internal control has to be practiced together with commercial transactions; this has to be done in accordance with Accounting principles and norms.
BookkeepingEvery business event, invoice or receipt should be put into the books in the order that they occur and are then called transactions. When a transaction is written into the books it must not be erased or made unreadable. According to the law, changes can be done by making a red line through the faulty transaction in a way that it still is possible to read the original transaction. A new transaction with the correct data can then be entered. Together with every change there must be a note about who did the change and when the change was made.
Chart of accountsAn average company normally has a large number of accounts. Even a small company can have 200-300 accounts.
In order to make the use of accounts easier, the legal or tax authorities in most countries have published a standard chart of accounts. In this way they ensure that companies use a similar chart of accounts, which helps the controlling authorities to check the books. These standard chart of accounts might be slightly different depending on your type of business. When a company selects a chart of accounts you normally start from a standard chart of accounts suitable for the type of business and the book keeping laws in the country.
Even if you start from a certain standard chart of accounts there is nothing that says that you must follow it completely. If, for example, there is an account for Buildings and the company doesn’t own any buildings you can just remove that account from the chart of accounts. In the same way you can add accounts. If the company has multiple lines of business you can expand the chart of accounts to differentiate the different parts. It is a good to discuss the chart of accounts with the company’s auditor or accountants.
Standard Nominal Ledger comes with Standard Chart of Accounts. You can modify it as you like, but remember to make changes also to report definitions.
The five types of accountsTo know when a certain account is to be debited and credited a chart of accounts can be divided into five different types of accounts.
! Assets (A)
! Equity (E)
! Liability (L)
! Income (I)
! Expense (E)
Asset accounts (A)These accounts contain things that the company owns. All accounts that contains the company’s available funds (cash, bank account etc) are asset accounts. Any machines and inventory the company owns are also in the asset accounts. If the company has debtors like customers that owe the company money then this is seen as an asset (accounts receivable). The account debtors is therefore an asset account. On the other hand, if a customer has paid in advance then this should be booked on the account for prepayments from customers, this should be seen as if the company owes the customer money and is not an asset account.
Not everything a company buys is automatically an asset. Some items that only have a minor value are rather seen as an expense. This would be, for example, pens, chairs, coffee for the office and similar things. A more detailed information about expense accounts is provided on the next page.
Equity accounts (A)The Equity shows the value of a company. It consists of at least two accounts. The Share Capital and the Result of Current Fiscal Year.
The share capital is cash or other assets introduced into the business by the owners. This share capital has to be brought before the company is founded. The sum is prescribed by law, and differs according to the countries and which type of company it is.
14/40

The Results of the Fiscal year are the profit that has been made or the loss. A loss will reduce the share capital and a profit will increase it.
How to work with Equity accounts has to regard very specific legal rules. It is not handled as an asset account but rather seen as an account that contains the companies liability to the owners. Most companies are started with the help of money from the owners. These funds are to be seen as a liability to the owners.
Liability accounts (L)These accounts contain the liabilities (debts) that the company have. This includes all debts to the suppliers, which are short term debts, but also long term debts like loans. Normal liability accounts are accounts payable and bank loans.
Income accounts (I)You maybe hope that the most of the accounts would be income accounts but that is not the case. Just a few accounts are normally income accounts. An income or revenue comes up when the company sells a product. This is the most common type of income. As an income it does not matter whether the sale was paid by cash or through an invoice – income is income. If we send an invoice to a customer the income accounts are affected in a positive way. The income accounts can also be affected in a negative way if we send a credit note to a customer, which means that the customer returns the goods and wants his money back.
Expense (E):The expense accounts contains the company’s costs. ”Salaries”, ”Rent”, ”Purchase of goods”, ”Transportation”, ”Interest” are examples of expense accounts. Everything that the company pays that is not to be considered as an investment for the future and that does not have a long lasting value is to be seen as expenses (costs). A phone bill is an expense like salary, rent, electricity etc.
An example of an investment would be a machine used in production. This is never considered as a cost, because the machine will be used for producing and therefore generate value for the business. The machine is an investment and will therefore be recorded on the asset accounts.
Only items that are of minor value are counted as expense. This can also be small office equipment like chairs, cutlery for the canteen, pens and similar things.
Basic elements and fundamental equationAccounting is based on three fundamental elements namely: Assets, Liability and Equity. These three elements are combined into the most important accounting equation:
Assets = Liability + Equity
Assets: A useful and desirable thing or quality, a single item of ownership having an exchange value
Examples are: Property, Bank, Accounts Receivable
Liability is: Moneys owed; debts or pecuniary obligations
Examples are: Loans, Overdrafts, Accounts Payable
Equity is: The owners’ interest in the assets of a business. Owners’ Equity includes the amount invested by the owner plus the profit in the enterprise. Profit consists of 2 elements namely Income & Expenses. These 2 elements are combined in the following accounting equation:
Profit = Income – Expenses
Debit & Credit
All transactions are entered into “T-Accounts”. The left side of the T-account is called the Debit and the right side of the T-account is called the Credit.
15/40

The question now is what element is entered on the Debit side and what element is entered on the Credit side?
The answer to question is very simple and can be illustrated in the following:
Asset: When an asset increases (+) it will be entered in the Debit side. When an asset decreases (--) it will be entered in the Credit side.
Liability: When a liability increases (+) it will be entered in the Credit side. When a liability decreases (--) it will be entered in the Debit side.
Equity: When equity increases (+) it will be entered in the Credit side. When a liability decreases (--) it will be entered in the Debit side.
Income: When an income increases (+) it will be entered in the Credit side (It is the same side as equity because it increases the owner’s Profit.) When a liability decreases (--) it will be entered in the Debit side.
Expense: When an expense increases (+) it will be entered in the Debit side (It is the opposite side as equity because increase in expenses will decrease the owner ’s Profit.) When an expense decreases (--) it will be entered in the Credit side.
16/40

WORKING WITH STANDARD NOMINAL LEDGER
Setting up the VAT CodesIn order to comply with VAT regulations it is necessary to differentiate between domestic, EU and external trade. To solve this, Standard Nominal Ledger by HansaWorld makes use of VAT Codes, whereby any number of VAT Codes with different accounting specifications can be defined.
VAT Codes can be assigned to individual Sales and Purchase Accounts. The VAT Codes help Standard Nominal Ledger to use the correct VAT percentage, to control the Nominal Ledger accounting and to provide VAT statistics.
To edit the VAT Codes, double-click 'VAT Codes' in the 'Settings' list. The following window appears:
To edit a VAT Code record, simply click in the field to be changed and overtype the existing entry. To add a new VAT Code record, scroll down to the first blank line. The information required for each VAT Code record is as follows:
Code Each VAT Code record should be identified by a unique Code.
Excl % Specify the percentage to be applied to a figure that excludes VAT in order to calculate the VAT amount. You must specify an Input or Output Account if the percentage is zero, as shown in the illustration above.
Incl % Specify the percentage to be applied to a figure that includes VAT in order to calculate the VAT amount.
OutpA/C Specify here the VAT Outputs Account to be credited whenever this VAT Code is used in a sales transaction.
Inp A/C Specify here the VAT Inputs Account to be debited whenever this VAT Code is used in a purchase transaction.
Description The description entered here will appear in the 'Paste Special' list, so should be detailed enough to ensure the correct VAT Code is always chosen. To save changes and close the window, click the [Save] button. To close the window without saving changes, click the close box.
AccountsThis register allows you to enter all the chart of accounts.
To enter a new record in the Account register, click [New] in the Button Bar or use the -N keyboard⌘ shortcut. Alternatively, highlight a record similar to the one you want to enter and click [Duplicate] on the Button Bar.
17/40

By clicking the tabs you can navigate between cards. The header is always visible, as a reminder of the Account you are working with.
Enter the unique code you are assigning to this Account: this is the means by which this Account will be identified elsewhere in the system as well as the name or description for the record.
Once you have saved the record, you cannot change the Account Number!
The 'Account Type' radio buttons make it easier to define what kind of account it is. Assets represent the company goods and they are exposed in the balance sheet. Liability represents the company payable accounts and they are exposed in the balance sheet. Equity represents the owner money and they are exposed in the balance sheet. Income represents all sales and they are exposed in the profit & loss. Expense represents all company cost and they are exposed in the profit & loss report.
Check box Closed Check this box i f you want to close the Account for further transactions. You will no longer be able to use it or post to it and it will not appear in the 'Paste Special' selection window. If you want to open the Account again later, you simply
click in the box again to remove the check mark.
Entering an AccountThere are two ways to add new Accounts to the Chart of Accounts: creating a new Account or duplicating and then editing an existing one.
In the ‘Accounts: Browse’ window, click [New] in the Button Bar, or highlight the Account to be copied and click [Duplicate] in the Button Bar. The ‘Account: New’ window appears. This is as described in the previous section.
Enter the new information or change the copied record as appropriate. Click [Save] to save the new record or [Cancel] to close without saving the record.
Deleting Accounts You can delete an Account from the Chart of Accounts, as long as it has not been used in any Transactions.
In the ‘Accounts: Browse’ window, double-click the Account you want to delete. This opens the ‘Account: Inspect’ window.
Select ‘Delete’ from the Record menu. The Account is deleted and the previous Account in the list is shown.
Note that you cannot undo the deletion of an Account. Used Accounts cannot be deleted.
Printing the Chart of Accounts
18/40

You can print the Chart of Accounts from the module Nominal Ledger. Open [Reports] and choose the report 'Chart of Accounts'.
Entering TransactionsIn a Company, all accounting events are entered as Transactions. This can be done into the Transactions register and there are four things you can do with your Transactions:
1.Enter transactions
2.Inspect transactions
3.Make corrections
4.Print transactions
To enter a Transaction, first you need to open the Transaction register from the Master Control panel.
Then, click [New] in the Button Bar or use the -N keyboard shortcut. Alternatively, highlight a⌘ Transaction similar to the one you want to enter and click [Duplicate] on the Button Bar.
19/40
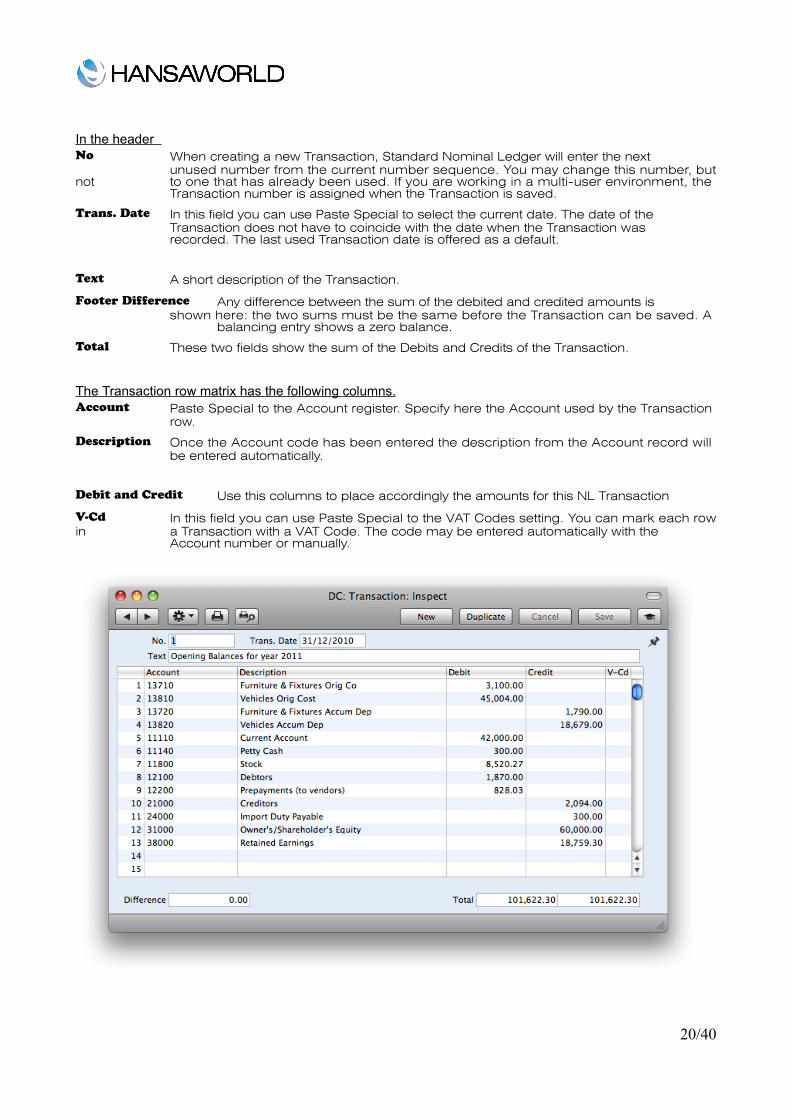
In the header No When creating a new Transaction, Standard Nominal Ledger will enter the next
unused number from the current number sequence. You may change this number, but not to one that has already been used. If you are working in a multi-user environment, the
Transaction number is assigned when the Transaction is saved.
Trans. Date In this field you can use Paste Special to select the current date. The date of the Transaction does not have to coincide with the date when the Transaction was recorded. The last used Transaction date is offered as a default.
Text A short description of the Transaction.
Footer Difference Any difference between the sum of the debited and credited amounts is shown here: the two sums must be the same before the Transaction can be saved. A
balancing entry shows a zero balance.
Total These two fields show the sum of the Debits and Credits of the Transaction.
The Transaction row matrix has the following columns.Account Paste Special to the Account register. Specify here the Account used by the Transaction
row.
Description Once the Account code has been entered the description from the Account record will be entered automatically.
Debit and Credit Use this columns to place accordingly the amounts for this NL Transaction
V-Cd In this field you can use Paste Special to the VAT Codes setting. You can mark each row in a Transaction with a VAT Code. The code may be entered automatically with the
Account number or manually.
20/40
Automatic Balance Function If you have entered the debit amounts in Debit column you can easily balance the transaction. With the cursor in the Credit column, press the Return or Enter key.
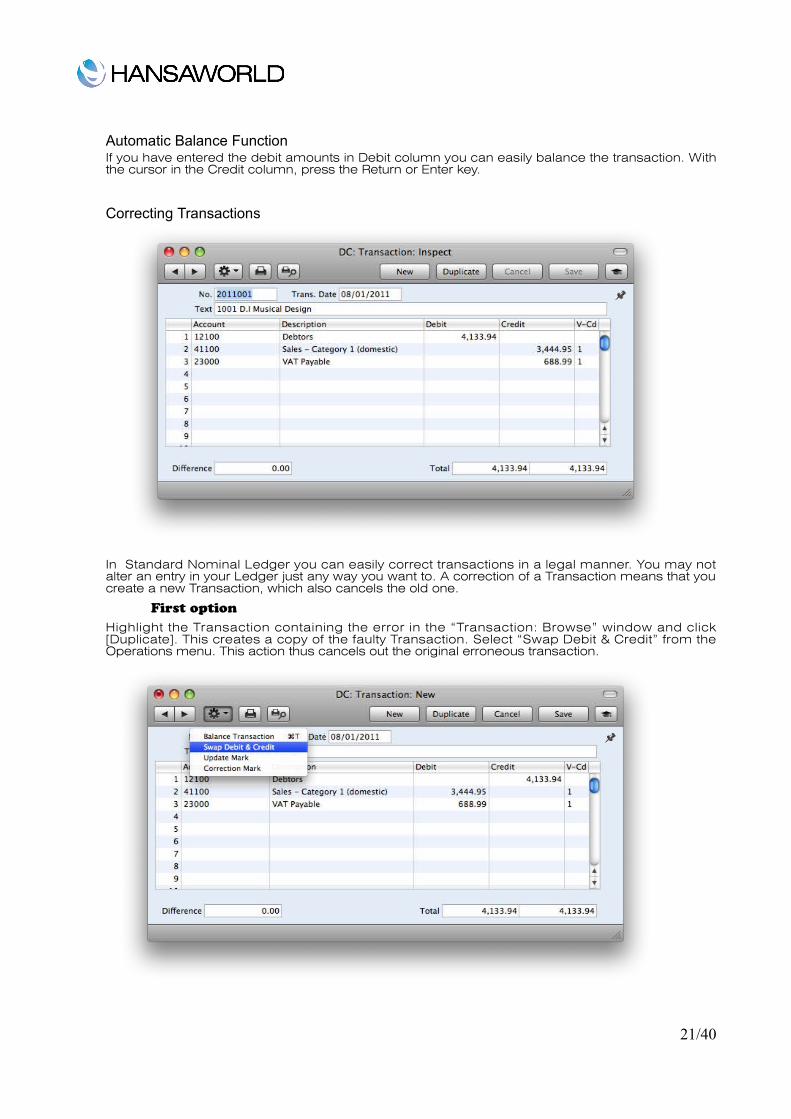
Correcting Transactions
In Standard Nominal Ledger you can easily correct transactions in a legal manner. You may not alter an entry in your Ledger just any way you want to. A correction of a Transaction means that you create a new Transaction, which also cancels the old one.
First optionHighlight the Transaction containing the error in the “Transaction: Browse” window and click [Duplicate]. This creates a copy of the faulty Transaction. Select “Swap Debit & Credit” from the Operations menu. This action thus cancels out the original erroneous transaction.
21/40

Select “Correction Mark” from the same Operations Menu. This contains a cross reference to the Transaction containing the error. Remember to include the prefix of the financial year.
Second optionThe second method that can be used for correcting nominal ledger entries is by striking a line through the entry. A note is created with the initials of the User and a correction entry is made. To use this option in Standard Nominal Ledger, double-click the incorrect Transaction to open the record.
Go to the Operations menu and select 'Update Mark'. A line is added with the initials of the person performing the action. Highlight the row that you want to correct and press the 'Backspace' key to draw a line through it. Add the correct information and Save the record.
Entering a BudgetThe Budget register allows you to enter a budget for the company – Account for Account.
It is possible to change the budgeted value during the current accounting year. This may be tempting, if the actual balance differs very much from those budgeted. It is, however, advisable to leave the budget unchanged, to enable a realistic evaluation of the quality of the budgeting process. Budgeting is a way of guessing the future.
22/40
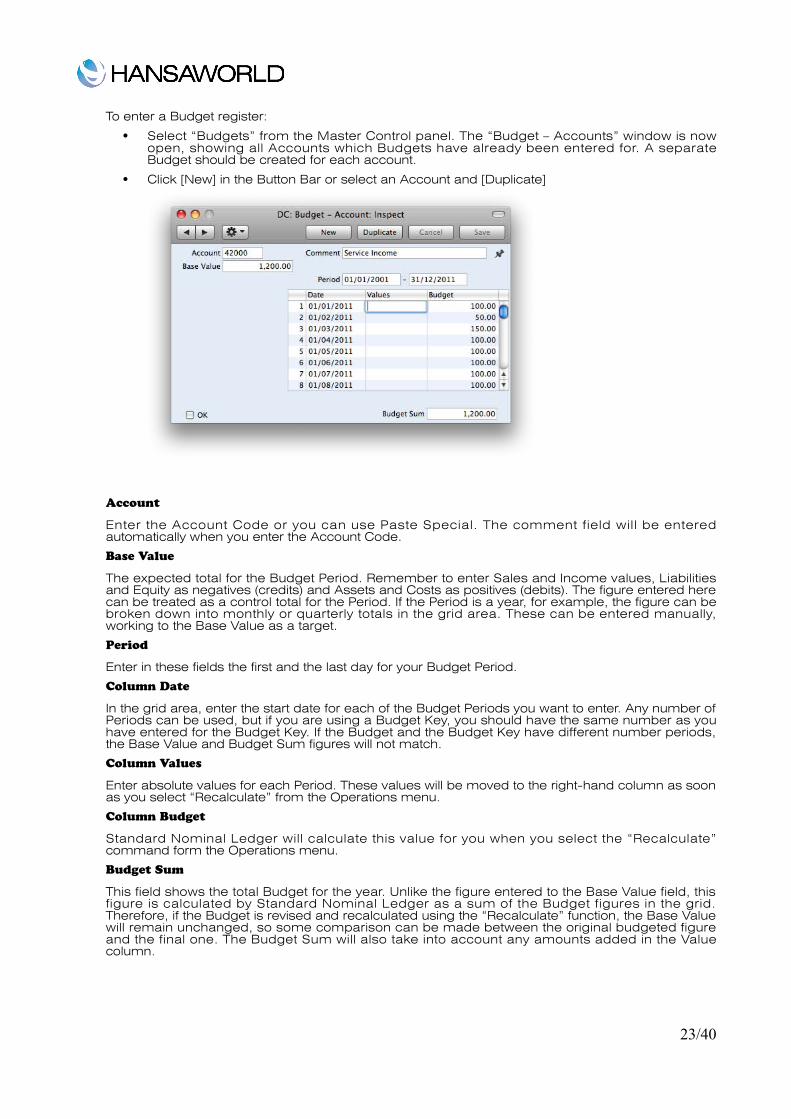
To enter a Budget register:
" Select “Budgets” from the Master Control panel. The “Budget – Accounts” window is now open, showing all Accounts which Budgets have already been entered for. A separate Budget should be created for each account.
" Click [New] in the Button Bar or select an Account and [Duplicate]
Account
Enter the Account Code or you can use Paste Special. The comment field will be entered automatically when you enter the Account Code.
Base Value
The expected total for the Budget Period. Remember to enter Sales and Income values, Liabilities and Equity as negatives (credits) and Assets and Costs as positives (debits). The figure entered here can be treated as a control total for the Period. If the Period is a year, for example, the figure can be broken down into monthly or quarterly totals in the grid area. These can be entered manually, working to the Base Value as a target.
Period
Enter in these fields the first and the last day for your Budget Period.
Column Date
In the grid area, enter the start date for each of the Budget Periods you want to enter. Any number of Periods can be used, but if you are using a Budget Key, you should have the same number as you have entered for the Budget Key. If the Budget and the Budget Key have different number periods, the Base Value and Budget Sum figures will not match.
Column Values
Enter absolute values for each Period. These values will be moved to the right-hand column as soon as you select “Recalculate” from the Operations menu.
Column Budget
Standard Nominal Ledger will calculate this value for you when you select the “Recalculate” command form the Operations menu.
Budget Sum
This field shows the total Budget for the year. Unlike the figure entered to the Base Value field, this figure is calculated by Standard Nominal Ledger as a sum of the Budget figures in the grid. Therefore, if the Budget is revised and recalculated using the “Recalculate” function, the Base Value will remain unchanged, so some comparison can be made between the original budgeted figure and the final one. The Budget Sum will also take into account any amounts added in the Value column.
23/40

Setting up of the Balance Sheet and Profit & Loss reportsBalance Sheet
The Balance Sheet shows the assets, liabilities and capital of the company at a given point in time. You can use the Balance Sheet model supplied with Standard Nominal Ledger, or you can define your own, possibly editing the standard definition to suit your needs.
De!ning the Balance SheetYou can define the structure of the Balance Sheet to suit your requirements. The following example illustrates the set-up process.
To change the report definition of the Balance Sheet, first click the [Settings] button in the Master Control panel, then double-click ‘Report Settings’ in the subsequent list. Then, highlight ‘Balance Sheet’ in the list on the left-hand side of the ‘Report Settings’ window and click the
24/40
[Definition] button. The ‘Balance Sheet Report Definition: Browse’ window is opened.
The window shows the Balance Sheet row by row, as it has been presented up to now. The rows are numbered 1010, 1020, 1030, 1040 etc., so there is room to insert new rows in between. These numbers determine the order in which the rows will be printed in the report. You can insert new rows using the [New Line] button.
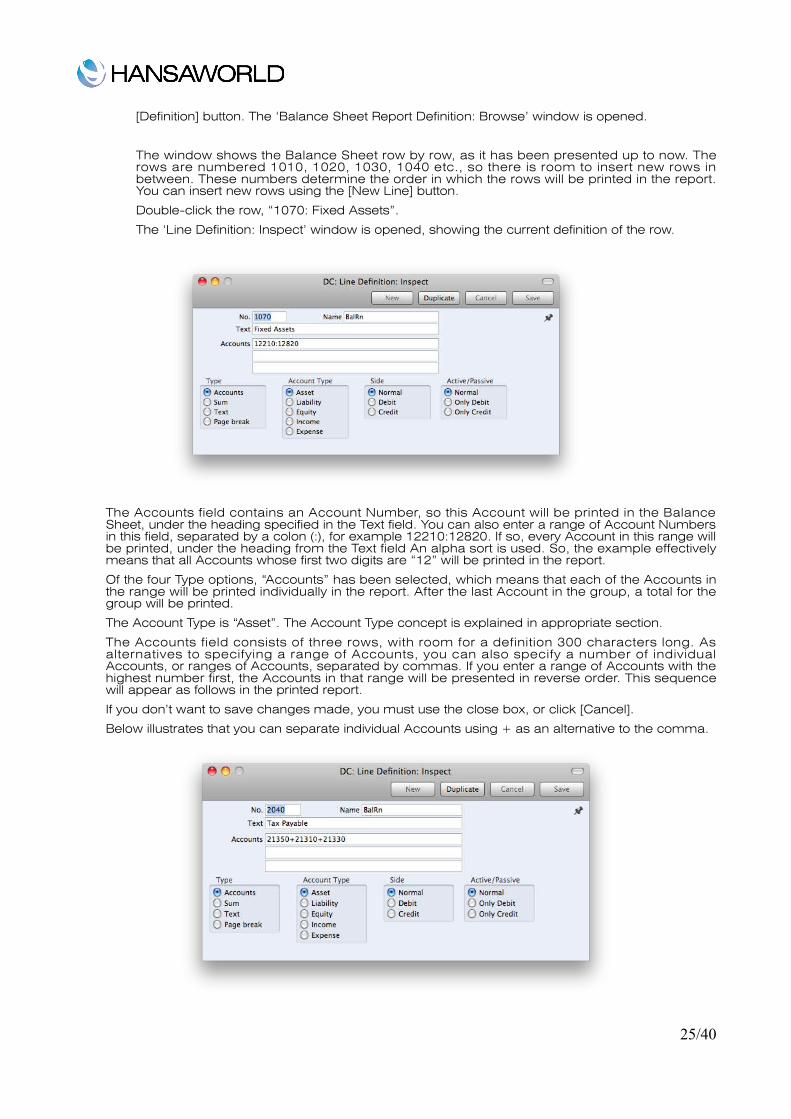
Double-click the row, “1070: Fixed Assets”.
The ‘Line Definition: Inspect’ window is opened, showing the current definition of the row.
The Accounts field contains an Account Number, so this Account will be printed in the Balance Sheet, under the heading specified in the Text field. You can also enter a range of Account Numbers in this field, separated by a colon (:), for example 12210:12820. If so, every Account in this range will be printed, under the heading from the Text field An alpha sort is used. So, the example effectively means that all Accounts whose first two digits are “12” will be printed in the report.
Of the four Type options, “Accounts” has been selected, which means that each of the Accounts in the range will be printed individually in the report. After the last Account in the group, a total for the group will be printed.
The Account Type is “Asset”. The Account Type concept is explained in appropriate section.
The Accounts field consists of three rows, with room for a definition 300 characters long. As alternatives to specifying a range of Accounts, you can also specify a number of individual Accounts, or ranges of Accounts, separated by commas. If you enter a range of Accounts with the highest number first, the Accounts in that range will be presented in reverse order. This sequence will appear as follows in the printed report.
If you don’t want to save changes made, you must use the close box, or click [Cancel].
Below illustrates that you can separate individual Accounts using + as an alternative to the comma.
25/40
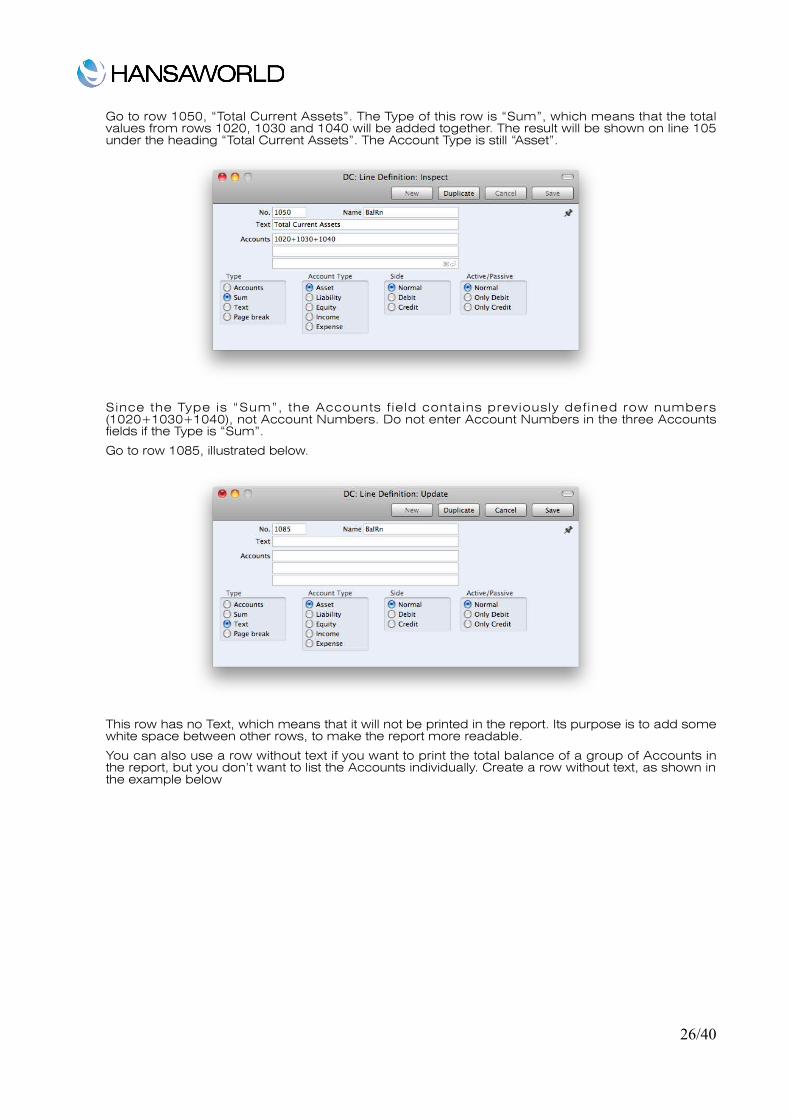
Go to row 1050, “Total Current Assets”. The Type of this row is “Sum”, which means that the total values from rows 1020, 1030 and 1040 will be added together. The result will be shown on line 105 under the heading “Total Current Assets”. The Account Type is still “Asset”.
Since the Type is “Sum”, the Accounts f ield contains previously defined row numbers (1020+1030+1040), not Account Numbers. Do not enter Account Numbers in the three Accounts fields if the Type is “Sum”.
Go to row 1085, illustrated below.
This row has no Text, which means that it will not be printed in the report. Its purpose is to add some white space between other rows, to make the report more readable.
You can also use a row without text if you want to print the total balance of a group of Accounts in the report, but you don’t want to list the Accounts individually. Create a row without text, as shown in the example below
26/40
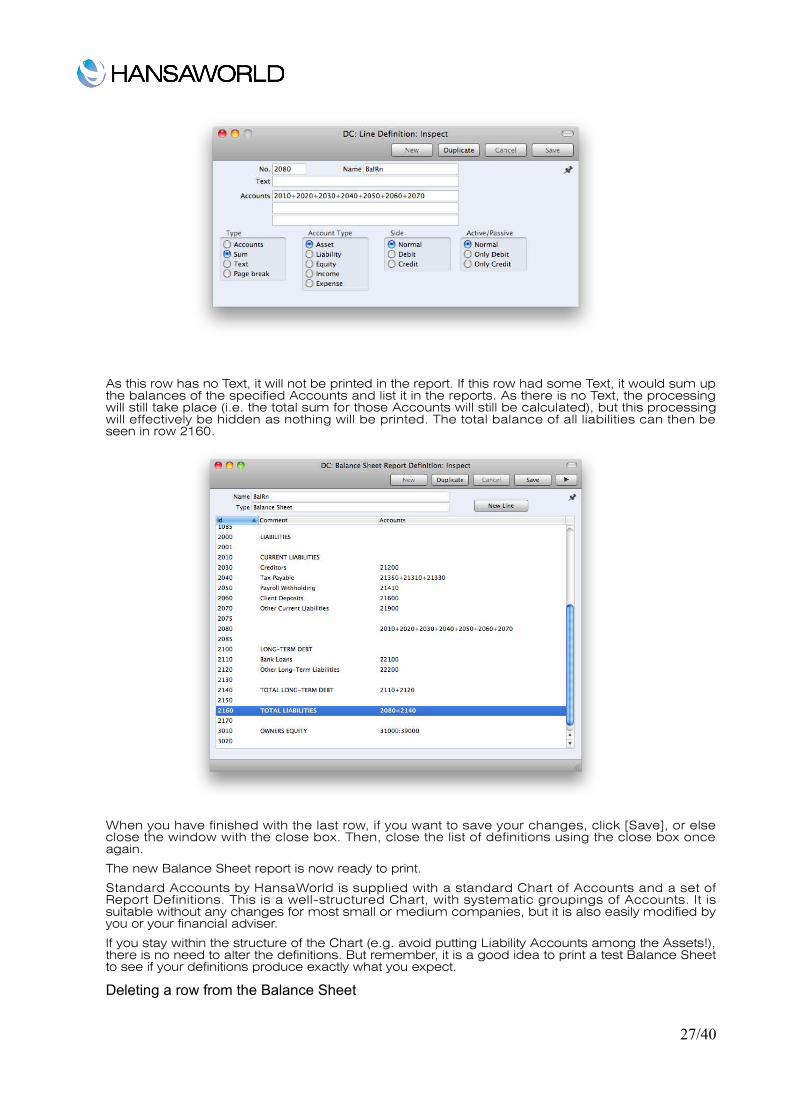
As this row has no Text, it will not be printed in the report. If this row had some Text, it would sum up the balances of the specified Accounts and list it in the reports. As there is no Text, the processing will still take place (i.e. the total sum for those Accounts will still be calculated), but this processing will effectively be hidden as nothing will be printed. The total balance of all liabilities can then be seen in row 2160.
When you have finished with the last row, if you want to save your changes, click [Save], or else close the window with the close box. Then, close the list of definitions using the close box once again.
The new Balance Sheet report is now ready to print.
Standard Accounts by HansaWorld is supplied with a standard Chart of Accounts and a set of Report Definitions. This is a well-structured Chart, with systematic groupings of Accounts. It is suitable without any changes for most small or medium companies, but it is also easily modified by you or your financial adviser.
If you stay within the structure of the Chart (e.g. avoid putting Liability Accounts among the Assets!), there is no need to alter the definitions. But remember, it is a good idea to print a test Balance Sheet to see if your definitions produce exactly what you expect.
Deleting a row from the Balance Sheet
27/40

1. Click the [Settings] button in the Master Control panel and double-click ‘Report Settings’ in the subsequent list. Then, highlight ‘Balance Sheet’ in the list on the left-hand side of the ‘Report Settings’ window and click the [Definition] button.
The ‘Balance Sheet Report Definition: Browse’ window is opened.
2. Double-click the row you want to remove, to show its definition window.
3. Select ‘Delete’ from the Record menu.
The row is deleted from the Balance Sheet and the definition for the following row is shown in its place.
4. Close the window.
You will be returned to the ‘Balance Sheet Report Definition: Browse’ window.
** Note that you cannot undo the deletion of a row in the Balance Sheet.
Printing a Balance SheetClick the [Reports] button in the Master Control panel and then double-click ‘Balance Sheet’ in the ‘Reports’ list. The ‘Specify Balance Sheet’ window is opened.
Period
Enter the period for the Balance Sheet you want to print. The first period in the Reporting Periods setting will be offered as a default.
Accounts
Select how you want the Accounts printed in the report.
All
This option will show all Accounts that have been included in the Balance Sheet definitions.
Used Only
This option will only show Accounts that have been used. This includes Accounts that have balances brought forward from a previous period but that have not been used in the report period, and Accounts with no opening balances that have been used during the period in such a way that they also have no closing balances.
Groups Only
This option does not show balances for individual Accounts. Instead, it simply shows an overall balance for each row as entered in the Balance Sheet definitions.
Used Groups Only
This option only shows balances for rows as entered in the Balance Sheet definitions that have been used.
Comparison
Choose to compare with Net Change or the same period the previous Year.
List Transaction Nos.
With this box checked, the Transaction Numbers of all Transactions that fall within the reporting period, together with debit and credit totals, will be listed at the bottom of the report.
When you click [Run], the Balance Sheet is printed as you have specified it.
When printed to screen, the Balance Sheet has the Standard Nominal Ledger by HansaWorld Drill-down feature. Click on the Account Number of any Account in the report to open the Nominal Ledger Report for the same Account and period. From the Nominal Ledger report, you can click on any Transaction Number to open an individual Transaction record.
Profit & Loss ReportThe Profit & Loss report shows the sales turnover achieved by your company in the specified period. It also shows the total cost of sales and thus the gross profit, and the total overheads and thus the net profit of your business.
When printed to screen, the Profit & Loss report has the Standard Nominal Ledger by HansaWorld Drill-down feature. Click on the Account Number of any Account in the report to open the Nominal Ledger Report for the same Account and period. When in the Nominal Ledger report, you can click on any Transaction Number to open an individual Transaction record.
28/40

De!nition
The content of the Profit & Loss report is defined in the same way as the Balance Sheet. Please refer to the ‘Balance Sheet’ section above for full details.
Locking PeriodsThis setting allows you to close an accounting period to prevent the further entry of new or corrected transactions. You will do this by specifying a cut-off date: no transactions whose Transaction Date is on or before this cut-off date will be permitted. Because Locking is carried out by specifying a single date, months or periods must be locked chronologically. Once a cut-off date has been entered, Standard Nominal Ledger by HansaWorld will not allow you to enter an earlier date to the same field.
Standard Nominal Ledger does not force you to close months or periods, but this setting allows you to do so if necessary.
To open this setting, click [Settings] in the Master Control panel, then double-click ‘Lockings’ in the ‘Settings’ list. Fill in the fields as described below. Then, to save changes and close the window, click the [Save] button. To close the window without saving changes, click the close box.
Lock TransactionsIf you enter a date in this field, the entry of the records whose Date is on or before this date will not be permitted.
If you discover that a record that falls within a closed month contains an error, you can only correct it using the ‘Correction Mark’ function.
If you try to enter a record whose Date is on or before the Lock date, a warning will appear.
After locking the accounts at a certain date, you may not move the date backwards, you will not be able to enter records with earlier dates, and you may not alter earlier records.
Warn on TransactionsIf you enter a date in this field, a warning will be displayed when you enter an record whose Date is on or before this date. You will still be able to save the record.
If you enter a date in the 'Warn on other' field, a warning will be displayed when you enter a record whose Transaction Date is on or before this date. You will still be able to save the record.
29/40
YEAR END PROCEDURES
At the end of the financial year, the books are closed and a new year is started. The final accounts are produced, the auditors will produce their report, and management will produce their report to the owners’ annual meeting. After approval, in the case of limited companies, the annual report is filed with the registrar of companies.
To end a financial year and start a new one in Standard Nominal Ledger by HansaWorld, follow these steps. Companies will have their own methods for recording profit/loss at the end of a financial year. A typical method is described in steps 4-9 below: this method may not be suitable for every company in every country. Please refer to your financial adviser for more advice on this subject.
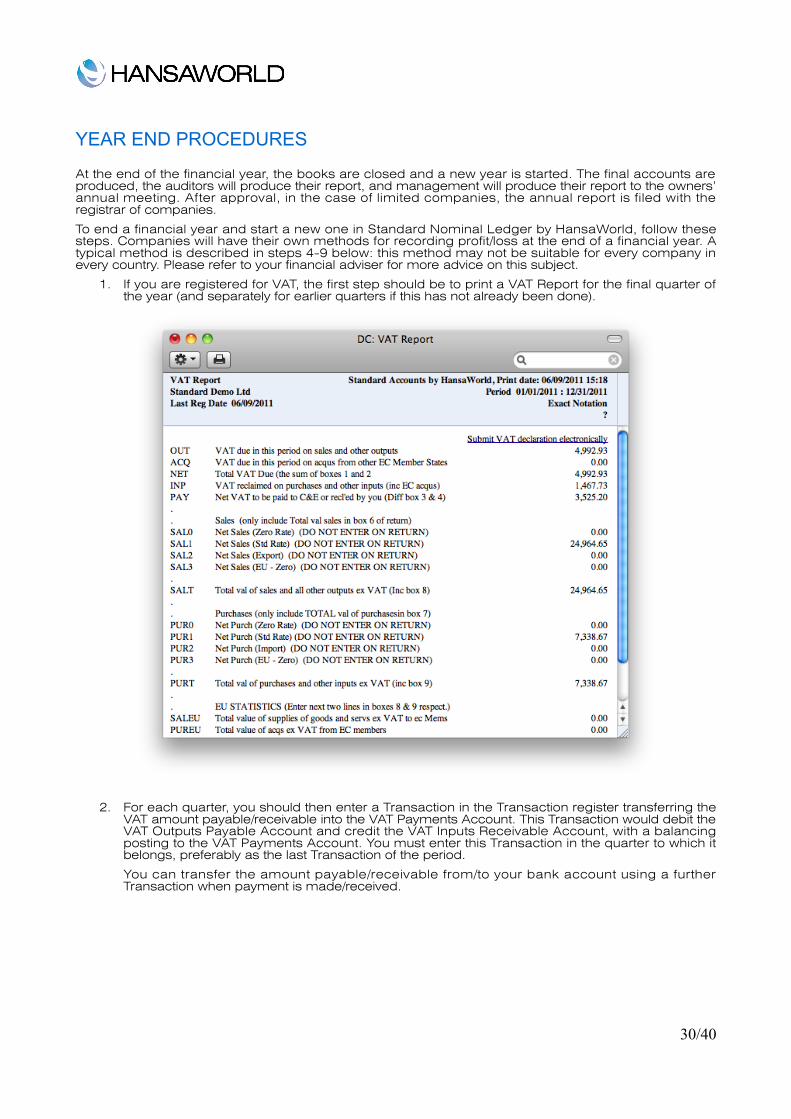
1. If you are registered for VAT, the first step should be to print a VAT Report for the final quarter of the year (and separately for earlier quarters if this has not already been done).
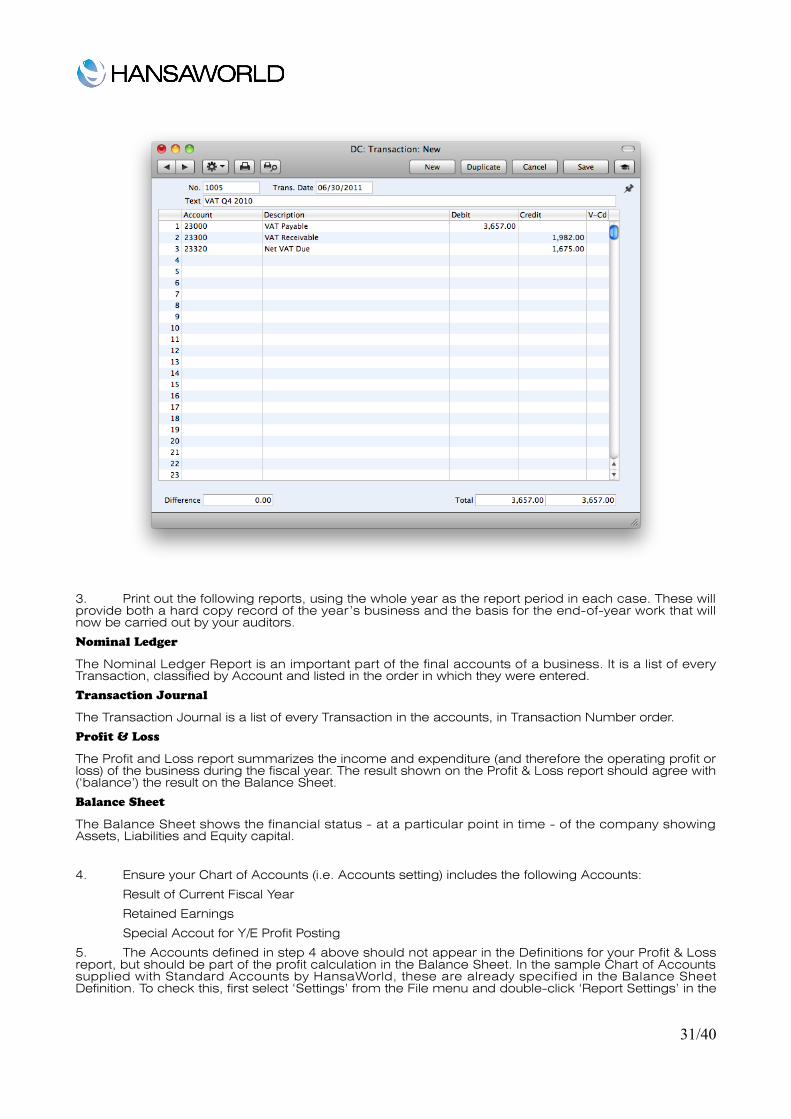
2. For each quarter, you should then enter a Transaction in the Transaction register transferring the VAT amount payable/receivable into the VAT Payments Account. This Transaction would debit the VAT Outputs Payable Account and credit the VAT Inputs Receivable Account, with a balancing posting to the VAT Payments Account. You must enter this Transaction in the quarter to which it belongs, preferably as the last Transaction of the period.
You can transfer the amount payable/receivable from/to your bank account using a further Transaction when payment is made/received.
30/40
3. Print out the following reports, using the whole year as the report period in each case. These will provide both a hard copy record of the year’s business and the basis for the end-of-year work that will now be carried out by your auditors.
Nominal Ledger
The Nominal Ledger Report is an important part of the final accounts of a business. It is a list of every Transaction, classified by Account and listed in the order in which they were entered.
Transaction Journal
The Transaction Journal is a list of every Transaction in the accounts, in Transaction Number order.
Pro!t & Loss
The Profit and Loss report summarizes the income and expenditure (and therefore the operating profit or loss) of the business during the fiscal year. The result shown on the Profit & Loss report should agree with (‘balance’) the result on the Balance Sheet.
Balance Sheet
The Balance Sheet shows the financial status - at a particular point in time - of the company showing Assets, Liabilities and Equity capital.
4. Ensure your Chart of Accounts (i.e. Accounts setting) includes the following Accounts:
Result of Current Fiscal Year
Retained Earnings
Special Accout for Y/E Profit Posting
5. The Accounts defined in step 4 above should not appear in the Definitions for your Profit & Loss report, but should be part of the profit calculation in the Balance Sheet. In the sample Chart of Accounts supplied with Standard Accounts by HansaWorld, these are already specified in the Balance Sheet Definition. To check this, first select ‘Settings’ from the File menu and double-click ‘Report Settings’ in the
31/40
subsequent list. Then, highlight ‘Balance Sheet’ in the list on the left-hand side of the ‘Report Settings’ window and click the [Definition] button.
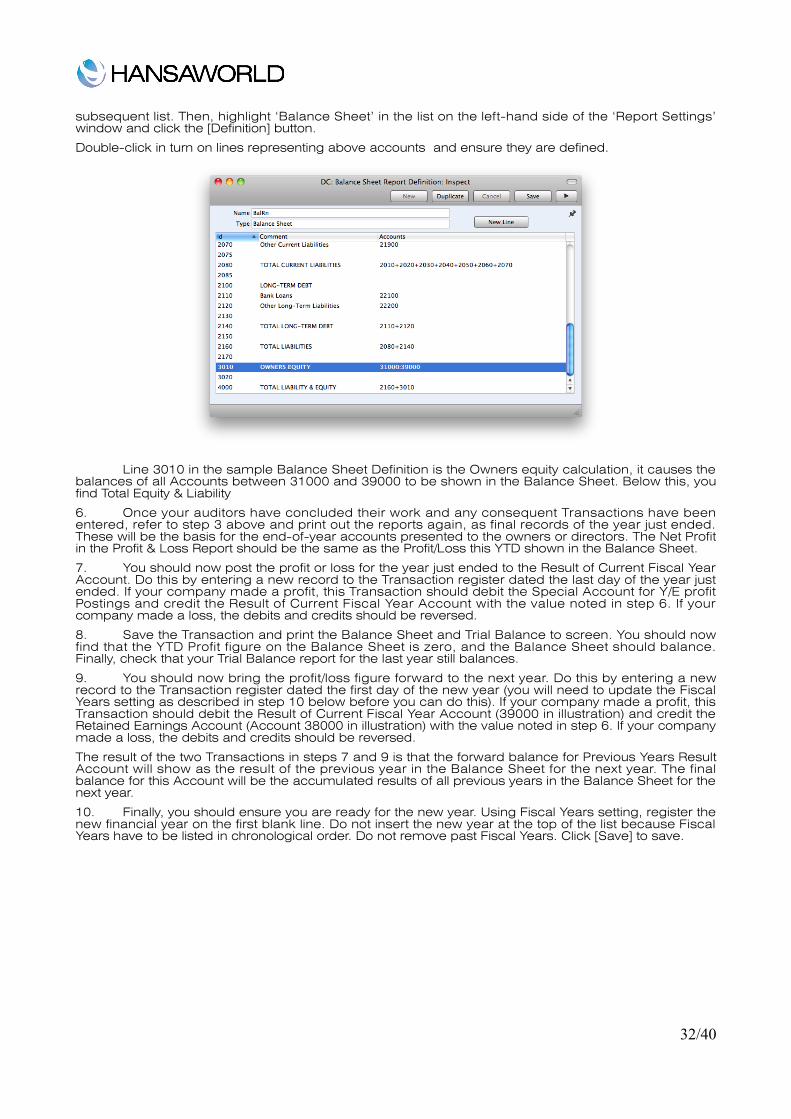
Double-click in turn on lines representing above accounts and ensure they are defined.
Line 3010 in the sample Balance Sheet Definition is the Owners equity calculation, it causes the balances of all Accounts between 31000 and 39000 to be shown in the Balance Sheet. Below this, you find Total Equity & Liability
6. Once your auditors have concluded their work and any consequent Transactions have been entered, refer to step 3 above and print out the reports again, as final records of the year just ended. These will be the basis for the end-of-year accounts presented to the owners or directors. The Net Profit in the Profit & Loss Report should be the same as the Profit/Loss this YTD shown in the Balance Sheet.
7. You should now post the profit or loss for the year just ended to the Result of Current Fiscal Year Account. Do this by entering a new record to the Transaction register dated the last day of the year just ended. If your company made a profit, this Transaction should debit the Special Account for Y/E profit Postings and credit the Result of Current Fiscal Year Account with the value noted in step 6. If your company made a loss, the debits and credits should be reversed.
8. Save the Transaction and print the Balance Sheet and Trial Balance to screen. You should now find that the YTD Profit figure on the Balance Sheet is zero, and the Balance Sheet should balance. Finally, check that your Trial Balance report for the last year still balances.
9. You should now bring the profit/loss figure forward to the next year. Do this by entering a new record to the Transaction register dated the first day of the new year (you will need to update the Fiscal Years setting as described in step 10 below before you can do this). If your company made a profit, this Transaction should debit the Result of Current Fiscal Year Account (39000 in illustration) and credit the Retained Earnings Account (Account 38000 in illustration) with the value noted in step 6. If your company made a loss, the debits and credits should be reversed.
The result of the two Transactions in steps 7 and 9 is that the forward balance for Previous Years Result Account will show as the result of the previous year in the Balance Sheet for the next year. The final balance for this Account will be the accumulated results of all previous years in the Balance Sheet for the next year.
10. Finally, you should ensure you are ready for the new year. Using Fiscal Years setting, register the new financial year on the first blank line. Do not insert the new year at the top of the list because Fiscal Years have to be listed in chronological order. Do not remove past Fiscal Years. Click [Save] to save.
32/40

33/40
REPORTS
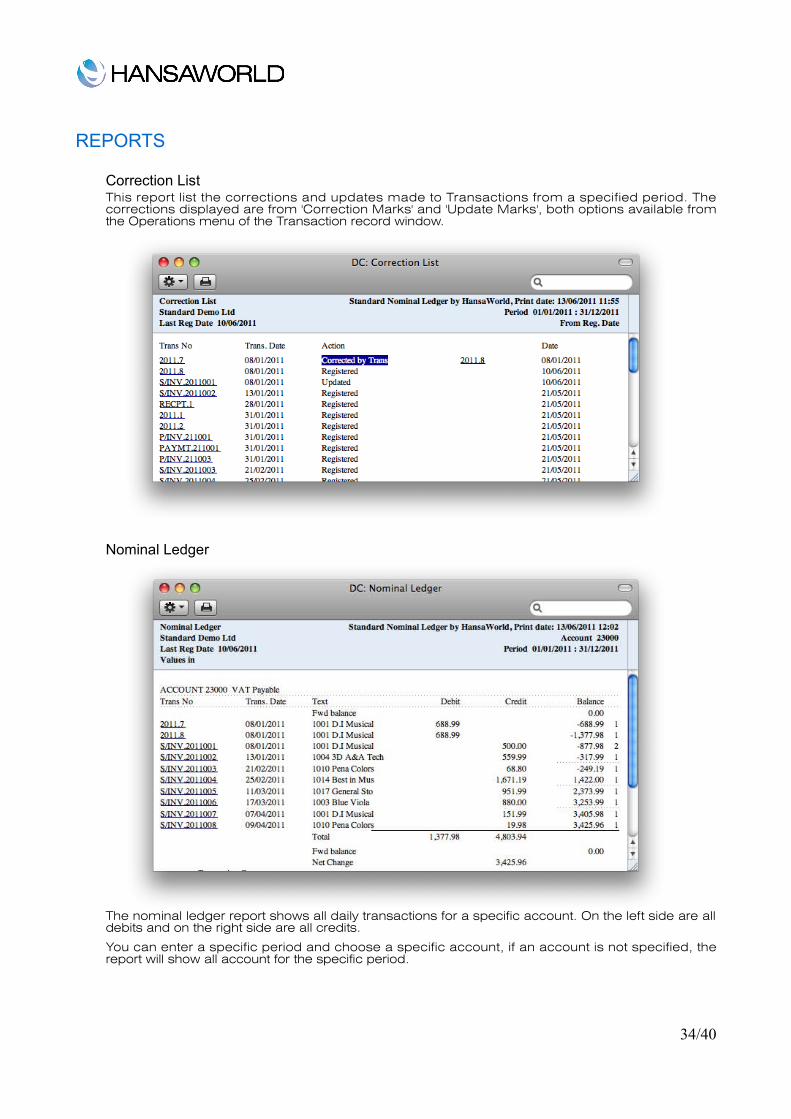
Correction ListThis report list the corrections and updates made to Transactions from a specified period. The corrections displayed are from 'Correction Marks' and 'Update Marks', both options available from the Operations menu of the Transaction record window.
Nominal Ledger
The nominal ledger report shows all daily transactions for a specific account. On the left side are all debits and on the right side are all credits.
You can enter a specific period and choose a specific account, if an account is not specified, the report will show all account for the specific period.
34/40

Balance sheetThe Balance sheet report exposes the assets, liabilities and equities from the business in a specific period. This is a static report because it shows the balance sheet accounts that represent all assets at the end of a fiscal year.
Profit & LossThe Profit & Loss report shows the economical results from the business operation in a period. This report exposes the incomes vs. expenses and shows the net profit or loss in a specific period.
This report can be considered one of the principle reports and could be considered a dynamic report because this exposes the results after a period.
35/40
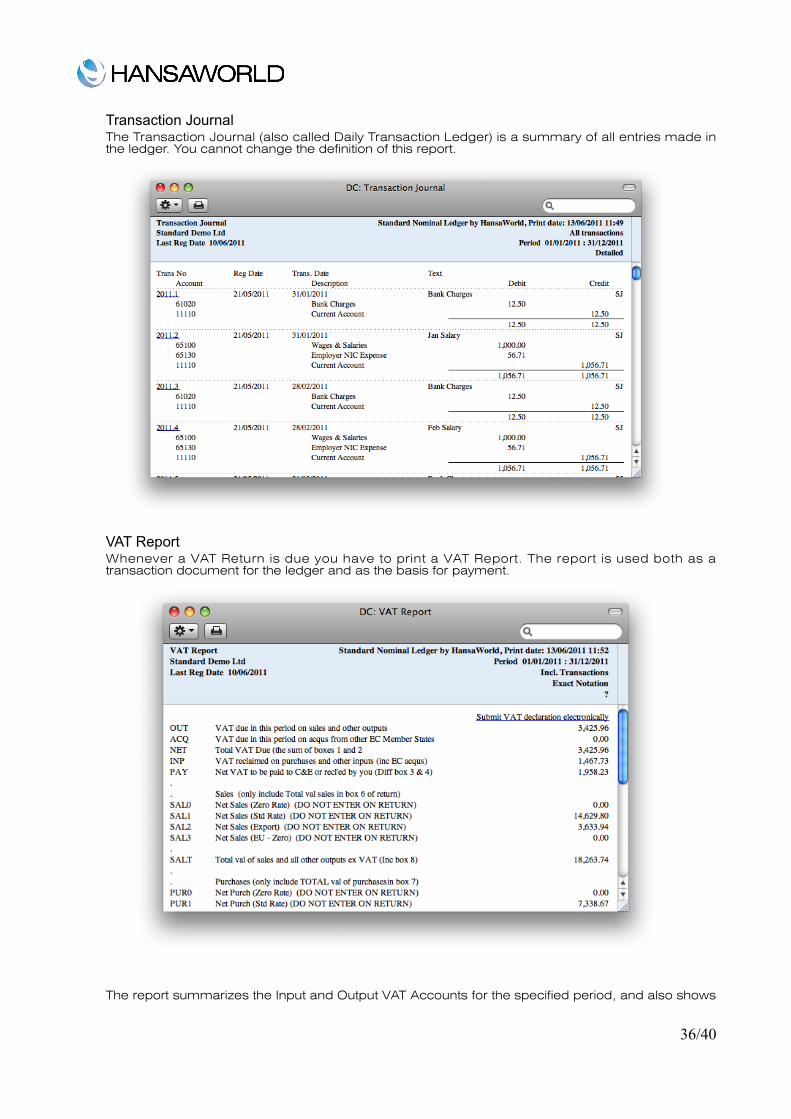
Transaction JournalThe Transaction Journal (also called Daily Transaction Ledger) is a summary of all entries made in the ledger. You cannot change the definition of this report.
VAT ReportWhenever a VAT Return is due you have to print a VAT Report. The report is used both as a transaction document for the ledger and as the basis for payment.
The report summarizes the Input and Output VAT Accounts for the specified period, and also shows
36/40

the total Inputs (purchases) and Outputs (sales). A positive total indicates that you are liable for VAT, a negative one signifies that you are owed money by the VAT authority.
Once a VAT Return has been printed for a given period, it is recommended that you enter a Transaction in the Transaction register transferring the VAT amount payable/receivable into the VAT Payments Account. This Transaction would debit the VAT Outputs Payable Account and credit the VAT Inputs Receivable Account, with a balancing posting to the VAT Payments Account. This Transaction must be entered within the period it concerns, preferably as the last Transaction of the period. The amount payable/receivable can then be transferred to your bank account with a further Transaction when payment is made/received.
37/40

EXPORT
ImportsThe 'Export' function allows you to export certain information from your Standard Nominal Ledger by HansaWorld database to tab-delimeted text files from where you can edit in spreadsheets for further statistical anaylysis or in a word processing programs for mail-merge.
Monthly BalancesSelect this option if you want to export the monthly balances of the company, for all or just a selection of Accounts.
System DataSelect this option to export specific information from your database. The options are: Accounts, Report Definitions and VAT Codes.
Trial BalanceThe Trial Balance is a form of combined Balance Sheet and Profit & Loss report. It shows the balances for each Account but not debit and credit subtotals. You may export the Trial Balance for the whole year or for an arbitrary part of the year as a tab-separated text file.
BackupThis option is explained in detail in the next chapter, 'Imports, Backing Up and Restoring Procedures'.
38/40
IMPORTS, BACKING UP AND RESTORING PROCEDURES
ImportsThe 'Imports' function allows you to import information from tab-delimited text files exported by other Standard Invoicing databases or from other applications such as spreadsheets.
You can use this function when you need to restore from a back-up, or to import set-up information.. You can also use this function to import data exported from other systems, after appropriate formatting. It is not recommended to do this on your own, since database can be damaged easily by importing false data.
To import a file you, click the [Routines] button in the Master Control panel. Then click the [Imports] button in the subsequent window. Alternatively, use the -Shift-I keyboard shortcut. An 'Imports' list⌘ window appears. There are two import options: double-click one to activate it.
AutomaticIf you choose this import function, you will get a list of available text files for import (files with the extension .txt). These files are located inside the application's package.
The left-hand column contains any Backup Comment that you may have inserted in a file if you created it by exporting from another database.
Double-click an item in the list to import it.The file will be imported automatically. A message window informs you about the progress of the import.
When the import is finished, repeat the process if you need to import another file. Note: it is not recommended to import a text backup twice since information will be overwritten. We can also recommend to do a database text backup after every import.
Automatic, Manual !le searchThis function is similar to the Automatic import. The only difference is:
It allows you to import files from anywhere on your hard disk or on your network, while files imported by the 'Automatic' function have to be located inside the application's package.
It allows you to import files with any filename. The 'Automatic' function is restricted to files whose names do not contain any spaces or other non-alphabetic characters and have .txt extensions.
Comments inserted in the back-up files are not visible when you use the 'Manual file search' function, so be certain that you are selecting the correct file to be imported. You can read these comments when you use the 'Automatic' import.
When you select this function from the 'Imports' list window, a standard 'Open File' system dialogue will open, allowing you to locate the file that you want to import.
Backing up and restoring the database
Creating a Database Text BackupThe method of backing up with Standard Invoicing is fast and economical. The data will be saved in a back-up file that takes up a minimal amount of space, and the back-up files are independent of the program versions. This means that restoring from a back-up file will be successful, even if you have updated the version of your application since doing the back-up. This is known as the "text back-up" method of backing up.
To create a text back-up, Click the [Routines] button in the Master Control panel and then [Exports]. Alternatively, use the -E keyboard shortcut. ⌘In the Exports window, double-click 'Database Text Backup' to back up the whole database.
The 'Specify Text Backup' window appears. Here you can enter a description of the back-up file that you are about to create. You can use up to 40 characters. If you later need to restore from a back-up, this description will be shown in the list of importable files to help you select the correct one.
Enter an appropriate description and click [Run].
A dialogue box will open, allowing you to name and place the export file. Enter the name of the file in the filename area and locate it in the appropriate folder or directory in the usual way. The
39/40
name of the back-up should include the date the back-up was made, in order to avoid confusion. For ease of importing later, it is recommended that you do not include spaces or other non-alphabetic characters in the name of your back-up file, and that you give it a .txt extension.
Then, click [Save]. A message window informs you about the progress of the export.
When the export is finished, you are brought back to the 'Exports' list. Close it using the close box.
Restoring from a BackupFollow these steps:
Locate the "Standard Invoicing.hdf" file on your hard disk. It is stored as follows:
1. "Standard Invoicing.hdf" file will be stored in Home/Library/Application Support/Standard Nominal Ledger 6.3.
2. Hold down the Ctrl key on your keyboard and click on this file. When the menu appears, choose 'Show Package Contents'. A window will open, listing the contents of the "Standard Invoicing.hdf" file. Move the "HANSA.HDB" file out of the package. If you need to restore your database using a text back-up file stored in the "Backup" folder in the package, move this text back-up file out of the package as well.
Note: The HANSA.HDB file is the database file of the system, containing all your data. Treat it with care! Do not remove it without reason.
3. Leave the "Attach" folder and its contents in place, otherwise all attachment links will be lost after restoring!
4. Double-click the Books by HansaWorld application. As there is no "HANSA.HDB" file in place, a new database will be created.
When the 'Welcome' window appears, click the [Import backup] button.
When the 'Open File' dialogue box opens, locate and open the back-up file in the normal way. The back-up data will be imported.
40/40


