26
Star Trac ® Studio Series Group Cycle Bikes OWNER’S MANUAL
Star Trac® Studio Series Group Cycle Bikes
OWNER’S MANUAL
Star Trac Studio Series Group Cycle Bikes Owner’s Manual | 2
Table of Contents
INTRODUCTION ........................................................................................................................ 1 WARNING .................................................................................................................................. 4 EMERGENCY STOP .................................................................................................................. 6 SAFETY INSTRUCTIONS .......................................................................................................... 7
Precautions ........................................................................................................................................................... 8
BEFORE USING THE PRODUCT ............................................................................................. 9
TESTING EQUIPMENT AFTER ASSEMBLY .......................................................................... 10
OPERATING INSTRUCTIONS ................................................................................................ 11 Seat and Handlebar Adjustment ....................................................................................................................... 11 Pedal Strap Adjustment ..................................................................................................................................... 12 Resistance Control ............................................................................................................................................. 13 Bike Setup ........................................................................................................................................................... 13
TRAINING INFORMATION ...................................................................................................... 16
MAINTENANCE ....................................................................................................................... 17 Tools .................................................................................................................................................................... 17 Moving and Leveling .......................................................................................................................................... 17 Preventative Maintenance .................................................................................................................................. 17 Adjusting Chain Tension on the Studio 3 ........................................................................................................ 19 Checking and Adjusting Belt Tension on the Studio 5 and Studio 7 ............................................................ 20 Replacing Worn Brake Pads on the Studio 3, Studio 5, and Studio 7 .......................................................... 23
CONTACT INFORMATION ...................................................................................................... 26

Star Trac Studio Series Group Cycle Bikes Owner’s Manual | 3
INTRODUCTION This manual will acquaint you with the operation, safety, and maintenance of your Star Trac Studio series group cycling bike.
7270 – Star Trac Studio 3
7280 – Star Trac Studio 5
7290 – Star Trac Studio 7
7290 – Star Trac Studio 7, Candy Apple Red (Special Edition) Refer to the Assembly Instructions in the box for your specific model for proper assembly of your bike.

Star Trac Studio Series Group Cycle Bikes Owner’s Manual | 4
WARNING – to reduce the risk of personal injury:
1. This equipment is designed for use in a commercial gymnasium or health club. To ensure the proper use
of the equipment in a safe manner, all users of the equipment should read this manual before using the machine. This machine should be made a part of your club training program in order that the equipment is used by your members in as safe a manner as intended. In addition to instructing the club members in the proper use of the equipment, the club member should obtain a complete physical examination from their health care provider before beginning any exercise program.
2. This machine is not intended to be used by children. It is not intended to be used by persons with reduced physical, sensory, or mental capabilities or lack of experience and knowledge, unless given instruction and under the personal supervision concerning use of the machine by a person responsible for their safety. Do not leave children unsupervised around the machine.
3. Assemble and operate the machine on a solid level surface. Position the machine with a minimum of 20 inches (0.5 meters) of clearance on all sides to allow for ease of mounting and dismounting. These dimensions are the recommended minimum distances. The actual area for access and passage is the responsibility of the facility and should take into account this training envelope and any other national or local codes or regulations.
4. Do not exceed the maximum allowable weight limit of 350 lbs. / 159 kg.
5. Use care when getting on or off the machine. Never remove your feet from the pedals while the pedals are still in motion. Prevent your feet from coming out of the toe clip or shoe cage by keeping shoe laces tucked in and foot straps pulled snug around your shoe. If your foot does become disengaged, push down on the resistance knob to stop the flywheel’s motion.
6. Do not over exert yourself during exercise. Stop exercising if you feel pain or tightness in your chest, become short of breath or feel faint. If you feel pain or experience any abnormal symptoms, stop exercising and consult your health care provider.
7. Wear proper exercise clothing and athletic shoes during a workout. Avoid wearing loose clothing. Tie back long hair and keep towels away from the moving parts. Face forward at all times and never attempt to turn around while the machine is moving.
8. Ensure that adjustment knobs (seat height, seat fore-and-aft, and handlebar) are properly secured and do not interfere with range of motion during exercise.
9. Do not insert any object, hands or feet into any openings, or expose hands, arms or feet to the drive
mechanism or other potentially moving part of the machine. 10. Studio series bikes have a weighted flywheel and a fixed gear. This means that in order to stop, you must
gradually slow your pedal strokes rather than stopping abruptly. If you do need to stop immediately, push down on the resistance knob (See pictures on page 6). Do not dismount the machine or remove your feet from the pedals until both the pedals and the flywheel have stopped completely. Failure to comply may lead to loss of control and serious injury.
11. After exercising, turn the resistance knob to increase resistance so the pedals will not rotate freely and
potentially injure someone. 12. If at any time you feel dizzy or have difficulty breathing, gradually stop pedaling and carefully dismount
the machine. 13. Listen to your body, ride at your own pace, and set your machine’s resistance at the level that feels right
for you. 14. Keep children and pets away from the machine whenever it's in use.
Star Trac Studio Series Group Cycle Bikes Owner’s Manual | 5
15. Never turn the pedal crank arms by hand. 16. Stay hydrated. Drink water throughout your ride as needed. 17. Always pedal with some resistance on the flywheel. 18. Stay in control by executing all core movements and hand positions at a slow pace before attempting to
increase your speed. Do not attempt to ride the machine in a standing position at a high RPM until you have practiced at slower speeds.
19. Focus on form, posture and making smooth transitions between movements. 20. Do not use the machine without proper footwear. Never operate the machine with bare feet.
SAVE THESE INSTRUCTIONS

Star Trac Studio Series Group Cycle Bikes Owner’s Manual | 6
EMERGENCY STOP Push down on red knob to stop flywheel
Star Trac Studio Series Group Cycle Bikes Owner’s Manual | 7
SAFETY INSTRUCTIONS
This section includes precautions and fitness safeguards for the installation and use of the Star Trac Studio
series bikes. Please read this section carefully before installing or using your equipment.
CAUTION: Before using this product, it is essential to read this ENTIRE owner’s manual and
ALL Assembly Instructions. It describes equipment setup and instructs members on how to use it correctly and safely.

Star Trac Studio Series Group Cycle Bikes Owner’s Manual | 8
Precautions These safety notes are directed to you as the owner of the equipment. Please train all your users and fitness staff to follow these safety instructions.
Do instruct your members to obtain a medical exam before starting any exercise program. If at any time during exercise you feel faint, dizzy or experience pain, stop and consult your physician.
Do read, understand and carefully follow all warnings, instructions and procedures on the machine and in this manual before use.
Do use your machine only for its intended use, as described in this manual.
Do set up the machine on a solid, level surface.
Do inspect the machine for incorrect, worn or loose components and then correct, replace or tighten prior to use.
Do stop operating your machine if you feel dizzy, faint or exhausted.
Do use care when mounting or dismounting the machine, and make sure it is completely stopped before attempting to mount or dismount.
Do perform regular preventive maintenance as instructed in the manual.
Do reduce pedal/crank speed in a controlled manner – this unit is not equipped with a free-wheel.
Do not let children operate your machine. Supervise invalids or disabled persons who use your machine.
Do not exceed the maximum allowable user weight (350 lbs. / 159 kg).
Do not use your machine without athletic shoes.
Do not wear loose or dangling clothing while using the machine.
Do not step or jump on or off the machine while it is in motion.
Do not use this machine in damp or wet locations.
Do not ever drop or insert any object, hands, or feet into any opening, or underneath this equipment.
Do not place water bottles or cups on the machine unless you are using the designed holders.
Do not use attachments or parts not recommended by the manufacturer.

Star Trac Studio Series Group Cycle Bikes Owner’s Manual | 9
BEFORE USING YOUR PRODUCT Find and read the warning label on your Star Trac Studio bike (pointed out in the picture below) before using your bike. Be sure to replace the warning label if it is damaged, illegible, or missing. Contact customer support to order new labels. Label 1: Warning Label Location: On the down tube
Label 2: Serial Number Label Location: On the underside of the down tube
Warning Label
Serial Number Label
Star Trac Studio Series Group Cycle Bikes Owner’s Manual | 10
TESTING EQUIPMENT AFTER ASSEMBLY Use this checklist to perform the test procedure on all new units.
Check all nuts and bolts and make sure they are all tightened to the proper torque specification (when indicated) in the Assembly Instructions, and verify that no parts are missing.
Test the handlebar and seat post to make sure they move freely, and you are able to lock them in at different positions.
Check the seat to make sure it is level and tight, and does not rotate around or tilt. Tighten and adjust as needed.
Test the seat slide for movement front to rear, and check it by setting it at different settings.
Adjust the seat post and handlebar post to your needs. Ride/test the machine for proper operation according to this owner's manual.
Pedal the machine at a moderate pace, and test for proper and smooth resistance changes while varying the amount of turns on the resistance knob. CAUTION: The flywheel will continue to spin after you pedal, and the crank arms and pedals will rotate with the flywheel. Brake tension is adjustable using the red resistance knob in the front of the machine. Pressing down on the knob will apply the brake if you need to stop quickly.
When you have completed testing the machine, tip the it forward using the handlebars, roll it on a smooth surface to the final location where it will be used, and adjust the leveling feet so the machine is stable.
Star Trac Studio Series Group Cycle Bikes Owner’s Manual | 11
OPERATING INSTRUCTIONS This section provides the instructions for making seat adjustments, handlebar adjustments, pedal strap adjustments, and for controlling resistance. PLEASE NOTE: In a club setting, we recommend each user be properly fitted on the bike by a certified indoor cycling instructor.
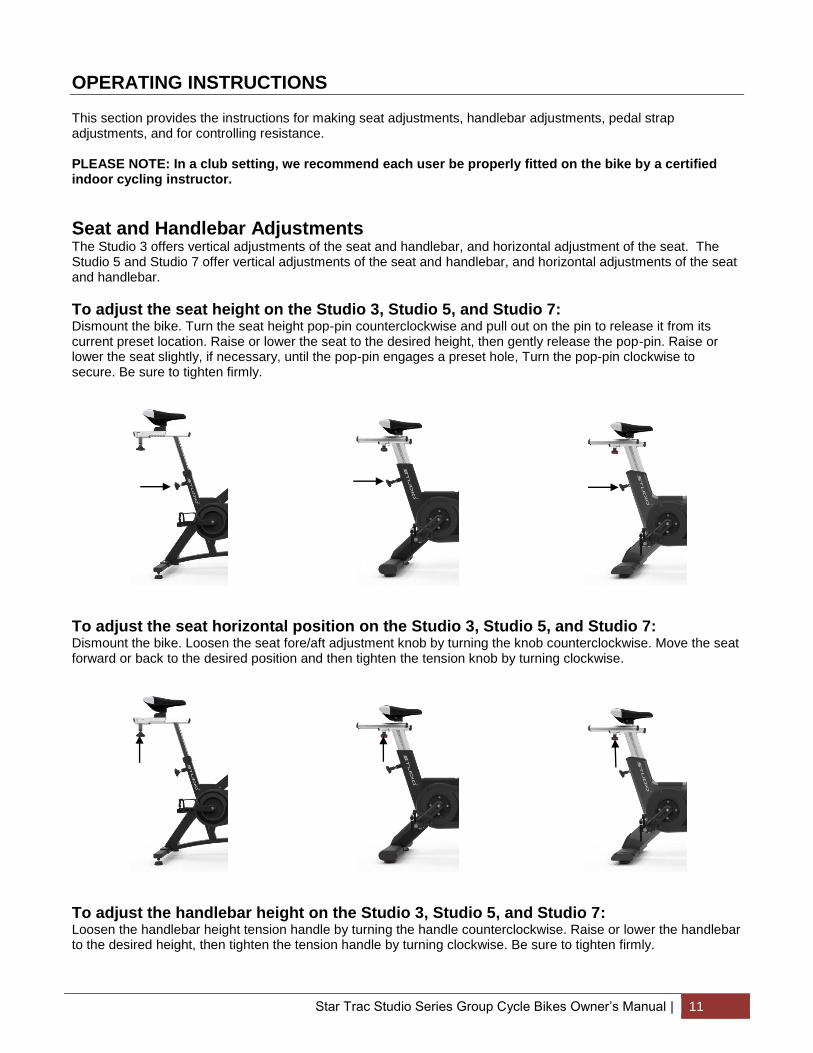
Seat and Handlebar Adjustments The Studio 3 offers vertical adjustments of the seat and handlebar, and horizontal adjustment of the seat. The Studio 5 and Studio 7 offer vertical adjustments of the seat and handlebar, and horizontal adjustments of the seat and handlebar.
To adjust the seat height on the Studio 3, Studio 5, and Studio 7: Dismount the bike. Turn the seat height pop-pin counterclockwise and pull out on the pin to release it from its current preset location. Raise or lower the seat to the desired height, then gently release the pop-pin. Raise or lower the seat slightly, if necessary, until the pop-pin engages a preset hole, Turn the pop-pin clockwise to secure. Be sure to tighten firmly.
To adjust the seat horizontal position on the Studio 3, Studio 5, and Studio 7: Dismount the bike. Loosen the seat fore/aft adjustment knob by turning the knob counterclockwise. Move the seat forward or back to the desired position and then tighten the tension knob by turning clockwise.
To adjust the handlebar height on the Studio 3, Studio 5, and Studio 7: Loosen the handlebar height tension handle by turning the handle counterclockwise. Raise or lower the handlebar to the desired height, then tighten the tension handle by turning clockwise. Be sure to tighten firmly.
Star Trac Studio Series Group Cycle Bikes Owner’s Manual | 12
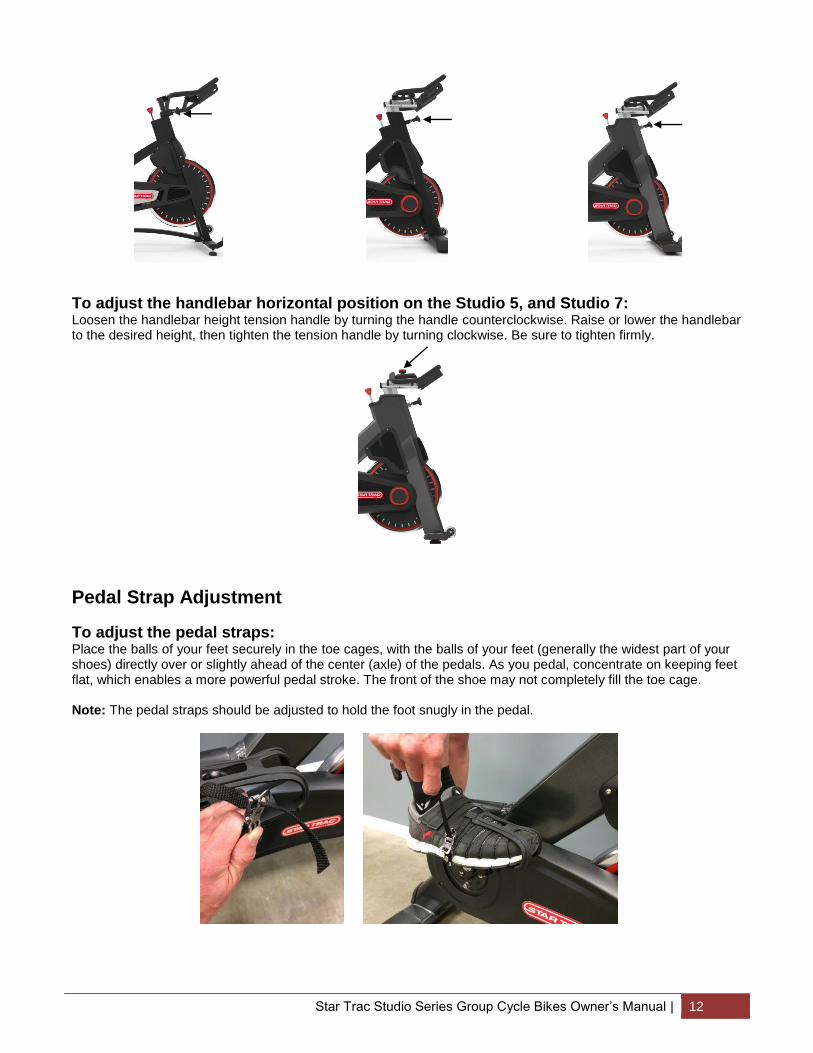
To adjust the handlebar horizontal position on the Studio 5, and Studio 7: Loosen the handlebar height tension handle by turning the handle counterclockwise. Raise or lower the handlebar to the desired height, then tighten the tension handle by turning clockwise. Be sure to tighten firmly.
Pedal Strap Adjustment
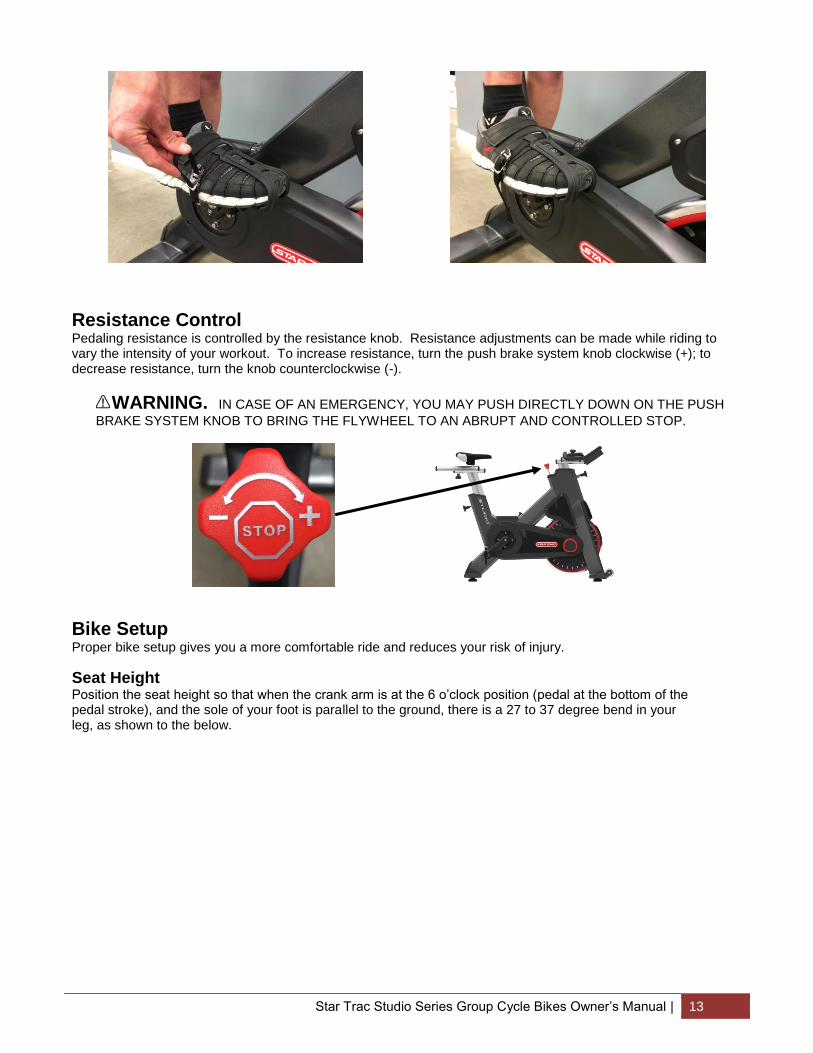
To adjust the pedal straps: Place the balls of your feet securely in the toe cages, with the balls of your feet (generally the widest part of your shoes) directly over or slightly ahead of the center (axle) of the pedals. As you pedal, concentrate on keeping feet flat, which enables a more powerful pedal stroke. The front of the shoe may not completely fill the toe cage. Note: The pedal straps should be adjusted to hold the foot snugly in the pedal.
Star Trac Studio Series Group Cycle Bikes Owner’s Manual | 13
Resistance Control Pedaling resistance is controlled by the resistance knob. Resistance adjustments can be made while riding to vary the intensity of your workout. To increase resistance, turn the push brake system knob clockwise (+); to decrease resistance, turn the knob counterclockwise (-).
WARNING. IN CASE OF AN EMERGENCY, YOU MAY PUSH DIRECTLY DOWN ON THE PUSH
BRAKE SYSTEM KNOB TO BRING THE FLYWHEEL TO AN ABRUPT AND CONTROLLED STOP.
Bike Setup Proper bike setup gives you a more comfortable ride and reduces your risk of injury.
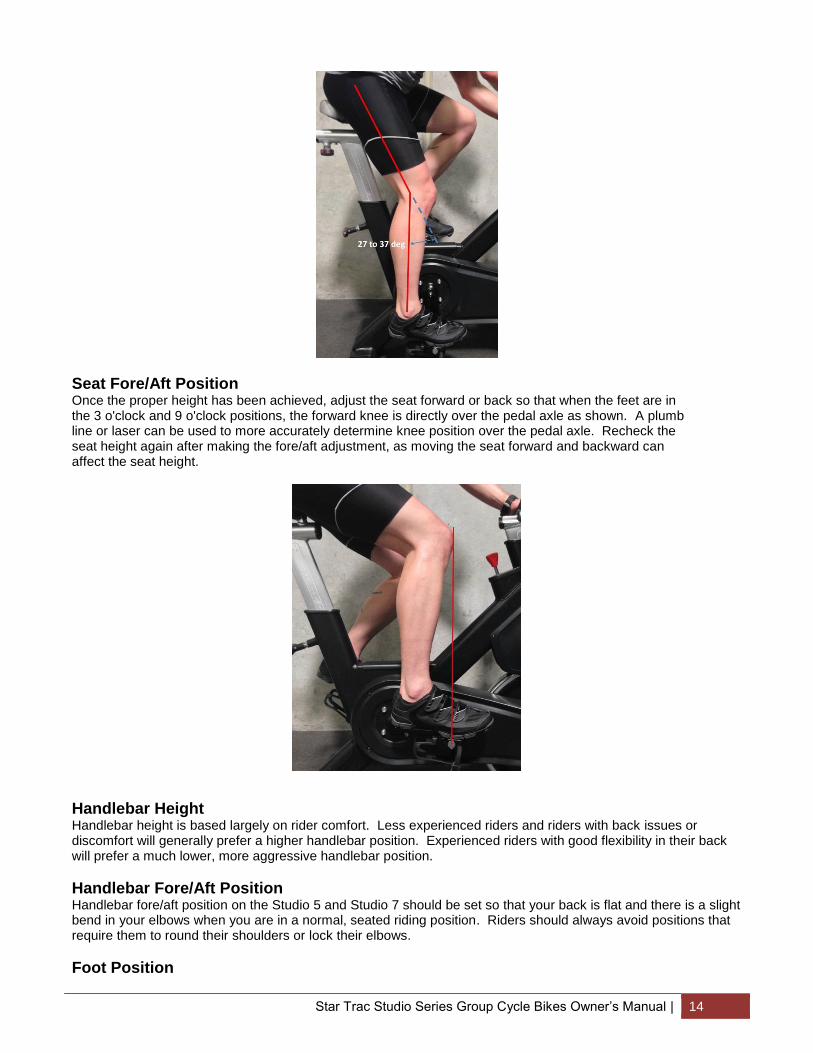
Seat Height Position the seat height so that when the crank arm is at the 6 o’clock position (pedal at the bottom of the pedal stroke), and the sole of your foot is parallel to the ground, there is a 27 to 37 degree bend in your leg, as shown to the below.
Star Trac Studio Series Group Cycle Bikes Owner’s Manual | 14
Seat Fore/Aft Position Once the proper height has been achieved, adjust the seat forward or back so that when the feet are in the 3 o'clock and 9 o'clock positions, the forward knee is directly over the pedal axle as shown. A plumb line or laser can be used to more accurately determine knee position over the pedal axle. Recheck the seat height again after making the fore/aft adjustment, as moving the seat forward and backward can affect the seat height.
Handlebar Height Handlebar height is based largely on rider comfort. Less experienced riders and riders with back issues or discomfort will generally prefer a higher handlebar position. Experienced riders with good flexibility in their back will prefer a much lower, more aggressive handlebar position.
Handlebar Fore/Aft Position Handlebar fore/aft position on the Studio 5 and Studio 7 should be set so that your back is flat and there is a slight bend in your elbows when you are in a normal, seated riding position. Riders should always avoid positions that require them to round their shoulders or lock their elbows.
Foot Position

Star Trac Studio Series Group Cycle Bikes Owner’s Manual | 15
Place the balls of your feet securely in the toe cages, with the balls of your feet (generally the widest part of your shoes) directly over or slightly ahead of the center (axle) of the pedals. As you pedal, concentrate on keeping your feet flat, which enables a more powerful pedal stroke. The front of the shoe may not completely fill the toe cage.
Star Trac Studio Series Group Cycle Bikes Owner’s Manual | 16
TRAINING INFORMATION This section will provide very basic information regarding the structure of an indoor cycling workout. IMPORTANT: User should be aware of the features, functions and proper operation instructions of the bike before using the bike for the first time.
Before Beginning Be sure the seat, handlebar and pedal straps are properly adjusted for your body size and comfort before beginning your workout. Consult your physician before beginning this or any other exercise routine. Discontinue any exercise that causes you discomfort and consult a medical expert.
Warm-Up Once you are in position and sitting on the bike with your hands in a comfortable position on the handlebar, slowly begin pedaling. A gradual warm-up prepares the muscles and cardiovascular system for a more intense workout, and helps prevent potential injuries from occurring. Your warm-up should be sufficient once your breathing rate begins to increase and you begin to perspire lightly. The warm-up period should last about five minutes.
Work Out A brisk and rhythmic workout will train the muscles and cardiovascular system to perform at a higher efficiency. The key is to exercise aerobically; typically at 60% – 75% of your maximum heart rate.
Cool-Down Slow and relaxed activity after a workout allows the muscles and cardiovascular system to gradually return to a resting level.
Dismounting the Bike WARNING: The flywheel momentum of the bike will keep the pedals turning even after the user stops
pedaling, or in the event the user’s feet slip off the pedals. DO NOT DISMOUNT THE BIKE OR REMOVE YOUR FEET FROM THE PEDALS UNTIL BOTH THE PEDALS AND THE FLYWHEEL HAVE STOPPED COMPLETELY. Failure to comply may lead to loss of control and serious personal injury. You may stop the bike using ANY of the following methods:
Pedal more slowly until the pedals come to a complete stop.
Increase the resistance by turning the push brake system knob clockwise (+) until the pedals come to a complete stop.
Push down on the push brake system knob until the pedals come to a complete stop.

Star Trac Studio Series Group Cycle Bikes Owner’s Manual | 17
MAINTENANCE
Why Maintenance A regular preventative maintenance schedule with all fitness equipment ensures that products are working at an optimal condition without affecting the end user exercise experience. To assist in the maintenance regiment, it is recommended to break service into daily, weekly, and monthly intervals. Details on each interval can be found in the “Preventative Maintenance” section of this document.
Tools Working on this product will require basic and/or sometimes specialty tools based on the type of service that will be performed at any time. To assist, we recommend having the tools listed (Table 1) available when performing maintenance.
Table 1. Tool List
Tool Purpose
Crank Puller Removing cranks & pedals
Metric Allen (Hex Key) Wrench Set Tightening or removing various hex head screws throughout the product.
Metric Sockets Set Tightening or removing various hex nuts used throughout the product.
Metric Open Wrench Set Tightening or removing various hex nuts used throughout the product.
Square Drive Ratchet Wrenches To use in conjunction with hex head and or hex socket sets.
Torque Wrench Tightening various critical bolts throughout the product to specific torque specifications.
Phillips Head Screwdriver Set Tightening or removing various Phillips head screws used throughout the product.
Flat Head Screwdriver Set Prying off specific shrouds from wedged locations.
Belt Tension Measuring Device (e.g. a Krikit) For measuring belt tension
Moving & Leveling To move the bike to a new location: Lift the bike from the rear and use the front wheels (located on the front leg, below the handlebar) to roll the bike from one location to another.
To level the bike: Use the four leveling adjusters (located on the underside of the front and rear legs) to compensate for uneven floor surfaces.
Preventive Maintenance Perform regularly scheduled preventive maintenance in order to maintain equipment in serviceable condition. Note: Pedals are wear items that need to be inspected routinely and replaced at least every 2 years.

Star Trac Studio Series Group Cycle Bikes Owner’s Manual | 18
Table 2. Maintenance Schedule
Daily Weekly Monthly Notes
Wipe down and clean X
Wipe and clean any part of the bike where sweat can settle, including:
Handlebar, slider, post
Seat, slider, post
Flywheel
Stabilizer legs
Chain/belt guards
Pop pins
Brake knob assembly NOTE: Never use abrasive or petroleum-based liquids to clean the bike.
Inspect for loose assemblies, buts, and bolts
X Tighten any loose items found
Inspect pedals X
Verify that pedal bolts are tight after the first 10 hours of use and every 100 hours of use thereafter. Inspect NOTE: Pedal-to-crank-arm bolt torque is 33-37 ft-lbs IMPORTANT: If your facility allows members to interchange pedals, it is critical that the pedals are checked after each class to prevent damage, which may lead to injuries if ignored.
Check flywheel alignment X Tighten flywheel nuts as necessary
Check for proper chain tension X
Stand on pedals with crank arms at 3 and 9 o’clock. Hold down the emergency brake and see if there is movement in the crank arms. If there is backlash, then tension the chain according to the instructions in the section “Adjusting Chain Tension on the Studio 3.”
Check for rust X Use a small wire brush to remove rust build up.
Lubricate the chain X Use chain lubricant to lubricate the chain. The chain lubricant hole in the back of the outer chain guard provides access for a thin nozzle attachment.
Inspect brake pads X
Excessive wear, such as glazing, dryness, or leather separation indicate the pad needs to be replaced. To replace the brake pads, following the instructions in the section “Replacing Brake Pads on the Studio Series Bikes.”
Inspect seat for wear Rips, tears, or excessive movement indicates the seat needs to be replaced.
Inspect pedals X Excessive side-to-side movement or bearing resistance indicates the pedals needs to be replaced.
Tighten seat hardware X
Inspect and tighten pedal toe clips and shoe straps
Inspect leveling feet X
Clean and seal frame X Use water with a non-abrasive soap, car wash soap, or bike cleaner soap to clean. Wipe with water and dry. Seal with wax or bike polish.
Star Trac Studio Series Group Cycle Bikes Owner’s Manual | 19
Adjusting Chain Tension on the Studio 3 The chain on your Studio 3 bike has been factory set and lubricated. It should not require adjustment initially. Over time, you will need to adjust the tension, particularly when the chain is still somewhat new and the bike has been ridden several times. Following this initial break-in period, the chain should not require frequent adjustment. Evidence of a loose chain is the feeling of backlash in the cranks. Often riders will describe this backlash as a “clicking” sound. To test for backlash, stand on the pedals with the pedals at 3 and 9 o’clock, and hold down on the brake. If the cranks wiggle back and forth, this is backlash and indicates that the chain must be adjusted. CAUTION: Improper chain adjustment will cause premature wear and may void the warranty. To adjust the chain on the Studio 3:
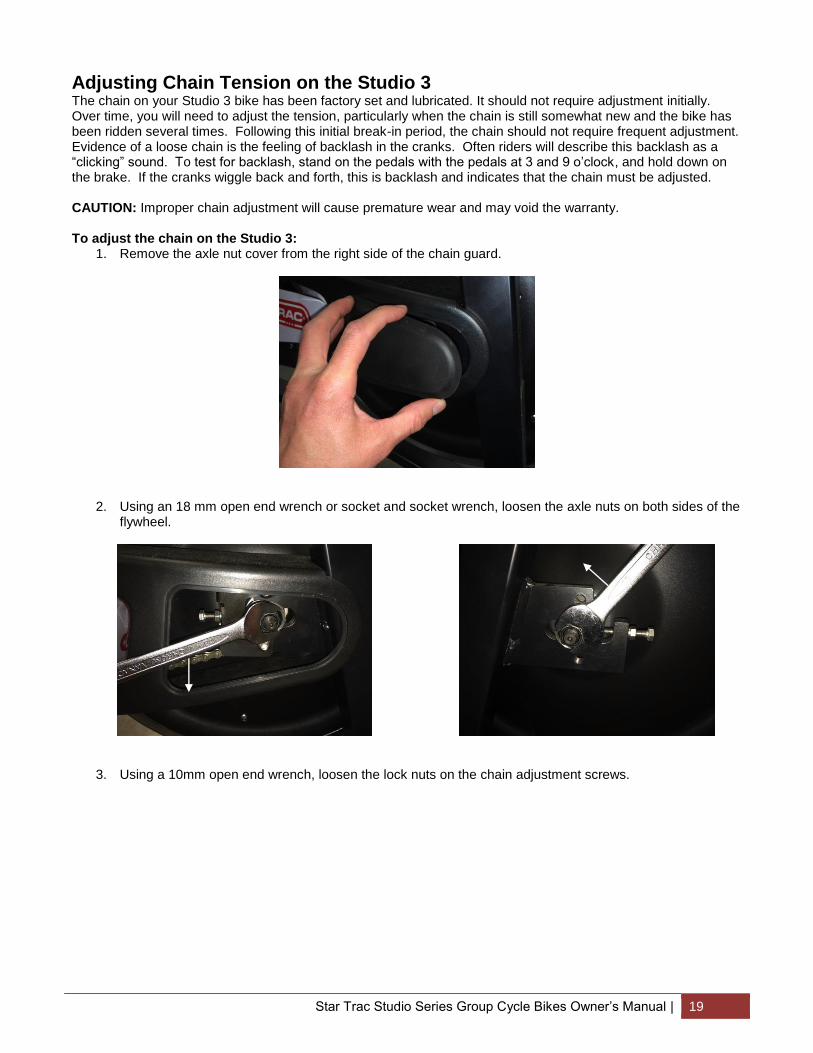
1. Remove the axle nut cover from the right side of the chain guard.
2. Using an 18 mm open end wrench or socket and socket wrench, loosen the axle nuts on both sides of the
flywheel.
3. Using a 10mm open end wrench, loosen the lock nuts on the chain adjustment screws.
Star Trac Studio Series Group Cycle Bikes Owner’s Manual | 20
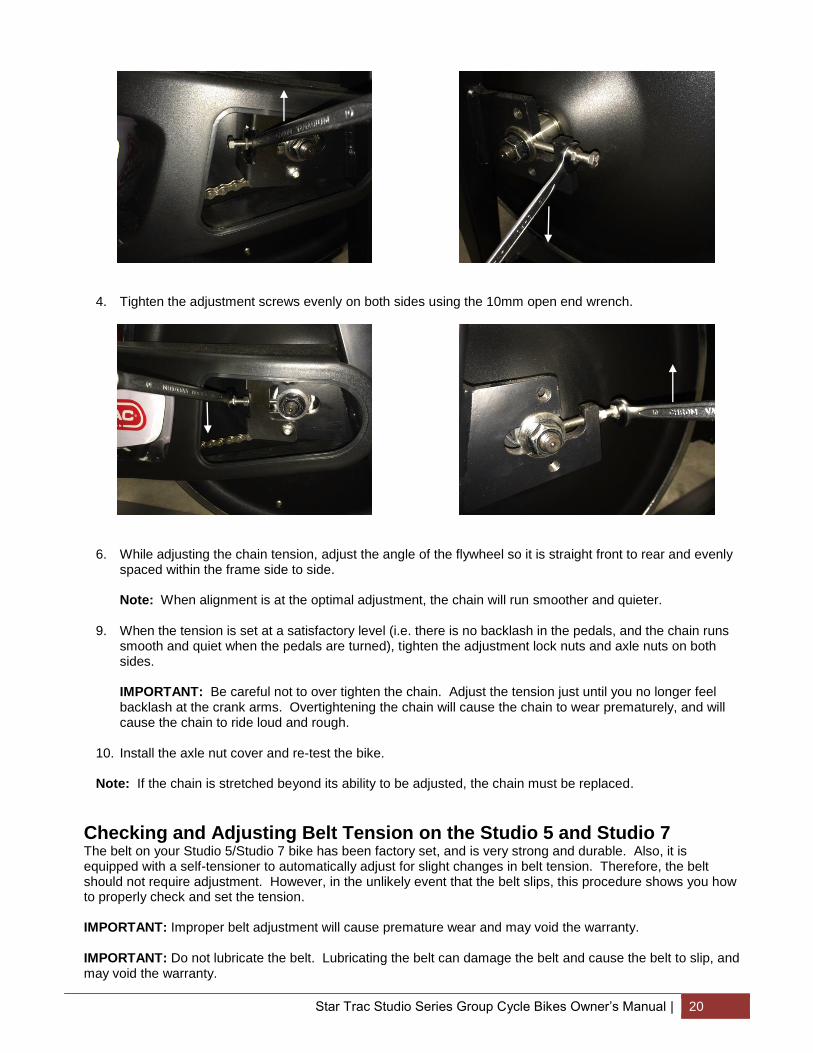
4. Tighten the adjustment screws evenly on both sides using the 10mm open end wrench.
6. While adjusting the chain tension, adjust the angle of the flywheel so it is straight front to rear and evenly
spaced within the frame side to side.
Note: When alignment is at the optimal adjustment, the chain will run smoother and quieter. 9. When the tension is set at a satisfactory level (i.e. there is no backlash in the pedals, and the chain runs
smooth and quiet when the pedals are turned), tighten the adjustment lock nuts and axle nuts on both sides.
IMPORTANT: Be careful not to over tighten the chain. Adjust the tension just until you no longer feel backlash at the crank arms. Overtightening the chain will cause the chain to wear prematurely, and will cause the chain to ride loud and rough.
10. Install the axle nut cover and re-test the bike.
Note: If the chain is stretched beyond its ability to be adjusted, the chain must be replaced.
Checking and Adjusting Belt Tension on the Studio 5 and Studio 7 The belt on your Studio 5/Studio 7 bike has been factory set, and is very strong and durable. Also, it is equipped with a self-tensioner to automatically adjust for slight changes in belt tension. Therefore, the belt should not require adjustment. However, in the unlikely event that the belt slips, this procedure shows you how to properly check and set the tension. IMPORTANT: Improper belt adjustment will cause premature wear and may void the warranty.
IMPORTANT: Do not lubricate the belt. Lubricating the belt can damage the belt and cause the belt to slip, and may void the warranty.
Star Trac Studio Series Group Cycle Bikes Owner’s Manual | 21
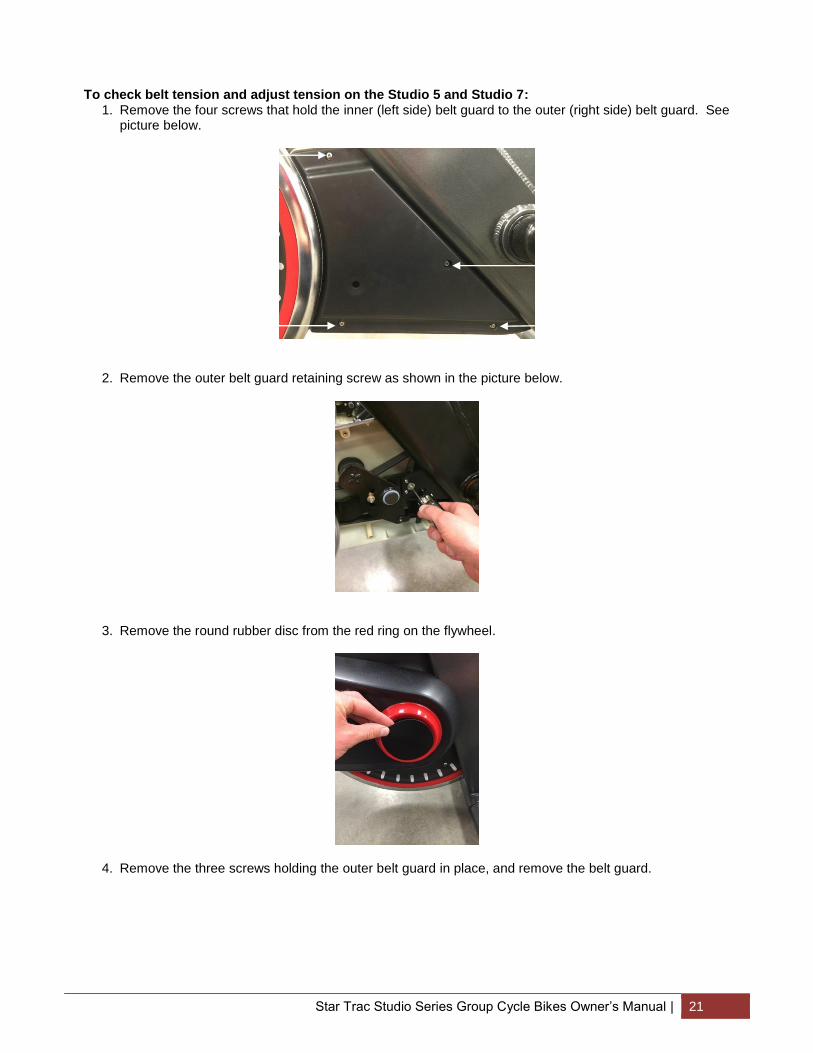
To check belt tension and adjust tension on the Studio 5 and Studio 7:
1. Remove the four screws that hold the inner (left side) belt guard to the outer (right side) belt guard. See picture below.
2. Remove the outer belt guard retaining screw as shown in the picture below.
3. Remove the round rubber disc from the red ring on the flywheel.
4. Remove the three screws holding the outer belt guard in place, and remove the belt guard.

Star Trac Studio Series Group Cycle Bikes Owner’s Manual | 22
5. Use a belt tension measuring tool to measure the belt tension. The belt tension must be in the range of 150 to 180 pounds. A Krikit is used in the picture below to measure belt tension. When using a Krikit or similar device, measure the tension mid-span of the belt on the bottom span of belt.
Note: Please refer to the manufacturer’s instructions on to properly measure belt tension with the chosen belt tension measuring device.
6. If the belt tension is below 150 pounds of tension, then the belt must be tightened.
7. To increase the belt tension, tighten the die spring nut shown in the picture below. Make small
adjustments while stopping to measure belt tension in order to avoid over tighten the belt.
8. In the rare event of the belt being stretched beyond adjustment, replace the belt. Contact Star Trac
customer support for directions on how to replace a belt.

Star Trac Studio Series Group Cycle Bikes Owner’s Manual | 23
9. When the belt tension is set to the proper range, replace the out and inner belt guards, and the round rubber disc on the outer belt guard.
Replacing Worn Brake Pads on the Studio 3, Studio 5, and Studio 7 Your Studio series bike is equipped with a friction brake pad that pushed against the flywheel for creating resistance when pressure is applied by the resistance knob. The brake pad consists of an oiled leather strap and a dense foam pad attached to an aluminum block. Over time with normal use the leather pad will become dry and worn, and the foam pad will deform, requiring brake pad replacement. The amount of time that a brake pad will last depends on the frequency and intensity of use. Key indicators that a brake pad is worn are when the resistance no longer feels smooth, the pad develops a dry “scratchy” feel, or the brake pad makes a grinding sound. NOTE: The brake pad replacement procedure is shown below for the Studio 7; however, the procedure is the same for the Studio 3 and Studio 5.
1. Remove the side fenders from both sides of the bike by removing the three screws holding each fender in place.
2. Remove the bottom screw on each side of the brake pad that holds the links to the top of the brake pad.
3. Flip the links up out of the way of the brake pad.
Star Trac Studio Series Group Cycle Bikes Owner’s Manual | 24
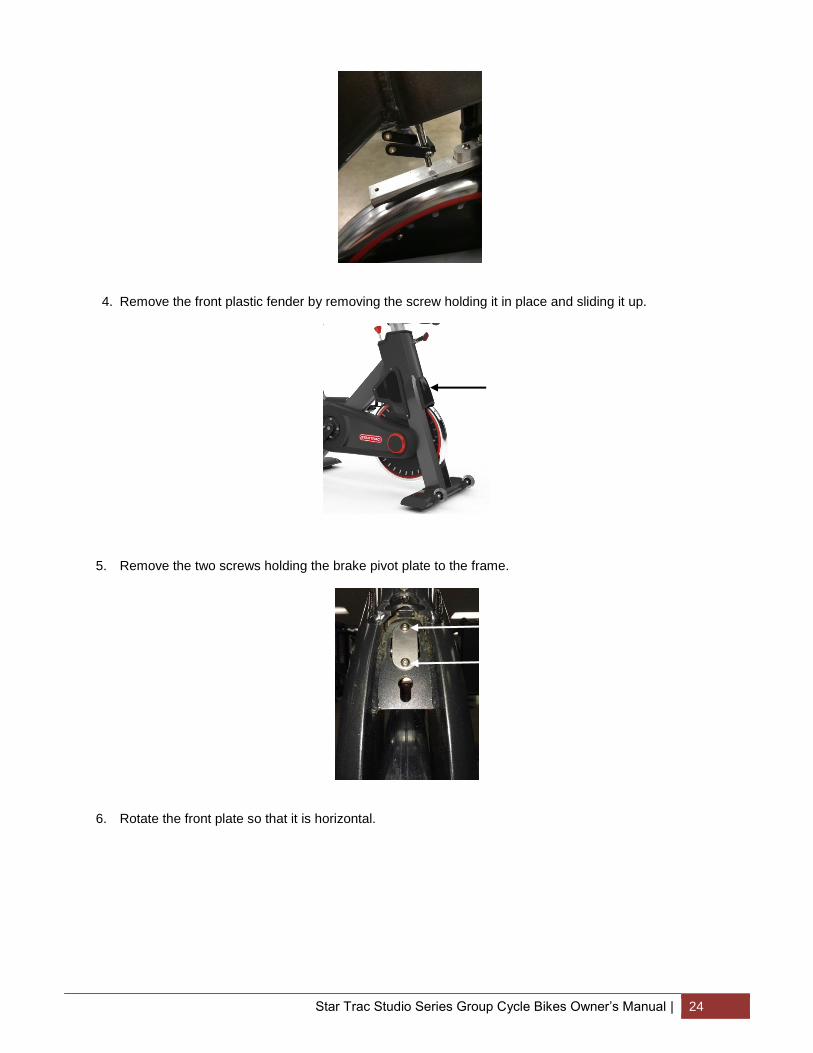
4. Remove the front plastic fender by removing the screw holding it in place and sliding it up.
5. Remove the two screws holding the brake pivot plate to the frame.
6. Rotate the front plate so that it is horizontal.

Star Trac Studio Series Group Cycle Bikes Owner’s Manual | 25
7. Pull the brake pad assembly through the rectangular hole and pull the assembly out the back from between the forks.
8. Remove the screw and nut holding the brake to the assembly, replace brake pad, and reinstall the screws.
9. Reinstall brake assembly, front fender, brake cartridge mechanism links, and side fenders.
Star Trac Studio Series Group Cycle Bikes Owner’s Manual | 26
CONTACT INFORMATION
Manufacturer CORE HEALTH & FITNESS
4400 NE 77th Avenue, Suite 300 Vancouver, WA 98662 Telephone: (888) 678-2476 http://www.stairmaster.com
Customer Support Contact your local distributor, or Core Health & Fitness directly at:
1-800-503-1221 [email protected]
Please supply the serial number of your machine and the date of purchase when you call. Use the space in the boxes below to write down this information. To find the serial number on your machine, refer to the Safety Warning Label information page.
Please record the following information for future reference.
Serial Number
Date of Purchase
Document Number 620-8349 Rev A. October, 2015


