23
GTm 5250 Installation and Admin Guide 27 April 2018

GTm5250Installation andAdmin Guide
27 April 2018
Contents
About theGTm5250 codec 3The connectors 3
LEDs 4
Dimensions 4
Using the correct HDMI and DVI cables 4
Extending the camera cables 4
About the touchscreen controller 6Windows 10 user interface 6
Skype for Business user interface 6
Lync/Skype for Business/Exchange requirements 7Lync/Skype for Business requirements 7
Exchange requirements 7
How to install GTm5250 8
ConfiguringGTm5250 11Camera presets 12
Typical installation 14
Using theaudio injector 16
Appendix: LEDbehavior 17Network port LED 17
StarLeaf Controller Port LED behavior 17
Power and Status LED behavior 17
Appendix: Ports andprotocols 18GTm system connectivity 18
Outbound 18
Inbound 18
On-premise Skype for Business 2015 or Lync 2013 19
Outbound 19
GTm on external network 20
Skype for Business Online 20
Outbound 20
Inbound 21
Legal information 23Third party software acknowledgments 23
Disclaimers and notices 23
GTm 5250, 27 April 2018 Page 2 of 23
About the GTm 5250 codec
About the GTm 5250 codec
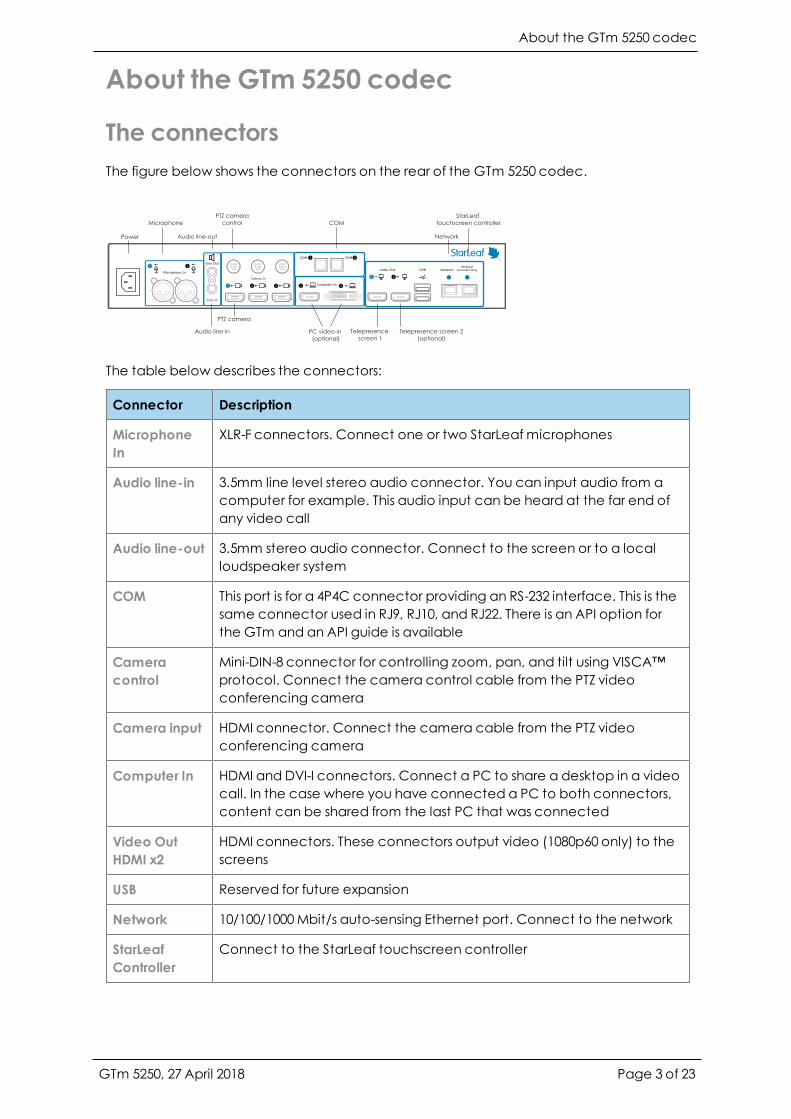
The connectorsThe figure below shows the connectors on the rear of the GTm 5250 codec.
Microphone
Audio line-out
PTZ camera
control
Power
PC video-in
(optional)
Network
PTZ camera
Telepresence
screen 1Telepresence screen 2
(optional)
StarLeaf
touchscreen controller
Audio line-in
COM
The table below describes the connectors:
Connector Description
MicrophoneIn
XLR-F connectors. Connect one or two StarLeaf microphones
Audio line-in 3.5mm line level stereo audio connector. You can input audio from acomputer for example. This audio input can be heard at the far end ofany video call
Audio line-out 3.5mm stereo audio connector. Connect to the screen or to a localloudspeaker system
COM This port is for a 4P4C connector providing an RS-232 interface. This is thesame connector used in RJ9, RJ10, and RJ22. There is an API option forthe GTm and an API guide is available
Cameracontrol
Mini-DIN-8 connector for controlling zoom, pan, and tilt using VISCA™protocol. Connect the camera control cable from the PTZ videoconferencing camera
Camera input HDMI connector. Connect the camera cable from the PTZ videoconferencing camera
Computer In HDMI and DVI-I connectors. Connect a PC to share a desktop in a videocall. In the case where you have connected a PC to both connectors,content can be shared from the last PC that was connected
Video OutHDMI x2
HDMI connectors. These connectors output video (1080p60 only) to thescreens
USB Reserved for future expansion
Network 10/100/1000Mbit/s auto-sensing Ethernet port. Connect to the network
StarLeafController
Connect to the StarLeaf touchscreen controller
GTm 5250, 27 April 2018 Page 3 of 23
About the GTm 5250 codec
Connector Description
Power An IEC mains power connector . The codec automatically adjusts tothe supply voltage. Use the supplied power cable to connect thecodec to the power. Connect all other cables before connecting thepower
LEDsThere are Power and Status LEDs on the front of the codec. LED behavior is described inAppendix: LED behavior (p17).
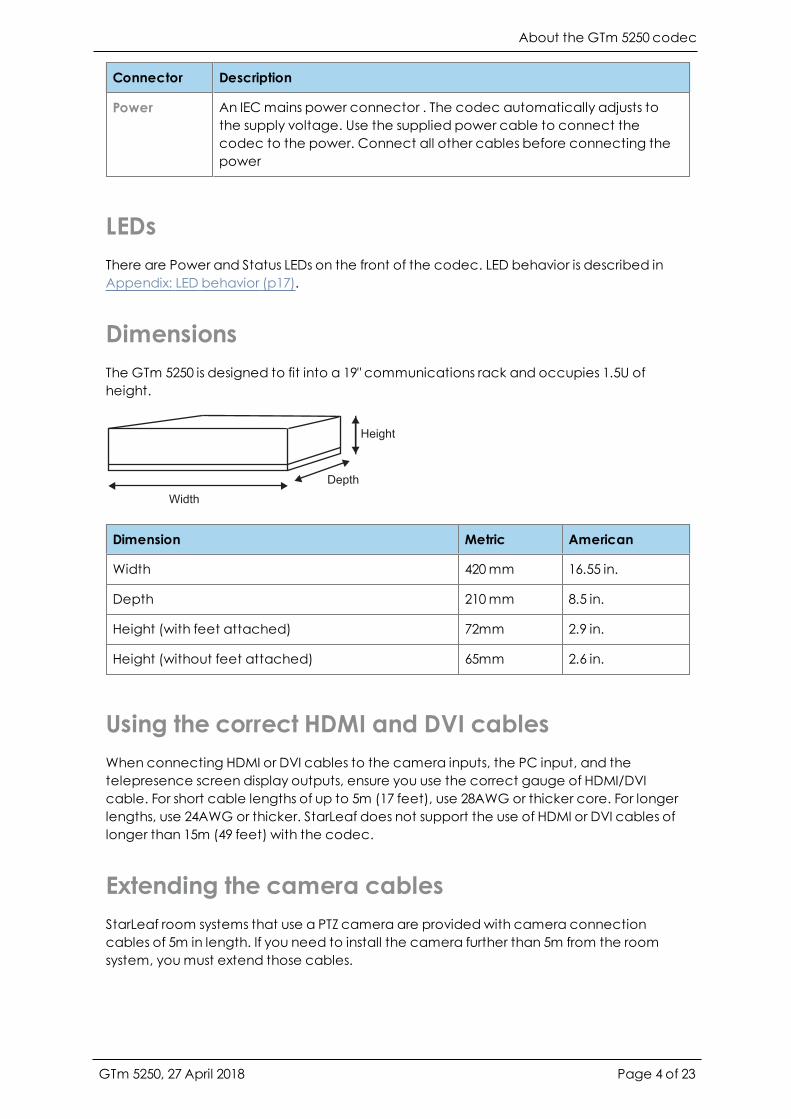
DimensionsThe GTm 5250 is designed to fit into a 19" communications rack and occupies 1.5U ofheight.
Width
Depth
Height
Dimension Metric American
Width 420mm 16.55 in.
Depth 210mm 8.5 in.
Height (with feet attached) 72mm 2.9 in.
Height (without feet attached) 65mm 2.6 in.
Using the correct HDMI and DVI cablesWhen connecting HDMI or DVI cables to the camera inputs, the PC input, and thetelepresence screen display outputs, ensure you use the correct gauge of HDMI/DVIcable. For short cable lengths of up to 5m (17 feet), use 28AWG or thicker core. For longerlengths, use 24AWG or thicker. StarLeaf does not support the use of HDMI or DVI cables oflonger than 15m (49 feet) with the codec.
Extending the camera cablesStarLeaf room systems that use a PTZ camera are providedwith camera connectioncables of 5m in length. If you need to install the camera further than 5m from the roomsystem, youmust extend those cables.
GTm 5250, 27 April 2018 Page 4 of 23

About the GTm 5250 codec
You can extend those cables using a third-party product called an extender. This producteffectively carries the media and camera-control signals across a cat 6 Ethernet cable.
StarLeaf has partneredwith SoundControl Technologies to provide this solution which isavailable at http://www.soundcontrol.net/solutions/#
GTm 5250, 27 April 2018 Page 5 of 23
About the touchscreen controller
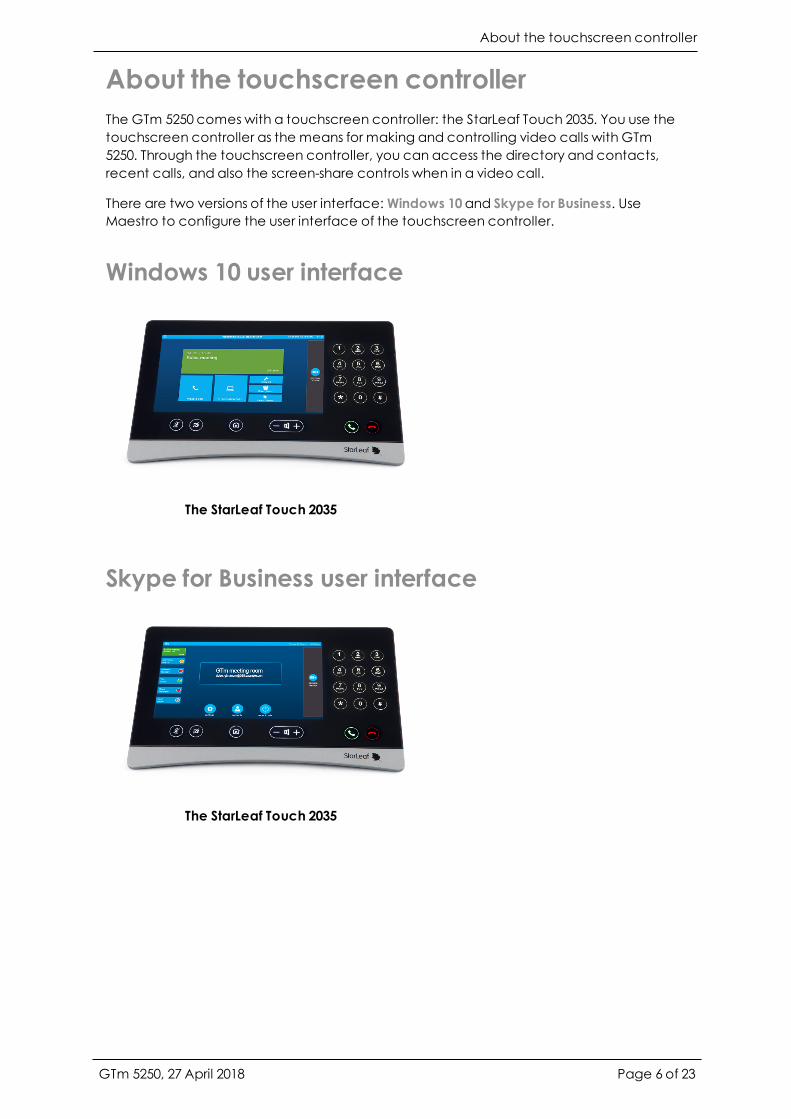
About the touchscreen controllerThe GTm 5250 comes with a touchscreen controller: the StarLeaf Touch 2035. You use thetouchscreen controller as the means for making and controlling video calls with GTm5250. Through the touchscreen controller, you can access the directory and contacts,recent calls, and also the screen-share controls when in a video call.
There are two versions of the user interface:Windows 10and Skype for Business. UseMaestro to configure the user interface of the touchscreen controller.
Windows 10 user interface
The StarLeaf Touch 2035
Skype for Business user interface
The StarLeaf Touch 2035
GTm 5250, 27 April 2018 Page 6 of 23

Lync/Skype for Business/Exchange requirements
Lync/Skype for Business/Exchangerequirements
Lync/Skype for Business requirementsThe GTm supports:
n Lync 2010 Server, Lync 2013 Server, Skype for Business 2015 ServerNote: If the deployment is not a Lync 2013 server, ensure that the Lync 2013 userinterface is enabled.
n Skype for Business Online
The GTm needs:
n A user or room system account with Lync/Skype for Business enabledn For on-prem deployments: if the Lync/Skype for Business server certificates were issued
by a private certificate authority, the GTm requires the certificate of the RootCertificate Authority and any intermediate certificates. Microsoft has documentedhow to export Root Certification Authority Certificates
Exchange requirementsThe GTm supports:
n Exchange 2010 SP2 Servern Exchange 2013 Servern Exchange Online
The GTm needs:
n A user account or room resource with Calendar enabled and linked to a Skype forBusiness enabled account. Auto-responding to invitations is not required but supported
Note: Conference invite emails to the GTm must remain intact with necessaryattachments in order for conferencing facilities to function correctly. Be aware thatstripping attachments from emails causes the Join Now button to stop working. Auto-responding to invitations can cause attachments to be deleted and youmust configure itnot to do so.
Note: If you are using a room resource andwould like to show the meeting title correctlyon the GTm, refer to this Microsoft article.
GTm 5250, 27 April 2018 Page 7 of 23
How to install GTm 5250
How to install GTm 5250Before installing the StarLeaf GTm 5250, read the safety information at GTm 5250 safetyand compliance.
Pre-requisitesBefore installing the GTm 5250, ensure you have the following:
n One or two telepresence screens that support a 1080p60 input format (use televisionsthat have an audio-output capability, or alternatively, you can connect loud speakersto the codec). If the televisions have an option to enable "Game Mode" or "PC Mode",then do so as this reducesmedia processing delays and improves video experience
n Supported video cameran Microphonen StarLeaf touchscreen controller
Note: If you are not using a separate audio system, ensure that you use televisions thathave an audio-output capability. In this case, you also need to use the supplied audioinjector. For more information, refer to Using the audio injector.
Unpack the GTm 5250. The package contents are:
n Codec (with feet attached)n Audio injectorn Installation sheetn Rack mounting ears kitn Cables
l Power cablel DVI-I to DVI-I cablel HDMI to HDMI cables (two) (connects codec to screens)l 3.5mm jack to 3.5mm jack (connects codec to PC video and audio)l Network cables
n Adaptors for the codec-to-PC cablel DVI-I to HDMIl DVI-I to VGAl DVI-I to DVI-D
Positioning the codec1. Ensure you have chosen an appropriate installation site:
l The codec must be accessible with all cables easily connectedl Youmust provide ventilation for the codec; leave a space of at least 10cm (4inches) behind, in front, and to the left and right of the codec
l Use a grounded AC power outlet for the codec2. Rack mount the unit or place on firm horizontal surface. The codec is 1.5 U high (with
removable feet detached) and fits in most standard 19-inch racks.
Connecting cables and peripherals
GTm 5250, 27 April 2018 Page 8 of 23
How to install GTm 5250
Connecting network cables to the codec
1. Using an Ethernet cable, connect the StarLeaf Controller Only connector on thecodec to the PoE network port on the rear of the touchscreen controller. The networkport on the touchscreen controller is markedwith this symbol:
2. Using an Ethernet cable, connect the Network port on the rear of the codec to anEthernet switch in your network. The Ethernet port is a 10/100/1000Mbit/s auto-sensingport and is set to ‘auto’ by default.
Note: The touchscreen controller must connect directly to the codec; do notconnect the touchscreen controller via a switch to the codec.
Note: In all cases, the speed and duplex settings at either end of the connectionmustbe identical. Using non-matching settings causes severe packet loss.
To configure the network speed and duplex settings of the codec’sNetwork port: onthe touchscreen controller that you have connected to the codec, go to settings >networking > network port speed.
Note: By default, the GTm 5250 uses DHCP to acquire an IP address. If necessary, you canconfigure the GTm 5250with a static IP address, to do so:On the touchscreen controller that you have connected to the codec, go to settings >networking, switch off DHCPand edit the IP address, netmask, gateway, and nameserverfields.
Connecting the camera and microphone
1. Connect the PTZ camera: connect the camera to Camera Inwith the camera controlcable and the camera video input cable and then connect power to the camera.
2. Connect the microphone toMicrophone In. Note that if required, you can connectthird-party microphones to either the XLR connectors or the Line-In connector. In thiscase, you need to configure the audio inputs from the web user interface (seeConfiguring GTm 5250 (p11)).
Mounting the camera
StarLeaf recommends that when youmount the camera, you place it at the top of thescreen, as opposed to the base. This makes it easier for you to see the participants on thescreen while still appearing to make eye contact.
If you have a dual-screen system, ensure that the camera is mounted on the screen thatwill display the view of the main video (telepresence screen 1).
Connecting screens and loudspeakers
On the GTm 5250, the audio emits from the audio-out connector on the rear of thecodec. Either:
GTm 5250, 27 April 2018 Page 9 of 23
How to install GTm 5250
n Connect the Line out connector on the rear of the codec to amplifier andloudspeakers. Connect one telepresence screen to Video Out HDMI 1. If you have asecond telepresence screen, connect it to Video Out HDMI 2.
or
n To send the audio over HDMI to the loudspeakers of the screen, use the supplied audioinjector as shown in Using the audio injector to connect screen 1 to the codec. If youhave a second telepresence screen, connect it to Video Out HDMI 2.
Connecting power
Using the supplied power cable, connect the IEC mains power connector on the rear ofthe codec to the mains power.
Creating a user accountOn your Lync/Skype for Business server, create a new user account for the GTm 5250.Make a note of the authentication details. (You can use an existing account if you prefer.)
GTm 5250, 27 April 2018 Page 10 of 23
Configuring GTm 5250
Configuring GTm 5250The following instructions are for setting up the GTm 5250.
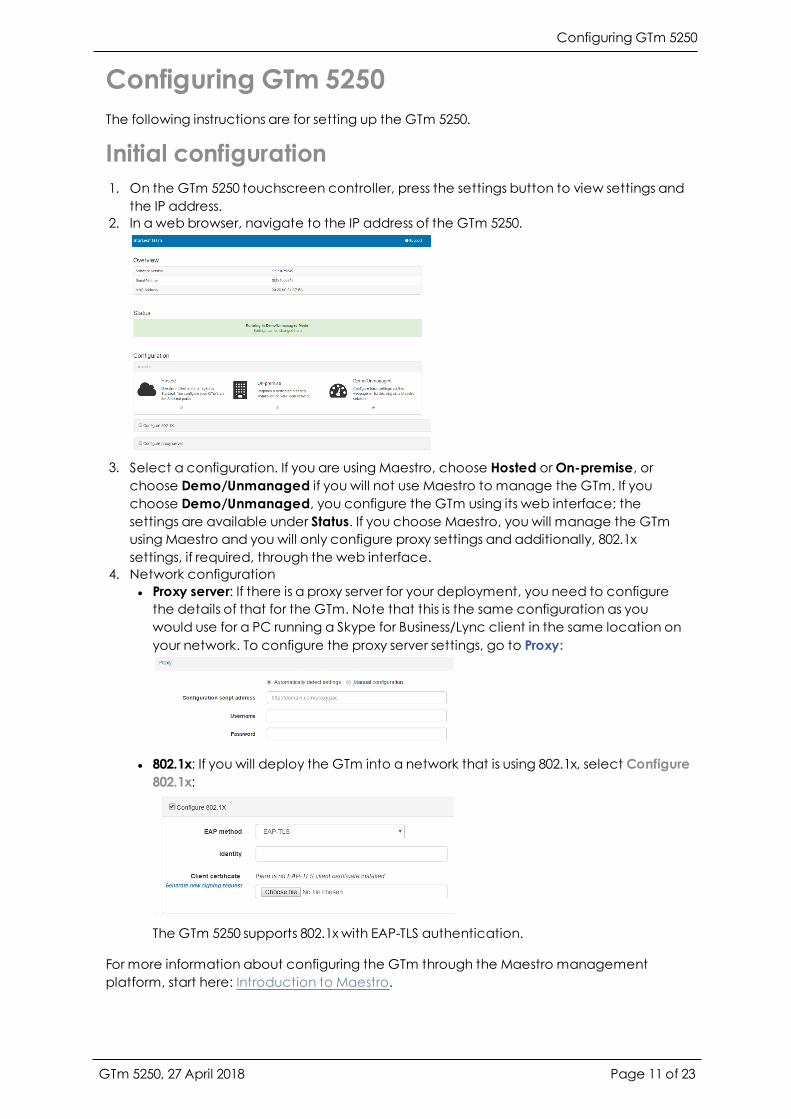
Initial configuration1. On the GTm 5250 touchscreen controller, press the settings button to view settings and
the IP address.2. In a web browser, navigate to the IP address of the GTm 5250.
3. Select a configuration. If you are using Maestro, choose Hosted orOn-premise, orchoose Demo/Unmanaged if you will not use Maestro to manage the GTm. If youchoose Demo/Unmanaged, you configure the GTm using its web interface; thesettings are available under Status. If you choose Maestro, you will manage the GTmusing Maestro and you will only configure proxy settings and additionally, 802.1xsettings, if required, through the web interface.
4. Network configurationl Proxy server: If there is a proxy server for your deployment, you need to configurethe details of that for the GTm. Note that this is the same configuration as youwould use for a PC running a Skype for Business/Lync client in the same location onyour network. To configure the proxy server settings, go to Proxy:
l 802.1x: If you will deploy the GTm into a network that is using 802.1x, select Configure802.1x:
The GTm 5250 supports 802.1x with EAP-TLS authentication.
For more information about configuring the GTm through the Maestro managementplatform, start here: Introduction to Maestro.
GTm 5250, 27 April 2018 Page 11 of 23

Configuring GTm 5250
For more information about using GTm in demo/unmanagedmode, refer toDemo/UnmanagedGTm configuration.
Allowing users to connect a laptop or other digitalsources to the GTm 5250Connect the DVI-I to DVI-I cable to Computer In 2on the rear of the codec. For theconvenience of the GTm 5250 users, leave the other end of the cable on the meetingroom table. This allows users to connect a laptop to the GTm 5250when they need to doso. The GTm 5250 includes a selection of adaptors to be usedwith the DVI-I to DVI-I cablewhere the video output of a PC is other than DVI-I (for example, VGA, HDMI, DVI-D).
Additionally, you can connect an HDMI source to Computer In 1on the rear of the codec.This can be useful where you have a permanent digital source that you want to connectto the GTm, for example an Apple TV or whiteboard.
When users are in ameeting, they can select to share content using the touchscreencontroller. If more than one source is connected, the GTm 5250 displays content from themost-recently connected source.
Connect PC audio out (or indeed another audio source) to the audio line-in on the rear ofthe codec to send PC audio to the speakers at the far end of the call.
Near-end camera control for GTm 5250The Camera Control tab on the home screen provides you with controls for the GTm 5250PTZ camera.
The active camera selector reflects the currently selected camera.
The near-end camera control allows you to pan, tilt, and zoom your camera. This control isavailable both in a call and before youmake a call.
Camera presetsCamera presets are pre-defined camera positions. For example, a pre-defined positionthat points the camera at the whiteboard, or that changes the camera to awide-angledview. Room users can select the position they require from the Camera Control tab on the
GTm 5250, 27 April 2018 Page 12 of 23

Configuring GTm 5250
touchscreen controller and they can swap between presets at any time.
GTm room systems can have up to five camera presets.
You will create the camera presets using Maestro. Refer to Maestro room management.
Presets appear on the touch panel.
Standby modeWhen the GTm goes into standbymode, the screens darken, the microphone is disabled,and the camera turns away from the room. The touchscreen controller does not dimunless it is during out-of-hours. Refer to the Knowledge Center for more information aboutout-of-hours functionality.
The GTm does not go into this state if an active content source is connected. If you touchthe controller or connect a content source, the GTm comes out of standbymode suchthat the screens will display the content. The camera andmicrophone will come out ofstandbymode if there is an active call.
Standbymode can be disabled using Maestro. Refer to the Knowledge Center for moreinformation about standbymode.
GTm 5250, 27 April 2018 Page 13 of 23
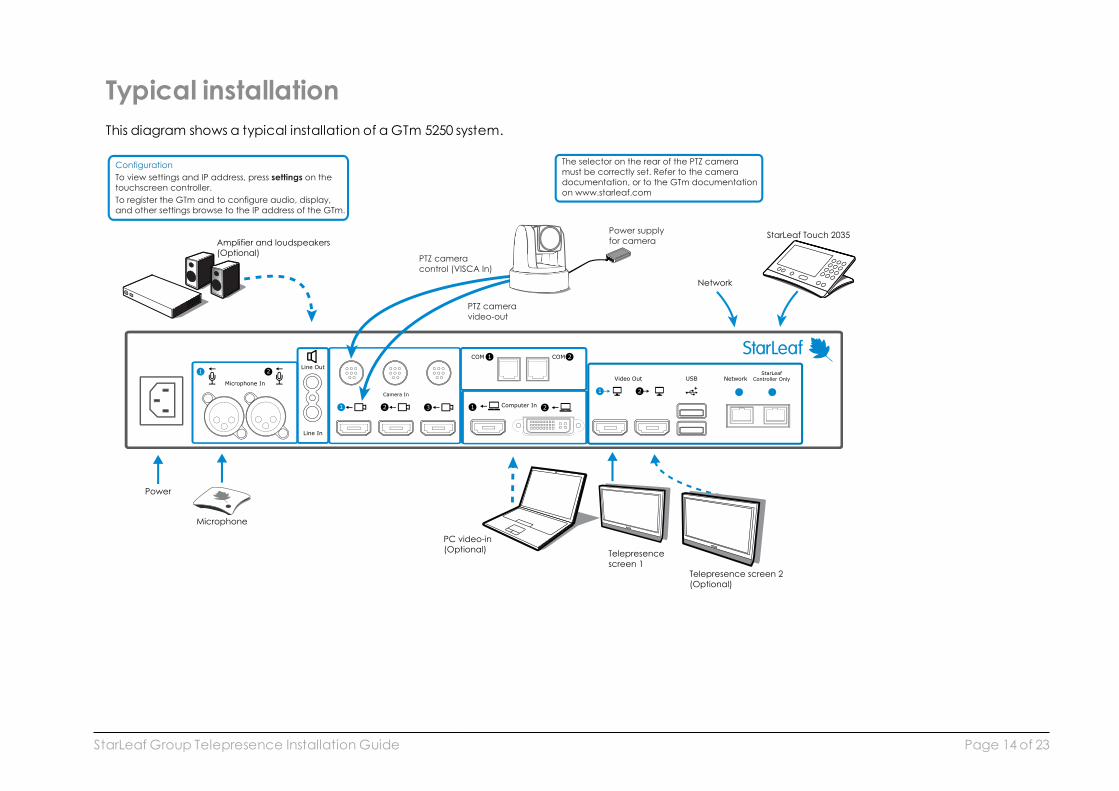
Typical installationThis diagram shows a typical installation of a GTm 5250 system.
Configuration
To view settings and IP address, press settings on the
touchscreen controller.
To register the GTm and to configure audio, display,
and other settings browse to the IP address of the GTm.
Microphone
Telepresence screen 2
(Optional)
Telepresence
screen 1
PC video-in
(Optional)
Power
Network
StarLeaf Touch 2035Amplifier and loudspeakers
(Optional)
The selector on the rear of the PTZ camera
must be correctly set. Refer to the camera
documentation, or to the GTm documentation
on www.starleaf.com
Power supply
for camera
PTZ camera
control (VISCA In)
PTZ camera
video-out
StarLeaf Group Telepresence Installation Guide Page 14 of 23

Typical installation
GTm 5250, 27 April 2018 Page 15 of 23

Using the audio injector
Using the audio injectorIf you want to send sound over HDMI to the screen of the GTm 5250 room system, youmustuse the audio injector.
The dip switches on the audio injector must be correctly set. All dip switchesmust be zeroexcept Mode switch 0, whichmust be set to 1. This is shown below.
ModeEDID
3 2 1
1
0
0
1
1
0
0
GTm 5250, 27 April 2018 Page 16 of 23
Appendix: LED behavior
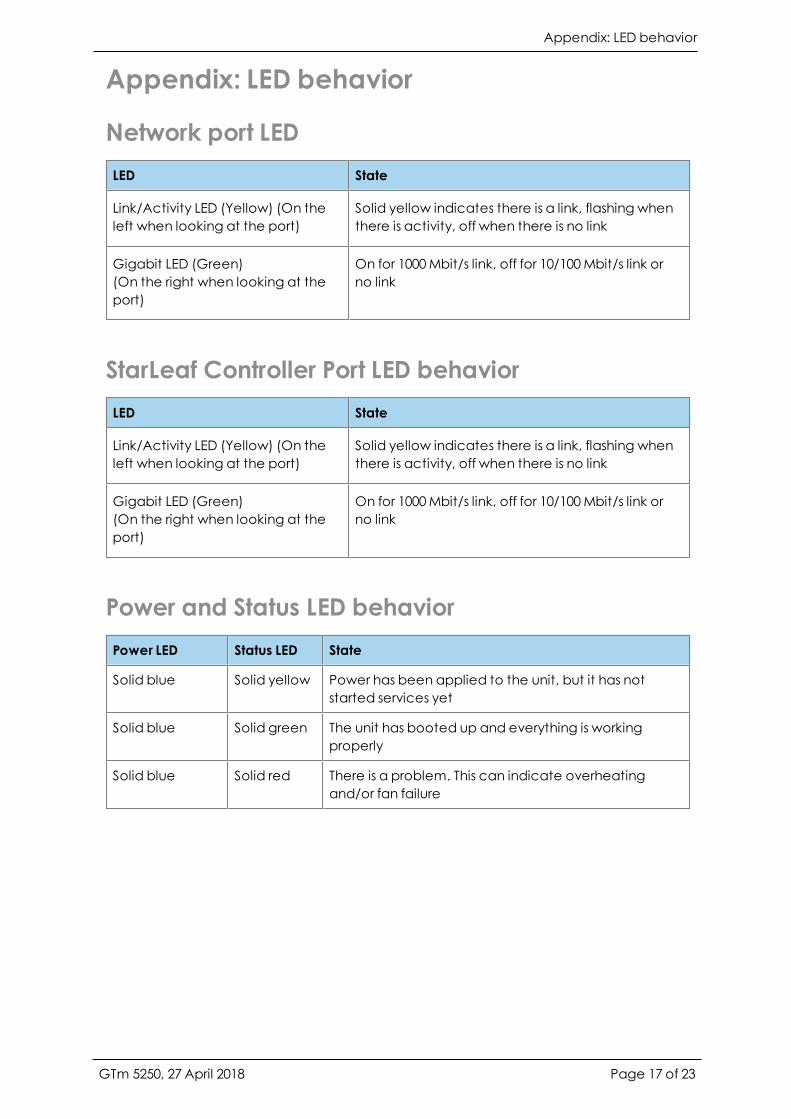
Appendix: LED behavior
Network port LEDLED State
Link/Activity LED (Yellow) (On theleft when looking at the port)
Solid yellow indicates there is a link, flashing whenthere is activity, off when there is no link
Gigabit LED (Green)(On the right when looking at theport)
On for 1000Mbit/s link, off for 10/100Mbit/s link orno link
StarLeaf Controller Port LED behaviorLED State
Link/Activity LED (Yellow) (On theleft when looking at the port)
Solid yellow indicates there is a link, flashing whenthere is activity, off when there is no link
Gigabit LED (Green)(On the right when looking at theport)
On for 1000Mbit/s link, off for 10/100Mbit/s link orno link
Power and Status LED behaviorPower LED Status LED State
Solid blue Solid yellow Power has been applied to the unit, but it has notstarted services yet
Solid blue Solid green The unit has booted up and everything is workingproperly
Solid blue Solid red There is a problem. This can indicate overheatingand/or fan failure
GTm 5250, 27 April 2018 Page 17 of 23

Appendix: Ports and protocols
Appendix: Ports and protocolsThis is a list of ports and protocols used by the GTm. You will need this if your network hasNetwork Access Control (NAC) enabled, which analyzes traffic from the unit for securitypurposes.
GTm system connectivity
Outbound
Port Host Protocol Notes
53 DNS server as defined in thenetwork configuration
TCP/UDP(DNS)
Used to resolve domainnames or find services(for example, inautodiscovery on olderconfigurations using SRVor A records)
67 Broadcast
DHCP server
UDP (DHCP) Requests to DHCP server
443 *.maestro.starleaf.com
Local Maestro server
TCP (HTTPS) Management serverconnection (eitherCloud or on-premise)
* currently denoteseither config or fw. Ifyou are using a proxy,the whitelist should be*.maestro.starleaf.com,andmaestro.starleaf.com ifthe first rule doesn'tcover this
5355 Windowsmachines TCP/UDP(LLMNR)
Used to resolve nameson the local network
All source ports are ephemeral, that is, 1024-65535, unless otherwise specified.
Inbound
Port Host Protocol Notes
68 DHCP server UDP (DHCP) Responses fromDHCP server
GTm 5250, 27 April 2018 Page 18 of 23
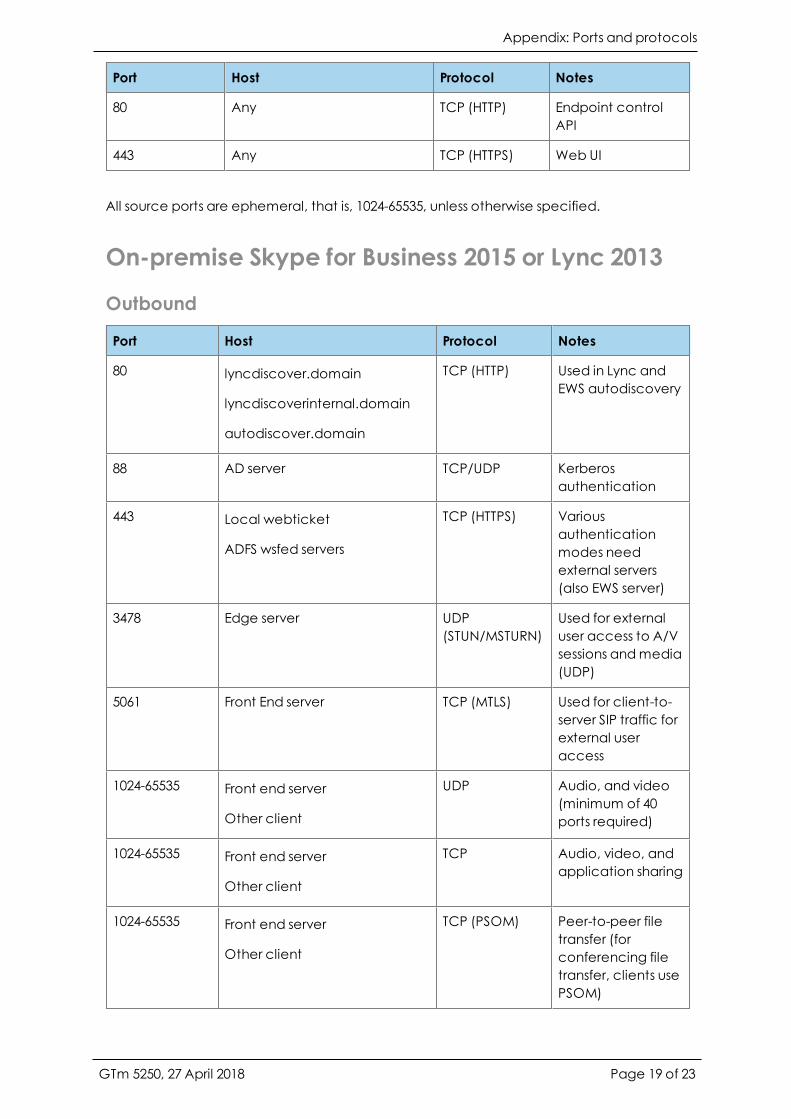
Appendix: Ports and protocols
Port Host Protocol Notes
80 Any TCP (HTTP) Endpoint controlAPI
443 Any TCP (HTTPS) Web UI
All source ports are ephemeral, that is, 1024-65535, unless otherwise specified.
On-premise Skype for Business 2015 or Lync 2013
Outbound
Port Host Protocol Notes
80 lyncdiscover.domain
lyncdiscoverinternal.domain
autodiscover.domain
TCP (HTTP) Used in Lync andEWS autodiscovery
88 AD server TCP/UDP Kerberosauthentication
443 Local webticket
ADFS wsfed servers
TCP (HTTPS) Variousauthenticationmodes needexternal servers(also EWS server)
3478 Edge server UDP(STUN/MSTURN)
Used for externaluser access to A/Vsessions andmedia(UDP)
5061 Front End server TCP (MTLS) Used for client-to-server SIP traffic forexternal useraccess
1024-65535 Front end server
Other client
UDP Audio, and video(minimum of 40ports required)
1024-65535 Front end server
Other client
TCP Audio, video, andapplication sharing
1024-65535 Front end server
Other client
TCP (PSOM) Peer-to-peer filetransfer (forconferencing filetransfer, clients usePSOM)
GTm 5250, 27 April 2018 Page 19 of 23
Appendix: Ports and protocols
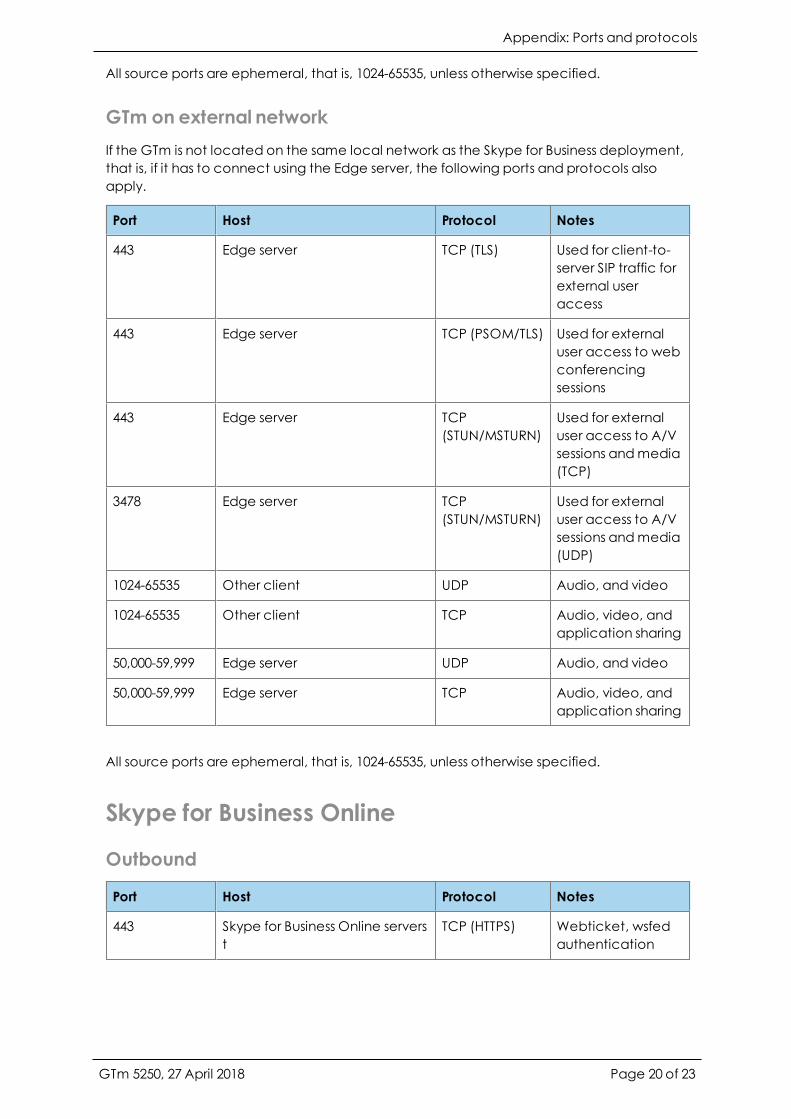
All source ports are ephemeral, that is, 1024-65535, unless otherwise specified.
GTm on external networkIf the GTm is not located on the same local network as the Skype for Business deployment,that is, if it has to connect using the Edge server, the following ports and protocols alsoapply.
Port Host Protocol Notes
443 Edge server TCP (TLS) Used for client-to-server SIP traffic forexternal useraccess
443 Edge server TCP (PSOM/TLS) Used for externaluser access to webconferencingsessions
443 Edge server TCP(STUN/MSTURN)
Used for externaluser access to A/Vsessions andmedia(TCP)
3478 Edge server TCP(STUN/MSTURN)
Used for externaluser access to A/Vsessions andmedia(UDP)
1024-65535 Other client UDP Audio, and video
1024-65535 Other client TCP Audio, video, andapplication sharing
50,000-59,999 Edge server UDP Audio, and video
50,000-59,999 Edge server TCP Audio, video, andapplication sharing
All source ports are ephemeral, that is, 1024-65535, unless otherwise specified.
Skype for Business Online
Outbound
Port Host Protocol Notes
443 Skype for Business Online serverst
TCP (HTTPS) Webticket, wsfedauthentication
GTm 5250, 27 April 2018 Page 20 of 23

Appendix: Ports and protocols
Port Host Protocol Notes
443 Skype for Business Online serverst
TCP (TLS) SIP signaling
443 Skype for Business Online serverst
TCP (PSOM/TLS) PSOMconnectionsweb conferencing
443 Skype for Business Online serverst
TCP Audio, video, andapplication sharing(source portdepends onconfiguration)
3478-3481 Skype for Business Online serverst
UDP Audio, video, andapplication sharing(source portdepends onconfiguration)
50,000-59,999 Skype for Business Onlineservers t
Other client
TCP/UDP Audio (source port50,000-50,019)
50,000-59,999 Skype for Business Onlineservers t
Other client
TCP/UDP Video (source port50,020-50,039)
50,000-59,999 Skype for Business Onlineservers t
Other client
TCP Application sharing(source port 50,040-50,059)
All source ports are ephemeral, that is, 1024-65535, unless otherwise specified.
The full range of Skype for Business Online IP addresses is available herehttps://support.office.com/en-us/article/Office-365-URLs-and-IP-address-ranges-8548a211-3fe7-47cb-abb1-355ea5aa88a2?ui=en-US&rs=en-US&ad=US&fromAR=1#BKMK_LYO
Inbound
Port Host Protocol Notes
50,000-50,019 Skype for Business Onlineservers ‡
Other client
TCP/UDP Audio (source port50,000-59,999)
GTm 5250, 27 April 2018 Page 21 of 23
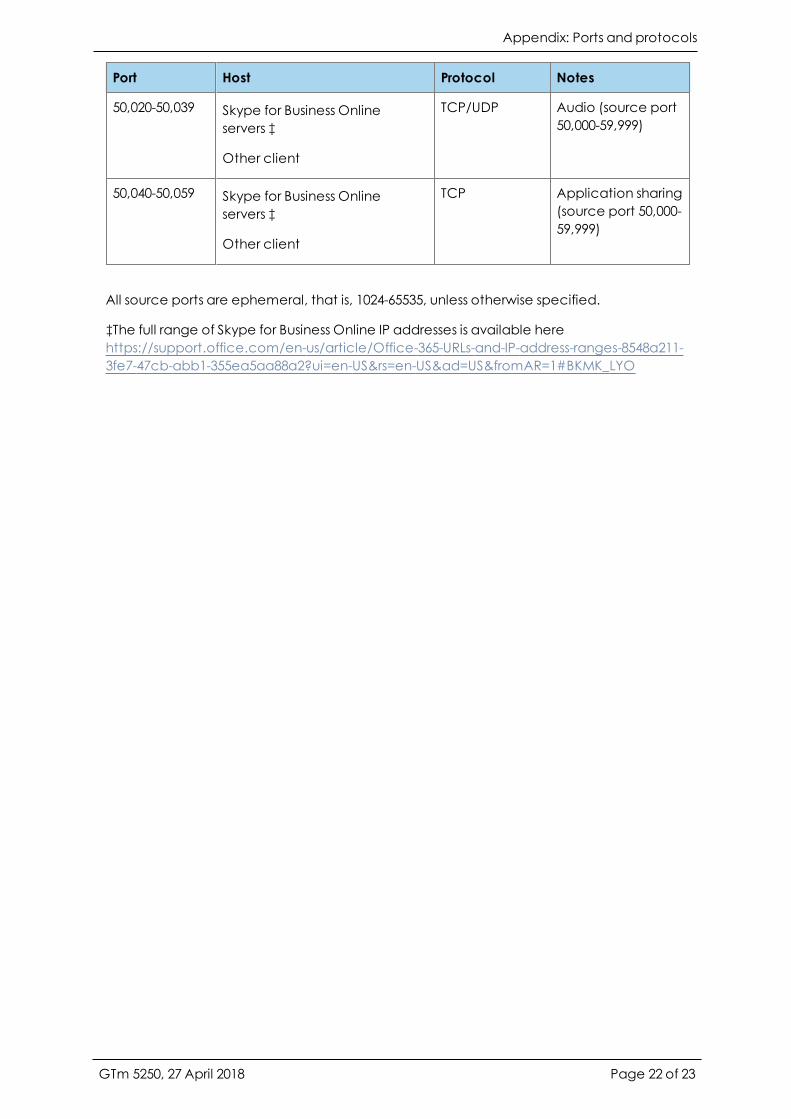
Appendix: Ports and protocols
Port Host Protocol Notes
50,020-50,039 Skype for Business Onlineservers ‡
Other client
TCP/UDP Audio (source port50,000-59,999)
50,040-50,059 Skype for Business Onlineservers ‡
Other client
TCP Application sharing(source port 50,000-59,999)
All source ports are ephemeral, that is, 1024-65535, unless otherwise specified.
‡The full range of Skype for Business Online IP addresses is available herehttps://support.office.com/en-us/article/Office-365-URLs-and-IP-address-ranges-8548a211-3fe7-47cb-abb1-355ea5aa88a2?ui=en-US&rs=en-US&ad=US&fromAR=1#BKMK_LYO
GTm 5250, 27 April 2018 Page 22 of 23

Legal information
Legal information
Third party software acknowledgmentsAcknowledgments of third-party software are available at:
www.starleaf.com/support/legal
Disclaimers and noticesCopyright © StarLeaf 2018. All rights reserved.
This guide may not be copied, photocopied, translated, reproduced, or converted intoany electronic or machine-readable form in whole or in part without prior writtenapproval of StarLeaf Limited.
StarLeaf Limited reserves the right to revise this documentation and to make changes incontent from time to time without obligation on the part of StarLeaf Limited to providenotification of such revision or change.
StarLeaf Limited provides this documentation without warranty, term, or condition of anykind, either implied or expressed, including, but not limited to, the implied warranties,terms or conditions of merchantability, satisfactory quality, and fitness for a particularpurpose. StarLeaf Limitedmaymake improvements or changes to the product(s) and/orthe program(s) described in this documentation at any time. All other product andcompany names herein may be trademarks of their respective owners.
GTm 5250, 27 April 2018 Page 23 of 23


