175
09/25/2015 State of Nevada Unemployment Insurance Tax Guide to Online Employer Self Service

09/25/2015
State of Nevada Unemployment Insurance
Tax
Guide to Online Employer Self Service

Guide to Online Employer Self Service
UINV - ESS Employer-RS Guide State of Nevada Page 2
Table of Contents
Getting Started ................................................................................................................... 4 Introduction ............................................................................................................................................ 4 Getting Help ............................................................................................................................................ 4 Basic System Navigation ......................................................................................................................... 5
Creating Your Initial ESS Employer Logon (Online User Account) .................................... 6 Background ............................................................................................................................................. 6 Instructions ............................................................................................................................................. 7
Registering a New Employer ............................................................................................ 16 Background ........................................................................................................................................... 16 Instructions ........................................................................................................................................... 17
Maintaining ESS Users for Employers .............................................................................. 39 Background ........................................................................................................................................... 39 Instructions ........................................................................................................................................... 40
Updating ESS Account Information ................................................................................. 51 Background ........................................................................................................................................... 51 Instructions ........................................................................................................................................... 52
Updating ESS Account Status ........................................................................................... 61 Background ........................................................................................................................................... 61 Instructions ........................................................................................................................................... 62
Managing a PEO Account (Registering as a PEO and adding/dropping clients) ............ 67 Background ........................................................................................................................................... 67 Instructions ........................................................................................................................................... 67
Manually Filing Quarterly [Contributions and Wage] Reports ....................................... 74 Background ........................................................................................................................................... 74 Instructions ........................................................................................................................................... 75
Uploading Employer Reports ........................................................................................... 83 Background ........................................................................................................................................... 83 Instructions ........................................................................................................................................... 84
Amending Contribution and Wage Reports .................................................................... 94 Background ........................................................................................................................................... 94 Instructions ........................................................................................................................................... 94
Submitting Employer Payments .................................................................................... 104 Background ......................................................................................................................................... 104 Instructions ......................................................................................................................................... 105
Submitting Employer Requests...................................................................................... 110 Background ......................................................................................................................................... 110 Instructions ......................................................................................................................................... 110
Accessing Employer Summary Information .................................................................. 116 Background ......................................................................................................................................... 116 Instructions ......................................................................................................................................... 117
Managing Multi-Claimant Groups ................................................................................. 130 Background ......................................................................................................................................... 130 Instructions ......................................................................................................................................... 131

Guide to Online Employer Self Service
UINV - ESS Employer-RS Guide State of Nevada Page 3
Employer Claimant Fact Finding .................................................................................... 139 Background ......................................................................................................................................... 139 Instructions ......................................................................................................................................... 139
Other Benefits Information ........................................................................................... 146 Background ......................................................................................................................................... 146 Instructions ......................................................................................................................................... 146
Rptg Svc: Creating Your Initial Logon (Online User Account) for a Reporting Service 148 Background ......................................................................................................................................... 148 Instructions ......................................................................................................................................... 149
Rptg Svc: Registering a New Reporting Service ............................................................ 158 Background ......................................................................................................................................... 158 Instructions ......................................................................................................................................... 159
Rptg Svc: Maintaining ESS Users for Reporting Services .............................................. 164 Background ......................................................................................................................................... 164 Instructions ......................................................................................................................................... 165
Rptg Svc: Updating Reporting Service ESS Profile Information .................................... 170 Background ......................................................................................................................................... 170 Instructions ......................................................................................................................................... 170
Rptg Svc: Requesting UI Rates ....................................................................................... 172 Background ......................................................................................................................................... 172 Instructions ......................................................................................................................................... 172
Rptg Svcs: Uploading Employer Reports ....................................................................... 175 Background & Instructions ................................................................................................................. 175

Guide to Online Employer Self Service
UINV - ESS Employer-RS Guide State of Nevada Page 4
Getting Started
Introduction
Welcome to the State of Nevada Unemployment Insurance Employer Self Service (ESS) system. Employers (or their designated Reporting Service) can use this online system to view and maintain key account information, file their quarterly contribution and wage reports, submit electronic payments, view correspondence, and much more.
In order to gain access to this system, employers (or their Reporting Services) must first create an online user account.
This guide provides instructions on how to perform these and other functions.
Getting Help
If you experience difficulties with the Employer Self Service (ESS) Login, the following options are available to provide assistance:
If you forgot your ESS Username or Password:
o To retrieve your Username, click the Forgot your Username? link on the ESS Login screen
o To reset your Password, enter your Username on the ESS Login screen and click the Forgot your Password? link on the subsequent screen
If you were established as an additional ESS user by the person in your company with ESS Administrator access, you should have received an email with a user access code to activate your account. If you do not have the user access code, contact the person in your company with ESS Administrator access.
For issues regarding Security, please call the Security Help Desk:
o Northern Nevada (775) 687-6850
o Southern Nevada (702) 486-3257
UI Tax Questions
To inquire about the services the Employer Self Service (ESS) provides, please call the following UI Tax Help Desk Numbers:
How to File or Make Corrections Online to a Quarterly Report (866) 429-9757
How to Make an Online Payment (775) 684-6345
How to Register a New Business Online for UI Tax (866) 429-9758
For all other ESS online screens and functions for UI Tax (775) 684-6300
UI Benefits and Claims Questions
For employer questions related to Benefits and Claims online response (forms), please contact the Benefits Internet Help Desk:
(775) 684-0427 (8:00 am to 5:00 pm Pacific Time)
Email: [email protected]

Guide to Online Employer Self Service
UINV - ESS Employer-RS Guide State of Nevada Page 5
Basic System Navigation
Many of the ESS system’s screens have common features that are described below:
Note that you should not use your Internet browser’s Back button to navigate through the screens in ESS. Instead, you should use only the buttons on the screens (some screens contain an ESS Back button) or use the navigation menu on the left side to move between screens.
Note that the screenshots used throughout this guide are meant for illustrative purposes, and not all are intended to be readable within this document.
Be sure to click the Logoff
link when you are done using the system
Some questions or field names have words or
phrases that appear in blue, underlined text.You can click on these "hyperlinks" to get
additional information about the information being requested.
Depending on the screen, some
screens show a navigation menu on the left side indicating where in a process you are, and that allows you to jump
directly to different screens.
Once you are logged into the system, there are
links in the upper right corner of most screens that provide you with additional support.

Guide to Online Employer Self Service
UINV - ESS Employer-RS Guide State of Nevada Page 6
Creating Your Initial ESS Employer Logon (Online User Account)
Background
The first step in managing your online employer account is to create a new Employer Self Service (ESS) online user account, which includes creating your ESS username and password and providing other basic profile information. You will need this username and password to log into the ESS system to perform any transactions.
If you choose to allow access to the ESS account by more than one individual, each user will need their own unique logon. This topic will show you how to create your first and primary logon ID for your ESS account, which will be assigned the "Administrator" authorization level. The "Administrator" authorization level provides full access to all pages within the ESS account. Additional user logons for the ESS account may be set up using the User Maintenance menu. User Maintenance is covered under a separate topic.
Note the following:
If you already have a DETR SUTA account, during this process you will need to provide your Federal Employer Identification Number (FEIN), your DETR-assigned SUTA number, and the total gross wages from your most recently filed Employer's Quarterly Report (this can be 0.00 if you have not yet reported any payroll).
If you do not yet have a DETR SUTA account, you will need to register as a new employer AFTER setting up your ESS online user account (covered in the next topic).

Guide to Online Employer Self Service
UINV - ESS Employer-RS Guide State of Nevada Page 7
Instructions
1. Connect your computer to the following internet address: http://ui.nv.gov
2. Select Employer / Reporting Service.
3. You will arrive on the ESS tab of the Nevada Unemployment Insurance system (there is a separate tab for claimants to file their claims and perform other functions).
The main portion of the screen contains buttons and links you can use to perform common functions and the bottom portion of the screen provides links to key information and may contain special announcements from time to time.
Click the Employer Sign In link in the upper right portion of the screen.
While the ESS tab contains specific buttons and links to perform certain common tasks, all tasks can be performed from the main "Employer Self Service Login" screen, which you can access via the Employer Sign In link in the upper right portion of the screen.
The instructions in this guide all start from either the ”Employer Self Service Login” screen, or from the “Employer Summary” screen (described in a later topic).

Guide to Online Employer Self Service
UINV - ESS Employer-RS Guide State of Nevada Page 8
4. You arrive on the “Employer Login” screen.
Be sure to read the "Important Information" section of the screen.
Click the Create New User Account link.
5. Read the "Website Terms of Use Agreement” and click the I Accept button.

Guide to Online Employer Self Service
UINV - ESS Employer-RS Guide State of Nevada Page 9
6. Click the Employer button.
7. If you are already registered as an employer with DETR, then you have an existing SUTA number, so you should click the Yes button. Otherwise click the No button.
Guide to Online Employer Self Service
UINV - ESS Employer-RS Guide State of Nevada Page 10
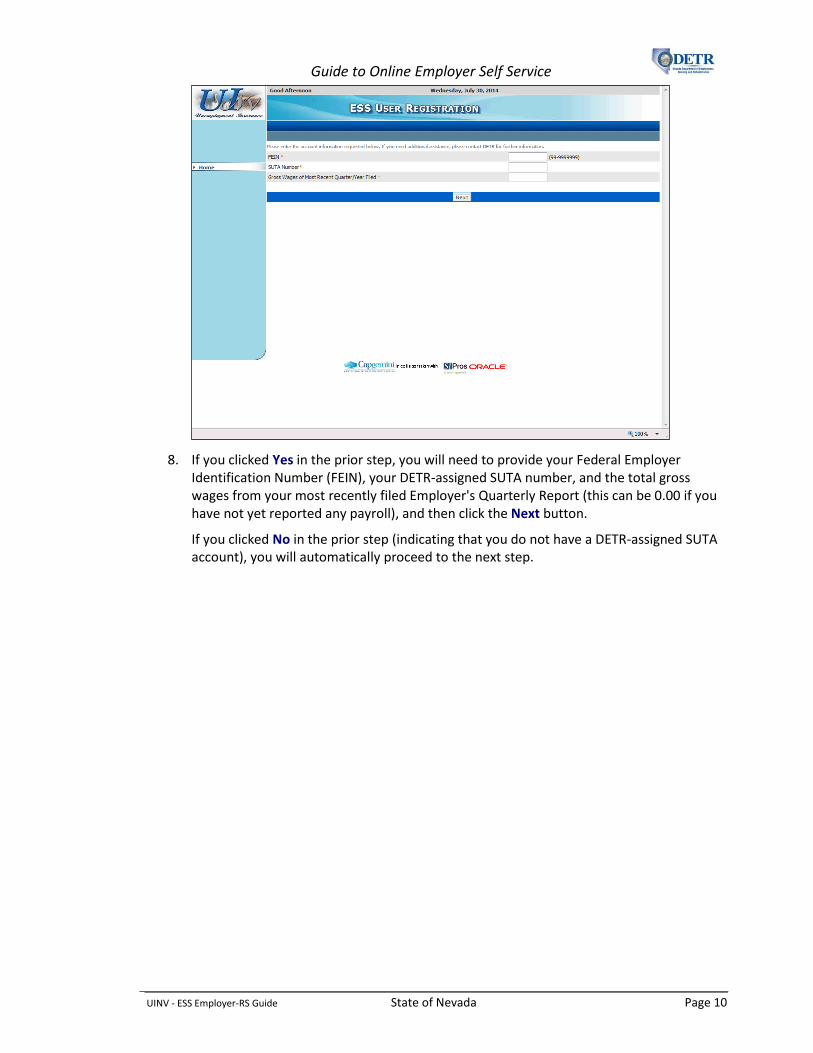
8. If you clicked Yes in the prior step, you will need to provide your Federal Employer Identification Number (FEIN), your DETR-assigned SUTA number, and the total gross wages from your most recently filed Employer's Quarterly Report (this can be 0.00 if you have not yet reported any payroll), and then click the Next button.
If you clicked No in the prior step (indicating that you do not have a DETR-assigned SUTA account), you will automatically proceed to the next step.

Guide to Online Employer Self Service
UINV - ESS Employer-RS Guide State of Nevada Page 11
9. Complete the information on this “ESS User Registration” screen and click the Next button. (Be sure to follow the Username Rules and Password Rules listed on the right side of the screen when completing those fields.)
10. From this screen, review the information you entered and then click the Submit button (or click the Back button if you need to change any information.)

Guide to Online Employer Self Service
UINV - ESS Employer-RS Guide State of Nevada Page 12
11. After your information has been accepted you will receive a message that your user account has been created. (This may take a few moments to complete.) The next part of the process is to create your security profile from this screen.
Select a question for each of the three security questions, and type your answers in their respective boxes to the right.
Click the Submit button.
Guide to Online Employer Self Service
UINV - ESS Employer-RS Guide State of Nevada Page 13
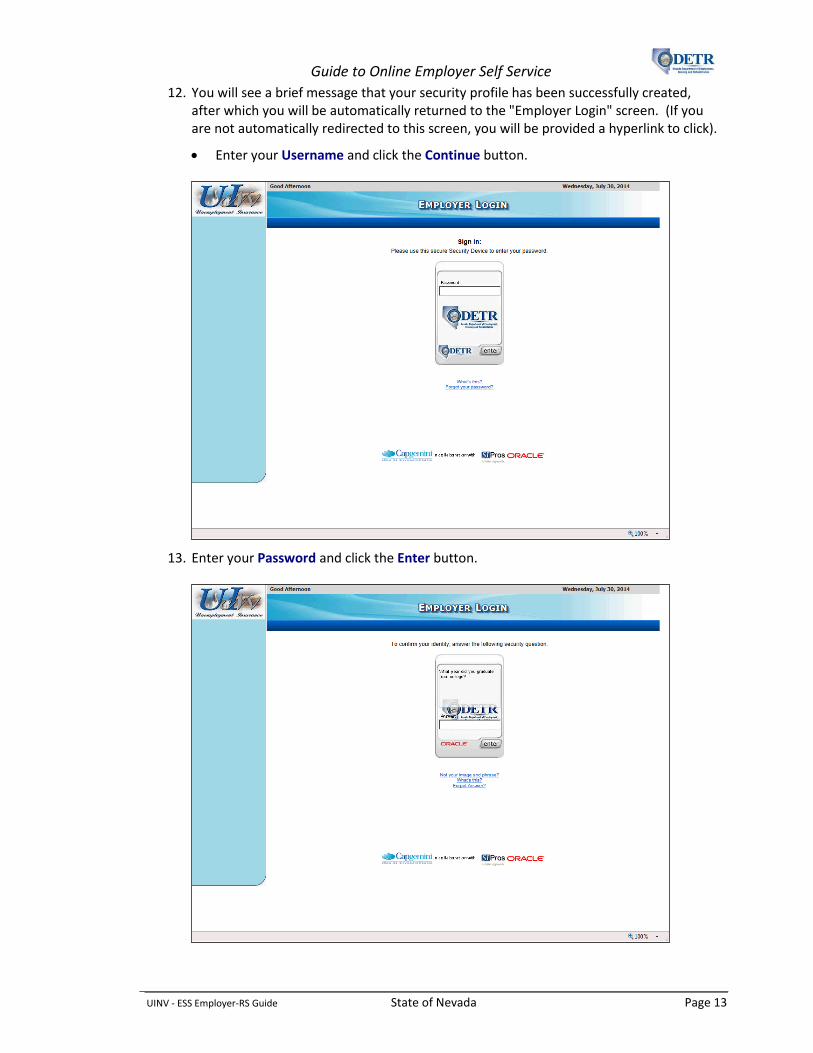
12. You will see a brief message that your security profile has been successfully created, after which you will be automatically returned to the "Employer Login" screen. (If you are not automatically redirected to this screen, you will be provided a hyperlink to click).
Enter your Username and click the Continue button.
13. Enter your Password and click the Enter button.

Guide to Online Employer Self Service
UINV - ESS Employer-RS Guide State of Nevada Page 14
14. Since this is your first time logging in, you will need to establish a personalized “Security Device” required for future access.
Answer the security question and click the Enter button.

Guide to Online Employer Self Service
UINV - ESS Employer-RS Guide State of Nevada Page 15
15. The system generates a picture and a phrase for your “Security Device” (in the future, you should never enter your password unless you see the exact device you set up).
If you wish to change your assigned image and phrase, you can click the link to obtain new ones. Otherwise click the Continue button on the right.
16. At this point, your online user account and security profile have been set up.
If you already have a DETR-assigned SUTA account, the system will display your "Employer Summary" screen. This is your home screen and where you will begin your work when you log in to your ESS online user account. At this point, you can continue to use ESS, or click the Logoff link in the upper right.
If you do not already have a DETR-assigned SUTA account, you will arrive on the "Employer FEIN Information" screen. This is the first screen of a series of screens that you must complete to register for a DETR-assigned SUTA account. This process is covered in the next topic.

Guide to Online Employer Self Service
UINV - ESS Employer-RS Guide State of Nevada Page 16
Registering a New Employer
Background
This topic will show you, as a new employer (an employer that is not yet registered with DETR for Unemployment Insurance (UI) tax), how to register with DETR using the ESS system. (Employers are required to register for UI tax with DETR within 30 days of their first payroll.) During the registration process, you will be prompted to provide such information as:
Federal Employer Identification Number (FEIN)
Payroll History
Legal Information
Correspondence Information
Officer/Ownership and Contact Information
Nevada Business Identification Number (optional)
Business Location(s) and Type(s)
Note the following:
Prior to registering, you must first create a logon ID (described in the previous topic).
Upon successful completion of the UI registration, the system generates a confirmation number, and generates a New Employer Packet to be mailed to you. Contributory employers are also assigned a tax rate. The system automatically generates UI report packets for any outstanding quarterly reports, and creates Smart Links (discussed in a later topic) for you to use to file your reports online.
This topic is specifically for new employers who have not yet registered with DETR for UI tax(and who have already created their logon).

Guide to Online Employer Self Service
UINV - ESS Employer-RS Guide State of Nevada Page 17
Instructions
Note that if you are continuing with the employer registration process immediately after having created your ESS logon, you can skip directly to step 4.
1. Navigate to the “Employer Login” screen (connect to http://ui.nv.gov and click the Employer Sign In link).
2. Enter your Username and click the Continue button.
If you forget your Username, click the Forgot your username? link. You will be sent to a new screen where you will be asked to provide your email address, your business FEIN, your date of birth, and your mother’s maiden name. The system will then display your Username.

Guide to Online Employer Self Service
UINV - ESS Employer-RS Guide State of Nevada Page 18
3. Enter your Password and click the Enter button.
If you forget your Password, click the Forgot your Password? link. You will be sent to a new screen where you will be asked to provide answers to your security questions and will then be prompted to reset your password.

Guide to Online Employer Self Service
UINV - ESS Employer-RS Guide State of Nevada Page 19
4. Enter your FEIN (Federal Employer Identification Number) and click the Next button. (If you do not already have a FEIN, you can click the link to obtain one from the IRS website, and then return to the ESS system to start your employer registration for UI tax.)

Guide to Online Employer Self Service
UINV - ESS Employer-RS Guide State of Nevada Page 20
5. Answer the Yes/No questions on the “Employer Liability” screen and click the Next button.
Note that, depending on how you respond to these questions, some of the questions on the following screens may vary slightly from those shown in this guide, or you may be required to enter some additional types of related information.
The system will determine if you are liable based upon responses to several qualification questions. If you are deemed not liable, the system will inform you to not continue with the registration process, and provide you with a notification that you can print.

Guide to Online Employer Self Service
UINV - ESS Employer-RS Guide State of Nevada Page 21
6. Answer the question on the “Employer Qualify” screen and click the Next button.
Guide to Online Employer Self Service
UINV - ESS Employer-RS Guide State of Nevada Page 22
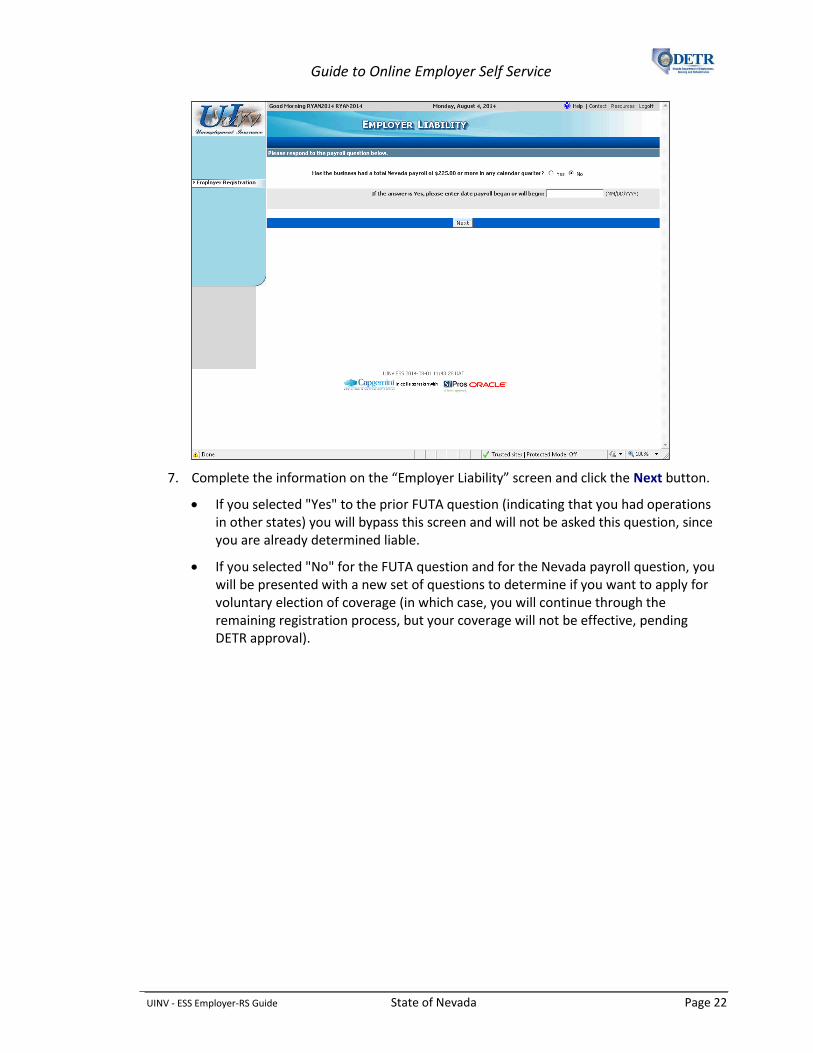
7. Complete the information on the “Employer Liability” screen and click the Next button.
If you selected "Yes" to the prior FUTA question (indicating that you had operations in other states) you will bypass this screen and will not be asked this question, since you are already determined liable.
If you selected "No" for the FUTA question and for the Nevada payroll question, you will be presented with a new set of questions to determine if you want to apply for voluntary election of coverage (in which case, you will continue through the remaining registration process, but your coverage will not be effective, pending DETR approval).

Guide to Online Employer Self Service
UINV - ESS Employer-RS Guide State of Nevada Page 23
8. Complete the information on the “Employer Legal Information” screen and click the Next button at the bottom of the screen.
Depending on your selection for Business Type, some of the screen's fields may change to correspond with your selected Business Type.
If you select a Country option other than "USA", some of the fields on the screen may change to reflect address and phone formats for your selected country.
If you select “Email” as your Preferred Method of Communication, you will be required to provide your Email Address. You must also read the "Important Information" about selecting Email as your Preferred Method of Communication and click the related checkbox.

Guide to Online Employer Self Service
UINV - ESS Employer-RS Guide State of Nevada Page 24
9. If an exact match is not found for your mailing address, the system will display an “Address Search Result” pop-up box. Select the appropriate address and click the Select button.
Make sure that your browser is set to allow “pop-ups” so that you will be able to see the verification window.
After clicking Select, you will be returned to the “Employer Legal Information” screen. Scroll down and click the Next button at the bottom of the screen to continue.
Guide to Online Employer Self Service
UINV - ESS Employer-RS Guide State of Nevada Page 25
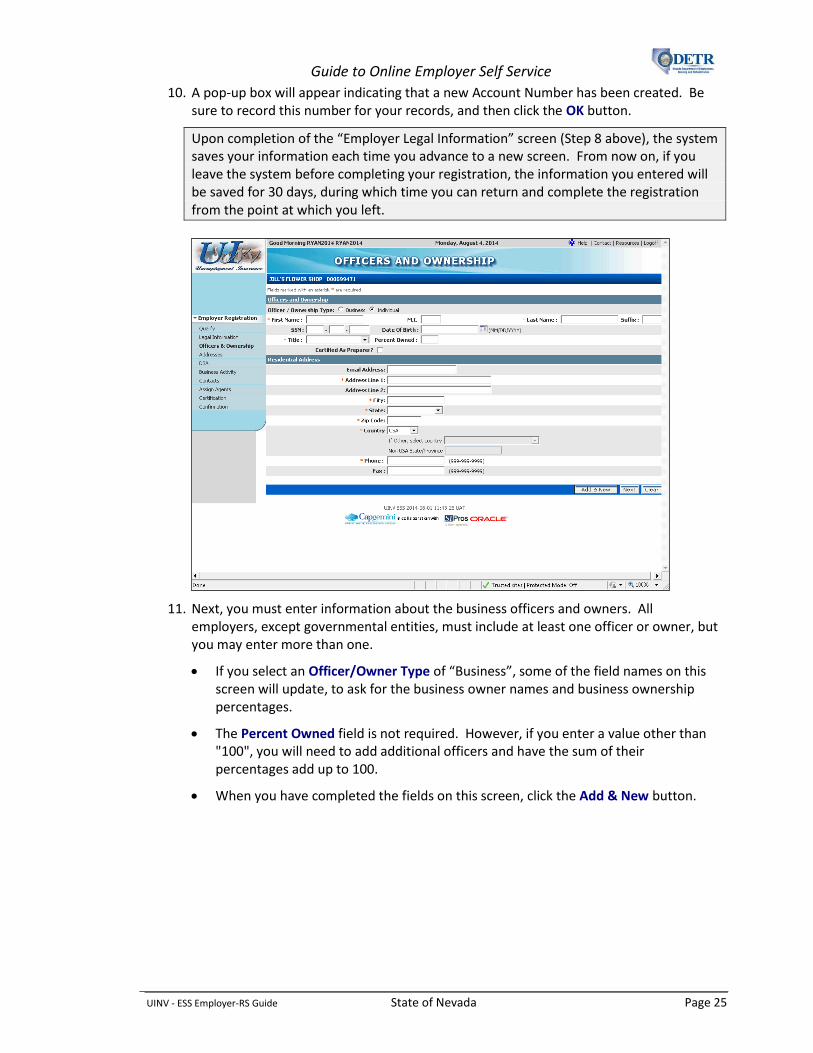
10. A pop-up box will appear indicating that a new Account Number has been created. Be sure to record this number for your records, and then click the OK button.
Upon completion of the “Employer Legal Information” screen (Step 8 above), the system saves your information each time you advance to a new screen. From now on, if you leave the system before completing your registration, the information you entered will be saved for 30 days, during which time you can return and complete the registration from the point at which you left.
11. Next, you must enter information about the business officers and owners. All employers, except governmental entities, must include at least one officer or owner, but you may enter more than one.
If you select an Officer/Owner Type of “Business”, some of the field names on this screen will update, to ask for the business owner names and business ownership percentages.
The Percent Owned field is not required. However, if you enter a value other than "100", you will need to add additional officers and have the sum of their percentages add up to 100.
When you have completed the fields on this screen, click the Add & New button.

Guide to Online Employer Self Service
UINV - ESS Employer-RS Guide State of Nevada Page 26
12. If you receive the “Address Search Result” pop-up box, select the appropriate address and click the Select button.

Guide to Online Employer Self Service
UINV - ESS Employer-RS Guide State of Nevada Page 27
13. The screen refreshes and displays a message that the first owner has been successfully added (you will also see their information in the table toward the bottom of the screen).
If you need to add additional officers/owners, complete the top portion of the screen with the next person’s information, click the Add & New button, and repeat the similar steps.
When you have finished entering all the officer/owner information, click the Next button.

Guide to Online Employer Self Service
UINV - ESS Employer-RS Guide State of Nevada Page 28
14. Next, you need to enter your business address information.
You can enter addresses for more than one location.
All employers are required to have a "Business Records" address.
If you are an out-of-state (non-Nevada) employer, you must provide at least one Nevada Operations address. This address must be a physical address and not a P.O. Box.
Complete the information on this screen and click the Add & New button.
If you receive the “Address Search Result” pop-up window, select the appropriate address and click the Select button. You will see the newly added address in the table toward the bottom of the screen when you return to the “Business Addresses” screen.
If you need to add additional addresses, complete the screen for each additional address and follow the same process.
When you have finished entering all of your addresses, click the Next button.

Guide to Online Employer Self Service
UINV - ESS Employer-RS Guide State of Nevada Page 29
15. Next, you need to enter your DBA information (all businesses are required to have at least one DBA, or "Doing Business As"). The more information that you enter, the easier it will be for claimants to find the correct business location when filing their unemployment claims, therefore avoiding employer notification delays and associated corrections.
Enter your DBA name in the Doing Business As field (consider including store numbers or street references to identify various locations).
Click in the appropriate business location’s checkbox to indicate the location associated with this DBA (a single DBA can be associated with more than one business location).
If you want to enter additional DBAs, click the Add & New button to enter them. Otherwise, click the Next button.

Guide to Online Employer Self Service
UINV - ESS Employer-RS Guide State of Nevada Page 30
16. Next, you must complete the "Business Activity Information" screen by searching for and entering the North American Industry Classification System (NAICS) Code that identifies the primary economic activity for each business location in Nevada.
Click the Lookup your NAICS Code link for one of your addresses.
17. Enter a keyword in the Keywords field and click the NAICS Search button.
Guide to Online Employer Self Service
UINV - ESS Employer-RS Guide State of Nevada Page 31
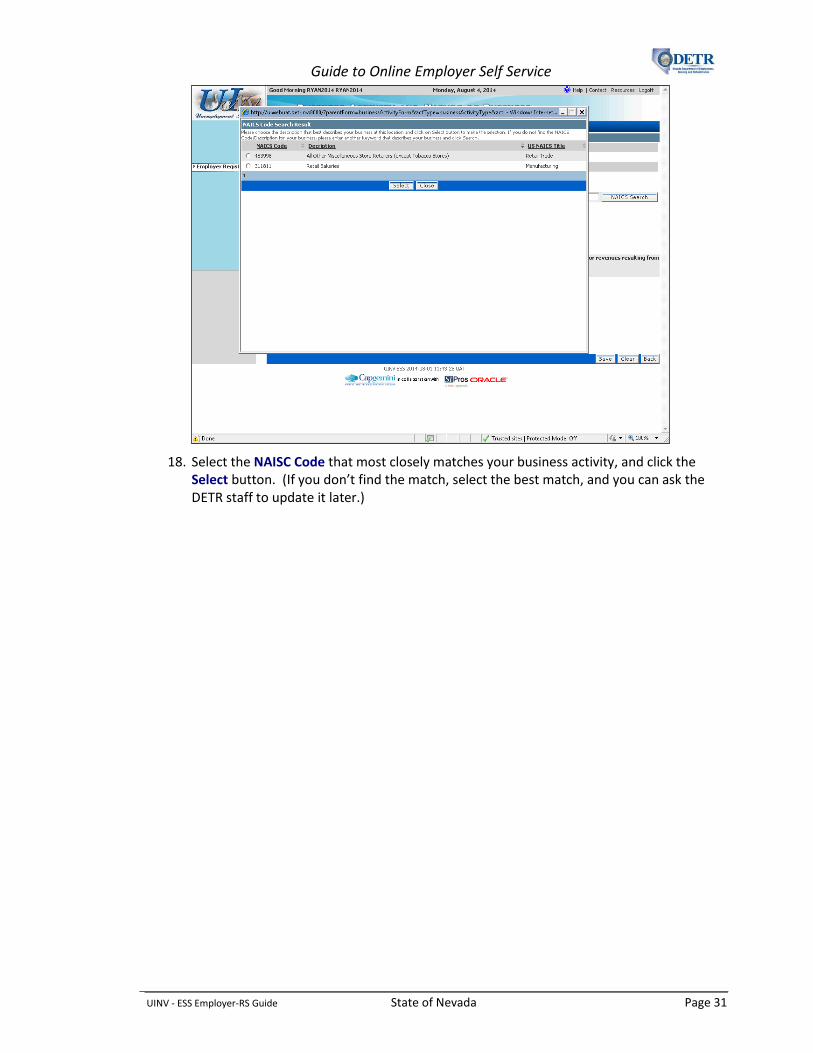
18. Select the NAISC Code that most closely matches your business activity, and click the Select button. (If you don’t find the match, select the best match, and you can ask the DETR staff to update it later.)

Guide to Online Employer Self Service
UINV - ESS Employer-RS Guide State of Nevada Page 32
19. Next, complete the information on the “Business Activity and Nature of Business” screen for this location, and click the Save button.
If you enter more than one Nature of Business, make sure the total Percentages add up to 100.

Guide to Online Employer Self Service
UINV - ESS Employer-RS Guide State of Nevada Page 33
20. You are returned to the “Business Activity Information Screen”. Notice the NAICS description now appears next to the address you chose on the previous screen.
If you have additional addresses, you will need to enter business activity information for each one. Each address will have a Lookup your NAICS Code link. Click on the link and repeat the process for each address.
When you have finished entering the business activity information for each address, click the Next button.

Guide to Online Employer Self Service
UINV - ESS Employer-RS Guide State of Nevada Page 34
21. Next, you need to enter contacts for your business. Every employer must have at least a "Registration Contact."
Complete this screen for your first contact. Click the Next button if there is only one contact, or click the Add & New button if you need to add additional contacts. As with previous screens, you may receive “Address Search Result” pop-ups for you to validate each address.
After entering each contact, you will see them listed in the table toward the bottom of the screen.
When you are done entering all your contacts, click the Next button.
22. Additionally, you can assign up to three correspondence contacts also known as Correspondence Agents. Correspondence Agents can be listed if you want to redirect certain mailed correspondences to a hired, outside agency. This process is described in the topic on “Updating ESS Account Information” as well as here, as you can assign Correspondence Agents at any time.
Note the difference between a Correspondence Agent and a Reporting Service. A Correspondence Agent receives mail on your behalf, while a Reporting Service has authorization to perform transactions (submit quarterly UI reports and make payments, etc.) and receive mail on your behalf. The assignment of a Reporting Service is performed via “User Maintenance” (after your registration is complete) and is discussed in a separate topic.
You should assign a Correspondence Agent only if you already have established a business relationship with that agent.
You have the option to assign a separate agent to receive mailed correspondence for your Tax, Benefits, and/or Appeals correspondences, but only one correspondence agent for each type of correspondence.

Guide to Online Employer Self Service
UINV - ESS Employer-RS Guide State of Nevada Page 35
Once assigned, these agents will continue to receive your correspondence as directed until you remove the agent from your account.
Only Correspondence Agents/Reporting Services that have registered with DETR are listed in the agent listing. If you cannot find your Correspondence Agent or Reporting Service, you will need to contact the agent to request that they register with DETR.
For now, click the Next button.
23. The "Certification" page displays the information entered on the previous screens. Carefully review this information to ensure that it is correct (be sure to scroll down so that you can review the entire screen).
Note that if you are a Non Profit employer you are required to upload a file of a copy of your IRS 501(c)(3) certification form. An upload button will be provided.
If you need to correct any of the information on this page, click the Edit link associated with the section you wish to modify. (Clicking an Edit link will send you back to the related screen. After updating the appropriate information, you will click that screen's Next button to return to this "Certification" screen.)
Note: You cannot update any of the information in the Qualification Information section. If you need to correct any of that information, you will need to complete the registration as is and contact DETR Staff at (775)684-6310 to get the information corrected.
After verifying the information on this screen, click the Certification checkbox.
Click the Submit Registration button.

Guide to Online Employer Self Service
UINV - ESS Employer-RS Guide State of Nevada Page 36
Note that upon submission, the system performs a cross-match of FEIN, Legal Name, DBA, Officer Name, and Officer SSN to see if any of that information already exists in the system.
If it is determined that a match exists, you will be contacted by DETR staff to follow up as needed.
24. The screen refreshes and displays a message that you should print this screen for your records. Click the Print button.

Guide to Online Employer Self Service
UINV - ESS Employer-RS Guide State of Nevada Page 37
25. The system will generate a printer friendly version of the registration information you have entered. Click the Print button to open your printer's dialogue box to print a copy of this information. Then click the Close button.
26. You are now ready to submit your registration information. Click the Submit Registration button.

Guide to Online Employer Self Service
UINV - ESS Employer-RS Guide State of Nevada Page 38
27. The "Confirmation" screen displays your legal name, account number, UI and CEP tax rates, and the date and time the registration was submitted. There is also a Print button if you would like to print a copy of your confirmation information for your records.
Click the Home button.
28. You have successfully completed your registration. The system now displays your "Employer Summary" screen. This is your home page and will be displayed each time you log in to your account.
At this point, you can continue to use ESS, or click the Logoff link in the upper right.

Guide to Online Employer Self Service
UINV - ESS Employer-RS Guide State of Nevada Page 39
Maintaining ESS Users for Employers
Background
Each ESS employer account must have at least one user with "Administrator" access. The user who initially creates the ESS online account is designated by the sytem as the “Administrator.” That user will have the ability to maintain (add, update, and delete) the list of internal and external users having access to the account. (Internal users are those who are employed by the employer; External users are those employed by authorized reporting services or agencies.) The As the “Administrator” you are responsible for maintaining each user's information and authorization level (described in this topic).
An “Administrator” also has the ability to associate multiple accounts that have the same Federal Employer Identification Number (FEIN), allowing their users to access those accounts using the same set of usernames and passwords (if it is applicable to do so based on the employer's business practices).
This topic will instruct an ESS employer administrator how to:
Add, edit, and delete an internal user.
Add an external user (grant a reporting service access to their account).
Associate another account (with the same FEIN) with this account (allowing the same internal users to access accounts for related business entities).
Note the following:
To add an external user (reporting service), the reporting service needs to already be set up within the ESS system.
When you associate another account (with the same FEIN) with this account, the system will automatically generate correspondences to both the newly associated account and the initiating account.
Note the difference between a correspondence agent and a reporting service: a correspondence agent receives mail on the employer's behalf, while a reporting service has authorization to perform transactions (submit reports and filings, etc.) on their behalf. This topic shows you how to assign reporting services, but the assignment of correspondence agents is performed via Profile Maintenance and is described in the topic on “Updating ESS Account Information.” If you want the reporting service to receive any mail you must designate the reporting service as the correspondence agent for the particular mailing.
Guide to Online Employer Self Service
UINV - ESS Employer-RS Guide State of Nevada Page 40
Instructions
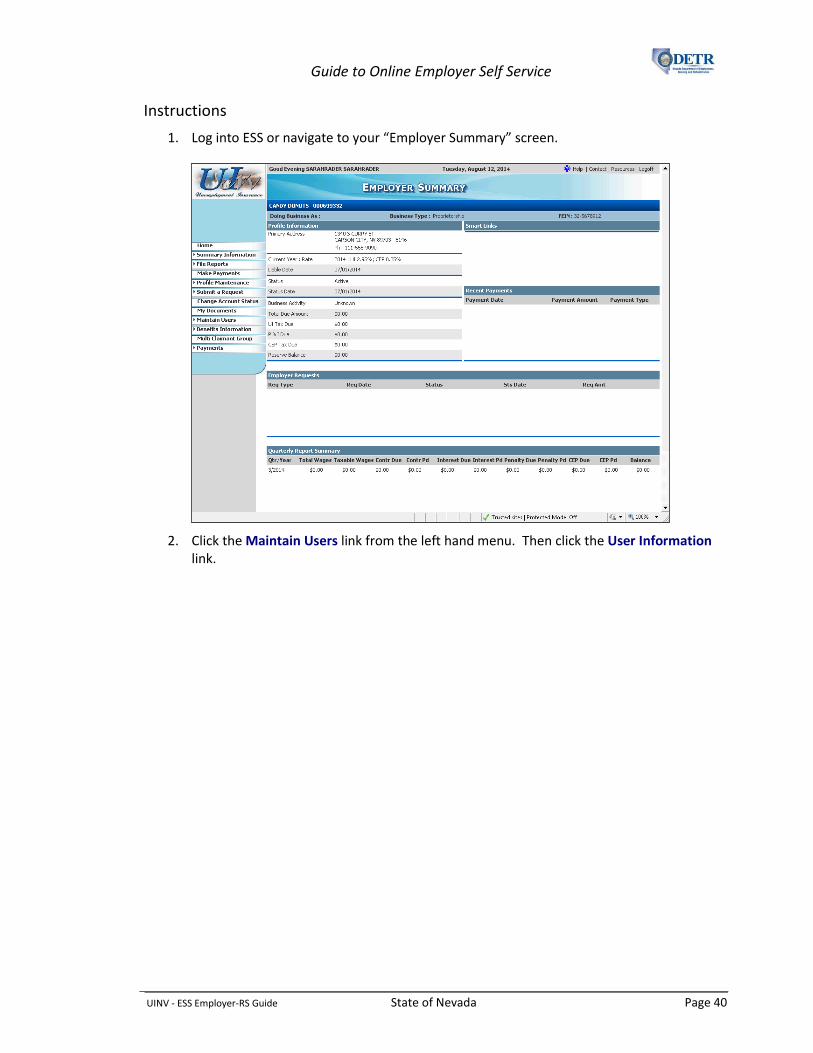
1. Log into ESS or navigate to your “Employer Summary” screen.
2. Click the Maintain Users link from the left hand menu. Then click the User Information link.

Guide to Online Employer Self Service
UINV - ESS Employer-RS Guide State of Nevada Page 41
3. The system displays the "User Maintenance" screen. Current users for this employer will be listed in the appropriate sections. The user who initially created the online account will always be listed but there may be multiple additional users listed for an account.
Notice that there are separate sections used to maintain internal (employer) users, external users (reporting services), and to add a related employer account(s).
The next several steps will show you how to add a new internal user to this employer’s account.
Click the Add button to the right of the “Internal Account Users” section.
Guide to Online Employer Self Service
UINV - ESS Employer-RS Guide State of Nevada Page 42
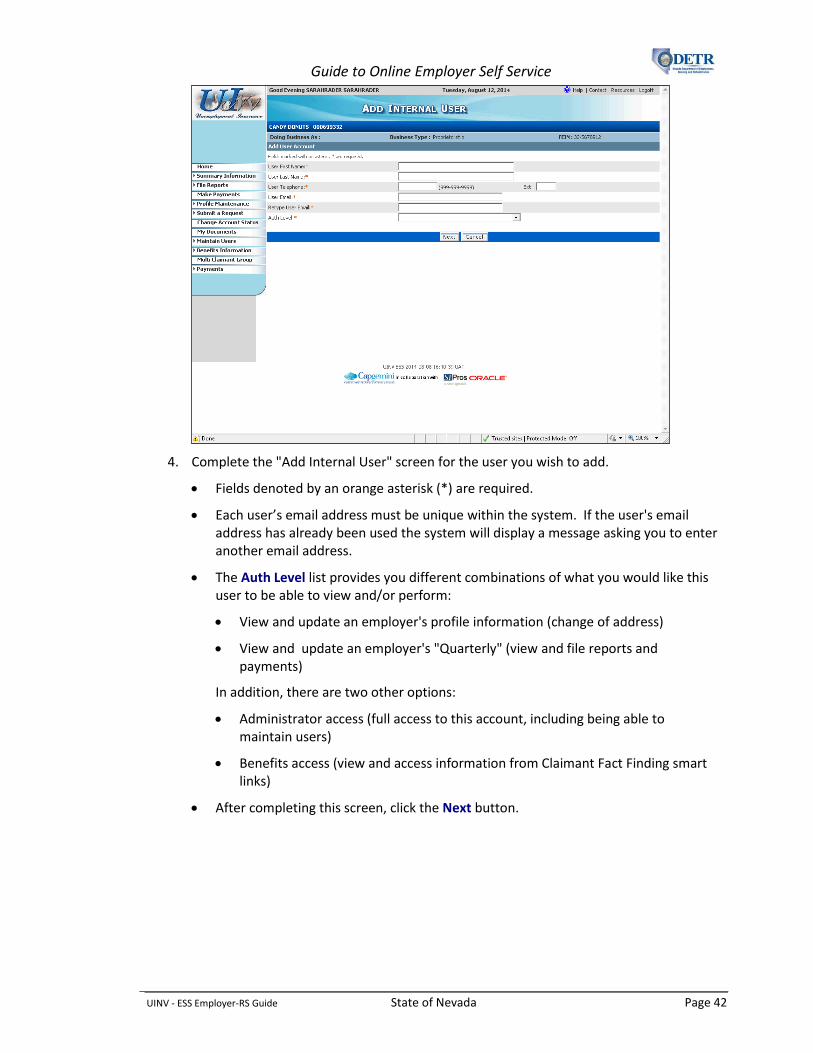
4. Complete the "Add Internal User" screen for the user you wish to add.
Fields denoted by an orange asterisk (*) are required.
Each user’s email address must be unique within the system. If the user's email address has already been used the system will display a message asking you to enter another email address.
The Auth Level list provides you different combinations of what you would like this user to be able to view and/or perform:
View and update an employer's profile information (change of address)
View and update an employer's "Quarterly" (view and file reports and payments)
In addition, there are two other options:
Administrator access (full access to this account, including being able to maintain users)
Benefits access (view and access information from Claimant Fact Finding smart links)
After completing this screen, click the Next button.
Guide to Online Employer Self Service
UINV - ESS Employer-RS Guide State of Nevada Page 43
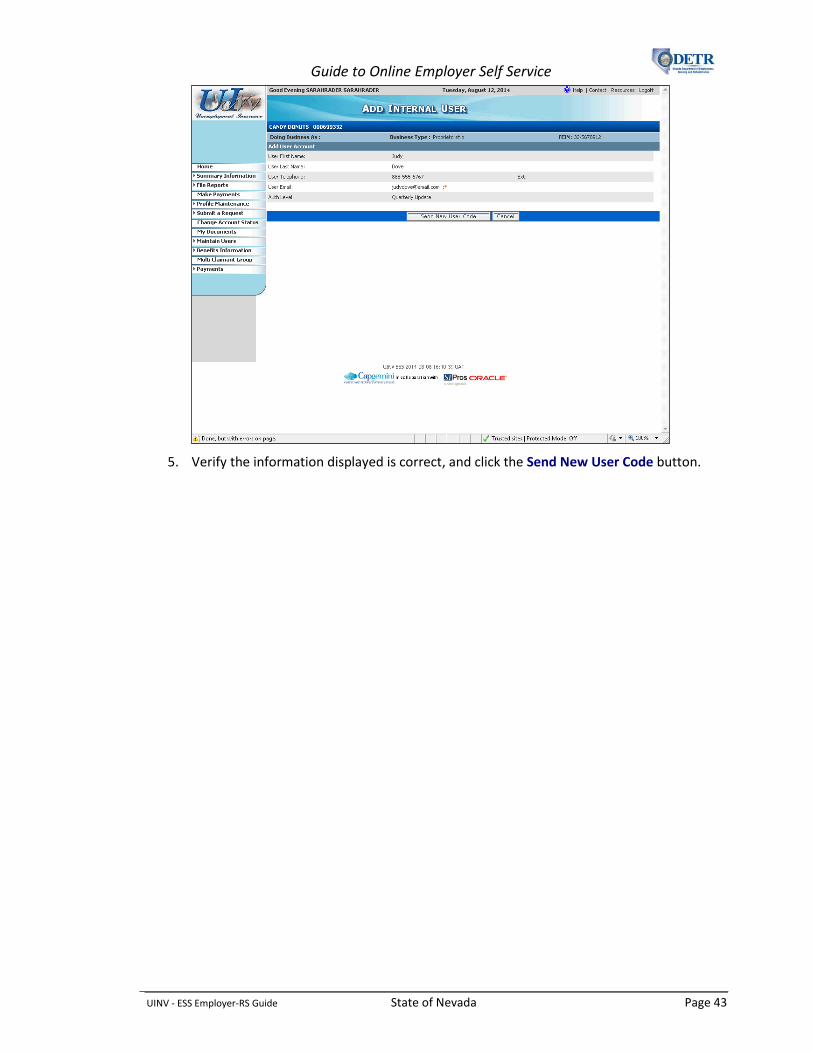
5. Verify the information displayed is correct, and click the Send New User Code button.

Guide to Online Employer Self Service
UINV - ESS Employer-RS Guide State of Nevada Page 44
6. The system returns to the "User Maintenance" screen with a message indicating that the new user has been successfully added.
An email will be automatically generated and sent to the user containing information on how to access their newly created user account access. The email will contain a link which the new user must click, enter the user code provided in the email, and then follow the instructions provided to complete their access to this account.
Notice that the newly created user information is listed in the "Internal Account User" section of the screen. (Note that the User Name field will not display until after the user has completed their online user access process.)
If desired, you can update an internal user’s information or access level by selecting the user, clicking the Edit button, updating the appropriate information on the "Edit Internal User" screen, and clicking that screen’s Update button.
Likewise, you can remove an internal user by selecting the user, clicking the Delete button, and then confirming the deletion. However, note that you cannot delete a user with "Administrator" level access unless there is at least one other user with that same administrator access. (You may need to browse through the listed users by selecting them one at a time and clicking Edit to determine if there is another administrator or to change one to be an administrator.)
The next several steps will show you how to add a Reporting Service as an external user to this employer’s account.
Click the Add button to the right of the “External Account Authorization (Reporting Services)” section.

Guide to Online Employer Self Service
UINV - ESS Employer-RS Guide State of Nevada Page 45
7. Click the Search link to search for the Reporting Service (you must search for the name – you will not be able to type in the Reporting Service Name field).
8. Enter part of the Reporting Service’s name in the Agent Name field and click the Search button.
Guide to Online Employer Self Service
UINV - ESS Employer-RS Guide State of Nevada Page 46
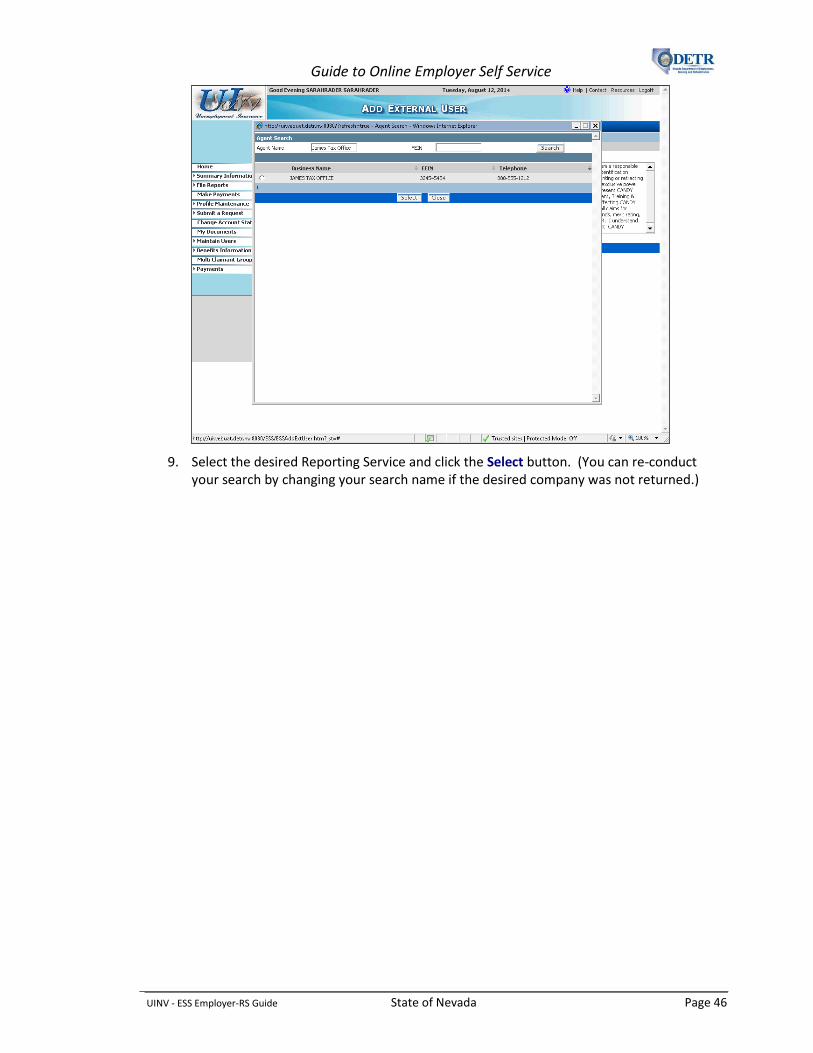
9. Select the desired Reporting Service and click the Select button. (You can re-conduct your search by changing your search name if the desired company was not returned.)

Guide to Online Employer Self Service
UINV - ESS Employer-RS Guide State of Nevada Page 47
10. Notice the Reporting Service’s information now displays on the screen.
Select the desired Auth Level to determine their authorization privileges.
Read the “Important Information” to the right and click the checkbox.
If you want to assign another Reporting Service, click the Add & New button and repeat the process. Otherwise, click the Next button.

Guide to Online Employer Self Service
UINV - ESS Employer-RS Guide State of Nevada Page 48
11. The system returns to the "User Maintenance" screen with a message indicating that the new user has been successfully added. Notice that the newly created user information is now listed in the "External Account Authorizations (Reporting Services)" section of the screen.
If desired, you can update an external user’s information (authorization level only) by selecting the user, clicking the Edit button, updating the authorization level on the "Edit External User" screen, re-clicking the “Important Information” checkbox, and clicking that screen’s Update button.
Likewise, you can remove an external user by selecting the user, clicking the Delete button, and then confirming the deletion.

Guide to Online Employer Self Service
UINV - ESS Employer-RS Guide State of Nevada Page 49
The next several steps will show you how to associate another DETR employer account with this employer’s account.
12. You can associate another account to your account if the account has the same Federal Employer Identification Number (FEIN) as your account. Once associated, you will only
need to log in once to access all of the associated accounts. (In order to do so, you must have the account number and Contribution Report information in order to set up this association.)
Click the Add button to the right of the “Related Employer Accounts” section.
Guide to Online Employer Self Service
UINV - ESS Employer-RS Guide State of Nevada Page 50
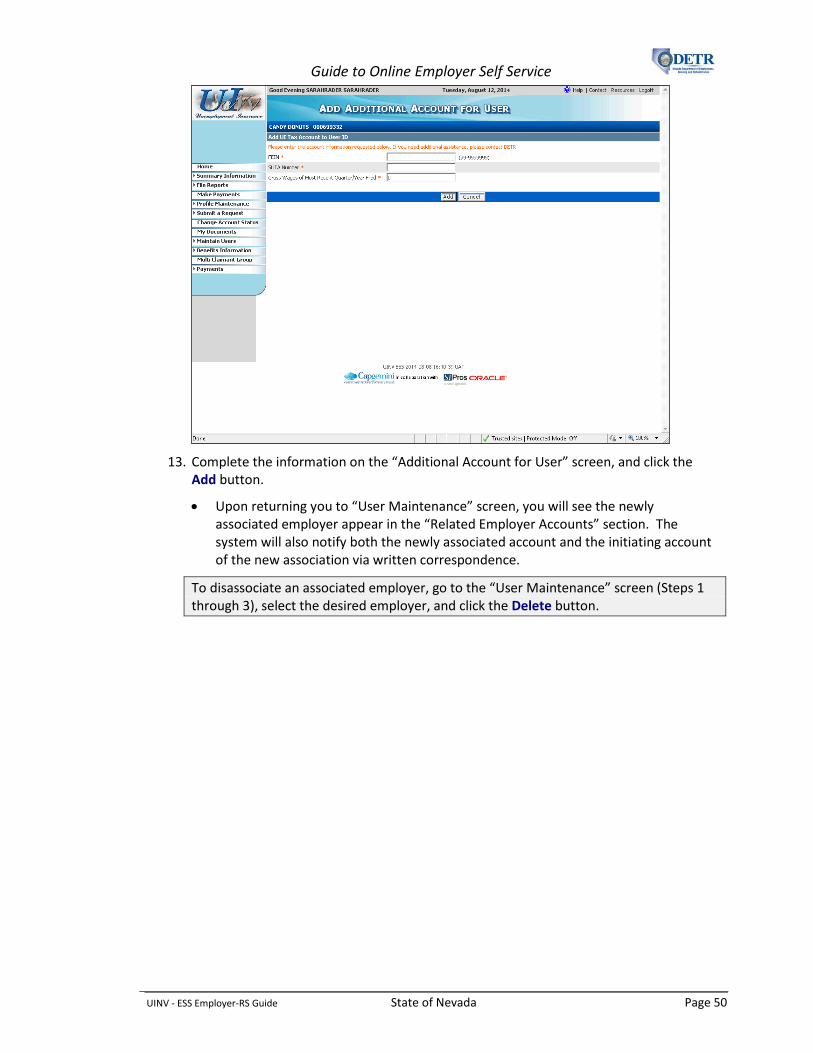
13. Complete the information on the “Additional Account for User” screen, and click the Add button.
Upon returning you to “User Maintenance” screen, you will see the newly associated employer appear in the “Related Employer Accounts” section. The system will also notify both the newly associated account and the initiating account of the new association via written correspondence.
To disassociate an associated employer, go to the “User Maintenance” screen (Steps 1 through 3), select the desired employer, and click the Delete button.

Guide to Online Employer Self Service
UINV - ESS Employer-RS Guide State of Nevada Page 51
Updating ESS Account Information
Background
This topic shows you, as an employer (or designated reporting service), how to update your existing ESS account profile information. This maintenance is performed under the "Profile Maintenance" section of the ESS main menu using screens similar to those used during the employer registration process.
This topic will show you how to add or change the following information:
Business legal information
Officer/Owner information
Contact information
Addresses and location information
Correspondence agent(s)
Note the following:
There are certain attributes (e.g., on the "Legal Information" screen) that cannot be updated using the ESS screens. Updates to those attributes will require assistance from DETR.
For the most part, the rules for maintaining account information are similar to those when initially registering a new employer. (Refer to the topic on Registering a New Employer for more information.)
Note the difference between a Correspondence Agent and a Reporting Service. A Correspondence Agent receives mail on the employer's behalf, while a Reporting Service has authorization to perform transactions (submit quarterly UI reports and make payments, etc.) and receive mail on the employer's behalf. This topic shows you how to assign Correspondence Agents, while the assignment of Reporting Services is performed via User Maintenance and is discussed in a separate topic.
There is a separate topic that shows how to update an employer account status.

Guide to Online Employer Self Service
UINV - ESS Employer-RS Guide State of Nevada Page 52
Instructions
The first several steps will show how to update your Legal Information.
1. Log into ESS or navigate to your “Employer Summary” screen.
2. Click the Profile Maintenance link from the left hand menu. Then click the Legal Information link.

Guide to Online Employer Self Service
UINV - ESS Employer-RS Guide State of Nevada Page 53
3. The "Employer Legal Information" screen displays the information needed in determining how and when you qualify as an employer. Some information on this page cannot be changed using ESS. If you that feel any of the "read only" information is incorrect, please contact the DETR Registration Help Desk (866-429-9758) for assistance.
Information that you can update is shown in edit boxes. To update any of that information, type the new information in the box, or select a new value from the pull down list, or use the field’s Look It Up link. Then click the Update button toward the bottom of the screen.
If you change your preferred method of notification to “Email”, be sure to provide an Email Address, read the “Important Information”, and click the “Important Information” checkbox.
The next several steps will show how to update your business location information.
Click the Profile Maintenance link from the left hand menu.
Then click the Locations link.

Guide to Online Employer Self Service
UINV - ESS Employer-RS Guide State of Nevada Page 54
4. The "Update Additional Addresses" screen provides the functionality to change, add, or delete address information associated with a business. Select the appropriate location you wish to update and click the Edit button.

Guide to Online Employer Self Service
UINV - ESS Employer-RS Guide State of Nevada Page 55
5. Notice that the screen refreshes and the "Additional Addresses" section is populated based on the address you selected.
Update the desired information and click the Update button. Depending on the change you made, you may see it reflected in the table toward the bottom. (If the change you made is not visible in the address list, you can confirm your update by selecting the address record and clicking the Details button below the list.)
To delete an address, select the location on the “Update Additional Addresses” screen and click the Delete button. But recall that the system will require that all businesses have a Business Records address, and any out-of-state employers with a business location in Nevada must also have a Nevada Operations address.
To add an address, fill in the information in the "Additional Addresses" section and click the Add & New button.
The next several steps will show how to update your contact information.
Click the Profile Maintenance link from the left hand menu.
Then click the Contacts link.
Guide to Online Employer Self Service
UINV - ESS Employer-RS Guide State of Nevada Page 56
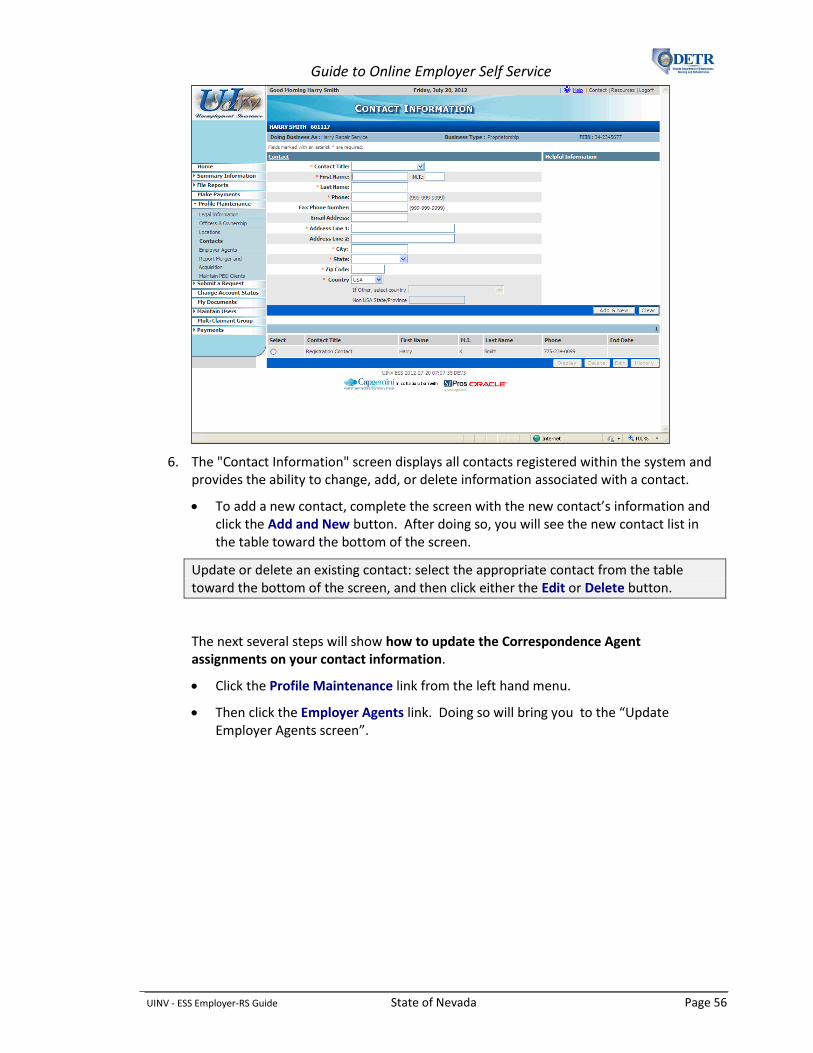
6. The "Contact Information" screen displays all contacts registered within the system and provides the ability to change, add, or delete information associated with a contact.
To add a new contact, complete the screen with the new contact’s information and click the Add and New button. After doing so, you will see the new contact list in the table toward the bottom of the screen.
Update or delete an existing contact: select the appropriate contact from the table toward the bottom of the screen, and then click either the Edit or Delete button.
The next several steps will show how to update the Correspondence Agent assignments on your contact information.
Click the Profile Maintenance link from the left hand menu.
Then click the Employer Agents link. Doing so will bring you to the “Update Employer Agents screen”.

Guide to Online Employer Self Service
UINV - ESS Employer-RS Guide State of Nevada Page 57
7. The "Assign Correspondence Agent" section allows you to assign up to three Correspondence Agents to receive DETR correspondence on your behalf (or to retract that right if already established). Correspondence Agents can receive Tax, Benefits, and/or Appeals correspondence. Note the following:
You should select a Correspondence Agent only if you already have established a business relationship with the agent.
You have the option to select a separate agent for your Tax, Benefits, and/or Appeals correspondences, but only one Correspondence Agent for each type of correspondence.
Once assigned, these agents will continue to receive your correspondence until you remove the agent from your account.
Note the difference between a Correspondence Agent and a Reporting Service: a Correspondence Agent receives mail on your behalf, while a Reporting Service has authorization to perform transactions (submit quarterly UI reports and make payments, etc.) and receive mail on your behalf. The assignment of Reporting Services is performed via User Maintenance (after your new employer registration is complete) and is discussed in a separate topic.
If you already have Correspondence Agents assigned, they will appear in the lower half of the screen.
To add a new Correspondence Agent click the Agent Details Search link under the “Assign Correspondence Agent” section.

Guide to Online Employer Self Service
UINV - ESS Employer-RS Guide State of Nevada Page 58
8. Enter the Correspondence Agent’s name in the Agent Name field, and then click the Search button. (To be assigned as a Correspondence Agent, they must first be set up in the system as a Reporting Service.)
Alternatively, you can also search for a specific Correspondence Agent using their FEIN number, if you know it. Performing this search will help narrow your search results if there are multiple Reporting Services with similar names.

Guide to Online Employer Self Service
UINV - ESS Employer-RS Guide State of Nevada Page 59
9. Select the appropriate agent and click the Select button.
If your agent is not listed (and you've tried different search criteria), you should check with the agent to see if they are registered with DETR. They need to register as a Reporting Service with DETR in order for you to select them in the system. (If they have registered, ask them for their FEIN number to simplify your search.)
Guide to Online Employer Self Service
UINV - ESS Employer-RS Guide State of Nevada Page 60
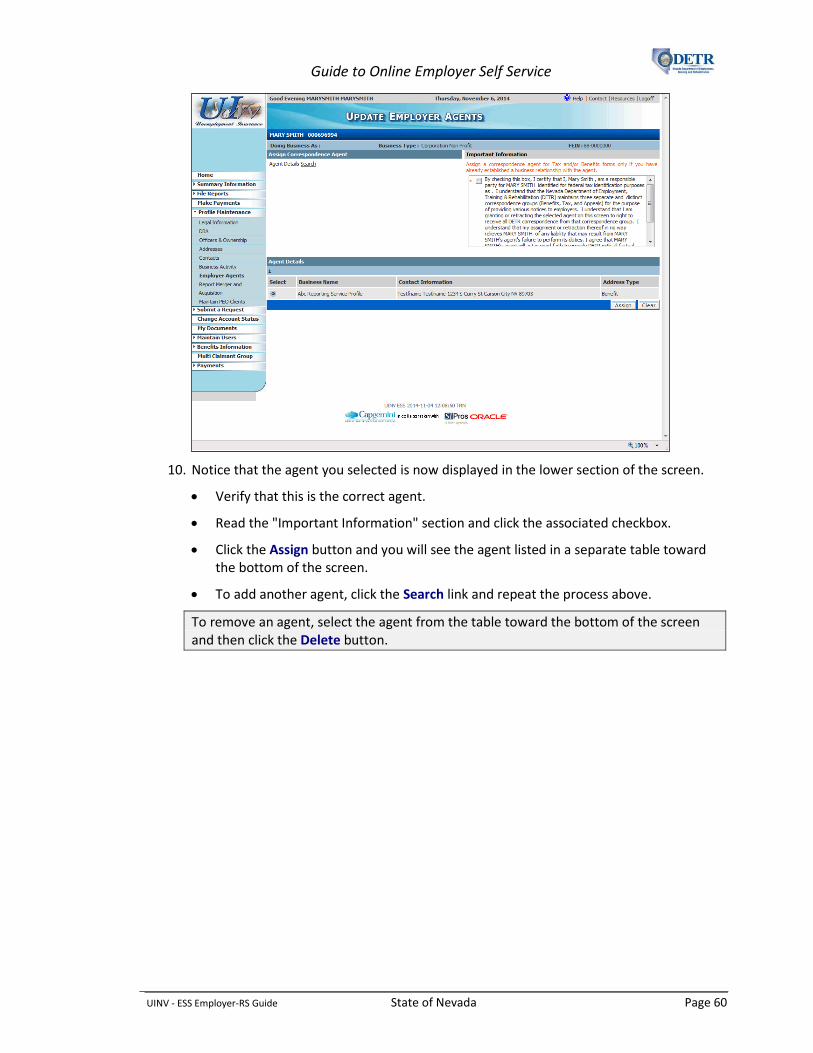
10. Notice that the agent you selected is now displayed in the lower section of the screen.
Verify that this is the correct agent.
Read the "Important Information" section and click the associated checkbox.
Click the Assign button and you will see the agent listed in a separate table toward the bottom of the screen.
To add another agent, click the Search link and repeat the process above.
To remove an agent, select the agent from the table toward the bottom of the screen and then click the Delete button.

Guide to Online Employer Self Service
UINV - ESS Employer-RS Guide State of Nevada Page 61
Updating ESS Account Status
Background
An employer can inactivate their account online if they go out of business and no longer have employees. They may also reactivate their account if they have been inactive and now have employees and it is within two years of their inactivation date. (Reporting Services can also make these status changes on the employer’s behalf if they have "Profile Update" level access to the employer's account.) This topic will describe how to inactivate an employer's account.
Note the following:
The changes are reflected immediately to the account and the system keeps a history of all changes.
The system will send you correspondence based on the update.
The system will adjust the account Smart Links appropriately (when inactivating your account, your existing Smart Links for past due reports prior to your inactivation effective date will remain, but any reports past the inactivation effective date will be removed).
When an employer account is inactivated, you can still log into the account and view information and access any remaining Smart Links.
When an account is reactivated, the system will create Smart Links for any now past due reports based on the effective date you entered.
The system won't allow you to inactivate your account if there are quarterly reports or levies posted for quarters during the period being requested as 'inactive'.

Guide to Online Employer Self Service
UINV - ESS Employer-RS Guide State of Nevada Page 62
Instructions
1. Log into ESS or navigate to your “Employer Summary” screen.
2. Click the Change Account Status link from the left hand menu.

Guide to Online Employer Self Service
UINV - ESS Employer-RS Guide State of Nevada Page 63
3. Complete the fields on the “Change Account Status” screen and click the Change Status
button. Note the following:
Your Change account status to Inactive as of date must be the current date or earlier. You cannot inactivate or reactivate an account using a future date.
You cannot enter a date that is earlier than any reports that you have already filed.
You will receive an error message if you attempt to inactivate your account and you have quarterly reports or levies posted for quarters during your requested 'inactive' period.

Guide to Online Employer Self Service
UINV - ESS Employer-RS Guide State of Nevada Page 64
4. Verify that the information displayed on the "Account Status Change Confirmation" screen is correct and click the Confirm button.
Guide to Online Employer Self Service
UINV - ESS Employer-RS Guide State of Nevada Page 65
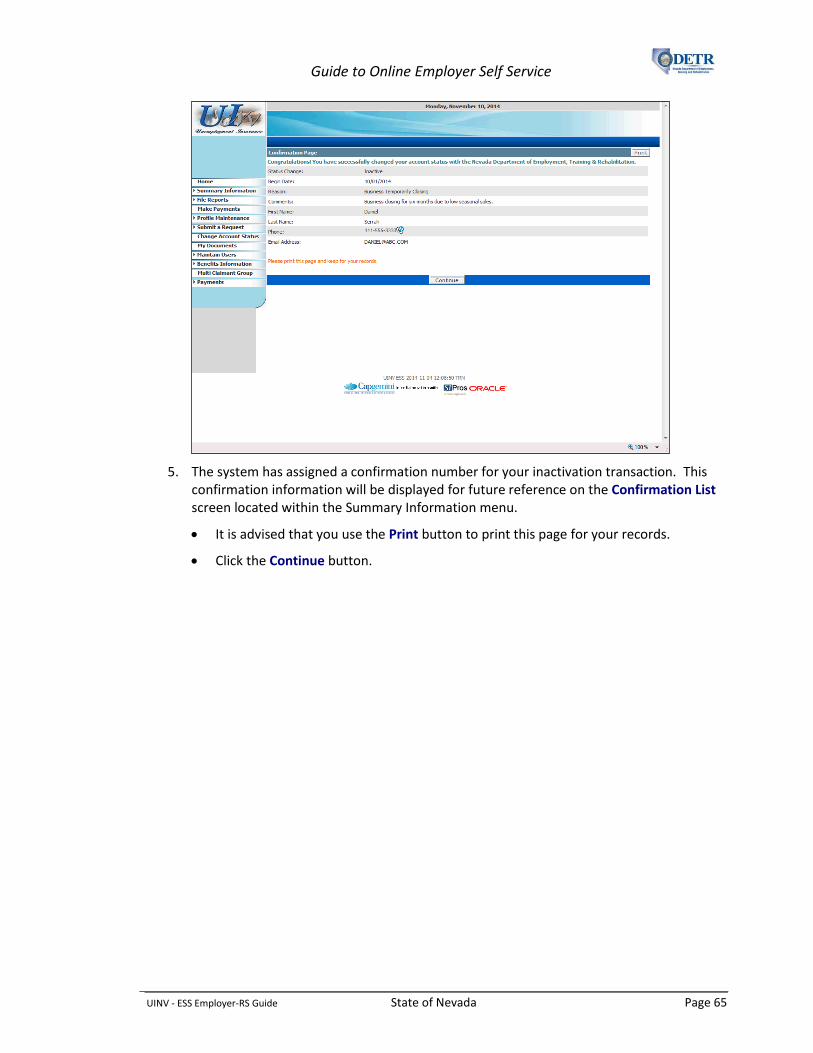
5. The system has assigned a confirmation number for your inactivation transaction. This confirmation information will be displayed for future reference on the Confirmation List screen located within the Summary Information menu.
It is advised that you use the Print button to print this page for your records.
Click the Continue button.

Guide to Online Employer Self Service
UINV - ESS Employer-RS Guide State of Nevada Page 66
6. Notice that your Status has been updated to "Inactive" and the Status Date (effective date) has been updated. You will not be required to submit quarterly reports until you once again have employees, at which time you will need to reactivate your employer account.
The Smart Links section has been adjusted to reflect only items due at the time of the inactivation.
To reactivate an employer, access the “Change Account Status” screen and follow the steps above to complete the fields and submit and confirm the reactivation request.

Guide to Online Employer Self Service
UINV - ESS Employer-RS Guide State of Nevada Page 67
Managing a PEO Account (Registering as a PEO and adding/dropping clients)
Background
Due to a Nevada law change, effective Ocotber 1, 2015 this section is no longer applicable. NRS 616B.691(1) NRS 616B.691(1) has been amended to deem the client company of an employee leasing company to be the employer of the employees it leases for the purposes of chapter 612 of NRS pertaining to unemployment compensation. As such, it will now be necessary for the client companies of an employee leasing company to register for unemployment insurance (UI). Registration is best done online through ESS. The client company will now have primary responsibility as the employer for submitting required quarterly UI tax and wage reports, payment of UI tax and bond contributions, and respond to notices from the Employment Security Division.
A Professional Employer Organization (PEO) hires an employer’s employees and leases them back to the employer. The PEO becomes the employer liable for the UI contributions on the workers. This is an attractive arrangement to employers because it generally reduces the cost of UI contributions, workers’ compensation insurance, and insurance premiums due to the PEO’s economy of scale. PEO's are responsible for notifying DETR each time a client is added or dropped.
This topic describes the process for a PEO to manage its clients using ESS. The employer identifies themselves as a PEO when they register. The general registration process is followed, with only two additional steps to designate the employer as a PEO. (This topic will describe only the areas where the PEO registration process differs from the regular registration process, and not the entire registration process. Please see the ESS and Paper Registration topics if you need to view the details for registering an employer.)
Once registered, the PEO can access their ESS account and may add, update, or delete a client. The client information includes name, address, UI account number, FEIN, add or drop date, etc.
This topic describes the process used by the PEO to register and manage their account and clients. More specifically the process includes:
Registering the PEO as a liable employer
Adding a client
Dropping a client
Viewing the PEO's answer to the Business and Industry question
Instructions
1. To register as a PEO using ESS, be sure to first create your ESS Logon (Online User Account).
2. Then follow the instructions on how to register as a new employer, with the following two exceptions:

Guide to Online Employer Self Service
UINV - ESS Employer-RS Guide State of Nevada Page 68
On the “Employer Liability” screen, be sure to select “Yes” to the question asking if you are a Professional Employer Organization.

Guide to Online Employer Self Service
UINV - ESS Employer-RS Guide State of Nevada Page 69
Toward the end of the registration process (after completing the “Correspondence Contacts” screen), you will arrive at the “PEO Legal Requirements” screen. Nevada law requires that a PEO register with Nevada’s Business and Industry agency. If you have not done so already you must do so. If registered as required, verify you have done so by answering “Yes” to the related question (this is necessary in order to be considered a PEO).
3. After submitting your registration, click the Home button to navigate to your “Employer Summary” screen.

Guide to Online Employer Self Service
UINV - ESS Employer-RS Guide State of Nevada Page 70
4. Next, you need to add clients to your PEO account.
Click the Profile Maintenance link from the left hand menu.
Then click the Maintain PEO Clients link.
5. Click the Add Client button.

Guide to Online Employer Self Service
UINV - ESS Employer-RS Guide State of Nevada Page 71
6. Complete the information on the “PEO Client Maintenance” screen for the client you wish to add.
If the client has previously registered with DETR, and you know their account number, enter it into the Client Account # field. Otherwise, leave that field blank.
If you know the client’s FEIN, you should enter it into the FEIN field. Otherwise, leave that field blank.
The Client Add Date should be the effective date of the contract between the PEO and the client (this field is required).
After completing this screen, click the Add & New button if you would like to add another client. Otherwise, click the Add button.
When you click the Add or Add & New button on the “PEO Client Maintenance” screen, the system searches to determine if the new client’s account number and/or FEIN are already in the system with an active account. If found, the system will automatically inactivate the client's account (the PEO is now the “employer”) and generate correspondence to the client.
Guide to Online Employer Self Service
UINV - ESS Employer-RS Guide State of Nevada Page 72
The next several steps will show how to drop one of the clients from the PEO account.
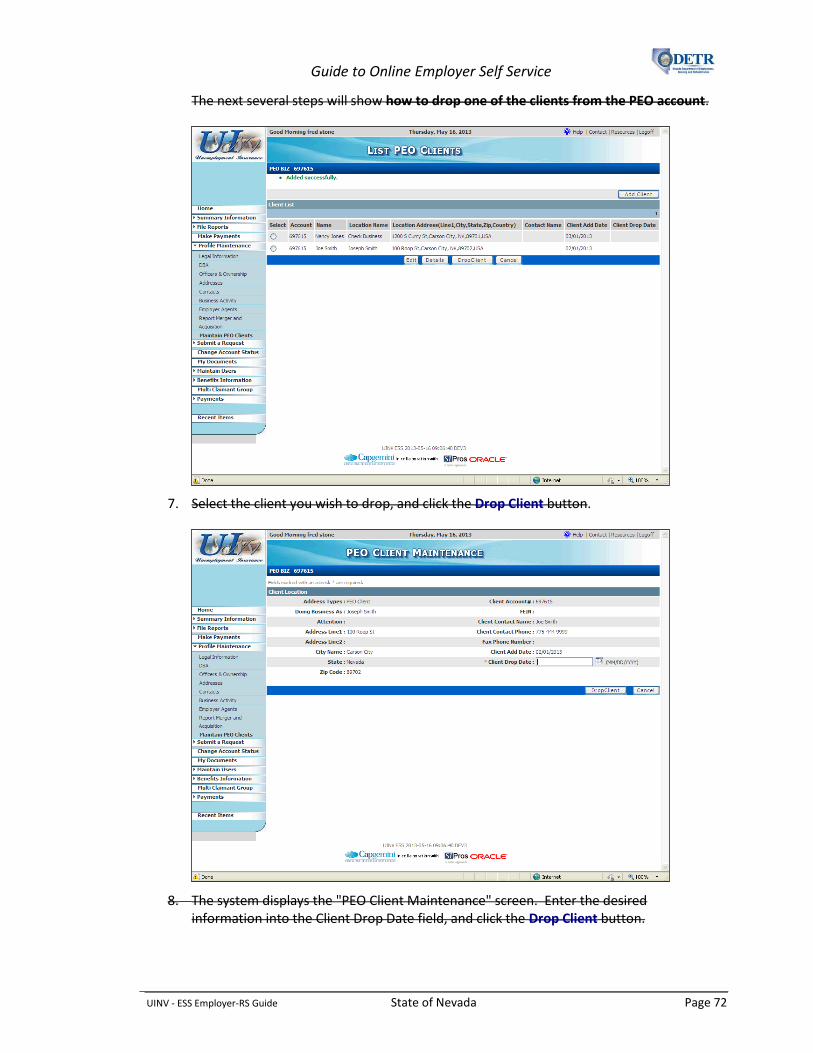
7. Select the client you wish to drop, and click the Drop Client button.
8. The system displays the "PEO Client Maintenance" screen. Enter the desired information into the Client Drop Date field, and click the Drop Client button.

Guide to Online Employer Self Service
UINV - ESS Employer-RS Guide State of Nevada Page 73
9. Note that the Client remains in the PEO's "Client List" but now has the Client Drop Date displayed.
If desired, you can also view or update an existing client’s information by selecting the desired client, and then clicking either the Details or Edit button.

Guide to Online Employer Self Service
UINV - ESS Employer-RS Guide State of Nevada Page 74
Manually Filing Quarterly [Contributions and Wage] Reports
Background
Employers (or their authorized Reporting Services) can file Employer’s Quarterly Reports ("Contribution Reports") and Wage Reports using the Employer Self Service (ESS) system by either manually entering their report information using the ESS screens or by uploading files containing the information. To help manage their reporting, the system provides employers with Smart Links for any past due reports.
You are provided four options when filing quarterly reports: file the Contribution and Wage Report at the same time; file a Contribution Report only; file "No Wages to Report"; or file a “Wage Report Only.”
This topic will show you how to manually enter both an Employer's Quarterly Report and Wage Report using the ESS screens (there is a separate topic describing how to upload report files).
Note the following regarding Wage Reports:
If you have submitted a previous Wage Report, the system reduces data entry by pre-populating the employee SSN and name fields. You will then only need to enter the wages and tips for the quarter, add new worker detail, and delete workers no longer employed.
The system automatically calculates each employee’s taxable wage amount based on the Gross Wages entered and Nevada's taxable wage base for the specific year. However, it provides you the ability to override this amount for any particular employee for a specific reason (e.g., if they have predecessor-successor or out-of-state wages that need to be taken into consideration).
Note the following regarding Employer's Quarterly Reports:
When filing both an Employer's Quarterly Report and Wage Report at the same time, the system automatically calculates amounts due on the Employer's Quarterly Report based upon the amounts reported on the Wage Report or amounts that you enter directly into the Employer's Quarterly Report fields. It calculates your total reportable gross and taxable wages, however, it provides you the option to override these calculations (e.g., for predecessor-successor and out-of-state wage situations).
Note that there are separate topics on how to submit the payment for the report filing, and for Reporting Services that upload reporting files for one or more employers at the same time.

Guide to Online Employer Self Service
UINV - ESS Employer-RS Guide State of Nevada Page 75
Instructions
1. Log into ESS or navigate to your “Employer Summary” screen.
You will have “Smart Links” for any past due Contributions or Wage Reports that you might have. You can use these links to file the respective reports. First, you will see how to file a past due Wage Report:
Click on the oldest Wage Report Due link. (If you have more than one past due Wage Report, it's best to file the oldest one first, since the employee lists carry forward from each quarter to the next.)
To file a report for the current quarter (that isn't past due and therefore doesn't have a Smart Link), you'll need to:
Click on the File Reports menu option Click on Reporting Options Select Enter Report using UINV Select the appropriate Reporting Quarter and Reporting Year
Guide to Online Employer Self Service
UINV - ESS Employer-RS Guide State of Nevada Page 76
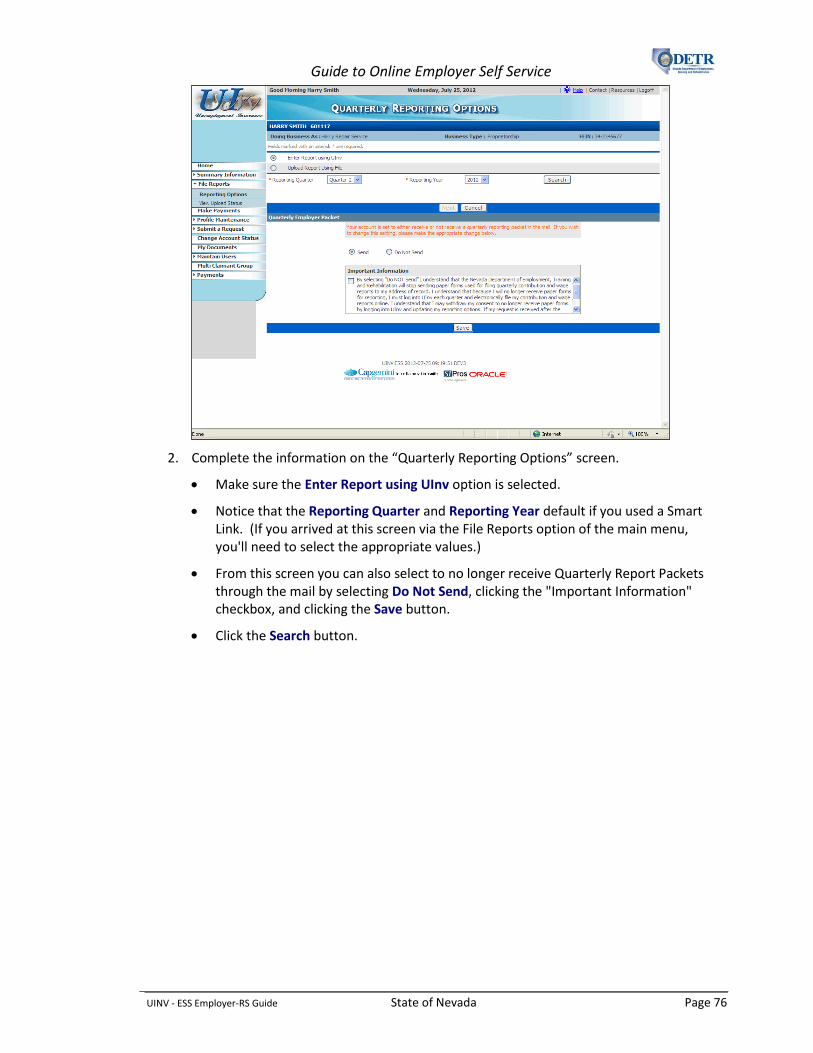
2. Complete the information on the “Quarterly Reporting Options” screen.
Make sure the Enter Report using UInv option is selected.
Notice that the Reporting Quarter and Reporting Year default if you used a Smart Link. (If you arrived at this screen via the File Reports option of the main menu, you'll need to select the appropriate values.)
From this screen you can also select to no longer receive Quarterly Report Packets through the mail by selecting Do Not Send, clicking the "Important Information" checkbox, and clicking the Save button.
Click the Search button.

Guide to Online Employer Self Service
UINV - ESS Employer-RS Guide State of Nevada Page 77
3. Select the appropriate option under the “Employer Options” section (for this example we will file both the Contribution and Wage reports for this period).
Note that if you choose "No Wages to Report", you'll file both a Contribution and a Wage Report with zero wages.
Click the Next button.

Guide to Online Employer Self Service
UINV - ESS Employer-RS Guide State of Nevada Page 78
4. When filing both a Contribution and Wage report for the same period, you will first file the Wage Report. Complete the “Wage Report Details” screen.
If you have filed a Wage Report for a past quarter, those employees (names and SSNs) will be pre-populated here. Complete their information as follows:
For pre-populated employees (those carried over from the past quarter) that have wages for this period, fill in their Gross Wages (and Tip Amounts if applicable) for this period. (You'll also be able to override Taxable Wages, if appropriate, similar to the instructions on the next screen.)
For pre-populated employees that don't have wages for this period (e.g., terminated employees, those on leave, etc.), place a check mark in their corresponding box and click the Delete button. (The system won't allow you to file the Wage Report if you have employees listed without wages.)
Then, to add any new employees (or when entering your first Wage Report), click the Add button.

Guide to Online Employer Self Service
UINV - ESS Employer-RS Guide State of Nevada Page 79
5. Complete a row for each employee that you need to add.
The Location field is provided for employers who wish to file their wages by Nevada Operations locations. (Employers who wish to do so should contact DETR if they don't know their location numbers.)
For single-name individuals (e.g., Cher), you should enter the single-name (e.g., Cher) in the Last Name field and enter a period (.) in the First Name field.
For hyphenated last names (e.g., Jane Smith-Jones), enter the entire hyphenated last name (e.g., Smith-Jones) in the Last Name field.
If the employee did not receive any tips, you can leave the Tip Amount blank (it is not necessary to enter "0").
The Taxable Wages field is used only if you wish to override the system's calculated amount, in which case you'll need to provide an Override Reason. In most cases you should leave this field blank to accept the system's calculated amount, which is based on the Gross Wages you enter and Nevada's taxable wage base for this specific year (this amount is not displayed until the next screen).
When you are done adding new employees, click the Add button.

Guide to Online Employer Self Service
UINV - ESS Employer-RS Guide State of Nevada Page 80
6. The "Wage Report Details" screen shows the comprehensive list of employees for which you are filing wages for this period (those employees carried over from the past period, minus any employees without wages, plus any new employees you added). Verify the information on this screen is correct.
If you need to make any corrections, make the changes on this screen and click the Update button to apply them. (Note that if you click Update, the Taxable Wage amounts will be calculated and filled in, however it's not necessary to click Update unless you made changes.)
If you need to remove any employees, place a check mark in their corresponding box, and click the Delete button.
After verifying the information on this screen, click the Next button.

Guide to Online Employer Self Service
UINV - ESS Employer-RS Guide State of Nevada Page 81
7. Complete the fields on the "Contribution Report Details" screen.
If you had chosen to file just the Wage Report, you would instead arrive on the "Certification" screen (shown in the next step).
Notice that the Total Gross Wages and the calculated Total Taxable Wages automatically carry forward from the Wage Report; however, you can override these amounts if necessary. (If you had chosen to file just the Contribution Report, you will need to manually enter these amounts.)
Excess Wages is the total amount of wages that exceed the annual taxable wage limit for individual employees (this is not a required field).
When you have completed this screen, click the Next button.

Guide to Online Employer Self Service
UINV - ESS Employer-RS Guide State of Nevada Page 82
8. Review the information on the “Certification” screen (this screen may look a little different depending on which report (s) you are submitting.
If you need to update any of the information, click the Edit button in the appropriate section.
BEFORE submitting the report(s), it is recommended that you print the report information using the Print button.
Once you verified that the information is correct, check the Certification box and then click the Submit button.
Guide to Online Employer Self Service
UINV - ESS Employer-RS Guide State of Nevada Page 83
Uploading Employer Reports
Background
The Employer Self Service (ESS) system provides employers and Reporting Services with the ability to submit Wage Reports online by manually entering the wage details or uploading a file containing the wage detail information. This topic will cover the report upload process. The online data entry process is discussed in a separate section.
Employers may use one of two accepted file formats:
Upload a Comma Separated Value (CSV) or tab delimited file to report wage detail information.
Upload an Electronic Filing W2 (EFW2), formerly MMREF, to file both the Contribution and Wage Reports.
Both formats are uploaded in the same manner. The upload process accepts one or more original reports.
The system provides the ability to test the file prior to actually uploading it, in order to verify that the file will process without any issues. The employer may view the results of the test, or the actual uploaded file, on the "Upload Status" screen. If the file fails when uploaded, the employer must correct the file and upload it again. The failed file data is not retained.
This topic will simulate the report upload process. More specifically, it will describe the processes used to:
Access the upload screen
Test the file to be uploaded
Upload a EFW2 wage file
View the wage details of the uploaded file
View the statistical data for the uploaded file
EFW2 instructions are provided on the DETR website: http://ui.nv.gov/ESSHTML/electronic_specs.htm.
CSV and tab delimited file formats are defined at: http://devapps.nvdetr.org/crphtml/help_tw_upload.htm#p_delimiter

Guide to Online Employer Self Service
UINV - ESS Employer-RS Guide State of Nevada Page 84
Instructions
1. Log into ESS or navigate to your “Employer Summary” screen.
2. Click the File Reports link from the left hand menu. Then click the Reporting Options link.

Guide to Online Employer Self Service
UINV - ESS Employer-RS Guide State of Nevada Page 85
3. Select the Upload Report Using File option, and click the Next button.
4. Select the appropriate File Format option. Then click the Browse button.

Guide to Online Employer Self Service
UINV - ESS Employer-RS Guide State of Nevada Page 86
5. Locate the desired file on your PC, and click the Open button.
6. It is recommended that you test the file prior to uploading it. Click the Test File button.

Guide to Online Employer Self Service
UINV - ESS Employer-RS Guide State of Nevada Page 87
7. Notice the green message toward the top of the screen to check back later for the results. Click the View Upload Status link from the left hand menu. (If there had been issues with the file’s format, you instead would have received an error message at the top of the screen, in which case you would need to make any appropriate changes to the file and then retest it by starting again with Step 3.)
Guide to Online Employer Self Service
UINV - ESS Employer-RS Guide State of Nevada Page 88
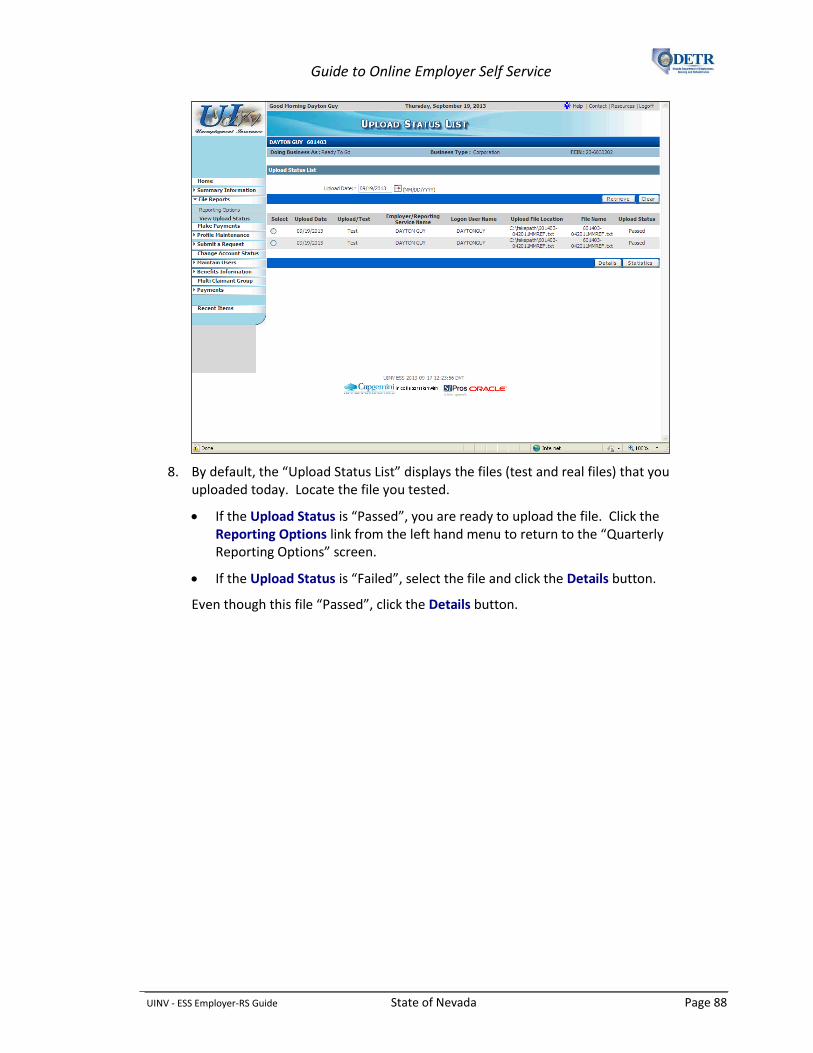
8. By default, the “Upload Status List” displays the files (test and real files) that you uploaded today. Locate the file you tested.
If the Upload Status is “Passed”, you are ready to upload the file. Click the Reporting Options link from the left hand menu to return to the “Quarterly Reporting Options” screen.
If the Upload Status is “Failed”, select the file and click the Details button.
Even though this file “Passed”, click the Details button.

Guide to Online Employer Self Service
UINV - ESS Employer-RS Guide State of Nevada Page 89
9. You arrive on the “Upload Status Details List” screen that provides record-level error messages (e.g., error messages indicating if there are issues with specific record lengths, if records are in the wrong positions, if key data elements are missing or in an incorrect format or outside their acceptable ranges, etc.). Be sure to read the message(s) carefully and adjust your file. Then re-test your file to make sure it passes before actually uploading the file.
If your test file’s Upload Status was “Passed”, you are now ready to submit the report. Click the Reporting Options link from the left hand menu to return to the “Quarterly Reporting Options” screen.

Guide to Online Employer Self Service
UINV - ESS Employer-RS Guide State of Nevada Page 90
10. You are returned to the “Quarterly Reporting Options” screen.
Re-select the Upload Report Using File option and click the Next button.

Guide to Online Employer Self Service
UINV - ESS Employer-RS Guide State of Nevada Page 91
11. Re-select the appropriate File Format.
Re-click the Browse button to locate and select (“Open”) the appropriate file.
Read the statement in the “Reports Certification” section, and upon agreeing, click the related checkbox.
Click the Upload button (this time you are going to submit the file).

Guide to Online Employer Self Service
UINV - ESS Employer-RS Guide State of Nevada Page 92
12. Again, notice the green message toward the top of the screen to check back later for the results. Click the View Upload Status link from the left hand menu.

Guide to Online Employer Self Service
UINV - ESS Employer-RS Guide State of Nevada Page 93
13. Locate the appropriate upload and verify that the Upload Status is “Passed”. If so, the file upload\filing process is now complete.
If desired, you can select the file and click the Details button to view all of the data that was included in the file (the information will be read-only and cannot be changed on that screen). After viewing the information, you would click the Cancel button to return to the “Upload Status List” screen.
If desired, you can select the file and click the Statistics button to see additional information about the upload, such as the wage totals, the amount of time it took to upload the file, and additional information.
If you receive error messages related to specific records when uploading a file, all records will post to the employer’s account except for the ones containing the errors. You will need to correct and resubmit the problematic records separately in another upload file or enter them separately using the ESS data entry screen.

Guide to Online Employer Self Service
UINV - ESS Employer-RS Guide State of Nevada Page 94
Amending Contribution and Wage Reports
Background
This topic describes the process used by employers and Reporting Services to amend previously submitted Contribution Reports and Wage Reports using ESS. Since the amount of total wages must be the same on both the Contribution Report and Wage Report, most changes will require that you update both reports in order to keep them in balance. For example, if you add, change or delete employees (and therefore their wages) on a quarter’s Wage Report (and therefore affecting the overall total wages on that report), you will need to update the total wages amount on the Contribution Report to keep them in sync. (If the two reports are not in balance, you will receive discrepancy correspondence after the end of the quarter.) This topic will show you how to update both types of reports.
More specifically, this topic describes the process used to:
Add wages to an existing Wage Report
Update wages on an existing Wage Report
Delete wages from an existing Wage Report
Amend an existing Contributions Report
Instructions
1. Log into ESS or navigate to your “Employer Summary” screen.
2. Click the File Reports link from the left hand menu. Then click the Reporting Options link.

Guide to Online Employer Self Service
UINV - ESS Employer-RS Guide State of Nevada Page 95
3. The system displays the "Quarterly Reporting Options" screen. (Note that if you have more than one employer account linked to the logon ID, you can change between them via the Related Account pull down field toward the upper right.)
First, you will see how to manually amend a previously submitted report.
Make sure the Enter Report using UInv option is selected.
Select the appropriate Reporting Quarter and Reporting Year.
Click the Search button.
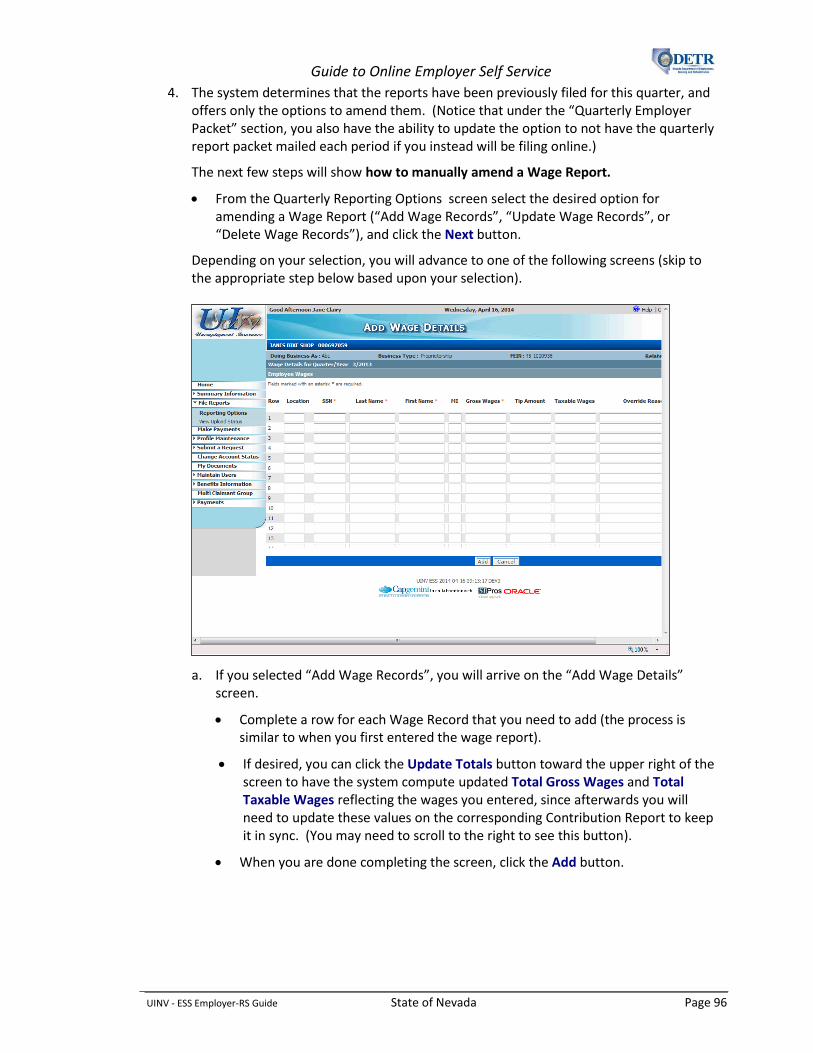
Guide to Online Employer Self Service
UINV - ESS Employer-RS Guide State of Nevada Page 96
4. The system determines that the reports have been previously filed for this quarter, and offers only the options to amend them. (Notice that under the “Quarterly Employer Packet” section, you also have the ability to update the option to not have the quarterly report packet mailed each period if you instead will be filing online.)
The next few steps will show how to manually amend a Wage Report.
From the Quarterly Reporting Options screen select the desired option for amending a Wage Report (“Add Wage Records”, “Update Wage Records”, or “Delete Wage Records”), and click the Next button.
Depending on your selection, you will advance to one of the following screens (skip to the appropriate step below based upon your selection).
a. If you selected “Add Wage Records”, you will arrive on the “Add Wage Details” screen.
Complete a row for each Wage Record that you need to add (the process is similar to when you first entered the wage report).
If desired, you can click the Update Totals button toward the upper right of the screen to have the system compute updated Total Gross Wages and Total Taxable Wages reflecting the wages you entered, since afterwards you will need to update these values on the corresponding Contribution Report to keep it in sync. (You may need to scroll to the right to see this button).
When you are done completing the screen, click the Add button.

Guide to Online Employer Self Service
UINV - ESS Employer-RS Guide State of Nevada Page 97
The system then displays a "Confirmation" screen that provides a summary of the Wage Report information, including the date and time that the Wage Report was amended and a Confirmation Number for reference. There is also a Print button available to print a hard copy of the confirmation information.
You can then click the “Confirmation” screen’s Home button to return you to the "Employer Summary" screen, or click the Reporting Options link to make additional amendments to a report.
See the note following Step 4c regarding the need to also update the Contribution Report to keep it in sync.

Guide to Online Employer Self Service
UINV - ESS Employer-RS Guide State of Nevada Page 98
b. If you selected “Update Wage Records”, you will arrive on the “Update Wage Details” screen. This screen lists all employee wages contained on the selected quarterly report. Be sure to read the information in the "Important Information" section before making changes to the wage records.
Place a checkmark in the checkbox for any records you wish to update.
Update those records with corrected wage information as appropriate.
You will need to provide a Change Reason for any records you update (you may need to scroll to the right to see this column).
After updating all of the appropriate records, you may wish to click the Update Totals button toward the upper right of the screen to have the system compute updated Total Gross Wages and Total Taxable Wages reflecting the changes you made, since afterwards you will need to update these values on the corresponding Contribution Report to keep it in sync.
When you are done updating the appropriate records, click the screen’s Next button.
The system then displays a "Confirmation" screen that provides a summary of the Wage Report information, including the date and time the Wage Report was amended and a Confirmation Number for reference. There is also a Print button available to print a hard copy of the confirmation information. (See Step (a) above for an example of this screen.)
You can then click the “Confirmation” screen’s Home button to return you to the "Employer Summary" screen, or click the Reporting Options link to make additional amendments to a report.
See the note following Step 4c regarding the need to also update the Contribution Report to keep it in sync.

Guide to Online Employer Self Service
UINV - ESS Employer-RS Guide State of Nevada Page 99
c. If you selected “Delete Wage Records”, you will arrive on the “Delete Wages Details” screen. This screen lists all employee wages contained on the selected quarterly report.
Place a checkmark in the checkbox for any records you wish to delete.
You will need to provide a Reason for any records you wish to delete. Select from the choices provided for that field.
After selecting all of the appropriate records, and providing a reason for each, click the screen’s Delete button.
Review the information on the resulting "Wages Delete Confirmation" screen, and if correct, click the Confirm Delete button.
The system then displays a "Confirmation" screen that provides a summary of the Wage Report information, including the date and time the Wage Report was amended, and a Confirmation Number for reference. There is also a Print button available to print a hard copy of the confirmation information. (See Step (a) above for an example of this screen.)
You can then click the “Confirmation” screen’s Home button to return you to the "Employer Summary", or click the Reporting Options link to make additional amendments to a report.
Note that when you make a change to an existing Wage Report, you need to update the corresponding Contribution Report (described next) so that they remain in balance. (If the two are not in balance, you will receive discrepancy correspondence after the end of the quarter.)

Guide to Online Employer Self Service
UINV - ESS Employer-RS Guide State of Nevada Page 100
The next few steps will show how to manually amend a Contribution Report.
5. On the “Quarterly Reporting Options” screen:
Make sure the Enter Report using UInv option is selected.
Select the appropriate Reporting Quarter and Reporting Year.
Click the Search button.

Guide to Online Employer Self Service
UINV - ESS Employer-RS Guide State of Nevada Page 101
6. Make sure the Amend Contribution Report option is selected on the “Quarterly Reporting Options” screen, and click the Next button.

Guide to Online Employer Self Service
UINV - ESS Employer-RS Guide State of Nevada Page 102
7. The system displays the "Contribution Report Details" screen. Update the appropriate information on this screen.
Note that you will need to select an Adjustment Reason Code to indicate why you are amending the report.
If the number of employees had not been entered on the original report, or has changed, be sure to provide updated information in the three month fields.
When you are finished updating this screen, click the Next button.

Guide to Online Employer Self Service
UINV - ESS Employer-RS Guide State of Nevada Page 103
8. The system then displays a "Confirmation" screen that provides a summary of the Contribution Report information, including the date and time the Contribution Report was amended and a Confirmation Number for reference. There is also a Print button available to print a hard copy of the confirmation information.
You can then click the “Confirmation” screen’s File Wages button to submit or amend the corresponding Wage Report, its Home button to return you to the "Employer Summary", its Next button if you have any additional amount due based on the amended report, or click the Reporting Options link to make additional amendments to a report.
Note that when you make a change to an existing Contribution Report, you need to also update the corresponding Wage Report so that they remain in balance. (If the two are not in balance, you will receive discrepancy correspondence after the end of the quarter.) See the information in the opening paragraph of this section.

Guide to Online Employer Self Service
UINV - ESS Employer-RS Guide State of Nevada Page 104
Submitting Employer Payments
Background
The payment functionality in ESS allows employers and Reporting Services to easily make payments on current and past due liability amounts. They have the option of making a payment by accessing "Smart Links" on the “Employer Summary” screen or by selecting the payment option from the menu.
The system displays all outstanding amounts by quarter/year, organized by Unemployment Insurance (UI) amounts due and Career Enhancement Program (CEP) amounts due. Employers and Reporting Services may also view the Contribution Report detail for each quarter that includes the contribution, CEP, interest, penalty, special assessments, amounts due and paid, and credits on the account.
Employers and Reporting Services may file their reports online and then initiate a payment through their bank using the ACH Debit process if they have previously gone through the ACH Debit Authorization steps with DETR. They may also make a payment by Debit or Credit Card, by electronic e-checks, or by submitting a check with a payment coupon (created in ESS). Note that debit/credit card payments may incur a convenience fee. If the payment coupon option is used, the payment must be received by DETR within seven days of the generation of the payment coupon in order to avoid receiving a billing statement. Timeliness of the check and payment coupon is determined by the postmark which must be on or before the due date.
There are four basic steps to make a payment through ESS payment:
Accessing the payment screen
Entering the payment information
Selecting a date for the payment, if needed
Submitting the payment
Employers or Reporting Services may also make and apply a payment to a payment agreement or settlement agreement using ESS (ESS displays the installment amounts paid and due). This functionality is discussed in a separate section.
This topic will describe how to perform the following payment related tasks in ESS:
Make an ACH Debit payment
Make a Debit/Credit Card payment
Print a payment coupon
Make an electronic check payment (e-check)

Guide to Online Employer Self Service
UINV - ESS Employer-RS Guide State of Nevada Page 105
Instructions
1. Log into ESS or navigate to your “Employer Summary” screen.
2. Click the Make Payments link from the left hand menu.
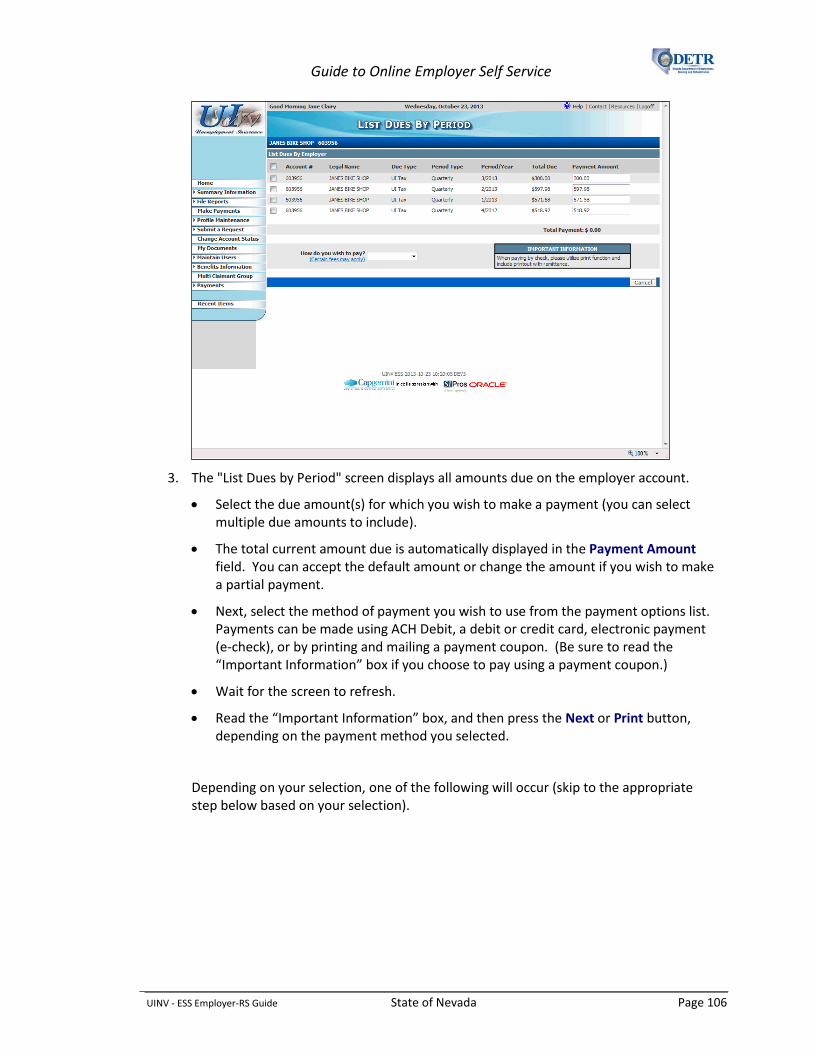
Guide to Online Employer Self Service
UINV - ESS Employer-RS Guide State of Nevada Page 106
3. The "List Dues by Period" screen displays all amounts due on the employer account.
Select the due amount(s) for which you wish to make a payment (you can select multiple due amounts to include).
The total current amount due is automatically displayed in the Payment Amount field. You can accept the default amount or change the amount if you wish to make a partial payment.
Next, select the method of payment you wish to use from the payment options list. Payments can be made using ACH Debit, a debit or credit card, electronic payment (e-check), or by printing and mailing a payment coupon. (Be sure to read the “Important Information” box if you choose to pay using a payment coupon.)
Wait for the screen to refresh.
Read the “Important Information” box, and then press the Next or Print button, depending on the payment method you selected.
Depending on your selection, one of the following will occur (skip to the appropriate step below based on your selection).

Guide to Online Employer Self Service
UINV - ESS Employer-RS Guide State of Nevada Page 107
a. If you selected “ACH Debit” and clicked the Next button on the “List Dues by Period” screen, you will advance to the “ACH Debit Process” screen. Complete the information on this screen and click the Next button.
b. You will see a confirmation screen with the payment details listed.
If you had selected “Electronic Check” (e-check), the process and screen are similar to that of ACH Debit, with the exception that you cannot future date the payment.

Guide to Online Employer Self Service
UINV - ESS Employer-RS Guide State of Nevada Page 108
c. If you selected “Debit/Credit Card” and clicked the Next button on the “List Dues by Period” screen, you will advance to the “Debit/Credit Card Payment Process” screen. Complete the information on this screen and then click the Next button.
d. You will see a confirmation screen with the payment details listed.

Guide to Online Employer Self Service
UINV - ESS Employer-RS Guide State of Nevada Page 109
e. If you selected “Payment Coupon” and clicked the Print button on the “List Dues by Period” screen, you will advance to the “Payment Coupon” screen.
Review the information on this screen.
If the information is correct, click the Print Coupon button.
The payment coupon will be displayed on the screen in print format. Scroll to the bottom of the window and click the Print Coupon button.
Use your PC’s print dialogue box to print the coupon.
After printing the coupon, click the Close button to return to the prior window.
After printing the payment coupon, mail it with your check to the address on the screen. The payment must be received by DETR within seven days of the generation of an amount due in order to avoid receiving a billing statement.
When you are ready to continue, click the Next button to return to the “Employer Summary” screen where you can see the payment displayed in the “Recent Payments” section.

Guide to Online Employer Self Service
UINV - ESS Employer-RS Guide State of Nevada Page 110
Submitting Employer Requests
Background
This topic describes Employer Self Service (ESS) functionality that allows employers and their Reporting Services to easily submit requests for certain actions to be taken on their account.
More specifically, this topic describes the processes used by the employer, or their Reporting Service, to submit the following requests via ESS:
A waiver of assessed penalty due to a late report or payment
A Federal Unemployment Tax Act (FUTA) recertification of taxable wages and payments filed
A Corporate Dissolution Certificate or Certificate of Good Standing
A refund of overpaid Unemployment Insurance contributions
A payment agreement
A Subcontractor Certificate of Good Standing
After submitting a request, you can view the status of the request via ESS, as well as edit or withdraw the request if it has not yet been completed.
Note that all requests except for Clearance Certificates for Corporate Dissolution or Good Standing require further DETR action to either approve or deny the request in order to complete the process. In all situations you will be advised in writing whether the request has been approved or denied.
Instructions
1. Log into ESS or navigate to your “Employer Summary” screen.

Guide to Online Employer Self Service
UINV - ESS Employer-RS Guide State of Nevada Page 111
2. Click the Submit a Request link from the left hand menu.
3. Then, based on your desired request, click the appropriate link from the left hand menu and follow the additional instructions below:

Guide to Online Employer Self Service
UINV - ESS Employer-RS Guide State of Nevada Page 112
Request/Link Instructions
Request Penalty Waiver You arrive on the “Wavier List” screen. Any previous waiver requests will be listed.
To request a new waiver:
Click the Add a Waiver Request button, complete the “Request a Waiver” screen (be sure to click the Certification checkbox verifying that you read and agree with the statement), and click the Request Waiver button.
Verify the information on the “Confirmation” screen, print the page (if desired) using the Print button, and click the Continue button.
You are returned to the “Wavier Request” screen where you can edit (including withdraw) the request, view its details, or view its history.
Request Federal Recertification
You arrive on the “Federal Certification Request” screen. Any previous certification requests will be listed on the bottom half of the screen.
To request a new Federal certification:
Complete the “Federal Certification Request” screen and click the Add Recertification Request button.
The system submits your recertification request and provides a confirmation number. You can print the page (if desired) using the Print button.
Request Clearance Certificate
You arrive on the “Clearance Certificate Request” screen.
To request a new clearance certificate:
Select the type of the type of certificate (Good Standing Certificate or Corporate Dissolution Certificate).
If you select “Corporate Dissolution Certificate”, you need to also enter the Last Payroll Date and Dissolution Date.
Click the Add Request button.
The screen refreshes, and displays a message indicating whether the request passed or failed (and a reason for the failure, if applicable). A record of the request is added toward the bottom of the screen.

Guide to Online Employer Self Service
UINV - ESS Employer-RS Guide State of Nevada Page 113
Request/Link Instructions
Request Refund You arrive on the “Refund List” screen. (Note that you cannot request a refund if the account has an amount due.)
To request a refund:
Click the Add a Refund Request button.
Complete the fields on the “Refund Request” screen.
o If there is an amount eligible for a refund it will be displayed in the Refund Amount field.
o You need to enter a reason for the refund in the Comments field, and then click the certification checkbox.
Click the Request Refund button.

Guide to Online Employer Self Service
UINV - ESS Employer-RS Guide State of Nevada Page 114
Request/Link Instructions
Request Payment Agreement
You arrive on the “Agreement List” screen. Any previous payment agreements will be listed on the bottom half of the screen.
To request a new payment agreement:
Click the Request Payment Agreement button. The system displays the "Request a Payment Agreement" screen. The "Liabilities" section lists your liabilities due that will be included in this payment agreement.
To calculate a payment amount based on a set number of payments:
o Set the # of Installments to the desired number.
o Click the Calculate Installment Amount button.
o The system calculates the down payment amount, first and last payment amounts, and the dates of those payments.
To calculate the number and amount of payments based on a specific first installment amount:
o Enter the desired amount in the First Installment field.
o Click the Calculate # of Installments button.
o The system calculates the number of installments, amount of the down payment, and the amount of the final installment.
Regardless of your calculation method, the system calculates your down payment to be equal to one installment payment, and the maximum number of payments (including the down payment) is 4. However, you can request a larger down payment amount.
When you are ready to submit your payment agreement request, click the certification checkbox, and then click the Save button. (Remember this is a request and you will be advised in writing if it has been either approved or denied.)
The system then displays the "Payment Agreement Confirmation" screen where, if desired, you can print a record of your payment agreement request.
Guide to Online Employer Self Service
UINV - ESS Employer-RS Guide State of Nevada Page 115
Request/Link Instructions
Subcontractor Certification Request
You arrive on the “Subcontractor Certification Request” screen (this screen allows you to notify DETR that you have a subcontractor working for your business).
To request a new subcontractor:
Complete the fields on this screen.
Note that you must upload a copy of the “Certification of Subcontractor’s Unemployment Insurance Payments” document. Click the Browse button to search for and attach the document.
Click the Add Certification Request button.
The screen refreshes and displays a message that the certification has been successfully requested.

Guide to Online Employer Self Service
UINV - ESS Employer-RS Guide State of Nevada Page 116
Accessing Employer Summary Information
Background
Each time an employer logs into ESS, they arrive on their “Employer Summary” screen. This screen provides a global view of the employer's account, and contains a summary of the most common ‘quick glance’ information items needed by an employer or their Reporting Service.
There are also several screens that contain additional summary information. The summary screens display data lists, and most provide drill-down functionality to view additional details. Many of these screens also provide links for you to perform other actions associated with the data on that page.
This topic provides an overview of the “Employer Summary” screen and the following additional summary information screens:
Contribution Reports
Wage Reports
Liabilities
Payments
Rate History
Federal Certifications
Payment Agreements
Penalty Waivers
Confirmations
CEP Assessments
My Documents

Guide to Online Employer Self Service
UINV - ESS Employer-RS Guide State of Nevada Page 117
Instructions
1. Log into ESS or navigate to your “Employer Summary” screen.
2. This screen contains the following sections and information:
Section Description
“Profile Information” Provides the current account address and telephone number, the Unemployment Insurance (UI) and Career Enhancement Program (CEP) rates, the current account status, the business activity designation, the total amount due on the account, and the reserve balance (contributions paid minus benefit charges paid to their employees).

Guide to Online Employer Self Service
UINV - ESS Employer-RS Guide State of Nevada Page 118
Section Description
“Smart Links” Provides short-cut access to past-due Contribution and Wage Reports, outstanding liabilities, and Claimant Fact Finding. This section may contain one or more of these links.
Clicking on a Contribution Report Due or Wage Report Due link brings you to the screen used to initiate the report filing process.
Clicking a Payments Due link will navigate you to the "List Dues by Period" screen where you can initiate the payment process.
Clicking a Claimant Fact Finding link provides a listing of claimants with timely requests for claimant adjudication fact finding. A claimant’s name is dropped from the claimant list when their fact finding is completed or when their fact finding request is no longer timely.
“Recent Payments” Provides a listing of all recent payments, including entries if the payment was rejected by the bank (NSF designation), or adjusted. This section displays the date the payment was deposited and the amount and type of payment (i.e. ACH Debit, Credit Card, Check).
"Employer Requests" Displays any requests that have been made on the account, as well as the request status, and easy access to details of the request.
"Quarterly Report Summary"
Displays a summarized listing of Employer's Quarterly Report information that includes the gross and taxable wages reported per quarter/year, the contribution amount due and paid for each quarter/year, as well as any interest and/or penalties assessed and paid. For each quarter/year there is a balance at the end of the line.

Guide to Online Employer Self Service
UINV - ESS Employer-RS Guide State of Nevada Page 119
3. ESS also provides the following summary information screens:
a. The "Contribution Reports" screen can be accessed by clicking the Summary Information link, and then clicking the Contribution Reports link.
This screen lists all Employer’s Quarterly Reports that have been posted to the account. It also displays all quarters for which you are liable to file a report, even though one has not yet been filed.
If desired, you can select a report and click the Details button to view the "Contribution Report Details" screen. That screen provides information on the monthly employee count for each month of the quarter, the report type, status, and effective date of the report, the amount paid (if any), and any remaining amount due. There is also a Print button available.

Guide to Online Employer Self Service
UINV - ESS Employer-RS Guide State of Nevada Page 120
b. The "Wage Reports" screen can be accessed by clicking the Summary Information link, and then clicking the Wage Reports link.
This screen lists all wage reports that have been posted to the account.
If desired, you can select a wage report and click the Details button to view the "Wage Report Details" screen. That screen displays detailed wages by employee for the selected quarter.

Guide to Online Employer Self Service
UINV - ESS Employer-RS Guide State of Nevada Page 121
c. The "Liabilities" screen can be accessed by clicking the Summary Information link, and then clicking the Liabilities link.
This screen displays all amounts due on the account. The liabilities are listed by period and details of the amounts due are listed separately in columns.

Guide to Online Employer Self Service
UINV - ESS Employer-RS Guide State of Nevada Page 122
d. The "Payments" screen can be accessed by clicking the Summary Information link, and then clicking the Payments link.
This screen lists all payments made on the employer account.

Guide to Online Employer Self Service
UINV - ESS Employer-RS Guide State of Nevada Page 123
e. The "Rate History" screen can be accessed by clicking the Summary Information link, and then clicking the Rate History link.
This screen lists all rate listings for the account beginning with calendar year 2008. If the rate for a year has been changed, only the current rate for that year is displayed.
If desired, you can select a record and click the Details button to view the "Rate Details" screen. That screen provides detailed information on components of the selected rating year.

Guide to Online Employer Self Service
UINV - ESS Employer-RS Guide State of Nevada Page 124
f. The "Federal Certification Request" screen can be accessed by clicking the Summary Information link, and then clicking the Federal Certifications link.
This screen lists any requests for recertification that have been submitted for the account.
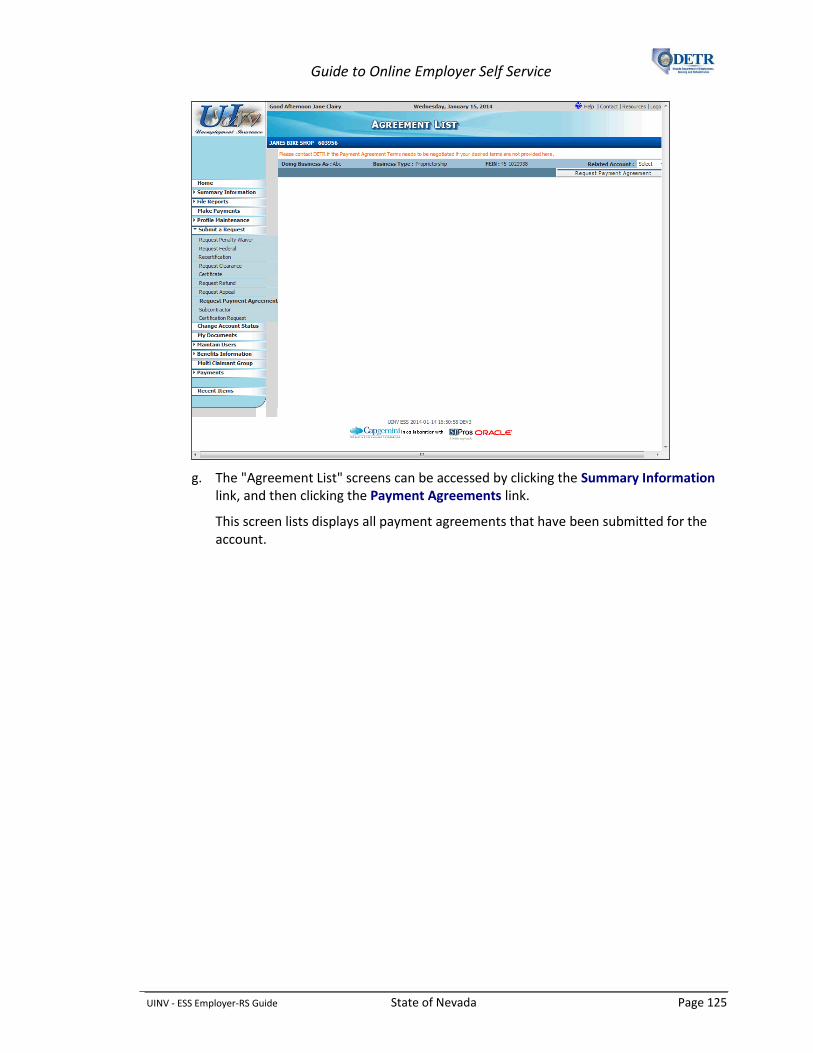
Guide to Online Employer Self Service
UINV - ESS Employer-RS Guide State of Nevada Page 125
g. The "Agreement List" screens can be accessed by clicking the Summary Information link, and then clicking the Payment Agreements link.
This screen lists displays all payment agreements that have been submitted for the account.

Guide to Online Employer Self Service
UINV - ESS Employer-RS Guide State of Nevada Page 126
h. The "Waiver List" screen can be accessed by clicking the Summary Information link, and then clicking the Penalty Waivers link.
This screen lists all waivers that have been requested on the account.
If desired, you can select a waiver and click the Details button to view the "Waiver Details" screen. That screen provides detailed information about the waiver, including the status, amount approved, and amount applied to the account. There is also a Print button available to print the details of the waiver.

Guide to Online Employer Self Service
UINV - ESS Employer-RS Guide State of Nevada Page 127
i. The "Confirmation List" screen can be accessed by clicking the Summary Information link, and then clicking the Confirmations link.
All account actions will have a confirmation number assigned to them. Details about these confirmations can be viewed on this screen.

Guide to Online Employer Self Service
UINV - ESS Employer-RS Guide State of Nevada Page 128
j. The "List CEP Assessments" screen can be accessed by clicking the Summary Information link, and then clicking the CEP Assessments link.
This screen lists details for all CEP assessment amounts for the employer account.

Guide to Online Employer Self Service
UINV - ESS Employer-RS Guide State of Nevada Page 129
k. The “My Documents” screen can be accessed by clicking the My Documents link.
This screen displays a list of most going correspondence that have been sent to you from DETR.

Guide to Online Employer Self Service
UINV - ESS Employer-RS Guide State of Nevada Page 130
Managing Multi-Claimant Groups
Background
ESS allows employers to create and manage Multi-Claimant Groups to associate claimants that are related to an event such as a Mass Layoff, Labor Dispute, or other event.
Employers can use these groups if ever a need to perform mass resolution for a given issue type. (If there are multiple employers involved in a scenario, such as a labor dispute, these would have to be split out into separate multi-claimant groups per each employer.)
To create a Multi-Claimant Group, the employer can provide the list of event affected employees by uploading a formatted file or by using a screen to individually enter each employee. Employers also have the ability to copy prior group activity, if the affected employees are similar to a prior group event.
This topic describes the following functionality used by employers to manage groups and their affected employee lists in Employer Self Service (ESS):
Add a new group
Edit an existing group’s information
Upload a listing of affected employees
Manually enter affected employees
Edit or delete an employee
View group history information
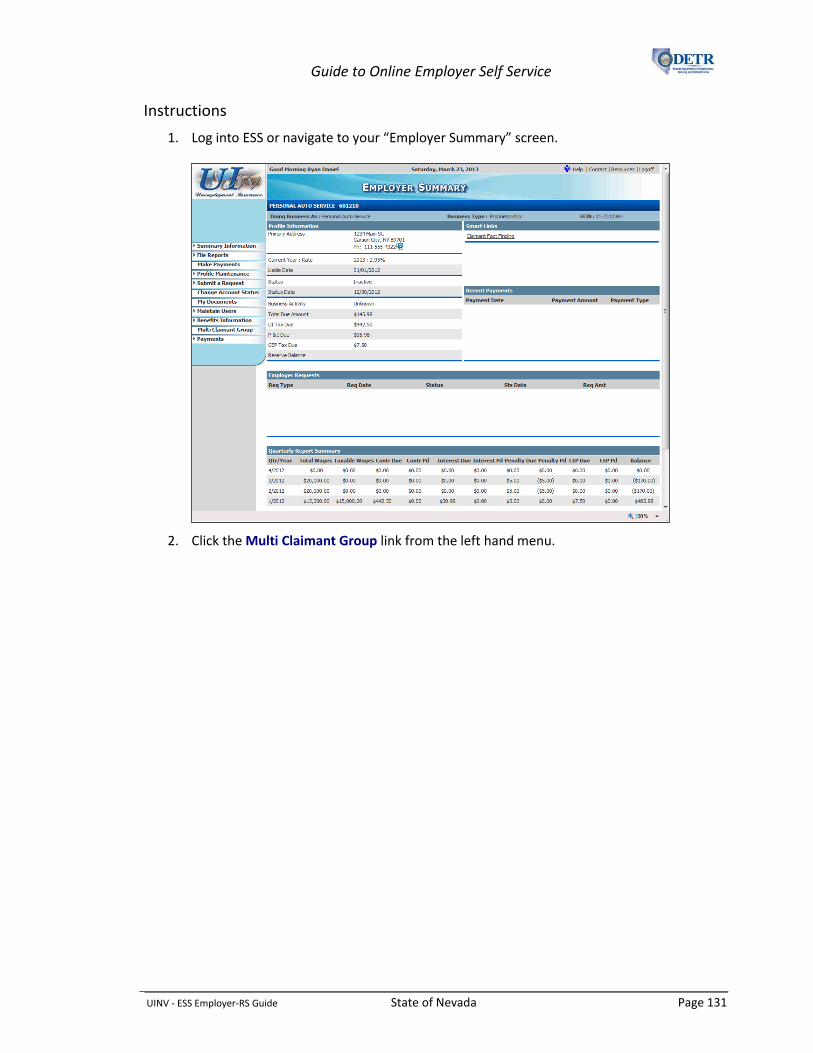
Guide to Online Employer Self Service
UINV - ESS Employer-RS Guide State of Nevada Page 131
Instructions
1. Log into ESS or navigate to your “Employer Summary” screen.
2. Click the Multi Claimant Group link from the left hand menu.

Guide to Online Employer Self Service
UINV - ESS Employer-RS Guide State of Nevada Page 132
3. The system displays the "Multi-Claimant Groups" home screen. If you had created past groups, they would be listed under the "Group Records" section.
The next several steps will show you how to add (create) a new Multi-Claimant Group.
Select the appropriate Group Type toward the top right of the screen and then click the Add button.
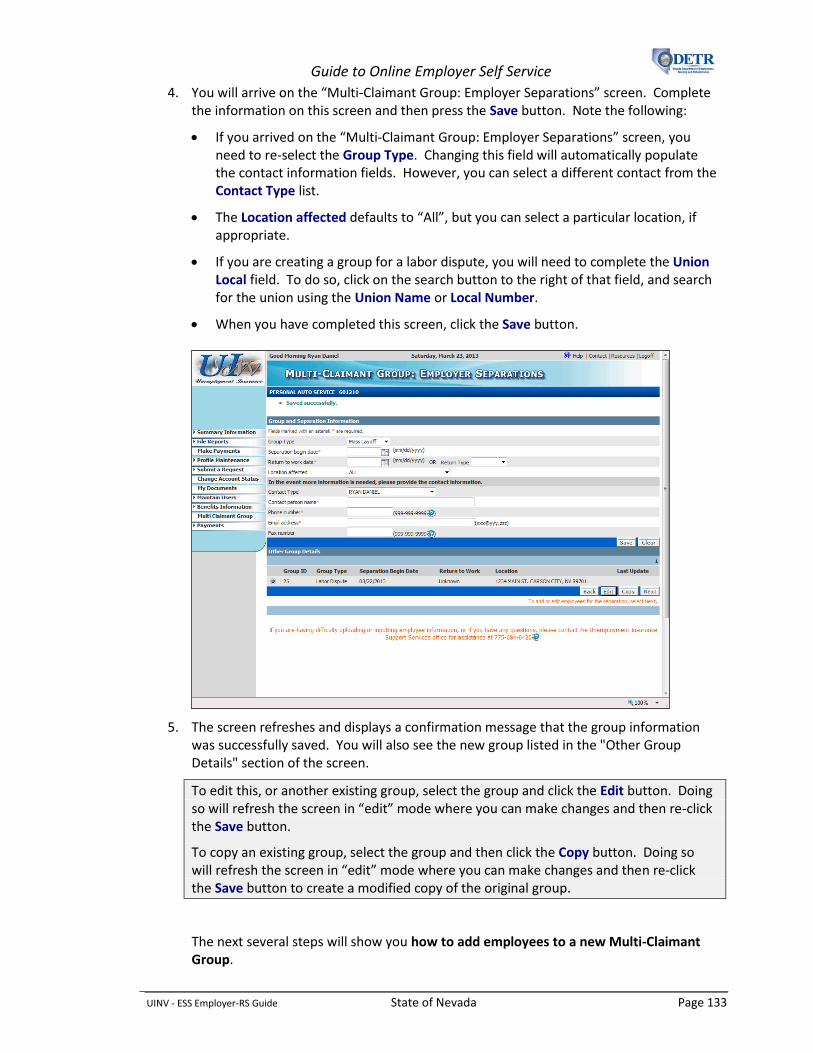
Guide to Online Employer Self Service
UINV - ESS Employer-RS Guide State of Nevada Page 133
4. You will arrive on the “Multi-Claimant Group: Employer Separations” screen. Complete the information on this screen and then press the Save button. Note the following:
If you arrived on the “Multi-Claimant Group: Employer Separations” screen, you need to re-select the Group Type. Changing this field will automatically populate the contact information fields. However, you can select a different contact from the Contact Type list.
The Location affected defaults to “All”, but you can select a particular location, if appropriate.
If you are creating a group for a labor dispute, you will need to complete the Union Local field. To do so, click on the search button to the right of that field, and search for the union using the Union Name or Local Number.
When you have completed this screen, click the Save button.
5. The screen refreshes and displays a confirmation message that the group information was successfully saved. You will also see the new group listed in the "Other Group Details" section of the screen.
To edit this, or another existing group, select the group and click the Edit button. Doing so will refresh the screen in “edit” mode where you can make changes and then re-click the Save button.
To copy an existing group, select the group and then click the Copy button. Doing so will refresh the screen in “edit” mode where you can make changes and then re-click the Save button to create a modified copy of the original group.
The next several steps will show you how to add employees to a new Multi-Claimant Group.

Guide to Online Employer Self Service
UINV - ESS Employer-RS Guide State of Nevada Page 134
Select the appropriate group from the “Other Group Details” section and then click the Next button.
6. You will arrive on the “Employee List” screen that you will use to add employees to this group. There are two ways to add employees to a group: (a) you can upload a file containing the employee list, or (b) you can manually add employees via an ESS screen. Be sure to read the instructions on the screen under the “Upload File” section, and also be sure to click the Help link (under the Upload button) to learn more about file formats, if you plan to upload a file.
The next several steps will show you how to add employees to the group.
To add employees using the upload process, you must first download the file template to your PC. Click the Download button and save the template to your PC in a location where you will be able to easily locate it.
Then open the file.

Guide to Online Employer Self Service
UINV - ESS Employer-RS Guide State of Nevada Page 135
7. The template is in .CSV file format and will open in an Excel window. It will display the employer account information and all employees listed for the employer account.
Review the employees already listed in the template and add additional employees, if necessary.
You must also enter the Worker Class field for each employee.
When you are done updating the file, save it to the desired location on your computer so you can easily locate it.

Guide to Online Employer Self Service
UINV - ESS Employer-RS Guide State of Nevada Page 136
8. After completing and saving the spreadsheet you are ready to locate the file on your computer and upload it into UInv.
Click the Upload button. Then browse for and select (“open”) the file.
When you return to the “Upload Separation File” screen, click the Upload button.
You will return to the “Employee List” screen, where you will see all the employees listed toward the bottom of the screen.
Once a list of employees has been associated to the group, you cannot use the upload functionality to modify the list. All modifications to the employee list records must be done using the "Employee List" screen, and manual entry and edit functionality.
To manually add an employee, enter their information in the fields toward the center of the “Employee List” screen and click the Save button.
See the orange note toward the bottom of the screen for information on how to contact the Unemployment Insurance Support Services office if you need assistance with uploading or inputting employee information.
9. Any manually added employees will be added to the list toward the bottom of the “Employee List” screen, along with any that were added via the file upload.
If desired, you can use the screen’s Edit and Delete buttons to update or delete employees.
If the list of employees is large, you can use the screen’s A-Z hyperlinks to search for employees’ names.
You can also use the Print button to print the employee list.
When you have finished entering all of the employee information and are ready to submit it, click the Finish button.

Guide to Online Employer Self Service
UINV - ESS Employer-RS Guide State of Nevada Page 137
10. If you created a Mass Layoff or Labor Dispute group, the system displays the "Mass Layoff: Confirmation" screen. If desired, you can print a copy of this information. Click the Home button to return to the home screen.

Guide to Online Employer Self Service
UINV - ESS Employer-RS Guide State of Nevada Page 138
11. The system displays the "Multi-Claimant Groups" home screen with the groups you have created displayed in the "Group Records" section.
If desired, you can select a group and click the Edit button to make changes to the group’s information.
If desired, you can select a group and click the Copy button to make a copy of the group, and then be able to change the group type or dates for the second group. (This can be helpful for an employer who has many layoffs or shutdowns during the year.)
If desired, you can select a group and click the View List button to see (and edit, if desired) the list of affected employees.
If desired, you can select a group and click the View History button to see a summary of changes that have been made to the group.

Guide to Online Employer Self Service
UINV - ESS Employer-RS Guide State of Nevada Page 139
Employer Claimant Fact Finding
Background
This topic describes functionality available in Employer Self Service (ESS) that allows employers, or their Reporting Service, to provide online dynamic fact finding for issues generated by an unemployment insurance claim. (Dynamic fact finding is an automated process by which the system asks specific questions to collect information needed to adjudicate a particular claim.)
When the system detects an employer issue that needs to be adjudicated for a claim, it creates dynamic fact finding to be collected from the employer. Fact finding will only be collected if the issue type has pre-defined fact finding associated with it, the issue has not yet been resolved, and the claim has not yet expired. A link notifying the employer of the need to complete fact finding for an issue will be displayed on their ESS “Employer Summary” screen.
More specifically, this topic describes the process used to:
Locate the Claimant Fact Finding link on the “Employer Summary” screen and on the navigation menu
Select a claimant for which to complete a fact finding
Complete the dynamic fact finding interview questions
Instructions
1. Log into ESS or navigate to your “Employer Summary” screen.

Guide to Online Employer Self Service
UINV - ESS Employer-RS Guide State of Nevada Page 140
2. If you have any outstanding claimant fact finding that needs to be completed, you will see a related link in the “Smart Links” section of the screen.
Click the Claimant Fact Finding link. (Alternatively, you can click the Benefits Information link from the left hand menu, and then click the Fact Finding link.)
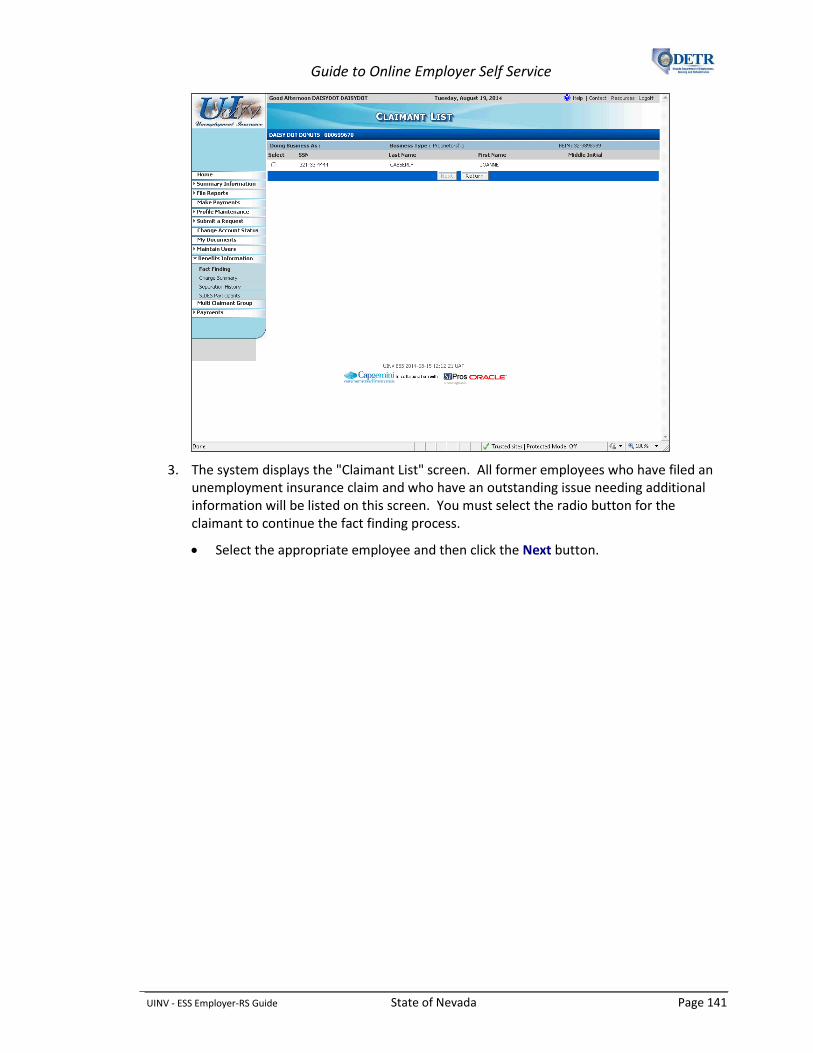
Guide to Online Employer Self Service
UINV - ESS Employer-RS Guide State of Nevada Page 141
3. The system displays the "Claimant List" screen. All former employees who have filed an unemployment insurance claim and who have an outstanding issue needing additional information will be listed on this screen. You must select the radio button for the claimant to continue the fact finding process.
Select the appropriate employee and then click the Next button.

Guide to Online Employer Self Service
UINV - ESS Employer-RS Guide State of Nevada Page 142
4. The system displays the "Issue List" screen, containing information for the claimant. Each issue needing fact finding will be listed separately and include the issue number, issue type, issue effective date, issue due date, and an indicator for outstanding fact finding.
Select an issue, and then click the Complete Fact Finding button.

Guide to Online Employer Self Service
UINV - ESS Employer-RS Guide State of Nevada Page 143
5. The system will next guide you through a series of screens (in the “Fact Finding Interview" window), presenting you with a series of questions specific to the particular issue.
Progress through the screens by completing each screen’s required fields, and then clicking the Submit button.
Continue progressing through the screens until you arrive on the “Fact Finding Interview” Summary screen.

Guide to Online Employer Self Service
UINV - ESS Employer-RS Guide State of Nevada Page 144
6. Review the questions and answers on the “Fact Finding Information” Summary screen.
If you need to make any changes, you can click the hyperlink for the specific question you wish to update. After making the updates, you will return to the summary page to review your answers.
If you want to exit the fact-finding without submitting your answers, click the Cancel button to return to the "Issue List" screen where you can restart the fact finding from where you left off.
If you are satisfied with all your answers, scroll to the bottom of the window and click the Submit button.
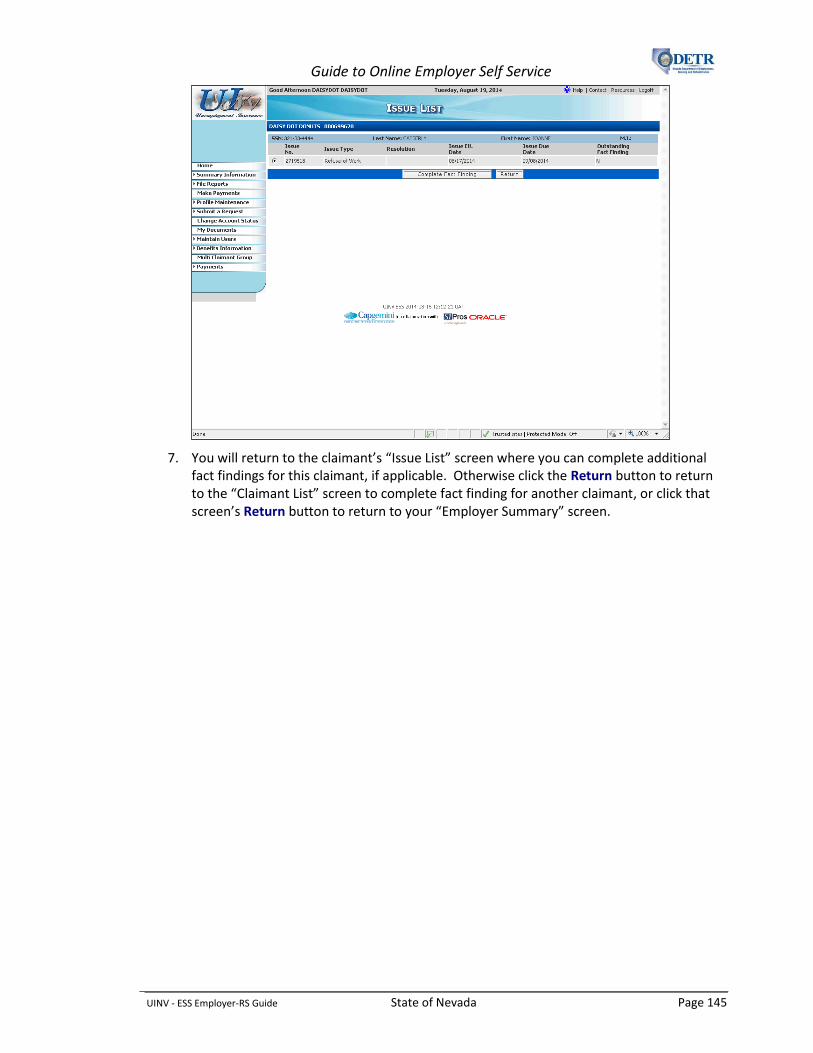
Guide to Online Employer Self Service
UINV - ESS Employer-RS Guide State of Nevada Page 145
7. You will return to the claimant’s “Issue List” screen where you can complete additional fact findings for this claimant, if applicable. Otherwise click the Return button to return to the “Claimant List” screen to complete fact finding for another claimant, or click that screen’s Return button to return to your “Employer Summary” screen.

Guide to Online Employer Self Service
UINV - ESS Employer-RS Guide State of Nevada Page 146
Other Benefits Information
Background
This topic describes the following two additional screens that provide Benefits-related information:
The “Benefits Charge Summary” screen
The “Employer Summary Separation History” screen
Instructions
1. The “Benefits Charge Summary” screen can be accessed by clicking the Benefits Information link from the left hand menu, and then clicking the Charge Summary link.
This screen will display the most recent six quarters of unemployment insurance benefit charges information. This information can be viewed in either the Summary or Detail format and can be filtered using the Quarter Begin/End Dates or SSN.
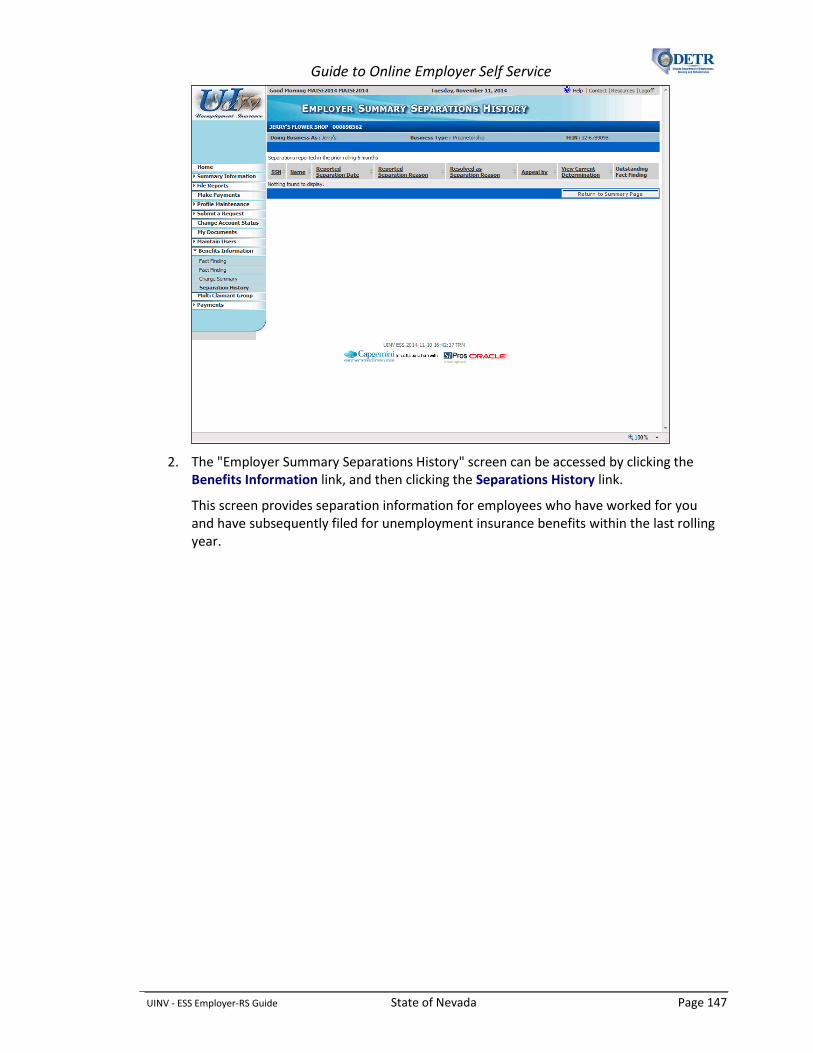
Guide to Online Employer Self Service
UINV - ESS Employer-RS Guide State of Nevada Page 147
2. The "Employer Summary Separations History" screen can be accessed by clicking the Benefits Information link, and then clicking the Separations History link.
This screen provides separation information for employees who have worked for you and have subsequently filed for unemployment insurance benefits within the last rolling year.

Guide to Online Employer Self Service
UINV - ESS Employer-RS Guide State of Nevada Page 148
Rptg Svc: Creating Your Initial Logon (Online User Account) for a Reporting Service
Background
A Reporting Service user needs an ESS logon (online user account) in order to access and manage their clients’ accounts. This topic will show a Reporting Service how to create their initial ESS logon, which includes creating their ESS username and password, providing other basic profile information, and creating their security profile.
Each Reporting Service user will need their own unique logon. The first logon ID you create for a Reporting Service will be assigned the "Administrator" authorization level to the Reporting Service account. The "Administrator" authorization level gives you full access to any page for your Reporting Service account and allows you to perform any ESS related functions for which the Reporting Service is authorized by its clients. Additional user logons for the Reporting Service account may be set up using the User Maintenance menu. User Maintenance is covered under a separate topic.
Note the following:
If the Reporting Service is already registered (as a Reporting Service) with DETR, during this process, you will be required to provide the SUTA number for at least one of your clients.
If the Reporting Service is not yet registered with DETR, you will need to complete the Reporting Service registration process after setting up your initial ESS Reporting Service user account (covered in the next topic).
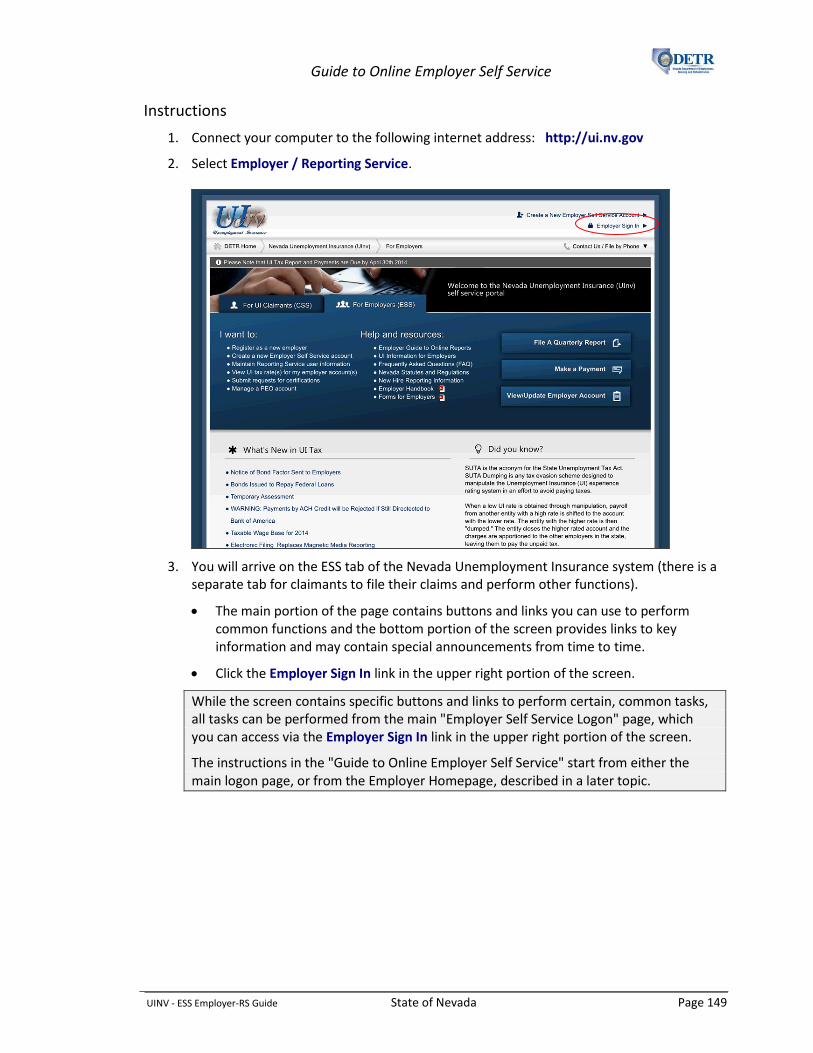
Guide to Online Employer Self Service
UINV - ESS Employer-RS Guide State of Nevada Page 149
Instructions
1. Connect your computer to the following internet address: http://ui.nv.gov
2. Select Employer / Reporting Service.
3. You will arrive on the ESS tab of the Nevada Unemployment Insurance system (there is a separate tab for claimants to file their claims and perform other functions).
The main portion of the page contains buttons and links you can use to perform common functions and the bottom portion of the screen provides links to key information and may contain special announcements from time to time.
Click the Employer Sign In link in the upper right portion of the screen.
While the screen contains specific buttons and links to perform certain, common tasks, all tasks can be performed from the main "Employer Self Service Logon" page, which you can access via the Employer Sign In link in the upper right portion of the screen.
The instructions in the "Guide to Online Employer Self Service" start from either the main logon page, or from the Employer Homepage, described in a later topic.

Guide to Online Employer Self Service
UINV - ESS Employer-RS Guide State of Nevada Page 150
4. You arrive on the “Employer Login” screen.
Be sure to read the “Important Information” section of the screen.
Click the Create New User Account link.
5. Read the “Website Terms of Use Agreement” and click the I Accept button.

Guide to Online Employer Self Service
UINV - ESS Employer-RS Guide State of Nevada Page 151
6. Click the Reporting Service button.
7. If you already have an existing Reporting Service account with DETR, click the Yes button. Otherwise click the No button.
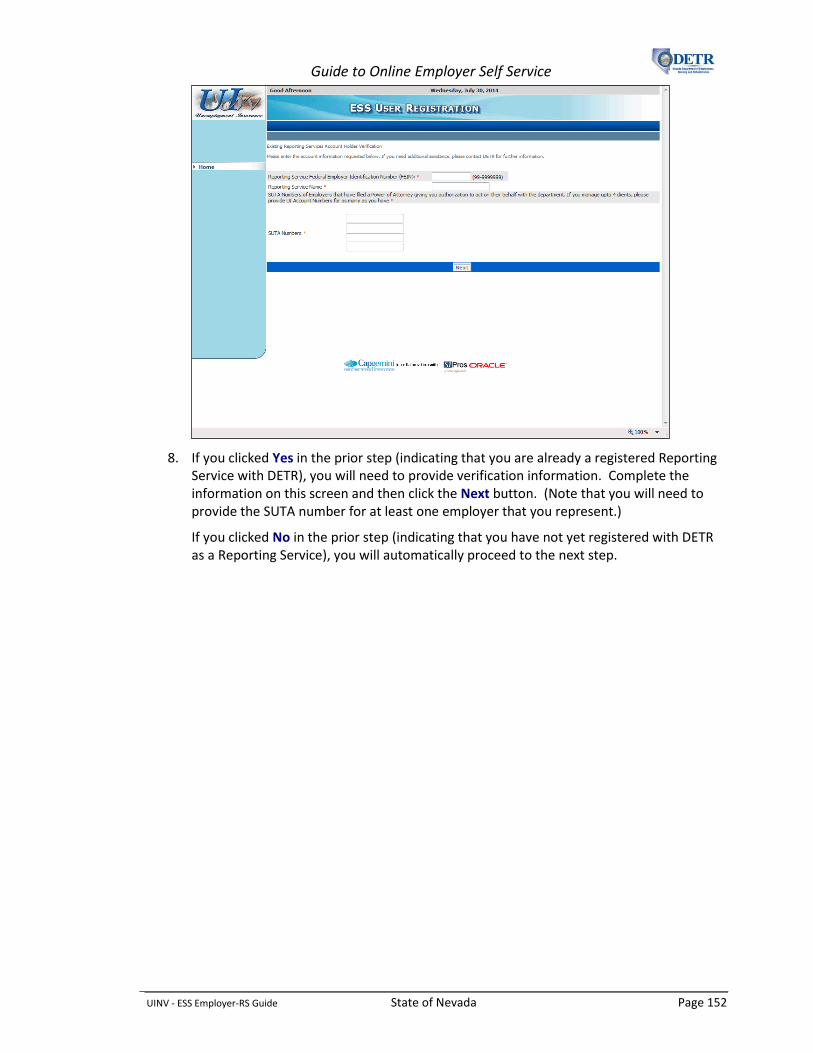
Guide to Online Employer Self Service
UINV - ESS Employer-RS Guide State of Nevada Page 152
8. If you clicked Yes in the prior step (indicating that you are already a registered Reporting Service with DETR), you will need to provide verification information. Complete the information on this screen and then click the Next button. (Note that you will need to provide the SUTA number for at least one employer that you represent.)
If you clicked No in the prior step (indicating that you have not yet registered with DETR as a Reporting Service), you will automatically proceed to the next step.

Guide to Online Employer Self Service
UINV - ESS Employer-RS Guide State of Nevada Page 153
9. Complete the information on the next “ESS User Registration” screen and click the Next button. (Be sure to follow the Username Rules and Password Rules listed on the right side of the screen when completing those fields.)
10. Review the information on the next screen and then click the Submit button (or click the Back button if you need to change any information).

Guide to Online Employer Self Service
UINV - ESS Employer-RS Guide State of Nevada Page 154
11. After your information has been accepted you will receive a message that your account has been created. (This may take a few moments to complete.) The next part of the process to create your online access is to create your security profile.
Select a different question for each of the three security questions, and type your answers in their respective boxes to the right.
Click the Submit button.

Guide to Online Employer Self Service
UINV - ESS Employer-RS Guide State of Nevada Page 155
12. You will see a brief message that your security profile has been successfully created, after which you will be automatically returned to the "Employer Login" screen. (If you are not automatically redirected to this screen, you will be provided a hyperlink to click).
Enter your Username and click the Continue button.
13. Enter your Password and click the Enter button.
14. Since this is your first time logging in, you will need to complete your security profile.

Guide to Online Employer Self Service
UINV - ESS Employer-RS Guide State of Nevada Page 156
Answer the security question and click the Enter button.

Guide to Online Employer Self Service
UINV - ESS Employer-RS Guide State of Nevada Page 157
15. The system generates a picture and a phrase for your “Security Device” (in the future, you should never enter your password unless you see this exact device).
If you wish to change your assigned image and phrase, you can click the link to obtain new ones. Otherwise, click the Continue button.
16. At this point, your online user account and security profile are set up.
If you are already registered as a Reporting Service with DETR, the system will display the "Select Employer" screen. This is your home screen and where you will begin your work when you login to your online user account. All employers for whom you have been assigned as an external authorized user will be listed on this screen. At that point, you can continue to use ESS, or click the Logoff link in the upper right.
If you have not yet registered as a Reporting Service with DETR, you will arrive on the "Agent Profile" screen. This is the first screen of a series of screens that you must complete to register with DETR as a Reporting Service. This process is covered in the next topic.

Guide to Online Employer Self Service
UINV - ESS Employer-RS Guide State of Nevada Page 158
Rptg Svc: Registering a New Reporting Service
Background
This topic will show a new Reporting Service (one that is not yet registered as a Reporting Service with DETR) how to register within the ESS system. A Reporting Service must first register with DETR through ESS in order for an employer to provide them access to their employer account or to be assigned as their correspondence agent.
During the registration process, the new Reporting Service will be prompted to provide such information as:
Business Name and Address
Federal Employer Identification Number (FEIN) for the Reporting Service
Contact Information
After completing the Reporting Service registration process, you will be assigned your unique Reporting Service Account Number.
This topic assumes the new Reporting Service has already created their online user account (described in the prior topic)

Guide to Online Employer Self Service
UINV - ESS Employer-RS Guide State of Nevada Page 159
Instructions
Note that if you are continuing with the Reporting Service registration process immediately after having created your ESS logon, you can skip directly to step 4.
1. Navigate to the “Employer Login” screen (connect to http://ui.nv.gov and click the Employer Sign In link).
2. Enter your Username and click the Continue button.

Guide to Online Employer Self Service
UINV - ESS Employer-RS Guide State of Nevada Page 160
3. Enter your Password and click the Enter button.

Guide to Online Employer Self Service
UINV - ESS Employer-RS Guide State of Nevada Page 161
4. Complete the information on the “Agent Profile” screen, and then click the Next button. Note the following:
The Email address you enter must be unique within the ESS system (each user is required to have their own individual email account.
Your Registrar Name is automatically assigned by the system and is the same as your account username.

Guide to Online Employer Self Service
UINV - ESS Employer-RS Guide State of Nevada Page 162
5. If an exact match is not found for your address, the system will display an “Address Search Result” pop-up box. Select the appropriate address and click the Select button.
Make sure that your browser is set to allow “pop-ups” so that you will be able to see the verification window.
After clicking Select, you will be returned to the “Agent Profile” screen where you should re-click the Next button.
6. The "Agent Registration Confirmation" screen is displayed with a message indicating that you have been successfully registered.
Notice you have been assigned your unique Reporting Service Account Number for your business. You should provide this account number, or your FEIN number, to your clients to assist them in adding your company as their "External User" or "Correspondence Agent". (These processes are covered under separate topics.)
A Print button is available if you would like to have a paper copy of this information for your records.
When you are ready to continue, click the Next button.

Guide to Online Employer Self Service
UINV - ESS Employer-RS Guide State of Nevada Page 163
7. You arrive on the “Reporting Service Locations” screen. Each Reporting Service must have at least one location associated with their account. These locations are used in the event that an employer chooses to select them as a correspondence agent for a particular type of correspondence (i.e., Benefits, Tax, or Appeals). Select a Contact Type and complete the fields on this screen.
You can select each of the contact types if appropriate for your Reporting Service (e.g., selecting "Tax" indicates that the employer can select you as an agent for their tax correspondence).
After completing the screen, click the Add & New button if you want to add another contact type/location. Otherwise, click the Next button.
If you received the “Address Search Results” pop-up window, select the appropriate address and click the Select button. Then re-click the Add & New or Next button on this “Reporting Service Locations” screen.
When you are done entering your locations, use the left hand navigation menu to move to another section of ESS.

Guide to Online Employer Self Service
UINV - ESS Employer-RS Guide State of Nevada Page 164
Rptg Svc: Maintaining ESS Users for Reporting Services
Background
In ESS, each Reporting Service has a user with "System Administrator" access (this will be the initial username that was created for the account). That user will have the ability to maintain (add, update, delete) the list of Reporting Service users having access to their clients' ESS accounts. As the Reporting Service account System Administrator, you provide each new user's information, including their authorization level (described later in this topic). Note that each user must have a unique email address within the ESS system.
This topic will show Reporting Service System Administrators for ESS how to add a new Reporting Service user.
Note the following:
In order to access an employer's account, the employer first needs to add the Reporting Service to their list of authorized external users.
When an employer grants a Reporting Service access to their employer account, they are granting access for all the users at the Reporting Service that have a logon.
Each Reporting Service user's security access level for each employer account is based on the lower level of security access granted by either (a) the employer, or (b) the level of access the Reporting Service System Administrator granted that particular user.
This topic assumes you have previously set up the initial logon for this Reporting Service ESS account.

Guide to Online Employer Self Service
UINV - ESS Employer-RS Guide State of Nevada Page 165
Instructions
1. Log into ESS or navigate to your “Select Employer” home screen.
2. Click the User Maintenance link. Then click the User Information link.

Guide to Online Employer Self Service
UINV - ESS Employer-RS Guide State of Nevada Page 166
3. The system displays the "User Maintenance" screen. Current users for this Reporting Service will be listed in the "Internal Account Users" section. The user who initially created the online account will always be listed but there may be multiple additional users listed for an account.
To add a new user to this account, click the Add button.

Guide to Online Employer Self Service
UINV - ESS Employer-RS Guide State of Nevada Page 167
4. Complete the "Add Internal User" screen for the user you wish to add.
Fields denoted by an orange asterisk (*) are required.
Each user’s email address must be unique within the system. If the user's email address has already been used the system will display a message asking you to enter another email address.
The Auth Level list provides you different authorization options to determine which types of information this user can update or which types of functions they can perform:
“Benefits Update” –Allows access only to benefits-related information (perform fact finding, maintain multi-claimant groups, and view charge summary and separation history).
“ESS Agent” – Provides all rights associated with a “Benefits Update” user, plus:
Access to tax-related information (access to the “Employer Summary” screen and its Smart Links, the ability to review individual summary screens such as the details and/or history of wage reports, contribution reports, liabilities, payments, rates, etc.)
The ability to perform key employer related transactions (ability to file/upload and amend contribution and wage reports, make/schedule payments, enter total and partial mergers and acquisitions, maintain PEO clients, submit requests for refunds and clearance certificates, change employer account status, etc.). This role cannot submit requests for federal certifications or payment agreements, can read but not make changes to key account info such as legal info, responsible parties, business addresses, contacts, etc., cannot view, edit, add, or delete internal or external employer ESS users.

Guide to Online Employer Self Service
UINV - ESS Employer-RS Guide State of Nevada Page 168
“Administrator”- A Reporting Service can have more than one “Administrator” level user who can add, edit, and delete individual Reporting Service users.
After completing this screen, click the Next button.
5. Verify the information displayed is correct, and click the Send New User Code button.
6. The system returns to the "User Maintenance" screen with a message indicating that the new user has been successfully added.

Guide to Online Employer Self Service
UINV - ESS Employer-RS Guide State of Nevada Page 169
An email has been automatically generated and sent to the user containing information on how to access ESS. The email will contain a link which the new user must click, enter the user code provided in the email, and then follow the instructions provided to complete their access to this account.
Notice that the newly created user information is listed in the "Internal Account User" section of the screen. (Note that the User Name field will not display until after the user has completed their online user access process.)
If desired, you can update a user’s information or access level by selecting the user, clicking the Edit button, updating the appropriate information on the "Edit Internal User" screen, and clicking that screen’s Update button.
Likewise, you can remove a user by selecting the user, clicking the Delete button, and then confirming the deletion.

Guide to Online Employer Self Service
UINV - ESS Employer-RS Guide State of Nevada Page 170
Rptg Svc: Updating Reporting Service ESS Profile Information
Background
Reporting Services can update their account profile information at any time through ESS. This includes the ability to update:
The name of the Reporting Service
The Federal Employer Identification Number (FEIN)
The contact name, address, and the email address associated with the contact for this Reporting Service
All changes made are reflected immediately on the Reporting Services account.
This topic will show a Reporting Service how to update their profile information.
Instructions
1. Log into ESS or navigate to your “Select Employer” home screen.
2. Click the Profile Maintenance link.

Guide to Online Employer Self Service
UINV - ESS Employer-RS Guide State of Nevada Page 171
3. You will arrive on the “Agent Profile” screen, where you can edit any of fields on this screen except the Registrar Name.
Make the desired updates and then click the Update button to save your changes.
You will receive a confirmation message toward the top of the screen indicating that the information was updated.
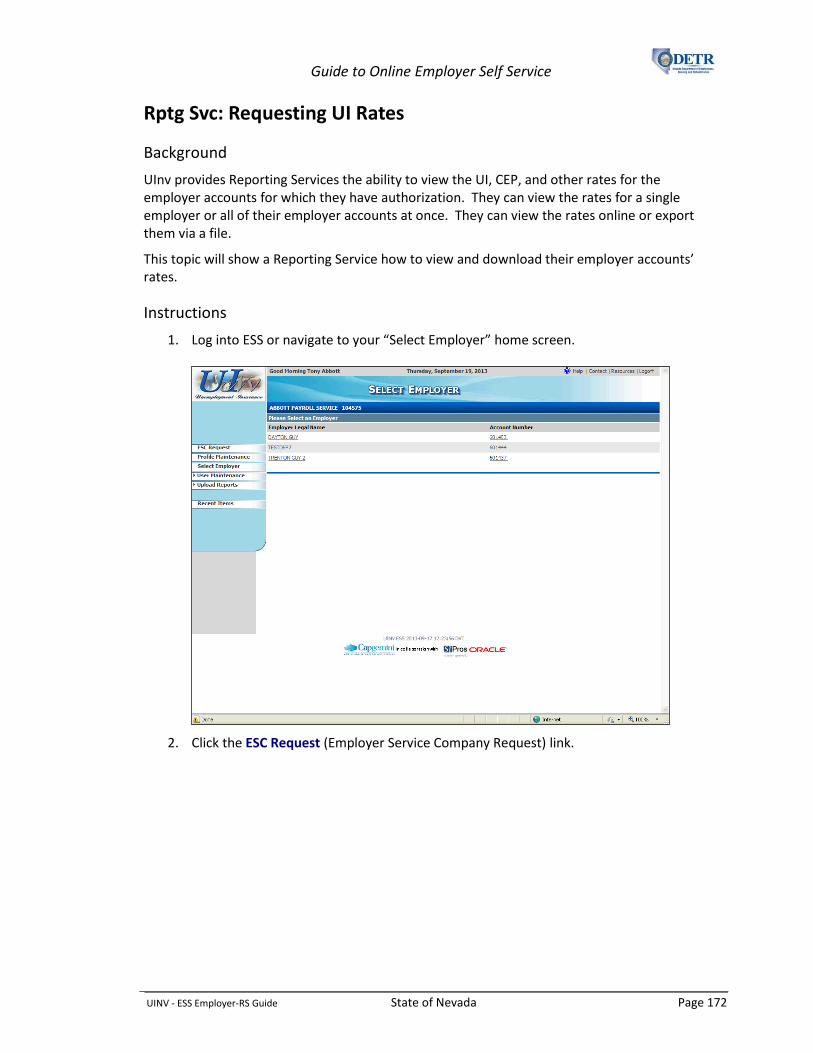
Guide to Online Employer Self Service
UINV - ESS Employer-RS Guide State of Nevada Page 172
Rptg Svc: Requesting UI Rates
Background
UInv provides Reporting Services the ability to view the UI, CEP, and other rates for the employer accounts for which they have authorization. They can view the rates for a single employer or all of their employer accounts at once. They can view the rates online or export them via a file.
This topic will show a Reporting Service how to view and download their employer accounts’ rates.
Instructions
1. Log into ESS or navigate to your “Select Employer” home screen.
2. Click the ESC Request (Employer Service Company Request) link.

Guide to Online Employer Self Service
UINV - ESS Employer-RS Guide State of Nevada Page 173
3. You arrive on the "Agent Client Rate Requests" screen. Determine the employer account(s) whose rates you would like to view.
You can choose to view the rates for a specific employer by entering their Name, FEIN, or account number (Emp Acct #), or view the rates for all your employers by leaving these fields blank.
Click the Search button to retrieve the rates.
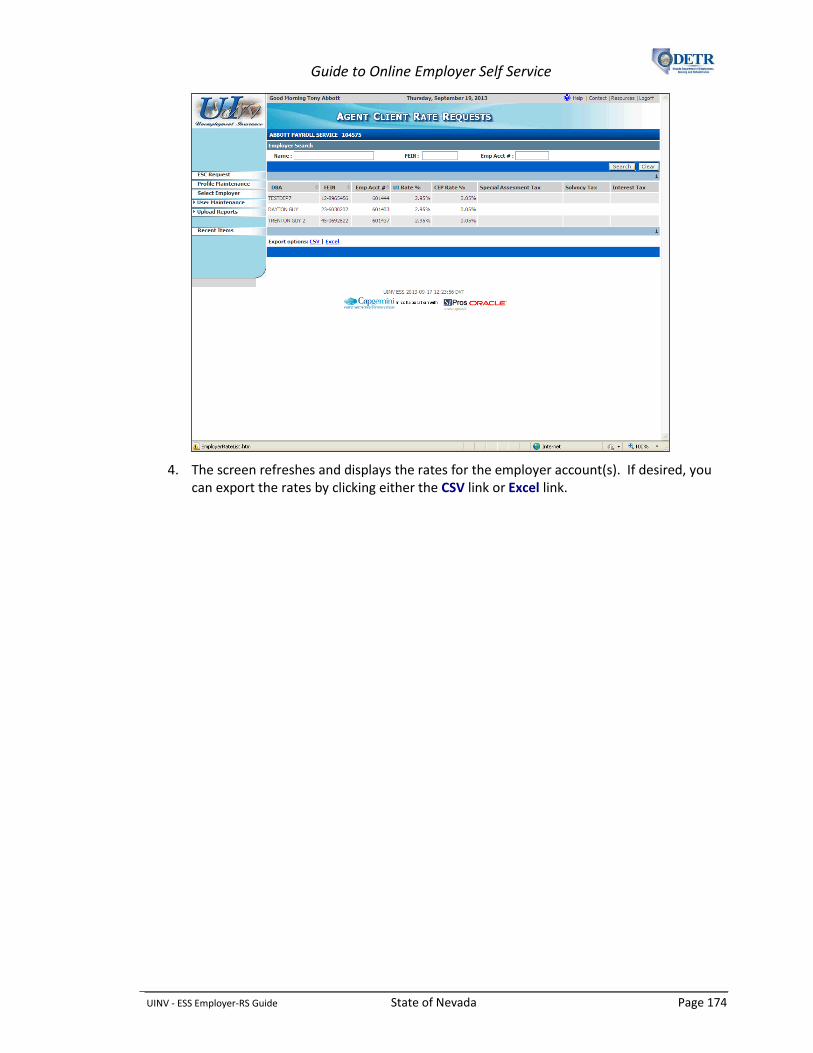
Guide to Online Employer Self Service
UINV - ESS Employer-RS Guide State of Nevada Page 174
4. The screen refreshes and displays the rates for the employer account(s). If desired, you can export the rates by clicking either the CSV link or Excel link.

Guide to Online Employer Self Service
UINV - ESS Employer-RS Guide State of Nevada Page 175
Rptg Svcs: Uploading Employer Reports
Background & Instructions
Reporting Services have the ability to upload quarterly Contribution and Wage reports for the employer accounts for which they have been granted authority. The process for doing so is the same as described in the “Uploading Employer Reports” topic, with the following exceptions:
The Reporting Service first selects the appropriate employer from their “Select Employer” home screen.
They then use the Upload Reports and Upload Status links from beneath the left hand menu’s Upload Reports link to access the appropriate screens.


