Step 1: IGT Site Preparation 12’ Site Location Several factors must be considered when choosing the site for your new In-Ground Trampoline (IGT) system. Since local soil and weather conditions vary greatly from region to region, it is recommended that a local landscape expert be consulted for placement of the system. A minimum of 12 feet of overhead clearance and 5 feet of clearance from the trampoline to other objects on the ground is recommended for the jumpers protection. Using impact-absorbing ground cover such as grass, sand or bark chips is recommended for 4-6 feet around the trampoline. Drainage Drainage is not a problem with our In-Ground Trampoline system. It is recommended to leave 2-4 inches of the trampoline above the final grade and gradually berming the soil up to the edge of the trampoline. This will keep water from flowing into the pit in the event of heavy rain. Depending on local soil conditions you may consider adding 4 to 6 inches of rock into the bottom of the pit, creating a sump effect to prevent standing water. You will need to excavate the center of the pit deeper at the same depth as the rock you intend to add. Extreme conditions may require additional drainage methods or the use of a sump pump. It is always a good idea to consult a local landscaper regarding local soil conditions and drainage for your area. The Pit The IGT system is designed to be installed partially or completely recessed in the ground. Either way, the pit will need to be excavated to a diameter of at least13 feet 4 inches. If the IGT system must be assembled in the pit due to size constraints of the yard, a 14 foot pit is recommended for easier access to assembly hardware. For a completely recessed system we recommend the excavation of the pit depth be 16-18 inches deep around the edges and 30 inches in the center. See below for Pit Dimensions. The system is a total of 20 inches tall so this allows for the trampoline to remain at least 2-4 inches above the grade as recommended in the Drainage section. For a partially recessed system, the dirt excavated from the pit can be used to build up the area around the installation. Excavating the pit to a depth of 8 inches leaves 12 inches of the system exposed. This method eliminates the need for removing excavated soil from the property.
Transcript
Step 1: IGT Site Preparation 12’ Site Location Several factors must be considered when choosing the site for your new In-Ground Trampoline (IGT) system. Since local soil and weather conditions vary greatly from region to region, it is recommended that a local landscape expert be consulted for placement of the system. A minimum of 12 feet of overhead clearance and 5 feet of clearance from the trampoline to other objects on the ground is recommended for the jumpers protection. Using impact-absorbing ground cover such as grass, sand or bark chips is recommended for 4-6 feet around the trampoline. Drainage Drainage is not a problem with our In-Ground Trampoline system. It is recommended to leave 2-4 inches of the trampoline above the final grade and gradually berming the soil up to the edge of the trampoline. This will keep water from flowing into the pit in the event of heavy rain. Depending on local soil conditions you may consider adding 4 to 6 inches of rock into the bottom of the pit, creating a sump effect to prevent standing water. You will need to excavate the center of the pit deeper at the same depth as the rock you intend to add. Extreme conditions may require additional drainage methods or the use of a sump pump. It is always a good idea to consult a local landscaper regarding local soil conditions and drainage for your area. The Pit The IGT system is designed to be installed partially or completely recessed in the ground. Either way, the pit will need to be excavated to a diameter of at least13 feet 4 inches. If the IGT system must be assembled in the pit due to size constraints of the yard, a 14 foot pit is recommended for easier access to assembly hardware. For a completely recessed system we recommend the excavation of the pit depth be 16-18 inches deep around the edges and 30 inches in the center. See below for Pit Dimensions. The system is a total of 20 inches tall so this allows for the trampoline to remain at least 2-4 inches above the grade as recommended in the Drainage section. For a partially recessed system, the dirt excavated from the pit can be used to build up the area around the installation. Excavating the pit to a depth of 8 inches leaves 12 inches of the system exposed. This method eliminates the need for removing excavated soil from the property.
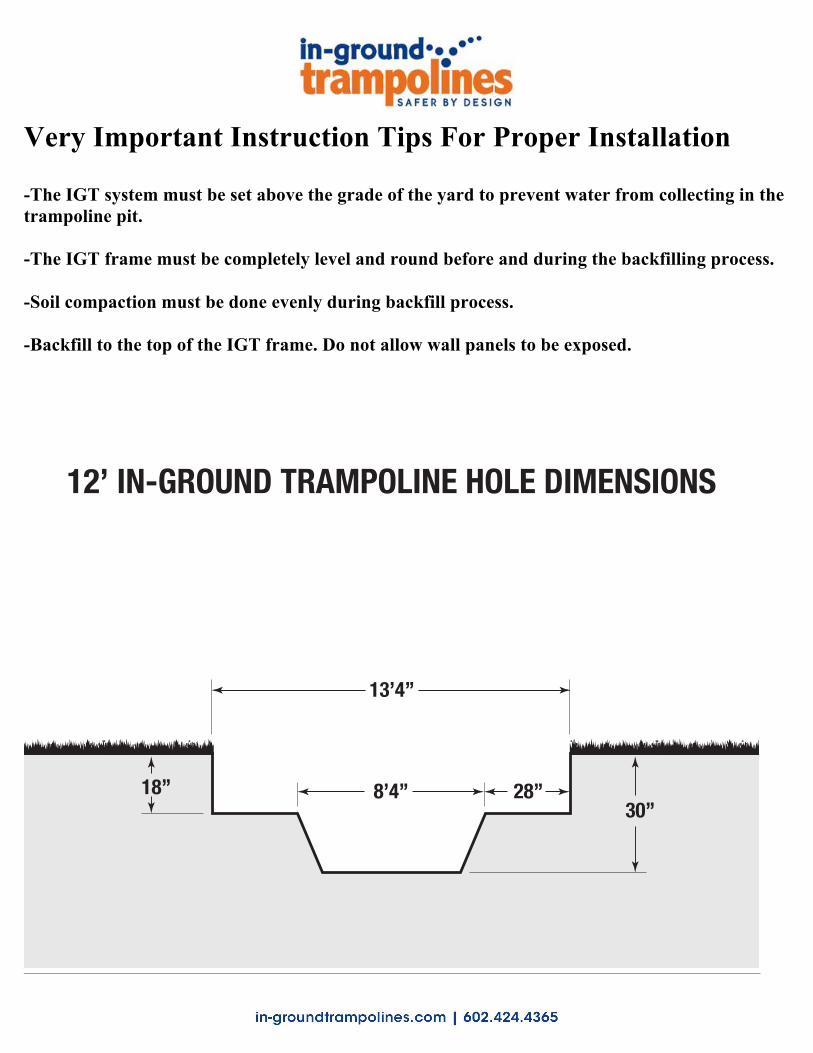
Very Important Instruction Tips For Proper Installation -The IGT system must be set above the grade of the yard to prevent water from collecting in the trampoline pit. -The IGT frame must be completely level and round before and during the backfilling process. -Soil compaction must be done evenly during backfill process. -Backfill to the top of the IGT frame. Do not allow wall panels to be exposed.
Details on Trampoline Installation Depth The IGT system is a total of 20 inches tall. Excavation to a depth of 16-18 inches will leave the frame 2-4 inches above the yard grade. This will keep water out of the IGT system. In order to have the trampoline appear to be flush in the yard, simply use excavated soil to create a berm up to the edge of the frame. See diagram.
Step 2: Lay Out Parts Parts list Quantity 12 Foot __________________________Description_________ 12 Top Frame Segments (with spring holes)
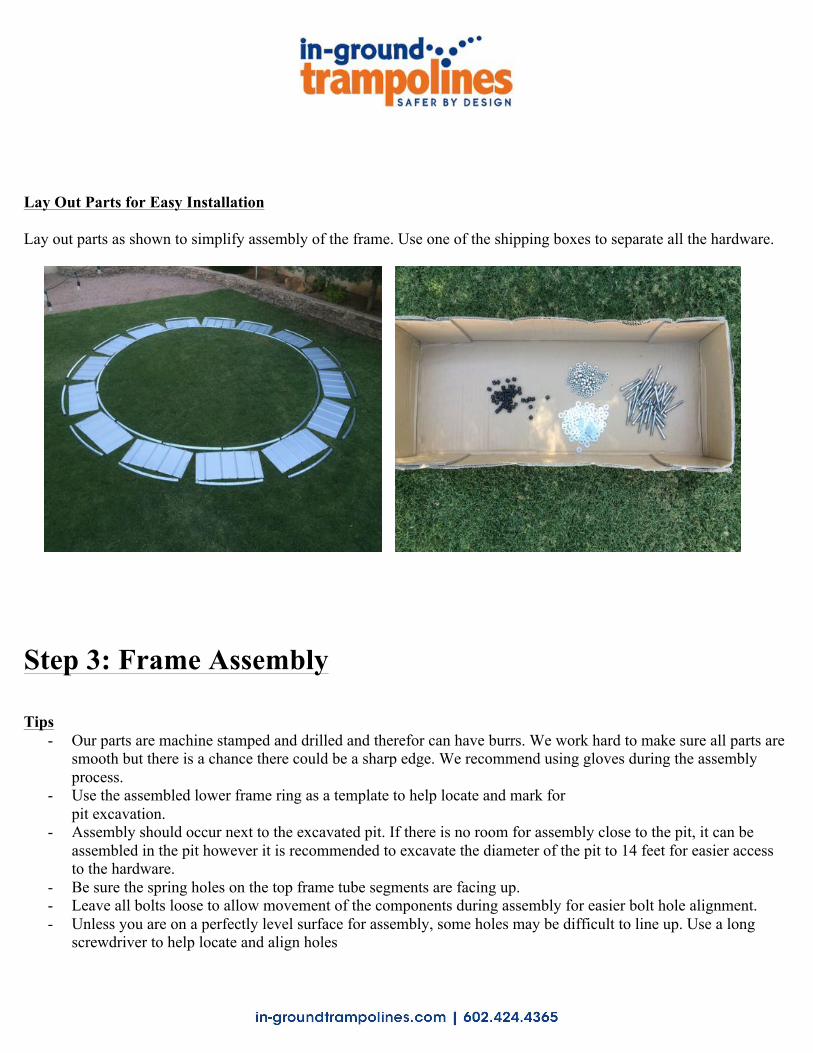
Lay out parts as shown to simplify assembly of the frame. Use one of the shipping boxes to separate all the hardware.
Step 3: Frame Assembly Tips
- Our parts are machine stamped and drilled and therefor can have burrs. We work hard to make sure all parts are smooth but there is a chance there could be a sharp edge. We recommend using gloves during the assembly process.
- Use the assembled lower frame ring as a template to help locate and mark for pit excavation.
- Assembly should occur next to the excavated pit. If there is no room for assembly close to the pit, it can be assembled in the pit however it is recommended to excavate the diameter of the pit to 14 feet for easier access to the hardware.
- Be sure the spring holes on the top frame tube segments are facing up. - Leave all bolts loose to allow movement of the components during assembly for easier bolt hole alignment. - Unless you are on a perfectly level surface for assembly, some holes may be difficult to line up. Use a long
screwdriver to help locate and align holes
Step A: Assemble lower frame ring section. Assemble lower ring (frame tubes without spring holes) using the 12 lower frame tube segments.
Step B: install rubber protective strips Locate the 12 black rubber protective strips and apply them to the top edge of each wall panel.
Step B: Join the wall panels to the lower frame. We recommend the assistance of a helper for this stage of the assembly, one person to hold the panels and another to install the hardware. Use the supplied “T” handled hex key to help push the bolts through the wall and frame. Using the center hole, attach one of the wall panels to the lower ring using a bolt with a washer on the wall side and a washer and locking nut on the tube side. Then add a second panel, overlapping the first panel and bolt that onto the lower ring. Add a third panel. Do not tighten the bolts at this time.
Step C: Join the upper frame segments to the wall panels. Join one of the upper frame segments (with spring holes) to any wall panel using a bolt and washer on the panel side and a nut and washer on the frame side. Continue adding upper frame segments and wall panels all the way around the bottom ring.
Step D: Complete the frame assembly. The final wall panel and upper segment installation may require lifting and/or shifting the frame. This is why the bolts should be left loose until the frame is completed. Be sure all edge protectors are properly seated then tighten the hardware. Place the protective plastic caps onto the top ring exposed bolt threads.
The Frame is now complete
Step 4: Position Frame Assembly into Pit Install The frame can now be placed into the excavated hole. The completed frame weighs 235 lbs. (12’) and will require 3 to 4 adults to position the frame into the pit. Do not force the frame into a pit that is not excavated to spec. This could cause the frame to take on an oblong shape. If the frame does not fit into the pit without touching the pit walls the frame must be removed and the pit must be reshaped to allow the frame to be placed into the pit without force. Be sure that the portion of the pit where the trampoline will be placed is completely flat and as level as possible. This will make final leveling much easier.
Level Frame and Check for Roundness
Very Important! A level and round frame is important for best performance and safe trampoline use. The best way to level the frame is with a laser level or transit. A string level can be used as well. We recommend you using at least 4 strings to get the frame as level as possible. Shims can be used under the edge of the frame to help level the trampoline until backfill process is compete. You can use scraps of wood, tile or bricks as shims. Small squares of plywood work great. It is critical that the frame is round. Measure the diameter at every other bolt to make sure it is as round as possible. Make sure there is no more that 1 ½ inches of variance. You can push and pull on the frame to adjust the shape.
Backfill and Compact Backfill the outside of the frame assembly using the excavated soil. It is not necessary to backfill the inside of the frame. Try to use loose dirt free of large clumps. It is critical to back fill evenly to avoid pushing the frame out of round. For best results add 6-8 inches of dirt all the way around the frame and compact. Check for roundness during the backfill process to make sure the frame stays good and true. Keep evenly adding layers of dirt and compacting until the dirt is flush with the top of the frame. The final landscape can be finished at this point if desired or later. It is important to have the final surface, whether it is grass or mulch etc, at the same level as the top of the frame. The wall panels should not be exposed. For a good flush look, you may need to start the backfill up to the edge of the frame from 2-3 feet away from the trampoline gradually sloping up from the existing yard grade up to the top of the frame.
Step 5: Install Jumping Surface Attach Every 4th Spring Start at any point attaching every 4th spring from the frame to the rings on the jump mat, skipping 3 holes on the frame and 3 rings on the mat. You can use another spring as a spring tool to help stretch the springs into place It is very important to attach springs in the correct pattern. Be sure the “D” ring on the jump mat is oriented properly.
NO!
Attach middle springs Attach the springs in the middle of the first round of springs
Attach all remaining springs Make sure the springs already attached are correct. There will be a frame hole and mat ring for each spring. After the pattern is confirmed correct, attach the rest of the springs to the frame and mat.
Step 6: Attach pad Edge protector Before installing pads, make sure the Edge Protector is properly in place Install pad It is important to make sure the pad is properly attached so that the springs and frame components are always covered. Correct bungee placement is critical to make sure the pad is centered properly on the frame. The Next Gen frame has gaps built into the wall panels that allow the bungees to be secured to the frame. Start at any of these gaps for the first attachment. The next attachment point will be 8 springs away where there will be another gap. See the diagram below. The red markers indicate where the pad bungees should be placed, just to the right of every other frame bolt.
Start with the pad folded on top of the IGT frame. Locate the small fabric strap loop on the bottom seam of the pad.
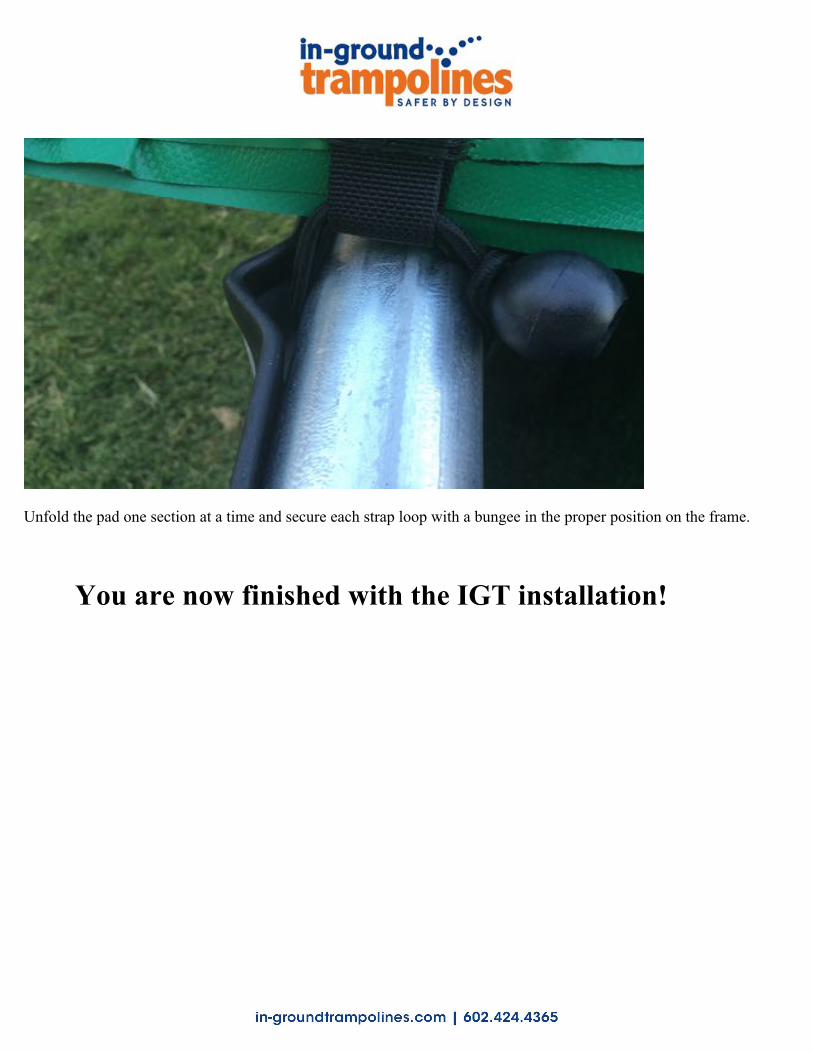
Slide one of the bungees through the loop from the inside to the outside. Push the bungee between the wall panel and the frame tube and wrap it around the frame tube and over the ball on the end of the bungee securing it in place.
Unfold the pad one section at a time and secure each strap loop with a bungee in the proper position on the frame.
Your new In-Ground trampoline will provide many years of fun and fitness but your system does need regular cleaning, inspection and occasional maintenance.
Failure to provide the care your system needs could affect the warranty. Please read the following recommendations for cleaning and maintenance.
Cleaning and Protecting
Regular cleaning and conditioning of the trampoline pad and mat will extend the looks and life of your IGT system. We recommend more frequent cleaning and conditioning if the IGT system is in contact with sprinkler systems. Use a mild soap and warm water to clean the pad and jump mat. Dish soap works well. We recommend using a soft brush to scrub off as much dirt as possible. Rinse with water and dry with a towel. We recommend using 303 Aerospace Protectant, a conditioner and UV protectant, on the pad and jump mat. Simply spay on and wipe off with a clean dry towel. Please refer to their website for additional details and locations where this product is sold. www.303products.com
Varying soil and hard water conditions in different areas can have an effect on how long the components will last.
Inspection and Maintenance A routine inspection of the trampoline components is essential to ensure your IGT system is safe to use. We recommend inspecting the condition of the springs, jump mat and pad. You should check for loose or missing springs, which can indicate worn out springs, or failing jump mat. Eventually the jump mats will wear out from use or UV and moisture exposure. It is important to check the jump mat “D” rings for corrosion and the “D” ring straps for fraying or tearing. Springs should be checked for corrosion and good tension. Pad should be checked to make sure the straps that hold the pad in place are tight so the pad doesn’t shift exposing the springs or frame. The pad will need to be replaced if the vinyl cover or the foam has deteriorated. Any component that is worn or broken should be replaced before continuing use of the trampoline. It is important to check the surface surrounding the IGT system. Over time, the soil or impact-absorbing surface surrounding the IGT system can settle exposing the top of the IGT frame. The surrounding surface should always be flush with the top of the frame.