Login Page A link is provided on this page allowing new users to register. Returning users can simply input their email address and password to enter the site. If you are a returning user and have forgotten your password, use the link provided to reset it. Click here for more detailed registration instructions Step 1: Register as a new user
Transcript
Login Page
A link is provided on this page allowing new users to register. Returning users can simply input their email address and password to enter the site.
If you are a returning user and have forgotten your password, use the link provided to reset it.
Click here for more detailed
registration instructions
Step 1: Register as a new user
Home Page
A compact navigation bar will help you find what you are looking for. The button corresponding to the current page will remain highlighted. The main content section of the Home Page provides quick access to common areas. Users can browse products, view the most recently placed orders or view the most accessed links of “Manage My Account.”
Step 2: Browse Products
You can either browse the catalog or select from the drop-down menu on the navigation bar
Product Menu
You can skip directly to any product at any time by using the left menu (below “Personalized Items”), which displays all categories. As you scroll over each category, you will see the products in a compact format with a preview included.
Product Catalog
Click “View All” for a list or thumbnail view of all store products.
Step 3: Select the item you wish
to order
Item Detail
Once you have selected a product, you will see the “Item Detail” screen. This allows you to view a larger image and select the quantity of items before customizing the product.
Step 4: Select quantity
Personalizing Items
Once a product has been selected, you will be directed to the “Personalize Your Item” screen. This screen also allows you to select shipping options and quantity. This screen includes personalization prompts with instant proofing. You have the option to zoom the image up to 200% or to view and save it as a PDF. Approve or cancel your selection in the lower right of the screen (below the proof).
Step 5: Personalize your item
Once finished, click Approve/Continue
Item Added to Basket
A popup screen will appear to notify you that the item has been added to your basket. From here, you can checkout, browse the catalog or add a duplicate item to your basket.
Step 6: Select the option of your preference
View Basket
The shopping cart includes a product thumbnail and the estimated delivery date, which will adjust according to the specified shipping location. Shipping and payment options are included in this section.
Step 7: Complete all required fields
on the checkout page
Step 8: Approve your order and
submit
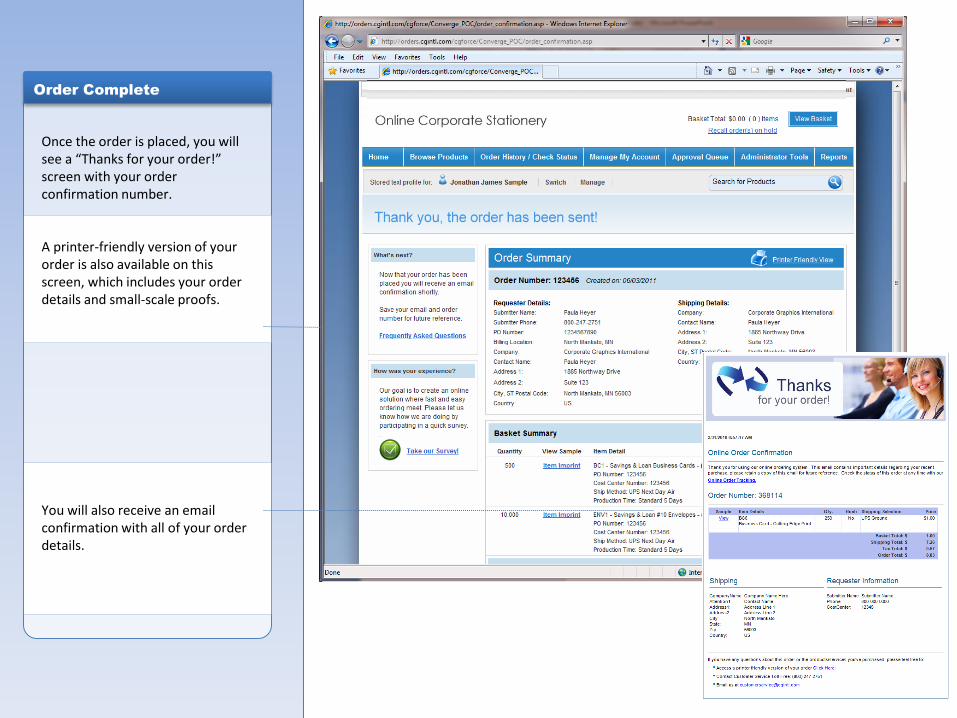
Order Complete
Once the order is placed, you will see a “Thanks for your order!” screen with your order confirmation number. A printer-friendly version of your order is also available on this screen, which includes your order details and small-scale proofs. You will also receive an email confirmation with all of your order details.
History / Tracking
Click on “Order History/Check Status” in the navigation bar to quickly view previous orders and to check the status of a recent order.
Manage My Account
Click on “Manage My Account” in the navigation bar to store imprint, requester and shipping information. You can also change your password. You may also set up sub-users which are managed by one administrator. See the following pages for details.
Manage My Account
Use “Stored Text” to save data to use on your imprint screens
Use “Requester Information” and “Shipping Locations” to store information to make your checkout faster
The profiles you create are accessible at any time
Manage My Account
Click 'Stored Text Prompts' to save imprint data for each of your user profiles so you don't have to retype it each time you place an order
To create a profile, simply click “+ Add New”
Thank You!
Each Converge™ web page includes a CGI Customer Service phone number at the top of the screen. Please call us if you have further questions.