Step 7: Calculate a Solution 1. Increase the Number of iterations to 1000. Solution Setup 2. Modify the parameters for the solver. (a) In the Solver setup panel, click Advanced defaults. The Advanced solver setup panel will open. Step 7: Calculate a Solution http://www.ualberta.ca/dept/chemeng/package/FluentCDs/airpak-doc/a... 5 از1 ﺻﻔﺤﻪ2010/01/22 07:49 ق.ظ
Transcript
Step 7: Calculate a Solution
1. Increase the Number of iterations to 1000.
Solution Setup
2. Modify the parameters for the solver.
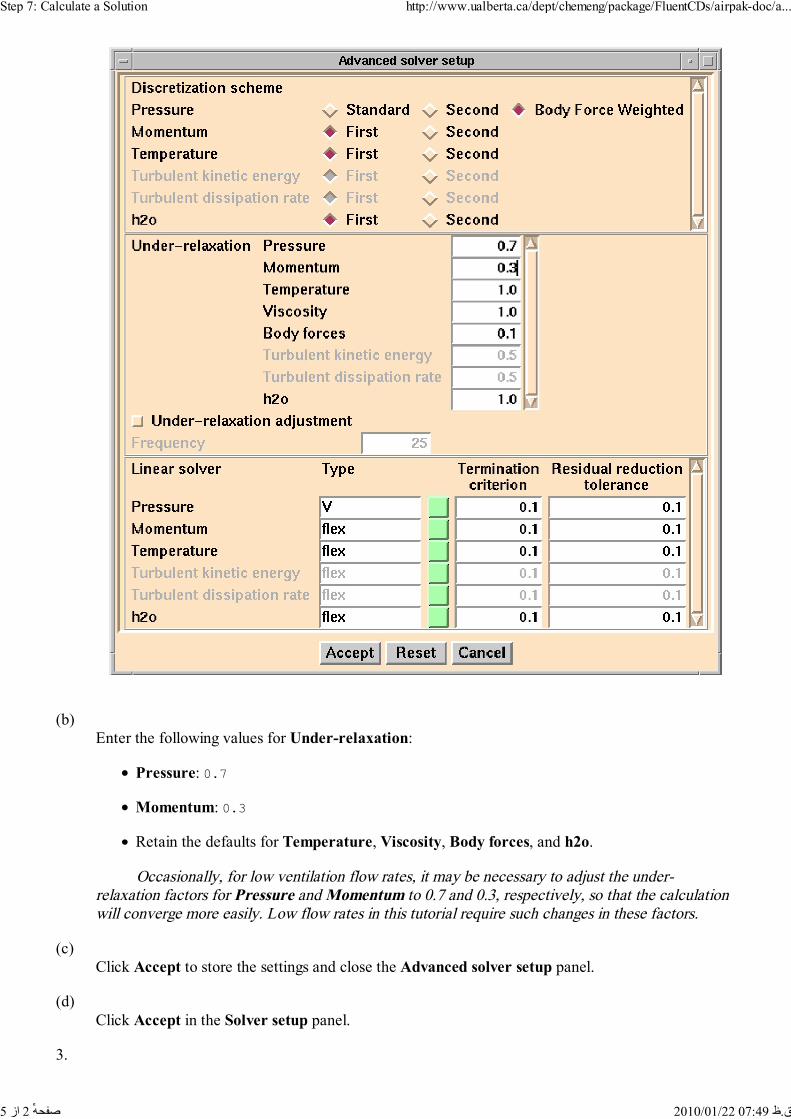
(a)In the Solver setup panel, click Advanced defaults.
The Advanced solver setup panel will open.
Step 7: Calculate a Solution http://www.ualberta.ca/dept/chemeng/package/FluentCDs/airpak-doc/a...
1 از 5 ق.ظ 07:49 2010/01/22 ٔصفحه
(b)Enter the following values for Under-relaxation:
Pressure: 0.7
Momentum: 0.3
Retain the defaults for Temperature, Viscosity, Body forces, and h2o.
Occasionally, for low ventilation flow rates, it may be necessary to adjust the under-relaxation factors for Pressure and Momentum to 0.7 and 0.3, respectively, so that the calculationwill converge more easily. Low flow rates in this tutorial require such changes in these factors.
(c)Click Accept to store the settings and close the Advanced solver setup panel.
(d)Click Accept in the Solver setup panel.
3.
Step 7: Calculate a Solution http://www.ualberta.ca/dept/chemeng/package/FluentCDs/airpak-doc/a...
2 از 5 ق.ظ 07:49 2010/01/22 ٔصفحه
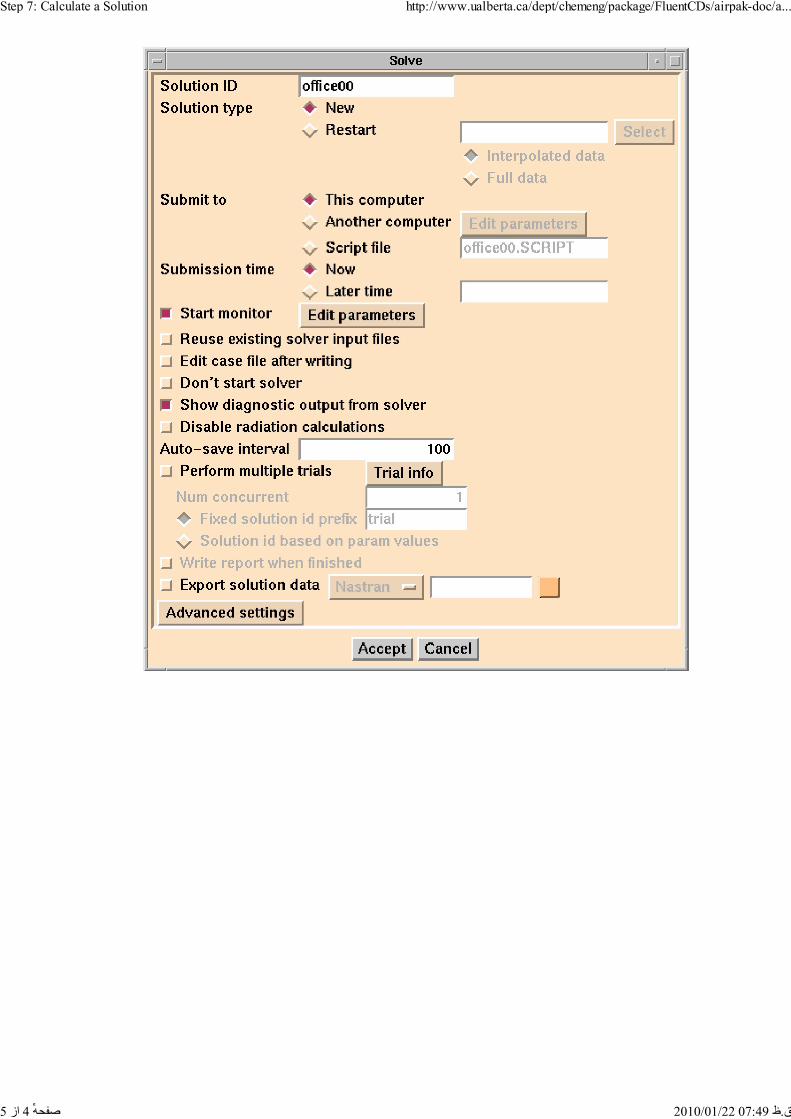
Start the calculation.
Solution Solve
(a)Keep the default settings in the Solve panel.
(b)Click Accept to start the solver.
Airpak will begin to calculate a solution for the model, and a separate window will openwhere the solver will print the numerical values of the residuals. Airpak will also open the Monitorgraphics display and control window, where it will display the convergence history for thecalculation.
If you do not want to wait for the calculation to finish, you can save time by reading in the resultsprovided in the tutorials directory and then following the instructions (in the next step of thistutorial) for examining the results. See the preface for details.
Upon completion of the calculation, your residual plot will look similar to Figure 1.5. Note that theactual values of the residuals may differ slightly on different machines, so your plot may not lookexactly the same as Figure 1.5. In the window where the residual values are printed, the calculationwill continue after the residual plot stops, as the equations for radiation and mean age of air aresolved.
Note: To get a more accurate solution, it may be necessary to continue the calculation until allresidual plots level off. You can do this by reducing the convergence criteria for the flow andenergy equations in the Solver setup panel and restarting the calculation. See the User's Guide fordetails about restarting the calculation from an existing solution.
Step 7: Calculate a Solution http://www.ualberta.ca/dept/chemeng/package/FluentCDs/airpak-doc/a...
3 از 5 ق.ظ 07:49 2010/01/22 ٔصفحه
Step 7: Calculate a Solution http://www.ualberta.ca/dept/chemeng/package/FluentCDs/airpak-doc/a...
4 از 5 ق.ظ 07:49 2010/01/22 ٔصفحه
Figure 1.5: Residuals
4. When the solution is completed, as in Figure 1.5, close the Monitor window by clicking Done.


![x (too small) E - PC\|MACimages.pcmac.org/SiSFiles/Schools/NC/OnslowCounty/...Calculate the [H+] for a 0.10 M acetic acid solution. Then calculate % ionization 1.8 x 10−5 = ionization](https://static.documents.pub/doc/80x56/5aae55f47f8b9a190d8c04e0/x-too-small-e-pc-the-h-for-a-010-m-acetic-acid-solution-then-calculate.jpg)


