Hydrostatic and Aquifer Pump Testing General Permit eNOI Step by Step Document Hydrostatic and Aquifer Pump Testing General Permit eNOI can be submitted using the Division of Water’s Online Application System. This document will guide you through the online submission process. Hydrostatic and Aquifer Pump Testing eNOI Step by Step 1 Go to the Division of Water’s Excavation Dewatering/Aquifer Pump Test General Permits homepage: http://dec.alaska.gov/water/wnpspc/stormwater/ edhsgp.html Select the APDES eNOI link under Of Interest. This will take you directly to the DEC’s Water Online Application System homepage.
Transcript
Hydrostatic and Aquifer Pump Testing General Permit eNOI Step by Step Document
Hydrostatic and Aquifer Pump Testing General Permit eNOI can be submitted using the Division of Water’s Online Application
System. This document will guide you through the online submission process.
Hydrostatic and Aquifer Pump Testing eNOI Step by Step
1 Go to the Division of Water’s Excavation Dewatering/Aquifer Pump Test General Permits homepage: http://dec.alaska.gov/water/wnpspc/stormwater/edhsgp.html
Select the APDES eNOI link under Of Interest.
This will take you directly to the DEC’s Water Online Application System homepage.
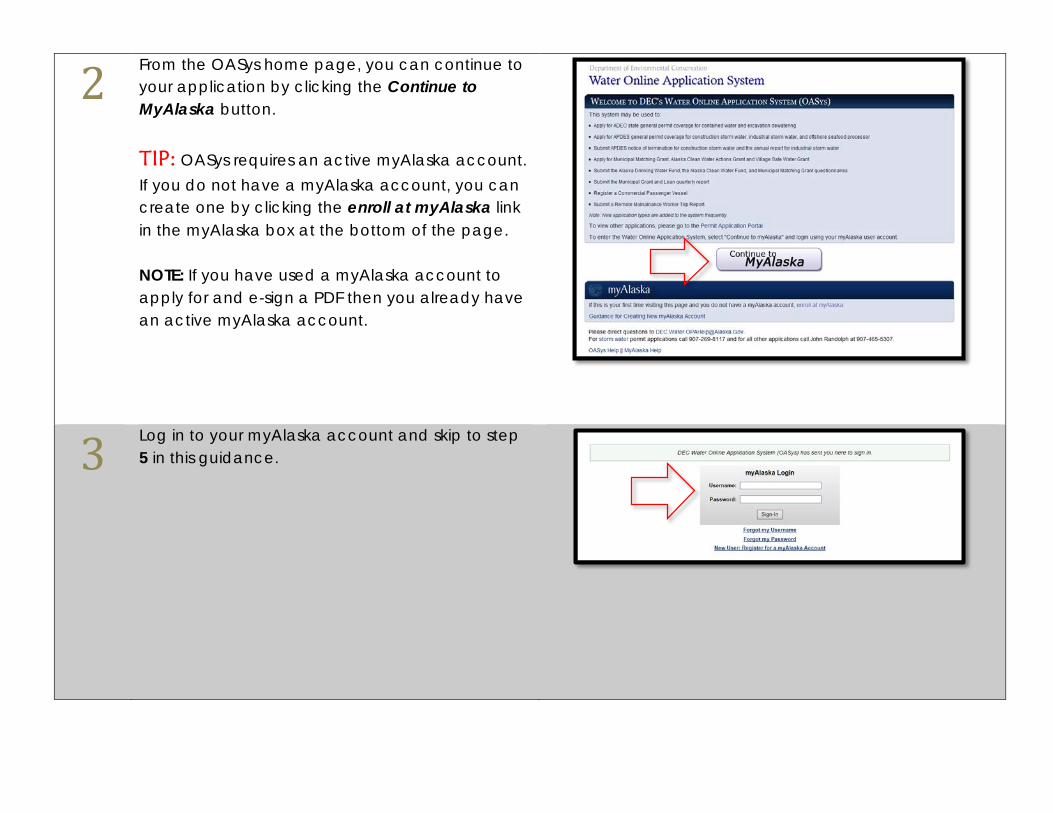
2 From the OASys home page, you can continue to your application by clicking the Continue to MyAlaska button.
TIP: OASys requires an active myAlaska account. If you do not have a myAlaska account, you can create one by clicking the enroll at myAlaska link in the myAlaska box at the bottom of the page. NOTE: If you have used a myAlaska account to apply for and e-sign a PDF then you already have an active myAlaska account.
3 Log in to your myAlaska account and skip to step 5 in this guidance.
4 If you don’t have a myAlaska account, select the enroll at myAlaska link. You only need to create a myAlaska account once.
Guidance for creating a new myAlaska account is available at:
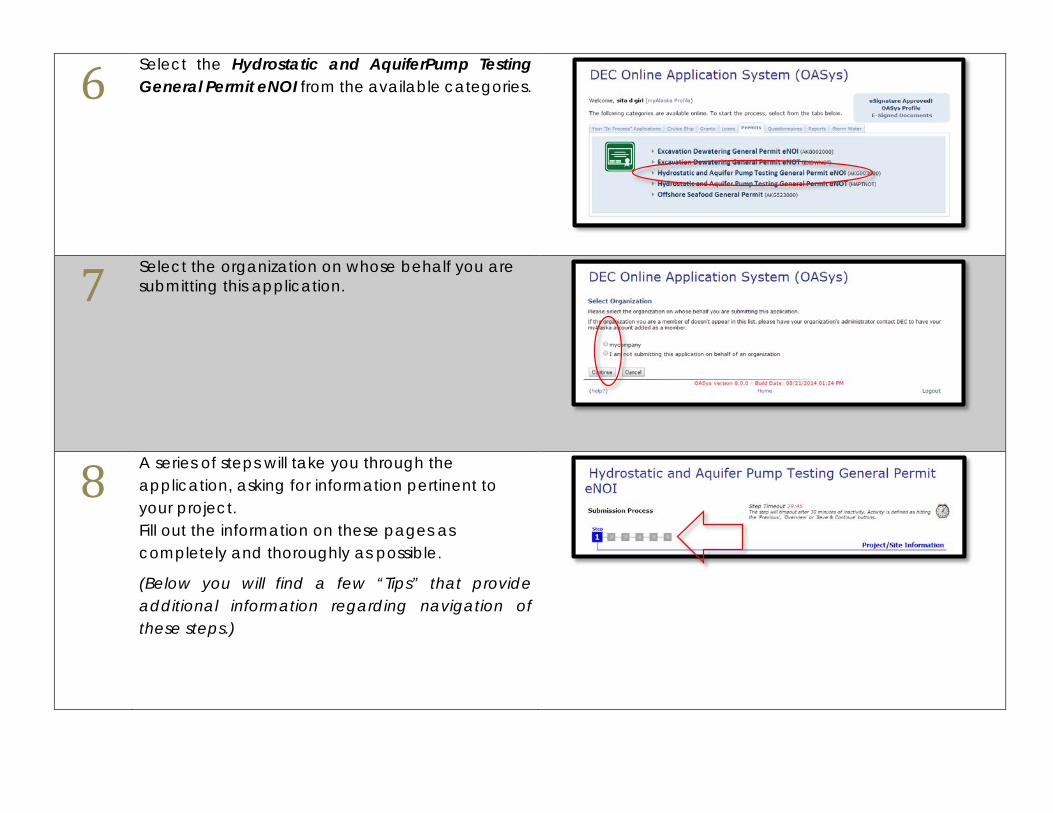
6 Select the Hydrostatic and AquiferPump Testing General Permit eNOI from the available categories.
7 Select the organization on whose behalf you are submitting this application.
8 A series of steps will take you through the application, asking for information pertinent to your project. Fill out the information on these pages as completely and thoroughly as possible.
(Below you will find a few “Tips” that provide additional information regarding navigation of these steps.)
T I P
The step numbers at the top of the page can be used to navigate directly to pages that have already been completed.
T I P
Any question with a red star ( ) next to it is required and must be completed before the current step can be completed.
T I P
When finished with a step, go to the next page by selecting the Save & Continue button in the lower right corner. NOTE: At any time, you can logout, and your information will be saved, however changes to the current page are not saved until you hit Save & Continue.
T I P
At any time, you can also select the Overview button at the bottom of any page to go to the overview step (last step). This step allows you to review your information from all steps and to edit previously entered information.
*
T I P
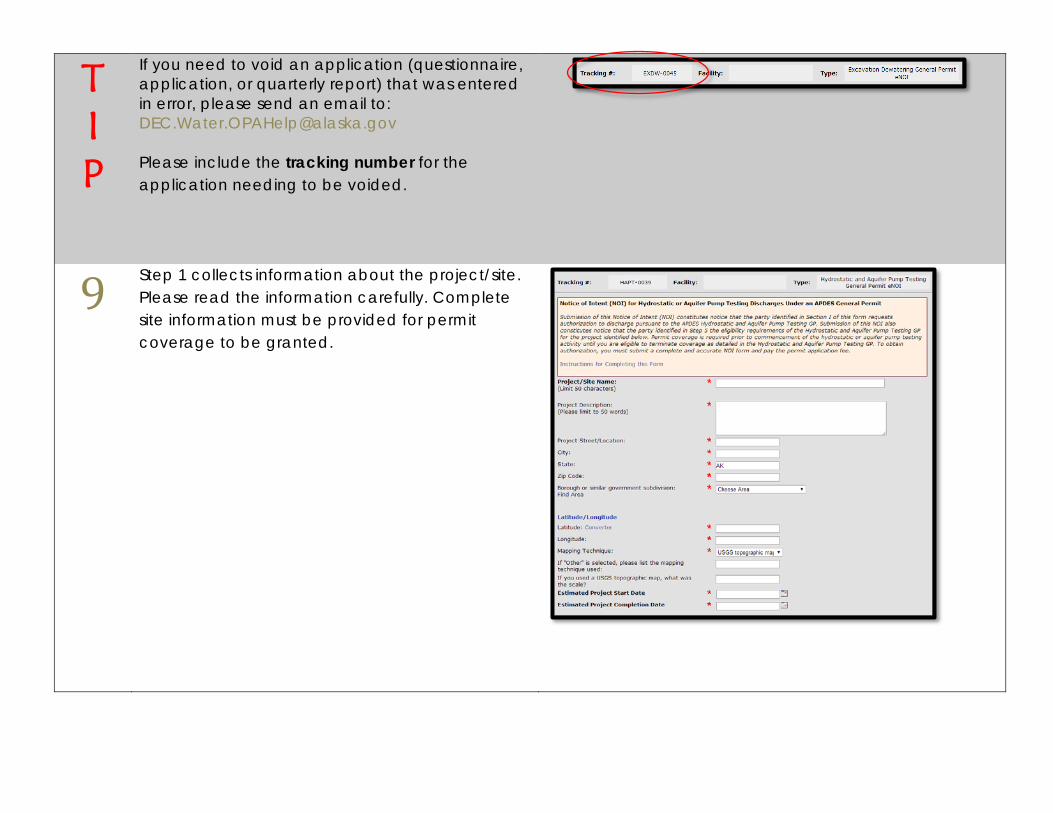
If you need to void an application (questionnaire, application, or quarterly report) that was entered in error, please send an email to: [email protected] Please include the tracking number for the application needing to be voided.
9 Step 1 collects information about the project/site. Please read the information carefully. Complete site information must be provided for permit coverage to be granted.
10 Step 2 will collect discharge information for the project.
11 Step 3 collects information about your Best Management Practices (BMPs).
12 Step 4 will allow you to electronically submit any supporting documents. If you don't supply the required documents here, you will need to send them in later. Use the Choose File button to select a file from your local system. Then, complete the attachment type, title and description fields before clicking the Attach button to add the file to your application attachment list. While the upload is in progress, clicking on any button will cancel the upload. If you would like to remove the file from your application, select it in the list and click the Remove button. NOTE: File size limit is 20MB for each attachment.
13 Step 5 will allow you to enter contacts that fulfill different roles. Click the Add button.
14 A new window will open where you can enter all of your contact details. All contacts that are marked as required must have a contact that fulfills that role. Click Save. NOTE: You may enter multiple contacts and a single contact may fulfill multiple roles. Simply check all applicable roles for each contact.
15
Step 6, the Application Overview page (last step), gives you an opportunity to review and edit the information that you have entered so far.
To change any information in a section, select the Edit button that corresponds to that section.
16
After all information is entered and you have finished adding all online attachments, you will need to submit your application.
NOTE: A check will appear next to Complete Steps if the application is complete and ready to be signed.
To go the Final Steps page, select the Sign link under tasks on the Application Overview page. You can also click on the Continue button at the bottom of the page.
17
The Final Steps page presents the options for signing and paying for your application.
To sign you application, you may:
Sign using an e-Signature (Continue to step 18 of this guide)
Print and sign a hard-copy (Skip to step 21 of this guide)
Invite another party to sign your application (Skip to step 26 of this guide)
To pay for your application, you may either:
Pay by credit card or electronic funds transfer (Skip to step 24 of this guide)
Invite another party to pay for your application (Skip to step 26 of this guide)
18
Select Sign this Application Using e-Signature if you are already validated to electronically sign an application. NOTE: If you have used a myAlaska account to apply for and e-sign a PDF then you are already automatically validated.
19
Check the box indicating that you agree with the Signing Agreement. To complete the signing process, click on the E-Sign in myAlaska button to continue to the Signing Ceremony.
20
Enter your password and the answer to your secret question into the respective fields and click the Sign and Submit button. (Skip to step 24 in this guidance.)
21
Select Print, Sign and Submit a Hard-Copy Signature Page to print a hard-copy version of the application signature page.
22
This page explains the steps for printing and submitting a hard-copy signature page. Click on Print the Official Signature Page link. WARNING: Printing your official signature page will lock your application and you will not be able to make any additional changes.
23
Once printed, sign and date the signature page in the Certification Information section. Then mail, fax or email all pages of the Signature Page to the address shown at the top of the page. Your signature page will typically be processed within a few days of being received and your eNOI will then be “signed”.
24
To pay for your application, select Pay for this Application. (If you will be inviting another party to pay for or sign this application skip to step 26 of this guidance.)
25
You will be taken to the Payment Summary page. From here, you can choose to pay via credit card or an electronic funds transfer from a checking or savings bank account.
Follow the on-screen instructions, you will be taken back to your application. (Skip to step 31 of this guidance.)
26
If you require another party to sign or pay for your application, select the Invite another party to Sign and/or Pay for this Application from the Final Steps Page.
27
Depending on whether you are inviting another party to sign, pay, or both, select from the available options: Payer, Signer, or Signer and Payer. Then enter the email of your alternative signer/payer into the input field and click the
button to add that contact to the e-mail list.
TIP: You can enter multiple emails in this step. Simply enter each additional contact as described above, pressing the button after each contact. Click the Continue button and an email will be sent to each of your invited alternates.
WARNING: You must click the button to add the e-mail to the displayed list of alternates before clicking the Continue button or else they won’t receive an e-mail.
28
An instructional email containing a link to this application is sent to the alternate signer/payer allowing them to complete the final steps in the application process. NOTE: The alternate signer/payer will need to have a myAlaska account.
29
After clicking on the link provided in the email, the alternate signer/payer will login to OASys and enter the Tracking Number and PIN which is also provided in the email.
30
The alternate signer/payer will be taken to the Final Steps page, giving them the opportunity to e-sign (if validated) or print, sign and submit a hard-copy signature page for your Grant Application.
31
Once the signature and payment steps are complete, an acknowledgment email will be sent to the NOI Preparer’s myAlaska account email address. IMPORTANT: Attached to this email is the PDF of the completed ExDW NOI form.
32
When you return to the eNOI, the Application Overview will display all tasks as completed.
33
Highlighted Feature #1:You now have the ability to make a change to a questionnaire you have already submitted.
To make a change to a previously submitted questionnaire, open your original submittal and select the Create Modification button at the bottom of the questionnaire overview page.
34
Highlighted Feature #2:The Copy to New button allows you to create a new questionnaire of the same type that pre-populates with information from a previous questionnaire.
To copy previously submitted information, open your original submittal and select Copy to New at the bottom of the questionnaire overview page.
For assistance with the online process, please contact the Division of Water at