20
Step-by-Step Guide for Masking Files on Mount Points Version 2.0 By Serge De La Sablonniere
Step-by-Step Guide for Masking Files on Mount Points Version 2.0
By Serge De La Sablonniere
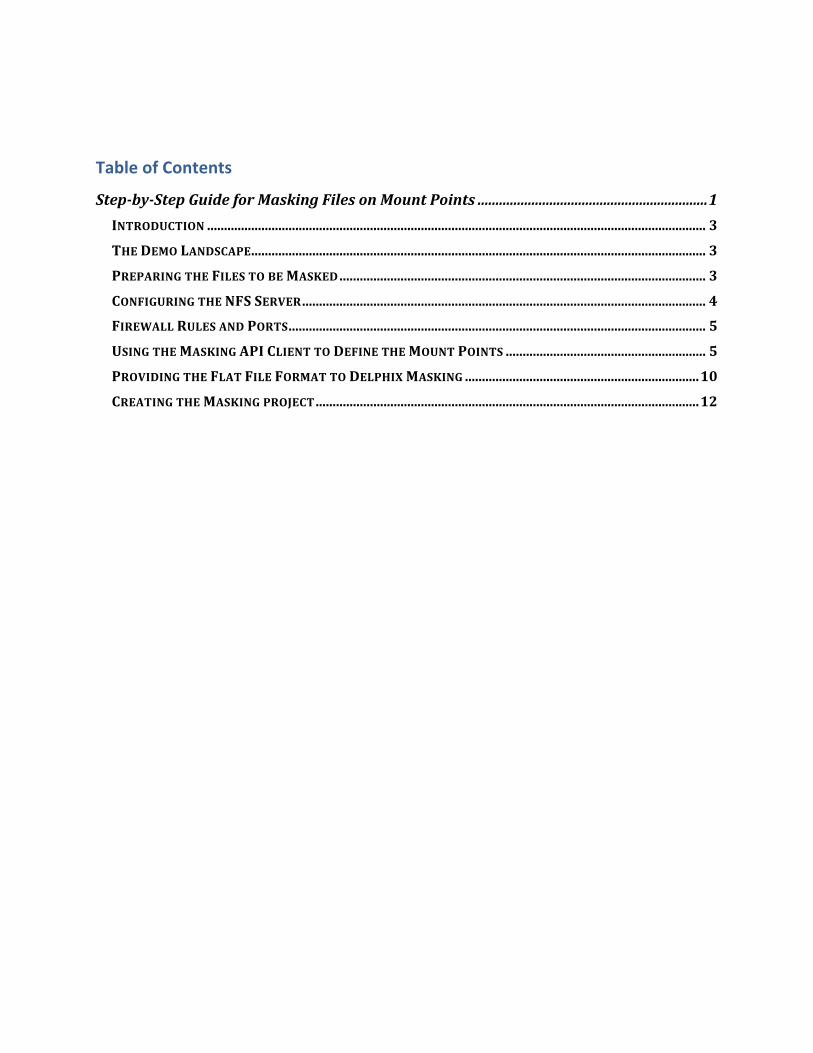
Table of Contents
Step-by-StepGuideforMaskingFilesonMountPoints................................................................1INTRODUCTION...................................................................................................................................................3THEDEMOLANDSCAPE......................................................................................................................................3PREPARINGTHEFILESTOBEMASKED............................................................................................................3CONFIGURINGTHENFSSERVER.......................................................................................................................4FIREWALLRULESANDPORTS...........................................................................................................................5USINGTHEMASKINGAPICLIENTTODEFINETHEMOUNTPOINTS...........................................................5PROVIDINGTHEFLATFILEFORMATTODELPHIXMASKING.....................................................................10CREATINGTHEMASKINGPROJECT.................................................................................................................12

INTRODUCTION In earlier versions of Delphix Masking, the only way to mask files was via FTP/SFTP. Starting with Delphix Masking 6.0, we enable users to directly mount and mask files over NFS & CIFS. This should dramatically simplify the process of file masking. For example, it will be possible to mask files on AWS through mounting S3 buckets. This guide provides a visual aid to the steps needed to create a masking project for files residing in a shared NFS mount. Please note that this guide is not intended to replace formal training. Please consult the Delphix Masking documentation and knowledge base to get the most up to date information about our product. Delphix also have eLearning available on Masking (please consult your local Delphix contact for more information) Delphix Masking Documentation: https://maskingdocs.delphix.com/ Delphix Masking Knowledge Base: https://support.delphix.com/Delphix_Masking_Engine
THE DEMO LANDSCAPE You will need the following components: Component IP Address in my demo FYI Delphix Masking Engine 6.0 172.16.55.129 Linux Server 172.16.55.190
PREPARING THE FILES TO BE MASKED In this demo, we will put some files that we need to mask in a folder. We will then export this folder as an NFS share so that the masking engine can connect to it via NFS. Capture the IP address of your Linux server (you’ll need it later)

Create a new directory structure that will contain the source files and the destination target directory that will hold the results of our masked files.
Create some files to mask and place them in the newly created “Source_Files” directory. In my demo, I will create 2 csv files delimited with “|”. In a later step, we will define the file structure so that our masking engine can understand the field mappings.
CONFIGURING THE NFS SERVER My Linux demo server is built on CentOS 7. Good instructions for setting up NFS for this OS can be found here: https://www.howtoforge.com/tutorial/setting-up-an-nfs-server-and-client-on-centos-7/. There are the steps I took for my demo server: Install the NFS server packages
Enable and start the NFS server service

Edit the file /etc/exports and add the directory to be shared as an NFS export. The IP address we add will limit the share to be only visible accessible from the masking engine. You will also need the userid and groupid associated with the directory you created. In my case the user is delphix (userid 1000) and the group is delphix (groupid 1000)
Whenever you update the file /etc/exports, you have run
That should do it for the configuration steps needed on the Linux server…Now let’s move on to the Delphix Masking Engine.
FIREWALL RULES AND PORTS Before heading to your masking engine, make sure you don’t have any firewall rules or closed ports that would prevent communication between the Masking Engine and the NFS server. For Linux, Port 111 (TCP and UDP) and 2049 (TCP and UDP) are used for the NFS server.
USING THE MASKING API CLIENT TO DEFINE THE MOUNT POINTS In the previous steps, we created a Linux NFS export share ‘/home/delphix/Masking_Demo_Files”. We will now provide to the Masking Engine the information it needs in order to register & connect to this NFS share. For Delphix Masking version 6.0 we can use the Masking API Client to accomplish this. Additional reading material: https://maskingdocs.delphix.com/Connecting_Data/Managing_Remote_Mounts/#mount-information Access the Delphix Masking API Client

Initiate the login of the API client to the masking engine. Click login
You can click on the Example Value box to pre-fill the login connection box (it’s the box with the white background). Enter the username and password to connect to your masking engine. Click the Try it out button.
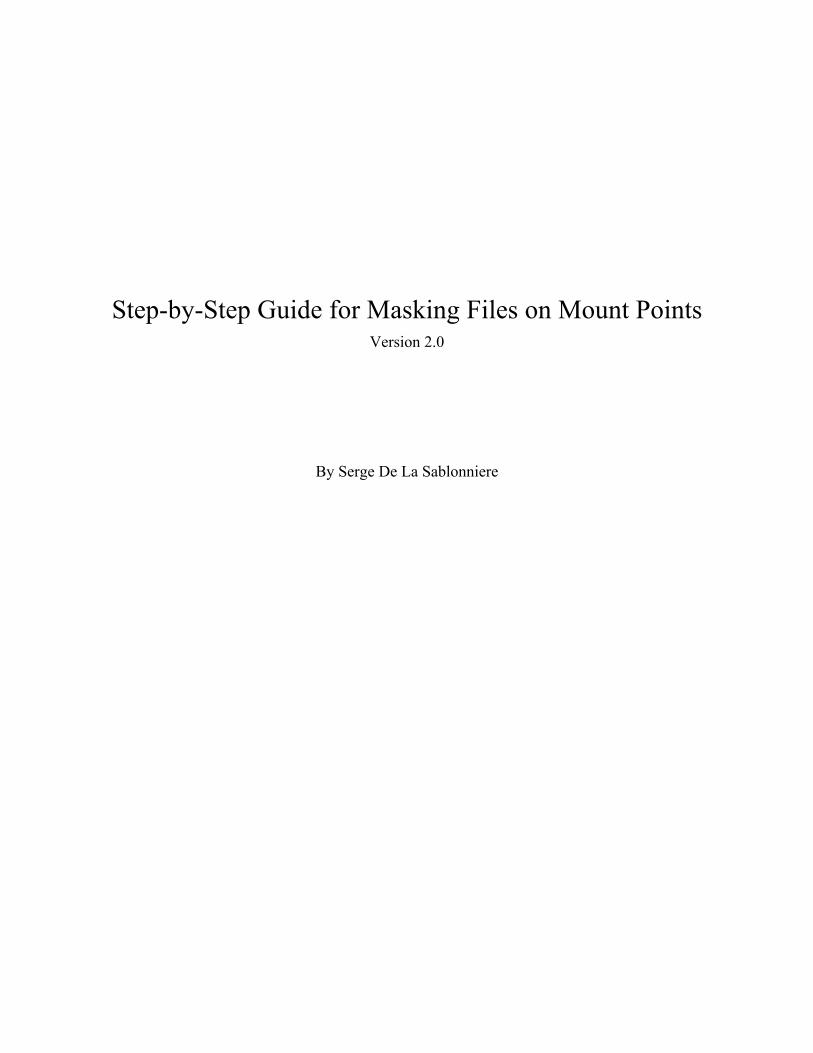
You should observe a Response Code of 200 (the API call succeeded). Copy the Authorization key as you will need it in the next step.
Create a Session with the masking engine using the Authorization Key from the previous step. Enter the key and click the Authorize button.
Next step is to register the NFS Mount Point into the Masking Engine.
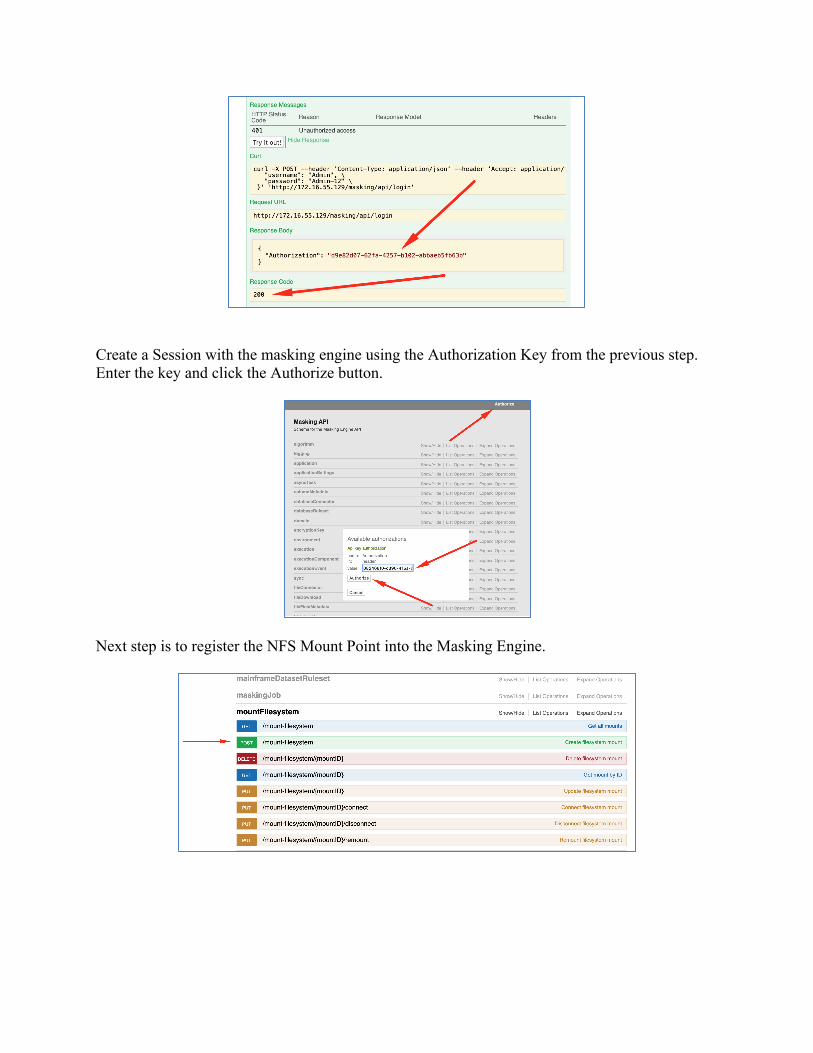
Enter the body payload and click the Try it out button. mountName: That is the name of mount point you will see in Delphix Masking hostAddress: The IP of the location of the NFS Server (in my case the Linux box) type: I use NFS3 (other options available here, consult the documentation) options: leave empty connectOnStartup: true (if the Masking Engine reboots, it will try to reconnect)
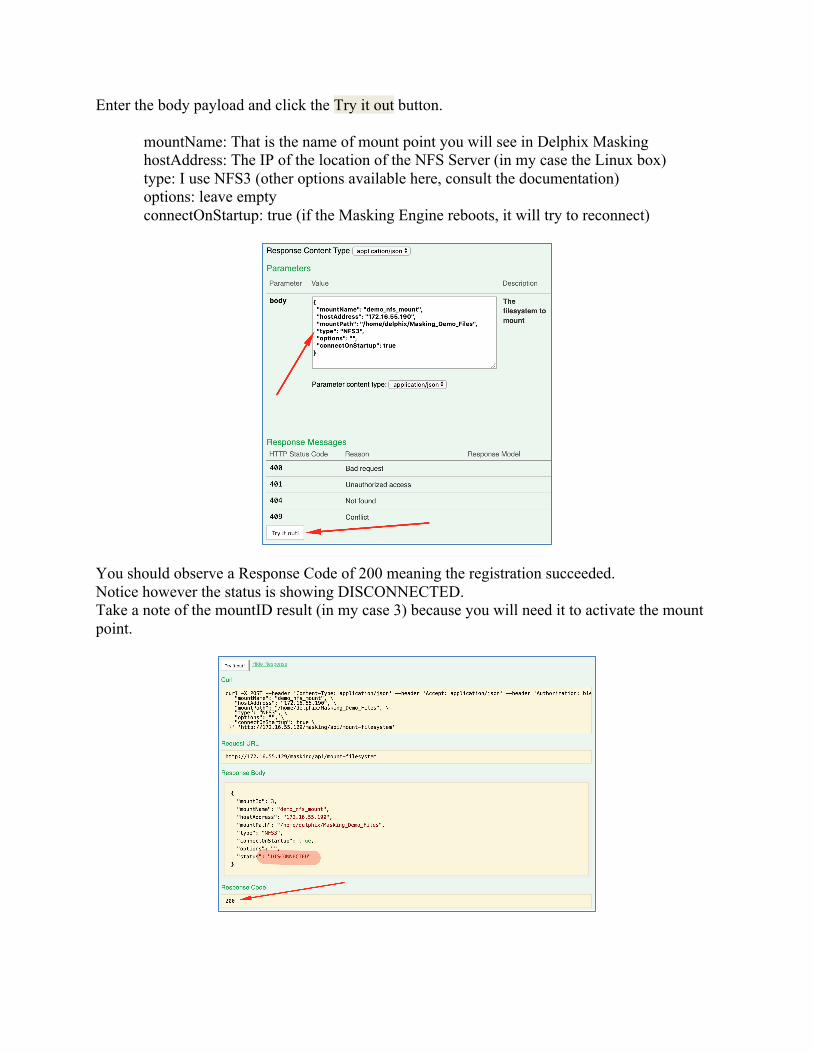
You should observe a Response Code of 200 meaning the registration succeeded. Notice however the status is showing DISCONNECTED. Take a note of the mountID result (in my case 3) because you will need it to activate the mount point.
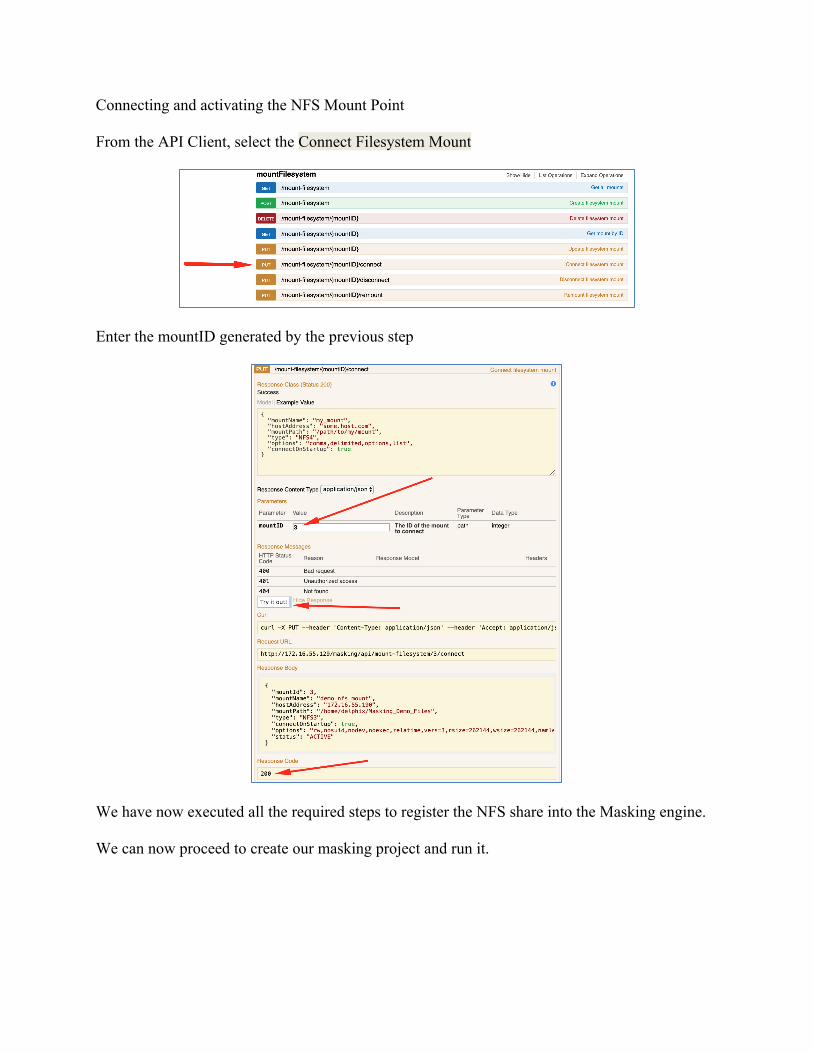
Connecting and activating the NFS Mount Point From the API Client, select the Connect Filesystem Mount
Enter the mountID generated by the previous step
We have now executed all the required steps to register the NFS share into the Masking engine. We can now proceed to create our masking project and run it.

PROVIDING THE FLAT FILE FORMAT TO DELPHIX MASKING Remember the files we created earlier… We need to define the structure to Delphix Masking. It’s very easy to do.
Create a file containing the name of the fields in the delimited flat file (you can create this file on your local desktop)
Connect to the Masking Engine
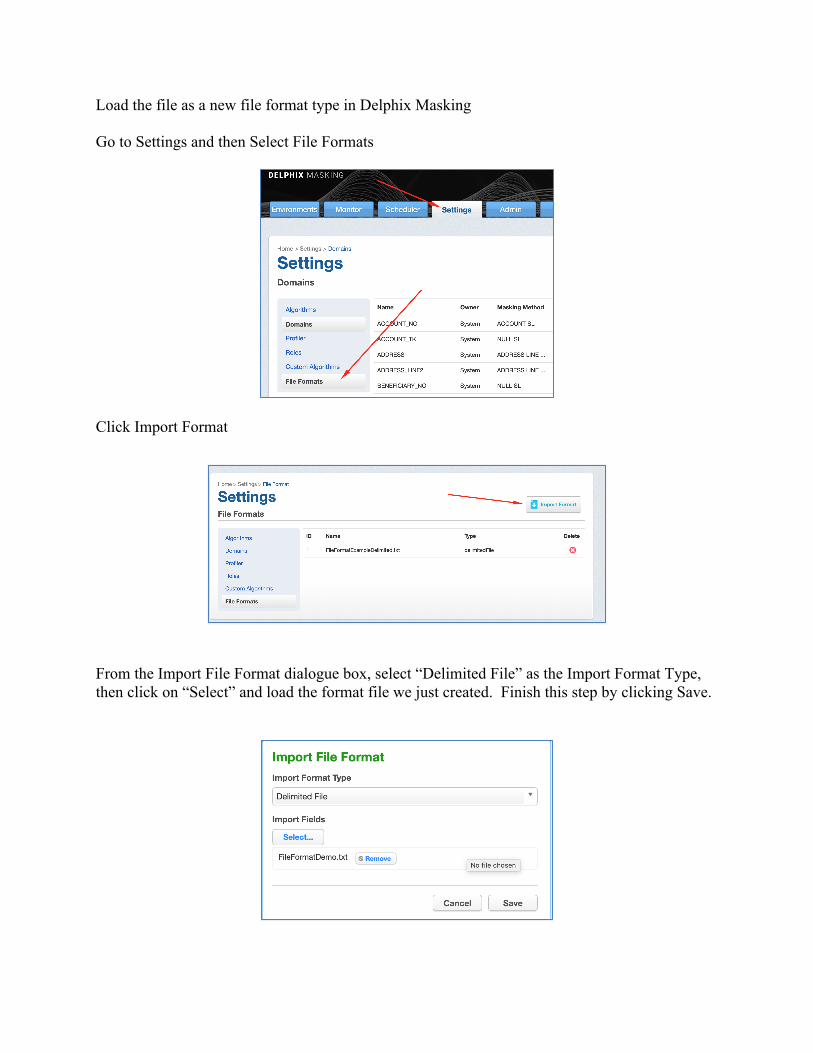
Load the file as a new file format type in Delphix Masking Go to Settings and then Select File Formats
Click Import Format
From the Import File Format dialogue box, select “Delimited File” as the Import Format Type, then click on “Select” and load the format file we just created. Finish this step by clicking Save.

CREATING THE MASKING PROJECT Navigate to Environment and Add a new Application
Choose a name for your Application and click
Its best practice for file masking to read the source files from one location and save the masked files into another location. We call that “On-The-Fly Masking”. To prepare for that, we created 2 directories under “/home/delphix/”: Source_Files will contain all the files we want to mask Target_Files will be where Delphix masking will store the files once they are masked (this way we do not alter the source files and can repeat the masking process with consistent results) Let’s first create the Environment that will be used to identify where are the source files Select Add Environment, an give it the name “File_SRC_Env” and pick ‘Mask’ as the purpose

Click on the Environment Name we just created
Select Connector
Click on Create Connection
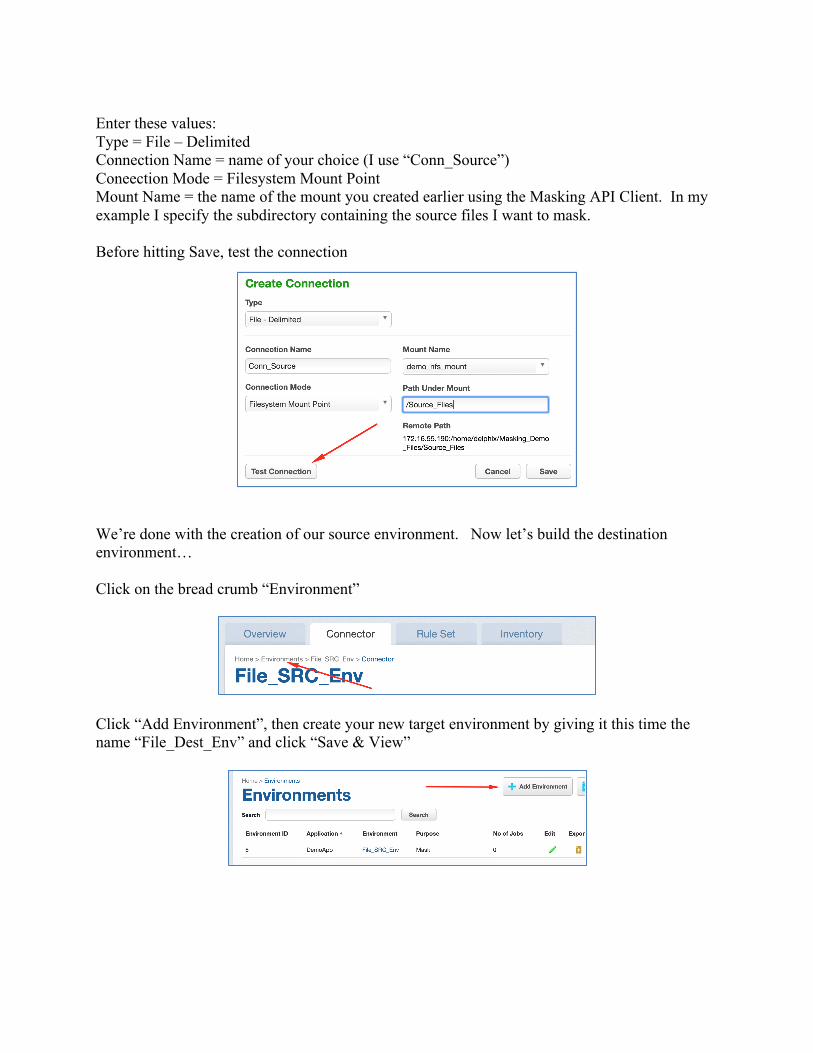
Enter these values: Type = File – Delimited Connection Name = name of your choice (I use “Conn_Source”) Coneection Mode = Filesystem Mount Point Mount Name = the name of the mount you created earlier using the Masking API Client. In my example I specify the subdirectory containing the source files I want to mask. Before hitting Save, test the connection
We’re done with the creation of our source environment. Now let’s build the destination environment… Click on the bread crumb “Environment”
Click “Add Environment”, then create your new target environment by giving it this time the name “File_Dest_Env” and click “Save & View”

Create a new connection
Enter these values: Type = File – Delimited Connection Name = name of your choice (I use “Conn_Target”) Coneection Mode = Filesystem Mount Point Mount Name = the name of the mount you created earlier using the Masking API Client. In my example I specify the subdirectory containing where I want Delphix to save the files once they are masked.

Next click on Rule Set
Click Create Rule Set
Give your Rule Set a name and pick the Connector we just created. Since we want to use File Name Pattern matching, enter the regular expression as following: .*\.csv
We must specify the format of the file that we will be masking. For this select the green pen to Edit the Rule Set, followed by the green pen next to the file

Select again the red pencil to edit the property for the file format matching the pattern “.*\.csv”
Then with the Edit File panel up, pick the following: File Format: <pick the name for the file format we loaded earlier> End of Record: Pick “LF terminated (Unix) Delimiter: Pick “|” – this is for my example. Your delimiter could be different off course
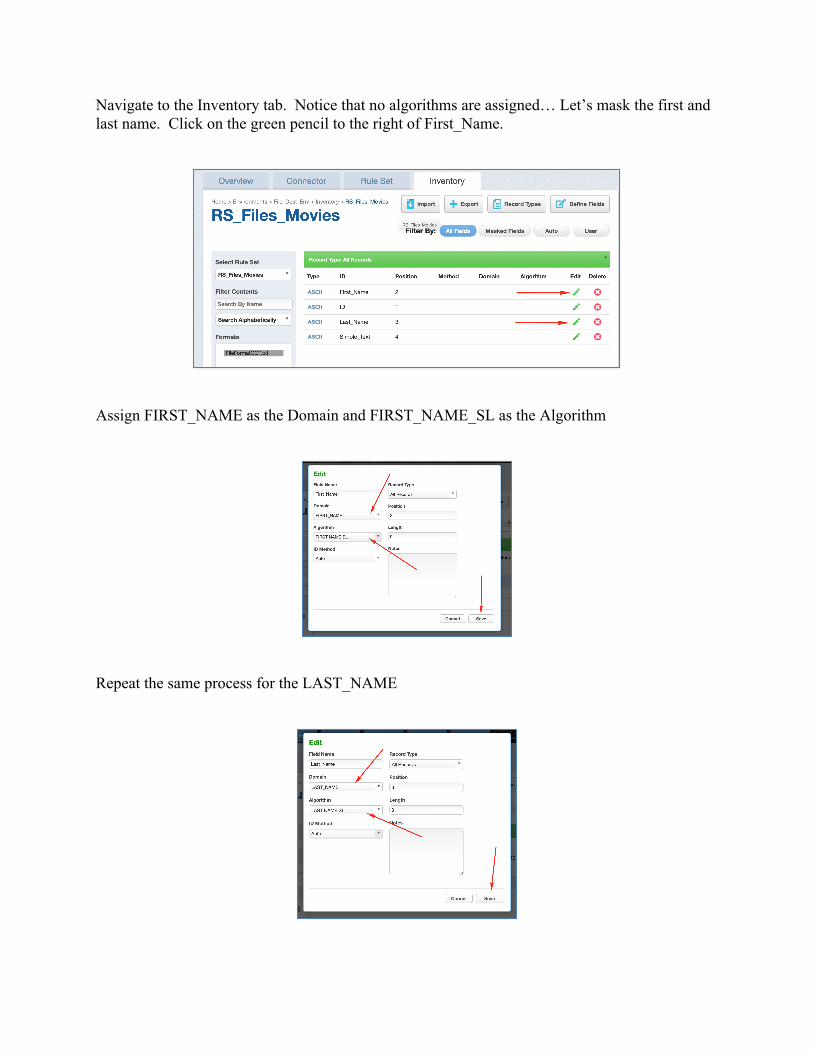
Navigate to the Inventory tab. Notice that no algorithms are assigned… Let’s mask the first and last name. Click on the green pencil to the right of First_Name.
Assign FIRST_NAME as the Domain and FIRST_NAME_SL as the Algorithm
Repeat the same process for the LAST_NAME
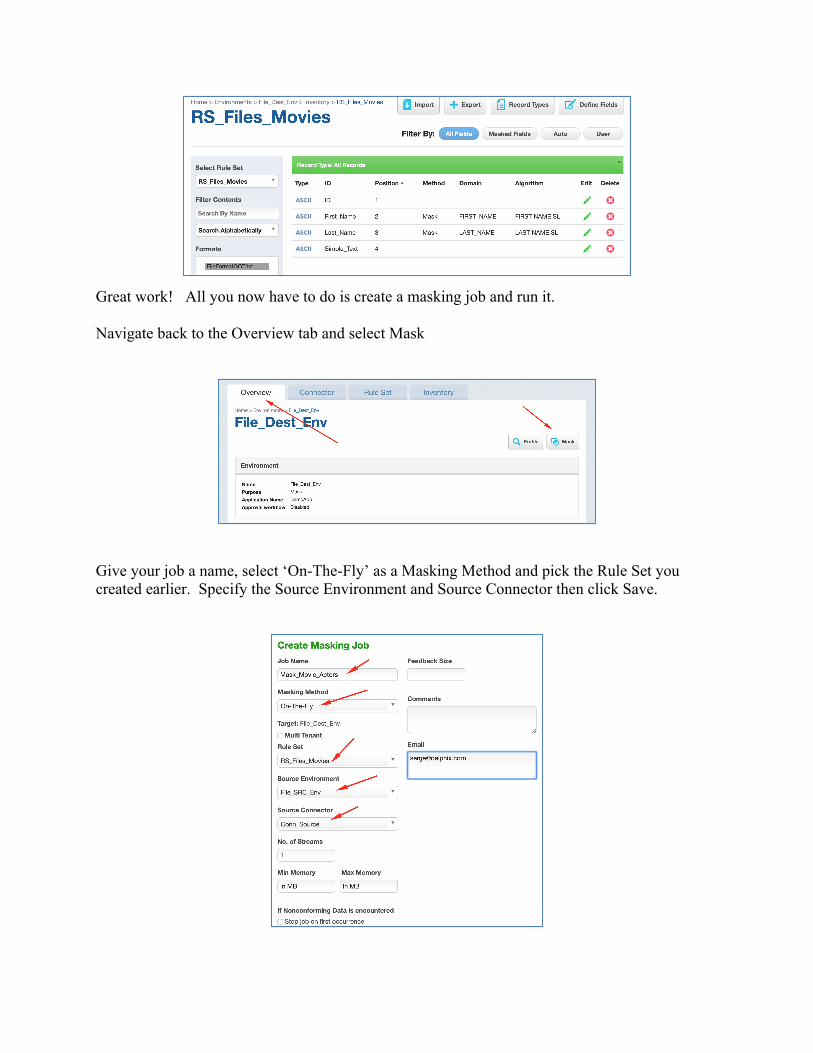
Great work! All you now have to do is create a masking job and run it. Navigate back to the Overview tab and select Mask
Give your job a name, select ‘On-The-Fly’ as a Masking Method and pick the Rule Set you created earlier. Specify the Source Environment and Source Connector then click Save.

Start the masking job by clicking on the blue play button
The status will change to Running
When masking is completed, the status will change to Succeeded
Now validate that masking did its job…. Look at the before and after and validate that First_Name and Last_Name on the csv files got masked! File 007.csv
Before After
File GoT.csv
Before After
Congratulations, you have taken your first steps in file masking on NFS mount points.


