+ All Categories
Home > Documents > Sterilization and cross-infection control in the dental...

Sterilization and cross-infection control in the dental...

Date post: 06-Mar-2018
Category:
Upload: dangphuc
View: 218 times
Download: 2 times
Share this document with a friend
24
Sterilization and cross-infection control in the dental practice Educational aims The overall aim of this module is to inform and educate the dental professionals on the basic principles of cross-contamination barriers and infection control measures in the dental health care facility. Expected outcomes On completion of the module, the dentist: will have knowledge of the importance of appropriate protection of the dental personnel through meticulous hand washing, gloving and dental clothing will be able to perform the best practice techniques related to the management of contaminated surfaces and instruments will be able to apply appropriate cleaning, decontamination and sterilization protocols will have fully understood the importance of cross-contamination barriers on the overall patient safety will be informed on the currently existing protocols on the issue Sterilization and cross-infection control is a core compulsory or recommended dental CPD (continuing professional development) topic in most European countries.
Transcript

Sterilization and cross-infection control in the dental practice

Educational aims

The overall aim of this module is to inform and educate the dental professionals on

the basic principles of cross-contamination barriers and infection control measures in

the dental health care facility.

Expected outcomes

On completion of the module, the dentist:

will have knowledge of the importance of appropriate protection of the

dental personnel through meticulous hand washing, gloving and dental

clothing

will be able to perform the best practice techniques related to the

management of contaminated surfaces and instruments

will be able to apply appropriate cleaning, decontamination and

sterilization protocols

will have fully understood the importance of cross-contamination barriers

on the overall patient safety

will be informed on the currently existing protocols on the issue

Sterilization and cross-infection control is a core compulsory or recommended dental

CPD (continuing professional development) topic in most European countries.

1. Taking protection measures prior to beginning work

The dental staff must do the following before performing any dental work:

Get vaccinated against hepatitis B – It is an imperative.

Take a detailed medical history. This is necessary to find out if the patient has been through

some kind of active contamination or other diseases indicating immunosuppression or other

systemic illnesses. Independently of the information you have collected from your patient, you

must consider him/her potentially contaminated and take the precautions advised for all

patients.

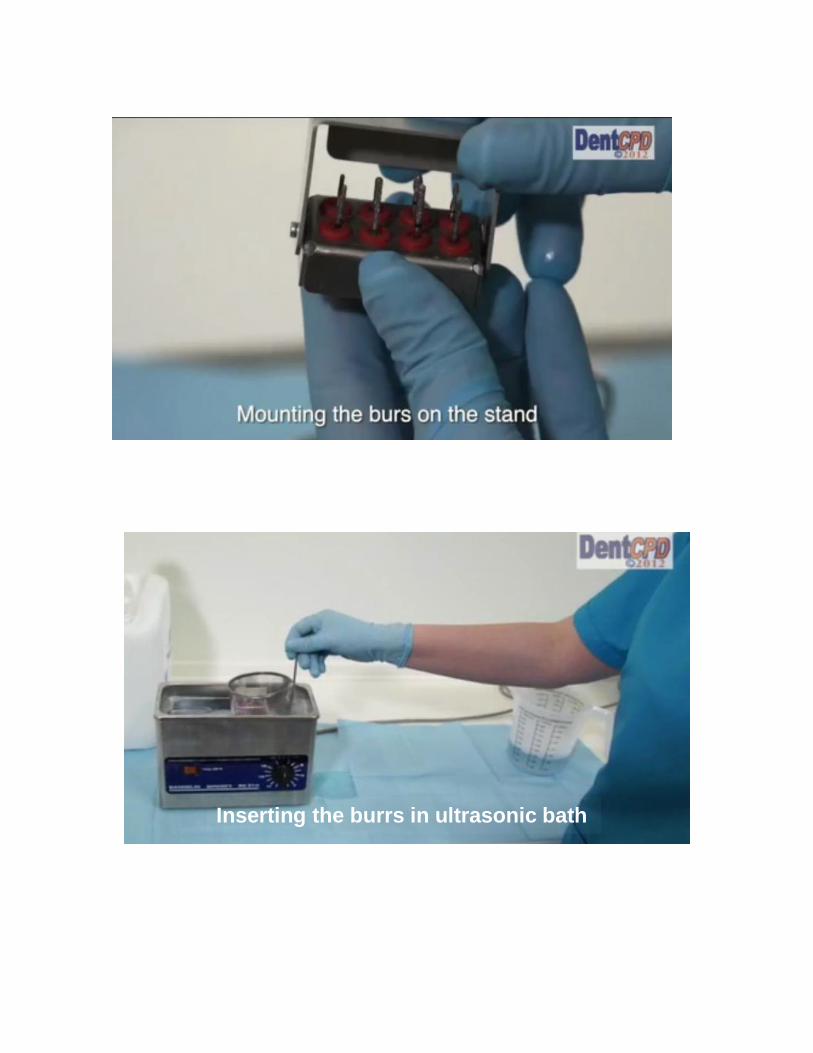
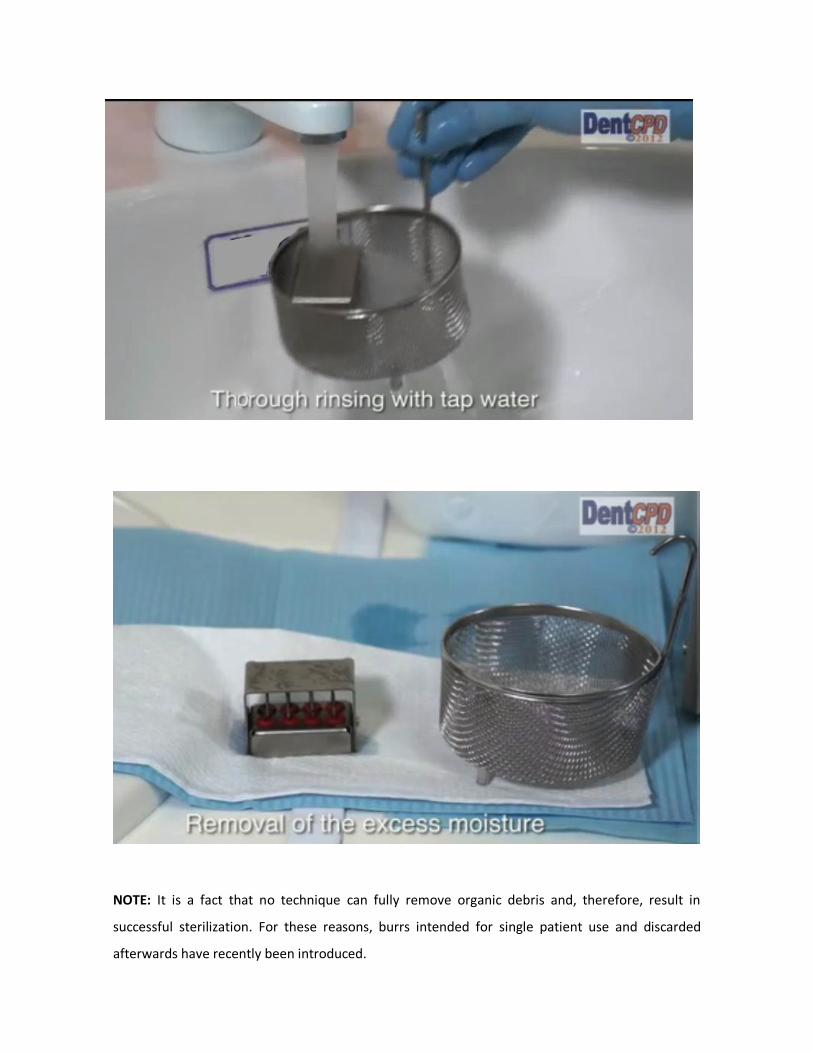
Make sure all the instruments are sterilized. Any instruments used to penetrate soft tissues

or bones, such as tweezers, chisels, cleaning scoops, scrapers, must be sterilized after use.

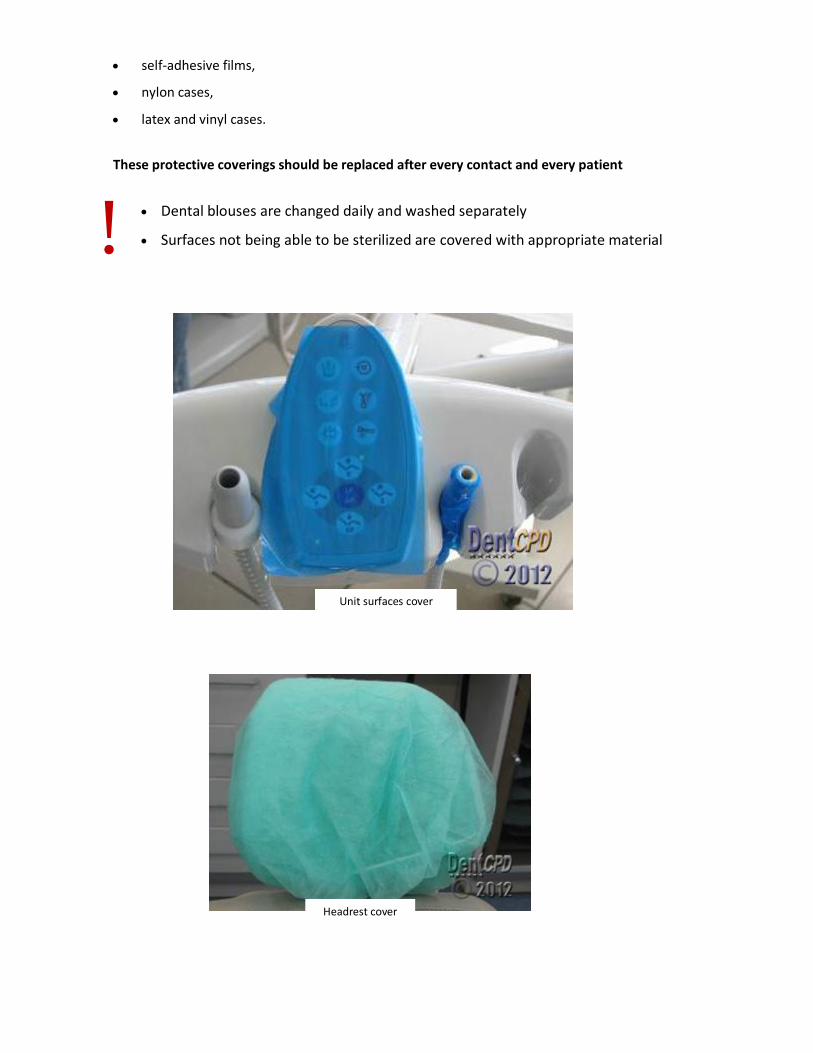
Protect working surfaces.

Make sure they have at their disposal all the disinfectant fluids and waste containers

necessary.

2. Hand washing

Hand washing is the cornerstone of the ‘patient – doctor – auxiliary

staff’ protection circle aiming at the prevention of cross infection.

The dental personnel is obliged to wash their hands before and after coming in contact with the

patient (or the instruments used) independently of wearing gloves or not during the operation.

Hand washing must be performed meticulously so that every hand surface is adequately cleaned.

Special attention must be paid to hand surfaces usually neglected when washed.

The pictures illustrate the areas requiring special attention so that hands are properly cleaned.

Various methods for drying hands

After removing the gloves, hands must be carefully washed as very often there are pores in latex

allowing the penetration of contaminating matter.

Although frequent hand washing is a necessity, sometimes problems may appear such as dry skin and

dermatitis. To avoid such problems special moisturising lotions are recommended. These lotions,

moisturising creams etc. should be applied at the end of the day as they may cause the gloves to

develop pinholes, due to their chemical composition, in which case no protection is offered by the

gloves.

In most kinds of dental work, water and soap followed by an antimicrobial solution are sufficient.

In case of an injury, scratch or exudative injury, the person should postpone treating patients until

the wound is healed. If this is not possible, the use of a double pair of suitable and tolerable gloves

is recommended. As regards to antimicrobial solutions, although their use is not required,

solutions with prolonged action are preferable.

Their contribution to hand antisepsis is significant as pinholes may pre-exist or develop when

the gloves are in use allowing the penetration of oral fluids and blood. When an

antimicrobial solution remains effective for a long time after its application, adequate hand

protection from the development of germs on the skin surface below the gloves is provided.

Using antimicrobial solutions without prior meticulous hand washing is a defective and inefficient

procedure.

Alcohol antiseptic solutions or gels are effective in destroying the germs on the hand surface,

provided that their use is preceded by adequate cleaning.

It should be noted that a solution can have a prolonged antiseptic action only if it contains an

antiseptic agent such as chlorhexidine, quaternary ammonium compounds, octenidine or

triclosan.

Hand washing before and after patient contact is absolutely necessary

Antimicrobial solutions contribute to hand antisepsis

Solutions are not used are the only antiseptic means

!

3. Gloves

The medical and auxiliary staff is obliged to always wear latex (or vinyl or nitrile)

gloves during any dental work which involves contact with blood or saliva

containing blood or mucus. These gloves should not necessarily be sterilized unless

an operation is going to take place, particularly on patients with HIV infection.

Hands must be meticulously washed before wearing gloves.

The same procedure must be followed after removing gloves. Gloves are used during any dental

work, for a single patient only and, afterwards, they are removed and discarded.

Washing the gloves and performing any dental work to another patient is strictly forbidden.

Sterilizing examination gloves is also not allowed as manufacturally there is no guarantee of the

protection of their integrity. Disinfection fluids, essential oils, acrylic monomers, various dental

materials and instruments, several skin soaps and lotions may distort the cohesion of the glove

material.

In patients with confirmed HIV or HBV and HCV infection, it is recommended that double gloves

are used for the protection of the surgeon. If during any dental work it is necessary to use an extra

device or material, gloves should be covered with an extra pair of nylon gloves so that

contamination of those surfaces is prevented.

More often than not, aphylactic responses, at various levels, have been recorded due to latex

gloves.

In such cases the exact cause of this response must be searched (latex, talc, maize powder)

considering, also, agents facilitating aphylactic (anaphylactic?) responses (humidity). Finally,

appropriate hypoallergic gloves or vinyl/nitrile gloves should be provided. If there are injuries,

scratches or exudative injuries and the operation cannot be avoided, double gloving is

recommended for extra protection.

Hand washing is necessary before wearing gloves

Gloves are discarded after each patient

Double gloves are recommended for patients with HIV, HBV, HCV infection

!

4. Mask and glasses

During the examination or any dental work, an appropriate mask and eye

protectors are necessary. These masks must follow certain specifications

regarding the size, the thickness and the material, excluding those designed

for structural or technical occupations due to intense particle penetration

ability.

Masks must be able to withhold at least 95% of the microorganisms.

In case the dental patient suffers from an airborne disease (tuberculosis), the mask must be

enhanced and fully adaptable to the wearer’s face. Also, it must be able to withhold particles and

microorganisms with a diameter up to 1μm, at a percentage of 95% (aspirator N95, FFP3). If the

mask gets wet it must be immediately discarded and replaced.

Eye protectors may include various types of glasses or plastic masks or shields made of

transparent materials. The side frame should be wide enough to cover adequately the eye.

These protectors must be rinsed with abundant water and get disinfected in case they get stained

in between the patients.

Masks and eye protectors enhance dentist and patient safety

!

Mask, glasses and head cover

!

5. Dental clothing & Surface coverings

Blouses should cover a big part of the dentist’s body and hands.

They must be changed on a daily basis and definitely as soon as they get stained.

If the operation is expected to involve a large amount of bleeding or the patient is likely to be

seropositive, it is highly recommended that specially designed single-use clothing be used.

Reusable clothing must be washed in a machine washer at an appropriate temperature, using a

detergent and always separately from domestic and non-medical clothing.

Surface coverings

Any surfaces, devices, electric switches, door handles, drawer knobs, taps, handles and device

tubes not able to be sterilised or disinfected, should be meticulously covered with appropriate

materials, such as:

special rollers and plasticized paper sheets,

cellulose film,

aluminium foil,

Appropriate dressing for high risk patients

self-adhesive films,

nylon cases,

latex and vinyl cases.

These protective coverings should be replaced after every contact and every patient

Dental blouses are changed daily and washed separately

Surfaces not being able to be sterilized are covered with appropriate material

!

Headrest cover

Unit surfaces cover

6. Cleaning and Sterilization of dental instruments

Any dental hand instrument used during a dental incident must

undergo a cleaning and sterilization procedure.

Step 1. Right after the completion of the incident (examination, restoration, surgery) the

instruments must be discarded in a special plastic container filled with an appropriate disinfectant

solution or enzyme solution with a proteolytic action.

Step 2. After leaving the instruments within the solution for as long as the manufacturer

recommends, they are transferred to the machine washer where they undergo thorough

mechanical cleaning using the appropriate detergents. If dental materials (cements, pastes, oxides,

etc) have been fixed on the instruments, the latter must be cleaned with ultrasonic devices and

appropriate solutions.

Air-water syringe cover

Handpiece cover

Manual cleaning is not recommended due to the high risk involved in causing injuries

and because it is inferior to mechanical cleaning in terms of quality.

Step 3. After the instruments have been cleaned, they are packaged in special bags or perforated

cassettes and they are taken to the autoclaves to be sterilized.

The autoclave is programmed to operate depending on the packaging of the instruments and

according to the default parameters set by the manufacturer, e.g. 134oC for 3 minutes or 121 oC for

20 minutes or 121oC for 13 minutes, etc. it should be noted that the above times do not include

warm up or air removal. The completion of the cycle and the sterilization process is confirmed

through electronic instrument indications as well as changes in the color or shape of the indicators.

Autoclaves

6a. Single use instruments

These instruments are divided into two categories:

Obligatory single use instruments. They can only be used once and be discarded afterwards.

Anesthetic needles, Scalpel blades, Suture needles, Saliva ejectors, Dental cups, Surgical suction

nozzles, Pulp instruments, Wedges, Rubber cups, Artificial walls, Fluoride gel trays.

Optionally single use instruments

Certain mirrors, Artificial wall retainers, Napkin holders, Various types of burrs, impression trays,

Material mixing pads, Low speed handpieces for polishing after cleaning, High speed handpieces

for cavity and stump formation in seropositve patients.

Single use disposable needles for etching

Disposable single use examining set

Single use wood wedges

Single use brushes

6b. Use and care of sharp instruments and needles

Sharp instruments, having been in contact with blood and saliva, should be used with special care

so that injuries are prevented.

Place any surgical blade and needle within a solid, hard plastic container for sharp instruments. Do

not cap, bend or destroy the needles before you discard them. Do not overfill the plastic

container, close tightly and, finally, discard.

Used needles must not be recapped with both hands or any other technique and care must be taken

so that the needle does not point towards the body. The 'one hand' technique to recap the needle

or a mechanical means designed to hold the cap should always be used. Recently, the use of needle

destroyers which melt the metallic edge of the instrument has been suggested.

Dental instruments must undergo a cleaning and sterilization procedure

Sharp instruments and needles must be managed with special care !

One-hand technique to recap the needle

Mechanical means for holding the needle

7. Sterilization of handpieces and burrs

Low and high speed handpieces as well as various burrs used in everyday clinical

practice should be sterilized before use so that all conditions ensuring harmless

dental care provided to all population groups are met.

Sterilizing the handpieces requires special attention and suitable preparation so that

any damages to their interior are avoided and, consequently, defective operation

and financial burden are prevented.

After the completion of any dental work, the external surfaces of the handpiece have come in

contact with saliva, blood, dental tissue debris and residues of dental materials. However, it is

likely that the internal tubes of the handpieces are infected due to various hydrodynamic

phenomena taking place on their tip:

- when cavities are formed subgingivally,

- opening up a coronal cavity during endodontic therapy,

- forming stumps,

- polishing gingival restorations,

- polishing the cervical areas of the tooth after a periodontal treatment.

Several ways to control the spread of contaminating matter between two patients have been

recommended. The most common methods of asepsis control are the following:

Protection from any contact with the fluids existent in the oral environment

Chemical disinfection

Thermal sterilization

Disinfection using microwaves

Disinfection via irrigation

Single use handpieces

Among the above techniques, moist heat using saturated water vapours (autoclave)

offers the best results as regards the sterilization of handpieces in a very short time.

Brushing the handpieces

7a. Sterilization of handpieces

Step 1. After the end of the dental work the handpiece must operate for 5-10 seconds over the

wash basin or a similar container while ejecting water and air.

Step 2. Then, after being detached from the tubes connecting it with the unit it must be

meticulously washed and brushed under running water.

Step 3. Finally, it must be dried with an absorbent paper.

Step 4. After external cleaning, the handpiece is reconnected to the tubes and operates for 3-5

seconds only with air so that any water residues are removed from the interior of the tubes and

the impellers.

Step 5. Then, the handpiece is lubricated with the lubricant recommended by the manufacturer

and operates again for 10-20 seconds only with air so that the lubricant is properly distributed

throughout the sensitive areas of the head.

Step 6. After the end of this procedure, the handpiece along with the burr extractor are enclosed

in a special pouch airtightly sealed either with a self-adhesive tape or a thermosealer.

Step 7. The handpiece is placed in the autoclave where care should be taken for the pouches not

to be clambered so that the air passes unhampered.

The pouch with the handpiece must also include a sterilisation indicator which could be

either a special tape or a vial with carbon grains. This is not necessary if the pouch includes a

system controlling the length of stay and the vapour temperature within the autoclave.

Depending on the manufacturer's indications, the autoclave is programmed to operate at

121oC for 20 minutes or at 127oC for 13 minutes or at 134oC for 3 minutes.

After these cycles have finished and after the indicators have confirmed that the conditions

worked properly, the handpieces and the extractors are sterilised and are ready to use.

Step 8. Right before using them, some handpieces must be lubricated again with an appropriate

lubricant which, this time, must be either sterilised or new and generally different from the one

used to lubricate the septic handpiece before being placed in the autoclave.

Drying with absorbent paper

New burrs (left) and damaged burrs after repeated usage and sterilization (right)

7b. Sterilization of burrs

Burrs should be sterilized independently of their type or mouth area they have worked in.

Step 1. A necessary step prior to sterilizing a burr is meticulous cleaning from tooth tissue debris,

residues of dental materials, blood clots or a paste-like mixture of all the above with saliva.

The most widely accepted cleaning method for burrs and other micro instruments are ultrasonic

devices (baths) using suitable fluids and with the addition of enzymes with proteolytic action.

In these baths using suitable fluids at a temperature of about 60°C, burs vibrate at a

frequency of 60-80 kHz for at least 15 minutes. After the end of this procedure, burs are free

from foreign matter as well as oxides very often being deposited on their stem.

Step 2. After taken out of the ultrasonic bath, burrs must be dried using an absorbent paper and

hot air.

Step 3. They must be placed in an appropriate device for sterilization, depending on the material

they are made of:

1) burrs made of common carbon steel should not be placed in the autoclave because they are

oxidized.

2) on the contrary, burrs made of stainless steel or tungsten carbide are not affected.

3) dry heat ovens, ovens for chemical vapour sterilisation and ethylene oxide ovens are suitable

for sterilising all types of burrs. However, dry heat ovens, due to prolonged heating involved,

may seriously damage the cutting edge of the burrs.

4) using various aldehydes and phenols for at least 30 minutes offers adequate sterilization

while after 10 hours chemical sterilization is achieved. Nevertheless, they may damage the

integrity of rotating cutting instruments.

Inserting the burrs in ultrasonic bath

NOTE: It is a fact that no technique can fully remove organic debris and, therefore, result in

successful sterilization. For these reasons, burrs intended for single patient use and discarded

afterwards have recently been introduced.

8. Preparing impressions for the Lab

After removing the tray from the oral cavity, all impressions must be

cleaned and sterilised in a certain way and using suitable solutions.

More specifically:

Step 1. After making the impression the tray must be transferred to the wash basin where the flow

of tap water will remove any visible organic contaminants (blood, saliva etc.).

Step 2. Afterwards, the tray is sprayed with or immersed in a suitable disinfectant solution

depending on the properties of the material each impression is made of.

Step 3. Impressions must be packaged in a suitable plastic box or a pet bag so that they are safely

sent to the dental lab.

Single use plastic box for casts Transportation

9. Taking protection measures after ending work

Before you clean the working surfaces, wear thick work gloves, so

that your hands are covered and are not exposed to blood and other

biological fluids left on surfaces or instruments.

Remove any protective cover. If the cover has been stained with blood, place it in a red bag.

If the blood is completely dry or the cover has not been contaminated, place it in a regular bag.

Use absorbent paper in case blood has penetrated the protective cover and put the absorbent

paper in the red bag. Use an appropriate disinfectant.

Clean and sterilize all the instruments and disinfect the working surfaces with an

appropriate disinfectant solution (phenolic, alcoholic, quaternary ammonium compounds).

Sterilize in the autoclave or dry heat oven any instruments having been in close contact with

tissues. A special tape indicating that they have been sterilized must be attached on the

instruments so that one is sure that sterilization has been carried out. This procedure is performed

by specialized personnel.

All handpieces must be sterilized in between patients. Follow the instructions recommended

by the manufacturers. Chemical sterilization is not safe. Ultrasonic handpieces, scrapers and air

syringes must be washed and sterilized. This procedure is performed by specialized personnel.

Place and remove any used waste. All plastic bags must be collected on a daily basis to

prevent the spread of infectious diseases.

Clean and disinfect the impressions. Any impression or mapping should not be sent to the lab

before being cleaned or disinfected.

Remove your gloves and wash your hands with a disinfectant and water. If more patients are

waiting to be examined, place back the protective covers and repeat the procedure.

10. What must be done in case of an accident and exposure to infected material

Although the transmission probability of HIV after an accident is below 0.5%, it

is imperative that protection measures are taken. In case of professional

exposure to HIV after been pierced with an infected needle or other sharp

instrument used on a patient diagnosed with HIV infection, the following actions

must be taken:

Prompt and meticulous washing of the injured area.

Immediate placing of a gauze with a disinfectant solution on the injury (e.g. Cidex,

formaldehyde, povidone iodine or 75% alcohol etc.) for at least 15 minutes.

The professional must be examined as soon as possible. HIV can be detected in antigen

presenting cells and peripheral ganglia within 72 hours after the infection while viraemia

develops in about five days. The latter allows a 72-hour-period within which treatment can be

provided.

Chemoprophylaxis with antiretroviral drugs must begin as soon as possible after the incident.

After 72 hours have passed, there is no point in administering chemoprophylaxis medication.

Post exposure prophylaxis, PEP

Depending on the size of the injury and the viral load of the patient two or three antiretroviral

drugs are used (two nucleosides with the addition or not of a protease inhibitor). These same

drugs are used to treat HIV infected people.

Chemoprophylaxis with antiretroviral drugs lasts four weeks and has a 80% chance of success

in preventing seroconversion.

Position of the handpieces to avoid potentially harmful incidents


Recommended