{ STIHL RMA 370 Warning! Read and follow all safety precautions in Instruction Manual – improper use can cause serious or fatal injury. Advertencia! Lea y siga todas las precauciones de seguridad dadas en el manual de instrucciones – el uso incorrecto puede causar lesiones graves o mortales. Instruction Manual Manual de instrucciones
Transcript
{
STIHL RMA 370
Warning!Read and follow all safety precautions in Instruction Manual – improper use can cause serious or fatal injury.
Advertencia!Lea y siga todas las precauciones de seguridad dadas en el manual de instrucciones – el uso incorrecto puede causar lesiones graves o mortales.
Instruction ManualManual de instrucciones
Instruction Manual1 - 33Manual de instrucciones34 - 69
Allow only persons who fully understand this manual to operate your lawn mower.To receive maximum performance and satisfaction from your STIHL lawn mower, it is important that you read, understand and follow the safety precautions and the operating and maintenance instructions in the chapters "Important Safety Instructions" and "Safety Precautions and Working Techniques" before using your lawn mower. For further information you can go to www.stihlusa.com.Contact your STIHL dealer or the STIHL distributor for your area if you do not understand any of the instructions in this manual.
WARNINGBecause a lawn mower is a high-speed cutting tool and is battery-powered, some special safety precautions must be observed to reduce the risk of personal injury. Careless or improper use may cause serious or even fatal injury, including the amputation of hands and feet.
Guide to Using this Manual 2Important Safety Instructions 2Safety Precautions and Working Techniques 3Description of Operation 11Using the Unit 11Mulching 12Mounting the Handlebar 12Grassbox 13Adjusting Cutting Height 14Connecting Charger to Power Supply 15Charging the Battery 15Light Emitting Diodes (LED) on Battery 16Light Emitting Diodes (LED) on Charger 18Switching On 19Switching Off 20Storing the Machine 21Inspection and Maintenance by User 22Sharpening Instructions 22Maintenance and Care 25Main Parts 26Specifications 27Special Accessories 28Troubleshooting 29Maintenance and Repairs 31Battery Recycling 31
Disposal 31Trademarks 32Addresses 33
0000
0052
41_0
RMA 370 1
{ This instruction manual is protected by copyright. All rights reserved, especially the rights to reproduce, translate and process with electronic systems.
English
Pictograms
The meanings of the pictograms attached to or embossed on the machine are explained in this manual.Depending on the model concerned, the following pictograms may be on your machine.
Symbols in Text
Many operating and safety instructions are supported by illustrations.The individual steps or procedures described in the manual may be marked in different ways:N A bullet marks a step or procedure.A description of a step or procedure that refers directly to an illustration may contain item numbers that appear in the illustration. Example:N Loosen the screw (1).N Lever (2) ...In addition to the operating instructions, this manual may contain paragraphs that require your special attention. Such paragraphs are marked with the symbols and signal words described below:
DANGERIndicates an imminent risk of severe or fatal injury.
WARNINGIndicates a hazardous situation which, if not avoided, could result in severe or fatal injury.
Engineering Improvements
STIHL’s philosophy is to continually improve all of its products. As a result, engineering changes and improvements are made from time to time. Therefore, some changes, modifications and improvements may not be covered in this manual. If the operating characteristics or the appearance of your machine differs from those described in this manual, please contact your STIHL dealer for assistance.
WARNINGWhen using electric lawn mowers, basic safety precautions should always be followed to reduce the risk of fire, electric shock and personal injury, including the following:READ ALL INSTRUCTIONS1. Avoid Dangerous Environments –
Do not use lawn mowers in damp or wet locations.
2. Do Not Use In Rain.3. Keep Children Away –
All visitors should be kept a safe distance from work area.
4. Dress Properly –Do not wear loose clothing or jewelry. They can be caught in moving parts. Use of gloves and footwear is recommended when working outdoors.
5. Use Safety Glasses –Always use face or dust mask if operation is dusty.
6. Use Right Appliance –Do not use lawn mower for any job except that for which it is intended.
7. Do Not Force Lawn Mower –It will do the job better and safer at the rate for which it was designed.
8. Do Not Overreach –Keep proper footing and balance at all times.
Guide to Using this Manual
Key
NOTICEIndicates a risk of property damage, including damage to the machine or its individual components.
Important Safety Instructions
RMA 3702
English
9. Stay Alert –Watch what you are doing. Use common sense. Do not operate lawn mower when you are tired.
10. Disconnect Lawn Mower –Disconnect the lawn mower from the power supply by removing the fuse key and battery when not in use, before servicing, when changing accessories such as blades, and the like.
11. Store Idle Lawn Mower Indoors –When not in use, lawn mower should be stored in an indoor dry and locked place – out of reach of children.
12. Maintain Lawn Mower With Care –Keep cutting edges sharp and clean for best and safest performance. Follow instructions for lubricating and changing accessories.
13. Keep guards in place and in working order.
14. Keep blades sharp.15. Keep hands and feet away from
cutting area.16. Objects struck by lawn mower blade
can cause severe injuries to persons. The lawn should always be carefully examined and cleared of all objects prior to each mowing.
17. If lawn mower strikes a foreign object, follow these steps:
– Stop lawn mower. Release switch lever.
– Remove fuse key and battery.
– Inspect for damage.– Repair any damage before
restarting and operating the lawn mower.
18. Use identical replacement blades only.
SAVE THESE INSTRUCTIONS
Have your STIHL dealer show you how to operate your power tool. Observe all applicable local safety regulations, standards and ordinances.The use of noise emitting power tools may be restricted to certain times by national or local regulations.
WARNINGDo not lend or rent your lawn mower without the instruction manual. Be sure that anyone using it understands the information contained in this manual.
WARNINGUse your lawn mower only for mowing grass. Do not use it for other purposes, since misuse may result in personal injury or property damage, including damage to the machine.
Safety Precautions and Working Techniques
Because this lawn mower is a high-speed, fast-cut-ting power tool and is battery-powered, special safety precautions must be observed to reduce the risk of personal injury.
It is important that you read, fully understand and observe the following safety precautions and warnings. Read the instruction manual and the safety precautions periodically. Careless or improper use may cause serious or fatal injury.
RMA 370 3
English
WARNINGMinors should never be allowed to use this power tool. Bystanders, especially children, and animals should not be allowed in the area where it is in use. Tragic accidents can occur if the operator is not alert to the presence of children. Children are often attracted to the machine and it mowing activities. Never assume that children will remain where you last saw them. Keep children under the watchful eye of a responsible adult other than the operator. Use extra care when approaching blind corners, shrubs, trees or other objects that may block your view of a child!
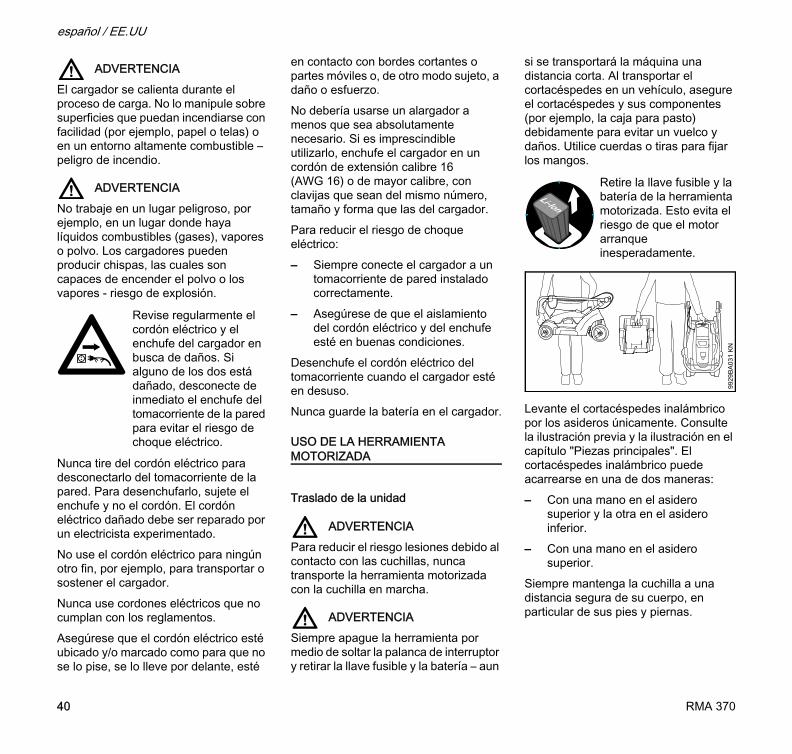
WARNINGTo reduce the risk of injury to bystanders and damage to property, never let your lawn mower run unattended. When it is not in use (e.g. during a work break), shut it off and make sure that unauthorized persons do not use it. To do this, remove fuse key and battery from the power tool.Most of these safety precautions and warnings apply to the use of all STIHL lawn mowers. Different models may have different parts and controls. See the appropriate section of your instruction manual for a description of the controls and the function of the parts of your model.Always remove fuse key and battery before inspecting, cleaning, transporting, storing or carrying out any work on the power tool. This avoids the risk of the motor starting unintentionally.
Use only original STIHL replacement parts, including the cutting blade. They are specifically designed to match your model and meet your performance requirements. Use of non-STIHL parts may cause serious or fatal injury.Safe use of a lawn mower involves1. the operator2. the power tool3. the use of the power tool.
THE OPERATOR
Physical Condition
You must be in good physical condition and mental health and not under the influence of any substance (drugs, alcohol, etc.) which might impair vision, dexterity or judgment. Do not operate this machine when you are fatigued.
WARNINGBe alert – if you get tired, take a break. Tiredness may result in loss of control. Working with any power tool can be strenuous. If you have any condition that might be aggravated by strenuous work, check with your doctor before operating this machine.
Proper Clothing
WARNINGTo reduce the risk of injury, the operator should wear proper protective apparel.The housing of your lawn mower will not protect the operator from all foreign objects (gravel, glass, wire, etc.) thrown
back by the rotating cutting blade. Thrown objects may also ricochet and strike the operator.
Avoid loose-fitting jackets, scarfs, neckties, jewelry, flared or cuffed pants, unconfined long hair or anything that could become caught in scrub or moving parts of the unit. Secure hair so it is above shoulder level.
To reduce the risk of injury to your eyes never operate your lawn mower unless wearing goggles or properly fitted protec-tive glasses with adequate top and side protection complying with ANSI Z 87.1 (or your applicable national standard.)
Clothing must be sturdy but allow complete free-dom of movement. Wear long pants to help pro-tect your legs. Do not wear shorts.
Good footing is very important. Wear sturdy shoes with nonslip soles. Never wear sandals, flip-flops or go barefoot.
Always wear gloves when transporting the machine and carrying out work on the cutting blade.
RMA 3704
English
THE POWER TOOL
For illustrations and definitions of the power tool parts see the chapter on "Main Parts."
WARNINGNever modify your lawn mower in any way. Only attachments supplied by STIHL and expressly approved by STIHL for use with the specific STIHL model are authorized. Although certain unauthorized attachments are useable with STIHL power tools, their use may, in fact, be extremely dangerous.If your lawn mower is subjected to unusually high loads for which it was not designed (e.g. heavy impact or a fall), always check that it is in good condition before continuing work – see also "Before Starting Work." Make sure the safety devices are working properly. Do not continue operating your lawn mower if it is damaged. In case of doubt, have it checked by your STIHL servicing dealer.
Battery
WARNING
Do not place the battery on or near fires, stoves or in other high-temperature locations. Do not place the battery in direct sunlight or store it inside a vehicle
in hot weather. Doing so may cause the battery to generate heat, rupture or ignite. Using the batteries in this manner may also result in a loss of performance and a shortened life expectancy.In case of fire: Stay clear of any vapors or gases generated, taking wind direction into account. If possible without danger, remove battery from the vicinity of the fire. In principle, cooling the battery or extinguishing the fire with water is possible. It is preferable to extinguish the fire with a multipurpose dry chemical fire extinguisher. As for any fire, evacuate the area and fight the fire from a safe distance. Once the fire has been extinguished, the area should be monitored (fire watch) in case of a flare-up, until the battery has cooled sufficiently. Restrict access to the area until completion of clean-up. Do not touch the burnt battery or any spilled liquids. Use inert absorbent to absorb spilled liquids.
WARNINGUse STIHL batteries only with STIHL power tools and charge them only with STIHL chargers. Replace battery with STIHL AP battery only. Use only original STIHL rechargeable batteries.Charge the battery before use.
WARNINGDo not open, drop, hit or damage battery. Never insert objects into the battery's cooling slots, since they may damage the battery. The battery contains safety features and devices which, if damaged, may cause the battery to generate heat, rupture or ignite. Never use or charge a defective, damaged, cracked or deformed battery.Immediately discontinue use of the battery if, while using, charging or storing, it emits an unusual smell, feels hot or appears abnormal in any other way.
WARNINGFluid may leak from the battery if it is damaged or is not used properly – avoid contact with the skin! Leaking battery fluid can cause skin irritation and chemical burns. In the event of accidental contact, immediately rinse thoroughly with mild soap and water. If fluid gets into your eye(s), do not rub your eye(s) but rinse water over the open eye(s) for 15 minutes at least. Also seek medical attention immediately.
WARNINGNever bridge (short circuit) the battery terminals with metallic objects, since this may damage the battery and possibly cause a fire. Keep a battery that is not in
Risk of fire, explosion and/or burns, including chemical burns. Do not disassemble, crush, heat above 212 °F (100 °C), expose to fire or inciner-ate. Never expose the battery to microwaves or high pressures.
Use and store the bat-tery only within a temperature range from 14 °F (-10 °C) and no more than 122 °F (+ 50 °C). Protect the bat-tery from direct sunlight.
Protect from rain – do not immerse in fluids.
RMA 370 5
English
use away from metal objects (e.g. nails, coins, jewelry). Do not use metal containers for transporting batteries.Store the battery out of reach of children in a cool and dry area away from direct sunlight and excess heat or cold (14 °F – 122 °F (-10 °C – +50 °C)).
Charger
Use only original STIHL chargers.Use only for charging geometrically matching STIHL type AP batteries with a maximum capacity of 10 Ah and a maximum voltage of 42 V.Never charge defective, leaking or deformed batteries.Connect the charger only to a power supply with the voltage and frequency specified on the rating plate. Always connect the charger to a properly installed wall outlet.Never use a charger with damaged housing, damaged power supply cord or damaged plug. Do not operate the charger if it has received a sharp blow, been dropped or otherwise damaged in any way.Do not open or dissassemble charger – there are no user serviceable parts inside.Store charger out of the reach of children.
Operate charger at temperatures between 41 °F (5 °C) and 104 °F (40 °C).Allow the charger to cool down normally – do not cover it.Never bridge the contacts of the charger with metallic objects (e.g. nails, coins, jewelry) – short circuit. The charger may be damaged by a short circuit.In the event of smoke or fire in the charger, disconnect it from outlet immediately.
WARNINGTo reduce the risk of electric shock or short circuit, do not insert any objects into the charger's cooling slots.
WARNINGThe charger heats up during the charging process. Do not operate on an easily combustible surface (e.g. paper, texiles) or in an easily combustible environment – risk of fire.
WARNINGDo not operate in a hazardous location, i.e. in a location where there are combustible liquids (fumes), vapors or dusts. Chargers can produce sparks, which may ignite the dust or vapors – risk of explosion.
Never jerk the power supply cord to disconnect it from the wall outlet. To unplug, grasp the plug, not the cord. Have a damaged power supply cord repaired by an experienced electrician.Do not use the power supply cord for any other purpose, e.g. for carrying or hanging up the charger.Never use power supply cords that do not comply with regulations.Make sure the power supply cord is located and/or marked so that it will not be stepped on, tripped over, come in contact with sharp edges or moving parts or otherwise be subjected to damage or stress.An extension cord should not be used unless absolutely necessary. If an extension cord must be used, plug the charger into a properly wired 16 gauge (AWG 16) or heavier gauge extension cord with blades that are the same number, size and shapes as the blades on the charger.To reduce the risk of electric shock:– Always connect the charger to a
properly installed wall outlet.– Make sure the insulation of the
power supply cord and plug is in good condition.
Protect the charger from rain and dampness. Keep charger dry.
Use and store charger only indoors in dry rooms.
Check the charger's power supply cord and plug regularly for dam-age. If the power supply cord or plug is damaged, immediately disconnect the plug from the wall outlet to avoid the risk of electric shock.
RMA 3706
English
Unplug the power supply cord from the outlet when charger is not in use.Never store the battery in the charger.
THE USE OF THE POWER TOOL
Transporting the Unit
WARNINGTo reduce the risk of injury from blade contact, never carry or transport your power tool with the cutting blade moving.
WARNINGAlways switch off the power tool by releasing the switch lever, remove the fuse key and battery – even when you carry the unit for short distances. When transporting it in a vehicle, properly secure the lawn mower and its parts (e.g. grass box) to prevent turnover and damage. Use ropes or straps to secure the handles.
Lift your cordless lawn mower by the carrying grips only. See illustration above and illustration in "Main Parts" chapter. The cordless lawn mower can be carried in two ways:– One hand on the upper carrying grip
and one hand on the lower carrying grip.
– One hand on the upper carrying grip.
Always keep the cutting blade well at a safe distance from your body, especially your feet and legs.
Before Starting Work
WARNINGAlways check your lawn mower for proper condition and operation before starting, particularly the switch lever and switch lever lockout. The switch lever and the switch lever lockout must move freely and always spring back to the off position. Never attempt to modify the controls or safety devices.
WARNINGNever operate your lawn mower if it is damaged, improperly adjusted or maintained, or not completely or securely assembled.
Keep the handles clean and dry at all times; it is particularly important to keep them free of moisture, pitch, oil, grease or resin in order for you to maintain a firm grip and properly control your lawn mower.
WARNINGThe cutting blade must be properly tightened and in safe operating condition. Inspect for loose parts (nuts, screws, etc.). Regularly check the condition and tightness of the cutting blade – with the motor stopped, fuse key and battery removed! Replace damaged cutting blade before using the power tool.Do not use your lawn mower if safety devices are damaged, the coasting brake does not operate or safety devices are not properly mounted and in working order (e.g. ejection chute shield and lower rear flap).Inspect grass box frequently and replace with authorized replacement if there are signs of wear or deterioration. Never use your machine with a damaged grass box.Check contacts in battery compartment for foreign matter. Keep clean.Fit the battery correctly.Operate the machine only with the battery compartment closed.
Remove the fuse key and battery from the power tool. This avoids the risk of the motor starting unintentionally.
9929
BA
031
KN
RMA 370 7
English
WARNING
WARNINGYour lawn mower is a one-person machine. Do not allow other persons in the general work area, even when starting.
During Operation
Holding and Controlling the Power ToolAlways hold the unit firmly with both hands on the handle bar and switch lever while you are working. Wrap your fingers and thumbs around the handle bar and switch lever when cutting.Never attempt to operate your power tool with one hand. Loss of control of the lawn mower resulting in serious or fatal injury may result.
WARNING
Stay behind the handle when the motor is running.
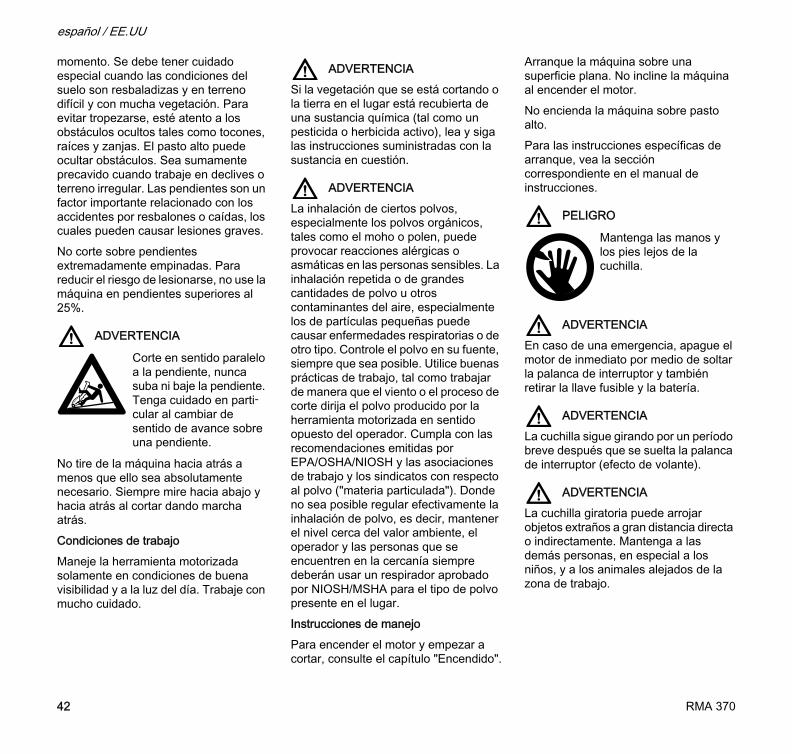
WARNINGDo not overreach. Keep proper footing and balance at all times. Special care must be taken in slippery conditions and in difficult, overgrown terrain. Watch for hidden obstacles such as tree stumps, roots and ditches to avoid stumbling. Tall grass can hide obstacles. Be extremely cautious when working on slopes or uneven ground. Slopes are a major factor related to slip and fall accidents, which in turn can result in severe injury.Do not mow extremely steep slopes. To reduce the risk of injury, do not operate your machine on slopes with a grade of more than 25%.
WARNING
Do not pull machine backwards unless absolutely necessary. Always look down and behind before and while mowing backwards.Working ConditionsOperate your power tool only under good visibility and daylight conditions only. Work carefully.
WARNINGIf the vegetation being cut or the surrounding ground is coated with a chemical substance (such as an active pesticide or herbicide), read and follow the instructions and warnings that accompanied the substance at issue.
WARNINGInhalation of certain dusts, especially organic dusts such as mold or pollen, can cause susceptible persons to have an allergic or asthmatic reaction. Substantial or repeated inhalation of dust and other airborne contaminants, in particular those with a smaller particle size, may cause respiratory or other illnesses. Control dust at the source where possible. Use good work practices, such as operating the unit so that the wind or operating process directs any dust raised by the power tool away from the operator. Follow the recommendations of EPA / OSHA / NIOSH and occupational and trade
Before you start work, examine the area and clear it of toys, stones, glass, fence wire, metal, trash or other solid objects. The cutting blade could throw objects of this kind.
To reduce the risk of cut injuries, never put hands or feet near or under the machine or near ejection chute, keeping them. Never touch a moving cutting blade with your hand or any other part of your body. To reduce the risk of injury, never attempt to clear clippings or debris from cutting blade, deck or ejection chute without first switch-ing off motor and removing fuse key and battery.
Mow parallel to the slope, never up or down. Take particular care when changing direction on slopes.
RMA 3708
English
associations with respect to dust ("particulate matter.") When the inhalation of dust cannot be substantially controlled, i.e., kept at or near the ambient (background) level, the operator and any bystanders should wear a respirator approved by NIOSH / MSHA for the type of dust encountered.Operating InstructionsTo switch on motor and begin mowing, see chapter "Switching On".Start the machine on a flat surface. Do not tilt the machine when you switch on the motor.Do not switch on the machine in high grass.For specific starting instructions, see the appropriate section of your instruction manual.
DANGER
WARNINGIn the event of an emergency, switch off the motor immediately by releasing the switch lever and remove the fuse key and battery.
WARNINGThe cutting blade continues to rotate for a short period after the switch lever is released (flywheel effect.)
WARNINGThe rotating cutting blade may fling foreign objects directly or by ricochet a great distance. Keep bystanders, especially children, and animals away from the work area.
To reduce the risk of injury ensure that bystanders are at least 50 feet (15 m) away. To reduce the risk of damage to property, also maintain this distance from such objects as vehicles or windows.Switch off the motor immediately by releasing the switch lever if you are approached.
WARNINGAvoid contact with electrical cables or wires – risk of electric shock.Operate the machine at walking pace only – never run.Always switch off the motor by releasing the switch lever before wheeling the machine over surfaces other than grass, to and from the grassed area, and when you remove the grass box. The machine must not be used for transporting persons, particularly children, or objects.Do not attach objects to the handlebar.
WARNINGDuring cutting, check the tightness and the condition of the cutting blade at regular short intervals with the motor and blade stopped and the fuse key and battery removed. If the behavior of the blade changes during use, switch off the motor immediately, wait until the cutting blade stops, remove the fuse key and battery and check the screw securing the blade for tightness and the blade for cracks, wear and damage. Never examine the cutting blade while the motor is running. Never open the ejection chute shield or remove the grass box while the motor is running. There is otherwise a risk of injury from the rotating cutting blade.If the machine should start to vibrate abnormally, stop the motor, remove the fuse key and battery and check for the cause immediately. Vibration is generelly a warning of trouble.
WARNINGIf the cutting blade becomes obstructed, or if there is a blockage in the discharge duct or in the area of the cutting blade, always switch off the motor, remove the fuse key and battery and make sure the cutting blade has stopped before cleaning.In the event of contact with foreign matter, check the cutting blade for signs of damage. Do not operate your power tool with a damaged or bent blade shaft or motor shaft.
Keep Hands and Feet away from cutting blade.
15 m (50 ft)
RMA 370 9
English
WARNINGTo reduce the risk of unintentional rotation of the cutting blade and injury, always switch off the motor and remove fuse key and battery before replacing the cutting blade. Always switch off the motor by releasing the switch lever before adjusting the cutting height.
WARNING
Do not overload your machine during operation to a point where the motor slows down. If motor speed begins to slow, select a higher cutting height or reduce the feed rate.Switching the machine on and off frequently within a short period may cause the motor to overheat.If the motor is thermally overloaded during operation, it is designed to cut out automatically and must cool down before it is restarted. Causes of overload:– Mowing overlong grass or cutting
height set too low.– Feed rate too high from walking too
fast.– Dirty cooling air inlets (intake slots).Do not mow at temperatures below 41 °F (+5 °C).
Do not mow wet grass.
Do not leave the machine outdoors in the rain.
MAINTENANCE, REPAIR AND STORING
If you make a warranty claim for a component which has not been serviced or maintained properly or if nonapproved replacement parts were used, STIHL may deny coverage.
WARNINGUse only identical STIHL replacement parts for maintenance and repair, including the cutting blade. Use of non-STIHL parts may cause serious or fatal injury.Strictly follow the maintenance and repair instructions in the appropriate section of your instruction manual. Please also refer to the maintenance chart in this manual.
WARNINGAlways switch off the motor, remove the fuse key and battery and make sure that the cutting blade is stopped before doing any maintenance or repair work or cleaning the power tool. Do not attempt any maintenance or repair work not described in your instruction manual. Have such work performed by your STIHL servicing dealer only.Tighten all nuts, bolts and screws after each use.Regularly check the electrical contacts and ensure that the insulation of the power cord and plug of the charger is in good condition and shows no sign of aging.Electrical components, e.g. power cord of charger, may only be repaired or replaced by a qualified electrician.Clean plastic components with a cloth. Do not use aggressive detergents. They may damage the plastic.Clean cooling air openings in motor housing as necessary.Do not spray the machine with water.Do not clean your machine with a pressure washer. The solid jet of water may damage parts of the machine.Keep the battery guides free from foreign matter – clean as necessary.Maintain or replace warning and instruction labels as necessary.Store the power tool in a dry, locked location with the fuse key and battery removed and out of reach of children.
Do not rely on the tool’s insulation against elec-tric shock. To reduce the risk of electrocution, never operate this power tool in the vicinity of any wires or cables (power, etc.) which may be carry-ing electric current.
The drive motor is not waterproof. Never work with the lawn mower in the rain or in wet or very damp locations.
Always remove the fuse key and battery from the lawn mower before carry-ing out any repairs or maintenance work, such as replacing the cutting blade. This avoids the risk of the motor starting unintentionally.
RMA 37010
English
The power tool is operated with a rechargeable battery. Use only STIHL chargers to recharge the battery.
Data exchange
The power tool, battery and charger communicate with each other. The charger charges the battery and the battery supplies the necessary power only if data exchange functions properly. For this reason you should operate your power tool only with the approved STIHL batteries and STIHL chargers.
Mowing
A beautiful and dense lawn is obtained by frequent mowing. The lawn should not be kept too short in hot and dry weather because it will otherwise be burned by the sun and become unattractive. A sharp blade produces a more attractive finish than a dull one. Sharpen the blade regularly – see also "Sharpening the Cutting Blade".Cuttings can be collected in the grassbox or ejected to the rear.
Mowing on Slopes
Your cordless lawn mower can be used on gradients of up to 25°.
Cutting Performance
The cutting performance depends on the type of grass and the height of cut selected. Cutting performance is increased by:– Mowing frequently.– Increasing the height of cut.– Reducing mowing speed.– Allowing lawn to dry before mowing.
Disposal
Do not throw cuttings in the garbage can – they can be composted!
Description of Operation Using the Unit
RMA 370 11
English
Mulch Kit
The mulch kit, consisting of a mulching blade, blade mounting screw and mulch plug, converts the conventional mower into a multi-purpose mower. The normal mowing blade is replaced by a mulching blade.During mowing, clippings can be collected in the grassbox in the usual way. Alternatively, the grassbox can be removed and the rear ejection chute used. For mulching, the grassbox is removed and the mulch plug fitted, see instruction sheet supplied with mulch kit.
Mulching
In the mulching mode, the grass clippings are recirculated in the airstream, recut several times and then blown back onto the lawn. The fine clippings remain on the lawn surface where they decompose quickly and serve as a natural fertilizer. Frequent mulching produces a beautiful, dense lawn. One third of the grass height should be cut in this process. Recommendation: Mulch at least twice a week in spring and at least once a week in summer/autumn.
Mulching Result
Prerequisites for a good mulching result:– Optimum cutting height (between
setting 3 and 5)– Lawn should be dry– Use properly sharpened blades– Low mowing speed– Vary mowing direction and overlap
the cuts– Mow very high grass in gradual
stagesThe housing can become clogged and block the blade if the cutting height is too low or the grass is wet.
Replacing the Blade
Blade replacement and maintenance – see "Sharpening the Cutting Blade".
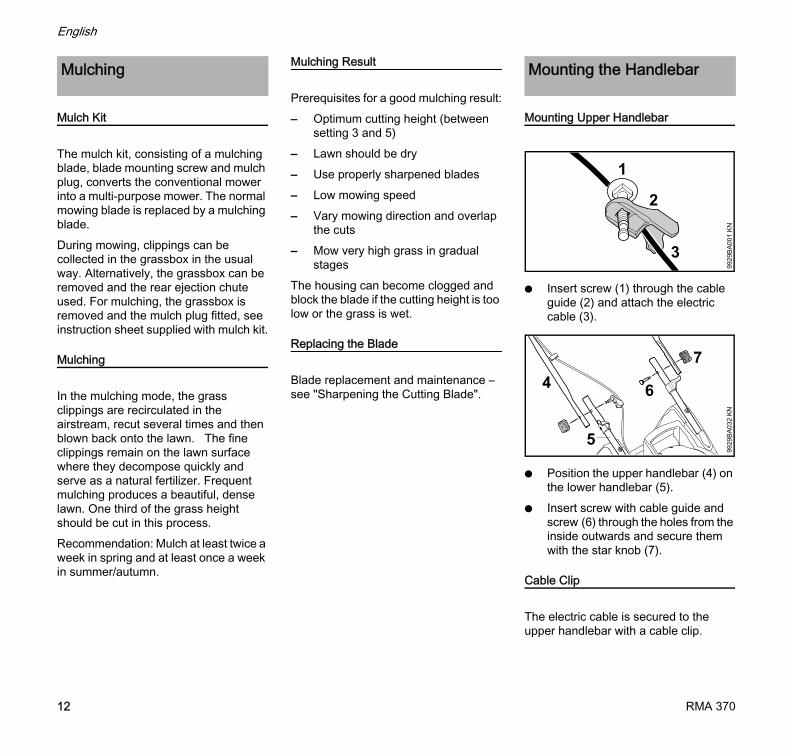
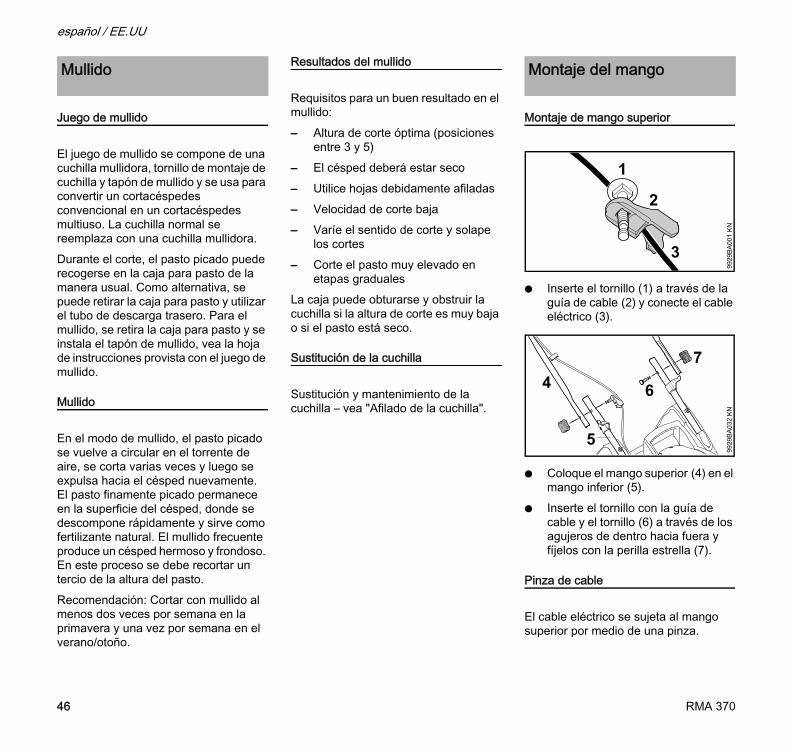
Mounting Upper Handlebar
N Insert screw (1) through the cable guide (2) and attach the electric cable (3).
N Position the upper handlebar (4) on the lower handlebar (5).
N Insert screw with cable guide and screw (6) through the holes from the inside outwards and secure them with the star knob (7).
Cable Clip
The electric cable is secured to the upper handlebar with a cable clip.
Mulching Mounting the Handlebar
1
3
2
9929
BA
001
KN
6
5
9929
BA
032
KN
47
RMA 37012
English
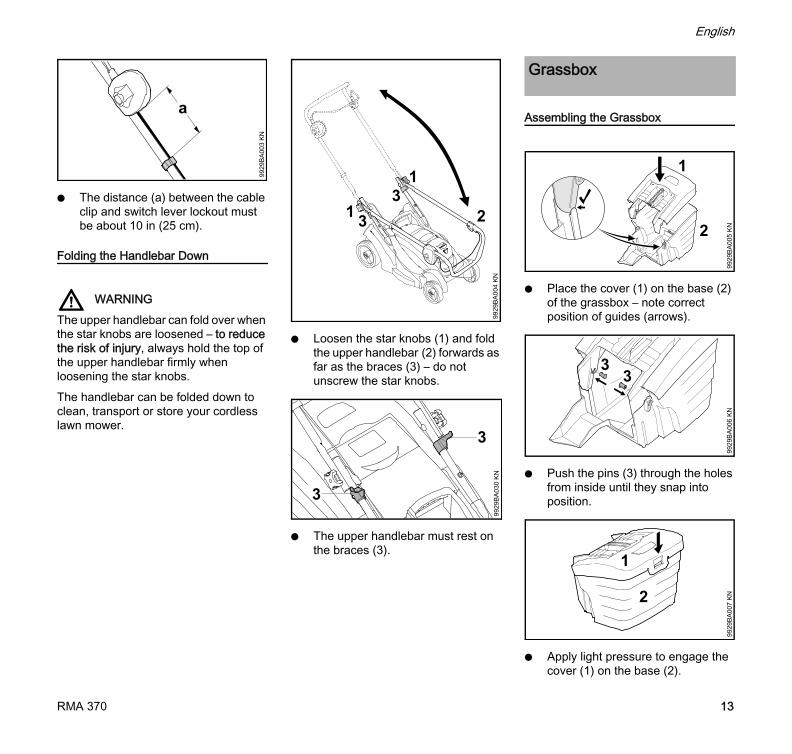
N The distance (a) between the cable clip and switch lever lockout must be about 10 in (25 cm).
Folding the Handlebar Down
WARNINGThe upper handlebar can fold over when the star knobs are loosened – to reduce the risk of injury, always hold the top of the upper handlebar firmly when loosening the star knobs.The handlebar can be folded down to clean, transport or store your cordless lawn mower.
N Loosen the star knobs (1) and fold the upper handlebar (2) forwards as far as the braces (3) – do not unscrew the star knobs.
N The upper handlebar must rest on the braces (3).
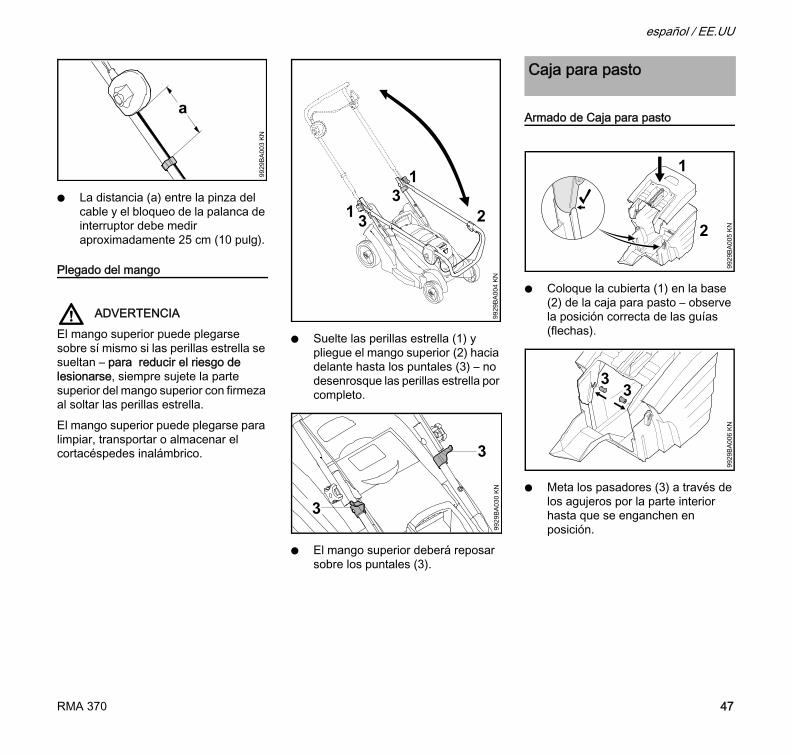
Assembling the Grassbox
N Place the cover (1) on the base (2) of the grassbox – note correct position of guides (arrows).
N Push the pins (3) through the holes from inside until they snap into position.
N Apply light pressure to engage the cover (1) on the base (2).
9929
BA
003
KN
a
33
1
1
9929
BA
004
KN
2
9929
BA
030
KN
3
3
Grassbox
1
9929
BA
005
KN2
33
9929
BA
006
KN
9929
BA
007
KN
1
2
RMA 370 13
English
Attaching the Grassbox
N Open the flap (1) and hold it in position.
N Engage the lugs (3) of the grassbox (2) in the recesses (4) on the back of the mower.
N Close the flap (1).
Full Indicator
The grassbox is equipped with a 'full' indicator (1). The 'full' indicator is lifted up by the airstream created by the rotating cutting blade. The grassbox fills up with cuttings as mowing progresses. This reduces the airstream and the 'full' indicator drops.
Emptying the Grassbox
N Switch off the machine.
N Open the flap (1) and hold it in position.
N Lift the grassbox (2) and remove it to the rear.
N Close the flap (1).
N Open the grassbox lock (3) and swing the cover (4) open.
N Hold the grassbox by the carrying grips (5) and empty it.
The mower can be set to five different cutting heights – see also "Specifications".
Setting 1 = lowest cutting heightSetting 5 = highest cutting heightSetting S: not in all versions, market-specificIn order to reduce the risk of damage, use the lowest cutting height setting only on perfectly flat lawns (without bumps and hollows).
Adjusting Cutting Height
N Ease the height adjusting lever (1) away from the housing until it is clear of the detents (2).
Higher cutting height:
44
1 3
9929
BA
033
KN
2
9929
BA
034
KN
1
1
9929
BA
035
KN2
5
3
54
9929
BA
011
KN4
Adjusting Cutting Height
9929
BA
050
KN
1
3
2
9929
BA
012
KN
RMA 37014
English
N Use the height adjusting lever (1) to raise the mower – the lever is pushed forwards.
Lower cutting height:N Use the height adjusting lever (1) to
push the mower down – the lever is pushed to the rear.
N Push the height adjusting lever (1) against the housing until the detents (2) engage.
The chosen height setting is indicated by the front detent (3).
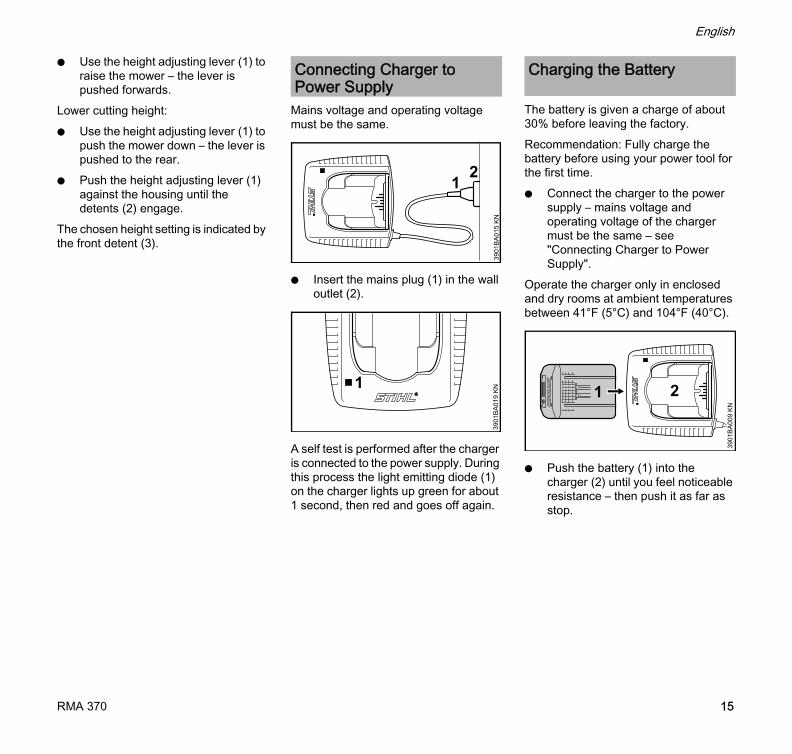
Mains voltage and operating voltage must be the same.
N Insert the mains plug (1) in the wall outlet (2).
A self test is performed after the charger is connected to the power supply. During this process the light emitting diode (1) on the charger lights up green for about 1 second, then red and goes off again.
The battery is given a charge of about 30% before leaving the factory.Recommendation: Fully charge the battery before using your power tool for the first time.N Connect the charger to the power
supply – mains voltage and operating voltage of the charger must be the same – see "Connecting Charger to Power Supply".
Operate the charger only in enclosed and dry rooms at ambient temperatures between 41°F (5°C) and 104°F (40°C).
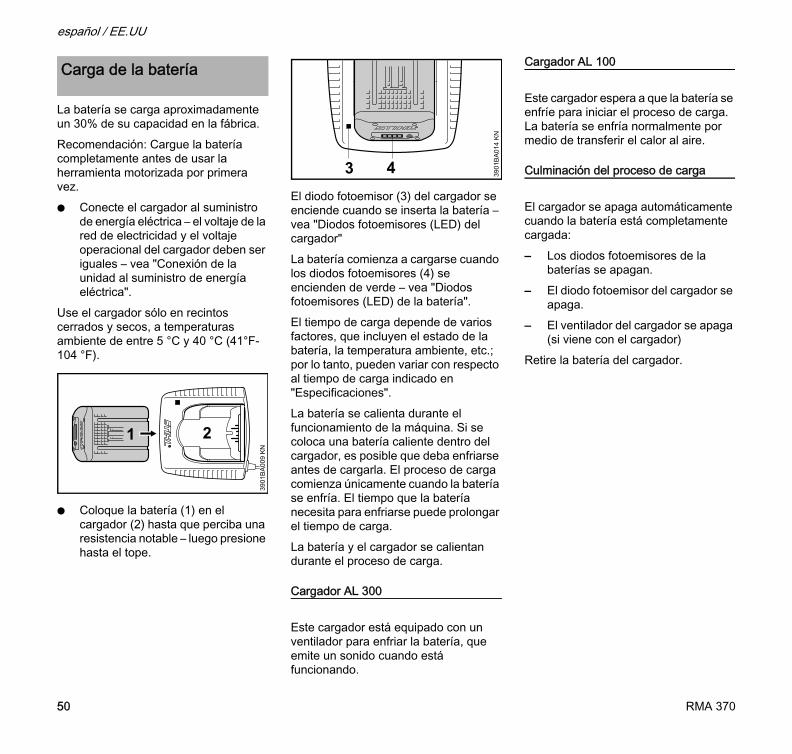
N Push the battery (1) into the charger (2) until you feel noticeable resistance – then push it as far as stop.
Connecting Charger to Power Supply
3901
BA
015
KN
21
1
3901
BA
019
KN
Charging the Battery
2
3901
BA
009
KN
RMA 370 15
English
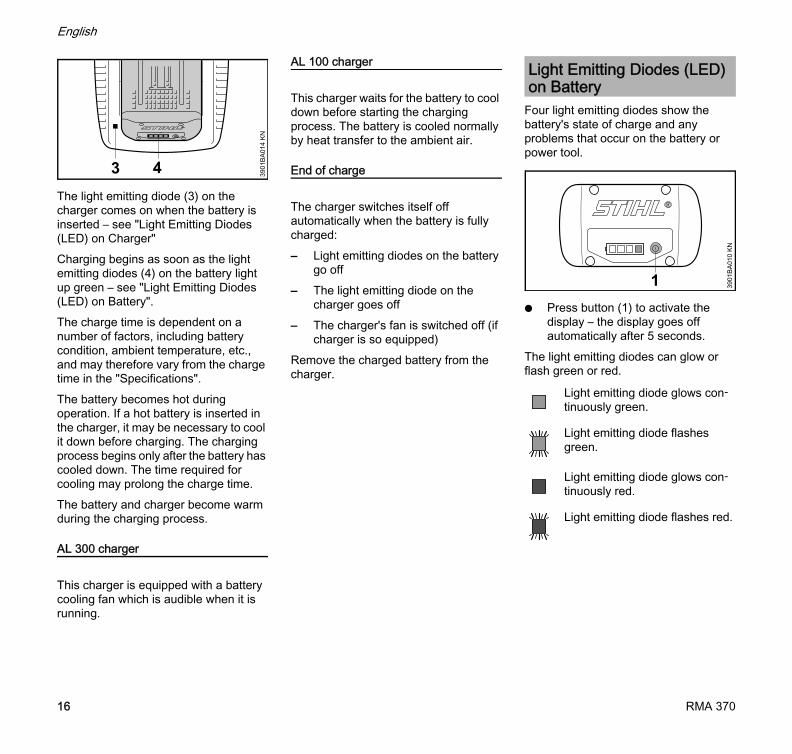
The light emitting diode (3) on the charger comes on when the battery is inserted – see "Light Emitting Diodes (LED) on Charger"Charging begins as soon as the light emitting diodes (4) on the battery light up green – see "Light Emitting Diodes (LED) on Battery". The charge time is dependent on a number of factors, including battery condition, ambient temperature, etc., and may therefore vary from the charge time in the "Specifications".The battery becomes hot during operation. If a hot battery is inserted in the charger, it may be necessary to cool it down before charging. The charging process begins only after the battery has cooled down. The time required for cooling may prolong the charge time.The battery and charger become warm during the charging process.
AL 300 charger
This charger is equipped with a battery cooling fan which is audible when it is running.
AL 100 charger
This charger waits for the battery to cool down before starting the charging process. The battery is cooled normally by heat transfer to the ambient air.
End of charge
The charger switches itself off automatically when the battery is fully charged:– Light emitting diodes on the battery
go off– The light emitting diode on the
charger goes off– The charger's fan is switched off (if
charger is so equipped)Remove the charged battery from the charger.
Four light emitting diodes show the battery's state of charge and any problems that occur on the battery or power tool.
N Press button (1) to activate the display – the display goes off automatically after 5 seconds.
The light emitting diodes can glow or flash green or red.
4 3901
BA
014
KN
3
Light Emitting Diodes (LED) on Battery
Light emitting diode glows con-tinuously green.
Light emitting diode flashes green.
Light emitting diode glows con-tinuously red.
Light emitting diode flashes red.
1 3901
BA
010
KN
RMA 37016
English
During Charging Process
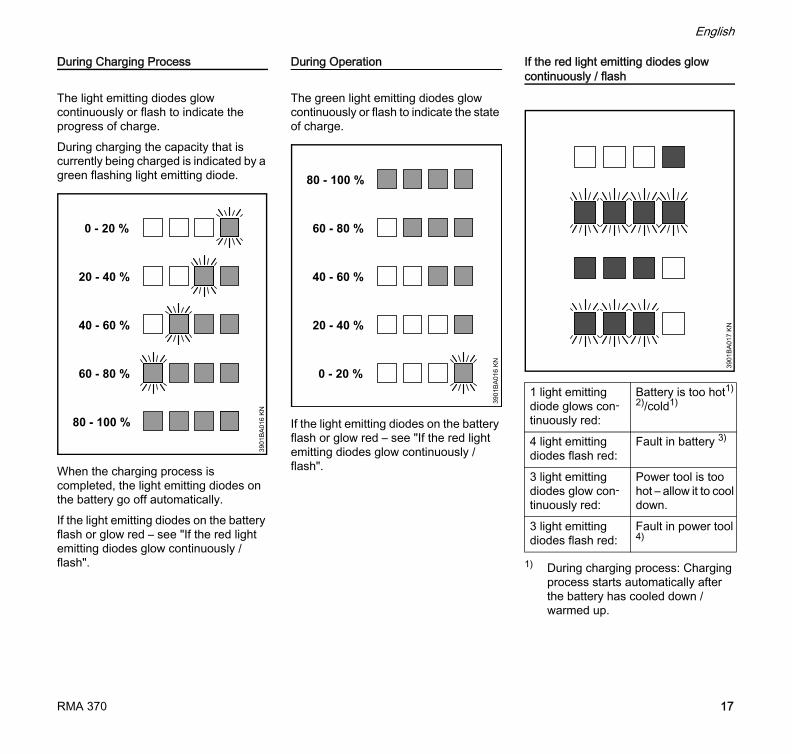
The light emitting diodes glow continuously or flash to indicate the progress of charge.During charging the capacity that is currently being charged is indicated by a green flashing light emitting diode.
When the charging process is completed, the light emitting diodes on the battery go off automatically.If the light emitting diodes on the battery flash or glow red – see "If the red light emitting diodes glow continuously / flash".
During Operation
The green light emitting diodes glow continuously or flash to indicate the state of charge.
If the light emitting diodes on the battery flash or glow red – see "If the red light emitting diodes glow continuously / flash".
If the red light emitting diodes glow continuously / flash
1) During charging process: Charging process starts automatically after the battery has cooled down / warmed up.
4 light emitting diodes flash red:
Fault in battery 3)
3 light emitting diodes glow con-tinuously red:
Power tool is too hot – allow it to cool down.
3 light emitting diodes flash red:
Fault in power tool 4)
3901
BA
017
KN
RMA 370 17
English
The light emitting diode (1) lights up green or flashes red.
Green continuous light ...
... means the following:The battery– is being charged– is too hot and must cool down
before it is chargedSee also "Light Emitting Diodes (LED) on Battery".The green light emitting diode on the charger goes off as soon as the battery is fully charged.
Red flashing light ...
... means the following:– No electrical contact between
battery and charger – remove and refit the battery
– Faulty battery – see also "Light Emitting Diodes (LED) on Battery".
– Charger faulty – have checked by a servicing dealer. STIHL recommends a STIHL servicing dealer.
2) During operation: Power tool cuts out – allow battery to cool down; it may be necessary to take the battery out of the power tool for this purpose.
3) Electromagnetic interference or fault. Take the battery out of the power tool and refit it. Switch on the power tool – if the light emitting diodes still flash, the battery is faulty and must be replaced.
4) Electromagnetic interference or fault. Take the battery out of the power tool and refit it. Switch on the power tool – if the light emitting diodes still flash, the power tool is faulty and must be checked by a servicing dealer – STIHL recommends an authorized STIHL servicing dealer.
Light Emitting Diodes (LED) on Charger
1
3901
BA
019
KN
RMA 37018
English
The battery is given a charge of about 30% before leaving the factory.Recommendation: Fully charge the battery before using your power tool for the first time.
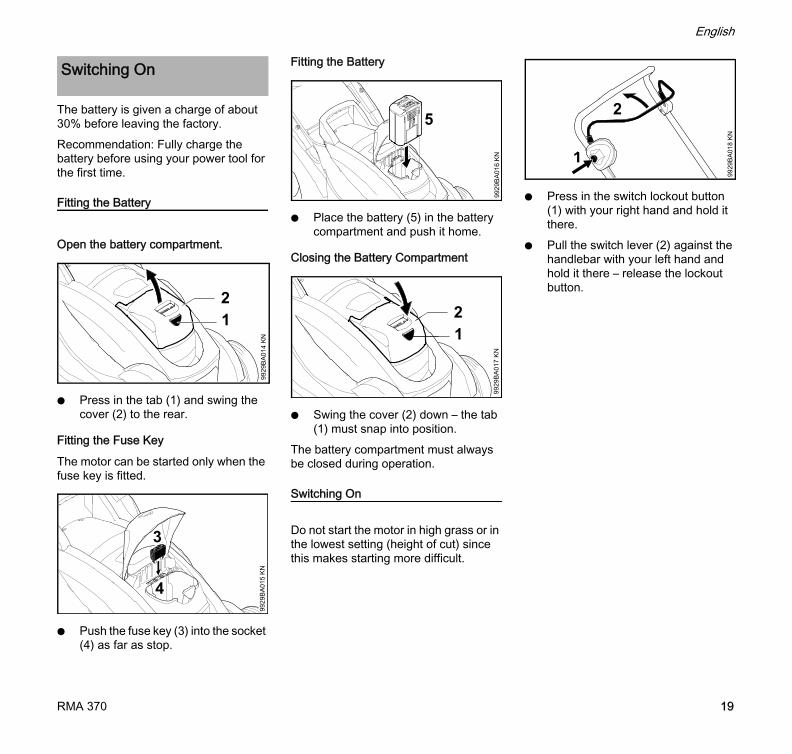
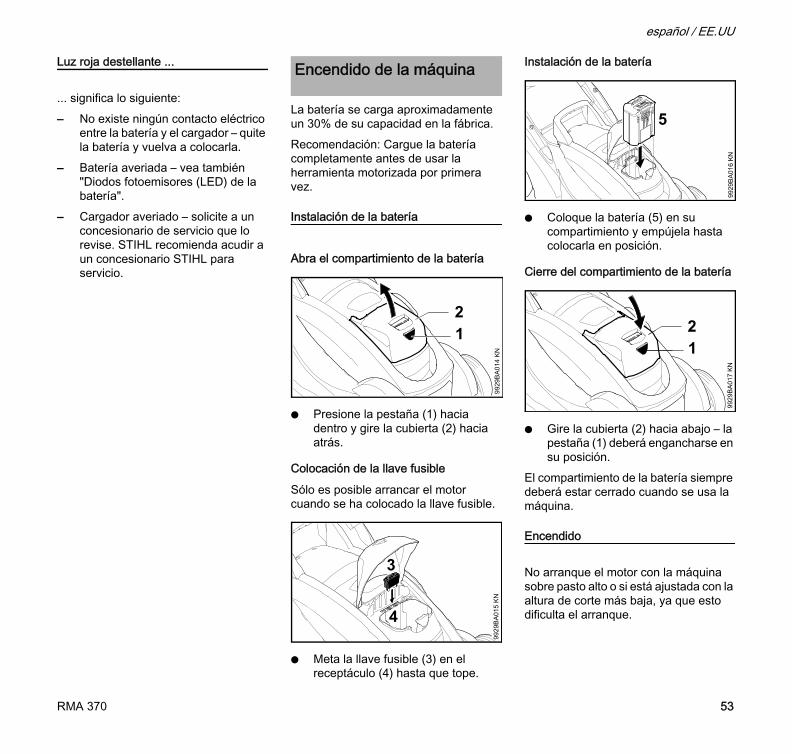
Fitting the Battery
Open the battery compartment.
N Press in the tab (1) and swing the cover (2) to the rear.
Fitting the Fuse Key
The motor can be started only when the fuse key is fitted.
N Push the fuse key (3) into the socket (4) as far as stop.
Fitting the Battery
N Place the battery (5) in the battery compartment and push it home.
Closing the Battery Compartment
N Swing the cover (2) down – the tab (1) must snap into position.
The battery compartment must always be closed during operation.
Switching On
Do not start the motor in high grass or in the lowest setting (height of cut) since this makes starting more difficult.
N Press in the switch lockout button (1) with your right hand and hold it there.
N Pull the switch lever (2) against the handlebar with your left hand and hold it there – release the lockout button.
Switching On
9929
BA
014
KN
21
4
3
9929
BA
015
KN
9929
BA
016
KN
5
9929
BA
017
KN
21
1
9929
BA
018
KN
2
RMA 370 19
English
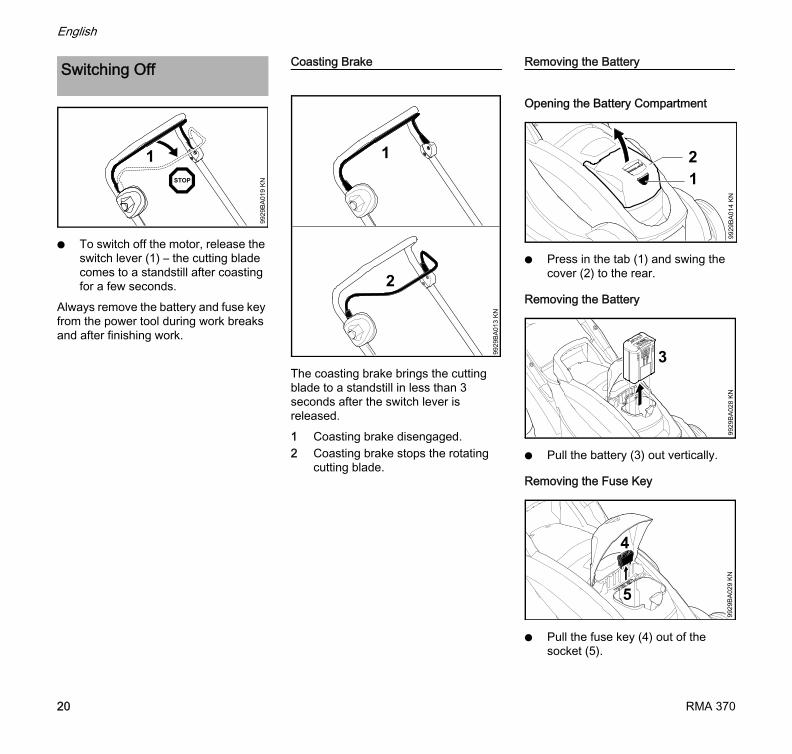
N To switch off the motor, release the switch lever (1) – the cutting blade comes to a standstill after coasting for a few seconds.
Always remove the battery and fuse key from the power tool during work breaks and after finishing work.
Coasting Brake
The coasting brake brings the cutting blade to a standstill in less than 3 seconds after the switch lever is released. 1 Coasting brake disengaged.2 Coasting brake stops the rotating
cutting blade.
Removing the Battery
Opening the Battery Compartment
N Press in the tab (1) and swing the cover (2) to the rear.
Removing the Battery
N Pull the battery (3) out vertically.
Removing the Fuse Key
N Pull the fuse key (4) out of the socket (5).
Switching Off
9929
BA
019
KN
1
9929
BA
013
KN
2
1
9929
BA
014
KN
21
9929
BA
028
KN
3
4
5
9929
BA
029
KN
RMA 37020
English
Closing the Battery Compartment
N Swing the cover (2) down – the tab (1) must snap into position.
When the cordless lawn mower is not in use, store it so that it does not endanger others – remove te battery and the fuse key from the machine. Secure it against unauthorized use.
N Remove the battery.
N Pull the fuse key (1) out of the socket (2) and keep it in a separate place.
N Remove the grassbox.N Allow power tool to cool down
completely.N Thoroughly clean the machine.N Lubricate moving parts with oil or
grease.N Store the machine in a dry and
secure location out of the reach of children and other unauthorized persons.
Storing the Battery
N Take the battery out of the power tool or the charger.
N Store indoors in a dry and safe location. Keep it out of the reach of children and other unauthorized persons and protected from contamination.
N Do not store spare batteries unused – use in rotation.
To ensure maximum battery life:N Store at temperatures between
50°F (10°C) and 68°F (20°C).N Store with a charge of about 30%.
Storing the Charger
N Remove the battery.N Disconnect the plug from the wall
outlet.N Store the charger indoors in a dry
and secure location. Keep it out of the reach of children and other unauthorized persons and protected from contamination.
9929
BA
017
KN
21
Storing the Machine
9929
BA
020
KN
RMA 370 21
English
Clean the unit thoroughly after each use. Careful maintenance protects the unit from damage and extends its useful life.
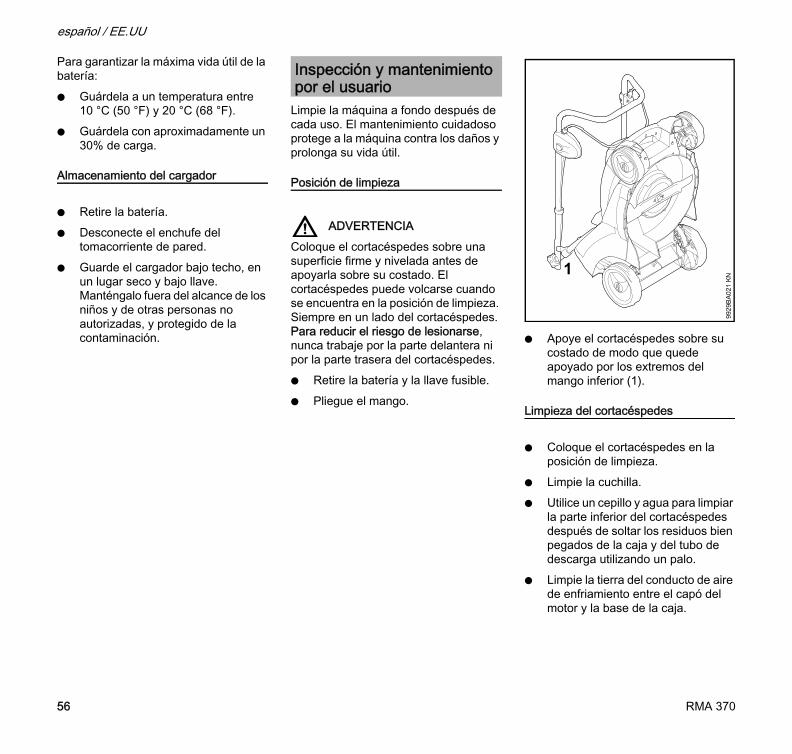
Cleaning Position
WARNINGPlace your mower on a firm level surface before standing it on end. The mower can topple over when it is in the cleaning position. Always to one side of the mower. To reduce the risk of injury, never work in front of or behind the mower.N Remove the battery and fuse key.N Fold the handlebar.
N Stand the mower on end so that it is supported by the ends of the lower handlebar (1).
Cleaning the Mower
N Put the mower in the cleaning position.
N Clean the cutting blade.N Use a brush and water to clean the
underside of the mower after loosening stubborn grass residue from the housing and ejection chute with a stick.
N Clean dirt from cooling air duct between motor hood and housing base.
If dirt cannot be removed with water, brush or cloth, STIHL recommends you use a special cleaner (e.g. STIHL special cleaner).
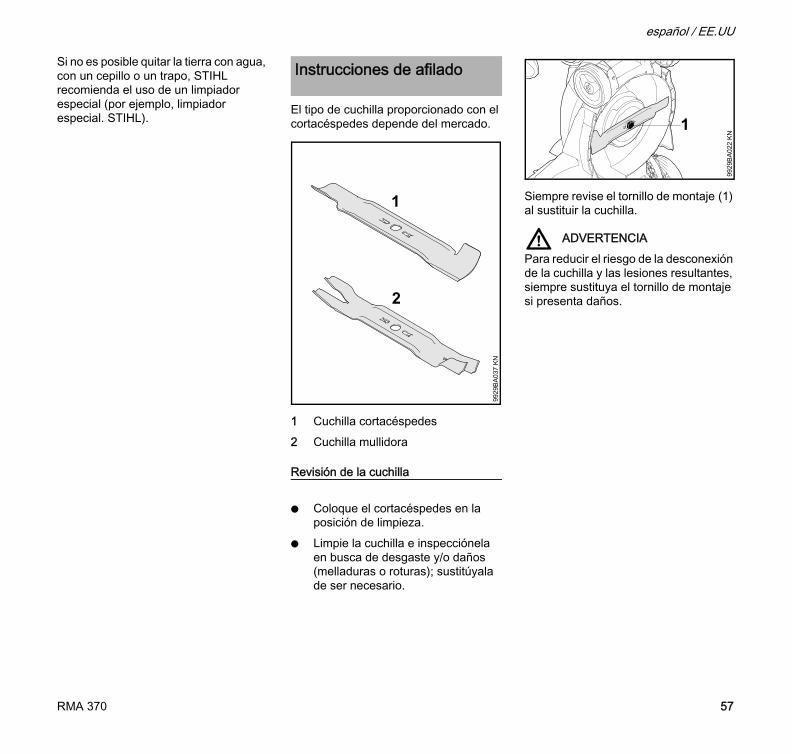
The type of blade initially supplied with the mower depends on the market.
1 Mowing blade2 Mulching blade
Checking the Blade
N Put the mower in the cleaning position.
N Clean the cutting blade and inspect it for wear and/or damage (nicks or cracks), replace if necessary.
Inspection and Maintenance by User
9929
BA
021
KN1
Sharpening Instructions
1
2
9929
BA
037
KN
RMA 37022
English
Always check the mounting screw (1) when replacing the blade.
WARNINGTo reduce the risk of blade detachment and resulting injury, always replace a damaged mounting screw.
Mowing blade
N Use a caliper gauge to check blade thickness at a minimum of 5 different points.
N Place a ruler on the front edge of the blade and measure how far it has been filed back.
Blade thickness must not be less than a = 0.06 in (1.6 mm) at any point.Cutting edges may be filed back no more than b = 0.2 in (5 mm).
Mulching blade
N Use a caliper gauge to check blade thickness at a minimum of 5 different points.
N Place a ruler on the rear edge of the blade and measure how far it has been filed back.
Blade thickness must not be less than a = 0.06 in (1.6 mm) at any point.Blade width at the cutting edges must be a minimum of b = 0.87 in (22 mm).
1
9929
BA
022
KN
9929
BA
040
KN
b
a
bb
a
9929
BA
038
KN
RMA 370 23
English
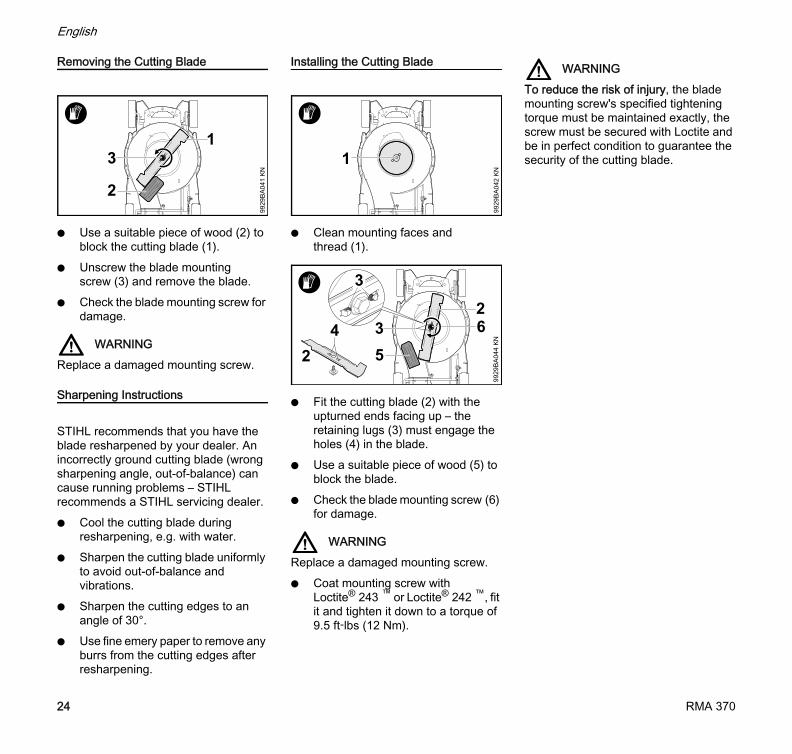
Removing the Cutting Blade
N Use a suitable piece of wood (2) to block the cutting blade (1).
N Unscrew the blade mounting screw (3) and remove the blade.
N Check the blade mounting screw for damage.
WARNINGReplace a damaged mounting screw.
Sharpening Instructions
STIHL recommends that you have the blade resharpened by your dealer. An incorrectly ground cutting blade (wrong sharpening angle, out-of-balance) can cause running problems – STIHL recommends a STIHL servicing dealer.N Cool the cutting blade during
resharpening, e.g. with water.N Sharpen the cutting blade uniformly
to avoid out-of-balance and vibrations.
N Sharpen the cutting edges to an angle of 30°.
N Use fine emery paper to remove any burrs from the cutting edges after resharpening.
Installing the Cutting Blade
N Clean mounting faces and thread (1).
N Fit the cutting blade (2) with the upturned ends facing up – the retaining lugs (3) must engage the holes (4) in the blade.
N Use a suitable piece of wood (5) to block the blade.
N Check the blade mounting screw (6) for damage.
WARNINGReplace a damaged mounting screw. N Coat mounting screw with
Loctite® 243 ™ or Loctite® 242 ™, fit it and tighten it down to a torque of 9.5 ft-lbs (12 Nm).
WARNINGTo reduce the risk of injury, the blade mounting screw's specified tightening torque must be maintained exactly, the screw must be secured with Loctite and be in perfect condition to guarantee the security of the cutting blade.
1
9929
BA
041
KN
2
3
9929
BA
042
KN
1
32
4 62
9929
BA
044
KN
5
RMA 37024
English
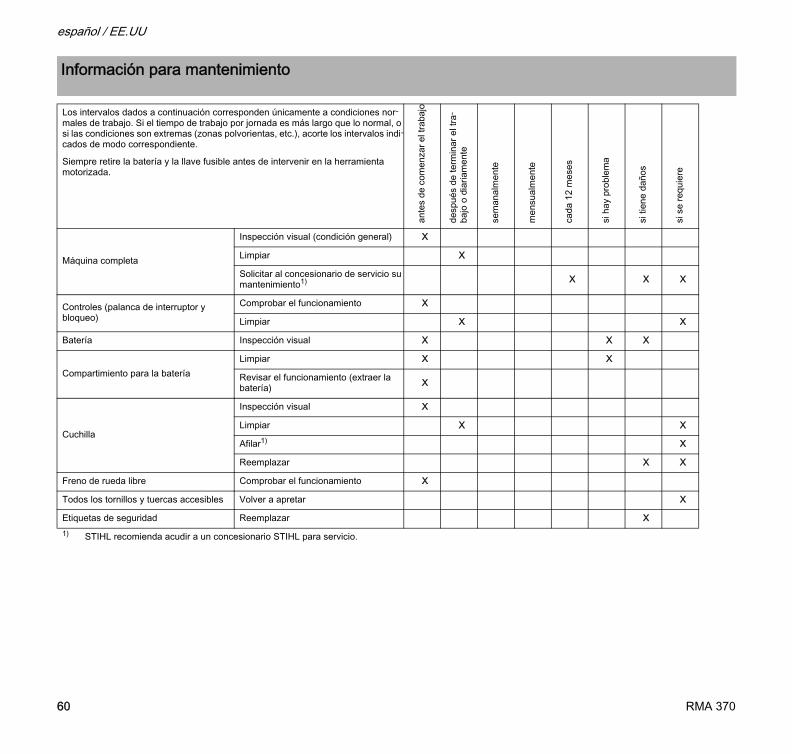
Maintenance and Care
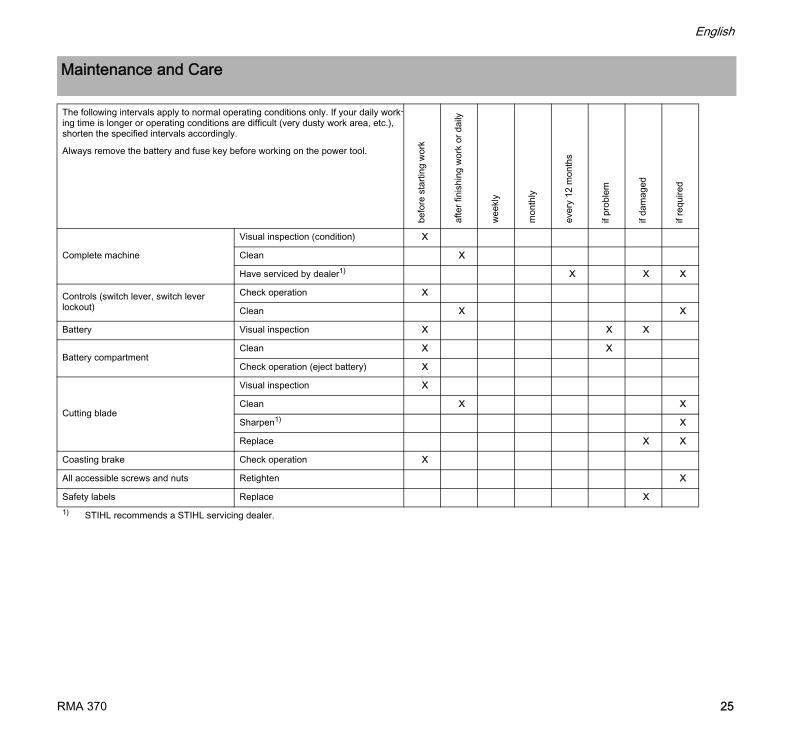
The following intervals apply to normal operating conditions only. If your daily work-ing time is longer or operating conditions are difficult (very dusty work area, etc.), shorten the specified intervals accordingly.
Always remove the battery and fuse key before working on the power tool.
befo
re s
tarti
ng w
ork
afte
r fin
ishi
ng w
ork
or d
aily
wee
kly
mon
thly
ever
y 12
mon
ths
if pr
oble
m
if da
mag
ed
if re
quire
d
Complete machine
Visual inspection (condition) X
Clean X
Have serviced by dealer1) X X X
Controls (switch lever, switch lever lockout)
Check operation X
Clean X X
Battery Visual inspection X X X
Battery compartmentClean X X
Check operation (eject battery) X
Cutting blade
Visual inspection X
Clean X X
Sharpen1) X
Replace X X
Coasting brake Check operation X
All accessible screws and nuts Retighten X
Safety labels Replace X1) STIHL recommends a STIHL servicing dealer.
RMA 370 25
English
1 Upper Handlebar2 Switch Lever3 Switch Lever Lockout4 Grass Box5 Ejection Chute Shield (Rear Flap)6 Star Nut7 Brace8 Lower Handlebar9 Upper Carrying Grip10 Cutting Height Adjustment11 Battery Compartment Cover12 Battery Compartment13 Lower Carrying Grip14 Cutting Blade15 Power Supply Cord16 Charger17 Battery18 Fuse Key19 Trailing Shield20 Ejection Chute# Serial Number
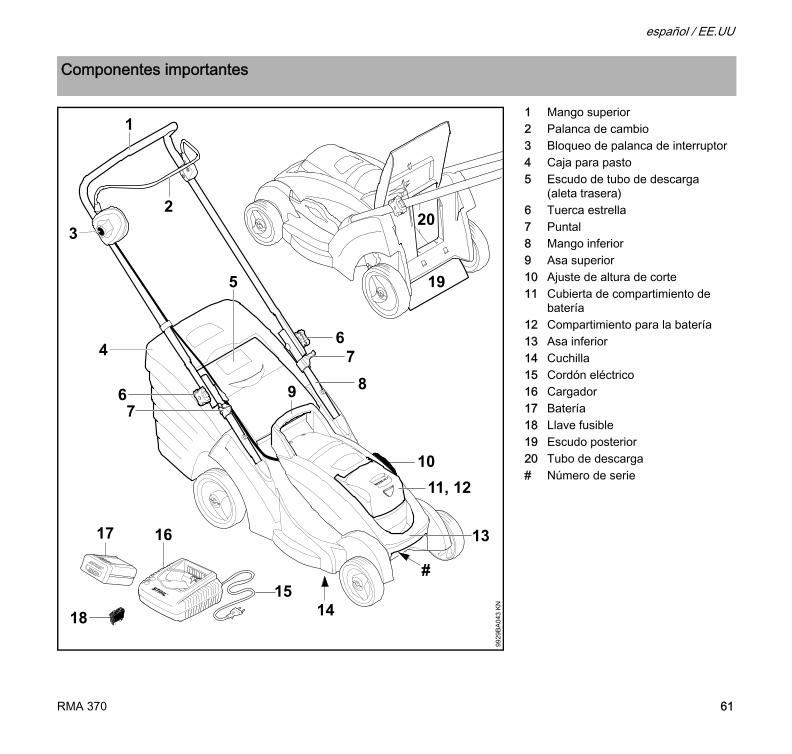
Main Parts
19
3
6
18
1
8
13
10
9929
BA
043
KN
2
46
5
9
11, 12
17 16
1514
7
7
20
#
RMA 37026
English
Definitions
1. Upper HandlebarFor control of machine during cutting work.
2. Switch LeverSwitches the motor on and off and controls the speed of the motor.
3. Switch Lever LockoutMust be depressed before the switch lever can be activated.
4. Grass BoxCollects cuttings during mowing.
5. Ejection Chute Shield (Rear Flap)When grass box is not mounted, this spring-loaded flap is designed to reduce the risk of injury from foreign objects flung backwards toward the operator by the cutting attachment and from contact with the cutting attachment.
6. Star NutEnables upper handelbar to be folded down and secured to lower handlebar.
7. BraceSupports the upper handlebar in storing and transport position.
8. Lower HandlebarConnects upper handlebar to motor housing.
9. Upper Carrying GripFor transporting the unit.
10. Cutting Height AdjustmentUsed to set cutting blade to the required height.
11. Battery Compartment CoverCovers and protects battery compartment, battery and fuse key.
12. Battery CompartmentAccommodates the battery in the unit.
13. Lower Carrying GripFor transporting the unit.
14. Cutting BladeMetal cutting blade for cutting grass.
15. Power Supply CordSupplies electric current to charger.
16. ChargerCharges the battery.
17. BatterySupplies the motor with electrical power.
18. Fuse KeyInterrupts circuit between battery and motor.
19. Trailing ShieldThe trailing shield is designed to reduce the risk of injury from thrown objects and/or blade contact.
20. Ejection ChuteEjects cuttings during mowing.
Battery
The power tool can be operated with STIHL type AP batteries.The running time of the power tool depends on the battery's energy content (e.g. 160 Wh with AP 160).
Charger
Specifications
Type: Lithium-ion
AL 100Mains voltage: 120 VRated current: 1.3 AFrequency: 60 HzPower consumption: 75 WCharging current: 1.6 AInsulation: II, E (double
insulated)
AL 300Mains voltage: 120 VRated current: 4.7 AFrequency: 60 HzPower consumption: 330 WCharging current: 6.5 AInsulation: II, E (double
insulated)
RMA 370 27
English
Charging Times
Cutting blade
Grassbox
Weight
Transport
STIHL batteries fulfill the requirements stated in UN-Manual ST/SG/AC.10/11/Rev.5 Part III, Subsection 38.3. The user can transport STIHL batteries by road transport to the place where the machine is to be used without additional requirements.Observe national regulations for air or sea transport.
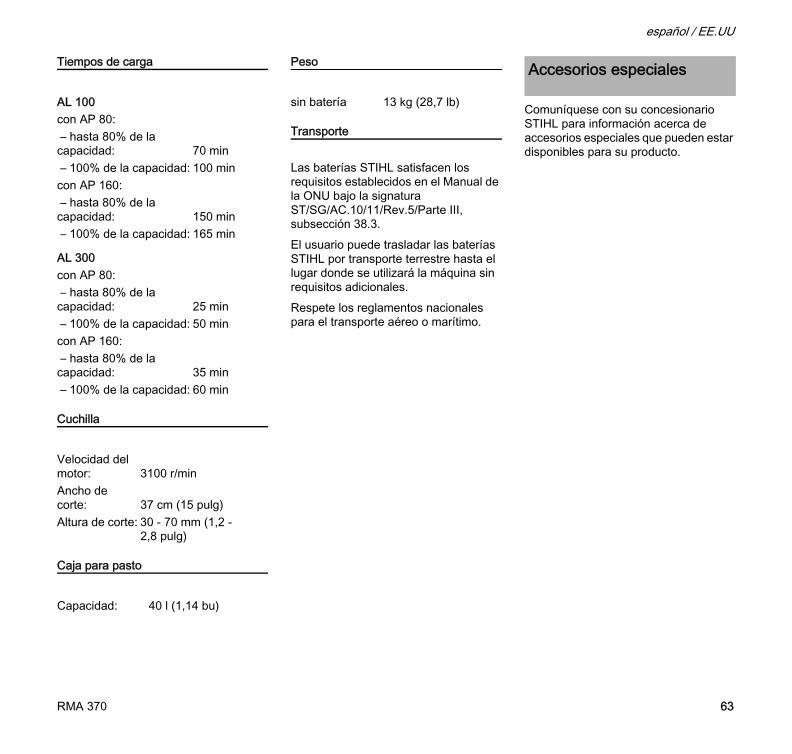
Contact your STIHL dealer for information regarding special accessories that may be available for your product.
AL 100with AP 80: – up to 80 % capacity: 70 min – up to 100 % capacity: 100 minwith AP 160: – up to 80 % capacity: 150 min – up to 100 % capacity: 165 min
AL 300with AP 80: – up to 80 % capacity: 25 min – up to 100 % capacity: 50 minwith AP 160: – up to 80 % capacity: 35 min – up to 100 % capacity: 60 min
Motor speed: 3,100 rpmCutting width: 15 in (37 cm)Cutting height: 1.2 - 2.8 in (30 - 70 mm)
Capacity: 1.14 bushels (40 l)
without battery 28.7 lbs (13 kg)
Special Accessories
RMA 37028
English
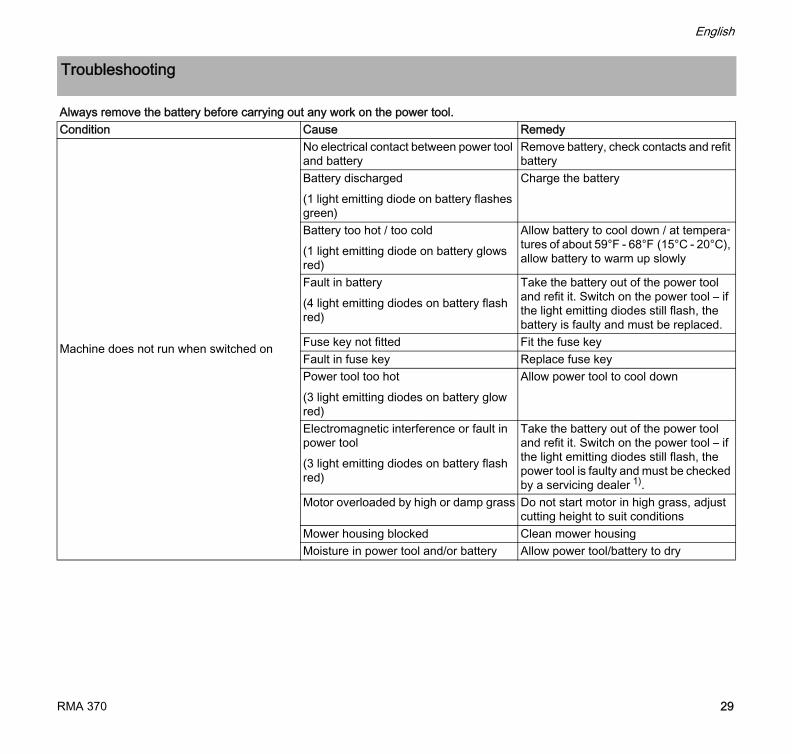
Troubleshooting
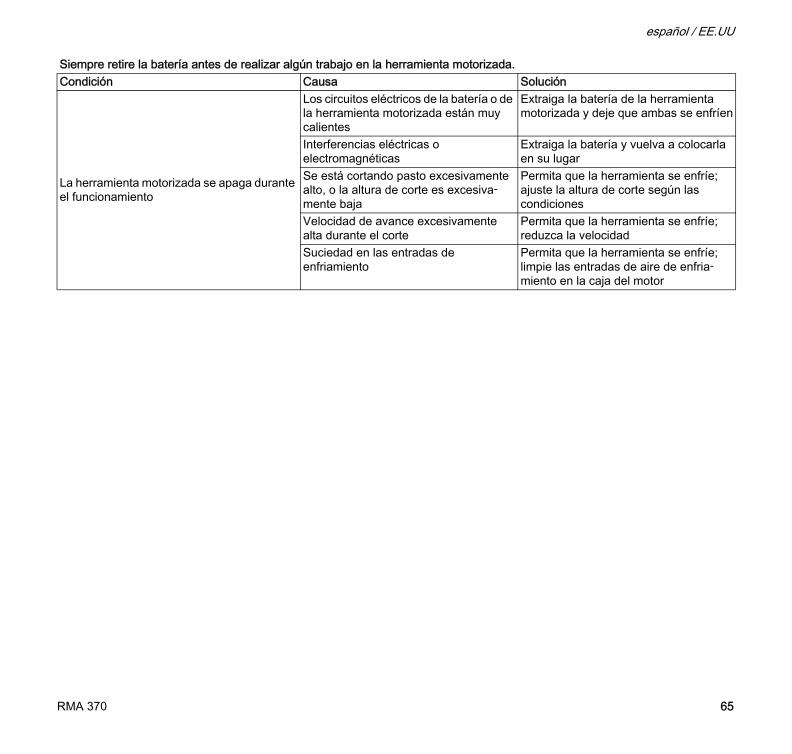
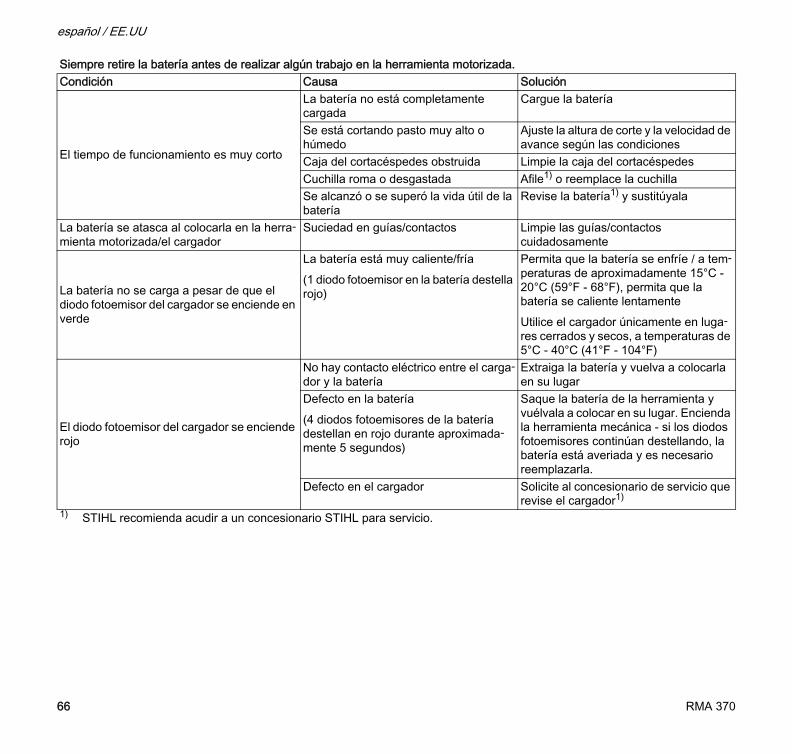
Always remove the battery before carrying out any work on the power tool.Condition Cause Remedy
Machine does not run when switched on
No electrical contact between power tool and battery
Remove battery, check contacts and refit battery
Battery discharged (1 light emitting diode on battery flashes green)
Charge the battery
Battery too hot / too cold(1 light emitting diode on battery glows red)
Allow battery to cool down / at tempera-tures of about 59°F - 68°F (15°C - 20°C), allow battery to warm up slowly
Fault in battery(4 light emitting diodes on battery flash red)
Take the battery out of the power tool and refit it. Switch on the power tool – if the light emitting diodes still flash, the battery is faulty and must be replaced.
Fuse key not fitted Fit the fuse keyFault in fuse key Replace fuse keyPower tool too hot(3 light emitting diodes on battery glow red)
Allow power tool to cool down
Electromagnetic interference or fault in power tool(3 light emitting diodes on battery flash red)
Take the battery out of the power tool and refit it. Switch on the power tool – if the light emitting diodes still flash, the power tool is faulty and must be checked by a servicing dealer 1).
Motor overloaded by high or damp grass Do not start motor in high grass, adjust cutting height to suit conditions
Mower housing blocked Clean mower housingMoisture in power tool and/or battery Allow power tool/battery to dry
RMA 370 29
English
Power tool cuts out during operation
Battery or power tool circuitry too hot Take the battery out of the power tool; allow the battery and power tool to cool down
Electric or electromagnetic interference Remove the battery and refit it againMowing overlong grass or cutting height set too low
Allow power tool to cool down, adjust cutting height to suit conditions
Mowing speed too high Allow power tool to cool down, reduce speed
Cooling inlets dirty Allow power tool to cool down, clean cooling air openings in motor housing
Running time is too short
Battery is not fully charged Charge the batteryMowing high or damp grass Adjust cutting height and mowing speed
to suit conditionsMower housing blocked Clean mower housingBlade dull or worn Resharpen1) or replace bladeUseful life of battery has been reached or exceeded
Check battery1) and replace
Battery jams when being inserted in power tool / charger
Guides / contacts dirty Carefully clean the guides / contacts
Battery is not being charged even though the light emitting diode on the charger glows green
Battery too hot / too cold(1 light emitting diode on battery glows red)
Allow battery to cool down / at tempera-tures of about 59°F - 68°F (15°C - 20°C), allow battery to warm up slowlyOperate charger only in closed, dry rooms at ambient temperatures of 41°F - 104°F (5°C - 40°C)
Light emitting diode on charger flashes red
No electrical contact between charger and battery
Remove the battery and refit it again
Fault in battery(4 light emitting diodes on battery flash red for about 5 seconds)
Take the battery out of the power tool and refit it. Switch on the power tool – if the light emitting diodes still flash, the battery is faulty and must be replaced.
Fault in charger Have charger checked by servicing dealer1)
1) STIHL recommends a STIHL servicing dealer.
Always remove the battery before carrying out any work on the power tool.Condition Cause Remedy
RMA 37030
English
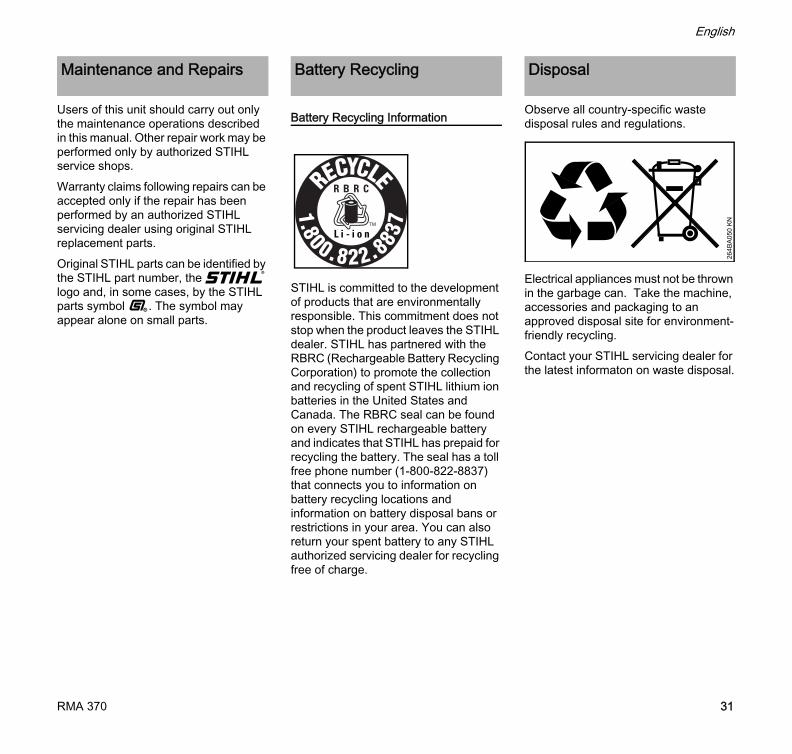
Users of this unit should carry out only the maintenance operations described in this manual. Other repair work may be performed only by authorized STIHL service shops.Warranty claims following repairs can be accepted only if the repair has been performed by an authorized STIHL servicing dealer using original STIHL replacement parts.Original STIHL parts can be identified by the STIHL part number, the { logo and, in some cases, by the STIHL parts symbol K. The symbol may appear alone on small parts.
Battery Recycling Information
STIHL is committed to the development of products that are environmentally responsible. This commitment does not stop when the product leaves the STIHL dealer. STIHL has partnered with the RBRC (Rechargeable Battery Recycling Corporation) to promote the collection and recycling of spent STIHL lithium ion batteries in the United States and Canada. The RBRC seal can be found on every STIHL rechargeable battery and indicates that STIHL has prepaid for recycling the battery. The seal has a toll free phone number (1-800-822-8837) that connects you to information on battery recycling locations and information on battery disposal bans or restrictions in your area. You can also return your spent battery to any STIHL authorized servicing dealer for recycling free of charge.
Observe all country-specific waste disposal rules and regulations.
Electrical appliances must not be thrown in the garbage can. Take the machine, accessories and packaging to an approved disposal site for environment-friendly recycling.Contact your STIHL servicing dealer for the latest informaton on waste disposal.
Maintenance and Repairs Battery Recycling Disposal
264B
A05
0 K
N
RMA 370 31
English
STIHL Registered Trademarks
STIHL®
{
K
The color combination orange-grey (U.S. Registrations #2,821,860; #3,010,057, #3,010,058, #3,400,477; and #3,400,476)
4-MIX®
AUTOCUT®
EASYSTART®
FARM BOSS®
iCademy®
MAGNUM®
MasterWrench Service®
MotoMix®
OILOMATIC®
STIHL Cutquik®
STIHL DUROMATIC®
STIHL Quickstop®
STIHL ROLLOMATIC®
STIHL WOOD BOSS®
TIMBERSPORTS®
WOOD BOSS®
YARD BOSS®
Some of STIHL’s Common Law Trademarks
BioPlus ™Easy2Start ™EasySpool ™ElastoStart ™Ematic ™FixCut ™HT Plus ™IntelliCarb ™Master Control Lever ™Micro ™Pro Mark ™Quad Power ™Quiet Line ™STIHL Arctic ™STIHL Compact ™
STIHL HomeScaper Series ™STIHL Interchangeable Attachment Series ™STIHL M-Tronic ™STIHL MiniBoss ™STIHL MotoPlus 4 ™STIHL Multi-Cut HomeScaper Series ™STIHL OUTFITTERS ™STIHL PICCO ™STIHL PolyCut ™STIHL PowerSweep ™STIHL Precision Series ™STIHL Protech ™STIHL RAPID ™STIHL SuperCut ™STIHL Territory ™TapAction ™TrimCut ™This listing of trademarks is subject to change.Any unauthorized use of these trademarks without the express written consent of ANDREAS STIHL AG & Co. KG, Waiblingen is strictly prohibited.
Permita que solamente las personas que comprenden totalmente la materia tratada en este manual manejen su cortacéspedes.Para obtener el rendimiento y satisfacción máximos del cortacéspedes STIHL, es importante que lea, obedezca y comprenda las precauciones de seguridad y las instrucciones de uso y mantenimiento dadas en los capítulos "Instrucciones importantes de seguridad" y "Precauciones de seguridad y técnicas de uso", antes de usar el cortacéspedes. Para obtener información adicional, visite www.stihlusa.com.Comuníquese con su representante de STIHL o el distribuidor de STIHL para su zona si no se entiende alguna de las instrucciones dadas en el presente manual.
ADVERTENCIADado que el cortacéspedes es una herramienta de corte motorizada de gran velocidad impulsada por baterías, es necesario tomar medidas especiales de seguridad para reducir el riesgo de lesiones. El uso descuidado o incorrecto puede causar lesiones graves o aun mortales, incluyendo la amputación de manos y pies.
Acerca de este manual de instrucciones 35Instrucciones importantes de seguridad 35Medidas de seguridad y técnicas de manejo 36Descripción del funcionamiento 45Uso 45Mullido 46Montaje del mango 46Caja para pasto 47Ajuste de la altura de corte 49Conexión del cargador al suministro de energía eléctrica 49Carga de la batería 50Diodos fotoemisores (LED) de la batería 51Diodos fotoemisores (LED) del cargador 52Encendido de la máquina 53Apagado de la máquina 54Almacenamiento de la máquina 55Inspección y mantenimiento por el usuario 56Instrucciones de afilado 57Información para mantenimiento 60Componentes importantes 61Especificaciones 62Accesorios especiales 63Localización de averías 64Información de reparación 67Reciclado de las baterías 67
Desecho 67Marcas comerciales 68Direcciones 69
RMA 37034
{ Este manual de instrucciones está protegido por derechos de propiedad intelectual. Todos los derechos reservados, especial-mente los derechos de reproducción, traducción y procesamiento con sistemas electrónicos.
español / EE.UU
Pictogramas
Todos los pictogramas que se encuentran fijados o grabados en la máquina se explican en este manual.Según el modelo, los pictogramas siguientes pueden aparecer en su máquina.
Símbolos en el texto
Muchas de las instrucciones de uso y seguridad vienen acompañadas de ilustraciones.Los pasos individuales o procedimientos descritos en el manual pueden estar señalados en diferentes maneras:N Se usa un punto para denotar un
paso o procedimiento.Una descripción de un paso o procedimiento que se refiere directamente a una ilustración puede contener números de referencia que aparecen en la ilustración. Ejemplo:N Suelte el tornillo (1).N Palanca (2) ...Además de las instrucciones de uso, en este manual pueden encontrarse párrafos a los que usted debe prestar atención especial. Tales párrafos están
marcados con los símbolos y las palabras identificadoras que se describen a continuación.
PELIGROIndica un riesgo inminente de lesiones graves o mortales.
ADVERTENCIAIdentifica una situación de peligro que, al no evitarse, puede resultar en lesiones graves o mortales.
Mejoramientos técnicos
La filosofía de STIHL es mejorar continuamente todos sus productos. Como resultado de ello, periódicamente se introducen cambios de diseño y mejoras. Por lo tanto, es posible que algunos cambios, modificaciones y mejoras no se describen en este manual. Si las características de funcionamiento o la apariencia de su máquina difieren de las descritas en este manual, comuníquese con el concesionario STIHL para obtener la ayuda que requiera.
ADVERTENCIAPara reducir el riesgo de incendios, choques eléctricos y lesiones personales, siempre siga las precauciones de seguridad básicas al usar cortacéspedes eléctricos:LEA TODAS LAS INSTRUCCIONES1. Evite los entornos peligrosos –
No use los cortacéspedes en lugares húmedos o mojados.
2. No se use bajo la lluvia.3. Mantenga alejados a los niños –
Las demás personas deben mantenerse a una distancia segura de la zona de trabajo.
4. Use vestimenta apropiada –No utilice ropa suelta ni artículos de joyería. Estos pueden ser atrapados por las piezas en movimiento. Se recomienda usar guantes de caucho y calzado al trabajar a la intemperie.
5. Use gafas de seguridad –Siempre utilice una máscara contra polvo si se trabaja en un lugar polvoriento.
6. Utilice el aparato apropiado para el trabajo –No utilice el cortacéspedes para ninguna tarea distinta de aquellas para las cuales fue diseñado.
7. No fuerce el cortacéspedes –Se hace el trabajo de modo mejor y más seguro al ritmo para el cual fue diseñada.
Acerca de este manual de instrucciones
Llave AVISOIndica el riesgo de daños a la propie-dad, incluyendo a la máquina o sus componentes.
Instrucciones importantes de seguridad
RMA 370 35
español / EE.UU
8. No extienda su alcance excesivamente –Mantenga los pies bien apoyados y equilibrados en todo momento.
9. Permanezca alerta –Preste atención a su trabajo. Use buen criterio. No maneje el cortacéspedes cuando está fatigado.
10. Desconecte el cortacéspedes –Desconecte el cortacéspedes de la fuente de energía por medio de retirar la llave fusible o la batería cuando no esté en uso, antes de darle mantenimiento y al sustituir accesorios tales como la cuchilla y similares.
11. Almacene el cortacéspedes bajo techo cuando no esté en uso –Cuando no esté en uso, guardar el cortacéspedes bajo techo, en un lugar seco y bajo llave - fuera del alcance de los niños.
12. Mantener el cortacéspedes minuciosamente –Mantener los filos afilados y limpios para obtener el rendimiento mejor y más seguro. Siga las instrucciones para lubricar la máquina y cambiar sus accesorios.
13. Mantenga los protectores en su lugar y en buenas condiciones.
14. Mantenga las cuchillas afiladas.15. Mantenga las manos y los pies lejos
de la zona de corte.
16. Los objetos golpeados por la cuchilla del cortacéspedes pueden causar lesiones graves. Examine el césped minuciosamente y despeje todos los objetos del mismo antes de cortarlo.
17. Si el cortacéspedes choca contra un objeto extraño, siga los pasos dados a continuación:
– Detenga el cortacéspedes. Suelte la palanca de interruptor.
– Retire la llave fusible y la batería.– Revise en busca de daños.– Repare los daños antes de volver a
arrancar y usar el cortacéspedes.18. Utilice únicamente cuchillas de
repuesto idénticas.GUARDE ESTAS INSTRUCCIONES
Pida a su concesionario STIHL que le enseñe el manejo de la herramienta motorizada. Respete todas las disposiciones, reglamentos y normas de seguridad locales del caso.Es posible que el uso de herramientas motorizadas que producen ruido esté restringido a determinados horarios por reglamentos nacionales y locales.
ADVERTENCIANo preste ni alquile nunca su cortacéspedes sin el manual de instrucciones. Asegúrese que todas las
Medidas de seguridad y técnicas de manejo
Debido a que este cortacéspedes es una herramienta de corte de alta velocidad y es impul-sada por batería, es necesario tomar precau-ciones especiales para reducir el riesgo de sufrir lesiones personales.
Es importante que usted lea, comprenda bien y respete las siguientes advertencias y medidas de seguridad. Lea el manual de instrucciones y las precauciones de seguridad periódicamente. El uso descuidado o inadecuado puede causar lesiones graves o incluso mortales.
RMA 37036
español / EE.UU
personas que utilicen la máquina lean y comprendan la información contenida en este manual.
ADVERTENCIAUtilice el cortacéspedes únicamente para cortar pasto. No debe usarse para ningún otro propósito ya que el uso indebido puede resultar en lesiones personales o daños a la propiedad, incluso daños de la máquina.
ADVERTENCIANunca se debe permitir a los niños que usen esta herramienta motorizada. No se debe permitir la proximidad de otros, especialmente niños y animales, donde se esté utilizando la máquina. Pueden suceder accidentes trágicos si el operador no está atento a la presencia de niños. Los niños frecuentemente se sienten atraídos a la máquina y a los trabajos de corte. Nunca suponga que los niños permanecerán en el último lugar donde los vio. Mantenga a los niños bajo la vigilancia de una persona adulta responsable que no sea el operador. Tenga cuidado adicional al acercarse a esquinas sin visibilidad, arbustos, árboles u otros objetos que pudieran impedirle ver a un niño.
ADVERTENCIAPara reducir el riesgo de ocasionar lesiones a las personas en la cercanía y daños a la propiedad, nunca deje el cortacéspedes en marcha desatendido. Cuando no está en uso (por ejemplo durante el descanso), apáguela y asegúrese de que las personas no autorizadas no puedan usarla. Para hacerlo, retire la llave fusible y la batería de la herramienta.
La mayoría de las medidas de seguridad y avisos contenidos en este manual se refieren al uso de todos los cortacéspedes de STIHL. Los distintos modelos pueden contar con piezas y controles diferentes. Vea la sección correspondiente de su manual de instrucciones para tener una descripción de los controles y la función de los componentes de su modelo.Siempre retire la llave fusible y la batería antes de inspeccionar, transportar, almacenar o intervenir en la herramienta motorizada. Esto evita el riesgo de que el motor arranque inesperadamente. Utilice únicamente repuestos originales STIHL, incluyendo la cuchilla. Éstas han sido diseñadas específicamente para usar con su modelo y satisfacen sus necesidades de rendimiento. El uso de piezas no fabricadas por STIHL puede causar lesiones graves o mortales.El uso seguro del cortacéspedes involucra a1. el operador2. la herramienta motorizada3. el uso de la herramienta
motorizada.
EL OPERADOR
Condición física
Usted debe estar en buenas condiciones físicas y psíquicas y no encontrarse bajo la influencia de ninguna sustancia (drogas, alcohol, etc.) que le pueda restar visibilidad, destreza o juicio. No maneje esta máquina cuando está fatigado.
ADVERTENCIAEsté alerta. Si se cansa, tómese un descanso. El cansancio puede provocar una pérdida del control. El uso de cualquier herramienta motorizada es fatigoso. Si usted padece de alguna dolencia que pueda ser agravada por la fatiga, consulte a su médico antes de utilizar esta máquina.
Vestimenta adecuada
ADVERTENCIAPara reducir el riesgo de lesiones el operador debe usar el equipo protector adecuado.La caja del cortacéspedes no protege al operador contra todos los objetos extraños (gravilla, vidrio, alambre, etc.) arrojados por la cuchilla giratoria. Los objetos arrojados o lanzados por el accesorio también pueden rebotar y golpear al operador.
Para reducir el riesgo de lesionarse los ojos, nunca maneje el cortacéspedes si no tiene puestas gafas o anteojos de seguridad bien ajusta-dos con una protección adecuada en las partes superior y lateral que satisfagan la norma ANSI Z 87.1 (o la norma nacio-nal correspondiente.)
RMA 370 37
español / EE.UU
Evite el uso de chaquetas sueltas, bufandas, corbatas, joyas, pantalones acampanados o con vueltas, pelo largo suelto o cualquier cosa que pueda engancharse en los matorrales o las piezas en movimiento de la máquina. Sujétese el pelo de modo que quede sobre los hombros.
LA HERRAMIENTA MOTORIZADA
Para las ilustraciones y definiciones de los componentes de la herramienta motorizada, vea el capítulo sobre "Piezas principales".
ADVERTENCIANunca modifique el cortacéspedes en forma alguna. Utilice únicamente los accesorios y repuestos suministrados por STIHL y expresamente autorizados por STIHL para usarse con el modelo específico de STIHL. Si bien es posible conectar a la herramienta motorizada de STIHL ciertos accesorios no autorizados, su uso puede ser, en la práctica, extremadamente peligroso.Si el cortacéspedes experimenta cargas excesivas para las cuales no fue diseñado (por ejemplo, impactos severos o una caída), siempre asegúrese de que la máquina esté en buenas condiciones antes de seguir con el trabajo – vea también "Antes de empezar a trabajar". Compruebe que los dispositivos de seguridad funcionen correctamente. No utilice el cortacéspedes si están dañados. En caso de dudas, pida que el concesionario de servicio de STIHL la revise.
Batería
ADVERTENCIA
No la coloque sobre o cerca del fuego, estufas u otros sitios con altas temperaturas. No la exponga a la luz solar directa ni la guarde dentro de un vehículo en climas calurosos. De lo contrario, la batería puede generar calor, reventarse o incendiarse. Además, puede disminuir su rendimiento y su vida útil.En caso de incendio: Manténgase alejado de los vapores y los gases, teniendo en cuenta la dirección del viento. Si es posible hacerlo sin exponerse a ningún riesgo, retire la batería de las inmediaciones del incendio. En principio, es posible enfriar la batería o extinguir un incendio con agua. Es preferible extinguir los incendios con un extinguidor universal con agente químico seco. Para cualquier tipo de incendio, evacue el área y extinga el fuego desde una distancia segura. Una vez apagado, controle la zona (vigilancia contra incendios) hasta que la batería se haya enfriado lo suficiente para actuar en caso de que el fuego vuelva a encenderse. Restrinja el acceso al área hasta terminar de limpiar. No toque la batería quemada ni ningún líquido derramado. Use un absorbente inerte para absorber los líquidos derramadas.
La ropa debe ser de confección fuerte, pero permitir la completa liber-tad de movimiento. Use pantalones largos para ayudar a protegerse las piernas. No vista pantalo-nes cortos.
Es muy importante tener una buena superficie de apoyo para los pies. Póngase zapatos resis-tentes con suela antideslizante. Nunca use sandalias, ojotas ni ande descalzo.
Siempre use guantes al transportar la máquina y al intervenir en la cuchilla.
Riesgo de incendio, explosión y/o quemadu-ras, inclusive aquellas provocadas por agentes químicos. No la desarme, aplaste, caliente a más de 100 °C (212 °F), exponga a incendios ni la incinere. Nunca la exponga a microondas o altas presiones.
Utilice y almacene la batería únicamente en un intervalo de temperaturas de 10 °C (14 °F) a no más de + 50 °C (122 °F). Proteja la batería de la luz solar directa.
RMA 37038
español / EE.UU
ADVERTENCIAUtilice baterías STIHL sólo con herramientas motorizadas STIHL y cárguelas únicamente con cargadores STIHL. Sustituya la batería únicamente con la batería STIHL AP. Use sólo baterías recargables STIHL originales.Cargue la batería antes de utilizarla.
ADVERTENCIANo abra, arroje, golpee ni dañe la batería. Nunca inserte objetos en las ranuras de enfriamiento de la batería porque podría dañarla. La batería posee características y dispositivos de seguridad que, de dañarse, pueden provocar que ésta genere calor, se reviente o se incendie. Nunca utilice ni cargue una batería defectuosa, dañada, agrietada o deformada.Suspenda su uso si mientras la usa, la carga o la guarda, emana un olor poco habitual, está caliente al tacto o tiene un aspecto anormal.
ADVERTENCIAPuede haber fuga de líquido si la batería está dañada o se utiliza incorrectamente – ¡evite el contacto con la piel! El líquido que se escapa de la batería puede irritar de la piel y causar quemaduras. En caso de contacto inadvertido, lávese inmediatamente con agua y un jabón suave. Si el líquido penetra en los ojos, no los restriegue, sino láveselos con
agua durante al menos 15 minutos manteniéndolos abiertos. También busque atención médica de inmediato.
ADVERTENCIANunca cree un puente (cortocircuito) entre los bornes de la batería con objetos metálicos porque se puede dañar la batería y posiblemente generar un incendio. Mantenga las baterías en desuso alejadas de objetos metálicos (por ejemplo, clavos, monedas, joyas). No emplee recipientes metálicos para transportar baterías.Guarde la batería fuera del alcance de niños, en un lugar fresco y seco, alejado de la luz solar directa y de temperaturas extremadamente calientes o frías [-10 °C – +50 °C (14 °F – 122 °F)].
Cargador
Utilice sólo cargadores STIHL originales.Utilícelo únicamente para cargar baterías con forma geométrica correspondiente STIHL tipo AP, con una capacidad máxima de 10 Ah y un voltaje máximo de 42 V.Nunca cargue baterías defectuosas, deformadas o que pierdan líquido.Conecte el cargador únicamente a un suministro de energía eléctrica que brinde el voltaje y la frecuencia indicados en la chapa de especificaciones. Siempre conecte el cargador a un tomacorriente de pared instalado correctamente.Nunca use un cargador que tenga la caja, el cordón eléctrico o el enchufe dañado. No opere el cargador si éste
hubiera recibido un fuerte golpe, o se hubiera caído o dañado de cualquier otro modo.No abra ni desarme el cargador – no contiene piezas reparables por el usuario.Guarde el cargador fuera del alcance de los niños.
Utilice el cargador a temperaturas de 5 °C (41 °F) a 40 °C (104 °F).Deje que se enfríe por sí solo – no lo cubra.Nunca cree un puente entre los contactos del cargador con objetos metálicos (por ejemplo, clavos, monedas, joyas) – cortocircuito. El cargador podría dañarse debido a un cortocircuito.En caso de producirse humo o fuego en el cargador, desconéctelo del tomacorriente inmediatamente.
ADVERTENCIAPara reducir el riesgo de choque eléctrico o cortocircuito, no inserte ningún objeto en las ranuras de enfriamiento del cargador.
Protéjala de la lluvia – no la sumerja en líquidos.
Protéjalo de la lluvia y la humedad. Mantenga el cargador seco.
Úselo y guárdelo bajo techo y en un recinto seco.
RMA 370 39
español / EE.UU
ADVERTENCIAEl cargador se calienta durante el proceso de carga. No lo manipule sobre superficies que puedan incendiarse con facilidad (por ejemplo, papel o telas) o en un entorno altamente combustible – peligro de incendio.
ADVERTENCIANo trabaje en un lugar peligroso, por ejemplo, en un lugar donde haya líquidos combustibles (gases), vapores o polvo. Los cargadores pueden producir chispas, las cuales son capaces de encender el polvo o los vapores - riesgo de explosión.
Nunca tire del cordón eléctrico para desconectarlo del tomacorriente de la pared. Para desenchufarlo, sujete el enchufe y no el cordón. El cordón eléctrico dañado debe ser reparado por un electricista experimentado.No use el cordón eléctrico para ningún otro fin, por ejemplo, para transportar o sostener el cargador.Nunca use cordones eléctricos que no cumplan con los reglamentos.Asegúrese que el cordón eléctrico esté ubicado y/o marcado como para que no se lo pise, se lo lleve por delante, esté
en contacto con bordes cortantes o partes móviles o, de otro modo sujeto, a daño o esfuerzo.No debería usarse un alargador a menos que sea absolutamente necesario. Si es imprescindible utilizarlo, enchufe el cargador en un cordón de extensión calibre 16 (AWG 16) o de mayor calibre, con clavijas que sean del mismo número, tamaño y forma que las del cargador.Para reducir el riesgo de choque eléctrico:– Siempre conecte el cargador a un
tomacorriente de pared instalado correctamente.
– Asegúrese de que el aislamiento del cordón eléctrico y del enchufe esté en buenas condiciones.
Desenchufe el cordón eléctrico del tomacorriente cuando el cargador esté en desuso.Nunca guarde la batería en el cargador.
USO DE LA HERRAMIENTA MOTORIZADA
Traslado de la unidad
ADVERTENCIAPara reducir el riesgo lesiones debido al contacto con las cuchillas, nunca transporte la herramienta motorizada con la cuchilla en marcha.
ADVERTENCIASiempre apague la herramienta por medio de soltar la palanca de interruptor y retirar la llave fusible y la batería – aun
si se transportará la máquina una distancia corta. Al transportar el cortacéspedes en un vehículo, asegure el cortacéspedes y sus componentes (por ejemplo, la caja para pasto) debidamente para evitar un vuelco y daños. Utilice cuerdas o tiras para fijar los mangos.
Levante el cortacéspedes inalámbrico por los asideros únicamente. Consulte la ilustración previa y la ilustración en el capítulo "Piezas principales". El cortacéspedes inalámbrico puede acarrearse en una de dos maneras:– Con una mano en el asidero
superior y la otra en el asidero inferior.
– Con una mano en el asidero superior.
Siempre mantenga la cuchilla a una distancia segura de su cuerpo, en particular de sus pies y piernas.
Revise regularmente el cordón eléctrico y el enchufe del cargador en busca de daños. Si alguno de los dos está dañado, desconecte de inmediato el enchufe del tomacorriente de la pared para evitar el riesgo de choque eléctrico.
Retire la llave fusible y la batería de la herramienta motorizada. Esto evita el riesgo de que el motor arranque inesperadamente.
9929
BA
031
KN
RMA 37040
español / EE.UU
Antes de empezar a trabajar
ADVERTENCIASiempre revise que el cortacéspedes esté en buenas condiciones y funcione correctamente antes de arrancarlo, en particular la palanca de interruptor y su bloqueo. La palanca de interruptor y su bloqueo deberán moverse libremente y siempre regresar a la posición de apagado. Nunca intente modificar los controles o los dispositivos de seguridad.
ADVERTENCIANo maneje nunca un cortacéspedes que esté dañado, mal ajustado o mantenido o que no fue armado completa y debidamente.Mantenga los mangos limpios y secos en todo momento; es particularmente importante mantenerlos libres de humedad, aceite, grasa o resinas para garantizar que el cortacéspedes pueda empuñarse firmemente para mantenerlo bajo control seguro.
ADVERTENCIALa cuchilla debe estar correctamente apretada y en condiciones de funcionamiento seguro. Inspeccione en busca de piezas flojas (tuercas, tornillos, etc.). Revise periódicamente la condición y el apriete de la cuchilla – con el motor apagado y la llave fusible y la batería retiradas. Sustituya una cuchilla dañada antes de usar la herramienta motorizada.No utilice el cortacéspedes si los dispositivos de seguridad están dañados, si el freno de rueda libre no funciona o si los dispositivos de
seguridad no están debidamente montados y en buenas condiciones (por ejemplo, el tubo de descarga y la aleta inferior trasera).Inspeccione la caja para pasto con frecuencia y sustitúyala con un repuesto autorizado si muestra señales de desgaste o deterioro. Nunca use la máquina si tiene la caja para pasto dañada.Revise los contactos del compartimiento de la batería en busca de materia extraña. Manténgalos limpios.Instale la batería correctamente.Utilice la batería únicamente con el compartimiento de batería cerrado.
ADVERTENCIA
ADVERTENCIAEl cortacéspedes es una máquina para una sola persona. No deje que otras personas estén en el lugar de trabajo, aun durante el arranque.
Durante el trabajo
Sujeción y control de la herramienta motorizadaSiempre sujete la máquina firmemente con las dos manos en el mango y en la palanca de interruptor durante el trabajo. Envuelva sus dedos y pulgares alrededor del mango y de la palanca de interruptor durante el corte.Nunca intente manejar la herramienta motorizada con una sola mano. La pérdida de control del cortacéspedes puede ocasionar lesiones graves o mortales.
ADVERTENCIA
Permanezca detrás del mango cuando el motor esté en marcha.
ADVERTENCIANo trate de alcanzar más lejos de lo debido. Mantenga los pies bien apoyados y equilibrados en todo
Antes de empezar a tra-bajar, examine la zona y retire los juguetes, pie-dras, artículos de vidrio, cercos de alambre, pie-zas metálicas, basura y demás objetos sólidos. El accesorio de corte puede arrojar los objetos de esta clase.
Para reducir el riesgo de sufrir cortaduras, nunca coloque las manos cerca ni debajo de la máquina o del tubo de descarga. No toque nunca con las manos ni con cualquier parte del cuerpo una cuchilla en movimiento. Para reducir el riesgo de lesionarse, nunca intente despejar pasto cortado o desperdicios de la cuchi-lla, la plataforma o el tubo de descarga sin antes apagar el motor y sacar la llave fusible y la batería.
RMA 370 41
español / EE.UU
momento. Se debe tener cuidado especial cuando las condiciones del suelo son resbaladizas y en terreno difícil y con mucha vegetación. Para evitar tropezarse, esté atento a los obstáculos ocultos tales como tocones, raíces y zanjas. El pasto alto puede ocultar obstáculos. Sea sumamente precavido cuando trabaje en declives o terreno irregular. Las pendientes son un factor importante relacionado con los accidentes por resbalones o caídas, los cuales pueden causar lesiones graves.No corte sobre pendientes extremadamente empinadas. Para reducir el riesgo de lesionarse, no use la máquina en pendientes superiores al 25%.
ADVERTENCIA
No tire de la máquina hacia atrás a menos que ello sea absolutamente necesario. Siempre mire hacia abajo y hacia atrás al cortar dando marcha atrás.Condiciones de trabajoManeje la herramienta motorizada solamente en condiciones de buena visibilidad y a la luz del día. Trabaje con mucho cuidado.
ADVERTENCIASi la vegetación que se está cortando o la tierra en el lugar está recubierta de una sustancia química (tal como un pesticida o herbicida activo), lea y siga las instrucciones suministradas con la sustancia en cuestión.
ADVERTENCIALa inhalación de ciertos polvos, especialmente los polvos orgánicos, tales como el moho o polen, puede provocar reacciones alérgicas o asmáticas en las personas sensibles. La inhalación repetida o de grandes cantidades de polvo u otros contaminantes del aire, especialmente los de partículas pequeñas puede causar enfermedades respiratorias o de otro tipo. Controle el polvo en su fuente, siempre que sea posible. Utilice buenas prácticas de trabajo, tal como trabajar de manera que el viento o el proceso de corte dirija el polvo producido por la herramienta motorizada en sentido opuesto del operador. Cumpla con las recomendaciones emitidas por EPA/OSHA/NIOSH y las asociaciones de trabajo y los sindicatos con respecto al polvo ("materia particulada"). Donde no sea posible regular efectivamente la inhalación de polvo, es decir, mantener el nivel cerca del valor ambiente, el operador y las personas que se encuentren en la cercanía siempre deberán usar un respirador aprobado por NIOSH/MSHA para el tipo de polvo presente en el lugar.Instrucciones de manejoPara encender el motor y empezar a cortar, consulte el capítulo "Encendido".
Arranque la máquina sobre una superficie plana. No incline la máquina al encender el motor.No encienda la máquina sobre pasto alto.Para las instrucciones específicas de arranque, vea la sección correspondiente en el manual de instrucciones.
PELIGRO
ADVERTENCIAEn caso de una emergencia, apague el motor de inmediato por medio de soltar la palanca de interruptor y también retirar la llave fusible y la batería.
ADVERTENCIALa cuchilla sigue girando por un período breve después que se suelta la palanca de interruptor (efecto de volante).
ADVERTENCIALa cuchilla giratoria puede arrojar objetos extraños a gran distancia directa o indirectamente. Mantenga a las demás personas, en especial a los niños, y a los animales alejados de la zona de trabajo.
Corte en sentido paralelo a la pendiente, nunca suba ni baje la pendiente. Tenga cuidado en parti-cular al cambiar de sentido de avance sobre una pendiente.
Mantenga las manos y los pies lejos de la cuchilla.
RMA 37042
español / EE.UU
Para reducir el riesgo de ocasionar lesiones a otras personas, asegúrese que estén a por lo menos 15 m (50 pies) de distancia de la máquina. Para reducir el riesgo de ocasionar daños a la propiedad, mantenga esta distancia con respecto a los vehículos y las ventanas.Si alguna persona se le acerca, apague el motor de inmediato por medio de soltar la palanca de interruptor.
ADVERTENCIAEvite el contacto con los cables o alambres eléctricos – riesgo de sacudidas eléctricas.Utilice la máquina caminando únicamente – nunca corra.Siempre apague el motor por medio de soltar la palanca de interruptor antes de mover la máquina sobre superficies diferentes al pasto, al trasladarla desde y hacia el césped y cuando se retire la caja para pasto. La máquina no debe utilizarse para transportar a personas, en especial a niños, ni objetos.No fije objetos al mango.
ADVERTENCIADurante el corte, revise el apriete y la condición de la cuchilla en intervalos breves y periódicos, con el motor y la cuchilla detenidos y la llave fusible y la
batería retiradas. Si el funcionamiento de la cuchilla cambia durante el uso, apague el motor de inmediato, espere a que la cuchilla se detenga, retire la llave fusible y la batería y revise el tornillo que sujeta la cuchilla para verificar que esté apretado y revise la cuchilla en busca de roturas, desgaste y daños. Nunca examine la cuchilla mientras el motor está en marcha. Nunca abra el escudo del tubo de descarga ni retire la caja para pasto mientras el motor está en marcha. De lo contrario existe el riesgo de sufrir lesiones a causa de la cuchilla giratoria.Si la máquina empieza a vibrar de modo anómalo, pare el motor, retire la llave fusible y la batería y busque la causa de inmediato. La vibración generalmente es una señal de averías.
ADVERTENCIASi la cuchilla queda obstruida o se produce una obstrucción en el conducto de descarga o en la zona de la cuchilla, siempre apague el motor, retire la llave fusible y la batería y compruebe que la cuchilla se haya detenido antes de despejar la zona.En caso de producirse contacto con materiales extraños, revise la cuchilla en busca de daños. No ponga en marcha la herramienta si el eje de la cuchilla o el eje del motor presentan daños o deformaciones.
ADVERTENCIAPara reducir el riesgo que representa la rotación inesperada de la cuchilla y las posibles lesiones, siempre apague el motor y retire la llave fusible y la batería antes de sustituir la cuchilla. Siempre
apague el motor por medio de soltar la palanca de interruptor antes de ajustar la altura de corte.
ADVERTENCIA
No sobrecargue la máquina durante el uso hasta el punto que el motor llegue a pararse. Si el motor empieza a perder velocidad, seleccione una altura de corte mayor o reduzca el ritmo de alimentación de materiales.Encender y apagar la máquina frecuentemente en un período breve puede causar el sobrecalentamiento del motor.
15 m (50 ft)
No confíe en el aisla-miento contra choques eléctricos de la herra-mienta. Para reducir el riesgo de electrocución, nunca utilice esta herra-mienta motorizada cerca de alambres o cables (de alimentación, etc.) que puedan tener corriente eléctrica.
RMA 370 43
español / EE.UU
Si el motor se sobrecarga térmicamente durante el funcionamiento, está diseñado para pararse automáticamente, haciendo necesario dejar que se enfríe antes de poder volverlo a arrancar. Causas de sobrecarga:– Se está cortando pasto
excesivamente alto, o la altura de corte es excesivamente baja.
– El ritmo de alimentación es excesivamente alto porque se está caminando muy rápido.
– Suciedad en entradas de aire de enfriamiento (ranuras de toma de aire).
No corte a temperaturas menores que +5 °C (41 °F).No corte el pasto si está húmedo.
No deje la máquina al aire libre bajo la lluvia.
MANTENIMIENTO, REPARACIÓN Y ALMACENAMIENTO
Si usted está reclamando cobertura de garantía para algún componente que no ha sido reparado o mantenido debidamente, o cuando se utilizan repuestos no autorizados, STIHL puede denegar la garantía.
ADVERTENCIAUtilice exclusivamente repuestos STIHL idénticos para el mantenimiento y reparación, incluyendo la cuchilla. El uso de piezas no fabricadas por STIHL puede causar lesiones graves o mortales.Siga precisamente las instrucciones de mantenimiento y reparación dadas en la sección correspondiente del manual de instrucciones. Consulte también la tabla de mantenimiento en este manual.
ADVERTENCIASiempre apague el motor, retire la llave fusible y la batería y asegúrese de que la cuchilla se detenga antes de realizar algún trabajo de mantenimiento o reparación o de limpiar la herramienta motorizada. No intente hacer ningún trabajo de mantenimiento o reparación que no esté descrito en su manual de instrucciones. Este tipo de trabajo debe ser realizado únicamente por el concesionario de servicio de STIHL.Apriete todas las tuercas, pernos y tornillos después de haber usado la máquina.Revise regularmente los contactos eléctricos y asegúrese de que el aislamiento del cordón eléctrico y del
enchufe del cargador estén en buenas condiciones y no muestren signos de deterioro.Es posible que los componentes eléctricos, como el cordón eléctrico del cargador, sólo puedan ser reparados o sustituidos por un electricista calificado.Limpie los componentes de plástico con un trapo. No use detergentes abrasivos. Éstos pueden dañar el plástico.Limpie las entradas de aire de enfriamiento de la caja del motor según sea necesario.No rocíe agua sobre la máquina.No limpie la máquina con una lavadora a presión. El chorro fuerte de agua puede dañar las piezas de la máquina.Mantenga las ranuras de la batería libres de materia extraña – límpielas según sea necesario.Dele mantenimiento o reemplace las etiquetas de advertencia y de instrucciones según sea necesario.Guarde la herramienta motorizada en un lugar seco y bajo llave, con la llave fusible y la batería retiradas y fuera del alcance de los niños.
El motor propulsor no es a prueba de agua. Nunca trabaje con el cortacéspedes bajo la llu-via o en lugares muy húmedos o mojados.
Siempre retire la llave fusible y la batería del cortacéspedes antes de llevar a cabo trabajos de reparación o manteni-miento, tales como la sustitución de la cuchilla. Esto evita el riesgo de que el motor arranque inesperadamente.
RMA 37044
español / EE.UU
La herramienta motorizada funciona con una batería recargable. Utilice únicamente cargadores STIHL para recargar la batería.
Intercambio de datos
La herramienta motorizada, la batería y el cargador se comunican entre sí. El cargador carga la batería y ésta suministra la potencia necesaria sólo si el intercambio de datos funciona correctamente. Por tal motivo, debe hacer funcionar la herramienta motorizada únicamente con baterías y cargadores STIHL apropiados.
Corte de césped
Un césped hermoso y frondoso se obtiene por medio de cortes frecuentes. El césped no debe cortarse muy bajo en tiempo caliente y seco, ya que esto permitiría que el sol lo queme, tornándolo poco atractivo. Una cuchilla afilada produce un acabado más atractivo que una hoja roma. Afile la cuchilla periódicamente - vea "Afilado de la cuchilla"El pasto picado puede recogerse en la caja para pasto o expulsarse por la parte trasera.
Corte de césped en pendientes
Su cortacéspedes inalámbrico puede utilizarse en pendientes de hasta 25°.
Rendimiento de corte
El rendimiento de corte depende del tipo de pasto y de la altura de corte que se haya seleccionado. El rendimiento de corte se mejora por medio de:– Cortar con frecuencia.– Aumentar la altura de corte.– Reducir la velocidad de corte.– Dejar que el césped se seque antes
de cortarlo.
Desecho
No tire los recortes al basurero – pueden usarse para abono.
Descripción del funcionamiento
Uso
RMA 370 45
español / EE.UU
Juego de mullido
El juego de mullido se compone de una cuchilla mullidora, tornillo de montaje de cuchilla y tapón de mullido y se usa para convertir un cortacéspedes convencional en un cortacéspedes multiuso. La cuchilla normal se reemplaza con una cuchilla mullidora.Durante el corte, el pasto picado puede recogerse en la caja para pasto de la manera usual. Como alternativa, se puede retirar la caja para pasto y utilizar el tubo de descarga trasero. Para el mullido, se retira la caja para pasto y se instala el tapón de mullido, vea la hoja de instrucciones provista con el juego de mullido.
Mullido
En el modo de mullido, el pasto picado se vuelve a circular en el torrente de aire, se corta varias veces y luego se expulsa hacia el césped nuevamente. El pasto finamente picado permanece en la superficie del césped, donde se descompone rápidamente y sirve como fertilizante natural. El mullido frecuente produce un césped hermoso y frondoso. En este proceso se debe recortar un tercio de la altura del pasto. Recomendación: Cortar con mullido al menos dos veces por semana en la primavera y una vez por semana en el verano/otoño.
Resultados del mullido
Requisitos para un buen resultado en el mullido:– Altura de corte óptima (posiciones
entre 3 y 5)– El césped deberá estar seco– Utilice hojas debidamente afiladas– Velocidad de corte baja– Varíe el sentido de corte y solape
los cortes– Corte el pasto muy elevado en
etapas gradualesLa caja puede obturarse y obstruir la cuchilla si la altura de corte es muy baja o si el pasto está seco.
Sustitución de la cuchilla
Sustitución y mantenimiento de la cuchilla – vea "Afilado de la cuchilla".
Montaje de mango superior
N Inserte el tornillo (1) a través de la guía de cable (2) y conecte el cable eléctrico (3).
N Coloque el mango superior (4) en el mango inferior (5).
N Inserte el tornillo con la guía de cable y el tornillo (6) a través de los agujeros de dentro hacia fuera y fíjelos con la perilla estrella (7).
Pinza de cable
El cable eléctrico se sujeta al mango superior por medio de una pinza.
Mullido Montaje del mango
1
3
2
9929
BA
001
KN
6
5
9929
BA
032
KN
47
RMA 37046
español / EE.UU
N La distancia (a) entre la pinza del cable y el bloqueo de la palanca de interruptor debe medir aproximadamente 25 cm (10 pulg).
Plegado del mango
ADVERTENCIAEl mango superior puede plegarse sobre sí mismo si las perillas estrella se sueltan – para reducir el riesgo de lesionarse, siempre sujete la parte superior del mango superior con firmeza al soltar las perillas estrella.El mango superior puede plegarse para limpiar, transportar o almacenar el cortacéspedes inalámbrico.
N Suelte las perillas estrella (1) y pliegue el mango superior (2) hacia delante hasta los puntales (3) – no desenrosque las perillas estrella por completo.
N El mango superior deberá reposar sobre los puntales (3).
Armado de Caja para pasto
N Coloque la cubierta (1) en la base (2) de la caja para pasto – observe la posición correcta de las guías (flechas).
N Meta los pasadores (3) a través de los agujeros por la parte interior hasta que se enganchen en posición.
9929
BA
003
KN
a
33
1
1
9929
BA
004
KN
2
9929
BA
030
KN
3
3
Caja para pasto
1
9929
BA
005
KN2
33
9929
BA
006
KN
RMA 370 47
español / EE.UU
N Aplique una presión leve para enganchar la cubierta (1) en la base (2).
Fijación de la caja para pasto
N Abra la aleta (1) y sujétela en posición.
N Enganche las orejetas (3) de la caja para pasto (2) en las hendiduras (4) del dorso del cortacéspedes.
N Cierre la aleta (1).
Indicador de lleno
La caja para pasto está provista de un indicador de "lleno" (1). El indicador de "lleno" es elevado por la corriente de aire creada por la cuchilla giratoria. La caja para pasto se llena con pasto picado durante el corte. Esto reduce el volumen de la corriente de aire y el indicador de "lleno" desciende.
Vaciado de la caja para pasto
N Apague la máquina.
N Abra la aleta (1) y sujétela en posición.
N Levante la caja para pasto (2) y retírela hacia atrás.
N Cierre la aleta (1).
N Abra la traba (3) de la caja para pasto y gire la cubierta (4) para abrirla.
N Sujete la caja para pasto por sus asideros (5) y vacíela.
9929
BA
007
KN
1
2
44
1 3
9929
BA
033
KN
2
9929
BA
034
KN
1
1
9929
BA
035
KN2
5
3
54
9929
BA
011
KN4
RMA 37048
español / EE.UU
El cortacéspedes puede ajustarse a cinco alturas de corte diferentes – vea también "Especificaciones".
Posición 1 = altura de corte más bajaPosición 5 = altura de corte más altaPosición S: no se instala en todas las versiones, depende del mercadoPara reducir el riesgo de daños, utilice la altura de corte más baja únicamente en prados perfectamente planos (sin baches ni hoyos).
Ajuste de la altura de corte
N Aleje la palanca de ajuste de altura (1) de la caja hasta que quede libre de los topes (2).
Aumento de altura de corte:
N Utilice la palanca de ajuste de altura (1) para elevar el cortacéspedes – empuje la palanca hacia delante.
Reducción de altura de corte:N Utilice la palanca de ajuste de
altura (1) para empujar el cortacéspedes hacia abajo – empuje la palanca hacia atrás.
N Empuje la palanca de ajuste de altura (1) contra la caja hasta que se enganche en los topes (2).
La altura seleccionada se indica por medio del tope delantero (3).
El voltaje de la red de electricidad y el voltaje operacional deben ser iguales entre sí.
N Inserte el enchufe de alimentación (1) en el tomacorriente de pared (2).
Se realiza una prueba de error luego de que el cargador se conecta al suministro de energía eléctrica. Durante este proceso el diodo fotoemisor (1) del cargador se ilumina de verde durante 1 segundo aproximadamente, luego de rojo y luego se apaga otra vez.
Ajuste de la altura de corte
9929
BA
050
KN
1
3
2
9929
BA
012
KN
Conexión del cargador al suministro de energía eléctrica
3901
BA
015
KN
21
1
3901
BA
019
KN
RMA 370 49
español / EE.UU
La batería se carga aproximadamente un 30% de su capacidad en la fábrica.Recomendación: Cargue la batería completamente antes de usar la herramienta motorizada por primera vez.N Conecte el cargador al suministro
de energía eléctrica – el voltaje de la red de electricidad y el voltaje operacional del cargador deben ser iguales – vea "Conexión de la unidad al suministro de energía eléctrica".
Use el cargador sólo en recintos cerrados y secos, a temperaturas ambiente de entre 5 °C y 40 °C (41°F-104 °F).
N Coloque la batería (1) en el cargador (2) hasta que perciba una resistencia notable – luego presione hasta el tope.
El diodo fotoemisor (3) del cargador se enciende cuando se inserta la batería – vea "Diodos fotoemisores (LED) del cargador"La batería comienza a cargarse cuando los diodos fotoemisores (4) se encienden de verde – vea "Diodos fotoemisores (LED) de la batería". El tiempo de carga depende de varios factores, que incluyen el estado de la batería, la temperatura ambiente, etc.; por lo tanto, pueden variar con respecto al tiempo de carga indicado en "Especificaciones".La batería se calienta durante el funcionamiento de la máquina. Si se coloca una batería caliente dentro del cargador, es posible que deba enfriarse antes de cargarla. El proceso de carga comienza únicamente cuando la batería se enfría. El tiempo que la batería necesita para enfriarse puede prolongar el tiempo de carga.La batería y el cargador se calientan durante el proceso de carga.
Cargador AL 300
Este cargador está equipado con un ventilador para enfriar la batería, que emite un sonido cuando está funcionando.
Cargador AL 100
Este cargador espera a que la batería se enfríe para iniciar el proceso de carga. La batería se enfría normalmente por medio de transferir el calor al aire.
Culminación del proceso de carga
El cargador se apaga automáticamente cuando la batería está completamente cargada:– Los diodos fotoemisores de la
baterías se apagan.– El diodo fotoemisor del cargador se
apaga.– El ventilador del cargador se apaga
(si viene con el cargador)Retire la batería del cargador.
Carga de la batería
2
3901
BA
009
KN
4 3901
BA
014
KN
3
RMA 37050
español / EE.UU
Cuatro diodos fotoemisores indican el estado de carga de la batería y cualquier problema que pueda ocurrir en ésta o en la herramienta motorizada.
N Presione el botón (1) para activar la pantalla – la pantalla se apaga automáticamente después de 5 segundos.
Los diodos fotoemisores pueden encenderse o destellar en verde o rojo.
Durante el proceso de carga
Los diodos fotoemisores se encienden continuamente o destellan para indicar el progreso de la carga.Durante la carga, la capacidad que se está cargando se indica con un diodo fotoemisor verde destellante.
Cuando se completa el proceso de carga, los diodos fotoemisores de la batería se apagan en forma automática.Si los diodos fotoemisores de la batería destellan o se encienden en rojo – vea "Si los diodos fotoemisores rojos se encienden / destellan".
Durante el trabajo
Los diodos fotoemisores verdes se encienden continuamente o destellan para indicar el estado de la carga.
Si los diodos fotoemisores de la batería destellan o se encienden en rojo – vea "Si los diodos fotoemisores rojos se encienden / destellan".
Diodos fotoemisores (LED) de la batería
El diodo fotoemisor se enciende en verde continuamente.
El diodo fotoemisor destella en verde.
El diodo fotoemisor se enciende en rojo continuamente.
El diodo fotoemisor destella en rojo.
1 3901
BA
010
KN
3901
BA
016
KN
80 - 100 %
60 - 80 %
40 - 60 %
20 - 40 %
0 - 20 %
3901
BA
016
KN
80 - 100 %
60 - 80 %
40 - 60 %
20 - 40 %
0 - 20 %
RMA 370 51
español / EE.UU
Si los diodos fotoemisores rojos se encienden continuamente/destellan
El diodo fotoemisor (1) se enciende de verde o destella en rojo.
Luz verde continua...
... significa lo siguiente:La batería– se está cargando– está muy caliente y debe enfriarse
antes de cargarseVea también "Diodos fotoemisores (LED) de la batería".El diodo fotoemisor verde del cargador se apaga cuando la batería está completamente cargada.
El diodo fotoemisor se enciende en rojo continuamente:
Si la batería está muy caliente1) 2) / fría1)
1) Durante el proceso de carga: El proceso de carga se inicia automáticamente una vez que la batería se enfría / calienta.
4 los diodos fotoemi-sores destellan en rojo:
Defecto en la batería 3)
3 los diodos fotoemi-sores se iluminan continuamente en rojo:
La herramienta motorizada está muy caliente – deje que se enfríe.
3 los diodos fotoemi-sores destellan en rojo:
Defecto en herramienta motorizada 4)
3901
BA
017
KN
2) Durante el trabajo: Si la herramienta motorizada se apaga, deje que la batería se enfríe; puede ser necesario extraer la batería de la herramienta motorizada para este fin.
3) Interferencias electromagnéticas o defecto. Saque la batería de la herramienta y vuélvala a colocar en su lugar. Encienda la herramienta mecánica - si los diodos fotoemisores continúan destellando, la batería está averiada y es necesario reemplazarla.
4) Interferencias electromagnéticas o defecto. Saque la batería de la herramienta y vuélvala a colocar en su lugar. Encienda la herramienta - si los diodos fotoemisores continúan destellando, la herramienta está averiada y deberá ser revisada por un concesionario de servicio - STIHL recomienda acudir a un concesionario autorizado de STIHL.
Diodos fotoemisores (LED) del cargador
1
3901
BA
019
KN
RMA 37052
español / EE.UU
Luz roja destellante ...
... significa lo siguiente:– No existe ningún contacto eléctrico
entre la batería y el cargador – quite la batería y vuelva a colocarla.
– Batería averiada – vea también "Diodos fotoemisores (LED) de la batería".
– Cargador averiado – solicite a un concesionario de servicio que lo revise. STIHL recomienda acudir a un concesionario STIHL para servicio.
La batería se carga aproximadamente un 30% de su capacidad en la fábrica.Recomendación: Cargue la batería completamente antes de usar la herramienta motorizada por primera vez.
Instalación de la batería
Abra el compartimiento de la batería
N Presione la pestaña (1) hacia dentro y gire la cubierta (2) hacia atrás.
Colocación de la llave fusible
Sólo es posible arrancar el motor cuando se ha colocado la llave fusible.
N Meta la llave fusible (3) en el receptáculo (4) hasta que tope.
Instalación de la batería
N Coloque la batería (5) en su compartimiento y empújela hasta colocarla en posición.
Cierre del compartimiento de la batería
N Gire la cubierta (2) hacia abajo – la pestaña (1) deberá engancharse en su posición.
El compartimiento de la batería siempre deberá estar cerrado cuando se usa la máquina.
Encendido
No arranque el motor con la máquina sobre pasto alto o si está ajustada con la altura de corte más baja, ya que esto dificulta el arranque.
Encendido de la máquina
9929
BA
014
KN
21
4
3
9929
BA
015
KN
9929
BA
016
KN
5
9929
BA
017
KN
21
RMA 370 53
español / EE.UU
N Pulse el botón de bloqueo (1) con la mano derecha y sujételo en esa posición.
N Tire de la palanca de interruptor (2) contra el mango con la mano izquierda y sujétela en esa posición – suelte el botón de bloqueo.
N Para apagar el motor, suelte la palanca de interruptor (1) – la cuchilla se detiene luego de girar en rueda libre por unos cuantos segundos.
Siempre retire la batería y la llave fusible de la herramienta motorizada durante los descansos y después de terminar el trabajo.
Freno de rueda libre
El freno de rueda libre detiene la cuchilla menos de 3 segundos después de haber soltado la palanca de interruptor. 1 Freno de rueda libre suelto.2 El freno de rueda libre detiene la
cuchilla giratoria.
1
9929
BA
018
KN
2
Apagado de la máquina
9929
BA
019
KN
1
9929
BA
013
KN
2
1
RMA 37054
español / EE.UU
Extracción de la batería
Apertura del compartimiento de la batería
N Presione la pestaña (1) hacia dentro y gire la cubierta (2) hacia atrás.
Extracción de la batería
N Tire de la batería (3) verticalmente para extraerla.
Retiro de la llave fusible
N Saque la llave fusible (4) del receptáculo (5).
Cierre del compartimiento de la batería
N Gire la cubierta (2) hacia abajo – la pestaña (1) deberá engancharse en su posición.
Cuando el cortacéspedes inalámbrico no se utilizará, almacénelo de forma que no ponga en peligro a terceros - retire la batería y la llave fusible de la máquina. Tome medidas para proteger la máquina contra el uso no autorizado.
N Retire la batería.
N Saque la llave fusible (1) del receptáculo (2) y guárdela aparte.
N Retire la caja para pasto.N Deje que la herramienta motorizada
se enfríe por completo.N Limpie a fondo la máquina.N Lubrique las piezas móviles con
aceite o grasa.N Guarde la máquina en un lugar seco
y bajo llave, fuera del alcance de los niños y de otras personas no autorizadas.
Almacenamiento de la batería
N Extraiga la batería de la herramienta motorizada o del cargador.
N Almacénese bajo techo, en un lugar seco y bajo llave. Manténgala fuera del alcance de los niños y de otras personas no autorizadas, y protegida de la contaminación.
N No guarde baterías sin usar – alterne su uso.
9929
BA
014
KN
21
9929
BA
028
KN
3
4
5
9929
BA
029
KN
9929
BA
017
KN
21
Almacenamiento de la máquina
9929
BA
020
KN
RMA 370 55
español / EE.UU
Para garantizar la máxima vida útil de la batería:N Guárdela a un temperatura entre
10 °C (50 °F) y 20 °C (68 °F).N Guárdela con aproximadamente un
30% de carga.
Almacenamiento del cargador
N Retire la batería.N Desconecte el enchufe del
tomacorriente de pared.N Guarde el cargador bajo techo, en
un lugar seco y bajo llave. Manténgalo fuera del alcance de los niños y de otras personas no autorizadas, y protegido de la contaminación.
Limpie la máquina a fondo después de cada uso. El mantenimiento cuidadoso protege a la máquina contra los daños y prolonga su vida útil.
Posición de limpieza
ADVERTENCIAColoque el cortacéspedes sobre una superficie firme y nivelada antes de apoyarla sobre su costado. El cortacéspedes puede volcarse cuando se encuentra en la posición de limpieza. Siempre en un lado del cortacéspedes. Para reducir el riesgo de lesionarse, nunca trabaje por la parte delantera ni por la parte trasera del cortacéspedes.N Retire la batería y la llave fusible.N Pliegue el mango.
N Apoye el cortacéspedes sobre su costado de modo que quede apoyado por los extremos del mango inferior (1).
Limpieza del cortacéspedes
N Coloque el cortacéspedes en la posición de limpieza.
N Limpie la cuchilla.N Utilice un cepillo y agua para limpiar
la parte inferior del cortacéspedes después de soltar los residuos bien pegados de la caja y del tubo de descarga utilizando un palo.
N Limpie la tierra del conducto de aire de enfriamiento entre el capó del motor y la base de la caja.
Inspección y mantenimiento por el usuario
9929
BA
021
KN1
RMA 37056
español / EE.UU
Si no es posible quitar la tierra con agua, con un cepillo o un trapo, STIHL recomienda el uso de un limpiador especial (por ejemplo, limpiador especial. STIHL).
El tipo de cuchilla proporcionado con el cortacéspedes depende del mercado.
1 Cuchilla cortacéspedes2 Cuchilla mullidora
Revisión de la cuchilla
N Coloque el cortacéspedes en la posición de limpieza.
N Limpie la cuchilla e inspecciónela en busca de desgaste y/o daños (melladuras o roturas); sustitúyala de ser necesario.
Siempre revise el tornillo de montaje (1) al sustituir la cuchilla.
ADVERTENCIAPara reducir el riesgo de la desconexión de la cuchilla y las lesiones resultantes, siempre sustituya el tornillo de montaje si presenta daños.
Instrucciones de afilado
1
2
9929
BA
037
KN
1
9929
BA
022
KN
RMA 370 57
español / EE.UU
Cuchilla cortacéspedes
N Utilice un calibrador de pinzas para medir el grosor de la cuchilla en 5 puntos diferentes como mínimo.
N Coloque una regla contra el filo anterior de la cuchilla y mida la distancia que se ha rebajado por afilarla.
El grosor de la cuchilla no deberá ser menor que a = 1,6 mm (0,06 pulg) en ningún punto.El filo puede haberse rebajado por el afilado a una distancia no mayor que b = 5 mm (0,2 pulg).
Cuchilla mullidora
N Utilice un calibrador de pinzas para medir el grosor de la cuchilla en 5 puntos diferentes como mínimo.
N Coloque una regla contra el filo posterior de la cuchilla y mida la distancia que se ha rebajado por afilarla.
El grosor de la cuchilla no deberá ser menor que a = 1,6 mm (0,06 pulg) en ningún punto.El ancho entre filos deberá medir un mínimo de b = 22 mm (0,87 pulg).
Retiro de la cuchilla
N Utilice un trozo de madera (2) adecuado para inmovilizar la cuchilla (1).
N Desenrosque el tornillo de montaje (3) y retire la cuchilla.
N Revise el tornillo de montaje de la cuchilla en busca de daños.
ADVERTENCIASustituya el tornillo de montaje si presenta daños.
Instrucciones de afilado
STIHL recomienda que se solicite al concesionario que afile la cuchilla. Una cuchilla incorrectamente rectificada (ángulo de afilado incorrecto, desequilibrada) puede causar problemas de funcionamiento – STIHL recomienda que se acuda a un concesionario de servicio STIHL.N Enfríe la cuchilla al afilarla, por
ejemplo, con agua.N Afile la cuchilla de modo uniforme
para evitar el desequilibrio y las vibraciones.
9929
BA
040
KN
b
a
bb
a
9929
BA
038
KN
1
9929
BA
041
KN
2
3
RMA 37058
español / EE.UU
N Afile los filos con un ángulo de 30°.N Utilice arpillera fina para eliminar las
rebabas de los filos después de haberlos afilado.
Instalación de la cuchilla
N Limpiar las superficies de montaje y las roscas (1).
N Instale la cuchilla (2) con los extremos curvados hacia arriba – las orejetas retenedoras (3) deberán engancharse en los agujeros (4) de la cuchilla.
N Utilice un trozo de madera (5) adecuado para inmovilizar la cuchilla.
N Revise el tornillo de montaje (6) de la cuchilla en busca de daños.
ADVERTENCIASustituya el tornillo de montaje si presenta daños. N Cubra el tornillo de montaje con
pasta selladora Loctite® 243 ™ o Loctite® 242 ™, instálelo y apriételo a un par de 12 Nm (9,5 lb-pie).
ADVERTENCIAPara reducir el riesgo de lesionarse, es necesario mantener el par de apriete especificado del tornillo de montaje de la cuchilla con precisión, el tornillo debe asegurarse con pasta selladora Loctite y estar en buenas condiciones para asegurar que la cuchilla esté fijada con seguridad.
9929
BA
042
KN
1
32
4 62
9929
BA
044
KN
5
RMA 370 59
español / EE.UU
Información para mantenimiento
Los intervalos dados a continuación corresponden únicamente a condiciones nor-males de trabajo. Si el tiempo de trabajo por jornada es más largo que lo normal, o si las condiciones son extremas (zonas polvorientas, etc.), acorte los intervalos indi-cados de modo correspondiente.
Siempre retire la batería y la llave fusible antes de intervenir en la herramienta motorizada.
ante
s de
com
enza
r el t
raba
jo
desp
ués
de te
rmin
ar e
l tra-
bajo
o d
iaria
men
te
sem
anal
men
te
men
sual
men
te
cada
12
mes
es
si h
ay p
robl
ema
si ti
ene
daño
s
si s
e re
quie
re
Máquina completa
Inspección visual (condición general) X
Limpiar X
Solicitar al concesionario de servicio su mantenimiento1) X X X
Controles (palanca de interruptor y bloqueo)
Comprobar el funcionamiento X
Limpiar X X
Batería Inspección visual X X X
Compartimiento para la bateríaLimpiar X X
Revisar el funcionamiento (extraer la batería) X
Cuchilla
Inspección visual X
Limpiar X X
Afilar1) X
Reemplazar X X
Freno de rueda libre Comprobar el funcionamiento X
Todos los tornillos y tuercas accesibles Volver a apretar X
Etiquetas de seguridad Reemplazar X1) STIHL recomienda acudir a un concesionario STIHL para servicio.
RMA 37060
español / EE.UU
1 Mango superior2 Palanca de cambio3 Bloqueo de palanca de interruptor4 Caja para pasto5 Escudo de tubo de descarga
(aleta trasera)6 Tuerca estrella7 Puntal8 Mango inferior9 Asa superior10 Ajuste de altura de corte11 Cubierta de compartimiento de
batería12 Compartimiento para la batería13 Asa inferior14 Cuchilla15 Cordón eléctrico16 Cargador17 Batería18 Llave fusible19 Escudo posterior20 Tubo de descarga# Número de serie
Componentes importantes
19
3
6
18
1
8
13
10
9929
BA
043
KN
2
46
5
9
11, 12
17 16
1514
7
7
20
#
RMA 370 61
español / EE.UU
Definiciones
1. Mango superiorPara controlar la máquina durante el proceso de corte.
2. Palanca de interruptorApaga y enciende el motor y controla su velocidad.
3. Bloqueo de palanca de interruptorHay que oprimirlo antes de poder activar la palanca de interruptor.
4. Caja para pastoRecoge el pasto picado durante el corte.
5. Escudo de tubo de descarga (aleta trasera)Cuando la caja para pasto no está montada, esta aleta bajo tensión de resorte ha sido diseñada para reducir el riesgo de sufrir lesiones causadas por objetos lanzados hacia el operador por el accesorio de corte y por el contacto con el accesorio de corte.
6. Tuerca estrellaPermite plegar el mango superior y fijarlo contra el mango inferior.
7. PuntalApoya el mango superior en las posiciones de almacenamiento y de transporte.
8. Mango inferiorConecta el mango superior a la caja del motor.
9. Asa superiorPara transportar la máquina.
10. Ajuste de altura de corteSe usa para fijar la cuchilla a la altura requerida.
11. Cubierta de compartimiento de bateríaCubre y protege el compartimiento de la batería, la batería y la llave fusible.
12. Compartimiento para la bateríaAloja la batería en la unidad.
13. Asa inferiorPara transportar la máquina.
14. CuchillaHoja metálica para cortar pasto.
15. Cordón eléctricoSuministra corriente eléctrica al cargador.
16. CargadorCarga la batería.
17. BateríaSuministra energía eléctrica al motor.
18. Llave fusibleInterrumpe el circuito entre la batería y el motor.
19. Escudo posteriorEl escudo posterior está diseñado para reducir el riesgo de lesionarse por objetos lanzados y/o por el contacto con la cuchilla.
20. Tubo de descargaDescarga el pasto picado durante el corte.
Batería
La herramienta motorizada puede accionarse con baterías STIHL tipo AP.El tiempo de funcionamiento de la herramienta depende de la energía contenida por la batería (ejemplo: 160 Wh en la AP 160).
Cargador
Especificaciones
Tipo: Iones de litio
AL 100Voltaje de alimentación: 120 VCorriente nominal: 1,3 AFrecuencia: 60 HzConsumo de corriente: 75 WCorriente de carga: 1,6 AAislamiento: II, E (aisla-
miento doble)
AL 300Voltaje de alimentación: 120 VCorriente nominal: 4,7 AFrecuencia: 60 HzConsumo de corriente: 330 WCorriente de carga: 6,5 AAislamiento: II, E (aisla-
miento doble)
RMA 37062
español / EE.UU
Tiempos de carga
Cuchilla
Caja para pasto
Peso
Transporte
Las baterías STIHL satisfacen los requisitos establecidos en el Manual de la ONU bajo la signatura ST/SG/AC.10/11/Rev.5/Parte III, subsección 38.3. El usuario puede trasladar las baterías STIHL por transporte terrestre hasta el lugar donde se utilizará la máquina sin requisitos adicionales.Respete los reglamentos nacionales para el transporte aéreo o marítimo.
Comuníquese con su concesionario STIHL para información acerca de accesorios especiales que pueden estar disponibles para su producto.
AL 100con AP 80: – hasta 80% de la capacidad: 70 min – 100% de la capacidad: 100 mincon AP 160: – hasta 80% de la capacidad: 150 min – 100% de la capacidad: 165 min
AL 300con AP 80: – hasta 80% de la capacidad: 25 min – 100% de la capacidad: 50 mincon AP 160: – hasta 80% de la capacidad: 35 min – 100% de la capacidad: 60 min
Velocidad del motor: 3100 r/minAncho de corte: 37 cm (15 pulg)Altura de corte: 30 - 70 mm (1,2 -
2,8 pulg)
Capacidad: 40 l (1,14 bu)
sin batería 13 kg (28,7 lb)
Accesorios especiales
RMA 370 63
español / EE.UU
Localización de averías
Siempre retire la batería antes de realizar algún trabajo en la herramienta motorizada.Condición Causa Solución
La máquina no funciona cuando se la enciende.
No hay contacto eléctrico entre la herra-mienta motorizada y la batería
Extraiga la batería, revise los contactos y vuelva a colocarla
La batería está descargada (1 diodo fotoemisor en la batería destella verde)
Cargue la batería
La batería está muy caliente/fría(1 diodo fotoemisor en la batería destella rojo)
Permita que la batería se enfríe / a tem-peraturas de aproximadamente 15°C - 20°C (59°F - 68°F), permita que la batería se caliente lentamente
Defecto en la batería(4 diodos fotoemisores en la batería destellan rojo)
Saque la batería de la herramienta y vuélvala a colocar en su lugar. Encienda la herramienta mecánica - si los diodos fotoemisores continúan destellando, la batería está averiada y es necesario reemplazarla.
La llave fusible no se ha instalado Instale la llave fusibleAvería de la llave fusible Sustituya la llave fusibleHerramienta se calienta excesivamente(3 diodos fotoemisores en la batería se iluminan en rojo)
Deje que la herramienta motorizada se enfríe
Interferencia electromagnética o avería de la herramienta motorizada(3 diodos fotoemisores en la batería destellan rojo)
Saque la batería de la herramienta y vuélvala a colocar en su lugar. Encienda la herramienta - si los diodos fotoemiso-res continúan destellando, la herramienta está averiada y deberá ser revisada por un concesionario de servi-cio 1).
Sobrecarga del motor causada por pasto muy alto o húmedo
No arranque el motor sobre pasto muy alto, ajuste la altura de corte según las condiciones
Caja del cortacéspedes obstruida Limpie la caja del cortacéspedesHay humedad en la herramienta motori-zada y/o en la batería
Deje que la herramienta motorizada/batería se seque
RMA 37064
español / EE.UU
La herramienta motorizada se apaga durante el funcionamiento
Los circuitos eléctricos de la batería o de la herramienta motorizada están muy calientes
Extraiga la batería de la herramienta motorizada y deje que ambas se enfríen
Interferencias eléctricas o electromagnéticas
Extraiga la batería y vuelva a colocarla en su lugar
Se está cortando pasto excesivamente alto, o la altura de corte es excesiva-mente baja
Permita que la herramienta se enfríe; ajuste la altura de corte según las condiciones
Velocidad de avance excesivamente alta durante el corte
Permita que la herramienta se enfríe; reduzca la velocidad
Suciedad en las entradas de enfriamiento
Permita que la herramienta se enfríe; limpie las entradas de aire de enfria-miento en la caja del motor
Siempre retire la batería antes de realizar algún trabajo en la herramienta motorizada.Condición Causa Solución
RMA 370 65
español / EE.UU
El tiempo de funcionamiento es muy corto
La batería no está completamente cargada
Cargue la batería
Se está cortando pasto muy alto o húmedo
Ajuste la altura de corte y la velocidad de avance según las condiciones
Caja del cortacéspedes obstruida Limpie la caja del cortacéspedesCuchilla roma o desgastada Afile1) o reemplace la cuchillaSe alcanzó o se superó la vida útil de la batería
Revise la batería1) y sustitúyala
La batería se atasca al colocarla en la herra-mienta motorizada/el cargador
Suciedad en guías/contactos Limpie las guías/contactos cuidadosamente
La batería no se carga a pesar de que el diodo fotoemisor del cargador se enciende en verde
La batería está muy caliente/fría(1 diodo fotoemisor en la batería destella rojo)
Permita que la batería se enfríe / a tem-peraturas de aproximadamente 15°C - 20°C (59°F - 68°F), permita que la batería se caliente lentamenteUtilice el cargador únicamente en luga-res cerrados y secos, a temperaturas de 5°C - 40°C (41°F - 104°F)
El diodo fotoemisor del cargador se enciende rojo
No hay contacto eléctrico entre el carga-dor y la batería
Extraiga la batería y vuelva a colocarla en su lugar
Defecto en la batería(4 diodos fotoemisores de la batería destellan en rojo durante aproximada-mente 5 segundos)
Saque la batería de la herramienta y vuélvala a colocar en su lugar. Encienda la herramienta mecánica - si los diodos fotoemisores continúan destellando, la batería está averiada y es necesario reemplazarla.
Defecto en el cargador Solicite al concesionario de servicio que revise el cargador1)
1) STIHL recomienda acudir a un concesionario STIHL para servicio.
Siempre retire la batería antes de realizar algún trabajo en la herramienta motorizada.Condición Causa Solución
RMA 37066
español / EE.UU
Los usuarios de esta máquina deben efectuar únicamente los trabajos de mantenimiento descritos en este manual. Solamente los talleres autorizados por STIHL deben llevar a cabo los demás trabajos de reparación.Los reclamos de garantía presentados después de realizadas las reparaciones serán aceptados únicamente si las mismas fueron ejecutadas por un concesionario de servicio autorizado STIHL utilizando piezas de repuesto originales de STIHL.Es posible identificar las piezas originales de STIHL por el número de pieza STIHL, el logotipo de { y, en ciertos casos, el símbolo K de piezas STIHL. En las piezas pequeñas el símbolo puede aparecer solo.
Información sobre reciclado de baterías
STIHL está comprometida con el desarrollo de productos que protejan el medio ambiente. Este compromiso no termina cuando el producto sale del concesionario STIHL. STIHL se asoció con la RBRC (Corporación de Reciclaje de Baterías Recargables) para fomentar la recolección y el reciclado de baterías de ion de litio STIHL en los Estados Unidos y Canadá. En todas las baterías recargables STIHL se puede encontrar el sello de la RBRC, que indica que la empresa aportó dinero para financiar el reciclado de dicha batería. El sello lleva impreso un número telefónico gratuito (1-800-822-8837) que le permite acceder a información sobre lugares de reciclaje de baterías y prohibiciones o restricciones respecto del reciclado de baterías en su zona. También puede devolver las baterías a cualquier concesionario STIHL autorizado para reciclarlas gratuitamente.
Respete todas las leyes y los reglamentos sobre eliminación de desechos que correspondan a su país.
No se debe tirar los aparatos eléctricos en el basurero. Lleve la máquina, los accesorios y el embalaje a un vertedero autorizado para reciclarlos y contribuir al cuidado del medio ambiente.Comuníquese con un concesionario de servicio de STIHL para obtener la información más actualizada sobre la eliminación de desechos.
Información de reparación Reciclado de las baterías Desecho
264B
A05
0 K
N
RMA 370 67
español / EE.UU
Marcas registradas de STIHL
STIHL®
{
K
La combinación de colores anaranjado-gris (Números de registro EE.UU. 2,821,860; 3,010,057, 3,010,058, 3,400,477; y 3,400,476)
4-MIX®
AUTOCUT®
EASYSTART®
FARM BOSS®
iCademy®
MAGNUM®
MasterWrench Service®
MotoMix®
OILOMATIC®
STIHL Cutquik®
STIHL DUROMATIC®
STIHL Quickstop®
STIHL ROLLOMATIC®
STIHL WOOD BOSS®
TIMBERSPORTS®
WOOD BOSS®
YARD BOSS®
Algunos de las marcas comerciales de STIHL por ley común
BioPlus ™Easy2Start ™EasySpool ™ElastoStart ™Ematic ™FixCut ™HT Plus ™IntelliCarb ™Master Control Lever ™Micro ™Pro Mark ™Quad Power ™Quiet Line ™STIHL Arctic ™STIHL Compact ™
STIHL HomeScaper Series ™STIHL Interchangeable Attachment Series ™STIHL M-Tronic ™STIHL MiniBoss ™STIHL MotoPlus 4 ™STIHL Multi-Cut HomeScaper Series ™Stihl Outfitters ™STIHL PICCO ™STIHL PolyCut ™STIHL PowerSweep ™STIHL Precision Series ™STIHL Protech ™STIHL RAPID ™STIHL SuperCut ™STIHL Territory ™TapAction ™TrimCut ™Esta lista de marcas comerciales está sujeta a cambios.Queda terminantemente prohibido todo uso de estas marcas comerciales sin el consentimiento expreso por escrito de ANDREAS STIHL AG & Co. KG, Waiblingen.
This product contains chemicals known to the State of California to cause
cancer, birth defects or other reproductive harm.
! WARNING! ! ADVERTENCIA!
Este producto contiene sustancias químicas consideradas por el Estado de California como causantes de cáncer, defectos de nacimiento u otra toxicidad reproductora.