55
StoragePoint A January 16, 2018 www.metalogix.com [email protected] 202.609.9100 Advanced Installation Guide
| Date post: | 29-Mar-2018 |
| Category: |
Documents |
| Upload: | truongthuan |
| View: | 223 times |
| Download: | 1 times |

StoragePoint
A
January 16, 2018
www.metalogix.com [email protected] 202.609.9100
Advanced Installation Guide

Copyright
Technical Support
© 2018 Copyright Metalogix International GmbHAll rights reserved. No part or section of the contents of this material may be reproduced or transmitted inany form or by any means without the written permission of Metalogix International GmbH.
StoragePoint™ is a trademark of Metalogix International GmbH.
Windows SharePoint Services is either a registered trademark or a trademark of Microsoft Corporation inthe United States and/or other countries. Other product and company names mentioned herein may bethe trademarks of their respective owners.
For information about Metalogix Technical support visit http://metalogix.com/support.
Technical support specialists can be reached by phone at 1.202.609.9100.
The level of technical support provided depends upon the support package that you have purchased.Contact us to discuss your support requirements.
Advanced Installation Guide
www.metalogix.com [email protected] 202.609.9100
Metalogix StoragePoint

www.metalogix.com [email protected] 202.609.9100
Metalogix StoragePointAdvanced Installation Guide
Contents
Planning the Metalogix StoragePoint Implementation ................................................................................... 4
Minimum Server Software Requirements ............................................................................................. 4
Advanced Installation ................................................................................................................................. 6
Install or Upgrade Metalogix StoragePoint ........................................................................................... 6
Setting up Metalogix StoragePoint ...................................................................................................... 6
Repair Metalogix StoragePoint ........................................................................................................... 6
AppServer Install ............................................................................................................................... 6
StoragePoint Management Shell ......................................................................................................... 6
Change StoragePoint Database Name or Server ................................................................................... 6
Remove Metalogix StoragePoint ......................................................................................................... 6
Solution Deployment Timeout Setting ................................................................................................. 6

Metalogix StoragePointAdvanced Installation Guide
4
Planning the Metalogix StoragePoint Implementation
Preparation
Metalogix StoragePoint is installed as a SharePoint solution on a single SharePoint web front-end (WFE), making forsimple installation and deployment to the SharePoint farm. This section will outline the necessary software andsecurity prerequisites needed to install Metalogix StoragePoint.
Before configuring Metalogix StoragePoint there are few things to consider and understand. This section will touchon each of these and provide some guidance and best practices.
Minimum Server Software Requirements
SharePoint (pick one)SharePoint Server 2016 and SharePoint Foundation 2016
Operating System Windows Server 2012 R2 or Windows Server 2016
SharePoint Server SharePoint Server 2016
Other Server Software SQL Server 2014 SP1, 64 bit Enterprise Edition or SQL Server 2016 RTM Enterprise
Edition
SharePoint Server 2013 and SharePoint Foundation 2013
Operating System Windows 2008 R2 Server or Windows 2012 Server
SharePoint Server SharePoint Server 2013 or SharePoint Foundation 2013
Other Server Software SQL Server 2008 R2 SP1 Enterprise Edition, SQL Server 2012 Enterprise Edition, or
SQL Server 2014 Enterprise Edition
SharePoint Foundation 2010 and SharePoint Server 2010
Operating System Windows 2008 Server, Windows 2008 R2 Server or Windows 2012 Server
SharePoint Server SharePoint Foundation Server 2010, Microsoft SharePoint Server 2010
Other Server Software SQL Server 2005 64 bit, 2008, 2008 R2 or 2012
Use of RBS requires SQL Server 2008, 2008 R2, 2012, or 2014 Enterprise Editions
NOTE: For Microsoft SharePoint Server 2010 (MSS), Service Pack 1 or the EBS hotfix must be applied.
Windows SharePoint Services 3.0 (WSS) or Microsoft Office SharePoint Server 2007 (MOSS)
Operating System Windows 2003 or 2008 Server, 64 bit.
SharePoint Server Windows SharePoint Services 3.0 (WSS)

Metalogix StoragePointAdvanced Installation Guide
5
Microsoft Office SharePoint Server 2007 (MOSS), Standard or Enterprise
Service Pack 1 or Higher
Other Server Software Microsoft .net Framework version 3.5 is required
Server Hardware RequirementsMetalogix StoragePoint does not have any hardware requirements beyond what is prescribed by MicrosoftSharePoint. For reference, those can be reviewed here: 2016 - https://technet.microsoft.com/en-us/library/cc262485(v=office.16).aspx2013 - https://technet.microsoft.com/en-us/library/Cc262485.aspx2010 - https://technet.microsoft.com/en-us/library/Cc288751(v=Office.14).aspx2007 - https://technet.microsoft.com/en-us/library/Cc262485(v=office.12).aspx
Security RequirementsThe User Account used to perform the install must be a SharePoint Farm Administrator.Also review FileShare and Content Database Rights when a profile is created.
Screen Resolution RequirementsMetalogix StoragePoint requires a minimum screen resolution of 1024 x 768 for optimizing the user interface on theStoragePoint pages that are linked from the main menu on Application Administration in Central Administration.
Internet Browser RequirementsMicrosoft Internet Explorer is the recommended browser for use with StoragePoint interface. Other browsers maywork, but are not verified as supported for all functions.
Temporary Storage RequirementsThe amount of temporary storage needed to support the timer jobs depends on the number of threads being usedfor the timer job. It is recommended that 10GB per thread, for each timer job running concurrently, be available onthe server running the timer job. Most timer jobs can use a Master/Worker configuration to spread this overmultiple servers. The temporary storage location can be configured on General Settings or during installation to usesomething other than the default (%appdata/local/temp).
NOTE: Please see the known issue regarding Distributed File System usage with StoragePoint, in the Known Issuesdocument. This document can be found in the Metalogix folder under Programs.

Metalogix StoragePointAdvanced Installation Guide
6
Advanced Installation
Install or Upgrade Metalogix StoragePoint
Install or Upgrade Metalogix StoragePoint
This section will walk through the process of installing Metalogix StoragePoint for the first time in the SharePoint
farm or upgrading an existing installation.
NOTE: An upgrade is irreversible. Before proceeding with any install, make sure proper preparation has beencompleted. As an added precaution it is advisable to back-up the Metalogix StoragePoint configuration databaseprior to performing any upgrade.
NOTE: To install bits on an app server outside of the farm, please see Advanced Options, Install AppServer.
1. Refer to the welcome e-mail with instructions on how to download the Metalogix StoragePoint software. This e-
mail will be sent after registering for a trial or making a software purchase. Follow the instructions and
download the software to one of the SharePoint WFEs or download it to another location and copy it to one of
the WFEs.
2. Once downloaded or copied to a WFE within the farm or single-server environment, simply double-click the
executable to launch the Metalogix StoragePoint Install Wizard.
NOTE: For Windows 2008 or Windows 2008 R2, right click on the executable and click Run as Administrator.
3. Click Install StoragePoint. The Evaluation Guide or this Quick Start Guide can also be loaded. Please note that
both of these documents are PDFs, so please have Adobe Acrobat Reader or some other PDF viewer installed.

Metalogix StoragePointAdvanced Installation Guide
7

Metalogix StoragePointAdvanced Installation Guide
8
If SharePoint has been upgraded, and software for a previous version is being installed, a message similar to the
one below will be displayed. Contact Metalogix to get the correct version.
4. A welcome screen is displayed. Click Next.

Metalogix StoragePointAdvanced Installation Guide
9
5. (Install only) Select the I Accept radio button, and click Next.
Metalogix StoragePointAdvanced Installation Guide
10
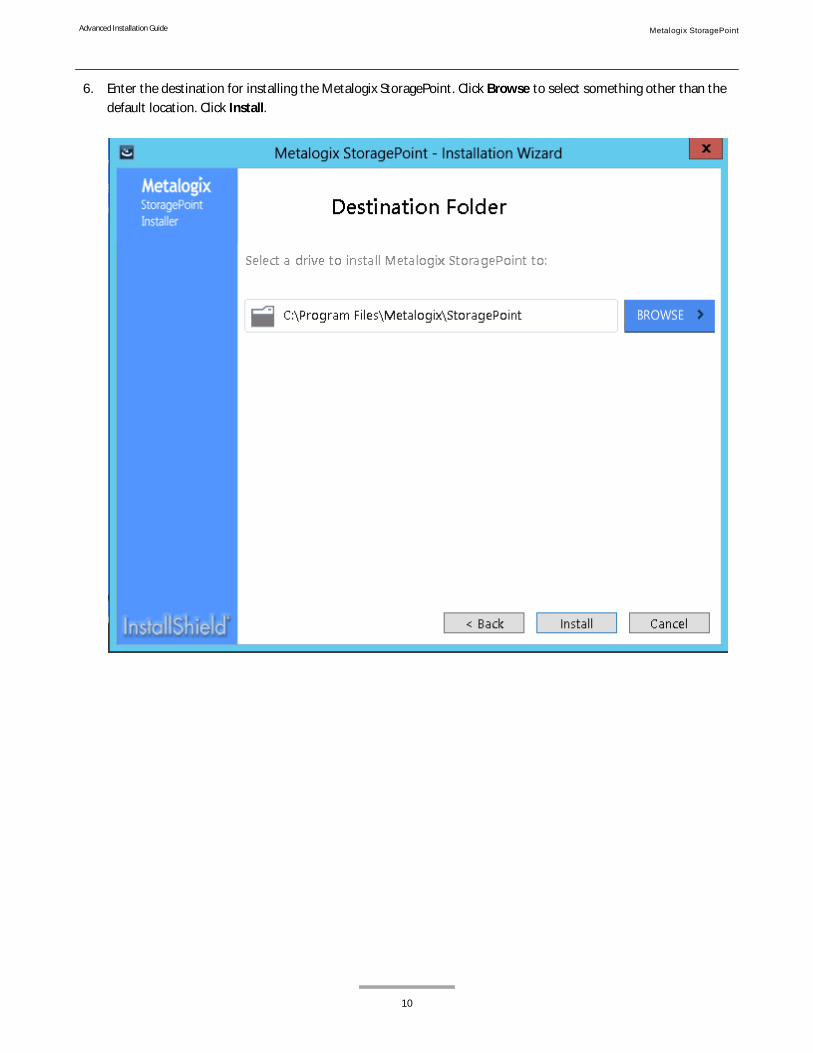
6. Enter the destination for installing the Metalogix StoragePoint. Click Browse to select something other than the
default location. Click Install.

Metalogix StoragePointAdvanced Installation Guide
11
7. After the files are placed in the drive, make sure the Run StoragePoint Configuration Wizard checkbox is
selected. Click Finish.
This message may display briefly to indicate that StoragePoint is looking for other installed software that may
not be compatible with StoragePoint externalization.

Metalogix StoragePointAdvanced Installation Guide
12
8. The StoragePoint Configuration Wizard will launch. Click Next.

Metalogix StoragePointAdvanced Installation Guide
13
9. The installer will now perform a series of system checks to make sure the system is ready for Metalogix
StoragePoint to be installed. If all system checks pass then click Next.
NOTE: If a system check fails it will be denoted with a red X and the install will not be able to continue until the
issue(s) are resolved. The installer will also check whether the most recent supported SharePoint CU is installed.
NOTE: Unless a server is running only in a web server role, it will be detected as an app server. The bits will most
likely deploy successfully, but use the AppServer Install if needed. If unsure, run the following PowerShell script to
see the servers in the farm: Get-SPServer | Select Name, Role

Metalogix StoragePointAdvanced Installation Guide
14
10. UPGRADE ONLY: Choose Upgrade and Click Next.
11. Enter the license key.
NOTE: There may be more than one registration key depending on what licenses are installed. Please make
sure to use the correct key. There are different keys for production and non-production licenses.
NOTE: If a Trial license key is being activated, all Metalogix StoragePoint features except deleting storage
profiles and the Recall timer job will stop working at the end of the trial period.
Verify the number of WFE servers in the farm. This can be less than the number requested with the license. An
explanation in the Reason for Override field must be entered if the Override box is checked.

Metalogix StoragePointAdvanced Installation Guide
15
Provide the credentials for an account that has local administrator rights on the WFE(s). The activation and
provisioning job that runs requires this access to register certain components on each WFE.
StoragePoint Proxy Settings
Use the optional StoragePoint Proxy Settings dialog to configure proxy settings for connecting to the license
server. This setting can be edited on General Settings after the installation is complete.

Metalogix StoragePointAdvanced Installation Guide
16
12. Select the Activate Online option and click Next (go to Step 19) or if the server does not have an Internet
connection, click Activate Offline and go to the next step.
13. (OPTIONAL) If the Active Offline option was selected, there will be a screen with Activation Data generated. The
data is already selected; copy the data.
14. Click the link or open a browser on a computer with access to the internet and navigate to
http://www.metalogix.com/OfflineActivation.

Metalogix StoragePointAdvanced Installation Guide
17
15. Paste the Activation Data in the top field and click Activate.
16. There will be an error if an invalid registration key is entered. If all values entered are valid there will be a file
download dialog. Save the file to a location that is accessible by the server where the license activation is being

Metalogix StoragePointAdvanced Installation Guide
18
performed.

Metalogix StoragePointAdvanced Installation Guide
19
17. Back on the Offline Activation window, upload the license key file by clicking on the Browse… button.
a. Navigate to the location where the file was saved.
b. Select the file and click Open.
See Automatic (Internet) Activation or Manual Activation in the Administration Guide for more information on
this process.
18. Click Next on the Offline Activation window.
19. Provide the name of the database server where the Metalogix StoragePoint configuration database will be
installed. The database name and SA credentials can be modified if the currently logged on user does not have
database and object create privileges on the specified SQL Server instance.
NOTE: If SQL AlwaysON is being used, On Database Creation Login Credentials dialog, enter the name of the
Listener in the Database Server field.

Metalogix StoragePointAdvanced Installation Guide
20
Click Test Connection to make sure the supplied values are valid.
Click Next.

Metalogix StoragePointAdvanced Installation Guide
21
20. Provide the credentials that will be used to access the Metalogix StoragePoint configuration database. We
recommend using the default setting, which will access the database via the app pool account(s) that the
SharePoint web application(s) run under.
Click Test Connection to test the connection based on selected authentication method.
Click Next.
Advanced Settings
Edit Connection String Directly
Use the optional text filed to manually edit the SQL database connection string.

Metalogix StoragePointAdvanced Installation Guide
22
Temp Folder Settings
Use the optional Temp Folder Settings to allocate a location and size limit for temporary storage of
StoragePoint files. This setting can be edited on General Settings.
NOTE: There will be an error similar to this if an invalid server/instance name or authentication credentials are
entered. Click Previous to go back and repair the error.

Metalogix StoragePointAdvanced Installation Guide
23
The solution file will now be installed on the local server and deployed to the all servers in the farm.
This page will periodically refresh to update the provisioning status. This process can take upwards of 5
minutes depending on the size of the farm.
NOTE: If the deployment process fails for any reason the error will be presented in the following dialog.

Metalogix StoragePointAdvanced Installation Guide
24
Click Next.
21. After the install, restart IIS and the SharePoint timer service. Click OK.
Copy to Clipboard will copy these instructions and make them available for pasting into a text editor for later
reference or to create a script.

Metalogix StoragePointAdvanced Installation Guide
25
Run Now will immediately perform the iisreset and stop and start the timer services on all servers in the farm
where StoragePoint was deployed.
22. Upon completion of the deployment process the progress status will change to All operations successfully
completed. Click Next.

Metalogix StoragePointAdvanced Installation Guide
26
23. The installation process is complete. Click Close.
A browser window will be opened and to the Metalogix StoragePoint License Management page in SharePoint
Central Administration.
NOTE: While Metalogix StoragePoint is now deployed to the farm, BLOBs will not be externalized until the
software is configured. See the Setting Up Metalogix StoragePoint section in the Reference Guide.
Setting up Metalogix StoragePoint
Metalogix StoragePoint is entirely managed within SharePoint Central Administration on the Application
Management page. Once there, the state of the EBS Provider can be changed, farm-wide storage profile defaults can
be established, and the storage endpoints and profile(s) can be managed.
The general high-level steps to follow when setting up Metalogix StoragePoint to run within the SharePoint farm are
as follows:
1. Configure Metalogix StoragePoint Logging. (OPTIONAL)
a. This step will establish how verbose Metalogix StoragePoint logs information and errors.
b. Go to the Configuring Metalogix StoragePoint Logging section of the Metalogix StoragePoint Reference
Guide for detailed instructions on performing this step.
2. Configure the Metalogix StoragePoint System Cache (OPTIONAL)

Metalogix StoragePointAdvanced Installation Guide
27
a. This step will establish the temporary location for BLOBs during Asynchronous operations. If a cloud-based
storage platform is being used or any of the additional capabilities associated with asynchronous
operations, then this is a required step.
b. Go to the System Cache section of the Metalogix StoragePoint Reference Guide for details on performing
this step.
3. Activate the EBS Provider. (REQUIRED only for EBS)
a. This step will prepare the farm to externalize BLOBs.
b. Go to the Change the State of the External BLOB Store (EBS) Provider section of the Metalogix
StoragePoint Reference Guide for detailed instructions on performing this step.
4. Configure the Default Values, General Settings and Farm Wide Timer Jobs. (OPTIONAL)
a. This step will establish default values for newly-created endpoints and storage profiles. If defaults are not
configured then newly-created endpoints and storage profiles will be blank. This step will allow the
administrator to monitor the health and activity of the storage endpoints, as long as capacity thresholds
are established when endpoints are created. It will also set up the frequency of migration jobs for archiving
and asynchronous externalization.
b. Go to the General Settings section of the Metalogix StoragePoint Reference Guide for detailed
instructions on performing this step.
5. Configure the Storage Endpoints. (REQUIRED)
a. This step will create the storage location(s) (endpoints) where content will be externalized. One or more
endpoints can be defined per storage profile. They can be created from the Storage and Backup Endpoints
link in Metalogix StoragePoint’s Central Administration section or from within the Storage Profile user
interface.
b. Go to the Manage Storage Endpoints section of the Metalogix StoragePoint Reference Guide for detailed
instructions on performing this step.
6. Create one or more Storage Profiles. (REQUIRED)
a. This step will create the storage profile(s) that will dictate how BLOBs are externalized. Profiles can be
scoped by web application, content database, and/or site collection.
b. Go to the Managing Storage Profiles section of the Metalogix StoragePoint Reference Guide for detailed
instructions on performing this step.
7. Configure Archiving Setting for each storage profile. (OPTIONAL)
a. This step will enable less accessed content to be moved to less expensive tiers of storage.
b. Go to the Archiving section of the Metalogix StoragePoint Reference Guide for detailed instructions on
performing this step.
8. Configure the Orphan BLOB Cleanup Job for the Storage Profile. (OPTIONAL)

Metalogix StoragePointAdvanced Installation Guide
28
a. This step involves scheduling how frequently the Orphan BLOB Cleanup Job is run.
b. There are important considerations to keep in mind when scheduling this job. Please see the Orphan BLOB
Cleanup Job Considerations section of the Metalogix StoragePoint Reference Guide for more information.
9. Run an Externalize job for each configured Storage Profile. (OPTIONAL)
a. This step assumes that there is an existing content database for which to externalize the existing BLOBs.
b. Go to the Configure Storage Profile Timer Jobs section of the Metalogix StoragePoint Reference Guide for
detailed instructions on performing this step.
Once these steps are completed, the BLOBs within the SharePoint farm will start externalizing to their configuredlocations (endpoints).
Repair Metalogix StoragePoint
A Repair function may be necessary in some situations, such as if it is being used on a SharePoint farm that is also
using Content Matrix.
1. For Windows Server 2008, go to the start menu>Metalogix>StoragePoint>StoragePoint Configuration Wizard.

Metalogix StoragePointAdvanced Installation Guide
29
For Windows Server 2012 go to Search and type StoragePoint Configuration Wizard.

Metalogix StoragePointAdvanced Installation Guide
30
2. The configuration wizard opens. Click Next.

Metalogix StoragePointAdvanced Installation Guide
31
3. The installer will now perform a series of system checks to make sure the system is ready for Metalogix
StoragePoint to be modified. If all system checks pass click Next.
NOTE: If a system check fails it will be denoted with a red X and the install will not be able to continue until
the issue(s) are resolved. The installer will also check whether the most recent supported SharePoint CU is
installed.

Metalogix StoragePointAdvanced Installation Guide
32
4. With Repair selected, click Next.

Metalogix StoragePointAdvanced Installation Guide
33
5. The solution file will now be removed from and re-deployed to all the servers in the farm.
6. After the repair, restart IIS and the SharePoint timer service. Click OK.

Metalogix StoragePointAdvanced Installation Guide
34
7. Upon completion of the deployment process the progress status will change to All operations successfully
completed. Click Next.

Metalogix StoragePointAdvanced Installation Guide
35
8. The repair process is complete. Click Close.
AppServer Install
If there are application servers that need the Metalogix StoragePoint bits installed to facilitate Microsoft Office
integration with SharePoint, these are the steps which will put the dll files to the GAC. Generally, the regular install
will take care of this, but if the app server didn’t receive the bits during deployment, this utility will take care of it.
This utility is also used to remove the bits from the app server.
The SharePoint Foundation web service must be running on the app server in order to install. It is also required if
the app server will be used to run any StoragePoint or SharePoint timer jobs.
1. Once downloaded or copied to the app server within the farm or single-server environment, simply double-click
the executable to launch the Metalogix StoragePoint installer.

Metalogix StoragePointAdvanced Installation Guide
36
2. Run through the installation steps as normal, but uncheck the box to Run the StoragePoint Configuration
Wizard before clicking Finish.
3. Find the Tools folder.
For Windows Server 2008, go to the start menu>Metalogix>StoragePoint>Tools>App Server Local Install.

Metalogix StoragePointAdvanced Installation Guide
37
For Windows Server 2012 go to Search and type App Server Local Install.
4. A new command prompt window will open and show the progress of the bits being installed.
5. When complete, the screen will display a message that the install has been registered successfully. Press any
key to close the window.

Metalogix StoragePointAdvanced Installation Guide
38
NOTE: There is no upgrade or repair option. If Metalogix StoragePoint is upgraded, remove the existing app server
bits and install the new bits on the app server that were downloaded with the upgrade.
To uninstall the app server bits, click the executable. Select the version of SharePoint, then enter 2 to remove.
StoragePoint Management Shell
StoragePoint Management Shell will make the StoragePoint-specific PowerShell cmdlets available. For more
information on the cmdlets, please see the following page on the Metalogix website.
For Windows Server 2008, go to the start menu>Metalogix>StoragePoint>StoragePoint Management Shell.
For Windows Server 2012 go to Search and type StoragePoint Management Shell.

Metalogix StoragePointAdvanced Installation Guide
39
Change StoragePoint Database Name or Server
This option allows the database to be renamed, or specify another server or StoragePoint database to be used.
For Windows Server 2008, go to the start menu>Metalogix>StoragePoint>Tools>Change StoragePoint Database
Server.
For Windows Server 2012 go to Search and type Change StoragePoint Database Server.
NOTE: Using this on a farm that is already in use is like restoring a StoragePoint database. Some restoration of
endpoint information will be needed, as well as a recall and externalization of all content that is under
StoragePoint control.

Metalogix StoragePointAdvanced Installation Guide
40
Provide the name of the database server where the Metalogix StoragePoint configuration database will be installed.
The database name and SA credentials can be modified if the currently logged on user does not have database and
object create privileges on the specified SQL Server instance.
Click Test Connection to make sure the supplied values are valid.
Click Next.

Metalogix StoragePointAdvanced Installation Guide
41
Provide the credentials that will be used to access the Metalogix StoragePoint configuration database. We
recommend using the default setting, which will access the database via the app pool account(s) that the SharePoint
web application(s) run under. Click Test Connection to test the connection based on selected authentication
method.
Advanced Settings
Edit Connection String Directly
Use the optional text filed to manually edit the SQL database connection string.

Metalogix StoragePointAdvanced Installation Guide
42
Temp Folder Settings
Use the optional Temp Folder Settings to allocate a location and size limit for temporary storage of StoragePoint
files. This setting can be edited on General Settings.
StoragePoint Proxy Settings
Use the optional StoragePoint Proxy Settings dialog to configure proxy settings for connecting to the license server.
This setting can be edited on General Settings.
Remove Metalogix StoragePoint
This section will walk through the process of removing an existing Metalogix StoragePoint installation. For
installation steps, see the Metalogix StoragePoint Quick Start Guide.
WARNING: Removing Metalogix StoragePoint from a farm where content is externalized will leave that content
irretrievable. Therefore, recall content for all active Storage Profiles and deactivate the EBS Provider before
removing Metalogix StoragePoint from the SharePoint farm. See the Deactivating the EBS Provider section of the
Reference Guide for more information.

Metalogix StoragePointAdvanced Installation Guide
43
NOTE: StoragePoint must be present to allow for continued management of Large File content through
SharePoint. Please see Large File Support in the Reference Guide for more information.
1. Launch the Metalogix StoragePoint Installer. Click Start Installing.

Metalogix StoragePointAdvanced Installation Guide
44
2. Click Remove.
3. Click OK to begin the StoragePoint retraction.

Metalogix StoragePointAdvanced Installation Guide
45
4. The configuration wizard opens. Click Next.

Metalogix StoragePointAdvanced Installation Guide
46
5. The installer will now perform a series of system checks to make sure the system is ready for Metalogix
StoragePoint to be modified. If all system checks pass click Next.
NOTE: If a system check fails it will be denoted with a red X and the install will not be able to continue until the
issue(s) are resolved. The installer will also check whether the most recent supported SharePoint CU is installed.

Metalogix StoragePointAdvanced Installation Guide
47
6. Click Next.

Metalogix StoragePointAdvanced Installation Guide
48
The solution file will now be removed from all servers in the farm. This process can take upwards of 5 minutes
depending on the size of the farm.

Metalogix StoragePointAdvanced Installation Guide
49
7. Upon completion of the uninstall process the progress status will change to All operations successfully
completed. Click Next.

Metalogix StoragePointAdvanced Installation Guide
50
8. The uninstall process is complete. Click Close.

Metalogix StoragePointAdvanced Installation Guide
51
9. The Installation wizard will complete the uninstall. Click Finish.

Metalogix StoragePointAdvanced Installation Guide
52
10. Close the Install Wizard by clicking Quit in the bottom left, and Yes on the prompt.
Solution Deployment Timeout Setting
If the deployment of the solution needs more time than the default 15 minutes, a setting can be added to the setupconfiguration file to add more time. This may be necessary for larger farms or servers with less than optimalperformance, but still operational for hosting SharePoint.

Metalogix StoragePointAdvanced Installation Guide
53
1. Launch the StoragePoint Installer. This will place files in the StoragePoint installation path specified during theinstaller.

Metalogix StoragePointAdvanced Installation Guide
54
2. Go to the location of the files and update the properties on Setup.exe.config to enable write.
3. Open the file in Notepad and add the following: <add key="InstallationSTPTimeout" value="900000"/>,where 900000 is the amount of time in milliseconds to wait for solution deployment to complete. Save the file.Mark the file as Read Only.

Metalogix StoragePointAdvanced Installation Guide
55
4. Continue with the StoragePoint configuration wizard. The new timeout setting will be visible during deployment.


