484
Submit comments about this document to [email protected]. StorageTek Automated Cartridge System Library Software Administrator’s Guide Version 8.1 Part Number: E25009-03 December 2012

Submit comments about this document to [email protected].
StorageTek Automated Cartridge System Library Software
Administrator’s Guide
Version 8.1
Part Number: E25009-03December 2012

2 ACSLS 8.2 Adminstrator’s December 2012
StorageTek Automated Cartridge System Library Software Administrator’s Guide
E25009-03
Oracle welcomes your comments and suggestions for improving this book. Contact us at [email protected]. Please include the title, part number, issue date, and revision.
Copyright © 1989, 2012, Oracle and/or its affiliates. All rights reserved.
This software and related documentation are provided under a license agreement containing restrictions on use and disclosure and are protected by intellectual property laws. Except as expressly permitted in your license agreement or allowed by law, you may not use, copy, reproduce, translate, broadcast, modify, license, transmit, distribute, exhibit, perform, publish, or display any part, in any form, or by any means. Reverse engineering, disassembly, or decompilation of this software, unless required by law for interoperability, is prohibited.
The information contained herein is subject to change without notice and is not warranted to be error-free. If you find any errors, please report them to us in writing.
If this is software or related software documentation that is delivered to the U.S. Government or anyone licensing it on behalf of the U.S. Government, the following notice is applicable:
U.S. GOVERNMENT RIGHTS Programs, software, databases, and related documentation and technical data delivered to U.S. Government customers are "commercial computer software" or "commercial technical data" pursuant to the applicable Federal Acquisition Regulation and agency-specific supplemental regulations. As such, the use, duplication, disclosure, modification, and adaptation shall be subject to the restrictions and license terms set forth in the applicable Government contract, and, to the extent applicable by the terms of the Government contract, the additional rights set forth in FAR 52.227-19, Commercial Computer Software License (December 2007). Oracle USA, Inc., 500 Oracle Parkway, Redwood City, CA 94065.
This software or hardware is developed for general use in a variety of information management applications. It is not developed or intended for use in any inherently dangerous applications, including applications which may create a risk of personal injury. If you use this software or hardware in dangerous applications, then you shall be responsible to take all appropriate fail-safe, backup, redundancy, and other measures to ensure the safe use. Oracle Corporation and its affiliates disclaim any liability for any damages caused by use of this software or hardware in dangerous applications.
Oracle is a registered trademark of Oracle Corporation and/or its affiliates. Oracle and Java are registered trademarks of Oracle and/or its affiliates. Other names may be trademarks of their respective owners.
AMD, Opteron, the AMD logo, and the AMD Opteron logo are trademarks or registered trademarks of Advanced Micro Devices. Intel and Intel Xeon are trademarks or registered trademarks of Intel Corporation. All SPARC trademarks are used under license and are trademarks or registered trademarks of SPARC International, Inc. UNIX is a registered trademark licensed through X/Open Company, Ltd.
This software or hardware and documentation may provide access to or information on content, products, and services from third parties. Oracle Corporation and its affiliates are not responsible for and expressly disclaim all warranties of any kind with respect to third-party content, products, and services. Oracle Corporation and its affiliates will not be responsible for any loss, costs, or damages incurred due to your access to or use of third-party content, products, or services.
December 2012 3
Table of Contents
Revision ................................................................................................................................... 21
Preface ...................................................................................................................................... 23
Access to Oracle Support .......................................................................................................... 23
1 Overview .................................................................................................................................. 25
About ACSLS ........................................................................................................................... 25
About ACSLS HA .................................................................................................................... 25
The acssa and acsss User IDs .................................................................................................... 25
Additional ACSLS GUI Users ................................................................................................... 26
The acsss Utility ....................................................................................................................... 26
Using a cmd_proc .................................................................................................................... 27
cmd_proc Window ............................................................................................................. 27
Using cmd_proc: Curses Mode vs. Line Mode ..................................................................... 28
How to Suspend and Resume a cmd_proc ........................................................................... 29
Terminating a cmd_proc ..................................................................................................... 29
Starting a cmd_proc ............................................................................................................ 30
Logging in as acsss from the ACSLS Server ......................................................................... 30
Logging in Remotely as acssa .............................................................................................. 30
Logging in as acssa from a Non-UNIX Client ...................................................................... 31
Manually Starting a cmd_proc ............................................................................................ 31
cmd_proc Keyboard Shortcuts ............................................................................................ 32
Redirecting cmd_proc Inputs and Outputs .......................................................................... 32
ACSLS Directory Structure .................................................................................................. 34
2 ACSLS License Key ............................................................................................................. 37
3 ACSLS GUI .............................................................................................................................. 39
Starting the ACSLS GUI ........................................................................................................... 40
Administering GUI Users and Passwords ........................................................................... 40
The GUI Welcome Screen ......................................................................................................... 40
Masthead ................................................................................................................................. 40
Alarms Color Code ............................................................................................................. 41
System Preferences ............................................................................................................. 42
Navigation Tree ....................................................................................................................... 42
Overview and Status ........................................................................................................... 42

4 ACSLS 8.1 Adminstrator’s Guide December 2012
Configuration and Administration ...................................................................................... 43
Tape Library Operations ..................................................................................................... 43
Tape Libraries & Drives ...................................................................................................... 44
System Operations Not Included in the ACSLS 8.1 GUI ............................................................ 44
4 Installing and Configuring Your Library Hardware .................................................. 47
Installing Connections to Your Library Hardware .................................................................... 47
Adding the SCSI mchanger Device Driver ........................................................................... 47
Enabling SL8500 or SL3000 Dual TCP/IP Support ............................................................... 48
Configuring or Re-configuring Library Hardware ............................................................... 48
Using acsss_config to Configure Your Library Hardware ......................................................... 49
Renumbering an ACS ............................................................................................................... 54
5 Setting Variables that Control ACSLS Behavior ....................................................... 55
Accessing the ACSLS Feature Configuration Menu .................................................................. 56
Verifying and Changing Dynamic and Static Variables ............................................................. 56
Setting CSI Tuning Variables ............................................................................................... 57
Setting Event Logging Variables .......................................................................................... 59
Setting General Product Behavior Variables ........................................................................ 61
Setting Access Control Variables ......................................................................................... 66
Setting Automatic Backup Variables .................................................................................... 67
Rebuilding Access Control Information ............................................................................... 68
Defining Event Notification Settings ................................................................................... 68
Configuring or Updating your Library Hardware ............................................................... 69
6 Access Control ...................................................................................................................... 71
Volume Access Control ............................................................................................................ 71
Enabling Volume Access Control ........................................................................................ 71
Associating a client identity with a user name ..................................................................... 72
Defining other users that are allowed access to the user's volumes ...................................... 73
Establishing Ownership of Your Volumes ........................................................................... 74
Volume Access Summary .................................................................................................... 75
Command Access Control ........................................................................................................ 76
Enabling Command Access Control .................................................................................... 76
Associating a client identity with a user name ..................................................................... 77
Defining What Commands are Available to Which Users .................................................... 77
Logging Access Control Messages ............................................................................................ 79
7 Library Management ............................................................................................................ 81
Specifying ACS Numbers ......................................................................................................... 81
Auditing the Library ................................................................................................................ 82
How Audit Works .............................................................................................................. 82
When to Run an Audit ........................................................................................................ 82
Audit Intervals .................................................................................................................... 83
Adding a SCSI or fibre-attached library to ACSLS .................................................................... 83
Using the Extended Store Feature ............................................................................................. 83
Managing a Mixed-Media Library ............................................................................................ 86
Displaying the ACSLS Mixed-Media Settings ...................................................................... 86

December 2012 5
Mixed-Media Restrictions for SCSI-Attached LSMs ............................................................. 87
Setting Scratch Preferences .................................................................................................. 87
Managing Dual TCP/IP Connections ....................................................................................... 89
Managing a Dual-LMU Configuration ...................................................................................... 89
Managing a Dual-LAN Client Configuration ............................................................................ 92
Registering the IP Addresses of Primary and Secondary LANs ............................................ 93
Installing a Second Ethernet Port for a Multi-Homed ACSLS Server .................................... 93
Setting the TCP/IP Connection Timeout Interval ................................................................ 94
Registering for Event Notification ............................................................................................ 94
Automatic Recovery to Desired State ....................................................................................... 95
Current state and desired state ............................................................................................ 95
Current state cascades down, desired state does not ............................................................ 95
Queue and Retry Mounts and Dismounts when Library is Temporarily Unavailable ................ 96
8 Cartridge Management ....................................................................................................... 99
Populating the LSM ............................................................................................................... 100
Using the CAP ....................................................................................................................... 100
CAP Types ........................................................................................................................ 100
CAP States ........................................................................................................................ 101
CAP Modes ....................................................................................................................... 102
CAP Priorities ................................................................................................................... 103
Displaying CAP Information ............................................................................................. 104
Entering Cartridges ................................................................................................................ 104
Terminating an Enter Request ........................................................................................... 105
Ejecting Cartridges ................................................................................................................. 106
Recovering CAPs ................................................................................................................... 107
General CAP Recovery Procedures ................................................................................... 107
Recovering a CAP After Opening the Access Door ............................................................ 107
Recovery Procedures to Unlock a CAP in an L1400, L700, L700e, or L180 Library .............. 109
Automatically Applying Policies to New and Reactivated Cartridges ..................................... 110
Cleaning Cartridges ............................................................................................................... 110
Automatic Cleaning .......................................................................................................... 110
Defining Cleaning Cartridges ............................................................................................ 110
Ejecting Used Cleaning Cartridges .....................................................................................111
Manually Cleaning a Drive ............................................................................................... 112
Cleaning Cartridges on SCSI-Attached LSMs .................................................................... 112
Correcting Cleaning Cartridge Problems ........................................................................... 113
What To Do When Drives are not Being Cleaned ............................................................... 113
Managing Scratch Cartridges ................................................................................................. 114
Displaying Scratch Pool and Scratch Cartridge Information ............................................... 115
Adding Scratch Cartridges to the Library .......................................................................... 115
Rebalancing Scratch Pools ................................................................................................. 116
Deleting Scratch Pools ....................................................................................................... 116
Mounting Scratch Cartridges ............................................................................................. 117
Unscratching Cartridges ................................................................................................... 118
Using Absent and Ejected Cartridge Support .......................................................................... 118
Absent, Ejected and Missing Cartridges ................................................................................. 119

6 ACSLS 8.1 Adminstrator’s Guide December 2012
Cartridge (Volume) Status Reporting ................................................................................ 119
Cartridge Recovery ................................................................................................................ 120
Missing Cartridges ................................................................................................................. 120
Absent and Ejected Cartridges ............................................................................................... 121
Cartridges Not Found ....................................................................................................... 121
Cartridges Found .............................................................................................................. 121
Using the Manual Volume Delete Utility ................................................................................ 122
Identifying Expired Cartridges ............................................................................................... 122
Cartridge End-of-Life Percentages ..................................................................................... 123
Access Counts ................................................................................................................... 123
ACSLS Cartridge Mount Count Details ............................................................................. 124
Cartridge Warranty and End-of-life Thresholds ................................................................. 124
Moving Least-Recently Accessed Cartridges from Active LSMs .............................................. 125
Identify the LSMs with too Few Free Cells and LSMs with Empty Cells ............................. 126
Review Cartridges in an LSM by Access Date .................................................................... 126
Move the cartridges from Full LSMs to LSMs with Empty Cells ........................................ 127
Manually Loading Cartridges Into Drives in a Disabled LSM ................................................. 128
9 Database Administration ................................................................................................. 129
Utilities Used ......................................................................................................................... 130
Exporting the Database .......................................................................................................... 130
Exporting to a Disk File .................................................................................................... 131
Exporting to Tape ............................................................................................................. 132
Importing the Database .......................................................................................................... 133
Importing From a Disk File ............................................................................................... 133
Importing from Tape ......................................................................................................... 135
Verifying the Imported Database and Library Configuration .................................................. 136
Automatic Database Backup .................................................................................................. 137
Performing Manual Backups to Tape ...................................................................................... 137
Backing up to a Specified Tape Device Attached to the ACSLS Server .................................... 137
Backing up to a UNIX File ...................................................................................................... 138
Recovering and Restoring ...................................................................................................... 138
Restoring the Database to the Most Recent Backup ................................................................. 139
Recovering from a Failed Server ............................................................................................. 140
Restoring ACSLS Control Files ............................................................................................... 140
10 Reporting and Logging ..................................................................................................... 143
Creating a Custom Volume Report ......................................................................................... 143
Custom Volume Report ..................................................................................................... 144
Creating a Logging Volume Statistics Report .......................................................................... 147
11 Utility Reference .................................................................................................................. 151
Overview ............................................................................................................................... 153
Legacy Start/Stop Scripts .................................................................................................. 153
acs_renumber.sh .................................................................................................................... 154
acsss ...................................................................................................................................... 155
Format .............................................................................................................................. 155
Options ............................................................................................................................. 156

December 2012 7
bdb.acsss ................................................................................................................................ 157
Format .............................................................................................................................. 157
Options ............................................................................................................................. 157
Usage ................................................................................................................................ 157
Dynamic Configuration (config) utilities ................................................................................ 158
Limitations of Dynamic Configuration .............................................................................. 159
Things You Should Not Do ............................................................................................... 159
config acs ............................................................................................................................... 160
Format .............................................................................................................................. 160
Adding a new ACS ........................................................................................................... 161
Reconfiguring an existing ACS .......................................................................................... 161
Limitation of config acs ..................................................................................................... 162
config drives .......................................................................................................................... 162
Format .............................................................................................................................. 162
Usage ................................................................................................................................ 162
config lsm .............................................................................................................................. 163
Format .............................................................................................................................. 163
Usage ................................................................................................................................ 163
Limitation of config lsm .................................................................................................... 164
config ports ............................................................................................................................ 164
Format .............................................................................................................................. 164
Usage ................................................................................................................................ 164
Limitations of config ports ................................................................................................ 165
db_export.sh .......................................................................................................................... 165
Format .............................................................................................................................. 165
Options ............................................................................................................................. 165
Usage ................................................................................................................................ 166
db_import.sh ......................................................................................................................... 166
Format .............................................................................................................................. 166
Options ............................................................................................................................. 166
Usage ................................................................................................................................ 166
del_vol ................................................................................................................................... 167
Format .............................................................................................................................. 167
Options ............................................................................................................................. 167
Usage ................................................................................................................................ 168
Example ............................................................................................................................ 168
See Also ............................................................................................................................ 168
drives_media.sh ..................................................................................................................... 168
Format .............................................................................................................................. 169
Options ............................................................................................................................. 169
ejecting.sh .............................................................................................................................. 169
Format .............................................................................................................................. 169
Options ............................................................................................................................. 169
Usage ................................................................................................................................ 169
Examples .......................................................................................................................... 170
free_cells.sh ........................................................................................................................... 170

8 ACSLS 8.1 Adminstrator’s Guide December 2012
Format .............................................................................................................................. 170
Option .............................................................................................................................. 170
Examples .......................................................................................................................... 171
getHba.sh .............................................................................................................................. 173
Format .............................................................................................................................. 173
....................................................................................................................................... get_license_info 174
greplog .................................................................................................................................. 174
Format .............................................................................................................................. 175
Options ............................................................................................................................. 175
Usage ................................................................................................................................ 175
licensekey.sh .......................................................................................................................... 175
moving.sh .............................................................................................................................. 175
Format .............................................................................................................................. 176
Usage ................................................................................................................................ 176
Examples .......................................................................................................................... 181
See also ............................................................................................................................. 182
probeFibre.sh ......................................................................................................................... 183
Format .............................................................................................................................. 183
Options ............................................................................................................................. 183
rdb.acsss ................................................................................................................................ 183
Format .............................................................................................................................. 184
Menu Options ................................................................................................................... 184
showDevs.sh .......................................................................................................................... 187
Format .............................................................................................................................. 187
Usage ................................................................................................................................ 187
Options ............................................................................................................................. 188
stats_report ............................................................................................................................ 188
Format .............................................................................................................................. 188
Usage ................................................................................................................................ 189
userAdmin.sh ........................................................................................................................ 190
Format .............................................................................................................................. 191
volrpt ..................................................................................................................................... 193
Format .............................................................................................................................. 193
Options ............................................................................................................................. 193
Usage ................................................................................................................................ 194
Examples .......................................................................................................................... 196
watch_vols ............................................................................................................................. 198
Format .............................................................................................................................. 198
Usage ................................................................................................................................ 198
Example ............................................................................................................................ 199
12 Command References ...................................................................................................... 201
General Command Syntax ..................................................................................................... 202
Component Types and Identifiers .......................................................................................... 203
Common Command Error Messages ...................................................................................... 206
audit ...................................................................................................................................... 206
Format .............................................................................................................................. 206

December 2012 9
Usage ................................................................................................................................ 207
Examples .......................................................................................................................... 209
Command Area Messages ................................................................................................. 209
cancel ..................................................................................................................................... 211
Format .............................................................................................................................. 211
Options ............................................................................................................................. 211
Examples .......................................................................................................................... 213
Command Area Messages ................................................................................................. 214
clear lock ................................................................................................................................ 215
Format .............................................................................................................................. 215
Options ............................................................................................................................. 215
Usage ................................................................................................................................ 215
Examples .......................................................................................................................... 215
Command Area Messages ................................................................................................. 216
Display Area Messages ..................................................................................................... 216
define pool ............................................................................................................................. 216
Format .............................................................................................................................. 217
Options ............................................................................................................................. 217
Usage ................................................................................................................................ 217
Examples .......................................................................................................................... 217
Command Area Messages ................................................................................................. 218
Display Area Messages ..................................................................................................... 218
delete pool ............................................................................................................................. 218
Format .............................................................................................................................. 218
Options ............................................................................................................................. 219
Usage ................................................................................................................................ 219
Examples .......................................................................................................................... 219
Command Area Messages ................................................................................................. 220
dismount ............................................................................................................................... 220
Format .............................................................................................................................. 220
Options ............................................................................................................................. 220
Usage ................................................................................................................................ 221
Examples .......................................................................................................................... 221
Command Area Messages ................................................................................................. 222
Display Area Messages ..................................................................................................... 223
eject ....................................................................................................................................... 223
Format .............................................................................................................................. 224
Options ............................................................................................................................. 224
Usage ................................................................................................................................ 224
Examples .......................................................................................................................... 225
Command Area Messages ................................................................................................. 225
Display Area Messages ..................................................................................................... 227
enter ...................................................................................................................................... 227
Options ............................................................................................................................. 227
Usage ................................................................................................................................ 228
Examples .......................................................................................................................... 228

10 ACSLS 8.1 Adminstrator’s Guide December 2012
Command Area Messages ................................................................................................. 229
Success Messages .............................................................................................................. 229
Intermediate Messages ...................................................................................................... 229
Error Messages ................................................................................................................. 229
Display Area Messages ..................................................................................................... 230
idle ........................................................................................................................................ 230
Format .............................................................................................................................. 230
Options ............................................................................................................................. 230
Usage ................................................................................................................................ 231
Examples .......................................................................................................................... 231
Command Area Messages ................................................................................................. 231
Display Area Messages ..................................................................................................... 232
lock ........................................................................................................................................ 232
Format .............................................................................................................................. 232
Options ............................................................................................................................. 232
Usage ................................................................................................................................ 233
Examples .......................................................................................................................... 233
Command Area Messages ................................................................................................. 233
Display Area Messages ..................................................................................................... 234
logoff ..................................................................................................................................... 234
Format .............................................................................................................................. 234
Options ............................................................................................................................. 234
Usage ................................................................................................................................ 235
Examples .......................................................................................................................... 235
Display Area Messages ..................................................................................................... 235
mount .................................................................................................................................... 235
Format .............................................................................................................................. 235
Options ............................................................................................................................. 235
Usage ................................................................................................................................ 236
Examples .......................................................................................................................... 236
Command Area Messages ................................................................................................. 237
Display Area Messages ..................................................................................................... 238
mount * .................................................................................................................................. 238
Format .............................................................................................................................. 238
Options ............................................................................................................................. 238
Usage ................................................................................................................................ 238
Examples .......................................................................................................................... 239
Command Area Messages ................................................................................................. 240
Display Area Messages ................................................................................................... 242
move ...................................................................................................................................... 242
Format .............................................................................................................................. 242
Options ............................................................................................................................. 242
Usage ................................................................................................................................ 242
Examples .......................................................................................................................... 243
Command Area Messages ................................................................................................. 243
query commands ................................................................................................................... 244

December 2012 11
Format .............................................................................................................................. 244
Command Area Messages ................................................................................................. 244
Display Area Messages ..................................................................................................... 245
query acs ............................................................................................................................... 245
Format .............................................................................................................................. 245
Options ............................................................................................................................. 245
Usage ................................................................................................................................ 245
Examples .......................................................................................................................... 246
query cap ............................................................................................................................... 246
Format .............................................................................................................................. 246
Options ............................................................................................................................. 246
Usage ................................................................................................................................ 246
Examples .......................................................................................................................... 248
query clean ............................................................................................................................ 248
Format .............................................................................................................................. 248
Options ............................................................................................................................. 248
Usage ................................................................................................................................ 249
Examples .......................................................................................................................... 249
query drive ............................................................................................................................ 250
Format .............................................................................................................................. 250
Options ............................................................................................................................. 250
Usage ................................................................................................................................ 250
Examples .......................................................................................................................... 251
query lmu .............................................................................................................................. 252
Format .............................................................................................................................. 252
Options ............................................................................................................................. 252
Usage ................................................................................................................................ 252
Examples .......................................................................................................................... 255
query lock .............................................................................................................................. 255
Format .............................................................................................................................. 255
Options ............................................................................................................................. 255
Usage ................................................................................................................................ 256
Examples .......................................................................................................................... 257
query lsm ............................................................................................................................... 257
Format .............................................................................................................................. 257
Options ............................................................................................................................. 257
Examples .......................................................................................................................... 258
query mount .......................................................................................................................... 259
Format .............................................................................................................................. 259
Options ............................................................................................................................. 259
Usage ................................................................................................................................ 259
Examples .......................................................................................................................... 261
query mount * ........................................................................................................................ 261
Format .............................................................................................................................. 261
Options ............................................................................................................................. 261
Usage ................................................................................................................................ 261
12 ACSLS 8.1 Adminstrator’s Guide December 2012
Examples .......................................................................................................................... 263
query pool ............................................................................................................................. 263
Format .............................................................................................................................. 263
Options ............................................................................................................................. 263
Usage ................................................................................................................................ 264
Examples .......................................................................................................................... 264
query port .............................................................................................................................. 265
Format .............................................................................................................................. 265
Options ............................................................................................................................. 265
Usage ................................................................................................................................ 265
Examples .......................................................................................................................... 266
query request ......................................................................................................................... 266
Format .............................................................................................................................. 266
Options ............................................................................................................................. 266
Usage ................................................................................................................................ 266
Examples .......................................................................................................................... 267
query scratch ......................................................................................................................... 267
Format .............................................................................................................................. 267
Options ............................................................................................................................. 267
Usage ................................................................................................................................ 267
Examples .......................................................................................................................... 268
query server ........................................................................................................................... 268
Format .............................................................................................................................. 268
Options ............................................................................................................................. 268
Usage ................................................................................................................................ 269
Examples .......................................................................................................................... 269
query volume ......................................................................................................................... 269
Format .............................................................................................................................. 270
Options ............................................................................................................................. 270
Usage ................................................................................................................................ 270
Examples .......................................................................................................................... 271
set commands ........................................................................................................................ 271
Format .............................................................................................................................. 271
Command Area Messages ................................................................................................. 271
Display Area Messages ..................................................................................................... 272
set cap mode .......................................................................................................................... 272
Format .............................................................................................................................. 272
Options ............................................................................................................................. 272
Usage ................................................................................................................................ 272
Examples .......................................................................................................................... 273
Command Area Messages ................................................................................................. 273
set cap priority ....................................................................................................................... 274
Format .............................................................................................................................. 274
Options ............................................................................................................................. 274
Usage ................................................................................................................................ 274
Examples .......................................................................................................................... 274

December 2012 13
Command Area Messages ................................................................................................. 275
Display Area Messages ..................................................................................................... 275
set clean ................................................................................................................................. 275
Format .............................................................................................................................. 275
Options ............................................................................................................................. 275
Usage ................................................................................................................................ 276
Examples .......................................................................................................................... 276
Command Area Messages ................................................................................................. 276
Display Area Messages ..................................................................................................... 277
set lock ................................................................................................................................... 277
Format .............................................................................................................................. 277
Options ............................................................................................................................. 277
Usage ................................................................................................................................ 277
Examples .......................................................................................................................... 277
Command Area Messages ................................................................................................. 278
Display Area Messages ..................................................................................................... 278
set owner ............................................................................................................................... 278
Format .............................................................................................................................. 278
Options ............................................................................................................................. 278
Usage ................................................................................................................................ 279
Examples .......................................................................................................................... 279
Command Area Messages ................................................................................................. 279
Display Area Messages ..................................................................................................... 279
set scratch .............................................................................................................................. 279
Format .............................................................................................................................. 279
Options ............................................................................................................................. 279
Usage ................................................................................................................................ 279
Examples: ......................................................................................................................... 280
Command Area Messages ................................................................................................. 280
Display Area Messages ..................................................................................................... 281
show ...................................................................................................................................... 281
Format .............................................................................................................................. 281
Options ............................................................................................................................. 281
Usage ................................................................................................................................ 281
Examples .......................................................................................................................... 281
Command Area Messages ................................................................................................. 282
Display Area Messages ..................................................................................................... 282
start ....................................................................................................................................... 282
Format .............................................................................................................................. 282
Options ............................................................................................................................. 282
Usage ................................................................................................................................ 282
Examples: ......................................................................................................................... 283
Command Area Messages ................................................................................................. 283
Display Area Messages ..................................................................................................... 283
switch lmu ............................................................................................................................. 283
Format .............................................................................................................................. 284

14 ACSLS 8.1 Adminstrator’s Guide December 2012
Options ............................................................................................................................. 284
Usage ................................................................................................................................ 284
Examples .......................................................................................................................... 284
Command Area Messages ................................................................................................. 285
Display Area Messages ..................................................................................................... 286
unlock .................................................................................................................................... 286
Format .............................................................................................................................. 286
Options ............................................................................................................................. 286
Usage ................................................................................................................................ 286
Examples .......................................................................................................................... 287
Command Area Messages ................................................................................................. 287
Display Area Messages ..................................................................................................... 288
vary ....................................................................................................................................... 288
Format .............................................................................................................................. 288
Options ............................................................................................................................. 288
Usage ................................................................................................................................ 289
Examples .......................................................................................................................... 290
Command Area Messages ................................................................................................. 291
Display Area Messages ..................................................................................................... 293
venter .................................................................................................................................... 293
Format .............................................................................................................................. 294
Options ............................................................................................................................. 294
Usage ................................................................................................................................ 294
Examples .......................................................................................................................... 294
Command Area Messages ................................................................................................. 295
Display Area Messages ..................................................................................................... 295
13 Display Command Reference ......................................................................................... 297
Using display Command Options .......................................................................................... 298
Using Wildcard Characters ............................................................................................... 298
Using Ranges .................................................................................................................... 299
Format .............................................................................................................................. 299
display cap ............................................................................................................................. 300
Format .............................................................................................................................. 301
Fields ................................................................................................................................ 301
Options ............................................................................................................................. 301
Examples .......................................................................................................................... 303
display cell ............................................................................................................................. 303
Format .............................................................................................................................. 303
Fields ................................................................................................................................ 303
Options ............................................................................................................................. 303
Example ............................................................................................................................ 304
display drive .......................................................................................................................... 304
Format .............................................................................................................................. 305
Fields ................................................................................................................................ 305
Options ............................................................................................................................. 305
Examples .......................................................................................................................... 308
December 2012 15
display lock ........................................................................................................................... 309
Format .............................................................................................................................. 309
Fields ................................................................................................................................ 309
Options ............................................................................................................................. 309
Example ............................................................................................................................ 310
display lsm ............................................................................................................................ 310
Format .............................................................................................................................. 310
Fields ................................................................................................................................ 310
Examples .......................................................................................................................... 313
display panel ......................................................................................................................... 313
Format .............................................................................................................................. 313
Fields ................................................................................................................................ 313
Options ............................................................................................................................. 313
Example ............................................................................................................................ 314
display pool ........................................................................................................................... 314
Format .............................................................................................................................. 314
Fields ................................................................................................................................ 314
Options ............................................................................................................................. 315
Examples .......................................................................................................................... 316
display port ........................................................................................................................... 316
Format .............................................................................................................................. 316
Fields ................................................................................................................................ 316
Options ............................................................................................................................. 316
Example ............................................................................................................................ 318
display volume ...................................................................................................................... 318
Format .............................................................................................................................. 318
Fields ................................................................................................................................ 318
Options ............................................................................................................................. 318
Examples .......................................................................................................................... 321
A ACSLS Backup and Recovery Tools ........................................................................... 323
ACSLS Backup Tools .............................................................................................................. 323
Automatic Backups ........................................................................................................... 323
Manual Backups ............................................................................................................... 324
Manual Database Exports .................................................................................................. 324
ACSLS Recovery Tools ........................................................................................................... 325
Using rdb.acsss ................................................................................................................. 325
Using db_import.sh .......................................................................................................... 326
Disaster Scenarios .................................................................................................................. 327
Database becomes corrupted – need to restore the database to a working state .................. 327
Ran acsss_config against the wrong library ....................................................................... 327
Server failure – rebuilding the same server with new hardware ......................................... 327
Server failure – rebuilding another ACSLS server with new hardware ............................... 327
B Enterprise Library Connection Options ..................................................................... 329
Overview ............................................................................................................................... 329
Displaying the status of ACSLS Communication with Libraries ......................................... 330

16 ACSLS 8.1 Adminstrator’s Guide December 2012
Dual TCP/IP Support ........................................................................................................... 330
Requirements .................................................................................................................... 331
Configuration ................................................................................................................... 331
Retaining Customized Routing Table Entries after a Reboot .............................................. 337
Multi TCP/IP Support ........................................................................................................... 338
Redundant Electronics ........................................................................................................... 340
ACSLS Support for RE ...................................................................................................... 341
C ACSLS Support of the SL8500 ....................................................................................... 345
Connecting to Multiple SL8500s Using Multi TCP/IP ........................................................ 346
Verifying that all SL8500 Components are Operational ...................................................... 347
Understanding SL8500 Internal Addresses and ACSLS Addresses .......................................... 347
Using SL Console to Translate Addresses ............................................................................... 349
Tape Drive Locations ........................................................................................................ 349
Moving Cartridges Before Removing Cells from a Partition .................................................... 350
SL8500 CAP Behavior ............................................................................................................ 351
Enter or Eject Operations ................................................................................................... 351
Enter, Eject, and Audit Operations for Some ACSLS Clients .............................................. 351
Minimizing Elevator and PTP Activity ................................................................................... 352
Configuring Tape Drives to Support Your Workloads ............................................................ 352
Managing Cartridge Locations ............................................................................................... 353
Finding Missing Cartridges .................................................................................................... 354
Varying the SL8500 Offline ..................................................................................................... 355
Use ACSLS to vary SL8500 components offline, not SL Console ......................................... 355
When to vary SL8500 components offline to ACSLS .......................................................... 355
Using the Dynamic Configuration (config) utility ................................................................... 356
Expanding the SL8500 ............................................................................................................ 357
What is Involved ............................................................................................................... 357
Diagram of SL8500 Modules: ............................................................................................. 359
Connecting SL8500s with Pass-Thru-Ports ......................................................................... 361
D ACSLS Support of the SL3000 ....................................................................................... 373
ACSLS Support ...................................................................................................................... 373
Before Configuring ACSLS for the SL3000 .............................................................................. 374
Connecting the SL3000 to ACSLS ...................................................................................... 374
Verifying that all SL3000 Components are Operational ...................................................... 374
Configuring SL3000 to ACSLS ........................................................................................... 375
Auditing the SL3000 .......................................................................................................... 375
SL3000 Addressing ................................................................................................................ 375
CAP Numbering ............................................................................................................... 376
SL3000 Modules ................................................................................................................ 376
New Panel Types .............................................................................................................. 377
Understanding Internal SL3000 Addressing ...................................................................... 377
Using the AEM ...................................................................................................................... 378
Access Door ...................................................................................................................... 378
Safety Door ....................................................................................................................... 378
CAP Operations ................................................................................................................ 378

December 2012 17
Non-Disruptive Maintenance ............................................................................................ 379
Aliasing SL3000 CAP IDs ....................................................................................................... 380
Moving Cartridges Before Removing Cells from a Partition .................................................... 381
SL3000 CAP Behavior ............................................................................................................ 381
Finding Missing SL3000 Cartridges ........................................................................................ 382
Varying the SL3000 Offline ..................................................................................................... 382
Use ACSLS to vary SL3000 components offline, not SL Console ......................................... 382
When to vary SL3000 components offline to ACSLS .......................................................... 382
Using the Dynamic Configuration (config) utility ................................................................... 383
Auditing New Cartridge Addresses ....................................................................................... 383
ACSLS Dual TCP/IP ............................................................................................................. 384
E ACSLS Support of the SL500 ......................................................................................... 385
ACSLS Connectivity ............................................................................................................... 385
ACSLS and SL500 Library Differences .................................................................................... 385
Library Configuration ....................................................................................................... 385
Identifying Library Locations ............................................................................................ 386
ACSLS Limitations ................................................................................................................. 387
Configuring SL500 Library Settings ........................................................................................ 387
SL500 CAP Behavior .............................................................................................................. 388
Auditing the Library .............................................................................................................. 388
When this is a new library ................................................................................................. 388
After adding, removing, or swapping modules ................................................................. 388
After manually adding or removing cartridges through the door ...................................... 389
After changing library configuration settings .................................................................... 389
F ACSLS Support of the StorageTek Virtual Tape Library ....................................... 391
Supported Configurations ...................................................................................................... 391
VTL Behavior ......................................................................................................................... 392
Configuring the VTL to ACSLS .............................................................................................. 393
Prerequisites ..................................................................................................................... 393
Installation ........................................................................................................................ 393
G Logical Library Support ................................................................................................... 395
About Logical Libraries .......................................................................................................... 395
Benefits ............................................................................................................................. 396
Limitations ........................................................................................................................ 397
Creating a Logical Library ...................................................................................................... 397
Specifying a Physical ACS ................................................................................................. 398
Specifying the Attributes of the Logical Library ................................................................. 398
Assigning One or More Physical Drives ............................................................................ 399
Assigning One or More Physical Volumes ......................................................................... 399
Specifying Client Connections ........................................................................................... 400
Fast Load .......................................................................................................................... 401
Deleting a Logical Library ...................................................................................................... 401
Troubleshooting ..................................................................................................................... 401
What if a client cannot see the logical library that I've assigned? ........................................ 402
What if a client is connected correctly, but still doesn't see the logical library? ................... 402

18 ACSLS 8.1 Adminstrator’s Guide December 2012
What if a client has trouble configuring to a logical library? ............................................... 402
How to Fix an Incorrect “in-transit” Volume Status? ......................................................... 403
How to Configure an FC Port in Target Mode ................................................................... 403
H Library Partitioning ............................................................................................................ 405
Aspects Common to both SL8500 and SL3000 Partitioning ................................................. 405
Guidelines for Partitioning ..................................................................................................... 406
Plan Your New Configuration ........................................................................................... 406
Minimize Disruptions when Partitioning an SL8500 or SL3000 .......................................... 407
Partitioning a Library or Changing Partition IDs .................................................................... 407
Re-partitioning a Library ........................................................................................................ 408
Changing a Partitioned ACS to an Un-partitioned ACS .......................................................... 409
Viewing an ACS Partition ID .................................................................................................. 410
CAP Behavior ........................................................................................................................ 411
Partitioned Library ............................................................................................................ 411
Reserving the CAP ............................................................................................................ 412
Moving Cartridges to a Specific Cell ....................................................................................... 413
I Troubleshooting .................................................................................................................. 415
ACSLS Event Log ................................................................................................................... 415
Managing the Event log .................................................................................................... 416
Using greplog to Search Event Logs .................................................................................... 416
Additional Logs ................................................................................................................ 417
Key Observation Points .......................................................................................................... 418
Testing Library Connections .................................................................................................. 419
testports ............................................................................................................................ 419
testlmutcp ......................................................................................................................... 419
testlmu .............................................................................................................................. 419
pinglmu.sh ........................................................................................................................ 420
probescsi.sh ...................................................................................................................... 420
probeFibre.sh .................................................................................................................... 420
showDevs.sh ..................................................................................................................... 420
Testing a Client Connection ................................................................................................... 421
Gathering Diagnostic Information for Software Support ......................................................... 421
GUI Troubleshooting Tips ................................................................................................. 422
J Library Performance .......................................................................................................... 425
Overview ............................................................................................................................... 425
Connecting to Multiple SL8500s ............................................................................................. 425
Minimizing Pass-thru Activity Between LSMs ........................................................................ 425
Floating Cartridges During a Dismount ................................................................................. 426
Entering Cartridges into a Library .......................................................................................... 426
Ejecting Cartridges from a Library ......................................................................................... 426
Maintaining Empty Storage Cells in an LSM .......................................................................... 426
Minimizing Pass-Thru Activity Using ACSAPI Requests and ACSLS Commands ................... 426
Mounting a Specific Cartridge ........................................................................................... 427
Mounting a Scratch Cartridge Selected by ACSLS ............................................................. 427
Using these ACSAPI Requests & ACSLS Commands .............................................................. 428

December 2012 19
K Firewall Security Option ................................................................................................... 431
Running ACSLS behind a Firewall ......................................................................................... 431
Addressing security areas ...................................................................................................... 431
RPC .................................................................................................................................. 432
Security ............................................................................................................................. 432
Communications Components .......................................................................................... 432
Benefits of the Firewall-Secure Option .................................................................................... 432
Server Side ........................................................................................................................ 432
Server Port Restriction ...................................................................................................... 433
Client Side ........................................................................................................................ 433
Client Port Restriction ....................................................................................................... 434
Advantages ....................................................................................................................... 434
Firewall-Secure Solution Scenarios ......................................................................................... 434
Turning On the Firewall-Secure Option .................................................................................. 438
Turning Off the Firewall-Secure Option ................................................................................. 440
Firewall-Secure Configuration ................................................................................................ 441
Troubleshooting Firewall-Secure Communications ................................................................. 442
Frequently Asked Questions .................................................................................................. 443
L CSCI ......................................................................................................................................... 447
Overview of CSCI .................................................................................................................. 447
CSCI Connectivity ............................................................................................................. 447
Architecture and Subsystems ............................................................................................ 447
Error Messages ...................................................................................................................... 449
Common Error Messages .................................................................................................. 449
Environmental Variables ........................................................................................................ 449
M Media Management ............................................................................................................ 451
Overview ............................................................................................................................... 451
Restrictions ....................................................................................................................... 451
Examples .......................................................................................................................... 451
Solution ............................................................................................................................ 452
Managing Common Media with Recording Densities Reported by ACSLS ............................. 453
Managing Common Media Recorded in Different Densities with ACSLS Pools ...................... 455
N Accessibility Features in ACSLS .................................................................................. 459
User Interfaces ....................................................................................................................... 459
The ACSLS (text-only) Command-line Interface (CLI) ....................................................... 459
Accessibility Provisions in the ACSLS GUI ............................................................................. 460
Special Steps Required to Configure Accessibility Modes in ACSLS ....................................... 461
GUI Tree Menu ................................................................................................................. 461
Glossary ................................................................................................................................. 463
Index ............................................................................................................................................ 1

20 ACSLS 8.1 Adminstrator’s Guide December 2012

December 2012 Revision 21
Revision
December 2011 E25009-01 This release supports ACSLS 8.1.
April 2012 E25009-02 Updates.
December 2012 E25009-03 Updated Media Management

22 ACSLS 8.1 Adminstrator’s Guide December 2012
December 2012 Preface 23
Preface
StorageTek Automated Cartridge System Library Software (ACSLS) is Oracle’s StorageTek's UNIX server software that controls a StorageTek Automated Cartridge System (ACS). The StorageTek ACS family of products consists of fully automated, tape cartridge-based data storage and retrieval systems. StorageTek ACSLS supports network access to different client systems that can range from workstations to mainframes to supercomputers running on a variety of operating systems.
This guide is for the individual responsible for administering StorageTek ACSLS. It is expected that you already have a working knowledge of the following:
• UNIX file and directory structure
• How to use UNIX commands and utilities for your platform
• UNIX system files
• How to do typical UNIX system administrator tasks, such as logging on as root and setting up user accesses to a UNIX application
Access to Oracle SupportOracle customers have access to electronic support through My Oracle Support. For information, visit http://www.oracle.com/support/contact.html or visit http://www.oracle.com/accessibility/support.html if you are hearing impaired.

Access to Oracle Support
24 ACSLS 8.1 Adminstrator’s Guide December 2012

December 2012 Overview 25
1
Overview
About ACSLSAutomated Cartridge System Library Software (ACSLS) is Oracle’s StorageTek server software that controls a StorageTek tape library. An Automated Cartridge System (ACS) is a group of tape libraries connected through pass-thru-ports (PTPs). ACSLS accesses and manages information stored in one or more ACSs through command processing across a network. The software includes a system administration component and interfaces to client system applications, and library management facilities.
About ACSLS HA ACSLS HA is a hardware and software configuration that provides dual-redundancy, automatic recovery and automatic fail-over recovery to ensure uninterrupted tape library control service in the event of component or subsystem failure. Refer to the ACSLS-HA 8.1 Installation, Configuration, and Operation guide for more information.
The acssa and acsss User IDsTo control and interact with ACSLS, you use the following user IDs:
acssa
lets you enter ACSLS commands from cmd_proc.
acsss
lets you run ACSLS utilities from the UNIX command line prompt. You can also open a cmd_proc from the acsss user ID if you prefer to work from a single user ID.
You can log into multiple windows with both the acssa and the acsss usr IDs. This lets you enter both ACSLS utilities and commands. These windows contains the following:
• A UNIX terminal window
logged in as the acsss user.
• A “tailed” ACSLS Event Log
Additional ACSLS GUI Users
26 ACSLS 8.1 Adminstrator’s Guide December 2012
that lets you monitor ACSLS activity.
To do this, go to the log directory, cd $ACS_HOME/log, and enter the UNIX command:
tail -f acsss_event.log
You can now see the most recent Event Log messages.
• A cmd_proc window
that lets you enter ACSLS commands.
For more information, see “Using a cmd_proc” on page 27.
• A system clock
showing the current date and time.
Additional ACSLS GUI Users For adding and managing users of the ACSLS Web-based GUI, refer to “userAdmin.sh” on page 190.
The acsss UtilityThe acsss command is the primary tool used to start and stop ACSLS software. This utility provides ten possible options for enabling and disabling the software or reporting status information.
Command Function
enable This is the default method to bring up ACSLS. It checks for dependencies and activates, in the proper order, the five ACSLS services and the ACSLS GUI. When this method is used, the services are configured to restart automatically after a system reboot.
temp-enable Same as acsss enable but services are not restarted after a system reboot.
maint-enable Intended for maintenance operations, this option brings up the ACSLS database and the GUI infrastructure. This method is used in contexts of database maintenance (restore, import, export), library configuration (acsss_config), and minor software patch installations. Neither the acsls nor the smce service are enabled.
disable This is the default method used to halt ACSLS operation. It is not a complete shutdown and allows for the database and any GUI login sessions to remain active for maintenance operations after the acsls and smce services have been disabled. The resulting state is identical to that of acsss maint-enable. This is the safest method to bring down the server since ACSLS and the library are placed in an idle state before the services are disabled.
force-disable Same as acsss disable but the operation does not wait for an idle state before disabling acsls and smce.

Using a cmd_proc
December 2012 Overview 27
Using a cmd_proc
cmd_proc Window
The following figure shows the cmd_proc window displayed when you log in as acssa. The cmd_proc window is a split screen where the top section is the message area and the bottom section is the command area. You enter ACSLS commands at the prompt.
ACSLS must be running to accept commands. You can supress this initial query server reqest when you start cmd_proc with the "-q" option:
cmd_proc -q
shutdown This renders a complete shutdown of all ACSLS services. It is intended for contexts of software installation and de-installation, and other maintenance contexts that require the database (acsdb) or the GUI infrastructure (rmi-registry and surrogate) to be shutdown.
db Brings up only acsdb. It shuts down all other services. It is used for database maintenance activities at times when the ACSLS GUI is not running.
status This option provides a quick status report of the five ACSLS services and the GUI.
g-status This option displays the status of the ACSLS GUI.
l-status This option provides a verbose status summary of the five ACSLS services and includes pointers to log data for further analysis in troubleshooting contexts.
p-status Similar to acsss status, this report includes a listing of the various process id's that are monitored by each respective service contract.
legal This option displays the ACSLS Legal Notice in English or French.
Command Function
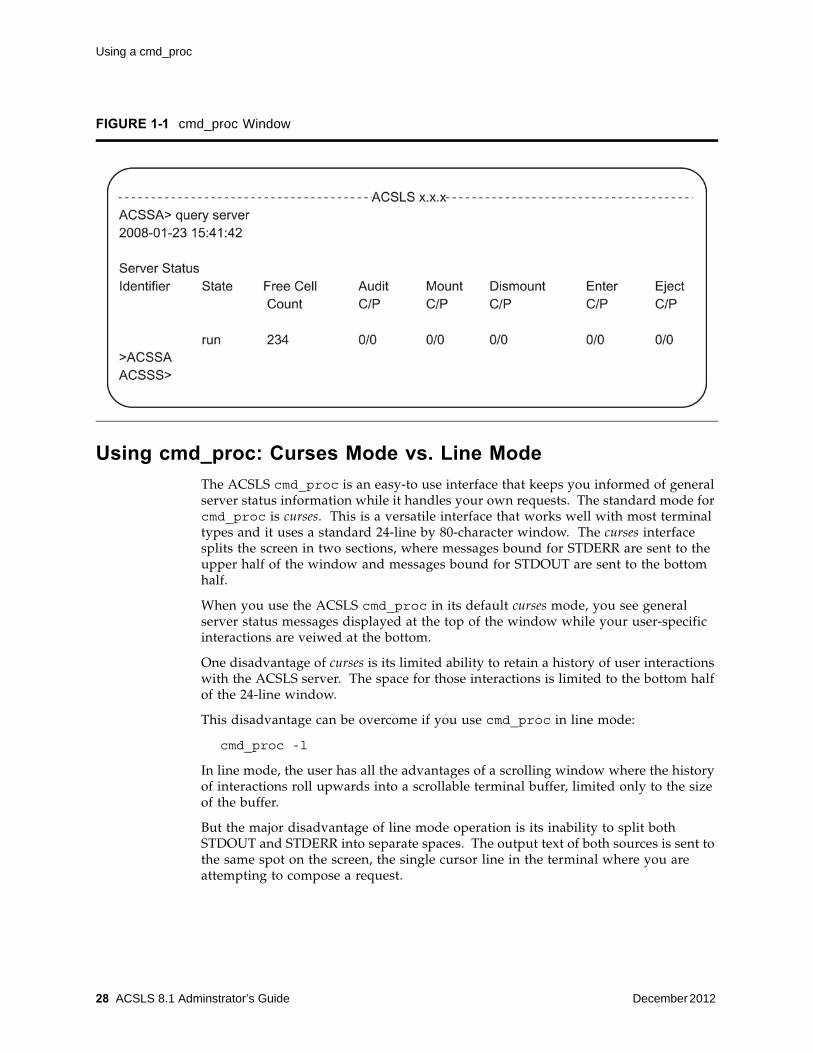
Using a cmd_proc
28 ACSLS 8.1 Adminstrator’s Guide December 2012
Using cmd_proc: Curses Mode vs. Line Mode
The ACSLS cmd_proc is an easy-to use interface that keeps you informed of general server status information while it handles your own requests. The standard mode for cmd_proc is curses. This is a versatile interface that works well with most terminal types and it uses a standard 24-line by 80-character window. The curses interface splits the screen in two sections, where messages bound for STDERR are sent to the upper half of the window and messages bound for STDOUT are sent to the bottom half.
When you use the ACSLS cmd_proc in its default curses mode, you see general server status messages displayed at the top of the window while your user-specific interactions are veiwed at the bottom.
One disadvantage of curses is its limited ability to retain a history of user interactions with the ACSLS server. The space for those interactions is limited to the bottom half of the 24-line window.
This disadvantage can be overcome if you use cmd_proc in line mode:
cmd_proc -l
In line mode, the user has all the advantages of a scrolling window where the history of interactions roll upwards into a scrollable terminal buffer, limited only to the size of the buffer.
But the major disadvantage of line mode operation is its inability to split both STDOUT and STDERR into separate spaces. The output text of both sources is sent to the same spot on the screen, the single cursor line in the terminal where you are attempting to compose a request.
FIGURE 1-1 cmd_proc Window

Using a cmd_proc
December 2012 Overview 29
If your cmd_proc session is the only session on the system, this may not be a problem. But in a busy production environment where active operations are in progress with ACSLS, it may be difficult, if not frustrating, to work in a window where status information is being printed on the same line where you are composing an ACSLS request.
While it is safe to ignore the system status chatter on the line where you are typing, you may prefer to redirect that chatter elsewhere. To redirect system messages to another destination you can run line-mode cmd_proc in the following manner:
cmd_proc -l 2> /tmp/SysChatter.out
The expression 2> instructs the shell to redirect STDERR to another location. In this example, the status messages are sent to a file in the /tmp directory.
If you want to view the system status information as you work, you can open a second shell window and view a running tail of the file where you sent the status messages:
tail -f /tmp/SysChatter.out
If you don't care about general system messages while you carry out your intended cmd_proc operations, then you can redirect STDERR to /dev/null.
cmd_proc -l 2> /dev/null
How to Suspend and Resume a cmd_proc
If you use “Manually Starting a cmd_proc” on page 31, you can suspend the cmd_proc to perform UNIX commands, and then resume the.
1. You must start the cmd_proc manually.
2. Any in-process requests that you initiated at the cmd_proc will continue to completion while the cmd_proc is suspended.
To suspend and resume a cmd_proc, do the following:
1. While running a cmd_proc, press <CTRL>+Z.
2. The UNIX shell prompt appears.
Perform whatever UNIX operations you want.
3. To resume the cmd_proc, enter the following UNIX command: fg
Terminating a cmd_proc
1. While running a cmd_proc, wait until all in-process activity is complete and the ACSSS> prompt has returned.
2. To exit the cmd_proc, enter the following command
logoff
The cmd_proc terminates.

Using a cmd_proc
30 ACSLS 8.1 Adminstrator’s Guide December 2012
Caution – Do not “kill” a cmd_proc process or exit the session by closing the shell window. Terminating the cmd_proc without the proper “logoff” may lock up a shared memory segment which is used by other ACSLS processes.
Starting a cmd_proc
You can start a cmd_proc from any terminal type with a minimum 24 x 80 display size. The terminal type must be defined in the workstation's /etc/termcap file.
After logging in, you can start additional cmd_procs by entering the cmd_proc command from a UNIX terminal window as described in “Manually Starting a cmd_proc” on page 31. Typically, you will run only one cmd_proc, but you can run as many as your system resources will allow.
Note – A cmd_proc session runs independent of ACSLS. If you start a cmd_proc session without starting ACSLS, there will be no response to your commands. You may see a socket communication error in the cmd_proc if you attempt to run commands while ACSLS is not running. You need not re-start this cmd_proc session. It will respond normally once ACSLS is up and running.
Logging in as acsss from the ACSLS Server
To start a cmd_proc when logged in as acsss on the ACSLS server, do the following:
1. From the ACSLS server, open a UNIX terminal window.
2. To log in as acsss, enter the following command:
login acsss
3. To start the cmd_proc, enter the following command:
cmd_proc
4. Respond to the prompt by entering your terminal type.
Example of terminal types are sun, sun-cmd, xterm, and dtterm.
5. Press [[RETURN]].
The cmd_proc window appears.
Logging in Remotely as acssa
1. From a UNIX host on the network, open a UNIX terminal window.
2. To access the ACSLS server, enter the following command:
ssh accsa@hostname
Where hostname is the UNIX hostname of the ACSLS server.
Example of terminal types are sun, sun-cmd, xterm, and dtterm.
3. Press [[RETURN]].

Using a cmd_proc
December 2012 Overview 31
The cmd_proc window appears.
Logging in as acssa from a Non-UNIX Client
Use this procedure to start an interactive command cmd_proc from a non-UNIX client on the network.
To use this procedure you must have a TCP/IP link to the ACSLS server. Depending on your installation, you may be directly connected to TCP/IP, or you may have to access it manually.
1. If necessary, access TCP/IP.
See your system administrator for instructions on how to access TCP/IP at your location.
2. To access the ACSLS server, enter the following command:
ssh acssa@hostname
Where hostname is the UNIX hostname of the ACSLS server.
3. Log in as acssa.
4. Respond to the prompt by entering your terminal type.
Example of terminal types are sun, sun-cmd, xterm, and dtterm.
5. Press [[RETURN]].
The cmd_proc window appears.
Manually Starting a cmd_proc
Typically, you will manually start a cmd_proc from the acsss user ID if you do not want to log in as acssa to bring up a cmd_proc.
1. While logged in as acssa or acsss, open a UNIX terminal window.
2. To start the cmd_proc, enter the following command:
cmd_proc
3. Respond to the prompt by entering your terminal type.
Example of terminal types are sun, sun-cmd, xterm, and dtterm.
4. Press [[RETURN]].
The cmd_proc window appears.
cmd_proc options
When you manually start a cmd_proc, you can also enter the following options:
-q
suppresses the automatic query server command.
-l

Using a cmd_proc
32 ACSLS 8.1 Adminstrator’s Guide December 2012
brings up cmd_proc in command line mode (command area only, no split screen, no separate message area).
Messages are displayed in the command area.
cmd_proc Keyboard Shortcuts
The following table describes the cmd_proc keyboard shortcuts, which are <CTRL>+ keystroke combinations.
Redirecting cmd_proc Inputs and Outputs
You can use an input file to automatically enter commands when you start a cmd_proc. For example, the following input file verifies ACSLS by mounting and dismounting a cartridge.
query drive 0,0,0,0 query volume JB1400 mount JB1400 0,0,0,0 dismount JPB1400 0,0,0,0 force logoff
TABLE 1-1 cmd_proc Keyboard Shortcuts
Key Combination Action Notes
<CTRL>+C Cancels the last cmd_proc command.
<CTRL>+C is the keyboard shortcut for the cancel command. See “cancel” on page 211 for more information about the cancel command.
<CTRL>+D Returns to the cmd_proc prompt.
<CTRL>+D has no effect if the current command has completed. If the current command is processing, it completes but cmd_proc does not display a response message. If you have not entered the current command at the ACSSS prompt, <CTRL>+D deletes the command.
<CTRL>+H Deletes the previous character on the command line.
On most keyboards, you can also use the [[DELETE]] or [[BACK SPACE]] key.
<CTRL>+I Refreshes the cmd_proc display
This function is useful if the current cmd_proc display has been corrupted by noise on the communications lines.
<CTRL>+R Refreshes the current command line.
This function is useful if the current command line display has been corrupted by noise on the communications lines.
<CTRL>+U Deletes the current command line.
<CTRL>+Z Suspends cmd_proc and escapes to the shell environment.
Enter the C shell fg command to resume cmd_proc.

Using a cmd_proc
December 2012 Overview 33
To start an additional cmd_proc and specify an input file, do the following:
To start the cmd_proc, enter the following command:
cmd_proc -q < filename
You can also start a cmd_proc, specify an input file, and redirect the output to another file. Using input and output files lets you run a set of commands at cmd_proc startup and look at the results. For example, the following file shows the results of the commands run in the previous example that showed cmd_proc with only an input file.
To start an additional cmd_proc, specify an input file, and redirect the output, do the following:
1. While logged in as acssa or acsss, open a UNIX terminal window.
2. To start the cmd_proc, enter the following command:
cmd_proc -q < file1 > file2
Where file1 is the input file and file2 is the file to which the output is directed.
By default, cmd_proc display area messages are written to stderr. but you can also redirect these messages. For example:
cmd_proc -q < file1 > file2 2>> file2
Idling ACSLS
Use this procedure to suspend request processing by putting ACSLS in the idle state. Typically, this procedure is used before shutting down ACSLS, but you can also use it to temporarily stop ACSLS request processing.
To idle ACSLS, do the following:
From a cmd_proc, enter the following command:
ACSSA> query drive 0,0,0,0
1998-06-30 18:23:08
IdentifierStateStatusCartridge Type
0,0,0,0onlineavailable 9840
ACSSA> query volume JPL1400
1998-06-30 18:23:09
IdentifierStatusCurrent location
JB1400home0,0,3,0,0
ACSSA> mount JPL1400 0,0,0,0
ACSSA> Mount: JB1400 mounted on 0,0,0,0
ACSSA> dismount JPL1400 0,0,0,0 force
ACSSA> Dismount: Forced dismount of JB1400 from 0,0,0,0

Using a cmd_proc
34 ACSLS 8.1 Adminstrator’s Guide December 2012
idle
ACSLS processes all current requests, rejects all new requests, and goes into the idle state.
Restarting ACSLS
Use this procedure to resume request processing by putting ACSLS in the run state. Typically, you restart ACSLS to remove it from the idle state.
To restart ACSLS, do the following:
From a cmd_proc, enter the following command:
start
ACSLS resumes request processing.
ACSLS Directory Structure
The following table shows a listing of the directories, subdirectories, and most common used files and shell scripts in ACSLS directory structure.
Two variables are used for ACSLS paths. They are:
• $ACS_HOME
This is the home directory for the acsss user ID. It is also where the ACSLS product is installed.
For Solaris, $ACS_HOME is /export/home/ACSSS by default.
• $ACSDB_BKUP
This is the directory where the ACSLS backups are saved.
TABLE 1-2 ACSLS Directory Structure
Directory Contents
/export/home The installation directory referred to as BASEDIR.
/export/home/SSLM Home of ACSLS java components including the ACSLS GUI and the SMCE (logical library operation)
/export/home/SSLM/AcslsDomain The home directory of the ACSLS Web-based GUI application.
/export/home/wlinstall The bundled WebLogic application server package and related installation scripts.
/export/home/Oracle The un-bundled WebLogic home directory.
/export/home/acsls_thirdPartySoftware A collection of third-party license information and related republished source code.
$ACS_HOME
(by default /export/home/ACSSS/)
Home directory for the acsss user ID. Also the ACSLS home directory. (By default, the ACS_HOME environment variable points to this directory.)
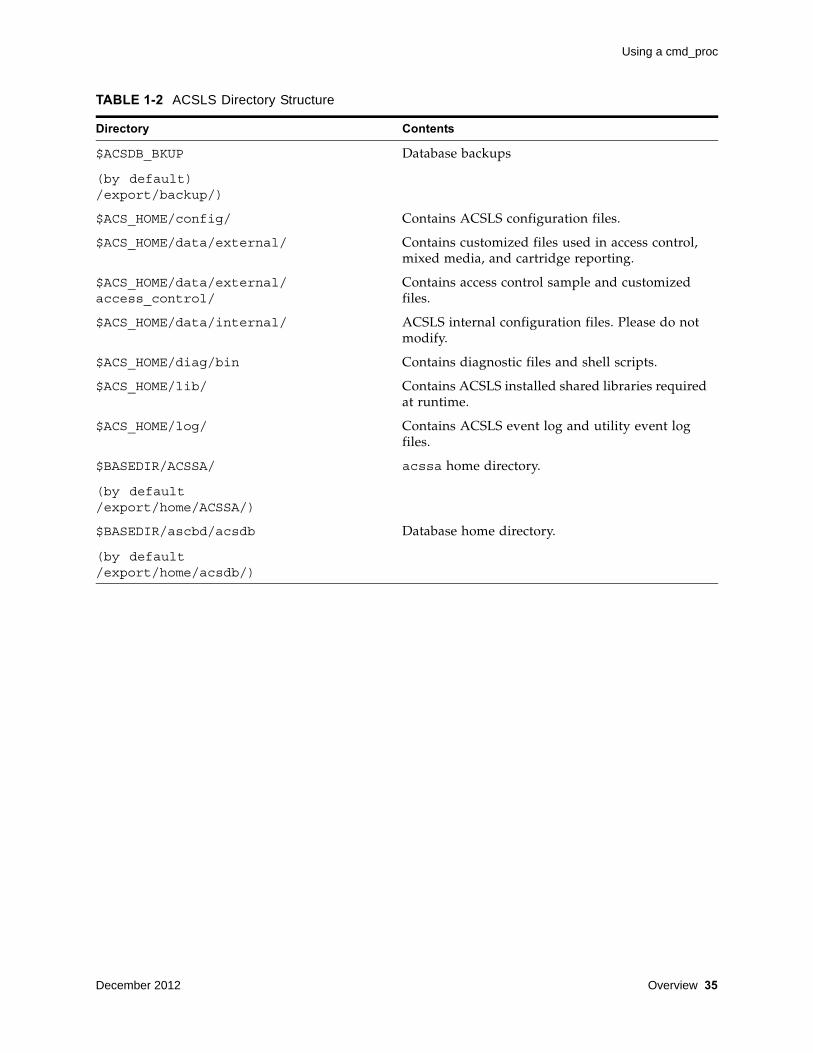
Using a cmd_proc
December 2012 Overview 35
$ACSDB_BKUP
(by default) /export/backup/)
Database backups
$ACS_HOME/config/ Contains ACSLS configuration files.
$ACS_HOME/data/external/ Contains customized files used in access control, mixed media, and cartridge reporting.
$ACS_HOME/data/external/access_control/
Contains access control sample and customized files.
$ACS_HOME/data/internal/ ACSLS internal configuration files. Please do not modify.
$ACS_HOME/diag/bin Contains diagnostic files and shell scripts.
$ACS_HOME/lib/ Contains ACSLS installed shared libraries required at runtime.
$ACS_HOME/log/ Contains ACSLS event log and utility event log files.
$BASEDIR/ACSSA/
(by default /export/home/ACSSA/)
acssa home directory.
$BASEDIR/ascbd/acsdb
(by default /export/home/acsdb/)
Database home directory.
TABLE 1-2 ACSLS Directory Structure
Directory Contents

Using a cmd_proc
36 ACSLS 8.1 Adminstrator’s Guide December 2012
December 2012 ACSLS License Key 37
2
ACSLS License Key
Beginning with StorageTek ACSLS versions 7.3.1 software enforcement of the right-to-use license is no longer employed in StorageTek ACSLS and ACSLS no longer checks for a valid license key. Messages regarding a soon-to-be-expired license key or library capacity license no longer display on the system console or in the acsss_event.log.
The following utilities no longer function in their capacity to set and check for a valid license key:
• licensekey.sh
• get_license_info.sh
To view your library slot usage see “free_cells.sh” on page 170.

38 ACSLS 8.1 Adminstrator’s Guide December 2012
December 2012 ACSLS GUI 39
3
ACSLS GUI
Introduced in ACSLS 8.0, the Web-based ACSLS Graphical User Interface (GUI) provides a graphical console for manipulating and monitoring library operations and for the administration and operation of logical libraries. Refer to the online help for procedures and detailed information for using the GULI.
The GUI provides:
• an alternative library console with greatly expanded flexibility and ease of use. It provides most of the operations that are available in the legacy cmd_proc (exceptions are shown under “System Operations Not Included in the ACSLS 8.1 GUI” on page 44).
• logical library support
For more information about logical libraries, refer to “About Logical Libraries” on page 395.
• for library administration and operation. It provides the ability to perform most legacy cmd_proc operations, along with new operations related to logical library management.
• real-time monitoring of tape library components.
• a tree browser to navigate physical and logical configuration.
• real time alerts are visible from each screen.
An alert informs you of conditions that might result in damage to hardware, corruption of data, or corruption of application software. It always precedes the information to which it pertains.
• ability to filter volume and drive displays with user-specified criteria.
• user-customized views of system events and system logs.
• online help.
To create, manage, or delete logical libraries, you must use the ACSLS Graphical User Interface (GUI). The GUI is automatically included in the ACSLS 8.1 installation package. For more information on logical libraries, refer to “Logical Library Support” on page 395.
Starting the ACSLS GUI
40 ACSLS 8.1 Adminstrator’s Guide December 2012
Starting the ACSLS GUIThe software that controls the ACSLS GUI starts automatically when the ACSSS services are enabled. The ACSLS GUI is deployed among other applications inside WebLogic on the Solaris platform.
To log into the ACSLS GUI:
1. Open a browser and submit a URL with the server hostname or IP address:
https://myAcslsHostName.myDomainName:7002/SlimGUI/faces/Slim.jsp
or
http://127.99.99.99:7001/SlimGUI/faces/Slim.jsp
It is best to use the fully-qualified host name or the i.p. address of the host machine. Some pages, including the ACSLS help pages, may not display properly if the URL cannot be fully resolved by WebLogic.
If you use http with port 7001, WebLogic automatically re-routes you to https on port 7002.
Since WebLogic is using the secure https protocol, your browser may warn you the site security certificate has not been registered, and therefore is untrusted. If you are confident that the URL is your local ACSLS machine, you are safe to proceed. At this point, you should see the login screen.
2. On the login screen, enter a valid ACSLS user ID and the corresponding password. These are the user IDs that you set up when installing WebLogic or using userAdmin.sh (e.g. acsls_admin).
3. After successful login, you should see the ACSLS GUI Welcome page.
Administering GUI Users and Passwords
Use the userAdmin.sh menu-driven utility to administer ACSLS GUI users and passwords. See “userAdmin.sh” on page 190.
The GUI Welcome ScreenThe ACSLS GUI Welcome screen displays three windows:
• The masthead in the top frame
• The navigation tree in the left-hand frame
• The Overview and Status page in the right-hand frame
Note – After an initial load of the GUI into your browser, if the right-hand frame does not display, refresh your browser.
MastheadThe masthead comprises the following buttons:
• Applications
Masthead
December 2012 ACSLS GUI 41
Note – The Applications button logs you out. (It was used with Java Web Console in earlier releases but serves no function with WebLogic.)
• Version - displays the current ACSLS version and copyright notice.
• Preferences - opens up a page in which you can specify GUI system preferences.
• Logout - ends the current session.
• Help - launches the online help system
• Current Status - displays the number of system alerts
• Active Operations - shows the number of ACSLS operations in progress. This is a hyperlink to the Overview and Status page which reveals details about alarms and active operations.
• Current Status - displays the number of active alerts. This is a hyperlink that takes you to the Overview and Status page.
• Date and Time of Login - This time stamp displays the original login time of the current GUI session.
• Current Alarms - a dashboard view showing the number and severity of any current system alarms. The details of any current alarm is summarized on the Overview and Status page. See “Alarms Color Code” on page 41.
Alarms Color Code
The following table describes the alarms color code:
Color Severity Level Device Affected
Red Critical This signifies a condition that seriously inhibits normal ACSLS operation. A critical alarm displays when the underlying problem requires immediate attention. The resulting impact leads to a system-wide halt to normal ACSLS library operations.
Black Down This alarm indicates that one or more subsystems within ACSLS is offline. The offline status may be due to intentional manual operation or may be due to other factors. Usually the presence of associated technical factors will be indicated by the yellow (minor) alarm or the orange (major) alarm icon.
Orange Major A major alarm indicates a perceived malfunction with the software or with any of the underlying components that enable ACSLS or the GUI to function.
Yellow Minor This color implies that the system is not fully functional. The system may be initializing, or there may be one or more discrete subsystems that are not operational. This interruption is viewed as temporary, or when the function it represents is discrete and not vital to the overall library control operation.

Navigation Tree
42 ACSLS 8.1 Adminstrator’s Guide December 2012
System Preferences
This page is accessed from the Preferences button in the Masthead. The page provides numerous drop-down menus that allow you to alter system behavior depending on your personal preferences:
• Default Tree Menu - Specify an expanded or collapsed menu format.
• Log Page Size - Specify the number of events to be displayed on pages in the Log Viewer.
• Alert Update Interval - Specify how often the browser should probe the server for system alerts. If your GUI response time is slow, you can increase this interval.
• Number of Days to Retain Events - Specify how much history should be displayed on the System Events page.
• Enable Fast Load for SCSI Clients - Specify (yes) to return a successful response to the SCSI client immediately after a valid mount request has been received, or (no) to wait until the robotic mount operation has actually completed.
Navigation Tree The Navigation Tree will always be located in the left-hand frame of the ACSLS GUI. The collapsed tree offers navigational links to:
• The Overview and Status page
• Configuration and Administration pages
• Tape Library Operations pages
• Tape Libraries and Drives pages
• Logical Libraries pages
Overview and Status
This page is the first place to go when you wish to identify the specific malfunction or interruption of service indicated by the alarm icons in the Masthead. At the top of this page is a status summary that reflects the severity of the overall system condition. Two boxes display under the status summary:
• Current alarms
Current alarms show the device affected, the severity level, a description, and the time the event took place. The severity levels are:
• System Critical is shown with a red icon and red background color. This signifies a condition that seriously inhibits normal ACSLS operation.
• System Degraded is shown with a yellow icon and yellow background color. This implies that the system is not fully functional. The system may be initializing, or there may be one or more discrete subsystems that are not operational.
• System Operational is shown with a green background color. This indicates that all subsystems are functional and no errors have been detected with system components.

Navigation Tree
December 2012 ACSLS GUI 43
• Active operations table lists library operations that are currently in progress. Each operation is listed with a brief description, the time the action started, the current status, and a radio-button option to cancel the operation.
Configuration and Administration
The Configuration and Administration section contains links to pages that enable you to monitor the ACSLS system and other pages that allow you to manage logical library configurations.
When you expand this leaf of the tree, you will get the following sub-menu:
• Log Viewer
• System Events
• Logical Library Configuration
The Log Viewer
The default Log Viewer page displays a running tail of the various logs that monitor system events, including the acsss_event.log, the smce_trace.log. This page provides navigational buttons that enable you to scroll through the history of the log back to its beginning.
System Events
Every discrete library operation is recorded in the System Events log. Each record in this log contains an event time stamp, an event type, and a description of the event.
Logical Library Configuration
When you expand this leaf of the tree, it opens into various options for configuring and managing logical libraries:
• Create a logical library
• Edit a logical library
• Assign volumes to a logical library
• Unassign volumes from a logical library
• Manage client connections.
For more information on logical libraries, refer to “Logical Library Support” on page 395.
Tape Library Operations
Tape operations enable you to:
• Audit the ACS, LSM, or panel
• Mount volumes
• Dismount volumes
System Operations Not Included in the ACSLS 8.1 GUI
44 ACSLS 8.1 Adminstrator’s Guide December 2012
• Enter volumes
• Eject volumes
Tape Libraries & Drives
The following detailed information is provided for tape libraries and drives:
• Library operations that let you stop or start processing
• Capability to view:
• physical state of the library server
• current activity that graphically shows mounts in the past hour and mounts in the past 24 hours
• physical components which includes:
• total number of ACSs
• capacity
• total volumes
• total volumes by type
• total free cells
• graphical view of the cell usage
• total LSMs
• total LSMs by type
• total drives
• total drives by type
• total number of CAPs
• list of logical libraries
System Operations Not Included in the ACSLS 8.1 GUIMost installation utilities, diagnostics, and other shell-command utilities remain outside the scope of the ACSLS GUI console. There are a few operations in the legacy cmd_proc that have not been implemented in the ACSLS GUI for Release 8.1. These include:
• Define, delete, query, or display pools
• Display panels
• Idle or start the server
• Lock or unlock volumes
• Lock or unlock drives
• Mount scratch volumes
• Query or switch LMUs

System Operations Not Included in the ACSLS 8.1 GUI
December 2012 ACSLS GUI 45
• Perform a query mount
• Set scratch volumes
• Set or clear locks
• vary, query, or display ports
• venter

System Operations Not Included in the ACSLS 8.1 GUI
46 ACSLS 8.1 Adminstrator’s Guide December 2012

December 2012 Installing and Configuring Your Library Hardware 47
4
Installing and Configuring Your Library Hardware
The installation and configuration of your library hardware involve the following tasks:
• “Installing Connections to Your Library Hardware” on page 47
Installing connections to library hardware involves:
• Adding a the SCSI mchanger device driver
• Optionally enabling Dual TCP/IP support (for the SL8500 or SL3000)
• “Using acsss_config to Configure Your Library Hardware”
This lets you:
• Establish library communications
• Configure the number of libraries to be supported and if they are partitioned
• Establish if the connection to a library is SCS/Fibre, TCP/IP, serial or SCSI/Fibre and the format to use
• Reconfigure your library hardware
Note – Refer to the ACSLS Product Information Guide for the current list of libraries, drive types, media types and drive-to-media compatibility supported.
Installing Connections to Your Library Hardware
Adding the SCSI mchanger Device Driver
The SCSI Media Changer (mchanger) is the SCSI/Fibre attached library device driver that communicates between ACSLS and any SCSI/Fibre attached library. An mchanger must be created for each SCSI/Fibre attached library that is connected to ACSLS.
Adding an mchanger device is part of the installation process. However, there may be times when you need to add a new SCSI library to an existing ACSLS installation. In this case, you must create a new mchanger device driver. To do this:

Installing Connections to Your Library Hardware
48 ACSLS 8.1 Adminstrator’s Guide December 2012
Note – Unless multi-pathing hardware has been deliberately configured for the SL500 library, it is important to disable multi-path I/O for any parent device driver such as the "fp" driver that is used in the library connection path. If you have difficulty making a successful connection to the SL500, you should confirm that multi-path I/O has been disabled in your <driver>.conf file, typically /kernel/drv/fp.conf.
mpxio-disable="yes"
1. Login to the ACSLS server as root user and enter your password.
2. Go to the installation directory:
cd/export/home/ACSSS/install
3. Make sure that the SCSI library is functional and physically attached to the ACSLS server.
4. Invoke the driver installation script:
./install_scsi_sol.sh
Enabling SL8500 or SL3000 Dual TCP/IP Support
If you have installed the SL8500 or SL3000 library and want to enable dual TCP/IP support, refer to following sections:
“Dual TCP/IP Support” on page 330. These sections also discuss the customized routing table entries that you need to create.
Configuring or Re-configuring Library Hardware
There are two ways to configure or re-configure library hardware (new or changed libraries and/or tape drives):
• acsss_config
This command must be run while ACSLS is down. You must use acsss_config:
• for your initial (first time) configuration of library hardware.
• to remove ACSs.
• to change or remove port connections to a library.
• to re-configure Fibre or SCSI-attached libraries.
• Dynamic Configuration (config) utility
You run this utility while ACSLS remains running. Use config for all changes except those excluded above. The config utility:
• adds new libraries.
• updates TCP/IP-attached library configurations.
• adds port connections, LSMs, CAPs, and drives.

Using acsss_config to Configure Your Library Hardware
December 2012 Installing and Configuring Your Library Hardware 49
Using acsss_config to Configure Your Library Hardware
Using acsss_config lets you configure or reconfigure your library hardware:
• Each ACS must have at least one CAP. This can be a CAP that is shared with another partition.
• There must be at least one drive configured to the entire ACSLS system.
Example: ACSLS supports four libraries. Three of the libraries can contain zero (0) drives. However, the fourth library must contain at least one drive.
• Configure your library hardware
You must use the acsss_config utility to configure your library hardware for the first time. The acsss_config utility is menu driven and selecting option 8 lets you to perform tasks such as: configuring hardware for the first time; deleting libraries; or changing port connections to libraries.
Note – ACSLS allows you to skip ACS numbers when you configure or reconfigure libraries (see # 6). Both acsss_config and Dynamic Configuration support specifying and skipping ACS numbers. For example: After migrating from an ACS 0 of 9310s to an ACS 1 of SL8500s, you can remove ACS 0 without renumbering the drive and volume IDs in the remaining SL8500 ACS 1.
• Reconfigure your library hardware
Before using acsss_config to update the configuration information for all your libraries, record your current configuration. Changing the ACS numbers assigned to your current libraries would cause all of your volumes to be marked absent and all of your drive's addresses to change. Save the output from a query lmu all command to record your current ACS numbers and port connections.
After your initial library configuration, you can also use the config utility, to dynamically add or reconfigure ACSs, LSMs, or tape drives without stopping ACSLS.
For more information and procedures, refer to “Dynamic Configuration (config) utilities” on page 158.
Note – The ACSLS database must be updated using acsss_config or config whenever the physical configuration of the library changes. ACSLS will not run correctly if the configuration defined in its database does not match the configuration defined in the library.
Examples:
Examples of configuration changes requiring an update to the database include:
• Adding or removing an ACS, LSM (including a SCSI-attached LSM such as the SL500), Pass-Thru Port (PTP), transport, or standby LMU

Using acsss_config to Configure Your Library Hardware
50 ACSLS 8.1 Adminstrator’s Guide December 2012
Caution – After you install a new ACS or LSM, make sure that each attached library and LSM is fully (hardware) configured, powered on, and ready before you reconfigure ACSLS. Otherwise, acsss_config or config will not configure the library correctly.
Note – In order for ACSLS HA to monitor an added library, you need to make an entry in the ha_acs_list.txt file. Refer to “About ACSLS HA” on page 25 for more information.
• Adding or removing a port connection between the server system and the LMU
To start acsss_config:
1. Log in as acsss.
2. Follow this step if you are re-configuring your library hardware:
Display your existing ACS numbers, partition IDs, and port connections with the query lmu all cmd_proc command before stopping ACSLS and record this information.
3. Shut down ACSLS if it is running.
4. Run the configuration utility:
acsss_config
The ACSLS feature configuration screen appears.
Note – The configuration utility, acsss_config, configures the library correctly unless all libraries, LSMs, and transports are not fully configured, powered on, and ready.
The following menu appears:
ACSLS feature configuration
Please enter the number followed by Return for your choice from the following menu to configure product behavior in that area.
Press? followed by the Return key for help.
1: Set CSI tuning variables
2: Set event logging variables
3: Set general product behavior variables
4: Set access control variables
5: Set automatic backup parameters
6: Rebuild Access Control information
7: Event Notification settings
8: Define or Change Library Hardware Configuration
E: Exit
Menu choice:
Note – For a discussion of options 1-7, refer to “Setting Variables that Control ACSLS Behavior” on page 55.

Using acsss_config to Configure Your Library Hardware
December 2012 Installing and Configuring Your Library Hardware 51
5. Select option 8.
The following prompts take you through setting up your configuration.
• Prompt: Configure library communications? (y/n):
Enter y to establish communications between the ACSLS server and any libraries.
Selecting n refreshes the configurations of your current libraries.
Bypassing configuring your library communications and just refreshing your hardware configuration is the easiest and best option if you do not need to: add or remove ACSs or add, change, or remove connections to libraries. You skip re-defining all of your current connections to your libraries and just refresh the library configuration recorded in the ACSLS database. This eliminates the risk of omitting a connection to a library or specifying it incorrectly.
• Prompt: Library server database exists and will be overwritten, continue? (y or n): y
This prompt only displays if library communications have been previously established and there is an existing database.
If you enter y to this prompt, changes are made to the configuration information only.
6. Specify the number of ACSs to be supported.
• Prompt: Number of ACSs to be supported:
Enter the number of ACSs (between 1 and 32) that are to be supported at your site. You must have at least “1” ACS. Hardware must be installed to support one or more ACSs.
Note – A pair of L700e libraries connected by a pass-thru-port counts as one ACS.
You can skip ACS numbering when configuring or re-configuring libraries without assigning the ACS numbers in sequence.
7. Specify each ACS number.
• Prompt: Please enter the first ACS number [default: 0]:
Enter the number for this ACS.
Caution – When you reconfigure existing ACSs, specify the same ACS numbers that are currently assigned to them.
You are then prompted (see step 7) to define the device connections for each ACS.
8. Specify and define library partitioning.
• Prompt: Is ACS #n in a partitioned SL8500 or SL3000? (y or n)
• If you enter y, you are asked for the partition ID for the ACS.
This partition ID must match the partition ID on the SL Console.

Using acsss_config to Configure Your Library Hardware
52 ACSLS 8.1 Adminstrator’s Guide December 2012
• If this is not a partitioned library or is SCSI/Fibre-attached, enter n.
ACSLS does not support partitioned SCSI/Fibre-attached libraries, such as the SL500. Also, partitioned SCSI/Fibre-attached libraries do not have partition IDs.
9. Define the device connections (ports) for each ACS.
• Prompt: Number of connections to ACS #n
This prompt appears for each ACS configured and establishes the number of communication ports for each ACS. The connections are:
• SCSI connection(s)
Note – An L1400 with a pair of L700e SCSI libraries connected by a pass-thru-port has two connections - one for each L700e.
• Serial or TCP/IP connection between the ACSLS and the library. At least two connections are recommended
If you are connecting to multiple SL8500 libraries, a maximum of fifteen connections is allowed.
The ACSs must be physically connected.You must enter a decimal number between 1 and 15.
• Prompt: Device or host - ACS#n, connection #n:
Enter the device or host for each connection.
Caution – Make sure you specify the correct hostname or IP address. Do not connect to the wrong library.
Ensure that all connections specified for an ACS are actually connected to the same ACS.
To specify the connection to a TCP/IP attached LMU, enter one of the following:
• An IP address
• A hostname
• A fully qualified hostname
Note – If a host name is specified, this host name must be mapped to the IP address entered into an SL8500 or SL3000 library or an 9330 LMU. This host name-to-IP address mapping is site-specific. Typically, this is done by the /etc/hosts file, your Domain Name Server, NIS, or NIS+.
Example:
Sample TCP/IP device names for SL8500, SL3000, or 9300 libraries Device or host - ACS #0, connection #0: hostname1 Device or host - ACS #0, connection #1: hostname2 Device or host - ACS #1, connection #0: fully_qualified_hostname Device or host - ACS #2, connection #0: 192.168.174.31
Note – ACSLS only supports TCP/IP connections to an SL3000; ACSLS does not support Fibre-attached SL3000s. A connection to an 9330 ACS can be either serial or TCP/IP, but not both.

Using acsss_config to Configure Your Library Hardware
December 2012 Installing and Configuring Your Library Hardware 53
Example:
Sample serial device names for 4400 or 9300 libraries Device or host - ACS #0, device #0: /dev/ttya Device or host - ACS #0, device #1: /dev/ttyb
Fibre or SCSI-attached libraries are connected through mchanger devices.
Example:
Sample device name for SCSI Library Device or host - ACS #1, connection #0: /dev/mchanger2
An L1400 with a pair of L700e SCSI libraries connected by a pass-thru-port has two connections - one for each L700e.
Example:
Sample device name for pair of L700e libraries Device or host - ACS #1, connection #0: /dev/mchanger2 Device or host - ACS #1, connection #1: /dev/mchanger3
If you have more ACSs to define, you will be asked to specify their ACS numbers (see step 6).
10. Create or update the configuration in the ACSLS database.
• Prompt: This step builds a database image of your complete library hardware configuration. Before proceeding, make sure that your library is completely configured, that all subsystems are functional and powered on. Build/Verify library configuration? (y or n):
Enter y.
Before proceeding, make sure that your library is completely configured, that all subsystems are functional and powered on.
This step updates the database with all configuration changes except adding or removing port connections.
• Prompt: Library server database exists and will be overwritten, continue? (y or n):
Enter y. As the script builds the library configuration, it displays the following message of each panel in each LSM.
ACS # n, LSM # nn, PANEL # nn, created
The script also generates a library configuration report and appends it to the following file:
/export/home/ACSSS/log/acsss_config.log
11. Optionally, configure non-TCP/IP clients on Solaris.
• Prompt: Configure client system interfaces? (y or n):
Respond (y or n) when the system asks whether to configure client system interfaces.
Enter n unless you are using an ICL client with OSLAN protocol.
Renumbering an ACS
54 ACSLS 8.1 Adminstrator’s Guide December 2012
Entering y displays the following message:
CSI SELECTION TABLE
1) OSLAN CSI Not Selected 2) ONC/RPC CSI Always Selected
Do you want to change the CSI selection table (n):
If y, the following message appears:
Select OSLAN CSI (n):
ONC/RPC is always selected.
Note – acsss_config automatically backups the database and then terminates.
12. Run acsss enable to start the server.
You can look at the event log to verify everything is up and running.
If the automatic startup on reboot option was enabled during ACSLS installation, ACSLS is initiated automatically when the server system is rebooted.
13. Perform an audit of the Library
An audit updates the ACSLS database to match the actual inventory of library cartridges.
ACSLS is now ready for library operations. If you want to enter ACSLS commands, log in as acssa.
Renumbering an ACSIf it is necessary or desirable for you to change the number of an existing ACS, please refer to “acs_renumber.sh” on page 154.

December 2012 Setting Variables that Control ACSLS Behavior 55
5
Setting Variables that Control ACSLS Behavior
You must use the acsss_config menu to set the variables that control ACSLS behavior. With options 1-8, you will be:
• “Setting CSI Tuning Variables” on page 57
• “Setting Event Logging Variables” on page 59
• “Setting General Product Behavior Variables” on page 61
• “Setting Access Control Variables” on page 66
• “Setting Automatic Backup Variables” on page 67
• “Rebuilding Access Control Information” on page 68
• “Defining Event Notification Settings” on page 68
• “Configuring or Updating your Library Hardware” on page 69
Note – You need to reboot your system if you have set any static variable(s). You do not have to do this for the dynamic variables.
To save or view current variables:
• Display the current settings of the variables by entering:
dv_config -d
• Save the current settings of the variables to a file:
dv_config -d > filename
• View the file:
vi filename
• Print values of dynamic options:
dv_print

Accessing the ACSLS Feature Configuration Menu
56 ACSLS 8.1 Adminstrator’s Guide December 2012
Accessing the ACSLS Feature Configuration MenuWhen you install or upgrade ACSLS, system defaults have already been set based on most user environments. However, when necessary, you can use options 1-8 to change any of these settings. Options 1 through 7 allow you to change dynamic and static variables. For static variable to take effect, you must re-start ACSLS.
Use option 8 to add and define your library hardware. Use this option if you have just installed ACSLS for the first time, or, for example, when you need to add a new library.
Note – Select ? for help on each prompt.
To start acsss_config:
1. Exit out of the CDE until you reach the CDE login.
2. Log in as acsss.
3. Run the configuration script:
acsss_config
The ACSLS feature configuration screen appears.
The configuration script, acsss_config, will fail unless all LMUs, LSMs, and transports are fully configured, powered on, and ready.
The following menu appears:.
ACSLS Feature Configuration
Please enter the number followed by Return for your choice from the following menu to configure product behavior in that area.
Press ? followed by the Return key for help.
1: Set CSI tuning variables 2: Set event logging variables 3: Set general product behavior variables 4: Set access control variables 5: Set automatic backup parameters 6: Rebuild Access Control information 7: Event Notification settings 8: Define or Change Library Configuration E: Exit
Menu choice:
Verifying and Changing Dynamic and Static VariablesOptions 1 through 8 allow you to change the following dynamic and static variables.

Verifying and Changing Dynamic and Static Variables
December 2012 Setting Variables that Control ACSLS Behavior 57
Setting CSI Tuning Variables
The Client System Interface (CSI) handles communication between ACSLS and clients of other servers. It sets up how communications are handled for each client. If communication with one client is lost, the other clients are not affected and their communication continues without interruption. Multiple CSIs can run under ACSLS.
Note – Select ? for help on each prompt.
Option 1 allows you to set or change the following:
• Prompt: Maximum age in seconds of pending requests in CSI request queue [172800]
Variable: CSI_CONNECT_AGETIME
A dynamic variable, this setting determines how long ACSLS holds on to client requests to which it has not responded.
Valid entry is: 600 to 315360000 seconds. Default is 172800 seconds.
• Prompt: Number of seconds between successive retries [4]
Variable: CSI_RETRY_TIMEOUT
The default is 4 seconds.
A dynamic variable, this option specifies the minimum amount of time, in seconds, that the CSI should wait between attempts to establish a network connection.
You should modify this value if timing problems occur between the CSC and CSI.
• Prompt: Number of retries for the CSI before a timeout condition occurs [5].
Variable: CSI_RETRY_TRIES
A dynamic variable, this option specifies the number of attempts the CSI should make to transmit a message. Pending messages are discarded if a connection cannot be established within the number of retries specified. Default is 5 retries.
• Prompt: Changes to alter use of the TCP protocol will not take effect until the product is restarted. CSI support for RPC using the TCP protocol is enabled [TRUE].
Variable: CSI_TCP_RPCSERVICE
A static option, this option specifies if the CSI is to act as a TCP RPC server. Default is true.
• Prompt: Changes to alter the use of the UDP protocol will not take effect until the product is restarted. CSI support for RPC using the UDP protocol is enabled [TRUE].
Variable: CSI_UDP_RPCSERVICE
A static option, this option specifies if the CSI is to act as a UDP RPC server. You must accept the default for clients to communication with ACSLS over UDP. Default is true.
ACSLS must be restarted for this option to take effect.
• Prompt: Enable the CSI on server platform to handle request packets from a multi-homed client; i.e., a client from a machine with more than one IP address. Also, respond to the IP address modified by NAT (Network Address Translation) or a VPN. (TRUE/FALSE) [FALSE]

Verifying and Changing Dynamic and Static Variables
58 ACSLS 8.1 Adminstrator’s Guide December 2012
Variable: CSI_MULTI_HOMED_CL
This option allows the CSI on the server to handle incoming packets where the IP address in the packet header is not the same as the IP address from which the packet was sent. The address in the request packet that the client sends to ACSLS is derived from a 'hostname' call by the client application, followed by a 'get hostbyname' lookup. This puts the local host IP address into the request packet.
Normally this works. However, there are exceptions:
• In most cases, a client to ACSLS has a single, fixed host address. However, a client machine may have more than one network interface and use any of its multiple IP ports to submit requests to ACSLS, or
• A client machine may be behind a NAT, with an internal, private IP address that is not accessible externally, or
• When the client is connected to the ACSLS server via a VPN, and the client's IP address is not the IP address to which ACSLS must respond.
In these cases, ACSLS must respond to an IP address other than the localhost address at the client application. The CSI_MULTI_HOMED_CL variable is designed to handle such situations. Valid sections are:
• FALSE
This is the default setting for ACSLS operation. This causes ACSLS to always respond to the localhost's IP address when returning a response to the client.
• TRUE
ACSLS disregards the IP address in the request packet. Instead, when ACSLS responds to the client, it uses the address found in the IP header of the incoming RPC datagram associated with the ACSAPI request packet. That is the IP address from which the request was submitted. If Access Control is enabled, this alternate IP address must be specified in the internet.addresses file.
• Prompt: Changes to alter use of the port mapper will not take effect until the product is restarted. Enable port mapper: (ALWAYS / NEVER /IF_DUAL_LAN_NOT_ENABLED) [IF_DUAL_LAN_NOT_ENABLED].
Variable: CSI_USE_PORTMAPPER
Default is IF_DUAL_LAN_NOT_ENABLED. A static option, the valid options are:
• ALWAYS - the port mapper should always be interrogated when the CSI is unable to send a message to a client.
• NEVER - the port mapper should never be interrogated when the CSI is unable to send a message to a client. Select this option if clients do not support a port mapper.
• IF_DUAL_LAN_NOT_ENABLED - the port mapper should be interrogated only if dual LAN support has not been enabled. If dual LAN support has been enabled, then it is assumed that clients do not support a port mapper. Choosing this option provides for backward compatibility in product behavior.
• Prompt: Number of ACSSURR persistent processes that should be started [0]:
Variable: SURROGATE_PROCESSES

Verifying and Changing Dynamic and Static Variables
December 2012 Setting Variables that Control ACSLS Behavior 59
Valid entries: 0 or 1. Enter 0 if the LM Gateway is not installed.
• Prompt: TCP/IP port number that the ACSLS surrogate (ACSSURR) socket will listen on for requests from a gateway system [50300].
Variable: SURROGATE_PORT
This variable applies only to the Library Management (LM) Gateway. Valid entries: 50300 - 99999.
• Prompt: Number of seconds to wait for data packets to be read on surrogate/gateway sockets:
Variable: SURROGATE_TIMEOUT
This variable applies only to the Library Management (LM) Gateway. Valid entries: 1 - 600.
• Prompt: Number of minutes to wait before deleting a stale queue entry [5].
Variable: SURROGATE_QUEUE_AGE
This variable applies only to the Library Management (LM) Gateway. Valid entries: 5 - 60.
• Prompt: Automatically start CSCI at ACSLS startup (TRUE/FALSE) [FALSE]:
Variable: START_CSCI_PROCESS
This variable determines if the CSCI process is automatically started during ACSLS startup. The default value, FALSE, means that the CSCI is not started with ACSLS. Set this variable to TRUE to start the CSCI process with ACSLS.
• Prompt: Enable CSI to be used behind a firewall (user-defined inbound port) (TRUE/FALSE) [FALSE]:
Variable: CSI_FIREWALL_SECURE
A dynamic variable, this setting enables or disables the firewall security definition of a single, user-defined port for incoming requests to ACSLS. Values are:
False - if you do not want the ports on the ACSLS server to be restricted.
True - this is the default. ACSLS server operates behind a secured firewall.
• Prompt: Port number used by the CSI to receive incoming ACSLS requests [30031].
Variable: CSI_INET_PORT
This variable specifies the single, user-defined port used by the CSI for incoming TCP requests from one or more clients.
This variable is used only when the firewall secure CSI is enabled by setting CSI_FIREWALL_SECURE to True.
Default: 30031
Valid entry: 1024 - 65535, but not 50003
Setting Event Logging Variables
Note – Select ? for help on each prompt.

Verifying and Changing Dynamic and Static Variables
60 ACSLS 8.1 Adminstrator’s Guide December 2012
Option 2 allows you to set or change the following event logs:
• Prompt: Number of event log files to retain [9]:
Variable: EVENT_FILE_NUMBER
This option specifies the number of additional event log files to retain. If this option is enabled and the current event log file size reaches the threshold size, the log is automatically copied to another file. Once the specified number of files is reached, the data in the oldest file is overlaid.
Enter 0 to retain no additional event log files; a single event log file grows until manually truncated. In this case, when the event log file size reaches the threshold size, the unsolicited "Event log full" message is displayed periodically until the event log is renamed or deleted. Nine (9) is the default value when the ACSLS is installed or upgraded.
Enter a number between 1 and 9, inclusive, to enable this feature and specify the number of log files to retain. When the event log reaches the threshold size, the data is moved into the file event0.log. The next time the threshold size is reached, the event0.log data is moved to event1.log and the event log data is moved to event0.log. This cycle continues until the specified number of retained files is reached, at which point the data is discarded from the oldest file.
• Prompt: Changes to the logging directory will not take effect until the product is restarted. What directory should logging information be in [$ACS_HOME/log]:
Variable: LOG_PATH
Select a directory where log files will be placed. As installed, ACSLS logs information to the $ACS_HOME/log directory. In normal usage, the value of this variable won't be changed. An alternate path may be specified if there are disk space problems in the file system which contains $ACS_HOME. The path given must be an absolute path (i.e. one which starts with a / or $ACS_HOME).
The ACSLS product must be restarted for this variable to take effect.
• Prompt: Maximum library server event log size in Kilobytes (=1000 bytes).
Variable: LOG_SIZE
This option specifies the threshold size for the Event Log in Kbytes (1,000 bytes). Enter a non-negative number. Default is 500 when ACSLS is installed or upgraded.
Valid entry: 32-2147483
• Prompt: Date/time format for all logs [%Y-%m-%d%H:%M:%S]:
Variable: TIME_FORMAT
This option specifies the format to use for printing the date and time information in the event and trace logs. The format is the same as is used by the C language function, strftime.
• Prompt: Should library manager request process auditing be turned on? [TRUE]:
Variable: LM_RP_TRAIL

Verifying and Changing Dynamic and Static Variables
December 2012 Setting Variables that Control ACSLS Behavior 61
When set to TRUE, this option enables an audit trail of all ACSLS requests. Each request is logged with a time stamp and the name of the client or user interface from which the request was launched. The resulting log is found in the file, rpTrail.log.
• Prompt: Maximum size in Kbytes for the rpTrail Log [1000]:
Variable: RP_TRAIL_LOG_SIZE
This option specifies the threshold size for the rpTrail log expressed in Kbytes. You cannot enter a negative number. When ACSLS is installed, or ungraded, 1000 Kbytes (1MB) is the default value. When the rpTrail.log exceeds this size, it is compressed and archived, and a new rpTrail.log is created for subsequent request auditing.
Enter a value between 10 and 10000.
• Prompt: Number of rpTrail archive files to retain [10]:
Variable: RP_TRAIL_FILE_NUM
This option specifies the number of archived rpTrail log files to retain. When the current rpTrail.log size exceeds the threshold size, the log is automatically compressed and archived with a time stamp (yyyy-mm-dd_hh:mm) taken the moment is was compressed. The archived files are saved in the “log_archives” directory. Once the specified number of archived logs is reached and a new one is added, the oldest file is removed.
You can retain between 1 and 999 archived log files.
• Prompt: Log diagnostic time stamps for internal request processing? [FALSE]:
Variable: RP_TRAIL_DIAG
This option specifies whether to include diagnostic information in the audit trail.
If set to TRUE, time stamps for “QUEUED AT”, “FORKED/WRITTEN TO AT”, and “FINAL RESPONSE SENT TO <recipient” AT” is included in the trail log.
Setting General Product Behavior Variables
Note – Select ? for help on each prompt.
Option 3 allows you to set or change the following:
• Prompt: Enable Library Volume Statistics Gathering: (ON / OFF) [OFF]:
Variable: LIB_VOL_STATS
This option specifies whether or not Library Volume Statistics (LVSTATS) information will be collected from the enter, eject, dismount, mount and audit operations. Enter ON to start a LVSTATS gathering and reporting session. Enter OFF to end a LVSTATS gathering and reporting session. When a session is started or terminated, an appropriate message will be printed to the log file acsss_stats.log. Judicious use of the options causes log file bracketing for each of the individual operations listed above.
• Prompt: Number of acsss_stats log files to retain [9]:
Variable: VOL_STATS_FILE_NUM
Verifying and Changing Dynamic and Static Variables
62 ACSLS 8.1 Adminstrator’s Guide December 2012
This option specifies the number of additional acsss_stats log files to retain. If this option is enabled and the current acsss_stats log file sizes reaches the threshold size, the log is automatically copied to another file. Once the specified number of files is reached, the data in the oldest file is overlaid.
Enter 0 to retain no additional log files; a single acsss_stats log file grows until manually truncated. In this case, when the acsss_stats log file size reaches the threshold size, the unsolicited "acsss_stats log full" message is displayed periodically in the event log until the acsss_stats log is renamed or deleted. Nine (9) is the default value when the ACSLS is installed or upgraded.
Enter a number between 1 and 9, inclusive, to specify the number of log files to retain. When the acsss_stats log reaches the threshold size, the data is moved into the file vol_stats0.log. The next time the threshold size is reached, the vol_stats0.log data is moved to vol_stats1.log and the acsss_stats log data is moved to vol_stats0.log. This cycle continues until the specified number of retained files is reached, at which point the data is discarded from the oldest file.
• Prompt: Maximum library server access_stats log size in Kbytes (=1000 bytes) [500]:
Variable: VOL_STATS_FILE_SIZE
This option specifies the threshold size for the acsss_stats log, expressed in Kbytes (here defined as "1000 bytes.") Enter a value of 32 or above. When ACSLS is installed or upgraded 500 is the default value for the size, in kbytes, for this option.
Valid entry: 32-10000
• Prompt: Select cleaning cartridge ordering method [VOLID_SORT]:
Variable: UNIFORM_CLEAN_USE
Valid options are:
• VOLID_SORT - orders the cleaning cartridges by the volume identifier. This uses up a cleaning cartridge before moving to the next one. If you select this option, ACSLS uses and returns cleaning cartridges in the same order as in previous releases of the ACSLS software. This is the default value when ACSLS is installed or updated.
• LEAST_USED - orders the cleaning cartridges by usage. If you select this option, ACSLS sorts the volume list in reverse order of usage and returns the cartridges with the fewest usages first. This spreads out usage of cleaning cartridges uniformly.
• MOST_CAPACITY - orders the cleaning cartridges by number of uses left. If you select this option, ACSLS sorts the volume list based on the number of uses left on the cleaning cartridge and returns the cartridges with the most uses left first. This uses up all cleaning cartridges close to the same time.
• Prompt: Enable Transport Auto Clean Option (TRUE/FALSE) [TRUE]:
Variable: AUTO_CLEAN
Valid options are:
• TRUE - when a transport requires cleaning, ACSLS automatically cleans the transport before the next mount.

Verifying and Changing Dynamic and Static Variables
December 2012 Setting Variables that Control ACSLS Behavior 63
The drive cleaning operation in a SCSI or fibre-attached library is managed by the library firmware, not by ACSLS. Be sure to enable drive cleaning from the LSM control panel. Otherwise, you can periodically mount a cleaning cartridge from ACSLS by manual command as needed.
• FALSE - does not enable automatic cleaning
• Prompt: Library Server startup state (RUN/IDLE) [RUN]:
Variable: AUTO_START
This option specifies the initial ACSLS state after recovery completes during server software initiation. Valid options are:
• RUN - user requests are processed immediately after recovery completes.
• IDLE - prevents user requests from being immediately processed after recovery completes.
Setting this option to IDLE could be useful if you need to vary device states or perform some operational activity before you allow server access to your users.
• Prompt: Changes to the number of mount processes ACSLS supports will not take effect until the product is restarted. Number of mount processes [2]:
Variable: MAX_ACSMT
Valid entry is 1 to 5.
StorageTek recommends that you accept the default value at initial configuration, then change the value as required. Increasing this value may improve performance. For large configurations (those having more than eight LSMs), this value may need to be increased to improve mount/dismount performance.
Caution – If this number is set too high, ACSLS may not be able to start up properly. In this case, either lower the number or raise the maximum allowable processes per user.
Default is 2.
• Prompt: Enable QUERY persistent processes (TRUE/FALSE) [TRUE]:
Variable: ENABLE_ACSQY
This options allows you to execute queries as one or more persistent processes. Queries may be executed as persistent or request processes. Accept the default value at initial configuration, then change the value as required. Increasing this value may improve performance. Valid options are:
• TRUE - enables persistent query processes.
Caution – With a minimum configuration system, more than 10 query persistent processes could use up system resources and not allow ACSLS to start up.
• FALSE - disables persistent query processes. Queries are invoked as request processes.
• Prompt: Changes to the number of query processes ACSLS supports will not take effect until the product is restarted. Number of query processes [2]:
Variable: MAX_ACSQY
Verifying and Changing Dynamic and Static Variables
64 ACSLS 8.1 Adminstrator’s Guide December 2012
This option specifies the number of persistent query processes to create. This option is valid only if you enabled it in the above step. Valid numbers are 1 to 5.
StorageTek recommends that you accept the default value (2) at initial configuration, then change the value as required. For large configurations (more than eight LSMs), this value may need to be increased to improve performance.
Caution – If this number is set too high, ACSLS may not be able to start up properly. Either lower the number or increase the maximum allowable process per user.
ACSLS must be restarted for this option to take effect.
• Prompt: Changes to the maximum number of ACSLS processes will not take effect until the product is restarted. Number of ACSLS processes [40]:
Variable: MAX_ACS_PROCESSES
Valid numbers are: 32 to 100.
A transient process is used to satisfy all requests except: mount; dismount; lock; unlock; clear_lock; and query_lock. The default, 40 processes, works for all ACSLS processes except extremely large configurations. Default is 40.
Caution – It is recommended you contact Support for advice before changing this value.
ACSLS must be restarted for this option to take effect.
• Prompt: Enable automatic enter tracing facility (TRUE/FALSE) [FALSE]:
Variable: TRACE_ENTER
This option specifies if the results of automatic enter operations are written in the event log. Valid options are:
• TRUE - enables messages to be written to the event log at the end of each automatic enter operation. This is the only method for determining why volumes were not entered during an automatic enter operation.
• FALSE - disables this feature and helps minimize the number of messages written to the event log.
• Prompt: Enable volume tracing facility (TRUE/FALSE) [FALSE]:
Variable: TRACE_VOLUME
This option specifies if unsolicited messages are displayed when adding/deleting a volume(s) in the database. Valid options are:
• TRUE - enables unsolicited messages to be displayed whenever a volume is added or deleted in the database. Operations that can generate this messages are: audit; mount; dismount; enter; eject; recover; and vary.
• FALSE - disables this feature and helps minimize the number of messages written to the event log.
• Prompt: Number of days to retain volumes that are identified as ABSENT or EJECTED in the database. [5]:
Variable: ABSENT_VOLUME_RETENTION_PERIOD
Verifying and Changing Dynamic and Static Variables
December 2012 Setting Variables that Control ACSLS Behavior 65
A dynamic variable, it sets the number of days (0-999) to keep absent or ejected cartridges in the database. Unless you reenter the volume, ACSLS automatically deletes the volume from the database when the retention period expires.
If you never want the volume to be deleted, enter 999. To delete the volume immediately, enter 0.
Caution – Setting a high retention period can cause a large number of absent or ejected volumes to be retained. This uses more space in the database and causes it to fill up faster.
• Prompt: Report ABSENT and EJECTED volumes to ACSAPI clients. [FALSE]:
Variable: ENABLE_STATUS_VOLUME_ABSENT
Valid options are:
• TRUE - reports absent and ejected volumes to ACSAPI clients.
• FALSE - absent and ejected volumes are not reported to ACSAPI clients (as occurred in previous versions of ACSLS).
• Prompt: Status for MISSING volumes reported to ACSAPI clients: TRUE=MISSING. FALSE=IN TRANSIT [FALSE]:
Variable: ENABLE_STATUS_VOLUME_MISSING
This option sets the status code to be returned to ACSAPI clients for missing volumes. Valid options are:
• TRUE - reports missing cartridges to ACSAPI clients.
• FALSE - missing volumes are not reported to ACSAPI clients (as occurred in previous versions of ACSLS).
****ENABLE_INIT_ACSLM Must be TRUE**** This variable must be TRUE to allow the GUI and logical libraries to communicate with legacy ACSLS processes. [TRUE]:
Legacy ACSLS processes used only UNIX-based sockets for interprocess communication. This variable enables INET-based socket communication for the GUI and logical library support. ENABLE_INIT_ACSLM must be true to enable ACSLS 8+ features. The ACSLS product must be restarted for changes to take effect.
• Prompt: Support alphanumeric volume ranges for commands and utilities. Alphanumeric ranges will include all valid vol_ids, in ASCII collating sequence. Note - Changes to alphanumeric volume range support will not take effect until the product is restarted. (TRUE/FALSE) [FALSE]:
Variable: ALPHANUM_VOL_RANGES
Specifies whether alphanumeric volume range support is active for commands and utilities. Valid options are:
• FALSE (default) - when specifying volume range, the first characters of a vol_id range must be the same and the last variable characters must be numeric. Example: AAA000-AAA999

Verifying and Changing Dynamic and Static Variables
66 ACSLS 8.1 Adminstrator’s Guide December 2012
• TRUE - Any valid vol_id for the range can be specified, as long as the alphanumeric volume range includes all valid volume IDs. Valid volume ranges consist of any combination of numbers (0-9), letters (A-Z), dollar sign ($), pound sign (#), and spaces (leading and trailing).
Example: A1Z27BC-G$123R
• Prompt: During eject processing, send an intermediate response containing ejected volumes when the CAP is filled, rather than waiting for MAX_ID volumes to be ejected. (TRUE/FALSE) [FALSE].
Variable: EJECT_RESPONSE_ON_CAP_FULL
This option specifies whether the eject process should send an intermediate response when a CAP is filled, or wait for MAX_ID volumes to be ejected. On configurations with CAPs larger than MAX_ID cells, this does not affect any behavior, as an intermediate response is still generated when MAX_ID volumes are ejected. This setting will have no effect on cmd_proc, and cmd_proc will always receive a response when the CAP has been filled.
Caution – Changing the value of this variable will affect ACSAPI clients that expect intermediate eject responses to always contain MAX_ID volumes.
• Prompt: To prevent mount and dismount failures when a library is busy or temporarily unavailable, requests are queued and retried. Delay, in minutes, before queued mount and dismount requests are retried or ACSLS checks if a temporarily offline library or drive is available. Range of 1-6 minute [2]:
Variable: MOUNT_RETRY_DELAY
When mount and dismount requests would fail because the library is busy or temporarily unavailable, they are automatically queued. The requests are periodically retried, or library and drive availability is re-checked. This variable specifies the time interval, in minutes, between attempts to retry the sequence.
• Prompt: To prevent mount and dismount failures when a library is busy or temporarily unavailable, requests are queued and retried. Time limit, in minutes, to queue mount and dismount requests. When a request has been queued and retried longer than this time limit, the requests fails. Range of 10 [20]:
Variable: MOUNT_RETRY_TIME_LIMIT
When mount and dismount requests would fail because the library is busy or temporarily unavailable, they are automatically queued. The requests are periodically retried, or library and drive availability is re-checked. This variable is the maximum time that ACSLS will continue to queue a mount or dismount request.
Enter a number between 10 and 80.
Setting Access Control Variables
Note – Select ? for help on each prompt.
Option 4 allows you to set or change the following access control variables:
• Prompt: Changes to command access control will not take effect until the product is restarted. Access control is active for commands. (TRUE/FALSE) [FALSE].
Verifying and Changing Dynamic and Static Variables
December 2012 Setting Variables that Control ACSLS Behavior 67
Variable: AC_CMD_ACCESS
Specifies if access control is active for commands. This allows control over which ACSLS command each network client is allowed to execute.
The default, false, disables access control.
Note – You must stop, then restart ACSLS for this change to take effect.
• Prompt: Default access for commands (ACCESS/NOACCESS) [ACCESS].
Variable: AC_CMD_DEFAULT
Specifies the default access to commands if there is no relevant access control lists.
The default, ACCESS, allows command access unless otherwise denied through configuration information provided in the access control files.
• Prompt: Changes to volume access control will not take effect until the product is restarted. Access control is active for volumes. (TRUE/FALSE) [FALSE].
Variable: AC_VOL_ACCESS
Specifies if access control is active for volumes. This allows control over which ACSLS clients can access specific volumes. You must restart ACSLS for this option to take effect.
The default, false, disables access control for volumes.
Note – You must stop, then restart ACSLS for this change to take effect.
• Prompt: Default access for volumes (ACCESS/NOACCESS) [NOACCESS].
Variable: AC_VOL_DEFAULT
Specifies the default access to volumes if there is no relevant access control lists.
The default, NOACCESS, disallows volume access unless otherwise granted through configuration information provided in the access control files.
• Prompt: Messages will be logged when access to commands or volumes is denied (TRUE/FALSE) [FALSE].
Variable: AC_LOG_ACCESS
Specifies if a message is logged in the event log when access to a command or volume is denied. The command or volume id is logged, as well as the access id and host id if this option is enabled.
Setting Automatic Backup Variables
Note – Select ? for help on each prompt.
Option 5 allows you to set or change the following automatic backup variables:
• Prompt: Would you like to modify the automatic backup settings? ( y or n)
Variable: None. The automatic backup settings are saved in crontab. Please use acsss_config to modify these settings.
Valid options are:

Verifying and Changing Dynamic and Static Variables
68 ACSLS 8.1 Adminstrator’s Guide December 2012
• Y - If yes, you are asked if you want to back up everyday. If “yes”, then you must enter the time in HH:MM format.
If no, you must select the day(s) of the week to back up. Then you must enter the time in HH:MM format.
• N - you go to the next question regarding the retention period of SDM-managed database backup files.
• Prompt: Set the number of days for the retention period of SDM-managed database backup files. See Help for explanation. [5].
Variable: RETENTION_PERIOD
The option sets how many days DSM tracks the data on your storage cartridges before the cartridge is designated as not eligible for reuse. Valid number of days: 4-30
The retention period is the period of time for which you retain backups. Transaction log files are retained with each backup, increasing the space needed in the backup partition. When choosing a retention period, consider the following conditions specific to your site:
• The size and activity of your library
• The number of automatic and manual backups performed in a given period of time
Notes:
When you run a manual backup with the bdb.acsss utility, an automatic backup to local disk is also done, thereby increasing the number of backups in the backup partition.
The retention period should be greater than the interval between backups. For example, if you have a retention period of four days, you should take automated or manual backups at least three times a week, with no more than three days between backups.
• The period of time for which you would like to retain backups and transaction log files, keeping in mind that long retention periods increase the space needed in the backup partition.
Rebuilding Access Control Information
Option 6 rebuilds your access control tables, if access control is alive and/or has been changed.
Defining Event Notification Settings
Note – Select ? for help on each prompt.
Option 7 allows you to define your event notification settings.
• Prompt: Set the number of event messages sent to a client between two successive client checks by ACSLS. [100]
Variable: CLIENT_CHECK_MESSAGE_COUNT

Verifying and Changing Dynamic and Static Variables
December 2012 Setting Variables that Control ACSLS Behavior 69
This option specifies the number of event notification messages to send a client and the minimum check interval (set with next question) before ACSLS checks to verify the registered client is still alive.
Valid entry: 10 - 1000 messages
• Prompt: Enter the minimum interval between two successive client checks by ACSLS (in minutes). [30]
Variable: CLIENT_CHECK_MIN_INTERVAL
ACSLS checks periodically if a registered client is still alive. This check is performed when the minimum interval and the event notification message count is exceeded.
Valid entry: 1 - 600 minutes
• Prompt: Enter the time a client has to respond to a client check with a check registration request (in seconds) [30]:
Variable: CLIENT_CHECK_RESPONSE_TIME
When ACSLS checks periodically if a registered client is still alive, the client must respond with a check registration request within the specified response time. If the client does not respond within this time period, the client's Event Notification registration is cancelled.
Valid entry: 5 - 300 seconds
• Prompt: Enter the polling interval for confirming Event Notification client registration (in minutes) [60]:
Variable: CLIENT_CHECK_POLLING_INTERVAL
ACSLS checks periodically if a registered client is still alive. At the polling interval specified, ACSLS sends a client check response to all clients who have not issued register, unregister, or check registration requests within this polling interval.
Valid entry: 10 - 1440 minutes
Note – Reboot Your System If You Have Set Any Static Variable(s)
You do not have to do this for the dynamic variables.
Configuring or Updating your Library Hardware
You must use acsss_config (option 8) to create your library hardware for the first time or to add new libraries or re-configure existing libraries. After your initial library configuration, you can then use the config utility, to dynamically add, reconfigure, and remove LSMs and tape drives, add or reconfigure ACSs, and add port connections to libraries. For more information and procedures, refer to “Setting Variables that Control ACSLS Behavior” on page 55.
See “Installing and Configuring Your Library Hardware” on page 47 for more information.

Verifying and Changing Dynamic and Static Variables
70 ACSLS 8.1 Adminstrator’s Guide December 2012

December 2012 Access Control 71
6
Access Control
Access Control provides the following:
• Volume Access Control allows volumes to be assigned to one client application. Other clients can be allowed to access the client’s volumes.
• Command Access Control allows administrators to assign specific ACSLS commands to specific clients.
Both volume access control and command access control apply to users of client applications who submit requests via the ACSAPI.
Access control does not restrict access by administrative users who submit library requests using the cmd_proc or the ACSLS GUI.
Volume Access ControlWhen enabled, the volumes that are owned by a specific user are accessible only to that user or to trusted other users.
The first time you configure ACSLS for volume access control follow these steps:
1. Enable volume access control in ACSLS.
2. Associate a client application with a user name.
3. Define which other users may have access to the user's volumes.
4. Establish ownership of the volumes.
Enabling Volume Access Control
To enable volume access control in ACSLS:
1. Run the configuration utility, acsss_config.
The main menu displays.
2. Select Option 4 - "Set Access Control Variables".
Each variable is listed one at a time, and its current setting is displayed.
3. Press <Enter> to accept the current or default setting.

Volume Access Control
72 ACSLS 8.1 Adminstrator’s Guide December 2012
4. Select [TRUE] and press <Enter> when the utility displays the message "Access control is active for commands".
5. Select one of the following when the utility displays the message "Default access for volumes [ACCESS/NOACCESS"]...
• Select [ACCESS] if your goal is to disallow access to specific users and allow access to all others.
This requires specific users to be listed in a users.ALL.disallow file or a specific users.COMMAND.disallow file. See “Defining other users that are allowed access to the user's volumes” on page 73.
• Select [NOACCESS] if your goal is to allow access to specific users and disallow access to all others.
This requires specific users to be listed in a users.ALL.allow file or a specific users.COMMAND.allow file. See “Defining other users that are allowed access to the user's volumes” on page 73.
If you wish to log instances where access to volumes is denied, select [TRUE] in response to that prompt.
Whenever enabling or disabling volume access, you need to restart ACSLS for the change to take effect.
Associating a client identity with a user name
Not all client applications pass a user ID with its ACSLS request packets. In cases where the client is not identified by a user name, you can assign a user ID.
1. Go to the access_control configuration directory, $ACS_HOME/data/external/access_control.
2. Create a file by the name internet.addresses or copy the internet.addresses.SAMPLE file.
3. In this file, create a record for each client. Each record contains at least two fields: the client IP address followed by a corresponding user name. You can include additional fields for comments.
Separate the fields with spaces or tabs as shown in the following example:
654.32.10.10 ulyssis payroll department
You can create as many client-user associations as you have client applications.
• Where client applications pass the user name with the ACSLS request, the internet.addresses file authenticates the user name with the designated IP address and denies access where both fields do not agree with the values in the request packet. Where multiple clients are hosted from a common platform, the same IP address may be included multiple times in this file and this address can be associated with as many user names as are rightly applied to that IP address.
• Where client applications do not pass the user name with the request, the internet.addresses file is used to establish a user name for that client. In this case, only one user name may be associated with any client I address.
4. Save any updates to the internet.addresses file:

Volume Access Control
December 2012 Access Control 73
a. Run acsss_config.
a. Select Option 6 - "Rebuild Access Control Information".
ACSLS dynamically recognizes the change.
For SNA and OSLAN clients that do not use TCP/IP, refer to the lu62.names or adi.names file in the access_control directory.
Defining other users that are allowed access to the user's volumes
To grant other users access to a user's owned volumes:
1. Create a file users.ALL.allow or users.ALL.disallow in the access_control directory.
You can copy the templates users.SAMPLE.allow or users.SAMPLE.disallow.
2. Add a record in the file for each owner, placing the owner's user ID at the left margin.
3. Specify affected users on the same line with each owner.
4. Separate the user names with spaces or tabs as shown in the following example.
owner_john user-Allie user-andre
User names listed in the users.allow and users.disallow files must be unique, without regard to case. The type case of characters in the user name is ignored.
Users who are not listed on the same line with the owner are given the default (ACCESS or NOACCESS) relationship to the owner's volumes.
Note – You cannot have the same owner_ID and user_ID pair in both the users.COMMAND.allow and users.COMMAND.disallow files for the same command or ALL. You also cannot have the duplicate owner_ID and user_ID pair in the same users.COMMAND.allow and users.COMMAND.disallow files. This includes repeating the same user_ID on the same line.
If there are more allowed users for an owner than will fit on one line, the list of allowed users can be continue on subsequent lines. Each line must start with the owner ID.
5. Optionally, you can establish exceptions to the volume access policy you have defined.
Generally, users are allowed full access, or no access to volumes that are under access control. However, it is possible to allow users certain restricted access to other users' volumes.
For example, you can set a policy that allows any user to query volumes that are owned by a specific user, even though they may not mount or dismount those volumes. Exceptions can be applied to any of the commands that are affected by 'access control':

Volume Access Control
74 ACSLS 8.1 Adminstrator’s Guide December 2012
To configure volume access policy exceptions for certain commands:
• You must create a users.COMMAND.allow or users.COMMAND.disallow file (where COMMAND is replaced by the specific command you wish to grant or restrict).
The users.COMMAND.allow and users.COMMAND.disallow files must have a command component with the name specified exactly as listed below, with the name of the command in uppercase. Controlling access to other variants of commands (e.g. QUERY_VOLUME) is not supported.
DISMOUNT EJECT LOCK MOUNT (1) MOUNT_READONLY (2) QUERY REGISTER SET_CLEAN SET_SCRATCH UNLOCK
Notes:
MOUNT (1) - Policies do not apply to mount scratch or mount readonly.
MOUNT_READOLNY (2) - Policies for mount readonly are defined separately from mount.
• For each owner, place the owner's name at the left margin, followed by the users for whom the policy applies.
6. Save any updates to the policies you define:
a. Run acsss_config
a. Select Option 6 - "Rebuild Access Control Information".
ACSLS dynamically recognizes the change.
Establishing Ownership of Your Volumes
Volume access control applies only to volumes that have explicit ownership. Unowned volumes in the library are accessible to any user. To explicitly set volume ownership use the cmd_proc interface:
ACSSA>set owner "daffy" volume V00100-V00199 Set: owner set for volumes V00100-V00199 Set: Set completed, Success.
You can remove ownership in a similar fashion by using an empty string:
ACSSA> set owner "" volume V00100-V00199 Set: owner set for volumes V00100-V00199
This operation clears the ownership from all of the volumes in the range. For more information, refer to “set owner” on page 278.

Volume Access Control
December 2012 Access Control 75
Volume ownership can be set automatically by the watch_vols utility. For more information, refer to“watch_vols” on page 198 .
Ownership policies
A policy for setting and removing ownership automatically can also be defined in ACSLS. For example, you can set a policy in which any scratch volume that is mounted becomes owned by the user who mounted it. Thereafter, the volume is owned by that user. The same policy could be enhanced to remove ownership whenever the volume is returned to scratch status. A policy could be written such that all entered volumes are assigned to a default user, or to the user who requested the enter, or if the volume was previously owned, to its prior owner. Considerable flexibility is offered with this feature.
Ownership policies are defined in the ownership.assignments file which resides in the access_control directory. You can set a policy in this file to assign or to un-assign ownership automatically with each enter or automatic enter, set scratch, or mount scratch operation. The ownership.assignments file allows you to define a default owner. Whenever a volume encounters any of these operations, its ownership can be assigned to:
• Owner_default (the default owner)
• Same (the previous owner)
• Requestor (the user issuing the current request)
• Unowned (retract ownership from the volume)
Note – Instructions for defining ownership policies are described in detail in the ownership.assignments file. This file includes a complete list of commands that can be used to set volume ownership.
Verifying Ownership
To verify ownership you can run volrpt using the owner_id.volrpt template.
cd ~acsss/data/external/volrpt volrpt -f owner_id.volrpt
This produces a display of all the volumes in the library listed with their associated owner.
Volume Access Summary
The following commands are supported by Volume Access Control:
dismount* display eject enter lock set_clean set_scratch mount query_mount

Command Access Control
76 ACSLS 8.1 Adminstrator’s Guide December 2012
query_scratch query_volume unlock
* Access control does not apply to dismount force since the force option instructs StorageTek ACSLS to ignore the volume ID and to dismount to volume unconditionally.
The following table summarizes the contexts that apply when volume access control is enabled.
TABLE 6-1 Volume Access is Enabled
Command Access Control Command access control allows an ACSLS administrator to restrict certain classes of commands to specific client applications or specific users across the network. Controlled access applies only to user commands that are submitted via the ACSAPI and it does not apply to local users who submit commands via cmd_proc.
The process to configure ACSLS for command access control involves three steps.
The first time you configure ACSLS for command access control follow these steps:
1. Enable command access control in ACSLS.
2. Associate a client identity with a user name.
3. Define what commands are available to which users.
Enabling Command Access Control
To enable command access control in ACSLS,
Default access for volumes is ACCESSAccess Allowed
Access Denied
Access is by means of cmd_proc X
The specified volume is unowned X
The user is the owner of the volume X
The user is associated with the owner in users.ALL.disallow
X
If the user is not associated with the owner in users.ALL.disallow
X
Default access for volumes is NOACCESS Access Allowed
Access Denied
Access is by means of cmd_proc X
The specified volume is unowned X
The user is the owner of the volume X
The user is associated with the owner in users.ALL.allow
X
If the user is not associated with the owner in users.ALL.allow
X

Command Access Control
December 2012 Access Control 77
1. Run the configuration utility, acsss_config.
The main menu displays.
2. Select Option 4 - "Set Access Control Variables".
Each variable is listed, one at a time, and its current setting is displayed.
3. Press <Enter> to accept the current or default setting.
4. Select [TRUE] and press <Enter> when the utility displays the message "Access control is active for commands".
5. When the message "Default access for commands" is displayed:
• Select [ACCESS] if you want to allow all users access to all commands.
To block specific users from issuing commands, they must be listed in a command.ALL.disallow file or a specific command.XXX.disallow file, where:
XXX is the command for which access control is intended
• Select [NOACCESS] if you want to deny user access to commands.
To allow specific users to issue commands, they must be listed in a command.ALL.allow file or a specific command.XXX.allow file.
Note – If you wish to log instances where access to commands is denied, enter "TRUE" in response to that prompt.
Note – Whenever enabling or disabling command access, you need to restart ACSLS for the change to take effect.
Associating a client identity with a user name
Refer to the procedures under “Associating a client identity with a user name” on page 72.
Defining What Commands are Available to Which Users
This process depends upon the default behavior you have selected when you enabled command access control. You need to create a policy file in the $ACS_HOME/data/external/access_control directory.
• If the default behavior you defined above is [NOACCESS], you need to create a command.ALL.allow file that contains the user ID of each client that is to have access to all ACSLS commands. Each user ID should be listed on a separate line in the file.
If you wish to grant only specific commands to specific users, you need to create a command.XXX.allow file for each command the users are allowed to execute. For example, to grant permission for specific users to enter volumes into the library, you would create a file with the name command.ENTER.allow and list the ID of each qualified 'enter' user on a separate line in the file.

Command Access Control
78 ACSLS 8.1 Adminstrator’s Guide December 2012
• If the default behavior you defined above is [ACCESS], you need to create a command.ALL.disallow file that contains the user ID of each client that is not to have access to all ACSLS commands. Each user ID should be listed on a separate line in the file.
Note – You cannot have the same user_ID in both the command.XXX.allow and command.XXX.disallow files for the same command or ALL.
Command Names for Command Access Control allow and disallow Files
The command.XXX.allow and command.XXX.disallow files must have a command component with the name specified exactly as listed below, with the name of the command in uppercase. Controlling access to other variants of commands (e.g. QUERY_VOLUME) is not supported.
AUDIT CANCEL CHECK_REGISTRATION CLEAR_LOCK DEFINE_POOL DELETE_POOL DISMOUNT DISMOUNT_FORCE DISPLAY EJECT ENTER (1) IDLE LOCK MOUNT (2) QUERY QUERY_LOCK REGISTER SET_CAP SET_CLEAN SET_OWNER SET_SCRATCH START UNLOCK UNREGISTER VARY
Notes:
ENTER (1) - Policies apply to virtual enter and manual enter, but not for automatic enter.
MOUNT (2) - Policies also apply to mount scratch and mount readonly.
Use the following table as a quick reference for determining when command access is allowed.
TABLE 6-2 Command Access is Enabled
Default Access for Commands is NOACCESSAccess Allowed
Access Denied

Logging Access Control Messages
December 2012 Access Control 79
Logging Access Control MessagesYou can set a policy to log all transactions that failed because the user was denied access. The message displays the user name and the command that was attempted.
To enable access control logging:
1. Run acsss_config and select Option 4 - "Set Access Control Variables"
2. Change [FALSE] to [TRUE] at the following prompt: "Messages will be logged when access to commands or volumes is denied.
3. Select Option 6 - "Rebuild access control information."
ACSLS recognizes the change and begins logging each time a command request was denied.
The request is entered from cmd_proc X
The user_ID is listed in command.COMMAND.allow X
The user_ID is listed in command.ALL.allow X
- - All other conditions - - X
Default Access for Commands is ACCESSAccess Allowed
Access Denied
The request is entered from cmd_proc X
The user_ID is listed in command.COMMAND.disallow X
The user_ID is listed in command.ALL.disallow X
- - All other conditions - - X

Logging Access Control Messages
80 ACSLS 8.1 Adminstrator’s Guide December 2012

December 2012 Library Management 81
7
Library Management
Managing your libraries) may consist of the following tasks:
• “Specifying ACS Numbers” on page 81
• “Auditing the Library” on page 82
• “Adding a SCSI or fibre-attached library to ACSLS” on page 83
• “Using the Extended Store Feature” on page 83
• “Managing a Mixed-Media Library” on page 86
• “Managing Dual TCP/IP Connections” on page 89
• “Managing a Dual-LMU Configuration” on page 89
• “Managing a Dual-LAN Client Configuration” on page 92
• “Registering the IP Addresses of Primary and Secondary LANs” on page 93
• “Setting the TCP/IP Connection Timeout Interval” on page 94
• “Registering for Event Notification” on page 94
• “Automatic Recovery to Desired State” on page 95
• “Queue and Retry Mounts and Dismounts when Library is Temporarily Unavailable” on page 96
Specifying ACS NumbersACSLS lets you configure or re-configure libraries without assigning all ACS numbers in sequence.
Example:
You want to migrate from a 9310 library to a SL8500. The 9310 ACS is now ACS 0 and the SL8500 ACS is ACS 1.
Skipping ACS numbers lets you migrate all of the cartridges and drives to the SL8500 ACS and remove the 9310 ACS without having to renumber the SL8500 ACS.
If you renumbered the SL8500 ACS all volumes would be deleted, and then re-added in a subsequent audit. It would also cause all of the drive_ids to change.
To change the number of an existing ACS, refer to “acs_renumber.sh” on page 154.
Auditing the Library
82 ACSLS 8.1 Adminstrator’s Guide December 2012
Auditing the LibraryAn audit updates the ACSLS database to match the actual inventory of library cartridges.
How Audit Works
An audit ejects duplicate and invalid volumes. The cartridges have:
• An external label that duplicates one already scanned.
• A missing or unreadable external label and no virtual label.
• An invalid media type.
• An invalid volume ID.
ACSLS records any database changes from the audit in the event log and also displays cmd_proc messages during the audit. Audits only apply to LSM storage cells, not to tape drives or CAPs. For information about running an audit, refer to “audit” on page 206.
When to Run an Audit
You run an audit to:
• Create volume information in the database for newly configured libraries.
• Add volumes to the database when the cartridges were not entered through the CAP.
Example: you added an LSM to your library, opened the LSM door, and manually added cartridges to the LSM.
• Resolve discrepancies between the library and the database.
Example: run an audit if you opened an LSM door and manually removed cartridges instead of ejecting them through the CAP.
The audit either marks the volume absent or deletes the removed volumes from the database.
CAUTION
You must audit an SL3000 after it is configured or re-configured to ACSLS. The library reports the potential cell locations that are not accessible to ACSLS when ACSLS audits it. Inaccessible cell locations include:
• locations where CAPs, drives, and operator panels are installed.
• cell locations that the robots cannot access.
• cell locations that are not activated.
• cell locations that are not in this partition.

Adding a SCSI or fibre-attached library to ACSLS
December 2012 Library Management 83
Audit Intervals
Audit intervals depend on several factors, including: your ACSLS configuration; whether the library is reporting cell contents from its database or by examining each cell; your library configuration; the number of database changes required; and the scope of the audit. The following table describes how the differences in the scope of an audit affect the audit intervals.
In addition, consider the LSM type for the component you audit, as shown in the following table. For the 4410, 9310, and L5500 the best time can be achieved when all the cells are full, and worst time when cells are empty.
Adding a SCSI or fibre-attached library to ACSLSThe SCSI Media Changer (mchanger) is the device driver that communicates between ACSLS and any SCSI library. An mchanger must be created for each SCSI or fibre-attached library that is connected to ACSLS.
For more information, please see “Adding the SCSI mchanger Device Driver” on page 47.
Using the Extended Store FeatureThe following sections provide information about using the Extended Store Feature.
TABLE 7-1 How the Scope of an Audit Affects the Audit Interval
This audit takes less time Then this audit
A diagnostic ACS/LSM An online ACS/LSM
An ACS/LSM dedicated to the audit An ACS/LSM processing other requests
A full panel A (partially or completely) empty panel
A drive panel A standard panel
An inside panel An outside panel
TABLE 7-2 Average Audit Times for Supported LSMs
LSM Type ComponentAverage Audit Time (Best and Worse)
4410 LSM 3 - 8 hours
9310/L5500 LSM 1.2 - 6 hours
9360 LSM 5 minutes
97xx/L700/180 LSM 1 minute
SL500 LSM 3 minutes
SL8500 or SL3000 LSM 5 minutes (if the SL8500 physical audit completes before the ACSLS audit)
Note – These times assume no other active processes. 4410 and 9310 audit times may be reduced if a high percentage of the cells audited are occupied.

Using the Extended Store Feature
84 ACSLS 8.1 Adminstrator’s Guide December 2012
Note – This feature does not apply to a single LSM without a pass-thru port.
When a cartridge is mounted, its “home location” is the storage cell from which it was mounted. Normally, when a cartridge is dismounted and its home location is in a different LSM than the drive, ACSLS attempts to assign a new home location in the closest LSM (the shortest pass-thru distance from the tape drive). This is called “floating” a cartridge to a new home location.
ACSLS attempts to return a cartridge to its home location after a dismount if that home location is in an LSM that is enabled for the Extended Store feature.
Note – Events such as the volume’s home LSM being offline or a label mismatch on a dismount may prevent ACSLS from returning a cartridge to its home location. If such an event occurs, the cartridge is stored as close as possible to the LSM from which it was dismounted.
If you have an Extended Store LSM that you use for cartridge archive, this feature helps to ensure that cartridges from that LSM return to their home locations in that LSM. For example, if Extended Store LSM 3 is enabled for this feature and a cartridge from LSM 3 is mounted on a drive attached to LSM 1, after the cartridge is dismounted, ACSLS attempts to return the cartridge to its home location in LSM 3. If LSM 3 is not enabled, ACSLS tries to store the cartridge in a new cell in LSM 1.
You can only enable entire LSMs for this feature. You cannot enable LSM subcomponents, such as a panel or individual cell. To enable an entire ACS for this feature, you must enable each LSM in the ACS.
Note – Enabling the Extended Store feature will increase pass-thru activity when cartridges are dismounted. This may significantly decrease library performance.
To enable an LSM for the Extended Store feature, modify the lsm_fixed_volume file (found in the $ACS_HOME/data/external/fixed_volume directory). After you modify the file, stop and restart ACSLS to enable the specified LSMs.
Use the following conventions when you modify the sample file:
• Comment and blank lines are allowed throughout the file.
• Each LSM identifier line consists of the ACS number, followed by a comma, followed by the LSM number. No spaces or tabs are allowed between the ACS number and the LSM number.
• Each LSM identifier must be on a separate line.
• No explicit ordering of the LSM identifier lines is required.
• No explicit end-of-file delimiter is required
Example of the Extended Store Feature Control File# This lsm_fixed_volume file must be found in the # $ACS_HOME/data/external/fixed_volume # directory. This is a sample lsm_fixed_volume file that may be # edited your particular configuration. # Comments may appear anywhere in this file, but must include a # pound sign in the first column. # Blanks lines are also allowed throughout the file for

Using the Extended Store Feature
December 2012 Library Management 85
# readability, and # will be ignored. # For all the LSM identifiers found in this file, a “best” attempt # will be # made to return the volume to its home location at dismount. # A valid LSM identifier consists of the ACS number, separated by a comma, # and followed by the LSM number. Leading or trailing blanks are # ignored. # ACS,LSM # 0,0 # 0,1 # ACS 1, LSM 0 through 3 # ACS,LSM # 1,0 # 1,1 # 1,2 # 1,3
The following example is of a modified control file. In this example, the comment (#) character has been removed from the lines shown in bold to specify that LSMs 0,0 and 0,1 are enabled.# This lsm_fixed_volume file must be found in the # $ACS_HOME/data/external/fixed_volume # directory. This is a sample lsm_fixed_volume file that may be # edited your particular configuration. # Comments may appear anywhere in this file, but must include a # pound sign in the first column. # Blanks lines are also allowed throughout the file for # readability, and # will be ignored. # For all the LSM identifiers found in this file, a “best” attempt # will be # made to return the volume to its home location at dismount. # A valid LSM identifier consists of the ACS number, separated by a comma, # and followed by the LSM number. Leading or trailing blanks are # ignored. # ACS,LSM
0,0 0,1
# ACS 1, LSM 0 through 3 # ACS,LSM # 1,0 # 1,1 # 1,2 # 1,3
Managing a Mixed-Media Library
86 ACSLS 8.1 Adminstrator’s Guide December 2012
Managing a Mixed-Media Library“Mixed media support” means that ACSLS supports a mixture of tape drive and media (cartridge) types in the same library. ACSLS mixed-media support prevents the robot from mounting incompatible media types in a tape drive. For example, in an SL8500, the robot will not mount an LTO cartridge in a T10000 tape drive.
ACSLS mixed-media support requires Media ID labels with media characters on cartridges.
Note – Refer to the ACSLS Product Information Guide for the current list of drive types, media types and drive-to-media compatibility supported.
ACSLS has limited knowledge of the recording format used on cartridges. ACSLS does not have access to the data path to tape drives, so ACSLS cannot detect and prevent recording format incompatibilities. However, recent T9840, T9940, and T10000 tape drives report the media recording format on a dismount. ACSLS saves this information in the database, and it can be displayed with the command:
display volume [vol_id(s)] –f recording_format_family recording_format_model
For more information, refer to “display volume” on page 318.
Note – For 9310s and other obsolete libraries, the venter command allows you to enter unlabeled cartridges into a library. The venter command does not provide an option to specify the media type of the cartridge you want to enter. In a mixed-media environment, ACSLS cannot prevent tape drive/media incompatibilities for virtually entered cartridges. However, venter is not supported for the SL8500 and SL3000 libraries because these libraries cannot read a media label without a volser label, and ACSLS requires a media label to enter cartridges into these libraries.
Displaying the ACSLS Mixed-Media Settings
The drives_media.sh utility displays the drive types, media types, and drive-to-media compatibility settings currently supported by ACSLS. As support is added for new drives and media, they are displayed.
To display the ACSLS Mixed-Media settings, enter:
drives_media.sh
The information is written to the screen (standard output).
To output the ACSLS Mixed-Media settings to files in the /tmp directory, enter:
drives_media.sh -f
The information will be written to three files. (If the files already exist, they will be overwritten.)
/tmp/drive_types.txt /tmp/media_types.txt /tmp/media_compatibility.txt

Managing a Mixed-Media Library
December 2012 Library Management 87
Mixed-Media Restrictions for SCSI-Attached LSMs
Please note the following restrictions for SCSI-attached LSMs:
• Because some tape drives do not support dynamic write-protect settings by means of the control path, you must use caution when mounting cartridges using the ‘read-only’ option. All StorageTek drives support this feature. For non-StorageTek drives, you are advised to confirm that dynamic write-protection is supported. Specifically, LTO drives and some early DLT drives do not support the “read-only” option.
Unless the drive supports this feature, you run the risk of losing data on cartridges that you assumed are to be mounted with the write-disable protection of a ‘read-only’ mount.
• ACSLS does not support the venter command for SCSI-attached libraries with DLT tape drives.
• You cannot do virtual mounts and dismounts to DLT tape drives in SCSI-attached libraries. Compac tape cartridges, therefore, must have external labels to allow ACSLS to manage these cartridges.
• Automatic-cleaning operations in SCSI-attached libraries is handled by the library microcode and not by ACSLS. The library control panel provides a menu for users to enable library control of automatic-cleaning operations. For more information, see your library documentation.
• You can select a normal load or fast load option through the library. Not all tape management systems, however, support the fast load option.
Setting Scratch Preferences
On scratch mount requests you can explicitly specify the media type you want to use, or you can have ACSLS select a media type.
In order for ACSLS to select a media type, you must pre-define a prioritized list of compatible media types for each drive type. This list is referred to as the “scratch preferences.” Note that:
• There is one set of preferences for the entire server; preferences are not defined by client.
• If a compatible media type is not listed for a drive, the media will not be selected.
The following sections describe the user- and system-defined files that ACSLS uses in determining scratch preferences.
User-Defined Mixed-Media Files
Following are the user-defined mixed-media files that are located in $ACS_HOME/data/external/mixed_media/:
• scratch_preferences.dat
User-defined preferences file. Primary source of preference definitions.
• scratch_preferences.SAMPLE
Sample preferences file. Can be copied to create the scratch_preferences.dat file.
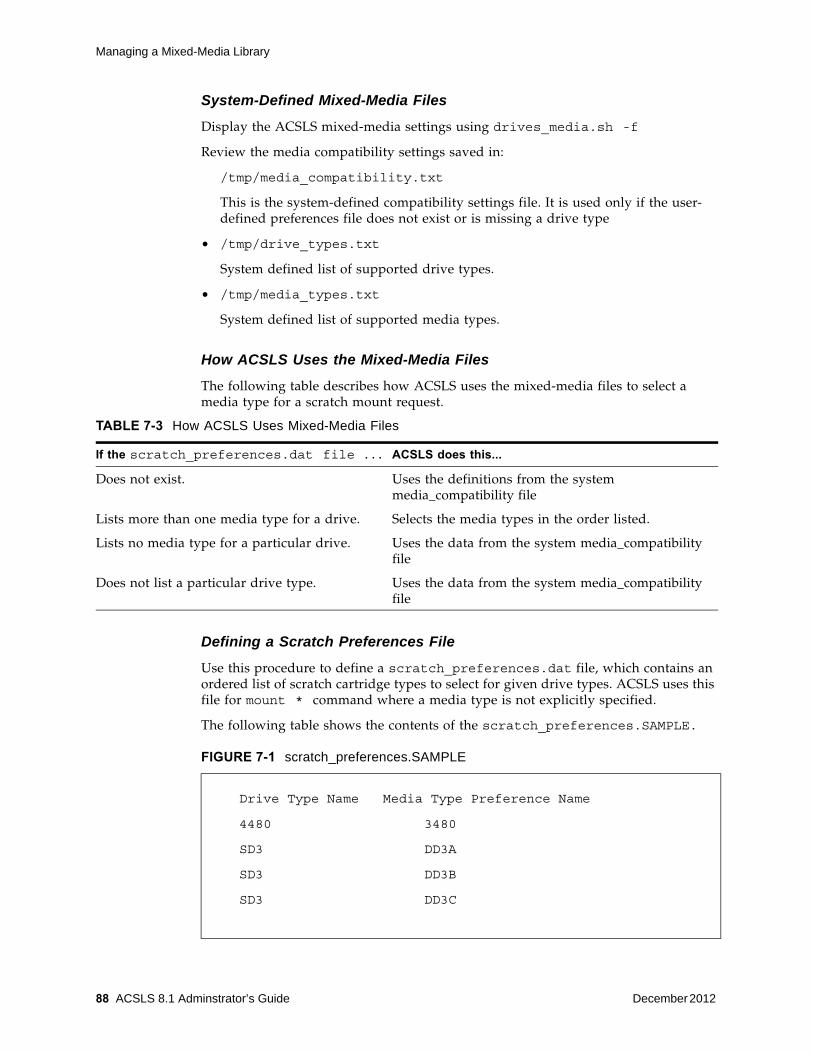
Managing a Mixed-Media Library
88 ACSLS 8.1 Adminstrator’s Guide December 2012
System-Defined Mixed-Media Files
Display the ACSLS mixed-media settings using drives_media.sh -f
Review the media compatibility settings saved in:
/tmp/media_compatibility.txt
This is the system-defined compatibility settings file. It is used only if the user-defined preferences file does not exist or is missing a drive type
• /tmp/drive_types.txt
System defined list of supported drive types.
• /tmp/media_types.txt
System defined list of supported media types.
How ACSLS Uses the Mixed-Media Files
The following table describes how ACSLS uses the mixed-media files to select a media type for a scratch mount request.
Defining a Scratch Preferences File
Use this procedure to define a scratch_preferences.dat file, which contains an ordered list of scratch cartridge types to select for given drive types. ACSLS uses this file for mount * command where a media type is not explicitly specified.
The following table shows the contents of the scratch_preferences.SAMPLE.
TABLE 7-3 How ACSLS Uses Mixed-Media Files
If the scratch_preferences.dat file ... ACSLS does this...
Does not exist. Uses the definitions from the system media_compatibility file
Lists more than one media type for a drive. Selects the media types in the order listed.
Lists no media type for a particular drive. Uses the data from the system media_compatibility file
Does not list a particular drive type. Uses the data from the system media_compatibility file
FIGURE 7-1 scratch_preferences.SAMPLE
Drive Type Name Media Type Preference Name
4480 3480
SD3 DD3A
SD3 DD3B
SD3 DD3C
Managing Dual TCP/IP Connections
December 2012 Library Management 89
To define a scratch preferences file, do the following:
1. Log in as acsss.
2. Change to the external mixed media directory:
cd $ACS_HOME/data/external/mixed_media
3. Copy the sample scratch preferences file to create the user-defined file:
cp scratch_preferences.SAMPLE scratch_preferences.dat
4. Using a text editor such as vi, modify the list of preferences in the scratch_preferences.dat file:
• Follow the instructions in the comments at the top of the file.
• If you want to use more than one media type for a drive type, enter each media type on a separate line; the order of preference is from top to bottom.
5. Save the file.
6. From a cmd_proc, restart ACSLS:
start
See the command, “set scratch” on page 279.
Managing Dual TCP/IP ConnectionsDual TCP/IP is an option that can be purchased for the SL8500 and SL3000. It provides two TCP/IP connections to the libraries. However, you can continue to use the libraries with only one of the two connections operational.
The purpose of dual TCP/IP is to automatically recognize and avoid a failing communication path. Since this is automated, there is no need for you to manually switch from an inoperative connection. For more information, see “Dual TCP/IP Support” on page 330.
Managing a Dual-LMU ConfigurationACSLS supports dual-LMU configurations, which consist of:
• An active LMU that manages an ACS
• A standby LMU that automatically switches to active role to manage the ACS if the active LMU fails
Both LMUs are connected to a LAN that is connected to the LSMs. The first LMU powered on is initially the active, while the second LMU powered on is initially the standby. The LMUs periodically check each other's status so the standby can take over the active role if the active fails.
Note – ACSLS supports dual-LMU configurations for only the 9330 and L5530 LMUs with host/LMU microcode compatibility Level 12 (or above) loaded. The same microcode level must be loaded in both LMUs. ACSLS communicates with these LMUs by a serial connection, or through TCP/IP. There can be only one Ethernet connection for each TCP/IP connected LMU.

Managing a Dual-LMU Configuration
90 ACSLS 8.1 Adminstrator’s Guide December 2012
Limitation: ACSLS does not automatically initiate an LMU switch. Even if communication between ACSLS and the active LMU is lost, ACSLS does not initiate an LMU switch. ACSLS continues trying to communicate with the existing active LMU. Except for ACSLS-HA configurations involving an SL8500 or SL3000library with redundant electronics, ACSLS does not automatically initate an LMU switch.
ACSLS dual-LMU support includes:
• ACSLS connects to both active and standby LMUs. ACSLS constantly monitors its connection to both LMUs. When communication is lost, ACSLS reports this condition.
• If the active LMU fails, the standby LMU automatically takes over as the new active LMU. When this happens, ACSLS recognizes the automatic switch and sends requests to the new active LMU. ACSLS also recovers transactions in progress (except for audits).
• You can issue the switch lmu command to manually switch ACS management from the active LMU to the standby LMU. ACSLS sends a “Force Switchover to Active” transmission to the standby LMU. The standby takes over as the new active LMU. After a manual switchover, ACSLS recovers outstanding transactions (except for audits).
To further enhance the redundancy of a serial dual-LMU configuration, we recommend that you use dual serial cables to connect the ACSLS server to each LMU. The following figure shows an example of an ACSLS server in a dual-LMU configuration. In the figure, a port connects to a serial patch panel, which has dual cabling to each LMU.

Managing a Dual-LMU Configuration
December 2012 Library Management 91
ACSLS dual-LMU support also enhances single-LMU configurations because the LMU can IPL without bringing down the ACSLS server.
The query lmu command displays LMU and port status for both single-LMU and dual-LMU ACS configurations; for more information see “query lmu” on page 252.
You can also use the switch lmu command to manually switch ACS management from the ACS’s active LMU to the standby LMU; for more information see “switch lmu” on page 283. You can use manual switchover for hardware maintenance, such as replacing a LAN cable connecting dual LMUs. For example, assume that LMU A is in the active role and LMU B is in the standby role. If you need to replace a LAN cable, you can:
FIGURE 7-2 ACSLS Server in a Dual-LMU Configuration
S403_005
Server
Serial Patch Panel
LMU A9330
LMU B9330
LSM 09310
LAN
Managing a Dual-LAN Client Configuration
92 ACSLS 8.1 Adminstrator’s Guide December 2012
1. Switch to LMU B.
2. Vary the port(s) to LMU A offline.
3. Replace the LAN cable.
4. Vary the port(s) to LMU A back online.
5. Switch back to LMU A.
After an LMU switchover (automatic or manual), ACSLS recovers all outstanding (active and pending) requests. The time to complete each outstanding request during a switchover is increased by the time required to switch between LMUs and recover any preceding outstanding requests. Request recovery, therefore, can take three to five minutes.
Managing a Dual-LAN Client ConfigurationACSLS 5.2 and above supports dual-LAN client configurations, which consist of a primary LAN and a secondary (backup) LAN. If the primary LAN fails, the client switches to the secondary LAN. ACSLS removes all outstanding messages to that client and begins communicating via the secondary LAN. Because ACSLS removes all outstanding messages before switching over to the secondary LAN, a client will not receive a success message even though a request completed successfully.
For example, a client requests ACSLS to eject ten cartridges. ACSLS starts ejecting the cartridges, then communications fail between ACSLS and the primary client LAN. ACSLS removes all outstanding messages to that client and begins communicating via the secondary LAN. ACSLS successfully completes ejecting all ten cartridges, but sends no success message to the client. The client must verify that the request completed successfully. In this example, if the client issues a query volume request against the IDs of the ejected volumes, ACSLS returns a volume not found error message, which confirms that ACSLS ejected the cartridges.
ACSLS ensures that any transient requests complete successfully if a LAN communications switchover occurs. After switchover, however, the client must cancel any persistent outstanding requests (such as CAP operations) originally submitted on the primary LAN and resubmit these requests via communications from the secondary LAN. Resources (such as, CAPs, locks, drives, and so forth) allocated via primary LAN communications will remain allocated after switchover to the secondary LAN.
The following sections tell how to configure ACSLS for dual-LAN client operations by:
• Register the IP addresses of primary and secondary LANs by creating a csc_ip_switch.dat file
• Install a second ethernet port for a multi-homed ACSLS server
• Set the TCP/IP connection timeout interval to decrease the system switchover time to the backup LAN.

Managing a Dual-LAN Client Configuration
December 2012 Library Management 93
Registering the IP Addresses of Primary and Secondary LANs
To register the IP addresses of the primary and secondary LANs with ACSLS, create the file csc_ip_switch.dat in the $ACSSS_HOME/data/internal/client_config/ directory. The following figure shows an example of a csc_ip_switch.dat file.
As shown in the above table, e a # sign precedes a comment. The entries consist of a client system's primary LAN IP address in the left column followed by one or more blanks, then a client system's secondary LAN IP address in the right column. In this example, System Zed's primary LAN IP address is 129.80.30.40 and its secondary LAN IP address is 129.80.30.50.
After you create or update the csc_ip_switch.dat file, if ACSLS is running, you must stop and restart ACSLS.
If ACSLS successfully reads the csc_ip_switch.dat file on restart, ACSLS logs the success message 2010 I DUAL PATH OPTION ACTIVATED in the he ACSLS event log. Otherwise, dual-LAN support is not activated.
Installing a Second Ethernet Port for a Multi-Homed ACSLS Server
This section describes the procedure for installing a second ethernet port for a multi-homed ACSLS server. The second ethernet port provides the attachment to the second control path adapter, which controls the backup LAN. This procedure requires the SBUS Buffered Ethernet card. You can order this Ethernet card from Oracle as part number X1053A.
The installation procedure includes:
• Installing the hardware and rebuilding the kernel
• Defining a host name for the new ethernet port
• Creating the /etc/notrouter file
To install a second ethernet port, do the following:
1. Install the SBus Buffered Ethernet card according to the manufacturer's instructions.
2. Reconfigure the system kernel for the new device:
a. Power the system on. When it begins to boot, press [[STOP]]-[[A]] to enter the PROM monitor.
a. At the ok prompt, boot the server:
boot -r
FIGURE 7-3 Example of csc_ip_switch.dat File
#The following entry is System Zed’s primary and secondary LAN IP addresses.
129.80.30.40 129.80.30.50
Registering for Event Notification
94 ACSLS 8.1 Adminstrator’s Guide December 2012
3. When the boot has completed, login as root.
4. Create a hostname for the second ethernet port.
echo 2nd_host_name > /etc/hostname/hme1
Where 2nd_host_name is the hostname for the second ethernet port.
5. Enter the following:
touch /etc/notrouter
This creates the /etc/notrouter file.
6. Reboot the server:
reboot
This completes this procedure.
Setting the TCP/IP Connection Timeout Interval
The UNIX system variable tcp_ip_abort_cinterval sets the TCP/IP connection timeout interval between the client and the ACSLS server. Changing the default value (180 seconds) of this variable may decrease the switchover time to the backup LAN. Note, however, that actual switchover time depends on the configuration and type of failure. For example, if an ACSLS server port fails and multiple clients are communicating via this port, ACSLS serially recovers communications with each client. Multi-client recovery for a failing port therefore takes longer than recovery with a single client communicating with a failing port.
To decrease the switchover time to the backup LAN, do the following:
1. Log in as root on the ACSLS server.
2. From the prompt, enter the following:
/usr/sbin/ndd -set /dev/tpc tcp_ip_abort_cinterval 15000
This command changes the TCP/IP connection timeout interval to 15 seconds (the default is 180 seconds).
HINT: To make this command persistent (across server reboots), add the command to the /etc/rc2.d/S69inet file in the “Set configurable parameters” section.
Registering for Event NotificationEvent notification allows tracking of events occurring in tape libraries for ACSAPI clients. This feature is provided by the CSC Toolkit. Specifically, with event notification, the ACSAPI client can do the following:
• Register for library resource events and/or volume events
• Unregister for these events
• Check registration status for library events and be notified when they occur
Automatic Recovery to Desired State
December 2012 Library Management 95
Client registration requests and event notification messages are delivered to the client until the registration is dropped. Event notification periodically checks the registration status of the client to verify that the client is alive. This avoids sending responses to clients that are no longer active and avoids the unnecessary use of network resources.
The following types of events can be tracked:
• Addition and deletion of volumes and when maximum usage is exceeded for cleaning cartridges in the ACSLS database.
• Changes in library component status such as an LSM or drive changing from online to offline, diagnostic, or recovery; or a CAP that is opened or closed.
• Hardware failures such as an inoperable robotic hand.
Automatic Recovery to Desired StateACSLS now restores tape libraries and drives to the availability desired by customers. This is done by tracking both the current state and the desired state for ACSs, ports, LSMs, and tape drives. When a library or drive is no longer accessible by ACSLS or is inoperative, ACSLS changes its current state to offline. After the library or drive becomes accessible or operative again, ACSLS will automatically recover it and bring it back online if its desired state is online.
Current state and desired state
• Desired state manages library and tape drive availability. Desired state is the availability that you want for an ACS, port connection, LSM, or tape drive. The initial desired state for all library components is online. Customers can set the desired state via an explicit vary command. (This is a vary from cmd_proc, the ACSLS GUI, or an ACSAPI client. It is not a vary that ACSLS internally generates because of a library status change.) The desired state for library components can be viewed using the query lmu and display commands.
• The current state (specified as "state") for an ACS, port, LSM, or drive is the current availability of the component limited by desired state. Current state reflects whether a library component is ready and communicating, limited by the desired state of the component and higher level components.
For example, if the desired state of an LSM is online but it is not ready, its current state will be offline. When the LSM comes ready again, the library sends ACSLS a message, and ACSLS automatically recovers the LSM and brings its current state back online.
However if an LSM’s desired state is offline, ACSLS sets the current state to offline. If the LSM goes not ready and comes back to ready status, ACSLS will leave the LSM’s current state offline.
Current state cascades down, desired state does not
The current state of a library component cascades down to lower level components.

Queue and Retry Mounts and Dismounts when Library is Temporarily Unavailable
96 ACSLS 8.1 Adminstrator’s Guide December 2012
• Specifically, if an ACS is no longer accessible, the current state of the ACS is offline. The current state of all LSMs and drives are also set to offline because they are also inaccessible.
• When the desired state of an ACS is changed to offline by a vary command, the current state of the ACS is set to offline, and the current state of all LSMs and drives in the ACS are set to offline.
• Likewise, when the current state of an LSM changes to offline, the current state of all drives in the LSMs become offline. The desired state of the drives does not change.
Changing the desired state of a library component does not affect the desired state of lower level components.
• Changing the desired state of an ACS does not affect the desired state of the LSMs and drives in the ACS.
• Changing the desired state of an LSM does not affect the desired state of the drives in the LSM.
• This lets you vary selected drives in an LSM offline to make them inaccessible. You can then vary the LSM offline for maintenance. When you vary the LSM back online, the selected drives remain offline, while the other drives come back online.
Availability of physical libraries and drives affects logical libraries and drives
• The availability of logical libraries and tape drives in logical libraries is also governed by the desired state that you set for both the underlying physical library and the logical library.
• If the desired states for both the physical library and logical library are online, the current states of logical libraries and logical tape drives reflect the current state of the underlying physical libraries and drives.
• However, if the desired state for the physical ACS or drive is online, but the desired state of the logical library or drive is offline, the logical library or drive remains offline and unavailable.
Queue and Retry Mounts and Dismounts when Library is Temporarily Unavailable
ACSLS now queries mount and dismount requests when temporary library outages are detected. Mount and dismount requests from all sources are automatically queued and retried, as long as the desired state of all required library components is online. This means mount and dismount requests from the following sources are all automatically queued and retried:
• ACSAPI clients
• cmd_proc
• Fibre-attached clients for tape drives in logical libraries
Queue and Retry Mounts and Dismounts when Library is Temporarily Unavailable
December 2012 Library Management 97
Temporary outages occur when the desired state of the library hardware is online, but the current state is offline. Examples of temporary outages are: when an LSM door is open; when ACSLS loses communications with a library; or during an LC switch operation. During a temporary library or tape drive outage, mounts and dismounts are queued, and are retried when the library is available.
If the desired state of the library hardware is offline, then ACSLS fails mount or dismount requests with the appropriate error status.
With ACSLS 7.3.1, two new dynamic variables, MOUNT_RETRY_DELAY and MOUNT_RETRY_TIME_LIMIT, were introduced for managing the queuing and retrying of mounts and dismounts. The:
• MOUNT_RETRY_DELAY controls how often queued mounts and dismounts are retried or availability of libraries and drives are re-checked.
• MOUNT_RETRY_TIME_LIMIT is the time limit to queue and retry mounts and dismounts. After this, requests fail.

Queue and Retry Mounts and Dismounts when Library is Temporarily Unavailable
98 ACSLS 8.1 Adminstrator’s Guide December 2012

December 2012 Cartridge Management 99
8
Cartridge Management
ACSLS provides sophisticated cartridge management features. These features are provided in several ways:
• Automatically, such as the recovery of lost cartridges.
• Enabled by default, such as retaining information about absent and ejected cartridges.
• Customer defined, such as assigning volume attributes when cartridges are added to the database by audit or when they are entered through a CAP.
Using appropriate cartridge management features enhance the value that ACSLS provides.
Cartridge management consists of the following:
• “Populating the LSM” on page 100
• “Using the CAP” on page 100
• “Entering Cartridges” on page 104
• “Ejecting Cartridges” on page 106
• “Recovering CAPs” on page 107
• “Automatically Applying Policies to New and Reactivated Cartridges” on page 110
• “Cleaning Cartridges” on page 110
• “Managing Scratch Cartridges” on page 114
• “Using Absent and Ejected Cartridge Support” on page 118
• “Absent, Ejected and Missing Cartridges” on page 119
• “Cartridge Recovery” on page 120
• “Missing Cartridges” on page 120
• “Absent and Ejected Cartridges” on page 121
• “Using the Manual Volume Delete Utility” on page 122
• “Identifying Expired Cartridges” on page 122

Populating the LSM
100 ACSLS 8.1 Adminstrator’s Guide December 2012
• “Moving Least-Recently Accessed Cartridges from Active LSMs” on page 125
• “Manually Loading Cartridges Into Drives in a Disabled LSM” on page 128
Populating the LSMCartridges can either be manually placed in cells when the library is offline, or entered into a library through a CAP.
An essential requirement for the library and ACSLS to function properly is the availability of a few free cells in each LSM to accommodate dismount, pass through, and eject operations. You should reserve at least one free cell for each tape drive installed in each LSM.
To determine the free cell count of an LSM, issue the command:
query lsm lsm_id
Note – In the SL8500, each rail is defined as an LSM.
Using the CAP
CAP Types
Each type of CAP has a standard capacity and method for loading it with cartridges. An LSM may have more than one type of CAP. The following table shows the supported CAP types, identifiers and capacities, and loading methods.
TABLE 8-1 CAP Types
CAP Type Identifier & Capacity Loading Method
Standard CAP00; holds 21 cartridges. Cartridges are loaded directly into the CAP cells.
Enhanced (4410 and 9310) CAP00 and CAP01; each holds 40 cartridges.
Cartridges are placed into removable magazines which are loaded into the CAP.
9360 CAP00 holds 20 cartridges; optional CAP01 holds 30 cartridges.
Cartridges are placed into removable magazines which are loaded into the CAP.
Priority (PCAP) CAP02; holds one cartridge. Cartridges are entered one at a time, directly into the CAP.
9710 or 9740 CAP CAP00, holds 14 cartridges or magazine, which holds 10 cartridges.
Cartridges are loaded directly into the CAP cells or placed into the removable magazine which is loaded into the CAP.
9714, 9730, or 9738 CAP CAP00, holds one cartridge Cartridges are loaded directly into the single-cell CAP.
L180 CAP00, holds 10 cartridges. 5 cartridges are placed into each of 2 removable magazines which are loaded into the CAP.

Using the CAP
December 2012 Cartridge Management 101
CAP States
A CAP's state determines whether it is available for entering and ejecting cartridges. The following table describes the valid CAP states. See “Displaying CAP Information” on page 104 for procedures for determining the CAP state. See the command, “vary” on page 288 for information about changing device states.
Note – Refer to “Moving Cartridges Before Removing Cells from a Partition” on page 350 for specifics regarding the SL8500 library. Refer to “SL500 CAP Behavior” on page 388 for specifics regarding the SL500 library.
L700 CAP00 and optional CAP01; each holds 20 cartridges.
5 cartridges are placed into each of 4 removable magazines which are loaded into the CAP.
SL500 CAP00; holds between 5 and 25 cartridges
5 cartridges are placed into removable magazines which are loaded into the CAP. One magazine in base module; 2 magazines in expansion modules that contains a CAP.
SL8500 CAP00 and optional CAP01; each holds 39 cartridges.
13 cartridges are placed into each of 3 removable magazines which are loaded into the CAP.
SL3000 CAP 06 and optionally CAP 01-05, CAP 07-10; each holds 26 cartridges.
13 cartridges are placed into each of 2 removable magazines which are loaded into the CAP.
StorageTek VTL CAP 0; holds 20 cartridges Virtual volumes are discovered using Audit. See “VTL Behavior” on page 392.
TABLE 8-1 CAP Types
CAP Type Identifier & Capacity Loading Method
TABLE 8-2 CAP States
State Description How requests are handled
online Normal operating state. All requests are accepted and processed.
offline The CAP is logically disabled. All requests are rejected.
offline-pending Transition state. Occurs when the CAP is taken from online to offline.
All new requests are rejected.
Current and pending requests are processed to completion.
diagnostic The CAP is available for diagnostic activity without interference from client applications.
Requests from client applications are rejected.
Requests from the cmd_proc are processed.

Using the CAP
102 ACSLS 8.1 Adminstrator’s Guide December 2012
CAP Modes
The CAP mode controls how a CAP will be used for cartridge enters and ejects. The following table describes the valid CAP modes. “Displaying CAP Information” on page 104 for procedures for determining the CAP mode. See the command, “set cap mode” on page 272 for information about changing the CAP mode.
HINT: You cannot change a CAP's mode while the CAP is in use. That is, if the door is open during either manual or automatic enter operations, you cannot change its mode until you complete the enter operation.
recovery Transition state. Occurs when the CAP is taken from offline to online.
New requests are rejected.
TABLE 8-2 CAP States
State Description How requests are handled
TABLE 8-3 CAP Modes
Mode Description Effects on enter/eject
manual The CAP is locked when not in use. This is the initial mode for all multi-cartridge CAPs.
You can enter or eject cartridges only after explicitly issuing a command. You either specify the cap_id on the command, or allow ACSLS to automatically select a CAP, based on previously defined CAP priorities.
Some client applications require CAPs to be in manual mode. See the documentation for your tape management system.
Note – Some client applications require CAPs to be in manual mode. See the documentation for your tape management system.

Using the CAP
December 2012 Cartridge Management 103
CAP Priorities
CAP priorities specify how ACSLS automatically selects CAPs when the CAP request specifies an asterisk (*) for the CAP ID, The following table describes the CAP priorities and their effect. See “Displaying CAP Information” on page 104 for procedures for determining the CAP priority. See “set cap priority” on page 274 for information about changing the CAP priority.
automatic The CAP is unlocked when not in use. This is the initial mode for all priority CAPs.
You cannot set the CAP mode to automatic in a partitioned library. The exception to this is a dedicated CAP (assigned to only one partition), in the SL3000 which can be set to automatic mode.
When the SL8500 access door is opened and closed, the SL8500 leaves the CAP locked. When the CAP is locked, it cannot be used for automatic mode enters.
You can enter cartridges without explicitly issuing an enter command. The enter is initiated when you open the CAP door, place the cartridge(s) inside, and close the CAP.
You cannot cancel an automatic enter operation that is in progress using the cancel command. To terminate an automatic enter in progress:
If the CAP door is open, remove all the cartridges and close the door.
If the CAP door is closed and the cartridges are being moved into the library, you must allow the remaining cartridges to be entered into the library. The enter then terminates.
To eject cartridges you must explicitly issue an eject command. You can either specify the cap_id on the command or allow ACSLS to automatically select a CAP, based on previously defined CAP priorities.
If ACSLS shows the CAP in automatic mode, but it is locked and cannot be opened and used for automatic enters, you must: synchronize ACSLS and the SL8500; then return the CAP to automatic enter. To do this:
set cap mode manual cap_id set cap mode automatic cap_id
TABLE 8-3 CAP Modes
Mode Description Effects on enter/eject
TABLE 8-4 Cap Priorities
Priority Effect
16 (highest) first used
15 (next highest) next used
-
1 (lowest) last used
0 never automatically selected (initial priority for all CAPs)
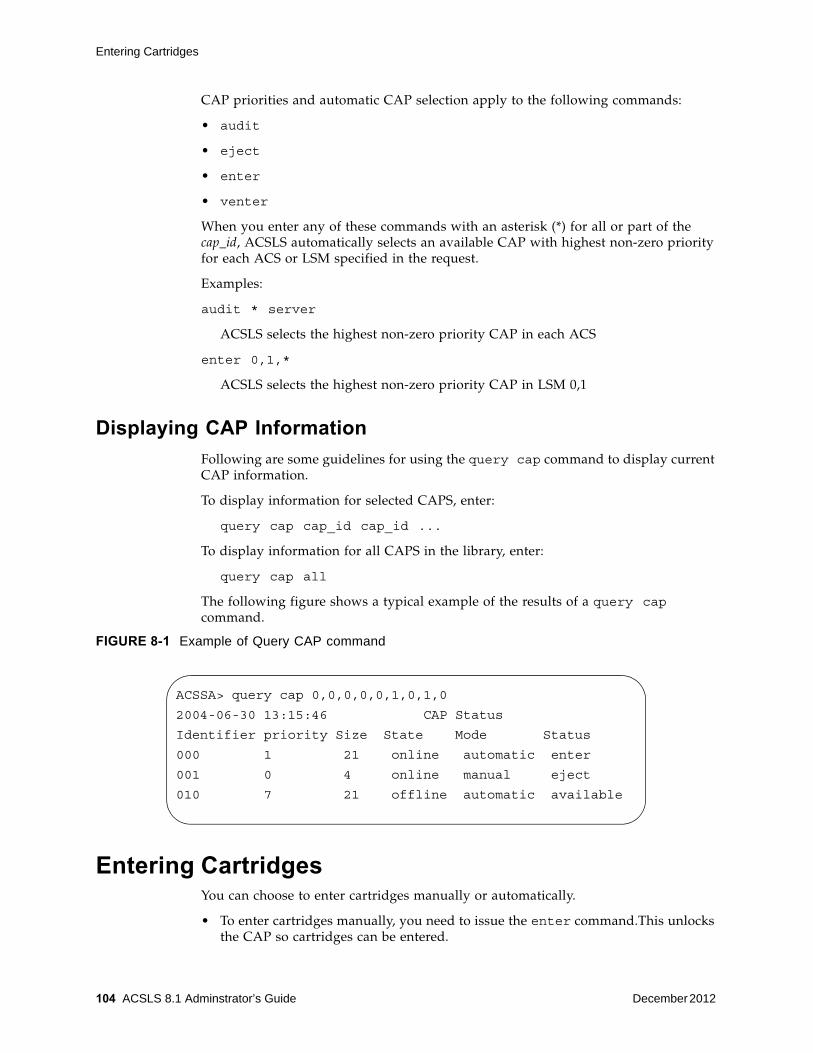
Entering Cartridges
104 ACSLS 8.1 Adminstrator’s Guide December 2012
CAP priorities and automatic CAP selection apply to the following commands:
• audit
• eject
• enter
• venter
When you enter any of these commands with an asterisk (*) for all or part of the cap_id, ACSLS automatically selects an available CAP with highest non-zero priority for each ACS or LSM specified in the request.
Examples:
audit * server
ACSLS selects the highest non-zero priority CAP in each ACS
enter 0,1,*
ACSLS selects the highest non-zero priority CAP in LSM 0,1
Displaying CAP Information
Following are some guidelines for using the query cap command to display current CAP information.
To display information for selected CAPS, enter:
query cap cap_id cap_id ...
To display information for all CAPS in the library, enter:
query cap all
The following figure shows a typical example of the results of a query cap command.
Entering CartridgesYou can choose to enter cartridges manually or automatically.
• To enter cartridges manually, you need to issue the enter command.This unlocks the CAP so cartridges can be entered.
FIGURE 8-1 Example of Query CAP command
ACSSA> query cap 0,0,0,0,0,1,0,1,0
2004-06-30 13:15:46 CAP Status
Identifier priority Size State Mode Status
000 1 21 online automatic enter
001 0 4 online manual eject
010 7 21 offline automatic available

Entering Cartridges
December 2012 Cartridge Management 105
• An automatic enter is initiated by opening a CAP that is in automatic mode. When a CAP is in automatic mode, you need not issue an enter command.
The following steps describes the enter process:
1. Once you start the enter, the CAP is unlocked and reserved. It cannot be used by another host.
2. After you open the CAP, place the cartridges into the CAP, and close the CAP, the CAP is locked.
The ACSLS library robot inspects/audits the cartridges in the CAP. All cartridges being entered must have valid external labels that do not duplicate other vol_ids already managed by this ACSLS server.
Note – Virtual enter allows you to enter unlabeled cartridges into some libraries.
3. ACSLS allocates home cells in the library to valid cartridges and moves them to their assigned home cell locations.
Duplicate cartridges and cartridges without external labels are left in the CAP and must be removed.
4. Upon completion, the CAP is unlocked so more cartridges can be entered.
• If the CAP is in automatic mode, the automatic enter is complete and the CAP is unreserved and available.
• If this is a manual enter, the CAP is still reserved for the manual enter. To terminate the manual enter, cancel it with either the cancel command or with <CTRL>+C at the cmd_proc where the enter was started.
For additional information on the enter command, refer to “enter” on page 227.
Note – If cartridge tracing is enabled, the event log records all cartridge enters.
Terminating an Enter Request
Use these procedures to terminate or cancel a current or pending manual enter or virtual enter.
TABLE 8-5 Cartridge Enter Commands
Task Command
Entering Cartridges in Automatic Mode set cap mode automatic cap_id
Entering Cartridges in Manual Mode enter cap_id
Entering Cartridges with Virtual Labels (venter) venter cap_id vol_id vol_id
Do not open the LSM door and place cartridges with missing or unreadable labels in a storage cell because ACSLS cannot manage these cartridges. During an audit, ACSLS will eject cartridges with missing or unreadable labels that were placed in storage cells.
Ejecting Cartridges
106 ACSLS 8.1 Adminstrator’s Guide December 2012
Note – You cannot cancel an automatic enter operation that is in progress using the cancel command. To terminate an automatic enter in progress: - If the CAP door is open, remove all the cartridges and close the door - If the CAP door is closed and the cartridges are being moved into the library, you must allow the remaining cartridges to be entered into the library. The enter then terminates.
To cancel a manual enter
1. Display all current and pending library activity:
query request all
2. Note the request_id of the enter/venter request you want to cancel.
3. From the cmd_proc, enter:
cancel request_id
where request_id is the identifier of the request you want to cancel.
4. Wait for the CAP to unlock, open the CAP, and remove all cartridges.
The cmd_proc will display a message indicating the number of cartridges entered into the library before the cancel request was received. These cartridges will remain under ACSLS control.
See also:
• “query request” on page 266
• “cancel” on page 211
Ejecting CartridgesTo eject cartridges from the library you need to issue the eject command.
The following steps describes the eject process:
1. Once you start the eject, the CAP is locked. It cannot be used by another host.
2. The robot places the specified cartridge(s) in the designated CAP, then ACSLS makes the cell locations where the cartridges were stored available for other cartridges.
3. Open the CAP, remove all cartridges from the CAP, and close the CAP. ACSLS then inspects the CAP to ensure it is empty. The CAP is now available for another operation, such as enter or audit.
Note – If you specify more than a CAP full of cartridges on the eject command, empty the CAP when it fills, close the CAP, and ACSLS continues the eject process until all cartridges are ejected.
For additional information on the eject command, refer to “eject” on page 223.
Note – If cartridge tracing is enabled, the event log records all cartridge ejections.

Recovering CAPs
December 2012 Cartridge Management 107
Recovering CAPs
General CAP Recovery Procedures
If Possible, Complete Enters and Ejects, Instead of Forcing CAP Recovery
If you can, let an enter or eject complete, instead of trying to cancel it and recover the CAP. This results in less complications and less risk of a hung CAP.
• Let the entry of a CAP-full of cartridges complete, and then terminate a manual enter by cancelling it. (A CAP in automatic mode only enters a single CAP-full of cartridges at a time.)
• If possible let the ejection of all the cartridges specified in the eject command complete. Otherwise, try to let ACSLS eject a full CAP of cartridges before trying to cancel the eject.
Recover a Hung CAP by Varying it with Offline Force Then Online
You must vary a CAP offline with force to recover it. Varying a CAP offline force and then back online both recovers the CAP and usually terminates a hung enter or eject that is using the CAP.
1. Vary the CAP offline with force.
vary cap cap_id offline force
Only the current robotic request completes, then the CAP goes offline immediately. Pending requests are discarded and new requests are rejected.
A hung manual enter or eject is usually cancelled.
2. Cancel the enter or eject request if it is still active.
To see if the enter or eject request is still active:
query request all
If the enter or eject is still active, cancel it:
cancel request_id
3. Vary the CAP back online.
vary cap cap_id online
This should recover the CAP and make it available for other requests.
Recovering a CAP After Opening the Access Door
ACSLS now unlocks a CAP in automatic enter mode after an SL8500 or SL3000 access door is opened and closed, or the SL8500 or SL3000 re-initializes.
After an SL8500 or SL3000 re-initializes, if the CAP is locked and you need to recover it, follow the appropriate procedure below to recover the CAP.

Recovering CAPs
108 ACSLS 8.1 Adminstrator’s Guide December 2012
CAP used for automatic enter will not unlock
To recover a CAP that will not unlock for an automatic enter, you must synchronize the state of the CAP between both ACSLS and the library: To do this:
1. Set the CAP mode to manual to terminate automatic enter mode.
set cap mode manual cap_id
2. Set the CAP back to automatic mode.
set cap mode automatic cap_id
CAP used for manual enter will not unlock
To recover a CAP that will not unlock for an manual enter, you must synchronize the state of the CAP between both ACSLS and the library. To do this:
1. Vary the CAP offline with force.
vary cap cap_id offline force
2. Vary the CAP back online.
vary cap cap_id online
3. Restart your manual enter.
enter cap_id
CAP used for ejects will not unlock
To recover a CAP where you were doing an eject, you must remove any cartridges left in the locked CAP and synchronize the state of the CAP between both ACSLS and the library. To do this:
1. Remove any cartridges in the CAP. To do this:
a. Vary the CAP offline with force.:
vary cap cap_id offline force
b. Vary the CAP back online.
vary cap cap_id online
2. Select one of the following:
If the CAP is in auto mode:
a. Set the CAP mode to manual to terminate the automatic enter mode.
set cap mode manual cap_id
b. Set the CAP to automatic mode. This unlocks the CAP.
set cap mode automatic cap_id
c. Open the CAP and remove any cartridges left in the CAP.
If the CAP is not in auto mode:
a. Start a manual enter.
Recovering CAPs
December 2012 Cartridge Management 109
enter cap_id
b. Remove any cartridges left in the CAP.
c. Cancel the enter.
Use either [Control + C] at the cmd_proc that is waiting for the enter, or cancel the enter request ID.
3. Restart your eject.
enter cap_id vol_id | volrange…
Recovery Procedures to Unlock a CAP in an L1400, L700, L700e, or L180 Library
If a CAP that is used for an enter or eject in an L1400, L700, L700e, or L180 library does not unlock, you can IPL the library to recover the CAP. Follow the appropriate procedure below to recover the CAP.
CAP used for a manual enter will not unlock
To recover a CAP that will not unlock for a manual enter:
1. Cancel the enter.
Use either [Control + C] at the cmd_proc that is waiting for the enter, or cancel the enter request ID.
2. Re-IPL the library by pressing the RESET button on the operator panel.
3. Start another enter after the library finishes initialization.
CAP used for an automatic enter will not unlock
To recover a CAP that will not unlock for an automatic enter:
1. Set the CAP mode back to manual to terminate automatic enter mode.
set cap mode manual cap_id
2. Re-IPL the library by pressing the RESET button on the operator panel.
3. Set the CAP back to automatic mode after the library finishes initialization.
set cap mode automatic cap_id
Cannot empty CAP used for an eject because it will not unlock
To recover a CAP that will not unlock for an eject (after the CAP is full or all volumes have been ejected):
1. Open the access door to the library, remove all cartridges from the CAP, and close the access door.
2. Re-IPL the library by pressing the RESET button on the operator panel.
Note – A Re-IPL of the library causes ACSLS to terminate the eject with a “library failure”.
Automatically Applying Policies to New and Reactivated Cartridges
110 ACSLS 8.1 Adminstrator’s Guide December 2012
3. Optionally, audit the library.
After the library finishes initialization, running an audit is a good idea, but it is not required.
4. Start another eject if all the cartridges were not ejected.
Automatically Applying Policies to New and Reactivated Cartridges
The watch_vols utility can automatically assign attributes to cartridges added to the database or reactivated by audit, as well as when they are entered or re-entered. This utility automatically:
• assigns cartridges to a pool.
• assigns volume ownership based on vol_id ranges or specific volumes listed in a vol_attr.dat policy table.
• moves new and reactivated cartridges to a specific LSM.
For more information, see “watch_vols” on page 198.
Cleaning CartridgesACSLS controls automatic cleaning for HLI-attached libraries (SL8500, L5500, 9300, 9740, and 4400 serial or TCP/IP attached libraries), but not for SCSI-attached libraries.
Tape drives must be cleaned periodically to prevent damage to them and the tape media. Drive control units track how much tape passes through each drive then send a message to ACSLS when a drive requires cleaning.
Automatic Cleaning
If auto-cleaning is enabled, ACSLS automatically mounts a cleaning cartridge on the drive when required. Automatic cleaning is enabled when the AUTO_CLEAN dynamic variable is set to TRUE (default).
For more information on cleaning cartridges, refer to:
• “Defining Cleaning Cartridges” on page 110
• “Ejecting Used Cleaning Cartridges” on page 111
• “Manually Cleaning a Drive” on page 112
• “Cleaning Cartridges on SCSI-Attached LSMs” on page 112
• “Correcting Cleaning Cartridge Problems” on page 113
Defining Cleaning Cartridges
You must use the set clean command to define a cleaning cartridge because ACSLS does not define cleaning cartridges by vol_id.
When you define cleaning cartridges, make sure to:

Cleaning Cartridges
December 2012 Cartridge Management 111
• Use cleaning cartridges whose media types are compatible with each drive type in your library. ACSLS will automatically select the correct type of cartridge for each cleaning operation.
• Define at least one cleaning cartridge for each drive in your library.
To define cleaning cartridges to ACSLS:
1. Make the CAP ready for entry.
See “Entering Cartridges” on page 104 for more information.
2. Enter the cleaning cartridges.
The cmd_proc displays messages with the cartridge IDs of the cartridges you enter.
3. To set the cleaning cartridge attribute:
set clean max_usage vol_id | volrange
Where:
max_usage is the number of times a cleaning cartridge is used before ACSLS stops selecting the cartridge to clean cartridges.
vol_id | volrange specifies the cleaning cartridge or range of cartridges that you entered in Step 2.
See also:
• “enter” on page 227
• “set clean” on page 275
• “query clean” on page 248
• “volrpt” on page 193
Ejecting Used Cleaning Cartridges
ACSLS logs a message to the event log when a cleaning cartridge has reached the maximum use specified on the set clean command. ACSLS leaves the cartridge in the library, but will no longer select it for cleaning. Eject the used cleaning cartridge and enter a replacement.
To eject used cleaning cartridges:
1. To eject the cleaning cartridges, enter:
eject cap_id vol_id | volrange
Where:
cap_id specifies the CAP used to eject the cleaning cartridges.
vol_id | volrange specifies the IDs of the cleaning cartridges to eject.
2. Remove the cleaning cartridges.
See also:
• “query clean” on page 248

Cleaning Cartridges
112 ACSLS 8.1 Adminstrator’s Guide December 2012
• “eject” on page 223
• “volrpt” on page 193
Manually Cleaning a Drive
Use this procedure to clean a drive when auto-clean is disabled or is not working.
To manually clean a drive:
1. Determine which cleaning cartridge types are compatible with the drive to be cleaned.
Refer to the Product Information Guide and look in the Drive and Media Compatibility table for a list of the cleaning cartridges for each drive type.
2. Display the available cleaning cartridges:
query clean all
To display all compatible cleaning cartridges in the same ACS as the drive, use the display command.
display volume * -home acs,*,*,*,* -media media_type
To display the cartridge’s maximum cleaning usage and current usage:
display volume * -home acs,*,*,*,* -media media_type -field vol_id acs lsm media max_use access_count
3. Select a compatible cleaning cartridge from those listed and mount it on the drive:
mount vol_id drive_id
4. After the drive is cleaned and the cleaning cartridge is unloaded, dismount the cleaning cartridge:
dismount vol_id drive_id
See also:
• “set clean” on page 275
• “display volume” on page 318
• “mount” on page 235
• “dismount” on page 220
Cleaning Cartridges on SCSI-Attached LSMs
You cannot use the acsss_config configuration program to enable auto-cleaning for drives attached to SCSI-attached LSMs. Using ACSLS, you can only clean these drives by manually mounting a cleaning cartridge. The LSM hardware, however, lets you enable auto-cleaning via the LSM control panel. For more information, see your LSM documentation. For 9714, 9730, or 9738 LSMs, if you either enable or disable auto-cleaning via the control panel, for the change to take effect you must do the following:
Rerun acsss_config without changing any options but ensuring that you enter Y to the Build/verify library configuration? prompt.

Cleaning Cartridges
December 2012 Cartridge Management 113
Correcting Cleaning Cartridge Problems
The following procedures tell how to:
• Change a cleaning cartridge's maximum use count. For example, if the manufacturer recommends that you use a cartridge only 10 times and you set max_usage to 20, reset max_usage to 10 if the cartridge is unused. If the cartridge was used five times, reset max_usage to 5.
• Set a cartridge's cleaning cartridge attribute off. For example, if you incorrectly defined a data cartridge as a cleaning cartridge, set the cartridge's cleaning cartridge attribute off to redefine the cartridge as a data cartridge.
To change a cleaning cartridge's maximum use count:
set clean max_usage vol_id | volrange
Where:
max_usage is the new maximum use.
vol_id | volrange specifies the cleaning cartridge or range of cartridges.
To turn off a cartridge's cleaning cartridge attribute:
set clean off vol_id | volrange
Where vol_id | volrange specifies the cartridge or range of cartridges.
What To Do When Drives are not Being Cleaned
The following are some troubleshooting tips to try when drives are not being cleaned.
• Verify Auto-Cleaning is Enabled
If auto-cleaning is disabled, ACSLS logs a message in the event log and displays cleaning messages at the cmd_proc when the drive requires cleaning. You then must manually mount a cleaning cartridge.
Use the acsss_config configuration program to enable or disable auto-cleaning. In addition, with acsss_config you can specify how cleaning cartridges are ordered for selections and queries.
Automatic cleaning is enabled when the AUTO_CLEAN dynamic variable is set to TRUE (on) by default. To view the setting, enter:
dv_config -e AUTO_CLEAN
Note – You cannot enable auto-cleaning on SCSI-attached libraries.
• Verify there are Cleaning Cartridges for the Drives
If all cleaning cartridges are expired (the max_usage value is exceeded), ACSLS honors the original mount request without cleaning the drive. For that mount and for each subsequent mount to the uncleaned drive, ACSLS posts message 376N to the event log. Add more cleaning cartridges of compatible media with the drive type as described in “Defining Cleaning Cartridges” on page 110.
If drives are not being cleaned, make sure that there are cleaning cartridges for the drives in the library and that they still have usage left.

Managing Scratch Cartridges
114 ACSLS 8.1 Adminstrator’s Guide December 2012
From cmd_proc, you can use the display command to see:
• All of your cleaning cartridges and their usage:
display volume * -clean -f media access_count max_use
• All of the volumes of a specific media type.
For example, to display all LTO cleaning cartridges:
display volume * -media LTO-CLNU -f access_count max_use
• Verify Auto-Cleaning is Disabled for an SL8500 or SL3000 library
If you ever have an issue where automatic cleaning for an SL8500 or SL3000 is NOT working, check to make sure Automatic Cleaning is NOT enabled for the library using the SL Console.
When automatic cleaning is enabled using ACSLS, it automatically mounts a cleaning cartridge before the next mount when it receives a "drive needs cleaning" message from the library after a dismount.
If automatic cleaning is enabled at the library level using the SL Console, the library is the one doing the automated cleaning. When the library does this, it does NOT send a drive needs cleaning message to ACSLS. Thus, ACSLS never knows that the drive needs to be cleaned. The library then tries to mount a cleaning cartridge from one of its system cells to clean the drive before sending ACSLS the dismount response.
As a result, there can be a mix-up where the library is trying to do automated cleaning, but has no cleaning cartridges in the system cells. ACSLS can be managing cleaning cartridges in normal cells, but ACSLS is not getting the drive needs cleaning message. The result is that the drive is not cleaned.
The solution:
If ACSLS automated cleaning is enabled, but drives are not being cleaned, check if the library also has auto cleaning enabled. If auto cleaning is enabled at the library, disable it using the SL Console.
To do this, use the SL Console or the library operator panel.
a. Select the System Detail tab.
b. Select Library.
c. Select the Auto Clean tab.
d. Select the Configure tab.
e. Check if Auto Cleaning is enabled for this partition (or "Partition 1 or None").
f. Disable automated cleaning if it is enabled.
Managing Scratch CartridgesScratch cartridges either contain no data or data that can be overwritten. A user or application mounts a scratch cartridge to write new data on that cartridge.
You must ensure that the library has enough available scratch cartridges to satisfy scratch mount requests. For more information see:

Managing Scratch Cartridges
December 2012 Cartridge Management 115
• “Adding Scratch Cartridges to the Library” on page 115
• “Rebalancing Scratch Pools” on page 116
The following sections provide additional information about managing scratch cartridges and scratch pools:
• “Displaying Scratch Pool and Scratch Cartridge Information” on page 115
• “Deleting Scratch Pools” on page 116
• “Mounting Scratch Cartridges” on page 117
• “Unscratching Cartridges” on page 118
Displaying Scratch Pool and Scratch Cartridge Information
To display scratch pool information, use the following ACSLS functions:
query pool
Displays scratch pool attributes, see “query pool” on page 263.
query scratch
Displays scratch cartridge information, see “query scratch” on page 267.
query mount *
Displays the status of media-compatible cartridges for a specified scratch pool (and, optionally, for a specific cartridge media type within the pool), see “query mount *” on page 261.
customized cartridge report
Can be created to report selected scratch cartridge information, see “Creating a Custom Volume Report” on page 143.
Adding Scratch Cartridges to the Library
Use this procedure to add scratch cartridges to the library.
To add scratch cartridges to the library:
1. If necessary, create a new scratch pool:
For more information, see the “define pool” on page 216
2. Enter scratch cartridges into the library.
For more information, see “Entering Cartridges” on page 104.
3. Define the cartridges you entered in Step 2 as scratch cartridges and assign them to a scratch pool.
For more information, see “set scratch” on page 279

Managing Scratch Cartridges
116 ACSLS 8.1 Adminstrator’s Guide December 2012
Rebalancing Scratch Pools
Use this procedure to rebalance scratch pools by moving scratch cartridges from one pool to another.
To rebalance scratch pools:
1. To display the attributes of all scratch pools, enter:
query pool all
For more information see “query pool” on page 263
2. Use the query scratch command to display the IDs of scratch cartridges in pools you want to rebalance.
For more information, see “query scratch” on page 267
3. Use the set scratch command to move scratch cartridges from one pool to another.
For example, to move cartridges YUMA20 through YUMA80 (which currently reside in pool 5) to pool 10, enter:
set scratch 10 YUMA20-YUMA80
For more information, see “set scratch” on page 279.
Deleting Scratch Pools
To manage scratch pools, you may want to delete any scratch pools that no longer contain scratch cartridges. You cannot delete the common pool (Pool 0). Note that you can delete only empty scratch pools; you cannot delete a scratch pool if it contains either data or scratch cartridges. You can, however, use “Deleting All Empty Pools” on page 117 to delete all empty pools (ACSLS will not delete any pools that contain scratch or data cartridges).
Emptying a Scratch Pool
Use this procedure to empty a scratch pool before deleting it.
To empty a scratch pool:
1. To move data cartridges out of the pool, enter:
set scratch off 0 vol_id volrange ...
Where the vol_id or volrange specifies the data cartridges you want to move to the common pool (pool 0). For more information, see “set scratch” on page 279.
2. To move scratch cartridges out of the pool, do one of the following:
• Move the cartridges to another pool.
• See “Ejecting Cartridges” on page 106. If you eject scratch cartridges, however, ACSLS no longer manages these cartridges. If you later want to use these cartridges, you must reenter them and assign them to a scratch pool.
Deleting a Single Pool
To delete a single pool:

Managing Scratch Cartridges
December 2012 Cartridge Management 117
delete pool pool_id
Deleting All Empty Pools
The delete pool all command deletes only empty scratch pools, not pools that contain scratch or data cartridges.
To delete all empty pools:
delete pool all
Mounting Scratch Cartridges
Use the following procedures to mount scratch cartridges in single-media and mixed-media environments.
Single-Media Environments
To mount a cartridge from a specified pool:
mount * drive_id pool_id
If no cartridge is available from the specified pool and the pool has been set for “overflow,” ACSLS will select a cartridge from the common pool (pool 0).
To mount a cartridge from the common pool:
mount * drive_id
Mixed-Media Environments
To mount a scratch cartridge with a specified media type from a specified pool:
mount * drive_id pool_id media media_type
If no cartridge is available from the specified pool and the pool has been set for overflow ACSLS will select a cartridge with the specified media type from the common pool (pool 0).
To mount a scratch cartridge from a specified pool with a media type determined by scratch preferences:
mount * drive_id pool_id media *
If no cartridge is available from the specified pool and the pool has been set for overflow ACSLS will select a cartridge from the common pool (pool 0) according to the defined scratch preferences.
To mount a cartridge from the common pool with a specified media type:
mount * drive_id media media_type
To mount a cartridge from the common pool with a media type determined by scratch preferences:
mount * drive_id media *
See also:
• “mount *” on page 238

Using Absent and Ejected Cartridge Support
118 ACSLS 8.1 Adminstrator’s Guide December 2012
• “query commands” on page 244
• “Setting Scratch Preferences” on page 87
Unscratching Cartridges
Use this procedure to “unscratch” cartridges (return them to data cartridge status) that were scratched in error.
To unscratch cartridges:
1. Use the query pool and query scratch commands to display the cartridge and pool IDs of the cartridges to unscratch.
For more information see“query pool” on page 263 and “query scratch” on page 267.
2. To unscratch the selected cartridges, enter:
set scratch off 0 vol_id volrange ...
Where the vol_id or volrange specifies the cartridges you want to change from scratch mode and move them to the common pool (pool 0). For more information, see “set scratch” on page 279.
Using Absent and Ejected Cartridge SupportAbsent cartridge support in ACSLS marks cartridges that cannot be found in the library as absent, instead of deleting them. If these cartridges are later found in the library, ACSLS changes them to active status instead of re-adding them to the database. Reactivation preserves the access count and settings, such as pool, volume access control ownership, and locks.
Similarly, ejected cartridge support retains cartridge information when cartridges are ejected. The cartridges are reactivated when they are re-entered.
Absent and ejected volume support is enabled when the ABSENT_VOLUME_RETENTION_PERIOD is set to a non-zero number of days. The default value is 5 days.
Additional aspects of absent and ejected cartridge support include:
• The Manual Volume Delete (del_vol) utility will retain volumes as absent unless the -d option is specified. If this option is specified, the volume is deleted without waiting for the expiration of an absent or ejected status.
• ACSLS queries SL3000 and SL8500 libraries for the location of lost cartridges.
• ACSLS improves volume recovery by searching for volumes that are not found in their expected locations in the library. ACSLS searches all recorded locations instead of automatically deleting the volume.
• Clients can specify, through the ENABLE_STATUS_VOLUME_ABSENT and ENABLE_STATUS_VOLUME_MISSING configuration settings, whether they want absent, ejected, and missing statuses to be reported through the ACSAPI.
• The volrpt utility with the -i option will report volume records with a status of absent or ejected. By default, volrpt does not report absent or ejected volumes.

Absent, Ejected and Missing Cartridges
December 2012 Cartridge Management 119
Absent, Ejected and Missing CartridgesACSLS reports three cartridge (volume) statuses:
• missing
The cartridge cannot be located in the library, and at least one recorded location for the cartridge cannot be searched because the LSM is offline or a drive is not communicating. The information about the cartridge has been retained.
• absent
The cartridge cannot be located in the library. All recorded locations for the cartridge have been searched, and the cartridge is not in any of them. The information about the cartridge is retained. If the cartridge is found or re-entered into the library (before the retention period expires), it is reactivated.
• ejected
The cartridge was ejected. The information about the cartridge is retained, and if the cartridge is found or re-entered (before the retention period expires), it is reactivated.
Cartridge (Volume) Status Reporting
ACSLS reports cartridges (volumes) with the status “missing”, “absent,” or “ejected,” differently in response to ACSLS commands than it does in response to ACSAPI requests.
The information displayed in response to ACSLS commands identifies a cartridge as “missing”, “absent”, or “ejected.”
However, the cartridge status information ACSLS displays in response to ACSAPI requests is governed by the following ACSLS dynamic variables:
1. missing
• If the ACSLS dynamic variable ENABLE_STATUS_VOLUME_MISSING is TRUE, ACSLS reports: STATUS_VOLUME_MISSING.
• If the ACSLS dynamic variable ENABLE_STATUS_VOLUME_MISSING is FALSE, ACSLS reports: STATUS_VOLUME_IN_TRANSIT.
2. absent
• If the ACSLS dynamic variable ENABLE_STATUS_VOLUME_ABSENT is TRUE, ACSLS reports: STATUS_VOLUME_ABSENT
• If the ACSLS dynamic variable ENABLE_STATUS_VOLUME_ABSENT is FALSE, ACSLS treats the volume as if it had been deleted from the ACSLS database and reports: STATUS_VOLUME_NOT_IN_LIBRARY.
3. ejected
• If the ACSLS dynamic variable ENABLE_STATUS_VOLUME_EJECTED is TRUE, ACSLS reports: STATUS_VOLUME_EJECTED
• If the ACSLS dynamic variable ENABLE_STATUS_VOLUME_EJECTED is FALSE, ACSLS treats the volume as if it had been deleted from the ACSLS database and reports: STATUS_VOLUME_NOT_IN_LIBRARY.

Cartridge Recovery
120 ACSLS 8.1 Adminstrator’s Guide December 2012
ABSENT_VOLUME_RETENTION_PERIOD Dynamic Variable
The ABSENT_VOLUME_RETENTION_PERIOD dynamic variable controls how long absent and ejected volumes are retained in the ACSLS database and specifies the number of days these volumes are retained. There are two special values:
• The value 0 (zero) days specifies that volumes are deleted and will not be marked absent or ejected. (This is the behavior of ACSLS releases previous to ACSLS 6.1.)
• The value 999 days specifies that absent and ejected volumes are retained forever in the database.
Cartridge RecoveryCartridge Recovery (acscr) is an ACSLS internal process that is called to resolve discrepancies whenever the actual content of a storage cell or tape drive does not match the information saved in the ACSLS database. It does this by:
• Having the library examine the volume’s home cell and, possibly, the drive, and then updating the ACSLS database with the results.
• With the SL3000 and SL8500 libraries, ACSLS recovers a cartridge by asking the library where a cartridge is located, and then using the library’s reply to update the ACSLS database.
If Cartridge Recovery finds a discrepancy, such as a cartridge that is recorded at another location, it creates another recovery request and adds it to its request queue. (This is called a “cascade”.)
Other processes pass recovery requests to Cartridge Recovery when they encounter a discrepancy between the ACSLS database and the actual contents of the library. Because of this, Cartridge Recovery is the central location where cartridges are marked as missing, changed to absent, and reactivated. Thus, what appears to be the behavior of many other ACSLS commands and utilities is actually done by Cartridge Recovery when it updates the database to match the information reported by the library.
When other processes pass recovery requests to Cartridge Recovery, you can:
1. continue and let Cartridge Recovery continue asynchronously (Cartridge Recovery proceeds independently), or
2. if you need a specific cartridge that is lost, wait for Cartridge Recovery to finish processing this recovery request and report what it found.
Missing CartridgesA cartridge is marked missing when:
• Cartridge Recovery cannot find a cartridge in the library, and
• it cannot examine all recorded locations for a cartridge (home cell and drive, if the cartridge has a recorded drive location).
For example, when Cartridge Recovery cannot examine the home cell in an offline LSM or an offline drive, and when it doesn't find the cartridge in other locations, it marks the cartridge missing.
Absent and Ejected Cartridges
December 2012 Cartridge Management 121
Cartridge Recovery preserves the cartridge's home location unless it examines the cartridge's home cell and finds another cartridge there. In this situation it marks the cartridge “homeless,” with a minus one (-1) in the home_lsm field.
When Cartridge Recovery finds a cartridge that was missing, it changes that cartridge's status to “home” or “in drive” in the database, depending where it found the missing cartridge.
1. If the cartridge is found in a cell other than its recorded home cell, Cartridge Recovery checks the cartridge's home cell to see whether it has found a duplicate cartridge.
2. If the cartridge is not in its recorded home cell, Cartridge Recovery records the cell in which it was found as its new home cell.
3. If the new cartridge is a duplicate, Cartridge Recovery reports this on the Event Log. The duplicate cartridge is not ejected.
4. If Cartridge Recovery finds a “homeless” cartridge in a drive, it does not assign a new home cell. When the cartridge is dismounted, the dismount process assigns a new home cell.
Absent and Ejected Cartridges
Cartridges Not Found
When Cartridge Recovery can examine all recorded locations and it cannot find a cartridge:
1. If the ABSENT_CARTRIDGE_RETENTION_PERIOD is 0, Cartridge Recovery
• deletes the cartridge record from the database.
• marks the cell record in the database for the cell that was the cartridge's home cell as “empty.”
2. If the ABSENT_CARTRIDGE_RETENTION_PERIOD is greater than 0, Cartridge Recovery
• changes the status of the cartridge record in the database to “absent” if the cartridge has not already been marked absent or ejected.
• records the cartridge as “homeless” (with a minus one (-1) in the home_lsm field).
• marks the cell record in the database of the cartridge's former home cell as “empty.”
Cartridges Found
If Cartridge Recovery finds an ejected or absent cartridge, it reactivates the cartridge.
If the ejected or absent cartridge is found in a storage cell, this becomes its new home cell, and Cartridge Recovery changes the cartridge's status to “home” in the database.
If the cartridge is found in a drive, ACSLS assigns a new home cell when the cartridge is dismounted.

Using the Manual Volume Delete Utility
122 ACSLS 8.1 Adminstrator’s Guide December 2012
Using the Manual Volume Delete UtilityThe Manual Volume Delete utility, del_vol, allows you to access a volume that is in an offline, unavailable LSM. If you manually remove the cartridge from the LSM and try to re-enter it into another LSM, ACSLS will issue a duplicate volume message and will not enter the cartridge. Using the del_vol utility, you can first delete the volume from the database, then manually remove it from the offline LSM and successfully re-enter it into an online LSM.
The del_vol utility now retains volumes as absent, with the option to delete the volume. The volume can be deleted without waiting for the expiration of an absent or ejected status.
Notes:
• To remove a cartridge from an online LSM, issue an eject command for the cartridge. If the cartridge is not actually in the LSM, you can run del_vol with the -f (force option).
• ACSLS and the database must be up and running to use this utility. Do not run del_vol while the system is in recovery; unpredictable results may occur.
For more information about this utility, see “del_vol” on page 167.
To delete a cartridge using the del_vol utility:
1. Log in as acsss.
2. Delete the cartridge:
del_vol vol_id
For more information see about switch options you can use with del_vol, see “del_vol” on page 167.
Identifying Expired CartridgesWhen tape cartridges exceed their design life, the media can wear thin, and mechanical parts, like the cartridge’s gate, can wear out. When cartridges reach the end of their engineered life, you should consider migrating the data on them to new cartridges and retiring the old cartridges. This avoids the slight risk of either mechanical cartridge components failing or the data being unreadable.
A cartridge’s chronological age and its usage are different. Some 9840 cartridges have been in use for a decade, but they have different usage patterns. Some have been used daily while others are used for deep archive and are rarely accessed. Identifying the cartridges that are past their design life is critical.
To identify the cartridges that need to be retired, you need to determine their usage. A cartridge’s usage is recorded in the cartridge’s directory, and before a cartridge is dismounted, the drive updates the directory.
For cartridges in libraries controlled by ACSLS:
• For some of the libraries that ACSLS manages, cartridge usage is displayed as a percentage of “warranty life” and “end-of-life”.
• For prior ACSLS releases and libraries, the ACSLS access_count can be displayed with the display command and the volrpt utility.

Identifying Expired Cartridges
December 2012 Cartridge Management 123
Cartridge End-of-Life Percentages
With modern libraries running the latest firmware and StorageTek drives running the latest firmware, the tape drive reports the cartridge’s “end-of-warranty-life” and “end-of-life percentages” to the library when the cartridge is dismounted. Then, the library reports this to ACSLS. ACSLS saves this information in its database, and you can see it by running the ACSLS display volume command. Refer to “display volume” on page 318.
Example: To display all T9840 cartridges, with ACS, LSM, media, and end_of_life information, sorted by end_of_life:
display volume * -media STK1R -f acs lsm media end_of_life warranty_life -s end_of_life
Specifically this information is reported to ACSLS for these libraries and drives:
Libraries:
• SL3000
• SL8500 (with the 4.10 firmware)
Tape Drives:
• All T10000 tape drives - with 1.38 firmware
• T9840A, T9840C, and T9840D (All T9840 tape drives except the T9840B.) – with 1.42 firmware
• T9940A and T9940B tape drives – with 1.42 firmware
Access Counts
In many cases, cartridge end-of-life reporting is not available. In these cases, the ACSLS access_count is the best information available. The ACSLS database records the number of times that volumes have been selected or accessed. This can be used to estimate the number of times that they have been mounted, as long as the cartridge has stayed in a group of connected libraries (within an ACS).
This information is collected regardless of library type, so it is maintained for 9310s, 4410s, and 9360s, as well as SL8500s and SL3000s. ACSLS has saved this information for decades, so even if you are still on down-level releases, you still have this information. However, this data has limits. The biggest one is that when a cartridge is entered into a library, the count is set to zero (0).
Information is retained about volumes for the retention period you have set, so counts are preserved when a cartridge is ejected from an ACS and re-entered into the same or different ACS within the retention period. The default retention period is five days. However, if a volume is ejected from a library and remains offsite for longer than the retention period for volume information, the information about the volume is deleted from the ACSLS database.
For cartridges that have remained in a single library these ACSLS access counts are very useful. For a T9840 cartridge, if the ACSLS access_count is over 11,000, the cartridge in question is near the end of it’s life, if not already over it’s end of life. T10000 cartridges have an end-of-life value of 16,000 mounts.
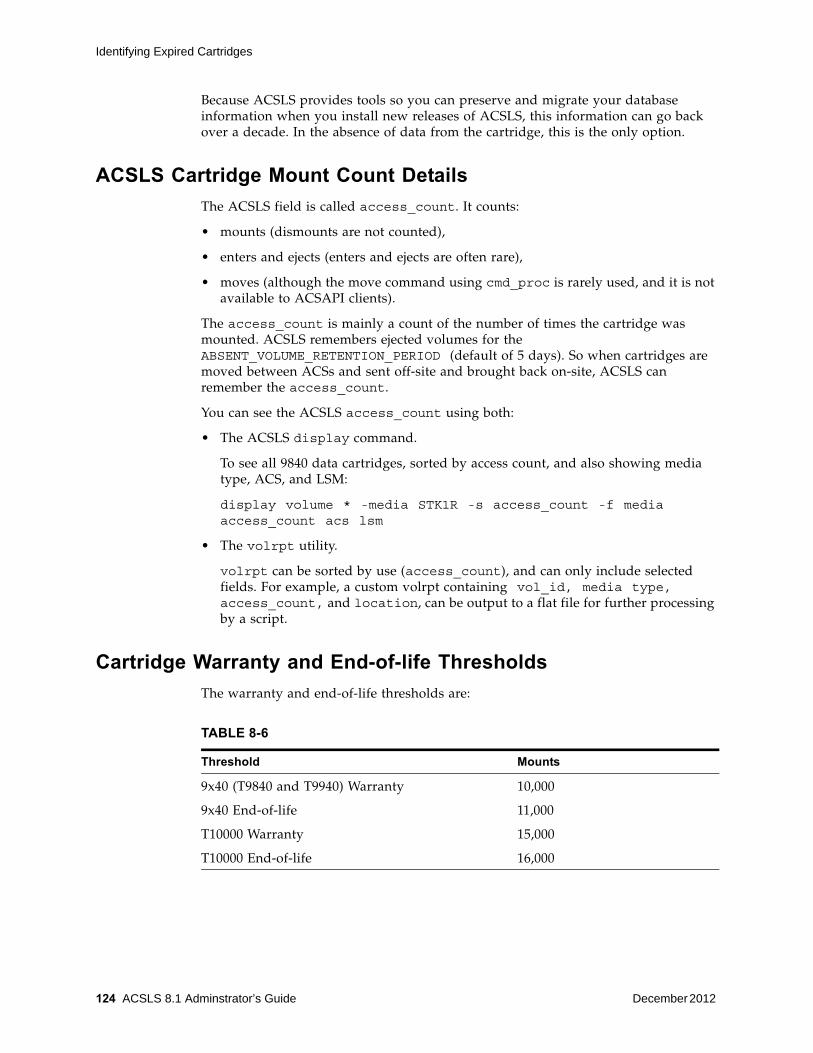
Identifying Expired Cartridges
124 ACSLS 8.1 Adminstrator’s Guide December 2012
Because ACSLS provides tools so you can preserve and migrate your database information when you install new releases of ACSLS, this information can go back over a decade. In the absence of data from the cartridge, this is the only option.
ACSLS Cartridge Mount Count Details
The ACSLS field is called access_count. It counts:
• mounts (dismounts are not counted),
• enters and ejects (enters and ejects are often rare),
• moves (although the move command using cmd_proc is rarely used, and it is not available to ACSAPI clients).
The access_count is mainly a count of the number of times the cartridge was mounted. ACSLS remembers ejected volumes for the ABSENT_VOLUME_RETENTION_PERIOD (default of 5 days). So when cartridges are moved between ACSs and sent off-site and brought back on-site, ACSLS can remember the access_count.
You can see the ACSLS access_count using both:
• The ACSLS display command.
To see all 9840 data cartridges, sorted by access count, and also showing media type, ACS, and LSM:
display volume * -media STK1R -s access_count -f media access_count acs lsm
• The volrpt utility.
volrpt can be sorted by use (access_count), and can only include selected fields. For example, a custom volrpt containing vol_id, media type, access_count, and location, can be output to a flat file for further processing by a script.
Cartridge Warranty and End-of-life Thresholds
The warranty and end-of-life thresholds are:
TABLE 8-6
Threshold Mounts
9x40 (T9840 and T9940) Warranty 10,000
9x40 End-of-life 11,000
T10000 Warranty 15,000
T10000 End-of-life 16,000

Moving Least-Recently Accessed Cartridges from Active LSMs
December 2012 Cartridge Management 125
Moving Least-Recently Accessed Cartridges from Active LSMs
When ACSLS dismounts a cartridge from a tape drive, it attempts to avoid pass-thru by “floating” cartridges that came from other LSMs to a new home cell in the same LSM as the tape drive.
For example, if a cartridge is mounted from SL8500 library 3, rail 2 (LSM 9) to a drive in library 1, rail 4 (LSM 3), this requires two horizontal pass-thrus and an elevator pass-thru. When ACSLS dismounts the cartridge, it tries to find a new home cell in LSM 4 and avoid any pass-thru on the dismount.
Problem
It is impossible to float cartridges to an LSM if there are no free (unassigned) storage cells in the LSM. If there are no free cells in the tape drive’s LSM, ACSLS still tries to dismount the cartridge to the closest LSM to the drive, but this requires at least one pass-thru.

Moving Least-Recently Accessed Cartridges from Active LSMs
126 ACSLS 8.1 Adminstrator’s Guide December 2012
Solution
Identify cartridges that have not been accessed in a long time, and move them out of full LSMs to provide free cells to which cartridges can float to on a dismount.
In the information ACSLS records about cartridges, the access_date is updated whenever a cartridge is mounted or dismounted, entered, or moved. The access_date can be used to identify those cartridges that are not active
This whole process is safe, as you are only moving volumes within the same ACS and are not doing anything which would prevent future mounts of these cartridges, such as ejecting cartridges or changing their status.
To identify and move least-recently used cartridges, you need to:
• Identify the LSMs with too few free cells and LSMs with empty cells.
• Select the cartridges in an LSM by earliest access date.
• Move the cartridges from full LSMs to LSMs with empty cells.
Identify the LSMs with too Few Free Cells and LSMs with Empty Cells
Using cmd_proc:
query lsm all
The Free Cell Count column lets you identify both LSMs with few or no free cells, and LSMs that have empty cells where you can move inactive cartridges.
Example:
Review Cartridges in an LSM by Access Date
You now need to identify inactive cartridges that you can move to other LSMs in the ACS.
Ensure Access Date is Reported for Easy Sorting
Ensure that the access date is reported in a manner conducive to sorting. The format that dates are reported is controlled by the TIME_FORMAT dynamic variable.

Moving Least-Recently Accessed Cartridges from Active LSMs
December 2012 Cartridge Management 127
• Use the default format: TIME_FORMAT=%Y-%m-%d %H:%M:%S. so cartridges can easily be sorted by access date. At the Unix command prompt enter:
dv_config -p TIME_FORMAT
Enter ? at the variable prompt to display help.
• If you’ve made changes, update the dynamic variable in shared memory.
dv_config -u
Look at the Distribution of Last Access Dates for Cartridges in an LSM
For each LSM without sufficient free cells, list the cartridges sorted by the last access date. To do this, you need a custom volrpt that only selects the VOLID and access_date.
For complete details, see the comment header in:
$ACS_HOME/data/external/volrpt/owner_id.volrpt
The fields on a line are field_name, field_length, and delimiter_length (spaces after the field).
In the following example, there are two active lines. You probably have 6-character VOLUME_IDs. For the ACCESS_DATE, you want only the date portion, not the time.
VOLUME_ID 6 2 ACCESS_DATE 10 2
To create the report:
1. Type: $ cd ACS_HOME/data/external/volrpt.
2. Copy owner_id.volrpt and save it to a file, such as access_date.volrpt
Refer to “Creating a Custom Volume Report” on page 143 for more information.
3. Use a text editor to edit for ACCESS_DATE.
4. Create a sorted list of cartridges for an LSM.volrpt -l <lsm_id> -d -f access_date.volrpt | sort -k 2,2 -0 vols_sorted_lsm_##
where access_date.volrpt is the name of the custom report and ## is the LSM number.
Look at the vols_sorted_lsm_## file to see the distribution of last access dates in each LSM.
Move the cartridges from Full LSMs to LSMs with Empty Cells
You now need to create lists of cartridges to move, and move them to LSMs with free space.
Create Lists of Cartridges to Move
1. Take the file with the list of cartridges sorted by access date and remove the access date so you just have a list of cartridges.

Manually Loading Cartridges Into Drives in a Disabled LSM
128 ACSLS 8.1 Adminstrator’s Guide December 2012
cat vols_sorted_LSM_## | cut –d” “ –f1 > vols_LSM_##_tmp
2. Now take each vols_LSM_## file and select the first 100 (or your number) of cartridges to move.
head -100 vols_LSM_##_tmp > vols_LSM_##
You can combine both of the above operations:
cat vols_sorted_LSM_## | cut –d” “ –f1 | head -100 > vols_LSM_##
Move the Cartridges to an LSM with Free Space
For each LSM from which you are moving cartridges, pick a destination LSM that has free space for the cartridges.
1. Use the moving.sh utility to move the cartridges to a new LSM, specified by –t <lsm_id> (e.g. –t 0,8).
moving.sh -f vols_LSM_## -t <lsm_id>
2. Run a separate moving.sh for each LSM.
Note – If your library is busy, you may want to only run one or two moving.sh utilities at a time.
Manually Loading Cartridges Into Drives in a Disabled LSM
If your LSM fails and you take it off line, you can still manually load cartridges into the library drives if the data path is still operational.
To manually load cartridges into drives in a disabled LSM:
1. Open the LSM door.
2. Note the cartridge labels of any cartridges that are already in drives and remove these cartridges.
You will need to replace these cartridges at the end of this procedure.
3. Load the drives with the cartridges you want to read from or write to.
Repeat this step as often as necessary until the LSM is repaired, then continue with Step 4.
Caution – In this step, you can remove cartridges from library cells and load these cartridges in the drives. Note the cell locations of these cartridges and ensure that you return the cartridges to these locations in Step 4.
4. After the LSM is repaired, remove all cartridges from the drives and replace them with the original cartridges you noted in Step 2.
5. Close the LSM door, vary the LSM back online, and resume normal operations.

December 2012 Database Administration 129
9
Database Administration
The database contains all information about the library configuration and the location of all library cartridges.
ACSLS control files that are backed up and are recovered include the customer-configurable files located in $ ACS_home under data/external and some files associated located in data/internal/client_config.
This chapter discusses: importing and exporting the database; verifying the imported database and library configuration; backing up the database; and restoring and recovering the database.
• Exporting and Importing the database includes:
• Exporting the database to a disk file or local tape device
• Importing the database from a disk file or local tape device
• Importing ACSLS control configuration files
• Merging any customized dynamic variables
• Verifying the imported database and library configuration
• Backing up the database and ACSLS control files includes:
• Automatic database backup
• Performing manual backups to a local tape device or to disk
• Backing up to a UNIX File
• Creating a backup that can be restored to a different server
• Recovering and restoring the database and ACSLS control files includes:
• Restoring the database to the most recent backup
• Recovering from a specific file
• Restoring ACSLS control files
• Restoring a backup created on a different server
• Restarting the database

Utilities Used
130 ACSLS 8.1 Adminstrator’s Guide December 2012
Utilities UsedYou will use the following utilities:
• the bdb.acsss utility for backups to a:
• specified UNIX file
• tape device
• default file and location
• the rdb.acsss utility for
• recovering the database from corruption
• from changes that produce unintended results
• from server failure
• the db_export.sh and db_import.sh utilities for migrating between versions of ACSLS. This includes going to a later release or going to a previous release.
When you install ACSLS, you also automatically install the database management software. The ACSLS database is initialized after ACSLS is installed when you:
• configure the library hardware using acsss_config
• import a previous exported database using db_import.sh
• recover a database backup created on a different server using rbd.acsss.sh
Exporting the DatabaseThis section describes how to migrate the ACSLS database and its associated ACSLS control files from either a previous version of ACSLS, the same release level of ACSLS, or return to a prior release.
The db_export.sh utility creates an ASCII representation of the database on tape or a specified file to disk. It is also responsible for gathering ACSLS control files. This utility can be used in two different ways.
• If it is executed without any options, the exported files are copied to the default tape device: /dev/rmt/0n
db_export.sh
• If you wish to use a different tape device, use the -f option, followed by the desired tape device:
db_export.sh -f /dev/rmt/3n
• If you wish to export to a local file on the same machine, specify the file path name using the -f option:
db_export/sh -f /export/save/acsls_export.03_Dec_2009
When saving to a file, the result will be two separate files. The database tables will be saved in the file name you specify. The miscellaneous control files will have the identical path name with a .misc extension.

Exporting the Database
December 2012 Database Administration 131
The files generated by db_export.sh are then used as input to the db_import.sh utility at the time of an upgrade or recovery.
Note – This is the preferred method to use to migrate from all previous versions of ACSLS to the most current version.
When executing the db_export.sh utility either with the -f option or without, you will be prompted to choose the version of ACSLS to which you are exporting.
$ db_export.sh
Exporting database to /dev/tape
Please choose the release to which you are exporting:
If exporting to tape, a no-rewind device is required.
1: ACSLS 5.3.2 or 5.4 2: ACSLS 6.0 or 6.0.1 3: ACSLS 6.0.1 with L700e 4: ACSLS 6.0.1 with PUT0201 5: ACSLS 6.1, 7.0, or 7.1/7.1.1 before PUT0701 6: ACSLS 7.1/7.1.1 with PUT0701 or ACSLS 7.2 (any) 7: ACSLS 7.3 (any) 8: ACSLS 8.0 or later E: Exit
Please select one of the above:
If you select an earlier ACSLS release that does not support a library, you are prompted to remove the library from your configuration before exporting your database.
Exporting to a Disk File
You can export the ACSLS database and ACSLS control files to a disk file, as shown in the following procedure.
1. Log in as acsss.
2. Disable ACSLS:
acsss disable (from a UNIX command prompt)
3. Start the db_export.sh utility.
db_export.sh -f /path/db_file
4. Select the desired option for the version to which you are migrating.
• As it executes, the utility displays output indicating successful table data being exported.
• When the export is complete, a message is displayed indicating that the export has been successful.
• The db_export.sh utility creates two files: db_file and db_file.misc in the location specified with the -f option.
5. Ensure that these files are placed in or moved to a secure location where they won't be removed.
Exporting the Database
132 ACSLS 8.1 Adminstrator’s Guide December 2012
Do not put these files in or under the following directories, because these directories may be removed or deleted when ACSLS maintenance is installed:
• $ACS_HOME (the ACSSS home directory)
• $ACSDB_BACKUP_DIR (directory where ACSLS backups are stored)
• /tmp
Note – If you plan to install a new release of the operating system, do not save the exported files on the ACSLS server.
6. To start ACSLS and the database, enter the following command:
acsss enable
Exporting to Tape
You can export the ACSLS database and ACSLS control files to tape, as shown in the following procedure.
To export the database and ACSLS control files to tape:
1. Log in as acsss.
2. Disable ACSLS:
acsss disable (from a UNIX command prompt)
3. Insert a blank tape into the default tape device.
4. Start the db_export.sh utility;
db_export.sh -f tape_device
Example: db_export.sh -f /dev/rmt/0mn
5. Select the desired option from which you are exporting.
As it executes, the utility displays output indicating successful table data being exported and successful ACSLS files being backed up. A message displays when the export is completed.
6. Remove the cartridge from the drive only when the program completes and the prompt re-appears.
Caution – You will lose files if you remove the cartridge before the program completes the export. Write protect the cartridge and clearly mark it to identify the contents as the exported database.
Do not leave the cartridge in the library.
7. To start ACSLS and the database, enter the following command:
acsss enable

Importing the Database
December 2012 Database Administration 133
Importing the DatabaseThe following attributes are imported into the new database when you use the db_import.sh utility.
• Volumes: These database tables include all of the information associated with each volume in the library, such as:
• where the volume resides
• type of cartridge (data, scratch, cleaning, etc.)
• last associated scratch pool
• current status of the cartridge (home, mounted, etc.)
• entry date and last accessed date
• number of mounts since the entry date
• maximum use (for cleaning cartridges)
• associated lock ID and user ID (if the cartridge is locked)
• ACS and Library: database tables include the ACSs and library components, such as: LSMs, drives, panels, and cells
• ACSLS control files include all configuration updates since the initial installation, including:
• access control information
• fixed volume preferences
• scratch media preferences
• custom volrpt templates
• Dynamic and static variables: dynamic variables that have been customized in a previous release can be imported.
This section describes how to use the db_import.sh utility to:
• recreate the ACSLS database
• recover important ACSLS control files
• recover customized dynamic variables from data exported using the db_export.sh utility.
Importing From a Disk File
You can import the ACSLS database and ACSLS control files from a disk file, as shown in the following procedure.
To import the ACSLS database, ACSLS control files, or customized dynamic variables from a disk file:
1. Log in as acsss.
2. Disable ACSLS:
acsss disable (from a UNIX command prompt)
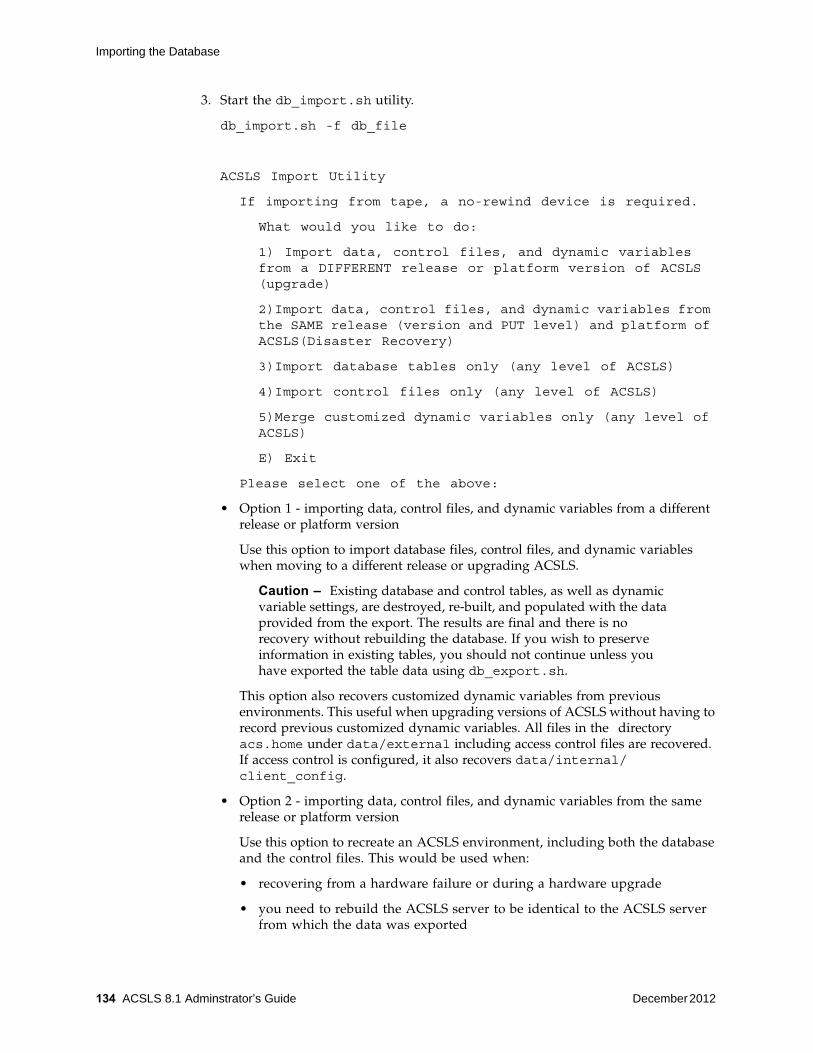
Importing the Database
134 ACSLS 8.1 Adminstrator’s Guide December 2012
3. Start the db_import.sh utility.
db_import.sh -f db_file
ACSLS Import Utility
If importing from tape, a no-rewind device is required.
What would you like to do:
1) Import data, control files, and dynamic variables from a DIFFERENT release or platform version of ACSLS (upgrade)
2)Import data, control files, and dynamic variables from the SAME release (version and PUT level) and platform of ACSLS(Disaster Recovery)
3)Import database tables only (any level of ACSLS)
4)Import control files only (any level of ACSLS)
5)Merge customized dynamic variables only (any level of ACSLS)
E) Exit
Please select one of the above:
• Option 1 - importing data, control files, and dynamic variables from a different release or platform version
Use this option to import database files, control files, and dynamic variables when moving to a different release or upgrading ACSLS.
Caution – Existing database and control tables, as well as dynamic variable settings, are destroyed, re-built, and populated with the data provided from the export. The results are final and there is no recovery without rebuilding the database. If you wish to preserve information in existing tables, you should not continue unless you have exported the table data using db_export.sh.
This option also recovers customized dynamic variables from previous environments. This useful when upgrading versions of ACSLS without having to record previous customized dynamic variables. All files in the directory acs.home under data/external including access control files are recovered. If access control is configured, it also recovers data/internal/client_config.
• Option 2 - importing data, control files, and dynamic variables from the same release or platform version
Use this option to recreate an ACSLS environment, including both the database and the control files. This would be used when:
• recovering from a hardware failure or during a hardware upgrade
• you need to rebuild the ACSLS server to be identical to the ACSLS server from which the data was exported

Importing the Database
December 2012 Database Administration 135
• Option 3 - importing only database tables from any ACSLS release level
Use this option to import only database files from any ACSLS release level
This option destroys the existing database tables and control files, rebuilds them, and then populates them with the data provided from the exported database. If you wish to preserve information in existing tables, you should not continue unless you have exported the data using db_export.sh
• Option 4 - importing ACSLS control files from any ACSLS release level
Use this option to import only ACSLS control files either from any version of ACSLS. This imports all files in the directory acs.home under data/external including access control files. If access control is configured, it also imports data/internal/client_config.
Use this option to recover ACSLS database files, control files, and dynamic variable from the same version. This recovers all files in the directory acs.home under data/external including access control files.
Use this option to recover customized dynamic variables from previous environments. This is a very useful option for upgrading versions of ACSLS without having to record previous customized dynamic variables.
Selecting this option gathers the settings from the database export, and then re-configures shared memory with the new variable settings.
• Option 5 - merging only customized dynamic variables
This is a very useful option for upgrading versions of ACSLS without having to record previous customized dynamic variables.
Selecting this option gathers the settings from the database export, and then re-configures shared memory with the new variable settings.
Warning – If you are importing from ACSLS 7.2.0 and if you start ACSLS prior to executing this option, certain data could be lost. If you are upgrading ACSLS from a previous version and had customized dynamic variables, you should import your customized variables PRIOR to starting ACSLS.
4. Verify the install as described under “Verifying the Imported Database and Library Configuration” on page 136.
5. To start ACSLS, enter the following command:
acsss enable
Importing from Tape
Use the following procedure to import the ACSLS database, recover ACSLS control files, and rebuild customized dynamic variables from tape.
1. Log in as acsss.
2. Disable ACSLS:
acsss disable (from a UNIX command prompt)
3. Insert the exported database tape that you exported with the db_export.sh command into the tape drive.

Verifying the Imported Database and Library Configuration
136 ACSLS 8.1 Adminstrator’s Guide December 2012
4. Run the database import utility by entering the following at a UNIX command prompt.
db_import.sh
The db_import.sh utility displays its main menu as shown in “Importing From a Disk File” on page 133. It also provides more information.
Note – You receive an “unsuccessful” message if you are running the db_import utility from one terminal and doing a tape rewind from a different terminal.
5. Refer to the step “Start the db_import.sh utility.” on page 134 for menu options.
6. Verify the install as described in “Verifying the Imported Database and Library Configuration” on page 136
7. Import from tape, other than the default tape device (no rewind).
8. To start ACSLS, enter the following command:
acsss enable
Verifying the Imported Database and Library Configuration
Use the following procedure to mount or dismount a cartridge to verify ACSLS.
Mount/dismount a cartridge to verify ACSLS:
1. Verify that you are logged in as acsss.
2. If ACSLS is not running, start it by entering
acsss enable
3. Query the server from the cmd_proc by entering
query server
If messages are displayed indicating that the server is in recovery mode, wait for a message indicating that the server is running.
4. Verify that the at least one of the following are online. If not, bring them online with the vary command.
query port all
query acs all
query lsm all
query drive all
5. Do you have at least one cartridge in an LSM
6. Mount a cartridge by entering:
YES Continue with the procedure.
NO Enter a cartridge into an LSM.

Automatic Database Backup
December 2012 Database Administration 137
mount vol_id drive_id
HINT: Use the query drive command to get the ID of an available drive and the query volume command to get the ID of a library cartridge.
7. Did you see a message indicating a successful mount?
A successful mount message is:
Mount: vol_id mounted on drive_id
8. Dismount the cartridge by entering:
dismount vol_id drive_id force
where vol_id is the volume and drive_id is the drive you specified in Step 6.
Automatic Database BackupACSLS automatically creates a backup file of the database to disk every 24 hours at midnight or the time of day and days of the week you specified in the backup options in acsss_config.
Performing Manual Backups to TapeIn addition to the automatic database backups that ACSLS creates, you should periodically run the bdb.acsss utility to manually create tape backups that can be stored offsite and used, if needed, for disaster recovery of the database.
Regular backups transferred to an offsite device can enable rapid restoration in the event of disaster to the ACSLS server.
Use bdb.acsss to manually back up the database to tape after:
• Running acsss_config.
• Importing the database.
• An audit of the entire library.
• Any database recovery.
Backing up to a Specified Tape Device Attached to the ACSLS Server
To back up the ACSLS database to a specified tape device attached to the ACSLS server, do the following:
1. Log in as acsss.
2. Insert a blank tape into the tape device.
YES Procedure is complete.
NO If an error message appears, run this verification procedure again, ensuring that you specified a valid, available drive and a library cartridge. If the mount/dismount still fails, call StorageTek for assistance.
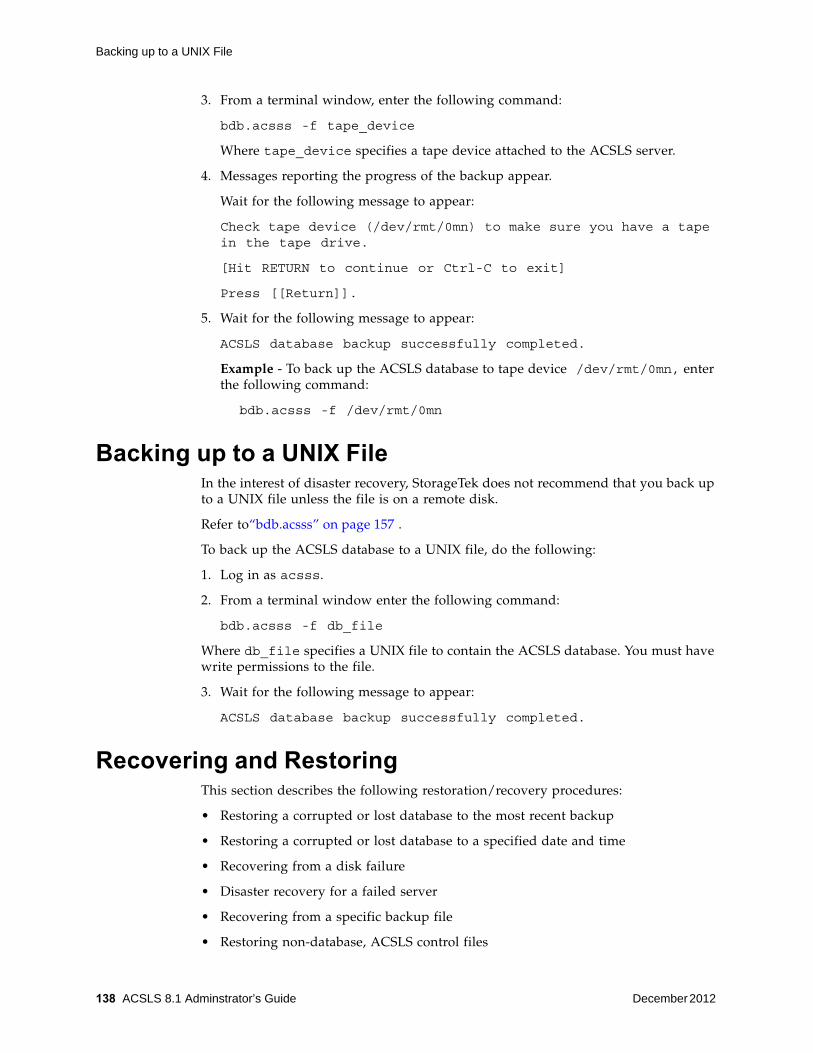
Backing up to a UNIX File
138 ACSLS 8.1 Adminstrator’s Guide December 2012
3. From a terminal window, enter the following command:
bdb.acsss -f tape_device
Where tape_device specifies a tape device attached to the ACSLS server.
4. Messages reporting the progress of the backup appear.
Wait for the following message to appear:
Check tape device (/dev/rmt/0mn) to make sure you have a tape in the tape drive.
[Hit RETURN to continue or Ctrl-C to exit]
Press [[Return]].
5. Wait for the following message to appear:
ACSLS database backup successfully completed.
Example - To back up the ACSLS database to tape device /dev/rmt/0mn, enter the following command:
bdb.acsss -f /dev/rmt/0mn
Backing up to a UNIX FileIn the interest of disaster recovery, StorageTek does not recommend that you back up to a UNIX file unless the file is on a remote disk.
Refer to“bdb.acsss” on page 157 .
To back up the ACSLS database to a UNIX file, do the following:
1. Log in as acsss.
2. From a terminal window enter the following command:
bdb.acsss -f db_file
Where db_file specifies a UNIX file to contain the ACSLS database. You must have write permissions to the file.
3. Wait for the following message to appear:
ACSLS database backup successfully completed.
Recovering and RestoringThis section describes the following restoration/recovery procedures:
• Restoring a corrupted or lost database to the most recent backup
• Restoring a corrupted or lost database to a specified date and time
• Recovering from a disk failure
• Disaster recovery for a failed server
• Recovering from a specific backup file
• Restoring non-database, ACSLS control files

Restoring the Database to the Most Recent Backup
December 2012 Database Administration 139
Most of these procedures use the rdb.acsss utility, which provides options for restoring a database from the most recent backup or from a specified date and time; disaster recovery using a backup created by bdb.acsss; and restoring ACSLS control files created by bdb.acsss. For more information about these options, see “rdb.acsss” on page 183.
Note – If the home cell of a cartridge changes from its last location after a backup, then the restored database will not be up-to-date. To avoid cartridge movement on dismounts: each LSM must be the only LSM in its ACS (true in most SCSI libraries), or the Extended Store Feature must be enabled for all LSMs that are connected to other LSMs via a pass-thru-port. For more information, see “Using the Extended Store Feature” on page 83. If the Extended Store Feature is not enabled for all connected LSMs or cartridges have been entered or ejected, you must audit the library after the restoration to make the database current and must be enabled for all LSMs that are connected to other LSMs via a pass-thru-port
Note – Do not specify the -f option as a general option for the rdb.acsss utility. If you backed up your database to an external network file or to an alternate tape device, you use the -f option only after entering rdb.acsss and then choosing the third recovery option. When prompted, enter -f and the path name to your external network file or alternate tape device. See “Select option 2:” on page 140 for more information.
Restoring the Database to the Most Recent BackupIn this procedure you restore the database to the most recent backup created on the local disk by automatic backups. ACSLS control files are also restored.
To restore a corrupted or lost database to the most recent backup:
1. Log in as acsss.
2. Disable ACSLS.
acsss disable
3. Enter the following command:
rdb.acsss
4. Select option 1:
1. Restore from a current local disk backup
5. Refer to “rdb.acsss” on page 183 for procedures.
6. To start ACSLS, enter the following command:
acsss enable

Recovering from a Failed Server
140 ACSLS 8.1 Adminstrator’s Guide December 2012
Recovering from a Failed ServerUse this procedure for a disaster recovery when you have lost or corrupted both primary and secondary disks.
To recover from a failed server:
1. Install the operating system.
2. Install ACSLS.
Caution – You must install ACSLS in the same directory you used before the disk failure.
3. Log in as acsss.
4. Disable ACSLS:
acsss disable
5. Enter the following command:
rdb.acsss
6. Select option 2:
2. Restore from a previous tape or network file backup
7. Refer to “rdb.acsss” on page 183 for procedures.
8. To start ACSLS, enter the following command:
acsss enable
9. You must run acsss_config to re-specify automated backup date and time and retention periods unless you want to accept the default settings.
Restoring ACSLS Control FilesIn this procedure you restore ACSLS control files. These are non-database files that include all files in the data/external directory such as access control files, the fixed volume file, the scratch preferences file, and custom volrpt files. These files are restored from a bdb.acsss backup to tape or an external network file.
To restore ACSLS control files:
1. Log in as acsss.
2. Disable ACSLS:
acsss disable
3. Enter the following command:
rdb.acsss
4. Select option 4:
4. Restore only ACSLS non-database control files
5. Refer to “rdb.acsss” on page 183 for procedures.

Restoring ACSLS Control Files
December 2012 Database Administration 141
6. To start ACSLS and the database, enter the following command:
acsss enable

Restoring ACSLS Control Files
142 ACSLS 8.1 Adminstrator’s Guide December 2012

December 2012 Reporting and Logging 143
10
Reporting and Logging
In this chapter, you will learn how to:
• Create a custom volume report
• Create a report for volume movement statistics
Creating a Custom Volume ReportYou can use the volrpt utility to create a volume report; for more information, see the “volrpt” on page 193. $ACS_HOME/data/external/volrpt/owner_id.volrpt is a sample input file that you can run or use as a template to create customized volume reports. You can also save your customized volume reports in the $ACS_HOME/data/external/volrpt directory. Use this procedure to create an input file to the volrpt utility to create a custom volume report.
To create a custom volume report, do the following:
1. Log in as acsss.
2. Open a UNIX command tool.
3. Change to the custom volume report directory:
cd /home/ACSSS/data/external/volrpt
4. Copy the sample volume report file to a new, custom file.
cp owner_id.volrpt my.volrpt
my.volrpt is the name you want to assign to the new file.
5. Using a text editor, such as vi, edit the my.volrpt file to specify the fields and formats you want to see on the custom report.
• You can specify any of the fields listed in the sample file.
• The format for each entry is: field_name field_length delimiter_length
• You can make the field lengths and delimiters any size you wish. Just be sure all the fields you specify will fit on one line when the report prints.
• Detailed editing instructions are given in the sample file.
6. When you are finished editing the file, save it.

Creating a Custom Volume Report
144 ACSLS 8.1 Adminstrator’s Guide December 2012
Custom Volume Report
You create a customized report by designating fields, field length, and delimiter lengths. in an input file, such as the one shown in the following figure.
From this input file you generate the customized report shown. Among other uses, a customized report, as shown in the following figure, allows you to report the owners of volumes.
FIGURE 10-1 Sample Volrpt Input File

Creating a Custom Volume Report
December 2012 Reporting and Logging 145
FIGURE 10-2 Customized Volume Report Using Input File
Custom Volume Report Example
The following volrpt includes ACSs 0 and 1, absent and ejected volumes, and shows the status of volumes.
The input volrpt options are:
volrpt -f my.volrpt -a 0 1 -i
These control statements are used to select and format the output.
FIGURE 10-3 Custom Volume Report Control Statements
1998-06-30 13:22:07
TOTALVOLUMES:2 SEQUENCE:sort by volume identifier
Volume Media Home Owner
Label Type Drive ID Location ID
RB1400 3480 Not-in-drv 0, 1, 1, 0, 0 cray
RB1401 DD3A 0, 0, 1, 0 0, 1, 2, 0, 0 cray
CELL_ID 14 2
VOLUME_ID 6 2
VOL_STATUS 17 0
POOL_ID 5 2
ACCESS_COUNT 5 1 LOCK_ID 5 1
OWNER_ID 20 0

Creating a Custom Volume Report
146 ACSLS 8.1 Adminstrator’s Guide December 2012
FIGURE 10-4 Customized volrpt Showing Absent and Ejected Volumes
VOLUME REPORT UTILITY
2002-06-03 15:27:48
TOTAL VOLUMES: 61 SEQUENCE: sort by volume identifier
Home Volume Volume Pool Times Lock Owner
Location--- Label Status ID Mount ID ID------------
1, 0, 0, 0, 0 ABC001 VOLUME_HOME 0 2 0 presc
0,-1, 0, 0, 0 ABC002 VOLUME_ABSENT 0 0 0
0,-1, 0, 0, 0 ABC003 VOLUME_ABSENT 0 0 0
1, 3, 0, 0, 3 ABC004 VOLUME_MISSING 0 0 0
1, 3, 0, 0, 4 ABC005 VOLUME_MISSING 4 0 28001 tom
1, 3, 0, 0, 5 ABC006 VOLUME_MISSING 0 0 0
0,-1, 0, 0, 0 ABC007 VOLUME_ABSENT 0 0 0
1, 0, 0, 0, 7 ABC008 VOLUME_HOME 0 0 0
0,-1, 0, 0, 0 ABC009 VOLUME_ABSENT 0 0 0
0,-1, 0, 0, 0 ABC010 VOLUME_ABSENT 0 0 0 presc
1, 0, 0, 0,10 ABC011 VOLUME_HOME 0 0 0
1, 0, 0, 0,12 ABC012 VOLUME_HOME 0 0 2371 abc012
1, 0, 0, 0,13 ABC013 VOLUME_HOME 0 0 28001
1, 0, 0, 0,14 ABC014 VOLUME_HOME 0 0 28001
0,-1, 0, 0, 0 ABC015 VOLUME_ABSENT 1 0 29712
0,-1, 0, 0, 0 ABC016 VOLUME_EJECTED 1 0 29712
0,-1, 0, 0, 0 ABC017 VOLUME_ABSENT 1 0 29712
0,-1, 0, 0, 0 ABC018 VOLUME_ABSENT 1 0 29712
1, 0, 0, 0,19 ABC019 VOLUME_HOME 1 0 0
1, 0, 0, 0,20 ABC020 VOLUME_HOME 1 0 0
0,-1, 0, 0, 0 ABC021 VOLUME_ABSENT 0 0 0
0,-1, 0, 0, 0 ABC022 VOLUME_ABSENT 4 0 0
Creating a Logging Volume Statistics Report
December 2012 Reporting and Logging 147
Creating a Logging Volume Statistics ReportYou can use the volume statistics log file (acsss_stats.log) to log volume movement statistics. These statistics consist of entries for each time ACSLS detects that a volume's location changed. ACSLS logs entries for enters, ejects, mounts, dismounts, and for each time an audit detects that a volume's location has changed (typically, by being manually moved).
You use the acsss_config configuration program to do the following:
• Enable or disable volume statistics logging via the LIB_VOL_STATS variable
• Specify the maximum size of the volume statistics log file
• Specify the number of rollover files for the volume statistics log file
The stats_report utility uses the acsss_stats.log to report all mounts and tape drive usage
The volume statistics log file contains collection mode entries that tell if volume statistics logging is enabled or disabled and volume statistics entries.
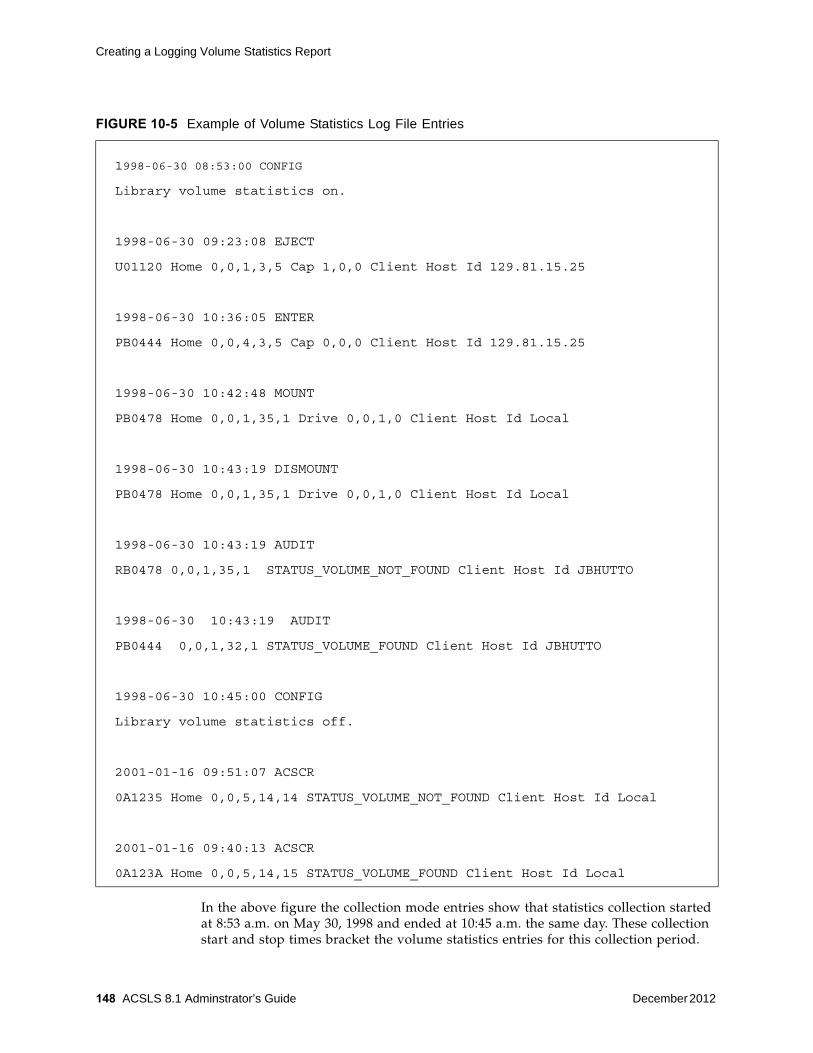
Creating a Logging Volume Statistics Report
148 ACSLS 8.1 Adminstrator’s Guide December 2012
In the above figure the collection mode entries show that statistics collection started at 8:53 a.m. on May 30, 1998 and ended at 10:45 a.m. the same day. These collection start and stop times bracket the volume statistics entries for this collection period.
FIGURE 10-5 Example of Volume Statistics Log File Entries
1998-06-30 08:53:00 CONFIG
Library volume statistics on.
1998-06-30 09:23:08 EJECT
U01120 Home 0,0,1,3,5 Cap 1,0,0 Client Host Id 129.81.15.25
1998-06-30 10:36:05 ENTER
PB0444 Home 0,0,4,3,5 Cap 0,0,0 Client Host Id 129.81.15.25
1998-06-30 10:42:48 MOUNT
PB0478 Home 0,0,1,35,1 Drive 0,0,1,0 Client Host Id Local
1998-06-30 10:43:19 DISMOUNT
PB0478 Home 0,0,1,35,1 Drive 0,0,1,0 Client Host Id Local
1998-06-30 10:43:19 AUDIT
RB0478 0,0,1,35,1 STATUS_VOLUME_NOT_FOUND Client Host Id JBHUTTO
1998-06-30 10:43:19 AUDIT
PB0444 0,0,1,32,1 STATUS_VOLUME_FOUND Client Host Id JBHUTTO
1998-06-30 10:45:00 CONFIG
Library volume statistics off.
2001-01-16 09:51:07 ACSCR
0A1235 Home 0,0,5,14,14 STATUS_VOLUME_NOT_FOUND Client Host Id Local
2001-01-16 09:40:13 ACSCR
0A123A Home 0,0,5,14,15 STATUS_VOLUME_FOUND Client Host Id Local
Creating a Logging Volume Statistics Report
December 2012 Reporting and Logging 149
The format of the volume statistics entries is:
yyyy-mm-dd hh:mm:ss command
vol_id home_loc function_loc client_host_ID
Where:
yyyy-mm-dd
is the year, month, and day of the entry. Four-digit year formats are supported. You specify the date format via the acsss_config program.
hh:mm:ss
is the hour, minute, and second of the entry.
command
is the ACSLS command or client request that either moved the volume or (for audits) detected that the volume was moved.
MOUNT
mount request.
DISMOUNT
dismount request.
ENTER
manual or automatic mode enter request.
EJECT
eject request.
AUDIT
audit request.
ACSMV
move request
ACSCR
Volume Recovery activity. This activity is generated automatically by ACSLS processing.
vol_id
is the volume IDs
home_loc
is the volume's home (storage cell) location.
function_loc
is the volume's location for the requests that used the volume as follows:
mount or dismount requests
location is a transport ID.

Creating a Logging Volume Statistics Report
150 ACSLS 8.1 Adminstrator’s Guide December 2012
enter or eject requests
location is a CAP ID.
audit requests
specifies that an audit detected one of the following errors:
STATUS_VOLUME_FOUND
The audit found a volume in a location that did not match the location specified in the database.
STATUS_VOLUME_NOT_FOUND
The audit did not find a volume in the location specified in the database.
Volume Recovery activity
Location may be a cell ID or a transport ID, indicating that Volume Recovery detected one of the following situations:
STATUS_VOLUME_FOUND
A volume was found which was not recorded in the database, and is being added.
STATUS_VOLUME_NOT_FOUND
A volume in the database was not found in any recorded location, and is being deleted.
client_host_ID
is one of the following;
• For client application requests, the host IP address.
• For cmd_proc commands, if the environment variable LIBVOLSTATS_CMD_PROC_ID is set (ASCII characters only) in the environment of the shell that started the cmd_proc, the entry is the first 12 characters of the value of the environment variable.
• For cmd_proc commands, if the environment variable LIBVOLSTATS_CMD_PROC_ID is not set or contains non-ASCII characters, the entry is Local.

December 2012 Utility Reference 151
11
Utility Reference
This chapter discusses the following ACSLS utilities:
“acs_renumber.sh” on page 154
enables you to change the identifier of a given ACS in your library complex without having to reconfigure the attached libraries.
“acsss” on page 155
starts and stops ACSLS, as well controls and monitors for maintenance and troubleshooting.
“bdb.acsss” on page 157
backs up the ACSLS database and ACSLS control files.
“Dynamic Configuration (config) utilities” on page 158
dynamically implements configuration changes to ACSLS libraries (and components) while ACSLS remains online and running. These configuration utilities are:
“config acs” on page 160
dynamically adds an ACS or re-configures an existing ACS and its components.
“config drives” on page 162
on existing drive panels, it dynamically adds drives, changes drive types, and deletes drives.
“config lsm” on page 163
dynamically re-configures an existing LSM and all of it’s components. These components include CAPs, panels, and drives.
“config ports” on page 164
dynamically re-configures the port connections to an ACS.
“db_export.sh” on page 165
exports the ACSLS database information and ACSLS control files in preparation for an upgrade installation or reinstallation of ACSLS.
“db_import.sh” on page 166
152 ACSLS 8.1 Adminstrator’s Guide December 2012
imports the ACSLS database information and ACSLS control files exported when you used the db_export.sh utility.
“del_vol” on page 167
deletes a volume from an offline LSM.
“drives_media.sh” on page 168
displays all drive types, media types and the drive-to-media compatibilities that are supported by the current release of ACSLS.
“ejecting.sh” on page 169
determines a list of volumes that are to be ejected and creates a file containing the set of eject commands for the specified CAP.
“free_cells.sh” on page 170
allows you to monitor and manage the free cells in libraries controlled by ACSLS.
“getHba.sh” on page 173
manages Fibre Channel HBA ports.
“get_license_info” on page 174
has been removed beginning with releases ACSLS 7.3.1 and 8.0.1 as the software enforcement of the right-to-use license is no longer employed in ACSLS. To display and manage the number of free cells in ACSLS controlled libraries use “free_cells.sh” on page 170.
“greplog” on page 174
filters the acsss_event log to include or exclude messages containing specific keywords.
“licensekey.sh” on page 175
has been removed beginning with releases ACSLS 7.3.1 and 8.0.1 as license key validation is no longer employed.
“moving.sh” on page 175
moves multiple cartridges to one or more LSMs.
“probeFibre.sh” on page 183
displays the model number, revision level, and Target-LUN address of each device connected behind an Emulex (LP10000) or QLogic (QLA2300) fibre-channel HBA.
“rdb.acsss” on page 183
restores the ACSLS database and ACSLS control files.
“showDevs.sh” on page 187
shows detail for every mchanger device configured on Solaris.
“stats_report” on page 188
gathers library volume statistical information.
“userAdmin.sh” on page 190
Overview
December 2012 Utility Reference 153
administers ACSLS GUI user passwords. You can add users, remove users, list users, and change user passwords.
“volrpt” on page 193
creates a volume report.
“watch_vols” on page 198
automatically assigns ownership and pool association to volumes as they are entered through the CAP.
OverviewFollow these general guidelines for using the ACSLS utilities:
• Generally, the utilities described in this chapter are intended for execution by user acsss. To inherit the privileges and environmental dependencies required to run them you should login as user acsss.
If you prefer to use su, be sure to use su - acsss.
• It is recommended that you use bdb.acsss to manually back up the database to tape after:
• Configuring your library hardware.
• Importing the database. After you upgrade to a new version of ACSLS, do not use database backups created with previous versions. Make sure, however, to create a new backup as soon as you have upgraded.
• Any database recovery.
• To ensure that you recover an accurate and consistent database, always use the most current database backup.
If a utility fails, retain all event logs. These logs aid Support in resolving any problems.
Legacy Start/Stop Scripts
The start/stop scripts that were used in ACSLS 7.x are not supported in ACSLS 8.x.
ACSLS 8.x provided a new mechanism for starting and stopping the library management application, which is integrated with the Solaris Service Management Facility (SMF). This replaces rc.accsss and kill.acsss used in ACSLS. This mechanism also provides the ability to monitor application status.
You can start and stop ACSLS 8.x with the acsss command. The single command acsss provides ACSLS startup, shutdown, and monitoring functions. The utility resides in the $ACS_HOME directory and is accessible to any user.

acs_renumber.sh
154 ACSLS 8.1 Adminstrator’s Guide December 2012
acs_renumber.shThis is a simple tool that enables you to change the identifier of a given ACS in your library complex without having to reconfigure the attached libraries. Since every LSM, every CAP, every drive, and every volume in the library is identified in relation to an ACS, this utility updates all of the various database tables so that each library resource aligns with the new ACS ID that you assign.
New logical libraries would use the currently active pattern. For example, if you renumber ACS 0 to 1, then 1001 and 1002 would stay as they are, but a new logical library in ACS 1 would be 2001. And if you then renumber ACS 6 to ACS 0, 7001 would stay as it is, but a new logical library in ACS 0 would be 1003. There’s no real correspondence anymore, although newly-added ones would be predictable based on ACS.
Note – Please be aware that the changes made by this utility apply only to the ACSLS server and not to the client applications that utilize these resources. Consequently, it may be necessary to reconfigure any client databases after having changed the ACS i.d. on the server.
Note – ACSLS must be disabled before running this script.
To change the assigned number of an ACS, run acs_renumber.sh. In an interactive session, you are first warned that the changes made impact any client applications and you are then prompted whether to continue.
$ acs_renumber.sh
N O T I C E Changes made by this script will impact client applications that use ACSLS. Specifically, drive i.d. mappings and LSM id's will change.
Continue...? (y or n):
If you respond y, the routine automatically backs up the existing database before any changes are made. This allows you to restore to the previous configuration, should it be necessary to back out of the change. (You can also reverse the change by repeating the acs_renumber.sh routine.)
The routine presents you with a list of the currently configured ACSs and, for each one, it asks whether to renumber that ACS, and if so, what new value to assign.
Current ACS list:
ACS-0 (SL8500)
Do you wish to renumber ACS-0? (y or n):
What is the new value for ACS-0? 5
Having accepted your input (in this example, your response was 5), the routine asks you to confirm the pending change.
Change ACS-0 to ACS-5.
Correct? (y or n):

acsss
December 2012 Utility Reference 155
If you answer "y", the routine begins updating all of the related database tables and automatically backs up the database in order to checkpoint the changes you have made.
Updating tables: Changing ACS-0 to ACS-5
acstable: 1 records captable: 4 records celltable: 13424 records drivetable: 128 records handtable: 16 records lmutable: 0 records lsmtable: 8 records paneltable: 280 records porttable: 1 records ptptable: 16 records scr_distr_table: 0 records volumetable: 0 records
Complete!
Current ACS list:
ACS-5 (SL8500)
Now backing up the database changes...
acsss The acsss command is used to start, stop, and monitor the status of the various services associated with ACSLS. This utility employs the Service Management Facility (SMF) to monitor and control ACSLS operation. SMF manages all major system resources on a Solaris system, bringing them up in the order of their dependencies. SMF will automatically restart any services that fail and SMF provides useful troubleshooting information in the event of failure.
The SMF services associated with ACSLS include the following:
• acsls - the legacy StorageTek Library control software.
• acsdb - the ACSLS database managed under Postgres.
• smce - SCSI Media Changer Library Emulation for logical libraries.
• surrogate - responsible for sending updates to the GUI display.
• rmi-registry - maps java client requests to their respective server ports.
• stmf - target mode driver for smce.
• weblogic - the secure Web servlet container for ACSLS GUI functions.
A single command, acsss is used to enable, disable and monitor this set of ACSLS services.
Format
acsss <command>

acsss
156 ACSLS 8.1 Adminstrator’s Guide December 2012
Note – Entering acsss without a command displays the list of options.
Options
In most cases, you use only the top three commands: enable, disable, and status. The remaining commands are for convenience in contexts of servicing the software.
Command Function
enable This is the default method to bring up ACSLS. It checks for dependencies and activates, in the proper order, the five ACSLS services and the ACSLS GUI. When this method is used, the services are configured to restart automatically after a system reboot.
temp-enable Same as acsss enable but services are not restarted after a system reboot.
maint-enable Intended for maintenance operations, this option brings up the ACSLS database and the GUI infrastructure. This method is used in contexts of database maintenance (restore, import, export), library configuration (acsss_config), and minor software patch installations. Neither the acsls nor the smce service are enabled.
disable This is the default method used to halt ACSLS operation. It is not a complete shutdown and allows for the database and any GUI login sessions to remain active for maintenance operations after the acsls and smce services have been disabled. The resulting state is identical to that of acsss maint-enable. This is the safest method to bring down the server since ACSLS and the library are placed in an idle state before the services are disabled.
force-disable Same as acsss disable but the operation does not wait for an idle state before disabling acsls and smce.
shutdown This renders a complete shutdown of all ACSLS services. It is intended for contexts of software installation and de-installation, and other maintenance contexts that require the database (acsdb) or the GUI infrastructure (rmi-registry and surrogate) to be shutdown.
db Brings up only acsdb. It shuts down all other services.
status This option provides a quick status report of the five ACSLS services and the GUI.
g-status This option displays the status of the ACSLS GUI.
l-status This option provides a verbose status summary of the five ACSLS services and includes pointers to log data for further analysis in troubleshooting contexts.
p-status Similar to acsss status, this report includes a listing of the various process id's that are monitored by each respective service contract.
legal This option displays the ACSLS Legal Notice in English or French.

bdb.acsss
December 2012 Utility Reference 157
bdb.acsssThe bdb.acsss utility backs up the ACSLS database contents and ACSLS control files that you need to rebuild the ACSLS environment. The backup is either placed in a tar file or tape device you have named, or in the directory defined as the default.
This utility performs ACSLS database backups without requiring ACSLS to be down (hot backup).
Without the -f option, a /export/backup/<time_stamp>.tar file is created. time_stamp is the time the bdb.acsss command was executed.
Note – To verify the contents of the tape after running bdb.acsss please modify the following examples for your specific tape devices.
• For Solaris:
tar tvbf 2048 /dev/rmt/0mn
After running the tar tvbf command, the tape advances to the next block. Make sure you have rewound or re-positioned the tape if you intend to run rdb.acsss after running the tar tvbf command.
Format
bdb.acsss -f [backup_file | tape_device]
If you enter bdb.acsss with no options, a default backup is performed that provides you the ability to restore the database back to the time when this backup was performed.
Options
-f backup_file
specifies a UNIX file to contain the ACSLS database backup. You must have write permissions to the file and directory.
-f tape_device
specifies any tape device attached and configured to the ACSLS server.
Usage
Use the bdb.acsss utility to back up the ACSLS database to tape or to an external network file to create backups that can be used, if needed, for recovery of the database.
It is recommended that you use bdb.acsss to manually back up the database after:
• Running acsss_config.
• Importing the database. After you upgrade to a new version of ACSLS, do not use database backups created with previous versions.
• An audit of the entire library.

Dynamic Configuration (config) utilities
158 ACSLS 8.1 Adminstrator’s Guide December 2012
• Any database recovery.
Example 1
$ bdb.acsss -f /export/backup/my_backup
In this example, a file named my_backup was created in the directory /export/backup. You can now choose whether to keep the file where it is or if to move it to another file system, another server, or a writable CD device.
This file can then be used to restore the database to the state it was in when the backup was performed.
For example, if the backup was performed at 1:00 pm on Friday and a restore is performed at 6:00 am on Monday, the database will revert back to its state as of 1:00 pm on Friday.
Within this same -f option, you can give a tape device instead of a file name and the backup will go to the named tape device.
Example 2
$bdb.acsss -f /dev/rmt/0mn
In this example, a tape archive on the tape device /dev/rmt/0mn was created. This can be stored for later use in an offsite location.
See also:
• “rdb.acsss” on page 183
• “Database Administration” on page 129
Dynamic Configuration (config) utilitiesThe dynamic configuration (config) utility allows you to implement configuration changes to ACSLS libraries (and components) while ACSLS remains online and running. These configuration changes are recorded in the acsss_config.log file.
The following dynamic configuration utilities are supported:
• config acs
• config drives
• config lsm
• config ports
Using the config utility provides the following benefits:
• ACSLS can continue running, allowing you to perform mount requests to unaffected library components.
• Allows you to reconfigure specified library components while all other configuration information remains unchanged. For example, when specifying:
An ACS, the configurations of other ACSs are not affected.
An LSM, the configurations of other LSMs are not affected.
A drive panel, the drives on a panel, mounts and dismounts to all existing drives are not affected.

Dynamic Configuration (config) utilities
December 2012 Utility Reference 159
Important
• ACSLS must be running to use the dynamic config utility.
• You must use acsss_config to create your initial ACSLS configuration. Refer to “Setting Variables that Control ACSLS Behavior” on page 55.
• Event notification reports all dynamic configuration changes.
• Before running dynamic configuration, ensure that all components being added or re configured are ready.
• The acsss_config.log file provides details regarding messages displayed.
• If you have not confirmed the configuration change, you can cancel the operation with [[CTRL]]+C.
• Dynamic configuration performs an automatic backup before and after the configuration change.
• After a configuration change is confirmed, it cannot be cancelled. If you want to reverse a configuration change, you should shut down ACSLS and restore the backup that was taken immediately before the configuration change was made.
You have 10 minutes to confirm a configuration change before it times out.
• You cannot remove the only (or last) ACS.
• Do not remove the last CAP in an ACS or the last drive defined to ACSLS.
Limitations of Dynamic Configuration
The dynamic configuration utility has two significant limitations:
• You cannot delete an ACS, or delete or change a port (connection) to a library.
• With an existing SCSI/fibre-attached library, you can only update drive configurations in config acs and config lsm utilities. Panel or CAP configurations are not updated.The config drives and config acs new works with SCSI/fibre-attached libraries without limitation. The config ports utility is not supported on a SCSI/fibre-attached library.
Solution:
For these configuration changes that are not supported through dynamic configuration, you need to bring down ACSLS and use acsss_config.
Things You Should Not Do
• Do not use dynamic configuration to display status information for a library and its components because it involves extensive I/O to the library
Use the query or display commands instead.
• Try to perform more than one configuration task at a time.
Only one dynamic configuration task can be performed at a time. This:
config acs
160 ACSLS 8.1 Adminstrator’s Guide December 2012
• Minimizes performance problems caused by the I/O between ACSLS and the library it is configuring,
• Avoids complex interactions between multiple configuration tasks.
config acsThe config acs utility allows you to:
• Add an ACS or re-configure an existing ACS and its components
• You can configure or re-configure libraries without assigning all ACS numbers in sequence.
Example: You want to migrate from a 9310 library to an SL8500 and then remove the 9310. The 9310 is numbered ACS 0 and the SL8500 is ACS 1. Using config acs, you can now migrate all of the cartridges and drives to the SL8500 and later remove the 9310 without having to renumber your SL8500. To do this:
• Add the SL8500 library with config acs acs_id new without shutting down ACSLS.
• Move drives from the 9310 to the SL8500 and update the drive configurations in both ACSs with config acs acs_id .
• Remove cartridges from the 9310 and enter them into the SL8500.
• Finally, schedule an outage to shutdown ACSLS and remove the 9310 from the configuration using acsss_config. Do not configure the 9310. Remember to specify that the SL8500 is ACS 1 (not the default of zero).
• Configure a partitioned ACS
• Add or remove LSMs, since the config lsm utility only allows you to reconfigure an existing LSM.
Warning:
• Each ACS must have at least one CAP. This can be a CAP that is shared with another partition.
• There must be at least one drive configured to the entire ACSLS system.
Example: ACSLS supports four libraries. Three of the libraries can contain zero (0) drives. However, the fourth library must contain at least one drive.
Format
To add a new ACS, enter:
config acs new
To reconfigure an existing ACS, enter:
config acs acs_id

config acs
December 2012 Utility Reference 161
Adding a new ACS
To add a new ACS:
1. Enter:
config acs new
2. Specify the ACS number for the new ACS.
ACSLS lets you configure or re-configure libraries without assigning all ACS numbers in sequence.
The ACS numbers already used and the first five available ACS numbers are displayed.
Enter the ACS number for your new ACS.
3. Select whether the ACS is in a partitioned SL8500 or SL3000.
• If you enter y, you are asked for the partition ID for the ACS.
This partition ID must match the partition ID on the SL Console.
• If this is not a partitioned library or is SCSI/Fibre-attached, enter n.
ACSLS does not support partitioned SCSI/Fibre-attached libraries, such as the SL500. Also, partitioned SCSI/Fibre-attached libraries do not have partition IDs.
4. Enter the number of connections to the ACS followed by the device or host ID(s).
You can have a maximum of fifteen connections.
Note – Ensure that all ports are connected to the same ACS.
The new ACS configuration is displayed.
5. Confirm the addition of the new ACS.
After confirmation, the configuration information is displayed and the database is updated.
Reconfiguring an existing ACS
The ACS should, if possible, be online or in diagnostic mode when you reconfigure the ACS.
To reconfigure the ACS:
1. Enter:
config acs acs_id
The old and new configurations are displayed.
2. Confirm the new configuration.
After confirmation, the database is updated.
If the configuration is unchanged, the configuration is displayed without asking for confirmation, and the utility exits. Examples of this are:

config drives
162 ACSLS 8.1 Adminstrator’s Guide December 2012
• Only drive types and/or serial numbers change
• LSM serial number changes
• Only LSM type changes between 4410 and 9310
• Number of hands, such as SL8500 robots, change.
However, if these changes occur with other changes requiring confirmation, then you must confirm the new configuration. The database is then updated.
The ACS and its components are removed from the database
Limitation of config acs
• With SCSI-attached libraries, config acs updates only the drive configuration. A SCSI-attached library must be IPLed to recognize drives that are added, removed, or changed. All drives must be ready when the library is IPLed.
• For a SCSI-attached library, config acs will not update panel or CAP configurations. In order to update them, you must bring down ACSLS and use acsss_config.
config drivesThe config drives utility allows you to reconfigure all drives on an existing drive panel. This includes, adding drives, updating drive types and serial numbers for existing drives, and deleting drives that were removed from the database.
Use the config drives utility for dynamic changes to drive configurations, which include installation, replacement, or removal of drives on an existing drive panel. Other changes to tape library hardware configurations such as changes in the number and/or location of storage cells, number or size of CAPs, or replacement of a storage cell panel with a drive panel must be made using the config lsm or config acs utility. Please note:
• The LSM containing the panel with the changed drive configuration must be online or in diagnostic mode.
• On the drive panel being re-configured, all drives must be ready.
• A SCSI-attached library must be IPLed to recognize drives that are added, removed, or changed. All drives must be ready when the library is IPLed.
• When new drives replace existing drives, varying the LSMs or drive types online or running config drives automatically updates the drive types and drive serial numbers.
Format
config drive panel_id or config drives panel_id
Usage
To reconfigure all drives on an existing drive panel:

config lsm
December 2012 Utility Reference 163
1. Enter:
config drive panel_id or config drives panel_id
The old and new drive configurations are displayed for the panel.
2. Confirm the configuration change.
After confirmation the database is updated.
• If the configuration has not changed, the configuration is displayed without asking for confirmation, and the utility exits.
• If only drive types or serial numbers changed, the ACSLS database is updated without requesting confirmation.
config lsmThis utility allows you to reconfigure an existing LSM and all of its components. These components include CAPs, panels, and drives.
If you want to add or delete an LSM in an ACS, you must use the config acs utility.
Procedures for when Panels Change:
• If there are panels that are being removed or changed and have been emptied of cartridges, the LSM can remain online.
• If there are panels that are being removed or changed and contain cartridges, it is recommended that you vary the affected LSM to diagnostic until you re-configure the LSM and audit the panels affected. If you do not do this, mounts and dismounts may fail.
• If you have added panels and have manually placed cartridges in these panels, please run an audit to reconcile the database.
Format
config lsm lsm_id
Usage
To reconfigure the LSM:
1. Enter:
config lsm lsm_id
The old and new configurations are displayed.
A “y” next to the panel notifies you that the panel type(s) have changed. Look in the acsss_config.log file for details.
2. Confirm the new configuration.
After confirmation, the database is updated.

config ports
164 ACSLS 8.1 Adminstrator’s Guide December 2012
If the configuration is unchanged, the configuration is displayed without asking for confirmation, and the utility exits.
Minor changes are made automatically without confirmation. Examples are:
• Only drive types and/or serial numbers change
• LSM serial number changes
• Only LSM type changes between the 4410 and 9310
• Number of hands, such as SL8500 robots, change.
However, if these changes occur with other changes requiring confirmation, then you must confirm the new configuration. The database is then updated.
Limitation of config lsm
• With SCSI-attached libraries, config lsm updates only the drive configuration. A SCSI-attached library must be IPLed to recognize drives that are added, removed, or changed. All drives must be ready when the library is IPLed.
• It will not update panel or CAP configurations. In order to update them, you must bring down ACSLS and use acsss_config.
config portsThe config ports utility allows you to dynamically add port connections to an ACS.
Note – All new ports must be connected to the same ACS as existing ports.
Run config acs acs_id and then config ports acs_id.
If you want to replace one ACS with another ACS or change port connection addresses, you must bring down ACSLS and use acsss_config.
Format
config ports acs_id or config port acs_id
Usage
To add ports:
1. Enter:
config port acs_id or config ports acs_id
The current port connection for the specified ACS are displayed.
2. Enter the number of port connections for the specified ACS.
You can have a maximum of fifteen connections.
3. Specify the device or host ID (s).

db_export.sh
December 2012 Utility Reference 165
Note – Ensure that new ports are connected to the same ACS as existing ports.
The old and new configurations are displayed.
A change in the order of the ports is not a configuration change. The connections are displayed on the order they are currently recorded in the database.
4. Confirm the new configuration.
After confirmation, the database is updated.
If the configuration is unchanged, the configuration is displayed, and the utility exits.
Limitations of config ports
The config ports acs_id utility is not supported on a SCSI/Fibre-attached library.
The config ports utility will not delete or change a port (connection) to a library. In order to do this, you must bring down ACSLS and use acsss_config.
db_export.shThe db_export.sh utility exports the ACSLS database table data and ACSLS control files in preparation for an upgrade installation or a reinstallation of ACSLS.
Note – Run acsss disable before running db_export.sh.
Format
db_export.sh -f [ db_file | tape_device ]
Options
-f db_file
specifies a UNIX file to contain a backup of the ACSLS database. You must have write permissions to both the file and directory.
Notes:
• If you export the database to a file, the file must reside in a non-volatile directory. If your intention is to re-install ACSLS, the re-installation will destroy the $ACS_HOME or $ACSDB_BKUP (e.g. ./export/backup) directories. Consequently, you should place the exported file elsewhere in your file system.
• If you specify the filename without a path, db_export saves the database file under that filename in the current working directory. It saves the ACSLS control files in a file named <filename>.misc in the same directory.
-f tape_device
specifies any tape device attached and configured to the ACSLS server.
If no options are specified, the system defaults to the tape device.
db_import.sh
166 ACSLS 8.1 Adminstrator’s Guide December 2012
Usage
Use the db_export.sh utility to prepare for a reinstallation of ACSLS or an upgrade installation of ACSLS.
See also:
• “db_import.sh” on page 166
• “rdb.acsss” on page 183
• “Exporting the Database” on page 130
db_import.shThe db_import.sh utility imports the ACSLS database table data and the ACSLS control files that you exported when you used the db_export.sh utility. The ACSLS control files are located in $ACS_HOME/data/external and consist of user definable variables and configuration for ACSLS. They specify Access Control settings, scratch preferences, Extended Store LSMs, custom volrpt settings, volume attributes (for watch_vols utility), etc. The db_import.sh utility also provides disaster recovery capabilities, as well as the retention of your customized dynamic variables when moving to a different operating system or from an earlier release.
Format
db_import.sh -f [ db_file | tape_device ]
Options
-f db_file
specifies a UNIX file created by db_export.sh.
-f tape_device
specifies any tape device attached and configured to the ACSLS server.
If no options are specified, the system defaults to the tape device.
Usage
Use the db_import.sh utility to import the ACSLS database that you exported using the db_export.sh utility.
Note – The db_import utility will not run if ACSLS is running.
See also
• “db_export.sh” on page 165
• “rdb.acsss” on page 183
• “Importing the Database” on page 133
del_vol
December 2012 Utility Reference 167
del_volThe del_vol utility looks for a volume in the library. If it cannot find the volume, del_vol either marks the volume missing or absent or deletes it from the database, depending on your request.
If all of the referenced locations for the volume can't be verified (i.e., the LSM is offline or the drive is not ready), you are prompted to confirm marking the volume absent or deleting it unless the -n (no_confirm_flag) is on. It the volume is deleted, the volume and information associated with it, such as scratch pool membership and current and pending locks, are removed from the database.
Volume-related information is displayed unless the -q (quiet_flag) has been entered. If multiple options are used, they can be formatted either as separate options or as a contiguous string.
Before marking a volume absent or deleting it, del_vol asks you to confirm, unless the -n option is specified.
• If the volume is in the library, it remains an active volume in the database.
• If the volume cannot be located in the library, it is marked absent, unless you specify that the volume should be deleted.
• If cells or drives where the volume may be located are inaccessible (because libraries or drives are offline or inoperative), the volume is marked missing, unless you specify that the volume should be deleted.
Notes:
• This utility does not delete a volume that is found in the library.
• You can use the del_vol utility to remove a volume record without waiting for the expiration of an absent or ejected status.
• ACSLS must be running (enabled) to support the del_vol utility.
Format
del_vol [-n] [-d] [-f] [-q] vol_id
Options
-n
no-confirm mode; marks absent or deletes a volume that cannot be located without prompting the user for confirmation.
-q
quiet mode; do not print out all information extracted from the database.
-d
deletes the specified volume without waiting for the expiration of an absent or ejected status.
-f
drives_media.sh
168 ACSLS 8.1 Adminstrator’s Guide December 2012
permits you to re-enter cartridges that were stuck in a tape drive. With the -f option, you can delete a volume or mark it absent without verifying if the volume is actually in the library. This permits you to delete from the database a volume that was in a faulty tape drive. Using this option, you can remove the volume from the drive, delete it from the database, then re-enter the volume for normal library use while the drive is being repaired.
vol_id
The volume serial number to be deleted.
Note – If the volume serial number contains a dollar ($) sign, enclose it in single quotes. For example: del_vol ‘AB$001’
Usage
You can use del_vol to remove a cartridge from an offline LSM and then reenter it in an online LSM, so it can be automatically mounted. To do this:
• Remove the cartridge from the offline LSM.
• Use del_vol to mark the cartridge as absent.
• Enter the cartridge into the online LSM.
ACSLS and the database must be up and running (not idle) to use this utility.
Note – If you mistakenly delete a cartridge from the database, you should audit the sub-panel containing the home cell of the deleted cartridge to re-enter the cartridge into the database. Running del_vol while the system is in recovery can produce unpredictable results. The recovery sequence also happens during a vary LSM online.
Example
To delete cartridge U01102 without a printout of the cartridge information:
del_vol -q U01102
See Also
• “Using the Manual Volume Delete Utility” on page 122
drives_media.shThis routine displays all drive types, media types and drive-to-media compatibility that is supported by the current release of ACSLS. The information is normally displayed to standard output.
Refer to the ACSLS Product Information Guide for the current list of libraries, drive types, media types and drive-to-media compatibility supported.

ejecting.sh
December 2012 Utility Reference 169
Format
drives_media.sh [ -f, -h ]
Options
-f
the information is written to three files:
• /tmp/drive_types.txt
• /tmp/media_types.txt
• /tmp/media_compatibility.txt.
-h
displays the syntax message.
ejecting.sh The ejecting.sh utility takes a list of cartridges intended for ejecting and creates a file containing a set of eject commands optimized for the specified CAP. The input file must contain a simple list of cartridges that are to be ejected. The resulting series of optimized eject commands must be input to cmd_proc to eject the volumes. The eject commands from ejecting.sh are sent to standard out and can be piped directly to cmd_proc
Format
ejecting.sh <CAP-id> <volume list file>
Options
CAP-id
the CAP containing the cartridges to be ejected.
volume list file
list of cartridges to be ejected.
The volume IDs in the file must follow these rules:
• One cartridge-id per line.
• The vol_ids must be valid ACSLS volume IDs.
Usage
• This script checks for the validity of the CAP-id argument and if the specified CAP does not exist, it displays the message CAP <CAP-id> not found.
free_cells.sh
170 ACSLS 8.1 Adminstrator’s Guide December 2012
• The script also determines the number of cells in the specified CAP and then formats an eject command to completely fill the CAP (as long as the CAP contains 42 cartridges or less). The script continues to create eject commands to completely fill the CAP. This is repeated until all of the cartridges in the incoming cartridge list have been included in the output.
Note – A maximum or 42 cartridges can be ejected to the CAP in a single eject command. Thus, only 42 cartridges are ejected to an SL3000 AEM at a time.
Examples
Example 1:
In this example a series of optimized eject commands are sent to standard out and piped directly to cmd_proc:
ejecting.sh 0,0,0 volume_list_file | cmd_proc -lq
Example 2:
The output is redirected to a file by one of the following methods:
ejecting.sh 0,0,0 volume_list_file > eject.dat
ejecting.sh 0,0,0 volume_list_file | tee eject.dat
The tee directs the output to both a terminal screen and the specified file.
If the output of this script has been redirected to a file, you may use that file as input for cmd_proc as follows:
cmd_proc -lq < eject.dat
free_cells.shThe free_cells.sh utility allows you to monitor and manage the free cells in libraries managed by ACSLS. This utility reports the free cell count for LSM, ACS, and the ACSLS server.
Note – Since free_cells.sh reads every cell record in the database, it is recommended that you run this utility infrequently, such as only during periods of low database activity.
This utility is located in the $ACS_HOME/utils directory
Format
free_cells.sh
Option
-a
displays the free cells, allocated cells and the total number of cells in each ACS and LSM, as well as those managed by the ACSLS server.

free_cells.sh
December 2012 Utility Reference 171
Examples
Free cells in each LSM
• LSM is not a L5500 (lists only the total free cells)
• No options selected
LSM 1,3
Total free cells = 2,345
• -a option (also lists allocated cells and total cell count)
LSM 1,3
Total free cells = 3,345 Allocated cells = 3,155 Total cells = 6,500
• LSM is a L5500 (lists LTO and non-LTO free cells separately)
• No options selected
LSM 0,2
LTO free cells = 573 non-LTO free cells = 467 Total free cells = 1,040
• -a option (also lists allocated cells and total cell count)
LSM 0,2
LTO free cells = 573 non-LTO free cells = 467 Total free cells = 1,040 Allocated cells = 4,460 Total cells = 5,500
Free cells in each ACS
If there is only one LSM in the ACS, only the ACS is listed as shown in the following examples.
• ACS does not include any L5500s
• No options selected (displays only the total free cell count)
ACS 1
Total free cells = 5,342
• -a option (also displays allocated cells and total cell count)
ACS 1
Total free cells = 5,342 Allocated cells = 5,658 Total cells = 11,000
• ACS includes L5500 (displays LTO and non-LTO free cells separately)
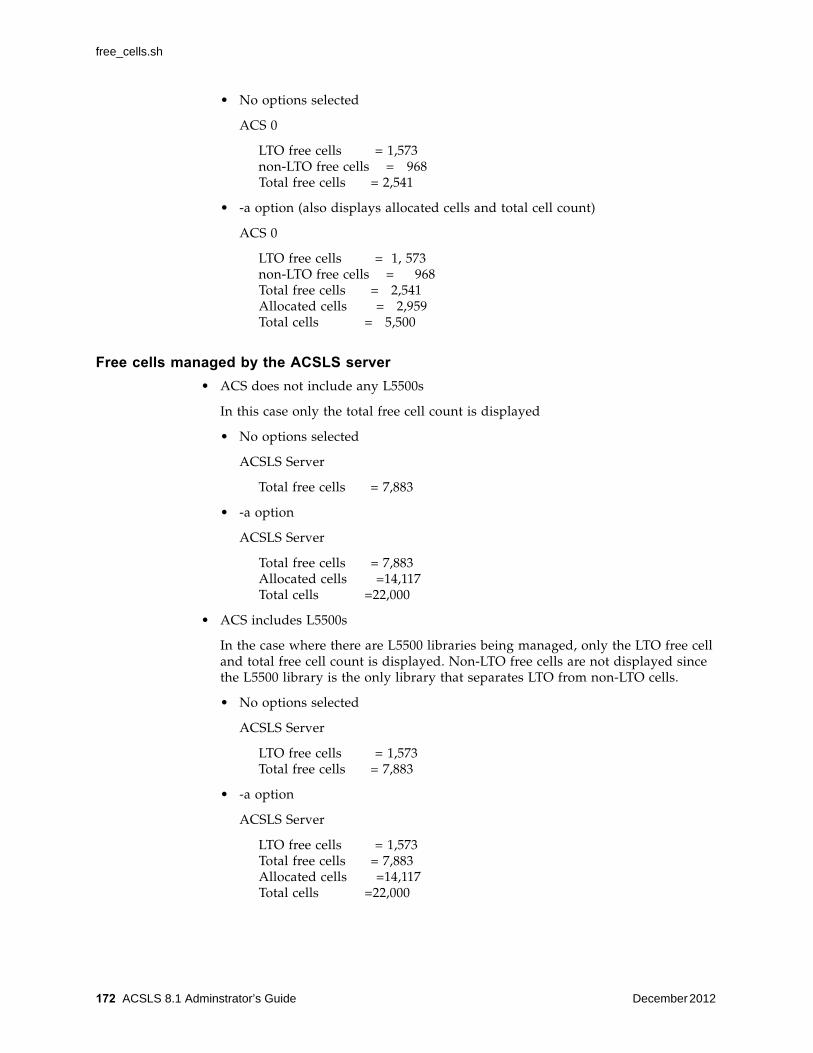
free_cells.sh
172 ACSLS 8.1 Adminstrator’s Guide December 2012
• No options selected
ACS 0
LTO free cells = 1,573 non-LTO free cells = 968 Total free cells = 2,541
• -a option (also displays allocated cells and total cell count)
ACS 0
LTO free cells = 1, 573 non-LTO free cells = 968 Total free cells = 2,541 Allocated cells = 2,959 Total cells = 5,500
Free cells managed by the ACSLS server
• ACS does not include any L5500s
In this case only the total free cell count is displayed
• No options selected
ACSLS Server
Total free cells = 7,883
• -a option
ACSLS Server
Total free cells = 7,883 Allocated cells =14,117 Total cells =22,000
• ACS includes L5500s
In the case where there are L5500 libraries being managed, only the LTO free cell and total free cell count is displayed. Non-LTO free cells are not displayed since the L5500 library is the only library that separates LTO from non-LTO cells.
• No options selected
ACSLS Server
LTO free cells = 1,573 Total free cells = 7,883
• -a option
ACSLS Server
LTO free cells = 1,573 Total free cells = 7,883 Allocated cells =14,117 Total cells =22,000

getHba.sh
December 2012 Utility Reference 173
getHba.shThe getHba.sh utility manages Fibre Channel HBA ports.
Format
getHba.sh
The getHba.sh utility is run at install time and is called by install_acsss.sh which is called by install.sh. The utility can be run directly any time a new HBA has been added to the system or any time the HBA ports are re-arranged. This utility identifies an appropriate HBA port to change from initiator to target mode in order to reveal a client access point to ACSLS logical libraries.
The best way to use this utility to set up your FC connections before getHba.sh is run. This enables getHba.sh to show you useful information about the existing connections.
The utility first assesses whether a target mode adapter has already been configured. If no target ports exist, the flow of the utility continues as discussed below. If the utility senses any existing target port, it displays the following menu of choices:
Please select a desired action:
1. Keep the existing HBA port configuration. 2. Configure an additional target-mode port. 3. Restore an existing target port to initiator mode.
Example of Option 2
Please select which local HBA port is to be changed to Target mode:
Select from the following list:
1. HBA Port WWN 2100001b32055d85 Not connected. 2. HBA Port WWN 2101001b32255d85 Connected to a remote HBA. 3. HBA Port WWN 2102001b32055d85 Connected to a target device. 4. None of these.
Note – If you have no intention of using the logical library feature select "none of these".
Once you make the selection, you are asked for confirmation:
Option Description
1 Exits this utility.
2 The utility lists the ports that are currently operating in initiator mode. When a port shows "Connected to a remote HBA", it's means there is an initiator at the other end, making it a potential candidate to become an ACSLS target port. When a port shows "Connected to a target device", there is probably a tape library or disk attached, so that port would be a bad choice for target mode operations.
3 Identifies each port configured for target mode operations and prompts you for confirmation to restore that port to initiator mode.
get_license_info
174 ACSLS 8.1 Adminstrator’s Guide December 2012
2
HBA Port WWN 2101001b32055d85 /pci@0,0/pci10de,377@f/pci1077,143@0
Is this correct? (y or n):
You are given the opportunity to change your mind. If you respond, "n" then the list of available ports are again displayed with a prompt for your selection. If you respond, “y” then you are asked if there are additional ports you want to reconfigure.
The utility proceeds to add a target group and a target group member, and you are instructed to reboot the server for the target-mode changes to take effect.
Creating Target Group 2101001b32255d85
Example of Option 3
This option enables you to unconfigure an existing target and restore the HBA to its native mode as an initiator.
# cd /export/home/ACSSS/install # ./getHba.sh
A Target-mode port has already been configured: Target: wwn.2100001B32050A28 Connected to ... Initiator: wwn.210100E08BA61A29
Please select a desired action: 1) Keep the HBA port configuration as it is. 2) Configure an additional target-mode port. 3) Restore a target port to initiator mode.
3
Target: wwn.2100001b32050a28
Do you wish to restore this port to initiator mode? (y or n): y
Removing 'qlt' binding in /etc/driver_aliases
Are there additional ports you wish to reconfigure? (y or n): n
A reboot will be necessary for these changes to take effect.
get_license_infoThis utility has been removed beginning with releases ACSLS 7.3.1 and 8.0.1 as software enforcement of the right-to-use license is no longer employed in ACSLS. To display and manage the number of free cells in ACSLS controlled libraries use “free_cells.sh” on page 170.
greplogUse the greplog utility to filter the acsss_event log to include or to exclude messages containing specific keywords. The syntax of this routine is similar to the Unix 'grep' function. greplog is specifically designed for use with the acsss_event.log, but it may function with any type of message file where the records are separated by an empty line.

licensekey.sh
December 2012 Utility Reference 175
Format
greplog -[v|i] <keyword> <logfile>
Options
-v
Optional. greplog displays all the messages in the log except those which include the keyword.
-i
Optional. greplog ignores the characters in the specified keyword.
-keyword
returns the complete multi-line message containing the keyword.
-logfile
list of log files.
Usage
Since the utility is specifically designed for log files, greplog returns the complete multi-line message containing the keyword rather than a single line containing that word. Using the -i option, greplog ignores the characters in a specified keyword. Using the -v option, greplog displays all of the messages in the log except those which include the keyword. greplog is specifically designed for use with the acsss_event.log, but it may function with any type of message file where the records are separated by an empty line.
licensekey.shhas been removed beginning with releases ACSLS 7.3.1 and 8.0.1 as license key validation is no longer employed.
moving.shThe moving.sh utility moves multiple cartridges to one or more LSMs. This utility reads a file that lists the cartridges to be moved. These cartridges can be:
• Cartridges in one or more LSMs
• Cartridges on a panel being moved to other panels in the same LSM or other LSMs
• Any group of cartridges you select
The limitations of moving.sh are:
• All destination LSMs and cartridges in the vol_list_file must be in same ACS
• If any destination LSM is offline or does not contain any free cells, no cartridges are moved to that LSM
moving.sh
176 ACSLS 8.1 Adminstrator’s Guide December 2012
Notes:
• The moving.sh utility runs only if ACSLS is running
• Internally, moving.sh moves only one cartridge at a time to avoid impacting library performance (mounts and dismounts)
• You can run multiple move utilities in parallel after creating separate lists of volumes. Please note that if:
• the destination LSM is same, you should make sure that there are enough free cells in the LSM to accommodate all cartridges
• you are moving within one SL8500 library - there are only two elevators, so running more than two move utilities at a time will not increase performance
Format
moving.sh -f vol_list_file -t lsm_id or list of lsm_
Where:
• -f vol_list_file
The name of the file containing the list of volumes to be moved.
Note – The volume IDs must follow these rules: One cartridge-id per line; The vol_ids must be valid ACSLS volume IDs; If the vol_ids include trailing or leading spaces, they must be enclosed within single quotes or double quotes.
• -t lsm_id s
Specifies one or more LSM IDs to which the cartridges are moved. Each LSM ID should be separated by a space and belong to the same ACS.
Usage
Use the moving.sh utility to move a list of cartridges to other LSMs or from one panel to other panels in the same LSM.
You can use either a custom volume report or the display volume command to create a file containing the list of volumes to be moved from an LSM.
You want to use the moving.sh utility:
• When a SL8500 is initially partitioned or re-partitioned, and one or more rails (LSMs) are removed from an existing partition (ACS), moving.sh can move cartridges from the LSM being removed from the partition to the LSM(s) that remains in the partition.
• When any LSM(s) is removed from an ACS, moving.sh can move cartridges to the LSMs that remains in the ACS.
For example, if SL8500s are removed from a library complex (ACS), moving.sh moves cartridges from the SL8500s that are being removed to the LSMs that will remain in the library. This also applies when 9310 LSMs are removed from an ACS of 9310s.

moving.sh
December 2012 Utility Reference 177
• When a storage expansion module(s) is removed from an SL8500, cartridges can be moved from the panels being removed to the panels that remains in the library.
• To optimize library performance you may need to move inactive cartridges to an LSM with few or no drives that are used to archive cartridges. This frees up space in LSMs with drives for new, active cartridges.
Creating the Volume List File
Before you begin, you must create a file that contains the list of volumes to be moved from an LSM. You can use either the volrpt (custom volume report) or the display volume command.
• Create a vol_list_file
volrpt -d -f custom_volrpt_input -l lsm_id > vol_list_file
Where the custom_volrpt_input file is:
VOLUME_ID 6
Sample output
$ volrpt -d -f my_custom -l 0,2 > my_file_list $ cat my_file_list ABC744 ABC748 ABC756 ACS151 EN0823 O00373
• Using the display volume command to create the vol_list_file
a. Display the list of volumes.
Example:
display volume * -home acs,lsm,panel,*,* -f vol_id
This example selects all volumes on the panel identified by the -home parameter. Row and column are wild-carded. Only the vol_id is output.
Sample output
ACSSA> display volume * -home 0,3,5,*,* -f vol_id 2007-02-12 15:31:45 Display Volume Vol_id PG0350 PG0353 PG0356 PG0358 PQ0616
a. Create and name your vol_list_file.
a. Cut and paste the list of volumes (created from the display command) into this file.
a. Edit the output.

moving.sh
178 ACSLS 8.1 Adminstrator’s Guide December 2012
The vol_list_file cannot contain any blank lines and leading spaces. Use to following vi command to eliminate them.
:%s/^[ ]*//g
If you do not do this, you get an error message as shown in the following example.
$ moving.sh -f my_file_list -t 0,2
Error in file my_file_list. Invalid entry ABC748 ABC756 ACS151 EN0823
This error message was generated because there was an extra space before volumes ABC748 and 756.
Procedures for Moving a Group of Cartridges
The following procedures describe how to:
• move cartridges before removing an LSM from an ACS
• move cartridges before changing or removing panels
Moving Cartridges Before Removing an LSM from an ACS
After a library is re-configured or re-partitioned and if an LSM is removed from an ACS, all cartridges in the LSM become inaccessible. So, before the LSM is removed, all its cartridges should be moved to LSM(s) that will remain in the ACS. Use the following procedure:
• When a rail (LSM) is removed from a legacy partition in a partitioned SL8500.
• When an LSM(s) is removed from an ACS. The ACS can include 9310s or an SL8500 library.
1. Plan your new configuration.
• Organize the cartridges and drives for performance.
• Empty an LSM shortly before you change the library configuration.
• Determine how many cartridges you have in the LSMs that you are emptying, and how many free cells in the LSMs to which you are moving cartridges.
Use free_cells.sh -a to find out the number of cartridges in these LSMs (allocated cells) and free cells.
2. Schedule the move and reconfiguration.
• Schedule the move to minimize the impact on your system.
Moving the cartridges takes time, and reconfiguring a library or re-partitioning an SL8500 is disruptive.
• Make sure there are enough free cells in the target LSM(s) for the cartridges being moved. If you have to, eject cartridges to free up space.
moving.sh
December 2012 Utility Reference 179
3. Vary all of the drives in the LSM being removed offline.
This prevents:
• Contention for robots in the LSM.
• Mounts to this LSM.
Otherwise, cartridges mounted to this LSM can float to new home cells in the LSM, filling up the LSM that you are trying to empty.
4. Vary the LSM being emptied to diagnostic mode to restrict access to only the cmd_proc using:
vary lsm lsm_id diagnostic
Example: vary lsm 0,1 diagnostic
5. Run a custom volrpt to output all of the cartridges in the LSM being emptied to a file, using the following command:
volrpt -f custom_volrpt_input -l from_lsm_id > move_vols_list
Where the custom-volrpt_input is:
VOLUME_ID 6
Example:volrpt -f volrpt_input -l 0,1 > move_vols_list
Refer to “Creating a Custom Volume Report” on page 143 for more information.
6. Move the cartridges out of the LSM being emptied, using the following:
moving.sh -f move_vols_list -t dest_lsm_id(s)
7. Check that the LSM is empty using volrpt since cartridges may have been entered into the LSM or may have “floated” into it.
volrpt -l from_lsm_id
If it is not empty run the custom volrpt again to select the volumes that are now in the LSM. Then, run moving.sh again (steps 3 and 4).
Note – Do not run moving.sh again with the original list of volumes.
8. Vary the LSM being emptied offline to prevent volumes from being moved to it.
vary lsm lsm_id offline
Note – Remove the LSM from the partition and/or ACS.
9. Reconfigure the ACS, using either config acs acs_id or acsss_config.
Moving Cartridges Before Removing Cells from a Partition
The SL3000 can partition down to the drive and cell level, and an SL8500 can partition to the drive and cell array level with enhanced partitioning.
Caution – If cells are reassigned from one partition to another, the cartridges in those cells will be orphaned, and will no longer be accessible by the partition that they were in before. The host managing the other partition could write over the data on the cartridges.

moving.sh
180 ACSLS 8.1 Adminstrator’s Guide December 2012
To prevent cartridges from being orphaned when partition boundaries change: before re-partitioning the library move them to cells that will remain in the partition. Since SL3000 is a single LSM, the existing ACSLS move command does not work, since you would just move them somewhere else in the library. You might also move them to another cell that will also be removed from the partition.
Use one of the following methods to move your cartridges:
• Use the StorageTek Library Console (SL Console).
You must audit the library to audit your volume’s locations.
Refer to the SL8500 or SL3000 User’s Guide for detailed information and procedures.
• Use the following ACSLS procedure:
1. Use “volrpt” on page 193 or “display volume” on page 318 to display volume locations.
2. Display a list of available (empty) cells in a specific panel using the display command:
display cell a,l,p,*,* -status empty -f status
For more information, refer to “display cell” on page 303.
3. Move the cartridges to a specific cell by specifying a free cell instead of an LSM ID. For a cell move, use the move command:
move AAAAAA a,l,p,r,c
Moving Cartridges Before Changing or Removing Panels
You need to move the cartridges before changing a cell panel to a drive panel in a 9310 or removing a storage expansion module in an SL8500.
Steps 1 - 4 as procedures as“Moving Cartridges Before Removing an LSM from an ACS” on page 178.
Step 5: Select the cartridges in the panel being emptied, and output them to a file.
a. Run a custom volrpt to output all of the cartridges in the LSM being emptied to a file. Include the panel number (in the home cell ID).
volrpt -f custom_volrpt_input -l from_lsm_id > move_vols_list_1
Where the custom-volrpt_input is:
VOLUME_ID 6 CELL_ID 14
Select the volumes in the panel(s) being emptied and output these vol_ids to your move_vols_list_2.
a. Select the cartridges in a panel being emptied using the display volume command.
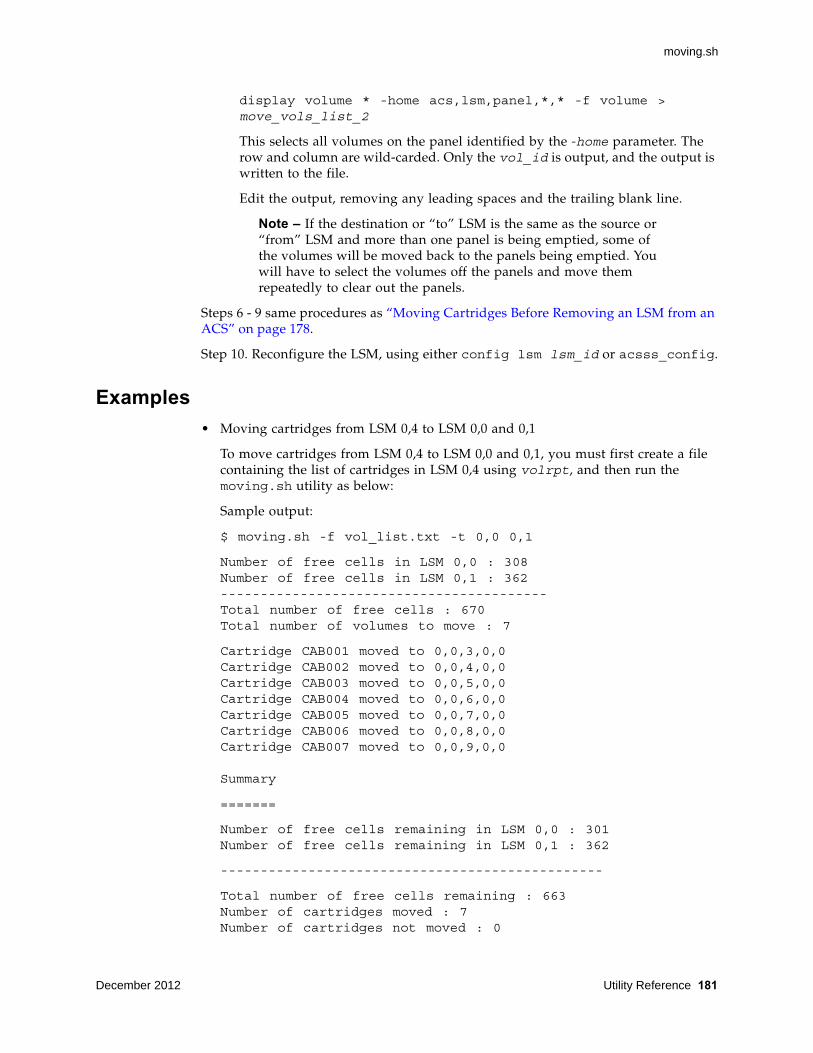
moving.sh
December 2012 Utility Reference 181
display volume * -home acs,lsm,panel,*,* -f volume > move_vols_list_2
This selects all volumes on the panel identified by the -home parameter. The row and column are wild-carded. Only the vol_id is output, and the output is written to the file.
Edit the output, removing any leading spaces and the trailing blank line.
Note – If the destination or “to” LSM is the same as the source or “from” LSM and more than one panel is being emptied, some of the volumes will be moved back to the panels being emptied. You will have to select the volumes off the panels and move them repeatedly to clear out the panels.
Steps 6 - 9 same procedures as “Moving Cartridges Before Removing an LSM from an ACS” on page 178.
Step 10. Reconfigure the LSM, using either config lsm lsm_id or acsss_config.
Examples
• Moving cartridges from LSM 0,4 to LSM 0,0 and 0,1
To move cartridges from LSM 0,4 to LSM 0,0 and 0,1, you must first create a file containing the list of cartridges in LSM 0,4 using volrpt, and then run the moving.sh utility as below:
Sample output:
$ moving.sh -f vol_list.txt -t 0,0 0,1
Number of free cells in LSM 0,0 : 308 Number of free cells in LSM 0,1 : 362 ----------------------------------------- Total number of free cells : 670 Total number of volumes to move : 7
Cartridge CAB001 moved to 0,0,3,0,0 Cartridge CAB002 moved to 0,0,4,0,0 Cartridge CAB003 moved to 0,0,5,0,0 Cartridge CAB004 moved to 0,0,6,0,0 Cartridge CAB005 moved to 0,0,7,0,0 Cartridge CAB006 moved to 0,0,8,0,0 Cartridge CAB007 moved to 0,0,9,0,0 Summary
=======
Number of free cells remaining in LSM 0,0 : 301 Number of free cells remaining in LSM 0,1 : 362
------------------------------------------------
Total number of free cells remaining : 663 Number of cartridges moved : 7 Number of cartridges not moved : 0
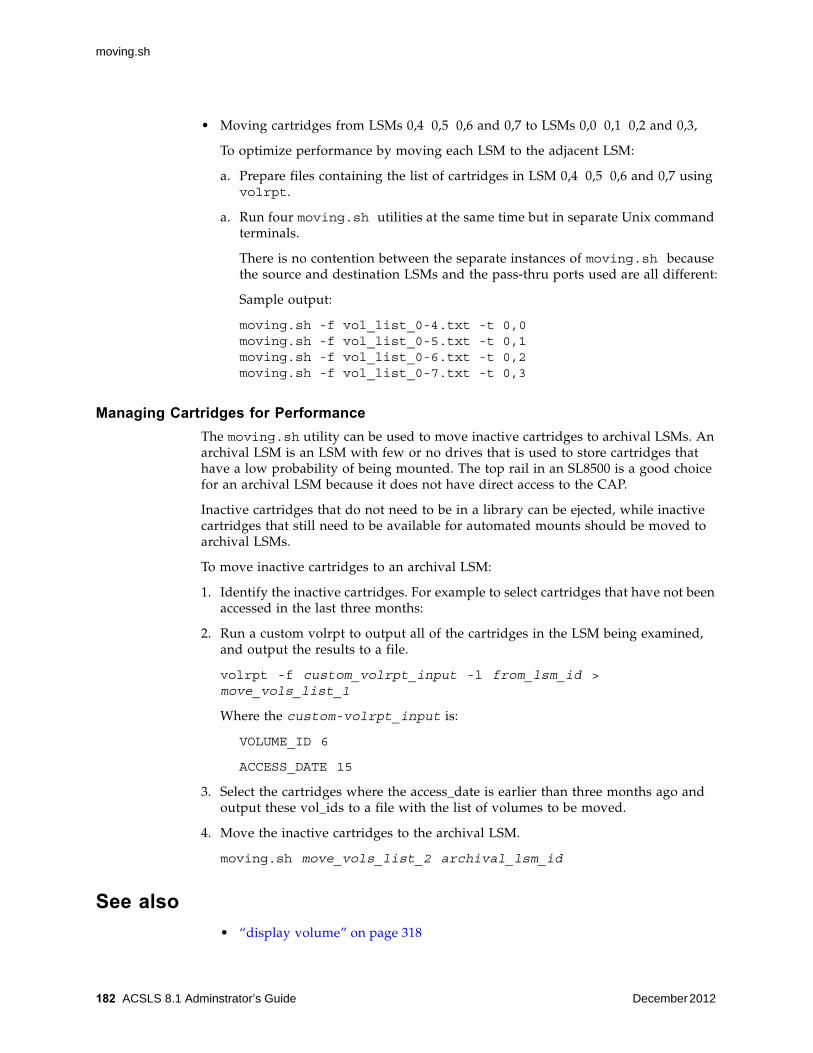
moving.sh
182 ACSLS 8.1 Adminstrator’s Guide December 2012
• Moving cartridges from LSMs 0,4 0,5 0,6 and 0,7 to LSMs 0,0 0,1 0,2 and 0,3,
To optimize performance by moving each LSM to the adjacent LSM:
a. Prepare files containing the list of cartridges in LSM 0,4 0,5 0,6 and 0,7 using volrpt.
a. Run four moving.sh utilities at the same time but in separate Unix command terminals.
There is no contention between the separate instances of moving.sh because the source and destination LSMs and the pass-thru ports used are all different:
Sample output:
moving.sh -f vol_list_0-4.txt -t 0,0 moving.sh -f vol_list_0-5.txt -t 0,1 moving.sh -f vol_list_0-6.txt -t 0,2 moving.sh -f vol_list_0-7.txt -t 0,3
Managing Cartridges for Performance
The moving.sh utility can be used to move inactive cartridges to archival LSMs. An archival LSM is an LSM with few or no drives that is used to store cartridges that have a low probability of being mounted. The top rail in an SL8500 is a good choice for an archival LSM because it does not have direct access to the CAP.
Inactive cartridges that do not need to be in a library can be ejected, while inactive cartridges that still need to be available for automated mounts should be moved to archival LSMs.
To move inactive cartridges to an archival LSM:
1. Identify the inactive cartridges. For example to select cartridges that have not been accessed in the last three months:
2. Run a custom volrpt to output all of the cartridges in the LSM being examined, and output the results to a file.
volrpt -f custom_volrpt_input -l from_lsm_id > move_vols_list_1
Where the custom-volrpt_input is:
VOLUME_ID 6
ACCESS_DATE 15
3. Select the cartridges where the access_date is earlier than three months ago and output these vol_ids to a file with the list of volumes to be moved.
4. Move the inactive cartridges to the archival LSM.
moving.sh move_vols_list_2 archival_lsm_id
See also
• “display volume” on page 318

probeFibre.sh
December 2012 Utility Reference 183
• “volrpt” on page 193
probeFibre.shThis utility displays all direct-attached or SAN-attached libraries behind a contemporary fibre-channel HBA. In the case of native Emulex or QLogic cards, probeFibre.sh relies on the Emulex 'hbacmd' or the QLogic scli utility to collect the vital product data. The probeFibre.sh utility displays the model number of the HBA, revision level, World Wide Name (WWN), and LUN ID of each fibre-attached library, as well as the World Wide Port Name (WWPN).
The probeFibre.sh utility can be run even before the mchanger devices are created for each library.
This utility requires root access.
Format
probeFibre.sh [-v] [-p]
Options
-v
displays the model number of the host bus adapter (BHA), as well as the attached library devices.
-p
produces an output that includes vendor:model:wwn:lun:wwpn with each field delimited by a colon.
rdb.acsssThe rdb.acsss utility restores the ACSLS database and the ACSLS Control files using a backup created by either the automatic backup function or the bdb.acsss utility. The ACSLS Control files are located in $ACS_HOME/data, and define several different environmental variables for ACSLS. They specify Access Control settings, scratch preferences, Extended Store LSMs, custom volrpt settings, and volume attributes (for watch_vols utility), etc.
Note – You need to rewind or position the tape device before you restore the ACSLS database and control files from tape. To do this, rewind or position the tape to the exact location where the backup files resided before running rdb.acsss.
For Solaris use one of the following:
mt -f /dev/rmt/0mn rewind
mt -f /dev/rmt/0mn nbsf 1

rdb.acsss
184 ACSLS 8.1 Adminstrator’s Guide December 2012
Format
rdb.acsss
Menu Options
When you run rdb.acsss, a menu displays four options:
1 Restore from a current local disk backup
All of the current ACSLS backup files on the local disk or listed.
Explanation: The database is restored to the backup. ACSLS Control files are restored from the backup only. The backups are saved in the default backup directory ($ACSDB_BKUP). The database is restored to any database backup listed and selected. Usually there are 8 different dates listed, but this varies depending on the database retention period set in acsss_config.
Usage: Use this option to restore a corrupted database. With this option, all backups are displayed and you can restore to any displayed database backup.
Example:
Menu choice: 1
rcvr_previous.sh 2642: ACSLS database recovery started.
You have taken backups on the following days. Please enter the corresponding date and time to the backup that you wish to recover from. ACSLS database and control files will be restored to that time.
2011-10-02 04:38:48
2011-10-03 00:00:01
2011-10-04 00:00:01
2011-10-05 00:00:01
FIGURE 11-1 rdb.acsss Menu Options
Please enter the number followed by Return for your choice from
the following menu.
Press? followed by the Return key for help.
1: Restore from a list of current local disk backup files
2: Restore from a previous tape or file backup
3: Restore database only (do not include ACSLS control files)
4: Restore only ACSLS non-database control files
E: Exit
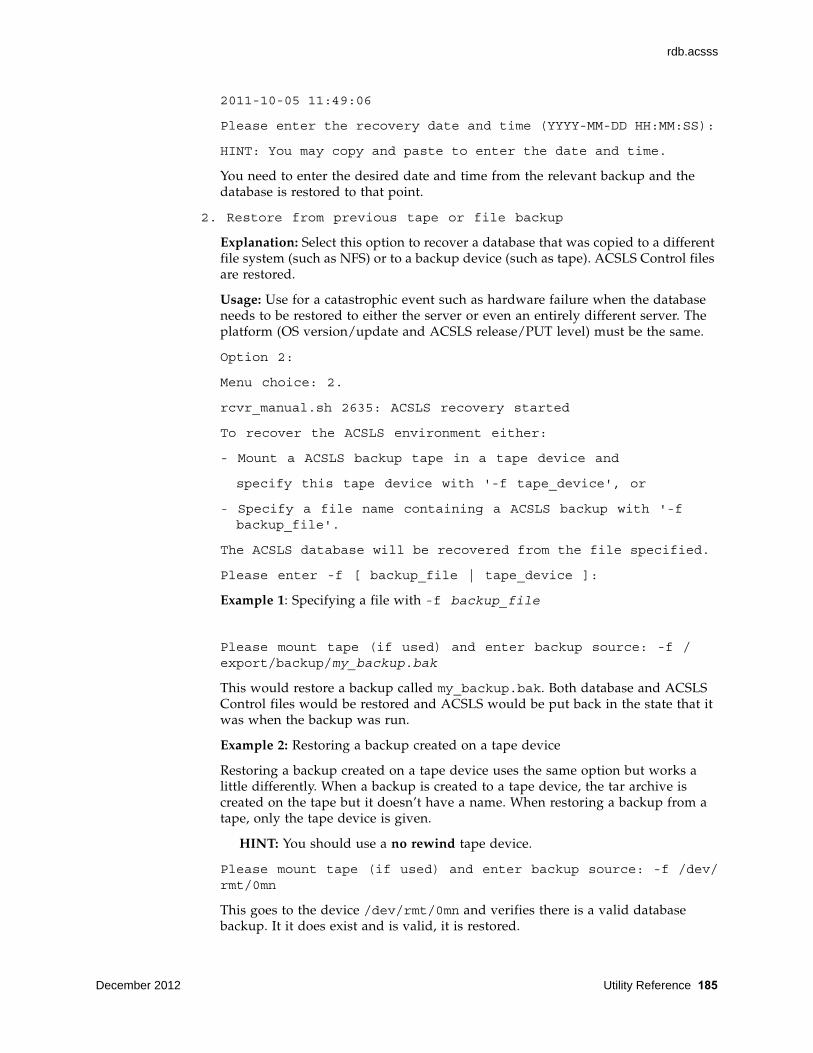
rdb.acsss
December 2012 Utility Reference 185
2011-10-05 11:49:06
Please enter the recovery date and time (YYYY-MM-DD HH:MM:SS):
HINT: You may copy and paste to enter the date and time.
You need to enter the desired date and time from the relevant backup and the database is restored to that point.
2. Restore from previous tape or file backup
Explanation: Select this option to recover a database that was copied to a different file system (such as NFS) or to a backup device (such as tape). ACSLS Control files are restored.
Usage: Use for a catastrophic event such as hardware failure when the database needs to be restored to either the server or even an entirely different server. The platform (OS version/update and ACSLS release/PUT level) must be the same.
Option 2:
Menu choice: 2.
rcvr_manual.sh 2635: ACSLS recovery started
To recover the ACSLS environment either:
- Mount a ACSLS backup tape in a tape device and
specify this tape device with '-f tape_device', or
- Specify a file name containing a ACSLS backup with '-f backup_file'.
The ACSLS database will be recovered from the file specified.
Please enter -f [ backup_file | tape_device ]:
Example 1: Specifying a file with -f backup_file
Please mount tape (if used) and enter backup source: -f /export/backup/my_backup.bak
This would restore a backup called my_backup.bak. Both database and ACSLS Control files would be restored and ACSLS would be put back in the state that it was when the backup was run.
Example 2: Restoring a backup created on a tape device
Restoring a backup created on a tape device uses the same option but works a little differently. When a backup is created to a tape device, the tar archive is created on the tape but it doesn’t have a name. When restoring a backup from a tape, only the tape device is given.
HINT: You should use a no rewind tape device.
Please mount tape (if used) and enter backup source: -f /dev/rmt/0mn
This goes to the device /dev/rmt/0mn and verifies there is a valid database backup. It it does exist and is valid, it is restored.
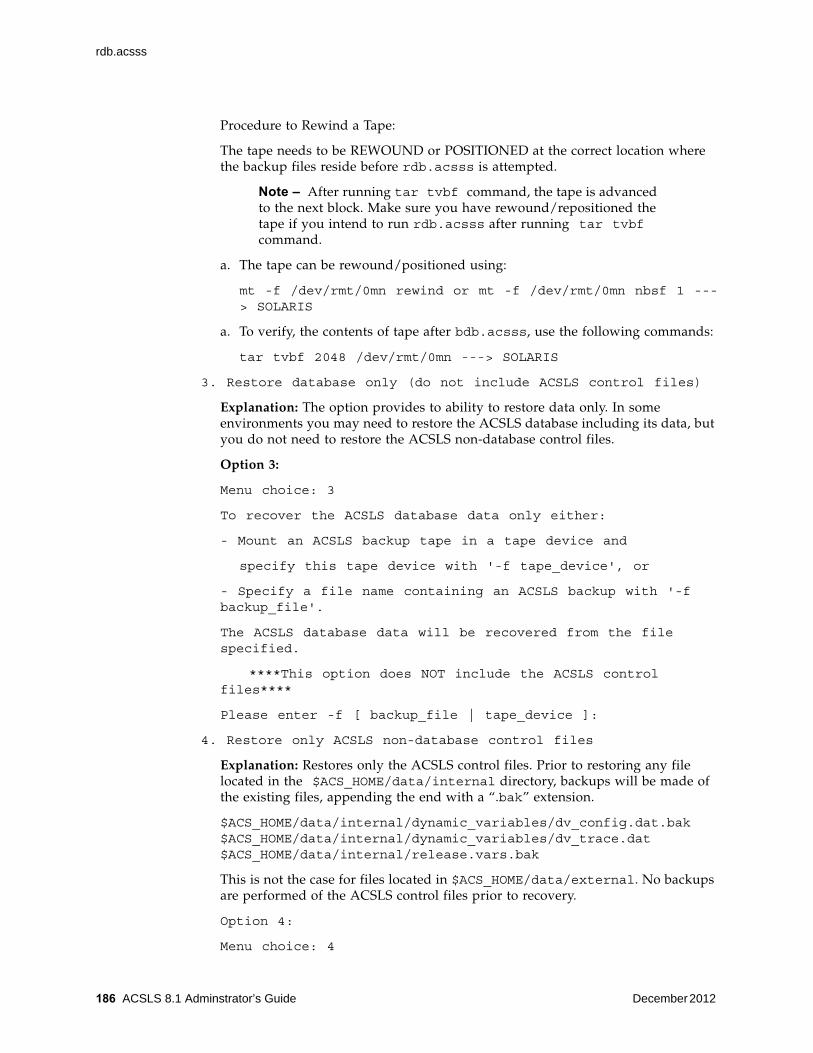
rdb.acsss
186 ACSLS 8.1 Adminstrator’s Guide December 2012
Procedure to Rewind a Tape:
The tape needs to be REWOUND or POSITIONED at the correct location where the backup files reside before rdb.acsss is attempted.
Note – After running tar tvbf command, the tape is advanced to the next block. Make sure you have rewound/repositioned the tape if you intend to run rdb.acsss after running tar tvbf command.
a. The tape can be rewound/positioned using:
mt -f /dev/rmt/0mn rewind or mt -f /dev/rmt/0mn nbsf 1 ---> SOLARIS
a. To verify, the contents of tape after bdb.acsss, use the following commands:
tar tvbf 2048 /dev/rmt/0mn ---> SOLARIS
3. Restore database only (do not include ACSLS control files)
Explanation: The option provides to ability to restore data only. In some environments you may need to restore the ACSLS database including its data, but you do not need to restore the ACSLS non-database control files.
Option 3:
Menu choice: 3
To recover the ACSLS database data only either:
- Mount an ACSLS backup tape in a tape device and
specify this tape device with '-f tape_device', or
- Specify a file name containing an ACSLS backup with '-f backup_file'.
The ACSLS database data will be recovered from the file specified.
****This option does NOT include the ACSLS control files****
Please enter -f [ backup_file | tape_device ]:
4. Restore only ACSLS non-database control files
Explanation: Restores only the ACSLS control files. Prior to restoring any file located in the $ACS_HOME/data/internal directory, backups will be made of the existing files, appending the end with a “.bak” extension.
$ACS_HOME/data/internal/dynamic_variables/dv_config.dat.bak $ACS_HOME/data/internal/dynamic_variables/dv_trace.dat $ACS_HOME/data/internal/release.vars.bak
This is not the case for files located in $ACS_HOME/data/external. No backups are performed of the ACSLS control files prior to recovery.
Option 4:
Menu choice: 4
showDevs.sh
December 2012 Utility Reference 187
To recover the ACSLS non-database control files either:
- Mount an ACSLS backup tape in a tape device and
specify this tape device with '-f tape_device', or
- Specify a file name containing an ACSLS backup with '-f backup_file'.
ACSLS non-database control files will be recovered from the file specified.
Please enter -f [ backup_file | tape_device ]:
Example:
Please enter -f [ backup_file | tape_device ]: -f /export/home/my_file.bak
• -f /export/home/my_file.bak recovers the ACSLS control files from the specified file
• -f /dev/rmt/0mn recovers ACSLS control files from the specified tape device
5. Exit
When you exit the rdb.acsss utility, a backup in initiated to the default directory, $ACSDB_BKUP.
See Also: Recovery procedures for:
• “Restoring the Database to the Most Recent Backup” on page 139
• “Recovering from a Failed Server” on page 140
• “bdb.acsss” on page 157
showDevs.shThe showDevs.sh utility displays the critical device attributes associated with each mchanger instance in the /dev directory. Critical attributes include the library model number, cell capacity, number of attached drives, and WWN-LUN address. The utility also displays the model number of the host bus adapter that is associated with each mchanger device. Additional attributes can be displayed using the options below.
Note – As user root, use probeFibre.sh to display the WWN and WWPN for each HBA and for attached library.
Format
showDevs.sh [-w][-s]
Usage
The utility can be run as root or as acsss. Each user ID provides a different set of capabilities. For example:

stats_report
188 ACSLS 8.1 Adminstrator’s Guide December 2012
• acsss
User acsss lists the serial number and the number of cells and drives associated with each library
• root
User root lists serial number and the number of cells and drives associated only for libraries that are not online to ACSLS.
User root is also able to display the WWNN and WWPN of each fibre-attached library.
Options
This utility can be run with several options.
no argument
This option displays each HBA, mchanger, code level, and number of cells and drives.
-w
World Wide Names. Displays HBA information, mchanger, WWPN, LUN, and number of cells and drives
-s
Serial number. Displays HBA information, mchanger, serial number, version, and number of cells and drives.
stats_reportThe stats_report utility generates library volume statistics reports. To run this utility, you must be logged in as acsss.
Format
stats_report [vol_statsX.log ...]
Where:
vol_statsX.log -
1. .Using this optional argument, you can specify one or more archived volume statistics log file names.
(The archived files have the format vol_statsX.log (where 0 <= X <= 8 ).)
Using one archived file as input:
$stats_report vol_stats0.log
The time centric and drive centric reports are generated with the name of the user input file pended to (and shown before) the report file name.

stats_report
December 2012 Utility Reference 189
For example, if you specify vol_stats0.log then the reports will be generated in the $ACS_HOME/log directory as
vol_stats0_drive_centric.txt and vol_stats0_time_centric.txt
2. To generate a report for all the archived volume stats files at once, follow the procedure below:
a. Generate the full log from individual files
$cd $ACS_HOME/log $cat vol_stats8.log .... vol_stats0.log acsss_stats.log > vol_statsXXXX.log
where vol_statsXXXX.log
(The string vol_stats is necessary, but XXXX can be anything like FULL, etc) is the concatenated file of all vol_statsX.log(where 0 <= X <= 8 ) and acsss_stats.log in reverse order.
a. Run stats_report.
$stats_report vol_statsXXXX.log
Reports are generated as vol_statsXXXX_drive_centric.txt and vol_statsXXXX_time_centric.txt.
If no filename is given as an argument, then the time centric and drive centric reports are generated from $ACS_HOME/log/acsss_stats.log.
Usage
• The stats_report uses the current acsss_stats.log to prepare two reports of volume statistics. You must enable library volume statistics gathering by setting the variable LIB_VOL_STATS. This can be done through the acsss_config (option 3) process or through the command line command dv_config -p LIB_VOL_STATS. ACSLS then automatically rolls and maintains 9 acsss_stats.log files when the log reaches the default size of 500 KB.
• The size of the log files and the number of files to retain is controlled through the variables LIB_STATS_FILE_NUM and VOL_STATS_FILE_SIZE. These variables are set using the same method as LIB_VOL_STATS discussed above.
• The two types of reports are:
drive_centric.txt
This report contains an ordered list of drives. Each drive record contains all cartridges mounted to the drive, the requestor, the time of the request and the duration of the mount.
time_centric.txt
Note – This report contains the usage of drive resources listed on an hourly time scale. Each record in a time period includes the requestor, the specific drive, the number of mounts during that period for that drive, and the duration of drive usage during the hour.

userAdmin.sh
190 ACSLS 8.1 Adminstrator’s Guide December 2012
If the drive usage exceeds 60 minutes for a time period it is an indication that the mount spanned two time periods and the mount will not be listed in the second time period.The first report created by stats_report is a drive view.
Notes on processing details:
• If there is a DISMOUNT record in the log but there is no corresponding MOUNT record, the reason could be that:
• The log was rolled over, or
• The operation was logged due to some unknown logging problem.
In this case the record is omitted from the report generated.
• If there is a MOUNT record in the log but there is no corresponding DISMOUNT record, the reason could be that:
• The DISMOUNT has not yet happened, or
• The operation was not logged due to some unknown logging problem.
In this case the mount duration is set to -1, which is an indication of cases mentioned above. These records are omitted from calculating the total mount duration in the time centric report.
• In the cases of going from day light savings time to standard time, scenarios where the calculated mount duration is negative can arise. To suppress them, the absolute value of the mount duration is taken.
userAdmin.shThe userAdmin.sh menu-driven utility is used to administer ACSLS GUI user passwords. It is found in the $ACS_HOME/install directory. You can add users, remove users, list users, and change user passwords. WebLogic must be running to use this utility. If it is not up, this utility starts WebLogic and confirms that it’s online before displaying the menu.
This utility is run by root, and requires acsls_admin authentication. The acsls_admin user account is configured during ACSLS 8.1 installation.
When adding a user or changing a password for any user, you are prompted for the user name and assigning password. The password is verified against WebLogic criteria of size and legal characters.
When a user is removed, that account could still have an active GUI session. Once they log out or terminate the session, they are unable to log back in. Restarting the GUI is the only way to force the session to terminate immediately. An option is provided to restart the ACSLS GUI (which terminates all sessions.
Note: You cannot use this utility to change the password for the acsls_admin user. When it is necessary to change or reset the password for acsls_admin, you should:
1. Run the wlinstall.sh utility.
/export/home/wlinstall/wlinstall
2. Run userAdmin.sh to re-establish the remaining user accounts.

userAdmin.sh
December 2012 Utility Reference 191
Format
userAdmin.sh
Examples
# ./userAdmin.sh ACSLS GUI User Administration Weblogic is online.
Please enter the acsls_admin password: Authenticating.........Connected!
userAdmin.sh
192 ACSLS 8.1 Adminstrator’s Guide December 2012
Menu:
1) Add a user account. 2) Remove a user account. 3) Change a user password. 4) List users. 5) Restart ACSLS GUI. 6) Exit.
Please select by number: 1
--- Add a User ---
Please enter the id of the user you wish to add: acsss Do you wish to add a GUI account for user 'acsss'? (y/n) y Please assign a password for 'acsss'. Passwd: Please confirm password: Passwd:
Connecting.......... User accounts has been added.
Please select by number: 2
--- Remove a User ---
Please enter the name of the user you wish to remove: accounts Do you wish to remove the ACSLS GUI account for user 'accounts'? (y/n) y Connecting.......... The account for accounts has been removed for future logins.> To disable any current login session for accounts, you must restart the ACSLS GUI.
Please select by number: 3
--- Change Password --- Enter the user name: acsss Passwd: Please confirm password: Passwd: Connecting.......... Password changed for acsss!
Please select by number: 4
--- List Users ---
Connecting.......... Configured WebLogic users: OracleSystemUser acsls_admin acsss

volrpt
December 2012 Utility Reference 193
Please select by number: 5
Do you wish to restart the ACSLS GUI (affects all users)? (y/n) y Restarting: Disabling WebLogic ........................... Enabling WebLogic ................................
Please select by number: e
#
volrptThe volrpt utility creates a volume report.
Format
volrpt [-s vol|loc|use] [-d] [-f filename] [-z] [-a|-l|-v identifier_list] [-i]
Options
-s
specifies the sort order. If you do not specify this option, the default is to sort by volume ID. If you specify this option, you must specify one of the following values:
vol
sort by volume ID.
loc
sort by volume home location.
use
sort by volume use (number of mounts).
-d
specifies that the output contains no page breaks or header information. The output can be used as input to other programs such as pr.
-f filename
filename specifies a custom volrpt template.
-z
zero fills identifier fields.
-a
restricts the report to the specified ACS. You can specify multiple ACSs (use blanks to separate the acs_ids).

volrpt
194 ACSLS 8.1 Adminstrator’s Guide December 2012
-l
restricts the report to the specified LSM. You can specify multiple LSMs (use blanks to separate the lsm_ids).
-v
restricts the report to the specified volumes (or volume ranges). You can specify a single vol_id, a list of vol_ids separated by blanks, or a volume range indicated by vol_id-vol_id.
identifier_list
described by the -v, -a, and -l options. This is a list of ACSs, LSMs, and volumes (or volume ranges).
-i
reports all volumes, including absent and ejected cartridges.
If this option is not specified, absent and ejected cartridges are not reported.
Usage
Use the volrpt utility to create a report of library cartridges, including their physical location, history, attributes, and use. You can also use volrpt to verify the database after you restore it. You can use the -a, -l, or -v options to specify the ACSs, LSMs, or cartridges for the report. If you do not specify any of these options, volrpt reports on only ACS 0.
Note – Special consideration for leading and trailing spaces. When specifying arguments for volumes that contain leading or trailing spaces, you should enclose the arguments in single quotes. And to assure that the single quote will be passed from one shell component to another, the quote must be tagged with an escape character. In UNIX, the standard escape character is the backslash (\). Examples: To formulate a volrpt command on the local machine where you wish to reference volume id's with a leading space, you would submit the command as follows: volrpt -v \'0000\'-\'9999\’ To submit the same command through a remote shell (rsh) you would enclose the entire argument inside double quotes: rsh <acsls_hostname> -l acsss bin/volrpt -v "\' 0000\'-\' 9999\'"

volrpt
December 2012 Utility Reference 195
The following figure provides an example of a standard volume report, which contains fields for volume id, location, label type, media type, and history of usage
In the Volume Type/Media column: C denotes cleaning cartridges; D denotes data cartridges; and S denotes scratch cartridges.
Use the -f filename option to create a customized report; see “Creating a Custom Volume Report” on page 143, for more information.
$ACS_HOME/data/external/volrpt/owner_id.volrpt is a sample input file that you can run or use as a template to create customized volume reports. You can also save your customized volume reports in the $ACS_HOME/data/external/volrpt directory.
You can redirect the volume report to a file with standard UNIX redirection:
volrpt > file
FIGURE 11-2 Standard Volume Report
VOLUME REPORT UTILITY
2002-06-30 14:01:21
TOTAL VOLUMES: 400 SEQUENCE: sort by volume identifier
Volume Home LabelVolume Times|---Entered---||--Last Used--| Label Location AttrType/Media MountedDateTime DateTime
CLN000 0,0,1,0,3 ExtC/STK1U 108/22/0109:30 10/04/01 14:26
RB0000 0,1,2,1,10Ext.D/STK1R 310/01/0108:16 10/01/01 08:18
RB1400 0,0,10,1,3Ext.S/STK1R 24310/01/0109:30 10/06/01 11:04
RB1401 0,0,10,3,5Virt.D/STK1R 1210/01/0103:29 10/05/01 23:11
“ " " " " ""
" " " " " ""
" " " " " ""
TB1440 0,1,3,1,9 Ext.D/STK2P 4308/12/0109:1109/28/0117:52
" " " " " ""
" " " " " ""
" " " " " ""
volrpt
196 ACSLS 8.1 Adminstrator’s Guide December 2012
Examples
By default, volrpt reports only the first ACS in the list. To report the cartridges in both ACS 0 and ACS 1, enter:
volrpt -a 0 1
To report the cartridges in LSMs 0,1 and 2,1 sorted by home cell location, enter:
volrpt -s loc -l 0,1 2,1
Notes
• volrpt displays the specified volume report if it completes successfully. volrpt prints a message to stderr and exits if you specify the -f option and volrpt cannot find the specified file or you specify more than one input file. For field errors within the input file, volrpt prints a message to stderr and ignores the line in error but does not exit.
• If cartridges are not found in the volume ID list or range or library component you specified, volrpt returns a no volumes found message.
• When a parameter is not specified, it uses the default of ACS 0.
• If a library component(s) is specified through the -a, -l, or -v option, but no volumes are found, messages such as the following are displayed:
-a option (ACS)
Messages:
when a single acs_id is provided and no volumes are present, the following error displays: No Volumes found for ACS: (<acsid>)
Example:
$ volrpt -a 2 No Volumes found for ACS: (2)
when multiple acs_ids are provided and none of them have any volumes, the following error displays:
No Volumes found for ACS: (<acsid1>)(<acsid2>)
Example:
$ volrpt -a 0 1 No Volumes found for LSM: (0) (1)
-l option (LSM)
Messages:
when a single lsm_id is provided and no volumes are present, the following error displays: No Volumes found for LSM: (<lsmid>)
Example:
$ volrpt -l 1,1 No Volumes found for LSM: (1,1)

volrpt
December 2012 Utility Reference 197
when multiple lsm_ids are provided and none of them have any volumes, the following error displays: No Volumes found for LSM: (<lsmid1>)(<lsmid2>)
Example:
$ volrpt -l 1,1 1,2 No Volumes found for LSM: (1,1) (1,2)
-v option (VOLUME)
Messages:
when a single volid is provided and no volumes are present, the following error displays: Volume(s) not: (<volid>)
Example:
$ volrpt -v BBB112 No Volumes found: (BBB112)
when multiple volids are provided and none of them have any volumes, the following error displays: Volume(s) not found: (<volid1>)(<volid2>)
Example:
$ volrpt -v BBB112 BBB114 No Volumes found: (BBB112) (BBB114)
The -v option can also be used for volume range, and produces similar messages when no volumes are present.
when a single volume range is provided and no volumes are present, the following error displays: Volume(s) not: (<volrange>)
Example:
$ volrpt -v BBB112-BBB116 No Volumes found: (BBB112-BBB116)
when multiple volume range is provided and no volumes are present, the following error displays: Volume(s) not: (<volrange1>) (<volrange2>)
Example:
$ volrpt -v BBB112-BBB116 BBB220-BBB224 No Volumes found: (BBB112-BBB116) (BBB220-BBB224)
• When an ACS or LSM has not been configured
When volrpt is used with an acs_id or lsm_id that does not exist, it displays a message according to the identifier.
-a (ACS)
ACS identifier (<acsid>) not configured
-l (LSM)
LSM identifier (<lsmid>) not configured

watch_vols
198 ACSLS 8.1 Adminstrator’s Guide December 2012
See Also
“Creating a Custom Volume Report” on page 143
watch_volsThis utility applies pre-defined policies for volumes that are:
• newly entered
• discovered by audit or cartridge recovery
• re-activated by audit, cartridge recovery, or an enter
These policies are defined in the file:
$ACS_HOME/data/external/vol_attr.dat
This file contains a list of user-defined volume IDs or volume ranges and a user-specified policy for each volume recorded. For each volume or volume range listed in that file, you can define volume ownership, pool association and/or preferred LSM location when a volume is entered. Specific instructions for defining policies are explained in detail in the vol_attr.dat file.
The watch_vols utility uses the acsss_stats.log to identify the existence of newly entered volumes or volumes discovered or re-activated during an audit or by cartridge recovery. To enable this capability, you must enable volume statistics with acsss_config (option 3). With volume statistics enabled, watch_vols monitors the tail of the acsss_stats.log, looking for matching volumes with the entries defined in vol_attr.dat. Wherever a match is found, the defined policy for that volume is automatically applied.
The volume IDs must follow these rules:
• One vol_id or volume range per line.
• The vol_ids must be valid ACSLS volume IDs.
• If the vol_ids include trailing or leading spaces, they must be represented as underscores (_).
Format
watch_vols [start|stop]
Usage
You can check the running status of the utility by invoking watch_vols with no parameter. If you are unsure of the status of watch_vols (running or stopped), the command watch_vols with no argument displays the current status.
There are two options for watch_vols, start and stop.
• watch_vols start

watch_vols
December 2012 Utility Reference 199
When the start parameter is invoked, watch_vols reviews the policies defined in vol_attr.dat. If there are errors in format or syntax, watch_vols displays the error and prompts you to make the necessary correction to vol_attr.dat. Once the defined policy is accepted by watch_vols, the utility invokes a daemon to run in the background. The daemon continues to run as long as ACSLS is running. It starts automatically whenever ACSLS is restarted.
The policy table in vol_attr.dat can be updated at any time. You need not stop watch_vols in order to update the policy. Just run watch_vols start to commit the updates to the running program.
• watch_vols stop
A log of all watch_vols activities is maintained in the log file:
$ACS_HOME/log/watch_vols_event.log
Each change of volume ownership, pool_id, or LSM home location is logged in this file.
Example
You are performing an enter operation and you want to move specific volumes to a target LSM when they are entered.
1. Audit the target LSM with watch_vols disabled.
2. Once the target LSM has been audited, start watch_vols.
3. Enter the volumes that have policies defined in vol_attr.dat.
watch_vols then moves the specified volumes to the destination LSM after they are entered.

watch_vols
200 ACSLS 8.1 Adminstrator’s Guide December 2012

December 2012 Command References 201
12
Command References
In this chapter, you will learn how to use the ACSLS commands, including general command syntax and reference information.
• “audit” on page 206
Creates or updates the database inventory of the volumes in a library component.
• “cancel” on page 211
Cancels a current or pending request.
• “clear lock” on page 215
Removes all active and pending locks on drives or cartridges.
• “define pool” on page 216
Creates or modifies scratch pools.
• “delete pool” on page 218
Deletes empty scratch pools.
• “dismount” on page 220
Dismounts a cartridge.
• “eject” on page 223
Ejects one or more cartridges from the ACS.
• “enter” on page 227
Sets a CAP to enter mode.
• “idle” on page 230
Stops ACSLS from processing new requests.
• “lock” on page 232
Locks (dedicates) a cartridge or drive to a user.
• “logoff” on page 234
Exits from cmd_proc.
• “move” on page 242
General Command Syntax
202 ACSLS 8.1 Adminstrator’s Guide December 2012
moves a specified cartridge to an available storage cell in a specified LSM.
• “mount” on page 235
Mounts a data or scratch cartridge.
• “query commands” on page 244
Displays the status of a library component.
• “set commands” on page 271
Sets various attributes of different library components.
• “show” on page 281
Displays your lock ID or user ID.
• “start” on page 282
Starts ACSLS request processing.
• “switch lmu” on page 283
Manually switches ACS management from the ACS's active LMU to the standby LMU.
• “unlock” on page 286
Removes active locks on cartridges or drives.
• “vary” on page 288
Changes the state of an ACS, LSM, CAP, drive, or port.
• “venter” on page 293
Enters one or more cartridges with missing or unreadable labels into the ACS.
Note – The L5500, SL500, and SL8500 libraries do not support unlabeled cartridges (venters).
General Command SyntaxThis section describes the general syntax of the ACSLS commands. The following sections fully describe each command, including its syntax.
ACSLS commands use the following general syntax:
command type identifier state options
Where:
type identifier
is the ACS component and its identifier; see “Component Types and Identifiers” on page 203 for more information.
state
is a device state for the vary command only.
options
are command options; see the description of the command you want to run.

Component Types and Identifiers
December 2012 Command References 203
Also note the following syntax rules:
• You must enter commands in the order shown above (command name, followed by the component and its identifier, followed by the state and any options).
• This chapter shows commands in lowercase, but you can enter commands in any combination of lowercase and uppercase letters.
• Underlines show minimum abbreviations for commands and keywords. For example, query server and q ser are both valid forms of the query server command.
• Ellipses (...) indicate that you can repeat an identifier.
• Brackets [ ] enclose optional options.
Component Types and IdentifiersThe following table describes the valid ranges of values for each of the ACS component identifiers. You can specify a maximum of 42 identifiers for each type. See specific command descriptions for the valid component types for each command.
Note – The identifiers specified in the following table represent valid ranges of values supported by the software. Your LSM type and library configuration determine what identifier values are valid for your particular site.
TABLE 12-1 ACSLS Component Types and Identifiers
Component Type Identifier Valid Values
entire library server none none
ACS acs acs_id acs(0-31),
lsm(0-99)
LSM lsm lsm_id acs(0-31),
lsm(0-99)
LSM panel panel panel_id acs(0-31),
lsm(0-99),
panel(0-50),
LSM subpanel * subpanel subpanel_id acs(0-31),
lsm(0-99),
panel(0-50),
startrow(0-51),
startcolumn(0-23),
endrow(0-51),
endcolumn(0-23)

Component Types and Identifiers
204 ACSLS 8.1 Adminstrator’s Guide December 2012
LSM storage cell subpanel cell_id acs(0-31), lsm(0-99), panel(0-50), row(0-51), column(0-23)
* The ending row (and column) must be greater than or equal to the beginning row (and column).Only cells within the beginning and ending matrix are audited: the matrix starts with the beginning row and beginning column and extends to the ending row and ending column.
CAP cap cap_id acs(0-31), lsm(0-99), cap(0-11)
An asterisk (*) in the cap_id does the following:
acs,lsm,* - causes ACSLS to select the highest priority available CAP in the LSM.
acs,* - causes ACSLS to select the highest priority available CAP in the ACS.
* - for an enter request causes ACSLS to select the CAP in the LSM with the most free cells.
* - for an eject request causes ACSLS to select the highest priority CAP in each ACS with a cartridge designated for ejection.
drive drive drive_id acs(0-31),
lsm(0-99),
panel(0-50),
drive(0-31)
drive type drive drive_type Up to a 10-character drive type identifier; can be any combination of numbers (0-9) or letters (A-Z). Spaces are not allowed.
port port port_id acs(0-31), port(0-3)
TABLE 12-1 ACSLS Component Types and Identifiers
Component Type Identifier Valid Values

Component Types and Identifiers
December 2012 Command References 205
volume serial number of a data or scratch cartridge or a cleaning cartridge
volume, scratch, clean
vol_id Six-character identifier consisting of any combination of numbers (0-9), letters (A-Z), dollar sign ($), pound sign (#), and spaces
Use single or double quotes to enclose volsers with leading or trailing spaces.
Do not specify volsers with embedded spaces.
range of volume serial numbers
volume volrange Specifies an ascending range of volumes separated by a dash (-)
If the ALPHANUM_VOL_RANGES dynamic variable is set to FALSE (default): ACSLS supports the starting and ending vol_ids of the range that are specified as complete vol_ids (Ex: AAA000-AAA999). Specify only the right-most numeric portions of the volsers as the range. All preceding characters must be identical. ***
If the ALPHANUM_VOL_RANGES dynamic variable is set to TRUE: ACSLS supports volume ranges consisting of any combination of numbers (0-9), letters (A-Z), dollar sign ($), pound sign (#), and spaces (leading and trailing). ***
*** Use single or double quotes to enclose volsers in a range with leading or trailing spaces. The range must be in ascending sequence per the ACSII collating sequence.
volume media type media media_type Up to a 10-character media type identifier; can be any combination of numbers (0-9),letters (A-Z), and dashes (-). Spaces are not allowed.
volume owner owner owner_id
scratch pool pool pool_id Decimal number (0-65534). Specifying an asterisk (*) for the pool_id reassigns the volume to its current pool_id.
ACSLS request request request_id Unique decimal number (0-65535) assigned by ACSLS.
drive or volume lock lock lock_id Decimal number (0-32767)
TABLE 12-1 ACSLS Component Types and Identifiers
Component Type Identifier Valid Values
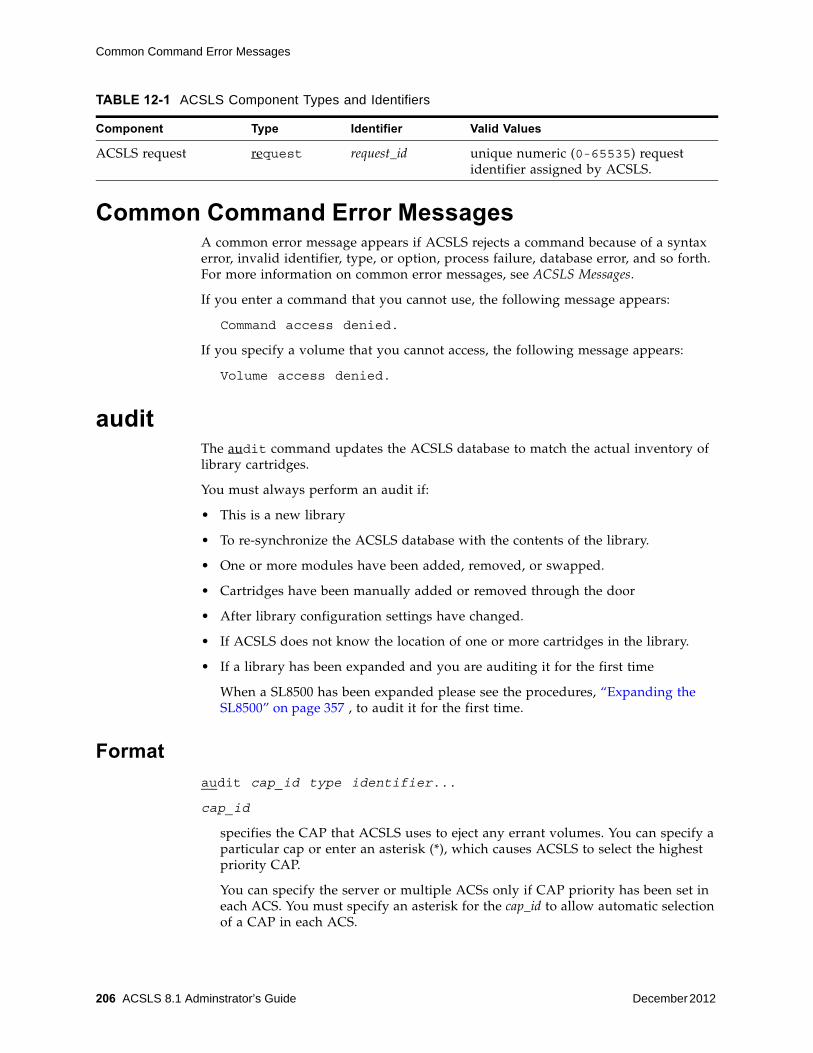
Common Command Error Messages
206 ACSLS 8.1 Adminstrator’s Guide December 2012
Common Command Error MessagesA common error message appears if ACSLS rejects a command because of a syntax error, invalid identifier, type, or option, process failure, database error, and so forth. For more information on common error messages, see ACSLS Messages.
If you enter a command that you cannot use, the following message appears:
Command access denied.
If you specify a volume that you cannot access, the following message appears:
Volume access denied.
auditThe audit command updates the ACSLS database to match the actual inventory of library cartridges.
You must always perform an audit if:
• This is a new library
• To re-synchronize the ACSLS database with the contents of the library.
• One or more modules have been added, removed, or swapped.
• Cartridges have been manually added or removed through the door
• After library configuration settings have changed.
• If ACSLS does not know the location of one or more cartridges in the library.
• If a library has been expanded and you are auditing it for the first time
When a SL8500 has been expanded please see the procedures, “Expanding the SL8500” on page 357 , to audit it for the first time.
Format
audit cap_id type identifier...
cap_id
specifies the CAP that ACSLS uses to eject any errant volumes. You can specify a particular cap or enter an asterisk (*), which causes ACSLS to select the highest priority CAP.
You can specify the server or multiple ACSs only if CAP priority has been set in each ACS. You must specify an asterisk for the cap_id to allow automatic selection of a CAP in each ACS.
ACSLS request request request_id unique numeric (0-65535) request identifier assigned by ACSLS.
TABLE 12-1 ACSLS Component Types and Identifiers
Component Type Identifier Valid Values

audit
December 2012 Command References 207
A single LSM audit waits until ACSLS updates the database, then reserves the CAP if required to eject errant volumes.
type identifier
specifies a library component. The following table lists the components you can audit.
You can specify multiple ACSs, LSMs, panels, or subpanels in a single audit request. You cannot specify overlapping subpanels.
You can specify the server or multiple ACSs only if CAP priority has been set in each ACS. You must specify an asterisk for the cap_id to allow automatic selection of a CAP in each ACS. If this is not done, audit is unable to eject any invalid cartridges found.
When you audit the server or an ACS, the parent audit process creates a separate audit process for each LSM. These LSM audits run in parallel and process panel-by-panel in ascending panel_id sequence. To audit all LSMs in all libraries or an ACS, just audit the server or ACS. There is no need to run multiple, separate LSM audits.
However, within an LSM, regardless of the order in which you specify multiple components the audit processes these components in ascending order by acs_id, lsm_id panel_id, subpanel_id. For example, the audit will process panel 0,0,9 before subpanel 0,0,10,1,7 even if you specify the subpanel first.
Usage
An audit updates the ACSLS database to match the actual inventory of library cartridges. You run an audit to:
• Create volume information in the database if you do not enter cartridges through the CAP. For example, run an audit if you add an LSM to your library, open the LSM door, and manually add cartridges to the LSM.
• Resolve discrepancies between the library and the database. For example, run an audit if you open an LSM door and manually remove cartridges instead of ejecting them through the CAP. The audit deletes information for the removed cartridges from the database.
• View the contents of cells specified by the audit (you must have a display monitor connected to the LSM robot's vision system).
TABLE 12-2 Valid Components for Audit
Library Component type identifier
all libraries server none
ACS acs acs_id
LSM lsm lsm_id
LSM panel panel panel_id
LSM subpanel subpanel subpanel_id

audit
208 ACSLS 8.1 Adminstrator’s Guide December 2012
Note – Audit recognizes particular models of cleaning cartridges and will record them in the database as cleaning cartridges. The audit command also sets the max_uses for new cleaning cartridges it encounters appropriately for each type of cleaning cartridge.
Note – When audit cannot find a cartridge in any recorded location (cell and possibly drive), audit either marks the cartridge as absent (if absent volume retention is enabled) or deletes the volume. When audit deletes the volume, it removes all information about the volume from the database, including volume information and customer-supplied information about access control, scratch status, lock IDs, and pool IDs. If audit later finds the cartridge in another location, it re-adds the volume information, but the customer-supplied information is lost.
An audit ejects errant volumes and deletes their information from the database. An errant volume has:
• An external label that duplicates one already scanned.
• A missing or unreadable external label and no virtual label.
• An invalid media type.
Audits only apply to LSM storage cells, not to drives or CAPs. ACSLS displays cmd_proc messages during the audit and records any database changes from the audit in the event log. If volume statistics logging is enabled, ACSLS records additional volume found and volume not found messages in the acsss_stats.log. See “Creating a Logging Volume Statistics Report” on page 147 for more information.
HINT: Use the following guidelines for running an audit:
• The ACS or LSM being audited must be either online or in diagnostic state. Normal library processing (including mounts and dismounts) can occur during an audit, although library processing slows down the audit.
The difference between online and diagnostic states is: an audit in diagnostic state can only be performed through the cmd_proc. Client requests are rejected while the LSM is in the diagnostic state. This state is faster because the audit now has exclusive run of the library without competing mount/dismount requests that could otherwise be submitted from the client.
• After you start an audit on an entire LSM, you cannot start another audit on the same LSM. You must cancel and rerun the audit.
• You can cancel any audit request, but ACSLS will always finish auditing the current panel or subpanel. When you cancel an audit, some or all of the cartridges marked for ejection may not be ejected. When you cancel an audit, cartridges already ejected are not re-entered.
Caution – If you cancel an audit or if there is a library or ACSLS hardware or software failure during the audit, you must rerun the same audit. Cartridges marked for ejection but not actually ejected during the first audit are no longer in the database and are not under ACSLS control.
audit
December 2012 Command References 209
Examples
To audit the entire library and specify the highest priority CAP in each ACS for ejections:
audit * server
To audit LSM 0,1 and specify CAP 0,1,1 for ejections:
audit 0,1,1 lsm 0,x
To audit panel 10 of LSM 0,1 and specify the highest priority CAP in LSM 0,1 for ejections:
audit 0,1,* panel 0,1,10
Note – A cell cannot be audited if it is reserved by another process. If a cell is reserved, ACSLS rechecks the database until the cell becomes available up to a maximum of 60 retries. If the cell is still unavailable, the audit skips the cell and logs a message to the event log.
See Also
Command Area Messages
Success Messages
The following message appears when the audit completes successfully.
Audit: Audit completed, Success.
In addition, one of the following messages appears to confirm which component was audited:
Audit: Audit of storage server, valid
Audit: Audit of ACS, acs_id, status valid
Audit: Audit of LSM, lsm_id, panel_id, valid
Audit: Audit of panel, panel_id, valid
For information about... See...
Guidelines for auditing the library “Auditing the Library” on page 82
Cancelling a command “cancel” on page 211
Displaying CAP status “query cap” on page 246
Displaying ACSLS and library status “query server” on page 268
Displaying ACS status “query acs” on page 245
Displaying LSM status “query lsm” on page 257
Setting CAP selection priority “set cap priority” on page 274
Setting CAP mode (manual or automatic) “set cap mode” on page 272
Changing the state of a library component “vary” on page 288
audit
210 ACSLS 8.1 Adminstrator’s Guide December 2012
Audit: Audit of subpanel, subpanel_id, valid
HINT: If you audit an invalid cell location (that is, just above or below a drive or on an extra column), ACSLS returns a success message to allow audits to work with PTPs.
Intermediate Messages
Intermediate messages consist of a two-line display with the following first line:
Audit: Intermediate response: Audit activity.
One of the following messages appears on the second line.
Audit: Volume ejected, unreadable label.
Explanation: ACSLS ejected a cartridge that had:
No external label
No virtual label, or
An unreadable label
Audit: Volume vol_id will be ejected, duplicate label.
Explanation: ACSLS ejected with a duplicate external label within the range of cells being audited.
Variable: vol_id is the volume with the duplicate label.
Audit: Volume vol_id found.
Explanation: The audit found a volume in the ACS that is not in the ACSLS database. The audit added the volume to the database.
Variable: vol_id is the volume added to the database.
Audit: Volume vol_id not found.
Explanation: A volume listed in the ACSLS database is not in the ACS. The volume is deleted from the database.
Variable: vol_id is the volume deleted from the database.
Audit: Volume will be ejected, invalid media type
Explanation: ACSLS ejected a volume with an invalid media type.
Error Messages
Audit in progress.
Explanation: ACSLS did not start the audit because another audit for the same LSM is in progress.
CAP cap_id in use.
Explanation: The CAP specified for the audit is in use.
Variable: cap_id is the CAP in use.
Multiple ACS audit.

cancel
December 2012 Command References 211
Explanation: The audit failed because the audit command specified multiple ACSs without specifying an * for the cap_id.
Not in same ACS.
Explanation: The audit failed because the cap_id and the identifier specified are not in the same ACS.
Variable:
cap_id is the CAP specified for the audit.
identifier is the library component specified for the audit.
Display Area Messages
cap_id Remove cartridges from CAP.
Explanation: The audit filled the CAP with ejected cartridges. Empty the CAP, then close it to continue the audit.
Variable: cap_id is the CAP that contains the ejected cartridges.
CAP cap_id: Place magazines in CAP.
Explanation: The CAP requires magazines for the audit. Open the CAP, place magazines inside, then close the CAP.
Variable: cap_id is the CAP that requires magazines.
CAP cap_id: No CAP available, waiting...
Explanation: No CAP is available to eject cartridges.
Variable: The cap_id appears as it was specified in the audit command:
acs, lsm, cap if the audit command explicitly specified the CAP.
acs, lsm, * if the audit command specified the CAP as acs, lsm, *.
acs, *, * if the audit command specified the CAP as acs, * or *.
cancelThe cancel command cancels a current or pending request.
Format
cancel request_id
Options
request_id
specifies the identifier of the request to cancel.

cancel
212 ACSLS 8.1 Adminstrator’s Guide December 2012
Use the cancel command to cancel current or pending request issued by an audit, define pool, delete pool, eject, enter, lock, query, set, or venter command or client application. Use the query request command to display the ID of the request you want to cancel.
You can cancel an audit of a server, ACS, or LSM. Because ACSLS internally translates server, ACS, or LSM audits into a series of panel audits, ACSLS completes the audit of the current panel before cancelling the remainder of the audit. You cannot cancel an audit of a panel or subpanel. When you cancel an audit, cartridges already ejected are not re-entered.
Caution – If you cancel an audit or if there is a library or ACSLS hardware or software failure during the audit, you must rerun the same audit. Cartridges marked for ejection but not actually ejected during the first audit are no longer in the database and are not under ACSLS control.
HINT: You must enter a cancel command from a different cmd_proc than the cmd_proc that issued the request you want to cancel.
The cancel command immediately cancels any pending requests and handles current requests as follows:
audit
Because ACSLS internally translates server, ACS, or LSM audits into a series of panel audits, ACSLS completes the audit of the current panel before cancelling the remainder of the audit.
Note – If you cancel an audit or if there is a library or ACSLS hardware or software failure during the audit, you must re-run the same audit. Cartridges marked for ejection but not actually ejected during the first audit are no longer in the database and are not under ACSLS control.
define pool
ACSLS stops defining scratch pools but does not delete any scratch pools already defined.
delete pool
ACSLS stops deleting scratch pools but does not redefine any scratch pools already deleted.
eject
ACSLS stops the ejection and the cmd_proc displays a message to remove any cartridges already ejected, which are not re-entered.
The eject does not terminate until the cartridges are removed, the CAP is closed, and ACSLS verifies that the CAP is empty.
enter
ACSLS stops the enter and, if any cartridges remain in the CAP, cmd_proc displays a message to remove these cartridges. Any cartridges already entered into the LSM are not ejected.
The enter does not terminate until the cartridges are removed, the CAP is closed, and ACSLS verifies that the CAP is empty.

cancel
December 2012 Command References 213
Note – Automatic enter. You cannot cancel an automatic enter operation that is in progress using the cancel command. To terminate an automatic enter in progress:
• If the CAP door is open, remove all the cartridges and close the door.
• If the CAP door is closed and the cartridges are being moved into the library, you must allow the remaining cartridges to be entered into the library. The enter then terminates.
lock
Resource locking by the specified request is stopped. If the request has not yet acquired all specified resources, none of the resources are locked.
query
ACSLS cancels the query.
set
For set cap, ACSLS stops setting CAP attributes, but does not change any attributes already set.
For set scratch or set clean requests, ACSLS stops setting scratch cartridge or cleaning cartridge attributes, but does not change any attributes already set.
venter
ACSLS stops the enter and, if any cartridges remain in the CAP, cmd_proc displays a message to remove these cartridges. Any cartridges already entered into the LSM are not ejected.
Examples
To display request IDs for all current and pending requests:
query request all
Example output of query request all:
Identifier Command Status
13 enter Current
15 query Pending
To cancel request 13 (current enter request) in the example above:
cancel 13
See Also
For information about... See...
Updating the ACSLS database to match the actual inventory of library cartridges
“audit” on page 206
Creating or modifying scratch pools “define pool” on page 216
Deleting empty scratch pools “delete pool” on page 218

cancel
214 ACSLS 8.1 Adminstrator’s Guide December 2012
Command Area Messages
Success Messages
Request request_id cancelled.
Explanation: ACSLS cancelled the requested command.
Variable: request_id is the request identifier of the cancelled command.
Intermediate Messages
None
Error Messages
Request request_id can not be cancelled: status.
Explanation: ACSLS cannot cancel the specified command.
Variable:
• request_id is the request identifier of the command that ACSLS cannot cancel.
• status is one of the following:
Request identifier request_id invalid.
The cancel command specified an invalid request identifier.
Request identifier request_id not found.
The cancel command specified an request identifier for a request that is not current or pending.
Display Area Messages
None.
Ejecting cartridges from the library “eject” on page 223
Making a CAP (manual mode) ready to enter labelled cartridges into the library
“enter” on page 227
Locking (dedicating) drives and cartridges to your current lock ID
“lock” on page 232
Displaying the status of a library component “query commands” on page 244
Setting various attributes of different library components
“set commands” on page 271
Making a CAP ready to enter unlabeled cartridges into the library
“venter” on page 293
For information about... See...
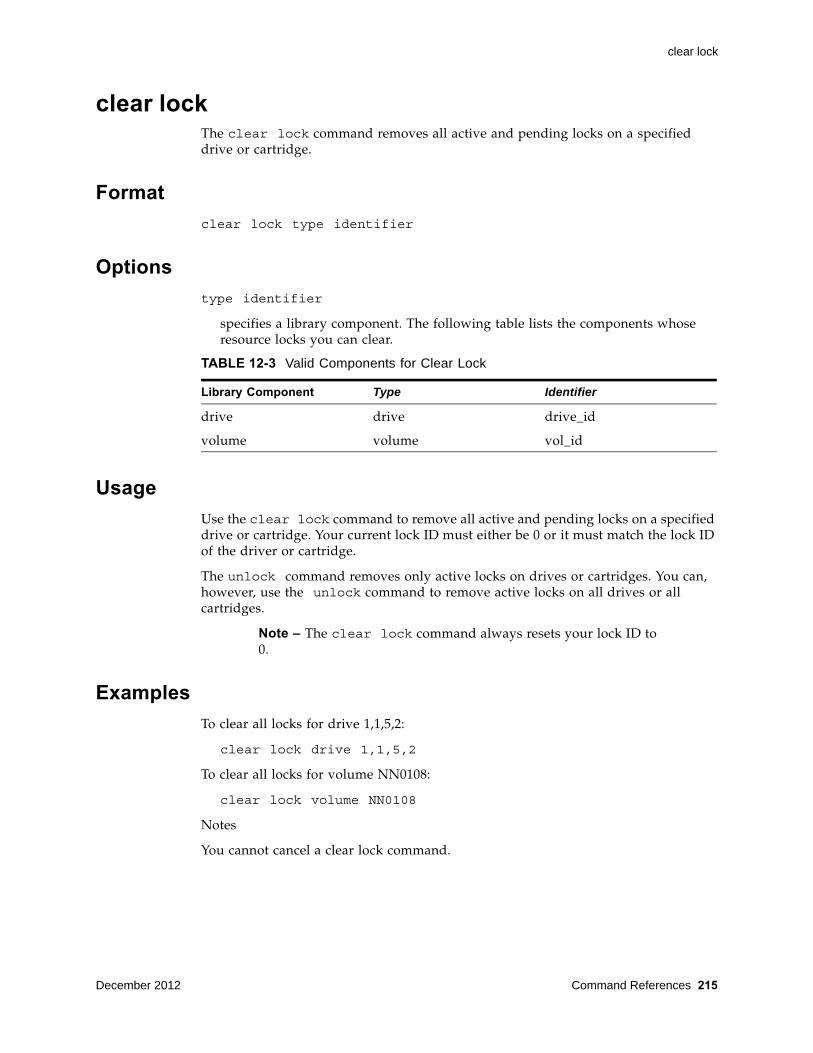
clear lock
December 2012 Command References 215
clear lockThe clear lock command removes all active and pending locks on a specified drive or cartridge.
Format
clear lock type identifier
Options
type identifier
specifies a library component. The following table lists the components whose resource locks you can clear.
Usage
Use the clear lock command to remove all active and pending locks on a specified drive or cartridge. Your current lock ID must either be 0 or it must match the lock ID of the driver or cartridge.
The unlock command removes only active locks on drives or cartridges. You can, however, use the unlock command to remove active locks on all drives or all cartridges.
Note – The clear lock command always resets your lock ID to 0.
Examples
To clear all locks for drive 1,1,5,2:
clear lock drive 1,1,5,2
To clear all locks for volume NN0108:
clear lock volume NN0108
Notes
You cannot cancel a clear lock command.
TABLE 12-3 Valid Components for Clear Lock
Library Component Type Identifier
drive drive drive_id
volume volume vol_id

define pool
216 ACSLS 8.1 Adminstrator’s Guide December 2012
See Also
Command Area Messages
Success Messages
The following message appears when a clear request succeeds:
Clear: Completed, Success.
In addition, for each identifier in the request, one of the following messages appears depending on the library component (type):
Clear: Drive drive_id all locks cleared.
Clear: Volume vol_id all locks cleared.
Intermediate Messages
None.
Error Messages
Clear: Clear lock of drive drive_id failed,
Drive identifier drive_id available.
Explanation: ACSLS cannot clear locks because the specified drive is not locked.
Variable: drive_id is the identifier of the specified drive.
Clear: Clear lock of volume vol_id failed, Volume identifier vol_id available.
Explanation: ACSLS cannot clear locks because the specified volume is not locked.
Variable: vol_id is the identifier of the specified volume.
Display Area Messages
None.
define poolThe define pool command creates or modifies scratch pools.
For information about... See...
Locking drives and cartridges “lock” on page 232
Displaying the lock status of a drive or cartridge “query lock” on page 255
Setting your lock ID “set lock” on page 277
Displaying your lock or user ID “show” on page 281
Removing active locks for drives or cartridges “unlock” on page 286
define pool
December 2012 Command References 217
Format
define pool low_water_mark high_water_mark pool_id...[overflow]
Options
low_water_mark
is the low volume warning threshold. If the scratch cartridge count falls below this threshold, ACSLS logs a warning message in the event log. Valid values are 0 to 231-1. The default is 0.
high_water_mark
is the high volume warning threshold. If the scratch cartridge count reaches or exceeds this threshold, ACSLS logs a warning message in the event log. This value must be greater than the value for low_water_mark.
pool_id
specifies the pool identifier. Pool 0 is the common scratch pool, which always exists. You can modify the common scratch pool attributes.
overflow
specifies that if this pool cannot satisfy mount scratch requests, ACSLS will select cartridges from the common pool (Pool 0).
Usage
Use the define pool command to create or modify scratch pools.
Examples
To define a low threshold of 0, a high threshold of 600, and overflow for new pool 1:
define pool 0 600 1 overflow
To define a low threshold of 0, a high threshold of 600, and no overflow for existing pool 5:
define pool 0 600 5
Note – Scratch pools are not owned by one client application or user ID. You can, however, use volume access control to restrict access for specific scratch cartridges.
See Also
For information about... See...
Cancelling a command “cancel” on page 211
Deleting empty scratch pools “delete pool” on page 218
Guidelines and procedures for managing scratch cartridges
“Managing Scratch Cartridges” on page 114

delete pool
218 ACSLS 8.1 Adminstrator’s Guide December 2012
Command Area Messages
Success Messages
The following message appears when a define pool command succeeds:
Define: Define completed, Success.
In addition, the following message appears for each created or modified pool:
Define: Pool pool_id created.
Intermediate Messages
None.
Error Messages
None.
Display Area Messages
Pool pool_id: low water mark warning.
Explanation: The number of volumes in the specified scratch pool is less than or equal to the low volume threshold.
Variable: low_water_mark is the low volume threshold of the specified scratch pool.
Pool pool_id: high water mark warning.
Explanation: The number of cartridges in the specified scratch pool is greater than or equal to the high volume threshold.
Variable: high_water_mark is the high volume threshold of the specified scratch pool.
delete poolThe delete pool command deletes empty scratch pools.
Format
delete pool pool_id...|all
Mounting a scratch cartridge on a drive “mount *” on page 238
Displaying scratch pool attributes “query pool” on page 263
Setting or clearing cartridge scratch attributes “set scratch” on page 279
For information about... See...

delete pool
December 2012 Command References 219
Options
pool_id
specifies the pool ID.
Pool 0 is the common pool, which you cannot delete.
all
specifies all empty scratch pools.
Usage
Use the delete pool command to delete empty scratch pools. If a pool contains scratch cartridges, you must reassign these cartridges to another pool before deleting the first pool. If a scratch cartridge is mounted, it becomes a data cartridge but remains in its scratch pool. Use the set scratch off command to reassign the data cartridge to the common pool.
Examples
To delete all empty scratch pools:
delete pool all
Hint: Only the empty pools will be deleted; pools with cartridges assigned are not affected.
To delete scratch pool 1:
1. Query scratch pool 1:
query scratch 1
Pool 1 has two cartridges, 34813 and 34815.
2. Empty pool 1 by reassigning its cartridges to pool 5:
set scratch 5 348013 348015
3. Delete pool 1:
delete pool 1

dismount
220 ACSLS 8.1 Adminstrator’s Guide December 2012
See Also
Command Area Messages
Success Messages
The following message appears when a delete pool command completes successfully:
Delete: Delete completed, Success.
In addition, the following message appears for each deleted pool.
Delete: Pool pool_id deleted.
Intermediate Messages
None
Error Messages
Delete: Pool pool_id failed, Pool not empty.
Explanation: ACSLS cannot delete the scratch pool because it is not empty.
Variable: pool_id is the identifier of the requested pool.
dismountThe dismount command dismounts a cartridge from a drive.
Format
dismount vol_id drive_id [force]
Options
vol_id
specifies the cartridge.
For information about... See...
Cancelling a command “cancel” on page 211
Creating or modifying scratch pools “define pool” on page 216
Guidelines and procedures for managing scratch cartridges
“Managing Scratch Cartridges” on page 114
Displaying scratch pool attributes “query pool” on page 263
Displaying the location and media type of a cartridge
“query volume” on page 269
Setting or clearing cartridge scratch attributes “set scratch” on page 279

dismount
December 2012 Command References 221
drive_id
specifies the drive.
force
forces a dismount of the actual volume in the specified drive, even if the vol_id of the cartridge in the drive does not match the specified vol_id.
This option also forces a dismount even if the drive is not unloaded.
Usage
Use the dismount command to dismount a volume from a drive and place the cartridge in an available storage cell.
Dismount
Use the dismount command without the force option to dismount a specified cartridge from a specified drive. A successful unforced dismount requires the following:
• The drive must be online
• The vol_id of the cartridge in the drive must match the vol_id you specify on the dismount command
• The drive must be unloaded
Dismount force
Use the dismount command with the force option to force a dismount of the actual cartridge mounted in a specified drive. The vol_id of the cartridge in the drive does not have to match the vol_id you specify on the dismount command. In addition, if the cartridge is not ready for dismounting, ACSLS forces the drive to automatically rewind, unload, and dismount the cartridge. The drive must be online.
A dismount force proceeds even if a drive was left marked as reserved by a mount or dismount operation that never received a response. A reserved drive is reported as in use to the cmd_proc or an ACSAPI client.
You can use the force option to dismount a cartridge with an unreadable or unknown label or a cartridge that a client application did not dismount. Note that ACSLS returns the cartridge to an available storage cell, even if the label is unreadable or missing.
Caution – Dismounting a cartridge with dismount force will unconditionally abort any read/write activity between the drive and any application that is currently using the drive. This is due to the fact that a forced dismount immediately rewinds and unloads the cartridge in the drive specified.
Examples
To dismount cartridge EDU200 from drive 0,1,10,2:
dismount EDU200 0,1,10,2

dismount
222 ACSLS 8.1 Adminstrator’s Guide December 2012
See Also
Command Area Messages
Success Messages
Dismount: vol_id dismounted from drive_id.
Explanation: A forced dismount succeeded.
Variable:
• vol_id is the identifier of the dismounted cartridge.
The vol_id displayed is the volume that was actually dismounted, not necessarily the volume that was specified in the dismount force command.
• drive_id is the identifier of the specified drive.
Dismount: Forced dismount of vol_id from drive_id.
Explanation: A forced dismount succeeded.
Variable:
• vol_id is the identifier of the dismounted cartridge.
The vol_id displayed is the volume that was actually dismounted, not necessarily the volume that was specified in the dismount force command.
• drive_id is the identifier of the specified drive.
Intermediate Messages
None
Error Messages
Dismount: Dismount failed, ACS acs_id full.
For information about... See...
Cancelling a command “cancel” on page 211
Ejecting cartridges from the library “eject” on page 223
Making a CAP (manual mode) ready to enter labelled cartridges into the library
“enter” on page 227
Mounting a scratch cartridge on a drive “mount *” on page 238
Mounting a data cartridge on a drive “mount” on page 235
Displaying CAP status “query cap” on page 246
Displaying drive status “query drive” on page 250
Setting CAP mode (manual or automatic) “set cap mode” on page 272
Setting CAP selection priority “set cap priority” on page 274

eject
December 2012 Command References 223
Explanation: ACSLS cannot dismount the cartridge because the ACS has no free storage cells. You must eject at least one other cartridge from the ACS so that ACSLS can dismount the cartridge from the drive.
Variable: acs_id is the identifier of the ACS that contains the cartridge.
Note – Only online LSMs are used in locating free cells; therefore this message can occur even when there is an LSM with free storage cells if that LSM is offline.
Dismount: Dismount failed, Audit in progress.
Explanation: ACSLS cannot dismount the cartridge because an audit in progress has locked out access to the last unoccupied cell location in the ACS.
Dismount: Dismount failed, Cartridge in drive drive_id, unreadable label
Explanation: ACSLS cannot dismount the cartridge because the cartridge either has no external label, an unreadable external label, or no virtual label. Use a forced dismount to dismount the cartridge.
Variable: drive_id is the identifier of the specified drive.
Dismount: Dismount failed, Drive identifier drive_id available.
Explanation: No cartridge is mounted in the specified drive.
Variable: drive_id is the identifier of the specified drive.
Dismount: Dismount failed, Drive identifier drive_id in use.
Explanation: ACSLS cannot dismount the cartridge because the cartridge is not rewound and unloaded. Either wait for the client application must either rewind and unload the cartridge, then enter a dismount command or use a forced dismount to dismount the cartridge.
Variable: drive_id is the identifier of the specified drive.
Dismount: Dismount failed, Misplaced tape.
Explanation: ACSLS cannot dismount the cartridge because the external label of the cartridge does not match the cartridge identifier in the ACSLS database. The cartridge identifier in the ACSLS database is updated to match the external label of the cartridge. Retry the dismount.
Dismount: Dismount failed, Cartridge not in drive.
Explanation: ACSLS cannot dismount the cartridge because the external label of the cartridge does not match the cartridge identifier specified in the dismount. Reenter the dismount command with the correct cartridge identifier.
Display Area Messages
None.
ejectThe eject command directs the robot to take cartridges from inside an LSM and place them into a CAP, where they can be removed by the operator.
eject
224 ACSLS 8.1 Adminstrator’s Guide December 2012
If you select the lsm_id option, you can use multiple CAPs in a single LSM to eject cartridges.
Format
eject cap_id|lsm_id vol_id|volrange...
Options
cap_id
specifies the CAP used to eject the cartridges.
lsm_id
If you select the lsm_id option, you can use multiple CAPs that are available in a single LSM to eject cartridges. All CAPs that satisfy the requirements (such as manual, non zero priority, available) are unlocked for ejecting cartridges. You can eject cartridges through any or all the CAPs selected, and in any order. Eject initially fills the CAPs with cartridges in order of highest priority.
Example: You have two CAPs - one with priority 2 and one with priority 5; eject fills the CAP with priority 5 status first, then the CAP with priority 2 status. If there are only enough cartridges to be ejected for one CAP, then CAP with priority 5 is filled.
vol_id | volrange
specifies the external or virtual label types of the cartridge or range of cartridges to eject.
Usage
Use the eject command to eject cartridges from the library, which removes them from ACSLS control. The robot places the specified cartridge in the designated CAP, then ACSLS frees the cell locations where the cartridges were stored. Cartridge information is either retained if the ABSENT_VOLUME_RETENTION_PERIOD variable has a non-zero value, or deleted if the ABSENT_VOLUME_RETENTION_PERIOD is set to zero. If you specify more than a CAP full of cartridges on the eject command, empty the CAP when it fills, close the CAP, and continue the ejection until all cartridges are ejected.
You can use a single eject command to eject multiple cartridges not in a range by specifying multiple cartridge IDs separated by a space.
Hint: If your library has two connected LSMs and the PTP is down, to successfully eject cartridges, either:
• Specify a CAP in the LSM where the cartridge is stored. For example, if cartridge NN0100 is stored in LSM 0,0, to eject this cartridge through CAP 0,0,0:
eject 0,0,0 NN0101

eject
December 2012 Command References 225
• For the cap_id, specify the LSM where the cartridge is stored but use a wildcard (*) for the CAP number; ACSLS will select the highest priority CAP in the LSM. For example, if cartridge NN0114 is stored in LSM 0,0, to eject this cartridge through LSM 0,0's highest priority CAP:
eject 0,0,* NN0114
Examples
To eject cartridge NN0101 through CAP 0,0,0:
eject 0,0,0 NN0101
To eject cartridge range NN0101-NN0109 through the highest priority CAP on ACS 0:
eject 0,* NN0101-NN0109
To eject cartridges NN0101, NN0103, NN0105, and NN0107 through the highest priority CAP on ACS 0:
eject 0,* NN0101 NN0103 NN0105 NN0107
To use multiple non-zero priority CAPs for ejecting cartridges in LSM 1,2:
eject 1,2 RB1000-RB2000
Note – Make sure you remove all ejected cartridges from the CAP. You must complete the ejection by unloading all ejected cartridges and closing the CAP door before you can use the CAP for another operation (such as an enter or audit).
See Also
Command Area Messages
Success Messages
Eject: Eject complete, a cartridges ejected
For information about... See...
Cancelling a command “cancel” on page 211
Dismounting a cartridge from a drive “dismount” on page 220
Guidelines and procedures for ejecting cartridges “Ejecting Cartridges” on page 106
Making a CAP (manual mode) ready to enter labelled cartridges into the library
“enter” on page 227
Displaying CAP status “query cap” on page 246
Displaying drive status “query drive” on page 250
Displaying the location and media type of a cartridge
“query volume” on page 269
Setting CAP mode (manual or automatic) “set cap mode” on page 272
Setting CAP selection priority “set cap priority” on page 274

eject
226 ACSLS 8.1 Adminstrator’s Guide December 2012
Eject: vol_id ejected from cap_id
Explanation: ACSLS ejected the specified cartridges.
Variable:
• nn is the number of cartridges ejected.
• vol_id is the cartridge identifier of the ejected cartridge.
• cap_id is the CAP that contains the ejected cartridge.
Intermediate Messages
None
Error Messages
Eject: vol_id Eject failed, CAP cap_id full.
Explanation: A cartridge was not ejected because the CAP is full.
Variable:
• vol_id is the cartridge identifier of the cartridge that was not ejected.
• cap_id is the CAP specified for the ejection.
Eject: vol_id Eject failed, CAP cap_id in use.
Explanation: A cartridge was not ejected because the CAP is in use.
Variable:
• vol_id is the cartridge identifier of the cartridge that was not ejected.
• cap_id is the CAP specified for the ejection.
Eject: vol_id Eject failed, Misplaced tape.
Explanation: ACSLS cannot eject the cartridge because the external label of the cartridge does not match the database's cartridge identifier for the storage cell. The database updates the cartridge identifier, media type, and cleaning cartridge attribute for the cartridge in the storage cell.
Variable: vol_id is the cartridge identifier of the cartridge that was not ejected.
Eject: vol_id Eject failed, Not in same ACS.
Explanation: A cartridge was not ejected because it is not in the ACS specified in the cap_id.
Variable: vol_id is the cartridge identifier of the cartridge that was not ejected.
Eject: vol_id Eject failed, Volume identifier vol_id not found.
Explanation: A cartridge was not ejected because it is not:
• In the storage cell specified in the database,
• In-transit, or
• In a drive.
ACSLS deletes the volume entry from the database.
enter
December 2012 Command References 227
Variable: vol_id is the cartridge identifier that was deleted from the database.
Eject: vol_id Eject failed, Cartridge in drive.
Explanation: A cartridge was not ejected because it is mounted in a drive.
Variable: vol_id is the cartridge identifier of the cartridge that was not ejected.
Eject: vol_id Eject failed, Volume vol_id in use.
Explanation: A cartridge was not ejected because it is reserved for use by another request.
Variable: vol_id is the cartridge identifier of the cartridge that was not ejected.
Display Area Messages
CAP cap_id Remove cartridges from CAP.
Explanation: Either the CAP is full or all requested cartridges are in the CAP. Empty the CAP.
Variable: cap_id is the CAP that contains the ejected cartridges.
CAP cap_id Place magazines in CAP.
Explanation: The CAP requires magazines for the ejection. Open the CAP, place magazines inside, then close the CAP.
Variable: cap_id is the CAP that requires magazines.
enterThis command allows you to set the CAP to operate in either manual or automatic mode. For procedures for setting the CAP to automatic mode or manual mode, refer to the section “Entering Cartridges” on page 104.
• Automatic mode
When a CAP is in automatic mode, you can initiate an enter operation without issuing an enter command. You do this by opening the CAP door, placing one or more cartridges inside, and closing the CAP. The CAP is locked while the enter is being processed; when the enter operation is compete, the CAP is unlocked.
• Manual mode
When in manual mode, the CAP is locked and can only be used by issuing the following command prior to opening the CAP and entering the cartridges.
enter cap_id
Options
cap_id
specifies the CAP. This can be wild-carded with an asterisk (*) to select the CAP with the highest non-zero priority in an LSM, such as 1,1,* or an ACS, such as 0,*,*.

enter
228 ACSLS 8.1 Adminstrator’s Guide December 2012
lsm_id
If you select the lsm_id option, you can use multiple CAPs that are available in a single LSM to enter cartridges. All CAPs that satisfy the requirements (such as manual, non zero priority, available) are unlocked for entering cartridges. You can enter cartridges through any or all the CAPs selected, and in any order. venter is not valid and returns a CAP invalid error.
Usage
Use the enter command to make a manual mode CAP ready to enter labelled cartridges.
Examples
To make CAP 0,0,2 ready to enter cartridges:
enter 0,0,2
To make the highest non-zero priority CAP in LSM 0,0 ready to enter cartridges:
enter 0,0,*
To use multiple CAPs for entering cartridges in an LSM 1,2:
enter 1,2
Note – Cartridges being entered into an LSM must be compatible with that LSM. For example, only T9840, T9940, and LTO cartridges can be entered into an L5500 LSM.
See Also
For information about... See...
Cancelling a command “cancel” on page 211
Creating or modifying scratch pools “define pool” on page 216
Ejecting cartridges from the library “eject” on page 223
Guidelines and procedures for entering cartridges “Entering Cartridges” on page 104
Mounting a scratch cartridge on a drive “mount *” on page 238
Mounting a data cartridge on a drive “mount” on page 235
Displaying CAP status “query cap” on page 246
Setting CAP mode (manual or automatic) “set cap mode” on page 272
Setting CAP selection priority “set cap priority” on page 274
Making a CAP ready to enter unlabeled cartridges into the library
“venter” on page 293

enter
December 2012 Command References 229
Command Area Messages
Success Messages
After all labelled cartridges have been entered, the following message appears, with the second line of the message repeated for each cartridge successfully entered:
Enter: Enter complete, nn volumes entered
Enter: vol_id Entered through cap_id
• nn is the total number of cartridges entered
• vol_id is the cartridge identifier of the entered cartridge
• cap_id is the CAP used to enter the cartridges
Intermediate Messages
None.
Error Messages
Enter: vol_id Enter failed, ACS acs_id full.
Explanation: A cartridge was not entered because the ACS has no free storage cells. You must eject at least one cartridge from the ACS so that ACSLS can enter the cartridge.
Variable:
• vol_id is the external label of the cartridge that was not entered.
• acs_id is the identifier of the ACS that has no free storage cells.
Note – ACSLS only searches online LSMs for free cells; this message can occur even if offline LSMS have free cells.
Enter: vol_id Enter failed, Audit in progress.
Explanation: A cartridge was not entered because an audit has locked out access to a cell location required for the enter.
Variable: vol_id is the external label of the cartridge that was not entered.
Enter: vol_id Enter failed, CAP cap_id in use.
Explanation: A cartridge was not entered because the specified CAP is in use for auditing, ejecting cartridges, or another enter process.
Variable:
vol_id is the external label of the cartridge that was not entered.
cap_id is the in-use CAP.
Enter: vol_id Enter failed, Duplicate label.
Explanation: A cartridge was not entered because the cartridge identifier of a cartridge in the CAP already exists in the ACSLS database.

idle
230 ACSLS 8.1 Adminstrator’s Guide December 2012
Variable: vol_id is the external label of the cartridge that was not entered.
Enter: Enter failed, Unreadable label.
Explanation: A cartridge was not entered because the cartridge either has no external label or an unreadable external label.
Enter: vol_id Enter failed, Unknown media type label.
Explanation: A cartridge was not entered because the cartridge does not have a media identifier on its externals label.
Variable: vol_id is the external label of the cartridge that was not entered.
Display Area Messages
CAP cap_id: Place cartridges in CAP.
Explanation: The CAP is ready for cartridge entry. Open the CAP and enter cartridges.
Variable: cap_id is the CAP used to enter cartridges.
CAP cap_id: Remove cartridges from CAP.
Explanation: One or more cartridges cannot be entered.
Variable: cap_id s the CAP used to enter cartridges. Open the CAP and remove the cartridges.
CAP cap_id: CAP cap_id Place magazines in CAP.
Explanation: The CAP uses magazines for cartridge entry. Load cartridges in the correct magazine, open the CAP, and insert the magazines.
Variable: cap_id s the CAP used to enter cartridges.
idleThe idle command stops ACSLS from processing new requests.
Format
idle [force]
You must enter the full command name for the idle command. ACSLS will reject all other forms of the command, such as i, id, or idl.
Options
force
forces termination of new request processing.

idle
December 2012 Command References 231
Usage
Use the idle command to stop ACSLS from processing new requests. For example, you idle ACSLS before doing maintenance or before terminating ACSLS.
Note – Use the start command to restart the request processing.
idle
Entering an idle command without the force option puts ACSLS in the idle-pending state. ACSLS completes current and pending requests (except pending lock requests, which are cancelled) and rejects new requests except those listed in “Notes.” ACSLS then goes to idle state and does not process subsequent requests until request processing is restarted.
Idle force
Entering an idle command with the force option puts ACSLS in the idle state. ACSLS cancels all current and pending requests and rejects new requests except those listed in the Note under “Examples”. ACSLS does not process subsequent requests until restarted. Because ACSLS does not complete current requests, forcing ACSLS to idle state may leave the database in an inconsistent state with the hardware, which requires an audit to correct.
HINT: Depending on the current requests processing when you enter an idle force, the event log may report process failures. If so, vary the affected LSMs offline and back online. See “vary” on page 288 for information about the vary command.
Examples
To put ACSLS in idle-pending state:
idle
To force ACSLS to idle state:
idle force
Note – In either idle or idle-pending state, ACSLS accepts new requests for the cancel, idle, query, start, and vary requests.
See Also
Command Area Messages
Success Messages
The following message appears when ACSLS request processing stops.
For information about... See...
Displaying the status of a library component “query commands” on page 244
Starting ACSLS request processing “start” on page 282
Changing the state of a library component “vary” on page 288

lock
232 ACSLS 8.1 Adminstrator’s Guide December 2012
ACSLM Request Processing Stopped: Success.
Intermediate Messages
None
Error Messages
ACSLM Request Processing Stopped: status
Explanation: ACSLS did not stop processing requests.
Variable: status is the reason for the failure. For more information on common status messages, see ACSLS Messages.
Display Area Messages
Variable:
Server system idle
Explanation: Request processing has stopped, and ACSLS is in idle state.
Server system idle is pending
Explanation: ACSLS is processing current or pending requests; idle state is pending.
lockThe lock command locks a cartridge or drive to a lock ID that ACSLS assigns.
Format
lock type identifier...[wait]
Options
type identifier
specifies a library component. The following table lists the components that you can lock. You can specify either a drive or a volume but not both in a single lock command. You can, however, use the same lock ID for both drives and volumes..
wait
TABLE 12-4 Valid Components for Lock
Library Component type identifier
drive drive drive_id
volume volume vol_id

lock
December 2012 Command References 233
specifies that the lock is pending if the component is unavailable (locked or in use). ACSLS then locks the component when it is available. You can clear or cancel a pending lock request. Idling ACSLS also cancels a pending lock request.
Usage
Use the lock command to lock a volume or drive to a lock ID that ACSLS assigns. You can only lock available (not locked or in use) volumes or drives.
Note – When you enter a lock command to lock a cartridge or drive, ACSLS assigns a lock ID to the volume or drive and then changes your lock ID to the lock ID of the volume or drive. You cannot use the set lock command to set your lock ID and then use the lock command to lock a volume or drive with the lock ID that you set with set lock.
Examples
To lock drive 0,1,10,2:
lock drive 0,1,10,2
To lock volume EDU445:
lock volume EDU445
See Also
Command Area Messages
Success Messages
The following message appears when a lock request succeeds:
Lock: Lock completed, Success.
In addition, for each identifier in the request, one of the following messages appears:
Lock: Drive drive_id locked under lock_id lock_id.
Lock: Volume vol_id locked under lock_id lock_id.
Where:
• drive_id is the locked drive.
For information about... See...
Removing all active or pending locks on a specified drive or cartridge
“clear lock” on page 215
Displaying the lock status of a drive or cartridge “query lock” on page 255
Setting your lock ID “set lock” on page 277
Displaying your lock or user ID “show” on page 281
Removing active locks on drives or cartridges “unlock” on page 286
logoff
234 ACSLS 8.1 Adminstrator’s Guide December 2012
• The vol_id is the cartridge identifier of the locked cartridge.
• lock_id is the lock ID.
Intermediate Messages
None.
Error Messages
One of the following messages appears if the lock request fails:
Lock: Lock of drive drive_id failed, Drive in use.
Explanation: ACSLS cannot lock the specified drive because the drive is already locked or in use.
Variable: drive_id is the drive that ACSLS cannot lock.
Lock: Lock of drive drive_id failed, Lock failed.
Explanation: ACSLS cannot lock the specified drive. Reenter the lock command with the correct syntax and drive identifier.
Variable: drive_id is the drive that ACSLS cannot lock.
Lock: Lock of volume vol_id failed, Volume in use.
Explanation: ACSLS cannot lock the specified cartridge because the cartridge is already locked or in use.
Variable: vol_id is the cartridge that ACSLS cannot lock.
Lock: Lock of volume vol_id failed, Lock failed.
Explanation: ACSLS cannot lock the specified cartridge. Reenter the lock command with the correct syntax and cartridge identifier.
Variable: vol_id is the cartridge that ACSLS cannot lock.
Display Area Messages
None.
logoffThe logoff command exits from a cmd_proc.
Format
logoff
Options
None.
mount
December 2012 Command References 235
Usage
Use the logoff command to exit from cmd_proc. If you are running an interactive (window) cmd_proc, logoff also quits the cmd_proc window.
Examples
To exit a cmd_proc:
logoff
Note – logoff exits from cmd_proc only, is valid in any ACSLS state, and does not affect ACSLS operations.
See Also
Command Area Messages
None.
Display Area Messages
None.
mountThe mount command mounts a data cartridge.
Format
mount vol_id drive_id [bypass] [readonly]
Options
vol_id
specifies the cartridge.
drive_id
specifies the drive.
bypass
overrides ACSLS verification of the compatibility between the tape drive and the cartridge’s media type. However, when the library receives the mount request, it verifies that the cartridge’s media is compatible with the tape drive; the library fails the mount if the media type is incompatible or is an unknown type.
For information about... See...
Starting a cmd_proc “Starting a cmd_proc” on page 30
Using a cmd_proc “Starting a cmd_proc” on page 30

mount
236 ACSLS 8.1 Adminstrator’s Guide December 2012
readonly
specifies that the cartridge is mounted write-protected.
Caution – LTO drives do not support mounts with write protect. If a "mount read-only" is attempted to an LTO drive, it will fail with a "Drive cannot honor write protect" message in the Event Log.
Also, some early 97xx SCSI-attached libraries do not support mounts with write protect. Even if you specify the read-only option on a mount command, the drive may write to the cartridge. To write protect cartridges for these drives, you must use the cartridge's readonly protection (such as a thumbwheel).
Usage
Use the mount command to mount a data cartridge. You can only mount one cartridge on one drive each time you enter a mount command.
A successful mount requires the following:
• The cartridge and drive must be in the same ACS.
• The cartridge must be available and the drive must be online and available.
Examples
To mount volume EDU010 on drive 0,0,10,2:
mount EDU010 0,0,10,2
In the following example, YUMA15 is a DD3C volume whose cartridge label is missing the seventh character. The bypass option bypasses the media compatibility checks and forces a mount of the cartridge on drive 0,0,4,0, an SD3 drive.
To mount YUMA15 on drive 0,0,4,0 using the bypass option:
See Also
For information about... See...
Dismounting a cartridge from a drive “dismount” on page 220
Making a CAP (manual mode) ready to enter labelled cartridges into the library
“enter” on page 227
Displaying CAP status “query cap” on page 246
Displaying drive status “query drive” on page 250
Displaying the lock status of a drive or cartridge “query lock” on page 255
Displaying the status of media-compatible drives for a specified data cartridge
“query mount” on page 259
Displaying the location and media type of a cartridge “query volume” on page 269
Setting CAP mode (manual or automatic) “set cap mode” on page 272
Setting CAP selection priority “set cap priority” on page 274
Making a CAP ready to enter unlabeled cartridges into the library “venter” on page 293

mount
December 2012 Command References 237
Command Area Messages
Success Messages
Mount: vol_id mounted on drive_id
Explanation: ACSLS mounted the specified cartridge.
Variable:
• vol_id is the cartridge identifier of the cartridge that ACSLS mounted.
• drive_id is the drive that mounted the cartridge.
Intermediate Messages
None.
Error Messages
Mount: Mount failed, Audit in progress.
Explanation: ACSLS cannot mount the cartridge because an audit has locked out access to the cell location of the specified cartridge.
Mount: Mount failed, In use.
Explanation: ACSLS cannot mount the cartridge because either the drive is in use or the requested cartridge is reserved for another command.
Mount: Mount failed, Misplaced tape.
Explanation: ACSLS cannot mount the cartridge because the external label of the cartridge does not match the database's cartridge identifier for the storage cell. The database updates the cartridge identifier, media type, and cleaning cartridge attribute for the cartridge in the storage cell.
Mount: Mount failed, Not in same ACS.
Explanation: ACSLS cannot mount the cartridge because the specified cartridge and drive are not in the same ACS.
Mount: Mount failed, Cartridge in drive.
Explanation: ACSLS cannot mount the cartridge because the specified cartridge is already mounted in a drive.
Mount: Mount failed, Unreadable label.
Explanation: ACSLS cannot mount the cartridge because the cartridge has no label, an unreadable label, or no virtual label.
Mount: Mount failed, Invalid media type.
Explanation: ACSLS cannot mount the cartridge because the specified cartridge's media type is invalid.
Mount: Mount failed, Invalid drive type.
Explanation: ACSLS cannot mount the cartridge because the specified drive's type is invalid.

mount *
238 ACSLS 8.1 Adminstrator’s Guide December 2012
Mount: Mount failed, Incompatible media type.
Explanation: ACSLS cannot mount the cartridge because the cartridge's media type is incompatible with the specified drive.
Display Area Messages
None.
mount *The mount * command selects a scratch cartridge and mounts it.
Format
mount * drive_id [pool_id] [media media_type | media *]
Options
drive_id
specifies the drive.
pool_id
specifies the pool from which ACSLS selects the scratch cartridge. pool_id is optional; if you do not specify a pool_id ACSLS tries to find a scratch cartridge in the common pool (pool 0).
If you specify a pool_id and the pool does not contain a scratch cartridge (or one of the correct media for mixed-media libraries) if the pool is set for overflow; ACSLS tries to find a scratch cartridge in the common pool (pool 0).
media media_type | media *
specifies the cartridge media type. Specifying the media type is optional.
Usage
Use the mount * command to select a scratch cartridge and mount it. The following sections describe how ACSLS selects the scratch cartridge to be mounted and how to specify the cartridge media type for a scratch cartridge.
How ACSLS Selects Scratch Cartridges
The mount * command selects a scratch cartridge by:
• Creating a list of LSMs in the ACS, based on proximity to the LSM containing the specified drive.
• Examining each LSM in the list, until it finds scratch cartridges that meet the pool and media type criteria.
• Choosing the scratch cartridge with the least recent access date in that LSM.
The selected scratch cartridge is then mounted on the drive.
mount *
December 2012 Command References 239
Specifying the Media Type
You can specify cartridge media type in any of the following ways:
• Explicitly specify the media type in this form of the mount * command:
mount * drive_id [pool_id] media media_type
Example: To mount a 9940 scratch cartridge from the common pool (pool 0):
mount * 0,0,10,2 media STK2P
• Use a wildcard (*) for the media type so that ACSLS selects the media by scratch preferences; for more information see“Setting Scratch Preferences” on page 87 . To use scratch preferences, enter this form of the mount * command:
mount * drive_id [pool_id] media *
Example: To use scratch preferences to mount a scratch cartridge from the common pool (pool 0):
mount * 0,0,10,2 media *
• Omit the media option in this form of the mount * command. This instructs ACSLS to pick a media type compatible with the drive.
mount * drive_id [pool_id]
Example: To mount a scratch cartridge compatible with the drive from the common pool (pool 0):
mount * 0,0,10,2
Examples
The following sections show mount scratch examples for single-media and mixed-media libraries.
Single-Media Libraries
To mount a scratch cartridge from pool 5 on drive 0,0,10,2:
mount * 0,0,10,2 5
HINT: If no cartridge is available from pool 5 and it has been set for overflow ACSLS will select a cartridge from the common pool (pool 0).
To mount a scratch cartridge from the common pool (pool 0) on drive 0,0,10,0
mount * 0,0,10,0
Mixed-Media Libraries
To mount a scratch cartridge from pool 5 with a media type of 3480 on drive 0,0,10,2:
mount * 0,0,10,2 5 media 3480
If no cartridge is available from pool 5 and it has been set for overflow ACSLS will select a cartridge with the specified media type from the common pool (pool 0).
To mount a scratch cartridge from pool 10 with media type determined by scratch preferences on drive 0,0,2,3:
mount *
240 ACSLS 8.1 Adminstrator’s Guide December 2012
mount * 0,0,2,3 10 media *
Hint: If no cartridge is available from pool 10 and it has been set for overflow ACSLS will select a cartridge with the specified media type from the common pool (pool 0).
To mount a scratch cartridge from the common pool (pool 0) with media type of 3480 on drive 0,0,10,2:
mount * 0,0,10,2 media 3480
To mount a scratch cartridge from the common pool (pool 0) with media type determined by scratch preferences on drive 0,0,2,3:
mount * 0,0,2,3 media *
To mount a scratch cartridge from the common pool (pool 0) with media compatible with drive 0,0,2,3:
mount * 0,0,2,3
See Also
Command Area Messages
Success Messages
Mount: vol_id mounted on drive_id
Explanation: ACSLS mounted the specified cartridge.
Variable:
• vol_id is the cartridge identifier of the cartridge that ACSLS mounted.
• drive_id is the drive that mounted the cartridge.
For information about... See...
Creating or modifying scratch pools “define pool” on page 216
Deleting empty scratch pools “delete pool” on page 218
Dismounting a cartridge from a drive “dismount” on page 220
Managing scratch cartridges “Managing Scratch Cartridges” on page 114
Displaying drive status “query drive” on page 250
Displaying the lock status of a drive or cartridge “query lock” on page 255
Displaying the status of media-compatible drives for a specified scratch pool
“query mount *” on page 261
Displaying scratch pool attributes “query pool” on page 263
Displaying scratch cartridge status “query scratch” on page 267
Displaying the location and media type of a cartridge “query volume” on page 269
Setting or clearing cartridge scratch attributes “set scratch” on page 279
Setting scratch preferences “Setting Scratch Preferences” on page 87
mount *
December 2012 Command References 241
Intermediate Messages
None.
Error Messages
Mount: Mount failed, Audit in progress.
Explanation: ACSLS cannot mount the cartridge because an audit has locked out access to the cell location of the specified cartridge.
Mount: Mount failed, In use.
Explanation: ACSLS cannot mount the cartridge because either the drive is in use or the requested cartridge is reserved for another command.
Mount: Mount failed, Misplaced tape.
Explanation: ACSLS cannot mount the cartridge because the external label of the cartridge does not match the database's cartridge identifier for the storage cell. The database updates the cartridge identifier, media type, and cleaning cartridge attribute for the cartridge in the storage cell.
Mount: Mount failed, Not in same ACS.
Explanation: ACSLS cannot mount the cartridge because the specified cartridge and drive are not in the same ACS.
Mount: Mount failed, Cartridge in drive.
Explanation: ACSLS cannot mount the cartridge because the specified cartridge is already mounted in a drive.
Mount: Mount failed, Unreadable label.
Explanation: ACSLS cannot mount the cartridge because the cartridge has no label, an unreadable label, or no virtual label.
Mount: Mount failed, Invalid media type.
Explanation: ACSLS cannot mount the cartridge because the specified cartridge's media type is invalid.
Mount: Mount failed, Invalid drive type.
Explanation: ACSLS cannot mount the cartridge because the specified drive's type is invalid.
Mount: Mount failed, Incompatible media type.
Explanation: ACSLS cannot mount the cartridge because the cartridge's media type is incompatible with the specified drive.
Mount: Mount failed, No compatible scratch cartridges in pool.
Explanation: ACSLS cannot mount the cartridge because there are no scratch cartridges in the ACS of the specified drive that match the scratch cartridge's media type. In addition, if the overflow attribute is set for the pool, there are no scratch cartridges with valid media types.

move
242 ACSLS 8.1 Adminstrator’s Guide December 2012
Display Area Messages
Pool pool_id: low water mark warning.
Explanation: The number of cartridges in the specified scratch pool is less than or equal to the low cartridge threshold.
Variable: low_water_mark is the low threshold of the specified scratch pool.
Pool pool_id: high water mark warning.
Explanation: The number of cartridges in the specified scratch pool is greater than or equal to the high cartridge threshold.
Variable: high_water_mark is the high water cartridge threshold of the specified scratch pool.
moveThe move command moves a specified cartridge to an available storage cell in a specified LSM or to a specific storage cell.
Note – SL3000 allows for cartridges to be moved to a specific cell. For more information, see “Moving Cartridges to a Specific Cell” on page 413.
Format
move vol_id lsm_id or move vol_id cell_id
Options
vol_id
specifies the cartridge.
lsm_id
specifies the LSM that will contain the moved cartridge.
cell_id
specifies the cell to which the cartridge will be moved.
Usage
Use the move command to move a specified cartridge to an available storage cell in either:
• A different panel in the same LSM. For example, if you want to empty an entire panel in an LSM, you can move all the cartridges in that panel to a different locations in the same LSM.
• A different LSM.

move
December 2012 Command References 243
You can move only one cartridge each time you enter the move command. If you specify the LSM where the cartridge currently resides, ACSLS will move the cartridge to another panel within that LSM. Otherwise, ACSLS will move it to the LSM you specify. You cannot cancel a move command.
A successful move requires the following:
• The cartridge must be available and in the same ACS as the specified LSM.
• The LSM where the cartridge currently resides and the specified LSM must both be online. The specified LSM must have at least one available storage cell. If the move is within the same LSM, there must be at least one available cell in a different panel in that LSM. If the move requires a pass-thru, any LSMs used must also be online.
Examples
To move cartridge EDU010 (which resides in LSM 0,1) to a different panel in this LSM:
move EDU010 0,1
To move cartridge EDU010 (which resides in LSM 0,1) to LSM 0,2:
move EDU010 0,2
See Also
Command Area Messages
Success Messages
Move: vol_id moved to location cell_id
Explanation: ACSLS moved the specified cartridge to the specified cell location.
Variable:
• vol_id is the cartridge identifier of the cartridge that ACSLS moved.
• cell_id is the new cell location of the specified cartridge.
Error Messages
Move: Move failed
Intermediate Messages
None.
For information about... See...
Displaying the lock status of a drive or cartridge “query lock” on page 255
Displaying the status of an LSM “query lsm” on page 257
Displaying the location and media type of a cartridge “query volume” on page 269

query commands
244 ACSLS 8.1 Adminstrator’s Guide December 2012
query commandsThe query commands display the status of a library component. See the following sections for more information about each query command, including format, options, and usage.
Format
The following shows the general format of the query commands:
query type [subtype | *] identifier... | all
Note – If a cancel request is issued against a pending or current query request, the display of information is halted.
See Also
Command Area Messages
Success Messages
Note – If the query succeeds, the requested status appears.
Intermediate Messages
None.
Error Messages
Library not available.
Explanation: The query failed because ACSLS is recovering (all queries except query server).
Cartridge identifier vol_id not found.
Explanation: The query mount * command cannot display status for the specified cartridge because it is not in the library.
Variable: vol_id is the specified cartridge.
Invalid media type
Explanation: The query mount * command cannot display status for the specified cartridge because it either has an invalid media type or you specified an invalid media type on the command.
Variable: vol_id is the specified cartridge.
For information about... See...
Cancelling a command “cancel” on page 211
Display Command “Using display Command Options” on page 298

query acs
December 2012 Command References 245
Display Area Messages
None.
query acsThe query acs command displays ACS status.
Format
query acs acs_id... | all
Options
acs_id | all
specifies the ACS to query or all for all ACSs.
Usage
Use the query acs command to display the status of an ACS in the following format:
Where:
acs_id
is the ACS identifier.
state is one of the following ACS states:
online
The ACS is online.
offline
The ACS is offline.
offline pending
The ACS will process current and pending requests, then go offline. The ACS will reject any new requests.
diagnostic
yyy-mm-ddhh:mm:ssACS Status
Identifier State Free Cell Audit Mount Dismount Enter Eject
Count C/P C/P C/P C/P C/P
acs_id state count n/n n/n n/n n/n n/n

query cap
246 ACSLS 8.1 Adminstrator’s Guide December 2012
The ACS will process only current and pending requests and will reject any new requests. The ACS is unavailable to client applications and can only be controlled via cmd_proc. Use the vary command to vary the ACS online.
recovery
The ACS is initializing or recovering from errors. Wait for the ACS to go online.
count
is the number of free cells in the ACS.
n
is the number of current (C) and pending (P) requests for the ACS for each command that requires library resources (audit, mount, dismount, enter, and eject).
Examples
To query ACS 1:
query acs 1
To query all ACSs in the library:
query acs all
See Also
query capThe query cap command displays CAP status.
Format
query cap cap_id... | all
Options
cap_id | all
specifies the CAP to query or all for all CAPs.
Note – You cannot specify a cap_id that contains asterisks.
Usage
Use the query cap command to display the status of a CAP.
For information about... See...
Changing the state of a library component “vary” on page 288
Displaying request status “query request” on page 266

query cap
December 2012 Command References 247
The query cap command displays CAP status in the following format:
cap_id
is the CAP identifier.
cap_priority
is the CAP priority.
cap_size
is the number of cells in the CAP.
cap_state
is one of the following CAP states:
• online
The CAP is online.
• offline
The CAP is offline.
• offline-pending
The CAP will process current and pending requests, then go offline. The CAP will reject any new requests.
• diagnostic
The CAP will process only current and pending requests and will reject any new requests. The CAP is unavailable to client applications and can only be controlled via cmd_proc. Use the vary command to vary the CAP online.
• recovery
The CAP is initializing or recovering from errors. Wait for the CAP to go online.
cap_mode
is one of the following CAP entry modes:
• manual
You must unlock the CAP before entering cartridges.
• automatic
The CAP is ready for cartridge entry.
status
yyy-mm-dd hh:mm:ss CAP Status
Identifier Priority Size State Mode Status
cap_id cap_priority cap_size cap_state cap_mode status

query clean
248 ACSLS 8.1 Adminstrator’s Guide December 2012
is one of the following CAP statuses:
• available
The CAP is available.
• enter
The CAP is unavailable (reserved for entering cartridges).
• eject
The CAP is unavailable (reserved for ejecting cartridges).
• audit
The CAP is unavailable (reserved for audit processing).
Examples
To query CAP 0,1,0:
query cap 0,1,0
To query all CAPs in the library:
query cap all
See Also
query cleanThe query clean command displays cleaning cartridge status. Absent or ejected cartridges are not displayed.
Format
query clean vol_id... | all
Options
vol_id | all
specifies the cleaning cartridge to query or all for all cartridges.
For information about... See...
Displaying request status “query request” on page 266
Setting CAP mode (manual or automatic) “set cap mode” on page 272
Setting CAP selection priority “set cap priority” on page 274
Changing the state of a library component “vary” on page 288
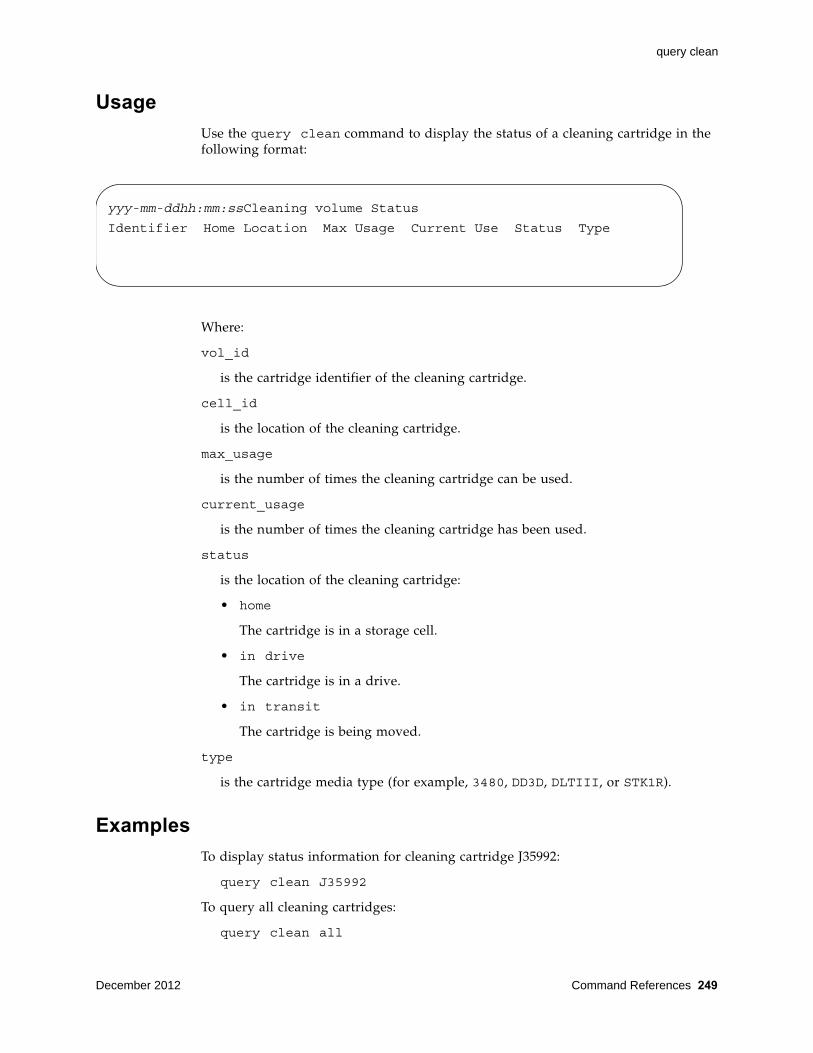
query clean
December 2012 Command References 249
Usage
Use the query clean command to display the status of a cleaning cartridge in the following format:
Where:
vol_id
is the cartridge identifier of the cleaning cartridge.
cell_id
is the location of the cleaning cartridge.
max_usage
is the number of times the cleaning cartridge can be used.
current_usage
is the number of times the cleaning cartridge has been used.
status
is the location of the cleaning cartridge:
• home
The cartridge is in a storage cell.
• in drive
The cartridge is in a drive.
• in transit
The cartridge is being moved.
type
is the cartridge media type (for example, 3480, DD3D, DLTIII, or STK1R).
Examples
To display status information for cleaning cartridge J35992:
query clean J35992
To query all cleaning cartridges:
query clean all
yyy-mm-ddhh:mm:ssCleaning volume Status
Identifier Home Location Max Usage Current Use Status Type
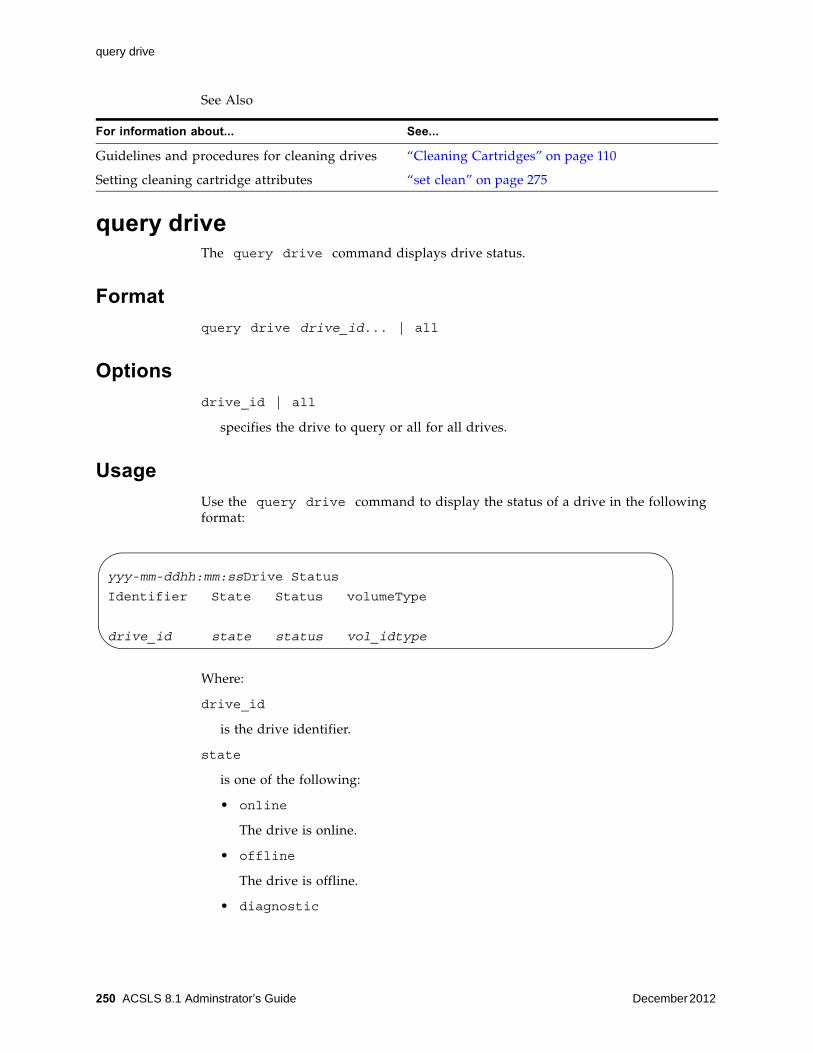
query drive
250 ACSLS 8.1 Adminstrator’s Guide December 2012
See Also
query driveThe query drive command displays drive status.
Format
query drive drive_id... | all
Options
drive_id | all
specifies the drive to query or all for all drives.
Usage
Use the query drive command to display the status of a drive in the following format:
Where:
drive_id
is the drive identifier.
state
is one of the following:
• online
The drive is online.
• offline
The drive is offline.
• diagnostic
For information about... See...
Guidelines and procedures for cleaning drives “Cleaning Cartridges” on page 110
Setting cleaning cartridge attributes “set clean” on page 275
yyy-mm-ddhh:mm:ssDrive Status
Identifier State Status volumeType
drive_id state status vol_idtype

query drive
December 2012 Command References 251
The drive will process only current and pending requests and will reject any new requests. The drive is unavailable to client applications and can only be controlled via cmd_proc. Use the vary command to vary the drive online.
• recovery
The drive is initializing or recovering from errors. Wait for the drive to go online.
status
is one of the following drive statuses:
• In use
The drive has a cartridge mounted or is reserved for a mount.
Possible Scenario: You perform a query drive all and get a message saying the drive is in use. You then perform a display drive * and get a message saying the drive is reserved. This means: the reserved status for the drive implies that a mount request is in progress and that a cartridge is on its way to the drive. At the same time the drive is considered to be in use.
• Available
The drive is available for a mount.
vol_id
is the identifier of the cartridge in the drive. This field is blank if there is no cartridge in the drive or if the cartridge's external label is unreadable or unknown.
drive_type
is the drive type.
Examples
To query drive 0,3,1,0:
query drive 0,3,1,0
To query all drives:
query drive all
See Also
For information about... See...
Changing the state of a library component “vary” on page 288
Dismounting a cartridge from a drive “dismount” on page 220
Drive serial numbers “Using display Command Options” on page 298 and “display drive” on page 304
query lmu
252 ACSLS 8.1 Adminstrator’s Guide December 2012
query lmuThe query lmu command displays LMU and port status for both single-LMU and dual-LMU ACS configurations, as well as the desired state for ACSs and ports. If a library is partitioned, it also displays the partition ID.
The query lmu command is the best way to monitor ACSLS communication with the libraries it manages. query lmu:
• Shows the status of ACSLS connections to the library.
• Shows Redundant Electronics (RE) if any library in a string reports RE.
• Shows single or Dual-LMU for non- RE libraries or a non- SL8500.
• Displays the desired state for ACSs, port connections, LSMs, and tape drives.
• Displays the partition ID of a partitioned library.
Note – ACSLS supports dual-LMU configurations for only the 9330 LMU with host/LMU microcode compatibility Level 12. The same microcode level must be loaded in both LMUs.
Format
query lmu acs_id... | all
Options
acs_id | all
specifies the ACS whose LMUs you want to query or select all to query LMUs for all ACSs.
Usage
Use the query lmu command to display LMU and port status, as well as desired state, for both single-LMU and dual-LMU ACS configurations. The following figures show output examples for a library without Redundant Electronics and a library with Redundant Electronics.Output Example without Redundant Electronics
The following figure shows a library without the Redundant Electronics option.

query lmu
December 2012 Command References 253
FIGURE 12-1 Library without Redundant Electronics
Output Example with Redundant Electronics
The following figure shows a library with the Redundant Electronics option.
FIGURE 12-2 Library with Redundant Electronics
Where:
acs_id
is the ACS identifier.
mode
is the LMU mode (Dual LMU, Single LMU, or SCSI LMU).
status
is the active or standby LMU status (Communicating, Not Communicating, or Offline).
partition_status
shows if the library is partitioned. If it is partitioned it shows the partition to which you are connected. The partition status is:

query lmu
254 ACSLS 8.1 Adminstrator’s Guide December 2012
Not Partitioned
Partition 1-n
The partition number.
acs_state
is the actual ACS state. States are:
• online
The ACS is online.
• diagnostic
The ACS will process only current and pending requests and will reject any new requests. The ACS is unavailable to client applications and can only be controlled via cmd_proc. Use the vary command to vary the ACS online.
• offline
The ACS is offline.
• offline pending
The ACS will process current and pending requests, then go offline. The ACS will reject any new requests.
acs_desired_state
you want the ACS to be in this state. The desired states are:
online
diagnostic
offline
port_id
is the port identifier.
port_state
is one of the following actual port states:
• online
The port is online.
• offline
The port is offline.
port_desired_state
you want to port to be in this state. The desired states are:
• online
• offline
role (des)
is the LMU’s role and designation (A or B) where roles are:

query lock
December 2012 Command References 255
• Active
LMU is in active role (the LMU is managing the ACS).
• Standby
LMU is in standby role (not managing the ACS, communicating with the active LMU and available for switch over).
Note – During switch over, the role field information is not current, and may display as a single dash (-). As the information becomes current, ACSLS refreshes the role field with the actual role of each LMU.
compat_level
is the host/LMU microcode compatibility level. Level 11 or above is required for dual-LMU configurations.
dev_name
is the port device name.
Examples
To display LMU and port status for all LMUs managing all ACSs:
query lmu all
To display LMU and port status for all LMUs managing ACSs 0 and 1:
query lmu 0 1
See Also
query lockThe query lock command displays the lock status of a drive or cartridge.
Format
query lock type identifier... | all
Options
type identifier | all
For information about... See...
Manually switching ACS management from the ACS's active LMU to the standby LMU
“switch lmu” on page 283
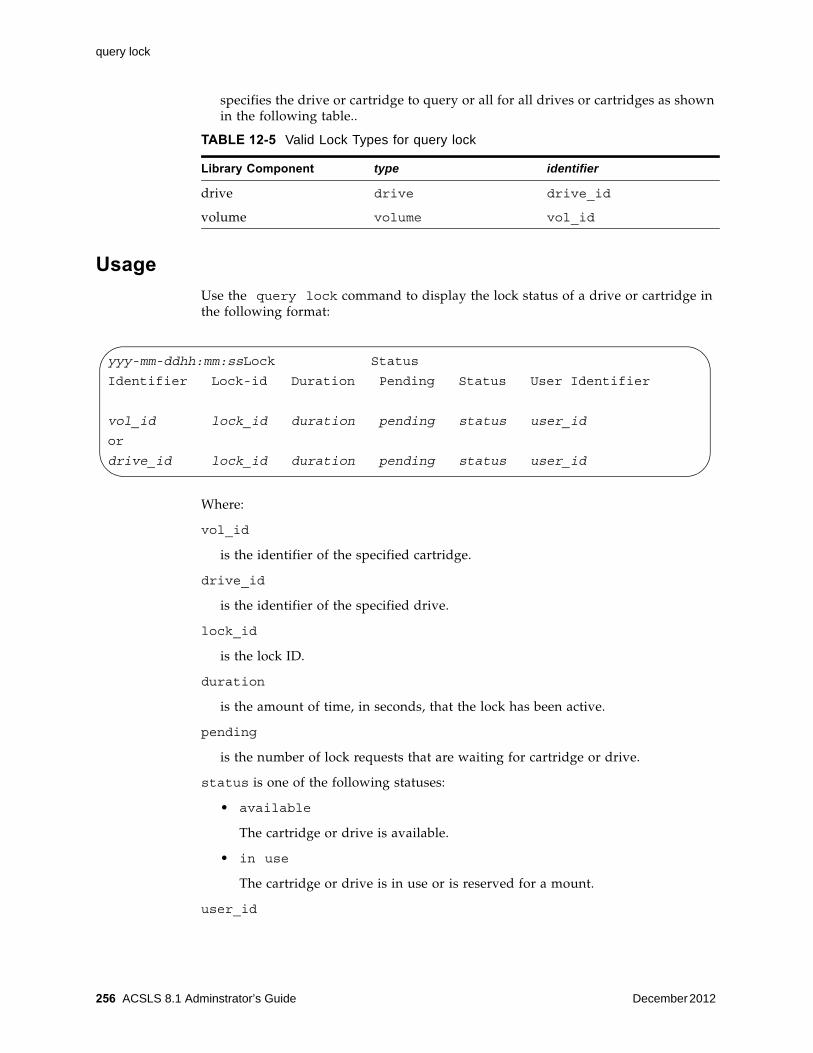
query lock
256 ACSLS 8.1 Adminstrator’s Guide December 2012
specifies the drive or cartridge to query or all for all drives or cartridges as shown in the following table..
Usage
Use the query lock command to display the lock status of a drive or cartridge in the following format:
Where:
vol_id
is the identifier of the specified cartridge.
drive_id
is the identifier of the specified drive.
lock_id
is the lock ID.
duration
is the amount of time, in seconds, that the lock has been active.
pending
is the number of lock requests that are waiting for cartridge or drive.
status is one of the following statuses:
• available
The cartridge or drive is available.
• in use
The cartridge or drive is in use or is reserved for a mount.
user_id
TABLE 12-5 Valid Lock Types for query lock
Library Component type identifier
drive drive drive_id
volume volume vol_id
yyy-mm-ddhh:mm:ssLock Status
Identifier Lock-id Duration Pending Status User Identifier
vol_id lock_id duration pending status user_id
or
drive_id lock_id duration pending status user_id

query lsm
December 2012 Command References 257
is the user ID that has locked the cartridge or drive. The user_id wraps after 80 characters.
Examples
To display lock status information for drive 1,0,4,0:
q loc dr 1,0,4,0
To display lock status information for all drives:
query lock drive all
To display lock status information for cartridge SL4493:
query lock cartridge SL4493
To display lock status information for all cartridges:
query lock cartridge all
See Also
query lsmThe query lsm command displays LSM status.
Format
query lsm lsm_id... | all
Options
lsm_id | all
specifies the LSM to query or all for all locks.
For information about... See...
Removing all active or pending locks on a specified drive or cartridge
“clear lock” on page 215
Locking drives and cartridges “lock” on page 232
Setting your lock ID “set lock” on page 277
Displaying your lock or user ID “show” on page 281
Removing active locks “unlock” on page 286
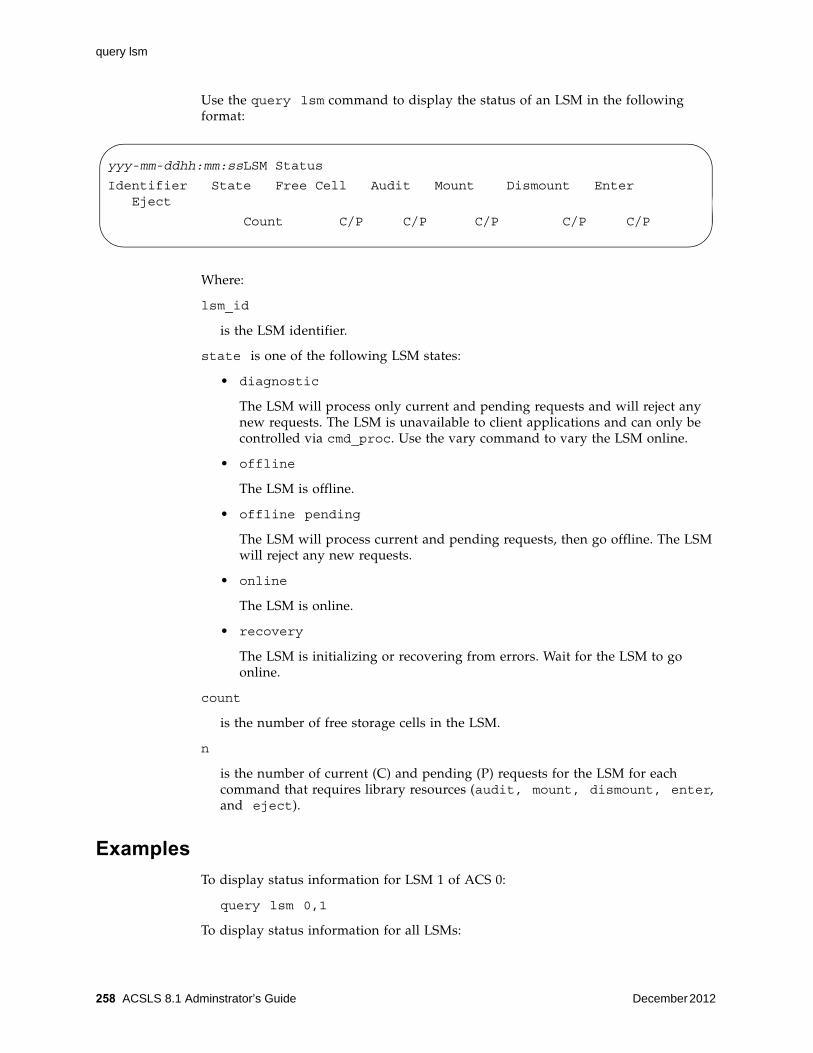
query lsm
258 ACSLS 8.1 Adminstrator’s Guide December 2012
Use the query lsm command to display the status of an LSM in the following format:
Where:
lsm_id
is the LSM identifier.
state is one of the following LSM states:
• diagnostic
The LSM will process only current and pending requests and will reject any new requests. The LSM is unavailable to client applications and can only be controlled via cmd_proc. Use the vary command to vary the LSM online.
• offline
The LSM is offline.
• offline pending
The LSM will process current and pending requests, then go offline. The LSM will reject any new requests.
• online
The LSM is online.
• recovery
The LSM is initializing or recovering from errors. Wait for the LSM to go online.
count
is the number of free storage cells in the LSM.
n
is the number of current (C) and pending (P) requests for the LSM for each command that requires library resources (audit, mount, dismount, enter, and eject).
Examples
To display status information for LSM 1 of ACS 0:
query lsm 0,1
To display status information for all LSMs:
yyy-mm-ddhh:mm:ssLSM Status
Identifier State Free Cell Audit Mount Dismount Enter Eject
Count C/P C/P C/P C/P C/P

query mount
December 2012 Command References 259
query lsm all
See Also
query mountUse the query mount command to optimize the performance of a library with multiple LSMs, such as an SL8500 or a string of connected SL8500s. It displays the status of media-compatible drives for a specified data cartridge. These drives are not displayed if a cartridge(s) is absent or rejected. In addition:
• When selecting the list of drives to be returned to a query mount request, the drives must be compatible with the volume specified.
• Drives are ordered primarily by pass-thru distance. The drives in LSMs closest to the cartridge are listed first.
• With ACSLS 7.3 and later releases, drives that are the same pass-thru distance from the cartridge are in least-recently-used order.
Example: The compatible drive with the longest time since a cartridge was dismounted, is first; the drive with the next longest time, is second, etc.
Format
query mount vol_id
Options
vol_id specifies the cartridge to query.
Usage
Use the query mount command to display the status of all library drives attached to the same ACS as the cartridge and compatible with the media type of the specified cartridge. query mount displays drive status for LSMs in any state (online, offline, offline pending, or diagnostic).
The compatible drives are ordered by proximity to the specified cartridge in the following format:
For information about... See...
Displaying request status “query request” on page 266
Changing the state of a library component “vary” on page 288
yyy-mm-dd hh:mm:ss Mount Status
Identifier Status Drive State Status Volume Drive Type
vol_id vol_stat drive_id state drive_stat inu_id drive_type

query mount
260 ACSLS 8.1 Adminstrator’s Guide December 2012
Where:
vol_id
is the identifier of the specified cartridge.
vol_stat
is the location of the cartridge:
• home
The cartridge is in a storage cell.
• in drive
The cartridge is in a drive.
• in transit
The cartridge is being moved or is missing.
drive_id
is a list of all library drives compatible with the media type of the specified cartridge.
drive_id
is the drive identifier.
state
is one of the following drive states:
• online
The drive is online.
• offline
The drive is offline.
• diagnostic
The drive will process only current and pending requests and will reject any new requests. The drive is unavailable to client applications and can only be controlled via cmd_proc. Use the vary command to vary the drive online.
• recovery
The drive is initializing or recovering from errors. Wait for the drive to go online.
status
is one of the following drive statuses:
• In use
The drive has a cartridge mounted or is reserved for a mount.
• Available
The drive is available for a mount.
inu_id

query mount *
December 2012 Command References 261
is the identifier of the cartridge in the drive. The cartridge id appears only if the drive_stat is In use.
drive_type
is the drive type.
Examples
To display status information of drives ordered by proximity to cartridge ZUNI14:
query mount ZUNI14
See Also
query mount *The query mount * command displays the status of drives that are compatible with the media in one or more specified scratch pools (and, optionally, only the drives compatible with a specific cartridge media type within the pool).
Format
query mount * pool_id... [media media_type | media *]
Options
pool_id
specifies the scratch pool to query.
media media_type | media *
specifies the media type.
Usage
Use the query mount * command to display the status of all library drives compatible with all cartridge media types in a specified scratch pool(s) and in the same ACS as the cartridges. Pool 0 is the common scratch pool. Specify the media_type option to restrict the display to drives compatible with a specific cartridge media type within the pool. The displayed drives are ordered by proximity to the densest scratch pools. query mount * displays drive status for drives in LSMs in any state (online, offline, offline-pending, or diagnostic).
For information about... See...
Mounting a data cartridge on a drive “mount” on page 235
Displaying the lock status of a drive or cartridge “query lock” on page 255
Displaying the location and media type of a cartridge
“query volume” on page 269
Changing the state of a library component “vary” on page 288

query mount *
262 ACSLS 8.1 Adminstrator’s Guide December 2012
The query mount * command displays drive status in the following format:
Where:
pool_id
is the specified scratch pool(s).
drive_id
is a list of all library drives compatible with all media types of the specified pool(s), or a specific media type within the pool if a media type was specified.
state
is one of the following drive states:
• online
The drive is online.
• offline
The drive is offline.
• diagnostic
The drive will process only current and pending requests and will reject any new requests. The drive is unavailable to client applications and can only be controlled via cmd_proc. Use the vary command to vary the drive online.
• recovery
The drive is initializing or recovering from errors. Wait for the drive to go online.
vol_id
is the identifier of the cartridge in the drive. The cartridge id appears only if the drive_stat is In use.
drive_stat
is one of the following drive statuses:
• In use
The drive has a cartridge mounted or is reserved for a mount.
• Available
The drive is available for a mount.
drive_type
is the drive type.
yyy-mm-dd hh:mm:ss Mount Scratch Status
Identifier Drive State Volume Status Drive Type
pool_id drive_id state vol_id drive_stat drive_type

query pool
December 2012 Command References 263
Examples
To display status of compatible drives listed by proximity to the largest concentration of scratch tapes in pool 5:
query mount * 5
To display status of compatible drives listed by proximity to the largest concentration of 3480 scratch tapes in common pool 0:
query mount * 0 media 3480
See Also
query poolThe query pool command displays scratch pool attributes.
Format
query pool pool_id... | all
Options
pool_id | all
specifies the scratch pool to query or all for all pools. Pool 0 is the common pool.
For information about... See...
Creating or modifying scratch pools “define pool” on page 216
Deleting empty scratch pools “delete pool” on page 218
Mounting a scratch cartridge on a drive “mount *” on page 238
Displaying the lock status of a drive or cartridge “query lock” on page 255
Displaying scratch pool attributes “query pool” on page 263
Displaying scratch cartridge status “query scratch” on page 267
Setting or clearing cartridge scratch attributes “set scratch” on page 279
Changing the state of a library component “vary” on page 288

query pool
264 ACSLS 8.1 Adminstrator’s Guide December 2012
Usage
Use the query pool command to display scratch pool attributes in the following format:
Where:
pool_id
is the specified scratch pool.
vol_count
is the number of scratch cartridges in the pool.
Cartridges not counted are absent and ejected scratch cartridges and data cartridges in a pool.
low_water_mark
is the low cartridge warning threshold. If the scratch cartridge count falls below this threshold, ACSLS logs a warning message in the event log.
A “-” after the value means that the scratch cartridge count is below the low cartridge threshold.
high_water_mark
is the high cartridge warning threshold. If the scratch cartridge count reaches or exceeds this threshold, ACSLS logs a warning message in the event log. A “+” after the value means that the scratch cartridge count is at or above the high cartridge threshold.
attribute
is displayed if overflow is set (via the set scratch command) for the specified scratch pool. overflow specifies that scratch cartridges are selected from the common scratch pool (Pool 0) if mount scratch * requests cannot be satisfied with a cartridge from the specified scratch pool.
Examples
To display status information for scratch pool 5:
query pool 5
To display status information for all scratch pools:
query pool all
yyy-mm-dd hh:mm:ss Pool Status
Identifier Volume Count Low Water Mark High Water Mark Attributes
pool_id vol_count low_water_mark high_water_mark attribute

query port
December 2012 Command References 265
See Also
query portThe query port command displays port status.
Format
query port port_id... | all
Options
port_id | all
specifies the port to query or all for all ports.
Usage
Use the query port command to display the status of a port in the following format:
Where:
state
is one of the following port states:
• online
The port is online.
• offline
The port is offline.
port_id
is the port identifier.
For information about... See...
Creating or modifying scratch pools “define pool” on page 216
Deleting empty scratch pools “delete pool” on page 218
Displaying scratch cartridge status “query scratch” on page 267
Setting or clearing cartridge scratch attributes “set scratch” on page 279
yyy-mm-dd hh:mm:ss Port Status
State Identifier
state port_id

query request
266 ACSLS 8.1 Adminstrator’s Guide December 2012
Examples
To display status information for port 0,0:
query port 0,0
To query all ports:
query port all
See Also
query requestThe query request command displays request status.
Format
query request request_id... | all
Options
request_id | all
specifies the request to query or all for all requests.
Usage
Use the query request command to display the status of a request in the following format:
Where:
request_id
is the ACSLS request identifier.
command
is the ACSLS command that corresponds to the request identifier.
status
is one of the following request statuses:
• Current
ACSLS is processing the request.
• Pending
The request is waiting to be processed.
• Not found
For information about... See...
Changing the state of a library component “vary” on page 288

query scratch
December 2012 Command References 267
The specified request is not a valid ACSLS request.
Examples
To display status information for request 33179:
query request 33179
To display all current and pending requests:
query request all
See Also
query scratchThe query scratch command displays the status of scratch cartridges in a pool sorted by ascending order of access date. The cartridges with the earliest access date are at the top of the list with the most recently used cartridges at the bottom of the list. Pool IDs in the first column do not appear in any particular order. Only those cartridges permitted through Access Control are displayed.
Format
query scratch pool_id... | all
Options
pool_id | all
specifies the scratch pool to query or all for all pools. Pool 0 is the common pool.
Usage
Use the query scratch command to display the status of scratch cartridges in a pool in the following format:
Where:
pool_id
is the specified scratch pool.
vol_id
is the identifier of the scratch cartridge.
cell_id
is the storage cell that contains the cartridge.
status
For information about... See...
Cancelling a command “cancel” on page 211
query server
268 ACSLS 8.1 Adminstrator’s Guide December 2012
is the location of the cartridge:
• home
The cartridge is in a storage cell.
• in drive
The cartridge is in a drive.
• in transit
The cartridge is being moved.
media_type
is the cartridge's media type (for example, 3480, 3490E, DD3D, or DLTIV).
Note – Scratch cartridges with a cartridge status of absent, ejected, or missing are not included in the query scratch output.
To see cartridges sorted by pool, you issue successive query scratch commands for each pool. Alternately, you can issue the display volume command to see the information and sort it by pool, but you will not be guaranteed of getting the least recently used scratch cartridge.
Examples
To display status information for scratch cartridges in scratch pool 29015:
query scratch 29015
To display status information for scratch cartridges in all scratch pools:
query scratch all
See Also
query serverThe query server command displays ACSLS and library status.
Format
query server
Options
None.
For information about... See...
Creating or modifying scratch pools “define pool” on page 216
Deleting empty scratch pools “delete pool” on page 218
Setting or clearing cartridge scratch attributes “set scratch” on page 279
query volume
December 2012 Command References 269
Usage
Use the query server command to display the status of ACSLS and the library in the following format:
Where:
Identifier
is blank
state
is one of the following ACSLS states:
• idle
ACSLS is idle (not processing requests).
• idle pending
ACSLS will process current and pending request, reject new request, then go idle.
• recovery
ACSLS is initializing (going to run state) or recovering from errors; ACSLS is not processing requests.
• run
ACSLS is running (processing requests).
count
is the number of free storage cells in the library.
n
is the number of current (C) and pending (P) ACSLS requests for each command that requires library resources (audit, mount, dismount, enter, and eject).
HINT: You cannot cancel a query server request.
Examples
To display status information on the server:
query server
See Also
query volumeThe query volume command displays the location of a cartridge.
For information about... See...
Changing the state of a library component “vary” on page 288
Displaying request status “query request” on page 266

query volume
270 ACSLS 8.1 Adminstrator’s Guide December 2012
Format
query volume vol_id... | all
Options
vol_id | all
specifies the volume to query or all for all volumes.
Usage
Use the query volume command to display the location of a volume in the following format:
Where:
vol_id
is the volume identifier.
status
is the location of the cartridge.
home
The cartridge is in a storage cell.
in drive
The cartridge is in a drive.
in transit
The cartridge is being moved or is missing.
absent
The cartridge cannot be found.
ejected
The cartridge has been ejected from the library.
location
specifies the location as one of the following:
• If the status is home, the location is a storage cell identifier.
• If the status is in transit, the location is either a cell identifier or a drive identifier.
• If the status is in drive, the location is a drive identifier.
media_type
is the volume's media type (for example, 3480, 3490E, DD3D, or DLTIV).

set commands
December 2012 Command References 271
Examples
To display status information for volume 2903B:
query volume 2903B
To display all volumes in the library:
q volume all
See Also
set commandsThe set commands set various attributes of different library components. See the following sections for more information about each set command, including format, options, usage, and messages.
Format
The following shows the general format of the set commands:
set type [off | subtype] [*] identifier...
See Also
Command Area Messages
Success Messages
The following message appears when a set command succeeds:
Set: Set completed, Success.
See each set command for specific success messages.
For information about... See...
Other volume information “Creating a Custom Volume Report” on page 143
Display Command “Using display Command Options” on page 298 and “display volume” on page 318
Mounting a data volume on a drive “mount” on page 235
Displaying the lock status of a drive or volume “query lock” on page 255
Displaying the status of media-compatible drives for a specified data volume
“query mount” on page 259
Displaying scratch pool attributes “query pool” on page 263
Setting or clearing volume scratch attributes “set scratch” on page 279
Changing the state of a library component “vary” on page 288
For information about... See...
Cancelling a command “cancel” on page 211

set cap mode
272 ACSLS 8.1 Adminstrator’s Guide December 2012
Intermediate Messages
None.
Error Messages
See each set command for specific messages.
Display Area Messages
See each set command for specific messages.
set cap modeThe set cap mode command sets a CAP's entry mode.
Format
set cap mode cap_mode cap_id
Options
cap_mode
specifies manual or automatic CAP mode.
cap_id
specifies the CAP identifier.
You cannot specify a CAP identifier that contains an asterisk (*) unless the priority is set.
Usage
Use the set cap mode command to set a CAP's entry mode to one of the following modes:
• manual
You must enter an enter command before entering cartridges.
• automatic
You can enter cartridges without first entering an enter command
Note – You cannot set the CAP mode to automatic in a partitioned library.
HINT: You cannot change a CAP's mode while the CAP is in use. That is, if the door is open during either manual or automatic enter operations, you cannot change its mode until you complete the enter operation.

set cap mode
December 2012 Command References 273
Examples
To set CAP 0,3,1 in manual mode:
set cap mode manual 0,3,1
To set CAP 0,3,1 in automatic mode:
set cap mode automatic 0,3,1
See Also
Command Area Messages
Success Messages
Set: CAP cap_id, mode changed to cap_mode.
Explanation: ACSLS changed the mode of the specified CAP.
Variable:
• cap_id is the CAP whose mode is changed.
• cap_mode is the new enter mode of the CAP.
Intermediate Messages
None.
Error Messages
Set: CAP cap_id Set failed, Incorrect attribute.
Explanation: ACSLS cannot change the mode of the specified CAP because you specified an invalid CAP mode.
Variable: cap_id is the CAP whose mode is not changed.
CAP cap_id: Automatic mode.
Explanation: ACSLS changed the specified CAP's mode to automatic.
Variable: cap_id is the CAP whose mode is changed.
CAP cap_id: Manual mode.
Explanation: ACSLS changed the specified CAP's mode to manual.
Variable: cap_id is the CAP whose mode is changed.
For information about... See...
Making a CAP (manual mode) ready to enter labelled cartridges into the library
“enter” on page 227
Displaying CAP status “query cap” on page 246
Changing the state of a library component “vary” on page 288
Making a CAP ready to enter unlabeled cartridges into the library “venter” on page 293

set cap priority
274 ACSLS 8.1 Adminstrator’s Guide December 2012
set cap priorityThe set cap priority command sets a CAP's automatic selection priority.
Format
set cap priority cap_priority cap_id
Options
cap_priority
specifies the CAP priority. Valid values are 0 to 16, where 16 is the highest priority. All CAPs initially have a 0 priority, which means that ACSLS does not automatically select the CAP.
Note – If you are using the AEM option. Since the AEM should not be used for small enters and ejects, the maximum CAP priority is 1. This aids in preventing the AEM from being selected when the CAP ID is wild-carded with an asterisk on an audit, enter, or eject. For more information on the AEM, refer to “Using the AEM” on page 378.
cap_id
specifies the CAP identifier. You must specify a particular CAP; you cannot specify an asterisk (*) to set the same priority for all CAPs.
Usage
Use the set cap priority command to set a CAP's automatic selection priority.
If a CAP request specifies an asterisk (*) for the CAP ID, ACSLS automatically selects an available CAP with highest non-zero priority for each ACS specified in the request.
Examples
To assign priority 16 to CAP 0,3,1:
set cap priority 16 0,3,1
See Also
For information about... See...
Updating the ACSLS database to match the actual inventory of library cartridges
“audit” on page 206
Ejecting cartridges from the library “eject” on page 223
Making a CAP (manual mode) ready to enter labelled cartridges into the library
“enter” on page 227
set clean
December 2012 Command References 275
Command Area Messages
Updates the ACSLS database to match the actual inventory of library cartridges.
Success Messages
Set: CAP cap_id, priority changed to cap_priority.
Explanation: ACSLS changed the priority of the specified CAP.
Variable:
• cap_id is the CAP whose priority is changed.
• cap_priority is the new CAP priority.
Intermediate Messages
None.
Error Messages
Set: CAP cap_id Set failed, Incorrect attribute.
Explanation: ACSLS cannot change the mode of the specified CAP because you specified an invalid CAP priority.
Variable: cap_id is the CAP whose priority is not changed.
Display Area Messages
None.
set cleanThe set clean command sets cleaning cartridge attributes.
Format
set clean max_usage | off vol_id | volrange
Options
max_usage | off
specifies the number of times a cleaning cartridge is used before ACSLS stops selecting the cartridge to clean drives. off specifies that ACSLS will not select the cartridge and redefines the cartridge as a data cartridge.
Displaying CAP status “query cap” on page 246
Changing the state of a library component “vary” on page 288
Making a CAP ready to enter unlabeled cartridges into the library “venter” on page 293
For information about... See...

set clean
276 ACSLS 8.1 Adminstrator’s Guide December 2012
Note – You cannot: specify a maximum cleaning usage for a media type that is reserved for only data cartridges; set cleaning off for a media type that is only a cleaning cartridge
vol_id | volrange
specifies the cleaning cartridge or range of cartridges.
Usage
Use the set clean command to set the number of times ACSLS will select a cleaning cartridge. You also use set clean to set a cartridge's cleaning cartridge attribute off, which you do if you have incorrectly defined a data cartridge as a cleaning cartridge.
Examples
To set the maximum use to 10 for cleaning cartridges CLN108 - CLN112:
set clean 10 CLN108-CLN112
To set the cleaning cartridge attribute off and redefine cartridges HRR234 - HRR244 as data cartridges:
set clean off HRR234-HRR244
See Also
Command Area Messages
Success Messages
Set: volume vol_id is a cleaning cartridge.
Explanation: ACSLS specified that the cleaning cartridge is valid for drive cleaning.
Variable: vol_id is the valid cleaning cartridge.
Set: volume vol_id is not a cleaning cartridge.
Explanation: ACSLS specified that the cleaning cartridge is not valid for drive cleaning.
Variable: vol_id is the invalid cleaning cartridge.
Intermediate Messages
None.
Error Messages
Set: Clean vol_id Set failed, Incorrect attribute.
For information about... See...
Guidelines and procedures for cleaning drives “Cleaning Cartridges” on page 110
Displaying cleaning cartridge status “query clean” on page 248

set lock
December 2012 Command References 277
Explanation: ACSLS cannot change the cleaning attribute because the specified cartridge is not a cleaning cartridge.
Variable: vol_id is the data or scratch cartridge.
Display Area Messages
None.
set lockThe set lock command sets your lock ID.
Format
set lock lock_id
Options
lock_id
specifies the lock ID. Valid lock IDs are 0 to 32767.
Usage
Use the set lock command to set or change your lock ID. Change your current lock ID when you want to remove locks on a drive or cartridge whose lock ID does not match your current lock ID as follows:
• To clear all locks on a specified drive or cartridge, set your lock ID to 0, then enter a clear lock command.
• To remove active locks on drives or cartridges, set your lock ID to the lock ID of the locked components, then enter an unlock command.
Note – When you enter a lock command to lock a cartridge or drive and your lock ID is zero (0), ACSLS assigns a lock ID to the cartridge or drive and then changes your lock ID to the lock ID of the cartridge or drive. You cannot use the set lock command to set your lock ID and then use the lock command to lock a cartridge or drive with the lock ID that you set with set lock.
Examples
To change your current lock ID lock to new lock ID 354:
set lock 354

set owner
278 ACSLS 8.1 Adminstrator’s Guide December 2012
See Also
Command Area Messages
Success Messages
Set: Changed lock identifier from previous_lock_id to lock_id.
Explanation: ACSLS changed your lock ID.
Variable:
previous_lock_id was your previous lock ID.
lock_id is your new lock ID.
Intermediate Messages
None.
Error Messages
None.
Display Area Messages
None.
set ownerThe set owner command sets volume ownership.
Format
set owner owner_id volume vol_id | volrange
Options
owner_id
specifies the owner identifier. You must enclose this value in quotes (" ").
volume vol_id | volrange
specifies the volume or range of volumes.
For information about... See...
Removing all active or pending locks on a specified drive or cartridge “clear lock” on page 215
Locking drives and cartridges “lock” on page 232
Displaying the lock status of a drive or cartridge “query lock” on page 255
Displaying your lock or user ID “show” on page 281
Removing active locks “unlock” on page 286

set scratch
December 2012 Command References 279
Usage
Use the set owner command to set volume ownership. You must enter set owner from cmd_proc; you cannot set volume ownership from a client application.
Examples
To assign ownership of volume YUMA06:
set owner "cray" volume YUMA06
Note – To remove volume ownership of volume YUMA06: set owner:"" volume 0YUMA06
Command Area Messages
None.
Display Area Messages
None.
set scratchThe set scratch command sets or clears a volume's scratch attribute and assigns the volume to a pool.
Format
set scratch [off] pool_id vol_id | volrange
Options
off
specifies that the volume is a data cartridge.
pool_id
specifies the cartridge's scratch pool. Specify an asterisk (*) to reassign a data cartridge to its current pool.
vol_id | volrange
specifies the volume or range of volumes.
Usage
Use the set scratch command to set or clear a volume's scratch attribute and assign the volume to a pool.

set scratch
280 ACSLS 8.1 Adminstrator’s Guide December 2012
Examples:
To define volumes YUMA10-YUMA20 as scratch volumes and assign them to scratch pool 5:
set scratch 5 YUMA10-YUMA20
To move scratch volumes YUMA10-YUMA15 to pool 10:
set scratch 10 YUMA10-YUMA15
To “unscratch” (change from scratch to data) volumes YUMA16-YUMA20 and move them to the common pool (pool 0):
set scratch off 0 YUMA16-YUMA20
To scratch to data volumes YUMA16-YUMA20 and keep them in their current pool:
set scratch * YUMA16-YUMA20
See Also
Command Area Messages
Success Messages
Set: volume vol_id in tape pool pool_id is a scratch cartridge.
Explanation: ACSLS changed the specified data cartridge to a scratch cartridge and assigned it to a pool.
Variable:
• vol_id is the specified volume.
• pool_id is the pool to which the volume is assigned.
Set: volume vol_id in tape pool pool_id is a data volume.
Explanation: ACSLS changed the specified scratch cartridge to a data cartridge.
Variable: vol_id is the specified volume.
Intermediate Messages
None.
Error Messages
Set: Scratch vol_id Set failed, Incorrect attribute.
Explanation: ACSLS cannot change the scratch attribute because the specified cartridge is a cleaning cartridge.
For information about... See...
Displaying scratch cartridge status “query scratch” on page 267
Displaying scratch pool attributes “query pool” on page 263
Creating or modifying scratch pools “define pool” on page 216
Deleting empty scratch pools “delete pool” on page 218
show
December 2012 Command References 281
Variable: vol_id is the cleaning cartridge.
Display Area Messages
Pool pool_id: low water mark warning.
Explanation: The number of cartridges in the specified scratch pool is less than or equal to the low threshold.
Variable: low_water_mark is the low threshold of the specified scratch pool.
Pool pool_id: high water mark warning.
Explanation: The number of cartridges in the specified scratch pool is greater than or equal to the high threshold.
Variable: high_water_mark is the high threshold of the specified scratch pool.
showThe show command displays your lock ID or user ID.
Format
show type
Options
type
specifies one of the following types:
lock
Your lock ID.
user
Your user ID.
Usage
Use the show command to display your lock ID or user ID.
Examples
To display requestor's user_id:
show user
To display current lock_id:
show lock
start
282 ACSLS 8.1 Adminstrator’s Guide December 2012
See Also
Command Area Messages
Success Messages
Show: Current lock identifier is lock_id
Explanation: Your current lock ID is lock_id.
Show: User identifier is user_id
Explanation: Your current user ID is user_id.
Intermediate Messages
None.
Error Messages
None.
Display Area Messages
None.
startThe start command starts ACSLS request processing.
Format
start
Options
None.
Usage
Use the start command to put ACSLS in run state and start ACSLS request processing. You typically use the start command to restart request processing if ACSLS is idled.
For information about... See...
Removing all active or pending locks on a specified drive or cartridge
“clear lock” on page 215
Locking drives and cartridges “lock” on page 232
Displaying the lock status of a drive or cartridge “query lock” on page 255
Setting your lock ID “set lock” on page 277
Removing active locks “unlock” on page 286
switch lmu
December 2012 Command References 283
Examples:
To restart ACSLS request processing:
start
If ACSLS is in run state, entering the start command has no effect.
See Also
Command Area Messages
Success Messages
ACSLM Request Processing Started: Success.
Explanation: ACSLS started processing requests.
Intermediate Messages
None.
Error Messages
ACSLM Request Processing Not Started: status
Explanation: ACSLS did not start processing requests.
Variable: status is the reason for the failure. For more information on common status messages, see ACSLS Messages.
Display Area Messages
Server system running
Explanation: ACSLS started processing requests.
switch lmuIn dual-LMU or Redundant Electronics (RE) configurations, the switch lmu command manually switches ACS management from the ACS's active LMU to the standby LMU.
Note – ACSLS supports dual-LMU configurations for only the 9330 LMU with host/LMU microcode compatibility Level 11 or above loaded. The same microcode level must be loaded in both LMUs.
For information about... See...
Stopping ACSLS from processing new requests “idle” on page 230
Displaying the status of a library component “query commands” on page 244
Changing the state of a library component “vary” on page 288

switch lmu
284 ACSLS 8.1 Adminstrator’s Guide December 2012
Format
switch lmu acs_id
Options
acs_id
specifies the ACS to switch ACS management from the active to the standby LMU.
Usage
Use the switch lmu command to manually switch ACS management from the ACS's active LMU to the standby LMU. Before you enter a switch lmu command, make sure that:
• ACSLS is in run state
• The ACS you specify is in online or diagnostic state
• At least one port is online to each LMU
Examples
In dual-LMU configurations, you can use the switch lmu command to switch ACS management from the ACS's active LMU to the standby LMU. Assume the following dual-LMU configuration:
• LMU A is in the active role and LMU B is in the standby role.
• Both LMUs manage ACS 0.
• The ports to LMU A have port IDs 0,0 and 0,1.
The following procedure tells how to use the switch lmu command to let you replace a LAN cable between the LMUs.
To replace a LAN cable between dual LMUs configured as described above, do the following:
1. Switch to LMU B:
switch lmu 0
2. Vary the ports to LMU A offline:
vary port 0,0 0,1 offline
3. Replace the LAN cable.
4. Vary the ports to LMU A back online:
vary port 0,0 0,1 online
5. Switch back to LMU A:
switch lmu 0
switch lmu
December 2012 Command References 285
See Also
Command Area Messages
Success Messages
Switch: Switch lmu completed for acs_id, Success.
Explanation: ACSLS switched ACS management from the active to the standby LMU.
Variable: acs_id is the ACS whose LMUs switched roles.
Switch: Switch lmu initiated for acs_id, Success.
Explanation: ACSLS started switching ACS management from the active to the standby LMU.
Variable: acs_id is the ACS whose LMUs are switching roles.
Switch: Switch lmu failed, acs_id not found.
Explanation: You specified an invalid ACS.
Variable: acs_id is the ACS identifier you specified on the switch lmu command.
Switch: Switch lmu failed, acs_id is offline.
Explanation: You specified an ACS that is offline. Use the vary command to vary the ACS to online or diagnostic mode.
Variable: acs_id is the ACS identifier you specified on the switch lmu command.
Switch: Switch lmu failed, acs_id not configured for dual lmu.
Explanation: You specified an ACS that is not configured with active and standby LMUs. Either:
• Reconfigure the specified ACS, then reenter the switch lmu command
• Enter a switch lmu command that specifies an LMU that is configured with active and standby LMUs.
Variable: acs_id is the ACS identifier you specified on the switch lmu command.
For information about... See...
Displaying ACS status “query acs” on page 245
Displaying LMU status “query lmu” on page 252
Displaying port status “query port” on page 265
Displaying ACSLS and library status “query server” on page 268
Starting ACSLS request processing “start” on page 282
Changing the state of a library component “vary” on page 288
Redundant Electronics “Redundant Electronics” on page 340

unlock
286 ACSLS 8.1 Adminstrator’s Guide December 2012
Switch: Switch lmu failed, not communicating.
Explanation: An LMU switch failed because the standby LMU is not communicating. Check the standby LMU for communications problems.
Switch: Switch lmu failed, switch already active.
Explanation: An LMU switch is in progress for the ACS you specified. Wait until the switch completes, then, if desired, reenter the switch lmu command.
Switch: Switch lmu failed, port is offline.
Explanation: You specified an ACS with no LMU ports online Vary at least one port online to each LMU.
Display Area Messages
None.
unlockThe unlock command removes active locks (associated with your current lock ID) on a specified drive or cartridge or removes all active locks.
Format
unlock type identifier...| all
Options
type identifier
specifies a library component. The following table lists the components that you can unlock.
all
specifies all active locks.
Usage
Use the unlock command to remove active locks on specified cartridges and drives or remove all active locks. The lock ID of the component must match your current lock ID.
TABLE 12-6 Valid Components for Unlock
Library Component type identifier
drive drive drive_id
volume volume vol_id

unlock
December 2012 Command References 287
When you unlock a component that is not in use, ACSLS checks for pending locks on the component. If there is a pending lock, ACSLS locks the component with the lock ID of the pending lock.
Note – The unlock command always resets your lock ID to 0.
Examples
To remove active locks on drive 0,0,2,0:
unlock drive 0,0,2,0
To remove active locks on all locked cartridges:
unlock volume all
See Also
Command Area Messages
Success Messages
Unlock: Unlock completed, Success.
Unlock: drive drive_id unlocked.
Explanation: ACSLS unlocked the specified drive.
Variable: drive_id is the unlocked drive.
Unlock: Unlock completed, Success.
Unlock: volume vol_id unlocked.
Explanation: ACSLS unlocked the specified volume.
Variable: vol_id is the unlocked volume.
Intermediate Messages
None.
Error Messages
Unlock: Unlock of drive drive_id failed, status.
Explanation: ACSLS cannot unlock the drive.
Variable: status is the reason for the failure. For more information on common status messages, see ACSLS Messages.
For information about... See...
Removing all active or pending locks on a specified drive or volume
“clear lock” on page 215
Locking drives and volumes “lock” on page 232
Displaying the lock status of a drive or cartridge “query lock” on page 255
Setting your lock ID “set lock” on page 277
Displaying your lock or user ID “show” on page 281

vary
288 ACSLS 8.1 Adminstrator’s Guide December 2012
Unlock: Unlock of volume vol_id failed, status.
Explanation: ACSLS cannot unlock the volume.
Variable: status is the reason for the failure. For more information on common status messages, see ACSLS Messages.
Display Area Messages
None.
varyThe vary command changes the state of a library component.
Format
vary type identifier...state [force]
Options
type [identifier]
specifies a library component. The following table lists the components you can vary.
state
specifies one of the following device states: online (online to clients and cmd_proc), offline, or diagnostic (online to cmd_proc only).
You can vary an ACS, LSM, CAP, or drive online, offline, or diagnostic. You can vary a port either online or offline. See “Usage” for more information about device states.
force
varies an ACS, LSM, CAP, or drive offline after processing only the current robotic request.
TABLE 12-7 Valid Components for Vary
ACS Component type identifier
ACS acs acs_id
LSM lsm acs_id,lsm_id
CAP cap cap_id
drive drive drive_id
port port port_id
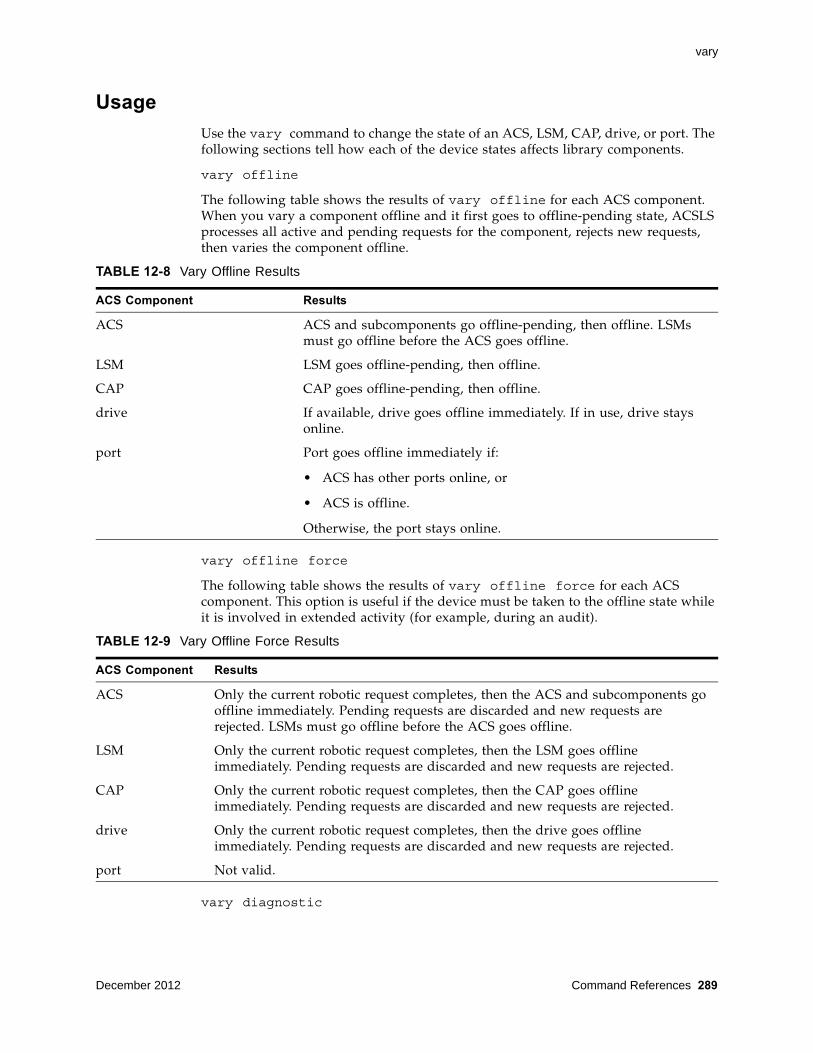
vary
December 2012 Command References 289
Usage
Use the vary command to change the state of an ACS, LSM, CAP, drive, or port. The following sections tell how each of the device states affects library components.
vary offline
The following table shows the results of vary offline for each ACS component. When you vary a component offline and it first goes to offline-pending state, ACSLS processes all active and pending requests for the component, rejects new requests, then varies the component offline.
vary offline force
The following table shows the results of vary offline force for each ACS component. This option is useful if the device must be taken to the offline state while it is involved in extended activity (for example, during an audit).
vary diagnostic
TABLE 12-8 Vary Offline Results
ACS Component Results
ACS ACS and subcomponents go offline-pending, then offline. LSMs must go offline before the ACS goes offline.
LSM LSM goes offline-pending, then offline.
CAP CAP goes offline-pending, then offline.
drive If available, drive goes offline immediately. If in use, drive stays online.
port Port goes offline immediately if:
• ACS has other ports online, or
• ACS is offline.
Otherwise, the port stays online.
TABLE 12-9 Vary Offline Force Results
ACS Component Results
ACS Only the current robotic request completes, then the ACS and subcomponents go offline immediately. Pending requests are discarded and new requests are rejected. LSMs must go offline before the ACS goes offline.
LSM Only the current robotic request completes, then the LSM goes offline immediately. Pending requests are discarded and new requests are rejected.
CAP Only the current robotic request completes, then the CAP goes offline immediately. Pending requests are discarded and new requests are rejected.
drive Only the current robotic request completes, then the drive goes offline immediately. Pending requests are discarded and new requests are rejected.
port Not valid.
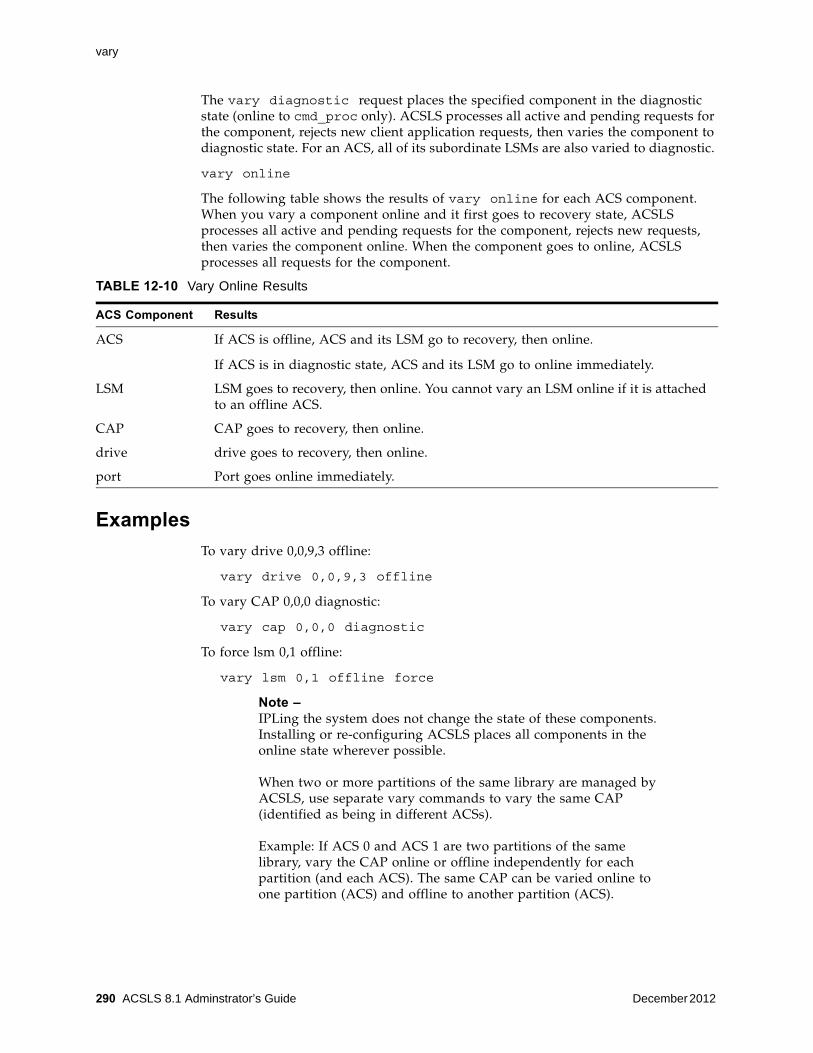
vary
290 ACSLS 8.1 Adminstrator’s Guide December 2012
The vary diagnostic request places the specified component in the diagnostic state (online to cmd_proc only). ACSLS processes all active and pending requests for the component, rejects new client application requests, then varies the component to diagnostic state. For an ACS, all of its subordinate LSMs are also varied to diagnostic.
vary online
The following table shows the results of vary online for each ACS component. When you vary a component online and it first goes to recovery state, ACSLS processes all active and pending requests for the component, rejects new requests, then varies the component online. When the component goes to online, ACSLS processes all requests for the component.
Examples
To vary drive 0,0,9,3 offline:
vary drive 0,0,9,3 offline
To vary CAP 0,0,0 diagnostic:
vary cap 0,0,0 diagnostic
To force lsm 0,1 offline:
vary lsm 0,1 offline force
Note – IPLing the system does not change the state of these components. Installing or re-configuring ACSLS places all components in the online state wherever possible. When two or more partitions of the same library are managed by ACSLS, use separate vary commands to vary the same CAP (identified as being in different ACSs). Example: If ACS 0 and ACS 1 are two partitions of the same library, vary the CAP online or offline independently for each partition (and each ACS). The same CAP can be varied online to one partition (ACS) and offline to another partition (ACS).
TABLE 12-10 Vary Online Results
ACS Component Results
ACS If ACS is offline, ACS and its LSM go to recovery, then online.
If ACS is in diagnostic state, ACS and its LSM go to online immediately.
LSM LSM goes to recovery, then online. You cannot vary an LSM online if it is attached to an offline ACS.
CAP CAP goes to recovery, then online.
drive drive goes to recovery, then online.
port Port goes online immediately.

vary
December 2012 Command References 291
See Also
Command Area Messages
Success Messages
Vary: type identifier Varied state
Explanation: ACSLS changed the state of the specified library component.
Variable:
• type is the library component type.
• identifier is the library component identifier.
• state is the new stat of the library component.
Intermediate Messages
None.
Error Messages:
In-transit volume recovery incomplete.
Explanation: The LSM robot cannot dispose of in-transit volumes while the LSM or its ACS is varied online. If you are varying an ACS online, the ACS state is changed to online immediately, but any LSMs that are unable to complete in-transit volume recovery remain offline.
Vary: Vary type identifier failed, Drive in use.
Explanation: ACSLS cannot change the state of the specified library component because the command involved an in-use drive.
Variable:
• type is the library component type.
• identifier is the library component identifier.
Vary: Vary type identifier failed, Incorrect lockid
Explanation: ACSLS cannot change the state of the specified library component because the drive lock_id does not match your lock_id.
Variable:
• type is the library component type.
• identifier is the library component identifier.
Vary: Vary type identifier failed, State unchanged.
Explanation: ACSLS cannot change the state of the specified library component because the component is already in the requested state.
Variable:
For information about... See...
Displaying the status of a library component “query commands” on page 244
vary
292 ACSLS 8.1 Adminstrator’s Guide December 2012
• type is the library component type.
• identifier is the library component identifier.
Vary: Vary type identifier failed, Vary disallowed.
Explanation: ACSLS cannot change the state of the specified library component because a vary diagnostic request was issued from a client application.
Variable:
• type is the library component type.
• identifier is the library component identifier.
Vary: Vary type identifier failed, Incorrect state.
Explanation: ACSLS cannot change the state of the specified library component because you tried to vary:
• A CAP online when the LSM or ACS is in the diagnostic or offline state.
• A CAP diagnostic when the LSM or ACS is offline.
• An LSM online when the ACS is in the diagnostic or offline state.
• An LSM diagnostic if the ACS is offline.
Variable:
• type is the library component type.
• identifier is the library component identifier.
Vary: Vary type identifier failed, Vary in progress.
Explanation: ACSLS cannot change the state of the specified library component because
• A CAP and the CAP or its LSM or ACS is in a transitory (recovery or offline-pending) state.
• An LSM and the LSM, its ACS, or a subordinate CAP is in a transitory state.
• An ACS and the ACS, a subordinate LSM, or a subordinate CAP is in a transitory state.
• An ACS, LSM, or CAP to the diagnostic or online state and a vary offline/force request overrode the attempt.
• A drive which is in a transition state of recovery.
Variable:
• type is the library component type.
• identifier is the library component identifier.
Vary: Vary type identifier failed, State unchanged.
Explanation: ACSLS cannot change the state of the specified library component because you tried to vary an ACS, LSM, or CAP offline and a vary offline/force request overrode the attempt.
Variable:
venter
December 2012 Command References 293
• type is the library component type.
• identifier is the library component identifier.
Vary: Vary type identifier failed, ACS online.
Explanation: ACSLS cannot change the state of the specified library component because you tried to vary the last port offline in an online ACS.
Variable:
• type is the library component type.
• identifier is the library component identifier.
Vary: Vary type identifier failed, No ports online.
Explanation: ACSLS cannot change the state of the specified library component because there are no ports online for an ACS.
Variable:
• type is the library component type.
• identifier is the library component identifier.
Display Area Messages
One of the following messages appears when an ACS, LSM, drive, or port changes state.
ACS acs_id: state
LSM lsm_id: state
Drive drive_id: state
Port port_id: state
The following message appears if, during recovery of in-transit volumes, a cartridge label is unreadable or duplicate. The cartridge is moved to the CAP.
CAP cap_id. Remove volumes from CAP.
cap_id
is the CAP containing the cartridges.
venterThe venter command makes a CAP ready to enter unlabeled cartridges into the library.
Note – The L5500 does not support cartridges without media labels. The SL500, SL3000, and SL8500 libraries do not support unlabeled cartridges (venters). The reason is because these libraries cannot read a media label without a volser label, and ACSLS will not venter a cartridge of unknown media type.

venter
294 ACSLS 8.1 Adminstrator’s Guide December 2012
Format
venter cap_id vol_id
Options
cap_id
specifies the CAP through which the cartridges are to be entered.
vol_id
specifies the virtual labels of the cartridges to be entered.
Usage
Use the venter command to make a CAP ready to enter cartridges with missing or unreadable labels into the library. You specify virtual labels (volume IDs) on the venter command, which adds cartridge information to the ACSLS database. From one to 42 cartridges can be entered at a time.
Unless the media type is “3480”, you cannot venter a cartridge that has no separate media type label.
Caution – ACSLS only supports the venter command for SCSI/Fibre-attached LSMs before the SL500 when both: the cartridge being ventered has a media label, and the cartridge's media label is compatible with drives attached to the SCSI library. Unless the cartridge's media type is 3480, you cannot venter a cartridge without a separate media label.
Use the venter command to enter cartridges with missing or unreadable labels. Do not open the LSM door and place cartridges with missing or unreadable labels in a storage cell because ACSLS cannot manage these cartridges. During an audit, ACSLS will eject cartridges with missing or unreadable labels and no virtual labels.
The venter command does not provide an option to specify the media type of the cartridge you want to enter. In a mixed-media environment, ACSLS cannot prevent drive/media incompatibilities for virtually entered cartridges!
Examples
To assign virtual labels to volumes MAINT1 and MAINT2 and enter these volumes through CAP 0,2,2:
venter 0,2,2 MAINT1 MAINT2
See Also
For information about... See...
Cancelling a command “cancel” on page 211
Creating or modifying scratch pools “define pool” on page 216
Ejecting cartridges from the library “eject” on page 223
venter
December 2012 Command References 295
Command Area Messages
Success Messages
Venter: Enter complete, nn cartridges entered.
Explanation: ACSLS entered the displayed number of cartridges.
Variable: nn is the total number of cartridges entered.
Venter: vol_id Entered through cap_id
Explanation: ACSLS entered the specified virtual cartridge.
Variable:
• vol_id is the virtual cartridge label.
• cap_id is the CAP through which the cartridge was entered.
Intermediate Messages
None.
Error Messages
Venter: vol_id Enter failed, status
Explanation: ACSLS did not enter the specified virtual cartridge.
Variable:
• vol_id is the virtual cartridge label.
• status is the translated completion status of the request returned by ACSLS.
Display Area Messages
CAP cap_id: Place cartridges in CAP.
Explanation: The CAP is ready for cartridge entry. Open the CAP and enter cartridges.
Variable: cap_id s the CAP used to enter cartridges.
CAP cap_id: Unknown media type label.
Making a CAP (manual mode) ready to enter labelled cartridges into the library
“enter” on page 227
Mounting a scratch cartridge on a drive “mount *” on page 238
Mounting a data cartridge on a drive “mount” on page 235
Displaying CAP status “query cap” on page 246
Setting CAP mode (manual or automatic) “set cap mode” on page 272
Setting CAP selection priority “set cap priority” on page 274
For information about... See...

venter
296 ACSLS 8.1 Adminstrator’s Guide December 2012
Explanation: One or more cartridges cannot be entered because the media type is unknown.
Variable: cap_id is the CAP used to enter cartridges. Open the CAP and remove the cartridges.

December 2012 Display Command Reference 297
13
Display Command Reference
In this chapter you will learn how to use the display command.
If you think in terms of SQL and look at the options, you will realize the power and flexibility in the display command. The display command is a powerful tool for reporting information from the ACSLS database. Like a SQL SELECT statement, display allows you to specify:
• the database table (ACSLS object) you want to display
• wildcards
• conditions that objects must meet to be selected
• fields to report and the order in which they will be reported
• the sort order in which output will be displayed
• that only the count of the number of objects meeting the selection criteria be displayed
The result is a query facility that lets you customize what you want displayed and how it should be presented. Much more information is available through the display command than is possible through ACSLS query commands. For example, display volume gives access to volume information that was only available through a custom volrpt. display lsm and display drive provide LSM and tape drive serial numbers.
The display commands are:
• “display cap” on page 300
Displays specific CAP information based on the options selected.
• “display cell” on page 303
Displays specific cell information based on the options selected.
• “display drive” on page 304
Displays specific drive information based on the options selected.
• “display lock” on page 309
Displays specific lock information based on user ID.
• “display lsm” on page 310

Using display Command Options
298 ACSLS 8.1 Adminstrator’s Guide December 2012
Displays specific LSM information based on the options selected.
• “display panel” on page 313
Displays specific library panel information based on the options selected.
• “display pool” on page 314
Displays specific scratch pool information based on the options selected.
• “display port” on page 316
Displays specific port information based on the options selected.
• “display volume” on page 318
Displays specific volume information based on the options selected.
Using display Command OptionsThe display command displays various fields of information for different library components. The display command allows you to select the order and format in which the output is displayed.
The information displayed can include multiple columns and long lines.To prevent lines from wrapping, you can re-size the terminal window used for display. A cmd_proc -lq window will probably be your best choice.
Wildcards, numeric or alpha ranges, and selection lists can be used with the display command.
Using Wildcard Characters
• The wildcard character, *, can be used to substitute: for certain display operands; for one or more subfields in compound display operands; or at the beginning or end of a volume ID. It must match one or more characters.
• Many of the ACSLS library components have a primary key composed of multiple fields.
For example, the primary key of:
• an LSM is acs,lsm
• a drive is acs,lsm,panel,drive
• When you wild card a primary key that contains multiple fields, you can either specify an asterisk (*) for all fields in the key or you can wild card individual key fields. If you specify (*) some of the key fields and wild card others, you must specify all of the key fields.
• Do not use an asterik (*) or underscore (_) to match a single character in a vol_id. The '_' is positional, and represents a single character. It may be used more than once in a vol_id to represent more than one character.
Examples
Examples of valid wild cards using the * character:
• display drive * (display all drives)

Using display Command Options
December 2012 Display Command Reference 299
• display drive 0,1,*,* (displays all drives in LSM 0,1)
• display volume *100 (displays all volumes ending in 100)
• display drive * -volume RB0001 (displays the drive(s) that contain volume RB0001)
Examples of invalid wildcard using the * character:
• display drive 0,1,* (Asterisks for both the panel and drive positions must be specified when selecting all drives in LSM 0,1)
• display cap * * (Only one asterisk is allowed when selecting all CAPs)
• display volume 1*111 (The embedded asterisk is not allowed. You must use display volume 1_111).
Using Ranges
• A range is denoted with a hyphen or dask.
• Rules for using ranges are:
• Negative numbers are not allowed, except for volume home LSM.
• <n and >n are allowed. <n is all numerics less than n. >n is all numerics greater than n.
• Multiple numbers or ranges can be used, separated by a white space.
• Volume ranges can be alphanumeric.
Examples
Examples of valid ranges:
• display volume * -drive 0,1,2,2-5 (displays all volumes in acs 0, lsm 1, panel 2, drives 2 through 5)
• display lsm * -state online -free_cells >50 -type 9730 (displays all 9730 lsms in an online state with a freecell count greater than 50)
Examples of invalid ranges:
• display drive 0,1,1,1-* (* is not valid in a range)
• display volume * -drive 0,1,?,1-5 (? is not valid in a range)
Format
display type arg ... [ -selection ... ] [ [ -c ] | [ -f field ... ] [ -s sort_field ... ] [ -n n ] ]
Options
type
specifies the object to be displayed. Valid types are: cap, cell, drive, lock, LSMs, panel, pool, port, and volume.

display cap
300 ACSLS 8.1 Adminstrator’s Guide December 2012
arg
(argument) specifies the identifiers for the object type. Only objects that match one or more of the identifiers are returned.
-selection
specifies additional selection criteria. To be selected, a component must match at least one of the selection identifiers for each selection criteria.
-c
(count) causes the request to display only the number of objects that satisfy the arg and selection criteria. This option is mutually exclusive with the -f field, -s sort_field, and -n n options.
-f field
specifies the fields of information to be returned and the order in which they are to be returned for each object selected. Each display type has a list of available, key, and default fields. If -f is specified, the default fields are not displayed unless they are key fields or have been specified. If -f is not specified, then the default fields are returned. Key fields for each type are normally displayed first. However, you can change the order in which the key fields are displayed by specifying them after the -f option.
The list of fields is separated by spaces.
-s sort_field
sorts the objects returned by the field(s) selected in the order specified. The default sort order for each display command is discussed under each command. Sorting is based on internal database values and may not always display in alphanumeric order.
All returned fields for a type are valid sort_fields.
-n n
specifies the maximum number of objects to be displayed.
display capThe display cap command displays specific CAP information based on the options selected.
Note – On SL3000s and SL8500s with 4.70 and later firmware. To prevent CAP IDs from changing when additional modules are added to the SL3000 or additional CAPs are installed, the library returns all possible CAP locations in its configuration information. CAPs that are not installed will be reported as “not installed” in the CAP Status.
ACSLS only adds database records for CAP locations that actually have CAPs installed.
Note – See “Using display Command Options” on page 298 for details about specifying display selection criteria and selecting the data to be displayed.

display cap
December 2012 Display Command Reference 301
Formatdisplay cap cap_id ... ] [ -availability cap_availability ...] [ -status cap_status ... ] [-priority cap_priority ... ] [ -state cap_state ... ] [ -manual | -automatic ] [ -condition cap_condition ... ] [ [ -c ] | [ -f field ... ] [ -s sort_field ... ] [ -n n ] ]
Fields
The fields for display cap are:
• key fields: acs, lsm, cap
• default fields: acs, lsm, cap, status, priority, state, mode, size, availability
• available fields: acs, lsm, cap, status, priority, state, desired_state, mode, size, condition, availability
Options
cap_id
specifies the CAP(s) to display. A cap_id is of the format: acs, lsm, cap.
Wildcard character,*, can be used in any cap_id subfield or used to represent all subfields. However, if it is used to represent all cap_ids (example: display cap * or display cap *,*,*), additional cap_ids (either numeric or *) are not allowed. Numeric ranges apply to any subfield of cap_id.
availability cap_availability
specifies one or more cap availabilities as additional selection criteria. CAP availabilities are: lib_not_partn, cap_shared, cap_dedicated, dedicated_other, not_installed.
CAPs that are dedicated_other or not_installed are not defined in the ACSLS database. These values are only seen when a CAP’s availability has changed (since it was configured). Reconfigure to remove these CAPs.
-status cap_status
specifies one or more CAP statuses as additional selection criteria. CAP statuses are: audit, available, eject, enter, insert_magazines.
-priority cap_priority
specifies one or more CAP priorities. Numeric range rules apply. CAP numeric ranges: 0-16.
-state cap_state
specifies one or more CAP states. CAP states are: diagnostic, offline, offline_pending, online, recovery.
-manual

display cap
302 ACSLS 8.1 Adminstrator’s Guide December 2012
selects CAPs in manual mode.
-automatic
selects CAPs in automatic mode.
-condition cap_condition
specifies one or more CAP conditions from which to select. Valid conditions are: inoperative, maint_required, or operative.
Note – An inoperative or maint_required condition is only cleared when a drive, LSM, or ACS is varied online. So, a CAP condition of inoperative or maint_required may be inaccurate.
-c
(count) causes the request to display only the number of objects that satisfy the arg and selection criteria. This option is mutually exclusive with the -f field, -s sort_field, and -n n options.
-f field
specifies the fields of information to be returned and the order in which they are to be returned for each object selected. Each display type has a list of available, key, and default fields. If -f is specified, the default fields are not displayed unless they are key fields or have been specified. If -f is not specified, then the default fields are returned. Key fields for each type are normally displayed first. However, you can change the order in which the key fields are displayed by specifying them after the -f option.
The list of fields is separated by spaces.
The following is a new CAP field that is not reported by query cap.
• desired_state
The desired state for an ACS, port, LSM, drive, or CAP is the availability that you want for the component. ACSLS sets desired state when an explicit vary operation is performed. (This is a vary from a cmd_proc or ACSAPI client command. It is not a vary that ACSLS internally generates because of a library status change.)
The current state (specified as "state") for an ACS, port, LSM, drive, or CAP is the current availability of the component limited by desired state. When a drive is varied online, its desired state is online. However, it’s current state could be offline because the drive is inoperative or is in an LSM that is offline or not ready. The current state of an ACS, port, LSM, drive, or CAP is also referred to as the “state” of the component in the results of query and display commands.
The current state of a CAP, based on availability, is not maintained at this time.
The availability of logical libraries and tape drives in logical libraries is also governed by the desired state that you set for both the underlying physical library and the logical library. If the desired states for both the physical library and logical library are online, the current states of logical libraries and logical tape drives reflect the current state of the underlying physical libraries and drives.

display cell
December 2012 Display Command Reference 303
-s sort_field
sorts the objects returned by the field(s) selected in the order specified. Sorting is based on internal database values and may not always display in alphanumeric order.
All returned fields for a type are valid sort_fields.
-n n
specifies the maximum number of objects to be displayed.
Examples
• To display all CAP data:
display cap *
• To display CAP data for ACS 1, LSM 1, CAP 1:
display cap 1,1,1
• To display all manual mode CAPs in LSM 1, 0:
display cap 1,0,* -manual
• To display all CAPs in an offline pending state:
display cap * -state offline_pending
display cellThe display cell command displays specific information about a cell based on the options selected.
Note – See “Using display Command Options” on page 298 for details about specifying display selection criteria and selecting the data to be displayed.
Formatdisplay cell cell_loc ... [ -status cell_status ... ] [ [ -c ] | [ -f field ... ] [ -s sort_field ... ] [ -n n ] ]
Fields
The fields for display cell are:
• key fields: acs, lsm, panel, row, column,
• default fields: acs, lsm, panel, row, column, status
• available fields: acs, lsm, panel, row, column, status
Options
-status cell_status

display drive
304 ACSLS 8.1 Adminstrator’s Guide December 2012
specifies one or more cell statuses as additional selection criteria. Valid cell statuses: empty, full, inaccessible, reserved.
The wildcard character,*, can be used in any cell_id subfield or used to represent all subfields. However, if it is used to represent all cell_ids (example: display cell * or display cell_id *,*,*,*), additional cell_ids (either numeric or *) are not allowed. Numeric ranges apply to any subfield of cell_id.
-c
(count) causes the request to display only the number of objects that satisfy the arg and selection criteria. This option is mutually exclusive with the -f field, -s sort_field, and -n n options.
-f field
specifies the fields of information and the order in which they are to be returned for each object selected. Each display type has a list of available, key, and default fields. If -f is specified, the default fields are not displayed unless they are key fields or have been specified. If -f is not specified, then the default fields are returned. Key fields for each type are normally displayed first. However, you can change the order in which the key fields are displayed by specifying them after the -f option.
The list of fields is separated by spaces.
-s sort_field
sorts the objects returned by the field(s) selected in the order specified. Sorting is based on internal database values and may not always display in alphanumeric order.
All returned fields for a type are valid sort_fields.
-n n
specifies the maximum number of objects to be displayed.
Example
To display information for cells with a reserved status:
display cell * -status reserved
display driveThe display drive command displays specific drive information based on the options selected.
Note – See “Using display Command Options” on page 298 for details about specifying display selection criteria and selecting the data to be displayed.

display drive
December 2012 Display Command Reference 305
Formatdisplay drive drive_id ... [ -status drive_status ... ] [-state drive_state ... ] [ -type drive_type ... ] [ -volume vol_id ... ] [ -lock lock_id... ] [ -serial drive_serial_num ... ] [ -condition drive_condition ...] [ [ -c ] | [ -f field ... ] [ -s sort_field ... ] [ -n n ] ]
Fields
The fields for display drive are:
• key fields: acs, lsm, panel, drivedefault fields: acs, lsm, panel, drive, status, state, volume, type
• available fields: acs, lsm, panel, drive, status, state, volume, type, lock, desired_state, serial_num, condition, wwn, last_dismount_time, error
Options
drive_id
displays the drive_id in the following format: acs, lsm, panel, drive.
Wildcard character,*, can be used in any drive_id subfield or used to represent all subfields. However, if it is used to represent all drive_ids (example: display drive * or display drive_id *,*,*,*), additional drive_ids (either numeric or *) are not allowed. Numeric ranges apply to any subfield of drive_id.
-status drive_status
displays one of the following statuses as additional selection criteria: available, in_use, reserved.
Possible scenario: You perform a query drive all and get a message saying the drive is in use. You then perform a display drive * and get a message saying the drive is reserved. This means: the reserved status for the drive implies that a mount request is in progress and that a volume is on its way to the drive. At the same time the drive is considered to be in use.
-state drive_state
displays the following states for one or more drives: diagnostic, online, offline, recovery.
-type drive_type
displays drives by transport type.
-volume vol_id
displays volume(s) mounted on the drive(s) selected. A vol_id can be a 6-alphanumeric string or wildcard string that specifies a tape volume or range of volume IDs.
-lock lock_id
displays drive information on locked drives by lock ID.

display drive
306 ACSLS 8.1 Adminstrator’s Guide December 2012
-serial drive_serial_num
specifies the drive serial number.
-condition drive_condition
displays condition of the drive(s) specified. Valid conditions are: operative, inoperative, or maint_required.
Note – An inoperative or maint_required condition is only cleared when a drive, LSM, or ACS is varied online. So, a drive condition of inoperative or maint_required may be inaccurate.
-c
(count) causes the request to display only the number of objects that satisfy the arg and selection criteria. This option is mutually exclusive with the -f field, -s sort_field, and -n n options.
-s sort_field
sorts the objects returned by the field(s) selected in the order specified. Sorting is based on internal database values and may not always display in alphanumeric order.
All returned fields for a type are valid sort_fields.
-f field
specifies the fields of information and the order in which they are to be returned for each object selected. Each display type has a list of available, key, and default fields. If -f is specified, the default fields are not displayed unless they are key fields or have been specified. If -f is not specified, then the default fields are returned. Key fields for each type are normally displayed first. However, you can change the order in which the key fields are displayed by specifying them after the -f option.
The list of fields is separated by spaces.The following is a list of new tape drive field descriptions that are not reported by query drive.
• desired_state
The desired state for an ACS, port, LSM, drive, or CAP is the availability that you want for the component. ACSLS sets desired state when an explicit vary operation is performed. (This is a vary from a cmd_proc or ACSAPI client command. It is not a vary that ACSLS internally generates because of a library status change.)
The current state (specified as "state") for an ACS, port, LSM, drive, or CAP is the current availability of the component limited by desired state. When a drive is varied online, its desired state is online. However, it’s current state could be offline because the drive is inoperative or is in an LSM that is offline or not ready. The current state of an ACS, port, LSM, drive, or CAP is also referred to as the “state” of the component in the results of query and display commands.
The availability of logical libraries and tape drives in logical libraries is also governed by the desired state that you set for both the underlying physical library and the logical library. If the desired states for both the physical library

display drive
December 2012 Display Command Reference 307
and logical library are online, the current states of logical libraries and logical tape drives reflect the current state of the underlying physical libraries and drives.
• serial_num
ACSLS can only report drive serial numbers when the drive reports its serial number to the library and the library reports its serial number to ACSLS. Only modern libraries and drives report the drive serial numbers to ACSLS. This includes T9840, T9940, T10000, LTO, DLT 7000, SDLT, and later drives. SCSI-attached libraries, L5500, 9310’s that support T10000 drives, and later libraries report serial numbers to ACSLS.
ACSLS reports the serial number on the tape drive "brick", not the serial number on the drive tray.
The serial number on the drive brick is the serial number reported by the drive to the library and to you through SL Console and ACSLS. It is also the serial number reported over the SCSI/Fibre data path (e.g. to the backup application).
The drive tray is labeled with its own serial number. The serial number on the drive tray’s label is used to license service, etc. through StorageTek. The number on the drive tray is used for activating so drives (drive "bricks") can be replaced without needing to update the activated serial number.
There is minimal communication between the drive tray and drive brick. This is displayed by way of a few ready/not ready indicators. The drive tray is basically a power supply for the drive without any smarts.
• wwn
The drive’s World Wide Name. The WWN is 8 bytes (binary). It is displayed as 16 hex characters (0-9 and A-F) with dot separators between the pairs of hex characters (bytes).
The WWN displayed is the WWN of the node. The WWN of the first port (Port A) is one number greater. If the drive has two ports, the WWN of Port B is two numbers greater.
The drive’s WWN is available for SL3000 libraries and for SL8500 libraries with 3.94 and later firmware.
• last_dismount_time
The date and time of the last time a cartridge was dismounted from the drive. ACSLS uses this to order the drives reported to query mount. The drives are listed primarily by LSM closeness (least pass-thrus) to the volume being mounted and secondarily by earliest last_dismount_time. Ordering the drives by earliest last_dismount_time evens out the use of drives.
These statistics are reported to ACSLS when a cartridge is dismounted from a drive. The following statistics fields are only reported for these libraries and drives:
Libraries:
All SL3000s.
SL8500s with 4.13 and later firmware.

display drive
308 ACSLS 8.1 Adminstrator’s Guide December 2012
Tape drives:
T9840A, T9840C, and T9840D with 1.42 and later drive firmware. (T9840B is not supported because of memory limitations.)
T9940A and T9940B with1.42 and later drive firmware.
T10000A and T10000B with 1.38 and later drive firmware.
• error - (drive maintenance required)
This is currently only reported for T10000 drives. Values are:
• none - No drive error reported
• maint_reqd - Maintenance is required for the tape drive.
This is only reported when the tape drive has determined that the drive is to be avoided and should be taken offline. You should call for service.
Primary drive error scenarios:
In these scenarios, the drive and library waits for manual intervention.
-s sort_field
sorts the objects returned by the field(s) selected in the order specified. Sorting is based on internal database values and may not always display in alphanumeric order. For example, drive type is sorted by an internal numeric drive type and not by the literal that is display.
All returned fields for a type are valid sort_fields.
-n n
specifies the maximum number of objects to be displayed.
Examples
• To display all drives in panel 0,1,1.
display drive 0,1,1,*
• To display all drives in LSM 0,1.
display drive 0,1,*,*
• To display a maximum of 56 rows for all drives in ACS 1, sorted by panel and drive:
display drive 1,*,*,* -s panel drive -n 56
• To display drive data for ACS 1, LSM 1, with status available:
FIGURE 13-1 Drive and Library waiting for Manual Intervention
Unload failures The cartridge is stuck in the drive
Drive Leader Off Hook failures The drive won't indicate a drive error until the media is extracted
Drive IPL failures The drive stops communicating with the library.

display lock
December 2012 Display Command Reference 309
display drive 1,1,*,* -status available
• To display drive types, serial numbers, and world wide names (wwn) for all drives:
display drive * -f type serial_num wwn
display lockThe display lock command displays specific lock information by lock_id based on the options selected.
Note – See “Using display Command Options” on page 298 for details about specifying display selection criteria and selecting the data to be displayed.
Formatdisplay lock lock_id ... [ -user user_id ... ] [ [ -c ] | [ -f field ... ] [ -s sort_field ... ] [ -n n ] ]
Fields
The fields for display lock are:
• key fields: lock_id
• default fields: lock_id, user_id
• available fields: lock_id, user_id
Options
lock_id
displays the numeric lock_id.
Wildcard character,*, can be used in any lock_id subfield or used to represent all subfields. However, if it is used to represent all lock_ids (example: display lock * or display lock_id *,*,*), additional lock_ids (either numeric or *) are not allowed. Numeric ranges apply to any subfield of lock_id.
user_id
specifies the user name (example: acsss) that has locked the volume or transport. The user_id wraps after 80 characters.
-c
(count) causes the request to display only the number of objects that satisfy the arg and selection criteria. This option is mutually exclusive with the -f field, -s sort_field, and -n n options.
-f field

display lsm
310 ACSLS 8.1 Adminstrator’s Guide December 2012
specifies the fields of information and the order in which they are to be returned for each object selected. Each display type has a list of available, key, and default fields. If -f is specified, the default fields are not displayed unless they are key fields or have been specified. If -f is not specified, then the default fields are returned. Key fields for each type are normally displayed first. However, you can change the order in which the key fields are displayed by specifying them after the -f option.
The list of fields is separated by spaces.
-s sort_field
sorts the objects returned by the field(s) selected in the order specified. Sorting is based on internal database values and may not always display in alphanumeric order.
All returned fields for a type are valid sort fields.
-n n
specifies the maximum number of objects to be displayed.
Example
To display lock information for lock_id 2:
display lock 2
display lsmThe display lsm command displays specific LSM information based on the options selected.
Note – See “Using display Command Options” on page 298 for details about specifying display selection criteria and selecting the data to be displayed.
Formatdisplay lsm lsm_id ... [ -status lsm_status ... ] [-state lsm_state ... ] [ -free_cells cell_count ... ] [ -type lsm_type ... ] [ -serial lsm_serial_num ... ] [ -condition lsm_condition ] [ -door_open | -door_closed ] [ [ -c ] | [ -f field ... ] [ -s sort_field ... ] [ -n n ] ]
Fields
The fields for display lsm are:
• key fields: acs, lsm
• default fields: acs, lsm, status, state, free_cells
• available fields: acs, lsm, status, state, desired_state, free_cells, type, serial_num, activity, condition, door_status

display lsm
December 2012 Display Command Reference 311
lsm_id
displays the lsm id in the following format: acs, lsm.
Wildcard character, *, can be used in any lsm_id subfield or used to represent all subfields. However, if it is used to represent all lsm_ids (example: display lsm * or display lsm_id *,*), additional lsm_ids (either numeric or *) are not allowed. Numeric ranges apply to any subfield of lsm_id.
-status lsm_status
specifies one or more LSM statuses from which to select. Valid statuses are: audit, normal
-state lsm_state
specifies one or more LSM states from which to select. Valid states are: diagnostic, online, offline, offline_pending, recovery.
-free_cells cell_count
selects LSMs by the number of free cells.
-type lsm_type
displays LSMs by type.
-serial lsm_serial_num
displays serial numbers for selected LSMs.
With SL8500 6.0+ and SL3000 3.0+ firmware, the library reports the licensed serial number. (To get the SL8500 library number, add 1 to the LSM number and divide by 4.)
-condition lsm_condition
displays condition of the selected LSMs. Valid conditions are: operative, inoperative, or maint_required.
Note – An inoperative or maint_required condition is only cleared when a drive, LSM, or ACS is varied online. So, an LSM condition of inoperative or maint_required may be inaccurate.
-door_open
displays LSMs with open doors.
-door_closed
displays LSMs with closed doors.
-c
(count) causes the request to display only the number of objects that satisfy the arg and selection criteria. This option is mutually exclusive with the -f field, -s sort_field, and -n n options.
-f field
specifies the fields of information and the order in which they are to be returned for each object selected. Each display type has a list of available, key, and default fields. If -f is specified, the default fields are not displayed unless they are key
display lsm
312 ACSLS 8.1 Adminstrator’s Guide December 2012
fields or have been specified. If -f is not specified, then the default fields are returned. Key fields for each type are normally displayed first. However, you can change the order in which the key fields are displayed by specifying them after the -f option.
The list of fields is separated by spaces. The following are new LSM fields that are not reported by query lsm.
• desired_state
The desired state for an ACS, port, LSM, drive, or CAP is the availability that you want for the component. ACSLS sets desired state when an explicit vary operation is performed. (This is a vary from a cmd_proc or ACSAPI client command. It is not a vary that ACSLS internally generates because of a library status change.)
The current state (specified as "state") for an ACS, port, LSM, drive, or CAP is the current availability of the component limited by desired state. When a drive is varied online, its desired state is online. However, it’s current state could be offline because the drive is inoperative or is in an LSM that is offline or not ready. The current state of an ACS, port, LSM, drive, or CAP is also referred to as the “state” of the component in the results of query and display commands.
The availability of logical libraries and tape drives in logical libraries is also governed by the desired state that you set for both the underlying physical library and the logical library. If the desired states for both the physical library and logical library are online, the current states of logical libraries and logical tape drives reflect the current state of the underlying physical libraries and drives.
• serial_num
The serial number that ACSLS reports for the LSM is the library’s serial number that is recorded in the HBC card of the SL3000 and SL8500 libraries (before SL8500 6.00 firmware or SL3000 3.0 firmware.). SL8500 and SL3000 libraries with later firmware report the frame serial number which is the activated serial number.
SL8500 and SL3000 libraries are activated through the serial number for the base module frame. This serial number is on the UL label on the frame and is recorded in the HBK card in the library. (Manufacturing can re-generate replacement HBK cards.) These serial numbers start with 516 for SL8500s and 571 for SL3000s. The frame serial number can be displayed through the SL Console (System Detail -> Properties -> General).
In the future, library firmware will report this frame serial number to ACSLS. Whenever an LSM serial number changes, ACSLS automatically updates the serial number when an LSM is varied online.
-s sort_field
sorts the objects returned by the field(s) selected in the order specified. Sorting is based on internal database values and may not always display in alphanumeric order.
All returned fields for a type are valid sort fields.
-n n

display panel
December 2012 Display Command Reference 313
specifies the maximum number of objects to be displayed.
Examples
• To display information for all LSMs in the library for type 9714:
display lsm * -type 9714
• To display types all LSMs:
display lsm * - f type
• To display library serial numbers:
display lsm * -f serial_num
display panelThe display panel command displays specific library panel information based on the options selected.
Note – See “Using display Command Options” on page 298 for details about specifying display selection criteria and selecting the data to be displayed.
Formatdisplay panel panel_id ...[ -type panel_type ... ] [ [ -c ] | [ -f field ... ] [ -s sort_field ... ] [ -n n ] ]
Fields
The fields for display panel are:
• key fields: acs, lsm, panel
• default fields: acs, lsm, panel, type
• available fields: acs, lsm, panel, type
Options
panel_id
displays the panel id in the following format: acs, lsm, panel.
Wildcard character, *, can be used in any panel_id subfield or used to represent all subfields. However, if it is used to represent all panel_ids (example: display panel * or display panel_id *,*,*), additional panel_ids (either numeric or *) are not allowed. Numeric ranges apply to any subfield of panel_id.
-type panel_type
specifies one or more valid panel types.
-c

display pool
314 ACSLS 8.1 Adminstrator’s Guide December 2012
(count) causes the request to display only the number of objects that satisfy the arg and selection criteria. This option is mutually exclusive with the -f field, -s sort_field, and -n n options.
-f field
specifies the fields of information and the order in which they are to be returned for each object selected. Each display type has a list of available, key, and default fields. If -f is specified, the default fields are not displayed unless they are key fields or have been specified. If -f is not specified, then the default fields are returned. Key fields for each type are normally displayed first. However, you can change the order in which the key fields are displayed by specifying them after the -f option.
The list of fields is separated by spaces.
-s sort_field
sorts the objects returned by the field(s) selected in the order specified. Sorting is based on internal database values and may not always display in numeric order.
All returned fields for a type are valid sort fields.
-n n
specifies the maximum number of objects to be displayed.
Example
Display panel data for all panels:
display panel *
display poolThe display pool command displays specific scratch pool information based on the options selected.
Note – See “Using display Command Options” on page 298 for details about specifying display selection criteria and selecting the data to be displayed.
Formatdisplay pool pool_id ... [ -low_water low_water_mark ... | -high_water high_water_mark... ] [-overflow | -no_overflow ] [ [ -c ] | [ -f field ... ] [ -s sort_field ... ] [ -n n ] ]
Fields
The fields for display pool are:
• key fields: pool_id
• default fields: pool_id, low_water, high_water, overflow

display pool
December 2012 Display Command Reference 315
• available fields: pool_id, low_water, high_water, overflow
Options
pool_id
displays the pool id of a scratch pool.
Wildcard character, *, can be used in any pool_id subfield or used to represent all subfields. However, if it is used to represent all pool_ids (example: display pool * or display pool_id *,*,*), additional pool_ids (either numeric or *) are not allowed. Numeric ranges apply to any subfield of pool_id.
-low_water low_water_mark
specifies the minimum number of scratch cartridges in the pool. If a low_water mark is displayed with a hyphen (-) appended to it, the number of cartridges in the library for the selected scratch pool is within the designated low_water mark.
-high_water high_water_mark
specifies the maximum number of scratch cartridges in the pool. If a high_water mark is displayed with a hyphen (-) appended to it, the number of cartridges in the library for the selected scratch pool is within the designated high_water mark.
-overflow
selects pools wherein if a scratch mount is requested and if the pool is empty, the common pool is used to satisfy the request.
-no_overflow
selects pools wherein if a scratch mount is requested and if the pool is empty, the mount fails without checking the common pool for available tapes.
-c
(count) causes the request to display only the number of objects that satisfy the arg and selection criteria. This option is mutually exclusive with the -f field, -s sort_field, and -n n options.
-f field
specifies the fields of information and the order in which they are to be returned for each object selected. Each display type has a list of available, key, and default fields. If -f is specified, the default fields are not displayed unless they are key fields or have been specified. If -f is not specified, then the default fields are returned. Key fields for each type are normally displayed first. However, you can change the order in which the key fields are displayed by specifying them after the -f option.
The list of fields is separated by spaces.
-s sort_field
sorts the objects returned by the field(s) selected in the order specified. Sorting is based on internal database values and may not always display in numeric order.
All returned fields for a type are valid sort fields.

display port
316 ACSLS 8.1 Adminstrator’s Guide December 2012
-n n
specifies the maximum number of objects to be displayed.
Examples
• To display all information for pool 5:
display pool 5
• To display all pools with overflow:
display pool * -overflow
display portThe display port command displays specific port information based on the options selected.
Note – See “Using display Command Options” on page 298 for details about specifying display selection criteria and selecting the data to be displayed.
Formatdisplay port port_id ... [ -online | -offline ] [ -name port_name ... ] [ [ -c ] | [ -f field ... ] [-s sort_field ... ] [ -n n ] ]
Fields
The fields for display port are:
• key fields: acs, port
• default fields: acs, port, name, state
• available fields: acs, port, name, state, desired_state
Options
port_id
displays the port id in the following format: acs, port.
Wildcard character, *, can be used in any port_id subfield or used to represent all subfields. However, if it is used to represent all port_ids (example: display port * or display port_id *,*,*), additional port_ids (either numeric or *) are not allowed. Numeric ranges apply to any subfield of port_id.
- online
selects and displays ports in an online state.
- offline
selects and displays ports in an offline state.

display port
December 2012 Display Command Reference 317
- name port_name
specifies the port name.
-c
(count) causes the request to display only the number of objects that satisfy the arg and selection criteria. This option is mutually exclusive with the -f field, -s sort_field, and -n n options.
-f field
specifies the fields of information and the order in which they are to be returned for each object selected. Each display type has a list of available, key, and default fields. If -f is specified, the default fields are not displayed unless they are key fields or have been specified. If -f is not specified, then the default fields are returned. Key fields for each type are normally displayed first. However, you can change the order in which the key fields are displayed by specifying them after the -f option.
The list of fields is separated by spaces. The following is a new port field that is not reported by query port.
• desired_state
The desired state for an ACS, port, LSM, drive, or CAP is the availability that you want for the component. ACSLS sets desired state when an explicit vary operation is performed. (This is a vary from a cmd_proc or ACSAPI client command. It is not a vary that ACSLS internally generates because of a library status change.)
The current state for an ACS, port, LSM, drive, or CAP is the current availability of the component limited by desired state. When a drive is varied online, its desired state is online. However, it’s current state could be offline because the drive is inoperative or is in an LSM that is offline or not ready. The current state of an ACS, port, LSM, drive, or CAP is also referred to as the “state” of the component in the results of query and display commands.
The availability of logical libraries and tape drives in logical libraries is also governed by the desired state that you set for both the underlying physical library and the logical library. If the desired states for both the physical library and logical library are online, the current states of logical libraries and logical tape drives reflect the current state of the underlying physical libraries and drives.
-s sort_field
sorts the objects returned by the field(s) selected in the order specified. Sorting is based on internal database values and may not always display in alphanumeric order
All returned fields for a type are valid sort fields.
-n n
specifies the maximum number of objects to be displayed.
display volume
318 ACSLS 8.1 Adminstrator’s Guide December 2012
Example
To display all ports in an online state:
display port * -online
display volumeThe display volume command displays specific volume information based on the options selected.
Note – See “Using display Command Options” on page 298 for details about specifying display selection criteria and selecting the data to be displayed.
Formatdisplay volume vol_id ... [ -home acs,lsm,panel,row,column...] [ -drive drive_loc ... ] [-data | -scratch | -clean ] [ -media media_type ... ] [ -pool pool_id... ] [ -standard | -virtual ] [ -status vol_status ... ] [ -entry entry_date ... ] [ -access access_date ... ] [ -lock lock_id ... ] [ [ -c ] | [ -f field ... ] [ -s sort_field ... ] [ -n n ] ] [ -max_use max_use] [ -lock_time lock_time]
Fields
The fields for display volume are:
• key field: vol_id
• default fields: vol_id, acs, lsm, panel, row, column, pool, status, media, type
• available fields: vol_id; acs; lsm; panel; row; column; drive_lsm, drive_panel, drive (display all three to display where a cartridge is mounted); type; media; pool; label_type; status; entry_date; access_date; access_count; max_use; lock; lock_time; recording_format_family; recording_format_model; encrypt_status; volsafe_status; media_status; warranty_life; end_of_life; load_limit_alert
Options
vol_id
displays the volume(s) selected.
A vol_id can be one or more 1-16 alphanumeric strings that specifies a tape cartridge.
The wildcard character, *, can be used to represent all vol_ids (example: display vol*) or to represent a group of cartridges (example:.display vol_id VAP* displays all cartridges starting with VAP).

display volume
December 2012 Display Command Reference 319
The vol_id may contain any valid volume ID characters and *.
-home home_loc
specifies volume home location(s) from which to retrieve volume information in the following format: acs,lsm,panel,row,column. It cannot be used with -drive.
home_loc subfields can use numeric ranges. All home_loc subfields must be specified. A wildcard character, *, can be used in place of one or more drive_loc subfields. Numeric range rules apply to any subfield or drive_loc.
-drive drive_loc
specifies drive location(s) from which to retrieve volume information in the following format: acs,lsm,panel,drive. It cannot be used with -home
drive_loc subfields can use numeric ranges. All home_loc subfields must be specified. A wildcard character, *, can be used in place of one or more drive_loc subfields. Numeric range rules apply to any subfield or drive_loc.
-data
selects data cartridges.
-scratch
selects cartridges in scratch mode.
-clean
selects cleaning cartridges.
-media media_type
selects only cartridges with the specified media type.
-pool pool_id
selects and displays cartridges from scratch pools. Cartridges retain the ID of the scratch pool even after they have changed to data cartridges.
-standard
selects a tape(s) with a scannable volume ID label_type. It cannot be used with -virtual.
-virtual
selects a tape(s) without an external volume ID label_type that was entered through the venter command. It cannot be used with -standard.
-status vol_status
valid entries are: dismount, eject, enter, mount, home, in_drive, move, missing, absent, ejected.
-entry entry_date
specifies the date and time the cartridge was entered into the library. It is entered and displayed in ISO standard format (yyyy-mm-dd).
-access access_date

display volume
320 ACSLS 8.1 Adminstrator’s Guide December 2012
specifies the date and time the cartridge was last used. It is entered and displayed in ISO standard format (yyyy-mm-dd).
-lock lock_id
specifies the lock ID for the volume.
-max_use max_use
specifies the maximum number of uses for a cleaning cartridge. Non-cleaning cartridges have a max_use value of zero.
-lock_time lock_time
specifies the date and time the lock was set. It is displayed according to the system default format.
-c
(count) causes the request to display only the number of objects that satisfy the arg and selection criteria. This option is mutually exclusive with the -f field, -s sort_field, and -n n options.
-f field
specifies the fields of information and the order in which they are to be returned for each object selected. Each display type has a list of available, key, and default fields. If -f is specified, the default fields are not displayed unless they are key fields or have been specified. If -f is not specified, then the default fields are returned. Key fields for each type are normally displayed first. However, you can change the order in which the key fields are displayed by specifying them after the -f option.
The list of fields is separated by spaces. The following is a list of new volume fields that are not reported by query volume. These statistics fields are only reported for these libraries and drives:
The following statistics fields are only reported for these libraries and drives:
Libraries:
All SL3000s.
SL8500s with 4.13 and later firmware.
Tape drives:
T9840A, T9840C, and T9840D with 1.42 and later drive firmware. (T9840B is not supported because of memory limitations.)
T9940A and T9940B with 1.42 and later drive firmware.
T10000A and T10000B with 1.38 and later drive firmware.
• recording_format_family
This shows the drive family that last recorded data on this cartridge.
• recording_format_model
This shows the drive model that last recorded data on this cartridge. This information is useful to:
display volume
December 2012 Display Command Reference 321
avoid mounting a cartridge on a drive that cannot read the data on a cartridge (e.g. A T10000A cannot read data recorded by a T10000B drive) or
append data to a cartridge (e.g. A T10000B cannot append data to a cartridge written by a T10000A).
• encrypt_status
This shows the encryption status of a cartridge, if known.
• volsafe_status
This shows whether this is a volsafe cartridge. Volsafe is StorageTek’s WORM (Write Once Read Many) cartridge.
• media_status
When the tape drive reports a cartridge as “questionable”, it should be examined.
• warranty_life and end_of_life
The volume’s warranty_life and end_of_life percentages are the volume’s use as a percentage of its end_of_life setting. These are values from 000.0% to over 100.0%. (The warranty_life is less than the end_of_life.)
This information can be used to identify cartridges that need to be retired after migrating their data to new cartridges.
For more information, refer to “Cartridge End-of-Life Percentages” on page 123.
• load_limit_alert
The volume’s load_limit_alert is a boolean value, where: True=1 and False=0.“Cartridge End-of-Life Percentages” on page 123. When a volume that reports an end_of_life percentage reaches 100%, its load_limit_alert is set to 1. Some drive types only report a load_limit_alert.
-s sort_field
sorts the objects returned by the field(s) selected in the order specified. Sorting is based on internal database values and may not always display in alphanumeric order. For example, media type is sorted by an internal numeric media type and not by the literal that is display.
All returned fields for a type are valid sort fields.
-n n
specifies the maximum number of objects to be displayed.
Examples
• To display volumes based on location:
This example displays all volumes with home locations in panel 0,1,9.
display volume * -home 0,1,9,*,*
• To display all 9840 data volumes.
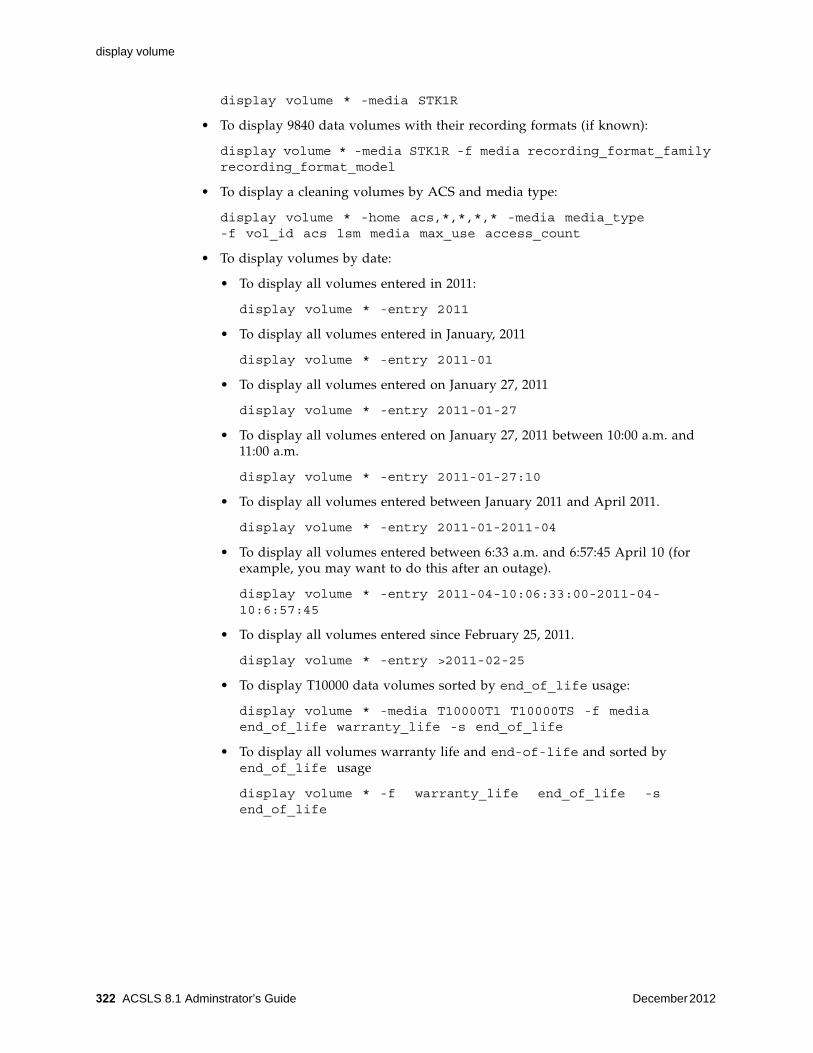
display volume
322 ACSLS 8.1 Adminstrator’s Guide December 2012
display volume * -media STK1R
• To display 9840 data volumes with their recording formats (if known):
display volume * -media STK1R -f media recording_format_family recording_format_model
• To display a cleaning volumes by ACS and media type:
display volume * -home acs,*,*,*,* -media media_type -f vol_id acs lsm media max_use access_count
• To display volumes by date:
• To display all volumes entered in 2011:
display volume * -entry 2011
• To display all volumes entered in January, 2011
display volume * -entry 2011-01
• To display all volumes entered on January 27, 2011
display volume * -entry 2011-01-27
• To display all volumes entered on January 27, 2011 between 10:00 a.m. and 11:00 a.m.
display volume * -entry 2011-01-27:10
• To display all volumes entered between January 2011 and April 2011.
display volume * -entry 2011-01-2011-04
• To display all volumes entered between 6:33 a.m. and 6:57:45 April 10 (for example, you may want to do this after an outage).
display volume * -entry 2011-04-10:06:33:00-2011-04-10:6:57:45
• To display all volumes entered since February 25, 2011.
display volume * -entry >2011-02-25
• To display T10000 data volumes sorted by end_of_life usage:
display volume * -media T10000T1 T10000TS -f media end_of_life warranty_life -s end_of_life
• To display all volumes warranty life and end-of-life and sorted by end_of_life usage
display volume * -f warranty_life end_of_life -s end_of_life
December 2012 ACSLS Backup and Recovery Tools 323
A
ACSLS Backup and Recovery Tools
ACSLS Backup ToolsACSLS offers three robust and distinctly different methods for backing up both its database and ACSLS control files. Each utility performs different functions and all methods play an important role in a complete disaster recovery plan.
This appendix:
• Outlines and explains each utility, what they are used for, and why they are important.
• Provides a high level view of disaster recovery scenarios
Automatic Backups
ACSLS provides automated database protection services. These automated protection services safeguard the daily operation of the ACSLS database against changes that can produce either unintended consequences or from database corruption
As a result of these automated backup protection services, you have the ability to restore your database back to any backup time from the present to the end of your retention period. The restore tools are discussed later in this appendix.
This section discusses the automated backup methods and why they are used.
• ACSLS default backup directory
During the initial installation of ACSLS, you were asked to supply the name of the directory to use for backups (/export/backup by default). It is in this directory that backup activity occurs.
• A complete database backup is performed and placed in the directory, using a date naming convention:
/export/backup/yyyy-mm-dd-hh:mm:ss.tar.
The time at which the daily backup is performed can be modified by changing the “Automatic Backup Variables” within acsss_config.
Refer to “Setting Variables that Control ACSLS Behavior” on page 55 for information on changing default backup behavior.
• Database retention period

ACSLS Backup Tools
324 ACSLS 8.1 Adminstrator’s Guide December 2012
Another configurable parameter within ACSLS that affects automatic backups is the database retention period. This is defined as the amount of time ACSLS retains the backups.
The default for the retention period is 8 days.
Refer to “Setting Variables that Control ACSLS Behavior” on page 55 for information on changing default backup behavior.
The retention period can also be modified by using acsss_config.
Manual Backups
ACSLS provides a utility called bdb.acsss that backs up the critical ACSLS data using the command line. This is also the method used to restore the ACSLS database where the environment consists of the same or identical hardware, OS level, and ACSLS version. Refer to “bdb.acsss” on page 157.
Used without any command line options, bdb.acsss provides the ability to create a database backup and store it in the default backup directory. All critical ACSLS database and ACSLS control files are backed up to a single file. This file can then be used to restore ACSLS to its previous state on the same or identical hardware for scenarios such as an internal disk or motherboard failure.
The rdb_acsss utility allows a “-f” option that can be used to either specify a file and location (rdb.acsss -f /path/my_file) or a tape device (-f /dev/rmt/0mn). When using a tape device, you do not provide a file name, on the tape device.
Manual Database Exports
ACSLS provides a utility called db_export.sh to export the ACSLS database, ACSLS control files, and any customized dynamic variables. The db_export.sh utility is responsible for dumping the ACSLS database to comma separated ACSII files, making a copy of the ACSLS control files, and making a copy of the dynamic variables. This is the method used to migrate to newer versions of ACSLS and is not recommended for daily backup operations because both ACSLS and the database must be down before performing the export.
The db_export.sh command line utility is the preferred method for migrating the database between different levels of server hardware, OS versions, and different releases of ACSLS. Without options, it can be used with the local default tape device such as /dev/0mn. This tape can then be moved to any location, and ACSLS and its associated ACSLS control files can be restored into any OS version or level of ACSLS.
Note – Although any tape device can be selected, a no-rewind device should be used. The db_export utility creates two files. If a rewind device is selected, the first file (datafiles) would be overwritten when the second file is created.
As in the bdb.acsss utility, the “-f” option can be used to specify a tape device other than the system default. Simply execute db_export.sh /dev/0mn or any attached tape device to use this option.

ACSLS Recovery Tools
December 2012 ACSLS Backup and Recovery Tools 325
The -f option also allows the database to be exported to the named file. When using this method, you will notice that two files are created, the one that you named and also another file with a .misc extension. Both files must be transferred to the server where the import will take place to ensure a successful import.
When executing the db_export.sh utility either with the -f option or without, you will be prompted to choose the version of ACSLS to which you are exporting. Selections are:
1: ACSLS 5.3.2 or 5.4
2: ACSLS 6.0 or 6.0.1
3: ACSLS 6.0.1 with L700e
4: ACSLS 6.0.1 with PUT0201
5: ACSLS 6.1, 7.0, 7.1/7.1.1 before PUT0701
6: ACSLS 7.1/7.1.1 with PUT0701 or ACSLS 7.2 (any)
7: ACSLS 7.3 or later
8: ACSLS 8.0 or later
E: Exit
Choose the appropriate version.
ACSLS Recovery ToolsACSLS uses two different recovery tools to restore all backups and exports. Both offer a menu driven user interface and easily selectable options. These two utilities are:
• rdb.acsss - the recovery tool for both automated and manual backups
• db_import.sh - restores an exported database and/or ACSLS control files from the same version of ACSLS, a different version of ACSLS, or from a different hardware platform. This option also allows the recovery of customized dynamic variables.
Using rdb.acsss
The rdb.acsss utility restores the ACSLS database and the ACSLS Control files using a backup created by either the automatic backup function or the bdb.acsss utility. The ACSLS Control files are located in $ACS_HOME/data, and define several different environmental variables for ACSLS. They specify Access Control settings, scratch preferences, Extended Store LSMs, custom volrpt settings, and volume attributes (for watch_vols utility), etc
Refer to “rdb.acsss” on page 183 for options and procedures.
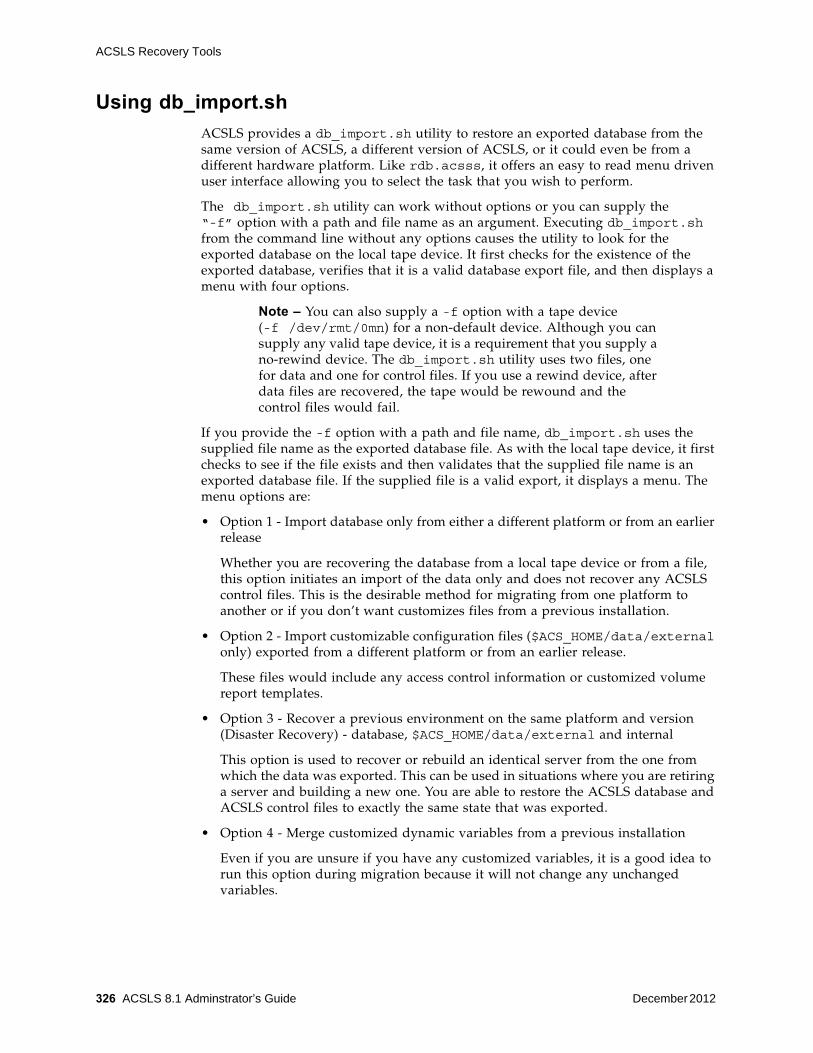
ACSLS Recovery Tools
326 ACSLS 8.1 Adminstrator’s Guide December 2012
Using db_import.sh
ACSLS provides a db_import.sh utility to restore an exported database from the same version of ACSLS, a different version of ACSLS, or it could even be from a different hardware platform. Like rdb.acsss, it offers an easy to read menu driven user interface allowing you to select the task that you wish to perform.
The db_import.sh utility can work without options or you can supply the “-f” option with a path and file name as an argument. Executing db_import.sh from the command line without any options causes the utility to look for the exported database on the local tape device. It first checks for the existence of the exported database, verifies that it is a valid database export file, and then displays a menu with four options.
Note – You can also supply a -f option with a tape device (-f /dev/rmt/0mn) for a non-default device. Although you can supply any valid tape device, it is a requirement that you supply a no-rewind device. The db_import.sh utility uses two files, one for data and one for control files. If you use a rewind device, after data files are recovered, the tape would be rewound and the control files would fail.
If you provide the -f option with a path and file name, db_import.sh uses the supplied file name as the exported database file. As with the local tape device, it first checks to see if the file exists and then validates that the supplied file name is an exported database file. If the supplied file is a valid export, it displays a menu. The menu options are:
• Option 1 - Import database only from either a different platform or from an earlier release
Whether you are recovering the database from a local tape device or from a file, this option initiates an import of the data only and does not recover any ACSLS control files. This is the desirable method for migrating from one platform to another or if you don’t want customizes files from a previous installation.
• Option 2 - Import customizable configuration files ($ACS_HOME/data/external only) exported from a different platform or from an earlier release.
These files would include any access control information or customized volume report templates.
• Option 3 - Recover a previous environment on the same platform and version (Disaster Recovery) - database, $ACS_HOME/data/external and internal
This option is used to recover or rebuild an identical server from the one from which the data was exported. This can be used in situations where you are retiring a server and building a new one. You are able to restore the ACSLS database and ACSLS control files to exactly the same state that was exported.
• Option 4 - Merge customized dynamic variables from a previous installation
Even if you are unsure if you have any customized variables, it is a good idea to run this option during migration because it will not change any unchanged variables.

Disaster Scenarios
December 2012 ACSLS Backup and Recovery Tools 327
Disaster Scenarios
Database becomes corrupted – need to restore the database to a working state
1. As user acsss, stop ACSLS and the database. Then run the database recovery.
$ acsss shutdown $ rdb.acsss
2. Select option 1. Refer to “rdb.acsss” on page 183.
3. When the recovery is complete, start ACSLS: acsss enable.
Ran acsss_config against the wrong library
1. Select option 2. Refer to “rdb.acsss” on page 183.
2. Start ACSLS and test according to procedures in “Database Backup and Restore” chapter.
Server failure – rebuilding the same server with new hardware
1. Install the operating system.
2. Configure the new server and OS with the settings from the previous server.
3. Install ACSLS.
4. Insert the backup tape or FTP backup file onto the server.
5. Start the rdb.acsss utility.
6. Select option 2. Refer to “rdb.acsss” on page 183.
7. Exit rdb.acsss.
8. Start ACSLS and test according to procedures in Database Backup and Restore.
Server failure – rebuilding another ACSLS server with new hardware
1. Install the operating system.
2. Install ACSLS.
3. Place the ACSLS server-to-server backup files in the proper location.
4. Enter rdb.acsss. Refer to “rdb.acsss” on page 183
5. Select option 3.
6. When the recovery utility completes, start ACSLS and test according to procedures in Database Backup and Restore.

Disaster Scenarios
328 ACSLS 8.1 Adminstrator’s Guide December 2012

December 2012 Enterprise Library Connection Options 329
BB
Enterprise Library Connection Options
This chapter contains an:
• “Overview” on page 329
• “Dual TCP/IP Support” on page 330
• “Multi TCP/IP Support” on page 338
• “Redundant Electronics” on page 340
OverviewThere are multiple options for connecting ACSLS to SL8500 and SL3000 libraries. These options can be used independently, or together, for communication between ACSLS and an SL8500 or SL3000.
In a string of connected SL8500s, you can implement Dual TCP/IP, and/or Multi-library TCP/IP, and/or Redundant Electronics.
In an SL3000 or SL8500, you can implement Dual TCP/IP and/or Redundant Electronics (RE). You can connect to an SL3000 or SL8500 through IPv4.
The following summarizes the connections options:
• Dual TCP/IP
Dual TCP/IP provides two separate and independent TCP/IP connections between ACSLS and a Library Controller card. If one of these communication paths fails, ACSLS automatically uses the second path for communication.
To implement Dual TCP/IP support, routing tables on both the ACSLS server and the library must be defined and managed using the “route” command. These routing tables force communication between a pair of ports on the ACSLS server and the library to use a defined network communication path.
Both the SL8500 and the SL3000 support Dual TCP/IP communication with the library.
• Multi TCP/IP Support
Dual TCP/IP Support
330 ACSLS 8.1 Adminstrator’s Guide December 2012
Multi TCP/IP support allows the ACSLS server to connect to multiple SL8500 libraries in a string of connected SL8500s. If communication with one library fails, ACSLS automatically sends library communication to the connections with the other libraries. The libraries automatically forward the messages to the other libraries.
Configuring and managing Multi TCP/IP communication is simpler than Dual TCP/IP because routing tables do not need to be defined on the ACSLS server or the SL8500 libraries. However, Multi TCP/IP requires a string of connected SL8500 libraries. It does not apply to single, stand-alone SL8500 or SL3000 libraries.
• Redundant Electronics
RE uses a redundant set of Library Controller cards. At any given time, one set is active and the other set is standby. The active Library Controller can failover to the standby in response to a command from ACSLS or the SL Console. Automatic failover can be initiated by the library in the event of a library card failure.
RE also enables minimally disruptive library firmware (microcode) downloads.
Within a string of connected SL8500s, RE can be implemented on a per library basis. You can implement RE in any or all libraries within a complex.
To support RE in the library, ACSLS 7.3.1 or 8.0.2 or later is required.
Displaying the status of ACSLS Communication with Libraries
Use the query lmu command to view and monitor the status of ACSLS communication with the libraries it manages. The query lmu command also shows the status of ACSs and port connections to libraries.
Dual TCP/IP Support Dual TCP/IP is an option that can be purchased for the SL8500 and SL3000 libraries (herein known as the library). It provides two TCP/IP connections to the library. However, you can continue to use the library with only one of the two connections operational.
The purpose of dual TCP/IP is to automatically recognize and avoid a failing communication path. Since this is automated, there is no need for you to manually switch from an inoperative connection.
To use dual TCP/IP support on the library, the routing tables on both the ACSLS server and the library must be managed using the “route” command. This forces a route to the defined network interfaces on the library which in essence, creates a one to one relationship between interfaces. The Customer Systems Administrator (CSA) changes the routing tables on the ACS server and the Customer Systems Engineer (CSE) updates the routing tables on the library. For further information on the UNIX “route” command, please refer to the manpages on your ACSLS server.
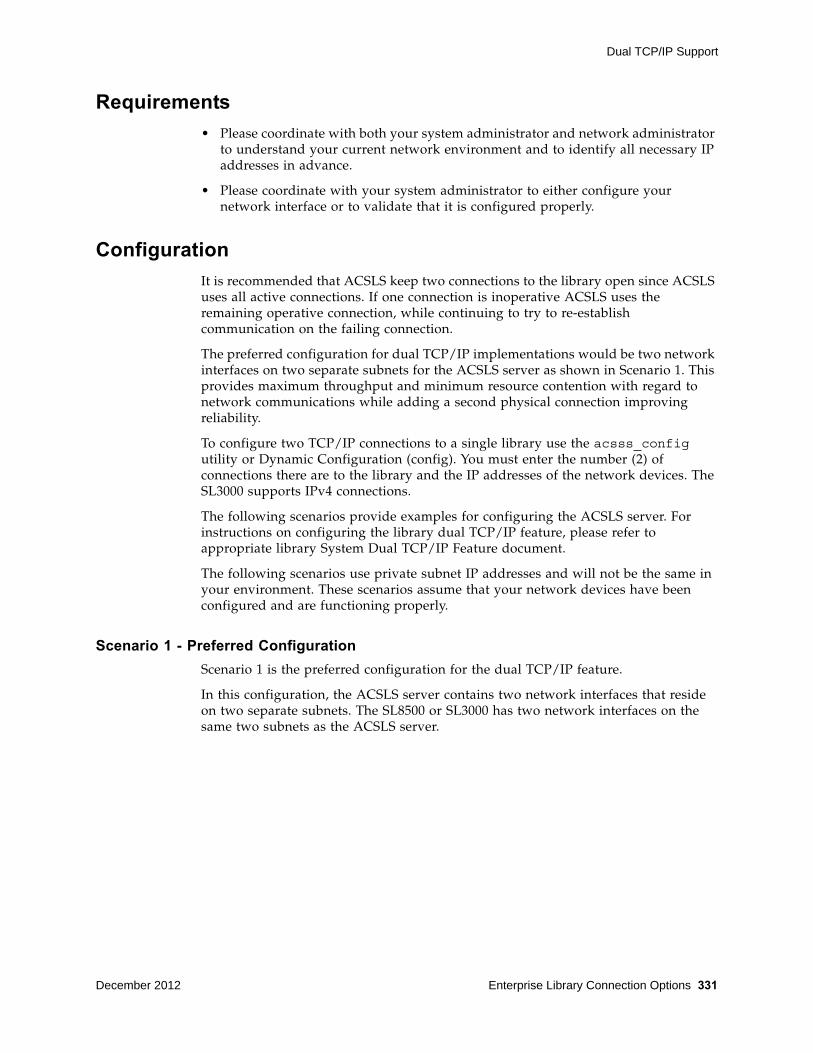
Dual TCP/IP Support
December 2012 Enterprise Library Connection Options 331
Requirements
• Please coordinate with both your system administrator and network administrator to understand your current network environment and to identify all necessary IP addresses in advance.
• Please coordinate with your system administrator to either configure your network interface or to validate that it is configured properly.
Configuration
It is recommended that ACSLS keep two connections to the library open since ACSLS uses all active connections. If one connection is inoperative ACSLS uses the remaining operative connection, while continuing to try to re-establish communication on the failing connection.
The preferred configuration for dual TCP/IP implementations would be two network interfaces on two separate subnets for the ACSLS server as shown in Scenario 1. This provides maximum throughput and minimum resource contention with regard to network communications while adding a second physical connection improving reliability.
To configure two TCP/IP connections to a single library use the acsss_config utility or Dynamic Configuration (config). You must enter the number (2) of connections there are to the library and the IP addresses of the network devices. The SL3000 supports IPv4 connections.
The following scenarios provide examples for configuring the ACSLS server. For instructions on configuring the library dual TCP/IP feature, please refer to appropriate library System Dual TCP/IP Feature document.
The following scenarios use private subnet IP addresses and will not be the same in your environment. These scenarios assume that your network devices have been configured and are functioning properly.
Scenario 1 - Preferred Configuration
Scenario 1 is the preferred configuration for the dual TCP/IP feature.
In this configuration, the ACSLS server contains two network interfaces that reside on two separate subnets. The SL8500 or SL3000 has two network interfaces on the same two subnets as the ACSLS server.
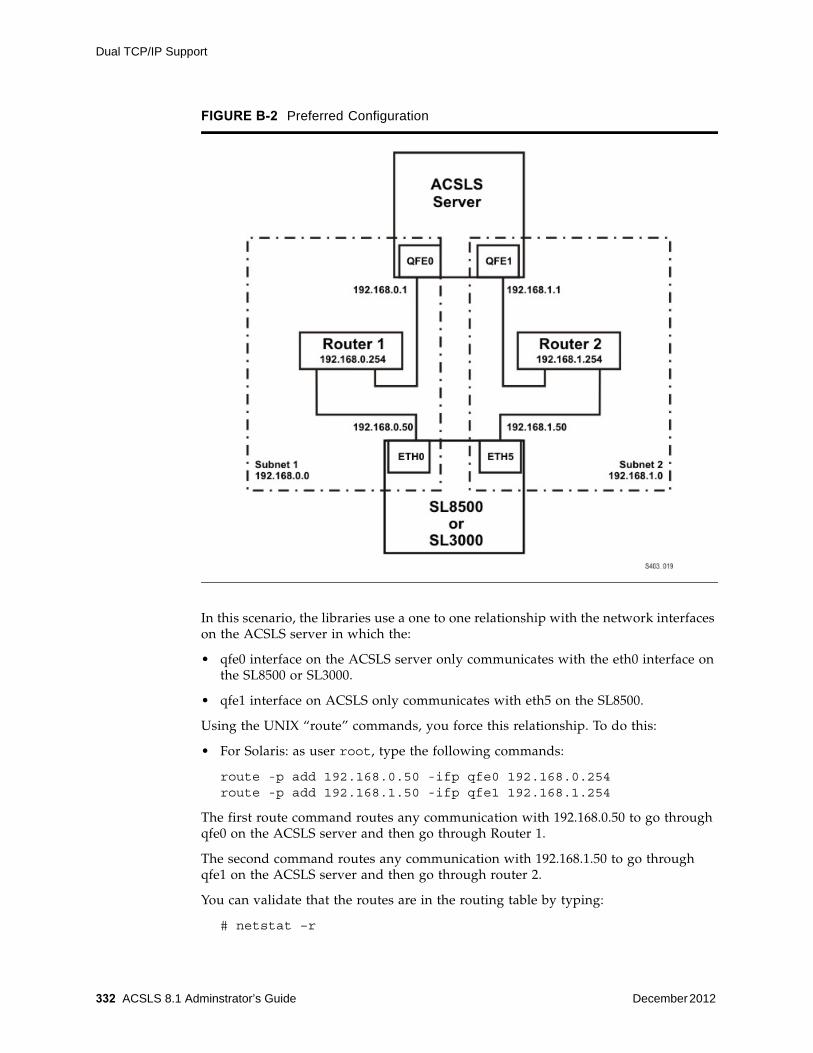
Dual TCP/IP Support
332 ACSLS 8.1 Adminstrator’s Guide December 2012
In this scenario, the libraries use a one to one relationship with the network interfaces on the ACSLS server in which the:
• qfe0 interface on the ACSLS server only communicates with the eth0 interface on the SL8500 or SL3000.
• qfe1 interface on ACSLS only communicates with eth5 on the SL8500.
Using the UNIX “route” commands, you force this relationship. To do this:
• For Solaris: as user root, type the following commands:
route -p add 192.168.0.50 -ifp qfe0 192.168.0.254 route -p add 192.168.1.50 -ifp qfe1 192.168.1.254
The first route command routes any communication with 192.168.0.50 to go through qfe0 on the ACSLS server and then go through Router 1.
The second command routes any communication with 192.168.1.50 to go through qfe1 on the ACSLS server and then go through router 2.
You can validate that the routes are in the routing table by typing:
# netstat –r
FIGURE B-2 Preferred Configuration

Dual TCP/IP Support
December 2012 Enterprise Library Connection Options 333
You can see the first two entries are the ones that were just added. All communication with 192.168.0.50 will go through QFE0 and communication with 192.168.1.50 will go through QFE1.
Remember: You must also configure the libraries’ routing tables according to the instructions in the StorageTek SL8500 Modular Library System Dual TCP/IP Feature document.
Scenario 2
Scenario 2 shows:
• ACSLS server with two interfaces on separate subnets from the library
• SL8500 or SL3000 library with two network interfaces on separate subnets from ACSLS
• Both ACSLS and SL8500 or SL3000 using a public network
FIGURE B-3 IPv4 Routing Table
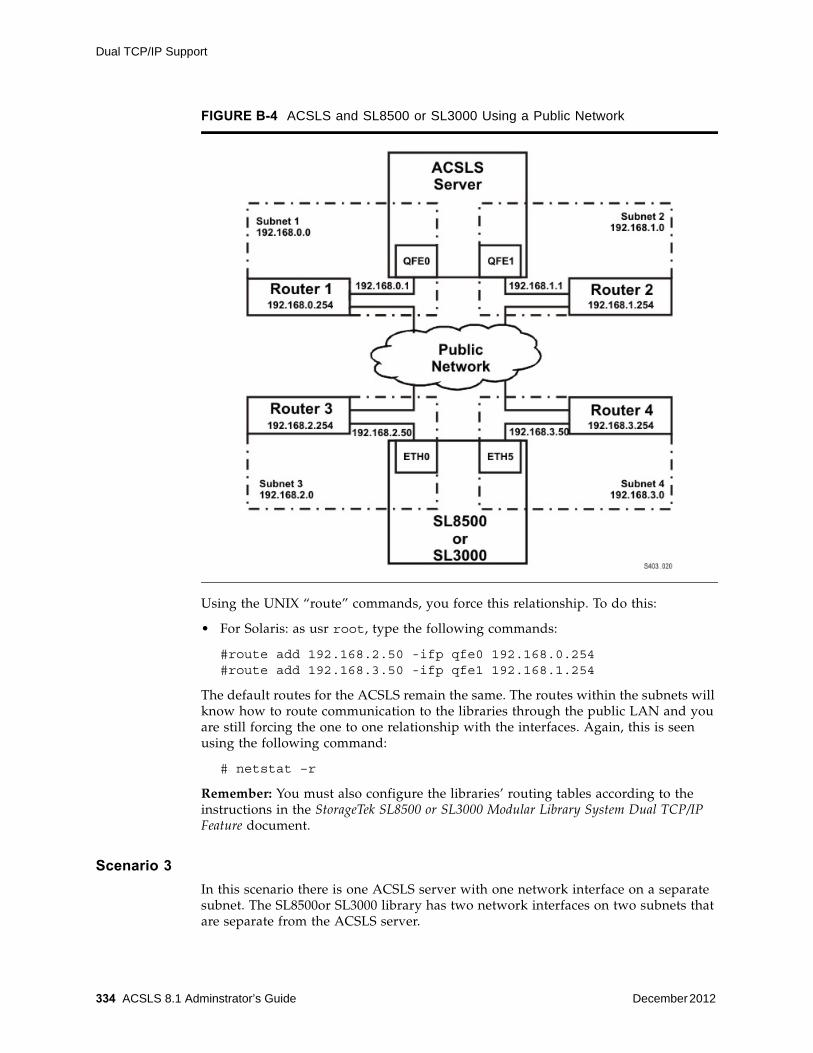
Dual TCP/IP Support
334 ACSLS 8.1 Adminstrator’s Guide December 2012
Using the UNIX “route” commands, you force this relationship. To do this:
• For Solaris: as usr root, type the following commands:
#route add 192.168.2.50 -ifp qfe0 192.168.0.254 #route add 192.168.3.50 -ifp qfe1 192.168.1.254
The default routes for the ACSLS remain the same. The routes within the subnets will know how to route communication to the libraries through the public LAN and you are still forcing the one to one relationship with the interfaces. Again, this is seen using the following command:
# netstat –r
Remember: You must also configure the libraries’ routing tables according to the instructions in the StorageTek SL8500 or SL3000 Modular Library System Dual TCP/IP Feature document.
Scenario 3
In this scenario there is one ACSLS server with one network interface on a separate subnet. The SL8500or SL3000 library has two network interfaces on two subnets that are separate from the ACSLS server.
FIGURE B-4 ACSLS and SL8500 or SL3000 Using a Public Network
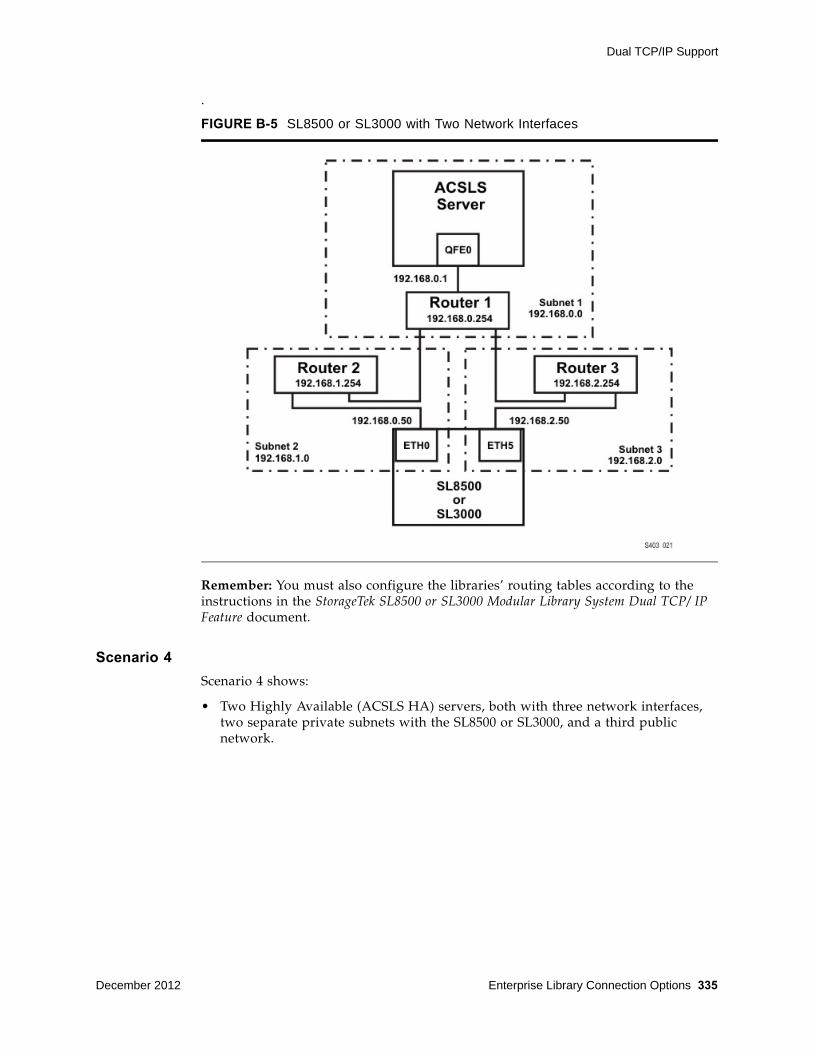
Dual TCP/IP Support
December 2012 Enterprise Library Connection Options 335
.
Remember: You must also configure the libraries’ routing tables according to the instructions in the StorageTek SL8500 or SL3000 Modular Library System Dual TCP/ IP Feature document.
Scenario 4
Scenario 4 shows:
• Two Highly Available (ACSLS HA) servers, both with three network interfaces, two separate private subnets with the SL8500 or SL3000, and a third public network.
FIGURE B-5 SL8500 or SL3000 with Two Network Interfaces

Dual TCP/IP Support
336 ACSLS 8.1 Adminstrator’s Guide December 2012
• One SL8500 or SL3000 library with two network interfaces on the same two private subnets as the ACSLS servers.
In this scenario, ACSLS HA uses two different servers with each using different network interfaces. This means that custom route entries must be added to both ACSLS servers.
For the Solaris user:
• On ACSLS server 1, you would type:
route add 192.168.0.50 –ifp qfe0 192.168.0.254 route add 192.168.1.50 –ifp qfe1 192.168.1.254
• On ACSLS Server 2, you would type:
route add 192.168.0.50 –ifp qfe1 192.168.0.254 route add 192.168.1.50 –ifp qfe2 192.168.1.254
You must add the IP addresses for both servers to the libraries’ configuration. Please refer to the StorageTek SL8500 or SL3000 Modular Library System Dual TCP/IP Feature document.
FIGURE B-6 ACSLS HA

Dual TCP/IP Support
December 2012 Enterprise Library Connection Options 337
It is important that you separate the libraries’ network interfaces over two different subnets when on ACSLS HA. The purpose of a Highly Available environment is to build in redundancy and eliminate single points of failure.
Remember: You must also configure the libraries’ routing tables according to the instructions in the StorageTek SL8500 or SL3000 Modular Library System Dual TCP/ IP Feature document
Retaining Customized Routing Table Entries after a Reboot
Any customized routing table entries are lost after a system re-boot. This is the nature of system routing tables and is expected behavior.
In order to support the Dual TCP/IP feature on the SL8500 or SL3000, it is necessary to add custom entries to the routing tables on the ACSLS server. When the ACSLS server is re-booted, all routing table entries are flushed and any necessary routes to the libraries are removed. Since this is the nature of the operating system, there are a couple of different ways to handle this situation.
Creating Scripts
You can create scripts to add custom routes to be initialized at boot time. See “Adding Custom Route To Be Initialized At Boot Time” on page 337 for procedures.
These scripts can then be placed in the rc directory structure for automatic execution at boot time. Please refer to your system documentation for details on the best way to implement this.
Use the ACSLS startup scripts to add your custom routing entries at boot up time. The startup scripts check for a file that contains customized route table entries. Any entries found are added to the routing table automatically using the UNIX route command. For standalone ACSLS installations this is a desirable method to maintain route entries that are necessary for libraries support.
Important: This solution will not work if the ACSLS installation is a Highly Available ACSLS (ACSLS HA) environment.
In this case, you need to use the first method to maintain routing tables.
ACSLS HA handles system initialization differently than a standalone ACSLS server because it relies on Solaris Cluster to manage its clustered resources which means ACSLS cannot be automatically started by way of the system RC mechanism at boot time. This is handled strictly by the Solaris Cluster agents with the S87ACSLS startup scripts never being used. You need to add a script with the appropriate “route add” commands and locate it within the /etc/rc2.d directory structure. It is highly recommended that anyone with an ACSLS HA environment engage Oracle Advanced Customer Support – preferably the same consultant that originally installed the ACSLS HA system.
Adding Custom Route To Be Initialized At Boot Time
To add custom routing entries:
1. cd to the following directory:
$ACS_HOME/data/external/ custom_routing.

Multi TCP/IP Support
338 ACSLS 8.1 Adminstrator’s Guide December 2012
This directory contains the template file custom_routing_tables.tpl.
2. Copy this file and change the file name to custom_routing_tables.
# cp custom_routing_tables.tpl custom_routing_tables
3. Edit (vi) the custom_routing_tables file and add your entries.
The file contains three fields.
• The IP address for the SL8500 or SL3000.
• The name of the interface on the ACSLS server that you wish to establish the one-to-one relationship.
• The IP address of the default route for your subnet.
4. Follow the instructions in the custom_routing_tables comment section for the format.
Note – Make sure that there are no blank lines.
When your server reboots, ACSLS is automatically initialized, and your custom routes are added to the routing table.
5. Verify all routes in the routing table with:
# netstat -r
Please refer to your Unix man pages for complete documentation on both the route and netstat commands.
Removing routing commands
Use the route command to remove any special routing commands that have been added erroneously or are no longer needed to the earlier configuration.
Example: As user root, type the following commands:
# route delete 192.168.0.50 192.168.0.254
This says to remove the route to 192.168.0.50 (the SL8500 or SL3000) using the default route of 192.168.0.254. The route is then removed.
Multi TCP/IP SupportWhen SL8500 3.97 or higher firmware is installed, ACSLS can connect to more than one SL8500 in an ACS (library complex).
ACSLS supports up to fifteen connections to an ACS. For example, this can be: fifteen connections to four SL8500s; two connections to each of two SL8500s; two connections to one SL8500 and two connections to two other SL8500s; three connections to two or three libraries, etc.
When ACSLS is connected to more than one library, the connections should be through different subnets for redundancy. If one subnet fails, communication between ACSLS and the library still continues over the other subnet(s).
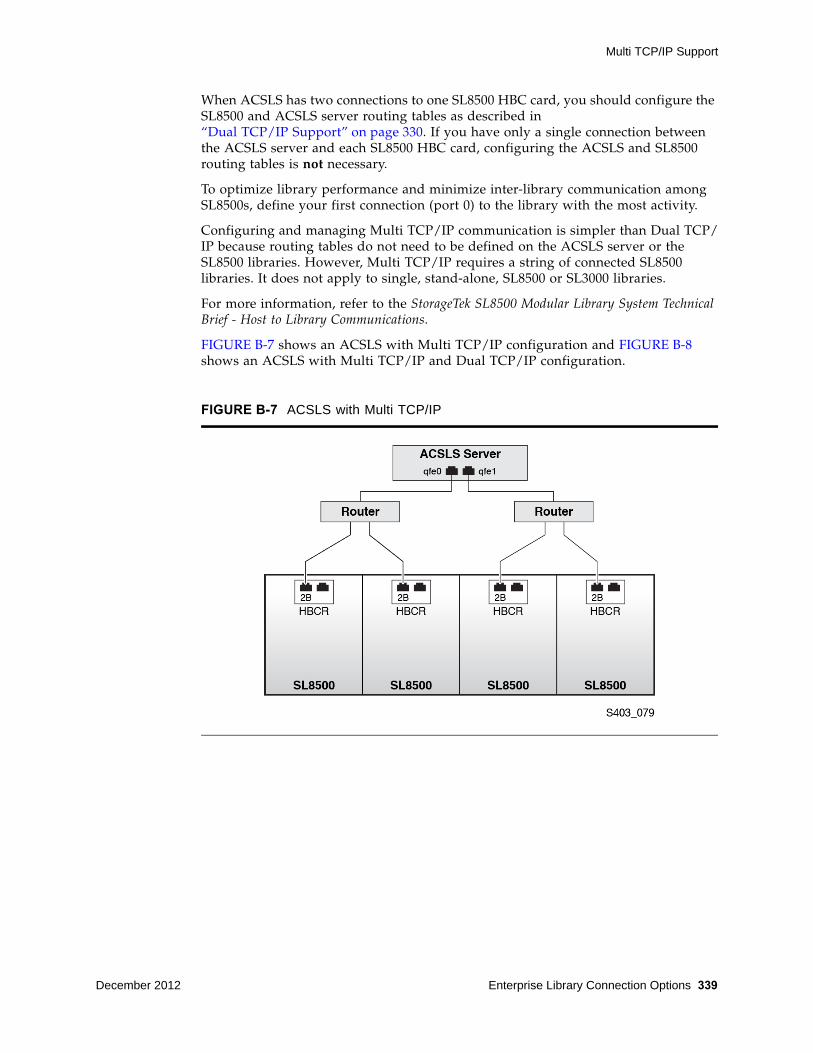
Multi TCP/IP Support
December 2012 Enterprise Library Connection Options 339
When ACSLS has two connections to one SL8500 HBC card, you should configure the SL8500 and ACSLS server routing tables as described in “Dual TCP/IP Support” on page 330. If you have only a single connection between the ACSLS server and each SL8500 HBC card, configuring the ACSLS and SL8500 routing tables is not necessary.
To optimize library performance and minimize inter-library communication among SL8500s, define your first connection (port 0) to the library with the most activity.
Configuring and managing Multi TCP/IP communication is simpler than Dual TCP/IP because routing tables do not need to be defined on the ACSLS server or the SL8500 libraries. However, Multi TCP/IP requires a string of connected SL8500 libraries. It does not apply to single, stand-alone, SL8500 or SL3000 libraries.
For more information, refer to the StorageTek SL8500 Modular Library System Technical Brief - Host to Library Communications.
FIGURE B-7 shows an ACSLS with Multi TCP/IP configuration and FIGURE B-8 shows an ACSLS with Multi TCP/IP and Dual TCP/IP configuration.
FIGURE B-7 ACSLS with Multi TCP/IP

Redundant Electronics
340 ACSLS 8.1 Adminstrator’s Guide December 2012
Redundant ElectronicsThe optional SL8500 or SL3000 Redundant Electronics (RE) feature provides failover protection in enterprise libraries. If the library controller experiences errors, it automatically switches operations to an alternate library controller, with minimal disruption to library and host operations. This allows your Oracle support representative to replace the faulty card while the library continues normal operations.
RE also provides minimal disruption of library operations during firmware upgrades.
Note – The libraries offer redundancy in a variety of components, including robots and power systems. The term “Redundant Electronics” refers specifically to redundancy in the library and drive controller components.
RE requires all of the following hardware components:
• Active library controller (HBC or HBCR) paired with the active drive controller (HBT)
• Standby HBC or HBCR paired with the standby HBT
• Other redundant components
For more information, refer to the StorageTek SL8500 or SL3000 User’s Guide.
FIGURE B-9 shows ACSLS with RE in a single library.
FIGURE B-8 ACSLS with Multi TCP/IP and Dual TCP/IP
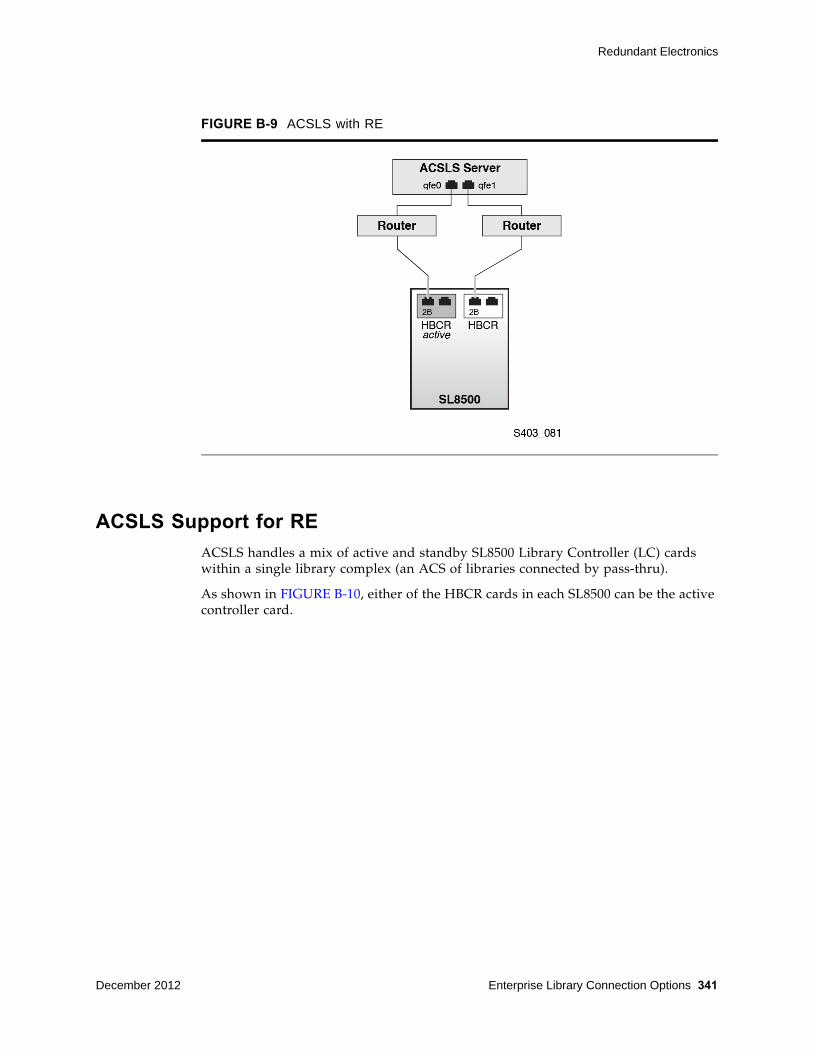
Redundant Electronics
December 2012 Enterprise Library Connection Options 341
ACSLS Support for RE
ACSLS handles a mix of active and standby SL8500 Library Controller (LC) cards within a single library complex (an ACS of libraries connected by pass-thru).
As shown in FIGURE B-10, either of the HBCR cards in each SL8500 can be the active controller card.
FIGURE B-9 ACSLS with RE

Redundant Electronics
342 ACSLS 8.1 Adminstrator’s Guide December 2012
Each library in a string of connected SL8500s can now have its own pair of redundant Library Controllers. In a library complex, some libraries can have a pair of library controller cards, with RE enabled, while other libraries only have a single library controller. ACSLS should be able to communicate with all of the active LCs at the same time.
ACSLS supports RE with Dual TCP/IP, as shown in FIGURE B-11, or with Dual and Multi TCP/IP, as shown in FIGURE B-12.
FIGURE B-10 ACSLS with RE and Multi TCP/IP

Redundant Electronics
December 2012 Enterprise Library Connection Options 343
FIGURE B-11 ACSLS with RE and Dual TCP/IP
FIGURE B-12 RE with Dual TCP/IP and Multi TCP?IP

Redundant Electronics
344 ACSLS 8.1 Adminstrator’s Guide December 2012
Query and Retry of Mounts and Dismounts
To support RE, ACSLS implemented the Query and Retry of mounts and dismounts during temporary library and drive outages. For more information, refer to “Queue and Retry Mounts and Dismounts when Library is Temporarily Unavailable” on page 96.
switch lmu for Only a Single Library
The switch lmu command can be used to force a switch between library controllers in an SL3000 or a single SL8500 library. The switch lmu command cannot be used to switch one SL8500 that is connected to other SL8500s in a library complex.

December 2012 ACSLS Support of the SL8500 345
C
ACSLS Support of the SL8500
This appendix discusses the following topics:
• “Connecting to Multiple SL8500s Using Multi TCP/IP” on page 346
• “Understanding SL8500 Internal Addresses and ACSLS Addresses” on page 347
• “Using SL Console to Translate Addresses” on page 349
• “Moving Cartridges Before Removing Cells from a Partition” on page 350
• “Minimizing Elevator and PTP Activity” on page 352
• “Configuring Tape Drives to Support Your Workloads” on page 352
• “Managing Cartridge Locations” on page 353
• “Finding Missing Cartridges” on page 354
• “Varying the SL8500 Offline” on page 355
• “Using the Dynamic Configuration (config) utility” on page 356
• “Expanding the SL8500” on page 357
• “Connecting SL8500s with Pass-Thru-Ports” on page 361
The following figure shows the SL8500 library with an ACSLS server.

346 ACSLS 8.1 Adminstrator’s Guide December 2012
The SL8500 library uses TCP/IP protocol over an Ethernet physical interface to manage and communicate with the host and ACSLS. This interface enables ACSLS to connect to and communicate with the SL8500. Before you configure ACSLS for the SL8500:
• Connect one or more SL8500s to ACSLS
• Verify that all the components of the SL8500 are operational.
ACSLS builds its library configuration from the information reported by the library. If SL8500 components are not operational, the library information may not be reported to ACSLS, and the ACSLS configuration of the SL8500 will be incomplete.
Note – If the components like drives or CAPs are not operational, it is easy to use Dynamic Configuration (config acs, config lsm, or config drives) to add or update them while ACSLS is running and the library is online.
Connecting to Multiple SL8500s Using Multi TCP/IP
When SL8500 3.97 or higher firmware is installed, ACSLS can connect to more than one SL8500 in an ACS (library complex).
ACSLS supports up to fifteen connections to an ACS. For example, this can be: fifteen connections to four SL8500s; two connections to each of two SL8500s; two connections to one SL8500 and two connections to two other SL8500s; three connections to two or three libraries, etc.
When ACSLS is connected to more than one library, the connections should be through different subnets for redundancy. If one subnet fails, communication between ACSLS and the library still continues over the other subnet(s).
FIGURE C-13 SL8500 with an ACSLS Server Before Configuring ACSLS for the SL8500
ACSLS Server
ACSLS Software
ACSLS Database
Workstation
Client System
T104 037
Ethernet
Control Path
Data Path
SL8500 Library
Data Path
Control Path

Understanding SL8500 Internal Addresses and ACSLS Addresses
December 2012 ACSLS Support of the SL8500 347
When ACSLS has two connections to one SL8500 HBC card, you must configure the SL8500 and ACSLS server routing tables as described in “Dual TCP/IP Support” on page 330. If you have only a single connection between the ACSLS server and each SL8500 library, configuring the ACSLS and SL8500 routing tables is not necessary.
To optimize library performance and minimize inter-library communication among SL8500s, connect to the libraries with the most activity. Make the first connection that you specify in acsss_config or config acs new to the SL8500 with the most activity.
For more information, refer to the SL8500 Modular Library System Technical Brief - Host to Library Communications.
Verifying that all SL8500 Components are Operational
To verify that all the components of the SL8500 are operational:
1. Logon to the StorageTek Library Console (SL Console).
You can use either the console on the SL8500 or a remote Library Console.
2. Select Tools -> System Detail.
• All SL8500 components should be green.
Exception: Drives that are yellow can be configured now, or later, using dynamic configuration (“config drives” on page 162).
• Missing components can be added using the Dynamic Configuration (config acs or config lsm) utility.
• IMPORTANT: Before configuring the SL8500, the elevators (Elevator Folder) must be green. If the elevators are not green, do not configure the SL8500 to ACSLS. The elevators are the logical pass-thru-ports (PTPs). Without PTPs, ACSLS will not know that the SL8500 rails are connected.
3. Once the SL8500 components are operational, configure SL8500 to ACSLS, as discussed in “Configuring or Updating your Library Hardware” on page 69 or under the “Dynamic Configuration (config) utilities” on page 158.
Understanding SL8500 Internal Addresses and ACSLS Addresses
There are differences in the internal addresses of the SL8500 and other libraries supported by ACSLS and HSC.
• The SL8500 is one’s-based (1) and uses negative numbers.
• Other libraries use a zero-based (0) with no negative numbers.
• The SL8500 uses five parameters: library, rail, column, side, and row.
• Legacy StorageTek libraries (e.g. 9310) use: ACS, LSM, panel, row, and column (HLI–PRC).
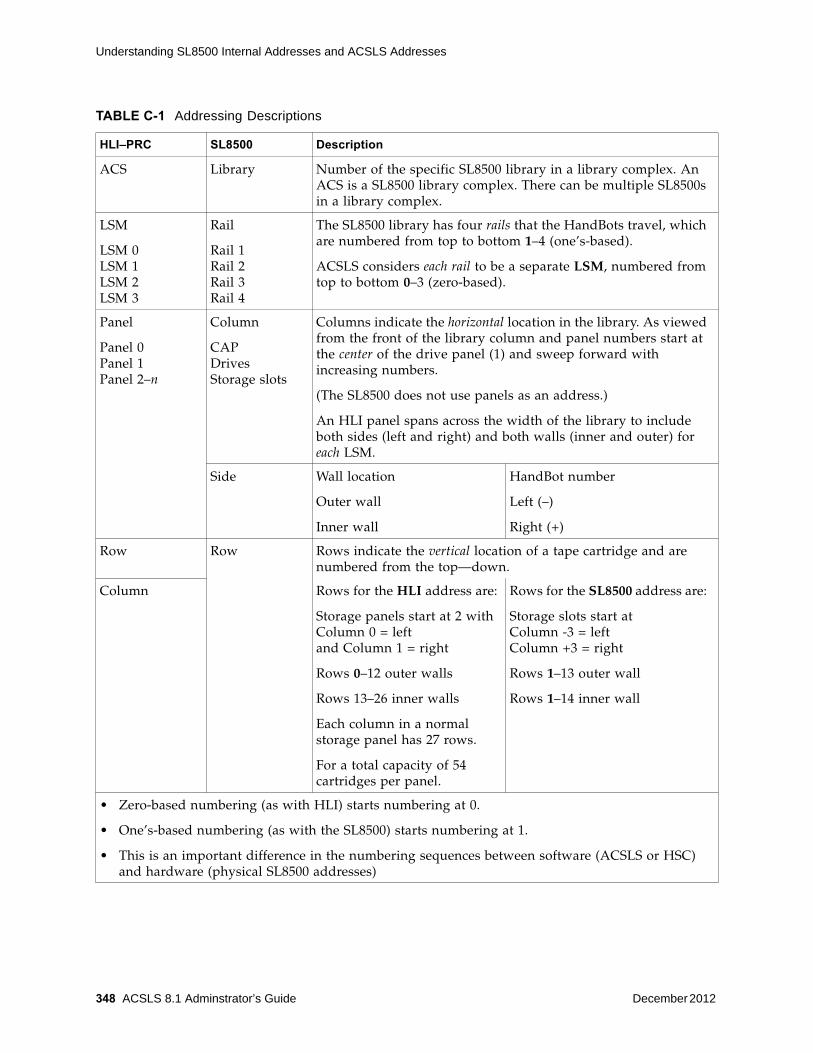
Understanding SL8500 Internal Addresses and ACSLS Addresses
348 ACSLS 8.1 Adminstrator’s Guide December 2012
TABLE C-1 Addressing Descriptions
HLI–PRC SL8500 Description
ACS Library Number of the specific SL8500 library in a library complex. An ACS is a SL8500 library complex. There can be multiple SL8500s in a library complex.
LSM
LSM 0 LSM 1 LSM 2 LSM 3
Rail
Rail 1 Rail 2 Rail 3 Rail 4
The SL8500 library has four rails that the HandBots travel, which are numbered from top to bottom 1–4 (one’s-based).
ACSLS considers each rail to be a separate LSM, numbered from top to bottom 0–3 (zero-based).
Panel
Panel 0 Panel 1 Panel 2–n
Column
CAP Drives Storage slots
Columns indicate the horizontal location in the library. As viewed from the front of the library column and panel numbers start at the center of the drive panel (1) and sweep forward with increasing numbers.
(The SL8500 does not use panels as an address.)
An HLI panel spans across the width of the library to include both sides (left and right) and both walls (inner and outer) for each LSM.
Side Wall location
Outer wall
Inner wall
HandBot number
Left (–)
Right (+)
Row Row Rows indicate the vertical location of a tape cartridge and are numbered from the top—down.
Column Rows for the HLI address are:
Storage panels start at 2 with Column 0 = left and Column 1 = right
Rows 0–12 outer walls
Rows 13–26 inner walls
Each column in a normal storage panel has 27 rows.
For a total capacity of 54 cartridges per panel.
Rows for the SL8500 address are:
Storage slots start at Column -3 = left Column +3 = right
Rows 1–13 outer wall
Rows 1–14 inner wall
• Zero-based numbering (as with HLI) starts numbering at 0.
• One’s-based numbering (as with the SL8500) starts numbering at 1.
• This is an important difference in the numbering sequences between software (ACSLS or HSC) and hardware (physical SL8500 addresses)

Using SL Console to Translate Addresses
December 2012 ACSLS Support of the SL8500 349
Using SL Console to Translate AddressesYou can use the SL Console Search utility to translate between the SL8500 internal address and the ACSLS or HSC panel, row, and column. To locate a cartridge:
1. Log in to the SL Console.
2. Select Tools > Diagnostics > Search.
3. Select Location.
4. Select one of the following operations in the Location field:
5. Select one of the following from the Requestor pull-down menu.
• default
The physical location inside the library (cell, drive, CAP).
If you know the physical location (the internal address), and need to find the HLI-PRC address, enter that address in the location and pick default as the requester.
• hli#
This selects the HLI-PRC address of the cartridge from the library management software where # is one of the following:
• hli0 for a non-partitioned.
• hli1-8 for a partitioned library, where the number is the partition number.
This option displays both the Internal Address and the hli# Requester.
6. Click the Search button in the top right corner of the SL Console.
The search result lists the location by slot-type (cell, drive, or CAP).
7. Click the Details (...) field.
A pop-up window provides more information such as: VOLID, media and cartridge type (LTO, SDLT tape, and T-Series, data, cleaning, or diagnostic) for cartridges, and shows both the internal and HLI addresses for the location.
Tape Drive Locations
The tape drives are associated with and belong to an LSM. To mount a cartridge tape in a different LSM, the cartridge must go through an internal pass-thru operation (in this case, the elevator) to the drive.
contains Example: 1,1,-9 lists the contents in Library 1, Rail 1, Column -9 for all rows on both sides
endsWith Example: 1,5 lists the slot contents for all rails and columns for Side 1, Row 5
equals Example: 1,1,-9,1,1 lists the contents in that specific location (L,R,C,S,W)
startsWith Example: 1, 3 lists the slot contents for all columns, sides, and rows in Library 1, Rail 3
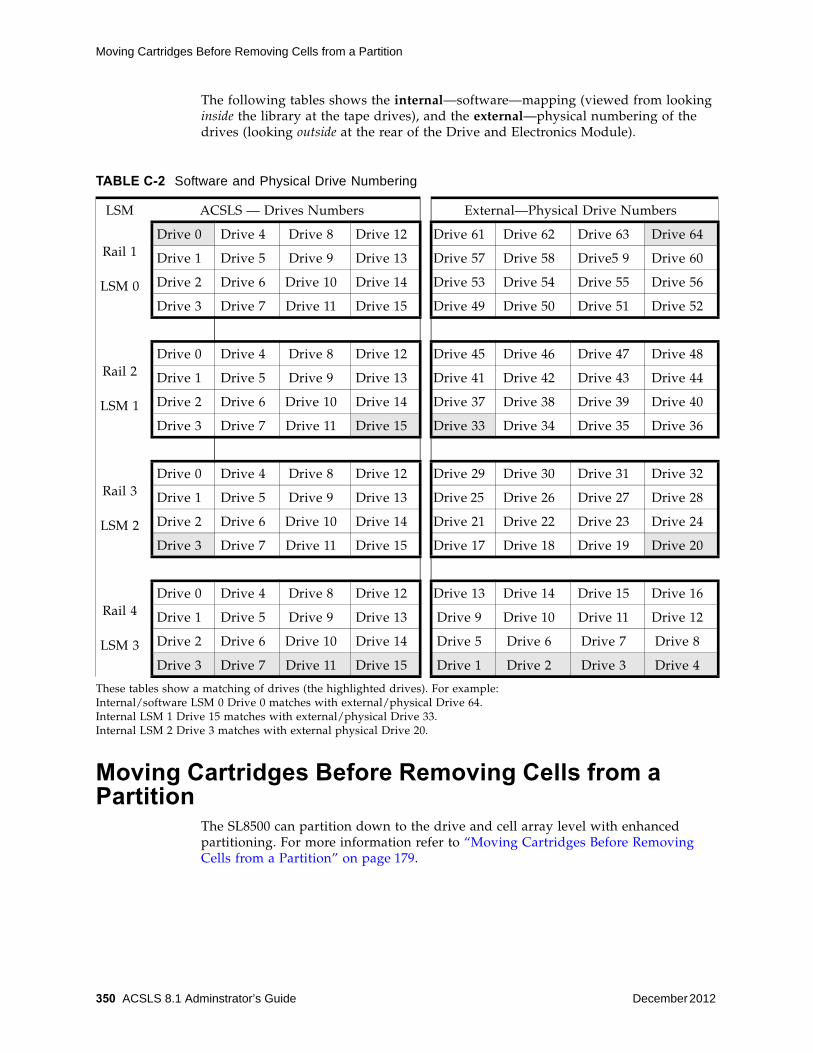
Moving Cartridges Before Removing Cells from a Partition
350 ACSLS 8.1 Adminstrator’s Guide December 2012
The following tables shows the internal—software—mapping (viewed from looking inside the library at the tape drives), and the external—physical numbering of the drives (looking outside at the rear of the Drive and Electronics Module).
Moving Cartridges Before Removing Cells from a Partition
The SL8500 can partition down to the drive and cell array level with enhanced partitioning. For more information refer to “Moving Cartridges Before Removing Cells from a Partition” on page 179.
TABLE C-2 Software and Physical Drive Numbering
LSM ACSLS — Drives Numbers External—Physical Drive Numbers
Rail 1
LSM 0
Drive 0 Drive 4 Drive 8 Drive 12 Drive 61 Drive 62 Drive 63 Drive 64
Drive 1 Drive 5 Drive 9 Drive 13 Drive 57 Drive 58 Drive5 9 Drive 60
Drive 2 Drive 6 Drive 10 Drive 14 Drive 53 Drive 54 Drive 55 Drive 56
Drive 3 Drive 7 Drive 11 Drive 15 Drive 49 Drive 50 Drive 51 Drive 52
Rail 2
LSM 1
Drive 0 Drive 4 Drive 8 Drive 12 Drive 45 Drive 46 Drive 47 Drive 48
Drive 1 Drive 5 Drive 9 Drive 13 Drive 41 Drive 42 Drive 43 Drive 44
Drive 2 Drive 6 Drive 10 Drive 14 Drive 37 Drive 38 Drive 39 Drive 40
Drive 3 Drive 7 Drive 11 Drive 15 Drive 33 Drive 34 Drive 35 Drive 36
Rail 3
LSM 2
Drive 0 Drive 4 Drive 8 Drive 12 Drive 29 Drive 30 Drive 31 Drive 32
Drive 1 Drive 5 Drive 9 Drive 13 Drive 25 Drive 26 Drive 27 Drive 28
Drive 2 Drive 6 Drive 10 Drive 14 Drive 21 Drive 22 Drive 23 Drive 24
Drive 3 Drive 7 Drive 11 Drive 15 Drive 17 Drive 18 Drive 19 Drive 20
Rail 4
LSM 3
Drive 0 Drive 4 Drive 8 Drive 12 Drive 13 Drive 14 Drive 15 Drive 16
Drive 1 Drive 5 Drive 9 Drive 13 Drive 9 Drive 10 Drive 11 Drive 12
Drive 2 Drive 6 Drive 10 Drive 14 Drive 5 Drive 6 Drive 7 Drive 8
Drive 3 Drive 7 Drive 11 Drive 15 Drive 1 Drive 2 Drive 3 Drive 4
These tables show a matching of drives (the highlighted drives). For example: Internal/software LSM 0 Drive 0 matches with external/physical Drive 64. Internal LSM 1 Drive 15 matches with external/physical Drive 33. Internal LSM 2 Drive 3 matches with external physical Drive 20.
SL8500 CAP Behavior
December 2012 ACSLS Support of the SL8500 351
SL8500 CAP BehaviorSL8500 CAPs span three rails (2-4). For ACSLS, this is LSMs 1-3. The SL8500 has one CAP with an optional Dual CAP. Each CAP has three magazines with 13 cells per magazine. Each magazine is adjacent to a separate rail, and can only be accessed by the handbots on that rail.
When the Dual CAP is not present, ACSLS reports that the CAP is offline or non-operational. To prevent any messages regarding the CAP from being displayed, vary the non-existent CAP to an offline state using the vary command. This also prevents any mistaken attempts to use the Dual CAP where it does not exist.
The SL8500 CAP is treated as an independent component, and does not belong to any one rail (LSM).
Examples:
• The SL8500 CAP can be online and operational even though the LSM identified in the CAP ID is offline or not operational.
• If LSM 1 is varied offline, the SL8500 CAP(s) are not automatically varied offline.
• If LSM 1 is varied online, ACSLS will not automatically vary the SL8500 CAP(s) online.
• The SL8500 CAP(s) can be online and used to enter or eject cartridges to and from SL8500 LSM 0, even though some of the SL8500 LSMs 1-3 are offline and/or not operational.
Note – For CAP behavior in a partitioned library, refer to “CAP Behavior” on page 411.
Enter or Eject Operations
During an enter, ACSLS will always try to move the cartridge to an LSM (rail) adjacent to the CAP magazine. For ejects, ACSLS will always try to eject cartridges to a CAP cell adjacent to the LSM containing the cartridge
If these two operations are not possible, the library controller takes care of moving the cartridge through the elevator to another LSM. This requires movements between two handbots and the elevator.
Enter, Eject, and Audit Operations for Some ACSLS Clients
Unlike other libraries, the SL8500 does not have CAPs defined for each LSM ID in an SL8500 library. The CAPs on an SL8500 contain LSM 1 in their CAP IDs. There are no CAPs in an SL8500 with LSM IDs 0, 2, or 3. Partitioning complicates this problem because LSM 1 (the LSM ID in the SL8500 CAP ID) may not be assigned to your partition. (Remember, the CAPs are still available to all partitions as a shared resource.)
Some ACSLS clients do not query ACSLS to identify which CAPs exist and are available before selecting a CAP for an enter, eject, or audit. They may specify cap_ids that do not exist or CAPs that are not online. For example, some ACSAPI clients

Minimizing Elevator and PTP Activity
352 ACSLS 8.1 Adminstrator’s Guide December 2012
assume CAPs exist for all LSM IDs. They may automatically specify a CAP with the same LSM ID as the location of cartridges or drives that they manage. Enters, ejects, or audits that specify non-existent CAP IDs will fail.
You need to use the ACSLS cmd_proc to:
• enter and eject cartridges for clients that specify non-existent CAP IDs.
• run audits for any ACSs and partitions used by these clients.
After entering, ejecting, or auditing, you need to re-synchronize the client application’s database with the ACSLS database.
Minimizing Elevator and PTP ActivityThere are several things you can do to minimize elevator and PTP activity, such as:
Configuring Tape Drives to Support Your WorkloadsHow tape drives are configured in the SL8500 can minimize both elevator and PTP activity while supporting your tape workloads. Strategies to use in determining where tape drives are located in the SL8500 include:
Mounting cartridges Whenever possible when mounting a tape, use cartridges and tape drives that are in the same LSM. LSM refers to a single rail within the SL8500 library. Each SL8500 contains 4 LSMs.
Using float
Take advantage of the ACSLS “float” option (enabled by default by ACSLS) by maintaining some free cells within each LSM. Cartridge float is a feature that allows ACSLS to place a dismounted tape cartridge in an empty slot in the same LSM or a closer LSM to the tape drive if the tape originally came from a different LSM using a pass-thru operation.
When cartridges are dismounted, ACSLS tries to avoid elevator (pass-thru) activity among LSMs by assigning a new home cell whenever the cartridge's old home cell is in a different LSM. ACSLS attempts to put the cartridge away:
• in the same LSM as the tape drive from which it was dismounted
• or to the closest LSM (with free storage cells) to the drive
Entering cartridges
Enter cartridges into an LSM that has compatible tape drives for the media being entered.
Example: You have only LTO drives on LSMs 2 and 3, and you want the LTO cartridges to be located in these LSMs. When entering these cartridges, you should place them in the CAP magazines adjacent to LSMs 2 and 3. ACSLS then makes every effort to put the cartridges in the LSM that is adjacent to that CAP magazine.
Scratch cartridgesMake sure that scratch cartridges are available in sufficient quantity in each LSM where they will be used. For an SL8500, this means having scratch cartridges available on each rail (LSM) of the library.
Free cells Make sure there are adequate free cells in each LSM.

Managing Cartridge Locations
December 2012 ACSLS Support of the SL8500 353
• Cluster cartridges by workload, with enough drives to support the maximum drives needed for the workload. Separate the cartridges used by each workload on separate rails, and ensure the rail(s) dedicated to a workload has enough drives to meet the maximum concurrent mounts for the peak usage of the workload. Ensure that the rail has not only the tape cartridges for the workload, but also the scratch cartridges that will be needed.
• Allocate separate rail(s) to each major application workload. This is because some applications, such as Symantic NetBackup and Tivoli, can use their own media and drives.
• Clustering drives and media on a single rail works until the mounts per hour threshold is reached, all drives are in use, or there are too many active cartridges to fit on a rail. When the resources needed for a workload exceeds the capacity of a rail, spread the cartridges and drives over two or more rails.
• Cluster drives by type, placing drives that use different media types on separate rails (LSMs). For example, place T9840 drives on one rail and T10000 drives on a different rail.
• Configure your heavy tape applications so they will not exceed the performance limits of your library configuration.
• Configure the SL8500 with 8 HandBots (two HandBots per rail) to provide redundancy. This allows you to always access the cartridges and drives that support a workload.
Managing Cartridge LocationsHow cartridges are originally entered in the library or their status in the library can have an affect on ACSLS performance. Considerations are:

Finding Missing Cartridges
354 ACSLS 8.1 Adminstrator’s Guide December 2012
Finding Missing CartridgesIf a cartridge is out of place or unaccounted for by ACSLS:
1. Perform a physical audit of the SL8500 using the SL Console.
The physical audit of the SL8500 is performed as a background task in between handling mount and other library operation requests.
Caution – If the SL8500 contents are out of sync with ACSLS due to manual operations such as loading cartridges directly, it is not advisable to attempt continued operations. If you want to manually add tapes, adding them to a particular LSM within the SL8500 is a better approach. Adding tapes to a particular LSM and auditing only the affected LSM is a quicker and more reliable solution. To do this, vary the affected LSM to a diagnostic state to ACSLS while the audit is in process. After the SL8500 library audit is performed vary the LSM online to ACSLS.
2. Run an ACSLS audit to update the ACSLS database to match the actual inventory of library cartridges.
Entering cartridges
Recommendation: Enter cartridges through the CAP.
When manually placing cartridges in the library with the front access door open, library operations cease and ACSLS must perform a full audit to update the library database to match the actual contents of the library.
To maximize performance: Enter cartridges through the cartridge access port (CAP). During an enter, the library stays online, mounts can continue, and the library management software always tries to move the cartridge to an LSM adjacent to the CAP magazine—minimizing pass-thru activity.
If this is not possible, the library controller moves the cartridge through the elevator to another LSM—which requires additional movement between two HandBots and the elevator.
Clustering cartridgesCluster cartridges by workload on separate rails with enough tape drives to support the maximum activity—peak usage—for that workload.
Using float
Recommendation: When float is on, ACSLS selects a new home cell for a cartridge that is in an LSM as close to the drive as possible on a dismount. This option automatically clusters cartridges by the drives for the workload.
Make sure each LSM contains enough free cells to allow selection of a new home cell in that LSM.
Supplying scratch cartridges
Make sure each rail has the correct amount and type of data cartridges plus enough scratch cartridges to support the workload.
Varying the SL8500 Offline
December 2012 ACSLS Support of the SL8500 355
Varying the SL8500 Offline You should vary SL8500 components offline to ACSLS before they are powered off, if they are inoperative, and before you open an SL8500 access door. This notifies ACSLS that they are unavailable. Once they are available, vary them back online.
Use ACSLS to vary SL8500 components offline, not SL Console
You should vary SL8500 components (ACSs, LSMs, and CAPs) offline to ACSLS, not the SL Console.
ACSLS allows outstanding requests to complete before taking components offline, unless it is a vary offline force. The SL Console has no knowledge of outstanding requests to ACSLS.
Varying components offline using SL Console may cause requests in progress to fail.
When to vary SL8500 components offline to ACSLS
Before opening the access door
Before opening the SL8500 access door vary the ACS or all four LSMs offline.
• For a standalone SL8500, vary the ACS offline:
vary acs acs_id offline
• For a SL8500 connected through PTPs, vary all four LSMs (in the SL8500 whose access door will be opened) offline using the following command four times (once for each of the four LSMs):
vary lsm lsm_id offline
Note – If any CAPs in the SL8500 are in automatic mode, you must:
1. Set them to manual mode before opening the access door.
2. Set them back to automatic mode after you close the access door and the SL8500 comes back online.
If a CAP is inoperative
If the CAP is inoperative, vary it offline:
vary cap cap_id offline
When closing the Service Safety Door
Whenever replacing hardware requires using the Service Safety Door, it is advisable to keep that Service Safety Door closed for the minimum amount of time possible. This is because the Service Safety Door blocks other hardware components (elevators, CAPs, and cells) to which access may be required for completing specific requests.

Using the Dynamic Configuration (config) utility
356 ACSLS 8.1 Adminstrator’s Guide December 2012
• Before closing the Service Safety Door on either the left or right side of the SL8500, vary the elevator on that side offline through the SL Console.
After the Service Safety Door is opened, vary the elevator on that side back online through the SL Console.
• When the Service Safety Door is closed on the right side, it will block access to the CAP.
• Before closing the Service Safety Door on the right side of the SL8500, vary the CAP offline through ACSLS.
• After the Service Safety Door is opened, vary the CAP online through ACSLS.
Note – When the SL8500 Service Safety Door is closed to separate a service bay from the rest of the library, the CSE can open the access door on that side without taking the LSM or ACS offline.
When using the Service Safety Door do not use these ACSLS commands and utilities
There are some ACSLS commands and utilities that should not be in progress or initiated when the Service Safety Door is being used. These commands are:
When the Service Safety Door is closed on either side, do not use these utilities:
• acsss_config
• config (config drives is OK)
When the Service Safety Door is closed on the right (CAP) side, do not use these commands:
• enter
• eject
• set cap mode auto <cap_id>
When the Service Safety Door is closed on the right (CAP) side, the following commands can be used, but special considerations apply:
• audit
The audit command can be used. However, if there is a need to eject cartridges as a result of the audit (e.g. because the audit encounters duplicates or unreadable labels), the audit will complete and update the ACSLS database, but the cartridges will not be ejected.
• vary acs and vary lsm
These commands will succeed, but messages will be displayed on cmd_proc and the event log reporting CAP failures and inoperative CAPs.
Using the Dynamic Configuration (config) utilityThe dynamic configuration (config) utility allows you to implement configuration changes to ACSLS libraries (and components) while ACSLS remains online and running. These configuration changes are recorded in the acsss_config.log file.
The following dynamic configuration utilities are supported:
Expanding the SL8500
December 2012 ACSLS Support of the SL8500 357
• config acs
• config drives
• config lsm
• config ports
Using the config utility provides the following benefits:
• ACSLS can continue running, allowing you to perform mount requests to unaffected library components.
• Allows you to reconfigure specified library components while all other configuration information remains unchanged. For example, when specifying:
• An ACS, the configurations of other ACSs are not affected.
• An LSM, the configurations of other LSMs are not affected.
• A drive panel, the drives on a panel, mounts and dismounts to all existing drives are not affected.
Expanding the SL8500Storage Expansion Modules (SEMs) are added to the SL8500 to increase its capacity. The SEMs are inserted between the Customer Interface Module (CIM), which includes the CAP, and the SEM or Robotics Interface Module (RIM) that is currently attached to the CIM.
When an SL8500 is expanded:
• The library’s configuration changes, and you must reconfigure ACSLS using either the ACSLS Dynamic Configuration utility while ACSLS is up or run acsss_config while ACSLS is down.
• Cartridges must be removed to expand the SL8500. When placing these cartridges back into the library, please leave the cell arrays that they were formerly in empty.
• After the expansion is complete, the SL8500 must be rebooted twice, first to discover the new configuration, and then to restart all library components with the updated configuration.
• The library must update the locations of all cartridges with a physical audit.
The library begins a physical audit automatically when the access door is closed. The library’s physical audit completes when all robot movement stops for at least a minute.
• After the library’s physical audit is complete, use the procedure “Auditing an Expanded SL8500” on page 359 to update the ACSLS database.
Note – Do not start automated library operations until the ACSLS audits are complete and the ACSLS database has been updated with the new cartridge locations
What is Involved
Physically expanding an SL8500 involves the following:
Expanding the SL8500
358 ACSLS 8.1 Adminstrator’s Guide December 2012
• A new SEM(s) is inserted between the existing SEMs or RIM and the CIM.
The panel numbers on the new SEM(s) and the CIM are now higher than the panel numbers on the existing SEMs and RIM.
• Because the CIM must move out, new and higher panel numbers are assigned to the three cell panels (columns) on the CIM. When the cell panels on the CIM are assigned higher panel numbers, the addresses of all the cartridges on the CIM change.
• Many cartridges must be removed to expand the SL8500. Cell arrays must be removed to both unbolt existing rails and bolt in new ones and to jack up the CIM.
• After the new rails are installed and the SL8500 is expanded, the cartridges that were removed may be loaded back into the library. Please leave the cell arrays that were temporarily removed to expand the library empty.
After expansion, you must audit the library so ACSLS can update its database with the new addresses of these cartridges. When cartridges are placed in new locations, ACSLS’ attempts to find the cartridges that were previously in the cells can seriously degrade library performance during an audit. To optimize both ACSLS and library performance, please:
1. Let the library’s physical audit complete before starting an ACSLS audit. The combined audits will finish faster if the library is able to just report cartridge locations to ACSLS from its database. Otherwise, the library must re-verify cartridge locations before responding to ACSLS’ audit requests.
2. For the cartridges that were removed to expand the library, use one of these strategies to re-insert them back into the library:
a. Remove the cartridges from the library, audit the library from ACSLS, then enter the cartridges that were removed back into the library.
b. Insert the cartridges only into the panel numbers that were added to the library, then audit these panels first.
If you are not using ACSLS scratch pools to track scratch cartridges, no special procedure is required as long as you have absent volume retention enabled (the default). When you audit the library, the cartridges that were moved are often marked absent, but audit finds them in their new locations and reactivates them. The location of the cartridges are updated and no important information is lost.
If you are managing scratch cartridges by assigning cartridges to ACSLS scratch pools, and you do not want to have the cartridges’ scratch status cleared, you should place the cartridges in the newly added panels and audit these panels first. To do this:
• Insert the cartridges that were removed into the panels that were added to the library. This means only insert them into panels (columns) beyond the three panels that are closest to the drives in the first new SEM. (The first three panels in the first SEM have the panel numbers that were formerly assigned to the three panels in the CIM.
• Then audit the panels in the ACS or LSMs from the highest panel number down, through all of the new panel numbers that were added.
Use audit cap_id panel panel_id commands.

Expanding the SL8500
December 2012 ACSLS Support of the SL8500 359
• Finally, audit the rest of the ACS or LSMs.
Use the audit cap_id acs acs_id or audit cap_id lsm lsm_id commands.
This procedure is described in full detail in “Auditing an Expanded SL8500” on page 359.
Diagram of SL8500 Modules:
In the following diagram, the three cell panels in the Customer Expansion Module (# 5) are the three columns of cartridges on both the outside and inside walls on the drive side of the CEM. These are the only cell addresses in the CIM that HandBots can access when the service safety door is activated.
Auditing an Expanded SL8500
Before you expand the SL8500:
FIGURE C-14 SL8500 Customer Expansion Module
Expanding the SL8500
360 ACSLS 8.1 Adminstrator’s Guide December 2012
1. If you want to preserve the cartridges’ scratch status:
a. Determine the highest panel number for the LSMs in the library by running:
display panel acs,lsm,*
Where:
• acs is the ACS
• lsm is one of the LSMs. All rails (LSMs) on the SL8500 have the same number of panels.
• * displays all panels in the LSM.
b. Record the highest panel number.
2. Vary the LSMs to a diagnostic state until the configuration is updated and cartridge addresses have been updated with audit.
3. Backup the ACSLS database.
4. Expand the SL8500:
During the expansion, cartridges must be removed to install new or expanded rails and to add the Storage Expansion Modules.
Caution – Do NOT insert these cartridges back into the cell arrays that were temporarily removed to expand the library. This avoids a severe degradation in library performance when these locations are first audited.
5. Insert the cartridges that were removed into the panels that were added to the library.
This means, you should only insert these cartridges into panels (columns) beyond the three panels that are closest to the drives in the first new Storage Expansion Module. (The first three panels in the first Storage Expansion Module retain the numbers formerly assigned to the panels in the CIM.)
After physical expansion of the SL8500 is complete:
6. After the expansion is complete, re-boot the library twice.
7. Leave the LSMs in a diagnostic state.
8. Update the configuration in the ACSLS database using one of the following methods:
• ACSLS is running:
config acs acs_id
or, for each LSM (rail) in the SL8500:
config lsm lsm_id
• Shutting down ACSLS:
i. Bring down ACSLS: acsss disable
ii. Update the ACSLS configuration: acsss_config
iii. Bring up ACSLS: acsss enable

Expanding the SL8500
December 2012 ACSLS Support of the SL8500 361
If you want to preserve the cartridges’ scratch status, audit the library using steps 9 thru 11. If you are not tracking cartridge scratch status using ACSLS scratch pools, skip to step 12.
9. Determine the new highest panel number for the LSMs in the library and record this number:
display panel acs,lsm,*
Where:
• acs is the ACS.
• lsm is one of the LSMs. All rails (LSMs) on the SL8500 have the same number of panels
• * displays all panels in the LSM.
10. Audit the panels that were added during the expansion, from the new highest panel number to the old highest panel number+1. Audit these panels in descending order.
audit cap_id panel panel_id
Where:
• cap_id is the CAP where cartridges with duplicate vol_ids or unreadable labels should be ejected.
• panel_id is the panel being audited (acs,lsm,panel)
11. Perform a separate audit for each added panel in each LSM.
Note – You can only run as many concurrent audits as you have CAPs in your library complex. Each concurrent audit needs a separate CAP. If the audit ejected any cartridges to the CAP, they must be removed before the audit finishes.
12. Audit each entire LSM in the expanded SL8500 (or audit the entire ACS).
13. Backup the ACSLS database.
14. Vary the LSMs online.
15. Resume automated library operations.
Connecting SL8500s with Pass-Thru-Ports
You may need to audit SL8500(s) to update cartridge addresses when adding SL8500 libraries to an existing SL8500 library complex.
LSMs in the SL8500 complex are numbered from top down and right to left when viewed from the CAP end, as shown in the following figure.
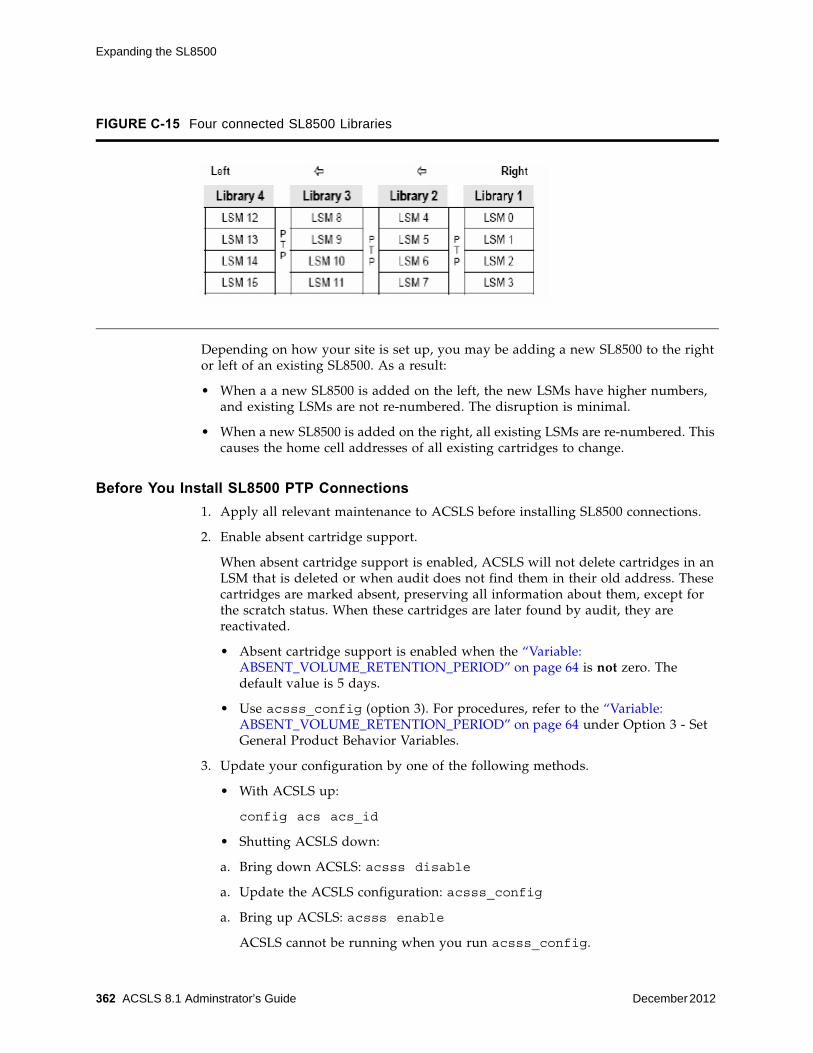
Expanding the SL8500
362 ACSLS 8.1 Adminstrator’s Guide December 2012
Depending on how your site is set up, you may be adding a new SL8500 to the right or left of an existing SL8500. As a result:
• When a a new SL8500 is added on the left, the new LSMs have higher numbers, and existing LSMs are not re-numbered. The disruption is minimal.
• When a new SL8500 is added on the right, all existing LSMs are re-numbered. This causes the home cell addresses of all existing cartridges to change.
Before You Install SL8500 PTP Connections
1. Apply all relevant maintenance to ACSLS before installing SL8500 connections.
2. Enable absent cartridge support.
When absent cartridge support is enabled, ACSLS will not delete cartridges in an LSM that is deleted or when audit does not find them in their old address. These cartridges are marked absent, preserving all information about them, except for the scratch status. When these cartridges are later found by audit, they are reactivated.
• Absent cartridge support is enabled when the “Variable: ABSENT_VOLUME_RETENTION_PERIOD” on page 64 is not zero. The default value is 5 days.
• Use acsss_config (option 3). For procedures, refer to the “Variable: ABSENT_VOLUME_RETENTION_PERIOD” on page 64 under Option 3 - Set General Product Behavior Variables.
3. Update your configuration by one of the following methods.
• With ACSLS up:
config acs acs_id
• Shutting ACSLS down:
a. Bring down ACSLS: acsss disable
a. Update the ACSLS configuration: acsss_config
a. Bring up ACSLS: acsss enable
ACSLS cannot be running when you run acsss_config.
FIGURE C-15 Four connected SL8500 Libraries

Expanding the SL8500
December 2012 ACSLS Support of the SL8500 363
For more information, refer to “Configuring or Updating your Library Hardware” on page 69 or under the “Dynamic Configuration (config) utilities” on page 158.
Adding New SL8500s
When additional SL8500s are added to an existing SL8500 library complex, the new ACSLS configuration must be updated. If the addition of new SL8500s causes the LSMs in the existing SL8500s to be renumbered, the cartridge addresses in those LSMs must be updated.
The cartridge addresses should be updated without losing the other information associated with the cartridges. This includes cartridge information, such as scratch status, pool, locks, and ownership, as well as cleaning cartridge usage counts, and the date and time cartridges were entered.
LSMs in connected SL8500s are numbered from top to bottom and right to left (as viewed from the CAP end).
Adding a New SL8500 to the Left
In the case of the non-disruptive addition of a new SL8500 on the left (from the CAP end) of the original SL8500(s), you can use the host software (ACSLS) to dynamically configure the additional drives and libraries. You do not need to re-cycle ACSLS if Dynamic Configuration is installed. Mount requests continue as normal to the existing SL8500s during this phase.
If cartridges were placed in cells in the new SL8500, an ACSLS audit must be run on the LSMs of the new SL8500 to add these cartridges to the ACSLS database.
The LSMs in the pre-existing SL8500s can be online during the audit.
Dynamically Configuring the New ACSLS Configuration
1. Add new SL8500(s) to the library complex.
2. Backup ACSLS before you make the configuration change.
3. Update the ACSLS configuration dynamically:
config acs acs_id
You can also update the ACSLS configuration when ACSLS is down:
FIGURE C-16 Four connected SL8500 Libraries
Expanding the SL8500
364 ACSLS 8.1 Adminstrator’s Guide December 2012
acsss_config
4. Backup ACSLS after you make the configuration change.
Note – If there are cartridges in the new SL8500, audit the LSMs (rails) in the new SL8500 to add these cartridges to the ACSLS database.
Adding a New SL8500 to the Right
If you wish to add a new SL8500 to the right, the existing LSMs will be renumbered, as shown in the following figures
Considerations When Adding an SL8500 to the Right
When new SL8500s are added to the right, all existing LSMs will be renumbered and cartridge addresses will change. The change to LSM numbers causes all existing cartridge addresses to change. If ACSLS attempts to mount a cartridge whose address changed, the mount will fail because ACSLS cannot find the cartridge.
• Quiesce mount activity until all cartridge addresses have been updated.
• Vary all LSMs in the ACS to diagnostic state to prevent mounts.
• Update the cartridge addresses by auditing the LSMs in the existing and new SL8500s in a specific sequence.
Dynamically Configuring the New ACSLS Configuration
To a update the ACSLS Configuration Dynamically after adding a new SL8500(s):
1. Vary existing LSMs in diagnostic state (vary lsm_id diag).
Caution – These LSMs must remain in diagnostic state until they have been audited. Otherwise these problems will occur:
• Mounts will fail because cartridges cannot be found in their last-known addresses.
• Until the audits update the ACSLS map of the empty cells in the renumbered LSMs:
• Enters of new cartridges will collide with existing cartridges.
• Movements of cartridges to existing (renumbered) LSMs will collide with cartridges already in the cells,
2. Add the new SL8500(s) to the library complex.
3. Backup ACSLS (before making any configuration changes).
4. Update the ACSLS configuration dynamically using:
config acs acs_id
Note – As an alternative, you can update the ACSLS configurations while ACSLS is down. To do this:
a. Bring ACSLS down using the acsss disable command.
a. Change the configuration with acsss_config.

Expanding the SL8500
December 2012 ACSLS Support of the SL8500 365
a. Bring ACSLS back up with acsss enable.
Note – New LSMs are added when in an online state. Vary these LSMs to a diagnostic state until they have been audited.
5. Backup ACSLS (after the configuration change).
6. Audit the library to update cartridge addresses (since they were renumbered).
To do this, use the following the following sequence:
a. First, audit each LSM in the pre-existing SL8500s that were renumbered.
• Audit the pre-existing SL8500s in a careful sequence to avoid losing cartridges.
Audit each LSM (rail) in sequence from the highest numbered LSM to the lowest numbered LSM ID. The audit finds all of the cartridges in their (renumbered) LSM addresses.
• For ACSLS, you must audit each LSM separately, and allow the audit of one LSM to finish before auditing the next LSM.
Audit checks the cartridges’ former home cell addresses (in the LSM to the right), and then update the cartridges’ addresses. The audits for the LSMs in the left most SL8500 will take a long time. The audits in all of the other SL8500s will be faster.
The reason the audits of the left most LSMs take longer is that they will trigger a cascade of Cartridge Recovery requests. When audit finds a cartridge that has a different home cell address, audit checks the cell address recorded in the database. If that cell has a different cartridge, Cartridge Recovery investigates that cartridge, etc. Because all of the LSM addresses have changed, these recoveries will cascade across the SL8500 library complex.
• Keep the LSMs in diagnostic state until they have been audited. After they have been audited, you can vary them online. Audit has updated the addresses of cartridges in this LSM, so you can resume automated mount activity with the audited LSM’s cartridges.
a. Last, audit the LSMs in the newly added SL8500 (that have the lowest LSM IDs).
After these LSMs have been audited, they can be varied online and cartridges in them can be mounted on tape drives, as shown in the following figures.
SL8500 SL8500 SL8500
LSM 8 LSM 4 LSM 0
LSM 9 LSM 5 LSM 1
LSM 10 LSM 6 LSM 2
LSM 11 LSM 7 LSM 3

Expanding the SL8500
366 ACSLS 8.1 Adminstrator’s Guide December 2012
7. Backup ACSLS after the audits have completed.
Procedures for Merging ACSs
SL8500 PTP supports the merging of multiple, separate SL8500s into a single ACS. To minimize the loss of information about cartridges and operational downtime, you should follow these recommended procedures.
Note – When the ACSLS configuration is updated, global cartridge address changes are not made.
For ACSLS, two scenarios are described below. In the first, the ACSs to be merged are numbered from right to left (as you face them from the CAP side). In the second, they are numbered from left to right. It is assumed that the resulting ACS will use the lower/lowest ACS ID.
Merging ACSs Numbered from Right to Left
In the following scenario, the ACSs to be merged are numbered from right to left (as you face them from the CAP side).
First Four Audits Second FourAudits
Third Four Audits Last Four Audits
Now LSM 12(Audit # 4)
Now LSM 8(Audit # 8)
Now LSM 4(Audit # 12)
New LSM 0(Audit # 16)
Now LSM 13(Audit # 3)
PTP
Now LSM 9(Audit # 7)
PTP
Now LSM 5(Audit # 11)
PTP
New LSM 1(Audit # 15)
Now LSM 14(Audit # 2)
Now LSM 10(Audit # 6)
Now LSM 6(Audit # 10)
New LSM 2(Audit # 14)
Now LSM 15(Audit # 1)
Now LSM 11(Audit # 5)
Now LSM 7(Audit # 9)
New LSM 3(Audit # 13)
TABLE C-3 ACSs that are to be merged
ACS 2 ACS 1 ACS 0
LSM 2,0 LSM 1,0 LSM 0,0
LSM 2,1 LSM 1,1 LSM 0,1
LSM 2,2 LSM 1,2 LSM 0,2
LSM 2,3 LSM 1,3 LSM 0,3

Expanding the SL8500
December 2012 ACSLS Support of the SL8500 367
Procedure for Merging ACSs Numbered from Right to Left
1. Vary all ACSs, except the right most ACS being merged, offline.
This prevents mounts and dismounts while cartridge addresses are being updated.
2. Stop ACSLS: acsss disable
3. Backup ACSLS before making any configuration changes.
4. Update the ACSLS configuration (while ACSLS is down) using acsss_config.
5. Bring up ACSLS: acsss enable
6. Vary the new LSMs (that were added to the ACS) to a diagnostic state.
These LSMs were added in while in online state.
7. Backup ACSLS after the configuration change.
8. Audit the LSMs that were added to the ACS
The order in which they are audited does not matter. The entire ACS or all LSMs can be audited at once.
The cartridges will be re-activated.
9. Backup ACSLS after the audits are complete.
10. Vary the new LSMs online and resume normal automated processing.
Merging ACSs Numbered from Left to Right
In the following scenario the ACSs to be merged are numbered from left to right.
TABLE C-4 Desired configuration: Single ACS
ACS 0
LSM 0,8 PTP LSM 0,4 PTP LSM 0,0
LSM 0,9 LSM 0,5 LSM 0,1
LSM 0,10 LSM 0,6 LSM 0,2
LSM 0,11 LSM 0,7 LSM 0,3
TABLE C-5 Existing Configuration - Three Separate ACSs
ACS 0 ACS 1 ACS 2
LSM 0,0 LSM 1,0 LSM 2,0
LSM 0,1 LSM 1,1 LSM 2,1
LSM 0,2 LSM 1,2 LSM 2,2
LSM 0,3 LSM 1,3 LSM 2,3

Expanding the SL8500
368 ACSLS 8.1 Adminstrator’s Guide December 2012
Procedure for Merging ACSs Numbered from Left to Right
1. Vary all ACSs offline.
This prevents mounts and dismounts while cartridge addresses are being updated.
2. Stop ACSLS: acsss disable.
3. Backup ACSLS before making any configuration changes.
4. Update the ACSLS configuration (while ACSLS is down) using acsss_config.
5. Bring up ACSLS: acsss enable.
6. Vary the new LSMs (that were added to the ACS) to a diagnostic state.
(These LSMs were added in while in online state).
7. Backup ACSLS after the configuration change.
8. Vary the new LSMs that were added to the left to a diagnostic state.
You do not want to perform mounts and dismounts until you have audited these LSMs.
9. Audit the newly configured LSMs.
The order in which they are audited does matter. Audit in this order:
a. First, audit the LSMs in the SL8500(s) that retains the same ACS number first.
• You want audit to find these cartridges in their new LSM addresses before you audit the LSMs that now are assigned to these cartridges’ old addresses.
• The LSM addresses will be updated for all cartridges in these SL8500(s).
• For ACSLS, you must audit each LSM separately, and allow the audit of one LSM to finish before auditing the next LSM.
• Keep the LSMs in diagnostic state until they have been audited.
After they have been audited, you can vary them online. Audit has updated the cartridge’s addresses, so you can resume automated mount activity with the audited LSM’s cartridges.
a. Last, audit the SL8500s that were merged into the lowest ACS. The cartridges in these SL8500s will be re-activated.
• All of these LSMs can be audited at the same time.
TABLE C-6 Desired Configuration - Single ACS
ACS 0
LSM 0,8 PTP LSM 0,4 PTP LSM 0,0
LSM 0,9 LSM 0,5 LSM 0,1
LSM 0,10 LSM 0,6 LSM 0,2
LSM 0,11 LSM 0,7 LSM 0,3

Expanding the SL8500
December 2012 ACSLS Support of the SL8500 369
• The order in which these LSMs are audited does not matter.
10. Backup ACSLS (after the audits are complete)
11. Vary all LSMs online and resume normal automated processing.
Removing PTPs and Splitting ACSs
You may decide to remove the PTP mechanisms that connect two SL8500s and split a single ACS into two separate ACSs. This configuration change is the reverse of merging two ACSs into a single ACS.
It is much easier to add the new ACS with the SL8500(s) on the left hand side of the split. This assigns the higher numbered LSMs to the new ACS and avoids renumbering the LSMs that remain in the existing ACS.

Expanding the SL8500
370 ACSLS 8.1 Adminstrator’s Guide December 2012
Splitting ACSs, with the new ACS Created from SL8500(s) on the Left - Possible Scenarios
ACSLS Procedure for Splitting an ACS
With Dynamic Configuration, ACSLS can add ACSs while it is running. However, Dynamic Configuration does not make global cartridge address changes.
1. Backup ACSLS before the configuration change.
2. Vary the LSMs that will be moved to the new ACS offline.
This prevents mounts and dismounts while cartridge addresses are being updated.
The LSMs that are remaining in the existing ACS can remain online.
Mounts and dismounts in these LSMs can continue.
3. Remove the four PTP mechanisms that connect the SL8500s that you want to separate.
4. Reconfigure the existing ACS once the pass-thru ports have been removed.
This will remove the LSMs that are moving to the new ACS.
config acs acs_id
5. Add the new ACS.
config acs acs_id new
Alternatively, you can update the ACSLS configurations when ACSLS is down:
acsss_config
New LSMs are added in an online state.
6. Vary these LSMs in a diagnostic state until they have been audited.
TABLE C-7 Existing Configuration – One ACS
ACS 0
LSM 0,12 PTP
LSM 0,8 PTP
LSM 0,4 PTP
LSM 0,0
LSM 0,13 LSM 0,9 LSM 0,5 LSM 0,1
LSM 0,14 LSM 0,10 LSM 0,6 LSM 0,2
LSM 0,15 LSM 0,11 LSM 0,7 LSM 0,3
TABLE C-8 Desired Configuration - Two ACSs
ACS 1 ACS 0
LSM 1,4 PTP
LSM 1,0 LSM 0,4 PTP
LSM 0,0
LSM 1,5 LSM 1,1 LSM 0,5 LSM 0,1
LSM 1,6 LSM 1,2 LSM 0,6 LSM 0,2
LSM 1,7 LSM 1,3 LSM 0,7 LSM 0,3
Expanding the SL8500
December 2012 ACSLS Support of the SL8500 371
7. Vary the new ACS to diagnostic state.
8. Backup ACSLS after the configuration change.
9. Audit the LSMs in the new ACS.
You do not want to perform mounts and dismounts until you have audited these LSMs.
The order in which they are audited does not matter. They can all be audited at once.
The cartridges will be re-activated.
10. Backup ACSLS after the audits are complete.
11. Vary the new LSMs online and resume normal automated processing.
LSMs can be varied online as soon as the audit of that LSM completes.
Adding the New ACS on the Right Hand side of the Split
If the new ACS is added on the right hand of the split, all cartridge addresses will be re-mapped.
As this is not recommended, a detailed procedure is not provided.
However, some considerations are:
• When the LSMs in the right hand SL8500(s) are removed from the existing ACS, the cartridges in these LSMs will be marked absent (if absent cartridge retention is active). They will be reactivated when the new ACS is audited.
• The LSMs in pre-existing ACS must be audited one LSM at a time to update the addresses of the cartridges in these LSMs. Audit the highest numbered LSM first, followed by the next lower LSM. The audit of one LSM must finish before the next audit is started.

Expanding the SL8500
372 ACSLS 8.1 Adminstrator’s Guide December 2012

December 2012 ACSLS Support of the SL3000 373
D
ACSLS Support of the SL3000
The SL3000 offers the following benefits:
• Storage capacity from 200 to 4500 storage cells.
• Performance from 1 to 56 tape drives.
• Support of mixed media and a variety of tape drive.
• Ability to partition an SL3000 at the storage cell and drive level.
• An option (with ACSLS 7.3 PUT0801 or later) to install an Access Expansion Module (AEM). This option is discussed under “Using the AEM” on page 378.
Caution – You must audit an SL3000 after it is configured or re-configured to ACSLS. You must also audit an SL3000 after increasing or changing the activated capacity of the library. The library reports the potential cell locations that are not accessible to ACSLS when ACSLS audits it. Inaccessible cell locations include: locations where CAPs, drives, and operator panels are installed; cell locations that the robots cannot access; cell locations that are not activated; and locations that are not in this partition.
ACSLS SupportACSLS provides support for the following SL3000 features:
• New LSM and panel types and panel maps for the SL3000 Library
• Up to eight (8) partitions.
The SL3000 can partition down to the drive and cell level. If cells are reassigned from one partition to a different partition, cartridges in those cells will be orphaned, and they will no longer be accessible by the partition that they were in before. To avoid this, before re-partitioning an SL3000, move cartridges to cells that will remain in your partition.
• New maximum numbers of CAPs (12), drives per panel (32), and cell rows (52) for the SL3000.
• Ability to dedicate a CAP to a partition within the SL3000.

Before Configuring ACSLS for the SL3000
374 ACSLS 8.1 Adminstrator’s Guide December 2012
CAPS are dedicated to a partition using the SL Console. The library reports dedicated CAPs to ACSLS.
CAPs dedicated to a partition managed by ACSLS can be set to automatic mode.
• SL3000 CAP Aliasing
The SL3000 can have up to 12 CAPs, but some backup applications currently only support a maximum of 3 CAPs per LSM. CAP aliasing lets you alias CAPs 3-10 as CAPs 0, 1, or 2.
With PUT0801, you are no longer able to alias CAP 0. CAP 0 is reserved for the Access Expansion Module (AEM) and has special characteristics. Because of this, only CAP numbers 1 and 2 can be used as aliases.
• ACSLS 7.3 with PUT0801 supports AEMs for bulk enters and ejects.
Before Configuring ACSLS for the SL3000Before you configure ACSLS for the SL3000:
• Connect the SL3000 to ACSLS
• Verify that all the components of the SL3000 are operational.
ACSLS builds its library configuration from the information reported by the library. If SL3000 components are not operational, the library information may not be reported to ACSLS, and the ACSLS configuration of the SL3000 could be incomplete.
Connecting the SL3000 to ACSLS
The SL3000 library uses TCP/IP protocol over an Ethernet physical interface to manage and communicate with the host and ACSLS. This interface enables ACSLS to connect to and communicate with the SL3000.
Using TCP/IP connection(s) to the SL3000 provide these advantages:
• ACSLS can send multiple concurrent requests to the library, and the library can process them in parallel. This improves library performance.
• When connected via TCP/IP, the SL3000 supports Dual TCP/IP and Redundant Electronics.
• The TCP/IP Host/Library Interface is a richer interface than the SCSI Media Changer over Fibre Channel. More information is available to ACSLS about library status, errors, etc.
It is preferable to have the SL3000 library on a separate subnet or a controlled network to protect it from floods of ARP broadcasts.
Verifying that all SL3000 Components are Operational
To verify that all the components of the SL3000 are operational, logon to the StorageTek Library Console (SL Console).
Refer to the SL3000 User’s Guide for procedures.

SL3000 Addressing
December 2012 ACSLS Support of the SL3000 375
Configuring SL3000 to ACSLS
Once the SL3000 components are operational, configure SL3000 to ACSLS. You can use either acsss_config (see “Configuring or Updating your Library Hardware” on page 69) or Dynamic Configuration (see “Using the Dynamic Configuration (config) utility” on page 383).
Auditing the SL3000
You must audit an SL3000 after it is configured or re-configured to ACSLS. Auditing informs ACSLS which cells are part of the partition that it is managing in this library, as well as, displaying the cells that are actually present on panel drives or CAPs. To do this:
• First configure or re-configure an SL3000 to ACSLS.
• Audit the ACS.
• Look at the allocated and free cells by entering any of the following:
• free_cells.sh -a
• get_license_info
• display cell * -f status
• Look at the drives using either:
• query drive all
• display drive * -f type serial_num wwn
SL3000 AddressingAn SL3000 can be expanded without changing any of the ACSLS addresses for drives and storage cells. Since ACSLS addresses map the largest possible SL3000 library, you can add modules without changing the addresses of existing cells, drives, and CAPs.
If modules are not installed, the panels on them are simply mapped as “not installed”. If panels are installed, the addresses on these panels become available. In this way, when you install a new module, addresses of the panels on existing modules do not change.
TABLE D-9 SL3000 Addressing
Center Line
Panel Numbers Rear Wall
0 2 4 6 8 10 12 14 16 18 20 22
Module AEM
CEM
CEM
CEM
CEM
DEM
Base
CEM
CEM
CEM
CEM
AEM
<- TallBot Area of Travel ->
Front Wall Panel Numbers
1
3
5
7
9
11
13
15
17
19
21
23
SL3000 Addressing
376 ACSLS 8.1 Adminstrator’s Guide December 2012
The smallest SL3000 configuration is a single Base Drive Module (BDM). In a single BDM configuration panels 12 and 13 are installed and all other potential panel locations are not installed. When you add a Drive Expansion Module (DEM), panels 10 and 11 are also installed. If you add a Cartridge Expansion Module (CEM), to the right of the BDM, panels 14 and 15 are now installed. The addresses of the cells and drives on the BDM never change. This ensures that as you increase your SL3000 capacity, the ACSLS addresses for drives and storage cells do not change.
CAP Numbering
CAPs are numbered as follows:
• CAP 0 is reserved for the AEM on the left
• CAPs 1-5 - in the CEMs on the left and the DEM
• CAP 6 - in the Base (the only required CAP)
• CAPs 7-10 - in the CEMs on the right
• CAP 11 is reserved for the AEM on the right
If CAPs are not present, ACSLS reports them as “not installed”. This keeps CAP locations from changing in SL3000 when new CAPs are added.
CAPs can be dedicated to a partition
SL3000 Modules
There are five types of modules in an SL3000 library:
• Base module, one, required
The Base Module consists of a single frame. This module centralizes the infrastructure for all other modules in the library, which includes the power configurations, robotics (TallBot), electronic modules, cartridge access port, storage cells, tape drives, and operator controls.
One Base Module, and only one, is required for every library installation.
On the front of this module is:
• A single, 26 cartridge-dual magazine-cartridge access port (CAP).
• A service door for library access.
• A front panel with three LEDs: Library Active, Service Required, and Wait.
• An optional feature for a touch screen operator panel or window.
• Drive expansion module (DEM) one, on the left side only
A Drive Expansion Module (DEM) may be attached adjacent to the Base Module on the left side only. This module allows further expansion of tape drives and provides additional data cartridge capacity.
• Cartridge expansion module (CEM) left or right side

SL3000 Addressing
December 2012 ACSLS Support of the SL3000 377
The Cartridge Expansion Module (CEM) provides additional cartridge cell capacity and growth—no tape drives are in this module A maximum of four CEMs are supported on a single library in addition to the Base Module (required) and optional drive expansion module.
• Parking expansion module (PEM) leftmost and the rightmost side modules.
The Parking Expansion Module (PEM) is the same as the cartridge expansion module with six columns of arrays (three on the front wall and three on the rear wall) that are inaccessible to allow the library to park a defective robot. In the left PEM, it is the three leftmost columns (front and back). In the right PEM, it is the three rightmost columns.
Note – An SL3000 with dual robots has either AEMs or PEMs
• Access Expansion Module (AEM)
AEM is discussed under “Using the AEM” on page 378.
New Panel Types
Instead of having specific panel definitions in the SL3000 that define each possible cell location, there are generic panel definitions.
The three generic panel types map to a variety of specific panel maps. They are:
• A single SL3000 cell panel type.
To find out which cells are present in this library, as well as which are part of the activated capacity and are assigned to this partition, you must audit the library.
• A drive panel type.
ACSLS identifies which drives are present by configuring the library. Before you do this, you must make sure all drives are powered-on and ready before configuring the library.
• Not installed
This is a placeholder for the front and rear panels on modules that are not yet installed.
Understanding Internal SL3000 Addressing
There are differences in the internal addresses of the SL3000 and other libraries supported by ACSLS and HSC.
• The SL3000 is one’s-based (1) and uses negative numbers.
• Other libraries use a zero-based (0) with no negative numbers.
• The SL3000 uses five parameters: library, rail, column, side, and row.
• Other libraries use: ACS, LSM, panel, row, and column (HLI–PRC).
The modules of the library consists of walls, columns, and rows that house cartridges, tape drives, cartridge access ports, and robotic units.
You can use the SL Console to translate between the SL3000 internal address and the ACSLS panel, row, and column.

Using the AEM
378 ACSLS 8.1 Adminstrator’s Guide December 2012
Refer to the SL3000 User’s Guide for detailed information and procedures.
Using the AEM The AEM (access expansion module) is essentially a very large CAP that has all the characteristics of a CAP, such as online/offline states and the ability to be shared by partitions.
The AEM lets you to perform bulk loads or unloads of up to 234 cartridges at a time to or from the library the library. It also allows for the non-disruptive maintenance of a library TallBot.
AEMs share many of the features and functions as rotational CAPs, but they also have some unique characteristics. They are:
• Access Door
• Safety Door
• CAP Operations
• Non-Disruptive Maintenance
For detailed information on the AEM, refer to the StorageTek SL3000 Modular Library System User’s Guide, part number 316194401.
Access Door
The AEM access door is the external door you open to bulk load or unload cartridges to or from the library.
Safety Door
The safety door is the internal “garage door”, which lowers to separate the AEM from the rest of the library. This door allows for safe access to the inside of the AEM, either for the library operator to load or unload cartridges, or for a Storage CSE to perform service on the Tallbot or other AEM components.
CAP Operations
The advantages of the AEM is that it allows you to perform:
• Bulk enters
• Bulk ejects
• Non-disruptive robot maintenance
Caution – When performing a bulk eject using the AEM, ensure all CAP magazines are present. The eject fails if there are missing CAP magazines at locations where ACSLS is attempting to eject cartridges.

Using the AEM
December 2012 ACSLS Support of the SL3000 379
Note – The AEM should NOT to be used for entering or ejecting small numbers of cartridges. It should only be used for bulk enters and ejects. Using the AEM for small enters and eject is much slower since the service safety door must be lowered when the AEM is accessed to enter or remove volumes and raised when access to the AEM is completed. For smaller numbers, use CAPs 1-10. See “CAP Numbering” on page 376. Since the AEM should not be used for small enters and ejects, the maximum CAP priority is 1. This aids in preventing the AEM from being selected when the CAP ID is wild-carded with an asterisk on an audit, enter, or eject.
Bulk Enters
Bulk enters lets you enter up to 234 cartridges at a single time.
To do this, start a normal enter specifying the AEM cap_id. This can either be a manual enter or you can set the AEM to automatic enter mode.
Note – In a partitioned library, you can only set a CAP to automatic enter mode if the CAP is dedicated to your partition. Dedicating an AEM to only your partition makes in unavailable to other partitions. Consider other SL3000 users before doing this.
Bulk ejects
You can eject up to 42 cartridges at a time when you use the vol_id command. When specifying volume ranges using the cmd_proc or the ACSAPI xeject command, you can eject up to 42 volume ranges in a single eject. By specifying volume ranges you can eject many cartridges at a time
Non-Disruptive Maintenance
The AEM allows the CSE access and service a library TallBot, through the use of an safety door (or “garage” door), without having to take the library offline. If the TallBot is defective, it parks itself in the AEM while the library remains online. If redundant TallBots are installed, the library can continue normal operations through the remaining functional TallBot.
The CSE uses a special key to unlock the Service Access lock on the safety door. This causes the AEM safety door to lower, sectioning off the AEM from the rest of the library. Once the safety door is fully down, the CSE opens the AEM safety door and safely performs maintenance on the defective TallBot or other AEM components, while the library remains online. The AEM itself is taken offline during the maintenance period, causing cartridge load/unload functions to be suspended.
When maintenance is complete the CSE: closes the safety door; the safety door raises; the TallBot is re-initialized and performs an audit to the AEM CAP cartridge slots; and the AEM is brought back online.

Aliasing SL3000 CAP IDs
380 ACSLS 8.1 Adminstrator’s Guide December 2012
Aliasing SL3000 CAP IDsThe SL3000 has 12 CAPs, but some backup applications currently only support a maximum of 3 CAPs per LSM. CAP aliasing lets you alias CAPs 3-10 as CAPs 1 or 2.
Cap 0 is reserved for the Access Expansion Module (AEM) bulk load CAP. Since CAP 0 in an SL3000 has special attributes, it cannot be an alias CAP ID.
Map the Library CAP IDs to alias CAP IDs by using the following template.
$ACS_HOME/data/external/SL3000/SL3000_CAP_Aliases.SAMPLE
Note – When Setting CAP IDs: For Library CAP IDs: - LSM must be zero (0) - ID must be 3-10 - There can be no duplicate library CAP IDs For Alias CAP IDs - CAP number must be 1 or 2 - There can be no duplicate alias CAP IDs
# SL3000 CAP Aliases (SL3000_CAP_Aliases)
#
# This file maps real library SL3000 CAP IDs to CAP ID aliases.
# It is used when ACSAPI clients do not support SL3000
# CAP numbers greater than 2.
# (The SL3000 can have 12 CAPs, with a maximum CAP number of 11.)
#
# Alias a SL3000 CAP to an alias CAP number by providing the full
# SL3000 CAP ID and the aliased CAP number on the same line.
# For example:
# SL3000 CAP ID Alias CAP Number
# 0,0,6 1
#
# Rules for SL3000 CAP IDs:
# The LSM must be zero.
# The CAP ID must be between 3 and 10
# No duplicate SL3000 CAP IDs.
#
# Rules for Alias CAP numbers:
# The CAP number must be 1 or 2.
# No duplicate alias CAP numbers.

Moving Cartridges Before Removing Cells from a Partition
December 2012 ACSLS Support of the SL3000 381
This figure shows an example of a modified SL3000_CAP_Aliases file. The comment (#) character has been removed from the lines shown in bold to specify that alias CAP number assignments are enabled. In this example, the:
• physical CAP ID 0,0,4 is aliased to CAP number 1.
• physical CAP ID 0,0,6 is aliased CAP number 2.
Moving Cartridges Before Removing Cells from a Partition
The SL3000 can partition down to the drive and cell level. For more information refer to “Moving Cartridges Before Removing Cells from a Partition” on page 179.
SL3000 CAP BehaviorThe SL3000 supports up to 12 Cartridge Access Ports (CAPs). There can be a CAP on each SL3000 panel.
# # Using the CAP Aliases file:
# (1) A # in the first column comments out a line.
# The above CAP alias example is commented out.
# (2) Only specify CAP numbers as an alias when there
# is no actual CAP at that location. For example,
# use CAP 2 as an alias when there is no CAP 2
# installed in the SL3000 library.
# (3) Only CAP numbers 1 and 2 can be used as aliases.
# NOTE: CAP number 0 (zero) is reserved for the
# Access Expansion Module (AEM) and thus cannot
# be specified as an alias.
# (4) After updating the CAP Aliases file, you must:
# a) Shutdown ACSLS.
# b) Reconfigure ACSLS (using acsss_config) to update
# the CAPs defined in the ACSLS database.
# c) Restart ACSLS.
# Save the CAP alias file as:
# $ACS_HOME/data/external/SL3000/SL3000_CAP_Aliases
# by copying and modifying the template:
# $ACS_HOME/data/external/SL3000/SL3000_CAP_Aliases.SAMPLE
#
# SL3000 CAP ID Alias CAP Number
0,0,6 1
0,0,4 2
Finding Missing SL3000 Cartridges
382 ACSLS 8.1 Adminstrator’s Guide December 2012
For CAP behavior in a partitioned library, refer to “CAP Behavior” on page 411.
Caution – All ACSs must have at least one CAP. This can be dedicated or is shared. Because all of the CAPs in an SL3000 can be dedicated to other partitions, this is a crucial restriction when configuring SL3000 partitions.
Finding Missing SL3000 CartridgesIf a cartridge is out of place or unaccounted for by ACSLS:
1. Perform a physical audit of the SL3000 using the SL Console.
The physical audit of the SL3000 is performed as a background task in between handling mount and other library operation requests.
Caution – If the SL3000 contents are out of sync with ACSLS due to manual operations such as loading cartridges directly, it is not advisable to attempt continued operations.
2. Run an ACSLS audit to update the ACSLS database to match the actual inventory of library cartridges.
Varying the SL3000 Offline You should vary SL3000 components offline to ACSLS before they are powered off, if they are inoperative, and before you open an SL3000 access door. This notifies ACSLS that they are unavailable. Once they are available, vary them back online.
Use ACSLS to vary SL3000 components offline, not SL Console
You should vary SL3000 components (ACSs, LSMs, and CAPs) offline to ACSLS, not the SL Console.
ACSLS allows outstanding requests to complete before taking components offline, unless it is a vary offline force. The SL Console has no knowledge of outstanding requests to ACSLS.
Varying components offline using SL Console may cause requests in progress to fail.
When to vary SL3000 components offline to ACSLS
Before opening the access door
Before opening the SL3000 access door vary the ACS offline.
vary acs acs_id offline
Note – If any CAPs in the SL3000 are in automatic mode, you must:
1. Set them to manual mode before opening the access door.
2. Set them back to automatic mode after you close the access door and the SL3000 comes back online.

Using the Dynamic Configuration (config) utility
December 2012 ACSLS Support of the SL3000 383
If a CAP is inoperative
If a CAP is inoperative, vary it offline:
vary cap cap_id offline
Using the Dynamic Configuration (config) utilityThe dynamic configuration (config) utility allows you to implement configuration changes to ACSLS libraries (and components) while ACSLS remains online and running. These configuration changes are recorded in the acsss_config.log file.
The following dynamic configuration utilities are supported:
• config acs
• config drives
• config lsm
• config ports
Using the config utility provides the following benefits:
• ACSLS can continue running, allowing you to perform mount requests to unaffected library components.
• Allows you to reconfigure specified library components while all other configuration information remains unchanged. For example, when specifying:
• An ACS, the configurations of other ACSs are not affected.
• An LSM, the configurations of other LSMs are not affected.
• A drive panel (the drives on a panel) mounts and dismounts to all existing drives are not affected.
Auditing New Cartridge AddressesAfter an expansion has occurred.
1. Vary the ACS and ports offline.
2. Do one of the following.
• Add or remove a module(s)
• Change capacity
• Re-partition the library
3. Vary the ACS and ports online.
4. Update the configuration in the ACSLS database using one of the following procedures.
• Dynamic:
a. config acs acs_id
or
config lsm lsm_id

ACSLS Dual TCP/IP
384 ACSLS 8.1 Adminstrator’s Guide December 2012
a. Audit the library.
• Static:
a. Bring down ACSLS: acsss disable
a. Update the ACSLS configuration: acsss_config
a. Bring up ACSLS: acsss enable
a. Audit the library
ACSLS Dual TCP/IP Dual TCP/IP connections between the ACSLS server and the library is an option that can be purchased for the SL3000.
SL3000 Requirements
• Please coordinate with both your system administrator and network administrator to understand your current network environment and to identify all necessary IP addresses in advance.
• Please coordinate with your system administrator to either configure your network interface or to validate that it is configured properly.
Refer to “Dual TCP/IP Support” on page 330 for more information on this feature and the StreamLine Modular Library System Dual TCP/IP Feature document.
Note – the procedure for implementing Dual TCP/IP connections is the same for both SL8500 and SL3000 libraries.

December 2012 ACSLS Support of the SL500 385
E
ACSLS Support of the SL500
The SL500 library is a SCSI-attached, single-LSM library. It requires either a fibre channel or a LVD SCSI connection to the ACSLS server for control path operations. This chapter discusses ACSLS support for the SL500 library.
ACSLS ConnectivityThe ACSLS server needs a Host-Bus Adapter (HBA) that is compatible with the interface card in the SL500 library (either LVD SCSI or Fibre). Refer to the ACSLS Product Information Guide for available feature codes and part numbers for library connections.
When you run $ACS_HOME/install/install_scsi_sol.sh, the system is probed for the existence of new hardware: either a JNI card or an LSILogic card. If either of these HBA cards is present on the system, but the corresponding driver is not in place, the routine displays a prompt that asks you for permission to locate the appropriate driver package and install it.
Note – Although the SL500 can be partitioned, ACSLS does not support partitioned SL500s.
ACSLS and SL500 Library Differences
Library Configuration
• ACS, LSM - SL500 library is an ACS with a single LSM (1 ACS and 1 LSM)
• SL500 does not currently support the pass-thru-port
• SL500 has at least 1 base module, and can have up to 4 expansion modules.
• ACSLS considers each SL500 module as a panel.
• SL500 libraries managed by ACSLS reports 6-character volser labels through ACSL interface

ACSLS and SL500 Library Differences
386 ACSLS 8.1 Adminstrator’s Guide December 2012
Identifying Library Locations
Addressing schemes
ACSLS addressing is ACS, LSM, panel, row, column
• SL500 addressing is LSM within the library, module, row, column
• ACSLS addresses are zero-based. They start with panel 0, row 0, and column 0.
• SL500 libraries are one-based. They start with module 1, row 1, and column 1.
• In order to ensure consistency between the SL500 library and ACSLS internal addresses, ACSLS defines placeholders for panel 0, row 0, and column 0.
Panels
• Panel 0 = not installed
• Panel 1 = base module
• Panels 2-5 = expansion modules
Row numbers
• Within each module (panel), rows are numbered 1-12
• Rows are numbered consecutively from the top down
• Numbering is identical between the SL500 and ACSLS
Column numbers
• Numbered from 1 to 11 (maximum)
• The current SL500 configuration is limited to 9 columns
• Columns 1-4 are on the left side from front to back
• Columns 5-8 on are the right side from back to front
• Column 9 is the back wall where the drives are located
• Numbering is identical between the SL500 and ACSLS
Drive addresses
SL500 addressing is - LSM, module, row, column
• Row is equal to the drive number or slot number
• Drive number is 1-2 on the base module and 1-4 on the expansion modules
• Column number is always 9 for drives
ACSLS addressing is ACS, LSM, panel, drive

ACSLS Limitations
December 2012 ACSLS Support of the SL500 387
• Drive number is equal to a row or slot
ACSLS Limitations• Maximum mum number of SL500 libraries = 31
• Maximum number of LSMs = 127
• Maximum number of panels in a SL500 library = 5
• Expansion modules add 1 panel each
• An SL500 with the base module only has just 1 panel
• The “move” command cannot be used
• The SL500 firmware does not support unlabeled cartridges. This means that the “venter” command cannot be used
Configuring SL500 Library SettingsThe SL500 supports new configuration settings that affect ACSLS. They are:
• CAP as storage – CAP cells
• Only allowed in expansion modules
• Base module CAP is always used as a CAP
• Configured on a per-module basis
• Any CAP used as storage cannot be used in enter/eject operations
• Reserved cells are for library use only (diagnostic, cleaning cartridges)
• Only affects base module
• Number (n) can be configured from 0 to 9 (max row in base module)
• The first (n) cells in column 1 will be reserved
• These cells are considered inaccessible to ACSLS
TABLE E-10 Example of drive addressing
ACSLS Drive Identifier SL500 Drive Address
Base module 0, 0, 1, 1 0, 1, 1, 9
0, 0, 1, 2 0, 1, 2, 9
Drive expansion module 0, 0, 2, 1 0, 2, 1, 9
0, 0, 2, 2 0, 2, 2, 9
0, 0, 2, 3 0, 2, 3, 9
0, 0, 2, 4 0, 2, 4, 9
Next expansion module 0, 0, 3, 1 0, 3, 1, 9
etc. etc.

SL500 CAP Behavior
388 ACSLS 8.1 Adminstrator’s Guide December 2012
SL500 CAP BehaviorThe CAP in the base module has one five-slot magazine. When a drive expansion module is added, the CAP in the drive expansion module has two five-slot magazines. In the case of expansion modules, the CAP can be configured for 10 additional storage slots per expansion module. In addition:
• CAP cells, other than those on a base module, can either be configured as CAP cells or as storage cells.
• The base module CAP is always used as a CAP.
• The SL500 must have one active CAP for entering and ejecting cartridges.
• If there are multiple CAPs, the SL500 library always reports to ACSLS that it has one CAP.
• The doors to all of the CAP sections lock and unlock as one unless the CAP has been configured as a storage cell.
If a module has been configured to use CAP cells as storage cells, the CAP section is not affected by library operations that access the CAP.
• When ACSLS audits the CAP, it examines all cells.
Auditing the LibraryYou must always perform an audit if:
• This is a new library
• One or more modules have been added, removed, or swapped.
• Cartridges have been manually added or removed through the door
• After library configuration settings have changed
Note – A self-audit of the library occurs when you:
• Power-on or re-initialize the library
• Open and close the door
After the self-audit is complete you need to update your database using ACSLS.
When this is a new library
A new library must be audited to synchronize the actual contents of the library with the database.
After adding, removing, or swapping modules
After a SL500 module has been added, removed, swapped, or if you are auditing the library for the first time, perform the following steps:
1. Vary the SL500 library offline to ACSLS and power down the library.
2. Perform the library change, such as adding a module.

Auditing the Library
December 2012 ACSLS Support of the SL500 389
3. Power on or re-initialize the SL500 library.
4. Terminate ACSLS (if it is running).
acsss disable
5. Run acsss_config.
6. Start up ACSLS.
acsss enable
7. Perform an audit of the SL500 panel(s) affected.
After manually adding or removing cartridges through the door
If you have manually added or removed cartridges from the LSM through the library door you must synchronize the databases. To do this, perform an audit as described under “audit” on page 206.
If you have entered or ejected cartridges from the LSM through the CAP using the ACSLS cmd_proc, the database is automatically updated.
After changing library configuration settings
If you have changed library configuration settings you should reconfigure ACSLS using acsss_config and then audit the library. You should also reconfigure and audit the library after changing the following library settings:
• Number of reserved cells
• CAPS as storage cells
To do this:
1. Vary the SL500 library offline to ACSLS and power down the library.
2. Perform the library change.
3. Re-initialize the SL500 library.
4. Terminate ACSLS (if it is running).
acsss disable
5. Run acsss_config.
6. Start up ACSLS.
acsss enable
7. Perform an audit of the SL500 panel(s) affected.

Auditing the Library
390 ACSLS 8.1 Adminstrator’s Guide December 2012

December 2012 ACSLS Support of the StorageTek Virtual Tape Library 391
F
ACSLS Support of the StorageTek Virtual Tape Library
ACSLS supports a new LSM type (StorageTek VTL), which identifies generic virtual libraries as implemented in the FalconStor-based VTL product line. A StorageTek VTL library can be configured, managed and operated just like any other single-LSM, SCSI-attached library.
ACSLS represents a StorageTek VTL configuration using the PRC-style identifiers (panel, row, column) to which you are familiar. You use these PRC-style identifiers when issuing ACSLS or ACSAPI requests against a StorageTek VTL library. These include cell identifiers (acs, lsm, panel, row, column), drive identifiers (acs, lsm, panel, transport) and CAP identifiers (acs, lsm, cap).
Supported ConfigurationsThe StorageTek VTL configuration is recorded in the acsss_config.log file when a library is configured to ACSLS. This file is generally used only for diagnostic purposes. Panel descriptions are also displayed during dynamic configuration (using the config utility).
The following table describes the VTL configurations supported by ACSLS.
• Number of storage cells: 1 to 10,000
• Starting element address: 1000
• Number of drives: 1 to 100
• Starting element address: 500
• Number of import/export elements: 1 to 20
• Starting element address: 10
The following describes library components support:
Number of Storage Cells
Starting Element Address
Number of Drives
Starting Element Address
Number of Import/Export
ElementsStarting Element
Address
1-10,000 1000 1-100 500 1-20 10

VTL Behavior
392 ACSLS 8.1 Adminstrator’s Guide December 2012
• Panels
Each supported configuration is presented as a set of panels where:
• Panel 0 - contains a CAP only
• Panel 1-10 - contains storage cells and drives
• Panel 11-50- contains storage cells
• CAPs
A single CAP is supported. It is identified as CAP 0 and can contain up to 20 CAP cells. The CAP is defined on panel 0 of a StorageTek VTL.
• Storage Cells
Storage cells are organized into panels containing 200 cells per panel. The largest configuration contains 50 200-cell storage panels for a total of 10,000 cells.
Storage cells are defined on panels 1-50 of a StorageTek VTL.
• Drives
Drives are organized into panels containing up to 10 drives per panel. The largest drive configuration contains 10 drive panels for a total of 100 drives.
Drives are defined on panels 1-10 of a StorageTek VTL.
• PTPs
Pass-through ports are not supported.
VTL BehaviorThe following behaviors apply specifically to the VTL:
• Enter Operations
Enter operations in ACSLS are not useful for adding tape volumes to a StorageTek VTL library. In order to discover new volumes in a VTL library, an audit should be performed against that library. This includes discovery of volumes that may have been imported from the VTL virtual vault.
Enter operations are not explicitly rejected for StorageTek VTL. If you do initiate an enter operation, it can simply be cancelled.
• Eject Operations
Eject operations in ACSLS are supported. Any ejected volumes are viewed by the VTL product as now residing in the virtual vault, but this is a VTL feature only - ACSLS is not aware of the virtual vault.
• Mount and Dismount Operations
ACSLS mount options (read-only, bypass) and dismount options (force) are accepted but ignored by the StorageTek VTL library. In addition, a normal dismount (without the force option) appears to function as if the force option had been specified.

Configuring the VTL to ACSLS
December 2012 ACSLS Support of the StorageTek Virtual Tape Library 393
Caution – Be careful when performing dismount operations, as they may dismount a virtual tape volume while data path operations are in progress.
• Virtual Tape Drives
After adding or removing virtual drives in a VTL, you can use the config drives utility to re-examine the drive configuration in ACSLS. When removing virtual tape drives from the VTL, you will need to delete the drives, not just un-assign them, using the VTL Console. Assignment or un-assignment of virtual drives affects the data path and does not affect ACSLS.
Configuring the VTL to ACSLSThis section describes the prerequisites and installation procedures when configuring the VTL to ACSLS.
Prerequisites
Before configuring the VTL to ACSLS you must meet the following prerequisites:
• ACSLS has been installed and includes a fibre channel HBA
• VTL system has been installed
• There is fibre channel connectivity between the systems (an ACSLS initiator port must be connected to a VTL target port)
Installation
To configure the VTL to ACSLS, perform the following steps:
1. Create a virtual library (StorageTek-VTL) using the VTL console.
Notes:
• When creating a virtual tape library for use by ACSLS, the tape identifiers for that library should match the traditional 6-character volume label format supported in ACSLS.
• The VTL Console allows you to create a StorageTek VTL library which exceeds the limits that are supported by ACSLS (10,000 slots, 100 drives). But if you try to configure an unsupported configuration to ACSLS, the configuration request will fail.
• When creating a new StorageTek VTL library, the VTL Console gives a warning if you set the slot count higher than 678. This warning limit is based on the L700 capacity, and can be ignored for StorageTek VTL library model.
For procedures, refer to the StorageTek Virtual Tape VTL Plus 2.0 (Update 2) Library Software Configuration Guide.
2. Assign the VTL library to ACSLS.
For procedures, refer to the StorageTek Virtual Tape VTL (Plus 2.0 Update 2) Library Software Configuration Guide.
3. Create a SCSI mchanger device driver.
Configuring the VTL to ACSLS
394 ACSLS 8.1 Adminstrator’s Guide December 2012
ACSLS is able to automatically discover StorageTek VTL libraries and to create the corresponding /dev/mchanger entries. This discovery takes place when running the install_scsi_sol.sh scripts during installation.
You can also refer to “Adding the SCSI mchanger Device Driver” on page 47.
4. Configure VTL to ACSLS.
Once the VTL components are operational, configure VTL to ACSLS. You can use either acsss_config. For more information refer to “Configuring or Updating your Library Hardware” on page 69 or config acs new (see “Adding a new ACS” on page 161.
5. Audit the VTL library.
After configuring a StorageTek VTL library to ACSLS, an audit must be performed in order to discover the virtual tape volumes and to identify any inaccessible cells (a panel may only be partially accessible).
6. Use the display lsm * -f type serial_num command to view the VTL configuration.

December 2012 Logical Library Support 395
G
Logical Library Support
About Logical LibrariesA portion of the ACSLS physical library configuration can be presented to SCSI clients as a logical library that can behave as a target device on the SAN. A logical library, in reality, is a defined parcel of a physical library with specific user-assigned resources including tape drives and volumes. Logical libraries are exposed to client application software by means of a SCSI (fibre-attached) interface.
A fibre channel HBA port typically operates in initiator mode, and can issue SCSI requests to a remote target device such as a disk drive, tape drive, or media changer device. In order to use logical libraries, you must configure one or more fibre ports to operate in target mode instead.
The ACSLS installation script presents you with a menu that shows all potential target ports that ACSLS has discovered on the Solaris system. You can select one or more of those ports for target mode operation. The last option in the menu is "None of these". If you do not use the logical library feature, this is the appropriate choice.
If you have selected any ports for target mode operation, a reboot is required after the installation script is complete. Once the system comes up after the reboot, those ports operate in target mode and can no longer communicate with remote target devices. This may affect how those ports behave when using Solaris 10 utilities such as fcinfo.
Should you wish to restore the HBA back to its default initiator mode, you can run the getHba.sh utility which resides in the ACSSS/install directory. The utility identifies any HBA port that has been converted to target mode, and you can select that device for use as an initiator port. A reboot is required for the change to take effect.
A logical library can be created using any eligible physical library as the backing ACS. The backing ACS identifies the physical library from which the logical library is created. The backing ACS:
• Must be configured to the ACSLS library server, but it need not be online in order to create a logical library.
• Can be an entire physical ACS, or it can be a physical partition of an ACS if the library itself supports physical partitioning.

About Logical Libraries
396 ACSLS 8.1 Adminstrator’s Guide December 2012
To create, manage, or delete logical libraries, you must use the ACSLS Graphical User Interface (GUI). The GUI is automatically included in the ACSLS installation package. An online help is provided with the GUI to guide you in creating, updating, and maintaining your logical libraries.
Benefits
Logical libraries enable you to:
• Report the entire 8-character barcode as the volser
When creating your logical library using the ACSLS GUI, you need to know if the library supports 6-character, 8-character-suffix, 8-character-prefix, or all volume label formats. ACSLS supports reporting the full 8-character barcode as a cartridge’s vol_id, with the media domain and type being reported either after or before the volser.
Note – Volume labels longer than 6 characters are not accessible to ACSAPI clients.
• Partition physical libraries into logical libraries
Logical libraries can be managed and utilized by client applications as if they were separate libraries.
ACSLS provides a flexible partitioning mechanism which is not tied to specific physical storage locations. A logical library is defined in terms of volumes and drives, and ACSLS presents these to the client using logical locations. The logical library is not limited by any physical divisions within an ACS, such as panel or rail boundaries.
Logical libraries also protect clients from potentially disruptive changes. When ACSLS chooses a new physical home cell for a volume, keeping it close to a compatible drive, the client application is not impacted by the change of location. The same is true when a logical library is expanded. Existing logical locations do not change for the client.
• Provide exclusive client access to drives and volumes through fencing
Fencing provides exclusive client access to drives and volumes. Once a drive or volume is assigned to a logical library, it is not accessible to other clients, including ACSAPI. In fact, they are not able to see those drives or volumes at all. However, the ACSLS GUI and cmd_proc are able to see them since these interfaces operate in superuser (root) capacity.
• Manage future capacity needs of a client
• Oversubscription
Oversubscription enables you to configure clients based on future needs by creating one or more logical libraries with a combined capacity that exceeds the installed and activated physical capacity of the backing ACS. This capacity can be used both to restrict the size of the logical library (by setting a limit which is less than the capacity which is actually available) or to enable growth (by setting a limit which is more than what is actually available).
As one logical library claims storage capacity (in the form of volumes), it decreases the available capacity for other logical libraries.

Creating a Logical Library
December 2012 Logical Library Support 397
Note – No logical library, regardless of its configured size can ever have more volumes than the activated capacity of the backing ACS. The same is true of multiple logical libraries that share a backing ACS. Their combined volume count cannot exceed the activated capacity of the backing ACS. The number of allocated and unallocated volumes may be lower than the originally configured size if there is not enough available physical capacity for more volumes.
• Capacity on demand
Capacity on demand enables you to manage the capacity of a logical library. A logical library can be created specifying a larger number of storage cells than is actually installed or activated in it’s backing ACS.
This allows clients the ability to pre-configure library size in advance, even though they can only use what is physically available at any point in time. When additional physical capacity is added or activated, additional volumes can be added to the logical library.
Limitations
Logical libraries:
• Are only accessible to clients using the ACSLS SCSI Media Changer Client Interface. They are not available to clients that use the legacy ACSAPI.
The SCSI Media Changer Client Interface:
• Assigns each logical library to one client for exclusive control of its drives and volumes.
• Provides immediate client support for longer volume labels.
• Allows for a single FC client port to access a given logical library over multiple target ports, if desired.
• ACSLS does not allow direct SCSI client access to the backing physical libraries - only the defined logical libraries are accessible.
• Cannot be accessed using the cmd_proc interface.
The cmd_proc interface does not provide access to logical libraries. But the physical resources which have been allocated to logical libraries do remain fully accessible via cmd_proc (although they are not accessible to ACSAPI clients).
• Cannot span more than one physical ACS (or physical partition).
• Cannot reserve specific storage cells in the physical ACS.
Creating a Logical LibraryBefore you use the ACSLS GUI to create a logical library, a physical library must have been created using the acsss_config or config acs utility. An audit should also be performed before you create the logical library.
When creating a logical library, you:
• Specify a physical ACS
Creating a Logical Library
398 ACSLS 8.1 Adminstrator’s Guide December 2012
• Specify the attributes of the logical library
• Assign one or more physical drives
• Assign one or more physical volumes
• Specify client access to the logical library
Specifying a Physical ACS
When you specify the backing ACS for a logical library, you automatically limit the drives and volumes that can be assigned to the logical library in subsequent steps. Only those drives and volumes which are in that ACS, and which are not already assigned to another logical library, are available.
A logical ACS number is assigned by ACSLS when the logical library is created. The ACS number range for a logical library is n001-n999 where n = (1 + the backing physical ACS ID).
For example:
• a logical library backed by physical ACS 0 might be 1001
• a logical library backed by ACS 4 might be 5001
Specifying the Attributes of the Logical Library
The following attributes can be specified for a logical library:
• Unique name for the logical library
• Capacity
This is the maximum number of volumes that can be assigned. The minimum is 0 and the maximum is 64,536. There is no default. The capacity size can be used both to restrict the size of the logical library (by setting a limit which is less than the capacity actually available) or to enable growth (by setting a limit which is more than what is actually available). Exceptions are:
• As one logical library claims storage capacity (in the form of volumes), it decreases the available capacity for other logical libraries.
• No logical library, regardless of its configured size, can ever have more volumes than the activated capacity of the backing ACS. The same is true of multiple logical libraries that share a backing ACS. Their combined volume count cannot exceed the activated capacity of the backing ACS.
• The number of allocated and unallocated volumes may be lower than the configured library size if there is not enough available physical capacity for more volumes.
• Number of import/export cells
The minimum is 2 and the maximum is 400. The default value is 2.
• Number of drive slots
This is the maximum number of drives that can be assigned. The minimum is 0 and the maximum 500. There is no default.

Creating a Logical Library
December 2012 Logical Library Support 399
• Label format
Today, support for longer volume labels in physical libraries relies on library firmware and configuration.
However, logical libraries can report the entire barcode (the 6 volser characters with the media domain and type suffixed). This provides an 8-character volser: xxxxxxL4. The logical library is configurable so the media domain and type can either be appended to the volser or they can prefix the volser (e.g. L4xxxxxx).
The label formats supported are: 6-character, 8-character-suffix (the default), and 8-character-prefix.
Assigning One or More Physical Drives
Any physical drive which is installed and configured in the backing ACS can be added to a logical library. There are no restrictions on drive type for a logical library.
Physical drives that are allocated to logical libraries:
• become inaccessible to ACSAPI clients.
The physical libraries, along with any drives and volumes that are NOT allocated to logical libraries, remain accessible to ACSAPI clients.
• are allocated exclusively.
They cannot be shared across logical libraries.
You cannot assign more physical drives to a logical library than the number of drive slots that were specified when creating the logical library. However, it is possible to assign fewer drives since a logical library can have empty drive slots.
Note – Locked drives cannot be assigned to a logical library. (A locked drive is already being used by some ACSAPI client.)
You can increase or decrease the number of drive slots at any time. But if you want to lower the number of slots to a value below the number of currently-assigned physical drives, you first have to unassign some of the drives.
Assigning One or More Physical Volumes
When creating a logical library, you must specify the maximum number of storage slots (cells) which can be added to the library. Storage slots are neither pre-allocated nor assigned to a logical library. Slots only “belong” to a logical library when they contain a library cartridge.
A logical library contains specific volumes rather than specific slots (cells). Cartridges which are physically present in the backing ACS, and which have not already been assigned to any logical library, can be added to a logical library. This assignment is exclusive since a cartridge cannot be shared among logical library instances.
Exceptions:
• cleaning cartridges cannot be assigned to a logical library. (There is no purpose in assigning cleaning cartridges, since drive cleaning is automatically managed by ACSLS and by the libraries themselves.)
Creating a Logical Library
400 ACSLS 8.1 Adminstrator’s Guide December 2012
• locked volumes cannot be assigned to a logical library. (A locked volume is already being used by some ACSAPI client.)
• owned volumes cannot be assigned to a logical library. (Owned volumes are already assigned to some ACSAPI client.)
Adding a cartridge to a logical library consumes one cell (slot) from the available number of storage cells. Once the number of cartridges added to a logical library has reached the maximum capacity which was specified when creating the logical library, no more cartridges can be added.
You can increase or decrease the number of storage slots at any time. But if you want to lower the number of slots to a value below the number of currently-assigned physical volumes, you first have to unassign some of the volumes.
You can view the total number of assigned volumes for a logical library as two separate counts from the GUI Logical Library Detail Information page. The assigned volumes are displayed as:
• Number of Volumes - This represents volumes that are assigned, are in the library, and are generally available for client use.
• Number of Volumes Outside Library - This represents volumes that are assigned, but are not available for client use because they have been ejected – either physically ejected, or marked for eject by the FC client.
Removing a cartridge from a logical library returns one cell to the available number of cells in the logical library. A cartridge can be removed from a logical library as long as the cartridge is not in use (e.g., it cannot be mounted in a logical drive, it cannot be selected for an eject operation, etc.).
Removing a cartridge from a logical library does not imply any type of deletion or eject operation with regard to the backing ACS being managed by ACSLS. It simply makes the cartridge unavailable for operations that are issued against the logical library.
Specifying Client Connections
The ACSLS SCSI Media Changer Interface makes logical libraries available for client use over a Fibre Channel (FC) connection. To allow FC clients to access the logical libraries, you'll need at least one FC port which is configured to operate in target mode.
If you configured a target port while running install.sh during the ACSLS installation process, continue to create the logical library. If you have not yet configured a target port, use getHba.sh to configure the target port. Then shutdown ACSLS and reboot the ACSLS server. For more information, see “How to Configure an FC Port in Target Mode” on page 403
Once you have configured a target port, the GUI makes it easy to manage client connections when you are creating or updating a logical library. The GUI screens provide a list of the target ports that are available on the ACSLS system, and also provide a list of any clients that have inquired about those ports over a FC connection. ACSLS automatically detects those inquiries and remembers the WWN of each client.
To assign a logical library to a client, check the appropriate boxes in the GUI.

Deleting a Logical Library
December 2012 Logical Library Support 401
A given logical library can only be assigned to one FC client at a time (more specifically, to one FC initiator at a time). But the logical library can be presented to that client on more than one target port if desired. This is important in an HA configuration, since after a failover the client can access the logical library on a different connection.
By default, ACSLS names the client systems that it detects simply by using their WWN as the name. The GUI does provide a screen in which you can provide a more friendly name to identify the client system.
Fast Load
The ACSLS Fast Load setting controls how completion of the move command is reported when the destination element is a tape drive.
With Fast Load enabled, a success status is returned once the operation has been validated and accepted by ACSLS, but before cartridge movement begins. If some error should occur during movement, ACSLS does not report that information. The client is responsible for identifying when the volume has been loaded and is usable, and for timing out the request in the case of any error.
With Fast Load disabled (the default setting), success status is not returned until the physical library has reported that the movement is complete. However, if an error should occur during movement, ACSLS reports that information to the client.
Please note that physical libraries may provide their own Fast Load option, which can affect the time required before ACSLS would return a success status (but only when ACSLS Fast Load is disabled). When ACSLS Fast Load is enabled, the library setting would have no effect on client notification.
Deleting a Logical LibraryA logical library can be removed from the ACSLS configuration when it is no longer needed. Removing a logical library also removes all logical drives, volume assignments, and client mappings. The number assigned to this logical library can now be used when a new logical library is created.
Note – ACSLS allows gaps in logical library numbering.
Before you remove a logical library:
• the logical library should be offline
• all logical drives should be offline
This ensures that no client operations are in progress when deleting the library. If a logical drive or volume is found to be in use, the logical library will not be deleted.
TroubleshootingThis section describes some possible problem scenarios and offers ideas on how to diagnose and resolve the problems.

Troubleshooting
402 ACSLS 8.1 Adminstrator’s Guide December 2012
What if a client cannot see the logical library that I've assigned?
1. Make sure that ACSLS is running by running acsss status.
This utility shows if ACSLS is in general enabled.
For FC problems, look at the smce service. This service provides the SCSI Media Changer interface to logical libraries.
2. If ACSLS is running, check to make sure your client connections have been defined correctly.
• You may have assigned a target-initiator pair which are not really connected over FC
• You may have assigned the logical library to the wrong client (the wrong target-initiator pair)
• The getHba.sh utility can be useful in identifying which initiators (clients) are detected, and which ones are connected to specific target ports.
What if a client is connected correctly, but still doesn't see the logical library?
You may need to force the client to re-discover target devices. The actual mechanism depends on the operating system of the client system. The client OS must be able to see the device before any client application is able to use it.
For example, on a Solaris client, the cfgadm and devfsadm commands can be used to update the device file system and configuration.
What if a client has trouble configuring to a logical library?
A client backup application may not recognize the ACSLS logical libraries as a supported library type. Logical libraries return a unique inquiry string which may require an update from the software vendor. An application-specific mapping file may also be required in order to configure the library and its tape drives correctly.
Sometimes client software expects that a tape library always appears as LUN 0 on a SCSI target. Normally, the first logical library on a target port for a client would in fact be presented as LUN 0. However, if multiple libraries are assigned to a client on a given target port, they cannot count on always seeing a library as LUN 0. This is a client issue.

Troubleshooting
December 2012 Logical Library Support 403
How to Fix an Incorrect “in-transit” Volume Status?
The fixVol.sh utility corrects the status of a volume that has been incorrectly marked as “in-transit” which makes the volume unable for use.
This utility checks for an in-transit status of the logical volume and, if the physical volume is not in-transit, updates the logical volume to an available status.
This utility is run by user acsss from a Unix shell with the command:
fixVol.sh vol_id
How to Configure an FC Port in Target Mode
During installation you are asked to select an HBA to be used as a target port. This operation applies only if you intend to present one or more logical libraries to SCSI (fc) client applications.
After installation, use the getHba.sh utility to configure a Fibre Channel port in target mode The getHBA.sh utility can be run any time a new HBA has been added to the system or any time the HBA ports are re-arranged. This utility identifies an appropriate HBA port to change from initiator to target mode in order to reveal a client access point to ACSLS logical libraries.
If you intend to configure one or more logical libraries for SCSI direct attach clients, then select the HBA that should be converted from initiator mode to target mode. Ideally, the HBA that you select is connected to the fabric and have visibility to the remote HBA intended as the SCSI client initiator.
Once the target-mode change has been set for the given HBA, a reboot is necessary in order to complete the HBA conversion.
To configure a Fibre Channel port in target mode:
1. Login as root
2. Go to the $ACS_HOME/install directory or include it in your path.
3. Run getHba.sh
Example:

Troubleshooting
404 ACSLS 8.1 Adminstrator’s Guide December 2012
December 2012 Library Partitioning 405
H
Library Partitioning
The SL8500 and SL3000 support partitioning of their libraries.
One ACSLS server can manage multiple partitions in the same library.
• SL8500 partitioning
Only a single stand-alone SL8500 can be partitioned. A library complex of SL8500s that are connected via pass-thru ports cannot be partitioned.
• Legacy SL8500 Partitioning
• Legacy SL8500 partitioning can support up to four physical partitions.
• Legacy SL8500 partitioning is at the rail (LSM) level and a rail includes all licensed tape drives and cartridges on the rail.
• A legacy SL8500 partition can include from one to four rails. The rails in a legacy SL8500 partition must be contiguous. For example, a partition can include rails 2, 3 and 4, but a partition cannot be just rails 2 and 4.
• Enhanced SL8500 Partitioning (available with the SL8500 7.0x firmware)
• Enhanced SL8500 partitioning can support up to eight physical partitions.
• Enhanced SL8500 partitioning is at the drive and cell array level.
For more information on partitioning, refer to the SL8500 Best Practices Guide.
• SL3000 partitioning
• The SL3000 can support up to eight physical partitions.
• The SL3000 can partition down to the drive and cell level.
For more information, refer to the SL3000 User’s Guide.
Aspects Common to both SL8500 and SL3000 Partitioning
Partitioning the SL8500 or SL3000 library provides the following capabilities:
• ACSLS can manage open systems drives and cartridges, and HSC can manage mainframe drives and cartridges sharing the library.
• More than one instance of ACSLS can access the library.

Guidelines for Partitioning
406 ACSLS 8.1 Adminstrator’s Guide December 2012
One instance of ACSLS can manage multiple partitions in the same library.
• Provides protection and isolation of data cartridges in separate partitions.
• A higher level of data organization.
• An increase in user efficiency.
Caution – You must audit a partitioned library after it is configured or re-configured to ACSLS. The library reports the potential cell locations that are not accessible to ACSLS when ACSLS audits it. Inaccessible cell locations include: locations where CAPs, drives, and operator panels are installed; cell locations that the robots cannot access; cell locations that are not activated; and cell locations that are not in this partition.
Caution – If cells are reassigned from one partition to another, the cartridges in those cells will be orphaned, and will no longer be accessible by the partition that they were in before. The host managing the other partition could write over the data on the cartridges.
Note – Although the SL500 can be partitioned, ACSLS does not support partitioned SL500s.
Guidelines for PartitioningThere are several steps that you need to follow when you are partitioning a library. They are:
1. Plan your new configuration.
2. Schedule an outage to partition or re-partition a library.
When a library is re-partitioned, the library drops its communication to all hosts managing all partitions, even if their partitions are not affected by the change.
Note – ACSAPI clients cannot be assigned to a physical partition of a library, just as they cannot be assigned to an ACS
3. Have your service representative license and enable partitioning on the SL8500 or SL3000.
4. Move cartridges from locations where they would not be accessible to locations that will still be in a partition managed by ACSLS.
5. Create your partitions using the SL Console.
Refer to the SL Console help for instructions.
6. Activate partitioning using ACSLS as described in “Partitioning a Library or Changing Partition IDs” on page 407.
7. You must configure ACSLS to a partitioned library using acsss_config by specifying that the library is partitioned and entering the partition number.
Plan Your New Configuration
Plan your new partitioned configuration ahead of time.

Partitioning a Library or Changing Partition IDs
December 2012 Library Partitioning 407
• Organize the cartridges and drives for performance.
• If you will do a lot of enters into and ejects from a partition, an SL8500 partition should include at least one of the bottom three rails. Partitions with few enters and ejects can be on the top rail.
Minimize Disruptions when Partitioning an SL8500 or SL3000
When an SL8500 or SL3000 is partitioned or the partitions in an SL8500 or SL3000 are modified, access to your data is affected. Tape drives and cartridges that were managed by one host server, may be managed by a different host.
Changes in Configuration
Changes in configuration occur when a:
• Library’s configuration has changed
• Library has been re-partitioned and the partition managed by ACSLS has changed (a message is displayed)
• Library capacity has changed and the cells reported as available to ACSLS have changed
• When LSM Configuration or capacity have changed
When the configuration may have changed, you are notified by ACSLS Event Log and Event Notification messages.
Keeping Outages to a Minimum
The following procedures provided below ensure that outages are minimized and that you can continue to access your data. These procedures explain how to:
• Partition an un-partitioned SL8500 or SL3000 into two or more partitions.
• Modify the partitions in an SL8500 or SL3000 that is already partitioned.
• Merge a partitioned SL8500 or SL3000 so it is a single un-partitioned ACS.
Challenges
The biggest challenges arise when: LSMs (SL8500 rails) are removed from a legacy SL8500 partition; or cells and drives are removed from an SL3000 or enhanced SL8500 partition.
Refer to the procedures for “Moving Cartridges Before Removing Cells from a Partition” on page 381 for details.
Partitioning a Library or Changing Partition IDsThese procedures describe how to partition an un-partitioned library or to change partition IDs on an existing partitioned library.
1. Move the cartridges before removing an SL8500 LSM or SL3000 or SL8500 cells from an ACS.

Re-partitioning a Library
408 ACSLS 8.1 Adminstrator’s Guide December 2012
If ACSLS manages one of the partitions in the new library configuration, you must first follow the procedures for “Moving Cartridges Before Removing an LSM from an ACS” on page 178 or “Moving Cartridges Before Removing Cells from a Partition” on page 381 to move the cartridges off of LSMs that will be assigned to another partition.
2. Quiesce the library before re-partitioning it and vary the ACS(s) and port(s) offline.
3. Partition the library using the SL Console.
4. The following then occurs after you press <Apply>. The library:
• Rejects any new requests from ACSLS.
• Drops all host connections.
• Applies partitioning changes.
• Accepts new host connections.
5. Reconfigure ACSLS to activate the partition changes.
Because the library was partitioned for the first time or it was re-partitioned and the partition ID changed, ACSLS cannot reconnect to the library. In order to reconnect, you must:
a. Bring down ACSLS: acsss disable.
b. Run acsss_config to configure the ACS and select Option 8.
Reply y (yes) when asked if the ACS is a partitioned library. After replying y (yes), you must enter the partition’s number. Refer to “Configuring or Updating your Library Hardware” on page 69 for more information.
6. Start ACSLS with the new configuration: acsss enable
7. Vary the port(s) online and ACS(s) to diagnostic mode.
8. Audit the ACS(s).
9. Vary the ACS(s) online.
Re-partitioning a LibraryThese procedures describe how to re-partition an existing partitioned library.
1. Move the cartridges before removing an LSM or cells from an ACS.
If ACSLS manages one of the partitions in the new library configuration, you must first follow the procedures for “Moving Cartridges Before Removing an LSM from an ACS” on page 178 or “Moving Cartridges Before Removing Cells from a Partition” on page 381 to move the cartridges off of LSMs that will be assigned to another partition.
2. Quiesce the library before re-partitioning it and vary the ACS(s) and port(s) offline.
This causes ACSLS to reject new requests from clients while the ACS(s) remain available for dynamic re-configuration (after the re-partition).
3. Re-partition the library using the SL Console.

Changing a Partitioned ACS to an Un-partitioned ACS
December 2012 Library Partitioning 409
The following then occurs after you press Apply. The library:
• Rejects any new requests from ACSLS.
• Drops all host connections.
• Applies partitioning changes.
• Accepts new host connections.
4. Reconfigure ACSLS to activate the partition changes.
Note – There may be no changes to a specific partition. The changes may only affect other partitions. In this case, no ACSLS configuration changes are needed.
Note – Because the library was not partitioned the first time or it was re-partitioned and the partition ID did not change, ACSLS can reconnect to the library.
To do this, select one of the following:
• Run Dynamic Config (config acs acs_id) while ACSLS is running. This updates the ACSLS configuration to match the new library configuration. To do this:
i. Vary the port(s) online.
ii. Update the ACS(s) configuration with config acs acs_id.
• Or, bring down ACSLS and run acsss_config (option 8) to update the partition configuration in ACSLS. To do this:
iii. Bring down ACSLS: acsss disable
iv. Update the configuration using acsss_config.
v. Restart ACSLS: acsss enable.
vi. Vary the port(s) online.
5. Vary the ACS(s) to diagnostic mode.
6. Audit the ACS(s).
7. Vary the ACS(s) online.
Changing a Partitioned ACS to an Un-partitioned ACS1. Optionally, eject cartridges from the partition(s) managed by ACSLS.
If ACSLS will not be managing the non-partitioned library, you may want to eject cartridges from the partition(s) managed by ACSLS. This allows you to enter them into other ACS(s) that ACSLS manages.
You can use the ejecting.sh utility for ejecting multiple cartridges.
2. Quiesce the library before re-partitioning it and vary the ACS(s) and port(s) offline.
3. Re-partition the library using the SL Console.
The following then occurs after you press Apply. The library:

Viewing an ACS Partition ID
410 ACSLS 8.1 Adminstrator’s Guide December 2012
• Rejects any new requests from ACSLS.
• Drops all host connections.
• Applies partitioning changes.
• Accepts new host connections.
4. Reconfigure ACSLS to change the ACS to an un-partitioned library or to remove this ACS (partition) from its configuration.
Because the library was changed from partitioned to un-partitioned, ACSLS cannot reconnect to the library. In order to reconnect, you must:
a. Bring down ACSLS: acsss disable
b. Run acsss_config to configure the ACS.
Reply n (no) when asked if the ACS is a partitioned library. Refer to “Configuring or Updating your Library Hardware” on page 69 for more information.
5. Start ACSLS with the new configuration: acsss enable.
6. Vary the port(s) and ACSs online.
Viewing an ACS Partition IDTo view the partition ID(s) for one or more ACSs use one of the following commands:
• query lmu all for all ACSs
• query lmu acs_id for a single ACS
Output Example:
ACSSA> q lmu 0 2008-02-27 06:08:02 ACS: 0 Mode: Single LMU Active Status: Not Comm Not Partitioned Standby Status: - ACS State Desired State offline online Port Port State Desired State Role CL Port Name 0, 0 offline online - 13 172.27.2.6

CAP Behavior
December 2012 Library Partitioning 411
CAP Behavior
Partitioned Library
Warning – All ACSs must have one CAP that is dedicated or is shared. Because all of the CAPs in an SL3000 can be dedicated to other partitions, this is a crucial restriction when configuring SL3000 partitions.
Dedicating a CAP in a Partitioned Library
With an SL3000 library, a CAP can be dedicated to a partition. When CAPs are dedicated to a partition, ACSLS can set these CAPs to automatic mode.
Sharing CAPs in a Partitioned Library
In an SL8500 library with legacy partitioning, CAPs are always shared among all partitions.
In a partitioned SL3000, or SL8500 with enhanced partitioning, library CAPs can be shared between partitions. The process is as follows:
1. When a host uses a CAP to enter or eject cartridges, it reserves the CAP for its exclusive use.
2. The host must complete the enter or eject and leave the CAP empty and closed.
Should you need to terminate an enter on:
• ACSLS - the cancelled enter command must be issued
• HSC - the drain command must be issued
3. The CAP is now available for use by any partition in the library.
When Another Host Needs the CAP
If a host does not complete the enter or eject, the CAP may still contain cartridges for the affected partition. The CAP is still in a reserved status. This causes problems when other partitions need to use the CAP. To resolve this, the library must identity the host holding the reserve and terminate the enter or eject from that host.
In rare cases, you may not be able to access the host holding the reservation, either because the host crashed and cannot be restarted or you lack physical access or the security authority to issue the commands needed. In these cases, the CAP reservation can be overridden using the SL Console.
Caution – Overriding a CAP reservation using the SL Console should be done only as a last resort.
Assigning CAP Priorities for Shared CAPs
ACSLS can manage multiple partitions in the same library, and these partitions can share the same CAP(s). Audit ejects all cartridges with a duplicate and unreadable vol_id. When you audit multiple partitions (ACSs) at the same time, the audits may
CAP Behavior
412 ACSLS 8.1 Adminstrator’s Guide December 2012
try to use the same shared CAP to eject the cartridges. The first audit reserves the CAP and the other audits are unable to reserve the CAP. The later audits are then unable to eject the cartridges.
To prevent this from happening, set the CAP priorities so different shared CAPs are the highest priority CAP in the different partitions. For example, if partitions 2 and 3 in an SL3000 are sharing CAPs 5 and 6, set CAP 5 as the highest priority CAP in partition 2 and CAP 6 as the highest priority CAP in partition 3.
Reserving the CAP
Consider the following when reserving the CAP:
• When a CAP is in use for an enter or eject operation, all 39 slots (SL8500) and 26 slots (SL3000) are reserved for that operation. The CAP cannot be subdivided.
• For addressing purposes, the CAP needs a location (ACS,LSM,CAP#). The LSM number is associated with the second rail in each library. For example: ACS#,1,0 for CAP A and ACS#,1,1 for CAP B
• Reserving the CAP
The CAP is a common component among partitions. Each host will:
• reserve the CAP to use it for an enter or eject
• release the CAP when the enter or eject is terminated. Another host can then use it.
Terminating a CAP Reservation
1. When ACSLS finds that a CAP is reserved by another partition, it reports the partition ID and host ID holding the reservation.
You then need to contact the host owning the reserved CAP and request them to complete the enter or eject.
Once this is done, the empty CAP is then unreserved and available.
2. If the CAP reservation cannot be released by the host holding it, the SL Console command is used to override the CAP reservation.
a. The SLC command displays a warning to the host informing it that the reservation from the specific partition owner will be removed.
a. The SL Console queries the CAP to find the partition owner/requester/reserver.
a. The SLC displays the partition name (HLI1, HLI2, HLI3, HLI4, or Default) in the warning.
3. The library sends a CAP Overridden Message to the host that held the reservation.
This host should terminate the enter or eject task that was in progress.
4. The library now owns the CAP.
The CAP must be empty and closed before it is available to be used by another host. If the:

Moving Cartridges to a Specific Cell
December 2012 Library Partitioning 413
• CAP has cartridges in it, you must empty the CAP before a partition can use it. Use the SL Console to do this.
• CAP is open, you must empty and close it. Then the library can audit it and ensure that it is empty. Until the CAP is closed, it cannot be made available to any partitions.
• CAP is empty, it will be locked, and it is available to be reserved by any partition.
5. The CAP is now unreserved and is available for use by any partition.
Moving Cartridges to a Specific CellAn SL3000 can partition down to the drive and cell level and an SL8500 with enhanced partitioning can partition to the drive and cell array level. If cells are reassigned from one partition to another, the cartridges in these cells are orphaned, and are no longer accessible by the partition that they were in before. The host managing the other partition could then write over the data on these cartridges.
To prevent cartridges from being orphaned when partition boundaries change, and before you re-partition the library, you meed to move the cartridges to cells that will remain in the partition.
Since SL3000 is a single LSM, the existing ACSLS move command does not work, because the cartridges would just be moved somewhere else in the library, and they might be moved to another cell that will also be removed from the partition. To handle this, the move command provides the ability to move cartridges to a specific cell.
The syntax for moving cartridges to a cell is like moving them to an LSM. However, instead of specifying an LSM ID, you specify a cell ID.
a=acs, l=lsm, p=panel, r=row, and c=column
move AAAAAA a,l,p,r,c (for a cell move) move AAAAAA a,l (for a standard LSM move)
Example for a cell move:
move EDU010 0,1,0,5,1
Note – You can use the display command to display a list of available (empty) cells in a specified panel: display cell a,l,p,*,* -status empty -f status

Moving Cartridges to a Specific Cell
414 ACSLS 8.1 Adminstrator’s Guide December 2012

December 2012 Troubleshooting 415
I
Troubleshooting
This chapter summarizes tools, tips, and techniques for troubleshooting problems in ACSLS. The range of troubleshooting resources includes logs, key observation points, and diagnostic probes.
ACSLS Event LogThe ACSLS event log is the first stop for useful information in the event of problems with your library operation. This log contains information about library events, status changes, and errors. All sub-components within ACSLS will report events to the acsss_event.log by sending messages to a process called the event logger. The standard event log, which is automatically created when ACSLS is installed, is contained in the file $ACS_HOME/log/acsss_event.log and where $ACS_HOME is usually /export/home/ACSSS/.
Logged events include:
• Significant Events
These are normal events that can help you manage the library. For example, events are logged when an audit is initiated or terminated, a device changes state, or a CAP is opened or closed.
• Library Errors
These are events where both fatal and nonfatal hardware and software errors are logged. Examples include: LSM failures; problems with cartridges; database errors; process failures; and library communications failures.
Each message in the event log includes a time stamp, the name of the component reporting the message, and a description of the event. For a complete explanation of each message, consult the ACSLS Messages manual.
A window on the ACSLS console displays a running tail of the event log. You can generate a similar display from any shell window. To do this:
1. As user acsss, run the command
acs_tail $ACS_HOME/log/acsss_event.log

ACSLS Event Log
416 ACSLS 8.1 Adminstrator’s Guide December 2012
2. To view the entire event log, use a text editor, such as vi, that enables you to navigate through the log, search for specific errors, or follow specific sequences of events.
Managing the Event log
ACSLS continues sending messages to the acsss_event.log.
• When this file reaches a threshold size (500KB by default), the file is renamed to event0.log and saved in the log directory. The acsss_event.log then continues as a new file.
• When acsss_event.log again reaches the threshold size, the event0.log is renamed to event1.log and the acsss_event.log is renamed event0.log.
• This process continues for as many log files that are configured for retention.
By default, nine event log files are retained in the log directory. With each subsequent threshold, the oldest file is removed and all remaining files are sequentially renamed.
You can configure the maximum size of the acsss_event.log and the number of log files to retain using acsss_config, Option 2. Refer to “Setting Event Logging Variables” on page 59.
Using greplog to Search Event Logs
The diagnostic tool, greplog, allows you to perform keyword searches through any and all event log files. Used very much like the Unix grep utility, greplog will return the complete log message associated with a given keyword expression. This allows you see the message's date and time stamp, message number and the function text related to every message containing that expression.
Format
greplog [-iv] pattern file_1 file_2 ... file_n
Options
• -i instructs greplog to ignore the case of the search pattern expression.
• -v instructs greplog to filter out all messages containing the expression and to display all of the entries in the log file. The exception are those entries which match the pattern expression.
pattern: the pattern is the search criteria to be used.
file_1 file_2 ... file_n
greplog accepts multiple file parameters and wild card expressions in the file list.
Examples
• To display all occurrences within an event sequence, use the sequence number.
greplog 1392 acsss_event.log
• To search the Event Log for all messages about volume CART89:

ACSLS Event Log
December 2012 Troubleshooting 417
greplog CART89 acsss_event.log
• To search all archived copies of the Event Log for messages about tape mounts:
greplog -i mount event*.log
Additional Logs
The acsss_event.log contains all of the messages pertaining to any aspect of the ACSLS running processes. But there are additional files in the log directory that contain status information about external utilities, such as backup and restore and installation utilities.
• S87ACSLS.log - Contains messages pertaining to the startup of ACSLS at boot time.
• acsss.pid - Stores the process id of the currently running acsss_daemon.
• acsss_config.log - Contains a summary of each library configuration.
• acsss_config_event.log - Contains event messages that were posted by the acsss_config routine.
• bdb_event.log - Contains event messages that were posted by the database backup utility, bdb.acsss.
• cron_event.log - Contains messages that were posted by cron utilities. To see the cron schedule, run the command crontab -l.
• di_trace.log - Contains trace information related to the database interface.
• install.log - Contains event messages posted while running the installation script, install.sh.
• ipc_trace.log - Contains trace information pertaining to ACSLS inter-process communications.
• rdb_event.log - Contains event messages that were posted by the database restore utility, rdb.acsss.
• timed_bkup.sh.log - Contains event messages related to the automatic database backup utility.
Additional trace logs may be found in the log directory depending upon the specific tracing that you have enabled on your system. These include the following:
• acsss_stats.log - Volume statistics tracing is enabled by acsss_config.
• acsss_trace.log - Client-server tracing is enabled at the request of Software Support personnel.
• acslh.log - Host-LMU tracing is enabled at the request of Software Support personnel.
• scsilh.log, mchangerX.log, scsipkt.log - All of these contain traces of SCSI communications to a SCSI-attached library and they are enabled at the request of Software Support.

Key Observation Points
418 ACSLS 8.1 Adminstrator’s Guide December 2012
Trace Log Management
Trace logs that are enabled at the request of Software Support can grow quite rapidly. These logs need to be monitored and managed in order to mitigate problems of a full disk.
The utility monitor.sh is provided to perform automatic log management and archiving services. The syntax is
monitor.sh <name of log>
When this utility is enabled to monitor a specific log, it will allow the log to grow to a size of 1MB (default) and then will compress the log using gzip, placing the compressed logfile with a time stamped name in the ACSSS/log/log_archives subdirectory. This operation will continue as long as tracing stays enabled.
Java Component Logs
A number of logs are maintained by the Java components in ACSLS including ACSLS GUI and Logical Library software components. These logs are found in the $ACS_HOME/log/sslm directory.
WebLogic installation procedures are logged in the weblogic.log. WebLogic and ACSLS GUI operations are logged in the AcslsDomain.log and the AdminServer.log.
An audit trail of user activity in the Web-based GUI is found in the guiAccess.log.
Transactions between Java components and legacy ACSLS components are logged in the surrogate_trace.0.log.
IPC packets between Java client components and the ACSLS server are traced in the acslm_ipc_trace.0.log.
Errors encountered by the ACSLS GUI are logged in the gui_trace.0.log.
Low-level communication between the SMCE and the SCSI (fibre) client are logged in the smce_trace.0.log.
Significant events involving the SMCE and other Java components are found in the slim.event.log.
Key Observation PointsThere are numerous utilities that enable you to verify the status of various aspects of ACSLS.
• psacs - shows a summary of all of the ACSLS running processes. It is the best indication whether ACSLS is running or not. A typical output should display no fewer than twelve different processes, all children of a common parent process.
• acsss status - checks if the acsdb database service is running
• To display your ACSLS release and maintenance level:
• On Solaris:
pkginfo -l STKacsls - shows the version of ACSLS you are running.

Testing Library Connections
December 2012 Troubleshooting 419
Testing Library ConnectionsACSLS provides utilities for verifying a good physical connection to the library. The tool you select is best determined by the context of your activity.
testports
This utility tests the connection to each library that has been configured to StorageTek ACSLS. It is also the easiest to use and is the most comprehensive. The test is un-obtrusive and does not impact normal library operations. Since testports utilizes the StorageTek ACSLS database to determine the library port name and library type, the library must already have been configured to StorageTek ACSLS in order for testports to function.
• For TCP/IP libraries, testports verifies the connection and whether or not the library is online and in use by StorageTek ACSLS.
• For SCSI and serial-attached libraries, the 'acs' and 'port' must be offline in order for testports to open the test connection.
To run this utility, the command syntax is:
testports
The library compat level or microcode level displays.
testlmutcp
This utility submits a TCP/IP packet to a network-attached library.
To test the library connection, you must include the library hostname or ip address in the command line:
testlmutcp <ip_address> or testlmutcp <hostname>
If you wish to test the connection while the library is online to ACSLS, you need to specify an unused socket number between 50002 and 50016. For example:
testlmutcp <ip_address>:50002
A successful response will include the compatibility level of the attached library.
testlmu
This utility can be used to test connectivity between ACSLS and legacy StorageTek serial-attached libraries. To run this utility, you must submit the devlink path to the serial port device node:
testlmu /dev/term/0
The library must be offline to ACSLS in order for testlmu to open the serial connection.

Testing Library Connections
420 ACSLS 8.1 Adminstrator’s Guide December 2012
pinglmu.sh
This utility allows you to verify communication between ACSLS and a serial-attached library while the library is online to ACSLS. A successful response includes the library compatibility level.
probescsi.sh
This utility exercises the connection between the ACSLS server and a SCSI or fibre-attached library. To run this utility, you must specify the devlink path to the mchanger device. The syntax is:
probescsi.sh /dev/mchangerX
where X is the specific mchanger instance of the library being tested.
The library must be offline to ACSLS in order for probescsi to open the SCSI connection. A successful response includes the microcode level of the attached library.
probeFibre.sh
This utility discovers all fibre-attached libraries that are reachable from the ACSLS server. The syntax is:
probeFibre.sh
A successful response displays the model number of each fibre-attached library along with its target and LUN IDs, and the World Wide Port Name (WWPN).
Using the "-v" option, you can also display the model number of the host bus adapter.
probeFibre.sh -v
showDevs.sh
This utility reveals details about every mchanger device that has been configured to ACSLS.
• No argument displays the model, target, LUN, and revision level of each attached mchanger library.
showDevs.sh
• -s option displays the serial number of each library:
showDevs.sh -s
• -q option displays only essential mchanger data, while excluding information about the HBAs.
showDevs.sh -q
• -sq option
Testing a Client Connection
December 2012 Troubleshooting 421
Testing a Client ConnectionClient applications communicate with ACSLS over TCP/IP using the RPC (remote procedure call) protocol. If a client system is unable to communicate with ACSLS, you can use rpcinfo to test whether ACSLS is reachable from the client machine. To do this:
1. From the ACSLS server, verify that ACSLS is running.
psacs
2. From the ACSLS server, verify that the RPC daemon is running.
ps -ef | grep rpc
3. From the ACSLS server, verify that program number 300031 is registered for TCP and IDP.
rpcinfo | grep 300031
This program number confirms that ACSLS is running and that ACSLS has registered with RPC.
4. From the client machine, or any Unix machine on the network, use rpcinfo to exchange a packet with program number 300031 on the ACSLS server.
You must specify the IP address of the ACSLS server along with the program number.
rpcinfo -t <ip address> 300031
If the communication exchange was successful, the rpcinfo utility will display the message:
program 300031 version 1 ready and waiting program 300031 version 2 ready and waiting
This confirms that ACSLS is available for client connections across the network.
Gathering Diagnostic Information for Software Support
As part of the service call, your software support representative may ask you to send the entire set of diagnostic logs and other diagnostic information for analysis. All of this data can be collected with a single command:
get_diags
When this utility has collected all of the information, it prompts you to either email the data or to make it available for manual transfer.
If you elect to email the data directly from the ACSLS machine, make sure that email communication is possible between your ACSLS machine and the Internet. Your enterprise may have a firewall to prevent email going directly from the target machine. In this case, you can email the information to yourself within the enterprise and then forward the diagnostic data to StorageTek.
Alternatively, you can elect to transfer the information manually. The get_diags utility advises you where to find the waiting tar packages for transfer. Typically, the staging area for diagnostic data is /export/backup/diag/acsss.
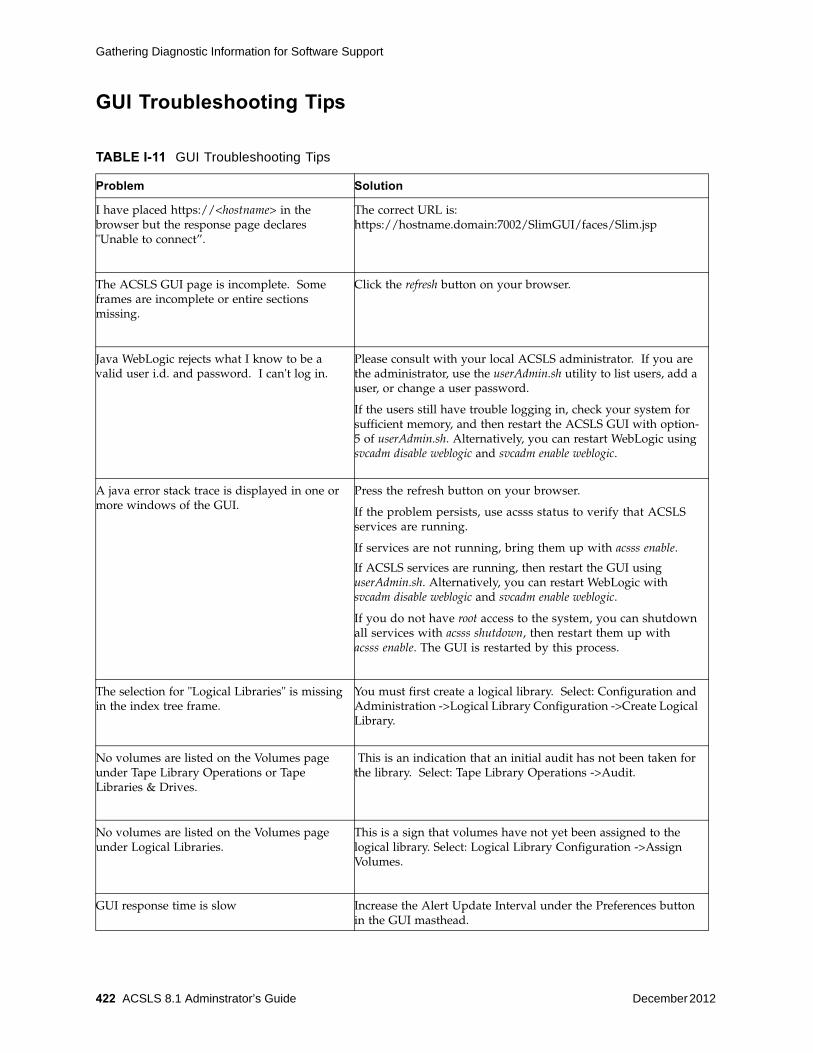
Gathering Diagnostic Information for Software Support
422 ACSLS 8.1 Adminstrator’s Guide December 2012
GUI Troubleshooting Tips
TABLE I-11 GUI Troubleshooting Tips
Problem Solution
I have placed https://<hostname> in the browser but the response page declares "Unable to connect”.
The correct URL is: https://hostname.domain:7002/SlimGUI/faces/Slim.jsp
The ACSLS GUI page is incomplete. Some frames are incomplete or entire sections missing.
Click the refresh button on your browser.
Java WebLogic rejects what I know to be a valid user i.d. and password. I can't log in.
Please consult with your local ACSLS administrator. If you are the administrator, use the userAdmin.sh utility to list users, add a user, or change a user password.
If the users still have trouble logging in, check your system for sufficient memory, and then restart the ACSLS GUI with option-5 of userAdmin.sh. Alternatively, you can restart WebLogic using svcadm disable weblogic and svcadm enable weblogic.
A java error stack trace is displayed in one or more windows of the GUI.
Press the refresh button on your browser.
If the problem persists, use acsss status to verify that ACSLS services are running.
If services are not running, bring them up with acsss enable.
If ACSLS services are running, then restart the GUI using userAdmin.sh. Alternatively, you can restart WebLogic with svcadm disable weblogic and svcadm enable weblogic.
If you do not have root access to the system, you can shutdown all services with acsss shutdown, then restart them up with acsss enable. The GUI is restarted by this process.
The selection for "Logical Libraries" is missing in the index tree frame.
You must first create a logical library. Select: Configuration and Administration ->Logical Library Configuration ->Create Logical Library.
No volumes are listed on the Volumes page under Tape Library Operations or Tape Libraries & Drives.
This is an indication that an initial audit has not been taken for the library. Select: Tape Library Operations ->Audit.
No volumes are listed on the Volumes page under Logical Libraries.
This is a sign that volumes have not yet been assigned to the logical library. Select: Logical Library Configuration ->Assign Volumes.
GUI response time is slow Increase the Alert Update Interval under the Preferences button in the GUI masthead.

Gathering Diagnostic Information for Software Support
December 2012 Troubleshooting 423
I need to add GUI users, change the passwords of GUI users, or set acsls_admin password.
See “userAdmin.sh” on page 190. This utility lets you add users, change user’s passwords, and tells you how to reset the acsls_admin password.
TABLE I-11 GUI Troubleshooting Tips
Problem Solution

Gathering Diagnostic Information for Software Support
424 ACSLS 8.1 Adminstrator’s Guide December 2012

December 2012 Library Performance 425
J
Library Performance
OverviewThis chapter discusses how to maximize your library performance during pass-thru activity between Library Storage Modules (LSMs). ACSLS works to minimize pass-thru activity in several ways. You can enhance performance by using these ACSLS facilities to minimize pass-thru activity. They are:
• Connecting to Multiple SL8500s
• Minimizing pass-thru activity between LSMs
• Floating cartridges during a dismount
• Entering cartridges into a library
• Ejecting cartridges from a library
• Maintaining empty storage cells in a library
• Minimizing pass-thru activity with ACSAPI requests and ACSLS commands
• Using these ACSAPI requests and ACSLS commands
Connecting to Multiple SL8500sIf your ACSLS server is managing a string of SL8500s connected through pass-thru ports, connect to each SL8500 in the string. This lets ACSLS optimize library performance by routing requests to the library that answers the status or initiates the cartridge movement.
Refer to “Multi TCP/IP Support” on page 338 for details on connecting to multiple SL8500s in a string.
Minimizing Pass-thru Activity Between LSMsTo improve tape library performance, it is important to minimize pass-thru activity from one library to another. When cartridges and drives are in connected libraries, it is always desirable if tape mounts occur when both the drive and the cartridge are in the same LSM (library). Mounts that require fewer pass-thus result in better

Floating Cartridges During a Dismount
426 ACSLS 8.1 Adminstrator’s Guide December 2012
performance. For more information, refer to “Minimizing Elevator and PTP Activity” on page 352, “Configuring Tape Drives to Support Your Workloads” on page 352, and “Managing Cartridge Locations” on page 353.
Floating Cartridges During a DismountWhen cartridges are dismounted, ACSLS tries to avoid pass-thru activity among LSMs by assigning a new home cell whenever the cartridge's old home cell is in a different LSM than the drive. This is ACSLS's default behavior. To disable this feature, use the “Extended Store” feature for an LSM. Cartridges being dismounted are “floated” to a new home cell to avoid movement between LSMs.
Entering Cartridges into a LibraryWhen cartridges are entered into a library, each cartridge is assigned a home cell in the closest LSM to the CAP. If the LSM with the CAP has empty cells, home cells are assigned in this LSM. If the LSM with the CAP is full, home cells are assigned in the closest LSM with empty cells.
To optimize performance, enter cartridges into an LSM with tape drives that are compatible with the cartridge(s). For example, enter 9940 cartridges into an LSM with T9940B tape drives, not into an LSM with only T9840B tape drives. Otherwise, the 9940 cartridges must be passed-thru to an LSM with T9940B tape drives.
Ejecting Cartridges from a LibraryWhen cartridges are ejected from a library, the cartridges must be moved to the specified CAP(s).
To optimize performance, eject cartridges to a CAP in the LSM where the cartridges are located. If the cartridges are located in several LSMs, choose a CAP that is close to most of the cartridges.
Maintaining Empty Storage Cells in an LSMACSLS cannot “float” cartridges to an LSM on a dismount if all the storage cells are full. Similarly, when cartridges are entered into a full LSM, the cartridges must be passed-thru to an LSM with empty cells.
To optimize performance, you should identify cartridges that do not need to be kept in the library for StreamLine access and eject those cartridges from the library. You may also want to move cartridges from full LSMs to other LSMs with enough empty cells so that all LSMs have empty storage cells. See “Moving Least-Recently Accessed Cartridges from Active LSMs” on page 125.
Note – Managing the cartridges in a library should be done when the library is not busy with mount requests.

Minimizing Pass-Thru Activity Using ACSAPI Requests and ACSLS Commands
December 2012 Library Performance 427
Minimizing Pass-Thru Activity Using ACSAPI Requests and ACSLS Commands
These ACSAPI requests and ACSLS cmd_proc commands can help you avoid unnecessary pass-thru activity between LSMs.
The following applies to both ACSAPI requests from a client to ACSLS, and to ACSLS commands entered using cmd_proc. The term “request” is used for both ACSAPI requests and cmd_proc commands.
Mounting a Specific Cartridge
This applies to either mounting a data cartridge or a specific scratch (empty) cartridge that you selected. Use these commands:
• query mount
• mount
query mount
• For a specified cartridge (vol_id), return a list of drives that are compatible with the cartridge's media type, ordered by proximity to the cartridge. (The compatible drives in the closest LSM are listed first, etc.)
• With ACSLS 7.3 and later releases, drives that are the same pass-thru distance from the cartridge are in least-recently-used order.
Example: The compatible drive within the cartridge’s LSM with the longest time since a cartridge was dismounted is first; the drive with the next longest time, is second, etc.
Command: query mount vol_id
mount
Mount your specific cartridge selecting an available (not in-use) drive from as close to the top of the list as possible.
Mounting a Scratch Cartridge Selected by ACSLS
query mount scratch (also known as query mount *)
For a specified scratch pool, a list of all drives compatible with the media type(s) of the cartridges in a specified scratch pool is returned. A specific media type can be specified to restrict the drives to only those compatible with the specified media type.
The list of drives returned is ordered so the drives closest to the densest scratch pools are listed first.
Command:
ACSAPI query mount scratch
cmd_proc query mount * pool_id [media media_type]

Using these ACSAPI Requests & ACSLS Commands
428 ACSLS 8.1 Adminstrator’s Guide December 2012
Either a specific media type or ALL_MEDIA_TYPE (media * in a cmd_proc command) can be specified. ANY_MEDIA_TYPE is not supported.
Note – When ALL_MEDIA_TYPE is specified, cartridges with media compatible with the drive are selected to determine the densest scratch pool.
mount scratch (also known as query mount *)
For a specified drive, select a scratch (empty) cartridge and mount it. Optionally, select the cartridge from a specified scratch pool and/or with a specified media type. ACSLS selects a compatible scratch cartridge in the closest LSM to the drive. In order to rotate use among all cartridges, the compatible cartridge with the least recent access date is selected within the selected LSM.
Command:
• For an ACSAPI request, drive_id, pool_id and media_type must be specified. (Either a specific media type, ALL_MEDIA_TYPE, or ANY_MEDIA_TYPE can be specified for media_type.)
• With a cmd_proc mount * command, if pool_id is not specified, it defaults to the common pool (pool 0).
A specific media type can be identified. If media * is specified, ANY_MEDIA_TYPE is chosen. If media is not specified, ALL_MEDIA_TYPE is chosen.
The special media_type values of ANY_MEDIA_TYPE and ALL_MEDIA_TYPE are processed as follows:
• When ALL_MEDIA_TYPE is specified, a cartridge with a media type compatible with the drive is selected. (This is based on the media_compatibility file.)
• When ANY_MEDIA_TYPE is specified, the scratch_preferences file identifies the preferred list of media to mount on a drive.
Using these ACSAPI Requests & ACSLS CommandsThis section describes how to use the ACSAPI requests and commands for improving tape library performance.
In the following discussion the term “request” is used for both ACSAPI requests and cmd_proc commands.
When mounting a specific cartridge (where the vol_id is known):
• Precede the mount request with a query mount request.
• Pick the first “available” drive, and specify this drive in the mount request.
When mounting a scratch cartridge on a specific drive, there are two options:
• To select the closest scratch cartridge to a specific drive:
ACSAPI mount scratch
cmd_proc mount * drive_id [pool_id] [media media_type]

Using these ACSAPI Requests & ACSLS Commands
December 2012 Library Performance 429
Use a mount scratch request specifying a drive and, optionally, a scratch pool.
For ACSAPI requests, specify one of the following:
• ALL_MEDIA_TYPE (compatible media is selected)
• ANY_MEDIA_TYPE (uses the scratch preference list).
For cmd_proc commands, select one of the following:
• Do not specify a media type (compatible media is selected)
• Specify media * (uses the scratch preference list).
• To select a specific drive from a list of drives and then select the closest scratch cartridge:
Pick the drive, then pick the scratch tape: This ensures the drive is close to the scratch cartridge.
a. Enter a query mount scratch request to identify the closest available drive to the most scratch media in the desired scratch pool.
a. Enter a mount scratch request to mount a scratch cartridge on the selected drive. Optionally, specify the scratch pool.
For ACSAPI requests, either specify:
• ALL_MEDIA_TYPE (and compatible media will be selected), or
• ANY_MEDIA_TYPE (to use the scratch preference list).
For cmd_proc commands, either:
• Do not specify a media type (and compatible media will be selected), or
• Specify media * (to use the scratch preference list).

Using these ACSAPI Requests & ACSLS Commands
430 ACSLS 8.1 Adminstrator’s Guide December 2012

December 2012 Firewall Security Option 431
K
Firewall Security Option
The firewall-secure option allows you to run ACSLS behind a firewall while the client software makes requests across that firewall.
Firewall security is also offered to ACSLS clients, which also allows them to operate behind their own respective firewalls. This is made available by StorageTek to its ISVs (Independent Software Vendor partners). Please contact the ISV for your client software component to find out the latest status for each specific client.
Running ACSLS behind a FirewallThis Firewall-secure solution provides the following capabilities:
• Allow ACSLS to run behind a firewall (i.e. ACSLS on the secure side of firewall, client on opposite side)
• Allow ACSLS client(s) to run behind their own firewall(s) (i.e. client(s) on secure side, ACSLS on the opposite side of firewall).
Note – To do this, the ISV must have implemented the supplied changes within their client side software component.
• Preserve compatibility with current ACSLS client implementations, allowing those clients to continue to run with ACSLS in the firewall solution.
• Preserve current ACSAPI/Client functionality and performance. This includes all functionality that is available in a non-firewall environment.
A complete solution would include combining the first two capabilities above. This would allow ACSLS and the ACSLS client(s) to each run behind their own respective firewalls (i.e. two firewalls between ACSLS and the client(s)), and still have the same communications performance as within a non-firewall environment.
Addressing security areasACSLS has addressed the following security concerns as follows:

Benefits of the Firewall-Secure Option
432 ACSLS 8.1 Adminstrator’s Guide December 2012
RPC
The use of RPC within ACSLS is a concern for some sites in trying to run within a firewall environment. Preserving compatibility with the current installed client base precludes the ability to remove RPC completely from the ACSLS.
However, the ACSLS firewall-secure feature has addressed the concerns inherent in RPC, which are:
• The need to allow outside (untrusted) parties to initiate connections to the trusted host across an unrestricted range of ports (1024-65535).
• The exposure of the mapping of available services on a platform via the portmap (or rpcbind) daemon running on well-known port 111.
Security
In a firewall solution, the fundamental security comes from restricting access from the untrusted (non-secure) side into the trusted (secure) side. In all cases, some limited and controlled access must be allowed in order to perform communications and allow data exchange. The goal is to allow that data exchange within a well-defined and restricted set of entry points, allowing you to control those access points and their corresponding communications. This goal is met by this solution.
Note – If you have an IPv4-based edge firewall, it should be configured to drop all outbound IPv4 protocol 41 packets and UDP port 3544 packets to prevent Internet hosts from using any IPv6-over-IPv4 tunnelled traffic to reach internal hosts.
Communications Components
ACSLS/Client communications rely on two network interface components to handle network communications between client platforms and the ACSLS platform. Software which acts as a client or proxy-server for ACSLS implements one of these two components, in order to be compatible with ACSLS platforms and existing clients. The component residing on the client platform is known as the SSI; the component residing on the ACSLS platform is known as the CSI. While it would be desirable to implement all changes within one side (e.g. the ACSLS platform), in order to maintain client compatibility and to provide all the firewall-secure features it is necessary that corresponding changes be made to each side where the benefits are to be realized. The positive side of this is that each side can independently implement the features and realize the firewall-secure benefits on its side (e.g. changes to the ACSLS allow the ACSLS platform to run behind a secured firewall).
Benefits of the Firewall-Secure Option
Server Side
With changes to just the server side component, as provided within this Firewall-secure solution, the benefits are:

Benefits of the Firewall-Secure Option
December 2012 Firewall Security Option 433
• Restricts incoming connections for ACSLS communications to a single TCP port for all registered program numbers (there are two registered program numbers for the ACSLS CSI, both of which will be serviced by one single port).
• Allows users to specify the identity of that port, and configure their firewall in a corresponding fashion.
• Allows users to turn off ACSLS communications to UDP ports.
• Allows users to disable any communication by the ACSLS server to the client-side portmapper(s)* (UDP/TCP port 111). The portmapper must still remain running on client platforms to preserve compatibility with client side code. However, it will not be used for network communications initiated by the server, and therefore the clients' firewall(s) can be configured to disallow access to it.
• Outgoing connections from the ACSLS server side to the client(s) are unrestricted with respect to the server-side ports used to preserve current performance. This follows the widely accepted practice by the security community.
Server Port Restriction
This solution potentially restricts the number of incoming ports to which any outside party can communicate with the server platform (i.e. initiate network connection) to either one or three ports - the single customer-specified port for ACSLS incoming requests, plus possibly the two portmapper ports (TCP & UDP port 111).
Note – To disallow client access to the ACSLS server portmapper, and thus disallow access to UDP and TCP ports 111, the changes must be made to the client software component. See the client side discussion below.
The server side of the solution, above, is implemented completely within this firewall-secure ACSLS solution.
Client Side
An identical set of restrictions can be realized on the client side. This would give the client an identical capability of residing behind its own secure firewall, as described in the server side discussion above. These restrictions allows the user to:
• Restrict incoming connections for communications (response) to the client to a single TCP port for each registered program number. There is one registered program number for the ACSLS SSI.
• Specify the identity of this port, and configure the firewall in a corresponding fashion. Specify the client’s fixed incoming port using the SSI_INET_PORT environmental valiable. Specify a port in the range of 1024-65535, excluding ports 50001 and 50004.
• Turn off client-side communications to UDP ports.
• Disable any communication by the client to the ACSLS server portmapper (UDP/TCP port 111). The portmapper must still remain running on the ACSLS platform to preserve compatibility with ACSLS code. However, it will not be used for network communications initiated by the clients, and the ACSLS server firewall can be configured to disallow access to it.

Firewall-Secure Solution Scenarios
434 ACSLS 8.1 Adminstrator’s Guide December 2012
• Outgoing connections from the client side to the server are unrestricted with respect to the client-side ports used to preserve current performance. This follows widely accepted practices by the security community.
Client Port Restriction
This solution restricts the number of incoming ports to which any outside party can communicate with the client platform (i.e. initiate network connection) to between one and three ports - one specified port for client incoming responses, and possibly the two portmapper ports (TCP & UDP port 111).
Note – To disallow ACSLS server access to the client's portmapper (and thus disallow access to UDP and TCP ports 111), the changes must be made to the ACSLS server software component (see server side discussion above).
This solution has a two-step implementation:
• StorageTek has made the needed code changes to the ACSLS CDK source code (CSC Developer's Toolkit)
• Clients of ACSLS who wish to provide this security for their client platform must integrate these changes into their client-side SSI code, rebuild that product, and again certify their CSC (Client System Component) with StorageTek's ACSLS.
Advantages
Each of the client-side and server-side parts of the solution is independent. This means that if only one of the two sides is behind a firewall with respect to the other side, the solution (software changes) need only be implemented on that side. In addition, that partial solution maintains compatibility with all current client and server implementations which already exist, as well as compatibility with other software components which use the CSI / SSI interface. This includes compatibility with current StorageTek products. This solution does not impact current performance, with respect to client / server communications.
Firewall-Secure Solution ScenariosThe following diagrams show possible scenarios of the operation, port usage, and relationship of the ACSLS components when used across a firewall. They are intended to be understood in conjunction with the text just presented (above). The “SSI” in the following diagrams is the network interface component of ACSLS that runs on the client side of the communications. The CSI is the network interface component of ACSLS that runs on the ACSLS platform.
Example 1
In the following figure, firewall security is implemented on the ACSLS server side (CSI) only.

Firewall-Secure Solution Scenarios
December 2012 Firewall Security Option 435
Note – Dynamic in this example means that the port is selected by the SSI at startup from the range 1024-65535. The port is not designated by the user, nor is it typically the same port across new executions of the SSI (i.e. from one instance of an SSI running process to the next).The portmapper 111 port(s) on the SSI side is only rarely queried by the CSI. It is only accessed by the CSI in the case where the return port number provided by the SSI in its request packet does not function (i.e. results in a network interface failure) for sending the response packets back to the SSI. In this case, as a retry mechanism, the CSI queries the SSI-side portmapper for the port to use, which is registered with the portmapper under the SIE’s program number.
Example 2
In the following figure, firewall security is implemented on the client side (SSI) only
FIGURE K-17 Firewall security on ACSLS server side (CSI) only
S403_006
CLIENT FIREWALL(S) SERVER
SSI
SSI
CSI
CSI
Source Ports: Unrestricted Ports
Destination Ports: 3 Static Ports1 - Dynamic Single Port*2 - TCP 111**3 - UDP 111**
Source Ports: Unrestricted Ports
Destination Ports: 3 Static Ports1 - Designated (Fixed single port set on CSI)2 - TCP 1113 - UDP 111

Firewall-Secure Solution Scenarios
436 ACSLS 8.1 Adminstrator’s Guide December 2012
Dynamic in this example means that the port is selected by the CSI at startup from the range 1024-65535 and the port is not designated by the user, nor is it typically the same port across new executions of the CSI (i.e. from one instance of an CSI running process to the next).The portmapper 111 port(s) on the SSI side is only rarely queried by the CSI. It is only accessed by the CSI in the case where the return port number provided by the SSI in its request packet does not function (i.e. results in a network interface failure) for sending the response packets back to the SSI. In this case, as a retry mechanism, the CSI queries the SSI-side portmapper for the port to use, which is registered with the portmapper under the SSI's program number.
Example 3
In the following figure, both client (SSI with CDK 2.2 and Firewall-secure Supplement) and the ACSLS server (CSI) are implementing Firewall-Secure API’s. The client and server is still relying on the portmapper for port identification).
FIGURE K-18 Firewall Security on Client Server Side (SSI) Only
S403_007
CLIENT FIREWALL(S) SERVER
SSI
SSI
CSI
CSI
Source Ports: Unrestricted Ports Destination Ports: 1 - Dynamic Single Port*2 - TCP 1113 - UDP 111
Source Ports: Unrestricted PortsDestination Ports: 3 Static Ports1 - Designated (Fixed single port set on SSI)2 - TCP 111**3 - UDP 111**
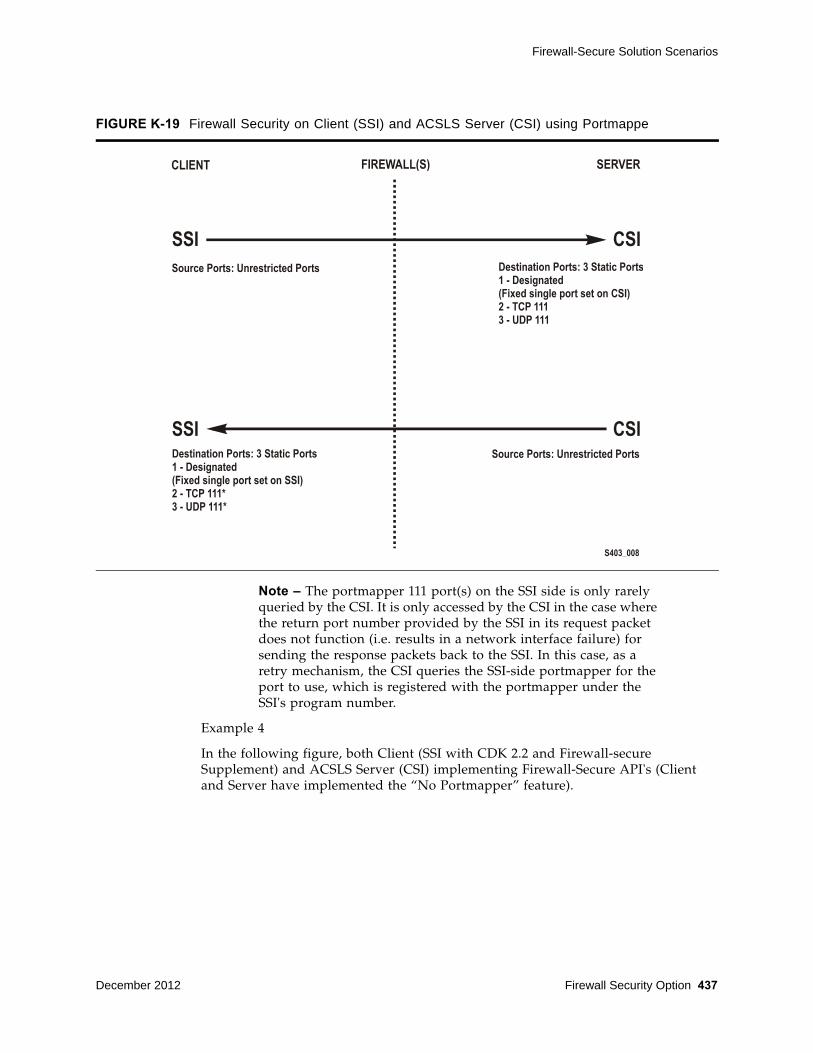
Firewall-Secure Solution Scenarios
December 2012 Firewall Security Option 437
Note – The portmapper 111 port(s) on the SSI side is only rarely queried by the CSI. It is only accessed by the CSI in the case where the return port number provided by the SSI in its request packet does not function (i.e. results in a network interface failure) for sending the response packets back to the SSI. In this case, as a retry mechanism, the CSI queries the SSI-side portmapper for the port to use, which is registered with the portmapper under the SSI's program number.
Example 4
In the following figure, both Client (SSI with CDK 2.2 and Firewall-secure Supplement) and ACSLS Server (CSI) implementing Firewall-Secure API's (Client and Server have implemented the “No Portmapper” feature).
FIGURE K-19 Firewall Security on Client (SSI) and ACSLS Server (CSI) using Portmappe
CLIENT FIREWALL(S) SERVER
SSI
SSI
CSI
CSI
Source Ports: Unrestricted Ports
Source Ports: Unrestricted Ports
Destination Ports: 3 Static Ports1 - Designated (Fixed single port set on CSI)2 - TCP 1113 - UDP 111
Destination Ports: 3 Static Ports1 - Designated (Fixed single port set on SSI)2 - TCP 111*3 - UDP 111*

Turning On the Firewall-Secure Option
438 ACSLS 8.1 Adminstrator’s Guide December 2012
Turning On the Firewall-Secure OptionTo turn on the firewall-secure option, you need to set several variables using the acsss_config utility.
1. Log in as acsss.
2. Stop the ACSLS server
Note – You must bring down the ACSLS server for the new firewall-secure variables to take effect.
acsss disable
3. To run the configuration script, enter
acsss_config
The ACSLS feature configuration screen appears.
4. Select option 1 - Set CSI tuning variables
Accept the default for all variables except for the following.
a. Set the value to TRUE at the following prompt:
FIGURE K-20 Firewall Security on Client (SSI) and SCSLS Server (CSI) without the Portmapper Feature
S403_009
CLIENT FIREWALL(S) SERVER
SSI
SSI
CSI
CSI
Source Ports: Unrestricted Ports
Source Ports: Unrestricted PortsDestination Ports: 1 Static Port1 - Designated (Fixed single port set on SSI)
Destination Ports: 1 Static Port1 - Designated (Fixed single port set on CSI)

Turning On the Firewall-Secure Option
December 2012 Firewall Security Option 439
Changes to alter use of the TCP protocol will not take effect until the product is restarted. CSI support for RPC using the TCP protocol is enabled [TRUE].
Variable: CSI_TCP_RPCSERVICE
Turning on TCP insures that the TCP protocol is available for use by clients of ACSLS for network communications. The firewall-secure feature of ACSLS supports TCP only, so clients should perform network communications using this protocol.
b. Set the value to FALSE at the following prompt:
Changes to alter the use of the UDP protocol will not take effect until the product is restarted. CSI support for RPC using the UDP protocol is enabled [TRUE].
Variable: CSI_UDP_RPCSERVICE
Caution – You must ensure that no ACSLS clients are depending on this UDP protocol. The firewall-secure ACSLS runs on TCP only. Turning off UDP insures that no clients will access the server using this protocol. This allows you to disallow all general UDP access to the ACSLS platform at the firewall, allowing only those accesses which are specifically required in your environment. You must allow clients access to the UDP and TCP port 111 for portmapper access, unless those clients implement the firewall-secure feature, and specifically turn off their queries to the ACSLS portmapper.
c. Set the value to NEVER at the following prompt:
Changes to alter use of the port mapper will not take effect until the product is restarted. Enable port mapper: (ALWAYS / NEVER /IF_DUAL_LAN_NOT_ENABLED) [IF_DUAL_LAN_NOT_ENABLED].
Variable: CSI_USE_PORTMAPPER
NEVER allows clients of ACSLS to disallow external access to the portmapper on those client platforms.
IMPORTANT: This does not allow you to turn off external access to the portmapper on the ACSLS platform; to do that, the client(s) of ACSLS must have adopted the firewall-secure changes in the client software component(s), and this feature must be turned on in the client software component.
This feature ensures that the ACSLS server will not make any queries of the portmapper on the client platform. This allows any firewall which is protecting the client to disallow access to the portmapper.
d. Set the value to TRUE at the following prompt:
Enable CSI to be used behind a firewall (user-defined inbound port) (TRUE/FALSE) [FALSE]:
Variable: CSI_FIREWALL_SECURE

Turning Off the Firewall-Secure Option
440 ACSLS 8.1 Adminstrator’s Guide December 2012
TRUE allows you to specify the single port that ACSLS will use for accepting inbound client communications (i.e. TCP connections). This variable simply enables this feature. The specific port will be specified in the next variable.
e. Set the value to an available fixed port on the ACSLS server at the following prompt:
Port number used by the CSI to receive incoming ACSLS requests.
Variable: CSI_INET_PORT
This is the port which will be used by the ACSLS CSI component for accepting incoming network connections.
IMPORTANT: You must configure your firewall to allow incoming connections on this port. This ensures that only that port is exposed for use by those outside clients wanting to initiate communications with ACSLS. You may disallow connections on all other incoming ports except this one, and UDP/TCP port 111 (unless clients have implemented the feature to eliminate their queries to the ACSLS portmapper; in that case, port 111 may also be disallowed at the firewall). The recommended default value for this port is 30031. It is unlikely (but not impossible) that this port will be used by other processes on most systems. See “Troubleshooting” on page 415 for steps to take if there is a port conflict.
5. Select E to exit acsss_config.
Your changes are saved.
6. Restart ACSLS by entering:
acsss enable
Turning Off the Firewall-Secure OptionSome of the variables used above for turning on the firewall-secure feature are also related to turning off that feature. To turn off the firewall-secure behavior, it is only necessary to perform the steps below, but a specific site may wish to make modifications to other variables as well.
1. Log in as acsss.
2. Stop the ACSLS server
Note – You must bring down the ACSLS server for the new firewall-secure variables to take effect.
acsss disable
3. To run the configuration script, enter
acsss_config
4. Select option 1 - Set CSI tuning variables
Change the following values that were set when you configured the firewall-secure feature. You must change the following variables:
a. Set the value to ALWAYS at the following prompt:

Firewall-Secure Configuration
December 2012 Firewall Security Option 441
Changes to alter use of the port mapper will not take effect until the product is restarted. Enable port mapper: (ALWAYS / NEVER /IF_DUAL_LAN_NOT_ENABLED) [IF_DUAL_LAN_NOT_ENABLED].
Variable: CSI_USE_PORTMAPPER
b. Set the value to FALSE at the following prompt:
Enable CSI to be used behind a firewall (user-defined inbound port) (TRUE/FALSE) [FALSE]:
Variable: CSI_FIREWALL_SECURE
5. Select E to exit acsss_config.
Your changes are saved.
6. Restart ACSLS by entering:
acsss enable
Firewall-Secure ConfigurationThe following requires that you are knowledgeable with regard to configuring the network firewall behind which ACSLS resides. ALL firewalls are “third-party” software, and will have varying details with regard to setting them up correctly for protecting your network environment. The following is not meant to be a recommendation of firewall security policy, but rather a set of helpful instructions for what the firewall must / can do with regard to the ACSLS product only. See your System Administrator for other security details.
Here is a list of details for setting up your firewall with respect to the ACSLS platform:
• Put in place an overall rule to disallow UDP incoming and outgoing connections.
• Put in place an overall rule to disallow TCP incoming connections (TCP outgoing connections must remain open).
• Put in place a specific rule to allow incoming TCP connections on the port which you specified for the ACSLS usage. IMPORTANT: This port must match the one you configured under acsss_config, or you will receive no client communications at the ACSLS server.
If all of your clients have implemented the firewall-secure feature and make no queries to the ACSLS platform's portmapper, you are done. If the clients still make use of that portmapper on the ACSLS platform, you must add the following:
• Put in place a specific rule to allow incoming and outgoing connections on the well-known portmapper TCP and UDP port 111.
Example
The following is an example of the rules which were put in place for an iptables-based firewall in order to put all of the above rules in place.
Note – These are in addition to other rules configured for the specific firewall.
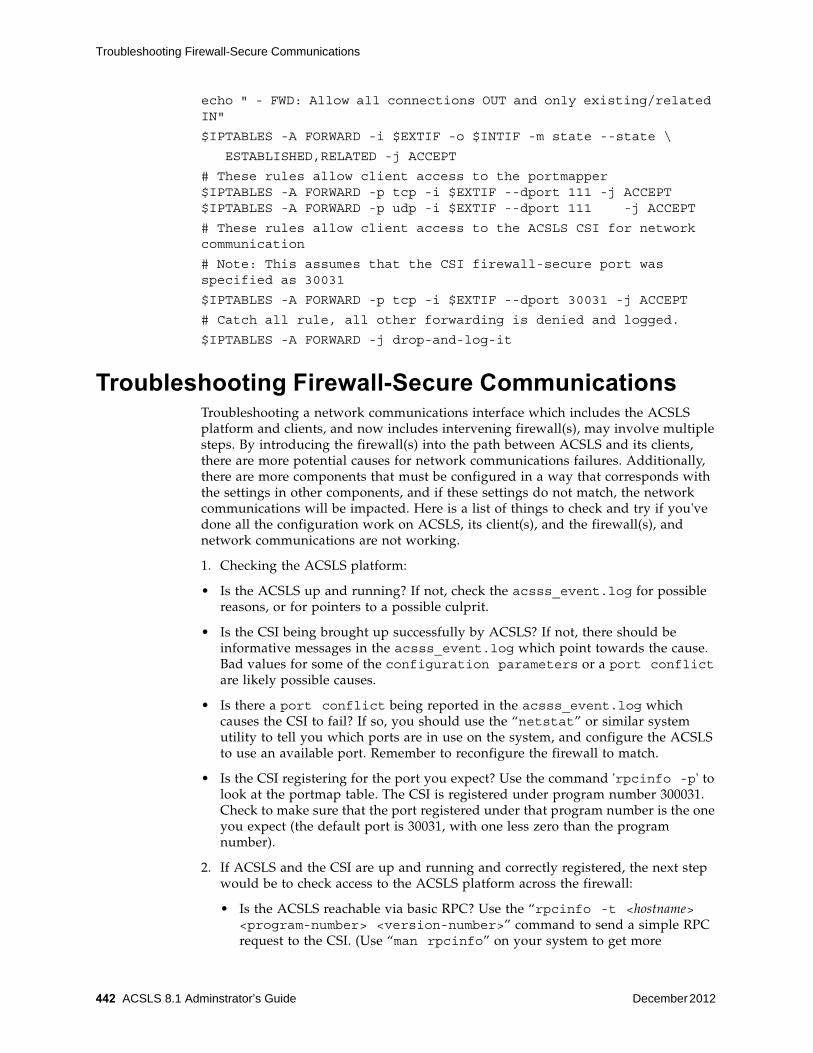
Troubleshooting Firewall-Secure Communications
442 ACSLS 8.1 Adminstrator’s Guide December 2012
echo " - FWD: Allow all connections OUT and only existing/related IN"
$IPTABLES -A FORWARD -i $EXTIF -o $INTIF -m state --state \
ESTABLISHED,RELATED -j ACCEPT
# These rules allow client access to the portmapper $IPTABLES -A FORWARD -p tcp -i $EXTIF --dport 111 -j ACCEPT $IPTABLES -A FORWARD -p udp -i $EXTIF --dport 111 -j ACCEPT
# These rules allow client access to the ACSLS CSI for network communication
# Note: This assumes that the CSI firewall-secure port was specified as 30031
$IPTABLES -A FORWARD -p tcp -i $EXTIF --dport 30031 -j ACCEPT
# Catch all rule, all other forwarding is denied and logged.
$IPTABLES -A FORWARD -j drop-and-log-it
Troubleshooting Firewall-Secure CommunicationsTroubleshooting a network communications interface which includes the ACSLS platform and clients, and now includes intervening firewall(s), may involve multiple steps. By introducing the firewall(s) into the path between ACSLS and its clients, there are more potential causes for network communications failures. Additionally, there are more components that must be configured in a way that corresponds with the settings in other components, and if these settings do not match, the network communications will be impacted. Here is a list of things to check and try if you've done all the configuration work on ACSLS, its client(s), and the firewall(s), and network communications are not working.
1. Checking the ACSLS platform:
• Is the ACSLS up and running? If not, check the acsss_event.log for possible reasons, or for pointers to a possible culprit.
• Is the CSI being brought up successfully by ACSLS? If not, there should be informative messages in the acsss_event.log which point towards the cause. Bad values for some of the configuration parameters or a port conflict are likely possible causes.
• Is there a port conflict being reported in the acsss_event.log which causes the CSI to fail? If so, you should use the “netstat” or similar system utility to tell you which ports are in use on the system, and configure the ACSLS to use an available port. Remember to reconfigure the firewall to match.
• Is the CSI registering for the port you expect? Use the command 'rpcinfo -p' to look at the portmap table. The CSI is registered under program number 300031. Check to make sure that the port registered under that program number is the one you expect (the default port is 30031, with one less zero than the program number).
2. If ACSLS and the CSI are up and running and correctly registered, the next step would be to check access to the ACSLS platform across the firewall:
• Is the ACSLS reachable via basic RPC? Use the “rpcinfo -t <hostname> <program-number> <version-number>” command to send a simple RPC request to the CSI. (Use “man rpcinfo” on your system to get more

Frequently Asked Questions
December 2012 Firewall Security Option 443
information on the rpcinfo command and its use.) Do this from a machine on the inside of the firewall with ACSLS (e.g. from the ACSLS platform itself), and from outside the firewall. If it works from inside but not from outside, then the firewall is intercepting your ACSLS requests. You need to double check the configuration of the firewall and the ACSLS port. Also check to be sure that the portmapper is accessible through the firewall (this test cannot be used from outside the firewall if access to the portmapper is disallowed).
• Do the ports configured for ACSLS and for the firewall match? Double-check these parameters. This is a likely cause of failure in network communications. Aside from the configured values, perform the 'rpcinfo -p' command mentioned above to insure that the CSI is indeed registering with the expected portnumber. If it is not, look in the acsss_event.log for information about the cause.
• Is the ACSLS receiving requests, but unable to send back responses? If you check the acsss_event.log and find that the CSI reports many dropped network packets or failures to communicate with network clients, then the client requests are getting in, but the responses are not getting out. Again, this is an indication that they are being blocked by a firewall.
3. If your problems are still not resolved.
The above addresses several levels of things to look for. If these yield no specific answer, it's time to do some lower-level checking to find out where communications are being broken down. The best way to do this is through the use of a network packet sniffer facility, such as 'snoop' under Solaris. Use “man snoop” on your Solaris-based system to get more information on the snoop command and its use.
Similar packet tracing facilities are available on other network-connected systems.
• To utilize this, you will have to do your packet sniffing from locations that show you where the packets are getting to and where they are being lost. This may be from both inside and outside the firewall.
• Additionally, looking at the packet data will be informative. If either side is allowing use of the portmapper, it is likely you will see some PORTMAP packets.
• Also, you should see RPC packets passing between the ACSLS and its clients.
• Finally, looking at the transport-level TCP connection will inform you of the specific ports being used on each side for the connection. This is often critical information to find out where the communications are being stopped.
• More detail on performing these operations is beyond the scope of this manual, but your System Administrator should be able to provide some help in this area.
Frequently Asked Questions• Why do I need the firewall-secure solution for ACSLS?
The firewall-secure solution allows you to effectively run the ACSLS behind a firewall, and allows you to restrict ports on that firewall so that security is significantly enhanced.
• What releases of ACSLS will support the firewall-secure feature?

Frequently Asked Questions
444 ACSLS 8.1 Adminstrator’s Guide December 2012
Only ACSLS 7.0.0 and above supports this feature.
• What is the maximum number of ports I will have to leave open if I use this firewall-secure feature?
The maximum number of ports on which you might have to allow incoming network connections is three: one for the ACSLS network interface, and two for the portmapper (UDP and TCP 111). Outgoing ports are unrestricted, in accord with accepted industry security practices.
• What is the minimum number of ports I can leave open?
The minimum number is one. This is possible if your clients (ISV software) have also implemented the firewall-secure features in their client, and make no queries to the portmapper which resides on the ACSLS platform. When that is the case, the only port that need be open for incoming connections is the one user-specified TCP port used by the ACSLS network interface.
• Why doesn't the feature use a range of ports?
There is no architectural advantage to using a range of ports, and there are some security disadvantages. The non-firewall-secure ACSLS uses a range of ports which consists of the full range of dynamic ports available on any given platform. This is correctly perceived as a potential compromise to the security of a site. Restricting this as much as possible, without adversely affecting ACSLS performance, is the goal in order to eliminate that compromise. Since the ACSLS network interface uses only one incoming port at any given time, there is no reason to extend the range beyond one port, provided that port is dedicated to ACSLS use for the ACSLS platform.
• What if the port I choose conflicts with another usage of that port on my system?
This is one of the reasons that the port is made user-specifiable. The specific ports available will vary from one customer site to another. The user is not allowed to use one of the well-known reserved ports from 0-1023. The default port of 30031 falls within the range of registered ports, which makes it less likely (though not impossible) that another application which uses dynamic ports will utilize it. Although it is in the range of registered ports, there is no application registered to use it, which makes it a reasonable default selection.
• Does this feature allow me to protect my ACSLS server with a firewall?
Yes, with this feature in place, your ACSLS server can be put on the trusted side of a firewall, with clients accessing it from the opposite (untrusted) side or from the same side.
• Does this feature allow me to protect my ACSLS clients (ISV components) with a firewall?
Potentially, yes, but not by itself. In order to realize this scenario, your client software components (clients of the ACSLS) must have adopted the firewall-secure feature, which has been made available via the StorageTek CDK (CSC Developer's Toolkit). Contact your client software provider for a current update on their status.
• If I want to be able to protect my clients with a firewall, what should I do?
You should contact your client software provider. They can tell you whether they have adopted any firewall-secure changes in their CSC (client software component).

Frequently Asked Questions
December 2012 Firewall Security Option 445
• What about the portmapper? Can I completely disallow access to the portmapper?
If your clients have adopted the firewall-secure changes, they may allow you to shut off the client's queries to the ACSLS platform's portmapper. In that case, you may disallow access to the portmapper on the firewall which protects the ACSLS platform. In any other case, the clients will depend on the ACSLS server side portmapper to help them make a connection with the ACSLS network interface, and it must be available for their use.
• Why must the client implement some changes in order for my ACSLS server firewall to shut down access to the ACSLS platform portmapper?
Because it is the client that is making these queries of the ACSLS platform. If the client continues to make these queries, the ACSLS platform must continue to provide the portmapper's services in order for those queries to succeed.
• I think the portmapper is bad. Why didn't you remove it completely?
The portmapper provides an important service to legacy clients. Removing it completely would invalidate the interface on which those clients depend. In short, no legacy clients would work without recoding, retesting, and again certifying with the new non-portmapper interface. In this firewall-secure solution, we have provided the capability to remove the queries to the portmapper from both the ACSLS to the client, and from the client to the ACSLS, but we cannot force client software to conform to this. Thus, the portmapper must remain available at least as an optional service until a site's clients have adopted the firewall-secure features and no longer make use of the portmapper service.
• Some of my clients have adopted the firewall-secure features and some have not. How can I take advantage of this?
Those clients which have adopted these features may be protected behind their own respective firewalls. In addition, access to the portmapper's well-known ports may be restricted at the firewall, and then configured to allow access to the portmapper only by those clients who require it. The details and ability to do this will vary based on the specific firewall in use at the site.
• I think RPC is bad. Why didn't you remove it completely?
The ACSLS network interface has been RPC-based since the first release of ACSLS. It has proven to be an effective, stable, and reliable mechanism, offering various advantages at the network communications layer. However, it can also be more difficult to secure a platform which uses RPC, due to its common dynamic allocation of ports and use of the portmapper. In this firewall-secure solution, both of these areas are addressed, which allows the customer to effectively configure a firewall in a restricted fashion, yielding the security benefits for which they have the firewall in place.
Additionally, complete removal of RPC from the ACSLS network interface would invalidate all current (legacy) ACSLS clients, making it impossible for any of them to communicate with ACSLS without recoding, retesting, and again certifying their CSCs (client software components).
• How will the firewall-secure feature affect network communications performance and timing between my ACSLS clients and the ACSLS server?
There is no effect on performance due to the new firewall-secure features. The usage of a firewall may have performance implications, but this will be based on the operational characteristics of each specific customer's firewall implementation.

Frequently Asked Questions
446 ACSLS 8.1 Adminstrator’s Guide December 2012
With a firewall which has negligible impact on performance, the ACSLS and its clients will continue to perform as they did prior to installing the firewall-secure feature. Also, the ACSLS network interface tolerances can be configured, so that delays imposed by the firewall could be handled gracefully.
• How does the firewall-secure feature affect the rest of my ACSLS operations?
There is no effect or impact on other parts of the ACSLS operations due to the installation of the firewall-secure solution.
• How does the firewall-secure feature affect the ACSLS functionality that my clients use (via the ACSAPI)?
The full set of functionality that is provided through the ACSAPI (and which our ACSLS clients use today to interface with ACSLS) will operate the same under the firewall-secure feature as it does without the feature installed. In particular, this firewall-secure feature supports access control, and also all of the newer features that have been added to the ACSLS product. The full functionality of the ACSAPI will continue to be supported by this feature.
• Does the firewall-secure feature work with the ACSLS HA (High Availability) solution?
The firewall-secure feature does not adversely affect HA operation. However, the HA solution is not designed to be run across a firewall (i.e. with each HA server on opposites sides of a firewall). The HA solution requires remote access to the portmapper, so the firewall could not disallow that access if an attempt were made to run each server on opposing sides of a firewall. There are other details of running across a firewall that could adversely affect an HA setup; it is highly recommended that this not be done.
If the HA servers are set up on the same secured side of the firewall, that set of HA servers could be set up with the firewall-secure feature, and clients on the opposite side of the firewall would be able to interact across the firewall with those servers with the same performance and behavior as they would against a non-firewall-secure HA solution.
• Does this firewall-secure feature work with other StorageTek software products?
Interoperability with other StorageTek products, as well as partner products (such as client software components which communicate with ACSLS) has been completely preserved. Those products can continue to operate without modification, communicating with the ACSLS server, with the ACSLS server running behind a secured firewall, or in the same environment with those products (as it does today).
• Do other StorageTek software products have the same firewall-secure features?
Other StorageTek products do not gain the firewall-secure benefit simply by being used in the same environment with the firewall-secure ACSLS. Each product can work with a firewall secured ACSLS (see previous question), but putting each of those products behind its own respective firewall is a question that the specific product itself must address. Some StorageTek products already have built-in policies which allow some restriction at a firewall used to protect the platforms where those products run. Additionally, any product which acts as a client to ACSLS has the option of adopting the firewall-secure changes which were made to ACSLS, and which are provided as part of the StorageTek CDK (CSC Developer's Toolkit).

December 2012 CSCI 447
L
CSCI
This chapter describes the Client Server Communications Interface (CSCI) component.
This chapter covers the following topics:
• Overview of CSCI
• Error messages
• Environmental variables
Installation of CSCI should follow installation of the operating system and installation and configuration of ACSLS.
Note – For ACSLS to function properly, the START_CSCI_PROCESS configuration variable must be set to TRUE. You do this in Option 1 of acsss_config. See “Setting Variables that Control ACSLS Behavior” on page 55.
Overview of CSCIThe Client Server Communications Interface (CSCI) is a stand-alone component responsible for the passing of request and response packets between a client system and a server system. CSCI is an optional component that lets MVS or RMLS/CSC clients communicate with ACSLS. If you do not use CSCI, you use CSI by default to communicate with ACSLS.
CSCI Connectivity
CSCI provides IPC and TCP/IP connectivity to link the ACSLS server with MVS clients or RMLS/CSC clients
Architecture and Subsystems
The following figure shows an overall CSCI architecture and subsystems.

Overview of CSCI
448 ACSLS 8.1 Adminstrator’s Guide December 2012
The following figure shows how the CSCI system connects with the network interface. On the server side, the data flows from the network hub through the TCP/IP interface to the CSCI interface. From here the data flows through an IPC interface to the ACSLS software in both directions but in a half duplex mode, i.e., one direction at a time.
FIGURE L-21 CSCI Architecture and Subsystems
CLIENT SYSTEMACSLS
SERVER SYSTEM
CSCIConfiguration
NETWORK BOUNDARY
IPC LU62
ACSAPI
Client Application
CSCIConfiguration
CSCI CSCI
IPCLU62
ACSLS
IPC Scoket # IPC Scoket #
LSM
Token Ring
Library Control
Path
FIGURE L-22 CSCI System with Token Ring Interface
CLIENT SYSTEM ACSLS SERVER SYSTEM
NETWORK BOUNDARY
LU62
RMLS/CSCCSCI
IPCLU62
IPC Scoket
ACSLSMAU
Token Ring
Error Messages
December 2012 CSCI 449
Error MessagesCSCI installation and configuration error messages relate to the following conditions:
• Improper ownership
• Improper access permission
• Undefined environment variables
• A variety of miscellaneous conditions
• Improper CSCI and TCP/IP configuration
Common Error Messages
Communication failure, verb = cmroutine, rc = xx, errno = yyy IPC failure on Socket CSCIzzzzz
Explanation: The read failed on the named connection.
Variable:
• xx is IBM CPI return code
• yyy is the UNIX errno value in /usr/include/sys/errno.h
• CSCIzzzzz is the socket number that was in use
• cmroutine is the IBM CPI routine name that failed
Read failed for connection: connection_name
Explanation: The read failed on the named connection.
Variable: connection_name is the name of the connection on which the read failed.
Write failed for connection: connection_name
Explanation: The write failed on the named connection.
Variable: connection_name is the name of the connection on which the write failed.
Environmental VariablesCSCI is invoked by csciTcpServer.sh, a Transaction Program Name (TPN) in the /$ACS_HOME/bin directory where ACSLS executables reside. This shell script defines CSCI environment variables.
The following table provides descriptions of CSCI environment variables for the server subsystem and a shell script similar to the one provided in the distribution of ACSLS/CSCI software. This shell script is started by TCP/IP on the server.
TABLE L-12 CSCI Server Subsystem Environment Variables
Name Description
START_CSCI_PROCESS Automatically starts CSCI at ACSLS startup (TRUE or FALSE)

Environmental Variables
450 ACSLS 8.1 Adminstrator’s Guide December 2012
CSCI_TRACE This variable is used to indicate whether CSCI tracing is ON or OFF.
CSCI_SLEEP_TIME This variable is used to indicate the PER sleep time at the end of each round-robin loop through the connection table (polling timeout). Default is 100 msec.
CSCI_INITIAL_CONNECTION This variable is used to indicate the CSCI's initial connect name to open first. This is the connection service name requiring i/o on initial startup of the CSCI. Clients usually open IPC first; Servers open TCP/IP first.
CSCI_SERVER_NAME This variable is used to indicate the name of the CSCI Server. It must be set the same for all CSCI's Clients defined to a single CSCI server. The server name must match its CSCI Clients CSCI_SERVER_NAME. The matching of the Server and Client CSCI_SERVER_NAME provides an end-to-end logical link between machines. Finally, this name is used later for the “connectionname” in other environment variables. The value assigned to the CSCI_SERVER_NAME must be replicated in the connectionname part of the subsequent variables.
CSCI_connectionname_NET_TYPE This variable is used to indicate what Network type this CSCI is configured for from the CIF subsystem. The NETTYPE defines the transport layer used by this CSCI. Valid assignments are LU62 or IPC.
CSCI_connectionname_INPUT_ SOCKET
This variable is used to indicate the input socket number to use as input to this CSCI. This number would match the Server or Client application output socket number.
CSCI_connectionname_CON_ TYPE
This variable is used to indicate this CSCI type. This CON_TYPE defines the CSCI to be either a SERVER or a CLIENT.
CSCI_connectionname_ TRANSLATE_TYPE
This variable is used to indicate this CSCI XDR type to be employed during execution. This can be assigned to either XDR or NONE.
CSCI_connectionname_ DESTINATION_SOCKET
This variable is used to indicate destination or output socket number to be used by the CSCI Server. This socket number would be the matching input socket number to the CSCI Server Application.
TABLE L-12 CSCI Server Subsystem Environment Variables
Name Description

December 2012 Media Management 451
M
Media Management
This chapter discusses how to manage the same type of media recorded in different densities, as well as how to separate cartridges written in the old density from cartridges written in the new density.
OverviewIn this overview, you gain an understanding of:
• Restrictions and the possible problems you may encounter
• Examples of tape drives that record on the same media in different densities
• Recommended solutions
Restrictions
Often, new tape drives are introduced that use existing tape media, but record at a higher density. These new drives can often read tapes recorded in the old density, but they cannot write in the old density. The older tape drives can neither read nor write in the higher density.
Because of these restrictions, you can encounter these problems:
• When a tape written in the new density is mounted on an older drive, the older drive cannot read the tape.
• When storage management applications try to fill up partially used tapes by appending additional files at a later time it fails if the tape was written using a different density than one to which a new tape drive can read but cannot write.
If you have a mix of both older and newer tape drives in your libraries, you need to manage your tape cartridges that are of the same media type.
Examples
The following examples show tape drives that record on the same media in different densities:
• T10000 Media used by T10000A and T10000B Tape Drives

Overview
452 ACSLS 8.1 Adminstrator’s Guide December 2012
The T10000B tape drive uses the same media as the T10000A, but writes data at double the T10000A's density. The T10000B can read T10000A media and can reclaim (write from beginning of tape) it for writing T10000B density data, but it cannot append data to a previously written T10000A.
The T10000A drive can reclaim a T10000B cartridge for writing T10000A density data, but can neither read from nor append data to a T10000B cartridge.
• 9840 Media used by T9840A, T9840B, T9840C and T9840D Tape Drives
You must manage 9840 media when a combination of T9840A, T9840B, T9840C, and/or T9840D drives are present because:
• T9840A and T9840B
The T9840A and T9840B tape drives use the same media and record in the same density.
• T9840C
The T9840C uses the same media as the T9840A and T9840B, but records at double the density.
• T9840D
The T9840D writes at almost double the T9840C drives density.
You must manage 9840 media when a combination of T9840A, T9840B, T9840C, and/or T9840D drives are present.
• 9940 Media used by T9940A and T9940B Tape Drives
• T9940A
The T9940A drive can reclaim a T9940B cartridge for writing single density data, but can neither read from nor append data to a T9940B cartridge.
• T9940B
The T9940B tape drive uses the same media as the T9940A, but writes data at double the T9940A's density. The T9940B can read T9940A media and can reclaim it for writing double density data. However, it cannot append data to a previously written T9940A cartridge.
Solution
ACSLS has tools you can use to manage common media on which two or more types of drives can write, but are in incompatible recording densities. The client application must use these tools to manage the read/append data incompatibilities.
You can manage drives that record on common media in different densities within an ACS by either:
• Replacing all of the older drives in an ACS with the new drives at the same time.
This is the simplest and safest strategy. Using this strategy, you avoid the problems caused by managing a combination of drives using different densities. If you are unable to do this, you can gradually replace the older drives with the new drives as discussed in the second bullet.

Managing Common Media with Recording Densities Reported by ACSLS
December 2012 Media Management 453
Note – Do not append files to any tapes written in the old recording density after replacing the old drives with the new drives. With Veritas NetBackup, this is done by suspending the tapes.
• Gradually replacing the older drives with the new drives.
This requires you to manage the common media recorded in different densities. You can do this by:
• Using the recording format information returned when the cartridge is dismounted in SL8500 and SL3000 libraries to mange media. This is discussed in the next section.
• Creating separate ACSLS pools for each format.
• Using the facilities of a backup application (for example, Veritas NetBackup, Legato NetWorker, IBM Tivoli, or CA BrightStor) to manage media pools.
Managing Common Media with Recording Densities Reported by ACSLS
When a cartridge is dismounted from a modern tape drive in a modern library, the recording format of the cartridge is reported to ACSLS. ACSLS saves the recording format in its database. You can use the display volume command to display this information.
Recording format is reported by:
• Libraries:
• SL3000
• SL8500 (with 4.10 or later firmware)
• Tape Drives:
• All T10000 tape drives (with 1.38 or later firmware)
• T9840A, T9840C, and T9840D (All T9840 tape drives except the T9840B.) (with 1.4.2 or later firmware)
• T9940A and T9940B tape drives (1.4.2 and later firmware)
The example below describes how to manage T10000 media recorded in both T10000A and T10000B formats. Use the following table to apply the procedure to your specific case:
Note – The discussion below uses the following syntax conventions for commands and utilities:
Old Format Drive(s) New Format Drive(s)
T10000A T10000B
T9940A T9940B
T9840A/T9840B T9840C or T9840D
T9840C T9840D
Managing Common Media with Recording Densities Reported by ACSLS
454 ACSLS 8.1 Adminstrator’s Guide December 2012
• Commands and Utilities entered as is are in bold.
• Variables (you must enter the exact value) are in italics.
▼ Procedure
After the T10000B drives are installed, use the recording format information to mount cartridges on compatible tape drives. Again, cartridges written at T10000A density can be read by either T10000A drives or T10000B drives, but only T10000A drives can append data written in a T10000A format. Only T10000B drives can read or append to cartridges written in a T10000B format.
No special processing is necessary when mounting scratch cartridges. When you write the cartridge from beginning-of-tape, the previous recording format does not matter.
To select a drive to read or append to a cartridge with data already recorded on it, follow this procedure. The following commands identify drives that can read and write a cartridges recording format.
Mounting Non-scratch Cartridges
1. Display the recording format of the cartridge.
display volume vol_id -f recording_format_family recording_format_model
The recording format for this volume is displayed.
2. Use the following query command to identify a compatible drive.
query mount vol_id
Drives compatible with a cartridge are displayed.
• You must select the correct drive type before mounting the cartridge.
This query command returns both T10000A and T10000B drives (because both drive types are compatible with T10000 media).
• Use drive type to separate T10000As from T10000Bs.
Selecting the first compatible drive in the list minimizes pass-thru and improves library performance.
3. Mount the cartridge on a drive compatible with the recording format.
mount vol_id drive_id
Migrating to the New Recording Format
• When all the data on the cartridge has expired, you can re-write the cartridge from beginning-of-tape in a new recording format.
For more information on expired cartridges, refer to “Identifying Expired Cartridges” on page 122.
• After all T10000A drives are converted to or replaced by T10000B drives, all T10000 media can be used by T10000B drives as long as data is not appended to cartridges written in T10000A format
Managing Common Media Recorded in Different Densities with ACSLS Pools
December 2012 Media Management 455
Managing Common Media Recorded in Different Densities with ACSLS Pools
The example below describes how to manage 9940 media recorded in both T9940A and T9940B densities. The following procedure applies to all cases where different tape drives record on a common media in different densities. Use the following table to apply the procedure to your specific case:
▼ Procedure
1. Identify all 9940 data (non-scratch) cartridges in the ACS and assign them to a T9940A pool.
Do this before installing T9940B drives in an ACS that has T9940A drives.
Now you can assign 9940 scratch cartridges to either the T9940A or T9940B pool.
a. Define T9940A and T9940B media pools:
define pool pool_id
a. Report all 9940 media.
You can do this by using either the display volume command (option 1) or a custom volrpt (option 2) as shown below:
Results are written to a file.
• Option 1
Use the display volume command to write the results to a file.
display volume * -media STK2P > filename
where:
All 9940 tape cartridges (media STK2P) are reported.
filename is the filename to which the output is written. The ACS ID in which the cartridge is located is also listed.
Read the output, selecting cartridges from specific ACS(s), if desired.
If you want cartridges from one ACS, use the -home operand to only select cartridges from this ACS.
display volume * -home acs_id.*,*,*,* -media STK2P> filename
• Option 2
Old Format Drive(s) New Format Drive(s)
T10000A T10000B
T9940A T9940B
T9840A/T9840B T9840C or T9840D
T9840C T9840D
SDLT 220 SDLT 320

Managing Common Media Recorded in Different Densities with ACSLS Pools
456 ACSLS 8.1 Adminstrator’s Guide December 2012
Use the custom volrpt for all volumes in the ACS. The results are written to a file:
volrpt -d -f custom_volrpt_file -a acs_id > filename
where:
custom_volrpt_file is the filename specifying the fields reported in a custom volrpt. The following fields are reported:
VOLUME_ID 6 2 MEDIA_TYPE 7 2 VOLUME_TYPE 4 2
acs_id is the ID of the ACS that you are managing.
filename is the filename to which the output is written.
Read the output, selecting only the volumes with a media type of STK2P.
a. Assign the selected volumes to the appropriate pools.
Assign all non-scratch (VOLUME_TYPE = D) cartridges to the T9940A pool.
set scratch off pool_id vol_id
Assign the scratch cartridges (VOLUME_TYPE = S) to either the T9940A or T9940B pools.
set scratch pool_id vol_id
2. After the T9940B drives are installed, use the pools to mount cartridges on compatible tape drives.
Again, cartridges written at T9940A recording density can be read by either T9940A drives or T9940B drives, but only T9940A drives can append data on 9940A media. Only T9940B drives can read or append to cartridges written at 9940B recording density.
The following commands can be used to identify, select and mount cartridges from the pool appropriate for a T9940A or T9940B drive. Use the pools to ensure you are mounting cartridges on the correct drive.
Note – If you want to mount a scratch cartridge on the correct drive type, follow procedure A. If you want to mount a non-scratch cartridge with data already recorded on it, follow procedure B.
Procedure A - Mounting Scratch Cartridges
a. Query drive(s) to identify drive types.
query drive drive_id | all
a. Identify the correct pool (media type) for the cartridges to be mounted on the desired drive
a. Mount scratch cartridges to a drive from the specified pool.
mount * drive_id pool_id
Procedure B - Mounting Non-scratch Cartridges
a. Display the status of drives compatible with a cartridge.

Managing Common Media Recorded in Different Densities with ACSLS Pools
December 2012 Media Management 457
display volume vol_id -f pool
The pool for this volume is displayed.
a. Identify a compatible drive using the query command.
query mount vol_id
Drives compatible with a cartridge are displayed.
You must select the correct drive type before mounting the cartridge. This query command returns both T9940A and T9940B drives (because both drive types are compatible with 9940 media).
Use drive type to separate T9940As from T9940Bs.
a. Mount the cartridge on the selected drive.
mount vol_id drive_id
3. When all the data on the cartridge has expired, you can migrate the scratch cartridges to the pool for the new recording density. Because T9940A and T9940B drives can re-initialize cartridges in their density, scratch cartridges can be reassigned to a different pool.
set scratch pool_id vol_id
4. After all T9940A drives are converted to or replaced by T9940B drives, all 9940 media can be used by T9940B drives as long as data is not appended to cartridges written in T9940A recording density.

Managing Common Media Recorded in Different Densities with ACSLS Pools
458 ACSLS 8.1 Adminstrator’s Guide December 2012
December 2012 Accessibility Features in ACSLS 459
N
Accessibility Features in ACSLS
Compliance with Section 508 Amendment to the US Rehabilitation Act
Oracle strives to provide high quality information technology that is accessible to people with disabilities. In particular, Oracle is committed to ensuring full compliance with the Section 508 accessibility standards. Specific accessibility features in ACSLS are summarized here.
User Interfaces
The ACSLS (text-only) Command-line Interface (CLI)
The CLI in ACSLS is known as cmd_proc. An ACSLS operator can manipulate all physical library operations from the cmd_proc, including the following:
• Tape movement activities such as mount, dismount, enter, eject and move operations.
• Query operations for tape drive and tape volume location and status, lsm status, lmu status, and CAP status.
• Control operations to vary all physical library resources online and offline and the ability to switch between multiple library interfaces (switch lmu).
• Tape administrative activities such as tape ownership, pool administration, lock functions for job control, and management of cleaning cartridges.
Administrative functions that are not accessible from the CLI include the following:
• Logical library administration: functions to create a logical library, and to assign and unassign tape drives and assign and unassign tape volumes to logical libraries.
• Logical library operation: functions to mount and dismount logical volumes to configured drives.
Primary Administrative Interface: Unix Shell Functions
Primary functions to install and configure ACSLS, to backup and restore the ACSLS database, and to operate auxiliary utilities are accessible by means of the standard Unix shell (sh, csh, ksh, and bash) under Solaris.

Accessibility Provisions in the ACSLS GUI
460 ACSLS 8.1 Adminstrator’s Guide December 2012
The ACSLS Graphical User Interface (GUI)
The ACSLS GUI is divided into three frames:
• The top frame always displays the ACSLS GUI masthead with five titled navigation buttons, and summary information including user id, server id, and dashboard-level status.
• The left-most frame always displays the expandable Navigation Tree.
• The content displayed in the right-hand frame changes dynamically as the user asserts content selections from the Navigation Tree or the preferences button from the masthead.
The Web-based GUI enables the user to perform all logical library operations and most physical library operations. GUI library operations include the following:
• Administrative functions to create a logical library and to assign or unassign volumes to a logical library and to set volume ownership or cleaning attributes.
• Physical and logical tape movement activities such as mount, dismount, enter, and eject.
• Query operations for physical tape drive and tape volume location and status, lsm status, lmu status, and CAP status.
• Query operations for physical library resources that have been assigned to a logical library.
• Control operations to vary physical and logical library resources online and offline.
Administrative functions that are not accessible from the GUI include the following:
• The ability to switch between multiple library interfaces (switch lmu).
• Specific tape administrative activities including pool administration and lock functions for job control.
These tasks are handled by means of the cmd_proc interface.
Accessibility Provisions in the ACSLS GUI• Every page displayed in the content frame is identified with a title at the top of
the page.
• A text equivalent tool tip is provided for every graphical element in the GUI. To display the alternative text, use the mouse to hover over the respective icon.
• All data tables displayed in the content frame are identified with column and row headers.
• The expandable Navigation Tree can be configured to be fully expanded by default.
• The Masthead includes color coded dashboard elements to indicate faulty status conditions. Color-blind users can look beside each status icon where any number higher than zero signifies the same message and displays how many library resources share the errant status.

Special Steps Required to Configure Accessibility Modes in ACSLS
December 2012 Accessibility Features in ACSLS 461
Special Steps Required to Configure Accessibility Modes in ACSLS
GUI Tree Menu
The ACSLS GUI allows for an expanded or collapsed tree menu. By collapsing the tree menu, the complexity of the menu is hidden behind a few initial selections which become expanded as the menu portions are selected. But for sight-impaired users who may rely on keyboard navigation or an audio summary of the menu, a collapsed tree menu may keep large portions of the GUI hidden from view. To enable an expanded tree menu, follow this procedure:
1. Locate the Preferences button which is the first of three buttons at the extreme top right corner of the ACSLS GUI Masthead. Asserting the Preferences button will cause the Preferences page to be displayed in the right-hand frame of the GUI.
2. In the Per-user Preferences portion of the Preferences frame, locate the 'Default Tree Menu' drop-down menu.
3. Assert the drop-down arrow and select "expanded".
4. Once the expanded choice has been selected, locate the two buttons at the top-right corner of the Preferences frame and assert the "set" button.

Special Steps Required to Configure Accessibility Modes in ACSLS
462 ACSLS 8.1 Adminstrator’s Guide December 2012
December 2012 Glossary 463
Glossary
This glossary defines terms and abbreviations used in this publication.
Some of the definitions are taken from the IBM Dictionary of Computing. The letters in the parentheses that follow some definitions indicate the source of the definition:
(A) The American National Standard Dictionary for Information Systems, ANS X3.172-1990, copyright 1990 by the American National Standards Institute (ANSI).
(CS) StorageTek Copyrighting and Editing Corporate Standards.
(E) The ANSI/Electronic Industries Association (EIA) Standard-440-A, Fiber Optic Terminology.
(I) The Information Technology Vocabulary, developed by Subcommittee 1, Joint Technical Committee 1, of the International Organization for Standardization and International Electrotechnical Commission (ISO/IEC/JTC1/SC1).
(IBM) The IBM Dictionary of Computing, copyright 1994 by IBM.
(SNIA) Storage Networking Industry Association.
(T) Draft international standards committee drafts, and working papers being developed by the ISO/IEC/JTC1/SC1.
Aabsent cartridgeA cartridge that is in the database, but that couldn't be found when all recorded locations for the cartridge were catalogued. If a nonzero retention period is set, the volume status is changed to STATUS_VOLUME_ABSENT.
ACSSee Automated Cartridge System.
ACSELSee ACS Event Logger.
ACS Event Logger (ACSEL)The software component that receives messages from other ACSLS components and writes them to an Event Log.
464 ACSLS 8.1 Adminstrator’s Guide December 2012
ACS IDA unique identifier for an ACS.
ACSLHSee ACS Library Handler.
ACS libraryA library is composed of one or more ACSs, attached tape drives, and cartridges residing in the ACSs.
ACS Library Handler (ACSLH)The part of the ACSLM that communicates directly with the LMU.
ACSLMSee ACS Library Manager.
ACS Library Manager (ACSLM)The software component that validates and routes library requests and responses.
ACSLSSee ACS Library Software.
ACSLS databaseACSLS database containing information about the location and status of the data or cleaning cartridges. The information includes cell location, scratch status, etc.)
ACSLS platformThe server hardware and software that provide the proper environment for ACSLS.
ACS Library Software (ACSLS)Manages contents of multiple libraries and controls library hardware to mount and dismount cartridges on ACS tape drives.
ACSLS databaseA database used by ACSLS to track the library configuration and the locations and IDs of all data or cleaning cartridges in the library.
ACSSASee ACS System Administrator.
ACS System Administrator (ACSSA)The interface between the Command Processor and the rest of the system.
ADIApplication Data Interchange.
auditA physical inventory of the contents of all or part of a library.
Automated Cartridge System (ACS)The library subsystem consisting of one or more libraries connected through pass-thru-ports.
automated librarySee library.
December 2012 Glossary 465
Bbacking libraryIdentifies the physical library from which the logical library is created.
beginning of tape (BOT)The location on a tape where written data begins.
BOTSee Beginning of Tape.
CCAPSee Cartridge Access Port.
CAP IDA unique identifier for the location of a CAP. A CAP ID consists of the ACS ID, the LSM number, and the CAP number.
cartridgeA plastic housing containing a length of data recording tape. The tape is threaded automatically when loaded in a transport. A plastic leader block is attached to the tape for automatic threading. The spine of the cartridge can contain an OCR/Bar Code label listing the volume ID.
Cartridge Access Port (CAP)A bidirectional port built into the door panel of an LSM, which provides for the manual entry or automatic ejection of data or cleaning cartridges.
cartridge drive (CD)A device containing two or four cartridge drives and their associated power and pneumatic supplies.
cartridge tape I/O driverOperating system software which issues commands (e.g., read, write, and rewind) to cartridge subsystems.
cartridge transportAn electromechanical device that moves tape from a cartridge over a head that writes and reads data from the tape. A transport is distinct from the power and pneumatic sources that supply the electricity and air it needs to function. See cartridge drive.
CCISee client computing system.
CDSee cartridge drive.
cellA receptacle in the LSM in which a cartridge is stored.
channelA device that connects the host and main storage with the input and output control units.

466 ACSLS 8.1 Adminstrator’s Guide December 2012
client applicationsSoftware applications that manage tape cartridge contents. They access tape cartridges by interacting with ACSLS. Any number of client applications can be resident on a client system.
client computing systemA computer and an executable image of the operating system.
client softwareThis software manages tape cartridge contents, generates requests for cartridges, and drives data to and from cartridges. The client software is not part of ACSLS.
Client System ComponentSoftware which provides an interface between the client computing system's operating system and ACSLS.
Client System Interface (CSI)The software component that translates and routes messages between the ACS Library Manager and the Client System Component.
command access controlLimits access to commands.
command areaThe bottom area of the cmd_proc interface where you enter requests and receive responses.
command processor (cmd_proc)The screen interface of the ACSSA. cmd_proc lets you enter the commands described in Chapter 7.
control path adapterA hardware device which converts a Client Computing System's control protocol to the control protocol of the StorageTek Library Control System.
control unit (CU)A microprocessor-based unit logically situated between a channel and up to fifteen cartridge transports. The CU translates channel commands into transport commands and sends transport status to the channel.
CSECustomer Services Engineer.
CSCClient System Component.
CSISee Client System Interface.
CSI variablesUsed to define various options to fine-tune communications between a CSC and the CSI. You change these variables in the acsss_config program.
CUSee control unit.
cycle error messagesMessages that indicate a library or ACSLS failure.

December 2012 Glossary 467
DdatabaseA collection of interrelated data records. See also ACSLS Database.
data pathThe network path that allows client applications read/write access to tape cartridges.
data path adapterA hardware device which translates a Client Computing System's data protocol to the data protocol of the StorageTek Control Unit.
display areaThe top area of the cmd_proc interface that collects messages regarding the status of the library.
Dual TCP/IPprovides two separate host connections between the host software (ACSLS or HSC) and a library
dynamic configurationallows you to implement configuration changes to ACSLS libraries (and components) while ACSLS remains online and running.
Eejected cartridgeA cartridge that has been ejected from the library. If a nonzero retention period is set, the cartridge status is changed to STATUS_VOLUME_EJECTED.
end of tape (EOT)The location on a tape where written data ends.
EOTSee end of tape.
EPOEmergency Power Off.
EPROMSee erasable programmable read only memory.
erasable programmable read-only memory (EPROM)A special memory chip that can be erased and reprogrammed.
Event LogA file, maintained by the ACSEL, that contains messages describing library and ACSLS events.
Event LoggerSee ACS Event Logger.
external label identifiersA six-character alphanumeric label on the outside edge of a cartridge used to identify a physical tape cartridge. It may consist of uppercase letters A through Z, numerals 0 through 9, $, #, and blanks.
468 ACSLS 8.1 Adminstrator’s Guide December 2012
FFast Load With Fast Load enabled, an FC initiator that issues a mount operation receives a successful response once the operation has been validated and accepted by ACSLS, but before cartridge movement begins.
full installationA complete software installation required for new customer sites or for existing sites where a new library has been installed.
HHLIHost/Library Interface. One way that the ACSLS communicates with a library.
HLI-attachedLibraries that are connected to the ACSLS through the HLI. These libraries can be connected through a serial interface (serial-attached) or through a TCP/IP interface (TCP/IP-attached).
home locationThe cell associated with a given cartridge.
Host Software Component (HSC)Software running on an IBM mainframe that controls multiple libraries as a library server.
IIDIdentifier or identification.
Initial Program Load (IPL)A process that activates a machine reset, initiates wake up diagnostics (from EPROMs) and loads functional code.
inline diagnosticsRoutines that test components of a subsystem while operating on a time-sharing basis with the functional microcode in the subsystem component.
in-transit cartridgesCartridges between their source and destination locations. Cartridges are considered in-transit if they are in pass-thru ports, robot hands, or playground.
I/OInput/Output.
IPCInterprocess Communication.
IPLSee Initial Program Load.

December 2012 Glossary 469
JjournalA sequential log of changes made to the database since the last checkpoint.
LLADLock Access Door.
LANSee local area network.
large CAP (LCAP)A 40-cartridge CAP with the storage cells arranged in four removable magazines of ten cells each. The magazines appear as a single column of 40 cells to the host software.
LCAPSee large CAP.
LCUSee Library Control Unit.
LEDSee Light Emitting Diode.
libraryA library is composed of one or more ACSs, attached tape drives, volumes in the ACSs, and the ACSLS software that controls and manages the ACSs.
library configuration optionsAllows the customer to specify the number of ACSs in the library and the connections between each ACS and the server system.
library control componentSoftware which controls the mounting and dismounting of cartridges in the ACS.
library control processorProperly configured computer hardware that, with the addition of appropriate software, supports the operation of the Library Control Software.
library control systemThe library control platform loaded with library control software (ACSLS).
library control softwareThe software components of ACSLS including the library control component, the Client System Interface and Library Utilities.
Library Control UnitThe portion of the LSM that controls the picking, mounting, dismounting, and replacing of data and cleaning cartridges.
library driveA cartridge transport attached to an LSM that is connected to, and controlled by, a client system. Library drives interact with the LCU during automated tape cartridge mount and dismount operations. Library drives interact with a client application
470 ACSLS 8.1 Adminstrator’s Guide December 2012
during tape data transfer operations. Library drives are individually addressable by the ACSLM and are individually accessible by client applications. See Cartridge Transport.
library errorsErrors that occur because the library is offline, has suffered hardware failure, is unavailable, etc.
Library Management Unit (LMU)The portion of an ACS that manages LSM's, allocates their resources, and communicates with ACSLS.
Library Storage Module (LSM)An ACS structure that provides the storage area for cartridges, cartridge drives, CAPs, and the robot necessary for moving them.
light emitting diode (LED)A light emitting device that uses little energy and is used mainly to indicate on/off conditions.
LMUSee Library Management Unit.
local area network (LAN)A computer network in which any component in the network can access any other component. This is the type of interface between an LMU and attached LSM's.
LSMSee Library Storage Module.
LSM IDA unique identifier for an LSM. The LSM ID consists of the ACS ID and the LSM number.
Mmissing cartridgeA cartridge that is in the database, but couldn't be found. If a recorded possible location for the cartridge could not be examined due to an offline LSM or a drive not communicating, the cartridge is marked MISSING instead of ABSENT. The cartridge status is changed to STATUS_VOLUME_MISSING.
Multiple TCP/IPUsing TCP/IP connections to multiple libraries to provide redundant communication paths between the host software (ACSLS or HSC) and an SL8500 library complex.
Nnetwork adapterEquipment that provides an electrical and logical interface between a network and specific attached equipment.

December 2012 Glossary 471
Network Interface (NI)An interface between the server system and the client systems that maintains network connections and controls the exchange of messages. The NI is resident on the server system and each client system.
NISee Network Interface.
OOCROptical character recognition.
ONCOpen network computing.
Open Systems Interconnection (OSI)A software architecture model of the International Organization for Standardization. The OSI model provides standards for the interconnection of data processing systems.
OSISee Open Systems Interconnection.
OSLANOpen Systems Local Area Network.
PPartitionPartition of a library cell’s, cartridges, drives, and CAPs assigned to a physical partition that is managed by ACSLS as a separate ACS.
Pass-Thru Port (PTP)Mechanism that allows a cartridge to be passed from one LSM to another in a multiple LSM ACS.
PCAPSee priority CAP.
playgroundA reserved area of special cells (within an LSM) used for storing diagnostic cartridges and cartridges found in-transit upon power-on and before initialization of the LSM is completed.
poolA collection of tape cartridges having one or more similar features or attributes, such as a pool of scratch tapes.
POSTPower-on self-test.
priority CAP (PCAP)A single-cartridge CAP used for priority entry and ejection of cartridges.

472 ACSLS 8.1 Adminstrator’s Guide December 2012
processing errorsErrors that result from processing or network communication failures.
PROMProgrammable read-only memory.
PTPSee Pass-Thru Port.
RRDBMSRelational database management system.
redo log filesBackup files used to restore the ACSLS database.
relational databaseA database that is organized and accessed according to relationships between the data items; relationships are represented by tables.
Redundant ElectronicsThe optional SL8500 Redundant Electronics (RE) feature provides failover protection in enterprise libraries. RE uses a two sets of library controller cards. At any given time, one set is active and the other set is standby. The active library controller can failover to the standby in response to a command from ACSLS or the SL Console. Automatic failover can be initiated by the library in the event of a library card failure.
ROMRead-only memory.
RPCRemote Procedure Call.
SSCAPSee standard CAP.
scratchAn attribute of a tape cartridges, indicating that it is blank or contains no useful data.
SCSISmall computer serial interface.
Serial-attachedSee HLI-attached.
server systemThe part of the library that is the residence for ACSLS, now referred to as the Library Control System. The Library Control System acts as an interface between a library and client systems.
December 2012 Glossary 473
server system userA person who invokes ACSLS commands, utilities, or procedures on the server system. Server system users are generally site and maintenance personnel (for example, library operators, tape librarians, system administrators, CSEs, and systems personnel).
servoA system that uses feedback to control a process.
siloA commonly used term for an LSM. See Library Storage Module.
SIMMSingle inline memory module.
SLOTsee cell.
SQLSee structured query language.
SRNSee service request number.
SSISee Storage Server Interface.
SSRSoftware Support Representative.
Standard CAP (SCAP)A 21-cartridge CAP with the storage cells arranged in three rows of seven fixed cells.
Storage Server Interface (SSI)A software component, resident on a client system, that translates and routes messages between client applications and the CSI.
structured query language (SQL)A language used to define, access, and update data in a database.
StorageTek Library Consolethe operator panel software application used for the StreamLine libraries.
system resource variableUsed to control the amount of system resources used by ACSLS.
system unitThe Library Control Platform.
Ttape library management system (TLMS)A type of client application.
TCPTransmission Control Protocol.
474 ACSLS 8.1 Adminstrator’s Guide December 2012
TLMSSee tape library management system.
TODTime of day.
UUDPUser Datagram Protocol.
UNIXAn operating system originally developed by Bell Laboratories (now UNIX Systems Laboratories, Inc.) and used by a variety of computer systems.
unsolicited messagesMessages that indicate an error or notify you when a particular routine action can be taken.
UOCUsable on codes.
upgrade installationPerformed when installing a new version of ACSLS at an existing customer site.
userselectable features and options variables-Used to define various user-selectable features and options.
Vvalidation errorsErrors that result from format and syntax validation performed by cmd_proc.
venterVirtual enter. Entering an unlabeled cartridge with a virtual label.
virtual labelA logical volume ID (volser) that can be assigned to a cartridge when its physical label is missing or unreadable.
volserVolume Serial Number.
volumeA data or cleaning cartridge.
volume access controlLimits access to volumes, usually by the client.
volume identifierA six-character string that uniquely identifies a data or cleaning cartridge to the database.
volume serial number (volser)A synonym for external label identifier.
December 2012 Glossary 475
WWTMwrite tape mark.
XXDRExternal data representation.
XMLExtensible Markup Language. A universal format for structured documents and/or data on the Web.

476 ACSLS 8.1 Adminstrator’s Guide December 2012
December 2012 Index 1
Index
A
absent cartridge 118absent volumes 120access control
enablingownership.assignments file 81
access control information, rebuilding 68accessibility 459ACS states 245ACSLS
audit 82commands 201database recovery 138directory structure 34dual-LAN client configuration 92dual-LMU configurations 89extended store feature 83idling 33mixed-media restrictions for SCSI-attached
LSMs 87mixed-media support 86reconfiguring
general product behavior 61logging options 59, 66, 67
restarting 34scratch preferences 87suspending request processing 29utilities 151
ACSLS commandsaudit 206cancel 211clear lock 215define pool 216delete pool 218dismount 220eject 223enter 227idle 230lock 232logoff 234mount 235mount * 238
move 242query 244query acs 245query cap 246query clean 248query drive 250query lmu 252query lock 255query lsm 257query mount 259query mount * 261query pool 263query port 265query request 266query scratch 267query server 268query volume 269set cap mode 272set cap priority 274set clean 275set commands 271set lock 277set owner 278set scratch 279show 281start 282switch lmu 283unlock 286vary 288venter 293
ACSLS utilitiesacsss 155bdb.acsss 157config acs 160config drives 162config lsm 163config ports 164db_export.sh 165db_import.sh 166del_vol 167drives_media.sh 168ejecting.sh 169free_cells.sh 170

2 ACSLS 8.1 Adminstrator’s Guide December 2012
getHba.sh 173get_license_info 174greplog 174moving.sh 175probeFibre.sh 183rdb.acsss 183stats_report 188userAdmin.sh 190volrpt 193watch_vols 198
acssaremote login 30server login 30
acssa user ID 25acsss command 155acsss user ID 25acsss_config 55, 447
enabling or disabling auto-clean 113for dynamic changes to drive configurations
162logging volume statistics report 147menu 50, 56run after adding, removing, or swapping
modules 388stats report 189
adding scratch volumes 115addresses, translating 349, 377AEM 378architecture, CSCI 447audit command 206audit, when to perform 82auditing the library 82
audit intervals 83running an audit 82
automatic database backup 137
B
backupautomatic 137manual to tape 137specified tape device attached to ACSLS server
137UNIX file 138
Backup and Recovery Toolsautomatic backups 323disaster scenarios
database corrupted-need to restore database to working state 327
ran acsss_config against wrong library 327server failure - rebuilding another ACSLS
server with new hardware 327server failure - rebuilding the same server
with new hardware 327
manual backups 324manual database exports 324using db_import.sh 326using rdb.acsss 325
bdb.acsss utility 157
C
cancel command 211CAP
cap_state 247displaying information about 104modes 102priorities 103set mode 272set priority 274states 101types 100
cartridgerecovery 120status reporting 119
cartridge access portsenter/eject cartridges 354
cartridgesabsent 118applying policies 110cleaning, correcting problems 113ejected 118ejecting 106entering 104expired 122loading into disabled LSM 128scratch 114
cell, display 303cleaning cartridges 275
checking 248defining 110
cleaning tape path, manual mode 112cleaning transports 110
auto clean option 62manually 112
cleaning transports in SCSI-attached LSMs 112clear lock command 215clustering
cartridges 354cmd_proc
batch user interface functionality 32, 33redirecting output 32using an input file 33
exiting 29input file 32logoff 234output file 32redirecting inputs and outputs 32

December 2012 Index 3
redirecting output 33shortcut keys 32using 27using an output file 33
command processorbatch user interface functionality 32, 33
redirecting output 32using an input file 33
exiting 29input file 32output file 32redirecting inputs and outputs 32redirecting output 33shortcut keys 32using 27using an output file 33
command syntax 202commands, ACSLS 201config acs 160config drives utility 162config lsm 163Configuration
configuring your library hardware 69defining event notification settings 68menu 56rebuilding access control information 68setting access control variables 66setting automatic backup variables 67setting CSI tuning variables 57setting event logging variables 59setting general product behavior variables 61
configurationupdating 49
configuringtape drives
layouts 350correcting cleaning cartridge problems 113CSCI
architecture 447environmental variables 449error messages 449overview 447
D
databaseautomatic backup 137backup to specified tape device 137backup to UNIX file 138deleting volumes 167exporting 130importing 133, 323installing 130manual backup to tape 137
recovering and restoring 138recovery 138restoring to most recent backup 139verifying 136verifying and library configuration 136
db_export.sh utility 130, 165db_import.sh utility 166define pool command 216delete pool command 218deleting scratch pools 116del_vol utility 167diagnostics
get_diags 421dismount command 220display cap command 300display cap information 101display cell command 303display command references 297display commands 298
display cap 300display cell 303display drive 304display lock 309display lsm 310display panel 313display pool 314display port 316display volume 318
display drive command 304display lock command 309display lsm command 310display panel command 313display pool command 314display port command 316display volume command 318displaying scratch information 115drive
clear lock 215configuration 162display 304lock 232, 255, 277state 250status 250unlock 286
Dual TCP/IP Support on SL3000 384Dual TCP/IP Support on SL8500 330dual-LAN client configuration 92dual-LMU 252
managing 89dual-LMU configuration 89dynamic configuration
config acs 160config drives 162config lsm 163

4 ACSLS 8.1 Adminstrator’s Guide December 2012
config ports 164dynamic configuration utilities 158dynamic variables
setting access control 66setting automatic backup 67setting CSI 57setting event logging 59setting event notification 68setting general product behavior 61
E
eject command 223ejected cartridge 118, 121ejected volumes 106, 121enabling access control, ownership.assignments file
81enter
cartridges 352, 354optimization 354
enter command 227enter command, manual vs automatic 228entering cartridges 104event log 59event log, search, using greplog 129event notification 94exiting a cmd_proc 29Expired Cartridges 122exporting
database to disk file 131database to tape 132
exporting the database 130Extended Store 83, 426extended store feature 83
F
Fast Load 401firewall security
ACSLS 431benefits 432communications 442communications concerns 432RPC concerns 432scenarios 434security concerns 432turning off 440turning on 438
fixVol.sh 403float 84, 179, 352, 426
optimization 354
frequently asked questions 443
G
greplog 129GUI
starting 40troubleshooting tips 422
H
HLI–PRC, description of 347, 377
I
idle command 230idling ACSLS 33importing
database from disk file 133db_import.sh 166
importing the database 133, 323initiating cmd_proc 30installing Solaris, preparation
Solaris 8 71internal addresses
description 347, 377invoking access control, ownership.assignments file
81IP addresses, registering for primary and secondary
LANs 92
K
keyboard shortcuts, cmd_proc 32
L
Library Hardwareconfiguring 47
library server utilities, general information 151LMU, switch 283loading a CAP 100loading cartridges into a disabled LSM 128lock
clear 215command 232
lock command 232logical libraries 395
benefits 396creating 397deleting 401limitations 397
logoff command 234LSM
display 310
December 2012 Index 5
populating 100query 257
M
managing a mixed-media library 86managing scratch volumes 114manual enter 227manual volume delete utility 122, 167media management 451, 455media optimization 352, 354miscellaneous ACSLS files, recovery 140missing cartridge 119, 120mixed media
files 86scratch preferences 87
library, managing 86media label 294mount 239restrictions for SCSI-attached LSMs 87scratch preferences 87
mount * command 238mount command 235mounting scratch volumes 117move 242move command 242move volume 242moving.sh 175multi-homed host 93
N
network IP addresses, registering for primary and secondary LANs 93
O
optimization guidelinescartridges 352, 354media 352, 354tape cartridges 352, 354
P
panel, row, column addressing 347, 377Partitioning 405
CAP behavior 411changing partition IDs 407changing partitioned ACS to un-partitioned
409guidelines 406library 407lre-partitioning a library 408
pass-thru 425pkginfo 418pool
define 216delete 218display 314query 263
port verification 316ports
adding 164information about 316
probeFibre 420
Q
query acs command 245query cap command 246query clean command 248query commands 244query drive command 250query lmu command 252query lock command 255query lsm command 257query mount * command 261query mount command 259query pool command 263query port command 265query request command 266query scratch command 267query server command 268query volume command 269Queue Mounts and Dismounts 96
R
rdb.acsss 183rdb.acsss utility 183rebalancing scratch pools 116reconfiguring ACSLS
logging options 59, 67, 68recovery
from failed server 140redirecting cmd_proc inputs and outputs 32Redundant Electronics 340
in query lmu 252in switch lmu 283
redundant electronics 340registering for event notification 94request, query 266restarting ACSLS 34restore 138
miscellaneous ACSLS files 140restoring database
to most recent backup 139

6 ACSLS 8.1 Adminstrator’s Guide December 2012
restoring miscellaneous ACSLS files 140Retry Mounts and Dismounts 96
S
scratchcartridge optimization 354
scratch pooldefining 216deleting 218displaying 314mount scratch, query 259rebalancing 116
scratch, query 267SCSI-attached
adding 83server
failure recovery 140idle 230starting 282
server state, query 268server utilities, general information 151set cap mode command 272set cap priority command 274set clean command 275set lock command 277set owner command 278set scratch command 279setting event notification 68show command 281SL3000
ACSLS Support 373aliasing CAP IDs 380auditing 375auditing new cartridge addresses 383before configuring 374CAP behavior 381CAP numbering 376connecting to ACSLS 374finding missing cartridges 382internal addressing 377modules 376new panel types 377using dynamic configuration 383varying offline 382
SL500ACSLS Connectivity 385address schemes 386auditing the library 388CAP behavior 388column numbers 386drive addresses 386library configurable settings and ACSLS 387Library Differences 385
panels 386row numbers 386
SL8500ACSLS HA 25adding new SL8500 to right 364adding new SL8500 to the left 363CAP behavior 351, 381connecting to multiple SL8500s 338, 346Dual TCP/IP 330, 384Expansion
auditing 359expansion 357internal addresses and ACSLS addresses 347managing cartridge locations 353minimizing elevator and PTP activity 352missing cartridges 354, 382partitioning 405pass-rhtu-ports
adding new SL8500s 363pass-thru ports 361pass-thru-ports
merging ACSs 366removing PTPs 369splitting ACSs 369
supporting tape workloads 352tape drive locations 349translating internal addresses 349vary offline 355, 382verify SL8500 components are operational 347,
374Solaris
backup and export database 130start command 282starting cmd_proc 30static variables
setting CSI 57setting event logging 59setting event notification 68setting general product behavior 61using acsss_config 56
stats_report utility 188support
get_diags 421suspending and resuming a cmd_proc 29suspending request processing 33switch lmu command 283
T
TCP/IP timeout 92translating addresses 349, 377transports
cleaning 110cleaning for SCSI attached LSMs 112
December 2012 Index 7
cleaning manually 112displaying 304
troubleshootingACSLS event log 415client conections 421database recovery 138drives not being cleaned 113GUI 422library connections 419
tuning variables 57
U
UNIX file backup 138unlock command 286unscratching volumes 118user, show 281userAdmin.sh 190using a cmd_proc 27Using display Command Options 298using the CAP 100utilities
acs_renumber.sh 154acsss 155bdb.acsss 157config acs 160config drives 162config lsm 163db_export.sh 165db_import.sh 166del_vol 167drives_media.sh 168ejecting.sh 169free_cells.sh 170getHba.sh 173get_license_info 174greplog 174licensekey.sh 175moving.sh 175pinglmu 420probeFibre.sh 183, 420probescsi.sh 420rdb.acsss 183showDevs 420stats_report 188testlmu 419testlmutcp 419testports 418, 419userAdmin.sh 190volrpt 193watch_vols 198
V
vary command 288venter command 293verifying imported database 136
dismounting a volume to verify 136mounting a volume to verify 136
Virtual Tape Library 391behavior 392configuring to ACSLS 393supported configurations 391
volrpt utility 193volume attributes 133volume reports, custom 144volume statistics 59volume statistics report
logging volume movement 147volume, querying 269volumes
absent 118, 119adding scratch 115delete 122display 318displaying scratch information 115ejecting 106managing scratch 114mounting scratch 117unscratching 118
W
watch_vols utility 198

8 ACSLS 8.1 Adminstrator’s Guide December 2012


![StorageTek Automated Cartridge System Library … comments about this document by clicking the Feedback [+] link at: StorageTek Automated Cartridge System Library Software ... ii ACSLS](https://static.documents.pub/doc/80x56/5b2b29a07f8b9a55588b4585/storagetek-automated-cartridge-system-library-comments-about-this-document-by-clicking.jpg)


![[1]StorageTek Enterprise Library Software …1]StorageTek Enterprise Library Software Introducing ELS Release 7.3 E60322-02 September 2016](https://static.documents.pub/doc/80x56/5abff6bd7f8b9a4e7c8b520f/1storagetek-enterprise-library-software-1storagetek-enterprise-library-software.jpg)


