Changing Needle Position When selecting straight stitch patterns 01, 03, 04 and 05, you can adjust the needle position from far left to far right. By pressing the stitch width button you can move the needle position and the indicator lights above will illuminate each time the needle moves. Please note: If you are selecting stitch pattern 01, the sewing machine will automatically default to a center needle position. Every time you press on the stitch width button, you will change the position of the needle. You have a total of 10 needle positions for this stitch. When selecting stitch pattern 02, this has already been preset to a left needle position. This position can not be changed. 19 STRAIGHT STITCH SEWING This sewing machine has 5 straight stitch patterns that you can choose from. Straight stitch patterns should be selected to suit the type of fabric sewn. Pattern “01” - straight stitch center position Pattern “02” - straight stitch left position Pattern “03” - quilting stitch Pattern “04” - stem stitch Pattern “05” - triple straight stitch After you have turned the sewing machine on, the LCD Stitch Selector Display will show “01” indicating that the straight stitch center position is selected. 1. To select another straight stitch pattern, press the “+” pattern selector button to go the desired straight stitch. (i.e. 02, 03, 04 or 05) 2. Place both threads under the presser foot (all purpose foot) and towards the back of the machine. 3. Position the fabric under the presser foot and lower the presser foot. 4. Step on the foot controller to start sewing. Guide the fabric gently with your hand. 5. When you reach the end of the seam, press on the reverse stitch button and sew for approximately 1/2-inch (1 cm). Release the reverse stitch button and sew again until the end to secure the seam. 6. Remove your foot from the foot controller to stop sewing. 7. Raise the presser foot, remove the fabric by pulling towards the back and cut the thread. 01 05 03 02 04 01 all purpose foot
Transcript
Changing Needle PositionWhen selecting straight stitch patterns 01, 03, 04 and 05, you can adjust the needle position from far left to far right. By pressing the stitch width button you can move the needle position and the indicator lights above will illuminate each time the needle moves. Please note: If you are selecting stitch pattern 01, the sewing machine will automatically default to a center needle position. Every time you press on the stitch width button, you will change the position of the needle. You have a total of 10 needle positions for this stitch.When selecting stitch pattern 02, this has already been preset to a left needle position. This position can not be changed.
19
STRAIGHT STITCH SEWINGThis sewing machine has 5 straight stitch patterns that you can choose from. Straight stitch patterns should be selected to suit the type of fabric sewn.
After you have turned the sewing machine on, the LCD Stitch Selector Display will show “01” indicating that the straight stitch center position is selected.
1. To select another straight stitch pattern, press the “+” pattern selector button to go the desired straight stitch. (i.e. 02, 03, 04 or 05)2. Place both threads under the presser foot (all purpose foot) and towards the back of the machine.3. Position the fabric under the presser foot and lower the presser foot.4. Step on the foot controller to start sewing. Guide the fabric gently with your hand.5. When you reach the end of the seam, press on the reverse stitch button and sew for approximately 1/2-inch (1 cm). Release the reverse stitch button and sew again until the end to secure the seam.6. Remove your foot from the foot controller to stop sewing.7. Raise the presser foot, remove the fabric by pulling towards the back and cut the thread.
01 050302 04
01
all purposefoot
20
ZIGZAG STITCH SEWINGYour sewing machine can sew zigzag stitches of various widths and lengths by changing the settings of the stitch width and the stitch length.
Pattern “06” - zigzag stitch
Zigzag stitches are used for seam finishing, applique and sewing various applications.
SATIN STITCHING
Pattern “16” - satin stitch
All Purpose footSatin Stitch foot (optional)
When the pattern selector is set for the satin stitch, the machine will sew the zigzag stitches closer than the normal zigzag stitch. Use the all purpose foot or the satin stitch foot (optional) for this stitch. Satin stitch is used for applique, edging and embroidery.
06
06
16
16
all purposefoot
all purposefoot
satin stitchfoot (optional)
21
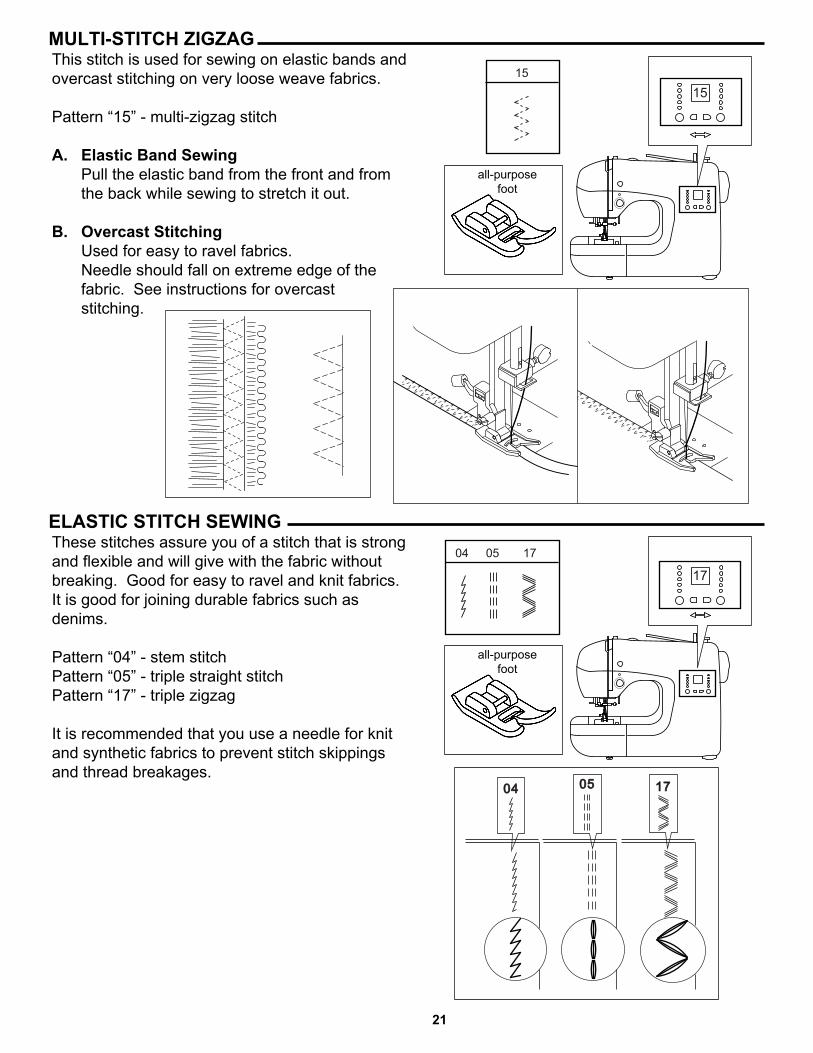
MULTI-STITCH ZIGZAGThis stitch is used for sewing on elastic bands and overcast stitching on very loose weave fabrics.
Pattern “15” - multi-zigzag stitch
A. Elastic Band Sewing Pull the elastic band from the front and from the back while sewing to stretch it out.
B. Overcast Stitching Used for easy to ravel fabrics. Needle should fall on extreme edge of the fabric. See instructions for overcast stitching.
1515
all-purposefoot
17
17
all-purposefoot
ELASTIC STITCH SEWINGThese stitches assure you of a stitch that is strong and flexible and will give with the fabric without breaking. Good for easy to ravel and knit fabrics. It is good for joining durable fabrics such as denims.
It is recommended that you use a needle for knit and synthetic fabrics to prevent stitch skippings and thread breakages.
04 05
0404 0505 1717
22
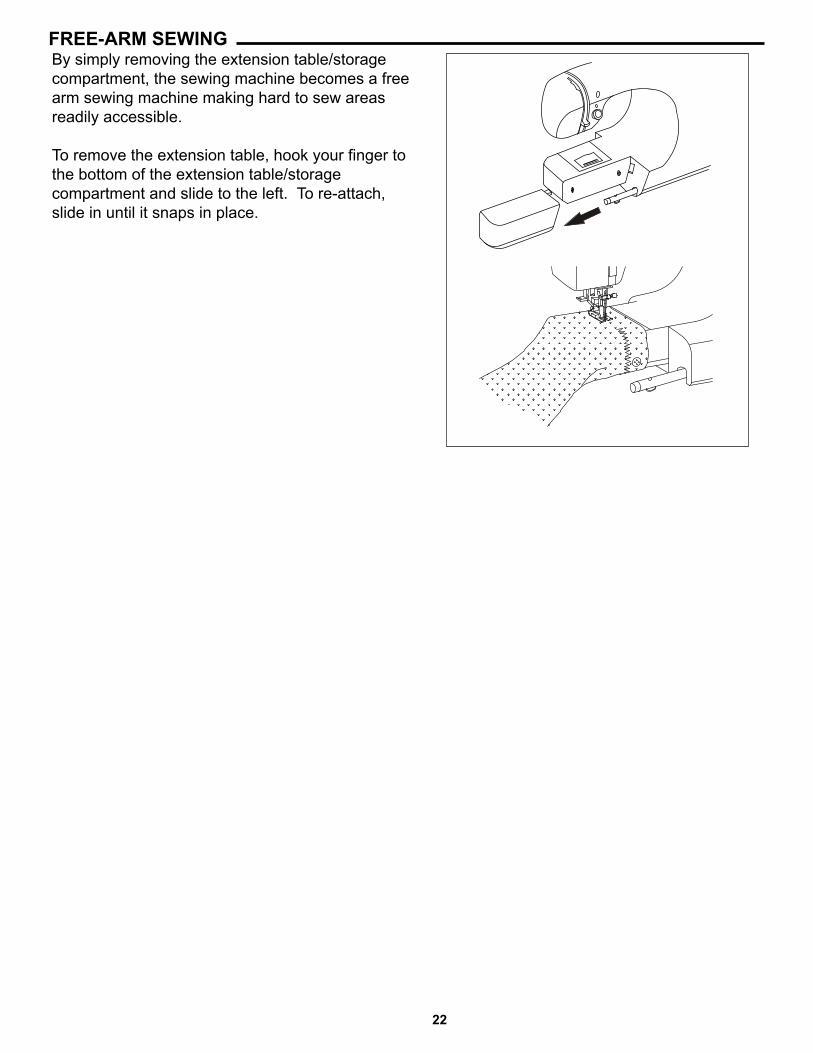
FREE-ARM SEWINGBy simply removing the extension table/storage compartment, the sewing machine becomes a free arm sewing machine making hard to sew areas readily accessible.
To remove the extension table, hook your finger to the bottom of the extension table/storage compartment and slide to the left. To re-attach, slide in until it snaps in place.
23
OVERCASTING - OVERLOCKINGAll overcasting and overlocking stitches are suitable for sewing and neatening edges and visible seams in one operation.
A. Using the All-Purpose Foot Patterns “06, 15, 18, 19, 20, 37, 38” Sew the overcast or overlock stitch along the edge of the fabric so that the needle drops over the edge of the fabric on the right side. Note: You can cut off the excess material after sewing the inside of the fabric. Be careful not to cut the thread when cutting off the excess fabric.
B. Using the Overcasting Foot (optional)
Patterns: “18, 19, 38”
Guide the fabric against the guide plate of the overcasting foot so that the needle falls near the edge of the seam.
Caution: Use the overcasting foot only for stitch patterns “18, 19” and “38”. It is possible that the needle could hit the presser foot and break when sewing other patterns.
15
all-purposefoot
1506 18 201918 2019 3837
18 1918 19 38overcasting
foot (optional)
24
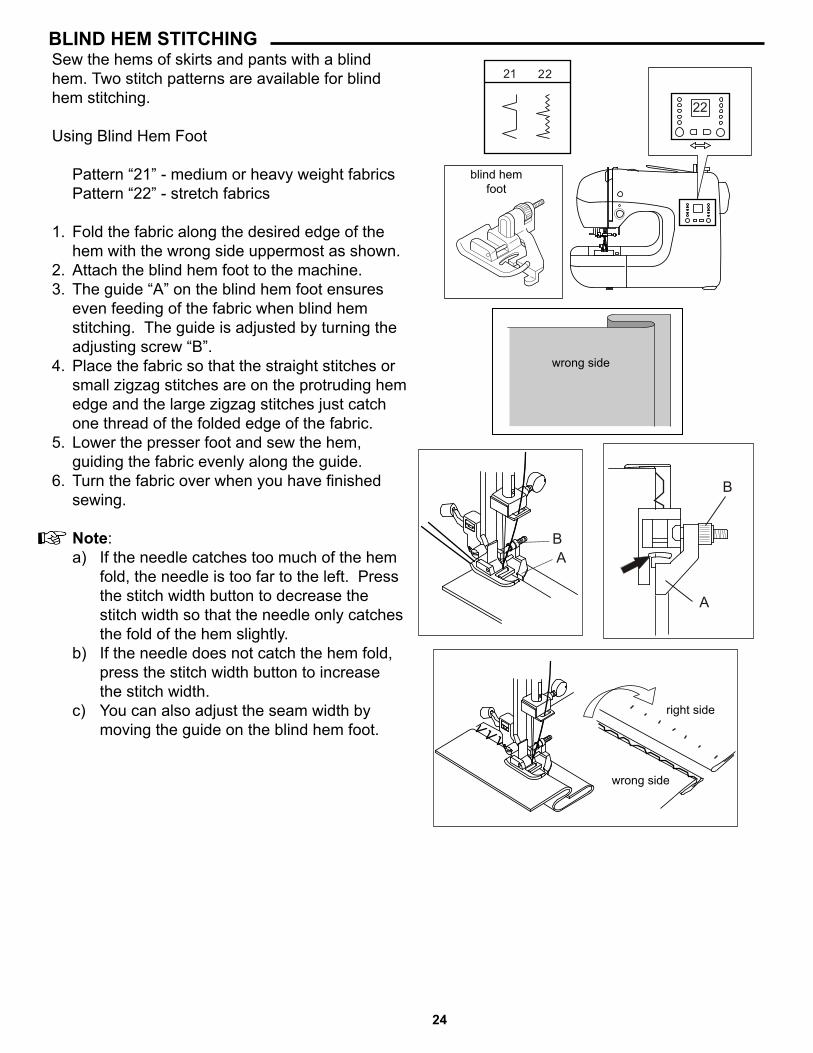
BLIND HEM STITCHINGSew the hems of skirts and pants with a blind hem. Two stitch patterns are available for blind hem stitching.
Using Blind Hem Foot Pattern “21” - medium or heavy weight fabrics Pattern “22” - stretch fabrics 1. Fold the fabric along the desired edge of the hem with the wrong side uppermost as shown.2. Attach the blind hem foot to the machine.3. The guide “A” on the blind hem foot ensures even feeding of the fabric when blind hem stitching. The guide is adjusted by turning the adjusting screw “B”.4. Place the fabric so that the straight stitches or small zigzag stitches are on the protruding hem edge and the large zigzag stitches just catch one thread of the folded edge of the fabric.5. Lower the presser foot and sew the hem, guiding the fabric evenly along the guide. 6. Turn the fabric over when you have finished sewing.
Note: a) If the needle catches too much of the hem fold, the needle is too far to the left. Press the stitch width button to decrease the stitch width so that the needle only catches the fold of the hem slightly. b) If the needle does not catch the hem fold, press the stitch width button to increase the stitch width. c) You can also adjust the seam width by moving the guide on the blind hem foot.
22
blind hemfoot
21 22
wrong side
wrong side
right side
AB
A
B
25
BUTTONHOLE SEWINGThis sewing machine can sew 8 different types of buttonholes.
Using Buttonhole Foot Pattern “07” - bar-tack buttonhole (narrow) for light to medium weight fabrics Pattern “08” - bar-tack buttonhole (wide) for large buttons Pattern “09” - keyhole buttonhole with reinforced bar tack Pattern “10” - tapered keyhole buttonhole Pattern “11” - round end buttonhole (narrow) with lengthwise bartack for light to medium weight fabrics Pattern “12” - round end buttonhole (wide) with lengthwise bartack for large buttons Pattern “13” - round end buttonhole with cross bar Pattern “14” - rounded buttonhole
1. Mark the position and the length of the buttonhole on the fabric. (Fig. 1)2. Place the button on the base of the buttonhole foot. If the button does not fit on the base, adjust the slide on the base to the diameter of the button plus the thickness of the button. (i.e. diameter of the button + thickness = size of buttonhole “A”) (Fig. 2, Fig. 3)3. Attach the buttonhole foot to the presser foot holder. (Fig. 4)4. Pass the upper thread through the hole of the buttonhole foot and bring both the upper and the bobbin threads to the left. 5. Position the fabric under the buttonhole foot so that the center line mark on the fabric is in the center of the buttonhole foot. Lower the foot.6. Lower the buttonhole lever (located on the left side of the needle bar) by pulling it down and to the back behind the first bracket on the buttonhole foot. (Fig. 5)
10
07 100908 11 12 141312 1413
buttonholefoot
A
Fig. 1
startingpoint
length
startingpoint
center
Fig. 2 Fig. 3
Fig. 4 Fig. 5buttonhole
lever
buttonholefoot bracket
buttonguideplate brackets
26
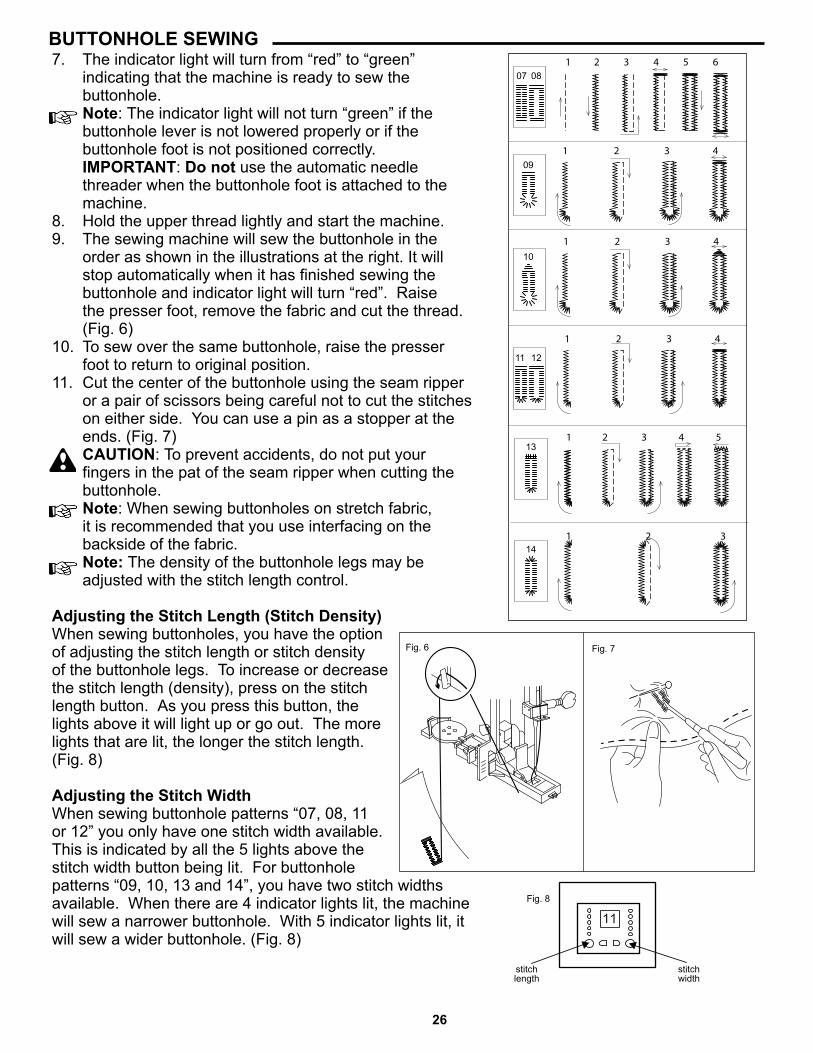
BUTTONHOLE SEWING7. The indicator light will turn from “red” to “green” indicating that the machine is ready to sew the buttonhole. Note: The indicator light will not turn “green” if the buttonhole lever is not lowered properly or if the buttonhole foot is not positioned correctly. IMPORTANT: Do not use the automatic needle threader when the buttonhole foot is attached to the machine.8. Hold the upper thread lightly and start the machine.9. The sewing machine will sew the buttonhole in the order as shown in the illustrations at the right. It will stop automatically when it has finished sewing the buttonhole and indicator light will turn “red”. Raise the presser foot, remove the fabric and cut the thread. (Fig. 6) 10. To sew over the same buttonhole, raise the presser foot to return to original position. 11. Cut the center of the buttonhole using the seam ripper or a pair of scissors being careful not to cut the stitches on either side. You can use a pin as a stopper at the ends. (Fig. 7) CAUTION: To prevent accidents, do not put your fingers in the pat of the seam ripper when cutting the buttonhole. Note: When sewing buttonholes on stretch fabric, it is recommended that you use interfacing on the backside of the fabric. Note: The density of the buttonhole legs may be adjusted with the stitch length control.
Adjusting the Stitch Length (Stitch Density)When sewing buttonholes, you have the option of adjusting the stitch length or stitch density of the buttonhole legs. To increase or decrease the stitch length (density), press on the stitch length button. As you press this button, the lights above it will light up or go out. The more lights that are lit, the longer the stitch length. (Fig. 8)
Adjusting the Stitch Width When sewing buttonhole patterns “07, 08, 11 or 12” you only have one stitch width available. This is indicated by all the 5 lights above the stitch width button being lit. For buttonhole patterns “09, 10, 13 and 14”, you have two stitch widths available. When there are 4 indicator lights lit, the machine will sew a narrower buttonhole. With 5 indicator lights lit, it will sew a wider buttonhole. (Fig. 8)
1 2 3 4 5 6
1 2 3 4
1 2 3 4
1 2 3 4
07 08
09
10
13
14
11 12
1 2 3 4 5
1 2 3
Fig. 6
Fig. 8
Fig. 7
11
stitchlength
stitchwidth
27
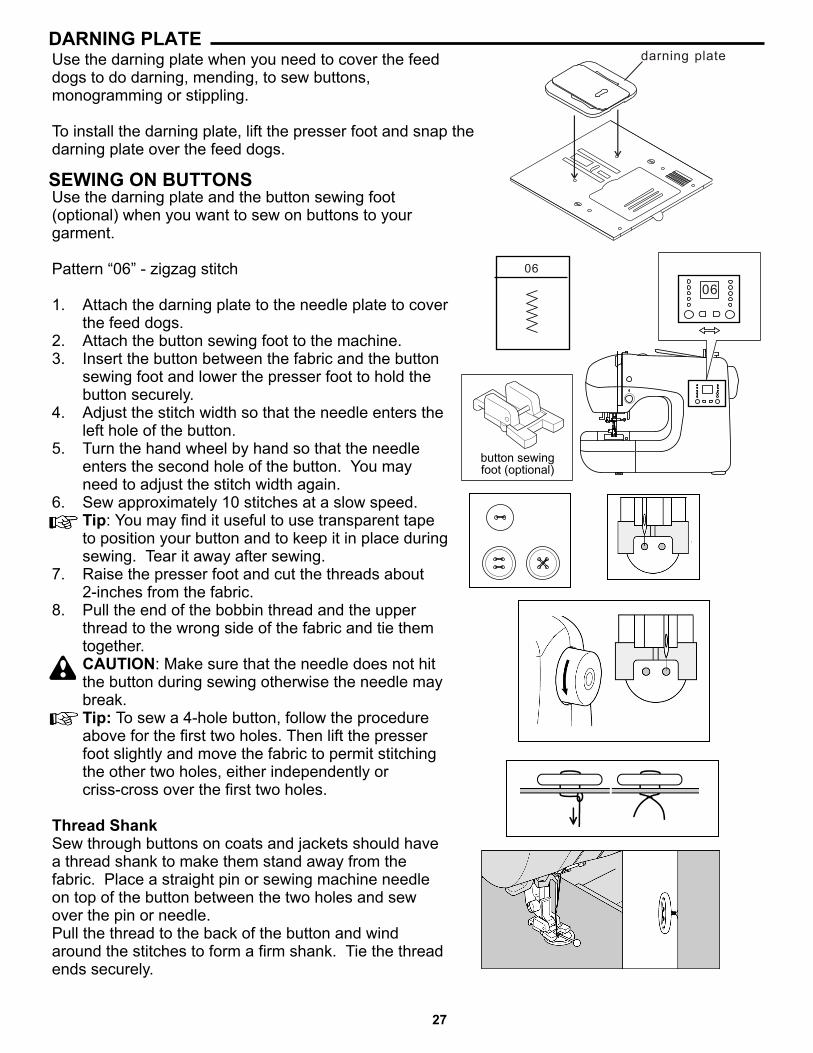
DARNING PLATE
SEWING ON BUTTONS
Use the darning plate when you need to cover the feed dogs to do darning, mending, to sew buttons, monogramming or stippling.
To install the darning plate, lift the presser foot and snap the darning plate over the feed dogs.
Use the darning plate and the button sewing foot (optional) when you want to sew on buttons to your garment.
Pattern “06” - zigzag stitch
1. Attach the darning plate to the needle plate to cover the feed dogs.2. Attach the button sewing foot to the machine.3. Insert the button between the fabric and the button sewing foot and lower the presser foot to hold the button securely. 4. Adjust the stitch width so that the needle enters the left hole of the button.5. Turn the hand wheel by hand so that the needle enters the second hole of the button. You may need to adjust the stitch width again.6. Sew approximately 10 stitches at a slow speed. Tip: You may find it useful to use transparent tape to position your button and to keep it in place during sewing. Tear it away after sewing.7. Raise the presser foot and cut the threads about 2-inches from the fabric.8. Pull the end of the bobbin thread and the upper thread to the wrong side of the fabric and tie them together. CAUTION: Make sure that the needle does not hit the button during sewing otherwise the needle may break. Tip: To sew a 4-hole button, follow the procedure above for the first two holes. Then lift the presser foot slightly and move the fabric to permit stitching the other two holes, either independently or criss-cross over the first two holes.
Thread ShankSew through buttons on coats and jackets should have a thread shank to make them stand away from the fabric. Place a straight pin or sewing machine needle on top of the button between the two holes and sew over the pin or needle.Pull the thread to the back of the button and wind around the stitches to form a firm shank. Tie the thread ends securely.
darning plate
0606
button sewingfoot (optional)
28
PATCH WORKThese stitches are used to join two pieces of fabric while leaving a space between their edges. This can be used when you are quilting or doing any other kinds of craft work.A. Using the all purpose footB. Using the satin stitch foot (optional)
Patterns “25, 26, 28, 33, 35, 39”
1. Place the two pieces of fabric right sides together and sew a basting stitch.2. Press the seam open.3. Select the stitch that you want, (i.e. “26”).4. Be sure that the stitches fall on both sides of the fabric as shown in the illustration.