41
Strategy Guideline: Quality Management in Existing Homes Cantilever Floor Example J. Taggart, J. Sikora, J. Wiehagen, and A. Wood NAHB Research Center December 2011
Strategy Guideline: Quality Management in Existing Homes Cantilever Floor Example J. Taggart, J. Sikora, J. Wiehagen, and A. Wood NAHB Research Center
December 2011
i
NOTICE
This report was prepared as an account of work sponsored by an agency of the United States government. Neither the United States government nor any agency thereof, nor any of their employees, makes any warranty, express or implied, or assumes any legal liability or responsibility for the accuracy, completeness, or usefulness of any information, apparatus, product, or process disclosed, or represents that its use would not infringe privately owned rights. Reference herein to any specific commercial product, process, or service by trade name, trademark, manufacturer, or otherwise does not necessarily constitute or imply its endorsement, recommendation, or favoring by the United States government or any agency thereof. The views and opinions of authors expressed herein do not necessarily state or reflect those of the United States government or any agency thereof.
Available electronically at http://www.osti.gov/bridge
Available for a processing fee to U.S. Department of Energy and its contractors, in paper, from:
U.S. Department of Energy Office of Scientific and Technical Information
P.O. Box 62 Oak Ridge, TN 37831-0062
phone: 865.576.8401 fax: 865.576.5728
email: mailto:[email protected]
Available for sale to the public, in paper, from: U.S. Department of Commerce
National Technical Information Service 5285 Port Royal Road Springfield, VA 22161 phone: 800.553.6847
fax: 703.605.6900 email: [email protected]
online ordering: http://www.ntis.gov/ordering.htm
Printed on paper containing at least 50% wastepaper, including 20% postconsumer waste
i
Strategy Guideline: Quality Management in Existing Homes
Prepared for:
Building America
Building Technologies Program
Office of Energy Efficiency and Renewable Energy
U.S. Department of Energy
Prepared by:
J. Taggart, J. Sikora, J. Wiehagen, A. Wood
The NAHB Research Center Industry Partnership
400 Prince George’s Boulevard
Upper Marlboro, Maryland 20774
NREL Technical Monitor: Stacey Rothgeb
Prepared under Subcontract No. KNDJ-0-40335-0
December 2011

ii
[This page left blank]
iii
Contents List of Figures ............................................................................................................................................ iv List of Tables .............................................................................................................................................. iv Background ................................................................................................................................................. 1 Introduction ................................................................................................................................................. 1
Scope of this Guideline ..............................................................................................................1 Ideal Whole-House Deep Retrofit vs. Customer Determined Partial Retrofit .....................2 What is a QA Approach? .....................................................................................................2 Cantilever Floor Example ....................................................................................................3
Section 1: Inspection of Existing Conditions ........................................................................................... 5 Typical Remodeling Project ......................................................................................................5 QA Approach for Energy Upgrade Remodeling Project ...........................................................6
Gather Data from Homeowner.............................................................................................6 Perform a Visual Inspection.................................................................................................6 Preliminary Testing (pre-retrofit) ........................................................................................9 Pre-Job Assessment Documentation ....................................................................................9
Section 2. Tradeoffs: Design, Cost and Performance Considerations ............................................... 11 System Interaction and Design Considerations .......................................................................11 Cost and Performance: Benefits ...............................................................................................12 Materials Specifications ...........................................................................................................14
Section 3: Measure Implementation Details ........................................................................................... 15 Installation Specifications and Procedure ................................................................................15 Establishing the Construction Process .....................................................................................15 Scope of Work for Energy Upgrade of Cantilevered Floor Area ............................................17
General Contractor (framing, insulation, air sealing, clean up) .........................................18 Plumber ..............................................................................................................................19 HVAC Contractor ..............................................................................................................19 Siding Contractor ...............................................................................................................19 Performance Testing/Home Energy Rater .........................................................................19
Approved Materials .................................................................................................................19 Preventive Training ..................................................................................................................20 Pre-Construction Meeting ........................................................................................................24 Construction Process/Installation Procedure ...........................................................................25 Field Inspections ......................................................................................................................27 Final Verification Procedures and Tests (post-retrofit) ...........................................................30
Quality Assurance and Satisfied Customers ......................................................................................... 30 References ................................................................................................................................................. 31 Appendix A: Field Inspections................................................................................................................. 33
iv
Figures Figure 1. Typical Building America climate regions ............................................................................... 2 Figure 2. House with cantilever front and rear following remodel......................................................... 3 Figure 3. Typical cantilevered floor area depicting issues leading to performance problems .......... 4 Figure 4. Existing conditions of cantilever floor area per visual inspection ........................................ 9 Figure 5. Pre-job assessment visual inspection checklist example .................................................... 10 Figure 6. Construction process flow chart for a sealed and insulated cantilevered floor area ........ 17 Figure 7. Cantilevered floor blocking, air sealing, and insulation detail ............................................. 18 Figure 8. Cantilevered floor blocking, air sealing, and insulation ....................................................... 20 Figure 9. Cantilevered floor blocking training sheet ............................................................................. 22 Figure 10. Cantilevered floor air sealing training sheet ........................................................................ 23 Figure 11. Cantilevered floor training sign-in sheet .............................................................................. 24 Figure 12. Job ready inspection checklist example .............................................................................. 28 Figure 13. Job complete inspection checklist example ........................................................................ 29
Unless otherwise noted, all figures were created by the NAHBRC team.
Tables Table 1. Initial Assessment Comparison for Cantilever Floor Area ...................................................... 5 Table 2. Impact of Cantilever Floor Area Improvement on House Systems/Features ....................... 12 Table 3. Example Qualitative Benefits for this Effort ............................................................................ 13 Table 4. Example Costs for this Effort .................................................................................................... 14 Table 5. Construction Process, Inspection Criteria, and Documentation Requirements for the
Energy Upgrade of a Cantilevered Floor Area ................................................................................. 25 Table 6. Inspection Schedule and Criteria Outline ................................................................................ 34 Unless otherwise noted, all tables were created by the NAHBRC team.
1
Background
The U.S. Department of Energy’s Building America (BA) Program research teams work with industry partners to enhance energy-efficiency, durability, indoor air quality and occupant comfort of new and existing homes. The recent increased emphasis in BA on high performing remodels is revealing a significant need for quality management in these projects for successful implementation because of the complexity of energy efficiency retrofits which must deal with aesthetic and performance improvements, and existing performance problems. This quality management need is heightened by the fragmented nature of the remodeling industry and by the lack of widespread adoption of quality management systems in the industry. Given this, a comprehensive package of remodeling details, measures, and guidelines is needed for remodeling to address the potential for energy efficiency as well as the livability of the home.
Introduction
The goal of existing home high performing remodeling quality management systems (HPR-QMS) is to establish practices and processes that can be used throughout any remodeling project. The research presented in this document provides a comparison of a selected retrofit activity as typically done versus that same retrofit activity approached from an integrated high performance remodeling and quality management perspective. It highlights some key quality management tools and approaches that can be adopted incrementally by a high performance remodeler for this or any high performance retrofit. This example is intended as a template and establishes a methodology that can be used to develop a portfolio of high performance remodeling strategies.
Scope of this Guideline This guideline is designed to highlight the quality assurance (QA) process that can be applied to any retrofit activity. The cantilevered floor retrofit detailed in this guideline is included only to provide an actual retrofit example to better illustrate the QA activities being presented. This document is not intended to present a thorough technical approach to any and all cantilevered floors of various types of construction and in various climate regions. Rather, this example is based on an actual house remodel of the cantilevered floors in the mixed-humid climate of the suburbs of Washington, D.C. This work is a detailed project that will ultimately be outlined by the U.S. Department of Energy's (DOE's) Guidelines for Home Energy Professionals Standard Work Specifications currently under development1
1 http://www1.eere.energy.gov/wip/retrofit_guidelines_overview.html
.
2
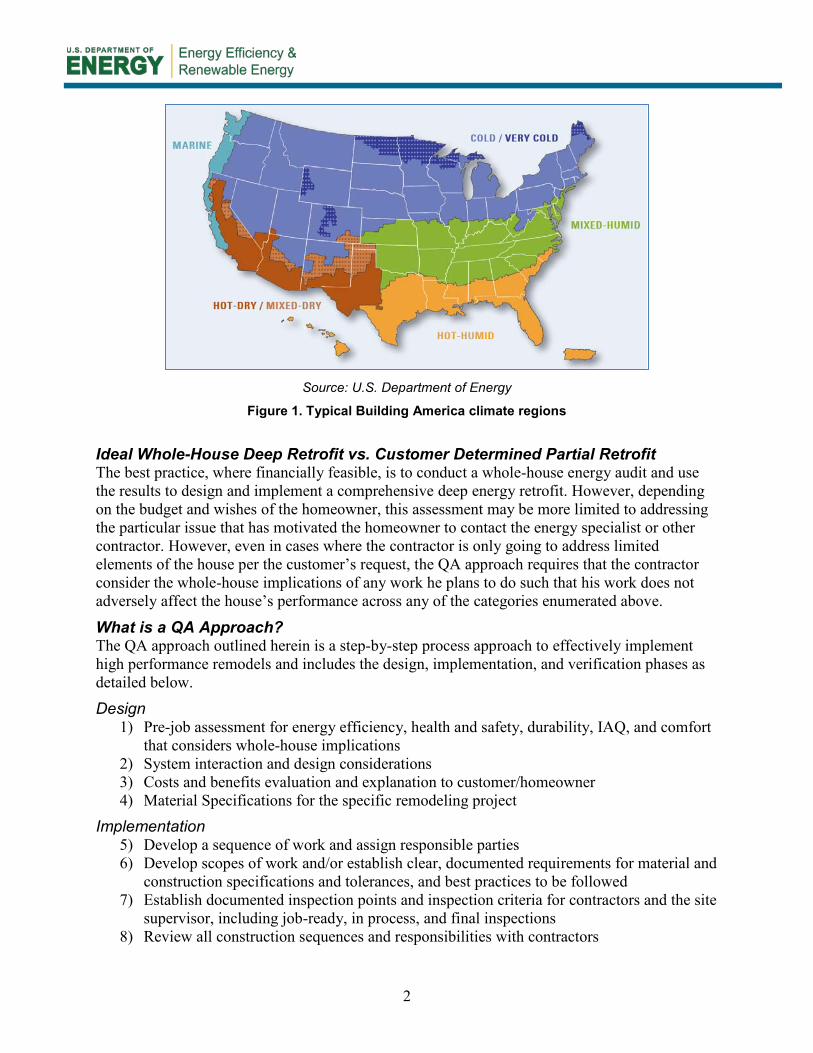
Source: U.S. Department of Energy
Figure 1. Typical Building America climate regions
Ideal Whole-House Deep Retrofit vs. Customer Determined Partial Retrofit The best practice, where financially feasible, is to conduct a whole-house energy audit and use the results to design and implement a comprehensive deep energy retrofit. However, depending on the budget and wishes of the homeowner, this assessment may be more limited to addressing the particular issue that has motivated the homeowner to contact the energy specialist or other contractor. However, even in cases where the contractor is only going to address limited elements of the house per the customer’s request, the QA approach requires that the contractor consider the whole-house implications of any work he plans to do such that his work does not adversely affect the house’s performance across any of the categories enumerated above.
What is a QA Approach? The QA approach outlined herein is a step-by-step process approach to effectively implement high performance remodels and includes the design, implementation, and verification phases as detailed below.
Design 1) Pre-job assessment for energy efficiency, health and safety, durability, IAQ, and comfort
that considers whole-house implications 2) System interaction and design considerations 3) Costs and benefits evaluation and explanation to customer/homeowner 4) Material Specifications for the specific remodeling project
Implementation 5) Develop a sequence of work and assign responsible parties 6) Develop scopes of work and/or establish clear, documented requirements for material and
construction specifications and tolerances, and best practices to be followed 7) Establish documented inspection points and inspection criteria for contractors and the site
supervisor, including job-ready, in process, and final inspections 8) Review all construction sequences and responsibilities with contractors

3
9) Train (or re-emphasize) contractors on the critical specifications and best practices for high performance retrofits with hotspot training sheets or other training approaches
Verification 10) Create accountability for contractors by conducting careful inspections and by utilizing
diagnostic and performance testing in the presence of the contractors in order to demonstrate to them the performance impact on the home of not doing precise and careful installations
Each of the QA elements listed above is explained in greater detail herein.
Cantilever Floor Example As outlined above, this document uses the example of a cantilever floor remodel as the basis for detailing a quality assurance approach. A cantilevered floor system that projects beyond the supporting wall as shown in Figure 2 is a common architectural element in U.S. homes. This system is common in split-level, ranch, and two-story homes as an affordable way to expand above-grade living area without increasing excavation costs. In this case, a homeowner in the mixed-humid climate of the suburbs of Washington, D.C., was experiencing cold floors and as a result wanted to remodel the cantilever area to improve interior comfort. The reason for the cold floors in this situation is due to poor air sealing and insulation in the cantilever area.
Figure 2. House with cantilever front and rear following remodel
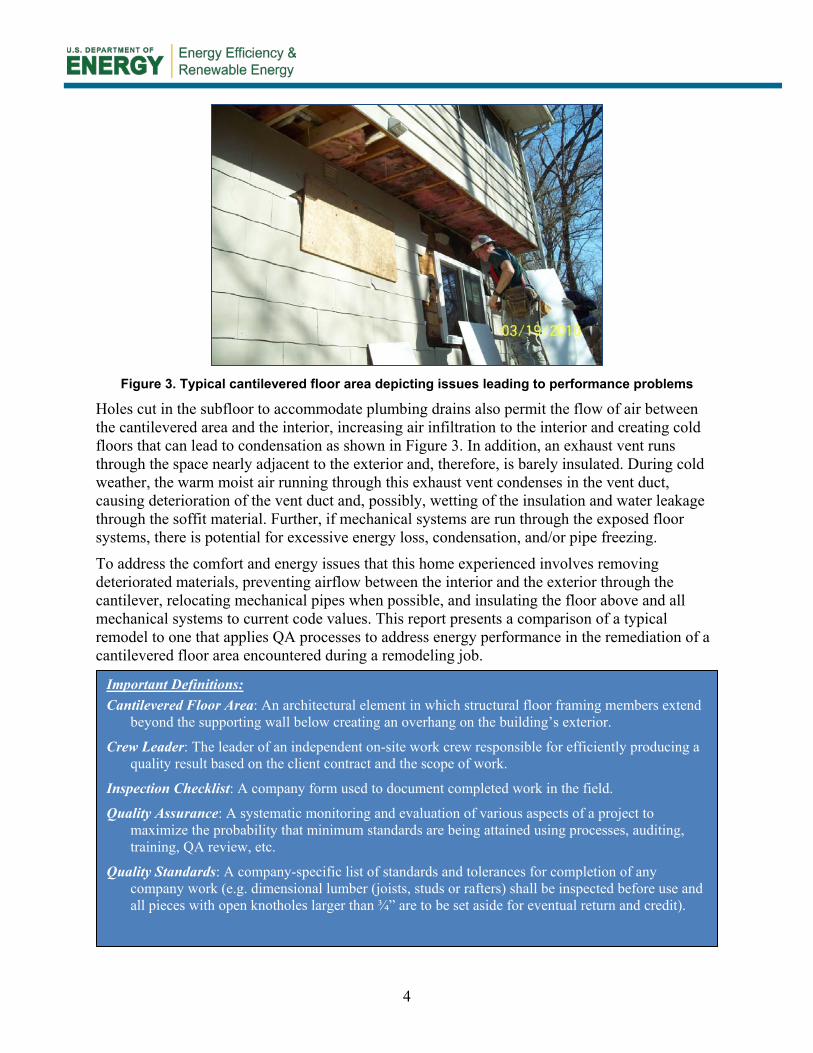
The cantilevered floor area was insulated with fiberglass batts and covered on the underside with soffit material that is perforated and permeable―therefore, not airtight. In addition, the existing design lacks an external air barrier (e.g., sheathing) and permits the relatively free flow of air into the cantilevered space and ultimately directly into the house. There is a direct path for air to infiltrate the home through the vented soffit over the interior wall as shown in Figure 3. The air leakage path through the cantilevered floor area is clearly evident by the dirty spots seen throughout the insulation in Figure 3. The air leakage through a typical cantilevered floor also leads to uneven room temperatures, increased energy bills, and potential condensation issues that can lead to deterioration within the cantilevered space.
4
Figure 3. Typical cantilevered floor area depicting issues leading to performance problems
Holes cut in the subfloor to accommodate plumbing drains also permit the flow of air between the cantilevered area and the interior, increasing air infiltration to the interior and creating cold floors that can lead to condensation as shown in Figure 3. In addition, an exhaust vent runs through the space nearly adjacent to the exterior and, therefore, is barely insulated. During cold weather, the warm moist air running through this exhaust vent condenses in the vent duct, causing deterioration of the vent duct and, possibly, wetting of the insulation and water leakage through the soffit material. Further, if mechanical systems are run through the exposed floor systems, there is potential for excessive energy loss, condensation, and/or pipe freezing.
To address the comfort and energy issues that this home experienced involves removing deteriorated materials, preventing airflow between the interior and the exterior through the cantilever, relocating mechanical pipes when possible, and insulating the floor above and all mechanical systems to current code values. This report presents a comparison of a typical remodel to one that applies QA processes to address energy performance in the remediation of a cantilevered floor area encountered during a remodeling job.
Important Definitions: Cantilevered Floor Area: An architectural element in which structural floor framing members extend
beyond the supporting wall below creating an overhang on the building’s exterior.
Crew Leader: The leader of an independent on-site work crew responsible for efficiently producing a quality result based on the client contract and the scope of work.
Inspection Checklist: A company form used to document completed work in the field.
Quality Assurance: A systematic monitoring and evaluation of various aspects of a project to maximize the probability that minimum standards are being attained using processes, auditing, training, QA review, etc.
Quality Standards: A company-specific list of standards and tolerances for completion of any company work (e.g. dimensional lumber (joists, studs or rafters) shall be inspected before use and all pieces with open knotholes larger than ¾” are to be set aside for eventual return and credit).
5
Section 1: Inspection of Existing Conditions
The first step in any remodeling project is determining the existing conditions of the home. In the cantilever floor example, a homeowner specifically requested remodeling the cantilever area due to cold floors. In order to facilitate this project, the first step is to assessg this area.
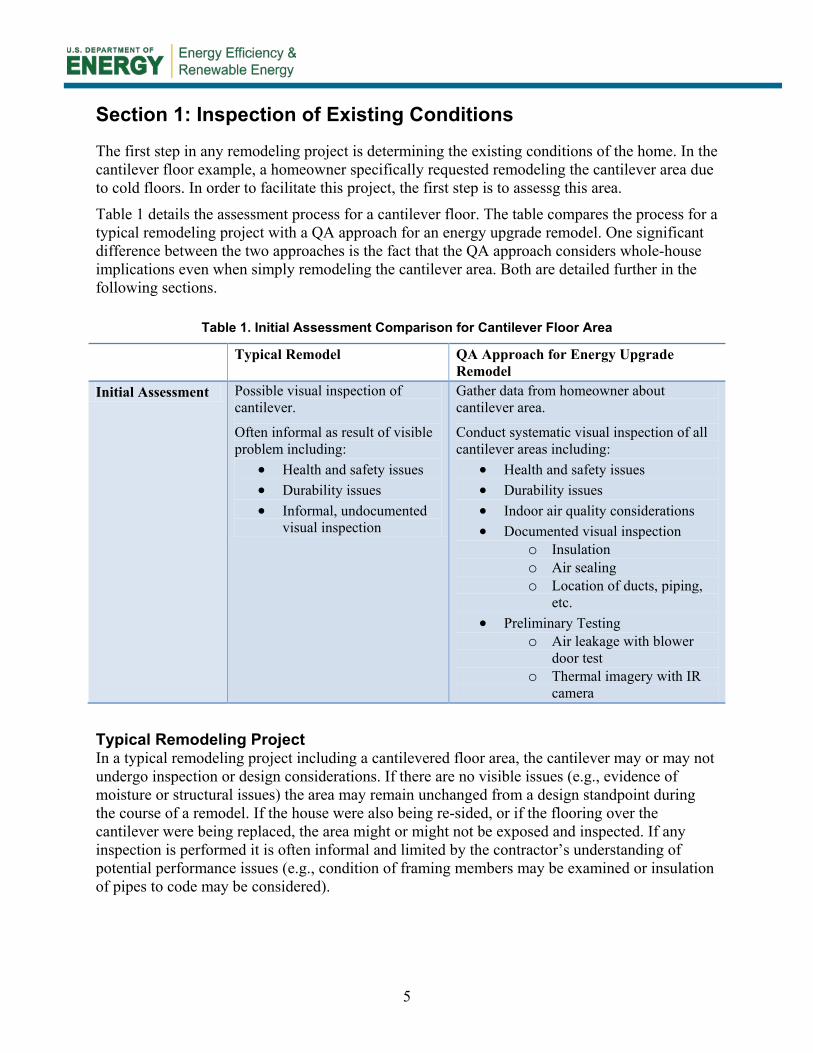
Table 1 details the assessment process for a cantilever floor. The table compares the process for a typical remodeling project with a QA approach for an energy upgrade remodel. One significant difference between the two approaches is the fact that the QA approach considers whole-house implications even when simply remodeling the cantilever area. Both are detailed further in the following sections.
Table 1. Initial Assessment Comparison for Cantilever Floor Area
Typical Remodel QA Approach for Energy Upgrade Remodel
Initial Assessment Possible visual inspection of cantilever. Often informal as result of visible problem including:
• Health and safety issues • Durability issues • Informal, undocumented
visual inspection
Gather data from homeowner about cantilever area. Conduct systematic visual inspection of all cantilever areas including:
• Health and safety issues • Durability issues • Indoor air quality considerations • Documented visual inspection
o Insulation o Air sealing o Location of ducts, piping,
etc. • Preliminary Testing
o Air leakage with blower door test
o Thermal imagery with IR camera
Typical Remodeling Project In a typical remodeling project including a cantilevered floor area, the cantilever may or may not undergo inspection or design considerations. If there are no visible issues (e.g., evidence of moisture or structural issues) the area may remain unchanged from a design standpoint during the course of a remodel. If the house were also being re-sided, or if the flooring over the cantilever were being replaced, the area might or might not be exposed and inspected. If any inspection is performed it is often informal and limited by the contractor’s understanding of potential performance issues (e.g., condition of framing members may be examined or insulation of pipes to code may be considered).
6
QA Approach for Energy Upgrade Remodeling Project To address energy performance, an inspection of obvious locations of areas where air leakage and inadequate insulation will likely be found can be incorporated as part of a whole house assessment as the first step of a remodeling project. Using a quality assurance (QA) approach in conjunction with energy efficiency considerations in a remodeling project ensures that performance issues and whole-house interactions with the house are identified for the homeowner. Using a QA approach for a remodel focused on high performance, a cantilevered floor area will be inspected as a matter of course because cantilevered floor areas are areas that commonly compromise energy efficiency and comfort in many existing homes. During this initial assessment, a general contractor will gather data, perform inspections, and assess the home.
Gather Data from Homeowner Before inspecting a cantilevered area, it is useful to verify the issues and ask the homeowners about any related problems they may have encountered. After all, specific items may have been previously rectified (or built properly from the outset) and, hence, no remediation is required. Suggested questions about the example cantilever for the homeowner include:
• Are the floors near this area cold in winter? Are they hot in the summer?
• Do you experience cooler winter temperatures in rooms adjacent to this area?
• Does this room feel “drafty” on windy days?
• Have you detected any signs of moisture from the overhanging area? (e.g., stains on siding, insect activity)
• Have you ever experienced frozen pipes in adjacent interior spaces?
• Has this area been previously renovated? If so, do you know what was done? Do you have photographs?
Perform a Visual Inspection After verifying that performance issues have been experienced, and the cantilevered floor area is the suspected culprit, the next step is to visually inspect the cantilever area. Depending on existing conditions and the scope of the remodeling job, visual inspection of the remodel area can take place from the interior or exterior of the home.
In general, a visual inspection from the exterior is typically the least destructive. Further, if remediation is needed, access from the exterior is desirable. If the remodeling job is extensive, however, access from the interior may also be possible. For this initial inspection, if minimal intrusion is required, interior inspection may be accomplished by creating small holes in several of the joist bays and inspecting with small mirrors and flashlights.
During inspection, the contractor assesses any potential risks related to the area. For a cantilevered floor area, this includes:
Health and Safety Asbestos: Asbestos siding should remain intact unless OSHA procedures are followed. If unsure whether material contains asbestos, contact a qualified asbestos professional to assess the material; sample and test as needed.
7
Lead Paint: EPA procedures for lead-based paint are followed for a house built prior to 1978. Renovations and retrofit activities should comply with EPA’s Lead-Safe Renovation, Repair and Painting Rules if disturbing an area greater than 6 square feet of interior or 20 square feet of exterior painted surfaces.
Combustion Safety: Combustion safety inspections should follow the BPI Home Energy Auditing Standard or the RESNET Mortgage Industry National Home Energy Rating Standards and address backdrafting and roll-out for homes using combustion equipment and/or appliances.
Radon: The requirements of the local ordinance for radon mitigation should be followed. Where local ordinances do not address radon mitigation for existing buildings, the protocol for new construction can be followed with regard to establishing radon hazard levels and the need for mitigation measures. Where local ordinances do not address radon, use the EPA Map of Radon Zones (www.epa.gov) or conduct radon testing on site to establish the radon hazard level. If radon level exceeds 4.0 pCi/L, implement mitigation measures in accordance with ASTM 2121 ‘Standard Practice for Installing Radon Mitigation Systems in Existing Low-Rise Residential Buildings’.
Address any health and safety issues prior to the retrofit.
Durability
Address degradation of the cantilevered area from moisture degradation of the structural members or improper structural design prior to the retrofit.
: Structural: Degradation of the structural members or improper structural design is considered.
Moisture Problems/Vapor Diffusion: Insufficient and improper air sealing and insulation can create conditions favorable for moisture accumulation, which can affect the building’s durability. The addition of interior moisture from improper ventilation (e.g. water vapor from showering, cooking, etc) can also increase moisture accumulation and affect durability.
Consider air sealing design of the cantilever area to reduce moisture accumulation.
Consider ventilation strategies with increased air sealing.
Moisture Problems/Bulk Water Leaks: Water leaks may be due to plumbing leaks, (drains, water on floor of bathroom or kitchen leaking onto floor assembly, etc.) or improper flashing and/or exterior drainage plane.
Address any bulk water leaks prior to remodel.
Contractor/ Homeowner Safety Addressing structural issues is paramount to the safety of the contractor and the homeowners. Under the typical remodeling approach, underlying issues that led to structural damage may not be rectified. Using a QA approach to repair of a cantilevered floor area, a contractor will systematically address all relevant health and safety issues.
References to Other Guidelines, Codes, and Standards: OSHA standard 1926.1101 covers safety and health regulations for construction involving asbestos EPA’s Lead-Safe Renovation, Repair and Painting Rules detail the requirements for lead-based paint in remodeling BPI Home Energy Auditing Standard & the RESNET Mortgage Industry National Home Energy Rating Standards address the procedures for auditing a home. ASTM2121 is the standard to installing radon mitigation systems in low-rise residential buildings
8
Consider flashing details and exterior drainage plane location in the cantilever remodel.
Freezing Pipes: Water pipes in the exterior of existing homes are often essentially running through unconditioned space. Without proper air sealing and insulation, freezing pipes can result.
Consider moving and/or insulating water pipes in cantilever area.
Insects: Unwanted pests such as termites can affect durability. In addition, stinging insects can impede remodeling projects.
Address termites and other insects affecting durability prior to remodeling the cantilever area.
Consider stinging insects when remodeling the cantilever.
Indoor Air Quality
Consider air sealing strategies to address air sealing in the cantilever area.
: Unmitigated airflow from insufficient and improper air sealing can bring unwanted pollutants into the home from the exterior or garage areas. If the home is not properly ventilated, water vapor from showering, cooking, etc. can affect indoor air quality.
Based on post-retrofit infiltration levels, additional mechanical ventilation may be necessary and should be installed to have the capability of supplying fresh air at levels outlined in ASHRAE Standard 62.2.
The initial visual inspection will examine the area and document the current conditions, to the extent possible prior to demolition, for any health and safety, durability, and indoor air quality items that need to be addressed. In addition, the initial inspection will also investigate how to improve the homeowner’s comfort around the cantilever floor area. This will focus on investigating the air sealing and insulation because these are the most common reasons in the mixed-humid climate for cold floors. Therefore, the visual inspection will also document any of the following, if present:
Existence of a continuous air barrier separating the outdoors and the cantilevered space
Existence and type of insulation
Blocking (to minimize airflow) between joist bays and supporting wall
Air sealing measures around penetrations through sub-floor above cantilevered area.
Existing duct sealing measures.
The results of the visual inspection are shown Figure 4. There is batt insulation installed, however, it is not installed in every cavity of the cantilever floor. In addition, the insulation is dirty indicating that there is significant air flow through the insulation. There is not currently an air barrier or blocking installed and there is minimal air sealing of penetrations and duct sealing measures currently installed.
9
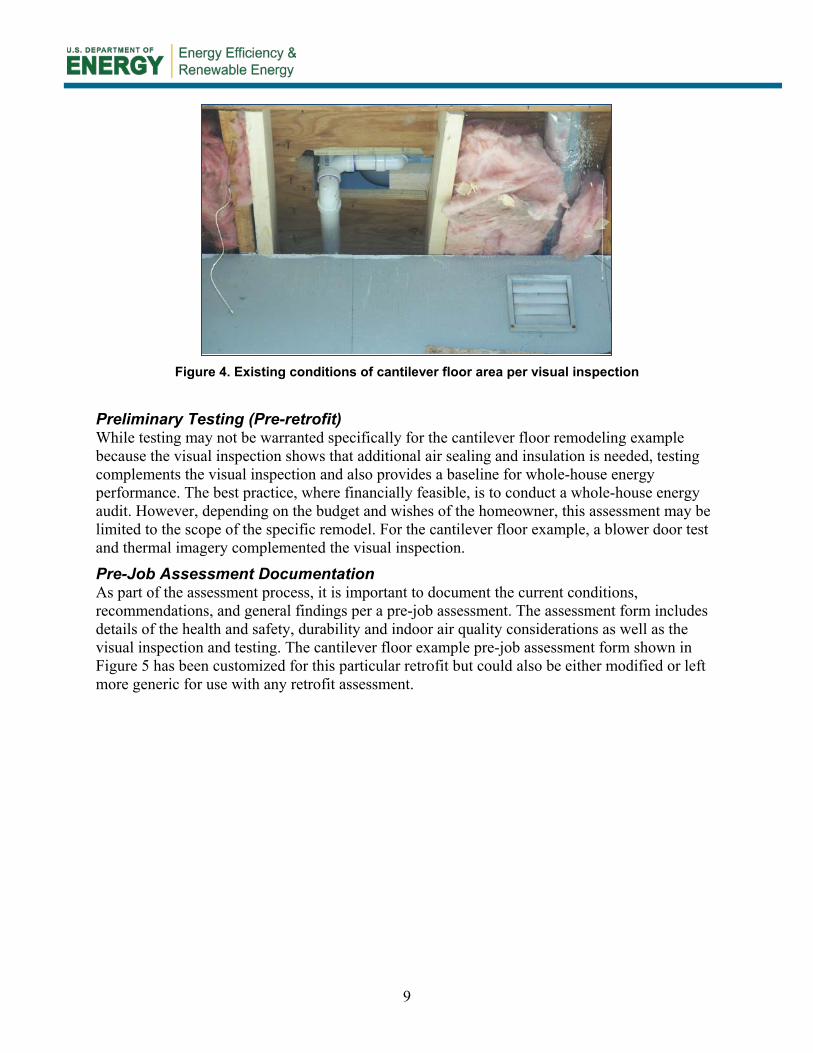
Figure 4. Existing conditions of cantilever floor area per visual inspection
Preliminary Testing (Pre-retrofit) While testing may not be warranted specifically for the cantilever floor remodeling example because the visual inspection shows that additional air sealing and insulation is needed, testing complements the visual inspection and also provides a baseline for whole-house energy performance. The best practice, where financially feasible, is to conduct a whole-house energy audit. However, depending on the budget and wishes of the homeowner, this assessment may be limited to the scope of the specific remodel. For the cantilever floor example, a blower door test and thermal imagery complemented the visual inspection.
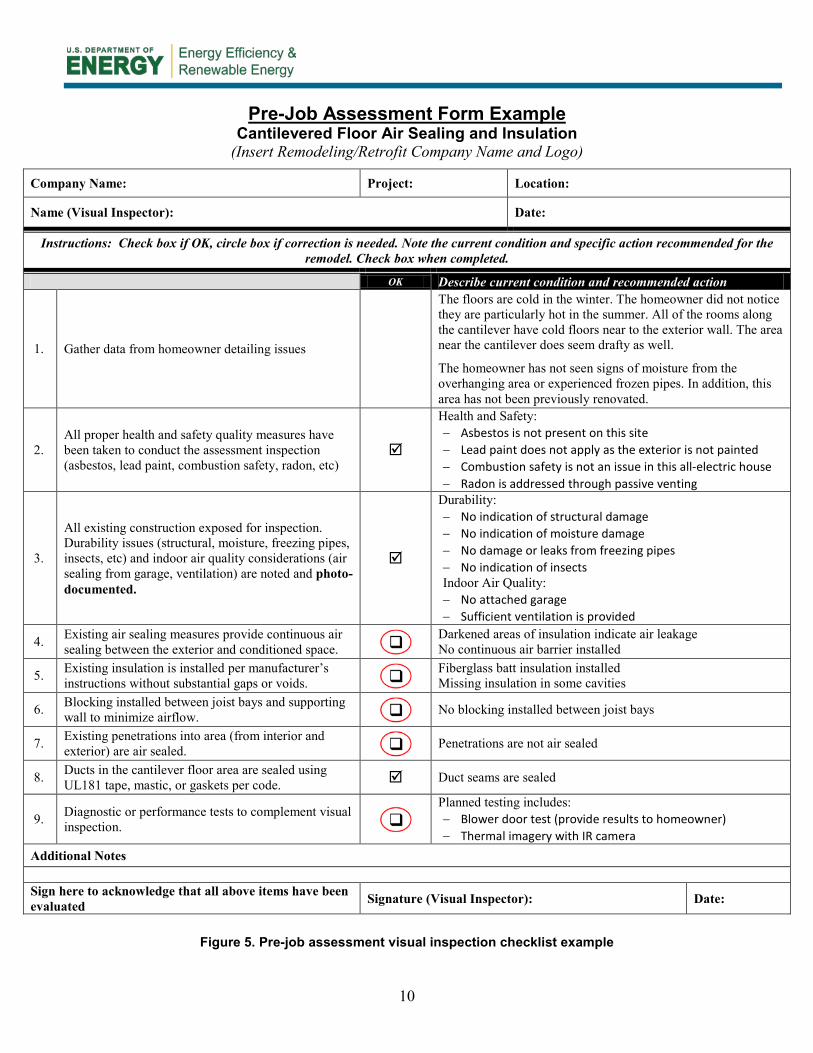
Pre-Job Assessment Documentation As part of the assessment process, it is important to document the current conditions, recommendations, and general findings per a pre-job assessment. The assessment form includes details of the health and safety, durability and indoor air quality considerations as well as the visual inspection and testing. The cantilever floor example pre-job assessment form shown in Figure 5 has been customized for this particular retrofit but could also be either modified or left more generic for use with any retrofit assessment.
10
Pre-Job Assessment Form Example Cantilevered Floor Air Sealing and Insulation
(Insert Remodeling/Retrofit Company Name and Logo)
Company Name: Project: Location:
Name (Visual Inspector): Date:
Instructions: Check box if OK, circle box if correction is needed. Note the current condition and specific action recommended for the remodel. Check box when completed.
OK Describe current condition and recommended action
1. Gather data from homeowner detailing issues
The floors are cold in the winter. The homeowner did not notice they are particularly hot in the summer. All of the rooms along the cantilever have cold floors near to the exterior wall. The area near the cantilever does seem drafty as well.
The homeowner has not seen signs of moisture from the overhanging area or experienced frozen pipes. In addition, this area has not been previously renovated.
2. All proper health and safety quality measures have been taken to conduct the assessment inspection (asbestos, lead paint, combustion safety, radon, etc)
Health and Safety: − Asbestos is not present on this site − Lead paint does not apply as the exterior is not painted − Combustion safety is not an issue in this all-electric house − Radon is addressed through passive venting
3.
All existing construction exposed for inspection. Durability issues (structural, moisture, freezing pipes, insects, etc) and indoor air quality considerations (air sealing from garage, ventilation) are noted and photo-documented.
Durability: − No indication of structural damage − No indication of moisture damage − No damage or leaks from freezing pipes − No indication of insects Indoor Air Quality: − No attached garage − Sufficient ventilation is provided
4. Existing air sealing measures provide continuous air sealing between the exterior and conditioned space.
Darkened areas of insulation indicate air leakage No continuous air barrier installed
5. Existing insulation is installed per manufacturer’s instructions without substantial gaps or voids.
Fiberglass batt insulation installed Missing insulation in some cavities
6. Blocking installed between joist bays and supporting wall to minimize airflow. No blocking installed between joist bays
7. Existing penetrations into area (from interior and exterior) are air sealed. Penetrations are not air sealed
8. Ducts in the cantilever floor area are sealed using UL181 tape, mastic, or gaskets per code. Duct seams are sealed
9. Diagnostic or performance tests to complement visual inspection.
Planned testing includes: − Blower door test (provide results to homeowner) − Thermal imagery with IR camera
Additional Notes Sign here to acknowledge that all above items have been evaluated Signature (Visual Inspector): Date:
Figure 5. Pre-job assessment visual inspection checklist example
11
Section 2. Tradeoffs: Design, Cost and Performance Considerations
After the initial assessment described in the previous section (including gathering data, visual inspections, and preliminary testing) identifies a need for a performance upgrade, the design process begins. This process involves consideration of several factors, including homeowner priorities, the extent of the need for remediation, the scope of the remodeling project, the benefits of potential solutions, whole-house system interactions, and the availability of materials.
In a typical remodel that exposes a cantilevered floor area, a contractor would likely address any wood deterioration issues, insulate mechanical systems that run through the space, and replace materials such as vented soffit and fiberglass insulation as needed. Yet, because a whole-house consideration and systematic approach to addressing building science issues would not occur under the typical scenario, the underlying issues which caused performance problems often would remain. In a typical remodeling scenario, the interaction between the cantilevered floor area and other systems may be informally or formally considered. However, this analysis would vary greatly depending on the contractor’s knowledge of building science and interest in addressing issues that may seem to be unrelated.
Using a QA approach, the remodeler methodically weighs many factors to identify possible actions for creating an effective air barrier between the exterior and the cantilevered floor area and for effectively insulating the area.
System Interaction and Design Considerations In a typical remodeling situation, repair of a cantilever floor area would focus on replacing materials that appear to be degraded (e.g., siding, wood framing) and, possibly, upgrades of floor and mechanical system insulation to meet code requirements.
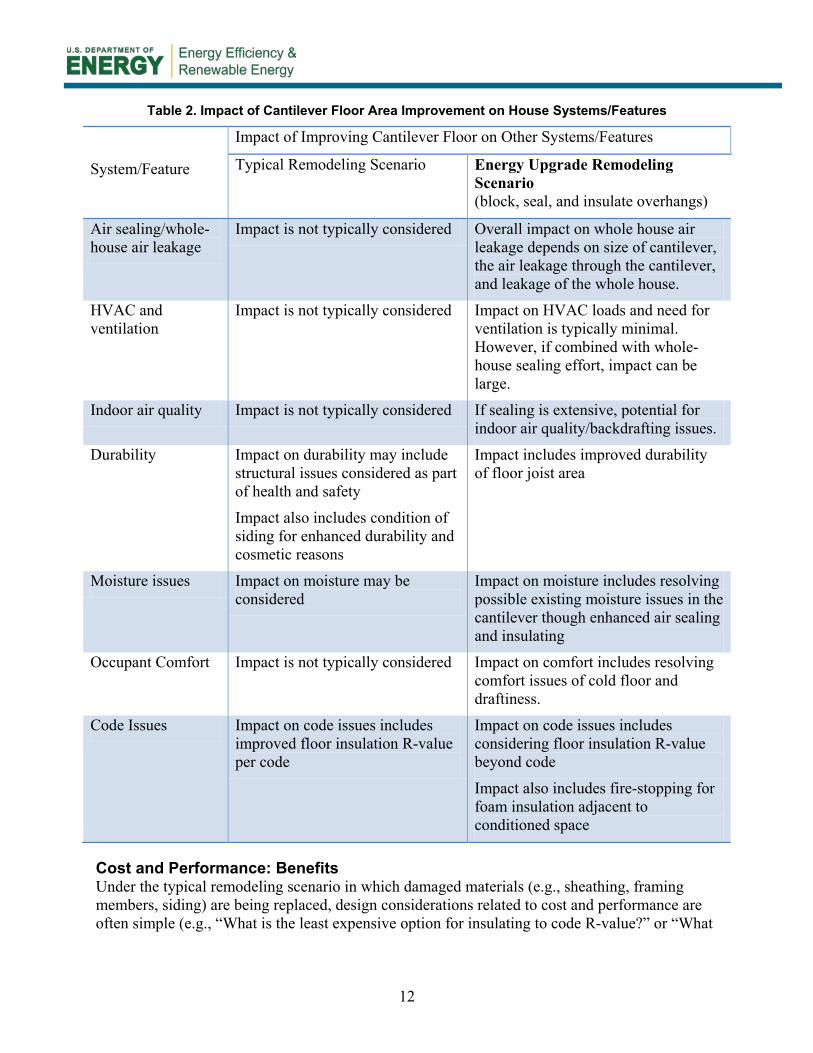
Using a QA approach, there are numerous other considerations for the cantilevered floor area. The remodeler taking a QA approach considers what improvements are needed for the whole-house, but will limit the applicable work to the scope of the project. In the cantilever floor example, the need for air sealing and insulating these areas and the impact of the upgrade on other systems of the home is part of the whole-house considerations. Via a QA approach, the remodeler considers possible energy efficiency, comfort, and durability improvements in every project. These considerations will answer the question: how does improving this specific area impact other systems in the house? Specifically for this example, how does improving the cantilever floor area impact other systems and/or features? The impact of the cantilever floor improvement is outlined in Table 2.
12
Table 2. Impact of Cantilever Floor Area Improvement on House Systems/Features
System/Feature
Impact of Improving Cantilever Floor on Other Systems/Features
Typical Remodeling Scenario Energy Upgrade Remodeling Scenario (block, seal, and insulate overhangs)
Air sealing/whole-house air leakage
Impact is not typically considered Overall impact on whole house air leakage depends on size of cantilever, the air leakage through the cantilever, and leakage of the whole house.
HVAC and ventilation
Impact is not typically considered Impact on HVAC loads and need for ventilation is typically minimal. However, if combined with whole-house sealing effort, impact can be large.
Indoor air quality Impact is not typically considered If sealing is extensive, potential for indoor air quality/backdrafting issues.
Durability Impact on durability may include structural issues considered as part of health and safety
Impact also includes condition of siding for enhanced durability and cosmetic reasons
Impact includes improved durability of floor joist area
Moisture issues Impact on moisture may be considered
Impact on moisture includes resolving possible existing moisture issues in the cantilever though enhanced air sealing and insulating
Occupant Comfort Impact is not typically considered Impact on comfort includes resolving comfort issues of cold floor and draftiness.
Code Issues Impact on code issues includes improved floor insulation R-value per code
Impact on code issues includes considering floor insulation R-value beyond code
Impact also includes fire-stopping for foam insulation adjacent to conditioned space
Cost and Performance: Benefits Under the typical remodeling scenario in which damaged materials (e.g., sheathing, framing members, siding) are being replaced, design considerations related to cost and performance are often simple (e.g., “What is the least expensive option for insulating to code R-value?” or “What
13
materials do I have leftover from another job to put into this small repair?”). Bigger decisions, such as what type of siding to use, rely heavily on homeowner preference.
In a QA approach for an energy upgrade remodeling project, performance benefits and values are important considerations for selecting retrofit measures. Table 3 summarizes the decision-making process for a typical remodeling scenario and an energy upgrade. The side-by-side comparison of the costs and benefits of each retrofit option (typical vs. energy upgrade) can be an effective method for communicating options to the customer.
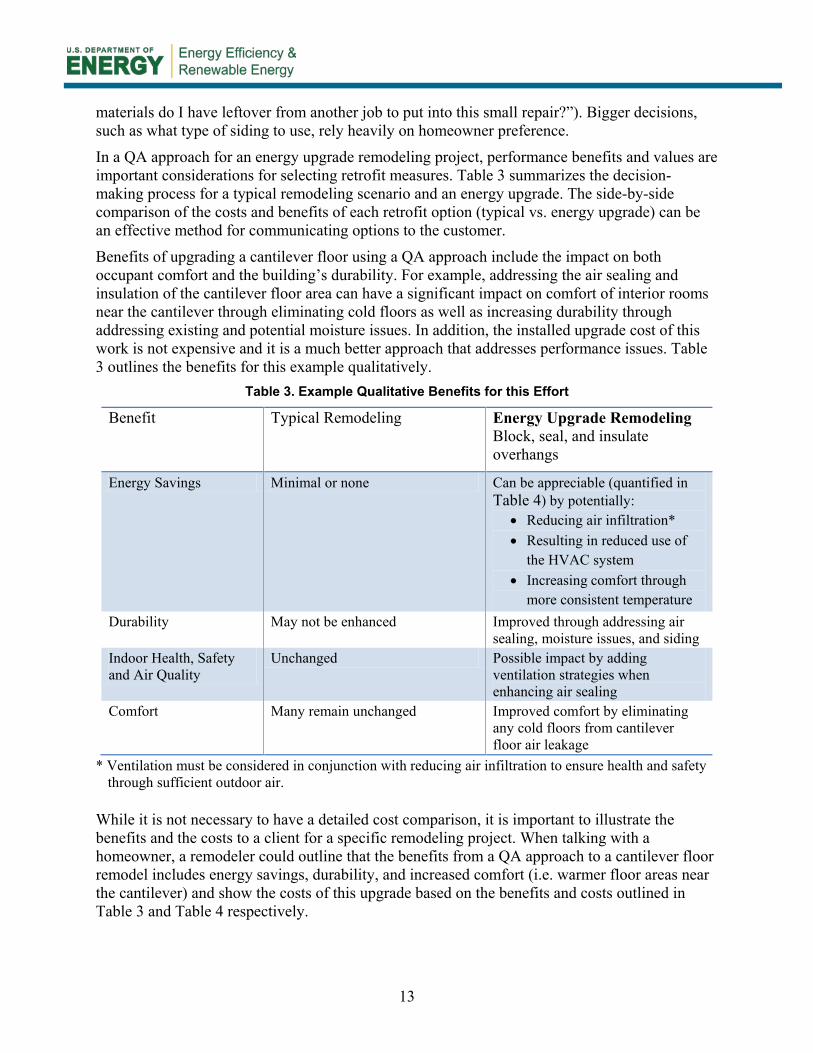
Benefits of upgrading a cantilever floor using a QA approach include the impact on both occupant comfort and the building’s durability. For example, addressing the air sealing and insulation of the cantilever floor area can have a significant impact on comfort of interior rooms near the cantilever through eliminating cold floors as well as increasing durability through addressing existing and potential moisture issues. In addition, the installed upgrade cost of this work is not expensive and it is a much better approach that addresses performance issues. Table 3 outlines the benefits for this example qualitatively.
Table 3. Example Qualitative Benefits for this Effort
Benefit Typical Remodeling Energy Upgrade Remodeling Block, seal, and insulate overhangs
Energy Savings Minimal or none Can be appreciable (quantified in Table 4) by potentially:
• Reducing air infiltration* • Resulting in reduced use of
the HVAC system • Increasing comfort through
more consistent temperature
Durability May not be enhanced Improved through addressing air sealing, moisture issues, and siding
Indoor Health, Safety and Air Quality
Unchanged Possible impact by adding ventilation strategies when enhancing air sealing
Comfort Many remain unchanged Improved comfort by eliminating any cold floors from cantilever floor air leakage
* Ventilation must be considered in conjunction with reducing air infiltration to ensure health and safety through sufficient outdoor air.
While it is not necessary to have a detailed cost comparison, it is important to illustrate the benefits and the costs to a client for a specific remodeling project. When talking with a homeowner, a remodeler could outline that the benefits from a QA approach to a cantilever floor remodel includes energy savings, durability, and increased comfort (i.e. warmer floor areas near the cantilever) and show the costs of this upgrade based on the benefits and costs outlined in Table 3 and Table 4 respectively.
14
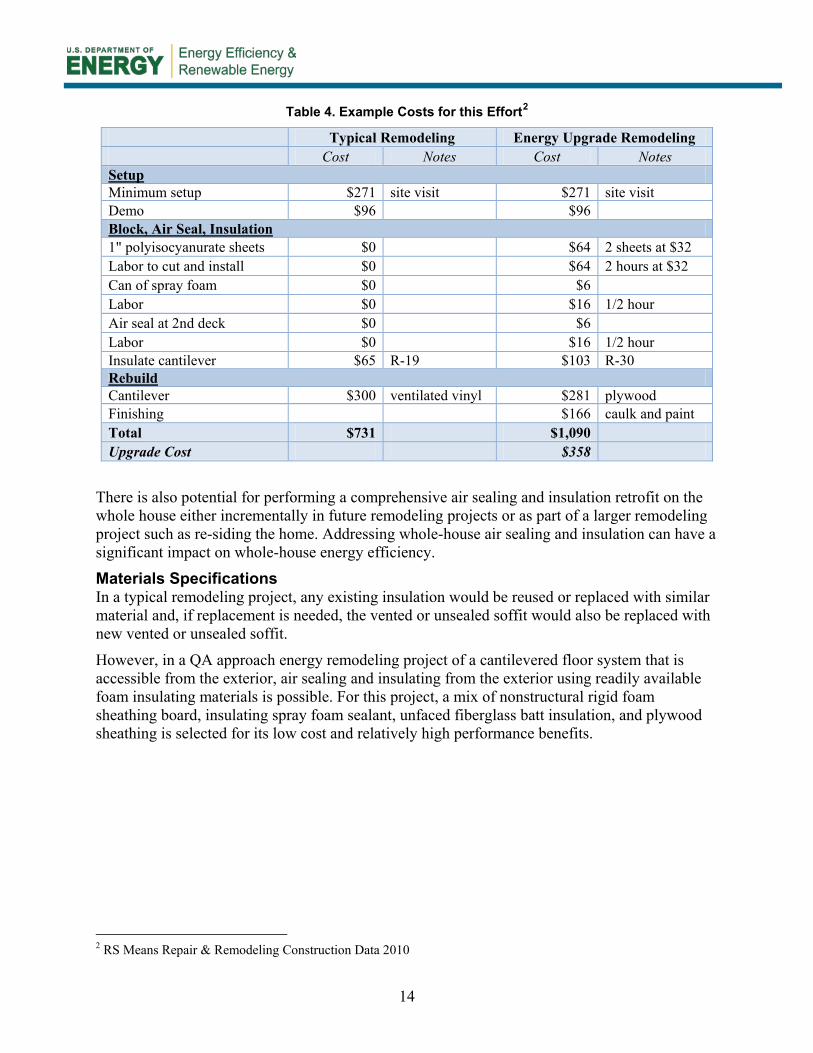
Table 4. Example Costs for this Effort2
Typical Remodeling Energy Upgrade Remodeling Cost Notes Cost Notes Setup Minimum setup $271 site visit $271 site visit Demo $96 $96 Block, Air Seal, Insulation 1" polyisocyanurate sheets $0 $64 2 sheets at $32 Labor to cut and install $0 $64 2 hours at $32 Can of spray foam $0 $6 Labor $0 $16 1/2 hour Air seal at 2nd deck $0 $6 Labor $0 $16 1/2 hour Insulate cantilever $65 R-19 $103 R-30 Rebuild Cantilever $300 ventilated vinyl $281 plywood Finishing $166 caulk and paint Total $731 $1,090 Upgrade Cost $358
There is also potential for performing a comprehensive air sealing and insulation retrofit on the whole house either incrementally in future remodeling projects or as part of a larger remodeling project such as re-siding the home. Addressing whole-house air sealing and insulation can have a significant impact on whole-house energy efficiency.
Materials Specifications In a typical remodeling project, any existing insulation would be reused or replaced with similar material and, if replacement is needed, the vented or unsealed soffit would also be replaced with new vented or unsealed soffit.
However, in a QA approach energy remodeling project of a cantilevered floor system that is accessible from the exterior, air sealing and insulating from the exterior using readily available foam insulating materials is possible. For this project, a mix of nonstructural rigid foam sheathing board, insulating spray foam sealant, unfaced fiberglass batt insulation, and plywood sheathing is selected for its low cost and relatively high performance benefits.
2 RS Means Repair & Remodeling Construction Data 2010
15
Section 3: Measure Implementation Details
Installation Specifications and Procedure In the typical remodeling process, after design decisions have been made and products selected, the contractor consults manufacturer’s literature for installation specifications and installation issues related to product warranties.
The remodeler conducting an energy upgrade taking a QA approach also consults manufacturer’s installation instructions and installation issues related to product warranties when developing specifications, but must go further to:
• Formalize the steps in the construction process
• Identify parties responsible for each phase of construction
• Develop scopes of work, as needed, for each trade contractor, including the establishment of tolerances for best practices that fall outside manufacturer’s installation specifications
• Establish inspection points and need for documenting work
• Provide training to contractors, as needed.
Establishing the Construction Process In a typical remodeling scenario, the construction process is outlined, to a varying degree of detail, in a contract or verbally between the homeowner and
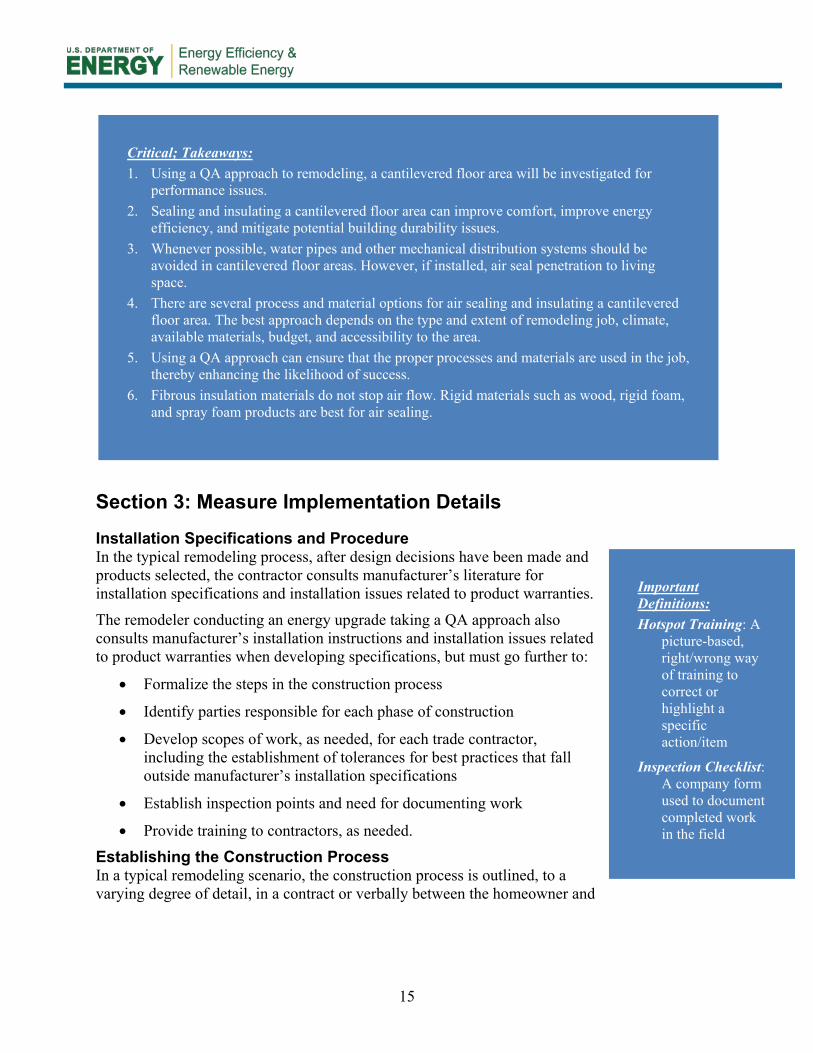
Critical; Takeaways: 1. Using a QA approach to remodeling, a cantilevered floor area will be investigated for
performance issues. 2. Sealing and insulating a cantilevered floor area can improve comfort, improve energy
efficiency, and mitigate potential building durability issues. 3. Whenever possible, water pipes and other mechanical distribution systems should be
avoided in cantilevered floor areas. However, if installed, air seal penetration to living space.
4. There are several process and material options for air sealing and insulating a cantilevered floor area. The best approach depends on the type and extent of remodeling job, climate, available materials, budget, and accessibility to the area.
5. Using a QA approach can ensure that the proper processes and materials are used in the job, thereby enhancing the likelihood of success.
6. Fibrous insulation materials do not stop air flow. Rigid materials such as wood, rigid foam, and spray foam products are best for air sealing.
Important Definitions: Hotspot Training: A
picture-based, right/wrong way of training to correct or highlight a specific action/item
Inspection Checklist: A company form used to document completed work in the field
16
the remodeler. If building permits are required, there may be a formal inspection by the authority having jurisdiction. However, in lieu of permits, there may be an informal inspection of the work by the homeowner, or between the general contractor and the subcontractor.
For a QA approach to an energy upgrade, the construction process is formalized with critical inspection points that ensure specifications are followed and tolerances met. Each person is assigned responsibilities and, through inspection or documentation, is held accountable for their role in the job’s execution. A diagram of the process of construction for the insulated and sealed cantilevered floor area is found in Figure 6. A more detailed discussion of the process follows in Construction Process/Installation Procedure section. While the cantilever remodel is a simple example, the process outlined enables a remodeler to effectively address more complex projects. In addition, the flow chart detailed in Figure 6 enables a remodeler to highlight the construction processes to show the homeowner improvements as well as to use as a marketing tool.
References to Other Guidelines, Codes, and Standards:
Section 316 of the 2009 International Residential Code covers the protection of foam insulation from flame spread
Section N1102 of the 2009 IRC covers R-value requirements for the building thermal envelope
Section N1103.2.1 of the 2009 IRC outlines insulation requirements for ducts. For ducts in cantilevered floor areas, insulation levels should be at least to those required for unconditioned space.
Section N1103.2.2 of the 2009 IRC outlines sealing requirements for ducts
Section 703.1.2 of the National Green Building Standard describes Grade I insulation installation
17
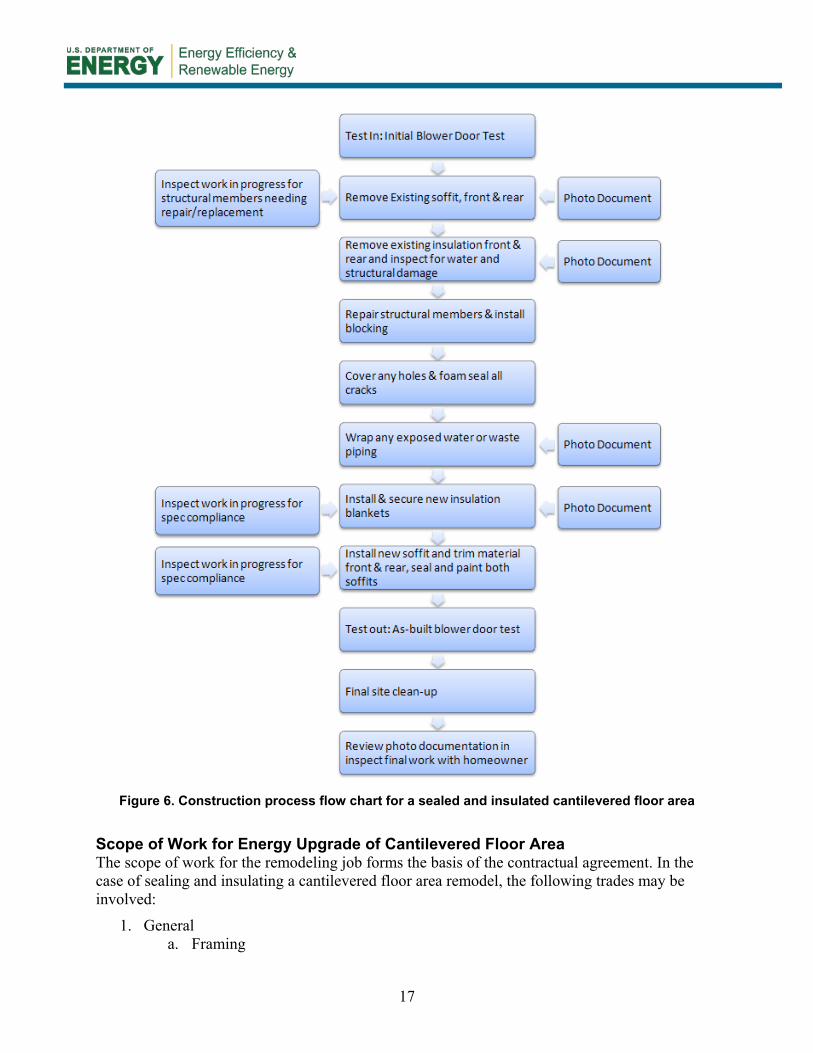
Figure 6. Construction process flow chart for a sealed and insulated cantilevered floor area
Scope of Work for Energy Upgrade of Cantilevered Floor Area The scope of work for the remodeling job forms the basis of the contractual agreement. In the case of sealing and insulating a cantilevered floor area remodel, the following trades may be involved:
1. General a. Framing
18
b. Insulation Contractor c. Air sealing Contractor d. Clean up Contractor
2. Plumber 3. HVAC Contractor 4. Siding Contractor 5. Performance Testing/Home Energy Rater
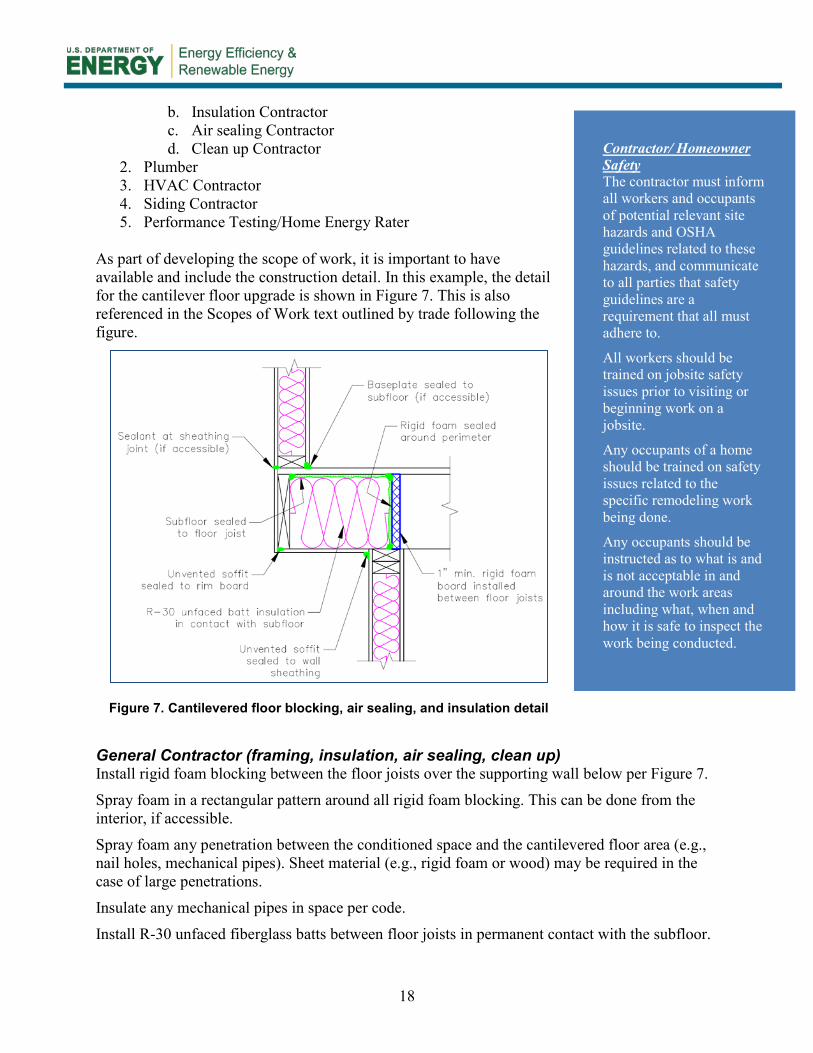
As part of developing the scope of work, it is important to have available and include the construction detail. In this example, the detail for the cantilever floor upgrade is shown in Figure 7. This is also referenced in the Scopes of Work text outlined by trade following the figure.
Figure 7. Cantilevered floor blocking, air sealing, and insulation detail
General Contractor (framing, insulation, air sealing, clean up) Install rigid foam blocking between the floor joists over the supporting wall below per Figure 7.
Spray foam in a rectangular pattern around all rigid foam blocking. This can be done from the interior, if accessible.
Spray foam any penetration between the conditioned space and the cantilevered floor area (e.g., nail holes, mechanical pipes). Sheet material (e.g., rigid foam or wood) may be required in the case of large penetrations.
Insulate any mechanical pipes in space per code.
Install R-30 unfaced fiberglass batts between floor joists in permanent contact with the subfloor.
Contractor/ Homeowner Safety The contractor must inform all workers and occupants of potential relevant site hazards and OSHA guidelines related to these hazards, and communicate to all parties that safety guidelines are a requirement that all must adhere to.
All workers should be trained on jobsite safety issues prior to visiting or beginning work on a jobsite.
Any occupants of a home should be trained on safety issues related to the specific remodeling work being done.
Any occupants should be instructed as to what is and is not acceptable in and around the work areas including what, when and how it is safe to inspect the work being conducted.
19
Install rigid, unvented plywood soffit to underside of fiberglass batt insulation. Seal all seams with silicone caulk to prevent air leakage into soffit area.
If electrical wires are installed in the cantilever, cut insulation to fit around wires.
Spray foam all penetrations into and out of the cantilevered floor area, (e.g., through the floor above and the cantilevered space), electrical penetrations in the soffit, and exhaust vent terminus.
Plumber Whenever possible, avoid running any plumbing lines in a cantilevered floor area.
If plumbing supply lines must be run in cantilevered floor areas, run as close as possible to the finished, conditioned space, allowing room for ample insulation around the pipes to protect from freezing temperatures.
HVAC Contractor When possible, avoid running mechanical vents or distribution pipes through a cantilevered floor area.
If ducts must be run through a cantilevered floor area, position as closely as possible to the conditioned space to maximize the amount of insulation around the pipes and seal all seams with mastic or foil tape at all seams.
If a vent pipe (e.g., exhaust fan duct) runs through a cantilevered floor area, seal around any termination at the exterior with spray foam to prevent air leakage into the cantilevered floor area.
If an exhaust vent runs through a cantilevered floor area to a termination, ensure a slight slope such that any potential condensation in the vent duct will drain away from the house.
Siding Contractor Vented soffit should not be used under a cantilevered floor area unless there is an air barrier (e.g., plywood soffit) above.
Performance Testing/Home Energy Rater The performance testing/home energy rater can be used to gather baseline data as well as perform a post-blower door test to document the improvement
Approved Materials It is also important to outline the approved materials for the project. For a QA approach to energy remodeling of a cantilevered floor, the material specifications as depicted in Figure 7 and Figure 8 include:
a. Unvented soffit: Exterior painted plywood sheathing b. Blocking:
i. 1” thick nonstructural sheathing board (R-6.5) between floor joists ii. Alternate acceptable products are 1” XPS or polyisocyanurate rigid foam
sheathing) c. Air Sealing:
i. Normal expansion polyurethane spray foam insulating sealant ii. Construction adhesive or caulk
d. Insulation: R-30 un-faced insulation in joist cavities
20
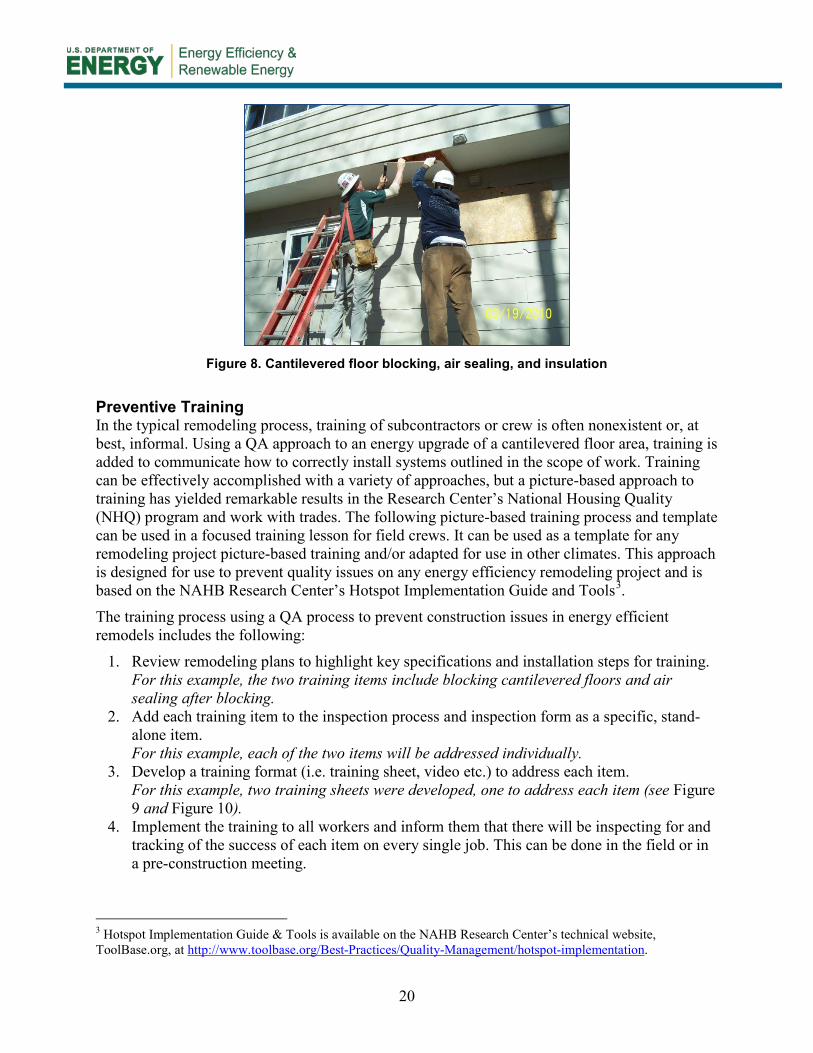
Figure 8. Cantilevered floor blocking, air sealing, and insulation
Preventive Training In the typical remodeling process, training of subcontractors or crew is often nonexistent or, at best, informal. Using a QA approach to an energy upgrade of a cantilevered floor area, training is added to communicate how to correctly install systems outlined in the scope of work. Training can be effectively accomplished with a variety of approaches, but a picture-based approach to training has yielded remarkable results in the Research Center’s National Housing Quality (NHQ) program and work with trades. The following picture-based training process and template can be used in a focused training lesson for field crews. It can be used as a template for any remodeling project picture-based training and/or adapted for use in other climates. This approach is designed for use to prevent quality issues on any energy efficiency remodeling project and is based on the NAHB Research Center’s Hotspot Implementation Guide and Tools3
The training process using a QA process to prevent construction issues in energy efficient remodels includes the following:
.
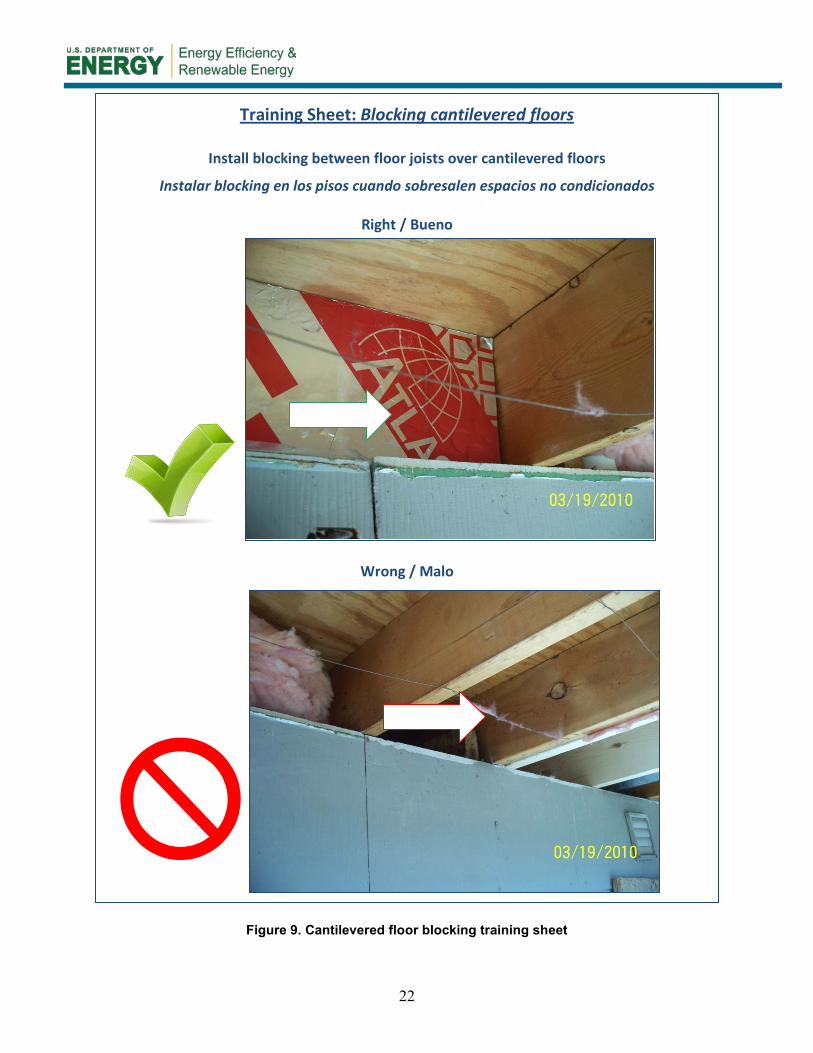
1. Review remodeling plans to highlight key specifications and installation steps for training. For this example, the two training items include blocking cantilevered floors and air sealing after blocking.
2. Add each training item to the inspection process and inspection form as a specific, stand-alone item. For this example, each of the two items will be addressed individually.
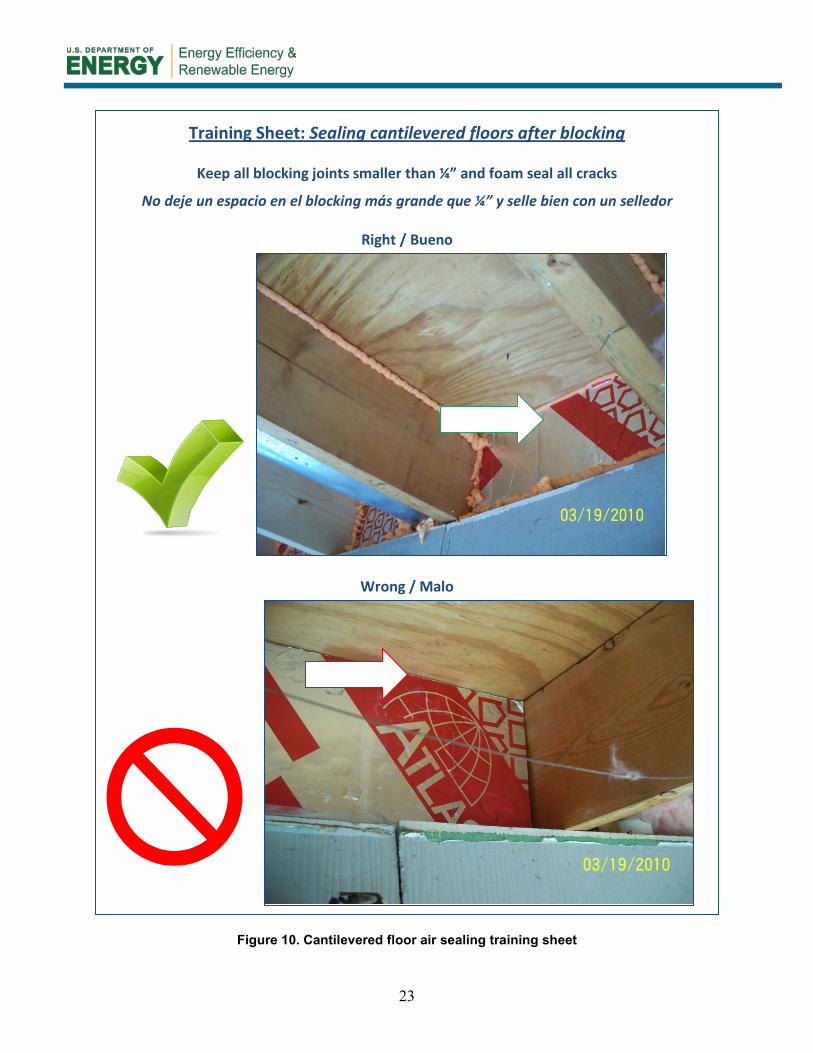
3. Develop a training format (i.e. training sheet, video etc.) to address each item. For this example, two training sheets were developed, one to address each item (see Figure 9 and Figure 10).
4. Implement the training to all workers and inform them that there will be inspecting for and tracking of the success of each item on every single job. This can be done in the field or in a pre-construction meeting.
3 Hotspot Implementation Guide & Tools is available on the NAHB Research Center’s technical website, ToolBase.org, at http://www.toolbase.org/Best-Practices/Quality-Management/hotspot-implementation.

21
For this example, the training sheets document the training per the training instructions (see Figure 11).
5. Inspect every job, every time, for each item to successfully implement a QA approach.
22
Training Sheet: Blocking cantilevered floors
Install blocking between floor joists over cantilevered floors
Instalar blocking en los pisos cuando sobresalen espacios no condicionados
Right / Bueno
Wrong / Malo
Figure 9. Cantilevered floor blocking training sheet
23
Training Sheet: Sealing cantilevered floors after blocking
Keep all blocking joints smaller than ¼” and foam seal all cracks
No deje un espacio en el blocking más grande que ¼” y selle bien con un selledor
Right / Bueno
Wrong / Malo
Figure 10. Cantilevered floor air sealing training sheet
24
Pre-Construction Meeting Before construction begins, the preconstruction meeting is used to schedule the construction process, identify responsibilities, clarify required documentation, and establish inspection points. In the typical process, this is an informal meeting between the crew leader and the subcontractors. Although inspection points may be established, inspections are typically visual only, and conducted at the completion of work. Documentation of completed work, outside of signing off on a contract, is not typical.
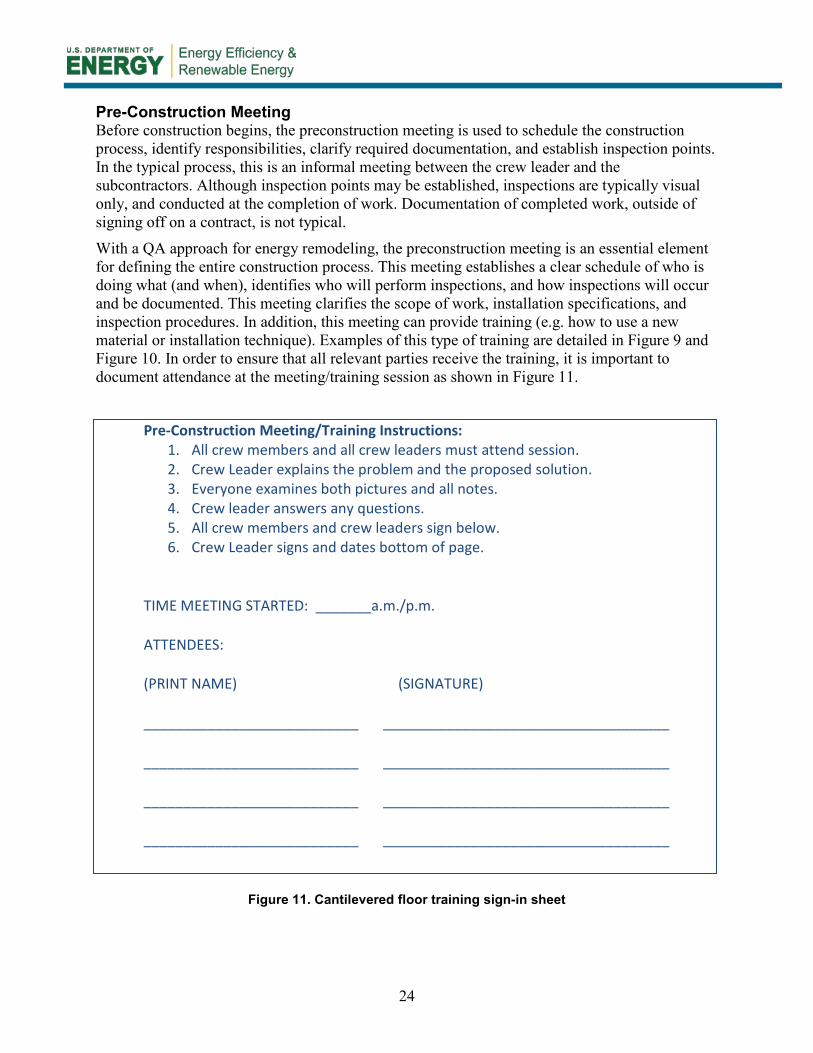
With a QA approach for energy remodeling, the preconstruction meeting is an essential element for defining the entire construction process. This meeting establishes a clear schedule of who is doing what (and when), identifies who will perform inspections, and how inspections will occur and be documented. This meeting clarifies the scope of work, installation specifications, and inspection procedures. In addition, this meeting can provide training (e.g. how to use a new material or installation technique). Examples of this type of training are detailed in Figure 9 and Figure 10. In order to ensure that all relevant parties receive the training, it is important to document attendance at the meeting/training session as shown in Figure 11.
Pre-Construction Meeting/Training Instructions: 1. All crew members and all crew leaders must attend session. 2. Crew Leader explains the problem and the proposed solution. 3. Everyone examines both pictures and all notes. 4. Crew leader answers any questions. 5. All crew members and crew leaders sign below. 6. Crew Leader signs and dates bottom of page.
TIME MEETING STARTED: _______a.m./p.m. ATTENDEES: (PRINT NAME) (SIGNATURE) ___________________________ ____________________________________ ___________________________ ____________________________________ ___________________________ ____________________________________ ___________________________ ____________________________________
Figure 11. Cantilevered floor training sign-in sheet
25
Construction Process/Installation Procedure Finally, construction begins. Under the typical remodeling scenario, if the cantilevered floor area is remodeled, the construction process typically would include:
1. Remove soffit 2. Replace or repair damaged materials per manufacturer’s installation specifications 3. Insulate piping and ductwork per code 4. Re-insulate with new materials 5. Replace vented soffit with unvented soffit 6. Inspect with crew leader and subcontractors 7. Final approval from homeowner
For a QA approach to an energy upgrade, the construction process is formalized and specifications for construction materials are carefully considered. Documentation and several inspection points are built into the process to assure that high performance specifications are followed.
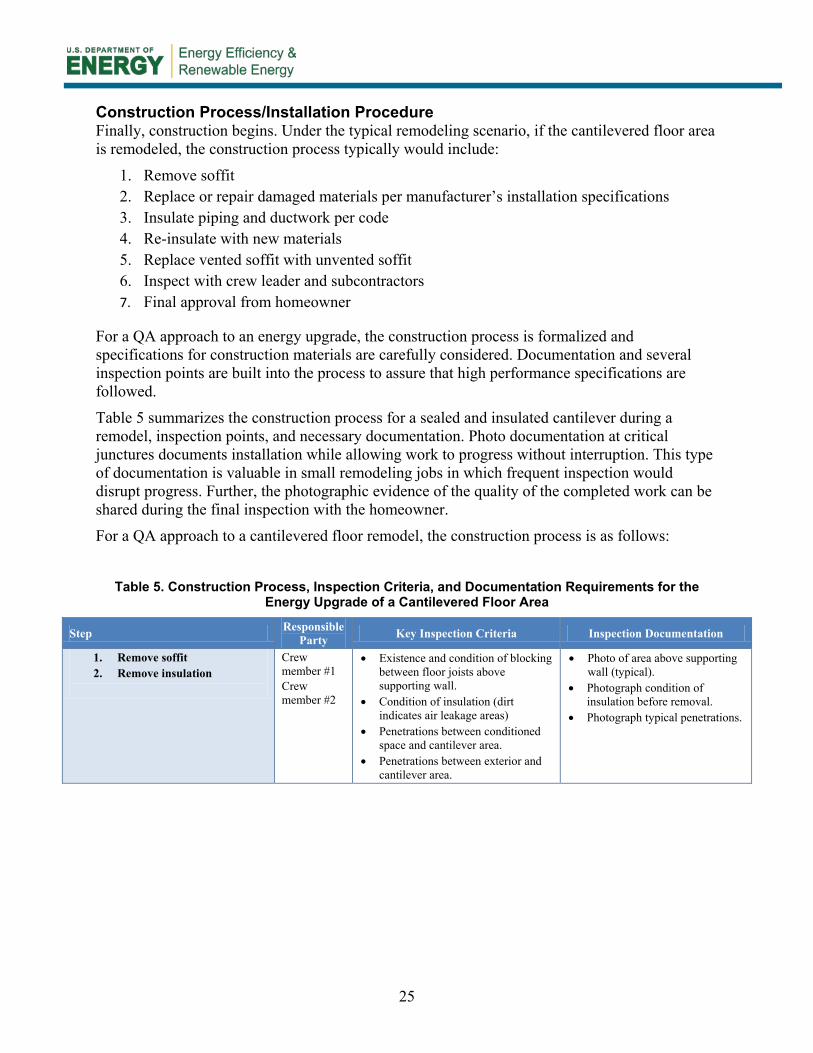
Table 5 summarizes the construction process for a sealed and insulated cantilever during a remodel, inspection points, and necessary documentation. Photo documentation at critical junctures documents installation while allowing work to progress without interruption. This type of documentation is valuable in small remodeling jobs in which frequent inspection would disrupt progress. Further, the photographic evidence of the quality of the completed work can be shared during the final inspection with the homeowner.
For a QA approach to a cantilevered floor remodel, the construction process is as follows:
Table 5. Construction Process, Inspection Criteria, and Documentation Requirements for the
Energy Upgrade of a Cantilevered Floor Area
Step Responsible Party Key Inspection Criteria Inspection Documentation
1. Remove soffit 2. Remove insulation
Crew member #1 Crew member #2
• Existence and condition of blocking between floor joists above supporting wall.
• Condition of insulation (dirt indicates air leakage areas)
• Penetrations between conditioned space and cantilever area.
• Penetrations between exterior and cantilever area.
• Photo of area above supporting wall (typical).
• Photograph condition of insulation before removal.
• Photograph typical penetrations.
26
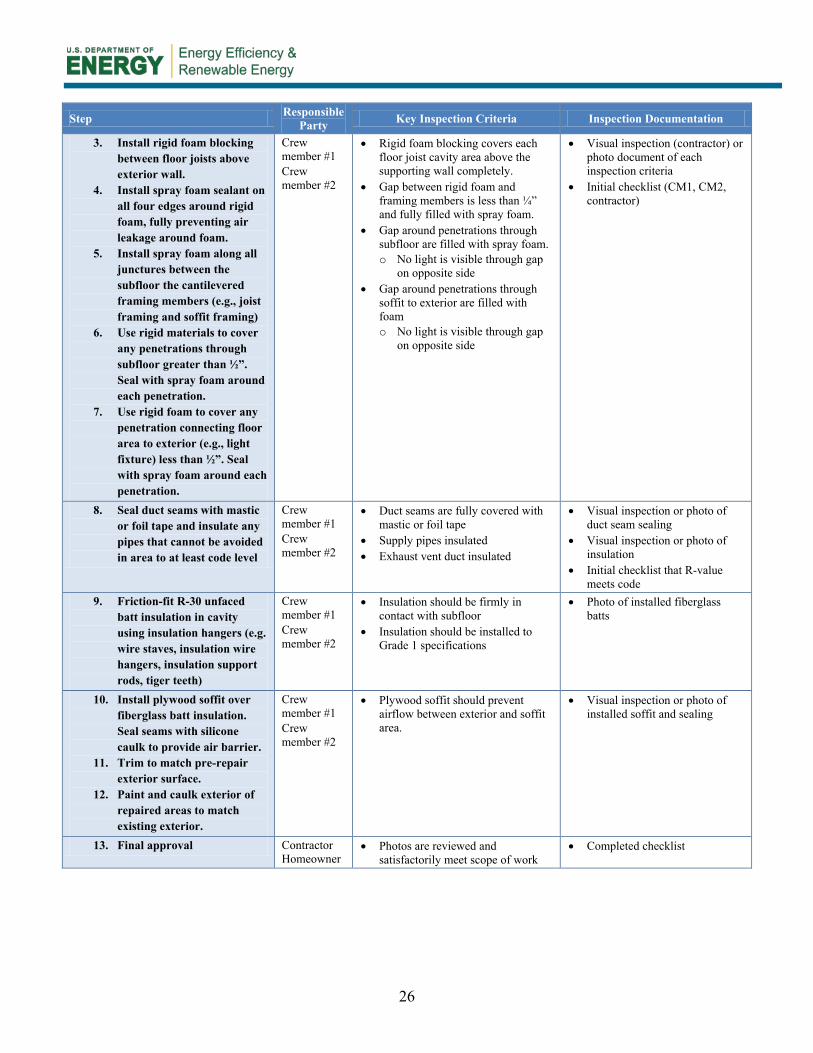
Step Responsible Party Key Inspection Criteria Inspection Documentation
3. Install rigid foam blocking between floor joists above exterior wall.
4. Install spray foam sealant on all four edges around rigid foam, fully preventing air leakage around foam.
5. Install spray foam along all junctures between the subfloor the cantilevered framing members (e.g., joist framing and soffit framing)
6. Use rigid materials to cover any penetrations through subfloor greater than ½”. Seal with spray foam around each penetration.
7. Use rigid foam to cover any penetration connecting floor area to exterior (e.g., light fixture) less than ½”. Seal with spray foam around each penetration.
Crew member #1 Crew member #2
• Rigid foam blocking covers each floor joist cavity area above the supporting wall completely.
• Gap between rigid foam and framing members is less than ¼” and fully filled with spray foam.
• Gap around penetrations through subfloor are filled with spray foam. o No light is visible through gap
on opposite side • Gap around penetrations through
soffit to exterior are filled with foam o No light is visible through gap
on opposite side
• Visual inspection (contractor) or photo document of each inspection criteria
• Initial checklist (CM1, CM2, contractor)
8. Seal duct seams with mastic or foil tape and insulate any pipes that cannot be avoided in area to at least code level
Crew member #1 Crew member #2
• Duct seams are fully covered with mastic or foil tape
• Supply pipes insulated • Exhaust vent duct insulated
• Visual inspection or photo of duct seam sealing
• Visual inspection or photo of insulation
• Initial checklist that R-value meets code
9. Friction-fit R-30 unfaced batt insulation in cavity using insulation hangers (e.g. wire staves, insulation wire hangers, insulation support rods, tiger teeth)
Crew member #1 Crew member #2
• Insulation should be firmly in contact with subfloor
• Insulation should be installed to Grade 1 specifications
• Photo of installed fiberglass batts
10. Install plywood soffit over fiberglass batt insulation. Seal seams with silicone caulk to provide air barrier.
11. Trim to match pre-repair exterior surface.
12. Paint and caulk exterior of repaired areas to match existing exterior.
Crew member #1 Crew member #2
• Plywood soffit should prevent airflow between exterior and soffit area.
• Visual inspection or photo of installed soffit and sealing
13. Final approval Contractor Homeowner
• Photos are reviewed and satisfactorily meet scope of work
• Completed checklist
27
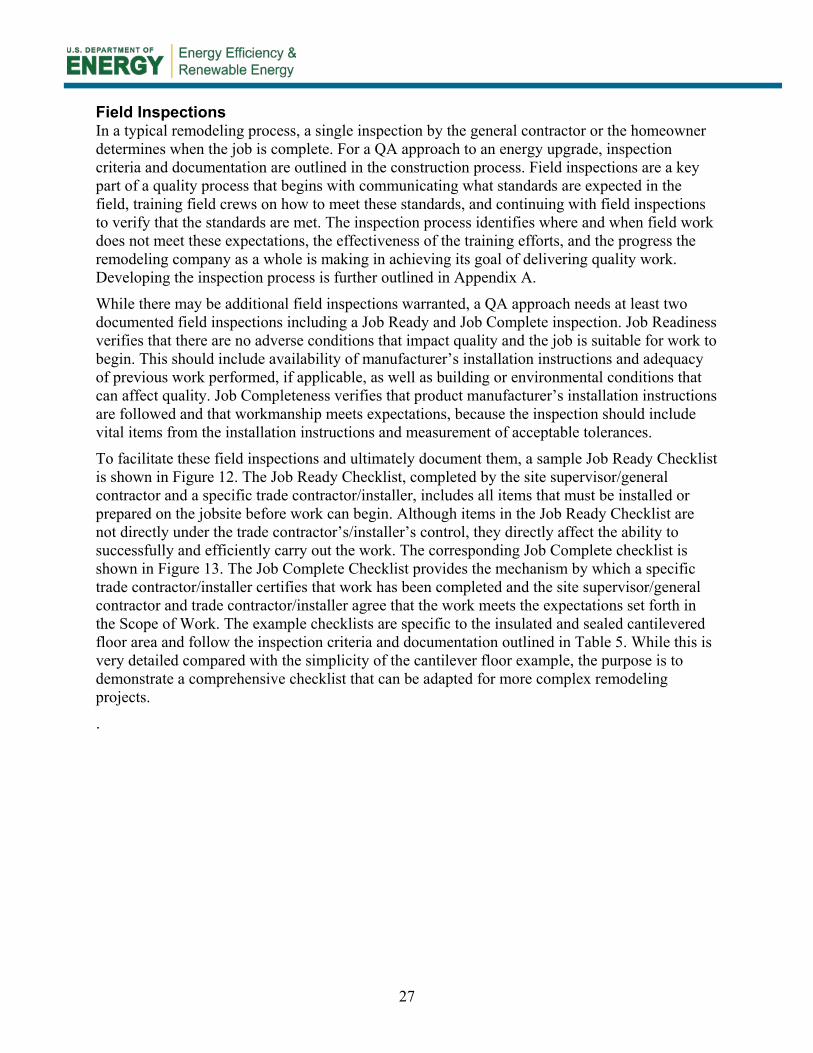
Field Inspections In a typical remodeling process, a single inspection by the general contractor or the homeowner determines when the job is complete. For a QA approach to an energy upgrade, inspection criteria and documentation are outlined in the construction process. Field inspections are a key part of a quality process that begins with communicating what standards are expected in the field, training field crews on how to meet these standards, and continuing with field inspections to verify that the standards are met. The inspection process identifies where and when field work does not meet these expectations, the effectiveness of the training efforts, and the progress the remodeling company as a whole is making in achieving its goal of delivering quality work. Developing the inspection process is further outlined in Appendix A.
While there may be additional field inspections warranted, a QA approach needs at least two documented field inspections including a Job Ready and Job Complete inspection. Job Readiness verifies that there are no adverse conditions that impact quality and the job is suitable for work to begin. This should include availability of manufacturer’s installation instructions and adequacy of previous work performed, if applicable, as well as building or environmental conditions that can affect quality. Job Completeness verifies that product manufacturer’s installation instructions are followed and that workmanship meets expectations, because the inspection should include vital items from the installation instructions and measurement of acceptable tolerances.
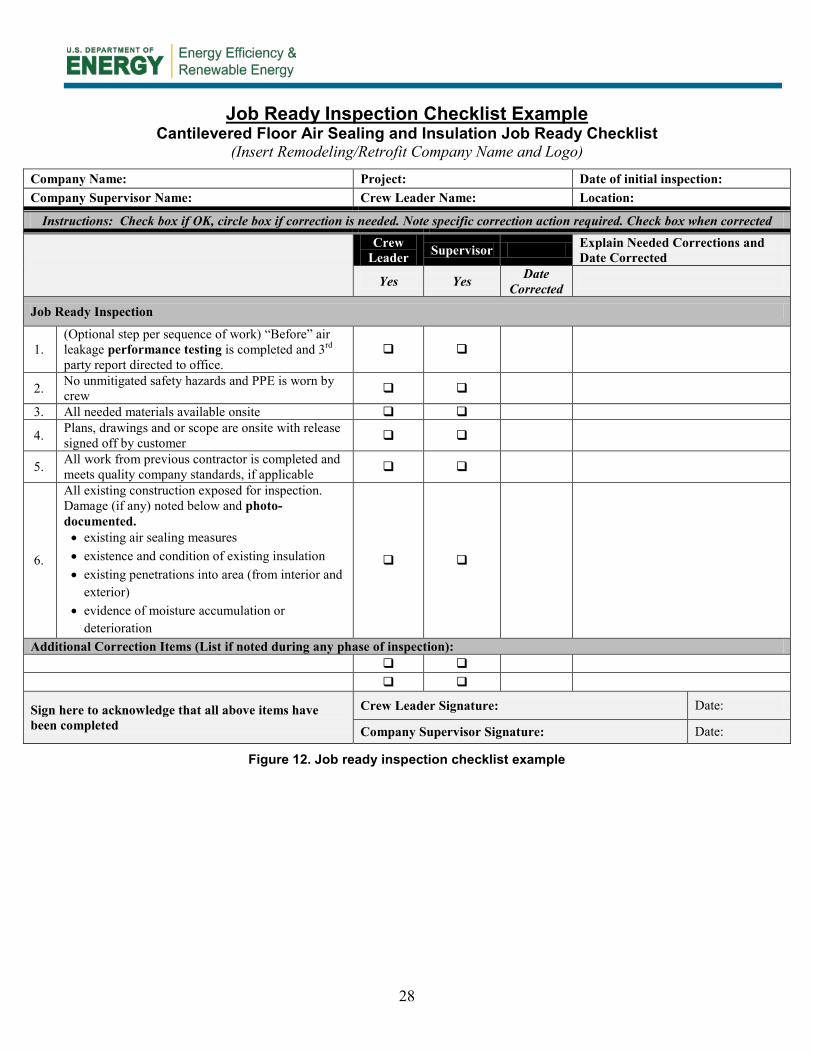
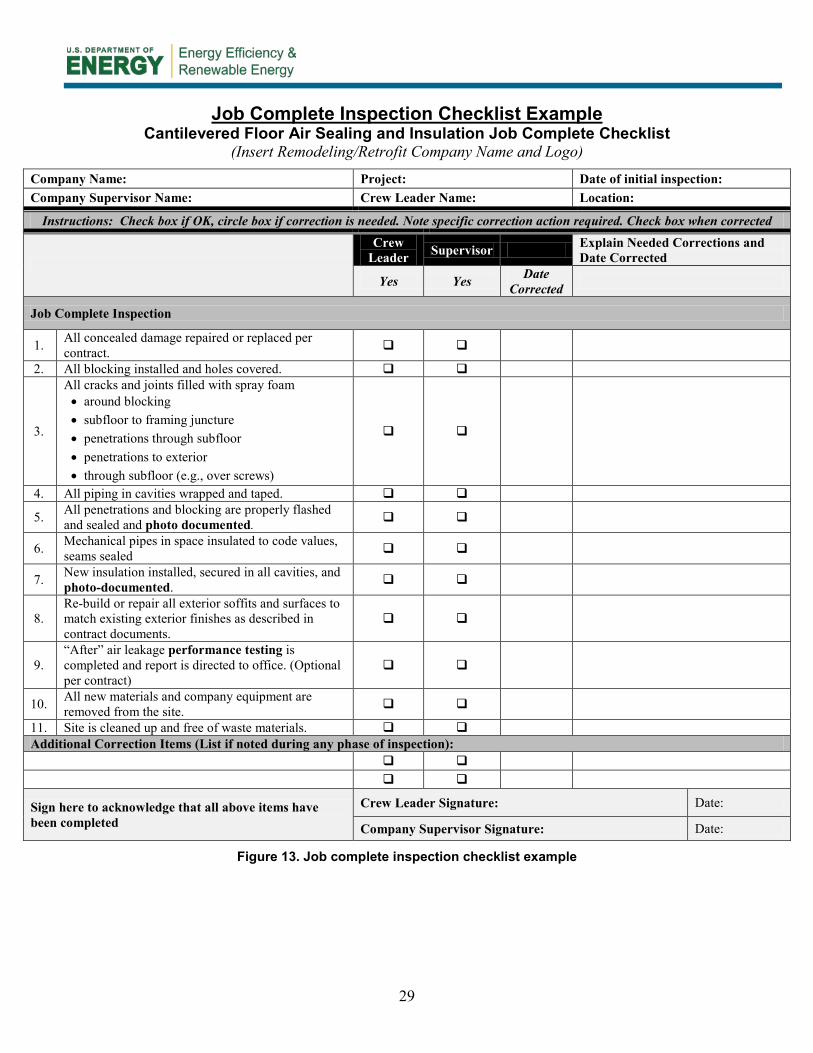
To facilitate these field inspections and ultimately document them, a sample Job Ready Checklist is shown in Figure 12. The Job Ready Checklist, completed by the site supervisor/general contractor and a specific trade contractor/installer, includes all items that must be installed or prepared on the jobsite before work can begin. Although items in the Job Ready Checklist are not directly under the trade contractor’s/installer’s control, they directly affect the ability to successfully and efficiently carry out the work. The corresponding Job Complete checklist is shown in Figure 13. The Job Complete Checklist provides the mechanism by which a specific trade contractor/installer certifies that work has been completed and the site supervisor/general contractor and trade contractor/installer agree that the work meets the expectations set forth in the Scope of Work. The example checklists are specific to the insulated and sealed cantilevered floor area and follow the inspection criteria and documentation outlined in Table 5. While this is very detailed compared with the simplicity of the cantilever floor example, the purpose is to demonstrate a comprehensive checklist that can be adapted for more complex remodeling projects.
.
28
Job Ready Inspection Checklist Example Cantilevered Floor Air Sealing and Insulation Job Ready Checklist
(Insert Remodeling/Retrofit Company Name and Logo)
Company Name: Project: Date of initial inspection: Company Supervisor Name: Crew Leader Name: Location:
Instructions: Check box if OK, circle box if correction is needed. Note specific correction action required. Check box when corrected
Crew Leader Supervisor Explain Needed Corrections and
Date Corrected
Yes Yes Date Corrected
Job Ready Inspection
1. (Optional step per sequence of work) “Before” air leakage performance testing is completed and 3rd party report directed to office.
2. No unmitigated safety hazards and PPE is worn by crew
3. All needed materials available onsite
4. Plans, drawings and or scope are onsite with release signed off by customer
5. All work from previous contractor is completed and meets quality company standards, if applicable
6.
All existing construction exposed for inspection. Damage (if any) noted below and photo-documented. • existing air sealing measures • existence and condition of existing insulation • existing penetrations into area (from interior and
exterior) • evidence of moisture accumulation or
deterioration
Additional Correction Items (List if noted during any phase of inspection):
Sign here to acknowledge that all above items have been completed
Crew Leader Signature: Date:
Company Supervisor Signature: Date:
Figure 12. Job ready inspection checklist example
29
Job Complete Inspection Checklist Example Cantilevered Floor Air Sealing and Insulation Job Complete Checklist
(Insert Remodeling/Retrofit Company Name and Logo)
Company Name: Project: Date of initial inspection: Company Supervisor Name: Crew Leader Name: Location:
Instructions: Check box if OK, circle box if correction is needed. Note specific correction action required. Check box when corrected
Crew Leader Supervisor Explain Needed Corrections and
Date Corrected
Yes Yes Date Corrected
Job Complete Inspection
1. All concealed damage repaired or replaced per contract.
2. All blocking installed and holes covered.
3.
All cracks and joints filled with spray foam • around blocking • subfloor to framing juncture • penetrations through subfloor • penetrations to exterior • through subfloor (e.g., over screws)
4. All piping in cavities wrapped and taped.
5. All penetrations and blocking are properly flashed and sealed and photo documented.
6. Mechanical pipes in space insulated to code values, seams sealed
7. New insulation installed, secured in all cavities, and photo-documented.
8. Re-build or repair all exterior soffits and surfaces to match existing exterior finishes as described in contract documents.
9. “After” air leakage performance testing is completed and report is directed to office. (Optional per contract)
10. All new materials and company equipment are removed from the site.
11. Site is cleaned up and free of waste materials. Additional Correction Items (List if noted during any phase of inspection):
Sign here to acknowledge that all above items have been completed
Crew Leader Signature: Date:
Company Supervisor Signature: Date:
Figure 13. Job complete inspection checklist example
30
Final Verification Procedures and Tests (Post-retrofit) In a typical remodeling process, final verification procedures and testing following the remodeling project are not included. For a QA approach to an energy upgrade, one of steps is to verify the results of the project. Often this includes final testing such as a blower door test or duct blaster test. In the case of the cantilever floor remodel, an initial blower door test was completed. However, a final blower door test was not in the scope of the project because the homeowner plans to wait until additional air sealing is completed for the home in subsequent remodeling projects. Along with final blower door testing, the homeowner will also consider other air sealing testing such as a smoke test per ASTM E1186 to verify that specific areas are well sealed. The duct blaster test was also outside the scope of this project as the focus of the cantilever floor remodel was on air sealing and insulation. Future work on the HVAC/duct system, however, would warrant both initial and final duct blaster testing.
Quality Assurance and Satisfied Customers
The use of a quality assurance approach for establishing what work needs to be done, who is responsible for the work, what tolerances and guidelines must be met, and how the work will be documented and inspected is key to getting a job done right the first time. Yet, the process allows for any mistakes to be caught sufficiently early to allow corrections if needed. In addition, the approach allows for customization based on a remodeler’s business practices and tools needed for a specific project.
Remodelers who set expectations—with customers and contractors—and use a QA approach to get the job done right, typically have satisfied customers and good reputations. When this good reputation is coupled with a high performance finished project that improves the comfort, durability, and energy efficiency, customer satisfaction is unparalleled4
.
4 Economics of Quality (New Homes) (NAHB Research Center, 2010) http://www.toolbase.org/Best-Practices/Quality-Management/quality-economics
Critical Takeaways: 1. A QA approach aids in streamlining a project and ensuring customer satisfaction.
2. A QA approach involves establishing a formal construction process, and identifying who is responsible for each task.
3. In a QA approach, tolerances are established, often for each step in process.
4. Inspection checklists clearly define what will be inspected and how it will be inspected. Multiple points of inspection allow mistakes to be caught in a timely manner.
31
References Current Building America and Related Quality Resources
High Performance Scopes of Work: Excavation and Backfill, Poured Basement Foundations, Framing, HVAC, Concrete Slab Foundations, Rigid Insulating Sheathing, Vinyl Siding, WRB/Housewrap, Wall Assemblies with WRB, Rigid Insulating Sheathing and Vinyl Siding (NAHB Research Center) http://www.toolbase.org/ToolbaseResources/level3.aspx?BucketID=5&CategoryID=62
Hotspot Implementation Guide and Tools (NAHB Research Center, 2010) http://www.toolbase.org/Best-Practices/Quality-Management/hotspot-implementation
Economics of Quality (New Homes) (NAHB Research Center, 2010) http://www.toolbase.org/Best-Practices/Quality-Management/quality-economics
Quality Management and High Performance Home Building: A Case Study of Veridian Homes (NAHB Research Center, 2010) http://www.toolbase.org/Best-Practices/Quality-Management/quality-management-high-performance-homes
Quality Assurance Roadmap for High Performance Residential Buildings (Building Science Corporation, 2008) http://www.toolbase.org/Best-Practices/Quality-Management/quality-assurance-roadmap
Quality Control Checklist (Building Science Corporation, 2008) http://www.toolbase.org/Best-Practices/Quality-Management/quality-control-checklist
Builder’s Challenge Quality Criteria (PNNL, 2009) http://www1.eere.energy.gov/buildings/challenge/pdfs/BuildersChallengeQualityCriteria_WEB.pdf
Implementing A Quality Assurance System: A Trade Contractor Case Study (NAHB Research Center, 2001) http://www.toolbase.org/Best-Practices/Quality-Management/implementing-quality-assurance
Quality Assurance System for Wood Framing Contractors (NAHB Research Center, 2000) http://www.toolbase.org/Best-Practices/Quality-Management/quality-assurance-wood-framing-contractors
Quality Certifications and Awards and Related Tools
NHQ Certified Builder Gap Analysis (NAHB Research Center, 2006) http://www.toolbase.org/Best-Practices/Quality-Management/nhq-gap-analysis
Gap Analysis for In-house Design, Design Centers, Escrow Departments, Land Development Operations, & In-house Mortgage Financing (NAHB Research Center, 2007) http://www.toolbase.org/Best-Practices/Quality-Management/example-requirements-gap-analysis
32
Sample Builder Quality Assurance Manual (NAHB Research Center, 2007) http://www.toolbase.org/Best-Practices/Quality-Management/sample-builder-quality-assurance-manual
NHQ Trade Contractor Requirements (NAHB Research Center, 2007) http://www.nahbrc.org/builder/quality/certifiedcontractor.aspx
NHQ Certified Builder Requirements (NAHB Research Center, 2008) http://www.nahbrc.org/builder/quality/builderrequirements.aspx
NHQ Award and application http://www.housingzone.com/pb/nhqa
Energy Value Housing Award (EVHA) NAHB Research Center http://www.nahbrc.com/evha/
33
Appendix A: Field Inspections
There are several key items to successful field inspections that are important to quality inspection processes. These include:
1. Accountability is a key to the process. Make sure the names of all inspectors and field managers and the dates of the inspection(s) are documented on the inspection checklist. A good inspection process frequently has more than one person reviewing completed work.
2. Inspect work before it is concealed. If any work will be covered up, inspect it first and document the inspection. A process that allows the crew leader to complete a phase and move forward after the inspection can work, especially if supervisors can randomly inspect work before it is concealed.
3. Training as an inspector: A competent mechanic is not automatically a competent inspector. A supervisor or field manager is not automatically a good inspector. Train on the inspection process that the company expects and then hold inspectors accountable for conducting and accurate and quality-based inspections.
4. Consider making a crew leader responsible for self-inspecting his/her work. With supervisory oversight and with measurable or quantifiable company standards it is possible to begin the inspection process with an inspection by the crew leader.
5. Defining standards and consistency: A good inspection is based on a measurable and reproducible standard. The inspection checklist should reference these standards and required work tolerances. Reference or quote the specifics of the agreed upon standard.
6. Follow-up any identified “noncompliance” items with a 2nd (or 3rd) inspection. This will help to confirm completion of acceptable quality work. ”
7. Tracking and follow up: Inspecting is part of a quality improvement process. The process is important to identify crews and individual workers that need additional training and confirm that training has been effective for work that is done right the first time, and to create well-defined expectations for quality and accountability for all workers to meet those expectations. The goal of inspections is to confirm that work meets or exceeds the quality expectations of the company (the standards)
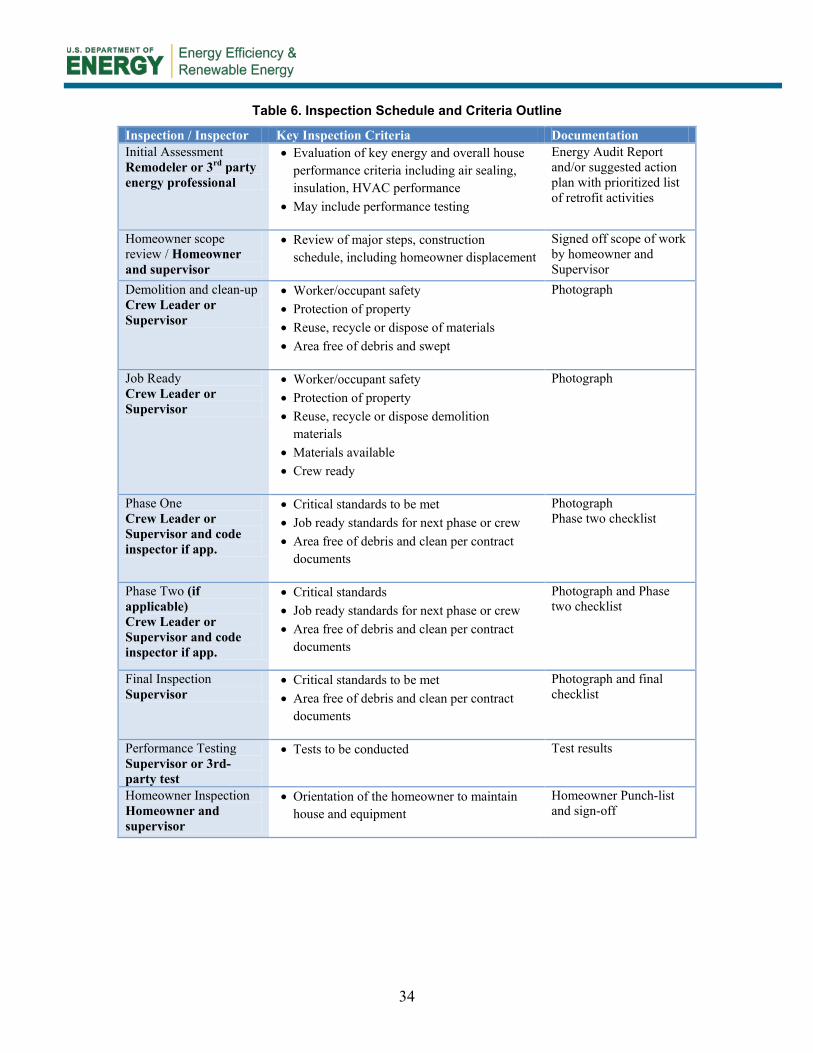
Based on these key items, it is possible to outline a project-specific inspection process and inspection form. The chart of inspections shown in Table 6 is an example to help determine what inspections are needed for a specific retrofit project.
34
Table 6. Inspection Schedule and Criteria Outline
Inspection / Inspector Key Inspection Criteria Documentation Initial Assessment Remodeler or 3rd party energy professional
• Evaluation of key energy and overall house performance criteria including air sealing, insulation, HVAC performance
• May include performance testing
Energy Audit Report and/or suggested action plan with prioritized list of retrofit activities
Homeowner scope review / Homeowner and supervisor
• Review of major steps, construction schedule, including homeowner displacement
Signed off scope of work by homeowner and Supervisor
Demolition and clean-up Crew Leader or Supervisor
• Worker/occupant safety • Protection of property • Reuse, recycle or dispose of materials • Area free of debris and swept
Photograph
Job Ready Crew Leader or Supervisor
• Worker/occupant safety • Protection of property • Reuse, recycle or dispose demolition
materials • Materials available • Crew ready
Photograph
Phase One Crew Leader or Supervisor and code inspector if app.
• Critical standards to be met • Job ready standards for next phase or crew • Area free of debris and clean per contract
documents
Photograph Phase two checklist
Phase Two (if applicable) Crew Leader or Supervisor and code inspector if app.
• Critical standards • Job ready standards for next phase or crew • Area free of debris and clean per contract
documents
Photograph and Phase two checklist
Final Inspection Supervisor
• Critical standards to be met • Area free of debris and clean per contract
documents
Photograph and final checklist
Performance Testing Supervisor or 3rd-party test
• Tests to be conducted Test results
Homeowner Inspection Homeowner and supervisor
• Orientation of the homeowner to maintain house and equipment
Homeowner Punch-list and sign-off

DOE/GO-102011-3441 ▪ December 2011 Printed with a renewable-source ink on paper containing at least 50% wastepaper, including 10% post-consumer waste.


