20
Stratix 5700 Network Address Translation Quick Start

Stratix 5700 Network Address Translation
Quick Start
Important User InformationSolid state equipment has operational characteristics differing from those of electromechanical equipment. Safety Guidelines for the Application, Installation and Maintenance of Solid State Controls (publication SGI-1.1 available from your local Rockwell Automation sales office or online at http://www.rockwellautomation.com/literature/) describes some important differences between solid state equipment and hard-wired electromechanical devices. Because of this difference, and also because of the wide variety of uses for solid state equipment, all persons responsible for applying this equipment must satisfy themselves that each intended application of this equipment is acceptable.
In no event will Rockwell Automation, Inc. be responsible or liable for indirect or consequential damages resulting from the use or application of this equipment.
The examples and diagrams in this manual are included solely for illustrative purposes. Because of the many variables and requirements associated with any particular installation, Rockwell Automation, Inc. cannot assume responsibility or liability for actual use based on the examples and diagrams.
No patent liability is assumed by Rockwell Automation, Inc. with respect to use of information, circuits, equipment, or software described in this manual.
Reproduction of the contents of this manual, in whole or in part, without written permission of Rockwell Automation, Inc., is prohibited.
Throughout this manual, when necessary, we use notes to make you aware of safety considerations.
Allen-Bradley, Rockwell Automation, and TechConnect are trademarks of Rockwell Automation, Inc.
Trademarks not belonging to Rockwell Automation are property of their respective companies.
WARNINGIdentifies information about practices or circumstances that can cause an explosion in a hazardous environment, which may lead to personal injury or death, property damage, or economic loss.
IMPORTANT Identifies information that is critical for successful application and understanding of the product.
ATTENTIONIdentifies information about practices or circumstances that can lead to personal injury or death, property damage, or economic loss. Attentions help you identify a hazard, avoid a hazard, and recognize the consequence
SHOCK HAZARDLabels may be on or inside the equipment, for example, a drive or motor, to alert people that dangerous voltage may be present.
BURN HAZARDLabels may be on or inside the equipment, for example, a drive or motor, to alert people that surfaces may reach dangerous temperatures.
Table of Contents
Preface Introduction . . . . . . . . . . . . . . . . . . . . . . . . . . . . . . . . . . . . . . . . . . . . . . . 3
Chapter 1Configuring and Verifying Network Address Translations
Assumptions . . . . . . . . . . . . . . . . . . . . . . . . . . . . . . . . . . . . . . . . . . . . . . . 7Configure NAT in the Stratix 5700 using the Device Manager Web Interface . . . . . . . . . . . . . . . . . . . . . . . . . . . . . . . . . . . . . . . . . . . . . . . . . . 8Checking connectivity . . . . . . . . . . . . . . . . . . . . . . . . . . . . . . . . . . . . . . 13Statistics . . . . . . . . . . . . . . . . . . . . . . . . . . . . . . . . . . . . . . . . . . . . . . . . . 14Summary . . . . . . . . . . . . . . . . . . . . . . . . . . . . . . . . . . . . . . . . . . . . . . . . . 16
1Publication IASIMP-QS038A-EN-P - June 2013 1

Notes:
2 Publication IASIMP-QS038A-EN-P - June 2013
Preface
Introduction Network Address Translation (NAT) is a technology that provides machine builders and automation engineers with the flexibility to build each of their machines using the same IP addresses, while allowing the machines to communicate with the larger manufacturing environment, requiring a unique IP address. NAT also provides a level of inherent security because end devices can be made available to the larger manufacturing environment only as necessary.
The Stratix 5700 NAT's hardware-based implementation makes it one of the fastest and most scalable solutions available. The Stratix 5700 allows users more flexibility as a switch-based NAT solution and provides built-in resiliency and redundancy protocols.
Imagine a manufacturing plant with 12 injection molding machines. Each molding machine has a ControlLogix system with I/O and an Ethernet module. These 12 machines are identical and from the same Original Equipment Manufacturer (OEM). All of the machines need to be connected on the plant/corporate networks for the HMI and Historian functions.
Without NAT:
• The OEM would need to give 12 unique IP addresses.
• The OEM would need to maintain 12 different ACD files.
• A change to a machine would require 12 changes to be made in the plant or at the OEM.
With NAT:
• Each machine would be configured with the same IP addresses.
• Number of projects to be maintained is reduced to one.
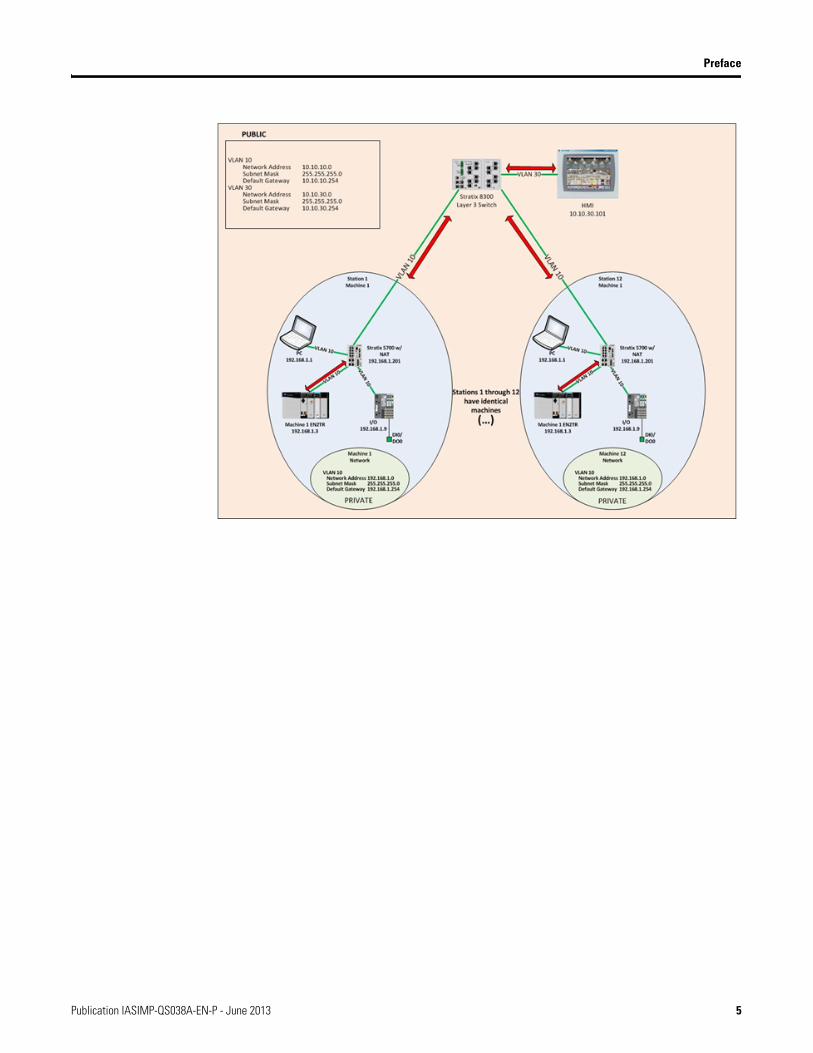
This Quick Start will take you through the process of configuring NAT on the Stratix 5700 that will translate private addresses to public addresses on a single VLAN and route to an HMI server on a separate VLAN through a Layer 3 switch.
Assume the manufacturing plant has 12 PC work stations with the 12 new injection mold machines from the Injection OEM. Each machine is identical and has an identical IP address assigned to it. Each machine has a Stratix 5700
The implementation of NAT in the Stratix 5700 switch is distinct in these ways:
1. One-to-one NAT—the switch uses one-to-one NAT, rather than one-to-many NAT. One-to-one NAT requires that each source address translates to one unique destination address. Unlike one-to-many NAT, multiple source addresses cannot share the same destination address.
2. Layer 2 implementation—the switch’s implementation of NAT operates at the Layer 2 (MAC) level. At this level, the switch translates IP addresses and does not act as a router.
3Publication IASIMP-QS038A-EN-P - June 2013 3
Preface
NAT switch installed with a PC, a ControlLogix controller and I/O attached to it and everything is running on EtherNet/IP. The plant has created a new central site operations control station with an HMI that will report connectivity status for each station’s machine to ensure data collection. Each of the machines should be connected to the overall plant network to allow the HMI server to report connectivity status.
The goal is to:
• Maintain only one Logix program for all 12 machines.
• Not have to reconfigure every device on each machine with new IP addresses.
• Connect to the plant network for data collection.
• Report connectivity status to HMI server.
The problem is that if each machine is identical and connected as is, this causes duplicate IP address errors on our network.
NAT is how we are going to solve this problem. This Quick Start helps you implement NAT on the Stratix 5700 in a manner that gives your PC and your controller a unique address on the Plant network to make communication to the HMI possible.
This Quick Start takes you through the process of configuring NAT on the Stratix 5700 switch t enable devices with existing private IP addresses to be assigned a unique public address. This allows communication from all machines with identical private IP addresses to communicate to an HMI server residing on a different subnet on the plant network. Each machine is assigned a unique public IP address.
4 Publication IASIMP-QS038A-EN-P - June 2013
Preface
Publication IASIMP-QS038A-EN-P - June 2013 5

Preface
Notes:
6 Publication IASIMP-QS038A-EN-P - June 2013

Chapter 1
Configuring and Verifying Network Address Translations
Assumptions
This Quick Start operates under the following assumptions:
• The PC is connected to port fa1/1 on the Stratix 5700.
• The 1756-EN2TR is connected to port fa1/6 on the Stratix 5700.
• The 1734-AENTR is connected to port fa1/8 on the Stratix 5700.
• The Gigabit port 1 is connected to the Stratix 8300 (layer 3 switch).
• All devices are configured with the IP addresses shown in the IP Address column of the table below.
Device IP Address Translated IP Address
PC 192.168.1.1 10.10.10.11
1756-EN2TR 192.168.1.3 10.10.10.101
1734-AENTR 192.168.1.9 N/A
7Publication IASIMP-QS038A-EN-P - June 2013 7

Chapter 1
Configure NAT in the Stratix 5700 using the Device Manager Web Interface
1. Launch Internet Explorer.
2. Type the Stratix 5700 IP address, 192.168.1.201, in the address bar and click Enter.
3. Enter the switch name and password.
4. The Stratix 5700 Device Manager opens. In the left pane shown below, expand the Configure folder and then click NAT.
Stratix 5700 192.168.1.201 N/A
HMI Server 10.10.30.1 N/A
Default Gateway VLAN 10 (Stratix 8300) 10.10.10.254 192.168.1.254
When routing through a layer 3 device; devices on the private subnet need to communicate with devices on the public network using their public address due to the fact a default gateway translation is in place, enabling routing to different subnets. Public devices always use the private device’s public translation to communicate with a device on the private network.
Device IP Address Translated IP Address
8 Publication IASIMP-QS038A-EN-P - June 2013

Chapter 1
The NAT page opens.
5. From the NAT page, shown below, you can configure your NAT Instances.
6. Click Create to open the NAT Instances window as shown below.
Publication IASIMP-QS038A-EN-P - June 2013 9
Chapter 1
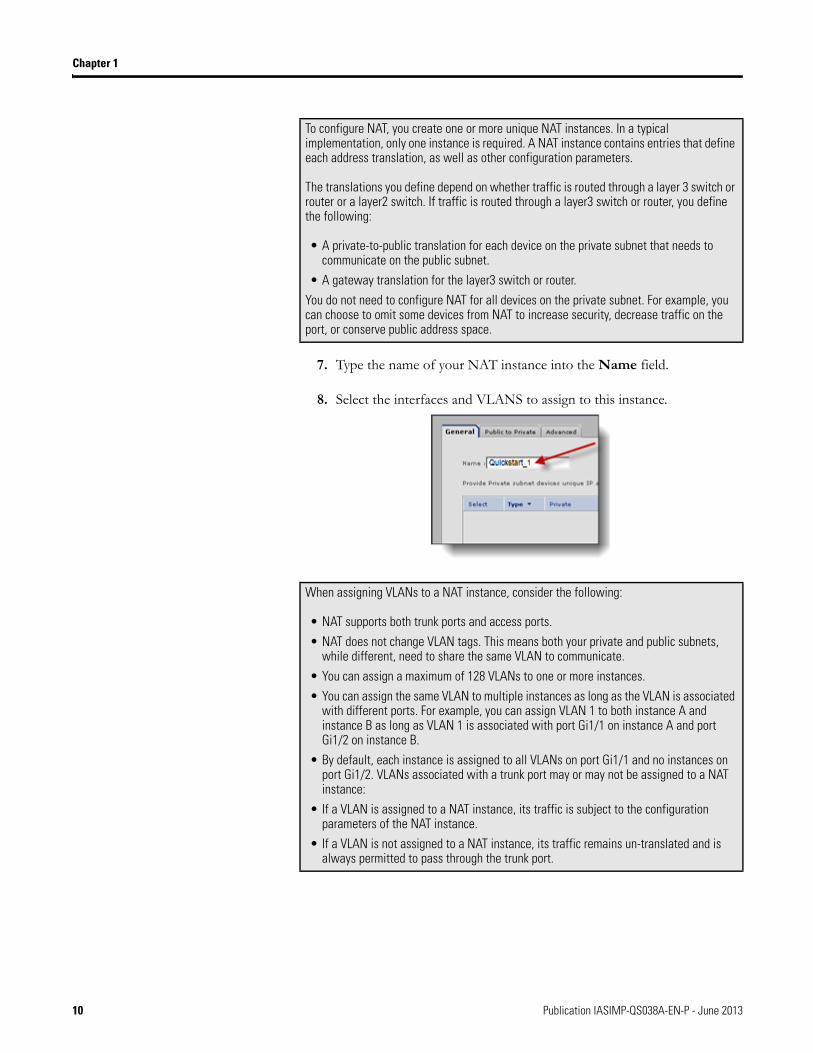
7. Type the name of your NAT instance into the Name field.
8. Select the interfaces and VLANS to assign to this instance.
To configure NAT, you create one or more unique NAT instances. In a typical implementation, only one instance is required. A NAT instance contains entries that define each address translation, as well as other configuration parameters.
The translations you define depend on whether traffic is routed through a layer 3 switch or router or a layer2 switch. If traffic is routed through a layer3 switch or router, you define the following:
• A private-to-public translation for each device on the private subnet that needs to communicate on the public subnet.
• A gateway translation for the layer3 switch or router.
You do not need to configure NAT for all devices on the private subnet. For example, you can choose to omit some devices from NAT to increase security, decrease traffic on the port, or conserve public address space.
When assigning VLANs to a NAT instance, consider the following:
• NAT supports both trunk ports and access ports.
• NAT does not change VLAN tags. This means both your private and public subnets, while different, need to share the same VLAN to communicate.
• You can assign a maximum of 128 VLANs to one or more instances.
• You can assign the same VLAN to multiple instances as long as the VLAN is associated with different ports. For example, you can assign VLAN 1 to both instance A and instance B as long as VLAN 1 is associated with port Gi1/1 on instance A and port Gi1/2 on instance B.
• By default, each instance is assigned to all VLANs on port Gi1/1 and no instances on port Gi1/2. VLANs associated with a trunk port may or may not be assigned to a NAT instance:
• If a VLAN is assigned to a NAT instance, its traffic is subject to the configuration parameters of the NAT instance.
• If a VLAN is not assigned to a NAT instance, its traffic remains un-translated and is always permitted to pass through the trunk port.
10 Publication IASIMP-QS038A-EN-P - June 2013
Chapter 1
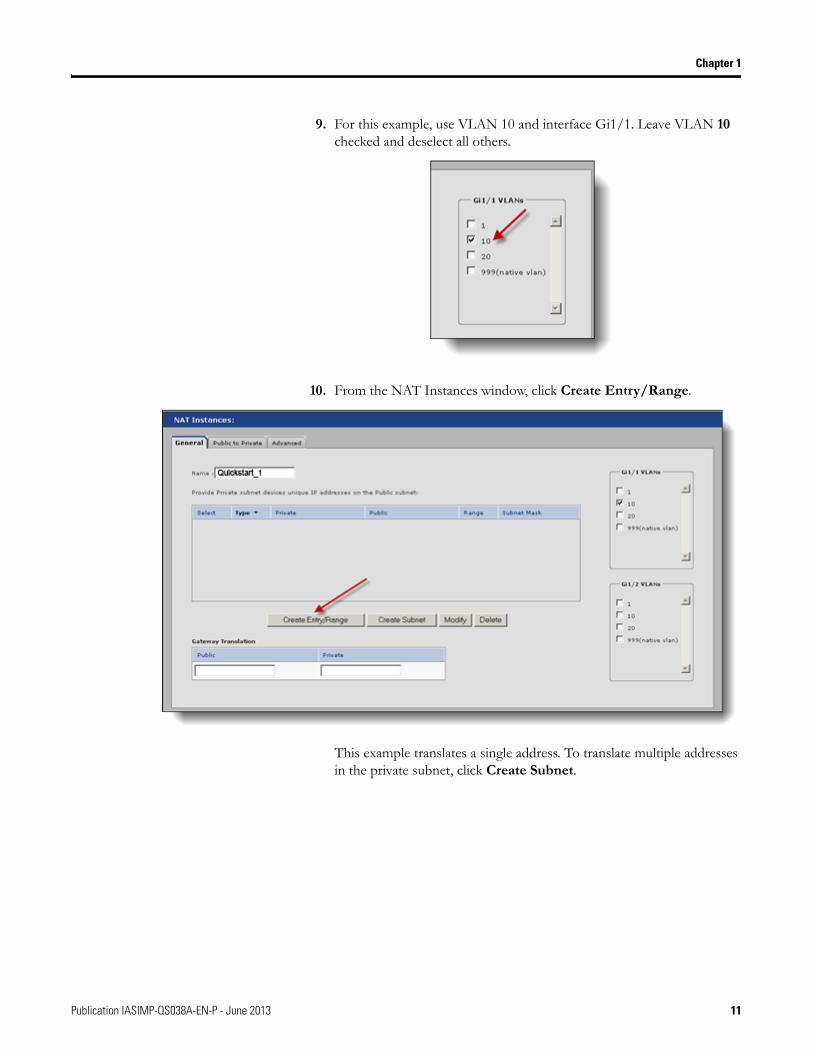
9. For this example, use VLAN 10 and interface Gi1/1. Leave VLAN 10 checked and deselect all others.
10. From the NAT Instances window, click Create Entry/Range.
This example translates a single address. To translate multiple addresses in the private subnet, click Create Subnet.
Publication IASIMP-QS038A-EN-P - June 2013 11
Chapter 1
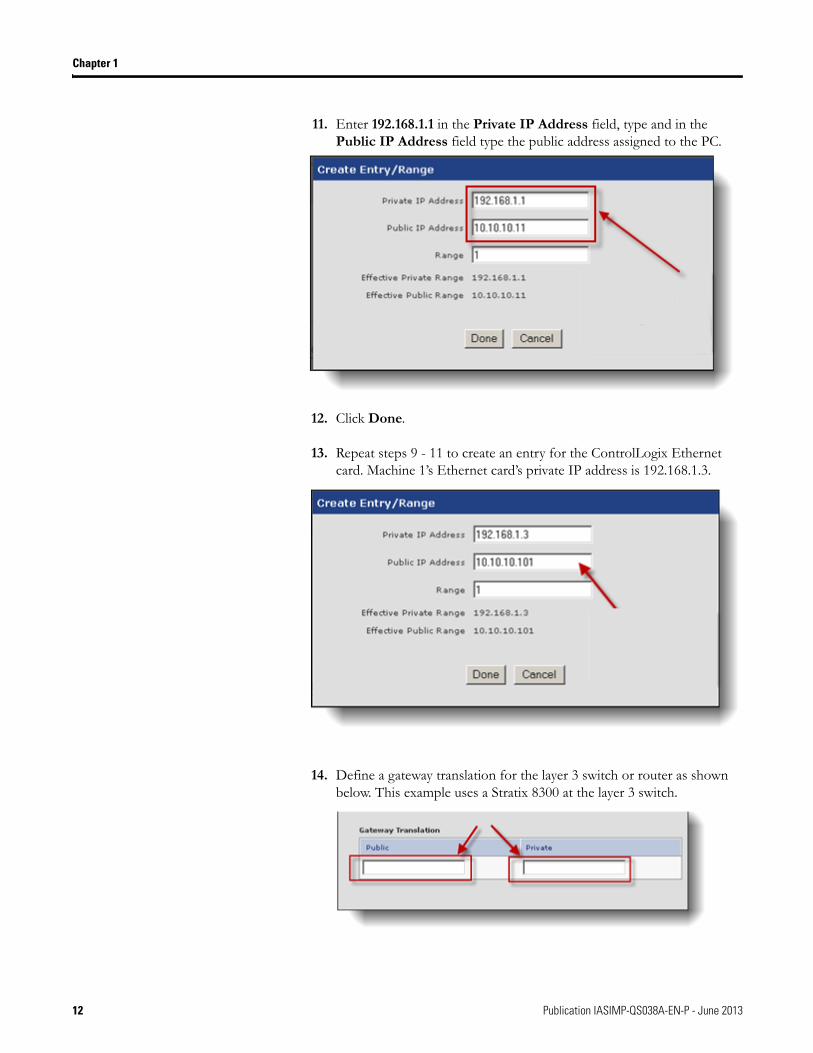
11. Enter 192.168.1.1 in the Private IP Address field, type and in the Public IP Address field type the public address assigned to the PC.
12. Click Done.
13. Repeat steps 9 - 11 to create an entry for the ControlLogix Ethernet card. Machine 1’s Ethernet card’s private IP address is 192.168.1.3.
14. Define a gateway translation for the layer 3 switch or router as shown below. This example uses a Stratix 8300 at the layer 3 switch.
12 Publication IASIMP-QS038A-EN-P - June 2013
Chapter 1
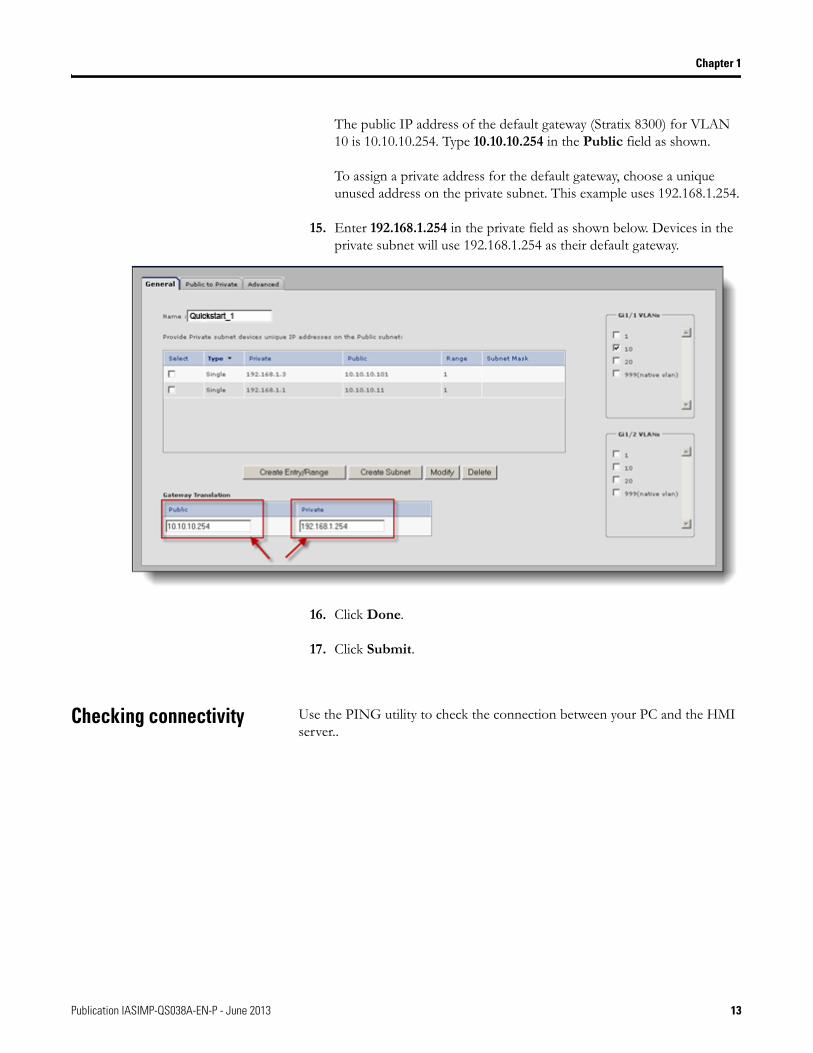
The public IP address of the default gateway (Stratix 8300) for VLAN 10 is 10.10.10.254. Type 10.10.10.254 in the Public field as shown.
To assign a private address for the default gateway, choose a unique unused address on the private subnet. This example uses 192.168.1.254.
15. Enter 192.168.1.254 in the private field as shown below. Devices in the private subnet will use 192.168.1.254 as their default gateway.
16. Click Done.
17. Click Submit.
Checking connectivity Use the PING utility to check the connection between your PC and the HMI server..
Publication IASIMP-QS038A-EN-P - June 2013 13
Chapter 1
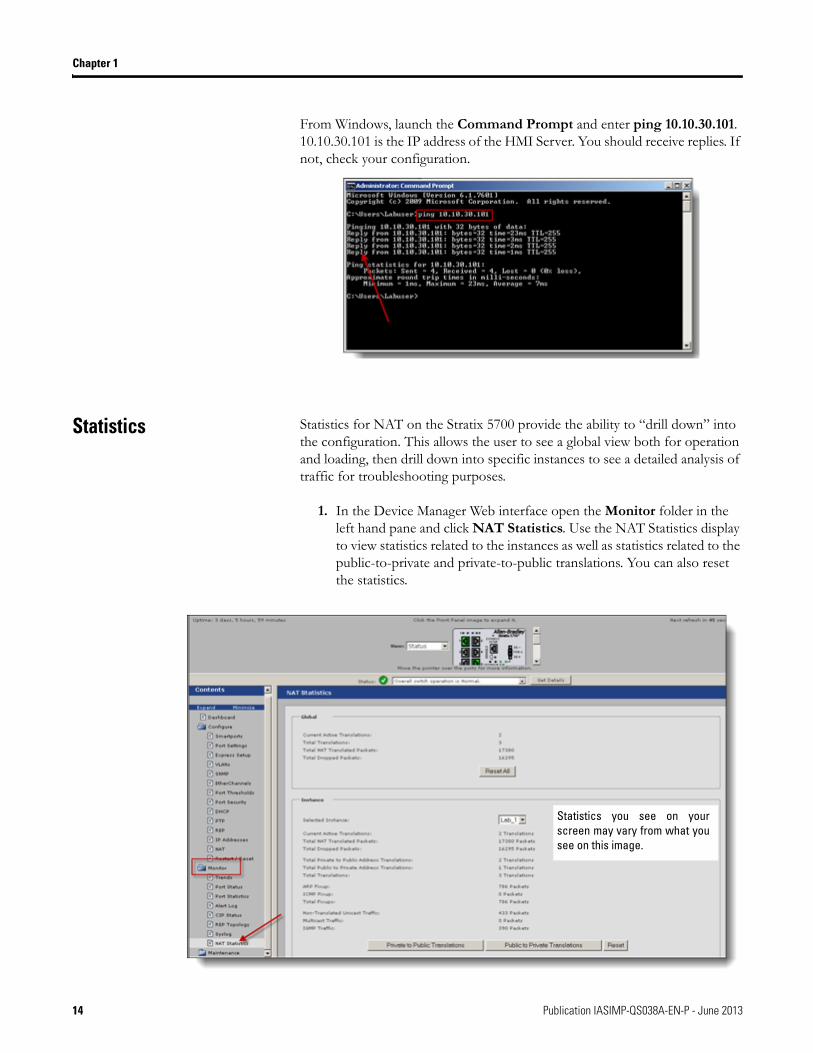
From Windows, launch the Command Prompt and enter ping 10.10.30.101. 10.10.30.101 is the IP address of the HMI Server. You should receive replies. If not, check your configuration.
Statistics Statistics for NAT on the Stratix 5700 provide the ability to “drill down” into the configuration. This allows the user to see a global view both for operation and loading, then drill down into specific instances to see a detailed analysis of traffic for troubleshooting purposes.
1. In the Device Manager Web interface open the Monitor folder in the left hand pane and click NAT Statistics. Use the NAT Statistics display to view statistics related to the instances as well as statistics related to the public-to-private and private-to-public translations. You can also reset the statistics.
Statistics you see on yourscreen may vary from what yousee on this image.
14 Publication IASIMP-QS038A-EN-P - June 2013
Chapter 1
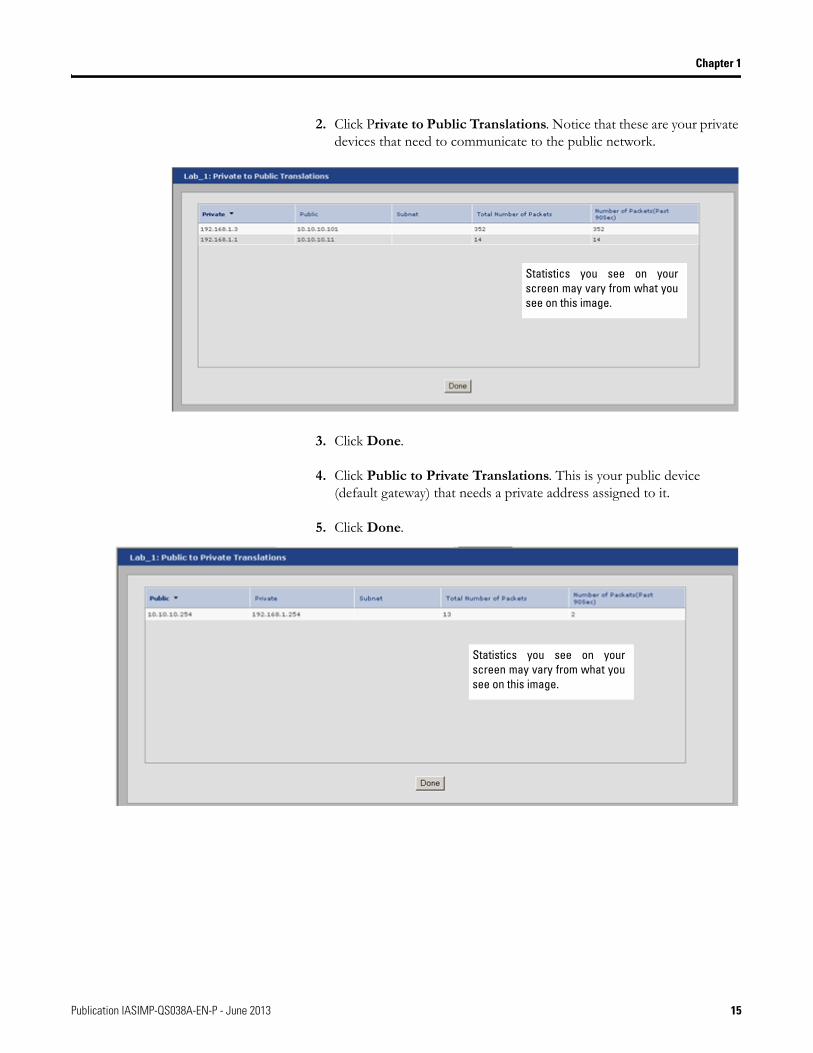
2. Click Private to Public Translations. Notice that these are your private devices that need to communicate to the public network.
3. Click Done.
4. Click Public to Private Translations. This is your public device (default gateway) that needs a private address assigned to it.
5. Click Done.
Statistics you see on yourscreen may vary from what yousee on this image.
Statistics you see on yourscreen may vary from what yousee on this image.
Publication IASIMP-QS038A-EN-P - June 2013 15
Chapter 1
Summary In this Quick Start, 12 identical machines with identical IP addresses all needed to communicate to the HMI server on the Plant network without having to reassign new IP addresses to each machine while maintaining only one Logix program for the 12 controllers instead of one each. The solution was to implement Network Address Translation (NAT) on the Stratix 5700 switch to translate the identical private addresses to unique public addresses and still have only one program to maintain.
The important thing to remember is what IP address to use and when. If a HMI server on the public side needs to communicate with a controller on a machine residing on the private side, the server needs to use its public address, which we assigned on the 10.10.10.x subnet.
Configuring a gateway translation, as we did in this Quick Start because we had a layer 3 device on our network, allowed communication from the private network to a device on the public network (HMI server) using its public address.
The Stratix 5700 management interface can be associated with a VLAN that is or is not assigned to a NAT instance:
• If its associated VLAN is assigned to a NAT instance, the management interface resides on the private subnet by default. To manage the switch from the private subnet, no additional configuration is required. To manage the switch from the public subnet, you must configure a private-to-public translation.
• If its associated VLAN is not assigned to a NAT instance, the management interface’s traffic remains un-translated and is always permitted to pass through the port. In this case the management addresses need to be unique for each switch.
16 Publication IASIMP-QS038A-EN-P - June 2013

Publication IASIMP-QS038A-EN-P - June 2013 18 Copyright © 2013 Rockwell Automation, Inc. All rights reserved. Printed in the U.S.A.
Rockwell Automation Support
Rockwell Automation provides technical information on the Web to assist you in using its products. At http://www.rockwellautomation.com/support/, you can find technical manuals, a knowledge base of FAQs, technical and application notes, sample code and links to software service packs, and a MySupport feature that you can customize to make the best use of these tools.
For an additional level of technical phone support for installation, configuration, and troubleshooting, we offer TechConnect support programs. For more information, contact your local distributor or Rockwell Automation representative, or visit http://www.rockwellautomation.com/support/.
Installation Assistance
If you experience an anomoly within the first 24 hours of installation, review the information that is contained in this manual.You can contact Customer Support for initial help in getting your product up and running.
New Product Satisfaction Return
Rockwell Automation tests all of its products to ensure that they are fully operational when shipped from the manufacturing facility. However, if your product is not functioning and needs to be returned, follow these procedures.
Documentation Feedback
Your comments will help us serve your documentation needs better. If you have any suggestions on how to improve this document, complete this form, publication RA-DU002, available at http://www.rockwellautomation.com/literature/.
United States or Canada 1.440.646.3434
Outside United States or Canada
Use the Worldwide Locator at http://www.rockwellautomation.com/support/americas/phone_en.html, or contact your local Rockwell Automation representative.
United States Contact your distributor. You must provide a Customer Support case number (call the phone number above to obtain one) to your distributor to complete the return process.
Outside United States Please contact your local Rockwell Automation representative for the return procedure.


