46
Study Unit Buying and Building a PC Reviewed By Brandon Nolta
| Date post: | 05-Dec-2015 |
| Category: |
Documents |
| Upload: | ileana-craita |
| View: | 219 times |
| Download: | 0 times |

Study Unit
Buying and Buildinga PCReviewed By
Brandon Nolta

All terms mentioned in this text that are known to be trademarks or servicemarks have been appropriately capitalized. Use of a term in this text should notbe regarded as affecting the validity of any trademark or service mark.
About the Reviewer
Brandon Nolta has more than a decade of experience in informa-tion technology, system administration, software testing, technical documentation, and freelance writing. He has worked for several companies in various technical capacities, including Hewlett-Packardand MPC. His freelance experience includes working as an Internetresearcher for the Sci-Fi Channel (now SyFy).
Mr. Nolta has a bachelor’s degree in mathematics from the Universityof Idaho and a master’s degree in English from Boise State University.He holds several technology-related certifications, including A+,Network+, and Microsoft Certified System Administrator (MCSA).
Copyright © 2011 by Penn Foster, Inc.
All rights reserved. No part of the material protected by this copyright maybe reproduced or utilized in any form or by any means, electronic ormechanical, including photocopying, recording, or by any informationstorage and retrieval system, without permission in writing from the copy-right owner.
Requests for permission to make copies of any part of the work should be mailed to Copyright Permissions, Penn Foster, 925 Oak Street, Scranton,Pennsylvania 18515.
Printed in the United States of America
05/21/13
iii
Pr
ev
ie
wP
re
vi
ew
In this study unit we’ll discuss the factors involved withbuying and building a personal computing system. The sys-tem may be for your own personal use, or you may want toassist one of your customers in choosing or designing theright system for their needs. In either case, you’ll have tounderstand how to assess the user’s computing require-ments and how to select the system functions and featuresneeded to satisfy those requirements.
Once you’ve determined the system requirements, you mustmake the choice of whether to buy a preassembled PC or tobuild a PC from parts. Needless to say, there are many advan-tages and disadvantages to each choice. In this study unityou’ll learn what factors you should take into considerationto make the basic decision of whether to buy or build. If youdecide to buy a preassembled PC, you also need to knowthe pros and cons of purchasing a brand-name PC versus awhitebox.
When you complete this study unit, you’ll be able to • List the questions and concerns that you must address to
determine the appropriate personal computing system and features required to support specific computing needs
• Identify the considerations in determining whether to buy apreassembled PC or build your own PC
• List the advantages and disadvantages to buying a brand-name PC versus a PC whitebox
• Describe what needs to be done to get ready to build a PC
• Explain the overall process for assembling a personal computer
• Describe the general procedure to install each major component of a personal computer
• Identify the various system board and device settings thatmust be made during the assembly process
• Explain the installation procedures for the operating system,peripherals, and device drivers
Remember to regularly check “My Courses” on your student home-page. Your instructor may post additional resources that you canaccess to enhance your learning experience.

v
DECIDING TO BUY OR BUILD A PC 1
How Will You Use Your Computer System? 1Choosing Your Software 2Organizing Your PC and System Requirements 3Deciding to Buy or Build Your PC 5The Monitor 9The Keyboard 10The Printer 10Other Peripherals 11Practical Exercise 1 11
BUILDING A PERSONAL COMPUTER 13
Maintaining Accurate Records 13Protect Yourself and Your PC 13Preparing the Work Area 14The Tools Required 14Before You Begin Any Assembly 14A Step-by-Step Computer Assembly Guide 15Install the Operating System 36Practical Exercise 2 37
SELF-CHECK ANSWERS 41
Co
nt
en
ts
Co
nt
en
ts
1
DECIDING TO BUY OR BUILD A PC
Think about some of the purchases you’ve made during yourlife. For example, you probably own a telephone. Why didyou buy that phone? Basically, you bought it because youneeded to be able to communicate with other people. Okay,but why did you decide on the particular phone you bought?There are so many different types. Some have built-in answer-ing machines, memory for storing phone numbers, and manyother features. You probably chose your phone because youwanted it to function in a certain way.
Buying a car is even more complicated. You need transporta-tion, of course, but what about all of those models andoptions and colors? In buying a car, some people like to cre-ate a certain image or make a statement about their lifestyle.If people bought cars just to satisfy the need for transporta-tion, there would be far fewer models to choose from.
Buying a computer is also a highly individual activity. Youmust begin by considering what you want a personal com-puter system to do before you can determine what specificfunctions and features you’ll need.
How Will You Use Your Computer System?
To select or design a personal computer system, the first andmost important question is “How will the system be used nowand in the future?” Basically, this question means that youshould begin by determining what you want to accomplishwith the computer. Your answer to this question will proba-bly consist of multiple uses.
Buying and Building a PC
For example, in a business environment, the system mightbe used
• To run business applications in either a stand-alone ornetworked environment
• To run engineering or mathematical applications such as CAD/CAM
• To create multimedia presentations
• To provide user support, such as a help-desk situation
• For use in retail management
• For use in a LAN environment with software stored on a server
• For network administration
• For software development
• For Internet access
In your home or for personal use, you may want to
• Keep track of financial data
• Generate and maintain information such as phone andaddress lists
• Create music, photographs, and video CDs and DVDs
• Access the Internet
• Play games
Choosing Your Software
Once you’ve identified what you want to do with the computersystem, you need to choose the appropriate software to accom-plish those tasks. Upon investigation, you’ll find many programsare available to do a particular task. To make things evenmore confusing, you’ll often find different levels or versions of the same program offering various features and functions.For example, if you buy a new computer that includes pre-loaded software, you may find that the software has limitedfunction and that you’ll need to upgrade it to the deluxe or full
Buying and Building a PC2
Buying and Building a PC 3
version to get the features you want. So when shopping forsoftware, your first objective is to be sure that it has all ofthe features and functions to do what you want.
After you’ve established that the program will do everythingyou want, there are more questions you may need to ask,beginning with—what are the software company’s upgradeand return policies? Does the software need to be compatiblewith other programs or data? Still another considerationmight involve learning to use the program. If you don’t knowhow to use the program, is there training available? Does thecompany provide the training, or do you need to use anothersource? Does the company provide technical support, and isthere a fee? Does the program include a tutorial and goodhelp information? Is the program’s documentation adequate?One method to avoid a lot of anxious moments is to selectsoftware that’s widely used. By using well-known software,you’re more likely to find good training materials, technicalsupport, and compatibility with other software.
Organizing Your PC and SystemRequirementsTo design a personal computer system, the most importantquestion is “How will the computer be used now and in thefuture?” Basically, this question means that you should beginby determining what you want to accomplish with the com-puter. Therefore, your first step should be to determine allthe application software you’ll need. Some applications maybe those you already own and use, some may be upgrades youintend to buy for your existing programs, and some may betotally new.
As you’ve learned earlier in your program, the PC hardwaremust be able to support the requirements of the software. Oneway to organize your requirements is to make a table similarto that shown in Table 1 and list each application programalong with its requirements. Be sure to list the recommendedrequirements in addition to the minimum requirements. Intoday’s environment, with relatively low cost of memory andhard-drive space, there’s no reason to settle for less than thefull installation of your software to enable the use of all theincluded features.

Buying and Building a PC4
Buying and Building a PC 5
After determining all of the known application software youintend to use, you should select the operating system neededto run the software. Perhaps the focus will be on networking,or maybe multiple users will have access to the PC. Thesefactors and more can influence your choice of the operatingsystem in addition to the requirements of the applicationprograms. After you’ve selected an operating system, enter it into the Operating System column (as shown in Table 1)and list the specific hardware requirements of the operatingsystem along with those of the application programs.
Use the data from the applications and operating system toestablish the overall PC requirements and enter them intothe PC Requirements column (Table 1). When determiningthe size of the hard drive you’ll need, remember that thehard drive is used to hold your operating system, applica-tion programs, and the files you create. If you happen to beworking with many large data files, especially those contain-ing graphics or photos, your hard-drive requirements maywell be much greater. Whatever hardware you decide isneeded to support your current activities, remember to allowfor future expansion in the way of speed, size, and the abilityto attach future input/output devices.
The important thing to remember is that whether you use atable similar to what we’ve described, or some other method,be sure to know exactly what you need before you beginshopping. Poor planning may result in buying a PC that’smissing an important feature or buying unneeded featuresand devices due to an aggressive salesperson.
Deciding to Buy or Build Your PC
Now that you’ve identified your system requirements, let’slook at some of the advantages and disadvantages of pur-chasing your PC versus building a PC.
One of the primary reasons for purchasing a PC is the timefactor. If you’re in a hurry to get your system up and run-ning, then you don’t want to get involved with orderingindividual parts and assembling a PC. Building a PC takespatience, and if this is your first time, you’re probably goingto hit a few snags. By ordering a customized PC directly from

the manufacturer, you should have your system and be upand running in less than a week. Of course, if you want tobuy a bundled system from a local store, you’ll be up andrunning the same day.
Other reasons for selecting a prebuilt system are cost andconvenience. Building your own PC probably won’t save youmoney, especially when you consider the operating system,some basic preloaded software, and usually a free trialInternet subscription that come with a purchased system.The lower cost and convenience of having the system ready to run right out of the box are good enough reasons for manypeople not to build their own PC.
Still another reason for purchasing a system is the warranty.If you build a system, the individual parts may have war-ranties, but you don’t have an overall system warranty. If youbuy a system directly from a manufacturer, you have techni-cal help as close as your phone or the Web. Also, if there’s aproblem that can’t be resolved over the phone, your warrantymay provide for a service technician to come to your site forrepairs. This initial warranty can be usually extended for anadditional cost.
So why should you consider building a PC? Well, if you havethe time and patience, it can be fun and educational. As a PC technician, the knowledge and experience you’ll gain byresearching parts, studying the documentation, and assem-bling the PC is well worth the effort. You’ll have completecontrol over the quality and features of each component inyour PC. Also, because you’ve built the system and have thedocumentation for each part, you’re in a position to serviceand upgrade the PC more easily. The software you install willbe only what you want. Your system won’t be cluttered withbundled software that you really don’t need. By purchasingand installing your own software, you’ll have the originalinstallation disks and complete documentation for each pro-gram. However, one piece of advice is that you don’t try toassemble your own PC for the first time unless you have anexperienced technician or some other type of technical helpavailable.
Buying and Building a PC6
A bundled system is acomputer system thatincludes both softwareprograms and hard-ware in one package.
Buying and Building a PC 7
Purchasing a Brand Name PC versus a Whitebox
If you’ve decided that purchasing a PC is the way to gorather than building it, you now must decide between buyinga brand-name PC or a whitebox. In comparing PCs with similarfeatures and functions, you’ll find that the brand-name PCcosts more. The higher cost is due in part to the warrantyand service that comes with a brand-name PC. A brand-name PC manufacturer usually provides a multiple-yearwarranty, a Web site for support, a 24-hour help line, limitedon-site service, and parts delivered to your doorstep. WhiteboxPC manufacturers may also provide good service, but usuallynot as comprehensive as that of a brand-name manufac-turer.
Another consideration is how the PC is made. Lower-pricedPCs incorporate functions such as sound, video, and networklogic on the system board rather than on separate expansioncards. When included on the system board, these functionsnormally have fewer features. You can usually identify whenfunctions are contained on the system board by looking atthe ports on the back of the PC. If the ports are aligned withthe edge of the system board, these functions probably origi-nate from the system board. In older brand-name PCs,functions mounted on the system board often couldn’t bereplaced. This made the system board proprietary in that ithad to be repaired by the original manufacturer. However,newer PCs, with these functions on the system board, canusually be overridden by installing an expansion card withthe same function. This may be fine depending on your needs.If you plan on adding high-intensity video or multimediacards, buy a board without these embedded devices. Whypay for something you won’t use?
Other methods used to make proprietary systems mightinclude storing the CMOS setup program on the hard driverather than in BIOS, or by designing the computer case sothat it will accept only the manufacturer’s system board, nota standard system board. Just be aware that a proprietarysystem can make it more difficult when it comes time toupgrade or repair the system.
A whitebox was previously called a clone.
A proprietary system isunique to a particularmanufacturer and usu-ally forces the customerto return to the manu-facturer for parts andservice.
Buying and Building a PC8
Preparing to Build a PC
If you’ve decided to build a PC, you need to begin by select-ing and ordering parts. One of the advantages of buildingyour own PC is to get exactly what you want with the qualityand function you want. Remember that the process of build-ing a PC takes time and patience—and that begins by doinga thorough job in your research and selection of parts. Asyou select each part, you must keep in mind functionalityand compatibility with other parts.
The basic parts you’ll need for your computer are the
• System board
• CPU
• RAM
• Case
• Power supply
• Hard drive
• Other drives (CD-ROM, DVD, etc.)
• Additional cards (video, audio, modem, etc.)
• Peripheral devices
The system board is the most important component andshould be selected first. Many of the other parts must beselected based on the system board.
If this is your first time building a system from parts, we recommend that you buy your parts locally, even though itmay cost more. That way you can check that the documenta-tion for each part is complete and easily understood. Also, bybuying locally, you can look at the part and, with luck, havethe dealer answer any of your technical questions. Beforebuying any part, make sure you check on the store’s returnpolicy and the manufacturer’s warranty in case there’s aproblem.
If possible, buy the system board, CPU, and memory fromthe same place so that the seller can assist you to ensurethat the parts are compatible. Instead of buying separateparts, you can often buy a system board with CPU installed

Buying and Building a PC 9
and the system board settings already set. Make sure thatthe system board supports all of the drives you intend toattach and has the appropriate slots available for other cardsyou intend to install.
After choosing a system board, CPU, and RAM, select thecase and power supply. The case must be compatible withthe system board and the other components you intend toinstall. Next select the hard drive and other drives. The floppydrive that once was a standard is now an optional add-on inmany new systems.
As we previously mentioned, some system boards have built-inaudio, video, and modem and/or network functions. However,if you’ve designed your own system, you’ve most likely chosento use separate cards to perform these functions. By havingseparate cards, you have more flexibility in function and theability to make future changes and upgrades.
The final step is to select your system peripherals, includingthe monitor, keyboard, mouse, and printer. Normally, youwould give little thought to purchasing these items. But, let’s take a brief look at how your selection of these items isaffected by the way you use your computer and by your com-puting needs.
The Monitor
It’s important to remember that the monitor, keyboard, andmouse are your primary input/output interfaces to the sys-tem. If you’re purchasing a bundled system from a local store,you may have no choice in monitors. If you’re ordering a systemfrom a manufacturer, you’ll probably find that your systemhas a basic monitor that can be upgraded to a larger or bet-ter model at additional cost. On the other hand, by buildingyour own PC system, you’ll have the freedom to choose yourmonitor from a variety of manufacturers with the quality andspecific features you want.
To select a monitor, you need to consider the way you’ll usethe computer system, your physical surroundings, and yourpocketbook, along with whatever personal preferences youmay have. The overall size of the display is especially impor-tant, depending on your intended use of the system. If the

Buying and Building a PC10
system is going to be used for hours at a time, or if the workis primarily text- or graphic-oriented, you may want a largerdisplay. On the other hand, if the PC is used infrequently orif it’s used primarily as a server, for example, you may notwant to spend a large amount of money on a high-tech display.
The Keyboard
The keyboard is probably not as critical to most people as the display. Most people who do casual data entry and letterwriting have slight preferences but can usually get along withalmost any keyboard for short periods. However, for thosewho may use the computer all day to do data entry, the key-board is almost certainly the most important component.These people need to have a comfortable keyboard with aparticular “feel” or “touch” that permits them to type accu-rately without watching the display to verify their input. Also,to eliminate problems from repetitive motion (such as musclestrain and carpal tunnel syndrome), an ergonomic keyboardwould be the best choice.
The Printer
The primary concern in selecting a printer is determiningwhat it will be used for. For business use where high-volumequality printing is required, you should probably opt for alaser printer. In networked situations, a laser printer is oftenused to support several PCs.
For small stand-alone PCs such as for home use, you wouldprobably select an inkjet printer. Inkjet printers are usual-ly slower but cost less and are commonly used to producecolor output, including photographs. Depending on yourrequirements for color, look at different cartridges and theirconfigurations. Color cartridges can cost a lot, even thoseused with an inexpensive printer. Many inkjet printers todayare multiple-function devices that also serve as copiers, faxmachines, and scanners. Many printers are also able to readmemory cards from digital cameras and print photos withoutprocessing through the PC.
Buying and Building a PC 11
Other Peripherals
Other peripherals, such as scanners or portable storagedevices, shouldn’t require much in the way of planning otherthan ensuring that you’ll be able to attach them to your newPC. Most devices are usually easily attached through a USBport. However, when planning for your new PC, don’t forgetabout any devices that you’re considering moving from yourold PC. For example, you may have a SCSI attached deviceon your old PC that won’t attach to your new PC without an adapter card. Be sure to plan ahead to ensure that alldevices you intend to transfer to your new system can beconnected and used on your new system.
Practical Exercise 1
Assume you’re setting up shop as a PC repair technician andyou need a computer system to keep track of your customers,your workload, and your business finances. Determine whathardware and software your system will need and develop alist of system specifications.
After you’ve developed your specifications, determine what itwould cost to purchase a system to satisfy your requirements.Begin by checking the advertisements in your local newspa-per and visiting your local stores that sell computers to see ifyou can find a prebuilt system that will fill your needs. Next,use the Internet to compare prices from various computermanufacturers for identical systems to match your specifica-tions. Finally, determine what it would cost to buy all of theparts and assemble the system yourself. What did you findand how did the prices compare?
Check your results against those on page 42.

Buying and Building a PC12
Self-Check 1At the end of each section of Buying and Building a PC, you’ll be asked to pause and check your understanding of what you have just read by completing a “Self-Check” exercise.Answering these questions will help you review what you’ve studied so far. Please complete Self-Check 1 now.
1. When preparing to buy or build a computer system, what is the next step after you’ve identi-fied the activities you’ll be doing with the computer system?
__________________________________________________________________________
__________________________________________________________________________
2. How can making a table such as shown in Table 1 help you when buying or building a system?
__________________________________________________________________________
3. What are some of the benefits of using common, well-known software products?
__________________________________________________________________________
__________________________________________________________________________
4. List two advantages of purchasing and installing your own software versus preinstalled soft-ware on a PC.
__________________________________________________________________________
__________________________________________________________________________
5. Two things to keep in mind when you’re selecting parts to build a computer are _______ and_______.
Check your answers with those on page 41.

Buying and Building a PC 13
BUILDING A PERSONAL COMPUTER
Okay, you’ve decided to build your own computer system fromindividual parts. You’ve documented the requirements of thecomputer system, and researched and purchased all of thecomponents. What’s next? Well, before we begin to assembleany parts, let’s take a few minutes to prepare a proper assem-bly area and discuss the overall assembly process.
Maintaining Accurate Records
When building your own system, it’s a good idea to keep anotebook to record the assembly details. You should begin bydocumenting all of the configuration settings for the systemboard. One reason for doing this is to protect yourself in caseyou accidentally alter a setting after you’ve assembled the PCand you’ve misplaced the documentation. Also, occasionally a setting is set differently from what’s directed by the manualin order to make a device operate properly.
Another type of information it may be wise to keep in yournotebook is the routing and connection of all cables and connectors. In some cases, connectors may not be keyed toprevent plugging them in backwards. Also, if you’ve disas-sembled your PC for some reason, you may accidentallyconfuse cables, such as the EIDE or SATA data connections if you have multiple drives.
Protect Yourself and Your PCBy now, protecting your PC from static electricity and protect-ing yourself from dangerous electrical shock or other accidentsshould be second nature to you. Therefore, we just want toremind you that, when building a PC, be sure to wear yourantistatic wrist strap and follow all the safety procedures.
It wouldn’t be a badidea to take photos ofall the switches andjumpers. Keep bothhard and soft copies ofthese photos in a safeplace. Then, in caseyou need the photos at a later date as refer-ence, they’ll truly beworth a thousandwords!
You’ll find additionalresources for computerrepair athttp://electronics.howstuffworks.com/tech
Buying and Building a PC14
Preparing the Work AreaA safe, clean, uncluttered, and well-lit work area will makethe assembly process a pleasant experience. Be sure that youthoroughly read all the instructions supplied with the individ-ual components. Also, ensure that you have all the necessarytools along with a grounding mat and wrist strap. Assembleyour computer in a logical, systematic process. If you findyourself becoming discouraged during the assembly process,simply stop, take a break, and try again.
The Tools RequiredWhile there might be a slight variation in the tools requiredto assemble a computer, in general you’ll need
• #0 Philips screwdriver
• #1 Philips screwdriver
• Antistatic earth wrist strap and cord
• Pair of side cutters
• Pack of small cable ties
Before You Begin Any AssemblyPrepare a step-by-step plan detailing the assembly sequence.Make sure that you resolve any unanswered questions beforeyou begin the assembly process. If you aren’t able to resolvea question using the documentation that came with the com-ponents, you can contact the manufacturer’s technical supportgroup, contact a computer supplier, or try to find the informa-tion on the Internet.
Buying and Building a PC 15
A Step-by-Step Computer Assembly Guide
Due to the great variety of processors, system boards, andRAM types available today, we couldn’t begin to cover all thecomputer system assembly combinations possible. So, forthis example, we’ll assemble a mid- to high-end computersystem suitable for a variety of applications including data-base, word processing, graphics, and music. For this system,we’ve selected the following basic components:
• Chassis (ATX mid-tower case and ATX12V/EPS12Vpower supply)
• An Intel system board with an LGA 1156 socket(includes onboard sound)
• Core i5 processor (3.2 GHz)
• Heat sink and cooling fan
• 4 GB of RAM (2 DDR3 modules)
• PCI Express x1 video card with High-DefinitionMultimedia Interface (HDMI) out
• 10/100/1000 Mbps PCI Express x1 Ethernet card (forconnection to high-speed Internet access such as digitalsubscriber line [DSL] or cable modem)
• One 500-GB SATA hard drive
• DVD/CD burner drive
• USB keyboard
• USB optical mouse
• Powered speakers
For this system we’ll use a 19-inch flat panel, liquid crystaldisplay (LCD) with DV/in and choose Windows 7 Professional64-bit for the operating system.
The following is a step-by-step assembly sequence for thissystem:
1. Prepare the chassis.
2. Set/check the system board jumpers if available.
3. Install the CPU, heat sink, and CPU cooling fan.Remember to attach all power connectors.
4. Install RAM.
5. Perform a memory test on the system board.
6. Install the system board in the case. On smaller cases,you’ll have to remove the power supply first.
7. Connect power and front-panel connectors to the systemboard. The front-panel wire goes from the on/off switchto the system board. On most cases, the system boardturns the system on and off.
8. Install the hard drive.
9. Install the video and modem or network interface cards.
10. Install the DVD/CD burner.
11. Connect the essential peripherals (power cords andcables).
12. Install the operating system.
13. Connect any remaining peripherals and install the devicedrivers.
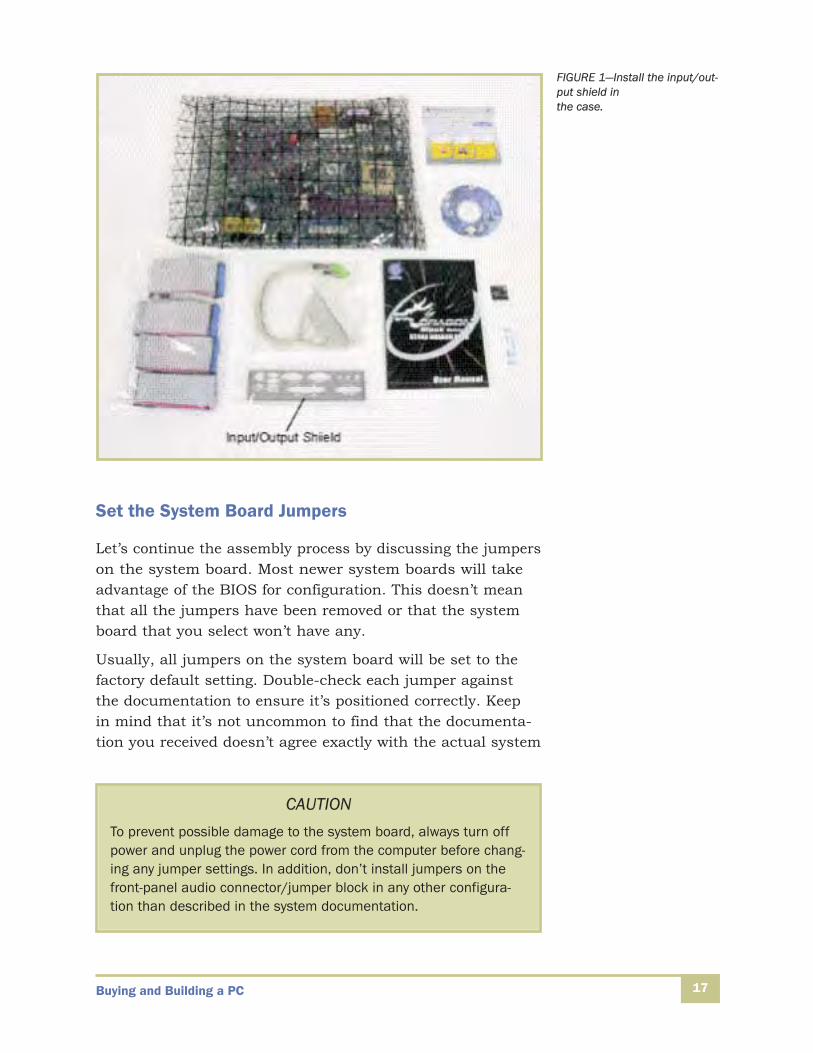
Install the Input/Output Shield
Install the input/output shield in the chassis before install-ing the board. The input/output shield is supplied with thesystem board (Figure 1). Place the shield inside the chassis so that it fits tightly and securely.
Buying and Building a PC16
Buying and Building a PC 17
Set the System Board Jumpers
Let’s continue the assembly process by discussing the jumperson the system board. Most newer system boards will takeadvantage of the BIOS for configuration. This doesn’t meanthat all the jumpers have been removed or that the systemboard that you select won’t have any.
Usually, all jumpers on the system board will be set to thefactory default setting. Double-check each jumper against the documentation to ensure it’s positioned correctly. Keep in mind that it’s not uncommon to find that the documenta-tion you received doesn’t agree exactly with the actual system
FIGURE 1—Install the input/out-put shield in the case.
CAUTIONTo prevent possible damage to the system board, always turn offpower and unplug the power cord from the computer before chang-ing any jumper settings. In addition, don’t install jumpers on thefront-panel audio connector/jumper block in any other configura-tion than described in the system documentation.
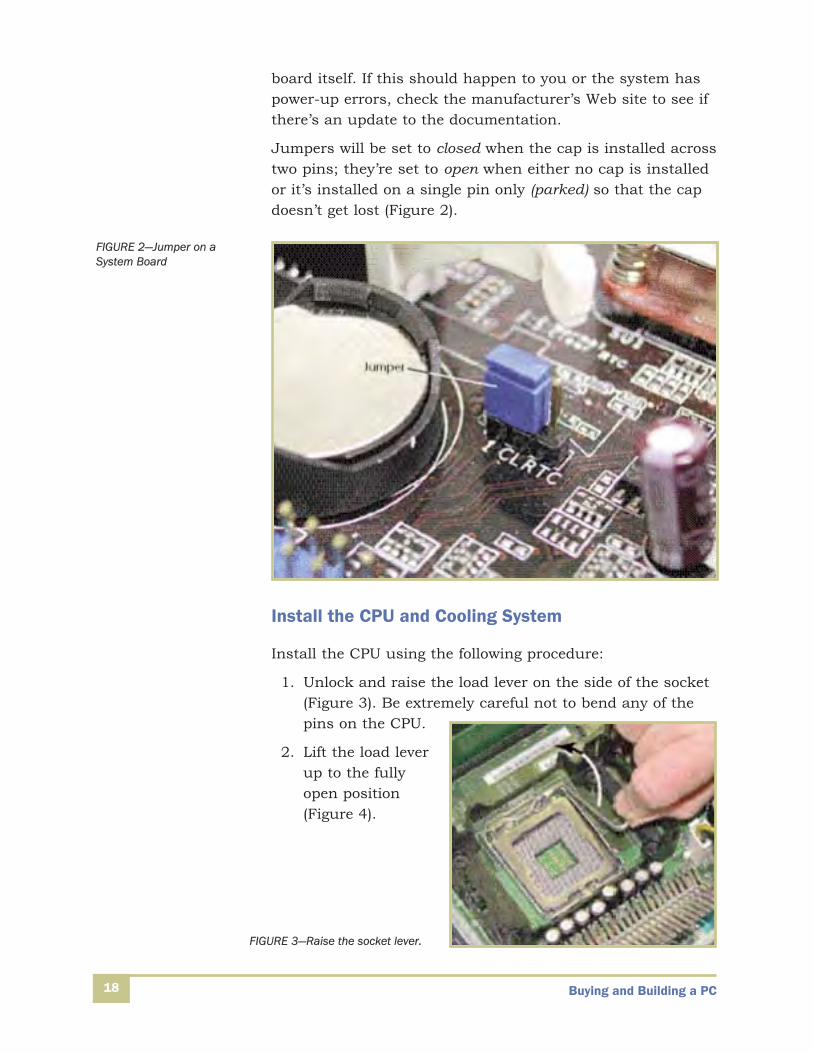
board itself. If this should happen to you or the system haspower-up errors, check the manufacturer’s Web site to see ifthere’s an update to the documentation.
Jumpers will be set to closed when the cap is installed acrosstwo pins; they’re set to open when either no cap is installedor it’s installed on a single pin only (parked) so that the capdoesn’t get lost (Figure 2).
Install the CPU and Cooling System
Install the CPU using the following procedure:
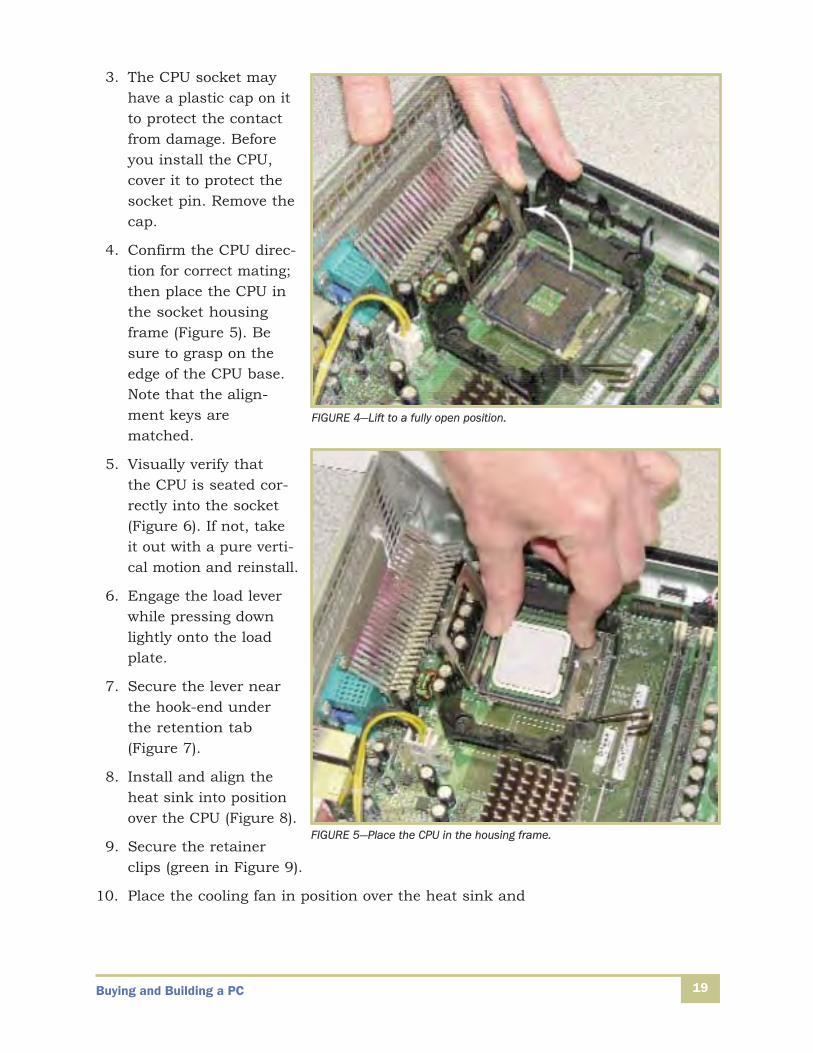
1. Unlock and raise the load lever on the side of the socket(Figure 3). Be extremely careful not to bend any of thepins on the CPU.
2. Lift the load leverup to the fullyopen position(Figure 4).
Buying and Building a PC18
FIGURE 2—Jumper on aSystem Board
FIGURE 3—Raise the socket lever.
Buying and Building a PC 19
3. The CPU socket mayhave a plastic cap on itto protect the contactfrom damage. Beforeyou install the CPU,cover it to protect thesocket pin. Remove thecap.
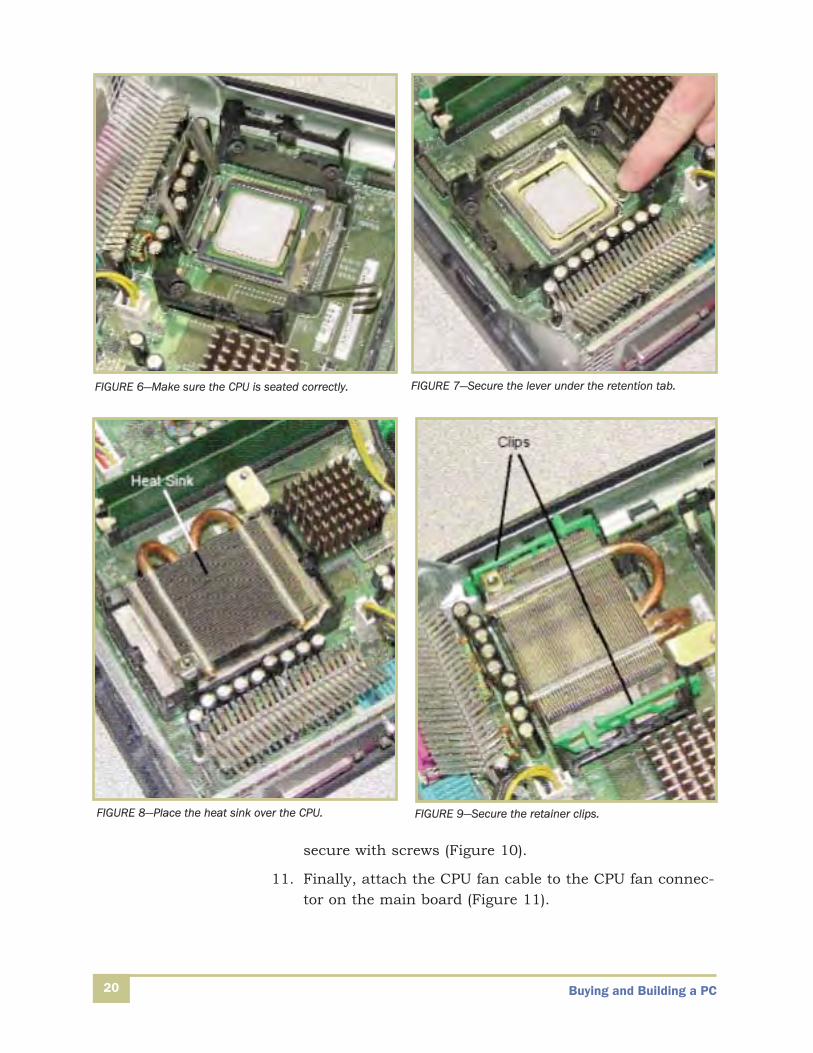
4. Confirm the CPU direc-tion for correct mating;then place the CPU inthe socket housingframe (Figure 5). Besure to grasp on theedge of the CPU base.Note that the align-ment keys arematched.
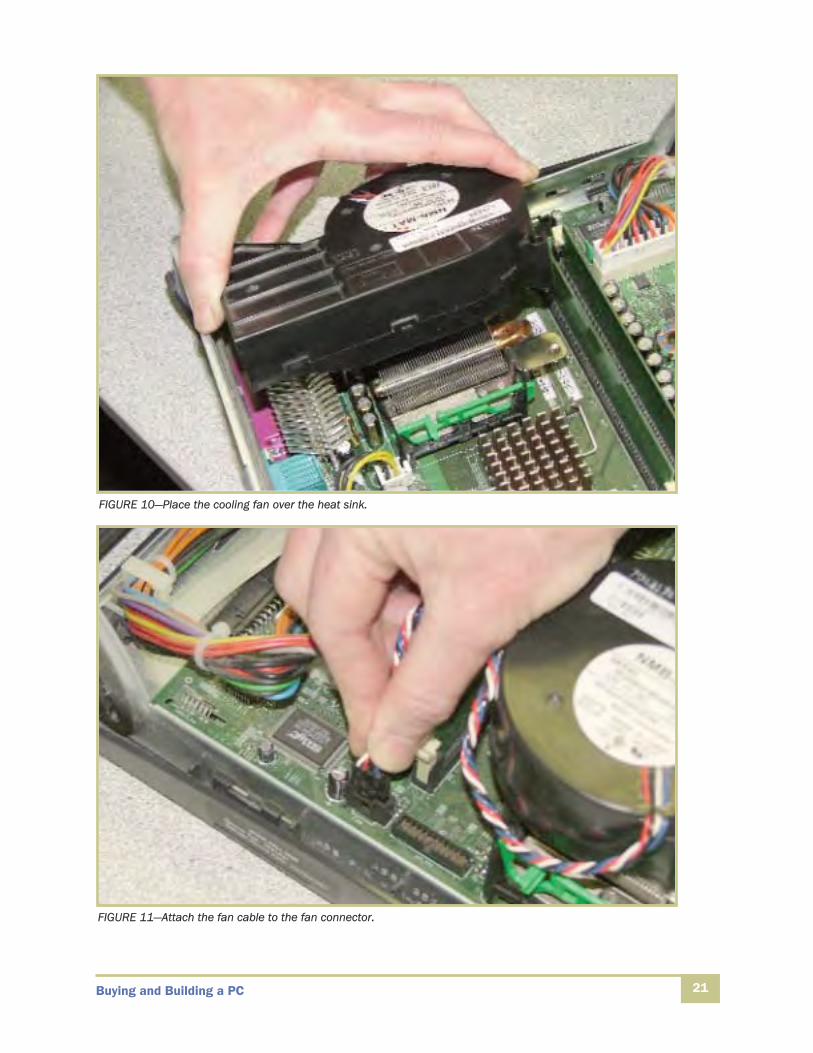
5. Visually verify that the CPU is seated cor-rectly into the socket(Figure 6). If not, take it out with a pure verti-cal motion and reinstall.
6. Engage the load leverwhile pressing downlightly onto the loadplate.
7. Secure the lever near the hook-end under the retention tab (Figure 7).
8. Install and align theheat sink into positionover the CPU (Figure 8).
9. Secure the retainer clips (green in Figure 9).
10. Place the cooling fan in position over the heat sink and
FIGURE 4—Lift to a fully open position.
FIGURE 5—Place the CPU in the housing frame.
Buying and Building a PC
secure with screws (Figure 10).
11. Finally, attach the CPU fan cable to the CPU fan connec-tor on the main board (Figure 11).
20
FIGURE 6—Make sure the CPU is seated correctly. FIGURE 7—Secure the lever under the retention tab.
FIGURE 8—Place the heat sink over the CPU. FIGURE 9—Secure the retainer clips.
Buying and Building a PC 21
FIGURE 10—Place the cooling fan over the heat sink.
FIGURE 11—Attach the fan cable to the fan connector.
12. After the CPU and cooling system are installed, you can’t see the information on the top of the chip. Toaccount for this chip, you can remove the label (it hasthe processor speed information, test specification, andlot number) from the box the CPU came in and place itinside the chassis. This will allow quick access to theinformation that’s no longer visible. In the event that theCPU is replaced or upgraded at a later date, ensure thatthis sticker is removed or marked as obsolete to avoidconfusion.
Install Memory on the System Board
For this system, we’re going to install two memory modules.The selection was based on the system board’s technicalspecifications, which allows memory (RAM) having the follow-ing specifications:
• Memory Size: 2 GB
• Speed: 333 MHz
• Memory Type: DDR3
• Pins: 240
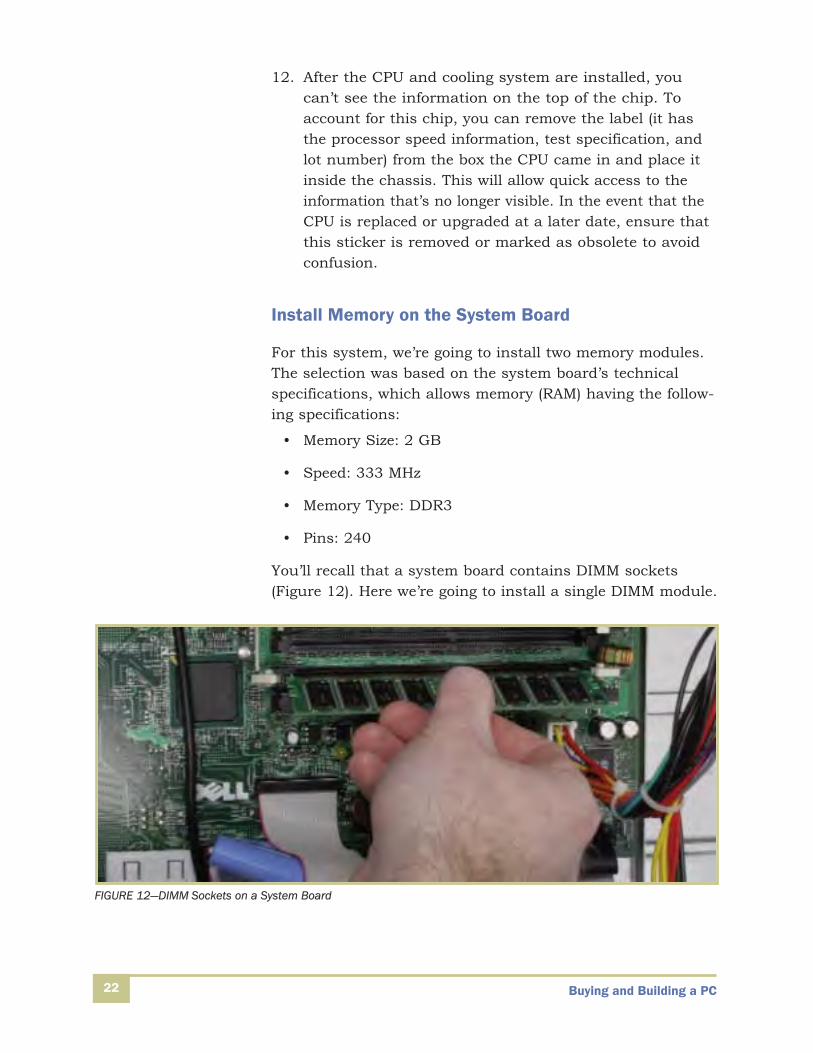
You’ll recall that a system board contains DIMM sockets(Figure 12). Here we’re going to install a single DIMM module.
Buying and Building a PC22
FIGURE 12—DIMM Sockets on a System Board
Buying and Building a PC 23
Memory modules are keyed so they’ll go in the empty slotonly one way. Hold the module between your thumbs andforefingers, gripping it along the flat surface towards theends, but keeping the end edges free of your remaining fingers. First, line up the notches with the partitions in thesocket. It takes more force than you might expect to seat thememory module properly. Firmly push the module straightinto the slot in the header. When the module is positionedcorrectly, the retainers will naturally click into the receivingnotches at the module’s ends. Never try to close the retainersin an attempt to force the module into the slot. If the retain-ers don’t close all by themselves during the process, eitherthe keying is reversed or the module wasn’t aligned properly.Remove the module, push back the retainers, check themodule’s orientation, and then try again.
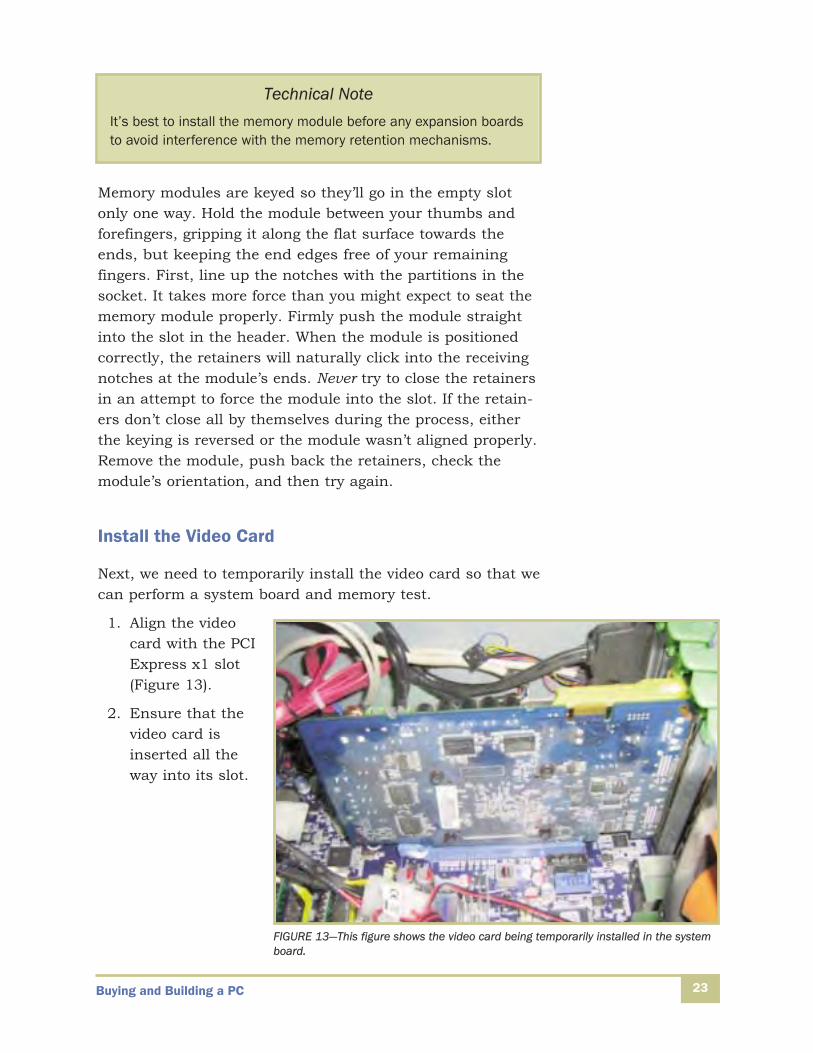
Install the Video Card
Next, we need to temporarily install the video card so that wecan perform a system board and memory test.
1. Align the video card with the PCIExpress x1 slot(Figure 13).
2. Ensure that thevideo card isinserted all the way into its slot.
Technical NoteIt’s best to install the memory module before any expansion boardsto avoid interference with the memory retention mechanisms.
FIGURE 13—This figure shows the video card being temporarily installed in the systemboard.
Buying and Building a PC
Perform a System Board and Memory Test
Assuming the power supply can handle this test, proceed asfollows:
1. Place the system board near the case so the powercables can be connected.
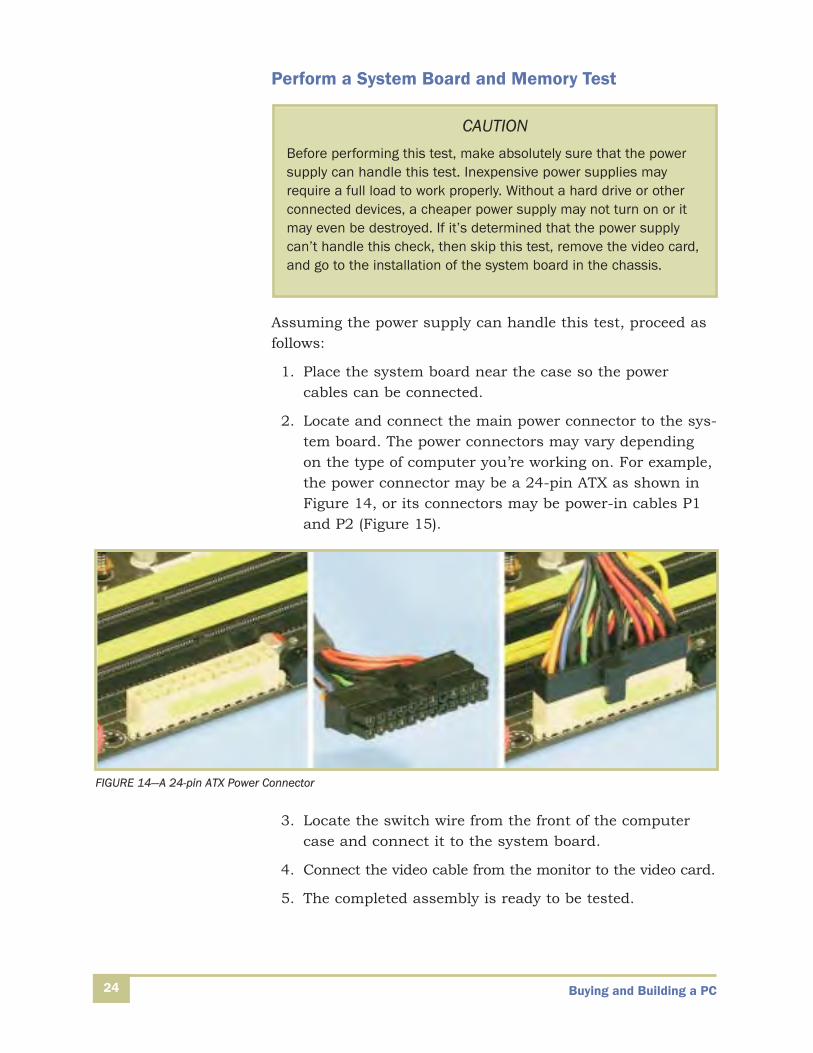
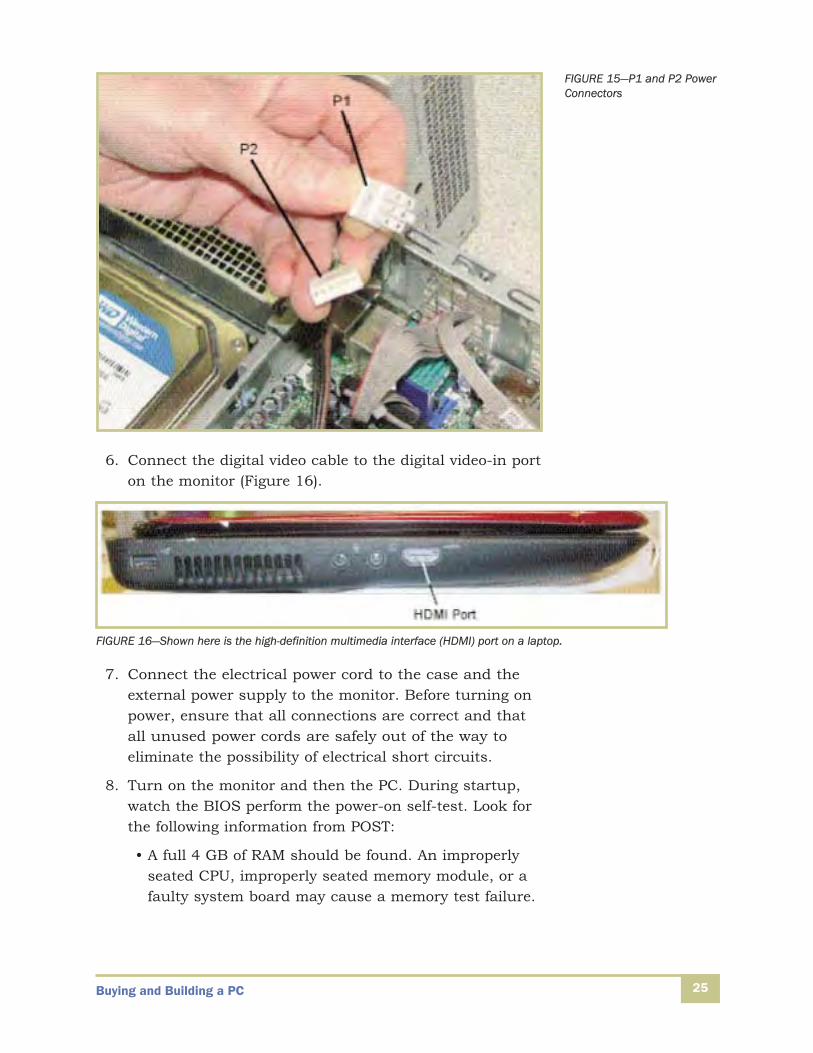
2. Locate and connect the main power connector to the sys-tem board. The power connectors may vary depending on the type of computer you’re working on. For example,the power connector may be a 24-pin ATX as shown inFigure 14, or its connectors may be power-in cables P1and P2 (Figure 15).
3. Locate the switch wire from the front of the computercase and connect it to the system board.
4. Connect the video cable from the monitor to the video card.
5. The completed assembly is ready to be tested.
24
CAUTIONBefore performing this test, make absolutely sure that the powersupply can handle this test. Inexpensive power supplies mayrequire a full load to work properly. Without a hard drive or otherconnected devices, a cheaper power supply may not turn on or itmay even be destroyed. If it’s determined that the power supplycan’t handle this check, then skip this test, remove the video card,and go to the installation of the system board in the chassis.
FIGURE 14—A 24-pin ATX Power Connector
Buying and Building a PC 25
6. Connect the digital video cable to the digital video-in porton the monitor (Figure 16).
7. Connect the electrical power cord to the case and theexternal power supply to the monitor. Before turning onpower, ensure that all connections are correct and thatall unused power cords are safely out of the way to eliminate the possibility of electrical short circuits.
8. Turn on the monitor and then the PC. During startup,watch the BIOS perform the power-on self-test. Look forthe following information from POST:
• A full 4 GB of RAM should be found. An improperlyseated CPU, improperly seated memory module, or afaulty system board may cause a memory test failure.
FIGURE 15—P1 and P2 PowerConnectors
FIGURE 16—Shown here is the high-definition multimedia interface (HDMI) port on a laptop.
Buying and Building a PC
• The speed of the CPU should be displayed, indicatingthat jumper settings are correct.
• An error message should indicate that a keyboardcan’t be detected. This is correct since the device isn’tinstalled at this point.
• Verify that the cooling fan on the power supply isworking. You don’t want to overheat the PC.
9. When the POST is complete:
• Turn off power to the computer and the monitor.
• Disconnect the electrical supply power cords as wellas the power cables to the system board.
• Disconnect the video cable from the video card.
• Carefully remove the video card.
Install the System Board in the Chassis
The next step is to install the system board in the case orchassis. First, we’ll need to install standoffs, then place thesystem board in the case, and finally secure it. The step-by-step process follows:
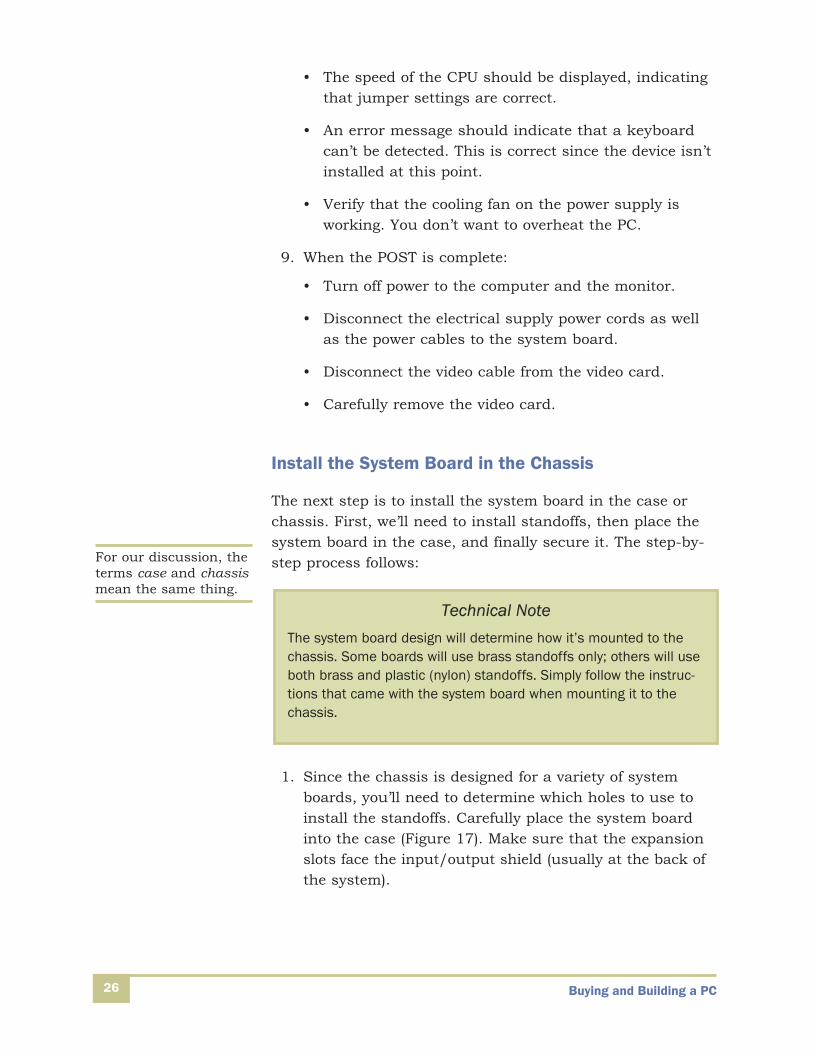
1. Since the chassis is designed for a variety of systemboards, you’ll need to determine which holes to use toinstall the standoffs. Carefully place the system boardinto the case (Figure 17). Make sure that the expansionslots face the input/output shield (usually at the back ofthe system).
26
For our discussion, theterms case and chassismean the same thing.
Technical NoteThe system board design will determine how it’s mounted to thechassis. Some boards will use brass standoffs only; others will useboth brass and plastic (nylon) standoffs. Simply follow the instruc-tions that came with the system board when mounting it to thechassis.
Buying and Building a PC 27
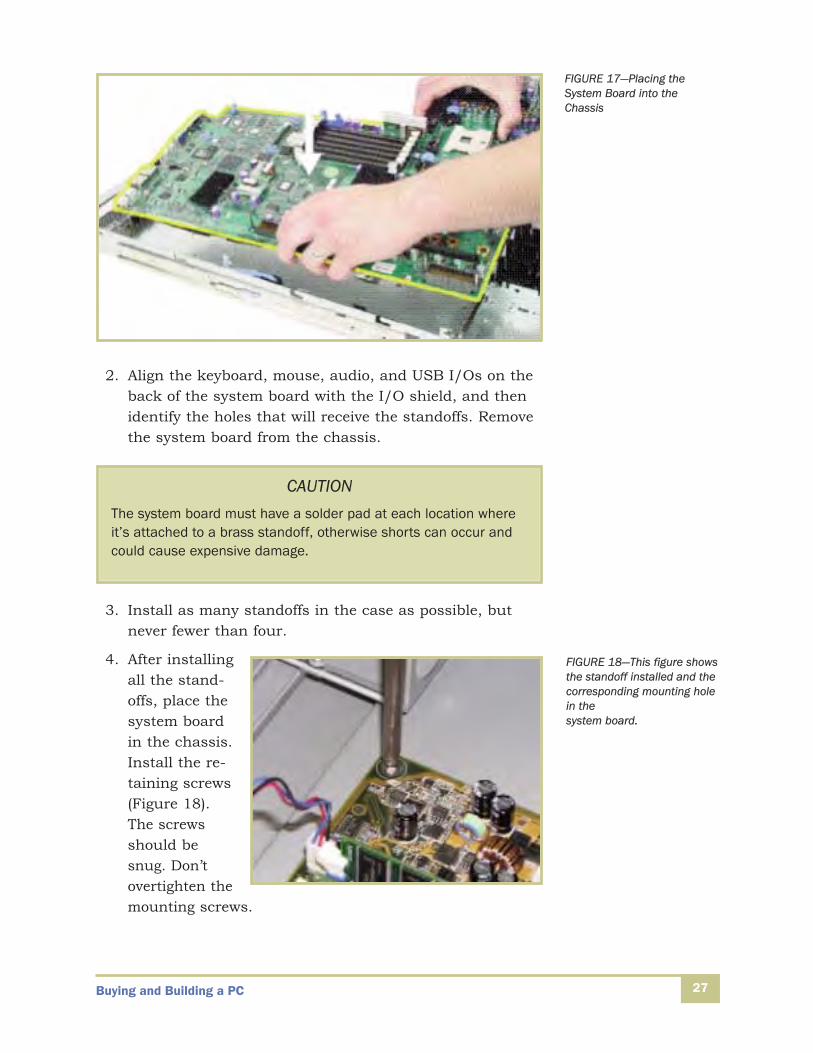
2. Align the keyboard, mouse, audio, and USB I/Os on theback of the system board with the I/O shield, and thenidentify the holes that will receive the standoffs. Removethe system board from the chassis.
3. Install as many standoffs in the case as possible, butnever fewer than four.
4. After installingall the stand-offs, place thesystem boardin the chassis.Install the re-taining screws(Figure 18).The screwsshould besnug. Don’tovertighten themounting screws.
FIGURE 17—Placing theSystem Board into theChassis
CAUTIONThe system board must have a solder pad at each location whereit’s attached to a brass standoff, otherwise shorts can occur andcould cause expensive damage.
FIGURE 18—This figure showsthe standoff installed and thecorresponding mounting holein the system board.
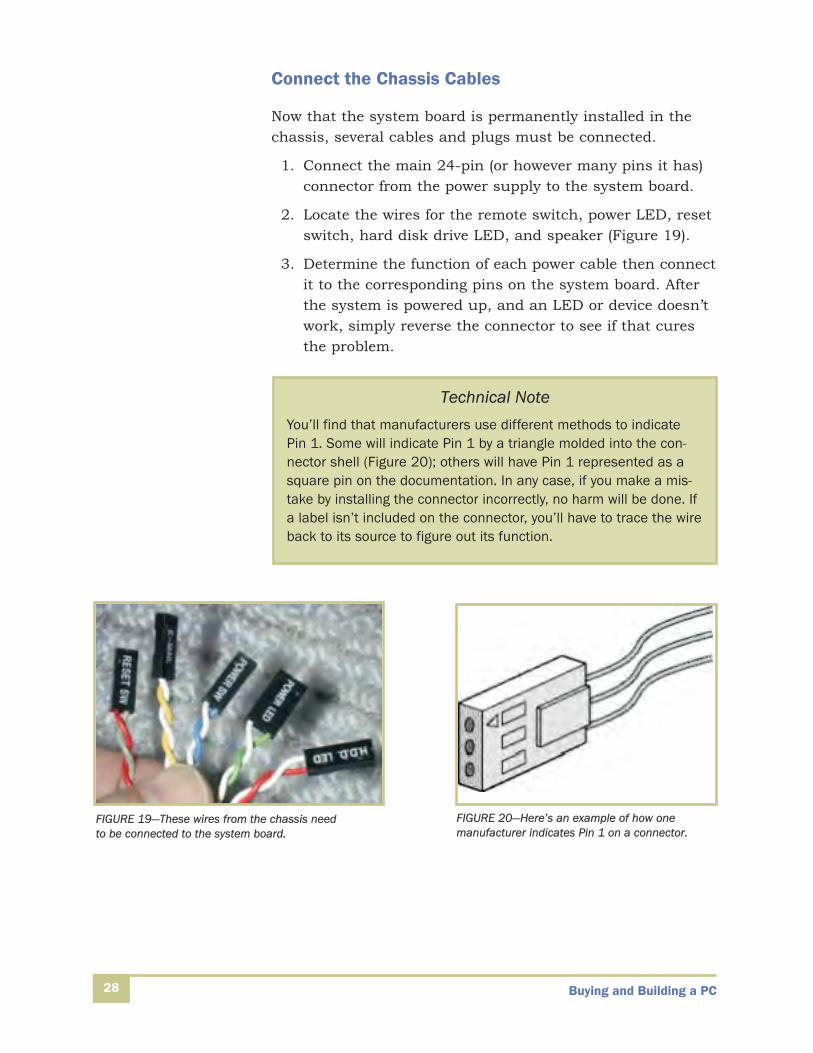
Connect the Chassis Cables
Now that the system board is permanently installed in thechassis, several cables and plugs must be connected.
1. Connect the main 24-pin (or however many pins it has)connector from the power supply to the system board.
2. Locate the wires for the remote switch, power LED, resetswitch, hard disk drive LED, and speaker (Figure 19).
3. Determine the function of each power cable then connectit to the corresponding pins on the system board. Afterthe system is powered up, and an LED or device doesn’twork, simply reverse the connector to see if that curesthe problem.
Buying and Building a PC28
FIGURE 19—These wires from the chassis need to be connected to the system board.
Technical NoteYou’ll find that manufacturers use different methods to indicatePin 1. Some will indicate Pin 1 by a triangle molded into the con-nector shell (Figure 20); others will have Pin 1 represented as asquare pin on the documentation. In any case, if you make a mis-take by installing the connector incorrectly, no harm will be done. Ifa label isn’t included on the connector, you’ll have to trace the wireback to its source to figure out its function.
FIGURE 20—Here’s an example of how one manufacturer indicates Pin 1 on a connector.
Buying and Building a PC 29
The Hard Drive
Let’s begin by configuring the hard drive and installing it intothe removable drive bay. We’ll finish by installing the assem-bly into the chassis.
Configuring the hard drive. For this system, we have justone hard drive. The following instructions show you how toconfigure the hard drive.
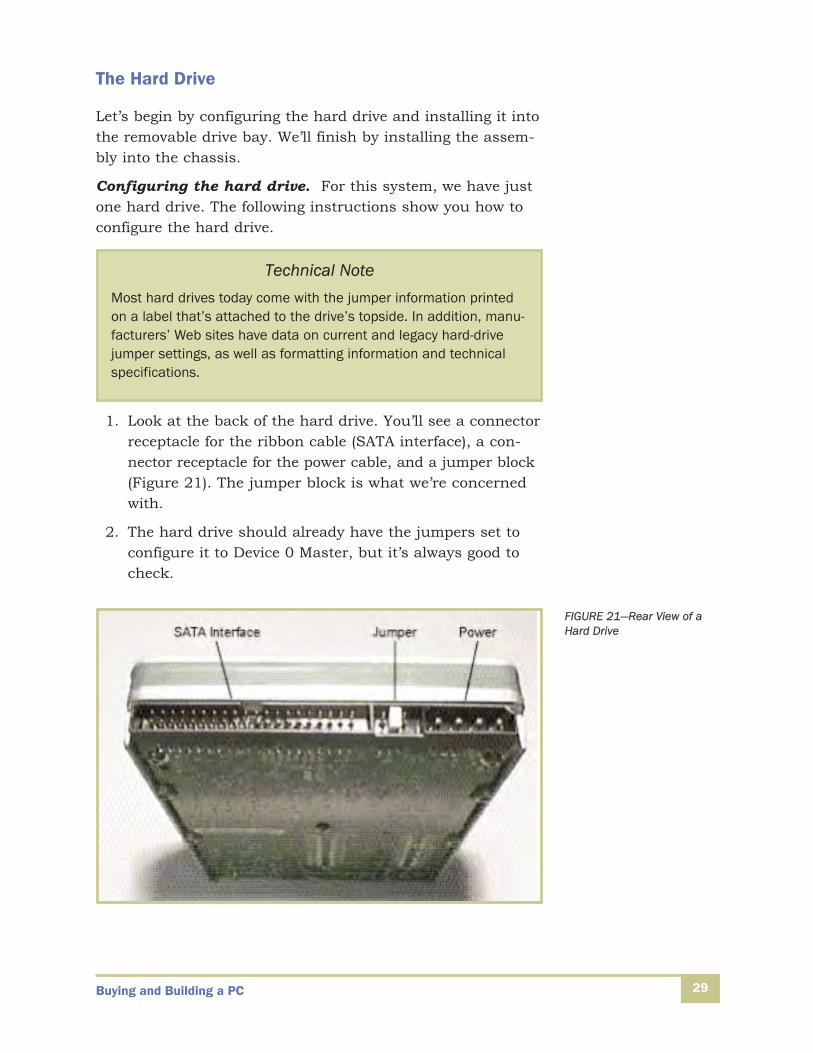
1. Look at the back of the hard drive. You’ll see a connectorreceptacle for the ribbon cable (SATA interface), a con-nector receptacle for the power cable, and a jumper block(Figure 21). The jumper block is what we’re concernedwith.
2. The hard drive should already have the jumpers set toconfigure it to Device 0 Master, but it’s always good tocheck.
Technical NoteMost hard drives today come with the jumper information printedon a label that’s attached to the drive’s topside. In addition, manu-facturers’ Web sites have data on current and legacy hard-drivejumper settings, as well as formatting information and technicalspecifications.
FIGURE 21—Rear View of aHard Drive

Buying and Building a PC30
Install the hard drive. Now that we have the hard driveconfigured, let’s install it.
1. The system case we selected comes with a drive bay that makes hard-drive installation easier. Since the drivebay is removable (simply by moving a lever on the side of the bay or pivoting the bay outward), the drives canbe installed in the bay and then the entire assembly canbe installed in the case. This type of arrangement makesit easier to get at both sides of the drive when installingthe mounting screws. Figure 22 shows the hard drivebeing pivoted outward. The location of the hard drive(front-to-back) in its slot is up to you as long as it allowsthe drive bay to be installed back in the case.
2. Connect the hard drive cable to the SATA socket on thehard drive (it’s keyed so it can be plugged in only oneway). Locate an SATA power connector coming out of thepower supply and connect it to the power receptacle atthe rear of the hard drive. This connector is also keyed
FIGURE 22—Pivoting theHard Drive Outward
Buying and Building a PC 31
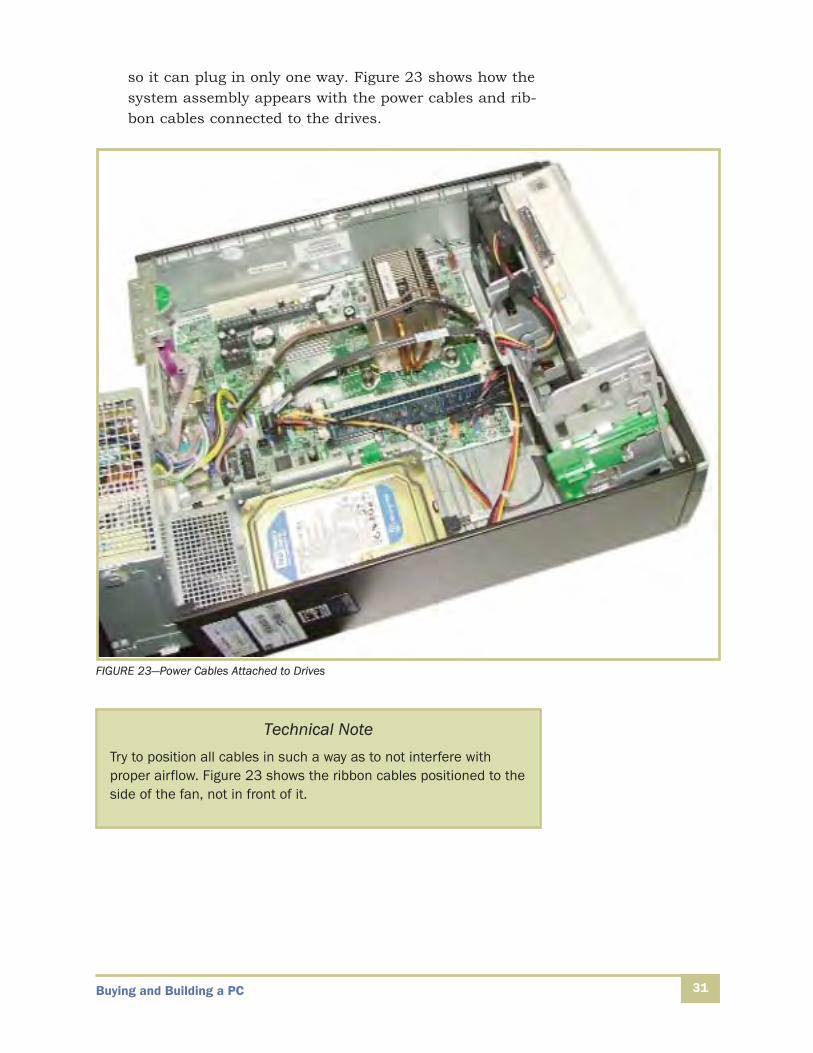
so it can plug in only one way. Figure 23 shows how thesystem assembly appears with the power cables and rib-bon cables connected to the drives.
FIGURE 23—Power Cables Attached to Drives
Technical NoteTry to position all cables in such a way as to not interfere withproper airflow. Figure 23 shows the ribbon cables positioned to theside of the fan, not in front of it.
Buying and Building a PC32
Install the DVD/CD Burner
The DVD/CD burner installation requires us to set thejumpers on the unit, install the unit in the chassis, and connect the cables. Let’s start the installation by setting the jumpers.
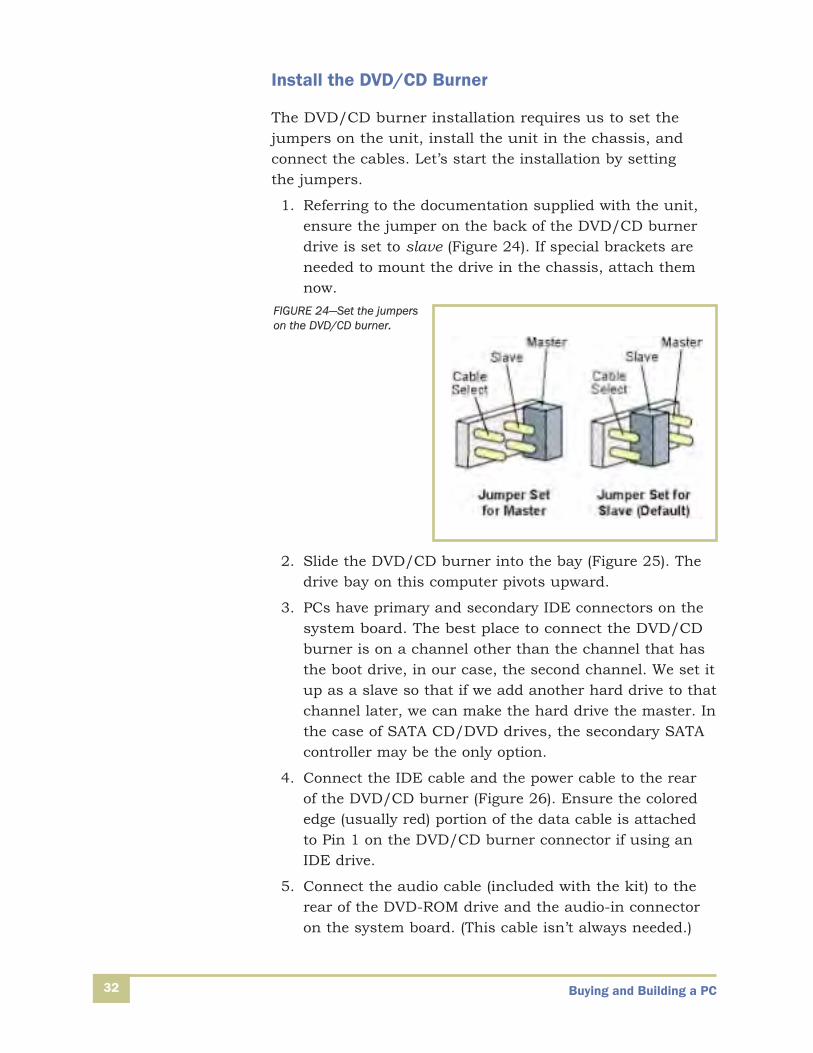
1. Referring to the documentation supplied with the unit,ensure the jumper on the back of the DVD/CD burnerdrive is set to slave (Figure 24). If special brackets areneeded to mount the drive in the chassis, attach themnow.
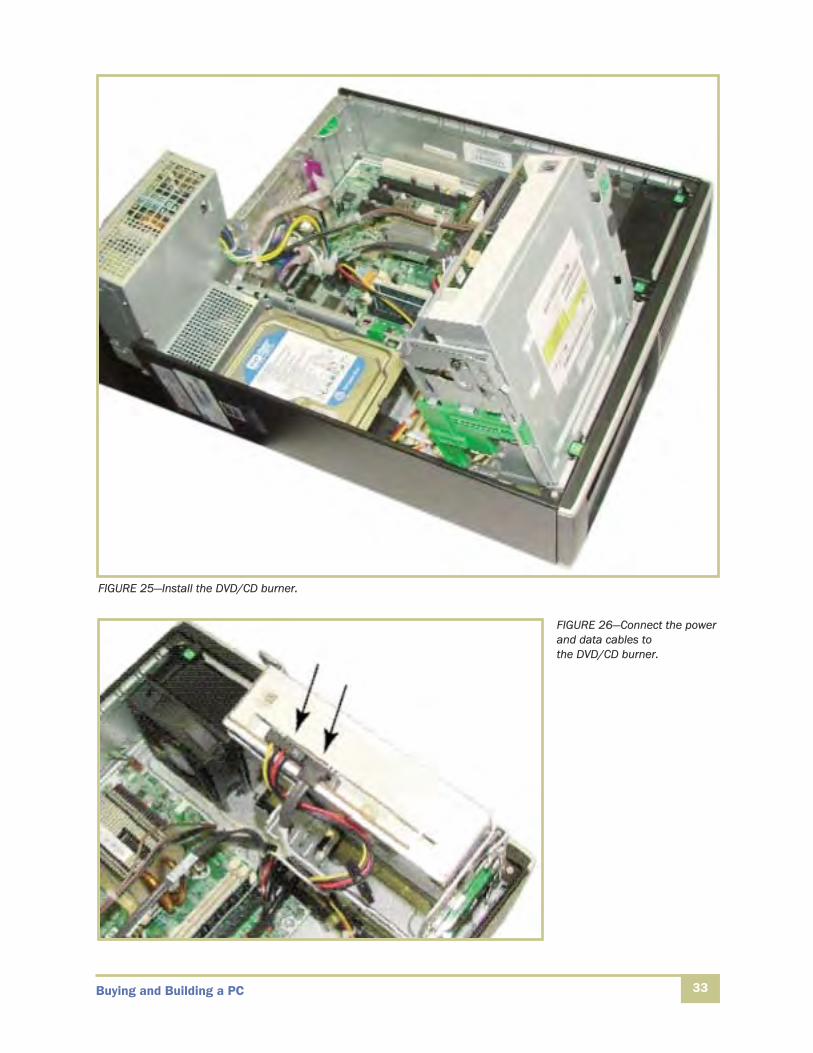
2. Slide the DVD/CD burner into the bay (Figure 25). Thedrive bay on this computer pivots upward.
3. PCs have primary and secondary IDE connectors on thesystem board. The best place to connect the DVD/CDburner is on a channel other than the channel that hasthe boot drive, in our case, the second channel. We set itup as a slave so that if we add another hard drive to thatchannel later, we can make the hard drive the master. Inthe case of SATA CD/DVD drives, the secondary SATAcontroller may be the only option.
4. Connect the IDE cable and the power cable to the rear of the DVD/CD burner (Figure 26). Ensure the colorededge (usually red) portion of the data cable is attached to Pin 1 on the DVD/CD burner connector if using anIDE drive.
5. Connect the audio cable (included with the kit) to therear of the DVD-ROM drive and the audio-in connectoron the system board. (This cable isn’t always needed.)
FIGURE 24—Set the jumperson the DVD/CD burner.
Buying and Building a PC 33
FIGURE 25—Install the DVD/CD burner.
FIGURE 26—Connect the powerand data cables to the DVD/CD burner.
Buying and Building a PC34
6. If you’ll be watching DVD movies on a television set, con-nect the TV to the video card if applicable (the majorityof video cards sold presently include either an S-Videoconnection or a composite video connection to interfacewith a TV or VCR). If your TV has S-Video input (for thehighest quality), you’ll need an S-Video cable (not includedwith most DVD-ROM drive kits). Otherwise, use theincluded S-Video to composite video cable adapter. You’llalso need a standard RCA cable to complete the connec-tion to your TV to accommodate the audio output of thePC and DVD-ROM. This cable is also not included withthe kit.
After the system is up and running, we’ll install the supplieddrivers and software.
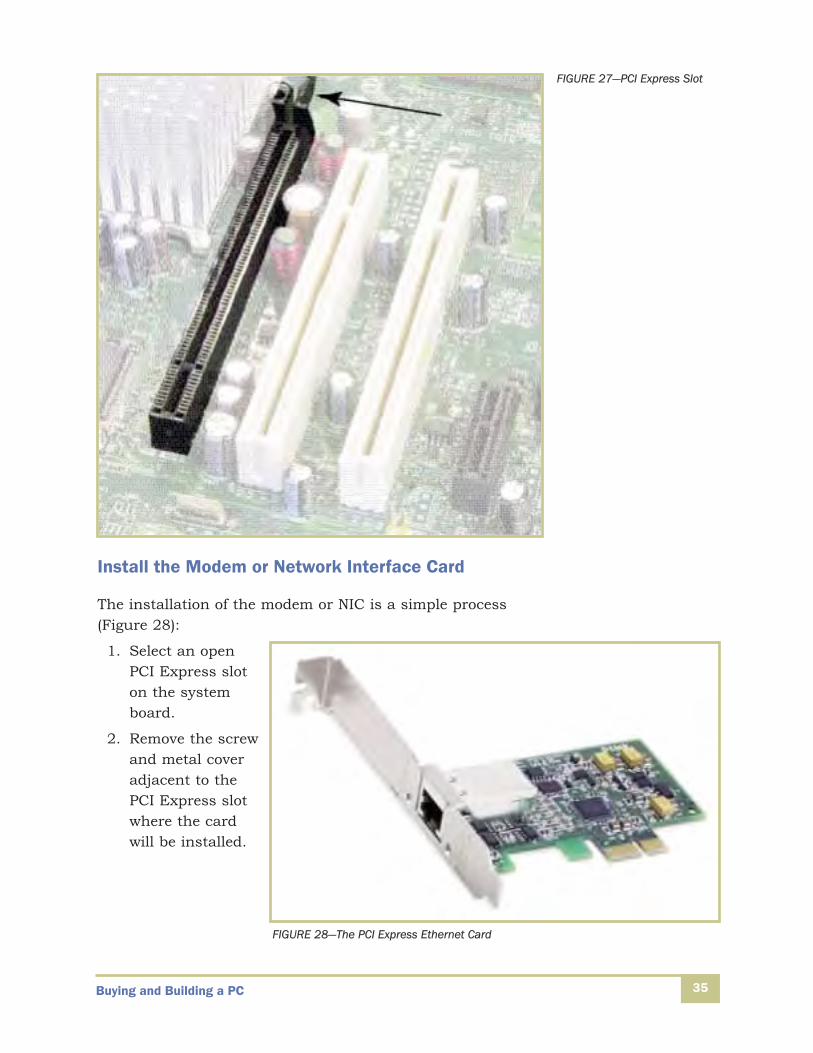
Install the Video Card
1. Remove the screw and metal cover adjacent to the PCIExpress connector.
2. Align the video card with the slot.
3. Install the video card in its slot so that its faceplate fitsinto the space where the metal cover was located at theback of the case (Figure 27).
4. Ensure that the video card is inserted all the way into its slot.
We’ll install the software for this device after the system isrunning.
Buying and Building a PC 35
Install the Modem or Network Interface Card
The installation of the modem or NIC is a simple process(Figure 28):
1. Select an openPCI Express sloton the systemboard.
2. Remove the screwand metal coveradjacent to thePCI Express slotwhere the cardwill be installed.
FIGURE 27—PCI Express Slot
FIGURE 28—The PCI Express Ethernet Card
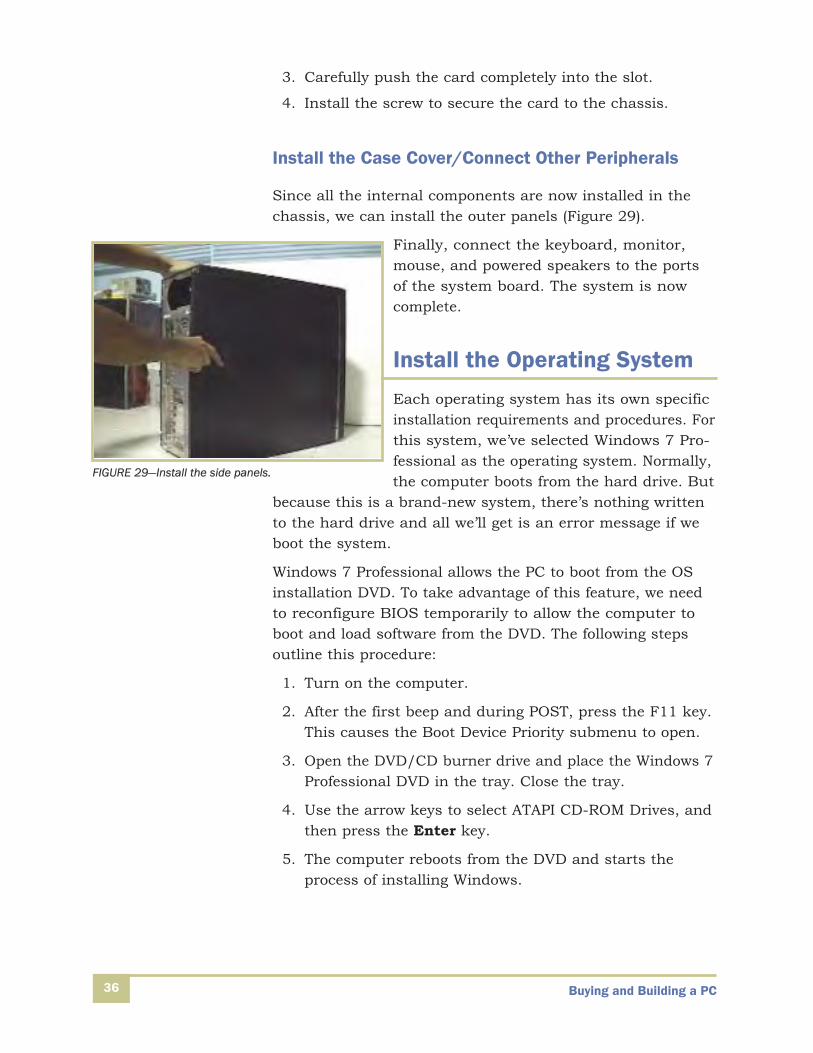
3. Carefully push the card completely into the slot.
4. Install the screw to secure the card to the chassis.
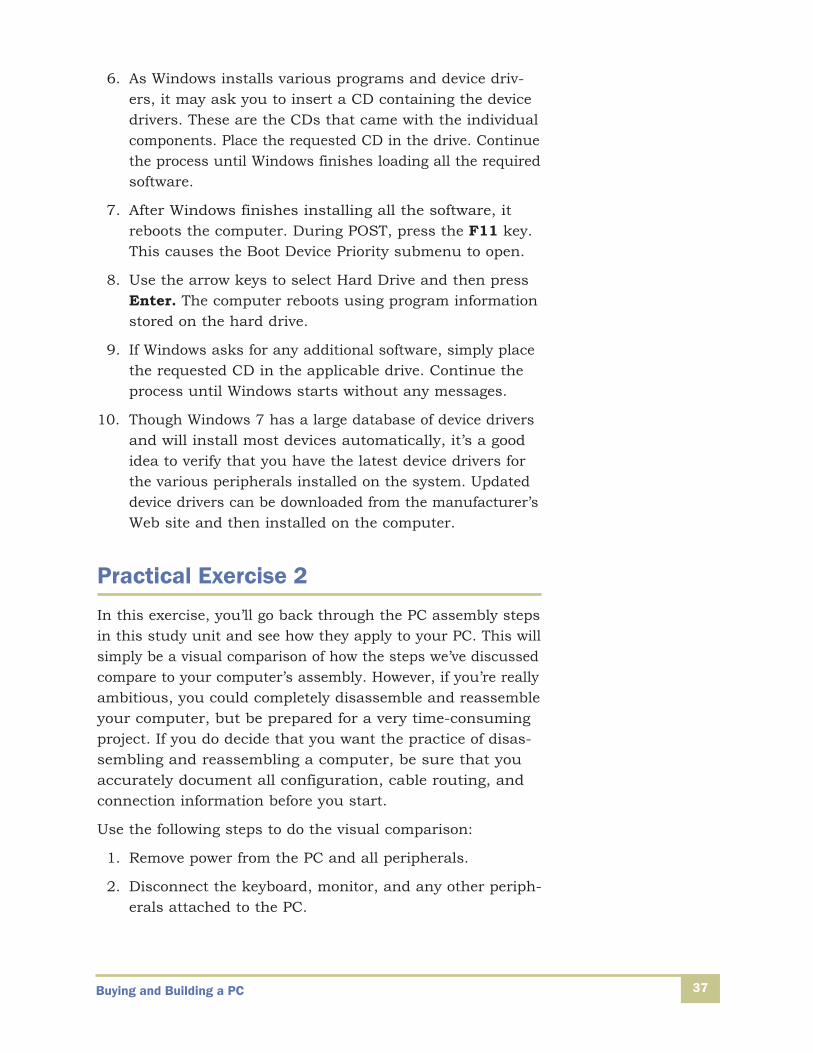
Install the Case Cover/Connect Other Peripherals
Since all the internal components are now installed in thechassis, we can install the outer panels (Figure 29).
Finally, connect the keyboard, monitor,mouse, and powered speakers to the ports of the system board. The system is nowcomplete.
Install the Operating System
Each operating system has its own specificinstallation requirements and procedures. Forthis system, we’ve selected Windows 7 Pro-fessional as the operating system. Normally,the computer boots from the hard drive. But
because this is a brand-new system, there’s nothing writtento the hard drive and all we’ll get is an error message if weboot the system.
Windows 7 Professional allows the PC to boot from the OSinstallation DVD. To take advantage of this feature, we needto reconfigure BIOS temporarily to allow the computer toboot and load software from the DVD. The following stepsoutline this procedure:
1. Turn on the computer.
2. After the first beep and during POST, press the F11 key.This causes the Boot Device Priority submenu to open.
3. Open the DVD/CD burner drive and place the Windows 7Professional DVD in the tray. Close the tray.
4. Use the arrow keys to select ATAPI CD-ROM Drives, andthen press the Enter key.
5. The computer reboots from the DVD and starts theprocess of installing Windows.
Buying and Building a PC36
FIGURE 29—Install the side panels.
Buying and Building a PC 37
6. As Windows installs various programs and device driv-ers, it may ask you to insert a CD containing the devicedrivers. These are the CDs that came with the individualcomponents. Place the requested CD in the drive. Continuethe process until Windows finishes loading all the requiredsoftware.
7. After Windows finishes installing all the software, itreboots the computer. During POST, press the F11 key.This causes the Boot Device Priority submenu to open.
8. Use the arrow keys to select Hard Drive and then pressEnter. The computer reboots using program informationstored on the hard drive.
9. If Windows asks for any additional software, simply placethe requested CD in the applicable drive. Continue theprocess until Windows starts without any messages.
10. Though Windows 7 has a large database of device driversand will install most devices automatically, it’s a goodidea to verify that you have the latest device drivers forthe various peripherals installed on the system. Updateddevice drivers can be downloaded from the manufacturer’sWeb site and then installed on the computer.
Practical Exercise 2
In this exercise, you’ll go back through the PC assembly stepsin this study unit and see how they apply to your PC. This willsimply be a visual comparison of how the steps we’ve discussedcompare to your computer’s assembly. However, if you’re reallyambitious, you could completely disassemble and reassembleyour computer, but be prepared for a very time-consumingproject. If you do decide that you want the practice of disas-sembling and reassembling a computer, be sure that youaccurately document all configuration, cable routing, andconnection information before you start.
Use the following steps to do the visual comparison:
1. Remove power from the PC and all peripherals.
2. Disconnect the keyboard, monitor, and any other periph-erals attached to the PC.
Buying and Building a PC38
3. Remove the cover from the PC.
4. Using this study unit as a reference, review the assemblyprocedure that starts on page 15.
5. For the first step of the procedure, note the systemboard jumpers on your PC that are used for configura-tion. Compare the jumpers on your system board tothose in the example. Refer to the technical manual orreference guide that came with your PC to determinewhat each jumper is for and what it’s currently set to.
6. For the remaining procedure, visualize each step as itapplies to your PC. Note the similarities and differencesbetween your PC and the PC in the study unit example.
7. When you’re finished, check to make sure that everythingis installed and secure. Then reinstall the PC case.
8. Reattach your keyboard, monitor, and any peripheralsthat were disconnected.
9. Restore power and test your system.

Buying and Building a PC 39
Self-Check 21. While assembling your new computer, you see several jumpers on the system board. What
purpose might these jumpers serve?
__________________________________________________________________________
2. What three failures might be related to a failed memory test?
__________________________________________________________________________
3. What type of connector will the hard drive likely use?
__________________________________________________________________________
4. List two reasons to record and maintain accurate records of your computer system.
__________________________________________________________________________
__________________________________________________________________________
5. What is rapidly replacing the nearly obsolete ribbon cable?
a. SATA cablesb. Ribbon cables that provide improved airflow c. SCSI cablesd. USB cables
Check your answers with those on page 41.

Buying and Building a PC40
NOTES

41
An
sw
er
sA
ns
we
rs
Self-Check 11. Determine what software you’ll need.
2. Rather than committing your needs to memory, the tablehelps you to organize your system requirements andprovides a list of features and functions for you to usewhen buying or building a system.
3. Better documentation, help information, training materi-als, technical support, and compatibility with other software
4. You’ll have the original installation disks and completedocumentation.
5. functionality, compatibility
Self-Check 21. One possible use is to rout audio signals. Another
possibility is the boot-up sequence.
2. An improperly seated CPU, an improperly seated memory module, or a faulty system board can cause a memory test failure.
3. SATA
4. You should maintain accurate records in case you misplace the system documentation, for fear that aswitch or jumper gets accidentally changed, or the actual settings for your computer varies from the system documentation.
5. a

Self-Check Answers42
Practical Exercise 1In looking for a prebuilt, bundled system, you probablycould find a system that you could use to do the job.However, with a bundled system, you often have to settlefor something less than you wanted or for some costlyfeature or function you don’t particularly need.
By visiting various manufacturers’ Web sites, youshould have found that you could design a system tomeet your unique requirements. At each Web site youshould have been able to specify all the functions andfeatures you need and get a price quote.
When you priced the individual parts for building a system you should have gained an appreciation of howmuch effort there is in merely identifying and pricing the parts you need. Also, when comparing prices, youprobably found that there are no significant savings bybuilding your own PC. Therefore, if you’re consideringbuilding your own PC, you need to closely weigh theadvantages and disadvantages before making your decision.


