110
Study Unit Customizing Gun Stocks By Dale Storey

Study Unit
Customizing Gun StocksBy
Dale Storey

Copyright © 1997 by Education Direct, Inc.
All rights reserved. No part of the material protected by this copyright may bereproduced or utilized in any form or by any means, electronic or mechanical,including photocopying, recording, or by any information storage and retrievalsystem, without permission in writing from the copyright owner.
Requests for permission to make copies of any part of the work should be mailed to Copyright Permissions, Education Direct, 925 Oak Street, Scranton,Pennsylvania 18515.
Printed in the United States of America
01/21/03
All terms mentioned in this text that are known to be trademarks or servicemarks have been appropriately capitalized. Use of a term in this text shouldnot be regarded as affecting the validity of any trademark or service mark.
About the Author
Dale Storey is a graduate of the Colorado School of Trades and
Montana State University. He runs DGS Inc., a full-time professional
gun shop in Casper, Wyoming, where he offers quality gunsmithing
and gun making.Mr. Storey’s 25 years of experience in general repair
and custom firearms represent skill, practical knowledge, and top
craftsmanship. He offers careful handwork backed by professional
grade machinery to ensure sound general gun repairs, as well as
accurate custom rifles. Many major arms publications have featured
his custom work, along with articles explaining his craft.
iii
This study unit continues work on the gun
stock. Where the previous unit detailed the
stock-making process, this one addresses
stock enhancement and embellishment. The
first skill we'll cover is glass bedding a stock
to increase firearm accuracy. This core skill
can prove financially rewarding to the gun pro, as firearm
owners insist on pinpoint accuracy.
Following glass bedding, we'll consider several ornate (and
functional) stock embellishments. We'll cover sling swivels
and their installation, as well as pistol grip caps, buttplates,
and recoil pads. The text also presents instructions for
designing and inletting decorative inlays, and for stippling
and carving stocks.
When you complete this study unit, you’ll be able to • Explain how to glass bed a gun stock
• Recognize the various types of sling swivels, mounts, andbases and explain how to install them
• Identify pistol grip caps, buttplates, and recoil pads andexplain how to install them
• Describe how to draw inlay templates, cut decorative inlays,and explain how to install them
• Explain how to perform stippling on a gun stock
• Differentiate between incise and relief carving and describehow to accomplish them
Pr
ev
ie
wP
re
vi
ew
v
GLASS BEDDING 1
Introduction 1The Glass Bedding Process 2Glass Bedding Procedures 4
SLING SWIVELS 18
Swivel Studs 19Flush Mount Swivel Bases 20Custom Bases 22Barrel Mount Bases 22Sling Base and Swivel Installation 24Flush Mount Bases 29Barrel Bands 31The Solder-on Sling Swivel Base 32Silver Soldering the Base 33Octagonal Barrels 34Thompson/Center Pistols 34The Lanyard Loop 34
STOCK ACCESSORIES 36
Pistol Grip Caps 36Buttplates 41Recoil Pads 45Fitting the Recoil Pad 47Final Considerations 61
ENHANCING THE GUN STOCK 66
Stock Inlays 66Checkering 73Checkering Pattern Layout 81
MORE WAYS TO ENHANCE THE STOCK 88
Stippling 88Stock Carving 92
SELF-CHECK ANSWERS 99
EXAMINATION 103
Co
nt
en
ts
Co
nt
en
ts
1
GLASS BEDDING
Introduction
As opposed to building a custom gun stock from a blank,
customizing a factory stock may require any number of
ornate or functional embellishments. For example, in one
instance the process may call for sling swivel installation. In
another, glass bedding a factory stock will provide greater
strength and accuracy. In yet a third, full-blown checkering
and carving, and/or stippling, will enhance visual effect as
well as add friction at the pistol grip and forend. Obviously,
on occasion, several embellishments will be performed on the
same stock.
Before progressing to how-to performance instructions,
perhaps a word of caution is in order. Performing the above-
mentioned tasks requires both skill and patience. Even after
obtaining an FFL, you should practice on scrap pieces and/
or guns of low value until you acquire sufficient experience to
take on commercial work. Also, while customizing can prove
quite financially rewarding, knowing when to provide such
services is important. Before beginning any work, you must
temper the wants and apparent needs of your customer,
explaining the negative side as well as the values of stock
enhancement. While customizing the gun stock will almost
always offer clear improvement, there are times when over-
customizing can interfere with natural wood beauty. You
wouldn’t want to devalue a collector item by embellishing it
and thus destroying its originality.
Customizing Gun Stocks
Finally, you, as a gunsmith with knowledge, tools, and expe-
rience, must collect pay for the time and funds you invest.
Practice and repetition of the skills presented herein will
bring you confidence and ability, well justifying the income
gained from each effort. The goal of the professional is to
accomplish each task correctly with speed. Base your charges
for customizing work upon the amount of time spent on a
particular job. Keep in mind that the market will bear only a
certain price level. Stock checkering, for example, can prove
profitable only when you execute a fully professional-level
checkering job within a reasonable time frame. Occasionally
a potential customer may turn you down because he or she
thinks your price is too high. Most people don’t understand
how much time and skill are involved in truly fine handwork.
However, you should never let your customer set your prices
unless you’re prepared to work for next to nothing.
The Glass Bedding Process
As previously stated, when performing stock customizing,
the professional’s goal is to correctly complete each task with
speed. However, a beginner should pace him or herself on
each job, and initially, the pace should be slow. While learn-
ing, it’s best to avoid mistakes that can become bad habits.
Remember, repetition builds speed. With these thoughts in
mind, it’s time to explore the glass bedding process.
Glass bedding can markedly improve rifle accuracy because
“glassing” a stock creates uniformity in metal-to-wood fit. In
a way, the term glass bedding is a misnomer because today’s
stock glassing is usually accomplished with one of the high-
quality epoxy formulas, which have replaced wood glues.
It’s not necessary to go into a long list of special epoxy for-
mulas because only a professional formulator can produce
the proper epoxies to make a substance compatible for use
on firearms. It is, however, important to note suppliers such
as Brownells who offer epoxy products such as Acraglas in
various derivations. Such bonding agents offer the gunsmith
choice in selecting the best epoxy for a given task.
Customizing Gun Stocks2

Customizing Gun Stocks 3
For example, thin-flowing liquid epoxies are available, which
effect a truly fantastic bond to repair cracked stocks. Epoxies
are also available in formulations of paste-like consistency to
which fibers (or powdered metal) are added to provide strength.
In addition, you can dye many compounds to match the
wood or other stock material. There are also gel formulations
that you can precisely introduce into a given area. Fortunately
for the modern gunsmith, epoxy kits come with complete
directions for specific applications.
The step-by-step procedure for glass bedding a rifle stock
we’ll discuss here makes use of an excellent space-age glass
epoxy and not the earlier fiberglass formulation that prompted
the term in the first place. In our example, glassing is being
performed to enhance rifle accuracy, even though glassing
can effect other improvements as well.
Production-made rifles almost always offer excellent accuracy
considering their modest cost. However, they’re manufactured
at plants in various geographic locations, many in areas of
high humidity. Woods used for making stocks are kiln-dried
and, of course, the stocks receive a finish. Factory finishes
aren’t always sufficient, however, to truly seal the wood at
all points.
It’s common for a rifle to be shipped many miles from its
place of origin to its new owner. So, you can imagine how
changes in humidity can cause the stock to warp. A rifle
built somewhere along the east coast, for example, may find
a home on the high and dry plains of Wyoming or the deserts
of Arizona where humidity is low. After a time, the stock
wood loses moisture and slightly shrinks and/or warps and
alters wood-to-metal fit.
The reverse can also happen when a rifle built in a low-
humidity climate is subjected to high humidity. Over an
extended period of time, the wood will take on moisture
and warp. In either situation, the result is the same. The
rifle may change its point of impact and lose its optimum
potential for accuracy. Since, as the great Colonel Townsend
Whelen observed, “Only accurate rifles are interesting,” glass
bedding may be the answer to either upgrade or restore the
accuracy of a given rifle.
Glass Bedding Procedures
When glass bedding, the essential idea is to remove a small
amount of stock wood around the barrel and receiver and
replace it with a liquid epoxy. As the epoxy cures, it bonds to
the wood (or whatever material the stock is made of) and
molds itself precisely around the metal parts. You coat the
metal parts with a release agent that prevents the epoxy from
sticking to them. When you do the job correctly, the result is
a perfect fit between the barreled action and the stock. If you
perform the job incorrectly, you can end up with a capital
mess, which you can usually prevent by
1. Careful preplanning
2. Total adherence to the instructions included with the
bedding kit
3. Experience gained by doing a job or two on practice
pieces or a gun you can afford to sacrifice
Look out for the following pitfalls.
Removing too much stock material. You must leave
enough support to hold the barreled action (or other parts)
in their original position. If you take out too much stock
material, the parts will “sink” until they find a place to rest.
Failing to seal holes, undercut ledges, and other places
where the epoxy can form a rivet-like shape within the
metal parts. You can prevent this by sealing or plugging
suspect holes and voids with modeling clay or covering them
with tape.
Not using enough release agent. Be sure all metal that
might come in contact with bedding compound is covered
with release agent—inside and out.
Incorrectly mixing the bedding compound. Be sure to fol-
low directions to the letter and to measure each component.
Forgetting to cover all stock that you don’t want to get
compound on with masking tape. Remember, if bedding
material gets on your hands (and it will), it will get on any-
thing you touch.
The first step in accomplishing a glass bedding job is to
inspect the rifle for stock warp. If warping has occurred, the
Customizing Gun Stocks4
Customizing Gun Stocks 5
forestock may be exerting undesirable pressure on the barrel
at some point. You might be able to correct that problem by
glass bedding. Furthermore, some rifles now come from the
factory complete with a pressure point in the forearm of the
stock. This pressure point may not be entirely compatible
with a particular barrel because of inherent individual barrel
differences. As in the case of undesirable barrel pressure
caused by warping, a factory-installed pressure point in the
wrong place can do more to harm than improve accuracy.
You can deal with either situation through glass bedding.
At this point it’s best to digress a bit. Naturally, the factory-
installed pressure point might best be removed and accuracy
improved through a free-floating barrel. However, rifles are
individual in nature, so free-floating may not cure degraded
accuracy.
Also, pillar bedding is a system designed to prevent nega-
tive results of normal wood shrinkage, whereby significant
alterations in wood-to-metal pressure result. Pillar bedding
prevents such problems because it stops the action from
compressing into the wood. It stops it to the point whereby
the magazine box is tightening against the action and the
action itself has become loose in the stock. The two pillars of
metal between the action and the floor plate won’t allow this
compression to take place.
Even pillar bedding, however, won’t overcome the negative
results of an uncured stock shrinking to the point that the
action becomes loose within the stock. The point is that a
survey of possible bedding problems is necessary to deter-
mine which procedures you should follow. So study the rifle
before proceeding with glass bedding to determine the extent
of glassing necessary to improve accuracy. Then go ahead
with the procedure. Incidentally, while you’re at it, check out
other potential causes of inaccuracy, such as a loose scope
ring or mount.
The following process describes the glass bedding of a Model
70 Winchester. Nearly all bolt-action rifles have enough in
common with the Model 70 so that the following procedures
will, with a little adjustment, fit whatever you’re working on.
Location of epoxy placement in other rifles should present
no problem when using the information on the Model 70 as
a guide.
Before you start removing wood, use some inletting black on
the bottom of the action and barrel to see exactly where
they’re bearing on the wood. What you find may give you a
big hint about what’s causing an accuracy problem. In addi-
tion, you must leave a few “pads” to hold the barrel action in
place. Otherwise it will sink to the bottom of the new grooves
you’re about to cut. Be sure the metal is presently resting on
the wood you’re going to leave, unless for some reason you
want to change that relationship. After you bed the rifle, you
can remove the pads and then glass over them if you wish.
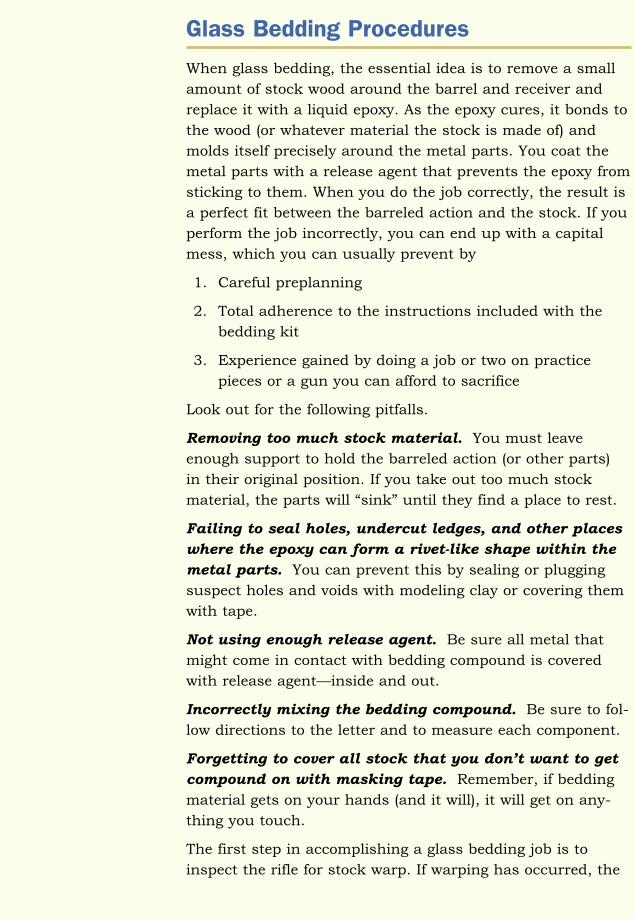
1. Remove about 1/16 inch of wood from the face of the
recoil lug recess. Leave a small section of the centermost
part of the recoil lug recess intact to ensure proper dis-
tance from the trigger guard as noted in Figure 1. On
heavy-recoiling Magnum rifles, you can reinforce the
area immediately in front of the magazine box by cutting
a deep groove in the wood and dropping a section of
threaded brass rod into it. The brass rod will extend
from side to side and you’ll glass it into place for added
strength at this point (Figure 1, lined area).
Customizing Gun Stocks6
FIGURE 1—This diagram shows theareas you’ll remove wood and glassthe brass rod.
Customizing Gun Stocks 7
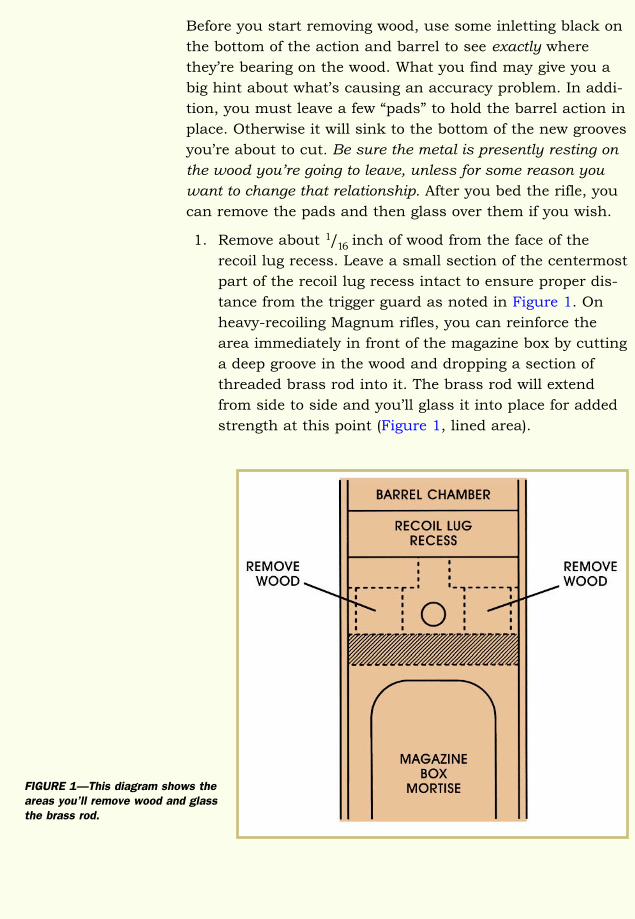
2. Rough up the barrel channel with gouges or inletting
rasps to ensure a sound mechanical bond between the
wood and the epoxy that you’ll eventually pour into the
barrel channel. You can also remove wood from the bar-
rel channel using a properly sized round wood dowel
wrapped with coarse 40 or 60 grit sandpaper. Remove
enough wood to allow adequate space between the barrel
channel and barrel to readily accept the barrel when you
wrap it with three layers of black electrician’s tape.
Also, eliminate original pressure points from the barrel chan-
nel using a gouge or rasp. After cleaning the barrel channel,
check the entire channel for points at which the barrel still
contacts the channel. If this condition exists, you must remove
more wood until all areas are relieved. There must be no
metal-to-wood contact over the entire length of the barrel
(Figure 2).
Importantly, if the barrel channel surface is smooth, bonding
won’t be as good. Ensure that the barrel channel is in a
rough condition and entirely void of finish, which will also
thwart a good epoxy-to-wood bond.
Note: In our glass bedding example, we are free-floating the
barrel with an option to add a pressure point in the forend.
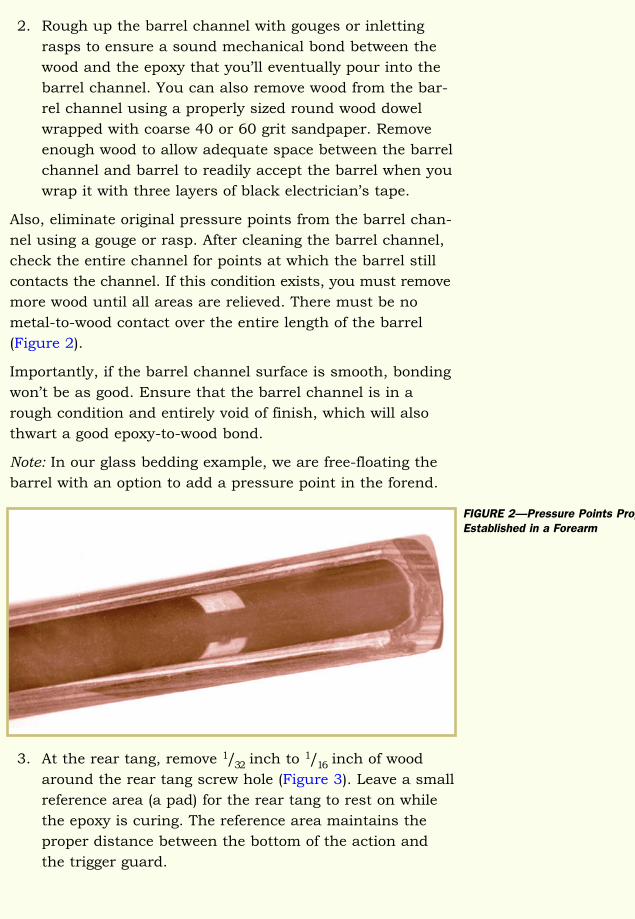
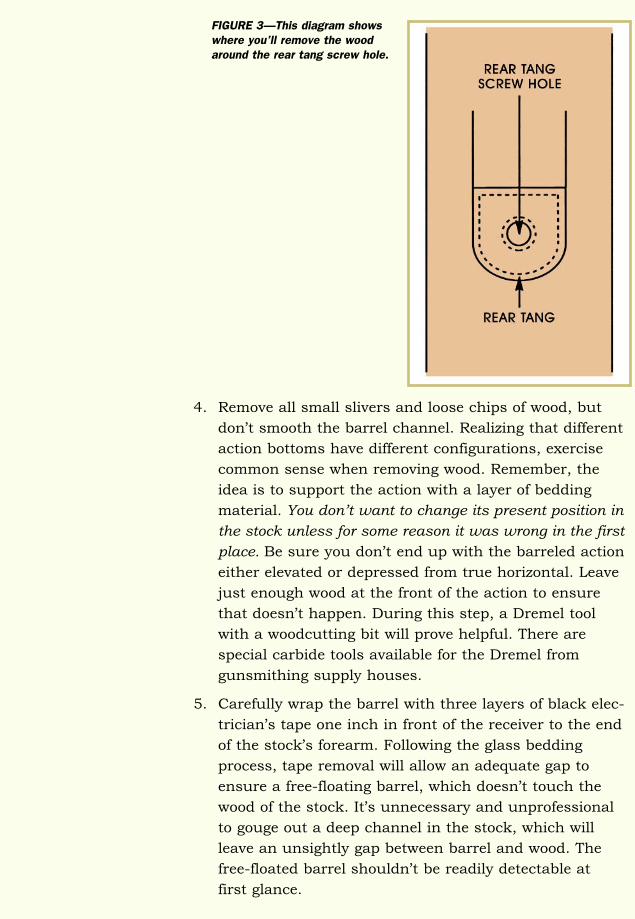
3. At the rear tang, remove 1/32 inch to 1/16 inch of wood
around the rear tang screw hole (Figure 3). Leave a small
reference area (a pad) for the rear tang to rest on while
the epoxy is curing. The reference area maintains the
proper distance between the bottom of the action and
the trigger guard.
FIGURE 2—Pressure Points ProperlyEstablished in a Forearm
Customizing Gun Stocks
4. Remove all small slivers and loose chips of wood, but
don’t smooth the barrel channel. Realizing that different
action bottoms have different configurations, exercise
common sense when removing wood. Remember, the
idea is to support the action with a layer of bedding
material. You don’t want to change its present position in
the stock unless for some reason it was wrong in the first
place. Be sure you don’t end up with the barreled action
either elevated or depressed from true horizontal. Leave
just enough wood at the front of the action to ensure
that doesn’t happen. During this step, a Dremel tool
with a woodcutting bit will prove helpful. There are
special carbide tools available for the Dremel from
gunsmithing supply houses.
5. Carefully wrap the barrel with three layers of black elec-
trician’s tape one inch in front of the receiver to the end
of the stock’s forearm. Following the glass bedding
process, tape removal will allow an adequate gap to
ensure a free-floating barrel, which doesn’t touch the
wood of the stock. It’s unnecessary and unprofessional
to gouge out a deep channel in the stock, which will
leave an unsightly gap between barrel and wood. The
free-floated barrel shouldn’t be readily detectable at
first glance.
8
FIGURE 3—This diagram showswhere you’ll remove the woodaround the rear tang screw hole.
Customizing Gun Stocks 9
The reason for applying epoxy over the full length of the
barrel channel is to effect a perfect seal. The barrel could
be free-floated by applying epoxy only toward the chamber
section, but the barrel channel would remain exposed to the
elements and further problems could ensue.
Note: If you wish, you can follow instructions 6 through 10 to
add a pressure point. If you want a true free-floating barrel,
skip to step 11.
6. Coat the taped barrel with a release agent, which you
can purchase from a gunsmith’s supply house if it isn’t
included in the kit. Treat the portion of the barrel that
will normally make contact with the stock with the
release agent. This is to ensure that the barrel won’t
bond itself to the wood in the barrel channel of the stock
when the epoxy is introduced.
7. Mix a small portion of five-minute epoxy (sold in most
hardware stores) and pour it into the forend of the stock
approximately 2 1/2 inches to 3 inches back from the
tip of the forend. Although a little more epoxy may be
required to fill possible barrel channel voids resulting
from removing a pressure point(s), mix only enough to
pour about a one inch pad. If the stock has a forend
cap, be certain to install the pad behind the cap and into
solid wood. Never use the cap for a platform for the pad
of epoxy.
8. Reassemble the barreled action in the stock, tightening
the tang screws. The tightening action distributes the
epoxy to form a pad only at the location where the sub-
stance has been installed in the barrel channel. The
shape of the pad is determined by the barrel contour, as
the barrel is in effect a pattern for the pad. The barrel is
perfectly supported by the pad because the fit between
the barrel and the epoxy pad is, for all practical purposes,
perfect. No stress is placed upon the barrel at any point
other than the pad. The remainder of the channel in the
stock has no bearing upon the barrel.
9. After the five-minute epoxy mixture has cured for at
least 30 minutes, remove the barreled action from the
stock. Reduce the pad to about one-half inch to three-
fourth inches in length using an X-Acto knife or wood
chisel. The result of squaring off the pad is a neat band
of epoxy spanning the barrel channel from one side to
the other. This touch adds professionalism to the job,
although it doesn’t alter the fit between the barrel chan-
nel and the barrel itself.
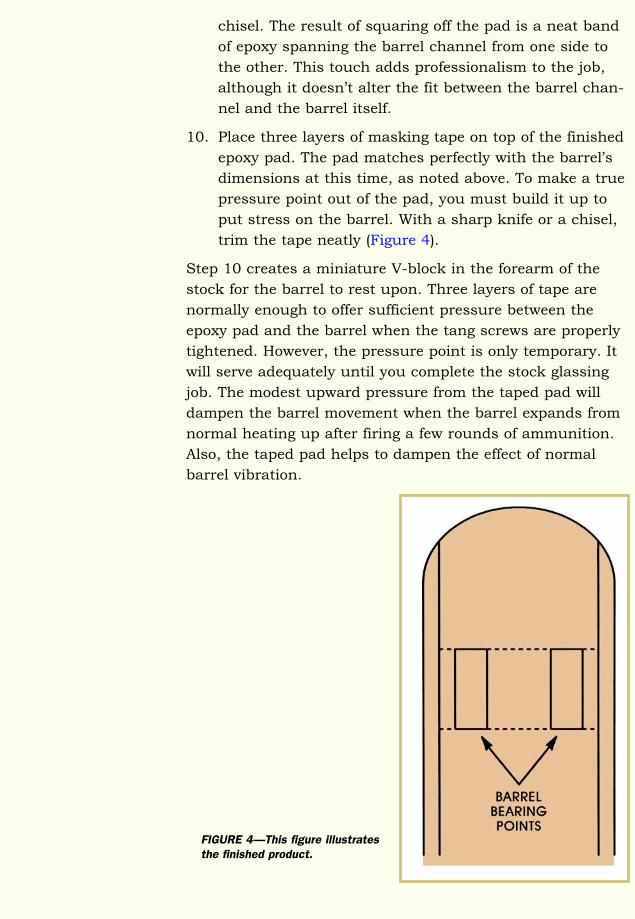
10. Place three layers of masking tape on top of the finished
epoxy pad. The pad matches perfectly with the barrel’s
dimensions at this time, as noted above. To make a true
pressure point out of the pad, you must build it up to
put stress on the barrel. With a sharp knife or a chisel,
trim the tape neatly (Figure 4).
Step 10 creates a miniature V-block in the forearm of the
stock for the barrel to rest upon. Three layers of tape are
normally enough to offer sufficient pressure between the
epoxy pad and the barrel when the tang screws are properly
tightened. However, the pressure point is only temporary. It
will serve adequately until you complete the stock glassing
job. The modest upward pressure from the taped pad will
dampen the barrel movement when the barrel expands from
normal heating up after firing a few rounds of ammunition.
Also, the taped pad helps to dampen the effect of normal
barrel vibration.
Customizing Gun Stocks10
FIGURE 4—This figure illustratesthe finished product.
Customizing Gun Stocks 11
11. Final stock preparation for glass bedding requires masking
off the forearm on the sides of the barrel channel and
the end of the forearm tip of the stock. The masking tape
will contain any overflow of epoxy, keeping the epoxy
from running onto the finished stock wood. Applying a
paste wax to those areas that might conceivably receive
a dose of epoxy can further protect the stock. A good
paste wax will prevent epoxy from adhering to the stock
surface. These protective measures, both taping and
waxing, are especially important when using a highly
fluid epoxy mixture that tends to run easily into areas
it doesn’t belong as well as those it does.
12. Metal preparation for glass bedding is very important,
as not only the barrel comes into contact with epoxy.
You must treat any metallic part that contacts epoxy
with a good coating of the release agent. To ensure
compatibility between the epoxy and the release agent,
it’s wise to use the release agent provided by the epoxy
manufacturer. As noted above for wood, a high-grade
paste wax will also serve to create a bond break between
the epoxy and the barrel/action metal when no release
agent is available.
Danger areas include milled cuts, drilled holes, and all other
cavities in the metalwork that could act as receptacles for
epoxy. Look out for screw holes or other openings through
which the liquid epoxy might flow into the receiver or action.
Also fill the locking lug recesses in bolt-action receivers with
modeling clay. Since epoxy is formulated to flow, it will readily
do so into these pockets. Therefore, all such areas must be
filled with modeling clay or covered with tape, or both. We
mean the same clay you used as a child in grade school. In
reality, you’ll encounter very few cavities on the normal
action. However, you must fill each with clay. An example of
a potential problem area concerns the Savage Model 110
action, as well as other actions that have a corrugated nut
directly in front of the ring. This nut acts as a lock nut on
the barrel, and epoxy can flow into it.
Caution: Coat every possible contact area between wood and
metal with a release agent. Such areas include barrel, action,
tang screws, magazine box, and all other contact points.
When in doubt, apply release agent.
An examination of each individual rifle will reveal those spe-
cial recesses that can cause trouble. Failure to perform this
part of the job correctly might result in a barrel and action
that are permanently glued to the stock. For obvious rea-
sons, such bonding is undesirable. Be especially generous
with release agent on screw threads and in threaded holes in
the action where the tang screws fit. A light coating of release
agent completely around the barrel is never a mistake. The
same can be said for the entire action and even the inside of
the magazine. A release agent coating will harm nothing, and
should epoxy end up where it’s not supposed to be, removal
will prove relatively easy.
After you’ve completely and correctly prepared the stock for
glass bedding, the more enjoyable part of the process begins.
The following steps should be accomplished with the stock
secured in a well-padded bench vice.
13. Install the floor plate and/or trigger guard. Leave the
magazine out if it’s a separate unit.
14. Place each tang screw in its proper position and hold it
in place with a piece of masking tape.
15. Mix bedding materials precisely according to manufacturer
instructions. Epoxies can be unforgiving. Of course,
there may be formulation options. One is the addition of
powdered glass or other materials. Sometimes these
materials are supplied with the epoxy kit. If additional
substances are mixed in, add a sufficient amount to
bring the epoxy to the consistency of heavy grease.
Certain applications call for thinner mixtures. However,
a thicker epoxy tends to remain where it’s initially
placed. Stir the mixture well, but not so vigorously that
air bubbles appear. Always bear in mind the specific
time frame under which you can operate. The time factor
is vital. There’s only so much time lapse allowed between
mixing the epoxy and setting the barrel into position so
that some of the liquid mixture oozes out slightly when
you set the barrel into the stock.
Customizing Gun Stocks12
Customizing Gun Stocks 13
16. Next, install the barreled action into the stock, gently
pressing it into place. Start the front tang screw, but
don’t tighten it fully. Start and tighten the rear tang
screw until it holds some pressure. Then tighten the
front tang screw down firmly, but without undue force.
Then tighten the rear tang screw completely.
17. After the barreled action is in place, use a clean stir
stick to wipe away excess epoxy that may have over-
flowed, but don’t remove the excess entirely. Leave a
slight fillet along the sides of the barrel and on other
areas where complete filling is demanded. The magazine
box is also checked for overflow and cleaned up. A cloth
dampened with vinegar or acetone is useful in cleaning
up minor epoxy overflows on metal parts.
It’s important for all areas to be checked for overflow of
epoxy. Special attention is necessary along the right-hand
side of the action, left-hand side for left-handed action
(Figure 5).
FIGURE 5—This diagram showsthe areas you should check foroverflow of epoxy.
Next, attend to the overflow around the rear tang. Remove
all excess epoxy from the tang area so that when you lift the
barreled action from the stock, it won’t be detained by hard-
ened epoxy overlaying the surface of this region. Overlays of
hardened epoxy here can cause pieces or even chunks of
wood to pop out of the stock when you remove the barreled
action. Careful inspection is necessary because some actions,
such as Interarms’ Mark X, have a slight bevel along the side
of the magazine box that can retain epoxy.
18. After removing excess epoxy, allow the epoxy to cure for
24 hours.
Note: You should never gauge setup time by leftover epoxy in
the cup. While this fluid may harden in a relatively short
time, the epoxy within the stock itself is a thin film and will
take longer to set up. Furthermore, the colder the ambient
temperature of the workroom, the longer it will take for the
epoxy to cure. Don’t rush it. Do follow the time instructions
noted in the instruction sheet(s) that came with the epoxy
formula.
19. Now we’ll remove the barreled action from the stock.
First, using a proper-fitting screwdriver to avoid damage
to the screw slots, remove the tang screws. Then, make
a final check to ensure that no epoxy overflow has cured
in the wrong place. As already stated, cured epoxy hang-
ing over metal parts of the action may cause a piece of
wood to break away from the stock.
Place the butt of the stock on the floor and tip the rifle over
until the muzzle makes about a 45 degree angle. Then, rotate
the rifle until the stock is upward and the barreled action
is facing downward toward the floor. Grasp the forearm
securely by edges and strike the bottom of the barrel, which
is facing upward since the top of the barrel is facing down-
ward. Use a rubber mallet for this operation. Firm multiple
raps may be required, but hard blows shouldn’t be neces-
sary. If the barreled action doesn’t budge, this may indicate a
problem with epoxy overflow. Check for any spot that may
represent a bond between metal and wood. When the barreled
action indicates that it has lost its grip with the stock, dis-
continue the use of the rubber mallet and return the rifle to
the padded bench vice.
Customizing Gun Stocks14
Customizing Gun Stocks 15
20. Now place the bolt back into the action and pull it to the
rearward stop. Next, grasp the bolt itself in one hand
and the barrel of the rifle with the other and carefully
work the barreled action up and out of the stock. Use
firm but steady pressure for this operation. Work the
barreled action free and then lift it carefully out of the
stock. Don’t lever the barreled action up at the muzzle,
as this may damage the stock.
21. With the barreled action out of the stock, you can now
remove the trigger guard and floor plate. Make a careful
inspection at this time for any bedding compound flow
that may be adhering to the stock mortise. You may have
to remove epoxy, for example, from the magazine box or
from behind the safety. A rat-tailed file will be useful in
cleaning all tang screw holes so that the screws fit freely
through these holes when you reassemble the rifle.
Tang screws must not bear on wood or epoxy, or they, too,
can cause splitting under recoil. Using a small gouge, relieve
the area immediately behind the tang so that there’s no metal-
to-wood or metal-to-epoxy contact. If this location isn’t
relieved, stock splitting may occur under recoil.
Note: The fact that epoxy provides a perfect fit is a problem
behind the tang and in back of the tang screws. A perfect fit
in either location is a problem.
22. The only remaining areas that may require attention are
along the top edges of the barrel channel and the action
mortise, providing epoxy overflow is present in either or
both of these regions. File excess epoxy away very cau-
tiously, filing only to the masking tape. Then remove the
tape from the stock. A slight ridge will remain at the top
of the barrel channel on either side. Remove this ridge
patiently, filing down to, but not into, the finish. The
idea is to remove epoxy at this location, not stock finish.
23. After you clean up the stock at all points, clean the
metal parts using whatever solvent(s) the epoxy kit’s
instructions specify. This procedure will remove release
agent and any minute bits of epoxy that cling to metal
parts. You can pop off epoxy bits on metal with a finger-
nail if you properly applied release agent. This supports
the original emphasis on applying release agent properly
and liberally.
24. You should apply a light coating of gun oil to all metal
parts prior to reassembly. After reassembly, allow another
24 hours for curing before firing the rifle.
The glass bedding process may seem long and involved; how-
ever, with practice the steps become routine. However, in all
glass bedding jobs, great care must be exercised to ensure
a professional job. Glasswork, or more properly these days
the use of epoxies, can be a tremendous boon to the modern
gunsmith, for glass has many applications other than stock
bedding. Of course, glass was never intended to take the
place of careful workmanship. Nothing can replace profes-
sional craftsmanship.
Customizing Gun Stocks16
Customizing Gun Stocks 17
Self-Check 1
At the end of each section of Customizing Gun Stocks, you’ll be asked to pause and checkyour understanding of what you have just read by completing a “Self-Check” exercise.Answering these questions will help you review what you’ve studied so far. Please completeSelf-Check 1 now.
Indicate whether the following statements are True or False.
_____ 1. Glassing a stock is really a misnomer, as the product used to accomplish this taskis really epoxy.
_____ 2. When glass bedding a rifle, use release agent sparingly on only the parts insidethe stock.
_____ 3. A bedding system that incorporates metal sleeves that surround the tang screws ispillar bedding.
_____ 4. When glass bedding a stock, the rear tang area should be relieved so recoil won’tsplit the stock.
_____ 5. A good glass bedding job can cover up sloppy workmanship.
_____ 6. During glass bedding, using masking tape can control the overflow of epoxy alongthe sides of a stock.
_____ 7. A good way to float a barrel is to wrap it with three layers of electrician’s tapebefore bedding it.
_____ 8. Epoxy adheres to wood through a chemical bond.
_____ 9. During bedding, you can use modeling clay to fill voids in the metal parts of a rifleto prevent epoxy from binding wood to metal.
_____10. You shouldn’t fire a rifle for at least 24 hours after being glass bedded.
Check your answers with those on page 99.
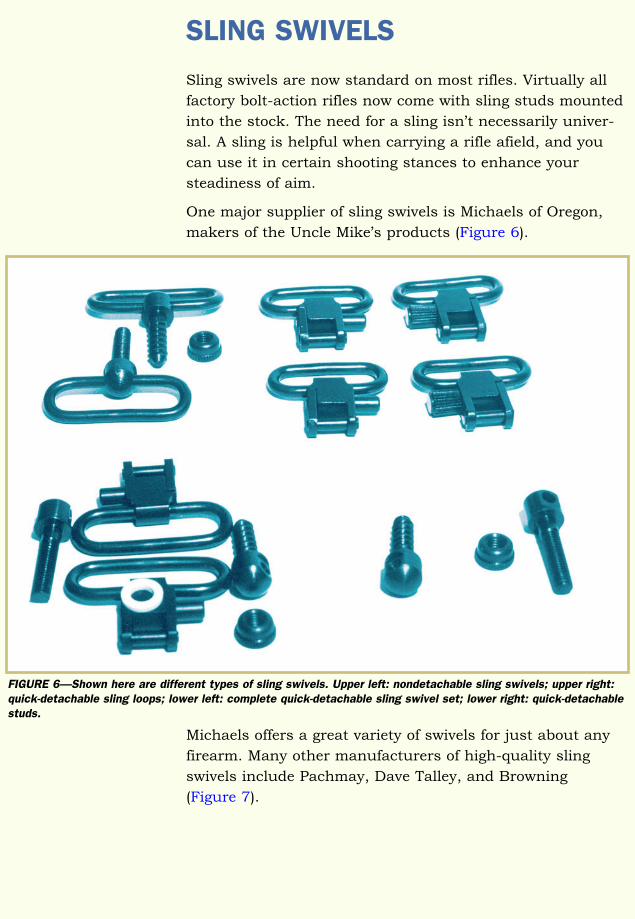
SLING SWIVELS
Sling swivels are now standard on most rifles. Virtually all
factory bolt-action rifles now come with sling studs mounted
into the stock. The need for a sling isn’t necessarily univer-
sal. A sling is helpful when carrying a rifle afield, and you
can use it in certain shooting stances to enhance your
steadiness of aim.
One major supplier of sling swivels is Michaels of Oregon,
makers of the Uncle Mike’s products (Figure 6).
Michaels offers a great variety of swivels for just about any
firearm. Many other manufacturers of high-quality sling
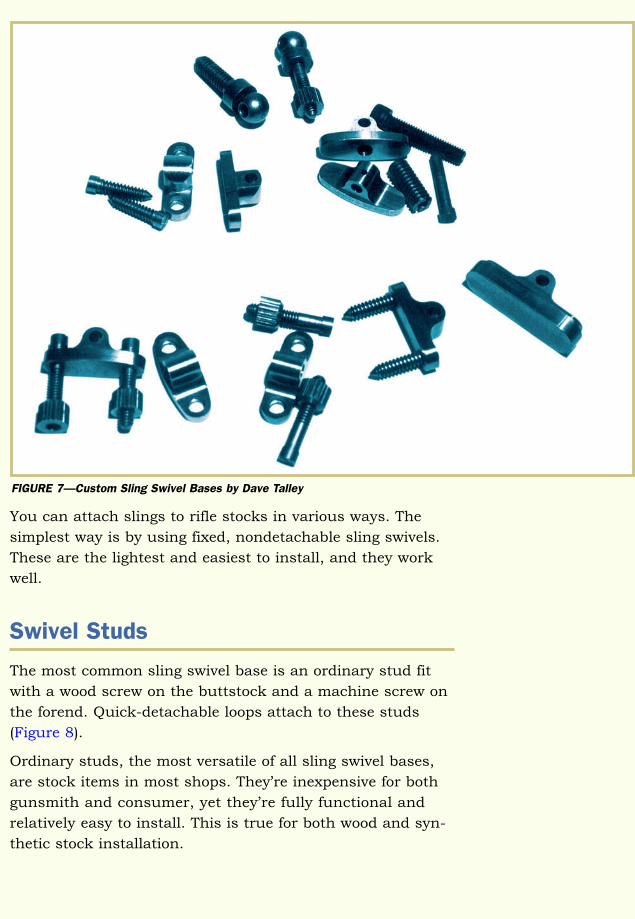
swivels include Pachmay, Dave Talley, and Browning
(Figure 7).
Customizing Gun Stocks18
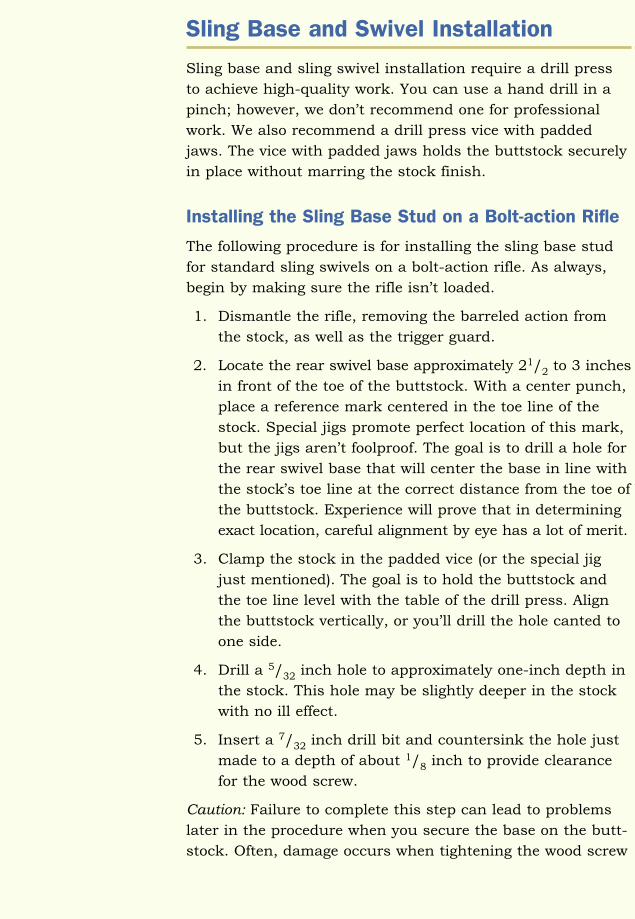
FIGURE 6—Shown here are different types of sling swivels. Upper left: nondetachable sling swivels; upper right:quick-detachable sling loops; lower left: complete quick-detachable sling swivel set; lower right: quick-detachablestuds.
Customizing Gun Stocks 19
You can attach slings to rifle stocks in various ways. The
simplest way is by using fixed, nondetachable sling swivels.
These are the lightest and easiest to install, and they work
well.
Swivel Studs
The most common sling swivel base is an ordinary stud fit
with a wood screw on the buttstock and a machine screw on
the forend. Quick-detachable loops attach to these studs
(Figure 8).
Ordinary studs, the most versatile of all sling swivel bases,
are stock items in most shops. They’re inexpensive for both
gunsmith and consumer, yet they’re fully functional and
relatively easy to install. This is true for both wood and syn-
thetic stock installation.
FIGURE 7—Custom Sling Swivel Bases by Dave Talley
With some creativity, you can adapt these bases to serve
many applications on a multitude of firearms including shot-
guns, muzzleloaders, and hand- guns. One application con-
cerns a single-shot rifle with an extremely heavy octagonal
barrel in which you use a machine screw-type stud. Cut the
threads all the way to the base of the stud and then drill and
tap a hole in the heavy octagonal barrel. Emphasis is on a
heavy barrel because it will have sufficient metal thickness
for this operation without creating a weakness problem. The
threaded stud fits directly to the underside of the barrel in its
tapped hole.
Flush Mount Swivel Bases
Another type of swivel attachment is the flush mount, whereby
the base is totally inletted into the wood. Only the top-most
part of the base is visible because it’s flush with the surface
of the wood. Browning and Pachmayer are noted for their
flush-type mounts.
You must insert the loop of the swivel into a slot that’s integral
with the base. Then give the loop a quarter turn to lock it in
place. The result is an attractive, clean-looking installation.
Customizing Gun Stocks20
FIGURE 8—Shown is a custom sling swivel base installed in a forearm with wooden molding.
Customizing Gun Stocks 21
The flush mount’s most significant drawback is that they
require special jigs for correct installation. Any errors made
during location or installation are difficult to correct. Another
minor drawback is a lack of versatility due to the physical
size of the unit. Sufficient wood must be available to accom-
modate the large base size since it inlets totally into the
stock.
The beginner is wise to approach the flush-type base with
caution. It can provide a handsome and functional sling
swivel arrangement, but you must exercise special care
during installation.
Another type of flush mount base is available from Michaels
of Oregon. The Uncle Mike’s unit is designed with loops that
have a built-in ball bearing-type release. The base consists of
a cup that you mount into the stock. When the loops aren’t
installed into the cup, a round one-half inch hole is visible.
These Uncle Mike’s flush-type mounts require a drill press
for installation. You must take special care to properly locate
the hole drilled to receive the cup in the stock at the correct
depth. Therefore, this type of base requires a stock of ade-
quate thickness to handle the large base.
Flush-type bases have definite advantages. Because they’re
in the same plane as the surface of both the forend and butt-
stock when the loops are removed (the sling taken off the
rifle), they offer a cosmetic advantage. Additionally, removing
the sling also makes sandbag shooting easier, and the flush-
type base won’t tear into the shooting rest as a protruding
base can.
As previously stated, the principal disadvantage of flush-type
bases concerns installation. They’re harder to install than
standard units and require special tools that can be expen-
sive. The loops can also prove more difficult to find if you
want to purchase just one set at a time. Flush mounts are
among the most expensive types. However, they have a place
on certain custom rifles.
Custom Bases
Sling swivel bases favored by the custom stock maker are
machined from bar stock. They attach to the forestock with
two finely threaded wood screws that precisely fit them.
Machine-type screws fasten them in the forearm. Craftsmen
like Dave Talley take the concept of custom sling swivels to
the point of creating bases with hidden screws for attachment
to the stock. Such bases are made to accept most types of
detachable loops. Brownells has an excellent selection of
bases from which to choose. These bases require inletting
skills for proper installation. They’re extremely durable as
well as attractive.
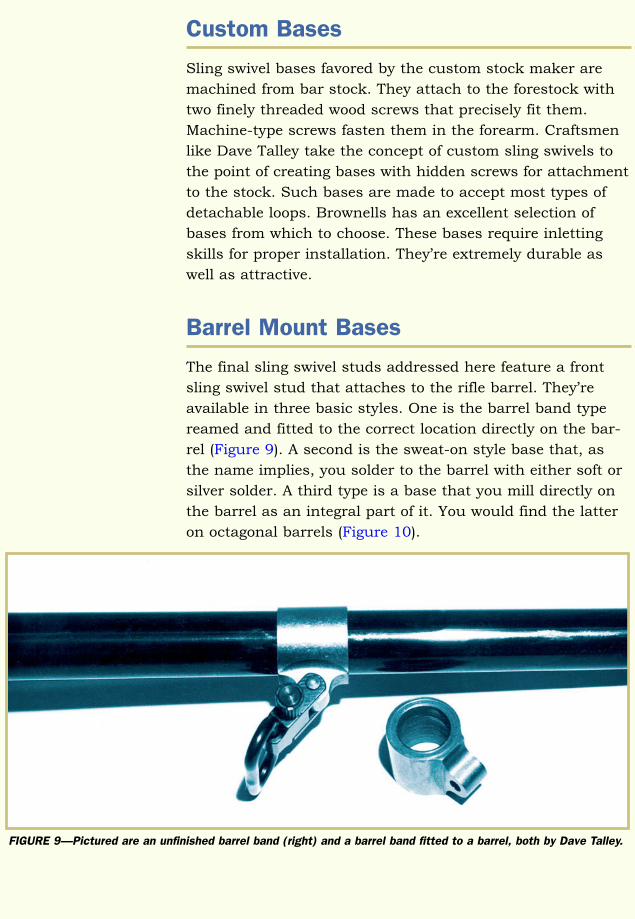
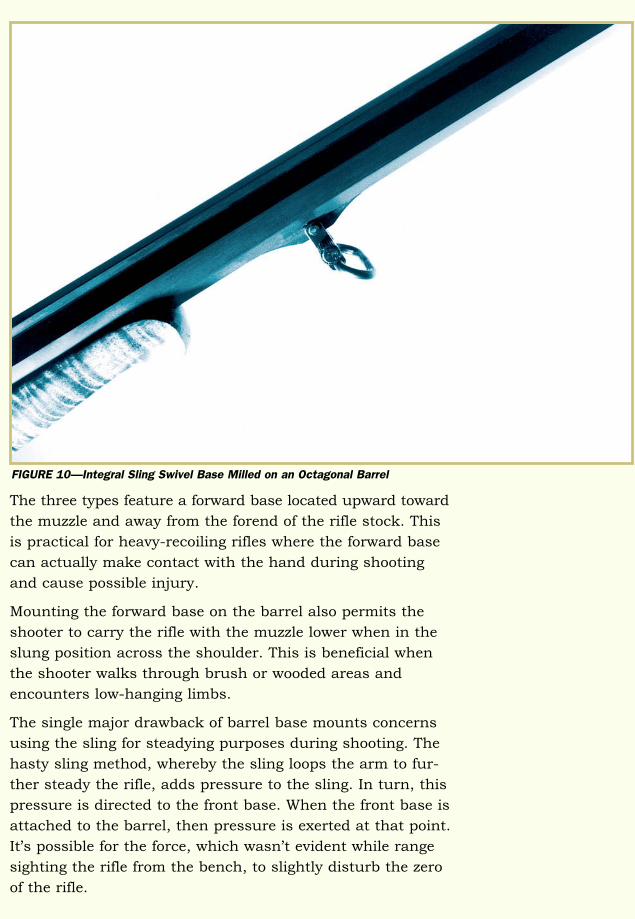
Barrel Mount Bases
The final sling swivel studs addressed here feature a front
sling swivel stud that attaches to the rifle barrel. They’re
available in three basic styles. One is the barrel band type
reamed and fitted to the correct location directly on the bar-
rel (Figure 9). A second is the sweat-on style base that, as
the name implies, you solder to the barrel with either soft or
silver solder. A third type is a base that you mill directly on
the barrel as an integral part of it. You would find the latter
on octagonal barrels (Figure 10).
Customizing Gun Stocks22
FIGURE 9—Pictured are an unfinished barrel band (right) and a barrel band fitted to a barrel, both by Dave Talley.
Customizing Gun Stocks 23
The three types feature a forward base located upward toward
the muzzle and away from the forend of the rifle stock. This
is practical for heavy-recoiling rifles where the forward base
can actually make contact with the hand during shooting
and cause possible injury.
Mounting the forward base on the barrel also permits the
shooter to carry the rifle with the muzzle lower when in the
slung position across the shoulder. This is beneficial when
the shooter walks through brush or wooded areas and
encounters low-hanging limbs.
The single major drawback of barrel base mounts concerns
using the sling for steadying purposes during shooting. The
hasty sling method, whereby the sling loops the arm to fur-
ther steady the rifle, adds pressure to the sling. In turn, this
pressure is directed to the front base. When the front base is
attached to the barrel, then pressure is exerted at that point.
It’s possible for the force, which wasn’t evident while range
sighting the rifle from the bench, to slightly disturb the zero
of the rifle.
FIGURE 10—Integral Sling Swivel Base Milled on an Octagonal Barrel
Customizing Gun Stocks
Sling Base and Swivel Installation
Sling base and sling swivel installation require a drill press
to achieve high-quality work. You can use a hand drill in a
pinch; however, we don’t recommend one for professional
work. We also recommend a drill press vice with padded
jaws. The vice with padded jaws holds the buttstock securely
in place without marring the stock finish.
Installing the Sling Base Stud on a Bolt-action Rifle
The following procedure is for installing the sling base stud
for standard sling swivels on a bolt-action rifle. As always,
begin by making sure the rifle isn’t loaded.
1. Dismantle the rifle, removing the barreled action from
the stock, as well as the trigger guard.
2. Locate the rear swivel base approximately 21/2 to 3 inches
in front of the toe of the buttstock. With a center punch,
place a reference mark centered in the toe line of the
stock. Special jigs promote perfect location of this mark,
but the jigs aren’t foolproof. The goal is to drill a hole for
the rear swivel base that will center the base in line with
the stock’s toe line at the correct distance from the toe of
the buttstock. Experience will prove that in determining
exact location, careful alignment by eye has a lot of merit.
3. Clamp the stock in the padded vice (or the special jig
just mentioned). The goal is to hold the buttstock and
the toe line level with the table of the drill press. Align
the buttstock vertically, or you’ll drill the hole canted to
one side.
4. Drill a 5/32 inch hole to approximately one-inch depth in
the stock. This hole may be slightly deeper in the stock
with no ill effect.
5. Insert a 7/32 inch drill bit and countersink the hole just
made to a depth of about 1/8 inch to provide clearance
for the wood screw.
Caution: Failure to complete this step can lead to problems
later in the procedure when you secure the base on the butt-
stock. Often, damage occurs when tightening the wood screw
24
Customizing Gun Stocks 25
that secures the base to the buttstock. If you don’t counter-
sink the hole, the screw head might chip a piece from the
buttstock as you tighten it.
6. Using a drift punch or an ordinary nail of the same
approximate diameter, screw the base down into place.
Be careful to avoid scratching the stock if the punch
handle comes around when the stud gets close to its full
seating depth.
Tip: If you have difficulty starting the screw, sharpen its
point on a grinder to facilitate its entry into the wood. When
the base reaches the level of the stock, turn the base just
enough to leave an impression in the wood. Then, unscrew
the base. With a gouge and small chisel, carefully relieve the
compressed area in the wood formed by the impression of the
base. This avoids crushing and breaking the wood when the
base is fully seated and aligned with the stock.
Tip: Don’t use a detachable swivel body as a wrench, as it
can damage the swivel.
7. Unscrew the base, apply a small amount of Loctite or
even glue to the hole, and reinstall the stud. Doing so
will prevent the stud from coming loose and/or twisting
out of position in the future.
Inevitably, a stud will sometimes get put in crooked. The best
remedy for a crooked stud is to withdraw the stud and plug
the original hole using a piece of hardwood dowel as a plug.
Glue the bit of hardwood dowel in place and trim it to match
the contour of the stock. If the hole wasn’t too crooked and
out of line, the base of the stud will usually cover, or at least
almost cover, your repair job. A hardwood plug allows
redrilling without concern for loss of strength. Seldom does
the plug cause a serious cosmetic problem.
Installing the Forearm Stud
1. Locate the forearm stud approximately 13 to 17 inches
in front of the trigger. Use common sense in determining
the exact location, as you may have to take into consid-
eration a checkering pattern or stippling.
Caution: Never install a forearm stud into a checkering pat-
tern. This makes an unprofessional-looking job and does
nothing for the checkering pattern itself.
Customizing Gun Stocks
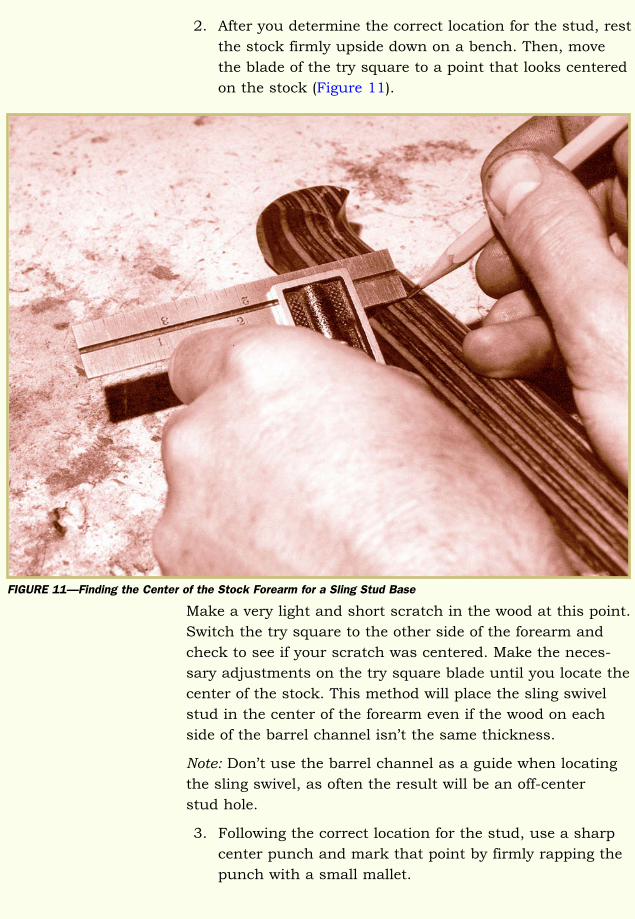
2. After you determine the correct location for the stud, rest
the stock firmly upside down on a bench. Then, move
the blade of the try square to a point that looks centered
on the stock (Figure 11).
Make a very light and short scratch in the wood at this point.
Switch the try square to the other side of the forearm and
check to see if your scratch was centered. Make the neces-
sary adjustments on the try square blade until you locate the
center of the stock. This method will place the sling swivel
stud in the center of the forearm even if the wood on each
side of the barrel channel isn’t the same thickness.
Note: Don’t use the barrel channel as a guide when locating
the sling swivel, as often the result will be an off-center
stud hole.
3. Following the correct location for the stud, use a sharp
center punch and mark that point by firmly rapping the
punch with a small mallet.
26
FIGURE 11—Finding the Center of the Stock Forearm for a Sling Stud Base
Customizing Gun Stocks 27
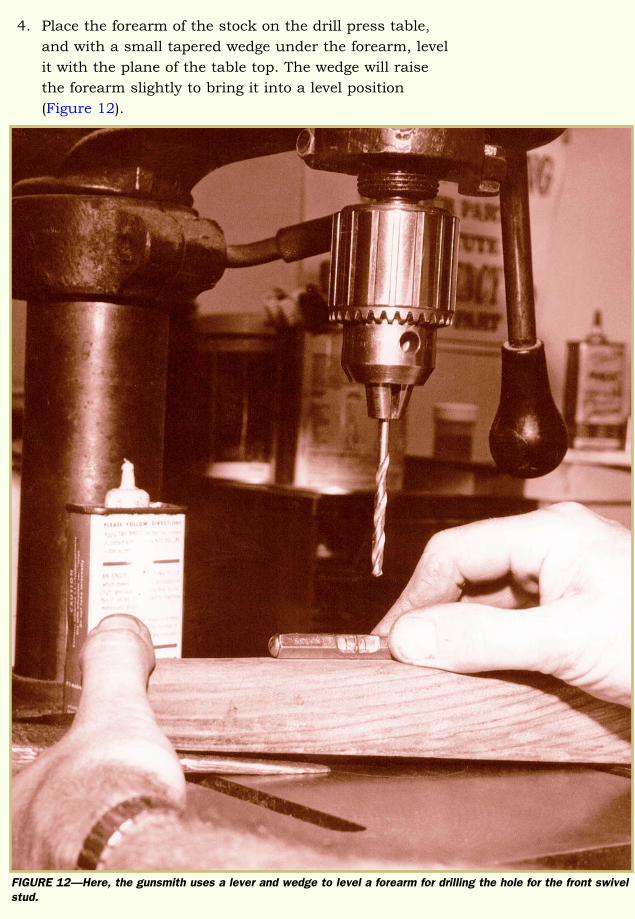
4. Place the forearm of the stock on the drill press table,
and with a small tapered wedge under the forearm, level
it with the plane of the table top. The wedge will raise
the forearm slightly to bring it into a level position
(Figure 12).
FIGURE 12—Here, the gunsmith uses a lever and wedge to level a forearm for drilling the hole for the front swivelstud.
The wedge also acts as a support under the forearm for
drilling. This enables drilling of a hole that will be at a right
angle to the bottom of the forend. The setup described here
can be handheld. Practice promotes speed and accuracy. An
alternate method is to use a padded vice to hold the forearm
in place for drilling purposes.
5. With a 3/16 inch drill bit, drill a hole completely through
the forearm from the outside down through the barrel
channel.
6. Then, turn the stock over with the barrel channel facing
upward and the forearm resting flat on the table of the
drill press. Countersink the drilled hole into the barrel
channel using a 23/64 inch drill bit. Drill this countersunk
hole to a depth of 1/4 inch to 5/16 inch for the purpose of
seating the machine screw nut. You must countersink
the machine screw nut below the level of the barrel
channel or it will make contact with the barrel when you
assemble the rifle.
7. Push the threaded part of the stud up through the fore-
arm and start the machine screw nut on it. If the nut
won’t reach the screw, seat the nut deeper into the hole.
To do this, pad a place on the workbench. Place the
stock on this padded spot with the barrel channel up.
Put the nut into the hole with the rounded side of the
nut down. With a drift punch that’s nearly the same
diameter as the nut, drive the nut downward into the
recess. Be careful to keep the nut straight rather than
allowing it to tilt in the hole. Then, start the threaded
end of the stud back up through the forearm, engaging
the nut. Firmly screw the base down on the stock, which
will pull the nut into its final position fully aligned. Take
care during this procedure so that you don’t crush or
crack the wood under the base. After a few experiences
with the process, you’ll develop a touch for knowing
when the nut is fully seated.
8. The screw portion of the stud may protrude beyond the
level of the barrel channel. If so, either make a mark on
the threads to indicate how much to cut off or count the
number of threads that you must remove to achieve a
flush fit. Now, remove the stud and shorten the screw
Customizing Gun Stocks28
Customizing Gun Stocks 29
appropriately. Put a drop or two of Loctite on the screw
and thread it back into place. The Loctite, of course,
helps the screw remain in place, preventing it from turn-
ing in the stock.
Installing the standard sling swivel stud isn’t difficult. Still,
you must follow all the previous steps to ensure a good job.
You must take care to keep all of the hardware properly
aligned. After a few installations (and perhaps a mistake or
two), installing sling swivel studs will become routine. As
stated earlier, but worth repeating, there are special jigs
available to locate holes for this operation. Special drills are
also available.
The Synthetic Stock
Installing sling swivel studs on synthetic stocks follows the
same steps as those for wood stocks. Furthermore, most
manufacturers of synthetic stocks offer them ready to go with
studs pre-installed. If not, the area into which the stud fits is
reinforced. There’s one saving grace with synthetics. If you
make a mistake when locating a stud, you can fill in the hole
with epoxy and repeat the process. Also, if necessary, you
can coat a sling swivel stud with release agent and epoxy it
into place in a synthetic stock.
Flush Mount Bases
Flush mount bases generally come with installation instructions,
and a special jig is required for near-perfect installation
(Figure 13). It’s impossible (and fortunately not necessary)
to cover each individual brand. As a rule of thumb, when
installing special bases, use the specific installation jig
offered by the base manufacturer and pay close attention
to the installation instructions.
Installing flush mount bases usually requires inletting, as
with Talley swivel bases that must be professionally inletted
and fitted into the stock.
Caution: Wood screws used to hold flush mount bases in
place are fine-threaded. You must exercise special care when
tightening them or the heads may snap off. This problem
usually occurs when pilot holes are too small and screws
turn too hard. It’s a royal mess to remove the broken shank
of a wood screw when the head snaps off.
After you fit the base, you must choose loops. Loops from
Uncle Mike’s are well manufactured and most popular. They
come with the standard detachable loop or in the Super
Swivel style with Swivellock. The Super Swivel locks in place
via a plunger sleeve that screws down. In this manner, the
loop can’t accidentally work free. You must unscrew the
sleeve to remove the swivel loop from the base. Uncle Mike’s
also offers a broad selection of swivel sets for rifles and shot-
guns that have two-piece stocks. These sets all come with
installation instructions.
Customizing Gun Stocks30
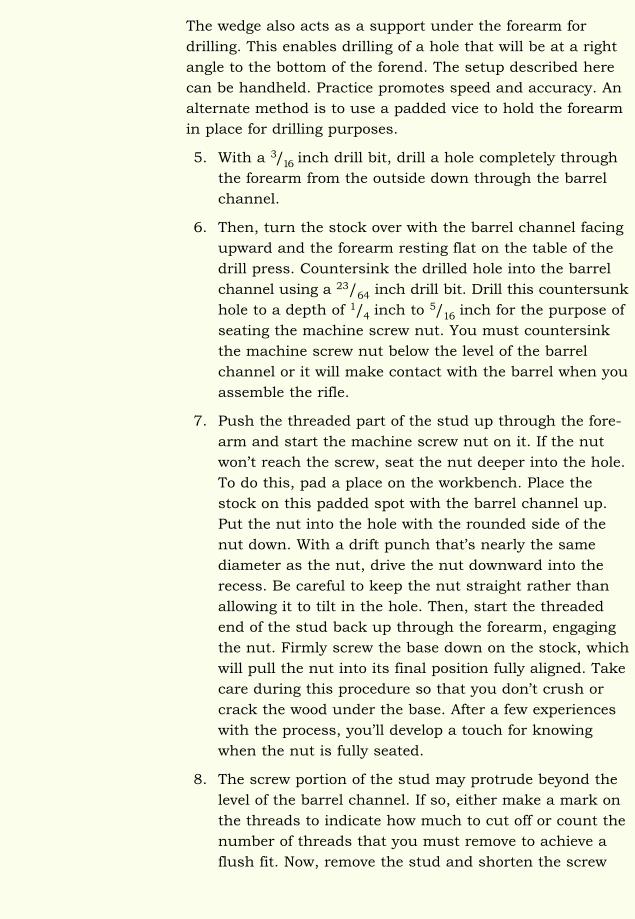
FIGURE 13—Sling swivel stud installation jig by B Square comes with instructions.

Customizing Gun Stocks 31
Barrel Bands
You can easily fit barrel bands to barrels. You should locate
the band at least far enough forward of the forearm tip so that
when the loop is in place, no part of the hardware contacts
the stock and scratches the finish. Of course, the barrel band
must match the barrel diameter at the point of installation.
1. Apply a light coat of oil to the barrel where the barrel
band will fit into place. Then, with a small hammer and
a nylon or brass punch, drift the band firmly (but with
due care) onto the barrel until it conforms to the barrel
contour.
Caution: When the band comes to an abrupt halt on the bar-
rel, don’t continue to drive it with the hammer. The band
can split by driving it beyond the proper diameter on the
barrel. Furthermore, you must yet remove the band as
described next.
2. Remove the band and thoroughly clean the area of the
barrel it will rest on. Also, clean the interior of the band.
This is necessary to remove all traces of oil that may
spoil a bond between the barrel band and the barrel.
3. Mix the typical high-quality liquid epoxy following the
exact directions for the specific formula used. Only a
small amount is necessary, enough to make contact
between the interior of the barrel band and the barrel.
4. Coat the barrel area precisely where the barrel band will
fit, using the proper amount of epoxy. Then slip the bar-
rel band back into place where it will correctly come to
rest in proper alignment.
5. Tap the band once more to ensure that it’s tight, but
don’t use heavy blows. Allow the epoxy to cure and the
band will hold. If later removal is necessary, you may
have to break the epoxy bond by heating it with a torch
to loosen its bond.
6. Naturally, you could soft-solder the band into place, or
drill a set screw and tap it down through the loop base
on the band. However, the consensus from manufactur-
ers of barrel bands suggests that epoxy is a more than
adequate means of securing the band in place.
7. If you’re to fit the band on a new barrel still in the white,
you can do so after you polish the barrel but before you
blue it. Then you accomplish the final fitting and setting
in place with epoxy after you blue the barrel and barrel
band. In this instance, you must mark the band to denote
which end faces forward so that you can drive it back
onto the barrel in the correct direction for final fitting.
8. If you’ll use a permanently soldered front sight ramp on
the new barrel, you must fit the barrel band before you
install the ramp or it won’t fit over the end of the barrel.
Alternately, you can use the type of sling swivel base
that gets soldered on if you install the ramp before you
put a barrel band into place.
The Solder-on Sling Swivel Base
You must fit the solder-on sling swivel base to the barrel with
care. If you use soft solder, there should be sufficient contact
surface between barrel and sling swivel base to offer a solid
platform for the solder. Soft solder is good, but it does have
strength limitations. Fitting must be precise.
Warning: Any soldering process is dangerous, as it involves
heating metals to extreme temperatures with a torch. To avoid
injury or death, those unskilled at using a torch should receive
proper certified training in torch operation before performing
soldering tasks.
1. First, fit the base perfectly to the barrel—a sloppy fit
won’t suffice. Use a good flux to clean the barrel and
swivel base areas that will make contact. It’s imperative
to properly prepare the joint area for soldering.
2. Next, tin the barrel and the base, using no more heat
from a torch than necessary to melt the solder. An acety-
lene torch may be necessary.
3. Following the tinning procedure, clamp the base onto the
barrel in the correct location. Then, heat the barrel and
base until the solder melts and you make a perfect fit
between the barrel and the base.
Customizing Gun Stocks32
Customizing Gun Stocks 33
Note: If you’re going to hot blue the barrel, it’s necessary to
use HI-FORCE 44 solder sold by Brownells. Regular 50/50
soft solder won’t maintain a bond when you place the barrel
into a caustic salt blueing bath. With HI-FORCE 44 solder,
the level of heat required to melt the solder is approximately
475° Fahrenheit.
If the barrel will be rust blued, a 50/50 solder will hold.
Again, use only enough heat to melt the solder.
4. You can clean up soft solder with a knife blade, scrap-
ers, or files. If a beadblast cabinet is available, it will
speed the cleaning of soft solder.
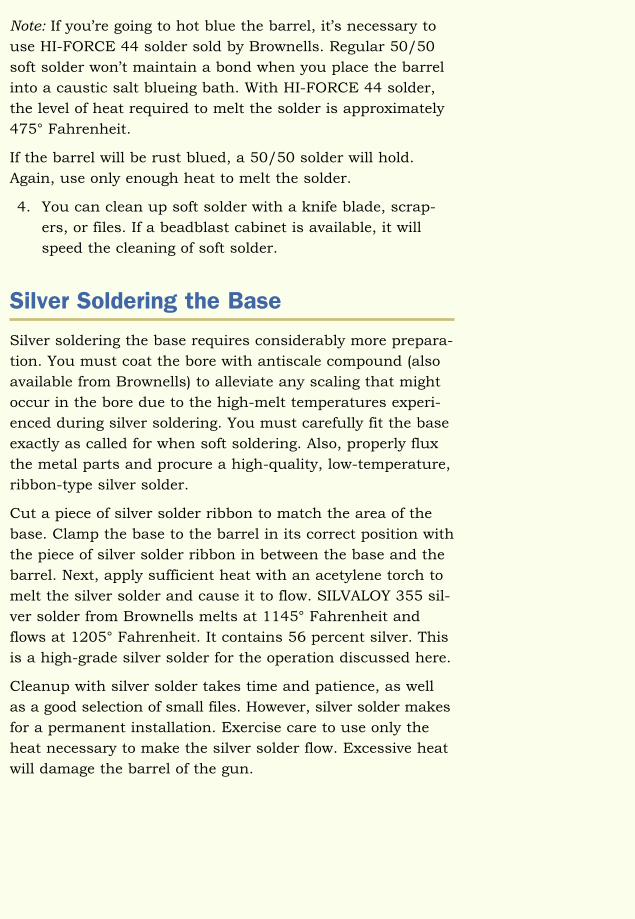
Silver Soldering the Base
Silver soldering the base requires considerably more prepara-
tion. You must coat the bore with antiscale compound (also
available from Brownells) to alleviate any scaling that might
occur in the bore due to the high-melt temperatures experi-
enced during silver soldering. You must carefully fit the base
exactly as called for when soft soldering. Also, properly flux
the metal parts and procure a high-quality, low-temperature,
ribbon-type silver solder.
Cut a piece of silver solder ribbon to match the area of the
base. Clamp the base to the barrel in its correct position with
the piece of silver solder ribbon in between the base and the
barrel. Next, apply sufficient heat with an acetylene torch to
melt the silver solder and cause it to flow. SILVALOY 355 sil-
ver solder from Brownells melts at 1145° Fahrenheit and
flows at 1205° Fahrenheit. It contains 56 percent silver. This
is a high-grade silver solder for the operation discussed here.
Cleanup with silver solder takes time and patience, as well
as a good selection of small files. However, silver solder makes
for a permanent installation. Exercise care to use only the
heat necessary to make the silver solder flow. Excessive heat
will damage the barrel of the gun.
Octagonal Barrels
You machine the sling swivel base on the octagonal barrel as
an integral part of the barrel. The only remaining task is to
drill a hole through the base to accept the sling loops.
Thompson/Center Pistols
The Thompson/Center Contender has become very popular.
The Thompson Center (T/C) pistols are large enough to
accept a sling. The best arrangement for sling attachment to
these handguns is a set of Uncle Mike’s swivels, which are
designed expressly for the T/C pistol.
The Lanyard Loop
A lanyard loop may be desired for a revolver. The easiest way
to provide a lanyard loop is to use a machine screw stud. Cut
the shank down short and chase the 10 � 32 threads all the
way to the base of the shank. Then, drill and tap a hole into
the bottom frame of the revolver and the pistol grip.
Caution: Prior to commencing work, record the serial number
of the firearm. Should a serial number be defaced while you
install a lanyard loop (in cases where the serial number
appears on the bottom frame), you must stamp the number
into the frame at some other point. To do otherwise is an
infraction of the law.
Prior to tightening the matching screw stud into place, coat
its threads with a couple drops of Loctite to help hold it in
place.
Customizing Gun Stocks34

Customizing Gun Stocks 35
Self-Check 2
Fill in the blanks in the following statements.
1. _______ -type mount bases have the advantage of being in the same plane as the sur-face of both the forend and buttstock when the loops are removed. From the practicalstandpoint, this makes _______ shooting easier.
2. Sling base and sling swivel installation require a _______ to achieve the highest qualitywork.
3. The simplest sling swivel type is the _______ type.
4. The base of the _______ mount is totally inletted into the wood.
5. When installing a rear swivel base, you should locate it approximately _______ inches infront of the toe of the buttstock.
6. You should never install forearm stud into a _______ pattern.
7. A _______ is required for perfect installation of flush mount bases.
8. The most common sling swivel base is the ordinary stud that’s fitted with a _______screw on the buttstock and a _______ screw on the forend of the one-piece stock.
9. When mounting swivels, the location of the forearm stud should be approximately_______ inches in front of the trigger.
10. A base that’s milled directly on the barrel is practical for _______ rifles where the for-ward base can actually make contact with the hand during shooting, possibly causinginjury to the shooter.
Check your answers with those on page 99.
Customizing Gun Stocks
STOCK ACCESSORIES
Pistol Grip Caps
Pistol grip caps are a valuable addition to a rifle stock. They
not only add beauty, but they’re functional as well. Caps pro-
vide protection for the bottom of the pistol grip, an area of
the stock that’s vulnerable to bumps and scrapes from nor-
mal use and storage. If left unprotected, the grip area may
suffer dents and/or have bits of wood chipped off, resulting
in lost value. Also, the damage can be difficult if not impossi-
ble to repair.
Note: The pistol grip caps discussed in this section are made
of plastic or metals. We discussed wooden pistol grip caps in
the previous unit.
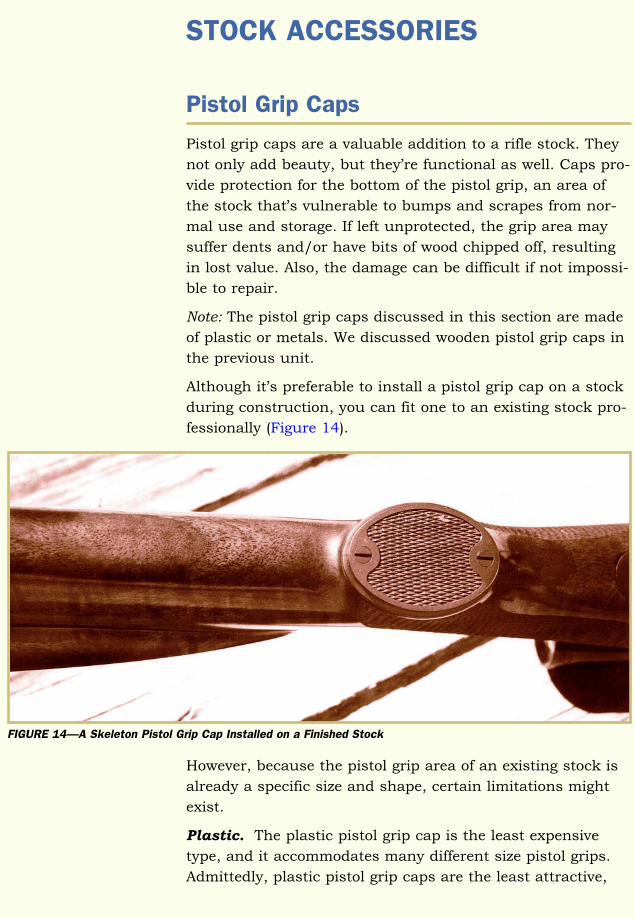
Although it’s preferable to install a pistol grip cap on a stock
during construction, you can fit one to an existing stock pro-
fessionally (Figure 14).
However, because the pistol grip area of an existing stock is
already a specific size and shape, certain limitations might
exist.
Plastic. The plastic pistol grip cap is the least expensive
type, and it accommodates many different size pistol grips.
Admittedly, plastic pistol grip caps are the least attractive,
36
FIGURE 14—A Skeleton Pistol Grip Cap Installed on a Finished Stock
Customizing Gun Stocks 37
and we seldom install them on custom rifles. Essentially, the
plastic pistol grip cap is a utilitarian item.
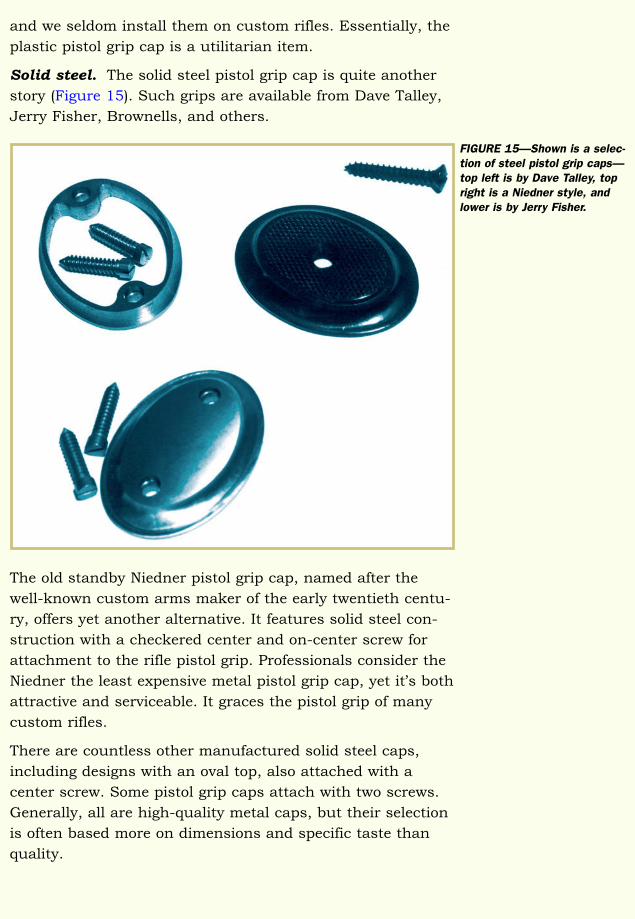
Solid steel. The solid steel pistol grip cap is quite another
story (Figure 15). Such grips are available from Dave Talley,
Jerry Fisher, Brownells, and others.
The old standby Niedner pistol grip cap, named after the
well-known custom arms maker of the early twentieth centu-
ry, offers yet another alternative. It features solid steel con-
struction with a checkered center and on-center screw for
attachment to the rifle pistol grip. Professionals consider the
Niedner the least expensive metal pistol grip cap, yet it’s both
attractive and serviceable. It graces the pistol grip of many
custom rifles.
There are countless other manufactured solid steel caps,
including designs with an oval top, also attached with a
center screw. Some pistol grip caps attach with two screws.
Generally, all are high-quality metal caps, but their selection
is often based more on dimensions and specific taste than
quality.
FIGURE 15—Shown is a selec-tion of steel pistol grip caps—top left is by Dave Talley, topright is a Niedner style, andlower is by Jerry Fisher.
Open steel. Open-style steel pistol grip caps often have no
center portion, thus allowing wood to show through. The
exposed wood can then be carved or checkered. Also, the
open area can feature an inlay. Imagination is the only limit-
ing factor when the open-style cap is selected. It’s important
to note that the open style still offers protection for the pistol
grip area. It covers the vulnerable edges of the pistol grip all
the way around.
Edge protection coupled with creative decorative enhance-
ment combine to make the open-style steel pistol grip cap a
desirable option. However, these caps require more skill to
install. They require inletting for a perfect matchup where
wood and metal meet along the edges of the pistol grip and
also on the inside where the wood and metal come together.
Trap. The trap grip cap has a little trapdoor built into it,
which conceals a small compartment within the pistol grip
and under the pistol grip cap. The shooter uses the compart-
ment to carry items such as sight inserts. Primarily, the trap
grip adds a touch of class to a fine custom firearm, as well as
added interest. The trap grip is expensive, but it deserves
consideration. It’s best to install it on a new rifle stock as
opposed to retrofitting on an existing one. Ideally, you’ll
design the trap grip into the stock plans, although when
refinishing and refurbishing require stock gripalteration, you
can figure in the grip quite nicely.
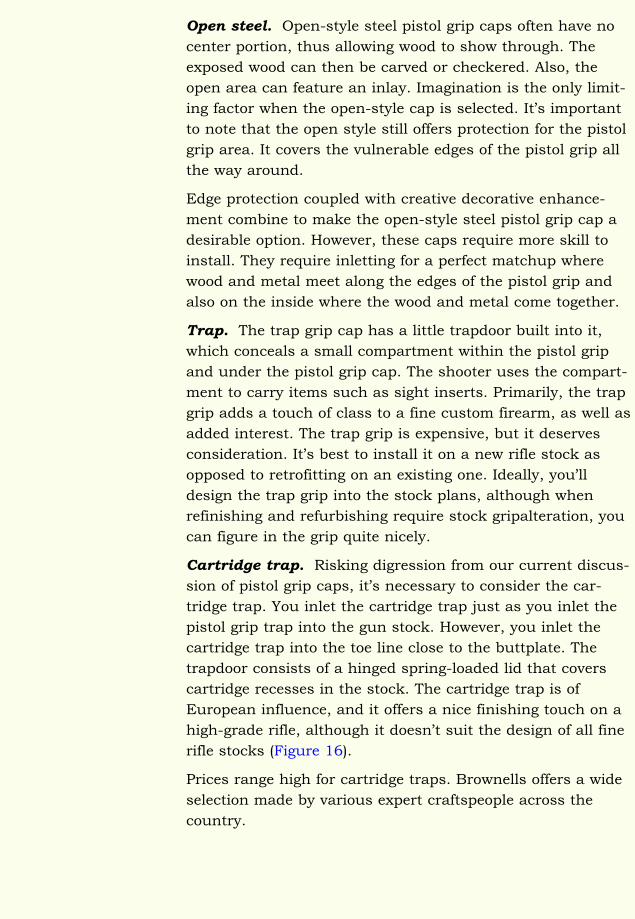
Cartridge trap. Risking digression from our current discus-
sion of pistol grip caps, it’s necessary to consider the car-
tridge trap. You inlet the cartridge trap just as you inlet the
pistol grip trap into the gun stock. However, you inlet the
cartridge trap into the toe line close to the buttplate. The
trapdoor consists of a hinged spring-loaded lid that covers
cartridge recesses in the stock. The cartridge trap is of
European influence, and it offers a nice finishing touch on a
high-grade rifle, although it doesn’t suit the design of all fine
rifle stocks (Figure 16).
Prices range high for cartridge traps. Brownells offers a wide
selection made by various expert craftspeople across the
country.
Customizing Gun Stocks38
Customizing Gun Stocks 39
Fitting a Pistol Grip Cap
Fitting a pistol grip cap is a straightforward process. If you’re
fitting the cap to a new stock, you file and sand the surface
of the pistol grip flat to prepare a proper contact area for the
pistol grip cap. Epoxy and a screw or screws hold the cap in
place, the latter provided with the cap. A bit of epoxy under-
neath the cap serves not only to hold the cap in place, but
also to seal the wood, making a perfect fit between the cap
and the pistol grip. Furthermore, the epoxy also prevents the
pistol grip cap from turning when a single-screw cap is used.
Caution: When using epoxy, a good release agent is necessary
to prevent the cap from becoming permanently glued to the
stock.
If you’re installing a pistol grip cap on an existing rifle stock,
you should know ahead of time whether the particular cap
will fit the rifle. This may seem a basic consideration, but it’s
common for a customer to request a particular cap, and later
be disappointed to learn that it won’t fit the rifle stock cor-
rectly. Your Brownell’s Catalog comes in handy here. First,
measure the pistol grip size of the firearm you’re fitting with
a cap. Then, compare the dimensions against the selection of
caps with measurements listed in the catalog. Doing so will
ensure that no surprises occur.
FIGURE 16—Cartridge Trap in the Toe Line of a Stock
Other Considerations
Metal pistol grip caps are generally offered in the white and
require blueing or some other type of metal finish. The gun-
smith realizes that the finish on the pistol grip cap must
match either the existing finish or that applied to the new
metals.
Also, when tightening the wood screw(s), there’s always a
danger of snapping a head off. Be careful to tighten a pistol
grip cap screw only to the point of security and not beyond.
Drill a pilot hole slightly smaller than the screw shank first
to offer a channel for the pistol grip cap screw. Then apply a
lubricant, such as paraffin, to the threads of the screw to aid
in tapping it into the wood.
Open-style pistol grip caps require the most installation time,
since you must inlet them down into the wood of the pistol
grip. You accomplish this task in the same manner as all
inletting using inletting black, chisels, and a large dose of
patience to achieve that perfect wood-to-metal fit. The fit
that’s the hallmark of professional gunsmithing.
The trap-type cap demands additional inletting of the tube
attached to the cap. Furthermore, you must build working
room for the spring and lid hinge into the fitting process.
You can drill the hole either on the drill press or with a
hand drill.
Caution: Be certain to leave adequate wood for the screws
that retain the trap cap. There must be sufficient remaining
wood for the screws to tap into. The additional labor required
to fit the open style and trap grip justifies a higher installa-
tion charge.
The cartridge trap also demands extra care in fitting. It’s best
suited to a newly constructed stock, as the length and width
of the trap dictate the profile of the toe line. The cartridge trap
also requires drilling the stock to accommodate the cartridge
recesses.
Customizing Gun Stocks40
Customizing Gun Stocks 41
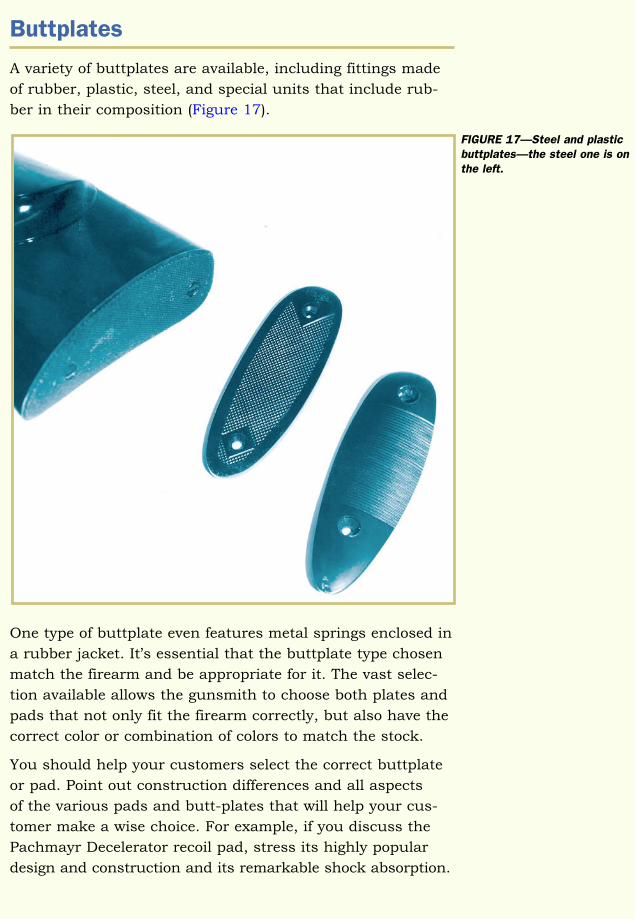
Buttplates
A variety of buttplates are available, including fittings made
of rubber, plastic, steel, and special units that include rub-
ber in their composition (Figure 17).
One type of buttplate even features metal springs enclosed in
a rubber jacket. It’s essential that the buttplate type chosen
match the firearm and be appropriate for it. The vast selec-
tion available allows the gunsmith to choose both plates and
pads that not only fit the firearm correctly, but also have the
correct color or combination of colors to match the stock.
You should help your customers select the correct buttplate
or pad. Point out construction differences and all aspects
of the various pads and butt-plates that will help your cus-
tomer make a wise choice. For example, if you discuss the
Pachmayr Decelerator recoil pad, stress its highly popular
design and construction and its remarkable shock absorption.
FIGURE 17—Steel and plasticbuttplates—the steel one is onthe left.
The Pachmayr Decelerator looks good and easily fits to a
buttstock in the same manner employed to fit the standard
rubber recoil pad. Of course, the Decelerator is only one of
many good recoil pads.
The Steel Buttplate
An alternative to the recoil pad, the steel buttplate is far from
extinct in modern gun making. Custom stock makers often
favor steel buttplates because they show the lines of the
buttstock cleanly. Steel buttplates aren’t obtrusive, and they
don’t clash with the color of the wood. With minor attention,
they’ll never deteriorate, although they may eventually
require reblueing. Furthermore, a steel buttplate offers one
more available surface for engraving.
Many rifles equipped with steel buttplates are chambered for
modest-sized cartridges that don’t produce heavy recoil.
However, many magnum owners who shoot on a regular
basis prefer them, too. Even the hardy shooter will admit
that for sustained range shooting, a recoil reducing pad is
preferable to steel. Exceptions include a few shooters who
always prefer steel. They use, or wear, a buffer pad between
the shoulder and the buttplate for extended shooting at the
range.
Warning: On a heavy-recoiling rifle, using a solid pad, such
as a sandbag, between the shoulder and buttplate may cause
the rifle stock to crack or break at the wrist.
Remember, many shooters use rifles as tools. The more they
use the tools, the more proficient they become with them.
They learn to manage recoil and/or to ignore it. This group
includes devout hobbyists, serious hunters with vast experi-
ence, government hunters, professional guides, and trappers.
Steel buttplates are generally semicurved. Such design is
reminiscent of the rifle-type or curved, crescent-shaped butt-
stock of the old days, as opposed to the flatter-based
buttplate (known as the shotgun-type) that’s more popular
today. The crescent shape of the metal buttplate demands
that the buttstock be contoured to accept it. This requires
considerable inletting and fitting with the tools of the trade:
inletting black and chisels. You apply inletting black to the
Customizing Gun Stocks42
Customizing Gun Stocks 43
surface of the buttplate and then press the buttplate up
against the buttstock and tape it so that the inletting black
leaves a mark. Then remove the wood as indicated by the
inletting black. Repeat the process until you achieve a
matchup between the steel buttplate and the buttstock.
Then fit the screws to hold the plate permanently in place.
Proper steel buttplate installation demands near-perfect fit,
and may require future refitting if the buttstock wood
shrinks and leaves an exposed metal edge. Most often, the
crescent-shaped type is reserved for newly built firearms. If a
customer wishes to fit a steel buttplate to an existing rifle,
you often use a flat plate. A flat metal buttplate may require
trimming and will tolerate it; however, a crescent-shaped
plate may not.
It’s the gunsmith’s responsibility to inform the customer that
while a steel buttplate can be handsome and long lasting, it’s
not as desirable as a buttpad with “give” for three reasons.
The first is most obvious: a steel buttplate doesn’t soften
recoil felt at the shoulder. Second, as a steel butt-plate doesn’t
absorb shock, the buttstock might split if the shooter sets
down the rifle with undue force, as against a rock surface or
hard flooring. It’s not uncommon to encounter rifles that
have been treated in this manner. They reveal a crack along
the toe line caused by shock against the steel buttplate.
Third, the steel buttplate is slick. Should the rifle be leaned
in a corner, it may slide away from its resting position and
fall crashing to the floor.
As previously stated, you’ll seldom find the steel buttplate on
heavy recoiling calibers such as the 338 Winchester Magnum.
Shooters don’t care for the unforgiving shoulder wallop; they
prefer instead the shock absorption of a recoil pad.
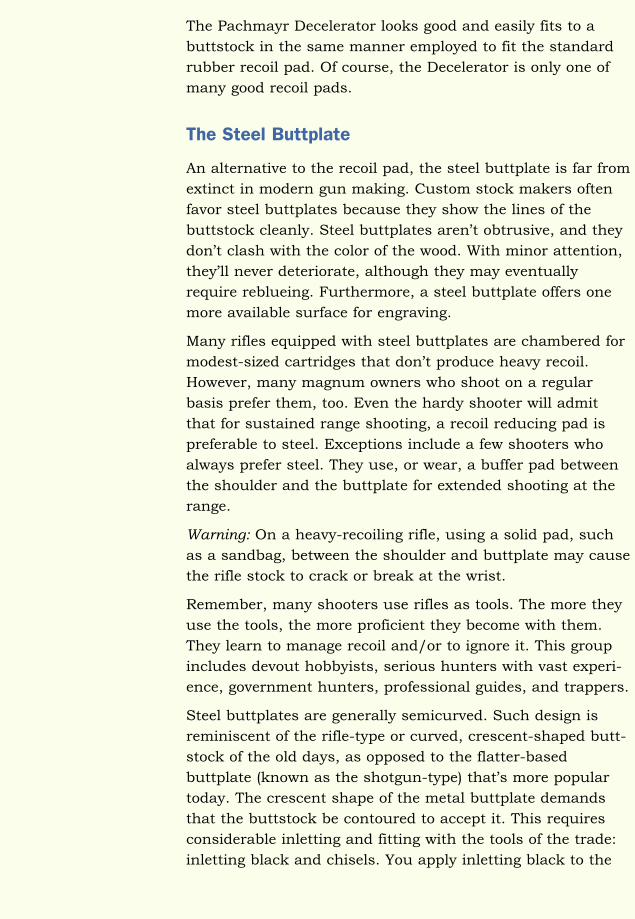
The Skeleton Buttplate
Another type of steel buttplate is the skeleton buttplate
(Figure 18). In design, the skeleton buttplate is on par with
the skeleton pistol grip cap. It consists of a steel border with
an open center through which the buttplate wood shows.
Skeleton buttplates are more for show than function. They’re
not very practical in the field.
FIGURE 18—A Steel SkeletonButtplate (Photo courtesy of
Reinhart Fajen, Inc.)
Customizing Gun Stocks
Skeleton buttplate installation allows a custom gun maker to
display his or her talents, as fitting them requires inletting.
Caution: The skeleton buttplate isn’t a task for the beginner.
Only when professionally fitted do they enhance the beauty
of the buttstock.
The Two-piece Buttplate
Yet another type of steel buttplate is the two-piece buttplate,
which features a top and bottom. You install each piece sep-
arately, and once again, the center of the buttstock features
exposed wood. The two-piece steel buttplate can be attractive
and interesting, as it once again shows off the skills of the
custom gun maker. The two-piece buttplate is more appropri-
ate on show rifles than in the field. Whereas you can purchase
most steel buttplate styles from suppliers, the two-piece
buttplate is a handmade proposition.
The Unprotected Buttplate Area
Often, the buttplate area receives no protection whatsoever.
This custom touch may be the epitome of the gun maker’s
art, but it’s entirely impractical. Rather than installing a
buttplate or pad, the buttstock is entirely bare. In this man-
ner, it can be fully checkered or carved and may actually
add a unique touch to a hunting rifle. However, we don’t
recommend exposing wood in such a manner.
The Plastic Buttplate
The simplest and most inexpensive of all buttplates is the
generic plastic type commonly found on commercially built
rifles. You can quickly fit the plastic buttplate. Some compa-
nies add a little more color to the plastic plate by using
a white line spacer between the body of the plate and the
buttstock. Often, fancier plastic plates have designs cast on
them. However, plastic remains plastic, and it offers no recoil
absorption. Plastic is like a steel buttplate in this regard. It
also shares the steel buttplate’s slick surface, which offers
very little clinging ability. Plastic does protect wood in the
buttstock area from chipping, however, and a plastic
buttplate is far better than none at all.
44
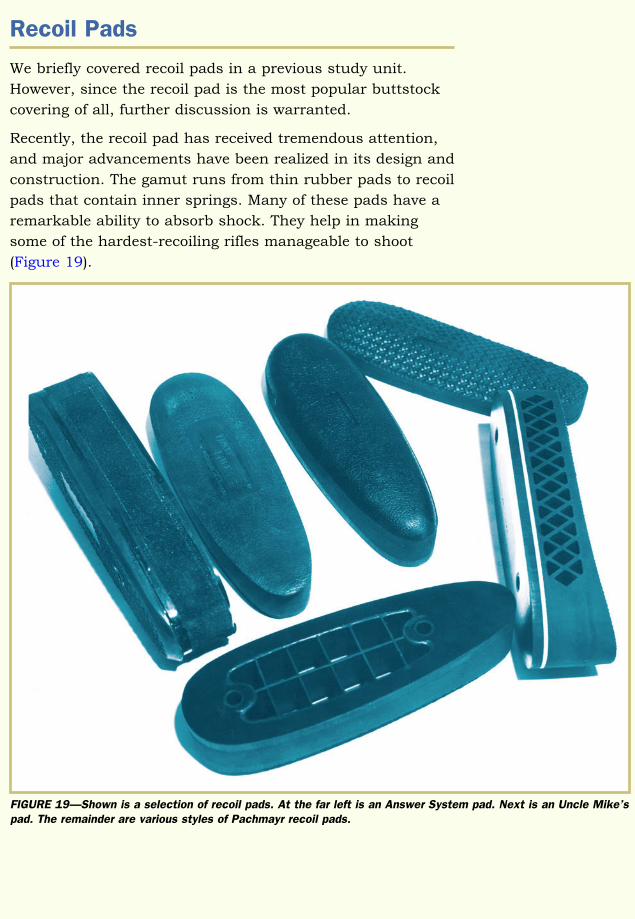
Customizing Gun Stocks 45
Recoil Pads
We briefly covered recoil pads in a previous study unit.
However, since the recoil pad is the most popular buttstock
covering of all, further discussion is warranted.
Recently, the recoil pad has received tremendous attention,
and major advancements have been realized in its design and
construction. The gamut runs from thin rubber pads to recoil
pads that contain inner springs. Many of these pads have a
remarkable ability to absorb shock. They help in making
some of the hardest-recoiling rifles manageable to shoot
(Figure 19).
FIGURE 19—Shown is a selection of recoil pads. At the far left is an Answer System pad. Next is an Uncle Mike’spad. The remainder are various styles of Pachmayr recoil pads.
Customizing Gun Stocks
One of the high-tech recoil pads now available can tame a
“hard-kicking” rifle of 10 years ago for shooting off the bench.
The end result is generally more accurate shooting, as
thoughts of felt recoil don’t distract the shooter when he or
she squeezes the trigger. Therefore, recoil pads are among
the most practical and useful additions to hunting rifles and
shotguns.
Pachmayr and Michaels of Oregon (Uncle Mike’s) dominate
the recoil pad field. Through extensive research efforts, both
of these companies have developed excellent products for
virtually every need imaginable.
The Thin Solid Rubber Pad
On a light-recoiling rifle, the thin solid rubber recoil pad is
often ideal. It’s also useful for rifles held solidly into the
shoulder. The color selection, with or without a white
spacer, is abundant for this type of pad.
The .75 inch to .80 inch Pad
The next thickness up from the thin solid rubber pad is the
.75 inch to .80 inch pad. It’s correct for medium-recoiling
guns where maximum pad thickness isn’t required. It may
serve perfectly for the owner of a 6mm rifle or smaller-gauge
shotgun.
The One Inch Pad
The one inch rubber recoil pad is the most popular. It’s avail-
able in two general forms, solid and ventilated. One inch pads
are excellent for rifles and shotguns that exert medium to
moderately heavy recoil.
Thicker Pads
A number of thicker rubber recoil pads made of elastomer
and sorbothane are also available. They’re superior in shock
reduction and are appreciated on heavy-recoiling rifles and
shotguns. Pachmayr’s popular Decelerator recoil pad has
earned a fine reputation for one obvious reason: it works.
46
Customizing Gun Stocks 47
The KICK-EEZ recoil pad isn’t nearly so well known, but it,
too, is a good unit. It functions in the same manner as the
Decelerator with sorbothane in the pad.
One of the latest entries to the field of high-recoil pads is
Answer Systems Contour Force recoil pad. It oper-
ates on five recoil springs (cone-shaped) that provide
a progressive resistance to recoil, rather than
absorbing shock in a shorter time frame (Figure 20).
Also, the harder the recoil, the more force the
springs exert. Both actions have the effect of push-
ing the firearm away from the shooter. The Contour
Force recoil pad does a good job of softening pri-
mary recoil and converting the swift jab of the butt-
stock into a softer push.
Fitting the Recoil Pad
Just as shooters face many choices for reducing felt
recoil, you can approach the fitting and installing of
various recoil pads in any number of ways. We
selected the methods we’ll discuss for their repeated
professional results. Once you master them, you’ll
surely provide total customer satisfaction. Fitting
recoil pads is a core skill that once mastered can
put a lot of bread and butter on the table. The keys
to success are consistent quality and speed.
The best way to ensure consistent quality while
maintaining speed is to use proper tools and a jig designed
specifically for the job. A highly recommended jig for
fitting recoil pads is the B&R Recoil Pad Fitting Jig sold
by Brownells. It works in conjunction with a disc sander
or a belt sander.
Note: All references and information presented here pertain
to the disc sander, which is fast and efficient to use. It takes
practice to develop confidence and skill at using the disc
sander to its full potential, but it’s wise to invest the neces-
sary time in doing so.
FIGURE 20—Cutaway View of an AnswerSystems Recoil Pad
Warning: Proper instruction in the correct and safe operation
of all power tools is an expected prerequisite to their use in
the workplace. Using a power tool without proper training
and experience can be fatal.
The jig used in conjunction with the sander is a simple device.
It attaches directly to the table of the sander and enables you
to sand a pad to the correct size and angle without the pad
being attached to the stock. If the pad were already attached
to the stock, the danger of the sander striking the wood and
removing finish would be great.
Selecting Correct Pad Size
Although the disc sander and jig will do a fine job in reduc-
ing recoil pad dimensions to correctly fit a buttstock, it’s
imperative that general pad size be correct to begin with.
Three available sizes—small, medium, and large—adequately
cover virtually all shotgun and rifle stock dimensions. The
medium size, as might be expected, is most popular. Still,
you must stock both small and large pads to serve your
customers.
Initial size selection is especially important when installing
pads that have interior metal washers. The Decelerator,
Pachmayr 750, and Uncle Mike’s Inner Cushion are all in
this category, featuring mounting screws that pass through
thin metal washers housed inside the pad. The metal washer
arrangement provides additional strength in securing the pad
to the buttstock. Unfortunately, the metal washers run out
toward the edges of the pad, and their exact locations differ
among manufacturers. Therefore, if the buttstock calls for a
small pad and you select a medium, you could possibly
strike and expose the interior metal washer while sanding
the pad down to fit the buttstock. This ruins the pad and
results in both time and money lost. (Solid-sided pads as
opposed to ventilated pads are critical in this respect.)
Note: Many pads show a faint outline or witness mark on the
hard portion that goes up against the buttstock. The witness
mark helps you determine how far you can trim the pad
before you’ll strike any interior metal, whether it be washers
or the metal plates inherent in many pad styles. You must
Customizing Gun Stocks48
Customizing Gun Stocks 49
observe witness mark lines with care. The newer solid-type
pads are especially critical in this regard. The older ventilated,
or open-sided, pads were less critical because interior metal
wasn’t as close to the edge of the pad. More size reduction
was possible before exposing interior metal became a consid-
eration.
Certain specialty pads such as the KICK-EEZ and Answer
Systems present another potential problem. These products
cut too far towards the heart of the pad, which may cause a
break in the rubber shell and expose the open center. Once
this happens, the pad is useless. As specialty pads are
expensive, a mistake of this nature can take the profit right
out of a job. Therefore, it only makes sense to select the
correct pad size and to know something about the pad’s
construction.
Steps in Fitting a Recoil Pad
1. Establish length of pull (distance from trigger to center
of buttstock) so that adding a recoil pad won’t render the
firearm too long for its owner. (We covered length of pull
in a previous study unit.) For example, assume that the
stock receiving the new recoil pad is to maintain the
same length of pull. The firearm in this example is a
bolt-action rifle with a plastic buttplate. The customer
desires a solid-sided, one inch thick recoil pad.
2. With the rifle resting on the gun bench, hold the pad
you’re fitting against the stock in the position it will
assume after installation. With a soft lead pencil, mark
along the edge of the pad.
3. Remove the pad and align a flexible six inch ruler with
the marks. Now draw a line down the buttstock to indi-
cate where you’ll cut the stock, thus removing a portion
of the wood and the plastic buttplate.
Note: Use a light touch in tracing a line to avoid scratching
the finish. You can purchase a Mark-On-Anything pencil
from Brownells specifically for this purpose. The pencil leaves
a visible line on just about any hard surface, yet it won’t
scratch it as a lead pencil can (Figure 21).
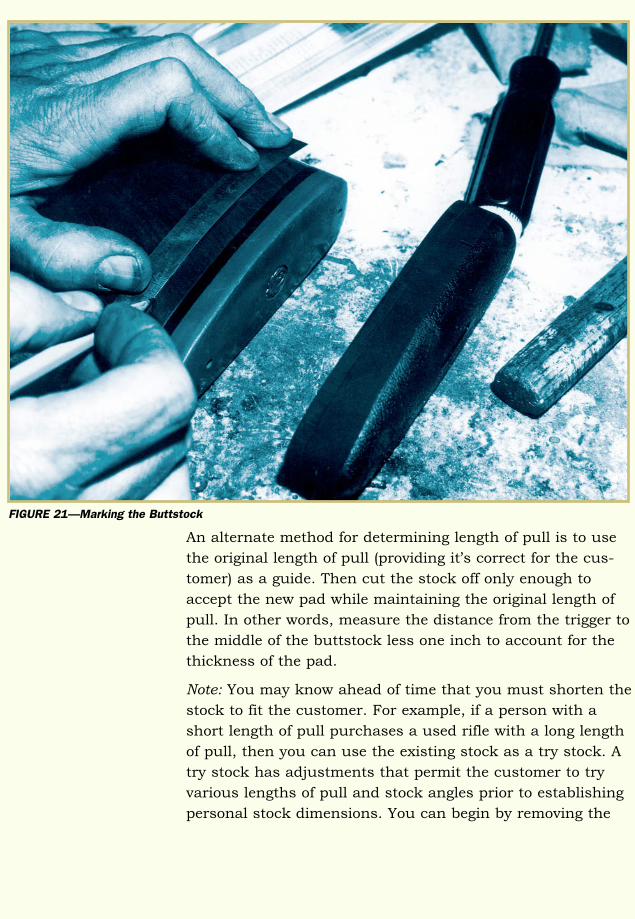
Customizing Gun Stocks
An alternate method for determining length of pull is to use
the original length of pull (providing it’s correct for the cus-
tomer) as a guide. Then cut the stock off only enough to
accept the new pad while maintaining the original length of
pull. In other words, measure the distance from the trigger to
the middle of the buttstock less one inch to account for the
thickness of the pad.
Note: You may know ahead of time that you must shorten the
stock to fit the customer. For example, if a person with a
short length of pull purchases a used rifle with a long length
of pull, then you can use the existing stock as a try stock. A
try stock has adjustments that permit the customer to try
various lengths of pull and stock angles prior to establishing
personal stock dimensions. You can begin by removing the
50
FIGURE 21—Marking the Buttstock
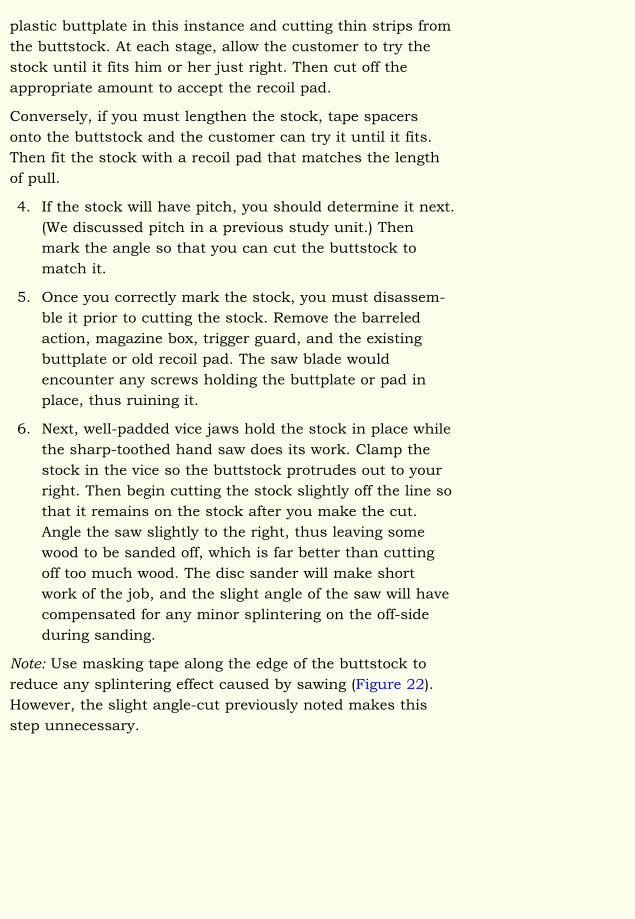
Customizing Gun Stocks 51
plastic buttplate in this instance and cutting thin strips from
the buttstock. At each stage, allow the customer to try the
stock until it fits him or her just right. Then cut off the
appropriate amount to accept the recoil pad.
Conversely, if you must lengthen the stock, tape spacers
onto the buttstock and the customer can try it until it fits.
Then fit the stock with a recoil pad that matches the length
of pull.
4. If the stock will have pitch, you should determine it next.
(We discussed pitch in a previous study unit.) Then
mark the angle so that you can cut the buttstock to
match it.
5. Once you correctly mark the stock, you must disassem-
ble it prior to cutting the stock. Remove the barreled
action, magazine box, trigger guard, and the existing
buttplate or old recoil pad. The saw blade would
encounter any screws holding the buttplate or pad in
place, thus ruining it.
6. Next, well-padded vice jaws hold the stock in place while
the sharp-toothed hand saw does its work. Clamp the
stock in the vice so the buttstock protrudes out to your
right. Then begin cutting the stock slightly off the line so
that it remains on the stock after you make the cut.
Angle the saw slightly to the right, thus leaving some
wood to be sanded off, which is far better than cutting
off too much wood. The disc sander will make short
work of the job, and the slight angle of the saw will have
compensated for any minor splintering on the off-side
during sanding.
Note: Use masking tape along the edge of the buttstock to
reduce any splintering effect caused by sawing (Figure 22).
However, the slight angle-cut previously noted makes this
step unnecessary.
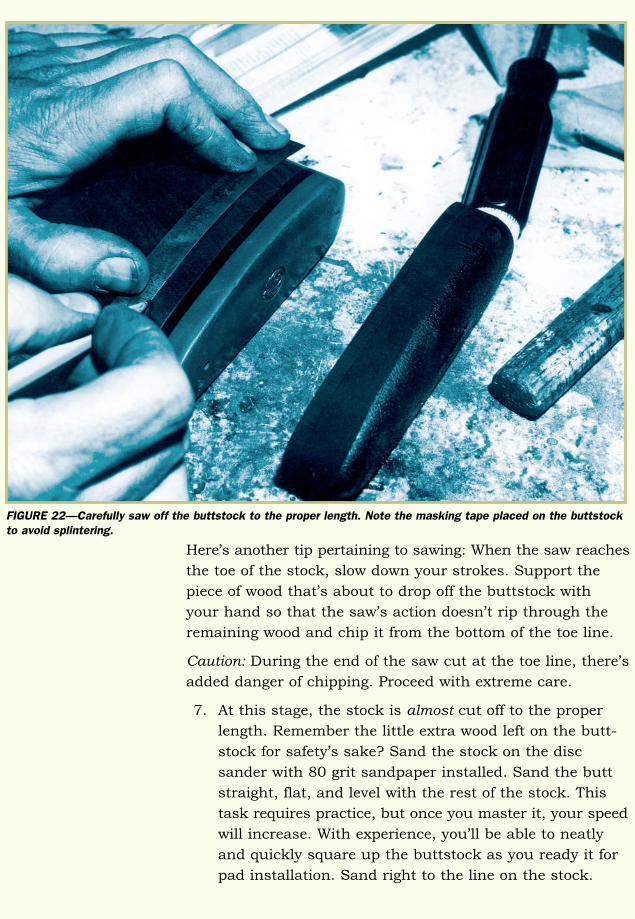
Customizing Gun Stocks
Here’s another tip pertaining to sawing: When the saw reaches
the toe of the stock, slow down your strokes. Support the
piece of wood that’s about to drop off the buttstock with
your hand so that the saw’s action doesn’t rip through the
remaining wood and chip it from the bottom of the toe line.
Caution: During the end of the saw cut at the toe line, there’s
added danger of chipping. Proceed with extreme care.
7. At this stage, the stock is almost cut off to the proper
length. Remember the little extra wood left on the butt-
stock for safety’s sake? Sand the stock on the disc
sander with 80 grit sandpaper installed. Sand the butt
straight, flat, and level with the rest of the stock. This
task requires practice, but once you master it, your speed
will increase. With experience, you’ll be able to neatly
and quickly square up the buttstock as you ready it for
pad installation. Sand right to the line on the stock.
52
FIGURE 22—Carefully saw off the buttstock to the proper length. Note the masking tape placed on the buttstockto avoid splintering.
Customizing Gun Stocks 53
8. With the stock sanded, it’s time to sand the recoil pad.
Few pads are absolutely precise and square. Therefore,
lightly sand the back of the pad on the disc sander to
make it true. It must match the trueness of the sanded
buttstock for proper fit. Again, use 80 grit sandpaper for
this purpose. Eighty grit is coarse enough to avoid load-
ing up from continued use, yet it’s fine enough to create
a relatively smooth surface on both the buttstock wood
and the back of the recoil pad.
Note: Some stock makers will use a finer grit, especially when
working the pad down. However, a finer grit paper requires
more time and the changing of extra belts or discs. Personal
experimentation with various grit sandpapers is in order
until you find what you prefer.
Let’s take a moment to discuss alternate methods of truing
the buttstock. Employ a sharp file in conjunction with a
straightedge to true the buttstock. Use the straightedge to
check the filing to ensure that the buttstock is true.
Another method of gaining a flat surface on the buttstock is
to place a sheet of 80 grit garnet paper on a perfectly flat
surface. Then place the buttstock on the paper and scrub
back and forth until the end surface of the butt is as flat as
the garnet paper.
A sanding block coupled with a straightedge will also do the
job using coarse 80 grit until the butt is flat. However, devel-
oping the technique of holding the stock on a power sander
is faster. (Time is money in the shop.)
9. Once you’ve properly prepared the buttstock and pad,
attach the pad to the stock using the screws provided
with the pad. Use a small drift punch (or a nail) to mark
the pad. Push the punch or nail through the pad from
the back with just enough force to indicate where the
holes should be. Then, with a sharp, thin-pointed edge
(such as that on an X-Acto knife), slit the rubber directly
over both hole locations. Each slit should be about 1/4 to5/16 inch long. The slits will allow you to push the screw
heads through the rubber without splitting it. Use a
small, round bladed (Philips) screwdriver to drive the
screws. Once the screws are adequately tightened, the
slits will close together and no longer be visible. You can
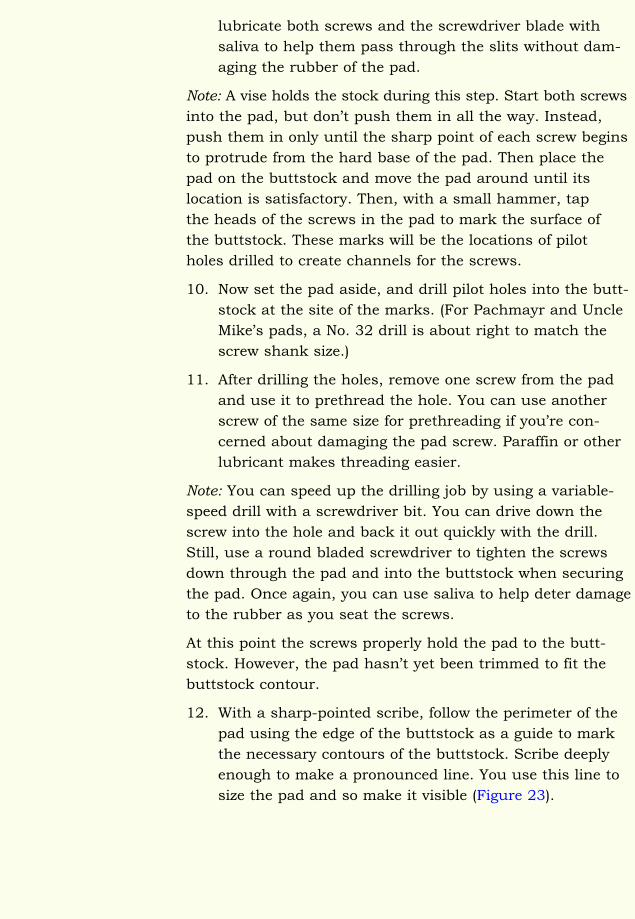
Customizing Gun Stocks
lubricate both screws and the screwdriver blade with
saliva to help them pass through the slits without dam-
aging the rubber of the pad.
Note: A vise holds the stock during this step. Start both screws
into the pad, but don’t push them in all the way. Instead,
push them in only until the sharp point of each screw begins
to protrude from the hard base of the pad. Then place the
pad on the buttstock and move the pad around until its
location is satisfactory. Then, with a small hammer, tap
the heads of the screws in the pad to mark the surface of
the buttstock. These marks will be the locations of pilot
holes drilled to create channels for the screws.
10. Now set the pad aside, and drill pilot holes into the butt-
stock at the site of the marks. (For Pachmayr and Uncle
Mike’s pads, a No. 32 drill is about right to match the
screw shank size.)
11. After drilling the holes, remove one screw from the pad
and use it to prethread the hole. You can use another
screw of the same size for prethreading if you’re con-
cerned about damaging the pad screw. Paraffin or other
lubricant makes threading easier.
Note: You can speed up the drilling job by using a variable-
speed drill with a screwdriver bit. You can drive down the
screw into the hole and back it out quickly with the drill.
Still, use a round bladed screwdriver to tighten the screws
down through the pad and into the buttstock when securing
the pad. Once again, you can use saliva to help deter damage
to the rubber as you seat the screws.
At this point the screws properly hold the pad to the butt-
stock. However, the pad hasn’t yet been trimmed to fit the
buttstock contour.
12. With a sharp-pointed scribe, follow the perimeter of the
pad using the edge of the buttstock as a guide to mark
the necessary contours of the buttstock. Scribe deeply
enough to make a pronounced line. You use this line to
size the pad and so make it visible (Figure 23).
54
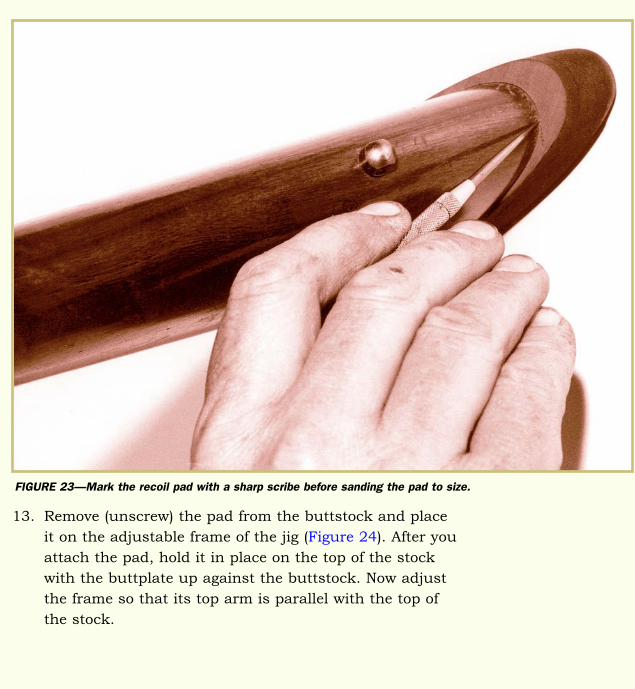
Customizing Gun Stocks 55
13. Remove (unscrew) the pad from the buttstock and place
it on the adjustable frame of the jig (Figure 24). After you
attach the pad, hold it in place on the top of the stock
with the buttplate up against the buttstock. Now adjust
the frame so that its top arm is parallel with the top of
the stock.
FIGURE 23—Mark the recoil pad with a sharp scribe before sanding the pad to size.
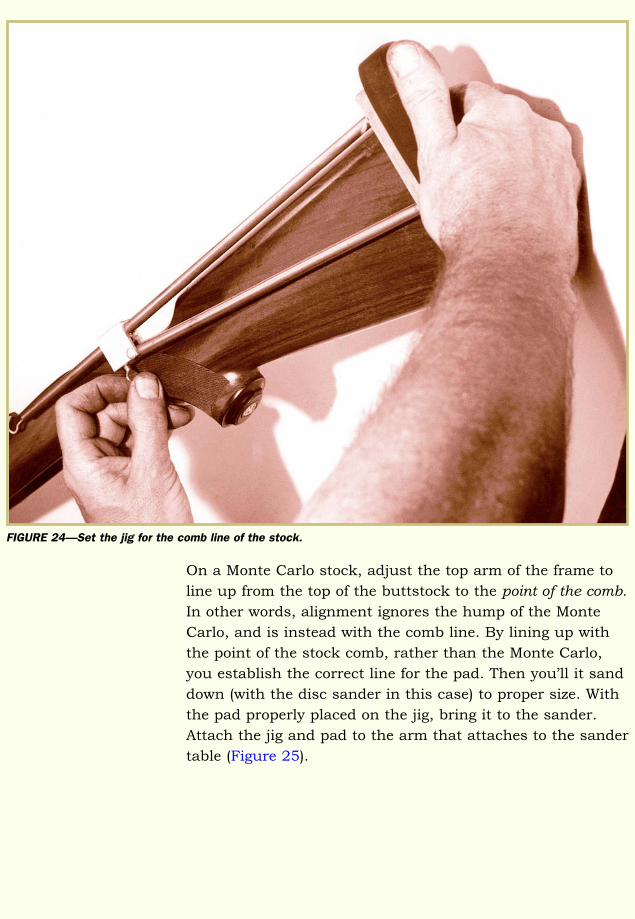
On a Monte Carlo stock, adjust the top arm of the frame to
line up from the top of the buttstock to the point of the comb.
In other words, alignment ignores the hump of the Monte
Carlo, and is instead with the comb line. By lining up with
the point of the stock comb, rather than the Monte Carlo,
you establish the correct line for the pad. Then you’ll it sand
down (with the disc sander in this case) to proper size. With
the pad properly placed on the jig, bring it to the sander.
Attach the jig and pad to the arm that attaches to the sander
table (Figure 25).
Customizing Gun Stocks56
FIGURE 24—Set the jig for the comb line of the stock.
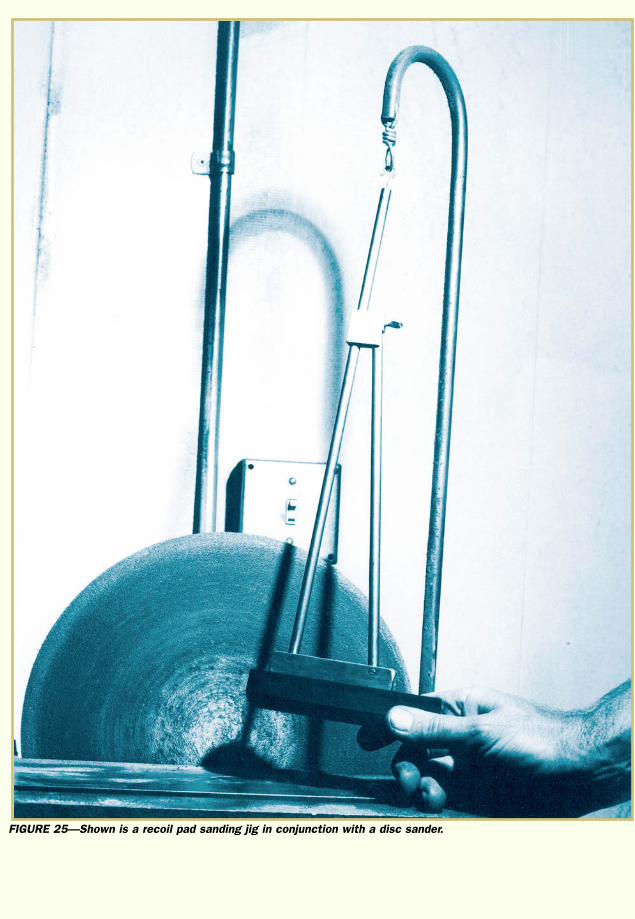
Customizing Gun Stocks 57
FIGURE 25—Shown is a recoil pad sanding jig in conjunction with a disc sander.
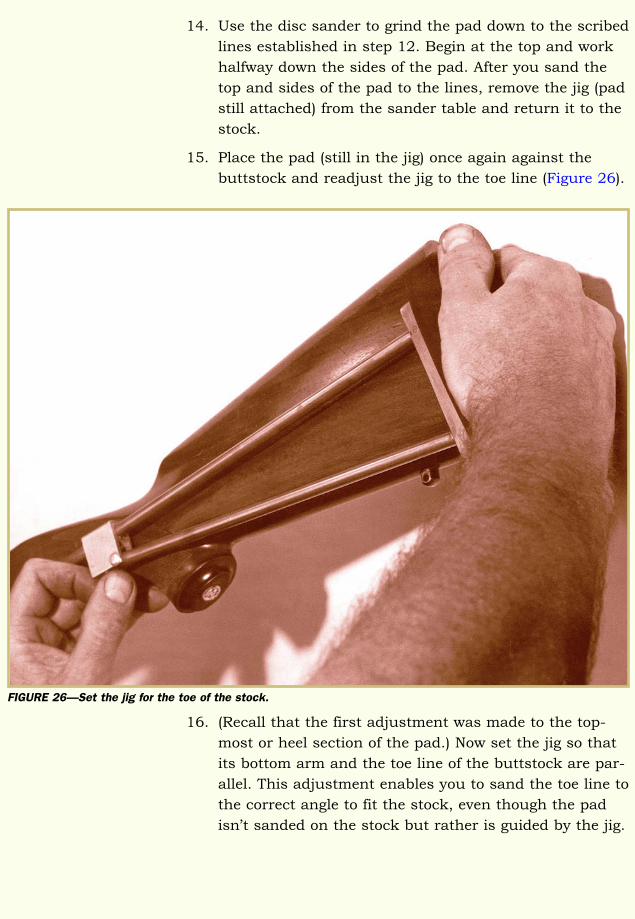
14. Use the disc sander to grind the pad down to the scribed
lines established in step 12. Begin at the top and work
halfway down the sides of the pad. After you sand the
top and sides of the pad to the lines, remove the jig (pad
still attached) from the sander table and return it to the
stock.
15. Place the pad (still in the jig) once again against the
buttstock and readjust the jig to the toe line (Figure 26).
16. (Recall that the first adjustment was made to the top-
most or heel section of the pad.) Now set the jig so that
its bottom arm and the toe line of the buttstock are par-
allel. This adjustment enables you to sand the toe line to
the correct angle to fit the stock, even though the pad
isn’t sanded on the stock but rather is guided by the jig.
Customizing Gun Stocks58
FIGURE 26—Set the jig for the toe of the stock.
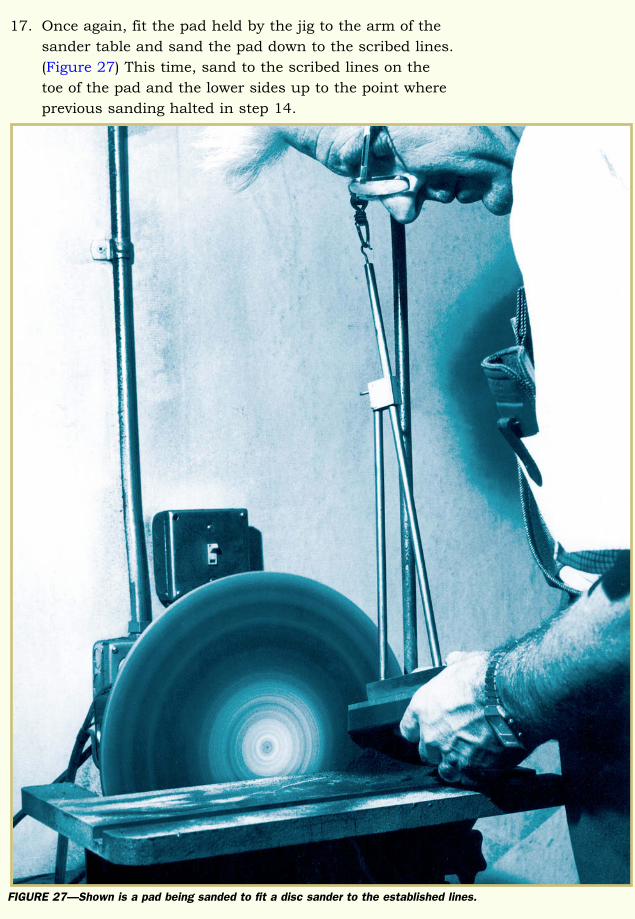
Customizing Gun Stocks 59
17. Once again, fit the pad held by the jig to the arm of the
sander table and sand the pad down to the scribed lines.
(Figure 27) This time, sand to the scribed lines on the
toe of the pad and the lower sides up to the point where
previous sanding halted in step 14.
FIGURE 27—Shown is a pad being sanded to fit a disc sander to the established lines.
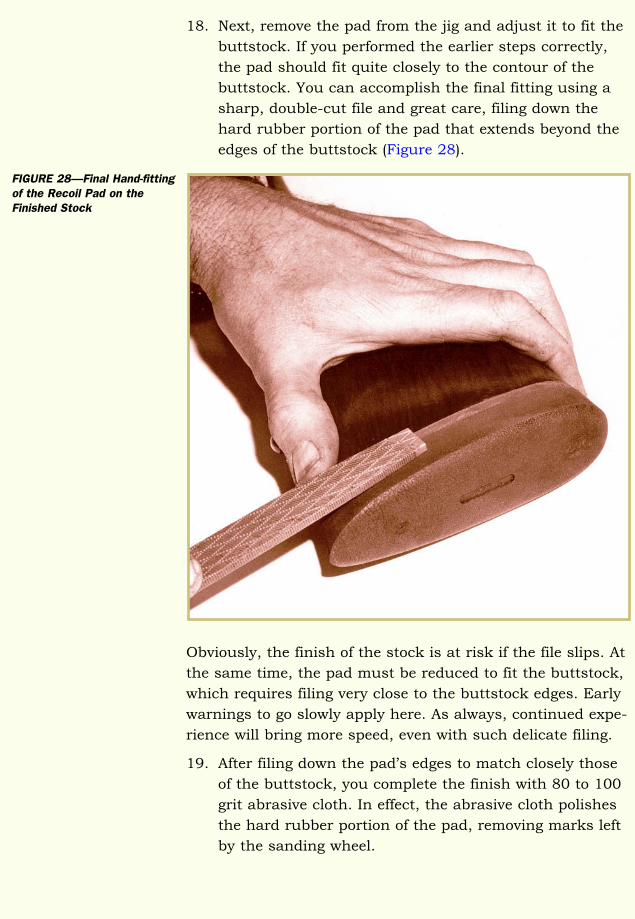
Customizing Gun Stocks
18. Next, remove the pad from the jig and adjust it to fit the
buttstock. If you performed the earlier steps correctly,
the pad should fit quite closely to the contour of the
buttstock. You can accomplish the final fitting using a
sharp, double-cut file and great care, filing down the
hard rubber portion of the pad that extends beyond the
edges of the buttstock (Figure 28).
Obviously, the finish of the stock is at risk if the file slips. At
the same time, the pad must be reduced to fit the buttstock,
which requires filing very close to the buttstock edges. Early
warnings to go slowly apply here. As always, continued expe-
rience will bring more speed, even with such delicate filing.
19. After filing down the pad’s edges to match closely those
of the buttstock, you complete the finish with 80 to 100
grit abrasive cloth. In effect, the abrasive cloth polishes
the hard rubber portion of the pad, removing marks left
by the sanding wheel.
60
FIGURE 28—Final Hand-fittingof the Recoil Pad on theFinished Stock
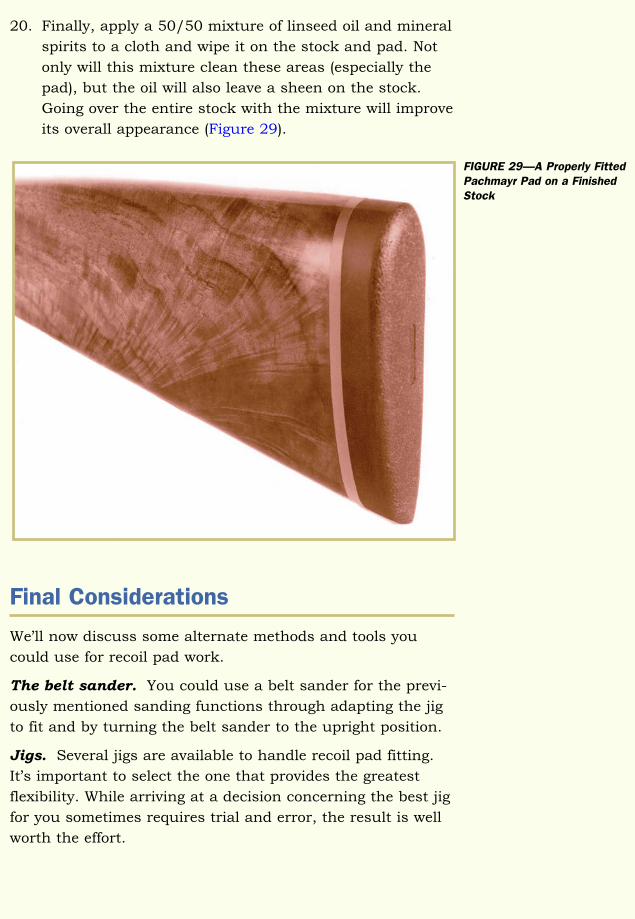
Customizing Gun Stocks 61
20. Finally, apply a 50/50 mixture of linseed oil and mineral
spirits to a cloth and wipe it on the stock and pad. Not
only will this mixture clean these areas (especially the
pad), but the oil will also leave a sheen on the stock.
Going over the entire stock with the mixture will improve
its overall appearance (Figure 29).
Final Considerations
We’ll now discuss some alternate methods and tools you
could use for recoil pad work.
The belt sander. You could use a belt sander for the previ-
ously mentioned sanding functions through adapting the jig
to fit and by turning the belt sander to the upright position.
Jigs. Several jigs are available to handle recoil pad fitting.
It’s important to select the one that provides the greatest
flexibility. While arriving at a decision concerning the best jig
for you sometimes requires trial and error, the result is well
worth the effort.
FIGURE 29—A Properly FittedPachmayr Pad on a FinishedStock
Alternate method for recoil pad fitting a finished stock.
An alternate method for fitting a recoil pad to a finished
stock includes most of the steps previously outlined. You
don’t, however, remove the pad from the stock. Instead, you
leave it on the stock and protect the stock with masking
tape, which you apply just ahead of the pad. Of course, you
could leave the stock unprotected and do the sanding free-
hand. This requires a steady hand and a degree of luck. Also,
visually speaking, when practicing the freehand method, it’s
extremely difficult to make the recoil pad lines compatible
with the buttstock lines. It’s not acceptable to bob the toe
line of the pad so that it ends up mismatched with the toe
line of the stock.
Alternate method for recoil pad fitting an unfinished
stock. Obviously, there’s less pressure to avoid striking the
finish when you’re fitting a recoil pad to a newly built stock.
You accomplish the initial fitting of the pad as described in
the numbered performance instructions. The difference is
that you can sand the pad to that point where the sander
just barely contacts the wood of the stock. This method will
provide a perfect fit because the pad is finished right to the
lines of the stock. In final fitting, you file together the pad
and stock.
Note: If you choose the previous method, it’s important that
very little fitting remains after the initial work. Hand sanding
can’t cut down the rubber portion of the recoil pad the way
the power sander does. Therefore, if there’s overlap on the
pad, it will be difficult to remove by hand.
Sealer. Before you attach the pad to the buttstock for the
final time, you can apply a sealer to the wood that was
exposed when you trimmed off the buttstock. This step will
help retard moisture invasion.
Glue. It’s difficult to recommend gluing pads on. While you
can successfully glue pads onto buttstocks, later removal will
be difficult. Often, a rifle or shotgun that changes hands
requires recoil pad replacement, as is often the case when a
shooter with a shorter length of pull takes over a given
firearm.
Customizing Gun Stocks62
Customizing Gun Stocks 63
Also, many two-piece stock guns have stock bolts that you
access through the butt of the stock. Gluing a recoil pad over
the bolt causes a major problem. Never glue a pad on one of
these stocks.
Removing the glued-on pad. If you’re faced with removing
a glued-on pad, what should you do? One method is to first
withdraw the screws in the stock, which will normally be
present even though glue was used. Then cut most of the
pad off the stock using a metal band saw. Remember the
steel pieces imbedded in the pad, especially in older models?
You’ll have to deal with them. With the great majority of the
pad cut away, you can sand the balance off on the power
sander with an abrasive disc or belt capable of grinding steel
without destroying sandpaper. Still, the process is burden-
some and can get quite messy. The object is to not glue the
pad on in the first place!
Dealing with a stripped screw hole. A screw hole may be
stripped out. In this event, pack the hole with steel wool and
rethread it. The steel wool should provide enough bite on the
screw to hold it in place. If the hole is simply too washed out,
the steel wool trick may not suffice. In this case, you must
drill out the hole and fit it with a hardwood dowel, such as
hickory. You can use fast-setting glues or five-minute epoxy
to permanently secure the dowel in the hole. After the glue or
epoxy dries, cut off the dowel flush with the surface of the
wood.
Note: The time to repair a washed out screw hole is immedi-
ately upon discovery and not later on toward the end of the
recoil pad operation.
Providing a longer length of pull. If added length is
required on a shotgun or rifle stock, you can purchase spac-
ers to solve the problem. You add spacers in between the
buttstock and the recoil pad. Solid black spacers are approx-
imately inch thick. White spacers are approximately inch
thick. There’s also a black and white spacer composite (not a
combination of the above two spacers, but a third and differ-
ent option) that also comes to a thickness of 3/16 inch. Glue
the spacer(s) to the pad before fitting. This keeps the pad and
spacer securely linked as a single unit and prevents a spacer
from slipping out of line during final fitting.
Often, more than one spacer may be necessary to achieve the
desired stock length. In regard for the delicate balance of a
firearm, it’s true that multiple spacers can add weight where
it’s undesirable. If this happens, the spacers can be skele-
tonized. First, you sand flat the spacers and glue or epoxy
them together to form one single spacer. Then, either mill
away or drill out the center portion, the part that won’t inter-
fere with screw holes. You then glue or epoxy the hollowed
out spacer directly to the recoil pad, forming one integral
unit. Naturally, you’ll need longer screws to accommodate
the extra thickness of the recoil pad and spacer. Hardened
deck screws of various lengths are available at lumber com-
panies. They work well and are inexpensive.
You can improve the appearance of spacers through careful
sanding. You can also polish a spacer for better appearance
on a soft muslin wheel dressed with a polishing compound
such as 555 from Brownells. You must accomplish polishing
spacers with a light touch because polishing can remove
material. Overdoing the job may result in a spacer that’s less
attractive after polishing than it was before. As always, a
hasty job can create lost time and ruined materials.
Customizing Gun Stocks64
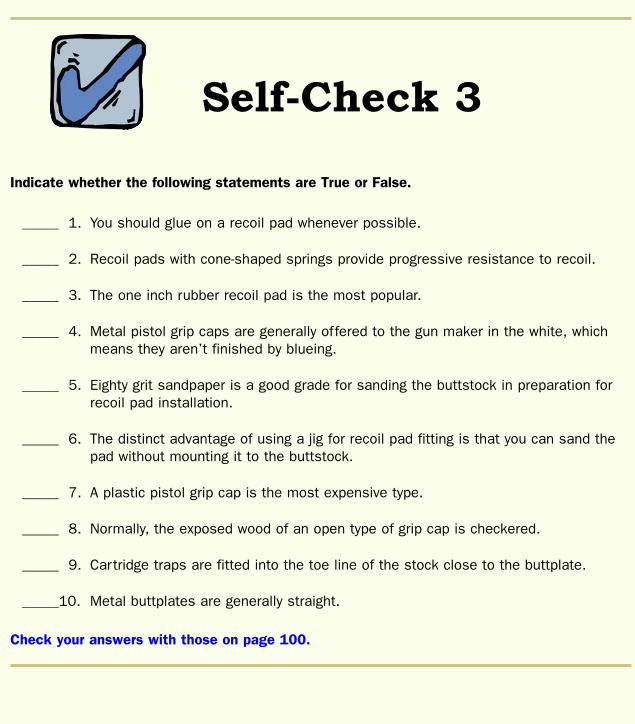
Customizing Gun Stocks 65
Self-Check 3
Indicate whether the following statements are True or False.
_____ 1. You should glue on a recoil pad whenever possible.
_____ 2. Recoil pads with cone-shaped springs provide progressive resistance to recoil.
_____ 3. The one inch rubber recoil pad is the most popular.
_____ 4. Metal pistol grip caps are generally offered to the gun maker in the white, whichmeans they aren’t finished by blueing.
_____ 5. Eighty grit sandpaper is a good grade for sanding the buttstock in preparation forrecoil pad installation.
_____ 6. The distinct advantage of using a jig for recoil pad fitting is that you can sand thepad without mounting it to the buttstock.
_____ 7. A plastic pistol grip cap is the most expensive type.
_____ 8. Normally, the exposed wood of an open type of grip cap is checkered.
_____ 9. Cartridge traps are fitted into the toe line of the stock close to the buttplate.
_____10. Metal buttplates are generally straight.
Check your answers with those on page 100.
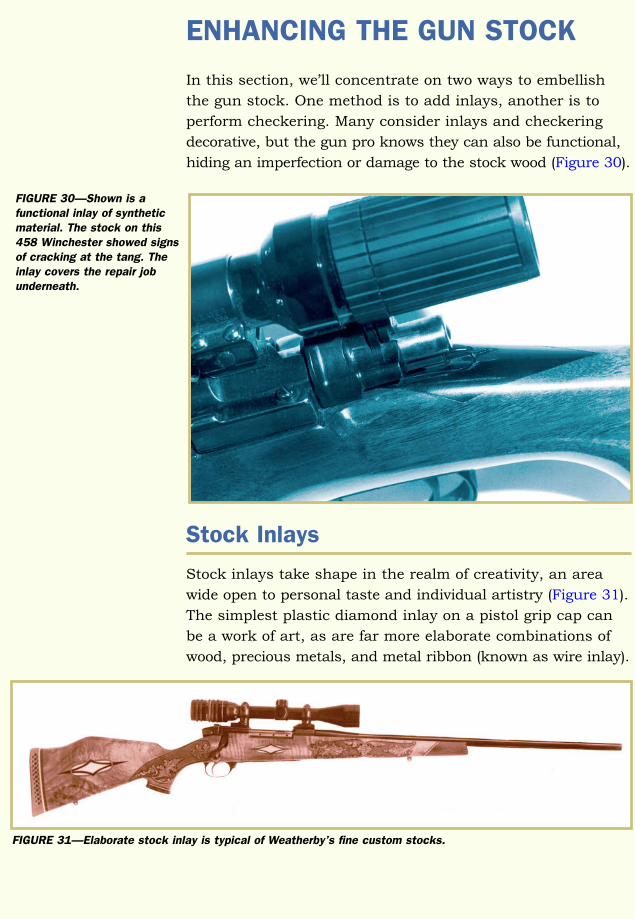
ENHANCING THE GUN STOCK
In this section, we’ll concentrate on two ways to embellish
the gun stock. One method is to add inlays, another is to
perform checkering. Many consider inlays and checkering
decorative, but the gun pro knows they can also be functional,
hiding an imperfection or damage to the stock wood (Figure 30).
Stock Inlays
Stock inlays take shape in the realm of creativity, an area
wide open to personal taste and individual artistry (Figure 31).
The simplest plastic diamond inlay on a pistol grip cap can
be a work of art, as are far more elaborate combinations of
wood, precious metals, and metal ribbon (known as wire inlay).
Customizing Gun Stocks66
FIGURE 30—Shown is a functional inlay of syntheticmaterial. The stock on this458 Winchester showed signsof cracking at the tang. Theinlay covers the repair jobunderneath.
FIGURE 31—Elaborate stock inlay is typical of Weatherby’s fine custom stocks.
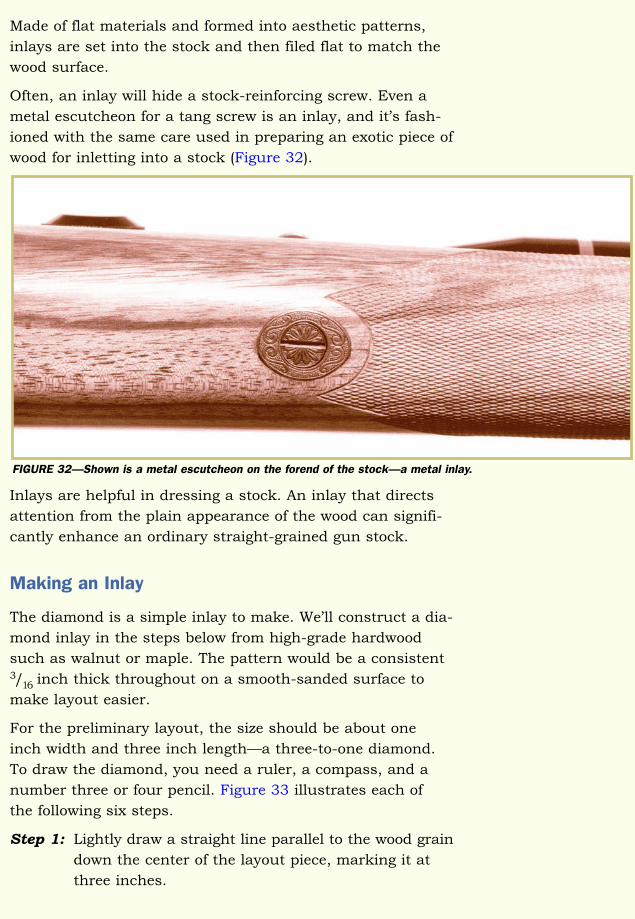
Customizing Gun Stocks 67
Made of flat materials and formed into aesthetic patterns,
inlays are set into the stock and then filed flat to match the
wood surface.
Often, an inlay will hide a stock-reinforcing screw. Even a
metal escutcheon for a tang screw is an inlay, and it’s fash-
ioned with the same care used in preparing an exotic piece of
wood for inletting into a stock (Figure 32).
Inlays are helpful in dressing a stock. An inlay that directs
attention from the plain appearance of the wood can signifi-
cantly enhance an ordinary straight-grained gun stock.
Making an Inlay
The diamond is a simple inlay to make. We’ll construct a dia-
mond inlay in the steps below from high-grade hardwood
such as walnut or maple. The pattern would be a consistent3/16 inch thick throughout on a smooth-sanded surface to
make layout easier.
For the preliminary layout, the size should be about one
inch width and three inch length—a three-to-one diamond.
To draw the diamond, you need a ruler, a compass, and a
number three or four pencil. Figure 33 illustrates each of
the following six steps.
Step 1: Lightly draw a straight line parallel to the wood grain
down the center of the layout piece, marking it at
three inches.
FIGURE 32—Shown is a metal escutcheon on the forend of the stock—a metal inlay.
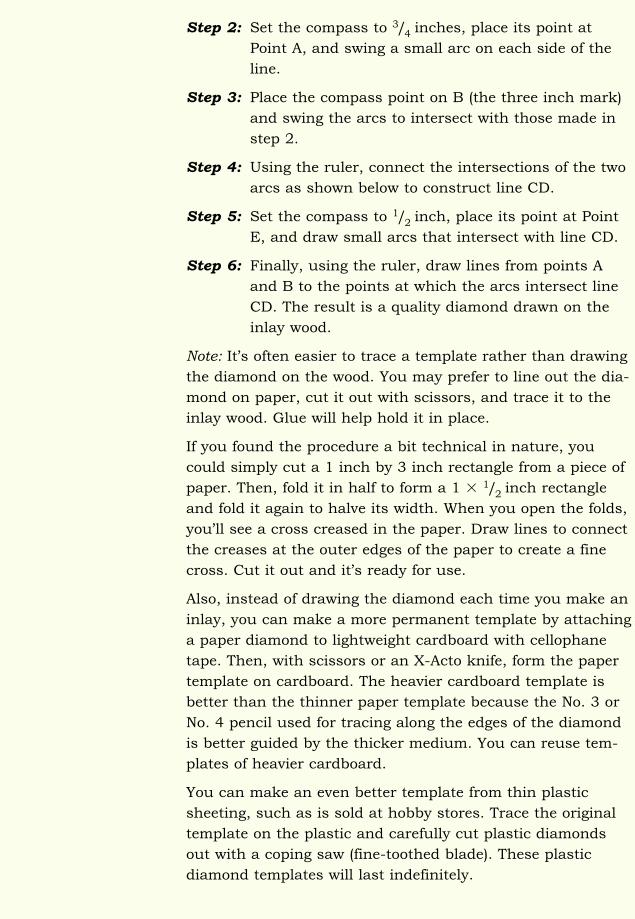
Customizing Gun Stocks
Step 2: Set the compass to 3/4 inches, place its point at
Point A, and swing a small arc on each side of the
line.
Step 3: Place the compass point on B (the three inch mark)
and swing the arcs to intersect with those made in
step 2.
Step 4: Using the ruler, connect the intersections of the two
arcs as shown below to construct line CD.
Step 5: Set the compass to 1/2 inch, place its point at Point
E, and draw small arcs that intersect with line CD.
Step 6: Finally, using the ruler, draw lines from points A
and B to the points at which the arcs intersect line
CD. The result is a quality diamond drawn on the
inlay wood.
Note: It’s often easier to trace a template rather than drawing
the diamond on the wood. You may prefer to line out the dia-
mond on paper, cut it out with scissors, and trace it to the
inlay wood. Glue will help hold it in place.
If you found the procedure a bit technical in nature, you
could simply cut a 1 inch by 3 inch rectangle from a piece of
paper. Then, fold it in half to form a 1 � 1/2 inch rectangle
and fold it again to halve its width. When you open the folds,
you’ll see a cross creased in the paper. Draw lines to connect
the creases at the outer edges of the paper to create a fine
cross. Cut it out and it’s ready for use.
Also, instead of drawing the diamond each time you make an
inlay, you can make a more permanent template by attaching
a paper diamond to lightweight cardboard with cellophane
tape. Then, with scissors or an X-Acto knife, form the paper
template on cardboard. The heavier cardboard template is
better than the thinner paper template because the No. 3 or
No. 4 pencil used for tracing along the edges of the diamond
is better guided by the thicker medium. You can reuse tem-
plates of heavier cardboard.
You can make an even better template from thin plastic
sheeting, such as is sold at hobby stores. Trace the original
template on the plastic and carefully cut plastic diamonds
out with a coping saw (fine-toothed blade). These plastic
diamond templates will last indefinitely.
68
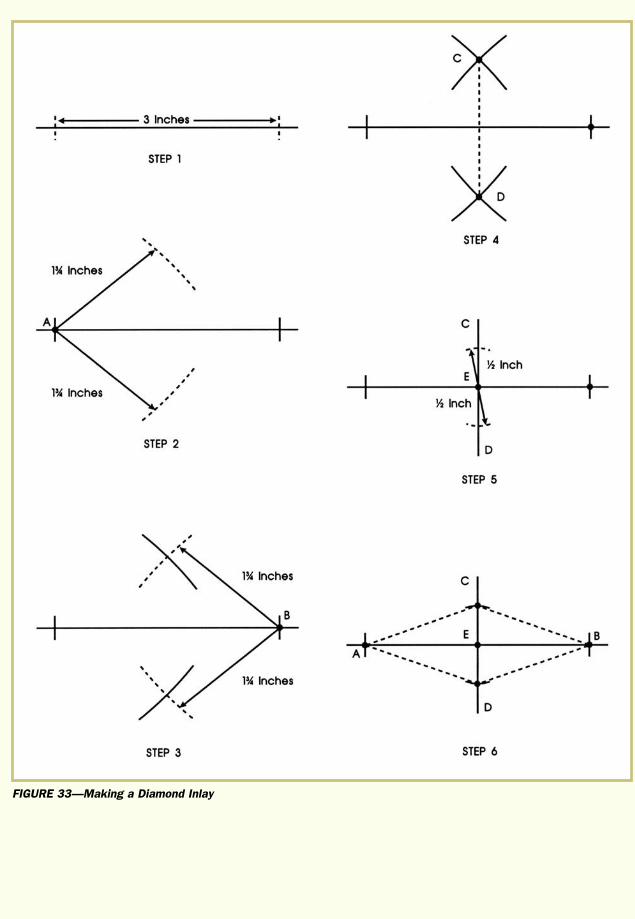
Customizing Gun Stocks 69
FIGURE 33—Making a Diamond Inlay
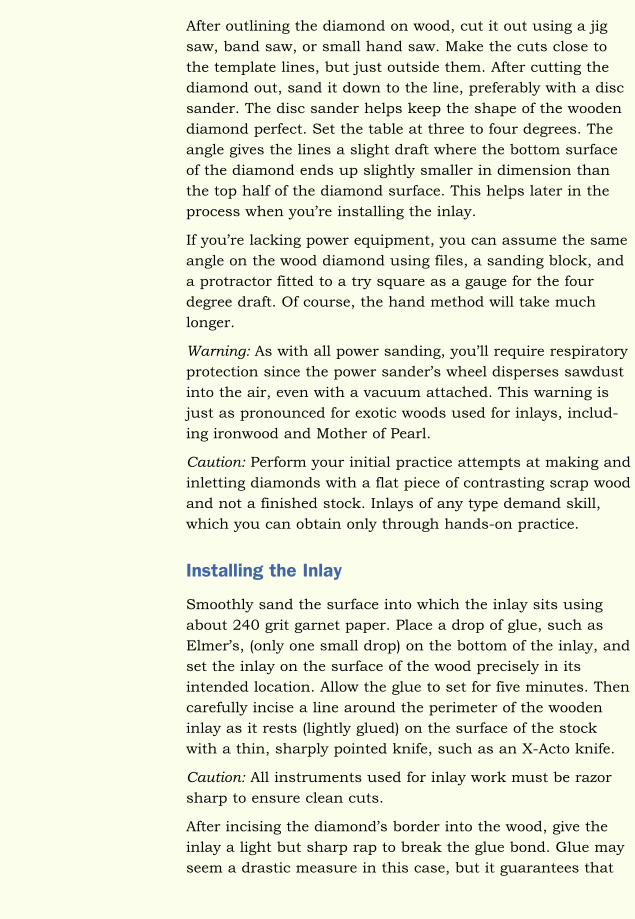
After outlining the diamond on wood, cut it out using a jig
saw, band saw, or small hand saw. Make the cuts close to
the template lines, but just outside them. After cutting the
diamond out, sand it down to the line, preferably with a disc
sander. The disc sander helps keep the shape of the wooden
diamond perfect. Set the table at three to four degrees. The
angle gives the lines a slight draft where the bottom surface
of the diamond ends up slightly smaller in dimension than
the top half of the diamond surface. This helps later in the
process when you’re installing the inlay.
If you’re lacking power equipment, you can assume the same
angle on the wood diamond using files, a sanding block, and
a protractor fitted to a try square as a gauge for the four
degree draft. Of course, the hand method will take much
longer.
Warning: As with all power sanding, you’ll require respiratory
protection since the power sander’s wheel disperses sawdust
into the air, even with a vacuum attached. This warning is
just as pronounced for exotic woods used for inlays, includ-
ing ironwood and Mother of Pearl.
Caution: Perform your initial practice attempts at making and
inletting diamonds with a flat piece of contrasting scrap wood
and not a finished stock. Inlays of any type demand skill,
which you can obtain only through hands-on practice.
Installing the Inlay
Smoothly sand the surface into which the inlay sits using
about 240 grit garnet paper. Place a drop of glue, such as
Elmer’s, (only one small drop) on the bottom of the inlay, and
set the inlay on the surface of the wood precisely in its
intended location. Allow the glue to set for five minutes. Then
carefully incise a line around the perimeter of the wooden
inlay as it rests (lightly glued) on the surface of the stock
with a thin, sharply pointed knife, such as an X-Acto knife.
Caution: All instruments used for inlay work must be razor
sharp to ensure clean cuts.
After incising the diamond’s border into the wood, give the
inlay a light but sharp rap to break the glue bond. Glue may
seem a drastic measure in this case, but it guarantees that
Customizing Gun Stocks70
Customizing Gun Stocks 71
the wooden inlay is held firmly in place while being outlined
on the stock’s surface. Also, a small drop of glue won’t pre-
vent easy removal of the wood inlay.
Next, use a sharp chisel along with a thin-bladed knife to
remove the wood inside the border to a depth that allows the
inlay to rest slightly above the wood surface when installed.
Caution: Even though you use practice materials in your first
attempts at installing the inlay, it’s wise to do a cautious job.
Rushing the work won’t provide good experience.
Exercise care to keep the edges of the inlay sharp, clean, and
exactly on the inscribed lines. Doing so will ensure that it fits
correctly.
Once you remove the wood and fully cut the pocket for the
diamond inlay, apply a light application of wood glue to the
base of the diamond and firmly press it into the waiting mor-
tise. Then tap it into place with a mallet. A flat piece of wood
on top of the diamond serves as a buffer between the mallet
and the inlay. Alternately, you can press the inlay into place
with a clamp. The clamp supplies force to seat the inlay and
holds it in place while the wood glue dries.
Caution: The mortise, which houses the inlay, must be a close
fit but not undersized—a delicate situation. If the mortise is
too large a sloppy fit results, but if it’s too small the inlay
might split during installation.
After the glue dries, you can sand the diamond to match the
surface of the stock. When all goes well, the end product is a
wooden diamond that looks like it grew in the wood. No gaps
show at any line. Each corner fits perfectly, wood to wood,
with no glue line evident.
You should repeat the inlay process until you feel comfort-
able with the work and the product is correct every time. You
can follow a number of small practice inlays by larger dia-
monds that maintain the three-to-one ratio. The objective in
constructing various sized inlays is to progress to where you
can set a smaller inlay inside a larger one. A smaller wooden
diamond of contrasting color inlaid into a larger diamond
is quite aesthetically pleasing, but accomplishing the task
requires much skill. The lines of the smaller inlay must
perfectly match those of the larger inlay. If not, the crooked
appearance is glaringly obvious. Remember, it’s better to
make mistakes on a practice piece than the real thing. Faulty
inlays are difficult and expensive to correct.
Inlays Other Than Wood
Inlaying procedures are similar for all materials. Of course,
when you use a metal inlay, that inlay must closely match
the surface level of the stock. Reducing the surface of the
metal inlay requires considerable effortcompared with reduc-
ing the surface of the wood inlay. Treat metal inlays the same
whether they’re an escutcheon for a tang screw or a barrel
wedge for a muzzleloading rifle or shotgun. As with wood,
the metal inlay should also have a slight draft for easier fit-
ting into the mortise. If the material is thin and prone to
breakage, take extra care to ensure exact metal-to-wood fit.
Bullying the metal inlay into place may damage it due to a
wedging effect on the drafted inlay. One positive feature of
the metal inlay is that you can use inletting black as a guide
when cutting the mortise.
Caution: When using inletting black, judicious application
and cautious readings are necessary. A false reading may
occur along the edges of the inlay, which suggests that more
wood removal is necessary. Proceed cautiously at a reason-
able pace. Speed will come with practice and experience.
Practical Inlays
In addition to providing attractiveness, inlays can be practi-
cal. One example of a wisely placed inlay is one that covers a
blemish in the wood. Another is one that covers the location
of a reinforcing cross-bolt in the stock that would otherwise
show. Of course, inlays should compliment a stock, rather
than clashing with its overall design and composition. The
gunsmith who can make and install inlays possesses added
money-making potential.
Customizing Gun Stocks72
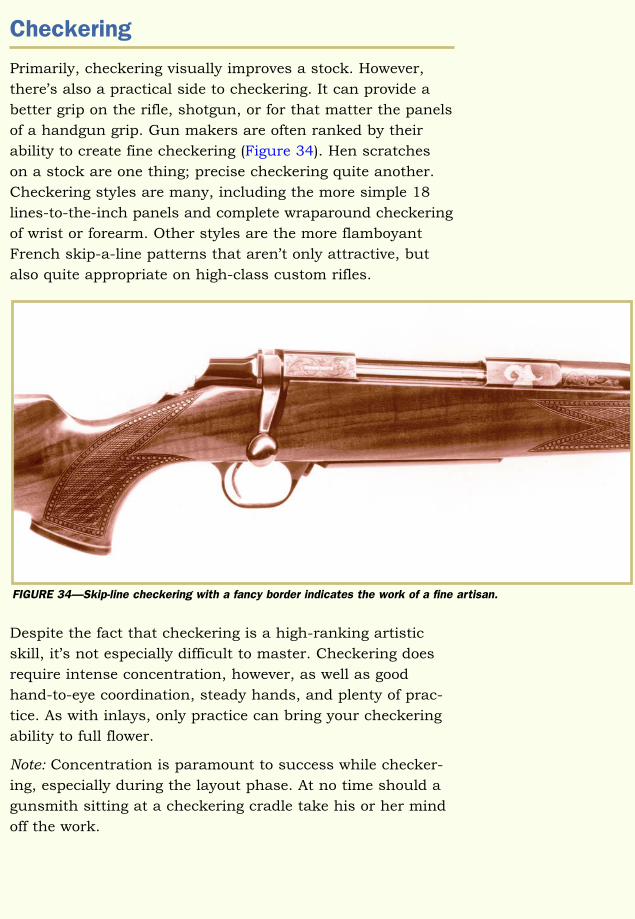
Customizing Gun Stocks 73
Checkering
Primarily, checkering visually improves a stock. However,
there’s also a practical side to checkering. It can provide a
better grip on the rifle, shotgun, or for that matter the panels
of a handgun grip. Gun makers are often ranked by their
ability to create fine checkering (Figure 34). Hen scratches
on a stock are one thing; precise checkering quite another.
Checkering styles are many, including the more simple 18
lines-to-the-inch panels and complete wraparound checkering
of wrist or forearm. Other styles are the more flamboyant
French skip-a-line patterns that aren’t only attractive, but
also quite appropriate on high-class custom rifles.
Despite the fact that checkering is a high-ranking artistic
skill, it’s not especially difficult to master. Checkering does
require intense concentration, however, as well as good
hand-to-eye coordination, steady hands, and plenty of prac-
tice. As with inlays, only practice can bring your checkering
ability to full flower.
Note: Concentration is paramount to success while checker-
ing, especially during the layout phase. At no time should a
gunsmith sitting at a checkering cradle take his or her mind
off the work.
FIGURE 34—Skip-line checkering with a fancy border indicates the work of a fine artisan.
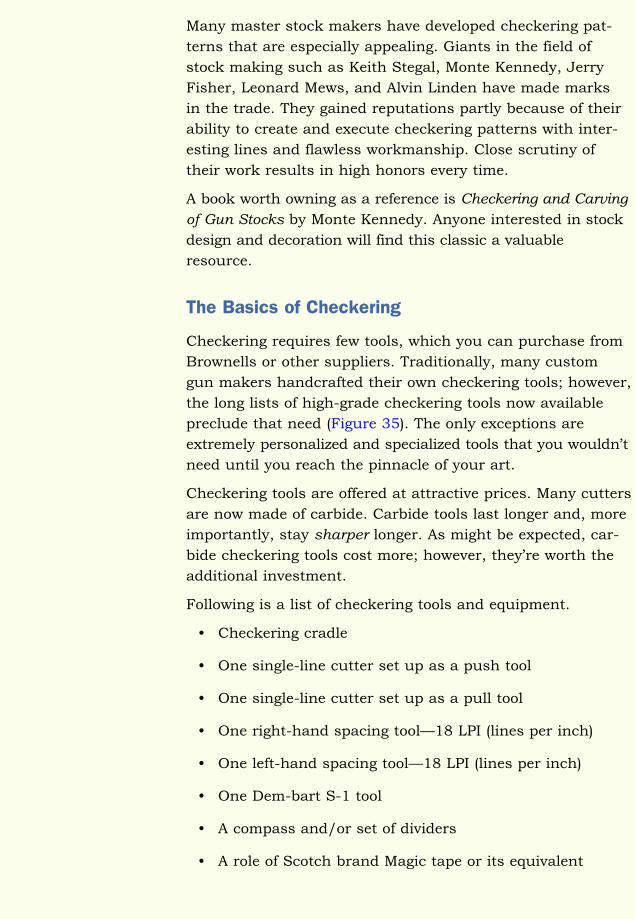
Many master stock makers have developed checkering pat-
terns that are especially appealing. Giants in the field of
stock making such as Keith Stegal, Monte Kennedy, Jerry
Fisher, Leonard Mews, and Alvin Linden have made marks
in the trade. They gained reputations partly because of their
ability to create and execute checkering patterns with inter-
esting lines and flawless workmanship. Close scrutiny of
their work results in high honors every time.
A book worth owning as a reference is Checkering and Carving
of Gun Stocks by Monte Kennedy. Anyone interested in stock
design and decoration will find this classic a valuable
resource.
The Basics of Checkering
Checkering requires few tools, which you can purchase from
Brownells or other suppliers. Traditionally, many custom
gun makers handcrafted their own checkering tools; however,
the long lists of high-grade checkering tools now available
preclude that need (Figure 35). The only exceptions are
extremely personalized and specialized tools that you wouldn’t
need until you reach the pinnacle of your art.
Checkering tools are offered at attractive prices. Many cutters
are now made of carbide. Carbide tools last longer and, more
importantly, stay sharper longer. As might be expected, car-
bide checkering tools cost more; however, they’re worth the
additional investment.
Following is a list of checkering tools and equipment.
• Checkering cradle
• One single-line cutter set up as a push tool
• One single-line cutter set up as a pull tool
• One right-hand spacing tool—18 LPI (lines per inch)
• One left-hand spacing tool—18 LPI (lines per inch)
• One Dem-bart S-1 tool
• A compass and/or set of dividers
• A role of Scotch brand Magic tape or its equivalent
Customizing Gun Stocks74
Customizing Gun Stocks 75
• A ruler and/or straightedge
• Number 3 or 4 pencils
Note: Eighteen LPI tools are good to start with, as they’re suf-
ficient for many applications and beginning work. You can
obtain finer-line checkering tools when experience and skill
warrant them. Furthermore, the wood density determines the
fineness of the checkering. Some woods won’t accept fine-line
checkering regardless of the gunsmith’s skill.
FIGURE 35—You’ll need a basic checkering tool set for beginning checkering work.

The Checkering Cradle
The checkering cradle enhances the entire checkering
process and should be considered a necessity. It fully con-
fines the stock, thus enabling accurate checkering on various
angled surfaces. Checkering demands continual change of
stock position. The cradle provides both rigidity and fluid
motion (Figure 36).
Using the cradle, you’re free to concentrate on checkering
rather than controlling the stock. Checkering cradles can
be handmade, but Brownells and others offer them at a
reasonable price.
Practice Patterns on Flat Surfaces
You should first attempt practice patterns on flat surfaces.
Secure a piece of hardwood about eight inches long and
four inches wide (thickness makes no difference) in a vise.
Customizing Gun Stocks76
FIGURE 36—This checkering cradle from Brownells, shown with a stock installed, is a simple, inexpensive, andefficient implement.

Customizing Gun Stocks 77
Straight-grained walnut makes a good practice piece. First,
sand the surface of the wood flat, then smooth it down,
finishing with 240 grit garnet paper.
With a compass, ruler, and sharp pencil, lay out a three-to-
one diamond—three inches long and one inch wide—as
described above in the inlay section. Secure the wood solidly
in a bench vise at an angle that allows you to get at the proj-
ect comfortably.
Note: Checkering is fine work, and good lighting is essential
for high-accuracy lines. You may require magnification of the
subject for best results, in which case a headset magnifier is
a good investment. Quality checkering involves discerning
fine detail.
Lay a piece of cellophane tape down along a lower leg of the
diamond from point to corner. With the single-line cutter,
carefully follow the edge of the tape in a straight line from
point-to-point, taking care not to extend beyond the dia-
mond. Repeat this process along the diamond’s other lower
leg. These perimeter lines become the master lines of the
checkering pattern panel, as is further discussed below.
Note: You should seat yourself comfortably on a stool while
checkering. Comfort allows the total concentration required
to perform fine work.
To ensure comfort, conduct a test. Holding the checkering
tool, gently swing your hand over the panel. Your hand
should flow effortlessly across the work area, devoid of force
or body strain. The checkering tool should move parallel to
one of the master lines on the pattern. If you experience any
problem whatsoever with hand motion, change your body
angle until the tool follows the line naturally. This warm-up
exercise sets a tone for the entire operation. Checkering is
accomplished in a concentrated flow. You should make this
warm-up a habit, as it helps ensure positive results.
With the body properly positioned, the single-line spacer tool
will follow a straight path without overtly steering or forcing
control over the tool. Forcing the tool to maintain straight
lines often results in exactly the opposite. Proper body pos-
ture also helps reduce body fatigue, which contributes to
crooked lines. Checkering itself isn’t physically taxing; how-
ever, body fatigue sets in naturally when you remain in one
Customizing Gun Stocks
position for a long period of time. Unfortunately, when check-
ering, one must sit at the checkering cradle for extended
periods. Therefore, correct body position helps keep lines
straight.
After cutting a particular set of lines, reposition yourself to
take on the next set in comfort.
Start the layout with either the left-hand or right-hand layout
tool. Place its guide in a master line and then cautiously
push from border to border of the diamond. Cut a second
line in the same manner to the same depth. Since these are
layout lines, cut them only deeply enough for the guide tool
to follow for the next line. Later, you’ll use single-line tools to
deepen and final-point the diamonds.
Note: You must cut each line to the same depth, or the lines
will become narrower or wider than desired. After you cut
two lines border to border, use dividers to check both the
tops and bottoms of the cuts. They should be the same dis-
tance on both ends. Lay out two more lines and repeat the
check using the dividers. Then lay out three more lines and
check them with dividers. Correctly laying out all of the lines
results in a quality job.
After laying out all lines in one direction, follow the same
routine with the other set of lines, beginning with the master
line. With a small diamond, it’s easy to keep the lines straight.
Straight-grained wood is beneficial in keeping the depth of
the cut equal from line to line.
If the layout cutter bites deeper into a line at one end than
the other, the end with the deeper cut will start a line that’s
closer to its guide line. This happens because the deeper cut
is wider. Crooked lines in a checkering pattern often begin
right here. With practice and experience, recognizing varying
line depth will help you to straighten out lines that are
becoming crooked.
After completing layout, use the single-line cutter to sepa-
rately deepen each line. Cut lines in one direction and then
again from the other direction. The single-line cutter set up
to be pulled (not pushed) is now pressed into service. Place it
up to the border and pull backwards to cut. This action helps
to prevent runovers, constant threats to fine checkering.
78
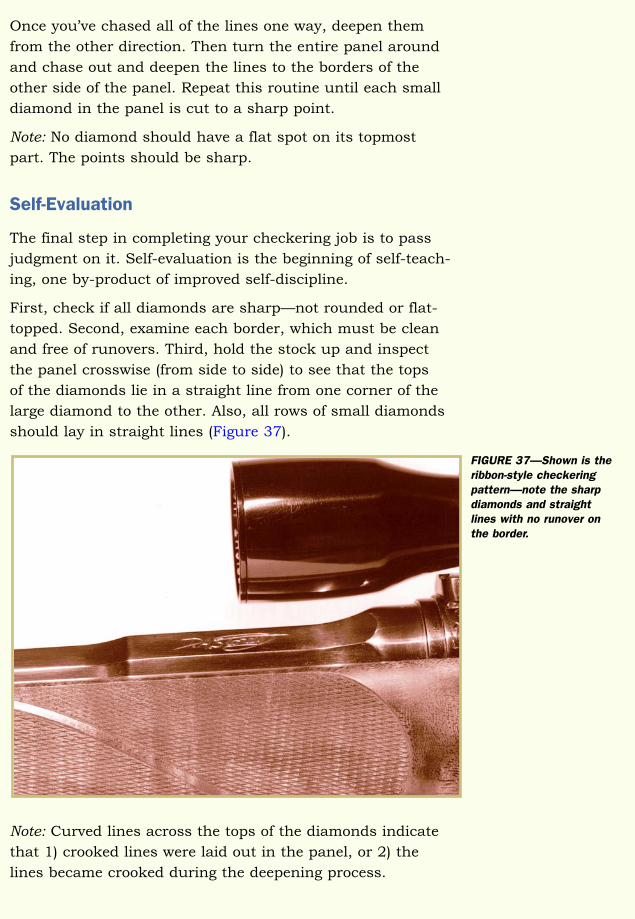
Customizing Gun Stocks 79
Once you’ve chased all of the lines one way, deepen them
from the other direction. Then turn the entire panel around
and chase out and deepen the lines to the borders of the
other side of the panel. Repeat this routine until each small
diamond in the panel is cut to a sharp point.
Note: No diamond should have a flat spot on its topmost
part. The points should be sharp.
Self-Evaluation
The final step in completing your checkering job is to pass
judgment on it. Self-evaluation is the beginning of self-teach-
ing, one by-product of improved self-discipline.
First, check if all diamonds are sharp—not rounded or flat-
topped. Second, examine each border, which must be clean
and free of runovers. Third, hold the stock up and inspect
the panel crosswise (from side to side) to see that the tops
of the diamonds lie in a straight line from one corner of the
large diamond to the other. Also, all rows of small diamonds
should lay in straight lines (Figure 37).
Note: Curved lines across the tops of the diamonds indicate
that 1) crooked lines were laid out in the panel, or 2) the
lines became crooked during the deepening process.
FIGURE 37—Shown is theribbon-style checkeringpattern—note the sharpdiamonds and straightlines with no runover onthe border.
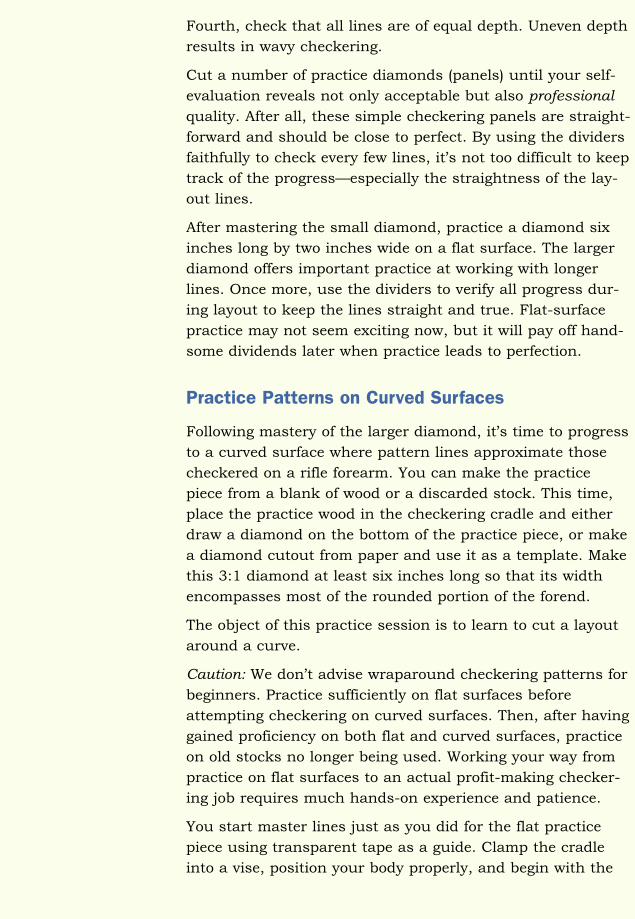
Fourth, check that all lines are of equal depth. Uneven depth
results in wavy checkering.
Cut a number of practice diamonds (panels) until your self-
evaluation reveals not only acceptable but also professional
quality. After all, these simple checkering panels are straight-
forward and should be close to perfect. By using the dividers
faithfully to check every few lines, it’s not too difficult to keep
track of the progress—especially the straightness of the lay-
out lines.
After mastering the small diamond, practice a diamond six
inches long by two inches wide on a flat surface. The larger
diamond offers important practice at working with longer
lines. Once more, use the dividers to verify all progress dur-
ing layout to keep the lines straight and true. Flat-surface
practice may not seem exciting now, but it will pay off hand-
some dividends later when practice leads to perfection.
Practice Patterns on Curved Surfaces
Following mastery of the larger diamond, it’s time to progress
to a curved surface where pattern lines approximate those
checkered on a rifle forearm. You can make the practice
piece from a blank of wood or a discarded stock. This time,
place the practice wood in the checkering cradle and either
draw a diamond on the bottom of the practice piece, or make
a diamond cutout from paper and use it as a template. Make
this 3:1 diamond at least six inches long so that its width
encompasses most of the rounded portion of the forend.
The object of this practice session is to learn to cut a layout
around a curve.
Caution: We don’t advise wraparound checkering patterns for
beginners. Practice sufficiently on flat surfaces before
attempting checkering on curved surfaces. Then, after having
gained proficiency on both flat and curved surfaces, practice
on old stocks no longer being used. Working your way from
practice on flat surfaces to an actual profit-making checker-
ing job requires much hands-on experience and patience.
You start master lines just as you did for the flat practice
piece using transparent tape as a guide. Clamp the cradle
into a vise, position your body properly, and begin with the
Customizing Gun Stocks80
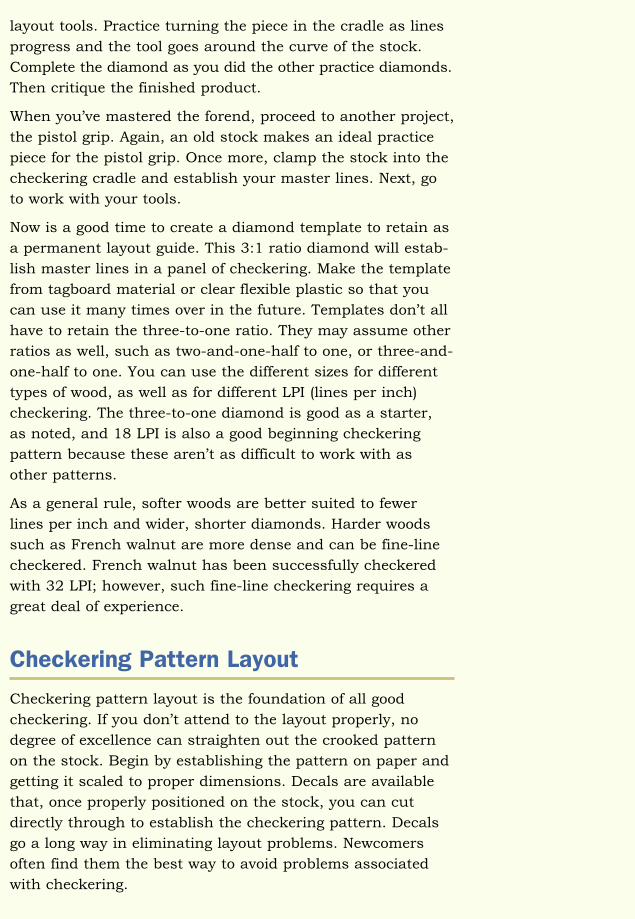
Customizing Gun Stocks 81
layout tools. Practice turning the piece in the cradle as lines
progress and the tool goes around the curve of the stock.
Complete the diamond as you did the other practice diamonds.
Then critique the finished product.
When you’ve mastered the forend, proceed to another project,
the pistol grip. Again, an old stock makes an ideal practice
piece for the pistol grip. Once more, clamp the stock into the
checkering cradle and establish your master lines. Next, go
to work with your tools.
Now is a good time to create a diamond template to retain as
a permanent layout guide. This 3:1 ratio diamond will estab-
lish master lines in a panel of checkering. Make the template
from tagboard material or clear flexible plastic so that you
can use it many times over in the future. Templates don’t all
have to retain the three-to-one ratio. They may assume other
ratios as well, such as two-and-one-half to one, or three-and-
one-half to one. You can use the different sizes for different
types of wood, as well as for different LPI (lines per inch)
checkering. The three-to-one diamond is good as a starter,
as noted, and 18 LPI is also a good beginning checkering
pattern because these aren’t as difficult to work with as
other patterns.
As a general rule, softer woods are better suited to fewer
lines per inch and wider, shorter diamonds. Harder woods
such as French walnut are more dense and can be fine-line
checkered. French walnut has been successfully checkered
with 32 LPI; however, such fine-line checkering requires a
great deal of experience.
Checkering Pattern Layout
Checkering pattern layout is the foundation of all good
checkering. If you don’t attend to the layout properly, no
degree of excellence can straighten out the crooked pattern
on the stock. Begin by establishing the pattern on paper and
getting it scaled to proper dimensions. Decals are available
that, once properly positioned on the stock, you can cut
directly through to establish the checkering pattern. Decals
go a long way in eliminating layout problems. Newcomers
often find them the best way to avoid problems associated
with checkering.

Customizing Gun Stocks
Adapting Existing Patterns
Even more popular than decals, however, is the process of
adapting an existing pattern to suit a particular stock. You
would draw the pattern on tracing or onionskin paper. Then
cut it out and place or tape it to the stock to study how it
will look. You can then make design changes until the pat-
tern suits the stock and becomes a template that you can
use for both sides.
Note: As patterns become more demanding, you often cut
their master lines in about the middle of the pattern rather
than along its outside borders. This way, when checkering
progresses to the outside edge of the pattern, you can scribe
border lines in at the proper distance from the last checkering
lines in the pattern. Using this trick may produce a pattern
that’s almost unnoticeably larger or smaller than you origi-
nally planned—even to the trained eye—but it will guarantee
evenly spaced lines along all borders.
As you gain checkering experience, you’ll learn many tricks-
of-the-trade like the one just covered. Here are a few more
tricks that will prove helpful.
• When adapting an existing pattern, tape the cutout
pattern into the desired position on the stock. Then use
a sharp scribe to prick through the paper and into the
wood to establish where the borders and master lines
begin and end.
• Before removing a pattern, trace around its exterior
using a grease crayon. This will give you a good idea of
where the borders are located, even though they might
not fall exactly along the line itself.
• Using a flexible transparent ruler as a guide, connect
master lines using a sharp scribe.
• Give the other side of the stock identical treatment using
the same template. Just turn the template over and tape
it into position so that it will effectively mirror its oppo-
site side.
• The placement of the pattern must be consistent on both
sides of the stock. When locating a pattern on the sec-
ond side of the stock, duplicate all measurement from
the initial side. A divider can prove useful here.
82
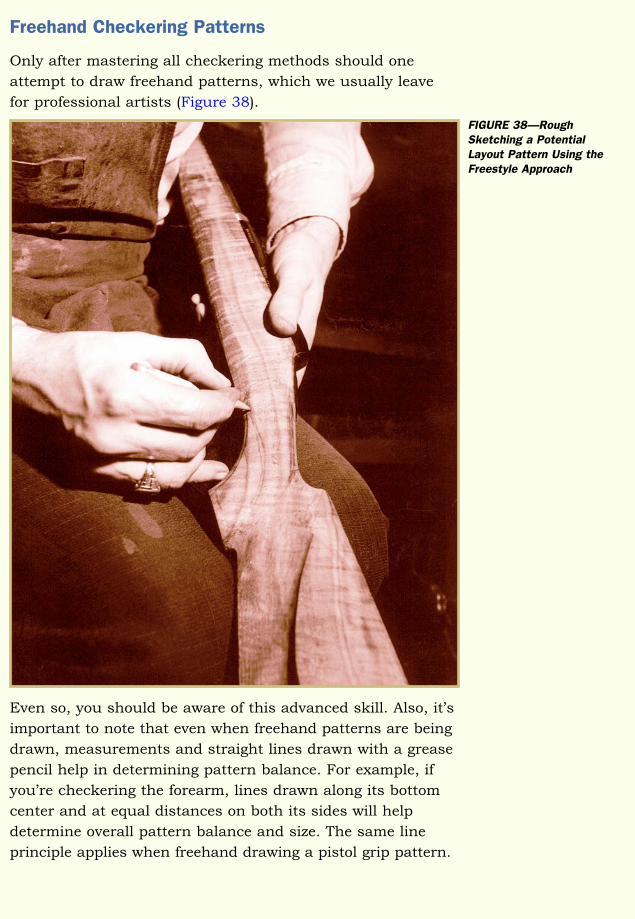
Customizing Gun Stocks 83
Freehand Checkering Patterns
Only after mastering all checkering methods should one
attempt to draw freehand patterns, which we usually leave
for professional artists (Figure 38).
Even so, you should be aware of this advanced skill. Also, it’s
important to note that even when freehand patterns are being
drawn, measurements and straight lines drawn with a grease
pencil help in determining pattern balance. For example, if
you’re checkering the forearm, lines drawn along its bottom
center and at equal distances on both its sides will help
determine overall pattern balance and size. The same line
principle applies when freehand drawing a pistol grip pattern.
FIGURE 38—RoughSketching a PotentialLayout Pattern Using theFreestyle Approach
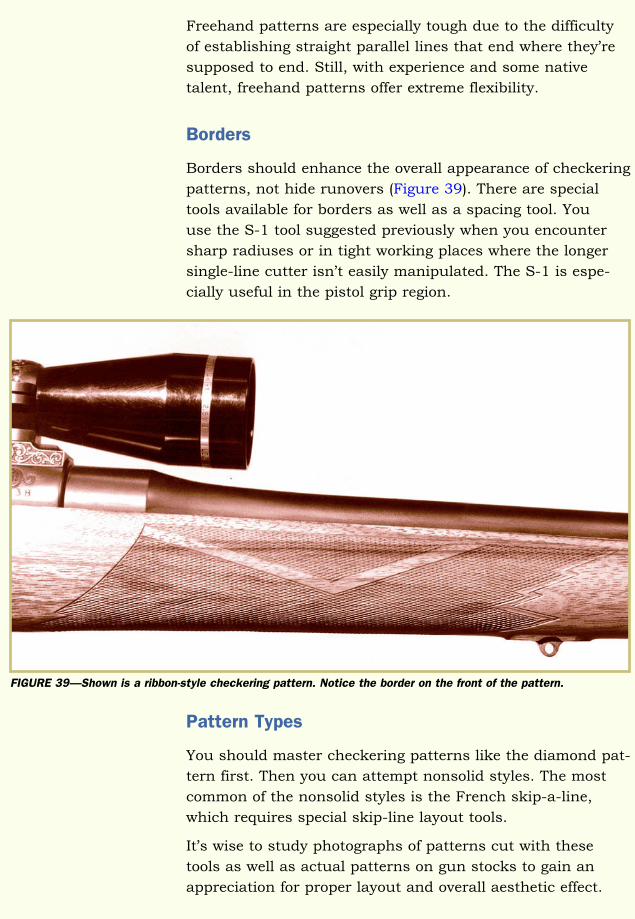
Customizing Gun Stocks
Freehand patterns are especially tough due to the difficulty
of establishing straight parallel lines that end where they’re
supposed to end. Still, with experience and some native
talent, freehand patterns offer extreme flexibility.
Borders
Borders should enhance the overall appearance of checkering
patterns, not hide runovers (Figure 39). There are special
tools available for borders as well as a spacing tool. You
use the S-1 tool suggested previously when you encounter
sharp radiuses or in tight working places where the longer
single-line cutter isn’t easily manipulated. The S-1 is espe-
cially useful in the pistol grip region.
Pattern Types
You should master checkering patterns like the diamond pat-
tern first. Then you can attempt nonsolid styles. The most
common of the nonsolid styles is the French skip-a-line,
which requires special skip-line layout tools.
It’s wise to study photographs of patterns cut with these
tools as well as actual patterns on gun stocks to gain an
appreciation for proper layout and overall aesthetic effect.
84
FIGURE 39—Shown is a ribbon-style checkering pattern. Notice the border on the front of the pattern.
Customizing Gun Stocks 85
The gunsmith realizes that the ability to work with more
advanced techniques will come in time through practice
and experience.
When to Checker
We’ve been careful to stress that extensive hands-on experi-
ence is prerequisite to performing checkering on your own
firearm or for profit. Aside from the obvious reasons for cau-
tion is the fact that checkering is ideally accomplished on full
finished stocks where mistakes are the most costly. If you
accomplish checkering before finish goes on the wood, the
finish tends to invade the checkering. Masking the checkering
pattern off will help, but it’s no guarantee against finish fill-
ing up at least part of the pattern. Furthermore, if checkering
is done on an unfinished stock, later final sanding may dam-
age the job significantly.
We don’t mean that the bare wood exposed by checkering
receives no treatment. As checkering involves cutting
through the finish on the stock, it leaves the freshly cut
wood exposed. You can brush a couple light coats of finish
into the checkering pattern using an old toothbrush as a
tool. This will introduce oil to the raw wood, but the tooth-
brush won’t allow excess oil to build up in the checkering.
Recutting Existing Patterns
Another excellent means of gaining important checkering
knowledge and experience is to recut existing checkering pat-
terns. Freshing out old patterns on an existing stock is like
following the strokes of an accomplished painter. Unless the
checkering is worn or sanded away, the layout is already
established, and you can follow the entire pattern.
You use the single-line checkering tool to recut checkering.
Fix the stock into the checkering cradle for recutting and
handle it just as you would for any other checkering job.
Caution: When freshing out a checkering job, it’s still critical
to keep the depth of checkering uniform. If part of the panel
is cut deeper, the effect will be wavy-looking lines.
Once you newly cut all existing lines, apply the finish with a
toothbrush to complete the job.

Freshing out checkering can be an important service for a
gun shop. The customer who brings in a stock for refinishing
especially appreciates checkering. The refinished stock may
look perfect in all regards, but if the existing checkering
is in a used condition, the refinishing job isn’t complete.
Furthermore, the checkering pattern can often enhance a
factory rifle by touching it up. This is especially true for
the impressed checkering seen on some rifles. You use the
straight-line tool to deepen the checkering, working it in both
directions following the lines of the impressed checkering.
The goal is to deepen the existing lines until the diamonds
of the pattern are properly formed and sharply cut. This
process requires more work than simply freshing out old
checkering, so you must take great care. Mistakes can be
almost impossible to rectify. On the other hand, when you
complete the job professionally, the value of the stock
increases and the customer is generally happy to pay well
for the work.
Do keep in mind that hand checkering, like most all other
handwork, is time consuming and requires skill that you
can only achieve through hours of practice. Set your rates
accordingly. If a potential customer suggests the cost of a
job is too high, explain exactly what’s involved. Once people
understand the process, they look at the cost more
realistically.
Note: You may wonder how professional gunsmiths can do
extensive checkering on a stock, especially a new one, and
still make adequate money for their efforts. The answer in
many cases is that they use motorized checkering tools.
Using motorized tools, a gunsmith can cut a pattern in a few
minutes that would otherwise take up to an hour or more.
However, the machines are expensive and you have to do
a lot of checkering to justify their purchase. Even so, they
offer another way to make money if the demand is there. You
can start with hand checkering, and if a promising business
develops, go ahead and get a machine. You’ll find them in
Brownell’s Catalog.
Customizing Gun Stocks86
Customizing Gun Stocks 87
Self-Check 4
Fill in the blanks in the following statements.
1. The most important quality the gun pro could bring to a checkering job is _______.
2. _______ checkering tools cost more, but they’re worth the additional investment.
3. In reference to checkering, LPI is an acronym for _______.
4. When cutting existing checkering patterns, you use a _______ checkering tool.
5. Besides being decorative, inlays can also be _______.
6. One positive feature of the _______ inlay is that you can use inletting black as a guide tocutting its mortise.
7. When cutting out an inlay template, you make the cuts just _______ the lines.
8. When making inlays, they should have about a _______ to _______ degree draft on theedges.
9. To ensure clean cuts when checkering, all instruments for inlay work must be _______.
10. You should sand the surface into which you’ll set the inlay with _______ grit garnetpaper.
Check your answers with those on page 100.

MORE WAYS TO ENHANCE THESTOCK
Stippling
Stippling, another means of embellishing a stock, involves
producing a matting effect with a sharply pointed tool. The
implement used for stippling can be as simple as a sharp-
ened nail or a background leather stamping tool, although
stippling tools are offered by many distributors. The key to
stippling lies in the fiber of the wood being broken—not just
dented. Denting won’t produce a lasting stippling effect. On
wood that’s too soft to hold a good checkering pattern, stip-
pling can often substitute. The effect of stippling is the same
as checkering, to decorate the wood. Like checkering, stippling
also produces a nonslip surface at the forearm and grip areas.
Stippling shouldn’t be considered a “poor man’s checkering,”
as some extremely high-grade stocks are adorned with it.
This is especially true of certain match-grade target rifles
that feature stippled pistol grips and forearms rather than
checkering (Figure 40).
Also, stippling offers an interesting alternative to checkering
on handgun grips. When a shooter carries the handgun con-
cealed under clothing, stippling’s finer texture is less likely
to abrade cloth while still providing a nonslip surface.
Furthermore, stippling can be used in conjunction with
checkering. Attractive decorative touches can be added with
such a combination. Checkering remains the major embel-
lishment in these instances, but subtle highlights of stippling
add to the overall visual effect of the pattern, especially in
appropriate areas, such as around a fleur-de-lis checkering
pattern (Figure 41).
Customizing Gun Stocks88
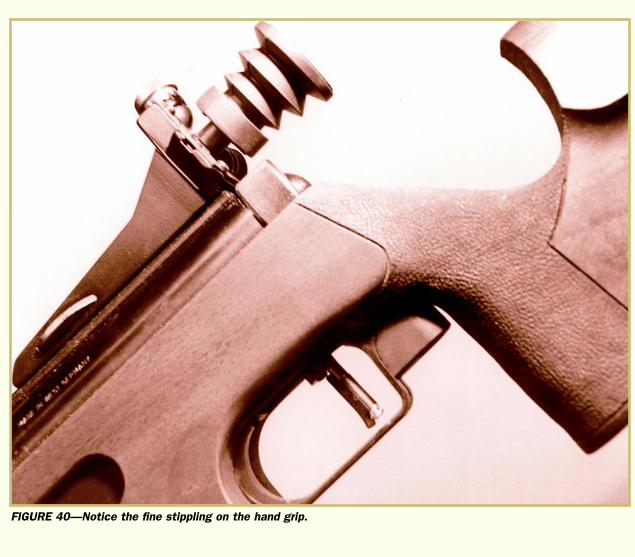
Customizing Gun Stocks 89
FIGURE 40—Notice the fine stippling on the hand grip.
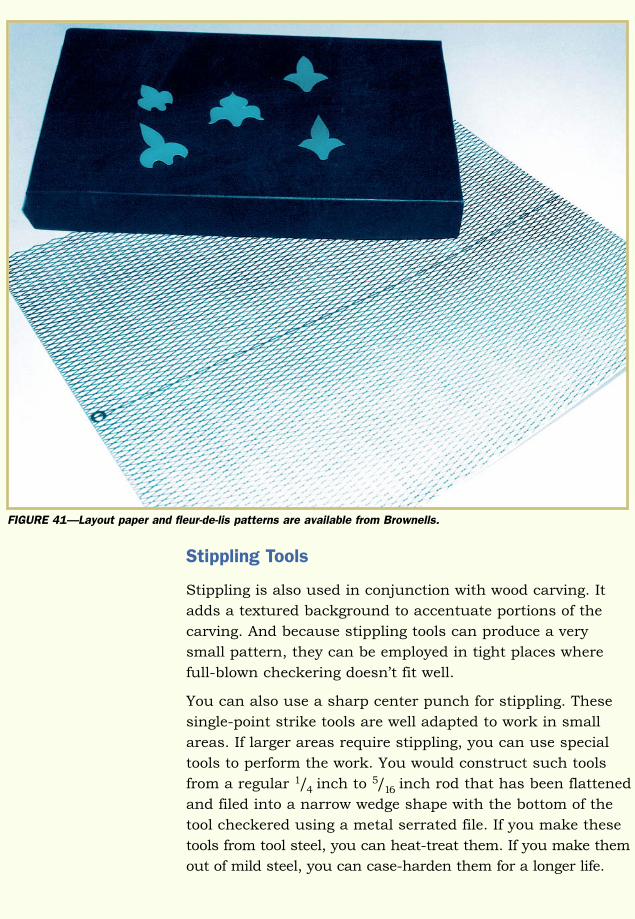
Stippling Tools
Stippling is also used in conjunction with wood carving. It
adds a textured background to accentuate portions of the
carving. And because stippling tools can produce a very
small pattern, they can be employed in tight places where
full-blown checkering doesn’t fit well.
You can also use a sharp center punch for stippling. These
single-point strike tools are well adapted to work in small
areas. If larger areas require stippling, you can use special
tools to perform the work. You would construct such tools
from a regular 1/4 inch to 5/16 inch rod that has been flattened
and filed into a narrow wedge shape with the bottom of the
tool checkered using a metal serrated file. If you make these
tools from tool steel, you can heat-treat them. If you make them
out of mild steel, you can case-harden them for a longer life.
Customizing Gun Stocks90
FIGURE 41—Layout paper and fleur-de-lis patterns are available from Brownells.
Customizing Gun Stocks 91
Another source of stippling tools are the background tools
leather carvers use. Tandy leather stores offer a wide selec-
tion at modest prices. Experimentation is the best way to
decide which tools perform best in given circumstances.
Stippling Techniques
As with all other aspects of gunsmithing and gun making,
you must master a few techniques to achieve top-grade stip-
pling. First, you must rigidly control the piece of wood so
that it doesn’t slip when you strike it with the stippling tool.
Firmly rest the heel of your hand on the stock and hold the
tool approximately 1/32 inch above the surface, rather than
holding your hand high above the work surface. Grasp the
tool firmly with your thumb, index, and middle fingers. With
your other hand, hold a lightweight hammer and apply quick
light strikes against the top of the stippling tool, thus driving
its point down into the wood surface. Ideally, the stippling
tool then rebounds to the original height above the work.
Note: It’s important to keep this rebounding effect as constant
and uniform as possible.
Quickly repeat the tapping process as you move the stippling
tool around the surface of the wood. Quick, even taps give a
smooth ripple-free effect to the wood surface. Uneven taps
produce an uneven surface with high and low spots. As men-
tioned earlier, you must strike the tool hard enough so that
the fiber of the wood breaks. Dents may pop back out,
whereas broken surface pockmarks remain intact. After stip-
pling an area, finish it with a light coat of thinned stock fin-
ish. Blot excess finish from the stippled wood immediately
with an absorbent rag to prevent the pockmarks from filling
with finish. A thin sealer oil is also useful for finishing a
stippled area.
As with checkering, stippling may have a border. Use a single-
cutter checkering tool to cut the initial pattern, and use a
regular border tool to cut the borders. Stippling will fill the
pattern.
As always, practice pieces of wood are ideal when starting
out. It’s obviously better to learn on throw-away wood or an
old stock than on a valuable piece of wood. The major goal is
to develop a personal stippling technique that will serve you
best in the future. Trial and error is the best teacher, even in
selecting stippling tools.
Stock Carving
Unfortunately, stock carving isn’t nearly as popular today as
it was a hundred or more years ago. Yet, it’s not an entirely
dead art. The act of using a knife or other cutting implement
to create a pattern or image in wood remains a fascination.
As an art form, wood carving is still practiced in many coun-
tries, and the talent exhibited by today’s carvers remains
high. Although contemporary gun stocks don’t receive as
much attention in this area, it’s not difficult to locate
Pennsylvania/Kentucky long rifles, for example, that carry
considerable stock carving.
Subjects for Carving
As already mentioned, Monte Kennedy’s Checkering and
Carving of Gun Stocks contains many examples of stock
carving patterns and images. The patterns generally lie in
the area of floral designs, from leaves to foliage and even
nuts. Wildlife is mainly in the area of mammals, such as
squirrels and deer, but birds are often subjects. Some sub-
jects are highly stylized. They represent images from real life
without attempting to duplicate them. All subjects for stock
carving must fit into the stock in a pleasing manner.
Drawings and Photographs
Drawings and photographs can be used for stock carving
patterns.
Warning: Don’t violate copyright laws. Drawings and photo-
graphs may be protected by law. If there’s no indication that
the drawing or photo is in the public domain, before using
either, request written permission to do so.
Customizing Gun Stocks92
Customizing Gun Stocks 93
A camera can transfer images to stocks. Enlarge photographs
only enough to suit the stock. First, trace the drawing or
photograph on thin paper and then transfer to the stock.
With the image traced to the stock, you can start carving.
Flexibility in Designs
Animals, birds, snakes, and other wildlife aren’t as forgiving
in detail alteration as are floral designs and patterns. If the
carver makes a mistake in executing a floral design, he or
she can generally alter the pattern to suit the mistake, and
no one will know. It’s wise for the beginner to select patterns
that can be easily altered.
Carving Tools
The tools required for carving are basic and simple (Figure 42).
A knife blade is ideal. It may even be a jackknife, although
some carvers prefer a hook-bill knife. The gouge and chisel
are also tools of the wood carving trade, and a V-tool is good
for threading-in, which we’ll discuss. (The V-tool is optional.)
Note that you can hand make various carving tools.
The key to useful carving tools is sharpness far beyond that
originally placed on a manufactured knife or tool. You can
sharpen chisels and convex edges on a flat, hard stone using
oil as a lubricant. To sharpen gouges with concave edges,
use a wedge-shaped stone. Very little decent carving can
transpire without an extremely sharp tool. However, extremely
sharp tools are very dangerous; so you should handle them
with extreme caution.
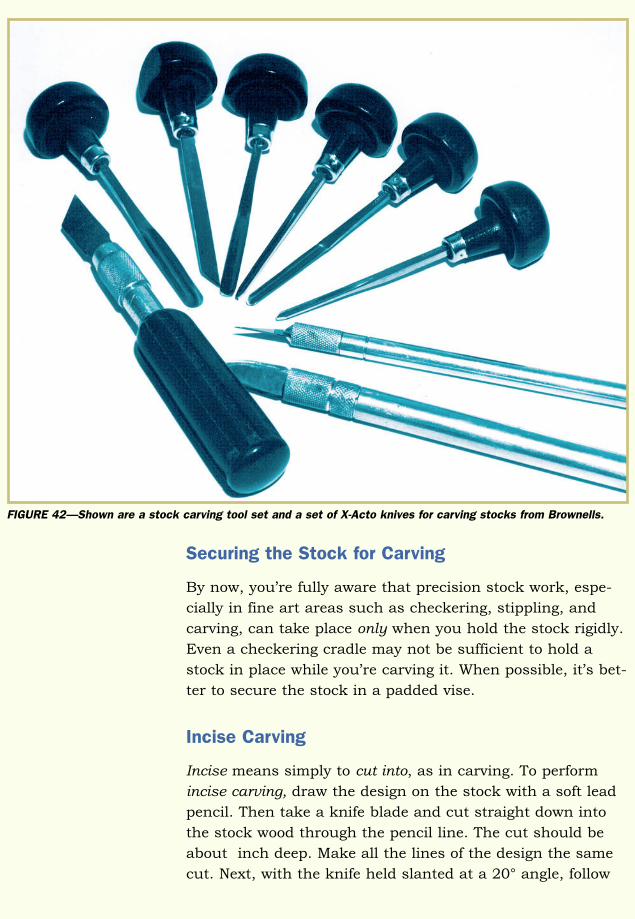
Customizing Gun Stocks
Securing the Stock for Carving
By now, you’re fully aware that precision stock work, espe-
cially in fine art areas such as checkering, stippling, and
carving, can take place only when you hold the stock rigidly.
Even a checkering cradle may not be sufficient to hold a
stock in place while you’re carving it. When possible, it’s bet-
ter to secure the stock in a padded vise.
Incise Carving
Incise means simply to cut into, as in carving. To perform
incise carving, draw the design on the stock with a soft lead
pencil. Then take a knife blade and cut straight down into
the stock wood through the pencil line. The cut should be
about inch deep. Make all the lines of the design the same
cut. Next, with the knife held slanted at a 20° angle, follow
94
FIGURE 42—Shown are a stock carving tool set and a set of X-Acto knives for carving stocks from Brownells.
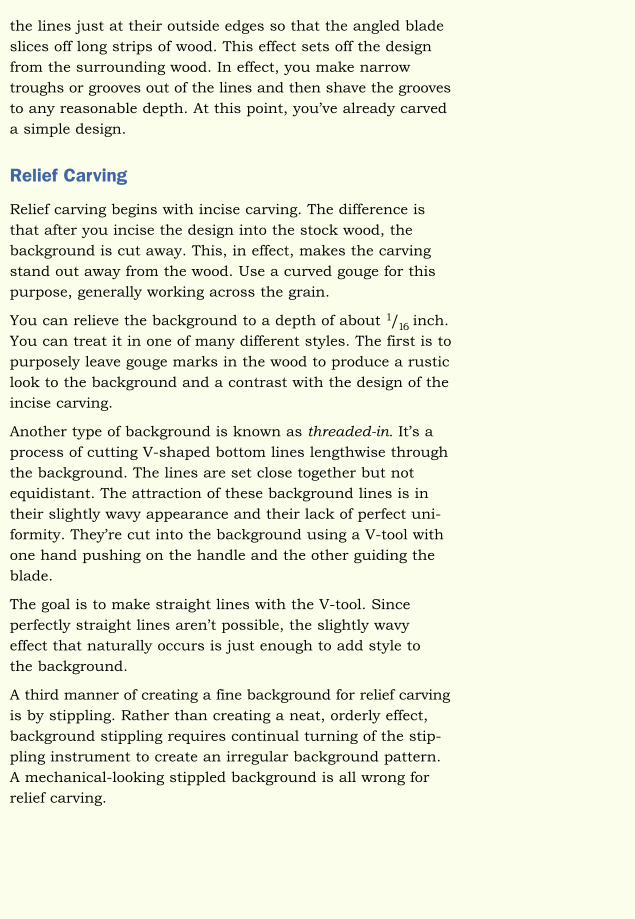
Customizing Gun Stocks 95
the lines just at their outside edges so that the angled blade
slices off long strips of wood. This effect sets off the design
from the surrounding wood. In effect, you make narrow
troughs or grooves out of the lines and then shave the grooves
to any reasonable depth. At this point, you’ve already carved
a simple design.
Relief Carving
Relief carving begins with incise carving. The difference is
that after you incise the design into the stock wood, the
background is cut away. This, in effect, makes the carving
stand out away from the wood. Use a curved gouge for this
purpose, generally working across the grain.
You can relieve the background to a depth of about 1/16 inch.
You can treat it in one of many different styles. The first is to
purposely leave gouge marks in the wood to produce a rustic
look to the background and a contrast with the design of the
incise carving.
Another type of background is known as threaded-in. It’s a
process of cutting V-shaped bottom lines lengthwise through
the background. The lines are set close together but not
equidistant. The attraction of these background lines is in
their slightly wavy appearance and their lack of perfect uni-
formity. They’re cut into the background using a V-tool with
one hand pushing on the handle and the other guiding the
blade.
The goal is to make straight lines with the V-tool. Since
perfectly straight lines aren’t possible, the slightly wavy
effect that naturally occurs is just enough to add style to
the background.
A third manner of creating a fine background for relief carving
is by stippling. Rather than creating a neat, orderly effect,
background stippling requires continual turning of the stip-
pling instrument to create an irregular background pattern.
A mechanical-looking stippled background is all wrong for
relief carving.
Getting Started with Carving
Prior to actively pursuing stock carving, you should first find
and digest reading materials that run the gamut from basic
to advanced carving. Some books contain step-by-step
instructions that explain how to carve specific patterns.
Others teach a great many secrets.
Next, locate and study carving examples. Hopefully, you’ll
find examples that appear on gun stocks. If you have access
to early Pennsylvania/Kentucky black powder rifles, this may
be the case. If not, good examples of woodcarvings on furni-
ture or decorations can serve as examples.
Finally, practice on blocks of wood just as you would practice
checkering and stippling patterns. Only after gaining sufficient
ability and confidence on the try pieces should you approach
a stock.
Caution: Don’t allow the stock to become a part of the carving.
Let the carving be a part of the stock. Oversized carvings,
especially when they demand buttstocks that are truly out of
proportion with the overall rifle design, are gaudy and self-
serving. The finest stock carvings blend into the overall
firearm design.
Customizing Gun Stocks96
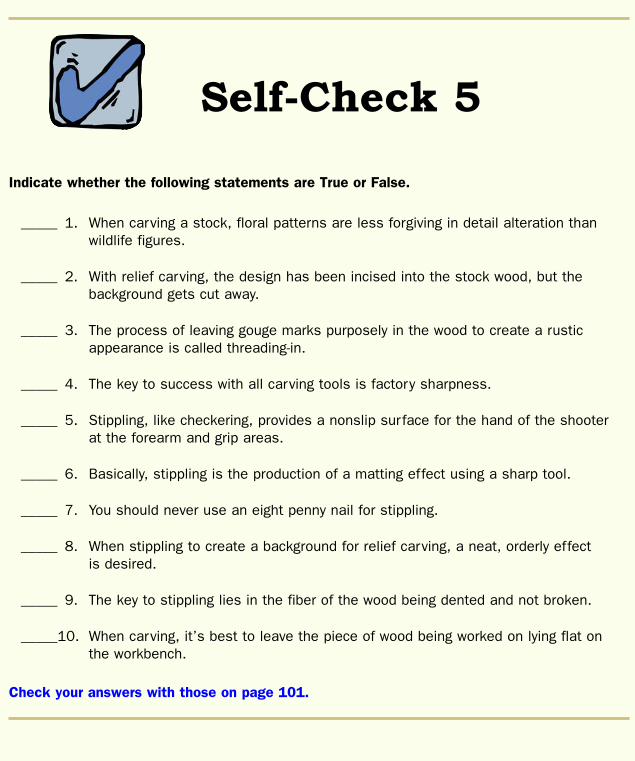
Customizing Gun Stocks 97
Self-Check 5
Indicate whether the following statements are True or False.
_____ 1. When carving a stock, floral patterns are less forgiving in detail alteration thanwildlife figures.
_____ 2. With relief carving, the design has been incised into the stock wood, but the background gets cut away.
_____ 3. The process of leaving gouge marks purposely in the wood to create a rusticappearance is called threading-in.
_____ 4. The key to success with all carving tools is factory sharpness.
_____ 5. Stippling, like checkering, provides a nonslip surface for the hand of the shooter at the forearm and grip areas.
_____ 6. Basically, stippling is the production of a matting effect using a sharp tool.
_____ 7. You should never use an eight penny nail for stippling.
_____ 8. When stippling to create a background for relief carving, a neat, orderly effect is desired.
_____ 9. The key to stippling lies in the fiber of the wood being dented and not broken.
_____10. When carving, it’s best to leave the piece of wood being worked on lying flat on the workbench.
Check your answers with those on page 101.

NOTES
Customizing Gun Stocks98
99
Self-Check 1
1. True
2. False. Use release agent liberally on all metal that might
come in contact with bedding compound.
3. True
4. True
5. False. Nothing can replace professional craftsmanship.
6. True
7. True
8. False. As epoxy cures, it bonds to the wood and molds
itself around the metal parts.
9. True
10. True
Self-Check 2
1. Flush, sandbag
2. drill press
3. nondetachable
4. flush
5. 21/2 –3
6. checkering
7. special jig
8. wooden, machine-type
9. 13–17
10. heavy-recoiling
An
sw
er
sA
ns
we
rs
Self-Check Answers100
Self-Check 3
1. False. Gluing on a recoil pad isn’t recommended because
later removal is so difficult.
2. True
3. True
4. True
5. True
6. True
7. False. It’s the least expensive type.
8. True
9. True
10. False. They’re usually semicurved or crescent shaped.
Self-Check 4
1. concentration
2. Carbide
3. lines per inch
4. single-line
5. functional
6. metal
7. outside
8. three, four
9. razor sharp
10. 240

Self-Check Answers 101
Self-Check 5
1. False. Floral patterns are more forgiving.
2. True
3. False. Purposely leaving gouge marks is a type of relief
carving.
4. False. The carving tools should be sharper than when
they arrive from the factory.
5. True
6. True
7. False. You could use such a nail or any sharp nail.
8. False. The desired effect is to avoid perfect uniformity.
9. False. The key is to break the wood, which produces a
lasting effect.
10. False. It’s best to secure the stock in a padded vice.

Self-Check Answers102
NOTES
103
925 Oak Street
Scranton, Pennsylvania 18515-0001
Customizing Gun Stocks
When you feel confident that you have mastered the material in this study unit, complete the following examination. Then submitonly your answers to the school for grading, using one of the exam-ination answer options described in your “Test Materials” envelope.Send your answers for this examination as soon as you complete it.Do not wait until another examination is ready.
Questions 1–20: Select the one best answer to each question.
1. When performing incise carving on a gun stock, the initial knifecuts should be about _______ deep.
A. 1/16 inch B. 1/8 inch
C. 3/16 inch D. 1/4 inch
2. All the following statements are correct except which one?
A. Flush mount sling swivel bases are best put in with specialjigs.
B. Flush mount sling swivel bases can dictate the size of astock’s toe line in some cases.
C. Flush mount sling swivel bases are all basically the same.D. Flush mount sling swivels are standard on most factory-built
rifles.
EXAMINATION NUMBER:
02530401Whichever method you use in submitting your exam
answers to the school, you must use the number above.
For the quickest test results, go to http://www.takeexamsonline.com
Ex
am
ina
tion
Ex
am
ina
tion
Examination104
3. To draw a diamond inlay, you need
A. a ruler and a number two pencil.B. a ruler, a protractor, and a number three pencil.C. a compass and a number three pencil.D. a compass, a ruler, and a number three or four pencil.
4. Recoil pads
A. do little to ease recoil.B. are highly developed and are available in many styles and sizes.C. rely solely on rubber for their cushioning effect.D. require sophisticated equipment for fit and installation.
5. A jig for fitting recoil pads on finished stocks
A. shouldn’t be used because it shows that the gunsmith doesn’t know how to fit a pad.B. should be used in every situation.C. can aid a gunsmith by allowing him or her to do a good job in a minimum amount
of time.D. is slow and hard to use.
6. Stippling
A. requires many specialized tools.B. is only used on cheaper guns.C. can be used in a variety of ways both alone and in conjunction with carving and
checkering.D. is strictly decorative.
7. Prior to glassing a rifle, you should do all of the following except which one?
A. Inspect the rifle for a bedding problem.B. Use modeling clay to plug holes in the receiver that bedding compound might flow into.C. Liberally coat all metal parts with a release agent.D. Liberally coat all metal parts with epoxy.
8. A checkering cradle is
A. more of a luxury than necessity for doing good checkering.B. difficult to master.C. an important fixture used by competent gunsmiths when checkering stocks.D. usually expensive to acquire.
9. When fitting recoil pads with solid sides, you
A. should take special care to choose the correct size pad to fit the stock.B. can use any size as long as it’s bigger than the stock.C. can use glue or epoxy when attaching the pad to the buttstock.D. can’t use a jig to fit the pads.
Examination 105
10. Stock inlays
A. should always be screwed in.B.C. can be made of wood, metal, plastic, or exotic materials.D. are used for decorative reasons only.
11. All of the following are characteristics of good checkering except which one?
A. Sharp diamonds B. Lines of even depthC. Straight lines D. A detailed floral design
12. Most accuracy problems with wooden factory stocks are caused by
A. faults in the wood.B. poor machining.C. drying out or absorbing moisture due to the climatic conditions.D. poor finish.
13. The pressure point in a stock
A. can be located most anywhere.B. should be located about two to three inches from the end of the forearm.C. can be located on a forend cap.D. should be located as close as possible to the end of the forearm.
14. When you use spacers to extend the length of pull, you should
A. screw them in between the recoil pad and stock and then grind to fit.B. epoxy or glue them to them to the stock before fitting the recoil pad.C. epoxy or glue them to the recoil pad first and then fit them to the stock.D. never glue them to the stock or the recoil pad.
15. If a stripped or washed-out screw hole is located where one of the recoil pad screws fasten,
A. use just the screw on the other side to hold the pad.B. drill out the hole, glue a hardwood plug in it, and redrill and tap the hole.C. just insert the new screw next to it.D. hammer a nail in the washed-out hole and drill another next to it.
16. A rifle will
A. always shoot best with a free-floating barrel.B. always shoot best with a pressure-pointed barrel.C. shoot best when only the action is bedded.D. sometimes require some experimenting with to reveal which bedding method will make
it shoot best.
should be inlet inch deeper than the stock surface.1/16
Examination106
17. Pistol grip caps
A. do little to protect the edges of pistol grips.B. are quite restricted in available sizes.C. are seldom used on customized stocks.D. can be both functional and add a decorative touch to a custom rifle.
18. When using 50/50 soft solder to solder a sling swivel base to a barrel,
A. the gun can be blued in a caustic salt bath without harming the bond.B. the sling swivel base should have a good size bearing surface on the barrel.C. the barrel bearing surface can be rather small.D. an antiscaling compound should be used inside the barrel.
19. When mixing epoxy for glass bedding,
A. always mix a thick mixture.B. experiment and develop your own ratios.C. follow the manufacturer’s directions carefully.D. always mix a thin liquid mixture.
20. Sling swivel bases attached to the barrel
A. probably shouldn’t be used on a rifle where the shooter uses a hasty sling.B. must be soldered on to be secure.C. must be welded on to be secure.D. have little application on a rifle.


