How to make a.... Strictly Dancing Tri Fold Box Shopping List:- Grand Calibur™ Die Cutting Machine : WIZCAL Sue Wilson Austrian Collection Background Die ( Collection 2 ) : CED2201 Creative Expressions Singles Stamps ~ Salsa : UMS186 , American Smooth : UMS183 & Paso Doble : UMS184 Spellbinders All in One Tool : WIZTOOL Wrinkled Edged Champagne Ribbon :NK02 Foundations A4 Teal Card : 40985 A3 Card or Coconut A4 Card : 40980 Cosmic Shimmer Clear Glue : CSGLUE & Silicone Glue Grime Boss : GB30 & Cut `n` Dry Foam : FOAMCUT Creative Expressions Cameo Embellishment : CAMEO9 Non-Stick craft sheet: CRAFTSHEET Clear and Resist Ink Pad : CRPAD Cosmic Shimmer Viola Black Embossing Powder : CSEPVIOBLK Shopping List:- Grand Calibur™ Die Cutting Machine : WIZGC-200 Sue Wilson Shadow Box Collection ~ In The Garden Die Set : CED9309, Stitched Lattice Frame Die Set : CED9303 & Delightful Daisies Die Set : CED1469 Spellbinders Tool in One : WIZTOOL Creative Kraft Card : KRAFTCARD Foundations Vellum : 40024, Foundations Antique Gold Card : PC009 , Coconut Card : 40980 Self Adhesive Sheet : ADHA4 & Acetate : HEATEMBOS Cosmic Shimmer Clear Glue : CSGLUE Tim Holtz Distress Dry Rock Candy Glitter : DGROCK Creative Expression Jute Twine Antique White, Natural & Black : CETWINEJUTE Mustard Seeds & Silicone Glue How to make a.... Sue Wilson Thank You Shadow Box Card
Transcript
How to make a....
Strictly Dancing Tri Fold Box
Shopping List:- Grand Calibur™ Die Cutting Machine : WIZCAL Sue Wilson Austrian Collection Background Die ( Collection 2 ) : CED2201 Creative Expressions Singles Stamps ~ Salsa : UMS186 , American Smooth : UMS183 & Paso Doble : UMS184 Spellbinders All in One Tool : WIZTOOL Wrinkled Edged Champagne Ribbon :NK02 Foundations A4 Teal Card : 40985 A3 Card or Coconut A4 Card : 40980 Cosmic Shimmer Clear Glue : CSGLUE & Silicone Glue Grime Boss : GB30 & Cut `n` Dry Foam : FOAMCUT Creative Expressions Cameo Embellishment : CAMEO9 Non-Stick craft sheet: CRAFTSHEET Clear and Resist Ink Pad : CRPAD Cosmic Shimmer Viola Black Embossing Powder : CSEPVIOBLK
Shopping List:- Grand Calibur™ Die Cutting Machine : WIZGC-200 Sue Wilson Shadow Box Collection ~ In The Garden Die Set : CED9309, Stitched Lattice Frame Die Set : CED9303 & Delightful Daisies Die Set : CED1469 Spellbinders Tool in One : WIZTOOL Creative Kraft Card : KRAFTCARD Foundations Vellum : 40024, Foundations Antique Gold Card : PC009 , Coconut Card : 40980 Self Adhesive Sheet : ADHA4 & Acetate : HEATEMBOS Cosmic Shimmer Clear Glue : CSGLUE Tim Holtz Distress Dry Rock Candy Glitter : DGROCK Creative Expression Jute Twine Antique White, Natural & Black : CETWINEJUTE Mustard Seeds & Silicone Glue
How to make a.... Sue Wilson Thank You Shadow Box Card
Step 1. This workshop will show you how to make this box frame card but with a twist. The sides have been extended to create an enclosed look, the sides also cover up the foam tape used to make the shaker section in the card which means you`ll use less foam mounting tape. The main products for the card are the Sue Wilson shadow box collection ~ in the garden die set, the Stitched lattice frame die set and the delightful daisies die set. Doubled up vellum has been used to make a thicker piece for the detailed die pieces and the flowers too.
Step 2. Select the main outer die from the Sue Wilson shadow box collection ~ in the garden die set. Where you place it will be up to you depending on the depth of the frame required. I started with a ½ cm score line and then a 1cm score line then the frame die, but later on found out it works better with a ½ cm spacing on both. Also keeping the die up towards the side will allow 2 frames to be cut from the one sheet. Secure the die in place with some low tack tape.
Step 3. Run the piece through the Grand Calibur machine and then pass it back through again. Please make sure the die goes through lengthways as this will give a better cut to the piece. Now use the pink embossing mat, the tan mat & base plate to emboss the cut panel.
Step 4. Embossing will have brought out the amazing detail in the die. It`s optional but you make want to prick through the tiny `X`s to remove any small pieces of card that stayed in the design. I found it very therapeutic and it didn`t take long either.
Step 5. Score a line about 1cm out from the embossed ridge the frame left. Complete this all the way around the 4 sides.
Step 6. Decide which width you want the box height. I originally did a 1cm scoreline but ½ cm score line and then another ½ cm score for the tab that will sit under the box and hold it to the base card is needed. So go ahead and score 2 lines ½ cm apart from the just scored point.
Step 7. Trim away the excess card where the outside line falls.
Step 8. Here is the basic box frame shape.
Step 9. There is also enough card to make a 2nd enclosed box frame card with the off cut.
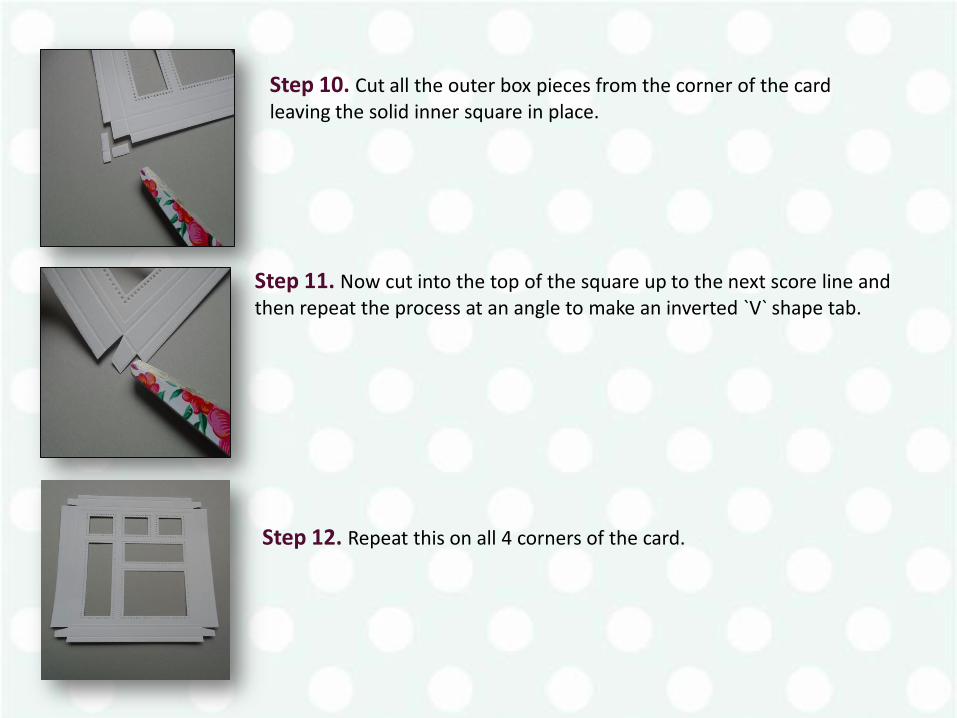
Step 10. Cut all the outer box pieces from the corner of the card leaving the solid inner square in place.
Step 11. Now cut into the top of the square up to the next score line and then repeat the process at an angle to make an inverted `V` shape tab.
Step 12. Repeat this on all 4 corners of the card.
Step 13. Here you can see all the pricked out detail of the `X`s made using the intricate die.
Step 14. Fold and crease up all the score lines including the corner tabs. You may want to do this step after the shaker section has been made but I prefer to do it first.
Step 15. Add a line of Cosmic Shimmer dries clear glue around the edge of the bottom square frame which will be used as the shaker section.
Step 16. Cut and place a piece of the acetate over the square making sure it stays within the frame border. Allow the glue to stick before carrying on.
Step 17. Use the off cut pieces that came from the frame to use as a guide when cutting the foam tape for the shaker section of this card, just make sure it`s a bit longer either end. Trim the foam tape down the centre to get the required size foam width needed.
Step 18. Attach it to the top and bottom of the frame.
Step 19. Complete the other 2 sides making sure that the foam tape meets together so it doesn`t allow any of the shaker contents to escape. Cut to size another white piece of card to be used to cover the seeds and seal them in later.
Step 20. I have added 2 rows of the foam tape to take up the depth of the seeds. Remove the backing from the foam tape and pour in the mustard seeds.
Step 21. Alternatively you can use the Creative Expressions black micro beads if you are using the poppy dies / stamps as these resemble the seeds of the poppy. This idea would also make a lovely remembrance card too.
Step 22. Place the white backing card over the mustard seeds to seal them all in. You may want that card slightly larger so it covers the sticky of the excess foam tape !!!!
Step 23. Turn the piece over to reveal the mustard seed shaker section of the box frame.
Step 24. Add some strong tape along the outer edge of the box tabs and also on the corner tabs.
Step 25. Remove the backing from the corner tabs before fixing them in place on the inside of the box sides. This will start to create the covered box side shape.
Step 26. Now fold the over sticky tape sides down as it is this piece which will stick the back to the base card.
Step 27. Turn the piece over to see the box frame taking shape.
Step 28. Lay the box frame onto a piece of kraft card and here you will see the frame sits perfectly over the inner Sue Wilson stitched lattice frame die and then cut and emboss the larger stitched die at the same time. (Remove the box before cutting the piece !!!) it`s just to show the sizing is correct if you use the 2 ~ ½cm score lines.
Step 29. This photo just shows the reduced side tabs as there were 1cm at the start of the project but that made it to deep for this project. I have left it in as it may be useful for another crafter to see how you can still save project.
Step 30. Remove the backing off the tape on the bottom of the box and stick the box onto the stitched kraft card panel. This effect saves using lots of foam tape and you don`t get to see the workings of the shaker section this way either.
Step 31. Trim the Foundations antique gold card to 7” x 8 ¼ “ or fold a tab and attach another piece of card to make a folded base card.
Step 32. Place the gold card onto a score board and score around the outer of the card and then repeat a smaller inner line a ¼ “ in, again all the way around.
Step 33. Add the larger kraft panel onto the base card using foam tape for added dimension.
Step 34. Add the already prepared box frame panels onto the base card using foam tape and just look at the depth created with 4 layers of card. The embossing, stitch effect and the box frame all play a part in the overall dimensional finish.
Step 35. Take a piece of A4 Foundations vellum and fold it in half, width wise. Cut a piece of sticky A4 sheet in half and remove the backing and stick it down on the inside of the vellum. Then fold the other side on top to create a lovely weighted piece of vellum. This is helps when gluing the die cut pieces onto the card as it`s harder to see the glue underneath yet still have the soft effect of the vellum.
Step 36. Select the flowers from the Sue Wilson delightful daisies die set and then add the small garden embellishment pieces from the shadow box collection ~ in the garden die set. IMPORTANTLY use low tack tape to secure the dies in place and so they do not move and cut into each other.
Step 37. Cut and then emboss the vellum through the Grand Calibur die cutting machine.
Step 38. Poke through the die to release the vellum and the lovely detail the embossing brings.
Step 39. Here are all the pieces cut in one pass.
Step 40. Poke the wings up on the small butterfly for added detail.
Step 41. Repeat the following so that the flowers can be decoupaged. Cut extra leaves, a butterfly a pot and a ladybird can be added.
Step 42. Cut and emboss another `Thank You` in the antique gold card so it can be shadowed.
Step 43. Add some Cosmic Shimmer dries clear glue onto the back of your hand and tap the vellum `Thank You` over the glue before off setting it over the gold `Thank You` sentiment.
Step 44. Place the different elements into the shadow box using some silicone glue for dimension. Lay the `Thank You` over the box above the seed shaker section. Add the delightful daisies so they are mainly stick at the bottom of the box and then the flower heads fall over the edge of the box. Decoupage some of the flower heads up.
Step 45. Cut one of the full flower daisies off the stem.....
Step 46. ........make a nice jute bow using the lightest jute from the natural twine bundle. Add the bow to the corner of the shaker box.
Step 48. Here is a close up of the twine bow which completes the seed shaker section.
Step 47. Add the daisy head to cover the knot of the bow. Add some of the Cosmic Shimmer pearl PVA glue to the centre of the whole daisy heads and then sprinkle some of the Tim Holtz distress dry rock candy glitter over the glue and tap off the excess.
Step 49. The vellum daisies climb up the bottom left hand box to compliment the garden theme.