1 ACCOUNTING MODULE #3 REVISED OCT 2014 DR. JOYCE K. BRYER – INDIANA UNIVERSITY NETSUITE TUTORIAL Module 3 – Item Creation and Purchasing Cycle (Purchase to Pay) Objectives In this module, you will Define a new item (product) Purchasing Cycle (Purchase to Pay) o Create a purchase order o Receive items o Bill a purchase order o Pay the bill o Print a check for the vendor Complete a hand-in homework assignment at the end of this tutorial If you make a mistake in this training environment, you may back out or delete your work or simply start over again. 3 – 1: Defining a Company Item In this exercise, you will define a new item/product. NetSuite defines items as both the physical products and the services that you sell to your customers. Items can also include supplies, gift certificates, kits, assemblies, and subcontracting fees. For this tutorial, we will only use the following item types: Inventory Items – Items that a company stocks and sells. Example: a bicycle. Service Items for Sale – Charges for a service your business performs that is billed to a customer. Example: charges for doing a tax return. Perform the following steps to add a new book as an inventory item. 1. Log in to your NetSuite account with your assigned Email address and your new password. 2. Navigate to Lists > Accounting > Items > New. 3. The New Item page displays. Select the Inventory Item link. 4. The New Inventory Item page displays.
Transcript
1
ACCOUNTING MODULE #3 REVISED OCT 2014 DR. JOYCE K. BRYER – INDIANA UNIVERSITY
NETSUITE TUTORIAL Module 3 – Item Creation and Purchasing Cycle (Purchase to Pay)
Objectives
In this module, you will Define a new item (product)
Purchasing Cycle (Purchase to Pay) o Create a purchase order o Receive items o Bill a purchase order o Pay the bill o Print a check for the vendor
Complete a hand-in homework assignment at the end of this tutorial
If you make a mistake in this training environment, you may back out or delete your work or simply start over again.
3 – 1: Defining a Company Item In this exercise, you will define a new item/product. NetSuite defines items as both the physical products and the services that you sell to your customers. Items can also include supplies, gift certificates, kits, assemblies, and subcontracting fees. For this tutorial, we will only use the following item types:
Inventory Items – Items that a company stocks and sells. Example: a bicycle. Service Items for Sale – Charges for a service your business performs that is billed to a customer. Example: charges for doing a tax return.
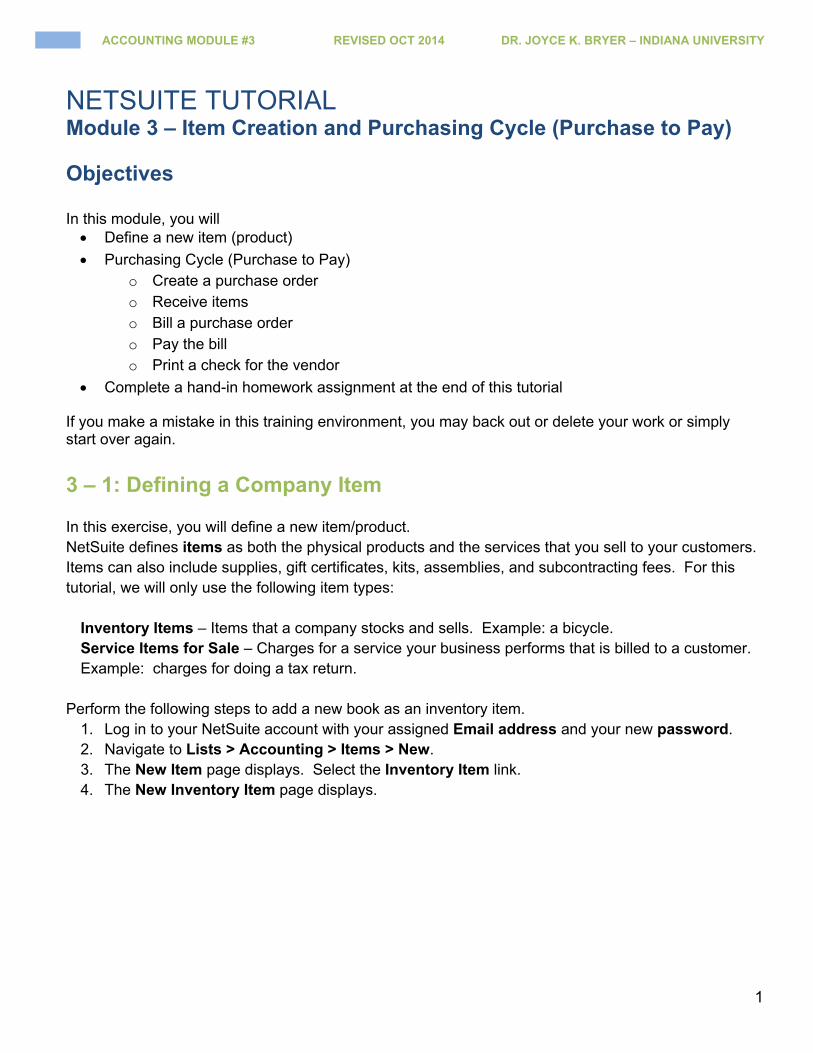
Perform the following steps to add a new book as an inventory item. 1. Log in to your NetSuite account with your assigned Email address and your new password. 2. Navigate to Lists > Accounting > Items > New. 3. The New Item page displays. Select the Inventory Item link. 4. The New Inventory Item page displays.
2
ACCOUNTING MODULE #3 REVISED OCT 2014 DR. JOYCE K. BRYER – INDIANA UNIVERSITY
5. Enter or select the following information. Some fields may already be filled in by default. Custom Form: Standard Inventory Part Form Item Name/Number: I Love Accounting Information Systems book Display Name/Code: I Love Accounting Information Systems book
6. On the Purchasing/Inventory tab, enter or select the following information:
Purchase Description: I Love Accounting Information Systems, Exciting Memoirs of an SEC Czar
Purchase Price: $14.99
7. Scroll down to Locations, enter or select the following information: Preferred Location: San Francisco Warehouse
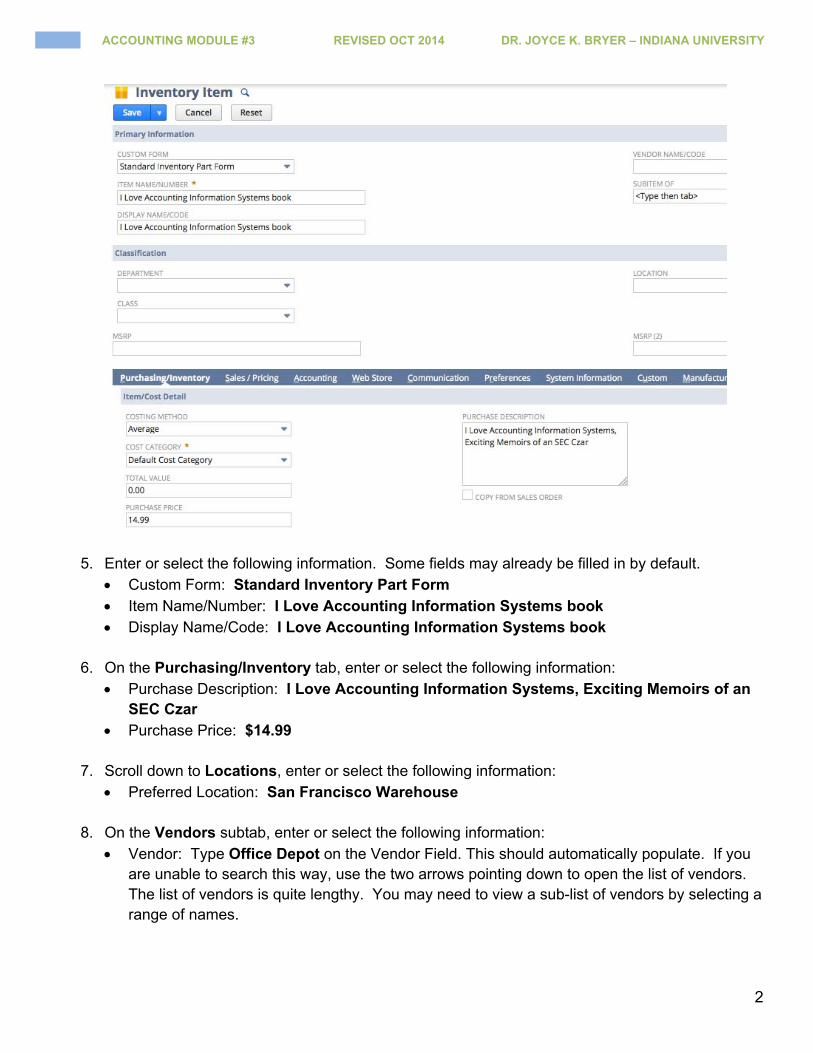
8. On the Vendors subtab, enter or select the following information:
Vendor: Type Office Depot on the Vendor Field. This should automatically populate. If you are unable to search this way, use the two arrows pointing down to open the list of vendors. The list of vendors is quite lengthy. You may need to view a sub-list of vendors by selecting a range of names.
3
ACCOUNTING MODULE #3 REVISED OCT 2014 DR. JOYCE K. BRYER – INDIANA UNIVERSITY
Preferred: Checked. Click the blank space on the Vendor line under Preferred. Click the little box that appears.
Click the Add button to add this vendor as the designated vendor for your new item.
9. On the Sales/Pricing subtab, enter or select the following information: Sales Description: Same as Purchase Description On the USA subtab, enter the Base Price: 29.99 Discount selling prices will automatically be
calculated when you exit this field.
4
ACCOUNTING MODULE #3 REVISED OCT 2014 DR. JOYCE K. BRYER – INDIANA UNIVERSITY
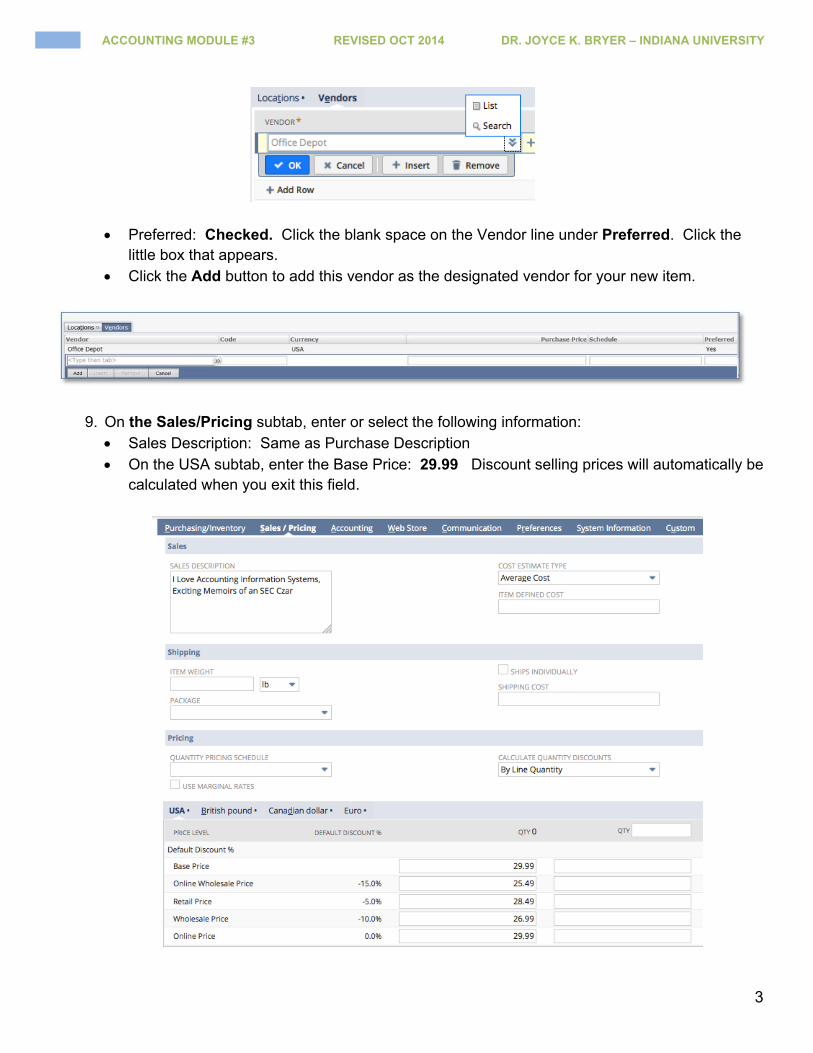
10. On the Accounting tab, enter or verify the following information: COGS Account: Cost of Goods Sold Asset Account: Inventory Asset Income Account: Select 4002 Sales: Sales - Merchandise from the drop down list of
accounts. Taxable: Not Checked. This is checked if any customer could pay sales tax on this item.
Whether or not an individual customer does pay sales tax is controlled by the customer record.
11. Click the Save button to save your new item. 12. Verify that your item has been correctly added by going to Lists > Accounting > Items. Select
your new item and click Edit or View. If you do not see your new item, make sure that the appropriate item type is selected in the footer. A faster method would be to select your new item from the Recent Records portlet on your Dashboard.
5
ACCOUNTING MODULE #3 REVISED OCT 2014 DR. JOYCE K. BRYER – INDIANA UNIVERSITY
3 – 2: Setting Accounting Preferences for Purchase Orders In this exercise you will enter accounting preferences for your NetSuite account that will be used when purchasing your items. You may ignore accounting preferences that are not specifically addressed in the instructions.
1. Navigate to Setup > Accounting > Accounting Preferences. The Accounting Preferences page displays.
2. Select the Order Management tab. In the Receiving section set the following parameter. Bill in Advance of Receipt: Not Checked. If this option is enabled, purchase orders would
automatically be converted into billed purchase orders (vendor invoices) before any items are received, which would be risky.
3. Click the Save button.
3 – 3: Creating a Purchase Order In this exercise, you will create a purchase order to purchase copies of your new item. NetSuite allows considerable flexibility to customize the purchasing process based upon each company’s business requirements. For this exercise, the purchasing process will include creating a purchase order, receiving items, billing a purchase order (approving payment), paying a vendor, and printing a check. This is also called the “Purchase to Pay” process.
You are now the purchasing agent, and you will enter a purchase order to buy AIS books from the vendor. If you discover that you make a mistake after you create your purchase order, you can re-edit the purchase order or delete it and start over again.
1. Navigate to Transactions > Purchases/Vendors > Enter Purchase Orders. The New Purchase Order page opens.
6
ACCOUNTING MODULE #3 REVISED OCT 2014 DR. JOYCE K. BRYER – INDIANA UNIVERSITY
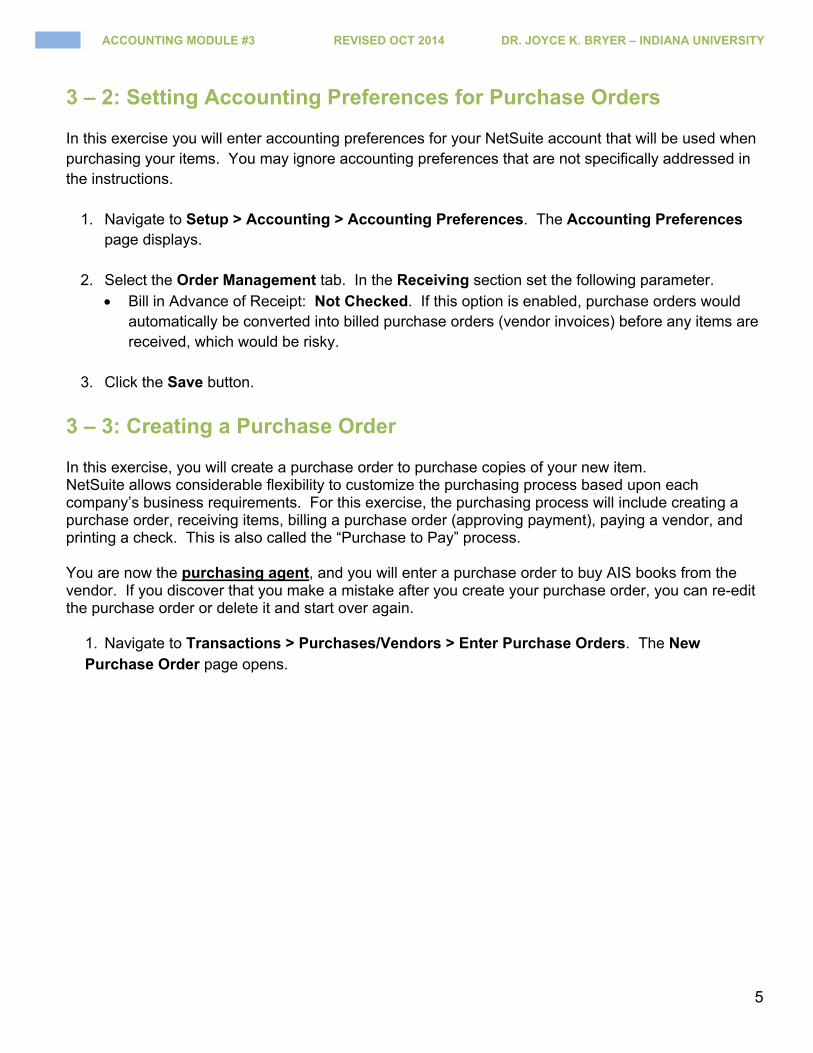
2. Enter or select the following information.
Custom Form: Ramsey PO Form
Vendor: Office Depot
Date Required: This is the date that you want the books delivered. Use the pop up calendar and enter a date two weeks from today.
Note that the current date and purchase order number are automatically entered on the form.
Location: San Francisco Warehouse
3. On the Items tab, enter the following information.
Item: I Love Accounting Information Systems book
Quantity: 30 $449.70 is automatically calculated (30 x $14.99) and entered into the Amount field.
Click the Add button to add this item.
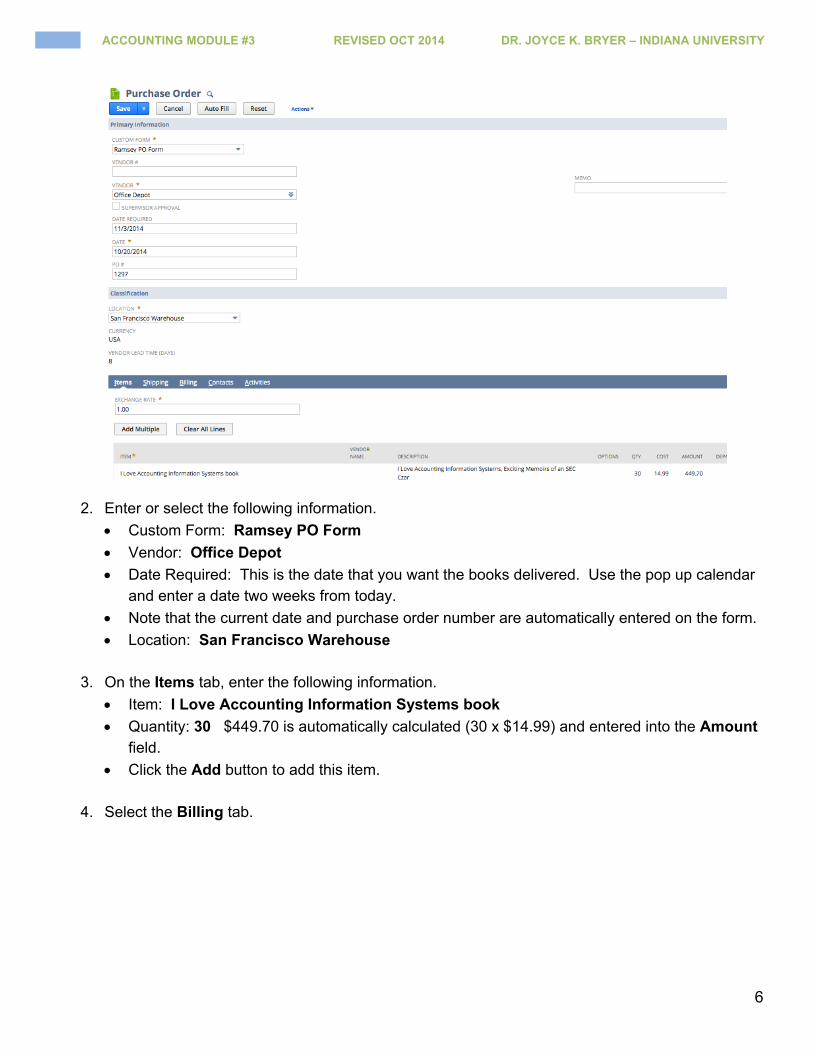
4. Select the Billing tab.
7
ACCOUNTING MODULE #3 REVISED OCT 2014 DR. JOYCE K. BRYER – INDIANA UNIVERSITY
Terms: 1% 10 Net 30
If the Billing Address for the vendor is blank or Unnamed Address, you can easily enter the vendor’s billing address without going to the vendor record. In the Vendor Select field, select New. A New Address window appears. Enter the address as 123 This Street, Kansas City, Kansas 66102.
Click the Save button on this pop up window to add the vendor address to this purchase order. This will also add the address to the vendor record.
8
ACCOUNTING MODULE #3 REVISED OCT 2014 DR. JOYCE K. BRYER – INDIANA UNIVERSITY
5. When your purchase order is complete, click the Save button to save the purchase order. The Purchase Order page opens showing your new purchase order. Note that the status in the upper right corner is Pending Receipt. The status field is very important since it reflects where the order is in the purchasing process.
6. You do not have to print the purchase order for this tutorial. However, you will need to print
documents for your homework assignment in which case do the following:
Click on the Print icon. This icon is located at both the top and the bottom of the page.
The purchase order is displayed in Adobe Acrobat PDF format in a new browser tab.
Right-click on the page and select Print.
Close this browser tab and return to NetSuite.
7. If you need to retrieve this purchase order at a later time, you can access it by going to Transactions > Purchases/Vendors > Enter Purchase Orders > List and selecting your purchase order. Remember, a faster method would be to select your purchase order from the Recent Records portlet on your Dashboard.
3 – 4: Receiving Items on a Purchase Order
In this exercise, you are the receiving clerk in the warehouse, and you will receive the books that you ordered. Let’s assume that the purchase order was sent a week ago to the vendor and your books have now arrived at the loading dock at the San Francisco warehouse.
1. Navigate to Transactions > Purchases/Vendors > Receive Orders. The Receive Order page opens listing all of the purchases orders that are pending receipt.
2. Locate the purchase order you created and click on the Receive link. (An alternate method would be to navigate to the Recent Records portlet on your Dashboard, select (do not edit) your purchase order, and click on the Receive button.)
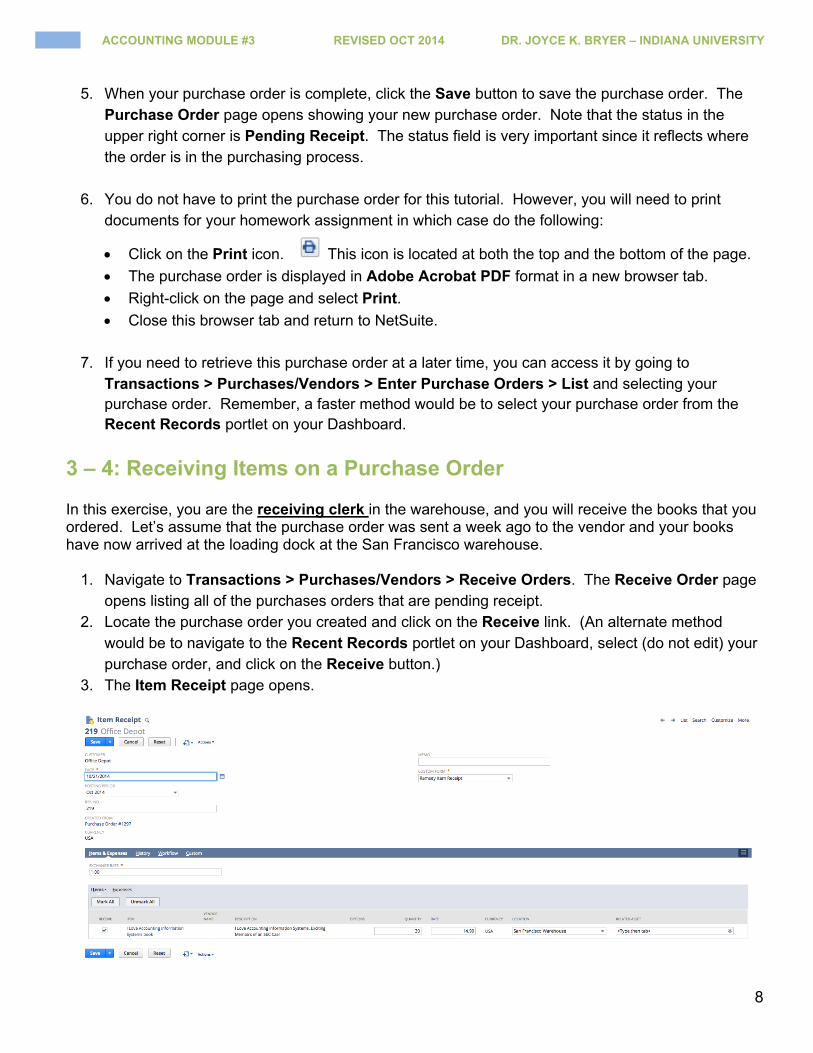
3. The Item Receipt page opens.
9
ACCOUNTING MODULE #3 REVISED OCT 2014 DR. JOYCE K. BRYER – INDIANA UNIVERSITY
4. Enter or verify the following information in the Items & Expenses tab, Items subtab:
Receive: Checked
Quantity: 30 (If you received fewer than 30 books, this would be a partial receipt. You would change the quantity to the amount actually received. Your purchase order would then have outstanding line items and/or quantities. The purchase order’s status would be changed to Pending Billing / Partially Received or Open Purchase Order until all items have been received.)
Location: San Francisco Warehouse 5. Click the Save and Bill button. 6. The status of the purchase order is now Pending Bill.
3 – 5: Billing a Purchase Order
In the previous exercises you created a purchase order and received the items. In this exercise you are the accounts payable manager, and you will bill the purchase order. This means that you are going to approve the purchase order for payment and a credit will be posted to accounts payable. This step has traditionally been performed after the vendor invoice has been received. In today’s business world, receiving the vendor invoice is not a requirement.
1. Navigate to Transactions > Purchases/Vendors > Bill Purchase Orders. The Bill Purchase Orders page opens.
2. Locate the purchase order that you created and click on the Date link. The Purchase Order page
opens. Again, a faster way to navigate to this page would be to click on your purchase order from your Recent Records portlet on your Dashboard.
3. As stated previously, the purchase order’s status will tell you whether all items on the purchase
order have been received. For additional information about the receipt(s), you can click on the Related Records tab and Receipts & Bills subtab. All activity associated with this purchase order will be listed. If necessary, you can then click the Item Receipt date to view the Item Receipt page for more details.
4. After verifying that the items and quantities are correct (and match those on the vendor invoice),
click the Bill button. The Bill page opens.
10
ACCOUNTING MODULE #3 REVISED OCT 2014 DR. JOYCE K. BRYER – INDIANA UNIVERSITY
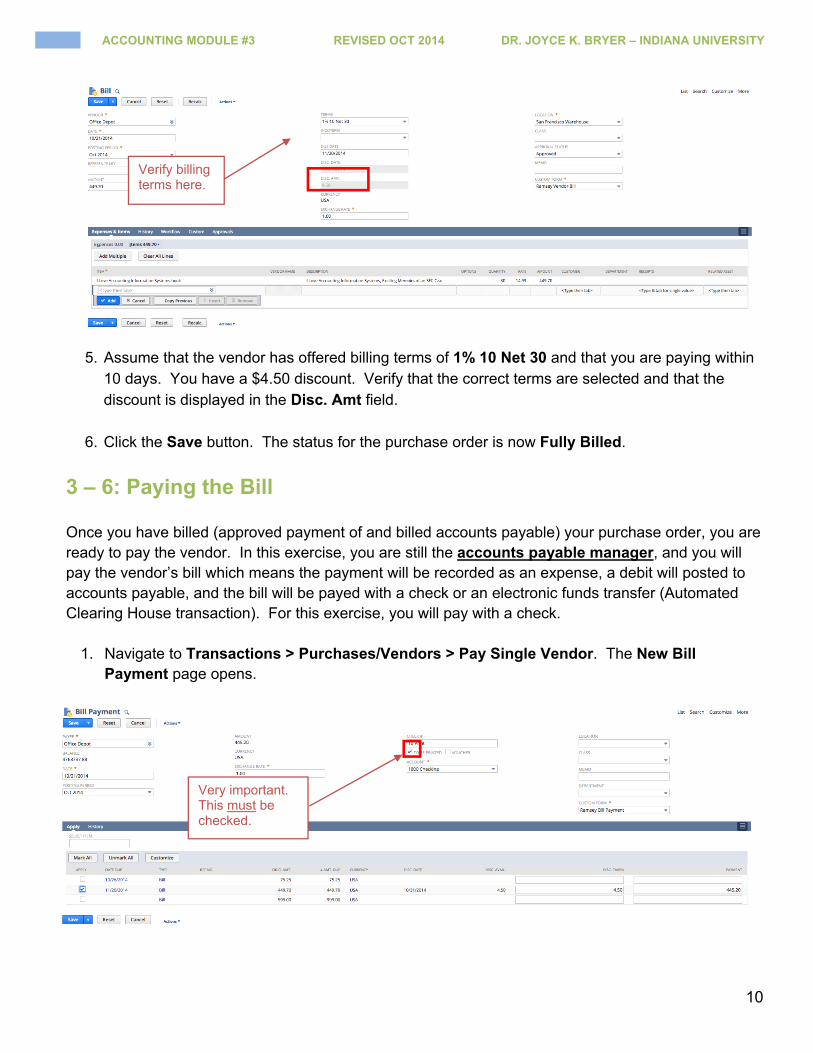
5. Assume that the vendor has offered billing terms of 1% 10 Net 30 and that you are paying within
10 days. You have a $4.50 discount. Verify that the correct terms are selected and that the discount is displayed in the Disc. Amt field.
6. Click the Save button. The status for the purchase order is now Fully Billed.
3 – 6: Paying the Bill Once you have billed (approved payment of and billed accounts payable) your purchase order, you are ready to pay the vendor. In this exercise, you are still the accounts payable manager, and you will pay the vendor’s bill which means the payment will be recorded as an expense, a debit will posted to accounts payable, and the bill will be payed with a check or an electronic funds transfer (Automated Clearing House transaction). For this exercise, you will pay with a check.
1. Navigate to Transactions > Purchases/Vendors > Pay Single Vendor. The New Bill Payment page opens.
Verify billing terms here.
Very important. This must be checked.
11
ACCOUNTING MODULE #3 REVISED OCT 2014 DR. JOYCE K. BRYER – INDIANA UNIVERSITY
2. Select Office Depot from the drop down list as the Payee. 3. Check the To Be Printed box. 4. Verify that the Account field is 1000 Checking. 5. On the Apply tab, check the Apply box next to your bill payment to Office Depot. The payment
amount should be $445.20 ($449.70 - $4.50). Note: If you have multiple outstanding bills for the same vendor, you could select all the bills and make a single payment.
6. Click the Save button.
3 – 7: Printing a Check for the Vendor Once you have payed the bill (posted expenses and payments) for your purchase order, you will want to print out a check to be sent to the vendor. In this exercise, you are now the cashier, and you will print a check that is payable to the vendor. Checks are usually printed in a batch mode using special pre-printed check forms periodically during the month. These check forms should be stored in a secure place.
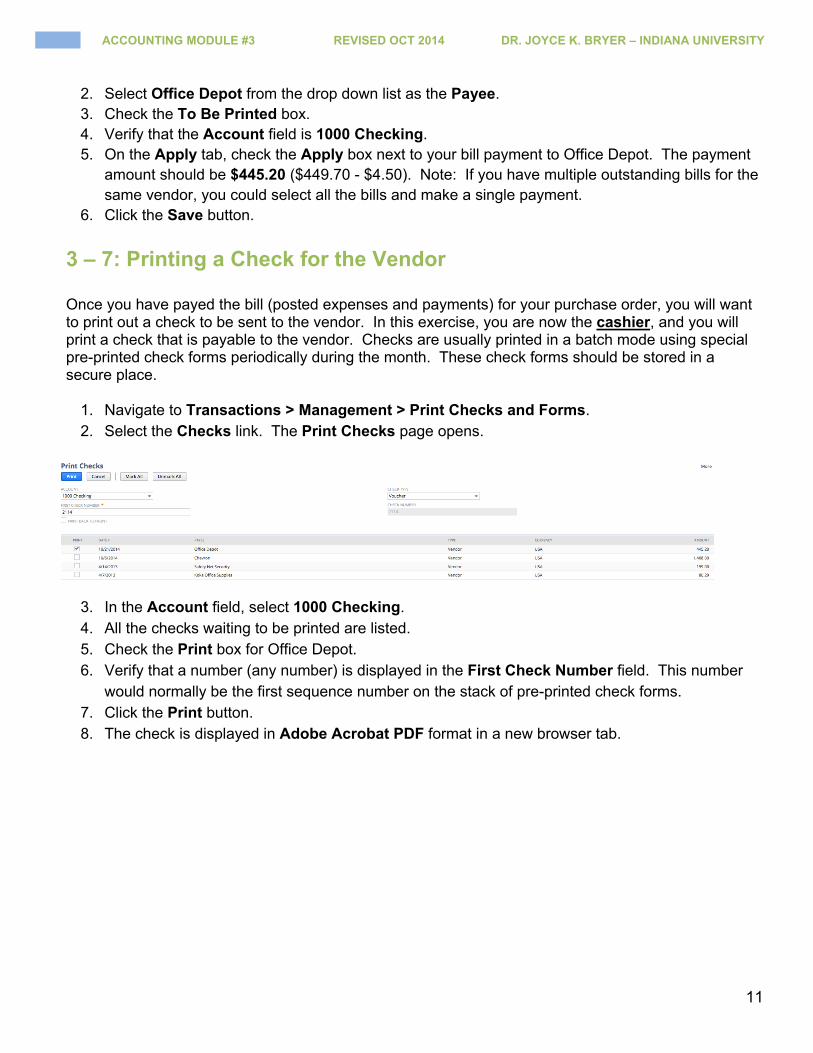
1. Navigate to Transactions > Management > Print Checks and Forms. 2. Select the Checks link. The Print Checks page opens.
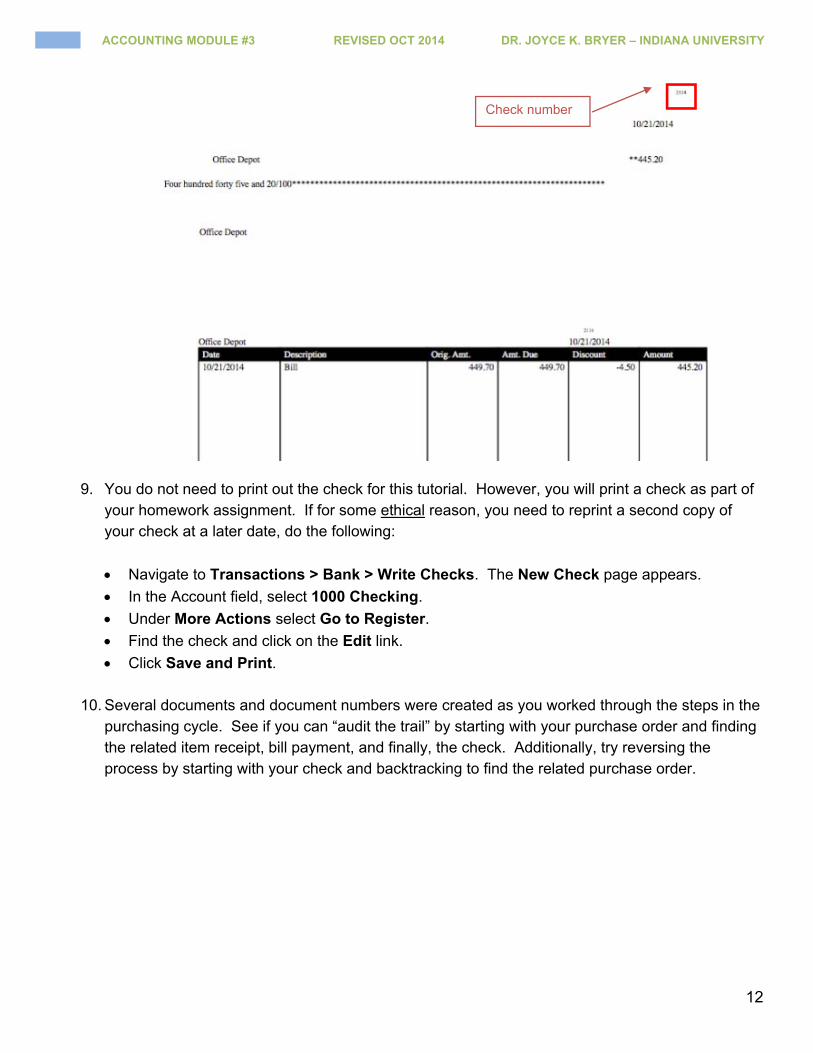
3. In the Account field, select 1000 Checking. 4. All the checks waiting to be printed are listed. 5. Check the Print box for Office Depot. 6. Verify that a number (any number) is displayed in the First Check Number field. This number
would normally be the first sequence number on the stack of pre-printed check forms. 7. Click the Print button. 8. The check is displayed in Adobe Acrobat PDF format in a new browser tab.
12
ACCOUNTING MODULE #3 REVISED OCT 2014 DR. JOYCE K. BRYER – INDIANA UNIVERSITY
9. You do not need to print out the check for this tutorial. However, you will print a check as part of your homework assignment. If for some ethical reason, you need to reprint a second copy of your check at a later date, do the following:
Navigate to Transactions > Bank > Write Checks. The New Check page appears.
In the Account field, select 1000 Checking.
Under More Actions select Go to Register.
Find the check and click on the Edit link.
Click Save and Print.
10. Several documents and document numbers were created as you worked through the steps in the purchasing cycle. See if you can “audit the trail” by starting with your purchase order and finding the related item receipt, bill payment, and finally, the check. Additionally, try reversing the process by starting with your check and backtracking to find the related purchase order.