Setting Up Your Telephone A Quick Tour of Your Telephone Answering and Placing Calls Features to Make You More Productive Using IntraMail Voice Mail Empowered by Innovation Super Display Telephone User Guide 1093056 A50-006191-002 Rev 1, July 31, 2009 Printed in Thailand This guide is for DSX Version 3 To show the software level on your display: ● Press INTERCOM + Dial #*#*.
Transcript
Sett
ing
Up
Your
Tele
phon
eA
Qui
ck T
our
ofYo
ur T
elep
hone
Answ
erin
g an
dPl
acin
g Ca
llsFe
atur
es t
o M
ake
You
Mor
e Pr
oduc
tive
Usi
ng In
traM
ail
Voic
e M
ail
Empowered by Innovation
Super Display TelephoneUser Guide
1093056A50-006191-002
Rev 1, July 31, 2009Printed in Thailand
This guide is for DSX Version 3To show the software level on your display:● Press INTERCOM + Dial #*#*.
1093056_rev1-09.qxd 7/31/09 3:23 PM Page 1
Installing the Handset And Line Cord
Adjusting the Two-Position Viewing Angle
When installing the handset:1. Plug the handset cord into the handset jack on the
bottom of the telephone.2. The handset cord routes through the lower channel
on the right side of the telephone base. 3. The line cord does not use a channel and drapes
down from the telephone line cord jack or connectsto the telephone legs.
To set the low viewing angle position:1. Fold the legs all the way back.
To set the high viewing angle position:1. Flip up the two leg supports.2. Fold the legs back until the supports contact the base.
2
1093056_rev1-09.qxd 7/31/09 3:23 PM Page 2
Removing and Reinstalling the FaceplateTo remove the faceplate (if installing a custom DESI label):
1. Put your finger in the recessed area under thefaceplate and lift off the faceplate.
To reinstall the faceplate:1. Remove the old label, then insert the customized
replacement DESI label.2. Press down on the faceplate as shown.
3
Sett
ing
Up
Your
Tele
phon
e
How To Use This GuideWhen using the instructions in this user guide, you:
1. Dial a digit on the key pad. For example:– Dial 9.
2. Press a Feature Key or Fixed Function Key. For example:– Press INTERCOM.
3. Push a soft key. For example:– Push Callbackand hang up.
See A Quick Telephone Tour on the next page for a quick tour of your telephone’s layout and keys.
1093056_rev1-09.qxd 7/31/09 3:23 PM Page 3
Your Feature Keys
the Display and Soft KeysAlphanumeric Display● While your phone is idle, the display shows:
– The date and time, your name (see page 13), and your extension number.● While your phone is ringing, the display shows:
– (If an Intercom call) Your caller’s name.– (If an outside call with Caller ID) The name and number of the incoming caller.
● While you are on a call, the display shows:– Your caller’s name and number (if Caller ID is provided).– The functions of the soft keys that help you handle your call.
● To adjust your display, pushMenu+Display+Contrast, MinBrightness,MaxBrightness, orAuto Backlight. Volume adjusts the level.
Soft Keys– Use soft keys instead of dialing feature codes when handling your calls.Menu Push to set up features on your phone (such as Call Forwarding).Directory Push to call a co-worker by selecting their name.V-Mailxx Push to call your voice mailbox (xx = number of new messages).Callsxx Push to review your Caller ID log (xx = number of new calls).Page Push to Page (all zones or a single zone).Spd Dial x Push to access your Personal Speed Dial.To customize your keys, see Programmable Idle Menu Soft Keys on Page 14.
● Press a line key to place or answer an outside call.– Line keys flash while ringing and are on steady when busy. – Your line key calls are green while co-workers’ calls are red.– Your line keys are normally located on the first two rows of Feature Keys.
● To make a Hotline key for a co-worker’s extension:– Push Menu+ KeyAssignment+ Feature Keys+ Press Feature Key +Select+ <<or >> to scroll to Hotline + Select+ Dial co-worker’s extension number + Save+ Exit to exit. (See theTelephone Feature Handbook for more Feature Key types you can set up.)
● Press a Hotline Key to call or Transfer your call to a co-worker:– If you’re not on a call, pressing the Hotline Key places an Intercom call to your co-worker.– While on the call, press the Hotline Key to Transfer. (The key lights red while your co-worker is busy, flashes red if in DND.)
● To check your Feature Key assignments: Press CHECK, then the Feature Key.
1093056_rev1-09.qxd 7/31/09 3:23 PM Page 4
Setting Up Your Speed Dial Bin Keys
Using the Fixed Function Keys
Understanding the Ring/Message Lamp
5
A Q
uick
Tou
r of
Your
Tel
epho
ne
●● TRANSFER– Press + Dial co-worker’s extension to Transfer your call.– Press + Dial co-worker’s extension + press V-MAIL to
transfer call to their mailbox.●● FLASH
– Lets you access features of your outside lines, such as callwaiting (if provided).
●● REDIAL– To redial your last outside call, press REDIAL.– To select one of your last 5 calls to redial, press
REDIAL + Soft key for the call.●● MUTE
– While on a call, MUTE turns off your handset orHandsfree microphone.
●● SPEAKER– Press to use Handsfree. Lift the handset for privacy.– While on a handset call, press twice for Group Listen.
●● VOLUME– Adjusts display contrast while idle, ring volume while
ringing, or music volume if Background Music is on.– While on a call, adjusts the call volume.
●● INTERCOM– Press and dial a co-worker’s extension number.– On (green) while talking to voice mail or a co-worker.– Flashes (green) during a Transfer or while an Intercom
call is on Hold.●● V-MAIL
– Calls your voice mailbox.– On (green) while you call your mailbox.– Flashes (red) during Call Screening broadcast.
●● DND– Enables Do Not Disturb (when you don’t want to be
interrupted). Soft key selects mode.– On (red) when Do Not Disturb is enabled.
●● CONF– While on a call, press to set up a Conference.– On (green) while on a Conference.– Flashes (green) if you put Conference call on Hold.
●● HOLD– Puts your call on Hold.– While idle, turns Background Music on and off.
The Ring/Message Lamp– Two quick flashes (green): You have new (unreviewed) calls in your Caller ID log.– Slow flash (green): A call is ringing your phone.– Fast flash (red): There are new voice mail messages in your mailbox.
● To store a Personal Speed Dial number:– Push Menu+ SpeedDial+ Select Personalor Company+ Choose 01-20 (Personal) or 001-999 (Company) +Select+ Choose type + Line or group (if required) + Next+ Enter number to call + Next+ Enter name (see page 13)+ Save+ Exitto exit.
● To call the stored number: – Push SpeedDialxthen soft key. (See the Telephone Feature Handbook for more.)
1093056_rev1-09.qxd 7/31/09 3:23 PM Page 5
6
Outside CallsTo answer an outside call:
1. Lift the handset.2. If you are not automatically connected, press flashing line key.
– If you hear a call ringing a co-worker, dial ** and their extension number to pick it up.
To place an outside call:1. Press a line key (normally located on your first two rows of Feature Keys).2. Wait for outside dial tone, then dial your outside number.
OR1. Press INTERCOM.2. Dial 9.
– You may also be able to dial other codes (such as 101 or #901 for outside line 1).3. Wait for outside dial tone, then dial your outside number.
To use Last Number Redial to quickly redial your outside call:1. To redial your last outside call, press an idle (unlit) line key.2. Wait for outside dial tone, then press REDIAL.
OR1. To select a call from the last 5 you dialed, press REDIAL.2. Press the soft key for the call you want to dial.
To return a call in your Caller ID log:1. Push Calls xx+ View All.2. Press a VOLUME key until the call you want to return is displayed.3. Push Callback.
– If the number does not dial out, press a soft key to select a number from the displayed list.
To place a Personal Speed Dial call:1. Push Spd Dial x.2. Press the soft key for the number you want to dial.
To call a number stored in a system-wide Speed Dial bin:1. Press INTERCOM.2. Dial # + 201 -299 (corresponding to System Speed Dial entries 001-099).
1093056_rev1-09.qxd 7/31/09 3:23 PM Page 6
7
Answ
erin
g an
dPl
acin
g Ca
lls
To answer an Intercom call from a co-worker:1. Do one of the following:
– If you hear two beeps, speak toward your phone.– If you hear Intercom ringing, lift the handset.
To dial a co-worker over the Intercom:1. Press INTERCOM.2. Dial your co-worker’s extension number.
– If you hear Intercom ringing, wait for your co-worker to answer.– If you hear two beeps, your call has voice-announced. Go ahead and speak.– If you hear a single beep, your call has voice-announced but your co-worker has their handsfree
microphone muted (turned off).3. (Optional) To make a voice-announced Intercom call ring, dial 1 after the beeps.
To call a co-worker using a Hotline Feature Key:1. Press the Hotline key.
– The Hotline key is off when your co-worker is idle, on if busy, and flashing if in Do Not Disturb.– See the Telephone Feature Handbook for more Feature Key types you can set up.
If the co-worker you call is busy:1. For Camp-On, push CampOnand wait on the line for them to become free.
OR1. For Callback, push Callbackand hang up.2. Wait for the system to call you back, then answer to have your call automatically go through.
To Page a co-worker over the telephone speakers:1. Push Page.2. Push Zonex for the zone you want to call (1-7) or All for All Call Page.
To leave a message for a co-worker:1. Call your co-worker on the Intercom, then press V-MAIL.
To call your own mailbox:1. Press V-MAIL or push V-Mailxx.
Intercom Calls To And From Co-Workers
1093056_rev1-09.qxd 7/31/09 3:23 PM Page 7
8
Place A Call On Hold
Transfer A Call To A Co-worker
To place your call on System (Regular) Hold:(Your co-workers can pick up calls you place on System Hold.)1. Press HOLD.
– While your outside call is on Hold, the line key will flicker (green).– While an Intercom call is on Hold, your INTERCOM key will flicker (green).– A call you leave on Hold too long will recall to you. If you don’t answer the recall from an outside
call, it will then ring your co-workers.– Your co-workers cannot pick up an Intercom call you place on Hold.
To place your outside call on Exclusive Hold:(Your co-workers cannot pick up calls you place on Exclusive Hold.)1. Press HOLD twice.
To pick up an outside call on Hold:1. Press the flashing line key.
To pick up an Intercom call on Hold:1. Press the flashing INTERCOM key.
To Transfer your call to a co-worker:(If you have a Hotline Feature Key for your co-worker, you may be able to press it and skip to step 3.)1. While on a call, press TRANSFER.
– To Transfer the call directly to your co-worker’s mailbox, press V-MAIL before going to step 2.2. Dial your co-worker’s extension number.3. Do one of the following:
– If you did not press V-MAIL after step 1, you can alternately press it here to send the call toyour co-worker’s mailbox.
– Announce the call and hang up.– Hang up to have the Transfer go through unannounced.
4. The transferred call will recall to you if it is not picked up.– If you don’t answer the recall, the call will ring your co-workers.
1093056_rev1-09.qxd 7/31/09 3:23 PM Page 8
9
Feat
ures
to
Mak
e Yo
uM
ore
Prod
uctiv
e
To set up a telephone meeting:1. Place or answer your first call (Intercom or outside caller) + Press CONF.2. Place or answer your next call (Intercom or outside caller) + Press CONF.3. Press CONF again to set up the Conference.
– Repeat step 2 to add additional callers to your Conference.– If you hear an error tone after trying to add another party, your Conference is full.– To place a Conference on Hold, press HOLD. To reinstate the Conference, press CONF.– If you Conference with two outside callers, you may be able to hang up and have them continue
their conversation in an Unsupervised Conference.
Set Up A Conference (Telephone Meeting)
Forward Calls To A Co-Worker or Voice MailTo forward (reroute) your calls to a co-worker or voice mail:
1. While idle, push Menu+ Call Forward.– Your display shows the current Call Forward setup, if forwarding is On or Off, or None if disabled.
2. Push Onto turn forwarding on, Offto turn forwarding off, or Editto change the Call Forward setup:– Immediate for Call Forwarding Immediate.– Ring No Answer for Call Forwarding when Not Answered.– Busy No Answer for Call Forwarding when Busy or Not Answered.– Off-Premise for Call Forwarding Off Premises.– Display Message for Selectable Display Messaging.– AME for Answering Machine Emulation.– None to cancel the current setup.
3. Push the soft key for the forwarding type you want to set up, then follow the on-screen guidance toenter the options. When setting the destination:
– Dial a co-worker’s extension number or 0 for the operator.– Press V-MAIL to forward your calls to your mailbox.
4. Push Save to save your entries, then Exit to exit.– Call Forwarding will only forward outside calls that directly ring your phone (such as calls trans-
ferred from a co-worker or from your Automated Attendant).– See the Telephone Feature Handbook for more on the Call Forwarding options.
1093056_rev1-09.qxd 7/31/09 3:23 PM Page 9
10
Change Your Ring TonesTo change the ring tones on your phone:
(See the Telephone Feature Handbook for more on Distinctive Ringing.)1. Push Menu+ Ringing+ KeyAssignments+ ToneAssignments, or ToneConfiguration.
– Key Assignments enables you to set the ringing mode for Line Keys, Call Coverage Keys, andCall Pickup Keys. After selecting a key type, press an illuminated key repeatedly to set the ring-ing mode. The available ringing modes are Always, Night Ring, Delay Ring, and Lamp Only.
– Tone Assignments allows you to assign a ring type to the Day Ring, Night Ring, and Delay Ringringing modes. You can choose between Line Setting (default), Line-Type “A”, Line-Type “B”, and“Line-Type C”. (See the next step to configure the tones for types A, B, and C.)
– Tone Configuration lets you set up the specific tone of the Intercom, Ring Groups, Recall, Line-Type “A”, Line-Type “B”, and Line-Type “C” ring types. For each type, you can select one of 10preset tones (0-9). You can also use this option to set the tones back to factory default.
Dialing By Name (Directory Dialing)To dial a co-worker or outside call by selecting from a group of names:
1. Push Directory.2. Select a Directory Dialing type:
– To call a co-worker, push Extension.– To call a Personal Speed Dial number, push Personal.– To call a System Speed Dial number, push Company.
3. To scroll, push Previousor Next to scroll through selected lists.To search, start dialing letters for the name. The search will narrow as you enter additional letters.
4. Push Dial to call the displayed name.– Alternately push Exit to exit.
1093056_rev1-09.qxd 7/31/09 3:23 PM Page 10
11
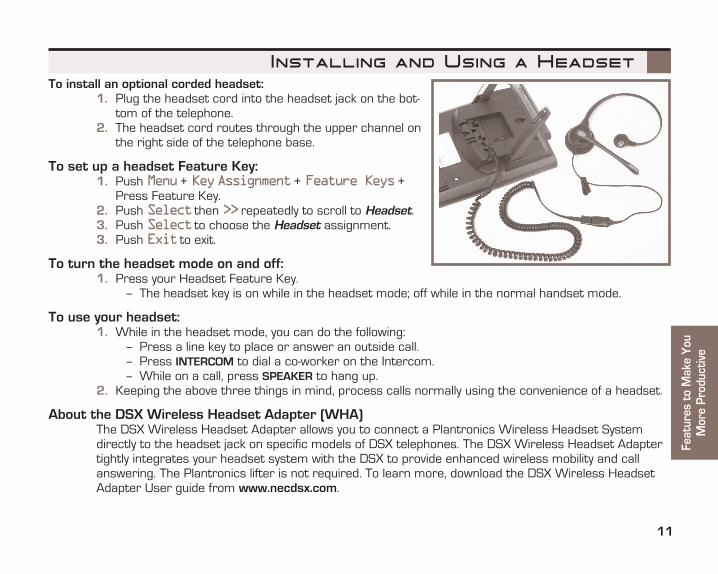
To install an optional corded headset:1. Plug the headset cord into the headset jack on the bot-
tom of the telephone.2. The headset cord routes through the upper channel on
the right side of the telephone base.
To set up a headset Feature Key:1. Push Menu+ KeyAssignment+ Feature Keys+
Press Feature Key.2. Push Select then >>repeatedly to scroll to Headset.3. Push Select to choose the Headset assignment.3. Push Exit to exit.
To turn the headset mode on and off:1. Press your Headset Feature Key.
– The headset key is on while in the headset mode; off while in the normal handset mode.
To use your headset:1. While in the headset mode, you can do the following:
– Press a line key to place or answer an outside call.– Press INTERCOM to dial a co-worker on the Intercom.– While on a call, press SPEAKER to hang up.
2. Keeping the above three things in mind, process calls normally using the convenience of a headset.
About the DSX Wireless Headset Adapter (WHA)The DSX Wireless Headset Adapter allows you to connect a Plantronics Wireless Headset Systemdirectly to the headset jack on specific models of DSX telephones. The DSX Wireless Headset Adaptertightly integrates your headset system with the DSX to provide enhanced wireless mobility and callanswering. The Plantronics lifter is not required. To learn more, download the DSX Wireless HeadsetAdapter User guide from www.necdsx.com.
Installing and Using a Headset
Feat
ures
to
Mak
e Yo
uM
ore
Prod
uctiv
e
1093056_rev1-09.qxd 7/31/09 3:23 PM Page 11
12
Using a DSS ConsoleFor more call handling power and flexibility, the DSS Console provides 60 additional Feature Keys as well asthree Speed Processing Keys along the bottom. (For more on setting up Feature Keys, see the TelephoneFeature Handbook.)
To use the Speed Processing Keys:The ANSWER Key
1. Press ANSWER to answer any call ringing your phone.The RELEASE Key
1. Press RELEASE to hang up (disconnect) your call.The TRANSFER Key
1. Press TRANSFER to transfer your call instead of using the key on your telephone.
If you are an attendant, you have the following unique features:Barge In
You can break into a co-worker’s active call.Direct Line Access
Dial a code to directly access a specific outside line.Forced Line Disconnect
Disconnect a busy line in an emergency or if the line won’t hang up.Line Queuing / Line Callback
Dial a code to wait for a busy outside line to become free.Night Service / Night Ring
Manually put the system in the night mode (for after-hours answering). This requires a Night Feature Key.Removing Lines and Extensions from Service
Remove problem lines and extensions from service – and return them to service once corrected.(See the Telephone Feature Handbook for more on these features.)
Special Features for Attendants
1093056_rev1-09.qxd 7/31/09 3:23 PM Page 12
13
Feat
ures
to
Mak
e Yo
uM
ore
Prod
uctiv
e
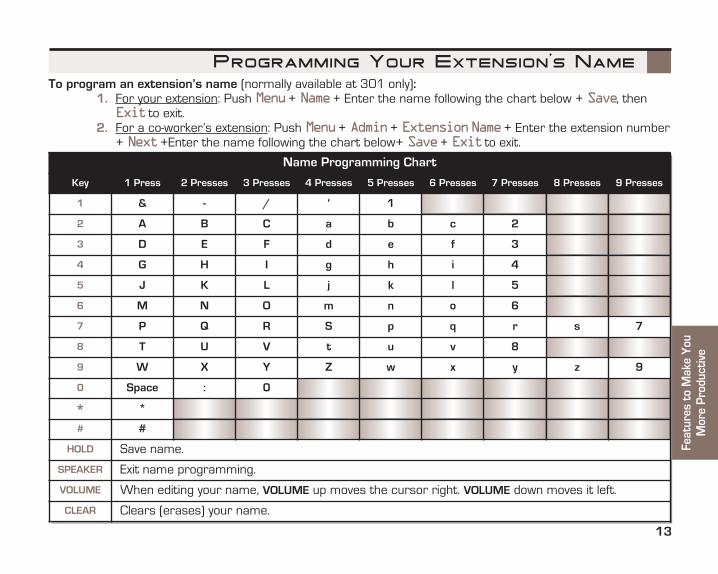
Programming Your Extension’s Name To program an extension’s name (normally available at 301 only):
1. For your extension: Push Menu+ Name+ Enter the name following the chart below + Save, thenExit to exit.
2. For a co-worker’s extension: Push Menu+ Admin+ ExtensionName+ Enter the extension number+ Next+Enter the name following the chart below+ Save+ Exit to exit.
VOLUME When editing your name, VOLUME up moves the cursor right. VOLUME down moves it left.
CLEAR Clears (erases) your name.
1093056_rev1-09.qxd 7/31/09 3:23 PM Page 13
When using Menu: Previousand Nextscroll options, Selectdrills down to entry, <<and >>scroll entries, and Savesaves entry.–To exit the Menusoft key options at any time, press the flashing (green) SPEAKER key or Exit.
Menu+Volume
Volume Preferences ● Ring, ● OffhookRing, ● PagePush Downor Up to adjust the selected option.
Menu+Display
Display Preferences ● Contrast, ● MinBrightness, ● MaxBrightness, ● AutoBacklightPush Downor Up to adjust the selected option.
Menu+Features
Feature Preferences ● VoiceAnnounce, ● HandsfreeReply, ● AutoCallTimer, ● HotDialpad,Push More, then: ● IlluminatedDialPad, ● IncomingPage, ● RingingLinePref,● OffhookSignal, ● AutoCallScreen,For the selected option, push On (to enable) or Off (to disable).
Menu+Ringing
Ring Preferences(Tone Assignments
is normally off.)
● Key Assignments, ● ToneAssignments, ● ToneConfigurationFor Key Assignments: Push Line, CallCoverage, or Pickup+ Press lit key for type.For Tone Assignment: Select mode + Select type + Backor Exit.For Tone Configuration: Select type + Dial tone (0-9) + Save.
Menu+ KeyAssignment
Key Assignments ● FeatureKeys, ● PrimelineKeys, ● Softkeys, ● DSS/BLF KeysFor Feature Keys: Select key + Select+ <<or >> for type + Select+ Enter keydata (if required) + Save+ Exit to exit.For Prime Line Keys: Push Primaryor Secondary+ Press key + Save.For Soft Keys: Push Previousor Next for key + Select+ <<or >> for type + Save.For BLF Keys: Select key + Select+ Enter extension number + Save.
Menu+SpeedDial
Speed Dial(Company Speed Dial pro-
grammed at 301 only.)
● Personal+ Choose 01-20 (or) ● Company+ Choose 001-999Select+ Choose type + Line or group (if required) + Next+ Enter number to call +Next+ Enter name (see page 13) + Save
Menu+Options
Option Preferences ● HeadsetMode, ● HeadsetVoiceAnnounce● Bluetooth (DSX IP Keysets and select Super Display models only) For headset options, push On (to enable) or Off (to disable).
Menu+ CallForward
Call Forwarding ● Call Forwarding Status (display line 1), ● Call Forward Type (display line 2)For Call Forwarding Status, push On (to enable), Off (to disable), or Edit to change.
Menu+Name
Name(Programmed at 301 only.)
● Name,Push Name+ Enter name using the chart on page 13 + Save.
Menu+Language
Language(Programmed at 301 only.)
● LanguagePush Language+ Select language + Save.
Menu+Admin
Time and Date(Programmed at 301 only.)
For Time: Push Time+ Enter time (HH:MM:SS, 24-hour clock) + Save.For Date: Push Date+ Enter date (DD/MM/YYYY) + Save.
1093056_rev1-09.qxd 7/31/09 3:23 PM Page 14
15
Usi
ng In
traM
ail
Voic
e M
ail
Calling (Logging Into) Your MailboxVoice Mail lets callers leave recorded messages for you and lets you leave recorded messages for co-workers.Messages get stored in each person’s mailbox. To listen to your messages or use other voice mail features, youcall your mailbox and access the Main Menu. When you have new messages, your Ring/Message lamp flashes(red) and your V-Mailxxsoft key shows the number of new messages.
The Automated Attendant can answer your company’s calls with a recorded message and give dialing instruc-tions for callers to follow.
To log into your mailbox from your own phone:1. Do one of the following:
– Press V-MAIL.– Push V-Mailxx (xx is the number of new messages in your mailbox).
To log into your mailbox from a co-worker’s phone:1. Press INTERCOM and dial 700.
– 700 is the voice mail “master number.”2. Dial your own extension number.
– If you share a Group Mailbox with co-workers, pressing V-MAIL on your phone or their phonelogs you into the same shared mailbox.
From outside, to log onto your mailbox after calling your company’s Automated Attendant:1. Dial # (for remote logon).2. Dial your own extension number.
To log onto your mailbox while listening to your own greeting:1. Wait for your greeting to start.2.Dial # to stop the greeting.3. Dial # and your own extension number, then follow the voice prompts.
From outside, to go right into your co-worker’s mailbox after calling your company’s Automated Attendant:1. Dial * (for quick message).2. Dial your co-worker’s extension number.
1093056_rev1-09.qxd 7/31/09 3:23 PM Page 15
16
Voice Mailbox BasicsReview these basic features before using your mailbox for the first time.
To record a greeting for your mailbox:(Callers hear your greeting before leaving you a message.)1. Press V-MAIL or push V-Mailxx.2. Push Greeting.3. Push Greeting1, Greeting2or Greeting3 to select which of the three available greetings you
want to be active.4. Do one of the following:
– Push Listen to listen to your greeting (if recorded).– Push Record to record a new greeting.– Push Erase to delete your greeting (and use the built-in prerecorded greeting).– Push Back to exit without changing your greeting.
To record a name for your mailbox:(Callers may hear your recorded name before leaving you a message.)1. Press V-MAIL or push V-Mailxx.2. Push Name.3. Do one of the following:
– Push Listen to listen to your name (if recorded).– Push Record to record a new name.– Push Erase to erase your name (and use your extension number instead).– Push Back to exit without changing your name.
To enter a security code for your mailbox:(A security code prevents unauthorized access to your mailbox.)1. Press V-MAIL or push V-Mailxx.2. Push MboxOptions+ Security Code.3. Do one of the following:
– Enter a new security code and push Requiredor Not Required for logons from your phone.– Push Erase to erase your security code.– Push Back to exit without changing your security code.– Push SecCode to reenter your security code.
1093056_rev1-09.qxd 7/31/09 3:23 PM Page 16
17
Usi
ng In
traM
ail
Voic
e M
ail
More Mailbox FeaturesWhen you log onto your mailbox, you get your mailbox main menu of options. These additional features are avail-able from your main menu.
To listen to your messages:1. Press V-MAIL or push V-Mailxx.2. Push Listen.3. While listening to your message, you can do one of the following:
– Push Reply to record a reply for the message sender.– Push Forward to forward the message to a co-worker.– Push Callback to make a return call to the message sender.– Dial TI (84) to hear the time and date the message was sent.– Dial SA (72) to save the message in your mailbox.– Push Erase to erase the message.– Push NextMessage to listen to the next message.– Dial B (2) to back the message up a few seconds, or G (4) to go ahead a few seconds.– Push Repeat to repeat the message from the beginning.– Push Pauseand Resume to pause and resume listening.– Push Back to exit the message listen mode.– Push Message List to listen to a specific message list (All Messages, New Messages, orSaved Messages). This option is also available from your mailbox main menu.
After listening to a message, to have voice mail announce the message sender, as well as thetime and date the message was sent to you:
1. Press V-MAIL or push V-Mailxx.2. Push MboxOptions+ TimeStamp.3. Do one of the following:
– Push On to turn Auto Time Stamp on.– Push Off to turn Auto Time Stamp off.– Push Back to exit without changing the current setting.
To play a recorded help message while you are handling your messages:1. Dial 0.
– This option is not always available.
1093056_rev1-09.qxd 7/31/09 3:23 PM Page 17
18
More Mailbox FeaturesTo record and send a message to a co-worker:
1. Press V-MAIL or push V-Mailxx.2. Push Record.3. Record your message and do one of the following:
– Push Done.– Push Pauseand Resume to pause and resume your recording.– Push Cancel to cancel your recording without sending it.
4. Enter the message recipient’s mailbox number.5. Do one of the following:
Push SendMsg to send your message.Push Mailbox to reenter the mailbox number.Push Exit to exit the recording mode without sending the message.
6. After pushing SendMsg to send your message, do one of the following:– Enter another mailbox number and return to step 5.– Push Exit to exit the recording mode.
To be notified at up to five destinations (e.g., your pager, cell phone, or home office) when youhave new messages:
(This feature requires IntraMail Pro. Standard IntraMail provides a single destination.)Part A: Enable Notification1. Press V-MAIL or push V-Mailxx.2. Push MboxOptions+ Notification.3. Push Phone to select Message Notification.4. Do one of the following:
– Push On to turn notification on.– Push Off to turn notification off.– Push Destinations to set up your notification destinations.– Push Back to exit without changing the current setting.
Cascading Message Notification
1093056_rev1-09.qxd 7/31/09 3:23 PM Page 18
19
Usi
ng In
traM
ail
Voic
e M
ail
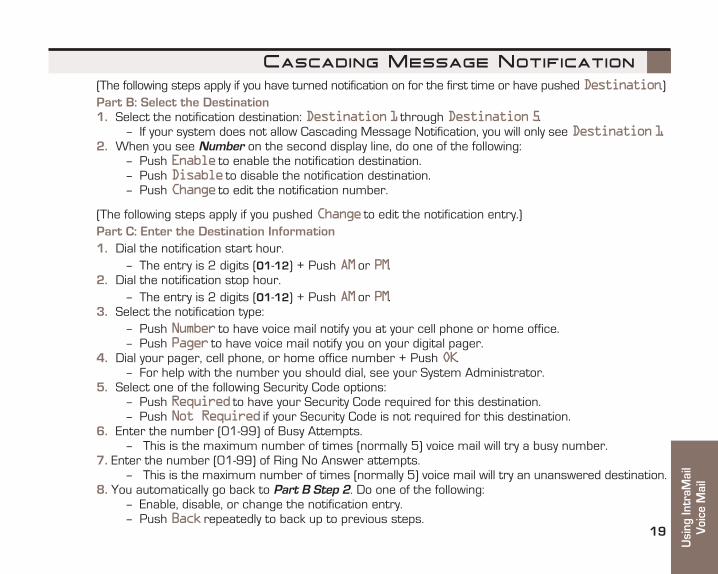
(The following steps apply if you have turned notification on for the first time or have pushed Destination.)Part B: Select the Destination1. Select the notification destination: Destination1 through Destination5.
– If your system does not allow Cascading Message Notification, you will only see Destination1.2. When you see Number on the second display line, do one of the following:
– Push Enable to enable the notification destination.– Push Disable to disable the notification destination.– Push Change to edit the notification number.
(The following steps apply if you pushed Change to edit the notification entry.)Part C: Enter the Destination Information1. Dial the notification start hour.
– The entry is 2 digits (01-12) + Push AMor PM.2. Dial the notification stop hour.
– The entry is 2 digits (01-12) + Push AMor PM.3. Select the notification type:
– Push Number to have voice mail notify you at your cell phone or home office.– Push Pager to have voice mail notify you on your digital pager.
4. Dial your pager, cell phone, or home office number + Push OK.– For help with the number you should dial, see your System Administrator.
5. Select one of the following Security Code options:– Push Required to have your Security Code required for this destination.– Push Not Required if your Security Code is not required for this destination.
6. Enter the number (01-99) of Busy Attempts.– This is the maximum number of times (normally 5) voice mail will try a busy number.
7. Enter the number (01-99) of Ring No Answer attempts.– This is the maximum number of times (normally 5) voice mail will try an unanswered destination.
8. You automatically go back to Part B Step 2. Do one of the following:– Enable, disable, or change the notification entry.– Push Backrepeatedly to back up to previous steps.
Cascading Message Notification
1093056_rev1-09.qxd 7/31/09 3:23 PM Page 19
System Administrator OptionsThe following administrative features are available only at the System Administrator’s extension (normally 301).See the IntraMail Feature Handbook for more on each of the underlined features.
To use the IntraMail System Administrator options:1. At extension 301, press V-MAIL or push V-Mailxx+ (Optional) Enter Security Code + SystemAdmin.2. For the System Administrator recording and routing options, do one of the following:
– To record an Instruction Menu (Automated Attendant main greeting), push Instruction+ Dialthe mailbox for the greeting (801-808) + Push Listen, Record, or Erase.Your system may have several main greetings that are active at different times. For example, youmight use 801 for the day greeting, 802 for night/weekends, and 803 for lunchtime.
– To record an Announcement Message (a mailbox that announces information to callers, suchas company directions or hours of operation), push Announcement+ Dial the mailbox for themessage (809-832) + Push Listen, Record, or Erase.
– To record a Message On Hold, push MessageOnHold+ Push Listen, Record, or Erase.OR
2. For the System Administrator mailbox maintenance options, do one of the following:– Push Subscriber+ Dial extension whose mailbox you want to maintain (e.g., 305).– To Erase All Messages in the mailbox, push EraseAllMessages.– To erase the mailbox Greeting, push EraseGreeting.– To erase the Mailbox Name, push EraseName.– To record a new Mailbox Name, push RecordNewName+ Push Listen, Record, or Erase.– To use Mailbox Security Code Delete to delete their Security Code, push EraseSecurityCode.
To record a Greeting or Message on Hold for the Built-In Automated Attendant (without IntraMail):● Greeting: At extension 301 (Access Level 5 required), press V-MAIL + InstructionMenu+ Dial
the mailbox for the greeting (801-808) + Push Listento listen, Recordto record, or Eraseto erase.● Message on Hold: At extension 301 (Access Level 5 required), press V-MAIL + MessageOnHold+
Push Listento listen, Recordto record (120 seconds max.), or Eraseto erase.
NEC Unified Solutions, Inc.4 Forest Parkway, Shelton, CT 06484