The Sound That Will Move You www.earthquakesound.com Supernova MKIV-10 & MKIV-12 Subwoofers User’s Manual "There might be better subwoofer on the planet, but I haven't heard them." "...simply the most amazing subwoofer I’ve ever tested." “...so good it rendered me speechless.”
Transcript
The Sound That Will Move You
www.earthquakesound.com
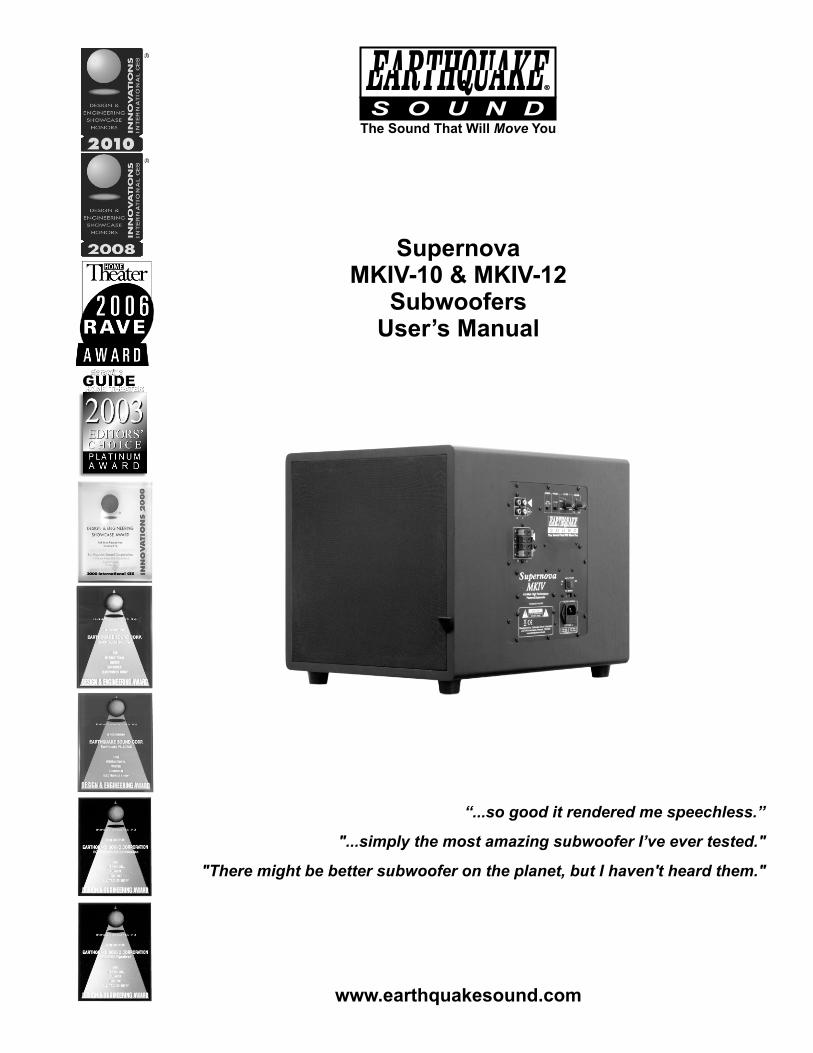
Supernova MKIV-10 & MKIV-12
SubwoofersUser’s Manual
"There might be better subwoofer on the planet, but I haven't heard them."
"...simply the most amazing subwoofer I’ve ever tested."
“...so good it rendered me speechless.”
2Specifications are subject to change without notice
SUPERNOVA MKIV USER’S MANUAL
For over 28 years, Earthquake Sound has been meticulously crafting a variety of high quality audio products that impress the audiophile communities throughout the world. With true dedication to excellence and keen attention to details, Earthquake Sound strives to continuously produce the highest quality audio products.
With that in mind, we thank you for choosing the Supernova MKIV subwoofer. Designed to enhance your home theater experience, this subwoofer will add power and impact to low frequency sound effects.
This user’s manual is designed to better acquaint you with the SuperNova MKIV subwoofer system and to guide you through the phases of its design and application. It is imperative that you read this manual in its entirely. Please do not hesitate to address any questions you may have on the Supernova MKIV subwoofer by contacting any of our technicians, either by calling our US Toll Free 1-800-576-7944 or e-mailing [email protected].
From all of us at Earthquake Sound, thank you and enjoy!
DEAR VALUED CUSTOMER,
Professor Joseph J. SahyounPresident & Chief Engineer
This document should not be construed as a commitment on the part of Earthquake Sound Corporation. The information is subject to change without notice.
Earthquake Sound Corporation assumes no responsibility for errors that may appear within this document.
The Supernova MKIV is capable of generating high sound pressure levels. You should exercise caution when operating this subwoofer system. Long term exposures to high levels of sound pressure will cause permanent damage to your hearing. Sound pressure levels exceeding 85dB can be dangerous with constant exposure. Set your audio system to a comfortable loudness level. The Supernova MKIV subwoofer system is designed to generate high levels of low frequencies (110 dB to 128 dB at 20 Hz to 25 Hz) and this will transmit a tremendous amount of vibration into walls, shelves and the structure; thus causing sheet rock flexing, glass and other objects to fall off shelves. Earthquake Sound Corporation does not assume liability for damages resulting from the direct use of the Supernova MKIV, and urges users to play the Supernova MKIV in moderate levels.
SAFETY FIRST
Appears on the component to indicate the presence of uninsulated, dangerous voltage inside the enclosure - voltage that may be sufficient to constitute a risk of shock.
Calls attention to a procedure, practice, condition of the like that, if not correctly performed or adhered to, could result in injury or death.
Calls attention to a procedure, practice, condition of the like that, if not correctly performed or adhered to, could result in damage to or destruction of part or all of the product.
Calls attention to information that is essential to highlight.
NOTE:
This documentation contains general safety, installation, and operating instructions for the Supernova MKIV subwoofer. It is important to read this user’s manual before attempting to use this. Please pay particular attention to the safety instructions.
Read these instructions in their entirety.
Store this manual and packaging in a safe place.
Heed all warnings.
Follow instructions (do not take short cuts).
Do not use this product near water.
Clean only with a dry cloth.
Do not block any ventilation openings. Install in accordance to the manufacturer’s instructions.
Do not install near any heat sources such as radiators, heat registers, stoves or other equipments that produce heat.
Do not defeat the safety purpose of the polarized or grounding-type plug. A polarized pug has two blades with one wider than the other. A grounding-type plug has two blades and a third grounding blade. The wide blade or the third blade is provided for your safety. If the provided plug does not fit into your outlet, consult an electrician for replacement of the obsolete outlet.
Protect the power cord from being walked on or pinched, particularly at plugs, convenience receptacles and the point where they exit from the equipment.
Only use attachments and accessories specified by the manufacturer.
Use only compatible rack or cart for final resting position.
Unplug this product during lighting storm or when unused for a long period of time.
Refer all servicing to qualified service personal. Servicing is required when the product does not operate normally, has been dropped or damaged in any way (i.e. power supply cord or plug is damaged, liquid has been spilled or objects have fallen into the product, exposure to rain or moisture, etc.).
To reduced the risk of fire or electric show, do not expose this product to rain or moisture.
IMPORTANT SAFETY INSTRUCTIONS
4Specifications are subject to change without notice
WHAT MAKES A SUPERNOVA? AMPLIFIER FEATURES EXPLAINED
The Supernova MKIV is a high performance power subwoofer with a high excursion driver, the patented SLAPS technology and a powerful 450-Watts class “A/B” amplifier.
The active driver used in the Supernova MKIV subwoofer is designed for accurate reproduction of bass and sub-bass frequencies. Its motor and voice coil structures were carefully selected to operate with extremely low distortion and impressive transient response, while its thermally pressed poly-ether foam surround was chosen to allow high excursion without any deformation.
Opposite to the active driver is the patented SLAPS that dramat ica l ly increases subwoofer efficiency and capability for ultra low frequency reproduction at high decibel levels. As the name indicates, SLAPS (Symmetrically Loaded Audio Passive System) is built symmetrically which distinguishes it from traditional passive radiators. It integrates identical components in its suspension and design, ensuring the unit to move symmetrically in both directions. It also overcomes the limitations known from conventional closed and ported designs that prevent radical excursion and deep response. The unique SLAPS design allows the active driver compression-free movement resulting in deep, dynamic and hard-hitting bass response. Furthermore, the pneumatic coupling of the active driver and the SLAPS delivers revolutionary results both in performance and efficiency as the SLAPS lets one amplifier produce the output of two woofers, reducing your power consumption and electricity bill.
The amplifier powering the Supernova MKIV is a 450-Watts class “A/B” amplifier with a multitude of user friendly features such as the auto signal detection switch, 0 - 180º phase switch, 12dB/octave variable filter, low level inputs and outputs, as well as high level inputs and outputs.
10
11
9
8
7
6543
2
1
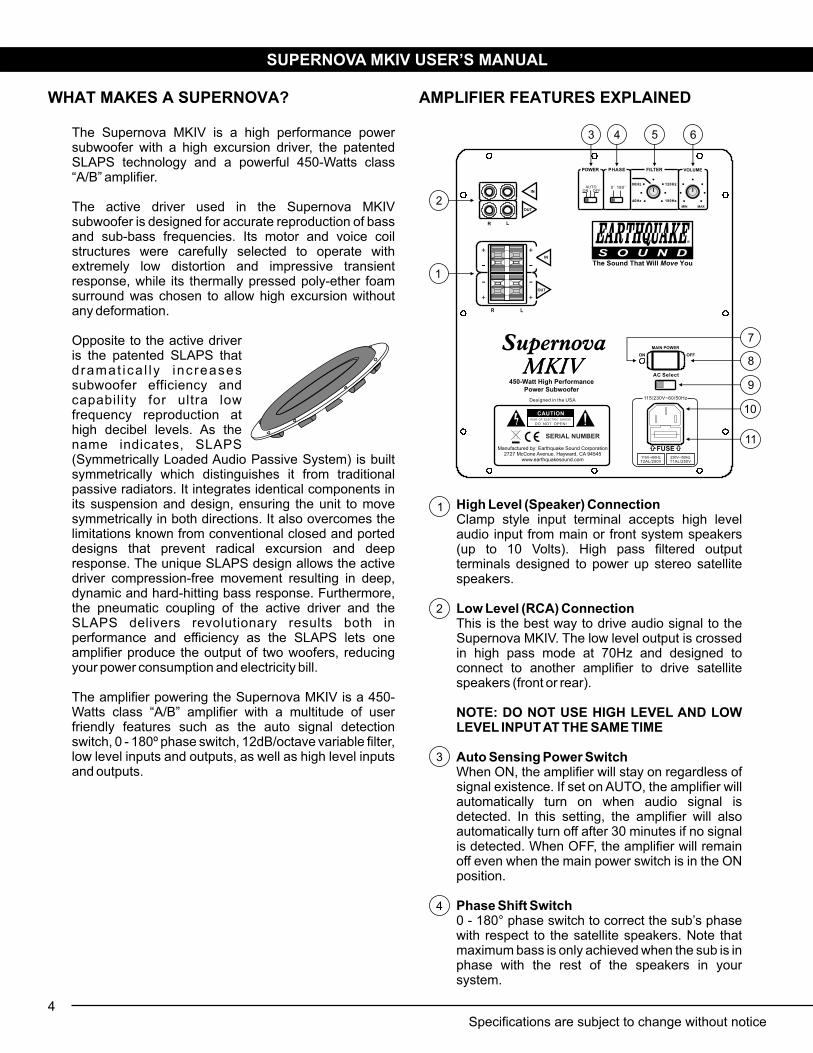
1 High Level (Speaker) ConnectionClamp style input terminal accepts high level audio input from main or front system speakers (up to 10 Volts). High pass filtered output terminals designed to power up stereo satellite speakers.
Low Level (RCA) ConnectionThis is the best way to drive audio signal to the Supernova MKIV. The low level output is crossed in high pass mode at 70Hz and designed to connect to another amplifier to drive satellite speakers (front or rear).
NOTE: DO NOT USE HIGH LEVEL AND LOW LEVEL INPUT AT THE SAME TIME
Auto Sensing Power SwitchWhen ON, the amplifier will stay on regardless of signal existence. If set on AUTO, the amplifier will automatically turn on when audio signal is detected. In this setting, the amplifier will also automatically turn off after 30 minutes if no signal is detected. When OFF, the amplifier will remain off even when the main power switch is in the ON position.
Phase Shift Switch0 - 180° phase switch to correct the sub’s phase with respect to the satellite speakers. Note that maximum bass is only achieved when the sub is in phase with the rest of the speakers in your system.
2
3
4
SUPERNOVA MKIV USER’S MANUAL
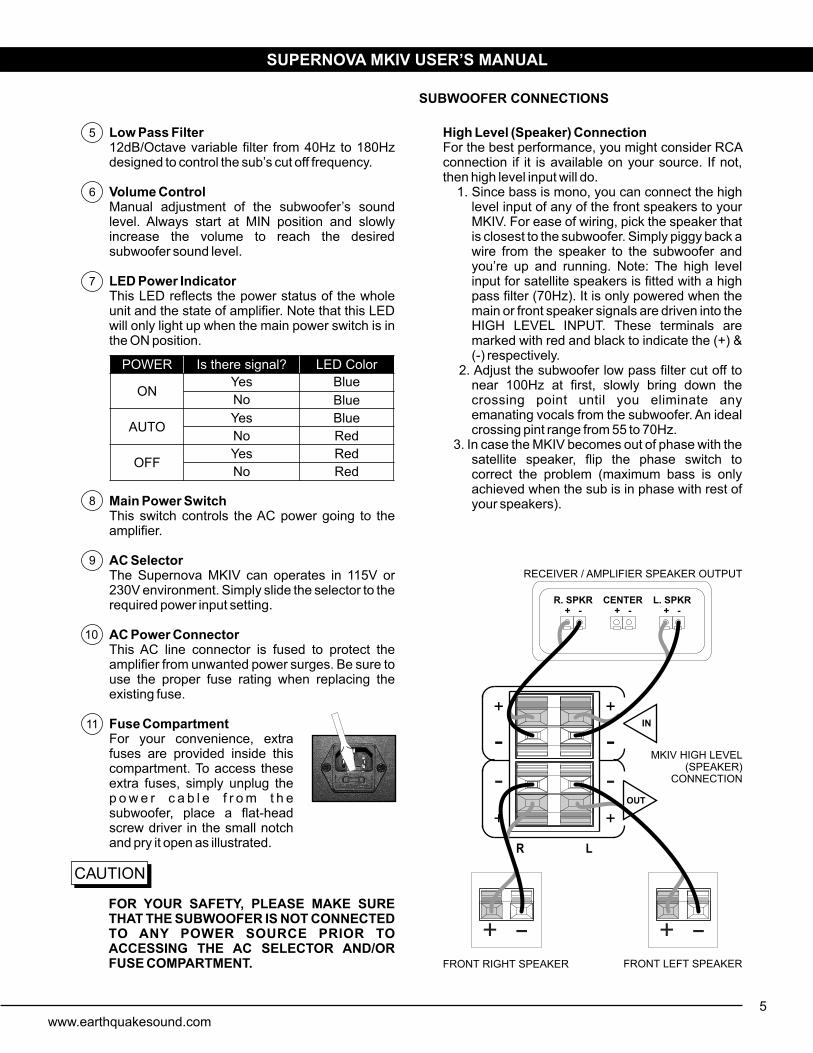
Low Pass Filter12dB/Octave variable filter from 40Hz to 180Hz designed to control the sub’s cut off frequency.
Volume ControlManual adjustment of the subwoofer’s sound level. Always start at MIN position and slowly increase the volume to reach the desired subwoofer sound level.
LED Power IndicatorThis LED reflects the power status of the whole unit and the state of amplifier. Note that this LED will only light up when the main power switch is in the ON position.
Main Power SwitchThis switch controls the AC power going to the amplifier.
AC SelectorThe Supernova MKIV can operates in 115V or 230V environment. Simply slide the selector to the required power input setting.
AC Power ConnectorThis AC line connector is fused to protect the amplifier from unwanted power surges. Be sure to use the proper fuse rating when replacing the existing fuse.
Fuse CompartmentFor your convenience, extra fuses are provided inside this compartment. To access these extra fuses, simply unplug the p o w e r c a b l e f r o m t h e subwoofer, place a flat-head screw driver in the small notch and pry it open as illustrated.
5www.earthquakesound.com
5
6
7
POWER Is there signal? LED Color
ONYes Blue
No Blue
AUTOYes Blue
No Red
OFFYes Red
No Red
8
9
10
11
FOR YOUR SAFETY, PLEASE MAKE SURE THAT THE SUBWOOFER IS NOT CONNECTED TO ANY POWER SOURCE PRIOR TO ACCESSING THE AC SELECTOR AND/OR FUSE COMPARTMENT.
SUBWOOFER CONNECTIONS
High Level (Speaker) ConnectionFor the best performance, you might consider RCA connection if it is available on your source. If not, then high level input will do. 1. Since bass is mono, you can connect the high
level input of any of the front speakers to your MKIV. For ease of wiring, pick the speaker that is closest to the subwoofer. Simply piggy back a wire from the speaker to the subwoofer and you’re up and running. Note: The high level input for satellite speakers is fitted with a high pass filter (70Hz). It is only powered when the main or front speaker signals are driven into the HIGH LEVEL INPUT. These terminals are marked with red and black to indicate the (+) & (-) respectively.
2. Adjust the subwoofer low pass filter cut off to near 100Hz at first, slowly bring down the crossing point until you eliminate any emanating vocals from the subwoofer. An ideal crossing pint range from 55 to 70Hz.
3. In case the MKIV becomes out of phase with the satellite speaker, flip the phase switch to correct the problem (maximum bass is only achieved when the sub is in phase with rest of your speakers).
RECEIVER / AMPLIFIER SPEAKER OUTPUT
+ _+ _
FRONT LEFT SPEAKERFRONT RIGHT SPEAKER
R. SPKR+ - + - + -
L. SPKRCENTER
MKIV HIGH LEVEL(SPEAKER)
CONNECTION
SUPERNOVA MKIV USER’S MANUAL
6Specifications are subject to change without notice
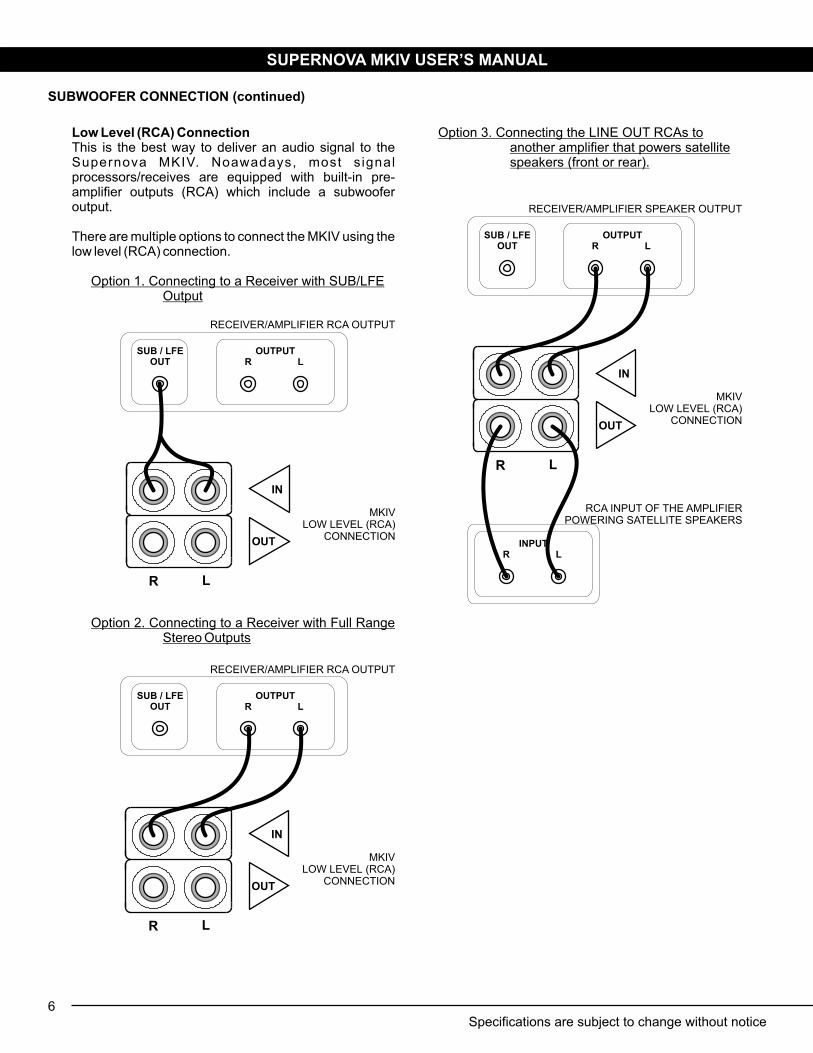
SUBWOOFER CONNECTION (continued)
Low Level (RCA) ConnectionThis is the best way to deliver an audio signal to the Supernova MKIV. Noawadays, most s ignal processors/receives are equipped with built-in pre-amplifier outputs (RCA) which include a subwoofer output.
There are multiple options to connect the MKIV using the low level (RCA) connection.
Option 1. Connecting to a Receiver with SUB/LFE Output
Option 2. Connecting to a Receiver with Full Range Stereo Outputs
Option 3. Connecting the LINE OUT RCAs to another amplifier that powers satellite speakers (front or rear).
SUPERNOVA MKIV USER’S MANUAL
RECEIVER/AMPLIFIER RCA OUTPUT
SUB / LFEOUT
OUTPUTLR
MKIVLOW LEVEL (RCA)
CONNECTION
SUB / LFEOUT
OUTPUTLR
RECEIVER/AMPLIFIER RCA OUTPUT
MKIVLOW LEVEL (RCA)
CONNECTION
SUB / LFEOUT
OUTPUTLR
RECEIVER/AMPLIFIER SPEAKER OUTPUT
INPUTLR
RCA INPUT OF THE AMPLIFIERPOWERING SATELLITE SPEAKERS
MKIVLOW LEVEL (RCA)
CONNECTION
SUPERNOVA MKIV OWNER’S MANUAL
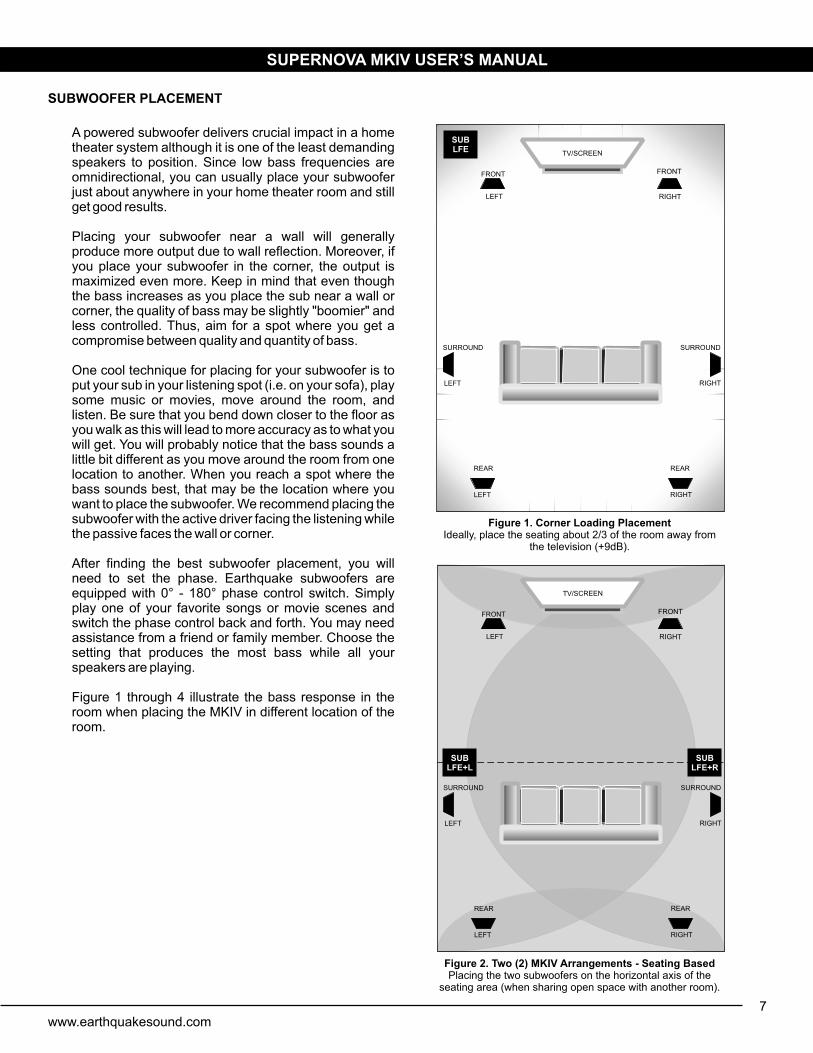
A powered subwoofer delivers crucial impact in a home theater system although it is one of the least demanding speakers to position. Since low bass frequencies are omnidirectional, you can usually place your subwoofer just about anywhere in your home theater room and still get good results.
Placing your subwoofer near a wall will generally produce more output due to wall reflection. Moreover, if you place your subwoofer in the corner, the output is maximized even more. Keep in mind that even though the bass increases as you place the sub near a wall or corner, the quality of bass may be slightly "boomier" and less controlled. Thus, aim for a spot where you get a compromise between quality and quantity of bass.
One cool technique for placing for your subwoofer is to put your sub in your listening spot (i.e. on your sofa), play some music or movies, move around the room, and listen. Be sure that you bend down closer to the floor as you walk as this will lead to more accuracy as to what you will get. You will probably notice that the bass sounds a little bit different as you move around the room from one location to another. When you reach a spot where the bass sounds best, that may be the location where you want to place the subwoofer. We recommend placing the subwoofer with the active driver facing the listening while the passive faces the wall or corner.
After finding the best subwoofer placement, you will need to set the phase. Earthquake subwoofers are equipped with 0° - 180° phase control switch. Simply play one of your favorite songs or movie scenes and switch the phase control back and forth. You may need assistance from a friend or family member. Choose the setting that produces the most bass while all your speakers are playing.
Figure 1 through 4 illustrate the bass response in the room when placing the MKIV in different location of the room.
SUBWOOFER PLACEMENT
Figure 1. Corner Loading PlacementIdeally, place the seating about 2/3 of the room away from
the television (+9dB).
Figure 2. Two (2) MKIV Arrangements - Seating BasedPlacing the two subwoofers on the horizontal axis of the
seating area (when sharing open space with another room).
SURROUND
RIGHT
SURROUND
LEFT
FRONT
TV/SCREEN
RIGHT
FRONT
LEFT
REAR
RIGHT
REAR
LEFT
SUBLFE
SUPERNOVA MKIV USER’S MANUAL
7www.earthquakesound.com
SURROUND
RIGHT
SURROUND
LEFT
FRONT
TV/SCREEN
RIGHT
FRONT
LEFT
REAR
RIGHT
REAR
LEFT
SUBLFE+L
SUBLFE+R
8Specifications are subject to change without notice
SUPERNOVA MKIV OWNER’S MANUAL
SUBWOOFER PLACEMENT SPEAKER ARRANGEMENT
SURROUND
RIGHT
SURROUND
LEFT
FRONT
TV/SCREEN
RIGHT
FRONT
LEFT
REAR
RIGHT
REAR
LEFT
SUBLFE+L
SUBLFE+R
SUBLFE
SUBLFE
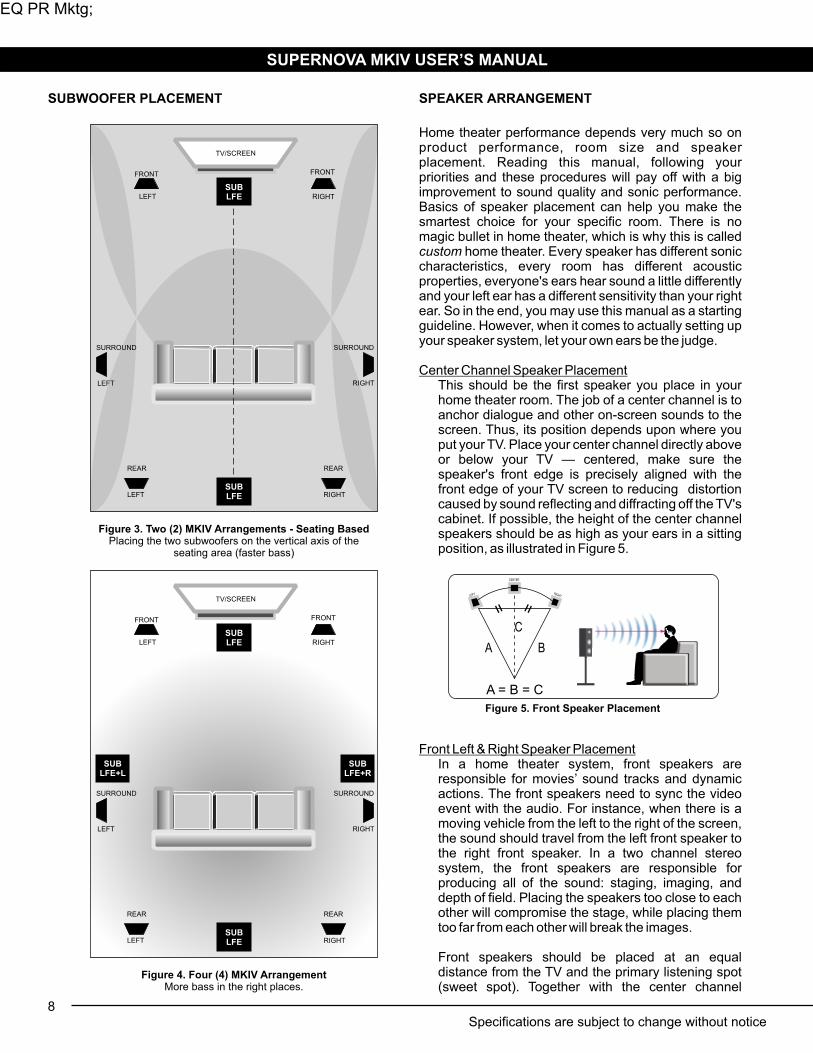
Figure 3. Two (2) MKIV Arrangements - Seating BasedPlacing the two subwoofers on the vertical axis of the
seating area (faster bass)
Figure 4. Four (4) MKIV ArrangementMore bass in the right places.
SUPERNOVA MKIV USER’S MANUAL
Home theater performance depends very much so on product performance, room size and speaker placement. Reading this manual, following your priorities and these procedures will pay off with a big improvement to sound quality and sonic performance. Basics of speaker placement can help you make the smartest choice for your specific room. There is no magic bullet in home theater, which is why this is called custom home theater. Every speaker has different sonic characteristics, every room has different acoustic properties, everyone's ears hear sound a little differently and your left ear has a different sensitivity than your right ear. So in the end, you may use this manual as a starting guideline. However, when it comes to actually setting up your speaker system, let your own ears be the judge.
Center Channel Speaker PlacementThis should be the first speaker you place in your home theater room. The job of a center channel is to anchor dialogue and other on-screen sounds to the screen. Thus, its position depends upon where you put your TV. Place your center channel directly above or below your TV — centered, make sure the speaker's front edge is precisely aligned with the front edge of your TV screen to reducing distortion caused by sound reflecting and diffracting off the TV's cabinet. If possible, the height of the center channel speakers should be as high as your ears in a sitting position, as illustrated in Figure 5.
Front Left & Right Speaker PlacementIn a home theater system, front speakers are responsible for movies’ sound tracks and dynamic actions. The front speakers need to sync the video event with the audio. For instance, when there is a moving vehicle from the left to the right of the screen, the sound should travel from the left front speaker to the right front speaker. In a two channel stereo system, the front speakers are responsible for producing all of the sound: staging, imaging, and depth of field. Placing the speakers too close to each other will compromise the stage, while placing them too far from each other will break the images.
Front speakers should be placed at an equal distance from the TV and the primary listening spot (sweet spot). Together with the center channel
speaker, they should form a slight arc with all three speakers at exactly the same distance from where you sit, as illustrated in Figure 5.
The tweeters from all three front speakers should have the same elevation as your ears while seated. Any deviation will work but it may reduce the performance. Make sure that there are no solid objects (like furniture) blocking the pathway of the sound traveling to your listening location.
Surround Speaker PlacementSurround speakers are there to envelop three dimensional sound that places you in the middle of the action. Ideally, your primary pair of surround speakers should be placed to the left and right of your listening position — either in line with it, or just behind it. They should form a 90°-110° angle with respect to your television. In a 7.1-channel system with more than two surround speakers, or if side placement is not available for your surrounds in a standard 5.1-channel setup, consider placement behind your listening position, facing the front of the room. Surround speakers should be placed high enough so that the drivers do not fire directly at your ears when you're sitting down. As a rule of thumb, place them at ear level while you are in standing position. Most people tend to over amplify the rear speakers. This is not recommended as it can over power the front speakers. Most of the time, the rear speakers are relatively quite. They simply come on when there are special effects.
Since every room has different acoustics, you might need to experiment with the speakers aiming. You may get good results by pointing them at the ceiling or toward the rear corners of the room. If no side or rear walls are available for mounting your speakers, try placing a pair of traditional bookshelf speakers on speaker stands, slightly behind and to the sides of your listening position. Avoid aiming them directly at your listening position. You may also try any of our Edgeless, SweetSpot, IQ Series, Imãge-X and RCS in-ceiling speakers.
Figure 6. Speaker Placement in 5.1 SystemPosition the rear left and right speakers 90° - 110° across from the primary listening/seating spot and at about 6 feet
from the floor.
Figure 7. Speaker Placement in 7.1 SystemPosition the left and right surround speakers at 90°angle
and the left and right rear speakers at 135° - 150°angle with respect of the television and about 6 feet from the floor.
SURROUND
RIGHT
SURROUND
LEFT
135° - 150°
SUPERNOVA MKIV USER’S MANUAL
Specifications are subject to change without notice10
^ including 5/8” (15mm) rubber feet* including amplifier controls
450 Watts
20Hz - 180Hz
40Hz - 180Hz
12dB/Octave
10 kOhm
0.1 - 1.5V
115/230V ~ 60/50Hz
115V: T2AL/250V
230V: T1AL/250V
LED DOES NOT LIGHT UP
Verify that the unit is plugged into the power outlet. If plugged, check if the power outlet is active and supplying the appropriate AC voltage.
Inspect the power cable. Never use one that has been altered in any way.
Make sure the subwoofer’s MAIN POWER switch is ON. Inspect the fuse (pg. 5).
LED LIGHTS UP BUT STAYS RED
Make sure that the POWER switch is either set to ON or AUTO position.
Check if signal is present at the RCA. The LED should turn blue when signal is detected and produce output.
If the LED remains red, then the problem is at the source of the audio cable: Troubleshoot the RCA cables by temporarily
connecting them to the stereo left and/or right of the source unit. The subwoofer can be heard if the cables are good.
If the cables are confirmed to be okay but there is still no output when connected to the SUB OUT of the receiver/processor, check the subwoofer setting at the source. Once again, make sure that the subwoofer’s POWER switch is either set to ON or AUTO.
HUM NOISE
Keeping the subwoofer on, unplug the RCA cable or speaker wires from the subwoofer. If the noise goes away, then the problem is coming from the source. There are 2 options to solve this problem:
Make sure that all other units in the system are grounded together (~18 - 22 AWG wire), with the exception of our subwoofer.
Grounding the loop isolator (on the RCA side) and the cheater plug (on the AC supply side) may be a temporary/quick solution. However, we highly recommend using the first option above.
If the noise is still present even though the RCA cables are unplugged, then try changing the AC outlet.If the hum noise still persists at this point, please contact an Earthquake Technician by phone (US Toll Free 1-800-576-7944) or e-mail [email protected].
(H)Height
(D) Depth(W)
Width
SPECS MKIV10 MKIV12
Freq. Response 25Hz - 180Hz 20Hz - 180Hz
Output Level > 130dB, including room gain
Height (H) ^ 12-1/8” (308mm) 14-3/4” (375mm)
Width (W) * 12” (305mm) 14-3/4” (375mm)
Depth (D) 15-3/4” (401mm) 17-3/4” (451mm)
Weight 24 lbs / 10.9 kgs 31 lbs / 14.1 kgs
SUPERNOVA MKIV OWNER’S MANUALFIVE (5) YEARS LIMITED WARRANTY GUIDELINES
Earthquake warrants the original purchaser that all Factory Sealed New Audio Products be free from defects in material and workmanship, under normal and proper use, for a period of five (5) years from the date of purchase (as shown on the original sales receipt with serial number affixed/written on it).
The five (5) years warranty period is valid only if the product is properly installed by an Earthquake authorized installer, and the warranty registration card is properly filled out and sent to Earthquake Sound Corporation. If the product is installed by a non-authorized installer, a ninety (90) days warranty period applies.
(A) Five (5) years limited warranty plan coverage guidelines First year: Earthquake pays for labor, parts, and ground shipping (only in US mainland, not including Alaska and Hawaii)
back to customer. Second, third, fourth & fifth year: Earthquake pays labor only. Customer must pay for parts and shipping both ways.
(B) WarningProducts (sent for repair) that are tested by Earthquake technicians and deemed to have no problem, will not be covered by the five (5) years limited warranty. Customer will be charged a minimum of one (1) hour of labor (at ongoing rates) plus shipping charges back to customer.
(C) Earthquake agrees to repair or replace - at our option - all such defective products/parts subject to the following provisions Defective products/parts have not been altered or repaired by other than an Earthquake factory approved technician. Products/parts are not subjected to negligence, misuse, improper use, or accident, damaged by improper line voltage,
used with incompatible products, or have its serial number or any part of it altered, defaced, removed, or have been used in any way that is contrary to Earthquake's written instructions.
(D) Warranty LimitationsEarthquake warranty does not cover products that have been modified and/or abused, including but not limited to the following: Damages to speaker cabinet and cabinet finish due to misuse, abuse, or improper use of cleaning
materials/methods. Bent speaker frame, broken speaker connectors, holes in speaker cone, surround & dust cap, burnt speaker voice coil. Fading, deterioration of speaker components & finish due to improper exposure to elements. Bent amplifier casing, damaged finish on the casing due to abuse, misuse, or improper use of cleaning material. Burnt tracers on PCB. Product/part damaged due to poor packaging or abusive shipping conditions. Subsequent damage to other products. A warranty claim will not be valid if the warranty registration card is not properly filled & returned to Earthquake with a copy of the sales invoice.
(E) Service Request:To receive product(s) service, contact Earthquake Sound’s service department at (510) 732-1000 and request an RMA number (Return Material Authorization), item(s) shipped without a valid RMA number will be refused. Make sure you provide us with your complete and correct shipping address, a valid phone number, and a brief description of the problem you are experiencing with the product. In most cases, our technicians might be able to resolve the problem over the phone, thus eliminating the need to ship the product.
(F) Shipping Instructions: Product(s) must be packaged in its original protective box(es) to minimize transport damage. Shipper claims regarding item(s) damaged in transit must be presented to the carrier. Earthquake Sound Corporation reserves the right to refuse improperly packed product(s). A copy of original sales receipt must accompany product(s) returned for service. We encourage you to include a written description of the problem inside the package. Ship product to:
Earthquake Sound Corp. 2727 Mc Cone Avenue
Hayward, CA 94545You are responsible for the cost of shipping the product to Earthquake Sound Corporation.
(G) Disputes Resolution:All disputes - between clients and Earthquake Sound Corporation - resulting from the five (5) years limited warranty policy must be resolved according to the laws & regulations of the county of Alameda, California.
www.earthquakesound.com11
Earthquake Sound Corporation2727 McCone Avenue. Hayward CA, 94545. USA
US Toll Free: 800-576-7944 | Phone: 510-732-1000 | Fax: 510-732-1095www.earthquakesound.com