Page 1
1 / 20
Express5800/R120h-1M, R120h-2M,
R120h-1E, R120h-2E, T120h
Supplement of Installation Guide (Windows)
Thank you for purchasing our product.
When using the EXPRESSBUILDER E8.10-004.01 (3.20.154), see this supplement before
installing Windows. Red lines indicate the changes of Installation Guide (Windows).
Please read the instructions carefully and keep this document for your future reference.
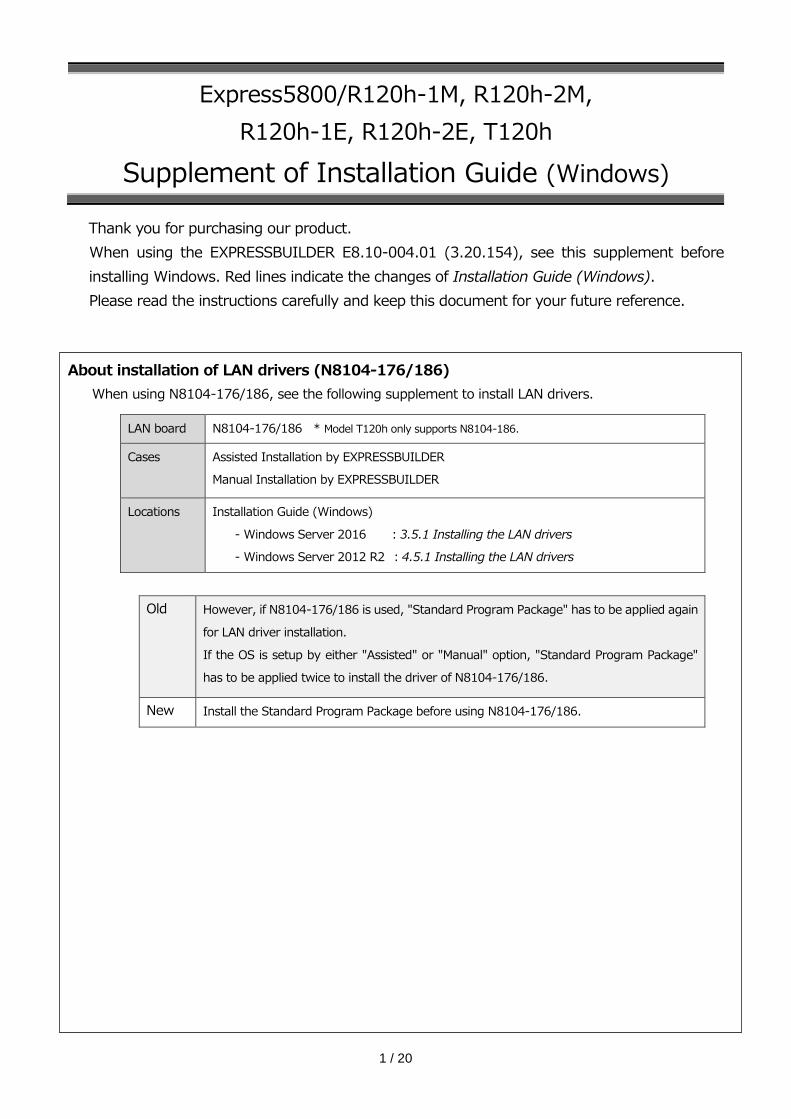
About installation of LAN drivers (N8104-176/186)
When using N8104-176/186, see the following supplement to install LAN drivers.
LAN board N8104-176/186 * Model T120h only supports N8104-186.
Cases Assisted Installation by EXPRESSBUILDER
Manual Installation by EXPRESSBUILDER
Locations Installation Guide (Windows)
- Windows Server 2016 :3.5.1 Installing the LAN drivers
- Windows Server 2012 R2 :4.5.1 Installing the LAN drivers
Old However, if N8104-176/186 is used, "Standard Program Package" has to be applied again
for LAN driver installation.
If the OS is setup by either "Assisted" or "Manual" option, "Standard Program Package"
has to be applied twice to install the driver of N8104-176/186.
New Install the Standard Program Package before using N8104-176/186.
Page 2
2 / 20
About EXPRESSBUILDER
The following description indicates the changes of Installation Guide (Windows).
Case Assisted Installation by EXPRESSBUILDER
Locations Installation Guide (Windows) “Assisted Installation“
- Windows Server 2016 :3.2.3 Installation procedure step 4
- Windows Server 2012 R2 :4.2.3 Installation procedure step 4
New * Underlines indicate the changes of guide.
4. Choose Assisted Install of Install Method.
Specify the following if necessary, and then click the ">" icon of the lower right of the screen.
Note When choosing DVD-ROM Media or USB at Install Source, click ">"
icon after setting the media.
RAID Configuration
Choose Keep Current Setting after configuring a RAID array by SSA or System Utilities when
using RAID controller.
Controller
Choose the controller of installation destination.
Disk
Choose the disk of installation destination.
Install Source
Choose an OS installation source from the following types.
DVD-ROM Media DVD-ROM
File on a USB drive USB flash drive
SMB/CIFS (Windows Share) Network sharing folder
An anonymous FTP server This option is not available.
Install ClearOS from the Internet This option is not available.
New
Page 3
3 / 20
Each media supports the following file format.
File on a USB drive Flat, ISO
SMB/CIFS (Windows Share) Flat, ISO
Flat : a standard folder/file structure
ISO : single ISO or UDF file
Attempt Firmware Update
Choose Skip Update. The other options are not available.
Install Method
Choose Assisted Install.
Case Assisted Installation by EXPRESSBUILDER
Locations Installation Guide (Windows) “Assisted Installation“
- Windows Server 2016 : 3.2.3 Installation procedure step 6
- Windows Server 2012 R2 : 4.2.3 Installation procedure step 6
New * Underlines indicate the changes of guide.
6. On the following screen, specify settings for the OS installation. Set your time zone.
New
Page 4
4 / 20
・ Specify the Computer Name within 15 characters.
If you set 16 or more characters, installation will stop with following error screen.
・ You can enable the functions of Windows if necessary.
Install the HyperV role on this system The HyperV role can be Enabled.
Enable Windows Firewall Windows Firewall can be Enabled.
Note Optional Password can be used alphanumeric characters only.
If a sign (such as "!") is included, an error message will appear.
Precautions for “Manual Installation”
If you install by “Manual Installation”, follow next procedure to install OS.
Important “Manual Installation” installs OS without EXPRESSBUILDER.
If you install OS with EXPRESSBUILDER, all data of the destination hard
disk drive will be deleted. Confirm carefully.
Case Manual Installation by EXPRESSBUILDER
Locations Installation Guide (Windows) “Manual Installation“
- Windows Server 2016 :3.3.3 Installation procedure
- Windows Server 2012 R2 :4.3.3 Installation procedure
New *Windows Server 2016
3.3.3 Installation procedure
Note Read the precautions in Chapter 1 (3.1 Precautions of Windows Server 2016
Installation) in advance.
1. Turn on peripherals (such as a display), and then turn on the server. Insert OS installation media into
the drive.
2. To run EXPRESSBUILDER, press <F11> key during POST.
On the [One-Time Boot Menu], select the optical disk drive in which the OS installation media was
inserted.
3. The system starts from the OS installation media.
The message “Press any key to boot from CD or DVD…” is displayed on the upper of the screen.
New
Page 5
5 / 20
Press the <Enter> key to start from the media.
The boot sequence proceeds and the message “Windows is Loading files…” appears.
Note If the Windows Setup screen (the screen in the next step) does not display, the
<Enter> key was not properly pressed. Turn the system power on again, and
then start again.
4. Click Next.
5. Click Install now.
If the following message is displayed: Go to Step 6.
If the following message is not displayed: Go to Step 8.
Loading the driver
The necessary media driver for the PC in use could not be found. Types of media
drivers include DVD, USB, and hard disk drivers. If you have a CD, DVD, or USB flash
drive with the driver stored, please insert it.
Note: If the Windows installation media is stored in the DVD drive or the USB drive, it
can be removed for this step.
Browse (B) OK Cancel
6. After connecting the removable media where the onboard RAID controller driver was copied,
specify the path and click OK.
<Removable media>:\sw_raid1_driver
Page 6
6 / 20
7. Select the following driver from the displayed list of drivers, and click Next.
HPE Smart Array S100i SR Gen10 SW RAID
8. Type the product key, and then click Next.
Tips If you are using Backup DVD-ROM, this screen does not appear.
9. Choose an operating system you want to install and click Next.
Options are displayed depending on the installation media you are using.
Tips Read the message of the screen, and then choose an installation option.
・ Windows Server 2016 Standard or Windows Server 2016 Datacenter
→ Described as “Server Core” by this manual
・ Windows Server 2016 Standard (Desktop Experience) or Windows
Server 2016 Datacenter (Desktop Experience)
→ Described as “Desktop Experience” by this manual
Page 7
7 / 20
10. Read the license terms carefully.
If you agree, check I accept the license terms and click Next.
11. Select Custom: Install Windows only (advanced).
12. The “Select Windows installation location” screen is displayed.
If the driver was loaded in steps 6 and 7, or if the RAID controller is not in use,
proceed to step 15. If you select Load driver here, the following screen will be displayed.
Loading the driver
To install the device driver of the drive, insert the installation media that
contains the driver file and click OK.
Note: The installation media is a CD, DVD, or USB flash drive.
Browse (B) OK Cancel
Page 8
8 / 20
13. After setting the Starter Pack DVD in the UBS-DVD drive, assign a file directory,
and click OK.
● onboard RAID Controller
Express5800/R120h-1M, R120h-2M
<Starter Pack DVD>:\software\001\drivers\sw_raid1_driver
Express5800/R120h-1E, R120h-2E, T120h
<Starter Pack DVD>:\software\002\drivers\sw_raid1_driver
● RAID Controller (N8103-189/190/191/192/193/194/195/201)
Express5800/R120h-1M, R120h-2M
<Starter Pack DVD>:\software\001\drivers\dac1_driver
Express5800/R120h-1E, R120h-2E, T120h
<Starter Pack DVD>:\software\002\drivers\dac1_driver
14. Select the following driver from the displayed list of drivers, and click Next.
● onboard RAID Controller
HPE Smart Array S100i SR Gen10 SW RAID
● RAID Controller (N8103-189/192)
HPE Smart Array E208i-a SR Gen10
● RAID Controller (N8103-190/193)
HPE Smart Array P408i-a SR Gen10
● RAID Controller (N8103-191/194)
HPE Smart Array P816i-a SR Gen10
● RAID Controller (N8103-195)
HPE Smart Array E208i-p SR Gen10
● RAID Controller (N8103-201)
HPE Smart Array P408i-p SR Gen10
15. Click New.
Tips If New is not displayed on the screen, click Drive options (advanced).
Page 9
9 / 20
16. Specify the partition size in the text box, and the click Apply.
If the partition is already created, proceed to step 18.
When the following window appears, click OK.
Tips When creating a partition, the OS creates the following partitions at top of the
hard disk drive.
- Recovery Partition
- EFI System Partition (ESP)
- Microsoft Reserved Partition (MSR)
17. Select the partition created in step 16, and then Format.
Important When the following screen appears, read the message and click [OK].
Carefully select the partition to be formatted because data in the partition will be
erased.
Page 10
10 / 20
18. Select the created partition, and then click Next.
Tips The number of partitions displayed differs depending on the hardware
configuration.
When the following message appears, Windows installation starts automatically.
The server will automatically restart after Windows Server 2016 is installed.
You will proceed to Windows setup after restart.
Page 11
11 / 20
19. Set user settings according to operating system chosen in step 9.
Desktop Experience
Type a password and click Finish.
Press <Ctrl>+<Alt>+<Delete> to unlock.
Type the password and press <Enter>.
Page 12
12 / 20
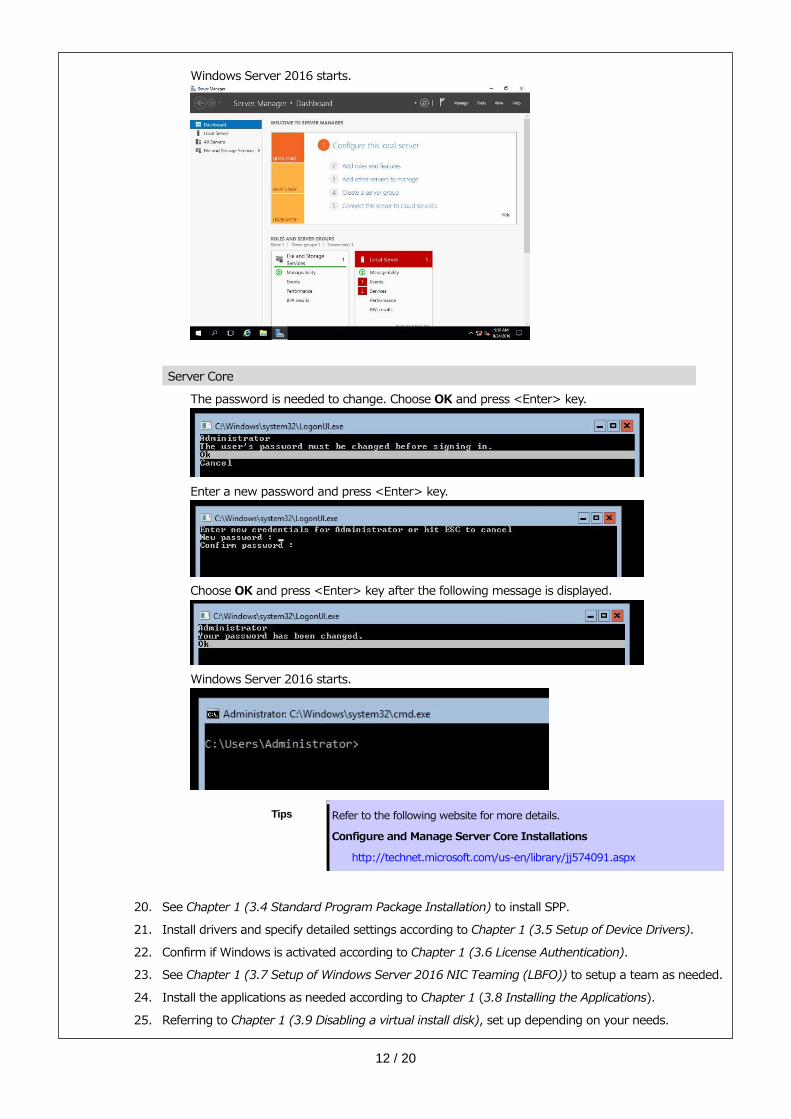
Windows Server 2016 starts.
Server Core
The password is needed to change. Choose OK and press <Enter> key.
Enter a new password and press <Enter> key.
Choose OK and press <Enter> key after the following message is displayed.
Windows Server 2016 starts.
Tips Refer to the following website for more details.
Configure and Manage Server Core Installations
http://technet.microsoft.com/us-en/library/jj574091.aspx
20. See Chapter 1 (3.4 Standard Program Package Installation) to install SPP.
21. Install drivers and specify detailed settings according to Chapter 1 (3.5 Setup of Device Drivers).
22. Confirm if Windows is activated according to Chapter 1 (3.6 License Authentication).
23. See Chapter 1 (3.7 Setup of Windows Server 2016 NIC Teaming (LBFO)) to setup a team as needed.
24. Install the applications as needed according to Chapter 1 (3.8 Installing the Applications).
25. Referring to Chapter 1 (3.9 Disabling a virtual install disk), set up depending on your needs.
Page 13
13 / 20
26. Set the other OS settings according to Chapter 1 (5. Setting up for Maintenance).
27. From time settings, check whether the current time and time zone have been set correctly. Correct
settings as needed. Also, from RBSU Date and Time, check whether the Time Format has been set to
Local Time and Time Zone to Unspecified Time Zone.
If the Time Zone is incorrect, see 5.6 Operation Troubleshooting under Chapter 1 (5. Troubleshooting)
in Maintenance Guide and set to the correct value.
The Windows installation with Manual option is now complete.
New *Windows Server 2012 R2
4.4.3 Installation procedure
Note Read the precautions in Chapter 1 (4.1 Precautions of Windows Server 2012
R2 Installation) in advance.
1. Turn on peripherals (such as a display), and then turn on the server. Insert OS installation media into
the drive.
2. To run EXPRESSBUILDER, press <F11> key during POST.
On the [One-Time Boot Menu], select the optical disk drive in which the OS installation media was
inserted.
3. The system starts from the OS installation media.
The message “Press any key to boot from CD or DVD…” is displayed on the upper of the screen.
Press the <Enter> key to start from the media.
The boot sequence proceeds and the message “Windows is Loading files…” appears.
Note If the Windows Setup screen (the screen in the next step) does not display, the
<Enter> key was not properly pressed. Turn the system power on again, and
then start again.
4. Click Next.
Page 14
14 / 20
5. Click Install now.
If the following message is displayed: Go to Step 6.
If the following message is not displayed: Go to Step 8.
Loading the driver
The necessary media driver for the PC in use could not be found. Types of media
drivers include DVD, USB, and hard disk drivers. If you have a CD, DVD, or USB flash
drive with the driver stored, please insert it.
Note: If the Windows installation media is stored in the DVD drive or the USB drive, it
can be removed for this step.
Browse (B) OK Cancel
6. After connecting the removable media where the onboard RAID controller driver was copied,
specify the path and click OK.
<Removable media>:\sw_raid1_driver
7. Select the following driver from the displayed list of drivers, and click Next.
HPE Smart Array A100i SR Gen10 SW RAID
8. Type the product key, and then click Next.
Tips If you are using Backup DVD-ROM, this screen does not appear.
9. Choose an operating system you want to install and click Next.
Options are displayed depending on the installation media you are using.
Page 15
15 / 20
10. Read the license terms carefully.
If you agree, check I accept the license terms and click Next.
11. Select Custom: Install Windows only (advanced).
12. Select Custom: Install Windows only (advanced).
If the driver was loaded in steps 6 and 7, or if the RAID controller is not in use,
proceed to step 15. If you select Load driver here, the following screen will be displayed.
Loading the driver
To install the device driver of the drive, insert the installation media that
contains the driver file and click OK.
Note: The installation media is a CD, DVD, or USB flash drive.
Browse (B) OK Cancel
13. After setting the Starter Pack DVD in the UBS-DVD drive, assign a file directory, and click OK.
● onboard RAID Controller
Express5800/R120h-1M, R120h-2M
<Starter Pack DVD>:\software\001\drivers\sw_raid1_driver
Express5800/R120h-1E, R120h-2E, T120h
<Starter Pack DVD>:\software\002\drivers\sw_raid1_driver
Page 16
16 / 20
● RAID Controller (N8103-189/190/191/192/193/194/195/201)
Express5800/R120h-1M, R120h-2M
<Starter Pack DVD>:\software\001\drivers\dac1_driver
Express5800/R120h-1E, R120h-2E, T120h
<Starter Pack DVD>:\software\002\drivers\dac1_driver
14. Select the following driver from the displayed list of drivers, and click Next.
● onboard RAID Controller
HPE Smart Array S100i SR Gen10 SW RAID
● RAID Controller (N8103-189/192)
HPE Smart Array E208i-a SR Gen10
● RAID Controller (N8103-190/193)
HPE Smart Array P408i-a SR Gen10
● RAID Controller (N8103-191/194)
HPE Smart Array P816i-a SR Gen10
● RAID Controller (N8103-195)
HPE Smart Array E208i-p SR Gen10
● RAID Controller (N8103-201)
HPE Smart Array P408i-p SR Gen10
15. Click New.
16. Specify the partition size in the text box, and the click Apply.
Page 17
17 / 20
When the following window appears, click OK.
Tips When creating a partition, the OS creates the following partitions at top of the
hard disk drive.
- Recovery Partition
- EFI System Partition (ESP)
- Microsoft Reserved Partition (MSR)
17. Select the partition created in step 16, and then Format.
18. Select the created partition, and then click Next.
Important If the four partition types Recovery, System, MSR (Reserved), and Primary have
not been created in the created partition, it means that you failed to create the
partition. Delete the partition you attempted to create, and then create a new
partition. If you have connected a data disk to a partition, be careful not to delete
that partition.
Tips The number of partitions displayed differs depending on the hardware
configuration.
Page 18
18 / 20
When the following message appears, Windows installation starts automatically.
The server will automatically restart after Windows Server 2012 R2 is installed.
You will proceed to Windows setup after restart.
19. Set user settings according to operating system chosen in Step 9.
Server with a GUI
Type a password and click Finish.
Press <Ctrl>+<Alt>+<Delete> to sign-in.
Page 19
19 / 20
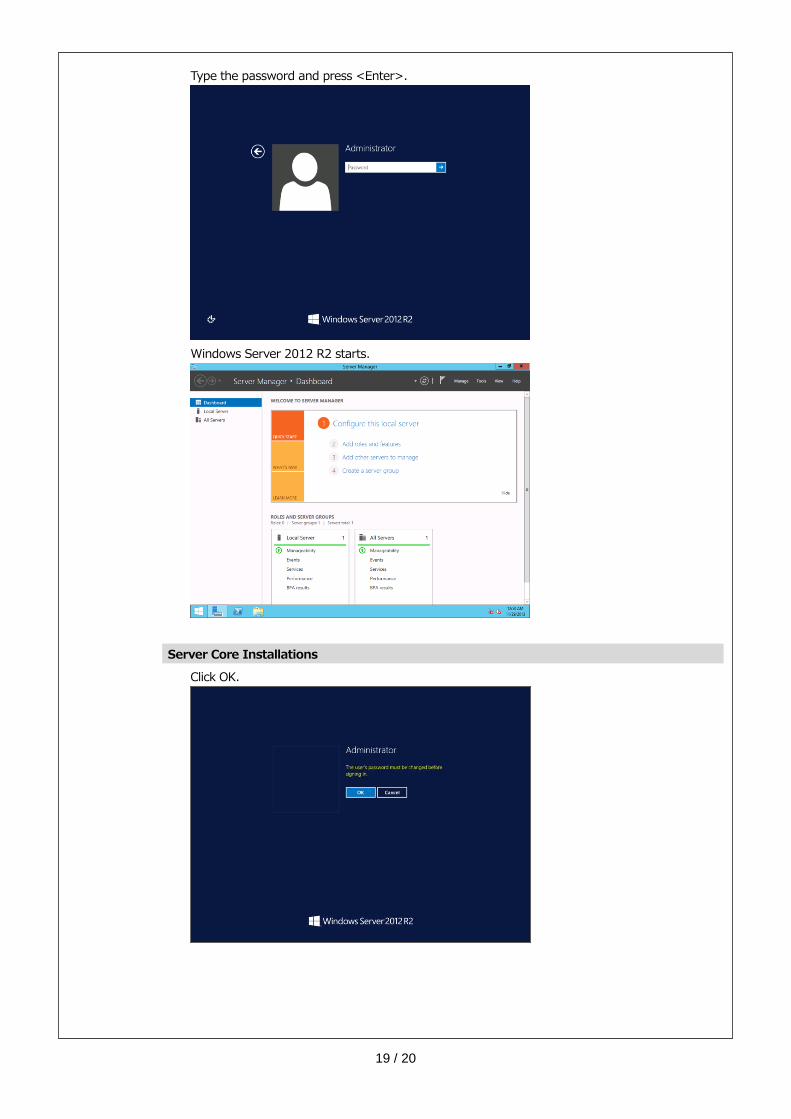
Type the password and press <Enter>.
Windows Server 2012 R2 starts.
Server Core Installations
Click OK.
Page 20
20 / 20
Windows Server 2012 R2 starts.
Tips Refer to the following website for more details.
Configure and Manage Server Core Installations
http://technet.microsoft.com/us-en/library/jj574091.aspx
20. See Chapter 1 (4.4 Standard Program Package Installation) to install SPP.
21. Install drivers and specify detailed settings according to Chapter 1 (4.5 Setup of Device Drivers).
22. Confirm if Windows is activated according to Chapter 1 (4.6 License Authentication).
23. See Chapter 1 (4.7 Setup of Windows Server 2012 R2 NIC teaming (LBFO)) to setup a team as needed.
24. Install the applications as needed according to Chapter 1 (4.8 Installing the Applications).
25. Referring to Chapter 1 (4.9 Disabling a virtual install disk), set up depending on your needs.
26. Set the other OS settings according to Chapter 1 (5. Setting up for Maintenance).
27. From time settings, check whether the current time and time zone have been set correctly. Correct
settings as needed. Also, from RBSU Date and Time, Check whether the Time Format has been set to
Local Tim and Time Zone to Unspecified Time Zone.
If the Time Zone is incorrect, see 5.6 Operation Troubleshooting under Chapter 1 (5. Troubleshooting)
in Maintenance Guide and set to the correct value.
The Windows installation with Manual option is now complete.