60
SupportAssist for Business PCs with Windows OS Administrator Guide January 2022 Rev. A08

SupportAssist for Business PCs withWindows OSAdministrator Guide
January 2022Rev. A08

Notes, cautions, and warnings
NOTE: A NOTE indicates important information that helps you make better use of your product.
CAUTION: A CAUTION indicates either potential damage to hardware or loss of data and tells you how to avoid
the problem.
WARNING: A WARNING indicates a potential for property damage, personal injury, or death.
© 2020 - 2022 Dell Inc. or its subsidiaries. All rights reserved. Dell, EMC, and other trademarks are trademarks of Dell Inc. or its subsidiaries.Other trademarks may be trademarks of their respective owners.

Chapter 1: Introduction................................................................................................................. 5Version................................................................................................................................................................................... 5Audience................................................................................................................................................................................ 5Document purpose.............................................................................................................................................................. 5New and enhanced features.............................................................................................................................................5Connect and manage capabilities and Dell service plans........................................................................................... 6Connect and manage roles in TechDirect......................................................................................................................7Supported systems............................................................................................................................................................. 8Dispatchable parts...............................................................................................................................................................9
Chapter 2: Overview.................................................................................................................... 10Customize the Overview page........................................................................................................................................ 11
Chapter 3: Managing your PC fleet and groups............................................................................ 12PC fleet inventory..............................................................................................................................................................12
Create a service request............................................................................................................................................ 14Create dispatch request............................................................................................................................................. 15Remove disconnected PCs........................................................................................................................................ 15
Groups overview................................................................................................................................................................ 16Create a group.............................................................................................................................................................. 16Move assets between existing groups.................................................................................................................... 17Update site name......................................................................................................................................................... 17Update group name..................................................................................................................................................... 18Delete group.................................................................................................................................................................. 18
Chapter 4: Managing a single PC................................................................................................. 19Details of a specific PC.....................................................................................................................................................19
Health of a specific PC.............................................................................................................................................. 20Application experience for a specific PC................................................................................................................21Security for a specific PC.......................................................................................................................................... 21Recommendations for a specific PC.......................................................................................................................22
Chapter 5: Recommendations for your PC fleet...........................................................................24
Chapter 6: Custom catalogs for your PC fleet............................................................................. 26Managing catalogs for PCs connected to Dell...........................................................................................................26
Create a new catalog..................................................................................................................................................27Managing catalogs.......................................................................................................................................................27Catalog states.............................................................................................................................................................. 28Deploy a catalog remotely......................................................................................................................................... 29Deployment status...................................................................................................................................................... 29
Managing catalogs for PCs not connected to Dell................................................................................................... 30Create a new catalog................................................................................................................................................. 30Managing catalogs....................................................................................................................................................... 31
Contents
Contents 3

Catalog states............................................................................................................................................................... 31Deploying a catalog manually....................................................................................................................................32
Chapter 7: Managing SupportAssist alerts...................................................................................35Alerts overview.................................................................................................................................................................. 35
Details of a specific alert........................................................................................................................................... 36Alert actions........................................................................................................................................................................36
Chapter 8: Remediation rules for your PC fleet........................................................................... 38Create a remediation rule................................................................................................................................................ 38Details of a specific rule...................................................................................................................................................39Update a remediation rule................................................................................................................................................41Delete a remediation rule................................................................................................................................................. 41
Chapter 9: Application experience for your PC fleet.................................................................... 42
Chapter 10: Security for your PC fleet.........................................................................................44
Chapter 11: Configuring settings................................................................................................. 46Set inventory identifiers.................................................................................................................................................. 46Set alert rules.....................................................................................................................................................................46Set PC update source...................................................................................................................................................... 47Define roles and permissions.......................................................................................................................................... 48Integrating SupportAssist alerts with external solutions......................................................................................... 48
Enable ServiceNow integration................................................................................................................................48Disable ServiceNow integration...............................................................................................................................49
Chapter 12: Data exports.............................................................................................................50
Chapter 13: Performance indicators.............................................................................................51
Chapter 14: Audit trail................................................................................................................. 53
Chapter 15: Email notifications from SupportAssist.................................................................... 55
Chapter 16: Retrieve SupportAssist data using WMI....................................................................56
Chapter 17: Resources.................................................................................................................59
Chapter 18: Contact Dell............................................................................................................. 60
4 Contents

IntroductionSupportAssist is a proactive and predictive technology that provides automated technical support for your Dell PCs. It enables ITadministrators to manage their PC fleet from TechDirect anytime, anywhere.
When deployed, SupportAssist monitors each PC and proactively detects both hardware and software issues. Depending onyour service plan, when an issue is detected, SupportAssist automatically opens a support case with technical support and sendsyou an email notification.
SupportAssist collects and sends the required information securely to Dell technical support. The collected information enablesDell to provide you an enhanced, efficient, and accelerated support experience.
SupportAssist enables you to optimize your PC by removing unwanted files, optimizing network settings, tuning-up systemperformance, and removing virus and malware. It also identifies driver updates available for your PC.
SupportAssist also collects telemetry, application experience, health, and security data proactively from your PCs and providesvarious performance insights about your PCs, based on your service plan.
After you have deployed SupportAssist on your PCs, you can manage the PC fleet using Connect and manage in TechDirect.
Version3.1.1.18
AudienceThe information in this administrator guide is intended for administrators, technicians, and partners who manage SupportAssiston PCs running the Windows operating system.
Document purposeThis document provides information about:
● Managing your PC fleet and groups.● Viewing and managing recommendations, health, security, and application experience for a single PC.● Viewing and managing recommendations, health, and application experience for your PC fleet.● Updating catalogs for your PC fleet.● Managing remediation rules to identify and remediate issues with your PC fleet.● Assessing the number of PCs at risk and acting on the potential security threats.● Managing SupportAssist alerts in TechDirect or ServiceNow.● Managing roles and permissions.● Viewing key performance indicators that help determine the fleet behavior.● Viewing the record of changes and activities performed for the Connect and manage service in TechDirect.
For more information about SupportAssist for business PCs, see the documentation resources and other useful links inResources.
New and enhanced features● Ability to create, manage, and deploy customized PC update catalogs.● Ability to view fleet metrics on capabilities through performance indicators (KPIs).● Support for partners to deploy and manage the PC fleet of their clients.● Option to transfer site ownership between Connect and manage users.
1
Introduction 5
● Ability to view and remove information about PCs that have not connected to Dell in last 30 days.● Support for Windows 11 operating system.● General enhancements and bug fixes.
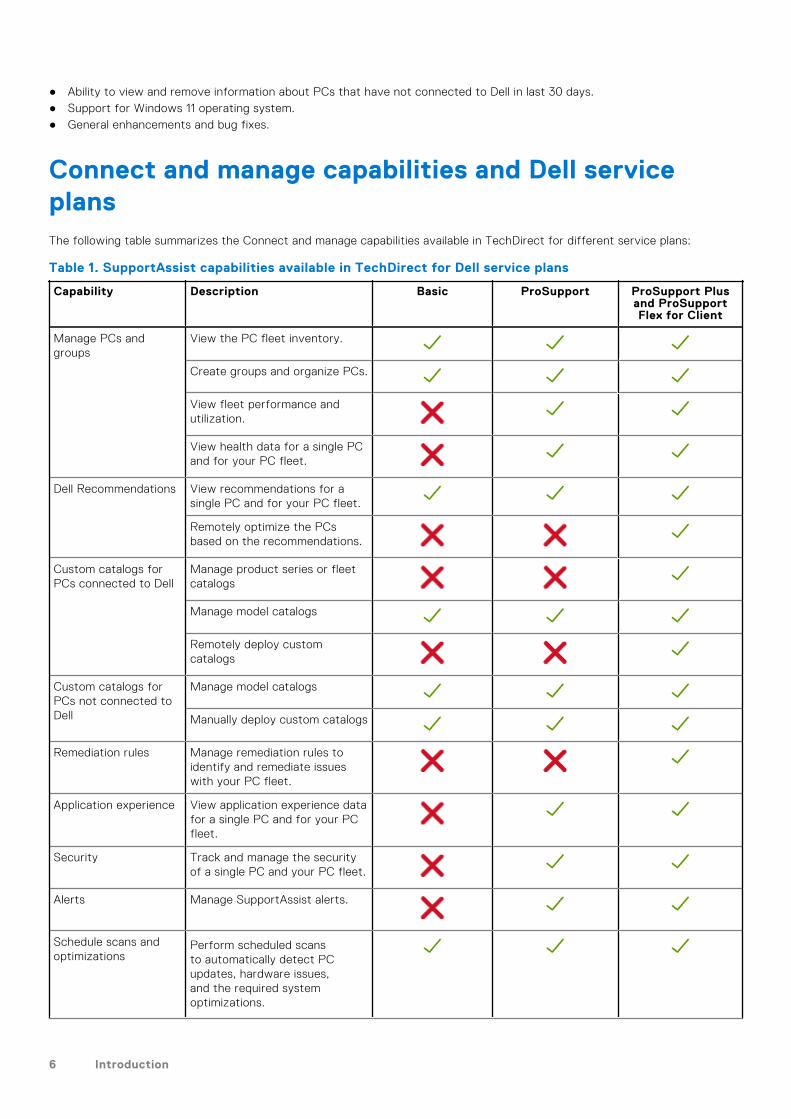
Connect and manage capabilities and Dell serviceplansThe following table summarizes the Connect and manage capabilities available in TechDirect for different service plans:
Table 1. SupportAssist capabilities available in TechDirect for Dell service plans
Capability Description Basic ProSupport ProSupport Plusand ProSupportFlex for Client
Manage PCs andgroups
View the PC fleet inventory.
Create groups and organize PCs.
View fleet performance andutilization.
View health data for a single PCand for your PC fleet.
Dell Recommendations View recommendations for asingle PC and for your PC fleet.
Remotely optimize the PCsbased on the recommendations.
Custom catalogs forPCs connected to Dell
Manage product series or fleetcatalogs
Manage model catalogs
Remotely deploy customcatalogs
Custom catalogs forPCs not connected toDell
Manage model catalogs
Manually deploy custom catalogs
Remediation rules Manage remediation rules toidentify and remediate issueswith your PC fleet.
Application experience View application experience datafor a single PC and for your PCfleet.
Security Track and manage the securityof a single PC and your PC fleet.
Alerts Manage SupportAssist alerts.
Schedule scans andoptimizations
Perform scheduled scansto automatically detect PCupdates, hardware issues,and the required systemoptimizations.
6 Introduction

Table 1. SupportAssist capabilities available in TechDirect for Dell service plans (continued)
Capability Description Basic ProSupport ProSupport Plusand ProSupportFlex for Client
Automatic systemoptimizations
Perform automatic softwareoptimizations.
NOTE: If autoforward is turned off in TechDirect for technical support or parts dispatch, you can review and determine if
the alert should be forwarded to Dell. See Set alert rules.
NOTE: Premium Support service plan offers the same capabilities as ProSupport. Similarly, Premium Support Plus service
plan offers the same capabilities as ProSupport Plus.
Connect and manage roles in TechDirectTechDirect enables organizations to designate administrators and add technicians under that administrator account.
To add a company administrator, go to Utilities > Administrator Control Panel, and click ADD COMPANYADMINISTRATOR.
To add a technician, go to Utilities > Administrator Control Panel, and click ADD TECHNICIAN.
The following table summarizes the SupportAssist capabilities available for different Connect and manage roles in TechDirect:
Table 2. SupportAssist capabilities and roles in TechDirect
Capability TechDirectnavigation
Description Connect and manageadministrator
Connect and managetechnician
Overview Connect and manage> Manage PC fleet >Connect and managePCs > Overview
View a summary ofvarious details aboutyour PC fleet.
Set up and connect Connect and manage> Manage PC fleet >Connect and managePCs > Set up andconnect
Configureand downloadSupportAssist tocentrally manage andmonitor your Dell PCs.
Requires permissionsfrom the Connect andmanage administrator.
PCs and groups Connect and manage> Manage PC fleet >Connect and managePCs > Manage >Connected PCs
View the PCfleet inventory, fleetperformance, andutilization.
Create groups andorganize PCs.
Requires permissionsfrom the Connect andmanage administrator.
Recommendations Connect and manage> Manage PC fleet >Connect and managePCs > Manage >Recommendations
View recommendationsfor a single PC andfor your PC fleetand remotely optimizethem.
Requires permissionsfrom the Connect andmanage administrator.
Update catalogs Connect and manage> Manage PC fleet >Connect and managePCs > Manage >Update catalogs
Create, edit, and deploycustom catalogs toupdate your fleet ofPCs
Requires permissionsfrom the Connect andmanage administrator.
Alerts Connect and manage> Manage PC fleet >Connect and manage
Manage SupportAssistalerts.
Requires permissionsfrom the Connect andmanage administrator.
Introduction 7

Table 2. SupportAssist capabilities and roles in TechDirect (continued)
Capability TechDirectnavigation
Description Connect and manageadministrator
Connect and managetechnician
PCs > Manage >Alerts
Remediation rules Connect and manage> Manage PC fleet >Connect and managePCs > Manage >Remediation rules
Manage remediationrules to identify andremediate issues withyour PC fleet.
Requires permissionsfrom the Connect andmanage administrator.
Application experience Connect and manage> Manage PC fleet >Connect and managePCs > Manage >Applications
View applicationexperience data for asingle PC and for yourPC fleet.
Requires permissionsfrom the Connect andmanage administrator.
Health Connect and manage> Manage PC fleet >Connect and managePCs > Manage >Connected PCs >Inventory
View health data for asingle PC and for yourPC fleet.
Requires permissionsfrom the Connect andmanage administrator.
Security Connect and manage> Manage PC fleet >Connect and managePCs > Manage >Security
Track and manage thesecurity of a single PCand your PC fleet.
Requires permissionsfrom the Connect andmanage administrator.
Settings Connect and manage> Manage PC fleet >Connect and managePCs > Manage >Settings
● Set an inventoryidentifier to identifyassets associatedwith your PC fleet.
● Set alert rules.● Set PC update
source.● Integrate alerts with
ServiceNow.● View and modify
Connect andmanage technicianroles andpermissions.
Performance indicators(KPIs)
Connect and manage> Manage PC fleet >Connect and managePCs > Summary> Performanceindicators (KPIs)
View an overview ofKPIs to help determinethe PC fleet behavior.
Requires permissionsfrom the Connect andmanage administrator.
Audit trail Connect and manage> Manage PC fleet >Connect and managePCs > Summary >Audit trail
View a record ofactivities performedby the Connect andmanage administratorand Connect andmanage technician.
Requires permissionsfrom the Connect andmanage administrator.
Supported systemsSupportAssist is supported on the following Dell devices:
8 Introduction

● Laptops and desktops○ Inspiron○ XPS○ Alienware○ Vostro○ Latitude○ Precision*○ OptiPlex
● Docking Stations
* Precision Rack and Tower workstations are not supported.
NOTE: SupportAssist is not supported on virtual machines.
Dispatchable partsWhen SupportAssist detects an issue on your PC, a replacement part may be automatically dispatched to you depending on yourPC service plan.
The following parts may be dispatched automatically:
● Hard drive● Memory module● Optical drive● Keyboard● Mouse● Battery● Video card
Introduction 9

OverviewThe Overview page provides a summary of various details about your PC fleet.
To view the overview, from the TechDirect dashboard, go to Connect and manage > Manage PC fleet > Connect andmanage PCs > Overview.
● Health—displays the overall health score, the number of unhealthy PCs, the number of PCs that need attention, the numberof healthy PCs, and the status for each category. Click the specific status to view information about the PCs on theInventory page.
● Application experience—displays the application experience score, the number of applications with issues, the number ofmost used applications, and the status for each category. Click the specific status to view information about the applicationson the Applications page.
● Security—displays the security score, the number of PCs at risk, the number of PCs that need attention, the number ofPCs that are secure, and the status for each category. Click the specific status to view information about the PCs on theSecurity page.
● Trend○ Health—displays a trend chart of PCs that are healthy, needs attention, and unhealthy for the last 26 weeks (Weekly
view) or 30 days (Daily view).■ You can switch between View by PCs and View by score to view the data.■ Click a specific date or week to view more information about the PCs for the selected time period.■ In the View by PCs view, click a specific color-coded section in the trend chart to view detailed information about
the PCs on the Inventory page.○ Application experience—displays a trend chart for applications with issues and most used applications for the last 26
weeks (Weekly view) or 30 days (Daily view).■ You can switch between View by applications and View by score to view the data.■ Click a specific date or week to view more information about the applications for the selected time period.■ In the View by applications view, click a specific color-coded section in the trend chart to view detailed information
about the applications on the Applications page.○ Security—displays a trend chart for the security assessment performed on the PC, for the last 26 weeks (Weekly view)
or 30 days (Daily view).■ You can switch between View by PCs and View by score to view the data.■ Click a specific date or week to view more information about the PCs for the selected time period.■ In the View by PCs view, click a specific color-coded section in the trend chart to view detailed information about
the PCs on the Security page.● Service plans—displays the number of PCs and the associated service plan of the PC. Click a specific color-coded section
to view detailed information about the PCs on the Inventory page. By default, the Service plans widget is not displayed.You can view this widget by customizing the Overview page. See Customize the Overview page.
● Versions—displays the number of PCs and the associated SupportAssist version installed on the PCs. Click a specific color-coded section to view detailed information about the PCs in the category, on the Inventory page. By default, the Versionswidget is not displayed. You can view this widget by customizing the Overview page. See Customize the Overview page.
● Alerts—displays the number of dispatches and cases. Click a specific color-coded section to view detailed informationabout the alerts on the Alerts page.
● PC recommendations—displays a list of recommendations that helps improve the PCs efficiency. Click the correspondinglink to view and act on each recommendation.
● PC utilizations—displays insights about the overall performance of the PC fleet. Click the corresponding link to view moreinformation about the fleet performance and utilization on the Inventory page.
● PCs connected to Dell—displays the number of PCs that are connected to Dell and the number of PCs that have notconnected to Dell from 30 days.
2
10 Overview

Customize the Overview page
About this task
You can show or hide the widgets, and move the placement of the widgets on the Overview page. You can only customize thefollowing widgets:
● Alerts● PC utilizations● PC recommendations● Service plans● Versions● PCs connected to Dell
NOTE: The Health, Application experience, and Security widgets, and the Trend charts are not customizable.
Steps
1. From the TechDirect dashboard, go to Connect and manage > Manage PC fleet > Connect and manage PCs >Overview.
2. Click Customize.
3. Customize the widgets as per your preference and click Done.
Overview 11

Managing your PC fleet and groupsAfter you deploy SupportAssist, the PCs are automatically displayed on the Inventory page in TechDirect within 24 hours afterthey connect to the Internet. For information about configuring and deploying SupportAssist, see the SupportAssist for BusinessPCs with Windows OS Deployment Guide available on the SupportAssist for Business PCs documentation page.
The Inventory page enables you to:
● View all the PCs in your fleet, and its health, performance, and utilization details.● View recommendations, insights about PC health, and application experience for each PC.● Create groups and organize PCs. See Groups overview.
To manage your PCs, from the TechDirect dashboard, go to Connect and manage > Manage PC fleet > Connect andmanage PCs > Manage > Connected PCs.
PC fleet inventoryBy default, the Inventory page displays information about connected PCs. To view information about PCs that have notconnected to Dell in last 30 days, select Disconnected PCs. For information about removing the disconnected PCs, seeRemove disconnected PCs.
The following table describes information about connected PCs that is displayed on the Inventory page:
NOTE: The performance and utilization data are not available for PCs with Basic or Expired service plan.
Table 3. Inventory
Column Description
Site Name of the site to which the asset is assigned.
Group Group to which the asset is assigned.
Service tag A unique five-to-seven digit alphanumeric code which isfound on a white bar-coded label affixed on your Dell PC orperipheral.
NOTE: To view the asset details, PC health details, andto optimize the PC, click the Service Tag. See Managing asingle PC.
Asset tag Asset tag of the PC that helps to easily track and inventorythe PC.
NOTE: This column is displayed if you have selectedAsset tag as an asset identifier. See Set inventoryidentifiers.
NOTE: To view the asset details, PC health details, andto optimize the PC, click the Asset tag. See Managing asingle PC.
Hostname Unique hostname of the asset.NOTE: This column is displayed if you have selectedHostname as an asset identifier. See Set inventoryidentifiers.
Region Region where the asset is present, for example, Americas.
Product type Type of Dell device, for example, Latitude.
3
12 Managing your PC fleet and groups

Table 3. Inventory (continued)
Column Description
Model Model of the PC, for example, Latitude 5400.
Service plan Service plan of the asset, for example, ProSupport Plus.NOTE: A graphical representation of the numbers ofPCs and the associated service plans is displayed on theOverview page.
Expiration date Date on which the service plan expires.
Version Version of SupportAssist installed on the PC, for example,3.0.0.4.
Last contact to Dell Date on which the asset last connected to Dell Technologies.
OS Edition of Windows operating system installed on the PC, forexample, Microsoft Windows 10 Enterprise.
PC Utilization* The extent to which a critical hardware component of thePC is used. This is used to gauge the overall performance ofthe PC. The utilization is categorized as follows based on thecriteria defined by Dell:● Normal—average load on the PC is normal.● Elevated—average load on the PC is increased.● High—average load on the PC is at the highest level and
may affect the device performance.
CPU utilization* The average load on the processor of the PC over a selectedtime period. The utilization is categorized as follows based onthe criteria defined by Dell:● Normal—average load on the CPU is normal.● Elevated—average load on the CPU is increased.● High—average load on the CPU is at the highest level and
may affect the device performance.
GPU utilization* The average amount of video memory (VRAM) used over aselected time. The utilization is categorized as follows basedon the criteria defined by Dell:● Normal—average GPU utilization is within the normal
level.● Elevated—average GPU utilization is increased.● High—average GPU utilization is at the highest level which
may affect the device performance and can lead to thevideo card to wear out sooner than expected.
Memory utilization* The amount of memory (RAM) installed on the PC and theaverage amount of memory used over a selected time period.Low memory or consistently high memory reduces the deviceperformance.
Installed memory* Size of RAM installed on the PC, for example, 32 GB.
Battery health* Average percentage of charge that the battery holds againstits designed capacity, when it is fully charged.
Battery runtime* Average number of hours the PC ran when it was notconnected to an electrical outlet.
Free storage remaining* Average storage remaining out of the installed memory.
PC age* Number of years/months/days since Dell shipped the PC, forexample, 3 yr, 6 mo, 7 d
OS failures* Number of operating system failures that occurred on the PC.
App failures* Number of application failures that occurred on the PC.
Managing your PC fleet and groups 13

Table 3. Inventory (continued)
Column Description
Battery event* Number of errors or failures encountered by the PC battery.
Storage event* Number of errors or failures encountered by the PC storage.
Thermal event* Number of components that exceeded sustainabletemperature.
OS events* Number of errors or failures encountered by the operatingsystem.
Utilization events* Number of errors or failures encountered by a criticalhardware component of the PC.
System events* Number of errors or failures encountered by a key componentof the PC.
Health status* The overall health status of the PC fleet for the selected weekor day. The status is categorized as follows:● Healthy—the health score is within 51-100, therefore the
PC is healthy.● Needs attention—the health score is within 10-49,
therefore the PC needs attention.● Unhealthy—the health score is within 0-9, therefore
the PC is not running optimally and affects the fleetperformance.
● Data unavailable—the health data was not received fromthe PC.
Current health status* The current or last updated health status of the PC fleetfor the selected week or day. The status is categorized asfollows:● Healthy—the health score is within 51-100, therefore the
PC is healthy.● Needs attention—the health score is within 10-49,
therefore the PC needs attention.● Unhealthy—the health score is within 0-9, therefore
the PC is not running optimally and affects the fleetperformance.
● Data unavailable—the health data was not received fromthe PC.
* This data is collected only when the user has logged in and is actively using the PC.
You can use the Filter option to filter and view specific information about the PCs, and use the Advanced Search option tospecify additional requirements for a search. The Inventory page also enables you to view the PC details weekly or daily basedon your preference.
Create a service request
Prerequisites
You must be signed in to TechDirect as a Connect and manage administrator or Connect and manage technician.
About this task
You can create a service request for connected PCs and submit it to Dell Technologies.
NOTE: You cannot create service requests for disconnected PCs.
14 Managing your PC fleet and groups

Steps
1. From the TechDirect dashboard, go to Connect and manage > Manage PC fleet > Connect and manage PCs > Manage> Connected PCs > Inventory.The Inventory page is displayed.
2. Locate the PC for which you want to create a service request, click , and then click Create service request.The Create Service Request page is displayed.
3. Verify the Service Tag, select a group, and click NEXT.
4. Enter the incident and contact information.
5. Review the information that you entered and click NEXT.
6. Click SUBMIT.
Results
The service request is submitted to Dell Technologies.
Create dispatch request
Prerequisites
You must be signed in to TechDirect as a Connect and manage administrator or Connect and manage technician.
NOTE: To manage dispatch requests, you must enroll for the self-dispatch service in TechDirect.
About this task
You can create dispatch requests for parts if there is a hardware failure.
NOTE: You cannot create dispatch requests for disconnected PCs.
Steps
1. From the TechDirect dashboard, go to Connect and manage > Manage PC fleet > Connect and manage PCs > Manage> Connected PCs > Inventory.The Inventory page is displayed.
2. Locate the PC for which you want to create a dispatch request, click , and then click Create dispatch request.The Create Dispatch Request page is displayed.
3. Verify the Service Tag, select a group, and click NEXT.
4. Enter the incident and contact information.
5. Review the information that you entered and click NEXT.
6. Click SUBMIT.
Results
The dispatch request is submitted to Dell Technologies.
Remove disconnected PCs
About this task
You can remove PCs that are no longer managed or used in your organization.
CAUTION: Ensure that you review the disconnected PCs before you remove them from the inventory.
Steps
1. From the TechDirect dashboard, go to Connect and manage > Manage PC fleet > Connect and manage PCs > Manage> Connected PCs > Inventory.The Inventory page is displayed.
Managing your PC fleet and groups 15

2. Select Disconnected PCs.
3. Select the PCs that you want to remove and click Remove PC.
Results
The selected PCs are removed from the fleet inventory, and the status is displayed on the Audit Trail page.NOTE: If SupportAssist is installed on the PCs, removing the disconnected PCs from the inventory will not uninstall
SupportAssist on the PCs.
NOTE: If a disconnected PC was unintentionally removed, you must reinstall SupportAssist. After the reinstallation, you can
manage the PC in TechDirect.
Groups overview
Site
When you configure and download SupportAssist from TechDirect using the Connect and manage administrator account, a siteis automatically created for that account.
When you deploy SupportAssist on PCs, all the PCs on which SupportAssist is deployed is displayed in TechDirect for that site.By default, every site contains a Default group.
Groups
A group is a logical group of assets within a site. You can create groups to organize the assets during deployment or inTechDirect. You can create one or more groups and organize your PCs within a site, but you cannot move PCs across groups ina different site.
The Groups tab on the Inventory page enables you to create a group and organize your PCs.
NOTE: You require Connect and manage administrator rights to organize groups in TechDirect. Connect and manage
technicians can organize groups if permitted by the administrator. See Define roles and permissions.
Create a group
Prerequisites
You must be signed in to TechDirect as a Connect and manage administrator or Connect and manage technician.
Steps
1. From the TechDirect dashboard, go to Connect and manage > Manage PC fleet > Connect and manage PCs > Manage> Connected PCs > Groups.The Inventory page is displayed.
2. Click Create group.The Create a new group window is displayed.
3. Select a site and enter a group name.
4. Click Create.
Results
The group is created, and the default group configuration of the site is copied to the newly created group.
NOTE: If the primary and secondary contacts are different for PCs running Windows and Chrome operating systems,
ensure that you create separate groups and assign unique primary and secondary contacts for managing these devices.
16 Managing your PC fleet and groups

Move assets between existing groups
Prerequisites
● You must be signed in to TechDirect as a Connect and manage administrator or Connect and manage technician.● To move PCs from one group to another, the source and target groups must be within the same site.
Steps
1. From the TechDirect dashboard, go to Connect and manage > Manage PC fleet > Connect and manage PCs > Manage> Connected PCs > Groups.The Inventory page is displayed.
2. Click Organize PCs.The Organize PCs window is displayed.
3. Select one of the following options:● By using online forms—to organize PCs by moving them from one group to another group in TechDirect.
You can move upto 5000 PCs by using online forms.
● By downloading and uploading a spreadsheet—to organize PCs by moving them from one group to another using aspreadsheet.
You can move unlimited number of PCs by using a spreadsheet.
4. If you selected By using online forms, perform the following steps:
a. From the Site list, select the site.b. From the From group list, select the group from which you want to move the assets.c. From the To group list, select the asset group to which you want to move the assets.d. Select the PCs that you want to move and click Move.
5. If you selected By downloading and uploading a spreadsheet, perform the following steps:
a. From the Site list, select the site.b. From the Select group list, select the groups.c. Download and update the inventory file, and then click Next.
In the spreadsheet, enter the group names in the To Group column. If you do not want to move the PC to anothergroup, leave the To Group cell blank.
d. Upload the inventory file and click OK.The group names provided in To Group column are automatically created, if they do not exist.
Results
The PCs are moved to the new group.
Update site name
Prerequisites
● You must be signed in to TechDirect as a Connect and manage administrator or Connect and manage technician.● To edit the site name, ensure that you have created one or more asset groups within a site.
Steps
1. From the TechDirect dashboard, go to Connect and manage > Manage PC fleet > Connect and manage PCs > Manage> Connected PCs > Groups.The Inventory page is displayed.
2. Locate the row where the details of the asset site that you want to update is listed, click , and click Edit.
3. Edit the site name, and click Save.
Managing your PC fleet and groups 17
Update group name
Prerequisites
You must be signed in to TechDirect as a Connect and manage administrator or Connect and manage technician.
Steps
1. From the TechDirect dashboard, go to Connect and manage > Manage PC fleet > Connect and manage PCs > Manage> Connected PCs > Groups.The Inventory page is displayed.
2. Locate the site that contains the group that you want to update and expand the site list.
3. Locate the row where the details of the group that you want to update is listed, click , and click Edit.
4. Edit the group name, and click Save.
Delete group
Prerequisites
● Ensure that the group that you want to delete does not contain any assets. To delete a group that has assets in it, move theassets to another group. See Move assets between existing groups.
● You must be signed in to TechDirect as a Connect and manage administrator or Connect and manage technician.
Steps
1. From the TechDirect dashboard, go to Connect and manage > Manage PC fleet > Connect and manage PCs > Manage> Connected PCs > Groups.The Inventory page is displayed.
2. Locate the site that contains the group that you want to delete and expand the site list.
3. Locate the row where the details of the group that you want to delete is listed, click , and click Delete.
NOTE: You cannot delete the Default group.
18 Managing your PC fleet and groups

Managing a single PCSupportAssist for business PCs enables you to view recommendations and perform remote optimizations on a PC. SupportAssistalso provides insights about PC health, application experience, and security data, that help manage your PC better.
To manage the PC, go to the Inventory page and click the Service Tag of the PC.
Details of a specific PC
Device details
When you click a Service Tag on the Inventory page, the following details are displayed:
● Device Overview○ Model type—model of the PC, for example, Latitude 5400.○ Service tag—unique five-to-seven digit alphanumeric code.○ Asset tag—asset tag of the PC.○ Express service code—unique numeric code that Dell uses to identify the PC.○ Hostname—unique hostname of the PC.○ Operating system—edition of Windows operating system installed on the PC, for example, Microsoft Windows 10
Enterprise.○ System BIOS version—version of BIOS installed on the PC.○ PC age—number of years/months/days since Dell shipped the PC, for example, 3 yr, 6 mo, 7 d.○ Display—the display information of the PC.
● Service information○ Service plan—service plan of the asset, for example, ProSupport Plus.○ Warranty expiration—date on which the service plan expires.○ Software version—version of SupportAssist installed on the PC, for example, 3.0.0.35.○ Last contact to Dell—date on which the asset last connected to Dell Technologies.○ Recent case details—case or dispatch request details and its status.
PC overview
The PC overview section enables you to view the following:
● PC Health● Application experience● Security● Recommendations
You can also view a summary of the PC health, application experience, and security in the respective widgets.
NOTE: To view the PC health, application experience, and security data, your PC must have an active ProSupport,
ProSupport Plus, or ProSupport Flex for Client service plan.
Table 4. PC overview
Widget Assessment factors Scoring
Health—displays the health score of thePC and the overall result of the healthassessment.
● Battery events● Hardware utilization● OS events● Thermal events
The status and scoring is categorized asfollows:
● 51-100—PC is healthy.
4
Managing a single PC 19

Table 4. PC overview (continued)
Widget Assessment factors Scoring
● Storage events● System events
● 10-49—PC needs attention.● 0-9—PC is unhealthy and not
running optimally. This affects thefleet performance.
● Data unavailable—health data wasnot received from the PC.
Application experience—displays theapplication experience score, number ofapplications with issues, and the numberof most used applications.
● Most used applications● Application context● Application crashes● PCs impacted by the application
crash
The application experience is consideredgood when the score is greater than 10,and is poor when the score is less than10.
Security—displays the security scoreand the overall result of the securityassessment.
● Anti-virus● BIOS administrator password● BIOS Verification● Disk encryption● Firewall● Indicators of attack● Trusted Platform Module
The status and scoring is categorized asfollows:
● 70-100—PC is secure and the risk isminimal.
● 50-69—PC needs attention.● 0-49—PC is at risk.● Data unavailable—data was not
received from the PC.
Health of a specific PC
The Health section of the PC overview page provides PC health data that helps you assess the overall performance of yourPC.
To view the health data, go to the Inventory page and click the Service Tag of the PC.
NOTE: The health data is collected only if:
● The user has logged in and is actively using the PC.
● Your PC has an active ProSupport, ProSupport Plus, or ProSupport Flex for Client service plan.
The Health section also displays a trend chart of PCs that are healthy, needs attention, and unhealthy, for the last 26 weeks(Weekly view) or 30 days (Daily view). The trend chart is derived based on the overall result of the following health assessmentsthat are performed on the PC:
● Battery events● Hardware utilization● OS events● Thermal events● Storage events● System events
The status is categorized as follows:
● Healthy—the health score is within 50-100, therefore the PC is healthy.● Needs attention—the health score is within 10-49, therefore the PC needs attention.● Unhealthy—the health score is within 0-9, therefore the PC is not running optimally and affects the fleet performance.● Data unavailable—the health data was not received from the PC.
You can click a specific color-coded section, or date or week, to view information about the performance of the PC.
PC usage
The PC usage section provides an overview of system utilization and performance.
This section displays the following:
20 Managing a single PC

● PC utilization—the extent to which a critical hardware component of the PC is used. This is used to gauge the overallperformance of the PC.
● Memory utilization—the amount of memory (RAM) installed on the PC and the average amount of memory that is usedover a selected time period.
● CPU utilization—the average load on the processor of the PC over a selected time period.● GPU utilization—the average amount of video memory (VRAM) used over a selected time.● Disk—the amount of hard drive still available for file storage and the average hard drive activity over a selected time period.● Battery health—average percentage of charge that the battery holds against its designed capacity, when it is fully
charged.
PC events
The PC events section provides an overview of events that contribute to your PC health score. PC events are system logs thatspecify an event type, when it occurred, and the impact on your PC.
To view the event type, event description, and date and time on which the event occurred, select an event. The types of eventsare as follows:
● Battery—number of errors or failures encountered by the PC battery.● Storage—number of errors or failures encountered by the PC storage.● Thermal—number of components that exceeded sustainable temperature.● Utilization—number of errors or failures encountered by a critical hardware component of the PC.● System Errors—number of errors or failures encountered by a key component of the PC.● OS—number of errors or failures encountered by the operating system.
Application experience for a specific PC
The Application experience section of the PC overview page provides insights on application usage and crashes that helpunderstand the PC performance. This data is collected only when the user has logged in and is actively using the PC.
To view the application experience data, go to the Inventory page and click the Service Tag of the PC.
The Application experience section also displays a trend chart for application crashes for 26 weeks (Weekly view) or 30 days(Daily view). You can click a specific color-coded section, or date or week, to view information about application crashes andmost used applications.
Application crashes and most used applications
The Application experience also displays the type of application crash, reason for the crash, and when the crash occurred.
Additionally, this section also displays details about most used applications such as application name, version, crashes perapplication, time spent on each application, average CPU usage, average memory usage, and average disk usage by theapplication.
Security for a specific PC
The Security section of the PC overview page provides information about PC security that help assess the risk to ensure thatthe PC is free from vulnerabilities and threats.
To view the security data, go to the Inventory page and click the Service Tag of the PC.
NOTE: The security data is collected only if:
● You have deployed Dell Trusted Device on your PC fleet. For more information about Dell Trusted Device, see the Dell
Trusted Device manuals available on the Dell Trusted Device documentation page.
● Your PC has an active ProSupport, ProSupport Plus, or ProSupport Flex for Client service plan.
The Security section displays a trend chart for the last 26 weeks (Weekly view) or 30 days (Daily view). The trend chart isderived based on the overall result of security assessments that are performed on the PC.
The following table describes the assessments that are performed on the PC and the associated results:
Managing a single PC 21

Table 5. Risk measurements
Risk assessment factor Possible assessment results
Anti-virus ● Pass—anti-virus solution is installed and enabled.● Fail—anti-virus solution is not installed and not enabled.● Data unavailable—data could not be retrieved from the Dell
Trusted Device.
BIOS administrator password ● Pass—BIOS administrator password is set.● Fail—BIOS administrator password is not set.● Data unavailable—data could not be retrieved from the Dell
Trusted Device.
BIOS Verification ● Pass—BIOS verification test is pass.● Warning—other failures detected during the verification.● Fail—BIOS verification test is fail.● Data unavailable—data could not be retrieved from the Dell
Trusted Device.
Disk encryption ● Pass—disk encryption is detected.● Fail—disk encryption is not detected.● Data unavailable—data could not be retrieved from the Dell
Trusted Device.
Firewall ● Pass—firewall solution is installed and enabled.● Fail—firewall solution is not installed and not enabled.● Data unavailable—data could not be retrieved from the Dell
Trusted Device.
Indicators of Attack ● Pass—no indicators of attacks detected.● Warning—partial indicators of attacks detected.● Fail—complete indicators of attacks detected.● Data unavailable—data could not be retrieved from the Dell
Trusted Device.
Trusted Platform Module ● Pass—Trusted Platform Module is enabled.● Fail—Trusted Platform Module is not enabled.● Data unavailable—data could not be retrieved from the Dell
Trusted Device.
Recommendations for a specific PC
You can perform remote optimizations instantly or by initiating an optimization task to run when the PC is online.
To perform updates and optimizations on the PC, go to the Inventory page and click the Service Tag of the PC.
NOTE: You can view the recommendations for all the PCs, but can only perform the optimizations on PCs with an active
ProSupport Plus or ProSupport Flex for Client service plan.
Performing remote optimizations instantly
To perform the optimizations immediately, the PC must be online and connected to Dell, and the user must be available forSupportAssist to run the tasks.
You can perform the following remote optimizations on the PC:
● Scan and install PC updates.● Scan the PC for hardware issues.● Clear temporary, redundant, and other unwanted files from the PC.● Adjust the power settings, registry files, and memory allocations to fine-tune performance of the PC.● Optimize network connectivity by adjusting the settings to have an efficient and reliable network.● Isolate, remove, and restore files that are corrupted by viruses and malware to keep PCs secure.
22 Managing a single PC

NOTE: You cannot install PC updates when using a Remote Desktop Protocol (RDP) connection.
When you run a remote optimization task, the task is queued to run when the PC is online and connected to Dell. To perform thetasks immediately, click SHARE LINK, provide the link to the user, and inform the user to open the link in a new web browserwindow. The browser window in the user's PC must be kept open while SupportAssist performs the optimizations remotely.
After the remote optimization tasks are complete on the PC, a confirmation message is displayed on each tile. You can theninform the PC user to close the browser window.
NOTE: After drivers and downloads updates are complete, a message is displayed if a PC reboot is required. You cannot
perform other optimizations until you reboot the PC.
Initiating remote optimization tasks to run later
You can initiate the following optimizations on PCs for maintenance purposes at regular intervals:
● Scan and install PC updates.● Scan the PC for hardware issues.● Clear temporary, redundant, and other unwanted files from their PC.● Adjust the power settings, registry files, and memory allocations to fine-tune performance of the PC.● Optimize network connectivity by adjusting the settings to have an efficient and reliable network.● Isolate, remove, and restore files that are corrupted by viruses and malware to keep PCs secure.
NOTE: You cannot install PC updates when using a Remote Desktop Protocol (RDP) connection.
To initiate the optimizations, click the required optimization task and the task is queued. When the PC is online and connectedto Dell, it checks for pending tasks every 4 hours. Depending on the SupportAssist configuration, the PC user is notified aboutthe optimization tasks or the tasks are performed in the background without user intervention. If the user is notified, the usercan opt to defer the task twice, after which the task is performed automatically. The notification is displayed for 90 seconds onthe PC. If the user does not defer the task within 90 seconds, the task is performed automatically.
After the optimization tasks are complete on the PC, a confirmation message is displayed on each tile.
NOTE: After drivers and downloads updates are complete, a message is displayed if a PC reboot is required. You cannot
perform other optimizations until you reboot the PC.
Managing a single PC 23

Recommendations for your PC fleetSupportAssist enables you to review the recommendations for the PCs and take action on them to keep your PCs running attheir best. These recommendations are displayed based on scheduled scans or the latest telemetry data that is collected fromthe PCs.
To optimize the PCs, from the TechDirect dashboard, go to Connect and manage > Manage PC fleet > Connect andmanage PCs > Manage > Recommendations and select the site and groups from the Sites & groups list.
NOTE: You can view recommendations for all the PCs in warranty, but can only remotely optimize PCs with an active
ProSupport Plus or ProSupport Flex for Client service plan.
NOTE: If you have enabled Automatic Software Optimization for PCs in SupportAssist configuration, recommendations are
not displayed for PCs with an active ProSupport Plus or ProSupport Flex for Client service plan using that configuration.
Optimizations for such PCs are automatically performed during scheduled scans.
If there are any actionable recommendations available for your fleet of PCs, a quick view of PC recommendations is displayed onthe Overview page. Click the corresponding link to remotely optimize the PC fleet.
The following table describes the details of recommendation types that are displayed on the Recommendations page:
Table 6. Recommendations for your Dell PC fleet
Tile Type of Recommendation Action
Drivers & DownloadsNOTE:Recommendations forDrivers & Downloadsupdates are notdisplayed if you aremanaging PC updatesusing custom catalogs.You can change thispreference in the SetPC update sourcepage. See Set PCupdate source.
Indicates the number of updates available foryour PC fleet. You can filter for security,critical, recommended, and optional updates.● Security—updates that prevent potential
security threats to your PC.● Critical—updates that are necessary to
ensure that the PCs are healthy.● Recommended—updates that improve the
performance of your PC.● Optional—updates that you can choose to
install.
To review the updates available, click REVIEWUPDATES. To update the drivers, perform thefollowing steps:1. Click REVIEW PC LIST.2. Select the PCs on which you want to update
the drivers.3. Click UPDATE.
NOTE: You may have to restart the PC tocomplete the installation of certain drivers.
NOTE: You cannot install updates on PCswhen using a Remote Desktop Protocol(RDP) connection.
Scan Hardware Indicates the number of PCs that have notbeen scanned in x number of days, where xdenotes 30 days, 60 days, or 90 days.
To scan the PC hardware, perform the followingsteps:1. Click REVIEW PC LIST.2. Select the PCs on which you want to run the
scan.3. Click RUN.
Clean Files Indicates the disk space that is cleanableacross PCs. This data is available for 30 days,60 days, or 90 days.
To clean the disk space, perform the followingsteps:1. Click REVIEW PC LIST.2. Select the PCs on which you want to clean
the disk space.3. Click RUN.
Tune Performance Indicates the number of PCs that have notbeen tuned for performance in x number ofdays, where x denotes 30 days, 60 days, or90 days.
To tune the PC performance, perform thefollowing steps:1. Click REVIEW PC LIST.2. Select the PCs on which you want to tune the
PC performance.
5
24 Recommendations for your PC fleet

Table 6. Recommendations for your Dell PC fleet (continued)
Tile Type of Recommendation Action
3. Click RUN.
Optimize Network Indicates the number of PCs that have notbeen optimized for network settings in xnumber of days, where x denotes 30 days, 60days, or 90 days.
To optimize the network connectivity, performthe following steps:1. Click REVIEW PC LIST.2. Select the PCs on which you want to optimize
the network connectivity.3. Click RUN.
Remove Viruses &Malware
NOTE: The virusand malware removalfeature is not availablein certain regions, forexample, China.
Indicates the number of unwanted programsavailable on PCs. You can also filter and viewthe count of virus, malware, and PotentiallyUnwanted Programs (PUPs).
To remove viruses, malware, or PUPs, performthe following steps:1. Click REVIEW PC LIST.2. Select the PCs from which you want to
remove viruses, malware, or PUPs.3. Click REMOVE.
NOTE: When you select a PUP for removal,all the associated references are deleted.
Use the toggle key to switch between two views—Run remotely and View only.
● Run remotely—displays PCs that can be remotely optimized because they have an active ProSupport Plus or ProSupportFlex for Client service plan.
● View only—displays PCs that cannot be remotely optimized because they do not have an active ProSupport Plus orProSupport Flex for Client service plan.
Recommendations for your PC fleet 25

Custom catalogs for your PC fleetIn Connect and manage, you can create, manage, and deploy customized catalogs of the latest BIOS, driver, firmware, utilities,and application software updates. These custom catalogs help streamline the process of finding and determining PC updatesthat are must, to keep the PCs secure and updated.
The PC updates can be managed using custom catalogs or by using SupportAssist recommendations. See Set PC update source.
If your PC fleet is connected to Dell and if your PCs have an active ProSupport Plus or ProSupport Flex for Client service plan,you can deploy the custom catalogs in Connect and manage. See Managing catalogs for PCs connected to Dell.
If your PC fleet is not connected to Dell, you can only deploy the catalogs manually. See Managing catalogs for PCs notconnected to Dell.
NOTE: You require Connect and manage administrator rights to manage custom catalogs. Connect and manage technicians
can manage the catalogs only if permitted by the administrator. See Define roles and permissions.
To manage custom catalogs for your PC fleet, from the TechDirect dashboard, go to Connect and manage > Manage PCfleet > Connect and manage PCs > Manage > Update catalogs.
The following table summarizes the custom catalog capabilities available for different service plans:
Table 7. Custom catalogs capabilities and Dell service plans
Update catalogsmanagementmode
Service plans Catalog types Capabilities
Create, manage,and downloadcatalogs
Deploy catalogsmanually
Deploy catalogsremotely
PCs connected toDell
● ProSupportPlus
● ProSupport Flexfor Client
Product Series
Fleet
Model
● Basic● ProSupport
Product Series
Fleet
Model
PCs not connectedto Dell
● Basic● ProSupport● ProSupport
Plus● ProSupport Flex
for Client
Product Series
Fleet
Model
Managing catalogs for PCs connected to DellIf your PCs are connected to Dell and if they have an active ProSupport Plus or ProSupport Flex for Client service plan, you cancreate, edit, manage, and remotely deploy the catalogs in Connect and manage.
6
26 Custom catalogs for your PC fleet

NOTE: You can manage custom catalogs only on PCs running SupportAssist for business PCs version 3.1.
Create a new catalog
Prerequisites
You must be signed in to TechDirect as a Connect and manage administrator or Connect and manage technician.
About this task
If your PCs connect to Dell and if the PCs have an active ProSupport Plus or ProSupport Flex for Client service plan, you cancreate a Product series, Fleet, or Model catalog.
● Product series—includes devices in your environment for a particular Dell commercial PC family.● Fleet—includes all commercial devices in your environment.● Model—allows you to select up to 40 individual commercial device models.
NOTE: The Dell commercial models include Latitude, Precision, OptiPlex, and XPS.
Steps
1. From the TechDirect dashboard, go to Connect and manage > Manage PC fleet > Connect and manage PCs > Manage> Update catalogs.The Update catalogs page is displayed.
2. Click Create catalog.The Create new catalog page is displayed.
3. In the Catalog type section, perform the following steps:
a. From the Select catalog type list, select Product series, Fleet, or Model.b. If you selected Product series, from the Select family list, select the PC family.c. Enter a catalog name and description.d. Click Next.
4. If you selected Model, perform the following steps:
a. In the PC model selection section, select the PC family and the PC models that you want to include in the catalog, andthen click Next.
b. In the OS selection section, select the operating systems for the PC models, and click Next.
5. In the Update type section, perform the following steps:
a. From the Select update type list, select the updates that you want to include in the catalog.
The PC updates include drivers, BIOS, firmware, applications, and utilities.
b. Click Next.
6. In the Criticality type section, perform the following steps:
a. From the Select criticality type list, select the type of updates that you want to include in the catalog.
Depending on the severity, PC updates are classified as follows:● Security—updates that prevent potential security threats to your PC.● Critical—updates that are necessary to ensure that the PCs are healthy.● Recommended—updates that improve the performance of your PC.● Optional—updates that you can choose to install.
b. Click Next.
7. Click Create.
Results
The catalog is created and is displayed on the Update catalogs page.
Managing catalogs
After you create a catalog, you can manage the catalogs in the Manage catalogs section of the Update catalogs page.
Custom catalogs for your PC fleet 27

Each catalog definition displays the catalog description, and the models and operating systems in the catalog. To view thecatalog description, list of models, and list of operating systems in the catalog, hover over the catalog name.
The following table describes the information that is displayed in the Manage catalogs section:
Table 8. Manage catalogs
Column Description
Name Name that is assigned to the catalog.
Status The status of the catalog.
Version The version of the catalog.
Last modified date The date and time on which the catalog was last modified.
Last modified by Name of the administrator or technician who last modified thecatalog.
You can also perform various actions on a catalog. To perform the following actions, click , and click the correspondingaction.
● View Archive—allows you to download or view the catalogs that you archived in the Production state.● Create Draft—allows you to create another draft catalog. This replaces the existing draft with a new draft.● Delete—allows you to delete the catalog definition and the associated catalogs in various states such as Draft, Test, and
Production.● Edit Definition—allows you to edit the catalog definition.
Catalog states
When you create a catalog, every catalog within the definition is assigned a state. You can assign each catalog to three states—Draft, Test, and Production.
When you create a new catalog, the catalog is automatically assigned the Draft state. After approval, you can assign thecatalog to the Test state where you can test the PC updates. After testing is complete, you can assign the catalog to theProduction state.
Every catalog also displays the models included for that catalog and the operating systems. To view the list of models andoperating systems, hover over the catalog name. To view the catalog state, definition, and its status expand the catalog row.
The following table describes the different states available for a catalog and the associated actions available for each state.
To perform the associated actions, expand the catalog definition, select , and then select the corresponding action that youwant to perform on the catalog.
Table 9. Catalog states
State Catalog definition Available actions
Draft Draft Ready—a draft catalog is readyto be tested.
● Delete—allows you to delete the catalog in theDraft state.
● Change to Test—changes the catalog to theTest state where you can test the PC updates.
● Edit Draft—allows you to update the type ofPC updates that you want to include or excludein the catalog.
Test Download Ready—the catalog is readyto be downloaded and tested on thePCs.
● Create Download—prepares the catalog fordownload.
● Download—allows you to download the catalogto a local environment for testing. To downloadthe catalog, the catalog must contain at leastone selected update type.
● Delete—allows you to delete the catalog in theTest state.
28 Custom catalogs for your PC fleet

Table 9. Catalog states (continued)
State Catalog definition Available actions
● Create Draft—replaces the existing draft witha new draft as you continue testing.
● Change to Production—changes the catalogto the Production state that you can use todeploy on the PC fleet.
● Edit Test—allows you to update the type of PCupdates that you want to include or exclude inthe catalog.
Production Download Ready—the catalog istested and is ready to be downloadedand deployed on the PC fleet.
● Download—allows you to download the catalogfor deployment.
● Create Draft—replaces the existing draft witha new draft as you continue testing.
● Move to Archive—allows you to archive thecatalog if you do not plan to use it anymore.
● Edit Production—allows you to update thetype of PC updates that you want to include orexclude in the catalog.
Deploy a catalog remotely
Prerequisites
● You must be signed in to TechDirect as a Connect and manage administrator or Connect and manage technician.● The catalogs that you want to deploy must be in the Test or Production states.● The PCs that you want to update must be connected to Dell and have an active ProSupport Plus or ProSupport Flex for
Client service plan.
About this task
After you create a custom catalog, you can deploy the catalogs remotely.
NOTE: You cannot install PC updates when using a Remote Desktop Protocol (RDP) connection.
Steps
1. From the TechDirect dashboard, go to Connect and manage > Manage PC fleet > Connect and manage PCs > Manage> Update catalogs.The Update catalogs page is displayed.
2. Click Deploy catalog.The Deploy catalog window is displayed.
3. Select the catalog that you want to deploy.
4. From the Select site & group list, select the site and group to deploy the selected catalog.
5. Click Deploy catalog.
Results
The selected catalog is queued for deployment and may take several minutes to appear on the Deployment Status pagedepending on the size of the catalog. The catalog is deployed when the PC is online and is connected to Dell.
Deployment status
The following table describes information about the deployed catalogs that is displayed on the Deployment status page:
Custom catalogs for your PC fleet 29

Table 10. Deployment status
Column Description
Name Name of the catalog that is selected for deployment.
Site Name of the site selected for deployment.
Group Name of the group within a site selected for deployment.
Version The version of the catalog state that is selected fordeployment.
Affected PCs The number of PCs on which the updates are queued.
Status The status of the catalog deployment. The status iscategorized as follows:● Queued—when you deploy a catalog, the PC updates
are queued to run when the PC is online and connectedto Dell. You can cancel the PC updates only when thedeployment in the Queued status.
To cancel the catalog deployment, select Queued fromthe Status list, select the catalogs that you want tocancel, and then click Cancel.
● In progress—when the PC is online and connected toDell, the catalog is deployed on the PC fleet and theIn progress status is displayed. You cannot cancel thePC update while it is in progress. After the updatesare installed on the PC, the number of Affected PCsdecreases.
After the catalogs are deployed, the status of deployment isdisplayed on the Audit trail page. See Audit trail.
Managing catalogs for PCs not connected to DellIf your PCs do not connect to Dell, then you can manually select the PC models to create, edit, and download the catalogs inConnect and manage, and then deploy the catalogs manually to your PC fleet.
Create a new catalog
About this task
If your PCs do not connect to Dell, you can only create a Model catalog in Connect and manage. This catalog allows you toselect up to 40 individual commercial device models such as Latitude, Precision, OptiPlex, and XPS.
Steps
1. From the TechDirect dashboard, go to Connect and manage > Manage PC fleet > Connect and manage PCs > Manage> Update catalogs.
2. Click Create catalog.The Create new catalog page is displayed.
3. In the Catalog type section, enter a catalog name and description, and click Next.
4. In the PC model selection section, select the PC line of business and PC models that you want to include in the catalog,and then click Next.
5. In the OS selection section, select the operating systems for the PC models, and click Next.
6. In the Update type section, perform the following steps:
a. From the Select update type list, select the updates that you want to include in the catalog.
The PC updates include drivers, BIOS, firmware, applications, and utilities.
b. Click Next.
30 Custom catalogs for your PC fleet

7. In the Criticality type section, perform the following steps:
a. From the Select criticality type list, select the type of updates that you want to include in the catalog.
Depending on the severity, PC updates are classified as follows:● Security—updates that prevent potential security threats to your PC.● Critical—updates that are necessary to ensure that the PCs are healthy.● Recommended—updates that improve the performance of your PC.● Optional—updates that you can choose to install.
b. Click Next.
8. Click Create.
Results
The catalog is created and is displayed on the Update catalogs page.
Managing catalogs
After you create a catalog, you can manage the catalogs in the Manage catalogs section of the Update catalogs page.
Each catalog definition displays the catalog description, and the models and operating systems in the catalog. To view thecatalog description, list of models, and list of operating systems in the catalog, hover over the catalog name.
The following table describes the information that is displayed in the Manage catalogs section:
Table 11. Manage catalogs
Column Description
Name Name that is assigned to the catalog.
Status The status of the catalog.
Version The version of the catalog.
Last modified date The date and time on which the catalog was last modified.
Last modified by Name of the administrator or technician who last modified thecatalog.
You can also perform various actions on a catalog. To perform the following actions, click , and click the correspondingaction.
● View Archive—allows you to download or view the catalogs that you archived in the Production state.● Create Draft—allows you to create another draft catalog. This replaces the existing draft with a new draft.● Delete—allows you to delete the catalog definition and the associated catalogs in various states such as Draft, Test, and
Production.● Edit Definition—allows you to edit the catalog definition.
Catalog states
When you create a catalog, every catalog within the definition is assigned a state. You can assign each catalog to three states—Draft, Test, and Production.
When you create a new catalog, the catalog is automatically assigned the Draft state. After approval, you can assign thecatalog to the Test state where you can test the PC updates. After testing is complete, you can assign the catalog to theProduction state.
Every catalog also displays the models included for that catalog and the operating systems. To view the list of models andoperating systems, hover over the catalog name. To view the catalog state, definition, and its status expand the catalog row.
The following table describes the different states available for a catalog and the associated actions available for each state.
To perform the associated actions, expand the catalog definition, select , and then select the corresponding action that youwant to perform on the catalog.
Custom catalogs for your PC fleet 31

Table 12. Catalog states
State Catalog definition Available actions
Draft Draft Ready—a draft catalog is readyto be tested.
● Delete—allows you to delete the catalog in theDraft state.
● Change to Test—changes the catalog to theTest state where you can test the PC updates.
● Edit Draft—allows you to update the type ofPC updates that you want to include or excludein the catalog.
Test Download Ready—the catalog is readyto be downloaded and tested on thePCs.
● Create Download—prepares the catalog fordownload.
● Download—allows you to download the catalogto a local environment for testing. To downloadthe catalog, the catalog must contain at leastone selected update type.
● Delete—allows you to delete the catalog in theTest state.
● Create Draft—replaces the existing draft witha new draft as you continue testing.
● Change to Production—changes the catalogto the Production state that you can use todeploy on the PC fleet.
● Edit Test—allows you to update the type of PCupdates that you want to include or exclude inthe catalog.
Production Download Ready—the catalog istested and is ready to be downloadedand deployed on the PC fleet.
● Download—allows you to download the catalogfor deployment.
● Create Draft—replaces the existing draft witha new draft as you continue testing.
● Move to Archive—allows you to archive thecatalog if you do not plan to use it anymore.
● Edit Production—allows you to update thetype of PC updates that you want to include orexclude in the catalog.
Deploying a catalog manually
To deploy a catalog manually, perform the following steps:
1. Download a catalog.2. Optionally, Verify the catalog.3. Download update packages.4. Deploy the catalog.
Download a catalog
Prerequisites
● You must be signed in to TechDirect as a Connect and manage administrator or Connect and manage technician.● The catalogs that you want to download must be in the Test or Production states.
Steps
1. From the TechDirect dashboard, go to Connect and manage > Manage PC fleet > Connect and manage PCs > Manage> Update catalogs.The Update catalogs page is displayed.
2. Expand the catalog that you want to download, click , and then select Create Download.
32 Custom catalogs for your PC fleet
To download a catalog, the catalog must be in the Download Ready status.
The status of the catalog changes from Creating Download to Download Ready.
3. Click and select Download.The Download catalog window is displayed.
4. Note the checksum value and click Download catalog.
Results
The selected catalog is downloaded on your PC.
Verify the catalog
About this task
After you download a catalog, to ensure the integrity of your download, you can verify the checksum value of the catalog.
Steps
1. Open Windows PowerShell.
2. Change directory to the folder where you have downloaded the catalog.
3. Type Get-FileHash .\<name_of_the_downloaded_catalog_file>.zip and press Enter.The SHA-256 Hash value is displayed.
4. Compare the checksum value displayed in the PowerShell window with the value displayed in the Download Catalogwindow.
Results
If the checksum values match, the downloaded catalog file is authentic and not corrupted.
Download update packages
Steps
1. Extract the downloaded catalog file to a folder.The following files are extracted:● <catalog-name>.xml—the catalog definition file.
● Dell.Command.Repository.Maker.exe—the executable file that reads the <catalog name>.xml file anddownloads the update packages.
● README.txt—a deployment instructions file.
2. Open Command Prompt and run the following commands along with Dell.Command.Repository.Maker.exe:
● To view the help information, type -?, -h, or --help and press Enter.
● To specify the .xml file, type -c or --catalog <file> and press Enter.
NOTE: If no catalog file is specified, <catalog name>.xml is searched in the current folder.
● To specify a target folder for the update packages, type -t or --target <path> and press Enter.NOTE: If a target folder is not specified, the location of the Dell.Command.Repository.Maker.exe is chosen
by default.
● The default baseLocation is downloads.dell.com. To define a new baseLocation, type -b or --baseLocation<path>.
● To specify a force-download if a software component installer exists and the download was ignored, type -f and pressEnter.
Deploy the catalog
After you have downloaded and extracted the update catalog, you can either host that catalog locally or use a deployment toolof your choice to distribute it. Each endpoint must then be configured to point to the location of your update catalog.
Custom catalogs for your PC fleet 33

The specified catalog is read, and the update packages are downloaded from https://downloads.dell.com or from thespecified baseLocation.
34 Custom catalogs for your PC fleet
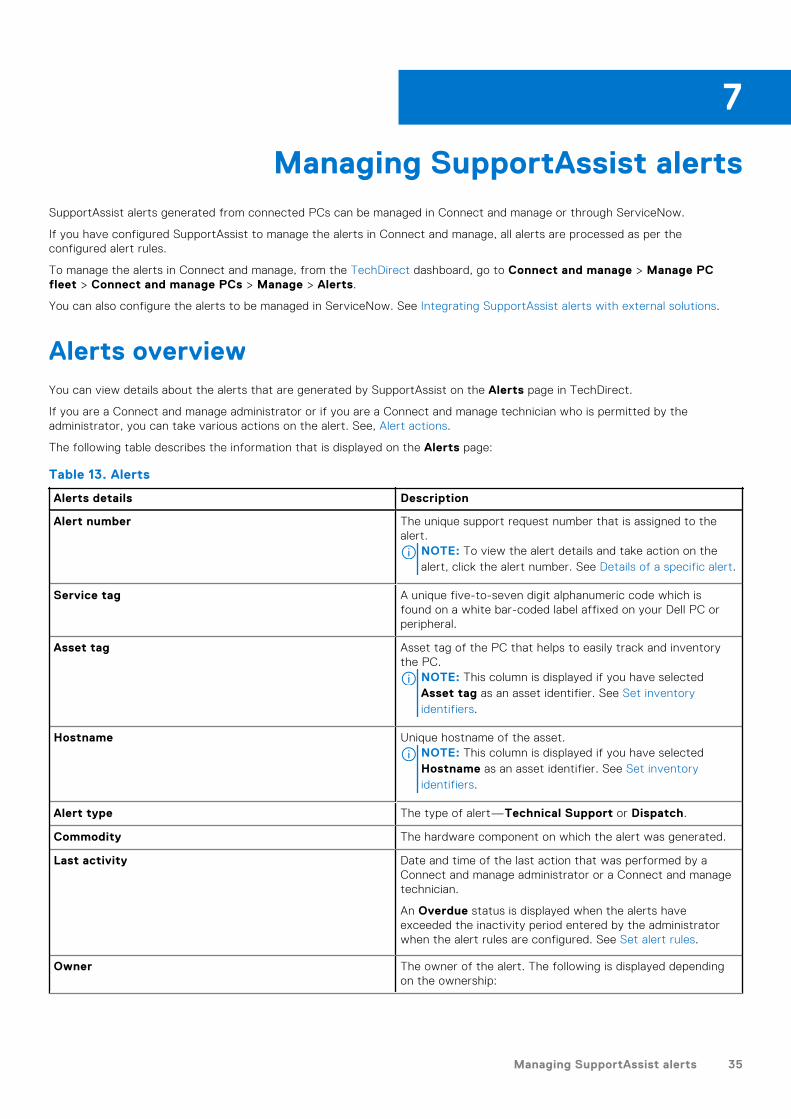
Managing SupportAssist alertsSupportAssist alerts generated from connected PCs can be managed in Connect and manage or through ServiceNow.
If you have configured SupportAssist to manage the alerts in Connect and manage, all alerts are processed as per theconfigured alert rules.
To manage the alerts in Connect and manage, from the TechDirect dashboard, go to Connect and manage > Manage PCfleet > Connect and manage PCs > Manage > Alerts.
You can also configure the alerts to be managed in ServiceNow. See Integrating SupportAssist alerts with external solutions.
Alerts overviewYou can view details about the alerts that are generated by SupportAssist on the Alerts page in TechDirect.
If you are a Connect and manage administrator or if you are a Connect and manage technician who is permitted by theadministrator, you can take various actions on the alert. See, Alert actions.
The following table describes the information that is displayed on the Alerts page:
Table 13. Alerts
Alerts details Description
Alert number The unique support request number that is assigned to thealert.
NOTE: To view the alert details and take action on thealert, click the alert number. See Details of a specific alert.
Service tag A unique five-to-seven digit alphanumeric code which isfound on a white bar-coded label affixed on your Dell PC orperipheral.
Asset tag Asset tag of the PC that helps to easily track and inventorythe PC.
NOTE: This column is displayed if you have selectedAsset tag as an asset identifier. See Set inventoryidentifiers.
Hostname Unique hostname of the asset.NOTE: This column is displayed if you have selectedHostname as an asset identifier. See Set inventoryidentifiers.
Alert type The type of alert—Technical Support or Dispatch.
Commodity The hardware component on which the alert was generated.
Last activity Date and time of the last action that was performed by aConnect and manage administrator or a Connect and managetechnician.
An Overdue status is displayed when the alerts haveexceeded the inactivity period entered by the administratorwhen the alert rules are configured. See Set alert rules.
Owner The owner of the alert. The following is displayed dependingon the ownership:
7
Managing SupportAssist alerts 35

Table 13. Alerts (continued)
Alerts details Description
● If the alerts are not assigned, the Unassigned status isdisplayed.
● If the alert is assigned to a technician, the name of theTechDirect administrator or technician is displayed.
Alert created on Date and time when the alert was created on the PC.
Line of business Type of Dell device, for example, Latitude.
Region Region where the asset is present, for example, Americas.
Service plan Service plan of the asset, for example, ProSupport Plus.
You can use the Show option to filter and view specific information about the alerts.
Details of a specific alert
When you click an alert number on the Alerts page, the following details are displayed:
● Service tag—unique five-to-seven digit alphanumeric code.● Asset tag—asset tag of the PC.● Hostname—unique hostname of the PC.● Alert type—the type of alert—Technical Support or Dispatch.● Last activity—date and time of the last action that was performed by a Connect and manage administrator or a Connect
and manage technician.● Due date—date by which the alert must be resolved.● Owner—the owner of the alert.
If you are a Connect and manage administrator or if you are a Connect and manage technician who is permitted by theadministrator, you can take various actions on the alert. See Alert actions.
The Overview section displays the following details about an alert:
● Details—the alert description and details about the logged in user.● Activity history—provides the record of activities that are performed by the administrator or technician on the alert.
Alert actionsWhen you select or click an alert number on the Alerts page, a list of actions that you can take on the alert are displayed.
The following table describes the actions available for every alert that is created in TechDirect:
Table 14. Alert actions
Available actions Description
Assign ownership Click Assign ownership to assign an administrator, technician, or user as theowner of the alert.
Take ownership Click Take Ownership to assign the alert to yourself.
Add notes Click Add notes to add details about the alert, for example, issue that wasdetected or error information for investigation. The notes must not exceed1000 characters.
Close alert Click Close alert to close the alert when the necessary action is taken toresolve the issue. After the alert is closed, the administrator, technician, orDell Technologies cannot take any further actions on the alert.
Forward To Dell Technologies Click Forward To Dell Technologies to forward the support request totechnical support. You can continue to monitor progress from either theTechnical Support page or Dispatch Summary page in TechDirect.
36 Managing SupportAssist alerts

Table 14. Alert actions (continued)
Available actions Description
To view the Technical Support page, from TechDirect, go to Services >Get Support and Replace Parts > Technical Support.
To view the Dispatch page, from TechDirect, go to Services > Get Supportand Replace Parts > Self-Dispatch.
Managing SupportAssist alerts 37
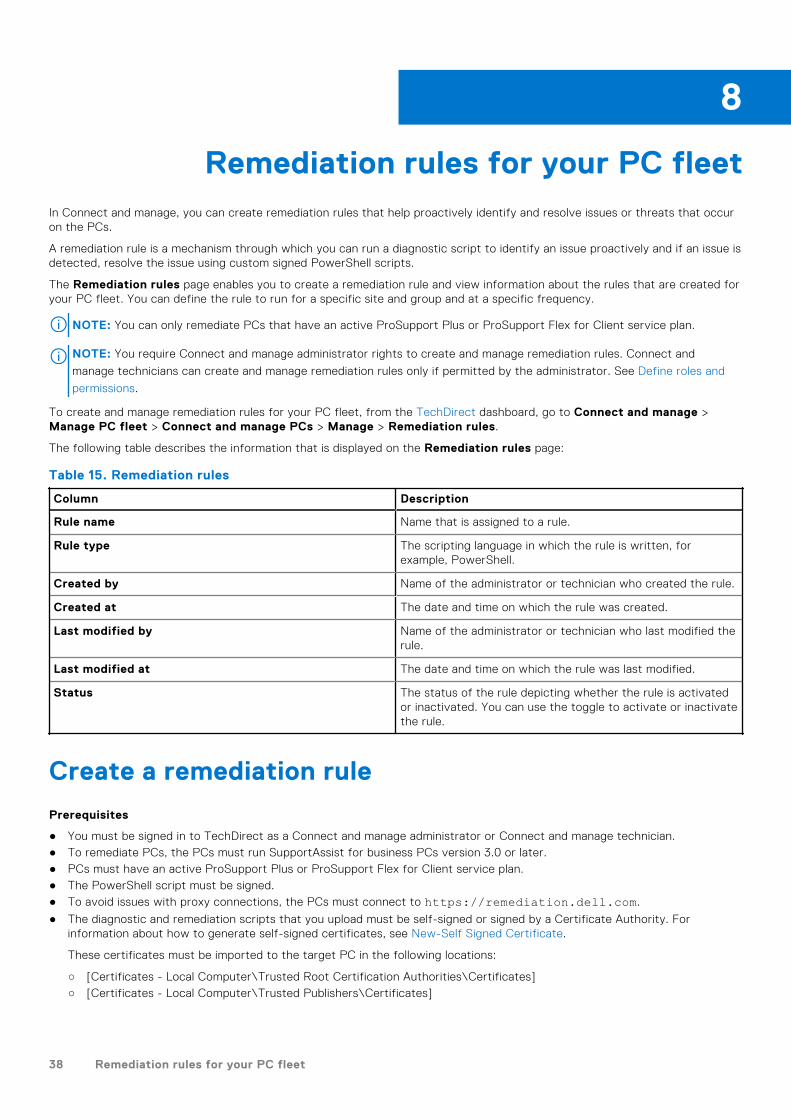
Remediation rules for your PC fleetIn Connect and manage, you can create remediation rules that help proactively identify and resolve issues or threats that occuron the PCs.
A remediation rule is a mechanism through which you can run a diagnostic script to identify an issue proactively and if an issue isdetected, resolve the issue using custom signed PowerShell scripts.
The Remediation rules page enables you to create a remediation rule and view information about the rules that are created foryour PC fleet. You can define the rule to run for a specific site and group and at a specific frequency.
NOTE: You can only remediate PCs that have an active ProSupport Plus or ProSupport Flex for Client service plan.
NOTE: You require Connect and manage administrator rights to create and manage remediation rules. Connect and
manage technicians can create and manage remediation rules only if permitted by the administrator. See Define roles and
permissions.
To create and manage remediation rules for your PC fleet, from the TechDirect dashboard, go to Connect and manage >Manage PC fleet > Connect and manage PCs > Manage > Remediation rules.
The following table describes the information that is displayed on the Remediation rules page:
Table 15. Remediation rules
Column Description
Rule name Name that is assigned to a rule.
Rule type The scripting language in which the rule is written, forexample, PowerShell.
Created by Name of the administrator or technician who created the rule.
Created at The date and time on which the rule was created.
Last modified by Name of the administrator or technician who last modified therule.
Last modified at The date and time on which the rule was last modified.
Status The status of the rule depicting whether the rule is activatedor inactivated. You can use the toggle to activate or inactivatethe rule.
Create a remediation rule
Prerequisites
● You must be signed in to TechDirect as a Connect and manage administrator or Connect and manage technician.● To remediate PCs, the PCs must run SupportAssist for business PCs version 3.0 or later.● PCs must have an active ProSupport Plus or ProSupport Flex for Client service plan.● The PowerShell script must be signed.● To avoid issues with proxy connections, the PCs must connect to https://remediation.dell.com.
● The diagnostic and remediation scripts that you upload must be self-signed or signed by a Certificate Authority. Forinformation about how to generate self-signed certificates, see New-Self Signed Certificate.
These certificates must be imported to the target PC in the following locations:
○ [Certificates - Local Computer\Trusted Root Certification Authorities\Certificates]○ [Certificates - Local Computer\Trusted Publishers\Certificates]
8
38 Remediation rules for your PC fleet
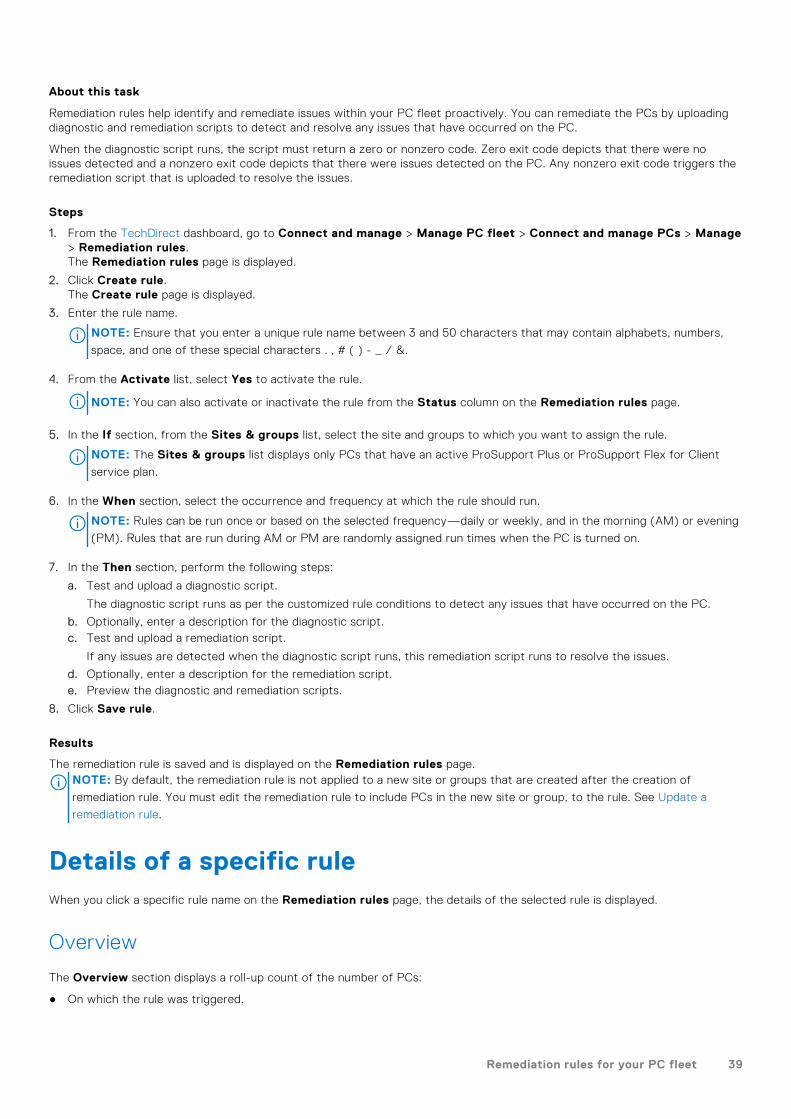
About this task
Remediation rules help identify and remediate issues within your PC fleet proactively. You can remediate the PCs by uploadingdiagnostic and remediation scripts to detect and resolve any issues that have occurred on the PC.
When the diagnostic script runs, the script must return a zero or nonzero code. Zero exit code depicts that there were noissues detected and a nonzero exit code depicts that there were issues detected on the PC. Any nonzero exit code triggers theremediation script that is uploaded to resolve the issues.
Steps
1. From the TechDirect dashboard, go to Connect and manage > Manage PC fleet > Connect and manage PCs > Manage> Remediation rules.The Remediation rules page is displayed.
2. Click Create rule.The Create rule page is displayed.
3. Enter the rule name.
NOTE: Ensure that you enter a unique rule name between 3 and 50 characters that may contain alphabets, numbers,
space, and one of these special characters . , # ( ) - _ / &.
4. From the Activate list, select Yes to activate the rule.
NOTE: You can also activate or inactivate the rule from the Status column on the Remediation rules page.
5. In the If section, from the Sites & groups list, select the site and groups to which you want to assign the rule.
NOTE: The Sites & groups list displays only PCs that have an active ProSupport Plus or ProSupport Flex for Client
service plan.
6. In the When section, select the occurrence and frequency at which the rule should run.
NOTE: Rules can be run once or based on the selected frequency—daily or weekly, and in the morning (AM) or evening
(PM). Rules that are run during AM or PM are randomly assigned run times when the PC is turned on.
7. In the Then section, perform the following steps:
a. Test and upload a diagnostic script.
The diagnostic script runs as per the customized rule conditions to detect any issues that have occurred on the PC.
b. Optionally, enter a description for the diagnostic script.c. Test and upload a remediation script.
If any issues are detected when the diagnostic script runs, this remediation script runs to resolve the issues.
d. Optionally, enter a description for the remediation script.e. Preview the diagnostic and remediation scripts.
8. Click Save rule.
Results
The remediation rule is saved and is displayed on the Remediation rules page.NOTE: By default, the remediation rule is not applied to a new site or groups that are created after the creation of
remediation rule. You must edit the remediation rule to include PCs in the new site or group, to the rule. See Update a
remediation rule.
Details of a specific ruleWhen you click a specific rule name on the Remediation rules page, the details of the selected rule is displayed.
Overview
The Overview section displays a roll-up count of the number of PCs:
● On which the rule was triggered.
Remediation rules for your PC fleet 39

● On which no issues were detected.● On which issues were detected.● Which self-healed.
This data helps assess the number of PCs that were able to self-heal using the remediation script and the number of PCs thatneed your attention. You can also modify the remediation script accordingly.
Details
The Details section information of the PCs on which the rule was triggered. The following table describes the informationdisplayed in the Details section:
Table 16. Details
Column Description
Site Name of the site to which the asset is assigned.
Group Group to which the asset is assigned.
Service tag A unique five-to-seven digit alphanumeric code which isfound on a white bar-coded label affixed on your Dell PC orperipheral.
Asset tag Asset tag of the PC that helps to easily track and inventorythe PC.
Hostname Unique hostname of the asset.
OS Version Version of the Windows operating system installed on the PCon which the rules was triggered.
PC Model Model of the PC on which the rule was triggered, for example,Latitude 5400.
Last run at The date and time on which the rule was last run.
Diagnostic status The status of the diagnostic script execution. The status iscategorized as follows:● No issue—the diagnostic script executed successfully and
no issues were found.● Issue detected—the diagnostic script executed
successfully and issues were found.● Error—the diagnostic script execution failed due to
various reasons, for example, unsigned script or expiredcertificate.
NOTE: Success or failure is determined by the exitcodes (zero or nonzero exit codes) that are generatedafter executing the diagnostic scripts. See Exit codes inPowerShell.
Remediation status The status of the remediation script execution. The status iscategorized as follows:● Success—the issues that were found during the
diagnostic script execution were solved successfully usingthe remediation script.
● Failed—the issues that were found during the diagnosticscript execution were not solved successfully using theremediation script.
● Error—the remediation script execution failed due tovarious reasons, for example, unsigned script or expiredcertificate.
NOTE: Success or failure is determined by the exitcodes (zero or nonzero exit codes) that are generated
40 Remediation rules for your PC fleet

Table 16. Details (continued)
Column Description
after executing the remediation scripts. See Exit codes inPowerShell.
Update a remediation rule
Prerequisites
You must be signed in to TechDirect as a Connect and manage administrator or Connect and manage technician.
Steps
1. From the TechDirect dashboard, go to Connect and manage > Manage PC fleet > Connect and manage PCs > Manage> Remediation rules.The Remediation rules page is displayed.
2. Locate the row where the details of the rule that you want to update are listed, click , and click Edit.
3. Update the rule details and click Save rule.
Delete a remediation rule
Prerequisites
You must be signed in to TechDirect as a Connect and manage administrator or Connect and manage technician.
Steps
1. From the TechDirect dashboard, go to Connect and manage > Manage PC fleet > Connect and manage PCs > Manage> Remediation rules.The Remediation rules page is displayed.
2. Locate the row where the rule that you want to delete is listed, click , and click Delete.
3. In the Delete rule window, click Yes.
Remediation rules for your PC fleet 41

Application experience for your PC fleetThe Applications page enables you to track applications by usage, crashes, and memory utilization that helps understand theperformance of each application across the fleet. The application experience data is collected only when the user has logged inand is actively using the PC. You can switch between the Weekly view or Daily view, based on your preference.
NOTE: You can view the application experience data only for PCs with an active ProSupport, ProSupport Plus, or
ProSupport Flex for Client service plan.
To view the application experience data for your PC fleet, from the TechDirect dashboard, go to Connect and manage >Manage PC fleet > Connect and manage PCs > Manage > Applications.
The following table describes the information that is displayed on the Applications page:
Table 17. Applications
Column Description
Application name Name of the application, for example, Zoom or GoogleChrome.
NOTE: To view the application utilization details and crashdetails, click the application name.
Version Version number of the application.
Impacted PCs Number of PCs on which the application stopped responding.
Crash count Total number of times the application closed unexpectedlyacross the PC fleet.
Application froze count Total number of times the application stopped respondingacross the PC fleet.
Average time in foreground The average time duration in which the application is activelyused.
Average total running time The average time duration in which the application is runningin the background or foreground.
CPU The application load on the PC processor. The utilization iscategorized as follows based on the criteria defined by Dell:● Normal—load on the CPU is normal.● Elevated—load on the CPU is increased.● High—load on the CPU is at the highest level and may
affect the device performance.
Memory paged The size of the paged pool. The paged pool is an area of thePC virtual memory that is used for objects that can be writtento disk when they are not being used.
Memory non paged The size of the non-paged pool. The non-paged pool is an areaof the PC virtual memory that is used for objects that cannotbe written to disk, and must remain in physical memory aslong as they are allocated.
Memory (Working set) The size of the private memory space that is in use by aparticular application. This space is not shared or shareablewith other processes.
Network I/O The rate at which the applications are reading and writingdata for network input-output operations.
9
42 Application experience for your PC fleet

Table 17. Applications (continued)
Column Description
Disk I/O The rate at which the applications are reading and writingdata for disk input-output operations.
When you click the Application name, the following details about the application are displayed:
● Application utilization—provides insights about application usage.● Crash details—provides details about the following:
○ Process name—the name of the application that has crashed.○ Process version—the version number of the application that has crashed.○ Application error—the error that has occurred on the application.○ Description—the error description depicting the reason for the application crash.○ Impacted PCs—the number of PCs that are impacted due to the application crash. Click the roll-up count to view
details about the impacted PCs.
Application experience for your PC fleet 43
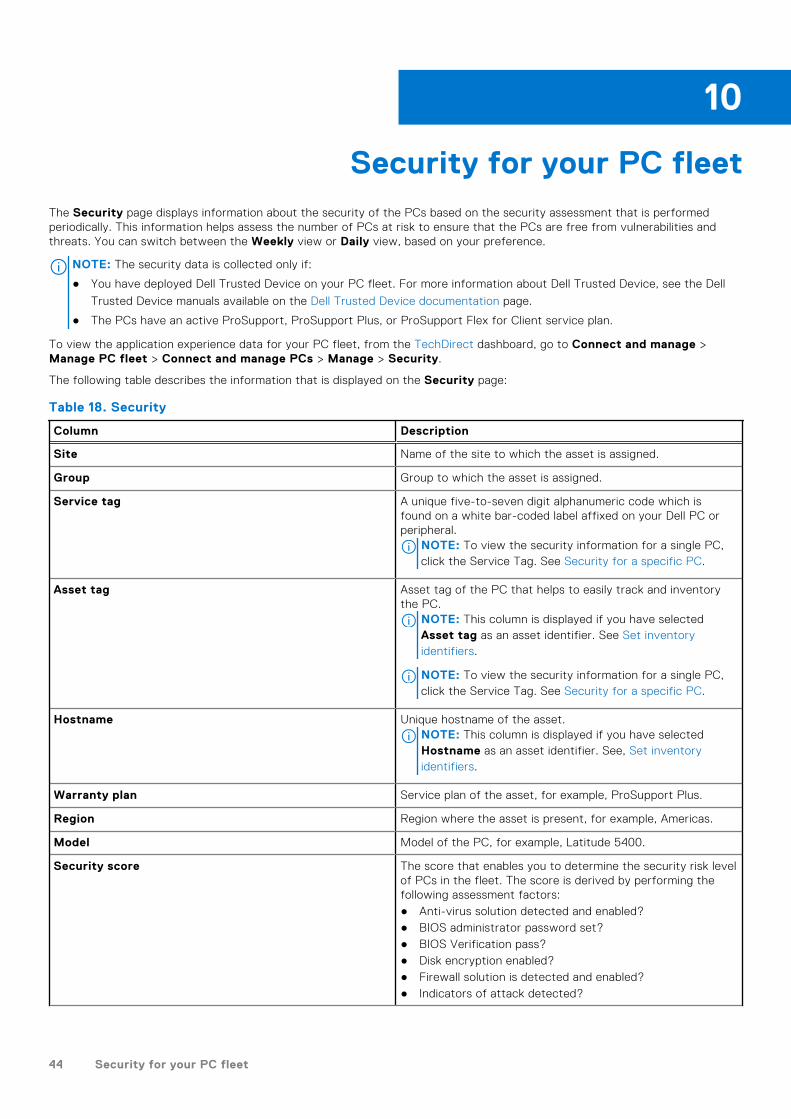
Security for your PC fleetThe Security page displays information about the security of the PCs based on the security assessment that is performedperiodically. This information helps assess the number of PCs at risk to ensure that the PCs are free from vulnerabilities andthreats. You can switch between the Weekly view or Daily view, based on your preference.
NOTE: The security data is collected only if:
● You have deployed Dell Trusted Device on your PC fleet. For more information about Dell Trusted Device, see the Dell
Trusted Device manuals available on the Dell Trusted Device documentation page.
● The PCs have an active ProSupport, ProSupport Plus, or ProSupport Flex for Client service plan.
To view the application experience data for your PC fleet, from the TechDirect dashboard, go to Connect and manage >Manage PC fleet > Connect and manage PCs > Manage > Security.
The following table describes the information that is displayed on the Security page:
Table 18. Security
Column Description
Site Name of the site to which the asset is assigned.
Group Group to which the asset is assigned.
Service tag A unique five-to-seven digit alphanumeric code which isfound on a white bar-coded label affixed on your Dell PC orperipheral.
NOTE: To view the security information for a single PC,click the Service Tag. See Security for a specific PC.
Asset tag Asset tag of the PC that helps to easily track and inventorythe PC.
NOTE: This column is displayed if you have selectedAsset tag as an asset identifier. See Set inventoryidentifiers.
NOTE: To view the security information for a single PC,click the Service Tag. See Security for a specific PC.
Hostname Unique hostname of the asset.NOTE: This column is displayed if you have selectedHostname as an asset identifier. See, Set inventoryidentifiers.
Warranty plan Service plan of the asset, for example, ProSupport Plus.
Region Region where the asset is present, for example, Americas.
Model Model of the PC, for example, Latitude 5400.
Security score The score that enables you to determine the security risk levelof PCs in the fleet. The score is derived by performing thefollowing assessment factors:● Anti-virus solution detected and enabled?● BIOS administrator password set?● BIOS Verification pass?● Disk encryption enabled?● Firewall solution is detected and enabled?● Indicators of attack detected?
10
44 Security for your PC fleet

Table 18. Security (continued)
Column Description
● Trusted Platform Module is enabled?
The score is categorized as follows:
● 70-100—PCs are secure and the risk is minimal.● 50-69—PCs need attention.● 0-49—PCs are at risk.
For more information about the security assessments that areperformed on the PC and the associated results, see Securityfor a specific PC.
Weekly/Daily status The overall security risk status for the PC fleet for theselected week or day. The status is categorized as follows:● Secure—the security score is within 70-100 and therefore
the PCs are secure.● Needs attention—the security score is within 50-69 and
therefore the PCs need attention.● Risk—the security score is within 0-49 and the PCs are
the risk to potential threats.● Data unavailable—data was not received from the PC.
Current status The current or last updated security risk status for the PCfleet. The status is categorized as follows:● Secure—the security score is within 70-100 and therefore
the PCs are secure.● Needs attention—the security score is within 50-69 and
therefore the PCs need attention.● Risk—the security score is within 0-49 and the PCs are
the risk to potential threats.● Data unavailable—data was not received from the PC.
Security for your PC fleet 45
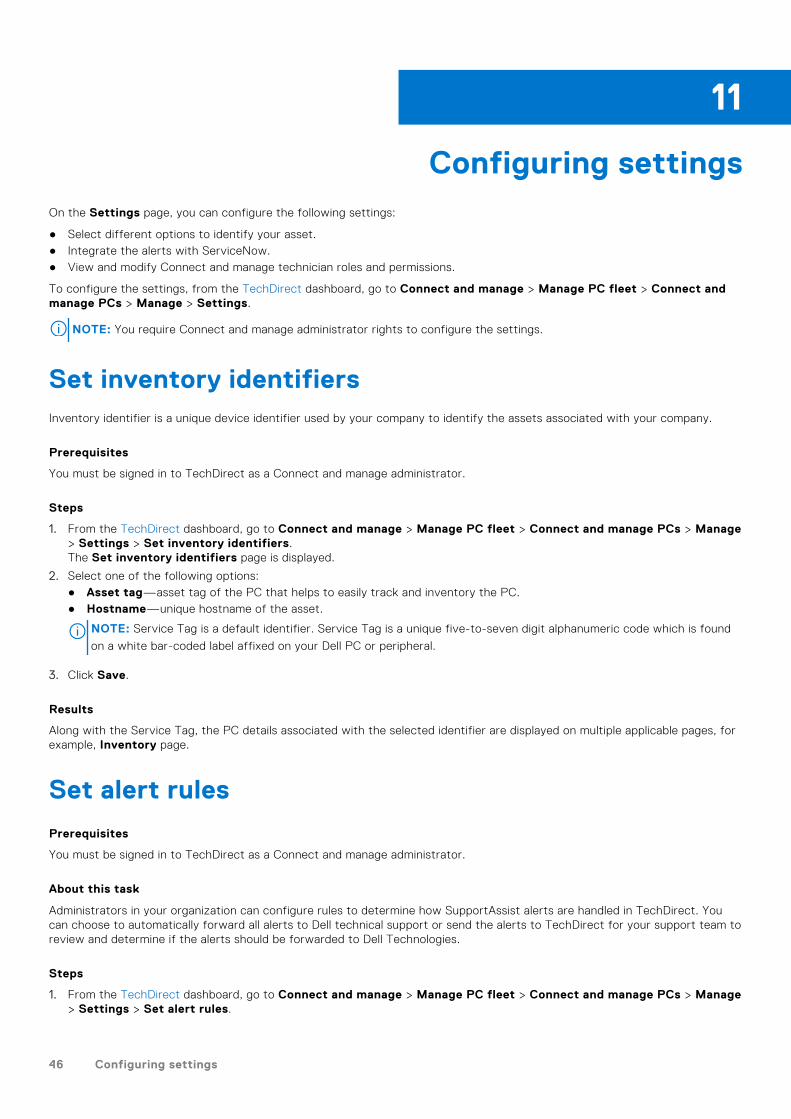
Configuring settingsOn the Settings page, you can configure the following settings:
● Select different options to identify your asset.● Integrate the alerts with ServiceNow.● View and modify Connect and manage technician roles and permissions.
To configure the settings, from the TechDirect dashboard, go to Connect and manage > Manage PC fleet > Connect andmanage PCs > Manage > Settings.
NOTE: You require Connect and manage administrator rights to configure the settings.
Set inventory identifiersInventory identifier is a unique device identifier used by your company to identify the assets associated with your company.
Prerequisites
You must be signed in to TechDirect as a Connect and manage administrator.
Steps
1. From the TechDirect dashboard, go to Connect and manage > Manage PC fleet > Connect and manage PCs > Manage> Settings > Set inventory identifiers.The Set inventory identifiers page is displayed.
2. Select one of the following options:● Asset tag—asset tag of the PC that helps to easily track and inventory the PC.● Hostname—unique hostname of the asset.
NOTE: Service Tag is a default identifier. Service Tag is a unique five-to-seven digit alphanumeric code which is found
on a white bar-coded label affixed on your Dell PC or peripheral.
3. Click Save.
Results
Along with the Service Tag, the PC details associated with the selected identifier are displayed on multiple applicable pages, forexample, Inventory page.
Set alert rules
Prerequisites
You must be signed in to TechDirect as a Connect and manage administrator.
About this task
Administrators in your organization can configure rules to determine how SupportAssist alerts are handled in TechDirect. Youcan choose to automatically forward all alerts to Dell technical support or send the alerts to TechDirect for your support team toreview and determine if the alerts should be forwarded to Dell Technologies.
Steps
1. From the TechDirect dashboard, go to Connect and manage > Manage PC fleet > Connect and manage PCs > Manage> Settings > Set alert rules.
11
46 Configuring settings

The Set alert rules page is displayed.
2. In the Inactivity period section, enter the number of days an alert can reside in the queue with no activity.The alert resides in the queue for the number of days you have entered. After the inactivity period ends, a notification is sentto the administrator and alert owner, and the alert status is displayed as Overdue in the Last activity column of the Alertspage. See Alerts overview.
3. In the Technical support alerts section, perform one of the following steps:● Select Yes to directly forward all technical support alerts to Dell Technologies.
The progress of the alerts that are forwarded to Dell Technologies can be monitored in the Technical Support page.
To view the Technical Support page, from TechDirect, go to Services > Get Support and Replace Parts >Technical Support.
● Select No, send all alerts to my alerts queue to send all technical support alerts to your TechDirect account. Yoursupport team can review the alerts and determine if the alerts should be forwarded to Dell Technologies.
4. In the Dispatch Alerts section, perform one of the following steps:● Select Yes to directly forward all dispatch alerts to Dell Technologies.
The User group management section is displayed. The progress of the alerts that are forwarded to Dell Technologiescan be monitored in the Dispatch Summary page.
To view the Dispatch page, from TechDirect, go to Services > Get Support and Replace Parts > Self-Dispatch.
● Select No, send all alerts to my alerts queue to send all dispatch alerts to your TechDirect account. Your supportteam can review the alerts and determine if the alerts should be forwarded to Dell Technologies.
5. If the User group management section is displayed, click Add user group rule.
NOTE: Group rules are used for identifying the address for dispatch. When a SupportAssist alert is forwarded to Dell
Technologies for parts dispatch, the address information in the alert is compared with the configured user group rules. If
a match is found, the address information that is associated with that user group is used for parts dispatch.
The Add user group rule page is displayed.
6. Select the location, country or region, user group, time zone, relationship, and technician, and then click Add rule.The rule is added, and the Alert rules page is displayed.
7. Click Save.
Set PC update sourceYou can manage the updates for your PC fleet using Dell recommended updates or using the custom catalogs.
Prerequisites
You must be signed in to TechDirect as a Connect and manage administrator.
Steps
1. From the TechDirect dashboard, go to Connect and manage > Manage PC fleet > Connect and manage PCs > Manage> Settings > Set PC update source.The Set PC update source page is displayed.
2. Select one of the following options:● Dell recommended updates—get PC update recommendations automatically from Dell. See Recommendations for your
PC fleet.● Custom catalog updates—update the PCs by creating, testing, downloading, and deploying custom catalogs on the PC
fleet. See Custom catalogs for your PC fleet.
3. If you selected Custom catalog updates, you can optionally specify a location to store all the updates defined in thecatalog.
4. Click Save.
Configuring settings 47

Define roles and permissionsTechDirect enables company administrators to designate Device Management Administrators and have Connect and managetechnicians added for the company account. The Connect and manage administrator can access and manage all SupportAssistactivities, whereas a Connect and manage technician has limited access to SupportAssist. The technicians can only manageSupportAssist based on the permissions configured by a Connect and manage administrator.
The Define roles & permissions page provides information about the users listed for your PC fleet, their assigned, roles, andso on.
To view and modify the roles and permissions, from the TechDirect dashboard, go to Connect and manage > Manage PCfleet > Connect and manage PCs > Manage > Settings > Define roles & permissions.
User details
The User details section provides information about the following:
● User—the username of the TechDirect user.● Roles—the roles assigned to the user, for example, Connect and manage administrator.● Email address—registered email address of the user.● Site created—the site that the user has created.● Last visit—date and time on which the user last visited the SupportAssist Device Management pages.
You can also assign the site ownership between Connect and manage users. To assign the ownership, select the user role andclick Assign ownership.
NOTE: You cannot assign site ownership if you are a partner or a client managed by a partner.
Features, roles, and permissions
By default, the Connect and manage administrator can access and manage all SupportAssist capabilities and features. You cangrant or revoke the technician permissions by selecting or clearing the corresponding check boxes. For more information aboutSupportAssist capabilities and roles, see Connect and manage roles in TechDirect.
Integrating SupportAssist alerts with externalsolutionsIf your organization uses ServiceNow for IT and Helpdesk management, you can integrate SupportAssist alerts withyour ServiceNow solution. Integration with ServiceNow enables automatic creation of an incident in ServiceNow for yourSupportAssist alerts.
NOTE: After ServiceNow integration is enabled, SupportAssist alerts cannot be managed using TechDirect. However, you
must use SupportAssist to request a parts dispatch or submit a support request to Dell.
Enable ServiceNow integration
Prerequisites
You must be signed in to TechDirect as a Connect and manage administrator.
Steps
1. From the TechDirect dashboard, go to Connect and manage > Manage PC fleet > Connect and manage PCs > Manage> Settings > Connect external solutions.The Connect external solutions page is displayed.
2. From the Select site list, select a site.
3. Clear Inactivate (continue managing SupportAssist Alerts in TechDirect), if selected.
48 Configuring settings

4. For SupportAssist to automatically create an incident in ServiceNow, perform the following steps:
a. Select Use ServiceNow Instance.b. Enter the ServiceNow instance ID, username, password, and failure notification email address.
NOTE: If SupportAssist is unable to automatically create an incident in ServiceNow, an email is sent to the email
address provided in the Failure Notification box.
c. Click Create a test incident in ServiceNow to send a test alert to your ServiceNow instance.
5. For SupportAssist to send alerts to ServiceNow by email, perform the following steps:
a. Select Use Email.b. In the Alerts Notification box, enter the email address to which you want to send the SupportAssist alert details.c. Click Create a test incident in ServiceNow to send a test email to the email address entered in the Alerts
Notification box.
6. Click Save.
Results
TechDirect forwards all the alerts generated from all the PCs in the site, to the ServiceNow instance you configured.
Disable ServiceNow integration
Prerequisites
You must be signed in to TechDirect as a Connect and manage administrator.
Steps
1. From the TechDirect dashboard, go to Connect and manage > Manage PC fleet > Connect and manage PCs > Manage> Settings > Connect external solutions.The Connect external solutions page is displayed.
2. From the Select site list, select a site.
3. Select Inactivate (continue managing SupportAssist Alerts in TechDirect).
4. Click Save.
Results
After ServiceNow integration is disabled, you can manage SupportAssist alerts using the SupportAssist Alerts page inTechDirect.
Configuring settings 49
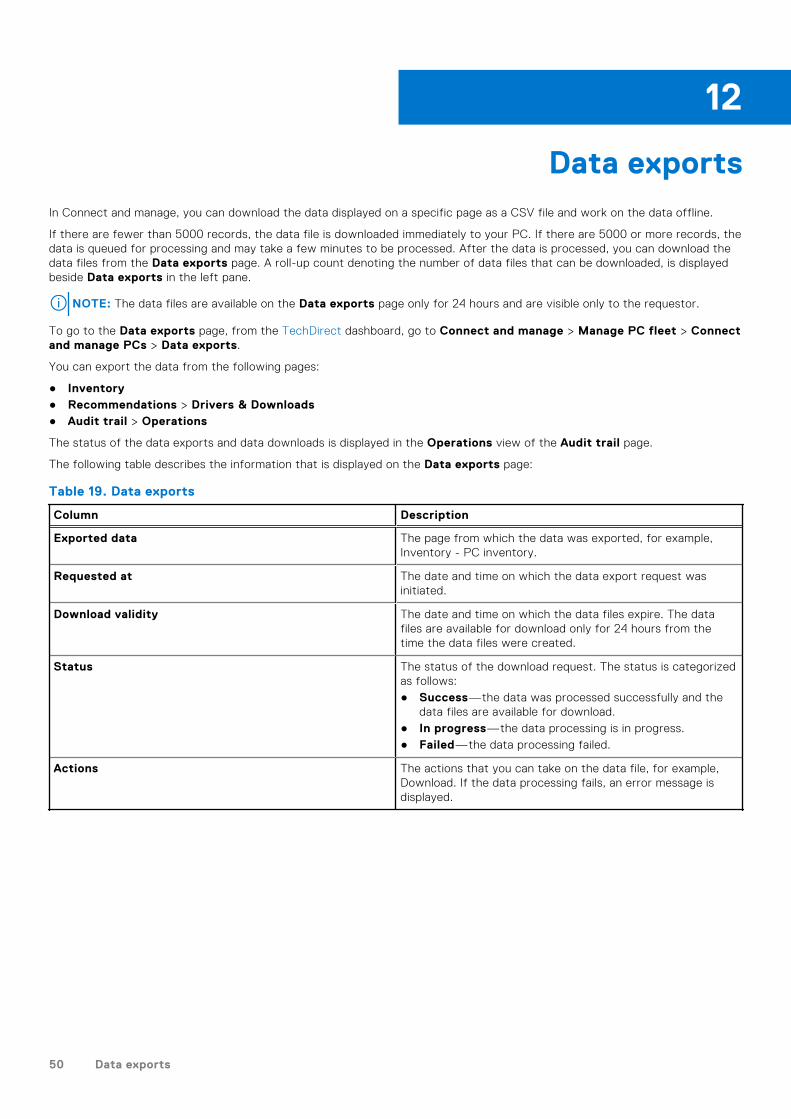
Data exportsIn Connect and manage, you can download the data displayed on a specific page as a CSV file and work on the data offline.
If there are fewer than 5000 records, the data file is downloaded immediately to your PC. If there are 5000 or more records, thedata is queued for processing and may take a few minutes to be processed. After the data is processed, you can download thedata files from the Data exports page. A roll-up count denoting the number of data files that can be downloaded, is displayedbeside Data exports in the left pane.
NOTE: The data files are available on the Data exports page only for 24 hours and are visible only to the requestor.
To go to the Data exports page, from the TechDirect dashboard, go to Connect and manage > Manage PC fleet > Connectand manage PCs > Data exports.
You can export the data from the following pages:
● Inventory● Recommendations > Drivers & Downloads● Audit trail > Operations
The status of the data exports and data downloads is displayed in the Operations view of the Audit trail page.
The following table describes the information that is displayed on the Data exports page:
Table 19. Data exports
Column Description
Exported data The page from which the data was exported, for example,Inventory - PC inventory.
Requested at The date and time on which the data export request wasinitiated.
Download validity The date and time on which the data files expire. The datafiles are available for download only for 24 hours from thetime the data files were created.
Status The status of the download request. The status is categorizedas follows:● Success—the data was processed successfully and the
data files are available for download.● In progress—the data processing is in progress.● Failed—the data processing failed.
Actions The actions that you can take on the data file, for example,Download. If the data processing fails, an error message isdisplayed.
12
50 Data exports

Performance indicatorsThe key performance indicators (KPIs) help evaluate the effectiveness of the PC fleet. The Performance Indicators pagedisplays an overview of the KPIs that help determine the fleet behavior and overall impact on the productivity.
To view the KPIs, from the TechDirect dashboard, go to Connect and manage > Manage PC fleet > Connect and managePCs > Summary > Performance indicators (KPIs).
NOTE: You require Connect and manage administrator rights to view the key performance indicators. Connect and manage
technicians can view the KPIs only if permitted by the administrator. See Define roles and permissions.
You can view the KPIs for a selected duration and also download a PDF copy of the KPIs overview.
PC fleetThe PC fleet section displays the following information:
● Installed PCs—displays the total number of PCs from the start to end of the duration.● Connected PCs—displays the total number of connected PCs at the end of the duration. Connected PCs are the PCs that
have connected to Dell in last 30 days.
AlertsThe Alerts section displays the total number of predictive and proactive alerts that can lead to Technical Support alerts orDispatch alerts.
Predictive alerts are for ProSupport Plus and ProSupport Flex for Client service plans and are based on the PCs telemetry dataforecasting future events that may require your attention.
Proactive alerts are based on the current state of the fleet and may require additional action from your end.
PC updatesThe PC updates section displays information about the following:
● Updates performed using Dell recommended updates—displays the total number of scans, total number of recommendedupdates, and total number of updates installed on the PC fleet.
● Updates performed using update catalogs—displays the total number of catalogs that are created, the total number of timesthe catalogs were deployed, and the total number of times the catalogs were downloaded.
Scans and optimizationThe Scans and optimization section displays information about the scans and optimizations that ran on the PC fleet:
● The overall disk space that was recovered (in GB).● The total number of unique PCs that were tuned for performance.● The total number of unique PCs that were optimized for network settings.● The total number of PUPs, virus, and malware removed from the PC fleet.
Remediation rulesThe Remediation rules section displays information about the following:
13
Performance indicators 51

● The total number of times rules were triggered to detect an issue.● The total number of issues detected.● The total number of issues remediated.
52 Performance indicators

Audit trailThe Audit trail page provides a record of activities that are performed by SupportAssist, the Connect and manageadministrator, and the Connect and manage technician in the last 30 days. This helps in tracking, monitoring, and reviewingall the actions performed on the PCs, when required.
To view the audit trail details, from the TechDirect dashboard, go to Connect and manage > Manage PC fleet > Connectand manage PCs > Summary > Audit trail.
You can select a time range and view the audit trail in either Device view or Operations view.
Device viewIn the Device view, you can view the activities that are performed or events that have occurred on each PC.
The following table describes the information that is displayed in the Device view:
Table 20. Device view
Column Description
Site Name of the site to which the PC is assigned.
Group Group to which the PC is assigned.
Service tag A unique five-to-seven digit alphanumeric code which isfound on a white bar-coded label affixed on your Dell PC orperipheral.
Asset tag Asset tag of the PC that helps to easily track and inventorythe PC.
NOTE: This column is displayed if you have selectedAsset tag as an asset identifier.
Hostname Unique hostname of the asset.NOTE: This column is displayed if you have selectedHostname as an asset identifier.
Activity Type of activity performed by the administrator or technician,for example, Remote Action.
Sub activity Type of sub activity that is associated with the Activity, forexample, Tune Performance or Remove Virus and Malware.
Action initiator The username of the administrator or technician who initiatedthe activity.
Start date & time Date and time on which the action was initiated.
End date & time Date and time on which the action was completed.
Status The status of the activity. The status is categorized asfollows:● Success—the initiated activity was performed
successfully.● Pending—the initiated activity is added to the pending
queue.● In Progress—the initiated activity is in progress.● Failure—the initiated activity has failed to perform
successfully.
14
Audit trail 53

Operations viewIn the Operations view, you can view the activities that are performed or events that have occurred in the Connect andmanage configuration, settings, or preferences.
The following table describes the information that is displayed in the Operations view:
Table 21. Operations view
Column Description
Activity Type of activity performed by the administrator or technician,for example, Remediation rules.
Sub activity Type of sub activity that is associated with the Activity, forexample, Rule activated.
Action initiator The username of the administrator or technician who initiatedthe activity.
Start date & time Date and time on which the action was initiated.
End date & time Date and time on which the action was completed.
Activity details The details about each activity performed on the PC.
Status The status of the activity. The status is categorized asfollows:● Success—the initiated activity was performed
successfully.● Failure—the initiated activity has failed to perform
successfully.
54 Audit trail
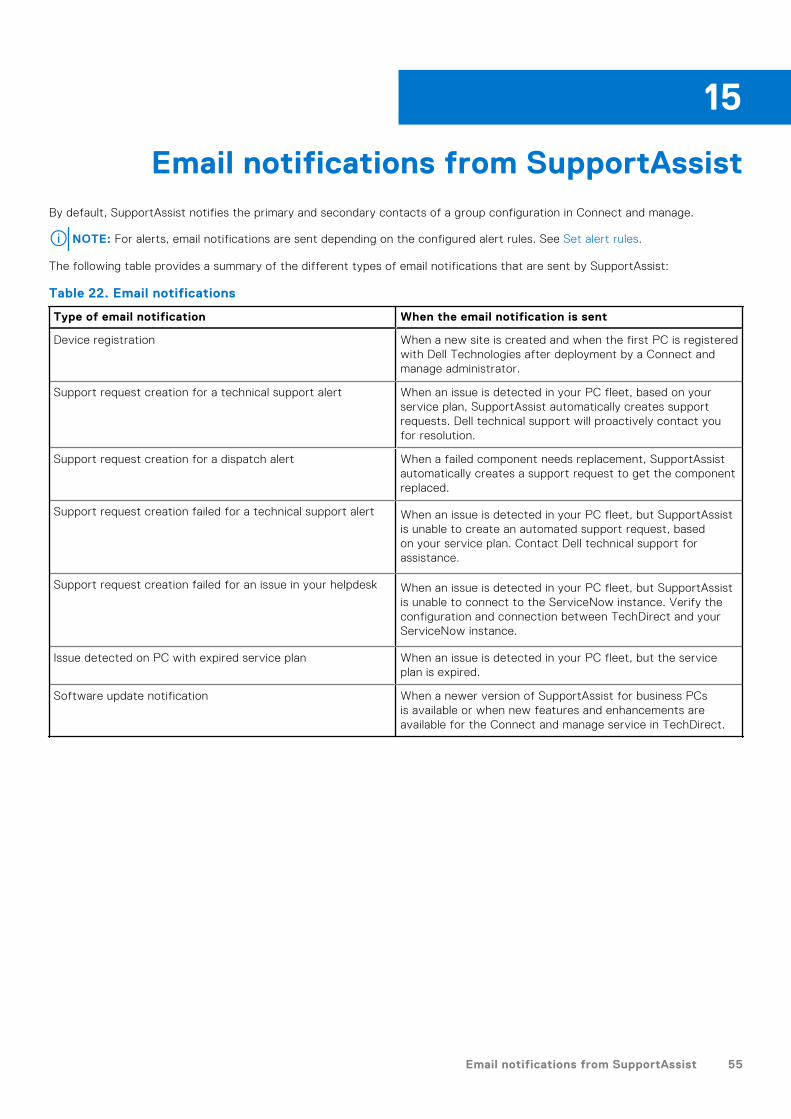
Email notifications from SupportAssistBy default, SupportAssist notifies the primary and secondary contacts of a group configuration in Connect and manage.
NOTE: For alerts, email notifications are sent depending on the configured alert rules. See Set alert rules.
The following table provides a summary of the different types of email notifications that are sent by SupportAssist:
Table 22. Email notifications
Type of email notification When the email notification is sent
Device registration When a new site is created and when the first PC is registeredwith Dell Technologies after deployment by a Connect andmanage administrator.
Support request creation for a technical support alert When an issue is detected in your PC fleet, based on yourservice plan, SupportAssist automatically creates supportrequests. Dell technical support will proactively contact youfor resolution.
Support request creation for a dispatch alert When a failed component needs replacement, SupportAssistautomatically creates a support request to get the componentreplaced.
Support request creation failed for a technical support alert When an issue is detected in your PC fleet, but SupportAssistis unable to create an automated support request, basedon your service plan. Contact Dell technical support forassistance.
Support request creation failed for an issue in your helpdesk When an issue is detected in your PC fleet, but SupportAssistis unable to connect to the ServiceNow instance. Verify theconfiguration and connection between TechDirect and yourServiceNow instance.
Issue detected on PC with expired service plan When an issue is detected in your PC fleet, but the serviceplan is expired.
Software update notification When a newer version of SupportAssist for business PCsis available or when new features and enhancements areavailable for the Connect and manage service in TechDirect.
15
Email notifications from SupportAssist 55

Retrieve SupportAssist data using WMIYou can get information about the state of each system where SupportAssist is deployed by using Windows ManagementInstrumentation (WMI) classes. The namespace to access the SupportAssist profiles and classes is root\supportassist.The information that are exposed by WMI classes is as follows:
● Registration status● Support request details● Alert details● Configuration and entitlement details
This section provides information about the available WMI classes.
DSA_RegistrationInformationTable 23. DSA_RegistrationInformation
Property Property Type Description
InstanceID CIM_STRING [KEY] A string that uniquely identifies theinstance of the class.
IsRegistrationDone CIM_BOOLEAN A Boolean value that indicates whetherSupportAssist is registered with Dell. Thepossible values are:● True—SupportAssist is registered
with Dell.● False—SupportAssist is not
registered with Dell.
RegistrationErrorCode CIM_STRING [KEY] A string that provides information aboutregistration failures.
RegistrationTime CIM_DATETIME Indicates the date and time whenSupportAssist was registered.
DSA_CaseInformationTable 24. DSA_CaseInformation
Property Property Type Description
InstanceID CIM_STRING [KEY] A string that uniquely identifies theinstance of the class.
CaseID CIM_STRING A string that identifies the supportrequest number created for an instance.
Description CIM_STRING A string that provides a description ofthe support request.
Type CIM_UNIT16 An integer that indicates the type of thesupport request. The possible values are:● 0—any other support request.● 1—support request to get support
from Dell technical support.
16
56 Retrieve SupportAssist data using WMI

Table 24. DSA_CaseInformation (continued)
Property Property Type Description
● 2—support request for partsdispatch.
Status CIM_UNIT16 An integer that indicates the status ofthe support request. The possible valuesare:● 0—any other status.● 1—the support request has been
submitted.● 2—the support request is open.● 3—the support request is reopened.● 4—the support request is in
progress.● 5—the customer has deferred the
support request.● 6—the support request is closed.
CaseCreationTime CIM_DATETIME Indicates the date and time when thesupport request was created.
AlertDetails CIM_STRING The string provides details of the alertfor which the support request is created.
DSA_AlertInformationTable 25. DSA_AlertInformation
Property Property Type Description
InstanceID CIM_STRING [KEY] A string that uniquely identifies theinstance of the class.
TrapID CIM_STRING A string that identifies the trap ID of thealert.
EventID CIM_STRING A string that identifies the alert ID of thealert.
AlertDecription CIM_STRING A string that describes the alert.
AlertTime CIM_DATETIME Indicates the date and time when thealert was created.
DSA_SystemInformationTable 26. DSA_SystemInformation
Property Property Type Description
Name CIM_STRING [KEY] A string that provides the name of thesystem.
IsConfigurationSet CIM_BOOLEAN A Boolean value that indicates whetherthe configuration is set on the system.The possible values are:● True—the configuration is set on the
system.● False—the configuration is not set
on the system.
Retrieve SupportAssist data using WMI 57
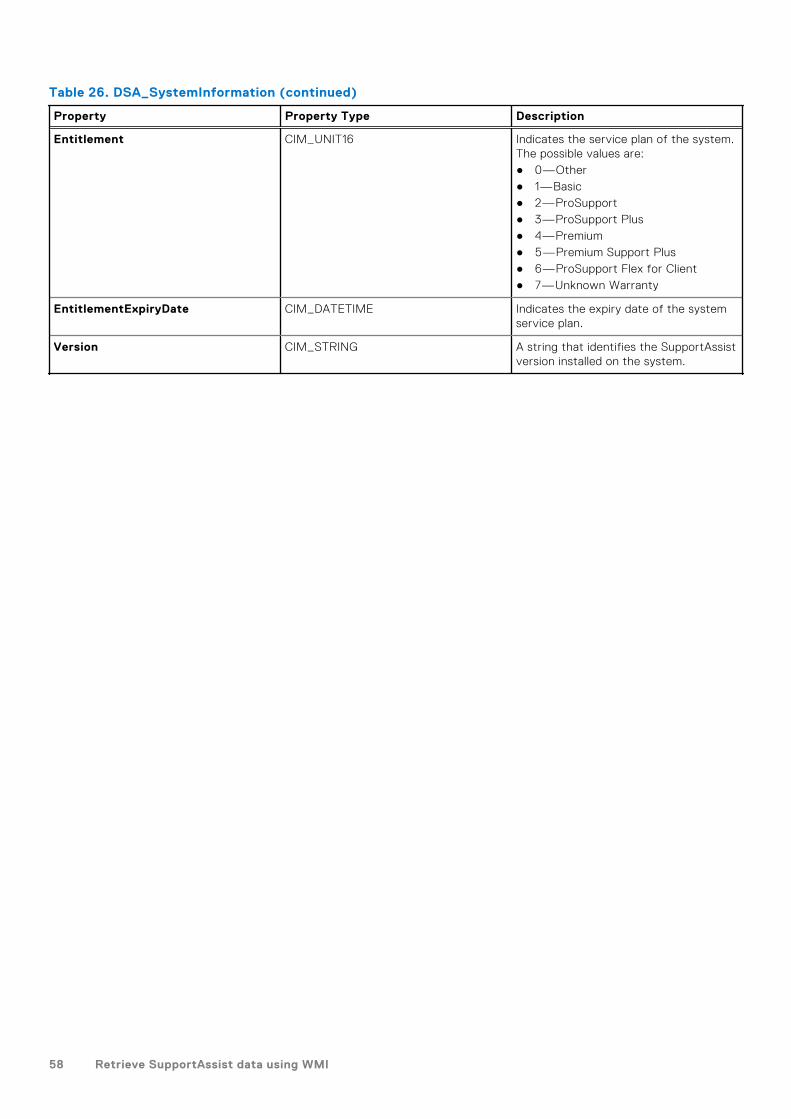
Table 26. DSA_SystemInformation (continued)
Property Property Type Description
Entitlement CIM_UNIT16 Indicates the service plan of the system.The possible values are:● 0—Other● 1—Basic● 2—ProSupport● 3—ProSupport Plus● 4—Premium● 5—Premium Support Plus● 6—ProSupport Flex for Client● 7—Unknown Warranty
EntitlementExpiryDate CIM_DATETIME Indicates the expiry date of the systemservice plan.
Version CIM_STRING A string that identifies the SupportAssistversion installed on the system.
58 Retrieve SupportAssist data using WMI

ResourcesThis section lists the documentation resources and other useful links that provide more information about SupportAssist forbusiness PCs.
Table 27. Resources
For more information about See Available at
Onboarding to TechDirect, configuring,downloading, and deployingSupportAssist on the PC fleet
IT Administrators—SupportAssist forBusiness PCs with Windows OSDeployment Guide
SupportAssist for Business PCsdocumentation page
Partners—SupportAssist for BusinessPCs with Windows OS DeploymentGuide for Partners
Using TechDirect to manage your PCsrunning SupportAssist for business PCs
SupportAssist for Business PCs withWindows OS Administrator Guide
Frequently asked questions and answersabout SupportAssist for business PCs
SupportAssist for Business PCswith Windows OS Frequently AskedQuestions
Setting up SupportAssist for businessPCs
SupportAssist for Business PCs withWindows OS Quick Setup Guide
Data collected from various componentsof your PC
SupportAssist for Business PCs withWindows OS Data Collected fromConnected PCs
Summary of recent changes,enhancements, known issues, andlimitations in the release
SupportAssist for Business PCs withWindows OS Release Notes
Using SupportAssist that is configuredand deployed on your PC by youradministrator
SupportAssist for Business PCs withWindows OS User's Guide
Enrolling your organization, managingSupportAssist alerts, and parts dispatchrequests in TechDirect
TechDirect home page https://techdirect.dell.com
SupportAssist benefits and features SupportAssist home page SupportAssist for Business PCs homepage
17
Resources 59
Contact DellDell provides several online and telephone-based support and service options. Availability varies by country or region andproduct, and some services may not be available in your area. If you do not have an active Internet connection, you can findcontact information in your purchase invoice, packing slip, bill, or Dell product catalog.
Steps
1. To contact Dell for sales, technical support, or customer service issues, perform the following steps:
a. Go to https://www.dell.com/support.b. Select your country or region in the selection list at the bottom of the page.c. Click Contact Support and select the appropriate support link.
2. To find manuals and documents, perform the following steps:
a. Go to https://www.dell.com/support.b. Click Browse all products.c. Select the appropriate product category and then select the desired product.d. To view or download the manuals and documents, click the Documentation tab.
You can also directly access the manuals and documents for Serviceability Tools from https://www.dell.com/serviceabilitytools.
18
60 Contact Dell


