12
SURGICAL TECHNIQUE GUIDE: PROXIMAL ROTATIONAL METATARSAL OSTEOTOMY “PROMO”

SURGICAL TECHNIQUE GUIDE:PROXIMAL ROTATIONAL METATARSAL OSTEOTOMY “PROMO”
DESIGN RATIONALEThe PROMO concept originated with work performed by Pablo Wagner, MD and Emilio Wagner, MD.
Further reading on their work in this field has been published in the following journal articles:
• Wagner et al. Proximal Oblique Sliding Closing Wedge Osteotomy for Hallux Valgus.
Foot Ankle Int (2013); 34(11): 1493-1500. • Wagner et al. Rotational Osteotomy for Hallux Valgus. A New Technique for Primary and Revision Cases.
Tech Foot & Ankle (2017); 16: 3-10.
The premise of the procedure is based on the understanding that many hallux valgus deformities consist of a
combined transverse plane and frontal plane deformity. The goal of hallux valgus correction is to relocate the
metatarsal to its original location. To perform this correction, an accurate deformity measurement has to be
performed pre-operatively.
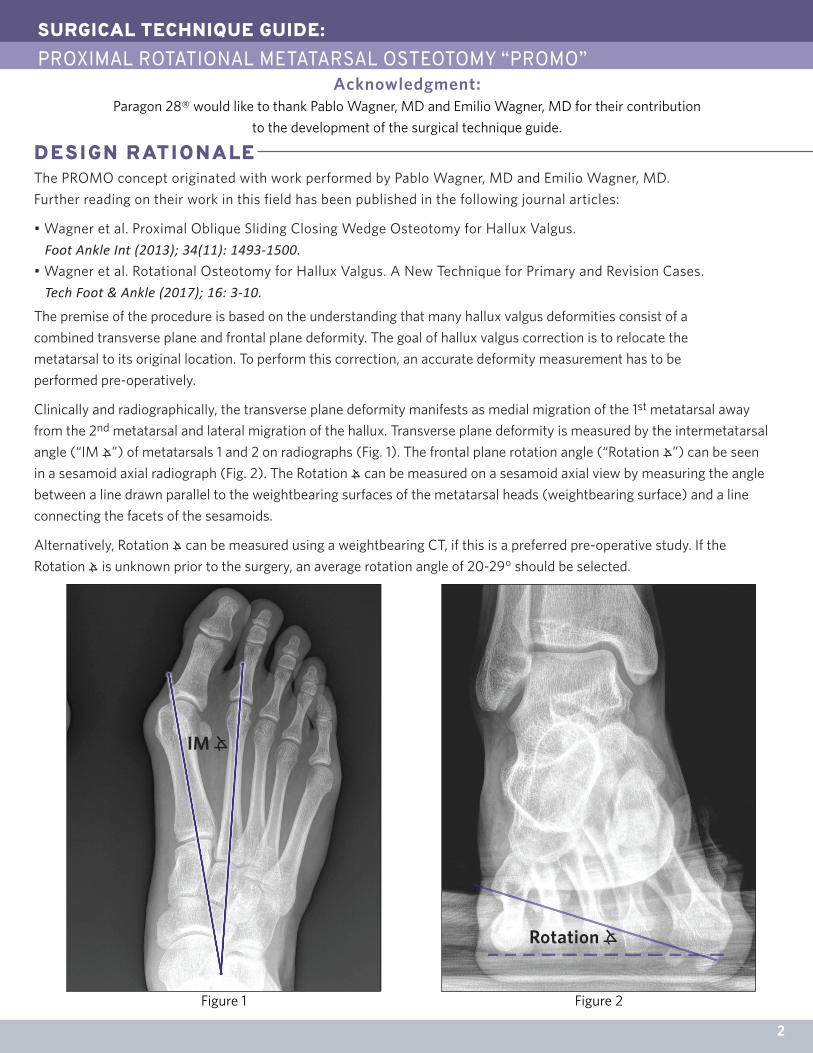
Clinically and radiographically, the transverse plane deformity manifests as medial migration of the 1st metatarsal away
from the 2nd metatarsal and lateral migration of the hallux. Transverse plane deformity is measured by the intermetatarsal
angle (“IM ⦛”) of metatarsals 1 and 2 on radiographs (Fig. 1). The frontal plane rotation angle (“Rotation ⦛”) can be seen
in a sesamoid axial radiograph (Fig. 2). The Rotation ⦛ can be measured on a sesamoid axial view by measuring the angle
between a line drawn parallel to the weightbearing surfaces of the metatarsal heads (weightbearing surface) and a line
connecting the facets of the sesamoids.
Alternatively, Rotation ⦛ can be measured using a weightbearing CT, if this is a preferred pre-operative study. If the
Rotation ⦛ is unknown prior to the surgery, an average rotation angle of 20-29° should be selected.
Rotation ⦛�
IM ⦛�
SURGICAL TECHNIQUE GUIDE:PROXIMAL ROTATIONAL METATARSAL OSTEOTOMY “PROMO”
2
Acknowledgment:Paragon 28® would like to thank Pablo Wagner, MD and Emilio Wagner, MD for their contribution
to the development of the surgical technique guide.
Figure 2Figure 1

Rotation Angle
10-19
8-10 38 28 23 13
18283347
55 38 33 23
28384255
33424755
11-12
13-14
15-17
18-20
20-29 30-39 40-50
IM A
ngle
Oste
oto
my C
ut Ang
le
The osteotomy cut angle can be delineated from this table by inputting in the IM⦛ and Rotation⦛. For example, a
patient with a 12° IM⦛ and a 30° Rotation⦛ would have a 28° osteotomy cut angle.
Paragon 28 has developed instrumentation that facilitates precise and repeatable proximal rotational metatarsal
osteotomies of the first metatarsal. A detailed surgical technique using this system is provided in the following pages.
Likewise, solutions for fixation of this osteotomy were developed to provide a streamlined method of implant insertion
that helps guard against plantar gapping, osteotomy shifting and de-rotation. By using the Paragon 28 patent-pending
Precision™ Guide PROMO system, a cross screw can be placed centrally across the osteotomy while a Baby Gorilla™
plate buttresses the metatarsal medially. This plate is intended for use with 2.5 mm locking screws.
The mathematics for calculating the osteotomy cut angle have their roots in trigonometry with adjustments made to
increase the correction power. They have been simplified into the following table:
SURGICAL TECHNIQUE GUIDE: PROXIMAL ROTATIONAL METATARSAL OSTEOTOMY “PROMO”
INSTRUMENTATION
Rotation Jig
Placement Jig – Left and Right
Cutting Jig
1.0 mm Wire Sleeve
1.2 mm Wire Sleeve
Precision™ GuidePROMO
Set Screw
3

SURGICAL TECHNIQUE GUIDE: PROXIMAL ROTATIONAL METATARSAL OSTEOTOMY “PROMO”INSTRUMENTATION
IMPL ANTS
2.5 mm Locking Baby Gorilla Plate Screws
2.0 mm Locking Baby Gorilla Plate Screws
2.5 mm Non-locking Baby Gorilla Plate Screws
2.0 mm Mini-Monster®Cannulated Screw
2.5 mm Mini-Monster®Cannulated Screw
3.0 mm Mini-Monster®Cannulated Screw
3.5 mm Mini-Monster®Cannulated Screw 2 Hole 2 Hole with Compression Anatomic Medial Akin
13-18-23*PROMO Plate
28-33-38*PROMO Plate
42-47*PROMO Plate
55*PROMO Plate
* Plate numbers correspond to Osteotomy Cut Angles
Right Plates Left Plates
4
K-wire Guide Retainer
Foot Plate K-wire Guide
Foot Plate
Baby Gorilla Plate ScrewsPROMO Implants
In the case where an Akin osteotomy is necessary to correct residual phalangeal deformity, Baby Gorilla Akin plates as well as Mini-Monster® 2.0 mm and 2.5 mm screws are available.
A Mini-Monster® cannulated screw caddy is available in 3.0 mm or 3.5 mm for cross-screw fixation of the osteotomy.
2.0 mm Non-locking Baby Gorilla Plate Screws

Rotation Angle
10-19
8-10 38 28 23 13
18283347
55 38 33 23
28384255
33424755
11-12
13-14
15-17
18-20
20-29 30-39 40-50
IM A
ngle
The procedure may be combined with a lateral release for hallux valgus correction, if desired. A medial or dorsomedial incision is made over the proximal
1st metatarsal, per surgeon preference. Dissection is carried down to the base of the first metatarsal.
SURGICAL TECHNIQUE GUIDE:PROXIMAL ROTATIONAL METATARSAL OSTEOTOMY “PROMO”
INCISION/EXPOSURE
PRE-OPERATIVE PL ANNING
ROTATIONAL CORRECTIONA line is etched along the medial midline of the first metatarsal using a bovie or light skiving with a sagittal saw.
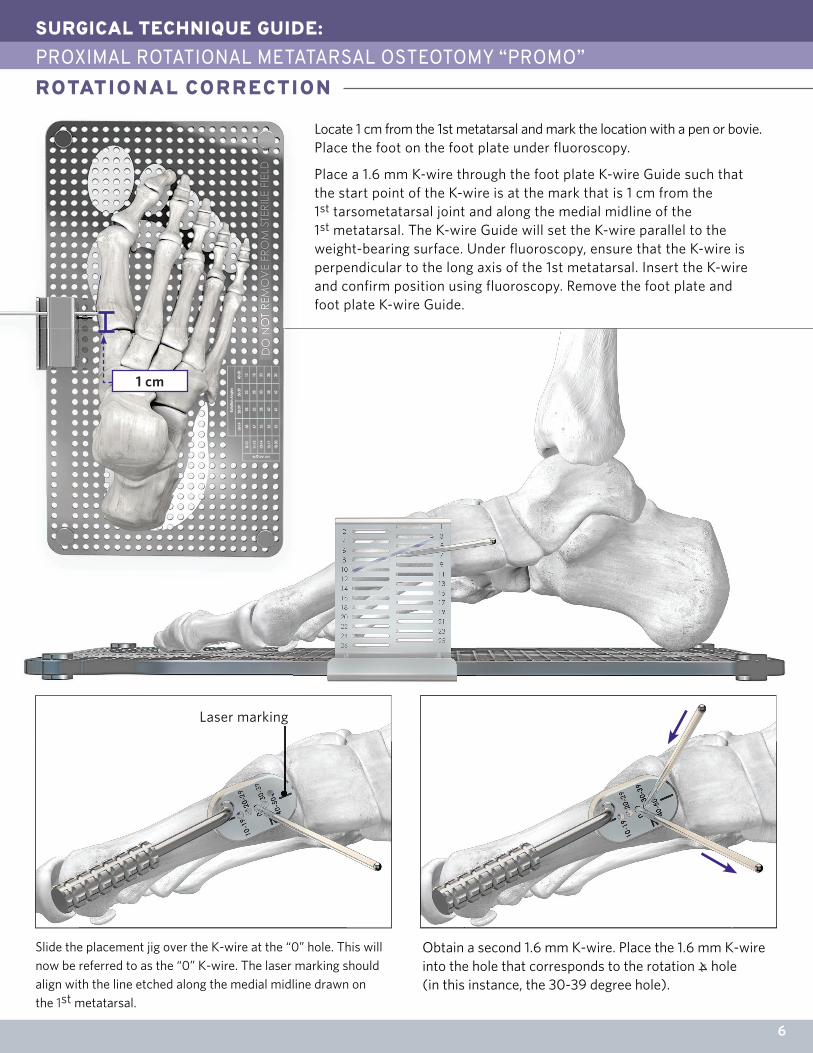
Measurement of IM⦛ and Rotation⦛ are performed pre-operatively and should be recorded or known prior to beginning the procedure. The surgical technique presented here is for a hallux valgus deformity that pre-operatively measured 30° of hallux rotation and an IM angle of 12°, resulting in an osteotomy cut angle of 28°.
5
Insert the legs of the foot plate K-wire Guide into the edge of the foot plate. Slide the K-wire Guide Retainer over the legs of the K-wire Guide and slide to lock.
SURGICAL TECHNIQUE GUIDE: PROXIMAL ROTATIONAL METATARSAL OSTEOTOMY “PROMO”ROTATIONAL CORRECTION
6
Slide the placement jig over the K-wire at the “0” hole. This will now be referred to as the “0” K-wire. The laser marking should align with the line etched along the medial midline drawn on the 1st metatarsal.
Obtain a second 1.6 mm K-wire. Place the 1.6 mm K-wire into the hole that corresponds to the rotation ⦛ hole (in this instance, the 30-39 degree hole).
Laser marking
Locate 1 cm from the 1st metatarsal and mark the location with a pen or bovie. Place the foot on the foot plate under fluoroscopy.
Place a 1.6 mm K-wire through the foot plate K-wire Guide such that the start point of the K-wire is at the mark that is 1 cm from the 1st tarsometatarsal joint and along the medial midline of the 1st metatarsal. The K-wire Guide will set the K-wire parallel to the weight-bearing surface. Under fluoroscopy, ensure that the K-wire is perpendicular to the long axis of the 1st metatarsal. Insert the K-wire and confirm position using fluoroscopy. Remove the foot plate and foot plate K-wire Guide.
1 cm

Obtain the Cutting Jig and determine right and left sides. Place the operative side of the cutting jig away from the bone and slide the hole that matches the osteotomy cut angle (28° in this case) over the K-wire. Place a second K-wire into the distal hole ofthe Cutting Jig along the marked midline.
Insert the rotation guide on the distal K-wire of the metatarsal at the “0” measurement.
Remove the Cutting Jig. Complete the osteotomy making a free hand cut with the saw following the large, flat plane of the osteotomy as a guide for the cut plane, if necessary.
SURGICAL TECHNIQUE GUIDE:PROXIMAL ROTATIONAL METATARSAL OSTEOTOMY “PROMO”
7
ROTATIONAL CORRECTION
DE-ROTATION OF OSTEOTOMY AND TEMPORARY FIXATION
Place second K-wire in the hole that corresponds to
the rotation ⦛ (30-39° in this case) that is below the centerline. Remove the K-wire at the “0” measurement.
Perform an osteotomy through the cutting jig using a saw. In most instances, the proximal slot will be the most appropriate location for the osteotomy, capturing as much of the metaphyseal bone as possible while allowing room for two proximal plate holes. Any of the three slots can be used depending on surgeon preference and ideal osteotomy placement.
NOTE: A saw blade may not extend across the entire osteotomy.
SURGICAL TECHNIQUE GUIDE: PROXIMAL ROTATIONAL METATARSAL OSTEOTOMY “PROMO”DE-ROTATION OF OSTEOTOMY AND TEMPORARY FIXATION
8
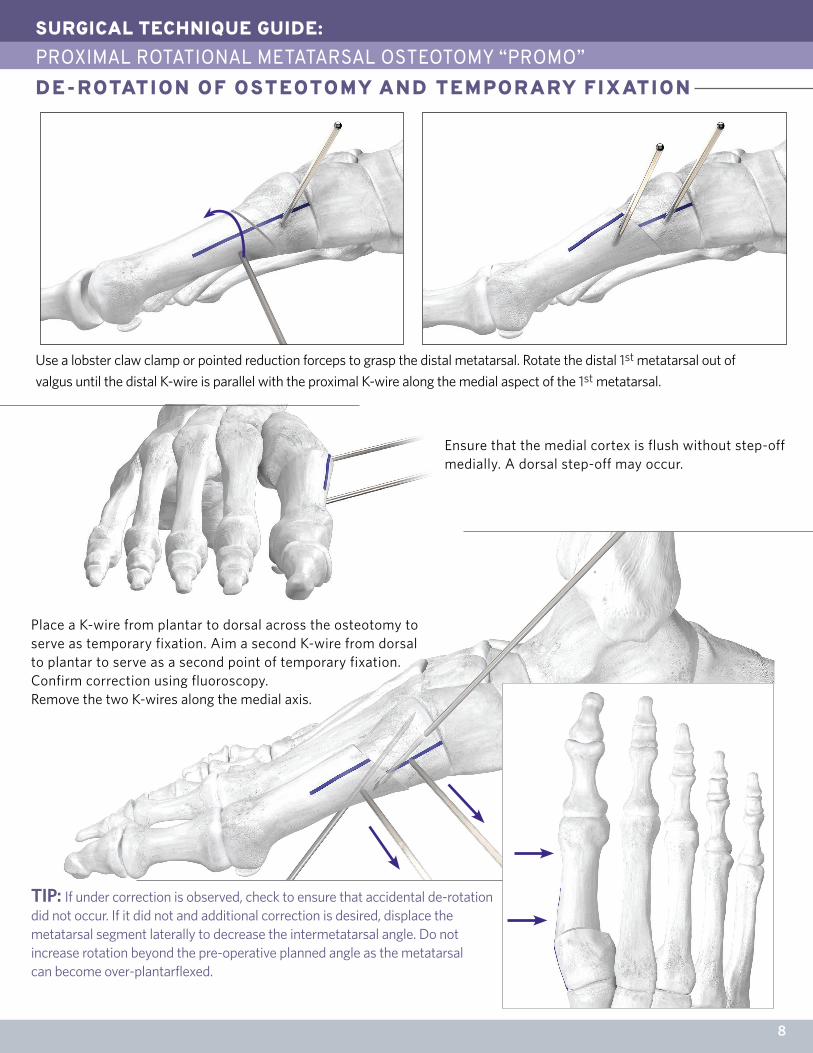
Ensure that the medial cortex is flush without step-off medially. A dorsal step-off may occur.
Place a K-wire from plantar to dorsal across the osteotomy to serve as temporary fixation. Aim a second K-wire from dorsal to plantar to serve as a second point of temporary fixation. Confirm correction using fluoroscopy. Remove the two K-wires along the medial axis.
TIP: If under correction is observed, check to ensure that accidental de-rotation did not occur. If it did not and additional correction is desired, displace the metatarsal segment laterally to decrease the intermetatarsal angle. Do not increase rotation beyond the pre-operative planned angle as the metatarsal can become over-plantarflexed.
Use a lobster claw clamp or pointed reduction forceps to grasp the distal metatarsal. Rotate the distal 1st metatarsal out of
valgus until the distal K-wire is parallel with the proximal K-wire along the medial aspect of the 1st metatarsal.

Retrieve the Baby Gorilla PROMO plate that corresponds with the osteotomy cut angle (in this situation, the 28-33-38 PROMO Plate). Attach the Precision Guide to the plate by threading the set screw into the central threaded hole of the plate while the alignment peg is inserted into the alignment hole to ensure proper orientation of the Precision Guide. Rotate the set screw clockwise to secure the Precision Guide to the plate. Insert the 1.0 mm or 1.2 mm K-wire guide depending on desired cross-screw diameter (3.0 mm or 3.5 mm,respectively).
Position the Baby Gorilla PROMO Plate/Precision
Guide medially on the 1st metatarsal, centering the
plate along the long axis of the 1st metatarsal with the plate holes approximately equidistant from the osteotomy. Secure the plate to the boneusing two olive wires. Check plateplacement using fluoroscopy.
Retrieve a K-wire corresponding to the diameter of Mini-Monster screw used. In this instance, a 1.2 mm K-wire is selected for use with a 3.5 mm Mini-Monster cannulated screw. Drive the K-wire through the K-wire guide, into the bone and across the osteotomy. Check wire position and length using fluoroscopy. Once correct, remove the Precision Guide from the plate by rotating the set screw counterclockwise and sliding the Precision Guide off the 1.2 mm K-wire.
SURGICAL TECHNIQUE GUIDE:PROXIMAL ROTATIONAL METATARSAL OSTEOTOMY “PROMO”
9
PERMANENT FIXATION
TIP: If it is desired to place the screw from plantar to dorsal as opposed to dorsal to plantar (shown), drive the K-wire plantarly such that only the tip of the wire remains at the dorsal aspect of the first metatarsal. The subsequent steps would then be performed through the plantar aspect of the 1st metatarsal.
SURGICAL TECHNIQUE GUIDE: PROXIMAL ROTATIONAL METATARSAL OSTEOTOMY “PROMO”PERMANENT FIXATION
CLOSUREProceed to incision closure or concomitant procedures at this time.
10
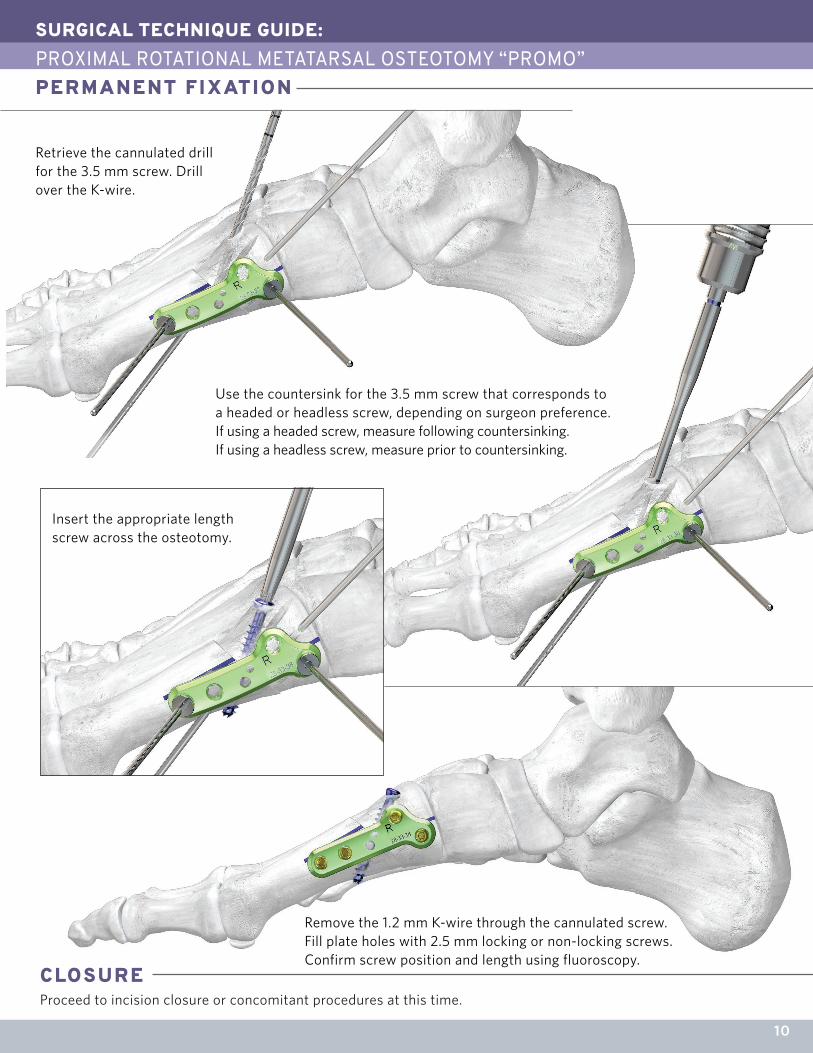
Remove the 1.2 mm K-wire through the cannulated screw. Fill plate holes with 2.5 mm locking or non-locking screws. Confirm screw position and length using fluoroscopy.
Insert the appropriate length screw across the osteotomy.
Retrieve the cannulated drill for the 3.5 mm screw. Drill over the K-wire.
Use the countersink for the 3.5 mm screw that corresponds to a headed or headless screw, depending on surgeon preference.If using a headed screw, measure following countersinking. If using a headless screw, measure prior to countersinking.
MR SAFETY INFORMATION
SURGICAL TECHNIQUE GUIDE:INDICATIONS, CONTRAINDICATIONS, AND WARNINGSINDICATIONS FOR USE
CONTRAINDICATIONS
POTENTIAL COMPLICATIONS AND ADVERSE REACTIONS
WARNINGS AND PRECAUTIONS
11
Use of the BABY GORILLA®/GORILLA® Plating System is contraindicated in cases of inflammation, cases of active or suspected sepsis/infection and osteomyelitis; or in patients with certain metabolic diseases.All applications that are not defined by the indications are contraindicated. In addition, surgical success can be adversely affected by:• Acute or chronic infections, local or systemic• Vascular, muscular or neurological pathologies that compromise the concerned extremity• All concomitant pathologies that could affect the function of the implant• Osteopathies with reduced bone substance that could affect the function of the implant• Any mental or neuromuscular disorder that could result in an unacceptable risk of failure at the time of fixation or complications in post-operative treatment.• Known or suspected sensitivity to metal• Corpulence; an overweight or corpulent patient can strain the implant to such a degree that stabilization or implant failure can occur• Whenever the use of the implant comes into conflict with the anatomical structures of physiological statusOther medical or surgical pre-conditions that could compromise the potentially beneficial procedure, such as:• The presence of tumors• Congenital abnormalities• Immunosuppressive pathologies• Increased sedimentation rates that cannot be explained by other pathologies• Increased leukocyte (WBC) count• Pronounced left shift in the differential leukocyte count
In any surgical procedure, the potential for complications and adverse reactions exist. The risks and complications with these implants include:• Loosening, deformation or fracture of the implant• Acute post-operative wound infections and late infections with possible sepsis• Migration, subluxation of the implant with resulting reduction in range of movement• Fractures resulting from unilateral joint loading• Thrombosis and embolism• Wound hematoma and delayed wound healing• Temporary and protracted functional neurological perturbation• Tissue reactions as the result of allergy or foreign body reaction to dislodged particles.• Corrosion with localized tissue reaction and pain• Pain, a feeling of malaise or abnormal sensations due to the implant used• Bone loss due to stress shielding
The BABY GORILLA®/GORILLA® Bone Plates and Bone Screws of the BABY GORILLA®/GORILLA® Plating System are indicated for use in stabilization and fixation of fractures or osteotomies; intra and extra articular fractures, joint depression, and multi-fragmentary fractures; revision procedures, joint fusion and reconstruction of small bones of the toes, feet and ankles including the distal tibia, talus, and calcaneus. The system can be used in both adult and pediatric patients.
In addition, the non-locking screws and washers are indicated for use in bone reconstruction, osteotomy, arthrodesis, joint fusion, fracture repair and fracture fixation, appropriate for the size of the device.
All possible complications listed here are not typical of Paragon 28® Inc. products but are in principle observed with any implant. Promptly inform Paragon 28®, Inc. as soon as complications occur in connection with the implants or surgical instruments used. In the event of prema-ture failure of an implant in which a causal relationship with its geometry, surface quality or mechanical stability is suspected, please provide Paragon 28®, Inc. with the explant(s) in a cleaned, disinfected and sterile condition. Paragon 28®, Inc. cannot accept any other returns of used implants. The surgeon is held liable for complications associated with inadequate asepsis, inadequate preparation of the osseous implant bed in the case of implants, incorrect indication or surgical technique or incorrect patient information and consequent incorrect patient behavior.
• Re-operation to remove or replace implants may be required at any time due to medical reasons or device failure. If corrective action is not taken, complications may occur.• Use of an undersized plate or screw in areas of high functional stresses may lead to implant fracture and failure.• Plates and screws, wires, or other appliances of dissimilar metals should not be used together in or near the implant site.• The implants and guide wires are intended for single use only.• Instruments, guide wires and screws are to be treated as sharps.• Do not use other manufacturer’s instruments or implants in conjunction with the BABY GORILLA®/GORILLA® Plating System.• If a stainless steel GORILLA Breakaway Screw is used, it may only be used standalone.• The device should only be used in pediatric patients where the growth plates have fused or in which active growth plates will not be crossed by the system implants or instrumentation.
The BABY GORILLA®/GORILLA® Plating System has not been evaluated for safety and compatibility in the MR environment. It has not been tested for heating, migration, or image artifact in the MR environment. The safety of BABY GORILLA®/GORILLA® Plating System in the MR environment is unknown. Scanning a patient who has this device may result in patient injury.

P53-STG-0002 Rev C™Trademarks and ®Registered Marks of Paragon 28®, Inc.© Copyright 2017 Paragon 28®, Inc. All rights reserved.Patents: www.paragon28.com/index.php/patents
Paragon 28, Inc.4B Inverness Ct. E., Suite 280Englewood, CO 80112 USA(855) 786-2828
DISCLAIMER
The purpose of the PROMO™ Surgical Technique Guide is to demonstrate the optionality and functionality of the PROMO™ implants and instrumentation. Although variations in placement and use of the PROMO™ System can be performed, the fixation options demonstrated in this technique were chosen to demonstrate the functionality of the system and for simplicity of explanation. Other uses for the PROMO™ System can be employed, appropriate for the size of the device.
Paragon 28 Medical Devices Trading Limited43 Fitzwilliam Square WestDublin 2, D02 K792, Ireland+353 (0) 1541 47560086
PATENTED, DESIGNED & EXCLUSIVELY DISTRIBUTED BY
www.PARAGON28.com


