314
Solaris Volume Manager Administration Guide Sun Microsystems, Inc. 4150 Network Circle Santa Clara, CA 95054 U.S.A. Part No: 816–4520–12 May 2006

Solaris VolumeManagerAdministrationGuide
SunMicrosystems, Inc.4150Network CircleSanta Clara, CA95054U.S.A.
Part No: 816–4520–12May 2006

Copyright 2006 SunMicrosystems, Inc. 4150Network Circle, Santa Clara, CA95054U.S.A. All rights reserved.
This product or document is protected by copyright and distributed under licenses restricting its use, copying, distribution, and decompilation. No part of thisproduct or documentmay be reproduced in any form by anymeans without prior written authorization of Sun and its licensors, if any. Third-party software,including font technology, is copyrighted and licensed from Sun suppliers.
Parts of the product may be derived fromBerkeley BSD systems, licensed from the University of California. UNIX is a registered trademark in the U.S. and othercountries, exclusively licensed through X/Open Company, Ltd.
Sun, SunMicrosystems, the Sun logo, docs.sun.com,AnswerBook,AnswerBook2, and Solaris are trademarks or registered trademarks of SunMicrosystems, Inc. inthe U.S. and other countries.All SPARC trademarks are used under license and are trademarks or registered trademarks of SPARC International, Inc. in the U.S. andother countries. Products bearing SPARC trademarks are based upon an architecture developed by SunMicrosystems, Inc.
TheOPEN LOOK and Sun™Graphical User Interface was developed by SunMicrosystems, Inc. for its users and licensees. Sun acknowledges the pioneering efforts ofXerox in researching and developing the concept of visual or graphical user interfaces for the computer industry. Sun holds a non-exclusive license fromXerox to theXerox Graphical User Interface, which license also covers Sun’s licensees who implement OPEN LOOKGUIs and otherwise comply with Sun’s written licenseagreements.
U.S. Government Rights – Commercial software. Government users are subject to the SunMicrosystems, Inc. standard license agreement and applicable provisionsof the FAR and its supplements.
DOCUMENTATION IS PROVIDED “AS IS”ANDALLEXPRESSOR IMPLIEDCONDITIONS, REPRESENTATIONSANDWARRANTIES, INCLUDINGANYIMPLIEDWARRANTYOFMERCHANTABILITY, FITNESS FORAPARTICULAR PURPOSEORNON-INFRINGEMENT,AREDISCLAIMED, EXCEPTTOTHE EXTENTTHAT SUCHDISCLAIMERSAREHELDTOBE LEGALLY INVALID.
Copyright 2006 SunMicrosystems, Inc. 4150Network Circle, Santa Clara, CA95054U.S.A. Tous droits réservés.
Ce produit ou document est protégé par un copyright et distribué avec des licences qui en restreignent l’utilisation, la copie, la distribution, et la décompilation.Aucune partie de ce produit ou document ne peut être reproduite sous aucune forme, par quelquemoyen que ce soit, sans l’autorisation préalable et écrite de Sun etde ses bailleurs de licence, s’il y en a. Le logiciel détenu par des tiers, et qui comprend la technologie relative aux polices de caractères, est protégé par un copyright etlicencié par des fournisseurs de Sun.
Des parties de ce produit pourront être dérivées du système Berkeley BSD licenciés par l’Université de Californie. UNIX est unemarque déposée aux Etats-Unis etdans d’autres pays et licenciée exclusivement par X/Open Company, Ltd.
Sun, SunMicrosystems, le logo Sun, docs.sun.com,AnswerBook,AnswerBook2, et Solaris sont desmarques de fabrique ou desmarques déposées, de SunMicrosystems, Inc. aux Etats-Unis et dans d’autres pays. Toutes les marques SPARC sont utilisées sous licence et sont desmarques de fabrique ou desmarquesdéposées de SPARC International, Inc. aux Etats-Unis et dans d’autres pays. Les produits portant les marques SPARC sont basés sur une architecture développée parSunMicrosystems, Inc.
L’interface d’utilisation graphique OPEN LOOK et Sun a été développée par SunMicrosystems, Inc. pour ses utilisateurs et licenciés. Sun reconnaît les efforts depionniers de Xerox pour la recherche et le développement du concept des interfaces d’utilisation visuelle ou graphique pour l’industrie de l’informatique. Sun détientune licence non exclusive de Xerox sur l’interface d’utilisation graphique Xerox, cette licence couvrant également les licenciés de Sun quimettent en place l’interfaced’utilisation graphique OPEN LOOK et qui en outre se conforment aux licences écrites de Sun.
CETTE PUBLICATIONEST FOURNIE “EN L’ETAT” ETAUCUNEGARANTIE, EXPRESSEOU IMPLICITE, N’ESTACCORDEE, YCOMPRISDESGARANTIES CONCERNANT LAVALEURMARCHANDE, L’APTITUDEDE LAPUBLICATIONAREPONDREAUNEUTILISATIONPARTICULIERE, OULE FAITQU’ELLENE SOIT PASCONTREFAISANTEDE PRODUITDETIERS. CEDENIDEGARANTIENE S’APPLIQUERAIT PAS, DANS LAMESUREOUILSERAIT TENU JURIDIQUEMENTNULETNONAVENU.
060327@14558

Contents
Preface ...........................................................................................................................................................17
1 Getting StartedWith Solaris VolumeManager ......................................................................................21Solaris VolumeManager Roadmap—What’s New ...................................................................................22Solaris VolumeManager Roadmap—Storage Capacity ...........................................................................22Solaris VolumeManager Roadmap—Availability ....................................................................................23Solaris VolumeManager Roadmap—I/O Performance ..........................................................................24Solaris VolumeManager Roadmap—Administration .............................................................................24Solaris VolumeManager Roadmap—Troubleshooting ...........................................................................25
2 StorageManagement Concepts ................................................................................................................27Introduction to StorageManagement ........................................................................................................27
Storage Hardware .................................................................................................................................27RAID Levels ...........................................................................................................................................28
Configuration Planning Guidelines ...........................................................................................................29Choosing Storage ..................................................................................................................................29
General Performance Guidelines ...............................................................................................................31Random I/O and Sequential I/OOptimization ........................................................................................31
Random I/O ...........................................................................................................................................32SequentialAccess I/O ...........................................................................................................................32
3 Solaris VolumeManager Overview ...........................................................................................................35What’s New in Solaris VolumeManager ...................................................................................................35Introduction to Solaris VolumeManager ..................................................................................................35
How Solaris VolumeManagerManages Storage ..............................................................................36How toAdminister Solaris VolumeManager ...........................................................................................36
�How toAccess the Solaris VolumeManager Graphical User Interface (GUI) .........................37Solaris VolumeManager Requirements .....................................................................................................38
3

Overview of Solaris VolumeManager Components ................................................................................38Overview of Volumes ...........................................................................................................................39State Database and State Database Replicas ......................................................................................43Hot Spare Pools .....................................................................................................................................43Disk Sets .................................................................................................................................................44
Solaris VolumeManager Configuration Guidelines ................................................................................44General Guidelines ...............................................................................................................................44File SystemGuidelines .........................................................................................................................44
Overview of Creating Solaris VolumeManager Components ................................................................45Prerequisites for Creating Solaris VolumeManager Components .................................................45
Overview ofMulti-Terabyte Support in Solaris VolumeManager .........................................................45Large Volume Support Limitations ....................................................................................................46Using Large Volumes ............................................................................................................................46
Upgrading to Solaris VolumeManager ......................................................................................................47
4 Solaris VolumeManager for Sun Cluster (Overview) ............................................................................49Introduction to Solaris VolumeManager for Sun Cluster .......................................................................49
Prerequisite: Required Software Components forMulti-Owner Disk Set Functionality ............50Multi-Owner Disk Set Concepts .................................................................................................................51
TasksAssociatedWithMulti-Owner Disk Sets .................................................................................52Solaris VolumeManager for Sun Cluster Configuration .........................................................................53RAID–1 (Mirror) Volumes inMulti-Owner Disk Sets ............................................................................54
Mirror OwnershipWithMulti-Owner Disk Sets ..............................................................................54DataManagement and Recovery Processes ......................................................................................55
5 Configuring and Using Solaris VolumeManager (Scenario) ................................................................57Scenario Background Information .............................................................................................................57
Hardware Configuration ......................................................................................................................57Initial Physical Storage Configuration ...............................................................................................58
Final Solaris VolumeManager Configuration ..........................................................................................58
6 State Database (Overview) ........................................................................................................................61About the Solaris VolumeManager State Database and Replicas ...........................................................61Understanding theMajority ConsensusAlgorithm .................................................................................62Administering State Database Replicas .....................................................................................................63Handling State Database Replica Errors ....................................................................................................64
Contents
Solaris VolumeManagerAdministration Guide • May 20064

Scenario—State Database Replicas .............................................................................................................65
7 State Database (Tasks) ................................................................................................................................67State Database Replicas (TaskMap) ...........................................................................................................67Creating State Database Replicas ................................................................................................................68
�How to Create State Database Replicas .........................................................................................68Maintaining State Database Replicas .........................................................................................................70
�How to Check the Status of State Database Replicas ....................................................................70�How toDelete State Database Replicas ..........................................................................................71
8 RAID-0 (Stripe and Concatenation) Volumes (Overview) .....................................................................73Overview of RAID-0 Volumes ....................................................................................................................73
RAID-0 (Stripe) Volume ......................................................................................................................74RAID-0 (Concatenation) Volume ......................................................................................................76RAID-0 (Concatenated Stripe) Volume .............................................................................................77
Background Information for Creating RAID-0 Volumes ........................................................................80RAID-0 Volume Requirements ...........................................................................................................80RAID-0 VolumeGuidelines ................................................................................................................80
Scenario—RAID-0 Volumes .......................................................................................................................81
9 RAID-0 (Stripe and Concatenation) Volumes (Tasks) .............................................................................83RAID-0 Volumes (TaskMap) ......................................................................................................................83Creating RAID-0 (Stripe) Volumes ............................................................................................................84
�How to Create a RAID-0 (Stripe) Volume ....................................................................................84Creating RAID-0 (Concatenation) Volumes .............................................................................................85
�How to Create a RAID-0 (Concatenation) Volume .....................................................................85Expanding Storage Capacity .......................................................................................................................87
�How to Expand Storage Capacity for Existing Data ....................................................................87�How to Expand an Existing RAID-0 Volume ...............................................................................88
Removing a RAID-0 Volume ......................................................................................................................90�How to Remove a RAID-0 Volume ................................................................................................90
10 RAID-1 (Mirror) Volumes (Overview) ........................................................................................................93Overview of RAID-1 (Mirror) Volumes ....................................................................................................93
Overview of Submirrors .......................................................................................................................93
Contents
5

Scenario—RAID-1 (Mirror) Volume .................................................................................................94Providing RAID-1+0 and RAID-0+1 .................................................................................................95
RAID-1 Volume (Mirror) Resynchronization ..........................................................................................96Full Resynchronization ........................................................................................................................97Optimized Resynchronization ............................................................................................................97Partial Resynchronization ...................................................................................................................97
Creating andMaintaining RAID-1 Volumes ............................................................................................97Configuration Guidelines for RAID-1 Volumes ...............................................................................97Performance Guidelines for RAID-1 Volumes .................................................................................99About RAID-1 VolumeOptions .........................................................................................................99Understanding Submirror Status to DetermineMaintenanceActions .......................................101
TheAffect of Booting Into Single-UserMode on RAID-1 Volumes ....................................................102Scenario—RAID-1 Volumes (Mirrors) ....................................................................................................103
11 RAID-1 (Mirror) Volumes (Tasks) ..............................................................................................................105RAID-1 Volumes (TaskMap) ....................................................................................................................105Creating a RAID-1 Volume .......................................................................................................................107
�How to Create a RAID-1 Volume FromUnused Slices .............................................................107�How to Create a RAID-1 Volume From a File System ...............................................................109� SPARC: How to Create a RAID-1 Volume From the root (/) File System ............................... 113x86: Creating a RAID-1 Volume From the root (/) File System .................................................... 117
� x86: How to Create a RAID-1 Volume From the root (/) File System byUsing GRUB 118� x86: How to Create a RAID-1 Volume From the root (/) File System byUsing DCA ...122
Understanding Boot TimeWarningsWhenMirroring the root (/) File System ........................127WorkingWith Submirrors .........................................................................................................................128
�How toAttach a Submirror ...........................................................................................................128�How toDetach a Submirror ..........................................................................................................129�How to Place a Submirror Offline andOnline ............................................................................130�How to Enable a Slice in a Submirror ..........................................................................................131
Maintaining RAID-1 Volumes ..................................................................................................................132�How to View the Status ofMirrors and Submirrors ...................................................................132�How to Change RAID-1 VolumeOptions ..................................................................................134�How to Expand a RAID-1 Volume ...............................................................................................135
Responding to RAID-1 Volume Component Failures ...........................................................................136�How to Replace a Slice in a Submirror .........................................................................................136�How to Replace a Submirror .........................................................................................................137
Contents
Solaris VolumeManagerAdministration Guide • May 20066

Removing RAID-1 Volumes (Unmirroring) ...........................................................................................139�How toUnmirror a File System ....................................................................................................139�How toUnmirror a File SystemThat Cannot Be Unmounted .................................................141
Backing UpData on a RAID-1 Volume ...................................................................................................144�How to Perform anOnline Backup of a RAID-1 Volume .........................................................144
12 Soft Partitions (Overview) ........................................................................................................................147Overview of Soft Partitions ........................................................................................................................147Configuration Guidelines for Soft Partitions ..........................................................................................148Scenario—Soft Partitions ..........................................................................................................................148
13 Soft Partitions (Tasks) ...............................................................................................................................149Soft Partitions (TaskMap) .........................................................................................................................149Creating Soft Partitions ..............................................................................................................................150
�How to Create a Soft Partition ......................................................................................................150Maintaining Soft Partitions .......................................................................................................................151
�How to Check the Status of a Soft Partition ................................................................................151�How to Expand a Soft Partition ....................................................................................................152�How to Remove a Soft Partition ...................................................................................................153
14 RAID-5 Volumes (Overview) .....................................................................................................................155Overview of RAID-5 Volumes ..................................................................................................................155
Example—RAID-5 Volume ...............................................................................................................156Example—Concatenated (Expanded) RAID-5 Volume ................................................................157
Background Information for Creating RAID-5 Volumes ......................................................................159Requirements for RAID-5 Volumes .................................................................................................159Guidelines for RAID-5 Volumes .......................................................................................................159
Overview of Checking Status of RAID-5 Volumes .................................................................................160Overview of Replacing and Enabling Slices in RAID-5 Volumes .........................................................162Scenario—RAID-5 Volumes .....................................................................................................................162
15 RAID-5 Volumes (Tasks) ............................................................................................................................163RAID-5 Volumes (TaskMap) ....................................................................................................................163Creating RAID-5 Volumes ........................................................................................................................164
�How to Create a RAID-5 Volume .................................................................................................164
Contents
7

Maintaining RAID-5 Volumes ..................................................................................................................165�How to Check the Status of a RAID-5 Volume ...........................................................................165�How to Expand a RAID-5 Volume ...............................................................................................166�How to Enable a Component in a RAID-5 Volume ...................................................................167�How to Replace a Component in a RAID-5 Volume .................................................................168
16 Hot Spare Pools (Overview) .....................................................................................................................171Overview of Hot Spares andHot Spare Pools .........................................................................................171
Hot Spares ............................................................................................................................................172Hot Spare Pools ...................................................................................................................................172HowHot SparesWork ........................................................................................................................172Hot Spare Pool States ..........................................................................................................................173Example—Hot Spare Pool .................................................................................................................173
Scenario—Hot Spares ................................................................................................................................174
17 Hot Spare Pools (Tasks) .............................................................................................................................175Hot Spare Pools (TaskMap) ......................................................................................................................175Creating aHot Spare Pool ..........................................................................................................................176
�How to Create a Hot Spare Pool ...................................................................................................176�How toAddAdditional Slices to a Hot Spare Pool ....................................................................177
Associating a Hot Spare PoolWith Volumes ...........................................................................................178�How toAssociate a Hot Spare PoolWith a Volume ...................................................................178�How to Change theAssociatedHot Spare Pool ..........................................................................180
MaintainingHot Spare Pools ....................................................................................................................181�How to Check the Status of Hot Spares andHot Spare Pools ...................................................181�How to Replace a Hot Spare in a Hot Spare Pool ........................................................................182�How toDelete a Hot Spare From aHot Spare Pool ....................................................................183�How to Enable a Hot Spare ...........................................................................................................184
18 Disk Sets (Overview) ..................................................................................................................................185What’s New inDisk Sets ............................................................................................................................185Introduction to Disk Sets ...........................................................................................................................185Types of Disk Sets ........................................................................................................................................186
Local Disk Sets .....................................................................................................................................186NamedDisk Sets .................................................................................................................................186
Solaris VolumeManager Disk SetAdministration .................................................................................188
Contents
Solaris VolumeManagerAdministration Guide • May 20068

Reserving a Disk Set ............................................................................................................................189Releasing a Disk Set ............................................................................................................................189Importing a Disk Set ...........................................................................................................................189Automatic Disk Partitioning .............................................................................................................190Disk Set Name Requirements ............................................................................................................192Example—Two SharedDisk Sets ......................................................................................................192
Guidelines forWorkingWith Disk Sets ...................................................................................................193Asynchronous Shared Storage in Disk Sets .............................................................................................194Scenario—Disk Sets ....................................................................................................................................194
19 Disk Sets (Tasks) .........................................................................................................................................195Disk Sets (TaskMap) ..................................................................................................................................195Creating Disk Sets .......................................................................................................................................196
�How to Create a Disk Set ...............................................................................................................196Expanding Disk Sets ...................................................................................................................................198
�How toAddDisks to a Disk Set ....................................................................................................198�How toAddAnother Host to a Disk Set ......................................................................................199�How to Create Solaris VolumeManager Components in a Disk Set .......................................200
Maintaining Disk Sets ................................................................................................................................202�How to Check the Status of a Disk Set .........................................................................................202�How toDelete Disks From aDisk Set ..........................................................................................202�How to Take a Disk Set ..................................................................................................................203�How to Release a Disk Set ..............................................................................................................205�How toDelete a Host or Disk Set .................................................................................................206
Importing Disk Sets ....................................................................................................................................208�How to Print a Report onDisk SetsAvailable for Import ..........................................................208�How to Import a Disk Set FromOne System toAnother System .............................................209
20 Maintaining Solaris VolumeManager (Tasks) ...................................................................................... 211Solaris VolumeManagerMaintenance (TaskMap) ............................................................................... 211Viewing the Solaris VolumeManager Configuration ............................................................................212
�How to View the Solaris VolumeManager Volume Configuration .........................................212Where ToGo FromHere ...................................................................................................................216
Renaming Volumes ....................................................................................................................................216Background Information for Renaming Volumes ..........................................................................216Exchanging VolumeNames ..............................................................................................................217
Contents
9

�How to Rename a Volume .............................................................................................................217WorkingWith Configuration Files ...........................................................................................................219
�How to Create Configuration Files ..............................................................................................219�How to Initialize Solaris VolumeManager From a Configuration File ...................................219
Changing Solaris VolumeManager Default Values ................................................................................221Expanding a File SystemUsing the growfsCommand .........................................................................221
Background Information for Expanding Slices and Volumes .......................................................222�How to Expand a File System ........................................................................................................223
Overview of Replacing and Enabling Components in RAID-1 and RAID-5 Volumes ......................224Enabling a Component ......................................................................................................................224Replacing a ComponentWithAnotherAvailable Component .....................................................225Maintenance and Last Erred States ...................................................................................................225Background Information for Replacing and Enabling Components in RAID-1 and RAID-5Volumes ...............................................................................................................................................226
21 Best Practices for Solaris VolumeManager ...........................................................................................229Deploying Small Servers ............................................................................................................................229Using Solaris VolumeManagerWith Networked Storage Devices ......................................................231
22 Top-Down Volume Creation (Overview) ................................................................................................233Overview of Top-DownVolume Creation ...............................................................................................233Top-DownVolume Creation ImplementationWith Disk Sets .............................................................234Top-DownVolume Creation Processes ...................................................................................................234DeterminingWhichDisksAreAvailable for Top-DownVolume Creation ........................................236
23 Top-Down Volume Creation (Tasks) ........................................................................................................237Top-DownVolume Creation (TaskMap) ................................................................................................237Prerequisites for Top-DownVolume Creation .......................................................................................238Creating VolumesAutomatically ..............................................................................................................239
Analyzing Volume Creation by Specifying Output Verbosity .......................................................239�How to Create RAID-1 (mirror) Volumes Using the metassistCommand .........................239
WorkingWith File-Based Data Using the metassistCommand ........................................................242Creating a Command File (Shell Script) Using the metassistCommand .................................242�How to Create a Command File (Shell Script) Using the metassistCommand ..................243Creating a VolumeWith a Saved Shell Script Created by the metassistCommand .................247
�How to Execute a Saved metassistCommand Shell Script .............................................247
Contents
Solaris VolumeManagerAdministration Guide • May 200610

Creating a Volume Configuration FileWith the metassistCommand ......................................248�How to Create a Volume Configuration File Using the metassistCommand .....................248
Changing the Default Behavior of the metassistCommand ..............................................................250Changing the VolumeDefaults File ..................................................................................................250
24 Monitoring and Error Reporting (Tasks) ................................................................................................253Solaris VolumeManagerMonitoring and Reporting (TaskMap) ........................................................254Configuring the mdmonitordCommand for Periodic Error Checking ................................................254
�How to Configure the mdmonitordCommand for Periodic Error Checking .........................254Solaris VolumeManager SNMPAgents Overview .................................................................................255Configuring the Solaris VolumeManager SNMPAgents ......................................................................256
�How to Configure the Solaris VolumeManager SNMPAgents ...............................................256Limitations of the Solaris VolumeManager SNMPAgent ....................................................................258Monitoring Solaris VolumeManagerWith a cron Job ..........................................................................259
�How toAutomate Checking for Errors in Volumes ...................................................................259
25 Troubleshooting Solaris VolumeManager (Tasks) ..............................................................................269Troubleshooting Solaris VolumeManager (TaskMap) .........................................................................270Overview of Troubleshooting the System ................................................................................................271
Prerequisites for Troubleshooting the System .................................................................................271General Guidelines for Troubleshooting Solaris VolumeManager ..............................................271General TroubleshootingApproach .................................................................................................271
Replacing Disks ...........................................................................................................................................272�How to Replace a Failed Disk .......................................................................................................272
Recovering FromDiskMovement Problems ..........................................................................................274DiskMovement andDevice IDOverview .......................................................................................274Resolving UnnamedDevices ErrorMessage ...................................................................................274
Device IDDiscrepanciesAfter Upgrading to the Solaris 10 Release ....................................................275Recovering FromBoot Problems ..............................................................................................................277
Background Information for Boot Problems ..................................................................................278How to Recover From Improper /etc/vfstab Entries .................................................................278�Recovering the root (/) RAID-1 (Mirror) Volume ....................................................................278�How to Recover From a Boot Device Failure ..............................................................................280
Recovering From State Database Replica Failures ..................................................................................284�How to Recover From Insufficient State Database Replicas .....................................................284
Recovering From Soft Partition Problems ...............................................................................................287
Contents
11

�How to Recover ConfigurationData for a Soft Partition ..........................................................287Recovering Storage From aDifferent System ..........................................................................................289
�How to Recover Storage From a Local Disk Set ..........................................................................289Recovering Storage From aKnownDisk Set ...................................................................................294
�How to Print a Report onDisk SetsAvailable for Import ..................................................294�How to Import a Disk Set FromOne System toAnother System .....................................295
Recovering FromDisk Set Problems ........................................................................................................296What to DoWhenYou Cannot Take Ownership ofADisk Set .....................................................296
�How to Purge a Disk Set ........................................................................................................297PerformingMounted Filesystem Backups Using the ufsdumpCommand .........................................298
�How to Perform a Backup of aMounted Filesystem Located on a RAID-1 Volume .............298Performing SystemRecovery ....................................................................................................................299
�How to Recover a SystemUsing a Solaris VolumeManager Configuration ...........................299
A Important Solaris VolumeManager Files ..............................................................................................301System Files and Startup Files ...................................................................................................................301Manually Configured Files ........................................................................................................................302
Overview of the md.tab File ...............................................................................................................302
B Solaris VolumeManager Quick Reference ............................................................................................305Command-Line Reference ........................................................................................................................305
C Solaris VolumeManager CIM/WBEMAPI ...............................................................................................307Managing Solaris VolumeManager .........................................................................................................307
Index ............................................................................................................................................................309
Contents
Solaris VolumeManagerAdministration Guide • May 200612

Tables
TABLE 2–1 Comparison of Types of Storage .....................................................................................29TABLE 2–2 Optimizing Redundant Storage ......................................................................................30TABLE 3–1 Summary of Solaris VolumeManager Features ............................................................39TABLE 3–2 Classes of Volumes ...........................................................................................................40TABLE 10–1 RAID-1 Volume Read Policies ......................................................................................100TABLE 10–2 RAID-1 VolumeWrite Policies .....................................................................................100TABLE 10–3 Submirror States .............................................................................................................101TABLE 10–4 Submirror Slice States ....................................................................................................102TABLE 14–1 RAID-5 Volume States ...................................................................................................160TABLE 14–2 RAID-5 Slice States ........................................................................................................161TABLE 16–1 Hot Spare Pool States (Command Line) ......................................................................173TABLE 18–1 Example VolumeNames for Disk Sets .........................................................................192TABLE 25–1 Common Boot ProblemsWith Solaris VolumeManager .........................................277TABLE B–1 Solaris VolumeManager Commands ..........................................................................305
13

14

Figures
FIGURE 3–1 View of the Enhanced Storage Tool (Solaris VolumeManager) in the SolarisManagement Console .......................................................................................................37
FIGURE 3–2 RelationshipAmong a Volume, Physical Disks, and Slices .........................................41FIGURE 4–1 Sample Cluster Configuration ........................................................................................50FIGURE 5–1 Basic Hardware Diagram Storage Scenario ...................................................................58FIGURE 8–1 RAID-0 (Stripe) Volume Example .................................................................................76FIGURE 8–2 RAID-0 (Concatenation) Volume Example ..................................................................77FIGURE 8–3 RAID-0 (Concatenated Stripe) Volume Example ........................................................80FIGURE 10–1 RAID-1 (Mirror) Example ..............................................................................................95FIGURE 10–2 RAID-1+0 Example .........................................................................................................96FIGURE 14–1 RAID-5 Volume Example ..............................................................................................157FIGURE 14–2 Expanded RAID-5 Volume Example ...........................................................................158FIGURE 16–1 Hot Spare Pool Example ................................................................................................174FIGURE 18–1 Disk Sets Example ..........................................................................................................193FIGURE 21–1 Small SystemConfiguration .........................................................................................230FIGURE 22–1 Processing Options for Top-DownVolume Creation ................................................235
15

16

Preface
The Solaris VolumeManager Administration Guide explains how to use Solaris™ VolumeManager tomanage your system’s storage needs. Solaris VolumeManager enables you to create, modify, and useRAID-0 (concatenation and stripe) volumes, RAID-1 (mirror) volumes, RAID-5 volumes, and softpartitions.
Note –This Solaris release supports systems that use the SPARC® and x86 families of processorarchitectures: UltraSPARC®, SPARC64,AMD64, Pentium, and Xeon EM64T. The supported systemsappear in the Solaris 10 Hardware Compatibility List at http://www.sun.com/bigadmin/hcl. Thisdocument cites any implementation differences between the platform types.
In this document these x86 related termsmean the following:
� x86 refers to the larger family of 64-bit and 32-bit x86 compatible products.� x64 points out specific 64-bit information aboutAMD64 or EM64T systems.� 32-bit x86 points out specific 32-bit information about x86 based systems.
For supported systems, see the Solaris 10 Hardware Compatibility List.
WhoShouldUse This BookSystem and storage administrators can use this book to identify:
� Tasks supported by Solaris VolumeManager� Ways to use Solaris VolumeManager to providemore reliable and accessible data
HowThis Book IsOrganizedThe Solaris VolumeManager Administration Guide includes the following information:
Chapter 1 provides a detailed “roadmap” to the concepts and tasks described in this book. Use thischapter as a navigational aid to the book’s content.
Chapter 2 provides an introduction to general storagemanagement concepts for those readers whoare new to this technology.
17

Chapter 3 describes Solaris VolumeManager. This chapter introduces essential product-relatedconcepts and explains how to access Solaris VolumeManager tools.
Chapter 4 provides an introduction tomulti-owner disk sets. Multi-owner disk sets enhance the useof Solaris VolumeManager in a Sun™ Cluster environment.
Chapter 5 provides the storage configuration scenario used throughout this book. This scenario isintended to help you understand the Solaris VolumeManager product.
Chapter 6 describes concepts related to state databases and state database replicas.
Chapter 7 explains how to perform tasks related to state databases and state database replicas.
Chapter 8 describes concepts related to RAID-0 (stripe and concatenation) volumes.
Chapter 9 explains how to perform tasks related to RAID-0 (stripe and concatenation) volumes.
Chapter 10 describes concepts related to RAID-1 (mirror) volumes.
Chapter 11 explains how to perform tasks related to RAID-1 (mirror) volumes.
Chapter 12 describes concepts related to Solaris VolumeManager’s soft partitioning feature.
Chapter 13 explains how to perform tasks related to soft partitioning.
Chapter 14 describes concepts related to RAID-5 volumes.
Chapter 15 explains how to perform tasks related to RAID-5 volumes.
Chapter 16 describes concepts related to hot spares and hot spare pools.
Chapter 17 explains how to perform tasks related to hot spares and hot spare pools.
Chapter 18 describes concepts related to disk sets.
Chapter 19 explains how to perform tasks related to disk sets.
Chapter 20 explains some general maintenance tasks that are not related to a specific Solaris VolumeManager component.
Chapter 21 provides some “best practices” information about configuring and using Solaris VolumeManager.
Chapter 23 describes concepts of and tasks related to the Solaris VolumeManager top-down volumecreation feature.
Chapter 24 provides concepts and instructions for using the Solaris VolumeManager SNMPagentand for other error-checking approaches.
Chapter 25 provides information about troubleshooting and solving common problems in theSolaris VolumeManager environment.
HowThis Book Is Organized
Solaris VolumeManagerAdministration Guide • May 200618
AppendixA lists important Solaris VolumeManager files.
Appendix B provides tables that summarize commands and other helpful information.
Appendix C provides a brief introduction to the CIM/WBEMAPI that allows open Solaris VolumeManagermanagement fromWBEM-compliant management tools.
RelatedBooksSolaris VolumeManager is one of several system administration tools available for the Solarisoperating system. Information about overall system administration features and functions, as well asrelated tools are provided in the following:
� SystemAdministration Guide: Basic Administration� SystemAdministration Guide: Advanced Administration� SystemAdministration Guide: Devices and File Systems
Documentation, Support, andTraining
Sun Function URL Description
Documentation http://www.sun.com/documentation/ Download PDF andHTMLdocuments, and order printeddocuments
Support andTraining
http://www.sun.com/supportraining/ Obtain technical support,download patches, and learnabout Sun courses
Typographic ConventionsThe following table describes the typographic changes that are used in this book.
TABLE P–1TypographicConventions
Typeface or Symbol Meaning Example
AaBbCc123 The names of commands, files, and directories,and onscreen computer output
Edit your .login file.
Use ls -a to list all files.
machine_name% you have mail.
Typographic Conventions
19
TABLE P–1TypographicConventions (Continued)Typeface or Symbol Meaning Example
AaBbCc123 What you type, contrasted with onscreencomputer output
machine_name% su
Password:
AaBbCc123 Command-line placeholder: replace with a realname or value
The command to remove a file is rmfilename.
AaBbCc123 Book titles, new terms, and terms to beemphasized
Read Chapter 6 in theUser’s Guide.
Perform a patch analysis.
Do not save the file.
[Note that some emphasized itemsappear bold online.]
Shell Prompts in CommandExamplesThe following table shows the default system prompt and superuser prompt for theC shell, Bourne shell, and Korn shell.
TABLE P–2Shell Prompts
Shell Prompt
C shell prompt machine_name%
C shell superuser prompt machine_name#
Bourne shell and Korn shell prompt $
Bourne shell and Korn shell superuser prompt #
Shell Prompts in Command Examples
Solaris VolumeManagerAdministration Guide • May 200620

Getting StartedWith Solaris VolumeManager
The Solaris VolumeManager Administration Guide describes how to set up andmaintain systemsusing Solaris VolumeManager tomanage storage for high availability, flexibility, and reliability.
This chapter serves as a high-level guide to find information for certain Solaris VolumeManagertasks, such as setting up storage capacity. This chapter does not address all the tasks that you willneed to use Solaris VolumeManager. Instead, this chapter provides an overview of new features andan easy way to find procedures describing common tasks associated with Solaris VolumeManagerconcepts.
This chapter includes the following roadmaps:
� “Solaris VolumeManager Roadmap—What’s New” on page 22� “Solaris VolumeManager Roadmap—Storage Capacity” on page 22� “Solaris VolumeManager Roadmap—Availability” on page 23� “Solaris VolumeManager Roadmap—I/O Performance” on page 24� “Solaris VolumeManager Roadmap—Administration” on page 24� “Solaris VolumeManager Roadmap—Troubleshooting” on page 25
Caution – If you do not use Solaris VolumeManager correctly, you can destroy data. Solaris VolumeManager provides a powerful way to reliablymanage your disks and data on them. However, youshould alwaysmaintain backups of your data, particularly before youmodify an active SolarisVolumeManager configuration.
1C H A P T E R 1
21

Solaris VolumeManager Roadmap—What’sNew
Task Description For Instructions
Manage storage in which one ormore components is greater than 1TB
Use physical logical unit numbers(LUNs) that are greater than 1 TBin size, or create logical volumesthat are greater than 1 TB.
“Overview ofMulti-TerabyteSupport in Solaris VolumeManager” on page 45
Import a disk set from one systemto another
Use the metaimport command toimport disk sets, even disk setscreated on different systems. Thiscommand uses expanded device IDsupport to automatically track diskmovement within named disk sets.
“Importing a Disk Set” on page 189
“Asynchronous Shared Storage inDisk Sets” on page 194
Create andmanagemulti-ownerdisk sets
Use the metaset -M to administermulti-owner disk sets in a SunCluster environment.
“TasksAssociatedWithMulti-Owner Disk Sets” on page 52
Solaris VolumeManager Roadmap—StorageCapacity
Task Description For Instructions
Set up storage Create storage that spans slices bycreating a RAID-0 or a RAID-5volume. The RAID-0 or RAID-5volume can then be used for a filesystem or any application, such as adatabase, that accesses the rawdevice.
“How to Create a RAID-0 (Stripe)Volume” on page 84
“How to Create a RAID-0(Concatenation) Volume” on page85
“How to Create a RAID-1 VolumeFromUnused Slices” on page 107
“How to Create a RAID-1 VolumeFrom a File System” on page 109
“How to Create a RAID-5 Volume”on page 164
Expand an existing file system Increase the capacity of an existingfile system by creating a RAID-0(concatenation) volume, thenadding additional slices to thatvolume.
“How to Expand Storage Capacityfor Existing Data” on page 87
Solaris VolumeManager Roadmap—What’s New
Solaris VolumeManagerAdministration Guide • May 200622

Task Description For Instructions
Expand an existing RAID-0(concatenation or stripe) volume
Expand an existing RAID-0volume by concatenatingadditional slices to it.
“How to Expand an ExistingRAID-0 Volume” on page 88
Expand a RAID-5 volume Expand the capacity of a RAID-5volume by concatenatingadditional slices to it.
“How to Expand a RAID-5Volume” on page 166
Increase the size of a UFS filesystem on an expanded volume
Expand a file system by using thegrowfs command to expand thesize of a UFS while it is mountedand without disrupting access tothe data.
“How to Expand a File System”on page 223
Subdivide slices or logical volumesinto smaller partitions, breakingthe 8-slice hard partition limit
Subdivide logical volumes or slicesby using soft partitions.
“How to Create a Soft Partition”on page 150
Create a file system Create a file system on a RAID-0(stripe or concatenation), RAID-1(mirror), RAID-5, or on a softpartition.
Chapter 18, “Creating UFS,TMPFS, and LOFS File Systems(Tasks),” in SystemAdministrationGuide: Devices and File Systems
Solaris VolumeManager Roadmap—Availability
Task Description For Instructions
Maximize data availability Use Solaris VolumeManager’smirroring feature tomaintainmultiple copies of your data. Youcan create a RAID-1 volume fromunused slices in preparation fordata, or you canmirror an existingfile system, including root (/) and/usr.
“How to Create a RAID-1 VolumeFromUnused Slices” on page 107
“How to Create a RAID-1 VolumeFrom a File System” on page 109
Add data availability withminimumhardware cost
Increase data availability with aminimum of hardware by usingSolaris VolumeManager’s RAID-5volumes.
“How to Create a RAID-5 Volume”on page 164
Solaris VolumeManager Roadmap—Availability
Chapter 1 • Getting StartedWith Solaris VolumeManager 23

Task Description For Instructions
Increase data availability for anexisting RAID-1 or RAID-5volume
Increase data availability for aRAID-1 or a RAID-5 volume, bycreating a hot spare pool thenassociating it with the submirrorsof a RAID-1 volume, or a RAID-5volume.
“Creating aHot Spare Pool”on page 176
“Associating a Hot Spare PoolWithVolumes” on page 178
Solaris VolumeManager Roadmap—I/OPerformance
Task Description For Instructions
Tune RAID-1 volume readanwritepolicies
Specify the read and write policiesfor a RAID-1 volume to improveI/O performance for a givenconfiguration.
“RAID-1 Volume Read-and-WritePolicies” on page 100
“How to Change RAID-1 VolumeOptions” on page 134
Optimize device performance Create RAID-0 (stripe) volumes tooptimize I/O performance ofdevices that make up the stripe.The interlace value can beoptimized for random orsequential access.
“Creating RAID-0 (Stripe)Volumes” on page 84
Maintain device performancewithin a RAID-0 (stripe)
Expand a stripe or concatenationthat has run out of space byconcatenating a new component toit.Aconcatenation of stripes isbetter for I/O performance than aconcatenation of slices.
“Expanding Storage Capacity”on page 87
Solaris VolumeManager Roadmap—Administration
Task Description For Instructions
Graphically administer yourvolumemanagement configuration
Use the SolarisManagementConsole graphical user interface(GUI) to administer your volumemanagement configuration.
Online help fromwithin SolarisVolumeManager (EnhancedStorage) node of the SolarisManagement Console application
Solaris VolumeManager Roadmap—I/O Performance
Solaris VolumeManagerAdministration Guide • May 200624

Task Description For Instructions
Graphically administer slices andfile systems
Use the SolarisManagementConsole GUI to administer yourdisks and file systems, performingsuch tasks as partitioning disks andconstructing UFS file systems.
Online help fromwithin the SolarisManagement Console application
Optimize Solaris VolumeManager Solaris VolumeManagerperformance is dependent on awell-designed configuration. Oncecreated, the configuration needsmonitoring and tuning.
“Solaris VolumeManagerConfiguration Guidelines” on page44
“WorkingWith ConfigurationFiles” on page 219
Plan for future expansion Because file systems tend to run outof space, you can plan for futuregrowth by putting a file system intoa concatenation.
“Creating RAID-0 (Concatenation)Volumes” on page 85
“Expanding Storage Capacity”on page 87
Solaris VolumeManager Roadmap—Troubleshooting
Task Description For Instructions
Replace a failing slice If a disk fails, youmust replace theslices used in your Solaris VolumeManager configuration. In the caseof RAID-0 volume, you have to usea new slice, delete and re-create thevolume, then restore data from abackup. Slices in RAID-1 andRAID-5 volumes can be replacedand resynchronized without loss ofdata.
“Responding to RAID-1 VolumeComponent Failures” on page 136
“How to Replace a Component in aRAID-5 Volume” on page 168
Recover from boot problems Special problems can arise whenbooting the system, due to ahardware problem or operatorerror.
“How to Recover From Improper/etc/vfstab Entries” on page 278
“How to Recover From InsufficientState Database Replicas” on page284
“How to Recover From a BootDevice Failure” on page 280
Solaris VolumeManager Roadmap—Troubleshooting
Chapter 1 • Getting StartedWith Solaris VolumeManager 25

26

StorageManagement Concepts
This chapter provides a brief introduction to some common storagemanagement concepts.
This chapter contains the following information:
� “Introduction to StorageManagement” on page 27� “Configuration Planning Guidelines” on page 29� “General Performance Guidelines” on page 31� “Random I/O and Sequential I/OOptimization” on page 31
Introduction to StorageManagementHow you choose tomanage your storage determines how you control the devices that store the activedata on your system. To be useful, active datamust be available and remain persistent even afterunexpected events, such as a hardware or software failure.
StorageHardwareThere aremany different devices on which data can be stored. The selection of devices to best meetyour storage needs depends primarily on three factors:
� Performance� Availability� Cost
You can use Solaris VolumeManager to helpmanage the trade-offs in performance, availability, andcost. You can oftenmitigatemany of the trade-offs with Solaris VolumeManager.
Solaris VolumeManager works well with any supported storage on any system that runs the Solarisoperating system.
2C H A P T E R 2
27

RAID LevelsRAID is an acronym for RedundantArray of Inexpensive (or Independent) Disks. RAID refers to aset of disks, called an array or a volume, that appears to the user as a single large disk drive.Depending on the configuration, this array provides improved reliability, response time, or storagecapacity.
Technically, there are six RAID levels, 0-5. Each level refers to amethod of distributing data whileensuring data redundancy. (RAID Level 0 does not provide data redundancy, but is usually includedas a RAID classification anyway. RAID Level 0 provides the basis for themajority of RAIDconfigurations in use.) Very few storage environments support RAID Levels 2, 3, and 4, so thoseenvironments are not described here.
Solaris VolumeManager supports the following RAID levels:
� RAID LEVEL0 –Although stripes and concatenations do not provide redundancy, thesevolumes are often referred to as RAID-0. Basically, data are spread across relatively small,equally-sized fragments that are allocated alternately and evenly across multiple physical disks.Any single drive failure can cause data loss. RAID-0 offers a high data transfer rate and high I/Othroughput, but suffers lower reliability and lower availability than a single disk.
� RAID Level 1 –Mirroring uses equal amounts of disk capacity to store data and a copy (mirror)of the data. Data is duplicated, ormirrored, over two ormore physical disks. Data can be readfrom both drives simultaneously, meaning that either drive can service any request, whichprovides improved performance. If one physical disk fails, you can continue to use themirrorwith no loss in performance or loss of data.Solaris VolumeManager supports both RAID-0+1 and (transparently) RAID-1+0mirroring,depending on the underlying volumes. See “Providing RAID-1+0 and RAID-0+1” on page 95for details.
� RAID Level 5 – RAID-5 uses striping to spread the data over the disks in an array. RAID-5 alsorecords parity information to provide some data redundancy.ARAID-5 volume can withstandthe failure of an underlying device without failing. If a RAID-5 volume is used in conjunctionwith hot spares, the volume can withstandmultiple failures without failing.ARAID-5 volumewill have a substantial performance degradation when operating with a failed device.In the RAID-5model, every device has one area that contains a parity stripe and other areas thatcontain data. The parity is spread over all of the disks in the array, which reduces the write time.Write time is reduced because writes do not have to wait until a dedicated parity disk can acceptthe data.
Introduction to StorageManagement
Solaris VolumeManagerAdministration Guide • May 200628

ConfigurationPlanningGuidelinesWhen you are planning your storagemanagement configuration, keep inmind that for any givenconfiguration, there are trade-offs in performance, availability, and hardware costs. Youmight needto experiment with the different variables to determine what works best for your configuration.
This section provides guidelines for working with the following types of volumes:
� RAID-0 (concatenation and stripe) volumes� RAID-1 (mirror) volumes� RAID-5 volumes� Soft partitions� File systems that are constructed on Solaris VolumeManager volumes
Choosing StorageBefore you implement your storagemanagement approach, you need to decide what kinds of storagedevices to use. This set of guidelines compares the various types of storage to help you choose.Additional sets of guidelines apply to specific types of storage as implemented in Solaris VolumeManager. See specific chapters about each volume type for details.
Note –The types of storage that are listed here are notmutually exclusive. You can use these volumesin combination tomeetmultiple goals. For example, you could first create a RAID-1 volume forredundancy. Next, you could create soft partitions on that RAID-1 volume to increase the possiblenumber of discrete file systems.
The following table provides a comparison between the features available for each type of storage.
TABLE 2–1Comparison of Types of Storage
RequirementsRAID-0(Concatenation) RAID-0 (Stripe) RAID-1 (Mirror) RAID-5 Soft Partitions
Redundant data No No Yes Yes No
Improved readperformance
No Yes Depends onunderlyingdevice
Yes No
Improved writeperformance
No Yes No No No
More than 8slices per device
No No No No Yes
Configuration PlanningGuidelines
Chapter 2 • StorageManagement Concepts 29

TABLE 2–1Comparison of Types of Storage (Continued)
RequirementsRAID-0(Concatenation) RAID-0 (Stripe) RAID-1 (Mirror) RAID-5 Soft Partitions
Larger availablestorage space
Yes Yes No Yes No
The following table outlines the trade-offs in write operations, random reads, and hardware costsbetween RAID-1 and RAID–5 volumes.
TABLE 2–2OptimizingRedundant Storage
RAID-1 (Mirror) RAID-5
Write operations Faster Slower
Random read Faster Slower
Hardware cost Higher Lower
The following list summarizes the information outlined in the tables:
� RAID-0 volumes (stripes and concatenations) and soft partitions do not provide any redundancyof data.
� Concatenation works well for small random I/O operations.� Striping performs well for large sequential I/O operations and for random I/O operations.� Mirroringmight improve read performance, but write performance is always degraded in
mirrors.� Because of the read-modify-write nature of RAID-5 volumes, volumes with over 20 percent
writes should not be RAID-5. If redundancy is required, considermirroring.� RAID-5 writes cannot be as fast as mirrored writes, which in turn cannot be as fast as
unprotected writes.� Soft partitions are useful formanaging very large storage devices.
Note – In addition to these generic storage options, see “Hot Spare Pools” on page 43 formoreinformation about using Solaris VolumeManager to support redundant devices.
Configuration PlanningGuidelines
Solaris VolumeManagerAdministration Guide • May 200630

General PerformanceGuidelinesWhen you design your storage configuration, consider the following performance guidelines:
� Striping generally has the best performance, but striping offers no data redundancy. Forwrite-intensive applications, RAID-1 volumes generally have better performance than RAID-5volumes.
� RAID-1 and RAID-5 volumes both increase data availability, but both types of volumes generallyhave lower performance for write operations.Mirroring does improve random readperformance.
� RAID-5 volumes have a lower hardware cost than RAID-1 volumes, while RAID-0 volumes haveno additional hardware cost.
� Both stripes and RAID-5 volumes distribute data across multiple disk drives and help balance theI/O load.
� Identify themost frequently accessed data, and increase access bandwidth to that data withmirroring or striping.
� Use available performancemonitoring capabilities and generic tools such as the iostatcommand to identify themost frequently accessed data. Once identified, the access bandwidth tothis data can be increased using striping, RAID-1 volumes or RAID-5 volumes.
� The performance of soft partitions can degrade when the soft partition size is changedmultipletimes.
� RAID-5 volume performance is lower than stripe performance for write operations. Thisperformance penalty results from themultiple I/O operations required to calculate and store theRAID-5 volume parity.
� For raw random I/O reads, the stripe and the RAID-5 volume are comparable. Both the stripeand RAID-5 volumes split the data across multiple disks. RAID-5 volume parity calculations arenot a factor in reads except after a slice failure.
� For raw random I/Owrites, the stripe is superior to RAID-5 volumes.
For configuration guidelines specific to Solaris VolumeManager, see “Solaris VolumeManagerConfiguration Guidelines” on page 44.
Random I/OandSequential I/OOptimizationThis section explains strategies for optimizing your configuration.
If you do not know if sequential I/O or random I/O predominates on the Solaris VolumeManagervolumes you are creating, do not implement these performance tuning tips. These tips can degradeperformance if the tips are improperly implemented.
The following optimization suggestions assume that you are optimizing a RAID-0 volume. Ingeneral, you would want to optimize a RAID-0 volume, thenmirror that volume to provide bothoptimal performance and data redundancy.
Random I/O and Sequential I/OOptimization
Chapter 2 • StorageManagement Concepts 31

Random I/OIn a random I/O environment, such as an environment used for databases and general-purpose fileservers, all disks should spend equal amounts of time servicing I/O requests.
For example, assume that you have 40 Gbytes of storage for a database application. If you stripeacross four 10 Gbyte disk spindles, and if the I/O is random and evenly dispersed across the volume,then each of the disks will be equally busy, which generally improves performance.
The target formaximum random I/O performance on a disk is 35 percent or lower usage, as reportedby the iostat command. Disk use in excess of 65 percent on a typical basis is a problem. Disk use inexcess of 90 percent is a significant problem. The solution to having disk use values that are too highis to create a new RAID-0 volumewithmore disks (spindles).
Note – Simply attaching additional disks to an existing volume cannot improve performance. Youmust create a new volumewith the ideal parameters to optimize performance.
The interlace size of the stripe does notmatter because you just want to spread the data across all thedisks.Any interlace value greater than the typical I/O request will suffice.
SequentialAccess I/OYou can optimize the performance of your configuration in a sequential I/O environment, such asDBMS servers that are dominated by full table scans andNFS servers in very data-intensiveenvironments. To take advantage of a sequential I/O environment, set the interlace value low relativeto the size of the typical I/O request.
For example, assume a typical I/O request size of 256 Kbytes and striping across 4 spindles.Agoodchoice for the stripe unit size in this example would be:
256 Kbytes / 4 = 64 Kbytes, or smaller
This strategy ensures that the typical I/O request is spread across multiple disk spindles, thusincreasing the sequential bandwidth.
Note – Seek time and rotation time are practically zero in the sequential I/O environment.When youoptimize sequential I/O, the internal transfer rate of a disk is most important.
In sequential applications, the typical I/O size is usually large, meaningmore than 128 Kbytes or evenmore than 1Mbyte.Assume an application with a typical I/O request size of 256 Kbytes and assumestriping across 4 disk spindles, thus:
256 Kbytes / 4 = 64 Kbytes
Random I/O and Sequential I/OOptimization
Solaris VolumeManagerAdministration Guide • May 200632

So, a good choice for the interlace size would be 32–64 Kbytes.
Random I/O and Sequential I/OOptimization
Chapter 2 • StorageManagement Concepts 33

34

Solaris VolumeManager Overview
This chapter explains the overall structure of Solaris VolumeManager. This chapter contains thefollowing information:
� “What’s New in Solaris VolumeManager” on page 35� “Introduction to Solaris VolumeManager” on page 35� “Solaris VolumeManager Requirements” on page 38� “Overview of Solaris VolumeManager Components” on page 38� “Solaris VolumeManager Configuration Guidelines” on page 44� “Overview of Creating Solaris VolumeManager Components” on page 45� “Overview ofMulti-Terabyte Support in Solaris VolumeManager” on page 45� “Upgrading to Solaris VolumeManager” on page 47
What’sNew in Solaris VolumeManagerThis section describes new features for working with Solaris VolumeManager in this Solaris release.
For a complete listing of new Solaris features and a description of Solaris releases, see Solaris 10What’s New.
Introduction to Solaris VolumeManagerSolaris VolumeManager is a software product that lets youmanage large numbers of disks and thedata on those disks.Although there aremany ways to use Solaris VolumeManager, most tasksinclude the following:
� Increasing storage capacity� Increasing data availability� Easing administration of large storage devices
In some instances, Solaris VolumeManager can also improve I/O performance.
3C H A P T E R 3
35

For information on the types of disks supported in the Solaris operating system, see Chapter 11,“Managing Disks (Overview),” in SystemAdministration Guide: Devices and File Systems.
HowSolaris VolumeManagerManages StorageSolaris VolumeManager uses virtual disks tomanage physical disks and their associated data. InSolaris VolumeManager, a virtual disk is called a volume. For historical reasons, some command-lineutilities also refer to a volume as ametadevice.
From the perspective of an application or a file system, a volume is functionally identical to a physicaldisk. Solaris VolumeManager converts I/O requests directed at a volume into I/O requests to theunderlyingmember disks.
Solaris VolumeManager volumes are built from disk slices or from other Solaris VolumeManagervolumes.An easy way to build volumes is to use the graphical user interface (GUI) that is built intothe SolarisManagement Console. The Enhanced Storage tool within the SolarisManagementConsole presents you with a view of all the existing volumes. By following the steps in wizards, youcan easily build any kind of Solaris VolumeManager volume or component. You can also build andmodify volumes by using Solaris VolumeManager command-line utilities.
For example, if you needmore storage capacity as a single volume, you could use Solaris VolumeManager tomake the system treat a collection of slices as one larger volume.After you create avolume from these slices, you can immediately begin using the volume just as you would use any“real” slice or device.
For amore detailed discussion of volumes, see “Overview of Volumes” on page 39.
Solaris VolumeManager can increase the reliability and availability of data by using RAID-1 (mirror)volumes and RAID-5 volumes. Solaris VolumeManager hot spares can provide another level of dataavailability formirrors and RAID-5 volumes.
Once you have set up your configuration, you can use the Enhanced Storage tool within the SolarisManagement Console to report on its operation.
How toAdminister Solaris VolumeManagerUse either of thesemethods to administer Solaris VolumeManager:
� SolarisManagement Console – This tool provides a GUI to administer volumemanagementfunctions. Use the Enhanced Storage tool within the SolarisManagement Console. See Figure3–1 for an example of the Enhanced Storage tool. This interface provides a graphical view ofSolaris VolumeManager components, including volumes, hot spare pools, and state databasereplicas. This interface offers wizard-basedmanipulation of Solaris VolumeManagercomponents, enabling you to quickly configure your disks or change an existing configuration.
� The command line –You can use several commands to perform volumemanagement functions.The Solaris VolumeManager core commands begin with meta, for example the metainit andmetastat commands. For a list of Solaris VolumeManager commands, see Appendix B.
How toAdminister Solaris VolumeManager
Solaris VolumeManagerAdministration Guide • May 200636

Note –Do not attempt to administer Solaris VolumeManager with the command line and the GUI atthe same time. Conflicting changes could bemade to the configuration, and its behavior would beunpredictable. You can use both tools to administer Solaris VolumeManager, but not concurrently.
FIGURE 3–1View of the Enhanced Storage Tool (Solaris VolumeManager) in the SolarisManagement Console
� How toAccess the Solaris VolumeManagerGraphicalUser Interface (GUI)The Solaris VolumeManager GUI (Enhanced Storage) is part of the SolarisManagement Console.To access the GUI, use the following instructions:
Start the SolarisManagement Console on the host systembyusing the following command:% /usr/sbin/smc
Double-click This Computer in theNavigation pane.
1
2
How toAdminister Solaris VolumeManager
Chapter 3 • Solaris VolumeManager Overview 37

Double-click Storage in theNavigation pane.
Double-click Enhanced Storage in theNavigation pane to load the Solaris VolumeManager tools.
If prompted to log in, log in as root or as a userwhohas equivalent access.
Double-click the appropriate icon tomanage volumes, hot spare pools, state database replicas, anddisk sets.
Tip –All tools in the SolarisManagement Console display information in the bottom section of theconsole window or at the left side of a wizard panel. Choose Help at any time to find additionalinformation about performing tasks in this interface.
Solaris VolumeManager RequirementsSolaris VolumeManager requirements include the following:
� Youmust have root privilege to administer Solaris VolumeManager. Equivalent privilegesgranted through the User Profile feature in the SolarisManagement Console allowadministration through the SolarisManagement Console. However, only the root user can usethe Solaris VolumeManager command-line interface.
� Before you can create volumes with Solaris VolumeManager, state database replicas must existon the Solaris VolumeManager system.Astate database replica contains configuration and statusinformation for all volumes, hot spares, and disk sets.At least three replicas should exist, and thereplicas should be placed on different controllers and different disks formaximum reliability. See“About the Solaris VolumeManager State Database and Replicas” on page 61 formoreinformation about state database replicas. See “Creating State Database Replicas” on page 68 forinstructions on how to create state database replicas.
Overviewof Solaris VolumeManager ComponentsThe five basic types of components that you create with Solaris VolumeManager are volumes, softpartitions, disk sets, state database replicas, and hot spare pools. The following table gives anoverview of these Solaris VolumeManager features.
3
4
5
6
Solaris VolumeManager Requirements
Solaris VolumeManagerAdministration Guide • May 200638

TABLE 3–1 Summary of Solaris VolumeManager Features
Solaris VolumeManager Feature Definition Purpose ForMore Information
� RAID-0 volume (stripe,concatenation,concatenated stripe)
� RAID-1 (mirror) volume� RAID-5 volume
Agroup of physical slices thatappear to the system as a single,logical device
To increase storage capacity,performance, or dataavailability.
“Overview of Volumes”on page 39
Soft partition Asubdivision of physical slicesor logical volumes to providesmaller, moremanageablestorage units
To improvemanageability oflarge storage volumes.
Chapter 12
State database (state databasereplicas)
Adatabase that containsconfiguration and statusinformation for all volumes, hotspares, and disk sets. SolarisVolumeManager cannotoperate until you have createdthe state database replicas.
To store information about thestate of your Solaris VolumeManager configuration
“State Database and StateDatabase Replicas” on page 43
Hot spare pool Acollection of slices (hotspares) reserved. These slicesare automatically substitutedwhen either a submirror orRAID-5 volume componentfails.
To increase data availability forRAID-1 and RAID-5 volumes.
“Hot Spare Pools” on page 43
Disk set Aset of shared disk drives in aseparate namespace thatcontains volumes and hotspares and that can be sharednon-concurrently bymultiplehosts
To provide data redundancyand data availability and toprovide a separate namespacefor easier administration.
“Disk Sets” on page 44
OverviewofVolumesAvolume is a group of physical slices that appears to the system as a single, logical device. Volumesare actually pseudo, or virtual, devices in standardUNIX® terms.
Note –Historically, the Solstice DiskSuite™ product referred to these logical devices asmetadevices.However, for simplicity and standardization, this book refers to these devices as volumes.
Overview of Solaris VolumeManager Components
Chapter 3 • Solaris VolumeManager Overview 39

Classes of VolumesYou create a volume as a RAID-0 (concatenation or stripe) volume, a RAID-1 (mirror) volume, aRAID-5 volume, or a soft partition.
You can use either the Enhanced Storage tool within the SolarisManagement Console or thecommand-line utilities to create and administer volumes.
The following table summarizes the classes of volumes.
TABLE 3–2Classes ofVolumes
Volume Description
RAID-0 (stripe orconcatenation)
Can be used directly, or as the basic building block formirrors. RAID-0 volumes donot directly provide data redundancy.
RAID-1 (mirror) Replicates data bymaintainingmultiple copies.ARAID-1 volume is composed ofone ormore RAID-0 volumes that are called submirrors.
RAID-5 Replicates data by using parity information. In the case of disk failure, themissingdata can be regenerated by using available data and the parity information.ARAID-5 volume is generally composed of slices. One slice’s worth of space isallocated to parity information, but the parity is distributed across all slices in theRAID-5 volume.
Soft partition Divides a slice or logical volume into one ormore smaller, extensible volumes.
HowVolumesAreUsedYou use volumes to increase storage capacity, performance, and data availability. In some instances,volumes can also increase I/O performance. Functionally, volumes behave the same way as slices.Because volumes look like slices, the volumes are transparent to end users, applications, and filesystems.As with physical devices, volumes are accessed through block or raw device names. Thevolume name changes, depending on whether the block or raw device is used. See “VolumeNames”on page 42 for details about volume names.
You can usemost file system commands, including mkfs, mount, umount, ufsdump, ufsrestore, andothers, on volumes. You cannot use the format command, however. You can read, write, and copyfiles to and from a volume, as long as the volume contains amounted file system.
Example—VolumeThat Consists of TwoSlicesFigure 3–2 shows a volume that contains two slices, one slice fromDiskAand one slice fromDisk B.An application or UFS treats the volume as if it were one physical disk.Addingmore slices to thevolume increases its storage capacity.
Overview of Solaris VolumeManager Components
Solaris VolumeManagerAdministration Guide • May 200640

Physical disksA and B
d0
d0
c2t2d0s2
c1t1d0s2Disk Ac1t1d0s2
Disk Bc2t2d0s2
FIGURE 3–2RelationshipAmong aVolume, Physical Disks, and Slices
VolumeandDisk Space ExpansionUsing the growfsCommandSolaris VolumeManager enables you to expand a volume by adding additional slices. You can useeither the Enhanced Storage tool within the SolarisManagement Console or the command-lineinterface to add a slice to an existing volume.
You can expand amounted or unmountedUFS file system that is contained within a volumewithouthaving to halt or back up your system. Nevertheless, backing up your data is always a good idea.Afteryou expand the volume, use the growfs command to grow the file system.
Note –After a file system has been expanded, the file system cannot be reduced in size. The inability toreduce the size of a file system is a UFS limitation. Similarly, after a Solaris VolumeManager partitionhas been increased in size, it cannot be reduced.
Applications and databases that use the raw volumemust have their ownmethod to “grow” theadded space so that applications can recognize it. Solaris VolumeManager does not provide thiscapability.
You can expand the disk space in volumes in the following ways:
� Adding one ormore slices to a RAID-0 volume� Adding one ormore slices to all submirrors of a RAID-1 volume� Adding one ormore slices to a RAID-5 volume� Expanding a soft partition with additional space from the underlying component
Overview of Solaris VolumeManager Components
Chapter 3 • Solaris VolumeManager Overview 41

The growfs command expands a UFS file systemwithout loss of service or data. However, writeaccess to the volume is suspended while the growfs command is running. You can expand the filesystem to the size of the slice or the volume that contains the file system.
The file system can be expanded to use only part of the additional disk space by using the -s sizeoption to the growfs command.
Note –When you expand amirror, space is added to themirror’s underlying submirrors. The growfscommand is then run on the RAID-1 volume. The general rule is that space is added to theunderlying devices, and the growfs command is run on the top-level device.
VolumeNamesAswith physical slices, volumes have logical names that appear in the file system. Logical volumenames have entries in the /dev/md/dsk directory for block devices and the /dev/md/rdsk directoryfor raw devices. Instead of specifying the full volume name, such as /dev/md/dsk/volume-name, youcan often use an abbreviated volume name, such as d1, with any meta* command. You can generallyrename a volume, as long as the volume is not currently being used and the new name is not beingused by another volume. Formore information, see “Exchanging VolumeNames” on page 217.
Originally, volume names had to begin with the letter “d” followed by a number (for example, d0).This format is still acceptable. The following are examples of volume names that use the “d*” namingconstruct:
/dev/md/dsk/d0 Block volume d0
/dev/md/dsk/d1 Block volume d1
/dev/md/rdsk/d126 Raw volume d126
/dev/md/rdsk/d127 Raw volume d127
VolumeNameGuidelines
The use of a standard for your volume names can simplify administration and enable you at a glanceto identify the volume type. Here are a few suggestions:
� Use ranges for each type of volume. For example, assign numbers 0–20 for RAID-1 volumes,21–40 for RAID-0 volumes, and so on.
� Use a naming relationship formirrors. For example, namemirrors with a number that ends inzero (0), and submirrors that end in one (1), two (2), and so on. For example, youmight namemirrors as follows: mirror d10, submirrors d11 and d12; mirror d20, submirrors d21, d22, d23,and d24.
� Use a namingmethod that maps the slice number and disk number to volume numbers.
Overview of Solaris VolumeManager Components
Solaris VolumeManagerAdministration Guide • May 200642

StateDatabase andStateDatabaseReplicasThe state database is a database that stores information about the state of your Solaris VolumeManager configuration. The state database records and tracks changesmade to your configuration.Solaris VolumeManager automatically updates the state database when a configuration or statechange occurs. Creating a new volume is an example of a configuration change.Asubmirror failure isan example of a state change.
The state database is actually a collection ofmultiple, replicated database copies. Each copy, referredto as a state database replica, ensures that the data in the database is always valid.Multiple copies ofthe state database protect against data loss from single points-of-failure. The state database tracks thelocation and status of all known state database replicas.
Solaris VolumeManager cannot operate until you have created the state database and its statedatabase replicas.ASolaris VolumeManager configurationmust have an operating state database.
When you set up your configuration, you can locate the state database replicas on either of thefollowing:
� On dedicated slices� On slices that will later become part of volumes
Solaris VolumeManager recognizes when a slice contains a state database replica, and automaticallyskips over the replica if the slice is used in a volume. The part of a slice reserved for the state databasereplica should not be used for any other purpose.
You can keepmore than one copy of a state database on one slice. However, youmightmake thesystemmore vulnerable to a single point-of-failure by doing so.
The Solaris operating system continues to function correctly if all state database replicas are deleted.However, the system loses all Solaris VolumeManager configuration data if a reboot occurs with noexisting state database replicas on disk.
Hot Spare PoolsAhot spare pool is a collection of slices (hot spares) reserved by Solaris VolumeManager to beautomatically substituted for failed components. These hot spares can be used in either a submirroror RAID-5 volume. Hot spares provide increased data availability for RAID-1 and RAID-5 volumes.You can create a hot spare pool with either the Enhanced Storage tool within the SolarisManagementConsole or the command-line interface.
When component errors occur, Solaris VolumeManager checks for the first available hot sparewhose size is equal to or greater than the size of the failed component. If found, Solaris VolumeManager automatically replaces the component and resynchronizes the data. If a slice of adequatesize is not found in the list of hot spares, the submirror or RAID-5 volume is considered to havefailed. Formore information, see Chapter 16.
Overview of Solaris VolumeManager Components
Chapter 3 • Solaris VolumeManager Overview 43

Disk SetsAdisk set is a set of physical storage volumes that contain logical volumes and hot spares. Volumesand hot spare pools must be built on drives fromwithin that disk set. Once you have created avolumewithin the disk set, you can use the volume just as you would a physical slice.
Adisk set provides data availability in a clustered environment. If one host fails, another host cantake over the failed host’s disk set. (This type of configuration is known as a failover configuration.)Additionally, disk sets can be used to helpmanage the Solaris VolumeManager namespace, and toprovide ready access to network-attached storage devices.
Formore information, see Chapter 18.
Solaris VolumeManager ConfigurationGuidelinesApoorly designed Solaris VolumeManager configuration can degrade performance. This sectionoffers tips for achieving good performance from Solaris VolumeManager. For information onstorage configuration performance guidelines, see “General Performance Guidelines” on page 31.
General Guidelines� Disk and controllers – Place drives in a volume on separate drive paths, or for SCSI drives,
separate host adapters.An I/O load distributed over several controllers improves volumeperformance and availability.
� Systemfiles –Never edit or remove the /etc/lvm/mddb.cf or /etc/lvm/md.cf files.Make sure these files are backed up regularly.
� Volume Integrity – If a slice is defined as a volume, do not use the underlying slice for any otherpurpose, including using the slice as a dump device.
� Information about disks and partitions –Keep a copy of output from the prtvtoc andmetastat -p commands in case you need to reformat a bad disk or recreate your Solaris VolumeManager configuration.
File SystemGuidelinesDo notmount file systems on a volume’s underlying slice. If a slice is used for a volume of any kind,youmust notmount that slice as a file system. If possible, unmount any physical device that youintend to use as a volume before you activate the volume.
Solaris VolumeManager Configuration Guidelines
Solaris VolumeManagerAdministration Guide • May 200644

Overviewof Creating Solaris VolumeManager ComponentsWhen you create a Solaris VolumeManager component, you assign physical slices to a logical SolarisVolumeManager name, such as d0. The Solaris VolumeManager components that you can createinclude the following:
� State database replicas� Volumes (RAID-0 (stripes, concatenations), RAID-1 (mirrors), RAID-5, and soft partitions)� Hot spare pools� Disk sets
Note – For suggestions on how to name volumes, see “VolumeNames” on page 42.
Prerequisites for Creating Solaris VolumeManagerComponentsThe prerequisites for creating Solaris VolumeManager components are as follows:
� Create initial state database replicas. If you have not done so, see “Creating State DatabaseReplicas” on page 68.
� Identify slices that are available for use by Solaris VolumeManager. If necessary, use the formatcommand, the fmthard command, or the SolarisManagement Console to repartition existingdisks.
� Make sure you have root privilege.� Have a current backup of all data.� If you are using the GUI, start the SolarisManagement Console and navigate to the Solaris
VolumeManager feature. For information, see “How toAccess the Solaris VolumeManagerGraphical User Interface (GUI)” on page 37.
OverviewofMulti-Terabyte Support in Solaris VolumeManager
Starting with the Solaris 9 4/03 release, Solaris VolumeManager supports storage devices and logicalvolumes greater than 1 terabyte (Tbyte) on systems running a 64-bit kernel.
Overview ofMulti-Terabyte Support in Solaris VolumeManager
Chapter 3 • Solaris VolumeManager Overview 45

Note –Use isainfo -v to determine if your system is running a 64-bit kernel. If the string “64-bit”appears, you are running a 64-bit kernel.
Solaris VolumeManager allows you to do the following:
� Create, modify, and delete logical volumes built on or from logical storage units (LUNs) greaterthan 1 Tbyte in size.
� Create, modify, and delete logical volumes that exceed 1 Tbyte in size.
Support for large volumes is automatic. If a device greater than 1 Tbyte is created, Solaris VolumeManager configures it appropriately and without user intervention.
LargeVolumeSupport LimitationsSolaris VolumeManager only supports large volumes (greater than 1 Tbyte) on the Solaris 9 4/03 orlater release when running a 64-bit kernel. Running a systemwith large volumes under 32-bit kernelon previous Solaris 9 releases will affect Solaris VolumeManager functionality. Specifically, note thefollowing:
� If a systemwith large volumes is rebooted under a 32-bit Solaris 9 4/03 or later kernel, the largevolumes will be visible through metastat output, but they cannot be accessed, modified ordeleted. In addition, new large volumes cannot be created.Any volumes or file systems on a largevolumewill also be unavailable.
� If a systemwith large volumes is rebooted under a Solaris release prior to Solaris 9 4/03, SolarisVolumeManager will not start.All large volumesmust be removed before Solaris VolumeManager will run under another version of the Solaris platform.
Caution –Do not create large volumes if you expect to run the Solaris software with a 32-bit kernel orif you expect to use a version of the Solaris OS prior to the Solaris 9 4/03 release.
Using LargeVolumesAll Solaris VolumeManager commands work with large volumes. No syntax differences or specialtasks are required to take advantage of large volume support. Thus, system administrators who arefamiliar with Solaris VolumeManager can immediately work with Solaris VolumeManager largevolumes.
Overview ofMulti-Terabyte Support in Solaris VolumeManager
Solaris VolumeManagerAdministration Guide • May 200646
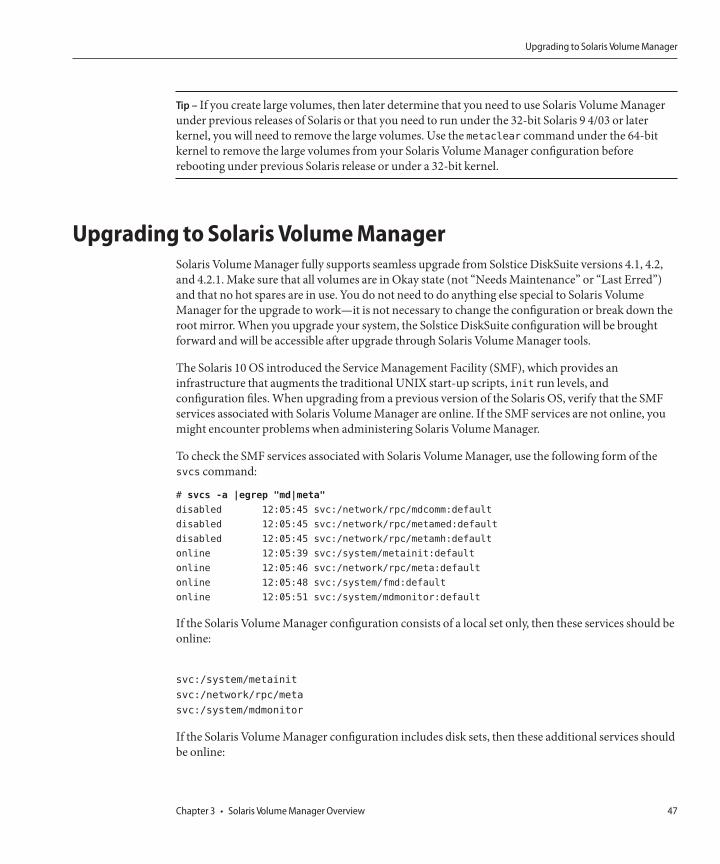
Tip – If you create large volumes, then later determine that you need to use Solaris VolumeManagerunder previous releases of Solaris or that you need to run under the 32-bit Solaris 9 4/03 or laterkernel, you will need to remove the large volumes. Use the metaclear command under the 64-bitkernel to remove the large volumes from your Solaris VolumeManager configuration beforerebooting under previous Solaris release or under a 32-bit kernel.
Upgrading to Solaris VolumeManagerSolaris VolumeManager fully supports seamless upgrade from Solstice DiskSuite versions 4.1, 4.2,and 4.2.1. Make sure that all volumes are in Okay state (not “NeedsMaintenance” or “Last Erred”)and that no hot spares are in use. You do not need to do anything else special to Solaris VolumeManager for the upgrade to work—it is not necessary to change the configuration or break down therootmirror.When you upgrade your system, the Solstice DiskSuite configuration will be broughtforward and will be accessible after upgrade through Solaris VolumeManager tools.
The Solaris 10 OS introduced the ServiceManagement Facility (SMF), which provides aninfrastructure that augments the traditional UNIX start-up scripts, init run levels, andconfiguration files.When upgrading from a previous version of the Solaris OS, verify that the SMFservices associated with Solaris VolumeManager are online. If the SMF services are not online, youmight encounter problems when administering Solaris VolumeManager.
To check the SMF services associated with Solaris VolumeManager, use the following form of thesvcs command:
# svcs -a |egrep "md|meta"
disabled 12:05:45 svc:/network/rpc/mdcomm:default
disabled 12:05:45 svc:/network/rpc/metamed:default
disabled 12:05:45 svc:/network/rpc/metamh:default
online 12:05:39 svc:/system/metainit:default
online 12:05:46 svc:/network/rpc/meta:default
online 12:05:48 svc:/system/fmd:default
online 12:05:51 svc:/system/mdmonitor:default
If the Solaris VolumeManager configuration consists of a local set only, then these services should beonline:
svc:/system/metainit
svc:/network/rpc/meta
svc:/system/mdmonitor
If the Solaris VolumeManager configuration includes disk sets, then these additional services shouldbe online:
Upgrading to Solaris VolumeManager
Chapter 3 • Solaris VolumeManager Overview 47

svc:/network/rpc/metamed
svc:/network/rpc/metamh
If the Solaris VolumeManager includesmulti-node disk sets, then this service should be online inaddition to the other services alreadymentioned:
svc:/network/rpc/mdcomm
Formore information on SMF, see Chapter 14, “Managing Services (Overview),” in SystemAdministration Guide: Basic Administration.
Upgrading to Solaris VolumeManager
Solaris VolumeManagerAdministration Guide • May 200648

Solaris VolumeManager for Sun Cluster(Overview)
This chapter provides an overview of Solaris VolumeManager for Sun Cluster.
This chapter includes the following information:
� “Introduction to Solaris VolumeManager for Sun Cluster” on page 49� “Multi-Owner Disk Set Concepts” on page 51� “Solaris VolumeManager for Sun Cluster Configuration” on page 53� “RAID–1 (Mirror) Volumes inMulti-Owner Disk Sets” on page 54
Introduction to Solaris VolumeManager for SunClusterStarting with the Solaris 9 9/04 release, Solaris VolumeManager canmanage storage in a Sun Clusterenvironment usingmulti-owner disk sets.Multi-owner disk sets allowmultiple nodes to shareownership of a disk set and to simultaneously write to the shared disks. Previously, shared disk setswere visible from all participating hosts in the disk set, but only one host could access it at a time.Multi-owner disk sets work with Sun Cluster and with applications such as Oracle RealApplicationClusters.
Multi-owner disk sets and Solaris VolumeManager shared disk sets can coexist on the same node.However, moving disk sets between the two configurations is not supported.
Note – Solaris VolumeManager for SunCluster device id support formulti-owner disk sets is notavailable. Therefore, importingmulti-owner disk sets from one system to another is not supported atthis time.
Solaris VolumeManager for Sun Cluster creates the same components that you can create withSolaris VolumeManager, including stripes, concatenations, mirrors, soft partitions, and hot spares.Solaris VolumeManager for Sun Cluster does not support RAID-5 volumes and transactionalvolumes.
4C H A P T E R 4
49

The following figure shows the association between the software and the shared storage in a typicalcluster configuration.
Switch
Node 2
Applications
Solaris
Oracle RAC
SunCluster
Node 3
Applications
Solaris
Oracle RAC
SunCluster
Node 1
Applications
Solaris
Oracle RAC
SunCluster
FIGURE 4–1 SampleClusterConfiguration
Each node has local storage as well as at least one path to shared storage. Themulti-owner disk sets inthe cluster aremanaged by Solaris VolumeManager for Sun Cluster, which is part of the SolarisOperating System (Solaris OS).
Prerequisite: Required Software Components forMulti-OwnerDisk Set FunctionalityTo use Solaris VolumeManager for Sun Cluster, the following softwaremust be installed in additionto the Solaris OS:
� Sun Cluster initial cluster framework� Sun Cluster Support for Oracle RealApplication Clusters software� Oracle RealApplication Clusters software
Note – For information on setting up SunCluster andOracle RealApplication Clusters software, seeSun Cluster Software Installation Guide for Solaris OS. and Sun Cluster Data Service for Oracle RealApplication Clusters Guide for Solaris OS.
Introduction to Solaris VolumeManager for Sun Cluster
Solaris VolumeManagerAdministration Guide • May 200650

Multi-OwnerDisk Set ConceptsThe storagemanaged by Solaris VolumeManager for Sun Cluster is grouped intomulti-owner disksets. Multi-owner disk sets allowmultiple nodes to share ownership of a disk set and tosimultaneously write to the shared disks.An instance of an application such as Oracle RealApplication Clusters runs on each node in the cluster, somulti-owner disk sets provide scalability.Since each instance of the application directly accesses the shared storage, multi-owner disk sets alsoenhance the performance of the application.
Note –Multi-owner disk set functionality is enabled only in a SunCluster environment.Nodes are thephysical machines that are part of a Sun Cluster system.
Eachmulti-owner disk set is associated with a list of nodes. These nodes share ownership of the diskset. The following metaset -s disk-set command shows the output for amulti-owner disk set.
# metaset -s blue
Multi-owner Set name = blue, Set number = 1, Master = nodeone
Host Owner Member
nodeone multi-owner Yes
nodetwo multi-owner Yes
Drive Dbase
d9 Yes
d13 Yes
This output shows nodeone and nodetwo in the list of nodes that share ownership of the disk set.Additionally, nodeone is designated as themaster node.
Eachmulti-owner disk set has amaster node.After a disk set is created, the node that adds the firstdisk to the disk set becomes themaster node of the disk set. Themaster node creates, deletes, andupdates the state database replicas in the disk set.
Note – Formore information on state database replicas, see Chapter 6.
Solaris VolumeManager for Sun Cluster can support disk sets with different, yet overlapping, nodelists. Because each disk set has amaster node, multiple masters can exist simultaneously on the samecluster.
The following output from the metaset command shows that nodeone becomes themaster nodewhen the first disk is added to the disk set.
Multi-Owner Disk Set Concepts
Chapter 4 • Solaris VolumeManager for Sun Cluster (Overview) 51

nodeone# metaset -s red
Multi-owner Set name = red, Set number = 1, Master =
Host Owner Member
nodeone Yes
nodetwo Yes
nodeone# metaset -s red -a /dev/did/dsk/d9
nodeone# metaset -s red
Multi-owner Set name = red, Set number = 1, Master = nodeone
Host Owner Member
nodeone multi-owner Yes
nodetwo multi-owner Yes
Drive Dbase
d9 Yes
Solaris VolumeManager for Sun Cluster can support disk sets with different, yet overlapping, nodelists. Because each disk set has amaster node, multiple masters can exist simultaneously on the samecluster.
TasksAssociatedWithMulti-OwnerDisk Sets
Caution –Before configuringmulti-owner disk sets, youmust have the following software installed, inaddition to the Solaris OS:
� Sun Cluster initial cluster framework� Sun Cluster Support for Oracle RealApplication Clusters software� Oracle RealApplication Clusters software
For information on setting up Sun Cluster andOracle RealApplication Clusters software, see SunCluster Software Installation Guide for Solaris OS. and Sun Cluster Data Service for Oracle RealApplication Clusters Guide for Solaris OS.
Solaris VolumeManager for Sun Cluster generally uses the same set of Solaris VolumeManagercommands to perform tasks associated with disk sets. Some command options unique tomulti-owner disk sets have been added to the metaset command. For example, the task to create amulti-owner disk set requires the -M to the metaset command. The following output shows you howto create amulti-owner disk set using the metaset -s diskset-name -a -M -h hostname command.
# metaset -s red -a -M -h nodeone
# metaset
Multi-owner Set name = red, Set number = 1, Master =
Multi-Owner Disk Set Concepts
Solaris VolumeManagerAdministration Guide • May 200652

Host Owner Member
nodeone Yes
In addition, some of the metaset command options, such as the commands to take and release disksets, are not used withmulti-owner disk sets. Formore information, see the metaset(1M)man page.
Another example of how tasks differ in a Sun Cluster environment occurs when working with disks.Sun Cluster assigns each disk a unique device ID (DID) number. Rather than using the cntndnformat to identify a disk, use the Sun Cluster DID path name, /dev/did/dsk/dN. The variableN isthe device number assigned by Sun Cluster.
The following output shows you how to add a disk to amulti-owner disk set using the metaset -sdiskset-name -a disk-name command and the Sun Cluster DID path name to identify the disk.
nodeone# metaset -s red
Multi-owner Set name = red
Multi-owner Set name = red, Set number = 1, Master =
Host Owner Member
nodeone Yes
nodetwo Yes
nodeone# metaset -s red -a /dev/did/dsk/d13
nodeone# metaset -s red
Multi-owner Set name = red, Set number = 1, Master = nodeone
Host Owner Member
nodeone multi-owner Yes
Drive Dbase
d13 Yes
For information on creatingmulti-owner disk sets for the Oracle RealApplication Clusters, see“Creating aMulti-Owner Disk Set in Solaris VolumeManager for Sun Cluster for the Oracle RealApplication Clusters Database” in Sun Cluster Data Service for Oracle Real Application ClustersGuide for Solaris OS.
For tasks that are associated with disk sets, see Chapter 19.
Solaris VolumeManager for SunCluster ConfigurationSolaris VolumeManager for Sun Cluster supports the following configuration:
� Solaris VolumeManager for Sun Cluster supports up to 32 disk sets. These disk sets can includeany combination ofmulti-owner disk sets, shared disk sets, and the local disk set.
Solaris VolumeManager for Sun Cluster Configuration
Chapter 4 • Solaris VolumeManager for Sun Cluster (Overview) 53

Note – Formore information on different types of disk sets, see “Types of Disk Sets” on page 186.
� Eachmulti-owner disk set supports amaximum of 8192 volumes per disk set.� The default size for a state database replica is 16Mbytes. Theminimum size is 16Mbytes. The
maximum size is 256Mbytes.
Many of the extension properties for Sun Cluster Support for Oracle RealApplication Clustersspecify timeouts for steps in reconfiguration processes. For further information about settingtimeouts, refer to “Tuning Sun Cluster Support for Oracle RealApplication Clusters” in Sun ClusterData Service for Oracle Real Application Clusters Guide for Solaris OS.
RAID–1 (Mirror) Volumes inMulti-OwnerDisk SetsARAID–1 volume, ormirror, created in amulti-owner disk set functions identically to a RAID-1volume in a Solaris VolumeManager shared disk set. However, RAID-1 volumes inmulti-owner disksets have some additional features.
MirrorOwnershipWithMulti-OwnerDisk SetsThe concept of mirror ownership is unique tomulti-owner disk sets. Unlike a RAID-1 volume in aSolaris VolumeManager shared disk set, a RAID-1 volume in amulti-owner disk set usually has anowner associated with it. The ownership of themirror volume is chosen by the volumemanager. Theowner of the volume is one of the nodes designated in the node list for the disk set. Only the owner ofthe RAID-1 volume can write to the volume. If a non-owner node wants to write to the volume, theownership switches to the node doing the write operation. The following output from the metastat-s diskset-name command shows nodeone as the owner of the RAID-1 volume, d24.
# metastat -s red
red/d24: Mirror
Submirror 0: red/d20
State: Okay
Submirror 1: red/d21
State: Okay
Pass: 1
Read option: roundrobin (default)
Write option: parallel (default)
Resync option: optimizedresync
Owner: nodeone
Size: 825930 blocks (403 MB)
RAID–1 (Mirror) Volumes inMulti-Owner Disk Sets
Solaris VolumeManagerAdministration Guide • May 200654
DataManagement andRecovery ProcessesAswith RAID-1 volumes in Solaris VolumeManager, RAID-1 volumes in Solaris VolumeManagerfor Sun Cluster perform operations to ensure consistent data. Solaris VolumeManager for SunCluster provides RAID-1 volumes with two options for datamanagement and recovery.
OptimizedResynchronization for Solaris VolumeManager for SunClusterOptimized resynchronization in Solaris VolumeManager for Sun Cluster functions identically tooptimized resynchronization in Solaris VolumeManager. However, in amulti-owner disk set, aRAID-1 volumewith the resynchronization option set to optimized resynchronization always has amirror owner. The following output from the metastat -s diskset-name command shows theresynchronization option set to optimizedresync (for optimized resynchronization).
# metastat -s red
red/d24: Mirror
Submirror 0: red/d20
State: Okay
Submirror 1: red/d21
State: Okay
Pass: 1
Read option: roundrobin (default)
Write option: parallel (default)
Resync option: optimizedresync
Owner: nodeone
Size: 825930 blocks (403 MB)
Formore information on optimized resynchronization, see “Optimized Resynchronization” on page97.
Application-BasedRecovery andDirectedMirror ReadsTo optimize data recovery in Solaris VolumeManager for Sun Cluster, applications such as OracleRealApplication Clusters require the ability tomanage and control the recovery of data. Enabling anapplication to control the recovery improves the performance of the recovery. The ioctlsDKIOGETVOLCAP, DKIOSETVOLCAP, and DKIODMR provide support for an application’s datamanagement recovery in a cluster environment. These ioctls provide an application with thefollowing capabilities:
� Application Based Recovery (ABR)—Allows the application to control the recovery of data onmirrored volumes
� DirectedMirror Reads—Allows the application to direct reads to specific submirrors and todetermine the state of the data
Formore information on the ioctls used with application-based datamanagement recovery, see thedkio(7I) man page.
RAID–1 (Mirror) Volumes inMulti-Owner Disk Sets
Chapter 4 • Solaris VolumeManager for Sun Cluster (Overview) 55

ARAID-1 volumewith the resynchronization option set to application-based recovery only has amirror owner during the application-based recovery process. The following output from themetastat -s diskset-name command shows a RAID-1 volume in a normal state. Theresynchronization option is set to application-based recovery. There is nomirror owner.
# metastat -s red
red/d24: Mirror
Submirror 0: red/d20
State: Okay
Submirror 1: red/d21
State: Okay
Pass: 1
Read option: roundrobin (default)
Write option: parallel (default)
Resync option: application based
Owner: None
Size: 825930 blocks (403 MB)
RAID–1 (Mirror) Volumes inMulti-Owner Disk Sets
Solaris VolumeManagerAdministration Guide • May 200656

Configuring andUsing Solaris VolumeManager(Scenario)
Throughout the Solaris VolumeManager Administration Guide, the examples generally relate to asingle storage configuration, whenever that is possible. This chapter describes the scenario used inthe examples. The chapter provides details about the initial storage configuration that is used insubsequent chapters.
This chapter contains the following information:
� “Scenario Background Information” on page 57� “Final Solaris VolumeManager Configuration” on page 58
Scenario Background InformationThroughout this book, the scenarios andmany of the examples relate to a single configuration.Although this configuration is small (to simplify the documentation), the conceptsl scale tomuchlarger storage environments.
HardwareConfigurationThe hardware system is configured as follows:
� There are three physically separate controllers (c0 – IDE, c1 – SCSI, and c2 – SCSI).� Each SCSI controller connects to aMultiPack that contains six internal 9-Gbyte disks (c1t1
through c1t6 and c2t1 through c2t6). This creates amirror configuration.� Each controller/terminator pair (cntn) has 8.49 Gbytes of usable storage space.� Storage space on the root (/) drive c0t0d0 is split into six partitions.
An alternative way to understand this configuration is shown in the following diagram.
5C H A P T E R 5
57

c1t6d0
c1t5d0
c1t4d0
c1t3d0
c1t2d0
c1t1d0
c1
c2t6d0
c2t5d0
c2t4d0
c2t3d0
c2t2d0
c2t1d0
c2
c0
c0t0d0
FIGURE 5–1BasicHardwareDiagramStorage Scenario
Initial Physical StorageConfigurationHere is the storage configuration before Solaris VolumeManager is configured:
� The SCSI controller/terminator pairs (cntn) have approximately 20 Gbytes of storage space.� Storage space on each disk (for example, c1t1d0) is split into seven partitions (cntnd0s0 through
cntnd0s6).To partition a disk, follow the procedures explained in “Formatting a Disk” in SystemAdministration Guide: Devices and File Systems.
Final Solaris VolumeManager ConfigurationThroughout this book, specific scenarios are provided with specific tasks. However, so that you canbetter understand the examples throughout the book, the final configuration is approximately asfollows, as displayed by the metastat -p command:
[root@lexicon:/]$ metastat -p
d50 -r c1t4d0s5 c1t5d0s5 c2t4d0s5 c2t5d0s5 c1t1d0s5 c2t1d0s5 -k -i 32b
d1 1 1 c1t2d0s3
d2 1 1 c2t2d0s3
Final Solaris VolumeManager Configuration
Solaris VolumeManagerAdministration Guide • May 200658

d12 1 1 c1t1d0s0
d13 1 1 c2t1d0s0
d16 1 1 c1t1d0s1
d17 1 1 c2t1d0s1
d25 2 2 c1t1d0s3 c2t1d0s3 -i 32b \
1 c0t0d0s3
d31 1 2 c1t4d0s4 c2t4d0s4 -i 8192b
d80 -p d70 -o 1 -b 2097152
d81 -p d70 -o 2097154 -b 2097152
d82 -p d70 -o 4194307 -b 2097152
d83 -p d70 -o 6291460 -b 2097152
d84 -p d70 -o 8388613 -b 2097152
d85 -p d70 -o 10485766 -b 2097152
d70 -m d71 d72 1
d71 3 1 c1t3d0s3 \
1 c1t3d0s4 \
1 c1t3d0s5
d72 3 1 c2t3d0s3 \
1 c2t3d0s4 \
1 c2t3d0s5
d123 -p c1t3d0s6 -o 1 -b 204800
d124 -p c1t3d0s6 -o 204802 -b 204800
d125 -p c1t3d0s6 -o 409603 -b 204800
d126 -p c1t3d0s7 -o 3592 -b 20480
d127 -p c2t3d0s7 -o 3592 -b 1433600
hsp010
hsp014 c1t2d0s1 c2t2d0s1
hsp050 c1t2d0s5 c2t2d0s5
hsp070 c1t2d0s4 c2t2d0s4
See the metastat(1M) command formore information on the -p option.
Final Solaris VolumeManager Configuration
Chapter 5 • Configuring andUsing Solaris VolumeManager (Scenario) 59

60

State Database (Overview)
This chapter provides conceptual information about state database replicas. For information aboutperforming related tasks, see Chapter 7.
This chapter contains the following information:
� “About the Solaris VolumeManager State Database and Replicas” on page 61� “Understanding theMajority ConsensusAlgorithm” on page 62� “Handling State Database Replica Errors” on page 64� “Scenario—State Database Replicas” on page 65
About the Solaris VolumeManager StateDatabase andReplicas
The Solaris VolumeManager state database contains configuration and status information for allvolumes, hot spares, and disk sets. Solaris VolumeManagermaintainsmultiple copies (replicas) ofthe state database to provide redundancy and to prevent the database from being corrupted during asystem crash (at most, only one database copy will be corrupted).
The state database replicas ensure that the data in the state database is always valid.When the statedatabase is updated, each state database replica is also updated. The updates occur one at a time (toprotect against corrupting all updates if the system crashes).
If your system loses a state database replica, Solaris VolumeManagermust figure out which statedatabase replicas still contain valid data. Solaris VolumeManager determines this information byusing amajority consensus algorithm. This algorithm requires that amajority (half + 1) of the statedatabase replicas be available and in agreement before any of them are considered valid. Because ofthe requirements of themajority consensus algorithm, youmust create at least three state databasereplicas when you set up your disk configuration.Aconsensus can be reached as long as at least twoof the three state database replicas are available.
During booting, Solaris VolumeManager ignores corrupted state database replicas. In some cases,Solaris VolumeManager tries to rewrite state database replicas that are corrupted. Otherwise, they
6C H A P T E R 6
61

are ignored until you repair them. If a state database replica becomes corrupted because itsunderlying slice encountered an error, you need to repair or replace the slice and then enable thereplica.
Caution –Do not place state database replicas on fabric-attached storage, SANs, or other storage thatis not directly attached to the system. Youmight not be able to boot Solaris VolumeManager.Replicas must be on storage devices that are available at the same point in the boot process astraditional SCSI or IDE drives.
If all state database replicas are lost, you could, in theory, lose all data that is stored on your SolarisVolumeManager volumes. For this reason, it is good practice to create enough state database replicason separate drives and across controllers to prevent catastrophic failure. It is also wise to save yourinitial Solaris VolumeManager configuration information, as well as your disk partitioninformation.
See Chapter 7 for information on adding additional state database replicas to the system. See“Recovering From State Database Replica Failures” on page 284 for information on recovering whenstate database replicas are lost.
State database replicas are also used for RAID-1 volume resynchronization regions. Too few statedatabase replicas relative to the number of mirrors might cause replica I/O to impact RAID-1 volumeperformance. That is, if you have a large number of mirrors, make sure that you have at least twostate database replicas per RAID-1 volume, up to themaximum of 50 replicas per disk set.
By default each state database replica for volumes, the local set and for disk sets occupies 4Mbytes(8192 disk sectors) of disk storage. The default size of a state database replica for amulti-owner diskset is 16Mbytes.
Replicas can be stored on the following devices:
� Adedicated local disk partition� Alocal partition that will be part of a volume� Alocal partition that will be part of a UFS logging device
Replicas cannot be stored on the root (/), swap, or /usr slices. Nor can replicas be stored on slicesthat contain existing file systems or data.After the replicas have been stored, volumes or file systemscan be placed on the same slice.
Understanding theMajority ConsensusAlgorithmAn inherent problemwith replicated databases is that it can be difficult to determine which databasehas valid and correct data. To solve this problem, Solaris VolumeManager uses amajority consensusalgorithm. This algorithm requires that amajority of the database replicas agree with each otherbefore any of them are declared valid. This algorithm requires the presence of at least three initial
Understanding theMajority ConsensusAlgorithm
Solaris VolumeManagerAdministration Guide • May 200662

replicas, which you create.Aconsensus can then be reached as long as at least two of the threereplicas are available. If only one replica exists and the system crashes, it is possible that all volumeconfiguration data will be lost.
To protect data, Solaris VolumeManager does not function unless half of all state database replicasare available. The algorithm, therefore, ensures against corrupt data.
Themajority consensus algorithm provides the following:
� The system continues to run if at least half of the state database replicas are available.� The system panics if fewer than half of the state database replicas are available.� The system cannot reboot intomultiuser mode unless amajority (half + 1) of the total number of
state database replicas is available.
If insufficient state database replicas are available, youmust boot into single-usermode and deleteenough of the corrupted ormissing replicas to achieve a quorum. See “How to Recover FromInsufficient State Database Replicas” on page 284.
Note –When the total number of state database replicas is an odd number, Solaris VolumeManagercomputes themajority by dividing the number in half, rounding down to the nearest integer, thenadding 1 (one). For example, on a systemwith seven replicas, themajority would be four (sevendivided by two is three and one-half, rounded down is three, plus one is four).
Administering StateDatabaseReplicas� By default, the size of a state database replica is 4Mbytes or 8192 blocks. You should create state
database replicas on a dedicated slice with at least 4Mbytes per replica. Because your disk slicesmight not be that small, youmight want to resize a slice to hold the state database replica. Forinformation about resizing a slice, see Chapter 12, “Administering Disks (Tasks),” in SystemAdministration Guide: Devices and File Systems.
� To avoid single points-of-failure, distribute state database replicas across slices, drives, andcontrollers. You want amajority of replicas to survive a single component failure. If you lose areplica (for example, due to a device failure), problemsmight occur with running Solaris VolumeManager or when rebooting the system. Solaris VolumeManager requires at least half of thereplicas to be available to run, but amajority (half + 1) to reboot intomultiuser mode.
Aminimum of 3 state database replicas are recommended, up to amaximum of 50 replicas perSolaris VolumeManager disk set. The following guidelines are recommended:
� For a systemwith only a single drive: put all three replicas on one slice.� For a systemwith two to four drives: put two replicas on each drive.� For a systemwith five ormore drives: put one replica on each drive.
Administering State Database Replicas
Chapter 6 • State Database (Overview) 63

� If multiple controllers exist, replicas should be distributed as evenly as possible across allcontrollers. This strategy provides redundancy in case a controller fails and also helps balance theload. If multiple disks exist on a controller, at least two of the disks on each controller shouldstore a replica.
� If necessary, you could create state database replicas on a slice that will be used as part of aRAID-0, RAID-1, or RAID-5 volume, or soft partitions. Youmust create the replicas before youadd the slice to the volume. Solaris VolumeManager reserves the beginning of the slice for thestate database replica.
When a state database replica is placed on a slice that becomes part of a volume, the capacity ofthe volume is reduced by the space that is occupied by the replica. The space used by a replica isrounded up to the next cylinder boundary. This space is skipped by the volume.
� RAID-1 volumes are used for small-sized random I/O (as in for a database). For bestperformance, have at least two extra replicas per RAID-1 volume on slices (and preferably onseparate disks and controllers) that are unconnected to the RAID-1 volume.
� You cannot create state database replicas on existing file systems, or the root (/), /usr, and swapfile systems. If necessary, you can create a new slice (provided a slice name is available) byallocating space from swap. Then, put the state database replicas on that new slice.
� You can create state database replicas on slices that are not in use.� You can add additional state database replicas to the system at any time. The additional state
database replicas help ensure Solaris VolumeManager availability.
Caution – If you upgraded from the Solstice DiskSuite product to Solaris VolumeManager andyou have state database replicas sharing slices with file systems or logical volumes (as opposed toon separate slices), do not delete the existing replicas and replace themwith new replicas in thesame location.
The default state database replica size in Solaris VolumeManager is 8192 blocks, while the defaultsize in the Solstice DiskSuite product is 1034 blocks. Use caution if you delete a default-sized statedatabase replica created in the Solstice DiskSuite product, and then add a new default-sizedreplica with Solaris VolumeManager. You will overwrite the first 7158 blocks of any file systemthat occupies the rest of the shared slice, thus destroying the data.
Handling StateDatabaseReplica ErrorsIf a state database replica fails, the system continues to run if at least half of the remaining replicas areavailable. The system panics when fewer than half of the replicas are available.
The system can into rebootmultiuser mode when at least onemore than half of the replicas areavailable. If fewer than amajority of replicas are available, youmust reboot into single-usermodeand delete the unavailable replicas (by using the metadb command).
Handling State Database Replica Errors
Solaris VolumeManagerAdministration Guide • May 200664

For example, assume you have four replicas. The system continues to run as long as two replicas (halfthe total number) are available. However, to reboot the system, three replicas (half the total + 1)mustbe available.
In a two-disk configuration, you should always create at least two replicas on each disk. For example,assume you have a configuration with two disks, and you only create three replicas (two replicas onthe first disk and one replica on the second disk). If the disk with two replicas fails, the system panicsbecause the remaining disk only has one replica. This is less than half the total number of replicas.
Note – If you create two replicas on each disk in a two-disk configuration, Solaris VolumeManagerstill functions if one disk fails. But because youmust have onemore than half of the total replicasavailable for the system to reboot, you cannot reboot.
If a slice that contains a state database replica fails, the rest of your configuration should remain inoperation. Solaris VolumeManager finds a valid state database during boot (as long as at least half +1valid state database replicas are available).
When youmanually repair or enable state database replicas, Solaris VolumeManager updates themwith valid data.
Scenario—StateDatabaseReplicasState database replicas provide redundant data about the overall Solaris VolumeManagerconfiguration. The following example, is based on the sample system in the scenario provided inChapter 5. This example describes how state database replicas can be distributed to provide adequateredundancy.
The sample system has one internal IDE controller and drive, plus two SCSI controllers. Each SCSIcontroller has six disks attached.With three controllers, the system can be configured to avoid anysingle point-of-failure.Any systemwith only two controllers cannot avoid a single point-of-failurerelative to Solaris VolumeManager. By distributing replicas evenly across all three controllers andacross at least one disk on each controller (across two disks, if possible), the system can withstandany single hardware failure.
In aminimal configuration, you could put a single state database replica on slice 7 of the root disk,then an additional replica on slice 7 of one disk on each of the other two controllers. To help protectagainst the admittedly remote possibility of media failure, add another replica to the root disk andthen two replicas on two different disks on each controller, for a total of six replicas, providesmorethan adequate security.
To provide evenmore security, add 12 additional replicas spread evenly across the 6 disks on eachside of the twomirrors. This configuration results in a total of 18 replicas with 2 on the root disk and8 on each of the SCSI controllers, distributed across the disks on each controller.
Scenario—State Database Replicas
Chapter 6 • State Database (Overview) 65

66

State Database (Tasks)
This chapter provides information about performing tasks that are associated with Solaris VolumeManager’s state database replicas. For information about the concepts involved in these tasks, seeChapter 6.
StateDatabaseReplicas (TaskMap)The following taskmap identifies the procedures that are needed tomanage Solaris VolumeManagerstate database replicas.
Task Description For Instructions
Create state database replicas Use the Solaris VolumeManager GUI or themetadb -a command to create statedatabase replicas.
“How to Create State DatabaseReplicas” on page 68
Check the status of statedatabase replicas
Use the Solaris VolumeManager GUI or themetadb command to check the status ofexisting replicas.
“How to Check the Status ofState Database Replicas”on page 70
Delete state database replicas Use the Solaris VolumeManager GUI or themetadb -d command to delete statedatabase replicas.
“How toDelete State DatabaseReplicas” on page 71
7C H A P T E R 7
67
Creating StateDatabaseReplicas
Caution – If you upgraded from the Solstice DiskSuite product to Solaris VolumeManager and youhave state database replicas sharing slices with file systems or logical volumes (as opposed to onseparate slices), do not delete existing replicas and replace themwith new default replicas in the samelocation.
The default state database replica size in Solaris VolumeManager is 8192 blocks, while the defaultsize in the Solstice DiskSuite product is 1034 blocks. Use caution if you delete a default-sized statedatabase replica created in the Solstice DiskSuite product, and then add a new default-sized replicawith Solaris VolumeManager. You will overwrite the first 7158 blocks of any file system that occupiesthe rest of the shared slice, thus destroying the data.
Caution –Do not place state database replicas on fabric-attached storage, SANs, or other storage thatis not directly attached to the system. Youmight not be able to boot Solaris VolumeManager.Replicas must be on storage devices that are available at the same point in the boot process astraditional SCSI or IDE drives.
� How toCreate StateDatabaseReplicasCheck “Prerequisites for Creating Solaris VolumeManager Components” on page 45.
Become superuser.
To create state database replicas, use one of the followingmethods:
� From the Enhanced Storage tool within the SolarisManagement Console, open the StateDatabase Replicas node. ChooseAction⇒Create Replicas and follow the onscreen instructions.Formore information, see the online help.
� Use the following form of the metadb command. See the metadb(1M).
# metadb -a -c number -l length-of replica -f ctds-of-slice
-a Specifies to add or create a state database replica.
-f Specifies to force the operation, even if no replicas exist. Use the -f to force the creation ofthe initial replicas.
-c number Specifies the number of replicas to add to the specified slice.
-l length-of-replica Specifies the size of the new replicas, in blocks. The default size is 8192.This size should be appropriate for virtually all configurations, includingthose configurations with thousands of logical volumes.
ctds-of-slice Specifies the name of the component that will hold the replica.
BeforeYouBegin
1
2
Creating State Database Replicas
Solaris VolumeManagerAdministration Guide • May 200668

Note –The metadb command entered on the command line without options reports the status of allstate database replicas.
Creating the First State Database Replica
# metadb -a -f c0t0d0s7
# metadb
flags first blk block count
...
a u 16 8192 /dev/dsk/c0t0d0s7
Youmust use the -f option along with the -a option to create the first state database replica. The -aoption adds state database replicas to the system.The -f option forces the creation of the first replica(andmay be omitted when you add supplemental replicas to the system).
AddingTwo State Database Replicas to the Same Slice
# metadb -a -c 2 c1t3d0s1
# metadb
flags first blk block count
...
a u 16 8192 /dev/dsk/c1t3d0s1
a u 8208 8192 /dev/dsk/c1t3d0s1
The -a option adds state database replicas to the system. The -c 2 option places two replicas on thespecified slice. The metadb command checks that the replicas are active, as indicated by the a flag inthe metadb command output.
Adding State Database Replicas of a Specific Size
If you are replacing existing state database replicas, youmight need to specify a replica size.Particularly if you have existing state database replicas (on a system upgraded from the SolsticeDiskSuite product, perhaps) that share a slice with a file system, youmust replace existing replicaswith other replicas of the same size or add new replicas in a different location.
# metadb -a -c 3 -l 1034 c0t0d0s7
# metadb
flags first blk block count
...
a u 16 1034 /dev/dsk/c0t0d0s7
a u 1050 1034 /dev/dsk/c0t0d0s7
a u 2084 1034 /dev/dsk/c0t0d0s7
Example 7–1
Example 7–2
Example 7–3
Creating State Database Replicas
Chapter 7 • State Database (Tasks) 69
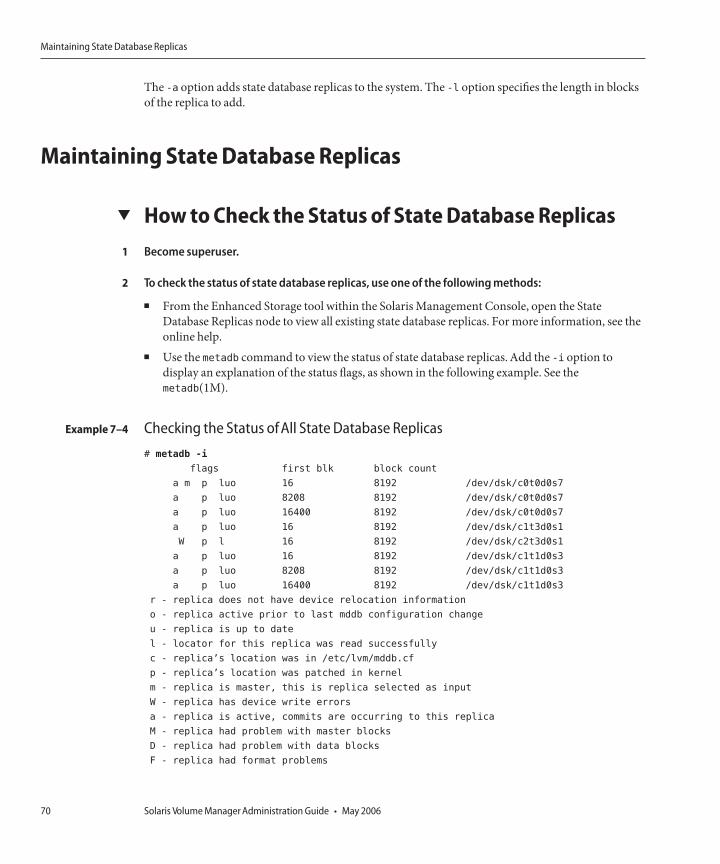
The -a option adds state database replicas to the system. The -l option specifies the length in blocksof the replica to add.
Maintaining StateDatabaseReplicas
� How toCheck the Status of StateDatabaseReplicasBecome superuser.
To check the status of state database replicas, use one of the followingmethods:
� From the Enhanced Storage tool within the SolarisManagement Console, open the StateDatabase Replicas node to view all existing state database replicas. Formore information, see theonline help.
� Use the metadb command to view the status of state database replicas.Add the -i option todisplay an explanation of the status flags, as shown in the following example. See themetadb(1M).
Checking the Status ofAll State Database Replicas
# metadb -i
flags first blk block count
a m p luo 16 8192 /dev/dsk/c0t0d0s7
a p luo 8208 8192 /dev/dsk/c0t0d0s7
a p luo 16400 8192 /dev/dsk/c0t0d0s7
a p luo 16 8192 /dev/dsk/c1t3d0s1
W p l 16 8192 /dev/dsk/c2t3d0s1
a p luo 16 8192 /dev/dsk/c1t1d0s3
a p luo 8208 8192 /dev/dsk/c1t1d0s3
a p luo 16400 8192 /dev/dsk/c1t1d0s3
r - replica does not have device relocation information
o - replica active prior to last mddb configuration change
u - replica is up to date
l - locator for this replica was read successfully
c - replica’s location was in /etc/lvm/mddb.cf
p - replica’s location was patched in kernel
m - replica is master, this is replica selected as input
W - replica has device write errors
a - replica is active, commits are occurring to this replica
M - replica had problem with master blocks
D - replica had problem with data blocks
F - replica had format problems
1
2
Example 7–4
Maintaining State Database Replicas
Solaris VolumeManagerAdministration Guide • May 200670

S - replica is too small to hold current data base
R - replica had device read errors
Alegend of all the flags follows the status. The characters in front of the device name represent thestatus. Uppercase letters indicate a problem status. Lowercase letters indicate an “Okay” status.
� How toDelete StateDatabaseReplicasYoumight need to delete state database replicas tomaintain your Solaris VolumeManagerconfiguration. For example, if you will be replacing disk drives, you want to delete the state databasereplicas before you remove the drives. Otherwise Solaris VolumeManager will report them as havingerrors.
Become superuser.
To remove state database replicas, use one of the followingmethods:
� From the Enhanced Storage tool within the SolarisManagement Console, open the StateDatabase Replicas node to view all existing state database replicas. Select replicas to delete, thenchoose Edit⇒Delete to remove them. Formore information, see the online help.
� Use the following form of the metadb command:
# metadb -d -f ctds-of-slice
-d Specifies to delete a state database replica.
-f Specifies to force the operation, even if no replicas exist.
ctds-of-slice Specifies the name of the component that contains the replica.
Note that you need to specify each slice fromwhich you want to remove the state databasereplica. See the metadb(1M)man page formore information.
Deleting State Database Replicas
# metadb -d -f c0t0d0s7
This example shows the last replica being deleted from a slice.
Youmust add the -f option to force the deletion of the last replica on the system.
1
2
Example 7–5
Maintaining State Database Replicas
Chapter 7 • State Database (Tasks) 71

72

RAID-0 (Stripe and Concatenation) Volumes(Overview)
This chapter describes RAID-0 (both stripe and concatenation) volumes that are available in SolarisVolumeManager. For information about related tasks, see Chapter 9.
This chapter provides the following information:
� “Overview of RAID-0 Volumes” on page 73� “Background Information for Creating RAID-0 Volumes” on page 80� “Scenario—RAID-0 Volumes” on page 81
Overviewof RAID-0VolumesRAID-0 volumes, are composed of slices or soft partitions. These volumes enable you to expand diskstorage capacity. They can be used either directly or as the building blocks for RAID-1 (mirror)volumes, and soft partitions. There are three kinds of RAID-0 volumes:
� Stripe volumes� Concatenation volumes� Concatenated stripe volumes
Note –A component refers to any devices, from slices to soft partitions, used in another logicalvolume.
Astripe volume spreads data equally across all components in the volume, while a concatenationvolumewrites data to the first available component until it is full, thenmoves to the next availablecomponent.Aconcatenated stripe volume is simply a stripe volume that has been expanded from itsoriginal configuration by adding additional components.
RAID-0 volumes allow you to quickly and simply expand disk storage capacity. The drawback is thatthese volumes do not provide any data redundancy, unlike RAID-1 or RAID-5 volumes. If a singlecomponent fails on a RAID-0 volume, data is lost.
8C H A P T E R 8
73

For sequential I/O operations on a stripe volume, Solaris VolumeManager reads all the blocks in asegment of blocks (called an interlace) on the first component, then all the blocks in a segment ofblocks on the second component, and so forth.
For sequential I/O operations on a concatenation volume, Solaris VolumeManager reads all theblocks on the first component, then all the blocks of the second component, and so forth.
On both a concatenation volume and a stripe volume, all I/O operations occurs in parallel.
You can use a RAID-0 volume that contains a single slice for any file system.
You can use a RAID-0 volume that containsmultiple components for any file system except thefollowing:
� root (/)� /usr
� swap
� /var
� /opt
� Any file system that is accessed during an operating system upgrade or installation
Note –When youmirror root (/), /usr, swap, /var, or /opt, you put the file system into a one-wayconcatenation or stripe (a concatenation of a single slice) that acts as a submirror. This one-wayconcatenation is mirrored by another submirror, whichmust also be a concatenation.
RAID-0 (Stripe) VolumeARAID-0 (stripe) volume is a volume that arranges data across one ormore components. Stripingalternates equally-sized segments of data across two ormore components, forming one logicalstorage unit. These segments are interleaved round-robin so that the combined space is madealternately from each component, in effect, shuffled like a deck of cards.
Note –To increase the capacity of a stripe volume , you need to build a concatenated stripe volume.See “RAID-0 (Concatenated Stripe) Volume” on page 77.
Striping enables multiple controllers to access data at the same time, which is also called parallelaccess. Parallel access can increase I/O throughput because all disks in the volume are busymost ofthe time servicing I/O requests.
An existing file system cannot be converted directly to a stripe. To place an existing file system on astripe volume , youmust back up the file system, create the volume, then restore the file system to thestripe volume.
Overview of RAID-0 Volumes
Solaris VolumeManagerAdministration Guide • May 200674

InterlaceValues for aRAID–0 (Stripe) VolumeAn interlace is the size, in Kbytes, Mbytes, or blocks, of the logical data segments on a stripe volume.Depending on the application, different interlace values can increase performance for yourconfiguration. The performance increase comes from having several disk armsmanaging I/Orequests.When the I/O request is larger than the interlace size, youmight get better performance.
Note –RAID-5 volumes also use an interlace value. See “Overview of RAID-5Volumes” on page 155formore information.
When you create a stripe volume, you can set the interlace value or use the Solaris VolumeManagerdefault interlace value of 16 Kbytes. Once you have created the stripe volume, you cannot change theinterlace value. However, you could back up the data on it, delete the stripe volume, create a newstripe volumewith a new interlace value, and then restore the data.
Scenario—RAID-0 (Stripe) VolumeFigure 8–1 shows a stripe volume that is built from three components (slices). It also illustrates howdata is written onto the volume components according to the interlace size and using theround-robin technique.
When Solaris VolumeManager writes data onto the components of a stripe volume, it writes datablocks of the interlace width to DiskA(interlace 1), Disk B (interlace 2), andDisk C (interlace 3).Solaris VolumeManager then repeats the pattern writing to DiskA(interlace 4), Disk B (interlace 5),Disk C (interlace 6), and so forth.
The interlace value sets the size of each time data is written to a slice. The total capacity of the stripevolume equals the number of components multiplied by the size of the smallest component. (If eachslice in the following example were 2 Gbytes, the volumewould equal 6 Gbytes.)
Overview of RAID-0 Volumes
Chapter 8 • RAID-0 (Stripe and Concatenation) Volumes (Overview) 75

interlace 4
interlace 1
interlace 5
interlace 2
interlace 6
interlace 3
Solaris VolumeManager
interlace 6
interlace 5
interlace 4
interlace 3
interlace 2
interlace 1
RAID 0 (Stripe) Volume
PhysicalSlice A
PhysicalSlice B
PhysicalSlice C
FIGURE 8–1RAID-0 (Stripe)VolumeExample
RAID-0 (Concatenation) VolumeARAID–0 (concatenation) volume is a volumewhose data is organized serially and adjacently acrosscomponents, forming one logical storage unit.
Use a concatenation volume to get more storage capacity by combining the capacities of severalcomponents. You can addmore components to the concatenation volume as the demand for storagegrows.
Aconcatenation volume enables you to dynamically expand storage capacity and file system sizesonline.Aconcatenation volume allows you to add components even if the other components arecurrently active.
Aconcatenation volume can also expand any active andmountedUFS file systemwithout having tobring down the system. In general, the total capacity of a concatenation volume is equal to the totalsize of all the components in the volume. If a concatenation volume contains a slice with a statedatabase replica, the total capacity of the volume is the sum of the components minus the space thatis reserved for the replica.
You can also create a concatenation volume from a single component. Later, when you needmorestorage, you can addmore components to the volume.
Overview of RAID-0 Volumes
Solaris VolumeManagerAdministration Guide • May 200676

Note –Youmust use a concatenation volume to encapsulate root (/), swap, /usr, /opt, or /varwhenmirroring these file systems.
Scenario—RAID-0 (Concatenation) VolumeFigure 8–2 illustrates a concatenation volume that is built from three components (slices). It alsoillustrates how data is written onto the volume components according to the interlace size and ontoeach slice sequentially.
The data blocks are written sequentially across the components, beginning with SliceA. You canenvision SliceAas containing logical data blocks 1 through 4. Disk B would contain logical datablocks 5 through 8. Drive Cwould contain logical data blocks 9 through 12. The total capacity ofvolumewould be the combined capacities of the three slices. If each slice were 2 Gbytes, the volumewould have an overall capacity of 6 Gbytes.
interlace 4
interlace 3
interlace 2
interlace 1
interlace 8
interlace 7
interlace 6
interlace 5
interlace 12
interlace 11
interlace 10
interlace 9
Solaris VolumeManager
interlace 12
. . .
. . .
. . .
interlace 2
interlace 1
RAID 0 (Concatenation) Volume
PhysicalSlice A
PhysicalSlice B
PhysicalSlice C
FIGURE 8–2RAID-0 (Concatenation)VolumeExample
RAID-0 (Concatenated Stripe) VolumeARAID–0 (concatenated stripe) volume is a stripe that has been expanded by adding additionalcomponents (stripes).
Overview of RAID-0 Volumes
Chapter 8 • RAID-0 (Stripe and Concatenation) Volumes (Overview) 77

To set the interlace value for a concatenated stripe volume, at the stripe level, use either the EnhancedStorage tool within the Solaris Management Console, or the metattach -i command. Each stripewithin the concatenated stripe volume can have its own interlace value.When you create aconcatenated stripe volume from scratch, if you do not specify an interlace value for a particularstripe, it inherits the interlace value from the previous stripe added to the volume.
Example—RAID-0 (Concatenated Stripe) VolumeFigure 8–3 illustrates a concatenated stripe volume that is a concatenation of three stripes.
The first stripe consists of three slices, SliceAthrough C, with an interlace value of 16 Kbytes. Thesecond stripe consists of two slices, Slice D and E, and uses an interlace value of 32 Kbytes. The laststripe consists of a two slices, Slice F andG. Because no interlace value is specified for the third stripe,it inherits the value from the stripe that was added before it, which in this case is 32 Kbytes.Sequential data blocks are added to the first stripe until that stripe has nomore space. Data blocks arethen added to the second stripe.When this stripe has nomore space, data blocks are added to thethird stripe.Within each stripe, the data blocks are interleaved according to the specified interlacevalue.
Overview of RAID-0 Volumes
Solaris VolumeManagerAdministration Guide • May 200678

interlace 10
interlace 7
interlace 4
interlace 1
interlace 11
interlace 8
interlace 5
interlace 2
interlace 12
interlace 9
interlace 6
interlace 3
interlace 19
interlace 17
interlace 15
interlace 13
interlace 20
interlace 18
interlace 16
interlace 14
interlace 27
interlace 25
interlace 23
interlace 21
interlace 28
interlace 26
interlace 24
interlace 22
Solaris VolumeManager
interlace 28
. . .
interlace 10
interlace 9
interlace 8
interlace 7
interlace 6
interlace 5
interlace 4
interlace 3
interlace 2
interlace 1
RAID 0 Volume
PhysicalSlice A
PhysicalSlice B
PhysicalSlice C
PhysicalSlice D
PhysicalSlice E
PhysicalSlice F
PhysicalSlice G
Stripe
Stripe
Stripe
Overview of RAID-0 Volumes
Chapter 8 • RAID-0 (Stripe and Concatenation) Volumes (Overview) 79

FIGURE 8–3RAID-0 (Concatenated Stripe)VolumeExample
Background Information for CreatingRAID-0Volumes
RAID-0VolumeRequirementsWhen you are working with RAID-0 volumes, consider the following:
� Use components that are each on different controllers to increase the number of simultaneousreads and writes that can be performed.
� Do not create a stripe from an existing file system or data. Doing so will destroy data. Instead, usea concatenation. (You can create a stripe from existing data, but youmust dump and restore thedata to the volume.)
� Use disk components of the same size for stripes. Striping components of different sizes results inwasted disk space.
� Set up a stripe’s interlace value to better match the I/O requests made by the system orapplications.
� Because a stripe or concatenation does not contain replicated data, when such a volume has acomponent failure, youmust replace the component, recreate the stripe or concatenation, andrestore data from a backup.
� When you recreate a stripe or concatenation, use a replacement component that has at least thesame size as the failed component.
RAID-0VolumeGuidelines� Concatenation uses less CPU cycles than striping and performs well for small random I/O and
for even I/O distribution.� When possible, distribute the components of a stripe or concatenation across different
controllers and busses. Using stripes that are each on different controllers increases the numberof simultaneous reads and writes that can be performed.
� If a stripe is defined on a failing controller and another controller is available on the system, youcan “move” the stripe to the new controller bymoving the disks to the controller and redefiningthe stripe.
� Number of stripes:Another way of looking at striping is to first determine the performancerequirements. For example, youmight need 10.4Mbytes/sec performance for a selectedapplication, and each diskmight deliver approximately 4Mbyte/sec. Based on this formula, thendetermine howmany disk spindles you need to stripe across:10.4 Mbyte/sec / 4 Mbyte/sec = 2.6
Therefore, you need three disks capable of performing I/O operations in parallel.
Background Information for Creating RAID-0 Volumes
Solaris VolumeManagerAdministration Guide • May 200680

Scenario—RAID-0VolumesRAID-0 volumes provide the fundamental building blocks for creatingmore complex storageconfigurations or for buildingmirrors. The following example, drawing on the scenario explained inChapter 5, describes how RAID-0 volumes can provide larger storage spaces and allow you toconstruct amirror of existing file systems, including root (/).
The sample system in the scenario has a collection of relatively small (9 Gbyte) disks, but specificapplications would likely require larger storage spaces. To create larger spaces (and improveperformance), you can create a stripe that spansmultiple disks. For example, each one of thefollowing disks, c1t1d0, c1t2d0, c1t3d0, c2t1d0, c2t2d0, and c2t3d0, could be formatted with aslice 0 that spans the entire disk. Then, a stripe including all three of the disks from one controllercould provide approximately 27 Gbytes of storage and allow faster access. The second stripe, fromthe second controller, could be used for redundancy, as described in Chapter 11 and specifically in the“Scenario—RAID-1 Volumes (Mirrors)” on page 103.
Scenario—RAID-0 Volumes
Chapter 8 • RAID-0 (Stripe and Concatenation) Volumes (Overview) 81

82

RAID-0 (Stripe and Concatenation) Volumes(Tasks)
This chapter contains information about tasks that are related to RAID-0 volumes. For informationabout related concepts, see Chapter 8.
RAID-0Volumes (TaskMap)The following taskmap identifies the procedures that are needed tomanage Solaris VolumeManagerRAID-0 volumes.
Task Description For Instructions
Create RAID-0 (stripe)volumes
Use the Solaris VolumeManager GUI or themetainit command to create a new volume.
“How to Create a RAID-0(Stripe) Volume” on page 84
Create RAID-0(concatenation) volumes
Use the Solaris VolumeManager GUI or themetainit command to create a new volume.
“How to Create a RAID-0(Concatenation) Volume”on page 85
Expand storage space Use the Solaris VolumeManager GUI or themetainit command to expand an existingfile system.
“How to Expand StorageCapacity for Existing Data”on page 87
Expand an existing RAID-0volume
Use the Solaris VolumeManager GUI or themetattach command to expand an existingvolume.
“How to Expand an ExistingRAID-0 Volume” on page 88
Remove a RAID-0 volume Use the Solaris VolumeManager GUI or themetaclear command to delete a volume.
“How to Remove a RAID-0Volume” on page 90
9C H A P T E R 9
83

CreatingRAID-0 (Stripe) Volumes
Caution –Do not create a stripe from an existing file system or data. Doing so destroys data. To createa stripe from existing data, youmust back up the data, create the stripe volume, and then restore thedata to the volume.
Caution –Do not create volumes larger than 1Tbyte if you expect to run the Solaris software with a32-bit kernel.Additionally, do not create volumes larger than 1Tbyte if you expect to use a version ofthe Solaris OS prior to the Solaris 9 4/03 release. See “Overview ofMulti-Terabyte Support in SolarisVolumeManager” on page 45 formore information about large volume support in Solaris VolumeManager.
� How toCreate aRAID-0 (Stripe) VolumeCheck “Prerequisites for Creating Solaris VolumeManager Components” on page 45 and“Background Information for Creating RAID-0 Volumes” on page 80.
To create a stripe volume, use one of the followingmethods:
� From the Enhanced Storage tool within the SolarisManagement Console, open the Volumesnode. ChooseAction⇒Create Volume, then follow the instructions in the wizard. Formoreinformation, see the online help.
� Use the following form of the metainit command:
# metainit volume-name number-of-stripescomponents-per-stripecomponent-names[ -i interlace]
volume-name Specifies the name of the volume to create. For information onnaming volumes, see “VolumeNames” on page 42.
number-of-stripes Specifies the number of stripes to create.
components-per-stripe Specifies the number of components each stripe should have.
component-names Specifies the names of the components that are used. If more than onecomponent is used, separate each component with a space.
-i interlace Specifies the interlace width to use for the stripe. The interlace widthis a value, followed by either ‘k’ for kilobytes, ‘m’ formegabytes, or ‘b’for blocks. The interlace specified cannot be less than 16 blocks, orgreater than 100megabytes. The default interlace width is 16kilobytes.
BeforeYouBegin
◗
Creating RAID-0 (Stripe) Volumes
Solaris VolumeManagerAdministration Guide • May 200684

See the following examples and the metainit(1M)man page formore information.
Creating a RAID–0 (Stripe) Volume of Three Slices
# metainit d20 1 3 c0t1d0s2 c0t2d0s2 c0t3d0s2
d20: Concat/Stripe is setup
This example shows the stripe, d20, consists of a single stripe (the number 1). The stripe is composedof three slices (the number 3). Because no interlace value is specified, the stripe uses the default of 16Kbytes. The system confirms that the volume has been set up.
Creating a RAID-0 (Stripe) Volume of Two SlicesWith a 32–Kbyte Interlace Value
# metainit d10 1 2 c0t1d0s2 c0t2d0s2 -i 32k
d10: Concat/Stripe is setup
This example shows the stripe, d10, consists of a single stripe (the number 1). The stripe is composedof two slices (the number 2). The -i option sets the interlace value to 32 Kbytes. (The interlace valuecannot be less than 8 Kbytes, nor greater than 100Mbytes.) The system verifies that the volume hasbeen set up.
To prepare the newly created stripe for a file system, see Chapter 18, “Creating UFS, TMPFS, andLOFS File Systems (Tasks),” in SystemAdministration Guide: Devices and File Systems. Someapplications, such as a database, do not use a file system. These applications instead use the rawdevice. The applicationmust have its ownway of accessing the raw device.
CreatingRAID-0 (Concatenation) Volumes
� How toCreate aRAID-0 (Concatenation) Volume
Caution –Do not create volumes larger than 1Tbyte if you expect to run the Solaris software with a32–bit kernel.Additionally, do not create volumes larger than 1 Tbyte if you expect to use a version ofthe Solaris OS prior to the Solaris 9 4/03 release. See “Overview ofMulti-Terabyte Support in SolarisVolumeManager” on page 45 formore information aboutmulti-terabyte volumes in Solaris VolumeManager.
Check “Prerequisites for Creating Solaris VolumeManager Components” on page 45 and“Background Information for Creating RAID-0 Volumes” on page 80.
Example 9–1
Example 9–2
SeeAlso
BeforeYouBegin
Creating RAID-0 (Concatenation) Volumes
Chapter 9 • RAID-0 (Stripe and Concatenation) Volumes (Tasks) 85

To create a concatenation volume, use one of the followingmethods:
� From the Enhanced Storage tool within the SolarisManagement Console, open the Volumesnode. ChooseAction⇒Create Volume, then follow the instructions in the wizard. Formoreinformation, see the online help.
� Use the following form of the metainit command:
# metainit volume-name number-of-stripescomponents-per-stripecomponent-names
volume-name Specifies the name of the volume to create.
number-of-stripes Specifies the number of stripes to create.
components-per-concatenation Specifies the number of components each concatenationshould have.
component-names Specifies the names of the components that are used. If morethan one component is used, separate each component with aspace.
Formore information, see the following examples and the metainit(1M)man page.
Creating a Concatenation of One Slice
# metainit d25 1 1 c0t1d0s2
d25: Concat/Stripe is setup
This example shows the creation of a concatenation, d25. This concatenation consists of one stripe(the first number 1) composed of a single slice (the second number 1 in front of the slice). The systemverifies that the volume has been set up.
The example shows a concatenation that can safely encapsulate existing data.
Creating a Concatenation of Four Slices
# metainit d40 4 1 c0t1d0s2 1 c0t2d0s2 1 c0t2d0s3 1 c0t2d1s3
d40: Concat/Stripe is setup
This example shows the creation of a concatenation, d40. The concatenation consists of four stripes(the number 4), each composed of a single slice (the number 1 in front of each slice). The systemverifies that the volume has been set up.
To prepare the newly created concatenation for a file system, see Chapter 18, “Creating UFS, TMPFS,and LOFS File Systems (Tasks),” in SystemAdministration Guide: Devices and File Systems.
◗
Example 9–3
Example 9–4
SeeAlso
Creating RAID-0 (Concatenation) Volumes
Solaris VolumeManagerAdministration Guide • May 200686

Expanding StorageCapacityTo add storage capacity to a file system, create a concatenation volume. To add storage capacity to anexisting stripe, create a concatenated stripe volume.
� How toExpandStorageCapacity for ExistingData
Caution –Do not create volumes larger than 1Tbyte if you expect to run the Solaris software with a32-bit kernel.Additionally, do not create volumes larger than 1 Tbyte if you expect to use a version ofthe Solaris OS prior to the Solaris 9 4/03 release. See “Overview ofMulti-Terabyte Support in SolarisVolumeManager” on page 45 formore information aboutmulti-terabyte volume support in SolarisVolumeManager.
Check “Prerequisites for Creating Solaris VolumeManager Components” on page 45 and“Background Information for Creating RAID-0 Volumes” on page 80.
Unmount the file system.# umount /filesystem
To create a concatenation, use one of the followingmethods:
� From the Enhanced Storage tool within the SolarisManagement Console, open the Volumesnode. ChooseAction⇒Create Volume, then follow the instructions in the wizard. Formoreinformation, see the online help.
� Use the following form of the metainit command:
# metainit volume-name number-of-stripescomponents-per-stripecomponent-names
volume-name Specifies is the name of the volume to create.
number-of-stripes Specifies the number of stripes to create.
components-per-stripe Specifies the number of components each stripe should have.
component-names Specifies the names of the components that are used. If more than onecomponent is used, separate each component with a space.
Formore information, see the metainit(1M)man page.
Edit the /etc/vfstab file so that the file system references the nameof the concatenation.
BeforeYouBegin
1
2
3
Expanding Storage Capacity
Chapter 9 • RAID-0 (Stripe and Concatenation) Volumes (Tasks) 87

Remount the file system.# mount /filesystem
Expanding a File Systemby Creating a Concatenation
# umount /docs
# metainit d25 2 1 c0t1d0s2 1 c0t2d0s2
d25: Concat/Stripe is setup
(Edit the /etc/vfstab file so that the file system references the volume d25 instead of slice c0t1d0s2)# mount /docs
This example shows the creation of a concatenation, d25, out of two slices, /dev/dsk/c0t1d0s2(which contains a file systemmounted on /docs) and /dev/dsk/c0t2d0s2. The file systemmust firstbe unmounted. Note that the first slice in the metainit commandmust be the slice that contains thefile system. If not, you will corrupt your data.
Next, the entry for the file system in the /etc/vfstab file is changed (or entered for the first time) toreference the concatenation. For example, initially, the following line appears in the /etc/vfstabfile:
/dev/dsk/c0t1d0s2 /dev/rdsk/c0t1d0s2 /docs ufs 2 yes -
This line should be changed to the following:
/dev/md/dsk/d25 /dev/md/rdsk/d25 /docs ufs 2 yes -
Finally, the file system is remounted.
For a UFS file system, run the growfs command on the concatenation. See “How to Expand a FileSystem” on page 223.
Some applications, such as a database, do not use a file system.An application such as a database usesthe raw concatenation andmust have its ownway of recognizing the concatenation, or of growingthe added space.
� How toExpandanExistingRAID-0VolumeAconcatenated stripe enables you to expand an existing stripe. For example, if a stripe has run out ofstorage capacity, you convert it into a concatenated stripe. Doing so allows you to expand yourstorage capacity without having to back up and restore data.
This procedure assumes that you are adding an additional stripe to an existing stripe.
4
Example 9–5
SeeAlso
Expanding Storage Capacity
Solaris VolumeManagerAdministration Guide • May 200688

Caution –Do not create volumes larger than 1Tbyte if you expect to run the Solaris software with a32-bit kernel.Additionally, do not create volumes larger than 1 Tbyte if you expect to use a version ofthe Solaris OS prior to the Solaris 9 4/03 release. See “Overview ofMulti-Terabyte Support in SolarisVolumeManager” on page 45 formore information aboutmulti-terabyte support in Solaris VolumeManager.
Check “Prerequisites for Creating Solaris VolumeManager Components” on page 45 and“Background Information for Creating RAID-0 Volumes” on page 80.
To create a concatenated stripe, use one of the followingmethods:
� From the Enhanced Storage tool within the SolarisManagement Console, open the Volumesnode. ChooseAction⇒Create Volume, then follow the instructions in the wizard. Formoreinformation, see the online help.
� To concatenate existing stripes from the command line, use the following form of the metattachcommand:
# metattach volume-name component-names
volume-name Specifies the name of the volume to expand.
component-names Specifies the names of the components that are used. If more than onecomponent is used, separate each component with a space.
See the metattach(1M)man page formore information.
Creating a Concatenated Stripe byAttaching a Single Slice
# metattach d2 c1t2d0s2
d2: components are attached
This example illustrates how to attach a slice to an existing stripe, d2. The system confirms that theslice is attached.
Creating a Concatenated Stripe byAdding Several Slices
# metattach d25 c1t2d0s2 c1t2d1s2 c1t2d3s2
d25: components are attached
This example takes an existing three-way stripe, d25, and concatenates another three-way stripe to it.Because no interlace value is given for the attached slices, the stripes inherit the interlace valueconfigured for d25. The system verifies that the volume has been set up.
BeforeYouBegin
◗
Example 9–6
Example 9–7
Expanding Storage Capacity
Chapter 9 • RAID-0 (Stripe and Concatenation) Volumes (Tasks) 89

For a UFS file system, run the growfs command on the volume. See “How to Expand a File System”on page 223.
Some applications, such as a database, do not use a file system.An application such as a database usesthe raw volume andmust have its ownway of recognizing the volume, or of growing the added space.
To prepare a newly created concatenated stripe for a file system, see Chapter 18, “Creating UFS,TMPFS, and LOFS File Systems (Tasks),” in SystemAdministration Guide: Devices and File Systems.
Removing aRAID-0Volume
� How toRemoveaRAID-0VolumeMake sure that youhave a current backupof all data and that youhave root privilege.
Make sure that youno longer need the volume.
If you delete a stripe or concatenation and reuse the slices that were part of the deleted volume, alldata on the volume is deleted from the system.
Unmount the file system, if needed.# umount /filesystem
To remove a volume, use one of the followingmethods:
� From the Enhanced Storage tool within the SolarisManagement Console, open the Volumesnode. Choose Edit⇒Delete, then follow the onscreen instructions. Formore information, see theonline help.
� Use the following format of the metaclear command to delete the volume:
metaclear volume-name
See the following example and the metaclear(1M)man page formore information.
Removing a Concatenation
# umount d8
# metaclear d8
d8: Concat/Stripe is cleared
(Edit the /etc/vfstab file)
This example illustrates removing the concatenation, d8, that also contains amounted file system.The file systemmust be unmounted before the volume can be removed. The system displays a
SeeAlso
1
2
3
4
Example 9–8
Removing a RAID-0 Volume
Solaris VolumeManagerAdministration Guide • May 200690

confirmationmessage that the concatenation is removed. If an entry in the /etc/vfstab file existsfor this volume, delete that entry. You do not want to confuse the system by asking it tomount a filesystem on a nonexistent volume.
Removing a RAID-0 Volume
Chapter 9 • RAID-0 (Stripe and Concatenation) Volumes (Tasks) 91

92

RAID-1 (Mirror) Volumes (Overview)
This chapter explains essential Solaris VolumeManager concepts related tomirrors and submirrors.For information about performing related tasks, see Chapter 11.
This chapter contains the following information:
� “Overview of RAID-1 (Mirror) Volumes” on page 93� “RAID-1 Volume (Mirror) Resynchronization” on page 96� “Creating andMaintaining RAID-1 Volumes” on page 97� “TheAffect of Booting Into Single-UserMode on RAID-1 Volumes” on page 102� “Scenario—RAID-1 Volumes (Mirrors)” on page 103
Overviewof RAID-1 (Mirror) VolumesARAID-1 volume, ormirror, is a volume that maintains identical copies of the data in RAID-0(stripe or concatenation) volumes. The RAID-0 volumes that aremirrored are called submirrors.Mirroring requires an investment in disks. You need at least twice asmuch disk space as the amountof data you have tomirror. Because Solaris VolumeManagermust write to all submirrors, mirroringcan also increase the amount of time it takes for write requests to be written to disk.
After you configure amirror, themirror can be used just like a physical slice.
You canmirror any file system, including existing file systems. These file systems root (/), swap, and/usr. You can also use amirror for any application, such as a database.
Tip –Use Solaris VolumeManager’s hot spare feature withmirrors to keep data safe and available. Forinformation on hot spares, see Chapter 16 and Chapter 17.
Overviewof SubmirrorsAmirror is composed of one ormore RAID-0 volumes (stripes or concatenations) called submirrors.
10C H A P T E R 1 0
93

Amirror can consist of up to four submirrors. However, two-waymirrors usually provide sufficientdata redundancy formost applications and are less expensive in terms of disk drive costs.A thirdsubmirror enables you tomake online backups without losing data redundancy while one submirroris offline for the backup.
If you take a submirror “offline,” themirror stops reading and writing to the submirror.At this point,you could access the submirror itself, for example, to perform a backup. However, the submirror is ina read-only state.While a submirror is offline, Solaris VolumeManager keeps track of all writes to themirror.When the submirror is brought back online, only the portions of themirror that were writtenwhile the submirror was offline (the resynchronization regions) are resynchronized. Submirrors canalso be taken offline to troubleshoot or repair physical devices that have errors.
Submirrors can be attached or be detached from amirror at any time, though at least one submirrormust remain attached at all times.
Normally, you create amirror with only a single submirror. Then, you attach a second submirrorafter you create themirror.
Scenario—RAID-1 (Mirror) VolumeFigure 10–1 illustrates amirror, d20. Themirror is made of two volumes (submirrors) d21 and d22.
Solaris VolumeManagermakes duplicate copies of the data onmultiple physical disks, and presentsone virtual disk to the application, d20 in the example.All disk writes are duplicated. Disk readscome from one of the underlying submirrors. The total capacity of mirror d20 is the size of thesmallest of the submirrors (if they are not of equal size).
Overview of RAID-1 (Mirror) Volumes
Solaris VolumeManagerAdministration Guide • May 200694

interlace 4
interlace 3
interlace 2
interlace 1
d21
interlace 4
interlace 3
interlace 2
interlace 1
d22Solaris Volume
Manager
interlace 4
interlace 3
interlace 2
interlace 1
RAID 1 Volume d20
FIGURE 10–1RAID-1 (Mirror) Example
ProvidingRAID-1+0andRAID-0+1Solaris VolumeManager supports both RAID-1+0 and RAID-0+1 redundancy. RAID-1+0redundancy constitutes a configuration ofmirrors that are then striped. RAID-0+1 redundancyconstitutes a configuration of stripes that are thenmirrored. The Solaris VolumeManager interfacemakes it appear that all RAID-1 devices are strictly RAID-0+1. However, Solaris VolumeManagerrecognizes the underlying components andmirrors each individually, when possible.
Note – Solaris VolumeManager cannot always provide RAID-1+0 functionality. However, where bothsubmirrors are identical to each other and are composed of disk slices (and not soft partitions),RAID-1+0 is possible.
Consider a RAID-0+1 implementation with a two-waymirror that consists of three striped slices.Without Solaris VolumeManager, a single slice failure could fail one side of themirror.Assumingthat no hot spares are in use, a second slice failure would fail themirror. Using Solaris VolumeManager, up to three slices could potentially fail without failing themirror. Themirror does not failbecause each of the three striped slices are individually mirrored to their counterparts on the otherhalf of themirror.
Figure 10–2 illustrates how a RAID-1 volume can experience the loss of a slice, yet the RAID-1+0implementation prevents data loss.
Overview of RAID-1 (Mirror) Volumes
Chapter 10 • RAID-1 (Mirror) Volumes (Overview) 95

PhysicalSlice A
(Submirror 1)
RAID 1 Volume
PhysicalSlice B
PhysicalSlice C
PhysicalSlice D
(Submirror 2) PhysicalSlice E
PhysicalSlice F
FIGURE 10–2RAID-1+0Example
The RAID-1 volume consists of two submirrors. Each of the submirrors consist of three identicalphysical disks that have the same interlace value.A failure of three disks,A, B, and F, is tolerated. Theentire logical block range of themirror is still contained on at least one good disk.All of the volume’sdata is available.
However, if disksAandD fail, a portion of themirror’s data is no longer available on any disk.Accessto these logical blocks fail. However, access to portions of themirror where data is available stillsucceed. Under this situation, themirror acts like a single disk that has developed bad blocks. Thedamaged portions are unavailable, but the remaining portions are available.
RAID-1Volume (Mirror) ResynchronizationRAID-1 volume (mirror) resynchronization is the process of copying data from one submirror toanother submirror when one of the following occurs:
� Submirrors fail� The system crashes� Asubmirror has been taken offline and brought back online� Anew submirror has been added
While the resynchronization takes place, themirror remains readable and writable by users.
Amirror resynchronization ensures propermirror operation bymaintaining all submirrors withidentical data, with the exception of writes in progress.
Note –Amirror resynchronization should not be bypassed. You do not need tomanually initiate amirror resynchronization. This process occurs automatically.
RAID-1 Volume (Mirror) Resynchronization
Solaris VolumeManagerAdministration Guide • May 200696

Full ResynchronizationWhen a new submirror is attached (added) to amirror, all the data from another submirror in themirror is automatically written to the newly attached submirror. Once themirror resynchronizationis done, the new submirror is readable.Asubmirror remains attached to amirror until it is detached.
If the system crashes while a resynchronization is in progress, the resynchronization is restartedwhen the system finishes rebooting.
OptimizedResynchronizationDuring a reboot following a system failure, or when a submirror that was offline is brought backonline, Solaris VolumeManager performs an optimizedmirror resynchronization. Themetadiskdriver tracks submirror regions. This functionality enables themetadisk driver to knowwhichsubmirror regionsmight be out-of-sync after a failure.An optimizedmirror resynchronization isperformed only on the out-of-sync regions. You can specify the order in whichmirrors areresynchronized during reboot. You can omit amirror resynchronization by setting submirror passnumbers to zero. For tasks associated with changing a pass number, see Example 11–16.
Caution –Apass number of zero should only be used onmirrors that aremounted as read-only.
Partial ResynchronizationFollowing the replacement of a slice within a submirror, Solaris VolumeManager performs a partialmirror resynchronization of data. Solaris VolumeManager copies the data from the remaining goodslices of another submirror to the replaced slice.
Creating andMaintainingRAID-1VolumesThis section provides guidelines can assist you in creatingmirrors. This section also providesperformance guidelines for themirrors that you create.
ConfigurationGuidelines for RAID-1Volumes� Before you create amirror, create the RAID-0 (stripe or concatenation) volumes that comprise
themirror.� When creating amirror, first create a one-waymirror, then attach a second submirror. This
strategy starts a resynchronization operation. This strategy also ensures that data is notcorrupted. You can also create a one-waymirror for use as a future two-way ormulti-waymirror.
Creating andMaintaining RAID-1 Volumes
Chapter 10 • RAID-1 (Mirror) Volumes (Overview) 97

� You can create a two-waymirror, three-waymirror, or four-waymirror from a one-waymirrorwith a single command. You can speed the creation process by creating all submirrors with asingle command. Use this process only if you are notmirroring existing data and if you arecomfortable destroying the data on all of the submirrors.
� You can create a RAID-1 volume from an existing file system that is built on a slice. Only thesingle slicemay be included in the primary RAID-0 volume (submirror). If you aremirroringroot or other system-critical file systems, all submirrors must consist of only a single slice.
� Use the swap -l command to check for all swap devices. Each slice that is specified as swapmustbemirrored independently from the remaining swap slices.
� The Enhanced Storage tool within the SolarisManagement Console does not supportunmirroring root (/), /opt, /usr, or swap. In fact, the tool does not support unmirroring any filesystem that cannot be unmounted while the system is running. Instead, use the command-lineprocedure for these file systems.
� Use submirrors of the same size. Submirrors of different sizes result in unused disk space.� Use only similarly configured submirrors within amirror. In particular, if you create amirror
with an unlabeled submirror, you cannot attach any submirrors that contain disk labels.� You can have amirrored file system in which the first submirror attached does not start on
cylinder 0.All additional submirrors you attachmust also not start on cylinder 0. If you attemptto attach a submirror starting in this situation, the following errormessage displays:
can’t attach labeled submirror to an unlabeled mirror
Either all submirrors intended for use within a specificmirrormust start on cylinder 0, or all ofthe submirrors must not start on cylinder 0.
Starting cylinders do not have to be the same across all submirrors. However, all submirrors musteither include or not include cylinder 0.
� You can improve amirror’s performance by adding additional state database replicas before youcreate themirror.As a general rule, add two additional replicas for eachmirror you add to thesystem. Solaris VolumeManager uses these additional replicas to store the dirty region log(DRL), which is used to provide optimized resynchronization. By providing adequate numbersof replicas, you canminimize I/O impact on RAID-1 volume performance. Using at least tworeplicas on the same disks or controllers as themirror that the replicas log also helps to improveoverall performance.
� Onlymount themirror device directly. Do not try tomount a submirror directly, unless thesubmirror is offline andmounted read-only. Do notmount a slice that is part of a submirror. Thisprocess could destroy data and crash the system.
Creating andMaintaining RAID-1 Volumes
Solaris VolumeManagerAdministration Guide • May 200698

PerformanceGuidelines for RAID-1Volumes� Keep the slices of different submirrors on different disks and controllers. Data protection is
diminished considerably if slices of two ormore submirrors of the samemirror are on the samedisk. Likewise, organize submirrors across separate controllers, because controllers andassociated cables tend to fail more often than disks. This practice also improvesmirrorperformance.
� Use the same type of disks and controllers in a single mirror. Particularly in old SCSI storagedevices, different models or different brands of disks or controllers can have widely varyingperformance. If disks and controller that have the different performance levels are used in asingle mirror, performance can degrade significantly.
� Mirroringmight improve read performance, but write performance is always degraded.Mirroring improves read performance only in threaded or asynchronous I/O situations.Asinglethread reading from the volume does not provide a performance gain.
� You can experiment with themirror read policies can improve performance. For example, thedefault readmode is to alternate reads in a round-robin fashion among the disks. This policy isthe default because round-robin tends to work best for UFSmultiuser, multiprocessor activity.In some cases, the geometric read option improves performance byminimizing headmotionand access time. This option is most effective when:
� There is only one slice per disk� Only one process at a time is using the slice or file system� I/O patterns are highly sequential or when all accesses are read
� You can attach a submirror to amirror without interrupting service. You attach submirrors tomirrors to create two-way, three-way, and four-waymirrors.
� When you place a submirror offline, you prevent themirror from reading from andwriting to thesubmirror. However, you preserve the submirror’s logical association to themirror.While thesubmirror is offline, Solaris VolumeManager keeps track of all writes to themirror. The writesare written to the submirror when it is brought back online. By performing an optimizedresynchronization, Solaris VolumeManager only has to resynchronize data that has changed, notthe entire submirror.When you detach a submirror, you sever its logical association to themirror. Typically, you place a submirror offline to performmaintenance. You detach a submirrorto remove it.
About RAID-1VolumeOptionsThe following options are available to optimizemirror performance:
� Mirror read policy� Mirror write policy� The order in whichmirrors are resynchronized (pass number)
You can definemirror options when you initially create themirror. You can also changemirroroptions after amirror has been set up and is running. For tasks related to changing these options, see“How to Change RAID-1 VolumeOptions” on page 134.
Creating andMaintaining RAID-1 Volumes
Chapter 10 • RAID-1 (Mirror) Volumes (Overview) 99

RAID-1VolumeRead-and-Write PoliciesSolaris VolumeManager enables different read-and-write policies to be configured for a RAID-1volume. Properly set read-and-write policies can improve performance for a given configuration.
TABLE 10–1RAID-1VolumeReadPolicies
ReadPolicy Description
Round-Robin (Default) Attempts to balance the load across the submirrors.All reads aremade in around-robin order (one after another) from all submirrors in amirror.
Geometric Enables reads to be divided among submirrors on the basis of a logical disk blockaddress. For example, with a two-way submirror, the disk space on themirror isdivided into two equally-sized logical address ranges. Reads from one submirror arerestricted to one half of the logical range. Reads from the other submirror arerestricted to the other half. The geometric read policy effectively reduces the seektime that is necessary for reads. The performance gained by this read policy dependson the system I/O load and the access patterns of the applications.
First Directs all reads to the first submirror. This policy should be used only when thedevice or devices that comprise the first submirror are substantially faster than thedevices of the second submirror.
TABLE 10–2RAID-1VolumeWrite Policies
Write Policy Description
Parallel (Default) Performs writes to amirror that are replicated and dispatched to all of thesubmirrors simultaneously.
Serial Performs writes to submirrors serially (that is, the first submirror write completesbefore the second submirror write is started). This policy specifies that writes to onesubmirrormust be completed before the next submirror write is initiated. Thispolicy is provided in case a submirror becomes unreadable, for example, due to apower failure.
PassNumberThe pass number, a number in the range 0–9, determines the order in which a particular mirror isresynchronized during a system reboot. The default pass number is 1. The lower pass numbers areresynchronized first. If zero is used, themirror resynchronization is skipped.Apass number of zeroshould be used only formirrors that aremounted as read-only.Mirrors with the same pass numberare resynchronized at the same time.
Creating andMaintaining RAID-1 Volumes
Solaris VolumeManagerAdministration Guide • May 2006100

Understanding Submirror Status toDetermineMaintenanceActionsThe metastat command of Solaris VolumeManager reports status information on RAID 1 volumesand submirrors. The status information helps you to determine if maintenance action is required ona RAID-1 volume. The following table explains submirror states shownwhen you run themetastatcommand on a RAID-1 volume.
TABLE 10–3Submirror States
State Meaning
Okay The submirror has no errors and is functioning correctly.
Resyncing The submirror is actively being resynchronized.An error has occurred and has beencorrected, the submirror has just been brought back online, or a new submirror hasbeen added.
NeedsMaintenance Aslice (or slices) in the submirror has encountered an I/O error or an open error.Allreads and writes to and from this slice in the submirror have been discontinued.
Additionally, for each slice in a submirror, the metastat command shows the following:
Device Indicates the device name of the slice in the stripe
Start Block Indicates the block on which the slice begins
Dbase Indicates if the slice contains a state database replica
State Indicates the state of the slice
Hot Spare Indicates that a slice is being used as a hot spare for a failed slice
The submirror state only provides general information on the status of the submirror. The slice stateis perhaps themost important information to reviewwhen you are troubleshootingmirror errors. Ifthe submirror reports a “NeedsMaintenance” state, youmust refer to the slice state formoreinformation.
You take a different recovery action depending on if the slice is in the “Maintenance” state or in the“Last Erred” state. If you only have slices in the “Maintenance” state, they can be repaired in anyorder. If you have slices both in the “Maintenance” state and in the “Last Erred” state, youmust fixthe slices in the “Maintenance” state first. Once the slices in the “Maintenance” state have been fixed,then fix the slices in the “Last Erred” state. Formore information, see “Overview of Replacing andEnabling Components in RAID-1 and RAID-5 Volumes” on page 224.
The following table explains the slice states for submirrors and possible actions to take.
Creating andMaintaining RAID-1 Volumes
Chapter 10 • RAID-1 (Mirror) Volumes (Overview) 101

TABLE 10–4 Submirror Slice States
State Meaning Action
Okay The slice has no errors and is functioningcorrectly.
None.
Resyncing The slice is actively beingresynchronized.An error has occurredand been corrected, the submirror hasjust been brought back online, or a newsubmirror has been added.
If desired, monitor the submirror status until theresynchronization is done.
Maintenance The slice has encountered an I/O error oran open error.All reads and writes to andfrom this component have beendiscontinued.
Enable or replace the failed slice. See “How toEnable a Slice in a Submirror” on page 131, or“How to Replace a Slice in a Submirror” on page136. The metastat commandwill show aninvoke recoverymessage with the appropriateaction to take with the metareplace command.You can also use the metareplace -e command.
Last Erred The slice has encountered an I/O error oran open error. However, the data is notreplicated elsewhere due to another slicefailure. I/O is still performed on the slice.If I/O errors result, themirror I/O fails.
First, enable or replace slices in the“Maintenance” state. See “How to Enable a Slicein a Submirror” on page 131, or “How to Replacea Slice in a Submirror” on page 136. Usually, thiserror results in some data loss, so validate themirror after it is fixed. For a file system, use thefsck command, then check the data.Anapplication or databasemust have its ownmethod of validating the device.
TheAffect of Booting Into Single-UserModeonRAID-1Volumes
Sometimes, youmay need to boot a systemwithmirrors for root (/), /usr, and swap, the so-called“boot” file systems, into single-user mode (by using the boot -s command). In this case, thesemirrors and possibly all mirrors on the systemwill appear in the “NeedingMaintenance” state whenviewed with the metastat command. Furthermore, if writes occur to these slices, the metastatcommand shows an increase in dirty regions on themirrors.
This situation appears to be potentially dangerous. However, the metasync -r command, whichnormally runs during boot to resynchronizemirrors, is interrupted when the system is booted intosingle-user mode. Once the system is rebooted, the metasync -r command will run andresynchronize all mirrors.
If this situation is a concern, you can run the metasync -r commandmanually.
TheAffect of Booting Into Single-UserMode on RAID-1 Volumes
Solaris VolumeManagerAdministration Guide • May 2006102

Scenario—RAID-1Volumes (Mirrors)RAID-1 volumes provide ameans of constructing redundant volumes. Thus, when a partial orcomplete failure of one of the underlying RAID-0 volumes occurs, there is no data loss orinterruption of access to the file systems. The following example, drawing on the scenario explainedin Chapter 5 and continued in “Scenario—RAID-0 Volumes” on page 81, describes how RAID-1volumes can provide redundant storage.
As described in “Scenario—RAID-0 Volumes” on page 81, the sample system has two RAID-0volumes. Each volume is approximately 27 Gbytes in size and spans three disks. By creating aRAID-1 volume tomirror these two RAID-0 volumes, a fully redundant storage space can provideresilient data storage.
Within this RAID-1 volume, the failure of either disk controller does not interrupt access to thevolume. Similarly, failure of up to three individual disksmight be tolerated without accessinterruption.
To provide additional protection against problems that could interrupt access, use hot spares, asdescribed in Chapter 16. Specifically, see “HowHot SparesWork” on page 172.
Scenario—RAID-1 Volumes (Mirrors)
Chapter 10 • RAID-1 (Mirror) Volumes (Overview) 103

104

RAID-1 (Mirror) Volumes (Tasks)
This chapter explains how to perform Solaris VolumeManager tasks that are related to RAID-1volumes. For information about related concepts, see Chapter 10.
RAID-1Volumes (TaskMap)The following taskmap identifies the procedures that are needed tomanage Solaris VolumeManagerRAID-1 volumes.
Task Description For Instructions
Create amirror from unusedslices
Use the Solaris VolumeManager GUI or themetainit command to create amirror fromunused slices.
“How to Create a RAID-1Volume FromUnused Slices”on page 107
Create amirror from anexisting file system
Use the Solaris VolumeManager GUI or themetainit command to create amirror froman existing file system.
“How to Create a RAID-1Volume From a File System”on page 109
Create amirror from theroot (/) file system
Use the Solaris VolumeManager GUI or themetainit command to create amirror fromthe root (/) file system.
“SPARC: How to Create aRAID-1 Volume From the root(/) File System” on page 113
“x86: How to Create a RAID-1Volume From the root (/) FileSystem byUsing DCA” on page122
Attach a submirror Use the Solaris VolumeManager GUI or themetattach command to attach a submirror.
“How toAttach a Submirror”on page 128
11C H A P T E R 1 1
105

Task Description For Instructions
Detach a submirror Use the Solaris VolumeManager GUI or themetadetach command to detach thesubmirror.
“How toDetach a Submirror”on page 129
Place a submirror online ortake a submirror offline
Use the Solaris VolumeManager GUI or themetaonline command to put a submirroronline. Use the Solaris VolumeManager GUIor the metaoffline command to take asubmirror offline.
“How to Place a SubmirrorOffline andOnline” on page 130
Enable a slice within asubmirror
Use the Solaris VolumeManager GUI or themetareplace command to enable a slice in asubmirror.
“How to Enable a Slice in aSubmirror” on page 131
Checkmirror status Use the Solaris VolumeManager GUI or themetastat command to check the status ofRAID-1 volumes.
“How to View the Status ofMirrors and Submirrors”on page 132
Changemirror options Use the Solaris VolumeManager GUI or themetaparam command to change the optionsfor a specific RAID-1 volume.
“How to Change RAID-1VolumeOptions” on page 134
Expand amirror Use the Solaris VolumeManager GUI or themetattach command to expand the capacityof amirror.
“How to Expand a RAID-1Volume” on page 135
Replace a slice within asubmirror
Use the Solaris VolumeManager GUI or themetareplace command to replace a slice in asubmirror.
“How to Replace a Slice in aSubmirror” on page 136
Replace a submirror Use the Solaris VolumeManager GUI or themetattach command to replace a submirror.
“How to Replace a Submirror”on page 137
Remove amirror (unmirror) Use the Solaris VolumeManager GUI, themetadetach command, or the metaclearcommand to unmirror a file system.
“How toUnmirror a FileSystem” on page 139
Remove amirror (unmirror)of a file system that cannotbe unmounted
Use the Solaris VolumeManager GUI, themetadetach command, or the metaclearcommand to unmirror a file system thatcannot be unmounted.
“How toUnmirror a FileSystemThat Cannot BeUnmounted” on page 141
Use amirror to performbackups
Use the Solaris VolumeManager GUI, themetaonline command, or the metaofflinecommands to perform backups withmirrors.
“How to Perform anOnlineBackup of a RAID-1 Volume”on page 144
RAID-1 Volumes (TaskMap)
Solaris VolumeManagerAdministration Guide • May 2006106

Creating aRAID-1Volume
� How toCreate aRAID-1VolumeFromUnusedSlicesThis procedure shows you how to create a two-waymirror. If you want to create a three-waymirroror a four-waymirror, use the same procedure.
Check “Prerequisites for Creating Solaris VolumeManager Components” on page 45 and “CreatingandMaintaining RAID-1 Volumes” on page 97.
Create two stripes or concatenations. These components become the submirrors.See “How to Create a RAID-0 (Stripe) Volume” on page 84 or “How to Create a RAID-0(Concatenation) Volume” on page 85.
To create themirror, use one of the followingmethods:
� From the Enhanced Storage tool within the SolarisManagement Console, open the Volumesnode, then chooseAction⇒Create Volume and follow the onscreen instructions. Formoreinformation, see the online help.
� Use the following form of the metainit command to create a one-waymirror:
# metainit volume-name -m submirror-name
volume-name Specifies the name of the volume to create
-m Specifies to create amirror
submirror-name Specifies the name of the component that will be the first submirror in themirror
See the following examples and the metainit(1M)man page formore information.
To add the second submirror, use one of the followingmethods:
� From the Enhanced Storage tool within the SolarisManagement Console, open the Volumesnode, then choose themirror you want tomodify. ChooseAction⇒Properties, then theSubmirrors. Follow the onscreen instructions to attach the submirror. Formore information, seethe online help.
� Use the following form of the metattach command:
# metattach volume-name submirror-name
volume-name Specifies the name of the RAID-1 volume onwhich to add the submirror
submirror-name Specifies the name of the component that will be the second submirrorattached to themirror
See the following examples and the metattach(1M)man page formore information.
BeforeYouBegin
1
2
3
Creating a RAID-1 Volume
Chapter 11 • RAID-1 (Mirror) Volumes (Tasks) 107

Creating a Two-WayMirror
# metainit d51 1 1 c0t0d0s2
d51: Concat/Stripe is setup
# metainit d52 1 1 c1t0d0s2
d52: Concat/Stripe is setup
# metainit d50 -m d51
d50: Mirror is setup
# metattach d50 d52
d50: Submirror d52 is attached
This example shows you how to create the two-waymirror, d50. The metainit command creates twosubmirrors (d51 and d52), which are RAID-0 volumes. The metainit -m command creates theone-waymirror from the d51RAID-0 volume. The metattach command attaches d52, creating atwo-waymirror and causing a resynchronization.Any data on the attached submirror is overwrittenby the other submirror during the resynchronization.
Creating a Two-WayMirrorWithout Resynchronization
# metainit d51 1 1 c0t0d0s2
d51: Concat/Stripe is setup
# metainit d52 1 1 c1t0d0s2
d52: Concat/Stripe is setup
# metainit d50 -m d51 d52
metainit: d50: WARNING: This form of metainit is not recommended.
The submirrors may not have the same data.
Please see ERRORS in metainit(1M) for additional information.
d50: Mirror is setup
This example shows the creation a two-waymirror, d50. The metainit command creates twosubmirrors (d51 and d52), which are RAID-0 volumes. The metainit -m command is then run withboth submirrors to create themirror.When you create amirror using the metainit command ratherthan the metattach command , no resynchronization operations occur.As a result, data couldbecome corrupted when Solaris VolumeManager assumes that both sides of themirror are identicaland can be used interchangeably.
To prepare a newly createdmirror for a file system, see Chapter 18, “Creating UFS, TMPFS, andLOFS File Systems (Tasks),” in SystemAdministration Guide: Devices and File Systems. Someapplications, such as a database, do not use a file system. These applications instead use the rawdevice. The applicationmust have its ownway of accessing the raw device.
Example 11–1
Example 11–2
SeeAlso
Creating a RAID-1 Volume
Solaris VolumeManagerAdministration Guide • May 2006108

� How toCreate aRAID-1VolumeFromaFile SystemUse this procedure tomirror an existing file system. If the file system can be unmounted, the entireprocedure can be completed without a reboot. For file systems that cannot be unmounted, such as/usr and /swap, the systemmust be rebooted to complete the procedure.
When creating a RAID-1 volume from an existing file system built on a slice, only the single slicemay be included in the primary RAID-0 volume (submirror). If you aremirroring system-critical filesystems, all submirrors must consist of only a single slice.
For the procedures associated withmirroring the root (/) file system, see “SPARC: How to Create aRAID-1 Volume From the root (/) File System” on page 113 and “x86: How to Create a RAID-1Volume From the root (/) File System byUsing DCA” on page 122.
In the example used in this procedure, the existing slice is c1t0d0s0. The second slice, c1t1d0s0, isavailable for the second half of themirror. The submirrors are d1 and d2, respectively, and themirroris d0.
Caution –Be sure to create a one-waymirror with the metainit command then attach the additionalsubmirrors with the metattach command.When the metattach command is not used, noresynchronization operations occur.As a result, data could become corrupted when Solaris VolumeManager assumes that both sides of themirror are identical and can be used interchangeably.
Check “Prerequisites for Creating Solaris VolumeManager Components” on page 45 and “CreatingandMaintaining RAID-1 Volumes” on page 97.
Identify the slice that contains the existing file system tobemirrored This example uses the slicec1t0d0s0.
Create a newRAID-0 volumeon the slice from theprevious step by using one of the followingmethods:
� From the Enhanced Storage tool within the SolarisManagement Console, open the Volumesnode, then chooseAction⇒Create Volume. Follow the onscreen instructions . Formoreinformation, see the online help.
� Use the following form of the metainit command:
# metainit -f volume-name number-of-stripes components-per-stripe component-name
-f Forces the command to continue. Youmust use this option when theslice contains amounted file system.
volume-name Specifies the name of the volume to create. For information onnaming volumes, see “VolumeNames” on page 42.
number-of-stripes Specifies the number of stripes to create.
BeforeYouBegin
1
2
Creating a RAID-1 Volume
Chapter 11 • RAID-1 (Mirror) Volumes (Tasks) 109

components-per-stripe Specifies the number of components each stripe should have.
component-names Specifies the names of the components that are used. This exampleuses the root slice, c0t0d0s0.
Create a secondRAID-0 volume (concatenation) on anunused slice (c1t1d0s0 in this example) to actas the second submirror. The second submirrormust be the same size as the original submirror orlarger. Use one of the followingmethods:
� From the Enhanced Storage tool within the SolarisManagement Console, open the Volumesnode, then chooseAction->Create Volume and follow the instructions on screen. Formoreinformation, see the online help.
� Use the following form of the metainit command.
# metainit volume-name number-of-stripes components-per-stripe component-name
Note – See Step 2 for an explanation of the options.
Create a one-waymirror by using one of the followingmethods:
� From the Enhanced Storage tool within the SolarisManagement Console, open the Volumesnode, then chooseAction⇒Create Volume. Follow the onscreen instructions . Formoreinformation, see the online help.
� Use the following form of the metainit command.
# metainit volume-name -m submirror-name
volume-name Specifies the name of the volume to create.
-m Specifies to create amirror.
submirror-name Specifies the name of the component that will be the first submirror in themirror. In this example, it is the RAID-0 volume that contains the root slice.
See the metainit(1M)man page formore information.
Caution –When you create amirror from an existing file system, youmust follow the next two stepsprecisely to avoid data corruption.
Edit the /etc/vfstab file so that the file systemmount instructions refer to themirror, not to theblock device. Formore information about the/etc/vfstab file, see “Mounting File Systems” inSystemAdministration Guide: Devices and File Systems.For example, if the /etc/vfstab file contains the following entry for the file system:/dev/dsk/slice /dev/rdsk/slice /var ufs 2 yes -
3
4
5
Creating a RAID-1 Volume
Solaris VolumeManagerAdministration Guide • May 2006110

Change the entry to read as follows:
/dev/md/dsk/mirror-name /dev/md/rdsk/mirror-name /var ufs 2 yes -
Remount your newlymirrored file systemaccording to one of the followingprocedures:
� If you aremirroring a file system that can be unmounted, then unmount and remount the filesystem.
# umount /filesystem# mount /filesystem
� If you aremirroring a file system that cannot be unmounted, then reboot your system.
# reboot
Use the following formof the metattach command to attach the second submirror.# metattach volume-name submirror-name
volume-name Specifies the name of the RAID-1 volume onwhich to add the submirror
submirror-name Specifies the name of the component that will be the second submirror attachedto themirror
See the metattach(1M)man page formore information.
Creating a Two-WayMirror Froma File SystemThat Can BeUnmounted
# metainit -f d1 1 1 c1t0d0s0
d1: Concat/Stripe is setup
# metainit d2 1 1 c1t1d0s0
d2: Concat/Stripe is setup
# metainit d0 -m d1
d0: Mirror is setup
# umount /master
(Edit the /etc/vfstab file so that the file system references the mirror)# mount /master
# metattach d0 d2
d0: Submirror d2 is attached
In this example, the -f option forces the creation of the first concatenation, d1, which contains themounted file system /master on /dev/dsk/c1t0d0s0. The second concatenation, d2, is created from/dev/dsk/c1t1d0s0. This slice must be the same size as , or larger than the size of d1.) The metainitcommandwith the -m option creates the one-waymirror, d0, from d1.
Next, the entry for the file system should be changed in the /etc/vfstab file to reference themirror.The following line in the /etc/vfstab file initially appears as follows:
/dev/dsk/c1t0d0s0 /dev/rdsk/c1t0d0s0 /var ufs 2 yes -
The entry is changed to the following:
6
7
Example 11–3
Creating a RAID-1 Volume
Chapter 11 • RAID-1 (Mirror) Volumes (Tasks) 111

/dev/md/dsk/d0 /dev/md/rdsk/d0 /var ufs 2 yes -
Finally, the file system is remounted and submirror d2 is attached to themirror, causing amirrorresynchronization. The system confirms that the RAID-0 and RAID-1 volumes are set up, and thatsubmirror d2 is attached.
Creating a Two-wayMirror Froma File SystemThat Cannot BeUnmounted
# metainit -f d12 1 1 c0t3d0s6
d12: Concat/Stripe is setup
# metainit d22 1 1 c1t0d0s6
d22: Concat/Stripe is setup
# metainit d2 -m d12
d2: Mirror is setup
(Edit the /etc/vfstab file so that /usr references the mirror)# reboot
...
# metattach d2 d22
d2: Submirror d22 is attached
This example creates a two-waymirror using a slice containing the /usr file system. The -f optionforces the creation of the first concatenation, d12, which contains themounted file system /usr on/dev/dsk/c0t3d0s6. The second concatenation, d22, is created from /dev/dsk/c1t0d0s6. This slicemust be the same size as, or larger than the size of d12. The metainit commandwith the -m optioncreates the one-waymirror d2 using the concatenation that contains the /usr file system. Next, the/etc/vfstab filemust be edited to change the entry for /usr to reference themirror.
The /etc/vfstab file contains the following entry for the /usr file system:
/dev/dsk/c0t3d0s6 /dev/rdsk/c0t3d0s6 /usr ufs 1 yes -
Change the entry to read as follows:
/dev/md/dsk/d2 /dev/md/rdsk/d2 /usr ufs 1 yes -
After a reboot, the second submirror d22 is attached to themirror, causing amirrorresynchronization.
Creating aMirror From the /swap Space
# metainit -f d11 1 1 c0t0d0s1
d11: Concat/Stripe is setup
# metainit d21 1 1 c1t0d0s1
d21: Concat/Stripe is setup
# metainit d1 -m d11
d1: Mirror is setup
(Edit the /etc/vfstab file so that swap references the mirror)# reboot
Example 11–4
Example 11–5
Creating a RAID-1 Volume
Solaris VolumeManagerAdministration Guide • May 2006112

...
# metattach d1 d21
d1: Submirror d21 is attached
In this example, the -f option forces the creation of the first concatenation, d11, which contains themounted file system swap on /dev/dsk/c0t0d0s1. The second concatenation, d21, is created from/dev/dsk/c1t0d0s1. This slice must be the same size as, or larger than the size of d11. The metainitcommandwith the -m option creates the one-waymirror d1 using the concatenation that containsswap. Next, if there is an entry for swap in the /etc/vfstab file, it must be edited to reference themirror.
The /etc/vfstab file contains the following entry for the swap space:
/dev/dsk/c0t0d0s1 - - swap - no -
Change the entry to read as follows:
/dev/md/dsk/d1 - - swap - no -
After a reboot, the second submirror d21 is attached to themirror, causing amirrorresynchronization.
To save the crash dumpwhen you havemirrored the swap space, use the dumpadm command toconfigure the dump device as a volume. For instance, if the swap device is named /dev/md/dsk/d2,use the dumpadm command to set this device as the dump device.
� SPARC:How toCreate aRAID-1VolumeFrom the root(/) File SystemThe process formirroring the root (/) file system on a SPARC platform is similar tomirroring anyother file system that you cannot unmount. The procedure differs in that the metaroot command isrun instead ofmanually editing the /etc/vfstab file. Mirroring the root (/) file system also requiresrecording the path to the alternate boot device. This device reboots the system if the submirror fails.
In the example used in this procedure, the existing slice is c1t0d0s0. The second slice, c1t1d0s0, isavailable for the second half of themirror. The submirrors are d1 and d2, respectively, and themirroris d0.
Caution –Be sure to create a one-waymirror with the metainit command then attach the additionalsubmirrors with the metattach command.When the metattach command is not used, noresynchronization operations occur.As a result, data could become corrupted when Solaris VolumeManager assumes that both sides of themirror are identical and can be used interchangeably.
Creating a RAID-1 Volume
Chapter 11 • RAID-1 (Mirror) Volumes (Tasks) 113

Check “Prerequisites for Creating Solaris VolumeManager Components” on page 45 and “CreatingandMaintaining RAID-1 Volumes” on page 97.
Identify the slice that contains the existing root (/) file system tobemirrored. This example uses theslice c1t0d0s0.
Create a newRAID-0 volumeon the slice from theprevious step by using one of the followingmethods. Only the single slice canbe included in the RAID-0 volume.
� From the Enhanced Storage tool within the SolarisManagement Console, open the Volumesnode, then chooseAction⇒Create Volume. Follow the onscreen instructions . Formoreinformation, see the online help.
� Use the following form of the metainit command:
# metainit -f volume-name number-of-stripes components-per-stripe component-name
-f Forces the command to continue. Youmust use this option when theslice contains amounted file system.
volume-name Specifies the name of the volume to create. For information onnaming volumes, see “VolumeNames” on page 42.
number-of-stripes Specifies the number of stripes to create.
components-per-stripe Specifies the number of components each stripe should have.
component-names Specifies the names of the components that are used. This exampleuses the root slice, c0t0d0s0.
Create a secondRAID-0 volumeon anunused slice (c1t1d0s0 in this example) to act as the secondsubmirror. The secondary submirrormust be the same size as the original submirror, or larger. Useone of the followingmethods:
� From the Enhanced Storage tool within the SolarisManagement Console, open the Volumesnode, then chooseAction->Create Volume and follow the instructions on screen. Formoreinformation, see the online help.
� Use the following form of the metainit command.
# metainit volume-name number-of-stripes components-per-stripe component-name
Note – See Step 2 for and explanation of the options.
Create a one-waymirror by using one of the followingmethods:
� From the Enhanced Storage tool within the SolarisManagement Console, open the Volumesnode, then chooseAction⇒Create Volume. Follow the onscreen instructions . Formoreinformation, see the online help.
BeforeYouBegin
1
2
3
4
Creating a RAID-1 Volume
Solaris VolumeManagerAdministration Guide • May 2006114
� Use the following form of the metainit command.
# metainit volume-name -m submirror-name
volume-name Specifies the name of the volume to create.
-m Specifies to create amirror.
submirror-name Specifies the name of the component that will be the first submirror in themirror. In this example, it is the RAID-0 volume that contains the root slice.
Remount your newlymirrored file system. Run the metaroot volume-name command, replacingvolume-namewith the nameof themirror youhave created. Then, reboot your system.# metaroot volume-name# reboot
Formore information, see the metaroot(1M)man page.
Use the following formof the metattach command to attach the second submirror.# metattach volume-name submirror-name
volume-name Specifies the name of the RAID-1 volume onwhich to add the submirror
submirror-name Specifies the name of the component that will be the second submirror attachedto themirror
See the metattach(1M)man page formore information.
Record the alternate boot path.
a. Determine the path to the alternate root device. Use the ls -l command on the slice that is beingattached as the second submirror to the root (/) file systemmirror.# ls -l /dev/dsk/c1t1d0s0
lrwxrwxrwx 1 root root 55 Mar 5 12:54 /dev/rdsk/c1t1d0s0 -> \
../../devices/sbus@1,f8000000/esp@1,200000/sd@3,0:a
b. Record the string that follows the /devicesdirectory:/sbus@1,f8000000/esp@1,200000/sd@3,0:a.
Note –Because the systemmight not be available, this information should also be written downsomewhere other than on the system. See “Recovering FromBoot Problems” on page 277 fordetails on booting from the alternate boot device.
5
6
7
Creating a RAID-1 Volume
Chapter 11 • RAID-1 (Mirror) Volumes (Tasks) 115

c. Edit the string to change themajor name (sd, in this case) to disk, resulting in/sbus@1,f8000000/esp@1,200000/disk@3,0:a. If the systemuses an IDEbus, the original fullpathmight look like$ ls -l /dev/dsk/c1t1d0s0
lrwxrwxrwx 1 root root 38 Mar 13 15:03 /dev/dsk/c0t0d0s0 -> \
../../devices/pci@1f,0/ide@d/dad@0,0:a
After changing themajor name dad to disk, you would have /pci@1f,0/ide@d/disk@0,0:a
d. Use theOpenBoot™PROM nvalias command to define a “backup root” device alias for thesecondary root (/) file systemmirror. For example:ok nvalias backup_root /sbus@1,f8000000/esp@1,200000/disk@3,0:a
e. Redefine the boot-device alias to reference both the primary and secondary submirrors, in theorder inwhich youwant them tobeused, and store the configuration.ok printenv boot-device
boot-device = disk net
ok setenv boot-device disk backup_root net
boot-device = disk backup_root net
ok nvstore
Note – In the event that the primary submirror fails, the systemwould automatically boot to thesecond submirror. Or, if you bootmanually, rather than using autoboot, you would enter:
ok boot backup_root
SPARC: Creating aMirror From the root (/) File System
# metainit -f d1 1 1 c0t0d0s0
d1: Concat/Stripe is setup
# metainit d2 1 1 c0t1d0s0
d2: Concat/Stripe is setup
# metainit d0 -m d1
d0: Mirror is setup
# metaroot d0
# lockfs -fa
# reboot
...
# metattach d0 d2
d0: Submirror d2 is attached
# ls -l /dev/dsk/c0t1d0s0
lrwxrwxrwx 1 root root 88 Feb 8 15:51 /dev/rdsk/c1t3d0s0 ->
../../devices/pci@1f,0/pci@1,1/ide@3/dad@0,0:a
# init 0
.
Example 11–6
Creating a RAID-1 Volume
Solaris VolumeManagerAdministration Guide • May 2006116

.
.
ok nvalias backup_root /pci@1f,0/pci@1,1/ide@3/disk@0,0:a
ok setenv boot-device disk backup_root net
ok nvstore
In this example, the -f option forces the creation of the first RAID-0 volume, d1, which contains themounted root (/) file system on /dev/dsk/c0t0d0s0. The second concatenation, d2, is created from/dev/dsk/c0t1d0s0. This slice must be the same size as, or larger than the size of d1. The metainitcommandwith the -m option creates the one-waymirror d0 using the concatenation that containsroot (/).
Next, the metaroot command edits the /etc/vfstab and /etc/system files so that the system can bebooted with the root (/) file system on a volume. It is a good idea to run the lockfs -fa commandbefore rebooting. Formore information, see the lockfs(1M)man page.
Do not attach the second submirror before the system is rebooted. Youmust reboot after running themetaroot command and before attaching the second submirror.
After a reboot, the submirror d2 is attached to themirror, causing amirror resynchronization. Thesystem confirms that the concatenations and themirror are set up, and that submirror d2 is attached.
The ls -l command is run on the root raw device to determine the path to the alternate root devicein case the systemmight later need to be booted from it.
x86: Creating aRAID-1VolumeFrom the root (/) FileSystemBeginning with the Solaris 10 1/06 release, the GRandUnified Bootloader (GRUB) has replaced theDevice ConfigurationAssistant (DCA) for boot processes and configurations in x86 based systems.For a brief description of this feature and the enhancements it introduces, refer to the “GRUBBasedBooting” in Solaris 10What’s New.
The procedures in this section describe steps to create RAID-1 volumes from the root (/) file system.If your system is running the Solaris 10 1/06 OS or subsequent releases, follow the first procedurethat uses GRUB. Otherwise, perform the steps in the second procedure that uses DCA.
The process formirroring the root (/) file system on an x86 based system is similar tomirroring rooton a SPARC system. However, on x86 based systems, the BIOS and fdisk partitioning add anadditional layer of complexity.
In the example used in the procedures, the existing slice is c1t0d0s0. The second slice, c1t1d0s0, isavailable for the second half of themirror. The submirrors are d1 and d2, respectively, and themirroris d0.
Creating a RAID-1 Volume
Chapter 11 • RAID-1 (Mirror) Volumes (Tasks) 117

Note –Before implementing any of the procedures, check “Prerequisites for Creating Solaris VolumeManager Components” on page 45 and “Creating andMaintaining RAID-1 Volumes” on page 97.
� x86:How toCreate aRAID-1VolumeFrom the root (/) File SystembyUsingGRUB
Verify that the ordering for the BIOSboot device canbe configured to allow the system toboot off ofthe seconddisk in themirror.
Before the kernel is started, the system is controlled by the read-only-memory (ROM) BasicInput/Output System (BIOS), which is the firmware interface on an x86 based system. The BIOS isanalogous to the boot PROMon a SPARC based system. Some of the BIOS’s tasks are as follows:
� Perform startup functions.� Detect the correct device fromwhich to boot the system.� Load themaster boot record from that device to allow the system to self-boot.
You can usually configure the BIOS to select the order of devices to probe for the boot record.Additionally, most modern BIOS implementations allow you to configure your devices so that thefailover to the secondary submirror is automatic. If your system’s BIOS does not have this featureand the primary submirror fails, you need to access the BIOS during system boot to reconfigure thesystem to boot from the secondary root slice. Consult the user’s guide for your BIOS for instructionson how to configure settings in your BIOS
Before setting up a rootmirror, check the BIOS on your system to verify that you can boot off of morethan one disk. Some device drivers are configured to only see one disk on the system.
Verify that the fdiskpartitions are configured to support rootmirroring.
The existence of a separate x86 boot partition presents a problemwhenmirroring the root (/) filesystem. Because it exists outside of the Solaris fdisk partition, the x86 boot partition cannot bemirrored by Solaris VolumeManager.Additionally, because only one copy of the x86 boot partitionexists, it represents a single point of failure.
The GRUB-based installation program of the Solaris 10 1/06 software and subsequent releases nolonger automatically creates an x86 boot partition. However, if the x86 already exists in the system,the installation program preserves that partition by default.
To determine if your system has a separate x86 boot partition, check the /etc/vfstab file. The x86boot partition exists if the file contains an entry similar to the following:/dev/dsk/c2t1d0p0:boot - /boot pcfs - no -
To use the Solaris VolumeManager tomirror the root (/) file system, the file systemmust use thesingle Solaris fdisk partition. Therefore, if the x86 boot partition already exists in the system, deletethis partition with the fdisk command and then reinstall the Solaris software.When you reinstall,the boot partition is no longer recreated.
1
2
Creating a RAID-1 Volume
Solaris VolumeManagerAdministration Guide • May 2006118

Note – Solaris VolumeManager can onlymirror slices within the Solaris fdisk partition If you havemultiple fdisk partitions, you need to use another approach to protect the data outside of the Solarisfdisk partition.
Make the secondary submirror bootablewith amaster boot program.
a. Specify themaster boot program.# fdisk -b /usr/lib/fs/ufs/mboot /dev/rdsk/c1t1d0p0
The following screen appears:
Total disk size is 31035 cylinders
Cylinder size is 1146 (512 byte) blocks
Cylinders
Partition Status Type Start End Length %
========= ====== ============ ===== === ====== ===
1 Active Solaris 1 31034 31034 100
SELECT ONE OF THE FOLLOWING:
1. Create a partition
2. Specify the active partition
3. Delete a partition
4. Change between Solaris and Solaris2 Partition IDs
5. Exit (update disk configuration and exit)
6. Cancel (exit without updating disk configuration)
Enter Selection:
b. Choose number 5 from themenu, andpress return.
Make the secondary disk bootable.# /sbin/installgrub /boot/grub/stage1 /boot/grub/stage2 /dev/rdsk/c1t1d0s0
Formore information about installgrub, refer to the installgrub(1M)man page.
Identify the slice that contains the existing root (/) file system tobemirrored.
This example uses the slice c1t0d0s0.
Create a newRAID-0 volumeon the slice from theprevious step.
Only the single slice can be included in the RAID-0 volume. Use one of the followingmethods:
� From the Enhanced Storage tool within the SolarisManagement Console, open the Volumesnode, then chooseAction⇒Create Volume. Follow the onscreen instructions. Formoreinformation, see the online help.
3
4
5
6
Creating a RAID-1 Volume
Chapter 11 • RAID-1 (Mirror) Volumes (Tasks) 119

� Use the following form of the metainit command:
# metainit -f volume-name number-of-stripes components-per-stripe component-name
-f Forces the command to continue. Youmust use this option when theslice contains amounted file system.
volume-name Specifies the name of the volume to create. For information onnaming volumes, see “VolumeNames” on page 42.
number-of-stripes Specifies the number of stripes to create.
components-per-stripe Specifies the number of components each stripe should have.
component-names Specifies the names of the components that are used. This exampleuses the root slice, c0t0d0s0.
Create a secondRAID-0 volume (c1t1d0s0 in this example) on anunused slice to act as the secondsubmirror.
Note –The secondary submirrormust be the same size as the original submirror, or larger.Also, theslice you use as the second submirrormust have a slice tag of “root” and the root slicemust be slice 0.
For information on configuring the slice tag field, see the format(1M)man page.
Use either of the followingmethods:
� From the Enhanced Storage tool within the SolarisManagement Console, open the Volumesnode, then chooseAction->Create Volume and follow the instructions on screen. Formoreinformation, see the online help.
� Use the following form of the metainit command.
# metainit volume-name number-of-stripes components-per-stripes component-names
Note – See Step 6 for an explanation of the options.
Create a one-waymirror by using one of the followingmethods:
� From the Enhanced Storage tool within the SolarisManagement Console, open the Volumesnode, then chooseAction⇒Create Volume. Follow the onscreen instructions. Formoreinformation, see the online help.
� Use the following form of the metainit command.
# metainit volume-name -m submirror-name
volume-name Specifies the name of the volume to create.
-m Specifies to create amirror.
7
8
Creating a RAID-1 Volume
Solaris VolumeManagerAdministration Guide • May 2006120

submirror-name Specifies the name of the component that will be the first submirror in themirror. In this example, it is the RAID-0 volume that contains the root slice.
Remount your newlymirrored file system, then reboot the system.# metaroot volume-name# reboot
Formore information, see the metaroot(1M)man page.
Attach the second submirror.# metattach volume-name submirror-name
volume-name Specifies the name of the RAID-1 volume onwhich to add the submirror.
submirror-name Specifies the name of the component that will be the second submirror attachedto themirror.
See the metattach(1M)man page formore information.
Define the alternative boot path in the menu.lstfile.
To enable the system to boot off of the disk that holds the secondary submirror, configure the systemto see the disk as the alternate boot device. In the current example, c1t1d0s0, the alternative path ison the first slice of the first fdisk partition on the second disk. Thus, you would edit the menu.lstwiththe following entry:title alternate boot
root (hd1,0,a)
kernel /boot/multiboot
module /boot/x86.miniroot-safe
Note –To properly edit entries in menu.lst, youmust be familiar with disk-naming conventions inGRUB. For details, see Chapter 11, “GRUBBased Booting (Tasks),” in SystemAdministration Guide:Basic Administration
After you have completed editing the menu.lst file, the system is set to failover to the second disk. Ifthe primary disk fails, disk numbering changes so that the system boots from the secondary disk.
9
10
11
Creating a RAID-1 Volume
Chapter 11 • RAID-1 (Mirror) Volumes (Tasks) 121

Caution –On certain cases, the automatic disk-renumbering feature of the BIOSmight affect recoveryfrom an unavailable primary disk.When disk renumbering forces the system to boot from thesecondary disk, the primary disk’s boot archive becomes stale. If the same primary disk becomesavailable later and you boot the system, the disk numbering switches again to use the default primarydisk for the system boot. However, at this stage, the primary disk’s boot archive remains stale.Consequently, the systemmight not boot at all. Thereforemake sure that in such cases, you select thecorrect entry from the GRUBmenu to boot the system from the valid boot archive.After the systemcompletes the boot up process, perform the normal metadevicemaintenance which synchronizesboth primary and secondary disks and restores the valid boot archive to the primary disk.
� x86:How toCreate aRAID-1VolumeFrom the root (/) File SystembyUsingDCA
Verify that the ordering for the BIOSboot device canbe configured to allow the system toboot off ofthe seconddisk in themirror.
Before the kernel is started, the system is controlled by the read-only-memory (ROM) BasicInput/Output System (BIOS), which is the firmware interface on an x86 based system. The BIOS isanalogous to the boot PROMon a SPARC based system. In addition to its other startup functions,the BIOS is responsible for finding the correct device to boot from and for loading themaster bootrecord from the device that allows the system to boot itself. You can usually configure the BIOS toselect the order of devices to probe for the boot record.Additionally, most modern BIOSimplementations allow you to configure your devices so that the failover to the secondary submirroris automatic. If your system does not have this feature and the primary submirror fails, you need toaccess the BIOSwhile the system is booting and reconfigure it to boot from the secondary root slice.Consult the user’s guide for your BIOS for instructions on how to configure settings in your BIOS.
You can use the DCAon your system to verify that you can boot off of more than one disk. Somedevice drivers are configured to only see one disk on the system.
Verify that the fdiskpartitions are configured to support rootmirroring.
Another feature of x86 based systems is the use of fdisk partitions. The default boot-disk partitionlayout of the Solaris OS installation program creates a Solaris fdisk partition and another, smallfdisk partition of about 10MB called the x86 boot partition.
The x86 boot partition presents a problemwhenmirroring the root (/) file system. The x86 bootpartition is outside of the Solaris fdisk partition. For that reason, the x86 boot partition cannot bemirrored by Solaris VolumeManager.Additionally, because only one copy of the x86 boot partitionexists, it represents a single point of failure.
You can determine if your Solaris OS has a separate x86 boot partition. The x86 boot partition ismounted in the /etc/vfstab file with an entry similar to the following:/dev/dsk/c2t1d0p0:boot - /boot pcfs - no -
1
2
Creating a RAID-1 Volume
Solaris VolumeManagerAdministration Guide • May 2006122

If the separate x86 boot partition does not exist, this entry does not appear in the /etc/vfstab file.
In order tomirror the root (/) file system, you need to customize your fdisk partitions to delete thex86 boot partition and use the single Solaris fdisk partition. If you intend to use Solaris VolumeManager rootmirroring, do not create a separate x86 boot partition during the system installation. Ifthe system is already installed and a separate x86 boot partition was created, delete that fdiskpartition using the fdisk command and reinstall the system. During installation, avoid creating aseparate x86 boot partition by customizing your disk partitions during the installation process.
Note – Solaris VolumeManager can onlymirror slices within the Solaris fdisk partition If you havemultiple fdisk partitions, you need to use another approach to protect the data outside of the Solarisfdisk partition.
Make the secondary submirror bootablewith amaster boot program.
a. Use the fdisk command to specify themaster boot program.# fdisk -b /usr/lib/fs/ufs/mboot /dev/rdsk/c1t1d0p0
The following screen appears:
Total disk size is 31035 cylinders
Cylinder size is 1146 (512 byte) blocks
Cylinders
Partition Status Type Start End Length %
========= ====== ============ ===== === ====== ===
1 Active Solaris 1 31034 31034 100
SELECT ONE OF THE FOLLOWING:
1. Create a partition
2. Specify the active partition
3. Delete a partition
4. Change between Solaris and Solaris2 Partition IDs
5. Exit (update disk configuration and exit)
6. Cancel (exit without updating disk configuration)
Enter Selection:
b. Choose number 5 from themenu, andpress return.
Install bootblocks on the secondary submirror in order tomake it bootable.
Slice 8 on the disk where the secondary submirror resides is necessary for booting the Solaris OSfrom this fdisk partition. This slice holds the partition boot record (pboot), the Solaris VTOC forthe disk, and the bootblock. This information is disk specific, so it is not mirrored with SolarisVolumeManager. However, youmust ensure that both disks are bootable so that you can boot from
3
4
Creating a RAID-1 Volume
Chapter 11 • RAID-1 (Mirror) Volumes (Tasks) 123

the secondary disk if the primary fails. Use the installboot command to setup the second disk as aSolaris bootable disk. See the installboot(1M)man page formore information.
Youmust specify slice 2 of the disk as the device, and slice 2must comprise the entire disk.# installboot /usr/platform/i86pc/lib/fs/ufs/pboot \
/usr/platform/i86pc/lib/fs/ufs/bootblk /dev/rdsk/c1t1d0s2
Identify the slice that contains the existing root (/) file system tobemirrored. This example uses theslice c1t0d0s0.
Create a newRAID-0 volumeon the slice from theprevious step by using one of the followingmethods. Only the single slice canbe included in the RAID-0 volume.
� From the Enhanced Storage tool within the SolarisManagement Console, open the Volumesnode, then chooseAction⇒Create Volume. Follow the onscreen instructions. Formoreinformation, see the online help.
� Use the following form of the metainit command:
# metainit -f volume-name number-of-stripes components-per-stripe component-name
-f Forces the command to continue. Youmust use this option when theslice contains amounted file system.
volume-name Specifies the name of the volume to create. For information onnaming volumes, see “VolumeNames” on page 42.
number-of-stripes Specifies the number of stripes to create.
components-per-stripe Specifies the number of components each stripe should have.
component-names Specifies the names of the components that are used. This exampleuses the root slice, c0t0d0s0.
Create a secondRAID-0 volumeon anunused slice (c1t1d0s0 in this example) to act as the secondsubmirror. The secondary submirrormust be the same size as the original submirror, or larger. Useone of the followingmethods:
Note –The slice you use as the second submirrormust have a slice tag of “root” and the root slicemustbe slice 0. For information on configuring the slice tag field, see the format(1M)man page.
� From the Enhanced Storage tool within the SolarisManagement Console, open the Volumesnode, then chooseAction->Create Volume and follow the instructions on screen. Formoreinformation, see the online help.
� Use the following form of the metainit command.
# metainit volume-name number-of-stripes components-per-stripes component-names
5
6
7
Creating a RAID-1 Volume
Solaris VolumeManagerAdministration Guide • May 2006124

Note – See Step 6 for and explanation of the options.
Create a one-waymirror by using one of the followingmethods:
� From the Enhanced Storage tool within the SolarisManagement Console, open the Volumesnode, then chooseAction⇒Create Volume. Follow the onscreen instructions. Formoreinformation, see the online help.
� Use the following form of the metainit command.
# metainit volume-name -m submirror-name
volume-name Specifies the name of the volume to create.
-m Specifies to create amirror.
submirror-name Specifies the name of the component that will be the first submirror in themirror. In this example, it is the RAID-0 volume that contains the root slice.
Remount your newlymirrored file system. Run the metaroot volume-name command, replacingvolume-namewith the nameof themirror youhave created. Then, reboot your system.# metaroot volume-name# reboot
Formore information, see the metaroot(1M)man page.
Use the following formof the metattach command to attach the second submirror.# metattach volume-name submirror-name
volume-name Specifies the name of the RAID-1 volume onwhich to add the submirror.
submirror-name Specifies the name of the component that will be the second submirror attachedto themirror.
See the metattach(1M)man page formore information.
Record the alternate boot path.
You need to configure your system so that if your primary submirror fails, the system boots from thesecondary submirror. To enable the system to boot off of the disk that holds the secondary submirror,configure the system to see the disk as the alternate boot device.
a. Determine the path to the alternate boot device. Use the ls -l command on the slice that isbeing attached as the second submirror to the root (/) file systemmirror.# ls -l /dev/dsk/c1t1d0s0
lrwxrwxrwx 1 root root 55 Mar 5 12:54 /dev/rdsk/c1t1d0s0 -> ../.
./devices/eisa/eha@1000,0/cmdk@1,0:a
8
9
10
11
Creating a RAID-1 Volume
Chapter 11 • RAID-1 (Mirror) Volumes (Tasks) 125

b. Record the string that follows the /devicesdirectory, /eisa/eha@1000,0/cmdk@1,0:a. This is thedevice tree path.
Note –Because the systemmight not be available, this information should be written downsomewhere other than on the system. This enables you tomore easily enter the device tree pathinformation if youmust use the DCAto boot the system.
c. Use the eeprom command to define the alternative boot path. For example:# eeprom altbootpath=/eisa/eha@1000,0/cmdk@1,0:a
If the primary submirror fails, the system tries to boot from the secondary submirror. The bootprocess is automatic if the BIOS can be configured to automatically failover to the second disk. Ifnot, you need to enter the BIOS and configure it to boot from the secondary disk. Once the systemstarts to boot, it tries to boot from the bootpath device. Since the primary boot disk is the deaddisk in the rootmirror, the system then attempts to boot from the altbootpath device. Consultthe user’s guide for your BIOS for instructions on how to configure settings in your BIOS.
If the system does not boot automatically, you can try using the DCAto select the secondarysubmirror. On some systems, you can choose to enter the DCAduring the boot process. If thisoption is not available, you need to boot from an x86 boot floppy disk and use the DCAto selectthe secondary submirror.After the operating system has booted, update the eeprom bootpathvalue with the value that you set as the alternate boot path (the altbootpath value). Then, thesystemwill boot automatically.
Formore information on using the eeprom command, see the eeprom(1M)man page.
x86: Creating aMirror From the root (/) File SystemByUsingDCA
# metainit -f d1 1 1 c0t0d0s0
d1: Concat/Stripe is setup
# metainit d2 1 1 c0t1d0s0
d2: Concat/Stripe is setup
# metainit d0 -m d1
d0: Mirror is setup
# metaroot d0
# lockfs -fa
# reboot
...
# metattach d0 d2
d0: Submirror d2 is attached
# ls -l /dev/dsk/c0t1d0s0
lrwxrwxrwx 1 root root 88 Feb 8 15:51 /dev/dsk/c1t3d0s0 ->
../../devices/pci@1f,0/pci@1,1/ide@3/dad@0,0:a,raw
# eeprom altbootpath=/pci@1f,0/pci@1,1/ide@3/dad@0,0:a,raw
# fdisk -b /usr/lib/fs/ufs/mboot /dev/dsk/c0t1d0p0
Total disk size is 31035 cylinders
Example 11–7
Creating a RAID-1 Volume
Solaris VolumeManagerAdministration Guide • May 2006126

Cylinder size is 1146 (512 byte) blocks
Cylinders
Partition Status Type Start End Length %
========= ====== ============ ===== === ====== ===
1 Active Solaris 1 31034 31034 100
SELECT ONE OF THE FOLLOWING:
1. Create a partition
2. Specify the active partition
3. Delete a partition
4. Change between Solaris and Solaris2 Partition IDs
5. Exit (update disk configuration and exit)
6. Cancel (exit without updating disk configuration)
Enter Selection: 5
# installboot /usr/platform/i86pc/lib/fs/ufs/pboot \
/usr/platform/i86pc/lib/fs/ufs/bootblk /dev/rdsk/c0t1d0s2
UnderstandingBoot TimeWarningsWhenMirroringthe root (/) File SystemAfter youmirror your root (/) file system, errormessages will be displayed in the console and loggedin the system log that is defined in the /etc/syslog.conf file. These errormessages do not indicate aproblem. Thesemessages are displayed for each device type that you are not currently using, becausean unusedmodule cannot be force loaded. The errormessages are similar to the following:
Jul 13 10:17:42 ifr genunix: [ID 370176 kern.warning] WARNING: forceload of
misc/md_trans failed
Jul 13 10:17:42 ifr genunix: [ID 370176 kern.warning] WARNING: forceload of
misc/md_raid failed
Jul 13 10:17:42 ifr genunix: [ID 370176 kern.warning] WARNING: forceload of
misc/md_hotspares failed
You can safely disregard these errormessages.
Creating a RAID-1 Volume
Chapter 11 • RAID-1 (Mirror) Volumes (Tasks) 127
WorkingWith Submirrors
� How toAttach a Submirror
Note – An error message stating “can’t attach labeled submirror to an unlabeled mirror”indicates that you unsuccessfully attempted to attach a RAID-0 volume to amirror.A labeled volume(submirror) is a volumewhose first component starts at cylinder 0, while an unlabeled volume’s firstcomponent starts at cylinder 1. To prevent the labeled submirror’s label from being corrupted,Solaris VolumeManager does not allow labeled submirrors to be attached to unlabeledmirrors.
Read “Creating andMaintaining RAID-1 Volumes” on page 97.
Identify the component (concatenation or stripe) to be used as a submirror.
The componentmust be the same size as, or larger than the existing submirror in themirror. If youhave not yet created a volume to be a submirror, see “Creating RAID-0 (Stripe) Volumes” on page 84or “Creating RAID-0 (Concatenation) Volumes” on page 85.
Make sure that youhave root privilege and that youhave a current backupof all data.
Verify that the status of themirror youwant toworkwith is in an “Okay” state using the metastatcommand.# metastat mirror
Use one of the followingmethods to attach a submirror.
� From the Enhanced Storage tool within the SolarisManagement Console, open the Volumesnode. Choose themirror. Then, chooseAction⇒Properties and click the Submirror tab. Followthe onscreen instructions. Formore information, see the online help.
� Use the metattach mirror submirror command.
# metattach mirror submirror
See the metattach(1M)man page formore information.
View the status of themirror using the metastat command.# metastat mirror
Attaching a Submirror
# metastat d30
d30: mirror
BeforeYouBegin
1
2
3
4
5
Example 11–8
WorkingWith Submirrors
Solaris VolumeManagerAdministration Guide • May 2006128

Submirror 0: d60
State: Okay
...
# metattach d30 d70
d30: submirror d70 is attached
# metastat d30
d30: mirror
Submirror 0: d60
State: Okay
Submirror 1: d70
State: Resyncing
Resync in progress: 41 % done
Pass: 1
Read option: roundrobin (default)
Write option: parallel (default)
Size: 2006130 blocks
...
This example shows the attaching of a submirror, d70, to a one-waymirror, d30. You create atwo-waymirror when your attach the submirror to themirror. Themirror d30 initially consists ofsubmirror d60. The submirror d70 is a RAID-0 volume. You verify that the status of themirror is“Okay” with the metastat command, then attach the submirror.When the metattach command isrun, the new submirror is resynchronized with the existingmirror.When you attach an additionalsubmirror to themirror, the system displays amessage. To verify that themirror is resynchronizing,use the metastat command.
� How toDetach a SubmirrorRead “Creating andMaintaining RAID-1 Volumes” on page 97.
Make sure that youhave root privilege.Make sure that youhave a current backupof all data.
Verify that the status of themirror youwant toworkwith is in an “Okay” state using the metastatcommand.
Use one of the followingmethods to detach a submirror.
� From the Enhanced Storage tool within the SolarisManagement Console, open the Volumesnode. Choose themirror. Then, chooseAction⇒Properties and click the Submirror tab. Followthe onscreen instructions. Formore information, see the online help.
� Use the metadetach command to detach a submirror from amirror.
# metadetach mirror submirror
See the metadetach(1M)man page formore information.
BeforeYouBegin
1
2
3
WorkingWith Submirrors
Chapter 11 • RAID-1 (Mirror) Volumes (Tasks) 129

Detaching a Submirror
# metastat
d5: mirror
Submirror 0: d50
...
# metadetach d5 d50
d5: submirror d50 is detached
In this example, mirror d5 has a submirror, d50. You detach the submirror with the metadetachcommand. The underlying slices from d50 can be reused elsewhere.After the submirror is detachedfrom themirror, the system displays a confirmationmessage.
� How toPlace a SubmirrorOffline andOnlineThe metaonline command can only be used when a submirror was taken offline by the metaofflinecommand.After the metaonline command runs, Solaris VolumeManager automatically beginsresynchronizing the submirror with themirror.
Note –The metaoffline command’s capabilities are similar to the capabilities offered by themetadetach command. However, the metaoffline command does not sever the logical associationbetween the submirror and themirror.
Read “Creating andMaintaining RAID-1 Volumes” on page 97.
Make sure that youhave root privilege and that youhave a current backupof all data.
Use one of the followingmethods to place a submirror online or offline.
� From the Enhanced Storage tool within the SolarisManagement Console, open the Volumesnode. Choose themirror. Then, chooseAction⇒Properties and click the Submirror tab. Followthe onscreen instructions . Formore information, see the online help.
� Use the metaoffline command to a submirror offline.
# metaoffline mirror submirror
See the metaoffline(1M)man page formore information.� Use the metaonline command to place a submirror online.
# metaonline mirror submirror
See the metaonline(1M)man page formore information.
Example 11–9
BeforeYouBegin
1
2
WorkingWith Submirrors
Solaris VolumeManagerAdministration Guide • May 2006130

Placing a Submirror Offline
# metaoffline d10 d11
d10: submirror d11 is offlined
In this example, submirror d11 is taken offline frommirror d10. Reads continue to bemade from theother submirror. Themirror is out of sync as soon as the first write is made. This inconsistency iscorrected when the offlined submirror is brought back online.
Placing a Submirror Online
# metaonline d10 d11d10: submirror d11 is onlined
In this example, submirror d11 is brought back online inmirror d10.
� How toEnable a Slice in a SubmirrorRead “Overview of Replacing and Enabling Components in RAID-1 and RAID-5 Volumes” on page224 and “Creating andMaintaining RAID-1 Volumes” on page 97.
Make sure that youhave root privilege and that youhave a current backupof all data.
Use one of the followingmethods to enable a slice in a submirror.
� From the Enhanced Storage tool within the SolarisManagement Console, open the Volumesnode. Choose themirror. Then, chooseAction⇒Properties and click the Submirror tab. Followthe onscreen instructions. Formore information, see the online help.
� Use the metareplace command to enable a failed slice in a submirror.
# metareplace -e mirror failed-slice
The metareplace command automatically starts a resynchronization to synchronize the repairedor replaced slice with the rest of themirror.
See the metareplace(1M)man page formore information.
Enabling a Slice in a Submirror
# metareplace -e d11 c1t4d0s7
d11: device c1t4d0s7 is enabled
In this example, themirror d11 has a submirror that contains slice, c1t4d0s7, which had a soft error.The metareplace commandwith the -e option enables the failed slice.
Example 11–10
Example 11–11
BeforeYouBegin
1
2
Example 11–12
WorkingWith Submirrors
Chapter 11 • RAID-1 (Mirror) Volumes (Tasks) 131

If a physical disk is defective, you can replace it with another available disk (and its slices) on thesystem as documented in “How to Replace a Slice in a Submirror” on page 136.Alternatively, you canrepair or replace the disk, format it, and then run the metareplace commandwith the -e option asshown in this example.
MaintainingRAID-1Volumes
� How toView the Status ofMirrors andSubmirrorsFor an overview of the status information associated with RAID-1 volumes and submirrors, see“Understanding Submirror Status to DetermineMaintenanceActions” on page 101.
Use one of the followingmethods to the checkmirror or submirror status.
� From the Enhanced Storage tool within the SolarisManagement Console, open the Volumesnode. Choose themirror. Then, chooseAction⇒Properties. Follow the onscreen instructions.Formore information, see the online help.
� Run the metastat command on themirror to view the status of each submirror.
# metastat mirror
See “How to Change RAID-1 VolumeOptions” on page 134 to change amirror’s pass number,read option, or write option.
See metastat(1M) formore information about checking device status.
Checking Status of RAID-1 Volumes
Here is sample output from the metastat command. Use metastat commandwithout amirrorname to display all the status of all mirrors.
# metastatd70: Mirror
Submirror 0: d71
State: Okay
Pass: 1
Read option: roundrobin (default)
Write option: parallel (default)
Size: 12593637 blocks
d71: Submirror of d70
State: Okay
Size: 12593637 blocks
Stripe 0:
Device Start Block Dbase State Reloc Hot Spare
BeforeYouBegin
◗
Example 11–13
Maintaining RAID-1 Volumes
Solaris VolumeManagerAdministration Guide • May 2006132

c1t3d0s3 0 No Okay Yes
Stripe 1:
Device Start Block Dbase State Reloc Hot Spare
c1t3d0s4 0 No Okay Yes
Stripe 2:
Device Start Block Dbase State Reloc Hot Spare
c1t3d0s5 0 No Okay Yes
d0: Mirror
Submirror 0: d1
State: Okay
Submirror 1: d2
State: Okay
Pass: 1
Read option: roundrobin (default)
Write option: parallel (default)
Size: 5600 blocks
d1: Submirror of d0
State: Okay
Size: 5600 blocks
Stripe 0:
Device Start Block Dbase State Hot Spare
c0t2d0s7 0 No Okay
...
Use the metastat commandwith amirror name argument to display output for a specificmirror.
metastat d70
d70: Mirror
Submirror 0: d71
State: Okay
Pass: 1
Read option: roundrobin (default)
Write option: parallel (default)
Size: 12593637 blocks
d71: Submirror of d70
State: Okay
Size: 12593637 blocks
Stripe 0:
Device Start Block Dbase State Reloc Hot Spare
c1t3d0s3 0 No Okay Yes
Stripe 1:
Device Start Block Dbase State Reloc Hot Spare
c1t3d0s4 0 No Okay Yes
Stripe 2:
Device Start Block Dbase State Reloc Hot Spare
Maintaining RAID-1 Volumes
Chapter 11 • RAID-1 (Mirror) Volumes (Tasks) 133

c1t3d0s5 0 No Okay Yes
For each submirror in themirror, the metastat command shows the status, an “invoke” line if thereis an error, the assigned hot spare pool (if any), the size in blocks, and information about each slice inthe submirror.
� How toChangeRAID-1VolumeOptionsCheck “About RAID-1 VolumeOptions” on page 99.
Make sure that youhave root privilege and that youhave a current backupof all data.
Use one of the followingmethods to change the RAID-1 options.
� From the Enhanced Storage tool within the SolarisManagement Console, open the Volumesnode. Choose themirror. Then, chooseAction⇒Properties. Follow the onscreen instructions.Formore information, see the online help.
� Use the metaparam command to display and change amirror’s options.
# metaparam [mirror options] mirror
See “About RAID-1 VolumeOptions” on page 99 for a description ofmirror options.Also, seethe metaparam(1M)man page.
Changing a RAID-1 Volume’s Read Policy
# metaparam -r geometric d30
# metaparam d30
d30: mirror current parameters are:
Pass: 1
Read option: geometric (-g)
Write option: parallel (default)
In this example, the -r option changes amirror’s read policy to geometric.
Changing a RAID-1 Volume’sWrite Policy
# metaparam -w serial d40
# metaparam d40
d40: mirror current parameters are:
Pass: 1
Read option: roundrobin (default)
Write option: serial (-S)
In this example, the -w option changes amirror’s write policy to serial.
BeforeYouBegin
1
2
Example 11–14
Example 11–15
Maintaining RAID-1 Volumes
Solaris VolumeManagerAdministration Guide • May 2006134

Changing a RAID-1 Volume’s Pass Number
# metaparam -p 5 d50
# metaparam d50
d50: mirror current parameters are:
Pass: 5
Read option: roundrobin (default)
Write option: parallel (default)
In this example, the -p option changes amirror’s pass number to 5.
� How toExpandaRAID-1VolumeRead “Creating andMaintaining RAID-1 Volumes” on page 97.
Make sure that youhave root privilege and that youhave a current backupof all data.
Use one of the followingmethods to expand amirror.
� From the Enhanced Storage tool within the SolarisManagement Console, open the Volumesnode. Choose themirror. Then, chooseAction->Properties and click the Submirror tab. Followthe onscreen instructions. Formore information, see the online help.
� Use the metattach command to attach additional slices to each submirror.
# metattach submirror slice
Each submirror in amirrormust be expanded. See the metattach(1M)man page formoreinformation.
Use the metattach command to cause themirror to recompute its size based on the size of thesubmirror.# metattach mirror
Expanding a Two-WayMirror That Contains aMounted File System
# metastat
d8: Mirror
Submirror 0: d9
State: Okay
Submirror 1: d10
State: Okay
...
# metattach d9 c0t2d0s5
d9: component is attached
# metattach d10 c0t3d0s5
Example 11–16
BeforeYouBegin
1
2
3
Example 11–17
Maintaining RAID-1 Volumes
Chapter 11 • RAID-1 (Mirror) Volumes (Tasks) 135

d10: component is attached
# metattach d8
This example shows how to expand amirrored, mounted file system by concatenating two diskdrives to themirror’s two submirrors. Themirror is named d8 and contains two submirrors namedd9 and d10.
For a UFS, run the growfs(1M) command on themirror volume. See “How to Expand a File System”on page 223.
An application, such as a database, that uses the raw volumemust have its ownway of expanding theadded storage.
Responding toRAID-1VolumeComponent Failures
� How toReplace a Slice in a SubmirrorRead “Overview of Replacing and Enabling Components in RAID-1 and RAID-5 Volumes” on page224 and “Creating andMaintaining RAID-1 Volumes” on page 97.
Make sure that youhave root privilege and that youhave a current backupof all data.
Use the metastat command to view the status of the RAID-1 volumeand associated submirrors.# metastat mirror-name
Use one of the followingmethods to replace a slice in a submirror.
� From the Enhanced Storage tool within the SolarisManagement Console, open the Volumesnode. Choose themirror. Then, chooseAction⇒Properties and click the Submirror tab. Followthe onscreen instructions. Formore information, see the online help.
� Use the following form of the metareplace command to replace a slice in a submirror:
# metareplace mirror-name component-name
� mirror-name is the name of the volume to create.� component-name specifies the name of the component to replace.
mirror-name Specifies the name of the volume to create
component-name Specifies the name of the component to replace
See the following examples and the metainit(1M)man page formore information.
SeeAlso
BeforeYouBegin
1
2
3
Responding to RAID-1 VolumeComponent Failures
Solaris VolumeManagerAdministration Guide • May 2006136

Replacing a Failed Slice in aMirror
The following example illustrates how to replace a failed slice when the system is not configured touse hot spare pools for the automatic replacement of failed disks. See Chapter 16 formoreinformation about using hot spare pools.
# metastat d6
d6: Mirror
Submirror 0: d16
State: Okay
Submirror 1: d26
State: Needs maintenance
...
d26: Submirror of d6
State: Needs maintenance
Invoke: metareplace d6 c0t2d0s2 <new device>
...
# metareplace d6 c0t2d0s2 c0t2d2s2
d6: device c0t2d0s2 is replaced with c0t2d2s2
The metastat command confirms that mirror d6 has a submirror, d26, with a slice in the “Needsmaintenance” state. The metareplace command replaces the slice as specified in the “Invoke” line ofthe metastat output with another available slice on the system. The system confirms that the slice isreplaced, and starts resynchronizing the submirror.
� How toReplace a SubmirrorRead “Overview of Replacing and Enabling Components in RAID-1 and RAID-5 Volumes” on page224 and “Creating andMaintaining RAID-1 Volumes” on page 97.
Make sure that youhave root privilege and that youhave a current backupof all data.
Use the metastat command to view the status of the RAID-1 volumeand associated submirrors.# metastat mirror-name
Use one of the followingmethods to replace a submirror.
� From the Enhanced Storage tool within the SolarisManagement Console, open the Volumesnode. Choose themirror. Then, chooseAction⇒Properties and click the Submirror tab. Followthe onscreen instructions. Formore information, see the online help.
� Use the metadetach, metaclear, metatinit, and metattach commands to replace an entiresubmirror.
a. Use the metadetach command to the failed submirror from themirror.
# metadetach -f mirror-name submirror
Example 11–18
BeforeYouBegin
1
2
3
Responding to RAID-1 VolumeComponent Failures
Chapter 11 • RAID-1 (Mirror) Volumes (Tasks) 137

-f Forces the detach to occur
mirror-name Specifies the name of themirror
submirror Specifies the submirror to detachb. Use the metaclear command to delete the submirror.
# metaclear -f submirror
-f Forces the deletion of the submirror to occur
submirror Specifies the submirror to deletec. Use the metainit command to create a new submirror.
# metainit volume-name number-of-stripes components-per-stripe component-name
volume-name Specifies the name of the volume to create. For information onnaming volumes, see “VolumeNames” on page 42.
number-of-stripes Specifies the number of stripes to create.
components-per-stripe Specifies the number of components each stripe should have.
component-names Specifies the names of the components that are used. This exampleuses the root slice, c0t0d0s0.
d. Use the metattach command to attach the new submirror.
# metattach mirror submirror
Replacing a Submirror in aMirror
The following example illustrates how to replace a submirror in an activemirror.
# metastat d20
d20: Mirror
Submirror 0: d21
State: Okay
Submirror 1: d22
State: Needs maintenance
...
# metadetach -f d20 d22
d20: submirror d22 is detached
# metaclear -f d22
d22: Concat/Stripe is cleared
# metainit d22 2 1 c1t0d0s2 1 c1t0d1s2
d22: Concat/Stripe is setup
# metattach d20 d22
d20: components are attached
In this example, the metastat command confirms that the two-waymirror, d20, has a submirror,d22, in the “Needsmaintenance” state. In this case, the entire submirror needs to be cleared and
Example 11–19
Responding to RAID-1 VolumeComponent Failures
Solaris VolumeManagerAdministration Guide • May 2006138

recreated. The metadetach command detaches the failed submirror from themirror by using the -foption, which forces the detachment to occur. The metaclear command clears the submirror. Themetainit command recreates submirror, d22, with new slices. Finally, the metattach commandattaches the rebuilt submirror.Amirror resynchronization begins automatically.
The specific configuration of the new volume, d22, depends on the component you are replacing.Aconcatenation, as shown here, can sufficiently replace a concatenation. However, a concatenationwould not be an ideal replacement for a stripe because it could impact performance.
You temporarily lose the capability for data redundancy while themirror is a one-waymirror.
RemovingRAID-1Volumes (Unmirroring)
� How toUnmirror a File SystemUse this procedure to unmirror a file system that can be unmounted while the system is running. Tounmirror root (/), /var, /usr, or swap, or any other file system that cannot be unmounted while thesystem is running, see “How toUnmirror a File SystemThat Cannot Be Unmounted” on page 141.
Read “Creating andMaintaining RAID-1 Volumes” on page 97.
Make sure that youhave root privilege and that youhave a current backupof all data.
Verify that at least one submirror is in theOkay state.# metastat mirror
Unmount the file system.# umount /file-system
Detach the submirror thatwill continue to be used for the file system.# metadetach mirror submirror
Formore information, see the metadetach(1M)man page.
Clear themirror and remaining subcomponents.# metaclear -r mirror
Formore information, see the metaclear(1M)man page.
Edit the /etc/vfstab file to use the component detached in Step 4, if necessary.
BeforeYouBegin
1
2
3
4
5
6
Removing RAID-1 Volumes (Unmirroring)
Chapter 11 • RAID-1 (Mirror) Volumes (Tasks) 139

Remount the file system.# mount /file-system
Unmirroring the /opt File System
# metastat d4
d4: Mirror
Submirror 0: d2
State: Okay
Submirror 1: d3
State: Okay
Pass: 1
Read option: roundrobin (default)
Write option: parallel (default)
Size: 2100735 blocks (1.0 GB)
d2: Submirror of d4
State: Okay
Size: 2100735 blocks (1.0 GB)
Stripe 0:
Device Start Block Dbase State Reloc Hot Spare
c0t0d0s0 0 No Okay Yes
d3: Submirror of d4
State: Okay
Size: 2100735 blocks (1.0 GB)
Stripe 0:
Device Start Block Dbase State Reloc Hot Spare
c1t0d0s0 0 No Okay Yes
...
# umount /opt
# metadetach d4 d2
d4: submirror d2 is detached
# metaclear -r d4
d4: Mirror is cleared
d3: Concat/Stripe is cleared
(Edit the /etc/vfstab file so that the entry for /opt is changed from d4 to the underlying slice or volume)# mount /opt
In this example, the /opt file system is composed of a two-waymirror, d4. The submirrors of themirror are d2 and d3. The submirrors are composed of slices /dev/dsk/c0t0d0s0 and/dev/dsk/c1t0d0s0. The metastat command verifies that at least one submirror is in the “Okay”state. (Amirror with no submirrors in the “Okay” state must be repaired first.) The file system isunmounted. Then, submirror d2 is detached. The metaclear -r command deletes the mirror andthe other submirror, d3.
7
Example 11–20
Removing RAID-1 Volumes (Unmirroring)
Solaris VolumeManagerAdministration Guide • May 2006140

Next, the entry for /opt in the /etc/vfstab file is changed to reference the underlying slice.
In this example the /etc/vfstab file contains the following entry for the /opt file system:
/dev/md/dsk/d4 /dev/md/rdsk/d4 /opt ufs 2 yes -
Change the entry to read as follows:
/dev/md/dsk/d2 /dev/md/rdsk/d2 /opt ufs 2 yes -
By using the submirror name, you can continue to have the file systemmounted on a volume. Finally,the /opt file system is remounted.
By using d2 instead of d4 in the /etc/vfstab file, you have unmirrored themirror. Because d2consists of a single slice, you canmount the file system on the slice name (/dev/dsk/c0t0d0s0) ifyou do not want the device to support a volume.
� How toUnmirror a File SystemThat CannotBeUnmountedUse this task to unmirror file systems, including root (/), /usr, /opt, and swap, that cannot beunmounted during normal system operation.
Make sure that youhave root privilege and that youhave a current backupof all data.
Verify that at least one submirror is in theOkay state.# metastat mirror
Detach the submirror thatwill continue to be used for the file system.# metadetach mirror submirror
Formore information, see the metadetach(1M)man page.
Use one of the following commands, depending the file systemyouwant to unmirror:
� For the /usr, /opt, or swap file systems, change the file system entry in the /etc/vfstab file touse a non-Solaris VolumeManager device (slice).
� For the root (/) file system only: run the metaroot command.
# metaroot rootslice
Formore information, see the metaroot(1M)man page.
Reboot the system.# reboot
1
2
3
4
5
Removing RAID-1 Volumes (Unmirroring)
Chapter 11 • RAID-1 (Mirror) Volumes (Tasks) 141

Clear the remainingmirror and submirrors.# metaclear -r mirror
Formore information, see the metaclear(1M)man page.
Unmirroring the root (/) File System
# metastat d0
d0: Mirror
Submirror 0: d10
State: Okay
Submirror 1: d20
State: Okay
Pass: 1
Read option: roundrobin (default)
Write option: parallel (default)
Size: 2100735 blocks (1.0 GB)
d10: Submirror of d0
State: Okay
Size: 2100735 blocks (1.0 GB)
Stripe 0:
Device Start Block Dbase State Reloc Hot Spare
c0t3d0s0 0 No Okay Yes
d20: Submirror of d0
State: Okay
Size: 2100735 blocks (1.0 GB)
Stripe 0:
Device Start Block Dbase State Reloc Hot Spare
c1t3d0s0 0 No Okay Yes
# metadetach d0 d20
d0: submirror d20 is detached
# metaroot /dev/dsk/c0t3d0s0
# reboot
...
# metaclear -r d0
d0: Mirror is cleared
d10: Concat/Stripe is cleared
# metaclear d20
d20: Concat/Stripe is cleared
In this example, the root (/) file system is a two-waymirror, d0. The submirrors of themirror are d10and d20. The submirrors are composed of slices /dev/dsk/c0t3d0s0 and /dev/dsk/c1t3d0s0. The
6
Example 11–21
Removing RAID-1 Volumes (Unmirroring)
Solaris VolumeManagerAdministration Guide • May 2006142

metastat command verifies that at least one submirror is in the “Okay” state. (Amirror with nosubmirrors in the “Okay” state must be repaired first.) Submirror d20 is detached tomake d0 aone-waymirror.
The rootslice is the slice containing the root (/) file system. The metaroot command is run, using therootslice fromwhich the system is going to boot. This command edits the /etc/system and/etc/vfstab files. The command removes information that specifiesmirroring of the root (/) filesystem.
After rebooting the system, the metaclear -r command deletes the mirror and the other submirror,d10. The last metaclear command clears submirror d20.
Unmirroring the swap File System
# metastat d1
d1: Mirror
Submirror 0: d11
State: Okay
Submirror 1: d21
State: Okay
...
# metadetach d1 d21
d1: submirror d21 is detached
(Edit the /etc/vfstab file to change the entry for swap frommetadevice to slice name)# reboot
...
# metaclear -r d1
d1: Mirror is cleared
d11: Concat/Stripe is cleared
# metaclear d21
d21: Concat/stripe is cleared
In this example, the swap file system ismade of a two-waymirror, d1. The submirrors of themirrorare d11 and d21. The submirrors are composed of slices /dev/dsk/c0t3d0s1 and/dev/dsk/c1t3d0s1. The metastat command verifies that at least one submirror is in the “Okay”state. (Amirror with no submirrors in the “Okay” state must be repaired first.) Submirror d21 isdetached tomake d1 a one-waymirror. Next, the /etc/vfstab file is edited to change the entry forswap to reference the slice that is in submirror d21.
In this example, the /etc/vfstab file contains the following entry for the swap file system:
/dev/md/dsk/d4 /dev/md/rdsk/d4 /opt ufs 2 yes -
/dev/md/dsk/d1 - - swap - no -
Change the entry to read as follows:
/dev/dsk/c0t3d0s1 - - swap - no -
Example 11–22
Removing RAID-1 Volumes (Unmirroring)
Chapter 11 • RAID-1 (Mirror) Volumes (Tasks) 143

After rebooting the system, the metaclear -r command deletes the mirror and the other submirror,d11. The final metaclear command clears submirror d21.
BackingUpData onaRAID-1VolumeSolaris VolumeManager is notmeant to be a “backup product.” Solaris VolumeManager doesprovide ameans for backing upmirrored data without causing any of the following to occur:
� Unmounting themirror� Taking the entire mirror offline� Halting the system� Denying users access to data
Solaris VolumeManager backs upmirrored data by first taking one of the submirrors offline. Duringthe backup, mirroring is temporarily unavailable.As soon as the backup is complete, the submirror isthen placed back online and resynchronized.
Note –TheUFS Snapshots feature provides an alternative way to backup a systemwithout taking thefile system offline. You can perform the backup without detaching the submirror and incurring theperformance penalty of resynchronizing themirror later. Before performing a backup using the UFSSnapshots feature, make sure you have enough space available on your UFS file system. Formoreinformation, see Chapter 26, “Using UFS Snapshots (Tasks),” in SystemAdministration Guide:Devices and File Systems.
� How toPerformanOnlineBackupof aRAID-1VolumeYou can use this procedure on any file system except the root (/) file system. Be aware that this type ofbackup creates a “snapshot” of an active file system. Depending on how the file system is being usedwhen it is write-locked, some files on the backupmight not correspond to the actual files on disk.
The following limitations apply to this procedure:
� If you use this procedure on a two-waymirror, be aware that data redundancy is lost while onesubmirror is offline for backup.Amulti-waymirror does not have this problem.
� There is some overhead on the systemwhen the reattached submirror is resynchronized after thebackup is complete.
The high-level steps in this procedure are as follows:
� Write-locking the file system (UFS only). Do not lock root (/).� Flushing all data from cache to disk.� Using the metadetach command to take one submirror off of themirror� Unlocking the file system
BackingUpData on a RAID-1 Volume
Solaris VolumeManagerAdministration Guide • May 2006144

� Using the fsck command to check the file system on the detached submirror� Backing up the data on the detached submirror� Using the metattach command to place the detached submirror back in themirror
Note – If you use these procedures regularly, put them into a script for ease of use.
Tip –The safer approach to this process is to attach a third or fourth submirror to themirror, allow itto resynchronize, and use it for the backup. This technique ensures that data redundancy ismaintained at all times.
Verify that themirror is in the “Okay” state.
Amirror that is in the “Maintenance” state should be repaired first.# metastat mirror
Flush data andUFS loggingdata fromcache to disk andwrite-lock the file system.# /usr/sbin/lockfs -w mount-point
Only a UFS volume needs to be write-locked. If the volume is set up as a raw device for databasemanagement software or some other application, running the lockfs command is not necessary.Youmight, however, want to run the appropriate vendor-supplied utility to flush any buffers andlock access.
Caution –Do not write-lock the root (/) file system.Write-locking the root (/) file system causes thesystem to hang. If you are backing up your root (/) file system, skip this step.
Detach one submirror from themirror.# metadetach mirror submirror
mirror Is the volume name of themirror.
submirror Is the volume name of the submirror (volume) being detached.
Reads continue to bemade from the other submirror. Themirror is out of sync as soon as the firstwrite is made. This inconsistency is corrected when the detached submirror is reattached in Step 7.
Unlock the file systemand allowwrites to continue.# /usr/sbin/lockfs -u mount-point
Youmight need to perform necessary unlocking procedures based on vendor-dependent utilitiesused in Step 2.
1
2
3
4
BackingUpData on a RAID-1 Volume
Chapter 11 • RAID-1 (Mirror) Volumes (Tasks) 145

Use the fsck command to check the file systemon the detached submirror. This step ensures a cleanbackupoccurs.# fsck /dev/md/rdsk/name
Performabackupof the offlined submirror.
Use the ufsdump command or your usual backup utility. For information on performing the backupusing the ufsdump command, see “PerformingMounted Filesystem Backups Using the ufsdumpCommand” on page 298.
Note –To ensure a proper backup, use the raw volume name, such as /dev/md/rdsk/d4. Using theraw volume name access to storage that is greater than 2 Gbytes.
Attach the submirror.# metattach mirror submirror
Solaris VolumeManager automatically begins resynchronizing the submirror with themirror.
Performing anOnline Backup of a RAID-1 Volume
This example uses amirror, d1. Themirror consists of submirrors d2, d3 and d4. The submirror d3 isdetached and backed up while submirrors d2 and d4 stay online. The file system on themirror is/home1.
# metastat d1
d1: Mirror
Submirror 0: d2
State: Okay
Submirror 1: d3
State: Okay
Submirror 1: d4
State: Okay
...
# /usr/sbin/lockfs -w /home1
# metadetach d1 d3
# /usr/sbin/lockfs -u /home1
# /usr/sbin/fsck /dev/md/rdsk/d3
(Perform backup using /dev/md/rdsk/d3)# metattach d1 d3
5
6
7
Example 11–23
BackingUpData on a RAID-1 Volume
Solaris VolumeManagerAdministration Guide • May 2006146

Soft Partitions (Overview)
This chapter provides information about Solaris VolumeManager soft partitions. For informationabout related tasks, see Chapter 13.
This chapter contains the following information:
� “Overview of Soft Partitions” on page 147� “Configuration Guidelines for Soft Partitions” on page 148
Overviewof Soft PartitionsAs the storage capacity of disks has increased, disk arrays present larger logical devices to Solarissystems. In order to createmoremanageable file systems or partition sizes, users might need tosubdivide disks or logical volumes intomore than eight partitions. Solaris VolumeManager’s softpartition feature addresses this need.
Solaris VolumeManager can support up to 8192 logical volumes per disk set. This number includesthe local, or unspecified, disk set. Solaris VolumeManager configures volumes dynamically as theyare needed.
You can use soft partitions to divide a disk slice or logical volume into asmany partitions as needed.Youmust provide a name for each division, or soft partition, just like you do for other storagevolumes, such as stripes ormirrors.Asoft partition, once named, can be accessed by applications,including file systems, as long as the soft partition is not included in another volume. Once includedin a volume, the soft partition should no longer be directly accessed.
Soft partitions can be placed directly above a disk slice, or on top of amirror, stripe, or RAID-5volume.Asoft partitionmay not be both above and below other volumes. For example, a softpartition built on a stripe with amirror built on the soft partition is not allowed.
Asoft partition appears to file systems and other applications as a single contiguous logical volume.However, the soft partition actually comprises a series of extents that could be located at arbitrary
12C H A P T E R 1 2
147
locations on the underlyingmedia. In addition to the soft partitions, extent headers (also calledsystem recovery data areas) on disk record information about the soft partitions to facilitate recoveryin the event of a catastrophic system failure.
ConfigurationGuidelines for Soft Partitions� Slices that are used for soft partitions cannot be used for other purposes.� When you partition a disk and build file systems on the resulting slices, you cannot later extend a
slice withoutmodifying or destroying the disk format. Soft partitions behave differently. You canextend a soft partition up to the amount of space on the underlying device withoutmoving ordestroying data on other soft partitions.
� While it is technically possible tomanually place extents of soft partitions at arbitrary locationson disk, you should allow the system to place them automatically. For an example of an extentthat has beenmanually placed, see the output of the metastat command in “Viewing the SolarisVolumeManager Configuration” on page 212.
� You can build soft partitions on any slice. However, creating a single slice that occupies the entiredisk and then creating soft partitions on that slice is themost efficient way to use soft partitions atthe disk level.
� Themaximum size of a soft partition is limited to the size of the slice or logical volume onwhichit is built. Because of this limitation, you should build a volume on top of your disk slices, thenbuild soft partitions on top of the volume. This strategy allows you to add components to thevolume later, and then expand the soft partitions as needed.
� Formaximumflexibility and high availability, build RAID-1 (mirror) or RAID-5 volumes ondisk slices, then create soft partitions on themirror or RAID-5 volume.
Scenario—Soft PartitionsSoft partitions provide tools with which to subdivide larger storage spaces intomoremanageablespaces. For example, in other scenarios (“Scenario—RAID-1 Volumes (Mirrors)” on page 103 or“Scenario—RAID-5 Volumes” on page 162), large storage aggregations provided redundant storageof many gigabytes. However, many possible scenarios would not initially, require somuch space. Softpartitions allow you to subdivide that storage space intomoremanageable partitions. Each of thosepartitions can have a complete file system. For example, you could create 1000 soft partitions on topof a RAID-1 or RAID-5 volume so that each of your users can have a home directory on a separatefile system. If a user needsmore space, you could simply expand the soft partition.
Configuration Guidelines for Soft Partitions
Solaris VolumeManagerAdministration Guide • May 2006148
Soft Partitions (Tasks)
This chapter provides information about performing tasks that are associated with Solaris VolumeManager soft partitions. For conceptual information regarding soft partitions, see Chapter 12.
Soft Partitions (TaskMap)The following taskmap identifies the procedures that are needed tomanage Solaris VolumeManagersoft partitions.
Task Description For Instructions
Create soft partitions Use the Solaris VolumeManager GUI or themetainit command to create soft partitions.
“How to Create a Soft Partition”on page 150
Check the status of softpartitions
Use the Solaris VolumeManager GUI or themetastat command to check the status ofsoft partitions.
“How to Check the Status of aSoft Partition” on page 151
Expand soft partitions Use the Solaris VolumeManager GUI or themetattach command to expand softpartitions.
“How to Expand a SoftPartition” on page 152
Remove soft partitions Use the Solaris VolumeManager GUI or themetaclear command to remove softpartitions.
“How to Remove a SoftPartition” on page 153
13C H A P T E R 1 3
149

Creating Soft Partitions
� How toCreate a Soft PartitionCheck the “Configuration Guidelines for Soft Partitions” on page 148.
Use one of the followingmethods to create a soft partition:
� From the Enhanced Storage tool within the SolarisManagement Console, open the Volumesnode. ChooseAction⇒Create Volume. Then, follow the instructions in the wizard. Formoreinformation, see the online help.
� To create a soft partition, use the following form of the metainit command:
# metainit [-s diskset] soft-partition -p [-e] component size
-sdiskset Specifies which disk set is being used. If -s is not specified, the local (default)disk set is used.
-p Specifies that a soft partition be configured.
-e Specifies that the entire disk should be reformatted. Formatting the diskprovides a slice 0, which takesmost of the disk. Formatting the disk alsoprovides a slice 7 of aminimum of 4Mbytes in size. Slice 7 contains a statedatabase replica.
soft-partition Specifies the name of the soft partition. The name is of the form dnnn, wherennn is a number in a range between 0 and 8192.
component Specifies the disk, slice, or logical volume fromwhich to create the softpartition.All existing data on the component is destroyed because the softpartition headers are written at the beginning of the component.
size Specifies the size of the soft partition. The size is specified as a number followedby one of the following:
� M or m for megabytes� G or g for gigabytes� T or t for terabytes� B or b for blocks (sectors)
See the following examples and the metainit(1M)man page formore information.
Creating a Soft Partition
In the following example, a 4-Gbyte soft partition called d20 is created on c1t3d0s2.
# metainit d20 -p c1t3d0s2 4g
BeforeYouBegin
◗
Example 13–1
Creating Soft Partitions
Solaris VolumeManagerAdministration Guide • May 2006150

Taking aWhole Disk for Soft Partitions
The following example creates a soft partition and formats disk c1t2d0. This action destroys any dataon that disk and creates a new soft partition on slice 0.
# metainit d7 -p -e c1t2d0 1G
Maintaining Soft PartitionsMaintaining soft partitions is no different frommaintaining other logical volumes.
� How toCheck the Status of a Soft PartitionRead the“Configuration Guidelines for Soft Partitions” on page 148.
Use one of the followingmethods to check the status of a soft partition:
� From the Enhanced Storage tool within the SolarisManagement Console, open the Volumesnode. Choose the soft partition that you want tomonitor. Then, chooseAction⇒Properties.Follow the onscreen instructions . Formore information, see the online help.
� To view the existing configuration, use the following form of the metastat command:
# metastat soft-partition
soft-partition Specifies the name of the partition you want to check.
Checking the Status of a Soft Partition
In the following example, the status of soft partition d1 is checked. This soft partition includes twoextents and is built on the RAID-1 volume d100.
# metastat d1
d1: soft partition
component: d100
state: OKAY
size: 42674285 blocks
Extent Start Block Block Count
0 10234 40674285
1 89377263 2000000
d100: Mirror
Submirror 0: d10
State: OKAY
Read option: roundrobin (default)
Write option: parallel (default)
Size: 426742857 blocks
Example 13–2
BeforeYouBegin
◗
Example 13–3
Maintaining Soft Partitions
Chapter 13 • Soft Partitions (Tasks) 151
d10: Submirror of d100
State: OKAY
Hot spare pool: hsp002
Size: 426742857 blocks
Stripe 0: (interlace: 32 blocks)
Device Start Block Dbase State Hot Spare
c3t3d0s0 0 No Okay
� How toExpandaSoft PartitionWhen no other logical volumes have been built on a soft partition, you can add space to the softpartition. Free space is located and used to extend the partition. Existing data is notmoved.
Note – If a soft partition has been used to create another volume (for example, if it is a component of aRAID-0 volume), the soft partition cannot be expanded. Inmost cases, the same objective (providingmore space for the device that contains the soft partition) can be achieved by concatenating othervolumes onto the containing device. See “Expanding Storage Capacity” on page 87 formoreinformation.
Read the “Configuration Guidelines for Soft Partitions” on page 148.
Use one of the followingmethods to expand a soft partition:
� From the Enhanced Storage tool within the SolarisManagement Console, open the Volumesnode. Choose the soft partition that you want to expand, then chooseAction⇒Properties. Followthe onscreen instructions. Formore information, see the online help.
� To add space to a soft partition, use the following form of the metattach command:
# metattach [-s diskset] soft-partition size
diskset Specifies the name of the disk set in which the soft partition exists.
soft-partition Specifies the name of an existing soft partition.
size Specifies the amount of storage space to add.
Expanding a Soft Partition
The following example shows how to attach space to a soft partition. The file system is then expandedusing the growfs commandwhile the soft partition is online andmounted.
BeforeYouBegin
◗
Example 13–4
Maintaining Soft Partitions
Solaris VolumeManagerAdministration Guide • May 2006152

# mount /dev/md/dsk/d20 /home2
# metattach d20 10g
# growfs -M /home2 /dev/md/rdsk/d20
Formore information on the growfs command, see “Expanding a File SystemUsing the growfsCommand” on page 221.
� How toRemovea Soft PartitionRead the “Configuration Guidelines for Soft Partitions” on page 148.
Use one of the followingmethods to delete a soft partition:
� From the Enhanced Storage tool within the SolarisManagement Console, open the Volumesnode. Choose the soft partition that you want to delete. Then chooseAction⇒Properties. Followthe onscreen instructions. Formore information, see the online help.
� To delete a soft partition, use one of the following forms of the metaclear command:
# metaclear [-s diskset] component# metaclear [-s diskset] -r soft-partition# metaclear [-s diskset] -p component
diskset Specifies the disk set in which the soft partition exists.
soft-partition Specifies the soft partition to delete.
-r Specifies to recursively delete logical volumes, but not volumes on whichothers depend.
-p Specifies to purge all soft partitions on the specified component, except thosesoft partitions that are open.
component Specifies the component fromwhich to clear all of the soft partitions.
Removing a Soft Partition
This example shows how to delete all soft partitions on c1t4d2s0.
# metaclear -p c1t4d2s0
BeforeYouBegin
◗
Example 13–5
Maintaining Soft Partitions
Chapter 13 • Soft Partitions (Tasks) 153

154

RAID-5 Volumes (Overview)
This chapter provides conceptual information about Solaris VolumeManager’s RAID-5 volumes.For information about performing related tasks, see Chapter 15.
This chapter contains the following:
� “Overview of RAID-5 Volumes” on page 155� “Background Information for Creating RAID-5 Volumes” on page 159� “Overview of Checking Status of RAID-5 Volumes” on page 160� “Overview of Replacing and Enabling Slices in RAID-5 Volumes” on page 162� “Scenario—RAID-5 Volumes” on page 162
Overviewof RAID-5VolumesRAID level 5 is similar to striping, but with parity data distributed across all components (disk orlogical volume). If a component fails, the data on the failed component can be rebuilt from thedistributed data and parity information on the other components. In Solaris VolumeManager, aRAID-5 volume is a volume that supports RAID level 5.
ARAID-5 volume uses storage capacity equivalent to one component in the volume to storeredundant information (parity). This parity information contains information about user datastored on the remainder of the RAID-5 volume’s components. That is, if you have three components,the equivalent of one component is used for the parity information. If you have five components,then the equivalent of one component is used for parity information. The parity information isdistributed across all components in the volume. Similar to amirror, a RAID-5 volume increases dataavailability, but with aminimum of cost in terms of hardware and only amoderate penalty for writeoperations. However, you cannot use a RAID-5 volume for the root (/), /usr, and swap file systems,or for other existing file systems.
Solaris VolumeManager automatically resynchronizes a RAID-5 volumewhen you replace anexisting component. Solaris VolumeManager also resynchronizes RAID-5 volumes duringrebooting if a system failure or panic took place.
14C H A P T E R 1 4
155

Example—RAID-5VolumeFigure 14–1 illustrates a RAID-5 volume that consists of four disks (components).
The first three data segments are written to ComponentA(interlace 1), Component B (interlace 2),and Component C (interlace 3). The next data segment that is written is a parity segment. This paritysegment is written to Component D (P 1–3). This segment consists of an exclusive OR of the firstthree segments of data. The next three data segments are written to ComponentA(interlace 4),Component B (interlace 5), and Component D (interlace 6). Then, another parity segment is writtento Component C (P 4–6).
This pattern of writing data and parity segments results in both data and parity being spread acrossall disks in the RAID-5 volume. Each drive can be read independently. The parity protects against asingle disk failure. If each disk in this example were 2 Gbytes, the total capacity of the RAID-5volumewould be 6 Gbytes. One drive’s worth of space is allocated to parity.
Overview of RAID-5 Volumes
Solaris VolumeManagerAdministration Guide • May 2006156

P(10-12)
interlace 7
interlace 4
interlace 1
interlace 10
P(7-9)
interlace 5
interlace 2
interlace 11
interlace 8
P(4-6)
interlace 3
Solaris VolumeManager
interlace 12
interlace 11
interlace 10
interlace 9
interlace 8
interlace 7
interlace 6
interlace 5
interlace 4
interlace 3
interlace 2
interlace 1
RAID 5 Volume
ComponentA
ComponentB
ComponentC
interlace 12
interlace 9
interlace 6
P(1-3)
ComponentD
FIGURE 14–1RAID-5VolumeExample
Example—Concatenated (Expanded) RAID-5VolumeThe following figure shows an example of an RAID-5 volume that initially consisted of four disks(components).Afifth disk has been dynamically concatenated to the volume to expand the RAID-5volume.
Overview of RAID-5 Volumes
Chapter 14 • RAID-5 Volumes (Overview) 157

P(10-12, 16)
interlace 7
interlace 4
interlace 1
interlace 10
P(7-9, 15)
interlace 5
interlace 2
interlace 11
interlace 8
P(4-6, 14)
interlace 3
Solaris VolumeManager
ComponentA
ComponentB
ComponentC
interlace 12
interlace 9
interlace 6
P(1-3, 13)
ComponentD
interlace 16
interlace 15
interlace 14
interlace 13
ComponentE
interlace 16
interlace 15
interlace 14
interlace 13
interlace 12
interlace 11
interlace 10
interlace 9
interlace 8
interlace 7
interlace 6
interlace 5
interlace 4
interlace 3
interlace 2
RAID 5 Volume
interlace 1
FIGURE 14–2ExpandedRAID-5VolumeExample
The parity areas are allocated when the initial RAID-5 volume is created. One component’s worth ofspace is allocated to parity, although the actual parity blocks are distributed across all of the originalcomponents to distribute I/O.When additional components are concatenated to the RAID-5volume, the additional space is devoted entirely to data. No new parity blocks are allocated. The dataon the concatenated component is, however, included in the parity calculations, so the data isprotected against single device failures.
Concatenated RAID-5 volumes are not suited for long-term use. Use a concatenated RAID-5 volumeuntil it is possible to reconfigure a larger RAID-5 volume. Then, copy the data to the larger volume.
Overview of RAID-5 Volumes
Solaris VolumeManagerAdministration Guide • May 2006158
Note –When you add a new component to a RAID-5 volume, Solaris VolumeManager “zeros” all theblocks in that component. This process ensures that the parity protects the new data.As data iswritten to the additional space, Solaris VolumeManager includes the data in the parity calculations.
Background Information for CreatingRAID-5VolumesWhen you work with RAID-5 volumes, consider the “Requirements for RAID-5 Volumes” on page159 and “Guidelines for RAID-5 Volumes” on page 159.Many striping guidelines also apply toRAID-5 volume configurations. See “RAID-0 Volume Requirements” on page 80.
Requirements for RAID-5Volumes� ARAID-5 volumemust consist of at least three components. Themore components a RAID-5
volume contains, however, the longer read and write operations take when a component fails.� RAID-5 volumes cannot be striped, concatenated, ormirrored.� Do not create a RAID-5 volume from a component that contains an existing file system. Doing so
will erase the data during the RAID-5 initialization process.� When you create a RAID-5 volume, you can define the interlace value. If not specified, the
interlace value defaults to 16 Kbytes. This value is reasonable formost applications.� ARAID-5 volume (with no hot spares) can only handle a single component failure.� When you create RAID-5 volumes, use components across separate controllers. Controllers and
associated cables tend to fail more often than disks.� Use components of the same size. Creating a RAID-5 volumewith components of different sizes
results in unused disk space.
Guidelines for RAID-5Volumes� Because of the complexity of parity calculations, volumes with greater than about 20 percent
writes should probably not be RAID-5 volumes. If data redundancy on a write-heavy volume isneeded, considermirroring.
� If the different components in a RAID-5 volume reside on different controllers and the accessesto the volume are primarily large sequential accesses, then setting the interlace value to 32 Kbytesmight improve performance.
� You can expand a RAID-5 volume by concatenating additional components to the volume.Concatenating a new component to an existing RAID-5 volume decreases the overallperformance of the volume because the data on concatenations is sequential. Data is not stripedacross all components. The original components of the volume have data and parity striped
Background Information for Creating RAID-5 Volumes
Chapter 14 • RAID-5 Volumes (Overview) 159

across all components. This striping is lost for the concatenated component. However, the data isstill recoverable from errors because the parity is used during the component I/O. The resultingRAID-5 volume continues to handle a single component failure.Concatenated components also differ in the sense that they do not have parity striped on any ofthe regions. Thus, the entire contents of the component are available for data.Any performance enhancements for large or sequential writes are lost when components areconcatenated.
� You can create a RAID-5 volumewithout having to “zero out” the data blocks. To do so, do one ofthe following:
� Use the metainit commandwith the -k option. The -k option recreates the RAID-5 volumewithout initializing it, and sets the disk blocks to the “Okay” state. This option is potentiallydangerous, as any errors that exist on disk blocks within the volumewill cause unpredictablebehavior from Solaris VolumeManager, including the possibility of fabricated data.
� Initialize the device and restore data from tape. See the metainit(1M)man page formoreinformation.
Overviewof Checking Status of RAID-5VolumesYou can check the status of RAID-5 volumes by looking at the volume states and the slice states forthe volume. The slice state provides themost specific information when you are troubleshootingRAID-5 volume errors. The RAID-5 volume state only provides general status information, such as“Okay” or “Maintenance.”
If the RAID-5 volume state reports a “Maintenance” state, refer to the slice state. The slice statespecifically reports if the slice is in the “Maintenance” state or the “Last Erred” state. You take adifferent recovery action depending on if the the slice is in the “Maintenance” state or the “LastErred” state. If you only have a slice in the “Maintenance” state, it can be repaired without loss ofdata. If you have a slice in the “Maintenance” state and a slice in the “Last Erred” state, data hasprobably been corrupted. Youmust fix the slice in the “Maintenance” state first, then fix the “LastErred” slice.
The following table explains RAID-5 volume states.
TABLE 14–1RAID-5VolumeStates
State Meaning
Initializing Slices are in the process of having all disk blocks zeroed. This process is necessary dueto the nature of RAID-5 volumes with respect to data and parity interlace striping.
Once the state changes to “Okay,” the initialization process is complete and you areable to open the device. Until then, applications receive errormessages.
Okay The device is ready for use and is currently free from errors.
Overview of Checking Status of RAID-5 Volumes
Solaris VolumeManagerAdministration Guide • May 2006160
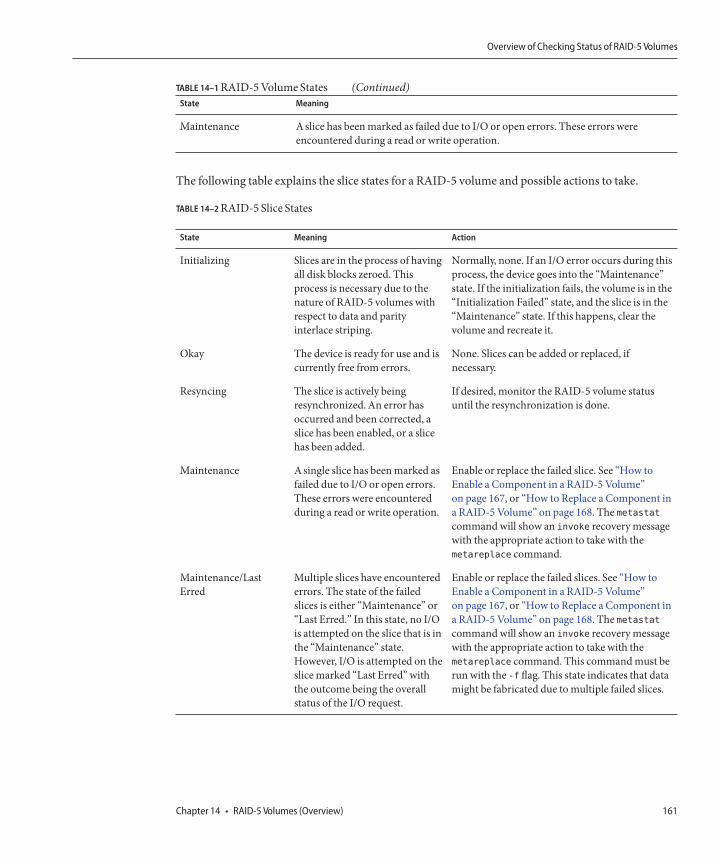
TABLE 14–1RAID-5VolumeStates (Continued)State Meaning
Maintenance Aslice has beenmarked as failed due to I/O or open errors. These errors wereencountered during a read or write operation.
The following table explains the slice states for a RAID-5 volume and possible actions to take.
TABLE 14–2RAID-5 Slice States
State Meaning Action
Initializing Slices are in the process of havingall disk blocks zeroed. Thisprocess is necessary due to thenature of RAID-5 volumes withrespect to data and parityinterlace striping.
Normally, none. If an I/O error occurs during thisprocess, the device goes into the “Maintenance”state. If the initialization fails, the volume is in the“Initialization Failed” state, and the slice is in the“Maintenance” state. If this happens, clear thevolume and recreate it.
Okay The device is ready for use and iscurrently free from errors.
None. Slices can be added or replaced, ifnecessary.
Resyncing The slice is actively beingresynchronized.An error hasoccurred and been corrected, aslice has been enabled, or a slicehas been added.
If desired, monitor the RAID-5 volume statusuntil the resynchronization is done.
Maintenance Asingle slice has beenmarked asfailed due to I/O or open errors.These errors were encounteredduring a read or write operation.
Enable or replace the failed slice. See “How toEnable a Component in a RAID-5 Volume”on page 167, or “How to Replace a Component ina RAID-5 Volume” on page 168. The metastatcommandwill show an invoke recoverymessagewith the appropriate action to take with themetareplace command.
Maintenance/LastErred
Multiple slices have encounterederrors. The state of the failedslices is either “Maintenance” or“Last Erred.” In this state, no I/Ois attempted on the slice that is inthe “Maintenance” state.However, I/O is attempted on theslicemarked “Last Erred” withthe outcome being the overallstatus of the I/O request.
Enable or replace the failed slices. See “How toEnable a Component in a RAID-5 Volume”on page 167, or “How to Replace a Component ina RAID-5 Volume” on page 168. The metastatcommandwill show an invoke recoverymessagewith the appropriate action to take with themetareplace command. This commandmust berun with the -f flag. This state indicates that datamight be fabricated due tomultiple failed slices.
Overview of Checking Status of RAID-5 Volumes
Chapter 14 • RAID-5 Volumes (Overview) 161
Overviewof Replacing andEnabling Slices in RAID-5VolumesSolaris VolumeManager has the capability to replace and enable components withinmirrors andRAID-5 volumes. The issues and requirements for doing so are the same formirrors and RAID-5volumes. Formore information, see “Overview of Replacing and Enabling Components in RAID-1and RAID-5 Volumes” on page 224.
Scenario—RAID-5VolumesRAID-5 volumes allow you to have redundant storage without the overhead of RAID-1 volumes,which require two times the total storage space to provide data redundancy. By setting up a RAID-5volume, you can provide redundant storage of greater capacity than you could achieve with aRAID-1 volume on the same set of disk components. In addition, with the help of hot spares (seeChapter 16 and specifically “HowHot SparesWork” on page 172), you can achieve nearly the samelevel of safety. The drawbacks are increased write time andmarkedly impaired performance in theevent of a component failure. However, those tradeoffs might be insignificant formany situations.The following example, drawing on the sample scenario explained in Chapter 5, describes howRAID-5 volumes can provide extra storage capacity.
Other scenarios for RAID-0 and RAID-1 volumes used 6 slices (c1t1d0, c1t2d0, c1t3d0, c2t1d0,c2t2d0, c2t3d0) on 6 disks, spread over 2 controllers, to provide 27 Gbytes of redundant storage. Byusing the same slices in a RAID-5 configuration, 45 Gbytes of storage is available.Also, theconfiguration can withstand a single component failure without data loss or access interruption. Byadding hot spares to the configuration, the RAID-5 volume can withstand additional componentfailures. Themost significant drawback to this approach is that a controller failure would result indata loss to this RAID-5 volume, while it would not with the RAID-1 volume described in“Scenario—RAID-1 Volumes (Mirrors)” on page 103.
Overview of Replacing and Enabling Slices in RAID-5 Volumes
Solaris VolumeManagerAdministration Guide • May 2006162

RAID-5 Volumes (Tasks)
This chapter provides information about performing Solaris VolumeManager tasks that areassociated with RAID-5 volumes. For information about the concepts involved in these tasks, seeChapter 14.
RAID-5Volumes (TaskMap)The following taskmap identifies the procedures that are needed tomanage Solaris VolumeManager’s 5 volumes.
Task Description For Instructions
Create RAID-5 volumes Use the Solaris VolumeManager GUI or themetainit command to create RAID-5volumes.
“How to Create a RAID-5Volume” on page 164
Check the status of RAID-5volumes
Use the Solaris VolumeManager GUI or themetastat command to check the status ofRAID-5 volumes.
“How to Check the Status of aRAID-5 Volume” on page 165
Expand a RAID-5 volume Use the Solaris VolumeManager GUI or themetattach command to expand RAID-5volumes.
“How to Expand a RAID-5Volume” on page 166
Enable a slice in a RAID-5volume
Use the Solaris VolumeManager GUI or themetareplace command to enable slices inRAID-5 volumes.
“How to Enable a Componentin a RAID-5 Volume” on page167
Replace a slice in a RAID-5volume
Use the Solaris VolumeManager GUI or themetareplace command to replace slices inRAID-5 volumes.
“How to Replace a Componentin a RAID-5 Volume” on page168
15C H A P T E R 1 5
163

CreatingRAID-5Volumes
Caution –Do not create volumes larger than 1 Tbyte if you expect to run the Solaris software with a32-bit kernel or if you expect to use a version of the Solaris OS prior to the Solaris 9 4/03 release. See“Overview ofMulti-Terabyte Support in Solaris VolumeManager” on page 45 formore informationabout large volume support in Solaris VolumeManager.
� How toCreate aRAID-5VolumeCheck “Prerequisites for Creating Solaris VolumeManager Components” on page 45 and“Background Information for Creating RAID-5 Volumes” on page 159.
To create a RAID-5 volume, use one of the followingmethods:
� From the Enhanced Storage tool within the SolarisManagement Console, open the Volumesnode. ChooseAction⇒Create Volume. Then, follow the steps in the wizard. Formoreinformation, see the online help.
� Use the following form of the metainit command:
# metainit wolume-name -r component component component -i interlace-value
volume-name Specifies the name of the volume to create.
-r Specifies to create a RAID-5 volume.
component Specifies a slice or soft partition to include in the RAID-5 volume.At least 3components are required.
-i Specifies an interlace value.
Formore information, see the metainit(1M)man page.
Creating a RAID-5 Volume of Three Slices
In this example, the RAID-5 volume d45 is created with the -r option from 3 slices. Because nointerlace value is specified, d45 uses the default of 16 Kbytes. The system verifies that the RAID-5volume has been set up and begins initializing the volume.
Youmust wait for the initialization to finish before you can use the RAID-5 volume.
# metainit d45 -r c2t3d0s2 c3t0d0s2 c4t0d0s2
d45: RAID is setup
To prepare the newly created RAID-5 volume for a file system, see Chapter 18, “Creating UFS,TMPFS, and LOFS File Systems (Tasks),” in SystemAdministration Guide: Devices and File Systems.
BeforeYouBegin
◗
Example 15–1
SeeAlso
Creating RAID-5 Volumes
Solaris VolumeManagerAdministration Guide • May 2006164

Some applications, such as a database, do not use a file system. These applications instead use the rawvolume. The applicationmust have its ownway of recognizing the volume.
To associate a hot spare pool with a RAID-5 volume, see “How toAssociate a Hot Spare PoolWith aVolume” on page 178.
MaintainingRAID-5Volumes
� How toCheck the Status of a RAID-5VolumeWhen checking status of RAID-5 volumes, you need to check both the RAID-5 state and the slicestate to fully understand the state of the volume and the possibility of data loss if the volumes are notin anOkay state. See “Overview of Checking Status of RAID-5 Volumes” on page 160 for details.
Note –RAID-5 volume initialization or resynchronization cannot be interrupted.
To check the status of a RAID-5 volume, use one of the followingmethods:
� From the Enhanced Storage tool within the SolarisManagement Console, open the Volumesnode and view the status of the volumes. Choose a volume. Then, chooseAction⇒Properties toseemore detailed information. Formore information, see the online help.
� Use the metastat command to display the status of a RAID-5 volume.
# metastat [-s diskset] [volume]
-s diskset Specifies the name of the disk set on which to perform the command.
volume Specifies the volume to display.
For each slice in the RAID-5 volume, the metastat command shows the following:
Device Specifies the device name of the slice in the stripe.
Start Block Specifies the block on which the slice begins.
Dbase Specifies whether the slice contains a state database replica
State Specifies the state of the slice.
Hot Spare Specifies whether the slice is being used to hot spare a failed slice
Viewing RAID-5 Volume Status
The following example shows RAID-5 volume output from the metastat command.
◗
Example 15–2
Maintaining RAID-5 Volumes
Chapter 15 • RAID-5 Volumes (Tasks) 165

# metastat d10
d10: RAID
State: Okay
Interlace: 32 blocks
Size: 10080 blocks
Original device:
Size: 10496 blocks
Device Start Block Dbase State Hot Spare
c0t0d0s1 330 No Okay
c1t2d0s1 330 No Okay
c2t3d0s1 330 No Okay
The metastat command output identifies the volume as a RAID-5 volume. This information isindicated by the “RAID” notation after the volume name. For each slice in the RAID-5 volume, theoutput shows the following:
� The name of the slice in the stripe.� The block on which the slice begins.� An indicator that none of these slices contain a state database replica.� The state of the slices. In this example all slices are in the “Okay” state.� If a slice is a hot spare replacement for a failed slice.
� How toExpandaRAID-5VolumeIn general, attaching components is a short-term solution to a RAID-5 volume that is running out ofspace. For performance reasons, it is best to have a “pure” RAID-5 volume. If youmust expand anexisting RAID-5 volume to gain extra storage space, use this procedure.
Caution –Do not create volumes larger than 1 Tbyte if you expect to run the Solaris software with a32–bit kernel or if you expect to use a version of the Solaris OS prior to the Solaris 9 4/03 release. See“Overview ofMulti-Terabyte Support in Solaris VolumeManager” on page 45 formore informationaboutmultiterabyte volume support in Solaris VolumeManager.
Read “Background Information for Creating RAID-5 Volumes” on page 159.
Make sure that youhave a current backupof all data and that youhave superuser access.
To attach additional components to a RAID-5 volume, use one of the followingmethods:
� From the Enhanced Storage tool within the SolarisManagement Console, open the Volumesnode, then open the RAID-5 volume. Choose the Components pane. Then, chooseAttachComponent. Follow the onscreen instructions. Formore information, see the online help.
BeforeYouBegin
1
2
Maintaining RAID-5 Volumes
Solaris VolumeManagerAdministration Guide • May 2006166

� Use the following form of the metattach command:
# metattach volume-name name-of-component-to-add
volume-name Specifies the name of the RAID-5 volume to expand.
name-of-component-to-add Specifies the name of the component to attach to the RAID-5volume.
See the metattach(1M)man page formore information.
Adding a Component to a RAID-5 Volume
The following example shows the addition of slice c2t1d0s2 to an existing RAID-5 volume, d2.
# metattach d2 c2t1d0s2
d2: column is attached
For a UFS file system, run the growfs command on the RAID-5 volume. See “Volume andDiskSpace ExpansionUsing the growfsCommand” on page 41.
Some applications, such as a database, do not use a file system. These applications instead use the rawvolume. In these cases, the applicationmust have its ownway of growing the added space.
� How toEnable a Component in aRAID-5VolumeIf a disk drive is defective, you can replace it with another available disk (and its slices) on the systemas documented in “How to Replace a Component in a RAID-5 Volume” on page 168.Alternatively,you can repair the disk, label it, and run the metareplace commandwith the -e option to re-enablethe disk.
Make sure that youhave a current backupof all data and that youhave superuser access.
To enable a failed component in a RAID-5 volume, use one of the followingmethods:
� From the Enhanced Storage tool within the SolarisManagement Console, open the Volumesnode, then open the RAID-5 volume. Choose the Components pane. Then, choose the failedcomponent. Click Enable Component. Follow the onscreen instructions. Formore information,see the online help.
� Use the following form of the metareplace command:
# metareplace -e volume-name component-name
-e Specifies to place the failed component into an available state and toperform a resynchronization on the failed component.
volume-name Specifies the name of the volume containing the failed component.
Example 15–3
SeeAlso
1
2
Maintaining RAID-5 Volumes
Chapter 15 • RAID-5 Volumes (Tasks) 167

component-name Specifies the name of the failed component.
The metareplace command automatically starts resynchronizing the new component with therest of the RAID-5 volume.
Enabling a Component in a RAID-5 Volume
In the following example, the RAID-5 volume d20 has a slice, c2t0d0s2, which had a soft error. Themetareplace commandwith the -e option enables the slice.
# metareplace -e d20 c2t0d0s2
� How toReplace aComponent in aRAID-5VolumeThis task replaces a failed slice of a RAID-5 volume in which only one slice has failed.
Caution –Replacing a failed slice whenmultiple slices are in errormight cause data to be fabricated. Inthis instance, the integrity of the data in this instance would be questionable.
You can use the metareplace command on non-failed devices to change a disk slice or othercomponent. This procedure can be useful for tuning the performance of RAID-5 volumes.
Make sure that youhave a current backupof all data and that youhave superuser access.
Use one of the followingmethods to determinewhich slice of the RAID-5 volumeneeds to bereplaced:
� From the Enhanced Storage tool within the SolarisManagement Console, open the Volumesnode. Then open the RAID-5 volume. Choose the Components pane. View the status of theindividual components. Formore information, see the online help.
� Use the metastat command.
# metastat volume
volume Specifies the name of the RAID-5 volume.
Look for the keyword phrase “NeedsMaintenance” to identify the state of the RAID-5 volume. Lookfor the keyword “Maintenance” to identify the failed slice.
Use one of the followingmethods to replace the failed slicewith another slice:
� From the Enhanced Storage tool within the SolarisManagement Console, open the Volumesnode. Then open the RAID-5 volume. Choose the Components pane. Choose the failedcomponent. Click Replace Component and follow the onscreen instructions. Formoreinformation, see the online help.
Example 15–4
1
2
3
Maintaining RAID-5 Volumes
Solaris VolumeManagerAdministration Guide • May 2006168

� Use the following form of the metareplace command:
# metareplace volume-name failed-component new-component
� volume-name is the name of the RAID-5 volumewith a failed component.� failed-component specifies the name of the component to replace.� new-component specifies the name of the component to add to the volume in place of the
failed component.
See the metareplace(1M)man page formore information.
To verify the status of the replacement slice, use one of themethods described in Step 2.
The state of the replaced slice should be “Resyncing” or “Okay.”
Replacing a RAID-5 Component
# metastat d1
d1: RAID
State: Needs Maintenance
Invoke: metareplace d1 c0t14d0s6 <new device>
Interlace: 32 blocks
Size: 8087040 blocks
Original device:
Size: 8087520 blocks
Device Start Block Dbase State Hot Spare
c0t9d0s6 330 No Okay
c0t13d0s6 330 No Okay
c0t10d0s6 330 No Okay
c0t11d0s6 330 No Okay
c0t12d0s6 330 No Okay
c0t14d0s6 330 No Maintenance
# metareplace d1 c0t14d0s6 c0t4d0s6
d1: device c0t14d0s6 is replaced with c0t4d0s6
# metastat d1
d1: RAID
State: Resyncing
Resync in progress: 98% done
Interlace: 32 blocks
Size: 8087040 blocks
Original device:
Size: 8087520 blocks
Device Start Block Dbase State Hot Spare
c0t9d0s6 330 No Okay
c0t13d0s6 330 No Okay
c0t10d0s6 330 No Okay
c0t11d0s6 330 No Okay
4
Example 15–5
Maintaining RAID-5 Volumes
Chapter 15 • RAID-5 Volumes (Tasks) 169

c0t12d0s6 330 No Okay
c0t4d0s6 330 No Resyncing
In this example, the metastat command displays the failed slice in the RAID-5 volume, d1. Afterlocating an available slice, the metareplace command is run, specifying the failed slice first, then thereplacement slice.
If no other slices are available, run the metareplace commandwith the -e option to attempt torecover from possible soft errors by resynchronizing the failed device. Formore information on thisprocedure, see “How to Enable a Component in a RAID-5 Volume” on page 167. If multiple errorsexist, the slice in the “Maintenance” state must first be replaced or enabled. Then the slice in the “LastErred” state can be repaired.After running the metareplace command, you can use the metastatcommand tomonitor the progress of the resynchronization. During the replacement, the state of thevolume and the new slice is “Resyncing.” You can continue to use the volumewhile it is in this state.
Maintaining RAID-5 Volumes
Solaris VolumeManagerAdministration Guide • May 2006170

Hot Spare Pools (Overview)
This chapter explains how Solaris VolumeManager uses hot spare pools. For information aboutperforming related tasks, see Chapter 17.
This chapter contains the following information:
� “Overview of Hot Spares andHot Spare Pools” on page 171� “Scenario—Hot Spares” on page 174
OverviewofHot Spares andHot Spare PoolsAhot spare pool is collection of slices (hot spares) that Solaris VolumeManager uses to provideincreased data availability for RAID-1 (mirror) and RAID-5 volumes. In a slice failure occurs, ineither a submirror or a RAID-5 volume, Solaris VolumeManager automatically substitutes the hotspare for the failed slice.
Note –Hot spares do not apply to RAID-0 volumes or one-waymirrors. For automatic substitution towork, redundant datamust be available.
Ahot spare cannot be used to hold data or state database replicas while it is idle.Ahot sparemustremain ready for immediate use a slice failure occurs in the volumewith which it is associated. To usehot spares, youmust invest in additional disks beyond those disks that the system actually requires tofunction.
Solaris VolumeManager enables you to dynamically add, delete, replace, and enable hot spareswithin hot spare pools. You can use either the SolarisManagement Console or the command-lineutilities to administer hot spares and hot spare pools. See Chapter 17 for details on these tasks.
16C H A P T E R 1 6
171

Hot SparesAhot spare is a slice (not a volume) that is functional and available, but not in use.Ahot spare isreserved, meaning that it stands ready to substitute for a failed slice in a submirror or RAID-5volume.
Hot spares provide protection from hardware failure. Slices fromRAID-1 and RAID-5 volumes areautomatically replaced by hot spares when they fail. The hot spares are resynchronized available foruse in the volume. The hot spare can be used temporarily until the failed submirror or RAID-5volume slice can either be fixed or replaced.
You create hot spares within hot spare pools. Individual hot spares can be included in one ormorehot spare pools. For example, youmight have two submirrors and two hot spares. The hot spares canbe arranged as two hot spare pools, with each pool having the two hot spares in a different order ofpreference. This strategy enables you to specify which hot spare is used first. This strategy alsoimproves availability by havingmore hot spares available.
Asubmirror or RAID-5 volume can use only a hot spare whose size is equal to or greater than the sizeof the failed slice in the submirror or RAID-5 volume. If, for example, you have a submirrormade of1-Gbyte drives, a hot spare for the submirrormust be 1 Gbyte or greater.
Hot Spare PoolsAhot spare pool is an ordered list (collection) of hot spares.
You can place hot spares into one ormore hot spare pools to get themost flexibility and protectionfrom the fewest slices. You could put a single slice designated for use as a hot spare intomultiple hotspare pools, with each hot spare pool having different slices and characteristics. Then, you couldassign a hot spare pool to any number of submirror volumes or RAID-5 volumes.
Note –You can assign a single hot spare pool tomultiple submirrors or RAID-5 volumes. However, asubmirror or a RAID-5 volume can be associated with only one hot spare pool.
HowHot SparesWorkWhen I/O errors occur, Solaris VolumeManager searches the hot spare pool for a hot spare based onthe order in which hot spares were added to the hot spare pool. Solaris VolumeManager checks thehot spare pool for the first available hot spare whose size is equal to or greater than the size of the slicethat is being replaced. The first hot spare found by Solaris VolumeManager that is large enough isused as a replacement. Solaris VolumeManager changes the hot spare’s status to “In-Use” andautomatically resynchronizes the data if necessary. The order of hot spares in the hot spare pool is notchanged when a replacement occurs.
Overview of Hot Spares andHot Spare Pools
Solaris VolumeManagerAdministration Guide • May 2006172

In the case of amirror, the hot spare is resynchronized with data from a functional submirror. In thecase of a RAID-5 volume, the hot spare is resynchronized with the other slices in the volume. If a sliceof adequate size is not found in the list of hot spares, the submirror or RAID-5 volume that failedgoes into a failed state and the hot spares remain unused. In the case of the submirror, the submirrorno longer replicates the data completely. In the case of the RAID-5 volume, data redundancy is nolonger available.
Tip –When you add hot spares to a hot spare pool, add them from smallest to largest in size. Thisstrategy avoids potentially wasting “large” hot spares as replacements for small slices.
When a slice experiences an I/O error, the failed slice is placed in the “Broken” state. To fix thiscondition, first repair or replace the failed slice. Then, bring the slice back to the “Available” state byusing the Enhanced Storage tool within the Solaris Management Console. Or, use the metahs -ecommand.
Asubmirror or RAID-5 volume is uses a hot spare in place of a failed slice until that failed slice isenabled or replaced. The hot spare is thenmarked “Available” in the hot spare pool. This hot spare isagain ready for use.
Hot Spare Pool StatesThe following table explains hot spare pool states and possible actions to take.
TABLE 16–1Hot Spare Pool States (Command Line)
State Meaning Action
Available The hot spares in the hot spare pool are runningand ready to accept data. The hot spares are notcurrently being written to or read from.
None.
In-Use This hot spare pool includes hot spares that arebeing used to replace failed slices in a redundantvolume.
Diagnose how the hot spares are beingused. Then, repair the slice in thevolume for which the hot spare isbeing used.
Broken Aproblem exists with a hot spare or hot sparepool. However, there is no immediate danger oflosing data. This status is also displayed if all thehot spares are in use.
Diagnose how the hot spares are beingused or why they are broken. You canaddmore hot spares to the hot sparepool, if desired.
Example—Hot Spare PoolFigure 16–1 illustrates a hot spare pool that is associated with submirrors d11 and d12 inmirror d1. Ifa slice in either submirror were to fail, a hot spare would automatically be substituted for the failed
Overview of Hot Spares andHot Spare Pools
Chapter 16 • Hot Spare Pools (Overview) 173

slice. The hot spare pool itself is associated with each submirror volume, not themirror. The hotspare pool could also be associated with other submirrors or RAID-5 volumes, if desired.
interlace 4
interlace 3
interlace 2
interlace 1
Submirror d12
interlace 4
interlace 3
interlace 2
interlace 1
Submirror d11
interlace 4
interlace 3
interlace 2
interlace 1
RAID 1 Volume d1
Slice 1 Slice 2
Hot Spare Pool
FIGURE 16–1Hot Spare Pool Example
Scenario—Hot SparesHot spares provide extra protection for redundant volumes (RAID-1 and RAID-5) to help guardagainst data loss. By associating hot spares with the underlying slices that comprise your RAID-0submirrors or RAID-5 configuration, you can have the system automatically replace failed slices withworking slices from the hot spare pool. Those slices that were swapped into use are updated with theinformation they should have. The slices then can continue to function just like the original slices.You can replace the failed slices at your convenience.
Scenario—Hot Spares
Solaris VolumeManagerAdministration Guide • May 2006174

Hot Spare Pools (Tasks)
This chapter explains how to work with Solaris VolumeManager’s hot spares and hot spare pools.For information about related concepts, see Chapter 16.
Hot Spare Pools (TaskMap)The following taskmap identifies the procedures that are needed tomanage Solaris VolumeManagerhot spare pools.
Task Description For Instructions
Create a hot spare pool Use the Solaris VolumeManager GUI or themetainit command to create a hot sparepool.
“How to Create a Hot SparePool” on page 176
Add slices to a hot spare pool Use the Solaris VolumeManager GUI or themetahs command to add slices to a hot sparepool.
“How toAddAdditional Slicesto a Hot Spare Pool” on page177
Associate a hot spare poolwith a volume
Use the Solaris VolumeManager GUI or themetaparam command to associate a hot sparepool with a volume.
“How toAssociate a Hot SparePoolWith a Volume” on page178
Change which hot spare poolis associated with a volume
Use the Solaris VolumeManager GUI or themetaparam command to change which hotspare pool is associated with a volume.
“How to Change theAssociatedHot Spare Pool” on page 180
Check the status of hotspares and hot spare pools
Use the Solaris VolumeManager GUI, themetastat command, or metahs -icommand to check the status of a hot spareor hot spare pool.
“How to Check the Status ofHot Spares andHot SparePools” on page 181
17C H A P T E R 1 7
175

Task Description For Instructions
Replace a hot spare in a hotspare pool
Use the Solaris VolumeManager GUI or themetahs command to replace a hot spare in ahot spare pool.
“How to Replace a Hot Spare ina Hot Spare Pool” on page 182
Delete a hot spare from a hotspare pool
Use the Solaris VolumeManager GUI or themetahs command to delete a hot spare from ahot spare pool.
“How toDelete a Hot SpareFrom aHot Spare Pool”on page 183
Enable a hot spare Use the Solaris VolumeManager GUI or themetahs command to enable a hot spare in ahot spare pool.
“How to Enable a Hot Spare”on page 184
Creating aHot Spare Pool
� How toCreate aHot Spare Pool
Caution –Do not create volumes or hot spares larger than 1 Tbyte if you expect to run the Solarissoftware with a 32–bit kernel or if you expect to use a version of the Solaris OS prior to the Solaris 94/03 release. See “Overview ofMulti-Terabyte Support in Solaris VolumeManager” on page 45 formore information aboutmultiterabyte volume support in Solaris VolumeManager.
Caution – Solaris VolumeManager does not warn you if you create a hot spare that is not largeenough. If the hot spare is not equal to, or larger than, the volume to which it is attached, the hotspare will not work.
Check “Prerequisites for Creating Solaris VolumeManager Components” on page 45.
Become superuser.
To create a hot spare pool, use one of the followingmethods:
� From the Enhanced Storage tool within the SolarisManagement Console, open theHot SparePools node. Then, chooseAction⇒Create Hot Spare Pool. Formore information, see the onlinehelp.
� Use the following form of the metainit command:
# metainit hot-spare-pool-name ctds-for-slice
hot-spare-pool-name Specifies the name of the hot spare pool.
BeforeYouBegin
1
2
Creating aHot Spare Pool
Solaris VolumeManagerAdministration Guide • May 2006176

ctds-for-slice Specifies the slice being added to the hot spare pool. The option isrepeated for each slice being added to the hot spare pool.
See the metainit(1M)man page formore information.
Note –The metahs command can also be used to create hot spare pools.
Creating aHot Spare Pool
# metainit hsp001 c2t2d0s2 c3t2d0s2
hsp001: Hotspare pool is setup
In this example, the hot spare pool hsp001 contains two disks as the hot spares. The system confirmsthat the hot spare pool has been set up.
To addmore hot spares to the hot spare pool, see “How toAddAdditional Slices to a Hot Spare Pool”on page 177.After you create the hot spare pool, you need to associate it with a submirror or RAID-5volume. See “How toAssociate a Hot Spare PoolWith a Volume” on page 178.
� How toAddAdditional Slices to aHot Spare PoolCheck “Prerequisites for Creating Solaris VolumeManager Components” on page 45.
Become superuser.
To add a slice to an existing hot spare pool, use one of the followingmethods:
� From the Enhanced Storage tool within the SolarisManagement Console, open theHot SparePools node. Choose the hot spare pool you want to change. ChooseAction⇒Properties. Then,choose the Hot Spares panel. Formore information, see the online help.
� Use one of the following forms of the metahs command:
# metahs -a hot-spare-pool-name slice-to-add
# metahs -a -all hot-spare-pool-name slice-to-add
-a hot-spare-pool-name Specifies to add the slice to the specified hot spare pool.
-a all Specifies to add the slice to all hot spare pools.
slice-to-add Specifies the slice to add to the hot spare pool.
See the metahs(1M)man page formore information.
Example 17–1
SeeAlso
BeforeYouBegin
1
2
Creating aHot Spare Pool
Chapter 17 • Hot Spare Pools (Tasks) 177

Note –You can add a hot spare to one ormore hot spare pools.When you add a hot spare to a hotspare pool, the hot spare is added to the end of the list of slices in the hot spare pool.
Adding aHot Spare Slice to OneHot Spare Pool
In this example, the -a option adds the slice /dev/dsk/c3t0d0s2 to hot spare pool hsp001. Thesystem verifies that the slice has been added to the hot spare pool.
# metahs -a hsp001 /dev/dsk/c3t0d0s2
hsp001: Hotspare is added
Adding aHot Spare Slice toAll Hot Spare Pools
In this example, the -a option used with all adds the slice /dev/dsk/c3t0d0s2 to all hot spare poolsconfigured on the system. The system verifies that the slice has been added to all hot spare pools.
# metahs -a -all /dev/dsk/c3t0d0s2
hsp001: Hotspare is added
hsp002: Hotspare is added
hsp003: Hotspare is added
Associating aHot Spare PoolWithVolumes
� How toAssociate aHot Spare PoolWith aVolumeCheck “Prerequisites for Creating Solaris VolumeManager Components” on page 45.
Become superuser.
To associate a hot spare poolwith a RAID-5 volumeor submirror, use one of the followingmethods:
� From the Enhanced Storage tool within the SolarisManagement Console, open the Volumes andchoose a volume. ChooseAction⇒Properties. Then, choose the Hot Spare Pool panel. Finally,chooseAttachHSP. Formore information, see the online help.
� Use the following form of the metaparam command:
# metaparam -h hot-spare-pool component
-h Specifies tomodify the named hot spare pooll.
hot-spare-pool Specifies the name of the hot spare pool.
Example 17–2
Example 17–3
BeforeYouBegin
1
2
Associating aHot Spare PoolWith Volumes
Solaris VolumeManagerAdministration Guide • May 2006178

component Specifies the name of the submirror or RAID-5 volume to which the hot sparepool is being associated.
See the metaparam(1M)man page formore information.
Associating aHot Spare PoolWith Submirrors
In the following example, the -h option associates a hot spare pool, hsp100, with two submirrors, d10and d11, of mirror, d0. The metastat command shows that the hot spare pool is associated with thesubmirrors.
# metaparam -h hsp100 d10
# metaparam -h hsp100 d11
# metastat d0
d0: Mirror
Submirror 0: d10
State: Okay
Submirror 1: d11
State: Okay
...
d10: Submirror of d0
State: Okay
Hot spare pool: hsp100
...
d11: Submirror of d0
State: Okay
Hot spare pool: hsp100
...
Associating aHot Spare PoolWith a RAID-5 Volume
In the following example, the -h option associates a hot spare, hsp001, with a RAID-5 volume,d10.The metastat command shows that the hot spare pool is associated with the RAID-5 volume.
# metaparam -h hsp001 d10
# metastat d10
d10: RAID
State: Okay
Hot spare pool: hsp001
...
Example 17–4
Example 17–5
Associating aHot Spare PoolWith Volumes
Chapter 17 • Hot Spare Pools (Tasks) 179

� How toChange theAssociatedHot Spare PoolCheck “Prerequisites for Creating Solaris VolumeManager Components” on page 45.
Become superuser.
To change a volume’s associated hot spare pool, use one of the followingmethods:
� From the Enhanced Storage tool within the SolarisManagement Console, open the Volumesnode and choose the volume. ChooseAction⇒Properties. Then choose the Hot Spare Poolpanel. Detach the unwanted hot spare pool and attach the new hot spare pool by following theonscreen instructions. Formore information, see the online help.
� Use the following form of the metaparam command:
# metaparam -h hot-spare-pool-name RAID5-volume-or-submirror-name
-h Specifies tomodify the hot spare pool named.
hot-spare-pool Specifies the name of the new hot spare pool, or the special keyword none toremove hot spare pool associations.
component Specifies the name of the submirror or RAID-5 volume to which the hot sparepool is being attached.
See the metaparam(1M)man page formore information.
Changing theHot Spare PoolAssociation
In the following example, the hot spare pool, hsp001, is initially associated with a RAID-5 volume,d4.The hot spare pool association for the volume is then changed to hsp002. The metastat commandshows the hot spare pool association before and after this change.
# metastat d4
d4: RAID
State: Okay
Hot spare pool: hsp001
...
# metaparam -h hsp002 d4
# metastat d4
d4: RAID
State: Okay
Hot spare pool: hsp002
...
BeforeYouBegin
1
2
Example 17–6
Associating aHot Spare PoolWith Volumes
Solaris VolumeManagerAdministration Guide • May 2006180

Removing a Volume’s Hot Spare PoolAssociation
In the following example, the hot spare pool, hsp001, is initially associated with a RAID-5 volume,d4. The hot spare pool association is then changed to none, which indicates that no hot spare poolshould be associated with this volume. The metastat command shows the hot spare pool associationbefore and after this change.
# metastat d4
d4: RAID
State: Okay
Hot spare pool: hsp001
...
# metaparam -h none d4
# metastat d4
d4: RAID
State: Okay
Hot spare pool:
...
MaintainingHot Spare PoolsThe following sections show how to performmaintenance tasks on hot spare pools.
� How toCheck the Status ofHot Spares andHot SparePoolsTo view the status of a hot spare pool and its hot spares, use one of the followingmethods:
� From the Enhanced Storage tool within the SolarisManagement Console, open theHot SparePools node and select a hot spare pool. ChooseAction⇒Properties to view detailed statusinformation. Formore information, see the online help.
� Run the following form of the metastat command:
# metastat hot-spare-pool-name
Viewing the Status of a Hot Spare Pool
The following example shows sample output from the metastat command on a hot spare pool.
# metastat hsp001
hsp001: 1 hot spare
c1t3d0s2 Available 16800 blocks
The metahs command can also be used to check the status of a hot spare pool.
Example 17–7
◗
Example 17–8
MaintainingHot Spare Pools
Chapter 17 • Hot Spare Pools (Tasks) 181

For information on the hot spare pool states and the possible actions to take, see “Hot Spare PoolStates” on page 173.
� How toReplace aHot Spare in aHot Spare PoolBecome superuser.
Verifywhether the hot spare is currently being usedby using one of the followingmethods:
� From the Enhanced Storage tool within the SolarisManagement Console, open theHot SparePools node and select a hot spare pool. ChooseAction⇒Properties. Then choose the Hot Sparespanel. Follow the onscreen instructions. Formore information, see the online help.
� Use the following form of the metastat command to view the status of the hot spare pool:
# metastat hot-spare-pool-name
Formore information, see the metastat(1M)man page.
To replace the hot spare, use one of the followingmethods:
� From the Enhanced Storage tool within the SolarisManagement Console, open theHot SparePools node and select a hot spare pool. ChooseAction⇒Properties. Then choose the Hot Sparespanel. Follow the onscreen instructions. Formore information, see the online help.
� Use the following form of the metahs command:
# metahs -r hot-spare-pool-name current-hot-spare replacement-hot-spare
-r Specifies to replace disks in the named hot spare pool.
hot-spare-pool-name Specifies the name of the hot spare pool. You can also use the specialkeyword all to change all hot spare pool associations.
current-hot-spare Specifies the name of the current hot spare that will be replaced.
replacement-hot-spare Specifies the name of the slice that will replace the current hot spare inthe named hot spare pool.
Formore information, see the metahs(1M)man page.
Replacing aHot Spare in OneHot Spare Pool
In the following example, the metastat command shows that the hot spare is not in use. The metahs-r command replaces the hot spare, /dev/dsk/c0t2d0s2, with the hot spare, /dev/dsk/c3t1d0s2, inthe hot spare pool, hsp003.
# metastat hsp003
hsp003: 1 hot spare
1
2
3
Example 17–9
MaintainingHot Spare Pools
Solaris VolumeManagerAdministration Guide • May 2006182

c0t2d0s2 Broken 5600 blocks
# metahs -r hsp003 c0t2d0s2 c3t1d0s2
hsp003: Hotspare c0t2d0s2 is replaced with c3t1d0s2
Replacing aHot Spare inAllAssociatedHot Spare Pools
In the following example, the keyword all replaces the hot spare, /dev/dsk/c1t0d0s2, with the hotspare, /dev/dsk/c3t1d0s2, in all its associated hot spare pools.
# metahs -r all c1t0d0s2 c3t1d0s2
hsp001: Hotspare c1t0d0s2 is replaced with c3t1d0s2
hsp002: Hotspare c1t0d0s2 is replaced with c3t1d0s2
hsp003: Hotspare c1t0d0s2 is replaced with c3t1d0s2
� How toDelete aHot Spare FromaHot Spare PoolBecome superuser.
Verifywhether the hot spare is currently being usedby using one of the followingmethods:
� From the Enhanced Storage tool within the SolarisManagement Console, open theHot SparePools node and select a hot spare pool. ChooseAction⇒Properties. Then choose the Hot Sparespanel. Follow the onscreen instructions. Formore information, see the online help.
� Use the following form of the metastat command to view the status of the hot spare pool:
# metastat hot-spare-pool-name
See the metastat(1M)man page.
Todelete the hot spare, use one of the followingmethods:
� From the Enhanced Storage tool within the SolarisManagement Console, open theHot SparePools node and select a hot spare pool. ChooseAction⇒Properties. Then choose the Hot Sparespanel. Follow the onscreen instructions. Formore information, see the online help.
� Use the following form of the metahs command:
# metahs -d hot-spare-pool-name current-hot-spare
-d Specifies to delete a hot spare from the named hot spare pool.
hot-spare-pool Specifies the name of the hot spare pool. You can also use the specialkeyword all to delete the hot spare from all hot spare pools.
current-hot-spare Specifies the name of the current hot spare that will be deleted.
Formore information, see the metahs(1M)man page.
Example 17–10
1
2
3
MaintainingHot Spare Pools
Chapter 17 • Hot Spare Pools (Tasks) 183

Deleting aHot Spare fromOneHot Spare Pool
In the following example, the metastat command shows that the hot spare is not in use. The metahs-d command deletes the hot spare, /dev/dsk/c0t2d0s2, in the hot spare pool, hsp003.
# metastat hsp003
hsp003: 1 hot spare
c0t2d0s2 Broken 5600 blocks
# metahs -d hsp003 c0t2d0s2
� How toEnable aHot SpareBecome superuser.
To return a hot spare to the “available” state, use one of the followingmethods:
� From the Enhanced Storage tool within the SolarisManagement Console, open theHot SparePools node and select a hot spare pool. ChooseAction⇒Properties. Then, choose the Hot Sparespanel. Follow the onscreen instructions. Formore information, see the online help.
� Use the following form of the metahs command:
# metahs -e hot-spare-slice
-e Specifies to enable a hot spare.
hot-spare-slice Specifies the name of the slice to enable.
Formore information, see the metahs(1M)man page.
Enabling aHot Spare
In the following example, the metahs command places the hot spare, /dev/dsk/c0t0d0s2 in the“Available” state after it has been repaired. It is unnecessary to specify a hot spare pool.
# metahs -e c0t0d0s2
Example 17–11
1
2
Example 17–12
MaintainingHot Spare Pools
Solaris VolumeManagerAdministration Guide • May 2006184

Disk Sets (Overview)
This chapter provides conceptual information about disk sets. For information about performingrelated tasks, see Chapter 19.
This chapter includes the following information:
� “What’s New inDisk Sets” on page 185� “Introduction to Disk Sets” on page 185� “Solaris VolumeManager Disk SetAdministration” on page 188� “Guidelines forWorkingWith Disk Sets” on page 193� “Asynchronous Shared Storage in Disk Sets” on page 194� “Scenario—Disk Sets” on page 194
What’sNew inDisk SetsThis section describes new disk set features in this Solaris release.
For a complete listing of new Solaris features and a description of Solaris releases, see Solaris 10What’s New.
Introduction toDisk SetsAdisk set is a set of physical storage volumes that contain logical volumes and hot spares. Volumesand hot spare pools must be built on drives fromwithin that disk set. Once you have created avolumewithin the disk set, you can use the volume just as you would use a physical slice. You can usethe volume to create and tomount a file system and to store data.
Note –Disk sets are supported on both SPARC and x86 based platforms.
18C H A P T E R 1 8
185

Types ofDisk SetsThis section discusses the different types of disk sets available in Solaris VolumeManager.
Local Disk SetsEach host has a local disk set. The local disk set consists of all of the disks on a host that are not in anamed disk set.A local disk set belongs exclusively to a specific host. The local disk set contains thestate database for that specific host’s configuration. Volumes and hot spare pools in the local disk setconsist only of drives fromwithin the local disk set.
NamedDisk SetsIn addition to local disk sets, hosts can participate in named disk sets.Anamed disk set is any disk setthat is not in the local disk set. You can implement the following types of named disk sets tomanagevolumes, depending on the configuration of your system.
SharedDisk SetsA shared disk set can be shared bymultiple hosts.Although a shared disk set is visible from all theparticipating hosts, only the owner of the disk set can access it. Each host can control a shared diskset, but only one host can control it at a time.Additionally, shared disk sets provide a distinctnamespace within which the volume is managed.
Ashared disk set supports data redundancy and data availability. If one host fails, another host cantake over the failed host’s disk set (this type of configuration is known as a failover configuration).
Note – Shared disk sets are intended, in part, for use with SunCluster, Solstice HA(HighAvailability),or another supported third-party HAframework. Solaris VolumeManager by itself does not provideall the functionality necessary to implement a failover configuration.
Although each host can control the set of disks, only one host can control it at a time.
AutotakeDisk SetsBefore the autotake feature became available in the Solaris 9 4/04 release, Solaris VolumeManagerdid not support the automatic mounting of file systems on disk sets through the /etc/vfstab file.Solaris VolumeManager required the system administrator tomanually issue a disk set takecommand by using the metaset -s setname -t command before the file systems on the disk setcould be accessed.
With the autotake feature, you can set a disk set to be automatically accessed at boot time by using themetaset -s setname -A enable command. The autotake featuremakes it possible for you to define atboot themount options for a file system in the /etc/vfstab file. This feature allows you to define themount options in the /etc/vfstab file for file systems on volumes in the enabled disk set.
Types of Disk Sets
Solaris VolumeManagerAdministration Guide • May 2006186

Only single-host disk sets support the autotake feature. The autotake feature requires that the disk setis not shared with any other systems.Adisk set that is shared cannot be set to use the autotakefeature, and the metaset -A commandwill fail. However, after other hosts are removed from the diskset, it may then be set to autotake. Similarly, an autotake disk set cannot have other hosts added to it.If the autotake feature is disabled, additional hosts can then be added to the disk set.
Note – In a SunCluster environment, the autotake feature is disabled. SunCluster handles the takeand release of a disk set.
Formore information on the autotake feature see the -A option of the metaset(1M) command.
Multi-OwnerDisk SetsNamed disk sets created in a Sun Cluster environment are calledmulti-owner disk sets. Multi-ownerdisk sets allowmultiple nodes to share the ownership of the disk sets and to simultaneously accessthe shared disks.All disks and volumes in amulti-owner disk set can be directly accessed by all thenodes in a cluster. Eachmulti-owner disk set contains a list of hosts that have been added to the diskset. Consequently, eachmulti-owner disk set within a cluster configuration can have a different (andsometimes overlapping) set of hosts.
Eachmulti-owner disk set has amaster node. The function of themaster node is tomanage andupdate the state database replica changes. Since there is amaster node per disk set, multiple masterscan exist simultaneously. There are two ways that themaster is chosen. The first way is that a nodebecomes themaster if it is the first node to add a disk to the disk set. The second way is when amasternode panics and fails. The node with the lowest node id becomes themaster node.
Multi-owner disk set functionality is enabled only in a Sun Cluster environment tomanagemulti-owner disk set storage. The Solaris VolumeManager for Sun Cluster feature works withreleases of Sun Cluster beginning with the Sun Cluster 10/04 software collection and withapplications like Oracle RealApplications Clusters. Formore information on Solaris VolumeManager for Sun Cluster, see Chapter 4, Solaris VolumeManager for Sun Cluster (Overview).
Before you can configuremulti-owner disk sets, the following softwaremust be installed in additionto the Solaris OS:
� Sun Cluster initial cluster framework� Sun Cluster Support for Oracle RealApplication Clusters software� Oracle RealApplication Clusters software
Note – For information on setting up SunCluster andOracle RealApplication Clusters software, seeSun Cluster Software Installation Guide for Solaris OS and Sun Cluster Data Service for Oracle RealApplication Clusters Guide for Solaris OS.
Types of Disk Sets
Chapter 18 • Disk Sets (Overview) 187
Solaris VolumeManagerDisk SetAdministrationUnlike local disk set administration, you do not need tomanually create or delete disk set statedatabases. Solaris VolumeManager places one state database replica (on slice 7) on each disk acrossall disks in the disk set, up to amaximum of 50 total replicas in the disk set.
When you add disks to a disk set, Solaris VolumeManager automatically creates the state databasereplicas on the disk set.When a disk is accepted into a disk set, Solaris VolumeManagermightrepartition the disk so that the state database replica for the disk set can be placed on the disk (see“Automatic Disk Partitioning” on page 190).
Afile system that resides on a volume in a disk set normally is notmounted automatically at boottime with the /etc/vfstab file. The necessary Solaris VolumeManager RPC daemons (rpc.metadand rpc.metamhd) do not start early enough in the boot process to permit this.Additionally, theownership of a disk set is lost during a reboot. Do not disable the Solaris VolumeManager RPCdaemons in the /etc/inetd.conf file. They are configured to start by default. These daemonsmustremain enabled to allow Solaris VolumeManager to use its full functionality.
When the autotake feature is enabled using the -A option of the metaset command, the disk set isautomatically taken at boot time. Under these circumstances, a file system that resides on a volume ina disk set can be automatically mounted with the /etc/vfstab file. To enable an automatic takeduring the boot process, the disk set must be associated with only a single host, andmust have theautotake feature enabled.Adisk set can be enabled either during or after disk set creation. Formoreinformation on the autotake feature, see “Autotake Disk Sets” on page 186.
Note –Although disk sets are supported in single-host configurations, they are often not appropriatefor “local” (not dual-connected) use. Two common exceptions are the use of disk sets to provide amoremanageable namespace for logical volumes, and tomore easily manage storage on a StorageArea Network (SAN) fabric (see “Scenario—Disk Sets” on page 194.
Disk sets can be created and configured by using the Solaris VolumeManager command-lineinterface (the metaset command) or the Enhanced Storage tool within the SolarisManagementConsole.
After disks are added to a disk set, the disk set can be reserved (or taken) and released by hosts in thedisk set.When a disk set is reserved by a host, the other host in the disk set cannot access the data onthe disks in the disk set. To performmaintenance on a disk set, a host must be the owner of the diskset or have reserved the disk set.Ahost takes implicit ownership of the disk set by putting the firstdisk into the set.
Disk sets, including disk sets created on a different system, can be imported into existing SolarisVolumeManager configurations using the metaimport command.
Solaris VolumeManager Disk SetAdministration
Solaris VolumeManagerAdministration Guide • May 2006188

Reserving aDisk SetBefore a host can use the disks in a disk set, the host must reserve the disk set. There are twomethodsof reserving a disk set:
� Safely -When you safely reserve a disk set, Solaris VolumeManager attempts to take the disk set,and the other host attempts to release the disk set. The release (and therefore the reservation)might fail.
� Forcibly -When you forcibly reserve a disk set, Solaris VolumeManager reserves the disk setwhether or not another host currently has the set reserved. This method is generally used when ahost in the disk set is down or not communicating.All disks within the disk set are taken over.The state database is read in on the host performing the reservation and the shared volumesconfigured in the disk set become accessible. If the other host had the disk set reserved at thispoint, it would panic due to reservation loss.Normally, two hosts in a disk set cooperate with each other to ensure that the disks in a disk setare reserved by only one host at a time.Anormal situation is defined as both hosts being up andcommunicating with each other.
Note – If a disk has been determined unexpectedly not to be reserved (perhaps because another hostusing the disk set forcibly took the disk), the host will panic. This behavior helps tominimize dataloss which would occur if two hosts were to simultaneously access the same disk.
Formore information about taking or reserving a disk set, see “How to Take a Disk Set” on page 203.
Releasing aDisk SetReleasing a disk set can be useful when you performmaintenance on the physical disks in the diskset.When a disk set is released, it cannot be accessed by the host. If both hosts in a disk set release theset, neither host in the disk set can access the disks in the disk set.
Formore information about releasing a disk set, see “How to Release a Disk Set” on page 205.
Importing aDisk SetBeginning with the Solaris 9 9/04 release, the metaimport command enables you to import disk sets,including replicated disk sets, into existing Solaris VolumeManager configurations that have deviceID support in the disk set. You can also use the metaimport command to report on disk sets that areavailable for import.
Replicated disk sets are created using remote replication software. In order for a replicated disk set tobe imported with the metaimport command, the slice containing the state database replica for eachdisk in the disk set must also be replicated onto the same slice of the replicated disk set. This
Solaris VolumeManager Disk SetAdministration
Chapter 18 • Disk Sets (Overview) 189

corresponds to slice 7 for non-EFI disks and slice 6 for EFI disks. Before replicating a disk set, makesure that the disk configurations of the data to be replicated and of the remote site match. This stepensures that both the state database replica and the data are replicated accurately.
The metaimport command also does not import a disk in a disk set if the disk does not contain avolume or a state database replica. This scenario occurs if a volume or a state database replica havenot been added to a disk or have been deleted from a disk. In this case, when you import the disk setto another system, you would find that the disk is missing from the disk set. For example, maximumof 50 state database replicas are allowed per Solaris VolumeManager disk set. If you have 60 disks in adisk set, the 10 disks that do not contain a state database replicamust contain a volume in order to beimported with the disk set.
For tasks associated with importing a disk set, see “Importing Disk Sets” on page 208.
Note – In a SunCluster environment, the metaimport command is not available.
AutomaticDisk PartitioningWhen you add a new disk to a disk set, Solaris VolumeManager checks the disk format. If necessary,Solaris VolumeManager repartitions the disk to ensure that the disk has an appropriately configuredslice 7 with adequate space for a state database replica. The precise size of slice 7 depends on the diskgeometry. However, the size will be no less than 4Mbytes, and probably closer to 6Mbytes(depending on where the cylinder boundaries lie).
By default, Solaris VolumeManager places one state database replica on slice 7. You can increase thedefault size of slice 7 or decrease the size of the state database replica in order to fitmore than onestate database replica onto the slice.
Note –Theminimal size for slice 7 will likely change in the future, based on a variety of factors,including the size of the state database replica and information to be stored in the state databasereplica. The default size for a state database replica in amulti-owner disk set is 16Mbytes.
For use in disk sets, disksmust have a slice 7 that meets these criteria:
� Starts at sector 0� Includes enough space for a disk label and state database replicas� Cannot bemounted� Does not overlap with any other slices, including slice 2
If the existing partition table does notmeet these criteria, Solaris VolumeManager repartitions thedisk.Asmall portion of each drive is reserved in slice 7 for use by Solaris VolumeManager. Theremainder of the space on each drive is placed into slice 0.Any existing data on the disks is lost byrepartitioning.
Solaris VolumeManager Disk SetAdministration
Solaris VolumeManagerAdministration Guide • May 2006190

Tip –After you add a drive to a disk set, youmay repartition it as necessary, with the exception thatslice 7 is not altered in any way.
The following output from the prtvtoc command shows a disk before it is added to a disk set.
[root@lexicon:apps]$ prtvtoc /dev/rdsk/c1t6d0s0
* /dev/rdsk/c1t6d0s0 partition map
*
* Dimensions:
* 512 bytes/sector
* 133 sectors/track
* 27 tracks/cylinder
* 3591 sectors/cylinder
* 4926 cylinders
* 4924 accessible cylinders
*
* Flags:
* 1: unmountable
* 10: read-only
*
* First Sector Last
* Partition Tag Flags Sector Count Sector Mount Directory
0 2 00 0 4111695 4111694
1 3 01 4111695 1235304 5346998
2 5 01 0 17682084 17682083
3 0 00 5346999 4197879 9544877
4 0 00 9544878 4197879 13742756
5 0 00 13742757 3939327 17682083
The above output shows that the disk does not contain a slice 7. Therefore, when the disk is added toa disk set, Solaris VolumeManager repartitions the disk. The following output from the prtvtoccommand shows the disk after it is added to a disk set.
[root@lexicon:apps]$ prtvtoc /dev/rdsk/c1t6d0s0
* /dev/rdsk/c1t6d0s0 partition map
*
* Dimensions:
* 512 bytes/sector
* 133 sectors/track
* 27 tracks/cylinder
* 3591 sectors/cylinder
* 4926 cylinders
* 4924 accessible cylinders
*
* Flags:
* 1: unmountable
* 10: read-only
Solaris VolumeManager Disk SetAdministration
Chapter 18 • Disk Sets (Overview) 191

*
* First Sector Last
* Partition Tag Flags Sector Count Sector Mount Directory
0 0 00 10773 17671311 17682083
7 0 01 0 10773 10772[root@lexicon:apps]$
The output shows that the disk has been repartitioned to include a slice 7 that starts at cylinder 0 andthat has sufficient space for the state database replica. If disks you add to a disk set each have anacceptable slice 7, they are not reformatted.
Note – If you have disk sets that you upgraded from Solstice DiskSuite software, the default statedatabase replica size on those sets is 1034 blocks, not the 8192 block size from Solaris VolumeManager.Also, slice 7 on the disks that were added under Solstice DiskSuite software arecorrespondingly smaller than slice 7 on disks that were added under Solaris VolumeManager.
Disk SetNameRequirementsDisk set volume names are similar to other Solaris VolumeManager component names. However,the disk set name is included as part of the name. For example, volume path names include the diskset name after /dev/md/ and before the actual volume name in the path.
The following table shows some example disk set volume names.
TABLE 18–1ExampleVolumeNames forDisk Sets
/dev/md/blue/dsk/d0 Block volume d0 in disk set blue
/dev/md/blue/dsk/d1 Block volume d1 in disk set blue
/dev/md/blue/rdsk/d126 Raw volume d126 in disk set blue
/dev/md/blue/rdsk/d127 Raw volume d127 in disk set blue
Similarly, hot spare pools have the disk set name as part of the hot spare name.
Example—TwoSharedDisk SetsFigure 18–1 shows an example configuration that uses two disk sets.
In this configuration, HostAandHost B share the disk sets red and blue. They each have their ownlocal disk set, which is not shared. If HostA fails, Host B can take over control of HostA’s shared diskset, the disk set red. Likewise, if Host B fails, HostAcan take control of Host B’s shared disk set, thedisk set blue.
Solaris VolumeManager Disk SetAdministration
Solaris VolumeManagerAdministration Guide • May 2006192

Disk 5
Disk 4
Disk 0Local
Disk Set Host A
Disk 3
Disk 2
Disk 1SharedDisk Setred
Disk 5
Disk 4
Disk 0Local
Disk Set Host B
Disk 3
Disk 2
Disk 1SharedDisk Setblue
FIGURE 18–1Disk Sets Example
Guidelines forWorkingWithDisk SetsWhenworking with disk sets, consider the following guidelines:
� Solaris VolumeManagermust be configured on each host that will be connected to the disk set.� Each host must have its local state database set up before you can create disk sets.� The sequence of steps for creating a disk set and creating the volumes for that disk set is to, first,
create the disk set. Then, add the disks to the disk set. Finally, create the volumes in the disk set.� To create and work with a disk set in a clustering environment, rootmust be amember of Group
14.Alternatively, the /.rhosts file on each host must contain an entry for the other host namesassociated with the disk set.
Note –This step is not necessary in a SunCluster 3.x environment.
� To performmaintenance on a disk set, a host must be the owner of the disk set or have reservedthe disk set.Ahost takes implicit ownership of the disk set by putting the first drives into the diskset.
� You cannot add a drive to a disk set that is in use for a file system, database or any otherapplication. Before you add a drive, make sure that it is not currently being used.
� Do not add to a disk set a drive containing existing data that you want to preserve. The process ofadding the disk to the disk set repartitions the disk and destroys existing data.
� Unlike local volume administration, it is not necessary tomanually create or delete state databasereplicas on the disk set. Solaris VolumeManager tries to balance a reasonable number of statedatabase replicas across all drives in a disk set.
Guidelines forWorkingWith Disk Sets
Chapter 18 • Disk Sets (Overview) 193
� When drives are added to a disk set, Solaris VolumeManager rebalances the state databasereplicas across the remaining drives. Later, if necessary, you can change the replica layout with themetadb command.
Asynchronous Shared Storage inDisk SetsIn previous versions of Solaris VolumeManager, all of the disks that you planned to share betweenhosts in the disk set had to be connected to each host. They also had to have the exact same path,driver, and name on each host. Specifically, a shared disk drive had to be seen by both hosts in thesame location (/dev/rdsk/c#t#d#). In addition, the shared disks had to use the same driver name(ssd).
In the current Solaris OS release, systems that have different views of commonly accessible storagecan nonconcurrently share access to a disk set.With the introduction of device ID support for disksets, Solaris VolumeManager automatically tracks diskmovement within named disk sets.
Note –Device ID support for disk sets is not supported in a SunCluster environment.
When you upgrade to the latest Solaris OS, you need to take the disk set once in order to enable disktracking. Formore information on taking a disk set, see “How to Take a Disk Set” on page 203.
If the autotake feature is not enabled, you have to take each disk set manually. If this feature isenabled, this step is done automatically when the system is rebooted. Formore information on theautotake feature, see “Autotake Disk Sets” on page 186.
This expanded device ID support also enables you to import disk sets, even disk sets that werecreated on different systems. Formore information on importing disk sets, see “Importing a DiskSet” on page 189.
Scenario—Disk SetsThe following example, drawing on the sample system shown in Chapter 5, describes how disk setsshould be used tomanage storage that resides on a SAN (StorageArea Network) fabric.
Assume that the sample system has an additional controller that connects to a fiber switch and SANstorage. Storage on the SAN fabric is unavailable to the system as early in the boot process as otherdevices, such as SCSI and IDE disks. In addition, Solaris VolumeManager would report logicalvolumes on the fabric as unavailable at boot. However, by adding the storage to a disk set, and thenusing the disk set tools tomanage the storage, this problemwith boot time availability is avoided.Also, the fabric-attached storage can be easily managed within a separate, disk set-controlled,namespace from the local storage.
Asynchronous Shared Storage in Disk Sets
Solaris VolumeManagerAdministration Guide • May 2006194

Disk Sets (Tasks)
This chapter provides information about performing tasks that are associated with disk sets. Forinformation about the concepts that are involved in these tasks, see Chapter 18.
Disk Sets (TaskMap)The following taskmap identifies the procedures that are needed tomanage Solaris VolumeManagerdisk sets and Solaris VolumeManager for Sun Cluster multi-owner disk sets.All commands work forboth types of disk sets except where noted. The Solaris VolumeManager GUI is not available fortasks associated withmulti-owner disk sets.
Task Description For Instructions
Create a disk set Use the Solaris VolumeManager GUI or themetaset command to create a disk set.
Use the metaset -Mcommand to create amulti-owner disk set.
“How to Create a Disk Set”on page 196
Add disks to a disk set Use the Solaris VolumeManager GUI or themetaset command to add disks to a disk set.
“How toAddDisks to a DiskSet” on page 198
Add a host to a disk set Use the Solaris VolumeManager GUI or themetaset command to add a host to a disk set.
“How toAddAnother Host to aDisk Set” on page 199
Create Solaris VolumeManager volumes in a diskset
Use the Solaris VolumeManager GUI or themetainit command to create volumes in adisk set.
“How to Create Solaris VolumeManager Components in a DiskSet” on page 200
Check the status of a disk set Use the Solaris VolumeManager GUI, or usethe metaset command to check the status ofa disk set.
“How to Check the Status of aDisk Set” on page 202
19C H A P T E R 1 9
195

Task Description For Instructions
Remove disks from a disk set Use the Solaris VolumeManager GUI or themetaset command to remove disks from adisk set.
“How toDelete Disks From aDisk Set” on page 202
Take a disk set Use the Solaris VolumeManager GUI or themetaset command to take a disk set.
“How to Take a Disk Set”on page 203
Release a disk set Use the Solaris VolumeManager GUI or themetaset command to release a disk set.
“How to Release a Disk Set”on page 205
Delete a host from a disk set Use the Solaris VolumeManager GUI or themetaset command to delete hosts from adisk set.
“How toDelete a Host or DiskSet” on page 206
Delete a disk set Use the Solaris VolumeManager GUI or themetaset command to delete the last hostfrom a disk set, thus deleting the disk set.
“How toDelete a Host or DiskSet” on page 206
Import a disk set Use the metaimport command to run reportson disk sets to determine which disk sets canbe imported and to import disk sets from onesystem to another.
“Importing Disk Sets” on page208
CreatingDisk Sets
� How toCreate aDisk SetCheck “Guidelines forWorkingWith Disk Sets” on page 193.
To create a disk set, use one of the followingmethods:
� From the Enhanced Storage tool within the SolarisManagement Console, open the Disk Setsnode. ChooseAction⇒Create Disk Set. Then, follow the instructions in the wizard. Formoreinformation, see the online help.
� To create a disk set from scratch from the command line, use the following form of the metasetcommand:
# metaset -s diskset-name -a -h -M hostname
-s diskset-name Specifies the name of a disk set on which the metaset commandwill work.
-a Adds hosts to the named disk set. Solaris VolumeManager supports up tofour hosts per disk set.
-M Specifies that the disk set being created is amulti-owner disk set.
BeforeYouBegin
1
CreatingDisk Sets
Solaris VolumeManagerAdministration Guide • May 2006196

-h hostname Specifies one ormore hosts to be added to a disk set.Adding the first hostcreates the set. The second host can be added later. However, the second hostis not accepted if all the disks within the set cannot be found on the specifiedhostname. hostname is the same name found in the /etc/nodename file.
See the metaset(1M)man page formore information.
Check the status of the newdisk set.# metaset
Creating aDisk Set
In the following example, you create a shared disk set called blue, from the host host1. The metasetcommand shows the status.At this point, the disk set has no owner. The host that adds disks to theset becomes the owner by default.
# metaset -s blue -a -h host1
# metaset
Set name = blue, Set number = 1
Host Owner
host1
Creating aMulti-Owner Disk Set
In the following example, you create amulti-owner disk set called red. The first line of the outputfrom the metaset command displays “Multi-owner,” indicating that the disk set is a multi-ownerdisk set.
# metaset -s red -a -M -h nodeone
# metaset -s red
Multi-owner Set name = red, Set number = 1, Master =
Host Owner Member
nodeone Yes
2
Example 19–1
Example 19–2
CreatingDisk Sets
Chapter 19 • Disk Sets (Tasks) 197

ExpandingDisk Sets
� How toAddDisks to aDisk Set
Caution –Do not add disks larger than 1Tbyte to disk sets if you expect to run the Solaris softwarewith a 32–bit kernel or if you expect to use a version of the Solaris OS prior to the Solaris 9 4/03release. See “Overview ofMulti-Terabyte Support in Solaris VolumeManager” on page 45 formoreinformation aboutmulti-terabyte volume support in Solaris VolumeManager.
Only disks that meet the following conditions can be added to a disk set:
� The diskmust not be in use in a volume or hot spare pool.� The diskmust not contain a state database replica.� The diskmust not be currently mounted, swapped on, or otherwise opened for use by an
application.
Check “Guidelines forWorkingWith Disk Sets” on page 193.
To adddisks to a disk set, use one of the followingmethods:
� From the Enhanced Storage tool within the SolarisManagement Console, open the Disk Setsnode. Select the disk set that you want tomodify. Then click the right mouse button and chooseProperties. Select the Disks tab. ClickAddDisk. Then follow the instructions in the wizard. Formore information, see the online help.
� To add disks to a disk set from the command line, use the following form of the metasetcommand:
# metaset -s diskset-name -a disk-name
-s diskset-name Specifies the name of a disk set on which the metaset commandwill work.
-a Adds disks to the named disk set.
disk-name Specifies the disks to add to the disk set. disk names are in the form cxtxdx.N The “sx” slice identifiers are not included when adding a disk to a disk set.
See the metaset(1M)man page formore information.
The first host to add a disk to a disk set becomes the owner of the disk set.
Caution –Do not add a disk with data to a disk set. The process of adding a disk with data to a disk setmight repartition the disk, destroying the data.
BeforeYouBegin
1
ExpandingDisk Sets
Solaris VolumeManagerAdministration Guide • May 2006198

Verify the status of the disk set anddisks.# metaset
Adding aDisk to a Disk Set
# metaset -s blue -a c1t6d0
# metaset
Set name = blue, Set number = 1
Host Owner
host1 Yes
Drive Dbase
c1t6d0 Yes
In this example, the host name is host1. The shared disk set is blue. Only the disk, c1t6d0, has beenadded to the disk set blue.
Optionally, you could addmultiple disks at once by listing each disk on the command line. Forexample, you could use the following command to add two disks to the disk set simultaneously:
# metaset -s blue -a c1t6d0 c2t6d0
� How toAddAnotherHost to aDisk SetThis procedure explains how to add another host to an existing disk set that only has one host. SolarisVolumeManager supports up to four hosts per disk set.
Check “Guidelines forWorkingWith Disk Sets” on page 193.
To add ahost to a disk set, use one of the followingmethods:
� From the Enhanced Storage tool within the SolarisManagement Console, open the Disk Setsnode and choose the disk set you want tomodify. Select the disk set you want tomodify. Thenclick the right mouse button , and choose Properties. Select the Hosts tab. ClickAddHost. Thenfollow the instructions in the wizard. Formore information, see the online help.
� To add hosts to a disk set from the command line, use the following form of the metasetcommand:
# metaset -s diskset-name -a -h hostname
-s diskset-name Specifies the name of a disk set on which to add the host.
-a Adds the host to the named disk set.
2
Example 19–3
BeforeYouBegin
1
ExpandingDisk Sets
Chapter 19 • Disk Sets (Tasks) 199

-h hostname Specifies one ormore host names to be added to the disk set.Adding the firsthost creates the disk set. The host name is the same name found in the/etc/nodename file.
See the metaset(1M)man page formore information.
Verify that the host has been added to the disk set.# metaset
AddingAnother Host to a Disk Set
# metaset -s blue -a -h host2
# metaset
Set name = blue, Set number = 1
Host Owner
host1 Yes
host2
Drive Dbase
c1t6d0 Yes
c2t6d0 Yes
This example shows the addition of the host, host2, to the disk set, blue.
� How toCreate Solaris VolumeManager Componentsin aDisk SetAfter you create a disk set, you can create volumes and hot spare pools using the disks you added tothe disk set. You can use either the Enhanced Storage tool within the SolarisManagement Console orthe command-line utilities.
To create volumes or other Solaris VolumeManager componentswithin a disk set, use one of thefollowingmethods:
� From the Enhanced Storage tool within the SolarisManagement Console, open the Volumes,State Database Replicas, or Hot Spare Pools node. ChooseAction⇒Create. Then follow theinstructions in the wizard. Formore information, see the online help.
� Use the same command line utilities with the same basic syntax to create volumes, state databasereplicas, or hot spare pools. However, add -s disk-set immediately after the command for everycommand.
# command -s disk-set
2
Example 19–4
◗
ExpandingDisk Sets
Solaris VolumeManagerAdministration Guide • May 2006200
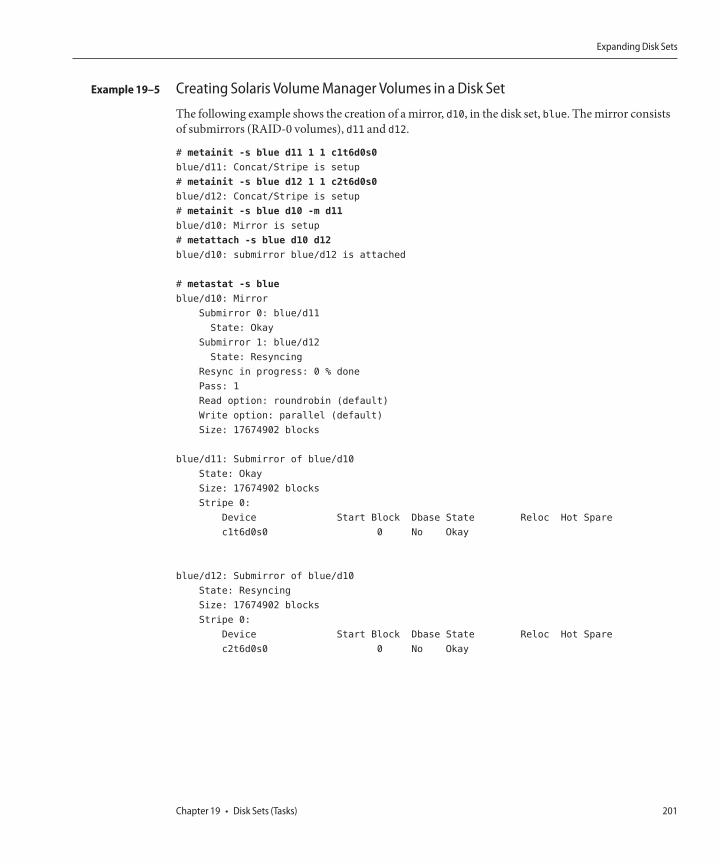
Creating Solaris VolumeManager Volumes in a Disk Set
The following example shows the creation of amirror, d10, in the disk set, blue. Themirror consistsof submirrors (RAID-0 volumes), d11 and d12.
# metainit -s blue d11 1 1 c1t6d0s0
blue/d11: Concat/Stripe is setup
# metainit -s blue d12 1 1 c2t6d0s0
blue/d12: Concat/Stripe is setup
# metainit -s blue d10 -m d11
blue/d10: Mirror is setup
# metattach -s blue d10 d12
blue/d10: submirror blue/d12 is attached
# metastat -s blue
blue/d10: Mirror
Submirror 0: blue/d11
State: Okay
Submirror 1: blue/d12
State: Resyncing
Resync in progress: 0 % done
Pass: 1
Read option: roundrobin (default)
Write option: parallel (default)
Size: 17674902 blocks
blue/d11: Submirror of blue/d10
State: Okay
Size: 17674902 blocks
Stripe 0:
Device Start Block Dbase State Reloc Hot Spare
c1t6d0s0 0 No Okay
blue/d12: Submirror of blue/d10
State: Resyncing
Size: 17674902 blocks
Stripe 0:
Device Start Block Dbase State Reloc Hot Spare
c2t6d0s0 0 No Okay
Example 19–5
ExpandingDisk Sets
Chapter 19 • Disk Sets (Tasks) 201

MaintainingDisk Sets
� How toCheck the Status of aDisk SetUse one of the followingmethods to check the status of a disk set.
� From the Enhanced Storage tool within the SolarisManagement Console, open the Disk Setsnode. Click the right mouse button on the Disk Set you want tomonitor. Then choose Propertiesfrom themenu. Formore information, see the online help.
� Use the following form of the metaset command to view disk set status.
# metaset -s diskset-name
See the metaset(1M)man page formore information.
Note –Disk set ownership is only shown on the owning host.
Checking the Status of a SpecifiedDisk Set
The following example shows the metaset commandwith the -s option followed by the name of thedisk set, blue. The output from this command displays status information for that disk set. Theoutput indicates that host1 is the disk set owner. The metaset command also displays the disks inthe disk set.
red# metaset -s blue
Set name = blue, Set number = 1
Host Owner
host1 Yes
Drive Dbase
c1t6d0 Yes
c2t6d0 Yes
The metaset command by itself displays the status of all disk sets.
� How toDeleteDisks FromaDisk SetTodelete a disk fromadisk set, use one of the followingmethods:
◗
Example 19–6
1
MaintainingDisk Sets
Solaris VolumeManagerAdministration Guide • May 2006202

� From the Enhanced Storage tool within the SolarisManagement Console, open the Disk Setsnode. Click the right mouse on the Disk Set that you want to release. Then choose Propertiesfrom themenu. Click the Disks tab. Follow the instructions in the online help.
� Use the following form of the metaset command to delete a disk from a disk set.
# metaset -s diskset-name -d disk-name
-s diskset-name Specifies the name of a disk set on which to delete the disk.
-d disk-name Specifies the disks to delete from the disk set. Disk names are in the formcxtxdx. The “sx” slice identifiers are not included when deleting a disk froma disk set.
See the metaset(1M)man page formore information.
Verify that the disk has beendeleted from thedisk.# metaset -s diskset-name
Note –To delete a disk set, youmust first delete all the disks from the disk set.
Deleting aDisk from aDisk Set
The following example shows the deletion of the disk, c1t6d0 from the disk set, blue.
host1# metaset -s blue -d c1t6d0
host1# metaset -s blue
Set name = blue, Set number = 1
Host Owner
host1
host2
Drive Dbase
c2t6d0 Yes
� How toTake aDisk Set
Note –This option is not available formulti-owner disk sets.
Use one of the followingmethods to take a disk set:
2
Example 19–7
◗
MaintainingDisk Sets
Chapter 19 • Disk Sets (Tasks) 203

� From the Enhanced Storage tool within the SolarisManagement Console, open the Disk Setsnode. Click the right mouse on the disk set you want to take. Then, hen choose Take Ownershipfrom themenu. Formore information, see the online help.
� Use the following form of the metaset command.
# metaset -s diskset-name -t -f
-s diskset-name Specifies the name of a disk set to take.
-t Specifies to take the disk set.
-f Specifies to take the disk set forcibly.
See the metaset(1M)man page formore information.
Only one host at a time can own a disk set.When one host in a disk set takes the disk set, the otherhost in the disk set cannot access data on the disks in the disk set.
The default behavior of the metaset command is to allow your host to take the disk set only if arelease is possible on the host that has ownership of the disk set. Use the -f option to forcibly take thedisk set. This option takes the disk set whether or not another host currently has the set. Use thismethod when a host in the disk set is down or not communicating. If the other host had the disk settaken at this point, it would panic when it attempts to perform an I/O operation on the disk set.
Note –Disk set ownership is only shown on the owning host.
Taking aDisk Set
In the following example, the host, host1, communicates with the host, host2. This communicationensures that the host host2 has released the disk set before the host, host1, attempts to take the diskset.
host1# metaset
...
Set name = blue, Set number = 1
Host Owner
host1
host2
...
host1# metaset -s blue -t
host2# metaset
...
Set name = blue, Set number = 1
Host Owner
host1 Yes
Example 19–8
MaintainingDisk Sets
Solaris VolumeManagerAdministration Guide • May 2006204
host2
...
If host2 owned the disk set, blue, the “Owner” column in the preceding output would still have beenblank. The metaset command only shows whether the host issuing the command owns the disk set.
Taking aDisk Set Forcibly
In the following example, the host that is taking the disk set does not communicate with the otherhost. Instead, the -f option allows the disks in the disk set to be forcibly taken without warning. If theother host had owned the disk set, that host would panic when it attempted an I/O operation on thedisk set.
# metaset -s blue -t -f
� How toRelease aDisk SetReleasing a disk set is useful when you performmaintenance on the physical disks in the disk set.When a disk set is released, it cannot be accessed by the host. If both hosts in a disk set release the set,neither host in the disk set can access directly the volumes or hot spare pools that are defined in thedisk set . However, if both hosts release the disk set, the hosts can access the disks directly throughtheir c*t*d* names.
Note –This option is not available formulti-owner disk sets.
Check “Guidelines forWorkingWith Disk Sets” on page 193.
Use one of the followingmethods to release a disk set:
� From the Enhanced Storage tool within the SolarisManagement Console, open the Disk Setsnode. Click the right mouse on the disk set that you want to release. Then choose ReleaseOwnership from themenu. Formore information, see the online help.
� To release ownership of the disk set, use the following form of the metaset command:
# metaset -s diskset-name -r
-s diskset-name Specifies the name of a disk set on which the metaset commandwill work.
-r Releases ownership of a disk set. The reservation of all the disks within thedisk set is removed. The volumes within the disk set are no longer accessible.
See the metaset(1M)man page formore information.
Example 19–9
BeforeYouBegin
1
MaintainingDisk Sets
Chapter 19 • Disk Sets (Tasks) 205

Note –Disk set ownership is only shown on the owning host.
Verify that the disk set has been released on this host.# metaset
Releasing aDisk Set
The following example shows the release of the disk set, blue. Note that there is no owner of the diskset. Viewing status from the host host1 could bemisleading.Ahost can only determine if it does ordoes not own a disk set. For example, if he host, host2, were to take ownership of the disk set, theownership would not appear from the host, host1. Only the host, host2, would display that host2has ownership of the disk set.
host1# metaset -s blue -r
host1# metaset -s blue
Set name = blue, Set number = 1
Host Owner
host1
host2
Drive Dbase
c1t6d0 Yes
c2t6d0 Yes
� How toDelete aHost orDisk SetDeleting a disk set requires that the disk set contains no disks and that no other hosts are attached tothe disk set. Deleting the last host destroys the disk set.
Use one of the followingmethods to delete a host fromadisk set, or to delete a disk set:
� From the Enhanced Storage tool within the SolarisManagement Console, open the Disk Setsnode. Click the right mouse on the disk set you want to release, then choose Delete from themenu. Follow the instructions in the online help.
� To delete the host use the following form of the metaset command.
metaset -s diskset-name -d -h hostname
-s diskset-name Specifies the name of a disk set on which the metaset commandwill work.
-d Deletes a host from a disk set.
2
Example 19–10
1
MaintainingDisk Sets
Solaris VolumeManagerAdministration Guide • May 2006206

-h hostname Specifies the name of the host to delete.
Use the same form of the preceding metaset command to delete a disk set. Deleting a disk setrequires that the disk set contains no disks and that no other hosts own the disk set. Deleting thelast host destroys the disk set.
See the metaset(1M)man page formore information.
Verify that the host has beendeleted from thedisk set by using the metaset command. Note thatonly the current (owning) host is shown.Other hosts have beendeleted.# metaset -s disk-set
Deleting aHost FromaDisk Set
The following example shows the deletion of the host, host2 from the disk set, blue.
# metaset -s blue
Set name = blue, Set number = 1
Host Owner
host1 Yes
..host2
Drive Dbase
c1t2d0 Yes
c1t3d0 Yes
c1t4d0 Yes
c1t5d0 Yes
c1t6d0 Yes
c2t1d0 Yes
# metaset -s blue -d -h host2
# metaset -s blue
Set name = blue, Set number = 1
Host Owner
host1 Yes
Drive Dbase
c1t2d0 Yes
c1t3d0 Yes
c1t4d0 Yes
c1t5d0 Yes
c1t6d0 Yes
c2t1d0 Yes
2
Example 19–11
MaintainingDisk Sets
Chapter 19 • Disk Sets (Tasks) 207

Deleting the Last Host from aDisk Set
The following example shows the deletion of the last host from the disk set, blue.
host1# metaset -s blue -d -h host1
host1# metaset -s blue
metaset: host: setname "blue": no such set
ImportingDisk Setsimporting a disk set
The metaimport command allows you to import disk sets from one system to another.
� How toPrint a Report onDisk SetsAvailable for ImportBecome superuser.
Obtain a report ondisk sets available for import.# metaimport -r -v
-r Provides a report of the unconfigured disk sets available for import on the system.
-v Provides detailed information about the state database (metadb) replica location and statuson the disks of unconfigured disk sets available for import on the system.
Reporting onDisk SetsAvailable for Import
The following examples show how to print a report on disk sets available for import. The outputfrom the metaimport command distinguishes between regular disk sets and replicated disk sets.
# metaimport -r
# metaimport -r
Drives in regular diskset including disk c1t2d0:
c1t2d0
c1t3d0
More info:
metaimport -r -v c1t2d0
Import: metaimport -s <newsetname> c1t2d0
Drives in replicated diskset including disk c1t4d0:
c1t4d0
c1t5d0
More info:
metaimport -r -v c1t4d0
Example 19–12
1
2
Example 19–13
ImportingDisk Sets
Solaris VolumeManagerAdministration Guide • May 2006208

Import: metaimport -s <newsetname> c1t4d0
# metaimport -r -v c1t2d0
Import: metaimport -s <newsetname> c1t2d0
Last update: Mon Dec 29 14:13:35 2003
Device offset length replica flags
c1t2d0 16 8192 a u
c1t3d0 16 8192 a u
� How to Import aDisk Set FromOneSystem toAnotherSystemBecome superuser.
Verify that a disk set is available for import.# metaimport -r -v
Import an available disk set.# metaimport -s diskset-name disk-name
- s diskset-name Specifies the name of the disk set being created.
disk-name Identifies a disk (c#t#d#) containing a state database replica from the disk setbeing imported.
Verify that the disk set has been imported.# metaset -s diskset-name
Importing aDisk Set
The following example shows how to import a disk set.
# metaimport -s red c1t2d0
Drives in diskset including disk c1t2d0:
c1t2d0
c1t3d0
c1t8d0
More info:
metaimport -r -v c1t2d0
# metaset -s red
Set name = red, Set number = 1
Host Owner
1
2
3
4
Example 19–14
ImportingDisk Sets
Chapter 19 • Disk Sets (Tasks) 209

host1 Yes
Drive Dbase
c1t2d0 Yes
c1t3d0 Yes
c1t8d0 Yes
ImportingDisk Sets
Solaris VolumeManagerAdministration Guide • May 2006210

Maintaining Solaris VolumeManager (Tasks)
This chapter provides information about performing general storage administrationmaintenancetasks with Solaris VolumeManager.
This is a list of the information in this chapter:
� “Solaris VolumeManagerMaintenance (TaskMap)” on page 211� “Viewing the Solaris VolumeManager Configuration” on page 212� “Renaming Volumes” on page 216� “WorkingWith Configuration Files” on page 219� “Changing Solaris VolumeManager Default Values” on page 221� “Expanding a File SystemUsing the growfsCommand” on page 221� “Overview of Replacing and Enabling Components in RAID-1 and RAID-5 Volumes” on page
224
Solaris VolumeManagerMaintenance (TaskMap)The following taskmap identifies the procedures that are needed tomaintain Solaris VolumeManager.
Task Description For Instructions
View the Solaris VolumeManager configuration
Use the Solaris VolumeManager GUI or themetastat command to view the systemconfiguration.
“How to View the SolarisVolumeManager VolumeConfiguration” on page 212
Rename a volume Use the Solaris VolumeManager GUI or themetarename command to rename a volume.
“How to Rename a Volume”on page 217
Create configuration files Use the metastat -p command and themetadb command to create configurationfiles.
“How to Create ConfigurationFiles” on page 219
20C H A P T E R 2 0
211

Task Description For Instructions
Initialize Solaris VolumeManager from configurationfiles
Use the metainit command to initializeSolaris VolumeManager from configurationfiles.
“How to Initialize SolarisVolumeManager From aConfiguration File” on page 219
Expand a file system Use the growfs command to expand a filesystem.
“How to Expand a File System”on page 223
Enable components Use the Solaris VolumeManager GUI or themetareplace command to enablecomponents.
“Enabling a Component”on page 224
Replace components Use the Solaris VolumeManager GUI or themetareplace command to replacecomponents.
“Replacing a ComponentWithAnotherAvailable Component”on page 225
Viewing the Solaris VolumeManager Configuration
Tip – The metastat command does not sort output. Pipe the output of the metastat -p command tothe sort or grep commands for amoremanageable listing of your configuration.
� How toView the Solaris VolumeManagerVolumeConfiguration
To view the volume configuration, use one of the followingmethods:
� From the Enhanced Storage tool within the SolarisManagement Console, open the Volumesnode. Formore information, see the online help.
� Use the following form of the metastat command:
# metastat -p -i component-name
-p Specifies to show output in a condensed summary. This output is suitablefor use in creating the md.tab file.
-i Specifies to verify that RAID-1 (mirror) volumes, RAID-5 volumes, andhot spares can be accessed.
component-name Specifies the name of the volume to view. If no volume name is specified, acomplete list of components is displayed.
◗
Viewing the Solaris VolumeManager Configuration
Solaris VolumeManagerAdministration Guide • May 2006212

Viewing the Solaris VolumeManager VolumeConfiguration
The following example illustrates output from the metastat command.
# metastat
d50: RAID
State: Okay
Interlace: 32 blocks
Size: 20985804 blocks
Original device:
Size: 20987680 blocks
Device Start Block Dbase State Reloc Hot Spare
c1t4d0s5 330 No Okay Yes
c1t5d0s5 330 No Okay Yes
c2t4d0s5 330 No Okay Yes
c2t5d0s5 330 No Okay Yes
c1t1d0s5 330 No Okay Yes
c2t1d0s5 330 No Okay Yes
d1: Concat/Stripe
Size: 4197879 blocks
Stripe 0:
Device Start Block Dbase Reloc
c1t2d0s3 0 No Yes
d2: Concat/Stripe
Size: 4197879 blocks
Stripe 0:
Device Start Block Dbase Reloc
c2t2d0s3 0 No Yes
d80: Soft Partition
Device: d70
State: Okay
Size: 2097152 blocks
Extent Start Block Block count
0 1 2097152
d81: Soft Partition
Device: d70
State: Okay
Size: 2097152 blocks
Extent Start Block Block count
0 2097154 2097152
d70: Mirror
Submirror 0: d71
Example 20–1
Viewing the Solaris VolumeManager Configuration
Chapter 20 • Maintaining Solaris VolumeManager (Tasks) 213

State: Okay
Submirror 1: d72
State: Okay
Pass: 1
Read option: roundrobin (default)
Write option: parallel (default)
Size: 12593637 blocks
d71: Submirror of d70
State: Okay
Size: 12593637 blocks
Stripe 0:
Device Start Block Dbase State Reloc Hot Spare
c1t3d0s3 0 No Okay Yes
Stripe 1:
Device Start Block Dbase State Reloc Hot Spare
c1t3d0s4 0 No Okay Yes
Stripe 2:
Device Start Block Dbase State Reloc Hot Spare
c1t3d0s5 0 No Okay Yes
d72: Submirror of d70
State: Okay
Size: 12593637 blocks
Stripe 0:
Device Start Block Dbase State Reloc Hot Spare
c2t3d0s3 0 No Okay Yes
Stripe 1:
Device Start Block Dbase State Reloc Hot Spare
c2t3d0s4 0 No Okay Yes
Stripe 2:
Device Start Block Dbase State Reloc Hot Spare
c2t3d0s5 0 No Okay Yes
hsp010: is empty
hsp014: 2 hot spares
Device Status Length Reloc
c1t2d0s1 Available 617652 blocks Yes
c2t2d0s1 Available 617652 blocks Yes
hsp050: 2 hot spares
Device Status Length Reloc
c1t2d0s5 Available 4197879 blocks Yes
c2t2d0s5 Available 4197879 blocks Yes
Viewing the Solaris VolumeManager Configuration
Solaris VolumeManagerAdministration Guide • May 2006214

hsp070: 2 hot spares
Device Status Length Reloc
c1t2d0s4 Available 4197879 blocks Yes
c2t2d0s4 Available 4197879 blocks Yes
Device Relocation Information:
Device Reloc Device ID
c1t2d0 Yes id1,sd@SSEAGATE_ST39204LCSUN9.0G3BV0N1S200002103AF29
c2t2d0 Yes id1,sd@SSEAGATE_ST39204LCSUN9.0G3BV0P64Z00002105Q6J7
c1t1d0 Yes id1,sd@SSEAGATE_ST39204LCSUN9.0G3BV0N1EM00002104NP2J
c2t1d0 Yes id1,sd@SSEAGATE_ST39204LCSUN9.0G3BV0N93J000071040L3S
c0t0d0 Yes id1,dad@s53554e575f4154415f5f53543339313430412525415933
Viewing aMulti-Terabyte Solaris VolumeManager Volume
The following example illustrates output from the metastat command for amulti-terabyte storagevolume (11 Tbytes).
# metastat d0
d0: Concat/Stripe
Size: 25074708480 blocks (11 TB)
Stripe 0: (interlace: 32 blocks)
Device Start Block Dbase Reloc
c27t8d3s0 0 No Yes
c4t7d0s0 12288 No Yes
Stripe 1: (interlace: 32 blocks)
Device Start Block Dbase Reloc
c13t2d1s0 16384 No Yes
c13t4d1s0 16384 No Yes
c13t6d1s0 16384 No Yes
c13t8d1s0 16384 No Yes
c16t3d0s0 16384 No Yes
c16t5d0s0 16384 No Yes
c16t7d0s0 16384 No Yes
c20t4d1s0 16384 No Yes
c20t6d1s0 16384 No Yes
c20t8d1s0 16384 No Yes
c9t1d0s0 16384 No Yes
c9t3d0s0 16384 No Yes
c9t5d0s0 16384 No Yes
c9t7d0s0 16384 No Yes
Stripe 2: (interlace: 32 blocks)
Device Start Block Dbase Reloc
c27t8d2s0 16384 No Yes
c4t7d1s0 16384 No Yes
Stripe 3: (interlace: 32 blocks)
Example 20–2
Viewing the Solaris VolumeManager Configuration
Chapter 20 • Maintaining Solaris VolumeManager (Tasks) 215

Device Start Block Dbase Reloc
c10t7d0s0 32768 No Yes
c11t5d0s0 32768 No Yes
c12t2d1s0 32768 No Yes
c14t1d0s0 32768 No Yes
c15t8d1s0 32768 No Yes
c17t3d0s0 32768 No Yes
c18t6d1s0 32768 No Yes
c19t4d1s0 32768 No Yes
c1t5d0s0 32768 No Yes
c2t6d1s0 32768 No Yes
c3t4d1s0 32768 No Yes
c5t2d1s0 32768 No Yes
c6t1d0s0 32768 No Yes
c8t3d0s0 32768 No Yes
Where ToGoFromHereFormore information, see the metastat(1M)man page.
RenamingVolumes
Background Information for RenamingVolumesSolaris VolumeManager enables you to renamemost types of volumes at any time, subject to someconstraints. You can use either the Enhanced Storage tool within the SolarisManagement Console orthe command line (the metarename(1M) command) to rename volumes.
Renaming volumes or switching volume names is an administrative convenience for themanagement of volume names. For example, you could arrange all file systemmount points in adesired numeric range. Youmight rename volumes tomaintain a naming scheme for your logicalvolumes or to allow a transactional volume to use the same name as the name of the underlyingvolume.
Note –Transactional volumes are no longer valid in Solaris VolumeManager. You can renametransactional volumes to replace them.
Before you rename a volume, make sure that it is not currently in use. For a file system,make surethat it is not mounted or being used as swap. Other applications that use the raw device, such as adatabase, should have their ownway of stopping access to the data.
Renaming Volumes
Solaris VolumeManagerAdministration Guide • May 2006216

Specific considerations for renaming volumes include the following:
� You can rename any volume except the following:
� Soft partitions� Volumes on which soft partitions are directly built� Volumes that are being used as log devices� Hot spare pools
� You can rename volumes within a disk set. However, you cannot rename volumes tomove themfrom one disk set to another disk set.
ExchangingVolumeNamesUsing the metarename commandwith the -x option exchanges the names of volumes that have aparent-child relationship. Formore information, see “How to Rename a Volume” on page 217 andthe metarename(1M)man page. The name of an existing volume is exchanged with one of itssubcomponents. For example, this type of exchange can occur between amirror and one of itssubmirrors. The metarename -x command canmake it easier to mirror or unmirror an existingvolume.
Note –Youmust use the command line to exchange volume names. This functionality is currentlyunavailable in the Solaris VolumeManager GUI. However, you can rename a volumewith either thecommand line or the GUI.
Consider the following guidelines when you want to rename a volume:
� You cannot rename a volume that is currently in use. This restriction includes volumes that areused asmounted file systems, as swap, or as active storage for applications or databases. Thus,before you use the metarename command, stop all access to the volume that is being renamed.For example, unmount amounted file system.
� You cannot exchange volumes in a failed state.� You cannot exchange volumes that are using a hot spare replacement.� An exchange can only take place between volumes with a direct parent-child relationship.� You cannot exchange (or rename) a log device. The workaround is to detach the log device and
attach another log device of the desired name.� Only volumes can be exchanged. You cannot exchange slices or hot spares.
� How toRenameaVolumeCheck the volume name requirements (“VolumeNames” on page 42), and “BackgroundInformation for Renaming Volumes” on page 216.
BeforeYouBegin
Renaming Volumes
Chapter 20 • Maintaining Solaris VolumeManager (Tasks) 217

Unmount the file system that uses the volume.# umount /filesystem
To rename the volume, use one of the followingmethods:
� From the Enhanced Storage tool within the SolarisManagement Console, open the Volumes.Select the volume you want to rename. Click the right mouse on the icon. Choose the Propertiesoption. Then, follow the onscreen instructions. Formore information, see the online help.
� Use the following form of the metarename command:
# metarename old-volume-name new-volume-name
old-volume-name Specifies the name of the existing volume.
new-volume-name Specifies the new name for the existing volume.
See the metarename(1M)man page formore information.
Edit the /etc/vfstab file to refer to the newvolumename, if necessary.
Remount the file system.# mount /filesystem
Renaming a VolumeUsed for a File System
In the following example, the volume, d10, is renamed to d100.
# umount /home
# metarename d10 d100
d10: has been renamed to d100
(Edit the /etc/vfstab file so that the file system references the new volume)# mount /home
Because d10 contains amounted file system, the file systemmust be unmounted before the volumecan be renamed. If the volume is used for a file systemwith an entry in the /etc/vfstab file, the entrymust be changed to reference the new volume name.
For example, if the /etc/vfstab file contains the following entry for the file system:
/dev/md/dsk/d10 /dev/md/rdsk/d10 /docs home 2 yes -
Change the entry to read as follows:
/dev/md/dsk/d100 /dev/md/rdsk/d100 /docs home 2 yes -
Then, remount the file system.
1
2
3
4
Example 20–3
Renaming Volumes
Solaris VolumeManagerAdministration Guide • May 2006218

If you have an existing mirror or transactional volume, you can use the metarename -x command toremove themirror or transactional volume and keep data on the underlying volume. For atransactional volume, as long as themaster device is a volume ( either a RAID-0, RAID-1, or RAID-5volume), you can keep data on that volume.
WorkingWithConfiguration FilesSolaris VolumeManager configuration files contain basic Solaris VolumeManager information, aswell as most of the data that is necessary to reconstruct a configuration. The following proceduresillustrate how to work with these files.
� How toCreate Configuration FilesOnce youhave defined all appropriate parameters for the Solaris VolumeManager environment, usethe metastat -p command to create the /etc/lvm/md.tab file.# metastat -p > /etc/lvm/md.tab
This file contains all parameters for use by the metainit command and metahs command. Use thisfile if you need to set up several similar environments or if you need to recreate the configurationafter a system failure.
Formore information about the md.tab file, see “Overview of the md.tab File” on page 302 and themd.tab(4) man page.
� How to Initialize Solaris VolumeManager FromaConfiguration File
Caution –Use this procedure in the following circumstances:
� If you have experienced a complete loss of your Solaris VolumeManager configuration� If you have no configuration yet, and you want to create a configuration from a saved
configuration file
On occasion, your system loses the informationmaintained in the state database. For example, thisloss might occur if the systemwas rebooted after all of the state database replicas were deleted.Aslong as no volumes were created after the state database was lost, you can use the md.cf or md.tabfiles to recover your Solaris VolumeManager configuration.
◗
WorkingWith Configuration Files
Chapter 20 • Maintaining Solaris VolumeManager (Tasks) 219

Note –The md.cf file does notmaintain information on active hot spares. Thus, if hot spares were inuse when the Solaris VolumeManager configuration was lost, those volumes that were using activehot spares are likely corrupted.
Formore information about these files, see the md.cf(4) and the md.tab(4) man pages.
Create state database replicas.
See “Creating State Database Replicas” on page 68 formore information.
Create or update the /etc/lvm/md.tab file.
� If you are attempting to recover the last known Solaris VolumeManager configuration, copy themd.cf file into the /etc/lvm/md.tab file.
� If you are creating a new Solaris VolumeManager configuration based on a copy of the md.tabfile that have you preserved, copy the preserved file into the /etc/lvm/md.tab file.
Edit the “new” /etc/lvm/md.tab file anddo the following:
� If you are creating a new configuration or recovering a configuration after a crash, configure themirrors as one-waymirrors. For example:
d80 -m d81 1
d81 1 1 c1t6d0s3
If the submirrors of amirror are not the same size, be sure to use the smallest submirror for thisone-waymirror. Otherwise, data could be lost.
� If you are recovering an existing configuration and Solaris VolumeManager was cleanly stopped,leave themirror configuration asmulti-waymirrors. For example:
d70 -m d71 d72 1
d71 1 1 c1t6d0s2
d72 1 1 c1t5d0s0
� Specify RAID-5 volumes with the -k option, to prevent reinitialization of the device. Forexample:
d45 -r c1t3d0s5 c1t3d0s3 c1t3d0s4 -k -i 32b
See the metainit(1M)man page formore information.
Check the syntax of the /etc/lvm/md.tab file entrieswithout committing changes by using one ofthe following forms of the metainit command:# metainit -n md.tab-entry
# metainit -n -a
1
2
3
4
WorkingWith Configuration Files
Solaris VolumeManagerAdministration Guide • May 2006220

The metainit command does notmaintain a hypothetical state of the devices that might have beencreated while running with the -n, so creating volumes that rely on other, nonexistent volumes willresult in errors with the -n even though the commandmay succeed without the -n option.
-n Specifies not to actually create the devices. Use this option to verify that the resultsare as you expected.
md.tab-entry Specifies the name of the component to initialize.
-a Specifies to check all components.
If no problemswere apparent from theprevious step, recreate the volumes andhot spare pools fromthe md.tabfile:# metainit -a
-a Specifies to activate the entries in the /etc/lvm/md.tab file.
As needed,make the one-waymirrors intomulti-waymirrors by using the metattach command.# mettach mirror submirror
Validate the data on the volumes to confirm that the configuration has been reconstructedaccurately.# metastat
Changing Solaris VolumeManagerDefault ValuesWith the Solaris 10 release, Solaris VolumeManager has been enhanced to configure volumesdynamically. You no longer need to edit the nmd and the md_nsets parameters in the/kernel/drv/md.conf file. New volumes are dynamically created, as needed.
Themaximum Solaris VolumeManager configuration values remain unchanged:
� Themaximumnumber of volumes that is supported is 8192.� Themaximumnumber of disk sets supported is 32.
Expanding a File SystemUsing the growfsCommandAfter a volume that contains a UFS file system is expanded (meaning that more space is added), youalso need to expand the file system in order to recognize the added space. Youmustmanually expandthe file systemwith the growfs command. The growfs command expands the file system, even whilethe file system ismounted. However, write access to the file system is not possible while the growfscommand is running.
5
6
7
Expanding a File SystemUsing the growfs Command
Chapter 20 • Maintaining Solaris VolumeManager (Tasks) 221

An application, such as a database, that uses the raw devicemust have its ownmethod to incorporatethe added space. Solaris VolumeManager does not provide this capability.
The growfs command “write-locks” amounted file system as it expands the file system. The lengthof time the file system is write-locked can be shortened by expanding the file system in stages. Forinstance, to expand a 1-Gbyte file system to 2 Gbytes, the file system can be grown in 16Mbyte stagesby using the -s option. This option specifies the total size of the new file system at each stage.
During the expansion, the file system is not available for write access because of the write-lockfeature.Write accesses are transparently suspended and are restarted when the growfs commandunlocks the file system. Read accesses are not affected. However, access times are not kept while thelock is in effect.
Background Information for Expanding Slices andVolumes
Note – Solaris VolumeManager volumes can be expanded. However, volumes cannot be reduced insize.
� Avolume can be expanded whether it is used for a file system, application, or database. You canexpand RAID-0 (stripe and concatenation) volumes, RAID-1 (mirror) volumes, and RAID-5volumes and soft partitions.
� You can concatenate a volume that contains an existing file systemwhile the file system is in use.As long as the file system is a UFS file system, the file system can be expanded (with the growfscommand) to fill the larger space. You can expand the file systemwithout interrupting readaccess to the data.
� Once a file system is expanded, it cannot be reduced in size, due to constraints in the UFS filesystem.
� Applications and databases that use the raw devicemust have their ownmethod to expand theadded space so that they can recognize it. Solaris VolumeManager does not provide thiscapability.
� When a component is added to a RAID-5 volume, it becomes a concatenation to the volume. Thenew component does not contain parity information. However, data on the new component isprotected by the overall parity calculation that takes place for the volume.
� You can expand a log device by adding additional components. You do not need to run thegrowfs command, as Solaris VolumeManager automatically recognizes the additional space onreboot.
� Soft partitions can be expanded by adding space from the underlying volume or slice.All othervolumes can be expanded by adding slices.
Expanding a File SystemUsing the growfs Command
Solaris VolumeManagerAdministration Guide • May 2006222

� How toExpanda File SystemCheck “Prerequisites for Creating Solaris VolumeManager Components” on page 45.
Review the disk space associatedwith a file system.# df -hk
See the df(1M)man page formore information.
Expand aUFSfile systemon a logical volume.# growfs -M /mount-point /dev/md/rdsk/volume-name
-M /mount-point Specifies themount point for the file system to be expanded.
/dev/md/rdsk/volume-name Specifies the name of the volume onwhich you want to expand.
See the following example and the growfs(1M)man page formore information.
Expanding a File System
In the following example, a new slice is added to a volume, d10, which contains themounted filesystem, /home2. The growfs command specifies themount point with the -M option to be /home2,which is expanded onto the raw volume /dev/md/rdsk/d10. The file systemwill span the entirevolumewhen the growfs command is complete. You can use the df -hk command before and afterexpanding the file system to verify the total disk capacity.
# df -hk
Filesystem kbytes used avail capacity Mounted on
...
/dev/md/dsk/d10 69047 65426 0 100% /home2
...
# growfs -M /home2 /dev/md/rdsk/d10
/dev/md/rdsk/d10: 295200 sectors in 240 cylinders of 15 tracks, 82 sectors
144.1MB in 15 cyl groups (16 c/g, 9.61MB/g, 4608 i/g)
super-block backups (for fsck -F ufs -o b=#) at:
32, 19808, 39584, 59360, 79136, 98912, 118688, 138464, 158240, 178016, 197792,
217568, 237344, 257120, 276896,
# df -hk
Filesystem kbytes used avail capacity Mounted on
...
/dev/md/dsk/d10 138703 65426 59407 53% /home2
...
Formirror volumes, always run the growfs command on the top-level volume. Do not run thecommand on a submirror ormaster device, even though space is added to the submirror ormasterdevice.
BeforeYouBegin
1
2
Example 20–4
Expanding a File SystemUsing the growfs Command
Chapter 20 • Maintaining Solaris VolumeManager (Tasks) 223

Overviewof Replacing andEnablingComponents in RAID-1andRAID-5Volumes
Solaris VolumeManager can replace and enable components within RAID-1 (mirror) and RAID-5volumes.
In Solaris VolumeManager terminology, replacing a component is a way to substitute an availablecomponent on the system for a selected component in a submirror or RAID-5 volume. You can thinkof this process as logical replacement, as opposed to physically replacing the component. Formoreinformation see “Replacing a ComponentWithAnotherAvailable Component” on page 225.
Enabling a componentmeans to “activate” or substitute a component with itself (that is, thecomponent name is the same). Formore information, see “Enabling a Component” on page 224.
Note –When recovering from disk errors, scan /var/adm/messages to see what kind of errorsoccurred. If the errors are transitory and the disks themselves do not have problems, try enabling thefailed components. You can also use the format command to test a disk.
Enabling aComponentYou can enable a component when any of the following conditions exist:
� Solaris VolumeManager cannot access the physical drive. This problemmight occur, forexample, due to a power loss, or a loose drive cable. In this case, Solaris VolumeManager puts thecomponents in the “Maintenance” state. You need tomake sure that the drive is accessible(restore power, reattach cables, and so on), and then enable the components in the volumes.
� You suspect that a physical drive is having transitory problems that are not disk-related. Youmight be able to fix a component in the “Maintenance” state by simply enabling it. If enabling thecomponent does not fix the problem, then you need to do one of the following:
� Physically replace the disk drive and enable the component� Replace the component with another available component on the system
When you physically replace a disk, be sure to partition the disk like the replaced disk to ensureadequate space on each used component.
Note –Always check for state database replicas and hot spares on the disk that is being replaced.Anystate database replica in an erred state should be deleted before you replace the disk. Then, after youenable the component, recreate the state database replicas using the same size. You should treat hotspares in the samemanner.
Overview of Replacing and Enabling Components in RAID-1 and RAID-5 Volumes
Solaris VolumeManagerAdministration Guide • May 2006224

Replacing aComponentWithAnotherAvailableComponentYou use the metareplace commandwhen you replace or swap an existing component with adifferent component that is available and not in use on the system.
You can use this commandwhen any of the following conditions exist:
� Adisk drive has problems, and you do not have a replacement drive. However, you do haveavailable components elsewhere on the system.Youmight want to use this strategy when a replacement is absolutely necessary, but you do notwant to shut down the system.
� You see soft errors on the physical disks.Physical disksmight report soft errors even though Solaris VolumeManager shows themirror/submirror or RAID-5 volume in the “Okay” state. Replacing the component in questionwith another available component enables you to perform preventativemaintenance andpotentially prevent hard errors from occurring.
� Youwant to do performance tuning.One way that you can evaluate components is by using the performancemonitoring featureavailable from the Enhanced Storage tool within the SolarisManagement Console. For example,youmight see that a particular component in a RAID-5 volume is experiencing a high loadaverage, even though it is in the “Okay” state. To balance the load on the volume, you can replacethat component with a component from a disk that is less utilized. You can perform this type ofreplacement online without interrupting service to the volume.
Maintenance and Last Erred StatesWhen a component in a RAID-1 or RAID-5 volume experiences errors, Solaris VolumeManagerputs the component in the “Maintenance” state. No further reads or writes are performed to acomponent in the “Maintenance” state.
Sometimes a component goes into a “Last Erred” state. For a RAID-1 volume, this usually occurswith a one-sidedmirror. The volume experiences errors. However, there are no redundantcomponents to read from. For a RAID-5 volume this occurs after one component goes into“Maintenance” state, and another component fails. The second component to fail goes into the “LastErred” state.
When either a RAID-1 volume or a RAID-5 volume has a component in the “Last Erred” state, I/O isstill attempted to the componentmarked “Last Erred.” This I/O attempt occurs because a “LastErred” component contains the last good copy of data from Solaris VolumeManager’s point of view.With a component in the “Last Erred” state, the volume behaves like a normal device (disk) andreturns I/O errors to an application. Usually, at this point, some data has been lost.
Overview of Replacing and Enabling Components in RAID-1 and RAID-5 Volumes
Chapter 20 • Maintaining Solaris VolumeManager (Tasks) 225

The subsequent errors on other components in the same volume are handled differently, dependingon the type of volume.
RAID-1 Volume ARAID-1 volumemight be able to tolerate many components in the“Maintenance” state and still be read from andwritten to. If components are inthe “Maintenance” state, no data has been lost. You can safely replace or enablethe components in any order. If a component is in the “Last Erred” state, youcannot replace it until you first replace the components in the “Maintenance”state. Replacing or enabling a component in the “Last Erred” state usuallymeans that some data has been lost. Be sure to validate the data on themirrorafter you repair it.
RAID-5 Volume ARAID-5 volume can tolerate a single component in the “Maintenance” state.You can safely replace a single component in the “Maintenance” state withoutlosing data. If an error on another component occurs, it is put into the “LastErred” state.At this point, the RAID-5 volume is a read-only device. You needto perform some type of error recovery so that the state of the RAID-5 volumeis stable and the possibility of data loss is reduced. If a RAID-5 volume reaches a“Last Erred” state, there is a good chance it has lost data. Be sure to validate thedata on the RAID-5 volume after you repair it.
Always replace components in the “Maintenance” state first, followed by those in the “Last Erred”state.After a component is replaced and resynchronized, use the metastat command to verify itsstate. Then, validate the data.
Background Information for Replacing andEnablingComponents in RAID-1 andRAID-5VolumesWhen you replace components in a RAID-1 volume or a RAID-5 volume, follow these guidelines:
� Always replace components in the “Maintenance” state first, followed by those components inthe “Last Erred” state.
� After a component is replaced and resynchronized, use the metastat command to verify the stateof the volume. Then, validate the data. Replacing or enabling a component in the “Last Erred”state usually means that some data has been lost. Be sure to validate the data on the volume afteryou repair it. For a UFS, run the fsck command to validate the “metadata” (the structure of thefile system). Then, check the actual user data. (Practically, users will have to examine their files.)Adatabase or other applicationmust have its ownway of validating its internal data structure.
� Always check for state database replicas and hot spares when you replace components.Any statedatabase replica in an erred state should be deleted before you replace the physical disk. The statedatabase replica should be added back before you enable the component. The same procedureapplies to hot spares.
Overview of Replacing and Enabling Components in RAID-1 and RAID-5 Volumes
Solaris VolumeManagerAdministration Guide • May 2006226

� During component replacement for a RAID-5 volume, data is recovered in one of two ways. Thedata is recovered either from a hot spare currently in use or from using the RAID-5 parity, whenno hot spare is in use.
� When you replace a component for a RAID-1 volume, Solaris VolumeManager automaticallystarts resynchronizing the new component with the rest of the volume.When theresynchronization completes, the replaced component becomes readable and writable. If thefailed component has been replaced with data from a hot spare, the hot spare is placed in the“Available” state andmade available for other hot spare replacements.
� The new componentmust be large enough to replace the old component.� As a precaution, back up all data before you replace “Last Erred” devices.
Overview of Replacing and Enabling Components in RAID-1 and RAID-5 Volumes
Chapter 20 • Maintaining Solaris VolumeManager (Tasks) 227

228

Best Practices for Solaris VolumeManager
This chapter provides general best practices information from a real-world storage scenario usingSolaris VolumeManager. In this chapter, you will see a typical configuration, followed by an analysis,followed by a recommended (“Best Practices”) configuration tomeet the same needs.
This chapter includes the following information:
� “Deploying Small Servers” on page 229� “Using Solaris VolumeManagerWith Networked Storage Devices” on page 231
Deploying Small ServersDistributed computing environments, often need to deploy similar or identical servers at multiplelocations. These environments include ISPs, geographically distributed sales offices, andtelecommunication service providers. Servers in a distributed computing environmentmightprovide some of the following services:
� Router or firewall services� Email services� DNS caches� Usenet (NetworkNews) servers� DHCP services� Other services best provided at a variety of locations
These small servers have several characteristics in common:
� High-reliability requirements� High-availability requirements� Routine hardware and performance requirements
As a starting point, consider a Netra™ server with a single SCSI bus and two internal disks. Thisoff-the-shelf configuration is a good starting point for distributed servers. Solaris VolumeManagercould easily be used tomirror some or all of the slices, thus providing redundant storage to helpguard against disk failure. See the following figure for an example of this small system configuration.
21C H A P T E R 2 1
229

c0t0d0 c0t1d0
SCSIcontroller
FIGURE 21–1 Small SystemConfiguration
This configurationmight includemirrors for the root (/), /usr, swap, /var, and /export file systems,plus state database replicas (one per disk).As such, a failure of either side of any of themirrors wouldnot necessarily result in system failure.Also, up to five discrete failures could possibly be tolerated.However, the system is not sufficiently protected against disk or slice failure.Avariety of potentialfailures could result in a complete system failure, requiring operator intervention.
While this configuration does help provide some protection against catastrophic disk failure, itexposes key possible single points of failure:
� The single SCSI controller represents a potential point of failure. If the controller fails, the systemis down, pending replacement of the part.
� The two disks do not provide adequate distribution of state database replicas. Themajorityconsensus algorithm requires that half of the state database replicas be available for the system tocontinue to run. This algorithm also requires half plus one replica for a reboot. So, if one statedatabase replica were on each disk and one disk or the slice that contains the replica failed, thesystem could not reboot.As a result a mirrored root (/) file systemwould become ineffective. Iftwo ormore state database replicas were on each disk, a single slice failure would likely not beproblematic. However, a disk failure would still prevent a reboot. If different number of replicaswere on each disk, one disk would havemore than half and one disk would have fewer than half.If the disk with fewer replicas failed, the system could reboot and continue. However, if the diskwithmore replicas failed, the systemwould immediately panic.
A“Best Practices” approach would be tomodify the configuration by adding onemore controllerand onemore hard drive. The resulting configuration would be far more resilient.
Deploying Small Servers
Solaris VolumeManagerAdministration Guide • May 2006230

Using Solaris VolumeManagerWithNetworkedStorageDevices
Solaris VolumeManager works well with networked storage devices, particularly those devices thatprovide configurable RAID levels and flexible options. Usually, the combination of Solaris VolumeManager and such devices can result in performance and flexibility that is superior to either productalone.
Generally, do not establish Solaris VolumeManager’s RAID-5 volumes on any hardware storagedevices that provide redundancy (for example, RAID-1 and RAID-5 volumes). Unless you have avery unusual situation, performance suffers.Also, you will gain very little in terms of redundancy orhigher availability.
Configuring underlying hardware storage devices with RAID-5 volumes, on the other hand, is veryeffective. Doing so provides a good foundation for Solaris VolumeManager volumes. HardwareRAID-5 provides additional redundancy for Solaris VolumeManager’s RAID-1 volumes, softpartitions, or other volumes.
Note –Do not configure similar software and hardware devices. For example, do not build softwareRAID-1 volumes on top of hardware RAID-1 devices. Configuring similar devices in hardware andsoftware results in performance penalties without offsetting any gains in reliability.
Solaris VolumeManager’s RAID-1 volumes that are built on underlying hardware storage devicesare not RAID-1+0. Solaris VolumeManager cannot understand the underlying storage well enoughto offer RAID-1+0 capabilities.
Configuring soft partitions on top of Solaris VolumeManager RAID-1 volume, built in turn on ahardware RAID-5 device, is a very flexible and resilient configuration.
Using Solaris VolumeManagerWith Networked StorageDevices
Chapter 21 • Best Practices for Solaris VolumeManager 231

232

Top-DownVolumeCreation (Overview)
This chapter provides conceptual information about Solaris VolumeManager top-down volumecreation.
This chapter contains the following information:
� “Overview of Top-DownVolume Creation” on page 233� “Top-DownVolume Creation ImplementationWith Disk Sets” on page 234� “Top-DownVolume Creation Processes” on page 234� “DeterminingWhichDisksAreAvailable for Top-DownVolume Creation” on page 236
For information about performing related tasks, see Chapter 23.
Overviewof Top-DownVolumeCreationTop-down volume creation enables you to automatically create Solaris VolumeManager volumeconfigurations using the metassist command. You no longer need tomanually go through theprocess of partitioning disks, creating RAID-0 volumes (as submirrors), creating hot spare pools andhot spares, and finally creating amirror. Instead, you can issue the metassist command to create avolume. Solaris VolumeManager does the rest for you.
The metassist command enables you to create Solaris VolumeManager volume configurationswith a single command. You can specify volume characteristics in terms of quality-of-service.Quality-of-service characteristics means that without specifying the hardware components to beused in a volume, you can use input to the metassist command to provide the following:
� Volume size� Level of redundancy, which refers to the number of copies of the data� Number of data paths to the volume� Fault recovery, which indicates whether the volume is associated with a hot spare pool
You can specify the volume by quality-of-service with command-line options or in an input filenamed on the command line.
22C H A P T E R 2 2
233
In some cases, it is important tomore specifically define the volume characteristics or the constraintsunder which the volumes should be created. In such cases, you can also specify the followingcharacteristics:
� Volume types (for example, a RAID-0 (concatenation) or RAID-0 (stripe) volume).� Components to use in specific volumes.� Components that are available or unavailable for use.� Number of components to use.� Details specific to the type of volume being created. Details include the stripes, the read policy for
mirrors, and similar characteristics.
If you prefer to specify the names, sizes, and components of a volume inmore detail, use an input file.Input files include volume request files and volume specification files. Formore information on howto use input files, see “Top-DownVolume Creation Processes” on page 234.
Finally, you can constrain the metassist command to use (or not use) specific disks or paths.
Top-DownVolumeCreation ImplementationWithDisk SetsThe metassist command uses Solaris VolumeManager disk sets tomanage volumes and availabledisks for top-down volume creation. For any given top-down volume creation process, all the disksused as building blocksmust be either in the disk set or available to add to the disk set. You can usethe top-down creation process to create volumes in different disk sets. However, the disks andcomponents that are available are constrained by disk set functionality.
Top-DownVolumeCreationProcessesThe top-down volume creation process provides flexibility by offering the following processes:
� Afully automated end-to-end process through which you can specify needed constraints andhave the necessary volumes created when the command completes
� Amore granular process with breakpoints at which you can write to an XML-based file
The following figure shows how the metassist command supports end-to-end processing based oncommand-line input and input files. The figure also shows how the metassist command supportspartial processing, which allows you to provide file-based data or to check volume characteristics.
Top-DownVolumeCreation ImplementationWith Disk Sets
Solaris VolumeManagerAdministration Guide • May 2006234

metassistProcessing
VolumeSpecification
File
CommandFile
VolumeRequest
File
Command Line
CreatedVolumes
FIGURE 22–1ProcessingOptions for Top-DownVolumeCreation
For an automatic, hands-off approach to volume creation, use the command line to specify thequality-of-service characteristics you require. The metassist command automatically creates therequested volumes for you. For example:
# metassist create -s storagepool -S 10Gb
This command creates a stripe volume of 10 Gbytes in size in the storagepool disk set. Thecommand uses available storage that exists in the storagepool disk set.
Alternatively, you can use a volume request file to define the characteristics of a volume. Then, youcan use the metassist -F request-file command to create a volumewith those characteristics.
You can use the metassist -d command to produce a volume specification file. You can use this fileto assess the intended implementation and edit the file, if needed. The volume specification file canthen be used as input to the metassist command to create volumes.
Finally, you can use the metassist -c command to create a command file. The command file is a shellscript that implements the Solaris VolumeManager device configuration specified by the metassistcommand. You can use this file for repeated volume creation and edit the file, as appropriate.
When you use the metassist command to create these files, you learn what the metassistcommand does and how it makes decisions. This information can be useful for troubleshooting someof the following:
� Why a volumewas created in a certain way� Why a volumewas not created� What volumes the metassist commandwould create, without actually creating the volumes
Top-DownVolumeCreation Processes
Chapter 22 • Top-DownVolumeCreation (Overview) 235

DeterminingWhichDisksAreAvailable for Top-DownVolumeCreation
The metassist command checks disks to determine which disks appear to be unused. Thecommand attempts to conservatively determine which disks are available.Any disk or slice that is inuse is unavailable for use by the metassist command. The metassist command checks thefollowing:
� Disks used in other disk sets� Mounted slices� Slices with a file system superblock, indicating amountable file system� Slices used in other Solaris VolumeManager volumes
Any slices that meet one of these criteria are unavailable for top-down volume creation.
DeterminingWhichDisksAreAvailable for Top-DownVolumeCreation
Solaris VolumeManagerAdministration Guide • May 2006236

Top-DownVolumeCreation (Tasks)
This chapter provides tasks associated with Solaris VolumeManager top-down volume creationusing the metassist command.
This is a list of the information in this chapter:
� “Top-DownVolume Creation (TaskMap)” on page 237� “Prerequisites for Top-DownVolume Creation” on page 238� “Creating VolumesAutomatically” on page 239� “WorkingWith File-Based Data Using the metassistCommand” on page 242� “Changing the Default Behavior of the metassistCommand” on page 250
For conceptual information about top-down volume creation, see Chapter 22.
Top-DownVolumeCreation (TaskMap)The following taskmap identifies the procedures needed to create Solaris VolumeManager volumesusing the metassist command. This command enables you to specify volumes based onquality-of-service characteristics and to create sets of layered volumes with a single command.
Task Description Instructions
Create volumes automatically Enables you to use the metassistcommand to create one ormoreSolaris VolumeManager volumes.
Also, enables you to control theamount of information about thevolume creation process that themetassist command provides fortroubleshooting or for diagnosingproblems.
“Creating VolumesAutomatically”on page 239
“Analyzing Volume Creation bySpecifying Output Verbosity”on page 239
23C H A P T E R 2 3
237

Task Description Instructions
Create a command file Helps you create a shell script withthe metassist command togenerate the volumes that thecommand specifies.
“Creating a Volume ConfigurationFileWith the metassistCommand” on page 248
Create a volumewith a shell script Shows you how to create the SolarisVolumeManager volumes that themetassist command specifiedwith the shell script previouslygenerated by the command.
“Creating a VolumeWith a SavedShell Script Created by themetassistCommand” on page247
Create a volume configuration file Helps you create a volumeconfiguration file, describing thecharacteristics of the volumes youwant to create.
“Creating a Volume ConfigurationFileWith the metassistCommand” on page 248
Change the volume defaults file Allows you to set default volumecharacteristics to customize thebehavior of metassist command.
“Changing the VolumeDefaultsFile” on page 250
Prerequisites for Top-DownVolumeCreationCreating volumes and volume configurations automatically using the metassist command requiresthat you have a functional Solaris VolumeManager configuration. Before you begin, you should havethe following:
� Superuser access, or be able to assume an equivalent role-based access control (RBAC) role. See“Becoming Superuser (root) orAssuming a Role” in SystemAdministration Guide: BasicAdministration for more information.
� State database replicas, distributed appropriately for your system. See “About the Solaris VolumeManager State Database and Replicas” on page 61 formore information about state databasereplicas.
� Available disks for creating volumes. The metassist command uses disk sets to helpmanagestorage. Completely unused disks (or an existing disk set) must be available to create newvolumes using the metassist command. See “DeterminingWhichDisksAreAvailable forTop-DownVolume Creation” on page 236 formore information about disk availability.
In addition to theseminimum requirements, do not disable the Solaris VolumeManager RPCdaemons (rpc.metad, rpc.metamhd, and rpc.metamedd) in the /etc/inetd.conf file. Thesedaemons are configured to start by default. Theymust remain enabled to allow Solaris VolumeManager to use shared disk sets.
Prerequisites for Top-DownVolumeCreation
Solaris VolumeManagerAdministration Guide • May 2006238

CreatingVolumesAutomaticallyThe metassist command enables you to create Solaris VolumeManager volumes, as well as sets ofvolumes, based on quality-of-service criteria. The metassist command creates volumes for you withone command, rather than the series of commands that Solaris VolumeManager traditionallyrequires to create volumes.
You can use the metassist command to create RAID-1 (mirror) volumes directly. Thus, you do nothave to first create the submirrors (concatenations or stripes) that are used as components of theRAID-1 (mirror) volume.
AnalyzingVolumeCreationby SpecifyingOutputVerbosityWhen you run the metassist command, you can specify the level of verbose output. More verboseoutput can help diagnose problems, such as determining why disks were or were not selected for usein a volume, or to determine why a specific attempted command failed. Less verbose output canreduce the amount of extraneous information that youmust review.
When you specify output verbosity, you can learn what the metassist command does and how itmakes its decisions. This information is useful for troubleshooting some of the following:
� Why a volumewas created in a certain way� Why a volumewas not created� What volumes the metassist commandwould create, without actually creating the volumes
� How toCreateRAID-1 (mirror) VolumesUsing themetassistCommandCheck “Prerequisites for Top-DownVolume Creation” on page 238.
Identify the available storage onwhich to create the volume.
If you do not explicitly specify storage, Solaris VolumeManager identifies unused storage on thesystem and uses it, as appropriate. If you choose to specify storage, either broadly (for example, allstorage on controller 1) or specifically (for example, use c1t4d2, but do not use c1t4d1), SolarisVolumeManager uses the storage you specify.
Use the metassist commandand the appropriate options for your task.
� To create volumes from the command line, use the following form of the metassist command.
# metassist create -s diskset-name -f -r redundancy -a device1, device2... -S size -v verbosity
create Is the subcommand used to create volumes.
BeforeYouBegin
1
2
Creating VolumesAutomatically
Chapter 23 • Top-DownVolumeCreation (Tasks) 239

-s diskset-name Specifies the name of the disk set to use for the volume.
-f Specifies that the volume be associated with a hot spare.
-r redundancy Specifies the level of redundancy (number of data copies) to create.
-a device1, device2... Specifies the devices that are available for creating the volume.
-S size Specifies the size of the volume to create in KB, MB, GB, or TB, forkilobytes, megabytes, gigabytes, and terabytes, respectively.
-v verbosity Specifies how verbose the output should be.Allowable values rangefrom 0 (nearly silent output) to 2 (significant output). The default levelis 1 (moderate output).
� To create volumes using an input file to specify volume characteristics, use one of the followingforms of the metassist command.
# metassist create [-v n] [-c] -F config_file# metassist create [-v n] [-c | -d] -F request_file
-c Specifies to output the command script that would implement thespecified or generated volume configuration. The command scriptis not run, and processing stops at this stage.
-d Specifies to output the volume configuration that satisfies thespecified or generated volume request. No command script isgenerated or executed, and processing stops at this stage.
-F config_file | request_file Specifies the volume request or volume configuration file toprocess. If config_file or request_file is specified as a dash (-), it isread from standard input. The -d option cannot be specified wheninput file is a volume configuration file.
Avolume configuration file describes detailed configurations ofthe volumes to be created, while a volume request file providescharacteristics for the volumes to be produced. Formoreinformation, see volume-config(4)volume-config(4) andvolume-request(4) man pages.
-v verbosity Specifies how verbose the output should be.Allowable valuesrange from 0 (nearly silent output) to 2 (significant output). Thedefault level is 1 (moderate output).
See the following examples and the metassist(1M)man page formore information.
Once youhave created the volumes, view the newvolumes.# metastat -s diskset-name
3
Creating VolumesAutomatically
Solaris VolumeManagerAdministration Guide • May 2006240

Creating a Two-WayMirror Using the metassist Command
The following example shows how to create a two-waymirror, 10Mbytes in size. The metassistcommand identifies unused disks and creates the best mirror possible using those disks. The-s myset argument specifies that the volumes will be created in the myset disk set. The disk set iscreated, if necessary.
# metassist create -s myset -r 2 -S 10mb
Creating a Two-WayMirror andHot Spare Using the metassist Command
The following example shows how to use the metassist command to create a two-waymirror, 10Mbytes in size, with a hot spare to provide additional fault tolerance. The -f option specifies the faulttolerance.
# metassist create -s myset -f -r 2 -S 10mb
Creating a StripeWith a Specific Controller Using the metassist Command
The following example shows how to use the metassist command to create a stripe using disksavailable on controller 1. The -a option specifies the available controller.
# metassist create -s myset -a c1 -S 10mb
SpecifyingOutput Verbosity From the metassist Command
The following example shows how to use the metassist command to create a two-waymirror, 10Mbytes in size, with a hot spare to provide additional fault tolerance. The -f option specifies faulttolerance. The final argument (-v 2) specifies a verbosity level of two, which is the maximum leveland will provide themost information possible about how the metassist commandworked.
# metassist create -s myset -f -r 2 -S 10mb -v 2
Scanning system physical device configuration...
These HBA/Controllers are known:.
c0 /pci@1f,0/pci@1,1/ide@3
c1 /pci@1f,0/pci@1/pci@2/SUNW,isptwo@4
These disks are known:
c0t0d0 id1,dad@AST34342A=____________VGD97101
c1t1d0 id1,sd@SSEAGATE_ST39204LCSUN9.0G3BV0L88P000021097XNL
c1t2d0 id1,sd@SSEAGATE_ST39102LCSUN9.0GLJW22867000019171JDF
c1t3d0 id1,sd@SSEAGATE_ST39204LCSUN9.0G3BV0L7RV00007108TG0H
c1t4d0 id1,sd@SSEAGATE_ST39204LCSUN9.0G3BV0LDFR000021087R1T
c1t5d0 id1,sd@SSEAGATE_ST39204LCSUN9.0G3BV0L0M200002109812L
Example 23–1
Example 23–2
Example 23–3
Example 23–4
Creating VolumesAutomatically
Chapter 23 • Top-DownVolumeCreation (Tasks) 241

c1t6d0 id1,sd@SSEAGATE_ST39204LCSUN9.0G3BV0L8K8000021087R0Z
.
.
.
(output truncated)
The following example shows how to use the metassist command to create a two-waymirror, 10Mbytes in size, with a hot spare to provide additional fault tolerance. The -f option specifies faulttolerance. The final argument (-v 0) specifies a verbosity level of zero, which is the minimum leveland will provide nearly silent output when the command runs.
# metassist create -s myset -f -r 2 -S 10mb -v 0
myset/hsp000: Hotspare pool is setup
myset/hsp000: Hotspare is added
myset/d2: Concat/Stripe is setup
myset/d1: Concat/Stripe is setup
myset/d0: Mirror is setup
myset/d0: submirror myset/d1 is attached
Creating a VolumeUsing an Input File
The following example shows how to use the metassist command to create a volume using an inputfile.
# metassist create -F request.xml
Formore information on using input files with the metassist command, see “WorkingWithFile-Based Data Using the metassistCommand” on page 242.
WorkingWith File-BasedDataUsing the metassistCommandThe metassist command enables you to create files that you can use to evaluate volumecharacteristics or for actual volume creation.
Creating aCommandFile (Shell Script) Using themetassistCommandBy running the metassist commandwith the -c argument, you can generate a Bourne shell scriptcontaining the commands that would be used to create the volume configuration. This techniqueenables you to review the commands before actually creating the volume, or even tomodify thescript somewhat tomeet specific needs.
Example 23–5
WorkingWith File-BasedData Using the metassist Command
Solaris VolumeManagerAdministration Guide • May 2006242

� How toCreate aCommandFile (Shell Script) Using themetassistCommandCheck “Prerequisites for Top-DownVolume Creation” on page 238.
Identify the available storage onwhich to create the volume.
If you do not explicitly specify storage, Solaris VolumeManager identifies unused storage on thesystem and uses it, as appropriate. If you choose to specify storage, either broadly (for example, allstorage on controller 1) or specifically (for example, use c1t4d2, but do not use c1t4d1), SolarisVolumeManager uses the storage you specify.
Use the metassist commandand the appropriate options for your task.
Use the -c option to specify that the volume should not actually be created.# metassist create -s diskset-name -f -r redundancy -a device1, device2... \-S size -v verbosity [-c]
create Is the subcommand used to create volumes.
-s diskset-name Specifies the name of the disk set to use for the volume.
-f Specifies that the volume be associated with a hot spare.
-r redundancy Specifies the level of redundancy (number of data copies) to create.
-a device1, device2... Specifies the devices that are available for creating the volume.
-S size Specifies the size of the volume to create in KB, MB, GB, or TB, for kilobytes,megabytes, gigabytes, and terabytes, respectively.
-v verbosity Specifies how verbose the output should be.Allowable values range from 0
(nearly silent output) to 2 (significant output). The default level is 1(moderate output).
-c Specifies that the volume should not actually be created. Instead, a shellscript that can be used to create the specified configuration is sent tostandard output.
Note –The shell script required by the -c argument is sent to standardoutput, while the rest of the output from the metassist command goes tostandard error. You can redirect the output streams as you choose.
See the following examples and the metassist(1M)man page formoreinformation.
BeforeYouBegin
1
2
WorkingWith File-BasedData Using the metassist Command
Chapter 23 • Top-DownVolumeCreation (Tasks) 243

Creating a Command File (Shell Script) Using the metassist Command
The following example shows how to use the metassist command to create a two-waymirror, 10Mbytes in size, with a hot spare to provide additional fault tolerance. The -f option specifies faulttolerance. The final argument (-c) specifies that the volume should not actually be created. Rather, ashell script that could be used to create the specified configuration should be sent to standard output.
# metassist create -s myset -f -r 2 -S 10mb -c
(output truncated)
.
.
.
Volume request completed successfully.
#!/bin/sh
#
# Environment
#
# Amend PATH
PATH="/usr/sbin:/usr/bin:$PATH"
export PATH
# Disk set name
diskset=’myset’
#
# Functions
#
# Echo (verbose) and exec given command, exit on error
execho () {
test -n "$verbose" && echo "$@"
"$@" || exit
}
# Get full /dev/rdsk path of given slice
fullpath () {
case "$1" in
/dev/dsk/*|/dev/did/dsk/*) echo "$1" | sed ’s/dsk/rdsk/’ ;;
/*) echo "$1" ;;
*) echo /dev/rdsk/"$1" ;;
esac
}
# Run fmthard, ignore partboot error, error if output
fmthard_special () {
ignore=’Error writing partboot’
Example 23–6
WorkingWith File-BasedData Using the metassist Command
Solaris VolumeManagerAdministration Guide • May 2006244

out=‘fmthard "$@" 2>&1‘
result=$?
echo "$out" |
case "$out" in
*"$ignore"*) grep -v "$ignore"; return 0 ;;
’’) return "$result" ;;
*) cat; return 1 ;;
esac >&2
}
#
# Main
#
# Verify root
if [ "‘id | sed ’s/^[^(]*(\([^)]*\).*/\1/’‘" != root ]
then
echo "This script must be run as root." >&2
exit 1;
fi
# Check for verbose option
case "$1" in
-v) verbose=1 ;;
*) verbose= ;;
esac
# Does the disk set exist?
if metaset -s "$diskset" >/dev/null 2>&1
then
# Take control of disk set
execho metaset -s "$diskset" -t
else
# Create the disk set
autotakeargs=
/usr/sbin/clinfo || autotakeargs=’-A enable’
execho metaset -s "$diskset" $autotakeargs -a -h ‘uname -n | cut -f1 -d.‘
fi
# Format slices
execho fmthard_special -d 7:0:0:0:0 ‘fullpath c1t3d0s7‘
execho fmthard_special -d 7:0:0:0:0 ‘fullpath c1t6d0s7‘
execho fmthard_special -d 7:0:0:0:0 ‘fullpath c1t4d0s7‘
# Add disks to set
execho metaset -s "$diskset" -a c1t3d0
execho metaset -s "$diskset" -a c1t6d0
WorkingWith File-BasedData Using the metassist Command
Chapter 23 • Top-DownVolumeCreation (Tasks) 245

execho metaset -s "$diskset" -a c1t4d0
# Format slices
execho fmthard_special -d 0:4:0:10773:17649765 ‘fullpath c1t3d0s0‘
execho fmthard_special -d 0:4:0:10773:17649765 ‘fullpath c1t6d0s0‘
execho fmthard_special -d 0:4:0:10773:17649765 ‘fullpath c1t4d0s0‘
execho fmthard_special -d 1:4:0:17660538:21546 ‘fullpath c1t3d0s1‘
execho fmthard_special -d 1:4:0:17660538:21546 ‘fullpath c1t4d0s1‘
execho fmthard_special -d 1:4:0:17660538:21546 ‘fullpath c1t6d0s1‘
# Does hsp000 exist?
metahs -s "$diskset" -i hsp000 >/dev/null 2>&1 || {
# Create hsp hsp000
execho metainit -s "$diskset" hsp000
}
# Add slices to hsp000
execho metahs -s "$diskset" -a hsp000 c1t3d0s1
# Create concat d2
execho metainit -s "$diskset" d2 1 1 c1t4d0s1
# Associate concat d2 with hot spare pool hsp000
execho metaparam -s "$diskset" -h hsp000 d2
# Create concat d1
execho metainit -s "$diskset" d1 1 1 c1t6d0s1
# Associate concat d1 with hot spare pool hsp000
execho metaparam -s "$diskset" -h hsp000 d1
# Create mirror d0
execho metainit -s "$diskset" d0 -m d2 1
execho metattach -s "$diskset" d0 d1
#
Saving a Command File (Shell Script) Using the metassist Command
The following example shows how to use the metassist command to create a two-waymirror, 10Mbytes in size, with a hot spare to provide additional fault tolerance. The -f option specifies faulttolerance. The final argument (-c) specifies that the volume should not actually be created. Rather, ashell script that could be used to create the specified configuration should be sent to standard output.The end of the command redirects standard output to create the /tmp/metassist-shell-script.shshell script that can later be used to create the specified volume.
# metassist create -s myset -f -r 2 -S 10mb -c > \
/tmp/metassist-shell-script.sh
Example 23–7
WorkingWith File-BasedData Using the metassist Command
Solaris VolumeManagerAdministration Guide • May 2006246

Creating aVolumeWith a SavedShell Script Createdby the metassistCommandAfter you have created a shell script with the metassist command, you can use that script to createthe volumes that you specified when the shell script was created.
Caution –The command script created by the metassist command has significant dependencies onthe specific system configuration of the system onwhich the script was created, at the time the scriptwas created. Using the script on different systems or after any changes to the system configurationcan lead to data corruption or loss.
� How toExecute a Saved metassistCommandShell ScriptCheck “Prerequisites for Top-DownVolume Creation” on page 238.
Ensure that the system configuration has not changed since the shell scriptwas created, and that youare executing the script on the same system itwas created on.
Execute the saved shell script.# sh ./metassist-shell-script-name
View the newvolume.# metastat -s diskset-name
Executing a Saved metassist Command Shell Script
The following example shows how to use the metassist command to create a volume using a shellscript.
# sh ./tmp/metassist-shell-script.sh
myset/hsp000: Hotspare pool is setup
myset/hsp000: Hotspare is added
myset/d2: Concat/Stripe is setup
myset/d1: Concat/Stripe is setup
myset/d0: Mirror is setup
myset/d0: submirror myset/d1 is attached
BeforeYouBegin
1
2
3
Example 23–8
WorkingWith File-BasedData Using the metassist Command
Chapter 23 • Top-DownVolumeCreation (Tasks) 247

Creating aVolumeConfiguration FileWith themetassistCommandBy running the metassist commandwith the -d argument, you can generate an XML-based volumeconfiguration file that specifies the volumes and their components in detail, including all options andrelevant information about the volumes. Reviewing this file helps you to understand theconfiguration that the metassist command recommends.Making careful changes to this file canalso enable you to fine-tune the configuration, then to use the volume configuration file as input tothe metassist command to actually create volumes.
� How toCreate aVolumeConfiguration FileUsing themetassistCommandCheck “Prerequisites for Top-DownVolume Creation” on page 238.
Identify the available storage onwhich to create the volume.
If you do not explicitly specify storage, Solaris VolumeManager identifies unused storage on thesystem and uses it, as appropriate. If you choose to specify storage, either broadly (for example, allstorage on controller 1) or specifically (for example, use c1t4d2, but do not use c1t4d1), SolarisVolumeManager uses the storage you specify.
Use the metassist commandand the appropriate options for your task.
Use the -d option to specify that the volume should not actually be created. Instead, an XML-basedvolume configuration file is sent to standard output:# metassist create -s diskset-name -f -r redundancy -a device1, device2... \-S size -v verbosity [-d]
create Is the subcommand used to create volumes.
-s diskset-name Specifies the name of the disk set to use for the volume.
-f Specifies that the volume be associated with a hot spare.
-r redundancy Specifies the level of redundancy (number of data copies) to create.
-a device1, device2... Specifies the devices that are available for creating the volume.
-S size Specifies the size of the volume to create in KB, MB, GB, or TB, for kilobytes,megabytes, gigabytes, and terabytes, respectively.
-v verbosity Specifies how verbose the output should be.Allowable values range from 0
(nearly silent output) to 2 (significant output). The default level is 1(moderate output).
-d Specifies that the volume should not actually be created.
BeforeYouBegin
1
2
WorkingWith File-BasedData Using the metassist Command
Solaris VolumeManagerAdministration Guide • May 2006248

Note –TheXML-based volume configuration file required by the -dargument is sent to standard output. However, the rest of the output fromthe metassist command goes to standard error. You can redirect theoutput streams as you choose.
See the following examples and the metassist(1M)man page formoreinformation.
Creating a VolumeConfiguration File Using the metassist Command
This example shows how to use the metassist command to create a two-waymirror, 10Mbytes insize, with a hot spare to provide additional fault tolerance. The -f option specifies fault tolerance.The final argument (-d) specifies that the volume should not actually be created. Rather, a volumeconfiguration file that could eventually be used to create the specified configuration should be sent tostandard output.
# metassist create -s myset -f -r 2 -S 10mb -d
.(output truncated)
.
.
Volume request completed successfully.
<?xml version="1.0"?>
<!DOCTYPE volume-config SYSTEM "/usr/share/lib/xml/dtd/volume-config.dtd">
<volume-config>
<diskset name="myset"/>
<disk name="c1t3d0"/>
<disk name="c1t6d0"/>
<disk name="c1t4d0"/>
<slice name="c1t3d0s7" sizeinblocks="0"/>
<slice name="c1t3d0s0" sizeinblocks="17649765" startsector="10773"/>
<slice name="c1t6d0s7" sizeinblocks="0"/>
<slice name="c1t6d0s0" sizeinblocks="17649765" startsector="10773"/>
<slice name="c1t4d0s7" sizeinblocks="0"/>
<slice name="c1t4d0s0" sizeinblocks="17649765" startsector="10773"/>
<hsp name="hsp000">
<slice name="c1t3d0s1" sizeinblocks="21546" startsector="17660538"/>
</hsp>
<mirror name="d0" read="ROUNDROBIN" write="PARALLEL" passnum="1">
<concat name="d2">
<slice name="c1t4d0s1" sizeinblocks="21546" startsector="17660538"/>
<hsp name="hsp000"/>
</concat>
<concat name="d1>
Example 23–9
WorkingWith File-BasedData Using the metassist Command
Chapter 23 • Top-DownVolumeCreation (Tasks) 249

<slice name="c1t6d0s1"sizeinblocks="21546" startsector="17660538"/>
<hsp name="hsp000"/>
</concat>
</mirror>
</volume-config>
#
Saving a VolumeConfiguration File Using the metassist Command
This example shows how to use the metassist command to create a two-waymirror, 10Mbytes insize, with a hot spare to provide additional fault tolerance. The -f option specifies fault tolerance.The final argument (-d) specifies that the volume should not actually be created. Rather, a volumeconfiguration file that could eventually be used to create the specified configuration should be sent tostandard output. The end of the command redirects standard output to create the/tmp/metassist-volume-config.xml volume configuration file that can later be used to create thespecified volume.
# metassist create -s myset -f -r 2 -S 10mb -d > \
/tmp/metassist-volume-config.xml
Changing theDefault Behavior of the metassistCommandYou can use the volume defaults file (/etc/defaults/metassist.xml) to change the defaultbehavior for the metassist command. By changing the defaults file, you can explicitly exclude fromconsideration, or include for consideration, specific disks or controllers. You can also specifyrequirements formost volume settings used by the metassist command.
The format of the /etc/defaults/metassist.xml is specified by the/usr/share/lib/xml/dtd/volume-defaults.dtdDocument Type Definition (DTD). The formatis documented in the volume-defaults(4) man page.
Changing theVolumeDefaults FileEdit the volume defaults file (/etc/defaults/metassist.xml) to specify how the metassistcommand should behave.
Note –When you edit the file, youmust ensure that the file continues to be compliant with the/usr/share/lib/xml/dtd/volume-defaults.dtdDocument Type Definition (DTD). If the XMLfile is not compliant with the DTD, the metassist commandwill fail with an errormessage.
Example 23–10
Changing theDefault Behavior of the metassist Command
Solaris VolumeManagerAdministration Guide • May 2006250

EXAMPLE 23–11Creating aVolumeWithChangedDefaults Using the metassistCommand
Before creating a volume, edit the /etc/default/metassist.xml file to specify the default settingsthat you want to apply to all volumes you will create with the metassist command. In this example,the metassist command only creates volumes on controller c1 and, when creating stripes, onlycreates stripes with exactly four components and an interlace of value 512KB. These constraints applyto all uses of the metassist command until the /etc/default/metassist.xml file is changed again.
# cat /etc/default/metassist.xml
<!DOCTYPE volume-defaults SYSTEM \
"/usr/share/lib/xml/dtd/volume-defaults.dtd">
<volume-defaults>
<available name="c1" />
<stripe mincomp="4" maxcomp="4" interlace="512KB" ></stripe>
</volume-defaults>
# metassist create -s myset -S 10Gb
The metassist command creates a 10-Gbyte stripe, using exactly four slices and an interlace value of512 Kbytes, as specified in the /etc/default/metassist.xml file.
Changing theDefault Behavior of the metassist Command
Chapter 23 • Top-DownVolumeCreation (Tasks) 251

252

Monitoring and Error Reporting (Tasks)
Sometimes Solaris VolumeManager encounters a problem, such as being unable to write to a volumedue to physical errors at the slice level.When problems occur, Solaris VolumeManager changes thestatus of the volume so that system administrators can stay informed. However, unless you regularlycheck the status in the Solaris VolumeManager GUI through the SolarisManagement Console, or byrunning the metastat command, youmight not see these status changes promptly.
This chapter provides information about variousmonitoring tools that are available for SolarisVolumeManager One tool is the Solaris VolumeManager SNMPagent, which is a subagent of theSolstice EnterpriseAgents™monitoring software. In addition to configuring the this tool to reportSNMP traps, you can create a shell script to activelymonitormany Solaris VolumeManagerfunctions. This shell script could run as a cron job and be valuable in identifying issues before theybecome problems.
This is a list of the information in this chapter:
� “Solaris VolumeManagerMonitoring and Reporting (TaskMap)” on page 254� “Configuring the mdmonitordCommand for Periodic Error Checking” on page 254� “Solaris VolumeManager SNMPAgents Overview” on page 255� “Configuring the Solaris VolumeManager SNMPAgents” on page 256� “Limitations of the Solaris VolumeManager SNMPAgent” on page 258� “Monitoring Solaris VolumeManagerWith a cron Job” on page 259
24C H A P T E R 2 4
253

Solaris VolumeManagerMonitoring andReporting (TaskMap)
The following taskmap identifies the procedures that are needed tomanage error reporting forSolaris VolumeManager.
Task Description For Instructions
Configure the mdmonitorddaemon to periodicallycheck for errors
Configure the error-checking interval usedby the mdmonitord daemon by editing the/lib/svc/method/svc-mdmonitor script.
“Configuring the mdmonitordCommand for Periodic ErrorChecking” on page 254
Configure the SolarisVolumeManager SNMPagent
Edit the configuration files in the/etc/snmp/conf directory so that SolarisVolumeManager will throw trapsappropriately, to the correct system.
“Configuring the SolarisVolumeManager SNMPAgents” on page 256
Monitor Solaris VolumeManager with scripts run bythe cron command
Create or adapt a script to check for errors,then run the script from the cron command.
“Monitoring Solaris VolumeManagerWith a cron Job”on page 259
Configuring the mdmonitordCommand for Periodic ErrorChecking
Solaris VolumeManager includes the /usr/sbin/mdmonitord daemon.When a disk fails, SolarisVolumeManager detects the failure and generates an error. This error event triggers the mdmonitorddaemon to perform a check of RAID-1 (mirror) volumes, RAID-5 volumes, and hot spares.However, you can also configure this program to actively check for errors at an interval that youspecify.
� How toConfigure the mdmonitordCommand forPeriodic Error CheckingEdit the /lib/svc/method/svc-mdmonitor script to add a time interval for periodic checking.
Become superuser.
Open the /lib/svc/method/svc-mdmonitor script in the editor of your choice. Locate the followingsection in the script:$MDMONITORD
error=$?
case $error in
1
2
Solaris VolumeManagerMonitoring and Reporting (TaskMap)
Solaris VolumeManagerAdministration Guide • May 2006254

0) exit 0
;;
*) echo "Could not start $MDMONITORD. Error $error."
exit 0
Change the line that starts the mdmonitord commandby adding a -tflag and the number of secondsbetween checks.
$MDMONITORD -t 3600
error=$?
case $error in
0) exit 0
;;
*) echo "Could not start $MDMONITORD. Error $error."
exit 0
;;
esac
Restart the mdmonitord command to activate your changes.# svcadm restart system/mdmonitor
Formore information, see the mdmonitord(1M)man page.
Solaris VolumeManager SNMPAgentsOverviewThe Solaris VolumeManager SNMP trap agents requires the core packages SUNWlvmr, and thepackages for the SUNWlvma and the Solstice EnterpriseAgents. These core packages include thefollowing:
� SUNWmibii
� SUNWsacom
� SUNWsadmi
� SUNWsasnm
These packages are part of the Solaris operating system. They are normally installed by default unlessthe package selection wasmodified at install time or aminimal set of packages was installed. Toconfirm that these packages are available, use the pkginfo pkgname command, as in pkginfo
SUNWsasnm. After you confirm that all five packages are available, you need to configure the SolarisVolumeManager SNMPagent, as described in the following section.
3
4
Solaris VolumeManager SNMPAgents Overview
Chapter 24 • Monitoring and Error Reporting (Tasks) 255

Configuring the Solaris VolumeManager SNMPAgentsThe Solaris VolumeManager SNMPagents is not enabled by default. Use the following procedure toenable SNMP traps.
Whenever you upgrade your Solaris operating system, you will probably need to editthe/etc/snmp/conf/enterprises.oid file and append the line in Step 6 again, then restart theSolaris EnterpriseAgents server.
After you have completed this procedure, your systemwill issue SNMP traps to the host or hosts thatyou specified. You will need to use an appropriate SNMPmonitor, such as Solstice EnterpriseAgentssoftware, to view the traps as they are issued.
Set the mdmonitord command to probe your system regularly to help ensure that you receive traps ifproblems arise. See “Configuring the mdmonitordCommand for Periodic Error Checking” on page254.Also, refer to “Monitoring Solaris VolumeManagerWith a cron Job” on page 259 for additionalerror-checking options.
� How toConfigure the Solaris VolumeManager SNMPAgents
Become superuser.
Move the /etc/snmp/conf/mdlogd.rsrc– configuration file to /etc/snmp/conf/mdlogd.rsrc.
# mv /etc/snmp/conf/mdlogd.rsrc- /etc/snmp/conf/mdlogd.rsrc
Edit the /etc/snmp/conf/mdlogd.acl file to specifywhich hosts should receive SNMP traps. Look inthe file for the following:
trap = {
{
trap-community = SNMP-trap
hosts = corsair
{
enterprise = "Solaris Volume Manager"
trap-num = 1, 2, 3
}
Change the line that contains hosts = corsair to specify the host name that you want to receiveSolaris VolumeManager SNMP traps. For example, to send SNMP traps to lexicon, you wouldchange the line to hosts = lexicon. If you want to include multiple hosts, provide acomma-delimited list of host names, as in hosts = lexicon, idiom.
1
2
3
Configuring the Solaris VolumeManager SNMPAgents
Solaris VolumeManagerAdministration Guide • May 2006256

Also edit the /etc/snmp/conf/snmpdx.acl file to specifywhich hosts should receive the SNMP traps.
Find the block that begins with trap = and add the same list of hosts that you added in the previousstep. This sectionmight be commented out with #’s. If so, youmust remove the # at the beginning ofthe required lines in this section.Additional lines in the trap section are also commented out.However, you can leave those lines alone or delete them for clarity.After uncommenting the requiredlines and updating the hosts line, this section could look similar to the following:###################
# trap parameters #
###################
trap = {
{
trap-community = SNMP-trap
hosts =lexicon
{
enterprise = "sun"
trap-num = 0, 1, 2-5, 6-16
}
# {
# enterprise = "3Com"
# trap-num = 4
# }
# {
# enterprise = "snmp"
# trap-num = 0, 2, 5
# }
# }
# {
# trap-community = jerry-trap
# hosts = jerry, nanak, hubble
# {
# enterprise = "sun"
# trap-num = 1, 3
# }
# {
# enterprise = "snmp"
# trap-num = 1-3
# }
}
}
Note –Make sure that you have the same number of opening and closing brackets in the/etc/snmp/conf/snmpdx.acl file.
4
Configuring the Solaris VolumeManager SNMPAgents
Chapter 24 • Monitoring and Error Reporting (Tasks) 257

Add anewSolaris VolumeManager section to the /etc/snmp/conf/snmpdx.acl file, inside thesection you that uncommented in the previous step.
trap-community = SNMP-trap
hosts = lexicon
{
enterprise = "sun"
trap-num = 0, 1, 2-5, 6-16
}
{
enterprise = "Solaris Volume Manager"
trap-num = 1, 2, 3
}
Note that the added four lines are placed immediately after the enterprise = “sun” block.
Append the following line to the /etc/snmp/conf/enterprises.oid file:"Solaris Volume Manager" "1.3.6.1.4.1.42.104"
Stop and restart the Solstice Enterprise Agents server.# /etc/init.d/init.snmpdx stop
# /etc/init.d/init.snmpdx start
Limitations of the Solaris VolumeManager SNMPAgentThe Solaris VolumeManager SNMPagent does not issue traps for all of the Solaris VolumeManagerproblems that system administrators need to be aware oft. Specifically, the agent issues traps only inthe following instances:
� ARAID-1 or RAID-5 subcomponent goes into a “NeedsMaintenance” state� Ahot spare is swapped into service� Ahot spare starts to resynchronize� Ahot spare completes resynchronization� Amirror is taken offline� Adisk set is taken by another host and the current host panics
Many problems, such as an unavailable disk with RAID-0 volumes or soft partitions on it, do notresult in SNMP traps, even when reads and writes to the device are attempted. SCSI or IDE errors aregenerally reported in these cases. However, other SNMPagents must issue traps for those errors to bereported to amonitoring console.
5
6
7
Limitations of the Solaris VolumeManager SNMPAgent
Solaris VolumeManagerAdministration Guide • May 2006258

Monitoring Solaris VolumeManagerWith a cron Job
� How toAutomateChecking for Errors inVolumesTo automatically check your Solaris VolumeManager configuration for errors, create a script that thecronutility can periodically run.The following example shows a script that you can adapt andmodify for your needs.
Note –This script serves as a starting point for automating error checking for Solaris VolumeManager. You probably need tomodify this script for your own configuration.
#
#!/bin/ksh
#ident "@(#)metacheck.sh 1.3 96/06/21 SMI"
# ident=’%Z%%M% %I% %E% SMI’
#
# Copyright (c) 1999 by Sun Microsystems, Inc.
#
# metacheck
#
# Check on the status of the metadevice configuration. If there is a problem
# return a non zero exit code. Depending on options, send email notification.
#
# -h
# help
# -s setname
# Specify the set to check. By default, the ’local’ set will be checked.
# -m recipient [recipient...]
# Send email notification to the specified recipients. This
# must be the last argument. The notification shows up as a short
# email message with a subject of
# "Solaris Volume Manager Problem: metacheck.who.nodename.setname"
# which summarizes the problem(s) and tells how to obtain detailed
# information. The "setname" is from the -s option, "who" is from
# the -w option, and "nodename" is reported by uname(1).
# Email notification is further affected by the following options:
# -f to suppress additional messages after a problem
# has been found.
# -d to control the supression.
# -w to identify who generated the email.
# -t to force email even when there is no problem.
# -w who
# indicate who is running the command. By default, this is the
# user-name as reported by id(1M). This is used when sending
◗
Monitoring Solaris VolumeManagerWith a cron Job
Chapter 24 • Monitoring and Error Reporting (Tasks) 259

# email notification (-m).
# -f
# Enable filtering. Filtering applies to email notification (-m).
# Filtering requires root permission. When sending email notification
# the file /etc/lvm/metacheck.setname.pending is used to
# controll the filter. The following matrix specifies the behavior
# of the filter:
#
# problem_found file_exists
# yes no Create file, send notification
# yes yes Resend notification if the current date
# (as specified by -d datefmt) is
# different than the file date.
# no yes Delete file, send notification
# that the problem is resolved.
# no no Send notification if -t specified.
#
# -d datefmt
# Specify the format of the date for filtering (-f). This option
# controls the how often re-notification via email occurs. If the
# current date according to the specified format (strftime(3C)) is
# identical to the date contained in the
# /etc/lvm/metacheck.setname.pending file then the message is
# suppressed. The default date format is "%D", which will send one
# re-notification per day.
# -t
# Test mode. Enable email generation even when there is no problem.
# Used for end-to-end verification of the mechanism and email addresses.
#
#
# These options are designed to allow integration of metacheck
# into crontab. For example, a root crontab entry of:
#
# 0,15,30,45 * * * * /usr/sbin/metacheck -f -w SVMcron \
# -d ’\%D \%h’ -m [email protected] [email protected]
#
# would check for problems every 15 minutes, and generate an email to
# [email protected] (and send to an email pager service) every hour when
# there is a problem. Note the \ prior to the ’%’ characters for a
# crontab entry. Bounced email would come back to root@nodename.
# The subject line for email generated by the above line would be
# Solaris Volume Manager Problem: metacheck.SVMcron.nodename.local
#
# display a debug line to controlling terminal (works in pipes)
decho()
{
if [ "$debug" = "yes" ] ; then
Monitoring Solaris VolumeManagerWith a cron Job
Solaris VolumeManagerAdministration Guide • May 2006260

echo "DEBUG: $*" < /dev/null > /dev/tty 2>&1
fi
}
# if string $1 is in $2-* then return $1, else return ""
strstr()
{
typeset look="$1"
typeset ret=""
shift
# decho "strstr LOOK .$look. FIRST .$1."
while [ $# -ne 0 ] ; do
if [ "$look" = "$1" ] ; then
ret="$look"
fi
shift
done
echo "$ret"
}
# if string $1 is in $2-* then delete it. return result
strdstr()
{
typeset look="$1"
typeset ret=""
shift
# decho "strdstr LOOK .$look. FIRST .$1."
while [ $# -ne 0 ] ; do
if [ "$look" != "$1" ] ; then
ret="$ret $1"
fi
shift
done
echo "$ret"
}
merge_continued_lines()
{
awk -e ’\
BEGIN { line = "";} \
$NF == "\\" { \
$NF = ""; \
line = line $0; \
next; \
} \
$NF != "\\" { \
Monitoring Solaris VolumeManagerWith a cron Job
Chapter 24 • Monitoring and Error Reporting (Tasks) 261

if ( line != "" ) { \
print line $0; \
line = ""; \
} else { \
print $0; \
} \
}’
}
# trim out stuff not associated with metadevices
find_meta_devices()
{
typeset devices=""
# decho "find_meta_devices .$*."
while [ $# -ne 0 ] ; do
case $1 in
d+([0-9]) ) # metadevice name
devices="$devices $1"
;;
esac
shift
done
echo "$devices"
}
# return the list of top level metadevices
toplevel()
{
typeset comp_meta_devices=""
typeset top_meta_devices=""
typeset devices=""
typeset device=""
typeset comp=""
metastat$setarg -p | merge_continued_lines | while read line ; do
echo "$line"
devices=‘find_meta_devices $line‘
set -- $devices
if [ $# -ne 0 ] ; then
device=$1
shift
# check to see if device already refered to as component
comp=‘strstr $device $comp_meta_devices‘
if [ -z $comp ] ; then
top_meta_devices="$top_meta_devices $device"
fi
# add components to component list, remove from top list
Monitoring Solaris VolumeManagerWith a cron Job
Solaris VolumeManagerAdministration Guide • May 2006262
while [ $# -ne 0 ] ; do
comp=$1
comp_meta_devices="$comp_meta_devices $comp"
top_meta_devices=‘strdstr $comp $top_meta_devices‘
shift
done
fi
done > /dev/null 2>&1
echo $top_meta_devices
}
#
# - MAIN
#
METAPATH=/usr/sbin
PATH=//usr/bin:$METAPATH
USAGE="usage: metacheck [-s setname] [-h] [[-t] [-f [-d datefmt]] \
[-w who] -m recipient [recipient...]]"
datefmt="%D"
debug="no"
filter="no"
mflag="no"
set="local"
setarg=""
testarg="no"
who=‘id | sed -e ’s/^uid=[0-9][0-9]*(//’ -e ’s/).*//’‘
while getopts d:Dfms:tw: flag
do
case $flag in
d) datefmt=$OPTARG;
;;
D) debug="yes"
;;
f) filter="yes"
;;
m) mflag="yes"
;;
s) set=$OPTARG;
if [ "$set" != "local" ] ; then
setarg=" -s $set";
fi
;;
t) testarg="yes";
;;
w) who=$OPTARG;
;;
Monitoring Solaris VolumeManagerWith a cron Job
Chapter 24 • Monitoring and Error Reporting (Tasks) 263

\?) echo $USAGE
exit 1
;;
esac
done
# if mflag specified then everything else part of recipient
shift ‘expr $OPTIND - 1‘
if [ $mflag = "no" ] ; then
if [ $# -ne 0 ] ; then
echo $USAGE
exit 1
fi
else
if [ $# -eq 0 ] ; then
echo $USAGE
exit 1
fi
fi
recipients="$*"
curdate_filter=‘date +$datefmt‘
curdate=‘date‘
node=‘uname -n‘
# establish files
msg_f=/tmp/metacheck.msg.$$
msgs_f=/tmp/metacheck.msgs.$$
metastat_f=/tmp/metacheck.metastat.$$
metadb_f=/tmp/metacheck.metadb.$$
metahs_f=/tmp/metacheck.metahs.$$
pending_f=/etc/lvm/metacheck.$set.pending
files="$metastat_f $metadb_f $metahs_f $msg_f $msgs_f"
rm -f $files > /dev/null 2>&1
trap "rm -f $files > /dev/null 2>&1; exit 1" 1 2 3 15
# Check to see if metadb is capable of running
have_metadb="yes"
metadb$setarg > $metadb_f 2>&1
if [ $? -ne 0 ] ; then
have_metadb="no"
fi
grep "there are no existing databases" < $metadb_f > /dev/null 2>&1
if [ $? -eq 0 ] ; then
have_metadb="no"
fi
grep "/dev/md/admin" < $metadb_f > /dev/null 2>&1
Monitoring Solaris VolumeManagerWith a cron Job
Solaris VolumeManagerAdministration Guide • May 2006264

if [ $? -eq 0 ] ; then
have_metadb="no"
fi
# check for problems accessing metadbs
retval=0
if [ "$have_metadb" = "no" ] ; then
retval=1
echo "metacheck: metadb problem, can’t run ’$METAPATH/metadb$setarg’" \
>> $msgs_f
else
# snapshot the state
metadb$setarg 2>&1 | sed -e ’1d’ | merge_continued_lines > $metadb_f
metastat$setarg 2>&1 | merge_continued_lines > $metastat_f
metahs$setarg -i 2>&1 | merge_continued_lines > $metahs_f
#
# Check replicas for problems, capital letters in the flags
# indicate an error, fields are seperated by tabs.
#
problem=‘awk < $metadb_f -F\t ’{if ($1 ~ /[A-Z]/) print $1;}’‘
if [ -n "$problem" ] ; then
retval=‘expr $retval + 64‘
echo "\
metacheck: metadb problem, for more detail run:\n\t$METAPATH/metadb$setarg -i" \
>> $msgs_f
fi
#
# Check the metadevice state
#
problem=‘awk < $metastat_f -e \
’/State:/ {if ($2 != "Okay" && $2 != "Resyncing") print $0;}’‘
if [ -n "$problem" ] ; then
retval=‘expr $retval + 128‘
echo "\
metacheck: metadevice problem, for more detail run:" \
>> $msgs_f
# refine the message to toplevel metadevices that have a problem
top=‘toplevel‘
set -- $top
while [ $# -ne 0 ] ; do
device=$1
problem=‘metastat $device | awk -e \
’/State:/ {if ($2 != "Okay" && $2 != "Resyncing") print $0;}’‘
if [ -n "$problem" ] ; then
echo "\t$METAPATH/metastat$setarg $device" >> $msgs_f
Monitoring Solaris VolumeManagerWith a cron Job
Chapter 24 • Monitoring and Error Reporting (Tasks) 265

# find out what is mounted on the device
mp=‘mount|awk -e ’/\/dev\/md\/dsk\/’$device’[ \t]/{print $1;}’‘
if [ -n "$mp" ] ; then
echo "\t\t$mp mounted on $device" >> $msgs_f
fi
fi
shift
done
fi
#
# Check the hotspares to see if any have been used.
#
problem=""
grep "no hotspare pools found" < $metahs_f > /dev/null 2>&1
if [ $? -ne 0 ] ; then
problem=‘awk < $metahs_f -e \
’/blocks/ { if ( $2 != "Available" ) print $0;}’‘
fi
if [ -n "$problem" ] ; then
retval=‘expr $retval + 256‘
echo "\
metacheck: hot spare in use, for more detail run:\n\t$METAPATH/metahs$setarg -i" \
>> $msgs_f
fi
fi
# If any errors occurred, then mail the report
if [ $retval -ne 0 ] ; then
if [ -n "$recipients" ] ; then
re=""
if [ -f $pending_f ] && [ "$filter" = "yes" ] ; then
re="Re: "
# we have a pending notification, check date to see if we resend
penddate_filter=‘cat $pending_f | head -1‘
if [ "$curdate_filter" != "$penddate_filter" ] ; then
rm -f $pending_f > /dev/null 2>&1
else
if [ "$debug" = "yes" ] ; then
echo "metacheck: email problem notification still pending"
cat $pending_f
fi
fi
fi
if [ ! -f $pending_f ] ; then
if [ "$filter" = "yes" ] ; then
echo "$curdate_filter\n\tDate:$curdate\n\tTo:$recipients" \
> $pending_f
Monitoring Solaris VolumeManagerWith a cron Job
Solaris VolumeManagerAdministration Guide • May 2006266

fi
echo "\
Solaris Volume Manager: $node: metacheck$setarg: Report: $curdate" >> $msg_f
echo "\
--------------------------------------------------------------" >> $msg_f
cat $msg_f $msgs_f | mailx -s \
"${re}Solaris Volume Manager Problem: metacheck.$who.$set.$node" $recipients
fi
else
cat $msgs_f
fi
else
# no problems detected,
if [ -n "$recipients" ] ; then
# default is to not send any mail, or print anything.
echo "\
Solaris Volume Manager: $node: metacheck$setarg: Report: $curdate" >> $msg_f
echo "\
--------------------------------------------------------------" >> $msg_f
if [ -f $pending_f ] && [ "$filter" = "yes" ] ; then
# pending filter exista, remove it and send OK
rm -f $pending_f > /dev/null 2>&1
echo "Problem resolved" >> $msg_f
cat $msg_f | mailx -s \
"Re: Solaris Volume Manager Problem: metacheck.$who.$node.$set" $recipients
elif [ "$testarg" = "yes" ] ; then
# for testing, send mail every time even thought there is no problem
echo "Messaging test, no problems detected" >> $msg_f
cat $msg_f | mailx -s \
"Solaris Volume Manager Problem: metacheck.$who.$node.$set" $recipients
fi
else
echo "metacheck: Okay"
fi
fi
rm -f $files > /dev/null 2>&1
exit $retval
For information on invoking scripts by using the cron utility, see the cron(1M)man page.
Monitoring Solaris VolumeManagerWith a cron Job
Chapter 24 • Monitoring and Error Reporting (Tasks) 267

268

Troubleshooting Solaris VolumeManager(Tasks)
This chapter describes how to troubleshoot problems that are related to Solaris VolumeManager.This chapter provides both general troubleshooting guidelines and specific procedures for resolvingsome known problems.
This chapter includes the following information:
� “Troubleshooting Solaris VolumeManager (TaskMap)” on page 270� “Overview of Troubleshooting the System” on page 271� “Replacing Disks” on page 272� “Recovering FromDiskMovement Problems” on page 274� “Device IDDiscrepanciesAfter Upgrading to the Solaris 10 Release” on page 275� “Recovering FromBoot Problems” on page 277� “Recovering From State Database Replica Failures” on page 284� “Recovering From Soft Partition Problems” on page 287� “Recovering Storage From aDifferent System” on page 289� “Recovering FromDisk Set Problems” on page 296� “PerformingMounted Filesystem Backups Using the ufsdumpCommand” on page 298� “Performing SystemRecovery” on page 299
This chapter describes some Solaris VolumeManager problems and their appropriate solution. Thischapter is not intended to be all-inclusive. but rather to present common scenarios and recoveryprocedures.
25C H A P T E R 2 5
269

Troubleshooting Solaris VolumeManager (TaskMap)The following taskmap identifies some procedures that are needed to troubleshoot Solaris VolumeManager.
Task Description For Instructions
Replace a failed disk Replace a disk, then update state databasereplicas and logical volumes on the new disk.
“How to Replace a Failed Disk”on page 272
Recover from diskmovement problems
Restore disks to original locations or contactproduct support.
“Recovering FromDiskMovement Problems” on page274
Recover from improper/etc/vfstab entries
Use the fsck command on themirror, thenedit the /etc/vfstab file so that the systemboots correctly.
“How to Recover FromImproper /etc/vfstab Entries”on page 278
Recover from a boot devicefailure
Boot from a different submirror. “How to Recover From a BootDevice Failure” on page 280
Recover from insufficientstate database replicas
Delete unavailable replicas by using themetadb command.
“How to Recover FromInsufficient State DatabaseReplicas” on page 284
Recover configuration datafor a lost soft partition
Use the metarecover command to recoverconfiguration data for a soft partition.
“How to Recover ConfigurationData for a Soft Partition”on page 287
Recover a Solaris VolumeManager configuration fromsalvaged disks
Attach disks to a new system and have SolarisVolumeManager rebuild the configurationfrom the existing state database replicas.
“How to Recover Storage Froma Local Disk Set” on page 289
Recover storage from adifferent system
Import storage from known disk sets to adifferent system.
“Recovering Storage From aDifferent System” on page 289
Purge an inaccessible diskset.
Use the metaset command to purgeknowledge of a disk set that you cannot takeor use.
“Recovering FromDisk SetProblems” on page 296
Recover a systemconfiguration stored onSolaris VolumeManagervolumes.
Use Solaris OS installationmedia to recover asystem configuration stored on SolarisVolumeManager volumes.
“Performing SystemRecovery”on page 299
Troubleshooting Solaris VolumeManager (TaskMap)
Solaris VolumeManagerAdministration Guide • May 2006270
Overviewof Troubleshooting the System
Prerequisites for Troubleshooting the SystemTo troubleshoot storagemanagement problems that are related to Solaris VolumeManager, you needto do the following:
� Have root privilege� Have a current backup of all data
General Guidelines for Troubleshooting SolarisVolumeManagerYou should have the following information on hand when you troubleshoot Solaris VolumeManagerproblems:
� Output from the metadb command� Output from the metastat command� Output from the metastat -p command� Backup copy of the /etc/vfstab file� Backup copy of the /etc/lvm/mddb.cf file� Disk partition information from the prtvtoc command (SPARC® systems) or the fdisk
command (x86 based systems)� The Solaris version on your system� Alist of the Solaris patches that have been installed� Alist of the Solaris VolumeManager patches that have been installed
Tip –Any time you update your Solaris VolumeManager configuration, ormake other storage oroperating system-related changes to your system, generate fresh copies of this configurationinformation. You could also generate this information automatically with a cron job.
General TroubleshootingApproachAlthough no single procedure enables you to evaluate all problems with Solaris VolumeManager, thefollowing process provides one general approach that might help.
1. Gather information about current the configuration.2. Review the current status indicators, including the output from the metastat and metadb
commands. This information should indicate which component is faulty.
Overview of Troubleshooting the System
Chapter 25 • Troubleshooting Solaris VolumeManager (Tasks) 271

3. Check the hardware for obvious points of failure:
� Is everything connected properly?� Was there a recent electrical outage?� Have there been equipment changes or additions?
ReplacingDisksThis section describes how to replace disks in a Solaris VolumeManager environment.
Caution – If you have soft partitions on a failed disk or on volumes that are built on a failed disk, youmust put the new disk in the same physical locationAlso, use the same cntndn number as the diskbeing replaced.
� How toReplace a FailedDiskIdentify the failed disk to be replacedby examining the /var/adm/messages file and the metastatcommandoutput.
Locate any state database replicas thatmight have beenplaced on the failed disk.Use the metadb command to find the replicas.
The metadb commandmight report errors for the state database replicas that are located on the faileddisk. In this example, c0t1d0 is the problem device.# metadb
flags first blk block count
a m u 16 1034 /dev/dsk/c0t0d0s4
a u 1050 1034 /dev/dsk/c0t0d0s4
a u 2084 1034 /dev/dsk/c0t0d0s4
W pc luo 16 1034 /dev/dsk/c0t1d0s4
W pc luo 1050 1034 /dev/dsk/c0t1d0s4
W pc luo 2084 1034 /dev/dsk/c0t1d0s4
The output shows three state database replicas on each slice 4 of the local disks, c0t0d0 and c0t1d0.The W in the flags field of the c0t1d0s4 slice indicates that the device has write errors. Three replicason the c0t0d0s4 slice are still good.
Record the slice namewhere the state database replicas reside and the number of state databasereplicas. Then, delete the state database replicas.The number of state database replicas is obtained by counting the number of appearances of a slice inthe metadb command output. In this example, the three state database replicas that exist onc0t1d0s4 are deleted.# metadb -d c0t1d0s4
1
2
3
ReplacingDisks
Solaris VolumeManagerAdministration Guide • May 2006272

Caution – If, after deleting the bad state database replicas, you are left with three or fewer, addmorestate database replicas before continuing. Doing so helps to ensure that configuration informationremains intact.
Locate anddelete any hot spares on the failed disk.Use the metastat command to find hot spares. In this example, hot spare pool hsp000 includedc0t1d0s6, which is then deleted from the pool.# metahs -d hsp000 c0t1d0s6
hsp000: Hotspare is deleted
Replace the failed disk.This stepmight entail using the cfgadm command, the luxadm command, or other commands asappropriate for your hardware and environment.When performing this step, make sure to followyour hardware’s documented procedures to properlymanipulate the Solaris state of this disk.
Repartition the newdisk.Use the format command or the fmthard command to partition the disk with the same sliceinformation as the failed disk. If you have the prtvtoc output from the failed disk, you can formatthe replacement disk with the fmthard -s /tmp/failed-disk-prtvtoc-output command.
If you deleted state database replicas, add the samenumber back to the appropriate slice.In this example, /dev/dsk/c0t1d0s4 is used.# metadb -a -c 3 c0t1d0s4
If any slices on the disk are components of RAID-5 volumes or are components of RAID-0 volumesthat are in turn submirrors of RAID-1 volumes, run the metareplace -e command for each slice.In this example, /dev/dsk/c0t1d0s4 andmirror d10 are used.# metareplace -e d10 c0t1d0s4
If any soft partitions are built directly on slices on the replaced disk, run the metarecover -m -pcommandon each slice that contains soft partitions. This command regenerates the extent headersondisk.In this example, /dev/dsk/c0t1d0s4 needs to have the soft partitionmarkings on disk regenerated.The slice is scanned and themarkings are reapplied, based on the information in the state databasereplicas.# metarecover c0t1d0s4 -m -p
If any soft partitions on the disk are components of RAID-5 volumes or are components of RAID-0volumes that are submirrors of RAID-1 volumes, run the metareplace -e command for each slice.In this example, /dev/dsk/c0t1d0s4 andmirror d10 are used.# metareplace -e d10 c0t1d0s4
4
5
6
7
8
9
10
ReplacingDisks
Chapter 25 • Troubleshooting Solaris VolumeManager (Tasks) 273
If any RAID-0 volumes have soft partitions built on them, run the metarecover command for eachRAID-0 volume.
In this example, RAID-0 volume, d17, has soft partitions built on it.# metarecover d17 -m -p
Replace hot spares thatwere deleted, and add them to the appropriate hot spare pool or pools.
In this example, hot spare pool, hsp000 included c0t1d0s6. This slice is added to the hot spare pool.# metahs -a hsp000 c0t1d0s6
hsp000: Hotspare is added
If soft partitions or nonredundant volumeswere affected by the failure, restore data frombackups. Ifonly redundant volumeswere affected, then validate your data.
Check the user and application data on all volumes. Youmight have to run an application-levelconsistency checker, or use some othermethod to check the data.
Recovering FromDiskMovement ProblemsThis section describes how to recover from unexpected problems after moving disks in the SolarisVolumeManager environment.
DiskMovement andDevice IDOverviewSolaris VolumeManager uses device IDs, which are associated with a specific disk, to track all disksthat are used in a Solaris VolumeManager configuration.When disks aremoved to a differentcontroller or when the SCSI target numbers change, Solaris VolumeManager usually correctlyidentifies themovement and updates all related Solaris VolumeManager records accordingly. Nosystem administrator intervention is required. In isolated cases, Solaris VolumeManager cannotcompletely update the records and reports an error on boot.
ResolvingUnnamedDevices ErrorMessageIf you add new hardware ormove hardware (for example, youmove a string of disks from onecontroller to another controller), Solaris VolumeManager checks the device IDs that are associatedwith the disks that moved, and updates the cntndn names in internal Solaris VolumeManagerrecords accordingly. If the records cannot be updated, the boot processes that are spawned by thesvc:/system/mdmonitor service report an error to the console at boot time:
Unable to resolve unnamed devices for volume management.
Please refer to the Solaris Volume Manager documentation,
Troubleshooting section, at http://docs.sun.com or from
your local copy.
11
12
13
Recovering FromDiskMovement Problems
Solaris VolumeManagerAdministration Guide • May 2006274

No data loss has occurred, and none will occur as a direct result of this problem. This errormessageindicates that the Solaris VolumeManager name records have been only partially updated. Outputfrom the metastat command shows some of the cntndn names that were previously used. Theoutput also shows some of the cntndn names that reflect the state after themove.
If you need to update your Solaris VolumeManager configuration while this condition exists, youmust use the cntndn names that are reported by the metastat commandwhen you issue any meta*commands.
If this error condition occurs, you can do one of the following to resolve the condition:
� Restore all disks to their original locations. Next, do a reconfiguration reboot, or run (as a singlecommand):
/usr/sbin/devfsadm && /usr/sbin/metadevadm -r
After these commands complete, the error condition is resolved.� Contact your support representative for guidance.
Note –This error condition is quite unlikely to occur. If it does occur, it is most likely to affectFibre Channel-attached storage.
Device IDDiscrepanciesAfterUpgrading to the Solaris 10Release
Beginning with the Solaris 10 release, device ID output is displayed in a new format. Solaris VolumeManagermay display the device ID output in a new or old format depending on when the device idinformation was added to the state database replica.
Previously, the device IDwas displayed as a hexadecimal value. The new format displays the deviceID as anASCII string. Inmany cases, the change is negligible, as in the following example:
old format: id1,ssd@w600c0ff00000000007ecd255a9336d00
new format: id1,ssd@n600c0ff00000000007ecd255a9336d00
In other cases, the change is more noticeable, as in the following example:
old format: id1,sd@w4849544143484920444b3332454a2d33364
e4320202020203433334239383939
new format: id1,ssd@n600c0ff00000000007ecd255a9336d00
When you upgrade to the Solaris 10 release, the format of the device IDs that are associated withexisting disk sets that were created in a previous Solaris release are not updated in the Solaris Volume
Device IDDiscrepanciesAfter Upgrading to the Solaris 10 Release
Chapter 25 • Troubleshooting Solaris VolumeManager (Tasks) 275

Manager configuration. If you need to revert back to a previous Solaris release, configurationchangesmade to disk sets after the upgrademight not available to that release. These configurationchanges include:
� Adding a new disk to a disk set that existed before the upgrade� Creating a new disk set� Creating state database replicas
These configuration changes can affect all disk sets that you are able to create in Solaris VolumeManager, including the local set. For example, if you implement any of these changes to a disk setcreated in the Solaris 10 release, you cannot import the disk set to a previous Solaris release.Asanother example, youmight upgrade one side of amirrored root to the Solaris 10 release and thenmake configuration changes to the local set. These changes would not be recognized if you thenincorporated the submirror back into the previous Solaris release.
The Solaris 10 OS configuration always displays the new format of the device ID, even in the case ofan upgrade. You can display this information using the prtconf -v command. Conversely, SolarisVolumeManager displays either the old or the new format.Which format is displayed in SolarisVolumeManager depends on which version of the Solaris OS you were running when you beganusing the disk. To determine if Solaris VolumeManager is displaying a different, but equivalent, formof the device ID from that of the Solaris OS configuration, compare the output from the metastatcommandwith the output from the prtconf -v command.
In the following example, the metastat command output displays a different, but equivalent, form ofthe device ID for c1t6d0 from the prtconf -v command output for the same disk.
# metastat
d127: Concat/Stripe
Size: 17629184 blocks (8.4 GB)
Stripe 0:
Device Start Block Dbase Reloc
c1t6d0s2 32768 Yes Yes
Device Relocation Information:
Device Reloc Device ID c1t6d0 Yes id1,sd@w4849544143484920444b3332454a2d33364e4320202020203433334239383939
# prtconf -v
.(output truncated)
.
.
sd, instance #6System properties:
name=’lun’ type=int items=1
value=00000000
name=’target’ type=int items=1
value=00000006
name=’class’ type=string items=1
Device IDDiscrepanciesAfter Upgrading to the Solaris 10 Release
Solaris VolumeManagerAdministration Guide • May 2006276
value=’scsi’
Driver properties:
name=’pm-components’ type=string items=3 dev=none
value=’NAME=spindle-motor’ + ’0=off’ + ’1=on’
name=’pm-hardware-state’ type=string items=1 dev=none
value=’needs-suspend-resume’
name=’ddi-failfast-supported’ type=boolean dev=none
name=’ddi-kernel-ioctl’ type=boolean dev=none
Hardware properties:
name=’devid’ type=string items=1
value=’id1,@THITACHI_DK32EJ-36NC_____433B9899’.
.
.
(output truncated)
The line containing “instance #6” in the output from the prtconf -v command correlates to the diskc1t6d0 in the output from the metastat command. The device id,id1,@THITACHI_DK32EJ-36NC_____433B9899, in the output from the prtconf -v commandcorrelates to the device id,id1,sd@w4849544143484920444b3332454a2d33364e4320202020203433334239383939, in theoutput from the metastat command. This difference in output indicates that Solaris VolumeManager is displaying the hexadecimal form of the device ID in the output from the metastatcommand, while the Solaris 10 OS configuration is displaying anASCII string in the output from theprtconf command.
Recovering FromBoot ProblemsBecause Solaris VolumeManager enables you tomirror the root (/), swap, and /usr directories,special problems can arise when you boot the system. These problems can arise either throughhardware failures or operator error. The procedures in this section provide solutions to suchpotential problems.
The following table describes these problems and points you to the appropriate solution.
TABLE 25–1CommonBoot ProblemsWith Solaris VolumeManager
Reason for the Boot Problem For Instructions
The /etc/vfstab file contains incorrectinformation.
“How to Recover From Improper /etc/vfstab Entries”on page 278
Not enough state database replicas have beendefined.
“How to Recover From Insufficient State Database Replicas”on page 284
Aboot device (disk) has failed. “How to Recover From a Boot Device Failure” on page 280
Recovering FromBoot Problems
Chapter 25 • Troubleshooting Solaris VolumeManager (Tasks) 277

Background Information for Boot Problems� If Solaris VolumeManager takes a volume offline due to errors, unmount all file systems on the
disk where the failure occurred.Because each disk slice is independent, multiple file systems can bemounted on a single disk. Ifthe software has encountered a failure, other slices on the same disk will likely experience failuressoon. File systems that aremounted directly on disk slices do not have the protection of SolarisVolumeManager error handling. Leaving such file systemsmounted can leave you vulnerable tocrashing the system and losing data.
� Minimize the amount of time you run with submirrors that are disabled or offline. Duringresynchronization and online backup intervals, the full protection ofmirroring is gone.
How toRecover From Improper /etc/vfstab EntriesIf you havemade an incorrect entry in the /etc/vfstab file, for example, whenmirroring the root(/) file system, the system appears at first to be booting properly. Then, the system fails. To remedythis situation, you need to edit the /etc/vfstab file while in single-usermode.
The high-level steps to recover from improper /etc/vfstab file entries are as follows:
1. Booting the system to single-usermode2. Running the fsck command on themirror volume3. Remounting file system read-write options enabled4. Optional: running the metaroot command for a root (/) mirror5. Verifying that the /etc/vfstab file correctly references the volume for the file system entry6. Rebooting the system
� Recovering the root (/) RAID-1 (Mirror) VolumeIn the following example, the root (/) file system ismirrored with a two-waymirror, d0. The root (/)entry in the /etc/vfstab file has somehow reverted back to the original slice of the file system.However, the information in the /etc/system file still shows booting to be from themirror d0. Themost likely reason is that the metaroot commandwas not used tomaintain the /etc/system and/etc/vfstab files.Another possible reason is that an old copy of the/etc/vfstab file was copiedback into the current /etc/vfstab file.
The incorrect /etc/vfstab file looks similar to the following:
#device device mount FS fsck mount mount
#to mount to fsck point type pass at boot options
#
/dev/dsk/c0t3d0s0 /dev/rdsk/c0t3d0s0 / ufs 1 no -
/dev/dsk/c0t3d0s1 - - swap - no -
Recovering FromBoot Problems
Solaris VolumeManagerAdministration Guide • May 2006278

/dev/dsk/c0t3d0s6 /dev/rdsk/c0t3d0s6 /usr ufs 2 no -
#
/proc - /proc proc - no -
swap - /tmp tmpfs - yes -
Because of the errors, you automatically go into single-usermode when the system is booted:
ok boot
...
configuring network interfaces: hme0.
Hostname: host1
mount: /dev/dsk/c0t3d0s0 is not this fstype.
setmnt: Cannot open /etc/mnttab for writing
INIT: Cannot create /var/adm/utmp or /var/adm/utmpx
INIT: failed write of utmpx entry:" "
INIT: failed write of utmpx entry:" "
INIT: SINGLE USER MODE
Type Ctrl-d to proceed with normal startup,
(or give root password for system maintenance): <root-password>
At this point, the root (/) and /usr file systems aremounted read-only. Follow these steps:
Run the fsck commandon the root (/)mirror.
Note –Be careful to use the correct volume for the root (/)mirror.
# fsck /dev/md/rdsk/d0
** /dev/md/rdsk/d0
** Currently Mounted on /
** Phase 1 - Check Blocks and Sizes
** Phase 2 - Check Pathnames
** Phase 3 - Check Connectivity
** Phase 4 - Check Reference Counts
** Phase 5 - Check Cyl groups
2274 files, 11815 used, 10302 free (158 frags, 1268 blocks,
0.7% fragmentation)
Remount the root (/) file systemas read/write file system so that you can edit the /etc/vfstab file.# mount -o rw,remount /dev/md/dsk/d0 /
mount: warning: cannot lock temp file </etc/.mnt.lock>
Run the metaroot command.# metaroot d0
1
2
3
Recovering FromBoot Problems
Chapter 25 • Troubleshooting Solaris VolumeManager (Tasks) 279

This command edits the /etc/system and /etc/vfstab files to specify that the root (/) file system isnow on volume d0.
Verify that the /etc/vfstab file contains the correct volumeentries.The root (/) entry in the /etc/vfstab file should appear as follows so that the entry for the filesystem correctly references the RAID-1 volume:#device device mount FS fsck mount mount
#to mount to fsck point type pass at boot options
#
/dev/md/dsk/d0 /dev/md/rdsk/d0 / ufs 1 no -
/dev/dsk/c0t3d0s1 - - swap - no -
/dev/dsk/c0t3d0s6 /dev/rdsk/c0t3d0s6 /usr ufs 2 no -
#
/proc - /proc proc - no -
swap - /tmp tmpfs - yes -
Reboot the system.The system returns to normal operation.
� How toRecover FromaBootDevice FailureIf you have a root (/) mirror and your boot device fails, you need to set up an alternate boot device.
The high-level steps in this task are as follows:
� Booting from the alternate root (/) submirror� Determining the erred state database replicas and volumes� Repairing the failed disk� Restoring state database replicas and volumes to their original state
Initially, when the boot device fails, you’ll see amessage similar to the following. This messagemightdiffer among various architectures.
Rebooting with command:
Boot device: /iommu/sbus/dma@f,81000/esp@f,80000/sd@3,0
The selected SCSI device is not responding
Can’t open boot device
...
When you see this message, note the device. Then, follow these steps:
Boot fromanother root (/) submirror.Since only two of the six state database replicas in this example are in error, you can still boot. If thiswere not the case, you would need to delete the inaccessible state database replicas in single-usermode. This procedure is described in “How to Recover From Insufficient State Database Replicas”on page 284.
4
5
1
Recovering FromBoot Problems
Solaris VolumeManagerAdministration Guide • May 2006280

When you created themirror for the root (/) file system, you should have recorded the alternate bootdevice as part of that procedure. In this example, disk2 is that alternate boot device.ok boot disk2
SunOS Release 5.9 Version s81_51 64-bit
Copyright 1983-2001 Sun Microsystems, Inc. All rights reserved.
Hostname: demo
...
demo console login: root
Password: <root-password>Dec 16 12:22:09 host1 login: ROOT LOGIN /dev/console
Last login: Wed Dec 12 10:55:16 on console
Sun Microsystems Inc. SunOS 5.9 s81_51 May 2002
...
Determine howmany state database replicas have failed by using the metadb command.# metadb
flags first blk block count
M p unknown unknown /dev/dsk/c0t3d0s3
M p unknown unknown /dev/dsk/c0t3d0s3
a m p luo 16 1034 /dev/dsk/c0t2d0s3
a p luo 1050 1034 /dev/dsk/c0t2d0s3
a p luo 16 1034 /dev/dsk/c0t1d0s3
a p luo 1050 1034 /dev/dsk/c0t1d0s3
In this example, the system can no longer detect state database replicas on slice /dev/dsk/c0t3d0s3,which is part of the failed disk.
Determine that half of the root (/), swap, and /usrmirrors have failed by using the metastatcommand.# metastat
d0: Mirror
Submirror 0: d10
State: Needs maintenance
Submirror 1: d20
State: Okay
...
d10: Submirror of d0
State: Needs maintenance
Invoke: "metareplace d0 /dev/dsk/c0t3d0s0 <new device>"
Size: 47628 blocks
Stripe 0:
Device Start Block Dbase State Hot Spare
/dev/dsk/c0t3d0s0 0 No Maintenance
d20: Submirror of d0
State: Okay
Size: 47628 blocks
2
3
Recovering FromBoot Problems
Chapter 25 • Troubleshooting Solaris VolumeManager (Tasks) 281

Stripe 0:
Device Start Block Dbase State Hot Spare
/dev/dsk/c0t2d0s0 0 No Okay
d1: Mirror
Submirror 0: d11
State: Needs maintenance
Submirror 1: d21
State: Okay
...
d11: Submirror of d1
State: Needs maintenance
Invoke: "metareplace d1 /dev/dsk/c0t3d0s1 <new device>"
Size: 69660 blocks
Stripe 0:
Device Start Block Dbase State Hot Spare
/dev/dsk/c0t3d0s1 0 No Maintenance
d21: Submirror of d1
State: Okay
Size: 69660 blocks
Stripe 0:
Device Start Block Dbase State Hot Spare
/dev/dsk/c0t2d0s1 0 No Okay
d2: Mirror
Submirror 0: d12
State: Needs maintenance
Submirror 1: d22
State: Okay
...
d12: Submirror of d2
State: Needs maintenance
Invoke: "metareplace d2 /dev/dsk/c0t3d0s6 <new device>"
Size: 286740 blocks
Stripe 0:
Device Start Block Dbase State Hot Spare
/dev/dsk/c0t3d0s6 0 No Maintenance
d22: Submirror of d2
State: Okay
Size: 286740 blocks
Stripe 0:
Device Start Block Dbase State Hot Spare
/dev/dsk/c0t2d0s6 0 No Okay
Recovering FromBoot Problems
Solaris VolumeManagerAdministration Guide • May 2006282

In this example, the metastat command shows that the following submirrors needmaintenance:
� Submirror d10, device c0t3d0s0� Submirror d11, device c0t3d0s1� Submirror d12, device c0t3d0s6
Halt the system, replace the disk. Use the format commandor the fmthard command, to partitionthe disk as itwas before the failure.
Tip – If the new disk is identical to the existing disk (the intact side of themirror, in this example),quickly format the new disk. To do so, use the prtvtoc /dev/rdsk/c0t2d0s2 | fmthard -s -
/dev/rdsk/c0t3d0s2 command (c0t3d0, in this example).
# halt
...
Halted
...
ok boot
...
# format /dev/rdsk/c0t3d0s0
Reboot the system.Note that youmust reboot from the other half of the root (/) mirror. You should have recorded thealternate boot device when you created themirror.# halt
...
ok boot disk2
Todelete the failed state database replicas and then add themback, use the metadb command.# metadb
flags first blk block count
M p unknown unknown /dev/dsk/c0t3d0s3
M p unknown unknown /dev/dsk/c0t3d0s3
a m p luo 16 1034 /dev/dsk/c0t2d0s3
a p luo 1050 1034 /dev/dsk/c0t2d0s3
a p luo 16 1034 /dev/dsk/c0t1d0s3
a p luo 1050 1034 /dev/dsk/c0t1d0s3
# metadb -d c0t3d0s3
# metadb -c 2 -a c0t3d0s3
# metadb
flags first blk block count
a m p luo 16 1034 /dev/dsk/c0t2d0s3
a p luo 1050 1034 /dev/dsk/c0t2d0s3
a p luo 16 1034 /dev/dsk/c0t1d0s3
a p luo 1050 1034 /dev/dsk/c0t1d0s3
a u 16 1034 /dev/dsk/c0t3d0s3
a u 1050 1034 /dev/dsk/c0t3d0s3
4
5
6
Recovering FromBoot Problems
Chapter 25 • Troubleshooting Solaris VolumeManager (Tasks) 283

Re-enable the submirrors by using the metareplace command.# metareplace -e d0 c0t3d0s0
Device /dev/dsk/c0t3d0s0 is enabled
# metareplace -e d1 c0t3d0s1
Device /dev/dsk/c0t3d0s1 is enabled
# metareplace -e d2 c0t3d0s6
Device /dev/dsk/c0t3d0s6 is enabled
After some time, the resynchronization will complete. You can now return to booting from theoriginal device.
Recovering FromStateDatabaseReplica FailuresIf the state database replica quorum is notmet, for example, due to a drive failure, the system cannotbe rebooted intomultiuser mode. This situation could follow a panic when Solaris VolumeManagerdiscovers that fewer than half of the state database replicas are available. This situation could alsooccur if the system is rebooted with exactly half or fewer functional state database replicas. In SolarisVolumeManager terminology, the state database has gone “stale.” This procedure explains how torecover from this problem.
� How toRecover From Insufficient StateDatabaseReplicasBoot the system.
Determinewhich state database replicas are unavailable.# metadb -i
If one ormore disks are known to be unavailable, delete the state database replicas on those disks.Otherwise, delete enough erred state database replicas (W,M,D, F, or R status flags reported bymetadb) to ensure that amajority of the existing state database replicas are not erred.# metadb -d disk-slice
Tip – State database replicas with a capitalized status flag are in error. State database replicas with alowercase status flag are functioning normally.
Verify that the replicas have beendeleted.# metadb
7
1
2
3
4
Recovering FromState Database Replica Failures
Solaris VolumeManagerAdministration Guide • May 2006284

Reboot the system.# reboot
If necessary, replace the disk, format it appropriately, then add any state database replicas that areneeded to the disk.Follow the instructions in “Creating State Database Replicas” on page 68.
Once you have a replacement disk, halt the system, replace the failed disk, and once again, reboot thesystem. Use the format command or the fmthard command to partition the disk as it was configuredbefore the failure.
Recovering FromStale State Database Replicas
In the following example, a disk that contains seven replicas has gone bad.As a result, the system hasonly three good replicas. The system panics, then cannot reboot intomultiuser mode.
panic[cpu0]/thread=70a41e00: md: state database problem
403238a8 md:mddb_commitrec_wrapper+6c (2, 1, 70a66ca0, 40323964, 70a66ca0, 3c)
%l0-7: 0000000a 00000000 00000001 70bbcce0 70bbcd04 70995400 00000002 00000000
40323908 md:alloc_entry+c4 (70b00844, 1, 9, 0, 403239e4, ff00)
%l0-7: 70b796a4 00000001 00000000 705064cc 70a66ca0 00000002 00000024 00000000
40323968 md:md_setdevname+2d4 (7003b988, 6, 0, 63, 70a71618, 10)
%l0-7: 70a71620 00000000 705064cc 70b00844 00000010 00000000 00000000 00000000
403239f8 md:setnm_ioctl+134 (7003b968, 100003, 64, 0, 0, ffbffc00)
%l0-7: 7003b988 00000000 70a71618 00000000 00000000 000225f0 00000000 00000000
40323a58 md:md_base_ioctl+9b4 (157ffff, 5605, ffbffa3c, 100003, 40323ba8, ff1b5470)
%l0-7: ff3f2208 ff3f2138 ff3f26a0 00000000 00000000 00000064 ff1396e9 00000000
40323ad0 md:md_admin_ioctl+24 (157ffff, 5605, ffbffa3c, 100003, 40323ba8, 0)
%l0-7: 00005605 ffbffa3c 00100003 0157ffff 0aa64245 00000000 7efefeff 81010100
40323b48 md:mdioctl+e4 (157ffff, 5605, ffbffa3c, 100003, 7016db60, 40323c7c)
%l0-7: 0157ffff 00005605 ffbffa3c 00100003 0003ffff 70995598 70995570 0147c800
40323bb0 genunix:ioctl+1dc (3, 5605, ffbffa3c, fffffff8, ffffffe0, ffbffa65)
%l0-7: 0114c57c 70937428 ff3f26a0 00000000 00000001 ff3b10d4 0aa64245 00000000
panic:
stopped at edd000d8: ta %icc,%g0 + 125
Type ’go’ to resume
ok boot -s
Resetting ...
Sun Ultra 5/10 UPA/PCI (UltraSPARC-IIi 270MHz), No Keyboard
OpenBoot 3.11, 128 MB memory installed, Serial #9841776.
Ethernet address 8:0:20:96:2c:70, Host ID: 80962c70.
5
6
Example 25–1
Recovering FromState Database Replica Failures
Chapter 25 • Troubleshooting Solaris VolumeManager (Tasks) 285
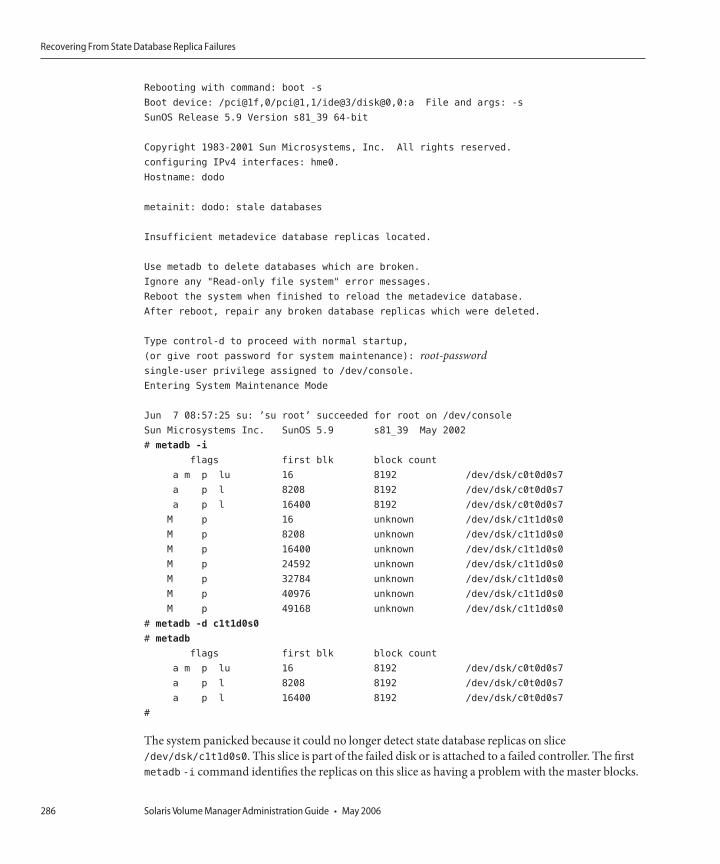
Rebooting with command: boot -s
Boot device: /pci@1f,0/pci@1,1/ide@3/disk@0,0:a File and args: -s
SunOS Release 5.9 Version s81_39 64-bit
Copyright 1983-2001 Sun Microsystems, Inc. All rights reserved.
configuring IPv4 interfaces: hme0.
Hostname: dodo
metainit: dodo: stale databases
Insufficient metadevice database replicas located.
Use metadb to delete databases which are broken.
Ignore any "Read-only file system" error messages.
Reboot the system when finished to reload the metadevice database.
After reboot, repair any broken database replicas which were deleted.
Type control-d to proceed with normal startup,
(or give root password for system maintenance): root-passwordsingle-user privilege assigned to /dev/console.
Entering System Maintenance Mode
Jun 7 08:57:25 su: ’su root’ succeeded for root on /dev/console
Sun Microsystems Inc. SunOS 5.9 s81_39 May 2002
# metadb -i
flags first blk block count
a m p lu 16 8192 /dev/dsk/c0t0d0s7
a p l 8208 8192 /dev/dsk/c0t0d0s7
a p l 16400 8192 /dev/dsk/c0t0d0s7
M p 16 unknown /dev/dsk/c1t1d0s0
M p 8208 unknown /dev/dsk/c1t1d0s0
M p 16400 unknown /dev/dsk/c1t1d0s0
M p 24592 unknown /dev/dsk/c1t1d0s0
M p 32784 unknown /dev/dsk/c1t1d0s0
M p 40976 unknown /dev/dsk/c1t1d0s0
M p 49168 unknown /dev/dsk/c1t1d0s0
# metadb -d c1t1d0s0
# metadb
flags first blk block count
a m p lu 16 8192 /dev/dsk/c0t0d0s7
a p l 8208 8192 /dev/dsk/c0t0d0s7
a p l 16400 8192 /dev/dsk/c0t0d0s7
#
The system panicked because it could no longer detect state database replicas on slice/dev/dsk/c1t1d0s0. This slice is part of the failed disk or is attached to a failed controller. The firstmetadb -i command identifies the replicas on this slice as having a problem with the master blocks.
Recovering FromState Database Replica Failures
Solaris VolumeManagerAdministration Guide • May 2006286

When you delete the stale state database replicas, the root (/) file system is read-only. You can ignorethe mddb.cf errormessages that are displayed.
At this point, the system is again functional, although it probably has fewer state database replicasthan it should.Any volumes that used part of the failed storage are also either failed, erred, orhot-spared. Those issues should be addressed promptly.
Recovering FromSoft PartitionProblemsThis section shows how to recover configuration information for soft partitions. You should only usethe following procedure if all of your state database replicas have been lost and you do not have oneof the following:
� Acurrent or accurate copy of metastat -p output� Acurrent or accurate copy of the md.cf file� An up-to-date md.tab file
� How toRecover ConfigurationData for a Soft PartitionAt the beginning of each soft partition extent, a sector is used tomark the beginning of the softpartition extent. These hidden sectors are called extent headers. These headers do not appear to theuser of the soft partition. If all Solaris VolumeManager configuration data is lost, the disk can bescanned in an attempt to generate the configuration data.
This procedure is a last option to recover lost soft partition configuration information. Themetarecover command should only be used when you have lost both your metadb and md.cf files,and your md.tab file is lost or out of date.
Note –This procedure only works to recover soft partition information. This procedure does notassist in recovering from other lost configurations or for recovering configuration information forother Solaris VolumeManager volumes.
Note – If your configuration included other Solaris VolumeManager volumes that were built on topof soft partitions, you should recover the soft partitions before attempting to recover the othervolumes.
Configuration information about your soft partitions is stored on your devices and in your statedatabase. Since either source could be corrupt, youmust indicate to the metarecover commandwhich source is reliable.
First, use the metarecover command to determine whether the two sources agree. If they do agree,the metarecover command cannot be used tomake any changes. However, if the metarecover
Recovering FromSoft Partition Problems
Chapter 25 • Troubleshooting Solaris VolumeManager (Tasks) 287

command reports an inconsistency, youmust examine its output carefully to determine whether thedisk or the state database is corrupt. Then, you should use the metarecover command to rebuild theconfiguration based on the appropriate source.
Read the “ConfigurationGuidelines for Soft Partitions” onpage 148.
Review the soft partition recovery information by using the metarecover command.# metarecover component-p -d
component Specifies the cntndnsnname of the raw component
-p Specifies to regenerate soft partitions
-d Specifies to scan the physical slice for extent headers of soft partitions
Recovering Soft Partitions fromOn-Disk Extent Headers
# metarecover c1t1d0s1 -p -d
The following soft partitions were found and will be added to
your metadevice configuration.
Name Size No. of Extents
d10 10240 1
d11 10240 1
d12 10240 1
# metarecover c1t1d0s1 -p -d
The following soft partitions were found and will be added to
your metadevice configuration.
Name Size No. of Extents
d10 10240 1
d11 10240 1
d12 10240 1
WARNING: You are about to add one or more soft partition
metadevices to your metadevice configuration. If there
appears to be an error in the soft partition(s) displayed
above, do NOT proceed with this recovery operation.
Are you sure you want to do this (yes/no)?yes
c1t1d0s1: Soft Partitions recovered from device.
bash-2.05# metastat
d10: Soft Partition
Device: c1t1d0s1
State: Okay
Size: 10240 blocks
Device Start Block Dbase Reloc
c1t1d0s1 0 No Yes
Extent Start Block Block count
0 1 10240
1
2
Example 25–2
Recovering FromSoft Partition Problems
Solaris VolumeManagerAdministration Guide • May 2006288

d11: Soft Partition
Device: c1t1d0s1
State: Okay
Size: 10240 blocks
Device Start Block Dbase Reloc
c1t1d0s1 0 No Yes
Extent Start Block Block count
0 10242 10240
d12: Soft Partition
Device: c1t1d0s1
State: Okay
Size: 10240 blocks
Device Start Block Dbase Reloc
c1t1d0s1 0 No Yes
Extent Start Block Block count
0 20483 10240
In this example, three soft partitions are recovered from disk, after the state database replicas wereaccidentally deleted.
Recovering Storage FromaDifferent SystemYou can recover a Solaris VolumeManager configuration, even onto a different system from theoriginal system.
� How toRecover Storage FromaLocal Disk SetIf you experience a system failure, you can attach the storage to a different system and recover thecomplete configuration from the local disk set. For example, assume you have a systemwith anexternal disk pack of six disks in it and a Solaris VolumeManager configuration, including at leastone state database replica, on some of those disks. If you have a system failure, you can physicallymove the disk pack to a new system and enable the new system to recognize the configuration. Thisprocedure describes how tomove the disks to another system and recover the configuration from alocal disk set.
Note –This recovery procedure works only with Solaris 9, and later, Solaris VolumeManagervolumes.
Recovering Storage FromaDifferent System
Chapter 25 • Troubleshooting Solaris VolumeManager (Tasks) 289

Attach the disk or disks that contain the Solaris VolumeManager configuration to a systemwith nopreexisting Solaris VolumeManager configuration.
Do a reconfiguration reboot to ensure that the system recognizes the newly addeddisks.# reboot -- -r
Determine themajor/minor number for a slice containing a state database replica on the newlyaddeddisks.
Use ls -lL, and note the two numbers between the group name and the date. These numbers are themajor/minor numbers for this slice.# ls -Ll /dev/dsk/c1t9d0s7
brw-r----- 1 root sys 32, 71 Dec 5 10:05 /dev/dsk/c1t9d0s7
If necessary, determine themajor name correspondingwith themajor number by looking up themajor number in /etc/name_to_major.# grep " 32" /etc/name_to_major sd 32
Update the /kernel/drv/md.conf filewith the information that instructs Solaris VolumeManagerwhere to find a valid state database replica on the newdisks.
For example, in the line that begins with mddb_bootlist1, replace the sdwith themajor name youfound in step 4. Replace 71 in the example with theminor number you identified in Step 3.#pragma ident "@(#)md.conf 2.2 04/04/02 SMI"
#
# Copyright 2004 Sun Microsystems, Inc. All rights reserved.
# Use is subject to license terms.
#
# The parameters nmd and md_nsets are obsolete. The values for these
# parameters no longer have any meaning.
name="md" parent="pseudo" nmd=128 md_nsets=4;
# Begin MDD database info (do not edit)
mddb_bootlist1="sd:71:16:id0";
# End MDD database info (do not edit)
Reboot to force Solaris VolumeManager to reload your configuration.
Youwill seemessages similar to the following displayed on the console.volume management starting.
Dec 5 10:11:53 host1 metadevadm: Disk movement detected
Dec 5 10:11:53 host1 metadevadm: Updating device names in
Solaris Volume Manager
The system is ready.
1
2
3
4
5
6
Recovering Storage FromaDifferent System
Solaris VolumeManagerAdministration Guide • May 2006290

Verify your configuration. Use the metadb command to verify the status of the state databasereplicas. and metastat command view the status for each volume.# metadb
flags first blk block count
a m p luo 16 8192 /dev/dsk/c1t9d0s7
a luo 16 8192 /dev/dsk/c1t10d0s7
a luo 16 8192 /dev/dsk/c1t11d0s7
a luo 16 8192 /dev/dsk/c1t12d0s7
a luo 16 8192 /dev/dsk/c1t13d0s7
# metastat
d12: RAID
State: Okay
Interlace: 32 blocks
Size: 125685 blocks
Original device:
Size: 128576 blocks
Device Start Block Dbase State Reloc Hot Spare
c1t11d0s3 330 No Okay Yes
c1t12d0s3 330 No Okay Yes
c1t13d0s3 330 No Okay Yes
d20: Soft Partition
Device: d10
State: Okay
Size: 8192 blocks
Extent Start Block Block count
0 3592 8192
d21: Soft Partition
Device: d10
State: Okay
Size: 8192 blocks
Extent Start Block Block count
0 11785 8192
d22: Soft Partition
Device: d10
State: Okay
Size: 8192 blocks
Extent Start Block Block count
0 19978 8192
d10: Mirror
Submirror 0: d0
State: Okay
Submirror 1: d1
State: Okay
7
Recovering Storage FromaDifferent System
Chapter 25 • Troubleshooting Solaris VolumeManager (Tasks) 291

Pass: 1
Read option: roundrobin (default)
Write option: parallel (default)
Size: 82593 blocks
d0: Submirror of d10
State: Okay
Size: 118503 blocks
Stripe 0: (interlace: 32 blocks)
Device Start Block Dbase State Reloc Hot Spare
c1t9d0s0 0 No Okay Yes
c1t10d0s0 3591 No Okay Yes
d1: Submirror of d10
State: Okay
Size: 82593 blocks
Stripe 0: (interlace: 32 blocks)
Device Start Block Dbase State Reloc Hot Spare
c1t9d0s1 0 No Okay Yes
c1t10d0s1 0 No Okay Yes
Device Relocation Information:
Device Reloc Device ID
c1t9d0 Yes id1,sd@SSEAGATE_ST39103LCSUN9.0GLS3487980000U00907AZ
c1t10d0 Yes id1,sd@SSEAGATE_ST39103LCSUN9.0GLS3397070000W0090A8Q
c1t11d0 Yes id1,sd@SSEAGATE_ST39103LCSUN9.0GLS3449660000U00904NZ
c1t12d0 Yes id1,sd@SSEAGATE_ST39103LCSUN9.0GLS32655400007010H04J
c1t13d0 Yes id1,sd@SSEAGATE_ST39103LCSUN9.0GLS3461190000701001T0
#
# metadb
flags first blk block count
a m p luo 16 8192 /dev/dsk/c1t9d0s7
a luo 16 8192 /dev/dsk/c1t10d0s7
a luo 16 8192 /dev/dsk/c1t11d0s7
a luo 16 8192 /dev/dsk/c1t12d0s7
a luo 16 8192 /dev/dsk/c1t13d0s7
# metastat
d12: RAID
State: Okay
Interlace: 32 blocks
Size: 125685 blocks
Original device:
Size: 128576 blocks
Device Start Block Dbase State Reloc Hot Spare
c1t11d0s3 330 No Okay Yes
Recovering Storage FromaDifferent System
Solaris VolumeManagerAdministration Guide • May 2006292

c1t12d0s3 330 No Okay Yes
c1t13d0s3 330 No Okay Yes
d20: Soft Partition
Device: d10
State: Okay
Size: 8192 blocks
Extent Start Block Block count
0 3592 8192
d21: Soft Partition
Device: d10
State: Okay
Size: 8192 blocks
Extent Start Block Block count
0 11785 8192
d22: Soft Partition
Device: d10
State: Okay
Size: 8192 blocks
Extent Start Block Block count
0 19978 8192
d10: Mirror
Submirror 0: d0
State: Okay
Submirror 1: d1
State: Okay
Pass: 1
Read option: roundrobin (default)
Write option: parallel (default)
Size: 82593 blocks
d0: Submirror of d10
State: Okay
Size: 118503 blocks
Stripe 0: (interlace: 32 blocks)
Device Start Block Dbase State Reloc Hot Spare
c1t9d0s0 0 No Okay Yes
c1t10d0s0 3591 No Okay Yes
d1: Submirror of d10
State: Okay
Size: 82593 blocks
Stripe 0: (interlace: 32 blocks)
Recovering Storage FromaDifferent System
Chapter 25 • Troubleshooting Solaris VolumeManager (Tasks) 293

Device Start Block Dbase State Reloc Hot Spare
c1t9d0s1 0 No Okay Yes
c1t10d0s1 0 No Okay Yes
Device Relocation Information:
Device Reloc Device ID
c1t9d0 Yes id1,sd@SSEAGATE_ST39103LCSUN9.0GLS3487980000U00907AZ1
c1t10d0 Yes id1,sd@SSEAGATE_ST39103LCSUN9.0GLS3397070000W0090A8Q
c1t11d0 Yes id1,sd@SSEAGATE_ST39103LCSUN9.0GLS3449660000U00904NZ
c1t12d0 Yes id1,sd@SSEAGATE_ST39103LCSUN9.0GLS32655400007010H04J
c1t13d0 Yes id1,sd@SSEAGATE_ST39103LCSUN9.0GLS3461190000701001T0
# metastat -p
d12 -r c1t11d0s3 c1t12d0s3 c1t13d0s3 -k -i 32b
d20 -p d10 -o 3592 -b 8192
d21 -p d10 -o 11785 -b 8192
d22 -p d10 -o 19978 -b 8192
d10 -m d0 d1 1
d0 1 2 c1t9d0s0 c1t10d0s0 -i 32b
d1 1 2 c1t9d0s1 c1t10d0s1 -i 32b
#
Recovering Storage FromaKnownDisk SetThe introduction of device ID support for disk sets in Solaris VolumeManager allows you to recoverstorage from known disk sets and to import the disk set to a different system. The metaimportcommand allows you to import known disk sets from one system to another system. Both systemsmust contain existing Solaris VolumeManager configurations that include device ID support. Formore information on device ID support, see “Asynchronous Shared Storage in Disk Sets” on page194. Formore information on the metaimport command, see the metaimport(1M)man page.
� How toPrint a Report onDisk SetsAvailable for Import
Become superuser.
Obtain a report ondisk sets available for import.# metaimport -r -v
-r Provides a report of the unconfigured disk sets available for import on the system.
-v Provides detailed information about the state database replica location and status on the disksof unconfigured disk sets available for import on the system.
1
2
Recovering Storage FromaDifferent System
Solaris VolumeManagerAdministration Guide • May 2006294

Reporting onDisk SetsAvailable for Import
The following examples show how to print a report on disk sets available for import.
# metaimport -r
Drives in regular diskset including disk c1t2d0:
c1t2d0
c1t3d0
More info:
metaimport -r -v c1t2d0
Import: metaimport -s <newsetname> c1t2d0
Drives in replicated diskset including disk c1t4d0:
c1t4d0
c1t5d0
More info:
metaimport -r -v c1t4d0
Import: metaimport -s <newsetname> c1t4d0
# metaimport -r -v c1t2d0
Import: metaimport -s <newsetname> c1t2d0
Last update: Mon Dec 29 14:13:35 2003
Device offset length replica flags
c1t2d0 16 8192 a u
c1t3d0 16 8192 a u
c1t8d0 16 8192 a u
� How to Import aDisk Set FromOneSystem toAnother System
Become superuser.
Verify that a disk set is available for import .# metaimport -r -v
Import an available disk set.# metaimport -s diskset-name drive-name
- s diskset-name Specifies the name of the disk set being created.
drive-name Identifies a disk (c#t#d#) containing a state database replica from the disk setbeing imported.
Verify that the disk set has been imported.# metaset -s diskset-name
Example 25–3
1
2
3
4
Recovering Storage FromaDifferent System
Chapter 25 • Troubleshooting Solaris VolumeManager (Tasks) 295

Importing aDisk Set
The following example shows how to import a disk set.
# metaimport -s red c1t2d0
Drives in diskset including disk c1t2d0:
c1t2d0
c1t3d0
c1t8d0
More info: metaimport -r -v c1t2d0# metaset -s red
Set name = red, Set number = 1
Host Owner
host1 Yes
Drive Dbase
c1t2d0 Yes
c1t3d0 Yes
c1t8d0 Yes
Recovering FromDisk Set ProblemsThe following sections detail how to recover from specific disk set related problems.
What toDoWhenYouCannot TakeOwnership ofADisk SetIn cases in which you cannot take ownership of a disk set from any node (perhaps as a result of asystem failure, disk failure, or communication link failure), and therefore cannot delete the disk setrecord, it is possible to purge the disk set from the Solaris VolumeManager state database replicarecords on the current host.
Purging the disk set records does not affect the state database information contained in the disk set,so the disk set could later be imported (with the metaimport command, described at “ImportingDisk Sets” on page 208).
If you need to purge a disk set from a Sun Cluster configuration, use the following procedure, but usethe -C option instead of the -P option you use when no Sun Cluster configuration is present.
Example 25–4
Recovering FromDisk Set Problems
Solaris VolumeManagerAdministration Guide • May 2006296
� How toPurge aDisk Set
Attempt to take the disk setwith the metaset command.# metaset -s setname -t -f
This commandwill attempt to take (-t) the disk set named setname forcibly (-f). If the set can betaken, this commandwill succeed. If the set is owned by another host when this command runs, theother host will panic to avoid data corruption or loss. If this command succeeds, you can delete thedisk set cleanly, without the need to purge the set.
If it is not possible to take the set, youmay purge ownership records.
Use the metaset commandwith the -P to purge the disk set from the current host.# metaset -s setname -P
This commandwill purge (-P) the disk set named setname from the host on which the command isrun.
Use the metaset command to verify that the set has beenpurged.# metaset
Purging aDisk Set
host1# metaset -s red -t -f
metaset: host1: setname "red": no such set
host2# metaset
Set name = red, Set number = 1
Host Owner
host2
Drive Dbase
c1t2d0 Yes
c1t3d0 Yes
c1t8d0 Yes
host2# metaset -s red -P
host2# metaset
� Chapter 18, for conceptual information about disk sets.� Chapter 19, for information about tasks associated with disk sets.
1
2
3
Example 25–5
SeeAlso
Recovering FromDisk Set Problems
Chapter 25 • Troubleshooting Solaris VolumeManager (Tasks) 297

PerformingMounted FilesystemBackupsUsing the ufsdumpCommand
The following procedure describes how to increase the performance of the ufsdump commandwhenyou use it to backup amounted filesystem located on a RAID-1 volume.
� How toPerformaBackupof aMounted FilesystemLocatedonaRAID-1VolumeYou can use the ufsdump command to backup the files of amounted filesystem residing on a RAID-1volume. Set the read policy on the volume to "first" when the backup utility is ufsdump. Thisimproves the rate at which the backup is performed.
Become superuser.
Run the metastat command tomake sure themirror is in the “Okay” state.# metastat d40
d40: Mirror
Submirror 0: d41
State: Okay
Submirror 1: d42
State: Okay
Pass: 1
Read option: roundrobin (default)
Write option: parallel (default)
Size: 20484288 blocks (9.8 GB)
Amirror that is in the “Maintenance” state should be repaired first.
Set the readpolicy on themirror to “first.”# metaparam -r first d40
# metastat d40
d40: Mirror
Submirror 0: d41
State: Okay
Submirror 1: d42
State: Okay
Pass: 1
Read option: first
Write option: parallel (default)
Size: 20484288 blocks (9.8 GB)
1
2
3
PerformingMounted FilesystemBackups Using the ufsdump Command
Solaris VolumeManagerAdministration Guide • May 2006298

Performabackup the filesystem.# ufsdump 0f /dev/backup /opt/test
After the ufsdump command is done, set the readpolicy on themirror to “roundrobin.”# metaparam -r roundrobin d40
# metastat d40
d40: Mirror
Submirror 0: d41
State: Okay
Submirror 1: d42
State: Okay
Pass: 1
Read option: roundrobin
Write option: parallel (default)
Size: 20484288 blocks (9.8 GB)
PerformingSystemRecoverySometimes it is useful to boot from a Solaris OS install image onDVD or CDmedia to perform asystem recovery. Resetting the root password is one example of when using the install image isuseful.
If you are using a Solaris VolumeManager configuration, then you want tomount the SolarisVolumeManager volumes instead of the underlying disks. This step is especially important if theroot (/) file system ismirrored. Because Solaris VolumeManager is part of the Solaris OS, mountingthe Solaris VolumeManager volumes ensures that any changes are reflected on both sides of themirror.
Use the following procedure tomake the Solaris VolumeManager volumes accessible from a SolarisOSDVD or CD-ROM install image.
� How toRecover a SystemUsing a Solaris VolumeManager ConfigurationBoot your system from the Solaris OS installationDVD or CDmedia. Perform this procedure fromthe root prompt of the Solaris miniroot.
Mount as read only the underlying disk containing the Solaris VolumeManager configuration.# mount -o ro /dev/dsk/c0t0d0s0 /a
Copy the md.conffile into /kernel/drvdirectory.# cp /a/kernel/drv/md.conf /kernel/drv/md.conf
4
5
1
2
Performing SystemRecovery
Chapter 25 • Troubleshooting Solaris VolumeManager (Tasks) 299

Unmount the file system from theminiroot.# umount /a
Update the Solaris VolumeManager driver to load the configuration. Ignore anywarningmessagesprinted by the update_drv command.# update_drv -f md
Configure the systemvolumes.# metainit -r
If you have RAID-1 volumes in the Solaris VolumeManager configuration, resynchronize them.# metasync mirror-name
Solaris VolumeManager volumes should be accessible using the mount command.# mount /dev/md/dsk/volume-name /a
Recovering a SystemUsing a Solaris VolumeManager Configuration
# mount -o ro /dev/dsk/c0t0d0s0 /a
# cp /a/kernel/drv/md.conf /kernel/drv/md.conf
# umount /a
# update_drv -f md
Cannot unload module: md
Will be unloaded upon reboot.
Forcing update of md.conf.
devfsadm: mkdir fialed for /dev 0xled: Read-only file system
devfsadm: inst_sync failed for /etc/path_to_inst.1359: Read-only file system
devfsadm: WARNING: failed to update /etc/path_to_inst
# metainit -r
# metasync d0
# mount /dev/md/dsk/d0 /a
3
4
5
6
7
Example 25–6
Performing SystemRecovery
Solaris VolumeManagerAdministration Guide • May 2006300

Important Solaris VolumeManager Files
This appendix contains information about Solaris VolumeManager files for reference purposes. Thisappendix contains the following:
� “System Files and Startup Files” on page 301� “Manually Configured Files” on page 302
SystemFiles andStartup FilesThis section explains the files that are necessary for Solaris VolumeManager to operate correctly.With the exception of a few specialized configuration changes, you do not need to access ormodifythese files.
� /etc/lvm/mddb.cf
Caution –Do not edit this file. If you change this file, you could corrupt your Solaris VolumeManager configuration.
The /etc/lvm/mddb.cf file records the locations of state database replicas.When state databasereplica locations change, Solaris VolumeManagermakes an entry in the mddb.cf file that recordsthe locations of all state databases. See the mddb.cf(4) man page formore information.
� /etc/lvm/md.cf
The /etc/lvm/md.cf file contains automatically generated configuration information for thedefault (unspecified or local) disk set.When you change the Solaris VolumeManagerconfiguration, Solaris VolumeManager automatically updates the md.cf file (except forinformation about hot spares in use). See the md.cf(4) man page formore information.
AA P P E N D I X A
301

Caution –Do not edit this file. If you change this file, you could corrupt or be unable to recoveryour Solaris VolumeManager configuration.
If your system loses the information that is maintained in the state database, and as long as novolumes were changed or created in themeantime, you can use the md.cf file to recover yourconfiguration. See “How to Initialize Solaris VolumeManager From a Configuration File”on page 219.
� /kernel/drv/md.conf
The md.conf configuration file is read by Solaris VolumeManager at startup. The md.conf filecontains the state database replica configuration information.As of Solaris 10, the nmd andmd_nsets parameters are no longer editedmanually. Solaris VolumeManager has been enhancedto configure volumes dynamically, as needed.
Manually Configured Files
Overviewof the md.tab FileThe /etc/lvm/md.tab file contains Solaris VolumeManager configuration information that can beused to reconstruct your Solaris VolumeManager configuration. Solaris VolumeManager can usethis file as input to the command-line utilities metainit, metadb, and metahs to reconstruct aconfiguration. Volumes, disk sets, and hot spare pools might have entries in this file. See “How toCreate Configuration Files” on page 219 for instructions on creating this file (by using the metastat-p > /etc/lvm/md.tab command).
Note –The configuration information in the /etc/lvm/md.tab filemight differ from the currentvolumes, hot spares, and state database replicas in use. This file is usedmanually, by the systemadministrator, to capture the intended configuration.After you change your Solaris VolumeManager configuration, recreate this file and preserve a backup copy.
Once you have created and updated the file, the metainit, metahs, and metadb commands thenactivate the volumes, hot spare pools, and state database replicas defined in the file.
In the /etc/lvm/md.tab file, one complete configuration entry for a single volume appears on eachline using the syntax of the metainit, metadb, and metahs commands.
Manually Configured Files
Solaris VolumeManagerAdministration Guide • May 2006302

Note – If you use the metainit -an command to simulate initializing all of the volumes in the md.tabfile, youmight see errormessages for volumes that have dependencies on other volumes defined inmd.tab. These errormessages occur because Solaris VolumeManager does notmaintain state of thevolumes that would have been created when running metainit -an. Each line is evaluated based onthe existing configuration, if a configuration exists. Therefore, even if it appears that the metainit-an commandwould fail, it might succeed without the -n option.
You then run the metainit commandwith either the -a option, to activate all volumes in the/etc/lvm/md.tab file, or with the volume name that corresponds to a specific entry in the file.
Note – Solaris VolumeManager does not write to or store configuration information in the/etc/lvm/md.tab file. Youmustmanually edit the file and run the metainit, metahs, or metadbcommands to create Solaris VolumeManager components.
Formore information, see the md.tab(4) man page.
Manually Configured Files
AppendixA • Important Solaris VolumeManager Files 303

304

Solaris VolumeManager Quick Reference
This appendix provides quick access information about the features and functions available withSolaris VolumeManager.
Command-LineReferenceListed here are all the commands that you use to administer Solaris VolumeManager. Formoredetailed information, see theman pages.
TABLE B–1 SolarisVolumeManagerCommands
Solaris VolumeManagerCommand Description Manpage
growfs Expands a UFS file system in a nondestructive fashion. growfs(1M)
metaclear Deletes active volumes and hot spare pools. metaclear(1M)
metadb Creates and deletes state database replicas. metadb(1M)
metadetach Detaches a volume from a RAID-0 or RAID-1 (mirror)volume, or a log device from a transactional volume.
Note –Transactional volumes are no longer supported.
metadetach(1M)
metadevadm Checks device ID configuration. metadevadm(1M)
metahs Manages hot spares and hot spare pools. metahs(1M)
metaimport Import disk sets, including replicated disk sets, intoexisting Solaris VolumeManager configurations thathave device ID support in the disk set.
metaimport(1M)
metainit Configures volumes. metainit(1M)
metaoffline Places submirrors offline. metaoffline(1M)
BA P P E N D I X B
305

TABLE B–1 SolarisVolumeManagerCommands (Continued)Solaris VolumeManagerCommand Description Manpage
metaonline Places submirrors online. metaonline(1M)
metaparam Modifies volume parameters. metaparam(1M)
metarecover Recovers configuration information for soft partitions. metarecover(1M)
metarename Renames and exchanges volume names. metarename(1M)
metareplace Replaces components in submirrors and RAID-5volumes.
metareplace(1M)
metaroot Sets up system files formirroring the root (/) file system. metaroot(1M)
metaset Administers disk sets. metaset(1M)
metastat Displays the status of volumes or hot spare pools. metastat(1M)
metasync Resynchronizes volumes during reboot. metasync(1M)
metattach Attaches a component to a RAID-0 or RAID-1 volume. metattach(1M)
Command-Line Reference
Solaris VolumeManagerAdministration Guide • May 2006306

Solaris VolumeManager CIM/WBEMAPI
Managing Solaris VolumeManagerThe Solaris VolumeManager CIM/WBEMApplication Programming Interface (API) provides apublic, standards-based programmatic interface to observe and configure Solaris VolumeManager.ThisAPI is based on the DistributedManagement Task Force (DMTF) Common InformationModel (CIM). Formore information about DMTF, see http://www.dmtf.org.
CIM defines the datamodel, referred to as the “schema“ which describes the following:
� Attributes of and the operations against Solaris VolumeManager devices� Relationships among the various Solaris VolumeManager devices� Relationships among the Solaris VolumeManager devices and other aspects of the operating
system, such as file systems
This model is made available through the SolarisWeb Based EnterpriseManagement (WBEM) SDK.TheWBEMSDK is a set of Java™ technology-basedAPI’s that allow access to systemmanagementcapabilities that are represented by CIM.
Formore information about the CIM/WBEMSDK, see the SolarisWBEMDeveloper’s Guide.
CA P P E N D I X C
307

308

Index
Aadding a host to a disk set, 199-200adding disks to a disk set, 198adding hot spares, 178administering disk sets, 188-193application based recovery, 54-56automatic disk partitioning, 190-192autotake disk set, 185-186
Bboot problems, 277-284booting into single-usermode, 102
Cchanging default values, 221checking status of a disk set, 202component, definition of, 73concatenated stripeSeeRAID–0 (concatenated stripe volumedefinitionSee alsoRAID–0 (concatenated stripe) volume
removing, 90concatenation
creating, 86definitionSee alsoRAID–0 (concatenation) volume
example with three slices, 77expanding, 89expanding UFS file system, 76removing, 90
concatenation (Continued)usage, 76
concatenation volume, SeeRAID–0 (concatenation)volume
configuration, viewing, 212-216configuration file, creating, 219-221configuration planning
guidelines, 29overview, 29trade-offs, 31
creating a disk set, 196-197creating components in a disk set, 200-201creating configuration files, 219-221cron command, 259
Ddeleting a disk set, 206-208deleting a host from a disk set, 206-208deleting disks from a disk set, 202-203device ID, formats of, 275-277directedmirror reads, 54-56disk set, 185-186
adding disks to, 198adding host to, 199-200administering, 188-193asynchronous shared storage, 194automatic disk partitioning, 190-192autotake, 185-186checking status, 202creating, 196-197creating components, 200-201definition, 39, 44
309

disk set (Continued)deleting a disk set, 206-208deleting a host from a disk set, 206-208deleting disks, 202-203example with two shared disk sets, 192guidelines, 193-194importing, 189-190local, 185-186multi-owner, 185-186Seemulti-owner disk set
named, 185-186naming conventions, 192releasing, 189, 205-206reserving, 189, 205scenario, 194shared, 185-186taking, 203-205usage, 185-186
disk setsimporting, 208-210maximumnumber supported, 221
DiskSuite Tool, See graphical interface
Eenabling a slice in a RAID-5 volume, 168enabling a slice in a submirror, 131Enhanced Storage, See graphical interfaceerror checking, 254-255errors, checking for using a script, 259-267/etc/lvm/md.cf file, 301/etc/lvm/mddb.cf file, 301/etc/vfstab file, 141
recovering from improper entries, 278exchanging volume names, 217
Ffailover configuration, 44file system
expanding, 221-223expanding by creating a concatenation, 88expansion overview, 41guidelines, 44
file system (Continued)unmirroring, 144
first read policy, 100fmthard command, 283, 285format command, 283, 285
Ggeneral performance guidelines, 31geometric read policy, 100graphical interface, overview, 36growfs command, 221-223, 305growfs command, 41, 223GUI, sample, 37
Hhot spare
adding to a hot spare pool, 178conceptual overview, 172definition, 172enabling, 184how hot spares work with Solaris Volume
Manager, 172replacing in a hot spare pool, 183
hot spare pool, 43adding slices to, 177-178associating, 179associating with a volume, 178-181basic operation, 43changing association, 180changing association of, 180-181checking status, 181-184conceptual overview, 171-174creating, 176-177definition, 39, 43, 172deleting hot spare, 183-184example withmirror, 173maintaining, 181-184replacing hot spare, 182-183states, 173
Index
Solaris VolumeManagerAdministration Guide • May 2006310

II/O, 31importing a disk set, 189-190install program, system recovery, 299-300interfaces, See Solaris VolumeManager interfacesinterlace, specifying, 85interlace value, 74
K/kernel/drv/md.conf file, 302
Llocal disk set, 185-186lockfs command, 145
Mmajority consensus algorithm, 61master node, 51-53md.cf file, 302
recovering a Solaris VolumeManagerconfiguration, 219
md.tab file, 220overview, 302-303
mdmonitord command, 254-255metaclear command, 305metaclear command, 90, 138, 139, 141-144metadb command, 305metadb command, 71metadb command, replacing a failed disk and, 272metadetach command, 305metadetach command, 130, 138, 139metadevadm command, 305
replacing a failed disk and, 272metadevice, See volumemetahs command, 305
adding slices to a hot spare pool, 177-178deleting hot spare, 183-184enabling, 184replacing a failed disk and, 272replacing hot spare, 182-183
metaimport command, 189-190, 208-210, 294-296, 305metainit command, 305metainit command, 220metainit command, creating hot spare pool, 176-177metaoffline command, 305metaoffline command, 131metaonline command, 306metaparam command, 306metaparam command, 134metaparam command
associating hot spare pool with volume, 178-181changing association of hot spare pool, 180-181
metarecover command, 306replacing a failed disk and, 272
metarename command, 217, 306metarename command, 218metareplace command, 306metareplace command, 131, 168, 284metareplace command, replacing a failed disk and, 272metaroot command, 306metaset command, 306
adding a host to a disk set, 199-200adding disks to a disk set, 198checking status of a disk set, 202creating a disk set, 196-197deleting a disk set, 206-208deleting a host from a disk set, 206-208deleting disks from a disk set, 202-203releasing a disk set, 205-206taking a disk set, 203-205
metastat command, 306metastat command, 134, 165metasync command, 306metattach
task, 111, 115, 121, 125metattach command, 306metattach command, 89, 129, 136
attach RAID-5 component, 167attach submirror, 221
mirrorSeeRAID-1 VolumeSee alsoRAID-1 volumeand online backup, 144attaching a submirror, 129changing options, 135creating, 107-127
Index
Index 311

mirror (Continued)definition, 40example with two submirrors, 94-95expanding, 136replacing and enabling components, 162resynchronization, 96, 97sample status output, 132two-waymirror, 241, 244-246, 246, 249-250, 250, 251updating the size of, 135-136
mirroringfile system, 109-113file system that can be unmounted, 111read and write performance, 30root (/), /usr, and swap, 112root file system
SPARC, 113-117using GRUB, 117-127x86, 117-127
multi-owner disk set, 185-186defined, 49-51device id support, 49-51importing, 49-51master node, 51-53
multi-owner disk setsRAID-1 volumes, 54-56tasks, 52-53
Nnamed disk set, 185-186
OOracle RealApplication Clusters, 49-51
Pparallel access, definition of, 74parallel write policy, 100pass number
and read-onlymirror, 97defined, 100
prtconf command, viewing device IDs, 275-277
RRAID, levels supported in Solaris VolumeManager, 28RAID-0 (stripe) Volume, example with three slices, 74RAID-0+1, 95-96RAID-0 volume
definition, 73usage, 73
RAID-1+0, 95-96RAID-1 Volume, 93-96
booting into single-usermode, 102RAID-1 volume
creating, 107-127information for replacing and enabling
components, 226-227maintenance vs. last erred, 225-226
RAID-1 Volumemirror, 93-96options, 99-100pass number, 100RAID-0+1, 95-96RAID-1+0, 95-96read-and-write policies, 100
RAID-1 volumereplacing and enabling components, 224-227
RAID-1 Volumesubmirror, 93-96
RAID-5 volumeand interlace, 159checking status of, 165-166creating, 164-165definition, 28, 40enabling a component, 167-168enabling a failed slice, 168example with an expanded device, 157example with four disks, 156expanding, 166-167, 167guidelines, 159information for replacing and enabling
components, 226maintenance vs. last erred, 225-226overview, 155-159parity calculations, 159parity information, 155, 158replacing a component, 168-170replacing a failed slice, 170replacing and enabling components, 162, 224-227
Index
Solaris VolumeManagerAdministration Guide • May 2006312

RAID-5 volume (Continued)requirements for, 159-160resynchronizing slices, 155slice states, 160-161states, 160-161tasks, 163-164
RAID–0 (concatenated stripe) volumeexample with three stripes, 78interlace value for, 77
RAID–0 (concatenation) volume, information forcreating, 80
RAID–0 (stripe) volume, 74information for creating, 80
RAID–0 volumeguidelines, 80types of, 73
random I/O, 31-33releasing a disk set, 189, 205-206renaming volumes, 216repartitioning a disk, 190-192replica, 43reserving a disk set, 189resynchronization
full, 97optimized, 97partial, 97
round-robin read policy, 100
SSCSI disk
replacing, 272, 274sequential I/O, 32serial write policy, 100ServiceManagement Facility (SMF), See SMFshared disk set, 185-186simple volume, definition, 40slices, expanding, 88small servers, overview of deploying, 229-230SMF
Solaris VolumeManager services, 47-48upgrading Solaris VolumeManager and, 47-48
soft partitioncreating, 150-151deleting, 153
soft partition (Continued)recovering configuration for, 287removing, 153
soft partitions, 147-148checking status of, 151-153definition, 147expanding, 152-153guidelines, 148locations, 147maintaining, 151-153tasks, 149
Solaris VolumeManagerSee Solaris VolumeManagerconfiguration guidelines, 44networked storage devices and, 231Oracle RealApplications Clusters and, 49-51recovering the configuration, 219Sun Cluster and, 49-51
Solaris VolumeManager elements, overview, 38Solaris VolumeManager for Sun Cluster
application based recovery, 54-56configuration, 53-54datamanagement and recovery, 54-56directedmirror reads, 54-56optimized resynchronization, 54-56software components, 50-51timeouts, 53-54
Solaris VolumeManager interfacescommand line, 36sample GUI, 37SolarisManagement Console, 36
state databaseconceptual overview, 43, 62corrupt, 61definition, 39, 43
state database replicacriteria for disk set, 190-192size of, 190-192
state database replicas, 43adding larger replicas, 71basic operation, 61creatingmultiple on a single slice, 63-64definition, 43errors, 65location, 43, 63-64minimumnumber, 63-64
Index
Index 313

state database replicas (Continued)two-disk configuration, 64-65usage, 61
status, 202stripe
creating, 85definitionSee alsoRAID–0 (stripe) volume
expanding, 89removing, 90
stripe volume, SeeRAID–0 (stripe) volumestriping, definition, 74submirror, 93-94SeeRAID-1 Volumeattaching, 94detaching, 94enabling a failed slice, 132operation while offline, 94replacing a failed slice, 137replacing entire, 139
Sun Cluster, 49-51svc-mdmonitor script, 254-255swap, unmirroring, 143system files, 301-302system recovery from install program, 299-300
Ttaking a disk set, 203-205topdown volume creation
defaults, 250-251RAID 1 volume, creating, 239-242shell script, 242-250volume configuration file, 248
troubleshootingboot problems, 277-284device ID discrepancies, 275-277general guidelines, 271importing a disk set, 294-296improper /etc/vfstab file entries, 278metaimport command, 294-296recovering from diskmovement problems, 274replacing a failed disk, 272
V/var/adm/messages file, 224
replacing a failed disk, 272viewing Solaris VolumeManager configuration, 212-216volume
conceptual overview, 39definition, 39exchanging name, 217expanding disk space, 41-42renaming, 218types, 40uses, 40using file system commands on, 40virtual disk, 36
volume name switching, 42volumes, maximumnumber supported, 221
Index
Solaris VolumeManagerAdministration Guide • May 2006314


