42
Switch List Creator Add On To JMRI with Location List Creator Version 1.13 01/21/18

Switch List Creator Add On To JMRI with Location List Creator
Version 1.13
01/21/18

This Page left BLANK for Duplex Printing if desired.

SLC4JMRIDoco-Ver11.3.docx Page 1 12/3/2014
Contents
Table of Figures ................................................................................................................................................................... 2
Switch List Creator - Introduction .......................................................................................................................................... 3
Switch List Creator – A JMRI Perspective .............................................................................................................................. 6
Switch List Creator (SLC) – An Excel Perspective ................................................................................................................. 14
Introduction ...................................................................................................................................................................... 14
The MASTERs .................................................................................................................................................................... 15
MASTER – Train List - MASTER-TL.xls .......................................................................................................................... 16
MASTER – Switch List – MASTER-SL.xls ....................................................................................................................... 17
MASTER – Train Orders - MASTER-TO.xls .................................................................................................................... 19
OUTPUT FILES - NAMING CONVENTIONS ........................................................................................................................ 20
Switch List Preferences. ................................................................................................................................................... 21
LOGO ................................................................................................................................................................................. 25
Printers ............................................................................................................................................................................. 25
JMRI to SLC Link Setup and Process. .................................................................................................................................... 31
Location List Creator. ........................................................................................................................................................... 33
Location Lists .................................................................................................................................................................... 34
The MASTER...................................................................................................................................................................... 36
In Closing ............................................................................................................................................................................... 37
Appendix A: History ............................................................................................................................................................. 38
Appendix B: Revision History ................................................................................................................................................ 39
Version 1.1 – 12/08/14 ..................................................................................................................................................... 39
Version 1.2 – 12/12/14 ..................................................................................................................................................... 39
Version 1.3 – 12/20/14 ..................................................................................................................................................... 40

SLC4JMRIDoco-Ver11.3.docx Page 2 12/3/2014
Table of Figures Figure 1: Train Information (TO) for Train 311 ...................................................................................................................... 3
Figure 2: Train List (TL) Leaving Hauser ................................................................................................................................. 3
Figure 3: Switch List (SL) - BURMAN QUARRY ....................................................................................................................... 4
Figure 4: Switch List (SL) - HAUSER ........................................................................................................................................ 4
Figure 5: Switch List (SL) - YARDLEY ....................................................................................................................................... 4
Figure 6: JMRI Manifest ......................................................................................................................................................... 5
Figure 7: Portion of KRID Industrial District .......................................................................................................................... 6
Figure 8: KRID Spurs with Sequence Numbers ...................................................................................................................... 7
Figure 9: Switch List - KRID ..................................................................................................................................................... 8
Figure 10: Train Build Screen ................................................................................................................................................. 9
Figure 11: Train List (TL) - Train 1000 ................................................................................................................................... 10
Figure 12: Train Information (TO) - Train 1000.................................................................................................................... 11
Figure 13: Location List (LL) for HAUSER Outbound ............................................................................................................ 12
Figure 14: Location List (LL) for HAUSER - Inbound ............................................................................................................. 12
Figure 15: Printer Modification - Print to left edge ............................................................................................................. 13
Figure 16: Switch List Creator (SLC4JMRI) Welcome - Main Menu .................................................................................... 15
Figure 17: Train List (TL) FORM Tab ..................................................................................................................................... 16
Figure 18: Train List (TL) FORMAT Tab ................................................................................................................................. 16
Figure 19: Train List (TL) - SANDPOINT ................................................................................................................................ 16
Figure 20: Switch List (SL) FORM Tab ................................................................................................................................... 17
Figure 21: Switch List (SL) FORMAT Tab .............................................................................................................................. 17
Figure 22: Switch List (SL) – TROY JCT .................................................................................................................................. 18
Figure 23: Switch List (SL) - HAUSER .................................................................................................................................... 18
Figure 24: Switch List (SL) – KETTLE FALLS ........................................................................................................................... 18
Figure 25: Train Orders (TO) FORM Tab .............................................................................................................................. 19
Figure 26: Train Orders (TO) FORMAT Tab .......................................................................................................................... 19
Figure 27: Train Orders (TO) - Train 377 .............................................................................................................................. 19
Figure 28: Directory Listing .................................................................................................................................................. 20
Figure 29: Switch List Preferences Screen ........................................................................................................................... 21
Figure 30: Sample Logos ....................................................................................................................................................... 24
Figure 31: Trains Window .................................................................................................................................................... 25
Figure 32: Switch List By Location Printers - 'default' ......................................................................................................... 26
Figure 33: Switch List By Location Printers - (assigned) ...................................................................................................... 26
Figure 34: MC4PRNT - Initial Screen .................................................................................................................................... 27
Figure 35: MC4PRNT - Initial List Window ........................................................................................................................... 27
Figure 36: MC4PRNT -Final Printer List ................................................................................................................................ 28
Figure 37: Stored Printer Names - Empty ............................................................................................................................ 29
Figure 38: Stored Printer Names - Printers Listed ............................................................................................................... 29
Figure 39: Location List – TERRE HAUTE - Train 95 .............................................................................................................. 34
Figure 40: Location List – TERRE HAUTE - Train 702 ............................................................................................................ 34
Figure 41: Location List - TERRE HAUTE - Train 702 ............................................................................................................ 35
Figure 42: Location List - TERRE HAUTE - Train 54 .............................................................................................................. 36
Figure 43: Location List - TERRE HAUTE - Train 55 .............................................................................................................. 36
Figure 44: Revision 1.1 and 1.2 ............................................................................................................................................ 39

SLC4JMRIDoco-Ver11.3.docx Page 3 12/3/2014 Number Type Destination Road Number Type From
ATSF 76640 GH HAUSER ATSF 82882 LO HAUSER
ATSF 76646 GH HAUSER
ATSF 76648 GH HAUSER
BN 435658 LO HAUSER
loading loading
Created 11/10/2014 7:22:56 PM
Road
SWITCH LIST TRAIN: 311
BURMAN QUARRY 11/10/2000 19:20
PULLS SETOUTS
Number Type Destination Road Number Type From
GATX 43212 T HAUSER GATX 40001 T HAUSER
GATX 40257 T HAUSER
GATX 40636 T HAUSER
OCE 12065 XM HAUSER
MRL 10008 XM off spot BNSF 724331 XM HAUSER
BN 244490 XM HAUSER
CPAA 204523 XM HAUSER
DRWX 1951 XM HAUSER UO 1524 XM HAUSER
BN 247253 XM HAUSER
BNSF 713086 XM HAUSER
SSAM 25125 XM B&S motors 3 BNSF 585026 FM HAUSER
BNSF 714268 XM HAUSER SSAM 25148 XM HAUSER
BNSF 713987 XM HAUSER NS 450665 XM HAUSER
BNSF 724395 XM HAUSER WC 177549 XM HAUSER
BNSF 541403 GT for train 334
BN 587643 GT Woodchip
BN 430316 LO HAUSER SP 401545 LO HAUSER
BNSF 581596 GB HAUSER
BNSF 511476 GB HAUSER
SWITCH LIST TRAIN: 311
YARDLEY 11/10/2000 19:20
PULLS SETOUTS
B&S motors 3 B&S motors 3
B&S motors 4 B&S motors 4
Road
Copher Chem Copher Chem
B&S motors 1 B&S motors 1
B&S motors 2 B&S motors 2
Roggensack 3
B&S motors 6 B&S motors 6
B&S motors 7 B&S motors 7
off spot off spot
Yardley scrap Yardley scrap
Created 11/10/2014 7:23:02 PM
B&S motors 5 B&S motors 5
Woodchip Woodchip
Chip offspot Chip offspot
Yardley sand Yardley sand
Roggensack 1 Roggensack 1
Roggensack 2 Roggensack 2
Roggensack 3
Switch List
No Work
Switch List
No Work
Switch List
No Work
No Work
Switch ListHAUSER
Setout Loco BNSF 2371 Track Engine Service
TRAIN INFORMATION for 311
CONSIST NO DEPARTS AT
#2371 HAUSER 15:15
Setout Loco BN 3513 Track Engine Service
Train Terminates
Created 11/10/2014 7:37:27 PM
Route Comment
West local works everything to Yardley and back
HAUSER
Sound units have delays to match the prime mover.
Pickup Loco BNSF 2371 Track Engine Service
Pickup Loco BN 3513 Track Engine Service
IRVIN
BURMAN QUARRY
YARDLEY JCT
YARDLEY
Be sure dispatch places you on the westbound track heading back
into Hauser so your engines can be routed into the yard.
YARDLEY JCT
IRVIN
Switch List Creator - Introduction
Switch List Creator (SLC) is an add-on application that may be used with output generated from JMRI Operations Train
Build feature. This application is written in Visual Basic for Applications (VBA) within Microsoft Excel. SLC is NOT part of
JMRI, but is used in conjunction with JMRI. The basic function of SLC is to produce a Train List (TL) (optional), a Switch
List (SL) for each Location with work to perform, and Train Order (TO) documents. Figure 1 through Figure 5 show a
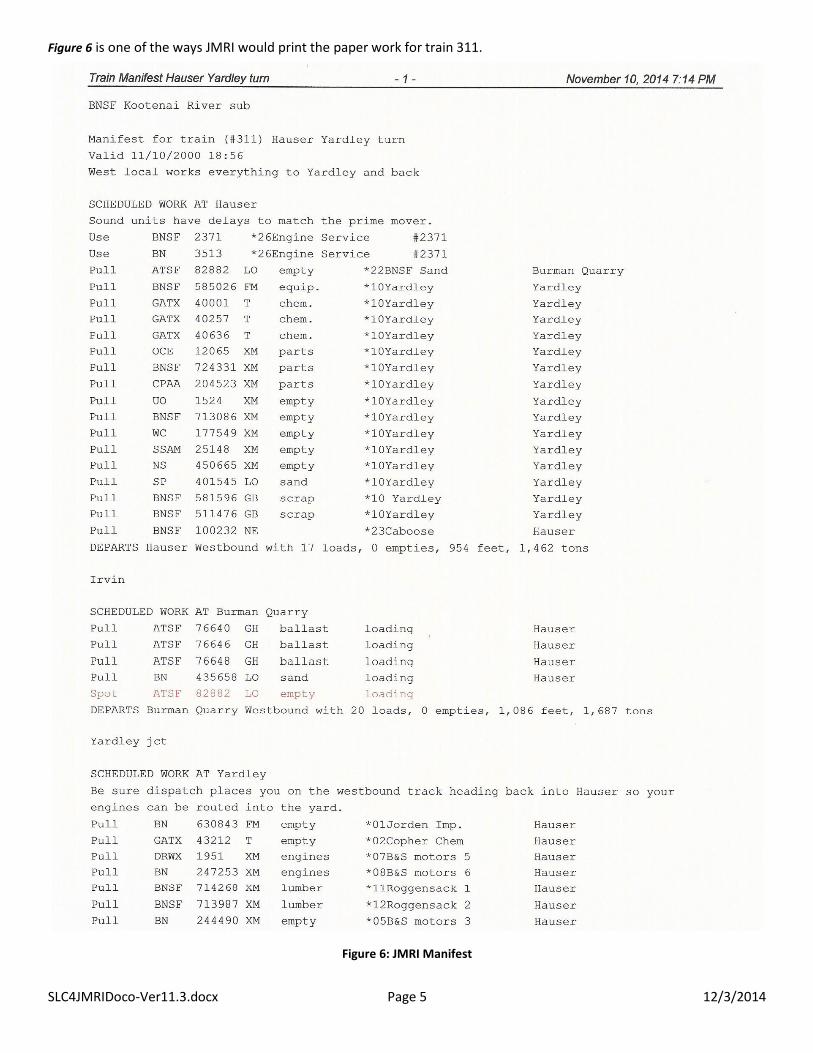
sample set of output from SLC. Figure 6 is the JMRI Manifest for the same Train. All switch lists were originally designed
for a half sheet of paper (4.25x11). These can be grouped together and given to the crew at the start of their run or they
can be placed at the different locations on the layout. Once the crew arrives they would have to find “their” work and
proceed with the switching at that location. The format of the various forms are fully customizable. With the RiverRail
group, which I worked with on implementation, the Peoria Western, Milwaukee Road, and the Great Northern all prefer
the lists be printed on a wider piece of paper, and theirs are around 5” wide. By making modifications to the MASTERs,
(described later in this document) you can customize the “look” to suit your fancy.
Below is the paperwork created for train 311. The Train Orders (TO), Figure 1, with Header modified to TRAIN
INFORMATION, would be the top page for the crew, followed by the Train List (TL), Figure 2, BURMAN QUARRY’s Switch
List (SL), Figure 3, YARDLEY’s SL, Error! Reference source not found., and the HAUSER’s SL, Figure 4 This train is a turn from
HAUSER to YARDLEY and back. HAUSER has a yard crew stationed there and they receive a Location List (LL) for this
train, so they know what cars to pull for departing trains, Figure 13, below, and where to place them when 311 returns,
Figure 14.
Figure 1: Train Information (TO) for Train 311
Figure 2: Train List (TL) Leaving Hauser

SLC4JMRIDoco-Ver11.3.docx Page 4 12/3/2014
Number Type Destination Road Number Type From
BNSF 724395 XM YARDLEY
ATSF 76640 GH BURMAN QUARRY
ATSF 76646 GH BURMAN QUARRY
ATSF 76648 GH BURMAN QUARRY
GATX 43212 T YARDLEY
DRWX 1951 XM YARDLEY
BN 247253 XM YARDLEY
BNSF 714268 XM YARDLEY
BNSF 713987 XM YARDLEY
BN 435658 LO BURMAN QUARRY
BN 244490 XM YARDLEY
BN 430316 LO YARDLEY
Road
SWITCH LIST TRAIN: 311
HAUSER 11/10/2000 19:20
PULLS SETOUTS
Kettle Falls Kettle Falls
off spot off spot
Created 11/10/2014 7:23:07 PM
Sandpoint Sandpoint
Spokane Spokane
Troy Troy
Figure 3: Switch List (SL) - BURMAN QUARRY
Figure 4: Switch List (SL) - HAUSER
Figure 5: Switch List (SL) - YARDLEY
NOTE: With the release of Version 1.1 and Version 1.2, the last two lines of the TL and SW have been modified. A new
line has been added providing Train Consist Information and the File Number has been added to the last line to aid in
sequencing the documents in their proper order should the need arise. Please refer to Appendix B for both the
explanation of the modifications and sample TL and SL. These changes have not been reflected in the various examples
in this document. There is no specific reference to them in the documentation.
SLC4JMRIDoco-Ver11.3.docx Page 5 12/3/2014
Figure 6 is one of the ways JMRI would print the paper work for train 311.
Figure 6: JMRI Manifest
SLC4JMRIDoco-Ver11.3.docx Page 6 12/3/2014
Switch List Creator – A JMRI Perspective
Before beginning please be certain that you have placed all required files in their proper directories as described in the
Read Me First Document.
You have seen an example of what this Switch List Creator program will generate for you. There are a few things you
need to do before you can achieve this style of paperwork. The documentation is all right here. You just need to
remember, the computer only does what you tell it to. So if you want this style of paperwork for your crews to use, let’s
get started.
The journey to this paperwork started with a need, and a very gracious individual that accepted the challenge to create
Switch List Creator. Dan Foltz created Manifest Creator for all of us to use. It gave us something different as far as
JMRI’s paperwork goes. I started using it and liked the results.
However, there is a fellow layout owner in this RiverRail area that models the Milwaukee Road and he was hand
generating his switch lists for his sessions, and that took him 6 hours to do. He would consider using a computer to do
this for him, but the paperwork that was available at the time was not to his needs. He wanted something a bit more
prototypical. I asked Dan if he would consider doing this for us and with some arm twisting, he agreed. A very big
THANK YOU goes to Dan Foltz for the many hours and hours he gave to creating this program for all of “us” to use.
So let’s get stated. Here is where you start to help Switch List Creator, (SLC), create the switch list style of paperwork.
The computer only does what we tell it so let’s create a switch list for this location.
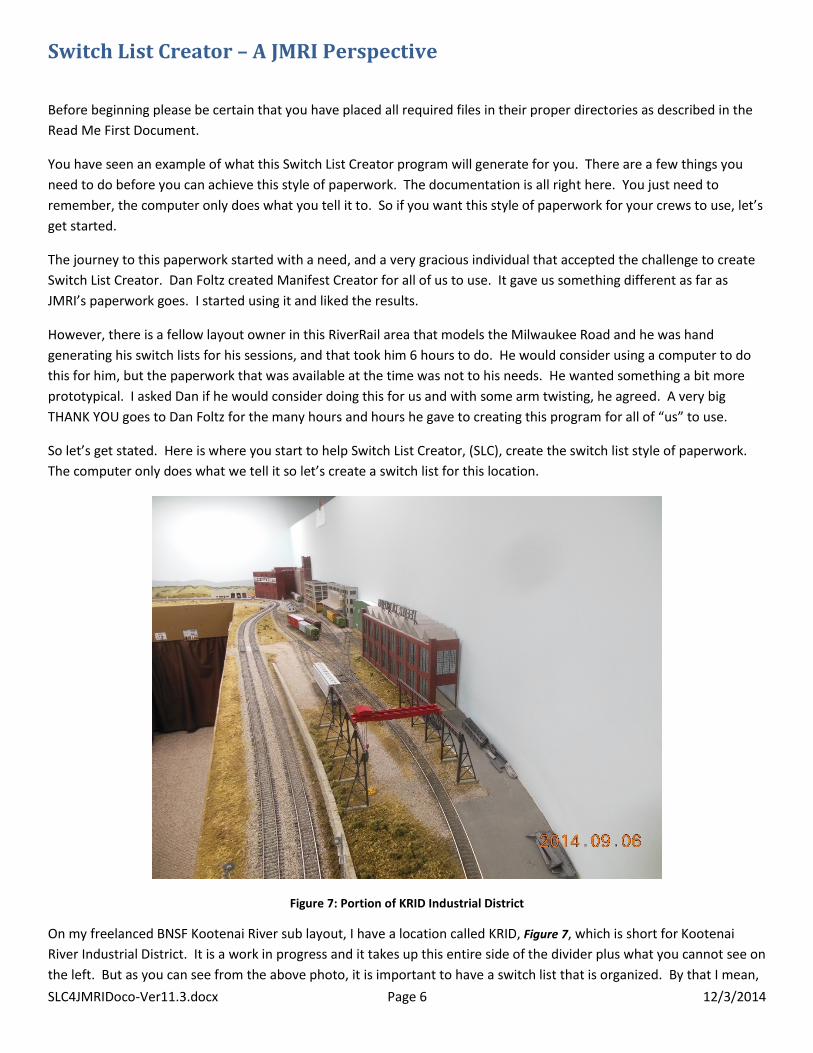
Figure 7: Portion of KRID Industrial District
On my freelanced BNSF Kootenai River sub layout, I have a location called KRID, Figure 7, which is short for Kootenai
River Industrial District. It is a work in progress and it takes up this entire side of the divider plus what you cannot see on
the left. But as you can see from the above photo, it is important to have a switch list that is organized. By that I mean,

SLC4JMRIDoco-Ver11.3.docx Page 7 12/3/2014
the crew assigned to work this complex needs a list that is organized in such a manner that the spurs are in location
order. It is not logical to place a spur on the list that is located at the far end of this complex on a line above the
overhead crane. SLC will do this for you but you need to help it.
Let’s take a look at what we need to do on the JMRI side of things. Later in this document we will explain Switch List
Creator and the “MASTER” files that come with it. For now, on to JMRI considerations.
NOTE: You will notice that most of the examples of TLs, SLs, and LLs shown in this document use AAR Codes rather than
Car Names. These codes fit the space provided for Type better than Car Names when using the default 4.25” wide
MASTERs. If you intend to make your TLs, SLs, TOs, and LLs wider than 4.25”, then you can create more room for Car
Names in the Type field. Either will work in the supplied MASTERs however.
Figure 8: KRID Spurs with Sequence Numbers
It is important to update to the latest version of JMRI before starting this installation.
Figure 8, shows this Location in JMRI. The Brew receiving, Brew ship., and Malt tracks are all on the far end of this photo
and Republic Steal is on this end. So to have SLC arrange the paperwork logically, we need to help it. Notice the *nn
before each spur at this Location. I also have off-spotted cars sitting here and those tracks are designated “yard” tracks
and they also have a *nn in front of their names. SLC will print this Location’s work in the order I have the spurs
identified. It drops the *nn and just prints the spur’s name on the switch list. Also when entering this information in

SLC4JMRIDoco-Ver11.3.docx Page 8 12/3/2014
JMRI, there is no space between the *nn and the spur name. By the way, spurs *07, *14 and *18 are yard tracks used
for off spotting certain car types, spurs 13, 15, 16 and 17 are not in this photo. It is important that you provide the
leading zero (0) in numbers less than 10 as shown in Figure 8.
Figure 9: Switch List - KRID
Number Type Destination Road Number Type From
MRL 20020 XM KR INTG
FGMR 12646 RP SPOKANE
BNSF 424424 LO KR INTG BNSF 421649 LO KR INTG
BNSF 414823 LO KR INTG USLX 1363 LO KR INTG
BNSF 473017 LO KR INTG AFEX 103 LO KR INTG
KCS 759183 XM SPOKANE
CNW 490032 LO KR INTG BNSF 402064 LO KR INTG
CNW 69911 LO KR INTG BNSF 401026 LO KR INTG
GACX 42830 LO SPOKANE
BN 439452 LO Sun Flour ship. BN 413353 LO SPOKANE
BN 566185 GB Rep. Stl. Ship
UP 54550 FM Rep. Stl. Ship
UP 905280 FM Rep. Stl. Ship
JEFX 1995 GB KR INTG
BNSF 580596 GB SPOKANE
BN 566193 GB SPOKANE
NYC 752600 GBS KR INTG
MLLX 97277 LO SPOKANE
BADX 1006 T KR INTG GATX 27494 T KR INTG
ACFX 78071 T KR INTG GATX 43228 T KR INTG
BN 625571 FCB SPOKANE TTZX 87698 FCB SPOKANE
BNSF 512044 GB SPOKANE
Road
SWITCH LIST TRAIN: 1000
KRID 11/10/2000 18:18
PULLS SETOUTS
Rep. Stl. Recv
Brew receiving Brew receiving
Sun Flour rec. Sun Flour rec.
Created 11/10/2014 6:19:03 PM
Brew ship. Brew ship.
Malt track Malt track
Britt's Plublishing Britt's Plublishing
Sun Flour ship. Sun Flour ship.
KRID off spot KRID off spot
Rep. Stl. Ship Rep. Stl. Ship
Rep. Stl. Recv
Tie plant 2 Tie plant 2
Team track Team track
Tank service Tank service
Tie plant 3 Tie plant 3
Brewery
Spurs
SLC4JMRIDoco-Ver11.3.docx Page 9 12/3/2014
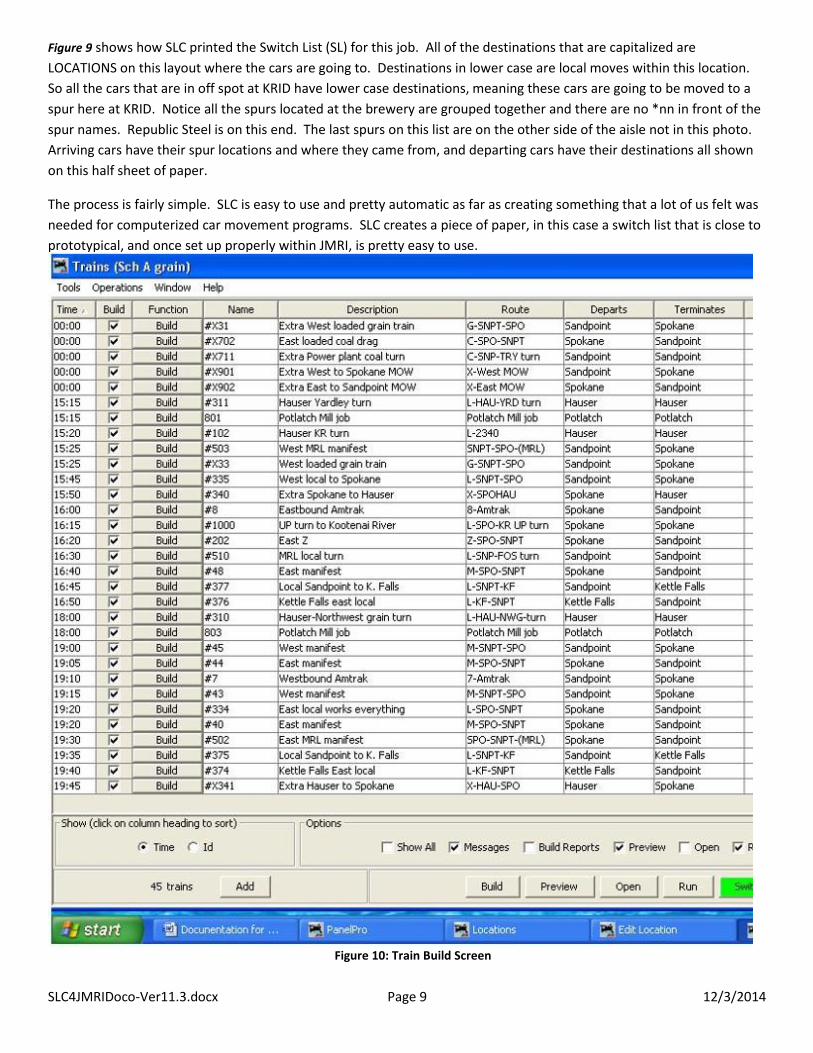
Figure 9 shows how SLC printed the Switch List (SL) for this job. All of the destinations that are capitalized are
LOCATIONS on this layout where the cars are going to. Destinations in lower case are local moves within this location.
So all the cars that are in off spot at KRID have lower case destinations, meaning these cars are going to be moved to a
spur here at KRID. Notice all the spurs located at the brewery are grouped together and there are no *nn in front of the
spur names. Republic Steel is on this end. The last spurs on this list are on the other side of the aisle not in this photo.
Arriving cars have their spur locations and where they came from, and departing cars have their destinations all shown
on this half sheet of paper.
The process is fairly simple. SLC is easy to use and pretty automatic as far as creating something that a lot of us felt was
needed for computerized car movement programs. SLC creates a piece of paper, in this case a switch list that is close to
prototypical, and once set up properly within JMRI, is pretty easy to use.
Figure 10: Train Build Screen
SLC4JMRIDoco-Ver11.3.docx Page 10 12/3/2014
Now let’s talk about the Train List (TL) and what is needed for that. Figure 10 shows how my Trains are entered in JMRI.
I have a couple of trains that just work a paper mill and they are 801 and 803. I have a morning shift and evening shift
for this mill. Notice these two trains do not have a # in front of their train number. The # tells SLC to create a TL for
trains that need one. The TL tells the crew what they are hauling and where the cars in their train are going when they
first pickup their train. My mill jobs do not need a train list so they do not have a # in front of their train numbers.
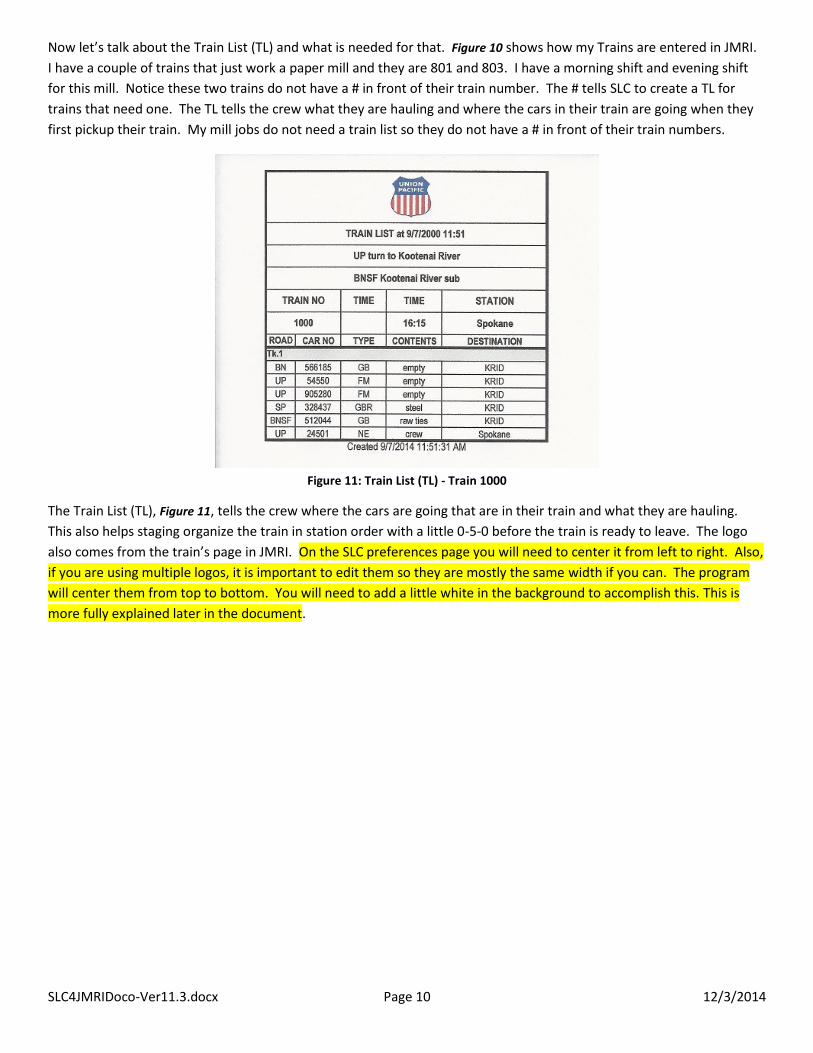
Figure 11: Train List (TL) - Train 1000
The Train List (TL), Figure 11, tells the crew where the cars are going that are in their train and what they are hauling.
This also helps staging organize the train in station order with a little 0-5-0 before the train is ready to leave. The logo
also comes from the train’s page in JMRI. On the SLC preferences page you will need to center it from left to right. Also,
if you are using multiple logos, it is important to edit them so they are mostly the same width if you can. The program
will center them from top to bottom. You will need to add a little white in the background to accomplish this. This is
more fully explained later in the document.

SLC4JMRIDoco-Ver11.3.docx Page 11 12/3/2014
Switch List
No Work
No Work
No Work
No Work
No Work
No Work
Switch List
No Work
Switch List
Switch List
No Work
No Work
No Work
No Work
No Work
No Work
Switch List
TRAIN INFORMATION for 1000
CONSIST NO DEPARTS AT
#605 SPOKANE 16:15
Created 11/10/2014 6:19:15 PM
Route Comment
Kootenai River and KRID UP turn
SPOKANE
Sound units have delays to match the prime mover.
Pickup Loco UP 605 Track Tk.1
YARDLEY JCT
IRVIN
HAUSER
RAMSEY
FOSTON JCT
BOW RIVER
KR INTG
HELPFUL HINTS! The KRID area is on both sides of the asile.
Work the tie plant first so you can build your outbound trains
there. The arrival track needs to be open for other trains that work
the interchange.
KR EAST
KRID
NOTE: Chain link gate at Repubnlic Steel opens out.
KR INTG
BOW RIVER
FOSTON JCT
RAMSEY
Train Terminates
HAUSER
IRVIN
YARDLEY JCT
SPOKANE
Setout Loco UP 605 Track Tk.1
Train Orders (TOs) are another feature of this program.
These TOs give an overview of the route and any work
along the way. Here are the TOs for train 1000, Figure
12. In the MASTERs I changed the word “ORDERS” to
“INFORMATION”, as this is a better name for what my
paperwork shows on this form. See information below
about the SLC MASTER files that come as part of SLC.
The TO page will give you the consist number for this
train. This greatly helps crews as far as which engine is
the lead unit of a Consist. Also, all locations that this
train needs to work, will show there was a switch list
generated for that location. Train 1000 has a switch list
generated for SPOKANE, KR INTG., KRID, back to KR
INTG., and back home to SPOKANE. Years ago, the
Station Agent would hand generate a switch list for the
arriving train and then hand them to the crew when
they arrived to work that location. These lists can be
placed in a holder at the location the crew works, or just
staple them in a packet for the crew like I do here. The
notes at the different locations all come from the
information I placed in the various Comment fields
within JMRI.
Notice that the information on the right side of the
form is in italics. This was accomplished by making a
change to the MASTER-TO file. Instructions on
modifying the MASTERs are found later in this
document.
Figure 12: Train Information (TO) - Train 1000

SLC4JMRIDoco-Ver11.3.docx Page 12 12/3/2014
If you have an engine change along the way, the paperwork will indicate that with a notation at the location where you
are changing locomotives. It will tell you the new consist number for the locomotive you are going to pick up there. All
my passing sidings and locations are in the route. These are printed on this list as a guide for the crews. You can include
as much or as little information as you wish in your JMRI routes. All the information on the Train Orders, Figure 12,
comes from the route for this train set in JMRI.
For those of us that want our yard crews to receive their own paperwork using this format, there is a need to place a
couple of files into your csvSwitchList folder, LLC4JMRI.xls(m) and MASTER_LL.xls(m). The Location List Creator (LLC)
creates the paperwork for your yard crews using the MASTER that is designed to incorporate the unique information
that is created when you create the local switch list. JMRI creates the switch list for your locations that you have setup
in the “Switch Lists by Location” area. All that is needed, is to build your train on the JMRI Trains page. The “switch list”
button, toward the bottom of your JMRI Trains page, will turn red if a local switch list was generated. All you need to
do, to have the local paperwork created, is to hit the “run” button in the Switch Lists screen. Excel will open and create
the paperwork for your yard crew. Note: You need to be certain that JMRI has been properly set up before this will work
as advertised. Please see JMRI to SLC Link Setup and Process. (Below) They now have the information in their hands to
pull and spot cars for the appropriate train. Below is an example of a switch list created for my HAUSER yard crew for
train 311. 311 is a turn that originates and terminates at HAUSER.
Figure 13: Location List (LL) for HAUSER Outbound
Figure 14: Location List (LL) for HAUSER - Inbound
SLC4JMRIDoco-Ver11.3.docx Page 13 12/3/2014
This train is a turn and it originates in HAUSER and works YARDLEY. It is supposed to leave at 15:15, work YARDLEY and
“maybe” arrive back at HAUSER around 17:35. Times are provided by JMRI with settings that you made in the Settings
screen. The left location list tells the yardmaster at HAUSER the cars this train needs and where they are located in
HAUSER. Upon its return, the right location list tells the yard crew where to place the cars in the yard and where the
cars are going to.
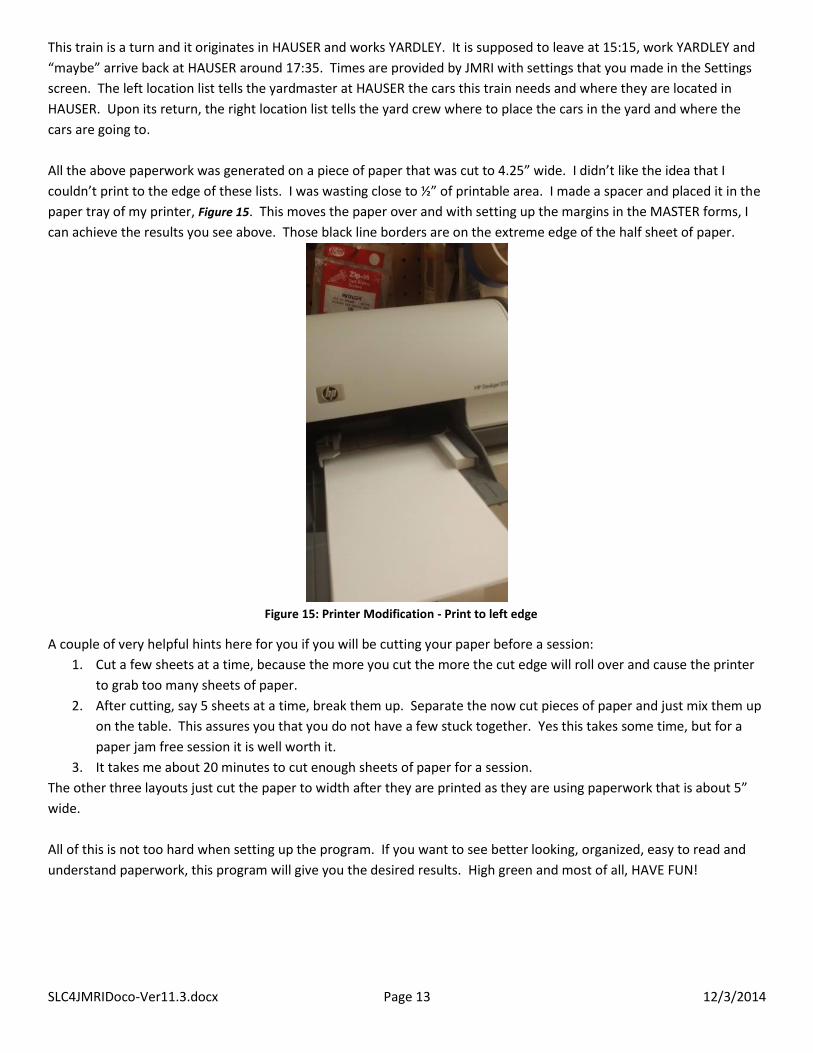
All the above paperwork was generated on a piece of paper that was cut to 4.25” wide. I didn’t like the idea that I
couldn’t print to the edge of these lists. I was wasting close to ½” of printable area. I made a spacer and placed it in the
paper tray of my printer, Figure 15. This moves the paper over and with setting up the margins in the MASTER forms, I
can achieve the results you see above. Those black line borders are on the extreme edge of the half sheet of paper.
Figure 15: Printer Modification - Print to left edge
A couple of very helpful hints here for you if you will be cutting your paper before a session:
1. Cut a few sheets at a time, because the more you cut the more the cut edge will roll over and cause the printer
to grab too many sheets of paper.
2. After cutting, say 5 sheets at a time, break them up. Separate the now cut pieces of paper and just mix them up
on the table. This assures you that you do not have a few stuck together. Yes this takes some time, but for a
paper jam free session it is well worth it.
3. It takes me about 20 minutes to cut enough sheets of paper for a session.
The other three layouts just cut the paper to width after they are printed as they are using paperwork that is about 5”
wide.
All of this is not too hard when setting up the program. If you want to see better looking, organized, easy to read and
understand paperwork, this program will give you the desired results. High green and most of all, HAVE FUN!
SLC4JMRIDoco-Ver11.3.docx Page 14 12/3/2014
Switch List Creator (SLC) – An Excel Perspective
Understanding that this application is written in Excel in Windows OS, it has a somewhat limited set of users. SLC has
been tested in all version of Excel from 2000 to 2013. The only issue is with graphics (Logo) manipulation in Excel 2007.
The program will function just fine with the exception of Logo placement. Send any comments or questions as to why it
will run in some but not all versions of Excel to Bill Gates please. There are two Versions of the same Release of
SLC4JMRI. One version has a file extension of XLS. This is to be used with Excel Version prior to 2007. You will also want
to use the XLS Version of the MASTER files. The other Version has a file extension of XLSM. This is to be used with Excel
version 2007 and above. Fortunately both Apps will work with MASTER files with an XLS extension.
If you might be interested in just how all of these “Creators” came about refer to History (See Appendix A)
Introduction
This application uses a CSV output file from JMRI. SLC uses this CSV file to generate Train Lists (TLs) (optional), Switch
Lists (SLs), and Train Orders (TOs). Various examples may be seen within this documentation and in the Samples
document stored in the Files/Operations area within the JMRI User Group.
There are several files that are part of each Release of SLC. This is further complicated by the different versions of Excel.
Four of these files are used to create the TLs, SLs, and TOs for the different Excel version explained above, while other
files are included as documentation or samples of generated output. When the displays (screens) were first created, a
rather obscure font, AR JULIAN, was used. Although not absolutely necessary, it is strongly suggested that you install
this font if not already on your system. This font file is included with the other files that make up a SLC Release.
SLC has been extracted from its parent application, Manifest Creator. However it has undergone major changes so that
only a few functions from the original application remain. Preferences have been GREATLY reduced by including pre-
built files for Train Lists, Switch Lists, and Train Orders that support the main application. These pre-built files are known
as the MASTERs and will be described shortly. There remain a few Preferences that you may set to obtain different
results and may be updated via a menu selection on the Welcome Screen. These too will be explained a bit later in this
document.
The Welcome Screen or Main Menu controls all of the capabilities of SLC. You simply click on a “button” of your choice.
The one you will use to build a set of Switch Lists is the Create Switch List button. Let’s start by building our first set of
Train List, Switch Lists, and Train Orders. First you will need to do several things within JMRI as described above. Once
that is set and you have built a Train or Trains in JMRI, you will be able to generate the Switch Lists using SLC.

SLC4JMRIDoco-Ver11.3.docx Page 15 12/3/2014
Figure 16: Switch List Creator (SLC4JMRI) Welcome - Main Menu
This selection allows you to generate the Switch Lists from the CSV files generated by JMRI. SLC will ask for the name of
the CSV file that you would like to process. This is done through the normal Windows Open File dialog box. With
SLC4JMRI placed in your csvManifests directory, SLC will show all .csv files in this directory. Once you see the file that
you would like to process, highlight it and click Open or simply double click the filename. There is also an automatic JMRI
to SLC Link function, explained below. A sample of the different documents generated were shown along with the
manifest that would have been created by JMRI in the Introduction above.
The MASTERs
Many formatting features are contained within the MASTERs. There are three (3) MASTERs, namely MASTER-TL.xls,
Figure 17, MASTER-SL.xls, Figure 20, and MASTER-TO.xls, Figure 25. Each of these files are updateable by you. However
you must make these changes on the TAB labeled Format for them to take effect. There are two TABs within each

SLC4JMRIDoco-Ver11.3.docx Page 16 12/3/2014
MASTER with Format being one of these. The other is Form. The concept behind the MASTERs that are supplied with SLC
is to keep the width so that it will fit on a 4.25” x 11” piece (or half sheet) of paper. However, you have the ability to
change the width of the document to suit your needs. Let’s take a look at these MASTERs and see what changes are
possible.
MASTER – Train List - MASTER-TL.xls
Please refer to the Train List, Figure 19, shown below. Immediately below is an “as is” supplied Train List MASTER. Each of
the two (2) TABS (Form and Format) are shown.
Figure 17: Train List (TL) FORM Tab
Figure 18: Train List (TL) FORMAT Tab
In comparing these two TABS, you can see that the Format has two more lines than the Form. These lines are used for
each of the detail lines. Refer to Train List, Figure 19, sample below. Also, notice that the “default” RN has been changed
to ROAD on the sample. This is done by the user on the Format Tab.
Line 15 in the MASTER is used for Spur (track) location of cars to be
picked up by Train 377 upon departure from Sandpoint. The individual
cars with Road Name (RN), Car No, Type (using AAR type codes in this
example), Contents, and destination Location. You can add color to the
spur names so they stand out for your crews. We used yellow in this
example. The TL is time stamped on the end of the list. This is the time
the file was created by SLC. The JMRI time of creation is under the TIME
within the TL Header. Other information in the “header” include Train
Name, and several other comments. Note: Many additional comments
will be found in the TO document depending on what comments you
have included in your JMRI setup.
Looking back at the TL MASTER, Figure 17 and Figure 18, you will see that
it appears to begin with Row 5. However Rows 1-4 are there, they just
have their height set to zero. Doing this allows room for your Logo, if
desired, but takes up no space if no Logo is requested. If you use a Logo,
you have the capability to size and locate this logo as well. This is all
done with the Preferences explained later.
Figure 19: Train List (TL) - SANDPOINT

SLC4JMRIDoco-Ver11.3.docx Page 17 12/3/2014
Rows 5 and 6 are merged together to form the TL Header. You can make any text, font color, size, etc. changes within
this space. Lines 7 and 8 are merged together and allow room for a fixed message of your choice. In this case the
message is Handle Cars With Care. Once again you may change text, font, color, size, and message. Certain message
types from JMRI will be placed within this area as well. Rows will be inserted to accommodate whatever messages are
included in the CSV file. Rows 9 and 10 are merged together to provide additional headings. Once again, you may make
any changes that you like (on the Format tab). Lines 11-and 12 are used by SLC to add Train Number, Time, and Station
(starting Location). You may also change the Row height to any value that suits you.
The Columns need a bit more attention. Once again you have the ability to change the Column width to any value that
suits you, but columns have been optimized to fix a 4.25” x 11” form (half sheet of paper). More importantly, you may
NOT INSERT columns NOR DELETE columns as SLC uses these specific addresses to locate the information. Most
important and not easily seen, is the fact that there is a Column A. It is set to a VERY narrow width as it has only
significant use internally to SLC. It is very important that this Column A does not get forgotten. However you may change
its width value.
You can modify the other MASTER forms in the Format tab in a similar fashion. However, the TL is the only form that has
the ability to hold a Logo. REMEMBER, the Logo is handled within the Preferences settings.
MASTER – Switch List – MASTER-SL.xls
Please refer to the Switch List, Figure 20 and Figure 21. This is an “as supplied” Switch List MASTER. This contains the two
tabs, Form and Format.
Figure 20: Switch List (SL) FORM Tab
Figure 21: Switch List (SL) FORMAT Tab
The same two line difference appears in the SL MASTER. Again these lines are used for the detail lines on the SL. Please
refer to details under MASTER – Train List (TL) for information on what changes you may make on the Format Tab.
An SL is generated for each Location in your route that has work to be done. The information seems self-explanatory.
PULLS or PICKUPS will appear on the left side of the form and SPOTS or SETOUTS will appear on the right side of the
form. MOVES are a bit trickier to spot. The best clue is that they will have a Spur (Track) name rather than a Location for
their Destination and From fields. A bit of experience will make this second nature. Currently, SLC will print all Locations
in UPPER CASE, while Spurs will be as entered in JMRI. This may be a habit that you might like to create when entering
your LOCATIONS and Spurs in JMRI as this automatic capitalization might be removed at the request of other users. In
that case it may become a Preference.
SLC4JMRIDoco-Ver11.3.docx Page 18 12/3/2014
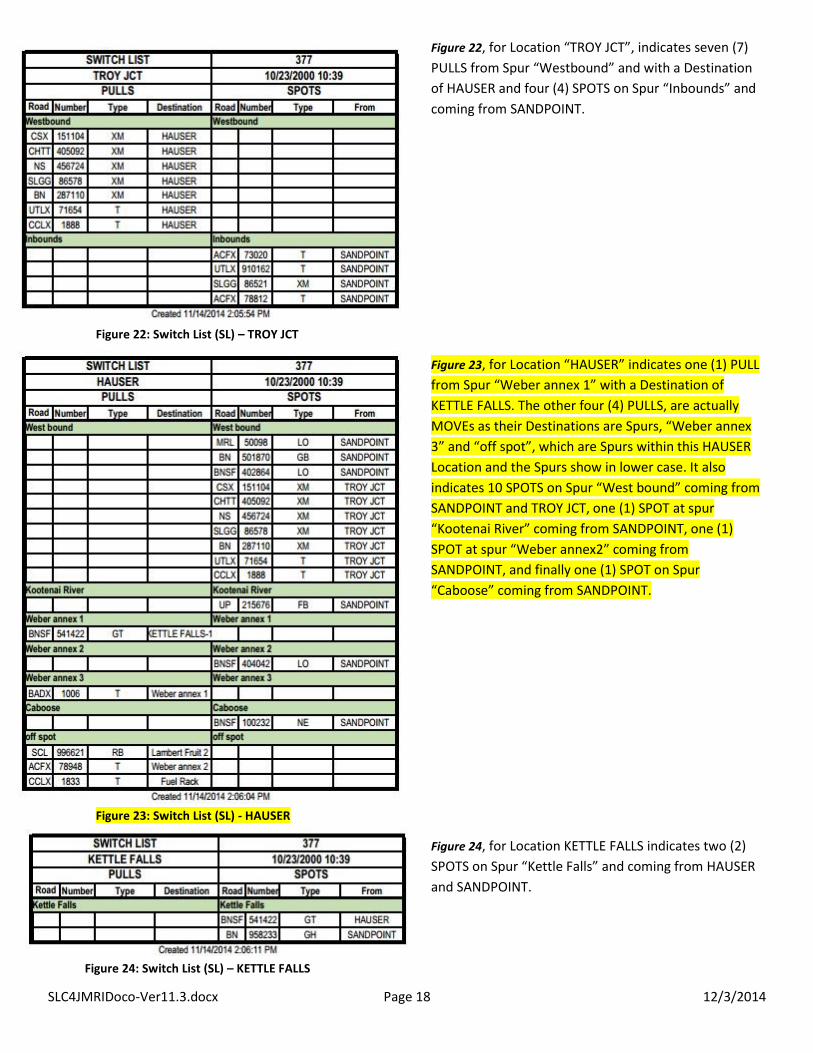
Figure 22, for Location “TROY JCT”, indicates seven (7)
PULLS from Spur “Westbound” and with a Destination
of HAUSER and four (4) SPOTS on Spur “Inbounds” and
coming from SANDPOINT.
Figure 22: Switch List (SL) – TROY JCT
Figure 23, for Location “HAUSER” indicates one (1) PULL
from Spur “Weber annex 1” with a Destination of
KETTLE FALLS. The other four (4) PULLS, are actually
MOVEs as their Destinations are Spurs, “Weber annex
3” and “off spot”, which are Spurs within this HAUSER
Location and the Spurs show in lower case. It also
indicates 10 SPOTS on Spur “West bound” coming from
SANDPOINT and TROY JCT, one (1) SPOT at spur
“Kootenai River” coming from SANDPOINT, one (1)
SPOT at spur “Weber annex2” coming from
SANDPOINT, and finally one (1) SPOT on Spur
“Caboose” coming from SANDPOINT.
Figure 23: Switch List (SL) - HAUSER
Figure 24, for Location KETTLE FALLS indicates two (2)
SPOTS on Spur “Kettle Falls” and coming from HAUSER
and SANDPOINT.
Figure 24: Switch List (SL) – KETTLE FALLS

SLC4JMRIDoco-Ver11.3.docx Page 19 12/3/2014
MASTER – Train Orders - MASTER-TO.xls
Please refer to the Train Orders, Figure 25 & Figure 26, shown below. This is an as supplied Train Orders MASTER. Each of
the two (2) TABS (Form and Format) are shown.
Figure 25: Train Orders (TO) FORM Tab
Figure 26: Train Orders (TO) FORMAT Tab
The same two line difference appears in the SL MASTER. Again these lines are used for the detail lines on the SL. Please
refer to details under MASTER – Train List (TL) for information on what changes you may make on the Format Tab.
The Train Orders list, Figure 27, contains much information used
by the Engine Crew. The paperwork created here, on my layout,
is more geared to information, rather than orders for my trains
so I changed the “ORDERS” to “INFORMATION” in the MASTERS.
Looking at the Master TO, Figure 25, graphic we see that Rows 1
and 2 are reserved for the Train Number. Rows 3 and 4 are the
Headers for the Consist Number, Departing Location, and time
of departure. These headings can all be changed by making
changes to the Format Tab, Figure 26. You may make the same
type of changes as described above. The sample TO shows the
formatting that is done for the TO itself. Information that is
important to the Train Crew is collected here. Most Comments
are shown here as well as each Location along the Route
indicating if there is work to be performed (Switch List) or just
passing by (No Work). Engine Number(s) and Consist Number is
provided. Also, if there is a Change Crew (CC JMRI Record) as
this sample shows, the new Consist Number is provided along
with the new Engine Number(s). Lastly it shows when the Route
is finished (Train Terminates) and a time stamp when SLC
actually created this document.
Figure 27: Train Orders (TO) - Train 377

SLC4JMRIDoco-Ver11.3.docx Page 20 12/3/2014
OUTPUT FILES - NAMING CONVENTIONS
If you request hardcopy output (the normal) Preference, file names will have little value. However, if you set Save the
File Preference to YES, you will want to understand the way that SLC names the files it creates. Each file will have the list
type (TL, SL, TO) along with the Train Number (or name) and a sequential three (3) digit number. SLC maintains this
number and is added so that you may determine the sequence of the files. TL and TO are rather self-explanatory as
there is only one (1) of each of these per Train. However there may be many SL files and their sequence cannot be
determined without this sequence number. Below is a sample of a set of files for Train 377.
The partial Directory list shows files generated for “train
(#377)”. The three (3) digit number in the file name provides
the sequence in which the files were generated. The Location
name is also included (Hauser, Kettle Falls, Troy jct, and
Sandpoint). The three (3) digit code after the train number
(‘train (#377)’ indicates the type of output you have. SL4 is
shorthand for Switch List For … Location.
Looking at these files in Route sequence would be:
Train (#377)_TL4_Sandpoint_589.xlsx
Train (#377)_SL4_Troy jct_590.xlsx
Train (#377)_SL4_Hauser_591.xlsx
Train (#377)_SL4_Kettle Falls_592.xlsx
Train (#377)_TO4_Dettle Falls_593.xlsx
Figure 28: Directory Listing
Remember that this naming convention is only used if you set the Save Switch List Files Preference to YES. This same
naming convention is used to provide information on any Hardcopy output you receive. Again this is to help you be
certain that the individual Lists can be put in proper sequence should the need arise.

SLC4JMRIDoco-Ver11.3.docx Page 21 12/3/2014
Switch List Preferences.
Figure 29: Switch List Preferences Screen
If you are familiar with Manifest Creator, you will see that the Preferences have been greatly reduced. Again, this is due
to the inclusion of the “MASTERs”.
OUTPUT PREFERENCES
Comment Wrap Length Integer 43
Let’s start with Comment Wrap Length. This tells SLC how many characters to put on one line before wrapping the next
portion of the text. This additional portion does not actually go to a new line, rather SLC increases the Row height to
accommodate the text. The number, 43 shown above, tells SLC to allow up to 43 characters on one line. If there are 44-
86 characters, SLC will double the height of the row. It will continue to grow like this to allow all characters to be shown
on the form. The significance of having this preference is that with your ability to change the font style, size, etc. and the
Column widths in the Format Tab, the number of characters on a line will be affected. 43 is set to fit the Masters as they
are distributed. The best way to work with this is to do a test, change the value, do a test, change again … until you have
it set to what best fits your form. Values are any integer value. Extreme values like 1 and/or 999 have not been tested,
so if you set these values, the results are unpredictable.

SLC4JMRIDoco-Ver11.3.docx Page 22 12/3/2014
Print Preview YES/NO NO
Print Preview allows you to see a sample of the output on your screen before you save it and/or print it on paper. This is
a good way to adjust the Comment Wrap Length value. WARNING: Print Preview does not currently function in Excel
2013 the same way as previous versions. To date a solution to this has not been found. One could do a Hardcopy Print to
a PDF Printer and then review the output before finalizing the look of the output. This was done extensively when
testing the creation of SLC. Once again, Bill Gates and company came up with a new way to handle Print Preview that is
NOT compatible with previous versions. If this makes you unhappy, please contact Bill Gates. Values are YES or NO.
Print Hardcopy YES/NO YES
Print Hardcopy will normally be set to YES. When set to YES, SLC will print the documents to the specified printer. Values
are YES or NO.
Save Switch List Files YES/NO NO
Save Switch List Files allow you to keep a hard copy of the TLs, SLs, and TOs that you create in the csvManifests folder.
This would make it possible to review them, modify, and/or print another copy. . Values are YES or NO.
Uty Car Rd Name (B,R,U) B,R,U U
Uty Car Road Name allows you to select what value will appear in the Road Name for a utility car. Since a utility car
record refers to more than 1 car, the Road Name may be meaningless for some while others might track their utility cars
by Road Name. There are three possible values. B – If you have a B set for this Preference the field will be blank. R - If
you have an R set for this Preference the field will contain the Road Name of the car represented in the car record. Note
that if you have utility cars with different road names, the road name of the first car in the list will be used. U - If you
have a U set for this Preference the field will contain ‘UTY’. Any value other than R or U will default to B (blank).
OTHER PREFERENCES
Show HOLD Cars YES/NO YES
HOLD Cars For Train Lists controls the inclusion or exclusion of HOLD Cars on the Train List and Switch Lists. If set to YES,
HOLD Cars will be added in the sequence of the Current Track. It set to NO, then HOLD Cars are not shown.
NOTE: Look below for an additional Preference for HOLD Cars.
Multi-Line Delim /*/
Multi-Line Delim is any string of characters you choose that will split comments in multiple segments as if they are
separate comments. You add this string of characters (matching what is set here) in your comment fields in JMRI and SLC
will split the comment at each delimiter it finds. NOTE: Do not place a delimiter at the beginning or end of your
comment text in JMRI.
Example:
Comment in JMRI is: WOW This is a nice feature Thank you SLC
Then SLC would print the text on a comment line just as is. Of course if the comment is longer than the
Comment Wrap Length, it will take effect as well.
Change the comment in JMRI to: WOW/*/This is a nice feature/*/Thank you SLC
SLC4JMRIDoco-Ver11.3.docx Page 23 12/3/2014
Now SLC will treat the Comment as three (3) individual comments. The output would look like:
WOW
This is a nice Feature
Thank you SLC
Remember that you may use any character string you like. You are not forced to use /*/.
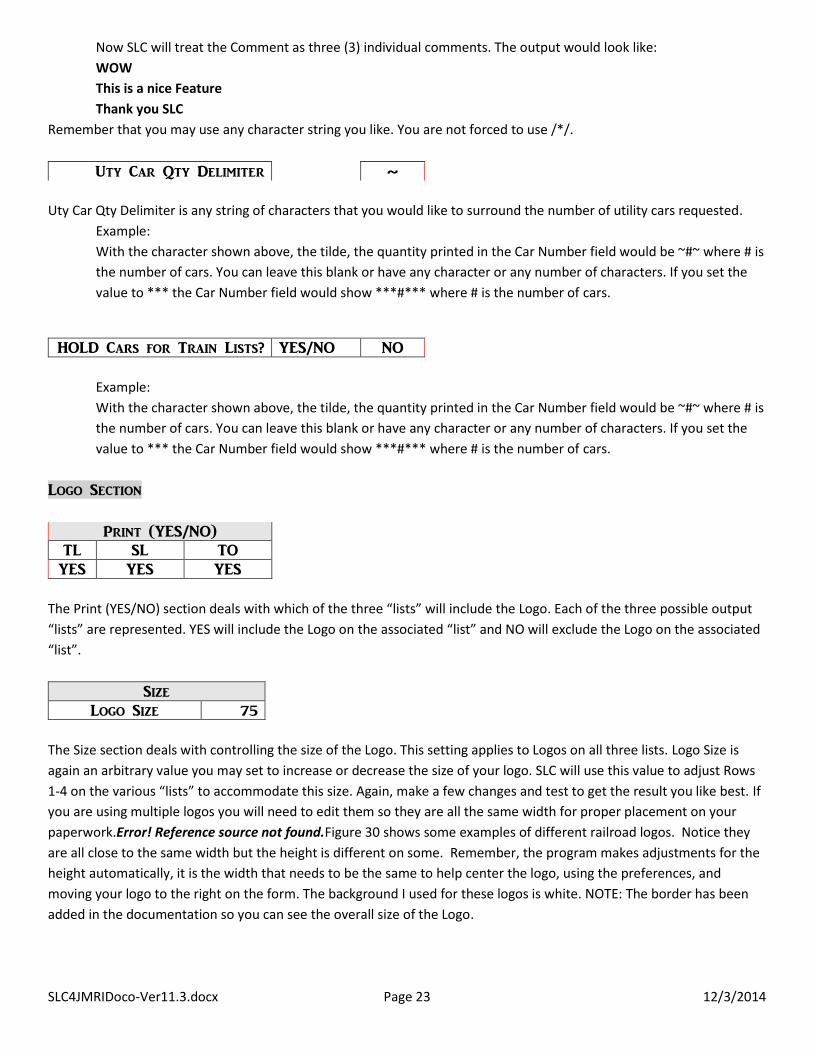
Uty Car Qty Delimiter ~
Uty Car Qty Delimiter is any string of characters that you would like to surround the number of utility cars requested.
Example:
With the character shown above, the tilde, the quantity printed in the Car Number field would be ~#~ where # is
the number of cars. You can leave this blank or have any character or any number of characters. If you set the
value to *** the Car Number field would show ***#*** where # is the number of cars.
HOLD Cars for Train Lists? YES/NO NO
Example:
With the character shown above, the tilde, the quantity printed in the Car Number field would be ~#~ where # is
the number of cars. You can leave this blank or have any character or any number of characters. If you set the
value to *** the Car Number field would show ***#*** where # is the number of cars.
Logo Section
Print (YES/NO) TL SL TO YES YES YES
The Print (YES/NO) section deals with which of the three “lists” will include the Logo. Each of the three possible output
“lists” are represented. YES will include the Logo on the associated “list” and NO will exclude the Logo on the associated
“list”.
Size Logo Size 75
The Size section deals with controlling the size of the Logo. This setting applies to Logos on all three lists. Logo Size is
again an arbitrary value you may set to increase or decrease the size of your logo. SLC will use this value to adjust Rows
1-4 on the various “lists” to accommodate this size. Again, make a few changes and test to get the result you like best. If
you are using multiple logos you will need to edit them so they are all the same width for proper placement on your
paperwork.Error! Reference source not found.Figure 30 shows some examples of different railroad logos. Notice they
are all close to the same width but the height is different on some. Remember, the program makes adjustments for the
height automatically, it is the width that needs to be the same to help center the logo, using the preferences, and
moving your logo to the right on the form. The background I used for these logos is white. NOTE: The border has been
added in the documentation so you can see the overall size of the Logo.
SLC4JMRIDoco-Ver11.3.docx Page 24 12/3/2014
Figure 30: Sample Logos
H-Position (L, C, R) TL SL TO C C C
The H-Position (L, C, R) section controls the placement of the Log on each of the three “lists”. The three possible
positions include L-Left, C-Center, R-Right. Place the appropriate character under each list type, TL, SL, TO.
Dest. Location or Track (L/T)
T T NA The Dest. Location or Track (L/T) section controls what information is placed in the Destination Field in the Train List and Switch List documents. An L indicates that Destination Location should be provide while a T indicates the Destination Track. Set these values to your liking.
Add Load to UTY Car Type Field (Yes/No) NO The Add Load to UTY Car Type Field (Yes/No) section determines if the Load will be included with the set of utility cars. Since UTY represents a Unit Train, all cars would contain the same load. Whether it be Empty or a specific Commodity. See the Preference to YES to include the load and NO to exclude the Load.

SLC4JMRIDoco-Ver11.3.docx Page 25 12/3/2014
LOGO This selection allows you to choose any graphic file that you like to use as a logo for the manifest. This logo will become
your ‘default’ Logo, meaning it will be used if there is no LOGO Record in the JMRI CSV file. If you do not have a Logo set
up here, the ‘default’ becomes no logo. When you click on this button you will be shown a normal Windows File Input
Dialog Box asking for the name of the logo file you would like you use. Navigate until you find the logo of choice and
Double Click (or select the file and Click Open). SLC will do its best to manipulate the graphic, whatever size, to make it
fit in the header area of the manifest. Remember that if you have chosen a logo within JMRI, it will override this setting.
NOTE: See Logo Size, Move Logo Down, Move Logo right, above, for directions on how to size and position your
particular Logo
Printers This option will allow you to define any printer that might be specific to your system. This ONLY needs to be used if you
have more than one printer and wish to have your Switch Lists, Train Lists, Train Orders, and/or Location Lists print on
different printers. This can be particularly helpful if you have a large yard or two and have a printer at this area of your
layout. SLC/LLC now has the ability to print specific documents at these “remote” printers. Inspector Dave again asked
for this enhancement. It has been added to JMRI and it is now passed to MC, SLC, & LLC. However, due to the quirky way
the Windows is set up, Excel cannot obtain the proper address that Windows needs in order to redirect to a different
printer. This needs to be done manually and is a rather convoluted process on the SLC/LLC side of things. The first step is
to open JMRI and select the Trains option from the Operations Menu.
Figure 31: Trains Window
Next select the Switch Lists button in the list of buttons at the bottom of the window. You will then be presented with
the Switch Lists by Location window.
SLC4JMRIDoco-Ver11.3.docx Page 26 12/3/2014
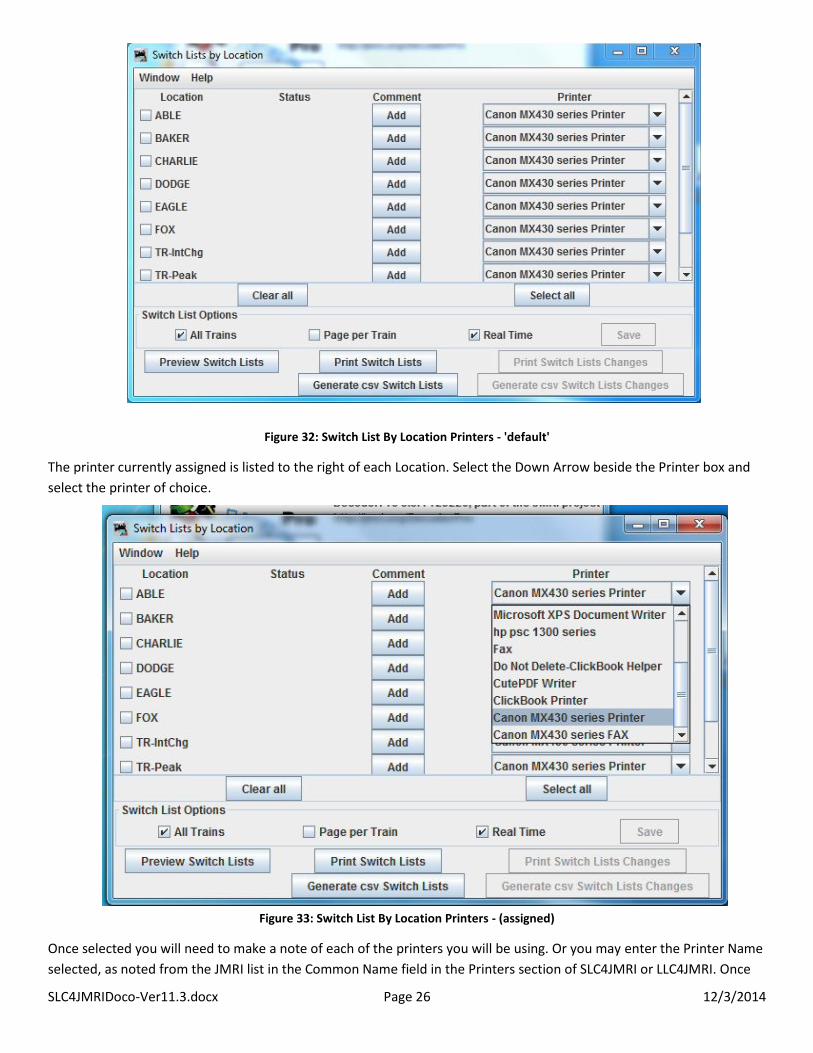
Figure 32: Switch List By Location Printers - 'default'
The printer currently assigned is listed to the right of each Location. Select the Down Arrow beside the Printer box and
select the printer of choice.
Figure 33: Switch List By Location Printers - (assigned)
Once selected you will need to make a note of each of the printers you will be using. Or you may enter the Printer Name
selected, as noted from the JMRI list in the Common Name field in the Printers section of SLC4JMRI or LLC4JMRI. Once
SLC4JMRIDoco-Ver11.3.docx Page 27 12/3/2014
you have done this, you may close JMRI and proceed below. I have introduced an ancillary application that is used to
determine the names of the printers as they are known to your Windows system. Again, this is unique to each user. The
name of this program is MC4PRNT.xls. This program was copied from the Internet and has a strange way of getting
printers but once you do it, you won't need to do it again until you get a new printer or change where you want your
TOs, TLs, SLs and/or LLs to print.
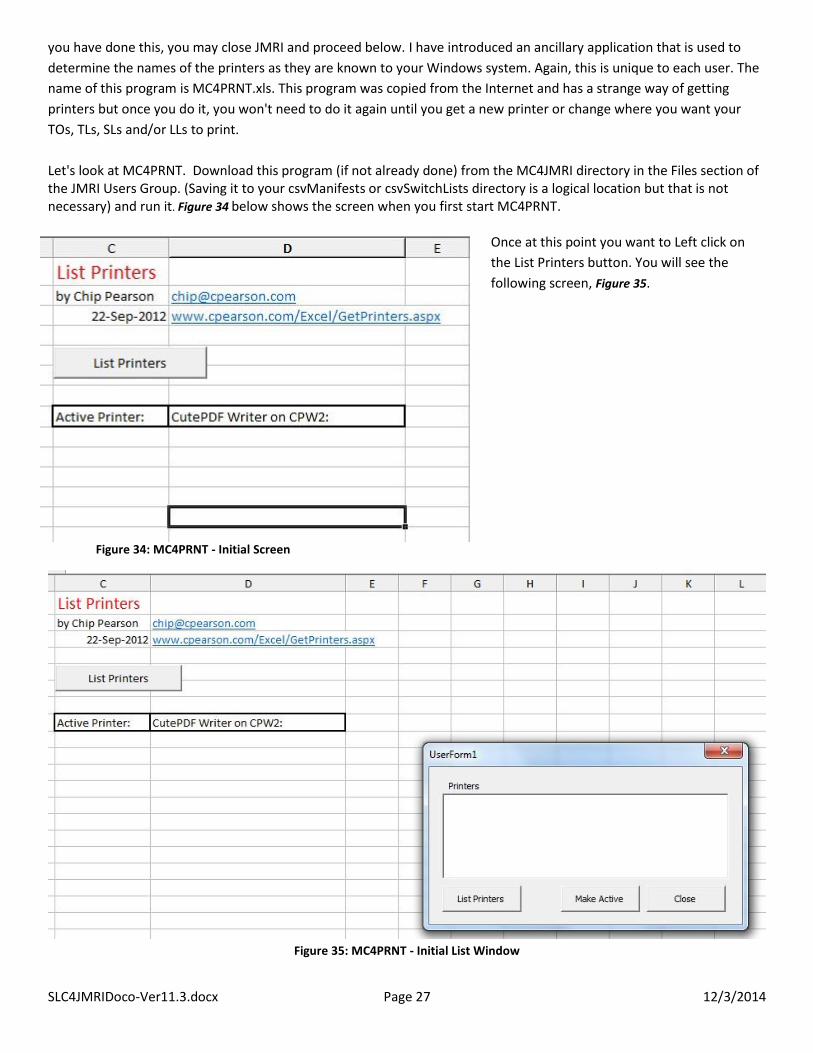
Let's look at MC4PRNT. Download this program (if not already done) from the MC4JMRI directory in the Files section of the JMRI Users Group. (Saving it to your csvManifests or csvSwitchLists directory is a logical location but that is not necessary) and run it. Figure 34 below shows the screen when you first start MC4PRNT.
Once at this point you want to Left click on
the List Printers button. You will see the
following screen, Figure 35.
Figure 34: MC4PRNT - Initial Screen
Figure 35: MC4PRNT - Initial List Window

SLC4JMRIDoco-Ver11.3.docx Page 28 12/3/2014
You need to Left click on the newly displayed List Printers button to arrive at your final destination. Please see Figure 36.
Figure 36: MC4PRNT -Final Printer List
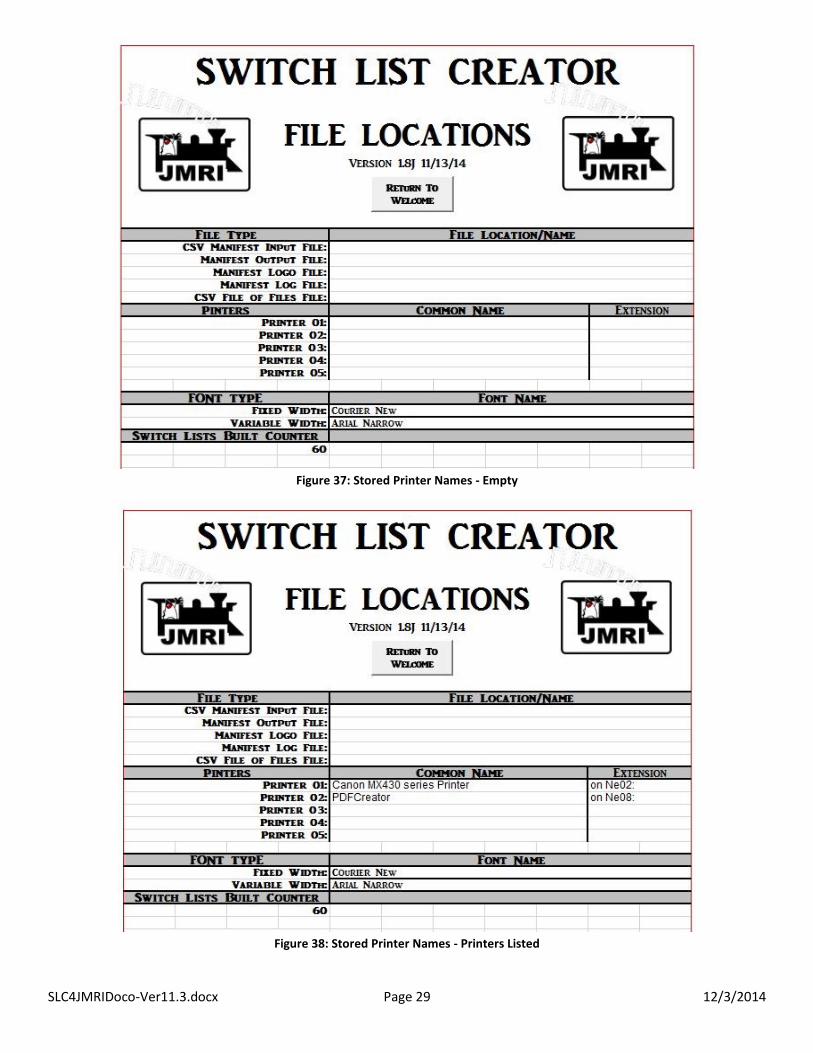
You may not be able to see the detail in the above figure but each on the printers ends with 'on Nenn' were nn is a two
digit number. You need to copy or type this information into the right hand portion of the Files and Printers screen
(below). It must be entered just as it is displayed in the MC4PRNT dialog box. These need to be entered to the right of
the corresponding printer that you listed from JMRI. These must match - printer and "on" address if you would. You may
then Left click on Close in the MC4PRNT Dialog Box. Then close the MC4PRNT screen. It will ask if you want to save your
changes. It does not matter how you answer this question. Once all that is accomplished, Left click on the Return To
Welcome button on the Files and Printers screen and you should be ready to go. Refer to Figure 37 & Figure 38.
SLC4JMRIDoco-Ver11.3.docx Page 29 12/3/2014
Figure 37: Stored Printer Names - Empty
Figure 38: Stored Printer Names - Printers Listed

SLC4JMRIDoco-Ver11.3.docx Page 30 12/3/2014
Exit Program does just as it indicates. However, it is important that you end the program using this option as it will save
the updates to various internal values that have been changed during the programs execution.
SLC4JMRIDoco-Ver11.3.docx Page 31 12/3/2014
JMRI to SLC Link Setup and Process.
When using the JMRI Auto Link with SLC or LLC, you will not be using any part of SLC on your own. The program will be
started from JMRI and will terminate upon completion. You may interact with SLC if you have the Print Preview
Preferences set to YES. This may be useful if you would like to print switch lists to a specific printer other than your
system's default printer. You will see the SLC Welcome Screen flash on your computer screen and other unusual looking
activities will take place. At this point in development, you should expect this as normal operating procedure. It is hoped
that future releases of SLC/LLC will eliminate much of this extra activity.
NOTE: YOU are NOT able to change Preferences when using the JMRI to SLC Link. You must use “Manual Mode” if you
need to change the applications Preferences.
You must adjust some settings in JMRI before the JMRI Auto Link will work properly. In the Trains window, select Tools >
Options and then set the Check Box by Generate CSV Manifest in the Options section at the bottom of the Options
screen and then click Save. NOTE: If you will be using LLC also, you will want to set the Check Box by Generate CSV
Switch List. Next select Trains > Tools > Setup Excel Program (Switch list Creator) and enter the name of the Excel file
that JMRI should execute. This would be SLC4JMRI.xls(m) or LLC4JMRI.xls(m).
Two extra Check Boxes (Open and Run) appear in the Trains window when you select "Generate CSV Manifest" in the
Options window. These two Check Boxes are mutually exclusive meaning you may select one or the other but not both.
To trigger SLC from JMRI, you must select the "RUN" Check Box. You then Build you train and once it completes
successfully you will see RUN in the Function column by the train you just built. When you click on Run, JMRI will trigger
SLC and pass it the name of the CSV file to process. Excel now pops up on your screen. Once Excel is finished creating
your switch lists, it disappears and your train’s page is back up. You may also select several trains to build and then use
the Build button on the bottom of the window. All of the Trains successfully Built will now show Run in the Function
column. Now you may click on the Run button on the bottom of the window and JMRI will trigger SLC and pass it all of
the CSV files that it should process. After clicking on the Run button, Excel pops up on your screen. Once Excel is
finished creating your switch lists, it disappears and your train’s page is back up on the screen. Note: You may need to
select Enable Macros depending on your version of Excel.
The Link between JMRI and SLC is a text file named MCFilesFile.txt. This name is to indicate that this is a "file of files",
which is exactly what it is and is found in the csvManifests Sub-directory in operations directory within JMRI. JMRI
creates (or updates) this "file of files" and adds the name(s) of the CSV manifest file(s) for SLC to process before linking
to SLC. SLC then looks for this "file of files", opens it if found, and processes all of the CSV manifest files that are
currently in this "file of files". When SLC has processed all the CSV manifest files in this "file of files", it will delete
MCFilesFile.txt. The next time a Train Build is Run, JMRI will create MCFilesFile.txt again and add the CSV manifest file(s)
that SLC should process. If everything goes as planned, JMRI creates MCFilesFile.txt and SLC deletes MCFilesFile.txt. If for
some reason SLC does not complete, MCFilesFile.txt will not be deleted. The next time that Train Build is run, JMRI will
add more CSV manifest files to the existing MCFilesFile.txt. This could easily be the same switch list as was already in
MCFilesFile.txt. This might make it appear that SLC is in a loop as it will process the same file more than once. If SLC does
not end properly, by disappearing, then something is wrong and needs to be investigated. (That is probably when you
send me a note!)
The OPEN button works in a similar fashion but will display the contents of the CSV file that was/will be sent to SLC for
processing. You could investigate records that appear to be causing SLC issues or that do not appear as you would think.

SLC4JMRIDoco-Ver11.3.docx Page 32 12/3/2014
The following paragraph is identical to that for generating a manifest manually. It refers to how you have set up your
Preferences and they have the same impact on what SLC generates whether it be generated manually or via the JMRI
link.
If you do receive a preview look at the switch list, you can print the switch list using the Print (icon) option within this
window (here you could print to any printer on your system). You may also select the Close (icon) if you do not wish to
print a hardcopy from here. Remember that you still might receive a hardcopy again based upon your Preference
settings. If you have set your Preferences so that you ask for a file to be created, SLC will create the switch list file and
save to the same directory as your input file directory. Unlike SLC in manual mode, when SLC has finished performing
the necessary actions, based upon your Preferences, it terminates. If you asked for SLC to create a switch list file and
wish to locate the switch list later, it has the same name as the CSV Input file but has an extension of .xls (Excel). This file
will remain here (same directory as your input CSV file) until your next build for this particular train. This is the very basic
operation of SLC. It is quick and easy to do and generates formatted switch list as shown in shown throughout this
document.

SLC4JMRIDoco-Ver11.3.docx Page 33 12/3/2014
Location List Creator.
Location List Creator (LLC) is a sister application with Switch List Creator (SLC). This application will create Switch Lists by
Location, thus the name Location List Creator, to differentiate it from SLC. It has all of the Preferences that are part of
SLC and looks and operates in the same or similar fashion. There are some differences that will be discussed in this
section.
The program file, LLC4JMRI.xls(m) is to be placed in your csvSwitchLists directory within the Operations directory of
JMRI. It works with the CSV files created by the Switch Lists generated by JRMI. This may sound confusing in that we deal
with SLC and LLC. SLC, including Train Orders, Train Lists, and Switch Lists (Creator names), are built from JMRI Manifest
information. LLC builds Location Lists from JRMI Switch List information. This is generated from the Trains screen just as
the Manifest information. There is a separate setting within Switch Lists (on the Trains screen) in JMRI to set up the Excel
file to use when running via the JMRI to LLC Link. This is explained as part of the SLC portion of this documentation. This
setting is found by selecting Switch Lists on the Trains screen then Tools. It is important to remember that you can build
all of your trains and then print all of your Location Lists. You build all of your trains and after doing that, in the “Switch
Lists by Location” page just hit the “Run” button on the lower left. All of the Location Lists will now be printed. For
those of us that run JMRI dynamically, that is building trains when the need is there, you will need to use the “Run
Changes” button on the bottom right of the “Switch Lists by Location” page in JMRI
SLC4JMRIDoco-Ver11.3.docx Page 34 12/3/2014
Location Lists
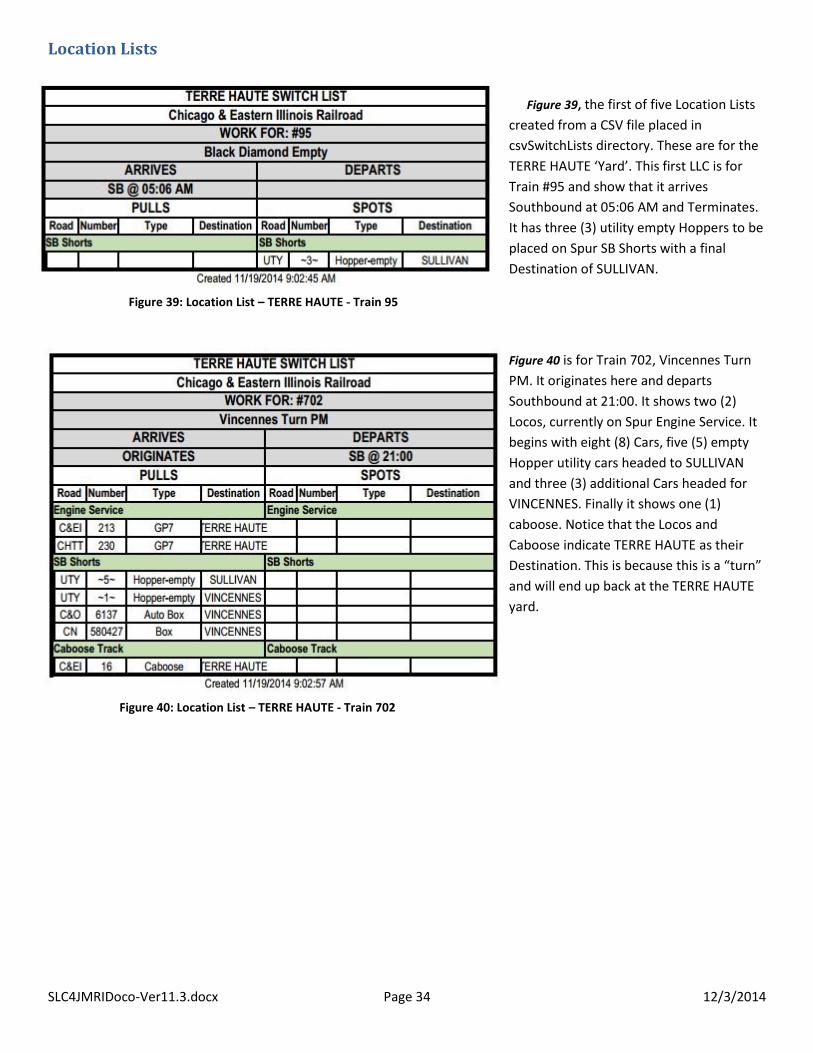
Figure 39, the first of five Location Lists
created from a CSV file placed in
csvSwitchLists directory. These are for the
TERRE HAUTE ‘Yard’. This first LLC is for
Train #95 and show that it arrives
Southbound at 05:06 AM and Terminates.
It has three (3) utility empty Hoppers to be
placed on Spur SB Shorts with a final
Destination of SULLIVAN.
Figure 39: Location List – TERRE HAUTE - Train 95
Figure 40 is for Train 702, Vincennes Turn
PM. It originates here and departs
Southbound at 21:00. It shows two (2)
Locos, currently on Spur Engine Service. It
begins with eight (8) Cars, five (5) empty
Hopper utility cars headed to SULLIVAN
and three (3) additional Cars headed for
VINCENNES. Finally it shows one (1)
caboose. Notice that the Locos and
Caboose indicate TERRE HAUTE as their
Destination. This is because this is a “turn”
and will end up back at the TERRE HAUTE
yard.
Figure 40: Location List – TERRE HAUTE - Train 702
SLC4JMRIDoco-Ver11.3.docx Page 35 12/3/2014
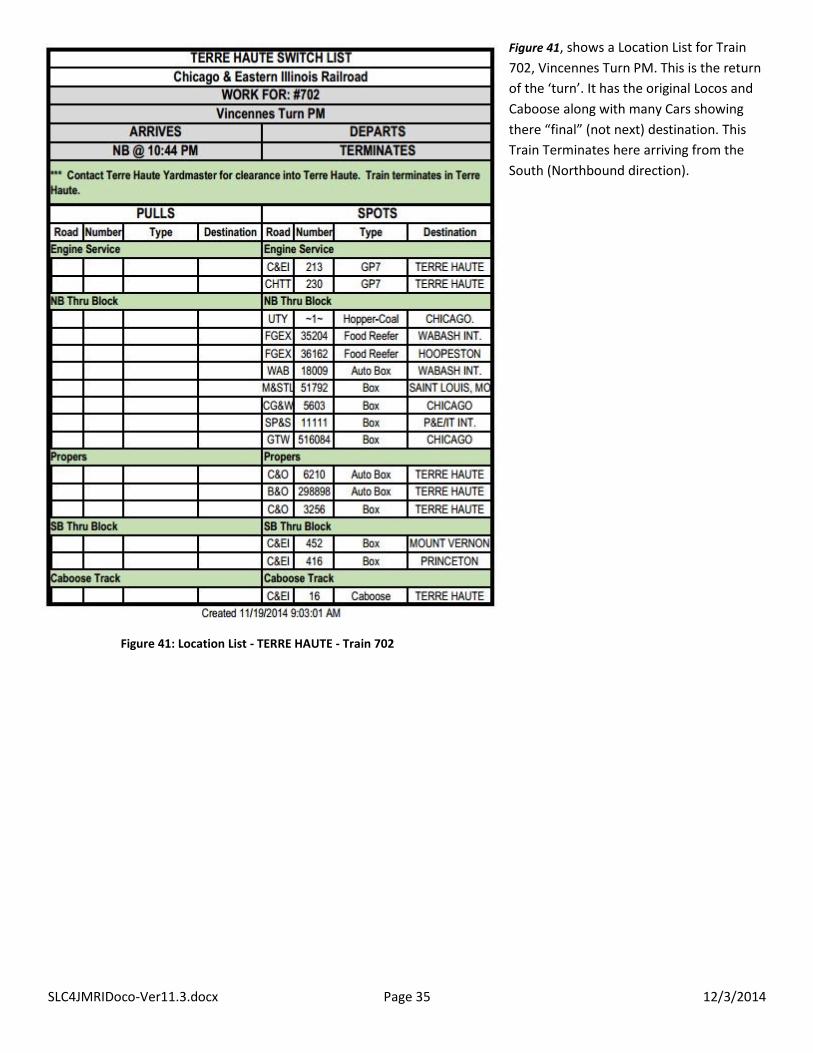
Figure 41, shows a Location List for Train
702, Vincennes Turn PM. This is the return
of the ‘turn’. It has the original Locos and
Caboose along with many Cars showing
there “final” (not next) destination. This
Train Terminates here arriving from the
South (Northbound direction).
Figure 41: Location List - TERRE HAUTE - Train 702

SLC4JMRIDoco-Ver11.3.docx Page 36 12/3/2014
Figure 42, is another LL for TERRE
HAUTE. This is for Train 54 – Terre Haute
to Chicago. This Train originates here and
travels Northbound. The list shows the
Cars that make up the Consist.
Figure 42: Location List - TERRE HAUTE - Train 54
Figure 43, the final sample, shows a LL for
Train 55 – Danville to Evansville. It is
travelling Southbound, so it arrives from
the North, picks up six (6) Cars and sets out
1 Car. NOTE: Currently JMRI does NOT
provide the necessary information to
provide the Departing information. This
may be posed to Dan B.
Figure 43: Location List - TERRE HAUTE - Train 55
The MASTER
LLC has its own MASTER file that may be used for modifying the “as is” format to most anything you would like. This
functions identically as do the MASTERs for SLC described above. This file, MASTER-LL.xls must be placed within the
csvSwitchLists Directory of Operations in JMRI.

SLC4JMRIDoco-Ver11.3.docx Page 37 12/3/2014
In Closing
This completes the documentation for SLC and LLC. Please excuse any typos and other imperfections in the document. I
would like to thank Inspector Dave (David Waraxa) for his tireless work not only in testing and suggesting but in urging
me to take on the project from the get go. We have formed a “pen pal” friendship that continues. I would also like to
thanks Joseph Mattick for his testing and suggestions as of late. These two folks have been instrumental in helping me
with the creation of these applications. If you have comments, questions, or suggestions, please feel free to send them
to either Dave or me ([email protected]). With this being the initial release, we are somewhat prepared for
additional ideas to flow our way. ABOVE ALL, if you find that you like this format for your Operations PLEASE ENJOY it.
That is the best payment we could ever receive.
Dan Foltz
SLC4JMRIDoco-Ver11.3.docx Page 38 12/3/2014
Appendix A: History
The creation of Manifest Creator (MC) came about via a very circuitous route. It all began when I was asked to an
Operating Session at Bill Zastro's layout in Clare, Michigan. I was very new to operations in general but knew that I
wanted to hold Operating Sessions in my then-under-construction layout. Bill used clipboards and hand drawn
manifests. The orders on these manifests were also generated by hand and entered into the photocopied manifests.
Being rather handy in the use of Microsoft Excel for generating forms, I felt that I could improve the hand designed
manifest that Bill was using. I wanted to do this as a thank-you for attending the operating session. I was able to do this
and the first version of MC was born. However, this was just a computer generated version of what Bill had done with
paper and pencil. The orders on these manifests still were done by hand, not only the entering of the data but figuring
what cars went where.
About this time I stumbled into JMRI Operations. I had been looking at Ship-It but the initial learning curve seemed very
steep, the software seemed pricey, and I just wasn't sure if it would do what I wanted. After looking at JMRI Operations,
I found that to begin with very rudimentary operations, the learning curve was almost non-existent. At the same time I
felt that at the rudimentary level, these computer generated orders would be an improvement to doing them by hand.
So I thought I would share this information with Bill as well.
I soon found that the original manifest that I had created using Excel would not function with the data generated by
JMRI. So in the beginning, I reformatted the original Excel manifest and attempted to use the text output that was used
to print the manifests in JMRI. Soon I began having discussions with Dan Boudreau and we decided that things would be
much easier for MC if Dan were to output a CSV formatted file.
This was the beginning of what we have now. Having a CSV formatted file made the parsing process in Excel VBA that
was required much easier than just reading the raw text file. So having started with Excel, it just seemed natural that I
would use Visual Basic for Applications (VBA) within Excel, since I was only doing this for my friend Bill. There were
several conversations on what items would be appropriate in the CSV file and Dan Boudreau finally came up with what
we all have now. (See JMRI Operations documentation for details.) After a bit of work, I thought that this format and
parsing of the CSV file might be of interest to others using JMRI. At this point I was unaware that so many JMRI users
were non-PC/Windows users, but since have found there are many that are not running on this platform. But the die
had been cast.
My initial release was announced via the JMRI User Group and I found that there were some users that were interested
in what Manifest Creator could do for them. The program has grown over the past years, mainly based upon user input
which has been invaluable. Thank you to all that have contributed ideas. And a big THANK YOU to Dan Boudreau for all
that he has done to make the MC workable. I also need to take time to recognize "Inspector Dave" as he was
instrumental in establishing the link between JMRI and MC. There have been many, many others that have contributed
great ideas and I thank you all!
NOTE: It is interesting that the original Excel formatted manifest was never used for an actual operating session by Bill,
and since then Bill has retired from the hobby. But I still thank him as he was the catalyst to the creation of the Manifest
Creator. Thank you Bill Zastro!
SLC4JMRIDoco-Ver11.3.docx Page 39 12/3/2014
Appendix B: Revision History
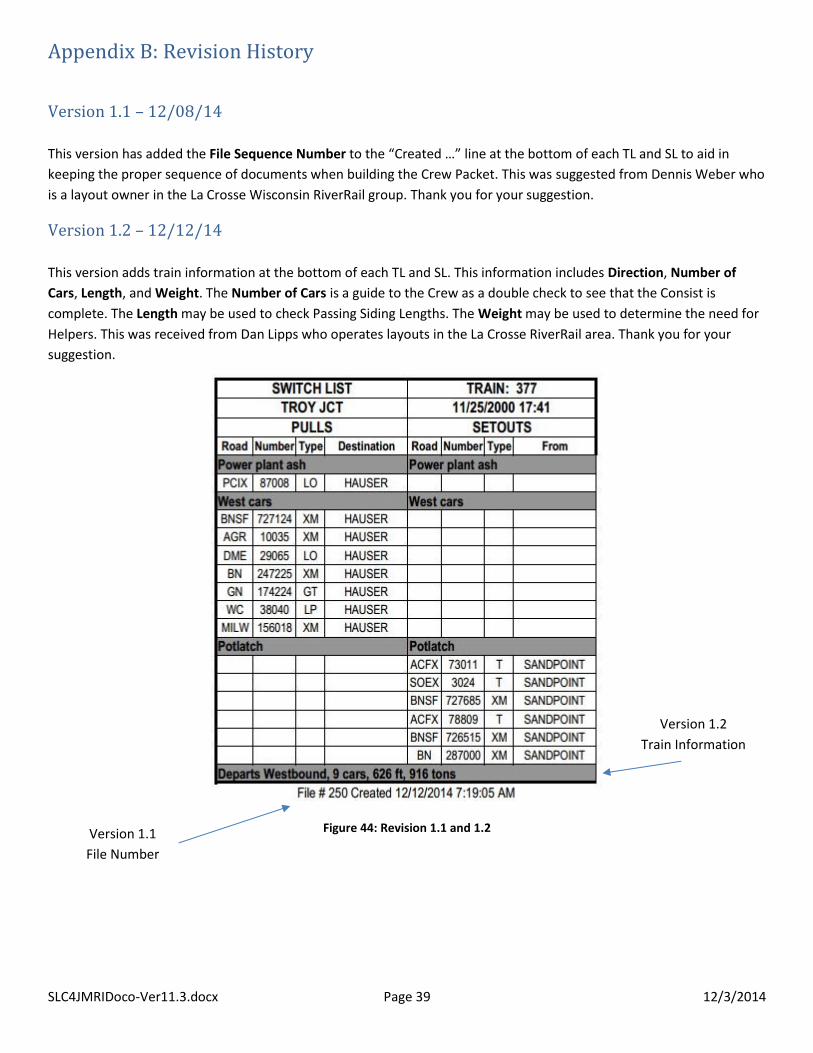
Version 1.1 – 12/08/14
This version has added the File Sequence Number to the “Created …” line at the bottom of each TL and SL to aid in
keeping the proper sequence of documents when building the Crew Packet. This was suggested from Dennis Weber who
is a layout owner in the La Crosse Wisconsin RiverRail group. Thank you for your suggestion.
Version 1.2 – 12/12/14
This version adds train information at the bottom of each TL and SL. This information includes Direction, Number of
Cars, Length, and Weight. The Number of Cars is a guide to the Crew as a double check to see that the Consist is
complete. The Length may be used to check Passing Siding Lengths. The Weight may be used to determine the need for
Helpers. This was received from Dan Lipps who operates layouts in the La Crosse RiverRail area. Thank you for your
suggestion.
Figure 44: Revision 1.1 and 1.2
Version 1.1
File Number
Version 1.2
Train Information

SLC4JMRIDoco-Ver11.3.docx Page 40 12/3/2014
Version 1.3 – 12/20/14
This version cleans up some issues reported by Users and improves some pre-processing error checking. It changes the
way the File Path is determined and checks for the existence of MASTER Files when the App first begins. Appropriate
Error Message have been added as well. This also fixes an issue with the Right Side Border on Switch Lists (SLs). And
finally fixed an issue with the Saved and Printed File Name. Several of these issues where pointed out by Dan Boudeau.
Thank you Dan.


![JMRI Operations x2011 West.ppt [Read-Only] - JMRI: A Java ...jmri.sourceforge.net/community/clinics/NMRA2011/JMRI-Operation… · JMRI Operations X2011 West So what is JMRI? JMRI](https://static.documents.pub/doc/80x56/5eab367bf9bbbf42690f38fb/jmri-operations-x2011-westppt-read-only-jmri-a-java-jmri-jmri-operations.jpg)

![Intro to Catalogue Creator...Creator Switch Pro]ect product Catalogues Enterprise / Manufacturer Tools Prod u Cts Undo Redo < No Name > [ ] Data Import Utilities Publish Price](https://static.documents.pub/doc/80x56/5ecd3a55e758c102e87a91cc/intro-to-catalogue-creator-creator-switch-proect-product-catalogues-enterprise.jpg)


