100
A Dell Technical White Paper Setting Up the Dell ™ DR Series System on Symantec ™ Backup Exec ™ Dell Engineering July 2015
| Date post: | 10-May-2018 |
| Category: |
Documents |
| Upload: | truongmien |
| View: | 235 times |
| Download: | 0 times |
A Dell Technical White Paper
Setting Up the Dell™ DR Series System on Symantec™ Backup Exec™ Dell Engineering July 2015
2 Setting Up the Dell™ DR Series System on Symantec™ Backup Exec™ | April 2015
Revisions
Date Description
January 2014 Initial release
August 2014 Added screenshots where new functionality is introduced in 2014
April 2015 Added screenshots for updates to DR Series system functionality for v3.2
July 2015 Consolidated content for various container types and updated cleaner recommendation
THIS WHITE PAPER IS FOR INFORMATIONAL PURPOSES ONLY, AND MAY CONTAIN TYPOGRAPHICAL ERRORS AND TECHNICAL INACCURACIES. THE CONTENT IS PROVIDED AS IS, WITHOUT EXPRESS OR IMPLIED WARRANTIES OF
ANY KIND.
© 2015 Dell Inc. All rights reserved. Reproduction of this material in any manner whatsoever without the express written permission of Dell Inc. is strictly forbidden. For more information, contact Dell.
PRODUCT WARRANTIES APPLICABLE TO THE DELL PRODUCTS DESCRIBED IN THIS DOCUMENT MAY BE FOUND
AT: http://www.dell.com/learn/us/en/19/terms-of-sale-commercial-and-public-sector Performance of network reference architectures discussed in this document may vary with differing deployment conditions, network loads, and
the like. Third party products may be included in reference architectures for the convenience of the reader. Inclusion of such third party products does not necessarily constitute Dell’s recommendation of those products. Please consult
your Dell representative for additional information.
Trademarks used in this text: Dell™, the Dell logo, and PowerVault™ are trademarks of Dell Inc. Other Dell trademarks may be used in this
document. Microsoft®, Windows®, Windows Server®, Internet Explorer®, MS-DOS®, Windows Vista® and Active Directory® are either trademarks or registered trademarks of Microsoft Corporation in the United States and/or other countries. Symantec™ and Backup Exec™ are trademarks owned by Symantec Corporation or its affiliates in the U.S.
and other countries. Other trademarks and trade names may be used in this document to refer to either the entities claiming the marks and/or names or their products and are the property of their respective owners. Dell disclaims
proprietary interest in the marks and names of others.
3 Setting Up the Dell™ DR Series System on Symantec™ Backup Exec™ | April 2015
Table of contents Executive summary ................................................................................................................................................................................... 5
1 Installing and configuring the DR Series system ....................................................................................................................... 6
2 Configuring the DR Series system as a backup to disk target on Symantec Backup Exec .......................................... 10
2.1 Creating a CIFS Container for use with Symantec Backup Exec 2012, 2014, and 2015 .................................... 10
2.2 Adding the DR Series system container share as a disk storage device on Backup Exec 2012/2014/2015 . 13
2.3 Creating a new backup job with the DR Series system as a target ..........................................................................17
2.4 Setting up DR Series system replication and restore from the replication target ............................................... 25
2.4.1 Creating the replication session ....................................................................................................................................... 25
2.4.2 Restoring from the replication target .............................................................................................................................. 28
3 Configuring VTL ............................................................................................................................................................................... 31
3.1 Creating a VTL container .................................................................................................................................................... 31
3.2 Setting the iSCSI target CHAP credentials ..................................................................................................................... 33
3.3 Configuring the iSCSI target – Windows ........................................................................................................................ 34
3.4 Configuring the iSCSI target – Linux ............................................................................................................................... 38
3.5 Adding additional media to the VTL container ............................................................................................................. 39
3.6 Configuring the DR Series system VTL in Backup Exec ............................................................................................. 41
3.7 Performing backup and restore using DR VTL.............................................................................................................. 46
3.8 Restoring from tape ............................................................................................................................................................. 58
4 Configuring an OST container on the DR Series system for use with Symantec Backup Exec Server 2014/2015 65
4.1 Creating an OST container................................................................................................................................................. 65
4.2 Installing the OST plugin ..................................................................................................................................................... 67
4.3 Configuring the OST device in Backup Exec................................................................................................................. 70
4.4 Performing backup and restore using the DR Series system OST device ............................................................. 76
4.6 Restoring data ........................................................................................................................................................................ 86
5 Setting up the DR Series system cleaner ................................................................................................................................... 93
6 Monitoring deduplication, compression, and performance ................................................................................................ 94
A Setting data expiration for Backup Exec 2012/2014/2015 .................................................................................................... 95
B Installing Backup Exec Agent on Linux client (RALUS) ........................................................................................................... 96
C VTL configuration guidelines ........................................................................................................................................................ 97
C.1 Installing latest Backup Exec service packs for the DR Series system iSCSI VTL capability .............................. 97
C.2 Managing VTL media and space use................................................................................................................................ 97
4 Setting Up the Dell™ DR Series System on Symantec™ Backup Exec™ | April 2015
C.2.1 General performance guidelines for DMA configuration ........................................................................................... 97
C.2.2 Physical DR space sizing and planning ........................................................................................................................... 97
C.2.3 Logical VTL geometry and media sizing ......................................................................................................................... 98
C.2.4 Media retention and grouping ........................................................................................................................................... 99
C.2.5 VTL media count guidelines ............................................................................................................................................... 99
C.2.6 Space reclamation guidelines ..........................................................................................................................................100
5 Setting Up the Dell™ DR Series System on Symantec™ Backup Exec™ | April 2015
Executive summary
This document provides information about how to set up the Dell DR Series system for Symantec Backup Exec, including:
• Configuring the DR Series system as a backup to disk target for Symantec Backup Exec 2012, 2014,
and 2015
• Configure a virtual tape library (VTL) of the DR Series System into Backup Exec Server 2014/2015
• Configuring an OST container on the DR Series system for use with Symantec Backup Exec Server
2014/2015
For additional information, see the DR Series system documentation and other data management application best practices whitepapers for your specific DR Series system at:
http://www.dell.com/powervaultmanuals
Note: The DR Series system/Symantec Backup Exec build version and screenshots used for this paper may vary slightly, depending on the version of the DR Series system/Symantec Backup Exec software version you are using.
6 Setting Up the Dell™ DR Series System on Symantec™ Backup Exec™ | April 2015
1 Installing and configuring the DR Series system
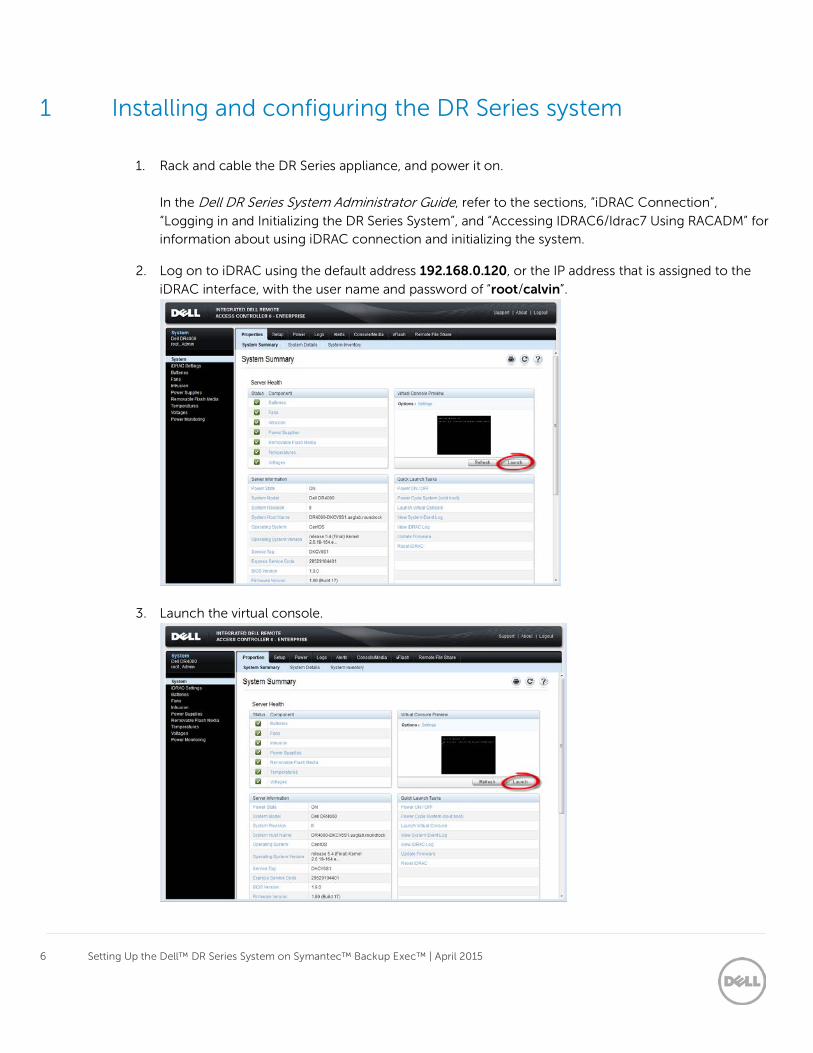
1. Rack and cable the DR Series appliance, and power it on.
In the Dell DR Series System Administrator Guide, refer to the sections, “iDRAC Connection”,
“Logging in and Initializing the DR Series System”, and “Accessing IDRAC6/Idrac7 Using RACADM” for information about using iDRAC connection and initializing the system.
2. Log on to iDRAC using the default address 192.168.0.120, or the IP address that is assigned to the
iDRAC interface, with the user name and password of “root/calvin”.
3. Launch the virtual console.
7 Setting Up the Dell™ DR Series System on Symantec™ Backup Exec™ | April 2015
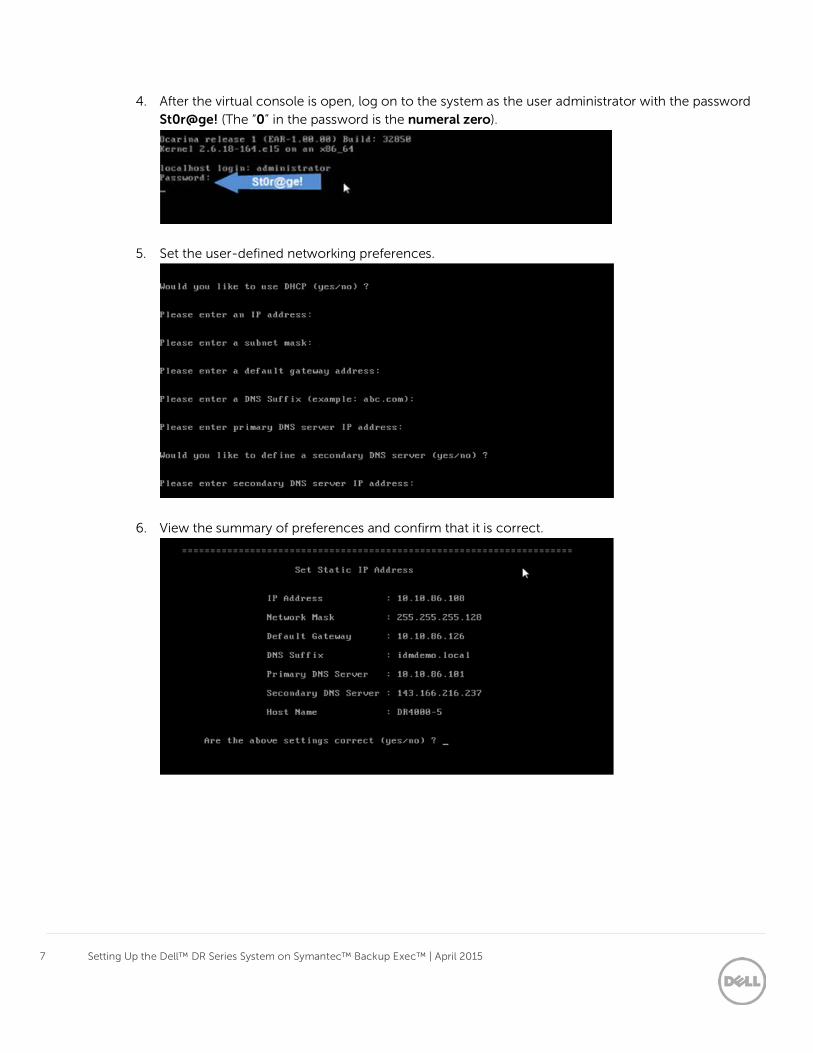
4. After the virtual console is open, log on to the system as the user administrator with the password St0r@ge! (The “0” in the password is the numeral zero).
5. Set the user-defined networking preferences.
6. View the summary of preferences and confirm that it is correct.
8 Setting Up the Dell™ DR Series System on Symantec™ Backup Exec™ | April 2015
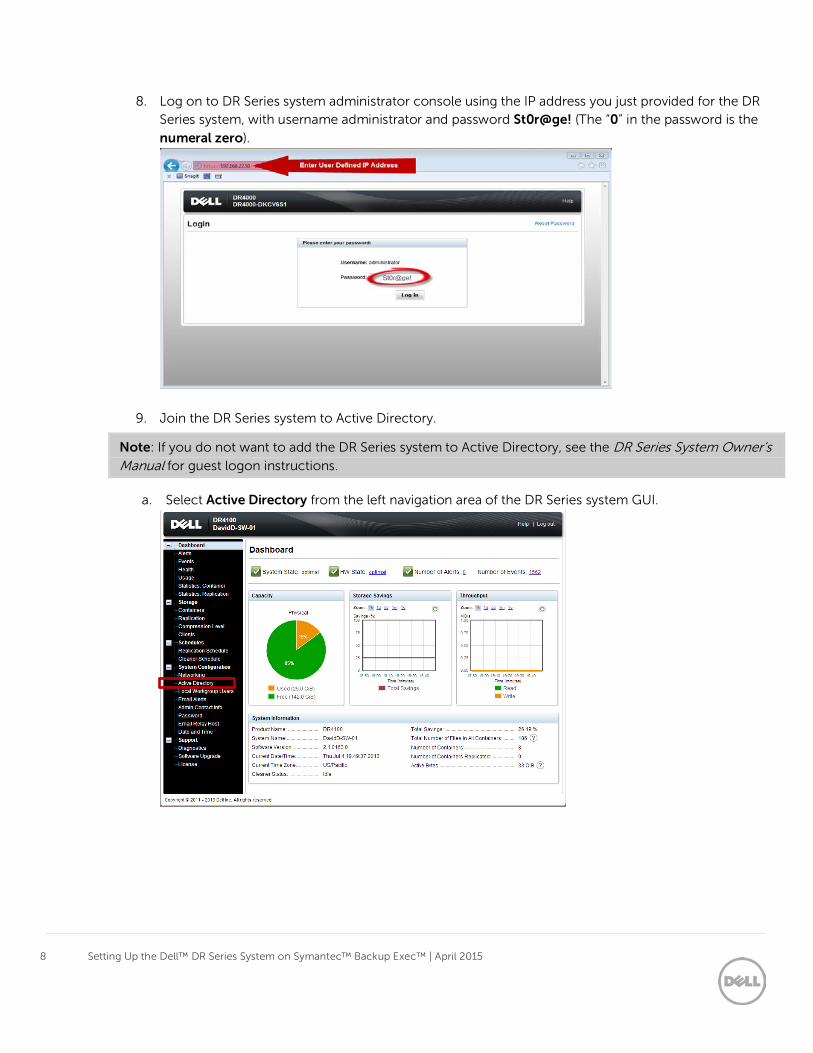
8. Log on to DR Series system administrator console using the IP address you just provided for the DR Series system, with username administrator and password St0r@ge! (The “0” in the password is the
numeral zero).
9. Join the DR Series system to Active Directory.
Note: If you do not want to add the DR Series system to Active Directory, see the DR Series System Owner’s Manual for guest logon instructions.
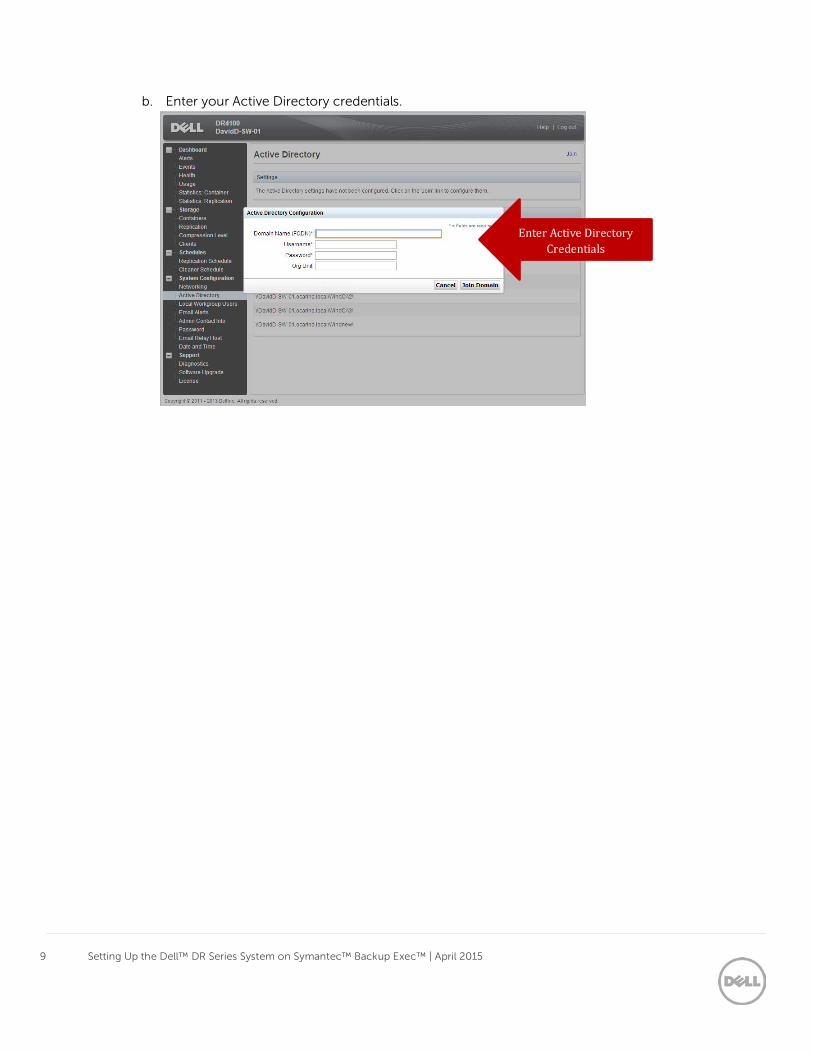
a. Select Active Directory from the left navigation area of the DR Series system GUI.
9 Setting Up the Dell™ DR Series System on Symantec™ Backup Exec™ | April 2015
b. Enter your Active Directory credentials.
Enter Active Directory Credentials
10 Setting Up the Dell™ DR Series System on Symantec™ Backup Exec™ | April 2015
2 Configuring the DR Series system as a backup to disk target
on Symantec Backup Exec
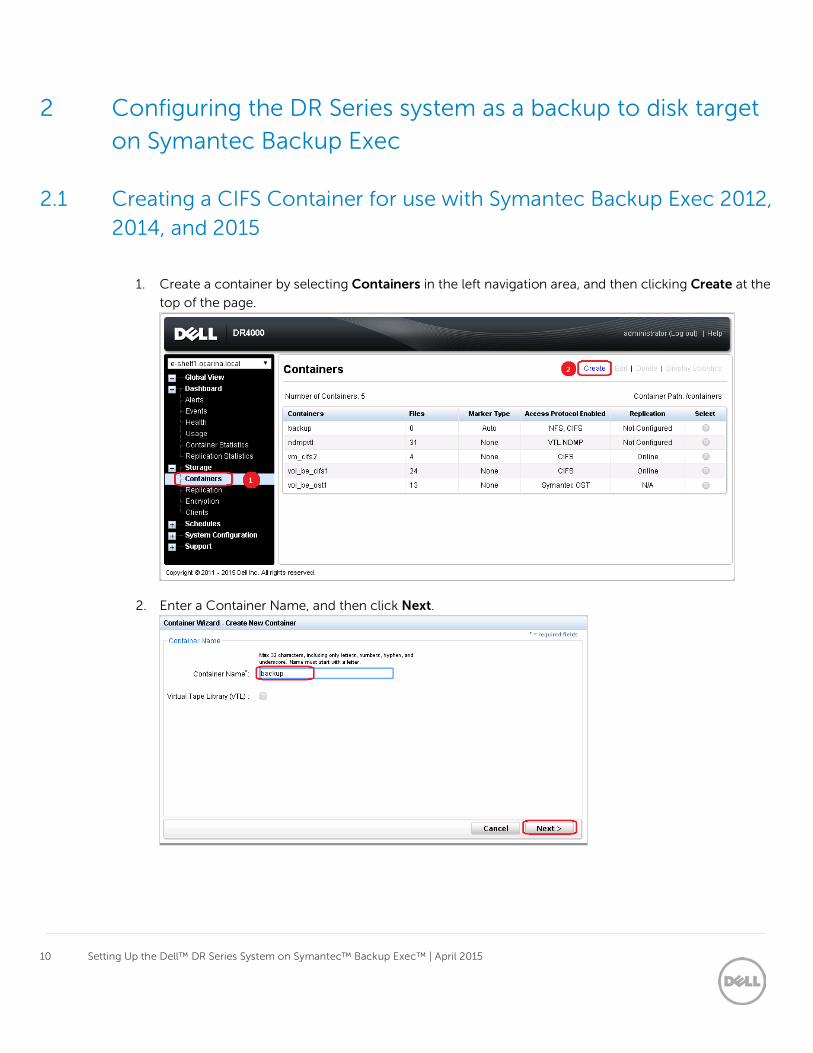
2.1 Creating a CIFS Container for use with Symantec Backup Exec 2012, 2014, and 2015
1. Create a container by selecting Containers in the left navigation area, and then clicking Create at the
top of the page.
2. Enter a Container Name, and then click Next.
11 Setting Up the Dell™ DR Series System on Symantec™ Backup Exec™ | April 2015
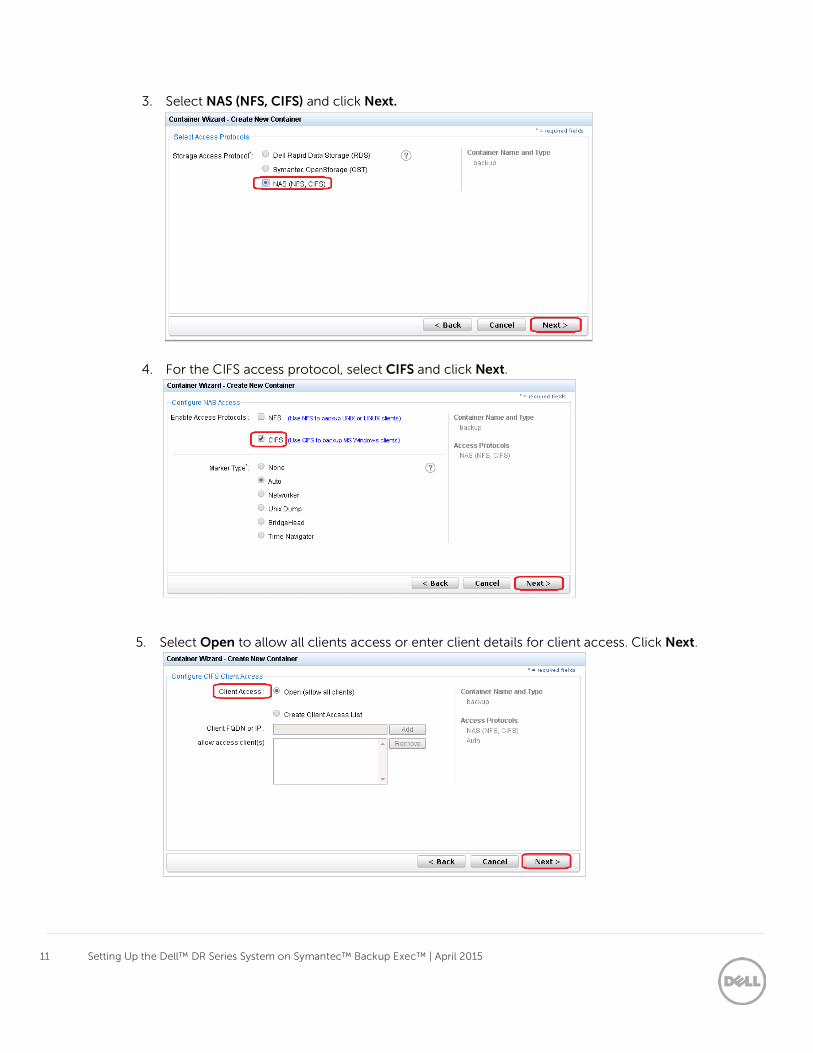
3. Select NAS (NFS, CIFS) and click Next.
4. For the CIFS access protocol, select CIFS and click Next.
5. Select Open to allow all clients access or enter client details for client access. Click Next.
12 Setting Up the Dell™ DR Series System on Symantec™ Backup Exec™ | April 2015
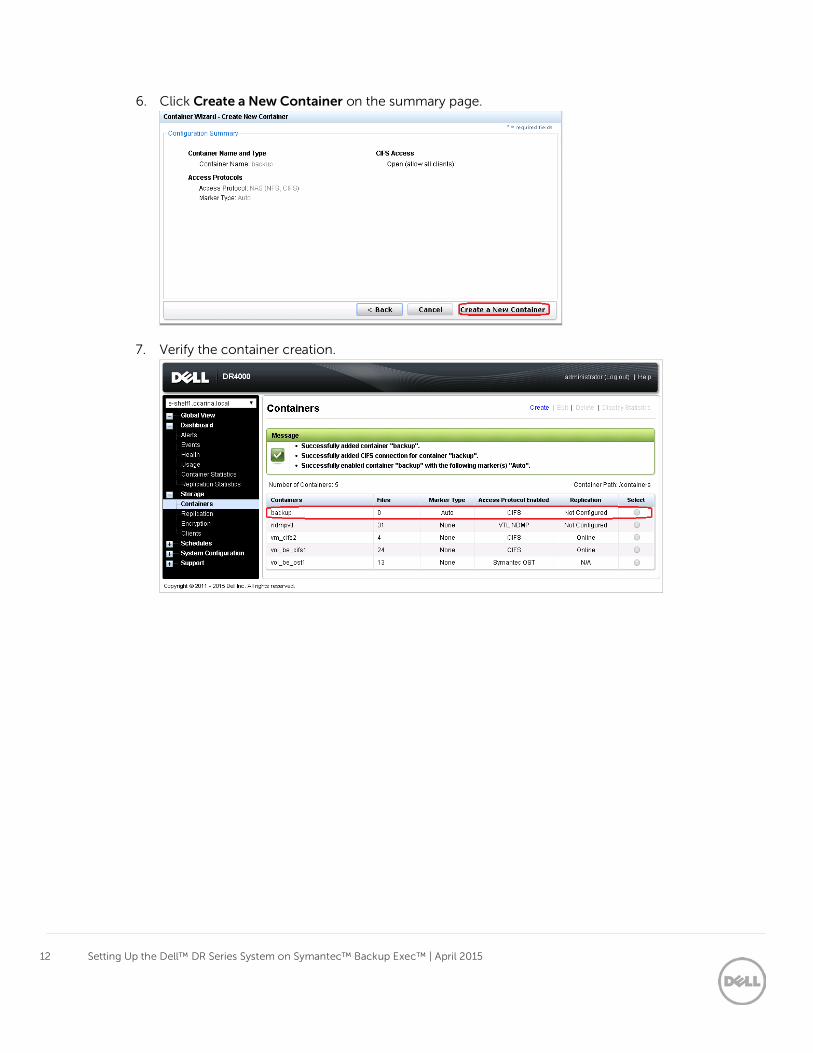
6. Click Create a New Container on the summary page.
7. Verify the container creation.
13 Setting Up the Dell™ DR Series System on Symantec™ Backup Exec™ | April 2015
2.2 Adding the DR Series system container share as a disk storage
device on Backup Exec 2012/2014/2015
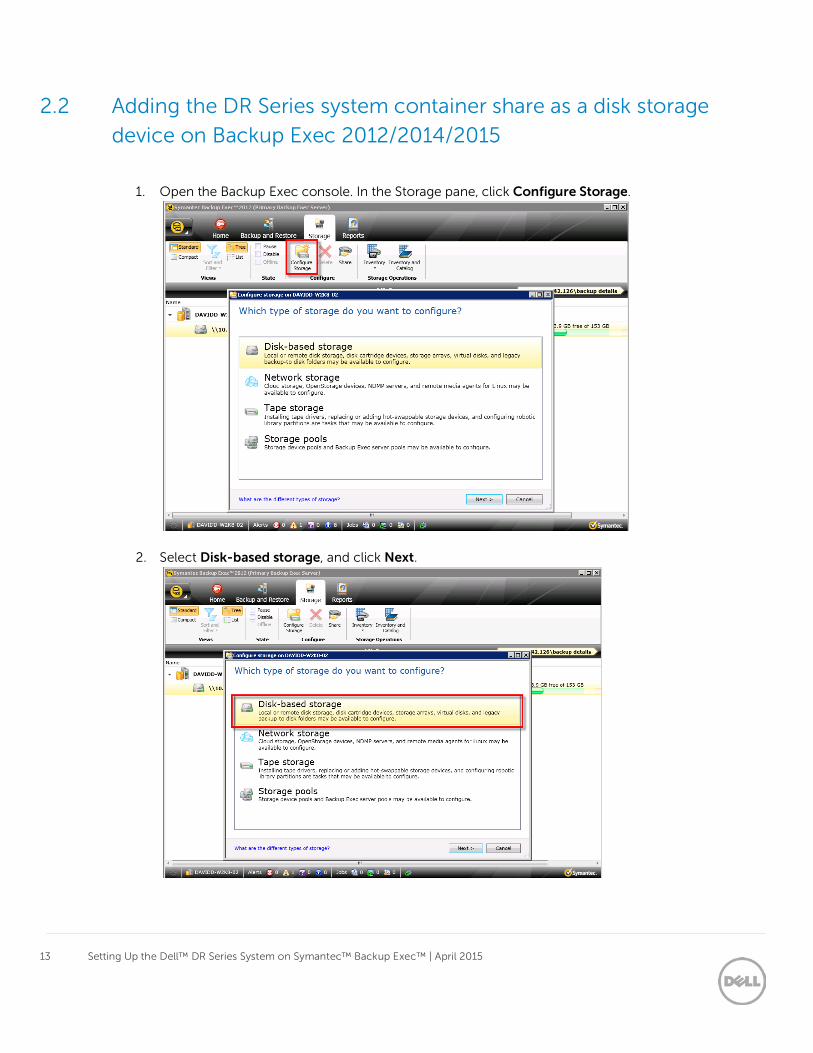
1. Open the Backup Exec console. In the Storage pane, click Configure Storage.
2. Select Disk-based storage, and click Next.
14 Setting Up the Dell™ DR Series System on Symantec™ Backup Exec™ | April 2015
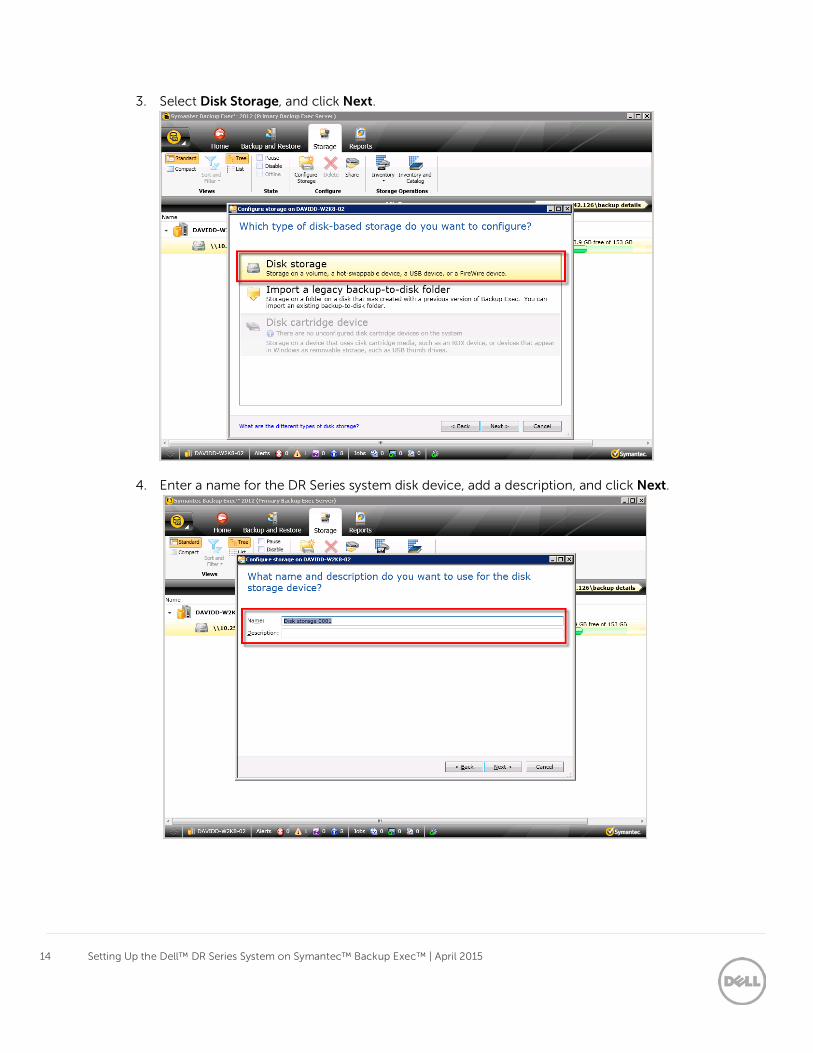
3. Select Disk Storage, and click Next.
4. Enter a name for the DR Series system disk device, add a description, and click Next.
15 Setting Up the Dell™ DR Series System on Symantec™ Backup Exec™ | April 2015
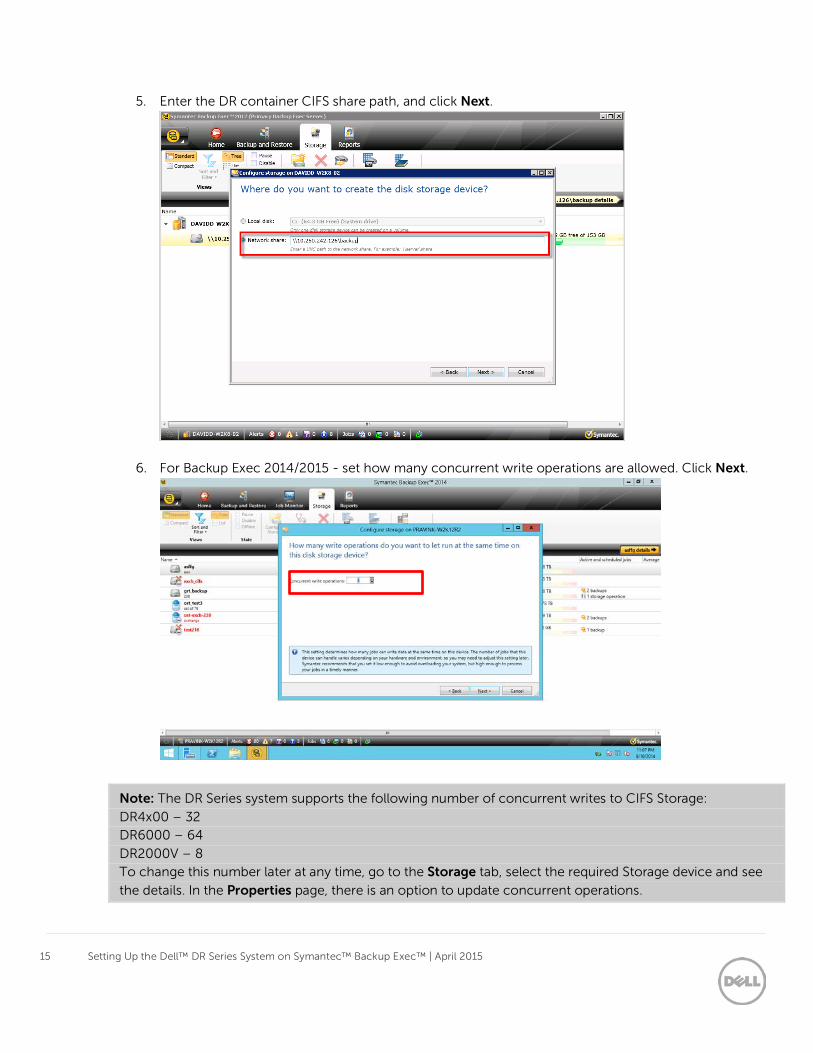
5. Enter the DR container CIFS share path, and click Next.
6. For Backup Exec 2014/2015 - set how many concurrent write operations are allowed. Click Next.
Note: The DR Series system supports the following number of concurrent writes to CIFS Storage:
DR4x00 – 32 DR6000 – 64
DR2000V – 8 To change this number later at any time, go to the Storage tab, select the required Storage device and see
the details. In the Properties page, there is an option to update concurrent operations.
16 Setting Up the Dell™ DR Series System on Symantec™ Backup Exec™ | April 2015
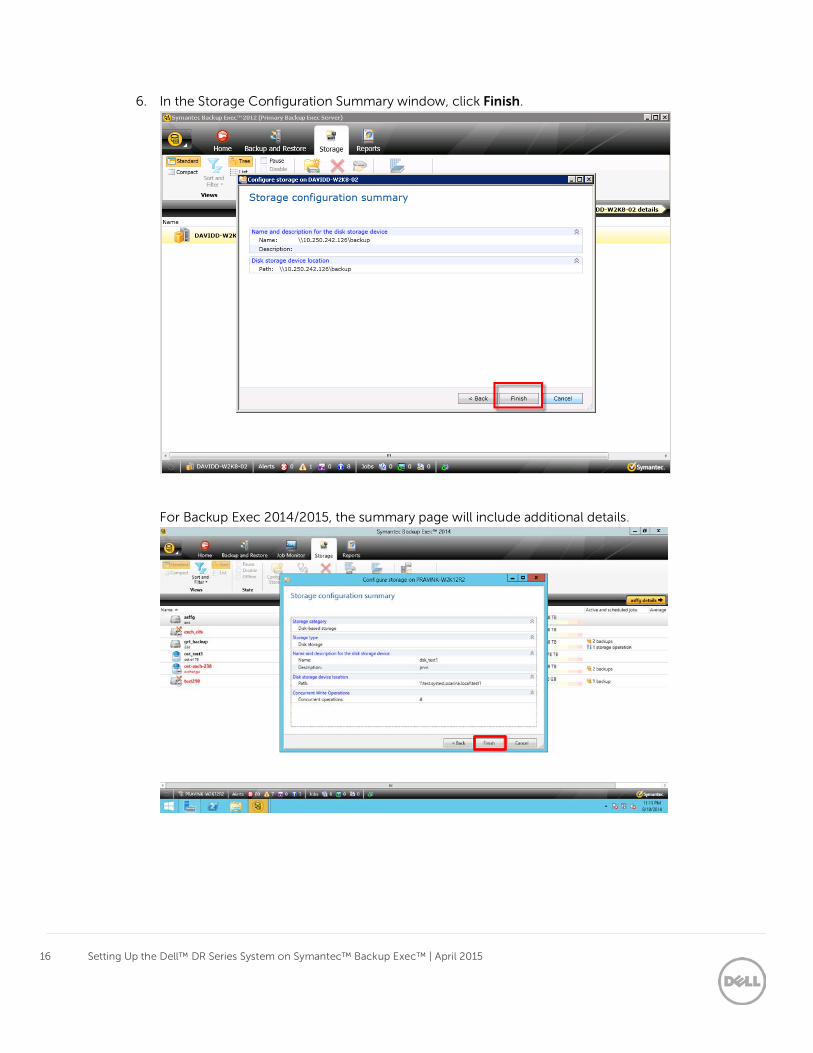
6. In the Storage Configuration Summary window, click Finish.
For Backup Exec 2014/2015, the summary page will include additional details.
17 Setting Up the Dell™ DR Series System on Symantec™ Backup Exec™ | April 2015
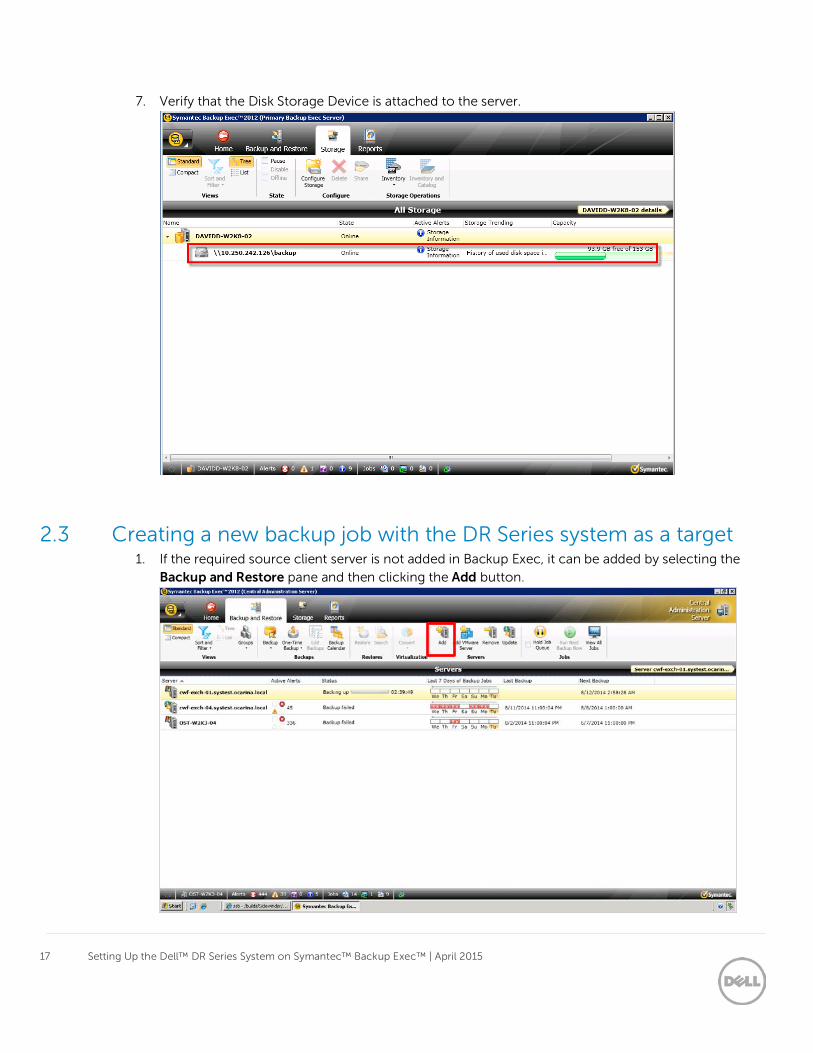
7. Verify that the Disk Storage Device is attached to the server.
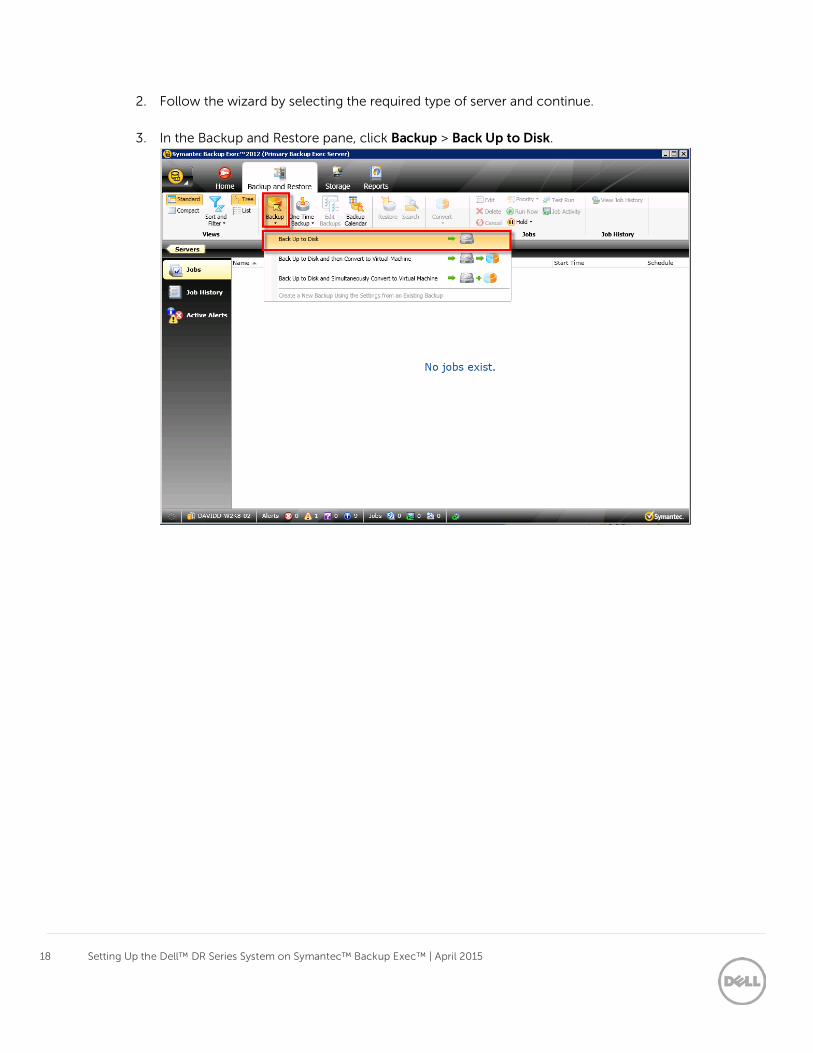
2.3 Creating a new backup job with the DR Series system as a target 1. If the required source client server is not added in Backup Exec, it can be added by selecting the
Backup and Restore pane and then clicking the Add button.
18 Setting Up the Dell™ DR Series System on Symantec™ Backup Exec™ | April 2015
2. Follow the wizard by selecting the required type of server and continue.
3. In the Backup and Restore pane, click Backup > Back Up to Disk.
19 Setting Up the Dell™ DR Series System on Symantec™ Backup Exec™ | April 2015
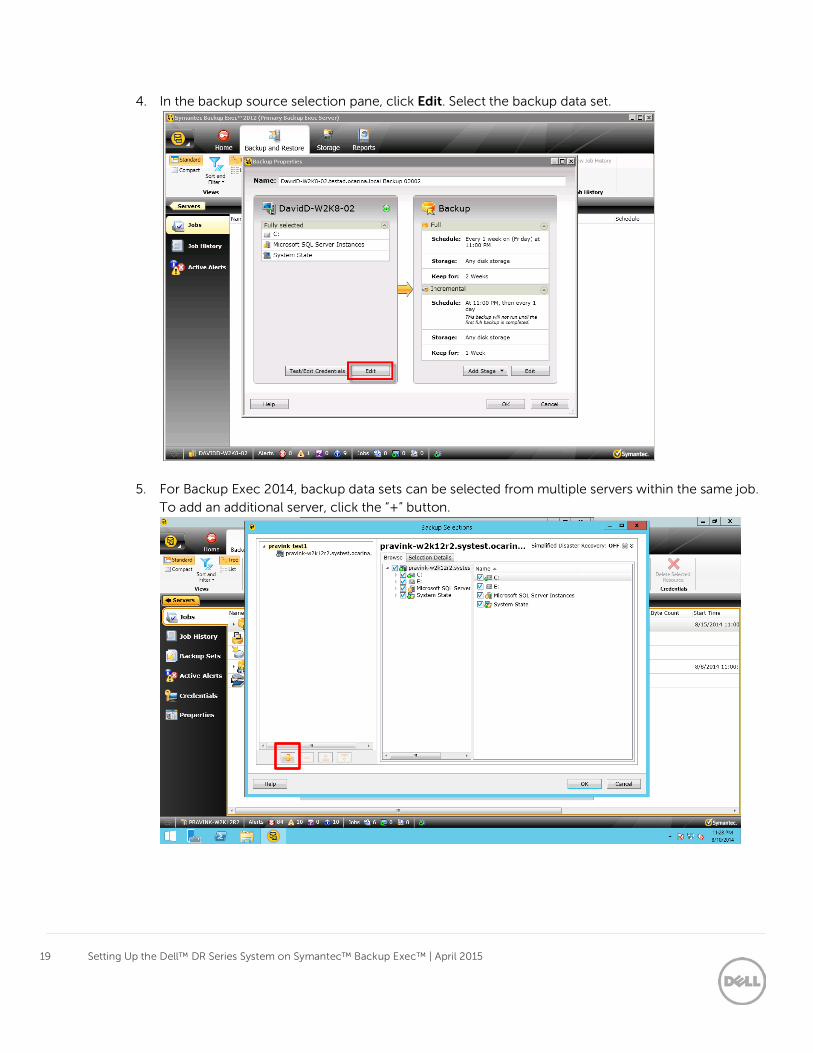
4. In the backup source selection pane, click Edit. Select the backup data set.
5. For Backup Exec 2014, backup data sets can be selected from multiple servers within the same job. To add an additional server, click the “+” button.
20 Setting Up the Dell™ DR Series System on Symantec™ Backup Exec™ | April 2015
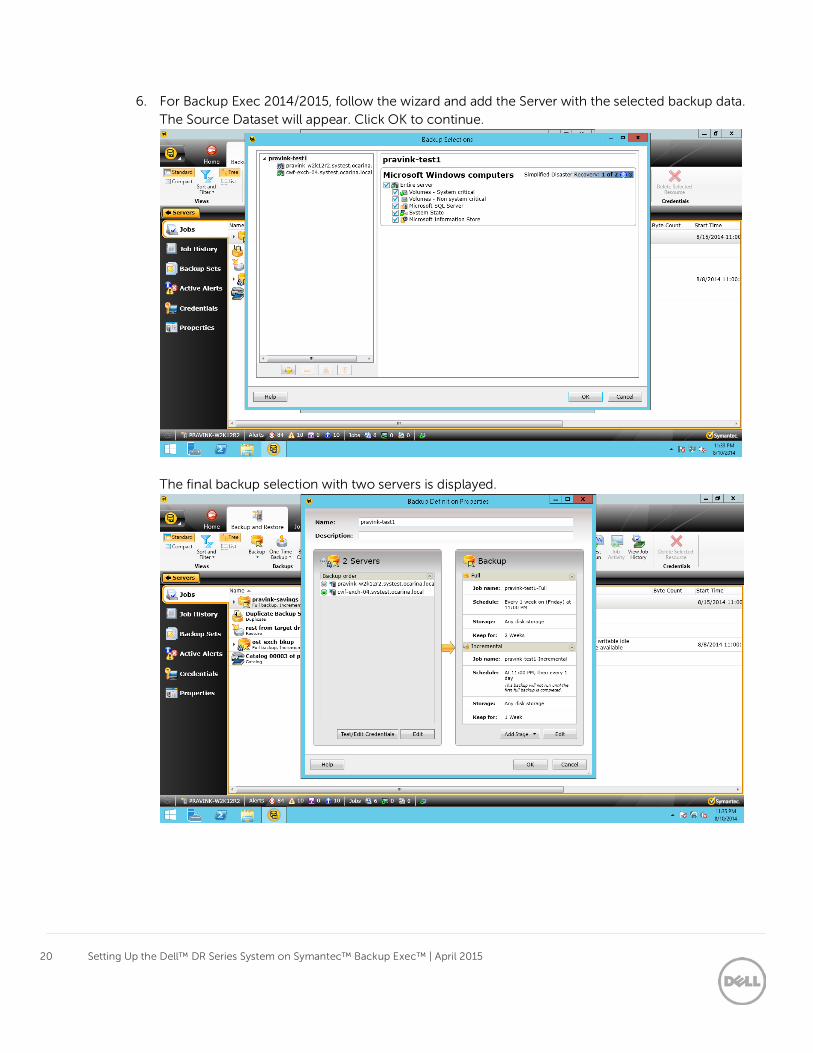
6. For Backup Exec 2014/2015, follow the wizard and add the Server with the selected backup data. The Source Dataset will appear. Click OK to continue.
The final backup selection with two servers is displayed.

21 Setting Up the Dell™ DR Series System on Symantec™ Backup Exec™ | April 2015
7. In the backup target selection pane, click Edit to define the backup strategy.
8. Click Schedule. Define the backup mode and select schedule options.
For Backup Exec 2014/2015 the screen includes additional information.
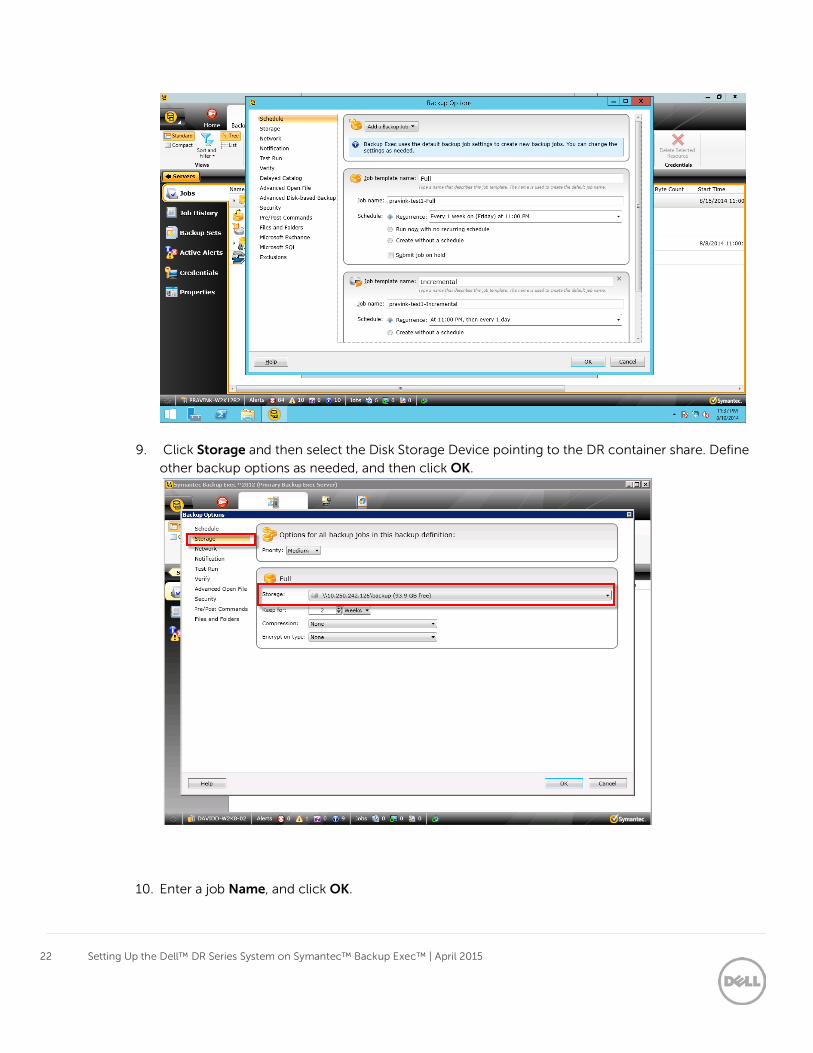
22 Setting Up the Dell™ DR Series System on Symantec™ Backup Exec™ | April 2015
9. Click Storage and then select the Disk Storage Device pointing to the DR container share. Define other backup options as needed, and then click OK.
10. Enter a job Name, and click OK.
23 Setting Up the Dell™ DR Series System on Symantec™ Backup Exec™ | April 2015
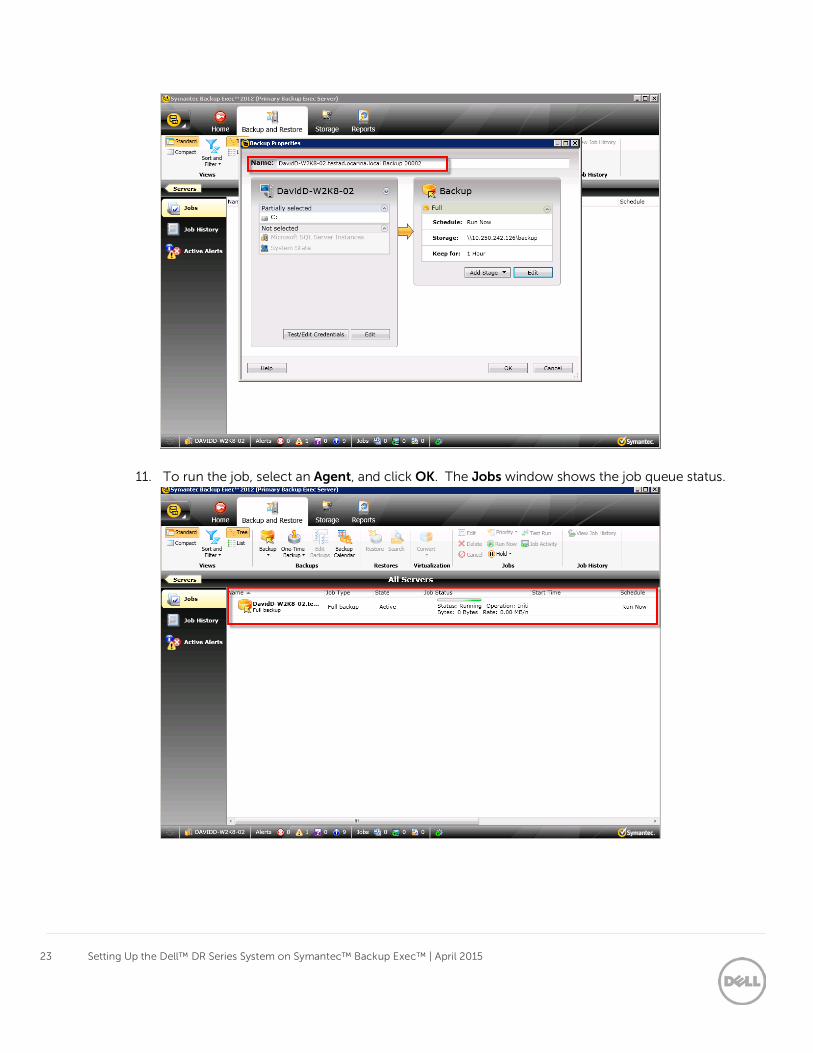
11. To run the job, select an Agent, and click OK. The Jobs window shows the job queue status.
24 Setting Up the Dell™ DR Series System on Symantec™ Backup Exec™ | April 2015
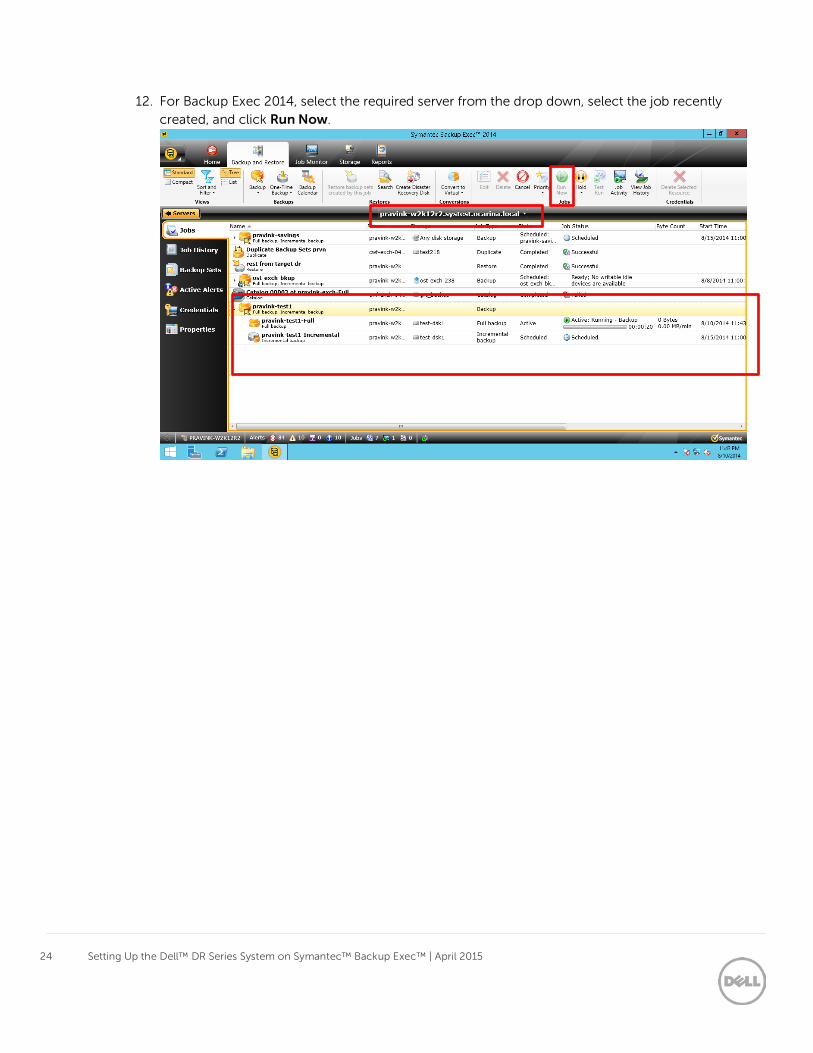
12. For Backup Exec 2014, select the required server from the drop down, select the job recently created, and click Run Now.
25 Setting Up the Dell™ DR Series System on Symantec™ Backup Exec™ | April 2015
2.4 Setting up DR Series system replication and restore from the
replication target
Note: For the steps in this procedure, assume DR1 is the replication source DR Series system, and DR2 is the replication target DR system. ‘source’ is the replication source container, and ‘target’ is the replication target
container.
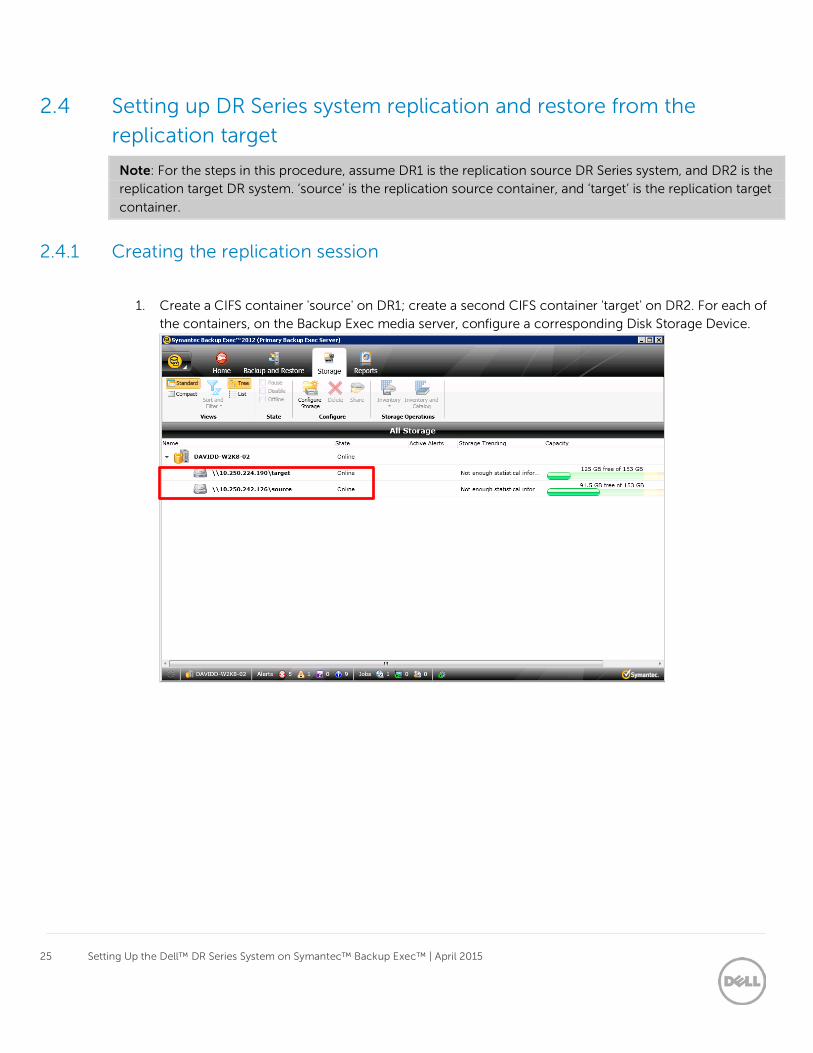
2.4.1 Creating the replication session
1. Create a CIFS container 'source' on DR1; create a second CIFS container 'target' on DR2. For each of the containers, on the Backup Exec media server, configure a corresponding Disk Storage Device.
26 Setting Up the Dell™ DR Series System on Symantec™ Backup Exec™ | April 2015
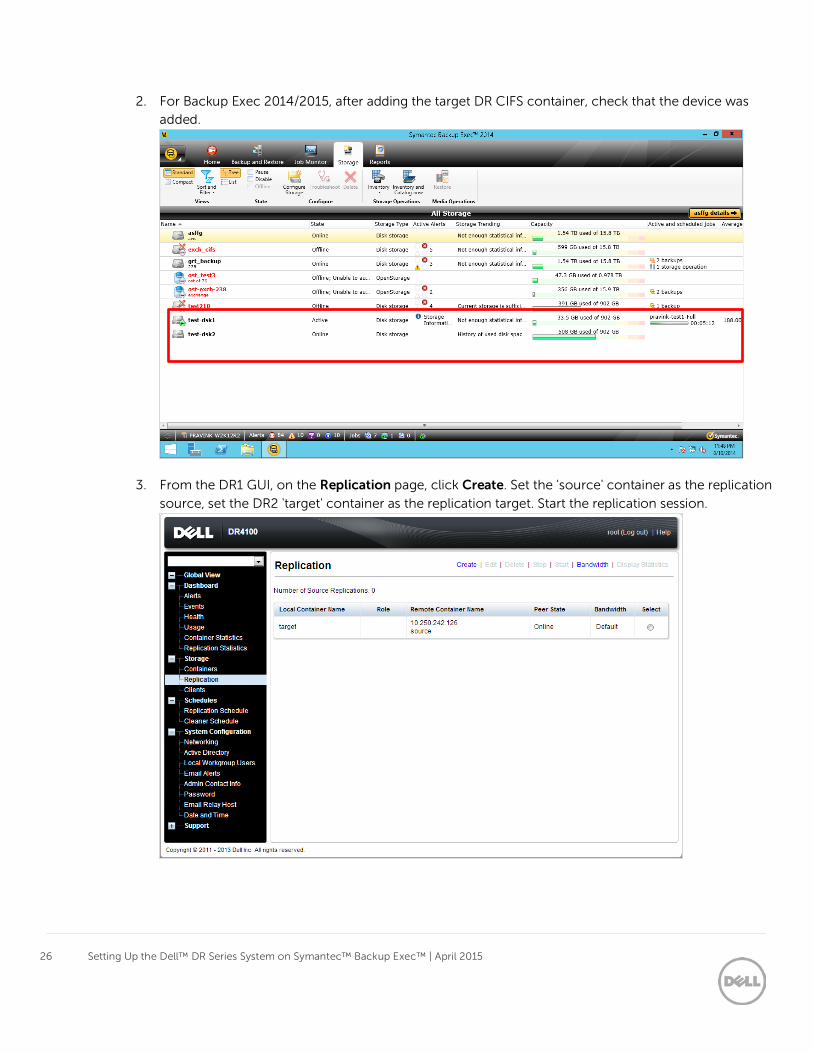
2. For Backup Exec 2014/2015, after adding the target DR CIFS container, check that the device was added.
3. From the DR1 GUI, on the Replication page, click Create. Set the 'source' container as the replication
source, set the DR2 'target' container as the replication target. Start the replication session.
27 Setting Up the Dell™ DR Series System on Symantec™ Backup Exec™ | April 2015
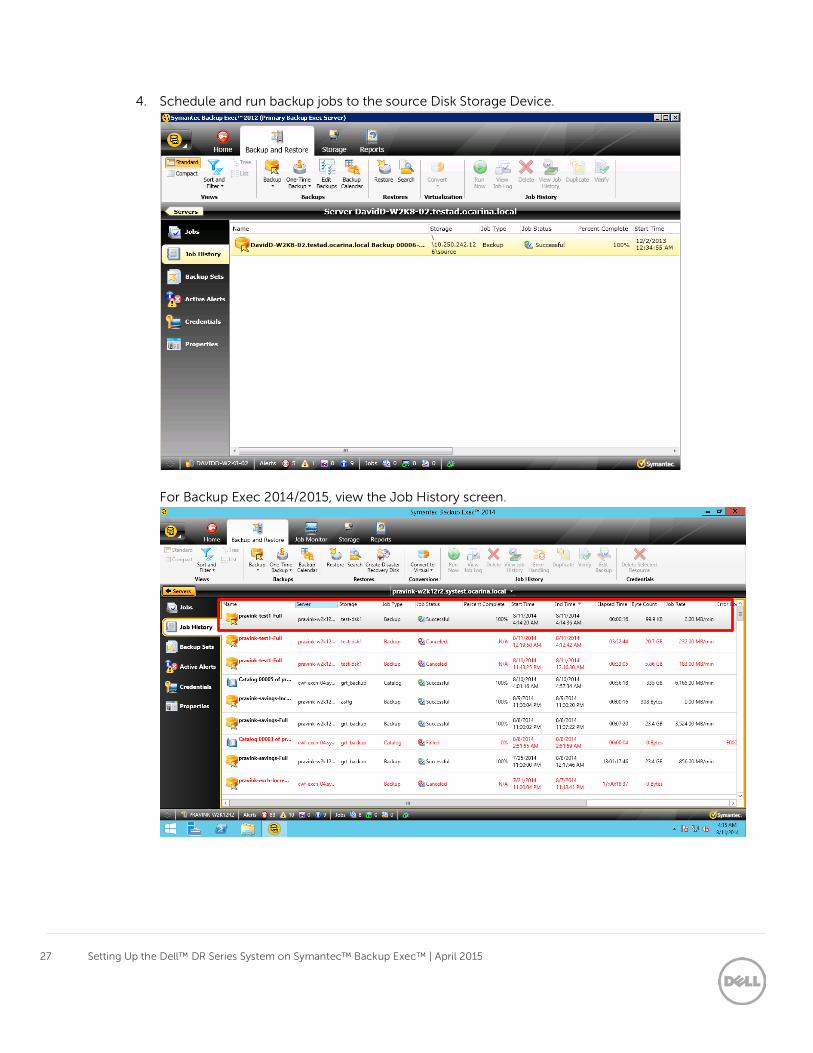
4. Schedule and run backup jobs to the source Disk Storage Device.
For Backup Exec 2014/2015, view the Job History screen.
28 Setting Up the Dell™ DR Series System on Symantec™ Backup Exec™ | April 2015
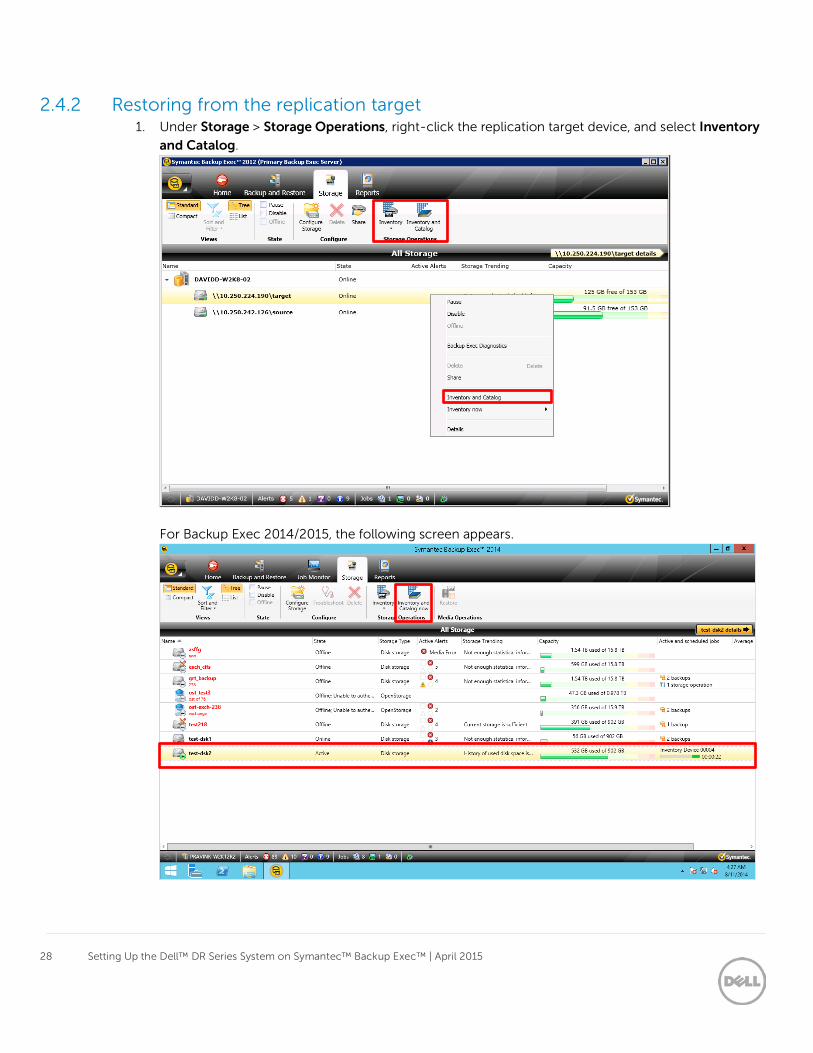
2.4.2 Restoring from the replication target 1. Under Storage > Storage Operations, right-click the replication target device, and select Inventory
and Catalog.
For Backup Exec 2014/2015, the following screen appears.
29 Setting Up the Dell™ DR Series System on Symantec™ Backup Exec™ | April 2015
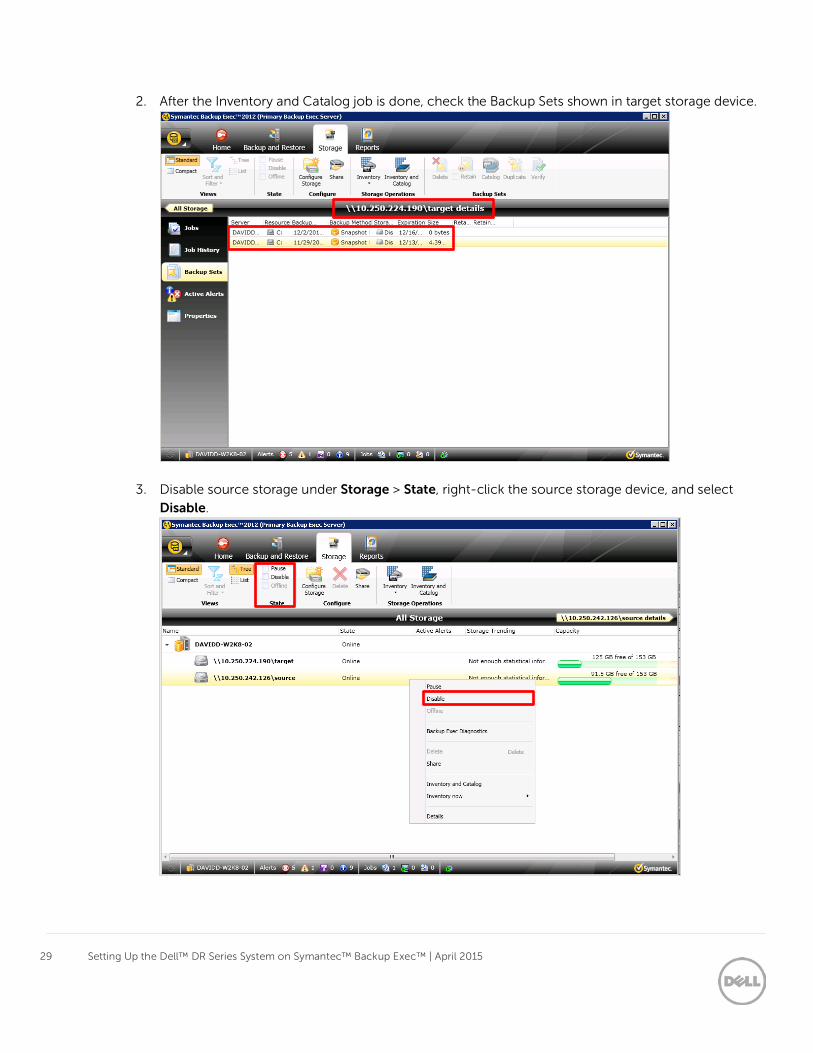
2. After the Inventory and Catalog job is done, check the Backup Sets shown in target storage device.
3. Disable source storage under Storage > State, right-click the source storage device, and select
Disable.
30 Setting Up the Dell™ DR Series System on Symantec™ Backup Exec™ | April 2015
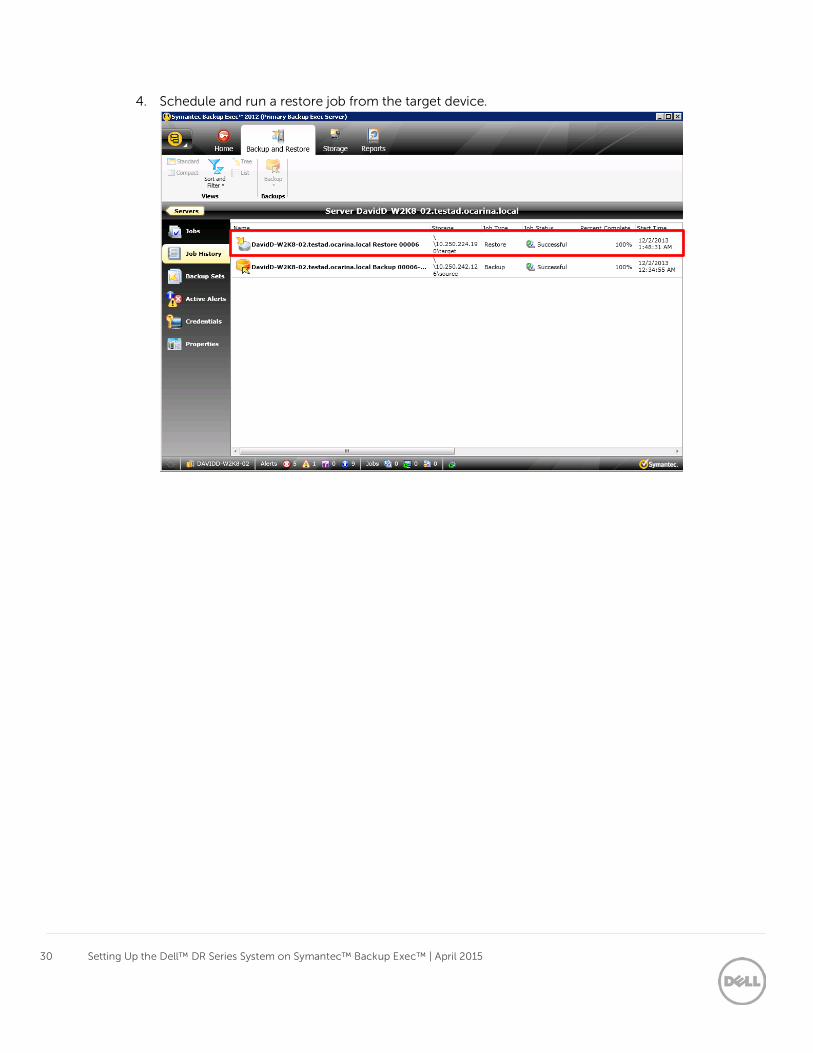
4. Schedule and run a restore job from the target device.
31 Setting Up the Dell™ DR Series System on Symantec™ Backup Exec™ | April 2015
3 Configuring VTL The latest release of the DR Series system (v3.2) adds Virtual Tape Library (VTL) support. This functionality can
be accessed by Backup Exec via iSCSI. Basic workflow includes:
1. DR Series system initial setup 2. Creation of VTL container
3. Setting iSCSI target CHAP credentials 4. Connecting windows Initiator to DR-VTL (See Appendix)
5. Installing Driver/Patch for Library (See Appendix) 6. Configuring DR Series system VTL into Backup Exec
7. Performing the backup 8. Performing a restore
9. Monitoring deduplication, compression and performance
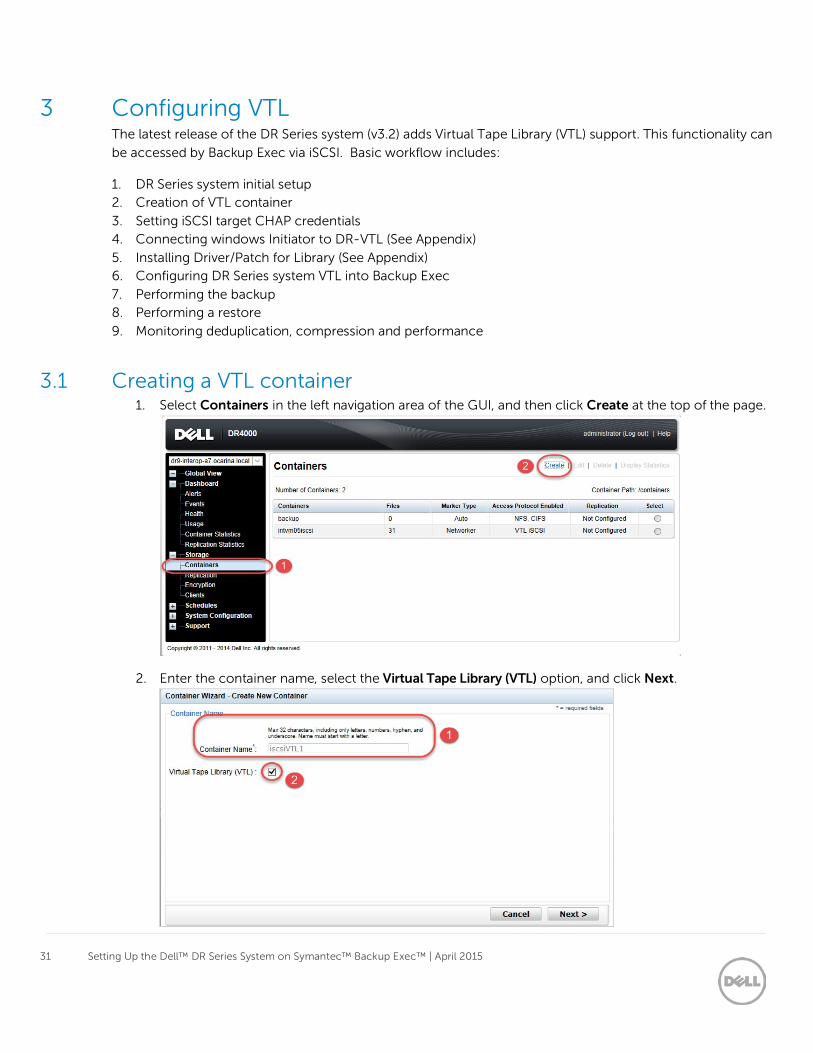
3.1 Creating a VTL container 1. Select Containers in the left navigation area of the GUI, and then click Create at the top of the page.
2. Enter the container name, select the Virtual Tape Library (VTL) option, and click Next.
32 Setting Up the Dell™ DR Series System on Symantec™ Backup Exec™ | April 2015
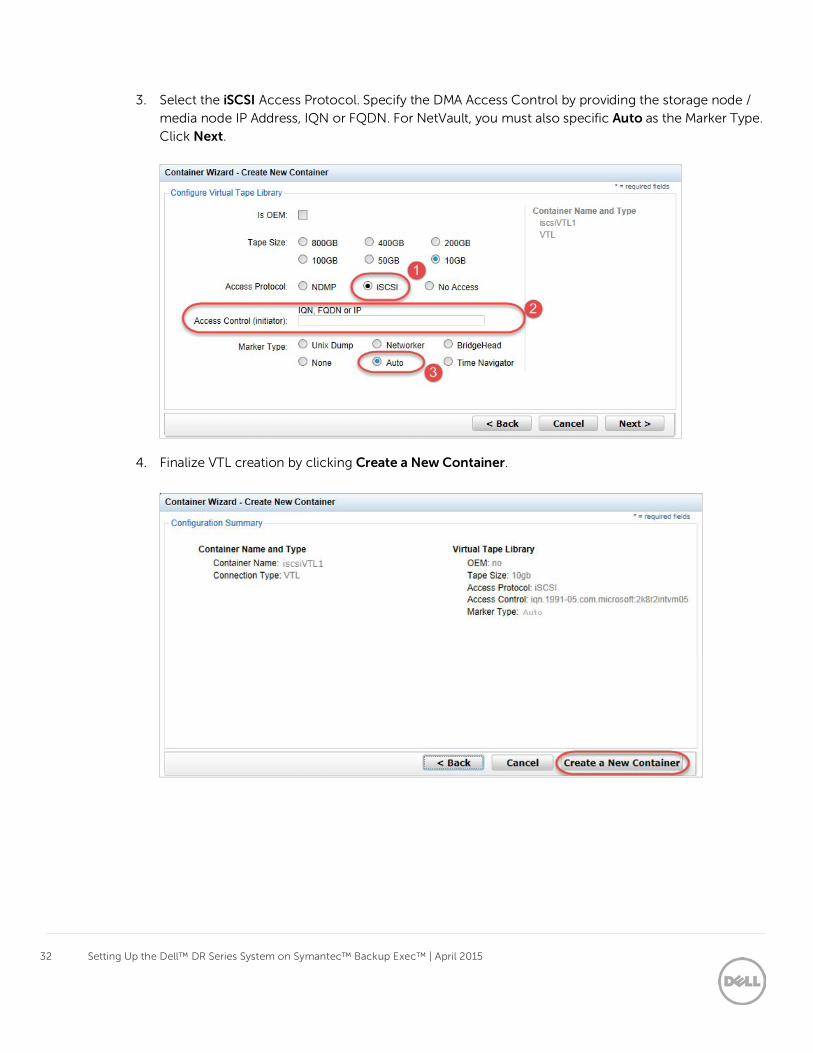
3. Select the iSCSI Access Protocol. Specify the DMA Access Control by providing the storage node / media node IP Address, IQN or FQDN. For NetVault, you must also specific Auto as the Marker Type. Click Next.
4. Finalize VTL creation by clicking Create a New Container.

33 Setting Up the Dell™ DR Series System on Symantec™ Backup Exec™ | April 2015
3.2 Setting the iSCSI target CHAP credentials
By default the iSCSI username is “iscsi_user” and can be confirmed by reviewing the output of the iscsi –
show user command. For example:
# iscsi --show –user user : iscsi_user
The default iSCSI password is “St0r@ge!iscsi”
1. You can modify the password by navigating to Clients in the DR Series system GUI and selecting the
iSCSI tab. 2. Select Edit CHAP Password and enter the new password as needed.
NOTE: iSCSI CHAP Passwords must be between 12 and 16 characters long
Alternatively you can use the “iscsi –setpassword” CLI command to change the iSCSI CHAP Password setting. For example:
> iscsi --setpassword
WARNING: All existing iSCSI sessions will be terminated!
Do you want to continue? (yes/no) [n]?
Enter new CHAP password:############
Re-type CHAP password:############
34 Setting Up the Dell™ DR Series System on Symantec™ Backup Exec™ | April 2015
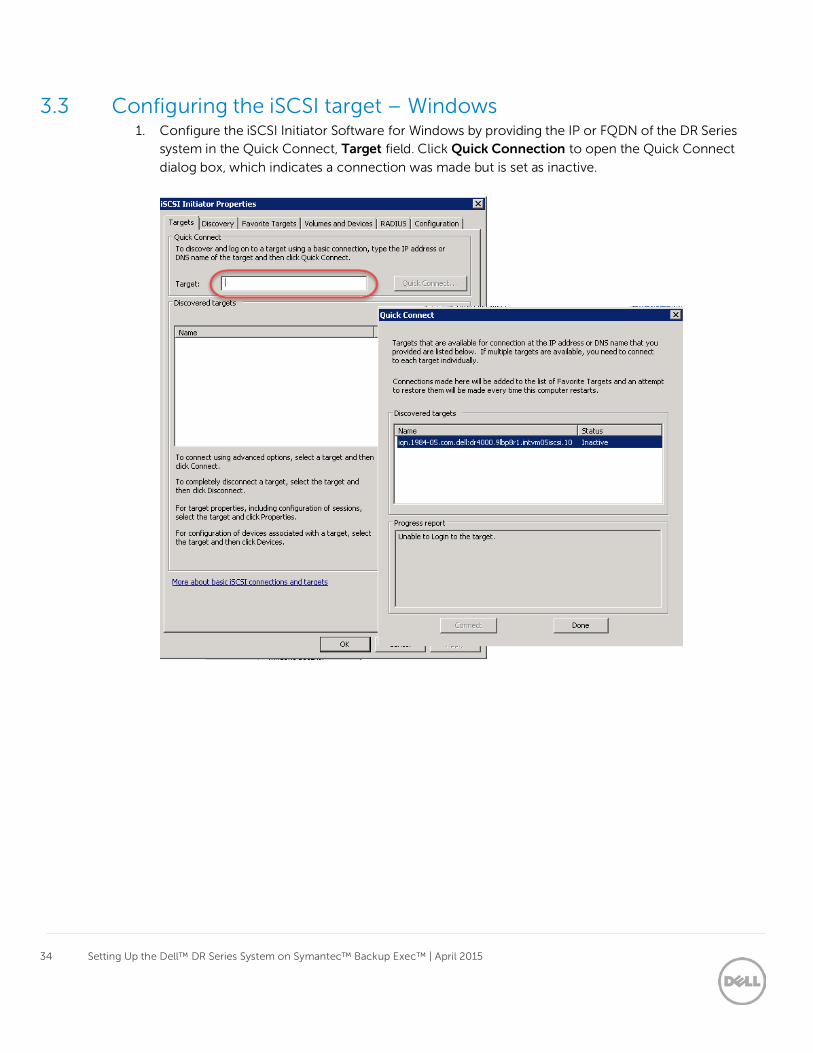
3.3 Configuring the iSCSI target – Windows 1. Configure the iSCSI Initiator Software for Windows by providing the IP or FQDN of the DR Series
system in the Quick Connect, Target field. Click Quick Connection to open the Quick Connect
dialog box, which indicates a connection was made but is set as inactive.
35 Setting Up the Dell™ DR Series System on Symantec™ Backup Exec™ | April 2015
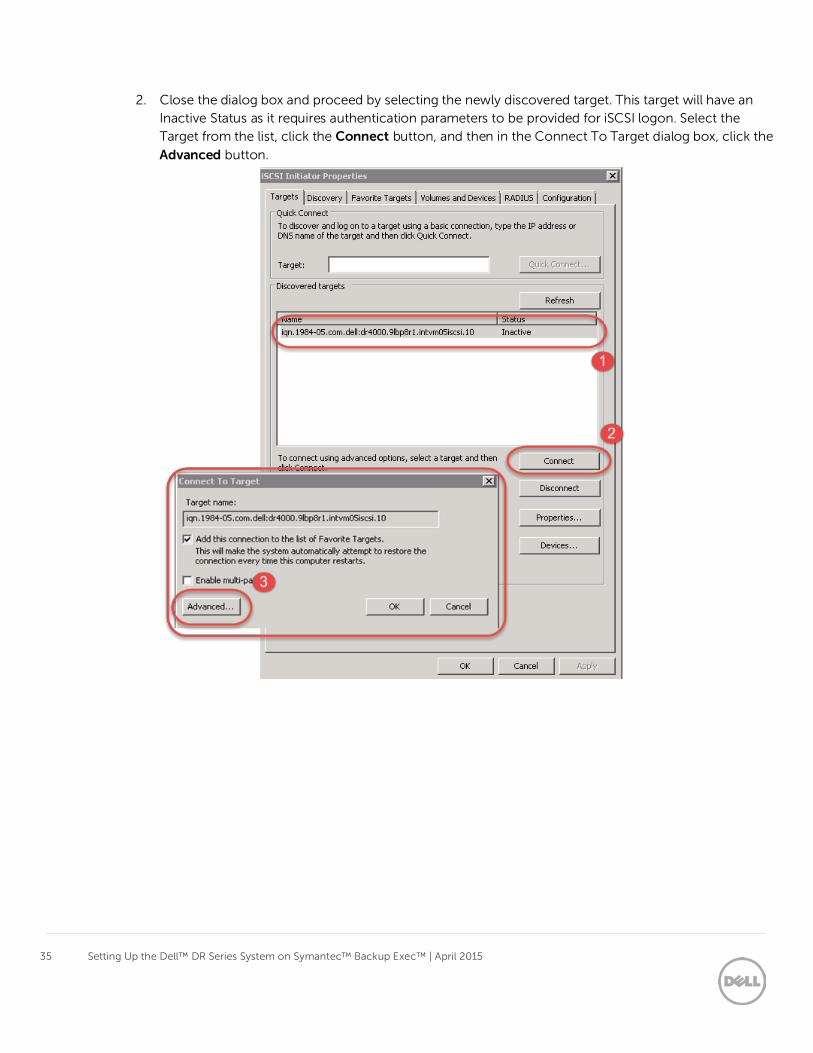
2. Close the dialog box and proceed by selecting the newly discovered target. This target will have an Inactive Status as it requires authentication parameters to be provided for iSCSI logon. Select the Target from the list, click the Connect button, and then in the Connect To Target dialog box, click the
Advanced button.
36 Setting Up the Dell™ DR Series System on Symantec™ Backup Exec™ | April 2015
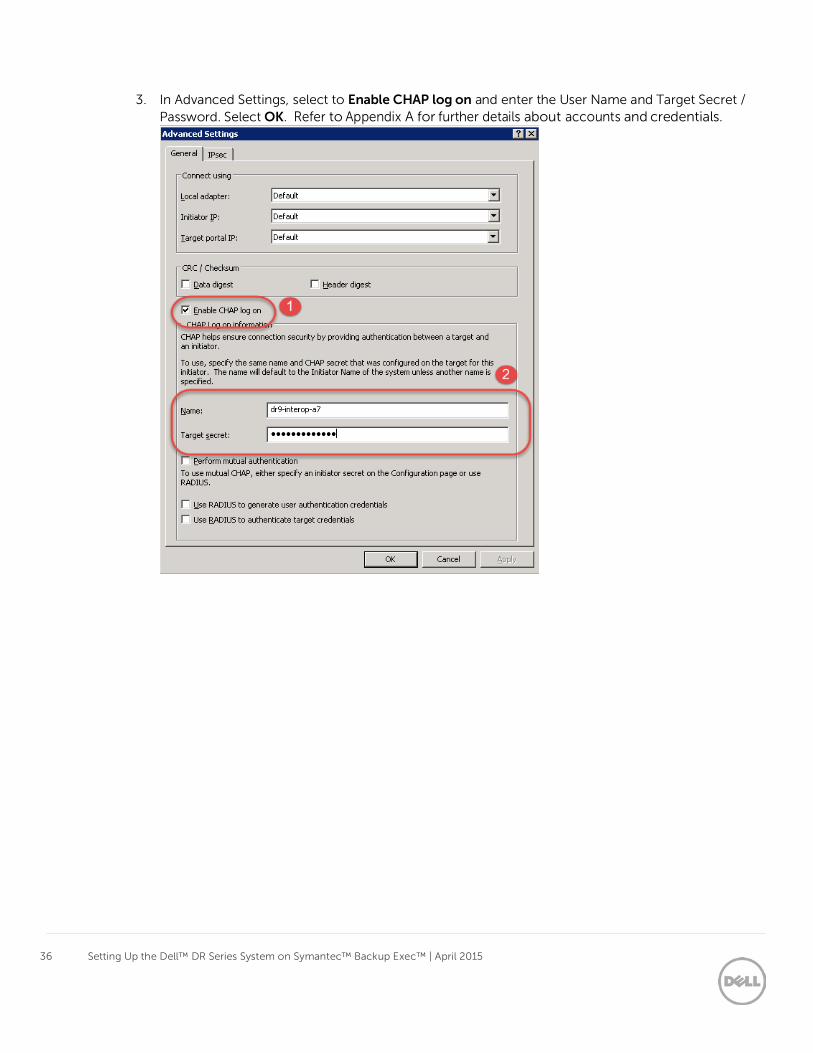
3. In Advanced Settings, select to Enable CHAP log on and enter the User Name and Target Secret / Password. Select OK. Refer to Appendix A for further details about accounts and credentials.
37 Setting Up the Dell™ DR Series System on Symantec™ Backup Exec™ | April 2015
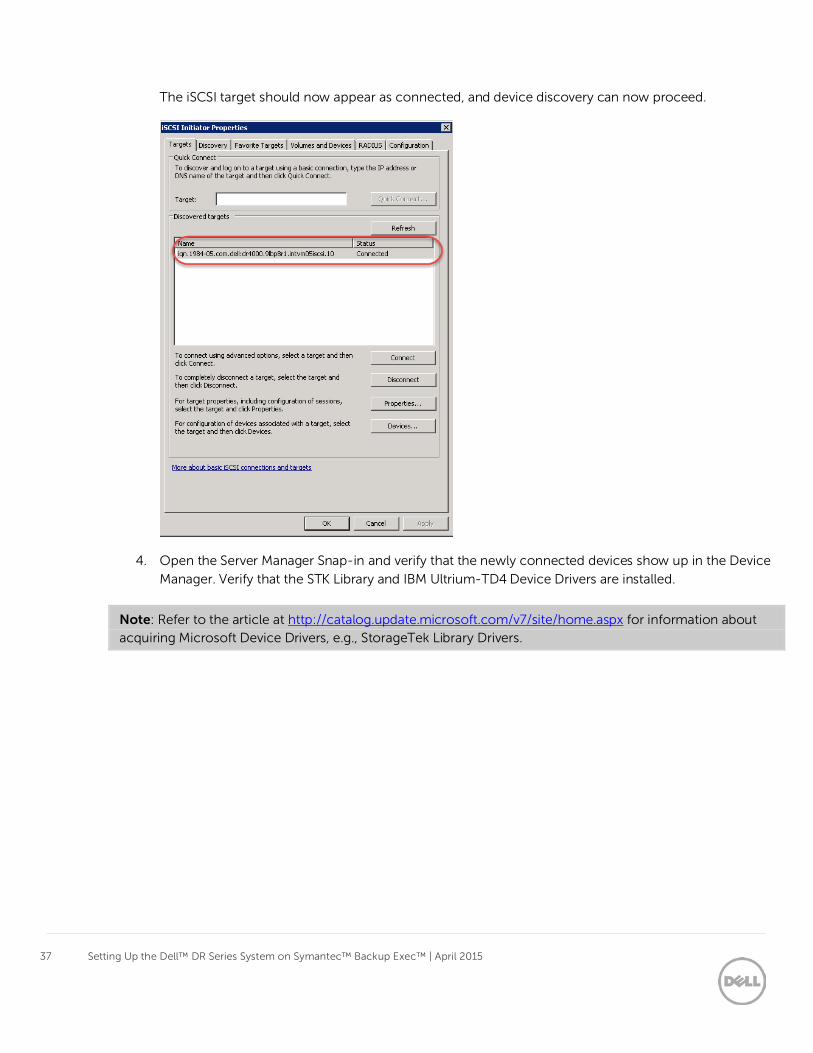
The iSCSI target should now appear as connected, and device discovery can now proceed.
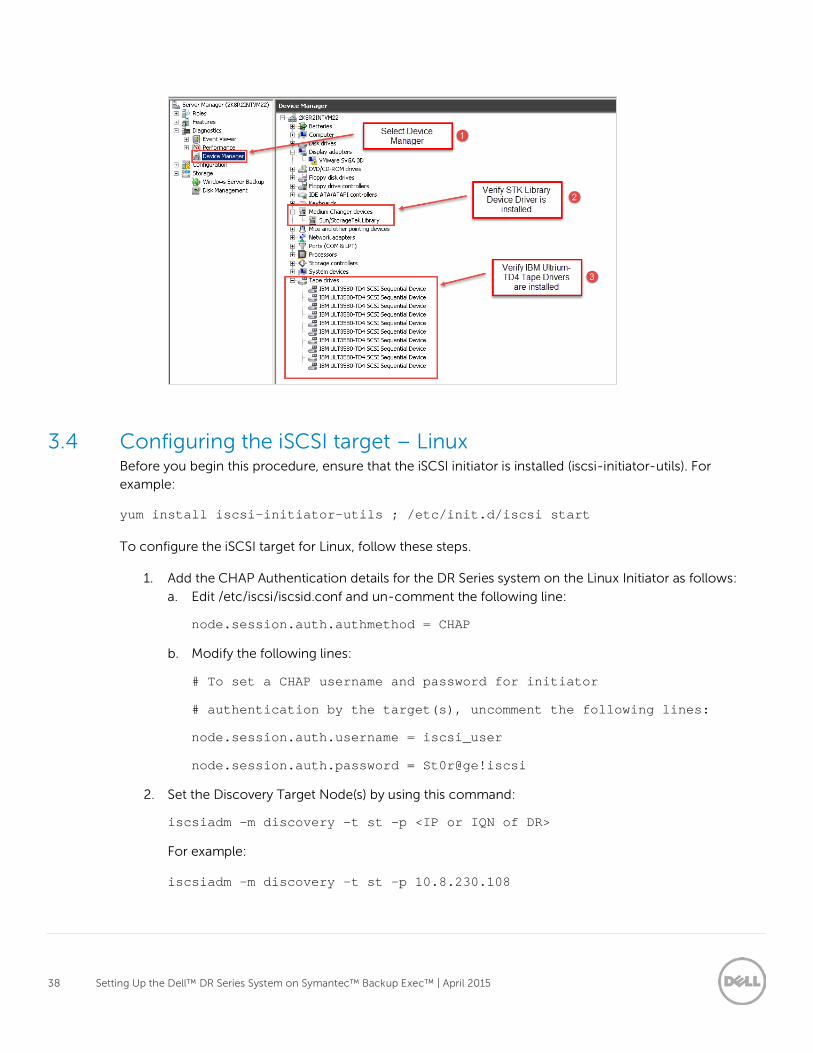
4. Open the Server Manager Snap-in and verify that the newly connected devices show up in the Device
Manager. Verify that the STK Library and IBM Ultrium-TD4 Device Drivers are installed.
Note: Refer to the article at http://catalog.update.microsoft.com/v7/site/home.aspx for information about acquiring Microsoft Device Drivers, e.g., StorageTek Library Drivers.
38 Setting Up the Dell™ DR Series System on Symantec™ Backup Exec™ | April 2015
3.4 Configuring the iSCSI target – Linux Before you begin this procedure, ensure that the iSCSI initiator is installed (iscsi-initiator-utils). For example:
yum install iscsi-initiator-utils ; /etc/init.d/iscsi start
To configure the iSCSI target for Linux, follow these steps.
1. Add the CHAP Authentication details for the DR Series system on the Linux Initiator as follows:
a. Edit /etc/iscsi/iscsid.conf and un-comment the following line:
node.session.auth.authmethod = CHAP
b. Modify the following lines:
# To set a CHAP username and password for initiator
# authentication by the target(s), uncomment the following lines:
node.session.auth.username = iscsi_user
node.session.auth.password = St0r@ge!iscsi
2. Set the Discovery Target Node(s) by using this command:
iscsiadm -m discovery -t st -p <IP or IQN of DR>
For example:
iscsiadm -m discovery -t st -p 10.8.230.108
39 Setting Up the Dell™ DR Series System on Symantec™ Backup Exec™ | April 2015
3. Enable logon to the DR Series system iSCSI VTL target(s) by using the following command:
iscsiadm -m node --portal <IP or IQN of DR:PORT> --login
For example:
iscsiadm -m node --portal "10.8.230.108:3260" --login
4. Display the open session(s) with DR VTL(s) by using the following command:
iscsiadm -m session
For example:
iscsiadm -m session = tcp: [8] 10.8.230.108:3260,1 iqn.1984-05.com.dell:dr4000.3071067.interoprhel52n1.30
5. Review dmesg or /var/log/messages for details about the tape devices created upon adding the DR Series system iSCSI VTL.
3.5 Adding additional media to the VTL container
Note: With a VTL container, it is very easy to add additional tapes when required. It is recommended to
add tapes in the increments of 50 and 100 to facilitate easy inventory from Backup Exec. Check the Backup Exec recommendations for the maximum number of tapes supported.
1. To add media to an existing VTL container click Containers in the DR Series system GUI. 2. Select and edit the target VTL container.
3. In the resulting dialog box, in the field Add More Tape (no of Tape), enter the number of tapes to add to the VTL container.
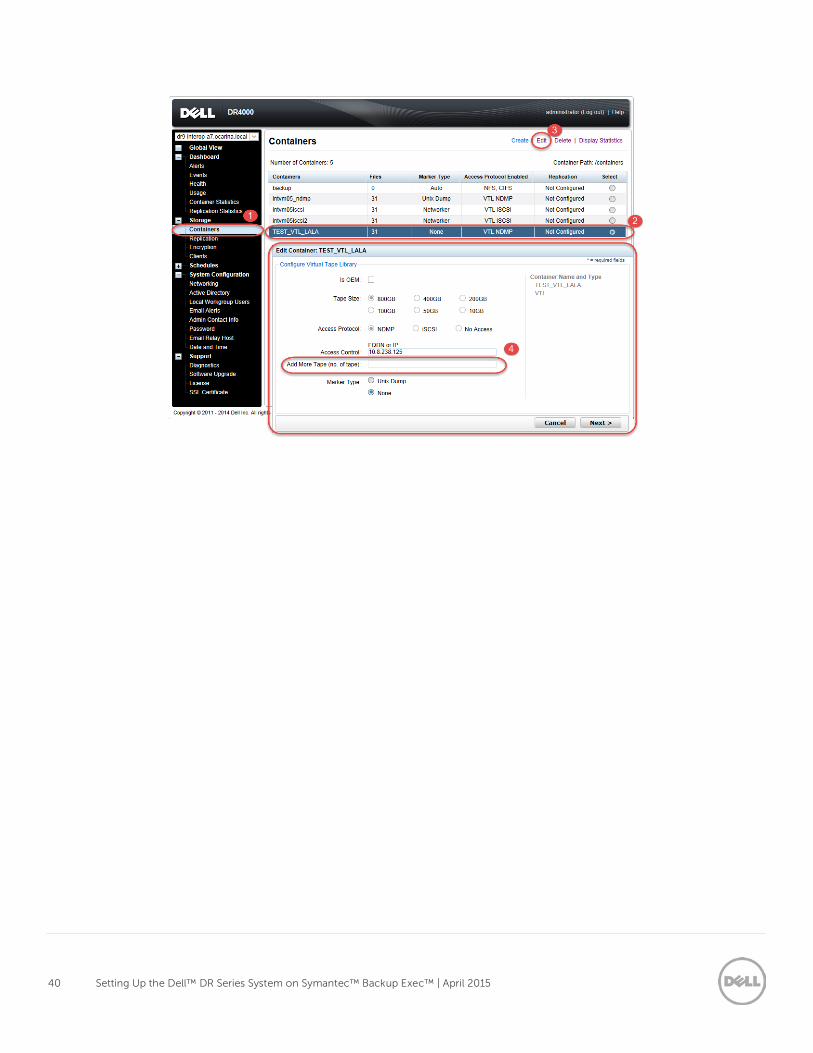
40 Setting Up the Dell™ DR Series System on Symantec™ Backup Exec™ | April 2015
41 Setting Up the Dell™ DR Series System on Symantec™ Backup Exec™ | April 2015
Alternatively you can use the “vtl –update_carts” cli command for this operation. For example:
> vtl –update_carts --name TEST_VTL_LALA –add –no_of_tapes 10
Created 10 cartridges
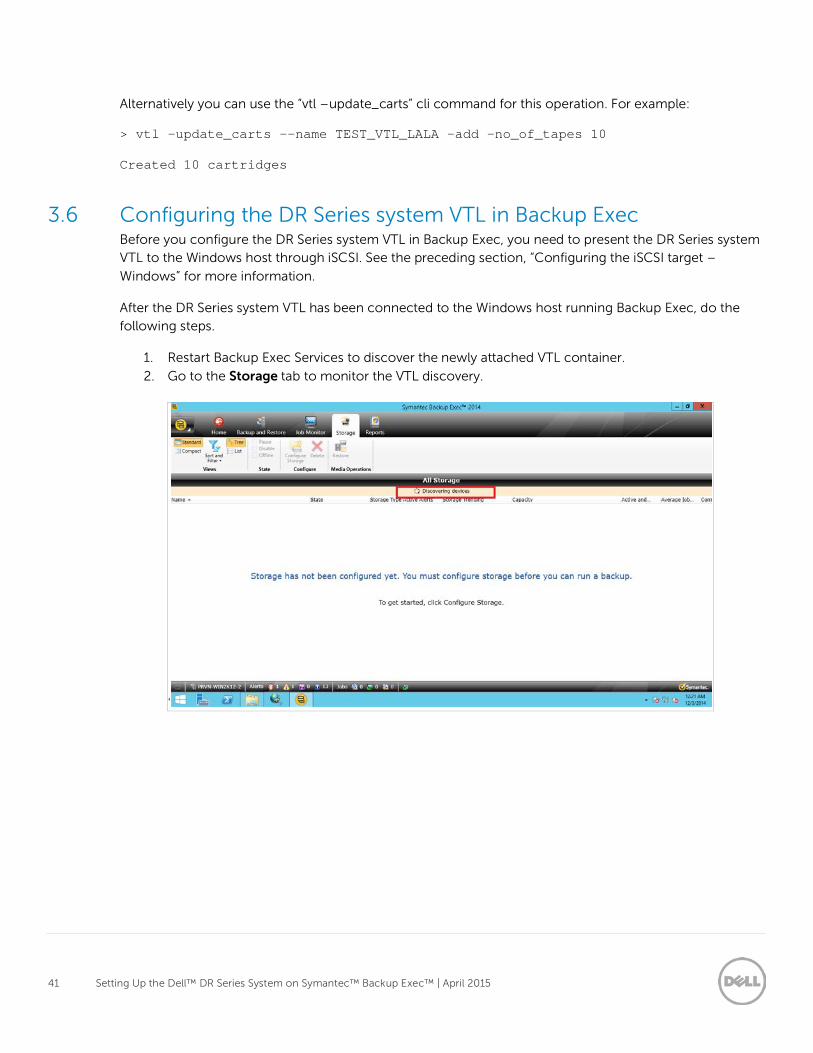
3.6 Configuring the DR Series system VTL in Backup Exec Before you configure the DR Series system VTL in Backup Exec, you need to present the DR Series system VTL to the Windows host through iSCSI. See the preceding section, “Configuring the iSCSI target –
Windows” for more information.
After the DR Series system VTL has been connected to the Windows host running Backup Exec, do the following steps.
1. Restart Backup Exec Services to discover the newly attached VTL container.
2. Go to the Storage tab to monitor the VTL discovery.
'
42 Setting Up the Dell™ DR Series System on Symantec™ Backup Exec™ | April 2015
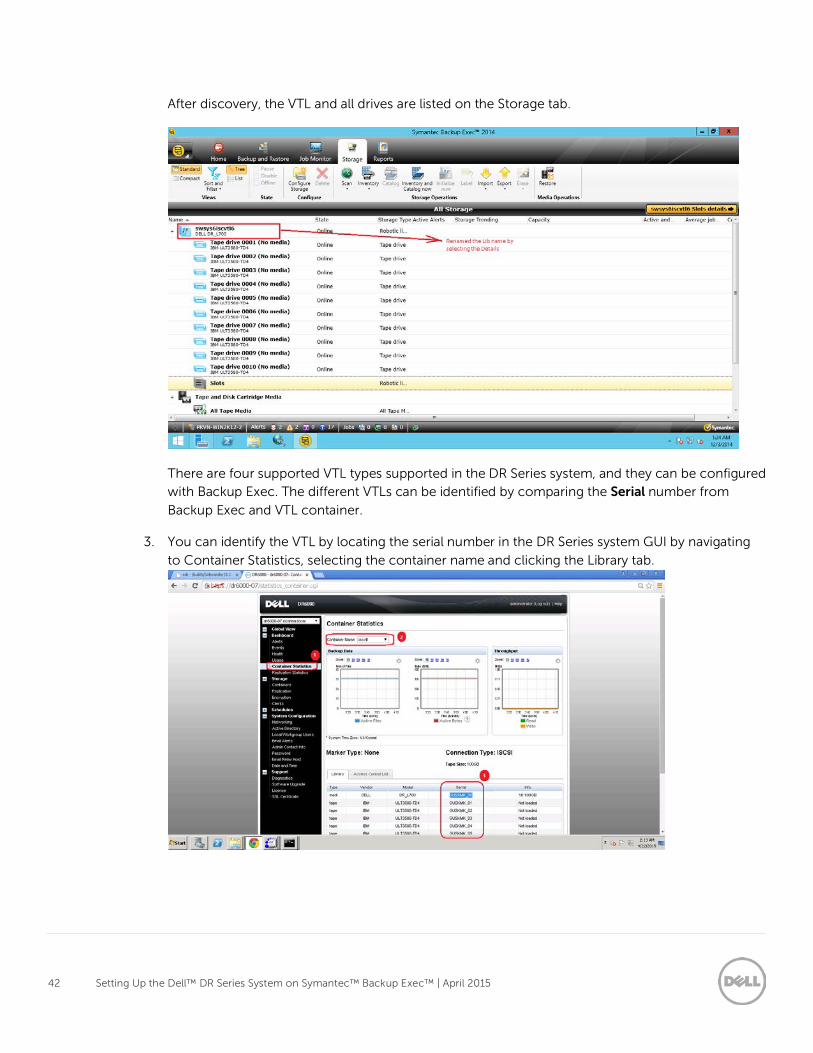
After discovery, the VTL and all drives are listed on the Storage tab.
There are four supported VTL types supported in the DR Series system, and they can be configured with Backup Exec. The different VTLs can be identified by comparing the Serial number from
Backup Exec and VTL container.
3. You can identify the VTL by locating the serial number in the DR Series system GUI by navigating
to Container Statistics, selecting the container name and clicking the Library tab.

43 Setting Up the Dell™ DR Series System on Symantec™ Backup Exec™ | April 2015
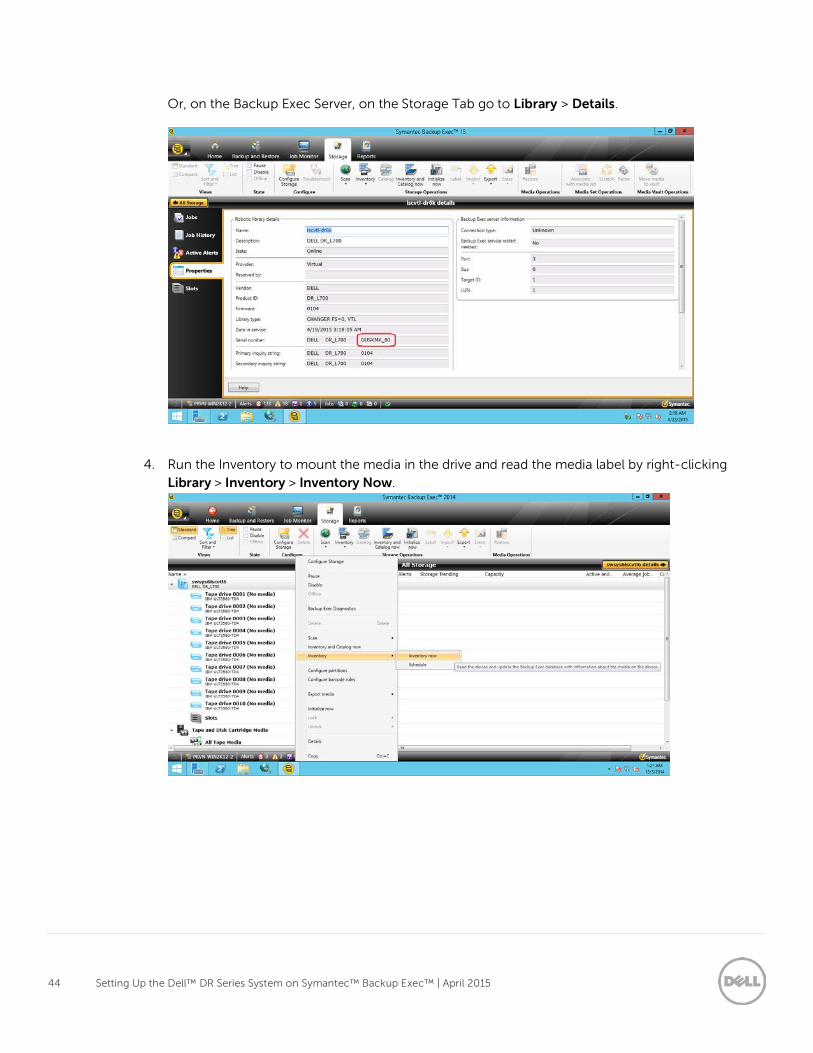
44 Setting Up the Dell™ DR Series System on Symantec™ Backup Exec™ | April 2015
Or, on the Backup Exec Server, on the Storage Tab go to Library > Details.
4. Run the Inventory to mount the media in the drive and read the media label by right-clicking Library > Inventory > Inventory Now.
45 Setting Up the Dell™ DR Series System on Symantec™ Backup Exec™ | April 2015
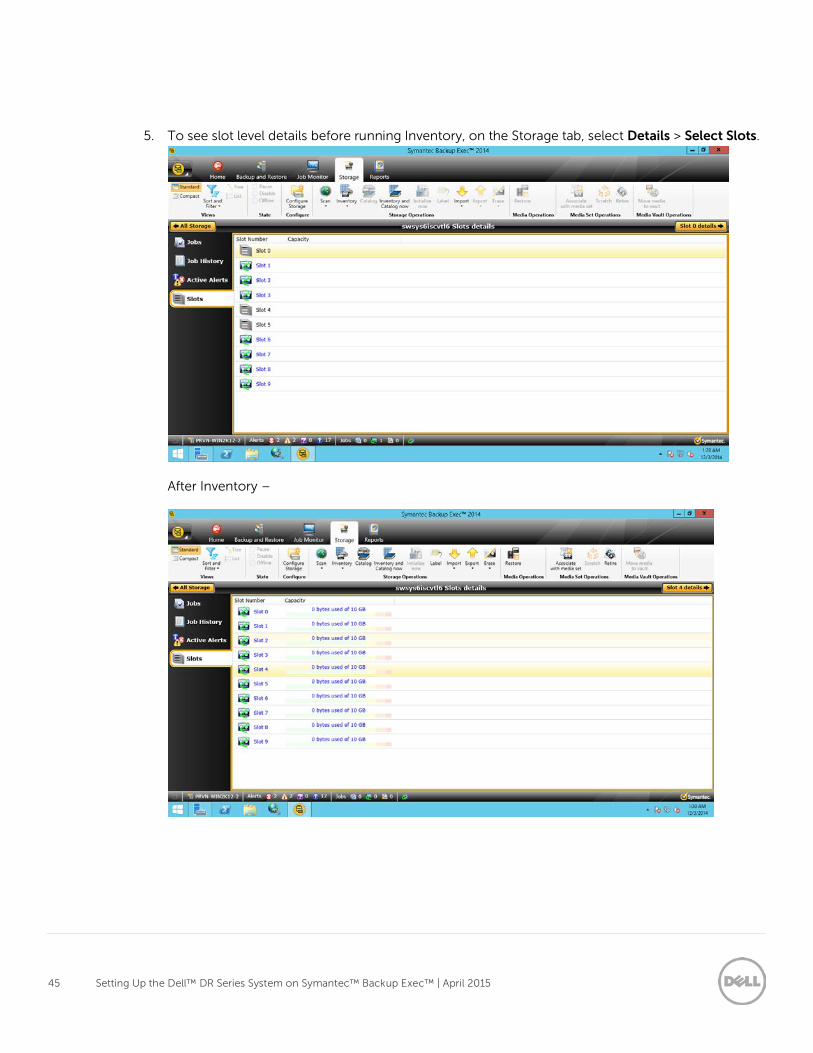
5. To see slot level details before running Inventory, on the Storage tab, select Details > Select Slots.
After Inventory –
46 Setting Up the Dell™ DR Series System on Symantec™ Backup Exec™ | April 2015
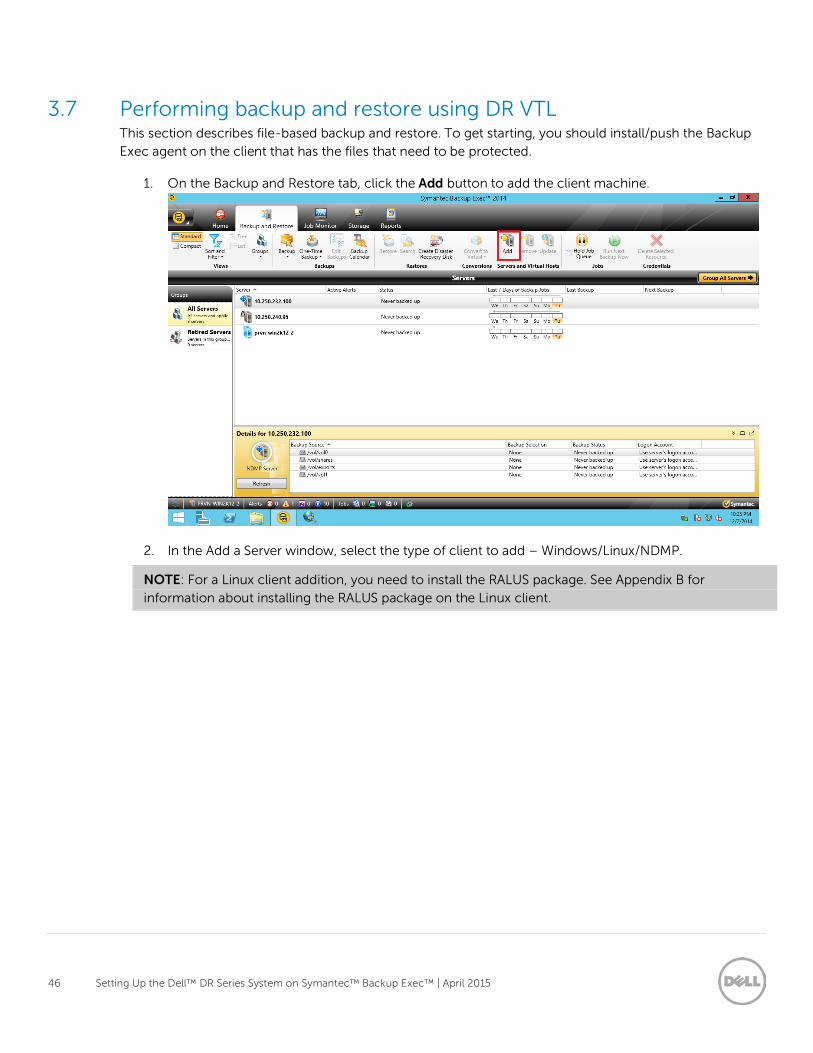
3.7 Performing backup and restore using DR VTL This section describes file-based backup and restore. To get starting, you should install/push the Backup Exec agent on the client that has the files that need to be protected.
1. On the Backup and Restore tab, click the Add button to add the client machine.
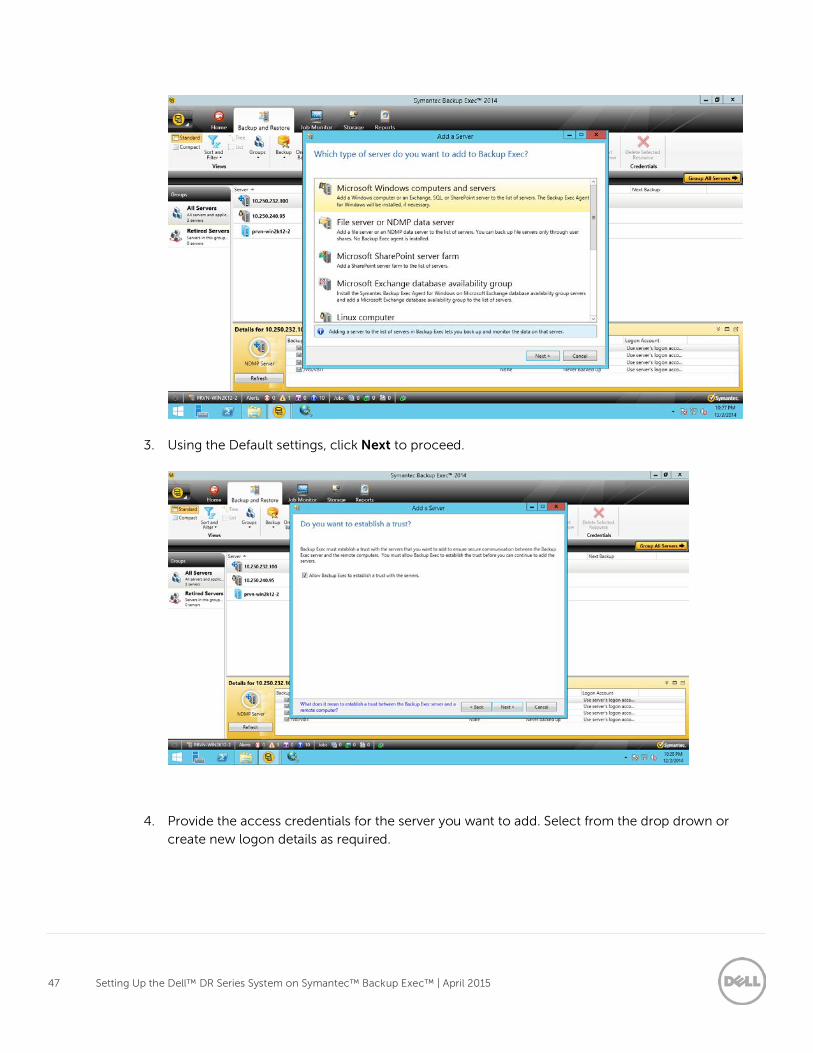
2. In the Add a Server window, select the type of client to add – Windows/Linux/NDMP.
NOTE: For a Linux client addition, you need to install the RALUS package. See Appendix B for information about installing the RALUS package on the Linux client.
47 Setting Up the Dell™ DR Series System on Symantec™ Backup Exec™ | April 2015
3. Using the Default settings, click Next to proceed.
4. Provide the access credentials for the server you want to add. Select from the drop drown or create new logon details as required.

48 Setting Up the Dell™ DR Series System on Symantec™ Backup Exec™ | April 2015
5. Using the default settings, click Next to proceed.
49 Setting Up the Dell™ DR Series System on Symantec™ Backup Exec™ | April 2015
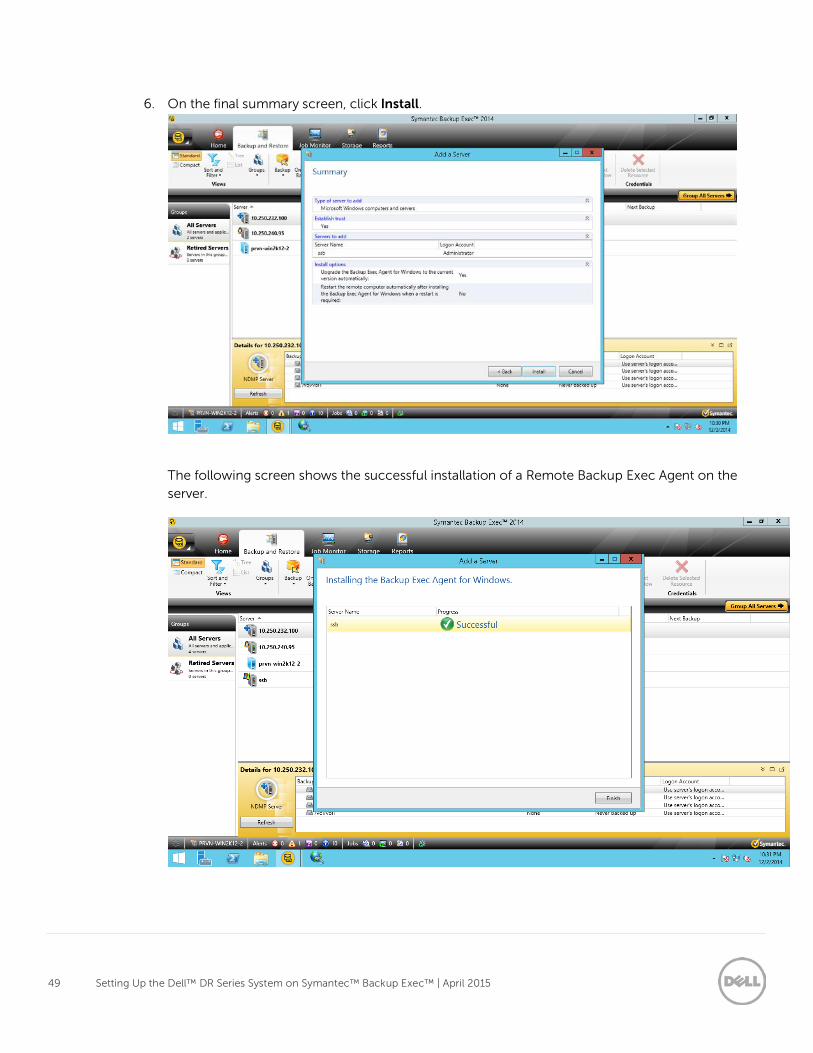
6. On the final summary screen, click Install.
The following screen shows the successful installation of a Remote Backup Exec Agent on the server.
50 Setting Up the Dell™ DR Series System on Symantec™ Backup Exec™ | April 2015
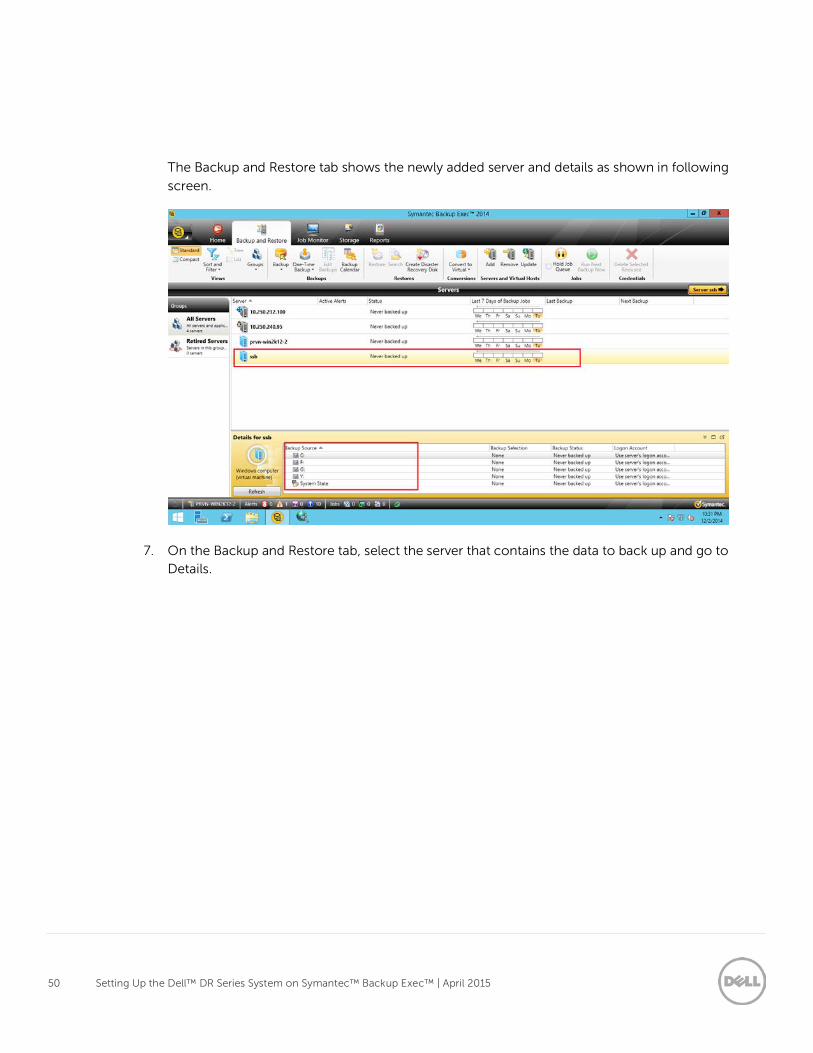
The Backup and Restore tab shows the newly added server and details as shown in following
screen.
7. On the Backup and Restore tab, select the server that contains the data to back up and go to Details.
51 Setting Up the Dell™ DR Series System on Symantec™ Backup Exec™ | April 2015
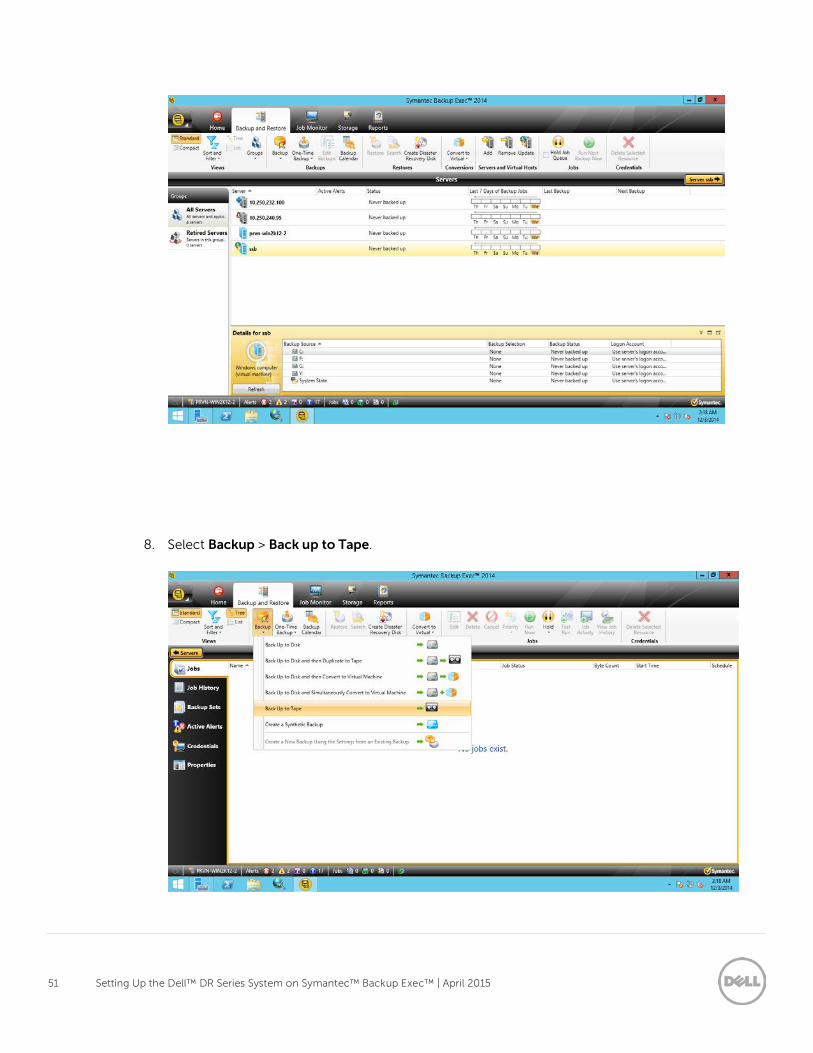
8. Select Backup > Back up to Tape.
52 Setting Up the Dell™ DR Series System on Symantec™ Backup Exec™ | April 2015
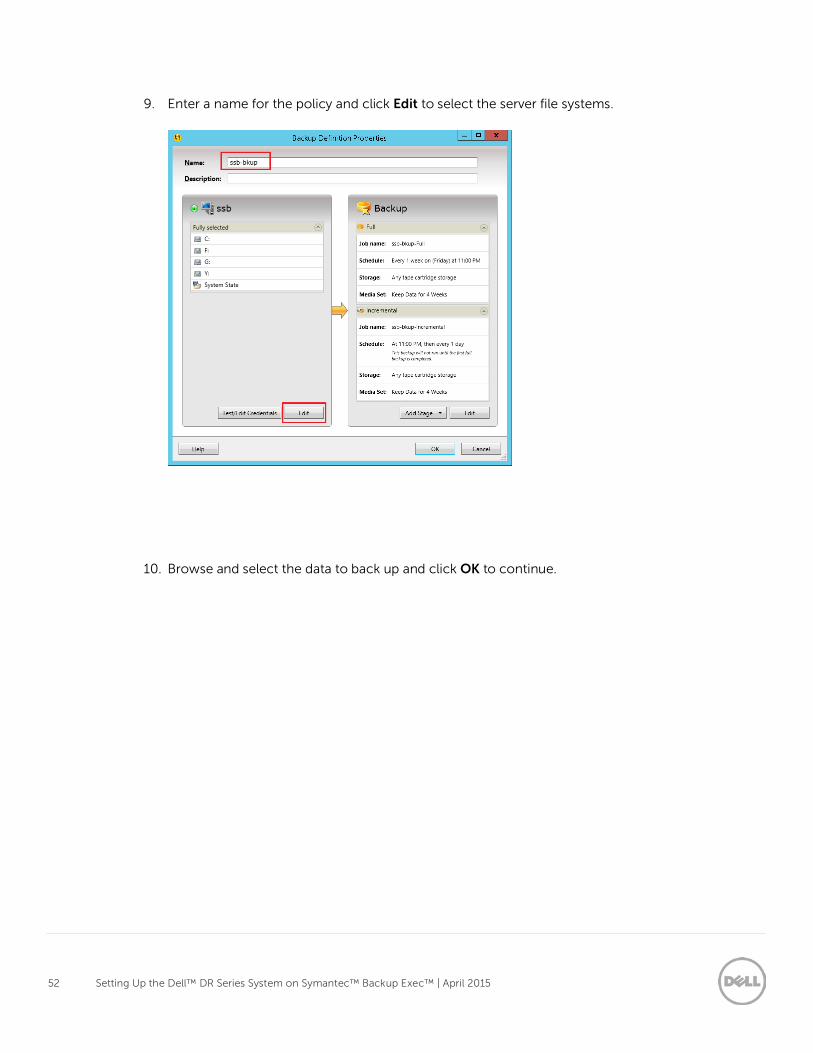
9. Enter a name for the policy and click Edit to select the server file systems.
10. Browse and select the data to back up and click OK to continue.
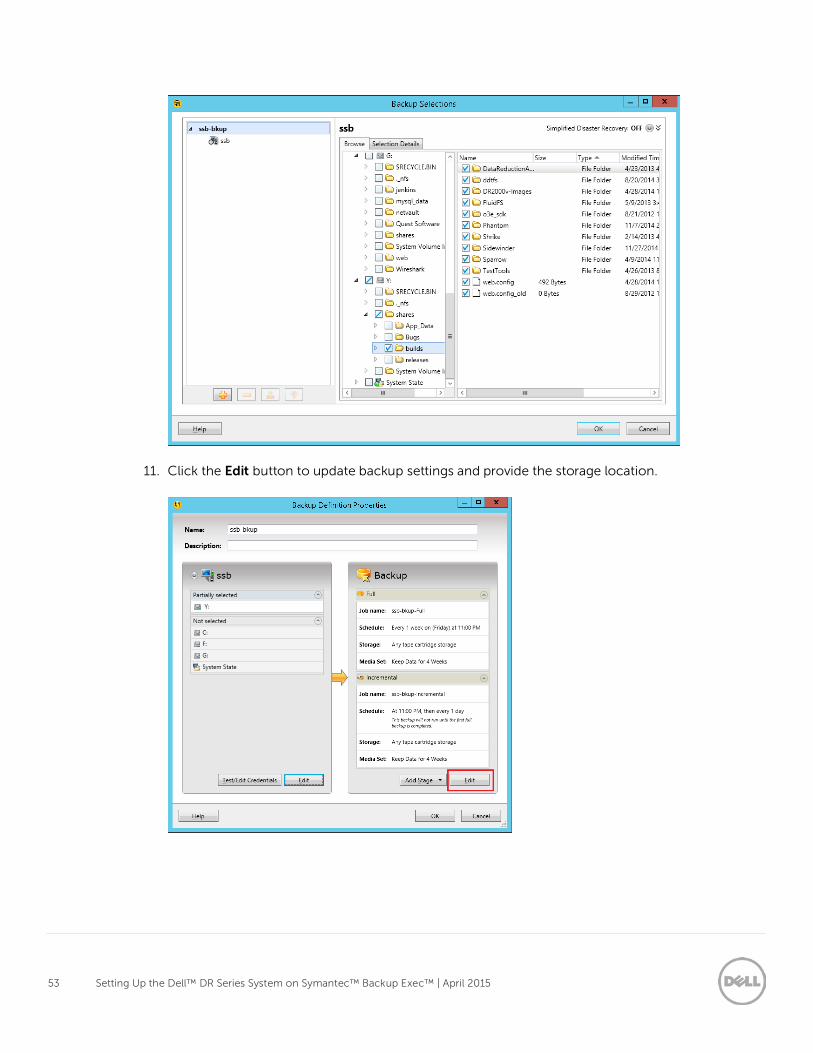
53 Setting Up the Dell™ DR Series System on Symantec™ Backup Exec™ | April 2015
11. Click the Edit button to update backup settings and provide the storage location.
54 Setting Up the Dell™ DR Series System on Symantec™ Backup Exec™ | April 2015
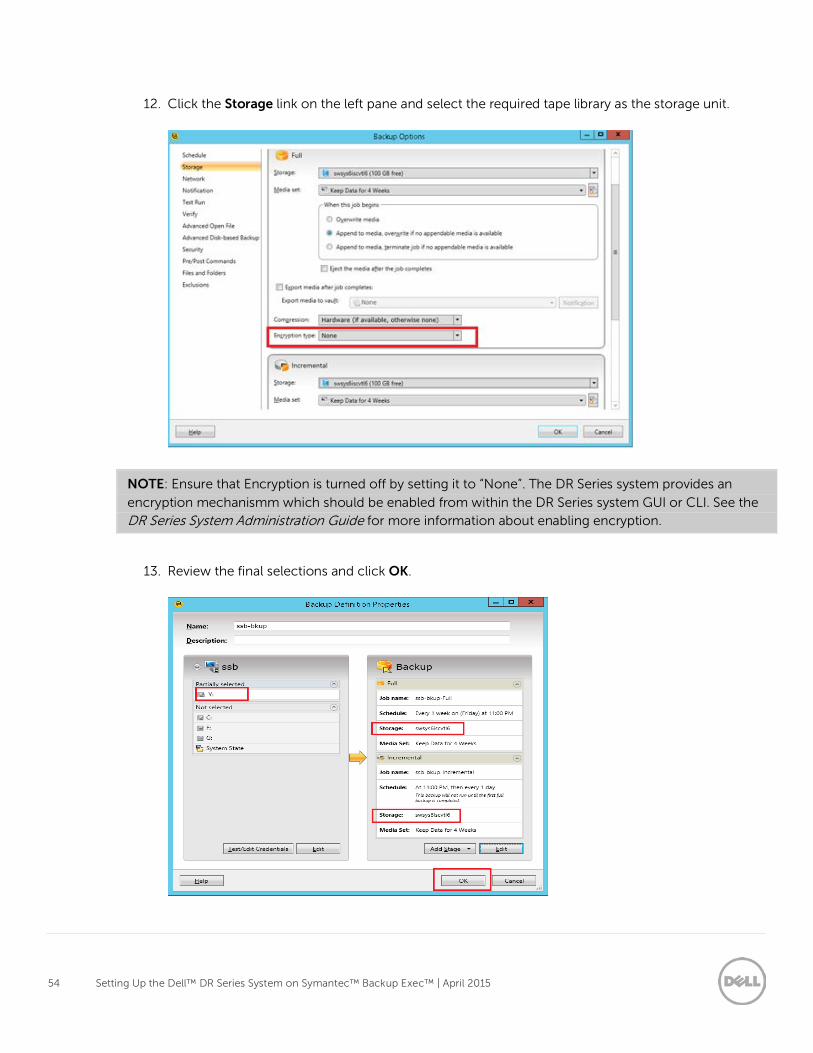
12. Click the Storage link on the left pane and select the required tape library as the storage unit.
NOTE: Ensure that Encryption is turned off by setting it to “None”. The DR Series system provides an
encryption mechanismm which should be enabled from within the DR Series system GUI or CLI. See the DR Series System Administration Guide for more information about enabling encryption.
13. Review the final selections and click OK.
55 Setting Up the Dell™ DR Series System on Symantec™ Backup Exec™ | April 2015
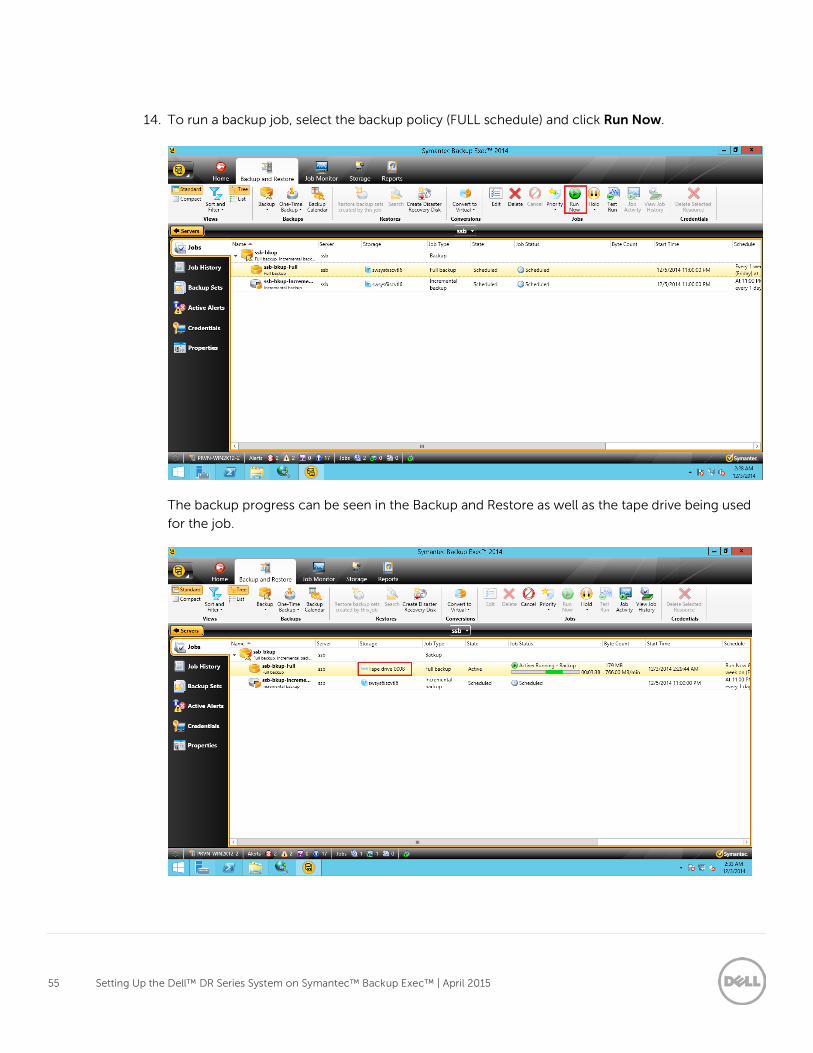
14. To run a backup job, select the backup policy (FULL schedule) and click Run Now.
The backup progress can be seen in the Backup and Restore as well as the tape drive being used
for the job.
56 Setting Up the Dell™ DR Series System on Symantec™ Backup Exec™ | April 2015
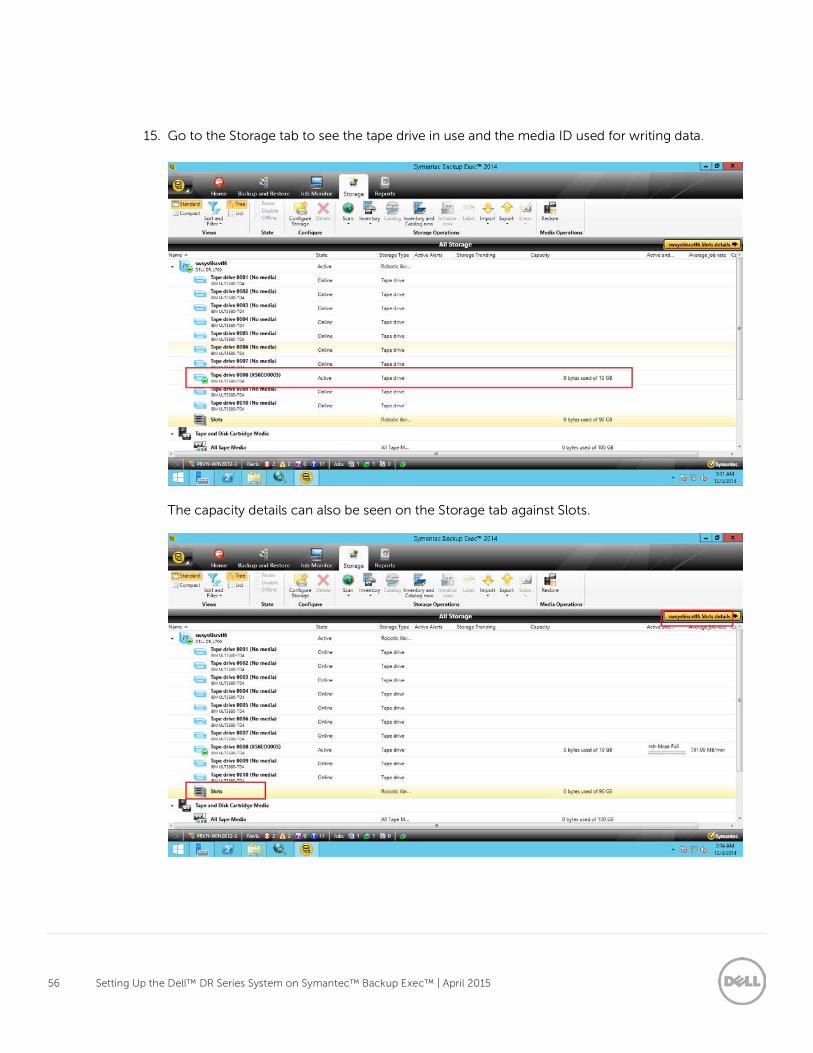
15. Go to the Storage tab to see the tape drive in use and the media ID used for writing data.
The capacity details can also be seen on the Storage tab against Slots.
57 Setting Up the Dell™ DR Series System on Symantec™ Backup Exec™ | April 2015
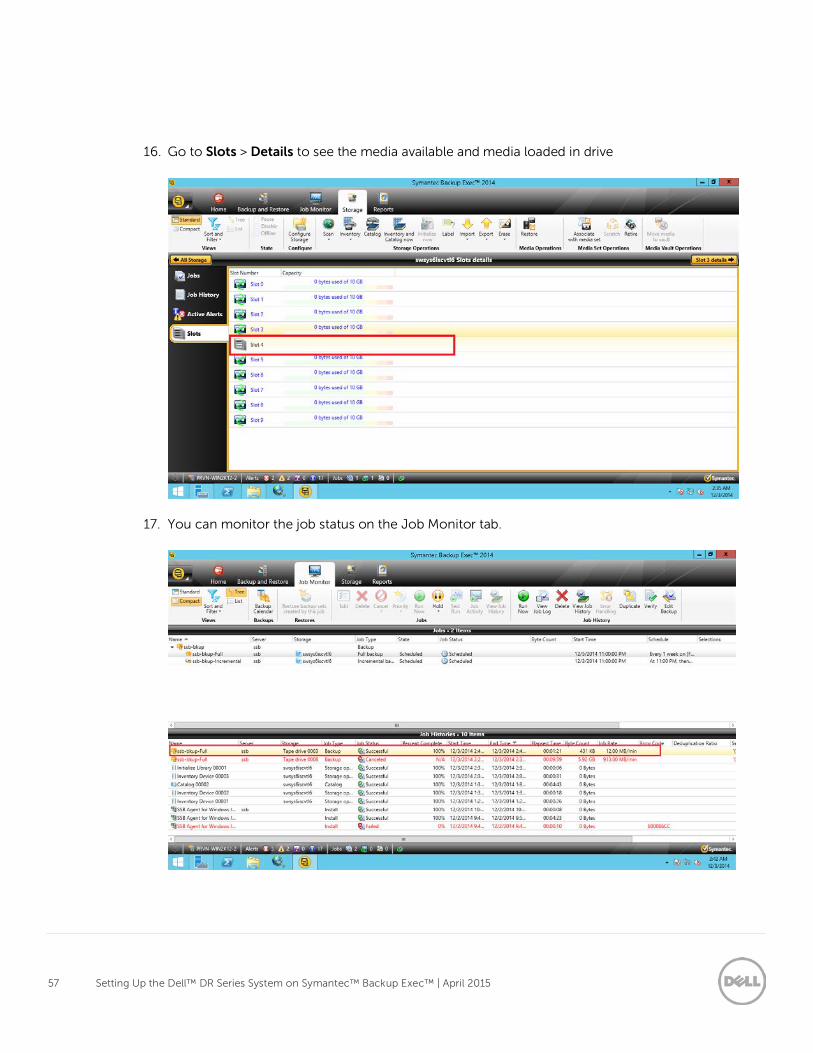
16. Go to Slots > Details to see the media available and media loaded in drive
17. You can monitor the job status on the Job Monitor tab.
58 Setting Up the Dell™ DR Series System on Symantec™ Backup Exec™ | April 2015
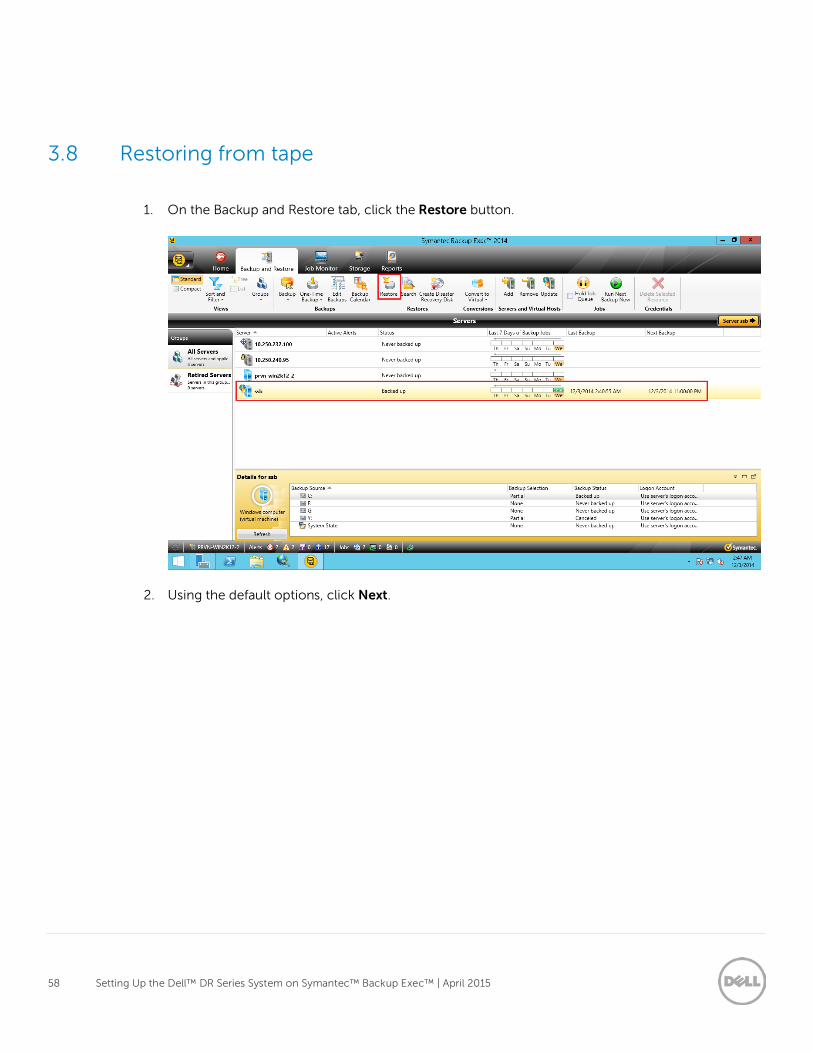
3.8 Restoring from tape
1. On the Backup and Restore tab, click the Restore button.
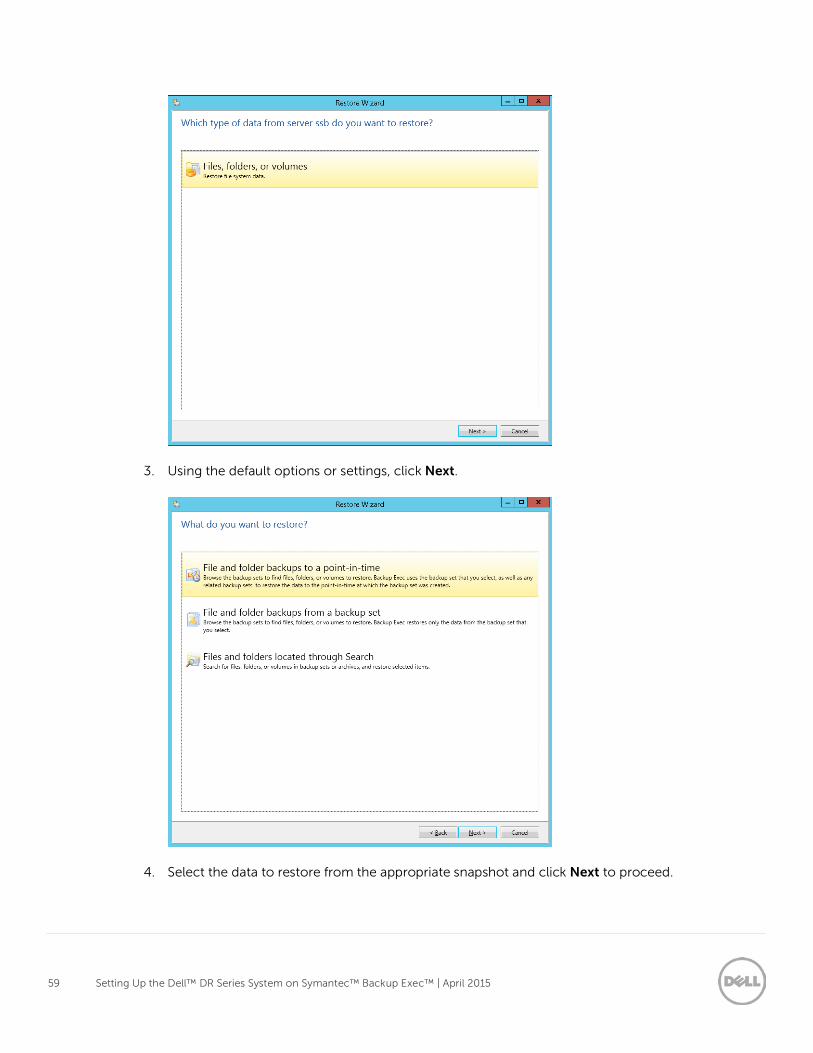
2. Using the default options, click Next.
59 Setting Up the Dell™ DR Series System on Symantec™ Backup Exec™ | April 2015
3. Using the default options or settings, click Next.
4. Select the data to restore from the appropriate snapshot and click Next to proceed.
60 Setting Up the Dell™ DR Series System on Symantec™ Backup Exec™ | April 2015
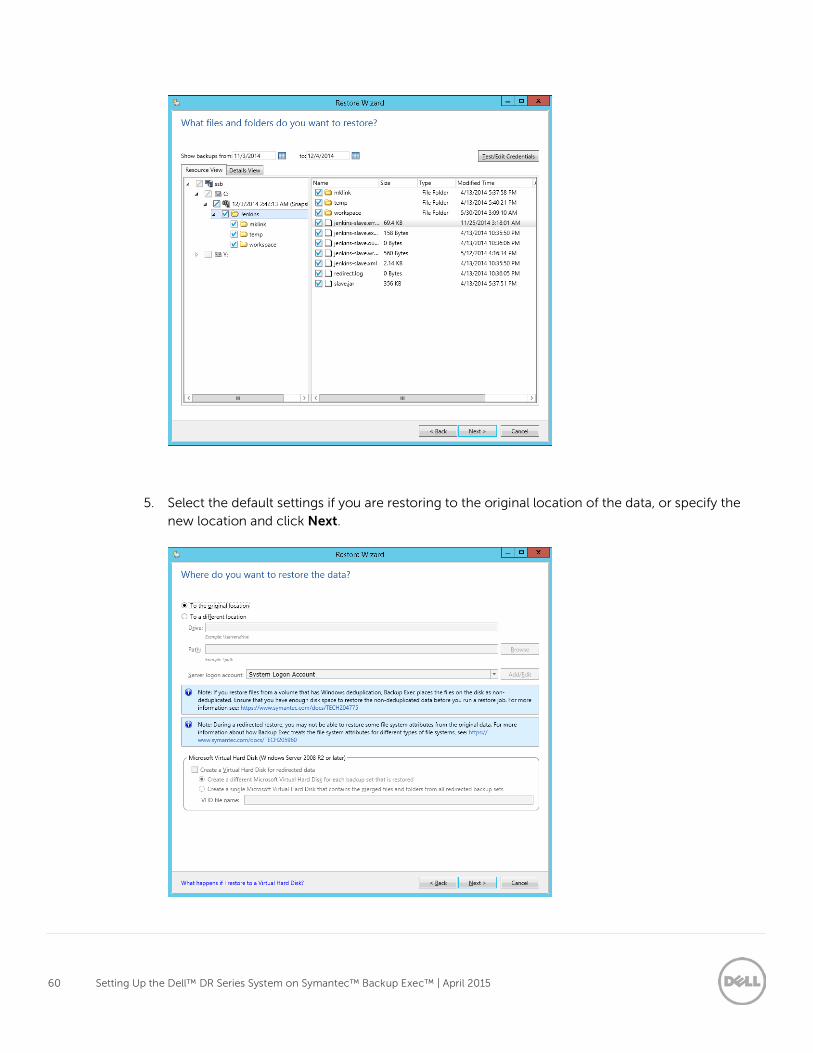
5. Select the default settings if you are restoring to the original location of the data, or specify the new location and click Next.
61 Setting Up the Dell™ DR Series System on Symantec™ Backup Exec™ | April 2015
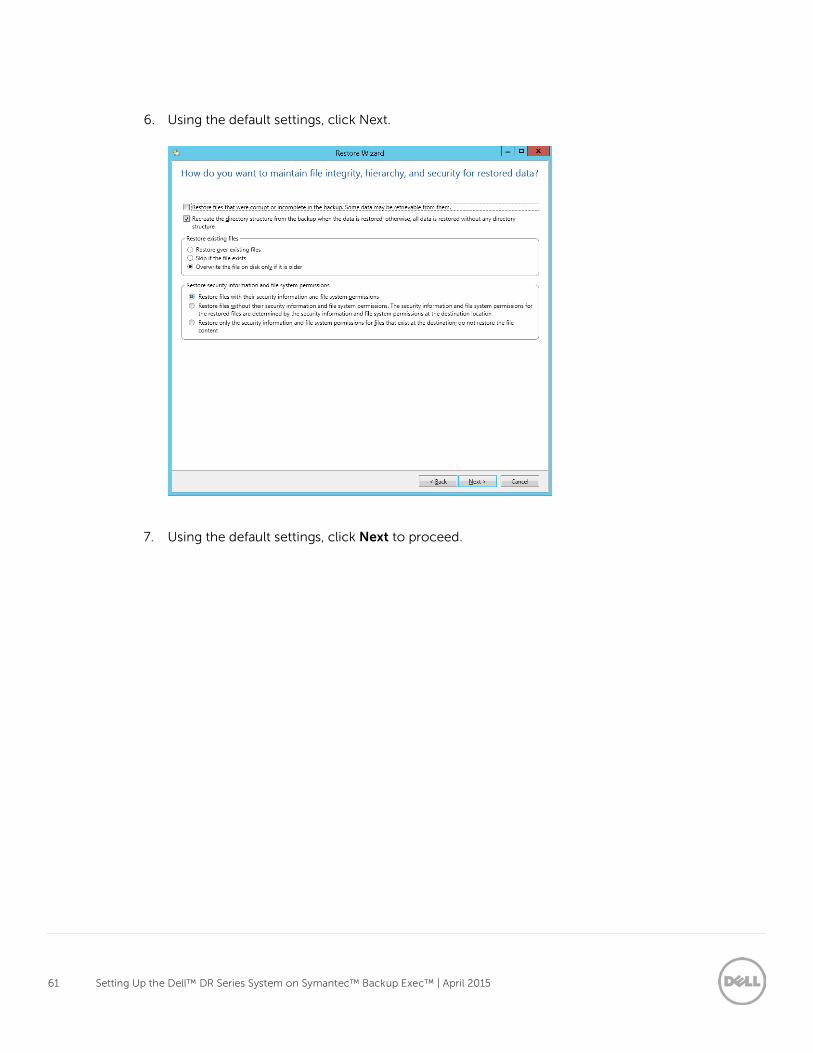
6. Using the default settings, click Next.
7. Using the default settings, click Next to proceed.
62 Setting Up the Dell™ DR Series System on Symantec™ Backup Exec™ | April 2015
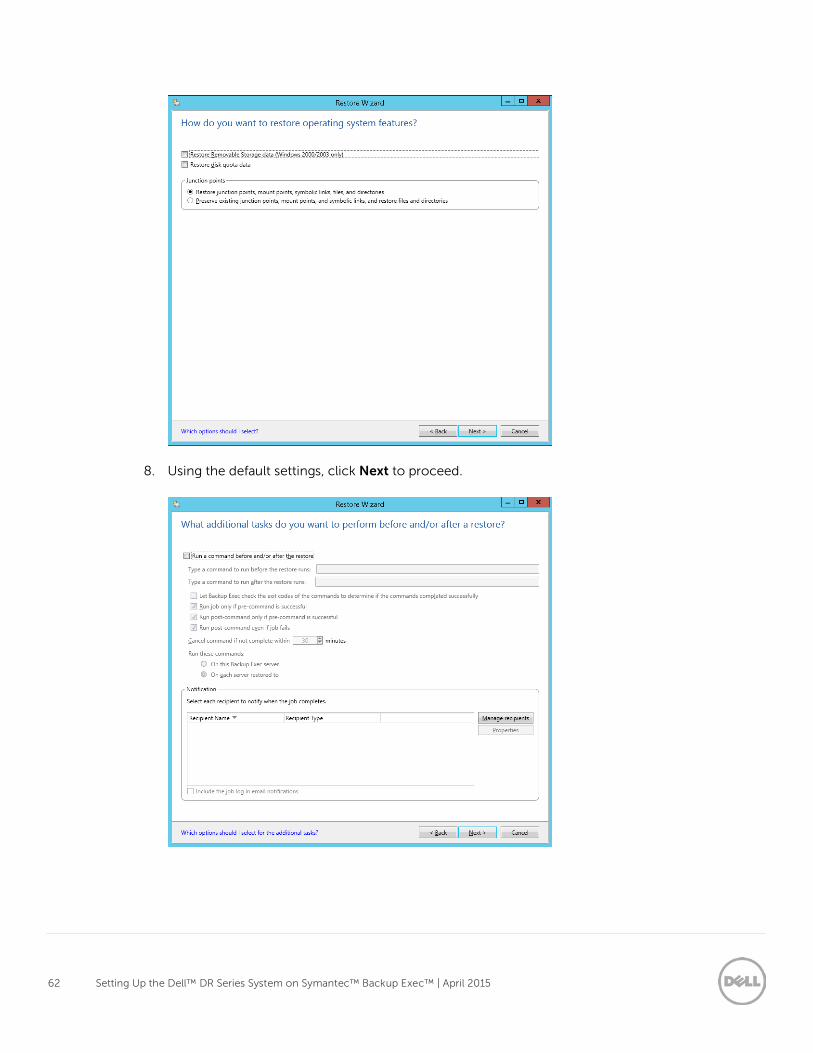
8. Using the default settings, click Next to proceed.
63 Setting Up the Dell™ DR Series System on Symantec™ Backup Exec™ | April 2015
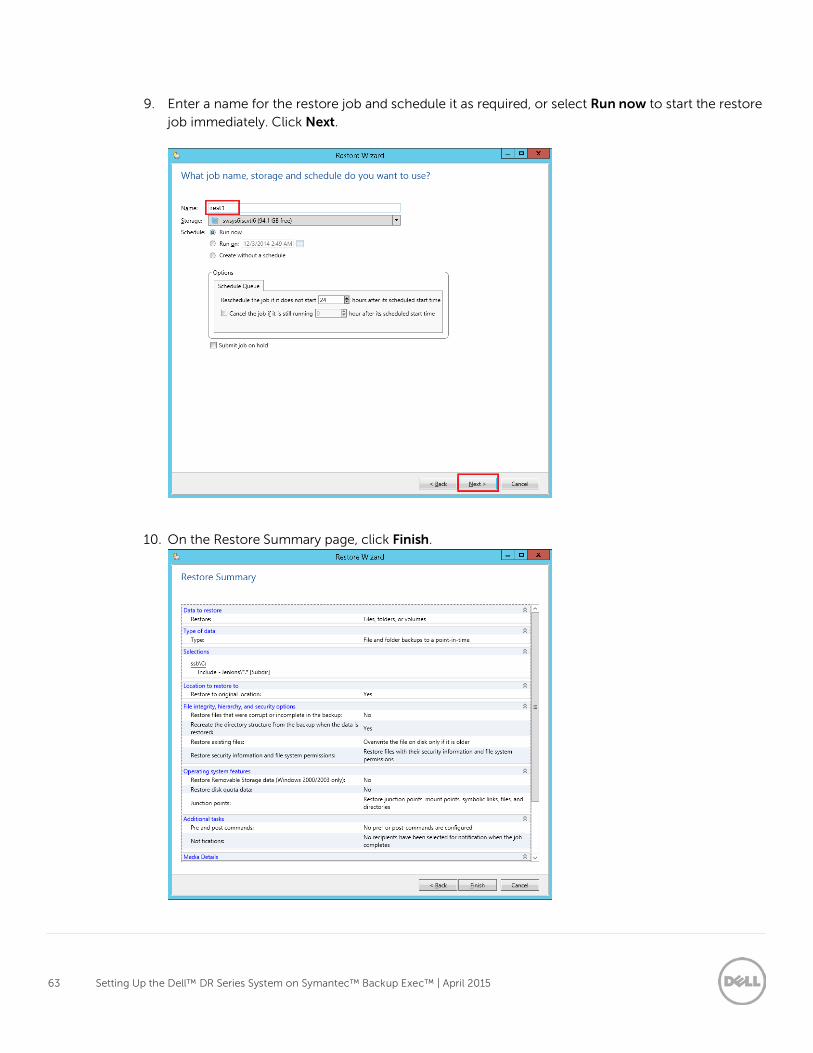
9. Enter a name for the restore job and schedule it as required, or select Run now to start the restore job immediately. Click Next.
10. On the Restore Summary page, click Finish.
64 Setting Up the Dell™ DR Series System on Symantec™ Backup Exec™ | April 2015
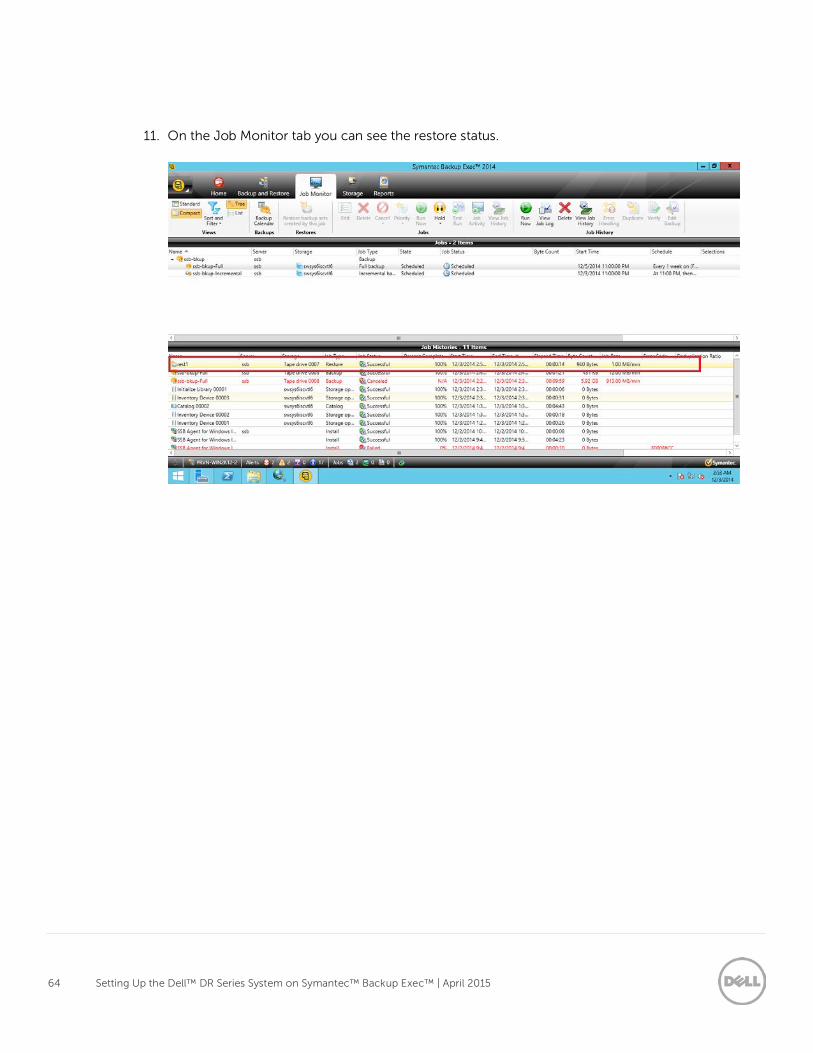
11. On the Job Monitor tab you can see the restore status.

65 Setting Up the Dell™ DR Series System on Symantec™ Backup Exec™ | April 2015
4 Configuring an OST container on the DR Series system for
use with Symantec Backup Exec Server 2014/2015
4.1 Creating an OST container 1. Select Containers in the left navigation area of the DR Series system GUI, and then click Create at
the top of the page.
2. Enter a Container Name and then click Next.
66 Setting Up the Dell™ DR Series System on Symantec™ Backup Exec™ | April 2015
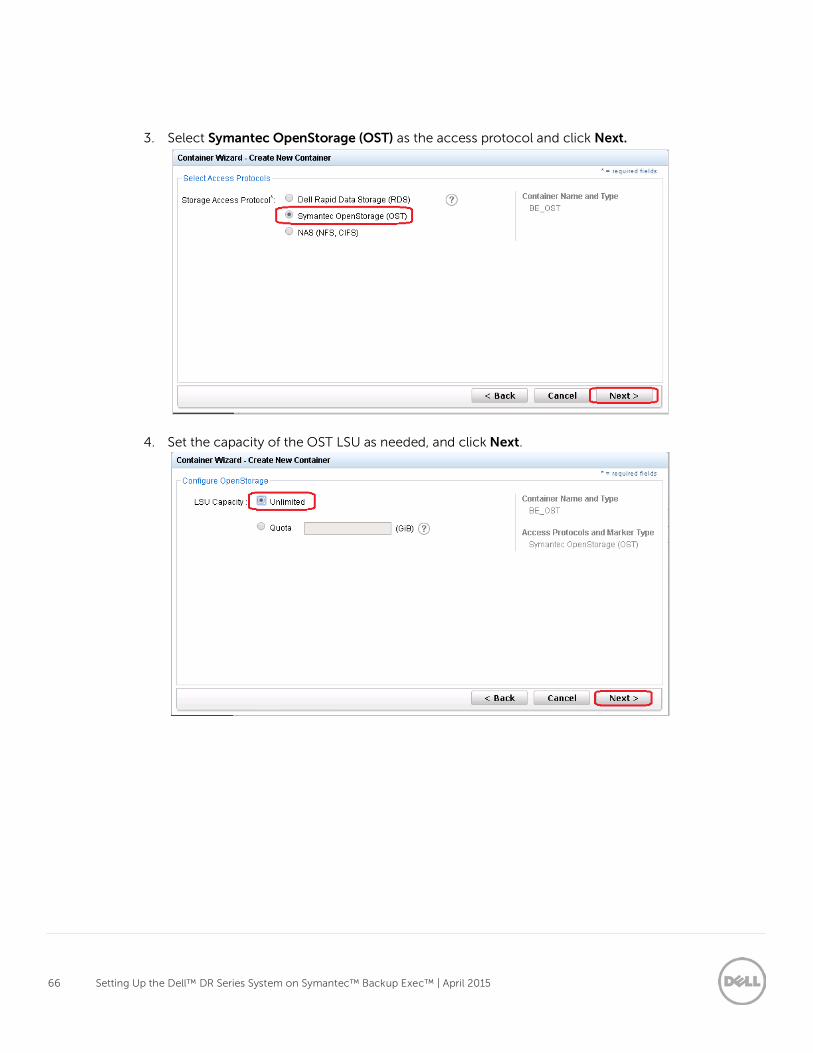
3. Select Symantec OpenStorage (OST) as the access protocol and click Next.
4. Set the capacity of the OST LSU as needed, and click Next.
67 Setting Up the Dell™ DR Series System on Symantec™ Backup Exec™ | April 2015
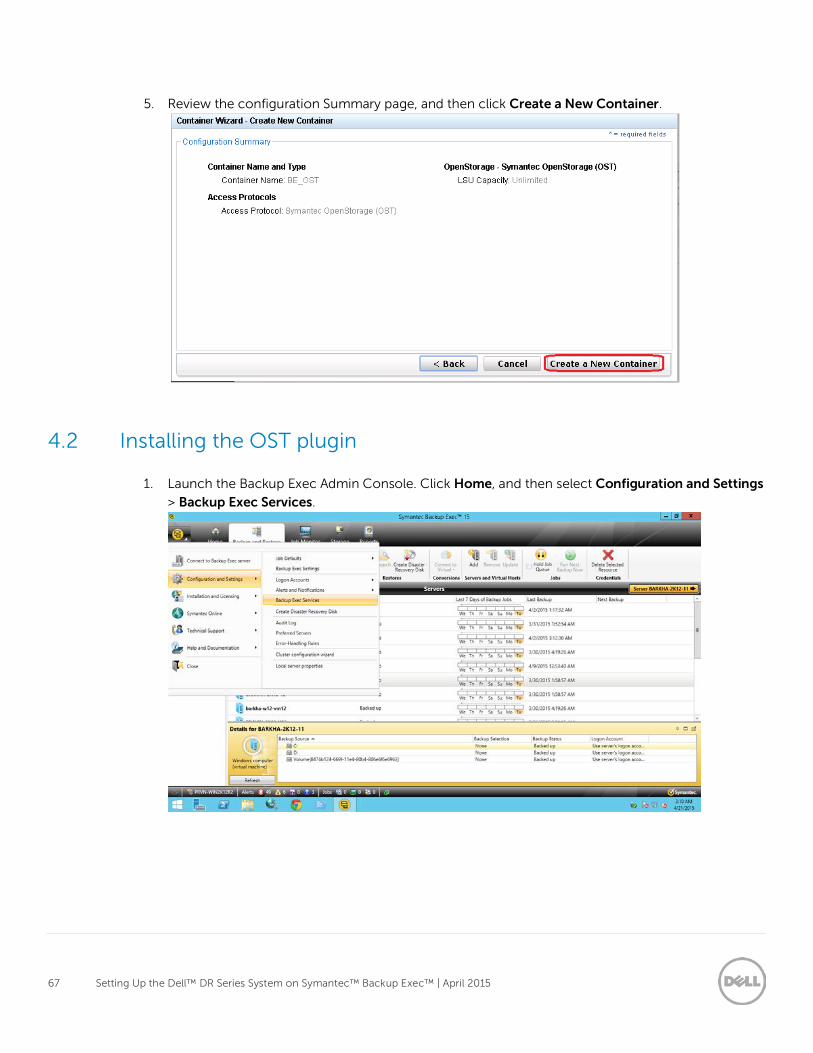
5. Review the configuration Summary page, and then click Create a New Container.
4.2 Installing the OST plugin
1. Launch the Backup Exec Admin Console. Click Home, and then select Configuration and Settings
> Backup Exec Services.
68 Setting Up the Dell™ DR Series System on Symantec™ Backup Exec™ | April 2015
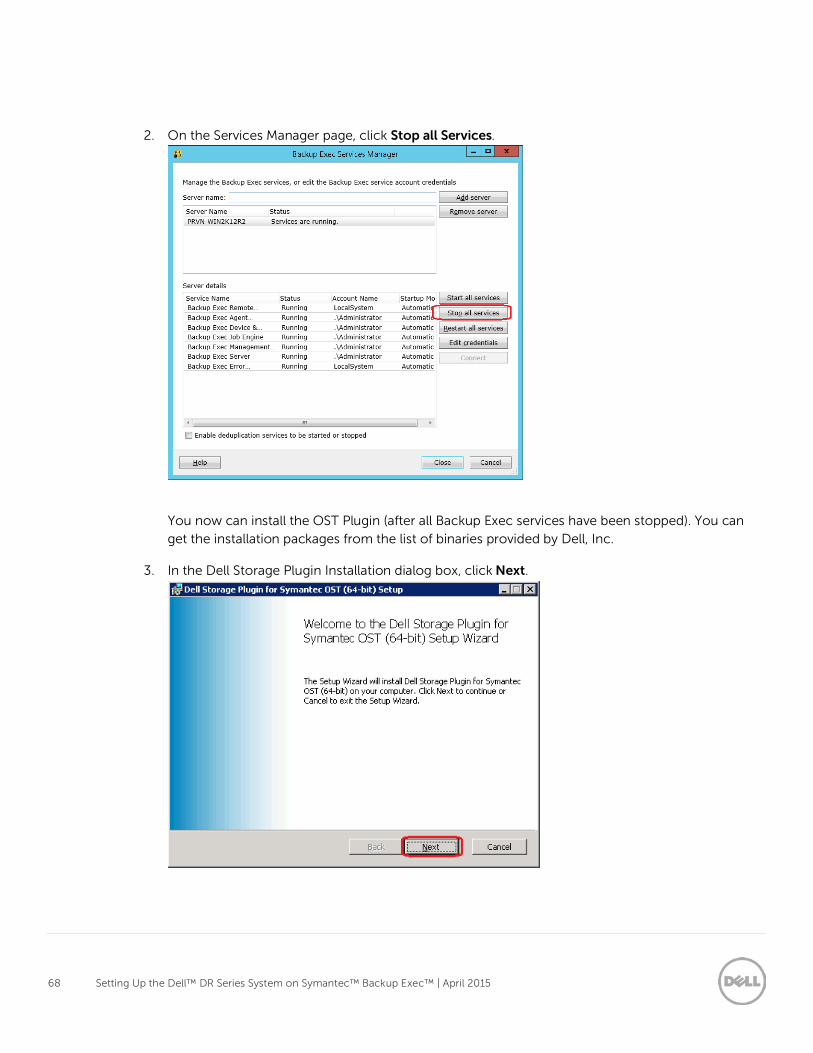
2. On the Services Manager page, click Stop all Services.
You now can install the OST Plugin (after all Backup Exec services have been stopped). You can get the installation packages from the list of binaries provided by Dell, Inc.
3. In the Dell Storage Plugin Installation dialog box, click Next.
69 Setting Up the Dell™ DR Series System on Symantec™ Backup Exec™ | April 2015
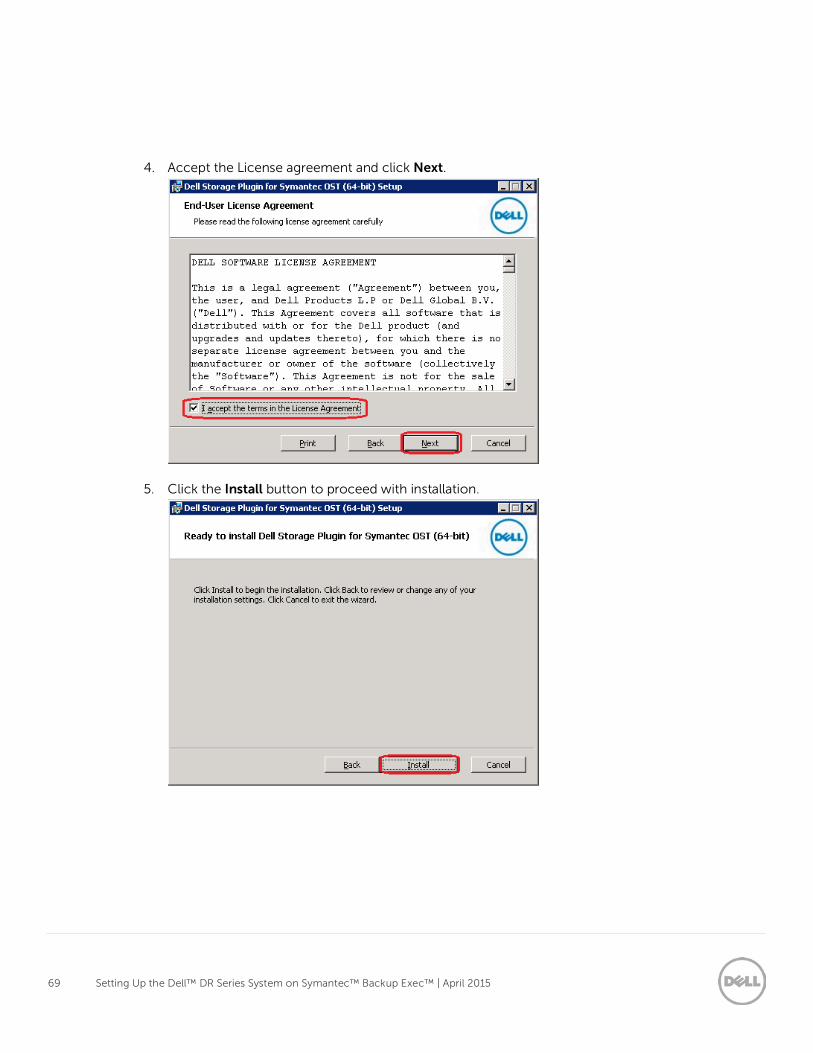
4. Accept the License agreement and click Next.
5. Click the Install button to proceed with installation.

70 Setting Up the Dell™ DR Series System on Symantec™ Backup Exec™ | April 2015
6. Click Finish to complete the installation of the OST plugin.
4.3 Configuring the OST device in Backup Exec
1. Launch the Backup Exec Admin Console. Click Home, and then select Configuration and Settings
> Backup Exec Services.
71 Setting Up the Dell™ DR Series System on Symantec™ Backup Exec™ | April 2015
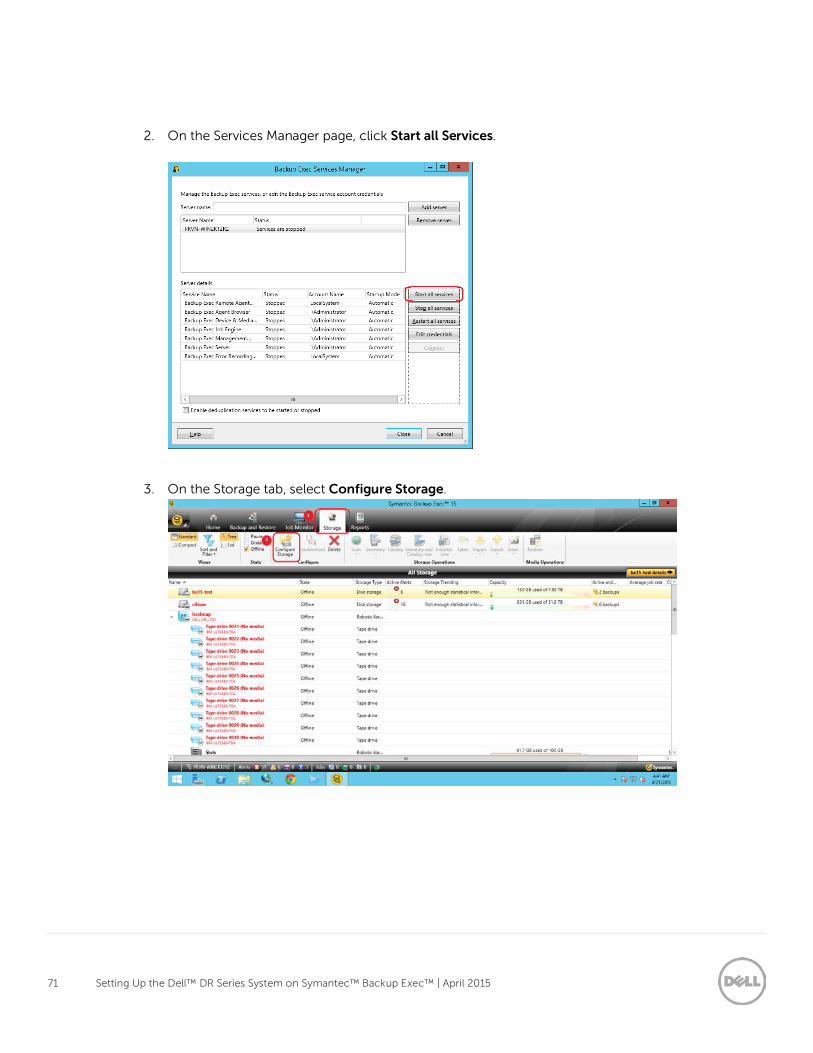
2. On the Services Manager page, click Start all Services.
3. On the Storage tab, select Configure Storage.
72 Setting Up the Dell™ DR Series System on Symantec™ Backup Exec™ | April 2015
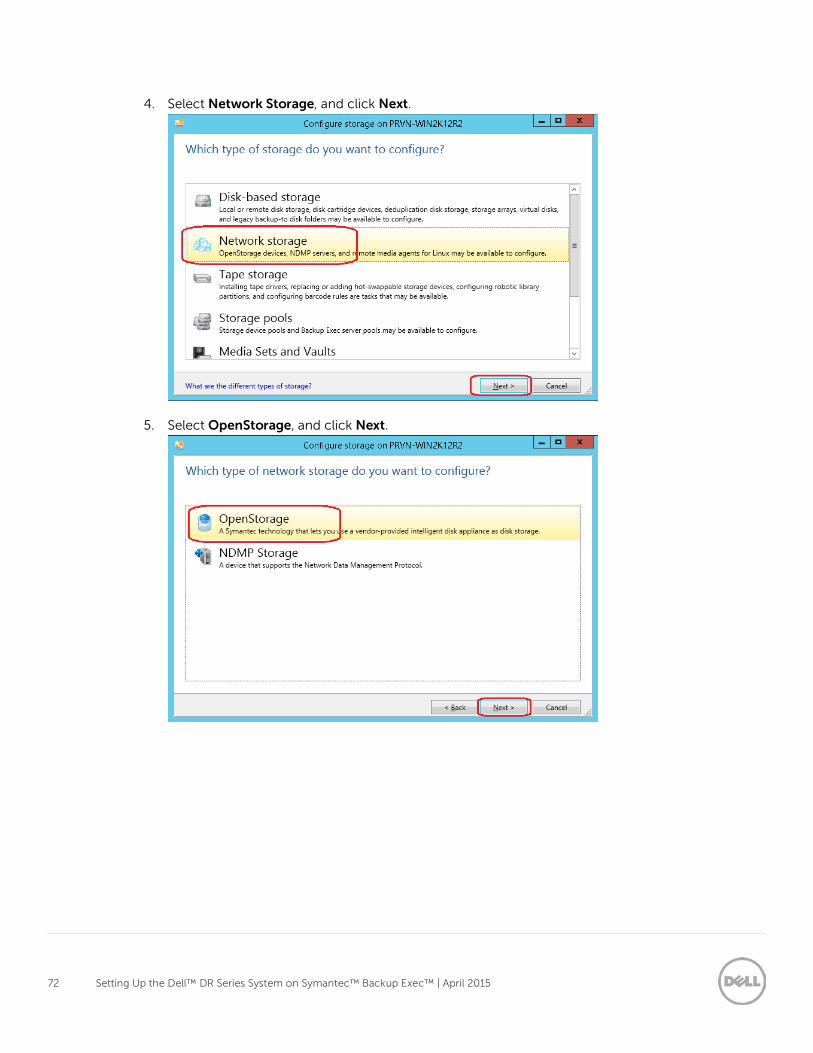
4. Select Network Storage, and click Next.
5. Select OpenStorage, and click Next.
73 Setting Up the Dell™ DR Series System on Symantec™ Backup Exec™ | April 2015
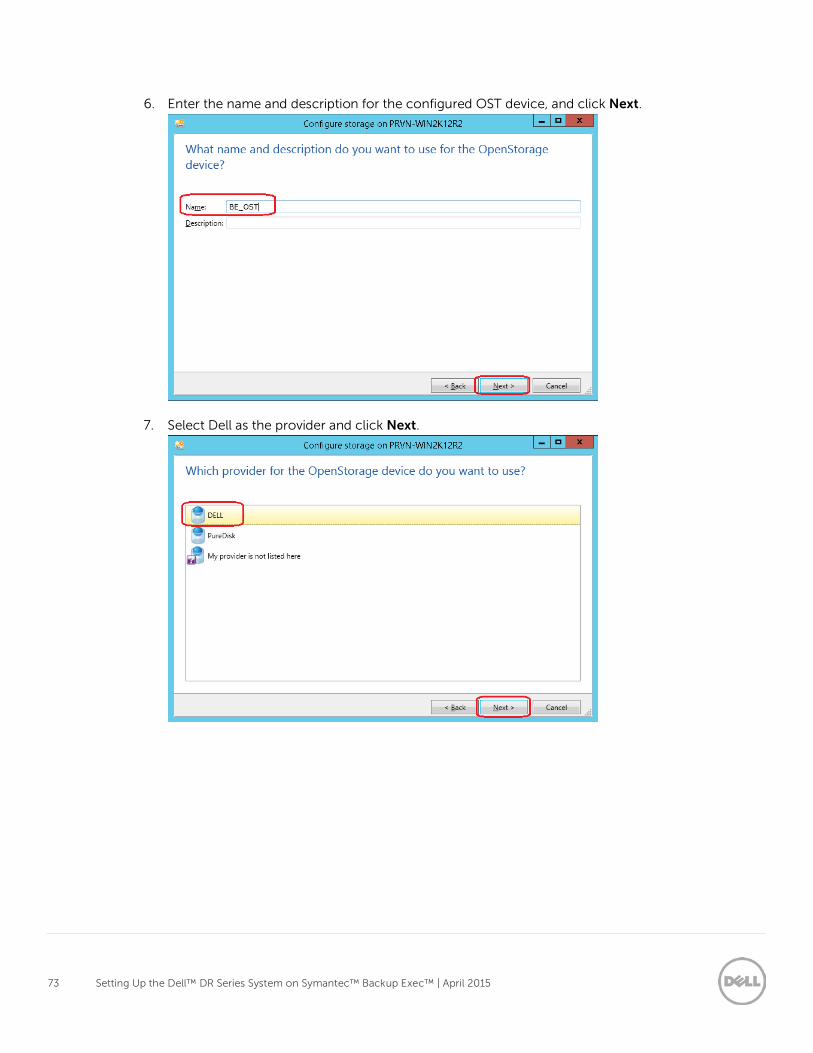
6. Enter the name and description for the configured OST device, and click Next.
7. Select Dell as the provider and click Next.

74 Setting Up the Dell™ DR Series System on Symantec™ Backup Exec™ | April 2015
8. Enter the Server name (IP or FQDN) and select the Backup_user as the logon account.
9. Select the created OST container from the list and click Next.
75 Setting Up the Dell™ DR Series System on Symantec™ Backup Exec™ | April 2015
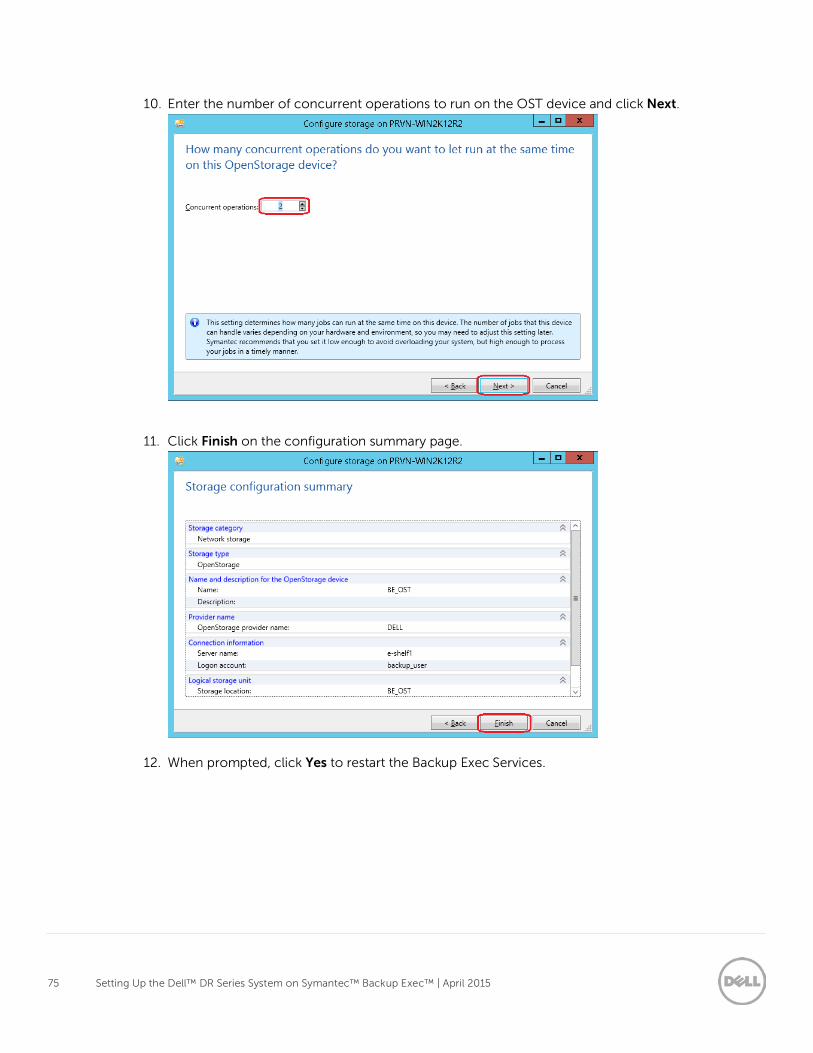
10. Enter the number of concurrent operations to run on the OST device and click Next.
11. Click Finish on the configuration summary page.
12. When prompted, click Yes to restart the Backup Exec Services.
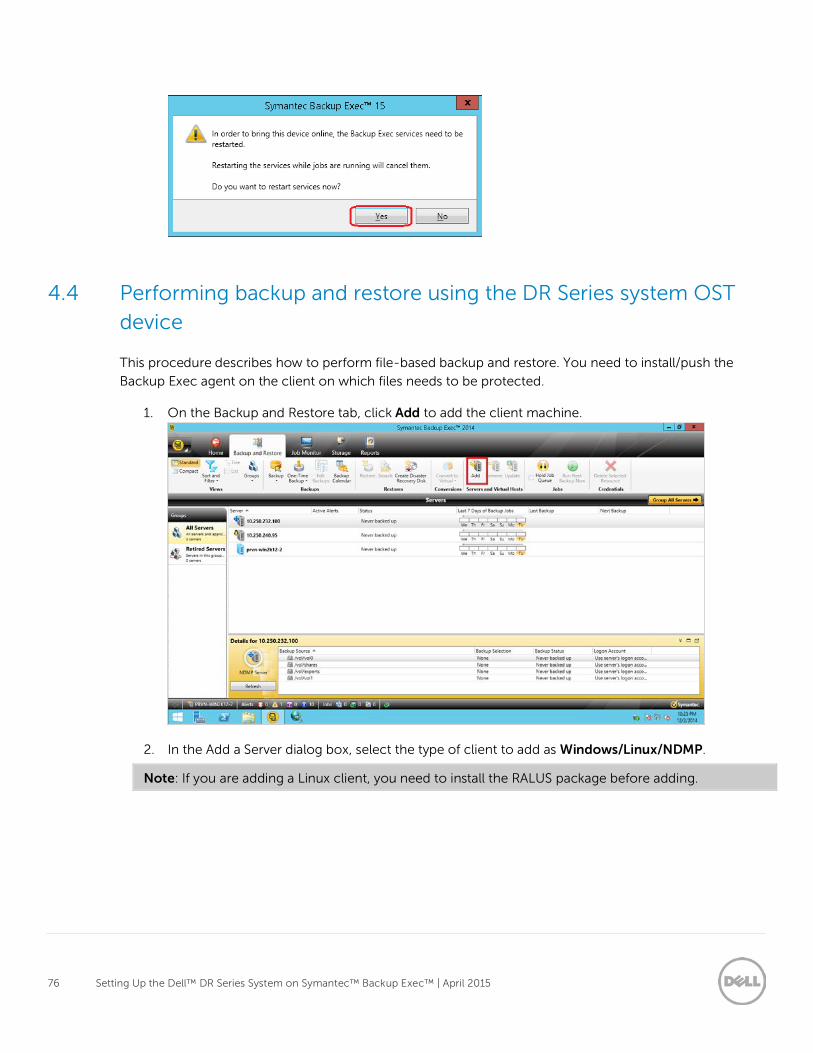
76 Setting Up the Dell™ DR Series System on Symantec™ Backup Exec™ | April 2015
4.4 Performing backup and restore using the DR Series system OST device
This procedure describes how to perform file-based backup and restore. You need to install/push the
Backup Exec agent on the client on which files needs to be protected.
1. On the Backup and Restore tab, click Add to add the client machine.
2. In the Add a Server dialog box, select the type of client to add as Windows/Linux/NDMP.
Note: If you are adding a Linux client, you need to install the RALUS package before adding.
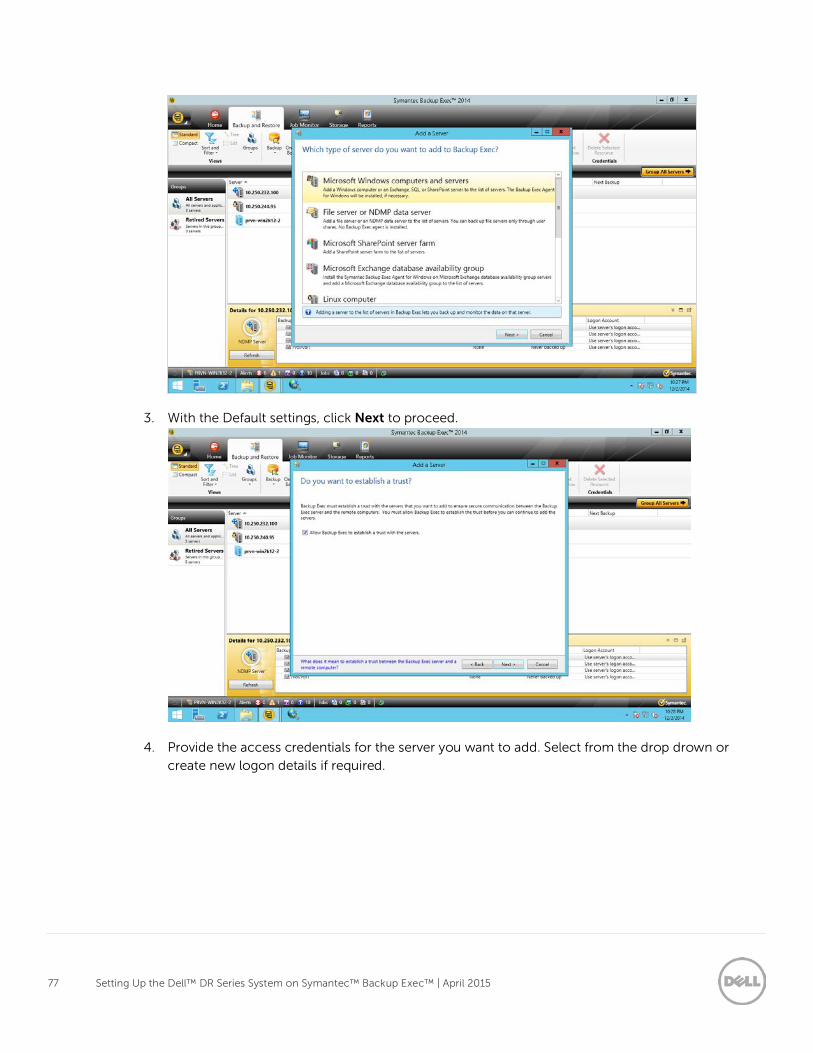
77 Setting Up the Dell™ DR Series System on Symantec™ Backup Exec™ | April 2015
3. With the Default settings, click Next to proceed.
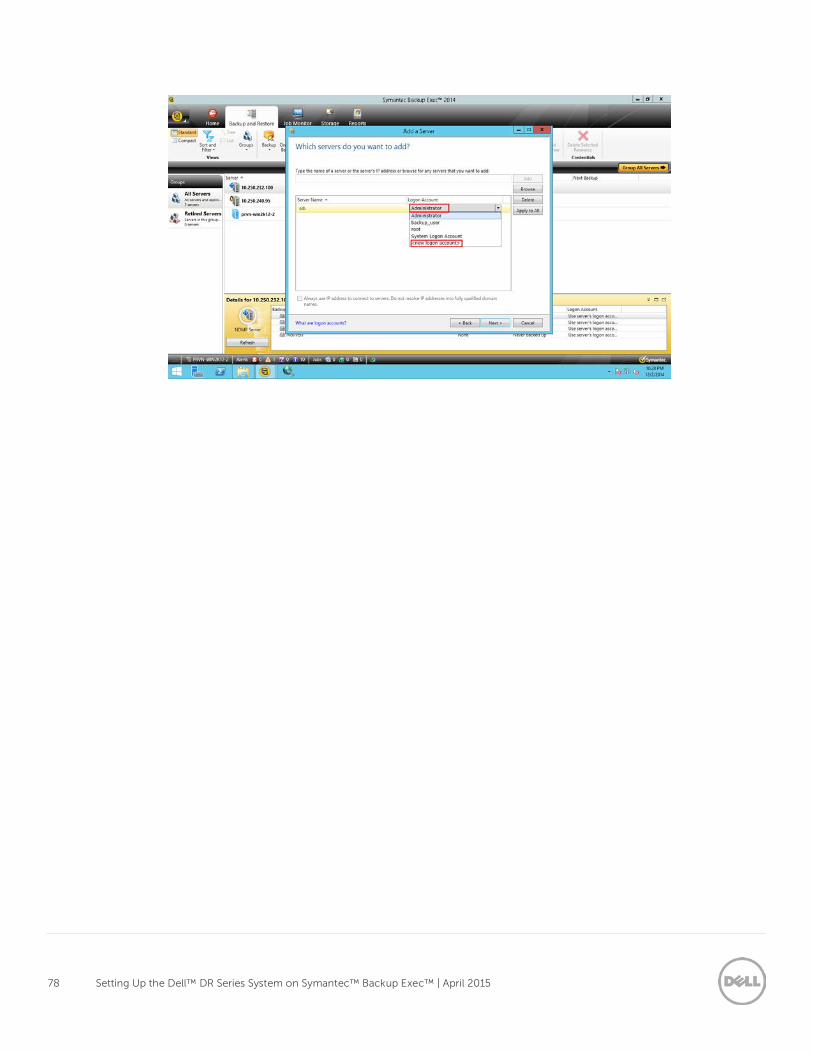
4. Provide the access credentials for the server you want to add. Select from the drop drown or create new logon details if required.
78 Setting Up the Dell™ DR Series System on Symantec™ Backup Exec™ | April 2015
79 Setting Up the Dell™ DR Series System on Symantec™ Backup Exec™ | April 2015
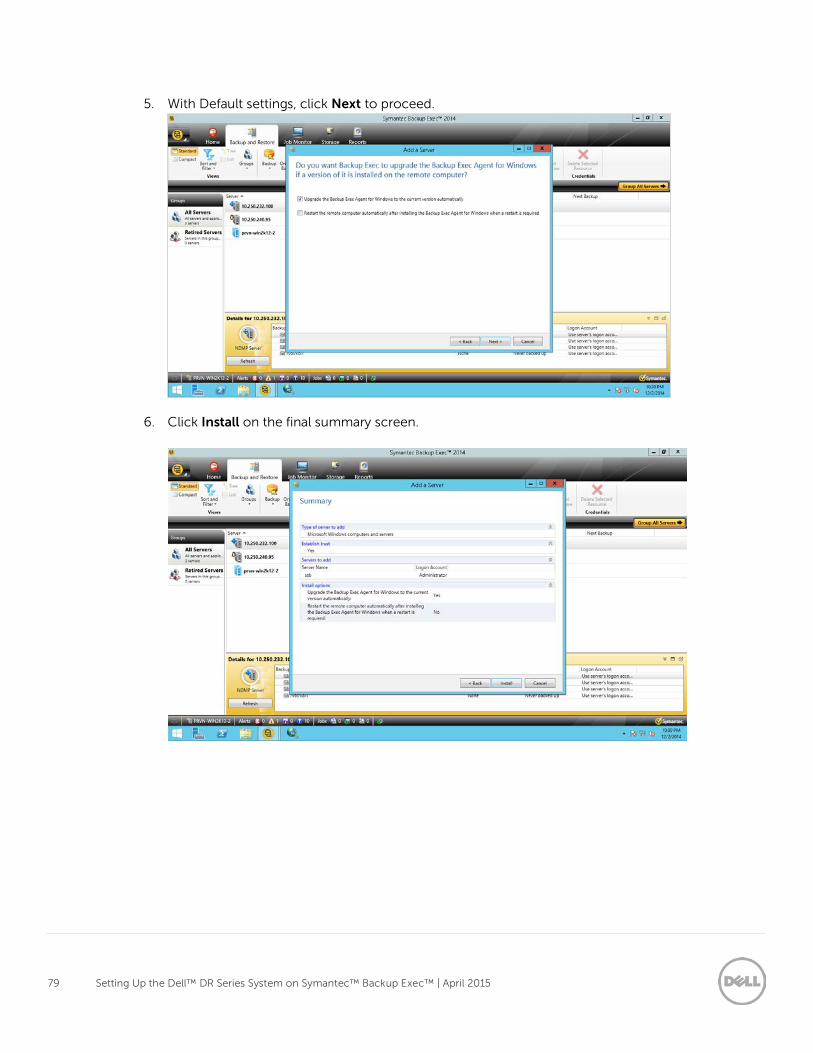
5. With Default settings, click Next to proceed.
6. Click Install on the final summary screen.
80 Setting Up the Dell™ DR Series System on Symantec™ Backup Exec™ | April 2015
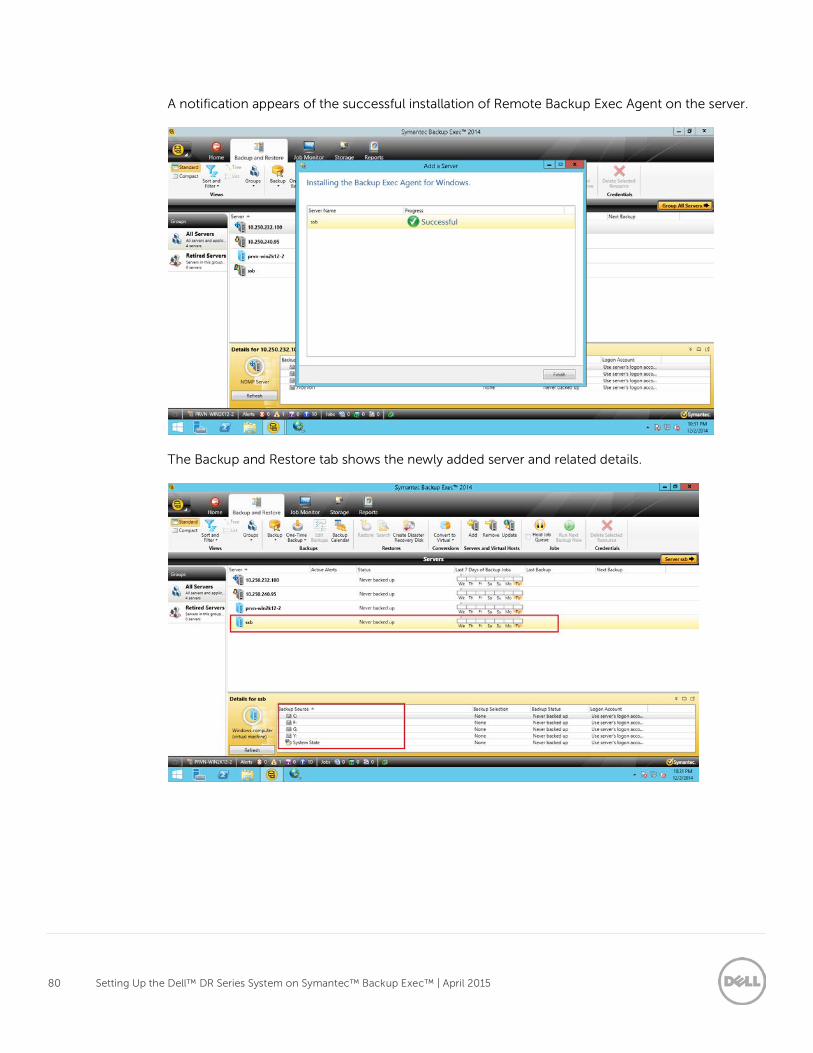
A notification appears of the successful installation of Remote Backup Exec Agent on the server.
The Backup and Restore tab shows the newly added server and related details.
81 Setting Up the Dell™ DR Series System on Symantec™ Backup Exec™ | April 2015
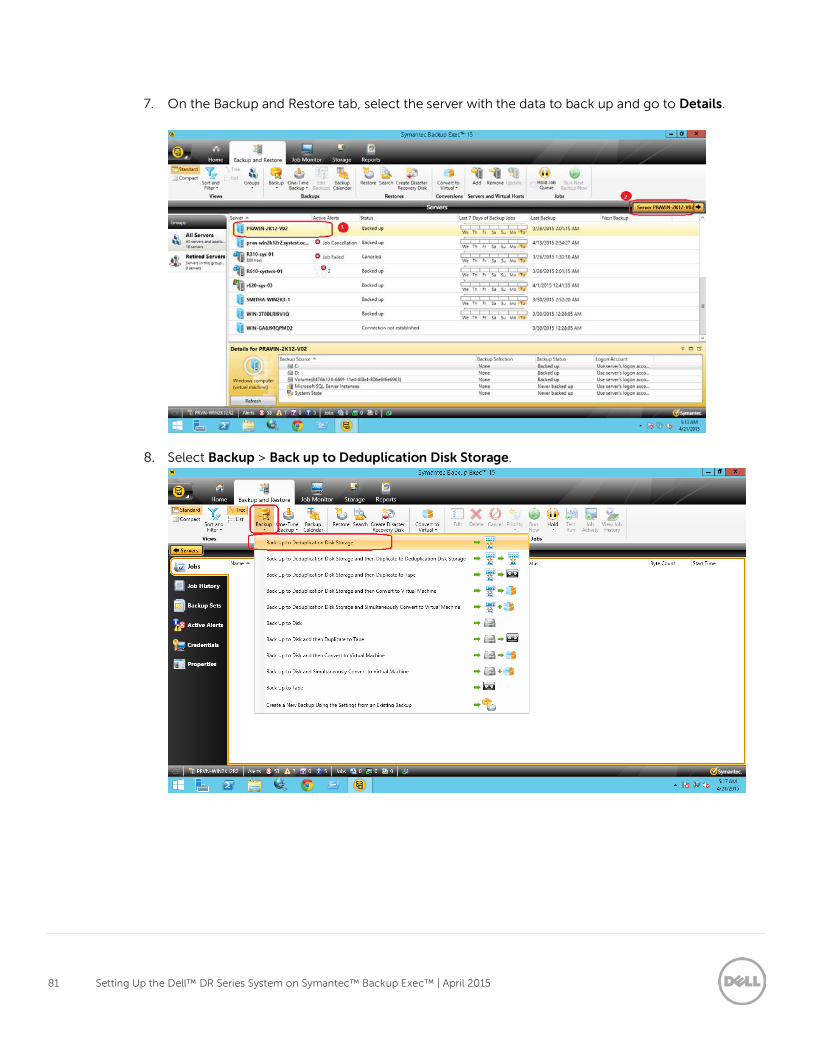
7. On the Backup and Restore tab, select the server with the data to back up and go to Details.
8. Select Backup > Back up to Deduplication Disk Storage.
82 Setting Up the Dell™ DR Series System on Symantec™ Backup Exec™ | April 2015
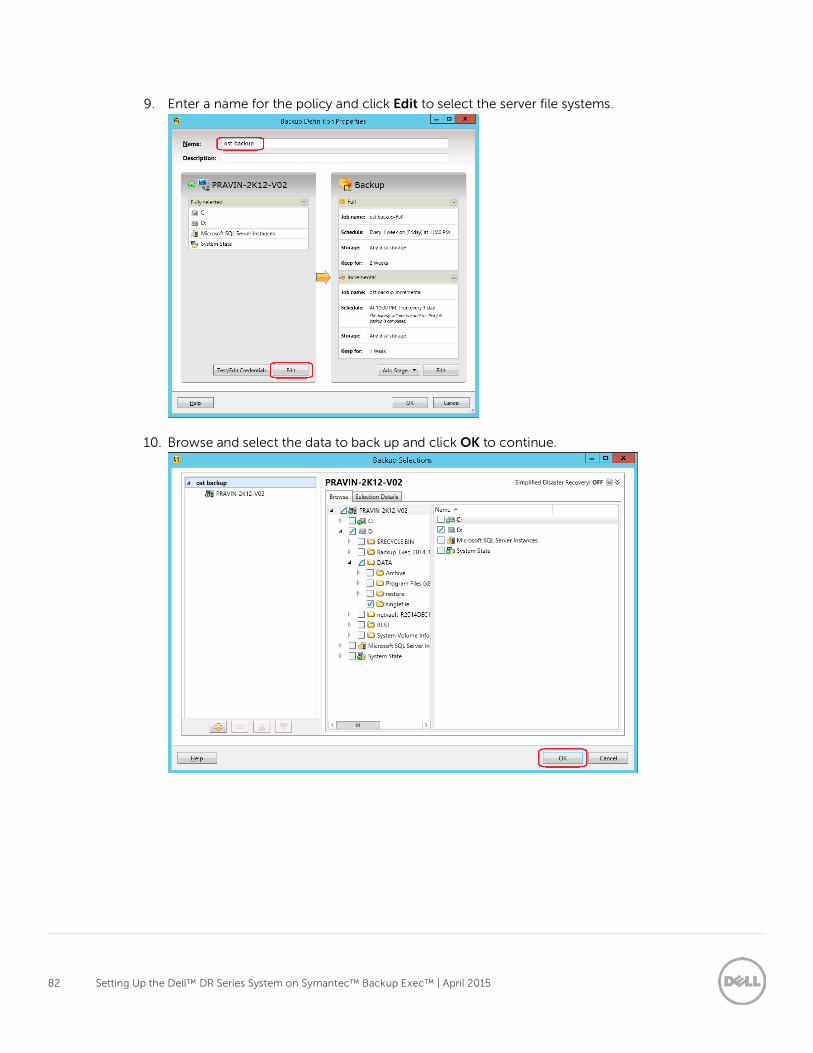
9. Enter a name for the policy and click Edit to select the server file systems.
10. Browse and select the data to back up and click OK to continue.
83 Setting Up the Dell™ DR Series System on Symantec™ Backup Exec™ | April 2015
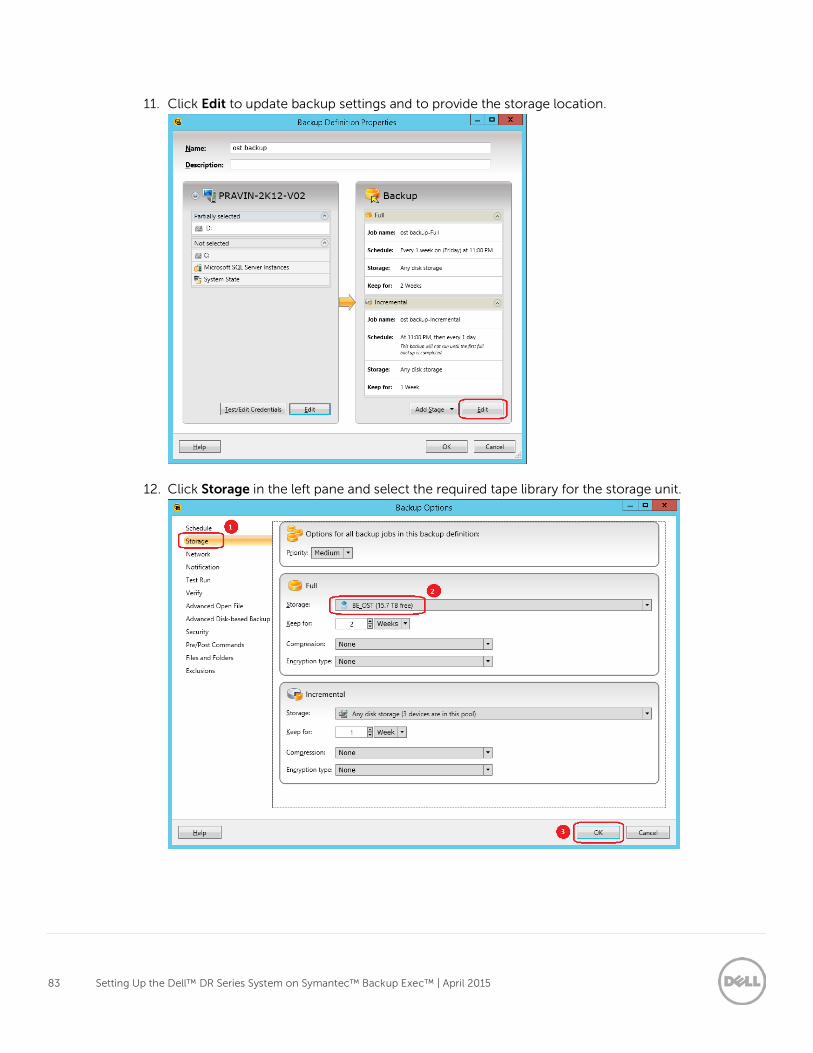
11. Click Edit to update backup settings and to provide the storage location.
12. Click Storage in the left pane and select the required tape library for the storage unit.

84 Setting Up the Dell™ DR Series System on Symantec™ Backup Exec™ | April 2015
13. Review the final selections and click OK to proceed.
14. To run a backup job, select the backup policy (FULL schedule) and click Run Now.
85 Setting Up the Dell™ DR Series System on Symantec™ Backup Exec™ | April 2015
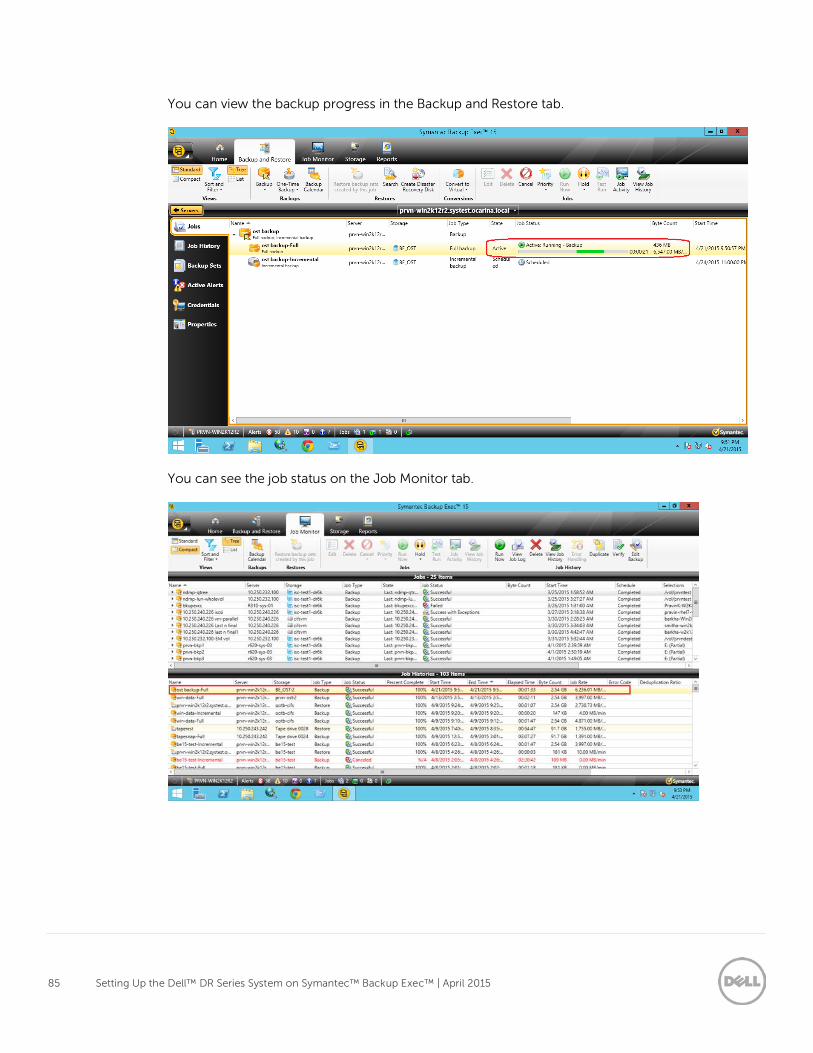
You can view the backup progress in the Backup and Restore tab.
You can see the job status on the Job Monitor tab.
86 Setting Up the Dell™ DR Series System on Symantec™ Backup Exec™ | April 2015
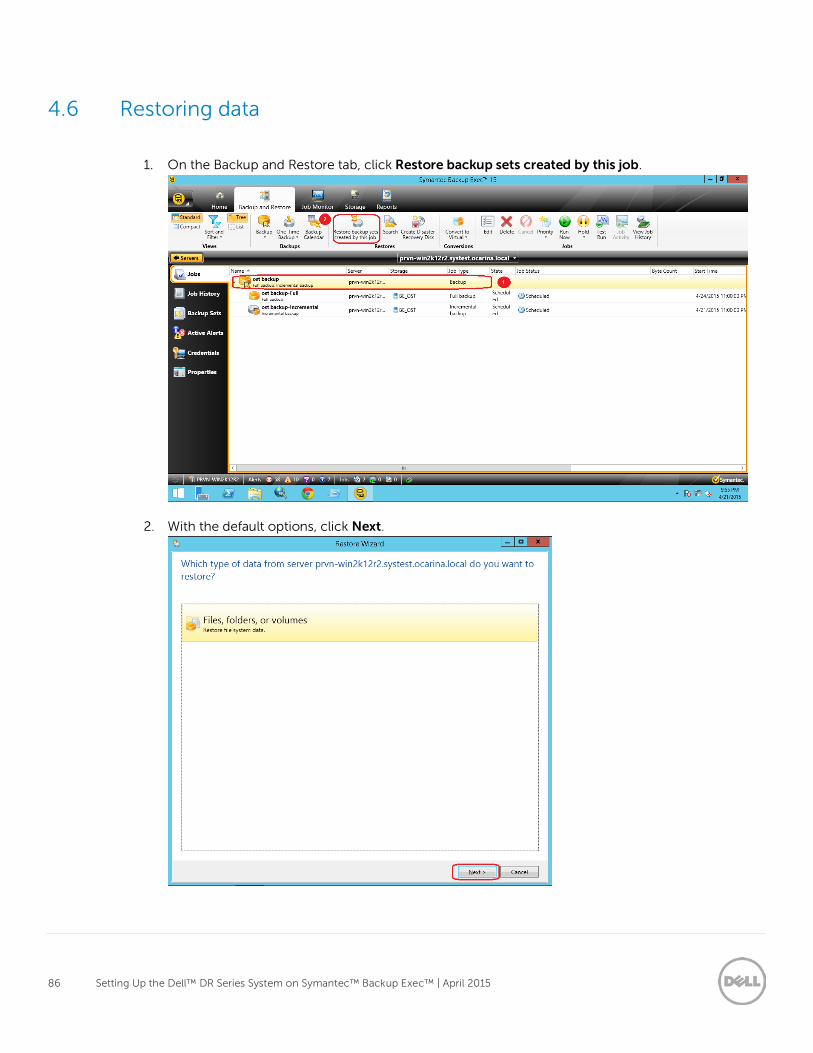
4.6 Restoring data
1. On the Backup and Restore tab, click Restore backup sets created by this job.
2. With the default options, click Next.
87 Setting Up the Dell™ DR Series System on Symantec™ Backup Exec™ | April 2015
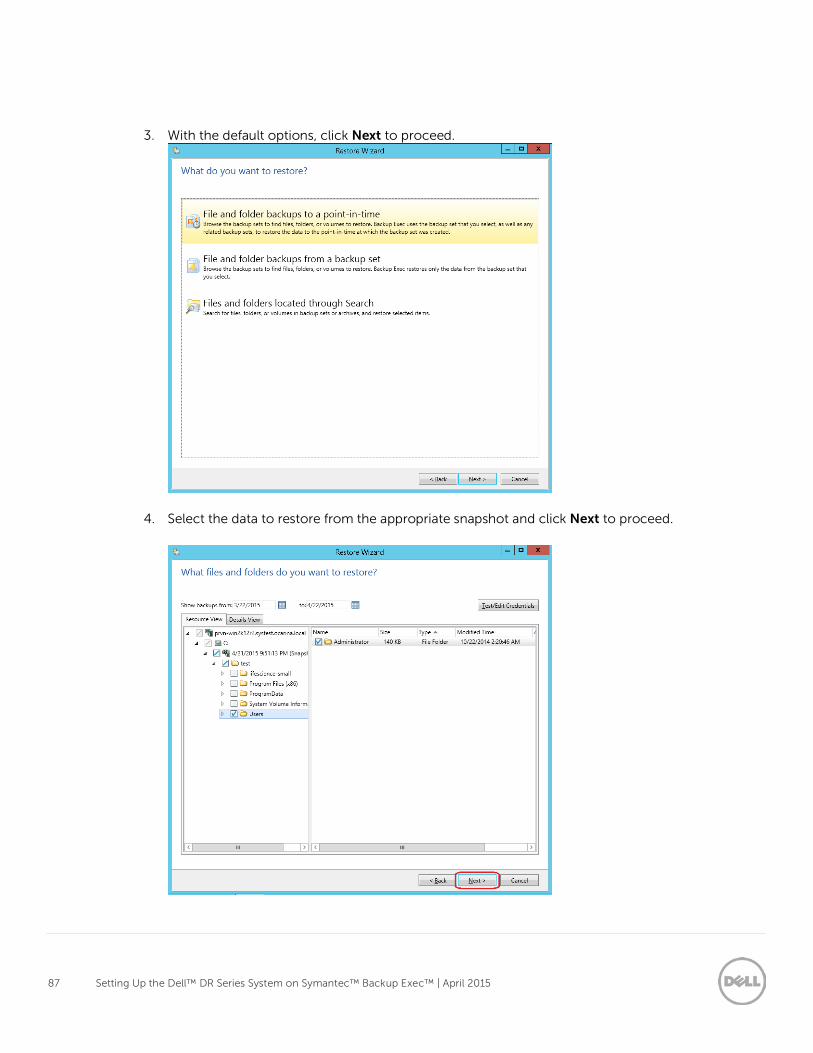
3. With the default options, click Next to proceed.
4. Select the data to restore from the appropriate snapshot and click Next to proceed.
88 Setting Up the Dell™ DR Series System on Symantec™ Backup Exec™ | April 2015
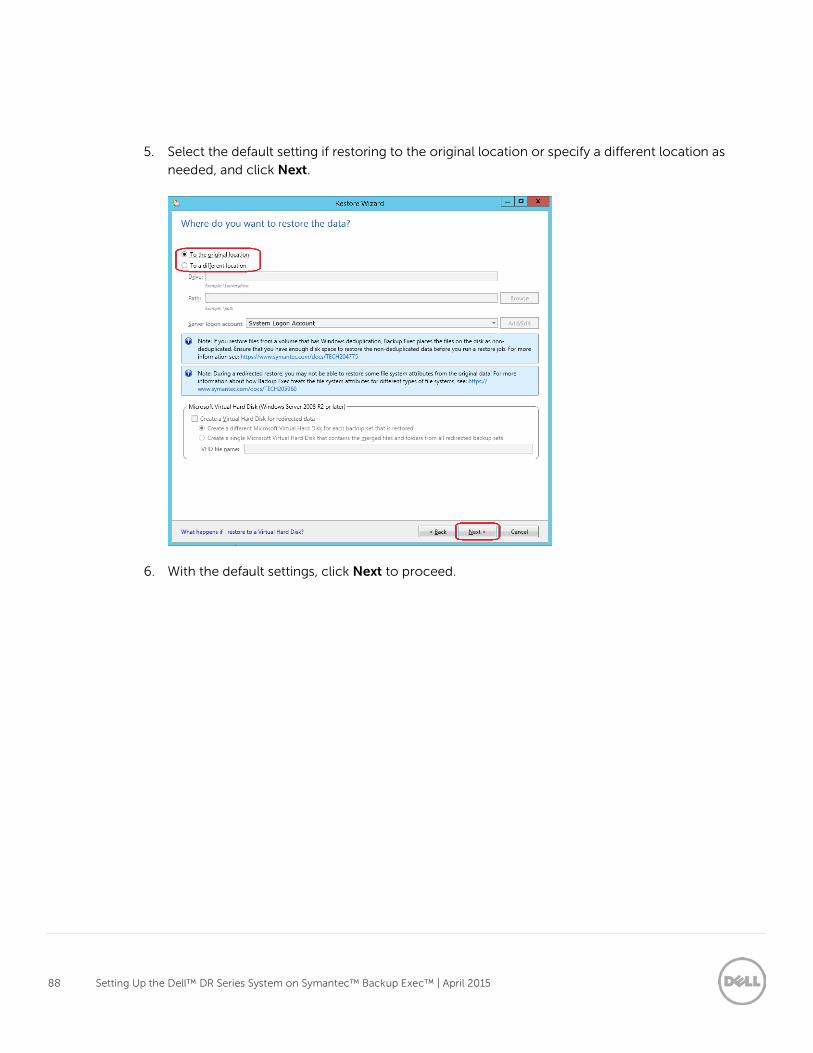
5. Select the default setting if restoring to the original location or specify a different location as needed, and click Next.
6. With the default settings, click Next to proceed.
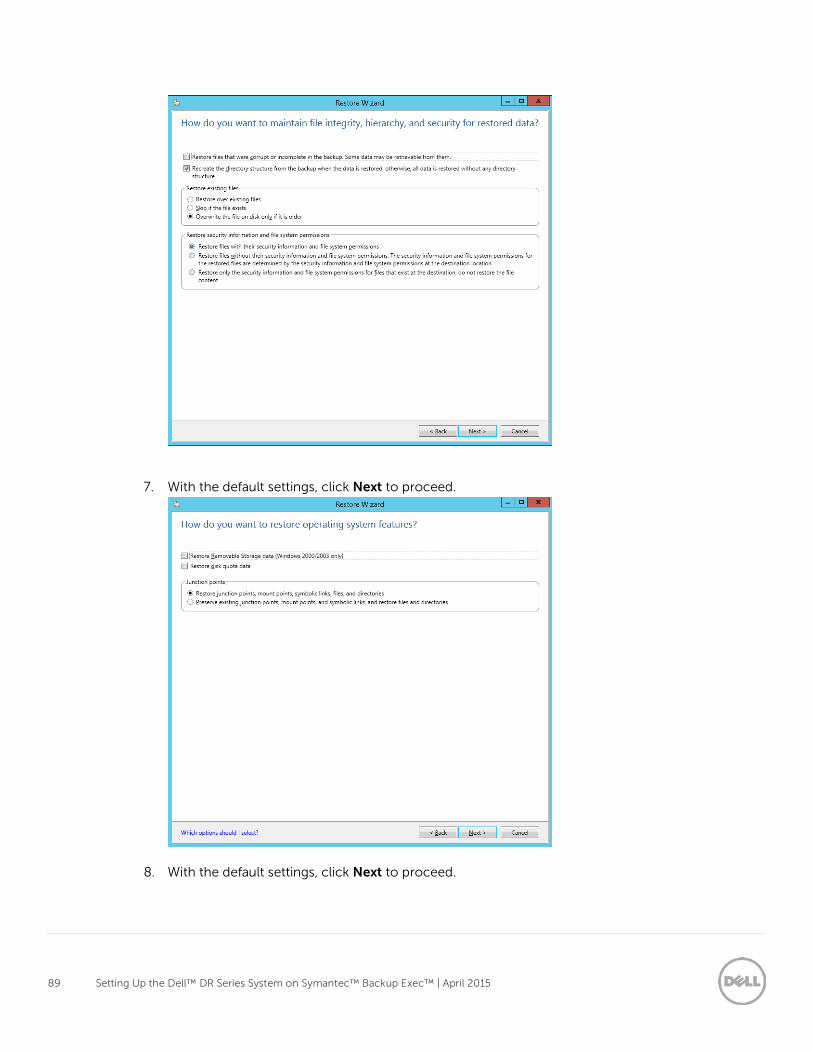
89 Setting Up the Dell™ DR Series System on Symantec™ Backup Exec™ | April 2015
7. With the default settings, click Next to proceed.
8. With the default settings, click Next to proceed.
90 Setting Up the Dell™ DR Series System on Symantec™ Backup Exec™ | April 2015
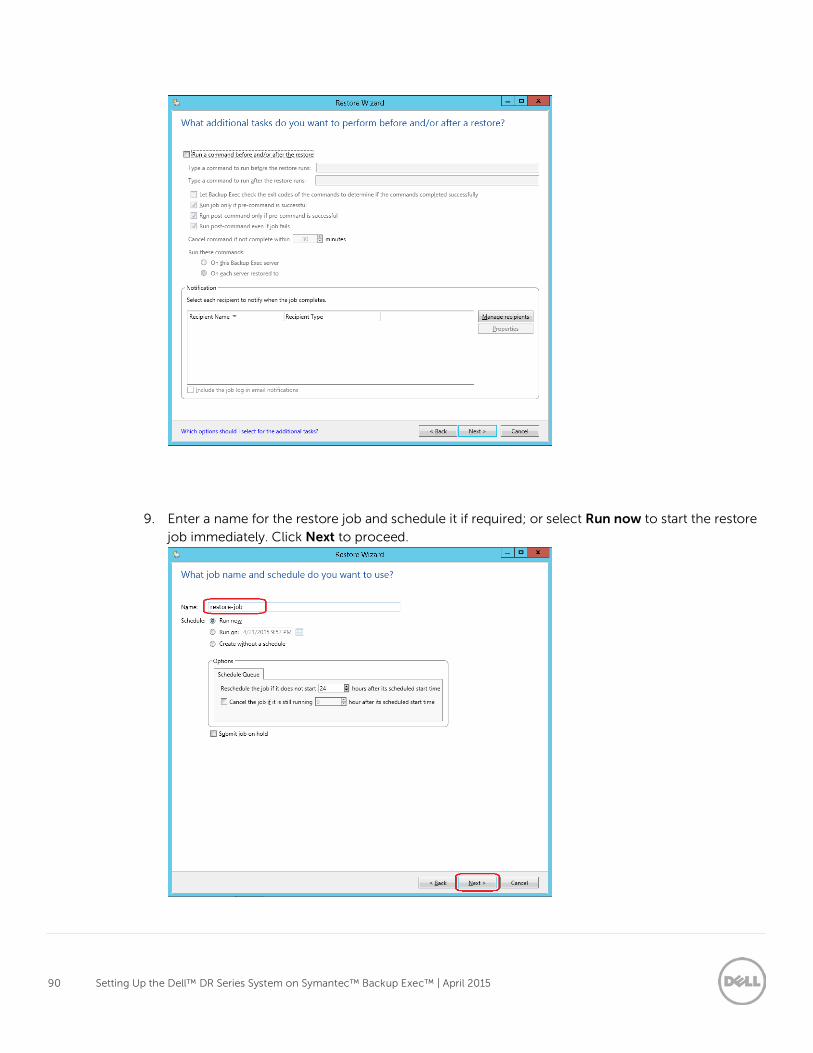
9. Enter a name for the restore job and schedule it if required; or select Run now to start the restore job immediately. Click Next to proceed.
91 Setting Up the Dell™ DR Series System on Symantec™ Backup Exec™ | April 2015
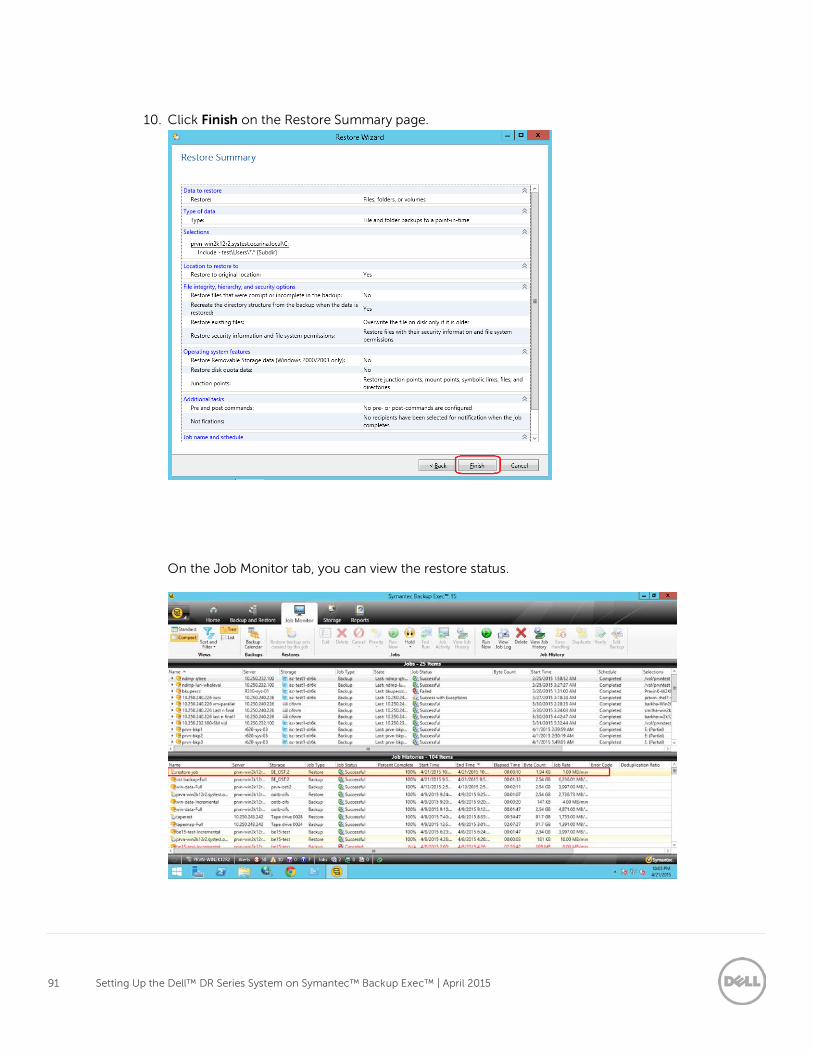
10. Click Finish on the Restore Summary page.
On the Job Monitor tab, you can view the restore status.

92 Setting Up the Dell™ DR Series System on Symantec™ Backup Exec™ | April 2015
93 Setting Up the Dell™ DR Series System on Symantec™ Backup Exec™ | April 2015
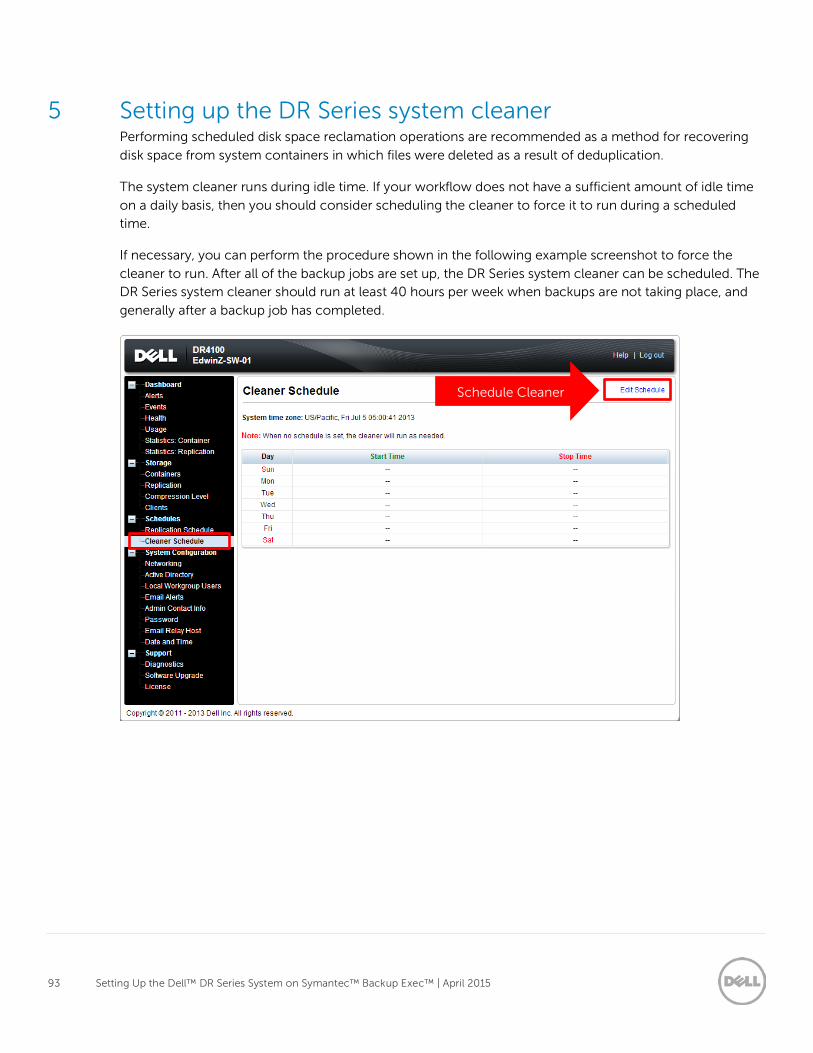
5 Setting up the DR Series system cleaner Performing scheduled disk space reclamation operations are recommended as a method for recovering
disk space from system containers in which files were deleted as a result of deduplication.
The system cleaner runs during idle time. If your workflow does not have a sufficient amount of idle time
on a daily basis, then you should consider scheduling the cleaner to force it to run during a scheduled time.
If necessary, you can perform the procedure shown in the following example screenshot to force the
cleaner to run. After all of the backup jobs are set up, the DR Series system cleaner can be scheduled. The DR Series system cleaner should run at least 40 hours per week when backups are not taking place, and
generally after a backup job has completed.
Schedule Cleaner

94 Setting Up the Dell™ DR Series System on Symantec™ Backup Exec™ | April 2015
6 Monitoring deduplication, compression, and performance After backup jobs have run, the DR Series system tracks capacity, storage savings, and throughput on the
DR Series system dashboard. This information is valuable in understanding the benefits of the DR Series system.
Note: Deduplication ratios increase over time. It is not uncommon to see a 2-4x reduction (25-50% total savings) on the initial backup. As additional full backup jobs are completed, the ratios will increase. Backup jobs with a 12-week retention will average a 15x ratio, in most cases.
95 Setting Up the Dell™ DR Series System on Symantec™ Backup Exec™ | April 2015
A Setting data expiration for Backup Exec 2012/2014/2015
Backup images are deleted by Backup Exec after image expiration if more backups have run (At least two
full backups of the same data set). Refer to the following article for more information: http://www.symantec.com/business/support/index?page=content&id=TECH187957
For more information about image expiration, refer to the Backup Exec 2012 Administration Guide
chapter, “About Backup Job Settings.” If you want to keep the backup set, refer to the topic, “About Keeping Backup Sets.”
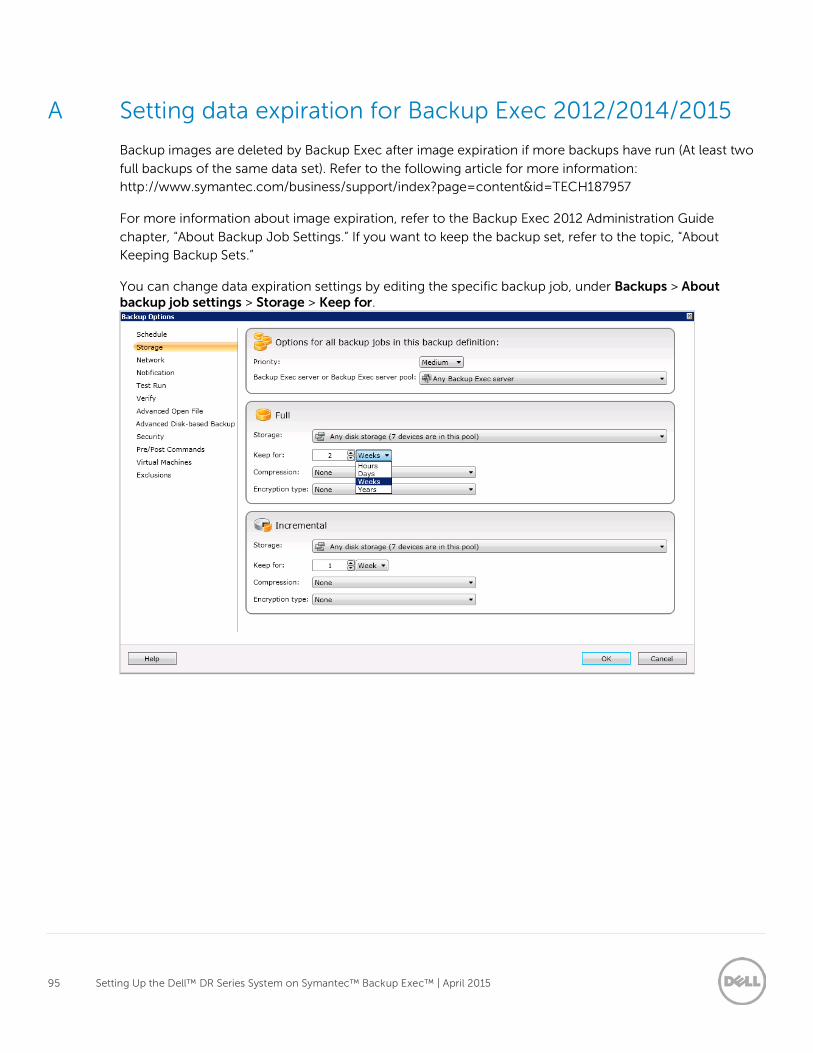
You can change data expiration settings by editing the specific backup job, under Backups > About backup job settings > Storage > Keep for.
96 Setting Up the Dell™ DR Series System on Symantec™ Backup Exec™ | April 2015
B Installing Backup Exec Agent on Linux client (RALUS)
Detailed information is available at following Symantec’s link – http://www.symantec.com/business/support/index?page=content&id=tech46461
97 Setting Up the Dell™ DR Series System on Symantec™ Backup Exec™ | April 2015
C VTL configuration guidelines
C.1 Installing latest Backup Exec service packs for the DR Series system iSCSI VTL capability
The following Service Pack 2 from Symantec is required on the Backup Exec 2014 Server for smooth
integration between Dell DR’s iSCSI-VTL and the BE server: Backup Exec 2014 revision 1786 Service Pack 2
Backup Exec 2015 server by default supports the Dell DR Series system iSCSI-VTL capability.
C.2 Managing VTL media and space use
C.2.1 General performance guidelines for DMA configuration
• The DR Series system (version 3.2 and later) provides inline VTL deduplication, compression, and
encryption at rest functionality. Backup applications (such as Dell NetVault, Symantec BackupExec, Symantec NetBackup, and so on) should be configured so that any multiplexing, pre-compression,
software-side deduplication, or encryption is disabled. Enabling any of these features may adversely affect the space savings and ingest performance of the DR Series system VTL feature.
• Slots and media should be configured so as to accommodate the environment backup requirements. Initially, the logical capacity of a VTL should be no more than twice the physical size of the DR Series system. If the initial VTL setup is over-subscribed at higher than a 2-1 ratio without
proper planning the DR Series system could fill up prematurely and cause unexpected system outage. It is highly advisable to configure the DR Series system VTL feature such that the media
count be made to accommodate your initial data protection requirements. and then media be added as the deduplication statistics become available to ascertain growth, media, and space
requirements.
• Media Type selection will depend on a number of factors including the DMA used, the backup cycles, data sources, and more. As a general rule, using smaller tapes is better than using larger
tapes so as to allow for a higher level of control over space usage by backup operations. This also allows for easier handling in the event of a system running out of physical space as well as the
normal data cleanup procedures.
• Adding media to an existing DR Series system VTL is painless and should be leveraged to
incrementally add media as needed. Although this may require a higher level of involvement in managing the media usage, it will result in better performance and avoid unplanned outages.
C.2.2 Physical DR space sizing and planning
98 Setting Up the Dell™ DR Series System on Symantec™ Backup Exec™ | April 2015
Various factors such as total data footprint, change rate, backup frequency and data lifecycle policies will dictate how much physical space will be needed to accommodate the Virtual Tape Libraries within a DR
Series environment. In addition, if other container types are hosted these two must be factored into space requirement calculations. As a general rule the following can be used as a reference architecture to
determine the basic capacity needed for a given virtual tape library container:
1. Determine Existing Data Set 2. Determine the change rate (Differential)
3. Determine the retention period 4. Calculate the data footprint during the retention period for existing data sets based
on a 10-1 deduplication ratio
5. Calculate the data footprint during the retention period for change rate data sets based on a 10-1 deduplication ratio
6. Calculate the ratios within the retention period for each of the data sets
7. Determine the lowest ratio data set to be retired within the retention period and create media of size that closest matches this data footprint so that when a retention period
is met the most amount of media is recycled to invoke data reclamation alignment and optimizing media consumption.
IMPORTANT: If other containers are being configured to host CIFS/ NFS / RDA or OST, these must also be factored into the planning and management of space.
C.2.3 Logical VTL geometry and media sizing
The logical size of the VTL including media size and media count should be made such so as to accommodate the existing data footprint targeted for protection. The calculation for such should include
the initial footprint, change rate and retention period. It should also take in account the size of both full and incremental data sets. Using the smallest iteration of the data sets to dictate the logical size of the VTL
media affords users the ability to retire media in smaller increments which results in high levels of use and also provides the users the ability to conduct operations across smaller objects which results in higher
levels of flexibility such as when a restore is needed during backup operations.
We can review a typical full weekly plus incremental daily example to demonstrate one method of conducting this calculation. In our example the total logical foot print for the customer environment is
20TB and with a 10% change within a weekly recovery point objective period for a complete weeks’ worth of protection we calculate that we will require 22TB of total logical media to retain the data footprint for
the given environment for one week. In order to allow for disparities we also include a 10% increase to allow for flexibility in the deployment and use of the VTL which results in a 24.2TB total virtual media
requirement for a single weekly retention period.
Important Note: Media can always be added as needed. Media cannot however be deleted so care must be taken in order to avoid creating too many media items.
99 Setting Up the Dell™ DR Series System on Symantec™ Backup Exec™ | April 2015
In the previous example at the end of the 5-week cycle the 1st week retires and frees up media to be reused
or recycled which once processed will allow the DR to reclaim the physical space associated with the virtual media. Since the smallest data set footprint resulting from the change rate is 2TB in each
incremental iteration we create our media at 800GB increments and add as we grow. For this example the
initial Virtual Tape Library would be created with 152 (121TB divided by 800GB) pieces of media at 800GB
for each piece media.
20TB Total initial footprint with a 10% change rate
Pre-Deduplication
Week Logical
Size
Logical
Full Metrics
10% Change Rate Logical
Incremental Metrics 1 24.2TB 20TB 2TB 2 24.2TB 20TB 2TB 3 24.2TB 20TB 2TB 4 24.2TB 20TB 2TB 5 24.2TB 20TB 2TB
Total 121TB
C.2.4 Media retention and grouping
Due to the nature of Virtual Tape Libraries media must be managed in order to insure that physical capacity
is reclaimed in an orderly fashion to avoid running out of space and disrupting operations. Media must be grouped within the data management application, such as NetVault Backup, in a way that full data sets are
targeted to separate media as incremental data and they in turn are grouped by data sets that expire within the same period or that share the same recovery point objective. This ensures that media can be reused
effectively so that when full all incremental data expire the logical space can be reconciled thus enabling the physical space to be reclaimed.
C.2.5 VTL media count guidelines
Type Capacity Max number of Tapes supported
LTO-4 800GiB 2000
LTO-3 400GiB 4000
100 Setting Up the Dell™ DR Series System on Symantec™ Backup Exec™ | April 2015
Type Capacity Max number of Tapes supported
LTO-2 200GiB 8000
LTO-1 100Gib 10000
LTO-1 50Gib 10000
LTO-1 10GiB 10000
Note: With a VTL container, it is very easy to add additional tapes as and when required. It is
recommended to add tapes in the increments of 50 and 100 to facilitate easy inventory from Backup
Exec. Check the Backup Exec recommendations for the maximum number of tapes supported.
C.2.6 Space reclamation guidelines
The DR Series system v3.2 Virtual Tape Library feature is presented to operating systems and data management applications alike as devices either through iSCSI or NDMP protocol connectivity. The DMA
interfaces with the virtual tape library and all its underlying components including the drives and media though these specific protocols.
The DMA must interact with the virtual tape media during a recycle, reuse or media initialization process in
order for the DR to be able to reclaim space during its own cleaning cycle.
This two-step process is required so that the backup software can reconcile the space by marking the media as expired then reusing it, consolidating space across volumes/tapes or by simply recycling the
media into a scratch pool. Once these operations have been completed the DRs own cleaning cycle should be used to reclaim that virtual tape media space which in turn will free up physical space on the DR
unit.
Implementing proper media pool, groups and recycling practices will allow the virtual tape media to be used at optimal levels and that the underlying physical space be reclaimed accordingly by the scheduled
DR reclamation.
Note: In general the guidelines provided above should be sufficient for normal operations to insure proper reclamation of space is conducted preemptively. Refer your individual DMA applications for best practices
and guidelines regarding tape reuse.


