22
Symantec Enterprise Security Manager™ Agent on Windows Server 2008 Release Notes
Symantec Enterprise Security Manager™ Agent on Windows Server 2008 Release Notes
2
Symantec Enterprise Security Manager™ Agent on Windows Server 2008 Release Notes
The software described in this book is furnished under a license agreement and may be used only in accordance with the terms of the agreement.
Legal NoticeCopyright ©2008 Symantec Corporation.
All Rights Reserved.
Symantec, the Symantec Logo, LiveUpdate, Symantec Enterprise Security Architecture, Enterprise Security Manager, and NetRecon are trademarks or registered trademarks of Symantec Corporation or its affiliates in the U.S. and other countries. Other names may be trademarks of their respective owners.
The product described in this document is distributed under licenses restricting its use, copying, distribution, and decompilation/reverse engineering. No part of this document may be reproduced in any form by any means without prior written authorization of Symantec Corporation and its licensors, if any.
THE DOCUMENTATION IS PROVIDED "AS IS" AND ALL EXPRESS OR IMPLIED CONDITIONS, REPRESENTATIONS AND WARRANTIES, INCLUDING ANY IMPLIED WARRANTY OF MERCHANTABILITY, FITNESS FOR A PARTICULAR PURPOSE OR NON-INFRINGEMENT, ARE DISCLAIMED, EXCEPT TO THE EXTENT THAT SUCH DISCLAIMERS ARE HELD TO BE LEGALLY INVALID. SYMANTEC CORPORATION SHALL NOT BE LIABLE FOR INCIDENTAL OR CONSEQUENTIAL DAMAGES IN CONNECTION WITH THE FURNISHING, PERFORMANCE, OR USE OF THIS DOCUMENTATION. THE INFORMATION CONTAINED IN THIS DOCUMENTATION IS SUBJECT TO CHANGE WITHOUT NOTICE.
The Licensed Software and Documentation are deemed to be commercial computer software as defined in FAR 12.212 and subject to restricted rights as defined in FAR Section 52.227-19 "Commercial Computer Software - Restricted Rights" and DFARS 227.7202, "Rights in Commercial Computer Software or Commercial Computer Software Documentation", as applicable, and any successor regulations. Any use, modification, reproduction release, performance, display or disclosure of the Licensed Software and Documentation by the U.S. Government shall be solely in accordance with the terms of this Agreement.
Symantec Corporation20330 Stevens Creek Blvd.Cupertino, CA 95014
http://www.symantec.com
3
Technical support
Symantec Technical Support maintains support centers globally. Technical Support’s primary role is to respond to specific queries about product feature and function, installation, and configuration. The Technical Support group also authors content for our online Knowledge Base. The Technical Support group works collaboratively with the other functional areas within Symantec to answer your questions in a timely fashion. For example, the Technical Support group works with Product Engineering and Symantec Security Response to provide alerting services and virus definition updates.
Symantec technical support offerings include the following:
■ A range of support options that give you the flexibility to select the right amount of service for any size organization
■ A telephone and web-based support that provides rapid response and up-to-the-minute information
■ Upgrade insurance that delivers automatic software upgrade protection
■ Content Updates for virus definitions and security signatures that ensure the highest level of protection
■ Global support that is available 24 hours a day, 7 days a week worldwide. Support is provided in a variety of languages for those customers that are enrolled in the Platinum Support program
■ Advanced features, including Technical Account Management
For information about Symantec’s Maintenance Programs, you can visit our Web site at the following URL:
www.symantec.com/techsupp/
Select your country or language under Global Support. The specific features that are available may vary based on the level of maintenance that was purchased and the specific product that you are using.
Contacting Technical SupportCustomers with a current maintenance agreement may access Technical Support information at the following URL:
www.symantec.com/techsupp/
Select your region or language under Global Support.
Before contacting Technical Support, make sure you have satisfied the system requirements that are listed in your product documentation. Also, you should be at the computer on which the problem occurred, in case it is necessary to recreate the problem.
When contacting the Technical Support group, please have the following information available:
■ Product release level
■ Hardware information
4
■ Available memory, disk space, NIC information
■ Operating system
■ Version and patch level
■ Network topology
■ Router, gateway, and IP address information
■ Problem description
■ Error messages/log files
■ Troubleshooting that was performed before contacting Symantec
■ Recent software configuration changes and network changes
Licensing and registrationIf your Symantec product requires registration or a license key, access our technical support Web page at the following URL:
www.symantec.com/techsupp/
Select your region or language under Global Support, and then select the Licensing and Registration page.
Customer ServiceCustomer service information is available at the following URL: www.symantec.com/techsupp/
Select your country or language under Global Support.
Customer Service is available to assist with the following types of issues:
■ Questions regarding product licensing or serialization
■ Product registration updates such as address or name changes
■ General product information (features, language availability, local dealers)
■ Latest information about product updates and upgrades
■ Information about upgrade insurance and maintenance contracts
■ Information about Symantec Value License Program
■ Advice about Symantec's technical support options
■ Nontechnical presales questions
■ Issues that are related to CD-ROMs or manuals
Maintenance agreement resourcesIf you want to contact Symantec regarding an existing maintenance agreement, please contact the maintenance agreement administration team for your region as follows:
5
■ Asia-Pacific and Japan: [email protected]
■ Europe, Middle-East, and Africa: [email protected]
■ North America and Latin America: [email protected]
Additional Enterprise servicesSymantec offers a comprehensive set of services that allow you to maximize your investment in Symantec products and to develop your knowledge, xpertise, and global insight, which enable you to manage your business risks proactively. Enterprise services that are available include the following:
To access more information about Enterprise services, please visit our Web site at the following URL:
http://www.symantec.com
Select your country or language from the site index.
Symantec Early Warning Solutions These solutions provide early warning of cyber attacks, comprehensive threat analysis, and countermeasures to prevent attacks before they occur.
Managed Security Services These services remove the burden of managing and monitoring security devices and events, ensuring rapid response to real threats.
Consulting Services Symantec Consulting Services provide on-site technical expertise from Symantec and its trusted partners. Symantec Consulting Services offer a variety of prepackaged and customizable options that include assessment, design, implementation, monitoring and management capabilities, each focused on establishing and maintaining the integrity and availability of your IT resources.
Educational ServicesEducational Services provide a full array of technical training, security education, security certification, and awareness communication programs.

6
Contents
Symantec Enterprise Security Manager™ Agent on Windows Server 2008 Re-lease Notes
About the ESM 6.5.3 agent on Windows Server 2008 ...................................... 9Pre-installation tasks ............................................................................................ 9System requirements .......................................................................................... 10Running the RenameAgentFolder utility ......................................................... 11Updating the ESM manager and console for using the ESM 6.5.3 agent
on Windows Server 2008 ............................................................................ 13Installing the Symantec ESM 6.5.3 agent on Windows Server 2008 ........... 14Uninstalling the Symantec ESM 6.5.3 agent from Windows Core Server
2008 ................................................................................................................ 21Post-installation tasks ........................................................................................ 21Known issues ........................................................................................................ 22

8 Contents
Symantec Enterprise Security Manager™ Agent on Windows Server 2008 Release Notes
The Symantec Enterprise Security Manager™ (ESM) agent on Windows Server 2008 Release Notes provides information on how to install/uninstall the ESM 6.5.3 agent on Windows Server 2008.
About the ESM 6.5.3 agent on Windows Server 2008You can install the ESM 6.5.3 agent on the Windows Server 2008 by using the MSI installer.
You cannot remotely install the ESM 6.5.3 agent on the Windows Server 2008 by using the MSI installer.
Note: The ESM 6.5.3 agent on Windows Server 2008 is supported on Security Update (SU) 34.
Pre-installation tasksMake sure that you do the following before you install the ESM 6.5.3 agent on Windows Server 2008 and register it with a manager:
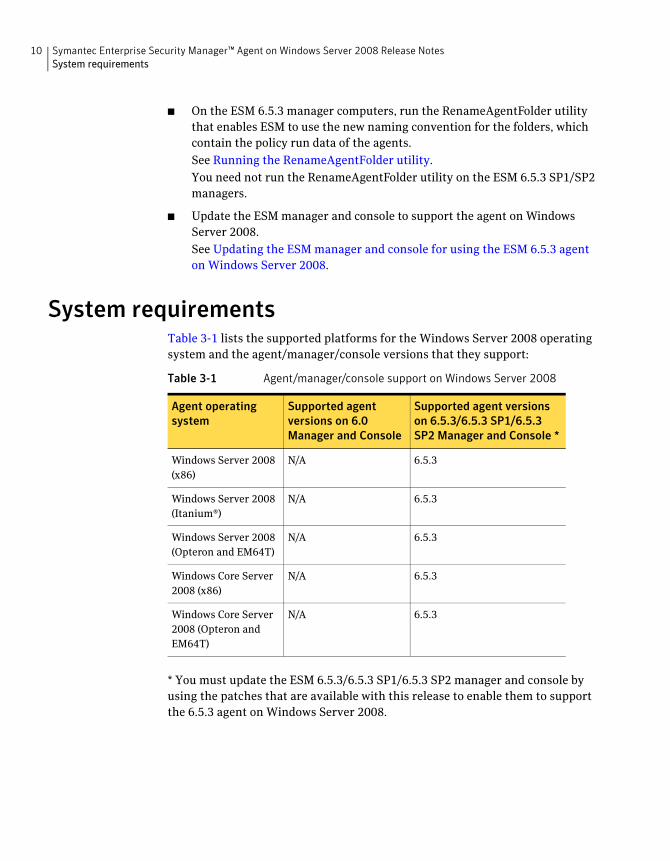
10 Symantec Enterprise Security Manager™ Agent on Windows Server 2008 Release NotesSystem requirements
■ On the ESM 6.5.3 manager computers, run the RenameAgentFolder utility that enables ESM to use the new naming convention for the folders, which contain the policy run data of the agents.
See Running the RenameAgentFolder utility.
You need not run the RenameAgentFolder utility on the ESM 6.5.3 SP1/SP2 managers.
■ Update the ESM manager and console to support the agent on Windows Server 2008.
See Updating the ESM manager and console for using the ESM 6.5.3 agent on Windows Server 2008.
System requirementsTable 3-1 lists the supported platforms for the Windows Server 2008 operating system and the agent/manager/console versions that they support:
* You must update the ESM 6.5.3/6.5.3 SP1/6.5.3 SP2 manager and console by using the patches that are available with this release to enable them to support the 6.5.3 agent on Windows Server 2008.
Table 3-1 Agent/manager/console support on Windows Server 2008
Agent operating system
Supported agent versions on 6.0 Manager and Console
Supported agent versions on 6.5.3/6.5.3 SP1/6.5.3 SP2 Manager and Console *
Windows Server 2008 (x86)
N/A 6.5.3
Windows Server 2008 (Itanium®)
N/A 6.5.3
Windows Server 2008 (Opteron and EM64T)
N/A 6.5.3
Windows Core Server 2008 (x86)
N/A 6.5.3
Windows Core Server 2008 (Opteron and EM64T)
N/A 6.5.3
11Symantec Enterprise Security Manager™ Agent on Windows Server 2008 Release NotesRunning the RenameAgentFolder utility
Note: ESM supports both the Graphical User Interface (GUI) and Command-line Interface (Core) versions of Windows Server 2008. Currently, ESM does not support the Windows Core Server 2008 on Itanium-based systems.
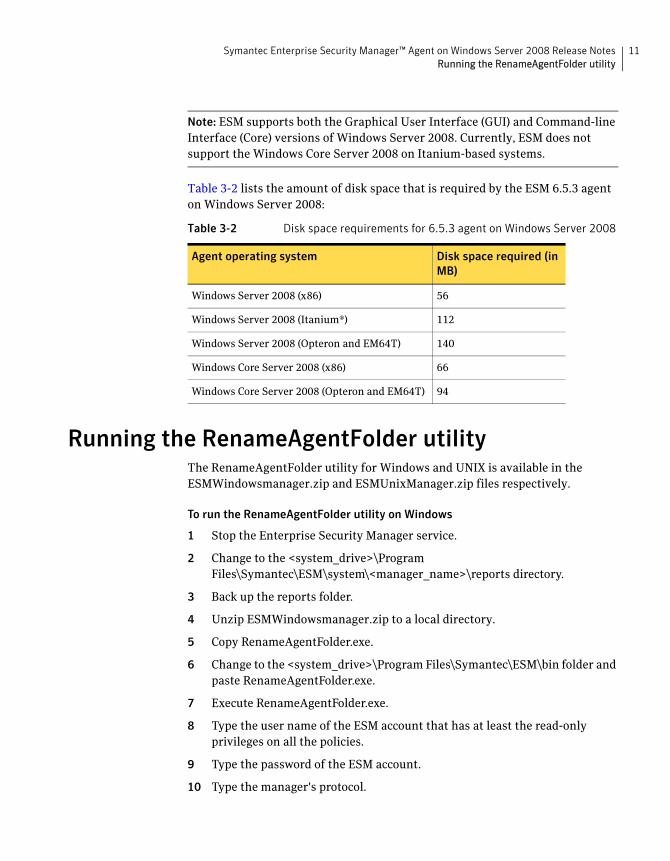
Table 3-2 lists the amount of disk space that is required by the ESM 6.5.3 agent on Windows Server 2008:
Running the RenameAgentFolder utilityThe RenameAgentFolder utility for Windows and UNIX is available in the ESMWindowsmanager.zip and ESMUnixManager.zip files respectively.
To run the RenameAgentFolder utility on Windows
1 Stop the Enterprise Security Manager service.
2 Change to the <system_drive>\Program Files\Symantec\ESM\system\<manager_name>\reports directory.
3 Back up the reports folder.
4 Unzip ESMWindowsmanager.zip to a local directory.
5 Copy RenameAgentFolder.exe.
6 Change to the <system_drive>\Program Files\Symantec\ESM\bin folder and paste RenameAgentFolder.exe.
7 Execute RenameAgentFolder.exe.
8 Type the user name of the ESM account that has at least the read-only privileges on all the policies.
9 Type the password of the ESM account.
10 Type the manager's protocol.
Table 3-2 Disk space requirements for 6.5.3 agent on Windows Server 2008
Agent operating system Disk space required (in MB)
Windows Server 2008 (x86) 56
Windows Server 2008 (Itanium®) 112
Windows Server 2008 (Opteron and EM64T) 140
Windows Core Server 2008 (x86) 66
Windows Core Server 2008 (Opteron and EM64T) 94
12 Symantec Enterprise Security Manager™ Agent on Windows Server 2008 Release NotesRunning the RenameAgentFolder utility
11 Type the manager's port number.
12 Type Y if you want to exit the utility and take a backup.
13 Type Y if you want the utility to continue processing other agents, should any failure occur while processing an agent.
14 If the agents are successfully renamed, the following output is displayed:Rename Agent folders completed successfullyHit ENTER to continue...
15 Make sure that the Enterprise Security Manager service is running. If it is not running, start the service manually.
To run the RenameAgentFolder utility on UNIX
1 Stop the ESM daemons on the ESM manager.
2 Change to the <esm_install_directory>/esm/system/<manager_name>/reports directory.
3 Back up the reports folder.
4 Unzip ESMUnixManager.zip to a local directory.
5 At the command prompt, type the following to copy the RenameAgentFolder utility to the \esm\bin folder:
cp RenameAgentFolder \esm\bin\<platform>
6 Type the following to run the RenameAgentFolder utility:
./RenameAgentFolder
7 Type the user name of the ESM account that has at least the read-only privileges on all the policies.
8 Type the password of the ESM account.
9 Type the manager's protocol.
10 Type the manager's port number.
11 Type Y for if you want to exit the utility and take a backup.
12 Type Y if you want the utility to continue processing other agents, if any failure occurs while processing an agent.
13 If the agents are successfully renamed, the following output is displayed:Rename Agent folders completed successfullyHit ENTER to continue...
14 Make sure that the ESM daemons are running. If they are not running, start the daemons manually.
13Symantec Enterprise Security Manager™ Agent on Windows Server 2008 Release NotesUpdating the ESM manager and console for using the ESM 6.5.3 agent on Windows Server 2008
Updating the ESM manager and console for using the ESM 6.5.3 agent on Windows Server 2008
To make the ESM 6.5.3 agent on Windows Server 2008 function correctly, you need to update the ESM manager and console.
The updates for the ESM manager and console are available in the form of following zip files:
■ ESMWindowsManager.zip
■ ESMUnixManager.zip
■ ESMConsole.zip
These updates are supported on ESM 6.5.3/6.5.3 SP1/6.5.3 SP2 versions.
You must apply these patches before you register the agent on Windows Server 2008 with the manager.
To update the manager on Windows
1 Unzip ESMWindowsManager.zip to a local directory.
2 Change to the <local_directory>\Symantec\ESMWinMgr directory, and copy esmmanager.exe.
3 Change to the <system_drive>\Program Files\Symantec\ESM\bin\<platform> directory.
4 Stop the Enterprise Security Manager service.
5 Rename the existing esmmanager.exe to old_esmmanager.exe.
6 Paste esmmanager.exe.
7 Restart the Enterprise Security Manager service.
To update the manager on UNIX
1 At the command prompt, type ./esmsetup.
2 Type 4 to select Post-installation configuration options, and press Enter.
3 Type 2 to select Shutdown the ESM software, and press Enter.
4 Change to the directory where the ESM manager is installed.
5 Type the following commands to rename the existing files:
■ mv esmcifd /esm/bin/<platform>/old_esmcifd
■ mv esmd /esm/bin/<platform>/old_esmd
■ mv esmnetd /esm/bin/<platform>/old_esmnetd
14 Symantec Enterprise Security Manager™ Agent on Windows Server 2008 Release NotesInstalling the Symantec ESM 6.5.3 agent on Windows Server 2008
6 Unzip ESMUnixManager.zip to a local directory on the manager.
7 Change to the directory where you unzipped the files, by typing the following command:
cd /<local_directory>/Symantec/ESMUnixMgr/<platform>
8 Type the following commands to copy the new files:
■ cp esmcifd /esm/bin/<platform>/
■ cp esmd /esm/bin/<platform>/
■ cp esmnetd /esm/bin/<platform>/
9 Type. /esmsetup.
10 Type 4 to select Post-installation configuration options, and press Enter.
11 Type 1 to select Start the ESM software, and press Enter.
To update the console on Windows
1 Close the ESM console.
2 Change to the <system_drive>\Program Files\Symantec\Symantec Enterprise Console directory.
3 Rename the existing esm.exe to old_esm.exe .
4 Unzip ESMConsole.zip to a local directory.
5 Change to the <local_directory>\Symantec\Symantec Enterprise Console directory, and copy esm.exe.
6 Change to the <system_drive>\Program Files\Symantec\Symantec Enterprise Console directory, and paste esm.exe.
7 Launch the ESM console.
Installing the Symantec ESM 6.5.3 agent on Windows Server 2008
You can do the following by using the MSI installer:
■ Install the ESM 6.5.3 agent
■ Silently install and register the ESM 6.5.3 agent
■ Silently register the ESM 6.5.3 agent
The 32-bit MSI installer is located in the esm65en_US-win2008-32.zip file and the 64-bit MSI installer is located in the esm65en_US-win2008-64.zip file.
15Symantec Enterprise Security Manager™ Agent on Windows Server 2008 Release NotesInstalling the Symantec ESM 6.5.3 agent on Windows Server 2008
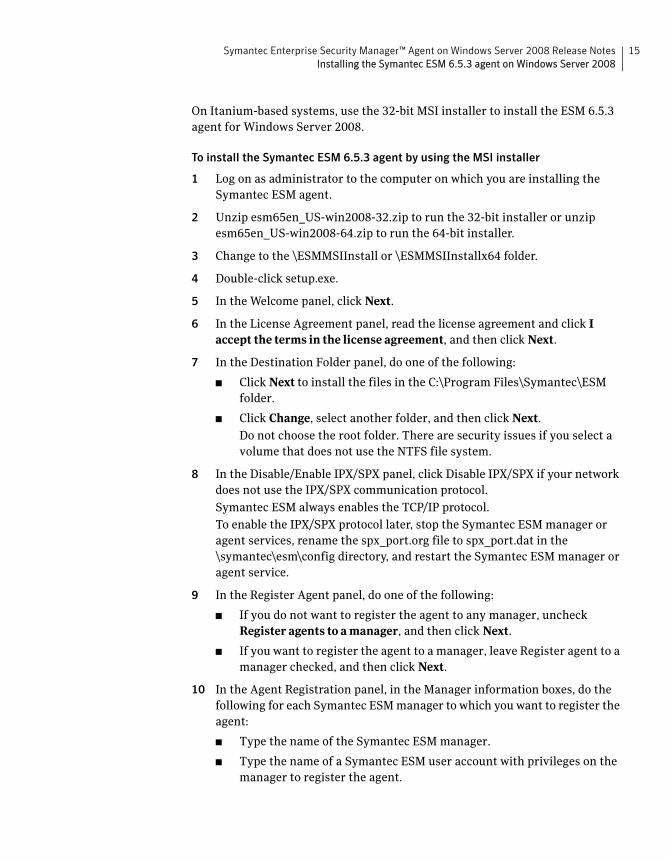
On Itanium-based systems, use the 32-bit MSI installer to install the ESM 6.5.3 agent for Windows Server 2008.
To install the Symantec ESM 6.5.3 agent by using the MSI installer
1 Log on as administrator to the computer on which you are installing the Symantec ESM agent.
2 Unzip esm65en_US-win2008-32.zip to run the 32-bit installer or unzip esm65en_US-win2008-64.zip to run the 64-bit installer.
3 Change to the \ESMMSIInstall or \ESMMSIInstallx64 folder.
4 Double-click setup.exe.
5 In the Welcome panel, click Next.
6 In the License Agreement panel, read the license agreement and click I accept the terms in the license agreement, and then click Next.
7 In the Destination Folder panel, do one of the following:
■ Click Next to install the files in the C:\Program Files\Symantec\ESM folder.
■ Click Change, select another folder, and then click Next.
Do not choose the root folder. There are security issues if you select a volume that does not use the NTFS file system.
8 In the Disable/Enable IPX/SPX panel, click Disable IPX/SPX if your network does not use the IPX/SPX communication protocol.
Symantec ESM always enables the TCP/IP protocol.
To enable the IPX/SPX protocol later, stop the Symantec ESM manager or agent services, rename the spx_port.org file to spx_port.dat in the \symantec\esm\config directory, and restart the Symantec ESM manager or agent service.
9 In the Register Agent panel, do one of the following:
■ If you do not want to register the agent to any manager, uncheck Register agents to a manager, and then click Next.
■ If you want to register the agent to a manager, leave Register agent to a manager checked, and then click Next.
10 In the Agent Registration panel, in the Manager information boxes, do the following for each Symantec ESM manager to which you want to register the agent:
■ Type the name of the Symantec ESM manager.
■ Type the name of a Symantec ESM user account with privileges on the manager to register the agent.
16 Symantec Enterprise Security Manager™ Agent on Windows Server 2008 Release NotesInstalling the Symantec ESM 6.5.3 agent on Windows Server 2008
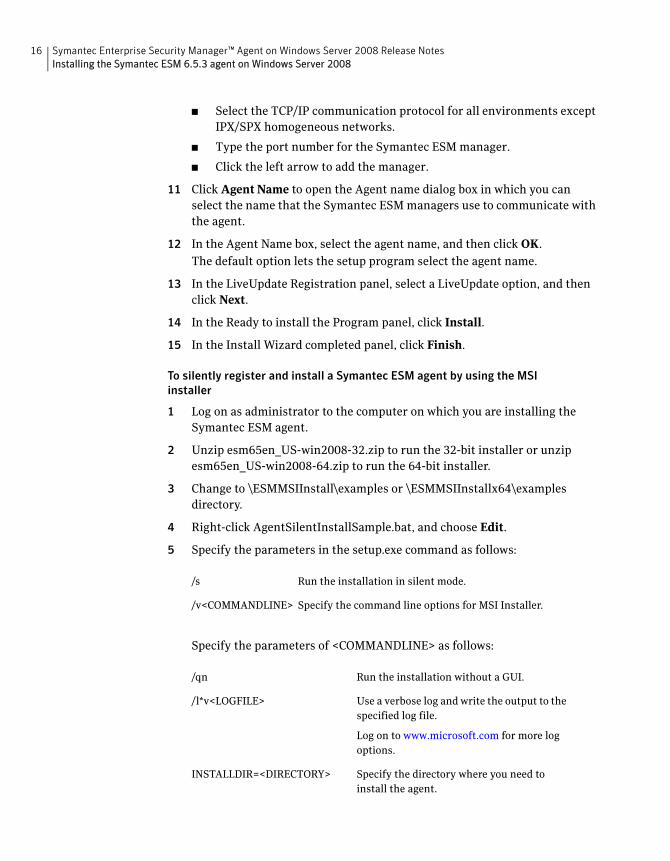
■ Select the TCP/IP communication protocol for all environments except IPX/SPX homogeneous networks.
■ Type the port number for the Symantec ESM manager.
■ Click the left arrow to add the manager.
11 Click Agent Name to open the Agent name dialog box in which you can select the name that the Symantec ESM managers use to communicate with the agent.
12 In the Agent Name box, select the agent name, and then click OK.
The default option lets the setup program select the agent name.
13 In the LiveUpdate Registration panel, select a LiveUpdate option, and then click Next.
14 In the Ready to install the Program panel, click Install.
15 In the Install Wizard completed panel, click Finish.
To silently register and install a Symantec ESM agent by using the MSI installer
1 Log on as administrator to the computer on which you are installing the Symantec ESM agent.
2 Unzip esm65en_US-win2008-32.zip to run the 32-bit installer or unzip esm65en_US-win2008-64.zip to run the 64-bit installer.
3 Change to \ESMMSIInstall\examples or \ESMMSIInstallx64\examples directory.
4 Right-click AgentSilentInstallSample.bat, and choose Edit.
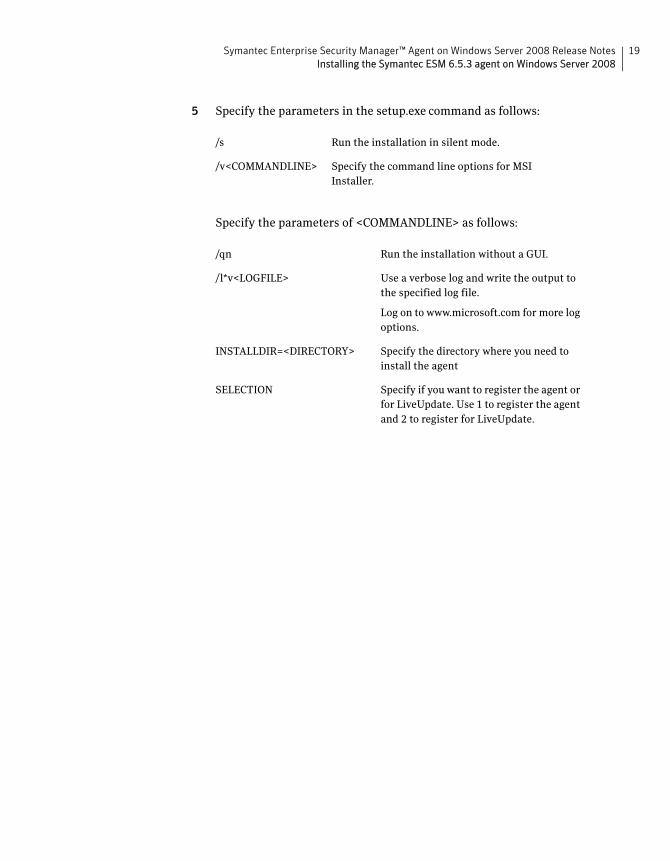
5 Specify the parameters in the setup.exe command as follows:
Specify the parameters of <COMMANDLINE> as follows:
/s Run the installation in silent mode.
/v<COMMANDLINE> Specify the command line options for MSI Installer.
/qn Run the installation without a GUI.
/l*v<LOGFILE> Use a verbose log and write the output to the specified log file.
Log on to www.microsoft.com for more log options.
INSTALLDIR=<DIRECTORY> Specify the directory where you need to install the agent.
17Symantec Enterprise Security Manager™ Agent on Windows Server 2008 Release NotesInstalling the Symantec ESM 6.5.3 agent on Windows Server 2008
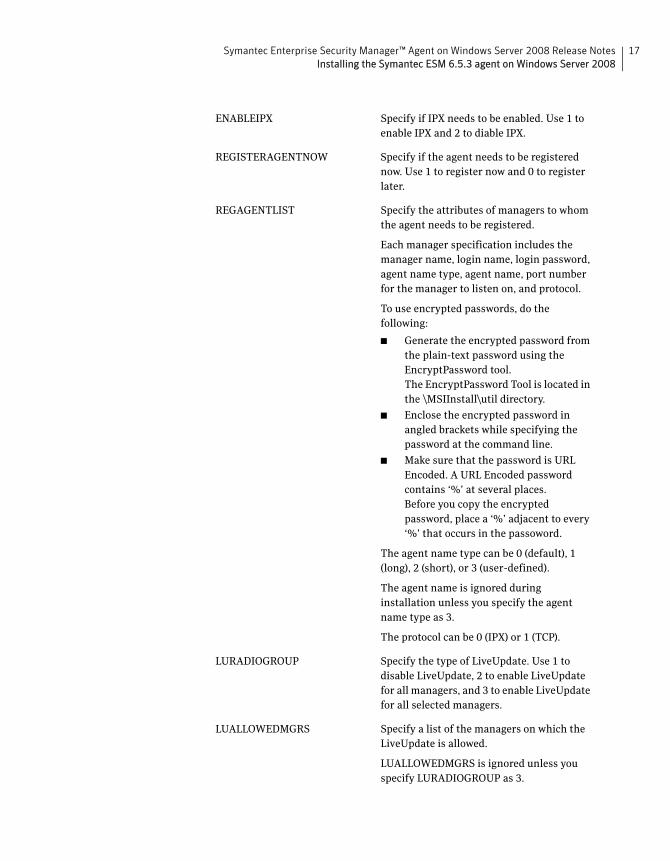
ENABLEIPX Specify if IPX needs to be enabled. Use 1 to enable IPX and 2 to diable IPX.
REGISTERAGENTNOW Specify if the agent needs to be registered now. Use 1 to register now and 0 to register later.
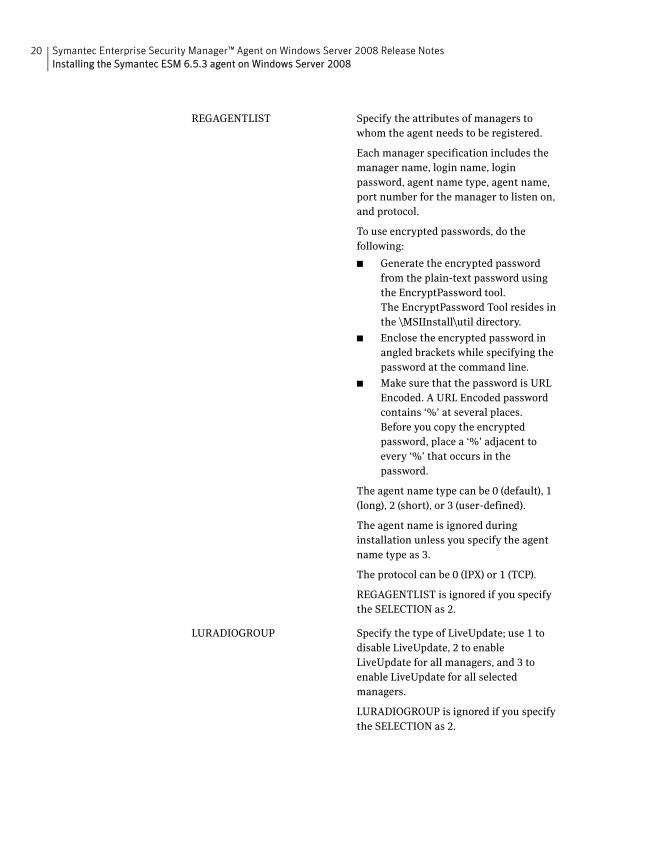
REGAGENTLIST Specify the attributes of managers to whom the agent needs to be registered.
Each manager specification includes the manager name, login name, login password, agent name type, agent name, port number for the manager to listen on, and protocol.
To use encrypted passwords, do the following:
■ Generate the encrypted password from the plain-text password using the EncryptPassword tool.The EncryptPassword Tool is located in the \MSIInstall\util directory.
■ Enclose the encrypted password in angled brackets while specifying the password at the command line.
■ Make sure that the password is URL Encoded. A URL Encoded password contains ‘%’ at several places. Before you copy the encrypted password, place a ‘%’ adjacent to every ‘%’ that occurs in the passoword.
The agent name type can be 0 (default), 1 (long), 2 (short), or 3 (user-defined).
The agent name is ignored during installation unless you specify the agent name type as 3.
The protocol can be 0 (IPX) or 1 (TCP).
LURADIOGROUP Specify the type of LiveUpdate. Use 1 to disable LiveUpdate, 2 to enable LiveUpdate for all managers, and 3 to enable LiveUpdate for all selected managers.
LUALLOWEDMGRS Specify a list of the managers on which the LiveUpdate is allowed.
LUALLOWEDMGRS is ignored unless you specify LURADIOGROUP as 3.
18 Symantec Enterprise Security Manager™ Agent on Windows Server 2008 Release NotesInstalling the Symantec ESM 6.5.3 agent on Windows Server 2008
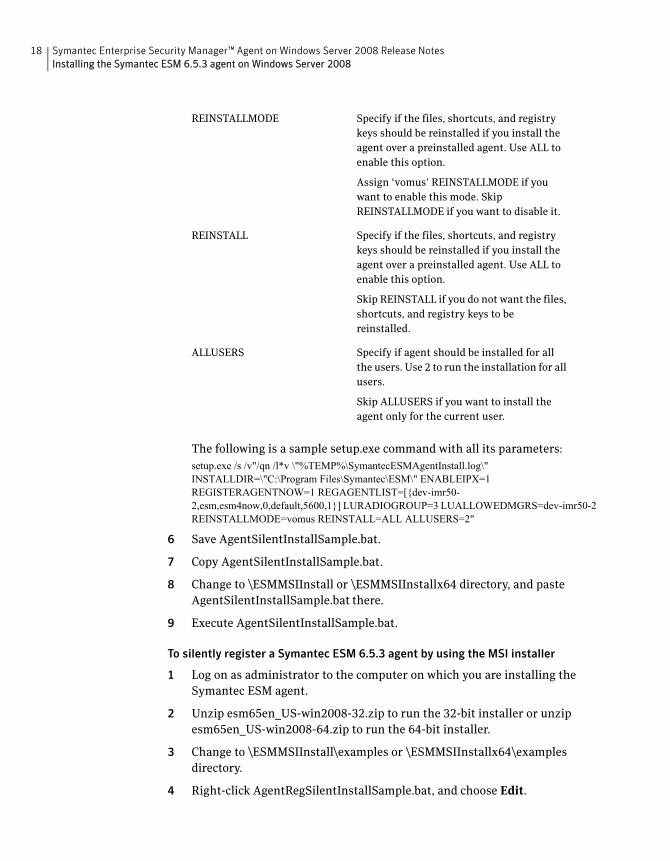
The following is a sample setup.exe command with all its parameters: setup.exe /s /v"/qn /l*v \"%TEMP%\SymantecESMAgentInstall.log\" INSTALLDIR=\"C:\Program Files\Symantec\ESM\" ENABLEIPX=1 REGISTERAGENTNOW=1 REGAGENTLIST=[{dev-imr50-2,esm,esm4now,0,default,5600,1}] LURADIOGROUP=3 LUALLOWEDMGRS=dev-imr50-2 REINSTALLMODE=vomus REINSTALL=ALL ALLUSERS=2"
6 Save AgentSilentInstallSample.bat.
7 Copy AgentSilentInstallSample.bat.
8 Change to \ESMMSIInstall or \ESMMSIInstallx64 directory, and paste AgentSilentInstallSample.bat there.
9 Execute AgentSilentInstallSample.bat.
To silently register a Symantec ESM 6.5.3 agent by using the MSI installer
1 Log on as administrator to the computer on which you are installing the Symantec ESM agent.
2 Unzip esm65en_US-win2008-32.zip to run the 32-bit installer or unzip esm65en_US-win2008-64.zip to run the 64-bit installer.
3 Change to \ESMMSIInstall\examples or \ESMMSIInstallx64\examples directory.
4 Right-click AgentRegSilentInstallSample.bat, and choose Edit.
REINSTALLMODE Specify if the files, shortcuts, and registry keys should be reinstalled if you install the agent over a preinstalled agent. Use ALL to enable this option.
Assign ‘vomus’ REINSTALLMODE if you want to enable this mode. Skip REINSTALLMODE if you want to disable it.
REINSTALL Specify if the files, shortcuts, and registry keys should be reinstalled if you install the agent over a preinstalled agent. Use ALL to enable this option.
Skip REINSTALL if you do not want the files, shortcuts, and registry keys to be reinstalled.
ALLUSERS Specify if agent should be installed for all the users. Use 2 to run the installation for all users.
Skip ALLUSERS if you want to install the agent only for the current user.
19Symantec Enterprise Security Manager™ Agent on Windows Server 2008 Release NotesInstalling the Symantec ESM 6.5.3 agent on Windows Server 2008
5 Specify the parameters in the setup.exe command as follows:
Specify the parameters of <COMMANDLINE> as follows:
/s Run the installation in silent mode.
/v<COMMANDLINE> Specify the command line options for MSI Installer.
/qn Run the installation without a GUI.
/l*v<LOGFILE> Use a verbose log and write the output to the specified log file.
Log on to www.microsoft.com for more log options.
INSTALLDIR=<DIRECTORY> Specify the directory where you need to install the agent
SELECTION Specify if you want to register the agent or for LiveUpdate. Use 1 to register the agent and 2 to register for LiveUpdate.
20 Symantec Enterprise Security Manager™ Agent on Windows Server 2008 Release NotesInstalling the Symantec ESM 6.5.3 agent on Windows Server 2008
REGAGENTLIST Specify the attributes of managers to whom the agent needs to be registered.
Each manager specification includes the manager name, login name, login password, agent name type, agent name, port number for the manager to listen on, and protocol.
To use encrypted passwords, do the following:
■ Generate the encrypted password from the plain-text password using the EncryptPassword tool.The EncryptPassword Tool resides in the \MSIInstall\util directory.
■ Enclose the encrypted password in angled brackets while specifying the password at the command line.
■ Make sure that the password is URL Encoded. A URL Encoded password contains ‘%’ at several places. Before you copy the encrypted password, place a ‘%’ adjacent to every ‘%’ that occurs in the password.
The agent name type can be 0 (default), 1 (long), 2 (short), or 3 (user-defined).
The agent name is ignored during installation unless you specify the agent name type as 3.
The protocol can be 0 (IPX) or 1 (TCP).
REGAGENTLIST is ignored if you specify the SELECTION as 2.
LURADIOGROUP Specify the type of LiveUpdate; use 1 to disable LiveUpdate, 2 to enable LiveUpdate for all managers, and 3 to enable LiveUpdate for all selected managers.
LURADIOGROUP is ignored if you specify the SELECTION as 2.
21Symantec Enterprise Security Manager™ Agent on Windows Server 2008 Release NotesUninstalling the Symantec ESM 6.5.3 agent from Windows Core Server 2008
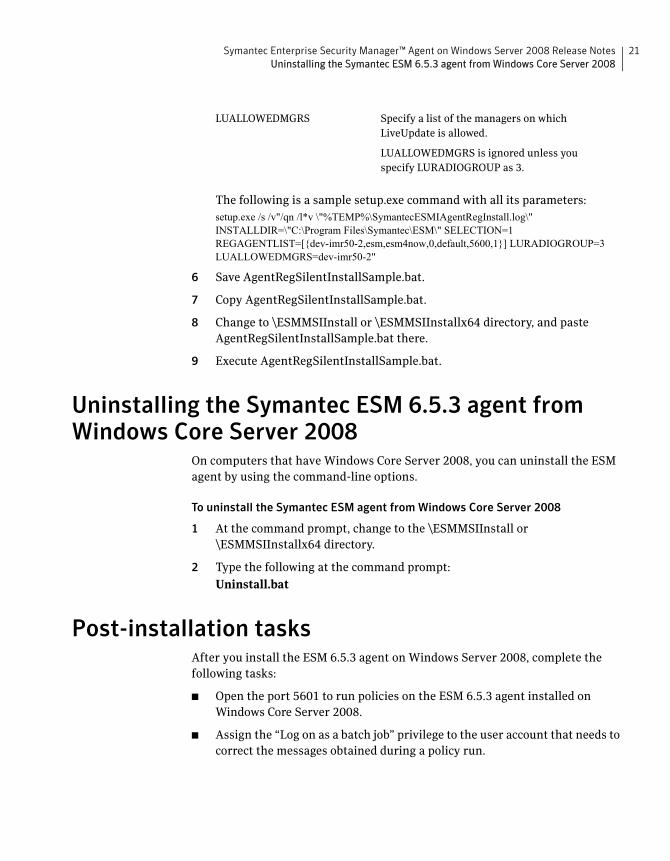
The following is a sample setup.exe command with all its parameters:setup.exe /s /v"/qn /l*v \"%TEMP%\SymantecESMIAgentRegInstall.log\" INSTALLDIR=\"C:\Program Files\Symantec\ESM\" SELECTION=1 REGAGENTLIST=[{dev-imr50-2,esm,esm4now,0,default,5600,1}] LURADIOGROUP=3 LUALLOWEDMGRS=dev-imr50-2"
6 Save AgentRegSilentInstallSample.bat.
7 Copy AgentRegSilentInstallSample.bat.
8 Change to \ESMMSIInstall or \ESMMSIInstallx64 directory, and paste AgentRegSilentInstallSample.bat there.
9 Execute AgentRegSilentInstallSample.bat.
Uninstalling the Symantec ESM 6.5.3 agent from Windows Core Server 2008
On computers that have Windows Core Server 2008, you can uninstall the ESM agent by using the command-line options.
To uninstall the Symantec ESM agent from Windows Core Server 2008
1 At the command prompt, change to the \ESMMSIInstall or \ESMMSIInstallx64 directory.
2 Type the following at the command prompt:
Uninstall.bat
Post-installation tasksAfter you install the ESM 6.5.3 agent on Windows Server 2008, complete the following tasks:
■ Open the port 5601 to run policies on the ESM 6.5.3 agent installed on Windows Core Server 2008.
■ Assign the “Log on as a batch job” privilege to the user account that needs to correct the messages obtained during a policy run.
LUALLOWEDMGRS Specify a list of the managers on which LiveUpdate is allowed.
LUALLOWEDMGRS is ignored unless you specify LURADIOGROUP as 3.
22 Symantec Enterprise Security Manager™ Agent on Windows Server 2008 Release NotesKnown issues
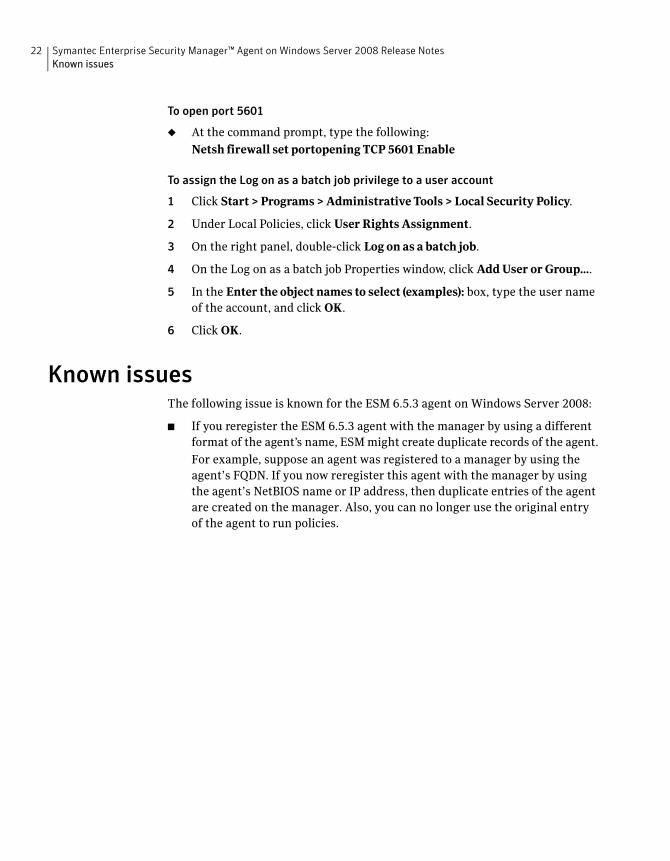
To open port 5601
◆ At the command prompt, type the following:
Netsh firewall set portopening TCP 5601 Enable
To assign the Log on as a batch job privilege to a user account
1 Click Start > Programs > Administrative Tools > Local Security Policy.
2 Under Local Policies, click User Rights Assignment.
3 On the right panel, double-click Log on as a batch job.
4 On the Log on as a batch job Properties window, click Add User or Group....
5 In the Enter the object names to select (examples): box, type the user name of the account, and click OK.
6 Click OK.
Known issuesThe following issue is known for the ESM 6.5.3 agent on Windows Server 2008:
■ If you reregister the ESM 6.5.3 agent with the manager by using a different format of the agent’s name, ESM might create duplicate records of the agent.
For example, suppose an agent was registered to a manager by using the agent’s FQDN. If you now reregister this agent with the manager by using the agent’s NetBIOS name or IP address, then duplicate entries of the agent are created on the manager. Also, you can no longer use the original entry of the agent to run policies.


