170
Symantec ™ Mobile Management for Configuration Manager Installation Guide 7.2 SP1
Symantec™ Mobile
Management for
Configuration Manager
Installation Guide
7.2 SP1
Symantec™ Mobile Management for
Configuration Manager: Installation Guide
The software described in this book is furnished under a license agreement and may
be used only in accordance with the terms of the agreement.
Last updated: 2013-01-22.
Legal Notice
Copyright © 2013 Symantec Corporation. All rights reserved.
Symantec, the Symantec Logo, and Athena are trademarks or registered trademarks
of Symantec Corporation or its affiliates in the U.S. and other countries. Other
names may be trademarks of their respective owners.
This Symantec product may contain third party software for which Symantec is
required to provide attribution to the third party (“Third Party Programs”). Some of
the Third Party Programs are available under open source or free software licenses.
The License Agreement accompanying the Software does not alter any rights or
obligations you may have under those open source or free software licenses. Please
see the Third Party Software file accompanying this Symantec product for more
information on the Third Party Programs.
See "Symantec Mobile Management for Configuration Manager Third-Party Legal
Notices" on page 143
The product described in this document is distributed under licenses restricting its
use, copying, distribution, and decompilation/reverse engineering. No part of this
document may be reproduced in any form by any means without prior written
authorization of Symantec Corporation and its licensors, if any.
THE DOCUMENTATION IS PROVIDED "AS IS" AND ALL EXPRESS OR IMPLIED
CONDITIONS, REPRESENTATIONS AND WARRANTIES, INCLUDING ANY IMPLIED
WARRANTY OF MERCHANTABILITY, FITNESS FOR A PARTICULAR PURPOSE OR
NON-INFRINGEMENT, ARE DISCLAIMED, EXCEPT TO THE EXTENT THAT SUCH
DISCLAIMERS ARE HELD TO BE LEGALLY INVALID. SYMANTEC CORPORATION
SHALL NOT BE LIABLE FOR INCIDENTAL OR CONSEQUENTIAL DAMAGES IN
CONNECTION WITH THE FURNISHING, PERFORMANCE, OR USE OF THIS
DOCUMENTATION. THE INFORMATION CONTAINED IN THIS DOCUMENTATION
IS SUBJECT TO CHANGE WITHOUT NOTICE.
The Licensed Software and Documentation are deemed to be commercial computer
software as defined in FAR 12.212 and subject to restricted rights as defined in FAR
Section 52.227-19 "Commercial Computer Software - Restricted Rights" and DFARS
227.7202, "Rights in Commercial Computer Software or Commercial Computer
Software Documentation", as applicable, and any successor regulations. Any use,
modification, reproduction release, performance, display or disclosure of the
Licensed Software and Documentation by the U.S. Government shall be solely in
accordance with the terms of this Agreement.
Symantec Corporation, 350 Ellis Street, Mountain View, CA 94043
http://www.symantec.com
Technical Support Symantec Technical Support maintains support centers globally. Technical
Support’s primary role is to respond to specific queries about product
features and functionality. The Technical Support group also creates
content for our online Knowledge Base. The Technical Support group works
collaboratively with the other functional areas within Symantec to answer
your questions in a timely fashion. For example, the Technical Support
group works with Product Engineering and Symantec Security Response to
provide alerting services and virus definition updates.
Symantec’s support offerings include the following:
A range of support options that give you the flexibility to select the
right amount of service for any size organization
Telephone and/or Web-based support that provides rapid response and
up-to-the-minute information
Upgrade assurance that delivers software upgrades
Global support purchased on a regional business hours or 24 hours a
day, 7 days a week basis
Premium service offerings that include Account Management Services
For information about Symantec’s support offerings, you can visit our
website at the following URL:
www.symantec.com/business/support/
All support services will be delivered in accordance with your support
agreement and the then-current enterprise technical support policy.
Contacting Technical Support Customers with a current support agreement may access Technical
Support information at the following URL:
www.symantec.com/business/support/
Before contacting Technical Support, make sure you have satisfied the
system requirements that are listed in your product documentation. Also,
you should be at the computer on which the problem occurred, in case it is
necessary to replicate the problem.
When you contact Technical Support, please have the following
information available:
Product release level
Hardware information
Available memory, disk space, and NIC information
Operating system
Version and patch level
Network topology
Router, gateway, and IP address information
Problem description:
Error messages and log files
Troubleshooting that was performed before contacting Symantec
Recent software configuration changes and network changes
Licensing and registration If your Symantec product requires registration or a license key, access our
technical support Web page at the following URL:
www.symantec.com/business/support/
Customer service Customer service information is available at the following URL:
www.symantec.com/business/support/
Customer Service is available to assist with non-technical questions, such
as the following types of issues:
Questions regarding product licensing or serialization
Product registration updates, such as address or name changes
General product information (features, language availability, local
dealers)
Latest information about product updates and upgrades
Information about upgrade assurance and support contracts
Information about the Symantec Buying Programs
Advice about Symantec's technical support options
Nontechnical presales questions
Issues that are related to CD-ROMs or manuals
Support agreement resources If you want to contact Symantec regarding an existing support agreement,
please contact the support agreement administration team for your region
as follows:
Asia-Pacific and Japan [email protected]
Europe, Middle-East, and Africa [email protected]
North America and Latin America [email protected]
Contents
Chapter 1 About this guide ................................................................................. 9
Introducing this guide ............................................................................................ 9 Comment on the documentation .......................................................................... 9
Chapter 2 Introducing Mobile Management for Configuration Manager ........ 11
About Mobile Management for Configuration Manager................................ 11 Components of Mobile Management for Configuration Manager ............... 12
Required Components ................................................................................. 12 Optional Components .................................................................................. 12 Supported Features ...................................................................................... 13
Before you begin ................................................................................................... 14
Chapter 3 Requesting an APNS Certificate ....................................................... 15
Creating a new APNS Certificate ............................................................... 15 Renew certificate .......................................................................................... 17 Installing and updating the replacement APNS Certificate .................. 19 Replace expired APNS Certificate ............................................................. 21
Chapter 4 Setting up Google Cloud Messaging ................................................. 23
Prerequisites ................................................................................................. 23 Gmail account creation ............................................................................... 24 Creating a project ID .................................................................................... 24 Enabling the GCM Service .......................................................................... 27 Obtain server key ......................................................................................... 28
Chapter 5 System Requirements ...................................................................... 31
Central and Primary Servers .............................................................................. 31 Secondary Servers or Management Points ...................................................... 33 Administrator Console Workstation PCs ......................................................... 33 Required Ports/Protocols ................................................................................... 33 Security Group Configuration ............................................................................ 35 Apple Enterprise Membership Requirements ................................................. 35 SYMC Agent for iOS Requirements ................................................................... 36

6 Contents
iOS Profile Security Requirements ................................................................... 36 Supported Mobile Devices .................................................................................. 37
Mobile Device Network ............................................................................... 37
Chapter 6 Installing ........................................................................................... 39
Installation Components .................................................................................... 39 Symantec Mobile Management Components Installation Order ......... 41
Push Services Installation Procedure ............................................................... 42 Console and Services Installation Procedures................................................. 46
Part 1 Console Installation ......................................................................... 47 Part 2 Add ISV Proxy Certificate ............................................................... 50 Part 3 Services Installation ........................................................................ 53
Post-Installation Procedures .............................................................................. 67
Chapter 7 Set Up Profiles for iOS Devices ......................................................... 69
View Profiles ......................................................................................................... 69 Configure iOS Signing and Encryption Profile ................................................ 70 Create Security Credentials ................................................................................ 72
Root or Signing with Public Key ................................................................ 72 Encryption ..................................................................................................... 75
Configure MDM Enrollment Profile .................................................................. 76
Chapter 8 Enrolling Devices .............................................................................. 79
Authentication for Agent Enrollment .............................................................. 79 iOS Device ............................................................................................................. 80
Install Symantec Mobile MGMT Agent ..................................................... 80 Enroll iOS Device .......................................................................................... 81
Android Device ..................................................................................................... 86 Authorizing the Symantec Mobile MGMT Agent for Device
Administrator Privileges............................................................................. 90 Windows Phone 7 Device .................................................................................... 91
Chapter 9 Registering Devices .......................................................................... 93
Windows Mobile and Windows CE Devices...................................................... 94 BlackBerry Smartphones .................................................................................... 96
Chapter 10 Device Licensing ............................................................................... 97
View License Information ................................................................................... 97 License Warning Dialog ...................................................................................... 99 License Tool ........................................................................................................ 100
Access the License Tool ............................................................................. 100 Obtain Licenses........................................................................................... 101 View Licenses .............................................................................................. 102
Chapter 11 View Devices in Collections ............................................................ 103
iOS Device (iPhone, iPad, iPod Touch) ............................................................ 103 Android Device ................................................................................................... 104 Windows Phone 7 ............................................................................................... 105 Windows Mobile or Windows CE Device ........................................................ 106 BlackBerry Smartphone .................................................................................... 107
Chapter 12 Configuring Device Ownership ....................................................... 109
Set Ownership .................................................................................................... 109
Chapter 13 EAS Blocking ................................................................................... 111
Blocking Settings ............................................................................................... 112 Exchange ActiveSync Blocking Functionality ....................................... 112 F5 Rules ....................................................................................................... 113 Query EAS Authorized Devices ................................................................ 113
Chapter 14 Additional Procedures .................................................................... 116
Using a Non-Domain Admin Account for Installation ................................. 117 Enabling ASP.Net in IIS .................................................................................... 118 Query for All Windows Mobile Devices Collection ....................................... 119 DNS Text Record Setup for Android and iOS Services ................................ 126
Chapter 15 Upgrading ....................................................................................... 133
Upgrade Procedure ............................................................................................ 134

8 Contents
Chapter 1
About this guide
Introducing this guide This guide contains the installation prerequisites and installation
procedures for Symantec Mobile Management for Microsoft® System
Center Configuration Manager.
This guide is intended for administrators who are familiar with
Configuration Manager and its operation and who are authorized to install
software.
Comment on the documentation Let us know what you like and dislike about the documentation. Were you
able to find the information you needed quickly? Was the information
clearly presented? Report errors and omissions, or tell us what you would
find useful in future versions of our guides and online help.
Please include the following information with your comment:
The title and product version of the guide on which you want to
comment.
The topic (if relevant) on which you want to comment.
Your name.
Email your comment to [email protected]. Please only use this
address to comment on product documentation.
We appreciate your feedback.

10 About this guide
Comment on the documentation
Chapter 2
Introducing Mobile
Management for
Configuration Manager
This chapter contains the following topics:
About Mobile Management for Configuration Manager
Components of Mobile Management for Configuration Manager
Supported Features
Before you begin
About Mobile Management for Configuration Manager
Symantec Mobile Management for Configuration Manager provides device
management for Windows Mobile®/CE, BlackBerry, iOS, Android, and
Windows Phone 7 mobile devices using the Microsoft System Center
Configuration Manager Console. Software package creation and
assignment are available for Windows Mobile/CE devices. Profile
management, profile payload configuration, profile assignment, and Mobile
Library Feed creation/assignment is available for iOS and Android devices.
Mobile Library Feed creation and assignment is available for Windows
Phone 7 devices. Access to Live Support Session, which enables the remote
viewing of current information on Windows Mobile, Windows CE devices,
BlackBerry smartphones, and Android devices is also available.
12 Introducing Mobile Management for Configuration Manager
Components of Mobile Management for Configuration Manager
Components of Mobile Management for Configuration Manager
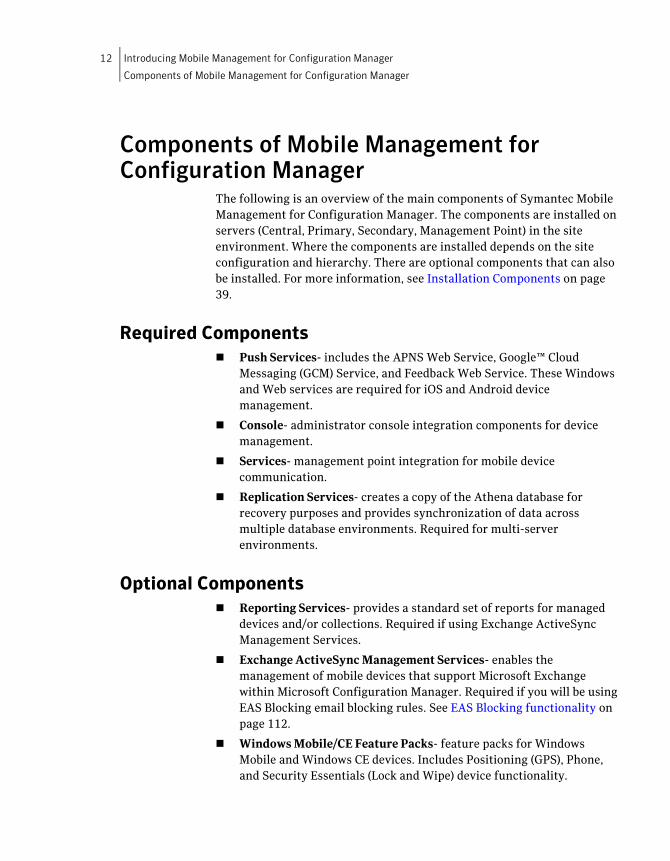
The following is an overview of the main components of Symantec Mobile
Management for Configuration Manager. The components are installed on
servers (Central, Primary, Secondary, Management Point) in the site
environment. Where the components are installed depends on the site
configuration and hierarchy. There are optional components that can also
be installed. For more information, see Installation Components on page
39.
Required Components
Push Services- includes the APNS Web Service, Google™ Cloud
Messaging (GCM) Service, and Feedback Web Service. These Windows
and Web services are required for iOS and Android device
management.
Console- administrator console integration components for device
management.
Services- management point integration for mobile device
communication.
Replication Services- creates a copy of the Athena database for
recovery purposes and provides synchronization of data across
multiple database environments. Required for multi-server
environments.
Optional Components
Reporting Services- provides a standard set of reports for managed
devices and/or collections. Required if using Exchange ActiveSync
Management Services.
Exchange ActiveSync Management Services- enables the
management of mobile devices that support Microsoft Exchange
within Microsoft Configuration Manager. Required if you will be using
EAS Blocking email blocking rules. See EAS Blocking functionality on
page 112.
Windows Mobile/CE Feature Packs- feature packs for Windows
Mobile and Windows CE devices. Includes Positioning (GPS), Phone,
and Security Essentials (Lock and Wipe) device functionality.
Introducing Mobile Management for Configuration Manager
Components of Mobile Management for Configuration Manager
13
Supported Features
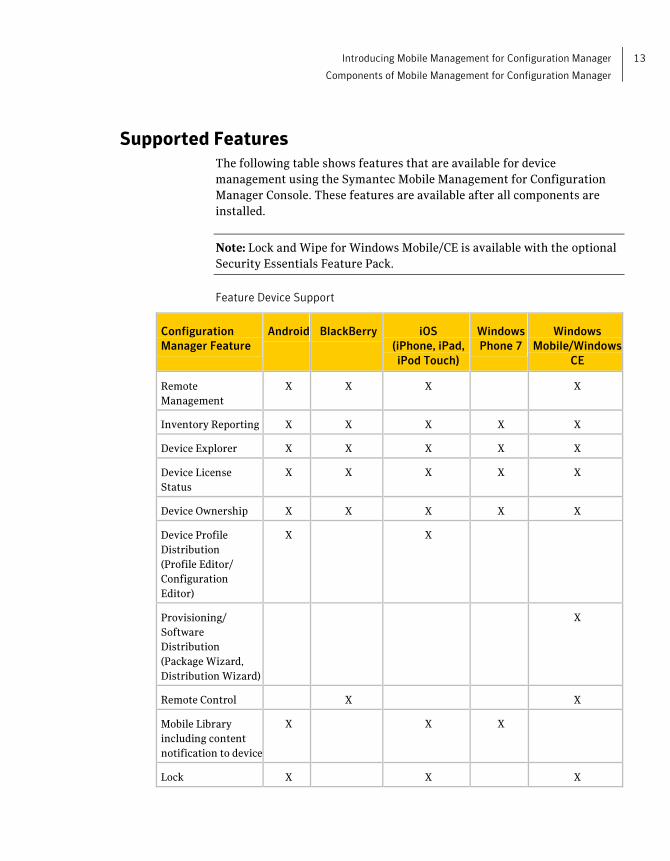
The following table shows features that are available for device
management using the Symantec Mobile Management for Configuration
Manager Console. These features are available after all components are
installed.
Note: Lock and Wipe for Windows Mobile/CE is available with the optional
Security Essentials Feature Pack.
Feature Device Support
Configuration
Manager Feature
Android BlackBerry iOS
(iPhone, iPad,
iPod Touch)
Windows
Phone 7
Windows
Mobile/Windows
CE
Remote
Management
X X X X
Inventory Reporting X X X X X
Device Explorer X X X X X
Device License
Status
X X X X X
Device Ownership X X X X X
Device Profile
Distribution
(Profile Editor/
Configuration
Editor)
X X
Provisioning/
Software
Distribution
(Package Wizard,
Distribution Wizard)
X
Remote Control X X
Mobile Library
including content
notification to device
X X X
Lock X X X
14 Introducing Mobile Management for Configuration Manager
Before you begin
Configuration
Manager Feature
Android BlackBerry iOS
(iPhone, iPad,
iPod Touch)
Windows
Phone 7
Windows
Mobile/Windows
CE
Wipe X X X
iOS App Push X (5.0 +)
Volume Purchase
Program
X (5.0 +)
Exchange
ActiveSync (EAS)
Blocking
X X
Symantec Licensing X X X X X
Dynamic Enrollment X X X
iOS 6 device support X
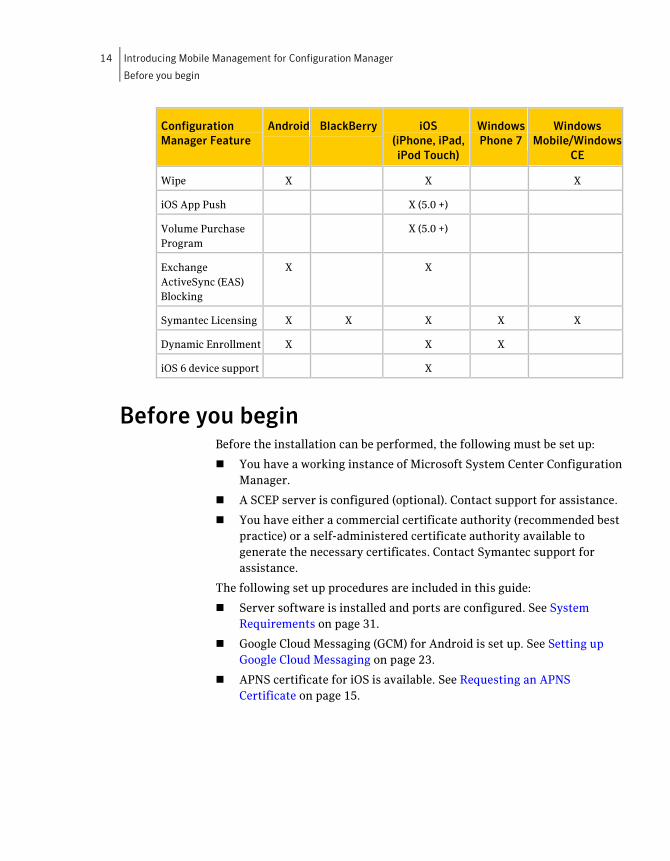
Before you begin Before the installation can be performed, the following must be set up:
You have a working instance of Microsoft System Center Configuration
Manager.
A SCEP server is configured (optional). Contact support for assistance.
You have either a commercial certificate authority (recommended best
practice) or a self-administered certificate authority available to
generate the necessary certificates. Contact Symantec support for
assistance.
The following set up procedures are included in this guide:
Server software is installed and ports are configured. See System
Requirements on page 31.
Google Cloud Messaging (GCM) for Android is set up. See Setting up
Google Cloud Messaging on page 23.
APNS certificate for iOS is available. See Requesting an APNS
Certificate on page 15.

Chapter 3
Requesting an APNS
Certificate
An SSL certificate signed by Symantec and Apple® is installed by the Push
Services Installer. The certificate is obtained by submitting a request to
Symantec for a signed certificate. The section describes the procedures to
generate, renew, manually install, and update the SSL certificate.
Creating a new APNS Certificate
Services that send notifications to an Apple iOS device must be registered
with Apple. Symantec Mobile Management for Configuration Manager uses
the Apple Push Notification Service to deliver notification messages to the
Mobile MGMT agent and to the Mobile Device Management (MDM)
component of iOS.
The Apple Push Notification Service allows a server to communicate with
the device without affecting performance or battery life.
Note: A Windows® 2008 server is required. If you cannot access the Apple
push certificate portal using Firefox® or Internet Explorer®, use Safari to
create the MDM certificate.
To generate a certificate request
1. Select Start > Control Panel > Administrative Tools > Internet
Information Services (IIS) Manager.
2. Select the server, and then double-click Server Certificates.
16 Requesting an APNS Certificate
Before you begin
3. On the Actions menu, click Create Certificate Request and enter the
following information:
Common Name - name that is attached to your certificate request.
Organization - name of your organization.
Organizational unit - name of the group or department within your
organization
City/locality - city or locality where your organization is located.
State/province - state or province where your organization is
located.
Country/region - country or region where your organization is
located.
4. Click Next.
5. In the CryptographicServiceProviderProperties window, select
Microsoft RSA SChannel Cryptographic Provider for the
Cryptographic service provider.
6. Set Bit length to 2048 and click Next.
7. In the File Name window, type a file path and name or click the ellipsis
button to browse.
8. Click Finish to generate and save the certificate request. The CSR file is
saved as a.TXT file.
9. Email the CSR file to your Symantec partner or SE to request a signed
CSR. Your partner or SE will deliver a signed CSR via email.
Create certificate procedure
To create the certificate:
1. After you receive the signed CSR from Symantec, use your
web-browser (Firefox, IE 8 or Safari) and visit
https://identity.apple.com/pushcert. Sign in with a verified Apple ID.
2. Click Create a Certificate and agree to the Terms of Use.
3. Select Choose File. Navigate to your signed CSR and click Upload. After
a moment, your certificate will be available for download.
4. Download the certificate. The certificate is a .PEM file. Copy the .PEM
file to the server where the CSR was created.
5. In IIS Manager, select the server and double-click Server Certificates.

Requesting an APNS Certificate
Before you begin
17
6. On the right, under Actions, choose Complete Certificate. When
prompted, enter the path to the new .PEM file.
Note: You may need to select *.* to see your .PEM file in your selected path.
7. Enter a user-friendly name for the certificate and then click OK. The
new certificate is now available with a private key.
8. Select the certificate and under Actions, choose Export. Enter a path
and file name to store the MDM certificate (key-pair) with a password.
The exported file has a file-type of .PFX.
IMPORTANT: Save the file in a safe place. You will need to browse to this
file when running the Symantec Mobile Management Push Services
installation.
Renew certificate
Typically, Apple certificates are valid for one year. After every year of use,
you must renew the certificate.
Important: You can only renew a certificate BEFORE it expires. If the
certificate has expired, you will not be able to renew the certificate. You will
have to generate a new certificate.
If a new certificate is generated, then a new certificate Subject is generated
and it will have the following effects:
The MDM Profile will need to be modified with the new APNS
certificate subject. See Replace Expired APNS Certificate on page 21 for
information on expired certificates.
All IOS devices will need to re-enroll to be able to accept push requests.
Generate the Certificate Signing Request
To generate a certificate request:
1. Select Start > Control Panel > Administrative Tools > Internet
Information Services (IIS) Manager.
2. Select the server, and then double-click Server Certificates.
18 Requesting an APNS Certificate
Before you begin
3. On the Actions menu, click Create Certificate Request and enter the
following information:
Common Name- name that is attached to your certificate request.
Organization- name of your organization.
Organizational unit- name of the group or department within your
organization
City/locality- city or locality where your organization is located.
State/province- state or province where your organization is
located.
Country/region- country or region where your organization is
located.
4. Click Next.
5. In the CryptographicServiceProviderProperties window, select
Microsoft RSA SChannel Cryptographic Provider for the Cryptographic
service provider.
6. Set Bit length to 2048 and click Next.
7. In the File Name window, type a file path and name or click the ellipsis
button to browse.
8. Click Finish to generate and save the certificate request. The CSR file is
saved as a.TXT file.
9. Email the CSR file to your Symantec partner or SE to request a signed
CSR. Your partner or SE will deliver a signed CSR via email.
Renew certificate procedure
To renew a certificate:
1. After you receive the signed CSR from Symantec, use your
web-browser (Firefox, IE 8 or Safari) and visit
https://identity.apple.com/pushcert. Sign in with a verified Apple ID.
2. Select the current APNS cert and click Renew.
3. Select Choose File.
4. Navigate to your signed CSR and click Upload. After a moment, your
certificate will be available for download. Download the certificate. The
certificate is a .PEM file. Copy the .PEM file to the server where the CSR
was created.
5. In IIS Manager, select the server and double-click Server Certificates.
Requesting an APNS Certificate
Before you begin
19
6. On the right, under Actions, choose Complete Certificate. When
prompted, enter the path to the new .PEM file.
Note: You may need to select *.* to see your .PEM file in your selected path.
7. Enter a user-friendly name for the certificate and then click OK. The
new certificate is now available with a private key.
8. Select the certificate and under Actions, choose Export. Enter a path
and file name to store the MDM certificate (key-pair) with a password.
The exported file has a file-type of .PFX.
Important: Save the file in a secure location. You will need to browse
to this file when running the Symantec Mobile Management Push
Services installation.
Installing and updating the replacement APNS Certificate
During the Symantec Mobile Management for Configuration Manager
installation, the MDM certificate thumbprint (APNS Cert Thumbprint) is
entered. The entry updates the APNSService.exe.config file automatically
and integrates the MDM certificate with Configuration Manager. The
certificate will expire within a year of the installation. Use the following
procedure to manually install and then update an expired MDM certificate.
Note: See Replace Expired APNS Certificate on page 21 for information on
expired certificates.
Install certificate procedure
The replacement APNS certificate is installed using the Microsoft
Certificates MMC PlugIn.
To install the replacement APNS Certificate:
1. On the server where the APNS service is running, click Start > Run
(Search Program and Files) MMC and click Enter.
2. When the MMC Console appears, click File > Add/Remove Snap In and
then select the Certificates snap-in from the Available snap-ins list.
3. Click Add >.
4. Select Computer Account and click Next.
5. On the next panel, select Local Computer and click Finish.
6. On the Add or Remove Snap-ins panel, click OK.
20 Requesting an APNS Certificate
Before you begin
7. In the left hand column of the MMC Console, Certificates Local
Computer_ appears. Expand this entry by selecting + at the left of the
entry.
8. Expand Personal and then click Certificates.
9. Right Click Certificates and select All Tasks > Import.
10. Browse for the PFX file that was created or renewed. If the file is not on
this server, copy and move it. Change the X.509 Certificate (*.cer, *.crt)
drop-down list entry to Personal Information Exchange (*.pfx, *.p12) to
locate the file. Once the file has been located and selected, click Next.
11. Enter the password. You do not need to make the key exportable but
you should Include all extended properties. Click Finish to import the
certificate.
12. Double-click the MDM Certificate you imported. Make note of the
thumbprint.
Update certificate procedure
To update the replacement certificate:
1. Navigate to C:\Program Files (x86)\Odyssey
Software\Athena\SCCM\WindowsServices (this path may be different
depending upon your installation and release version).
2. Locate and open the APNSService.exe.config file in a text editor, such
as Notepad.
3. Enter the MDM Certificate’s thumbprint in the
APNSAuthCertThumbPrint setting and save the file.
4. Restart the Odyssey Software APNS Service using the Microsoft
Administrative Tools console:
Access Start > Administrative Tools > Services.
Locate the Odyssey Software APNS Service.
Right-click the service and select Start.
Requesting an APNS Certificate
Before you begin
21
Replace expired APNS Certificate
When renewing an expired APNS certificate, determine if the Push
Certificate Subject needs updating in the MDM Enrollment Profile.
To check the Push Certificate Profile:
1. Open the Configuration Manager Console and navigate to Site
Database > Computer Management > Mobile Device Management >
Symantec Mobile Management > Profiles.
2. Right-click Enrollment MDM Profile and select Edit.
3. Note the entry in the Push Certificate Subject field.
If the entry is the same as the Subject taken from the new APNS
certificate, then no changes are required. If the entries are different,
you will need to update the profile with the new value taken from the
Subject of the Cert, starting with the characters com.apple. and the
remainder of the subject.
If the Subject has changed, all devices will need to re-enroll to receive
the new Push Certificate Subject, which ensures that APNS will work
properly with the devices.

22 Requesting an APNS Certificate
Before you begin
Chapter 4
Setting up Google Cloud
Messaging
Google Cloud Messaging (GCM) for Android allows information from
servers in the site environment to be sent to Android device applications.
To use GCM, you need to generate a Project ID, enable the GCM service, and
generate a server key using the Google apis website.
Prerequisites
Port 5228, 5229, and 5230- for connectivity with the GCM service using
WiFi, VPN, etc. GCM typically uses port 5228, but may also use ports
5229 and 5230. GCM does not provide specific IPs, so it frequently
changes IPs. Also, Google does not recommend using ACLs.
Port 443- must be open, outbound, on the Internet-facing server where
Push Services are installed. This port is required for IP addresses
behind android.googleapis.com. See the Push Services Installation
Procedure on page 42 for more information.
Google Mail (Gmail) account- to enable GCM.
Note: For Android 4.0.4 and higher versions, a Gmail account is not
required.
To use GCM, you must have the following:
Android 2.2 and higher versions- Google Play store installed.
Android 2.2 and lower versions- Gmail account available.
24 Setting up Google Cloud Messaging
Before you begin
Gmail account creation
If you do not have a Gmail account, you must create one before you can
enable GCM. For Android 4.0.4 and higher versions, this procedure is not
required.
To set up a Gmail account:
1. Access the following website: http://mail.google.com/mail/signup.
2. Enter an account name that is easily identified, such as
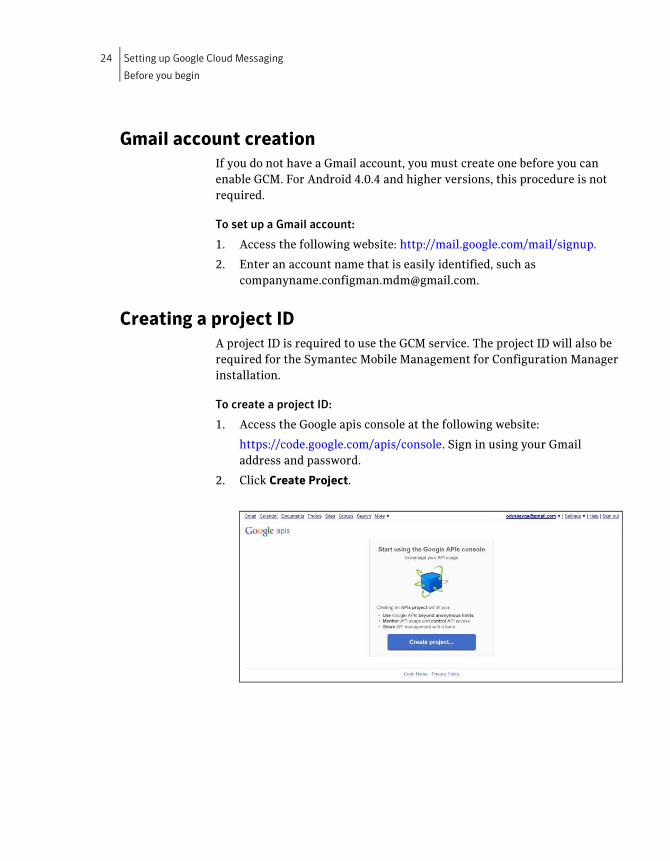
Creating a project ID
A project ID is required to use the GCM service. The project ID will also be
required for the Symantec Mobile Management for Configuration Manager
installation.
To create a project ID:
1. Access the Google apis console at the following website:
https://code.google.com/apis/console. Sign in using your Gmail
address and password.
2. Click Create Project.
Setting up Google Cloud Messaging
Before you begin
25
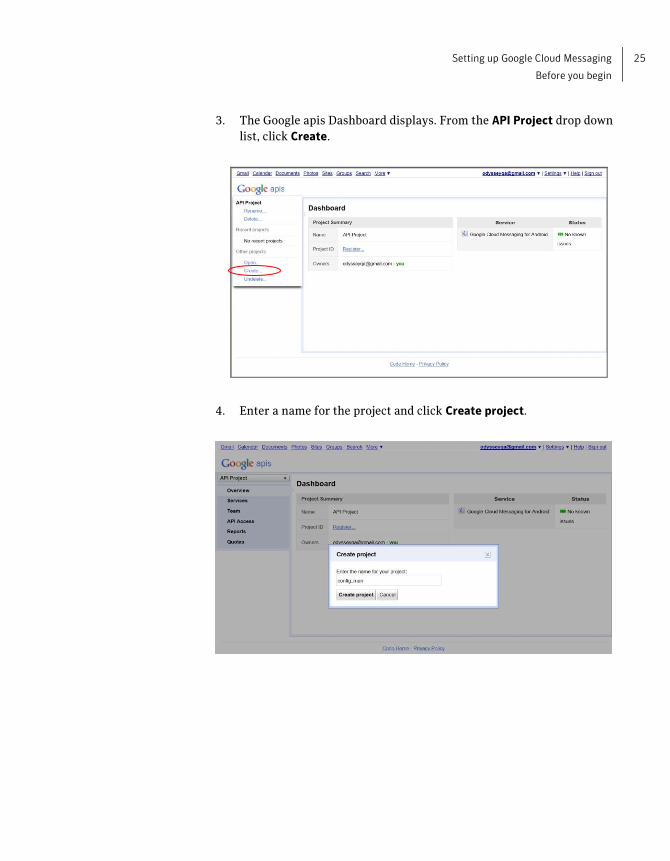
3. The Google apis Dashboard displays. From the API Project drop down
list, click Create.
4. Enter a name for the project and click Create project.
26 Setting up Google Cloud Messaging
Before you begin
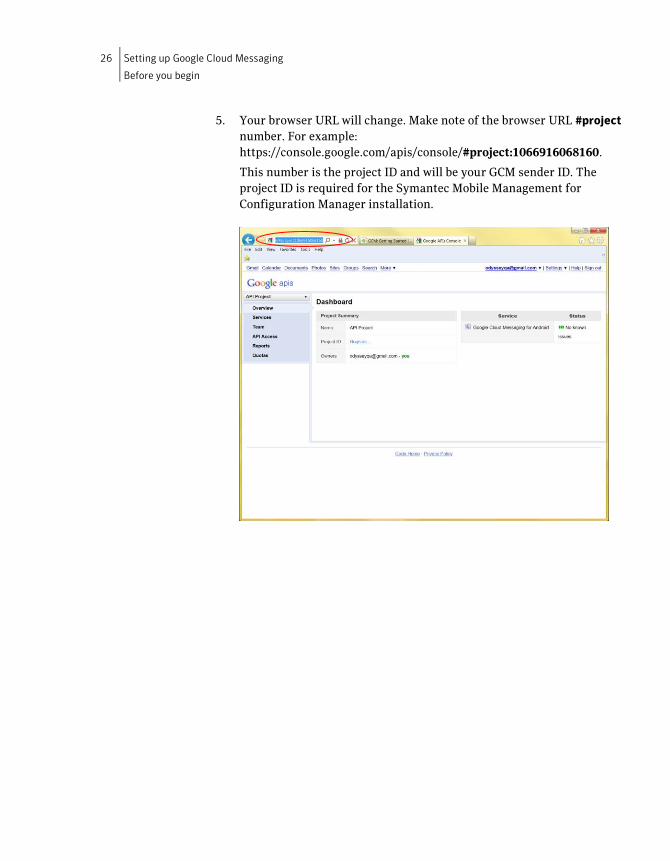
5. Your browser URL will change. Make note of the browser URL #project
number. For example:
https://console.google.com/apis/console/#project:1066916068160.
This number is the project ID and will be your GCM sender ID. The
project ID is required for the Symantec Mobile Management for
Configuration Manager installation.

Setting up Google Cloud Messaging
Before you begin
27
Enabling the GCM Service
To enable GCM service for your project:
1. If not already selected, select your project from the API Project
drop-down list.
2. Select Services from the left pane.
3. Scroll down and locate Google Cloud Messaging for Android.
4. Click the OFF control.
5. The Google APIs Terms of Service page displays. Click I agree to these
Terms and click Accept. GCM is now enabled for the project.
28 Setting up Google Cloud Messaging
Before you begin
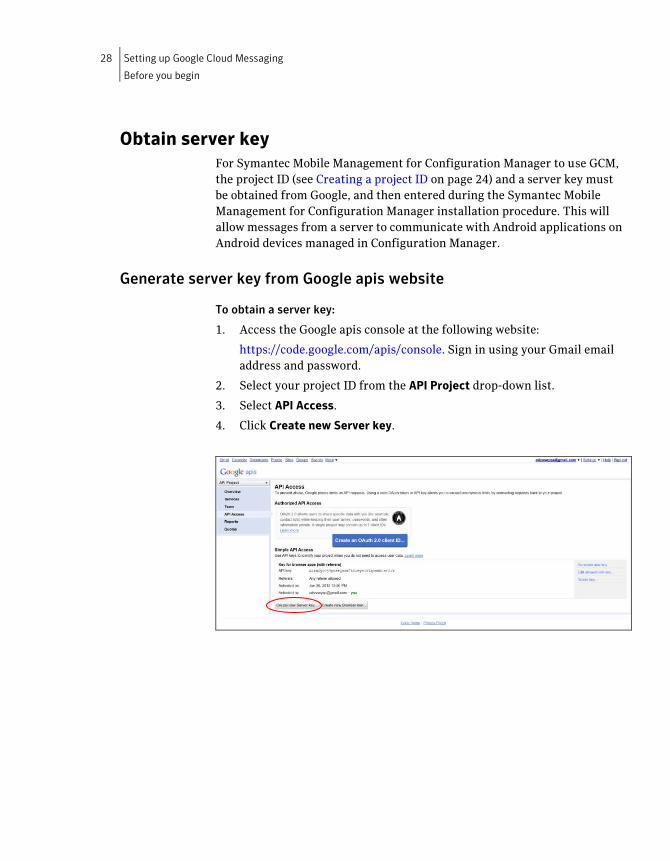
Obtain server key
For Symantec Mobile Management for Configuration Manager to use GCM,
the project ID (see Creating a project ID on page 24) and a server key must
be obtained from Google, and then entered during the Symantec Mobile
Management for Configuration Manager installation procedure. This will
allow messages from a server to communicate with Android applications on
Android devices managed in Configuration Manager.
Generate server key from Google apis website
To obtain a server key:
1. Access the Google apis console at the following website:
https://code.google.com/apis/console. Sign in using your Gmail email
address and password.
2. Select your project ID from the API Project drop-down list.
3. Select API Access.
4. Click Create new Server key.
Setting up Google Cloud Messaging
Before you begin
29
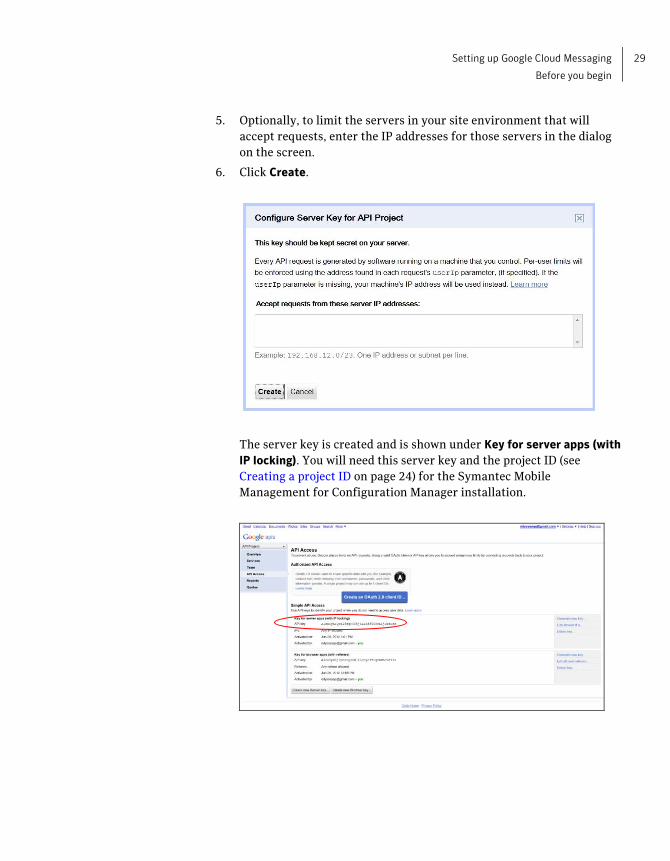
5. Optionally, to limit the servers in your site environment that will
accept requests, enter the IP addresses for those servers in the dialog
on the screen.
6. Click Create.
The server key is created and is shown under Key for server apps (with
IP locking). You will need this server key and the project ID (see
Creating a project ID on page 24) for the Symantec Mobile
Management for Configuration Manager installation.

30 Setting up Google Cloud Messaging
Before you begin
Chapter 5
System Requirements
This chapter lists the software requirements for servers in the System
Center Configuration Manager environment. It also includes required
domain group, port/protocol configuration, mobile device, iOS, Android,
and Windows Phone 7 specific requirements. For more information about
the Configuration Manager requirements, visit the Microsoft website
(www.microsoft.com).
Notes: All site servers must be members of the same or trusted Active
Directory domain.
Central and Primary Servers Windows Server 2008 (32 or 64-Bit Edition) or R2 (64-Bit Edition)
SQL Server® 2005 with Service Pack 2 or higher or SQL Server 2008
Microsoft Access Database Engine 2010 SP1 (64-Bit version). Visit
http://www.microsoft.com/en-us/download/details.aspx?id=26607 for
the information and the download.
Windows Server Active Directory Domain
Microsoft System Center Configuration Manager 2007 R2 Service Pack
1 or higher (includes SP2, R2, R3)
Microsoft Internet Information Services (IIS) version 7.1 (Windows
Server 2008), 7.5 (Windows Server 2008 R2)
ASP.Net 2.0 enabled in IIS. See Enabling ASP.Net in IIS on page 118 for
more information.
Microsoft .NET Framework 2.0 or higher
32 System Requirements
Central and Primary Servers
Microsoft Message Queuing (MSMQ)- Microsoft Message Queuing
Service, Message Queuing, Message Queuing Server, and Directory
Service Integration (installed on the server where APNS is running,
which is typically the Central server).
Windows Communication Foundation (WCF) service activated.
(Microsoft .NET 2.2 Framework or higher)
Microsoft Silverlight 4.0 for 32 bit systems
Microsoft Silverlight 5.0 for 64 bit systems
The following are also required on the Configuration Manager server if the
console is used on the Central or Primary server:
Microsoft Management Console (MMC) 3.0 or higher
Sun® Microsystems J2SE Runtime Environment Version 6 (Update 5)
or higher
The following are required for supporting iOS devices in Symantec Mobile
Management for System Center Configuration Manager:
MDM (Apple Mobile Device Management) Services configured on any
server that can access the internet or any server for WiFi
Microsoft Simple Certificate Enrollment Protocol (SCEP)/Network
Device Enrollment Service (NDES)
Note: SCEP/NDES is optional if a single Identity Certificate is not used
for all iOS devices.
Windows Server 2008- Certification Authority Role (CertServ)
configured on a domain managed server. For more information, visit
the following Microsoft website:
http://www.microsoft.com/downloads/en/details.aspx?familyid=E117
80DE-819F-40D7-8B8E-10845BC8D446&displaylang=en
Note: iOS devices will access the SCEP server using a URL that the
devices can reach.
System Requirements
Secondary Servers or Management Points
33
Secondary Servers or Management Points Windows Server 2008 (32 or 64-Bit Edition) or R2 (64-Bit Edition)
Microsoft System Center Configuration Manager 2007 R2 Service Pack
1 or higher (includes SP2, R2, R3)
Microsoft Internet Information Services (IIS) version 7.1 (Windows
Server 2008), 7.5 (Windows Server 2008 R2)
ASP.Net 2.0 enabled in IIS. See Enabling ASP.Net in IIS on page 118 for
more information.
Microsoft .NET Framework 2.0 or higher
Microsoft Message Queuing (MSMQ)- Microsoft Message Queuing
Service, Message Queuing, Message Queuing Server, and Directory
Service Integration
Administrator Console Workstation PCs Windows XP Professional, Windows 7, Windows Server 2008
Microsoft ActiveSync 4.2 or higher
Microsoft Management Console 3.0 or higher
Sun Microsystems J2SE Runtime Environment Version 6 (Update 5) or
higher
Microsoft Silverlight 4.0 for 32 bit systems
Microsoft Silverlight 5.0 for 64 bit systems
Required Ports/Protocols
Note: If your site security policy dictates using different ports, please
consult Symantec support for assistance.
The following are the required ports for communication to devices:
Port 80- for Symantec Mobile Management Device Client
communication with the Athena™ Web Services. Agents use either port
80 or 443 inbound to the Web Server for inventory.
Port 389- LDAP Service. From the Enrollment Server to an LDAP
Server (internal network) for authentication.
34 System Requirements
Required Ports/Protocols
Port 443- for Symantec Mobile Management Device Client
communication with the Athena Web Services with SSL Encryption.
Agents use either port 80 or 443 inbound to the Web Server for
inventory.
Port 444- for iOS enrollment with MDM (default). This port can be
changed.
Port 7778- for communication between the console and the Tunnel
Server. This port can be changed.
Port 7780- for communication between devices and the Tunnel Server.
This port can be changed.
Port 1433- for Symantec Mobile Management Replication Services SQL
server connection. This port can be changed.
To communicate with Apple services, the following outbound ports must be
open for outbound connections over TCP:
Port 2195- must be open, outbound, on the server hosting the Athena
APNS NT Service for communication with the Apple Push Notification
Service (APNS).
Port 5223- must be open, outbound, on any network on which iOS
devices will be confined to a WLAN and unable to access cellular data
networks. For a higher level of security, firewall rules can limit this
port to the 17.0.0.0/8 address block which is assigned to Apple. 5223
can be left closed if all iOS devices being managed have access to a
cellular data network.
Port 2196- must be open, outbound, on the server hosting the Athena
APNS NT Service for communication with the Apple Push Notification
Feedback Service (APNS).
To communicate with GCM services, the following ports must be available:
Port 443- must be open, outbound, on the Internet-facing server where
Push Services are installed. This port is required for IP addresses
behind android.googleapis.com. See the Push Services Installation
Procedure on page 42 for more information.
Port 5228, 5229, and 5230- for connectivity using WIFI, VPN, etc. GCM
typically uses port 5228, but may also use ports 5229 and 5230. GCM
does not provide specific IPs, so it frequently changes IPs. Also, Google
does not recommend using ACLs.
System Requirements
Security Group Configuration
35
Security Group Configuration Membership of the domain groups determine access to interactive Live
Support Sessions from Symantec Mobile Management Device Explorer, and
security groups for Tunnel Server. After installation, members of security
groups will have Athena Database read access. The Active Directory
account of the Configuration Manger Console user must be added to the
groups.
The following is the preferred security group configuration that should be
defined before performing the installation:
Tier1 (Level 1 group for Tunnel Server)
Tier2 (Level 2 group for Tunnel Server)
Tier3 (Level 3 group for Tunnel Server)
The number determines access level - the higher the number, the more
access the group will have. Three different security groups must be created
for use and can use any name or site naming convention.
Apple Enterprise Membership Requirements If you are only using MDM (features), an APNS certificate is required and
Apple memberships are not required.
If you are developing in-house apps, the following memberships are
required:
iOS Developer Enterprise Program membership- visit the following
website to become a member:
http://developer.apple.com/programs/ios/enterprise/.
This program provides the certificate that allows the use of APNS for
the Symantec Mobile MGMT agent for iOS and is the certificate used
within the Symantec Mobile Management server-side solution. The
program also provides the certificate for developing and testing an
in-house developed MDM agent.
Developer Program- visit the following website to become a member:
http://developer.apple.com/programs/ios/. This program will provide
the certificate used to sign a site-developed branded version of the
Symantec Mobile MGMT agent for submission to the App Store.
36 System Requirements
SYMC Agent for iOS Requirements
SYMC Agent for iOS Requirements For Symantec Mobile MGMT agent functionality, the following certificates
and Provisioning Profile are required before installation occurs:
MDM push certificate (com.apple.mgmt).
Developer certificate.
APNS Provisioning Profile for the Symantec Mobile MGMT Agent.
iOS Profile Security Requirements To configure server settings for iOS Profile security, the following is
required:
Profile Signing Certificate- certificate used for signing on the
Management Point server (local computer) personal store. This cert is
created automatically during installation.
Profile Encryption Certificate- certificate used for encryption on the
Management Point server (local computer) personal store. This cert is
created automatically during installation.
Device Encryption Credential- credential payload containing a
certificate to be placed on devices for encryption/decryption.
Device Signing Credential- credential payload containing a certificate
to be placed on devices to validate signing.
Device Signing/Encryption Root Credential- credential payload
containing a server root certificate to be placed on devices to complete
the certificate chain for the decryption and signing validation
certificates. Used only for non-commercial CAs.
Note: See Create Security Credentials on page 72 for more information
on credential payload creation.
System Requirements
Supported Mobile Devices
37
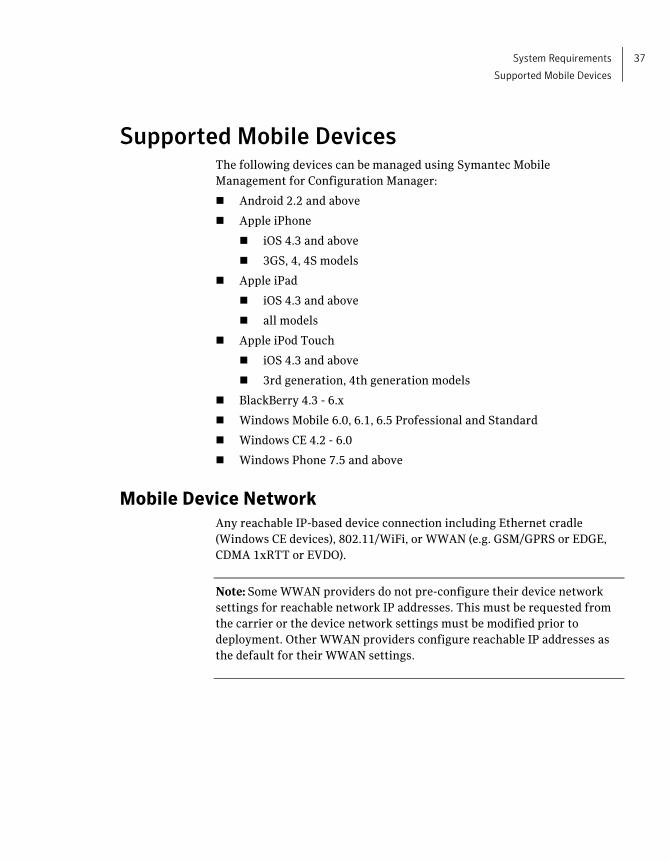
Supported Mobile Devices The following devices can be managed using Symantec Mobile
Management for Configuration Manager:
Android 2.2 and above
Apple iPhone
iOS 4.3 and above
3GS, 4, 4S models
Apple iPad
iOS 4.3 and above
all models
Apple iPod Touch
iOS 4.3 and above
3rd generation, 4th generation models
BlackBerry 4.3 - 6.x
Windows Mobile 6.0, 6.1, 6.5 Professional and Standard
Windows CE 4.2 - 6.0
Windows Phone 7.5 and above
Mobile Device Network
Any reachable IP-based device connection including Ethernet cradle
(Windows CE devices), 802.11/WiFi, or WWAN (e.g. GSM/GPRS or EDGE,
CDMA 1xRTT or EVDO).
Note: Some WWAN providers do not pre-configure their device network
settings for reachable network IP addresses. This must be requested from
the carrier or the device network settings must be modified prior to
deployment. Other WWAN providers configure reachable IP addresses as
the default for their WWAN settings.

38 System Requirements
Supported Mobile Devices
Chapter 6
Installing
The Symantec Mobile Management for System Center Configuration
Manager components, which include Push Services, Console, Services,
Reporting Services, Replication Services, and optional Windows Mobile/CE
Feature Packs, must be installed in a specific order on the servers in the site
environment. For multiple server sites, the installation should be done
following the site hierarchy starting with the highest level server and then
proceeding to the lower level servers.
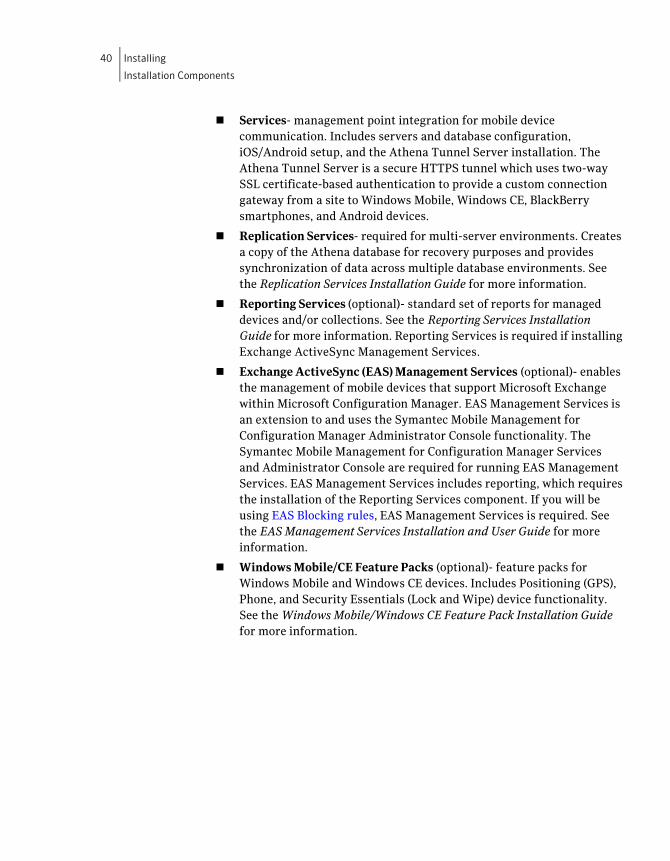
Installation Components The Symantec Mobile Management for Configuration Manager installation
includes the following components:
Push Services- includes the APNS Web Service, Google Cloud
Messaging (GCM) Service, and Feedback Web Service. These Windows
and Web services are required for iOS and Android device
management.
Console- administrator console integration components for device
management, which includes Symantec Mobile Management utilities
for interactive troubleshooting and live support, device data
inventory/history (Device Explorer), package creation (Device Software
Package Wizard), and package distribution (Software Distribution
Wizard). See the Device Explorer User Guide, iOS, Android, and
Windows Phone 7 Features User Guide, and Windows Mobile/CE
Package Creation, Assignment, and Distribution Guide for more
information.
40 Installing
Installation Components
Services- management point integration for mobile device
communication. Includes servers and database configuration,
iOS/Android setup, and the Athena Tunnel Server installation. The
Athena Tunnel Server is a secure HTTPS tunnel which uses two-way
SSL certificate-based authentication to provide a custom connection
gateway from a site to Windows Mobile, Windows CE, BlackBerry
smartphones, and Android devices.
Replication Services- required for multi-server environments. Creates
a copy of the Athena database for recovery purposes and provides
synchronization of data across multiple database environments. See
the Replication Services Installation Guide for more information.
Reporting Services (optional)- standard set of reports for managed
devices and/or collections. See the Reporting Services Installation
Guide for more information. Reporting Services is required if installing
Exchange ActiveSync Management Services.
Exchange ActiveSync (EAS) Management Services (optional)- enables
the management of mobile devices that support Microsoft Exchange
within Microsoft Configuration Manager. EAS Management Services is
an extension to and uses the Symantec Mobile Management for
Configuration Manager Administrator Console functionality. The
Symantec Mobile Management for Configuration Manager Services
and Administrator Console are required for running EAS Management
Services. EAS Management Services includes reporting, which requires
the installation of the Reporting Services component. If you will be
using EAS Blocking rules, EAS Management Services is required. See
the EAS Management Services Installation and User Guide for more
information.
Windows Mobile/CE Feature Packs (optional)- feature packs for
Windows Mobile and Windows CE devices. Includes Positioning (GPS),
Phone, and Security Essentials (Lock and Wipe) device functionality.
See the Windows Mobile/Windows CE Feature Pack Installation Guide
for more information.
Installing
Installation Components
41
Symantec Mobile Management Components Installation Order
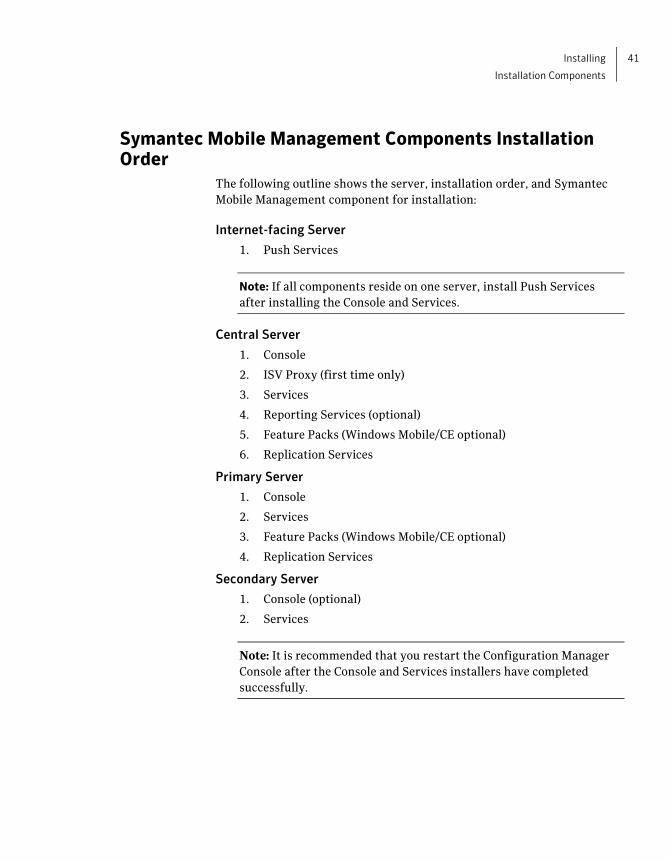
The following outline shows the server, installation order, and Symantec
Mobile Management component for installation:
Internet-facing Server
1. Push Services
Note: If all components reside on one server, install Push Services
after installing the Console and Services.
Central Server
1. Console
2. ISV Proxy (first time only)
3. Services
4. Reporting Services (optional)
5. Feature Packs (Windows Mobile/CE optional)
6. Replication Services
Primary Server
1. Console
2. Services
3. Feature Packs (Windows Mobile/CE optional)
4. Replication Services
Secondary Server
1. Console (optional)
2. Services
Note: It is recommended that you restart the Configuration Manager
Console after the Console and Services installers have completed
successfully.
42 Installing
Push Services Installation Procedure
Push Services Installation Procedure The Push Services Installation consists of the APNS Web Service, GCM
Service, and the Feedback Service. The network topology of the site
environment will determine where and when Push Services are installed.
Push Services must be installed on a server that has access to the internet.
Typically, this is a server that is not running Configuration Manager.
Note: If all components reside on one server, install Push Services after
installing the Console and Services.
To perform the Push Services installation:
1. Locate the executable and start the installation wizard by
double-clicking the Symantec Mobile Management Push Services icon.
2. The Welcome screen appears. Click Next to run the installation wizard.
3. Accept the end user software license agreement and click Next to
continue. Optionally, click Print to print a hard copy of the license
agreement before continuing with the installation (only appears for
first time installations).
4. Accept the default installation folder or click Change to browse and
select a different folder. When finished, click Next to continue.
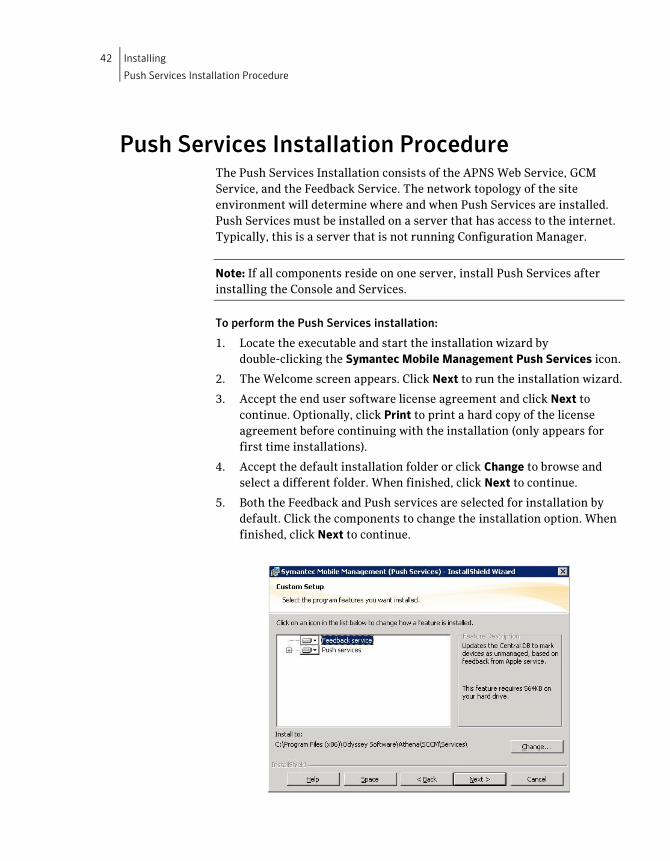
5. Both the Feedback and Push services are selected for installation by
default. Click the components to change the installation option. When
finished, click Next to continue.
Installing
Push Services Installation Procedure
43
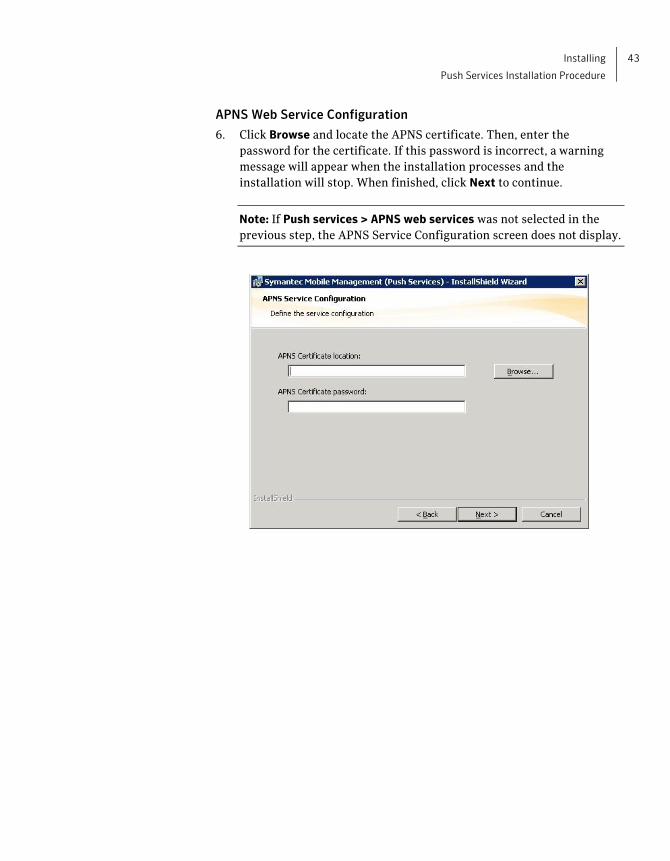
APNS Web Service Configuration
6. Click Browse and locate the APNS certificate. Then, enter the
password for the certificate. If this password is incorrect, a warning
message will appear when the installation processes and the
installation will stop. When finished, click Next to continue.
Note: If Push services > APNS web services was not selected in the
previous step, the APNS Service Configuration screen does not display.
44 Installing
Push Services Installation Procedure
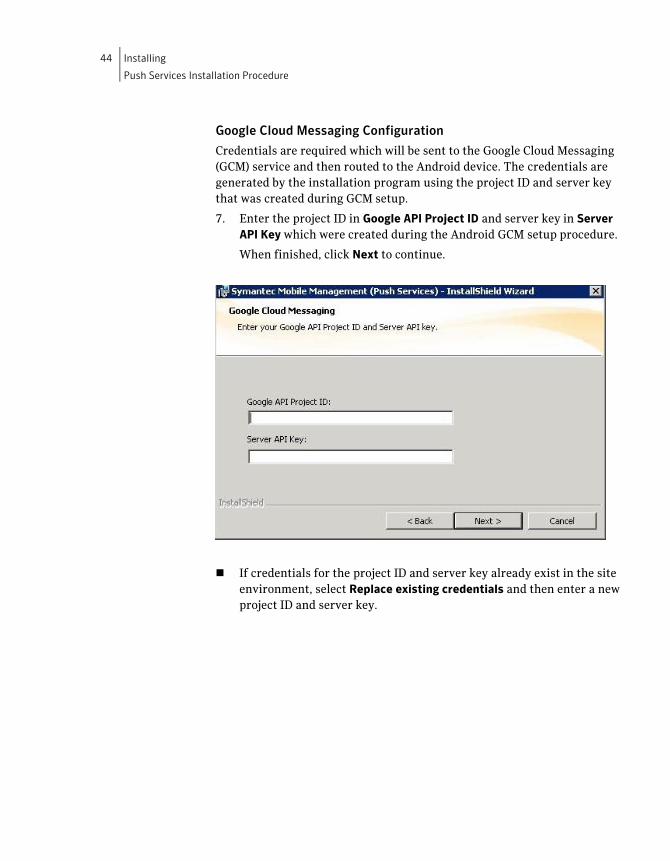
Google Cloud Messaging Configuration
Credentials are required which will be sent to the Google Cloud Messaging
(GCM) service and then routed to the Android device. The credentials are
generated by the installation program using the project ID and server key
that was created during GCM setup.
7. Enter the project ID in Google API Project ID and server key in Server
API Key which were created during the Android GCM setup procedure.
When finished, click Next to continue.
If credentials for the project ID and server key already exist in the site
environment, select Replace existing credentials and then enter a new
project ID and server key.
Installing
Push Services Installation Procedure
45
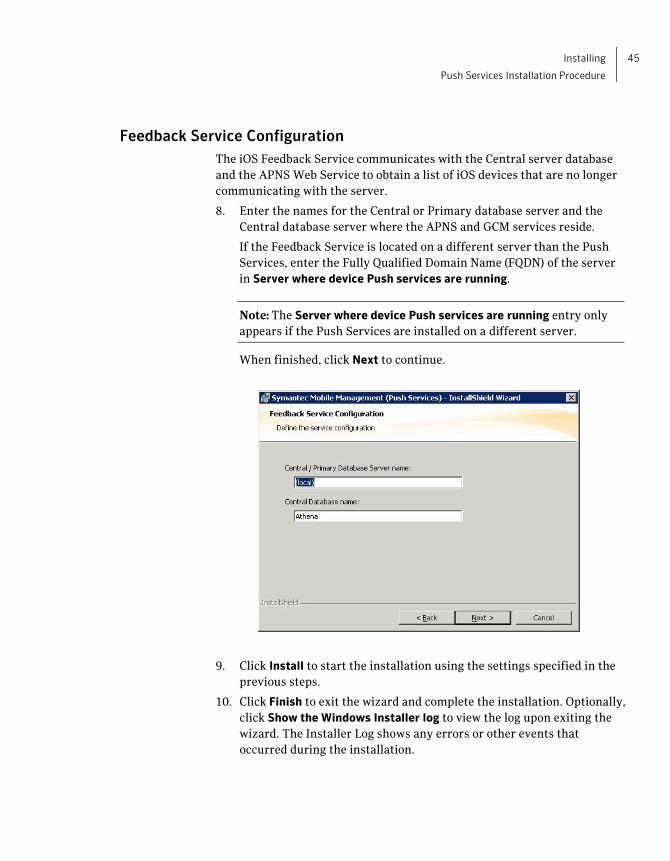
Feedback Service Configuration
The iOS Feedback Service communicates with the Central server database
and the APNS Web Service to obtain a list of iOS devices that are no longer
communicating with the server.
8. Enter the names for the Central or Primary database server and the
Central database server where the APNS and GCM services reside.
If the Feedback Service is located on a different server than the Push
Services, enter the Fully Qualified Domain Name (FQDN) of the server
in Server where device Push services are running.
Note: The Server where device Push services are running entry only
appears if the Push Services are installed on a different server.
When finished, click Next to continue.
9. Click Install to start the installation using the settings specified in the
previous steps.
10. Click Finish to exit the wizard and complete the installation. Optionally,
click Show the Windows Installer log to view the log upon exiting the
wizard. The Installer Log shows any errors or other events that
occurred during the installation.

46 Installing
Console and Services Installation Procedures
Console and Services Installation Procedures
Notes: To ensure success, all requirements should be met before beginning
the installation procedure.
Configuration Manager should be installed in Mixed mode, not Native mode.
Contact Symantec support for more information about running Symantec
Mobile Management for Configuration Manager in Native mode
environments.
The Symantec Mobile Management for Configuration Manager Console and
Services Installation consists of three parts that must be done in the
following order:
1. Part 1 Console Installation on page 47.
2. Part 2 Add ISV Proxy Certificate on page 50.
3. Part 3 Services Installation on page 53.
A Configuration Manager administrator is recommended to perform the
installation as the appropriate rights and permission are required to
administer the Configuration Manager server(s). On Central/Primary
servers, the installer should also be a member of the SMS Admins security
group.
Note: The installation procedures generate log files that may contain
sensitive information. To protect this information, purge the log files after
the installation is successfully completed.
Installing
Console and Services Installation Procedures
47
Part 1 Console Installation
The Console installation must be done for each console residing in the site
environment.
If the console is being installed on a 64bit OS (Server 2008/Windows 7) and
the console will be used to access Live Support Session for Remote Control,
the 64bit version of the Java JRE (Java Runtime Environment) must be
installed on the desktop/server.
If the 64bit version of the Java JRE has not been installed, an error message
will appear on the Remote Control page even though Java has been
installed on the desktop/server.
If the file “JRE-{latest version}-windows-x64.exe” is not available on the
desktop/server, use the 64bit version of Internet Explorer to browse to
www.java.com and obtain the latest 64bit version of the JRE installation.
Note: During the Console Installation, the Console should not be accessed
from the location where it is being installed.
To install the Administrator Console:
1. Locate the executable and start the installation wizard by
double-clicking the Symantec Mobile Management Console icon.
Note: For Windows 7 systems, right-click the icon and select Run as
administrator.
2. The Welcome screen appears. Click Next to run the installation wizard
for the Console portion of the installation.
3. Accept the end user software license agreement and click Next to
continue. Optionally, click Print to print a hard copy of the license
agreement before continuing with the installation (This screen only
appears for first time installations).
4. Accept the default installation folder or click Change to browse and
select a different folder. When finished, click Next to continue.
48 Installing
Console and Services Installation Procedures
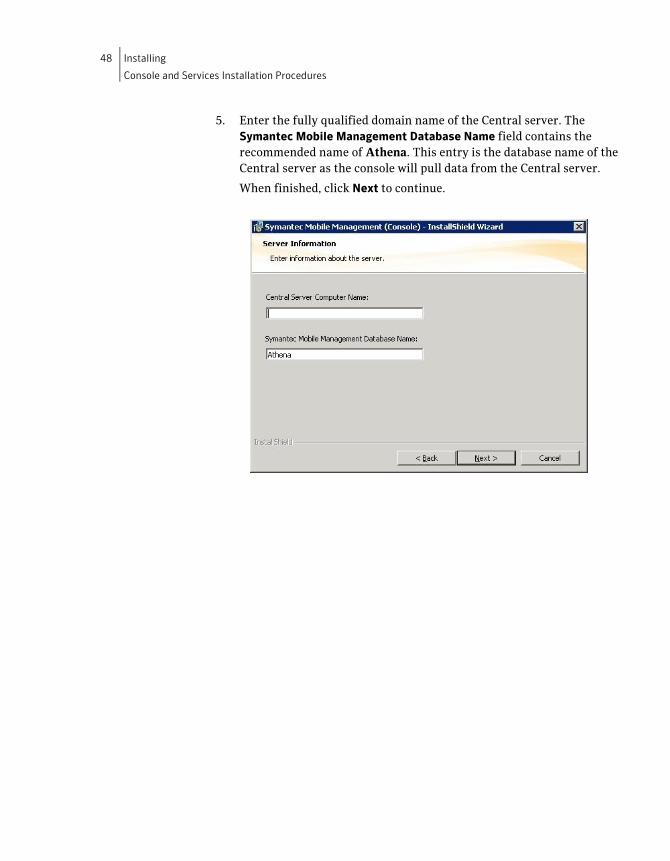
5. Enter the fully qualified domain name of the Central server. The
Symantec Mobile Management Database Name field contains the
recommended name of Athena. This entry is the database name of the
Central server as the console will pull data from the Central server.
When finished, click Next to continue.

Installing
Console and Services Installation Procedures
49
6. Locate and select the Central server database by clicking Browse or
type the Central server database name.
If the current user is a Configuration Manager administrator, use the
default Windows authentication credentials of current user.
If using SQL server logins, select Server authentication using the Login
ID and password below to create the SQL server login.
When finished, click Next to continue.
7. Click Install to start the installation of the Console using the settings
specified in the previous steps.
8. Click Finish to exit the wizard and complete the Console Installation.
Optionally, click Show the Windows Installer log to view the log upon
exiting the wizard. The Installer Log shows any errors or other events
that occurred during the installation.
50 Installing
Console and Services Installation Procedures
Part 2 Add ISV Proxy Certificate
The second part of the installation provides instructions for manually
adding the Symantec ISV proxy certificate (provided by Symantec) to the
Configuration Manager Console.
Note: This procedure should be performed on all Central and Primary
servers in the site hierarchy.
For messages sent from Athena Web Services to be authenticated by
Configuration Manager, an ISV (Independent Software Vendor) proxy
certificate is required. The certificate (odyssey-athena-sccm.cer) enables
devices running Symantec Mobile Management to communicate securely
with the Management Point by validating that they are Symantec devices.
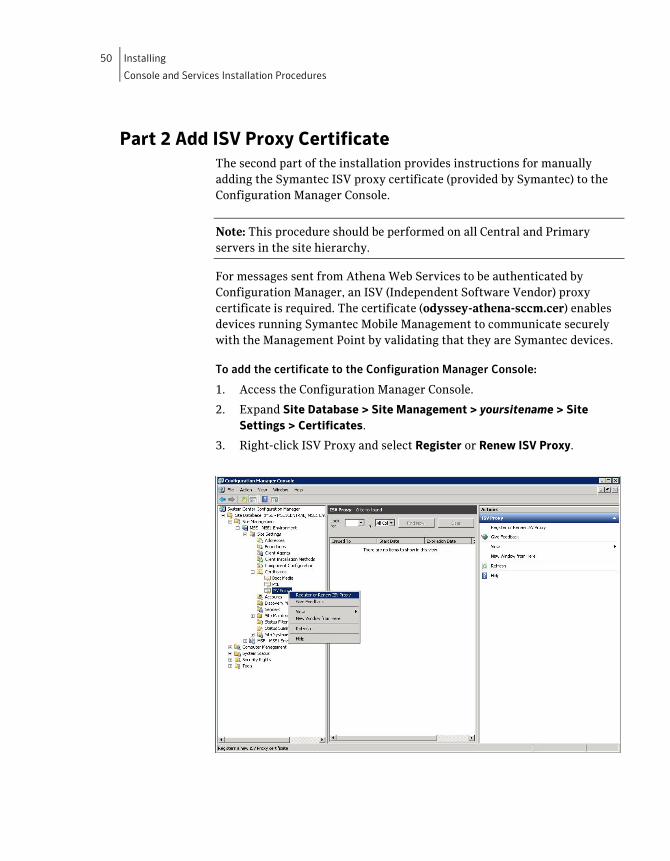
To add the certificate to the Configuration Manager Console:
1. Access the Configuration Manager Console.
2. Expand Site Database > Site Management > yoursitename > Site
Settings > Certificates.
3. Right-click ISV Proxy and select Register or Renew ISV Proxy.
Installing
Console and Services Installation Procedures
51
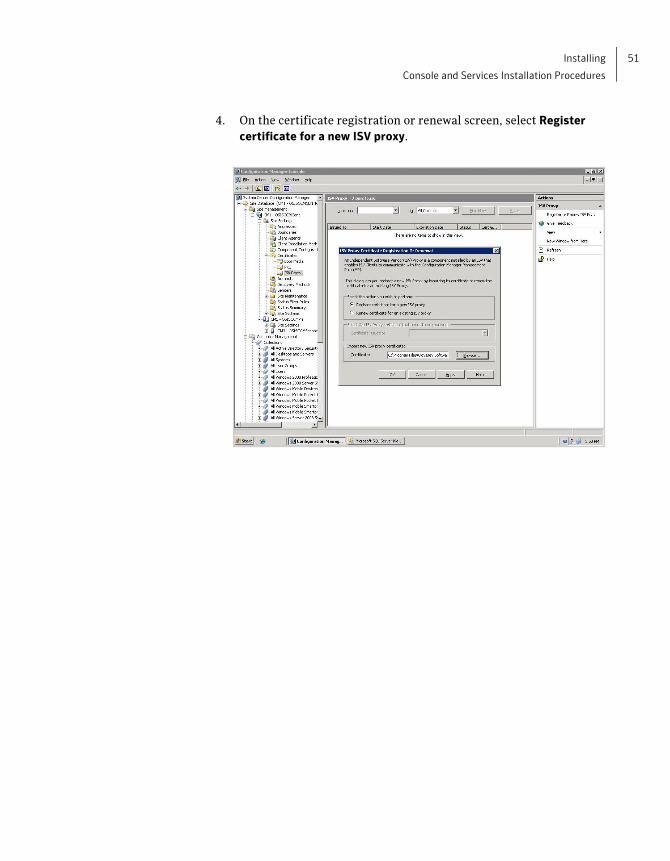
4. On the certificate registration or renewal screen, select Register
certificate for a new ISV proxy.
52 Installing
Console and Services Installation Procedures
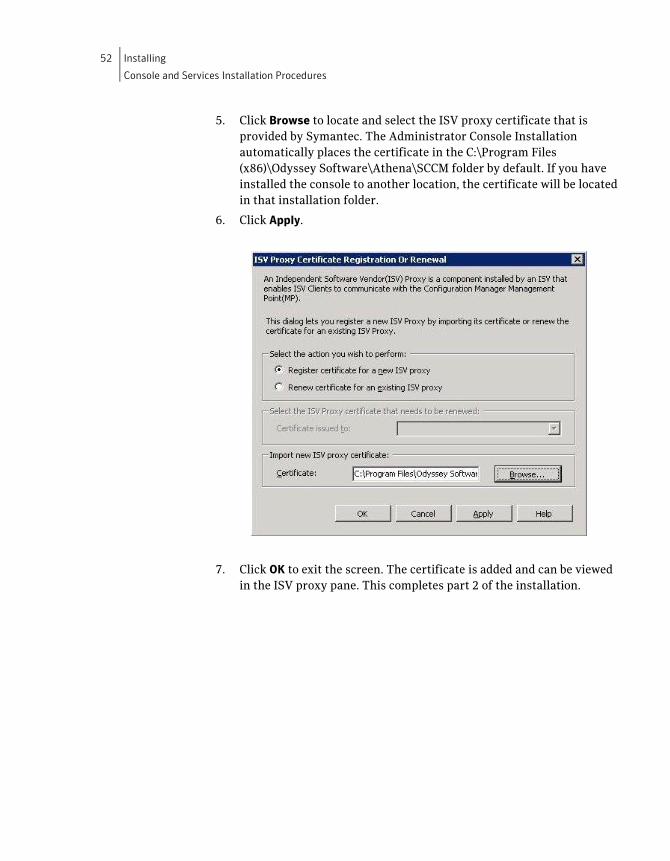
5. Click Browse to locate and select the ISV proxy certificate that is
provided by Symantec. The Administrator Console Installation
automatically places the certificate in the C:\Program Files
(x86)\Odyssey Software\Athena\SCCM folder by default. If you have
installed the console to another location, the certificate will be located
in that installation folder.
6. Click Apply.
7. Click OK to exit the screen. The certificate is added and can be viewed
in the ISV proxy pane. This completes part 2 of the installation.
Installing
Console and Services Installation Procedures
53
Part 3 Services Installation
The Services Installation is done on all (one or multiple) Management Point
servers to which the devices are reporting. For multiple server sites, the
Services installation should be done following the site hierarchy. For
example, starting with the highest level server and then proceeding to the
lower level servers. See Symantec Mobile Management Components
Installation Order on page 41 for more information.
Note: The computer account must have system administrator access to the
database server for creation of the Athena database and permissions
assignment.
The following steps must be done on each Configuration Manager server:
1. Log in as a Configuration Manager administrator.
2. On each Configuration Manager server, locate the executable and start
the installation wizard by double-clicking the Symantec Mobile
Management Services icon.
3. The Welcome screen appears. Click Next to run the installation wizard
for the Services portion of the Symantec Mobile Management for
Configuration Manager installation.
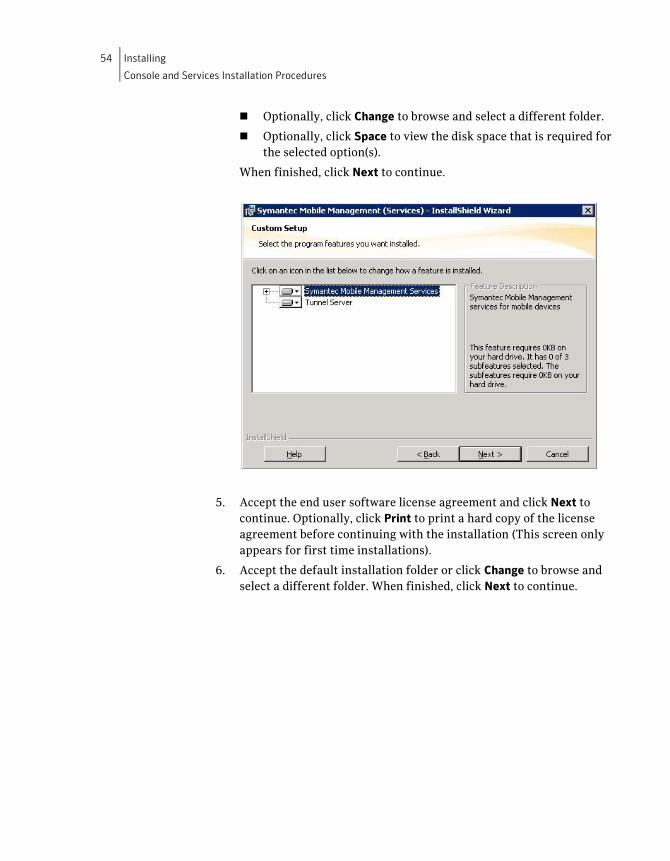
4. Both the Tunnel Server and Symantec Mobile Management Services
are selected for installation by default. Click the Tunnel Server and/or
Symantec Mobile Management Services components to change the
installation options.
Note: The Tunnel Server is required. If not installing the Tunnel Server at
this point or server location, it must be installed on another server located
in the Configuration Manager site environment.
54 Installing
Console and Services Installation Procedures
Optionally, click Change to browse and select a different folder.
Optionally, click Space to view the disk space that is required for
the selected option(s).
When finished, click Next to continue.
5. Accept the end user software license agreement and click Next to
continue. Optionally, click Print to print a hard copy of the license
agreement before continuing with the installation (This screen only
appears for first time installations).
6. Accept the default installation folder or click Change to browse and
select a different folder. When finished, click Next to continue.
Installing
Console and Services Installation Procedures
55
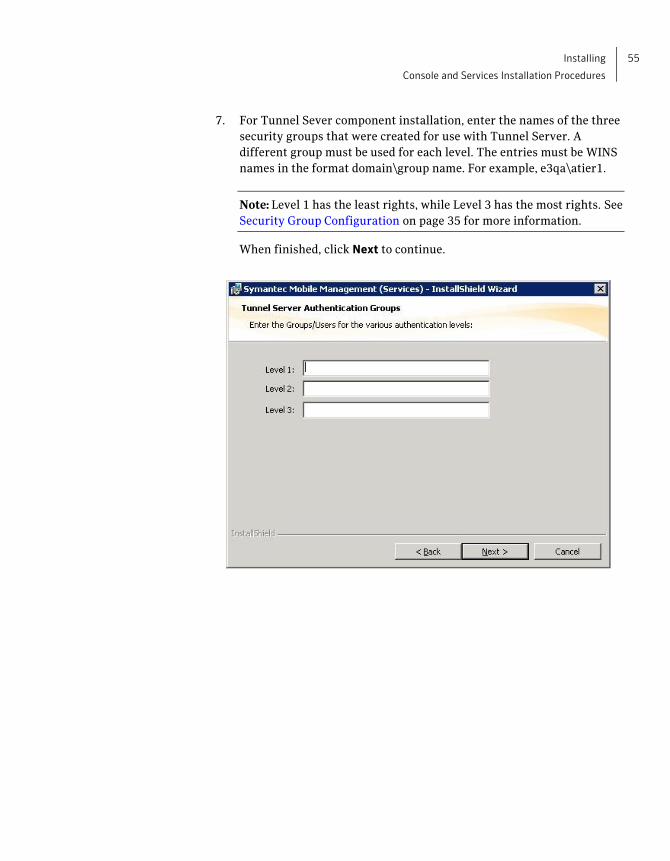
7. For Tunnel Sever component installation, enter the names of the three
security groups that were created for use with Tunnel Server. A
different group must be used for each level. The entries must be WINS
names in the format domain\group name. For example, e3qa\atier1.
Note: Level 1 has the least rights, while Level 3 has the most rights. See
Security Group Configuration on page 35 for more information.
When finished, click Next to continue.
56 Installing
Console and Services Installation Procedures
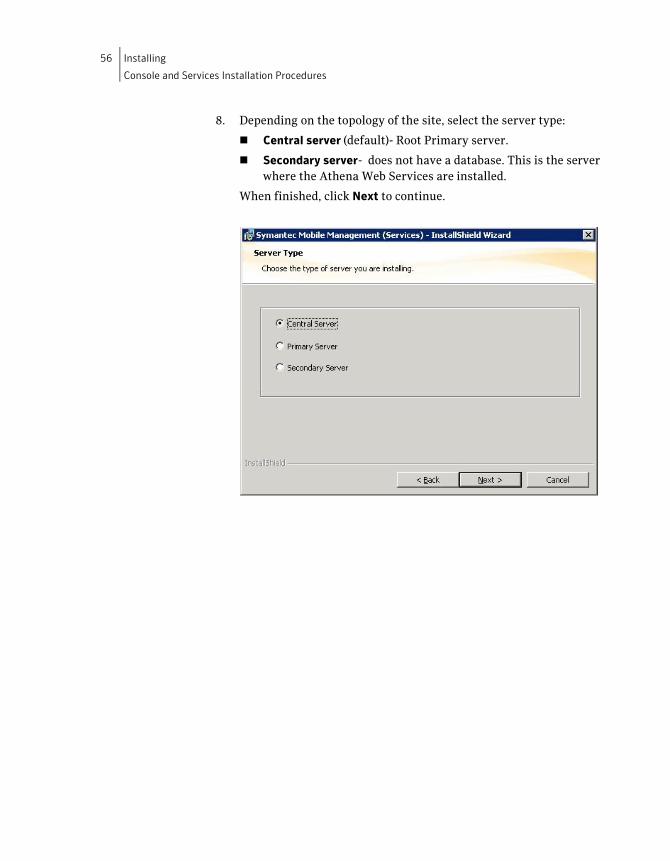
8. Depending on the topology of the site, select the server type:
Central server (default)- Root Primary server.
Secondary server- does not have a database. This is the server
where the Athena Web Services are installed.
When finished, click Next to continue.
Installing
Console and Services Installation Procedures
57
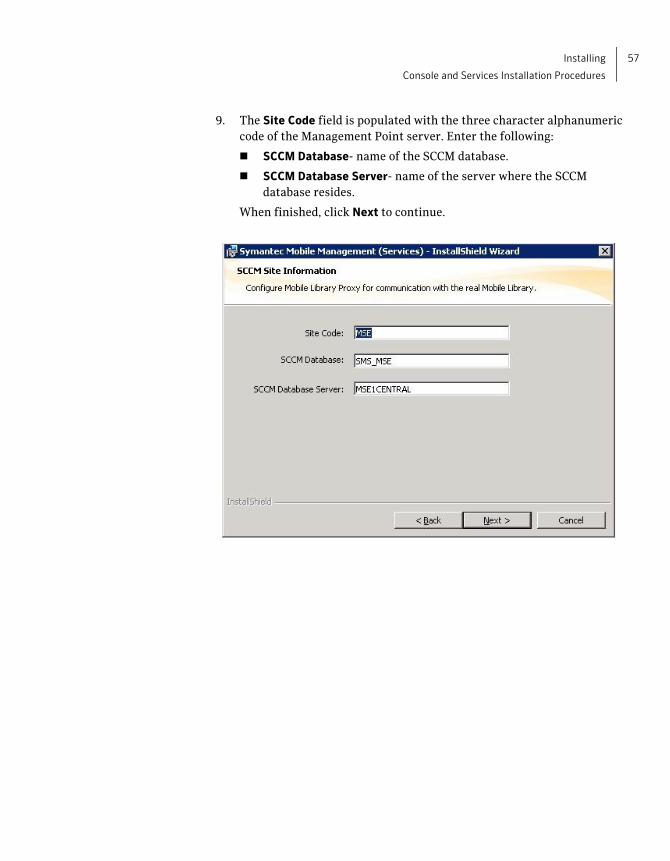
9. The Site Code field is populated with the three character alphanumeric
code of the Management Point server. Enter the following:
SCCM Database- name of the SCCM database.
SCCM Database Server- name of the server where the SCCM
database resides.
When finished, click Next to continue.
58 Installing
Console and Services Installation Procedures
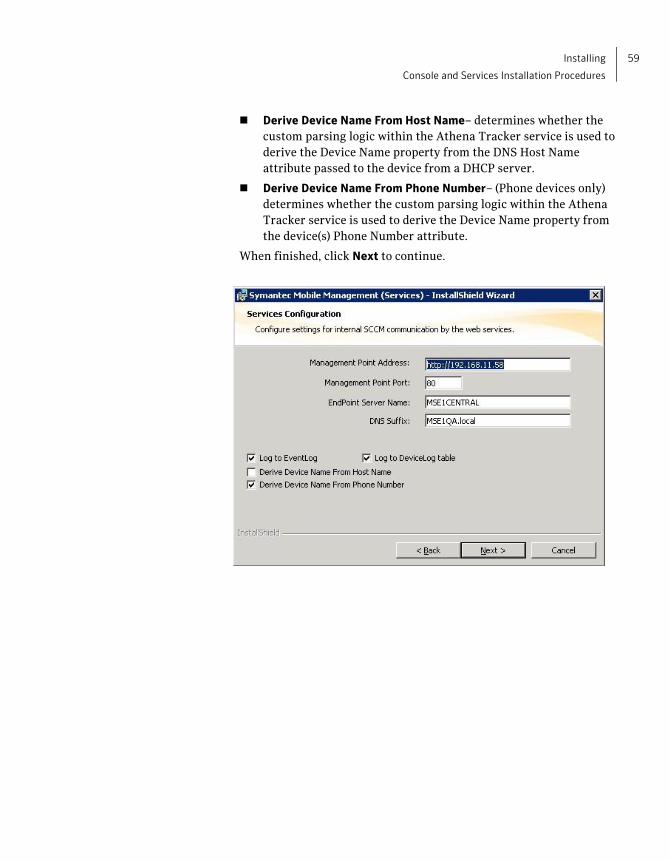
10. Review the default values for the following options. Make any changes
as required for the site:
Management Point Address- IP address of server. Typically this
entry is the address of the Central server or the Primary server
(when installing on a Primary server).
Note: The http:// prefix is not automatically pre-pended to the IP
address, so it must be entered with the IP address when a server is
running DHCP. For example, a valid entry is http://192.168.1.101. If
http:// is not entered, the correct Management Point address will not
be written to the Athena web.config file and DCOM will be used to
communicate, which is problematic.
Management Point Port- port of the server that is specified in the
Management Point Address field. Typically, the entry is port 80.
EndPoint Server Name- name of the Management Point server.
DNS Suffix– specifies the DNS suffix that managed devices use to
connect to the server. This setting is not required for WINS.
Note: Run the ipconfig /all command in a command window to view
the DNS suffix of the server.
Log to EventLog- when selected, specifies when the Athena Device
Tracker (Tracker) service logs run time errors to the server Event
Log under the Athena application group. Used by Athena Tracker
and Web Services.
Log to DeviceLog Table- when selected, specifies when Tracker
service writes run time errors and run time status messages to the
Athena database DEVICELOG table. Used by Athena Tracker and
Web Services.
Installing
Console and Services Installation Procedures
59
Derive Device Name From Host Name– determines whether the
custom parsing logic within the Athena Tracker service is used to
derive the Device Name property from the DNS Host Name
attribute passed to the device from a DHCP server.
Derive Device Name From Phone Number– (Phone devices only)
determines whether the custom parsing logic within the Athena
Tracker service is used to derive the Device Name property from
the device(s) Phone Number attribute.
When finished, click Next to continue.
60 Installing
Console and Services Installation Procedures
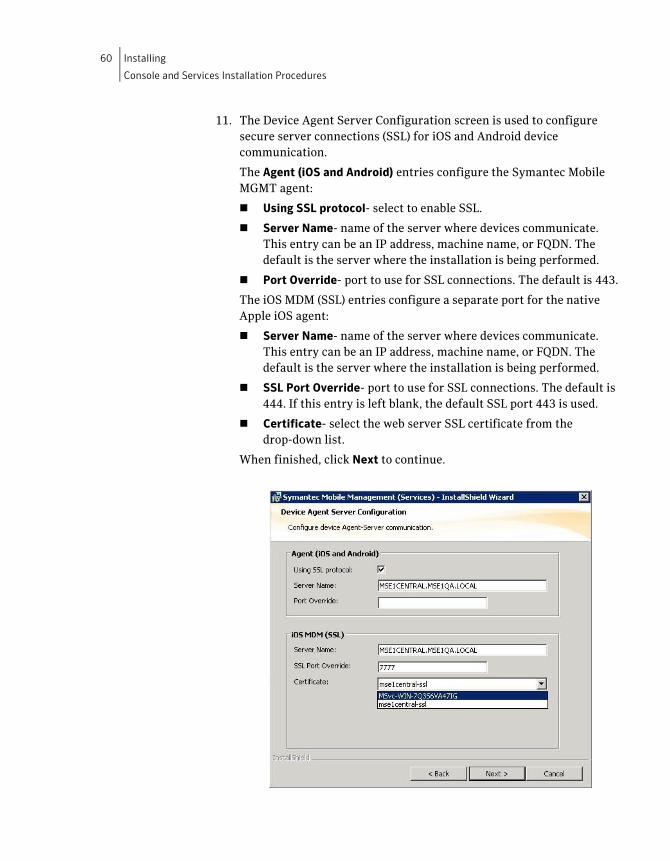
11. The Device Agent Server Configuration screen is used to configure
secure server connections (SSL) for iOS and Android device
communication.
The Agent (iOS and Android) entries configure the Symantec Mobile
MGMT agent:
Using SSL protocol- select to enable SSL.
Server Name- name of the server where devices communicate.
This entry can be an IP address, machine name, or FQDN. The
default is the server where the installation is being performed.
Port Override- port to use for SSL connections. The default is 443.
The iOS MDM (SSL) entries configure a separate port for the native
Apple iOS agent:
Server Name- name of the server where devices communicate.
This entry can be an IP address, machine name, or FQDN. The
default is the server where the installation is being performed.
SSL Port Override- port to use for SSL connections. The default is
444. If this entry is left blank, the default SSL port 443 is used.
Certificate- select the web server SSL certificate from the
drop-down list.
When finished, click Next to continue.
Installing
Console and Services Installation Procedures
61
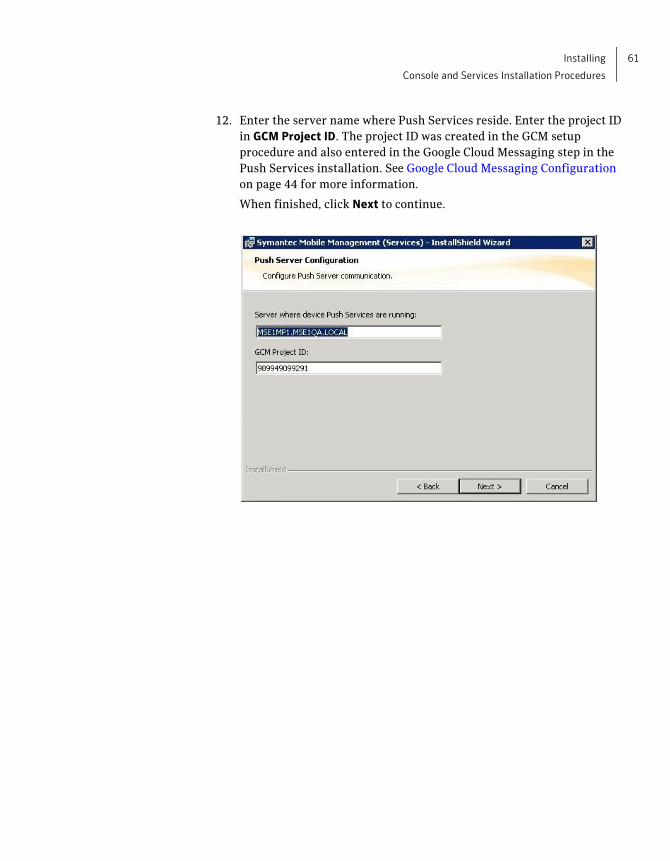
12. Enter the server name where Push Services reside. Enter the project ID
in GCM Project ID. The project ID was created in the GCM setup
procedure and also entered in the Google Cloud Messaging step in the
Push Services installation. See Google Cloud Messaging Configuration
on page 44 for more information.
When finished, click Next to continue.
62 Installing
Console and Services Installation Procedures
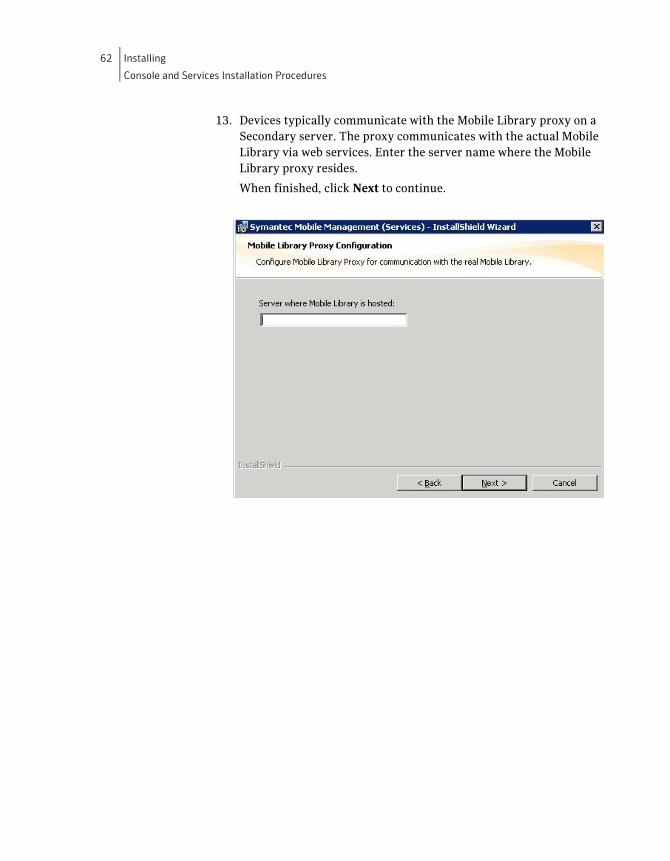
13. Devices typically communicate with the Mobile Library proxy on a
Secondary server. The proxy communicates with the actual Mobile
Library via web services. Enter the server name where the Mobile
Library proxy resides.
When finished, click Next to continue.
Installing
Console and Services Installation Procedures
63
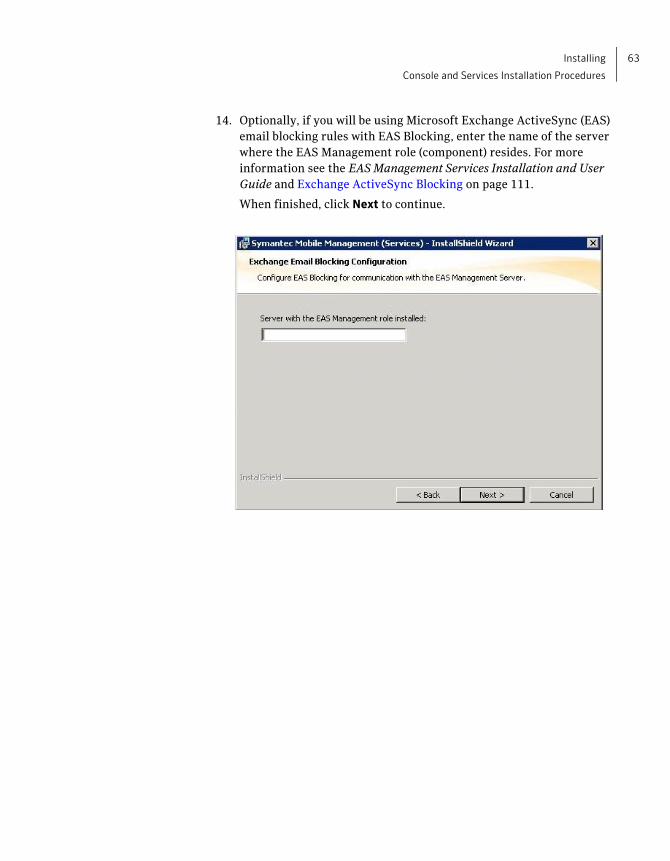
14. Optionally, if you will be using Microsoft Exchange ActiveSync (EAS)
email blocking rules with EAS Blocking, enter the name of the server
where the EAS Management role (component) resides. For more
information see the EAS Management Services Installation and User
Guide and Exchange ActiveSync Blocking on page 111.
When finished, click Next to continue.

64 Installing
Console and Services Installation Procedures
15. The Symantec Mobile Management Database Name entry is populated
with the recommended name Athena. This entry must match the
Symantec Mobile Management Database Server that will be entered on
the next screen of the installation wizard.
Select Use existing database for Central or Primary server
installations if planning to create the database manually or
preserve existing device information when performing an upgrade
or re-installation.
Note: This option is not available when installing Secondary servers.
Update packages from central database server- selected by
default when installing a Primary server. When selected, this
setting will get package updates from the Central database server.
For example, when installing a new Primary server in an existing
site hierarchy, this option will copy all packages (system and
user-defined) from the existing Central server.
Note: This option is not available when installing Central or Secondary
servers.
Installing
Console and Services Installation Procedures
65
Enter the Central Database Server name when installing a
Primary server. This entry should be a fully qualified domain
name.
Note: This option is not available when installing Central or Secondary
servers.
When finished, click Next to continue.
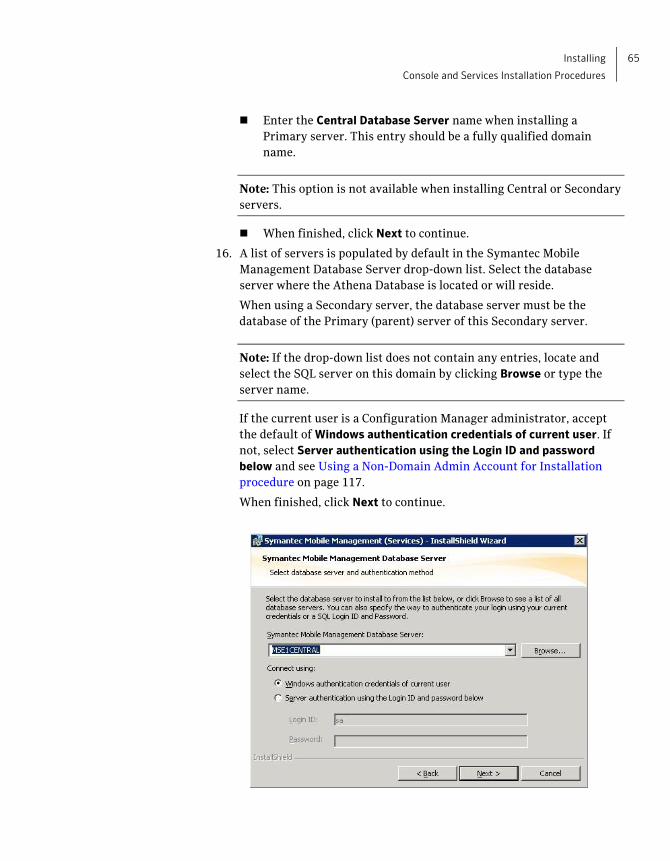
16. A list of servers is populated by default in the Symantec Mobile
Management Database Server drop-down list. Select the database
server where the Athena Database is located or will reside.
When using a Secondary server, the database server must be the
database of the Primary (parent) server of this Secondary server.
Note: If the drop-down list does not contain any entries, locate and
select the SQL server on this domain by clicking Browse or type the
server name.
If the current user is a Configuration Manager administrator, accept
the default of Windows authentication credentials of current user. If
not, select Server authentication using the Login ID and password
below and see Using a Non-Domain Admin Account for Installation
procedure on page 117.
When finished, click Next to continue.
66 Installing
Console and Services Installation Procedures
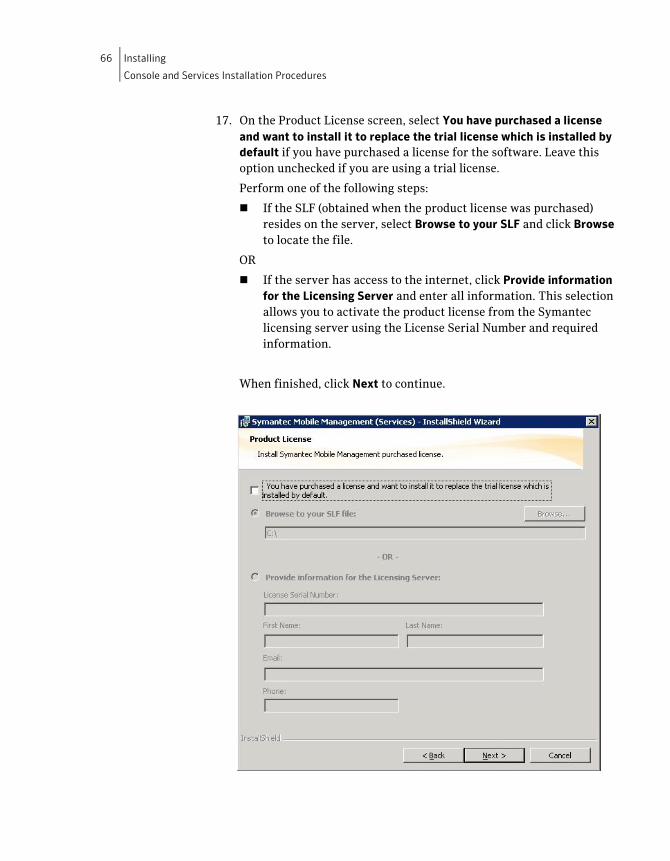
17. On the Product License screen, select You have purchased a license
and want to install it to replace the trial license which is installed by
default if you have purchased a license for the software. Leave this
option unchecked if you are using a trial license.
Perform one of the following steps:
If the SLF (obtained when the product license was purchased)
resides on the server, select Browse to your SLF and click Browse
to locate the file.
OR
If the server has access to the internet, click Provide information
for the Licensing Server and enter all information. This selection
allows you to activate the product license from the Symantec
licensing server using the License Serial Number and required
information.
When finished, click Next to continue.
Installing
Post-Installation Procedures
67
18. Click Install to start the installation of the Services using the settings
specified in the previous steps.
19. Click Finish to complete the installation and exit the wizard. The
Services installation portion of the Symantec Mobile Management for
Configuration Manager is now complete.
Note: The installation procedures generate log files that may contain
sensitive information. To protect this information, purge the log files
after the installation is successfully completed.
Post-Installation Procedures Perform the procedures in the Set Up Profiles for iOS Devices chapter
beginning on page 69.
Optionally, perform the DNS Text Record Setup for Android and iOS
Services procedure on page 126. This allows users to enroll iOS or
Android devices using their individual e-mail addresses.
If you will be using Microsoft Exchange ActiveSync (EAS) email
blocking rules, the EAS Blocking Service installed with the Services
component will be running on all servers (where Services are installed)
in the environment.
The EAS Blocking Service should only be run on one server in the
environment. You should leave the service running on the Central
server (recommended) and disable it on the other servers in the
environment. For more information see Exchange ActiveSync Blocking
on page 111 and the EAS Management Services Installation and User
Guide.
To disable the EAS Blocking Service using the Microsoft Administrative
Tools console:
1. Access Start > Administrative Tools > Services.
2. Locate SMM-CM EAS Blocking Services.
3. Right-click the service and select Stop.
4. Right-click the service and select Properties.
5. On the General tab, change Startup Type to Disabled.

68 Installing
Post-Installation Procedures
Chapter 7
Set Up Profiles for iOS
Devices
The Signing and Encryption and Enrollment MDM Profiles are created
during the Services installation. These system-created profiles are required
for securing iOS devices and automatically display in the Profiles list for
configuration with your site-specific credentials information. Once
configured, the profiles will be automatically distributed to iOS devices.
View Profiles
To view profiles:
1. Access the Configuration Manager Console, and expand Site Database
> Computer Management > Mobile Device Management > Symantec
Mobile Management.
2. Select Profiles. The Profiles list displays. Profiles are managed from
the Profiles list. For more information, see the iOS, Android, and
Windows Phone 7 Features User Guide.
The following default iOS Profiles display in the list:
iOS Signing and Encryption Profile- used to sign configuration
profiles (which prevents third-party tampering) and for iOS
devices to recognize signed profiles. This profile is automatically
assigned to devices when Signed and/or Encrypt is selected for an
iOS profile.
The iOS Signing and Encryption Profile also contains the root
certificate to complete the certificate chain for the decryption and
signing validation certificates.
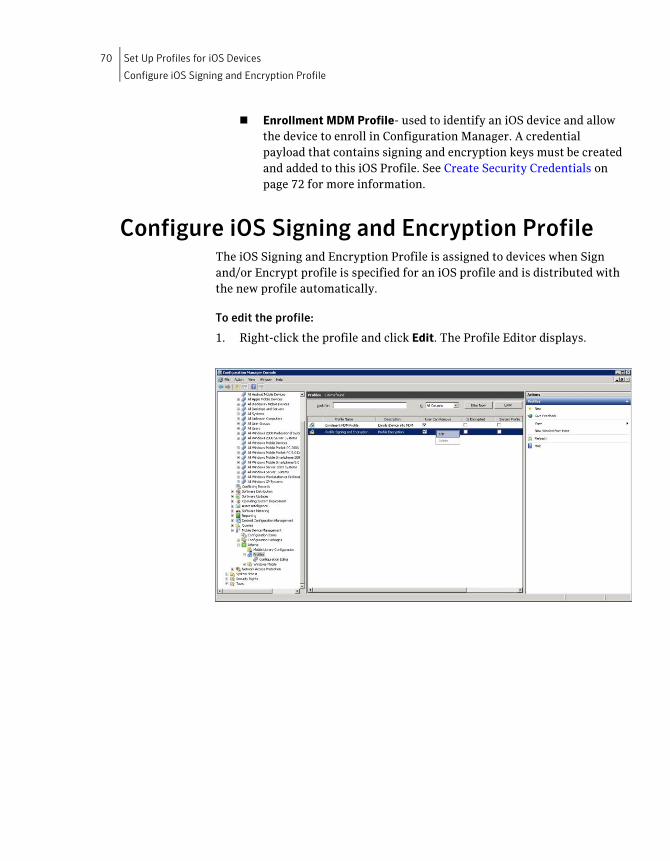
70 Set Up Profiles for iOS Devices
Configure iOS Signing and Encryption Profile
Enrollment MDM Profile- used to identify an iOS device and allow
the device to enroll in Configuration Manager. A credential
payload that contains signing and encryption keys must be created
and added to this iOS Profile. See Create Security Credentials on
page 72 for more information.
Configure iOS Signing and Encryption Profile The iOS Signing and Encryption Profile is assigned to devices when Sign
and/or Encrypt profile is specified for an iOS profile and is distributed with
the new profile automatically.
To edit the profile:
1. Right-click the profile and click Edit. The Profile Editor displays.
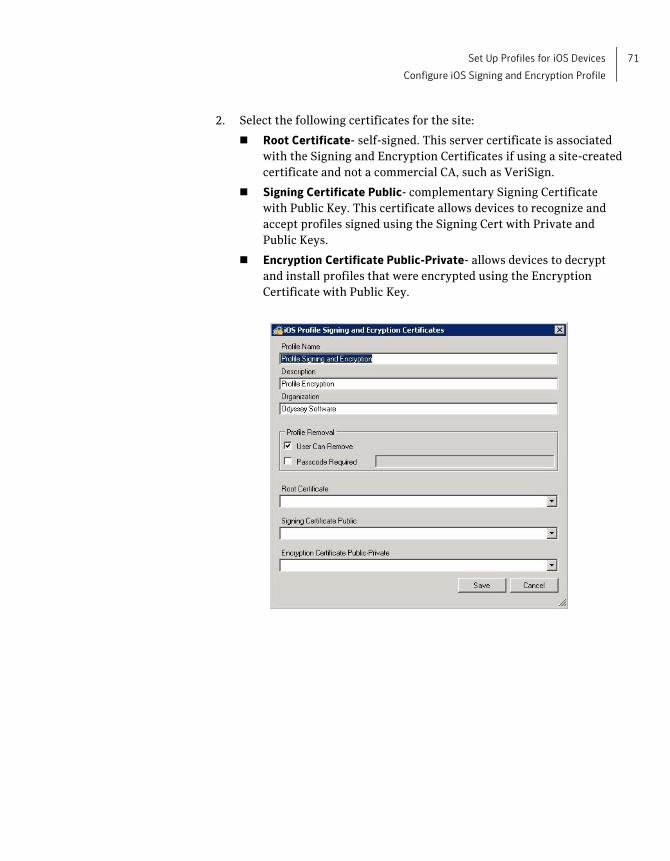
Set Up Profiles for iOS Devices
Configure iOS Signing and Encryption Profile
71
2. Select the following certificates for the site:
Root Certificate- self-signed. This server certificate is associated
with the Signing and Encryption Certificates if using a site-created
certificate and not a commercial CA, such as VeriSign.
Signing Certificate Public- complementary Signing Certificate
with Public Key. This certificate allows devices to recognize and
accept profiles signed using the Signing Cert with Private and
Public Keys.
Encryption Certificate Public-Private- allows devices to decrypt
and install profiles that were encrypted using the Encryption
Certificate with Public Key.

72 Set Up Profiles for iOS Devices
Create Security Credentials
Create Security Credentials Private keys, and an Encryption Certificate with Public key are required to
sign and encrypt profiles sent to iOS devices. For this reason, security
credentials or payloads for devices with the complementary Signing
Certificate with Public Key, and Encryption Certificate with Public and
Private keys must be created and distributed to devices.
After creating the security credentials, they can be added to the Enrollment
MDM Profile. The Enrollment MDM Profile will be automatically assigned
to iOS devices during the enrollment process.
Configuring security credentials and distributing with the Enrollment
MDM Profile is typically the method used for sites using SSL for
communication or for sites that are using more than one root certificate.
Root or Signing with Public Key
A credential payload with the Root Certificate associated with the Signing
and Encryption Certificates must be created if not using a commercial CA.
To create the Root credential:
1. In Configuration Manager, expand Site Database > Computer
Management > Mobile Device Management > Symantec Mobile
Management.
2. Expand Profiles.
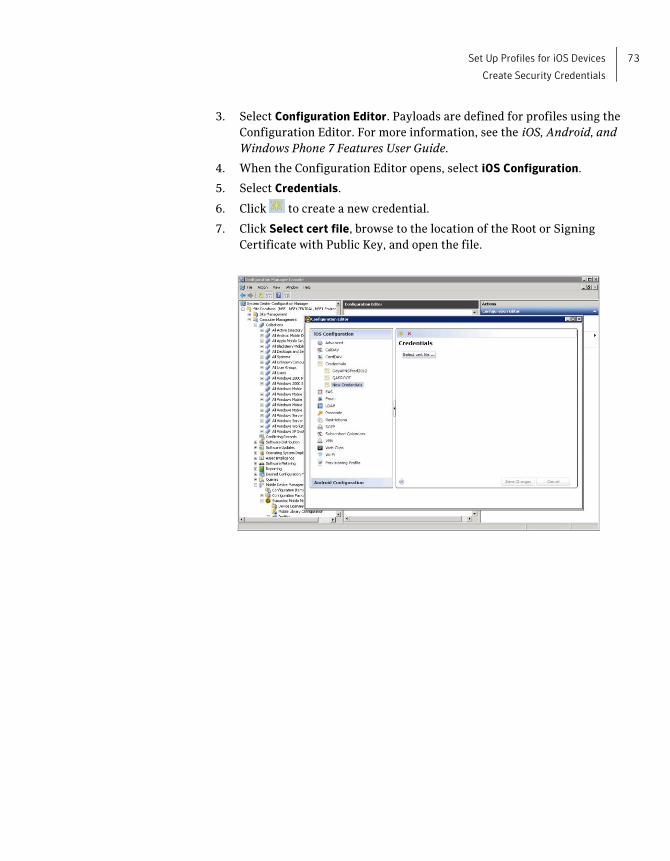
Set Up Profiles for iOS Devices
Create Security Credentials
73
3. Select Configuration Editor. Payloads are defined for profiles using the
Configuration Editor. For more information, see the iOS, Android, and
Windows Phone 7 Features User Guide.
4. When the Configuration Editor opens, select iOS Configuration.
5. Select Credentials.
6. Click to create a new credential.
7. Click Select cert file, browse to the location of the Root or Signing
Certificate with Public Key, and open the file.
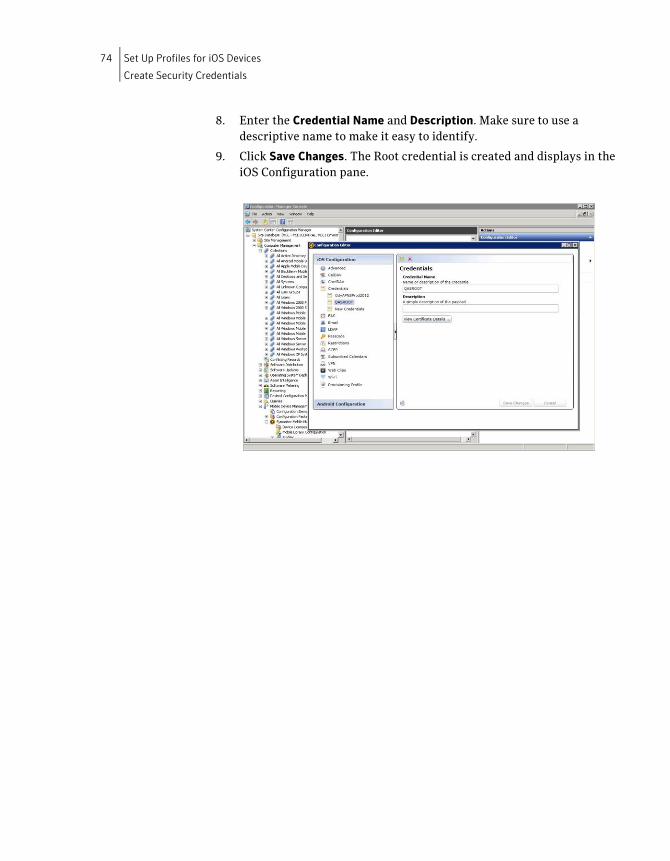
74 Set Up Profiles for iOS Devices
Create Security Credentials
8. Enter the Credential Name and Description. Make sure to use a
descriptive name to make it easy to identify.
9. Click Save Changes. The Root credential is created and displays in the
iOS Configuration pane.
Set Up Profiles for iOS Devices
Create Security Credentials
75
Encryption
A credential payload with the Encryption Certificate must be created if not
using a commercial CA.
To configure the Encryption credential:
1. In Configuration Manager, expand Site Database > Computer
Management > Mobile Device Management > Symantec Mobile
Management.
2. Expand Profiles.
3. Select Configuration Editor.
4. When the Configuration Editor opens, select iOS Configuration.
5. Click Credentials.
6. Click to create a new credential.
7. Click Select cert file, browse to the location of the Encryption
Certificate and open the file.
8. Enter the Credential Name and Description.
9. Enter a Password for the certificate. This is an optional entry.
10. Click Save Changes. The Encryption credential is created and displays
in the iOS Configuration pane.
11. Close the Configuration Editor.
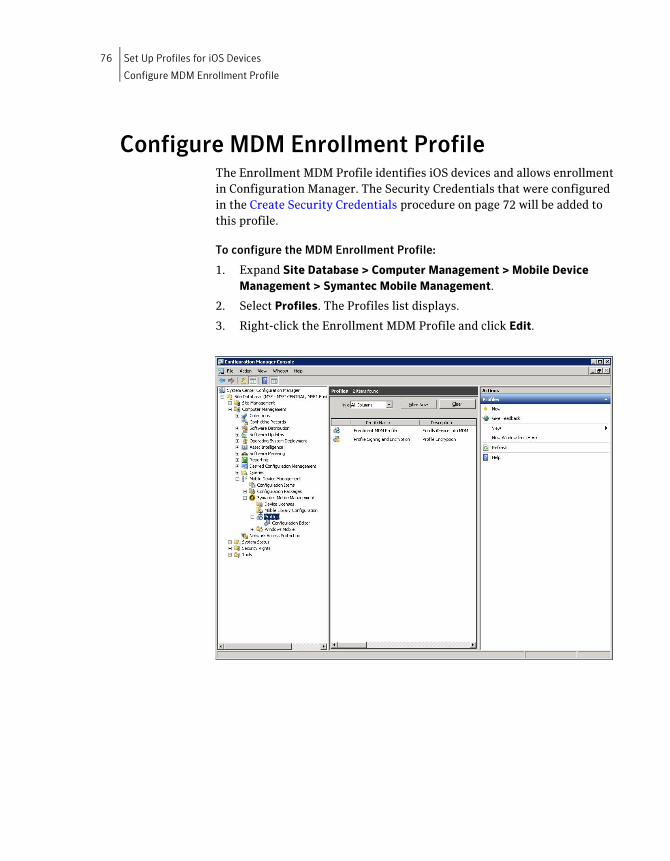
76 Set Up Profiles for iOS Devices
Configure MDM Enrollment Profile
Configure MDM Enrollment Profile The Enrollment MDM Profile identifies iOS devices and allows enrollment
in Configuration Manager. The Security Credentials that were configured
in the Create Security Credentials procedure on page 72 will be added to
this profile.
To configure the MDM Enrollment Profile:
1. Expand Site Database > Computer Management > Mobile Device
Management > Symantec Mobile Management.
2. Select Profiles. The Profiles list displays.
3. Right-click the Enrollment MDM Profile and click Edit.
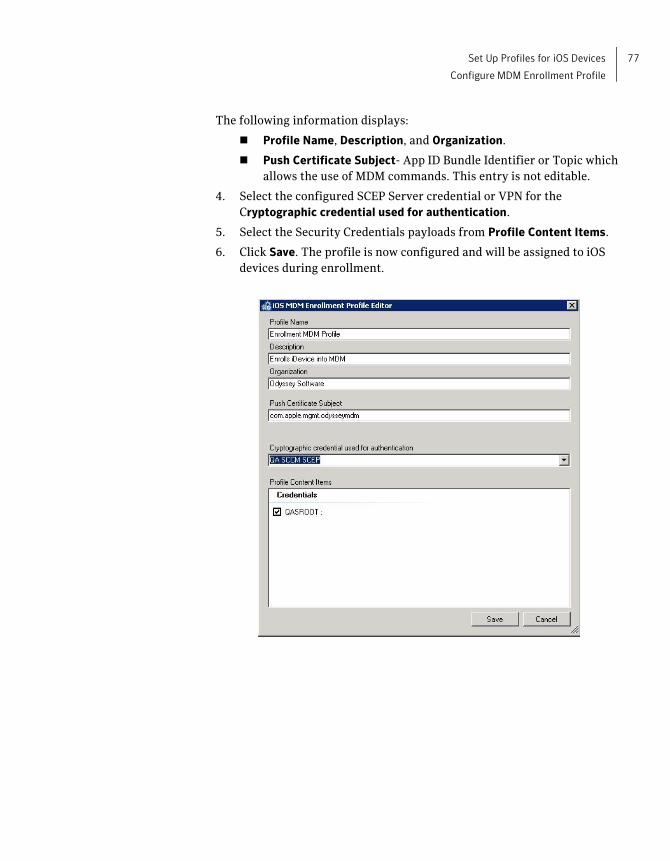
Set Up Profiles for iOS Devices
Configure MDM Enrollment Profile
77
The following information displays:
Profile Name, Description, and Organization.
Push Certificate Subject- App ID Bundle Identifier or Topic which
allows the use of MDM commands. This entry is not editable.
4. Select the configured SCEP Server credential or VPN for the
Cryptographic credential used for authentication.
5. Select the Security Credentials payloads from Profile Content Items.
6. Click Save. The profile is now configured and will be assigned to iOS
devices during enrollment.

78 Set Up Profiles for iOS Devices
Configure MDM Enrollment Profile
Chapter 8
Enrolling Devices
The Enrollment Process registers iOS (iPhone, iPad, iPod Touch), Android,
or Windows Phone 7 devices in Configuration Manager. Once a device is
enrolled, it can be viewed and managed using the Configuration Manager
Console. See the iOS, Android, and Windows Phone 7 Features User Guide
for more information about using these devices in Configuration Manager.
Authentication for Agent Enrollment For agent authentication to occur, the Enrollment Web Configuration file
must be edited to enable authentication (ON).
To turn on Agent Enrollment authentication:
1. Locate and open the C:\Program Files (x86)\Odyssey
Software\Athena\SCCM\Web\Enrollment\web.config file in a text
editor.
2. Make the following changes to the values in the file:
<add key="SCCM-iOSAuthenticate" value="true" />
<add key="SCCM-ActiveDirectoryServer" value="servername" />
<add key="SCCM-DomainName" value="domainname" />
<add key="SCCM-DomainExtension" value="local" />
<add key="SCCM-RequireDomain" value="false" />
<add key="SCCM-AndroidAuthenticate" value="true" />
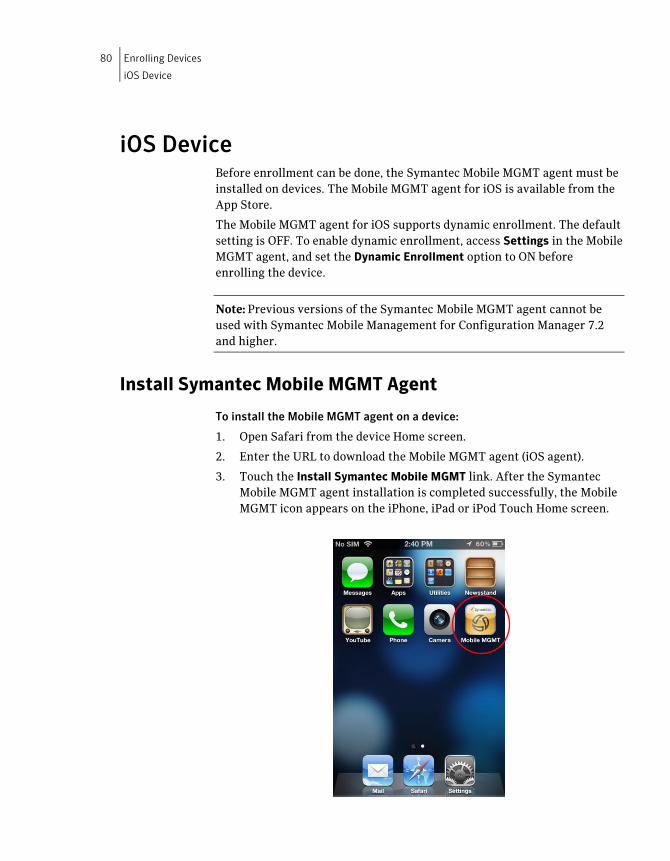
80 Enrolling Devices
iOS Device
iOS Device Before enrollment can be done, the Symantec Mobile MGMT agent must be
installed on devices. The Mobile MGMT agent for iOS is available from the
App Store.
The Mobile MGMT agent for iOS supports dynamic enrollment. The default
setting is OFF. To enable dynamic enrollment, access Settings in the Mobile
MGMT agent, and set the Dynamic Enrollment option to ON before
enrolling the device.
Note: Previous versions of the Symantec Mobile MGMT agent cannot be
used with Symantec Mobile Management for Configuration Manager 7.2
and higher.
Install Symantec Mobile MGMT Agent
To install the Mobile MGMT agent on a device:
1. Open Safari from the device Home screen.
2. Enter the URL to download the Mobile MGMT agent (iOS agent).
3. Touch the Install Symantec Mobile MGMT link. After the Symantec
Mobile MGMT agent installation is completed successfully, the Mobile
MGMT icon appears on the iPhone, iPad or iPod Touch Home screen.
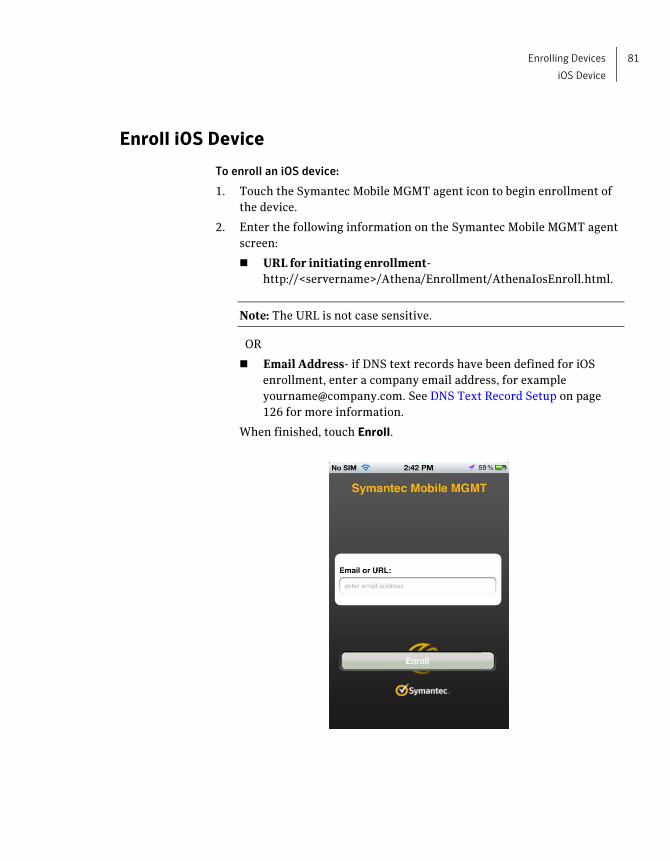
Enrolling Devices
iOS Device
81
Enroll iOS Device
To enroll an iOS device:
1. Touch the Symantec Mobile MGMT agent icon to begin enrollment of
the device.
2. Enter the following information on the Symantec Mobile MGMT agent
screen:
URL for initiating enrollment-
http://<servername>/Athena/Enrollment/AthenaIosEnroll.html.
Note: The URL is not case sensitive.
OR
Email Address- if DNS text records have been defined for iOS
enrollment, enter a company email address, for example
[email protected]. See DNS Text Record Setup on page
126 for more information.
When finished, touch Enroll.
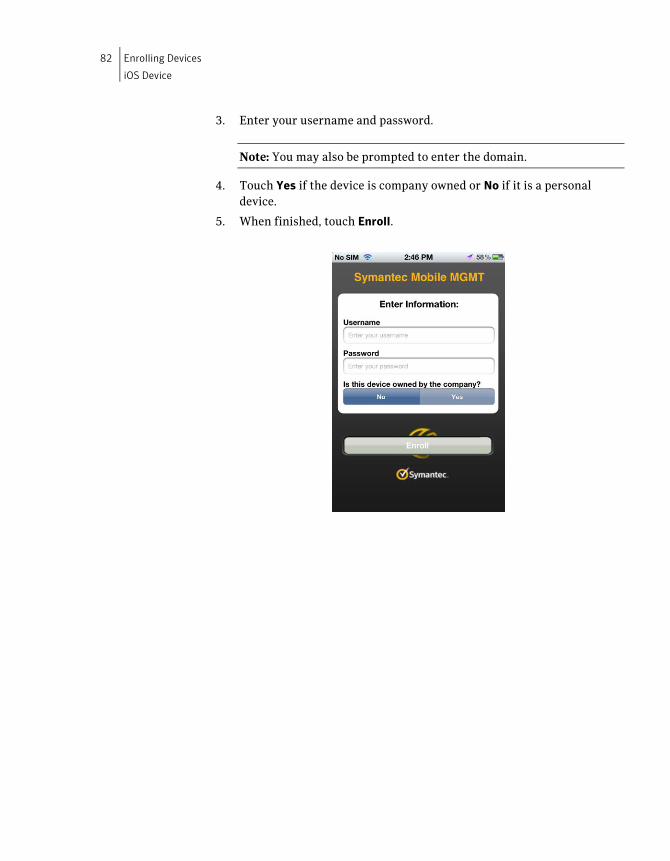
82 Enrolling Devices
iOS Device
3. Enter your username and password.
Note: You may also be prompted to enter the domain.
4. Touch Yes if the device is company owned or No if it is a personal
device.
5. When finished, touch Enroll.
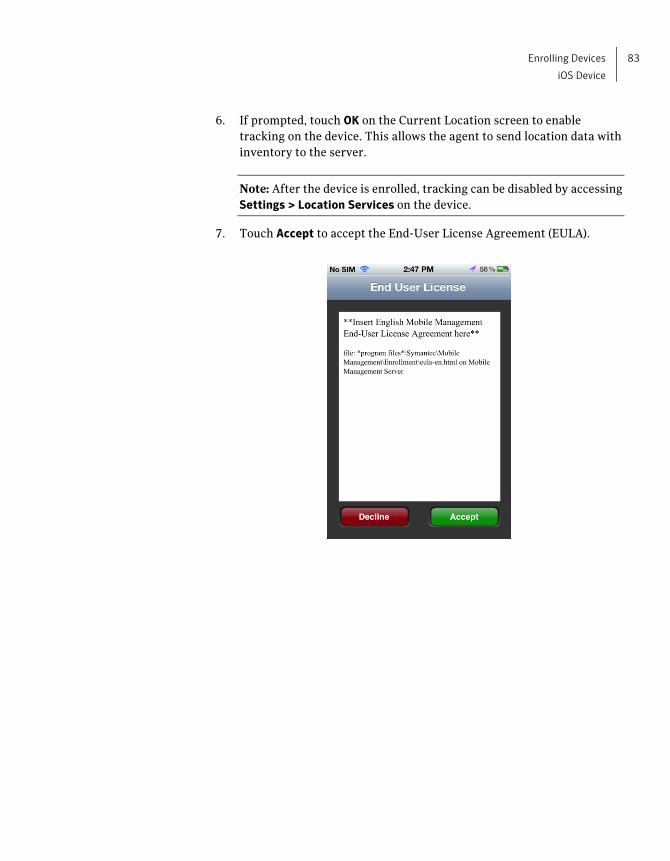
Enrolling Devices
iOS Device
83
6. If prompted, touch OK on the Current Location screen to enable
tracking on the device. This allows the agent to send location data with
inventory to the server.
Note: After the device is enrolled, tracking can be disabled by accessing
Settings > Location Services on the device.
7. Touch Accept to accept the End-User License Agreement (EULA).
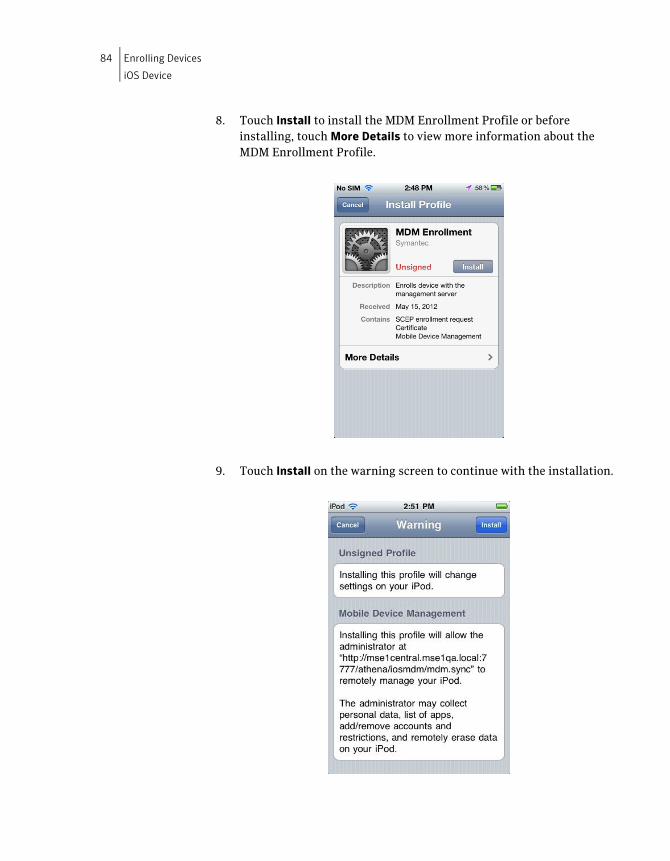
84 Enrolling Devices
iOS Device
8. Touch Install to install the MDM Enrollment Profile or before
installing, touch More Details to view more information about the
MDM Enrollment Profile.
9. Touch Install on the warning screen to continue with the installation.
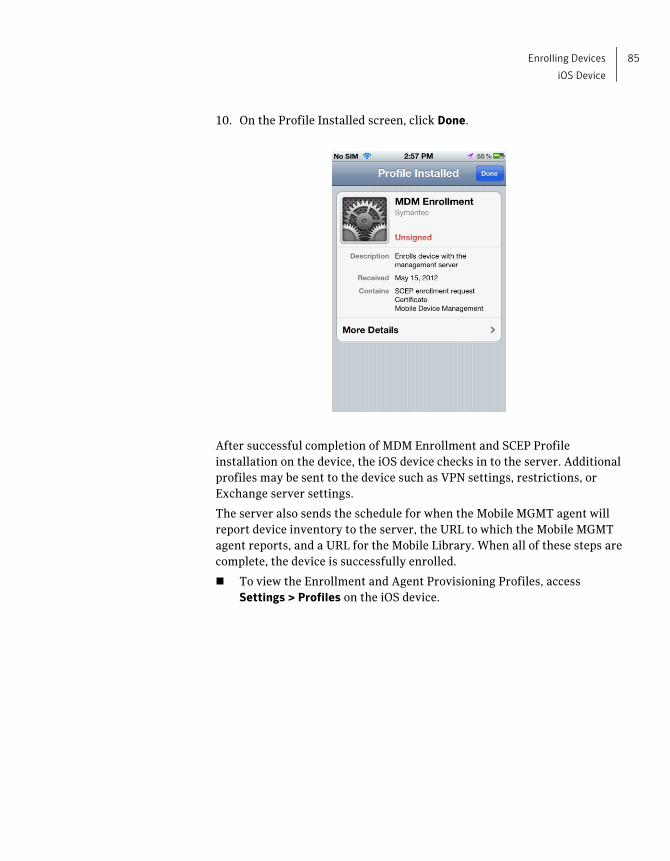
Enrolling Devices
iOS Device
85
10. On the Profile Installed screen, click Done.
After successful completion of MDM Enrollment and SCEP Profile
installation on the device, the iOS device checks in to the server. Additional
profiles may be sent to the device such as VPN settings, restrictions, or
Exchange server settings.
The server also sends the schedule for when the Mobile MGMT agent will
report device inventory to the server, the URL to which the Mobile MGMT
agent reports, and a URL for the Mobile Library. When all of these steps are
complete, the device is successfully enrolled.
To view the Enrollment and Agent Provisioning Profiles, access
Settings > Profiles on the iOS device.
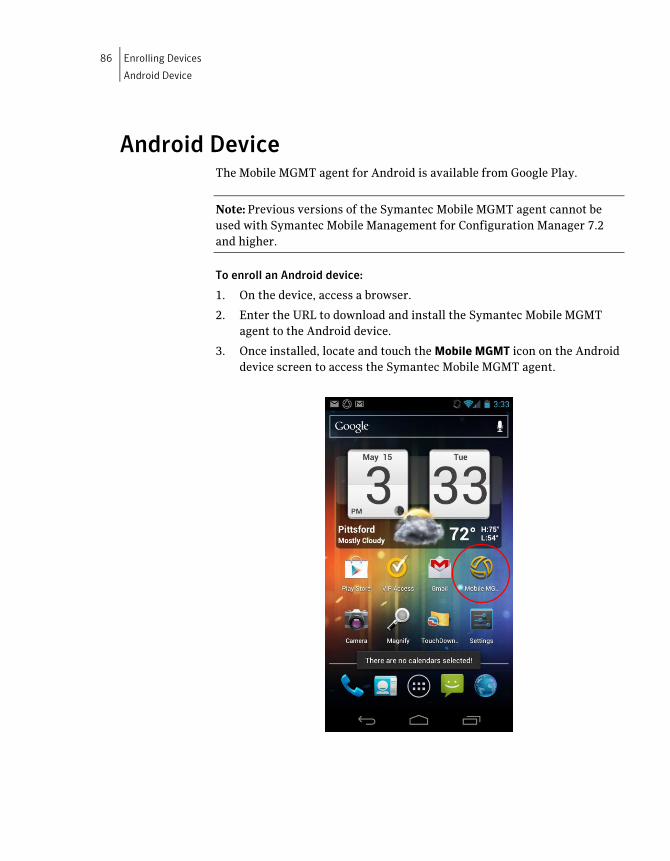
86 Enrolling Devices
Android Device
Android Device The Mobile MGMT agent for Android is available from Google Play.
Note: Previous versions of the Symantec Mobile MGMT agent cannot be
used with Symantec Mobile Management for Configuration Manager 7.2
and higher.
To enroll an Android device:
1. On the device, access a browser.
2. Enter the URL to download and install the Symantec Mobile MGMT
agent to the Android device.
3. Once installed, locate and touch the Mobile MGMT icon on the Android
device screen to access the Symantec Mobile MGMT agent.

Enrolling Devices
Android Device
87
4. Enter and select the following information on the initial Mobile
MGMT-Enroll Screen:
URL for initiating enrollment-
http://<servername>/Athena/Enrollment/AthenaAndroidEnroll.a
spx
Note: The URL is not case sensitive.
OR
Email Address- if DNS text records have been defined for Android
enrollment, enter a company email address, for example
Require SSL- select this option.
Accept all SSL certificates- select this option.
When finished, touch Submit.
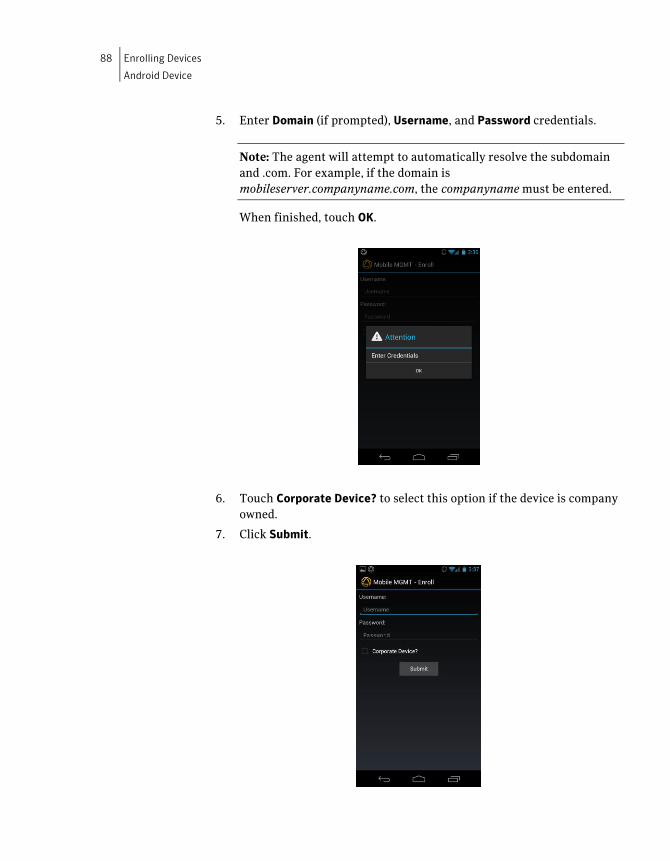
88 Enrolling Devices
Android Device
5. Enter Domain (if prompted), Username, and Password credentials.
Note: The agent will attempt to automatically resolve the subdomain
and .com. For example, if the domain is
mobileserver.companyname.com, the companyname must be entered.
When finished, touch OK.
6. Touch Corporate Device? to select this option if the device is company
owned.
7. Click Submit.
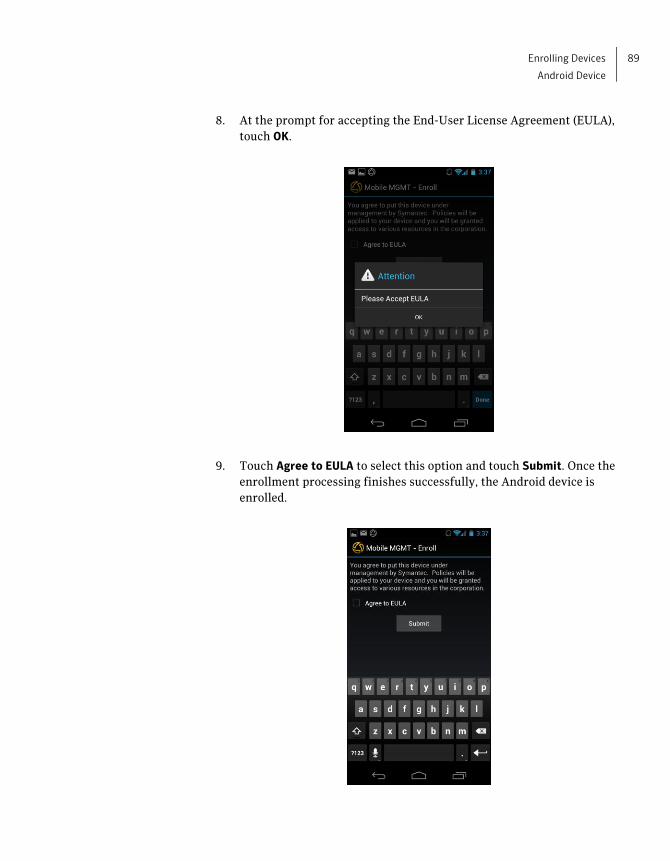
Enrolling Devices
Android Device
89
8. At the prompt for accepting the End-User License Agreement (EULA),
touch OK.
9. Touch Agree to EULA to select this option and touch Submit. Once the
enrollment processing finishes successfully, the Android device is
enrolled.
90 Enrolling Devices
Android Device
Authorizing the Symantec Mobile MGMT Agent for Device Administrator Privileges
After Enrollment, a Security Action Required notification will display for
activation. This occurs because administrator privileges are required for
the Mobile MGMT agent to lock, wipe, reset password or set password
policies on the Android device.
Note: This screen only appears the first time the device is enrolled.
To view the application notification and activate administrator privileges:
1. Select the icon in the upper right and drag down.
2. Select Security Action Required.
3. Select Activate. This will activate device administrator privileges for
the Symantec Mobile MGMT agent.
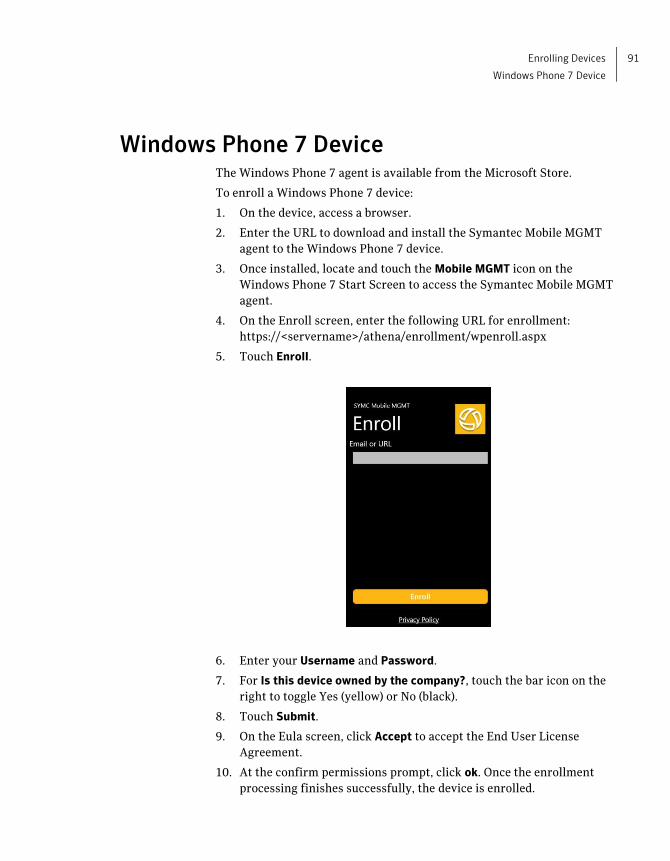
Enrolling Devices
Windows Phone 7 Device
91
Windows Phone 7 Device The Windows Phone 7 agent is available from the Microsoft Store.
To enroll a Windows Phone 7 device:
1. On the device, access a browser.
2. Enter the URL to download and install the Symantec Mobile MGMT
agent to the Windows Phone 7 device.
3. Once installed, locate and touch the Mobile MGMT icon on the
Windows Phone 7 Start Screen to access the Symantec Mobile MGMT
agent.
4. On the Enroll screen, enter the following URL for enrollment:
https://<servername>/athena/enrollment/wpenroll.aspx
5. Touch Enroll.
6. Enter your Username and Password.
7. For Is this device owned by the company?, touch the bar icon on the
right to toggle Yes (yellow) or No (black).
8. Touch Submit.
9. On the Eula screen, click Accept to accept the End User License
Agreement.
10. At the confirm permissions prompt, click ok. Once the enrollment
processing finishes successfully, the device is enrolled.

92 Enrolling Devices
Windows Phone 7 Device
Chapter 9
Registering Devices
Windows Mobile, Windows CE, and BlackBerry smartphone devices are
registered to the server by accessing the Locate Site Server web page via
Internet Explorer on the device. The registration process is automatic. iOS
and Android are registered during the enrollment process. See Enrolling
Devices on page 79 for more information.
Note: The screens and prompts for Locate Site Server and will vary between
devices and operating systems.
The following prerequisites are required for registering devices:
Device connected to the network.
Device communicating with a reachable Management Point that
has Athena Services.
Resolve the server by name with WINS and DNS.
Note: Referencing the server by IP is not sufficient.

94 Registering Devices
Windows Mobile and Windows CE Devices
Windows Mobile and Windows CE Devices
To register a Windows Mobile or Windows CE device:
1. On the device, access Internet Explorer.
2. Enter http://<Central Server name>/deviceupdates to access the
Locate Site Server web page.
3. Tap Continue.
Note: For devices running Windows CE .Net, Windows Mobile .Net
Compact Framework 2.0 (.NETCF) must be installed.
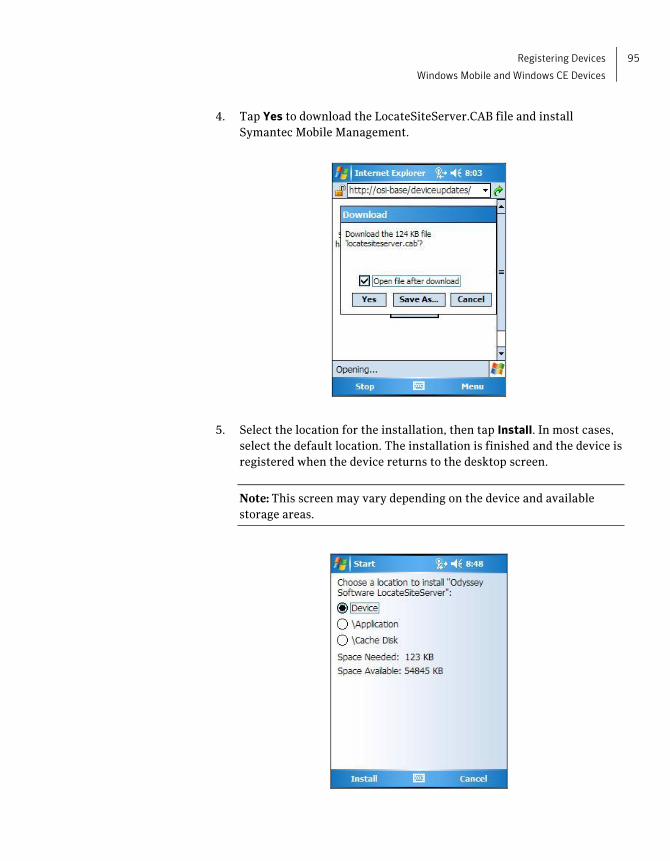
Registering Devices
Windows Mobile and Windows CE Devices
95
4. Tap Yes to download the LocateSiteServer.CAB file and install
Symantec Mobile Management.
5. Select the location for the installation, then tap Install. In most cases,
select the default location. The installation is finished and the device is
registered when the device returns to the desktop screen.
Note: This screen may vary depending on the device and available
storage areas.
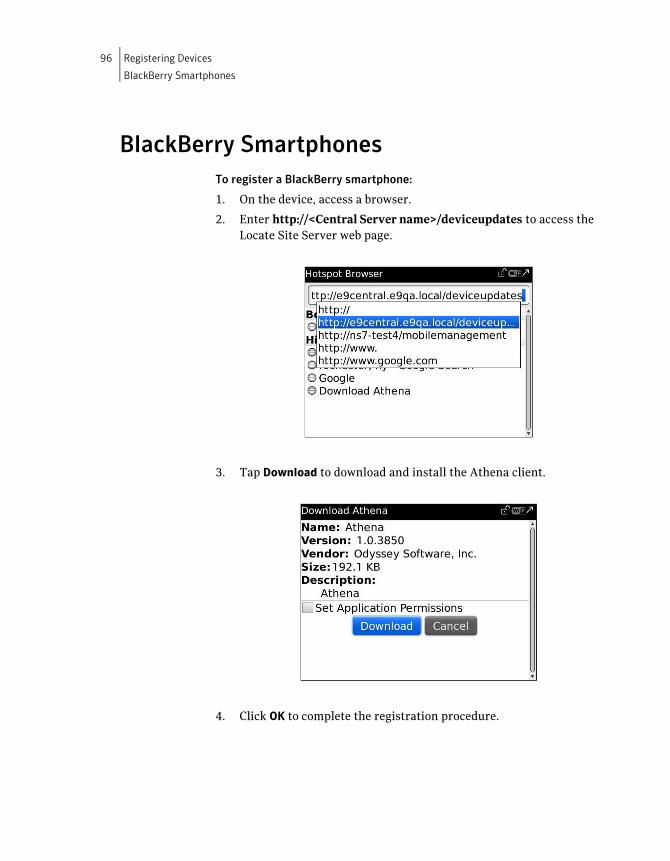
96 Registering Devices
BlackBerry Smartphones
BlackBerry Smartphones
To register a BlackBerry smartphone:
1. On the device, access a browser.
2. Enter http://<Central Server name>/deviceupdates to access the
Locate Site Server web page.
3. Tap Download to download and install the Athena client.
4. Click OK to complete the registration procedure.
Chapter 10
Device Licensing
Device licenses are initially obtained during the installation procedure of
Symantec Mobile Management for Configuration Manager. The License
Tool enables administrators to obtain more devices licenses directly from
Symantec when required.
The Device Licenses option in the Configuration Manager console provides
an illustration of the site environment's current device license status, along
with device license warning dialogs, to indicate licensing compliance.
View License Information Device Licenses provides a graphic and chart that illustrates the site
environment's deployed devices and indicates if the number of device
licenses has exceeded the maximum number of available device licenses.
To view device license information:
1. Select Site Database > Computer Management > Mobile Device
Management > Symantec Mobile Management.
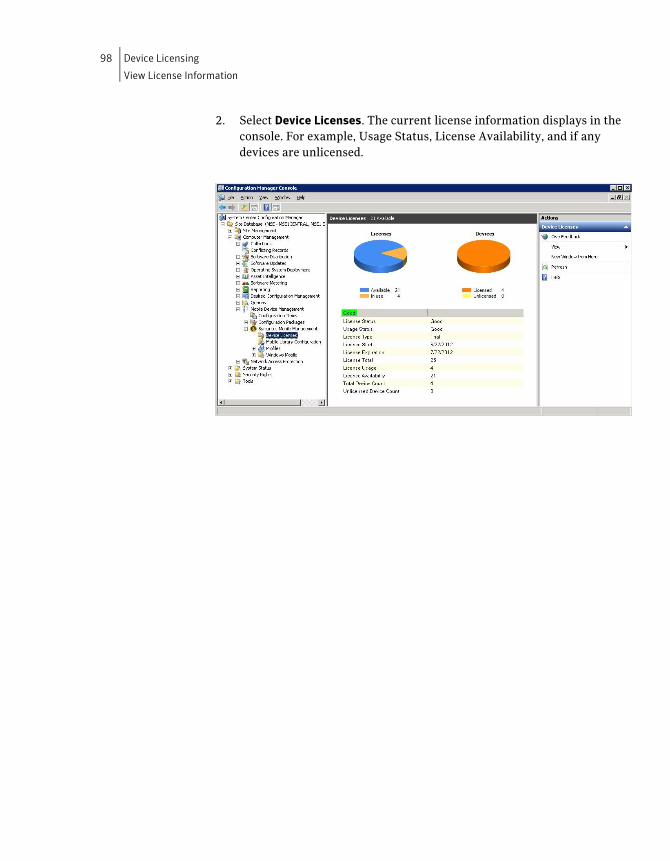
98 Device Licensing
View License Information
2. Select Device Licenses. The current license information displays in the
console. For example, Usage Status, License Availability, and if any
devices are unlicensed.
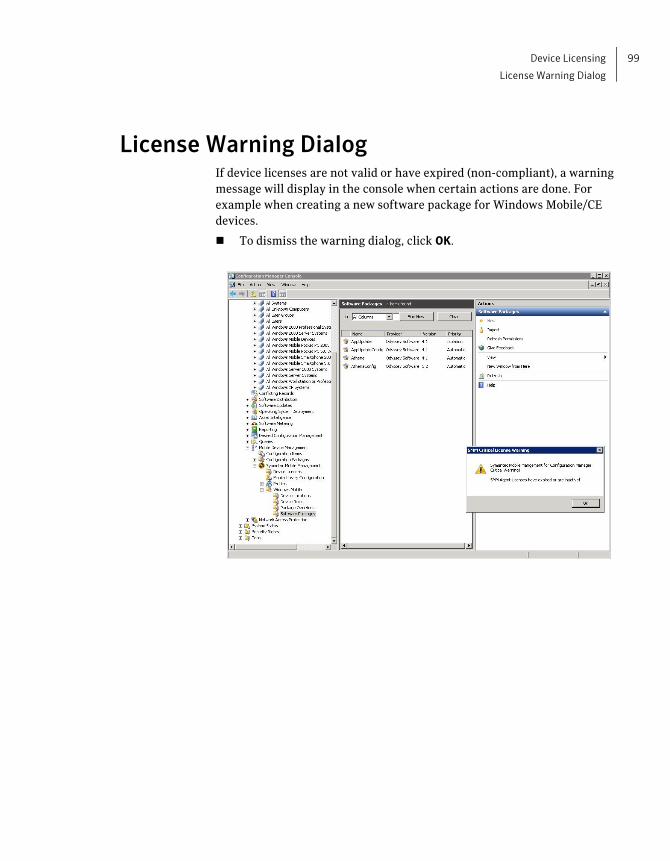
Device Licensing
License Warning Dialog
99
License Warning Dialog If device licenses are not valid or have expired (non-compliant), a warning
message will display in the console when certain actions are done. For
example when creating a new software package for Windows Mobile/CE
devices.
To dismiss the warning dialog, click OK.
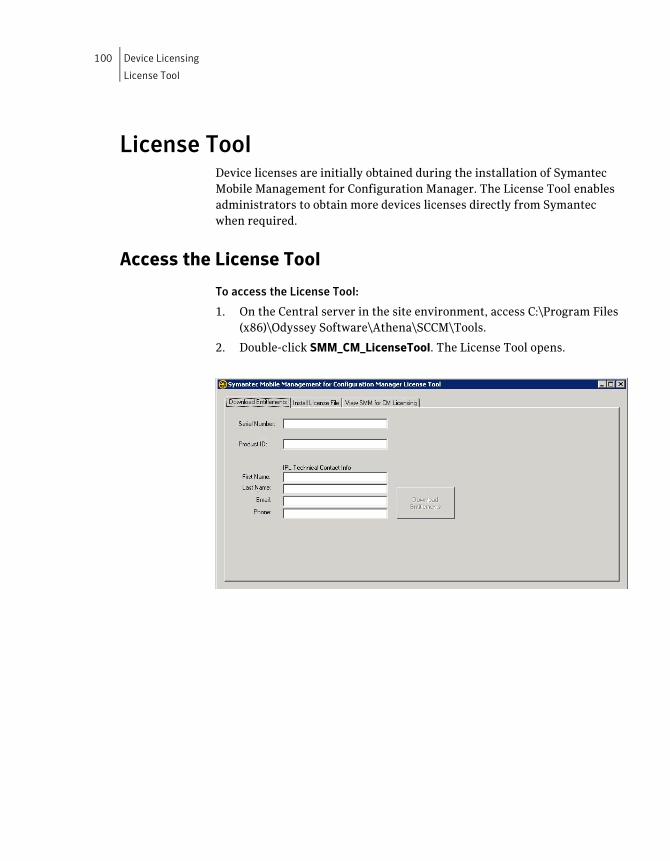
100 Device Licensing
License Tool
License Tool Device licenses are initially obtained during the installation of Symantec
Mobile Management for Configuration Manager. The License Tool enables
administrators to obtain more devices licenses directly from Symantec
when required.
Access the License Tool
To access the License Tool:
1. On the Central server in the site environment, access C:\Program Files
(x86)\Odyssey Software\Athena\SCCM\Tools.
2. Double-click SMM_CM_LicenseTool. The License Tool opens.
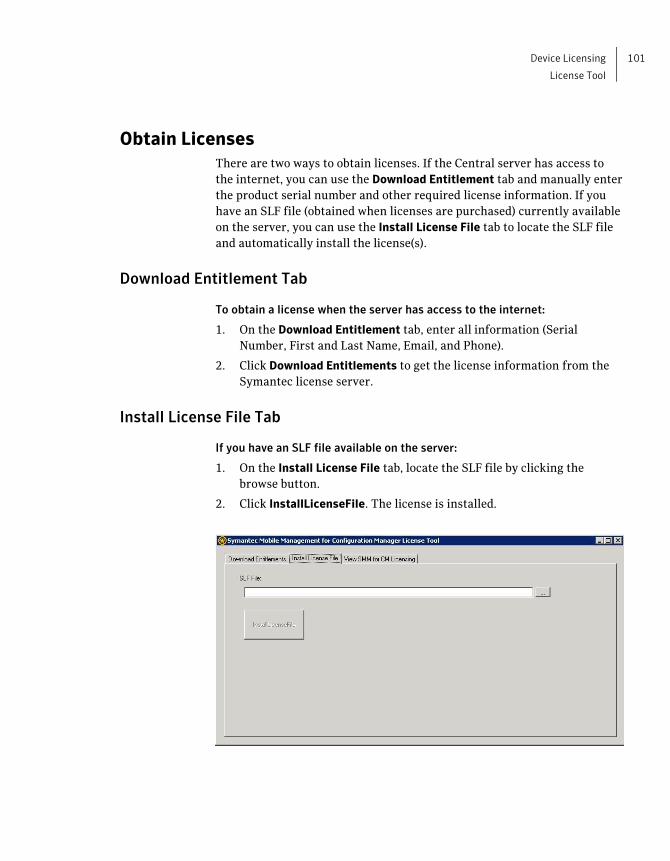
Device Licensing
License Tool
101
Obtain Licenses
There are two ways to obtain licenses. If the Central server has access to
the internet, you can use the Download Entitlement tab and manually enter
the product serial number and other required license information. If you
have an SLF file (obtained when licenses are purchased) currently available
on the server, you can use the Install License File tab to locate the SLF file
and automatically install the license(s).
Download Entitlement Tab
To obtain a license when the server has access to the internet:
1. On the Download Entitlement tab, enter all information (Serial
Number, First and Last Name, Email, and Phone).
2. Click Download Entitlements to get the license information from the
Symantec license server.
Install License File Tab
If you have an SLF file available on the server:
1. On the Install License File tab, locate the SLF file by clicking the
browse button.
2. Click InstallLicenseFile. The license is installed.
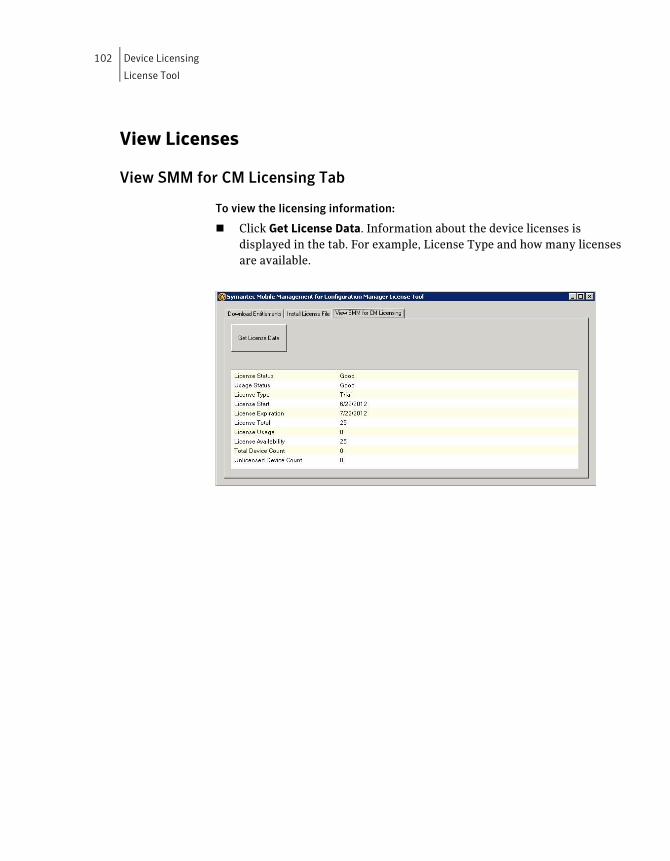
102 Device Licensing
License Tool
View Licenses
View SMM for CM Licensing Tab
To view the licensing information:
Click Get License Data. Information about the device licenses is
displayed in the tab. For example, License Type and how many licenses
are available.
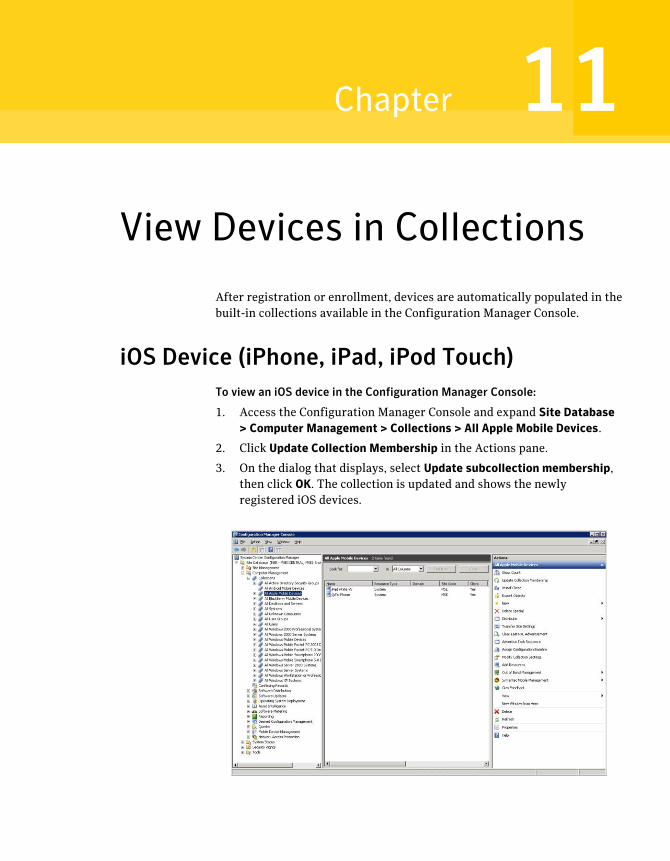
Chapter 11
View Devices in Collections
After registration or enrollment, devices are automatically populated in the
built-in collections available in the Configuration Manager Console.
iOS Device (iPhone, iPad, iPod Touch)
To view an iOS device in the Configuration Manager Console:
1. Access the Configuration Manager Console and expand Site Database
> Computer Management > Collections > All Apple Mobile Devices.
2. Click Update Collection Membership in the Actions pane.
3. On the dialog that displays, select Update subcollection membership,
then click OK. The collection is updated and shows the newly
registered iOS devices.
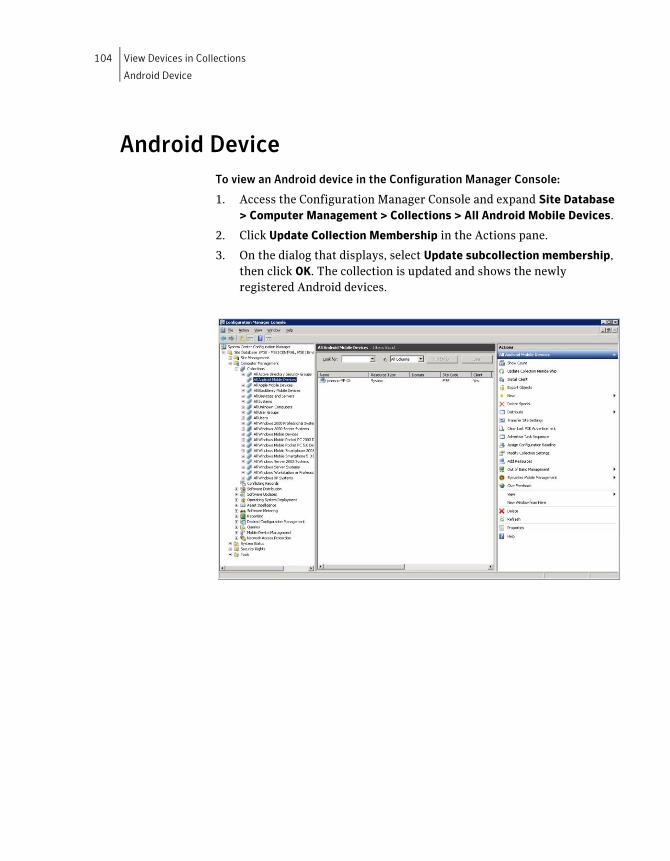
104 View Devices in Collections
Android Device
Android Device
To view an Android device in the Configuration Manager Console:
1. Access the Configuration Manager Console and expand Site Database
> Computer Management > Collections > All Android Mobile Devices.
2. Click Update Collection Membership in the Actions pane.
3. On the dialog that displays, select Update subcollection membership,
then click OK. The collection is updated and shows the newly
registered Android devices.

View Devices in Collections
Windows Phone 7
105
Windows Phone 7
To view a Windows Phone 7 in the Configuration Manager Console:
1. Access the Configuration Manager Console and expand Site Database
> Computer Management > Collections > All Windows Phone 7
Devices.
2. Click Update Collection Membership in the Actions pane.
3. On the dialog that displays, select Update subcollection membership,
then click OK. The collection is updated and shows the newly
registered Windows devices.
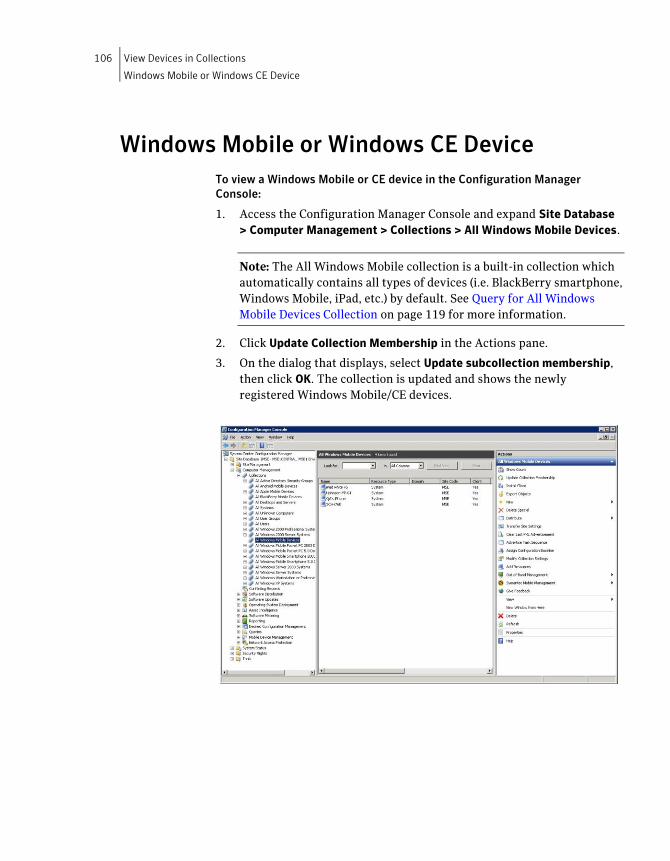
106 View Devices in Collections
Windows Mobile or Windows CE Device
Windows Mobile or Windows CE Device
To view a Windows Mobile or CE device in the Configuration Manager
Console:
1. Access the Configuration Manager Console and expand Site Database
> Computer Management > Collections > All Windows Mobile Devices.
Note: The All Windows Mobile collection is a built-in collection which
automatically contains all types of devices (i.e. BlackBerry smartphone,
Windows Mobile, iPad, etc.) by default. See Query for All Windows
Mobile Devices Collection on page 119 for more information.
2. Click Update Collection Membership in the Actions pane.
3. On the dialog that displays, select Update subcollection membership,
then click OK. The collection is updated and shows the newly
registered Windows Mobile/CE devices.
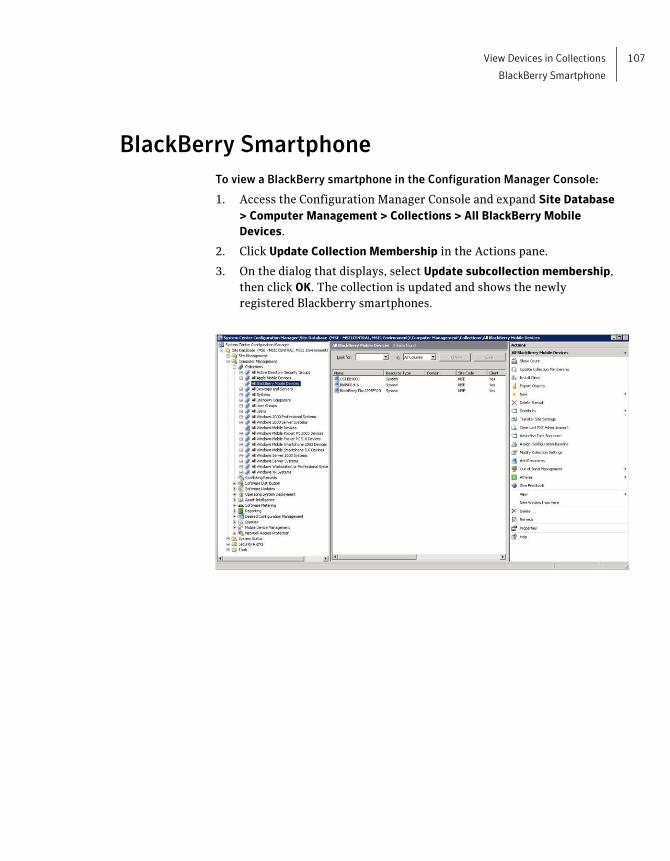
View Devices in Collections
BlackBerry Smartphone
107
BlackBerry Smartphone
To view a BlackBerry smartphone in the Configuration Manager Console:
1. Access the Configuration Manager Console and expand Site Database
> Computer Management > Collections > All BlackBerry Mobile
Devices.
2. Click Update Collection Membership in the Actions pane.
3. On the dialog that displays, select Update subcollection membership,
then click OK. The collection is updated and shows the newly
registered Blackberry smartphones.

108 View Devices in Collections
BlackBerry Smartphone
Chapter 12
Configuring Device
Ownership
Administrators can specify if an enrolled iOS or Android device, or
registered Windows Mobile/Windows CE device or BlackBerry smartphone
is company owned (Corporate) or employee owned (Personal). This allows
devices in the enterprise to be managed differently according to ownership.
For example, some companies may not perform a wipe of a lost personal
device or have different policies defined for a corporate device.
Note: For iOS, Android, and Windows Phone 7 devices, setting ownership
using this method overrides the device ownership declaration that was
made during enrollment. See the device ownership declaration steps in iOS
Enrollment on page 82, Android Enrollment on page 88, and Windows
Phone 7 Enrollment on page 91 for more information.
Set Ownership To set ownership for a device:
1. Access the Configuration Manager Console and expand Site Database
> Computer Management > Collections.
2. Select a device collection type. For example, All Android Mobile
Devices.
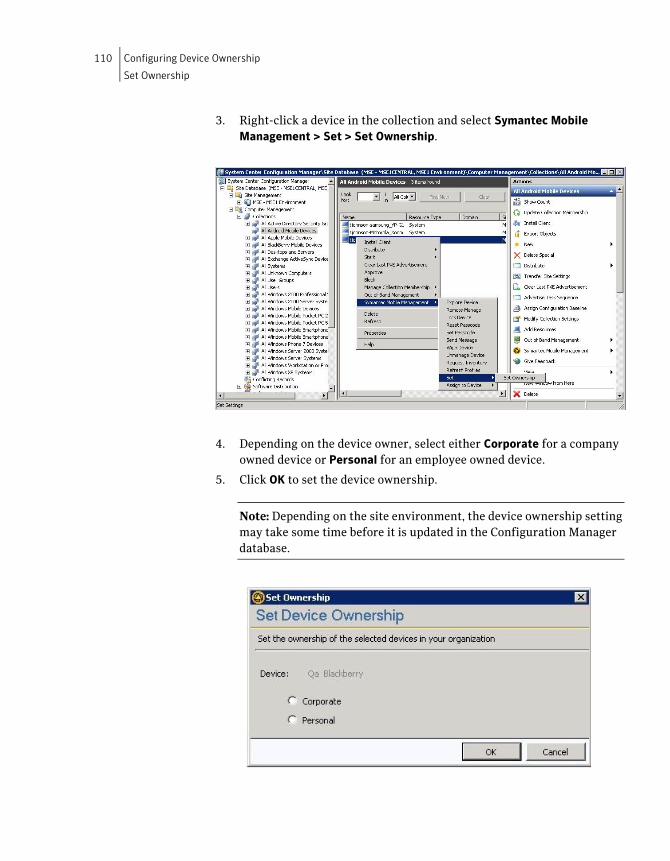
110 Configuring Device Ownership
Set Ownership
3. Right-click a device in the collection and select Symantec Mobile
Management > Set > Set Ownership.
4. Depending on the device owner, select either Corporate for a company
owned device or Personal for an employee owned device.
5. Click OK to set the device ownership.
Note: Depending on the site environment, the device ownership setting
may take some time before it is updated in the Configuration Manager
database.
Chapter 13
EAS Blocking
You can limit Microsoft Exchange ActiveSync (EAS) email access to only
authorized iOS and Android devices. EAS Blocking uses a default query,
which allows only devices that are managed by MDM. These managed
devices have a valid Device ID and an EAS ID (Exchange mail account ID).
You can block unauthorized devices from accessing Exchange email with
the following server options, which are discussed in this chapter:
Exchange ActiveSync (Exchange 2010 only)- allow, quarantine or
block Exchange functions. To use this functionality, the server where
the EAS Blocking (EAS Blocking Service) resides must have been
configured during the Services installation procedure. See the
Exchange Email Blocking installation step on page 63 for more
information.
F5 Rules- integration with F5 BIG-IP LTM server that is configured
with F5 Exchange blocking rules.
The Exchange ActiveSync and F5 server options that are specified perform
the actual blocking of the devices. The EAS Blocking query generates a list
of allowed devices, also called a whitelist of devices.
Note: Consult the Microsoft website or documentation for more
information about Exchange ActiveSync allow, quarantine or block
Exchange functions, and the F5 Networks website or documentation for
more information about F5 rules and rule files.
112 EAS Blocking
Blocking Settings
Blocking Settings The EAS Blocking Settings screen contains the options and queries to use.
To access EAS Blocking Settings:
1. Expand Configuration Manager Console > Site Database > Computer
Management > Mobile Device Management.
2. Right-click Symantec Mobile Management and select EAS Blocking
Settings. The EAS Blocking Settings screen displays.
Exchange ActiveSync Blocking Functionality
To specify Exchange ActiveSync settings for blocking:
1. Select Enable Exchange ActiveSync Blocking functionality.
2. Select one of the following options from EAS Access Level:
Allow All Devices- all devices are allowed access. Devices can
connect to Exchange and access email.
Quarantine Unauthorized Devices- unauthorized devices will be
quarantined. Devices can connect to Exchange, but cannot access
email.
Block Unauthorized Devices- unauthorized devices will be blocked.
Devices cannot connect to Exchange or access email.
3. Define and run a new query. See New Query on page 114.
Note: When devices are blocked or quarantined by Exchange, an email is
sent indicating the status. If this email is not received due to timing of the
block or quarantine, check the user webmail account (if enabled). An iOS
device user may also receive server timeout, cannot access mail server or
an invalid password error message when attempting to access email that
has been blocked.
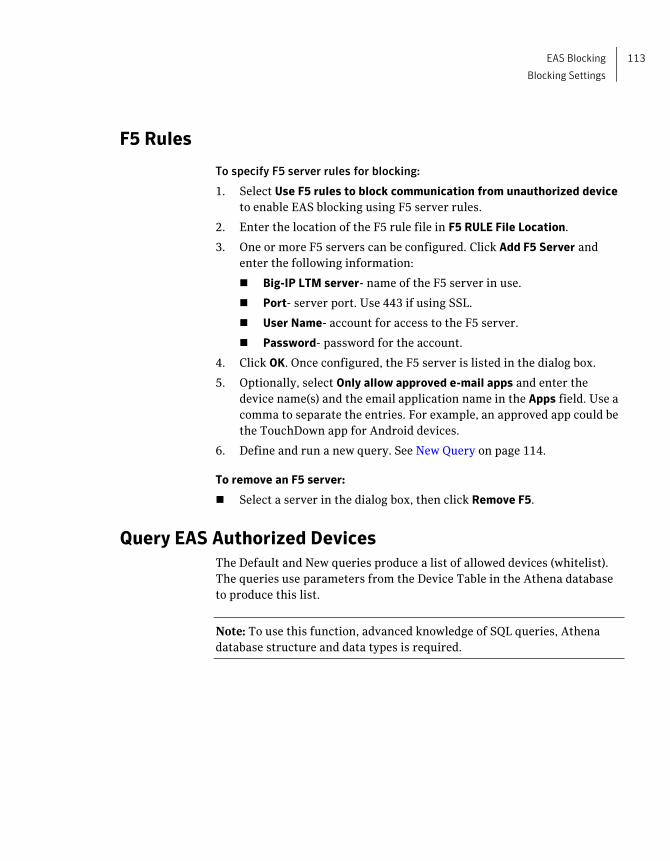
EAS Blocking
Blocking Settings
113
F5 Rules
To specify F5 server rules for blocking:
1. Select Use F5 rules to block communication from unauthorized device
to enable EAS blocking using F5 server rules.
2. Enter the location of the F5 rule file in F5 RULE File Location.
3. One or more F5 servers can be configured. Click Add F5 Server and
enter the following information:
Big-IP LTM server- name of the F5 server in use.
Port- server port. Use 443 if using SSL.
User Name- account for access to the F5 server.
Password- password for the account.
4. Click OK. Once configured, the F5 server is listed in the dialog box.
5. Optionally, select Only allow approved e-mail apps and enter the
device name(s) and the email application name in the Apps field. Use a
comma to separate the entries. For example, an approved app could be
the TouchDown app for Android devices.
6. Define and run a new query. See New Query on page 114.
To remove an F5 server:
Select a server in the dialog box, then click Remove F5.
Query EAS Authorized Devices
The Default and New queries produce a list of allowed devices (whitelist).
The queries use parameters from the Device Table in the Athena database
to produce this list.
Note: To use this function, advanced knowledge of SQL queries, Athena
database structure and data types is required.

114 EAS Blocking
Blocking Settings
Default Query
The Default Query field contains the default SQL query string that is used
for EAS Blocking. The default query allows all managed devices that have a
valid Device ID and EAS ID to access Exchange email. Click View Result to
see the list of managed devices that have an EAS ID.
The following is the default query:
SELECT DeviceId, DeviceName, Email, Managed, EASId, UserId FROM
[Athena].[dbo].[Device] Where Managed = 1 and EasId != "
New Query
The New Query field is where you add the query conditions (parameters) to
the displayed new query to filter or refine the allowed devices.
To create a new query:
1. Enter specific query parameters in the text box below New Query. You
only need to add the parameters in the text box. The parameters will be
automatically appended to the query.
The following is the new query that will be appended with your
parameters:
SELECT DeviceId, DeviceName, Email, Managed, EASId, UserId
FROM [Athena].[dbo].[Device]
Note: For certain non-Boolean data types, 1 and 0 are used for true or
false. For example, the Managed data type for managed devices.
2. Click View Result to list the results of the new query in the Device List
window. The Device List Window will list the allowed devices. Use this
list to check it for accuracy or test that an allowed device list is
generated by the new query. A message will display if an error occurs.
3. When finished, click Save to save the new query values to the Athena
database or click Done to save the changes and exit the screen.
Note: The Save or Done options will overwrite the default query with
the new query. All EAS Blocking and F5 settings are retained with the
query.
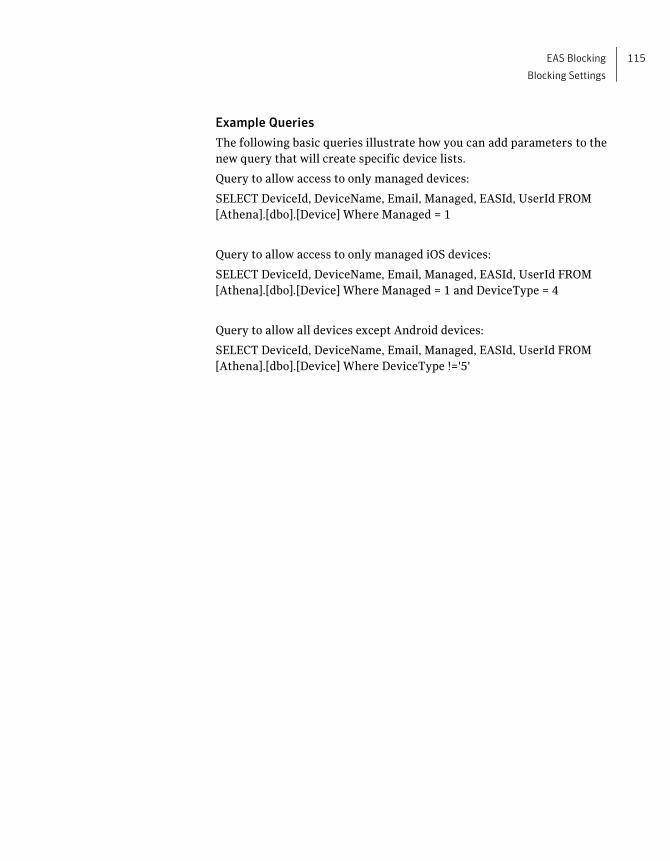
EAS Blocking
Blocking Settings
115
Example Queries
The following basic queries illustrate how you can add parameters to the
new query that will create specific device lists.
Query to allow access to only managed devices:
SELECT DeviceId, DeviceName, Email, Managed, EASId, UserId FROM
[Athena].[dbo].[Device] Where Managed = 1
Query to allow access to only managed iOS devices:
SELECT DeviceId, DeviceName, Email, Managed, EASId, UserId FROM
[Athena].[dbo].[Device] Where Managed = 1 and DeviceType = 4
Query to allow all devices except Android devices:
SELECT DeviceId, DeviceName, Email, Managed, EASId, UserId FROM
[Athena].[dbo].[Device] Where DeviceType !='5'
Chapter 14
Additional Procedures
The procedures in this chapter include optional Microsoft Configuration
Manager procedures that are used to configure the site environment after
Symantec Mobile Management for Configuration has been successfully
installed. The sections in this chapter discuss the following topics:
Using a Non-Domain Admin Account for Installation
Enabling ASP.Net in IIS
Query for All Windows Mobile Devices Collection
DNS Text Record Setup for Android and iOS Services
Additional Procedures
Using a Non-Domain Admin Account for Installation
117
Using a Non-Domain Admin Account for Installation
This procedure is done during the Services Installation on page 65. If the
current user performing the installation is not a domain or Configuration
Manager administrator, have a domain or Configuration Manager
administrator perform a re-installation or perform the following SQL
server authentication steps on each Configuration Manager server.
Note: This procedure is not recommended, as the best practice is to have a
domain or Configuration Manager administrator perform the installation.
When using SQL Server Logins, you must create a blank Athena database to
properly assign the Athena SQL server.
To configure SQL server authentication:
1. Log in with the appropriate authority to perform these database
administration tasks.
2. Create the Athena database using all of the default settings.
3. Modify the Athena SQL Server Login on the Configuration Manager
server:
On the General tab (node), the Default Database should be Athena.
On the Server Roles tab (node), select the Public and sysadmin
role check boxes. The sysadmin role is needed by the installation
to create the Athena_Purge job in the SQL Server agent.
On the User Mappings tab (node), select the check box for Athena
in the top section and check box for the role db_owner in the lower
section.
Note: Public should be selected.
4. Click OK.
5. Return to the server step on page 65 of the Services installation
procedure and finish the installation.
118 Additional Procedures
Enabling ASP.Net in IIS
Enabling ASP.Net in IIS This procedure enables ASP.Net 2.0 in IIS.
To enable ASP.Net in IIS:
1. Access the Windows command prompt.
2. Enter the following command:
Windows\Microsoft.Net\Framework\V2.0.50727\aspnet_regiis.exe –i
3. Access the IIS Console by selecting Start > Administrative Tools >
Internet Information Services (IIS) Manager.
4. Expand the site and select Web Service Extensions.
5. Ensure that ASP.Net v2.0 is set to Allowed.
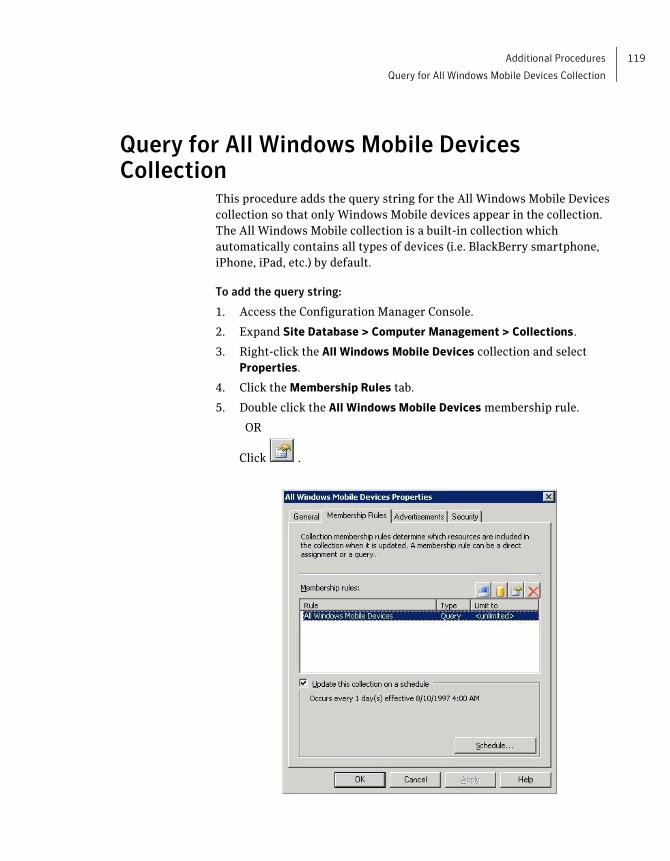
Additional Procedures
Query for All Windows Mobile Devices Collection
119
Query for All Windows Mobile Devices Collection
This procedure adds the query string for the All Windows Mobile Devices
collection so that only Windows Mobile devices appear in the collection.
The All Windows Mobile collection is a built-in collection which
automatically contains all types of devices (i.e. BlackBerry smartphone,
iPhone, iPad, etc.) by default.
To add the query string:
1. Access the Configuration Manager Console.
2. Expand Site Database > Computer Management > Collections.
3. Right-click the All Windows Mobile Devices collection and select
Properties.
4. Click the Membership Rules tab.
5. Double click the All Windows Mobile Devices membership rule.
OR
Click .
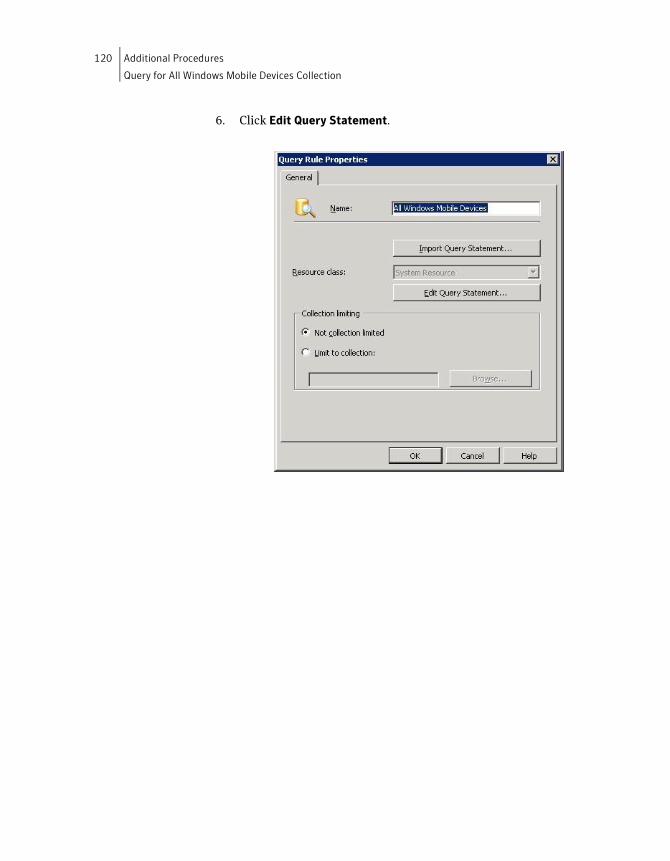
120 Additional Procedures
Query for All Windows Mobile Devices Collection
6. Click Edit Query Statement.
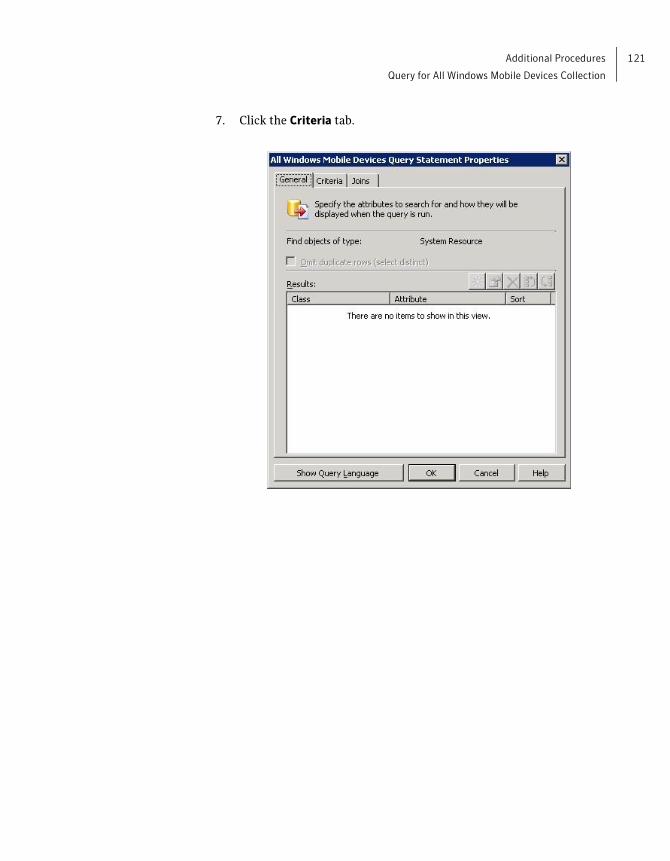
Additional Procedures
Query for All Windows Mobile Devices Collection
121
7. Click the Criteria tab.
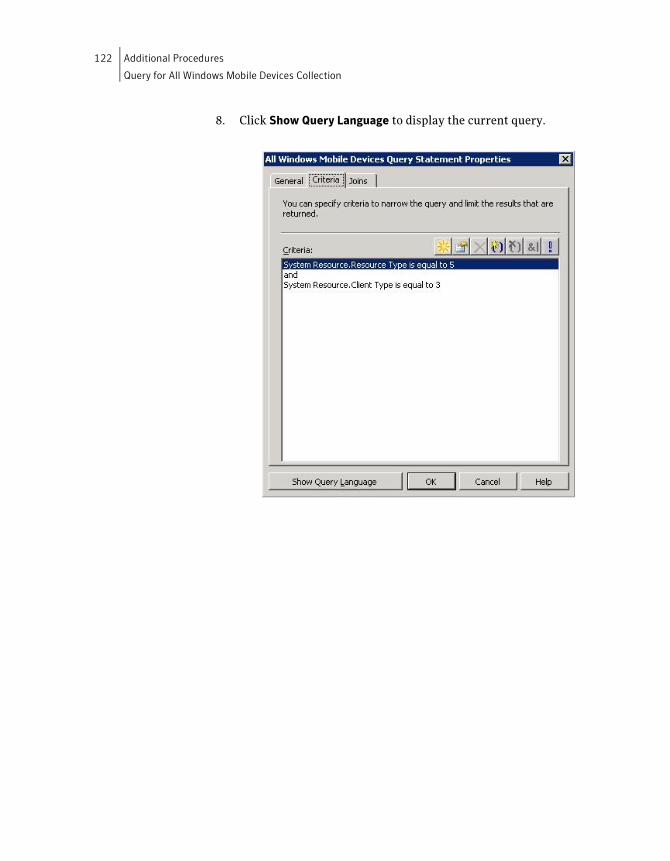
122 Additional Procedures
Query for All Windows Mobile Devices Collection
8. Click Show Query Language to display the current query.
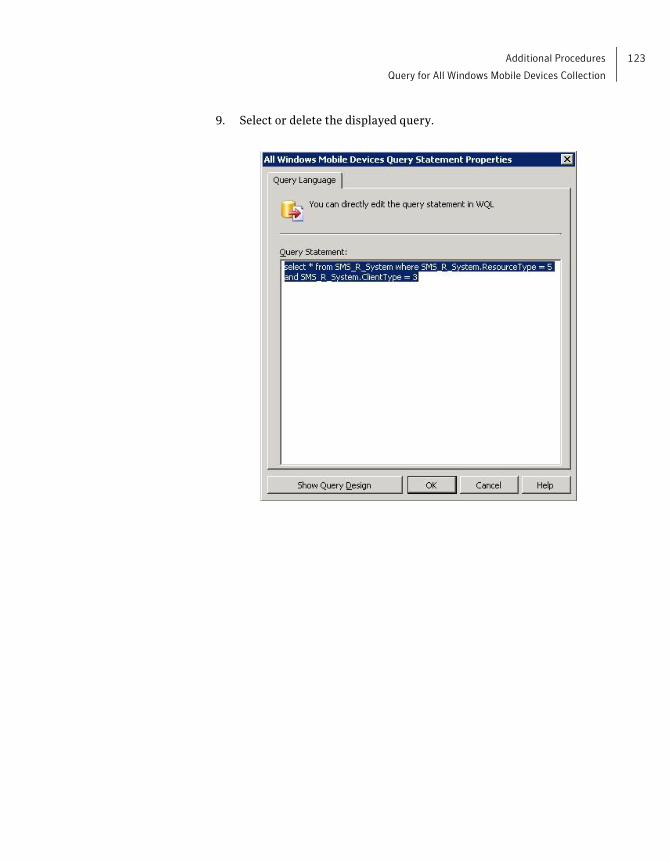
Additional Procedures
Query for All Windows Mobile Devices Collection
123
9. Select or delete the displayed query.
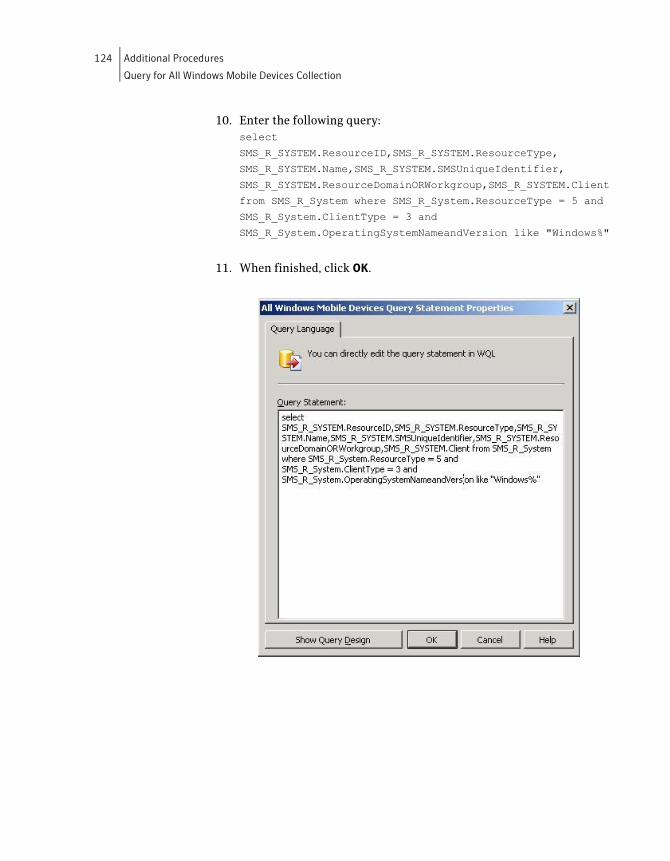
124 Additional Procedures
Query for All Windows Mobile Devices Collection
10. Enter the following query:
select
SMS_R_SYSTEM.ResourceID,SMS_R_SYSTEM.ResourceType,
SMS_R_SYSTEM.Name,SMS_R_SYSTEM.SMSUniqueIdentifier,
SMS_R_SYSTEM.ResourceDomainORWorkgroup,SMS_R_SYSTEM.Client
from SMS_R_System where SMS_R_System.ResourceType = 5 and
SMS_R_System.ClientType = 3 and
SMS_R_System.OperatingSystemNameandVersion like "Windows%"
11. When finished, click OK.
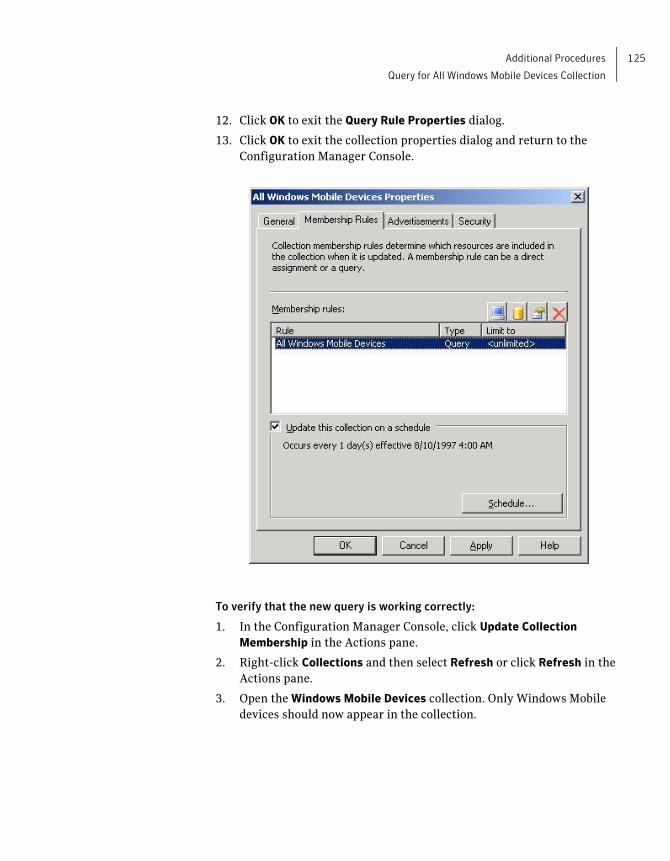
Additional Procedures
Query for All Windows Mobile Devices Collection
125
12. Click OK to exit the Query Rule Properties dialog.
13. Click OK to exit the collection properties dialog and return to the
Configuration Manager Console.
To verify that the new query is working correctly:
1. In the Configuration Manager Console, click Update Collection
Membership in the Actions pane.
2. Right-click Collections and then select Refresh or click Refresh in the
Actions pane.
3. Open the Windows Mobile Devices collection. Only Windows Mobile
devices should now appear in the collection.
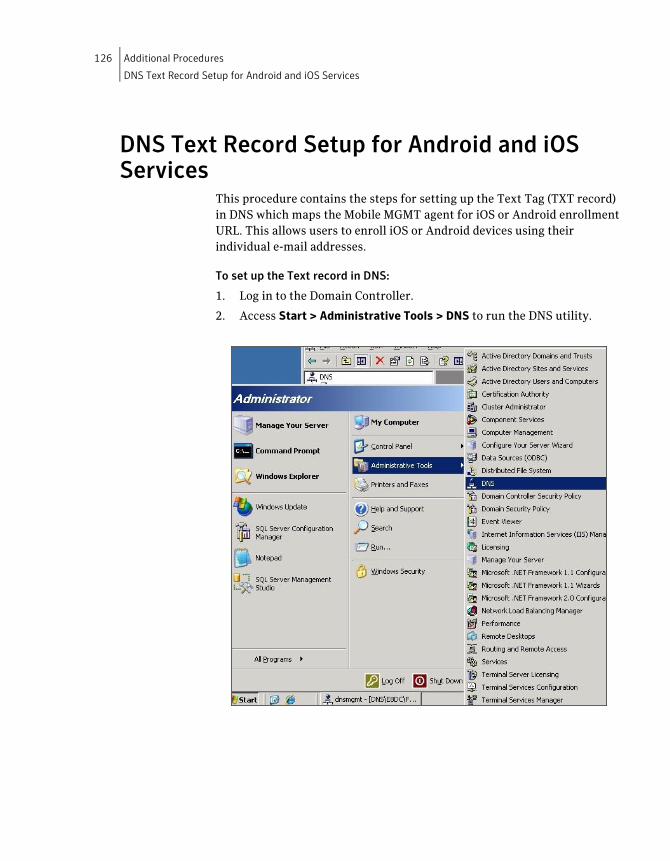
126 Additional Procedures
DNS Text Record Setup for Android and iOS Services
DNS Text Record Setup for Android and iOS Services
This procedure contains the steps for setting up the Text Tag (TXT record)
in DNS which maps the Mobile MGMT agent for iOS or Android enrollment
URL. This allows users to enroll iOS or Android devices using their
individual e-mail addresses.
To set up the Text record in DNS:
1. Log in to the Domain Controller.
2. Access Start > Administrative Tools > DNS to run the DNS utility.

Additional Procedures
DNS Text Record Setup for Android and iOS Services
127
3. From the DNS Window, navigate to the domain folder.
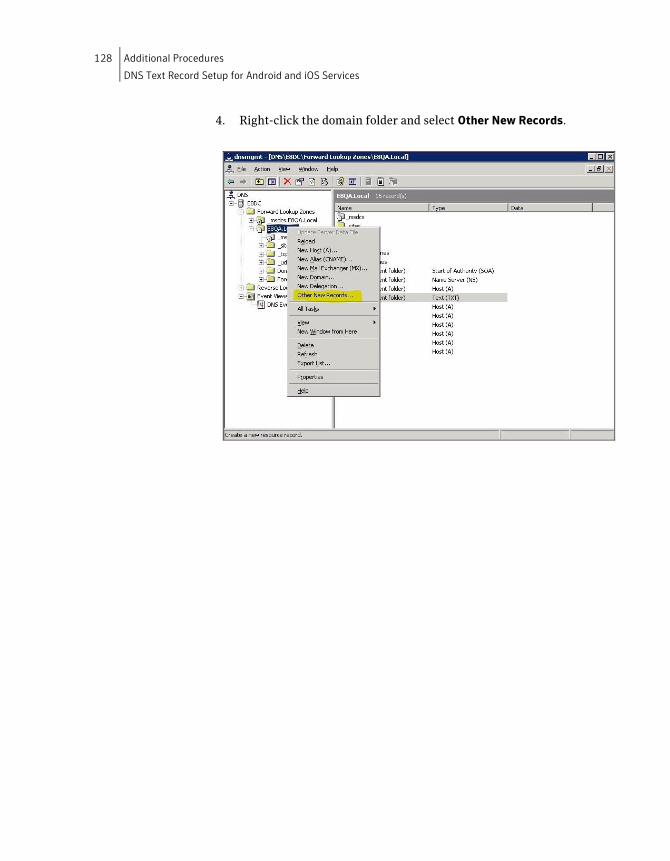
128 Additional Procedures
DNS Text Record Setup for Android and iOS Services
4. Right-click the domain folder and select Other New Records.
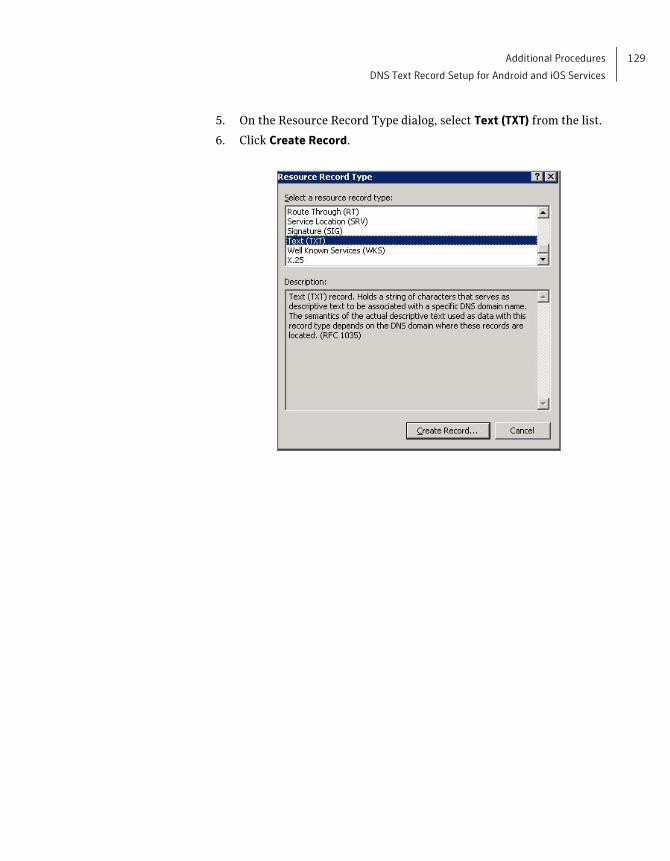
Additional Procedures
DNS Text Record Setup for Android and iOS Services
129
5. On the Resource Record Type dialog, select Text (TXT) from the list.
6. Click Create Record.
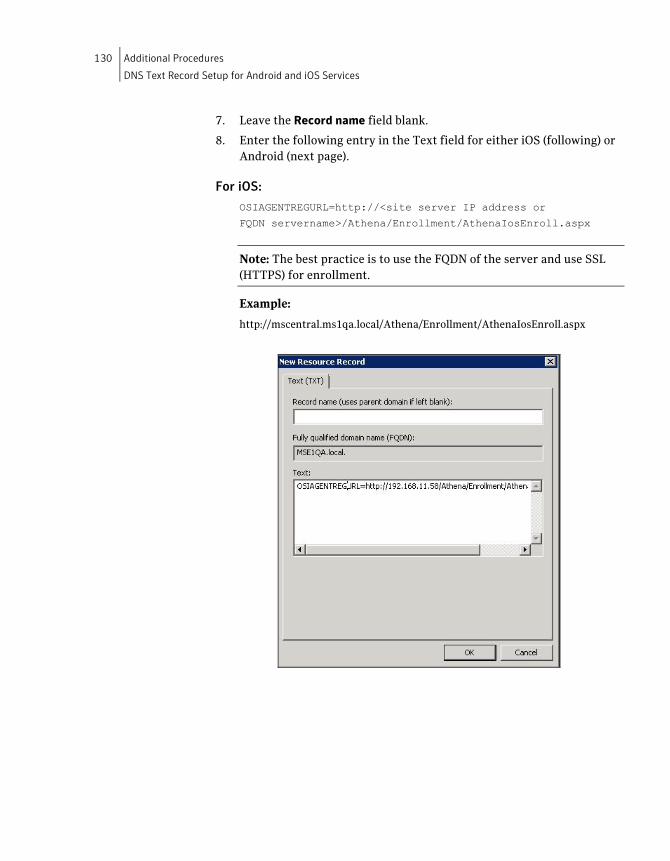
130 Additional Procedures
DNS Text Record Setup for Android and iOS Services
7. Leave the Record name field blank.
8. Enter the following entry in the Text field for either iOS (following) or
Android (next page).
For iOS:
OSIAGENTREGURL=http://<site server IP address or
FQDN servername>/Athena/Enrollment/AthenaIosEnroll.aspx
Note: The best practice is to use the FQDN of the server and use SSL
(HTTPS) for enrollment.
Example:
http://mscentral.ms1qa.local/Athena/Enrollment/AthenaIosEnroll.aspx
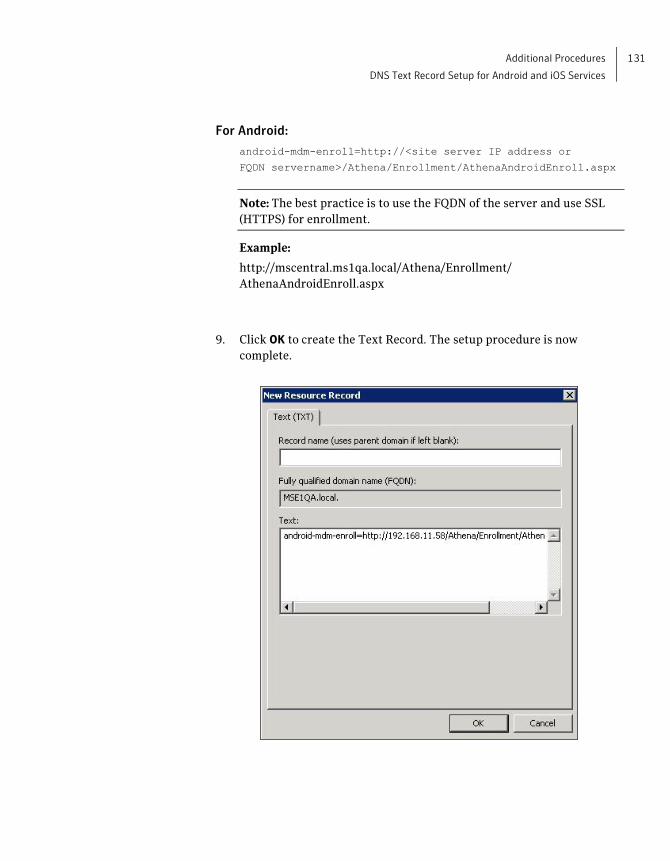
Additional Procedures
DNS Text Record Setup for Android and iOS Services
131
For Android:
android-mdm-enroll=http://<site server IP address or
FQDN servername>/Athena/Enrollment/AthenaAndroidEnroll.aspx
Note: The best practice is to use the FQDN of the server and use SSL
(HTTPS) for enrollment.
Example:
http://mscentral.ms1qa.local/Athena/Enrollment/
AthenaAndroidEnroll.aspx
9. Click OK to create the Text Record. The setup procedure is now
complete.

132 Additional Procedures
DNS Text Record Setup for Android and iOS Services
Chapter 15
Upgrading
You should upgrade Symantec Mobile Management for Configuration
Manager in the same order that the installation was done using the same
site environment (servers, ports) information that was entered during the
installation. When upgrading, the ISV proxy certificate installation and the
iOS profile setup post installation procedures do not need to be done.
Upgrades require the GCM service to be setup. See Google Cloud
Messaging Configuration on page 44 for more information.
Upgrades must use the same port number and certificate for IIS that
was used for the installation. Any changes made to these values during
the upgrade will prevent devices from enrolling.
Upgrades always use the existing database. Contact support if you
want to create a new database for use.
Upgrades follow the same order as the installation. See Component
Installation Order on page 41 for more information.
Note: Some upgrade scenarios, for example Symantec Mobile Management
for Configuration Manager MR1 to Symantec Mobile Management for
Configuration Manager SP1 may require assistance from professional
services. Contact Symantec support if you encounter issues during an
upgrade.

134 Upgrading
Upgrade Procedure
Upgrade Procedure
Push Services Upgrade
To perform the Push Services upgrade:
1. Locate the executable and start the wizard by double-clicking the
Symantec Mobile Management Push Services icon.
2. The Welcome screen appears. Click Next to run the wizard.
3. Use the same folder that was used for the installation. Click Next to
continue.
4. Both the Feedback and Push Services are selected for upgrade by
default. Click a service to change the upgrade selection. When finished,
click Next to continue.
Note: Be sure to upgrade the service(s) that were originally installed.
5. Click Browse and locate the APNS certificate. Make sure that this
certificate is current and has not expired. Then, enter the password for
the certificate. If this password is incorrect, a warning message will
appear when the installation processes and the installation will stop.
When finished, click Next to continue.
Note: If Push services > APNS web services was not selected in the
previous step, the APNS Service Configuration screen does not display.
6. Enter the project ID in Google API Project ID and server key in Server
API Key which were created during the Android GCM setup procedure.
When finished, click Next to continue.
Upgrading
Upgrade Procedure
135
7. Enter the names of the Central or Primary database server and the
Central database server where the APNS and GCM services reside.
If the Feedback Service is located on a different server than the Push
Services, enter the Fully Qualified Domain Name (FQDN) of the server
in Server where device Push services are running. This entry only
appears if the Push Services are installed on a different server.
Note: If C2DM was used for the installation, you will be prompted to
replace the C2DM credentials with GCM credentials
When finished, click Next to continue.
8. Click Install to start the upgrade using the settings specified in the
previous steps.
9. Click Finish to exit the wizard and complete the Push Services upgrade.
Optionally, click Show the Windows Installer log to view the log upon
exiting the wizard. The Installer Log shows any errors or other events
that occurred during the upgrade.
Console Upgrade
The Console upgrade must be done for each console residing in the site
environment. Use the same site environment (servers, ports) information
that was entered during the installation.
To upgrade the Administrator Console:
1. Locate the executable and start the wizard by double-clicking the
Symantec Mobile Management Console icon.
Note: For Windows Vista and Windows 7 systems, right-click on the icon
and select Run as administrator.
2. The Welcome screen appears. Click Next to run the wizard for the
Console portion of the upgrade.
3. Use the same folder that was used for the installation. Click Next to
continue.
136 Upgrading
Upgrade Procedure
4. Enter the fully qualified domain name of the Central server. The
Symantec Mobile Management Database Name field contains the
recommended name of Athena. This entry is the database name of the
Central server as the console will pull data from the Central server. If a
different database was used for the installation, enter its name.
Note: The existing database will be used for the upgrade. If you want to
create a new database, contact customer support for assistance.
When finished, click Next to continue.
5. Locate and select the Central server database by clicking Browse or
type the Central server database name.
If the current user is a Configuration Manager administrator, use the
default Windows authentication credentials of current user.
If using SQL server logins, select Server authentication using the Login
ID and password below to create the SQL server login.
When finished, click Next to continue.
6. Click Install to start the upgrade of the Console.
7. Click Finish to exit the wizard and complete the Console upgrade.
Optionally, click Show the Windows Installer log to view the log upon
exiting the wizard. The Installer Log shows any errors or other events
that occurred during the upgrade.
Services Upgrade
Perform the Services upgrade on all (one or multiple) Management Point
servers to which the devices are reporting. For multiple server sites, the
Services upgrade should be done following the site hierarchy. For example,
starting with the highest level server and then proceeding to the lower level
servers.
Note: The computer account must have system administrator access to the
database server for creation of the Athena database and permissions
assignment.
The following steps must be done on each Configuration Manager server:
1. Log in as a Configuration Manager administrator.
2. Locate the executable and start the wizard by double-clicking the
Symantec Mobile Management Services icon.

Upgrading
Upgrade Procedure
137
3. The Welcome screen appears. Click Next to run the wizard for the
Services portion of the Symantec Mobile Management for
Configuration Manager upgrade.
4. Both the Tunnel Server and Symantec Mobile Management Services
are selected for upgrade. Click the Tunnel Server and/or Symantec
Mobile Management Services components to change the upgrade
selection.
Note: Be sure to upgrade the component(s) that were originally
installed.
When finished, click Next to continue.
5. Use the same folder that was used for the installation. Click Next to
continue.
6. For the Tunnel Sever component upgrade, enter the names of the three
security groups that were created for use with Tunnel Server. The
entries must be WINS names in the format domain\group name. For
example, e3qa\atier1.
When finished, click Next to continue.
7. Depending on the topology of the site, select the server type:
Central server (default)- Root Primary server.
Secondary server- server where the Athena Web Services are
installed.
When finished, click Next to continue.
8. The Site Code field is populated with the three character alphanumeric
code of the Management Point server. Enter the following:
SCCM Database- name of the SCCM database.
SCCM Database Server- name of the server where the SCCM
database resides.
When finished, click Next to continue.
138 Upgrading
Upgrade Procedure
9. Select any options as required for the site:
Management Point Address- IP address of server. Typically this
entry is the address of the Central server or the Primary server.
Note: The http:// prefix is not automatically pre-pended to the IP
address, so it must be entered with the IP address when a server is
running DHCP. For example, a valid entry is http://192.168.1.101. If
http:// is not entered, the correct Management Point address will not
be written to the Athena web.config file and DCOM will be used to
communicate, which is problematic.
Management Point Port- port of the server that is specified in the
Management Point Address field.
EndPoint Server Name- name of the Management Point server.
DNS Suffix– specifies the DNS suffix that managed devices use to
connect to the server. This setting is not required for WINS.
Note: Run the ipconfig /all command in a command window to view
the DNS suffix of the server.
Log to EventLog– specifies when the Athena Device Tracker
(Tracker) service logs run time errors to the server Event Log
under the Athena application group. Used by Athena Tracker and
Web Services.
Log to DeviceLog Table- specifies when Tracker service writes run
time errors and run time status messages to the Athena database
DEVICELOG table. Used by Athena Tracker and Web Services.
Derive Device Name From Host Name– determines whether the
custom parsing logic within the Athena Tracker service is used to
derive the Device Name property from the DNS Host Name
attribute passed to the device from a DHCP server.
Derive Device Name From Phone Number– (Phone devices only)
determines whether the custom parsing logic within the Athena
Tracker service is used to derive the Device Name property from
the device(s) Phone Number attribute.
When finished, click Next to continue.
Upgrading
Upgrade Procedure
139
10. On the Device Agent Server Configuration screen, the Agent (iOS and
Android) entries configure the Symantec Mobile MGMT agent. The
following settings must match your site environment's current
settings:
Using SSL protocol- select to enable SSL.
Server Name- name of the server where devices communicate.
This entry can be an IP address, machine name, or FQDN. The
default is the server where the upgrade is being performed.
Port Override- port to use for SSL connections.
The iOS MDM (SSL) entries configure a separate port for the native
Apple iOS agent using the following entries:
Server Name- name of the server where devices communicate.
This entry can be an IP address, machine name, or FQDN. The
default is the server where the upgrade is being performed.
SSL Port Override- port to use for SSL connections.
Certificate- select the web server SSL certificate from the
drop-down list.
When finished, click Next to continue.
11. Enter the server name where Push Services reside. Enter the project ID
in GCM Project ID. The project ID was created in the GCM setup
procedure and also entered in the Google Cloud Messaging step in the
Push Services upgrade.
Note: If C2DM was used for the installation, you may be prompted for
C2DM email or Android Sender ID.
When finished, click Next to continue.
12. Enter the server name where the Mobile Library proxy resides.
When finished, click Next to continue.
13. The Symantec Mobile Management Database Name entry is populated
with the recommended name Athena. This entry must match the
Symantec Mobile Management Database Server that will be entered on
the next screen of the wizard. If a different database was used for the
installation, enter its name.
Note: The existing database will be used for the upgrade. If you want to
create a new database, contact customer support for assistance.
140 Upgrading
Upgrade Procedure
14. Use existing database is selected by default for Central or Primary
server upgrades to preserve existing device information when
performing the upgrade.
Note: This option is not available when upgrading Secondary servers.
Update packages from central database server- selected by
default when upgrading a Primary server.
Note: This option is not available when upgrading Central or
Secondary servers.
15. Enter the Central Database Server name when upgrading a Primary
server. This entry should be a fully qualified domain name.
Note: This option is not available when upgrading Central or
Secondary servers.
When finished, click Next to continue.
16. Select the database server where the Athena Database is located.
When using a Secondary server, the database server must be the
database of the Primary (parent) server of this Secondary server.
If the current user is a Configuration Manager administrator, accept
the default of Windows authentication credentials of current user.
If using SQL server logins, select Server authentication using the Login
ID and password below to create the SQL server login.
When finished, click Next to continue.
Upgrading
Upgrade Procedure
141
17. On the Product License screen, select You have purchased a license
and want to install it to replace the trial license which is installed by
default if you have purchased a license for the software. Leave this
option unchecked if you are using a trial license.
Perform one of the following steps:
If the SLF (obtained when the product license was purchased)
resides on the server, select Browse to your SLF and click Browse
to locate the file.
OR
If the server has access to the internet, click Provide information
for the Licensing Server and enter all information. This selection
allows you to activate the product license from the Symantec
licensing server using the License Serial Number and required
information.
When finished, click Next to continue.
18. Click Install to start the upgrade of the Services.
19. Click Finish to complete the upgrade and exit the wizard. The upgrade
is now complete.

142 Upgrading
Upgrade Procedure
Appendix
Symantec Mobile
Management for
Configuration Manager 7.2
Third-Party Legal Notices
Third-Party Legal Attributions This Symantec product contains third party software for which Symantec
is required to provide attribution (“Third Party Programs”). Some of the
Third Party Programs are available under open source or free software
licenses. The License Agreement accompanying the Software does not
alter any rights or obligations you may have under those open source or
free software licenses. This appendix contains proprietary notices for the
Third Party Programs and the licenses for the Third Party Programs, where
applicable.
Microsoft
Microsoft®, Windows
®, Windows Mobile
®, Active Directory
®, Windows Vista
®,
Windows Server®, ActiveX
®, Internet Explorer
®, SQL Server
®, and
ActiveSync® are registered trademarks of Microsoft Corporation in the
United States and other countries.
Bing™ is a trademark of Microsoft Corporation in the United States and
other countries.
144 Appendix
Apple
Apple®, Mac
®, Mac OS
®, iPhone
®, iPad
®, iPod Touch
®, iPod
®, FaceTime
®, and
iTunes® are registered trademarks of Apple Inc., registered in the United
States and other countries.
Sun Microsystems
Sun and Sun Microsystems are trademarks or registered trademarks of Sun
Microsystems, Inc. in the United States and other countries.
Research In Motion
BlackBerry® is a registered trademark of Research In Motion Limited.
Google™, Android™, and YouTube™ are trademarks of Google Inc.
NitroDesk
TouchDown™ is a trademark of NitroDesk, Inc.
Mozilla
Firefox® is a registered trademark of Mozilla.
F5
F5® is a registered trademark of F5 Networks, Inc.
Expat 1.2
Copyright (c) 1998, 1999, 2000 Thai Open Source Software Center, Ltd
Permission is hereby granted, free of charge, to any person obtaining a
copy of this software and associated documentation files (the "Software"),
to deal in the Software without restriction, including without limitation the
rights to use, copy, modify, merge, publish, distribute, sublicense, and/or
sell copies of the Software, and to permit persons to whom the Software is
furnished to do so, subject to the following conditions:
The above copyright notice and this permission notice shall be included in
all copies or substantial portions of the Software.
Appendix
145
THE SOFTWARE IS PROVIDED "AS IS", WITHOUT WARRANTY OF ANY KIND,
EXPRESS OR IMPLIED, INCLUDING BUT NOT LIMITED TO THE WARRANTIES
OF MERCHANTABILITY, FITNESS FOR A PARTICULAR PURPOSE AND
NONINFRINGEMENT. IN NO EVENT SHALL THE AUTHORS OR COPYRIGHT
HOLDERS BE LIABLE FOR ANY CLAIM, DAMAGES OR OTHER LIABILITY,
WHETHER IN AN ACTION OF CONTRACT, TORT OR OTHERWISE, ARISING
FROM, OUT OF OR IN CONNECTION WITH THE SOFTWARE OR THE USE OR
OTHER DEALINGS IN THE SOFTWARE
jQueryjs 1.4.1
Copyright (c) 2011 John Resig, http://jquery.com/
Permission is hereby granted, free of charge, to any person obtaining
a copy of this software and associated documentation files (the
"Software"), to deal in the Software without restriction, including
without limitation the rights to use, copy, modify, merge, publish,
distribute, sublicense, and/or sell copies of the Software, and to
permit persons to whom the Software is furnished to do so, subject to
the following conditions:
The above copyright notice and this permission notice shall be
included in all copies or substantial portions of the Software.
THE SOFTWARE IS PROVIDED "AS IS", WITHOUT WARRANTY OF
ANY KIND, EXPRESS OR IMPLIED, INCLUDING BUT NOT LIMITED
TO THE WARRANTIES OF MERCHANTABILITY, FITNESS FOR A
PARTICULAR PURPOSE AND NONINFRINGEMENT. IN NO EVENT
SHALL THE AUTHORS OR COPYRIGHT HOLDERS BE LIABLE FOR
ANY CLAIM, DAMAGES OR OTHER LIABILITY, WHETHER IN AN
ACTION OF CONTRACT, TORT OR OTHERWISE, ARISING FROM,
OUT OF OR IN CONNECTION WITH THE SOFTWARE OR THE USE
OR OTHER DEALINGS IN THE SOFTWARE.
146 Appendix
Libjpeg 6b
This software is based in part on the work of the Independent JPEG Group.
This software is copyright (C) 1991-2012, Thomas G. Lane, Guido
Vollbeding. All Rights Reserved except as specified below.
Log4Net 1.2.10
Licensed under the Apache License, Version 2.0 (the "License"); you may
not use this file except in compliance with the License. You may obtain a
copy of the License at http://www.apache.org/licenses/LICENSE-2.0
Unless required by applicable law or agreed to in writing, software
distributed under the License is distributed on an "AS IS" BASIS. WITHOUT
WARRANTIES OR CONDITIONS OF ANY KIND, either expressed or
implied. See the License for the specific language governing permissions
and limitations under the License.
Newlib 1.17.0
The newlib subdirectory is a collection of software from several sources.
Each file may have its own copyright/license that is embedded in the source
file. Unless otherwise noted in the body of the source file(s), the following
copyright notices will apply to the contents of the newlib subdirectory:
(1) Red Hat Incorporated
Copyright (c) 1994-2009 Red Hat, Inc. All rights reserved.
This copyrighted material is made available to anyone wishing to use,
modify, copy, or redistribute it subject to the terms and conditions of the
BSD License. This program is distributed in the hope that it will be useful,
but WITHOUT ANY WARRANTY expressed or implied, including the
implied warranties of MERCHANTABILITY or FITNESS FOR A
PARTICULAR PURPOSE. A copy of this license is available at
http://www.opensource.org/licenses. Any Red Hat trademarks that are
incorporated in the source code or documentation are not subject to the
BSD License and may only be used or replicated with the express
permission of Red Hat, Inc.
(2) University of California, Berkeley
Copyright (c) 1981-2000 The Regents of the University of California.
All rights reserved.
Appendix
147
Redistribution and use in source and binary forms, with or without
modification, are permitted provided that the following conditions are met:
Redistributions of source code must retain the above copyright notice,
this list of conditions and the following disclaimers.
Redistributions in binary form must reproduce the above copyright
notice, this list of conditions and the following disclaimer in the
documentation and/or other materials provided with the distribution.
Neither the name of the University nor the names of its contributors
may be used to endorse or promote products derived from this
software without specific prior written permission.
THIS SOFTWARE IS PROVIDED BY THE COPYRIGHT HOLDERS AND
CONTRIBUTORS "AS IS"
AND ANY EXPRESS OR IMPLIED WARRANTIES, INCLUDING, BUT NOT
LIMITED TO, THE IMPLIED WARRANTIES OF MERCHANTABILITY AND
FITNESS FOR A PARTICULAR PURPOSE ARE DISCLAIMED. IN NO EVENT
SHALL THE COPYRIGHT OWNER OR CONTRIBUTORS BE LIABLE FOR
ANY DIRECT, INDIRECT, INCIDENTAL, SPECIAL, EXEMPLARY, OR
CONSEQUENTIAL DAMAGES (INCLUDING, BUT NOT LIMITED TO,
PROCUREMENT OF SUBSTITUTE GOODS OR SERVICES; LOSS OF USE,
DATA, OR PROFITS; OR BUSINESS INTERRUPTION) HOWEVER CAUSED
AND ON ANY THEORY OF LIABILITY, WHETHER IN CONTRACT, STRICT
LIABILITY, OR TORT (INCLUDING NEGLIGENCE OR OTHERWISE)
ARISING IN ANY WAY OUT OF THE USE OF THIS SOFTWARE, EVEN IF
ADVISED OF THE POSSIBILITY OF SUCH DAMAGE.
(3) David M. Gay (AT&T 1991, Lucent 1998)
The author of this software is David M. Gay.
Copyright (c) 1991 by AT&T.
Permission to use, copy, modify, and distribute this software for any
purpose without fee is hereby granted, provided that this entire notice is
included in all copies of any software which is or includes a copy or
modification of this software and in all copies of the supporting
documentation for such software.
THIS SOFTWARE IS BEING PROVIDED "AS IS", WITHOUT ANY EXPRESS
OR IMPLIED WARRANTY. IN PARTICULAR, NEITHER THE AUTHOR NOR
AT&T MAKES ANY REPRESENTATION OR WARRANTY OF ANY KIND
CONCERNING THE MERCHANTABILITY OF THIS SOFTWARE OR ITS
FITNESS FOR ANY PARTICULAR PURPOSE.
-------------------------------------------------------------------
The author of this software is David M. Gay.
148 Appendix
Copyright (C) 1998-2001 by Lucent Technologies
All Rights Reserved
Permission to use, copy, modify, and distribute this software and its
documentation for any purpose and without fee is hereby granted, provided
that the above copyright notice appear in all copies and that both that the
copyright notice and this permission notice and warranty disclaimer
appear in supporting documentation, and that the name of Lucent or any of
its entities not be used in advertising or publicity pertaining to distribution
of the software without specific, written prior permission.
LUCENT DISCLAIMS ALL WARRANTIES WITH REGARD TO THIS
SOFTWARE, INCLUDING ALL IMPLIED WARRANTIES OF
MERCHANTABILITY AND FITNESS. IN NO EVENT SHALL LUCENT OR
ANY OF ITS ENTITIES BE LIABLE FOR ANY SPECIAL, INDIRECT OR
CONSEQUENTIAL DAMAGES OR ANY DAMAGES WHATSOEVER
RESULTING FROM LOSS OF USE, DATA OR PROFITS, WHETHER IN AN
ACTION OF CONTRACT, NEGLIGENCE OR OTHER TORTIOUS ACTION,
ARISING OUT OF OR IN CONNECTION WITH THE USE OR PERFORMANCE
OF THIS SOFTWARE.
(4) Advanced Micro Devices
Copyright 1989, 1990 Advanced Micro Devices, Inc.
This software is the property of Advanced Micro Devices, Inc (AMD) which
specifically grants the user the right to modify, use and distribute this
software provided this notice is not removed or altered. All other rights are
reserved by AMD.
AMD MAKES NO WARRANTY OF ANY KIND, EXPRESS OR IMPLIED, WITH
REGARD TO THIS SOFTWARE. IN NO EVENT SHALL AMD BE LIABLE FOR
INCIDENTAL OR CONSEQUENTIAL DAMAGES IN CONNECTION WITH OR
ARISING FROM THE FURNISHING, PERFORMANCE, OR USE OF THIS
SOFTWARE.
So that all may benefit from your experience, please report any problems or
suggestions about this software to the 29K Technical Support Center at:
800-29-29-AMD (800-292-9263) in the USA, or 0800-89-1131 in the UK, or
0031-11-1129 in Japan, toll free. The direct dial number is 512-462-4118.
Advanced Micro Devices, Inc.
29K Support Products
Mail Stop 573
5900 E. Ben White Blvd.
Austin, TX 78741
800-292-9263
Appendix
149
(5) C.W. Sandmann
Copyright (C) 1993 C.W. Sandmann
This file may be freely distributed as long as the author's name remains.
(6) Eric Backus
(C) Copyright 1992 Eric Backus
This software may be used freely so long as this copyright notice is left
intact. There is no warrantee on this software.
(7) Sun Microsystems
Copyright (C) 1993 by Sun Microsystems, Inc. All rights reserved.
Developed at SunPro, a Sun Microsystems, Inc. business. Permission to use,
copy, modify, and distribute this software is freely granted, provided that
this notice is preserved.
(8) Hewlett Packard
(c) Copyright 1986 HEWLETT-PACKARD COMPANY
To anyone who acknowledges that this file is provided "AS IS” without any
express or implied warranty: permission to use, copy, modify, and
distribute this file for any purpose is hereby granted without fee, provided
that the above copyright notice and this notice appears in all copies, and
that the name of Hewlett-Packard Company not be used in advertising or
publicity pertaining to distribution of the software without specific, written
prior permission. Hewlett-Packard Company makes no representations
about the suitability of this software for any purpose.
(9) Hans-Peter Nilsson
Copyright (C) 2001 Hans-Peter Nilsson
Permission to use, copy, modify, and distribute this software is freely
granted, provided that the above copyright notice, this notice and the
following disclaimer are preserved with no changes.
THIS SOFTWARE IS PROVIDED ``AS IS'' AND WITHOUT ANY EXPRESS
OR IMPLIED WARRANTIES, INCLUDING, WITHOUT LIMITATION, THE
IMPLIED WARRANTIES OF MERCHANTABILITY AND FITNESS FOR A
PARTICULAR PURPOSE.
(10) Stephane Carrez (m68hc11-elf/m68hc12-elf targets only)
Copyright (C) 1999, 2000, 2001, 2002 Stephane Carrez ([email protected])
The authors hereby grant permission to use, copy, modify, distribute, and
license this software and its documentation for any purpose, provided that
existing copyright notices are retained in all copies and that this notice is
included verbatim in any distributions. No written agreement, license, or
royalty fee is required for any of the authorized uses. Modifications to this

150 Appendix
software may be copyrighted by their authors and need not follow the
licensing terms described here, provided that the new terms are clearly
indicated on the first page of each file where they apply.
(11) Christopher G. Demetriou
Copyright (c) 2001 Christopher G. Demetriou
All rights reserved.
Redistribution and use in source and binary forms, with or without
modification, are permitted provided that the following conditions are met:
1. Redistributions of source code must retain the above copyright notice,
this list of conditions and the following disclaimer.
2. Redistributions in binary form must reproduce the above copyright
notice, this list of conditions and the following disclaimer in the
documentation and/or other materials provided with the distribution.
3. The name of the author may not be used to endorse or promote
products derived from this software without specific prior written
permission.
THIS SOFTWARE IS PROVIDED BY THE AUTHOR ``AS IS'' AND ANY
EXPRESS OR IMPLIED WARRANTIES, INCLUDING, BUT NOT LIMITED TO,
THE IMPLIED WARRANTIES OF MERCHANTABILITY AND FITNESS FOR
A PARTICULAR PURPOSE ARE DISCLAIMED. IN NO EVENT SHALL THE
AUTHOR BE LIABLE FOR ANY DIRECT, INDIRECT, INCIDENTAL, SPECIAL,
EXEMPLARY, OR CONSEQUENTIAL DAMAGES (INCLUDING, BUT NOT
LIMITED TO, PROCUREMENT OF SUBSTITUTE GOODS OR SERVICES;
LOSS OF USE, DATA, OR PROFITS; OR BUSINESS INTERRUPTION)
HOWEVER CAUSED AND ON ANY THEORY OF LIABILITY, WHETHER IN
CONTRACT, STRICT LIABILITY, OR TORT (INCLUDING NEGLIGENCE OR
OTHERWISE) ARISING IN ANY WAY OUT OF THE USE OF THIS
SOFTWARE, EVEN IF ADVISED OF THE POSSIBILITY OF SUCH DAMAGE.
(12) SuperH, Inc.
Copyright 2002 SuperH, Inc. All rights reserved
This software is the property of SuperH, Inc (SuperH) which specifically
grants the user the right to modify, use and distribute this software
provided this notice is not removed or altered. All other rights are reserved
by SuperH.
SUPERH MAKES NO WARRANTY OF ANY KIND, EXPRESS OR IMPLIED,
WITH REGARD TO THIS SOFTWARE. IN NO EVENT SHALL SUPERH BE
LIABLE FOR INDIRECT, SPECIAL, INCIDENTAL OR CONSEQUENTIAL
DAMAGES IN CONNECTION WITH OR ARISING FROM THE FURNISHING,
PERFORMANCE, OR USE OF THIS SOFTWARE.
Appendix
151
So that all may benefit from your experience, please report any problems or
suggestions about this software to the SuperH Support Center via e-mail at
SuperH, Inc.
405 River Oaks Parkway
San Jose
CA 95134
USA
(13) Royal Institute of Technology
Copyright (c) 1999 Kungliga Tekniska Högskolan
(Royal Institute of Technology, Stockholm, Sweden).
All rights reserved.
Redistribution and use in source and binary forms, with or without
modification, are permitted provided that the following conditions are met:
1. Redistributions of source code must retain the above copyright notice,
this list of conditions and the following disclaimer.
2. Redistributions in binary form must reproduce the above copyright
notice, this list of conditions and the following disclaimer in the
documentation and/or other materials provided with the distribution.
3. Neither the name of KTH nor the names of its contributors may be
used to endorse or promote products derived from this software
without specific prior written permission.
THIS SOFTWARE IS PROVIDED BY KTH AND ITS CONTRIBUTORS ``AS
IS'' AND ANY EXPRESS OR IMPLIED WARRANTIES, INCLUDING, BUT
NOT LIMITED TO, THE IMPLIED WARRANTIES OF MERCHANTABILITY
AND FITNESS FOR A PARTICULAR PURPOSE ARE DISCLAIMED. IN NO
EVENT SHALL KTH OR ITS CONTRIBUTORS BE LIABLE FOR ANY DIRECT,
INDIRECT, INCIDENTAL, SPECIAL, EXEMPLARY, OR CONSEQUENTIAL
DAMAGES (INCLUDING, BUT NOT LIMITED TO, PROCUREMENT OF
SUBSTITUTE GOODS OR SERVICES; LOSS OF USE, DATA, OR PROFITS;
OR BUSINESS INTERRUPTION) HOWEVER CAUSED AND ON ANY
THEORY OF LIABILITY, WHETHER IN CONTRACT, STRICT LIABILITY, OR
TORT (INCLUDING NEGLIGENCE OR OTHERWISE) ARISING IN ANY WAY
OUT OF THE USE OF THIS SOFTWARE, EVEN IF ADVISED OF THE
POSSIBILITY OF SUCH DAMAGE.
(14) Alexey Zelkin
Copyright (c) 2000, 2001 Alexey Zelkin <[email protected]>
All rights reserved.
152 Appendix
Redistribution and use in source and binary forms, with or without
modification, are permitted provided that the following conditions are met:
1. Redistributions of source code must retain the above copyright notice,
this list of conditions and the following disclaimer.
2. Redistributions in binary form must reproduce the above copyright
notice, this list of conditions and the following disclaimer in the
documentation and/or other materials provided with the distribution.
THIS SOFTWARE IS PROVIDED BY THE AUTHOR AND CONTRIBUTORS
``AS IS'' AND ANY EXPRESS OR IMPLIED WARRANTIES, INCLUDING,
BUT NOT LIMITED TO, THE IMPLIED WARRANTIES OF
MERCHANTABILITY AND FITNESS FOR A PARTICULAR PURPOSE ARE
DISCLAIMED. IN NO EVENT SHALL THE AUTHOR OR CONTRIBUTORS
BE LIABLE FOR ANY DIRECT, INDIRECT, INCIDENTAL, SPECIAL,
EXEMPLARY, OR CONSEQUENTIAL DAMAGES (INCLUDING, BUT NOT
LIMITED TO, PROCUREMENT OF SUBSTITUTE GOODS OR SERVICES;
LOSS OF USE, DATA, OR PROFITS; OR BUSINESS INTERRUPTION)
HOWEVER CAUSED AND ON ANY THEORY OF LIABILITY, WHETHER IN
CONTRACT, STRICT LIABILITY, OR TORT (INCLUDING NEGLIGENCE OR
OTHERWISE) ARISING IN ANY WAY OUT OF THE USE OF THIS
SOFTWARE, EVEN IF ADVISED OF THE POSSIBILITY OF SUCH DAMAGE.
(15) Andrey A. Chernov
Copyright (C) 1997 by Andrey A. Chernov, Moscow, Russia.
All rights reserved.
Redistribution and use in source and binary forms, with or without
modification, are permitted provided that the following conditions are met:
1. Redistributions of source code must retain the above copyright notice,
this list of conditions and the following disclaimer.
2. Redistributions in binary form must reproduce the above copyright
notice, this list of conditions and the following disclaimer in the
documentation and/or other materials provided with the distribution.
THIS SOFTWARE IS PROVIDED BY THE AUTHOR ``AS IS'' AND ANY
EXPRESS OR IMPLIED WARRANTIES, INCLUDING, BUT NOT LIMITED TO,
THE IMPLIED WARRANTIES OF MERCHANTABILITY AND FITNESS FOR
A PARTICULAR PURPOSE ARE DISCLAIMED. IN NO EVENT SHALL THE
REGENTS OR CONTRIBUTORS BE LIABLE FOR ANY DIRECT, INDIRECT,
INCIDENTAL, SPECIAL, EXEMPLARY, OR CONSEQUENTIAL DAMAGES
(INCLUDING, BUT NOT LIMITED TO, PROCUREMENT OF SUBSTITUTE
GOODS OR SERVICES; LOSS OF USE, DATA, OR PROFITS; OR BUSINESS
INTERRUPTION) HOWEVER CAUSED AND ON ANY THEORY OF
LIABILITY, WHETHER IN CONTRACT, STRICT LIABILITY, OR TORT
Appendix
153
(INCLUDING NEGLIGENCE OR OTHERWISE) ARISING IN ANY WAY OUT
OF THE USE OF THIS SOFTWARE, EVEN IF ADVISED OF THE
POSSIBILITY OF SUCH DAMAGE.
(16) FreeBSD
Copyright (c) 1997-2002 FreeBSD Project.
All rights reserved.
Redistribution and use in source and binary forms, with or without
modification, are permitted provided that the following conditions are met:
1. Redistributions of source code must retain the above copyright notice,
this list of conditions and the following disclaimer.
2. Redistributions in binary form must reproduce the above copyright
notice, this list of conditions and the following disclaimer in the
documentation and/or other materials provided with the distribution.
THIS SOFTWARE IS PROVIDED BY THE AUTHOR AND CONTRIBUTORS
``AS IS'' AND ANY EXPRESS OR IMPLIED WARRANTIES, INCLUDING,
BUT NOT LIMITED TO, THE IMPLIED WARRANTIES OF
MERCHANTABILITY AND FITNESS FOR A PARTICULAR PURPOSE ARE
DISCLAIMED. IN NO EVENT SHALL THE AUTHOR OR CONTRIBUTORS
BE LIABLE FOR ANY DIRECT, INDIRECT, INCIDENTAL, SPECIAL,
EXEMPLARY, OR CONSEQUENTIAL DAMAGES (INCLUDING, BUT NOT
LIMITED TO, PROCUREMENT OF SUBSTITUTE GOODS OR SERVICES;
LOSS OF USE, DATA, OR PROFITS; OR BUSINESS INTERRUPTION)
HOWEVER CAUSED AND ON ANY THEORY OF LIABILITY, WHETHER IN
CONTRACT, STRICT LIABILITY, OR TORT (INCLUDING NEGLIGENCE OR
OTHERWISE) ARISING IN ANY WAY OUT OF THE USE OF THIS
SOFTWARE, EVEN IF ADVISED OF THE POSSIBILITY OF SUCH DAMAGE.
(17) S. L. Moshier
Author: S. L. Moshier.
Copyright (c) 1984, 2000 S.L. Moshier
Permission to use, copy, modify, and distribute this software for any
purpose without fee is hereby granted, provided that this entire notice is
included in all copies of any software which is or includes a copy or
modification of this software and in all copies of the supporting
documentation for such software.
THIS SOFTWARE IS BEING PROVIDED "AS IS", WITHOUT ANY EXPRESS
OR IMPLIED WARRANTY. IN PARTICULAR, THE AUTHOR MAKES NO
REPRESENTATION OR WARRANTY OF ANY KIND CONCERNING THE
MERCHANTABILITY OF THIS SOFTWARE OR ITS FITNESS FOR ANY
PARTICULAR PURPOSE.
154 Appendix
(18) Citrus Project
Copyright (c) 1999 Citrus Project,
All rights reserved.
Redistribution and use in source and binary forms, with or without
modification, are permitted provided that the following conditions are met:
1. Redistributions of source code must retain the above copyright notice,
this list of conditions and the following disclaimer.
2. Redistributions in binary form must reproduce the above copyright
notice, this list of conditions and the following disclaimer in the
documentation and/or other materials provided with the distribution.
THIS SOFTWARE IS PROVIDED BY THE AUTHOR AND CONTRIBUTORS
``AS IS'' AND ANY EXPRESS OR IMPLIED WARRANTIES, INCLUDING,
BUT NOT LIMITED TO, THE IMPLIED WARRANTIES OF
MERCHANTABILITY AND FITNESS FOR A PARTICULAR PURPOSE ARE
DISCLAIMED. IN NO EVENT SHALL THE AUTHOR OR CONTRIBUTORS
BE LIABLE FOR ANY DIRECT, INDIRECT, INCIDENTAL, SPECIAL,
EXEMPLARY, OR CONSEQUENTIAL DAMAGES (INCLUDING, BUT NOT
LIMITED TO, PROCUREMENT OF SUBSTITUTE GOODS OR SERVICES;
LOSS OF USE, DATA, OR PROFITS; OR BUSINESS INTERRUPTION)
HOWEVER CAUSED AND ON ANY THEORY OF LIABILITY, WHETHER IN
CONTRACT, STRICT LIABILITY, OR TORT (INCLUDING NEGLIGENCE OR
OTHERWISE) ARISING IN ANY WAY OUT OF THE USE OF THIS
SOFTWARE, EVEN IF ADVISED OF THE POSSIBILITY OF SUCH DAMAGE.
(19) Todd C. Miller
Copyright (c) 1998 Todd C. Miller <[email protected]>
All rights reserved.
Redistribution and use in source and binary forms, with or without
modification, are permitted provided that the following conditions are met:
1. Redistributions of source code must retain the above copyright notice,
this list of conditions and the following disclaimer.
2. Redistributions in binary form must reproduce the above copyright
notice, this list of conditions and the following disclaimer in the
documentation and/or other materials provided with the distribution.
3. The name of the author may not be used to endorse or promote
products derived from this software without specific prior written
permission.
Appendix
155
THIS SOFTWARE IS PROVIDED ``AS IS'' AND ANY EXPRESS OR IMPLIED
WARRANTIES, INCLUDING, BUT NOT LIMITED TO, THE IMPLIED
WARRANTIES OF MERCHANTABILITY AND FITNESS FOR A
PARTICULAR PURPOSE ARE DISCLAIMED. IN NO EVENT SHALL THE
AUTHOR BE LIABLE FOR ANY DIRECT, INDIRECT, INCIDENTAL, SPECIAL,
EXEMPLARY, OR CONSEQUENTIAL DAMAGES (INCLUDING, BUT NOT
LIMITED TO, PROCUREMENT OF SUBSTITUTE GOODS OR SERVICES;
LOSS OF USE, DATA, OR PROFITS; OR BUSINESS INTERRUPTION)
HOWEVER CAUSED AND ON ANY THEORY OF LIABILITY, WHETHER IN
CONTRACT, STRICT LIABILITY, OR TORT (INCLUDING NEGLIGENCE OR
OTHERWISE) ARISING IN ANY WAY OUT OF THE USE OF THIS
SOFTWARE, EVEN IF ADVISED OF THE POSSIBILITY OF SUCH DAMAGE.
(20) DJ Delorie (i386)
Copyright (C) 1991 DJ Delorie
All rights reserved.
Redistribution and use in source and binary forms is permitted provided
that the above copyright notice and following paragraph are duplicated in
all such forms.
This file is distributed WITHOUT ANY WARRANTY; without even the
implied warranty of MERCHANTABILITY or FITNESS FOR A PARTICULAR
PURPOSE.
(21) Free Software Foundation LGPL License (*-linux* targets only)
Copyright (C) 1990-1999, 2000, 2001 Free Software Foundation, Inc.
This file is part of the GNU C Library.
Contributed by Mark Kettenis <[email protected]>, 1997.
The GNU C Library is free software; you can redistribute it and/or modify it
under the terms of the GNU Lesser General Public License as published by
the Free Software Foundation; either version 2.1 of the License, or (at your
option) any later version.
The GNU C Library is distributed in the hope that it will be useful, but
WITHOUT ANY WARRANTY; without even the implied warranty of
MERCHANTABILITY or FITNESS FOR A PARTICULAR PURPOSE. See the
GNU Lesser General Public License for more details.
You should have received a copy of the GNU Lesser General Public License
along with the GNU C Library; if not, write to the Free Software Foundation,
Inc., 51 Franklin Street, Fifth Floor, Boston, MA 02110-1301 USA.
(22) Xavier Leroy LGPL License (i[3456]86-*-linux* targets only)
Copyright (C) 1996 Xavier Leroy ([email protected])
156 Appendix
This program is free software; you can redistribute it and/or modify it
under the terms of the GNU Library General Public License as published by
the Free Software Foundation; either version 2 of the License, or (at your
option) any later version.
This program is distributed in the hope that it will be useful, but WITHOUT
ANY WARRANTY; without even the implied warranty of
MERCHANTABILITY or FITNESS FOR A PARTICULAR PURPOSE. See the
GNU Library General Public License for more details.
(23) Intel (i960)
Copyright (c) 1993 Intel Corporation
Intel hereby grants you permission to copy, modify, and distribute this
software and its documentation. Intel grants this permission provided that
the above copyright notice appears in all copies and that both the copyright
notice and this permission notice appear in supporting documentation. In
addition, Intel grants this permission provided that you prominently mark
as "not part of the original" any modifications made to this software or
documentation, and that the name of Intel Corporation not be used in
advertising or publicity pertaining to distribution of the software or the
documentation without specific, written prior permission.
Intel Corporation provides this AS IS, WITHOUT ANY WARRANTY,
EXPRESS OR IMPLIED, INCLUDING, WITHOUT LIMITATION, ANY
WARRANTY OF MERCHANTABILITY OR FITNESS FOR A PARTICULAR
PURPOSE. Intel makes no guarantee or representations regarding the use
of, or the results of the use of, the software and documentation in terms of
correctness, accuracy, reliability, currentness, or otherwise; and you rely
on the software, documentation and results solely at your own risk.
IN NO EVENT SHALL INTEL BE LIABLE FOR ANY LOSS OF USE, LOSS OF
BUSINESS, LOSS OF PROFITS, INDIRECT, INCIDENTAL, SPECIAL OR
CONSEQUENTIAL DAMAGES OF ANY KIND. IN NO EVENT SHALL
INTEL'S TOTAL LIABILITY EXCEED THE SUM PAID TO INTEL FOR THE
PRODUCT LICENSED HEREUNDER.
(24) Hewlett-Packard (hppa targets only)
(c) Copyright 1986 HEWLETT-PACKARD COMPANY
To anyone who acknowledges that this file is provided "AS IS” without any
express or implied warranty:
permission to use, copy, modify, and distribute this file for any purpose is
hereby granted without fee, provided that the above copyright notice and
this notice appears in all copies, and that the name of Hewlett-Packard
Company not be used in advertising or publicity pertaining to distribution
of the software without specific, written prior permission. Hewlett-Packard
Appendix
157
Company makes no representations about the suitability of this software
for any purpose.
(25) Henry Spencer (only *-linux targets)
Copyright 1992, 1993, 1994 Henry Spencer. All rights reserved.
This software is not subject to any license of the American Telephone and
Telegraph Company or of the Regents of the University of California.
Permission is granted to anyone to use this software for any purpose on
any computer system, and to alter it and redistribute it, subject to the
following restrictions:
1. The author is not responsible for the consequences of use of this
software, no matter how awful, even if they arise from flaws in it.
2. The origin of this software must not be misrepresented, either by
explicit claim or by omission. Since few users ever read sources,
credits must appear in the documentation.
3. Altered versions must be plainly marked as such, and must not be
misrepresented as being the original software. Since few users ever
read sources, credits must appear in the documentation.
4. This notice may not be removed or altered.
(26) Mike Barcroft
Copyright (c) 2001 Mike Barcroft <[email protected]>
All rights reserved.
Redistribution and use in source and binary forms, with or without
modification, are permitted provided that the following conditions are met:
1. Redistributions of source code must retain the above copyright notice,
this list of conditions and the following disclaimer.
2. Redistributions in binary form must reproduce the above copyright
notice, this list of conditions and the following disclaimer in the
documentation and/or other materials provided with the distribution.
THIS SOFTWARE IS PROVIDED BY THE AUTHOR AND CONTRIBUTORS
``AS IS'' AND ANY EXPRESS OR IMPLIED WARRANTIES, INCLUDING,
BUT NOT LIMITED TO, THE IMPLIED WARRANTIES OF
MERCHANTABILITY AND FITNESS FOR A PARTICULAR PURPOSE ARE
DISCLAIMED. IN NO EVENT SHALL THE AUTHOR OR CONTRIBUTORS
BE LIABLE FOR ANY DIRECT, INDIRECT, INCIDENTAL, SPECIAL,
EXEMPLARY, OR CONSEQUENTIAL DAMAGES (INCLUDING, BUT NOT
LIMITED TO, PROCUREMENT OF SUBSTITUTE GOODS OR SERVICES;
LOSS OF USE, DATA, OR PROFITS; OR BUSINESS INTERRUPTION)
HOWEVER CAUSED AND ON ANY THEORY OF LIABILITY, WHETHER IN
CONTRACT, STRICT LIABILITY, OR TORT (INCLUDING NEGLIGENCE OR
158 Appendix
OTHERWISE) ARISING IN ANY WAY OUT OF THE USE OF THIS
SOFTWARE, EVEN IF ADVISED OF THE POSSIBILITY OF SUCH DAMAGE.
(27) Konstantin Chuguev (--enable-newlib-iconv)
Copyright (c) 1999, 2000
Konstantin Chuguev. All rights reserved.
Redistribution and use in source and binary forms, with or without
modification, are permitted provided that the following conditions are met:
1. Redistributions of source code must retain the above copyright notice,
this list of conditions and the following disclaimer.
2. Redistributions in binary form must reproduce the above copyright
notice, this list of conditions and the following disclaimer in the
documentation and/or other materials provided with the distribution.
THIS SOFTWARE IS PROVIDED BY THE AUTHOR AND CONTRIBUTORS
``AS IS'' AND ANY EXPRESS OR IMPLIED WARRANTIES, INCLUDING,
BUT NOT LIMITED TO, THE IMPLIED WARRANTIES OF
MERCHANTABILITY AND FITNESS FOR A PARTICULAR PURPOSE ARE
DISCLAIMED. IN NO EVENT SHALL THE AUTHOR OR CONTRIBUTORS
BE LIABLE FOR ANY DIRECT, INDIRECT, INCIDENTAL, SPECIAL,
EXEMPLARY, OR CONSEQUENTIAL DAMAGES (INCLUDING, BUT NOT
LIMITED TO, PROCUREMENT OF SUBSTITUTE GOODS OR SERVICES;
LOSS OF USE, DATA, OR PROFITS; OR BUSINESS INTERRUPTION)
HOWEVER CAUSED AND ON ANY THEORY OF LIABILITY, WHETHER IN
CONTRACT, STRICT LIABILITY, OR TORT (INCLUDING NEGLIGENCE OR
OTHERWISE) ARISING IN ANY WAY OUT OF THE USE OF THIS
SOFTWARE, EVEN IF ADVISED OF THE POSSIBILITY OF SUCH DAMAGE.
iconv (Charset Conversion Library) v2.0
(28) Artem Bityuckiy (--enable-newlib-iconv)
Copyright (c) 2003, Artem B. Bityuckiy, SoftMine Corporation.
Rights transferred to Franklin Electronic Publishers.
Redistribution and use in source and binary forms, with or without
modification, are permitted provided that the following conditions are met:
1. Redistributions of source code must retain the above copyright notice,
this list of conditions and the following disclaimer.
2. Redistributions in binary form must reproduce the above copyright
notice, this list of conditions and the following disclaimer in the
documentation and/or other materials provided with the distribution.
THIS SOFTWARE IS PROVIDED BY THE AUTHOR AND CONTRIBUTORS
``AS IS'' AND ANY EXPRESS OR IMPLIED WARRANTIES, INCLUDING,
BUT NOT LIMITED TO, THE IMPLIED WARRANTIES OF
Appendix
159
MERCHANTABILITY AND FITNESS FOR A PARTICULAR PURPOSE ARE
DISCLAIMED. IN NO EVENT SHALL THE AUTHOR OR CONTRIBUTORS
BE LIABLE FOR ANY DIRECT, INDIRECT, INCIDENTAL, SPECIAL,
EXEMPLARY, OR CONSEQUENTIAL DAMAGES (INCLUDING, BUT NOT
LIMITED TO, PROCUREMENT OF SUBSTITUTE GOODS OR SERVICES;
LOSS OF USE, DATA, OR PROFITS; OR BUSINESS INTERRUPTION)
HOWEVER CAUSED AND ON ANY THEORY OF LIABILITY, WHETHER IN
CONTRACT, STRICT LIABILITY, OR TORT (INCLUDING NEGLIGENCE OR
OTHERWISE) ARISING IN ANY WAY OUT OF THE USE OF THIS
SOFTWARE, EVEN IF ADVISED OF THE POSSIBILITY OF SUCH DAMAGE.
(29) IBM, Sony, Toshiba (only spu-* targets)
(C) Copyright 2001,2006, International Business Machines Corporation,
Sony Computer Entertainment, Incorporated, Toshiba Corporation,
All rights reserved.
Redistribution and use in source and binary forms, with or without
modification, are permitted provided that the following conditions are met:
Redistributions of source code must retain the above copyright notice, this
list of conditions and the following disclaimer.
Redistributions in binary form must reproduce the above copyright notice,
this list of conditions and the following disclaimer in the documentation
and/or other materials provided with the distribution.
Neither the names of the copyright holders nor the names of their
contributors may be used to endorse or promote products derived from this
software without specific prior written permission.
THIS SOFTWARE IS PROVIDED BY THE COPYRIGHT HOLDERS AND
CONTRIBUTORS "AS IS" AND ANY EXPRESS OR IMPLIED WARRANTIES,
INCLUDING, BUT NOT LIMITED TO, THE IMPLIED WARRANTIES OF
MERCHANTABILITY AND FITNESS FOR A PARTICULAR PURPOSE ARE
DISCLAIMED. IN NO EVENT SHALL THE COPYRIGHT OWNER OR
CONTRIBUTORS BE LIABLE FOR ANY DIRECT, INDIRECT, INCIDENTAL,
SPECIAL, EXEMPLARY, OR CONSEQUENTIAL DAMAGES (INCLUDING,
BUT NOT LIMITED TO, PROCUREMENT OF SUBSTITUTE GOODS OR
SERVICES; LOSS OF USE, DATA, OR PROFITS; OR BUSINESS
INTERRUPTION) HOWEVER CAUSED AND ON ANY THEORY OF
LIABILITY, WHETHER IN CONTRACT, STRICT LIABILITY, OR TORT
(INCLUDING NEGLIGENCE OR OTHERWISE) ARISING IN ANY WAY OUT
OF THE USE OF THIS SOFTWARE, EVEN IF ADVISED OF THE
POSSIBILITY OF SUCH DAMAGE.
(30) - Alex Tatmanjants (targets using libc/posix)
160 Appendix
Copyright (c) 1995 Alex Tatmanjants [email protected] at Electronni
Visti IA, Kiev, Ukraine.
All rights reserved.
Redistribution and use in source and binary forms, with or without
modification, are permitted provided that the following conditions are met:
1. Redistributions of source code must retain the above copyright notice,
this list of conditions and the following disclaimer.
2. Redistributions in binary form must reproduce the above copyright
notice, this list of conditions and the following disclaimer in the
documentation and/or other materials provided with the distribution.
THIS SOFTWARE IS PROVIDED BY THE AUTHOR ``AS IS'' AND ANY
EXPRESS OR IMPLIED WARRANTIES, INCLUDING, BUT NOT LIMITED TO,
THE IMPLIED WARRANTIES OF MERCHANTABILITY AND FITNESS FOR
A PARTICULAR PURPOSE ARE DISCLAIMED. IN NO EVENT SHALL THE
AUTHOR BE LIABLE FOR ANY DIRECT, INDIRECT, INCIDENTAL, SPECIAL,
EXEMPLARY, OR CONSEQUENTIAL DAMAGES (INCLUDING, BUT NOT
LIMITED TO, PROCUREMENT OF SUBSTITUTE GOODS OR SERVICES;
LOSS OF USE, DATA, OR PROFITS; OR BUSINESS INTERRUPTION)
HOWEVER CAUSED AND ON ANY THEORY OF LIABILITY, WHETHER IN
CONTRACT, STRICT LIABILITY, OR TORT (INCLUDING NEGLIGENCE OR
OTHERWISE) ARISING IN ANY WAY OUT OF THE USE OF THIS
SOFTWARE, EVEN IF ADVISED OF THE POSSIBILITY OF SUCH DAMAGE.
(31) - M. Warner Losh (targets using libc/posix)
Copyright (c) 1998, M. Warner Losh <[email protected]>
All rights reserved.
Redistribution and use in source and binary forms, with or without
modification, are permitted provided that the following conditions are met:
1. Redistributions of source code must retain the above copyright notice,
this list of conditions and the following disclaimer.
2. Redistributions in binary form must reproduce the above copyright
notice, this list of conditions and the following disclaimer in the
documentation and/or other materials provided with the distribution.
THIS SOFTWARE IS PROVIDED BY THE AUTHOR AND CONTRIBUTORS
``AS IS'' AND ANY EXPRESS OR IMPLIED WARRANTIES, INCLUDING,
BUT NOT LIMITED TO, THE IMPLIED WARRANTIES OF
MERCHANTABILITY AND FITNESS FOR A PARTICULAR PURPOSE ARE
DISCLAIMED. IN NO EVENT SHALL THE AUTHOR OR CONTRIBUTORS
BE LIABLE FOR ANY DIRECT, INDIRECT, INCIDENTAL, SPECIAL,
EXEMPLARY, OR CONSEQUENTIAL DAMAGES (INCLUDING, BUT NOT
LIMITED TO, PROCUREMENT OF SUBSTITUTE GOODS OR SERVICES;
Appendix
161
LOSS OF USE, DATA, OR PROFITS; OR BUSINESS INTERRUPTION)
HOWEVER CAUSED AND ON ANY THEORY OF LIABILITY, WHETHER IN
CONTRACT, STRICT LIABILITY, OR TORT (INCLUDING NEGLIGENCE OR
OTHERWISE) ARISING IN ANY WAY OUT OF THE USE OF THIS
SOFTWARE, EVEN IF ADVISED OF THE POSSIBILITY OF SUCH DAMAGE.
(32) - Andrey A. Chernov (targets using libc/posix)
Copyright (C) 1996 by Andrey A. Chernov, Moscow, Russia.
All rights reserved.
Redistribution and use in source and binary forms, with or without
modification, are permitted provided that the following conditions are met:
1. Redistributions of source code must retain the above copyright notice,
this list of conditions and the following disclaimer.
2. Redistributions in binary form must reproduce the above copyright
notice, this list of conditions and the following disclaimer in the
documentation and/or other materials provided with the distribution.
THIS SOFTWARE IS PROVIDED BY THE AUTHOR ``AS IS'' AND ANY
EXPRESS OR IMPLIED WARRANTIES, INCLUDING, BUT NOT LIMITED TO,
THE IMPLIED WARRANTIES OF MERCHANTABILITY AND FITNESS FOR
A PARTICULAR PURPOSE ARE DISCLAIMED. IN NO EVENT SHALL THE
REGENTS OR CONTRIBUTORS BE LIABLE FOR ANY DIRECT, INDIRECT,
INCIDENTAL, SPECIAL, EXEMPLARY, OR CONSEQUENTIAL DAMAGES
(INCLUDING, BUT NOT LIMITED TO, PROCUREMENT OF SUBSTITUTE
GOODS OR SERVICES; LOSS OF USE, DATA, OR PROFITS; OR BUSINESS
INTERRUPTION) HOWEVER CAUSED AND ON ANY THEORY OF
LIABILITY, WHETHER IN CONTRACT, STRICT LIABILITY, OR TORT
(INCLUDING NEGLIGENCE OR OTHERWISE) ARISING IN ANY WAY OUT
OF THE USE OF THIS SOFTWARE, EVEN IF ADVISED OF THE
POSSIBILITY OF SUCH DAMAGE.
(33) - Daniel Eischen (targets using libc/posix)
Copyright (c) 2001 Daniel Eischen <[email protected]>.
All rights reserved.
Redistribution and use in source and binary forms, with or without
modification, are permitted provided that the following conditions are met:
1. Redistributions of source code must retain the above copyright notice,
this list of conditions and the following disclaimer.
2. Redistributions in binary form must reproduce the above copyright
notice, this list of conditions and the following disclaimer in the
documentation and/or other materials provided with the distribution.
162 Appendix
THIS SOFTWARE IS PROVIDED BY THE AUTHOR AND CONTRIBUTORS
``AS IS'' AND ANY EXPRESS OR IMPLIED WARRANTIES, INCLUDING,
BUT NOT LIMITED TO, THE IMPLIED WARRANTIES OF
MERCHANTABILITY AND FITNESS FOR A PARTICULAR PURPOSE ARE
DISCLAIMED. IN NO EVENT SHALL THE REGENTS OR CONTRIBUTORS
BE LIABLE FOR ANY DIRECT, INDIRECT, INCIDENTAL, SPECIAL,
EXEMPLARY, OR CONSEQUENTIAL DAMAGES (INCLUDING, BUT NOT
LIMITED TO, PROCUREMENT OF SUBSTITUTE GOODS OR SERVICES;
LOSS OF USE, DATA, OR PROFITS; OR BUSINESS INTERRUPTION)
HOWEVER CAUSED AND ON ANY THEORY OF LIABILITY, WHETHER IN
CONTRACT, STRICT LIABILITY, OR TORT (INCLUDING NEGLIGENCE OR
OTHERWISE) ARISING IN ANY WAY OUT OF THE USE OF THIS
SOFTWARE, EVEN IF ADVISED OF THE POSSIBILITY OF SUCH DAMAGE.
(34) - Jon Beniston (only lm32-* targets)
Contributed by Jon Beniston <[email protected]>
Redistribution and use in source and binary forms, with or without
modification, are permitted provided that the following conditions are met:
1. Redistributions of source code must retain the above copyright notice,
this list of conditions and the following disclaimer.
2. Redistributions in binary form must reproduce the above copyright
notice, this list of conditions and the following disclaimer in the
documentation and/or other materials provided with the distribution.
THIS SOFTWARE IS PROVIDED BY THE AUTHOR AND CONTRIBUTORS
``AS IS'' AND ANY EXPRESS OR IMPLIED WARRANTIES, INCLUDING,
BUT NOT LIMITED TO, THE IMPLIED WARRANTIES OF
MERCHANTABILITY AND FITNESS FOR A PARTICULAR PURPOSE ARE
DISCLAIMED. IN NO EVENT SHALL THE AUTHOR OR CONTRIBUTORS BE
LIABLE FOR ANY DIRECT, INDIRECT, INCIDENTAL, SPECIAL,
EXEMPLARY, OR CONSEQUENTIAL DAMAGES (INCLUDING, BUT NOT
LIMITED TO, PROCUREMENT OF SUBSTITUTE GOODS OR SERVICES;
LOSS OF USE, DATA, OR PROFITS; OR BUSINESS INTERRUPTION)
HOWEVER CAUSED AND ON ANY THEORY OF LIABILITY, WHETHER IN
CONTRACT, STRICT LIABILITY, OR TORT (INCLUDING NEGLIGENCE OR
OTHERWISE) ARISING IN ANY WAY OUT OF THE USE OF THIS
SOFTWARE, EVEN IF ADVISED OF THE POSSIBILITY OF SUCH DAMAGE.
(35) - ARM Ltd (arm and thumb variant targets only)
Copyright (c) 2009 ARM Ltd
All rights reserved.
Redistribution and use in source and binary forms, with or without
modification, are permitted provided that the following conditions are met:
Appendix
163
1. Redistributions of source code must retain the above copyright notice,
this list of conditions and the following disclaimer.
2. Redistributions in binary form must reproduce the above copyright
notice, this list of conditions and the following disclaimer in the
documentation and/or other materials provided with the distribution.
3. The name of the company may not be used to endorse or promote
products derived from this software without specific prior written
permission.
THIS SOFTWARE IS PROVIDED BY ARM LTD ``AS IS'' AND ANY EXPRESS
OR IMPLIED WARRANTIES, INCLUDING, BUT NOT LIMITED TO, THE
IMPLIED WARRANTIES OF MERCHANTABILITY AND FITNESS FOR A
PARTICULAR PURPOSE ARE DISCLAIMED. IN NO EVENT SHALL ARM
LTD BE LIABLE FOR ANY DIRECT, INDIRECT, INCIDENTAL, SPECIAL,
EXEMPLARY, OR CONSEQUENTIAL DAMAGES (INCLUDING, BUT NOT
LIMITED TO, PROCUREMENT OF SUBSTITUTE GOODS OR SERVICES;
LOSS OF USE, DATA, OR PROFITS; OR BUSINESS INTERRUPTION)
HOWEVER CAUSED AND ON ANY THEORY OF LIABILITY, WHETHER IN
CONTRACT, STRICT LIABILITY, OR TORT (INCLUDING NEGLIGENCE OR
OTHERWISE) ARISING IN ANY WAY OUT OF THE USE OF THIS
SOFTWARE, EVEN IF ADVISED OF THE POSSIBILITY OF SUCH DAMAGE.
(36) - Xilinx, Inc. (microblaze-* and powerpc-* targets)
Copyright (c) 2004, 2009 Xilinx, Inc. All rights reserved.
Redistribution and use in source and binary forms, with or without
modification, are permitted provided that the following conditions are met:
1. Redistributions source code must retain the above copyright notice,
this list of conditions and the following disclaimer.
2. Redistributions in binary form must reproduce the above copyright
notice, this list of conditions and the following disclaimer in the
documentation and/or other materials provided with the distribution.
Neither the name of Xilinx nor the names of its contributors may be used to
endorse or promote products derived from this software without specific
prior written permission.
THIS SOFTWARE IS PROVIDED BY THE COPYRIGHT HOLDER AND
CONTRIBUTORS "AS IS" AND ANY EXPRESS OR IMPLIED WARRANTIES,
INCLUDING, BUT NOT LIMITED TO, THE IMPLIED WARRANTIES OF
MERCHANTABILITY AND FITNESS FOR A PARTICULAR PURPOSE ARE
DISCLAIMED. IN NO EVENT SHALL THE COPYRIGHT HOLDER OR
CONTRIBUTORS BE LIABLE FOR ANY DIRECT, INDIRECT, INCIDENTAL,
SPECIAL, EXEMPLARY, OR CONSEQUENTIAL DAMAGES (INCLUDING,
BUT NOT LIMITED TO, PROCUREMENT OF SUBSTITUTE GOODS OR
164 Appendix
SERVICES; LOSS OF USE, DATA, OR PROFITS; OR BUSINESS
INTERRUPTION) HOWEVER CAUSED AND ON ANY THEORY OF
LIABILITY, WHETHER IN CONTRACT, STRICT LIABILITY, OR TORT
(INCLUDING NEGLIGENCE OR OTHERWISE) ARISING IN ANY WAY OUT
OF THE USE OF THIS SOFTWARE, EVEN IF ADVISED OF THE
POSSIBILITY OF SUCH DAMAGE.
(37) Texas Instruments Incorporated (tic6x-* targets)
Copyright (c) 1996-2010 Texas Instruments Incorporated
http://www.ti.com/
Redistribution and use in source and binary forms, with or without
modification, are permitted provided that the following conditions are
met:
Redistributions of source code must retain the above copyright notice,
this list of conditions and the following disclaimer.
Redistributions in binary form must reproduce the above copyright
notice, this list of conditions and the following disclaimer in the
documentation and/or other materials provided with the
distribution.
Neither the name of Texas Instruments, Incorporated nor the names of its
contributors may be used to endorse or promote products derived from
this software without specific prior written permission.
THIS SOFTWARE IS PROVIDED BY THE COPYRIGHT HOLDERS AND
CONTRIBUTORS "AS IS" AND ANY EXPRESS OR IMPLIED WARRANTIES,
INCLUDING, BUT NOT LIMITED TO, THE IMPLIED WARRANTIES OF
MERCHANTABILITY AND FITNESS FOR A PARTICULAR PURPOSE ARE
DISCLAIMED. IN NO EVENT SHALL THE COPYRIGHT OWNER OR
CONTRIBUTORS BE LIABLE FOR ANY DIRECT, INDIRECT, INCIDENTAL,
SPECIAL, EXEMPLARY, OR CONSEQUENTIAL DAMAGES (INCLUDING,
BUT NO LIMITED TO, PROCUREMENT OF SUBSTITUTE GOODS OR
SERVICES; LOSS OF USE, DATA, OR PROFITS; OR BUSINESS
INTERRUPTION) HOWEVER CAUSED AND ON ANY THEORY OF
LIABILITY, WHETHER IN CONTRACT, STRICT LIABILITY, OR TORT
(INCLUDING NEGLIGENCE OR OTHERWISE) ARISING IN ANY WAY OUT
OF THE USE OF THIS SOFTWARE, EVEN IF ADVISED OF THE
POSSIBILITY OF SUCH DAMAGE.
(38) National Semiconductor (cr16-* and crx-* targets)
Copyright (c) 2004 National Semiconductor Corporation
Appendix
165
The authors hereby grant permission to use, copy, modify, distribute, and
license this software and its documentation for any purpose, provided that
existing copyright notices are retained in all copies and that this notice is
included verbatim in any distributions. No written agreement, license, or
royalty fee is required for any of the authorized uses. Modifications to this
software may be copyrighted by their authors and need not follow the
licensing terms described here, provided that the new terms are clearly
indicated on the first page of each file where they apply.
NLog – Advanced .NET Logging 1.0
Copyright (c) 2004-2009, Jaroslaw Kowalski
All rights reserved.
Redistribution and use in source and binary forms, with or without
modification, are permitted provided that the following conditions are met:
Redistributions of source code must retain the above copyright notice,
this list of conditions and the following disclaimer.
Redistributions in binary form must reproduce the above copyright
notice, this list of conditions and the following disclaimer in the
documentation and/or other materials provided with the distribution.
Neither the name of Jaroslaw Kowalski nor the names of its
contributors may be used to endorse or promote products derived from
this software without specific prior written permission.
THIS SOFTWARE IS PROVIDED BY THE COPYRIGHT HOLDERS AND
CONTRIBUTORS "AS IS" AND ANY EXPRESS OR IMPLIED WARRANTIES,
INCLUDING, BUT NOT LIMITED TO, THE IMPLIED WARRANTIES OF
MERCHANTABILITY AND FITNESS FOR A PARTICULAR PURPOSE ARE
DISCLAIMED. IN NO EVENT SHALL THE COPYRIGHT OWNER OR
CONTRIBUTORS BE LIABLE FOR ANY DIRECT, INDIRECT, INCIDENTAL,
SPECIAL, EXEMPLARY, OR CONSEQUENTIAL DAMAGES (INCLUDING,
BUT NOT LIMITED TO, PROCUREMENT OF SUBSTITUTE GOODS OR
SERVICES; LOSS OF USE, DATA, OR PROFITS; OR BUSINESS
INTERRUPTION) HOWEVER CAUSED AND ON ANY THEORY OF
LIABILITY, WHETHER IN CONTRACT, STRICT LIABILITY, OR TORT
(INCLUDING NEGLIGENCE OR OTHERWISE) ARISING IN ANY WAY OUT
OF THE USE OF THIS SOFTWARE, EVEN IF ADVISED OF THE
POSSIBILITY OF SUCH DAMAGE.
166 Appendix
QuickLZ
1. GRANT OF LICENSE
This commercial license lets you use QuickLZ version 1.0.0 to 1.9.9,
both inclusive, for development within the company for any amount of
closed source products and product titles with unlimited
distribution/sales.
The license is persistent, non-exclusive and non-transferable. The
license does not cover derived or ported versions created by third
parties under GPL. The license does not need to be renewed if the
amount of employees increases.
2. APPLICABLE LAW
This license shall be deemed to have been made in, and shall be
construed pursuant to, the laws of Denmark.
3. DISCLAIMER OF WARRANTIES AND LIMITATION ON LIABILITY
3.1. No warranties. To the maximum extent permitted by applicable
law, the software is provided “as is” without warranty, express or
implied, of any kind or nature, including, but not limited to, any
warranties of performance or merchantability or fitness for a
particular purpose.
3.2. No Liability for Consequential Damages. To the maximum extent
permitted by applicable law, in no event shall licensor be liable for any
special, incidental, indirect or consequential damages whatsoever
(including, without limitation, damages for loss of business profits,
business interruption, loss of business information, or any pecuniary
loss) arising out of the use or inability to use the software, even if
licensor has been advised of the possibility of such damages.
4. LIMITED INTELLECTUAL PROPERTY INDEMNIFICATION
Licensor agrees that in the event of any actual or alleged infringement
of any patent, copyright, trade secret, trademark, or other proprietary
right arising out of licensee's use of the licensed software, licensor
shall, at licensee's option and at no charge to licensee, (a) obtain a
license so licensee may continue use of the software; (b) modify the
software to avoid the infringement; (c) replace the software with a
compatible, functionally equivalent and non-infringing product; or if
these options are commercially unreasonable (d) refund to licensee the
amount paid for the software. The foregoing states the entire set of
obligations and remedies flowing between licensee and licensor arising
from any intellectual property claim by a third party.
Appendix
167
SharpZipLib 0.85.4
Copyright (C) 2002 Ben Lowery ([email protected])
This software is provided 'as-is', without any express or implied warranty.
In no event will the authors be held liable for any damages arising from the
use of this software.
Permission is granted to anyone to use this software for any purpose,
including commercial applications, and to alter it and redistribute it freely,
subject to the following restrictions:
1. The origin of this software must not be misrepresented; you must not
claim that you wrote the original software. If you use this software in a
product, an acknowledgment in the product documentation would be
appreciated but is not required.
2. Altered source versions must be plainly marked as such, and must not
be misrepresented as being the original software.
3. This notice may not be removed or altered from any source
distribution.
Silverlight.js 2.0
4. Microsoft Public License (Ms-PL)
This license governs use of the accompanying software. If you use the
software, you accept this license. If you do not accept the license, do
not use the software.
1. Definitions
The terms "reproduce," "reproduction," "derivative works," and
"distribution" have the same meaning here as under U.S. copyright law.
A "contribution" is the original software, or any additions or changes
to the software.
A "contributor" is any person that distributes its contribution under
this license.
"Licensed patents" are a contributor's patent claims that read directly
on its contribution.
2. Grant of Rights
(A) Copyright Grant- Subject to the terms of this license, including the
license conditions and limitations in section 3, each contributor grants
you a non-exclusive, worldwide, royalty-free copyright license to
reproduce its contribution, prepare derivative works of its
contribution, and distribute its contribution or any derivative works
that you create.
168 Appendix
(B) Patent Grant- Subject to the terms of this license, including the
license conditions and limitations in section 3, each contributor grants
you a non-exclusive, worldwide, royalty-free license under its licensed
patents to make, have made, use, sell, offer for sale, import, and/or
otherwise dispose of its contribution in the software or derivative
works of the contribution in the software.
3. Conditions and Limitations
(A) No Trademark License- This license does not grant you rights to
use any contributors' name, logo, or trademarks.
(B) If you bring a patent claim against any contributor over patents
that you claim are infringed by the software, your patent license from
such contributor to the software ends automatically.
(C) If you distribute any portion of the software, you must retain all
copyright, patent, trademark, and attribution notices that are present
in the software.
(D) If you distribute any portion of the software in source code form,
you may do so only under this license by including a complete copy of
this license with your distribution. If you distribute any portion of the
software in compiled or object code form, you may only do so under a
license that complies with this license.
(E) The software is licensed "as-is." You bear the risk of using it. The
contributors give no express warranties, guarantees or conditions. You
may have additional consumer rights under your local laws which this
license cannot change. To the extent permitted under your local laws,
the contributors exclude the implied warranties of merchantability,
fitness for a particular purpose and non-infringement.
TBXML 1.4
Copyright 2012 71Squared. All rights reserved.
Permission is hereby granted, free of charge, to any person obtaining a
copy of this software and associated documentation files (the "Software"),
to deal in the Software without restriction, including without limitation the
rights to use, copy, modify, merge, publish, distribute, sublicense, and/or
sell copies of the Software, and to permit persons to whom the Software is
furnished to do so, subject to the following conditions:
The above copyright notice and this permission notice shall be included in
all copies or substantial portions of the Software.
THE SOFTWARE IS PROVIDED "AS IS", WITHOUT WARRANTY OF ANY
KIND, EXPRESS OR IMPLIED, INCLUDING BUT NOT LIMITED TO THE
WARRANTIES OF MERCHANTABILITY, FITNESS FOR A PARTICULAR
PURPOSE AND NONINFRINGEMENT. IN NO EVENT SHALL THE
Appendix
169
AUTHORS OR COPYRIGHT HOLDERS BE LIABLE FOR ANY CLAIM,
DAMAGES OR OTHER LIABILITY, WHETHER IN AN ACTION OF
CONTRACT, TORT OR OTHERWISE, ARISING FROM, OUT OF OR IN
CONNECTION WITH THE SOFTWARE OR THE USE OR OTHER DEALINGS
IN THE SOFTWARE.
Windows CE C Library Extensions
Copyright (c) 2006, Taxus SI Ltd., http://www.taxussi.com.pl
All rights reserved.
Redistribution and use in source and binary forms, with or without
modification, are permitted provided that the following conditions are met:
Redistributions of source code must retain the above copyright notice,
this list of conditions and the following disclaimer.
Redistributions in binary form must reproduce the above copyright
notice, this list of conditions and the following disclaimer in the
documentation and/or other materials provided with the distribution.
THIS SOFTWARE IS PROVIDED BY THE COPYRIGHT HOLDERS AND
CONTRIBUTORS "AS IS" AND ANY EXPRESS OR IMPLIED WARRANTIES,
INCLUDING, BUT NOT LIMITED TO, THE IMPLIED WARRANTIES OF
MERCHANTABILITY AND FITNESS FOR A PARTICULAR PURPOSE ARE
DISCLAIMED. IN NO EVENT SHALL THE COPYRIGHT HOLDER OR
CONTRIBUTORS BE LIABLE FOR ANY DIRECT, INDIRECT, INCIDENTAL,
SPECIAL, EXEMPLARY, OR CONSEQUENTIAL DAMAGES (INCLUDING,
BUT NOT LIMITED TO, PROCUREMENT OF SUBSTITUTE GOODS OR
SERVICES; LOSS OF USE, DATA, OR PROFITS; OR BUSINESS
INTERRUPTION) HOWEVER CAUSED AND ON ANY THEORY OF
LIABILITY, WHETHER IN CONTRACT, STRICT LIABILITY, OR TORT
(INCLUDING NEGLIGENCE OR OTHERWISE) ARISING IN ANY WAY OUT
OF THE USE OF THIS SOFTWARE, EVEN IF ADVISED OF THE
POSSIBILITY OF SUCH DAMAGE.
170 Appendix
Zlib 1.2.2/1.2.3
Copyright (C) 1995-2012 Jean-loup Gailly and Mark Adler
This software is provided 'as-is', without any express or implied warranty.
In no event will the authors be held liable for any damages arising from the
use of this software.
Permission is granted to anyone to use this software for any purpose,
including commercial applications, and to alter it and redistribute it freely,
subject to the following restrictions:
1. The origin of this software must not be misrepresented; you must not
claim that you wrote the original software. If you use this software in a
product, an acknowledgment in the product documentation would be
appreciated but is not required.
2. Altered source versions must be plainly marked as such, and must not
be misrepresented as being the original software.
3. This notice may not be removed or altered from any source
distribution.


