91061461-01B Boston Scientific (Master Brand DFU Template 8.2677in x 11.6929in A4, 90105918AW), eDFU, MB, Symphion, System, 91061461-01B Black (K) ∆E ≤5.0 1 ONLY Caution: Federal Law (USA) restricts this device to sale by or on the order of a physician. 1. REUSE WARNING The Symphion Resecting Device and Symphion Fluid Management Accessary are supplied STERILE using a Radiation process. Do not use if sterile barrier is damaged. If damage is found, call your Boston Scientific representative. The Symphion Resecting Device and Symphion Fluid Management Accessary are for single use only. Do not reuse, reprocess or resterilize. Reuse, reprocessing or resterilization may compromise the structural integrity of the device and/or lead to device failure which, in turn, may result in patient injury, illness or death. Reuse, reprocessing or resterilization may also create a risk of contamination of the device and/or cause patient infection or cross-infection, including, but not limited to, the transmission of infectious disease(s) from one patient to another. Contamination of the device may lead to injury, illness or death of the patient. After use, dispose of product and packaging in accordance with hospital, administrative and/or local government policy 2. DEVICE DESCRIPTION The Symphion System consists of the following procedural components: • Symphion Controller with Integrated Fluid Management ° Symphion Fluid Management Accessories ° Footswitch ° Saline Pole • Symphion Resecting Device The Controller provides bipolar radiofrequency outputs (resection and coagulation) and fluid management through the use of two integrated peristaltic pumps. The Resecting Device is a disposable, hand held bipolar radiofrequency device configured for the resection and aspiration of uterine pathology. Fluid infusion and aspiration of the uterine cavity are controlled by the Controller’s peristaltic pumps, in conjunction with the disposable Fluid Management Accessories; these components form a closed- loop re-circulating system. The Controller with Integrated Fluid Management System has two distinct modes; diagnostic mode and resection mode. Diagnostic Mode The Controller with the integrated closed loop recirculating Fluid Management System provides distension of the uterus during diagnostic hysteroscopy. Bipolar radiofrequency energy is NOT active in this mode (no resection and coagulation). A footswitch allows the surgeon to aspirate and re-circulate the saline. Resection Mode In Resection mode, bipolar radiofrequency energy is active (bipolar resection and coagulation). Aspiration is also active in Resection Mode. The Symphion System is for use with the Symphion Endoscope. Refer to Endoscope Instructions. 3. INTENDED USE/INDICATIONS FOR USE The Symphion System is intended to distend the uterus by filling it with saline to facilitate viewing with a hysteroscope during diagnostic and operative hysteroscopy and provide fluid management through the closed loop recirculation of filtered distension fluid. It is also intended for resection and coagulation of uterine tissue such as intrauterine polyps and myomas using a bipolar resecting device. Refer to Endoscope instructions for use for specific indications for use. 4. CONTRAINDICATIONS Pregnancy, genital tract infections, and known uterine cancer are contraindications to hysteroscopy. Use of this device for intrauterine distension is contraindicated whenever hysteroscopy is contraindicated. See the operator’s manual of your hysteroscope for absolute and relative contraindications. The Symphion System contains a large amount of metal components. Therefore it is MRI unsafe. Do not use the Symphion System in conjunction with MRI, CT or RFID. 5. WARNINGS Symphion System General Warning • The Symphion System is only intended for use as outlined in Section 3, Intended Use/Indications For Use. • Before using the Symphion System, please review all available product information carefully! • The Symphion System should only be used by physicians trained in hysteroscopy and hysteroscopic surgery using powered instruments. Healthy tissue can be injured, e.g., perforation by improper use of the Resecting Device. Use every available means to avoid such injury. • Do not use the Symphion System with another fluid management system, endoscope, or controller. Use with another fluid management system, endoscope or controller may result in failure of the device to operate or lead to patient or physician injury. • DANGER: Do not operate the Symphion System in close proximity to volatile solvents such as methanol or alcohol, or in the presence of flammable anesthetics, as explosion may occur. Controller with Integrated Fluid Management Warnings • Known Risks Associated with use of Electrosurgical Devices: • EMC issues – interference causes device failure, interference causes other devices to fail, RF interferes with pacemaker, defibrillator • Electrical safety issues – shock, burn – device/ controller overheats, incorrect power source used, water enters the controller, use of incorrect power source, arcing. • Explosion/fire if operated near volatile solvents • Tissue damaged during coagulation/resection • Fluid Overload: There is a risk of distension fluid reaching the circulatory system of the patient by passing into the capillaries of the body cavity. This can be caused by distension pressure, flow rate, perforation of the body cavity and duration of the endoscopic procedure. It is critical to closely monitor the inflow and outflow of the saline at all times. Vital signs recording, physical examination and pulse oximetry is recommended, as it may reduce the risk of fluid overload. • Fluid Deficit: The fluid absorbed by the patient must be monitored. The following equation should be used to calculate the fluid deficit using a single 3-liter saline bag: 3000 ml – (Remaining Volume in bag + 550 ml) = total fluid loss 3000 ml: Total amount of fluid in the saline bag at the start of the procedure* 550 ml: Dead volume (undeliverable volume in the tubing, filter, and tissue catch) The following equation should be used to calculate the fluid deficit using a single 2-liter saline bag: 2000 ml – (Remaining Volume in bag + 550 ml) = total fluid loss 2000 ml: Total amount of fluid in the saline bag at the start of the procedure* 550 ml: Dead volume (undeliverable volume in the tubing, filter, and tissue catch) *Take notice of the measurement tolerance of the saline bag (+/- 10%). • Fluid Intake: Strict monitoring of fluid intake should be maintained. Intrauterine instillation of saline exceeding 2 L should be followed with great care due to the possibility of fluid overload. ABOUT THIS MANUAL This manual provides information on how to operate, and maintain the Symphion System. It is essential that you read and understand all the information in this manual before using or maintaining the system. TABLE OF CONTENTS 1. REUSE WARNING ......................................................................... 1 2. DEVICE DESCRIPTION.................................................................. 1 3. INTENDED USE/INDICATIONS FOR USE .................................. 1 4. CONTRAINDICATIONS ................................................................. 1 5. WARNINGS .................................................................................... 1 6. PRECAUTIONS............................................................................... 1 7. ADVERSE EVENTS ........................................................................ 2 8. ENVIRONMENTAL PROTECTION................................................ 3 9. HOW SUPPLIED............................................................................. 3 10. COMPATIBILITY .......................................................................... 3 11. SYSTEM COMPONENTS............................................................ 3 12. SYSTEM SETUP........................................................................... 4 13. SYSTEM OPERATIONS .............................................................. 6 14. REPLACING THE FILTER ............................................................. 7 15. DISASSEMBLY ............................................................................ 7 16. FOLLOW STANDARD HOSPITAL PROCEDURES FOR CLEANING ......................................................................................... 7 17. STORAGE ...................................................................................... 7 18. CONTROLLER MAINTENANCE, TROUBLESHOOTING AND REPAIR ................................................................................................ 7 19. WARRANTY ................................................................................. 8 APPENDIX A ...................................................................................... 9 APPENDIX B ...................................................................................... 9 APPENDIX C....................................................................................... 9 APPENDIX D ...................................................................................... 9 APPENDIX E ..................................................................................... 10 APPENDIX F ..................................................................................... 11 APPENDIX G .................................................................................... 12 2017-12 (EN) Symphion ™ Tissue Removal System
Transcript
91061461-01B
Bo
sto
n S
cien
tifi
c (M
aste
r B
ran
d D
FU Te
mp
late
8.2
677i
n x
11.
6929
in A
4, 9
0105
918A
W),
eD
FU, M
B, S
ymp
hio
n, S
yste
m, 9
1061
461-
01B
Black (K) ∆E ≤5.0
1
ONLYCaution: Federal Law (USA) restricts this device to sale by or on the order of a physician.
1. Reuse waRningThe Symphion Resecting Device and Symphion Fluid Management Accessary are supplied STERILE using a Radiation process. Do not use if sterile barrier is damaged. If damage is found, call your Boston Scientific representative.The Symphion Resecting Device and Symphion Fluid Management Accessary are for single use only. Do not reuse, reprocess or resterilize. Reuse, reprocessing or resterilization may compromise the structural integrity of the device and/or lead to device failure which, in turn, may result in patient injury, illness or death. Reuse, reprocessing or resterilization may also create a risk of contamination of the device and/or cause patient infection or cross-infection, including, but not limited to, the transmission of infectious disease(s) from one patient to another. Contamination of the device may lead to injury, illness or death of the patient.
After use, dispose of product and packaging in accordance with hospital, administrative and/or local government policy
2. deviCe desCRiptionThe Symphion System consists of the following procedural components:• SymphionControllerwithIntegratedFluidManagement
° Symphion Fluid Management Accessories
° Footswitch
° Saline Pole• SymphionResectingDeviceThe Controller provides bipolar radiofrequency outputs (resection and coagulation) and fluid management through the use of two integrated peristaltic pumps. The Resecting Device is a disposable, hand held bipolar radiofrequency device configured for the resection and aspiration of uterine pathology. Fluid infusion and aspiration of the uterine cavity are controlled by the Controller’s peristaltic pumps, in conjunction with the disposable Fluid Management Accessories; these components form a closed-loop re-circulating system. The Controller with Integrated Fluid Management System has two distinct modes; diagnostic mode and resection mode.diagnostic ModeThe Controller with the integrated closed loop recirculating Fluid Management System provides distension of the uterus during diagnostic hysteroscopy. Bipolar radiofrequency energy is NOT active in this mode (no resection and coagulation). A footswitch allows the surgeon to aspirate and re-circulate the saline.Resection ModeIn Resection mode, bipolar radiofrequency energy is active (bipolar resection and coagulation). Aspiration is also active in Resection Mode.The Symphion System is for use with the Symphion Endoscope. Refer to Endoscope Instructions.
3. intended use/indiCations foR useThe Symphion System is intended to distend the uterus by filling it with saline to facilitate viewing with a hysteroscope during diagnostic and operative hysteroscopy and provide fluid management through the closed loop recirculation of filtered distension fluid. It is also intended for resection and coagulation of uterine tissue such as intrauterine polyps and myomas using a bipolar resecting device.
Refer to Endoscope instructions for use for specific indications for use.
4. ContRaindiCationsPregnancy, genital tract infections, and known uterine cancer are contraindications to hysteroscopy. Use of this device for intrauterine distension is contraindicated whenever hysteroscopy is contraindicated. See the operator’s manual of your hysteroscope for absolute and relative contraindications.
The Symphion System contains a large amount of metal components. Therefore it is MRI unsafe. Do not use the Symphion System in conjunction with MRI, CT or RFID.
5. waRningssymphion system general warning• TheSymphionSystemisonlyintendedforuseasoutlined
in Section 3, Intended Use/Indications For Use.• BeforeusingtheSymphionSystem,pleasereviewall
available product information carefully!• TheSymphionSystemshouldonlybeusedbyphysicians
trained in hysteroscopy and hysteroscopic surgery using powered instruments. Healthy tissue can be injured, e.g., perforation by improper use of the Resecting Device. Use every available means to avoid such injury.
• DonotusetheSymphionSystemwithanotherfluidmanagement system, endoscope, or controller. Use with another fluid management system, endoscope or controller may result in failure of the device to operate or lead to patient or physician injury.
• DANGER: Do not operate the Symphion System in close proximity to volatile solvents such as methanol or alcohol, or in the presence of flammable anesthetics, as explosion may occur.
Controller with integrated fluid Management warnings• Known Risks associated with use of electrosurgical devices:
• EMCissues–interferencecausesdevicefailure,interference causes other devices to fail, RF interferes with pacemaker, defibrillator
• Electricalsafetyissues–shock,burn–device/controller overheats, incorrect power source used, water enters the controller, use of incorrect power source, arcing.
• FluidOverload:Thereisariskofdistensionfluidreachingthecirculatory system of the patient by passing into the capillaries of the body cavity. This can be caused by distension pressure, flow rate, perforation of the body cavity and duration of the endoscopic procedure. It is critical to closely monitor the inflow and outflow of the saline at all times. Vital signs recording, physical examination and pulse oximetry is recommended, as it may reduce the risk of fluid overload.
• FluidDeficit:Thefluidabsorbedbythepatientmustbemonitored. The following equation should be used to calculate the fluid deficit using a single 3-liter saline bag: 3000ml–(RemainingVolumeinbag+550ml)=total
fluid loss 3000 ml: Total amount of fluid in the saline bag at the
start of the procedure* 550ml:Deadvolume(undeliverablevolumeinthe
tubing, filter, and tissue catch)The following equation should be used to calculate the fluid deficit using a single 2-liter saline bag:
2000ml–(RemainingVolumeinbag+550ml)=totalfluid loss
2000 ml: Total amount of fluid in the saline bag at the start of the procedure*
550ml:Deadvolume(undeliverablevolumeinthetubing, filter, and tissue catch)
*Take notice of the measurement tolerance of the saline bag (+/- 10%).
• FluidIntake:Strictmonitoringoffluidintakeshouldbemaintained.Intrauterine instillation of saline exceeding 2 L should be followed with great care due to the possibility of fluid overload.
aBout tHis ManuaL
This manual provides information on how to operate, and maintain the Symphion System. It is essential that you read and understand all the information in this manual before using or maintaining the system.
appendix d ......................................................................................9
appendix e .....................................................................................10
appendix f .....................................................................................11
appendix g ....................................................................................12
2017-12(EN)
Symphion™
Tissue Removal System
Bo
sto
n S
cien
tifi
c (M
aste
r B
ran
d D
FU Te
mp
late
8.2
677i
n x
11.
6929
in A
4, 9
0105
918A
W),
eD
FU, M
B, S
ymp
hio
n, S
yste
m, 9
1061
461-
01B
Black (K) ∆E ≤5.0
2
• SerumSodiumConcentration:Aswithanynormalsaline hysteroscopic insufflation, the possibility of fluid intravasation and subsequent electrolyte disturbances may occur. It is important that the physician monitor the patient’s electrolytes if significant intravasation occurs. The Symphion™ System does not measure sodium or other electrolyte concentrations.
• RuptureoftheFallopianTubeSecondarytoTubalObstruction: Distension of the uterus may lead to a tear of the fallopian tube should there be an obstruction or permanent occlusion. The rupture could lead to saline flowing into the patient’s peritoneal cavity, resulting in fluid overload. It is critical to closely monitor the input and outflow of saline at all times.
• Anairembolismcanbetheresultofaircontainedinthetubing set or connected instrument reaching the patient. To prevent air from being pumped into the patient ensure that the infusion tubing set is purged prior to start of the procedure and that there is always fluid in the saline bag. If air bubbles are seen in the infusion tubing set remove the Endoscope from the uterine cavity and discontinue the procedure.
• Topreventhypo/hypernatremiaassesselectrolytesbeforeand after procedure, and observe for signs of significant electrolyte imbalance (e.g., electrocardiogram and physician examination)
• Useofpressureshigherthan100mmHgisstronglydiscouraged. Intrauterine pressure should be maintained as low as possible so as to allow adequate visualization and minimize the forces potentially driving fluid, room air and/or gas into circulation. Cavity distension is usually possiblewithpressurevaluesbetween35to70mmHg.Apressureabove75to80mmHgisrequiredonlyinrarecases or if the patient has unusually high blood pressure.
• Whilefluidsmustalwaysbemonitoredduringuse,exercise extreme caution and very close fluid monitoring in patients with severe cardiopulmonary disease.
• TheSymphionclosed-loopsystempermitstheoperatortoelectintrauterinepressureupto125mmHg.Cliniciansusing the Symphion System should be aware of the 2013 AAGL practice guidelines regarding uterine cavity distension pressure (i.e. lowest pressure necessary to distend the uterine cavity and ideally should be maintained below the mean arterial pressure) when setting distension pressure on the Symphion System.
• TestingoftheSymphionSystemhasnotbeenconfirmedinpatients with hemoglobinopathies (e.g., Sickle Cell Disease, Beta Thalassemia) and therefore, the possible effects are unknown.
• Hemolysismayoccurduringrecirculation.Ifsignificanthemolysis occurs, this may result in electrolyte (e.g., increased serum potassium) changes or decrease in hemoglobin. Hemolysis may reveal red-tinged coloring of the recirculated fluid, but may not be visually apparent. Therefore, assessment of serum electrolytes and hemoglobin level after completion of the procedure is recommended.
visualization. The device resecting window area should be in the field of view while the Resecting Device is operating. If visualization is lost at any point during the procedure, resection/coagulation must be stopped immediately.
warnings applicable to air/gas emboli Hazards:• Gasbubblesareanormalby-productofelectrosurgical
proceduresperformedinliquids.Whenbubblesoccurinthe uterus, care should be taken to manage the removal of air/gas bubbles to minimize the inherent risk of emboli. Bubbles produced during tissue vaporization may interrupt surgery by temporarily interfering with field of view and may also result in electrode overheating, causing damage to the electrode tip.
• Surgeonsshouldconsidertheanticipatedlengthofsurgeryandsize of leiomyomata when selecting patients for procedures.
• Operatingroompersonnelmustbetrainedtopurgeairfromfluid lines prior to surgery, avoid entry of air into fluid lines, and provide constant, careful attention to fluid deficits. Avoid situations where the fluid bag is completely emptied.
• Basicequipmentshouldbeavailabletofulfilltherequirements for monitoring of fluid deficit, assessment and control of intrauterine pressure, and anesthesia monitoring. Intrauterine pressure should be maintained as low as possible so as to allow adequate visualization and minimize forces potentially driving air and gas into circulation.
hysteroscopic devices prior to use• Followingcervicaldilation,careshouldbetakentominimize
the exposure of the open cervix to room air• Keepinganeffectivecervicalsealduringsurgeryasmuch
as possible once the cervix is dilated• Usingactivefluidoutflowtoeffectivelyflushtheuterusof
bubbles and debris• Minimizingthefrequencyofremovalandreinsertionof
hysteroscopic devicesConsiderations for anesthesia• Nitrousoxideanesthesiamayenlargethesizeofairbubblesand
thus should be avoided when possible in operative hysteroscopy.• Patientsathighriskforroomairandgasembolismshouldbe
managed using controlled ventilation.• Forhigh-riskpatientsundergoingoperativehysteroscopy,one
should consider intra-operative monitoring, such as end-tidal CO2 monitoring if under general anesthesia and pre-cordial Doppler monitoring to detect room air and gas emboli early.
6. pReCautionssymphion system general precautions
Do not use the Symphion System in patients where anatomy does not support an endoscopic procedure (i.e. cervical stenosis, existence of an IUD, or in conditions that limit access to the target tissue).Use Resection and COAG with caution in the presence of any active implantable or body worn medical devices such as internal or external pacemakers or neurostimulators. Interference produced by the use of electrosurgical devices can cause a pacemaker to enter an asynchronous mode or can block the pacemaker effect entirely. The output of the Symphion device might also affect other types of active devices such as implanted neurostimulator devices. Consult the active implantable device manufacturer (for implanted pacemakers and ICDs the hospital cardiology department might also be helpful) for further information when use of myomectomy or tissue coagulation is planned in patients with active implantable devices such as cardiac pacemakers.If the patient has an implantable cardioverter defibrillator (ICD), contact the ICD manufacturer for instructions before performing myomectomy or tissue coagulation. Electrosurgery or tissue coagulation may cause multiple activations of ICDs.Small electrical arcs between the resection electrode and the tissue being resected can produce low-frequency currents that may produce local neuromuscular stimulation. Per standard of care, ensure that the patient’s legs are supported and secured appropriately.Prior to use, examine all system components for possible damage and ensure proper function. If any of the system components are damaged, do not use.Do not use the Resecting Device or the Fluid Management Accessories if the sterile barrier or sterility is compromised prior to or during the procedure. Failure to maintain sterile technique in the operating room could result in infection.Do not lubricate the Resecting Device or the Fluid Management Accessories.Do not use the Resecting Device or the Fluid Management Accessories after the expiration date.The Resecting Device and Fluid Management Accessories are intended for single use only. Discard the Resecting Device and Fluid Management Accessories after use.Do not re-use or re-sterilize the Resecting Device and Fluid Management Accessories. Use of re-processed, single use device(s) may result in patient or physician injury.
Controller with integrated fluid Management precautionsVerify the Controller is fully operational prior to starting the clinical procedure. Failure of the Controller could result in an unintended increase of output power.Interference produced by the operation of high-frequency equipment may adversely affect the operation of other electronic medical equipment such as monitors, imaging systems.Do not operate the Controller in a moist environment, as a shock hazard may exist. If liquids have entered the unit, the Controller must be returned to the manufacturer for testing prior to use.
Use of accessories and cables other than those specified may result in increased emissions or decreased immunity of the system.Return Controller to manufacturer for servicing in the event of failure.In case of Controller failure, remove the Endoscope and Resecting Device from the body cavity immediately. Remove the tubing from the pump heads; switch off/ unplug the power cord to stop Controller operation.Removing screws and/or opening this device will invalidate the warranty.To ensure proper grounding reliability, a Hospital Grade Power Cord must be used with a receptacle marked “Hospital Grade”.Do not sterilize the Controller. Sterilization may damage the unit.Reconditioning, refurbishing, repair, or modification of the Controller is expressly prohibited as it may result in loss of function and/or patient injury.Do not obstruct openings on the bottom and back of the Controller, as they provide required airflow for cooling.The Controller needs special precautions regarding EMC and needs to be placed and put into service according to the EMC information provided in this document. Note that portable and mobile RF communication equipment can affect the performance of the Controller (See Appendix G).The Controller should not be used adjacent to or stacked with other equipment. If adjacent or stacked use is necessary, the Controller should be observed to verify normal operation in the configuration in which it will be used.If electromagnetic interference with other equipment is suspected, re-orient the device and/or remove possible sources of interference (e.g., cellular phones, radios, etc.) from the room.Needle monitoring electrodes are not recommended.Patient should not come into contact with grounded metal parts; the use of antistatic sheeting is recommended.Cables to the surgical electrodes are recommended to be positioned such that contact with patient or other leads is avoided.
The lightning flash with arrowhead symbol, within an equilateral triangle, is intended to alert the user to the presence of un-insulated “dangerous voltage” within
the product’s enclosure that may be of sufficient magnitude to constitute a risk of electric shock to persons.Useonlynormalsaline(sodiumchloride(0.9%w/v;150mmol/l))irrigation solution. The performance of the system will be adversely affected by use of any other solution.The Fluid Management Accessories is designed for use with a SINGLE 2 liter or 3 liter Irrigation USP saline bag:
Hospirapart#0409-7972-08.USE A SINGLE 2-LITER or 3-LITER IRRIGATION USP SALINE BAG ONLY. DO NOT USE MULTIPLE SALINE BAGS. USE OF MULTIPLE SALINE BAGS INCREASES THE CHANCE OF FLUID OVERLOAD.Do not pinch, step on, kink or otherwise occlude the tubing set. Tubing restrictions can result in high pressure or poor device performance.Do not close the latch of the pump on the indicators installed on tubing. This may result in a failure of the pump.Continuous, extended RF energy output may cause the Controller to overheat. If this occurs, the Controller must be allowed to cool down before further use.
Resecting device precautionsExcessive force on the Resecting Device tip does not improve resection performance and may increase the risk of perforation or device damage.Do not allow the tip of the Resecting Device to touch any hard object. If such contact does occur, inspect the tip. If there are cracks, fractures, or if there is any other reason to suspect the tip is damaged, replace the Resecting Device immediately.Any monitoring electrodes are recommended to be placed as far as possible from the Resecting Device when high frequency surgical equipment and physiological monitoring equipment are used simultaneously on the same patient. Monitoring systems incorporating high frequency current-limiting devices are recommended for use.Excessive force applied during insertion or removal of the Resecting Device may result in device damage or tissue injury including perforation.
Bo
sto
n S
cien
tifi
c (M
aste
r B
ran
d D
FU Te
mp
late
8.2
677i
n x
11.
6929
in A
4, 9
0105
918A
W),
eD
FU, M
B, S
ymp
hio
n, S
yste
m, 9
1061
461-
01B
Black (K) ∆E ≤5.0
3
Insertion and removal of the Resecting Device should always be under direct visualization.Do not activate the Resecting Device unless the resecting window and tip are immersed in a saline environment. Electrodes may arc if activated in air, damaging the device.Do not activate the Resecting Device while the resecting window section is inside the Endoscope. Ensure that the resecting window is outside the Endoscope working channel in the saline environment before activating RF resection or coagulation.
7. adveRse eventsPotential complications of continuous flow endoscopic surgery include:• Anesthesia-related; adverse reaction or over-medication• Uterine perforation• Damage to Adjacent Organs• Cervical tear/injury• Bleeding• Endometritis• Urinary tract infections• Infection, sepsis• Nausea, vomiting• Pelvic cramping, abdominal pain• Cervical stenosis• Hematometra• Dysmenorrhea• Dyspareunia• Uterine synechiae (Asherman’s syndrome)• Vaginal discharge• Fluid overload• Electrolytic imbalance• Rupture/obstruction of the fallopian tube• Hyponatremia• Hypothermia• Pulmonary edema• Cerebral edema• Idiosyncratic reactions• Dehydration• Over-pressurization/over-fill the cavity• Biohazard exposure to tissue, blood, fluid• Under-filled cavity• Loss of visualization• Incorrect distention media used• Kinkedtubing,leaksintubing/system• Cannot create seal with cavity• Air embolism• Damage to healthy tissue
8. enviRonMentaL pRoteCtionFollow local governing ordinances and hospital practice regarding the disposal of the Resecting Device and Fluid ManagementAccessories–DisposableDevices.
The Resecting Device contains an electronic printed circuit assembly. At the end of the useful life of the equipment it should be disposed of in accordance with any applicable national or institutional policy relating to obsolete electronic equipment.
9. How suppLied9.1. Controller with integrated fluid Management
The Controller is supplied in a semi-ready-to-use state.Do not use if package is opened or damaged.Do not use if labeling is incomplete or illegible.
The shipping box contains:• One(1)Controller• One(1)Footswitch• One(1)Detached10ft.HospitalGradePowerCord• One(1)DetachedSalinePole• One(1)Symphion™SystemPackageInsert• One(1)SymphionControllerCalibrationSheet
9.2. fluid Management accessories The Fluid Management Accessories are supplied sterile and are intended for single use. The shelf box contains:
1. Remove Controller and saline pole from packaging. 2. Remove plastic cap from saline pole bracket (Fig 7) on
the back of the Controller (Fig. 1B Item 10).
Plastic Cap
figure 7
3. To attach the saline pole to the Controller slide the pole into the bracket on the back of the Controller.
4. Pushthebuttonontheleftsideofthepolebracketandrotate the pole until it settles to the bottom of the mount (Fig.8);thesalinehookonthepolewillbefacingawayfromthe Controller when the pole is oriented in the final position.
Saline Pole Button
figure 8
5. Poleshouldbeinalockedposition,verifybygentlylifting up on the pole.
6. Slide the silicone cap down the pole and place over the pole mount bracket to prevent ingress of liquid into the pole mount cavity (Fig. 9).
Silicone Cap
figure 9
12.2. Controller set up instructions1. Place the Controller on a stable flat work surface.
IMPORTANT: Prior to use verify that the Controller and footswitch are decontaminated and clean and that the Endoscope is clean and sterilized.
2. Connect the Controller Power Cord (Fig.10a) to the power entry module (Fig. 1B, Item 13).
figure 10a figure 10b fully seated not fully seated
IMPORTANT: Ensure that the Power Cord is fully seated, plugged all the way into the power entry module.
3. Connect the footswitch cable to the footswitch receptacle (Fig. 1A, Item 1) on the left-hand side of the front panel of the Controller (Fig. 11).
6. Set up instructions will appear on the Controller Screen (Fig. 13).
figure 13
CiRCuLating nuRse –ChecktheIrrigationUSPsalinebag(2-literor 3-liter) for damage; do not use if damaged. If undamaged, apply biohazard label (included in the Fluid Management shelf box) to the saline bag as instructed on the screen as a visual reminder not to reuse the saline bag (Fig.13)CiRCuLating nuRse –Hangthesalinebagonsalinepolehook.CiRCuLating nuRse–ConfirmthataSINGLE2-literor3-litersalinebagisbeingused,ifyes,pressOK(Fig.13).Fluid Management Accessories set up instructions will appear on the Controller screen (Fig. 16).
12.3. fLuid ManageMent set up instRuCtionssCRuB nuRse–PlacethesterilizedEndoscopeintothesterilefield.CiRCuLating nuRse–RemovetheFluidManagementAccessoriesfrom the shelf box. Do not use if product or packaging is damaged.CiRCuLating nuRse – Following sterile practices peel off theprotecting cover sheet from the top of the tray and hold the tray for the Scrub Nurse to remove the components within the sterile field.sCRuB nuRse –Tearthetubingtapetodisconnectthetubing.Remove the Introducer (Fig.2 Item8),and the tubing from thetray by grabbing the distal ends of the Infusion, Aspiration tube, andPressureSensorasshowninfigure14.Theremainderofthetubing will uncoil from the tray as the tubing is pulled.
Introducer
Distal Ends of Pressure Sensor, Aspiration Tube, and Infusion Tube
Distal Ends of Pressure Sensor, Aspiration Tube, and Infusion Tube
sCRuB nuRse – Follow the FluidManagement Accessoriesset up instructions on the Controller screen (Fig. 16).
figure 16
sCRuB nuRse – Connect the Introducer to Scope twist to lock in.• ConnecttheIntroducer(Fig.2,Item8)totheproximal
end of the Endoscope (Fig. 17) by aligning the grooves on the Endoscope with the slots on the introducer. Once aligned rotate counter clockwise until a click is felt (approximately15°).
Endoscope Introducer
figure 17
sCRuB nuRse – Connect the Aspiration Tube to Introducer as shown.
IMPORTANT: For all quick-connect fittings (Fig. 18) press connectors together until they click together securely. To disconnect, press tab on quick connect fitting and pull apart.
Tab
figure 18
• ConnecttheAspirationTube(Fig.2,Item6a)totheproximal end of the Introducer (Fig. 19).
Introducer
Aspiration Tube
figure 19
sCRuB nuRse – Connect the Infusion Tube to Scope as shown.• ConnecttheluerontheInfusionTube(Fig.2Item4b)toeither
of the two luer connections on the Endoscope (Fig. 20.).
figure 20
sCRuB nuRse – Connect the Pressure Sensor to Scope as shown.• ConnectthelueronthePressureSensor(Fig.2Item7a)to
the available luer connection on the Endoscope (Fig. 21).
figure 21
Aspiration Tube Pressure Sensor
Infusion Tubing Set
figure 22 fuLLy asseMBLed endosCope
CiRCuLating nuRse–Whenstep4iscompleted,pressOKontheController Screen (Fig. 16).Continue the Fluid Management Accessories setup following the instructions on the Controller screen (Fig. 23).
figure 23
CiRCuLating nuRse – Place Tubes into Pump Heads as shown.• PlacethesectionsoftheInfusionTube(Fig.2Item4)and
Aspiration Tube (Fig. 2 Item 6) between the indicators (approx.12cm)insidethePumpHeads(Fig.1AItem4and5)by matching the red circle at the upper part of the pump head with the red indicator on the tube and the blue circlewiththeblueindicator.(Fig.24).
Indicators on each side of the pump
figure 24
CiRCuLating nuRse – Close Pump Head Doors.• Slowlycloseeachpumpheaddooruntilthelatchisflush
withthepumphead(Fig.25).
figure 25
IMPORTANT: Do not close the latch of the pump head door on the tubing indicators or on the tubing (Fig. 26).
Tubing in Correct Position
Tubing in Incorrect Position
figure 26
CiRCuLating nuRse – Spike both ports of the Saline Bag.• FollowingsterilepracticesspiketheIrrigationUSPsaline
bag with the saline spikes on the end of the Infusion (Fig.2Item4a)andFilterTubes(Fig.2Item5).Ensurethat the saline spikes completely engage the saline orifice and no leakage occurs around the spikes (Fig. 27). Inspect the saline bag for any damage. Note: Either port is acceptable for the saline spikes.
figure 27
Bo
sto
n S
cien
tifi
c (M
aste
r B
ran
d D
FU Te
mp
late
8.2
677i
n x
11.
6929
in A
4, 9
0105
918A
W),
eD
FU, M
B, S
ymp
hio
n, S
yste
m, 9
1061
461-
01B
Black (K) ∆E ≤5.0
6
IMPORTANT: IF THE SALINE BAG BECOMES EMPTY DURING THE PROCEDURE, STOP AND TERMINATE THE PROCEDURE IMMEDIATELY. DO NOT REPLACE THE SALINE BAG.
CiRCuLating nuRse – Squeeze Drip Chamber to de-air.• De-airthedripchamber(Fig.28)attheendofthe
Infusion Tube by squeezing the drip chamber (pushing the air out) and releasing it (allowing the saline to pass into the drip chamber). Repeat until the drip chamber is completely full of saline (free from air) and the blue ball is at the top of the chamber.
Drip Chamber
figure 28CiRCuLating nuRse – Connect the Pressure Sensor to Controller as shown.
• Connectthepressuresensorconnectortothepressuresensor receptacle on the Controller (Fig. 29) by aligning the white markings on the connector and receptacle.
WhiteMarkings
figure 29
IMPORTANT: Ensure that the connector is advanced into the Controller receptacle in flush.
CiRCuLating nuRse –Whenpressuresensor isconnectedpressOKontheControllerScreen(Fig.23).The Controller will run the Pressure Sensor Self-Test (approximately5seconds).
• Ifpressuresensortestfails,theControllerwilldisplaythe “Pressure Sensor Test FAILED” message and “Replace Pressure Sensor”. If this occurs, replace the Fluid Management Accessories (see section 12 Fluid Management set up instructions)
IMPORTANT: If the Pressure Sensor is disconnected at any time during the procedure, the Controller will alert the user and the following message will appear on the touch screen: “No Pressure Sensor. Connect Pressure Sensor to Continue”.
If the pressure sensor test passes the following instruction will appear on the Controller screen (Fig. 30).
figure 30
CiRCuLating nuRse – press oK to purge systemsCRuB nuRse – Hold Scope until saline exits.During the purge cycle, air from the infusion tube will be expelled from the end of the endoscope to de-air the infusion tube prior to insertion into the uterine cavity. At the end of the purge approximately 20 ml of fluid will be expelled. The total purge time is within 10 seconds.WhenpurgingiscompletetheControllerwillenterdiagnosticmode.
13. systeM opeRation 12.1. diagnostic Mode1. Set the desired cavity pressure on the touch screen of the
Controller (Fig. 31) by pressing the up arrow in the cavity pressure box. The cavity pressure can be adjusted at any time duringtheprocedure.Acavitysetpressurehigherthan45mmHgis REQUIRED to start infusion.
1Bar=10mmHg
Press to start/stop infusion
Press to set cavity pressure
figure 31
IMPORTANT: Use of pressure 100 mmHg or higher will require confirmation from the user (Fig. 32). The maximum pressure that can be set by the user is 125 mmHg.
figure 32
2. Immediately before Endoscope insertion, start infusion by pressing the infusion pump button on the touch screen of the Controller to start fluid flow.
3. Insert the Endoscope using standard hysteroscopic techniques.
IMPORTANT: Infusion must be on to maintain inflow and distension in the cavity. Pressing the aspiration button with infusion off will cause the cavity to collapse.
4. Aspiration(Fig.33)canbeactivatedbypressingthecenterbutton on the footswitch (Fig. 3, Item 3). This will circulate the fluid through the Infusion and Aspiration Tubes. RESECT (Yellow) and COAG (Blue) footswitch pedals will not work in diagnostic mode.
figure 33 13.2. Resection ModeCiRCuLating nuRse –RemovetheResectingDevicefromtheshelfbox. Do not use if product or packaging is damaged. CiRCuLating nuRse – Following sterile practices peel off theprotecting cover sheet from the top of the tray and hold the tray for the Scrub Nurse to remove the Resecting Device.
sCRuB nuRse – Remove the Resecting Device (Fig. 6) fromsterile package and place onto the sterile table.sCRuB nuRse – Following sterile practices pass the devicecable out of the sterile field to the circulating nurse. CiRCuLating nuRse–Connectthedevicecablebypushingthedevice connector into the device receptacle (Fig. 1A. Item 2) on theControllerfrontpanel(Fig.34).
figure 34
CiRCuLating nuRse or pHysiCian –DisconnecttheAspirationTubefromtheIntroducer(Fig.35).
figure 35
CiRCuLating nuRse – Connect the Aspiration Tube to thequick connect fitting on the proximal end of the Resecting Device (Fig.36).
figure 36
CiRCuLating nuRse or pHysiCian–IntroducetheResectingDevice into the working channel of the Endoscope through the Introducer (Fig. 37).
figure 37
To begin Resection Mode, press the “to RESECTION” tab on the top right corner of the screen on the Controller (Fig. 33).Position the window of the Resecting device onto the surface of thetissueandpresstheresectpedaltoperformresection(Fig.38).
Bo
sto
n S
cien
tifi
c (M
aste
r B
ran
d D
FU Te
mp
late
8.2
677i
n x
11.
6929
in A
4, 9
0105
918A
W),
eD
FU, M
B, S
ymp
hio
n, S
yste
m, 9
1061
461-
01B
Black (K) ∆E ≤5.0
7
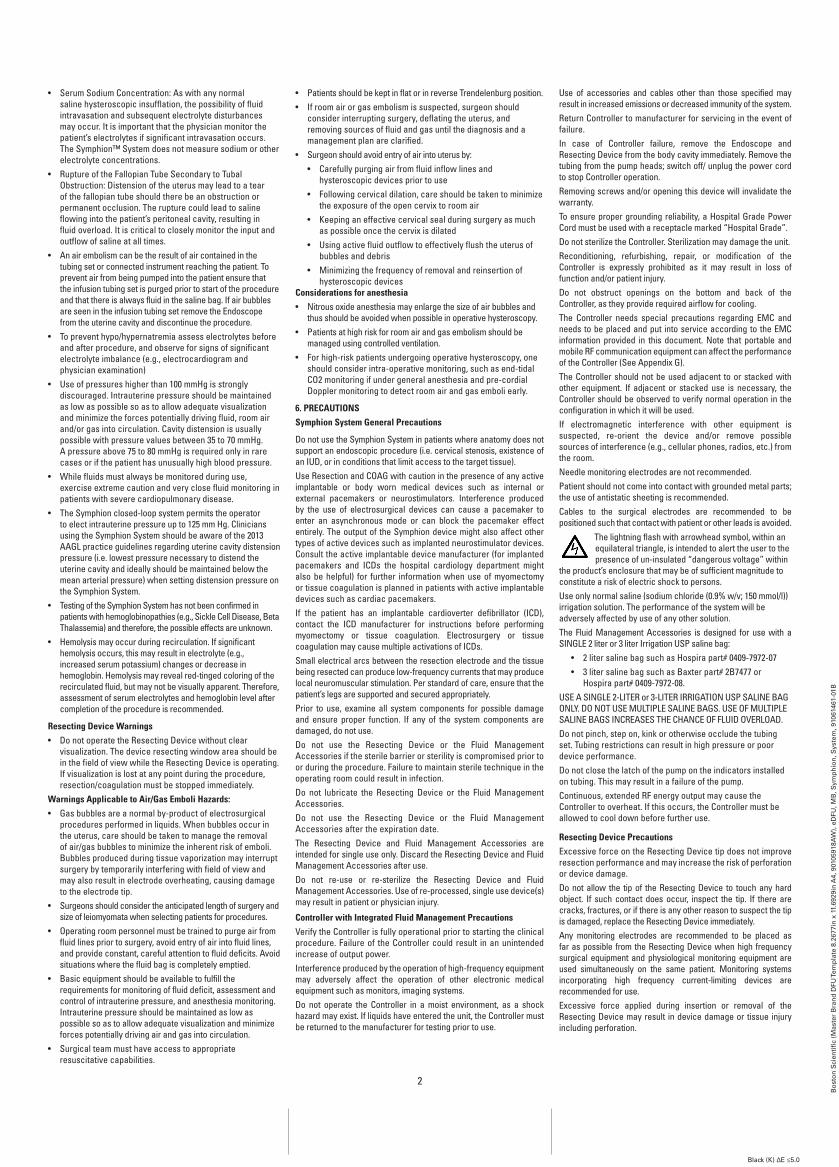
figure 38
The yellow RESECT foot pedal (Fig. 39) activates RF resection as indicatedonthedisplay(Fig.40).TheResectingDeviceoperatesat a fixed speed. The resected tissue is aspirated from the treatment area via the inner tube of the Resecting Device and then through the Aspiration Tube to the Tissue Catch.
IMPORTANT: If the Resecting Device is not reciprocating during the procedure, ensure that all connections are properly made to the Controller.
If bleeding occurs during the procedure, advance the active electrodeoftheResectingDevice(Fig41)tothesourceofthebleeding and depress the blue COAG foot pedal (Fig. 39).
Coagulation Zone
Active Electrode Return Electrode
figure 41
The blue COAG foot pedal (Fig. 39) activates coagulation as indicatedonthedisplay(Fig.42).
figure 42
Clinical observation (e.g., vital signs and physical examination) and visualization of filtered/returned fluid is recommended to reduce the risk of blood loss and excessive bleeding.
To maintain visualization during coagulation, fluid will be circulated at 10 second intervals while coagulation is active.
14. RepLaCing tHe fiLteR 1. If an error message appears on the Controller indicating “Check
filter tubing for kink, or replace filter to continue” check the Filter Tube(Fig.2Item.5)forkink.
2. If there is no kink on the Filter Tube turn off infusion by deactivating the infusion pump button on the touch screen of the Controller (Fig. 31).
3. Remove Resecting Device and Endoscope from the body cavity.4. Removesalinebagfromsalinepoleandplacelevelwithfilter
tubing to prevent saline leakage during filter replacement.5. DisassembletheFluidManagementAccessoriesandre-setup
a new one per section 12 Fluid Management Accessories Set Up Instructions.
6. Re-hang the saline bag on saline pole hook.
15. disasseMBLy1. Immediately before the removal of the Endoscope and Resecting
Device from the uterine cavity, turn off saline infusion by pressing the “infusion pump” button on the touch screen of the Controller (Fig. 31).
2. Remove the Resecting Device and Endoscope together from the uterine cavity.
3. Waitaminimumof60secondsforanyfluidpressuretodissipatefrom the tubing set.
9. Unhook the saline bag and place it on the Fluid Management Tray.
IMPORTANT: SALINE BAG IS A BIOHAZARD. DISPOSE OF THE LEFT-OVER SALINE AND THE SALINE BAG per hospital standards concerning biohazard materials.
10. Open the pump heads to remove the tubing.11. Dispose of the remainder of the Resecting Device, Fluid
Management Accessories and saline bag per hospital standards concerning biohazardous materials.
12. Disconnect the footswitch and turn off the Controller.
15.1. saline pole disassembly (optional)a. Push the button on the left side of the bracketb. Lift the pole straight up to remove
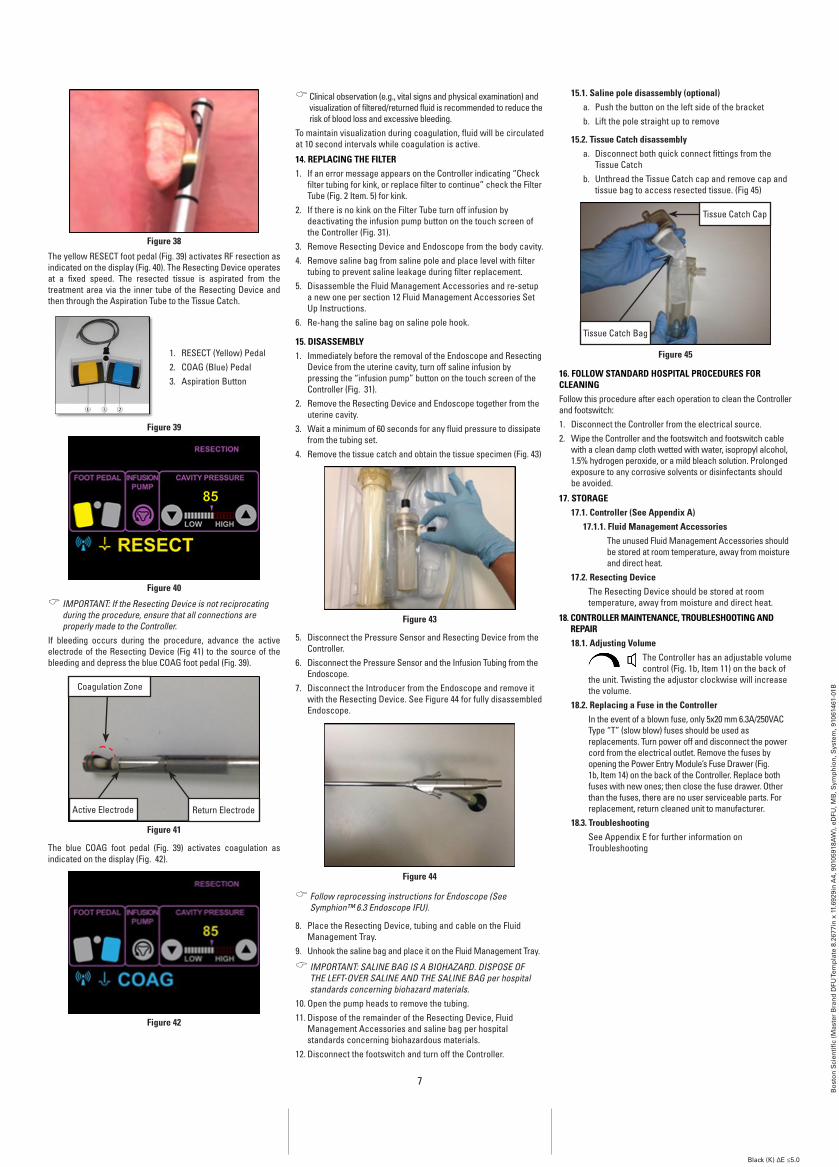
15.2. tissue Catch disassembly a. Disconnect both quick connect fittings from the
Tissue Catchb. Unthread the Tissue Catch cap and remove cap and
tissuebagtoaccessresectedtissue.(Fig45)
Tissue Catch Bag
Tissue Catch Cap
figure 45
16. foLLow standaRd HospitaL pRoCeduRes foR CLeaning Follow this procedure after each operation to clean the Controller and footswitch:1. Disconnect the Controller from the electrical source.2. WipetheControllerandthefootswitchandfootswitchcable
with a clean damp cloth wetted with water, isopropyl alcohol, 1.5%hydrogenperoxide,oramildbleachsolution.Prolongedexposure to any corrosive solvents or disinfectants should be avoided.
17. stoRage 17.1. Controller (see appendix a)
17.1.1. fluid Management accessories The unused Fluid Management Accessories should
be stored at room temperature, away from moisture and direct heat.
17.2. Resecting deviceThe Resecting Device should be stored at room temperature, away from moisture and direct heat.
18. ContRoLLeR MaintenanCe, tRouBLesHooting and RepaiR
18.1. adjusting volume
The Controller has an adjustable volume control (Fig. 1b, Item 11) on the back of
the unit. Twisting the adjustor clockwise will increase the volume.
18.2. Replacing a fuse in the ControllerIntheeventofablownfuse,only5x20mm6.3A/250VACType “T” (slow blow) fuses should be used as replacements. Turn power off and disconnect the power cord from the electrical outlet. Remove the fuses by opening the Power Entry Module’s Fuse Drawer (Fig. 1b,Item14)onthebackoftheController.Replacebothfuses with new ones; then close the fuse drawer. Other than the fuses, there are no user serviceable parts. For replacement, return cleaned unit to manufacturer.
18.3. troubleshootingSee Appendix E for further information on Troubleshooting
Bo
sto
n S
cien
tifi
c (M
aste
r B
ran
d D
FU Te
mp
late
8.2
677i
n x
11.
6929
in A
4, 9
0105
918A
W),
eD
FU, M
B, S
ymp
hio
n, S
yste
m, 9
1061
461-
01B
Black (K) ∆E ≤5.0
8
19. LiMited waRRantysymphion ControllerBoston Scientific Corporation (BSC) warrants that reasonable care has been used in the design and manufacture of this instrument. this warranty is in lieu of and excludes all other warranties not expressly set forth herein, whether express or implied by operation of law or otherwise, including, but not limited to, any implied warranties of merchantability or fitness for a particular purpose. Handling, storage, cleaning and sterilization of this instrument as well as other factors relating to the patient, diagnosis, treatment, surgical procedures and other matters beyond BSC’s control directly affect the instrument and the results obtained from its use. BSC’s obligation under this warranty is limited to the repair or replacement of this instrument and BSC shall not be liable for any incidental or consequential loss, damage or expense directly or indirectly arising from the use of this instrument. BSC neither assumes, nor authorizes any other person to assume for it, any other or additional liability or responsibility in connection with this instrument.symphion Resecting device and symphion fluid Management accessory Boston Scientific Corporation (BSC) warrants that reasonable care has been used in the design and manufacture of these devices. this warranty is in lieu of and excludes all other warranties not expressly set forth herein, whether express or implied by operation of law or otherwise, including, but not limited to, any implied warranties of merchantability or fitness for a particular purpose. Handling, storage, cleaning and sterilization of this instrument as well as other factors relating to the patient, diagnosis, treatment, surgical procedures and other matters beyond BSC’s control directly affect the instrument and the results obtained from its use. BSC’s obligation under this warranty is limited to the repair or replacement of this instrument and BSC shall not be liable for any incidental or consequential loss, damage or expense directly or indirectly arising from the use of this instrument. BSC neither assumes, nor authorizes any other person to assume for it, any other or additional liability or responsibility in connection with this instrument. BsC assumes no liability with respect to symphion Resecting devices and symphion fluid Management accessories that are reused, reprocessed or resterilized and makes no warranties, express or implied, including but not limited to merchantability or fitness for a particular purpose, with respect to such instruments.
CustoMeR seRviCe/teCHniCaL suppoRt
Contact Boston Scientific Customer Service for customer or technical support.
Consult instructions for use.Consultar las instrucciones de uso.Consulter le mode d’emploi.Gebrauchsanweisung beachten.Consultare le istruzioni per l'uso.Raadpleeg instructies voor gebruik.使用方法を参照のこと。Se brugsanvisningen.Συμβουλευτείτε τις οδηγίες χρήσης.Consulte as Instruções de UtilizaçãoSe bruksanvisningLásd a használati utasítást.Viz návod k použití.Zapoznać się z instrukcją obsługi.Se bruksanvisningen.参阅使用说明。사용 지침을 참조하십시오.Kullanma Talimatlarına Başvurun.Consulte as instruções de uso.Tutustu käyttöohjeisiin.Consultaţi instrucţiunile de utilizare.См. инструкции по применению.Pozri návod na použitie.Прочетете инструкциите за употреба.Pročitajte upute za upotrebu.Vaadake kasutusjuhendit.Kynntu þér notkunarleiðbeiningar.Skatīt lietošanas instrukcijas.Peržiūrėti naudojimo instrukcijas.Glejte navodila za uporabo.
Consult Instructions for use on this website: www.bostonscientific-elabeling.com
For single use only. Do not reuse.Para un solo uso. No reutilizar.À usage unique. Ne pas réutiliser.Für den einmaligen Gebrauch. Nicht wieder verwenden.Esclusivamente monouso. Non riutilizzare.Uitsluitend bestemd voor eenmalig gebruik. Niet opnieuw gebruiken.使用は1回限り。再使用しないこと。Kun til engangsbrug. Må ikke genanvendes.Για μία χρήση μόνο. Mην επαναχρησιμοποιείτε.Apenas para uma única utilização. Não reutilize.Endast för engångsbruk. Får inte återanvändas.Kizárólag egyszeri használatra. Ne használják újra.Pouze pro jednorázové použití. Nepoužívat opakovaně.Wyłącznie do jednorazowego użytku. Nie używać powtórnie.Kun til engangsbruk. Skal ikke brukes flere ganger.仅限单次使用。切勿重复使用。일회용입니다. 재사용하지 마십시오. Yalnızca tek kullanımlıktır. Yeniden kullanmayın.Somente para uso descartável. Não reutilize.Vain kertakäyttöön. Ei saa käyttää uudestaan.De unică folosinţă. A nu se refolosi.Только для одноразового применения. Не использовать повторно.Určené len na jednorazové použitie. Nepoužívajte opakovane.Само за еднократна употреба. Да не се използва повторно.Samo za jednokratnu upotrebu. Nemojte ponovno upotrebljavati.Ühe korra kasutatav. Mitte korduskasutada.Einnota. Endurnotið ekki.Tikai vienreizējai lietošanai. Nelietot atkārtoti.Naudoti tik vieną kartą. Nenaudoti pakartotinai.Samo za enkratno uporabo. Ne uporabite ponovno.
Federal (US) law restricts this device to sale by or on the order of a physician.
STERILE RSterilized Using Irradiation
Use ByFecha de caducidadDate limite d’utilisationVerwendbar bisUsare entroUiterste gebruiksdatum使用期限Anvendes indenΗμερομηνία λήξηςValidadeAnvänd föreSzavatosság lejártaDatum expiraceData ważnościBrukes innen使用截止日期유통기한Son Kullanma TarihiUsar atéKäytettävä viimeistäänValabil până laСрок годностиSpotrebujte doДа се използва доRok trajanjaKasutustähtaegNotist fyrirIzlietot līdzTinkamumo laikasUporabiti do
Use by date Date of Manufacture
Do not use if package is damaged.No usar si el envase está dañado.Ne pas utiliser si l’emballage est endommagé.Bei beschädigter Verpackung nicht verwenden.Non usare il prodotto se la confezione è danneggiata.Niet gebruiken als de verpakking is beschadigd.包装が破損している場合は使用しないこと。Må ikke anvendes, hvis pakken er beskadiget.Μη χρησιμοποιείτε αν η συσκευασία έχει υποστεί ζημιά.Não utilize se a embalagem estiver danificada.Använd inte om förpackningen är skadad.Ne használja, ha a csomagolás sérült.Nepoužívejte, pokud je obal poškozen.Nie używać, jeśli opakowanie jest uszkodzone.Skal ikke brukes hvis emballasjen er skadet.包装如有损坏,请勿使用。패키지가 손상된 경우 사용하지 마십시오.Eğer paket zarar görmüşse kullanmayın.Não utilize se a embalagem estiver danificada.Ei saa käyttää, jos pakkaus on vaurioitunut.A nu se utiliza dacă ambalajul este deteriorat.Не использовать, если упаковка повреждена.Nepoužívajte, ak je balenie poškodené.Да не се използва, ако опаковката е увредена.Nemojte upotrebljavati ako je pakiranje oštećeno.Ärge kasutage, kui pakend on kahjustatud.Notið ekki ef umbúðir eru skemmdar.Nelietot, ja iepakojums ir bojāts.Nenaudoti, jei pakuotė yra pažeista.Ne uporabite, če je embalaža poškodovana.
Do not use if package is damaged.
Do not use in the presence of flammable anesthetics
Type BF Applied Part
Radio Frequency (RF) Energy (non-ionizing radiation)
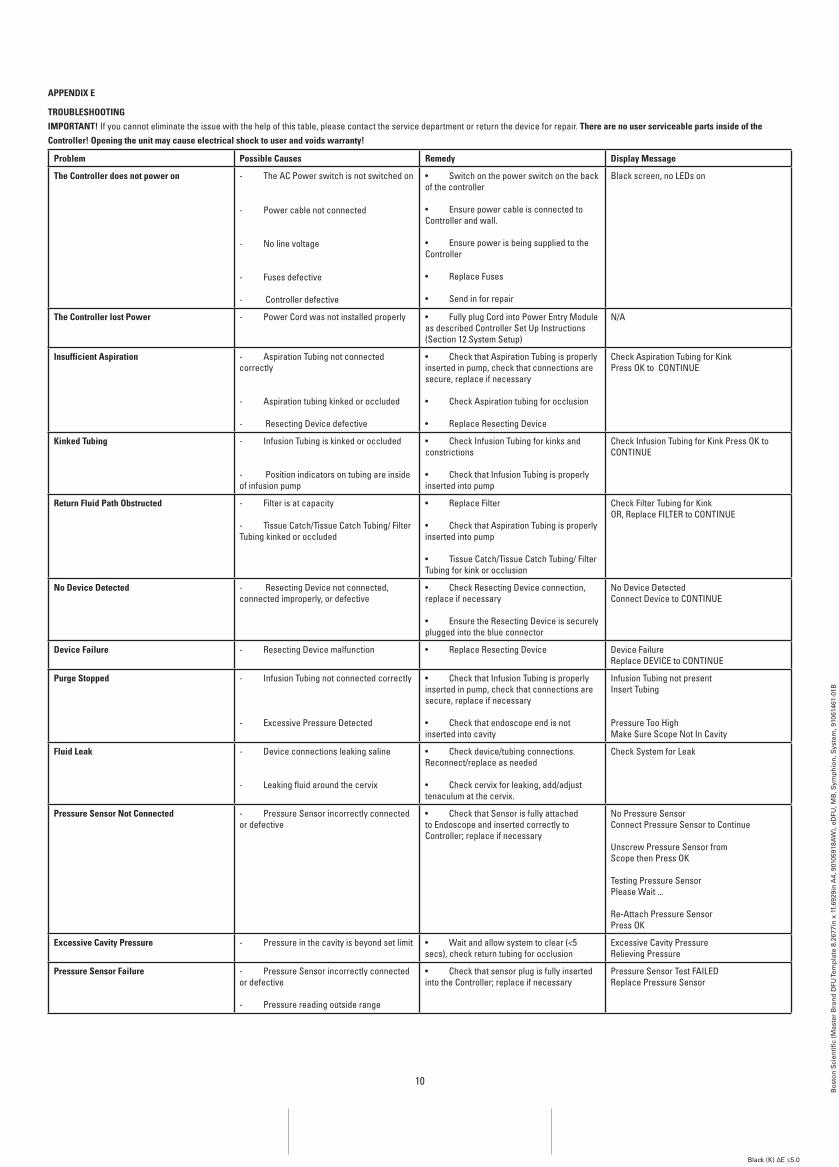
tRouBLesHootingiMpoRtant! If you cannot eliminate the issue with the help of this table, please contact the service department or return the device for repair. there are no user serviceable parts inside of the Controller! opening the unit may cause electrical shock to user and voids warranty!
problem possible Causes Remedy display Message
the Controller does not power on - The AC Power switch is not switched on
- Power cable not connected
- No line voltage
- Fuses defective
- Controller defective
• Switchonthepowerswitchonthebackof the controller
• EnsurepowercableisconnectedtoController and wall.
• EnsurepowerisbeingsuppliedtotheController
• ReplaceFuses
• Sendinforrepair
Black screen, no LEDs on
the Controller lost power - Power Cord was not installed properly • FullyplugCordintoPowerEntryModuleas described Controller Set Up Instructions (Section 12 System Setup)
N/A
insufficient aspiration - Aspiration Tubing not connected correctly
- Aspiration tubing kinked or occluded
- Resecting Device defective
• CheckthatAspirationTubingisproperlyinserted in pump, check that connections are secure, replace if necessary
• CheckAspirationtubingforocclusion
• ReplaceResectingDevice
CheckAspirationTubingforKinkPressOKtoCONTINUE
Kinked tubing - Infusion Tubing is kinked or occluded
- Position indicators on tubing are inside of infusion pump
• CheckInfusionTubingforkinksandconstrictions
• CheckthatInfusionTubingisproperlyinserted into pump
CheckInfusionTubingforKinkPressOKtoCONTINUE
Return fluid path obstructed - Filter is at capacity
- Tissue Catch/Tissue Catch Tubing/ Filter Tubing kinked or occluded
• ReplaceFilter
• CheckthatAspirationTubingisproperlyinserted into pump
• TissueCatch/TissueCatchTubing/FilterTubing for kink or occlusion
CheckFilterTubingforKinkOR, Replace FILTER to CONTINUE
no device detected - Resecting Device not connected, connected improperly, or defective
• CheckResectingDeviceconnection,replace if necessary
• EnsuretheResectingDeviceissecurelyplugged into the blue connector
• Ensurethatthefootswitchispluggedinto the gray port on the Controller
• CheckResectingDeviceconnection,replace if necessary
• EnsuretheResectingDeviceissecurelyplugged into the blue connector
N/A
N/A
N/A
No Device DetectedConnect Device to CONTINUE
fauLt Code: 17
temperature is out of Controller’s operating range
- Temperature is out of Controller’s operating range
• Poweroff,thenallowControllertoreturnto room temperature before powering on
• EnsureControllerventholesarenotoccluded
FAULT CODE: 17RF Board Temperature Out Of Range
fauLt Code: 19
temperature is out of Controller’s operating range
- Temperature is out of Controller’s operating range
• Poweroff,thenallowControllertoreturn to room temperature before powering on
• EnsureControllerventholesarenotoccluded
FAULT CODE: 19CPU Board Temperature Out Of Range
fauLt Code: 22
footswitch stuck
- Footswitch was depressed on startup
- Liquid causing short in footswitch
- Footswitch defective
• Poweroff,thenmakesurefootswitchpedals are not pressed and then power on the Controller
• Clearanyresidualliquid,allowswitchtoair dry
• Replacefootswitch
FAULT CODE: 22Footswitch Stuck: Restart and Check
unsuccessful self-test
(tone 8)
- Various internal self-diagnostics • Poweroff,thenpowerbackontheController. If the problem persists contact customer service
N/A
appendix f
appendix f essentiaL peRfoRManCe, poweR CuRvei. essential performance TheessentialperformanceoftheSymphion™SystemconsistsofoutputRFpowertoleranceof+/-20%whileactivelydeliveringRF;nounintentionalactivationofRFoutput,nounintentional
activationofpumpmotorsandcorrectpressuresensorindicationwithin+/-oneindicatorbar.ii. power Curve
Power (w)
Impedance(Ω)
Bo
sto
n S
cien
tifi
c (M
aste
r B
ran
d D
FU Te
mp
late
8.2
677i
n x
11.
6929
in A
4, 9
0105
918A
W),
eD
FU, M
B, S
ymp
hio
n, S
yste
m, 9
1061
461-
01B
Black (K) ∆E ≤5.0
12
appendix g
eMC taBLes The following tables provide information on the electromagnetic environment in which the Symphion™ System is capable of operating safely. Use of accessories and cables other than those
specified may result in increased emissions or decreased immunity of the system. To ensure proper grounding reliability, a Hospital Grade Power Cord must be used with a receptacle marked “Hospital Grade”.
List of syMpHion accessories:• SymphionFluidManagementAccessories• SymphionFootswitch• 10ft.HospitalGradePowerCord• SalinePole
table 1: electromagnetic emissions statement
guidance and Manufacturer’s declaration – electromagnetic emissions
The Symphion System is intended for use in the electromagnetic environment specified below. The customer or the user of the Symphion System should assure that it is used in such an environment.
emissions test Compliance electromagnetic environment – guidance
RF emissions CISPR 11 Group 1 The Symphion System uses RF energy only for its internal function. Therefore, its RF emissions are very low and are not likely to cause any interference in nearby electronic equipment.
RF emissions CISPR 11 Class A The Symphion System is suitable for use in all establishments other than domestic and those directly connected to the public low-voltage power supply network that supplies buildings used for domestic purposes.
Harmonic emissions IEC 61000-3-2 Class A
Voltage fluctuations/flicker emissionsIEC 61000-3-3
Complies
table 2: electromagnetic immunity statement
guidance and Manufacturer’s declaration – electromagnetic immunity
The Symphion System is intended for use in the electromagnetic environment specified below. The customer or the user of the Symphion System should assure that it is used in such an environment.
immunity test ieC 60601 test level Compliance level electromagnetic environment – guidance
Electrostaticdischarge (ESD)IEC61000-4-2
±6kVcontact±8kVair
±6kVcontact±8kVair
Floors should be wood, concrete or ceramic tile. If floors are covered with synthetic materi-al, the relative humidity should be at least 30 %.
Electrical fasttransient/burstIEC61000-4-4
±2kVforpowersupply lines±1kVforinput/outputlines
±2kVforpowersupply lines±1kVforinput/outputlines
Mains power quality should be that of a typical commercial or hospital environment.
SurgeIEC61000-4-5
±1kVline(s)toline(s)±2kVline(s)toearth
±1kVline(s)toline(s)±2kVline(s)toearth
Mains power quality should be that of a typical commercial or hospital environment.
immunity test ieC 60601 test level Compliance level electromagnetic environment – guidance
Voltage dips, shortinterruptions andvoltage variationson power supplyinput linesIEC61000-4-11
<5%UT(>95%dipinUT)for0.5cycle40%UT(60% dip in UT)for5cycles70% UT(30% dip in UT)for25cycles<5%UT(>95%dipinUT)for5s
<5%UT(>95%dipinUT)for0.5cycle40%UT(60% dip in UT)for5cycles70% UT(30% dip in UT)for25cycles<5%UT(>95%dipinUT)for5s
Mains power quality should be that of a typi-cal commercial or hospital environment. If the user of the Symphion System requires continued operation during power mains inter-ruptions, it is recommended that the Symphion System be powered from an uninterruptible power supply or a battery.
NOTE UT is the a.c. mains voltage prior to application of the test level.
Power frequency(50/60Hz)magnetic fieldIEC61000-4-8
3 A/m 3 A/m Power frequency magnetic fields should be at levels characteristic of a typical location in a typical commercial or hospital environment.
Portable and mobile RF communications equip-ment should be used no closer to any part of the Symphion System, including cables, than the recommended separation distance. The sepa-ration distance is calculated from the equation applicable to the frequency of the transmitter.
Bo
sto
n S
cien
tifi
c (M
aste
r B
ran
d D
FU Te
mp
late
8.2
677i
n x
11.
6929
in A
4, 9
0105
918A
W),
eD
FU, M
B, S
ymp
hio
n, S
yste
m, 9
1061
461-
01B
Black (K) ∆E ≤5.0
13
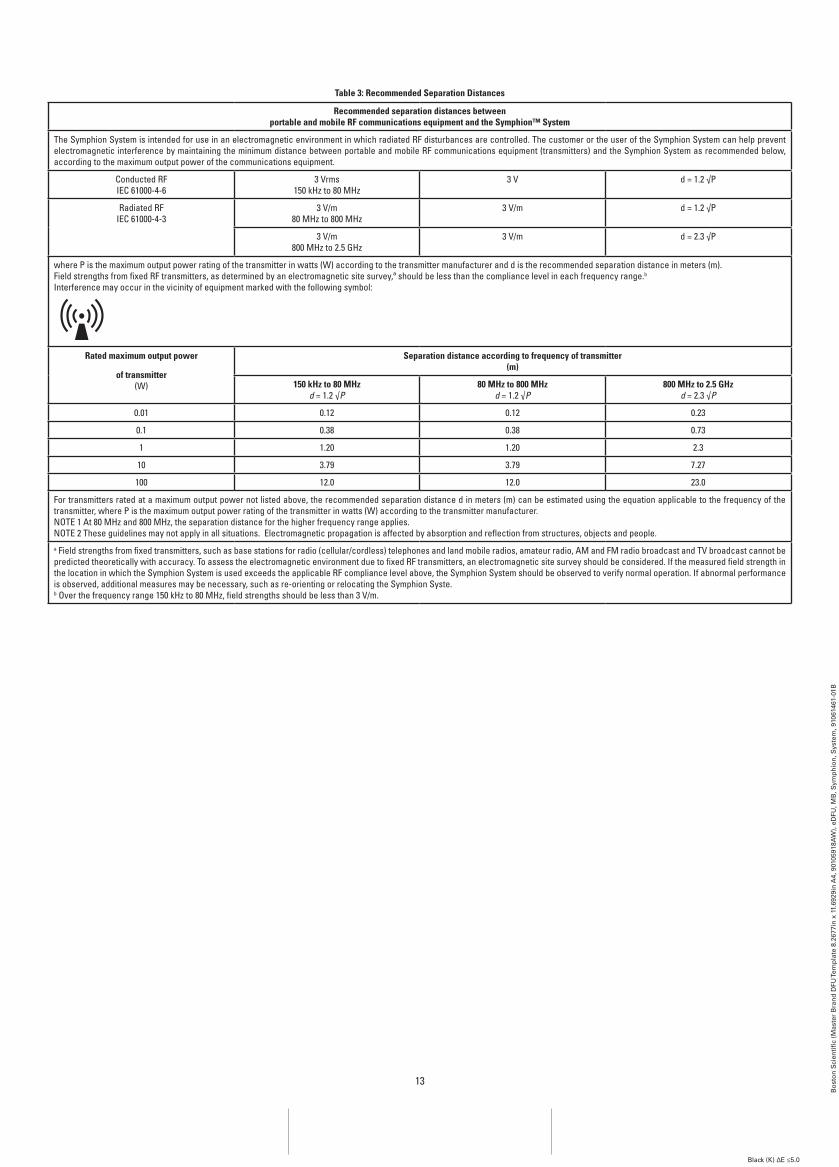
table 3: Recommended separation distances
Recommended separation distances betweenportable and mobile Rf communications equipment and the symphion™ system
The Symphion System is intended for use in an electromagnetic environment in which radiated RF disturbances are controlled. The customer or the user of the Symphion System can help prevent electromagnetic interference by maintaining the minimum distance between portable and mobile RF communications equipment (transmitters) and the Symphion System as recommended below, according to the maximum output power of the communications equipment.
Conducted RFIEC61000-4-6
3 Vrms150kHzto80MHz
3 V d=1.2√P
Radiated RFIEC61000-4-3
3 V/m80MHzto800MHz
3 V/m d=1.2√P
3 V/m800MHzto2.5GHz
3 V/m d=2.3√P
wherePisthemaximumoutputpowerratingofthetransmitterinwatts(W)accordingtothetransmittermanufactureranddistherecommendedseparationdistanceinmeters(m).Field strengths from fixed RF transmitters, as determined by an electromagnetic site survey,ª should be less than the compliance level in each frequency range.b
Interference may occur in the vicinity of equipment marked with the following symbol:
Rated maximum output power
of transmitter(W)
separation distance according to frequency of transmitter(m)
150 kHz to 80 MHzd=1.2√P
80 MHz to 800 MHzd=1.2√P
800 MHz to 2.5 gHzd=2.3√P
0.01 0.12 0.12 0.23
0.1 0.38 0.38 0.73
1 1.20 1.20 2.3
10 3.79 3.79 7.27
100 12.0 12.0 23.0
For transmitters rated at a maximum output power not listed above, the recommended separation distance d in meters (m) can be estimated using the equation applicable to the frequency of the transmitter,wherePisthemaximumoutputpowerratingofthetransmitterinwatts(W)accordingtothetransmittermanufacturer.NOTE1At80MHzand800MHz,theseparationdistanceforthehigherfrequencyrangeapplies.NOTE 2 These guidelines may not apply in all situations. Electromagnetic propagation is affected by absorption and reflection from structures, objects and people.a Field strengths from fixed transmitters, such as base stations for radio (cellular/cordless) telephones and land mobile radios, amateur radio, AM and FM radio broadcast and TV broadcast cannot be predicted theoretically with accuracy. To assess the electromagnetic environment due to fixed RF transmitters, an electromagnetic site survey should be considered. If the measured field strength in the location in which the Symphion System is used exceeds the applicable RF compliance level above, the Symphion System should be observed to verify normal operation. If abnormal performance is observed, additional measures may be necessary, such as re-orienting or relocating the Symphion Syste.bOverthefrequencyrange150kHzto80MHz,fieldstrengthsshouldbelessthan3V/m.


![Curs TB Diagnostic [Compatibility Mode]](https://static.documents.pub/doc/80x56/577c7aa21a28abe05495b90c/curs-tb-diagnostic-compatibility-mode.jpg)

