37
Synkronizer 9.5 User Manual
| Date post: | 11-Aug-2018 |
| Category: |
Documents |
| Upload: | hoangthuan |
| View: | 220 times |
| Download: | 0 times |

Synkronizer 9.5
User Manual

User Manual Synkronizer 9.5
Februar 2008 - Page 2
Table of Contents
1 Install / Uninstall Synkronizer..................................................................................................... 3
1.1 Versions ................................................................................................................................. 31.2 Installation Instructions........................................................................................................ 31.3 Install Synkronizer manually ................................................................................................ 31.4 Uninstall Synkronizer ........................................................................................................... 41.5 Uninstall Synkronizer manually ........................................................................................... 4
2 Synkronizer Main Menu ............................................................................................................... 5
2.1 Files ........................................................................................................................................ 52.1.1 Compare two worksheets........................................................................................... 62.1.2 Compare two databases.............................................................................................. 72.1.3 Compare multiple worksheets ................................................................................... 92.1.4 Compare ranges ........................................................................................................ 10
2.2 Compare ..............................................................................................................................112.3 Settings................................................................................................................................. 14
2.3.1 Filters .........................................................................................................................142.3.2 Display ....................................................................................................................... 162.3.3 Colors.........................................................................................................................172.3.4 System........................................................................................................................ 18
3 Action........................................................................................................................................... 20
3.1 Highlighter...........................................................................................................................213.2 Create a Difference Report ................................................................................................223.3 Navigator Toolbar .............................................................................................................. 23
4 Navigator Toolbar....................................................................................................................... 24
4.1 Toolbar ................................................................................................................................254.2 Show / Update.................................................................................................................... 26
4.2.1 Show / hide differences ...........................................................................................26
5 Synkronizer with Visual Basic for Applications ....................................................................... 29
5.1 Syntax................................................................................................................................... 295.2 Return Value........................................................................................................................ 295.3 Arguments ...........................................................................................................................305.4 Using Synkronizer in your VBA Scripts ........................................................................... 335.5 VBA-Examples ................................................................................................................... 33
5.5.1 Example 1.................................................................................................................. 335.5.2 Example 2.................................................................................................................. 345.5.3 Example 3.................................................................................................................. 355.5.4 Example 4.................................................................................................................. 365.5.5 Example 5 (Compare Multiple Files) ...................................................................... 37

User Manual Synkronizer 9.5
Februar 2008 - Page 3
1 Install / Uninstall Synkronizer
1.1 Versions
There are four different versions of Synkronizer available. Choose the one to fit your needs and budget. (The 30-day Trial version has all features enabled.)
LightVersion
StandardVersion
PremiumVersion
DeveloperVersion
TrialVersion
Highlight differences ü ü ü ü üCreate a difference report
ü ü ü ü
Navigator ü ü üSynkronizer VBA ü üPrice EUR 29.-- EUR 49.-- EUR 69.-- EUR 149.-- 30days
Please note that the user manual refers to the developer version only.
1.2 Installation Instructions
Just follow these easy steps to install Synkronizer:
1. Start the file synk95.exe and follow the install instructions. (Excel must be closed)
2. Start Excel.
3. Excel 97, 2000, XP & 2003: The menu entry "Synkronizer 9.5" appears in the menu "Tools". Excel 2007: The Synkronizer menu appears.
4. The installation is complete.
1.3 Install Synkronizer manually
You can also install Synkronizer manually by taking the following steps:
Excel 97, 2000, XP, 2003
1. Locate the directory where the installation program has copied the Synkronizer files. (Normally this should be C:\Program Files\Synkronizer\Synkronizer 9.5)
2. Copy the files "synk95.xla" and "synk95lf.xls" (the language file) to a directory of your choice.
3. Open Excel and select the menu Tools → Add-Ins.(You must have a workbook open, else this menu is not available)
4. Click on the Browse button, locate and select the file synk95.xla, then click on OK.The entry "»Synkronizer 9.5" is now listed (and checked) in the list of available add-ins.Click ok to close the dialog.
5. The menu entry "Synkronizer 9.5" appears in the menu "Tools". Now the installation has been completed successfully.
Versions of Synkronizer
Installation

User Manual Synkronizer 9.5
Februar 2008 - Page 4
Excel 2007
1. Locate the directory where the installation program has copied the Synkronizer files. (Normally this should be C:\Program Files\Synkronizer\Synkronizer 9.5)
2. Copy the files "synk9507.xlam" and "synk95lf.xls" (the language file) to a directory of your choice.
3. Open Excel and select the Excel item in the upper left corner.
4. Select “Excel options”.
5. Click the “add-ins”-category.
6. Select “manage Excel Add-ins” and press “go”.
7. Click on the Browse button, locate and select the file synk95xl07.xlam, then click on OK.Click ok to close the dialog.
8. The Synkronizer menu appears. Now the installation has been completed successfully.
1.4 Uninstall Synkronizer
Synkronizer is uninstalled with the following instruction: Start → Programs → Synkronizer 9.5 → Uninstall Synkronizer 9.5
1.5 Uninstall Synkronizer manually
You can also remove Synkronizer manually by taking the following steps:
Excel 97, 2000, XP & 2003
1. Select the menu Tools → Add-Ins(You must have a workbook open, else this menu is not available)
2. Deselect the entry »Synkronizer 9.5 from the list of available add-ins.
3. Delete the Synkronizer folder. (Synkronizer is normally installed in the folder C:\Program Files\Synkronizer\Synkronizer 9.5)
Excel 2007
1. Open Excel and select the Excel item in the upper left corner.
2. Select “Excel options”.
3. Click the “add-ins”-category.
4. Select “manage Excel Add-ins” and press “go”.
5. Deselect the entry »Synkronizer 9.5 from the list of available add-ins.
6. Delete the Synkronizer folder. (Synkronizer is normally installed in the folder C:\Program Files\Synkronizer\Synkronizer 9.5)

User Manual Synkronizer 9.5
Februar 2008 - Page 5
2 Synkronizer Main Menu
Synkronizer is started with the menu instruction Tools → Synkronizer 9.5 (Excel 97, 2000, XP & 2003) or the Synkronizer menu. A userform appears which is divided into four sections. The functions and properties of the Synkronizer main form are explained in the following chapters.
2.1 Files
In the section "Files" you can determine the following:
• Files to be compared• Worksheet name(s) or ranges• Worksheet options
1st file (Master) / 2nd file (Update)
Here you choose the files to be compared. The "first file" is the "Master" file and contains the older data, the "second file" the newer data or "Update". With the "Open File" buttons you can browse your file system to find the required Excel files. By choosing the first dropdown element you can also select either the "open" or the "last used" files.
With the second dropdown you have to decide if you want to compare two worksheets, all worksheets or a specified range. In the following chapters are described how to manage these different comparison types.
Start Synkronizer
Select files
User Manual Synkronizer 9.5
Februar 2008 - Page 6
Supported File Types
If you are working with Excel XP (Version 10.0) or a later version the following file types are also supported:
File type: File extension:Access databases *.mdb, *.mdeExternal databases *.odc, *.udl, *.dsnText files *.txt, *.csv, *.prn, *.tabWebpages *.htm, *.html, *.mht, *.mhtmXML files *.xmlLotus 1-2-3-Files, *.wk?QuattroPro/DOS-Files *.wq1Works 2.0-Files *.wksdBase Files *.dbf
Note:If you wish to compare an Access or other ODBC databases, the data will be imported as snapshot. Please note that Synkronizer only compares Excel copies of the databases. This means that a maximum of 65,535 data records (Excel 2000 – Excel 2003, the limit of Excel 2007 are 1’048’576 records) may be compared and that the databases cannot be updated.
2.1.1 Compare two worksheets
Here is explained how to compare two "normal" worksheets. The "database" comparison is explained in chapter 2.1.2.
1. Select the files to be compared
2. Select the worksheet names
3. In the area "Worksheet options" you can decide how the rows/columns should be linked. Synkronizer tries to match the columns and rows.
If you are sure that your worksheets contain no deleted or inserted columns/rows, you can check the fields "Link 1 on 1 for columns/rows". This overrides the linking algorithms.
4. Select "next"-button.
Access and ODBC-Databases

User Manual Synkronizer 9.5
Februar 2008 - Page 7
2.1.2 Compare two databases
Let us explain the most important differences between "normal" worksheets and "databases":
"Normal" Worksheets
are ordinary worksheets which do not contain column headings and primary keys (IDs).
Databases
are worksheets that contain data with a tabular structure. The data must be arranged as follows:
• The first row contains unique column names. Note: The checkbox “Worksheets are Databases” appears dimmed if your database doesn'tstart on the first row of the worksheet's “used range” or if the fieldnames can't be matched. Manually select the range of your database so that the field headers are on the first row of the range. See “Comparing Ranges”.
• The database contains one column with primary keys (unique identification number, article number etc.). A primary key uniquely identifies each data records and facilitates the sorting and synchronizing of your data. The primary key does not need to be a single field (e.g. employee number). It can be constructed from up to four fields (e.g. family name, first name and city) to create a unique identifier and avoid duplicate indexes.
• Duplicate indexes are data records, which contain the same identifier. Assuming the primary key is formed from the family and first name, if you have several customers called "John Miller" in your database, Synkronizer will not know which data records should be compared.Make sure that you always operate with unique primary keys.
• Synkronizer will check if your database contains duplicate records. These are records where all fields (not just the index fields) are the same. If found these records will be marked. Duplicate records serve no purpose and should be manually deleted.
The comparison of "databases" is very powerful and fast. The databases may be arbitrarily sorted or altered. The inserting and deleting of columns and rows is allowed. Synkronizer will recognize all differences between the two files.
To compare two databases proceed as follows:
1. Select the files to be compared
2. Select the worksheet names
3. In the area "Worksheet options" select "Worksheets are databases". The section "Database options" is displayed.
Normal worksheets
Databases
primary keys
duplicate indexes
duplicate records
User Manual Synkronizer 9.5
Februar 2008 - Page 8
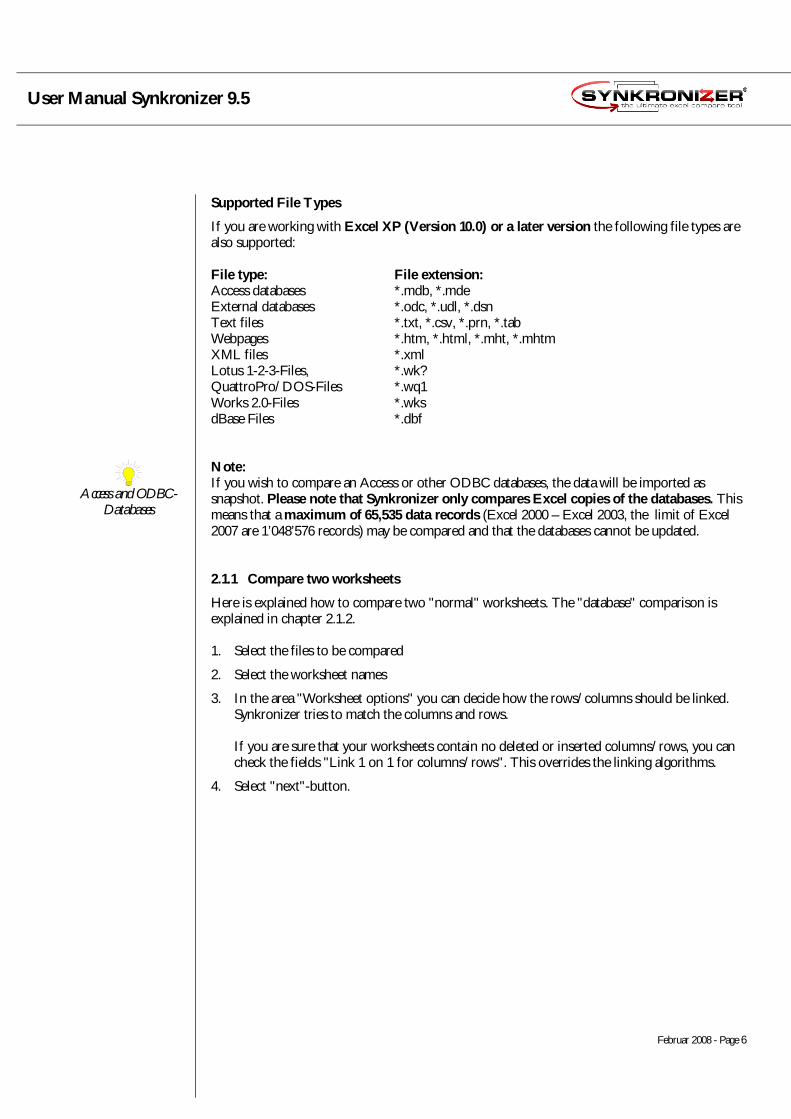
4. Select the section "Database".
5. Now you can select the key fields to be compared. You can enter up to four key fields.
6. Additionally you can choose the following options:
• Sort datathe databases are sorted according to the selected key fields.
• Group datathe databases are sorted according to the selected key fields and grouped so that the linked records are displayed at the top, followed by the duplicate indexes / records and the unmatched (added/deleted) records.
• Add Synk IDIn the last column of the databases a new column is inserted with the caption "Synkronizer IDs". This column contains the difference types. After the comparison you can use it to sort or filter your data, The following different types are written:
0-ID identical cell1-RD deleted row (only in Master)1-RA added row (only in Update)2-MD duplicate indexes (only in Master)2-MA duplicate indexes (only in Update)3-XD duplicate records (only in Master)3-XA duplicate records (only in Update)4-ZC different cell values5-ZF different formats
7. Select "next"-button.
User Manual Synkronizer 9.5
Februar 2008 - Page 9
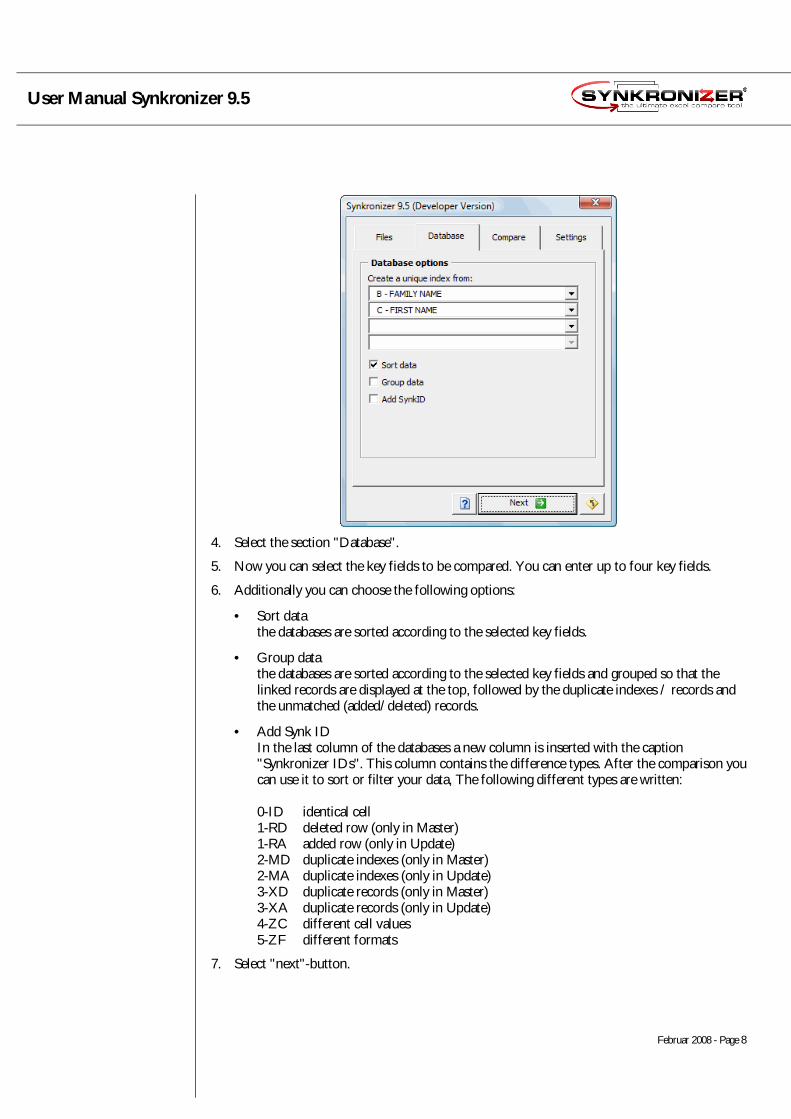
2.1.3 Compare multiple worksheets
If you want to compare multiple worksheets of a file just take the following steps:
1. Select the files to be compared
2. In the 2nd dropdown select "(multiple worksheets)"; the section "Sheets" is displayed.
3. Select the section "Sheets".
4. The area "Worksheet Matching" contains two list boxes which contain the worksheet names of the "Master" and "Update"-files. Auto matching: click the radio buttons "Link sheet by name" or "Link sheet by position". The worksheets are automatically matched by their name or position within the workbook.Manual matching: make your selections in the listboxes. Use the spinners to move selected items up or down: only items which are on the same row in the listbox can be matched.
5. All items which are selected and on the same row will be compared.Note: A red line between the list boxes indicates that the current selections do not match.
6. Select "next"-button.

User Manual Synkronizer 9.5
Februar 2008 - Page 10
2.1.4 Compare ranges
To compare two ranges proceed as follows:
1. Select the files to be compared
2. In the 2nd dropdown select "(specify a range)"; the 3rd dropdown field is activated.
3. Activate the 3rd dropdown field (which is a so-called refedit control). You can now select the desired range with the mouse.
4. Select the button with the blue checkmark to return to the form.
5. Now you decide if you want a "normal" or a "database" comparison.
6. Select "next"-button.

User Manual Synkronizer 9.5
Februar 2008 - Page 11
2.2 Compare
In this section you can determine which cell properties you want to compareand select the action to be taken.
Contents
Here you can set which the content to compare. You can choose one of the following criteria:
• Values• Formulas• Comments
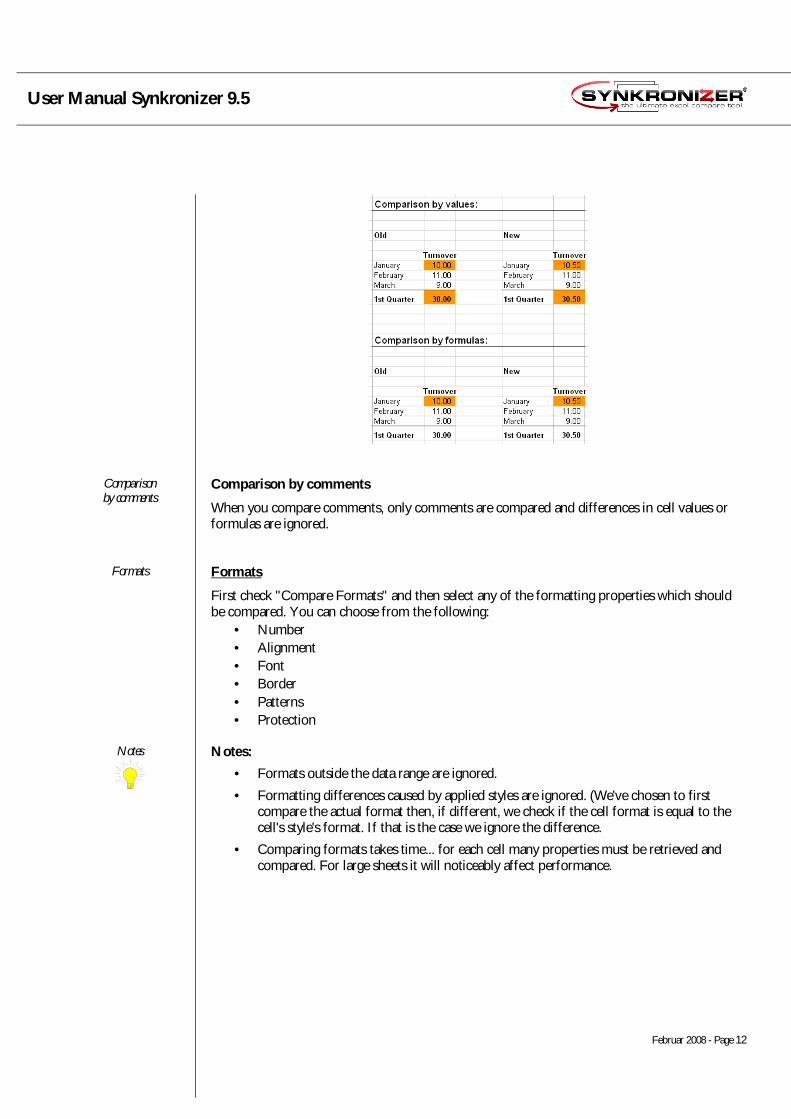
Difference between comparing values and formulas
The two examples below illustrate the differences between values and formulas.
The January turnover has been changed from $10.00 to $10.50. As a result the formula for the first quarter turnover changed from $30.00 to $30.50. When you are comparing values both cells will be considered different.
The formula comparison on the other hand only recognizes the January difference, as the formula for the first quarter is identical.
Comparisonby values
Comparisonby formulas
User Manual Synkronizer 9.5
Februar 2008 - Page 12
Comparison by comments
When you compare comments, only comments are compared and differences in cell values or formulas are ignored.
Formats
First check "Compare Formats" and then select any of the formatting properties which should be compared. You can choose from the following:
• Number• Alignment• Font• Border• Patterns• Protection
Notes:
• Formats outside the data range are ignored.
• Formatting differences caused by applied styles are ignored. (We've chosen to first compare the actual format then, if different, we check if the cell format is equal to the cell's style's format. If that is the case we ignore the difference.
• Comparing formats takes time... for each cell many properties must be retrieved and compared. For large sheets it will noticeably affect performance.
Comparisonby comments
Formats
Notes

User Manual Synkronizer 9.5
Februar 2008 - Page 13
Action
Depending on your version Synkronizer can take the following actions after it has compared your data:
• Highlighter• No highlighter• Reporter• Navigator Toolbar
You can check one or multiple actions.
In chapter 3 of the user manual the actions are described in detail.
Remove original background colors
Here you can select whether Synkronizer removes existing background colors of cells before highlighting the differences.
Use hyperlinks in "Difference Report"
If you check this option, hyperlinks are added to the difference report to easily jump to the differences found.
User Manual Synkronizer 9.5
Februar 2008 - Page 14
2.3 Settings
The settings page contains 4 individual pages with settings and options. The next chapters will explain each page in detail:
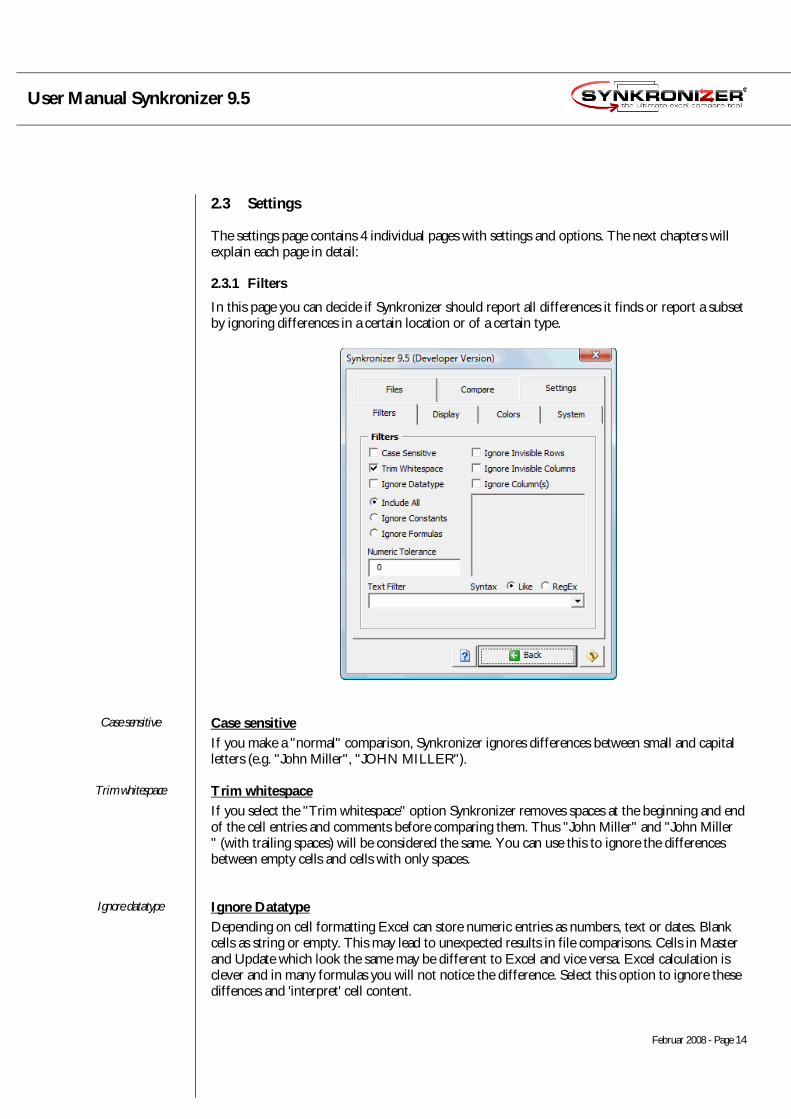
2.3.1 Filters
In this page you can decide if Synkronizer should report all differences it finds or report a subset by ignoring differences in a certain location or of a certain type.
Case sensitive
If you make a "normal" comparison, Synkronizer ignores differences between small and capital letters (e.g. "John Miller", "JOHN MILLER").
Trim whitespace
If you select the "Trim whitespace" option Synkronizer removes spaces at the beginning and end of the cell entries and comments before comparing them. Thus "John Miller" and "John Miller " (with trailing spaces) will be considered the same. You can use this to ignore the differences between empty cells and cells with only spaces.
Ignore Datatype
Depending on cell formatting Excel can store numeric entries as numbers, text or dates. Blank cells as string or empty. This may lead to unexpected results in file comparisons. Cells in Master and Update which look the same may be different to Excel and vice versa. Excel calculation is clever and in many formulas you will not notice the difference. Select this option to ignore these diffences and 'interpret' cell content.
Case sensitive
Trim whitespace
Ignore datatype
User Manual Synkronizer 9.5
Februar 2008 - Page 15
Include All / Ignore Constants / Ignore Formulas
Normally you compare both formulas and constants. Select ignore constants if you want to ignore user input but determine that a file uses the 'latest' formulas. (Synkronizer WILL report a difference if a cell contains a constant and its counterpart a formula.
Numeric Tolerance
Normally numeric tolerance is 0. All differences between numeric entries are reported. In some cases you may want to ignore small differences and focus on the significant ones. Set numeric tolerance to 0.01 to ignore differences of 1 cent or smaller.
Ignore Invisible Rows / Columns
When you select either of these options data in hidden columns or rows will not be compared.Note: The 'Master' file decides if a column/row is hidden or visible.
Ignore Columns
When you select any or multiple 'ignore columns' the data in these columns will not be compared.
Text Filter
With a text filter you can choose to ignore specific differences. Choose between VBA's 'like'operator or a RegEx pattern for Microsoft VBScript Regular Expressions (if installed on your system).
Following are a few examples of how to use a TextFilter:
1. In a project file the cells with 'Done' should be ignored. Syntax: Like. TextFilter: 'Done' (or [Dd]one if you want )
2. In a project file the cells with 'Todo' or 'Done' should be ignored.Syntax: RegEx. TextFilter: 'Todo|Done'
3. In a database the fields with 'New York' or 'Los Angeles' should be ignored.Syntax: RegEx. TextFilter: 'New York|Los Angeles'
Note : Case sensitivity for textfilters depends on Ignore Case option)
Constants/Formulas
Numeric Tolerance
Ignore InvisibleRows / Columns
Ignore Columns
Text Filter
User Manual Synkronizer 9.5
Februar 2008 - Page 16
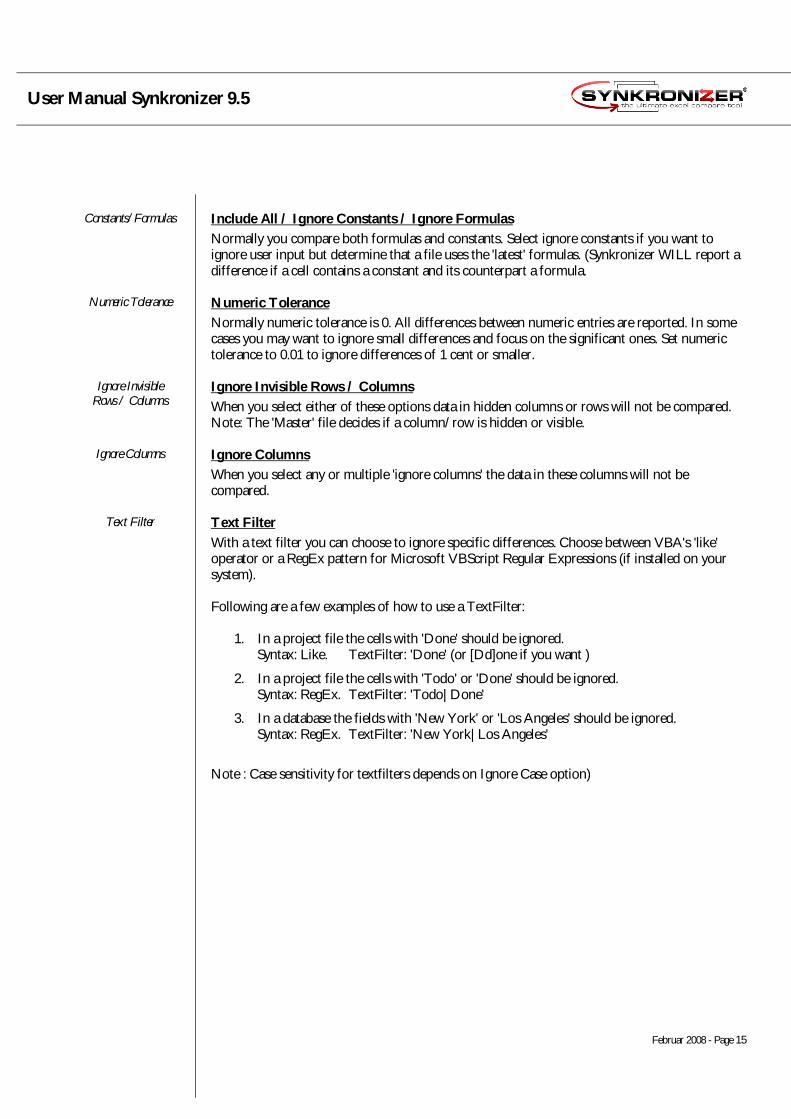
2.3.2 Display
In this section you can determine how Synkronizer should display the data after the comparison is complete.
Show / Hide
When enabled Synkronizer will show or hide selected entries after comparison.
• Deleted / added columns• Deleted / added rows• Duplicate indexes / records• Different cells• Different formats• Identical cells
If you don't want to show some data, just click on the values on the list box. The entry will be marked as "hide" or "delete". In the example shown above all cells will be displayed except the identical cells.
DELETE identical data instead of HIDING it?
Here you can determine whether non-marked data will be hidden or deleted. This option can only be selected if the "Highlighter" action is checked and all other actions are unchecked.
Note:The delete option can only be enabled when the action 'Highlighter' is selected on the compare page and all other actions are deselected.
Show / Hide
User Manual Synkronizer 9.5
Februar 2008 - Page 17
Show columns / rows
If the columns and/or rows are hidden and to be shown, please proceed as follows:
1. Select the entire worksheet (Keyboard Shortcut Ctrl-A)2. Execute the following menu instruction: Format → Rows → Unhide
Arrange windows
Determines how windows are arranged when using Synkronizer.
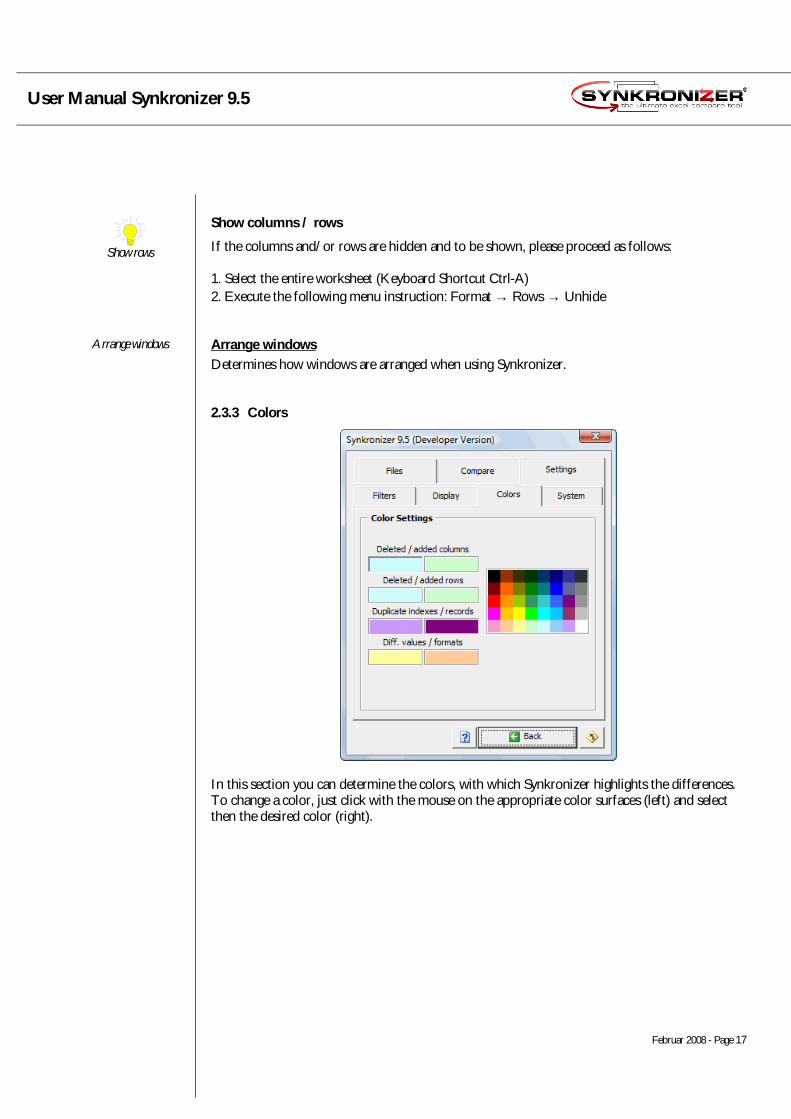
2.3.3 Colors
In this section you can determine the colors, with which Synkronizer highlights the differences. To change a color, just click with the mouse on the appropriate color surfaces (left) and select then the desired color (right).
Show rows
Arrange windows

User Manual Synkronizer 9.5
Februar 2008 - Page 18
2.3.4 System
In this section you can determine the langue. Additionally you can upgrade your Synkronizer version and check, if you are working with the latest release of Synkronizer.
Language Settings
Here you can change the language used in the user-interface and report. The language file (synk95lf.xls) must be in the same folder as the add-in (synk95.xla). By default the files can be found in "C:\Program Files\Synkronizer\Synkronizer 9.5".
The list of available languages is frequently extended. The latest language files can be downloaded at http://www.synkronizer.com
Free registration for translators!We will give you a free Synkronizer registration (Developer Version) if you help us translate Synkronizer material into your native language. Please send us a mail at [email protected] for detailed instructions.
Toolbar Button
If selected an additional command button is added to the standard toolbar.
Software / Version
In this area you can see the version you are working with and you can upgrade or update Synkronizer.
Language Settings
Toolbar Button
Software / Version

User Manual Synkronizer 9.5
Februar 2008 - Page 19
Update software
By clicking this button you can check if you are working with the latest release of Synkronizer. This is only possible with an online internet connection.
Upgrade versionIf you want to upgrade your version (e.g. from the "Standard" to the "Premium" version) you need to press this button.
Update software
Upgrade version

User Manual Synkronizer 9.5
Februar 2008 - Page 20
3 Action
When the "Start" button is pressed the comparison algoritms will analyse your worksheets. After a few seconds you'll see a screen summarizing the results of your comparison.
This summary always appears, regardless of the selected 'Actions'. (No Summary is shown when Synkronizer was started thru VBA code.)

User Manual Synkronizer 9.5
Februar 2008 - Page 21
3.1 Highlighter
If you choose this action, Synkronizer just highlights the differences in the underlying worksheets:
Differences are highlighted with the following (default) colors:
• light blue for deleted columns and rows • green for added and columns and rows• yellow for different cell entries• orange for different formats• lavender for duplicate indexes (only in database mode)• claret for duplicate records (only in database mode)
At one glance Synkronizer clearly displays all differences and you can decide with which version of the worksheet you wish to proceed.
The colors listed above are the default values, you can specify your own color settings as described earlier.
Versions:The action "Highlight Differences" can be used with all versions of Synkronizer.
Highlight Differences
Versions
User Manual Synkronizer 9.5
Februar 2008 - Page 22
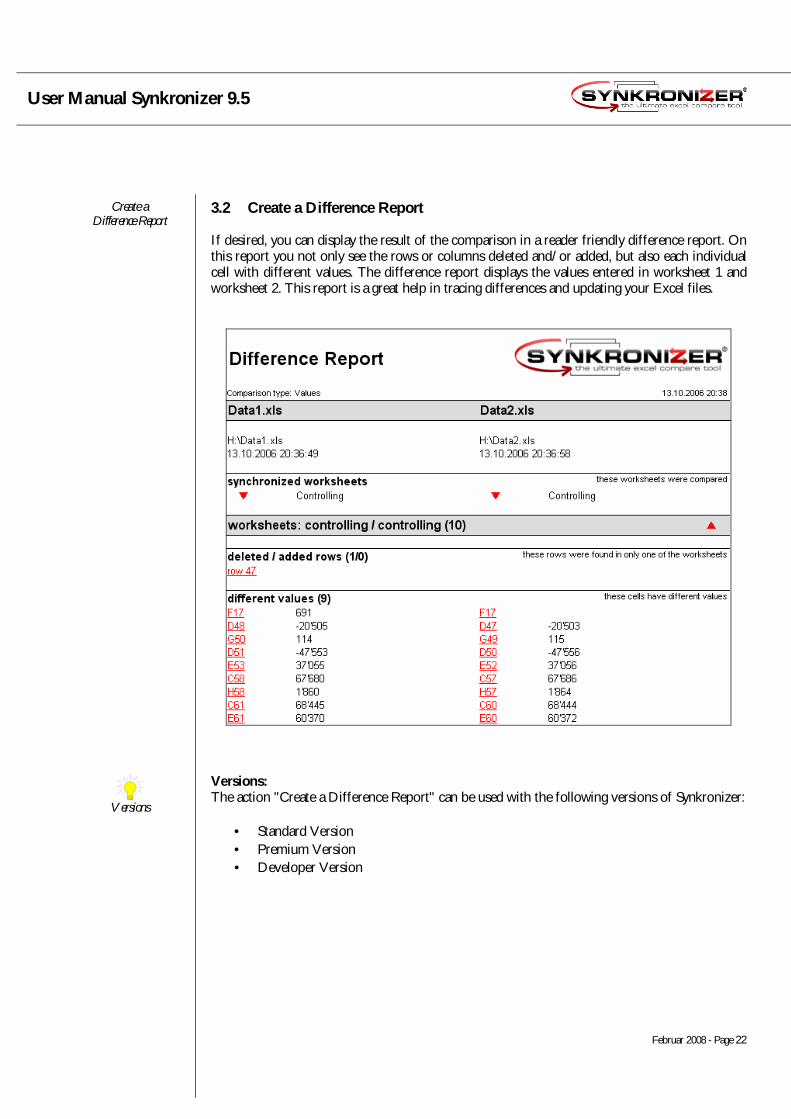
3.2 Create a Difference Report
If desired, you can display the result of the comparison in a reader friendly difference report. On this report you not only see the rows or columns deleted and/or added, but also each individual cell with different values. The difference report displays the values entered in worksheet 1 and worksheet 2. This report is a great help in tracing differences and updating your Excel files.
Versions:The action "Create a Difference Report" can be used with the following versions of Synkronizer:
• Standard Version• Premium Version• Developer Version
Create aDifference Report
Versions

User Manual Synkronizer 9.5
Februar 2008 - Page 23
3.3 Navigator Toolbar
The third function of Synkronizer is the "Navigator" toolbar: After the comparison process the worksheets are displayed vertically or horizontally and a user friendly toolbar is displayed, with which you can easily navigate through the differences.
Detailed information is described in chapter 4 Navigator.
Versions:The "Navigator" can be used with the following versions of Synkronizer:
• Premium Version• Developer Version
Navigator Toolbar
Versions
User Manual Synkronizer 9.5
Februar 2008 - Page 24
4 Navigator Toolbar
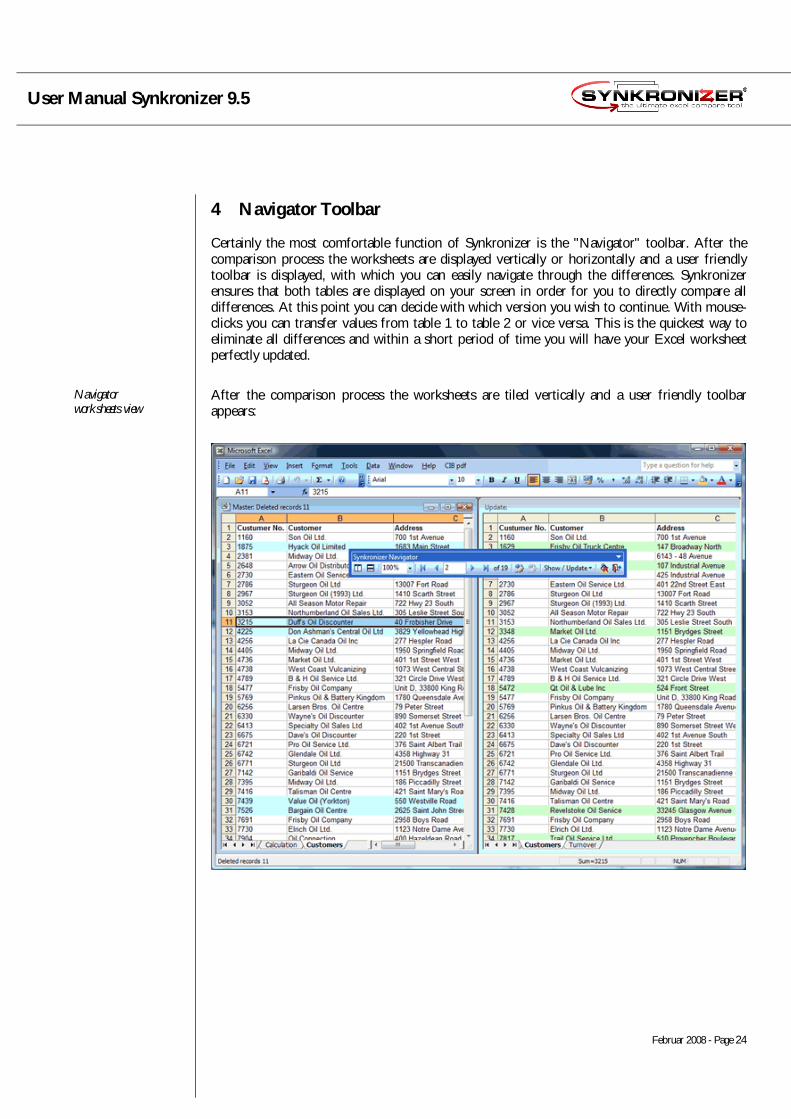
Certainly the most comfortable function of Synkronizer is the "Navigator" toolbar. After the comparison process the worksheets are displayed vertically or horizontally and a user friendly toolbar is displayed, with which you can easily navigate through the differences. Synkronizer ensures that both tables are displayed on your screen in order for you to directly compare all differences. At this point you can decide with which version you wish to continue. With mouse-clicks you can transfer values from table 1 to table 2 or vice versa. This is the quickest way to eliminate all differences and within a short period of time you will have your Excel worksheet perfectly updated.
After the comparison process the worksheets are tiled vertically and a user friendly toolbar appears:
Navigatorworksheets view
User Manual Synkronizer 9.5
Februar 2008 - Page 25
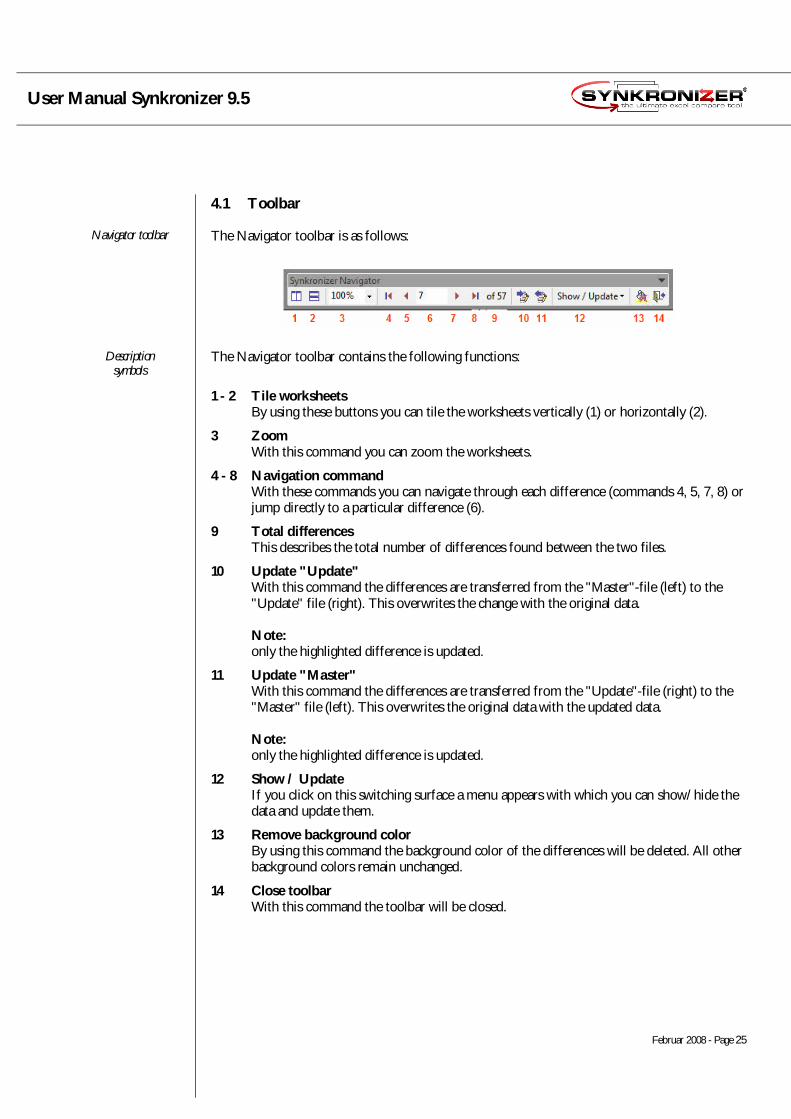
4.1 Toolbar
The Navigator toolbar is as follows:
The Navigator toolbar contains the following functions:
1 - 2 Tile worksheetsBy using these buttons you can tile the worksheets vertically (1) or horizontally (2).
3 ZoomWith this command you can zoom the worksheets.
4 - 8 Navigation commandWith these commands you can navigate through each difference (commands 4, 5, 7, 8) or jump directly to a particular difference (6).
9 Total differencesThis describes the total number of differences found between the two files.
10 Update "Update"With this command the differences are transferred from the "Master"-file (left) to the "Update" file (right). This overwrites the change with the original data.
Note:only the highlighted difference is updated.
11 Update "Master"With this command the differences are transferred from the "Update"-file (right) to the "Master" file (left). This overwrites the original data with the updated data.
Note:only the highlighted difference is updated.
12 Show / UpdateIf you click on this switching surface a menu appears with which you can show/hide the data and update them.
13 Remove background colorBy using this command the background color of the differences will be deleted. All other background colors remain unchanged.
14 Close toolbarWith this command the toolbar will be closed.
Navigator toolbar
Descriptionsymbols

User Manual Synkronizer 9.5
Februar 2008 - Page 26
4.2 Show / Update
With this menu you can show or hide differences. The show menu contains the following: functions:
4.2.1 Show / hide differences
With the menu commands 1 to 7 you can show or hide the desired differences dynamically. Depending on whether the menu commands have a checkmark on the left, differences are shown or hidden. With a checkmark differences, are shown, without one they are hidden.
The following is an explanation of the different menu commands:
21 WorksheetIf multiple worksheets are compared this item will be displayed. You can display only the differences within the selected worksheet. If you are working with only one worksheet this menu item is hidden.
22 Deleted / added columnsIf this menu option is selected, deleted (only in "Master" file) and added (only in "Update" file) colums are shown.
23 Deleted / added rowsWith this option, deleted and/or added rows are shown.
24 Duplicate indexes / records (database mode only)Duplicate indexes and records may occur with a database comparison. If this menu option is selected those rows are shown.
25 Different valuesWith this selection, rows with different cell values (or formulas or comments) are shown.
26 Different formatsIf your worksheets contain different formats you can show or hide the different formats.
Show / Update
Show / hidedifferences
User Manual Synkronizer 9.5
Februar 2008 - Page 27
27 Identical cellsIdentical cells contain the same data in both files. These cells can be shown or not if you select this menu.
28 Update MasterIn this menu you can update the "Master" file (table left hand side) by using the following functions:
28.1 Added columnsThe added columns (of the file "Update") can be added to the "Master"-file. The columns will be transferred from the right to the left worksheet.
28.2 Added rowsThe added rows (of the file "Update") can be added to the "Master"-file. The rows will be transferred from the right to the left worksheet.
28.3 Different valuesThe cells, which contain different values, can be transferred to the "Master"-file. The differences can be transferred directly or by manual confirmation.
28.4 Different formatsThe different format can be transferred from the "Update" to the "Master" file.
28.5 Selected range When only specific differences should be updated. Select a range and press this button. The differences in the selected range will be updated.
29 Update "Update"Within this menu you can update the "Update"-file. The menu functions are identical with the menu "Update Master" with the difference that the data are transferred from the "Master"-file to the "Update"-file (or from left to right).
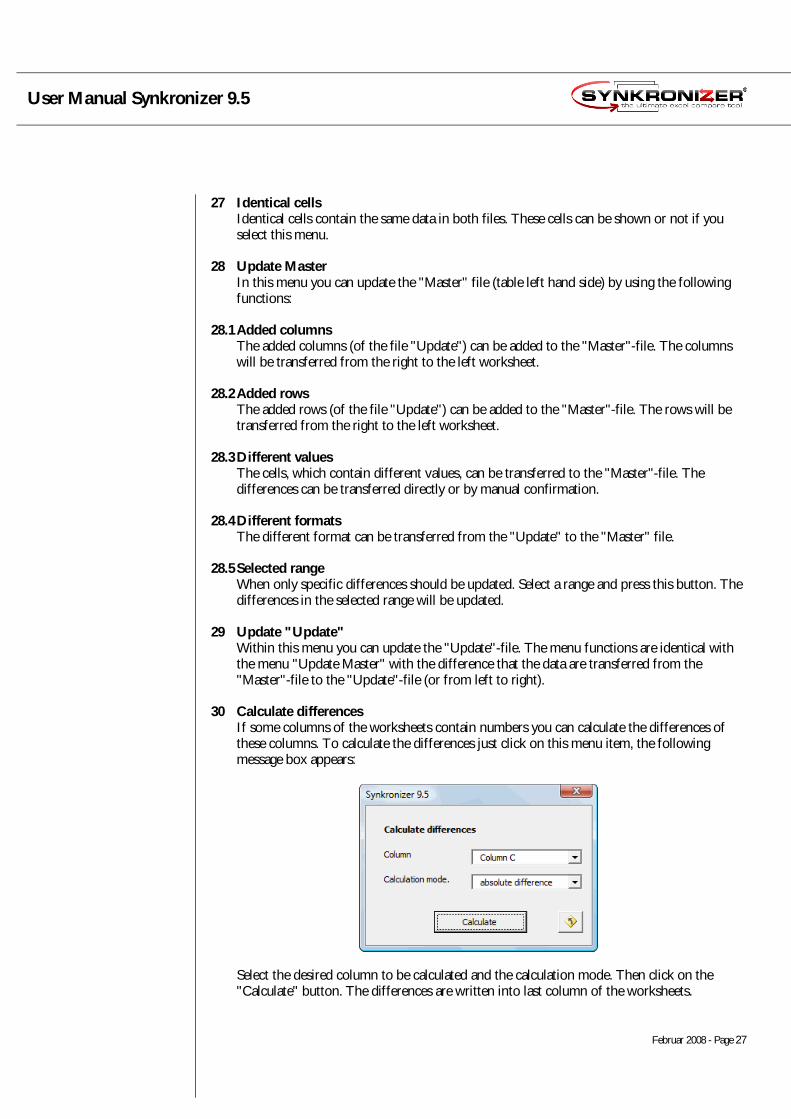
30 Calculate differencesIf some columns of the worksheets contain numbers you can calculate the differences of these columns. To calculate the differences just click on this menu item, the following message box appears:
Select the desired column to be calculated and the calculation mode. Then click on the "Calculate" button. The differences are written into last column of the worksheets.

User Manual Synkronizer 9.5
Februar 2008 - Page 28
31 Options
move to next difference after update
If this menu option is selected the cursor will automatically jump to the next difference after you press Update Master(1st) or Update Update (2nd).
update empty cells
If this menu option is selected all differences will be updated. Deselect this option to prevent cell contents being overwritten with blank (empty) content from the other file.
Example:You want to update your product list. The update contains newer information, but not all fields are complete. To prevent mishaps you don't want to overwrite existing information with blank cells from the incomplete update file.
User Manual Synkronizer 9.5
Februar 2008 - Page 29
5 Synkronizer with Visual Basic for Applications
Synkronizer can also be controlled using Visual Basic for Applications (VBA). This has the advantage that recurring, standardized or complex comparison processes can be automated.
Versions:Synkronizer VBA can be used with the following version of Synkronizer:
• Developer Version
5.1 Syntax
The syntax of the Synkronizer functions is as follows:
Synkronizer(sFileOld As String, sFileNew As String, vSheetOld As Variant, vSheetNew As Variant,
Optional sPasswordOld As String, Optional sPasswordNew As String, Optional sRangeOld As String, Optional sRangeNew As String, Optional sCompareType As String, Optional sHide As String,
Optional sFormats As String, Optional sKeyFields As String, Optional sDBOptions As String, Optional sLink1on1 As String, Optional sAction As String, Optional sReportFile As String, Optional bHyperlinks As Boolean, Optional bDeleteBGColor As Boolean, Optional sFilters As String, Optional sIgnoreCols As String, Optional dTolerance As String, Optional sTextfilter As String) As Variant
5.2 Return Value
The return value of the Synkronizer function is presented as follows :
"Err" Synkronizer could not interpret one or more of the arguments or errors during processing.
Array Synkronizer detected differences and returns the differences in a two dimensional array which is arranged as follows:
Versions
Syntax
Return Value

User Manual Synkronizer 9.5
Februar 2008 - Page 30
Element(1, 1): Caption "Total differences"Element(1, 2): Number of total differencesElement(2, 1): Caption "Deleted worksheets"Element(2, 2): Number of deleted worksheetsElement(3, 1): Caption "Added worksheets"Element(3, 2): Number of added worksheets
Element(4, 1): Caption "Deleted columns"Element(4, 2): Number of deleted columnsElement(5, 1): Caption "Added columns"Element(5, 2): Number of added columnsElement(6, 1): Caption "Duplicate indexes"Element(6, 2): Number of duplicate indexesElement(7, 1): Caption " Duplicate records "Element(7, 2): Number of duplicate recordsElement(8, 1): Caption "Deleted rows"Element(8, 2): Number of deleted rowsElement(9, 1): Caption "Added rows"Element(9, 2): Number of added rowsElement(10, 1): Caption "Different Cell Entries"Element(10, 2): Number of different cell entries Element(11, 1): Caption "Different Formats"Element(11, 2): Number of different formats Element(12, 1): Caption "Used filters:"Element(12, 2): Used filters
5.3 Arguments
The function contains the following arguments.
sFileOld File (incl. Path) of the 1st file (Master).You can use Excel-, text- and odc-files. Access databases must be entered in an odc file.
sFileNew File (incl. Path) of the 2nd file (Update).
vSheetOld Worksheet name or number of the 1st file. You can enter the following values:1 the first worksheet of the 1st file will be compared3 the third worksheet of the 1st file will be compared"sheet1" the worksheet with the caption "sheet1" will be compared"" all worksheets will be compared.
vSheetNew Worksheet name or number of the 2nd file.
sPasswordOld Optional. Password of the protected sheet of the 1st file.
sPasswordNew Optional. Password of the protected sheet of the 2nd file.
sRangeOld Optional. A1-Range of 1st worksheet. If this argument is empty, all cells will be compared.
Arguments
User Manual Synkronizer 9.5
Februar 2008 - Page 31
aRangeNew Optional. A1-Range of 2nd worksheet.
sCompareType Optional. This parameter contains the comparison type. You can choose one or multiple of the following characters:
v Comparison by valuesf Comparison by formulasc Comparison by comments
If this parameter is empty, a comparison by values is done (see also chapter 2.2.1 Area "Contents"). E.g. you want to make "case sensitive"-value comparison, just enter "vs".
sHide Optional. With this parameter you can set the data types to be hidden. You can choose one or multiple of the following options:
c deleted / added columnsr deleted / added rowsd duplicate indexes / recordsv different values (or formulas, comments)f different formatsi identical cells
sFormats Optional. With this parameter you determine the formats to compared:
n Number formattingsa Alignmentsf Fontsb Bordersp Patternst Cell protections
sKeyFields Optional. If you want to make a database-comparison, please enter the names of the keys in this section. The keys are divided with semicolons ";" (e.g. Family name; Fist name; City). If you do not make a database-comparison, leave the field empty.
sDBOptions Optional. If you are making a database-comparison, you can also set the following options:
s the data records will be sortedg the data records will groupedi a Synkronizer ID will be added at the end of the database
sLink1on1 Optional. If the columns or rows shall be linked 1 on 1 (the worksheets contain no added/deleted columns or rows), you can set these options:
c the columns are linked 1 on 1r the rows are linked 1 on 1
User Manual Synkronizer 9.5
Februar 2008 - Page 32
sAction Optional. This argument contains the action function. You can enter the following arguments:
h the differences are highlightedr a difference report is createdn the navigator is started
The values can be combined. If the differences should be highlighted and the Navigator started, you need to enter "hr". If this argument is empty, the worksheets are just compared without any action.
sReportFile Optional. If you want to create a difference report, just enter the filename (incl. Path) for the report to be created (e.g. C:\Documents\Report.xls).
bHyperlinks Optional. If true then difference report will contain hyperlinks.
bDeleteBGColor Optional. If true then existing background colors will be removed before the differences are highlighted.
sFilters Optional. Combination(s) of following filters:
s (case) sensitive comparisont trim whitespaced ignore datatypec ignore hidden columns r ignore hidden rows k ignore constants f ignore formulas
options can be combined in random order. (except ignore Constants /Formulas).
sIgnoreCols Optional. Ignore specified columns. A semicolon (;) delimited string.Use column numbers (relative to range) or Fields names in database mode.
dTolerance Optional. Ignore (numeric) difference below the tolerance.
sTextfilter Optional. Sets text filter.Must start with like: or regex: Then append a valid pattern.
Examples:Like like:doneRegEx regex:yes|no
User Manual Synkronizer 9.5
Februar 2008 - Page 33
5.4 Using Synkronizer in your VBA Scripts
To execute Synkronizer with VBA, set a reference to Synkronizer in your scripts. To set a reference, proceed as follows:
1. open the Excel worksheet that contains the VBA script
2. open the VBA Editor (Keyboard Shortcut Alt-F11)
3. set the focus to your VBA script
4. go to the Tools menu and select References
5. find 'Synkronizer95' in the list, and put a check next to it
Now you are able to use the Synkronizer-function. You can see some examples of VBA scripts below. Please feel free to use them.
5.5 VBA-Examples
5.5.1 Example 1
This example highlights the differences between the worksheets named "Addresses" in the files FileOld and FileNew.
Public Sub Example_1() Dim vSynk As Variant Dim sMsg As String Dim i As Integer
On Error GoTo errH
vSynk = Synkronizer(sFileOld:="C:\Documents\FileOld.xls", _ sFileNew:="C:\Documents\FileNew.xls", _ vSheetOld:="Addresses", _ vSheetNew:="Addresses", _ sAction:="h")
Beep If Not IsArray(vSynk) Then
MsgBox vSynk, vbExclamation ElseIf vSynk(1, 2) = 0 Then MsgBox "No differences noted.", vbInformation Else sMsg = "Synkronizer found differences:" & vbNewLine & vbNewLine For i = 1 To UBound(vSynk) sMsg = sMsg & vSynk(i, 1) & ": " & vSynk(i, 2) & vbNewLine Next i
MsgBox sMsg, vbInformation End If
Exit Sub
errH: MsgBox Err.Description, vbExclamationEnd Sub
VBA Examples
User Manual Synkronizer 9.5
Februar 2008 - Page 34
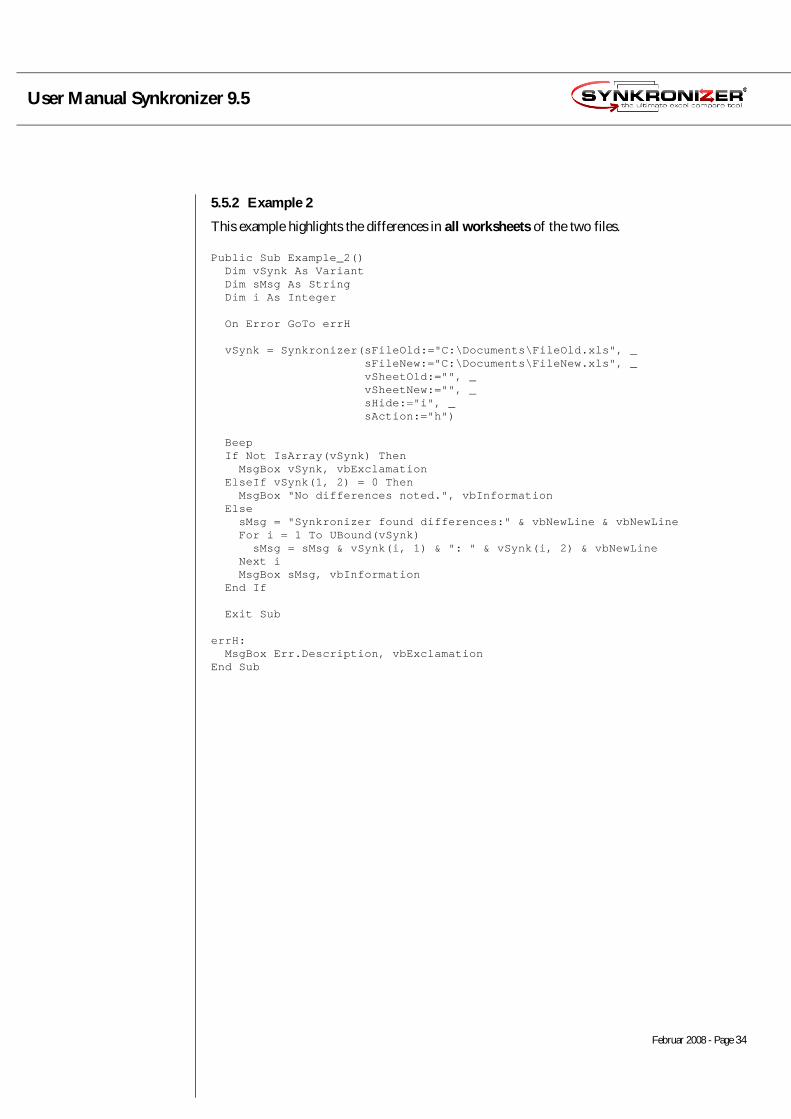
5.5.2 Example 2
This example highlights the differences in all worksheets of the two files.
Public Sub Example_2() Dim vSynk As Variant Dim sMsg As String Dim i As Integer
On Error GoTo errH
vSynk = Synkronizer(sFileOld:="C:\Documents\FileOld.xls", _ sFileNew:="C:\Documents\FileNew.xls", _ vSheetOld:="", _ vSheetNew:="", _ sHide:="i", _ sAction:="h")
BeepIf Not IsArray(vSynk) Then
MsgBox vSynk, vbExclamation ElseIf vSynk(1, 2) = 0 Then MsgBox "No differences noted.", vbInformation Else sMsg = "Synkronizer found differences:" & vbNewLine & vbNewLine For i = 1 To UBound(vSynk) sMsg = sMsg & vSynk(i, 1) & ": " & vSynk(i, 2) & vbNewLine Next i
MsgBox sMsg, vbInformation End If
Exit Sub
errH: MsgBox Err.Description, vbExclamationEnd Sub

User Manual Synkronizer 9.5
Februar 2008 - Page 35
5.5.3 Example 3
This procedure compares the first worksheet of both Excel files and creates a difference report called "Report.xls".
Public Sub Example_3() Dim vSynk As Variant Dim sMsg As String Dim i As Integer
On Error GoTo errH
vSynk = Synkronizer(sFileOld:="C:\Documents\FileOld.xls", _ sFileNew:="C:\Documents\FileNew.xls", _ vSheetOld:=1, _ vSheetNew:=1, _ sAction:="r", _
sReportFile:="C:\Documents\Report.xls")
Beep If Not IsArray(vSynk) Then
MsgBox vSynk, vbExclamation ElseIf vSynk(1, 2) = 0 Then MsgBox "No differences noted.", vbInformation Else sMsg = "Synkronizer found differences:" & vbNewLine & vbNewLine For i = 1 To UBound(vSynk) sMsg = sMsg & vSynk(i, 1) & ": " & vSynk(i, 2) & vbNewLine Next i
MsgBox sMsg, vbInformation End If
Exit Sub
errH: MsgBox Err.Description, vbExclamationEnd Sub

User Manual Synkronizer 9.5
Februar 2008 - Page 36
5.5.4 Example 4
This example compares the databases "Addresses". The primary key is "ID". The data records will be grouped and the Synkronizer IDs are added to the databases. Finally the differences are highlighted in both files and the Navigator is started.
Public Sub Example_4() Dim vSynk As Variant Dim sMsg As String Dim i As Integer
On Error GoTo errH
vSynk = Synkronizer(sFileOld:="C:\Documents\FileOld.xls", _ sFileNew:="C:\Documents\FileNew.xls", _ vSheetOld:="Addresses", _ vSheetNew:="Addresses", _ sKeyFields:="ID", _ sDBOptions:="gi", _ sAction:="hn")
Beep If Not IsArray(vSynk) Then
MsgBox vSynk, vbExclamation ElseIf vSynk(1, 2) = 0 Then MsgBox "No differences noted.", vbInformation Else sMsg = "Synkronizer found differences:" & vbNewLine & vbNewLine For i = 1 To UBound(vSynk) sMsg = sMsg & vSynk(i, 1) & ": " & vSynk(i, 2) & vbNewLine Next i
MsgBox sMsg, vbInformation End If
Exit Sub
errH: MsgBox Err.Description, vbExclamationEnd Sub

User Manual Synkronizer 9.5
Februar 2008 - Page 37
5.5.5 Example 5 (Compare Multiple Files)
This procedure compares one Master-file (Master.xls) with all files within the folder "C:\Documents\New\" and produces a difference report for every comparison. The difference reports are saved in the folder "C:\Documents\Reports\".
Public Sub Example_5() Dim sFile As String Dim vSynk As Variant Dim sFileOld As String
Dim sFileNew As String Dim sPathNew As String Dim sPathReport As String Dim sFileReport As String
On Error GoTo errH
sPathReport = "C:\Documents\Reports\"
sFileOld = "C:\Documents\Old\Master.xls" sPathNew = "C:\Documents\New\" sPathReport = "C:\Documents\Reports\"
sFileNew = Dir(sPathNew & "*.xls") Do While sFileNew <> "" sFileReport = "Difference Report " & sFileNew
vSynk = Synkronizer(sFileOld:=sFileOld, _ sFileNew:=sPathNew & sFileNew, _ vSheetOld:=1, _ vSheetNew:=1, _
sAction:="r", _ sReportFile:=sPathReport & sFileReport)
If Not IsArray(vSynk) ThenMsgBox vSynk, vbExclamation
End End If
Workbooks(sFileNew).Close SaveChanges:=True Workbooks(sFileReport).Close SaveChanges:=False sFileNew = Dir Loop
Beep MsgBox "Finished"
Exit Sub
errH: MsgBox Err.Description, vbExclamationEnd Sub
Compare multiple files


