A51971AD January 2014 User’s Guide PA 800 plus and 32 Karat Software PA 800 plus Pharmaceutical Analysis System System Administration Beckman Coulter, Inc. 250 S. Kraemer Blvd. Brea, CA 92821 U.S.A.
The following is a description of symbols and labels used on the Beckman Coulter PA 800 plus Pharmaceutical Analysis System or shown in this manual.
WARNING
If the equipment is used in a manner not specified by Beckman Coulter, Inc., the
protection provided by the instrument may be impaired.
General Biohazard Symbol
This caution symbol indicates a possible biohazard risk from patient specimen contamination.
Caution, Biohazard Label
This caution symbol indicates a caution to operate only with all covers in position to decrease risk of personal injury or biohazard.
A51971AD v
Safety Notices
Symbols and Labels
Caution, Moving Parts Label
This caution symbol warns the user of moving parts that can pinch or crush.
High Voltage Electric Shock Risk Symbol
This symbol indicates that there is high voltage and there is a risk of electric shock when the user works in this area.
Class 1 Laser Caution Label
A label reading “Complies with 21 CFR 1040.10 and 1040.11 except for deviations pursuant to Laser Notice No. 50, dated June 24, 2007” is found near the Name Rating tag. The laser light beam is not visible.
CAUTIONPARTS MOVEAUTOMATICALLY
A015081L.EPS
144557-AB
A016352L.EPS
A51971ADvi
Safety Notices
Symbols and Labels
Sharp Object Label
A label reading “CAUTION SHARP OBJECTS” is found on the PA 800 plus.
Recycling Label
This symbol is required in accordance with the Waste Electrical and Electronic Equipment (WEEE) Directive of the European Union. The presence of this marking on the product indicates:
1. The device was put on the European Market after August 13, 2005.
2. The device is not to be disposed of via the municipal waste collection system of any member state of the European Union.
It is very important that customers understand and follow all laws regarding the proper decontamination and safe disposal of electrical equipment. For Beckman Coulter products bearing this label, please contact your dealer or local Beckman Coulter office for details on the take back program that facilitates the proper collection, treatment, recovery, recycling, and safe disposal of this device.
Disposal of Devices Containing Mercury Components
This product contains a mercury-added part. Recycle or dispose of according to local, state, or federal laws. It is very important that you understand and comply with the safe and proper disposal of devices containing mercury components (switch, lamp, battery, relay, or electrode). The mercury component indicator label can vary depending on the type of device.
CAUTIONSHARP OBJECTS
A16558-AA
A016351L.EPS
A51971AD vii
Safety Notices
Symbols and Labels
Restriction of Hazardous Substances (RoHS) Labels
These labels and materials declaration table (the Table of Hazardous Substance’s Name and Concentration) are to meet People’s Republic of China Electronic Industry Standard SJ/T11364-2006 “Marking for Control of Pollution Caused by Electronic Information Products” requirements.
China RoHS Caution Label — This label indicates that the electronic information product contains certain toxic or hazardous substances. The center number is the Environmentally Friendly Use Period (EFUP) date, and indicates the number of calendar years the product can be in operation. Upon the expiration of the EFUP, the product must be immediately recycled. The circling arrows indicate the product is recyclable. The date code on the label or product indicates the date of manufacture.
China RoHS Environmental Label — This label indicates that the electronic information product does not contain any toxic or hazardous substances. The center “e” indicates the product is environmentally safe and does not have an Environmentally Friendly Use Period (EFUP) date. Therefore, it can safely be used indefinitely. The circling arrows indicate the product is recyclable. The date code on the label or product indicates the date of manufacture.
A51971ADviii
Safety Notices
Symbols and Labels
Alerts for Warning, Caution, Important, and Note
WARNING
WARNING indicates a potentially hazardous situation which, if not avoided, could
result in death or serious injury. The warning can be used to indicate the
possibility of erroneous data that could result in an incorrect diagnosis (does not
apply to all products).
CAUTION
CAUTION indicates a potentially hazardous situation, which, if not avoided, may
result in minor or moderate injury. It may also be used to alert against unsafe
practices. The caution can be used to indicate the possibility of erroneous data
that could result in an incorrect diagnosis (does not apply to all products).
IMPORTANT IMPORTANT is used for comments that add value to the step or procedure being performed.
Following the advice in the IMPORTANT notice adds benefit to the performance of a piece of equipment
or to a process.
NOTE NOTE is used to call attention to notable information that should be followed during installation, use,
or servicing of this equipment.
A51971AD ix
Safety Notices
Symbols and Labels
A51971ADx
Contents
Revision History, iii
Safety Notices, v
32 Karat Enterprise Overview, xiii
CHAPTER 1: Getting Started, 1-1
Setting the Login Option, 1-1To Enable Login, 1-1
Data System User Passwords, 1-2
Using the Networked Domain, 1-2
Selecting a User from a Network Domain, 1-2
Designating the System Administrator from the Domain, 1-3Additional Security, 1-4
Selecting a System Administrator from the Data System, 1-4
CHAPTER 3: Using 32 Karat Under System Administration, 3-1
Creating New Instruments, 3-1Instrument Administration Login, 3-1
Setting User-Access to Instruments, 3-1By Instrument Administrator, 3-1By System Administrator, 3-2
xi
Contents
CHAPTER 4: Additional Features, 4-1
Electronic Signature, 4-1Role Names, 4-2Number of Levels, 4-2Electronic Signature Reasons, 4-2Modifying the Electronic Signature Reasons, 4-3
Global Options, 4-4
System Activity Log, 4-4Manual Entry, 4-5Export, 4-6Archive, 4-6Purge, 4-6
CHAPTER 5: Example Administration Setup, 5-1
Laboratory Personnel, 5-1
Process Completion, 5-3
APPENDIX A: Worksheets, A-1
User Privileges, A-1
xii
32 Karat Enterprise Overview
Introduction
The PA 800 plus software includes the 32 Karat software. System Administration of instruments and users is done through the 32 Karat Enterprise screen. For the proper functioning of the PA 800 plus software, we highly recommend you enable the System Administration option. This is done by selecting Tools > Options, the Enterprise tab, and Enable user logins and permissions.
After these settings are enabled, each user must log in. This feature helps to ensure data integrity and system security.
Enterprise Screen
When the 32 Karat software is launched, the Enterprise Screen displays.
Figure 1 32 Karat Enterprise Screen
A51971AD xiii
32 Karat Enterprise Overview
System Administration
The Enterprise manages the following:
• Instruments - data acquisition and analysis
• Projects - specially identified sets of folders
• System Administration - user privileges and security
System Administration
System Administration supplies the tools to manage account and user privileges and security. When the 32 Karat Software is installed, security features are enabled and the Enterprise Screen contains the following users, groups, instruments, and projects:
User: pa800 password: plus
User: proteomelab password: pa800
Group: Characterize
Sub-Group: Proteins
Instrument - Project - Application
CHO
cIEF
IgG Purity
Performance
SDS MW
In System Administration, different types of users are designated along with limits to their access and control. The limit to the number of users that have access to the PA 800 plus and 32 Karat Software is also configured in System Administration.
For the proper functioning of the PA 800 plus, all instruments defined should have a project defined that is named exactly the same. The PA 800 plus associates like project names with like instrument names to simply the user experience.
System Administration Workflow
This user’s guide uses the following sequence for system setup:
1. Create System Administrator
2. Add Users
3. Create Projects
4. Assign Instrument Administrator
A51971ADxiv
32 Karat Enterprise Overview
User Types
5. Assign User Privileges
6. Create Instruments
7. Grant User Access to Instruments
System Administration Wizard
The System Administration Wizard and options within the Tools menu are active to enable setup of the above-listed features.
User Types
The 32 Karat Software has three different types of users:
• System Administrator
• Instrument Administrator
• User
System Administrator
The System Administrator can use all functions within the software, as well as manage the following:
• Enable login
• Manage project settings
• Add/Remove user access to 32 Karat and to PA 800 plus
• Assign instrument or instrument administrator responsibility to users
• Manage project privileges for each user
Instrument Administrator
The Instrument Administrator is limited to configuring instruments:
• Managing instruments (add, delete, rename, or configure)
• Granting user access to instruments
User
The user is limited to the specific Instruments and Projects as specified by the Administration Policies set by the Instrument and System Administrator.
A51971AD xv
32 Karat Enterprise Overview
User Locations
User Locations
The 32 Karat Enterprise Software administers user names and passwords. If connected to a network, user names can be selected from a domain. The password is inherited from the domain and subject to all of the domain password limits.
NOTE As installed, 32 Karat Software has two default users: pa800 and ProteomeLab. Both of these accounts
have system and instrumentation administration privileges.
A51971ADxvi
CHAPTER 1
Getting Started
When the 32 Karat Software is launched, the Enterprise screen displays. The Enterprise screen is the
main system module that controls many smaller applications, one of which is System Administration.
Setting the Login Option
When login is enabled, a valid user name and password must be entered to access instrument or administration features.
To Enable Login
1 Double-click on the 32 Karat icon to open the Enterprise screen.
2 Select the Tools.
3 To verify that the System administration mode is enabled, check to see if Enterprise Logout is
displayed under the Tools menu. If it is not, select Enterprise Login and login as pa800 with the password plus.
IMPORTANT The Options dialog box displays different tabs depending on whether a valid System
Administrator is logged in.
• If Enterprise Logout is not shown, the Enterprise tab on the Options dialog box is not visible.
• If no System Administrator has been selected, the Enterprise tab on the Options dialog box will
be visible.
• If a System Administrator has already been selected, the System Administrator user name and
password must be entered to enable System Administration.
4 Select Tools > Options.
5 Select the Enterprise tab.
A51971AD 1-1
Getting Started
Using the Networked Domain
6 Select Enable user logins and permissions.
Data System User Passwords
Adding users to the data system requires entry and confirmation of user passwords. If a high level of security is not required, the System Administrator can allow the system to save user passwords after the first login. These passwords will stay in the 32 Karat memory until the 32 Karat Software is closed.
A data system user may change their password at any time by selecting Tools > Change Password.
IMPORTANT Domain user passwords are managed according to Network Administration policies.
Using the Networked Domain
If the system is connected to a network, users can be selected from a specified domain. This can provide a greater degree of security, because passwords are inherited from the network domain.
As with data system users, the System Administrator can limit access to only one domain user at a time. If this feature is enabled, the System Administrator can also specify this user as the current domain user (the user currently logged on to the network at the PA 800 plus controller).
Selecting a User from a Network Domain
Identify the name of the network domain that contains the names of the users to be added.
NOTE Adding Domain Users may require assistance from your Network Administrator.
1 Open My Network Places on the Desktop to search for nearby domain names.
2 Select Entire Network. This option will display all of the available domains.
3 Select Tools > Options > Enterprise tab and Enable Login from the Enterprise screen.
4 Select Domain controller.
5 Select Add Domain.
A51971AD1-2
Getting Started
Designating the System Administrator from the Domain 1
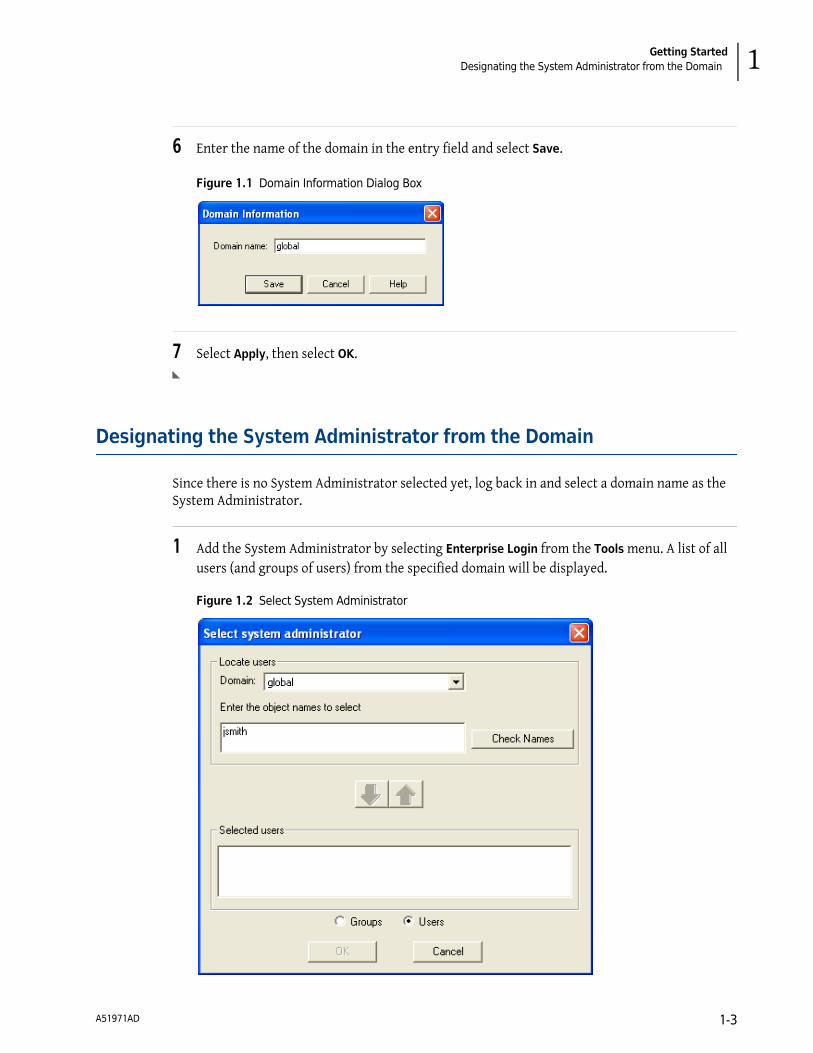
6 Enter the name of the domain in the entry field and select Save.
Figure 1.1 Domain Information Dialog Box
7 Select Apply, then select OK.
Designating the System Administrator from the Domain
Since there is no System Administrator selected yet, log back in and select a domain name as the System Administrator.
1 Add the System Administrator by selecting Enterprise Login from the Tools menu. A list of all
users (and groups of users) from the specified domain will be displayed.
Figure 1.2 Select System Administrator
A51971AD 1-3
Getting Started
Selecting a System Administrator from the Data System
2 Enter a user or group name and select Check Names. If the name is found, the down arrow turns
green. Select the valid name and the green arrow to move the name into the Selected user group. Select OK. A login dialog box displays to confirm the System Administrator’s user name and password.
3 Enter the network user name and password to continue in System Administration Mode.
Additional Security
The 32 Karat Software provides additional security to domain user accounts by adding options for Logout.
1 Select Tools > Options, then select General tab.
2 Select the option to log out the current user when idle for:. Enter the time out desired in minutes.
3 Select the E-mail tab and fill in the required fields. You may need a network administrator to
help you with the information required.
4 Select OK.
Selecting a System Administrator from the Data System
If a domain controller is not desired for logging in, you can use the Data System on the local PA 800 plus controller.
1 Select Tools > Options, then Enterprise.
2 Select Enable Login.
3 Select Data System.
4 Select Add User.
A51971AD1-4
Getting Started
Selecting a System Administrator from the Data System 1
5 Enter the user name and password for the System Administrator and select Save.
6 Select Save > Apply, then select OK.
7 Select Tools > Enterprise Login.
8 Select Tools > System Administration Wizard.
9 Select User, then select Next.
10 Select the user to be specified as the System Administrator and select Next.
11 Select the option for System Administration and select Finish.
More System Administrator Wizard features are described in CHAPTER 2, System Administration Wizard.
12 Select Tools > Enterprise Logout, then log in by selecting Tools > Enterprise Login.
13 Enter the user name and password for the user, then log in as the System Administrator.
NOTE The System Administrator name displays in the lower-left corner of the Enterprise screen.
Figure 1.3 Enterprise Screen depicting System Administrator login
A51971AD 1-5
Getting Started
Selecting a System Administrator from the Data System
A51971AD1-6
CHAPTER 2
System Administration Wizard
As the System Administrator, you can create projects, add users, and assign the user permissions.
Projects are represented by assigned Windows folders that are recognized by the software. Access for each is set by the System Administrator.
Adding Projects
After entering users, the System Administrator must specify project access for each user.
1 Select Tools > System Administration Wizard.
2 Select Project.
3 Select Next.
4 Select Create a new project.
5 Select Next to enter the General Project Settings.
6 Enter a new project name in Name.
This name will be assigned to a Windows folder that 32 Karat identifies as a project. The default path for all projects is C:\32Karat\Projects, but a different path can be specified.
NOTE Subfolders for this project will be automatically created.
A51971AD 2-1
System Administration Wizard
Additional Project Settings
Figure 2.1 Setting the Project Name
Additional Project Settings
1 Click Next to specify audit trails for this project.
Method and sequence audit trails can be enabled individually as they are created, or they can be made active automatically within the project as specified in this dialog box.
2 Select Next to define the Electronic Signature roles. These roles explain what each user
signature means for a given data file. For more information see Electronic Signature in CHAPTER 4, Additional Features.
3 Click Next to specify the users that will have access to this project.
A51971AD2-2
System Administration Wizard
Additional User Settings 2
Select Users
This setting describes the features each user can access in each project.
1 Select one or more users from the Available Users column. Use the SHIFT key to select multiple
contiguous users, or the (Control)key to select multiple non-contiguous users. Use the arrow
keys in the center to move users between the Available and Selected users.
2 Select Next to assign user privileges
3 Select one or more users from the Selected Users list (use the (SHIFT) or (CTRL) key to select
multiple users, or (CTRL) +A to select all users). Next select from the Unassigned privileges list
(use the (SHIFT) or (CTRL) key to select multiple privileges, or (CTRL) +A to select all privileges),
then use the arrow key to move them to the Assigned privileges.
See User Privileges in APPENDIX A, Worksheets for a complete list of user privileges. When options listed in the left pane are transferred to the right pane, they become assigned privileges for the selected users. This means a user has the right to use the specified feature in this project.
4 Select Next to set the user Electronic Signature Role.
User Electronic Signature Roles
As described above, the electronic signature roles for each project can be uniquely specified. If a user has been granted access to this option, the electronic signature role of the user must be set. See Electronic Signature in CHAPTER 4, Additional Features for more information.
After assigning electronic signature roles, select Finish.
Additional User Settings
The System Administrator may also designate another user as a System Administrator or an Instrument Administrator.
NOTE An Instrument Administrator is responsible for adding and configuring instruments.
1 Launch the System Administration Wizard from the Tools menu.
2 Select User.
A51971AD 2-3
System Administration Wizard
Additional User Settings
3 Click Next.
4 Select the user you want to grant System Administrator privileges.
5 Select System Administration or Instrument Administration.
NOTE In some cases, the Instrument Administrator may be the same user as the System Administrator.
6 Click Finish.
NOTE Ensure that at least one user is designated as a System Administrator and at least one user is
designated as an Instrument Administrator.
7 Select Enterprise Logout from the Tools menu to enable the settings.
A51971AD2-4
CHAPTER 3
Using 32 KaratUnder System Administration
Creating New Instruments
With a new PA 800 plus system, five instruments are installed. Only an Instrument Administrator can create new instruments.
Instrument Administration Login
The Instrument Administrator must first log into the Enterprise by selecting Enterprise Login from the Tools menu. After the Instrument Administrator enters the correct user name and password, the login dialog box indicates the user name and instrument administration mode in the bottom right corner of the active dialog box.
Figure 3.1 User name and Instrument Administration Mode
Create and configure instruments as instructed in the online help. With instruments present and configured, give access to the users.
Setting User-Access to Instruments
By Instrument Administrator
An Instrument Administrator can grant instrument access to existing users by right-clicking on the instrument and selecting Add/Modify Users….
Double-click on a user name to add users from the list on the left, or select and use the arrow buttons in the center to move users between Available and Selected users for the instrument.
A51971AD 3-1
Using 32 Karat Under System Administration
Setting User-Access to Instruments
By System Administrator
The System Administrator can also provide instrument access to a user from the System Administration Wizard.
1 Select Enterprise Login from the Tools menu. Enter use name and password and click Login.
2 Select Tools > System Administration Wizard. Select User and select Restart selected wizard when
finished.
3 Select Next.
4 Select a User.
5 Select Next.
6 Modify Administration privileges and select Next. Select instruments and use the arrow buttons
in the center to assign instrument access to users.
7 Select Finish.
8 Repeat steps 4 through 7 for each additional user. Select Cancel to close the wizard.
A51971AD3-2
CHAPTER 4
Additional Features
Electronic Signature
Electronic Signature features are set by the System Administrator and allow the user to acquire, review and/or sign off on data in a non-paper format.
The 32 Karat Software includes technical controls to facilitate 21 CFR part 11 compliance. Activation of Electronic Signatures assists with this compliance process by allowing for the generation of electronic audit trails in addition to electronic record keeping.
1 Select System Administration Wizard from the Tools menu.
2 Select Project, then select Next.
3 Select Change a project's settings, then select Next.
4 Select the project, then select Next.
5 Select Next, modify audit trail settings, then select Next
6 Define the Electronic Signature Roles applicable to the selected project. Select Finish or Next to
modify any other settings for the project.
A51971AD 4-1
Additional Features
Electronic Signature
Figure 4.1 Electronic Signature Roles Dialog Box
Role Names
Default names for the various signature roles are displayed, along with the signature reasons. To change a role name, highlight the role name, then retype it.
Number of Levels
Select the number of signature levels for this project. The default is 3. Once a user has electronically signed a data file, it may not be revoked by someone with a lower signature role.
Electronic Signature Reasons
Current signature reasons are displayed. To add, change, or delete Electronic Signature Reasons, click Modify.
A51971AD4-2
Additional Features
Electronic Signature 4
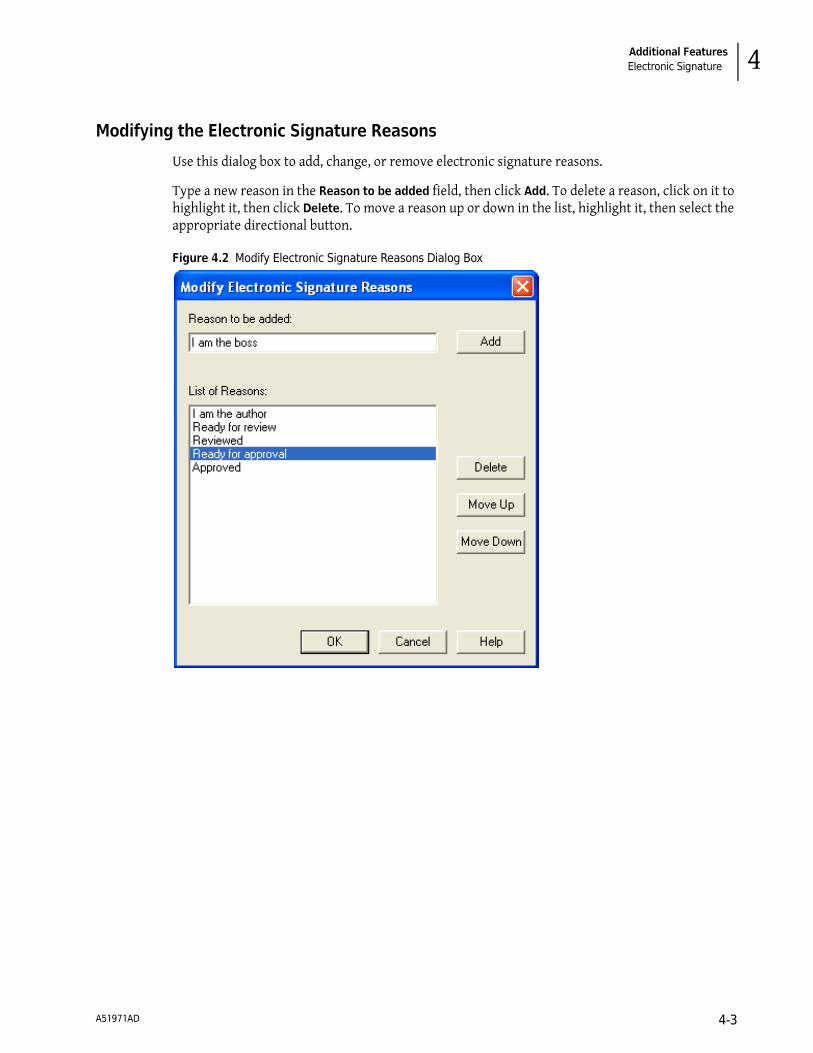
Modifying the Electronic Signature Reasons
Use this dialog box to add, change, or remove electronic signature reasons.
Type a new reason in the Reason to be added field, then click Add. To delete a reason, click on it to highlight it, then click Delete. To move a reason up or down in the list, highlight it, then select the appropriate directional button.
Select Tools > Options > General Tab. This option allows the System Administrator to automatically assign security settings to the entire system.
NOTE We recommend that you enable Extended security and select Enable system activity log.
Figure 4.3 Enable System Activity Log and Extended Security
System Activity Log
1 To view the current system activity log, go to the Main Menu.
2 Select File > System Activity Log > Display Log.
The current system activity log displays. Right-click in the table for a menu used to access the functions of the Activity Log.
IMPORTANT This menu is disabled unless the user has System Administration or Instrument
Administration rights assigned.
A51971AD4-4
Additional Features
System Activity Log 4
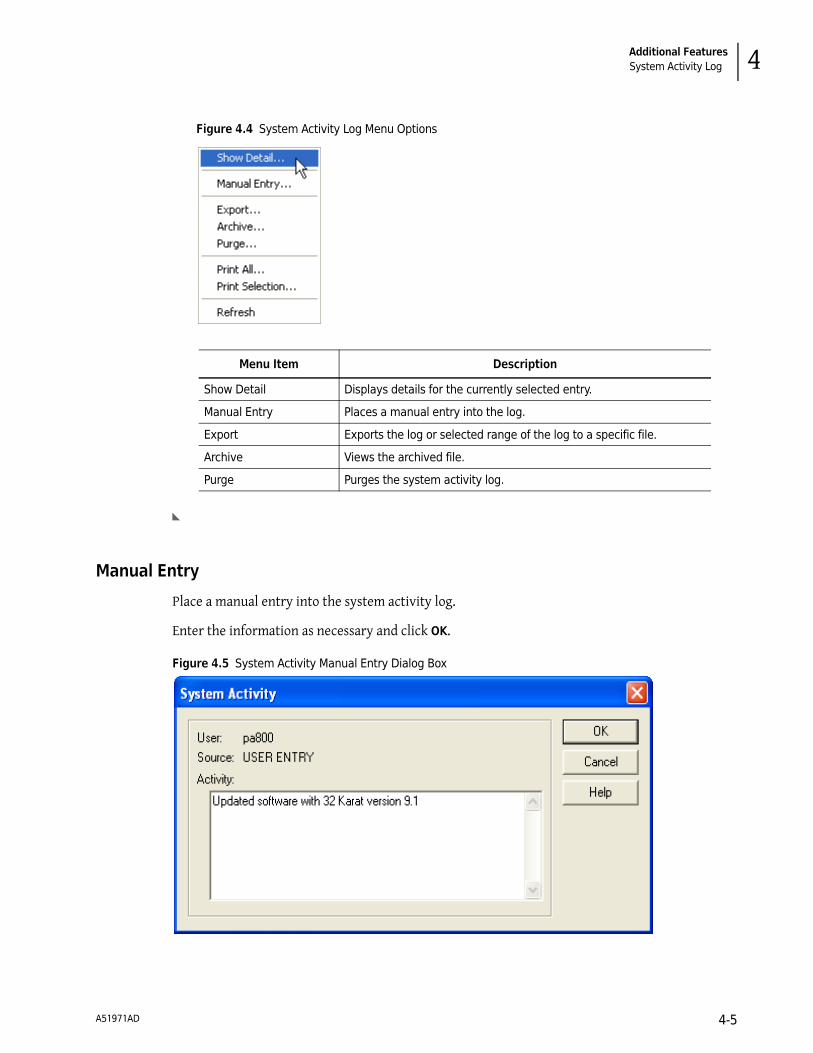
Figure 4.4 System Activity Log Menu Options
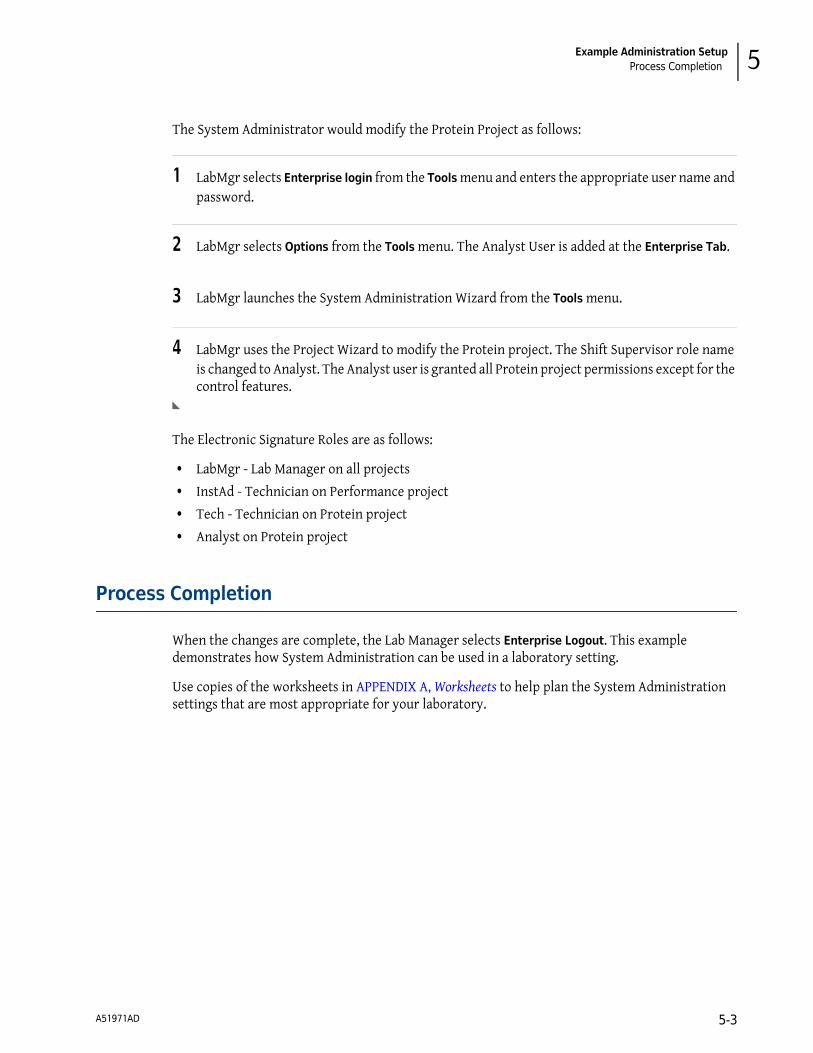
Manual Entry
Place a manual entry into the system activity log.
Enter the information as necessary and click OK.
Figure 4.5 System Activity Manual Entry Dialog Box
Menu Item Description
Show Detail Displays details for the currently selected entry.
Manual Entry Places a manual entry into the log.
Export Exports the log or selected range of the log to a specific file.
Archive Views the archived file.
Purge Purges the system activity log.
A51971AD 4-5
Additional Features
System Activity Log
Export
Export the system activity log to a specified external file. Click Save to save the system activity log for the range selected in the file specified.
Archive
To archive the System Activity Log, select File > System Activity Log > Archive from the Main menu. A dialog box opens so you can select the location for the archive file. A default name is assigned, with the .logarc extension. This file can be viewed using the Log Viewer that is run from the 32 Karat program group in Windows. (From Windows task bar, select Start > Programs > 32 Karat > Log
Viewer.)
Figure 4.6 Start the 32 Karat Log Viewer
Purge
To purge the System Activity Log, select File > System Activity Log > Purge from the Main menu.
• If the Activity Log Purge authorized only after archive option is selected, the System Activity Log Archive dialog box appears first. If confirmed, then the log is purged; otherwise, the purge operation is aborted.
NOTE The user must have System Administration rights to use this command. The purge activity varies
based on the global options selected. To view, select Tools > Options > General Tab.
• If the Activity Log Purge authorized only after archive box is not selected, then a confirmation message appears. If the user confirms, the purge operation occurs.
After the log is purged, an entry is added to the System Activity Log recording that the purge occurred.
Menu Item Description
File Name Enter the name to be used to store the system activity export file.
Save as type Select the type of file to be saved.
Select record ranges Select the option next to the desired range.
A51971AD4-6
CHAPTER 5
Example Administration Setup
In this section, a hypothetical lab is described. To suit the needs of this lab, various System
Administration features are enabled. Use the User Project Privilege Worksheet in APPENDIX A, Worksheets to help organize the system.
Laboratory Personnel
Consider a small pharmaceutical laboratory with 3 employees consisting of a Manager, a Technician, and an Equipment Maintenance person named as follows:
Laboratory Manager - LabMgr
Laboratory Technician - Tech
Equipment Maintenance - InstAd
In this laboratory, various analyses of proteins, nucleic acids, and small molecules are performed. The laboratory manager has spent a great deal of time developing and validating a number of protein methods. The laboratory technician will begin using these methods while the laboratory manager continues development on new methods. The equipment maintenance person performs daily performance qualification on the instrument and system maintenance as required.
The laboratory manager sets up the System Administration as follows:
Data System Users
The following users will be added to the data system:
• LabMgr - System Administrator
• InstAd - Instrument Administrator
• Tech - Standard User
See Adding Projects in CHAPTER 2, System Administration Wizard for setup instructions.
A51971AD 5-1
Example Administration Setup
Laboratory Personnel
System Projects
The lab manager will create the following projects:
• Protein
• Nucleic Acid
• Small Molecules
• Performance
See Adding Projects in CHAPTER 2, System Administration Wizard for setup instructions.
Project Access
The lab manager will grant project access as follows:
• LabMgr - Protein, Nucleic Acid, Small Molecules, Performance
• InstAd - Performance
• Tech - Protein
See Additional Project Settings in CHAPTER 2, System Administration Wizard for setup instructions.
Signature Authority
The following signature authority is granted:
• LabMgr - Lab Manager on all projects, all permissions
• InstAd - Technician on Performance project, all permissions
• Tech - Technician on Protein project, all permissions
See User Electronic Signature Roles in CHAPTER 2, System Administration Wizard for setup instructions.
System Instruments
The Instrument Administrator creates the following instruments:
• Protein - LabMgr, InstAd, and Tech as users
• Development - LabMgr and InstAd as user
• Performance - InstAd as user
See Creating New Instruments in CHAPTER 3, Using 32 Karat Under System Administration for setup instructions.
Adding a New User
At this point, the Lab Manager decides to hire a Bio-Statistician. Among other responsibilities, this employee will review data acquired by the Technician prior to submission to the manager for approval.
A51971AD5-2
Example Administration Setup
Process Completion 5
The System Administrator would modify the Protein Project as follows:
1 LabMgr selects Enterprise login from the Tools menu and enters the appropriate user name and
password.
2 LabMgr selects Options from the Tools menu. The Analyst User is added at the Enterprise Tab.
3 LabMgr launches the System Administration Wizard from the Tools menu.
4 LabMgr uses the Project Wizard to modify the Protein project. The Shift Supervisor role name
is changed to Analyst. The Analyst user is granted all Protein project permissions except for the control features.
The Electronic Signature Roles are as follows:
• LabMgr - Lab Manager on all projects
• InstAd - Technician on Performance project
• Tech - Technician on Protein project
• Analyst on Protein project
Process Completion
When the changes are complete, the Lab Manager selects Enterprise Logout. This example demonstrates how System Administration can be used in a laboratory setting.
Use copies of the worksheets in APPENDIX A, Worksheets to help plan the System Administration settings that are most appropriate for your laboratory.
A51971AD 5-3
Example Administration Setup
Process Completion
A51971AD5-4
APPENDIX A
Worksheets
User Privileges
Table A.1 User Privileges
Project Name User User User
Methods
Open Method
Save Method
Properties
Instrument Setup
Integration Events
Peaks/Groups
Advanced
Custom Report
System Suitability
Review Calibration
Calibrate
Data
Open Data
Save Data
Properties (Description)
Manual Integration Fixes
Electronic Signature
Sign Data Files
Multiple File Sign
Multiple File Revoke
A51971AD A-1
Worksheets
User Privileges
Sequences
Open Sequence
Save Sequence
Process
Properties
Summary
Custom Report
Control
Preview Run
Single Run
Sequence Run
Lock Instrument
Print Setup
Manual Control (Idle Only)
Manual Control
Pretreatment
Open Pretreat
Save Pretreat
Properties
Advanced Reports
Open Advanced Report
Save Advanced Report
Instrument Activity Log
Purge Activity Log
Security
Access Common Folder
Tune
Open Tune
Save Tune
Properties
Auto Tune
Calibration
Notes
Table A.1 User Privileges (Continued)
Project Name User User User
A51971ADA-2
Worksheets
User Privileges A
User Instrument Administrator System Administrator