» Notices» Introduction» Product overview» Initial setup» Screens and product layout» Operations» Reference» Support and other
resources» Assistance
» Glossary» Using Help
» Online help» HP SIM help categories
Online help
HP SIM provides an online help system that helps you understand management features.To view the online help, click the question mark icon on any page or use the Help menu toview the online help.
HP SIM help categories
Product overview Describes the features in HP SIM.
Initial setup Describes procedures for how to begin using and administering HPSIM.
Setting up managed systems Describes procedures for setting up managedsystems through Configure or Repair Agents and through Insight managed systemsetup wizard.
Screens and product layout Describes the HP SIM menu options and how tonavigate screens.
Operations Describes HP SIM tools and tasks.
Reference Describes additional reference information, such as setting up trustrelationships and configuring Cluster Monitor.
» Notices» Introduction» Product overview» Initial setup» Screens and product layout» Operations» Reference» Support and other
resources» Assistance
» Glossary» Using Help
» Notices» Introduction» Product overview
» Introduction» HP SIM features» Product architecture» Security» License Manager» HP SIM command line tools» Custom tools
» Initial setup» Setting language locale» Signing in» Single Sign On» Signing out» Product registration» First Time Wizard
» Configuring the managed environment» Enabling automatic system discovery» Configuring System Automatic Discovery task sign in credentials» Configuring managed systems» Configuring the WMI Mapper Proxy» Configuring privilege elevation on HP-UX» Configuring e-mail settings» Summary» Finishing the First time Wizard» First Time Wizard related topics
» Performing Initial setup» Setting up managed systems
» Setting up remote Linux systems from a Linux CMS» Setting up remote HP-UX systems from an HP-UX CMS» Setting up Windows managed systems manually» Related information
» Setting up systems using the HP Insight managed system setup wizard» Monitoring feature» Inventory feature» Remote Command Execution feature» Single Sign On feature» Events feature» Version Control feature» HP Insight managed system setup wizard - Protocol Preferences» HP Insight managed system setup wizard - SSH authentication» HP Insight managed system setup wizard - SSH user name for public key» HP Insight managed system setup wizard - HP Integrated Lights-Out 2 Advanced
» Advanced setup» Configuring browser timeout options» Changing the HP SIM default SSL port» Managing server certificates» Replicating trusted certificates» Configuring the presentation of SNMP traps in HP SIM
» Screens and product layout» Home page» Navigating the System and Event Collections panel» Users and user groups» Users tab» Toolboxes tab» Authorizations tab» Navigating the system table view page» Navigating the cluster table view page
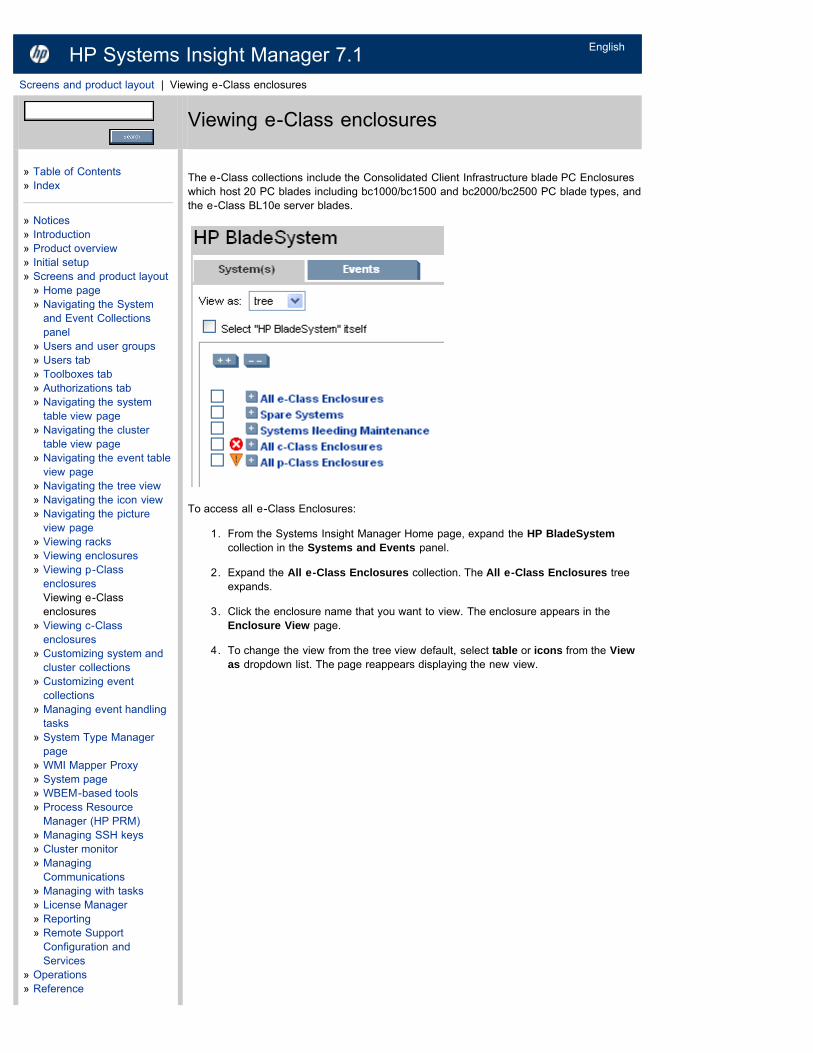
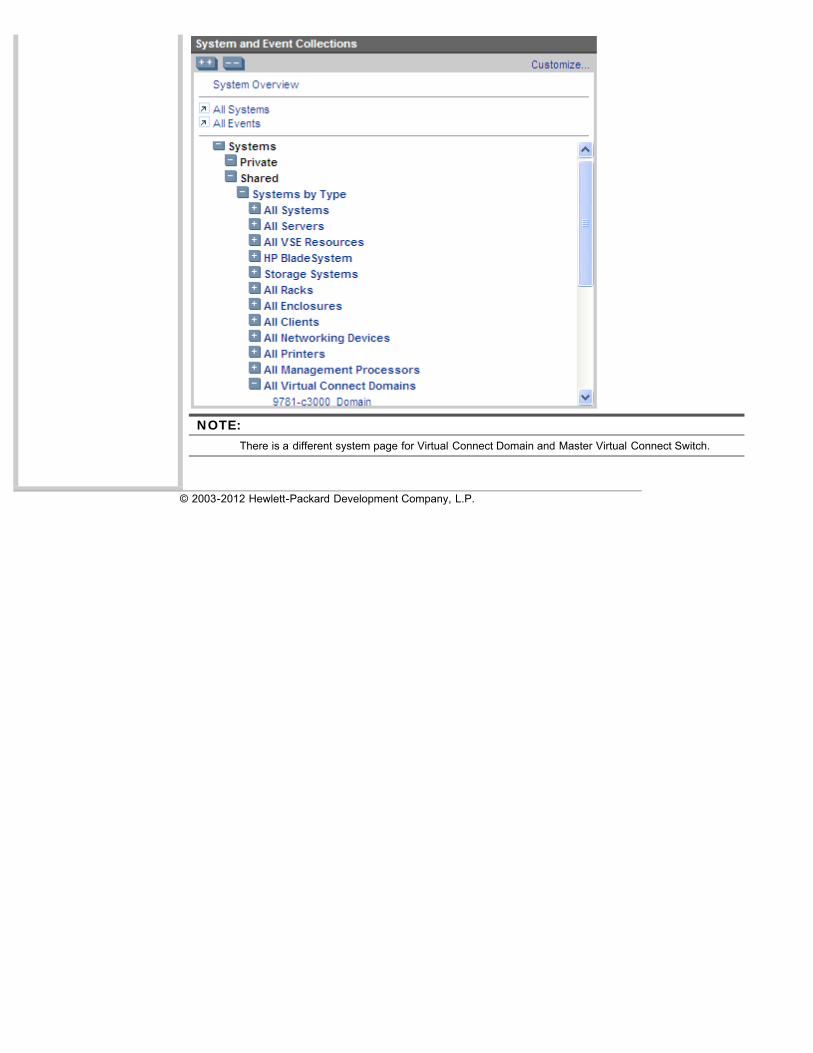
» Navigating the event table view page» Navigating the tree view» Navigating the icon view» Navigating the picture view page» Viewing racks» Viewing enclosures» Viewing p-Class enclosures» Viewing e-Class enclosures» Viewing c-Class enclosures» Customizing system and cluster collections» Customizing event collections» Managing event handling tasks» System Type Manager page» WMI Mapper Proxy» System page
» System tab for servers» System tab for blade servers» System tab for management processors» System tab for clusters» System tab for a complex» System tab for partitions» System tab for storage host» System tab for a storage switch» System tab for a storage array» System tab for a tape library» Tools & Links tab» Essentials tab» Performance tab for blades» Port mapping tab for blades» Managing contacts» Managing site information
» WBEM-based tools» HP SIM Property pages» System Fault Management overview» WBEM Management Providers overview
» Process Resource Manager (HP PRM)» Managing SSH keys
» Managing with tasks» Viewing task instance results» Navigating the All Scheduled Tasks page
» License Manager» Related information
» Reporting» Related information
» Remote Support Configuration and Services» Operations
» Customizing the Home page» Customizing the system status panel» Enlarging the System Status panel» Setting up managed systems from a Linux CMS» Setting up managed systems from a Windows CMS» Setting up managed systems from a HP-UX CMS» Discovery in HP SIM
» Configuring automatic discovery» Configuring automatic discovery settings of VM guests» Configuring discovery general settings» Creating a new discovery task» Configuring credentials for discovery tasks» Configuring Configure or Repair Agents for discovery tasks» Configuring system types for discovery tasks» Editing a discovery task
» Disabling or enabling an existing discovery task» Deleting a discovery task» Running a discovery task» Related information
» Discovery filters» Managing Hosts file
» Creating a new hosts file» Editing a hosts file» Deleting a hosts file» Adding systems in a hosts file to the HP SIM database
» Identification» Managing system types
» Creating STM rules» Editing STM rules» Deleting STM rules» Related information
» Users and authorizations» Creating new authorizations» Creating new toolboxes» Creating new users» Updating authorizations» Editing toolboxes» Creating new user groups» Deleting authorizations» Deleting toolboxes» Editing users and user groups» Authorization reports» Toolbox reports» Deleting users and user groups» System groups (CLI)» User and user group reports» Related information
» Directory Services» Configuring directory servers» Configuring directory groups» Related information
» Global credentials» System credentials
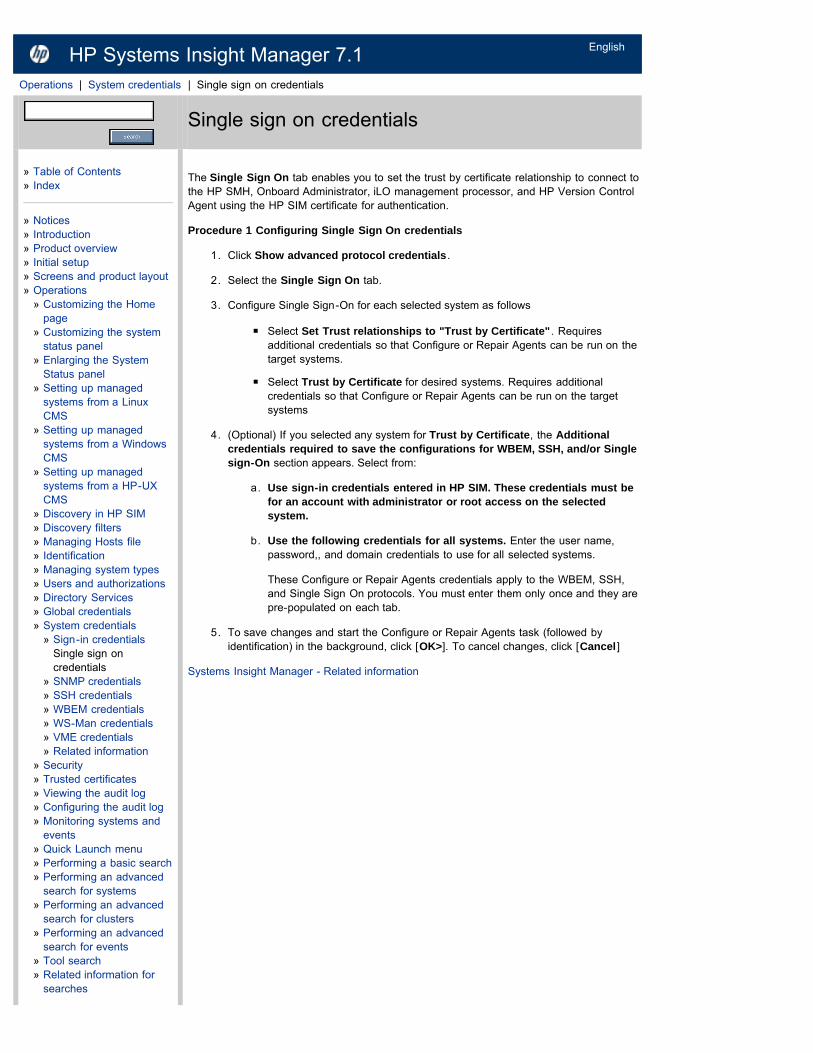
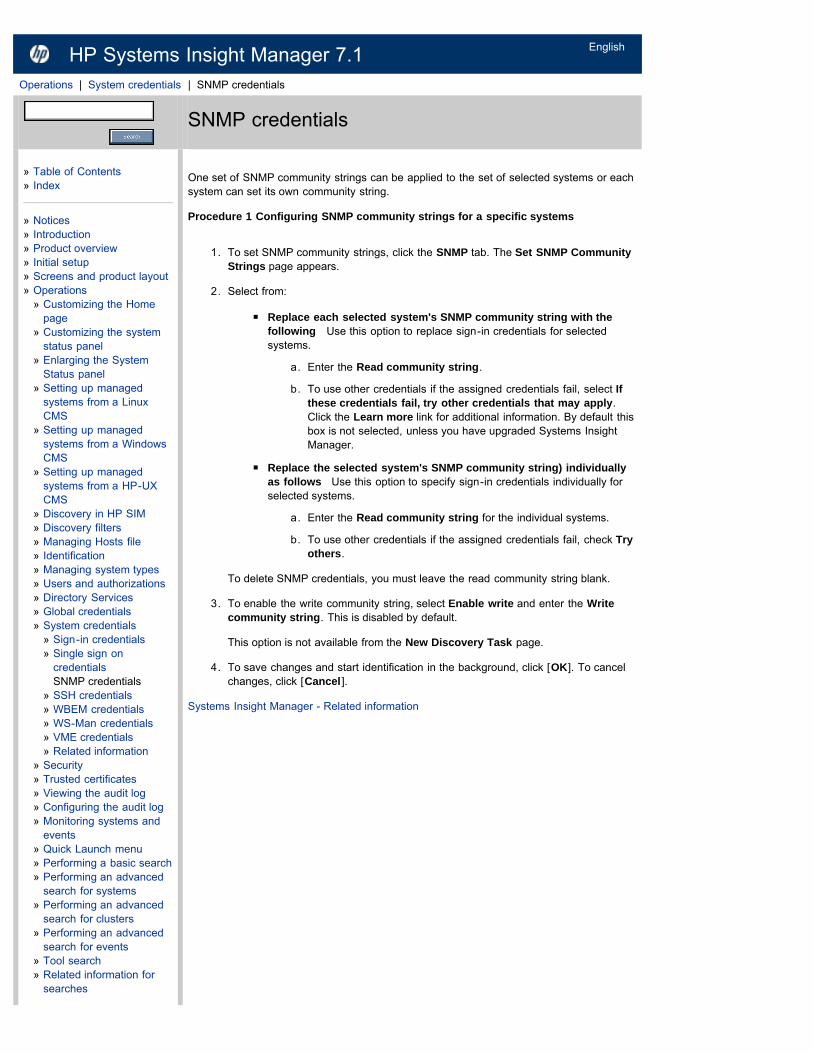
» Sign-in credentials» Single sign on credentials» SNMP credentials» SSH credentials» WBEM credentials» WS-Man credentials» VME credentials» Related information
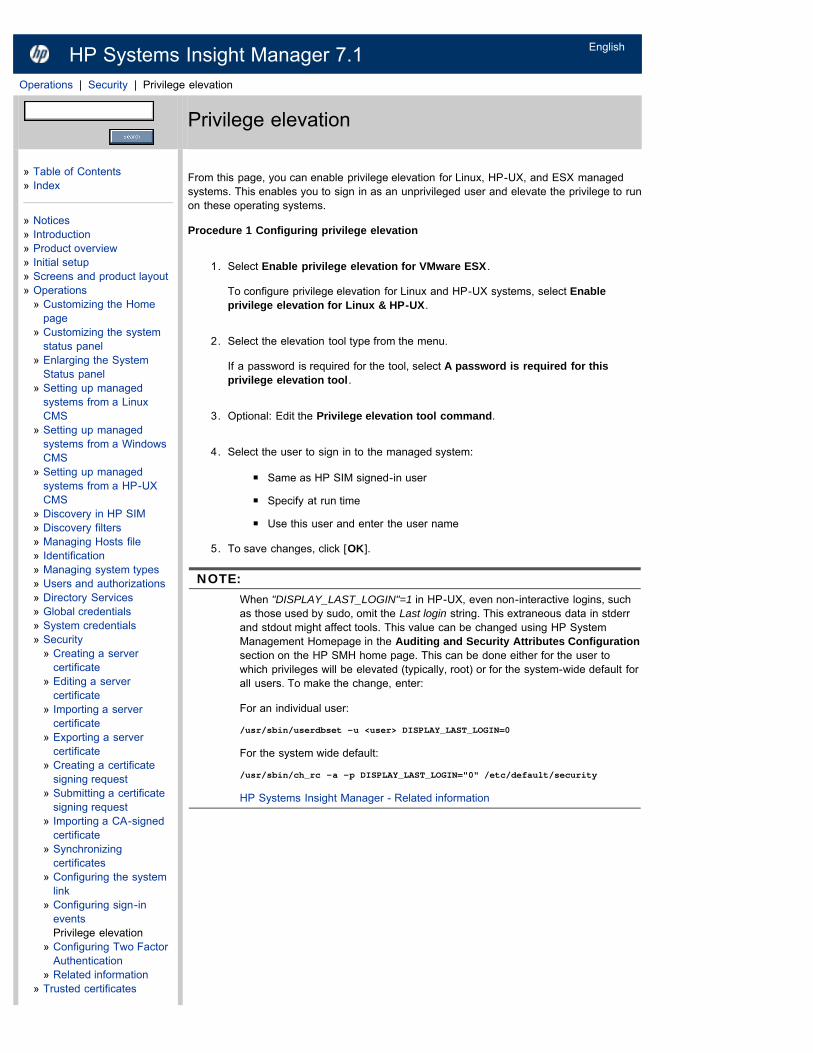
» Security» Creating a server certificate» Editing a server certificate» Importing a server certificate» Exporting a server certificate» Creating a certificate signing request» Submitting a certificate signing request» Importing a CA-signed certificate» Synchronizing certificates» Configuring the system link» Configuring sign-in events» Privilege elevation» Configuring Two Factor Authentication» Related information
» Related information» Viewing the audit log» Configuring the audit log» Monitoring systems and events
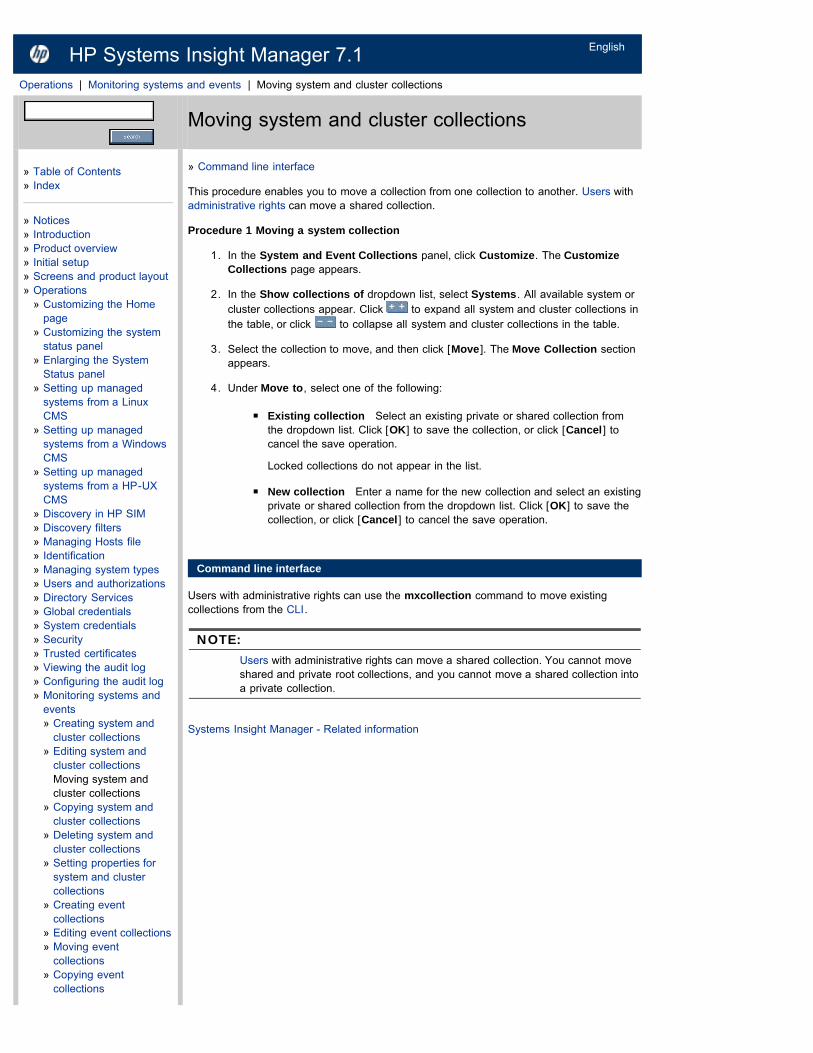
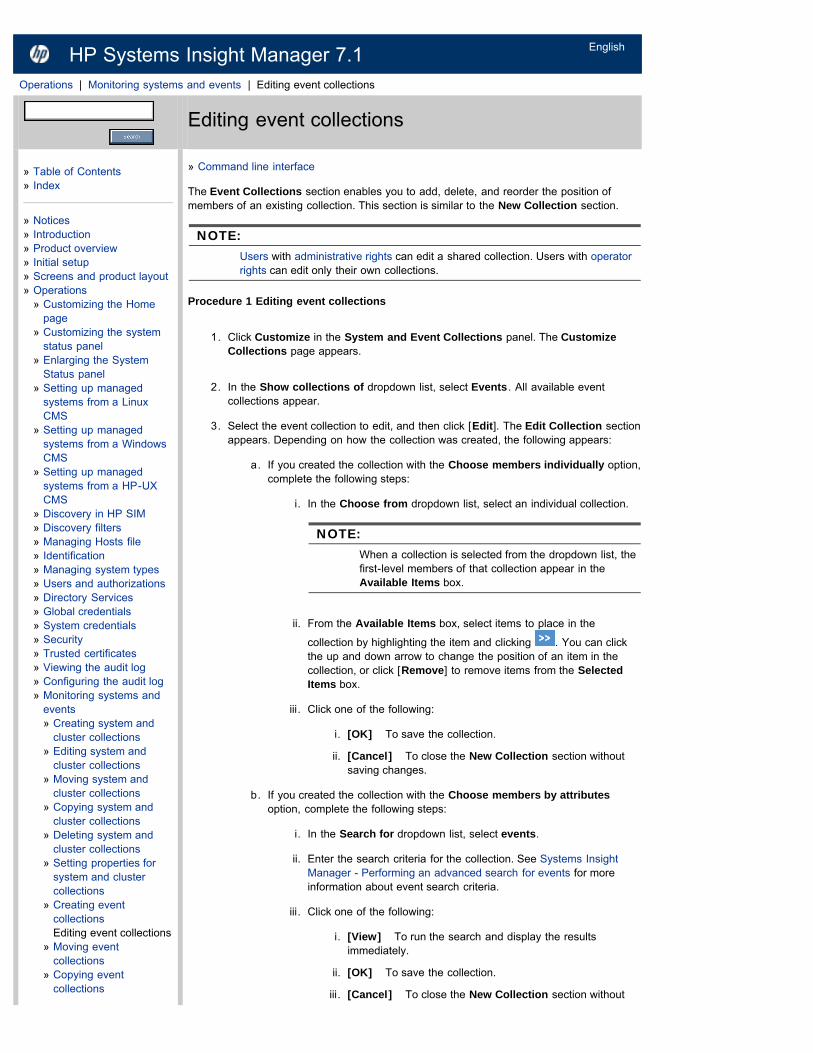
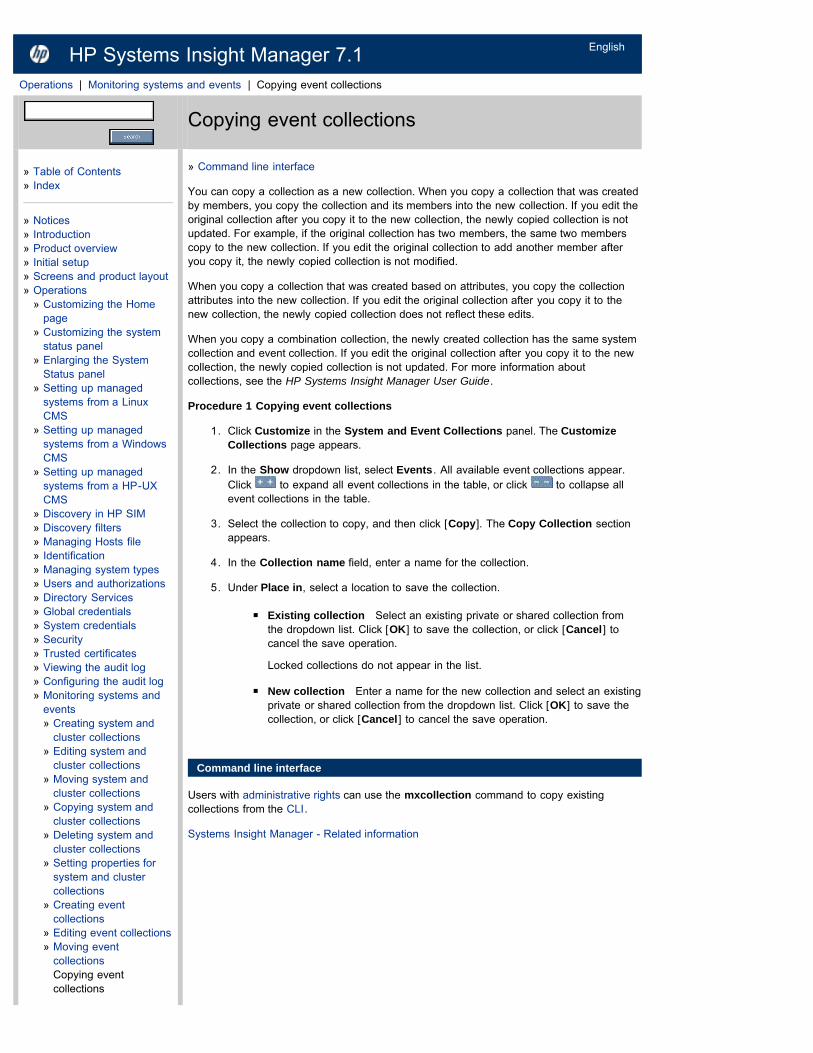
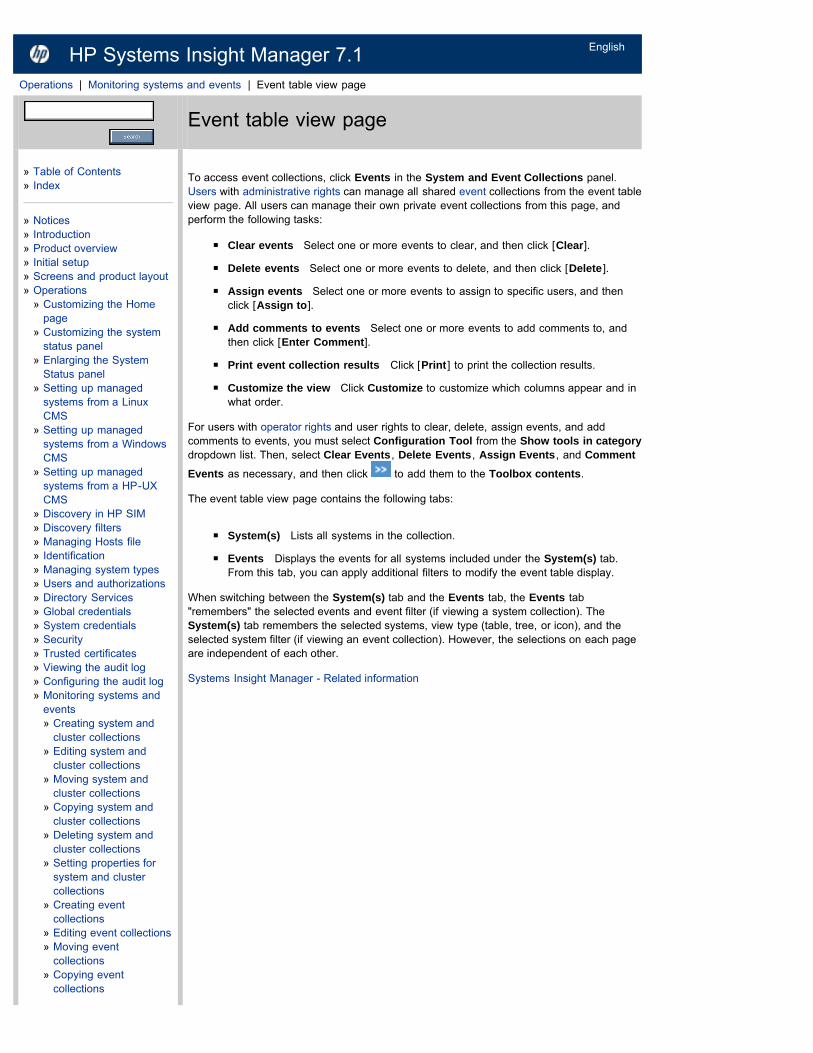
» Creating system and cluster collections» Editing system and cluster collections» Moving system and cluster collections» Copying system and cluster collections» Deleting system and cluster collections» Setting properties for system and cluster collections» Creating event collections» Editing event collections» Moving event collections» Copying event collections» Deleting event collections» Setting event properties» System table view page» Customizing the system table view page» Deleting systems from the HP SIM database» Printing a system collection view» Cluster table view page» Customizing the cluster table view page» Deleting clusters from the HP SIM database» Printing a cluster collection view» Event table view page» Customizing the event table view page» Clearing events from the collection» Deleting events from the HP SIM database» Assigning events to users» Printing an event collection view» Entering comments to events» Saving collections» Related information
» Quick Launch menu» Performing a basic search» Performing an advanced search for systems
» Deleting system search results from a search view» Printing system search results
» Performing an advanced search for clusters» Deleting cluster search results from a search view» Printing cluster search results
» Performing an advanced search for events» Deleting event search results from a search view» Printing event search results
» Tool search» Searching for tools
» Related information for searches» Configuring events
» Editing automatic event handling tasks» Copying automatic event handling tasks» Viewing task definitions for automatic event handling tasks» Viewing event task results» Enabling and disabling event handling tasks» Configuring e-mail settings» Configuring modem settings for paging on Windows systems» Clearing events» Deleting events» Configuring event filters for registered SNMP traps» Configuring SNMP traps» Configuring status change events» Subscribing to WBEM indications» Unsubscribing to WBEM indications» Subscribing to health lifecycle events» Verifying event configuration» Creating an automatic event handling task» Related information
» Protocol settings» Setting protocols and credentials for a system or group of systems» Setting protocols for a single system
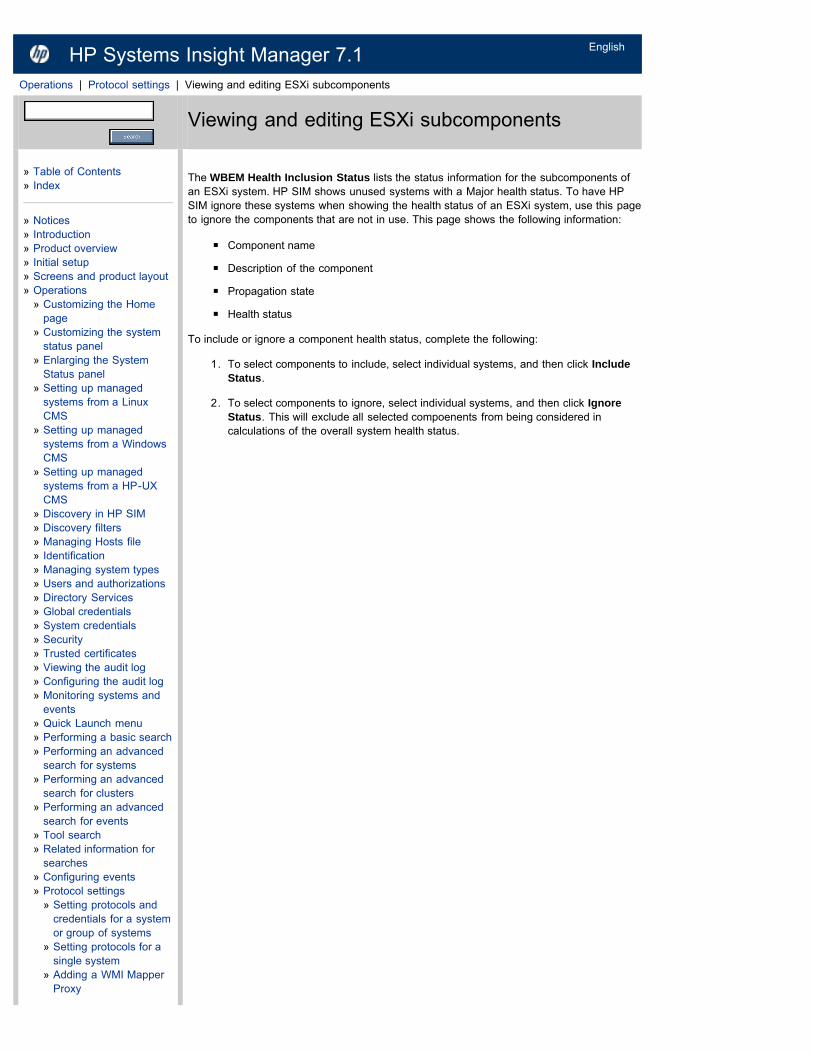
» Adding a WMI Mapper Proxy» Deleting a WMI Mapper Proxy» Editing a WMI Mapper Proxy» Viewing and editing ESXi subcomponents
» Software status polling» Hardware status polling» Data collection» System Properties
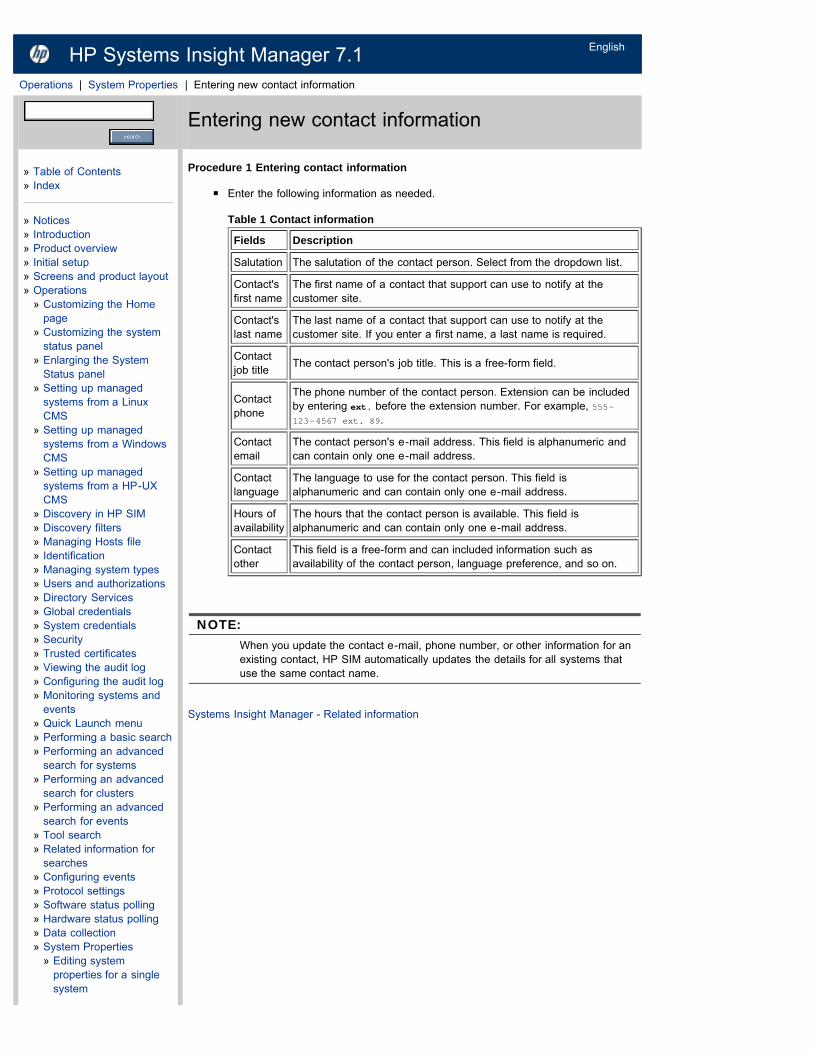
» Editing system properties for a single system» Entering new contact information» Editing contact information» Deleting contact information» Entering new site information» Editing site information» Deleting site information» Editing system properties for multiple systems» Suspending or resuming system monitoring for a single system» Suspending or resuming system monitoring for multiple systems» Related information
» Configuring WBEM health inclusion status» Specifying a Version Control Repository» Configuring software/firmware global settings» Reporting
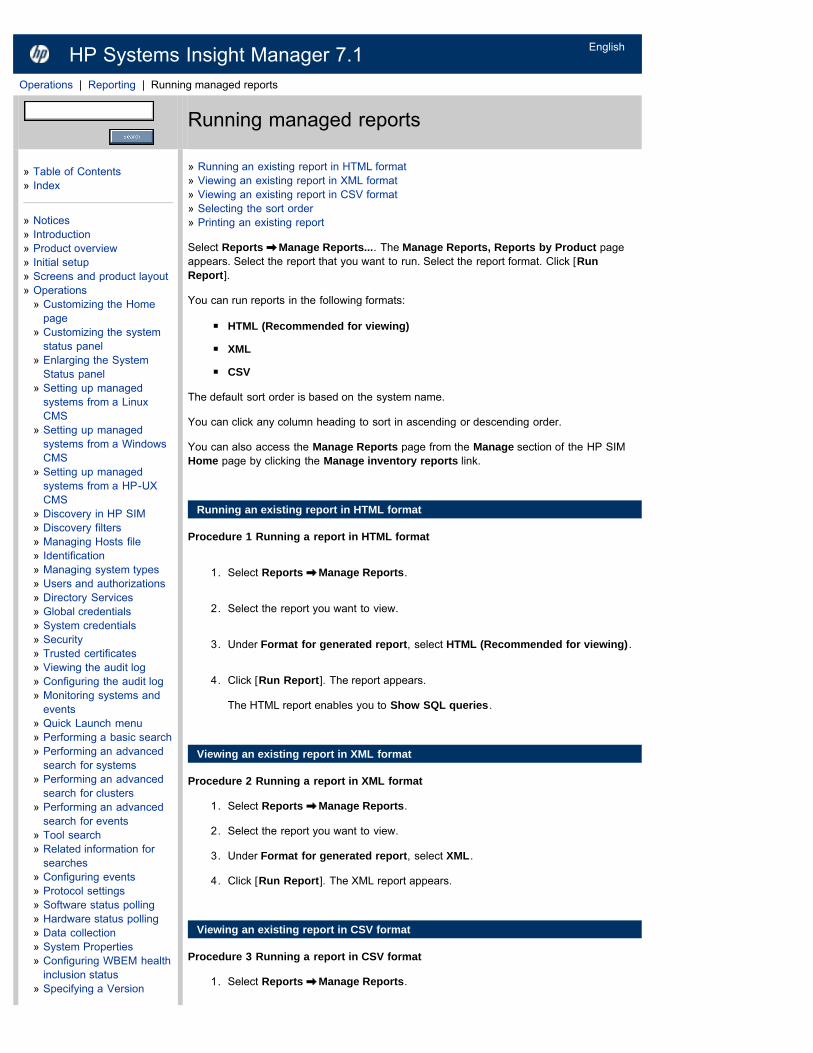
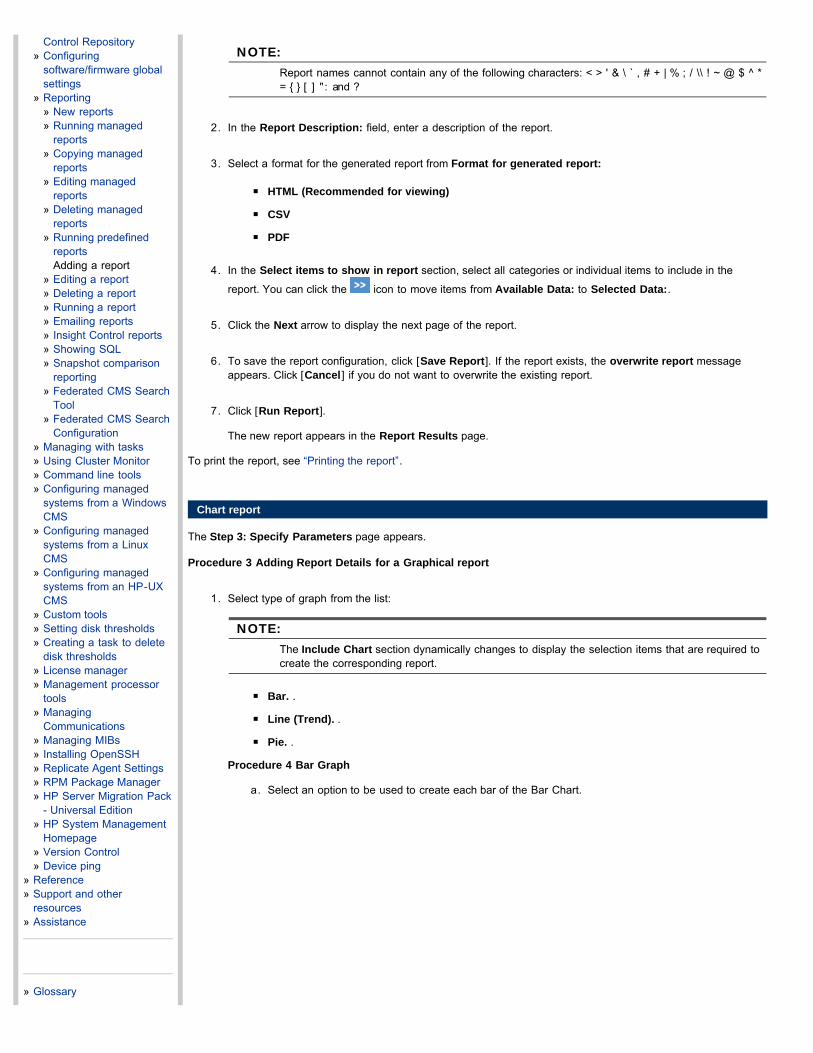
» New reports» Running managed reports» Copying managed reports» Editing managed reports» Deleting managed reports» Running predefined reports» Adding a report» Editing a report» Deleting a report» Running a report» Emailing reports» Insight Control reports» Showing SQL» Snapshot comparison reporting» Federated CMS Search Tool» Federated CMS Search Configuration
» Managing with tasks» Creating a task» Scheduling a task» Applying a time filter» Running a scheduled task» Editing a scheduled task» Deleting a scheduled task» Printing reports» Stopping a task» Configuring task results settings» Deleting task results» Task results list» Managing with tasks related information
» Creating a CMS tool» Editing a CMS tool» Creating a web page tool» Editing a web page tool» View tool definition» Delete a custom tool» Removing and restoring custom tools» Related information
» Setting disk thresholds» Creating a task to delete disk thresholds» License manager
» Viewing licensed systems» Managing licenses» Adding licenses individually» Adding licenses from a file» Assigning a license or Apply a license» Un-assigning a license» mxlmkeyconfig CLI
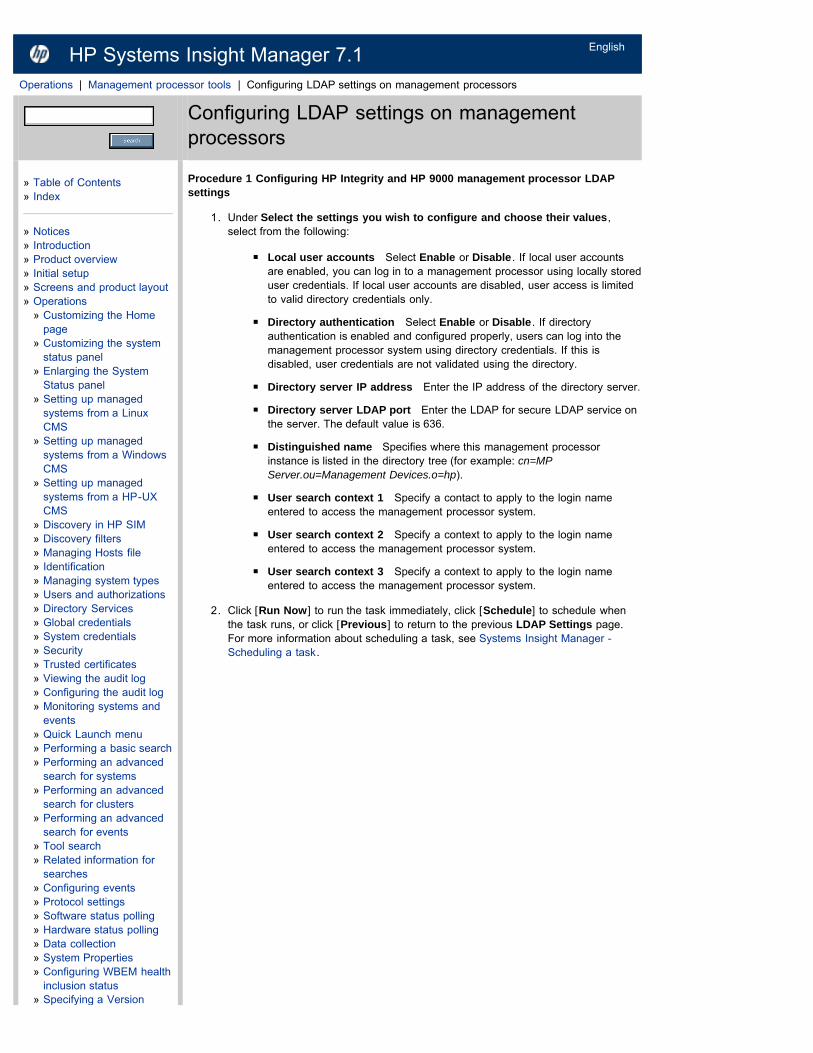
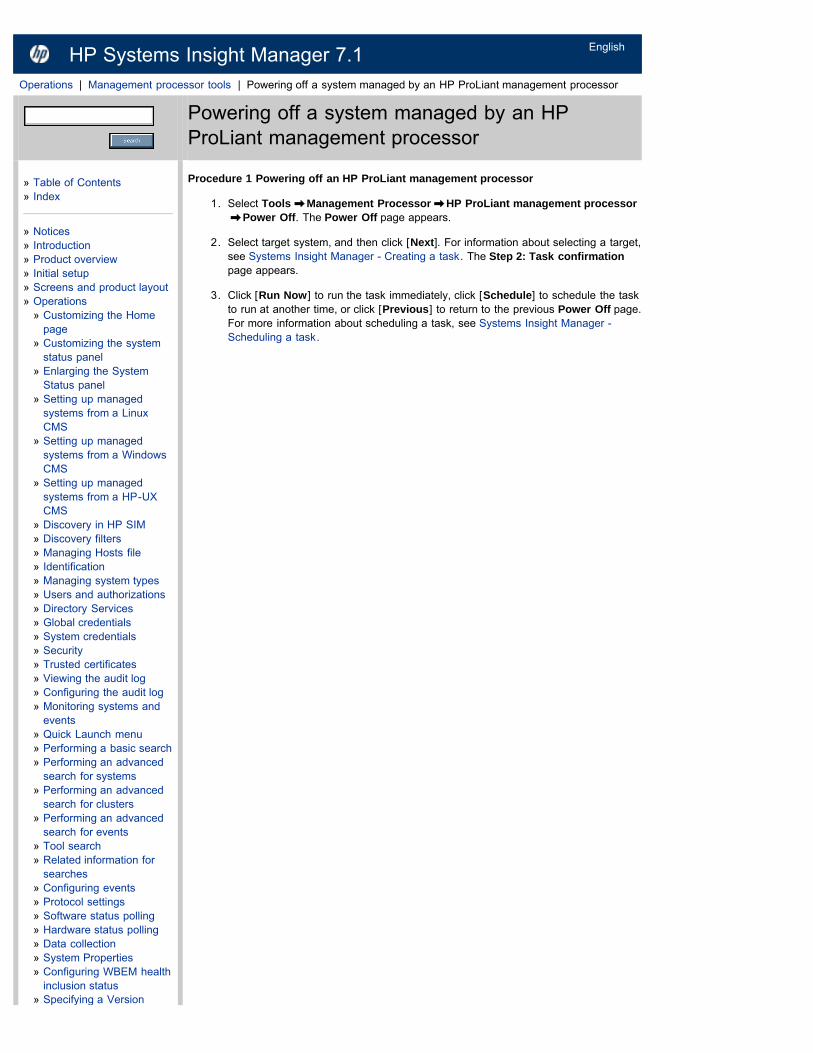
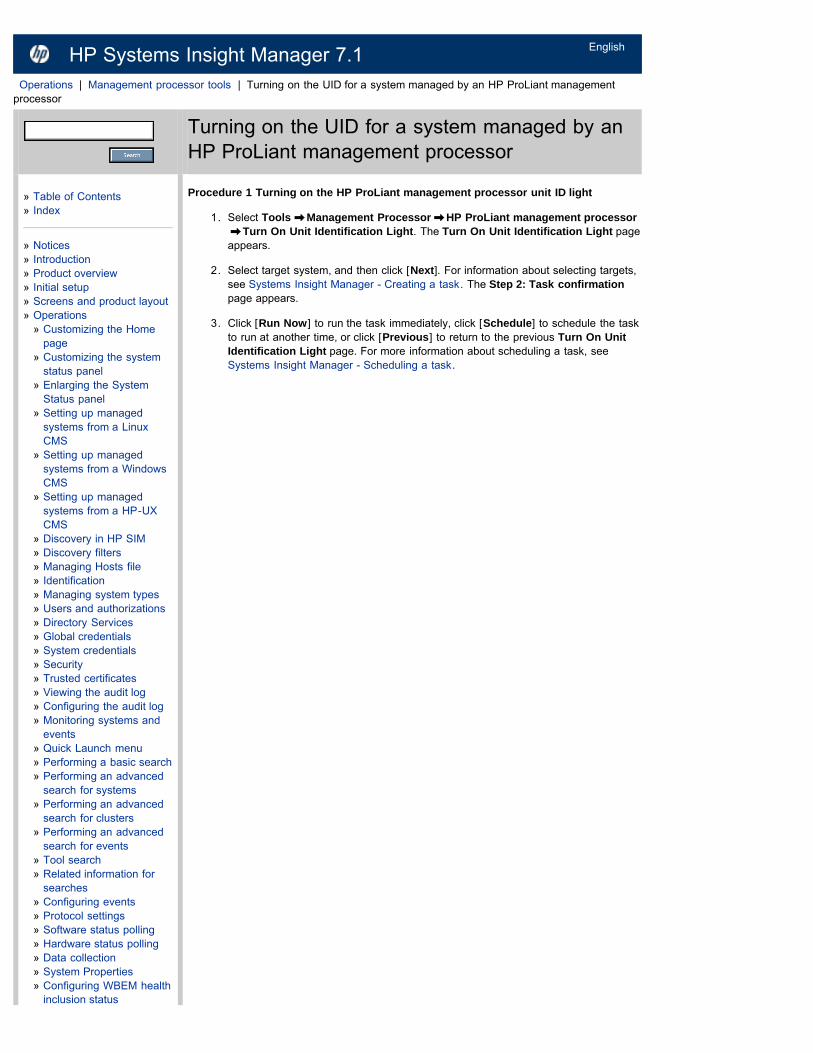
» Management processor tools» Controlling system power options through management processors» Controlling the system locator LED through management processors» Creating new users on management processors» Editing management processor users» Deleting management processor users» Configuring LAN access on management processors» Configuring LDAP settings on management processors» Executing internal control actions through management processors» Upgrading management processor firmware» Deploying SSH public keys to management processors» Cycling on the power on an HP ProLiant management processor» Powering on a system managed by an HP ProLiant management processor» Powering off a system managed by an HP ProLiant management processor» Turning on the UID for a system managed by an HP ProLiant management processor» Turning off the UID for a system managed by an HP ProLiant management processor» Related information
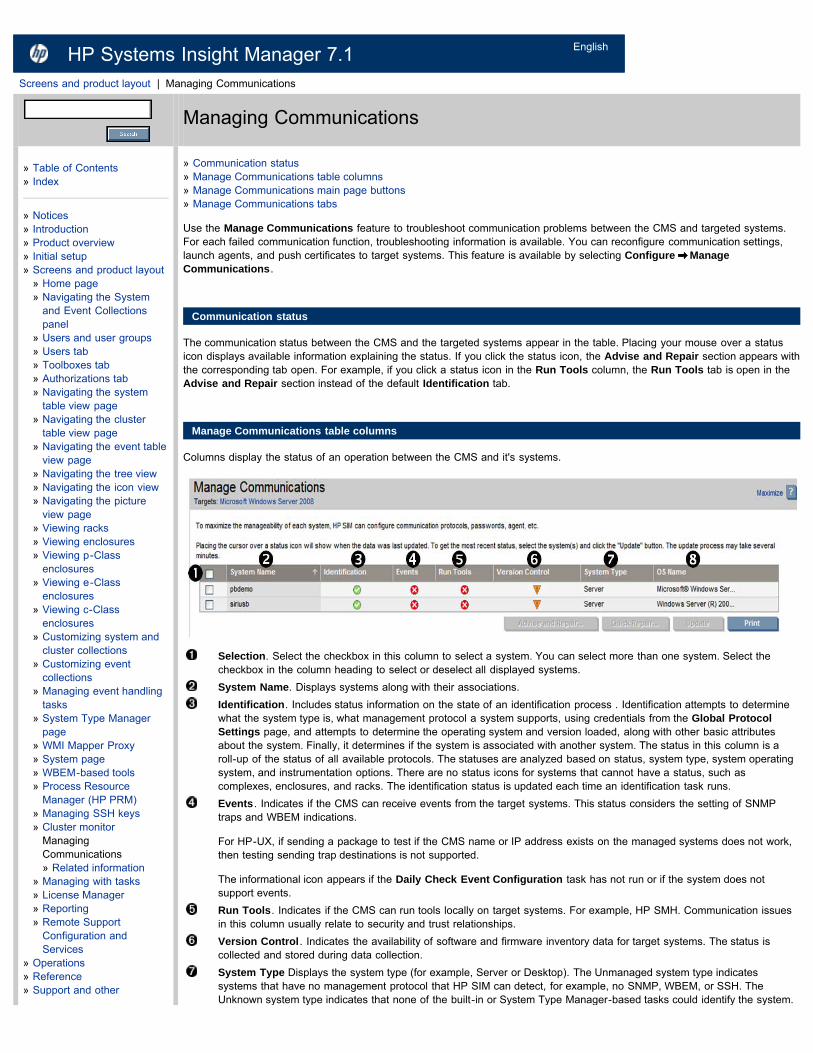
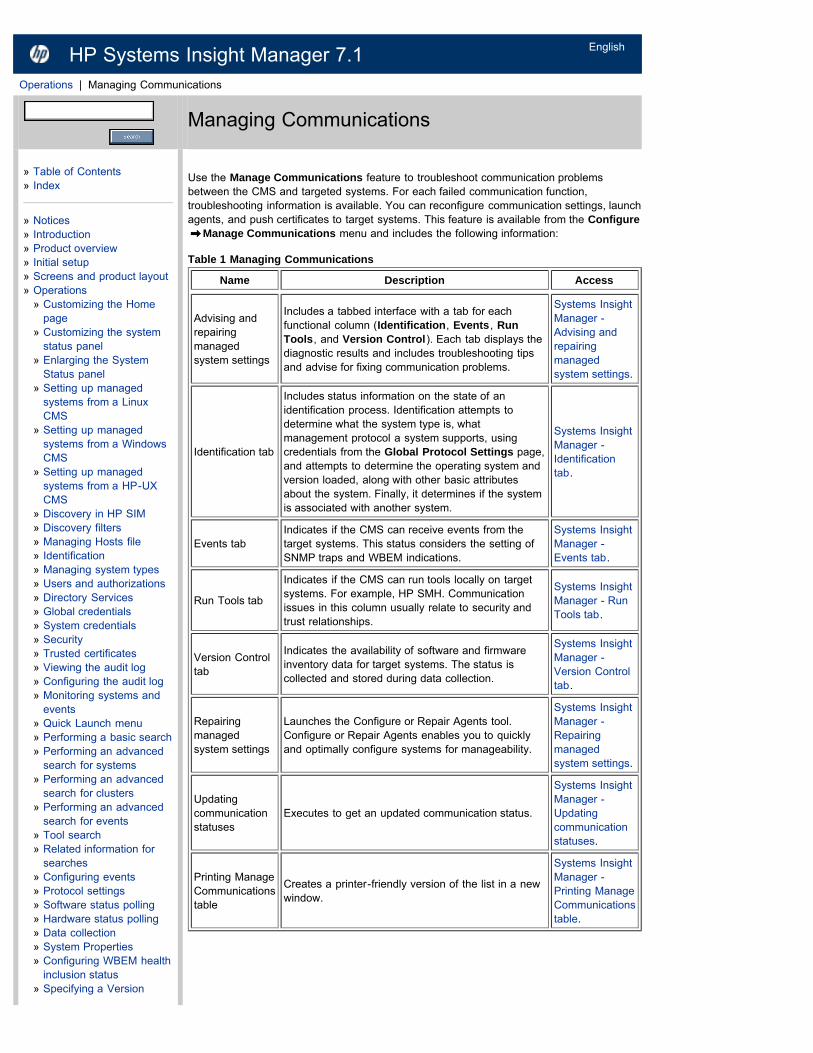
» Managing Communications» Advising and repairing managed system settings» Identification tab» Events tab» Run Tools tab» Version Control tab» Repairing managed system settings» Updating communication statuses» Printing Manage Communications table
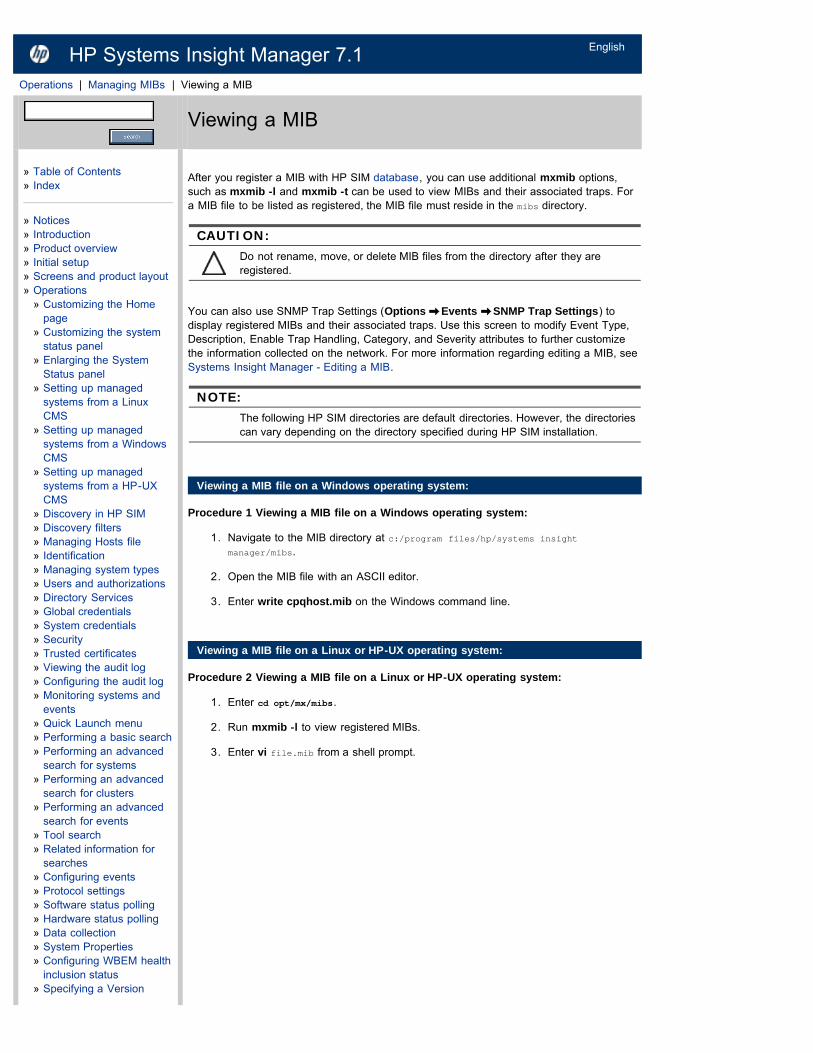
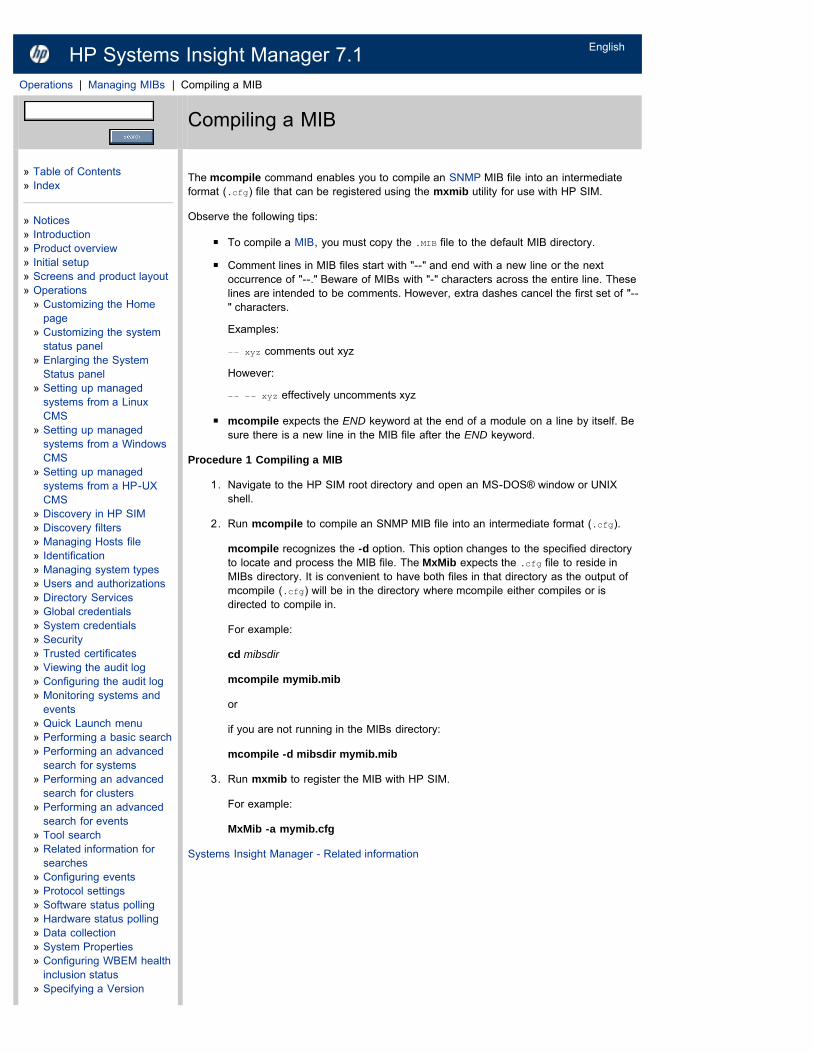
» Managing MIBs» Viewing a MIB» Editing a MIB» Compiling a MIB» Registering a MIB» Unregistering a MIB» Related information
» Installing OpenSSH» Creating an OpenSSH task through the CLI
» Replicate Agent Settings» Creating a Replicate Agent Settings task
» Tracking Software/Firmware Baselines» Installing Software and Firmware through baselines» Installing Software and Firmware task» Installing ROM firmware updates» Version Control status icons
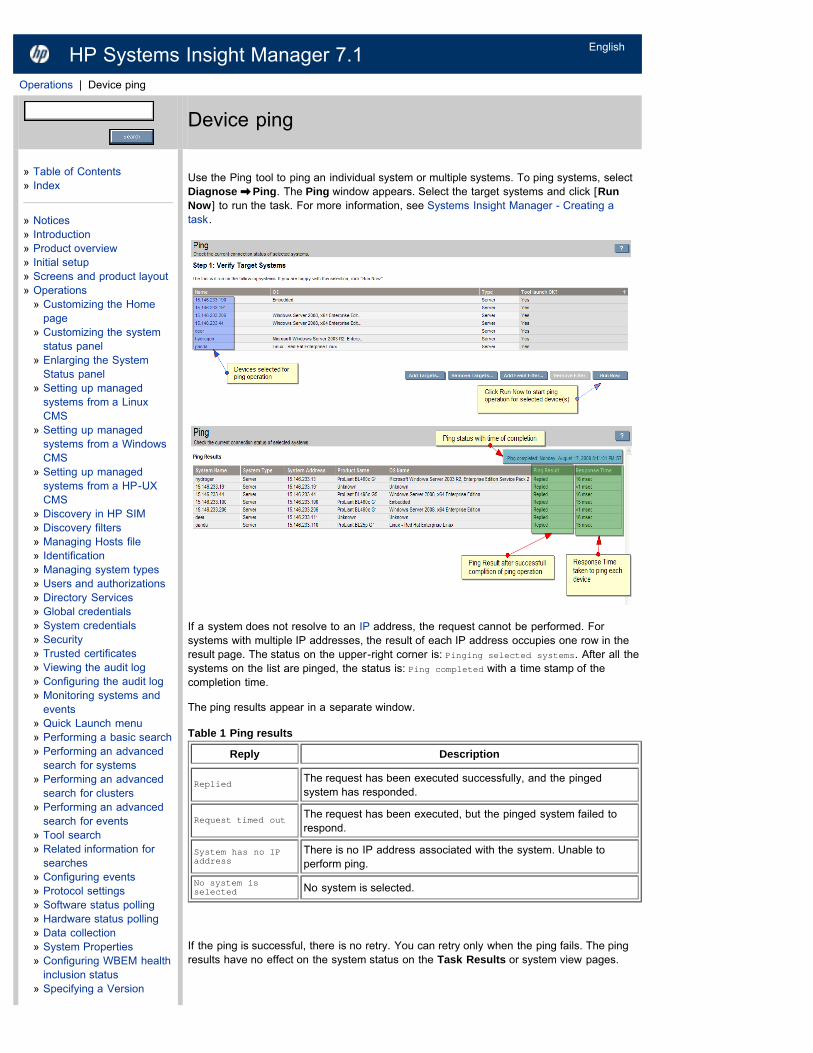
» Device ping» Reference
» Recommended discovery tasks» Search criteria» Entering IP ranges in discovery tasks» Operating-system-specific collections, reports, and tools» System status types» Setting up trust relationships» Configure or Repair Agents Learn More links
» Setting the administrator password for Insight Management Agents» Installing the WBEM/WMI provider for Windows» Configuring WBEM/WMI» Monitoring systems, clusters, and events» Installing the SNMP provider for Windows» Configuring SNMP» Installing OpenSSH from CRA» Installing Linux PSP or ESX Agents from CRA» Installing the Version Control Agent» Configuring VCA» Configuring a non-administrative account for HP SIM to access WMI data» Configuring SSH
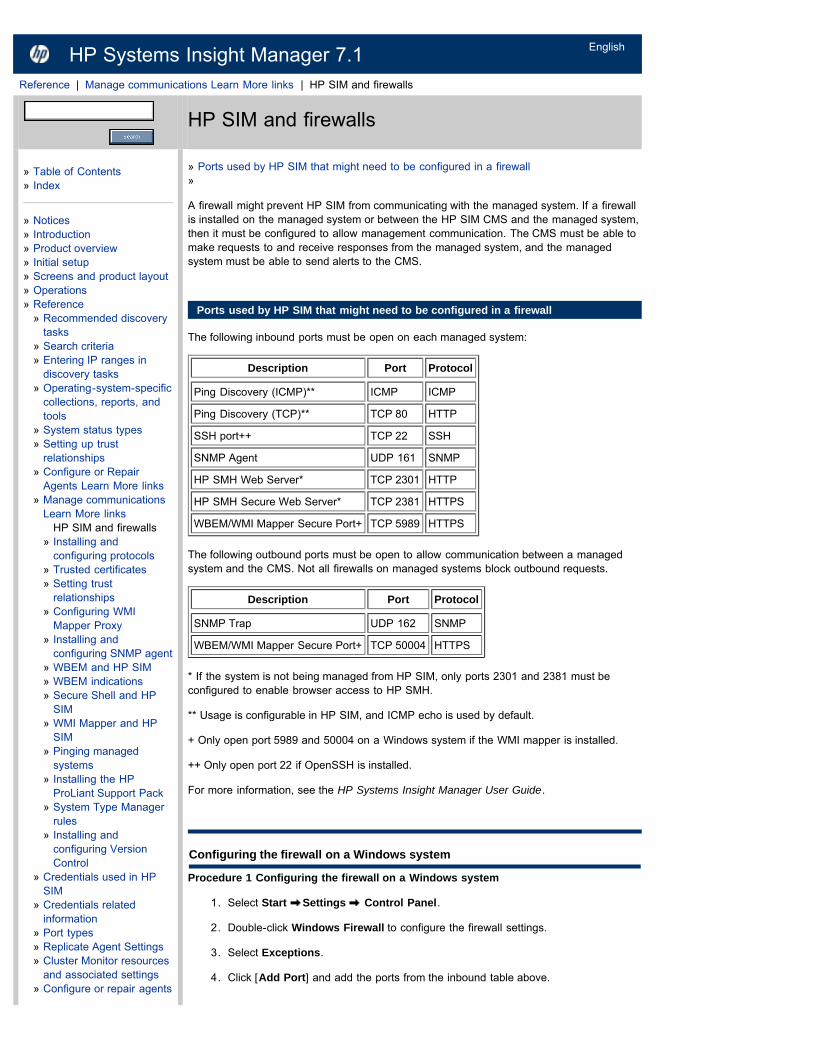
» Manage communications Learn More links» HP SIM and firewalls» Installing and configuring protocols» Trusted certificates» Setting trust relationships» Configuring WMI Mapper Proxy» Installing and configuring SNMP agent» WBEM and HP SIM» WBEM indications» Secure Shell and HP SIM» WMI Mapper and HP SIM» Pinging managed systems» Installing the HP ProLiant Support Pack» System Type Manager rules» Installing and configuring Version Control
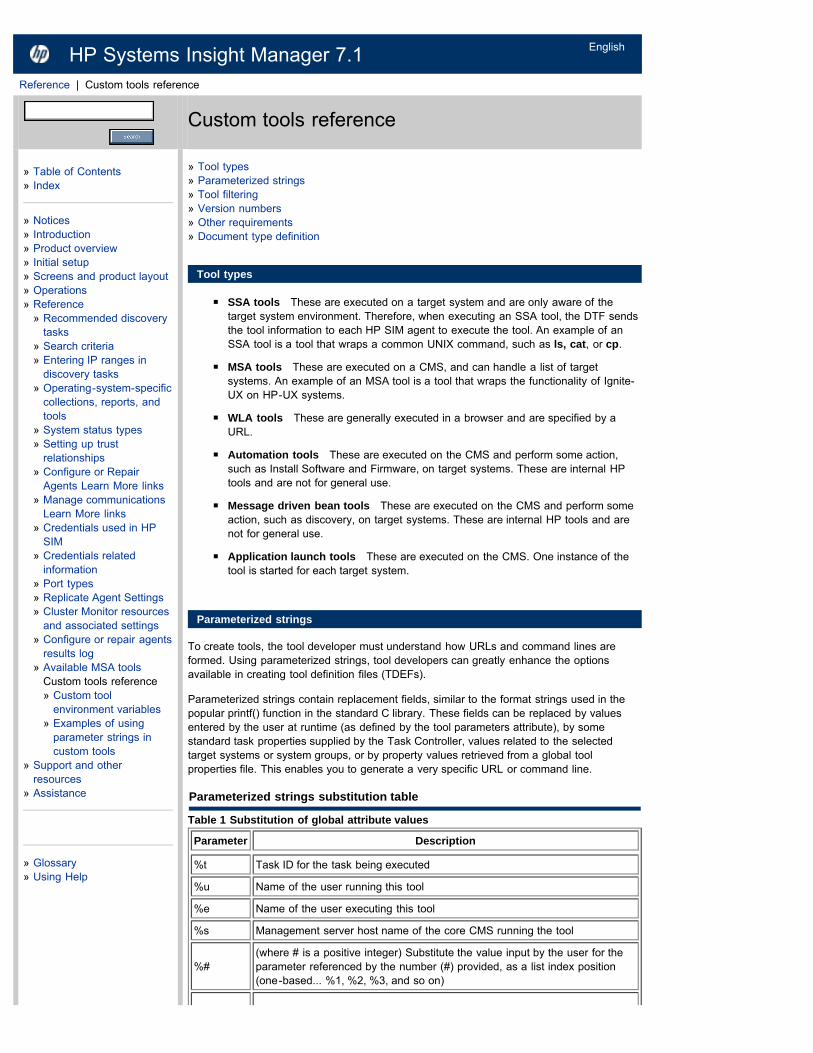
» Credentials used in HP SIM» Credentials related information» Port types» Replicate Agent Settings» Cluster Monitor resources and associated settings» Configure or repair agents results log» Available MSA tools» Custom tools reference
» Custom tool environment variables» Examples of using parameter strings in custom tools
» Notices» Introduction» Product overview» Initial setup» Screens and product layout» Operations» Reference» Support and other
resources» Assistance
» Glossary» Using Help
about
sign in Single Sign On - Systems Insight ManagerSingle Sign On Single Sign On - Systems Insight Managertrust relationships Setting trust relationships - Systems Insight Managertrust relationships Setting up trust relationships - Systems Insight Manager
accessingAccessing the Version Control Agent - Systems Insight ManagerAccessing the Version Control Repository Manager - Systems Insight Manager
discovery filters Discovery filters - Systems Insight ManagerHP Insight Control server deployment tools RPM Package Manager - SystemsInsight ManagerHP System Management Homepage Accessing HP System ManagementHomepage - Systems Insight ManagerPRM Process Resource Manager (HP PRM) - Systems Insight Managerproperty pages HP SIM Property pages - Systems Insight ManagerReplicate Agent Settings Replicate Agent Settings - Systems Insight Managerserver migration Accessing the HP Server Migration Pack - Systems InsightManagerserver migration HP Server Migration Pack - Universal Edition - Systems InsightManagerSystem Fault Management System Fault Management overview - Systems InsightManagerWBEM Providers for Linux WBEM Management Providers overview - SystemsInsight Manager
add
rack Viewing enclosures - Creating a rack
adding
hosts files to database Adding systems in a hosts file to the HP SIM database -Systems Insight Managerindividual keys Adding licenses individually - Systems Insight Managerkeys from file Adding licenses from a file - Systems Insight Managerserver migration license HP Server Migration Pack - Universal Edition - SystemsInsight ManagerSystem Type Manager rules System Type Manager page - Systems InsightManagersystems to database Managing Hosts file - Systems Insight ManagerWMI Mapper Proxy Adding a WMI Mapper Proxy - Systems Insight ManagerWMI Mapper Proxy WMI Mapper Proxy - Systems Insight Manager
administering
adding user groups Creating new user groups - Systems Insight Managerauthorizations Users and authorizations - Systems Insight Managerauthorizations Users and user groups - Systems Insight Managerauthorizations overview Authorizations tab - Systems Insight Managercluster resource settings Configuring cluster resource settings - Systems InsightManagercreating authorization Creating new authorizations - Systems Insight Managercreating toolbox Creating new toolboxes - Systems Insight Managercreating users Creating new users - Systems Insight Managerdeleting authorizations Deleting authorizations - Systems Insight Managerdeleting toolboxes Deleting toolboxes - Systems Insight Managerdeleting user groups Deleting users and user groups - Systems Insight Managerdeleting users Deleting users and user groups - Systems Insight Manager
events Configuring events - Systems Insight Managernode resource settings Configuring node resource settings - Systems InsightManagernode resource settings Nodes tab - Systems Insight Managerreport authorizations Authorization reports - Systems Insight Managertoolboxes overview Toolboxes tab - Systems Insight Managerupdating authorization Updating authorizations - Systems Insight Manageruser groups Users tab - Systems Insight Manageruser overview Users tab - Systems Insight Managerusers Users tab - Systems Insight Managerversion control repository Specifying a Version Control Repository - Systems InsightManagerWMI Mapper Proxy WMI Mapper Proxy - Systems Insight Manager
advanced search tab
federated search Federated CMS Search Tool - Systems Insight Managersearch Federated CMS Search Tool - Systems Insight Manager
agentsSetting up managed systems - Systems Insight ManagerSetting up managed systems from a HP-UX CMS - Installing the required softwareon an HP-UX systemSetting up managed systems from a Linux CMS - Setting up remote Linux systemsfrom a Linux CMSSetting up managed systems from a Windows CMS - Setting up Windows managedsystems manually
aggregate event statusSystem tab for management processors - HP Systems Insight Manager 7.0System tab for servers - Systems Insight Manager
alarmCustomizing the system status panel - Systems Insight Manager
all scheduled tasksData collection - Systems Insight ManagerDeleting a scheduled task - Systems Insight ManagerNavigating the All Scheduled Tasks page - Systems Insight Manager
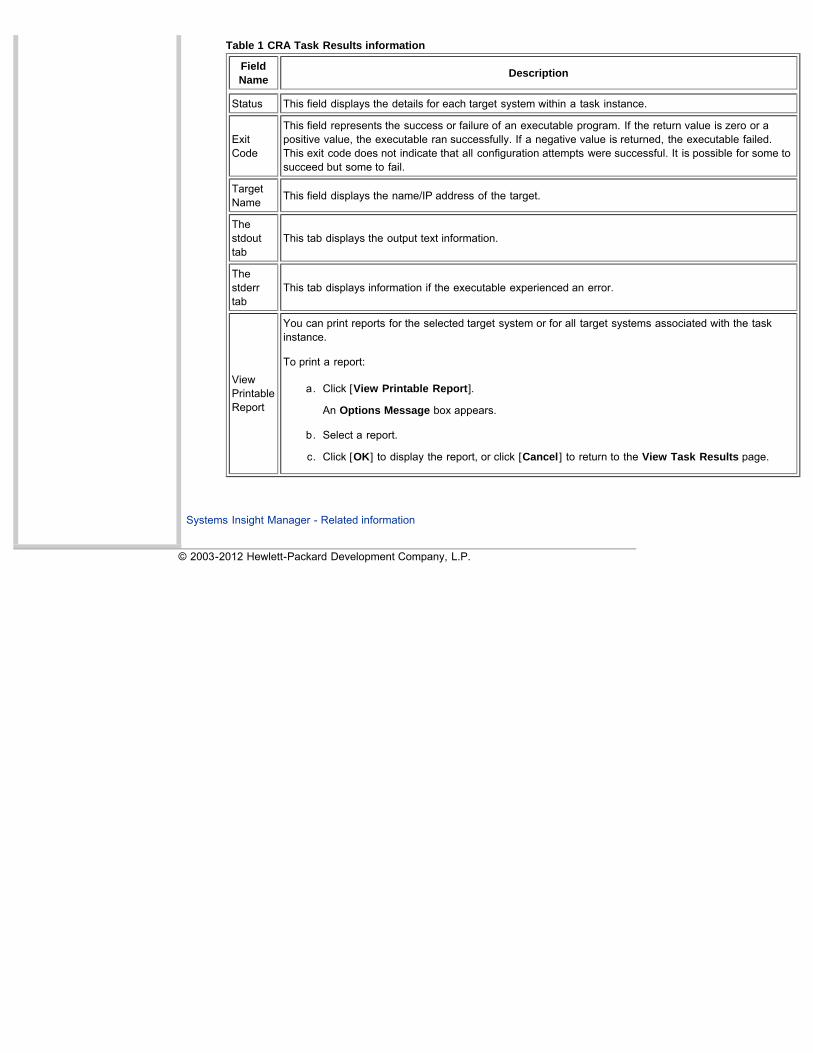
task results list Managing with tasks - Systems Insight Managerviewing Viewing task instance results - Systems Insight Manager
always accept
trusted certificates Trusted certificates - Systems Insight Manager
application
launching Custom tools - Systems Insight Manager
applying
time filters Applying a time filter - Systems Insight Managertime filters Creating an automatic event handling task - Systems Insight Managertime filters Scheduling a task - Systems Insight Manager
assigning licensesAssigning a license or Apply a license - Systems Insight Manager
assistanceAssistance -
audit logConfiguring sign-in events - Systems Insight ManagerCustom tools reference - Systems Insight ManagerViewing the audit log - Systems Insight Manager
configuring Configuring the audit log - Systems Insight Managerviewing Viewing the audit log - Systems Insight Manager
authenticationHP SIM features - Systems Insight Manager
authorizationsAuthorizations tab - Systems Insight ManagerSystem groups (CLI) - Systems Insight Manager
adding user groups Creating new user groups - Systems Insight Managerautomatically updating Creating new authorizations - Systems Insight Managercreating Authorizations tab - Systems Insight Managercreating Creating new authorizations - Systems Insight Managercreating toolbox Creating new toolboxes - Systems Insight Managercreating users Creating new users - Systems Insight Managerdelete authorizations Deleting authorizations - Systems Insight Managerdeleting Authorizations tab - Systems Insight Managerdeleting Deleting authorizations - Systems Insight Managerdeleting toolboxes Deleting toolboxes - Systems Insight Managerdeleting user groups Deleting users and user groups - Systems Insight Managerdeleting users Deleting users and user groups - Systems Insight Managerediting toolboxes Editing toolboxes - Systems Insight Managerediting user groups Editing users and user groups - Systems Insight Managerediting users Editing users and user groups - Systems Insight Manageroverview Authorizations tab - Systems Insight Manageroverview Users and authorizations - Systems Insight Manageroverview Users and user groups - Systems Insight Managerprinting reports Authorizations tab - Systems Insight Managerreports Authorization reports - Systems Insight Managertoolbox report Toolbox reports - Systems Insight Managerupdating Authorizations tab - Systems Insight Managerupdating Updating authorizations - Systems Insight Manageruser group report User and user group reports - Systems Insight Manageruser report User and user group reports - Systems Insight Managerusers Initial setup - Systems Insight Managerusers Performing Initial setup - Systems Insight Managerusers Users tab - Systems Insight Managerviewing reports Authorizations tab - Systems Insight Manager
authorizing
users Security - Securityusers Security - Systems Insight Manager
automatic
discovery Creating a new discovery task - Systems Insight Manager
automatic discoveryConfiguring automatic discovery - Systems Insight ManagerDiscovery filters - Systems Insight ManagerEditing a discovery task - Systems Insight ManagerEnabling automatic system discovery - Systems Insight ManagerHP SIM features - Systems Insight ManagerIdentification - Systems Insight ManagerInitial setup - Systems Insight ManagerPerforming Initial setup - Systems Insight ManagerProtocol settings - Systems Insight ManagerSystem status types - Systems Insight Manager
Discovery in HP SIM - Systems Insight Managerconfiguring Configuring discovery general settings - Systems Insight Manager
automatic event handlingHP SIM features - Systems Insight ManagerInitial setup - Systems Insight ManagerPerforming Initial setup - Systems Insight ManagerSummary - Systems Insight Manager
e-mail settings Configuring e-mail settings - Systems Insight Managere-mail settings Configuring e-mail settings - Systems Insight Managermodem settings Configuring modem settings for paging on Windows systems -Systems Insight Manager
automatic event handling task
with specified attributes Creating an automatic event handling task - SystemsInsight Manager
automatic event handling tasks
Configuring events - Systems Insight Manager
copying Managing event handling tasks - Systems Insight Managercreating Configuring events - Systems Insight Managercreating Creating an automatic event handling task - Systems Insight Managercreating Managing event handling tasks - Systems Insight Managerdeleting Configuring events - Systems Insight Managerdeleting Managing event handling tasks - Systems Insight Managerdisabling Enabling and disabling event handling tasks - Systems Insight Managerdisabling Managing event handling tasks - Systems Insight Managerdisabling Related information - Systems Insight Managere-mail settings Configuring events - Systems Insight Managerediting Managing event handling tasks - Systems Insight Managerenabling Enabling and disabling event handling tasks - Systems Insight Managerenabling Managing event handling tasks - Systems Insight Managerenabling Related information - Systems Insight Managerexamples Managing event handling tasks - Systems Insight Managermanaging Configuring events - Systems Insight Managermanaging Managing event handling tasks - Systems Insight Managermodem settings Configuring events - Systems Insight Managertask results Managing event handling tasks - Systems Insight Managerviewing definition Managing event handling tasks - Systems Insight Manager
bannerHome page - Systems Insight Manager
basic searchPerforming a basic search - Systems Insight Manager
bdfCustom tools reference - Systems Insight Manager
bladeConfiguring discovery general settings - Systems Insight ManagerHP SIM features - Systems Insight ManagerInstalling Software and Firmware task - Systems Insight ManagerNavigating the event table view page - Systems Insight ManagerNavigating the system table view page - Systems Insight ManagerPerformance tab for blades - Systems Insight ManagerPort mapping tab for blades - Systems Insight Manager
creating a rack Viewing enclosures - Creating a rackediting a rack Viewing enclosures - Editing a rackrack view Viewing racks - Systems Insight Manager
browsing
CMS Signing in - Systems Insight Manager
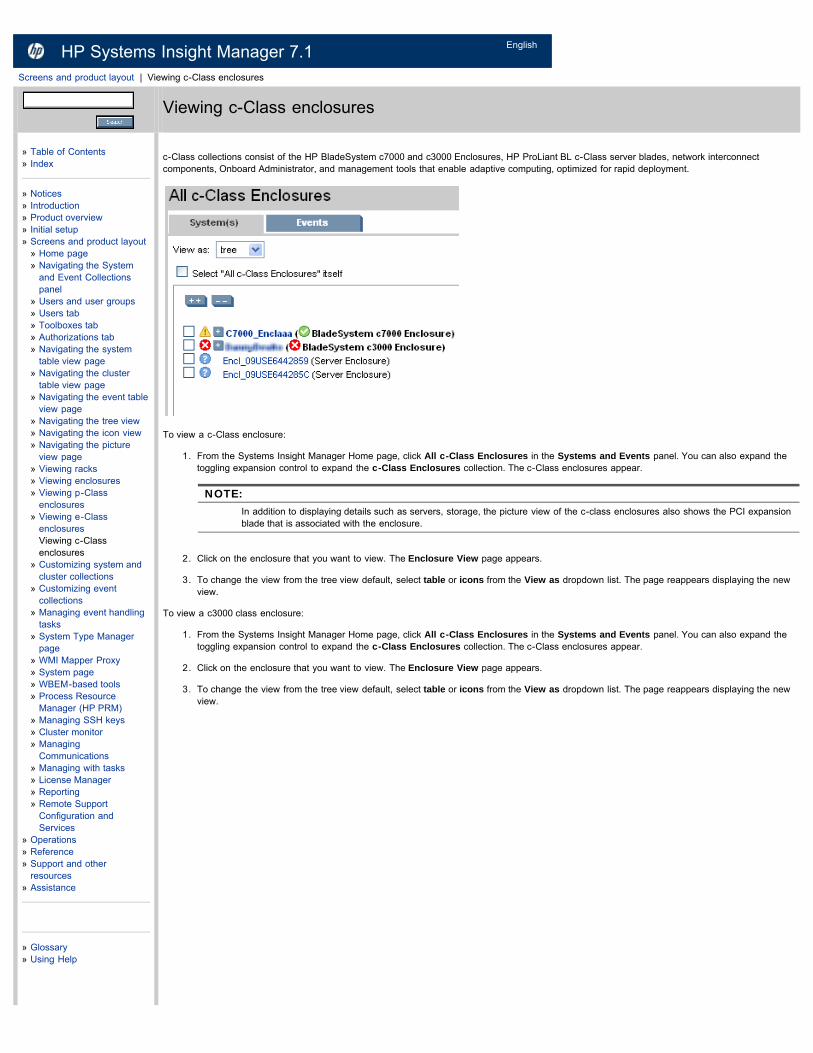
c-Class EnclosureViewing c-Class enclosures - Systems Insight Manager
c3000 enclosure
viewing Viewing c-Class enclosures - Systems Insight Manager
catCustom tools reference - Systems Insight Manager
CCI blade PCViewing e-Class enclosures - Systems Insight Manager
Central Management ServerHP SIM features - Systems Insight Manager
browsing to Signing in - Systems Insight Manageroverview Product architecture - Systems Insight Managersetting language Setting language locale - Systems Insight Managersetting locale Setting language locale - Systems Insight Managersetting up trust relationship Signing in - Systems Insight Manager
Central Management Server toolCreating a CMS tool - Systems Insight Manager
certificate signing request
creating Creating a certificate signing request - Systems Insight Managerimporting Importing a CA-signed certificate - Systems Insight Manager
submitting Submitting a certificate signing request - Systems Insight Manager
certificatesCreating a certificate signing request - Systems Insight ManagerCreating a server certificate - Systems Insight ManagerDeleting trusted certificates - Systems Insight ManagerEditing a server certificate - Systems Insight ManagerExporting a server certificate - Systems Insight ManagerExporting trusted certificates - Systems Insight ManagerImporting a CA-signed certificate - Systems Insight ManagerImporting a server certificate - Systems Insight ManagerImporting trusted certificates - Systems Insight ManagerManaging server certificates - Systems Insight ManagerReplicating trusted certificates - Systems Insight ManagerRequiring trusted certificates - Systems Insight ManagerSubmitting a certificate signing request - Systems Insight Manager
server Managing server certificates - Systems Insight Managerserver Security - Securityserver Security - Systems Insight Managersetting trust relationships Setting trust relationships - Systems Insight Managersetting trust relationships Setting up trust relationships - Systems Insight ManagerWBEM Configuring WMI Mapper Proxy - Systems Insight ManagerWBEM Security - SecurityWBEM Security - Systems Insight Manager
changing
SSL port Changing the HP SIM default SSL port - Systems Insight Manager
clear events task
running Clearing events - Systems Insight Managerscheduling Clearing events - Systems Insight Manager
clearing
events Clearing events - Systems Insight Managerevents Clearing events from the collection - Systems Insight Managerevents Configuring events - Systems Insight Manager
clusterIdentification - Systems Insight Manager
HP Serviceguard Navigating the cluster table view page - Systems Insight ManagerSystem tab System tab for clusters - Systems Insight Manager
cluster collectionsUsing Cluster Monitor - Systems Insight Manager
copying Copying system and cluster collections - Systems Insight Managercreating Creating system and cluster collections - Systems Insight Managercustomizing Cluster table view page - Systems Insight Managercustomizing Creating system and cluster collections - Systems Insight Managercustomizing Customizing system and cluster collections - Systems Insight Managerdeleting Deleting system and cluster collections - Systems Insight Managerediting Editing system and cluster collections - Systems Insight Managermanaging Cluster table view page - Systems Insight Managermoving Moving system and cluster collections - Systems Insight Manageroverview Navigating the System and Event Collections panel - Systems InsightManagerprinting Cluster table view page - Systems Insight Managerprinting Printing a cluster collection view - Systems Insight Managerreport Printing a cluster collection view - Systems Insight Managersetting properties Setting properties for system and cluster collections - SystemsInsight Manager
cluster monitorCluster tab - Systems Insight ManagerNetwork tab - Systems Insight ManagerResources tab - Systems Insight ManagerUsing Cluster Monitor - Systems Insight Manager
cluster resource settings Configuring cluster resource settings - Systems InsightManagercluster tab Cluster tab - Systems Insight Managernetwork tab Network tab - Systems Insight Managernode resource settings Configuring node resource settings - Systems InsightManagernode resource settings Nodes tab - Systems Insight Managerresources tab Resources tab - Systems Insight Managerviewing CPU utilization Cluster Monitor resources and associated settings - SystemsInsight Manager
cluster monitor resource
configure node settings Configuring node resource settings - Systems InsightManagerconfigure node settings Nodes tab - Systems Insight Managerconfigure settings Configuring cluster resource settings - Systems Insight ManagerCPU Cluster Monitor resources and associated settings - Systems Insight ManagerCPU polling rate Configuring node resource settings - Systems Insight ManagerCPU polling rate Nodes tab - Systems Insight ManagerCPU thresholds Configuring node resource settings - Systems Insight ManagerCPU thresholds Nodes tab - Systems Insight ManagerDisk polling rate Configuring node resource settings - Systems Insight ManagerDisk polling rate Nodes tab - Systems Insight ManagerDisk thresholds Configuring node resource settings - Systems Insight ManagerDisk thresholds Nodes tab - Systems Insight ManagerMSCS polling rate Configuring cluster resource settings - Systems Insight Manager
cluster search results
printing Printing cluster search results - Systems Insight Manager
cluster table view
printing results Navigating the cluster table view page - Systems Insight Manager
cluster table view pageUsing Cluster Monitor - Systems Insight Manager
adding columns Customizing the cluster table view page - Systems Insight Managercustomizing Customizing the cluster table view page - Systems Insight Managercustomizing Navigating the cluster table view page - Systems Insight Managerdeleting columns Customizing the cluster table view page - Systems InsightManagernavigating Navigating the cluster table view page - Systems Insight Manageroverview Cluster table view page - Systems Insight Managerprinting Printing a cluster collection view - Systems Insight Managersorting Customizing the cluster table view page - Systems Insight Manager
clustersConfiguring automatic discovery - Systems Insight Manager
deleting Cluster table view page - Systems Insight Managerdeleting Deleting clusters from the HP SIM database - Systems Insight Managerdeleting from search Deleting cluster search results from a search view - SystemsInsight Managermonitoring Monitoring systems, clusters, and events - Systems Insight ManagerMSCS Cluster tab - Systems Insight ManagerMSCS Using Cluster Monitor - Systems Insight Managersearching Performing an advanced search for clusters - Systems Insight ManagerServiceguard Manager HP SIM features - Systems Insight Manager
CMSProduct architecture - Systems Insight Manager
communications Managing Communications - Systems Insight Managercommunications Managing Communications - Systems Insight Manager
CMS security configuration rights
users Creating new users - Systems Insight Manager
CMS tool
editing Editing a CMS tool - Systems Insight Manager
collecting
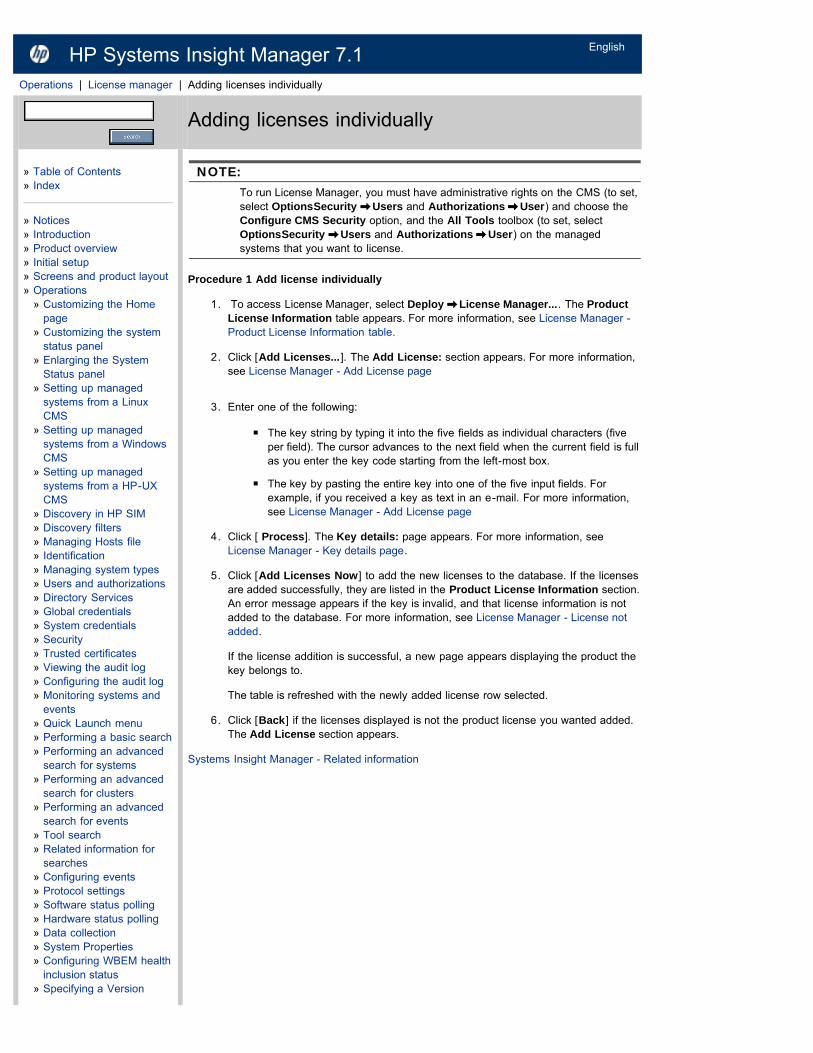
license information License Manager - Systems Insight Managerlicense information License Manager - Systems Insight Managerlicense information License manager - Systems Insight Managerlicense information Related information - Systems Insight Managerlicense keys Viewing licensed systems - Systems Insight Manager
collectionsSystem groups (CLI) - Systems Insight Manager
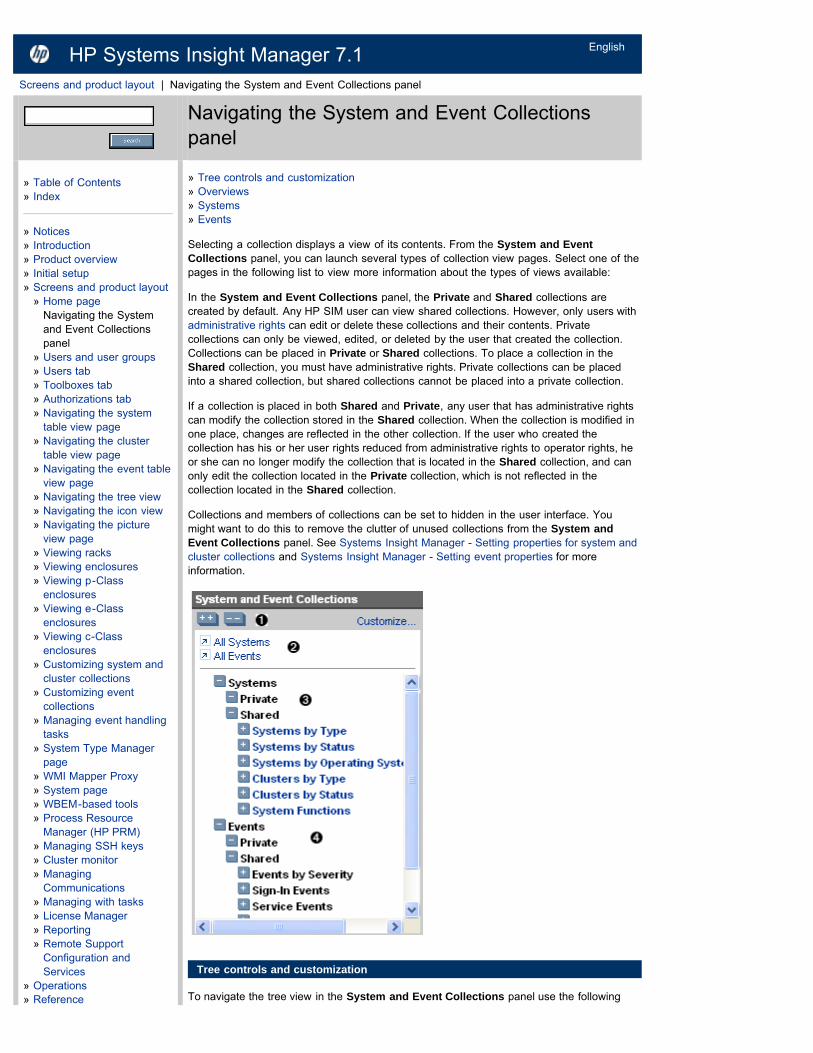
cluster Navigating the System and Event Collections panel - Systems InsightManagercombination Customizing system and cluster collections - Systems Insight Managerdeleting Deleting system and cluster collections - Systems Insight Managerevent Navigating the System and Event Collections panel - Systems InsightManagerprivate Navigating the System and Event Collections panel - Systems InsightManagersaving Saving collections - Systems Insight Managershared Navigating the System and Event Collections panel - Systems InsightManagersystem Navigating the System and Event Collections panel - Systems InsightManager
combination collectionsCustomizing system and cluster collections - Systems Insight Manager
command line
interface HP SIM features - Systems Insight Manager
command line toolsCommand line tools - Systems Insight ManagerHP SIM command line tools - Systems Insight Manager
parameters Examples of using parameter strings in custom tools - Systems InsightManager
commands
bdf Command line tools - Systems Insight Managerbdf HP SIM command line tools - Systems Insight Managercat Command line tools - Systems Insight Managercat HP SIM command line tools - Systems Insight Managercp Command line tools - Systems Insight Managercp HP SIM command line tools - Systems Insight Managerdf Command line tools - Systems Insight Managerdf HP SIM command line tools - Systems Insight Managerfind Command line tools - Systems Insight Managerfind HP SIM command line tools - Systems Insight Managerls Command line tools - Systems Insight Managerls HP SIM command line tools - Systems Insight Managermv Command line tools - Systems Insight Managermv HP SIM command line tools - Systems Insight Managerps Command line tools - Systems Insight Managerps HP SIM command line tools - Systems Insight Managerrm Command line tools - Systems Insight Managerrm HP SIM command line tools - Systems Insight Manager
communications
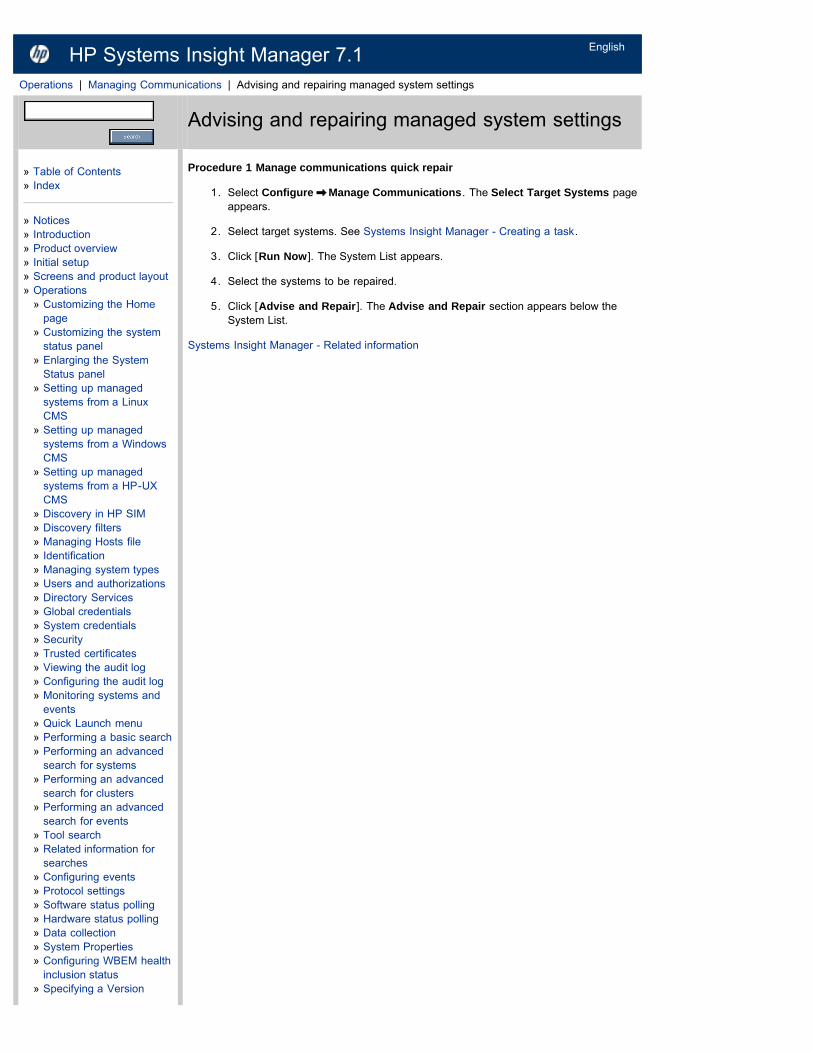
events tab Events tab - Systems Insight Manageridentification Identification tab - Systems Insight Managerprinting table Printing Manage Communications table - Systems Insight Managerquick repair Advising and repairing managed system settings - Systems InsightManagerquick repair Repairing managed system settings - Systems Insight Managerrun tools tab Run Tools tab - Systems Insight Manager
updating Updating communication statuses - Systems Insight Managerversion control tab Version Control tab - Systems Insight Manager
community stringsDiscovery in HP SIM - Systems Insight ManagerProtocol settings - Systems Insight ManagerSystem status types - Systems Insight Manager
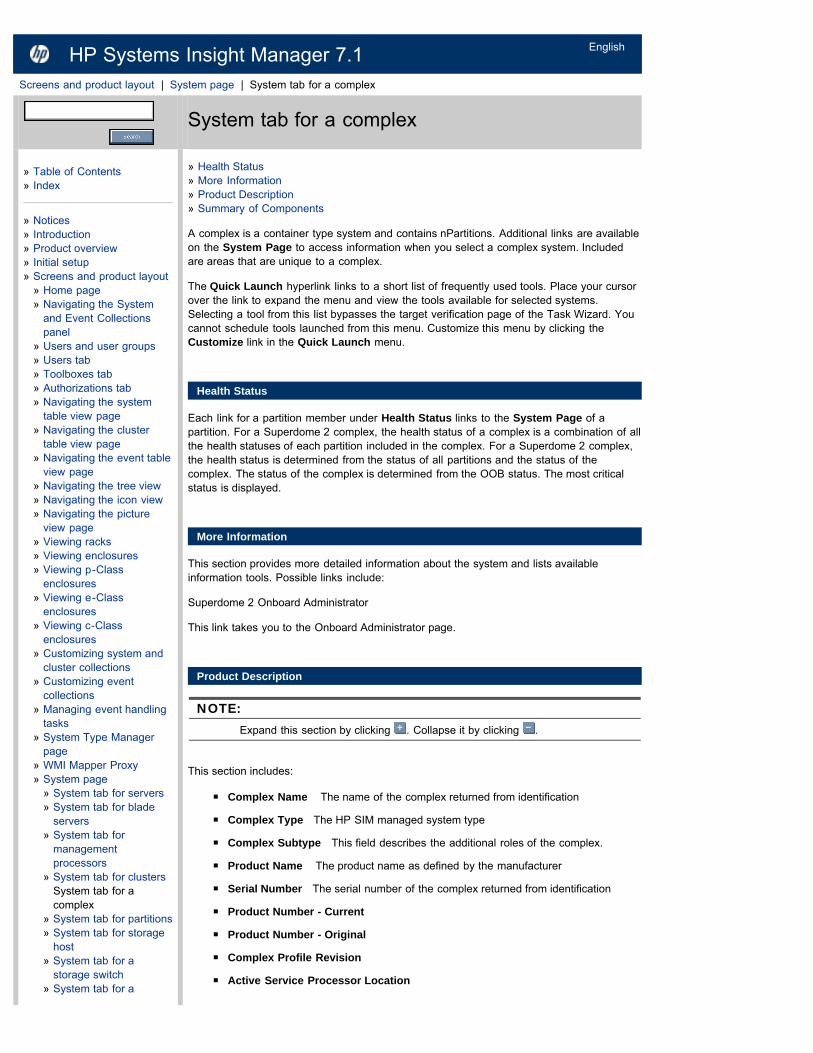
System tab System tab for a complex - Systems Insight Manager
configuration rightsUsers and authorizations - Systems Insight ManagerUsers and user groups - Systems Insight Manager
Configure or Repair AgentsConfiguring a non-administrative account for HP SIM to access WMI data -Systems Insight ManagerConfiguring SNMP - Systems Insight ManagerInstalling and configuring protocols - Systems Insight ManagerInstalling and configuring SNMP agent - Systems Insight ManagerInstalling the SNMP provider for Windows - Systems Insight ManagerInstalling the WBEM/WMI provider for Windows - Systems Insight ManagerSecure Shell and HP SIM - Systems Insight ManagerWBEM and HP SIM - Systems Insight ManagerWBEM indications - Systems Insight Manager
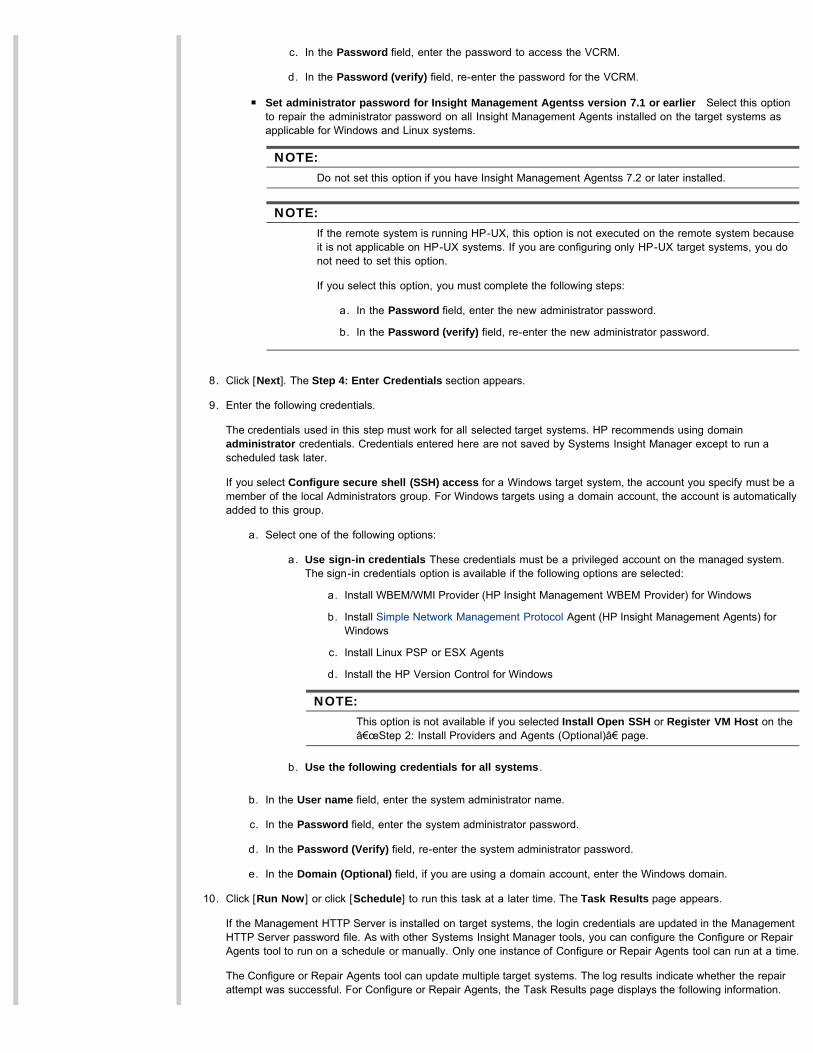
configuring Configuring credentials - Systems Insight Managerconfiguring Configuring credentials - Systems Insight Managerconfiguring Configuring credentials - Systems Insight Managerconfiguring Configuring managed systems from a Linux CMS - Systems InsightManagerconfiguring Configuring managed systems from a Windows CMS - Systems InsightManagerconfiguring Configuring managed systems from an HP-UX CMS - Systems InsightManagerconfiguring Configuring target system settings - Systems Insight Managerconfiguring Configuring target system settings - Systems Insight Managerconfiguring Configuring target system settings - Systems Insight Managerdiscovery tasks Creating a new discovery task - Systems Insight Managerrepairing Configuring credentials - Systems Insight Managerrepairing Configuring credentials - Systems Insight Managerrepairing Configuring credentials - Systems Insight Managerrepairing Configuring managed systems from a Linux CMS - Systems InsightManagerrepairing Configuring managed systems from a Windows CMS - Systems InsightManagerrepairing Configuring managed systems from an HP-UX CMS - Systems InsightManagerrepairing Configuring target system settings - Systems Insight Managerrepairing Configuring target system settings - Systems Insight Managerrepairing Configuring target system settings - Systems Insight Managerupdating Configuring credentials - Systems Insight Managerupdating Configuring credentials - Systems Insight Managerupdating Configuring credentials - Systems Insight Managerupdating Configuring managed systems from a Linux CMS - Systems InsightManagerupdating Configuring managed systems from a Windows CMS - Systems InsightManagerupdating Configuring managed systems from an HP-UX CMS - Systems InsightManagerupdating Configuring target system settings - Systems Insight Managerupdating Configuring target system settings - Systems Insight Managerupdating Configuring target system settings - Systems Insight Manager
audit log Configuring the audit log - Systems Insight Managerautomatic discovery Configuring discovery general settings - Systems InsightManagerConfigure or Repair Agents Configuring credentials - Systems Insight ManagerConfigure or Repair Agents Configuring credentials - Systems Insight ManagerConfigure or Repair Agents Configuring credentials - Systems Insight ManagerConfigure or Repair Agents Configuring managed systems from a Linux CMS -Systems Insight ManagerConfigure or Repair Agents Configuring managed systems from a Windows CMS -Systems Insight ManagerConfigure or Repair Agents Configuring managed systems from an HP-UX CMS -Systems Insight ManagerConfigure or Repair Agents Configuring target system settings - Systems InsightManagerConfigure or Repair Agents Configuring target system settings - Systems InsightManagerConfigure or Repair Agents Configuring target system settings - Systems InsightManagerdirectory groups Configuring directory groups - Systems Insight Managerdirectory service Configuring directory servers - Systems Insight Managere-mail settings Configuring e-mail settings - Systems Insight Managere-mail settings Configuring e-mail settings - Systems Insight Managere-mail settings Initial setup - Systems Insight Managere-mail settings Performing Initial setup - Systems Insight Managerevent filters Configuring event filters for registered SNMP traps - Systems InsightManagerevents Configuring status change events - Systems Insight Managerevents Verifying event configuration - Systems Insight Managerfirewalls HP SIM and firewalls - Systems Insight ManagerFirst Time Wizard First Time Wizard - Systems Insight Managerfirst time wizard Summary - Systems Insight ManagerHP SIM First Time Wizard - Systems Insight ManagerHP SIM Summary - Systems Insight ManagerHP Version Control Agent Configuring VCA - Systems Insight ManagerHP Version Control Repository Manager Specifying a Version Control Repository -Systems Insight Managermanaged systems Configuring managed systems - Systems Insight Managermanaged systems First Time Wizard - Systems Insight Managermodem settings Configuring modem settings for paging on Windows systems -Systems Insight Managerpager settings Creating new users - Systems Insight Managerpager settings Initial setup - Systems Insight Managerpager settings Performing Initial setup - Systems Insight ManagerPAM on HP-UX Single Sign On - Systems Insight ManagerPluggable Authentication Modules Single Sign On - Systems Insight Managerprotocol settings Initial setup - Systems Insight Managerprotocol settings Performing Initial setup - Systems Insight Managerprotocols Setting protocols and credentials for a system or group of systems -Systems Insight Managerprotocols Setting protocols for a single system - Systems Insight Manager OnlineHelpsign-in events Configuring sign-in events - Systems Insight ManagerSNMP traps Configuring SNMP traps - Systems Insight Managersystem link Configuring the system link - Systems Insight Managertimeout options Configuring browser timeout options - Systems Insight Managertwo factor authentication Configuring Two Factor Authentication - Systems InsightManagerWBEM Configuring WBEM/WMI - Systems Insight ManagerWMI Configuring WBEM/WMI - Systems Insight Manager
deleting Deleting systems from the HP SIM database - Systems Insight Manager
contract and warrantyCreating a task - Systems Insight Manager
search Search criteria - Systems Insight Managerstatus Navigating the system table view page - Systems Insight Managerstatus System tab for management processors - HP Systems Insight Manager 7.0status System tab for servers - Systems Insight Managersystem properties Editing system properties for a single system - Systems InsightManagersystem properties Editing system properties for multiple systems - Systems InsightManagersystem properties Entering new site information - Systems Insight Manager
controlling
HP 9000 management processor Executing internal control actions throughmanagement processors - Systems Insight ManagerHP Integrity management processor Executing internal control actions throughmanagement processors - Systems Insight Manager
Copy Depot SoftwareAvailable MSA tools - Systems Insight Manager
copying
automatic event handling tasks Managing event handling tasks - Systems InsightManagercluster collections Copying system and cluster collections - Systems InsightManagerevent collections Copying event collections - Systems Insight Managerreports Copying managed reports - Systems Insight Managersystem collections Copying system and cluster collections - Systems InsightManagertasks Copying automatic event handling tasks - Systems Insight Managertime filters Applying a time filter - Systems Insight Manager
copyrightNotices - Systems Insight Manager
cpCustom tools reference - Systems Insight Manager
CPU thresholdsConfiguring node resource settings - Systems Insight ManagerNodes tab - Systems Insight Manager
CPU utilization
cluster monitor Cluster Monitor resources and associated settings - Systems InsightManager
Create or Modify Recovery ArchiveAvailable MSA tools - Systems Insight Manager
Create or Modify Tape Recovery ArchiveAvailable MSA tools - Systems Insight Manager
creating
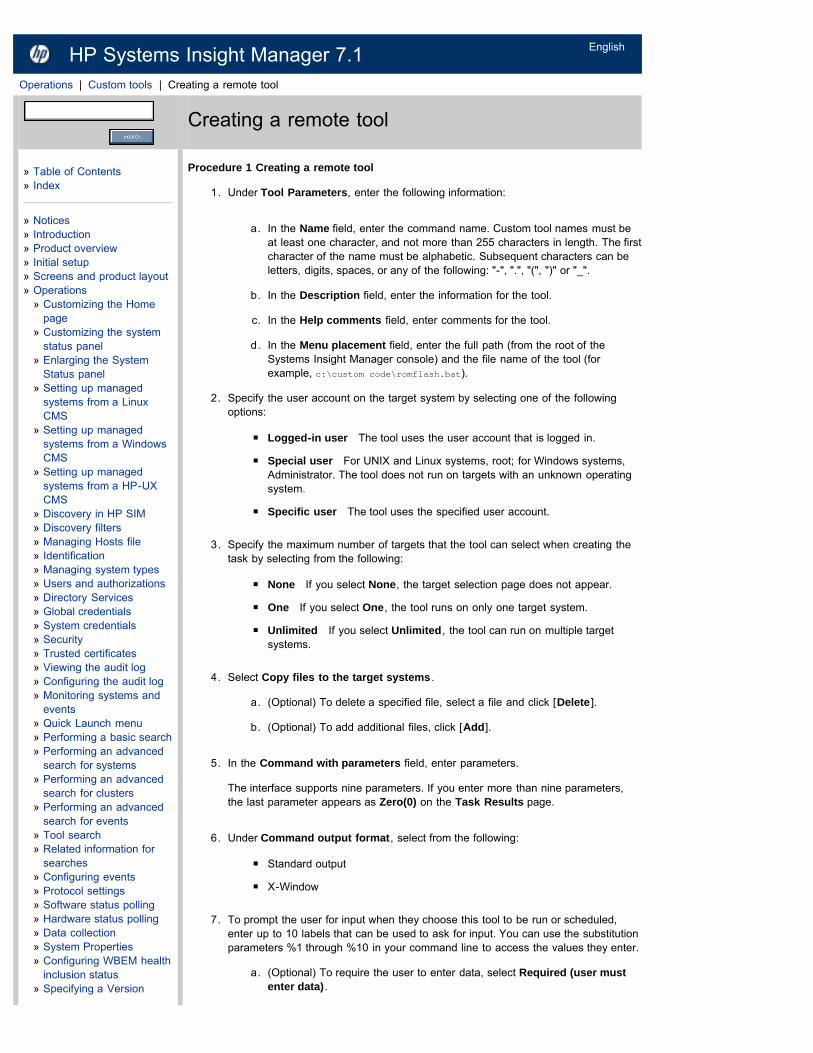
authorizations Authorizations tab - Systems Insight Managerautomatic event handling tasks Configuring events - Systems Insight Managerautomatic event handling tasks Creating an automatic event handling task -Systems Insight Managerautomatic event handling tasks Managing event handling tasks - Systems InsightManagercluster collections Creating system and cluster collections - Systems InsightManagercontacts Entering new contact information - Systems Insight ManagerCSR Creating a certificate signing request - Systems Insight Managercustom tools Creating a CMS tool - Systems Insight Managercustom tools Creating a remote tool - Systems Insight Managercustom tools Custom tools - Systems Insight Managerdata collection task Data collection - Systems Insight Manager
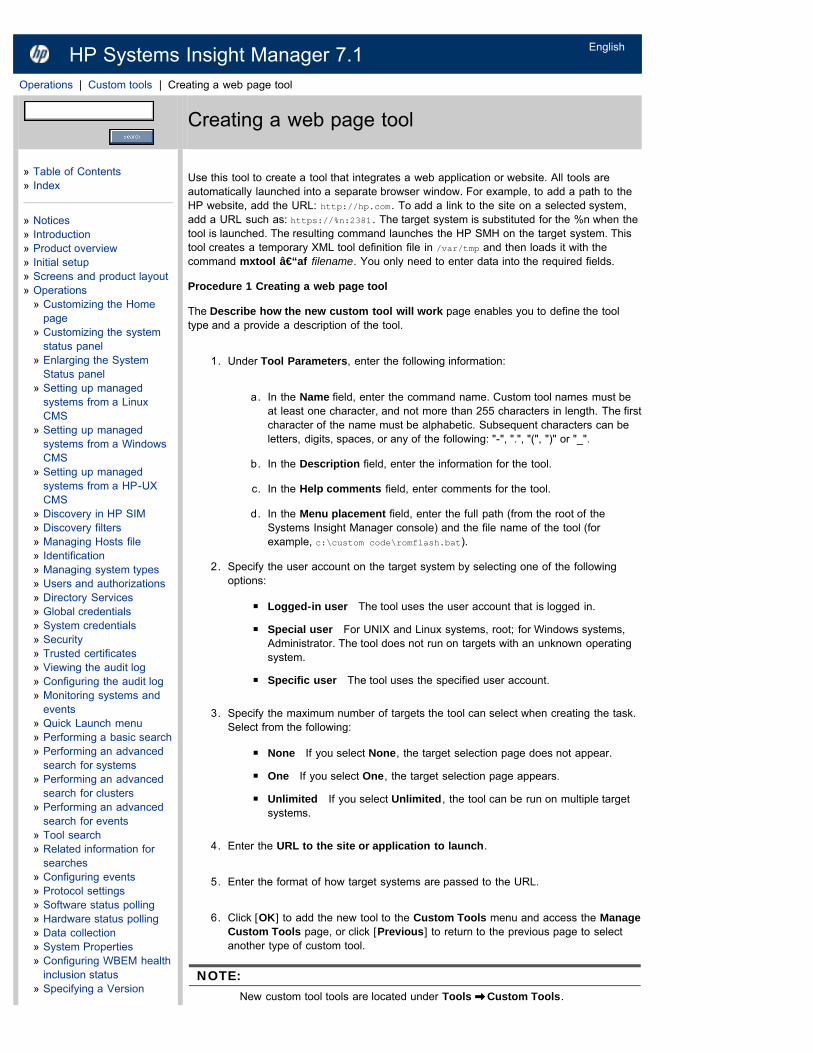
discovery hosts files Managing Hosts file - Systems Insight Managerdiscovery task Configuring automatic discovery - Systems Insight Managerdiscovery task Creating a new discovery task - Systems Insight Managerevent collections Creating event collections - Systems Insight Managerhosts files Creating a new hosts file - Systems Insight Managerhosts files Managing Hosts file - Systems Insight ManagerHP 9000 management processor user Creating new users on managementprocessors - Systems Insight ManagerHP Integrity user Creating new users on management processors - Systems InsightManagerreplicate agent settings task Creating a Replicate Agent Settings task - SystemsInsight Managerreports Adding a report - Systems Insight Managerserver certificates Creating a server certificate - Systems Insight Managerserver certificates Managing server certificates - Systems Insight Managersystem collections Creating system and cluster collections - Systems InsightManagerSystem Type Manager rules Creating STM rules - Systems Insight Managertasks Creating a task - Systems Insight Managertasks Managing with tasks - Systems Insight Managertime filters Applying a time filter - Systems Insight Managertoolboxes Creating new toolboxes - Systems Insight Managerusers Creating new users - Systems Insight Managerusers Initial setup - Systems Insight Managerusers Performing Initial setup - Systems Insight Managerweb page tool Creating a web page tool - Systems Insight Manager
credentialsSecurity - SecuritySecurity - Systems Insight Manager
deleting System credentials - HP Insight Manager 7.0 Online Helpdiscovery tasks Creating a new discovery task - Systems Insight Managerediting System credentials - HP Insight Manager 7.0 Online HelpFirst Time Wizard Configuring System Automatic Discovery task sign in credentials- Systems Insight ManagerFirst Time Wizard First Time Wizard - Systems Insight ManagerGlobal Credentials used in HP SIM - Systems Insight Managerglobal Global credentials - Systems Insight ManagerSystem Credentials used in HP SIM - Systems Insight Managersystem Configuring credentials for discovery tasks - Systems Insight Managersystem System credentials - HP Insight Manager 7.0 Online Helpsystem sign in Sign-in credentials - Systems Insight Managersystem single sign on Single sign on credentials - Systems Insight Managersystem SNMP SNMP credentials - Systems Insight Managersystem SSH SSH credentials - Systems Insight Managersystem WBEM WBEM credentials - Systems Insight Managersystem WS MAN WS-Man credentials - Systems Insight Managertrusted systems Credentials used in HP SIM - Systems Insight Managerviewing System credentials - HP Insight Manager 7.0 Online HelpVME VME credentials - Systems Insight Manager
CSRCreating a certificate signing request - Systems Insight ManagerSubmitting a certificate signing request - Systems Insight Manager
custom tools
CMS Creating a CMS tool - Systems Insight Managerdeleting Delete a custom tool - Systems Insight Managerdeleting Managing custom tools - Systems Insight Managerediting Managing custom tools - Systems Insight Managerenvironment variables Custom tool environment variables - Systems InsightManagerenvironment variables Custom tools - Systems Insight Managermanaging Custom tools - Systems Insight Managermanaging Custom tools - Systems Insight Manager
managing Managing custom tools - Systems Insight Managernaming conventions Creating a CMS tool - Systems Insight Managernaming conventions Creating a remote tool - Systems Insight Managerremote Creating a remote tool - Systems Insight Managerremoving Custom tools - Systems Insight Managerrunning Managing custom tools - Systems Insight Managerscheduling Managing custom tools - Systems Insight Managervalid characters Creating a CMS tool - Systems Insight Managervalid characters Creating a remote tool - Systems Insight Managerweb page tool Custom tools - Systems Insight Manager
customizing
cluster collections Creating system and cluster collections - Systems InsightManagercluster collections Customizing system and cluster collections - Systems InsightManagercluster table view Cluster table view page - Systems Insight Managercluster table view Navigating the cluster table view page - Systems Insight Managercluster table view page Customizing the cluster table view page - Systems InsightManagerevent collections Customizing event collections - Systems Insight Managerevent table view Navigating the event table view page - Systems Insight Managerevent table view page Customizing the event table view page - Systems InsightManagerSystem and Event Collections panel Navigating the System and Event Collectionspanel - Systems Insight Managersystem collections Creating system and cluster collections - Systems InsightManagersystem collections Customizing system and cluster collections - Systems InsightManagersystem status panel Customizing the system status panel - Systems InsightManagersystem table view Navigating the system table view page - Systems InsightManagersystem table view page Customizing the system table view page - Systems InsightManager
data collectionHP SIM features - Systems Insight Manager
data collection task
creating Data collection - Systems Insight Managerrunning Data collection - Systems Insight Managerscheduling Data collection - Systems Insight Managerviewing results Data collection - Systems Insight Manager
data migration toolHP SIM features - Systems Insight Manager
databaseIdentification - Systems Insight Manager
adding systems Managing Hosts file - Systems Insight Manageradministration Assigning events to users - Systems Insight Manageradministration Deleting clusters from the HP SIM database - Systems InsightManageradministration Deleting events from the HP SIM database - Systems InsightManagerassigning events Assigning events to users - Systems Insight Managerdeleting clusters Deleting clusters from the HP SIM database - Systems InsightManagerdeleting events Deleting events from the HP SIM database - Systems InsightManagerdeleting system Deleting systems from the HP SIM database - Systems InsightManager
deleting
authorizations Authorizations tab - Systems Insight Managerauthorizations Deleting authorizations - Systems Insight Managerautomatic event handling tasks Managing event handling tasks - Systems Insight
Managerclusters Cluster table view page - Systems Insight Managerclusters Deleting clusters from the HP SIM database - Systems Insight Managercollections Deleting system and cluster collections - Systems Insight Managercontacts Deleting contact information - Systems Insight Managercontainers Deleting systems from the HP SIM database - Systems Insight Managercustom tools Delete a custom tool - Systems Insight Managercustom tools Managing custom tools - Systems Insight Managerdiscovery task Configuring automatic discovery - Systems Insight Managerdiscovery task Deleting a discovery task - Systems Insight Managerdisk thresholds Creating a task to delete disk thresholds - Systems Insight Managerevent collections Deleting event collections - Systems Insight Managerevents Configuring events - Systems Insight Managerevents Deleting events - Systems Insight Managerevents Deleting events from the HP SIM database - Systems Insight Managerhosts files Deleting a hosts file - Systems Insight Managerhosts files Managing Hosts file - Systems Insight ManagerHP 9000 management processor user Deleting management processor users -Systems Insight ManagerHP Integrity user Deleting management processor users - Systems Insight Managermanagement proxy host systems Deleting systems from the HP SIM database -Systems Insight Managerreports Deleting a report - Systems Insight Managerreports Deleting managed reports - Systems Insight Managersite information Deleting site information - Systems Insight ManagerSSH keys Deleting an SSH key - Systems Insight ManagerSSH keys Managing SSH keys - Systems Insight Managersystem credentials System credentials - HP Insight Manager 7.0 Online HelpSystem Type Manager rule Deleting STM rules - Systems Insight ManagerSystem Type Manager rules System Type Manager page - Systems InsightManagersystems Deleting systems from the HP SIM database - Systems Insight Managersystems Navigating the system table view page - Systems Insight Managertask instance Deleting task results - Systems Insight Managertask results Task results list - Systems Insight Managertasks Deleting a scheduled task - Systems Insight Managertasks Managing with tasks - Systems Insight Managertasks Navigating the All Scheduled Tasks page - Systems Insight Managertime filters Applying a time filter - Systems Insight Managertoolboxes Deleting toolboxes - Systems Insight Managertrusted certificates Deleting trusted certificates - Systems Insight Managertrusted certificates Trusted certificates - Systems Insight Manageruser groups Deleting users and user groups - Systems Insight Managerusers Deleting users and user groups - Systems Insight ManagerWMI Mapper Proxy Deleting a WMI Mapper Proxy - Systems Insight ManagerWMI Mapper Proxy Deleting systems from the HP SIM database - Systems InsightManagerWMI Mapper Proxy WMI Mapper Proxy - Systems Insight Manager
Deploy SSH Public KeyAvailable MSA tools - Systems Insight Manager
deploying
HP 9000 management processor SSH public key Deploying SSH public keys tomanagement processors - Systems Insight ManagerHP Integrity SSH public key Deploying SSH public keys to management processors- Systems Insight Manager
dfUsers and authorizations - Systems Insight ManagerUsers and user groups - Systems Insight Manager
directory groupsDirectory Services - Systems Insight Manager
configuring Configuring directory groups - Systems Insight Manager
directory serviceDirectory Services - Systems Insight Manager
configuring Configuring directory servers - Systems Insight Manager
disabling
automatic event handling tasks Enabling and disabling event handling tasks -Systems Insight Managerautomatic event handling tasks Managing event handling tasks - Systems InsightManagerautomatic event handling tasks Related information - Systems Insight Managerdiscovery filters Discovery filters - Systems Insight Managerdiscovery task Configuring automatic discovery - Systems Insight Managerdiscovery task Disabling or enabling an existing discovery task - Systems InsightManagerdiscovery task Enabling automatic system discovery - Systems Insight Manager
discoveryIdentification - Systems Insight ManagerSetting up managed systems - Systems Insight ManagerSetting up managed systems from a HP-UX CMS - Installing the required softwareon an HP-UX systemSetting up managed systems from a Linux CMS - Setting up remote Linux systemsfrom a Linux CMSSetting up managed systems from a Windows CMS - Setting up Windows managedsystems manuallySummary - Systems Insight Manager
automatic Configuring automatic discovery - Systems Insight Managerautomatic Configuring discovery general settings - Systems Insight Managerautomatic Creating a new discovery task - Systems Insight Managerautomatic Discovery filters - Systems Insight Managerautomatic Discovery in HP SIM - Systems Insight Managerautomatic Editing a discovery task - Systems Insight Managerautomatic Enabling automatic system discovery - Systems Insight Managerautomatic Entering IP ranges in discovery tasks - Systems Insight Managerautomatic HP SIM features - Systems Insight Managerautomatic Identification - Systems Insight Managerautomatic Initial setup - Systems Insight Managerautomatic Performing Initial setup - Systems Insight Managerautomatic Protocol settings - Systems Insight Managerautomatic System status types - Systems Insight Managercreating hosts files Managing Hosts file - Systems Insight Managerdeleting hosts files Managing Hosts file - Systems Insight Managerediting hosts files Managing Hosts file - Systems Insight Managerevent based automatic discovery Discovery in HP SIM - Systems Insight Managerfirst Discovery in HP SIM - Systems Insight ManagerFirst Time Wizard First Time Wizard - Systems Insight Managergeneral settings Configuring discovery general settings - Systems Insight ManagerIP ranges Entering IP ranges in discovery tasks - Systems Insight Managerrecommended tasks Recommended discovery tasks - Systems Insight Managervm guests Configuring automatic discovery settings of VM guests - HP SystemsInsight Manager
discovery filtersConfiguring discovery general settings - Systems Insight ManagerHP SIM features - Systems Insight ManagerIdentification - Systems Insight Manager
accessing Discovery filters - Systems Insight Managerdisabling Discovery filters - Systems Insight Managerediting Discovery filters - Systems Insight Manager
discovery tasks
Configure or Repair Agents task Creating a new discovery task - Systems InsightManagerconfiguring credentials Configuring credentials for discovery tasks - Systems InsightManagerconfiguring credentials Creating a new discovery task - Systems Insight Managerconfiguring system types Creating a new discovery task - Systems Insight Managercreating Configuring automatic discovery - Systems Insight Managercreating Creating a new discovery task - Systems Insight Managerdeleting Configuring automatic discovery - Systems Insight Managerdeleting Deleting a discovery task - Systems Insight Manager
disabling Configuring automatic discovery - Systems Insight Managerdisabling Disabling or enabling an existing discovery task - Systems InsightManagerdisabling Enabling automatic system discovery - Systems Insight Managerediting Configuring automatic discovery - Systems Insight Managerediting Editing a discovery task - Systems Insight Managerenabling Configuring automatic discovery - Systems Insight Managerenabling Disabling or enabling an existing discovery task - Systems InsightManagerenabling Enabling automatic system discovery - Systems Insight Managergeneral settings Configuring automatic discovery - Systems Insight Managerrunning Configuring automatic discovery - Systems Insight Managerrunning Running a discovery task - Systems Insight Managerscheduling Creating a new discovery task - Systems Insight Managerstopping Configuring automatic discovery - Systems Insight Managerstopping Running a discovery task - Systems Insight Managersystem automatic discovery Enabling automatic system discovery - Systems InsightManager
disk thresholdsConfiguring node resource settings - Systems Insight ManagerNodes tab - Systems Insight Manager
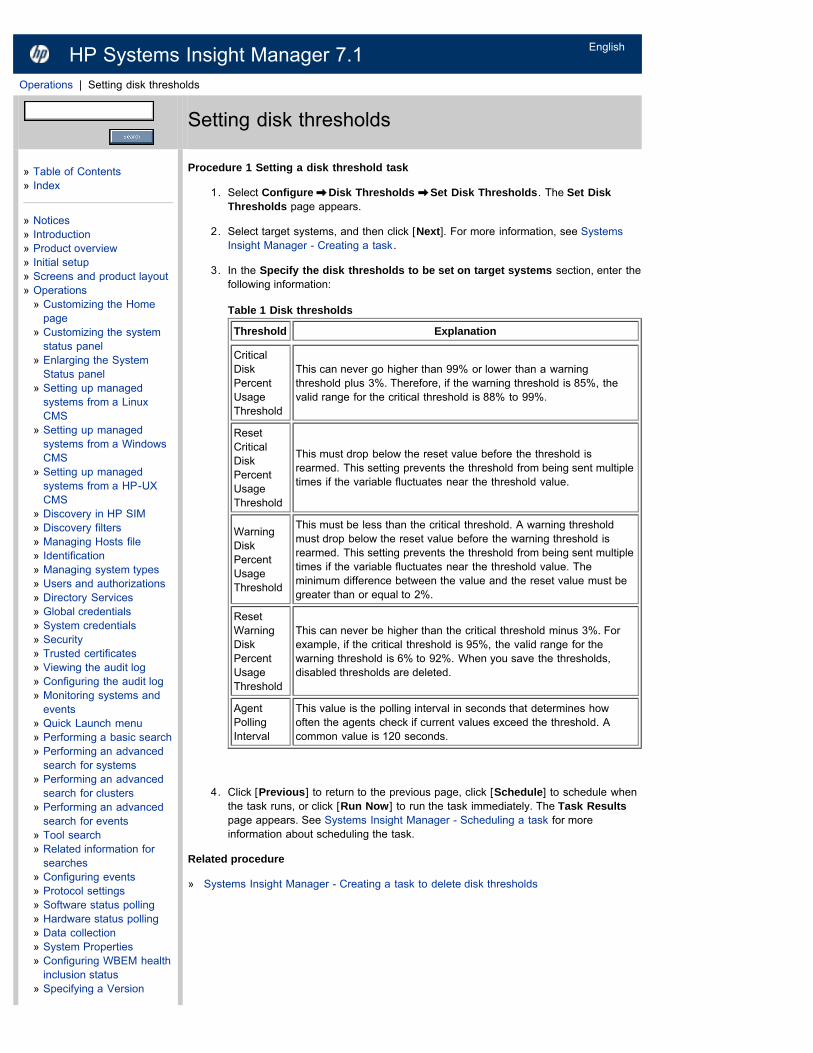
example Creating a task to delete disk thresholds - Systems Insight Managersetting Setting disk thresholds - Systems Insight Manager
Distributed Task FacilityCustom tools reference - Systems Insight Manager
DMIHardware status polling - HP Systems Insight ManagerSystem tab for servers - Systems Insight Manager
document type definition
mxtool Custom tools reference - Systems Insight Manager
DTDCustom tools reference - Systems Insight Manager
DTFCustom tools reference - Systems Insight Manager
e-Class EnclosureViewing e-Class enclosures - Systems Insight Manager
e-Class server bladeViewing e-Class enclosures - Systems Insight Manager
e-mail
encoding Creating an automatic event handling task - Systems Insight Managerhtml Creating an automatic event handling task - Systems Insight Managermessage format Creating an automatic event handling task - Systems InsightManagerpager/SMS Creating an automatic event handling task - Systems Insight Manager
e-mail settingsConfiguring events - Systems Insight ManagerSummary - Systems Insight Manager
automatic event handling tasks Configuring events - Systems Insight ManagerCMS Configuring e-mail settings - Systems Insight ManagerCMS Configuring e-mail settings - Systems Insight Managerconfiguring Configuring e-mail settings - Systems Insight Managerconfiguring Configuring e-mail settings - Systems Insight Managerconfiguring Initial setup - Systems Insight Managerconfiguring Performing Initial setup - Systems Insight ManagerFirst Time Wizard First Time Wizard - Systems Insight ManagerSMTP host Configuring e-mail settings - Systems Insight ManagerSMTP host Configuring e-mail settings - Systems Insight Manager
edit
rack Viewing enclosures - Editing a rack
editing
authorizations Authorizations tab - Systems Insight Managerautomatic event handling tasks Managing event handling tasks - Systems InsightManagercluster collections Editing system and cluster collections - Systems Insight ManagerCMS tool Editing a CMS tool - Systems Insight Managercontacts Editing contact information - Systems Insight Managercustom tools Managing custom tools - Systems Insight Managerdiscovery filters Discovery filters - Systems Insight Managerdiscovery task Configuring automatic discovery - Systems Insight Managerdiscovery task Editing a discovery task - Systems Insight Managerevent collections Editing event collections - Systems Insight Managerhosts files Editing a hosts file - Systems Insight Managerhosts files Managing Hosts file - Systems Insight ManagerHP 9000 management processor user Editing management processor users -Systems Insight ManagerHP Integrity user Editing management processor users - Systems Insight ManagerMIB Editing a MIB - Systems Insight Managerremote tool Editing a remote tool - Systems Insight Managerreports Editing a report - Systems Insight Managerreports Editing managed reports - Systems Insight Managerserver certificates Editing a server certificate - Systems Insight Managerserver certificates Managing server certificates - Systems Insight Managersite information Editing site information - Systems Insight Managersystem collections Editing system and cluster collections - Systems Insight Managersystem credentials System credentials - HP Insight Manager 7.0 Online Helpsystem properties HP SIM features - Systems Insight ManagerSystem Type Manager rules Editing STM rules - Systems Insight Managertasks Editing a scheduled task - Systems Insight Managertasks Editing automatic event handling tasks - Systems Insight Managertasks Managing with tasks - Systems Insight Managertasks Navigating the All Scheduled Tasks page - Systems Insight Managertime filters Applying a time filter - Systems Insight Managertoolboxes Editing toolboxes - Systems Insight Manageruser groups Editing users and user groups - Systems Insight Managerusers Editing users and user groups - Systems Insight Managerweb page tool Editing a web page tool - Systems Insight ManagerWMI Mapper Proxy Editing a WMI Mapper Proxy - Systems Insight ManagerWMI Mapper Proxy WMI Mapper Proxy - Systems Insight Manager
enabling
automatic event handling tasks Enabling and disabling event handling tasks -Systems Insight Managerautomatic event handling tasks Managing event handling tasks - Systems InsightManagerautomatic event handling tasks Related information - Systems Insight Managerdiscovery task Configuring automatic discovery - Systems Insight Managerdiscovery task Disabling or enabling an existing discovery task - Systems InsightManagerdiscovery task Enabling automatic system discovery - Systems Insight Managersystem monitoring HP SIM features - Systems Insight Manager
enclosureConfiguring discovery general settings - Systems Insight ManagerIdentification - Systems Insight ManagerNavigating the event table view page - Systems Insight ManagerNavigating the system table view page - Systems Insight ManagerPerformance tab for blades - Systems Insight ManagerPort mapping tab for blades - Systems Insight Manager
Enclosure viewViewing enclosures - Systems Insight Manager
EnglishSetting language locale - Systems Insight Manager
environment variables
custom tools Custom tool environment variables - Systems Insight Managercustom tools Custom tools - Systems Insight Manager
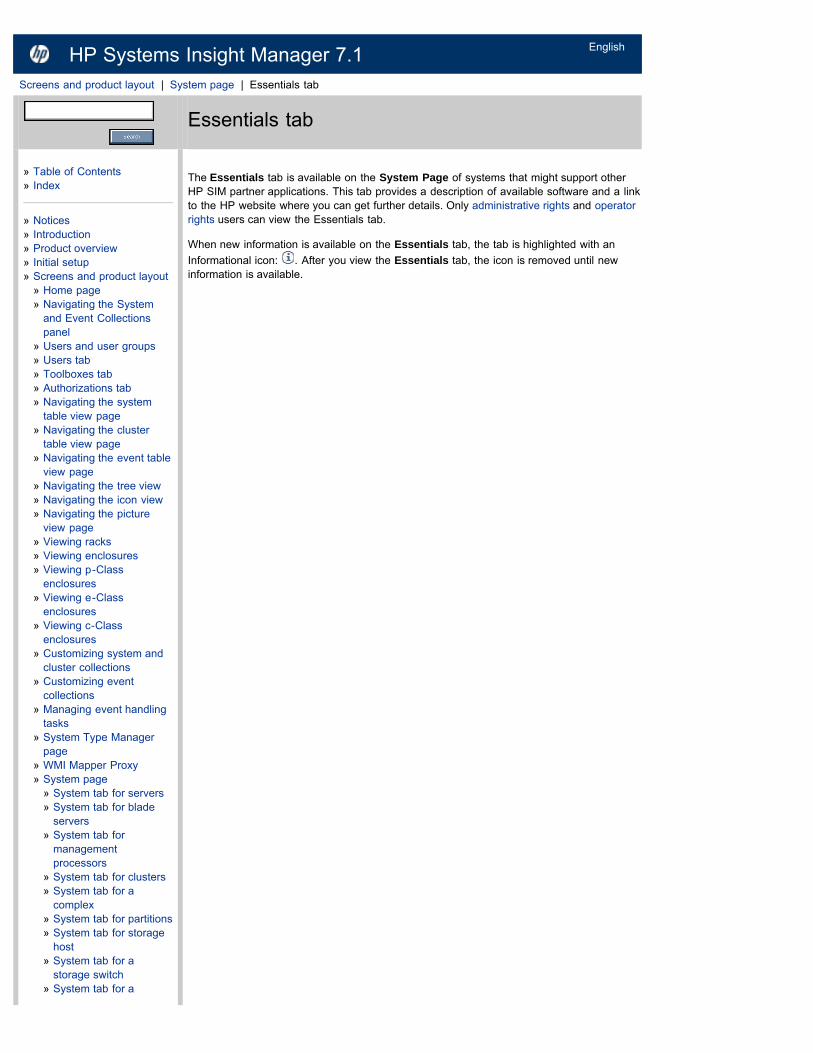
Essentials tabEssentials tab - Systems Insight Manager
ESXInstalling Linux PSP or ESX Agents from CRA - Systems Insight Manager
ESXi
WBEM health inclusion status Configuring WBEM health inclusion status - SystemsInsight Manager
ESXi systemsVME credentials - Systems Insight Manager
event collections
copying Copying event collections - Systems Insight Managercreating Creating event collections - Systems Insight Managercustomizing Customizing event collections - Systems Insight Managercustomizing Event table view page - Systems Insight Managerdeleting Deleting event collections - Systems Insight Managerediting Editing event collections - Systems Insight Managermanaging Event table view page - Systems Insight Managermoving Moving event collections - Systems Insight Manageroverview Navigating the System and Event Collections panel - Systems InsightManagerprinting Event table view page - Systems Insight Managerprinting Printing an event collection view - Systems Insight Managerreport Printing an event collection view - Systems Insight Managersetting properties Setting event properties - Systems Insight Manager
event filters
adding to tasks Creating a task - Systems Insight Managermodifying Creating a task - Systems Insight Manager
event search results
printing Printing event search results - Systems Insight Manager
event statusCustomizing the system status panel - Systems Insight Manager
event table view
printing results Navigating the event table view page - Systems Insight Manager
event table view pageAssigning events to users - Systems Insight ManagerClearing events from the collection - Systems Insight ManagerDeleting events from the HP SIM database - Systems Insight ManagerEntering comments to events - Systems Insight ManagerNavigating the System and Event Collections panel - Systems Insight ManagerSearch criteria - Systems Insight ManagerSystem page - Systems Insight Manager
adding columns Customizing the event table view page - Systems Insight Managercustomizing Customizing the event table view page - Systems Insight Managercustomizing Navigating the event table view page - Systems Insight Managerdeleting columns Customizing the event table view page - Systems Insight Managernavigating Navigating the event table view page - Systems Insight Manageroverview Event table view page - Systems Insight Managerprinting Printing an event collection view - Systems Insight Managersorting Customizing the event table view page - Systems Insight Manager
events
adding comments Entering comments to events - Systems Insight Manageradding comments Event table view page - Systems Insight Manageradministering Configuring events - Systems Insight Managerassigning Assigning events to users - Systems Insight Managerassigning Event table view page - Systems Insight Managerclearing Clearing events - Systems Insight Managerclearing Clearing events from the collection - Systems Insight Managerclearing Configuring events - Systems Insight Managerclearing Event table view page - Systems Insight Managerconfiguring Configuring sign-in events - Systems Insight Managerconfiguring Configuring status change events - Systems Insight Manager
configuring Verifying event configuration - Systems Insight Managerconfiguring filters Configuring event filters for registered SNMP traps - SystemsInsight Managercreating tasks Creating an automatic event handling task - Systems InsightManagerdeleting Configuring events - Systems Insight Managerdeleting Deleting event search results from a search view - Systems InsightManagerdeleting Deleting events - Systems Insight Managerdeleting Deleting events from the HP SIM database - Systems Insight Managerdeleting Event table view page - Systems Insight Managerdetails Navigating the event table view page - Systems Insight Managerfilter settings Configuring events - Systems Insight Managerfilters Configuring event filters for registered SNMP traps - Systems Insight Managermanaging tasks Managing event handling tasks - Systems Insight Managermodem settings Configuring modem settings for paging on Windows systems -Systems Insight Managermonitoring Monitoring systems, clusters, and events - Systems Insight Managersearching Performing an advanced search for events - Systems Insight Managerseverity Navigating the event table view page - Systems Insight ManagerSNMP trap settings Configuring events - Systems Insight ManagerSNMP traps Configuring SNMP traps - Systems Insight Managerstatus Configuring status change events - Systems Insight Managerstatus Navigating the event table view page - Systems Insight Managerstatus change Configuring status change events - Systems Insight Managertime Navigating the event table view page - Systems Insight Managertype Navigating the event table view page - Systems Insight Manager
events collections
printing Event table view page - Systems Insight Manager
events tab
communications Events tab - Systems Insight Manager
examplesReplicating trusted certificates - Systems Insight ManagerSetting up managed systems - Systems Insight ManagerSetting up managed systems from a HP-UX CMS - Installing the required softwareon an HP-UX systemSetting up managed systems from a Linux CMS - Setting up remote Linux systemsfrom a Linux CMSSetting up managed systems from a Windows CMS - Setting up Windows managedsystems manually
automatic event handling tasks Managing event handling tasks - Systems InsightManagercommand line tool parameters Examples of using parameter strings in custom tools- Systems Insight Managerdeleting disk thresholds Creating a task to delete disk thresholds - Systems InsightManagerweb launch tool parameters Examples of using parameter strings in custom tools -Systems Insight Manager
execute-as userSetting up managed systems - Systems Insight ManagerSetting up managed systems from a HP-UX CMS - Installing the required softwareon an HP-UX systemSetting up managed systems from a Linux CMS - Setting up remote Linux systemsfrom a Linux CMSSetting up managed systems from a Windows CMS - Setting up Windows managedsystems manually
exporting
server certificates Exporting a server certificate - Systems Insight ManagerSSH keys Exporting an SSH key - Systems Insight ManagerSSH keys Managing SSH keys - Systems Insight Managertrusted certificates Exporting trusted certificates - Systems Insight Managertrusted certificates Trusted certificates - Systems Insight Manager
fault managementHP SIM features - Systems Insight Manager
federated CMS configuration
add CMS Federated CMS Search Configuration - Systems Insight Managerdelete CMS Federated CMS Search Configuration - Systems Insight Managerfederated search Federated CMS Search Configuration - Systems Insight Managerfix CMS configuration Federated CMS Search Configuration - Systems InsightManagerrefresh CMS list Federated CMS Search Configuration - Systems Insight Manager
events Configuring events - Systems Insight Manager
filters
configuring Configuring event filters for registered SNMP traps - Systems InsightManager
firewalls
configuring HP SIM and firewalls - Systems Insight Manager
firmware
ROM firmware updates Installing ROM firmware updates - Systems InsightManager
First Time WizardFirst Time Wizard - Systems Insight ManagerHP SIM features - Systems Insight ManagerSigning in - Systems Insight Manager
credentials Configuring System Automatic Discovery task sign in credentials -Systems Insight Managerfinishing Finishing the First time Wizard - Systems Insight Managermanaged environment Configuring the managed environment - Systems InsightManagermanaged environment Operating-system-specific collections, reports, and tools -Systems Insight Managerprivilege elevation Configuring privilege elevation on HP-UX - Systems InsightManagersummary Summary - Systems Insight Managersystem automatic discovery Configuring System Automatic Discovery task sign incredentials - Systems Insight Managersystem automatic discovery Enabling automatic system discovery - Systems InsightManagerWMI Mapper Proxy Configuring the WMI Mapper Proxy - Systems Insight Manager
global credentialsGlobal credentials - Systems Insight ManagerVME credentials - Systems Insight Manager
global protocol settingsConfiguring automatic discovery - Systems Insight ManagerProtocol settings - Systems Insight Manager
setting Configuring discovery general settings - Systems Insight Manager
globalsettings.propsConfiguring browser timeout options - Systems Insight ManagerConfiguring e-mail settings - Systems Insight ManagerCreating new authorizations - Systems Insight ManagerEnlarging the System Status panel - Systems Insight ManagerHardware status polling - HP Systems Insight ManagerNavigating the cluster table view page - Systems Insight ManagerSetting language locale - Systems Insight Manager
graphical user interfaceHP SIM features - Systems Insight Manager
banner Home page - Systems Insight Managercustomize Home page Customizing the Home page - Systems Insight Managercustomizing system status panel Customizing the system status panel - SystemsInsight ManagerHome page Home page - Systems Insight Manageroverview Home page - Graphical user interface features
groupsAuthorizations tab - Systems Insight Manager
GUIHome page - Graphical user interface features
hardware statusNavigating the system table view page - Systems Insight Manager
hardware status pollingHardware status polling - HP Systems Insight Manager
running Hardware status polling - HP Systems Insight Managerscheduling Hardware status polling - HP Systems Insight Manager
health lifecycle indications
subscribing Subscribing to health lifecycle events - Systems Insight Managerunsubscribing Subscribing to health lifecycle events - Systems Insight Manager
health statusCustomizing the system status panel - Systems Insight ManagerDiscovery in HP SIM - Systems Insight ManagerHardware status polling - HP Systems Insight ManagerNavigating the System and Event Collections panel - Systems Insight ManagerSetting properties for system and cluster collections - Systems Insight ManagerSystem tab for management processors - HP Systems Insight Manager 7.0System tab for servers - Systems Insight Manager
types System status types - Systems Insight Manager
health status sectionHome page - Graphical user interface features
helpAssistance -
Home pageHome page - Systems Insight Manager
customize Customizing the Home page - Systems Insight Manageroverview Home page - Graphical user interface features
hosts files
Discovery in HP SIM - Systems Insight Manageradd system Discovery in HP SIM - Systems Insight Manageradding systems Managing Hosts file - Systems Insight Manageradding to database Adding systems in a hosts file to the HP SIM database -Systems Insight Managercreating Creating a new hosts file - Systems Insight Managercreating Managing Hosts file - Systems Insight Managerdeleting Deleting a hosts file - Systems Insight Managerdeleting Managing Hosts file - Systems Insight Managerediting Editing a hosts file - Systems Insight Managerediting Managing Hosts file - Systems Insight Managermanaging Configuring automatic discovery - Systems Insight Manager
valid format Creating a new hosts file - Systems Insight Manager
HP 9000 management processorManagement processor tools - Systems Insight Manager
controlling management processors Executing internal control actions throughmanagement processors - Systems Insight Managercreating user Creating new users on management processors - Systems InsightManagerdeleting user Deleting management processor users - Systems Insight Managerdeploying SSH public key Deploying SSH public keys to management processors -Systems Insight Managerediting user Editing management processor users - Systems Insight ManagerLAN access Configuring LAN access on management processors - Systems InsightManagerLDAP settings Configuring LDAP settings on management processors - SystemsInsight Managersystem locator Controlling the system locator LED through management processors- Systems Insight Managersystem power Controlling system power options through management processors -Systems Insight Managerupgrading firmware Upgrading management processor firmware - Systems InsightManager
HP BladeSystemHP SIM features - Systems Insight Manager
HP Configure or Repair AgentsConfigure or repair agents results log - Systems Insight ManagerConfiguring credentials - Systems Insight ManagerConfiguring credentials - Systems Insight ManagerConfiguring credentials - Systems Insight ManagerConfiguring managed systems from a Linux CMS - Systems Insight ManagerConfiguring managed systems from a Windows CMS - Systems Insight ManagerConfiguring managed systems from an HP-UX CMS - Systems Insight ManagerConfiguring target system settings - Systems Insight ManagerConfiguring target system settings - Systems Insight ManagerConfiguring target system settings - Systems Insight ManagerHP SIM features - Systems Insight Manager
HP iLOSystem status types - Systems Insight Manager
HP Insight ControlInsight Control reports - Systems Insight Manager
HP Insight Control performance managementHP SIM features - Systems Insight ManagerLicense Manager - Systems Insight ManagerLicense manager - Systems Insight ManagerNavigating the system table view page - Systems Insight ManagerRelated information - Systems Insight Manager
HP Insight Control power managementHP SIM features - Systems Insight Manager
HP Insight Control server deploymentHP SIM features - Systems Insight ManagerRPM Package Manager - Systems Insight Manager
accessing RPM Package Manager - Systems Insight Managerinstalling Installing RPM - Systems Insight Managerinstalling RPM Package Manager - Systems Insight Managerquerying Querying RPM - Systems Insight Managerquerying RPM Package Manager - Systems Insight Manageruninstalling RPM Package Manager - Systems Insight Manageruninstalling Uninstalling RPM - Systems Insight Managerverifying RPM Package Manager - Systems Insight Managerverifying Verifying RPM - Systems Insight Manager
HP Insight Control server migration
adding license HP Server Migration Pack - Universal Edition - Systems InsightManagerlicensing HP Server Migration Pack - Universal Edition - Systems Insight Manager
HP Insight Control virtual machine management
Configuring automatic discovery - Systems Insight ManagerHP SIM features - Systems Insight ManagerNavigating the system table view page - Systems Insight Manager
HP Insight Management WBEM Providers for Windows Server 2003 or Windows Server2008
Configuring WMI Mapper Proxy - Systems Insight ManagerHP Insight Remote Support Pack
HP SIM features - Systems Insight ManagerNavigating the system table view page - Systems Insight Manager
case status, case ID Navigating the event table view page - Systems InsightManagersystem properties Deleting contact information - Systems Insight Managersystem properties Deleting site information - Systems Insight Managersystem properties Editing contact information - Systems Insight Managersystem properties Editing site information - Systems Insight Managersystem properties Editing system properties for a single system - Systems InsightManagersystem properties Editing system properties for multiple systems - Systems InsightManagersystem properties Entering new contact information - Systems Insight Managersystem properties Entering new site information - Systems Insight Managersystem properties Managing contacts - Systems Insight Managersystem properties Managing site information - Systems Insight Manager
HP Insight Vulnerability and Patch Manager softwareHP SIM features - Systems Insight ManagerNavigating the system table view page - Systems Insight Manager
HP Instant ToptoolsNavigating the system table view page - Systems Insight Manager
HP IntegrityManagement processor tools - Systems Insight Manager
controlling management processors Executing internal control actions throughmanagement processors - Systems Insight Managercreating user Creating new users on management processors - Systems InsightManagerdeleting user Deleting management processor users - Systems Insight Managerdeploying SSH public key Deploying SSH public keys to management processors -Systems Insight Managerediting user Editing management processor users - Systems Insight ManagerLAN access Configuring LAN access on management processors - Systems InsightManagerLDAP settings Configuring LDAP settings on management processors - SystemsInsight Managersystem locator Controlling the system locator LED through management processors- Systems Insight Managersystem power Controlling system power options through management processors -Systems Insight Managerupgrading firmware Upgrading management processor firmware - Systems InsightManager
HP Integrity Integrated Lights OutManagement processor tools - Systems Insight Manager
HP NonStop Kernel servers
health lifecycle indications Subscribing to health lifecycle events - Systems InsightManager
HP OpenView Network Node ManagerHP SIM features - Systems Insight Manager
HP OpenView OperationsHP SIM features - Systems Insight Manager
HP ProLiant Essentials Virtual Machine Management PackHP Server Migration Pack - Universal Edition - Systems Insight Manager
HP ProLiant management processor
power cycle Cycling on the power on an HP ProLiant management processor -Systems Insight Managerpower off Powering off a system managed by an HP ProLiant managementprocessor - Systems Insight Manager
power on Powering on a system managed by an HP ProLiant managementprocessor - Systems Insight Managerturning off UID Turning off the UID for a system managed by an HP ProLiantmanagement processor - Systems Insight Managerturning on UID Turning on the UID for a system managed by an HP ProLiantmanagement processor - Systems Insight Manager
HP Serviceguard clusterNavigating the cluster table view page - Systems Insight Manager
HP Serviceguard ManagerHP SIM features - Systems Insight Manager
HP SIM
overview Introduction - Systems Insight Managerregistration Product registration - Systems Insight Managersetting up Initial setup - Systems Insight Managersetting up Performing Initial setup - Systems Insight Manager
HP Storage Essentials
toolboxes Toolboxes tab - Systems Insight Manager
HP System Management HomepageHP SIM features - Systems Insight ManagerHP System Management Homepage - Systems Insight Manager
accessing Accessing HP System Management Homepage - Systems InsightManagertrust relationships Setting up trust relationships - Systems Insight Manager
HP Version Control AgentAccessing the Version Control Agent - Systems Insight Manager
HP Version Control Repository ManagerAccessing the Version Control Repository Manager - Systems Insight ManagerInstalling Software and Firmware task - Systems Insight ManagerVersion Control status icons - Systems Insight Manager
installing Installing the Version Control Agent - Systems Insight Manageroverview Version Control - Systems Insight ManagerROM firmware updates Installing ROM firmware updates - Systems InsightManager
HP-UIXConfiguring the audit log - Systems Insight Manager
HP-UXCustom tools reference - Systems Insight ManagerHardware status polling - HP Systems Insight ManagerSynchronizing certificates - Systems Insight Manager
commands Users and authorizations - Systems Insight Managercommands Users and user groups - Systems Insight Managerconfiguring language Setting language locale - Systems Insight Managerconfiguring PAM Single Sign On - Systems Insight Managermanaged systems Setting up managed systems from a HP-UX CMS - Installing therequired software on an HP-UX systemuser authorization Single Sign On - Systems Insight Managerviewing MIB list Viewing a MIB - Systems Insight Manager
HP-UX commandsCommand line tools - Systems Insight ManagerHP SIM command line tools - Systems Insight Manager
HP-UX systems
WBEM indications HP SIM features - Systems Insight Manager
HTTPConfiguring discovery general settings - Systems Insight ManagerHardware status polling - HP Systems Insight ManagerIdentification - Systems Insight Manager
HTTPSConfiguring discovery general settings - Systems Insight Manager
icon view
Navigating the icon view - Systems Insight Manageridentification
HP SIM features - Systems Insight Manager
communications Identification tab - Systems Insight Managerinitial Identification - Systems Insight Managersystem Identification - Systems Insight Manager
identity tabSystem tab for blade servers - Systems Insight Manager
Ignite-UXCustom tools reference - Systems Insight Manager
Ignite-UX ConsoleAvailable MSA tools - Systems Insight Manager
Ignite-UX Restricted ConsoleAvailable MSA tools - Systems Insight Manager
iLOSystem status types - Systems Insight Manager
iLO 2
configuring HP Insight managed system setup wizard - HP Integrated Lights-Out 2Advanced - Systems Insight Manager
importing
CSR Importing a CA-signed certificate - Systems Insight Managerserver certificates Importing a server certificate - Systems Insight Managerserver certificates Managing server certificates - Systems Insight ManagerSSH keys Importing an SSH key - Systems Insight ManagerSSH keys Managing SSH keys - Systems Insight Managersubmitting CSR Submitting a certificate signing request - Systems Insight Managertrusted certificates Importing trusted certificates - Systems Insight Managertrusted certificates Trusted certificates - Systems Insight Managertrusted certificates Trusted certificates - Systems Insight Manager
initial ProLiant Pack installHP SIM features - Systems Insight Manager
initial setupInitial setup - Systems Insight ManagerPerforming Initial setup - Systems Insight Manager
initial status pollingIdentification - Systems Insight Manager
Insight Control server migrationHP Server Migration Pack - Universal Edition - Systems Insight ManagerHP SIM features - Systems Insight Manager
accessing Accessing the HP Server Migration Pack - Systems Insight Manager
Insight managed system setup wizardConfiguring automatic discovery - Systems Insight Manager
editing protocol preferences HP Insight managed system setup wizard - ProtocolPreferences - Systems Insight Managerediting SSH public authentication HP Insight managed system setup wizard - SSHauthentication - Systems Insight Managerediting users HP Insight managed system setup wizard - SSH user name for publickey - Systems Insight Managerevents feature Events feature - Systems Insight ManageriLO 2 HP Insight managed system setup wizard - HP Integrated Lights-Out 2Advanced - Systems Insight Managerinventory feature Inventory feature - Systems Insight Managermonitoring feature Monitoring feature - Systems Insight Manageroverview Setting up systems using the HP Insight managed system setup wizard -Systems Insight Managerprotocol preferences HP Insight managed system setup wizard - ProtocolPreferences - Systems Insight Managerpublic key authentication HP Insight managed system setup wizard - SSHauthentication - Systems Insight Managerremote command execution feature Remote Command Execution feature - SystemsInsight ManagerSingle Sign On feature Single Sign On feature - Systems Insight Manager
user authentication HP Insight managed system setup wizard - SSH user name forpublic key - Systems Insight Managerversion control feature Version Control feature - Systems Insight Manager
Install or Recover SystemAvailable MSA tools - Systems Insight Manager
Install WLM ConfigurationAvailable MSA tools - Systems Insight Manager
installationHP SIM features - Systems Insight Manager
installing
HP Insight Control server deployment Installing RPM - Systems Insight ManagerHP Insight Control server deployment RPM Package Manager - Systems InsightManagerHP VCRM Installing the Version Control Agent - Systems Insight ManagerOpenSSH Installing OpenSSH - Systems Insight ManagerOpenSSH tool HP SIM features - Systems Insight ManagerSNMP provider Installing the SNMP provider for Windows - Systems InsightManagerSSH provider Installing OpenSSH from CRA - Systems Insight ManagerWMI/WBEM provider Installing the WBEM/WMI provider for Windows - SystemsInsight Manager
Integrated AdministratorViewing e-Class enclosures - Systems Insight Manager
interconnect switchViewing e-Class enclosures - Systems Insight Manager
Internet Explorer
language Setting language locale - Systems Insight Manager
IPConfiguring discovery general settings - Systems Insight ManagerSystem tab for servers - Systems Insight Manager
IP addressDevice ping - Systems Insight Manager
IP ranges
reference Entering IP ranges in discovery tasks - Systems Insight Managerspecifying Configuring discovery general settings - Systems Insight Manager
IPX addressDevice ping - Systems Insight Manager
JapaneseSetting language locale - Systems Insight Manager
KerberosSigning in - Systems Insight Manager
keystoreSynchronizing certificates - Systems Insight Manager
known_hosts fileManaging SSH keys - Systems Insight Manager
LAN access
HP 9000 management processor Configuring LAN access on managementprocessors - Systems Insight ManagerHP Integrity Configuring LAN access on management processors - Systems InsightManager
language
English Setting language locale - Systems Insight ManagerInternet Explorer Setting language locale - Systems Insight ManagerJapanese Setting language locale - Systems Insight ManagerMozilla Setting language locale - Systems Insight Managersetting Setting language locale - Systems Insight Manager
launching
application Custom tools - Systems Insight Managercustom tools Custom tools - Systems Insight Manager
LDAP settings
HP 9000 management processor Configuring LDAP settings on managementprocessors - Systems Insight ManagerHP Integrity Configuring LDAP settings on management processors - SystemsInsight Manager
legal noticesNotices - Systems Insight Manager
legendHome page - Graphical user interface featuresHome page - Systems Insight Manager
license keys
adding from file Adding licenses from a file - Systems Insight Manageradding individually Adding licenses individually - Systems Insight Managerassigning and un-assigning Assigning a license or Apply a license - SystemsInsight Managermanagement processor Managing licenses - Systems Insight Managermanaging Managing licenses - Systems Insight Managermxlmkeyconfig mxlmkeyconfig CLI - Systems Insight Manager
license managementLicense Manager - Systems Insight ManagerLicense Manager - Systems Insight ManagerLicense manager - Systems Insight ManagerRelated information - Systems Insight Manager
license managerViewing licensed systems - Systems Insight Manager
licensing
adding keys from file Adding licenses from a file - Systems Insight Manageradding keys individually Adding licenses individually - Systems Insight Managerassigning and un-assigning Assigning a license or Apply a license - SystemsInsight Managerassigning licenses License Manager - Systems Insight Managerassigning licenses License Manager - Systems Insight Managerassigning licenses License manager - Systems Insight Managerassigning licenses Related information - Systems Insight Managercollecting license information License Manager - Systems Insight Managercollecting license information License Manager - Systems Insight Managercollecting license information License manager - Systems Insight Managercollecting license information Related information - Systems Insight Managercollecting license information Viewing licensed systems - Systems Insight ManageriLO License Manager - Systems Insight Managermanagement processor License Manager - Systems Insight Managermanagement processor License manager - Systems Insight Managermanagement processor Related information - Systems Insight Managermanaging keys Managing licenses - Systems Insight Managermanaging licenses License Manager - Systems Insight Managermanaging licenses License Manager - Systems Insight Managermanaging licenses License manager - Systems Insight Managermanaging licenses Related information - Systems Insight Managermxlmkeyconfig mxlmkeyconfig CLI - Systems Insight ManagerProLiant Essentials License Manager - Systems Insight ManagerProLiant Essentials License Manager - Systems Insight ManagerProLiant Essentials License manager - Systems Insight ManagerProLiant Essentials Related information - Systems Insight Managerserver migration HP Server Migration Pack - Universal Edition - Systems InsightManager
LinuxConfiguring the audit log - Systems Insight ManagerHardware status polling - HP Systems Insight ManagerSynchronizing certificates - Systems Insight Manager
commands Users and authorizations - Systems Insight Managercommands Users and user groups - Systems Insight Managerconfiguring language Setting language locale - Systems Insight Managermanaged systems Setting up managed systems from a Linux CMS - Setting upremote Linux systems from a Linux CMS
user authorization Single Sign On - Systems Insight Managerviewing MIB list Viewing a MIB - Systems Insight Manager
Linux commandsCommand line tools - Systems Insight ManagerHP SIM command line tools - Systems Insight Manager
Linux IPFHP SIM Property pages - Systems Insight Manager
Linux systems
WBEM indications HP SIM features - Systems Insight Manager
lists
task results Task results list - Systems Insight Manager
locale
English Setting language locale - Systems Insight ManagerJapanese Setting language locale - Systems Insight Manager
log
Configure or Repair Agents results Configure or repair agents results log - SystemsInsight Manager
log.propertiesConfiguring the audit log - Systems Insight Manager
logging in
CLI Signing in - Systems Insight Manager
logs
all scheduled tasks Deleting a scheduled task - Systems Insight Manager
lsCustom tools reference - Systems Insight ManagerUsers and authorizations - Systems Insight ManagerUsers and user groups - Systems Insight Manager
manage SSH keysManaging SSH keys - Systems Insight Manager
manage system types page
navigating System Type Manager page - Systems Insight Manager
Managed Environment
First Time Wizard Operating-system-specific collections, reports, and tools -Systems Insight Manager
managed environment
First Time Wizard Configuring the managed environment - Systems InsightManagerFirst Time Wizard First Time Wizard - Systems Insight Manager
managed system
overview Product architecture - Systems Insight Manager
managed systemsReplicating trusted certificates - Systems Insight Manager
communications Managing Communications - Systems Insight Managercommunications Managing Communications - Systems Insight Managerconfiguring Configuring automatic discovery - Systems Insight Managerconfiguring Configuring managed systems - Systems Insight Managerconfiguring First Time Wizard - Systems Insight ManagerHP-UX Setting up managed systems from a HP-UX CMS - Installing the requiredsoftware on an HP-UX systemLinux Setting up managed systems from a Linux CMS - Setting up remote Linuxsystems from a Linux CMSoverview Setting up managed systems - Systems Insight Manager
quick repair Repairing managed system settings - Systems Insight Managerrecommendation for repair Advising and repairing managed system settings -Systems Insight Managerrepairing communication Advising and repairing managed system settings - SystemsInsight Managerrepairing communication problems Repairing managed system settings - SystemsInsight Managersetting up Setting up managed systems - Systems Insight ManagerWindows Setting up managed systems from a Windows CMS - Setting up Windowsmanaged systems manually
management agentsNavigating the system table view page - Systems Insight ManagerSetting up managed systems - Systems Insight ManagerSetting up managed systems from a HP-UX CMS - Installing the required softwareon an HP-UX systemSetting up managed systems from a Linux CMS - Setting up remote Linux systemsfrom a Linux CMSSetting up managed systems from a Windows CMS - Setting up Windows managedsystems manually
management domain
overview Product architecture - Systems Insight Manager
Management HTTP Server
trust relationships Setting up trust relationships - Systems Insight Manager
management processorConfiguring discovery general settings - Systems Insight ManagerIdentification - Systems Insight ManagerNavigating the system table view page - Systems Insight ManagerSystem tab for servers - Systems Insight Manager
System tab System tab for management processors - HP Systems Insight Manager7.0
management processors
creating user Management processor tools - Systems Insight Managerdeleting user Management processor tools - Systems Insight Managerdeploying SSH public key Management processor tools - Systems Insight Managerediting user Management processor tools - Systems Insight ManagerLAN access Management processor tools - Systems Insight ManagerLDAP settings Management processor tools - Systems Insight Managermanagement processor control Management processor tools - Systems InsightManagersystem locator Management processor tools - Systems Insight Managersystem power Management processor tools - Systems Insight Managerupgrading firmware Management processor tools - Systems Insight Manager
management protocolsSetting up managed systems - Systems Insight ManagerSetting up managed systems from a HP-UX CMS - Installing the required softwareon an HP-UX systemSetting up managed systems from a Linux CMS - Setting up remote Linux systemsfrom a Linux CMSSetting up managed systems from a Windows CMS - Setting up Windows managedsystems manually
management proxies
deleting host systems Deleting systems from the HP SIM database - SystemsInsight Manager
managing
automatic event handling tasks Configuring events - Systems Insight Managerautomatic event handling tasks Managing event handling tasks - Systems InsightManagercluster collections Cluster table view page - Systems Insight ManagerCMS communications Managing Communications - Systems Insight ManagerCMS communications Managing Communications - Systems Insight Manager
custom tools Custom tools - Systems Insight Managercustom tools Managing custom tools - Systems Insight Managerdiscovery task Configuring automatic discovery - Systems Insight Managerevents Configuring events - Systems Insight Managerhosts files Configuring automatic discovery - Systems Insight Managerlicense keys Managing licenses - Systems Insight Managerlicenses License Manager - Systems Insight Managerlicenses License Manager - Systems Insight Managerlicenses License manager - Systems Insight Managerlicenses Related information - Systems Insight Managerreports Copying managed reports - Systems Insight ManagerSoftware/Firmware baselines Managing Software/Firmware Baselines - SystemsInsight ManagerSSH keys Configuring SSH key security - Systems Insight ManagerSSH keys HP SIM features - Systems Insight Managersystem groups from CLI System groups (CLI) - Systems Insight Managersystem groups from GUI System groups (CLI) - Systems Insight Managersystem types Managing system types - Systems Insight Managertime filters Applying a time filter - Systems Insight Manager
managing communications
ProLiant Support Pack Installing the HP ProLiant Support Pack - Systems InsightManagerprotocols Installing and configuring protocols - Systems Insight ManagerSNMP Installing and configuring SNMP agent - Systems Insight ManagerSSH Secure Shell and HP SIM - Systems Insight ManagerWBEM Installing and configuring SNMP agent - Systems Insight ManagerWBEM WBEM indications - Systems Insight ManagerWBEM; WBEM and HP SIM - Systems Insight Manager
managing contacts
creating Entering new contact information - Systems Insight Managerdeleting Deleting contact information - Systems Insight Managerediting Editing contact information - Systems Insight Managersystem properties Managing contacts - Systems Insight Manager
mcompileEditing a MIB - Systems Insight Manager
menus
quick launch Quick Launch menu - Systems Insight Manager
MIBConfiguring the presentation of SNMP traps in HP SIM - Systems Insight Manager
compiling Compiling a MIB - Systems Insight Managerediting Editing a MIB - Systems Insight Managerpreloaded Registering a MIB - HP Systems Insight Managerregistering Managing MIBs - Systems Insight Managerregistering Registering a MIB - HP Systems Insight Managerunregistering Unregistering a MIB - Systems Insight Managerviewing list Registering a MIB - HP Systems Insight Managerviewing list Viewing a MIB - Systems Insight Manager
migrating
P2V HP Server Migration Pack - Universal Edition - Systems Insight Managerserver migration HP Server Migration Pack - Universal Edition - Systems InsightManagerV2P HP Server Migration Pack - Universal Edition - Systems Insight ManagerV2V HP Server Migration Pack - Universal Edition - Systems Insight Manager
modem settingsConfiguring events - Systems Insight Manager
automatic event handling tasks Configuring events - Systems Insight Managerconfiguring Configuring modem settings for paging on Windows systems - SystemsInsight Manager
monitoring
HP SIM features - Systems Insight Manager
clusters Monitoring systems, clusters, and events - Systems Insight Managerevents Monitoring systems, clusters, and events - Systems Insight Managersystems Monitoring systems, clusters, and events - Systems Insight Manager
moving
cluster collections Moving system and cluster collections - Systems Insight Managerevent collections Moving event collections - Systems Insight Managersystem collections Moving event collections - Systems Insight Managersystem collections Moving system and cluster collections - Systems InsightManager
Mozilla
language Setting language locale - Systems Insight Manager
MSACustom tools - Systems Insight ManagerCustom tools reference - Systems Insight ManagerSetting language locale - Systems Insight ManagerTask results list - Systems Insight ManagerViewing task instance results - Systems Insight Manager
MSA toolsAvailable MSA tools - Systems Insight Manager
MSCS
clusters Using Cluster Monitor - Systems Insight Manager
MSCS polling rateConfiguring cluster resource settings - Systems Insight Manager
multiple-system awareCustom tools - Systems Insight Manager
multiple-system aware toolsCustom tools reference - Systems Insight ManagerSetting language locale - Systems Insight ManagerTask results list - Systems Insight Manager
mutliple-system awareViewing task instance results - Systems Insight Manager
mx.logConfiguring the audit log - Systems Insight Manager
mxagentconfigCustom tools - Systems Insight ManagerDeleting management processor users - Systems Insight ManagerHP SIM features - Systems Insight ManagerInstalling OpenSSH - Systems Insight Manager
mxauthAuthorization reports - Systems Insight ManagerCreating new authorizations - Systems Insight ManagerDeleting authorizations - Systems Insight Manager
mxcollectionCopying event collections - Systems Insight ManagerCopying system and cluster collections - Systems Insight ManagerCreating event collections - Systems Insight ManagerCreating system and cluster collections - Systems Insight ManagerCustomizing event collections - Systems Insight ManagerDeleting event collections - Systems Insight ManagerDeleting system and cluster collections - Systems Insight ManagerEditing event collections - Systems Insight ManagerEditing system and cluster collections - Systems Insight ManagerMoving system and cluster collections - Systems Insight ManagerSetting properties for system and cluster collections - Systems Insight Manager
mxexecAuthorization reports - Systems Insight ManagerCommand line tools - Systems Insight ManagerCreating a task - Systems Insight ManagerCreating new authorizations - Systems Insight ManagerCreating new toolboxes - Systems Insight ManagerCreating new user groups - Systems Insight ManagerCreating new users - Systems Insight Manager
Deleting authorizations - Systems Insight ManagerDeleting toolboxes - Systems Insight ManagerDeleting users and user groups - Systems Insight ManagerEditing toolboxes - Systems Insight ManagerEditing users and user groups - Systems Insight ManagerHP SIM command line tools - Systems Insight ManagerRunning a scheduled task - Systems Insight ManagerSetting language locale - Systems Insight ManagerToolbox reports - Systems Insight ManagerUser and user group reports - Systems Insight Manager
mxlmkeyconfig
license keys mxlmkeyconfig CLI - Systems Insight Manager
mxmibUnregistering a MIB - Systems Insight ManagerViewing a MIB - Systems Insight Manager
mxngroupAuthorization reports - Systems Insight ManagerCreating new authorizations - Systems Insight ManagerSystem groups (CLI) - Systems Insight ManagerUpdating authorizations - Systems Insight Manager
mxnodeDeleting authorizations - Systems Insight Manager
mxreportAdding a report - Systems Insight ManagerCopying managed reports - Systems Insight ManagerDeleting a report - Systems Insight ManagerDeleting managed reports - Systems Insight ManagerEditing a report - Systems Insight ManagerEditing managed reports - Systems Insight ManagerNew reports - Systems Insight ManagerRunning a report - Systems Insight ManagerRunning managed reports - Systems Insight Manager
mxstmCreating STM rules - Systems Insight ManagerDeleting STM rules - Systems Insight ManagerEditing STM rules - Systems Insight Manager
mxstopConfiguring the audit log - Systems Insight Manager
mxtartConfiguring the audit log - Systems Insight Manager
mxtaskCreating a new discovery task - Systems Insight ManagerCreating a task - Systems Insight ManagerCreating an automatic event handling task - Systems Insight ManagerData collection - Systems Insight ManagerDeleting task results - Systems Insight ManagerRunning a scheduled task - Systems Insight ManagerSetting language locale - Systems Insight Manager
mxtoolCustom tools - Systems Insight ManagerDeleting management processor users - Systems Insight Manager
document type definition Custom tools reference - Systems Insight Managerother requirements Custom tools reference - Systems Insight Managerparameterized strings Custom tools reference - Systems Insight Managerstrings substitution table Custom tools reference - Systems Insight Managertool filtering Custom tools reference - Systems Insight Managertool types Custom tools reference - Systems Insight Managerversion numbers Custom tools reference - Systems Insight Manager
mxtoolboxCreating new toolboxes - Systems Insight ManagerDeleting toolboxes - Systems Insight ManagerEditing toolboxes - Systems Insight ManagerToolbox reports - Systems Insight Manager
mxuserCreating new user groups - Systems Insight ManagerCreating new users - Systems Insight Manager
Deleting users and user groups - Systems Insight ManagerEditing users and user groups - Systems Insight ManagerUser and user group reports - Systems Insight Manager
mxwbemsubSubscribing to health lifecycle events - Systems Insight Manager
naming conventions
custom tools Creating a CMS tool - Systems Insight Managercustom tools Creating a remote tool - Systems Insight Manager
navigatingPerformance tab for blades - Systems Insight ManagerPort mapping tab for blades - Systems Insight Manager
All Scheduled Tasks page Navigating the All Scheduled Tasks page - SystemsInsight Managercluster table view page Navigating the cluster table view page - Systems InsightManagerevent table view page Navigating the event table view page - Systems InsightManagerHome page Home page - Systems Insight Managermanage system types page System Type Manager page - Systems Insight ManagerSystem and Event Collections panel Navigating the System and Event Collectionspanel - Systems Insight Managersystem table view page Navigating the system table view page - Systems InsightManager
network client
overview Product architecture - Systems Insight Manager
network clientsProduct architecture - Systems Insight Manager
new
reports New reports - Systems Insight Manager
OpenSSHConfiguring WMI Mapper Proxy - Systems Insight ManagerCreating an OpenSSH task through the CLI - Systems Insight ManagerInstalling and configuring protocols - Systems Insight ManagerInstalling OpenSSH from CRA - Systems Insight Manager
command line Creating an OpenSSH task through the CLI - Systems InsightManagerinstall HP SIM features - Systems Insight Managerinstalling Installing OpenSSH - Systems Insight Manager
OpenSSH tool
installing HP SIM features - Systems Insight Manager
OpenSSLSynchronizing certificates - Systems Insight Manager
operating systemNavigating the system table view page - Systems Insight Manager
name Identification - Systems Insight Managername Navigating the system table view page - Systems Insight Managertype Identification - Systems Insight Managerversion Identification - Systems Insight Manager
orphan systemsSystem tab for servers - Systems Insight Manager
OS nameNavigating the system table view page - Systems Insight Manager
other requirements
mxtool Custom tools reference - Systems Insight Manager
out of band statusSystem tab for servers - Systems Insight Manager
overview
License Manager - Systems Insight ManagerLicense Manager - Systems Insight ManagerLicense manager - Systems Insight ManagerRelated information - Systems Insight ManagerTrusted certificates - Systems Insight Manager
authorizations Users and authorizations - Systems Insight Managerauthorizations Users and user groups - Systems Insight ManagerHP SIM Introduction - Systems Insight ManagerHP Version Control Repository Manager Version Control - Systems Insight Managermanaged systems Setting up managed systems - Systems Insight Managerreporting Reporting - Systems Insight Managerreporting Reporting - Systems Insight Managersecurity Security - Securitysecurity Security - Systems Insight ManagerSystem Fault Management System Fault Management overview - Systems InsightManagerWBEM Providers for Linux WBEM Management Providers overview - SystemsInsight ManagerWMI Mapper Proxy WMI Mapper Proxy - Systems Insight Manager
overwrite existing data set
append new data set Data collection - Systems Insight Manager
p-Class EnclosureViewing p-Class enclosures - Systems Insight Manager
pager settings
configuring Creating new users - Systems Insight Managerconfiguring Initial setup - Systems Insight Managerconfiguring Performing Initial setup - Systems Insight Manager
pager supportHP SIM features - Systems Insight Manager
PAMSingle Sign On - Systems Insight Manager
parameterized strings
mxtool Custom tools reference - Systems Insight Managerstrings substitution table Custom tools reference - Systems Insight Manager
parameters
examples Examples of using parameter strings in custom tools - Systems InsightManager
partition
System tab System tab for partitions - Systems Insight Manager
path.propertiesConfiguring the audit log - Systems Insight Manager
performance managementHP SIM features - Systems Insight ManagerLicense Manager - Systems Insight ManagerNavigating the system table view page - Systems Insight Manager
Performance/Utilization tabPerformance tab for blades - Systems Insight Manager
permissionsCreating new authorizations - Systems Insight Manager
physical-to-virtual
migrating HP Server Migration Pack - Universal Edition - Systems Insight Manager
pingDevice ping - Systems Insight ManagerPinging managed systems - Systems Insight Manager
alternate HP SIM features - Systems Insight Manager
plug-in tools
RPM Package Manager - Systems Insight Manager
HP Integrity Integrated Lights Out Management processor tools - Systems InsightManagerSystem Fault Management System Fault Management overview - Systems InsightManagerWBEM Providers for Linux WBEM Management Providers overview - SystemsInsight Manager
Pluggable Authentication ModulesSingle Sign On - Systems Insight Manager
configuring Single Sign On - Systems Insight Manager
polling rate
cluster resource Configuring node resource settings - Systems Insight Managercluster resource Nodes tab - Systems Insight Manager
PortMapping tabPort mapping tab for blades - Systems Insight Manager
power cycle
HP ProLiant management processor Cycling on the power on an HP ProLiantmanagement processor - Systems Insight Manager
power off
HP ProLiant management processor Powering off a system managed by an HPProLiant management processor - Systems Insight Manager
power on
HP ProLiant management processor Powering on a system managed by an HPProLiant management processor - Systems Insight Manager
predefined
reports Running predefined reports - Systems Insight Manager
printing
cluster collections Cluster table view page - Systems Insight Managercluster table view Navigating the cluster table view page - Systems Insight Managercommunications table Printing Manage Communications table - Systems InsightManagerevent table view Navigating the event table view page - Systems Insight Managerreports Adding a report - Systems Insight Managerreports Editing a report - Systems Insight Managerreports Editing managed reports - Systems Insight Managerreports New reports - Systems Insight Managerreports Running a report - Systems Insight Managerreports Running managed reports - Systems Insight Managersystem table view Navigating the system table view page - Systems InsightManagertask results Printing reports - Systems Insight Manager
printing results
canceling Printing a cluster collection view - Systems Insight Managercanceling Printing a system collection view - Systems Insight Managercanceling Printing an event collection view - Systems Insight Managercluster search Printing cluster search results - Systems Insight Managercluster table view page Printing a cluster collection view - Systems Insight Managerevent search Printing event search results - Systems Insight Managerevent table view page Printing an event collection view - Systems Insight Managersystem search Printing system search results - Systems Insight Managersystem table view page Printing a system collection view - Systems InsightManager
printing search results
canceling Printing cluster search results - Systems Insight Manager
canceling Printing event search results - Systems Insight Managercanceling Printing system search results - Systems Insight Manager
private collectionsNavigating the System and Event Collections panel - Systems Insight Manager
privilege elevationCommand line tools - Systems Insight ManagerHP SIM command line tools - Systems Insight ManagerPrivilege elevation - Systems Insight ManagerSecurity - SecuritySecurity - Systems Insight Manager
First Time Wizard First Time Wizard - Systems Insight Managerfirst time wizard Configuring privilege elevation on HP-UX - Systems InsightManager
Process Resource ManagerProcess Resource Manager (HP PRM) - Systems Insight Manager
accessing Process Resource Manager (HP PRM) - Systems Insight Manager
product architectureProduct architecture - Systems Insight Manager
product nameIdentification - Systems Insight ManagerNavigating the system table view page - Systems Insight Manager
program
launching Custom tools - Systems Insight Manager
program launch toolsCustom tools reference - Systems Insight Manager
ProLiant Support PackSetting up managed systems - Systems Insight ManagerSetting up managed systems from a HP-UX CMS - Installing the required softwareon an HP-UX systemSetting up managed systems from a Linux CMS - Setting up remote Linux systemsfrom a Linux CMSSetting up managed systems from a Windows CMS - Setting up Windows managedsystems manually
property pages
accessing HP SIM Property pages - Systems Insight ManagerWBEM HP SIM features - Systems Insight ManagerWBEM HP SIM Property pages - Systems Insight Manager
protocol settings
configuring Initial setup - Systems Insight Managerconfiguring Performing Initial setup - Systems Insight Manager
protocolsSetting up managed systems - Systems Insight ManagerSetting up managed systems from a HP-UX CMS - Installing the required softwareon an HP-UX systemSetting up managed systems from a Linux CMS - Setting up remote Linux systemsfrom a Linux CMSSetting up managed systems from a Windows CMS - Setting up Windows managedsystems manually
configuring Setting protocols and credentials for a system or group of systems -Systems Insight Managerconfiguring Setting protocols for a single system - Systems Insight Manager OnlineHelpgroup Setting protocols and credentials for a system or group of systems - SystemsInsight ManagerHTTP Hardware status polling - HP Systems Insight ManagerHTTP Identification - Systems Insight ManagerIP Discovery in HP SIM - Systems Insight ManagerOpenSSH Installing and configuring protocols - Systems Insight ManagerOpenSSH Installing the WBEM/WMI provider for Windows - Systems InsightManager
setting global Configuring discovery general settings - Systems Insight Managersetting global Protocol settings - Systems Insight Managersingle system Setting protocols and credentials for a system or group of systems -Systems Insight Managersingle system Setting protocols for a single system - Systems Insight ManagerOnline HelpSNMP Discovery in HP SIM - Systems Insight ManagerSNMP Hardware status polling - HP Systems Insight ManagerSNMP HP Insight managed system setup wizard - Protocol Preferences - SystemsInsight ManagerSNMP Identification - Systems Insight ManagerSNMP Installing and configuring protocols - Systems Insight ManagerSNMP Installing and configuring SNMP agent - Systems Insight ManagerSNMP Installing OpenSSH from CRA - Systems Insight ManagerSNMP Protocol settings - Systems Insight ManagerSSH Identification - Systems Insight ManagerSSH Installing and configuring protocols - Systems Insight ManagerSSH Secure Shell and HP SIM - Systems Insight ManagerWBEM Discovery in HP SIM - Systems Insight ManagerWBEM HP Insight managed system setup wizard - Protocol Preferences - SystemsInsight ManagerWBEM Identification - Systems Insight ManagerWBEM Installing and configuring protocols - Systems Insight ManagerWBEM Installing and configuring SNMP agent - Systems Insight ManagerWBEM; WBEM and HP SIM - Systems Insight ManagerWBEM; WBEM indications - Systems Insight ManagerWMI HP Insight managed system setup wizard - Protocol Preferences - SystemsInsight ManagerWMI Installing and configuring protocols - Systems Insight ManagerWMI Mapper Proxy Adding a WMI Mapper Proxy - Systems Insight ManagerWMI Mapper Proxy Deleting a WMI Mapper Proxy - Systems Insight ManagerWMI Mapper Proxy Editing a WMI Mapper Proxy - Systems Insight ManagerWMI Mapper Proxy WMI Mapper Proxy - Systems Insight ManagerWS-MAN Hardware status polling - HP Systems Insight Manager
PSPInstalling Linux PSP or ESX Agents from CRA - Systems Insight Manager
public keyManaging SSH keys - Systems Insight Manager
security level Managing SSH keys - Systems Insight Manager
querying
HP Insight Control server deployment Querying RPM - Systems Insight ManagerHP Insight Control server deployment RPM Package Manager - Systems InsightManager
Quick Launch menuVME credentials - Systems Insight Manager
quick launch menu
customizing Quick Launch menu - Systems Insight Managersystem page Quick Launch menu - Systems Insight Manager
rackConfiguring discovery general settings - Systems Insight ManagerNavigating the event table view page - Systems Insight ManagerPerformance tab for blades - Systems Insight ManagerPort mapping tab for blades - Systems Insight Manager
add a rack Viewing enclosures - Creating a rackcreating Viewing enclosures - Creating a rackedit a rack Viewing enclosures - Editing a rackediting Viewing enclosures - Editing a rack
rack viewViewing racks - Systems Insight Manager
Really Simple SyndicationEnlarging the System Status panel - Systems Insight Manager
recommendation
repair managed system communication Advising and repairing managed systemsettings - Systems Insight Manager
registering
MIB Managing MIBs - Systems Insight ManagerMIB Registering a MIB - HP Systems Insight Manager
registration
HP SIM Product registration - Systems Insight Manager
release historyNotices - Systems Insight Manager
Remote Support ClientRemote Support Configuration and Services - Remote Support Client
Remote Support Configuration Services overviewRemote Support Configuration and Services - Systems Insight Manager
Remote Support System ListRemote Support Configuration and Services - About the Remote Support SystemList
remote toolCreating a remote tool - Systems Insight ManagerEditing a remote tool - Systems Insight Manager
Remove Depot SoftwareAvailable MSA tools - Systems Insight Manager
Remove SoftwareAvailable MSA tools - Systems Insight Manager
remove tool
running Removing and restoring custom tools - Systems Insight Manager
removing
custom tools Custom tools - Systems Insight Manager
repairing
communications Advising and repairing managed system settings - Systems InsightManagercommunications Repairing managed system settings - Systems Insight ManagerConfigure or Repair Agents Configuring credentials - Systems Insight ManagerConfigure or Repair Agents Configuring credentials - Systems Insight ManagerConfigure or Repair Agents Configuring credentials - Systems Insight ManagerConfigure or Repair Agents Configuring managed systems from a Linux CMS -Systems Insight ManagerConfigure or Repair Agents Configuring managed systems from a Windows CMS -Systems Insight ManagerConfigure or Repair Agents Configuring managed systems from an HP-UX CMS -Systems Insight ManagerConfigure or Repair Agents Configuring target system settings - Systems InsightManagerConfigure or Repair Agents Configuring target system settings - Systems InsightManagerConfigure or Repair Agents Configuring target system settings - Systems InsightManager
Replicate Agent SettingsReplicating trusted certificates - Systems Insight Manager
replicate agent settings
accessing Replicate Agent Settings - Systems Insight Managercreating task Creating a Replicate Agent Settings task - Systems Insight Managerevents Replicate Agent Settings - Systems Insight Managertrust relationship Replicate Agent Settings - Systems Insight Managertrust relationship Replicate Agent Settings - Systems Insight Manager
replicatingCreating a Replicate Agent Settings task - Systems Insight ManagerReplicating trusted certificates - Systems Insight Manager
reportingInsight Control reports - Systems Insight Manager
Snapshot comparison reporting -
creating a report Adding a report - Systems Insight Managerdeleting a report Deleting a report - Systems Insight Managerdeleting a report Deleting managed reports - Systems Insight Managerediting a report Editing a report - Systems Insight Managerediting a report Editing managed reports - Systems Insight Managernew report New reports - Systems Insight Manageroverview Reporting - Systems Insight Manageroverview Reporting - Systems Insight Managerrunning reports Running a report - Systems Insight Managerrunning reports Running managed reports - Systems Insight Managerscheduling a report Emailing reports - Systems Insight ManagerSQL queries Showing SQL - Systems Insight Managerviews Reporting - Systems Insight Managerviews Reporting - Systems Insight Managerviews Showing SQL - Systems Insight Manager
reportsHP SIM features - Systems Insight ManagerInsight Control reports - Systems Insight ManagerReporting - Systems Insight ManagerReporting - Systems Insight Manager
authorizations Authorization reports - Systems Insight Managercopying Copying managed reports - Systems Insight Managercreating Adding a report - Systems Insight Managerdeleting Deleting a report - Systems Insight Managerdeleting Deleting managed reports - Systems Insight Managerediting Editing a report - Systems Insight Managerediting Editing managed reports - Systems Insight Managermanaging Copying managed reports - Systems Insight Managernew New reports - Systems Insight Managerpredefined Running predefined reports - Systems Insight Managerprinting Adding a report - Systems Insight Managerprinting Editing a report - Systems Insight Managerprinting Editing managed reports - Systems Insight Managerprinting New reports - Systems Insight Managerprinting Running a report - Systems Insight Managerprinting Running managed reports - Systems Insight Managerrunning Running a report - Systems Insight Managerrunning Running managed reports - Systems Insight Managerscheduling Emailing reports - Systems Insight Managershowing SQL Showing SQL - Systems Insight Managersnapshot comparison HP SIM features - Systems Insight Managersort order Adding a report - Systems Insight Managersort order Editing a report - Systems Insight Managersort order Editing managed reports - Systems Insight Managersort order New reports - Systems Insight Managersort order Running a report - Systems Insight Managersort order Running managed reports - Systems Insight Managertoolbox Toolbox reports - Systems Insight Manageruser User and user group reports - Systems Insight Manageruser groups User and user group reports - Systems Insight Manager
requiring
trusted certificates Requiring trusted certificates - Systems Insight Managertrusted certificates Trusted certificates - Systems Insight Manager
resources
assistance Assistance -
Retrieve WLM ConfigurationAvailable MSA tools - Systems Insight Manager
rightsUsers and authorizations - Systems Insight ManagerUsers and user groups - Systems Insight Manager
ROM flashInstalling ROM firmware updates - Systems Insight Manager
routerIdentification - Systems Insight Manager
RSSEnlarging the System Status panel - Systems Insight Manager
rules
creating System Type Manager rules Creating STM rules - Systems InsightManagerdeleting System Type Manager rules System Type Manager page - Systems InsightManagerediting System Type Manager rules Editing STM rules - Systems Insight ManagerSystem Type Manager System Type Manager rules - Systems Insight Manager
run tools tab
communications Run Tools tab - Systems Insight Manager
running
clear events task Clearing events - Systems Insight Managercustom tools Managing custom tools - Systems Insight Managerdata collection task Data collection - Systems Insight Managerdiscovery task Configuring automatic discovery - Systems Insight Managerdiscovery task Running a discovery task - Systems Insight Managerremove tool Removing and restoring custom tools - Systems Insight Managerreports Running a report - Systems Insight Managerreports Running managed reports - Systems Insight Managertasks Navigating the All Scheduled Tasks page - Systems Insight Managertasks Running a scheduled task - Systems Insight Manager
saving
collections Saving collections - Systems Insight Managersystem collection Navigating the system table view page - Systems Insight Manager
scheduling
clear events task Clearing events - Systems Insight Managercustom tools Managing custom tools - Systems Insight Managerdata collection task Data collection - Systems Insight Managerdiscovery task Creating a new discovery task - Systems Insight Managerreports Emailing reports - Systems Insight Managertasks Managing with tasks - Systems Insight Managertasks Scheduling a task - Systems Insight Manager
script launch toolsCustom tools reference - Systems Insight Manager
SD Job BrowserAvailable MSA tools - Systems Insight Manager
searchHome page - Graphical user interface featuresHome page - Systems Insight Manager
saving Saving collections - Systems Insight Managersystem Saving collections - Systems Insight Manager
search criteriaHardware status polling - HP Systems Insight ManagerNavigating the event table view page - Systems Insight ManagerSearch criteria - Systems Insight Manager
cluster Search criteria - Systems Insight Managerevent Search criteria - Systems Insight Managersystem Search criteria - Systems Insight Manager
searching
advanced Performing an advanced search for clusters - Systems Insight Manageradvanced Performing an advanced search for events - Systems Insight Manageradvanced Performing an advanced search for systems - Systems Insight Managerbasic Performing a basic search - Systems Insight Managerclusters Performing an advanced search for clusters - Systems Insight Manager
criteria Search criteria - Systems Insight Managerdeleting clusters Deleting cluster search results from a search view - SystemsInsight Managerdeleting events Deleting event search results from a search view - Systems InsightManagerdeleting systems Deleting system search results from a search view - SystemsInsight Managerevents Performing an advanced search for events - Systems Insight Managersystems Performing an advanced search for systems - Systems Insight Managertools Searching for tools - Systems Insight Managertools Tool search - Systems Insight Manager
secure shellHP SIM features - Systems Insight ManagerManaging SSH keys - Systems Insight Manager
install HP SIM features - Systems Insight Manager
Secure Sockets LayerSecurity - SecuritySecurity - Systems Insight Manager
secure sockets layerHP SIM features - Systems Insight Manager
secure task executionSetting up trust relationships - Systems Insight Manager
securitySynchronizing certificates - Systems Insight Manager
about trust relationships Setting trust relationships - Systems Insight Managerabout trust relationships Setting up trust relationships - Systems Insight Manageroptions Security - Securityoptions Security - Systems Insight Manageroverview Security - Securityoverview Security - Systems Insight Managerrole-based HP SIM features - Systems Insight Managersign in Single Sign On - Systems Insight Managersign-in event settings Configuring sign-in events - Systems Insight ManagerSystem Link Configuration Configuring the system link - Systems Insight Managertimeout Configuring browser timeout options - Systems Insight Managertwo factor authentication Configuring Two Factor Authentication - Systems InsightManager
security level
SSH keys Configuring SSH key security - Systems Insight Manager
server
identity tab System tab for blade servers - Systems Insight Managersystem tab System tab for servers - Systems Insight Manager
server bladeSystem tab for servers - Systems Insight Manager
server certificateReplicating trusted certificates - Systems Insight Manager
Server Certificate pageManaging server certificates - Systems Insight Manager
server certificatesCreating a certificate signing request - Systems Insight ManagerImporting a CA-signed certificate - Systems Insight ManagerManaging server certificates - Systems Insight ManagerSubmitting a certificate signing request - Systems Insight ManagerSynchronizing certificates - Systems Insight Manager
creating Creating a server certificate - Systems Insight Managercreating Managing server certificates - Systems Insight Managerediting Editing a server certificate - Systems Insight Managerediting Managing server certificates - Systems Insight Managerexporting Exporting a server certificate - Systems Insight Managerimporting Importing a server certificate - Systems Insight Managerimporting Managing server certificates - Systems Insight Manager
synchronizing Synchronizing certificates - Systems Insight Manager
server deploymentHP SIM features - Systems Insight Manager
server migrationHP SIM features - Systems Insight Manager
Serviceguard ManagerNavigating the system table view page - Systems Insight Manager
setting
global protocols Configuring discovery general settings - Systems Insight Managerlanguage Setting language locale - Systems Insight Managerlocale Setting language locale - Systems Insight Managertrust relationships Setting trust relationships - Systems Insight Managertrust relationships Setting up trust relationships - Systems Insight Manager
setting global defaults
SNMP Protocol settings - Systems Insight Manager
setting properties
cluster collections Setting properties for system and cluster collections - SystemsInsight Managerevent collections Setting event properties - Systems Insight Managersystem collections Setting properties for system and cluster collections - SystemsInsight Manager
setting up
HP SIM Initial setup - Systems Insight ManagerHP SIM Performing Initial setup - Systems Insight Managermanaged systems Setting up managed systems - Systems Insight Managermanaged systems - HP-UX Setting up managed systems from a HP-UX CMS -Installing the required software on an HP-UX systemmanaged systems - Linux Setting up managed systems from a Linux CMS - Settingup remote Linux systems from a Linux CMSmanaged systems - Windows Setting up managed systems from a Windows CMS -Setting up Windows managed systems manually
settings
disk thresholds Setting disk thresholds - Systems Insight Managersign-in event Configuring sign-in events - Systems Insight Managertask results Configuring task results settings - Systems Insight Manager
setup
initial Initial setup - Systems Insight Managerinitial Performing Initial setup - Systems Insight Manager
SFMSystem Fault Management overview - Systems Insight Manager
shared collectionsNavigating the System and Event Collections panel - Systems Insight Manager
sign in
failure Single Sign On - Systems Insight Manager
sign-inSecurity - SecuritySecurity - Systems Insight Manager
configuring events Configuring sign-in events - Systems Insight Manager
sign-in address restrictionsCreating new users - Systems Insight Manager
sign-in events
settings Configuring sign-in events - Systems Insight Manager
signing in
automatically Single Sign On - Systems Insight ManagerGUI Signing in - Systems Insight Managermanually Single Sign On - Systems Insight Managerremotely Signing in - Systems Insight Managerusing SSL Signing in - Systems Insight Manager
signing out
CLI Signing out - Systems Insight ManagerGUI Signing out - Systems Insight Manager
Simple Network Management ProtocolInstalling and configuring SNMP agent - Systems Insight Manager
Single Sign OnSetting up trust relationships - Systems Insight ManagerSingle Sign On - Systems Insight Manager
single-system aware toolsCustom tools - Systems Insight ManagerCustom tools reference - Systems Insight ManagerSetting language locale - Systems Insight ManagerViewing task instance results - Systems Insight Manager
site information
deleting Deleting site information - Systems Insight Managerediting Editing site information - Systems Insight Managersystem properties Managing site information - Systems Insight Manager
SMI-S systems
WBEM indications HP SIM features - Systems Insight Manager
SMTP settingsConfiguring e-mail settings - Systems Insight ManagerConfiguring e-mail settings - Systems Insight Manager
snapshot comparisonHP SIM features - Systems Insight ManagerSnapshot comparison reporting -
snapshot comparisonsData collection - Systems Insight Manager
SNMPConfiguring discovery general settings - Systems Insight ManagerConfiguring WMI Mapper Proxy - Systems Insight ManagerDeleting an SSH key - Systems Insight ManagerExporting an SSH key - Systems Insight ManagerHardware status polling - HP Systems Insight ManagerHP Insight managed system setup wizard - Protocol Preferences - Systems InsightManagerIdentification - Systems Insight ManagerInstalling and configuring protocols - Systems Insight ManagerInstalling the SNMP provider for Windows - Systems Insight ManagerManaging SSH keys - Systems Insight ManagerProtocol settings - Systems Insight ManagerSetting up managed systems - Systems Insight ManagerSetting up managed systems from a HP-UX CMS - Installing the required softwareon an HP-UX systemSetting up managed systems from a Linux CMS - Setting up remote Linux systemsfrom a Linux CMSSetting up managed systems from a Windows CMS - Setting up Windows managedsystems manuallySummary - Systems Insight ManagerSystem tab for management processors - HP Systems Insight Manager 7.0System tab for servers - Systems Insight Manager
Discovery in HP SIM - Systems Insight Managerdeleting rules System Type Manager page - Systems Insight ManagerFirst Time Wizard Configuring System Automatic Discovery task sign in credentials- Systems Insight ManagerFirst Time Wizard First Time Wizard - Systems Insight Managerinstalling provider Installing OpenSSH from CRA - Systems Insight Managertrap Configuring events - Systems Insight Manager
SNMP provider
installing Installing the SNMP provider for Windows - Systems Insight Manager
SNMP SettingsSetting protocols and credentials for a system or group of systems - SystemsInsight Manager
SNMP settingsSetting protocols for a single system - Systems Insight Manager Online Help
SNMP trapNavigating the event table view page - Systems Insight Manager
SNMP trap settings
events Configuring events - Systems Insight Manager
SNMP trapsVerifying event configuration - Systems Insight Manager
configuring Configuring SNMP traps - Systems Insight Managerfields Configuring SNMP traps - Systems Insight Manager
SOAPCustom tools reference - Systems Insight Manager
Software DistributorHP SIM features - Systems Insight Manager
Software Distributor Job BrowserAvailable MSA tools - Systems Insight Manager
software statusNavigating the system table view page - Systems Insight ManagerSystem tab for servers - Systems Insight Manager
software status pollingSoftware status polling - Systems Insight Manager
Software/Firmware
global settings Configuring software/firmware global settings - Systems InsightManager
Software/Firmware baselinesInstalling Software and Firmware through baselines - Systems Insight Manager
managing Managing Software/Firmware Baselines - Systems Insight Managertracking Tracking Software/Firmware Baselines - Systems Insight Manager
specifying
IP ranges Configuring discovery general settings - Systems Insight Manager
SQL queriesShowing SQL - Systems Insight Manager
SSACustom tools - Systems Insight ManagerCustom tools reference - Systems Insight ManagerSetting language locale - Systems Insight ManagerViewing task instance results - Systems Insight Manager
SSHConfiguring SSH - Systems Insight ManagerHP SIM features - Systems Insight ManagerIdentification - Systems Insight ManagerImporting an SSH key - Systems Insight ManagerInstalling and configuring protocols - Systems Insight ManagerInstalling OpenSSH from CRA - Systems Insight ManagerManaging SSH keys - Systems Insight ManagerSecure Shell and HP SIM - Systems Insight ManagerSetting language locale - Systems Insight ManagerSetting up managed systems - Systems Insight ManagerSetting up managed systems from a HP-UX CMS - Installing the required softwareon an HP-UX systemSetting up managed systems from a Linux CMS - Setting up remote Linux systemsfrom a Linux CMSSetting up managed systems from a Windows CMS - Setting up Windows managedsystems manually
SSH Keys
deleting Deleting an SSH key - Systems Insight Manager
SSH keys
deleting Managing SSH keys - Systems Insight Managerexporting Exporting an SSH key - Systems Insight Managerexporting Managing SSH keys - Systems Insight Managerimporting Importing an SSH key - Systems Insight Managerimporting Managing SSH keys - Systems Insight Managermanaging Configuring SSH key security - Systems Insight Managermanaging HP SIM features - Systems Insight Managersecurity level Managing SSH keys - Systems Insight Manager
SSH provider
installing Installing OpenSSH from CRA - Systems Insight Manager
SSH security levelConfiguring SSH key security - Systems Insight Manager
SSLHP SIM features - Systems Insight ManagerSecurity - SecuritySecurity - Systems Insight Manager
SSL port
changing Changing the HP SIM default SSL port - Systems Insight Manager
status
event Customizing the system status panel - Systems Insight Managersystem System status types - Systems Insight Manager
status polling
initial Identification - Systems Insight Manager
stopping
discovery task Configuring automatic discovery - Systems Insight Managerdiscovery task Running a discovery task - Systems Insight Managertasks Managing with tasks - Systems Insight Managertasks Stopping a task - Systems Insight Managertasks Task results list - Systems Insight Manager
storage array
System tab System tab for a storage array - Systems Insight Manager
storage host
System tab System tab for storage host - Systems Insight Manager
storage switch
System tab System tab for a storage switch - Systems Insight Manager
submitting
CSR Submitting a certificate signing request - Systems Insight Manager
Subscribe to WBEM EventsAvailable MSA tools - Systems Insight Manager
subscribing
health lifecycle indications Subscribing to health lifecycle events - Systems InsightManagerWBEM events Configuring events - Systems Insight ManagerWBEM events Subscribing to WBEM indications - Systems Insight Manager
SuperdomeHP SIM features - Systems Insight Manager
supportAssistance -
suspending
system monitoring HP SIM features - Systems Insight Manager
switchIdentification - Systems Insight ManagerNavigating the system table view page - Systems Insight Manager
synchronizing
server certificates Synchronizing certificates - Systems Insight Manager
Syntax Check ConfigurationAvailable MSA tools - Systems Insight Manager
Syntax Check on the Systems Insight Manager Server ConfigurationAvailable MSA tools - Systems Insight Manager
system
credentials Configuring credentials for discovery tasks - Systems Insight Managerport types Port types - Systems Insight Managersearch Saving collections - Systems Insight Managerstatus System status types - Systems Insight Manager
system addressNavigating the system table view page - Systems Insight Manager
System and Event Collections panel
navigating Navigating the System and Event Collections panel - Systems InsightManagertree controls Navigating the System and Event Collections panel - Systems InsightManager
system automatic discoveryEnabling automatic system discovery - Systems Insight Manager
First Time Wizard Configuring System Automatic Discovery task sign in credentials- Systems Insight Manager
system collections
copying Copying system and cluster collections - Systems Insight Managercreating Creating system and cluster collections - Systems Insight Managercustomizing Creating system and cluster collections - Systems Insight Managercustomizing Customizing system and cluster collections - Systems Insight Managercustomizing System table view page - Systems Insight Managerdeleting Deleting system and cluster collections - Systems Insight Managerediting Editing system and cluster collections - Systems Insight Managermanaging System table view page - Systems Insight Managermoving Moving system and cluster collections - Systems Insight Manageroverview Navigating the System and Event Collections panel - Systems InsightManagerprinting Printing a system collection view - Systems Insight Managerprinting System table view page - Systems Insight Managerreport Printing a system collection view - Systems Insight Managersetting properties Setting properties for system and cluster collections - SystemsInsight Manager
System Fault Management
accessing System Fault Management overview - Systems Insight Manageroverview System Fault Management overview - Systems Insight Manager
system filters
adding to tasks Creating a task - Systems Insight Manager
system groups
managing System groups (CLI) - Systems Insight Manager
system keyHome page - Graphical user interface featuresHome page - Systems Insight Manager
system locator
HP 9000 management processor Controlling the system locator LED throughmanagement processors - Systems Insight ManagerHP Integrity Controlling the system locator LED through management processors -Systems Insight Manager
system monitoring
resume HP SIM features - Systems Insight Managerresume System Properties - Systems Insight Managerresume multiple systems Suspending or resuming system monitoring for multiplesystems - Systems Insight Managerresume single system Suspending or resuming system monitoring for a singlesystem - Systems Insight Managersuspend HP SIM features - Systems Insight Managersuspend System Properties - Systems Insight Managersuspend multiple systems Suspending or resuming system monitoring for multiplesystems - Systems Insight Managersuspend single system Suspending or resuming system monitoring for a singlesystem - Systems Insight Manager
system nameNavigating the event table view page - Systems Insight ManagerNavigating the system table view page - Systems Insight Manager
system pageHP SIM Property pages - Systems Insight ManagerNavigating the event table view page - Systems Insight ManagerSystem tab for a complex - Systems Insight ManagerSystem tab for a storage array - Systems Insight ManagerSystem tab for a storage switch - Systems Insight ManagerSystem tab for a tape library - Systems Insight ManagerSystem tab for blade servers - Systems Insight ManagerSystem tab for clusters - Systems Insight ManagerSystem tab for management processors - HP Systems Insight Manager 7.0System tab for partitions - Systems Insight ManagerSystem tab for servers - Systems Insight ManagerSystem tab for storage host - Systems Insight Manager
Essentials tab Essentials tab - Systems Insight Managerevent System page - Systems Insight Manageridentity System page - Systems Insight Managerlinks System page - Systems Insight Managerquick launch menu Quick Launch menu - Systems Insight Managertools & links Tools & Links tab - HP Systems Insight Manager
system power
HP 9000 management processor Controlling system power options throughmanagement processors - Systems Insight ManagerHP Integrity Controlling system power options through management processors -Systems Insight Manager
system properties
edit HP SIM features - Systems Insight Manageredit for single system Editing system properties for a single system - SystemsInsight Manageredit for single system Entering new site information - Systems Insight Managerediting HP SIM features - Systems Insight Managermanaging contacts Managing contacts - Systems Insight Managerset for multiple systems Editing system properties for multiple systems - SystemsInsight Managersite information Managing site information - Systems Insight Manager
system search results
printing Printing system search results - Systems Insight Manager
system statusNavigating the System and Event Collections panel - Systems Insight Manager
system status panelHome page - Systems Insight Manager
customizing Customizing the system status panel - Systems Insight Managerpop-up window Enlarging the System Status panel - Systems Insight Manager
system subtypesSystem tab for a storage array - Systems Insight ManagerSystem tab for a storage switch - Systems Insight ManagerSystem tab for a tape library - Systems Insight ManagerSystem tab for storage host - Systems Insight Manager
System tab
cluster System tab for clusters - Systems Insight Managercomplex System tab for a complex - Systems Insight Managermanagement processor System tab for management processors - HP SystemsInsight Manager 7.0partition System tab for partitions - Systems Insight Managerstorage array System tab for a storage array - Systems Insight Managerstorage host System tab for storage host - Systems Insight Managerstorage switch System tab for a storage switch - Systems Insight Managertape library System tab for a tape library - Systems Insight Manager
system tab
server System tab for servers - Systems Insight Manager
system table view
printing results Navigating the system table view page - Systems Insight Manager
system table view pageConfiguring discovery general settings - Systems Insight ManagerDeleting systems from the HP SIM database - Systems Insight ManagerDevice ping - Systems Insight ManagerNavigating the cluster table view page - Systems Insight ManagerNavigating the System and Event Collections panel - Systems Insight ManagerQuick Launch menu - Systems Insight ManagerSystem page - Systems Insight Manager
adding columns Customizing the system table view page - Systems InsightManagercustomizing Customizing the system table view page - Systems Insight Managercustomizing Navigating the system table view page - Systems Insight Managerdeleting columns Customizing the system table view page - Systems InsightManagerdeleting systems Navigating the system table view page - Systems Insight Managernavigating Navigating the system table view page - Systems Insight Manageroverview System table view page - Systems Insight Managerprinting Printing a system collection view - Systems Insight Managersaving collection Navigating the system table view page - Systems Insight Managersorting Customizing the system table view page - Systems Insight Manager
system typeConfiguring discovery general settings - Systems Insight ManagerNavigating the system table view page - Systems Insight Manager
System Type ManagerManaging system types - Systems Insight Manager
adding rules System Type Manager page - Systems Insight Managercreating new rule Creating STM rules - Systems Insight Managerdeleting rule Deleting STM rules - Systems Insight Managerediting SNMP rule Editing STM rules - Systems Insight Manager
system types
discovery tasks Configuring Configure or Repair Agents for discovery tasks -Systems Insight Managerdiscovery tasks Configuring system types for discovery tasks - Systems InsightManagerdiscovery tasks Creating a new discovery task - Systems Insight Manager
systemsManaging licenses - Systems Insight Manager
configuring links Configuring the system link - Systems Insight Managerdeleting Deleting system search results from a search view - Systems InsightManagerdeleting Deleting systems from the HP SIM database - Systems Insight Managerdeleting System table view page - Systems Insight Manageridentification Identification - Systems Insight Managermonitoring Monitoring systems, clusters, and events - Systems Insight Managerorphan System tab for servers - Systems Insight Managersearching Performing an advanced search for systems - Systems Insight Manager
tape library
System tab System tab for a tape library - Systems Insight Manager
target system
task schedule Creating a task - Systems Insight Manager
task
discovery Configuring Configure or Repair Agents for discovery tasks - SystemsInsight Managerdiscovery Configuring credentials for discovery tasks - Systems Insight Managerdiscovery Configuring system types for discovery tasks - Systems Insight Manager
task instanceManaging with tasks - Systems Insight Manager
deleting Deleting task results - Systems Insight Managerviewing Viewing task instance results - Systems Insight Manager
task results
automatic event handling tasks Managing event handling tasks - Systems InsightManagerdeleting Task results list - Systems Insight Managerprinting Printing reports - Systems Insight Managersettings Configuring task results settings - Systems Insight Managerviewing Clearing events - Systems Insight Managerviewing Navigating the All Scheduled Tasks page - Systems Insight Managerviewing Scheduling a task - Systems Insight Managerviewing Task results list - Systems Insight Managerviewing Viewing task instance results - Systems Insight Manager
task results list
task instance Task results list - Systems Insight Manager
tasksCreating a task - Systems Insight ManagerHP SIM features - Systems Insight Manager
copying Copying automatic event handling tasks - Systems Insight Managercreating Creating a task - Systems Insight Managercreating Managing with tasks - Systems Insight Managerdeleting Deleting a scheduled task - Systems Insight Managerdeleting Managing with tasks - Systems Insight Managerdeleting Navigating the All Scheduled Tasks page - Systems Insight Managerdiscovery Recommended discovery tasks - Systems Insight Managerediting Editing a scheduled task - Systems Insight Managerediting Editing automatic event handling tasks - Systems Insight Managerediting Managing with tasks - Systems Insight Managerediting Navigating the All Scheduled Tasks page - Systems Insight Managerinstance Managing with tasks - Systems Insight ManagerReplicate Agent Settings Creating a Replicate Agent Settings task - Systems InsightManagerrunning Navigating the All Scheduled Tasks page - Systems Insight Managerrunning Running a scheduled task - Systems Insight Managerscheduling Managing with tasks - Systems Insight Managerscheduling Scheduling a task - Systems Insight Managerstopping Managing with tasks - Systems Insight Managerstopping Stopping a task - Systems Insight Manager
stopping Task results list - Systems Insight Managertime filtering Applying a time filter - Systems Insight Managertrack status Managing with tasks - Systems Insight Manageruser privileges Managing with tasks - Systems Insight Manageruser privileges Navigating the All Scheduled Tasks page - Systems Insight Managerviewing Viewing task instance results - Systems Insight Managerviewing configuration Viewing task definitions for automatic event handling tasks -Systems Insight Managerviewing results Viewing event task results - Systems Insight Manager
TDEFHP SIM features - Systems Insight Manager
time filtersApplying a time filter - Systems Insight Manager
applying Applying a time filter - Systems Insight Managerapplying Creating an automatic event handling task - Systems Insight Managerapplying Scheduling a task - Systems Insight Managercopying Applying a time filter - Systems Insight Managercreating Applying a time filter - Systems Insight Managerdeleting Applying a time filter - Systems Insight Managerediting Applying a time filter - Systems Insight Managermanaging Applying a time filter - Systems Insight Manager
timeout
configuring options Configuring browser timeout options - Systems Insight Managersetting Hardware status polling - HP Systems Insight Manager
tool definition
viewing View tool definition - Systems Insight Manager
tool definition filesHP SIM features - Systems Insight Manager
tool filtering
mxtool Custom tools reference - Systems Insight Manager
tool types
mxtool Custom tools reference - Systems Insight Manager
toolbox
report Toolbox reports - Systems Insight Manager
toolboxesAuthorizations tab - Systems Insight ManagerCreating new toolboxes - Systems Insight ManagerUsers and authorizations - Systems Insight ManagerUsers and user groups - Systems Insight Manager
create Toolboxes tab - Systems Insight Managercreating Creating new toolboxes - Systems Insight Managerdelete Toolboxes tab - Systems Insight Managerdeleting Deleting toolboxes - Systems Insight Manageredit Toolboxes tab - Systems Insight Managerediting Editing toolboxes - Systems Insight ManagerHP Storage Essentials Toolboxes tab - Systems Insight Managerreports Toolboxes tab - Systems Insight Manager
toolsAccessing the Version Control Agent - Systems Insight ManagerAccessing the Version Control Repository Manager - Systems Insight ManagerHP SIM features - Systems Insight Manager
command line Command line tools - Systems Insight Managercommand line HP SIM command line tools - Systems Insight Managerping Device ping - Systems Insight Managersearching for Searching for tools - Systems Insight Managersearching for Tool search - Systems Insight ManagerSystem Type Manager Managing system types - Systems Insight Manager
tree controlsNavigating the System and Event Collections panel - Systems Insight Manager
tree viewNavigating the tree view - Systems Insight Manager
trust relationshipSecurity - SecuritySecurity - Systems Insight Manager
CMS Signing in - Systems Insight Manager
trusted certificateRequiring trusted certificates - Systems Insight ManagerTrusted certificates - Systems Insight Manager
deleting Deleting trusted certificates - Systems Insight Managerexporting Exporting trusted certificates - Systems Insight Managerimporting Importing trusted certificates - Systems Insight Manager
trusted certificates
always accept Trusted certificates - Systems Insight Managerdeleting Trusted certificates - Systems Insight Managerexporting Trusted certificates - Systems Insight Managerimporting Trusted certificates - Systems Insight Managerrequiring Trusted certificates - Systems Insight Manager
two factor authenticationConfiguring Two Factor Authentication - Systems Insight Manager
typographic conventionsSupport and other resources - Typographic conventions
un-assigning licensesAssigning a license or Apply a license - Systems Insight Manager
uninstalling
HP Insight Control server deployment RPM Package Manager - Systems InsightManagerHP Insight Control server deployment Uninstalling RPM - Systems Insight Manager
UNIX
commands Custom tools reference - Systems Insight Manager
unregistering
MIB Unregistering a MIB - Systems Insight Manager
Unsubscribe to WBEM EventsAvailable MSA tools - Systems Insight Manager
unsubscribing
health lifecycle indications Subscribing to health lifecycle events - Systems InsightManagerWBEM events Configuring events - Systems Insight ManagerWBEM events Unsubscribing to WBEM indications - HP Systems Insight Manager
updating
authorizations Authorizations tab - Systems Insight Managerauthorizations Updating authorizations - Systems Insight Managercommunications Updating communication statuses - Systems Insight ManagerConfigure or Repair Agents Configuring credentials - Systems Insight ManagerConfigure or Repair Agents Configuring credentials - Systems Insight ManagerConfigure or Repair Agents Configuring credentials - Systems Insight ManagerConfigure or Repair Agents Configuring managed systems from a Linux CMS -
Systems Insight ManagerConfigure or Repair Agents Configuring managed systems from a Windows CMS -Systems Insight ManagerConfigure or Repair Agents Configuring managed systems from an HP-UX CMS -Systems Insight ManagerConfigure or Repair Agents Configuring target system settings - Systems InsightManagerConfigure or Repair Agents Configuring target system settings - Systems InsightManagerConfigure or Repair Agents Configuring target system settings - Systems InsightManager
upgradingHP SIM features - Systems Insight Manager
HP 9000 management processor firmware Upgrading management processorfirmware - Systems Insight ManagerHP Integrity firmware Upgrading management processor firmware - Systems InsightManager
user groupsAuthorizations tab - Systems Insight ManagerCreating new user groups - Systems Insight Manager
adding Creating new user groups - Systems Insight Manageradministering Users tab - Systems Insight Managerdeleting Deleting users and user groups - Systems Insight Managerediting Editing users and user groups - Systems Insight Managerreport User and user group reports - Systems Insight Manager
user rightsUsers and authorizations - Systems Insight ManagerUsers and user groups - Systems Insight Manager
user settingsSummary - Systems Insight Manager
user templatesCreating new users - Systems Insight Manager
usersAuthorizations tab - Systems Insight ManagerCreating new users - Systems Insight Manager
administering Users tab - Systems Insight Managerauthorizing Creating new authorizations - Systems Insight ManagerCMS security configuration rights Creating new users - Systems Insight Managercreating Creating new users - Systems Insight Managercreating Initial setup - Systems Insight Managercreating Performing Initial setup - Systems Insight Managerdeleting Deleting users and user groups - Systems Insight Managerediting Editing users and user groups - Systems Insight Manageroverview Users tab - Systems Insight Managerpager settings Creating new users - Systems Insight Managerreport User and user group reports - Systems Insight Managersign-in address restrictions Creating new users - Systems Insight Manager
varbind mappingsConfiguring the presentation of SNMP traps in HP SIM - Systems Insight Manager
verifying
HP Insight Control server deployment RPM Package Manager - Systems InsightManagerHP Insight Control server deployment Verifying RPM - Systems Insight Manager
version controlHP SIM features - Systems Insight Manager
version control agentNavigating the system table view page - Systems Insight Manager
version control repository
selecting Specifying a Version Control Repository - Systems Insight Manager
version control tab
communications Version Control tab - Systems Insight Manager
version numbers
mxtool Custom tools reference - Systems Insight Manager
viewing
audit log Viewing the audit log - Systems Insight Managercluster CPU utilization Cluster Monitor resources and associated settings - SystemsInsight Managerdata collection task results Data collection - Systems Insight ManagerMIB list Registering a MIB - HP Systems Insight ManagerMIB list Viewing a MIB - Systems Insight Managerscheduled tasks Viewing task instance results - Systems Insight Managersystem credentials System credentials - HP Insight Manager 7.0 Online Helptask configuration Viewing task definitions for automatic event handling tasks -Systems Insight Managertask instance Viewing task instance results - Systems Insight Managertask results Clearing events - Systems Insight Managertask results Navigating the All Scheduled Tasks page - Systems Insight Managertask results Scheduling a task - Systems Insight Managertask results Task results list - Systems Insight Managertask results Viewing event task results - Systems Insight Managertask results Viewing task instance results - Systems Insight Managertasks Viewing task instance results - Systems Insight Managertool definition View tool definition - Systems Insight Manager
Configuration Status System tab for blade servers - Systems Insight ManagerEnclosure System tab for blade servers - Systems Insight ManagerFirmware Version System tab for blade servers - Systems Insight ManagerInterconnect Bay System tab for blade servers - Systems Insight ManagerPrimary Virtual Connect Ethernet Module System tab for blade servers - SystemsInsight ManagerRack Name System tab for blade servers - Systems Insight Manager
virtual-to-physical
migrating HP Server Migration Pack - Universal Edition - Systems Insight Manager
virtual-to-virtual
migrating HP Server Migration Pack - Universal Edition - Systems Insight Manager
VM serverHP SIM features - Systems Insight Manager
VME
credentials VME credentials - Systems Insight Manager
VPMNavigating the system table view page - Systems Insight Manager
Wake on LANReplicate Agent Settings - Systems Insight Manager
warrantyNotices - Systems Insight Manager
WBEMHP Insight managed system setup wizard - Protocol Preferences - Systems InsightManagerIdentification - Systems Insight ManagerInstalling and configuring protocols - Systems Insight ManagerInstalling and configuring SNMP agent - Systems Insight ManagerInstalling the WBEM/WMI provider for Windows - Systems Insight Manager
Security - SecuritySecurity - Systems Insight ManagerSetting up managed systems - Systems Insight ManagerSetting up managed systems from a HP-UX CMS - Installing the required softwareon an HP-UX systemSetting up managed systems from a Linux CMS - Setting up remote Linux systemsfrom a Linux CMSSummary - Systems Insight ManagerSystem tab for management processors - HP Systems Insight Manager 7.0System tab for servers - Systems Insight ManagerWBEM and HP SIM - Systems Insight Manager
Discovery in HP SIM - Systems Insight Managercertificates Configuring WMI Mapper Proxy - Systems Insight ManagerFirst Time Wizard First Time Wizard - Systems Insight Managerfirst time wizard Configuring the WMI Mapper Proxy - Systems Insight Managerhealth inclusion status Configuring WBEM health inclusion status - Systems InsightManagerhealth inclusion status Viewing and editing ESXi subcomponents - Systems InsightManagerinstalling provider Installing the WBEM/WMI provider for Windows - Systems InsightManagertools WBEM-based tools - Systems Insight Manager
WBEM certificatesSecurity - SecuritySecurity - Systems Insight Manager
WBEM indicationsHP SIM features - Systems Insight ManagerVerifying event configuration - Systems Insight Manager
HP-UX systems HP SIM features - Systems Insight ManagerLinux systems HP SIM features - Systems Insight ManagerSMI-S systems HP SIM features - Systems Insight Managersubscribing Subscribing to WBEM indications - Systems Insight Managersubscribing to Configuring events - Systems Insight Managerunsubscribing Unsubscribing to WBEM indications - HP Systems Insight Managerunsubscribing to Configuring events - Systems Insight Manager
WBEM property pagesHP SIM features - Systems Insight Manager
WBEM providersConfiguring WMI Mapper Proxy - Systems Insight Manager
WBEM Providers for Linux
accessing WBEM Management Providers overview - Systems Insight Manageroverview WBEM Management Providers overview - Systems Insight Manager
WBEM status
bypassing Hardware status polling - HP Systems Insight Manager
web launch tools
parameters Examples of using parameter strings in custom tools - Systems InsightManager
web page tool
creating Creating a web page tool - Systems Insight Managerediting Editing a web page tool - Systems Insight Manager
web page toolsCustom tools - Systems Insight Manager
Web-Based Enterprise ManagementWBEM indications - Systems Insight Manager
Web-launch aware toolsCustom tools reference - Systems Insight Manager
WindowsConfiguring the audit log - Systems Insight Manager
configuring locale Setting language locale - Systems Insight Manager
managed systems Setting up managed systems from a Windows CMS - Setting upWindows managed systems manuallyviewing MIB list Viewing a MIB - Systems Insight Manager
WLACustom tools reference - Systems Insight Manager
WMIConfiguring WMI Mapper Proxy - Systems Insight ManagerHP Insight managed system setup wizard - Protocol Preferences - Systems InsightManagerInstalling and configuring protocols - Systems Insight Manager
installing provider Installing the WBEM/WMI provider for Windows - Systems InsightManager
WMI MapperWMI Mapper and HP SIM - Systems Insight Manager
WMI Mapper Proxy
adding Adding a WMI Mapper Proxy - Systems Insight Manageradding WMI Mapper Proxy - Systems Insight Managerdeleting Deleting a WMI Mapper Proxy - Systems Insight Managerdeleting Deleting systems from the HP SIM database - Systems Insight Managerdeleting WMI Mapper Proxy - Systems Insight Managerediting Editing a WMI Mapper Proxy - Systems Insight Managerediting WMI Mapper Proxy - Systems Insight ManagerFirst Time Wizard Configuring the WMI Mapper Proxy - Systems Insight Manageroverview WMI Mapper Proxy - Systems Insight Manager
WMI mapper proxy
First Time Wizard First Time Wizard - Systems Insight Manager
WMI/WBEM provider
installing Installing the WBEM/WMI provider for Windows - Systems Insight Manager
WS-MANHardware status polling - HP Systems Insight Manager
WS-ManagementIdentification - Systems Insight Manager
X clientsSetting language locale - Systems Insight Manager
X Resource file propertiesSetting language locale - Systems Insight Manager
xlsfontsSetting language locale - Systems Insight Manager
Notices» Introduction» Product overview» Initial setup» Screens and product layout» Operations» Reference» Support and other
resources» Assistance
» Glossary» Using Help
» Warranty» Restricted rights legend» Copyright notice» Trademark notices» Release history
Confidential computer software. Valid license from HP required for possession, use orcopying. Consistent with FAR 12.211 and 12.212, Commercial Computer Software,Computer Software Documentation, and Technical Data for Commercial Items are licensedto the U.S. Government under vendor’s standard commercial license.
The information contained herein is subject to change without notice. The only warranties forHP products and services are set forth in the express warranty statements accompanyingsuch products and services. Nothing herein should be construed as constituting anadditional warranty. HP shall not be liable for technical or editorial errors or omissionscontained herein.
Warranty
A copy of the specific warranty terms applicable to your HP product and replacement partscan be obtained from your local Sales and Service Office.
Restricted rights legend
Use, duplication, or disclosure by the U.S. Government is subject to restrictions as set forthin subparagraph (c) (1) (ii) of the Rights in Technical Data and Computer Software clause atDFARS 252.227-7013 for DOD agencies, and subparagraphs (c) (1) and (c) (2) of theCommercial Computer Software Restricted Rights clause at FAR 52.227-19 for otheragencies.
HEWLETT-PACKARD COMPANY3000 Hanover StreetPalo Alto, California 94304 U.S.A.
Use of this documentation and any supporting software media supplied for this pack isrestricted to this product only. Additional copies of the programs may be made for securityand backup purposes only. Resale of the programs, in their present form or with alterations,is expressly prohibited.
HP-UX Release 10.20 and later and HP-UX Release 11.00 and later (in both 32- and 64-bit configurations) on all HP 9000 computers are Open Group UNIX 95-branded products.
Intel, Celeron, Itanium, Pentium, and Xeon are trademarks or registered trademarks of IntelCorporation or its subsidiaries in the United States and other countries.
Java is a U.S. trademark of Sun Microsystems, Inc.
Microsoft, Windows, and Windows NT are U.S. registered trademarks of MicrosoftCorporation.
Oracle is a registered U.S. trademark of Oracle Corporation, Redwood City, California.
UNIX is a registered trademark of The Open Group.
Release history
Edition 2, July 2012
356920-404
To ensure that you receive the newest editions when they become available, subscribe tothe appropriate product support service. See your HP sales representative for details.
» Product overview» Initial setup» Screens and product layout» Operations» Reference» Support and other
resources» Assistance
» Glossary» Using Help
» Online help» HP SIM help categories
Online help
HP SIM provides an online help system that helps you understand management features.To view the online help, click the question mark icon on any page or use the Help menu toview the online help.
HP SIM help categories
Overview Describes the features in HP SIM.
Initial setup Describes procedures for how to begin using and administering HPSIM.
Screens and product layout Describes how to navigate HP SIM menu pages.
Operations Describes procedures for monitoring and managing HP SIM, includingsecurity, users and authorizations, and discovery.
Reference Includes information on how to set up security trustrelationships,system types, custom tools, and Microsoft® Windows NT® error logmessages.
Support and other resources Includes document and support information andlinks to the HP SIM forum and documentation.
Assistance Includes additional resources, technical support, and technical FAQs.
Product overview» Introduction» HP SIM features» Product architecture» Security» License Manager» HP SIM command line
tools» Custom tools
» Initial setup» Screens and product layout» Operations» Reference» Support and other
resources» Assistance
» Glossary» Using Help
The Overview section includes a brief introduction to some of the major features of HPSystems Insight Manager. High-level information on command-line tools, custom tools,discovery, and license manager are some of the features discussed.
Initial setup» Setting language locale» Signing in» Single Sign On» Signing out» Product registration» First Time Wizard» Performing Initial setup» Setting up managed
systems» Setting up systems using
the HP Insight managedsystem setup wizard
» Advanced setup» Screens and product layout» Operations» Reference» Support and other
resources» Assistance
» Glossary» Using Help
The initial setup involves setting up managed systems, configuring discovery, configuringevent handling, adding users, and defining authorizations. It assumes that you justcompleted the installation of your CMS. If you bypassed or canceled the First Time Wizard,the following steps assist you in setting up your environment to run HP SIM.
NOTE:The First Time Wizard starts the first time a user with administrative rights signsin to HP SIM. If the wizard is canceled before completion, it restarts each time auser with administrative rights signs in. You can cancel and disable the wizardfrom automatically starting by selecting the Do not automatically show thiswizard again checkbox. You can manually start the wizard by selecting Options
First Time Wizard .
If you are a new administrator of an existing management domain, it might be useful for youto familiarize yourself with these steps, even though your CMS has already been throughthe initial setup. The steps in this process are common tasks that HP SIM administratorsperform on a regular basis.
Table 1 Initial setup
Name Description Access
Productregistration
When the HP SIM software is registered with HP,registration inclues:
Software update notification
Product support alerts
Optional newsletters with tips and tricks forusing your HP SIM product
Systems InsightManager - Productregistration
PerformingInitialsetup
Setup managed systems
Configure storage systems
Configure protocol settings
Configure discovery
Add new users
Configure e-mail settings
Configure paging settings
Set up automatic event handling
Systems InsightManager - PerformingInitial setup
Signing in Sign in through the GUI or the CLI. Systems InsightManager - Signing in
Signingout Sign out through the GUI or the CLI.
Systems InsightManager - Signingout
Settinglanguagelocale
Sets the language or locale in your operating system,in a command shell, or in your web browser toEnglish or Japanese.
Systems InsightManager - Settinglanguage locale
First TimeWizard
Provides step-by-step instructions for performing theinitial configuration of HP SIM.
Communications» Managing with tasks» License Manager» Reporting» Remote Support
Configuration andServices
» Operations» Reference
Table 1 Screen and menus
Name Description
Systems InsightManager - Homepage
Graphical user interface features
Systems InsightManager -Navigating theSystem and EventCollections panel
Selecting a collection displays a view of its contents.
Systems InsightManager - Usersand user groups
Enables you to configure authorizations for specific users or usergroups.
Systems InsightManager -Navigating thesystem table viewpage
The default view for an attribute-based system collection anddisplays a list of systems that meet common criteria.
Systems InsightManager -Navigating thecluster table viewpage
Clicking the name of the cluster in the Cluster Name column orcluster status icon in the CS column displays the System Page forthat cluster.
Systems InsightManager -Navigating theevent table viewpage
The view for an event collection and lists of events that meetcommon criteria.
Systems InsightManager -Navigating the treeview
Provides an automatically populated representation of the actualphysical hierarchy of blade components.
Systems InsightManager -Navigating the iconview
Lists the system name of all discovered systems, as well as thesystem health status for each system.
Systems InsightManager -Navigating thepicture view page
Contains a picture view of the discovered systems in the rack orenclosure if available.
Systems InsightManager - Viewingracks
Displays the following tabs:
Systems Insight Manager - System tab for blade servers
Systems Insight Manager - Navigating the event table viewpage
Systems InsightManager - Viewingenclosures
Contains a diagram of the discovered systems in the enclosure ifavailable.
Systems InsightManager - Viewingp-Class enclosures
Forms a rack if a set of enclosures are networked in the hardwarelevel and hosts the ProLiant BL p-Class server types.
» Support and otherresources
» Assistance
» Glossary» Using Help
Systems InsightManager - Viewinge-Class enclosures
Includes the Consolidated Client Infrastructure blade PC Enclosureswhich host 20 PC blades including bc1000/bc1500 andbc2000/bc2500 PC blade types, and the e-Class BL10e serverblades.
Systems InsightManager - Viewingc-Class enclosures
Consists of the HP BladeSystem c7000 and c3000 Enclosures, HPProLiant BL c-Class server blades, network interconnectcomponents, ProLiant Onboard Administrator, and managementtools that enable adaptive computing, optimized for rapiddeployment.
Systems InsightManager -Customizing systemand clustercollections
Contains a Systems collection and the Systems collection containsadditional system, cluster, and System Functions collections.
Systems InsightManager -Customizing eventcollections
Contains an Events collection. This collection contains collections ofdifferent types of events.
Systems InsightManager -Managing eventhandling tasks
Includes a table that shows all automatic event handling tasks andhow the task was set up.
Systems InsightManager - SystemType Managerpage
Lists rules currently defined in HP SIM.
Systems InsightManager - WMIMapper Proxy
Receives client CIM/XML WBEM requests and converts therequests to WMI requests.
Systems InsightManager - Systempage
Enables viewing information related to a specific system.
Systems Insight Manager - System tab for servers
Systems Insight Manager - System tab for blade servers
HP Systems Insight Manager 7.0 - System tab formanagement processors
Systems Insight Manager - System tab for clusters
Systems Insight Manager - System tab for a complex
Systems Insight Manager - System tab for partitions
Systems Insight Manager - System tab for storage host
Systems Insight Manager - System tab for a storage switch
Systems Insight Manager - System tab for a storage array
Systems Insight Manager - System tab for a tape library
HP Systems Insight Manager - Tools & Links tab
Systems Insight Manager - Essentials tab
Systems Insight Manager - Performance tab for blades
Systems Insight Manager - Port mapping tab for blades
Systems Insight Manager - Managing contacts
Systems Insight Manager - Managing site information
Systems InsightManager -Managing SSHkeys
Enables viewing and managing public SSH keys, stored in theknown_hosts file, from the CMS.
Displays the following tabs:
Systems InsightManager - Clustermonitor
Systems Insight Manager - Cluster tab
Systems Insight Manager - Nodes tab
Systems Insight Manager - Network tab
Systems Insight Manager - Resources tab
Systems InsightManager -ManagingCommunications
Troubleshoots communication problems between the CMS andtargeted systems.
Systems InsightManager -Managing withtasks
Managing tasks:
Systems Insight Manager - Viewing task instance results
Systems Insight Manager - Navigating the All ScheduledTasks page
Systems InsightManager - LicenseManager
Displays licenses by product.
Systems InsightManager -Reporting
Enables viewing diverse configurations such as:
Creating user defined reports
Viewing predefined reports
Viewing Snapshot comparisons
NOTE:All user defined, predefined, and snapshotcomparison reports can be run in HTML, CSV,and XML format.
Viewing Enhanced Reports - allows you to executegraphical reports for detailed analysis.
NOTE:All Enhanced reports can be run in HTML, PDF,CSV, and XML format.
Searching multiple CMSs and CMS systems
Systems InsightManager - RemoteSupportConfiguration andServices
Facilitates the collection of enterprise events and configuration datafrom monitored systems and establishes remote connectivity backto HP for reactive support in a timeframe determined by warranty orcontract level.
» Discovery in HP SIM» Discovery filters» Managing Hosts file» Identification» Managing system types» Users and authorizations» Directory Services» Global credentials» System credentials» Security» Trusted certificates» Viewing the audit log» Configuring the audit log» Monitoring systems and
events» Quick Launch menu» Performing a basic search» Performing an advanced
search for systems» Performing an advanced
search for clusters» Performing an advanced
search for events» Tool search» Related information for
searches» Configuring events» Protocol settings» Software status polling» Hardware status polling» Data collection» System Properties» Configuring WBEM health
inclusion status» Specifying a Version
Complete the following procedures to monitor and manage systems in HP SIM.
information» Port types» Replicate Agent Settings» Cluster Monitor resources
and associated settings» Configure or repair agents
results log» Available MSA tools» Custom tools reference
» Support and otherresources
» Assistance
» Glossary» Using Help
Table 1 Reference options
Name Description
Systems Insight Manager -Operating-system-specificcollections, reports, andtools
Collections, reports and tools of managed environments.
Systems Insight Manager -Configure or Repair AgentsLearn More links
Learn more to configure or repair Simple NetworkManagement Protocol settings and trust relationships thatexist between HP Systems Insight Manager and targetsystems.
Systems Insight Manager - Setting theadministrator password for Insight ManagementAgents
Systems Insight Manager - Installing theWBEM/WMI provider for Windows
Systems Insight Manager - ConfiguringWBEM/WMI
Systems Insight Manager - Installing the SNMPprovider for Windows
Systems Insight Manager - Configuring SNMP
Systems Insight Manager - Installing OpenSSHfrom CRA
Systems Insight Manager - Installing Linux PSP orESX Agents from CRA
Systems Insight Manager - Installing the VersionControl Agent
Systems Insight Manager - Configuring VCA
Systems Insight Manager - Configuring a non-administrative account for HP SIM to access WMIdata
Systems Insight Manager - Configuring SSH
Systems Insight Manager -Manage communicationsLearn More links
Learn more about managing communications:
Systems Insight Manager - HP SIM and firewalls
Systems Insight Manager - Installing andconfiguring protocols
Systems Insight Manager - Trusted certificates
Systems Insight Manager - Setting trustrelationships
Systems Insight Manager - Configuring WMIMapper Proxy
Systems Insight Manager - Installing andconfiguring SNMP agent
Systems Insight Manager - WBEM and HP SIM
Systems Insight Manager - WBEM indications
Systems Insight Manager - Secure Shell and HPSIM
Systems Insight Manager - WMI Mapper and HPSIM
Systems Insight Manager - Pinging managedsystems
Systems Insight Manager - Installing the HPProLiant Support Pack
Systems Insight Manager - System Type Managerrules
Systems Insight Manager - Installing andconfiguring Version Control
Systems Insight Manager -Credentials used in HP SIM Learn more about credentials.
Systems Insight Manager -Port types Port types for storage systems.
Systems Insight Manager -Replicate Agent Settings Settings
Systems Insight Manager -Version Control status icons
Based on comparing the installed versions with versions inthe repository.
Systems Insight Manager -Cluster Monitor resourcesand associated settings
Resources and associated settings.
Systems Insight Manager -Configure or repair agentsresults log
Results log.
Systems Insight Manager -Available MSA tools MSA tools.
Systems Insight Manager -Custom tools reference
Tool types, parameterized strings, filtering, versionnumbers, document type definition, and other requirements.
Systems Insight Manager -Custom tool environmentvariables
Supported in custom tool parameters and work asparameters on the New Custom Tool page or the ManageCustom Tools page.
» Information to collect before contacting HP» How to contact HP» Registering for software technical support and update service» HP authorized resellers» Documentation feedback» Typographic conventions
Information to collect before contacting HP
Be sure to have the following information available before you contact HP:
Software product name
Hardware product model number
Operating system type and version
Applicable error message
Third-party hardware or software
Technical support registration number (if applicable)
How to contact HP
Use the following methods to contact HP technical support:
See the Contact HP worldwide website:
http://www.hp.com/go/assistance
Use the Contact hp link on the HP Support Center website:
http://www.hp.com/go/hpsc
In the United States, call +1 800 334 5144 to contact HP by telephone. This serviceis available 24 hours a day, 7 days a week. For continuous quality improvement,conversations might be recorded or monitored.
Registering for software technical support and update service
Insight Management includes one year of 24 x 7 HP Software Technical Support andUpdate Service. This service provides access to HP technical resources for assistance inresolving software implementation or operations problems.
The service also provides access to software updates and reference manuals in electronicform as they are made available from HP. Customers who purchase an electronic licenseare eligible for electronic updates.
With this service, Insight Management customers benefit from expedited problem resolutionas well as proactive notification and delivery of software updates. For more informationabout this service, see the following website:
http://www.hp.com/services/insight
Registration for this service takes place following online redemption of the licensecertificate.
How to use your software technical support and update service
As HP releases updates to software, the latest versions of the software and documentationare made available to you. The Software Updates and Licensing portal gives you access tosoftware, documentation and license updates for products on your HP software supportagreement.
You can access this portal from the HP Support Center:
http://www.hp.com/go/hpsc
After creating your profile and linking your support agreements to your profile, see theSoftware Updates and Licensing portal at http://www.hp.com/go/hpsoftwareupdatesupport toobtain software, documentation, and license updates.
Warranty information
HP will replace defective delivery media for a period of 90 days from the date of purchase.This warranty applies to all Insight Management products.
HP authorized resellers
For the name of the nearest HP authorized reseller, see the following sources:
In the United States, see the HP U.S. service locator website:
http://www.hp.com/service_locator
In other locations, see the Contact HP worldwide website:
http://www.hp.com/go/assistance
Documentation feedback
HP welcomes your feedback. To make comments and suggestions about productdocumentation, send a message to:
The name of a placeholder that you replace with an actual value.
[ ]In command syntax statements, these characters enclose optional content.
{ }In command syntax statements, these characters enclose required content.
|The character that separates items in a linear list of choices.
...Indicates that the preceding element can be repeated one or more times.
WARNINGAn alert that calls attention to important information that, if not understood orfollowed, results in personal injury.
CAUTIONAn alert that calls attention to important information that, if not understood orfollowed, results in data loss, data corruption, or damage to hardware or software.
IMPORTANTAn alert that calls attention to essential information.
NOTEAn alert that contains additional or supplementary information.
HP SIM website at http://www.hp.com/go/hpsim/ for general product information andlinks to software downloads, documentation, and troubleshooting information
HP Technical Documentation website at http://www.docs.hp.com/ for access to HPSIM manuals and release notes
HP Software Depot website at http://www.software.hp.com/ for access to HP SIMsoftware downloads
HP Business Support Center website at http://www.hp.com/bizsupport/ for supportinformation about HP SIM and HP Commercial products
HP Support Center website at http://www.hp.com/go/hpsc for support informationabout HP SIM and HP Enterprise products
HP SIM SMI-S Providers website at http://www.hp.com/go/hpsim/providers forinformation about device support and SMI-S providers
Videos that showcase HP SIM and the Essentials athttp://h18013.www1.hp.com/products/servers/management/hpsim/infolibrary.html
HP SIM forum at http://forums1.itrc.hp.com/service/forums/categoryhome.do?categoryId=455 for discussions about HP SIM
HP SIM tools and scripts forum athttp://forums1.itrc.hp.com/service/forums/categoryhome.do?categoryId=495 forcontributing scripts to be used with HP SIM (these scripts are note supported by HP)
Technical support
Support for HP SIM is available through HP local Response Centers or through HPTechnology Services:
HP Response Center for HP SIM on HP-UX
1-800 HP Invent (1-800-474-6836) for North America, or contact your local HPResponse Center
Technology Services for HP SIM on Windows or Linux
First 90 days: HP provides warranty support for HP SIM for the first 90 days afterinstallation
North America: 1-800 HP Invent (1-800-474-6836)
Other countries: Support phone numbers all other countries
After 90 days: customers will be supported by HP SIM if they have one of the following:
Purchase Insight Control Suites (having 1-year 24x7 Technical Support embeddedwith the license purchase).
If the question is (Service Essentials) ISEE/RSP related, then HP SIM will besupported as it pertains to ISEE/RSP with a Hardware Warranty or HardwareContract.
» Notices» Introduction» Product overview» Initial setup» Screens and product layout» Operations» Reference» Support and other
resources» Assistance
Glossary» Using Help
A
administrative rights userA user who is authorized for the All Tools toolbox on all systems, including theCentral Management Server. This type of user has been given special privileges toadminister the HP SIM software.
agentA program that regularly gathers information or performs some other service withoutthe user's immediate presence. HP SIM agents provide in-depth hardware andsoftware information and subsystem status to HP SIM and numerous third-partymanagement applications.
see also management agent
alarmA user-configurable notification displayed in the System Status panel of HP SIMwhen certain events occur. For instance, if a monitored item changes, an alarmnotifies the user that a change has occurred.
see also trap
see also event
all events collectionDisplays all events that have occurred for all systems.
All Tools toolboxA default toolbox that provides complete access to all tools for the authorizedsystem or system group.
attributeA single characteristic of a manageable product or component, as in an attribute ofa Management Information Format (MIF) file. A set of related attributes constitutesa group. For example, the clock speed of a processor chip is an attribute of a groupthat describes that chip.
authenticationThe process of identifying an individual, based on a user name and password.Authentication is distinct from authorizations and ensures that the individual is whothey claim to be.
authorizationsA mapping of a relationship between a user, a toolbox, and a system or systemgroup.
automatic discoveryThe process that HP SIM uses to find and identify systems on your network andpopulate the database with that information. A system must first be discovered tocollect data and track system health status. The primary source for automaticdiscovery is ping sweeps configured in the automatic discovery tasks page. Othersources might include receiving events from unknown systems or from amanagement processor that has information about a server. Identificationautomatically runs on discovered systems.
available softwareA listing of the software components available in the repository to which the VersionControl Agent has been configured to point. When browsing directly into a HP VCA,these additional components can be selected for installation.
B
bannerThe section of the GUI at the top of the screen that includes the user name andlinks to the Home page and sign out functions.
C
cautionA note to indicate that failure to follow directions could result in damage toequipment or loss of information.
Central Management Server (CMS)A system in the management domain that executes the HP SIM software. Allcentral operations within HP SIM are initiated from this system.
central processing unit polling rateThe rate for how often the Cluster Monitor CPU Resource checks CPU utilization asreported by Insight Management Advisor on monitored systems.
certificateAn electronic document that contains a subject's public key and identifyinginformation about the subject. The certificate is signed by a certificate authority (CA)to bind the key and subject identification together.
see also certificate authority
certificate authority (CA)A trusted third-party organization or company that issues digital certificates used tocreate digital signatures and public-private key pairs. The role of the CA in thisprocess is to guarantee that the individual who has been granted the uniquecertificate is the individual they claim to be.
certificate keyA value used alone or with an encryption decoder (corresponding public or privatekey) for cryptography. In traditional private key cryptography, the communicatorsshare a key or cipher so that each can encrypt and decrypt messages. The risk inthis system is that if any party loses the key, the system is broken. In public keycryptography, the private key is associated with a public key, so each person in thesystem has a personal private key that is never shared.
cleared statusA status condition that indicates an event is cleared.
clearing eventsChanging the event status from uncleared to cleared.
clientsHP desktop, portable, and workstation systems.
clusterA parallel or distributed computing system made up of many discrete systems thatform a single, unified computing resource. Clusters vary in their features,complexity, and the purposes for which they are best suited.
cluster IP addressThe IP address of the cluster.
cluster monitorA core component of HP SIM. Cluster Monitor adds the ability to monitor andmanage multi-node clusters. Cluster Monitor also manages multiple clusterplatforms in a heterogeneous environment.
cluster monitor resourceA program that provides a monitoring or management function for clustered nodesin a cluster.
cluster system identificationInformation about cluster systems. This information is stored in the database.
collections
The method for grouping system or event.
command line interface (CLI)A text-based application that can be executed from a command shell such as sh,csh, ksh or the Microsoft Windows CMD shell.
common information model (CIM)An object-oriented schema defined by the Desktop Management Task Force(DMTF). CIM is an information model guide that describes and shares managementinformation enterprise-wide. CIM is designed for extending each managementenvironment in which it is used.
common information model object manager (CIMOM)A CIMOM acts as the interface for communication between web-based enterprisemanagement (WBEM) providers and management applications such as HPSystems Insight Manager. A CIMOM that provides an interface for an SMI-Sprovider is called an SMI CIMOM.
communications protocolsee management protocol
complexComputer systems that support multiple hardware partitions are referred to as acomplex. For example, the HP Integrity Superdome systems support multiplehardware partitions within a single complex.
componentA component is a single, self-describing, installable (interactive or silent) binary filecontaining a single piece of software, such as firmware image, driver, agent, orutility, that is supported by the management and update tools.
configuration history reportThe Survey Utility that contains reports that show configuration details for server andcompares configuration history files for differences.
Configure or Repair AgentsAn HP SIM feature that enables you to repair credentials for SNMP settings andtrust relationships that exist between HP SIM and target systems. You can alsoupdate Web Agent passwords on target systems that have 7.1 agents or earlierinstalled.
control tasksSequences of instructions that are associated with a search, event, or both, such asDelete Events, Remove Disk Thresholds, Set Disk Threshold, and Set DeviceAccess community strings.
critical statusA state generated when HP SIM can no longer communicate with a managedsystem.
custom toolsCustom tools are tools that can be created by the user to run on the CentralManagement Server or on target systems. For example:
Remote tool A tool that runs on selected target systems. It might copyfiles to the target systems or run specific X-Window applications on thetarget systems. You can schedule this tool.
CMS tool A tool that runs on the CMS. It is usually a script or batch fileand can pass in environment variables. Using Automatic Event Handling,you can configure this tool to run when events are received. You canschedule this tool.
Web page tool A tool that launches a web URL. The URL is launched ina separate browser window on the CMS. You cannot schedule this tool.
D
data collection reportsData collection reports include information about discovered systems in a singleinstance or a historical trend analysis report. HP SIM supports Overwrite existing
data set (for detailed analysis), formerly known as Single Instance Data Collectiontask in Insight Manager 7, and Append new data set (for historical trendanalysis) . With Overwrite existing data set (for detailed analysis), data iscollected from a system at a single instance. With Append new data set (forhistorical trend analysis), data detailing the system history is collected.
data collection tasksProcedure that involves gathering information from a group of managed systemsand storing that information in the database. HP SIM uses Hardware Status Pollingand Data Collection Tasks to implement data collection.
Desktop Management Task Force (DMTF)An industry standard body that defines WBEM standards for the industry. HP is anactive sponsor and participant in the DMTF body.
digital signaturesA technology used to validate the sender of a transaction. This technology usesprivate keys to digitally sign the data and public keys to verify the sender.
discoveryA feature within a management application that finds and identifies network objects.In HP management applications, discovery finds and identifies all the HP systemswithin a specified network range.
discovery filtersEnables users with to prevent or allow certain system types from ever being addedto the database.
discovery templateFiles that can be used by automatic discovery in lieu of typing the addressesdirectly in to the Ping inclusion ranges or Exclusion ranges fields on theAutomatic Discovery - General Settings page and are designed to be used as aquick way to change the scope of automatic discovery.
Distributed Component Object Model (DCOM)An extension of the Component Object Model (COM) that enables COMcomponents to communicate between clients and servers on the same network.
Distributed Task Facility (DTF)A management application that manages the remote execution of tasks onmanaged systems.
Domain Name Service (DNS)A service that translates domain names into IP addresses.
E
e-mail notificationOne of the notification tasks in HP SIM that sends notifications through e-mail.
edit collectionTo modify existing collections to add or remove search criteria.
enclosureA physical container for a set of server blades. It consists of a backplane thatroutes power and communication signals and additional hardware for cabling andthermal issues. It also hosts the CPU or server power supplies.
eventInformation sent to certain users that something in the managed environment haschanged. Events are generated from SNMP traps. HP SIM receives a trap when animportant event occurs. Events are defined as:
Warning. Events of this type indicate a state that might become aproblem.
Informational. Events of this type require no attention and are providedas useful information.
Normal. Events of this type indicate that this event is not a problem.
Minor. Events of this type indicate a warning condition that can escalateinto a more serious problem.
Major. Events of this type indicate an impending failure.
Critical. Events of this type indicate a failure and signal the need forimmediate attention.
event overviewA chart that summarizes the events by product type.
external sitesThird-party application URLs.
G
graphical user interface (GUI)A program interface that takes advantage of the graphics capabilities of thecomputer to make the program easier to use. The HP SIM GUI runs in a webbrowser.
H
BladeSystem Integrated ManagerBladeSystem Integrated Manager is an HP SIM plugin that enables you to manageblade systems from HP SIM for Windows, HP-UX and Linux. BladeSystemIntegrated Manager is composed of blade computer systems, integrated connectivityto data and storage networks, and shared power subsystems. The BladeSystemIntegrated Manager enables you to quickly navigate your HP blade environmentsincluding server blades and desktops, enclosure infrastructures, racks, andintegrated switches, through hierarchical tree views. Users are able to convenientlyconfigure, deploy, and manage individual or groups of blade systems.
health statusHealth status is an aggregate status all of the status sources (which can be SNMP,WBEM, and HTTP) with the most critical status being displayed.
see also system health status
hosts filesA file that follows the UNIX, Linux, or Windows host file format, which is an IPaddress followed by a name and each system is listed on a separate line in this file.This file is used by discovery to manually add multiple systems to the HP SIMdatabase,
HP Insight Control power managementAn integrated power monitoring and management application that providescentralized control of server power consumption and thermal output at thedatacenter level. It extends the capacity of datacenters by enabling the user tocontrol the amount of power and cooling required for ProLiant servers. Built onProLiant Power Regulator Technology, it extends new server energy instrumentationlevers into HP SIM for greater Unified Infrastructure Management.
HP Insight Control virtual machine managementProvides central management and control of Virtual Machines on Microsoft Virtualserver, Vmware’ GSX and ESX. Integrated with HP SIM, virt provides unifiedmanagement of HP ProLiant host servers and virtual machines.
HP ProLiant Essentials Vulnerability and Patch Management PackThe all-in-one vulnerability assessment and patch management tool integrated intoHP SIM, simplifying and consolidating the proactive identification and resolution ofissues that can impact server availability into one central console.
HP Smart Update Manager (HP SUM)HP SUM is a tool for retrieving software and firmware inventory from systems andthe updating software and firmware on those systems. HP SIM uses HP SmartUpdate Manager for installing support packs through the Initial ProLiant SupportPack Install tool as well as installing agents through the Configure or Repair Agentstool. HP Smart Update Manager is also integrated with the Install Firmware andSoftware tool which enables HP SIM to perform firmware updates to system unableto install HP VCA such as management processors and Onboard Administrator.There is no HP Smart Update Manager user interface through HP SIM.
HP Systems Insight Manager database (database)The database that stores vital information about HP SIM, including users, systems,and toolboxes.
HP Version Control Repository Manager (VCRM)An HP agent that enables a customer to manage HP provided software stored in auser-defined repository.
HyperText Transfer Protocol (HTTP)The underlying protocol used by the World Wide Web.
Insight Management AdvisorA program that regularly gathers information or performs some other service withoutthe user's immediate presence.
Systems Insight ManagerSystem management software that is the clear choice for managing HP servers andstorage by being the easiest, simplest, and least expensive way for HP systemadministrators to maximize system uptime and health
Delivers a consolidated view of everything you need to manage your HPinfrastructure from anywhere - physical and virtual
Optimizes a system uptime and health by proactively discovering,monitoring, and alerting for potential problems
Provides easy access to warranty and contract Information and automatesremote support
Is the Foundation for managing HP platforms and Support Services, easilyintegrates with bundles like ICE and ID-VSE, and extends to the OperationsCenter
Version Control Agent (VCA)An agent that is installed on a server to enable you to see the HP software installedon that server.
I
identificationWhile discovery finds systems, identification attempts to determine what the systemtype is. In addition, it determines what management protocol a system supports,and attempts to determine the operating system and version loaded, along withother basic attributes about the system. Finally, it determines if the system isassociated with another system. For example, a management processor in a server.
installed versionA particular HP software component that is installed on the server.
Internet Protocol (IP)Specifies the format of datagrams (packets) and the addressing scheme on anetwork. Most networks combine IP with Transmission Control Protocol (TCP),which establishes a virtual connection between a destination and a source.
IP rangeSystems with an IP address that falls in the specified range.
J
Java database connectivity (JDBC)Similar to Open DataBase Connectivity (ODBC), this set of application programinterfaces (APIs) provides a standard mechanism to allow Java applets access to adatabase.
Java Remote Method Invocation (RMI)A set of protocols that enable Java objects to communicate remotely with otherJava objects.
K
keystoreA database that maintains a list of keys. The keystore can contain a subject's ownprivate key. A keystore can also contain a list of public keys, as published incertificates.
M
Major statusStatus information collected from the system that indicates one or more of themonitored subsystems are not operating properly which is impacting the system.Action should be taken immediately.
managed systemsAny system managed by HP SIM, such as servers, desktops, storage systems, andRemote Insight Boards (RIBs).
management agentA daemon or process running on a managed system. It receives and executesrequests from the Central Management Server on the managed system.
management domainA collection of resources called managed systems that have been placed under thecontrol of HP SIM. Each Central Management Server is responsible for amanagement domain. The managed systems can belong to more than onemanagement domain.
Management HTTP ServerAn integrated piece of software used by the HP suite of HP Web-enabled SystemManagement Software to communicate over HTTP and HTTPS. It provides auniform set of functionality and security to HP Web-enabled System ManagementSoftware. This version is available in the ProLiant Support Pack 7.10 or earlier.
Management Information Base (MIB)The data specification for passing information using the SNMP protocol. An MIB isalso a database of managed objects accessed by network management protocols.
management instrumentationAgents running on systems that provide management information for HTTP, orSNMP protocols.
management LANA LAN dedicated to the communications necessary for managing systems. It istypically a moderate bandwidth (10/100 BaseT) and secured through limitedaccess.
management protocolA set of protocols, such as WBEM, HTTP, or SNMP used to establishcommunication with discovered systems.
management scopeA set of systems within the set of all discovered systems that HP SIM manages.
management servicesA core set of capabilities such as automatic discovery, data collection, a centralrepository for system and event information, event management, basic notification,and secure access. These functions are used by add-ins from HP, a ManagementSolutions Partner, and HP SIM users.
management tasksProcedures you set up to search systems or events.
manual discovery techniquesProcesses that enable you to bypass a full discovery for the following tasks:
Adding a single system
Editing the system
Creating or importing an HP SIM database hosts file
Creating or importing generic hosts files
Microsoft Clustering Service status pageA page that summarizes cluster status as defined by Microsoft Cluster Server andlists the status and values of MSCS-defined cluster attributes. The Cluster Monitoruses color to display status based on MSCS condition values (Normal, Degraded,Failed, and Other).
Minor statusStatus information collected from the system that indicates one or more of themonitored subsystems are not operating properly which is impacting the system.Action should be taken as soon as possible to prevent further failure.
Monitor Tools toolboxA default toolbox that contains tools that display the state of managed systems butnot tools that change the state of managed systems.
multiple-system aware (MSA)A run type that supports multi-system operations. Tools with this run type operateon the target systems using their own internal mechanisms instead of using theDistributed Task Facility. The MSA run type uses the Distributed Task Facility tolaunch the tool on a single system before the tool interacting with the othermanaged systems.
N
network clientsAny computer system connected to your network with a compatible browser used toconnect to the HP SIM GUI.
O
Onboard AdministratorThe Onboard Administrator is the central point for controlling an entire c-Class rack.It offers configuration, power, and administrative control over the rack, and itsassociated blades (Compute Servers), blade management processors, networkswitches (depending on the models of switches used) and storage components(such as SAN or SATA). The Onboard Administrator is a single managementprocessor, with shared resources to an optional backup twin processor for failover.
Open Service Event Manager (OSEM)Enables you to collect, filter, and send problem reports for supported systems(ProLiant and Integrity) running Insight Management Agents. In addition, OSEMautomatically sends service event notifications to HP SIM when a problem isdetected on the system.
OpenSSHA set of network connectivity tools providing encrypted communication sessionsover a computer network using SSH. It was created as an open source alternativeto the proprietary SSH software suite offered by SSH Communications Security.
operator rights userA user who has limited capability to configure the Central Management Server.operator rights users have permission to create, modify, and delete all reports andtheir own tools.
overall software statusThis section indicates whether the software on the server that the HP VCA isinstalled on has any updates available within the repository in which it has beenconfigured to monitor.
P
HP Insight Control performance managementA software solution that detects, analyzes, and explains hardware bottlenecks onHP ProLiant servers. performance management tools consist of Online Analysis,
Offline Analysis, Comma Separated Value (CSV) File Generator Report, SystemSummary Report, Status Analysis Report, Configuration, Licensing, and ManualLog Purge.
PredefinedReports that have been defined and installed with HP SIM.
ProLiant Essentials license keyThe contractual permissions granted by HP to the customer in the form of a codedembodiment of a license that represents a specific instance of a license. A singlelicense can be represented by a single key or by a collection of keys.
R
HP Insight Remote Support PackThe HP Insight Remote Support Pack provides proactive remote monitoring,diagnostics, and troubleshooting to help improve the availability of HP-supportedservers and storage devices in your data center. The Remote Support Packreduces cost and complexity in support of systems and devices. The RemoteSupport Pack securely communicates incident information through your firewalland/or Web proxy to the HP Support Center for reactive support. Additionally, basedon your support agreement, system information can be collected for proactiveanalysis and services.
Insight Remote Support AdvancedA baseline bundle of HP software components that the HP VCA can be configuredto point to in the repository. This setting enables users to indicate that they want tokeep all of their software up to a certain Support Pack level.
rackA set of components cabled together to communicate between themselves. A rackis a container for an enclosure.
Red Hat Package Manager (RPM)The Red Hat Package Manager is a powerful package manager that can be used tobuild, install, query, verify, update, and uninstall individual software packages. Apackage consists of an archive of files and package information, including name,version, and description.
remote wakeupSometimes referred to as Wake-On-LAN (WOL). The remote powering up of asystem through its resident WOL network card, provided that the system has beenenabled to be so awakened using the ROM or F10 Setup.
This is a capability on which HP SIM relies to turn on the systems for scheduledSoftware Updates or Replicate Agent Settings.
remove all disk thresholdsA task provided by HP SIM to remove disk thresholds for systems in an associatedcollection. This task only removes disk thresholds that were set by HP SIM or bybrowsing directly to the Web Agent. Any thresholds set by HP SIM for Windows 32,including disk thresholds, are not removed by this task.
Replicate Agent SettingsA tool that can be used to copy web-based agent settings to a group of systems.
repositoryA directory containing Integrity Support Packs and Smart Components.
Resource PartitionA subset of the resources owned by an operating system instance. The use ofthose resources is controlled through technologies such as the Fair ShareScheduler, pSets, and Memory Resource Groups.
A resource partition also has a set of processes associated with it, and only thoseprocesses can use the resources within the resource partition. Policies establishedby tools such as Process Resource Manager (PRM), Workload Manager (WLM), orGlobal Workload Manager (gWLM) control how resources are allocated to the set ofresource partitions within an operating system instance.
role
see toolbox
rule setConditions, policies, or criteria applied to system information to determine what it is.
S
HP System Management Homepage (SMH)An integrated piece of software used by the HP suite of HP Web-enabled SystemManagement Software to communicate over HTTP and HTTPS. It provides auniform set of functionality and security to HP Web-enabled System ManagementSoftware.
search criteriaA set of variables (information) used to define a requested subset of informationfrom the HP SIM database.
Secure HTTP (HTTPS)An extension to the HTTP protocol that supports sending data securely over theweb.
Secure Shell (SSH)A program to log in to another system over a network and execute commands onthat system. It also enables you to move files from one system to another, and itprovides authentication and secure communications over insecure channels.
Secure Sockets Layer (SSL)A standard protocol layer that lies between HTTP and TCP and provides privacyand message integrity between a client and server. A common usage of SSL is toprovide authentication of the server, so clients can be assured they arecommunicating with the server it claims to be. It is application protocol independent.
secure task execution (STE)A feature of HP SIM that securely executes a task from a managed system. STEensures that the user requesting the task has the appropriate rights to perform thetask, and encrypts the request to protect data from snooping.
security rolesA feature that enables administrators to restrict system access and manage accesson a per-user or per-group basis. This capability enables systems administrators todelegate tasks to junior staff without providing access to advanced or dangerousfeatures. It also enables systems administrators to delegate management ofsystems to specific organizations or customers without providing access to systemsowned by other organizations or customers.
self-signed certificateA certificate that is its own signer, such that the subject and the issuer are thesame.
see also certificate
see also certificate authority
server bladeTypically a very dense server system containing microprocessors, memory, andnetwork connections that can be easily inserted into a rack-mountable enclosure toshare power supplies, fans, switches, and other components with other serverblades. Server blades tend to be more cost-efficient, faster to deploy, and easier toadapt to growth and change than traditional rack-mounted or tower servers.
see also enclosure
server blade visual locatorA feature designed to provide visual representation of ProLiant BL e-Class, p-Classand c-Class servers within their respective enclosures and racks.
see also enclosure
Service Advertising Protocol (SAP)A NetWare protocol used to identify the services and addresses of servers attachedto the network.
set disk thresholdsA task provided by HP SIM to set a disk threshold for systems in an associatedcollection. This threshold is set on all disk volumes on the target systems.
Shared Resource Domain (SRD)A collection of compartments—all of the same type—that share system resources.The compartments can be nPartitions, virtual partitions, processor sets (pSets), orFair Share Scheduler (FSS) groups. A server containing nPartitions can be an SRD—as long as nPartition requirements are met. A server or an nPartition divided intovirtual partitions can be an SRD for its virtual partition compartments. Similarly, aserver, an nPartition, or a virtual partition containing pSets can be an SRD for itspset compartments. Lastly, a Server, an nPartition, or a virtual partition containingFSS groups can be an SRD for its FSS group compartments.
A complex with nPartitions can hold multiple SRDs. For example, if the complex isdivided into nPartitions, named Par1 and Par2, Par1's compartments could bevirtual partitions, while Par2's compartments are pSets.
Each compartment holds a workload. gWLM manages the workload by adjustingthe compartment's resource allocation.
Short Message Service (SMS)A convenient way to send brief text messages directly to a wireless phone. There isa maximum message length of 140 characters.
Simple Network Management Protocol (SNMP)One management protocol supported by HP SIM. Traditional management protocolused extensively by networking systems and most servers. ManagementInformation Base for Network Management of TCP/IP-based internets (MIB-II) isthe standard information available consistently across all vendors.
Simple Object Access Protocol (SOAP)A lightweight protocol for exchange of information in a decentralized, distributedenvironment.
Single Sign OnPermission granted to an authenticated user browsing to HP SIM to browse to anyof the managed systems from within HP SIM without re-authenticating to themanaged system. HP SIM is the initial point of authentication, and browsing toanother managed system must be from within HP SIM.
single-system aware (SSA)A run type that does not support multi-system operations. Tools with this run typeare only aware of the system on which they are running.
SMI CIMOMsee common information model object manager
SMI-S providerAn industry-standard WBEM provider that implements a well defined interface forstorage management. The manufacturers of host bus adapters (HBAs), switches,tape libraries, and storage arrays can integrate SMI-S providers with their systems,or provide them as separate software packages.
see also Web-Based Enterprise Management
SNMP communication settingDefault SNMP community string used when communicating with systems supportingSNMP communications.
SNMP trapAsynchronous event generated by an SNMP agent that the system uses tocommunicate a fault.
Software DistributorThe HP-UX administration tool set used to deliver and maintain HP-UX operatingsystems and layered software applications.
software inventoryA listing of the HP software installed on the system where the HP VCA is installed.
software updateA task to remotely update software and firmware.
spoofingThe act of a website posing as another site to gather confidential or sensitiveinformation, alter data transactions, or present false or misleading data.
standard error (stderr)The default place where the system writes error messages. The default is theterminal display.
standard output (stdout)The default place to which a program writes its output. The default is the terminaldisplay.
status message listA list created by Cluster Management Resources to collect entries found in thebottom left area of the Cluster Monitor page to bring your attention to clusterattributes that are in an abnormal state.
status message summary headerThe list header summary of the total number of status messages in the list and, inparentheses, the number of status messages that have not been examined.
status typeThe classification of status messages (for example, Critical, Major, Minor, Normal,Warning, and Unknown).
Storage Management Initiative Specification (SMI-S)A standard management interface developed by the Storage Networking IndustryAssociation (SNIA). SMI-S provides a common interface and facilitates themanagement of storage devices from multiple vendors. SMI-S uses industry-standard common information model and Web-Based Enterprise Managementtechnology.
storage systemsSAN-attached Fibre Channel disk arrays, switches, tape libraries, or hosts (withFibre Channel host bus adapters).
subnetOn TCP/IP networks, subnets are all systems whose IP addresses have the sameprefix. For example, all systems with IP addresses that start with 10.10.10. would bepart of the same subnet.
Survey UtilityAn agent (or online service tool) that gathers and delivers hardware and operatingsystem configuration information. This information is gathered while the server isonline.
symmetric keyA common key that both the server and receiver of a message share and use toencrypt and decrypt a message.
systemSystems on the network that communicate through TCP/IP. To manage a system,some type of management protocol (for example, SNMP, or WBEM) must bepresent on the system. Examples of systems include servers, workstations,desktops, portables, routers, switches, hubs, and gateways.
system groupA group of systems based on a system collection; a static snapshot of the sourcecollection at the time the system group was created. Used for authorizations.
system health statusThis is aggregate status all of the status sources (which can be SNMP, WBEM, andHTTP) that are supported on a target system, with the most critical status beingdisplayed. The following are the different system health statuses that can bedisplayed:
Critical HP SIM can no longer communicate with the system. The systemwas previously discovered but cannot be pinged. The system might bedown, powered off, or no longer accessible on the network because ofnetwork problems.
Major A major problem exists with this system. It should be addressedimmediately. For systems running an Insight Management Advisor, some
component has failed. The system might no longer be properly functioning,and data loss can occur.
Minor A minor problem exists with this system. For systems runningInsight Management Agent, some component has failed but the system isstill functioning.
Warning The system has a potential problem or is in a state that mightbecome a problem.
Normal The system is functioning correctly.
Disabled The system is disabled from monitoring but is not necessarilyturned off.
Unknown HP SIM cannot obtain management information about thesystem.
Informational The system might be in a transitional or non-error state.
system identificationIdentifying information about systems. This information is stored in the database.The following information is identified:
Type of management protocol on the system (SNMP, WBEM, HTTP, andSSH)
Type of HP system (server, client, switch, router, and so on)
Network name of system
system informationInformation that is provided on the System Page under the System tab. Thesystem information includes:
Network address
Network name
Description
Contact
Location
System links
system information using SNMPAgents that conform to SNMP MIB-2 standards.
system linksA summary information page for a specific system that has a management agent.
system overview reportA report indicating the state of systems that is available at the time that HP SIM isfirst opened. A system search result contains the number of systems that areregistered with the HP SIM databases. Systems are grouped by their statusconditions. Each number in a column is a hyperlink to a more detailed list ofsystems, which displays the systems that correspond to the number in theoverview.
system propertiesproperties can be set for a single system or for multiple systems at the same timeand include options such as system name, system type, system sub-type, operatingsystem version, asset number, contact information, and whether or not the systemproperties can be changed or updated by the discovery process.
system searchLogical grouping of systems into a collection based on information in the HP SIMdatabase. After a search is defined, you can display the results from the systemview page or associate it with a management task.
system search resultsThe result of a system search.
system status panelThe section of the GUI on the left of the screen that displays status information andsystem or event alarms.
system typeOne of 12 supplied types. You can add your own based on one of these types. Forexample, use Server type to create MyServer type. It is still a server and is reportedon in the same way, but it has your designation.
System Type Manager (STM)A utility that enables you to modify the default behavior of the discovery andidentification of objects classified as Unknown or as another category of systemsare discovered and identified precisely as you require. HP SIM discovers andidentifies the system and applies the new information when an Unknown systemmatches a rule set that you specify as the primary rule set. Furthermore, creatingthe new system type provides a System Link page for viewing the informationreturned from the system agent or from the communication protocol of SNMP .
T
taskAn executed instance of an HP SIM tool, on one or more systems, with a specificset of arguments.
task schedulingA master scheduling tool for the scheduling of polling, control, and notification tasks.
template filesTemplate files are a concept that was used before HP SIM had multiple automaticdiscovery tasks. Template files should no longer be used. However, a template fileenables you to create the same data range (IP ranges, and so on) that would beentered in a discover IP inclusion range. The automatic discovery task can have asinput one or more template files. However, template files cannot be nested.
thresholdA preset limit that produces an event when the limit is reached or exceeded.
TomcatAn open source implementation of Java Servlet and JavaServer Pagestechnologies that is used by HP SIM as a web server.
toolAn application, command, or script that can be executed by HP SIM on one or moresystems to perform a task.
toolboxA defined set of tools that a user might need for a particular task, such as databaseadministration or software management. Each HP SIM toolbox is associated with aset of tools and authorizations.
trapAn unsolicited message generated by a management agent that indicates that anevent has occurred. For example, a monitored item has exceeded a set threshold orchanged status. Previously called alarm.
see also event
trap categoriesEvent collection systems found by event type. SNMP traps categorized by HP SIMinto logical groups according to their functions.
trap forwarding addressThe IP address of a system that has been specified to receive trap notificationsforwarded by the HP SIM systems.
typeThe classification of a system, which identifies it as a standard system type. Thesystem types are client, cluster, portable, printer, remote access device, repeater,router, server, switch, unknown, workstation, and other.
U
uncleared event status
Events that have a Critical, Major, Minor, Normal, or Informational severity and havenot been cleared or deleted from the database. Events can be cleared without beingdeleted from the database by using the Clear events menu option.
Critical. A failure has occurred, and immediate attention is required.
Major. A failure is impending.
Minor. A warning condition exists that can escalate into a more seriousproblem.
Normal. These events are not a problem.
Informational. No attention required. This status is provided as usefulinformation
unknown statusHP SIM cannot obtain management information about the system using SNMP.Although no management instrumentation information is available, the system canbe pinged. It might have an invalid community string or security setting.
userA network user with a valid login on the Central Management Server that has beenadded to HP SIM.
user accountsAccounts used to sign-in to HP SIM. These accounts associate a local Windowsuser account or a domain account with privilege levels and paging attributes insideHP SIM.
user groupA group of users defined on the Central Management Server operating system thathas been added to HP SIM. Members of the user group in the operating system cansign-in to HP SIM.
user rights userA user who cannot configure the Central Management Server. However, the usercan view and run predefined reports on the Central Management Server and allmanaged systems.
V
version controlReferred to as the HP Version Control Repository Manager installed on a Windowssystem for Windows and Linux ProLiant systems, and Software Distributor on HP-UX operating systems. Provides an overview of the software status for all managedProLiant or Integrity systems and can update system software and firmware onthose systems programmatically using predetermined criteria. Version controlidentifies systems that are running out-of-date system software, indicates if anupgrade is available, and provides reasons for upgrading. For HP-UX systems,Software Distributor can be launched from an HP SIM Central Management Serveragainst one or more installed HP-UX systems.
Version Control Agent logA listing of all the software maintenance tasks completed by the HP VCA andreports resulting from those tasks.
Virtual Server Environment (VSE)An integrated server virtualization offering for HP-UX, Linux, and Windows serversthat provides a flexible computing environment maximizing usage of serverresources. VSE consists of a pool of dynamically sizeable virtual servers; each cangrow and shrink based on service level objectives and business priorities. For moreinformation, see http://hp.com/go/vse.
W
WBEM ServicesHP WBEM Services for HP-UX is an HP product that uses WBEM and DMTFstandards to manage HP-UX system resources.
This industry initiative provides management of systems, networks, users, andapplications across multiple vendor environments. WBEM simplifies systemmanagement, providing better access to software and hardware data that isreadable by WBEM client applications.
Web-Based Enterprise Services (WEBES)A tool suite that is aimed at preventing or reducing the downtime of a system.
Web-launch aware (WLA)A run type for tools that are launched in a web browser using a web server. WLAtools can be designed to deal with multiple systems.
Windows Management Instrumentation (WMI)An API in the Windows operating system that enables you to manage and controlsystems in a network.
workspaceThe section of the GUI where tools appear.
X
X clientAn application or tool that appears on an X server. X clients can also be called Xapplications.
X serverA local application that accepts X client requests and acts on them.
X Window SystemA cross-platform windowing system that uses the client/server model to distributeservices across a network. It enables applications or tools to run on a remotecomputer.
XML documentA collection of data represented in XML.
» Notices» Introduction» Product overview» Initial setup» Screens and product layout» Operations» Reference» Support and other
resources» Assistance
» GlossaryUsing Help
Help files are presented in HTML, based on the HTML 4.0 Transitional standard publishedby the W3C. These pages should be displayed in a reasonable format by any modern Webbrowser. The format will be considerably improved if you enable your browser's support forCascading Style Sheets (CSS) and Javascript.
NOTE:Some browsers will ignore CSS unless Javascript is also enabled.
Throughout the help, you will find links that can be clicked to move to another page, or toanother section of the current page. After visiting a link, you can use your browser's [Back]button to return to the help page that you were reading. There are three types of links inhelp pages.
Types of Links in Help Pages
inline help linksInline links are underlined, and are colored to stand out from ordinary text. Theselinks will usually take you to another help page, or to another section of thecurrent help page.
NOTE:Depending on the capabilities of your browser, the underline may onlyappear as you move your mouse cursor over the link text.
This is an example of an inline link.
Some inline links may point to external resources on the World Wide Web. Allsuch links will be clearly identified as external links.
NOTE:In order to use external links, your browser must have access to thepublic internet. If you are behind an internet firewall, you may need toconfigure proxy servers. Consult with your network administrator todetermine the appropriate settings for your browser.
inline glossary linksGlossary links are displayed the same as inline help links. These links will alwaystake you to the glossary definition of the underlined word or phrase.
link linesA link line is a link that appears on a line by itself, separate from surrounding text.Link lines may appear individually, or in a list. These links are preceded with thesymbol », as in this example:
» Using Help
These links are colored like inline links, and an underline may appear as youmove your mouse cursor over the link text.
To make it easy to use the help system, every help page contains certain commoncomponents.
Common Components of Each Help Page
bannerAt the top of the page is a colored banner identifying the help system and thelanguage in which the help page is written.
topic path
Beneath the banner is a single line in small font, showing the topic hierarchy thatleads to the current page. If the current topic has parent topics, you can click onany of the parent topic names to go to the corresponding help page.
title blockBeneath the topic path is a title block identifying the current help page.
search controlsIf the help system was configured with search capability, a search field will bedisplayed, allowing full-text search of the help system. Enter the word or phraseto search for, and click the Search button. Advanced search options are availablefrom the search results page.
NOTE:Search capability is not provided for all help systems.
page table of contentsSome help pages are subdivided into multiple sections. The section title inside acolored banner marks the beginning of each major section. The page table ofcontents is a list of link lines that point to the start of each section. It appearsdirectly under the title block in those pages that contain multiple sections.
navigation linksAt the left side of the page is a block of link lines, arranged as a topic outline.The link line corresponding to the current page is dimmed, and is inactive. As youmove through the help system, the outline is automatically expanded or collapsed,depending on the position of the current help page.
1. Top-level help topics are always shown.
2. All subtopics of the current page are shown.
3. All peer topics of the current page are shown.
4. All peer topics of the parent of the current page are shown.
These navigation links are designed to make it easy to get to other topics that areclosely related to the current topic, without cluttering the outline with unrelatedtopics. If you want to see the entire outline of topics and subtopics, click theTable of Contents link at the top of the navigation links.
The following standard links are included at the top and bottom of the navigation link lines.
Standard Navigation Links (top)
Table of ContentsAn outline view of all the help pages, with all subtopics expanded. From the tableof contents, you can go directly to any help page with a single mouse click.
IndexA keyword index of all the help pages. Index entries are linked to the help pageswhere the keywords appear. If you cannot find the help that you're looking for,you are always one click away from the index.
Standard Navigation Links (bottom)
GlossaryA glossary of terms used in the help pages.
Introduction» HP SIM features» Product architecture» Security» License Manager» HP SIM command line
tools» Custom tools
» Initial setup» Screens and product layout» Operations» Reference» Support and other
resources» Assistance
» Glossary» Using Help
HP Systems Insight Manager is the foundation for the HP unified server-storagemanagement strategy. HP SIM is a hardware-level management product that supportsmultiple operating systems on HP ProLiant, Integrity and HP 9000 servers, HPStorageWorks MSA, EVA, XP arrays, and third-party arrays. Through a single managementview of Microsoft® Windows®, HP-UX 11iv1, HP-UX 11iv2, HP-UX 11iv3, and Red Hat,and SuSE Linux, HP SIM provides the basic management features of:
System discovery and identification
Single-event view
Inventory data collection
Reporting
The core HP SIM software uses WBEM to deliver the essential capabilities required tomanage all HP server platforms.
HP SIM can provide systems management with plug-ins for HP clients, storage, power, andprinter products. Using HP Integrity Essentials you can choose plug-in applications thatdeliver complete lifecycle management for your hardware assets:
» Product architecture» Security» License Manager» HP SIM command line
tools» Custom tools
» Initial setup» Screens and product layout» Operations» Reference» Support and other
resources» Assistance
» Glossary» Using Help
» HP SIM management» Security» Installation» Discovery» Custom tools» Reporting
HP SIM management
Fault management and event handling HP SIM provides proactive notification ofactual or impending component failure alerts. Automatic Event Handling enables youto configure actions to notify appropriate users of failures through e-mail , pager, orSMS gateway , and enables automatic execution of scripts or event forwarding toenterprise platforms such as HP OpenView Network Node Manager or HPOpenVMS Systems.
NOTE:Pager support is only for Windows-based CMS.
Consistent multisystem management HP SIM initiates a task on multiplesystems or nodes from a single command on the CMS. This functionality eliminatesthe need for tedious, one-at-a-time operations performed on each system.
Two user interfaces HP SIM provides the option of a browser-based GUI or aCLI that enables you to incorporate HP SIM into your existing managementprocesses.
WBEM indications for HP-UX, Linux, and SMI-S devices HP SIM enables youto use the GUI or CLI to subscribe and unsubscribe to WBEM indications.
Security
Role-based security HP SIM enables effective delegation of managementresponsibilities by giving system administrators granular control over which userscan perform specific management operations on specific systems.
Manage SSH keys The SSH keys feature enables you to view and manage, fromthe CMS, the public SSH keys stored in the known_hosts file. The SSH keys enablethe CMS to authenticate a secure connection with a managed system.
Secure remote management HP SIM leverages operating system security foruser authentication and uses SSL and SSH to encrypt managementcommunications.
Configure or Repair Agents This feature enables you to repair credentials forSNMP settings, HP System Management Homepage, or Management HTTP Servertrust relationships on Windows, Linux, and HP-UX systems supported by HP SIM.See Systems Insight Manager - Configuring managed systems from a WindowsCMS for more information.
Installation
Easy and rapid installation. You can install HP SIM quickly and easily, on HP-UX 11i v1, HP-UX 11i v2, or HP-UX 11i v3 on PA-RISC/Integrity server platforms,or on ProLiant platforms running Windows or Linux.
First Time Wizard HP SIM provides you with step-by-step, online instructions for
performing the initial configuration of HP SIM. The wizard helps you configure basicHP SIM settings on the CMS.
Discovery
HP SIM can automatically discover and identify systems attached to the network. Discoveryfilters enable you to limit discovery to specific network segments or IP address ranges. Usediscovery filters to prevent discovery of unwanted system types.
Custom tools
HP SIM defines tools using simple XML documents that enable you to integrate off-the-shelf or custom tools. These tools can be command line tools, web-based applications, orscripts. Role-based security governs access to these integrated tools.
Reporting
Data collection and inventory reports HP SIM performs comprehensive systemdata collection and enables you to quickly produce detailed inventory reports formanaged systems. Reports can be generated in HTML, XML, or CSV format. Datacollection and reporting has been added for HP Superdome systems and othercellular complexes. You can collect information about:
Enclosures
Cabinets
Cell Blade
Memory
Fan and Power
Integrity virtual machines
Non-Integrity virtual machines
Virtual partitions (vPars)
Hard partitions (nPars)
The type of data collected depends on what filters are selected, or what WBEMproviders are installed.
Snapshot comparisons HP SIM enables you to compare configuration snapshotsof up to four different servers, or compare configuration snapshots of a single serverover a period of time. You can use snapshot comparisons to save a picture of astandard configuration for comparisons to other systems.
Federated CMS Search Federated CMS Search is a web-based HP SIM plug-inthat allows you to search quickly across a number of Systems Insight ManagerCMS systems.
Product architecture» Security» License Manager» HP SIM command line
tools» Custom tools
» Initial setup» Screens and product layout» Operations» Reference» Support and other
resources» Assistance
» Glossary» Using Help
» Central management server» Managed systems» Web-browser clients
HP SIM leverages a distributed architecture that has three types of systems: CMS,managed systems, and web-browser clients.
The CMS with the managed systems together are called the HP SIM management domain.
Central management server
Each management domain has a single CMS. The CMS is the system in the managementdomain that executes the HP SIM software and initiates all central operations within thedomain. In addition to the HP SIM software, the CMS maintains a database for storage ofpersistent objects that can reside locally or on a separate system. Typically, applications forthe MSA tools also reside on the CMS. However, these applications are not required toreside on the CMS. They can reside anywhere on the network.
Because the CMS is a system within the management environment, it manages itself aspart of the domain. You can add the CMS as a managed system within anothermanagement domain if you want to manage the domain using a separate CMS.
Managed systems
Systems that comprise a management domain are called managed systems. A system canbe any device on the network that can communicate with HP SIM, including servers,desktops, laptops, printers, workstations, hubs, storage systems, SANs, and routers. Inmost cases, these devices have an IP address associated with them. A managed systemcan be managed by more than one CMS, if desired.
Managed systems to be managed must have one or more Insight Management Advisorinstalled. There is a wide variety of agents, such as the HP Insight Management Agentsbased on SNMP, or the WMI for Windows systems, , or WBEM providers, and System FaultManagement providers for HP-UX. These agents provide management information andalerts (indications) to the CMS. The SSH agent (service) then enables the HP SIM CMS tolog in to the managed system to execute commands through scripts.
System collections
System collections group systems in the HP SIM database. Collections filter systems thatshare common attributes, such as operating system or hardware type. System collectionscan also be arbitrary collections of systems. Systems can belong to one or more systemcollections. Many default shared system collections are provided, and you can create sharedand private collections. Using system collections, you can, in a single step, perform a taskon every system in a system collection.
Web-browser clients
You can access HP SIM from any supported browser client. The network client can be partof the management domain. However, you must run a compatible browser to access theGUI or an SSH client application to securely access the CLI. You can restrict access to theweb server on the CMS to specific IP address ranges for specific users.
» Introduction» HP SIM features» Product architecture
Security» License Manager» HP SIM command line
tools» Custom tools
» Initial setup» Screens and product layout» Operations» Reference» Support and other
resources» Assistance
» Glossary» Using Help
» Secure Sockets Layer and certificates» Sign-in and accounts» Single Sign On, Replicate Agent Settings, and Install Software and Firmware» Certificates» Credentials» Privilege elevation
Secure Sockets Layer and certificates
SSL is used between the browser and HP SIM to ensure data integrity and privacy. Anintegral part of SSL is a certificate, which is a public document used to identify the HP SIMserver. When HP SIM is installed, it creates a self-signed certificate. Your browser mightinitially display a security alert when you browse to HP SIM, describing the certificate asuntrusted. This designation occurs because the certificate is self-signed (signed by the HPSIM server) and the signer is not in the browser list of CAs. By securely importing the HPSIM server certificate into the browser, the browser can authenticate the HP SIM server towhich you are browsing. For more information about importing certificates into your browser,see Systems Insight Manager - Importing a server certificate.
HP SIM also supports the ability to use a certificate from a third-party CA or your owninternal CA or PKI. In this case, you can import the CA certificate into your browser. Formore information, see Systems Insight Manager - Importing a CA-signed certificate.
Sign-in and accounts
A user name, domain name (for Windows CMS), and password are required before you canaccess any feature of HP SIM. HP SIM uses the user authorizations of the underlyingoperating system (Windows, Linux, or HP-UX) and relies on the operating system toauthenticate users.
The user that is installing HP SIM must be either a system administrator (for Windows) orroot user (for Linux and HP-UX). This user has administrative access to HP SIM.
After signing in with this account, create additional accounts for other users. Each accountcan have different configuration rights and authorizations. You can restrict the IP addressesfrom which each account can sign-in. For more information, see Systems Insight Manager -Users and authorizations.
Audit settings can be configured to log a notice for different types of security events,including sign-in and sign-out events. For more information, see Systems Insight Manager -Configuring sign-in events.
Single Sign On, Replicate Agent Settings, and Install Software and Firmware
To take advantage of Single Sign On or to execute Replicate Agent Settings or InstallSoftware and Firmware tasks on the managed systems, set up a trust relationship betweenHP SIM and the desired managed systems. A trust relationship enables the managedsystem to specify which HP SIM servers can issue commands to the system. Without anestablished trust relationship, these commands fail.
Setting up a trust relationship on the managed system requires that you browse to thesystem, set the trust mode, and add HP SIM to the Trusted System Certificates list.Managed systems can also be set up with an appropriate certificate during deployment. Atthe HP SIM server, you must also specify the user authorization for the managed systemand have executed a System Identification task. If you have enabled the Require option onthe Trusted System Certificates page, you must import the certificates of trusted managedsystems into HP SIM, or a root CA certificate.
Certificates
HP SIM allows secure and authorized management from the CMS. User authorizations formanaged systems and the CMS can be configured, helping ensure that only authorizedusers perform state-changing operations. Communication between the CMS, managedsystems, and the browser is secured using SSL and certificates, helping to authenticatesystems and protect user credentials and management data.
A new SSL certificate is created during CMS initialization that is used as a client credentialin WBEM requests (instead of the CMS certificate). To authenticate using the WBEMcertificate, select Use certificate instead in the WBEM settings section of the SystemProtocol Settings page. See Systems Insight Manager - Setting protocols and credentialsfor a system or group of systems for more information. To configure the WBEM certificate,use the Configure or Repair Agents task. See Systems Insight Manager - Configuringmanaged systems from a Windows CMS for more information.
NOTE:The WBEM client certificate authentication feature is supported only on HP-UXsystems, that have WBEM Services 2.5 installed for HP SIM.
Credentials
In HP SIM, there are three different types of credentials:
System credentials Credentials used by identification to access managedsystems. These credentials include WBEM, WS-MAN, and SSH credentials, Sign-in, SNMP community string, and Single Sign-On credentials. For more information,see HP Insight Manager 7.0 Online Help - System credentials.
Discovery task credentials Credentials used by a discovery task that apply to allsystems discovered by that task. For more information, see Systems InsightManager - Configuring credentials for discovery tasks.
Global Credentials Global credentials are system credentials that apply to allsystems. For more information, see Systems Insight Manager - Global credentials.
Systems Insight Manager - Related information
Privilege elevation
Privilege elevation enables you to sign in as an unprivileged user and elevate the privilegeto run a tool and support running tools on operating systems, such as AIX and Solaris.
» Introduction» HP SIM features» Product architecture» Security
License Manager» HP SIM command line
tools» Custom tools
» Initial setup» Screens and product layout» Operations» Reference» Support and other
resources» Assistance
» Glossary» Using Help
» CLI mxlmkeyconfig
License Manager enables you to view and manage product licenses within the HP SIM userinterface. To access additional information about Updates and Upgrades and Technicalsupport, contact your HP services or HP partner representative or access the IT ResourceCenter (ITRC) at www.itrc.hp.com.
NOTE:To run License Manager, you must have administrative rights on the CMS (to set,select OptionsSecurity Users and Authorizations User) and choose theConfigure CMS Security option, and the All Tools toolbox (to set, selectOptionsSecurity Users and Authorizations User) on the managedsystems that you want to license.
You can view and assign licenses to specified target systems discovered by HP SIM. Aproduct may use artificial systems to contain licenses. Therefore, you may see names ofnon-existent systems. System licenses can be reviewed by product. Licenses can beassociated with specific systems. Licenses can be collected and deployed to managementprocessors. New licenses can be added individually or in bulk from a file. License Managerdatabase tables are updated and synchronized daily at midnight or at HP SIM startup, andexpired license information is sent to registered plug-ins.
For some products, License Manager only permits users to review system licenses,available licenses, and add licenses. For other products, License Manager allowsassociation of licenses with systems selected by the user. The association of the license isdependent on the particular product. For some products, licenses can be freely associatedwith selected systems and those associations can be changed. However, in most cases thelicense is locked to the system once it is used with the product. Once locked, associationscan no longer be changed. For other products, the product association is permanent oncemade in License Manager. Finally, some products allow License Manager to manage theirlicenses entirely such that selection and licensing systems is final. The distinction betweenthese latter modes is that associations may be changed if the user options include Assign /Unassign and are final if there is one option, Apply.
License Manager includes functionality to collect and deploy licenses with mostmanagement processors. The License Manager core establishes and maintains a securecommunication channel for license deployment with the management processor through twooptions provided by HP SIM, Secure Sockets Layer (SSL) and Secure Shell (SSH). Both,SSL and SSH meet the requirements for a secure channel. If the target systems aremanagement processors, the management processor must support SSH and you mustprovide the required credentials. An SSH based solution uses CLP. All managementprocessor firmware releases include support for SSH/CLP. ProLiant SSH/CLP support isincluded in v1.70 or later of the management processor firmware. Integrity SSH/CLPsupport is included in management processor firmware. All management processors can beupdated to this version or later. The license collection uses an HTTP based mechanism andoperates without credentials. Management processor firmware in many instances allows theuser to define if license information is available on demand using this mechanism.
Table 1 Supported hardware for Integrity management processor license collections
Hardware Product name Server type Firmware support
NOTE:The new management processor license collection is supported on managementprocessor and management processor devices. Deployment is supported onmanagement processor and management processors with newer firmwareversions.
In some instances, licenses are managed and controlled by the licensed system (remotelicensing). In this case, License Manager provides the facility to collect and deploy licensesto those systems. For non-management processor systems, communication used is aMicrosoft DCOM mechanism.
For some products, the license is stored in a licensing structure in the Windows registry onthe licensed system. License Manager employs Microsoft's remote registry API over theDCOM protocol to assign licenses to and collect license information from those remotesystems. License information is duplicated in the HP SIM database, but licenses aremanaged remotely and must be periodically collected to keep this information current.Authentication credentials for the specified systems are needed when licenses are sent tothe specified system. If WBEM authentication credentials have been provided for a specifictarget, these credentials are used. If specific credentials have not been provided, each setof WBEM credentials provided as global credentials are used in turn. If no credentials areprovided, the connection is attempted using the default credentials of the HP SIM server.The remote registry service must be started and run on candidate target systems for keycollection or assignment.
NOTE:Management processors have used two key formats (key format v0 and thecurrent v1). The original v0 license key has limited support in License Manager.License input using a v0 key fails. However, it is rare that you will encounter a v0key license. All v1 key licenses work. Both v0 and v1 keys can be collected, butonly v1 keys can be deployed.
NOTE:Automatic collection of management processor licenses is not supported.
NOTE:You do not have support or upgrade options by default. After July 9, 2007, alllicense keys are included in one year of 24 x 7 Software Technical Support andUpdate Service. The License Manager informs you which license keys are"support and update enabled" and which license keys require the purchase offuture updates and upgrades.
CLI mxlmkeyconfig
The CLI mxlmkeyconfig allows you to combine all the License Manager key files into onefile instead of having to execute multiple files. Combining these files into a single file makesit easier when adding keys from a file through the License Manager graphical user interface(GUI).
The mxlmkeyconfig command takes all the keys and related information and places it in theresulting key file. The CLI program will not allow duplicates. If there are duplicate<keystring> values, a warning message appears and only the first value is placed in theresulting key file. If badly formatted files are encountered, warning messages appear.
The key file is created when CLI mxlmkeyconfig is executed. If the resulting key file alreadyexists, then the previous keys remain and the information from the source key files areadded to the resulting key file.
» Introduction» HP SIM features» Product architecture» Security» License Manager
HP SIM command linetools
» Custom tools» Initial setup» Screens and product layout» Operations» Reference» Support and other
resources» Assistance
» Glossary» Using Help
» Command line interface
Use the CLI tools to execute basic UNIX and Windows commands remotely on one or moresystems.
NOTE:For additional information about the individual commands, see the associatedmanpage on an HP-UX, ESX (non-embedded), Solaris, IBM, and Linux systemor the Windows command line help where the command tool is installed.
NOTE:Command line tools provided by HP-UX and Linux, such as the ls and dfcommands, are run as root by default. For security reasons, you might want themto run as a specific user to avoid permitting unintended capabilities to a user.
Procedure 1 Launching a command line tool
1. Choose one of the following:
Select Tools Command Line Tools UNIX/Linux for Linux or UNIXcommand line tools.
Select Tools Command Line Tools Windows for Windows commandline tools.
2. Select the command line tool that you want to run, and follow the steps to launchthe tool. For assistance with the steps, see Systems Insight Manager - Managingwith tasks.
3. Click [Run Now] to launch the tool.
4. In the Parameters field, enter the parameters for the tool.
5. If applicable, enter the privilege elevation password.
Command line interface
Use the mxexec command to launch these command line tools on one or more systemsfrom the command line interface. For assistance with this command, see the HP SystemsInsight Manager Command Line User Guide.
» Introduction» HP SIM features» Product architecture» Security» License Manager» HP SIM command line
toolsCustom tools
» Initial setup» Screens and product layout» Operations» Reference» Support and other
resources» Assistance
» Glossary» Using Help
Custom tools are executed on the CMS and on target systems. They can be scripts, batchfiles, or executables that can reference environment variables set by the tool in order toaccess system or event information. For example, creating a custom tool to launch Notepad.You can create or launch SSA, MSA, and WLA tools. You can create the following types ofcustom tools:
Remote tool A tool that runs on selected target systems. It might copy files to thetarget systems or run specific X-Window applications on the target systems. Youcan schedule this tool.
CMS tool A tool that runs on the CMS. It is usually a script or batch file and canpass in environment variables. Using Automatic Event Handling, you can configurethis tool to run when events are received. You can schedule this tool.
Web page tool A tool that launches a web URL. The URL is launched in aseparate browser window on the CMS. You cannot schedule this tool.
For more information on custom tools, see Systems Insight Manager - Custom tools.
Setting language locale» Signing in» Single Sign On» Signing out» Product registration» First Time Wizard» Performing Initial setup» Setting up managed
systems» Setting up systems using
the HP Insight managedsystem setup wizard
» Advanced setup» Screens and product layout» Operations» Reference» Support and other
resources» Assistance
» Glossary» Using Help
You can set the language or locale in your operating system, in a command shell, or in yourweb browser to English or Japanese and run HP SIM. Both the CMS and the managedsystems must support all the desired languages. The language presents all the labels,menus, and status and error messages in HP SIM in the requested language. The GUIshown in your browser appears in the preferred language of the web browser. Also, toolsand tasks executed interactively through the CMS have the same language as the languagethe tool command line is executed with on the target system. This enables your webbrowser to run tools, create scheduled tasks, and manually run scheduled tasks in thepreferred language. Likewise, the language setting of your command shell is forwardedthrough the mxexec and mxtask command line commands to set the language forexecuting a tool, manually executing a task, or creating a scheduled task when thecommand line for the tool is executed on the target systems.
The CMS has another locale independent from any user session the CMS Locale. Somefeatures inherit this locale, such as logging files and e-mail messages sent by AutomaticEvent Handling, which are neutral from any session.
Setting the web browser language or locale
When you configure your web browser and select the language you prefer, the HP SIM GUIdisplays the date and time in the language requested by the browser, although the overallHP SIM GUI appears in English or Japanese. The browser locale also sets the languageand encoding in the Secure Shell (SSH) command shell in which the tool commandexecutes. The browser locale is saved on a scheduled task when it is created and used toset the language and encoding on the target system for SSA tools and on the executionsystem for MSA tools. When you manually execute a task, the current browser localeoverrides the locale set in the scheduled task for this single manual execution of the task(for SSA and MSA tools).
Procedure 1 Configuring the language settings in Internet Explorer for Japanese
1. Select Tools Internet Options [Languages]. The Language Preferencewindow appears.
2. Click [Add]. The Add Language window appears.
3. Select Japanese from the list.
4. Click [OK] to add it to the language preference list.
5. Select Japanese in the language preference list, and click [Move Up] until it is atthe top of the list, or select and remove any other languages listed here.
6. Click [OK]. Continue to click [OK] until you have closed all windows.
Procedure 2 Configuring the language settings in Mozilla for Japanese
1. Select Tools Options Contents and click [Choose] in the languages section.The Language window appears.
2. Open the navigator dropdown from Select language to add option.
3. Select Japanese from the list.
4. Click [Add] to add it to the language preferences list.
5. Select Japanese in the language preferences list, and click [Move Up] until it is atthe top of the list, or select and remove any other languages listed here.
6. Click [OK] to save preferences, and close the window.
Configuring the language or locale settings on Windows operating systems
To install and run HP SIM in Japanese mode, you must first set the Locale for the currentuser to Japanese. After you have completed these steps, install HP SIM and it will run inJapanese language mode. For more information about installing HP SIM, see the HP SIMinstallation guides located athttp://h18013.www1.hp.com/products/servers/management/hpsim/infolibrary.html, and thenselect the appropriate guide for your operating system.
The HP SIM CLI commands use the Code page to determine what locale and encoding tooutput, as do the Command Prompt commands, such as dir.
Procedure 3 Configuring Windows XP language settings for Japanese
1. Select Start Settings Control Panel Regional and Language OptionsAdvanced.
2. Under Language to use for non-unicode programs, select Japanese.
3. Click [Apply] to apply changes.
4. Reboot the system.
5. Open a command prompt window.
6. Execute the chcp 932 (Japanese) and chcp 437 (English) commands to togglebetween the two languages.
Procedure 4 Configuring Windows 2000 locale settings for Japanese
1. Select Start Settings Control Panel Regional Options General.
2. Click [Set default ]. The Select System Locale window appears.
3. From the dropdown list, select Japanese.
4. Click [OK].
5. Click [Apply].
6. Reboot the system.
7. Open a command prompt window.
8. Execute the chcp 932 (Japanese) and chcp 437 (English) commands to togglebetween the two languages.
Configuring HP-UX and Linux language settings
Procedure 5 Configuring HP-UX and Linux language settings
1. Ensure that support for the desired languages and character map encodings areinstalled on the managed systems (for SSA tools) and execution systems (for MSAtools, usually the CMS).
2. To verify the language settings and see if the language and character mapencodings you need are listed, execute:
locale -a
3. To run command tools of the x-window command type, ensure that the X Displayyou select to display the X-window application has been configured to use the fontlists required for that application and the requested language. For Motif X Windowapplications (X clients), it might be enough to have the Common DesktopEnvironment (CDE) configured for the language you want to display. It should haveall the X11 resource file properties for X11 Motif or Gnome widget set font listsconfigured with fonts that support the language and encoding you want to use (forexample, Japanese and SJIS), or you must configure the X resource file of your Xclients to set the specific font lists you want to use for each application. To find outwhat fonts are installed, knowing what languages the X application supports, seeinghow the application sets fonts in its app-default file, run:
4. Edit the X Resource file properties on the X clients to configure the application fontlist properties.
Configuring HP SIM
HP SIM has a configuration file that you can be modify to override locale settings thatcontrol:
CMS locale The locale of the CMS, which affects the language used in the CMSlogs and e-mails sent by Automatic Event Handling tasks
Target locale The locale, character map encoding, code page, and LANGvariables used when executing a command on a remote system through SSH
This configuration file is globalsettings.props and is located on the following operatingsystems:
On Windows C:\Program Files\HP\Systems InsightManager\config\globalsettings.props .
On HP-UX and Linux /etc/opt/mx/config/globalsettings.props.
CMS locale
By default, the CMS Locale is determined by the environment. On an HP-UX CMS, it looksfor "LANG=" in "/etc/rc.config.d/LANG" and uses that setting. On a Linux CMS, it looks for"LANG=" in "/etc/sysconfig/i18n" and "/etc/sysconfig/language" and uses that setting.On a Windows CMS, it uses the default locale setting of the Java™ Virtual Machine, whichis based on the locale setting of the user account used to install HP SIM.
If the locale used by the CMS is not the desired locale, you can manually editglobalsettings.props and add a line, such as CMSLocale=en_US , or whatever locale youwant to override the CMS locale.
Target locale
For HP SIM, the character map encoding for a locale might be different for each targetoperating system and each language. To enable HP SIM to select the encoding to use foreach target system (for SSA tools) or each execution system (for MSA tools, usually theCMS), HP has defined the format of some properties you can add to theglobalsettings.props file. These properties provide the character map encoding to use foreach language on each operating system, what Code Page code to use for each languageon a Windows target and execution system, and the string that defines that encoding in theLANG environment variable on a Linux or HP-UX system. Also, some properties define whatto use for unsupported languages on each operating system. The format of the propertynames are:
where language is the two-character code for a language, os_name is the uppercase keywordfor the supported operating system (for example, LINUX, HPUX, WINNT), and encoding isthe canonical name for character map encoding for that language on the operating system.The supported names can be found in column 2 of the web pagehttp://java.sun.com/j2se/1.4.2/docs/guide/intl/encoding.doc.html.
For the Windows target and execution systems, use these properties to choose the chcpcommand to execute in the SSH command prompt shell, to force the language andencoding to set to execute the Windows command line command. For example:
chcp 932 (forces the language to Japanese Shift-JIS)
chcp 437 (forces the language to US English with at least ISO-8859-1 support)
For Linux and HP-UX target and execution systems, use the encoding with the locale todefine the LANG environment variable to be defined in the SSH environment on the targetand execution systems. Example values can be found by executing the locale -a commandon these operating systems. For example:
LANG=en_US.iso88591
(US English language, ISO-8859-1 encoding on HP-UX)
» Single Sign On» Signing out» Product registration» First Time Wizard» Performing Initial setup» Setting up managed
systems» Setting up systems using
the HP Insight managedsystem setup wizard
» Advanced setup» Screens and product layout» Operations» Reference» Support and other
resources» Assistance
» Glossary» Using Help
Access the GUI using a web browser or the CLI using a SSH client.
When you first sign in to HP SIM, the First Time Wizard window appears. The First TimeWizard provides information and procedures for getting started with HP SIM. Click [Close]to exit the window. If you do not want this window to appear each time you sign in to HPSIM, select Do not automatically show this wizard again, and then click [Close]. See theSystems Insight Manager - First Time Wizard for more information.
Signing in to the GUI
You can access the HP SIM GUI from any network client using a web browser. Forinformation about which browsers are supported, see the HP SIM installation guides locatedat HP Systems Insight Manager User Guide, and then select the appropriate guide for youroperating system.
NOTE:After accessing HP SIM, if you open additional windows in the same browserusing the same HP SIM URL, you do not need to sign in to HP SIM. Any timeyou start a new instance of the browser and navigate to HP SIM, you must signin.
If you sign in to HP SIM and then navigate to a different website, your HP SIMsession times out. If you use the same browser process to return to HP SIMwithin 20 minutes, you are not required to sign in.
Manually signing in to HP SIM
There are several reasons to manually sign in to HP SIM.
If automatic sign-in fails, the sign-in page appears This might occur if the useris logged in to the operating system using an account that is not an HP SIMaccount.
If automatic sign-in is not attempted This might occur if the browser is notproperly configured for automatic sign-in, or the feature is disabled in HP SIM.
If you click Sign Out from HP SIM This enables you to specify another useraccount if you are logged in to the operating system with a different account.
Procedure 1 Manually sign in to HP SIM
1. Open a supported web browser on any network client, and enter the address for thesign-in page by navigating to http://hostname:280/ , where hostname is the hostname of the CMS.
NOTE:If you are signing in directly on a Windows CMS, you can use the HPSIM desktop icon to access the sign-in page, or you can select StartPrograms HP Systems Insight Manager HP Systems InsightManager.
2. Enter your user name, password, domain, and time zone if requested.
NOTE:If the browser can determine its time zone with certainty, then the Time
zone selection field does not appear.
3. Click [Sign-in].
Automatically signing in
You can sign in to HP SIM using the same account with which you are logged in on yourdesktop, bypassing the HP SIM sign-in page. If user groups are configured for HP SIM,membership in these groups is accepted and treated the same as if you manually signed in.
Configuring the CMS
HP SIM must be running on a Windows CMS that is a member of a Windowsdomain. The browsing system must be a member of the same domain.
The HP SIM service account must be a domain account; local accounts can not beused.
The CMS must be registered with an SPN in the domain, which requires a domainadministrator to configure. From any system that is a member of the domain, thedomain administrator can run the setspn.exe utility from the Windows SupportTools. For example:setspn -a HTTP/<cms_fqdn> <sim_service_account>
Where HTTP is in all capital letters, <cms_fqdn> is the FQDN of the CMS, and<sim_service_account> is the domain account under which HP SIM service runs.
IMPORTANT:Automatic sign-in fails if the SPN registered more than once. If youchange the name of the HP SIM service account, you must first deletethe SPN associated with the old service account name, and then registerthe new service account name:
NOTE:Local accounts cannot be used for HP SIM service account if automaticsign-in is desired.
The automatic sign-in feature must be enabled in HP SIM in theglobalsettings.props file. You can use the mxglobalsettings command, or directlymodify the file. Set the value for the AutomaticSignIn property to 1. Restarting HPSIM is not necessary.
Configuring the browser
Supported in Internet Explorer 7 and Firefox. Internet Explorer 6 is not supported.
The browsing system must be remote; browsing locally from the CMS does notperform automatic sign-in.
The browsing system and the CMS must be members of the same Windowsdomain.
You must be logged in to the browsing system with a domain account that isconfigured as a user account in HP SIM, or is a member of a user group configuredin HP SIM.
There must be no proxy servers between the browser and the CMS. Use the proxybypass list in the browser, or use no proxy at all.
The browser must be configured to support automatic sign-in.
Procedure 2 Configuring the browser in Internet Explorer
1. In Internet Explorer, enable Integrated Windows Authentication under Tools
Internet Options Advanced tab.
2. The CMS must be in the Local Intranet or Trusted Sites zone, which can beconfigured under the Tools Internet Options Security tab.
3. (Optional) If the CMS is in the Internet Explorer Local Intranet zone, selectAutomatic Logon only in Intranet zone .
4. (Optional) If the CMS is in the Internet Explorer Trusted Sites zone, selectAutomatic logon with current user name and password.
In Firefox:
Firefox must be configured with a list of sites (for example, the CMS) where automatic sign-in can be performed, and should be restricted to local intranet sites. This list can beconfigured by entering about:config in the Firefox address bar. From the list of PreferenceNames , select network.negotiate-auth.trusted-uris and either double-click or right-click,and select [Modify]. Here, you can specify a comma-separated list of URLs or domains,enter the list of URLs used to access HP SIM. For example:https://cms_fqdn, wherecms_fqdn is the FQDN of the CMS.
Behavior
When automatic sign-in occurs, an intermediate sign-in page appears. If you click [Cancel ]from this page, the manual sign-in page appears. You might want to cancel automatic sign-in if any unexpected network or domain errors occur. If any browser configuration errors aredetected, automatic sign-in is cancelled and the manual sign-in page appears along withthe configuration error.
Failures encountered during automatic sign-in are logged as normal sign-in failures in boththe audit log and the event log. If automatic sign-in is not attempted, no failure is detected orlogged by HP SIM.
If automatic sign-in is configured, you can manually sign in to HP SIM.
If automatic sign-in fails, the manual sign-in page appears This might occur ifyou are logged in to the operating system using an account that is not an HP SIMaccount.
If automatic sign-in is not attempted This might occur if the browser is notproperly configured for automatic sign-in, or the feature is disabled in HP SIM.
If you click Sign Out from HP SIM This enables you to specify another useraccount to use if you are signed in to the operating system with a different account.
Signing in using SSL
CAUTION:If you are not certain that the HP SIM system to which you are browsing to isactually the HP SIM system you think it is, do not select either of the last twoSSL options. You might give your sign-in credentials to a rogue system disguisedas your HP SIM system, or you might import a certificate from a rogue systemdisguised as your HP SIM system and give your sign-in credentials to that roguesystem.
If your browser is not configured with the SSL system certificate of the HP SIM system, asecurity alert regarding a certificate of untrusted origin might appear when first browsing toHP SIM using SSL. If a security alert appears, perform one of the following procedures:
Use the browser to import the certificate into your browser. View the certificate by
double-clicking the lock icon ( ), and then installing the certificate. See SystemsInsight Manager - Importing a server certificate for more information.
Export the HP SIM system certificate to a file by first browsing from a local browseron the HP SIM system, and then manually importing it into the remote browser. SeeSystems Insight Manager - Exporting a server certificate for more information.
Sign in to the HP SIM system this time without a trusted certificate, but be sure toimport the certificate later. Your data is still encrypted.
After you have an SSL session established with HP SIM, all communications between thebrowser and HP SIM are secure through SSL.
Logging in to the CLI
You can access the HP SIM CLI directly from the CMS or from any network client usingSSH client software.
On an HP-UX or Linux CMS, you can log in to the operating system as any valid HP SIMuser and use the CLI. Not all CLI functionality is available to all users; some functions areonly available to users with administrative rights or operator rights on the CMS. On aWindows CMS, some commands require that the user be a member of the localAdministrators group. These commands include:
mxagentconfig
mxauth
mxcert
mxcollection
mxexec
mxglobalprotocolsettings
mxglobalsettings
mxlog
mxmib
mxngroup
mxnode
mxquery
mxreport
mxstm
mxtask
mxtool
mxtoolbox
mxuser
mxwbemsub
Logging in to the CMS directly
Procedure 3 Logging in to the CMS directly
1. Log in to the CMS using a valid user name and password ( SSH system name ).
HP SIM grants authorizations based on your operating system user login.
2. Open a terminal window or a command prompt window to execute HP SIMcommands.
Logging in to the CMS remotely using an SSH client
Procedure 4 Logging in remotely using an SSH client
1. Open an SSH client application on any network client.
2. Log in to the CMS through the SSH client software, using a valid user name andpassword.
HP SIM grants authorizations based on your operating system user login.
Single Sign On» Signing out» Product registration» First Time Wizard» Performing Initial setup» Setting up managed
systems» Setting up systems using
the HP Insight managedsystem setup wizard
» Advanced setup» Screens and product layout» Operations» Reference» Support and other
resources» Assistance
» Glossary» Using Help
Single Sign On allows a link within an HP SIM page to establish an authenticated browsersession to a managed system that supports Single Sign On without requiring users to re-enter their user names and passwords. However, if you are trying to establish anauthenticated browser session with another instance of HP SIM running on another system,you must re-enter your user name and password. Single Sign On links exist wherever thereis a link to another system.
NOTE:HP SIM is the initial point of authentication. You must browse to anothermanaged system from within HP SIM.
If you browse to a managed system using any method other than the links within HP SIM,Single Sign On is not supported, and you must enter the appropriate user name andpassword for each managed system. You must set up managed systems to trust an HP SIMsystem before accepting a Single Sign On command. Trust is set up at the system byimporting the HP SIM system certificate into the Trusted Management Servers List of thesystem. See Systems Insight Manager - Setting up trust relationships for more information.
NOTE:Single Sign On does not work on a Virtual Cluster system. However, it does workon the physical systems which compose the cluster.
» Setting language locale» Signing in» Single Sign On
Signing out» Product registration» First Time Wizard» Performing Initial setup» Setting up managed
systems» Setting up systems using
the HP Insight managedsystem setup wizard
» Advanced setup» Screens and product layout» Operations» Reference» Support and other
resources» Assistance
» Glossary» Using Help
Be sure to sign out from HP SIM to prevent unauthorized access to your active sessionwhile you are away.
If you are monitoring HP SIM, your session remains active and continually refreshes, unlessyou close the browser or navigate to another website. If you navigate to another browser,HP SIM signs you out after 20 minutes.
As long as you are actively working in HP SIM, your session stays active. If the session isinactive for more than 20 minutes, HP SIM ends the session and signs you out after 20minutes of inactivity. See Systems Insight Manager - Configuring browser timeout optionsfor more information about keeping sessions active.
» Setting language locale» Signing in» Single Sign On» Signing out
Product registration» First Time Wizard» Performing Initial setup» Setting up managed
systems» Setting up systems using
the HP Insight managedsystem setup wizard
» Advanced setup» Screens and product layout» Operations» Reference» Support and other
resources» Assistance
» Glossary» Using Help
You can register your HP SIM software with HP. Registration includes the following benefits:
Software update notification
Product support alerts
Optional newsletters with tips and tricks for using your HP SIM product
NOTE:You must be connected to the Internet to register HP SIM.
NOTE:After you upgrade or complete a fresh installation of HP SIM, you are remindedto register each time you sign in. You are reminded once per day only, and only ifyou have not previously registered or applied a product license.
Procedure 1 Registering HP SIM
1. If the Registration window is not already open, select Options Registration.
2. Click [Register Now]. The User sign-in page appears.
3. If you are already a member, enter your e-mail address and password underExisting users. Click [Sign-In] and the Product Selection page appears. If not:
a. Enter your e-mail address and password under First time users. Click[Sign-In]. The User profile page appears.
b. Enter the requested information. Items marked with an asterisk are required.
4. Click [Next]. The Product Selection page appears.
5. Click [Next]. The Enablement key request page appears.
6. Click [Next]. The Transaction summary page appears.
7. Click [Next]. The License certificate page appears.
8. Your password certificates and license key/password file are sent to the e-mailaddress you provided. Click Save license key/password file for HPSIMREG tosave the license key/password file to your system.
9. Select and copy the License Key number.
10. In the Registration window, position the cursor in any of the five fields forming theinput box, and press the Ctrl + V keys to paste the license key. You can also right-click to paste.
The license key appears with five characters in each field.
11. Click Submit. HP SIM notifies you that the license key was added successfully.Close the Registration window.
» Setting language locale» Signing in» Single Sign On» Signing out» Product registration
First Time Wizard» Configuring the
managed environment» Enabling automatic
system discovery» Configuring System
Automatic Discoverytask sign in credentials
» Configuring managedsystems
» Configuring the WMIMapper Proxy
» Configuring privilegeelevation on HP-UX
» Configuring e-mailsettings
» Summary» Finishing the First time
Wizard» First Time Wizard
related topics» Performing Initial setup» Setting up managed
systems» Setting up systems using
the HP Insight managedsystem setup wizard
» Advanced setup» Screens and product layout» Operations» Reference» Support and other
resources» Assistance
» Glossary» Using Help
The First Time Wizard is automatically launched the first time a user with administrativeprivileges signs in to HP SIM. The administrative account used to install HP SIM is the initialadministrative account. If the wizard is canceled before completion, it restarts each time anadministrative user signs in. You can cancel and disable the wizard from startingautomatically by selecting the Do not automatically show this wizard again checkboxand clicking [Cancel ]. The wizard can be started manually by selecting Options FirstTime Wizard .
The First Time Wizard provides step-by-step instructions for performing the initialconfiguration of HP SIM. Additional configuration options are available in the HP SIM GUI.
The First Time Wizard helps you configure the following settings on the CMS. Afterconfiguring a setting, click [Next] to continue the First Time Wizard setup procedure. TheFirst Time Wizard does not apply any changes until you click [Finish] on the Summarypage.
NOTE:The default settings in Firefox block the First Time Wizard. You must disable thepop-up blocker in Firefox to see the First Time Wizard.
The First Time Wizard includes the following options:
Introduction Describes the purpose of the First Time Wizard. You can cancel theFirst Time Wizard and disable the wizard from automatically starting when anadministrative user signs in.
Managed Environment Specifies all operating systems managed by the CMS.The selections made here configure HP SIM to show collections, tools, and reportsonly for managed environments that are selected.
This page also collects required details for each TDEF selection, such as IPaddress of the Ignite server, sign in credential information, and so on.
System Automatic Discovery Use the wizard to enable discovery, set up thediscovery schedule, and enter the IP address ranges or host names of the systemsyou want to discover. Discovery is the process HP SIM uses to find and identifysystems on your network and populate the database with that information. A systemmust be discovered to collect data and track system health status.
Credentials: System Automatic Discovery Use the wizard to set the sign-incredentials and the SNMP credentials for the System Automatic Discovery task.
Configure Managed Systems Configure managed systems as they arediscovered, by configuring WBEM and WMI, SNMP, SSH access, and trustrelationship.
WMI Mapper Proxy To retrieve managed system information on Windowssystems, enter the mapper proxy system host name and port number.
NOTE:This page only appears if you selected to manage a Windows system.
Privilege Elevation Enable privilege elevation if, on HP-UX, Linux, and ESXmanaged systems, you are required to sign in as a non-root user and then requestprivilege elevation to run root-level tools.
E-mail Enter the e-mail settings that the CMS will use to send e-mailnotifications. You can set up Automatic Event Handling tasks that prompt HP SIM tosend e-mails when the CMS receives a specific event.
Summary Displays all First Time Wizard settings with the option to modify settingsor to finish the First Time Wizard.
The First Time Wizard configures only the basic settings of HP SIM. See the HP SIMinstallation guides located athttp://h18013.www1.hp.com/products/servers/management/hpsim/infolibrary.html, and theSystems Insight Manager - First Time Wizard related topics for more information.
» Setting language locale» Signing in» Single Sign On» Signing out» Product registration» First Time Wizard
Configuring themanaged environment
» Enabling automaticsystem discovery
» Configuring SystemAutomatic Discoverytask sign in credentials
» Configuring managedsystems
» Configuring the WMIMapper Proxy
» Configuring privilegeelevation on HP-UX
» Configuring e-mailsettings
» Summary» Finishing the First time
Wizard» First Time Wizard
related topics» Performing Initial setup» Setting up managed
systems» Setting up systems using
the HP Insight managedsystem setup wizard
» Advanced setup» Screens and product layout» Operations» Reference» Support and other
resources» Assistance
» Glossary» Using Help
From this page, select the operating systems that the CMS will manage. There are fouroptions: Windows, Linux, HP-UX, and Other. The selections made here configure HP SIMto hide collections, tools, and reports for operating systems you do not manage. By defaultthe CMS operating system is selected on this page.
NOTE:These settings can be verified or changed at any time, and the hiddencollections, tools, and reports can be made visible again. To change thesesettings from the HP SIM menu, select Options Managed Environment.
Procedure 1 Configuring HP SIM to hide collections, tools, and reports
1. Select the operating systems for the CMS to manage.
If you select Linux or HP-UX, select menu items, and provide required information.The HP-UX menu items are for handling Integrity Extensions on a Windows orLinux CMS and are not available on an HP-UX CMS.
If both Linux and HP-UX are selected on Managed Environment page, the sameuser name must be specified for GlancePlus in both the places. Root user is used ifno user name is specified.
2. Click [Next] to go to the next First Time Wizard step, or click [Previous] to returnto the previous step.
If you selected Linux or HP-UX, the system attempts to verify the prerequisites.For example, for Ignite-UX, the system tries to connect to the Ignite server. If it isunable to do so, an error message appears. After closing the error message box,you are return to the Managed Environment First Time Wizard page until youprovide valid information or cancel the selection.
The minor version of the tool inside the TDEF file changes each time a tool is re-registered,if a later version is available.
Systems Insight Manager - First Time Wizard related topics
» Configuring SystemAutomatic Discoverytask sign in credentials
» Configuring managedsystems
» Configuring the WMIMapper Proxy
» Configuring privilegeelevation on HP-UX
» Configuring e-mailsettings
» Summary» Finishing the First time
Wizard» First Time Wizard
related topics» Performing Initial setup» Setting up managed
systems» Setting up systems using
the HP Insight managedsystem setup wizard
» Advanced setup» Screens and product layout» Operations» Reference» Support and other
resources» Assistance
» Glossary» Using Help
HP SIM uses automatic discovery to find and identify systems on the network. The SystemAutomatic Discovery task is the default discovery task and is disabled by default. You canenable and configure the System Automatic Discovery task by selecting to have it runimmediately when First Time Wizard finishes, or by selecting Options Discovery fromthe HP SIM menu. You can create multiple automatic discovery tasks from the Discoverypage. See Systems Insight Manager - Configuring automatic discovery.
1. Select Run discovery once after wizard finishes to have the System AutomaticDiscovery task run immediately after First Time Wizard finishes.
2. To schedule the task to run at a specific time, select Schedule.
3. To configure the System Automatic Discovery task to run on a regular schedule,enter how often the task should run. The default frequency is once per day. If youclear the Automatically execute discovery every option, the task is disabled afterit is created.
4. In the Ping inclusion ranges, system (hosts) names, and/or hosts files field,specify the IP addresses. If you want to use this task to discover SMI-S storagesystems, include the IP address of each SMI CIMOM. You can also enter Simple orFQDN host names. However, you cannot enter a range of host names. See HPSIM 6.3 User Guide athttp://h18013.www1.hp.com/products/servers/management/hpsim/infolibrary.html formore information about entering IP ranges. To use an existing hosts file, enter thehosts file name in the following format: $HostsFileName .
5. To go to the next First Time Wizard step, click [Next], or to return to the previousstep, click [Previous].
Systems Insight Manager - First Time Wizard related topics
» Setting language locale» Signing in» Single Sign On» Signing out» Product registration» First Time Wizard
» Configuring themanaged environment
» Enabling automaticsystem discoveryConfiguring SystemAutomatic Discoverytask sign in credentials
» Configuring managedsystems
» Configuring the WMIMapper Proxy
» Configuring privilegeelevation on HP-UX
» Configuring e-mailsettings
» Summary» Finishing the First time
Wizard» First Time Wizard
related topics» Performing Initial setup» Setting up managed
systems» Setting up systems using
the HP Insight managedsystem setup wizard
» Advanced setup» Screens and product layout» Operations» Reference» Support and other
resources» Assistance
» Printable version
» Glossary» Using Help
From this page, you can set sign in and SNMP credentials for the System AutomaticDiscovery task. This window is skipped if did not configure discovery in the First TimeWizard Discovery window.
Procedure 1 Set sign in and SNMP credentials for the System Automatic Discoverytask
1. To set the sign-in credentials for the System Automatic Discovery task, enter theuser name and password.
To add additional sign-in credentials, click [Add]. To delete existing sign-incredentials, click [Delete ] beside the credentials that you want to delete.
2. To have HP SIM try other credentials if the entered credentials fail, select If thesecredentials fail, try other credentials that may apply....
3. Enter read community strings for SNMP credentials for the System AutomaticDiscovery task.
To add additional SNMP credentials, click [Add]. To delete existing SNMPcredentials, click [Delete ] beside the credentials that you want to delete.
4. To have HP SIM try other credentials if the entered credentials fail, select If thesecredentials fail, try other credentials that may apply....
5. To go to the next First Time Wizard step, click [Next], or to return to the previousstep, click [Previous].
Systems Insight Manager - First Time Wizard related topics
» Setting language locale» Signing in» Single Sign On» Signing out» Product registration» First Time Wizard
» Configuring themanaged environment
» Enabling automaticsystem discovery
» Configuring SystemAutomatic Discoverytask sign in credentialsConfiguring managedsystems
» Configuring the WMIMapper Proxy
» Configuring privilegeelevation on HP-UX
» Configuring e-mailsettings
» Summary» Finishing the First time
Wizard» First Time Wizard
related topics» Performing Initial setup» Setting up managed
systems» Setting up systems using
the HP Insight managedsystem setup wizard
» Advanced setup» Screens and product layout» Operations» Reference» Support and other
resources» Assistance
» Glossary» Using Help
The Configure Managed Systems page in the First Time Wizard enables you to configuremanaged systems as they are discovered and to specify parameters for running Configureor Repair Agents. This step is skipped if you did not configure discovery on the First TimeWizard Discovery page. All steps are optional and can be configured from the HP SIMOptions menu at a later time. To skip this step, click [Next] to go to the next First TimeWizard step.
Procedure 1 Configure managed systems from the First Time Wizard
1. Select Configure newly managed systems when they are first discovered..
2. To specify credentials to configure the managed system for WBEM / WMI, SNMP,and SSH, select from the following:
Use sign in credentials This account must be an account withadministrative privileges.
Use these credentials Select this option to use another user name andpassword pair other than the one entered into HP SIM.
3. Under Configure WBEM / WMI, select from the following:
Create subscriptions to WBEM events
Send a test WBEM / WMI indication to this instance of Systems InsightManager to make sure that events appear in Systems Insight Managerevents lists
Use an HP SIM WBEM certificate (good for 10 years) rather thanusername/password to manage the system
4. Under Configure SNMP, select from the following:
Set read community string
Set traps to refer to this instance of HP SIM A read/write string isautomatically created on Windows systems.
Send a test SNMP trap to this instance of Systems Insight Manager tomake sure events appear in the HP SIM event lists
5. Under Configure secure shell (SSH) access, select from the following:
Host based authentication All users from this instance of HP SIM areauthenticated on the managed system.
Each user has to be authenticated on the managed system Each usermust be authenticated on the managed system.
6. Select Set trust relationship to "Trust by Certificate" to set a trust relationshipbetween managed systems and the CMS. This enables HP SIM users to connect toHP SMH, Onboard Administrator, management processors, and Version ControlAgent using the HP SIM certificate for authentication.
7. To go to the next First Time Wizard step, click [Next], or to return to the previousstep, click [Previous].
Systems Insight Manager - First Time Wizard related topics
HP Systems Insight Manager 7.1 English
Initial setup | First Time Wizard | Configuring the WMI Mapper Proxy
» Setting language locale» Signing in» Single Sign On» Signing out» Product registration» First Time Wizard
» Configuring themanaged environment
» Enabling automaticsystem discovery
» Configuring SystemAutomatic Discoverytask sign in credentials
» Configuring managedsystemsConfiguring the WMIMapper Proxy
» Configuring privilegeelevation on HP-UX
» Configuring e-mailsettings
» Summary» Finishing the First time
Wizard» First Time Wizard
related topics» Performing Initial setup» Setting up managed
systems» Setting up systems using
the HP Insight managedsystem setup wizard
» Advanced setup» Screens and product layout» Operations» Reference» Support and other
resources» Assistance
» Glossary» Using Help
WBEM is used by HP SIM to identify and communicate with managed systems. Therefore,on Windows systems, a WMI Mapper Proxy must be configured for this communication totake place.
Procedure 1 Configuring WMI Mapper Proxy
1. Enter the WMI Mapper Proxy host name and port number. The user name andpassword credentials must be entered on the First Time Wizard ConfigureManaged Systems page.
2. To go to the next First Time Wizard step, click [Next], or to return to the previousstep, click [Previous].
Systems Insight Manager - First Time Wizard related topics
» Setting language locale» Signing in» Single Sign On» Signing out» Product registration» First Time Wizard
» Configuring themanaged environment
» Enabling automaticsystem discovery
» Configuring SystemAutomatic Discoverytask sign in credentials
» Configuring managedsystems
» Configuring the WMIMapper ProxyConfiguring privilegeelevation on HP-UX
» Configuring e-mailsettings
» Summary» Finishing the First time
Wizard» First Time Wizard
related topics» Performing Initial setup» Setting up managed
systems» Setting up systems using
the HP Insight managedsystem setup wizard
» Advanced setup» Screens and product layout» Operations» Reference» Support and other
resources» Assistance
» Glossary» Using Help
From this page, you can enable privilege elevation for Linux, HP-UX, and ESX managedsystems. This enables you to sign in as an unprivileged user and elevate the privilege to runon these operating systems.
You can also configure privilege elevation from the HP SIM menu by selecting OptionsSecurity Privilege Elevation.
Procedure 1 Configure privilege elevation for ESX systems
1. Select Enable privilege elevation for VMware ESX .
To configure privilege elevation for Linux and HP-UX systems, select Enableprivilege elevation for Linux & HP-UX.
2. Select the elevation tool type from the menu.
If a password is required for the tool, select A password is required for thisprivilege elevation tool.
3. Optional: Edit the Privilege elevation tool command.
4. Select the user to sign in to the managed system:
Same as HP SIM signed-in user
Specify at run time
Use this user and enter the user name
5. To go to the next First Time Wizard step, click [Next], or to return to the previousstep, click [Previous].
Systems Insight Manager - First Time Wizard related topics
1. Enter the SMTP host name. The SMTP host is the outgoing e-mail server that theCMS uses to send e-mail notifications.
2. In the Sender's e-mail address box, enter the e-mail address that themanagement server uses when sending e-mail notifications.
3. Optional: Select Send test email and enter recipients e-mail address.
Click Send test email now.
4. To authenticate your SMTP server, select Server Requires Authentication.
5. Enter the account user name and password in the corresponding boxes.
NOTE:If you did not enter a valid SMTP host, HP SIM display an errormessage: The email could not be sent: Could not connect to the SMTPhost.
If you are changing the e-mail settings from the Options Events AutomaticEvent Handling Email Settings page, click [OK] to save changes.
NOTE:If you did not enter a valid SMTP host, HP SIM display an error message: Theemail could not be sent: Could not connect to the SMTP host.
NOTE:If the Server Requires Authentication option is selected, and you enterincorrect account information, an The email could not be sent: Authenticationerror message displays.
Additional e-mail settings
The globalsettings.props contains properties that can be set for additional information tobe included in e-mail messages.
EmailPrefixUserSubject
To have user defined information (from the e-mail information on the Actions page)displayed first on the subject line of an e-mail, you must change the EmailPrefixUserSubjectproperty in the globalsettings.props file to True. Otherwise, HP SIM defined informationappears first. The globalsettings.props file is located at:
On Windows It is typically located at C:\Program Files\HP\Systems InsightManager\config\globalsettings.props .
On HP-UX and Linux It is located at /etc/opt/mx/config/globalsettings.props.
Restart the HP SIM service after the flag is set. To restart:
If EmailPrefixUserSubject = false The format of the subject line is Device Name:Short Description from Alert: User's Defined Subject.
If EmailPrefixUserSubject = true The format of the e-mail subject line is User'sDefined Subject: Device Name: Short Description from Alert.
IMPORTANT:This property does not need to be configured for the e-mail feature to work. Thisproperty is automatically set to false in the globalsettings.props file and doesnot need to be changed unless you want user defined text to appear before theHP SIM text in the subject line.
EmailKeywords
To include event information in an e-mail message, edit the EmailKeywords property in theglobalsettings.props file.
IMPORTANT:Restart the HP SIM service if any of the keywords change.
Table 1 Keywords supported in the EmailKeywords property
Keyword Description
TID Trap ID
TDESC Trap description
TSDESC Short description about trap
TNAME Trap name
TNOTENUM Trap notice number
TRCVD Trap received time
TADDR Trap source address
TENTOID Enterprise trap OID
TNOTSEV Trap severity
TASSIGNTO Trap assigned to
TCOMMENT Trap comments
DNAME Device name
DDISCOV Device discovered time
DURL Device URL
HDR Header which can be used to format message
Systems Insight Manager - Related information
Systems Insight Manager - First Time Wizard related topics
» Setting language locale» Signing in» Single Sign On» Signing out» Product registration» First Time Wizard
» Configuring themanaged environment
» Enabling automaticsystem discovery
» Configuring SystemAutomatic Discoverytask sign in credentials
» Configuring managedsystems
» Configuring the WMIMapper Proxy
» Configuring privilegeelevation on HP-UX
» Configuring e-mailsettingsSummary
» Finishing the First timeWizard
» First Time Wizardrelated topics
» Performing Initial setup» Setting up managed
systems» Setting up systems using
the HP Insight managedsystem setup wizard
» Advanced setup» Screens and product layout» Operations» Reference» Support and other
resources» Assistance
» Glossary» Using Help
When you are finished entering information in the HP SIM First Time Wizard, review yourselections on the Summary Page, and then click [Finish] to save them.
If you selected HP-UX on the Managed Environment page, all selected menu itemsappear.
If you enabled automatic discovery or initiated Run discovery after the wizard finishes,discovery runs when you exit the First Time Wizard. If you did not enable automaticdiscovery or the Run discovery once after the wizard finishes, discovery does not take placeuntil you select Options Discovery from the HP SIM menu, and enable a discovery taskor select a task and click [Run Now]. See Systems Insight Manager - Configuringautomatic discovery for more information.
Systems Insight Manager - First Time Wizard related topics
» Setting language locale» Signing in» Single Sign On» Signing out» Product registration» First Time Wizard
» Configuring themanaged environment
» Enabling automaticsystem discovery
» Configuring SystemAutomatic Discoverytask sign in credentials
» Configuring managedsystems
» Configuring the WMIMapper Proxy
» Configuring privilegeelevation on HP-UX
» Configuring e-mailsettings
» SummaryFinishing the First timeWizard
» First Time Wizardrelated topics
» Performing Initial setup» Setting up managed
systems» Setting up systems using
the HP Insight managedsystem setup wizard
» Advanced setup» Screens and product layout» Operations» Reference» Support and other
resources» Assistance
» Glossary» Using Help
When you click [Finish] in the First Time Wizard, the Finish page appears with a messagestating Your settings are being applied, please do not close the window. For HP-UXsystems, TDEF files are updated, and the minor version of HP-UX tools is upgraded. If youselected Run discovery once after wizard finishes on the Discovery page, you arenotified that discovery is running and where to go in the HP SIM to monitor the progress ofdiscovery. Also included on this page is information on where to go to see discoveredsystems that you are managing and where to go to better manage these systems. To closethe First Time Wizard, click [Close].
After the First Time Wizard is finished, automatic discovery on the Ignite server is triggeredif Ignite-UX and Software Distributor (HP-UX) is selected and an IP address or host nameis placed in the Ignite and Software Distributor Server UI field. A check is made to verifyif the system is present and, if it is not, automatic discovery for that system is triggered.
SSH configuration is also completed on Ignite Server if Ignite-UX and Software Distributor(HP-UX) and Configure secure shell (SSH) access are selected and the host name or IPaddress, SSH and user name and password are given to ensure the Ignite Server is trusted.If not, SSH configuration runs.
Systems Insight Manager - First Time Wizard related topics
» Setting language locale» Signing in» Single Sign On» Signing out» Product registration» First Time Wizard
» Configuring themanaged environment
» Enabling automaticsystem discovery
» Configuring SystemAutomatic Discoverytask sign in credentials
» Configuring managedsystems
» Configuring the WMIMapper Proxy
» Configuring privilegeelevation on HP-UX
» Configuring e-mailsettings
» Summary» Finishing the First time
WizardFirst Time Wizardrelated topics
» Performing Initial setup» Setting up managed
systems» Setting up systems using
the HP Insight managedsystem setup wizard
» Advanced setup» Screens and product layout» Operations» Reference» Support and other
resources» Assistance
» Glossary» Using Help
Related procedures
» Systems Insight Manager - Configuring the managed environment» Systems Insight Manager - Configuring System Automatic Discovery task sign incredentials» Systems Insight Manager - Configuring managed systems» Systems Insight Manager - Configuring the WMI Mapper Proxy» Systems Insight Manager - Configuring privilege elevation on HP-UX» Systems Insight Manager - Configuring e-mail settings» Systems Insight Manager - Configuring automatic discovery
Related topics
» Systems Insight Manager - First Time Wizard» Systems Insight Manager - Summary» Systems Insight Manager - Finishing the First time Wizard» Systems Insight Manager - Operating-system-specific collections, reports, and tools» Systems Insight Manager - Discovery in HP SIM» Systems Insight Manager - Configuring discovery general settings
» Setting language locale» Signing in» Single Sign On» Signing out» Product registration» First Time Wizard
Performing Initial setup» Setting up managed
systems» Setting up systems using
the HP Insight managedsystem setup wizard
» Advanced setup» Screens and product layout» Operations» Reference» Support and other
resources» Assistance
» Glossary» Using Help
Initial setup process
1. Set up managed systems To set up managed systems, install the requiredmanagement agents and configure HP SIM software. See Systems Insight Manager- Setting up managed systems for more information.
2. Configure storage systems If you have storage systems on your network, youmust install and configure their SMI-S providers before HP SIM can discover them.
3. Configure protocol settings Configuring the protocol settings defines whatsystems are added to HP SIM using discovery in the next step. See SystemsInsight Manager - Protocol settings for more information.
If you ran the First Time Wizard, the protocol settings might already be configured.
IMPORTANT:If you have storage systems on your network, you must add the username and password for each SMI CIMOM to the Default WBEMsettings section of the Global Protocol Settings page. If you do notadd this information, your storage systems are not discovered.
4. Configure discovery Discovery is the process that HP SIM uses to find andidentify the systems on your network and populate the database with thatinformation. A system must first be discovered to collect data and track systemhealth status. Automatic discovery searches the network for systems runningspecific protocols. It runs automatically every 24 hours, but the process can bemanually executed or scheduled to execute at other times. See Systems InsightManager - Configuring automatic discovery for information about automaticdiscovery.
If you ran the First Time Wizard, discovery might be completed.
IMPORTANT:If you have storage systems on your network, you must add each SMICIMOM IP address to a discovery task. If an SMI CIMOM IP address isnot included in a discovery task, the associated storage system is notdiscovered.
5. Add new users You can add any user with a valid network login to HP SIM.
If you ran the First Time Wizard, new users might already be added.
6. Configure e-mail settings You can configure e-mail settings so that usersreceive e-mail notification of certain events. See Systems Insight Manager -Configuring e-mail settings for information about e-mail settings.
7. Configure paging settings You can configure paging settings so that usersreceive pages that notify them of certain events. See Systems Insight Manager -Configuring modem settings for paging on Windows systems for information aboutpaging settings.
8. Set up automatic event handling Automatic event handling enables you to definean action that HP SIM performs when an event is received. You can set upautomatic event handling to use the e-mail and paging settings that you specified inthe previous sections. See Systems Insight Manager - Creating an automatic eventhandling task for more information.
» Setting language locale» Signing in» Single Sign On» Signing out» Product registration» First Time Wizard» Performing Initial setup
Setting up managedsystems» Setting up remote Linux
systems from a LinuxCMS
» Setting up remote HP-UX systems from anHP-UX CMS
» Setting up Windowsmanaged systemsmanually
» Related information» Setting up systems using
the HP Insight managedsystem setup wizard
» Advanced setup» Screens and product layout» Operations» Reference» Support and other
resources» Assistance
» Glossary» Using Help
Setting up managed systems involves installing the required Management Agents softwareand configuring the supported protocols to communicate with the HP SIM software.
For steps to set up managed systems from the CMS see the following:
Systems Insight Manager - Setting up managed systems from a Linux CMS
Systems Insight Manager - Setting up managed systems from a HP-UX CMS
Systems Insight Manager - Setting up managed systems from a Windows CMS
» Setting language locale» Signing in» Single Sign On» Signing out» Product registration» First Time Wizard» Performing Initial setup» Setting up managed
systemsSetting up remote Linuxsystems from a LinuxCMS
» Setting up remote HP-UX systems from anHP-UX CMS
» Setting up Windowsmanaged systemsmanually
» Related information» Setting up systems using
the HP Insight managedsystem setup wizard
» Advanced setup» Screens and product layout» Operations» Reference» Support and other
resources» Assistance
» Glossary» Using Help
Procedure 1 Example: Setting up remote Linux systems from a Linux CMS
1. Sign in to the HP SIM on the Linux CMS with full CMS administrative privileges.
2. Run the First Time Wizard.
3. Run discovery. See Systems Insight Manager - Running a discovery task for moreinformation.
4. Preconfigure the HP System Management Homepage and HP Version ControlRepository Manager components. For more information about preconfiguring the HPSMH component, see HP System Management Homepage Installation andConfiguration Guide and for HP VCRM, seehttp://h18013.www1.hp.com/products/servers/management/agents/documentation.html.
5. Run the Configure or Repair Agents feature. For more information, see Setting upmanaged systems from a Linux CMS - Configuring the managed system software.
» Setting language locale» Signing in» Single Sign On» Signing out» Product registration» First Time Wizard» Performing Initial setup» Setting up managed
systems» Setting up remote Linux
systems from a LinuxCMSSetting up remote HP-UX systems from anHP-UX CMS
» Setting up Windowsmanaged systemsmanually
» Related information» Setting up systems using
the HP Insight managedsystem setup wizard
» Advanced setup» Screens and product layout» Operations» Reference» Support and other
resources» Assistance
» Glossary» Using Help
» Example: Setting up remote HP-UX systems from an HP-UX CMS
Example: Setting up remote HP-UX systems from an HP-UX CMS
Procedure 1 Example: Setting up remote HP-UX systems from an HP-UX CMS
1. Sign in to HP SIM on the HP-UX with full CMS administrative privileges.
2. Run the First Time Wizard if you have not already. See Systems Insight Manager -Running a discovery task for more information.
3. Run discovery if you have not already.
4. Ensure the managed system software is installed. For more information, see Settingup managed systems from a HP-UX CMS - Installing the required software on anHP-UX system.
5. Run the Configure or Repair Agents feature to configure the managed system. Formore information, see Setting up managed systems from a HP-UX CMS -Configuring the managed system software for HP-UX systems.
» Setting language locale» Signing in» Single Sign On» Signing out» Product registration» First Time Wizard» Performing Initial setup» Setting up managed
systems» Setting up remote Linux
systems from a LinuxCMS
» Setting up remote HP-UX systems from anHP-UX CMSSetting up Windowsmanaged systemsmanually
» Related information» Setting up systems using
the HP Insight managedsystem setup wizard
» Advanced setup» Screens and product layout» Operations» Reference» Support and other
resources» Assistance
» Glossary» Using Help
Procedure 1 Setting up Windows managed systems manually
1. Sign in to the HP SIM on the Windows CMS with full CMS administrative privileges.
2. Run the First Time Wizard if you have not already. See Systems Insight Manager -Running a discovery task for more information.
3. Run discovery if you have not already.
4. Preconfigure the HP SMH and HP Version Control Repository Manager components.For more information about preconfiguring the HP SMH component, see HP SystemManagement Homepage Installation and Configuration Guide and for HP VCRM, seehttp://h18013.www1.hp.com/products/servers/management/agents/documentation.html.
5. Run the Configure or Repair Agents feature. For more information, see Setting upmanaged systems from a Windows CMS - Configuring the managed system softwareusing the Configure or Repair Agents feature from the CMS.
» Setting language locale» Signing in» Single Sign On» Signing out» Product registration» First Time Wizard» Performing Initial setup» Setting up managed
systems» Setting up remote Linux
systems from a LinuxCMS
» Setting up remote HP-UX systems from anHP-UX CMS
» Setting up Windowsmanaged systemsmanuallyRelated information
» Setting up systems usingthe HP Insight managedsystem setup wizard
» Advanced setup» Screens and product layout» Operations» Reference» Support and other
resources» Assistance
» Glossary» Using Help
Related procedures
» Systems Insight Manager - Setting up managed systems from a HP-UX CMS» Systems Insight Manager - Setting up managed systems from a Linux CMS» Systems Insight Manager - Setting up managed systems from a Windows CMS
Related topics
» Systems Insight Manager - Setting up managed systems» Systems Insight Manager - Setting up remote HP-UX systems from an HP-UX CMS» Systems Insight Manager - Setting up remote Linux systems from a Linux CMS» Systems Insight Manager - Setting up Windows managed systems manually
» Setting language locale» Signing in» Single Sign On» Signing out» Product registration» First Time Wizard» Performing Initial setup» Setting up managed
systemsSetting up systems usingthe HP Insight managedsystem setup wizard» Monitoring feature» Inventory feature» Remote Command
Execution feature» Single Sign On feature» Events feature» Version Control feature» HP Insight managed
system setup wizard -Protocol Preferences
» HP Insight managedsystem setup wizard -SSH authentication
» HP Insight managedsystem setup wizard -SSH user name forpublic key
» Advanced setup» Screens and product layout» Operations» Reference» Support and other
resources» Assistance
» Glossary» Using Help
Insight managed system setup wizard enables you to configure systems to be managed withHP SIM and its plug-in applications. After you successfully complete this wizard, theselected managed systems are set up with the necessary agents, licenses, andconfiguration steps for the management features you specify.
You can re-run this wizard at any time to change the configuration or management featuresof your systems. This wizard can also be used to diagnose configuration issues with yoursystems.
For HP SIM, you can configure:
Protocol preferences by selecting WBEM, SNMP, or both
SSH public authentication by selecting between User based authentication and Hostbased authentication
SSH user name for public key authentication check and setup
» Setting language locale» Signing in» Single Sign On» Signing out» Product registration» First Time Wizard» Performing Initial setup» Setting up managed
» Advanced setup» Screens and product layout» Operations» Reference» Support and other
resources» Assistance
» Glossary» Using Help
» Configuration
The Monitoring feature enables HP Systems Insight Manager to discovery and identifysystems with basic information and monitor them through ping status. Basic informationincludes model system type, subtype, serial number, UUID, and so on of the managedsystems. This feature is supported on all servers, management processors, switches, andUnknown or Unmanaged systems and can run without installing any of the HP agents orproviders. The Central Management Server (CMS) must be preconfigured, includingcredentials, global protocol settings, WMI Mapper Proxy and so on. For additionalinformation on configuring these features quickly, see Systems Insight Manager - First TimeWizard.
Configuration
To configure global credentials, see Systems Insight Manager - Global credentials.
To configure system credentials, see HP Insight Manager 7.0 Online Help - Systemcredentials.
To configure global protocol settings, see Systems Insight Manager - Protocol settings.
To configure WMI Mapper Proxy settings, see Systems Insight Manager - Adding a WMIMapper Proxy.
The Monitoring feature checks for HP SIM discovery and identification errors, which appearon the Analyze Systems page.
When you receive errors from the monitoring feature, check credentials, protocol settings,and other Central Management Server (CMS) configuration, including firewall configurationon the managed systems.
For more detailed information on errors received, run HP SIM identification and review theidentification task results.
» Setting language locale» Signing in» Single Sign On» Signing out» Product registration» First Time Wizard» Performing Initial setup» Setting up managed
systems» Setting up systems using
the HP Insight managedsystem setup wizard» Monitoring feature
Inventory feature» Remote Command
Execution feature» Single Sign On feature» Events feature» Version Control feature» HP Insight managed
system setup wizard -Protocol Preferences
» HP Insight managedsystem setup wizard -SSH authentication
» HP Insight managedsystem setup wizard -SSH user name forpublic key
» Advanced setup» Screens and product layout» Operations» Reference» Support and other
resources» Assistance
» Glossary» Using Help
» Configuration» WBEM
HP Systems Insight Manager inventory collects inventory data from managed systems. Tosuccessfully do so, HP SIM depends on SNMP agents and WBEM providers. The Insightmanaged system setup wizard Inventory feature is supported on HP servers with Linux, HP-UX, and Windows operating systems and ESX and Citrix VM Hosts with Hypervisoroperating systems.
The inventory feature is dependent on the monitoring feature of HP SIM with the sameprotocol.
Configuration
To configure discovery, see Systems Insight Manager - Discovery in HP SIM.
To edit system properties for a single system, see Systems Insight Manager - Editing systemproperties for a single system.
You can install WBEM/WMI providers and SNMP agents from the Choose Options page inInsight managed system setup wizard. For all other servers, you must manually installproviders agents.
To manually set up managed systems on HP-UX and Linux, see Systems Insight Manager -Setting up remote HP-UX systems from an HP-UX CMS and Systems Insight Manager -Setting up remote Linux systems from a Linux CMS
WBEM
WBEM is one of the newest management protocols. This protocol leverages the industry-standard CIM as defined by the DMTF. HP SIM can communicate to systems directly usingthe WBEM protocol or to the Windows WMI systems using the WMI Mapper Proxy. HP SIMuses WBEM to communicate with storage system SMI-S WBEM providers. HP has beenleading this effort through its association with the Distributed Management Task Force(DMTF). WBEM is an initiative supported by HP, Microsoft, Intel, BMC, Cisco, and 120 otherplatform, operating system, and application software suppliers.
When WBEM is enabled, the management console can obtain information from any systemthat supports WBEM. For WBEM to work, you must provide the correct user name andpassword for the given system. WBEM enables a larger set of server and storagemanageability data to be collected and displayed on the System Page and in reports. Thepresence of WBEM enables the Properties pages and enables WBEM indications (events)to be displayed in event collections. Without HTTPS enabled, HP SIM does not discoverany web-based features on a system. Support for non-HP systems has been expandedbeginning with HP SIM 6.0.
NOTE:HP SIM supports WBEM over HTTPS to ensure user supplied WBEM name andpassword pairs are protected.
NOTE:OpenWBEM is not supported.
WBEM This industry initiative provides management of systems, networks, users,and applications across multiple vendor environments. WBEM simplifies systemmanagement, providing better access to software and hardware data that is
readable by WBEM client applications.
For HP-UX, WBEM is included in the operating system install. For Linux ItaniumProcessor Family (IPF), if WBEM is not installed, it must be manually installed. Goto the HP Software Depot (http://www.software.hp.com/) to download. The WBEMdownload from the openPegasus website does not include the hardware specificdata for Systems Insight Manager to manage Linux x86 systems.
NOTE:WMI is the implementation of WBEM from Microsoft.
NOTE:The WBEM providers cannot be installed on Linux or HP-UX systems.
NOTE:A CIMOM acts as the interface for communication between WBEMproviders and management applications such as Systems InsightManager.
The CMS must have the correct credentials to authenticate to WBEM and WMI.There are two ways to authenticate client certificates:
Basic authentication to WBEM Services or WMI using user name andpassword.
Using the CMS certificate for authentication is available only for HP-UXWBEM Services 2.05 or greater, which supports client certificateauthentication. Use the Configure or Repair Agents Use an SystemsInsight Manager WBEM certificate (good for 10 years) rather thanusername/password to manage the system option to deploy a WBEMcertificate to the managed system and is valid only for HP-UX systems.
WMI An API in the Windows operating system that enables you to manage andcontrol systems in a network.
The WMI Mapper Proxy is a configuration setting for WMI. The WMI Mapperreceives client CIM/XML WBEM requests and converts the requests to WMIrequests. The WMI results are converted to CIM/XML format and returned to theCMS. The discovery and Identification task uses the proxies in the WMI MapperProxy list to discover whether a system is a WMI-enabled system. If the system isWMI-enabled, then the identification information for that system is returned.
The WMI Mapper makes it possible to retrieve WMI instrumented data on aWindows machine through WBEM requests. The Windows version of SystemsInsight Manager installs this WMI Mapper locally so that it can make WMI requestsacross the network to the systems without the need to install the WMI Mapper onthe managed Windows systems.
The WMI Mapper is included in a Typical installation of the Systems InsightManager on a Windows CMS (optional in a Custom installation) . For HP-UX andLinux-based systems, the WMI Mapper is not available.
» Setting language locale» Signing in» Single Sign On» Signing out» Product registration» First Time Wizard» Performing Initial setup» Setting up managed
systems» Setting up systems using
the HP Insight managedsystem setup wizard» Monitoring feature» Inventory feature
Remote CommandExecution feature
» Single Sign On feature» Events feature» Version Control feature» HP Insight managed
system setup wizard -Protocol Preferences
» HP Insight managedsystem setup wizard -SSH authentication
» HP Insight managedsystem setup wizard -SSH user name forpublic key
» Advanced setup» Screens and product layout» Operations» Reference» Support and other
resources» Assistance
» Glossary» Using Help
» Configuration
The Remote Command Execution feature enables HP Systems Insight Manager tools to runremotely on managed systems though SSH.
SSH is installed as a part of UNIX and most operating systems other than Windows. IF SSHis not installed on a Windows system, Insight managed system setup wizard on a WindowsCentral Management Server (CMS) supports installing Open SSH on a Windows managedsystem. If you are running from a Linux or HP UX CMS, be sure that OpenSSH is installedmanually on the system. See Systems Insight Manager - Installing OpenSSH.
Configuration
Configuring SSH involves setting up Public key-based authentication between HP SIM CMSand the managed system. This establishes a trust relationship between HP SIM CMS andthe managed system. This is a prerequisite for the HP SIM’s Distributed Task Facility(DTF) to execute tasks, or commands on managed systems. This feature is also used byother features in the Insight managed system setup wizard for remote configurations on themanaged system.
SSH key-based authentication copies the HP SIM CMS public key to the users SSH keydirectory on the managed system. The HP SIM CMS public key is appended to theauthenticated keys file in the managed system. If host-based authentication is configured,then all valid users on the managed system can execute tasks from HP SIM. If user-basedauthentication is configured, then you must configure SSH keys for each user that needs toexecute an HP SIM tool or task. The user must be a valid SSH user on the managedsystem. This feature is supported on most managed servers with non-embedded operatingsystems. It is also supported on iLOs.
If no SSH user name is entered and user-based authentication is selected, HP SIM verifiesthere is a working SSH credential set for the system. SSH credential can be password-based, user–based or host-based.
If a user name is entered with the user-based authentication, then password-basedauthentication is included while verifying that a user can log in to the remote system. HPSIM can successfully login into the remote system using SSH if either password or host-based/user-based is configured correctly.
NOTE:Host-based in Windows is configured only for the user that configures SSH. Toenable other users to use the host-based key, you must add entries to the psswdfile on a managed system. You can use the sshuser utility. This utility is availablein the managed system if you installed OpenSSH through HP SIM. If not, thisutility is available in the lbin directory of HP SIM CMS
Run sshuser –u <username> -d <domain_name> -f <location of passwd file> on themanaged system. For example, the following command permits SSH access for user joe inthe Windows domain MyDomain:
sshuser –u joe –d MyDomain –f "C:\Program Files\OpenSSH\etc\passwd"
» Setting language locale» Signing in» Single Sign On» Signing out» Product registration» First Time Wizard» Performing Initial setup» Setting up managed
systems» Setting up systems using
the HP Insight managedsystem setup wizard» Monitoring feature» Inventory feature» Remote Command
Execution featureSingle Sign On feature
» Events feature» Version Control feature» HP Insight managed
system setup wizard -Protocol Preferences
» HP Insight managedsystem setup wizard -SSH authentication
» HP Insight managedsystem setup wizard -SSH user name forpublic key
» Advanced setup» Screens and product layout» Operations» Reference» Support and other
resources» Assistance
» Glossary» Using Help
SSO grants permission to an authenticated user browsing to HP SIM to browse to any ofthe managed systems from within HP SIM without re-authenticating to the managed system.This enables HP SIM users to browse to HP System Management Homepage (HP SMH),Management Processors, Onboard Administrator, HP Version Control Agent, and so on. HPSIM is the initial point of authentication, and browsing to another managed system must befrom within HP SIM.
SSO sets the trust mode to \â€Trust by Certificate\†in the system and by copying the HPSIM system certificate to the managed system’s trusted certificate directory. Setting atrust relationship enables the managed system to specify which HP SIM servers can issuecommands to the system. Without an established trust relationship, these commands fail.This is also a prerequisite if you want to execute Replicate Agent Settings or Install Softwareand Firmware tasks on the managed systems.
To install HP SMH on a Windows managed system from Windows CMS, select theInventory feature in the Insight managed system setup wizard.
To install HP SMH on a Linux managed system from Windows or Linux CMS, select theInventory feature, and then select the SNMP protocol as the preferred protocol. HP SIMdoes not support installing HP SMH on a HP-UX managed system.
For information on setting up managed systems from HP-UX, Linux, and Windows, see thefollowing: Systems Insight Manager - Setting up remote HP-UX systems from an HP-UXCMS, Systems Insight Manager - Setting up remote Linux systems from a Linux CMS, andSystems Insight Manager - Setting up Windows managed systems manually.
This feature is supported on all HP Servers with HP SMH installed or on all iLOs, iLO2s,iLo3s, and ProLiant OA's.
NOTE:Checking trust status on HP iLO systems is not supported.
» Setting language locale» Signing in» Single Sign On» Signing out» Product registration» First Time Wizard» Performing Initial setup» Setting up managed
systems» Setting up systems using
the HP Insight managedsystem setup wizard» Monitoring feature» Inventory feature» Remote Command
Execution feature» Single Sign On feature
Events feature» Version Control feature» HP Insight managed
system setup wizard -Protocol Preferences
» HP Insight managedsystem setup wizard -SSH authentication
» HP Insight managedsystem setup wizard -SSH user name forpublic key
» Advanced setup» Screens and product layout» Operations» Reference» Support and other
resources» Assistance
» Glossary» Using Help
» Configuration
The Events feature configures HP Systems Insight Manager to receive WBEM and SNMPevents from managed sytems. WBEM indications and SNMP trap events can be configured.
Configuration
To configure SNMP agents, subscribe to WBEM indications, and configure SNMP traps,see Systems Insight Manager - Installing and configuring SNMP agent.
For more information on manually installing providers, see Systems Insight Manager -Installing and configuring protocols. For more information on manually installing SNMPagents, see Systems Insight Manager - Installing the SNMP provider for Windows.
» Setting language locale» Signing in» Single Sign On» Signing out» Product registration» First Time Wizard» Performing Initial setup» Setting up managed
systems» Setting up systems using
the HP Insight managedsystem setup wizard» Monitoring feature» Inventory feature» Remote Command
Execution feature» Single Sign On feature» Events feature
Version Control feature» HP Insight managed
system setup wizard -Protocol Preferences
» HP Insight managedsystem setup wizard -SSH authentication
» HP Insight managedsystem setup wizard -SSH user name forpublic key
» Advanced setup» Screens and product layout» Operations» Reference» Support and other
resources» Assistance
» Glossary» Using Help
The Version Control feature enables you to configure the managed systems to use HPVersion Control Repository Manager. This feature is available for all ProLiant Windowsservers. HP Version Control Repository Manager must be installed on the CentralManagement Server (CMS).
This feature will let you install VCA on the managed systems and configure it to use theVCRM in HP SIM. If you do not have a VCRM in HP SIM, then, to configure HP VersionControl Agent, see Systems Insight Manager - Installing and configuring Version Control.
To install HP VCRM, see Systems Insight Manager - Specifying a Version ControlRepository.
» Setting language locale» Signing in» Single Sign On» Signing out» Product registration» First Time Wizard» Performing Initial setup» Setting up managed
systems» Setting up systems using
the HP Insight managedsystem setup wizard» Monitoring feature» Inventory feature» Remote Command
Execution feature» Single Sign On feature» Events feature» Version Control feature
HP Insight managedsystem setup wizard -Protocol Preferences
» HP Insight managedsystem setup wizard -SSH authentication
» HP Insight managedsystem setup wizard -SSH user name forpublic key
» Advanced setup» Screens and product layout» Operations» Reference» Support and other
resources» Assistance
» Glossary» Using Help
» SNMP» WBEM» Editing preferences
SNMP
The IETF, the standards-rating body for the worldwide Internet, has defined a managementprotocol, SNMP, which has accumulated a major share of the market and has the supportof over 20,000 different products. SNMP has its roots in the Internet community. Thecomplexity of large international TCP/IP networks has provided the necessary incentive todevelop a standard method of managing devices on the network.
Within the SNMP framework, manageable network devices (routers, bridges, servers, andso on) contain a software component called a management agent. The agent monitors thevarious subsystems of the network element and stores this information in a MIB. Theagents enable the device to generate traps, which can be sent to a trap destination serverthat is running HP SIM. Conceptually, the MIB is a database that can be written to and readby a management application using the SNMP protocol.
To obtain SNMP:
For Windows systems, if SNMP is not installed during the operating system installation, youcan install it from the Windows CD using Add or Remove Windows Component feature.
To install the HP Insight SNMP agents for ProLiant systems running on Linux x86 operatingsystem, go to http://www.software.hp.com/ and select the ProLiant Support Pack 7.90.
NOTE:The HP Insight SNMP agents cannot be installed on HP-UX systems.
To configure the read community string on the CMS, select Options Protocol SettingsSystem Protocol Settings from the Systems Insight Manager menu and click on the
System credentials page to set the read community string for a particular server. Toconfigure the read community string for multiple systems, select Options ProtocolSettings Global Protocol Settings and set the read community string.
WBEM
WBEM is one of the newest management protocols. This protocol leverages the industry-standard CIM as defined by the DMTF. HP SIM can communicate to systems directly usingthe WBEM protocol or to the Windows WMI systems using the WMI Mapper Proxy. HP SIMuses WBEM to communicate with storage system SMI-S WBEM providers. HP has beenleading this effort through its association with the Distributed Management Task Force(DMTF). WBEM is an initiative supported by HP, Microsoft, Intel, BMC, Cisco, and 120 otherplatform, operating system, and application software suppliers.
When WBEM is enabled, the management console can obtain information from any systemthat supports WBEM. For WBEM to work, you must provide the correct user name andpassword for the given system. WBEM enables a larger set of server and storagemanageability data to be collected and displayed on the System Page and in reports. Thepresence of WBEM enables the Properties pages and enables WBEM indications (events)to be displayed in event collections. Without HTTPS enabled, HP SIM does not discoverany web-based features on a system. Support for non-HP systems has been expandedbeginning with HP SIM 6.0.
HP SIM supports WBEM over HTTPS to ensure user supplied WBEM name andpassword pairs are protected.
NOTE:OpenWBEM is not supported.
WBEM This industry initiative provides management of systems, networks, users,and applications across multiple vendor environments. WBEM simplifies systemmanagement, providing better access to software and hardware data that isreadable by WBEM client applications.
For HP-UX, WBEM is included in the operating system install. For Linux ItaniumProcessor Family (IPF), if WBEM is not installed, it must be manually installed. Goto the HP Software Depot (http://www.software.hp.com/) to download. The WBEMdownload from the openPegasus website does not include the hardware specificdata for Systems Insight Manager to manage Linux x86 systems.
NOTE:WMI is the implementation of WBEM from Microsoft.
NOTE:The WBEM providers cannot be installed on Linux or HP-UX systems.
NOTE:A CIMOM acts as the interface for communication between WBEMproviders and management applications such as Systems InsightManager.
The CMS must have the correct credentials to authenticate to WBEM and WMI.There are two ways to authenticate client certificates:
Basic authentication to WBEM Services or WMI using user name andpassword.
Using the CMS certificate for authentication is available only for HP-UXWBEM Services 2.05 or greater, which supports client certificateauthentication. Use the Configure or Repair Agents Use an SystemsInsight Manager WBEM certificate (good for 10 years) rather thanusername/password to manage the system option to deploy a WBEMcertificate to the managed system and is valid only for HP-UX systems.
WMI An API in the Windows operating system that enables you to manage andcontrol systems in a network.
The WMI Mapper Proxy is a configuration setting for WMI. The WMI Mapperreceives client CIM/XML WBEM requests and converts the requests to WMIrequests. The WMI results are converted to CIM/XML format and returned to theCMS. The discovery and Identification task uses the proxies in the WMI MapperProxy list to discover whether a system is a WMI-enabled system. If the system isWMI-enabled, then the identification information for that system is returned.
The WMI Mapper makes it possible to retrieve WMI instrumented data on aWindows machine through WBEM requests. The Windows version of SystemsInsight Manager installs this WMI Mapper locally so that it can make WMI requestsacross the network to the systems without the need to install the WMI Mapper onthe managed Windows systems.
The WMI Mapper is included in a Typical installation of the Systems InsightManager on a Windows CMS (optional in a Custom installation) . For HP-UX andLinux-based systems, the WMI Mapper is not available.
Editing preferences
The option selected is used for all systems. To enter information for groups of systems,select the systems, and then click Edit Individually.
1. Select the way systems are displayed for editing by selecting one of the followingfrom the Show systems by dropdown list:
Operating System
System Name
System Type (Hardware-centric)
System Type (VM-centric)
Model
2. Select the systems to edit and select your protocol preferences.
3. To edit multiple systems with the same protocol preferences, select the systems,and then click [Edit Multiple Systems]. Enter your protocol preferences.
» Setting language locale» Signing in» Single Sign On» Signing out» Product registration» First Time Wizard» Performing Initial setup» Setting up managed
systems» Setting up systems using
the HP Insight managedsystem setup wizard» Monitoring feature» Inventory feature» Remote Command
Execution feature» Single Sign On feature» Events feature» Version Control feature» HP Insight managed
» Advanced setup» Screens and product layout» Operations» Reference» Support and other
resources» Assistance
» Glossary» Using Help
The option selected is used for all systems. To enter information for groups of systems,select the systems, and then click Edit Individually.
Host based authentication. All users from this instance of Systems Insight Manager areauthenticated on the managed system.
User based authentication. Each user must be authenticated on the managed system.
Procedure 1 Individually editing SSH public authentication
1. Select the systems to edit and select your SSH authentication preferences. Selecteither Userbased or Hostbased. For more information, see Systems InsightManager - HP Insight managed system setup wizard - Protocol Preferences.
2. To edit multiple systems with the same SSH authentication preferences, select thesystems, and then click [Edit Multiple Systems]. Select the SSH authentication.
Initial setup | Setting up systems using the HP Insight managed system setup wizard | HP Insight managed system setupwizard - SSH user name for public key
HP Insight managed system setup wizard - SSHuser name for public key
» Setting language locale» Signing in» Single Sign On» Signing out» Product registration» First Time Wizard» Performing Initial setup» Setting up managed
systems» Setting up systems using
the HP Insight managedsystem setup wizard» Monitoring feature» Inventory feature» Remote Command
Execution feature» Single Sign On feature» Events feature» Version Control feature» HP Insight managed
system setup wizard -Protocol Preferences
» HP Insight managedsystem setup wizard -SSH authenticationHP Insight managedsystem setup wizard -SSH user name forpublic key
» Advanced setup» Screens and product layout» Operations» Reference» Support and other
resources» Assistance
» Glossary» Using Help
The option selected is used for all systems. To enter information for groups of systems,select the systems, and then click Edit Individually.
Procedure 1 Individually editing SSH user name for public key authentication
1. Select the way systems are displayed for editing by selecting one of the followingfrom the Show systems by dropdown list:
Operating System
System Name
System Type (Hardware-centric)
System Type (VM-centric)
Model
2. Select the systems to edit and enter user name information. For more information,see Systems Insight Manager - HP Insight managed system setup wizard - SSHuser name for public key.
3. To edit multiple systems with the same user name information, select the systems,and then click [Edit Multiple Systems]. Enter the user name information.
Initial setup | Setting up systems using the HP Insight managed system setup wizard | HP Insight managed system setupwizard - HP Integrated Lights-Out 2 Advanced
HP Insight managed system setup wizard - HPIntegrated Lights-Out 2 Advanced
» Setting language locale» Signing in» Single Sign On» Signing out» Product registration» First Time Wizard» Performing Initial setup» Setting up managed
systems» Setting up systems using
the HP Insight managedsystem setup wizard» Monitoring feature» Inventory feature» Remote Command
Execution feature» Single Sign On feature» Events feature» Version Control feature» HP Insight managed
system setup wizard -Protocol Preferences
» HP Insight managedsystem setup wizard -SSH authentication
» HP Insight managedsystem setup wizard -SSH user name forpublic keyHP Insight managedsystem setup wizard -HP Integrated Lights-Out 2 Advanced
» Advanced setup» Screens and product layout» Operations» Reference» Support and other
resources» Assistance
» Glossary» Using Help
» Description» Configuration information
Description
HP iLO 2 provides an extension to the core functionality of the standard iLO managementtools. iLO 2 includes a remote graphical console for your system, power consumptionmanagement, and other features specific to either ProLiant or Integrity systems.
Configuration information
You can configure all features of an iLO for iLO 2 except for scanning for and applying alicense if none are found on the iLO.
For more detailed information about iLO 2, you can log into the iLO and access the onlinehelp available there. To log into the system from HP Systems Insight Manager, go to theSystem page for the iLO and click the Integrated Lights-Out 2 (iLO 2) link. The iLO WebAdministration tool appears.
» Setting language locale» Signing in» Single Sign On» Signing out» Product registration» First Time Wizard» Performing Initial setup» Setting up managed
systems» Setting up systems using
the HP Insight managedsystem setup wizardAdvanced setup» Configuring browser
timeout options» Changing the HP SIM
default SSL port» Managing server
certificates» Replicating trusted
certificates» Configuring the
presentation of SNMPtraps in HP SIM
» Screens and product layout» Operations» Reference» Support and other
resources» Assistance
» Glossary» Using Help
The following are advanced setup procedures for HP Systems Insight Manager:
Systems Insight Manager - Configuring browser timeout options
Systems Insight Manager - Changing the HP SIM default SSL port
Systems Insight Manager - Managing server certificates
Systems Insight Manager - Replicating trusted certificates
Systems Insight Manager - Configuring the presentation of SNMP traps in HP SIM
» Setting language locale» Signing in» Single Sign On» Signing out» Product registration» First Time Wizard» Performing Initial setup» Setting up managed
» Configuring thepresentation of SNMPtraps in HP SIM
» Screens and product layout» Operations» Reference» Support and other
resources» Assistance
» Glossary» Using Help
HP SIM enables you to configure the browser timeout settings to one of the following.These settings affect the browser session while signed in to the HP SIM GUI.
Monitor When the timeout option is configured to monitor, the HP SIM session remainsalive and is continually refreshed unless you close the browser or navigate to another site. Ifyou close the browser, the session is immediately closed. If you navigate to another site,HP SIM signs you out after 20 minutes. This option is the default and appears in theglobalsettings.props file as EnableSessionKeepAlive=true.
Active When the timeout option is configured to remain active, the HP SIM sessionremains alive as long as you are actively working in HP SIM. However, HP SIM ends yoursession and signs you out after 20 minutes of inactivity.
You can change the timeout settings to monitor or active by editing theglobalsettings.props file.
Procedure 1 Configuring timeout setting to active
1. Open the globalsettings.props file.
On a Windows operating system, the globalsettings.props file is located inthe C:\Program Files\HP\Systems Insight Manager\config folder.
On an HP-UX or Linux operating system, the globalsettings.props file islocated in the /etc/opt/mx/config directory.
2. Change EnableSessionKeepAlive=true to EnableSessionKeepAlive=false.
» Setting language locale» Signing in» Single Sign On» Signing out» Product registration» First Time Wizard» Performing Initial setup» Setting up managed
systems» Setting up systems using
the HP Insight managedsystem setup wizard
» Advanced setup» Configuring browser
timeout optionsChanging the HP SIMdefault SSL port
» Managing servercertificates
» Replicating trustedcertificates
» Configuring thepresentation of SNMPtraps in HP SIM
» Screens and product layout» Operations» Reference» Support and other
resources» Assistance
» Glossary» Using Help
If the HP SIM Secure Sockets Layer (SSL) port conflicts with an application, you canchange the default port number. For a list of ports in use, see the HP Systems InsightManager User Guide.
1. In the server.xml file (located in the %programfiles%\HP\Systems InsightManager\jboss\server\hpsim\deploy\jboss-web.deployer directory), change the twooccurrences of 50000 to the desired port.
» Setting language locale» Signing in» Single Sign On» Signing out» Product registration» First Time Wizard» Performing Initial setup» Setting up managed
systems» Setting up systems using
the HP Insight managedsystem setup wizard
» Advanced setup» Configuring browser
timeout options» Changing the HP SIM
default SSL portManaging servercertificates
» Replicating trustedcertificates
» Configuring thepresentation of SNMPtraps in HP SIM
» Screens and product layout» Operations» Reference» Support and other
resources» Assistance
» Glossary» Using Help
The Server Certificate page enables you to view and manage the SSL server certificate of the CMS. HP SIMsupports two types of certificates; self-signed and CA-signed. While a self-signed certificate is created by defaultduring installation, enabling you to browse to HP SIM, both the self-signed and CA-signed certificates can be createdafter installation. The CA-signed certificate requires an internal certificate server or an external CA to sign thecertificate.
HP SIM provides the following security certificate options:
Export server certificate Select Options Security HP Systems Insight Manager Server Certificate,and then click [Export].
Edit server certificate Select Options Security HP Systems Insight Manager Server Certificates,and then click [Edit].
Create new server certificate Select Options Security HP Systems Insight Manager ServerCertificates, and then click [New].
Import server certificate Select Options Security HP Systems Insight Manager ServerCertificates, and then click [ Import].
» Setting language locale» Signing in» Single Sign On» Signing out» Product registration» First Time Wizard» Performing Initial setup» Setting up managed
systems» Setting up systems using
the HP Insight managedsystem setup wizard
» Advanced setup» Configuring browser
timeout options» Changing the HP SIM
default SSL port» Managing server
certificatesReplicating trustedcertificates
» Configuring thepresentation of SNMPtraps in HP SIM
» Screens and product layout» Operations» Reference» Support and other
resources» Assistance
» Glossary» Using Help
» Using the Replicate Agent Settings feature
System administrators that have the HP SIM Require or First Time Accept featuresenabled can replicate the trusted certificates list to other HP SIM systems. If you do not usethe Require or First Time Accept features of HP SIM as a two-way trust solution, thisprocedure is not necessary.
Two options are available to migrate the trusted certificates from a source CMS to a targetCMS. The first option can be used when the source CMS has many trusted certificates andthe second option can be used when a source CMS has fewer of trusted certificates.
WARNING!When migrating certificates, you lose the existing SSL Server Key and certificateon the target CMS and must reestablish the trust relationship with any agentsconfigured to trust the target CMS. See Step 13.
Procedure 1 Migrate a trusted certificate from a source to a target CMS with manytrusted certificates
1. Log in with administrative rights HP SIM on the source CMS system.
2. Go to C\Program Files\HP\Systems Insight Manager\config\certstor.
3. Copy the files named hp.keystore and keyfile.3.
4. Log in with administrative privileges to the target CMS system.
5. Go to the <HPSIM Install folder>\Systems Insight Manager\config\certstordirectory.
6. Replace the hp.keystore and keyfile.3 files with the files copied in step 3.
7. On the target CMS system, select Start Settings Control PanelAdministrative Tools Services.
8. Restart the HP SIM service.
NOTE:You might see a browser warning indicating that the name in thecertificate does not match the name of the site. This result is expectedbecause you are temporarily using the certificate from the source CMS,but you can view the certificate displayed by the browser to ensure itsauthenticity before signing in.
9. Sign in with administrative rights to HP SIM on the target CMS. Select OptionsSecurity HP Systems Insight Manager Server Certificate.
10. To create a new server certificate, click [New].
11. On the target CMS system, select Start Settings Control PanelAdministrative Tools Services.
12. Restart the HP SIM service.
13. Install the new server certificate on the required managed systems using theReplicate Agent Settings feature. For more information, see “Using the ReplicateAgent Settings feature”.
Procedure 2 Migrating certificates when the source CMS has a lower number oftrusted certificates
1. Log in to the source CMS system with administrative privileges.
5. Repeat steps 2 and 3 for all certificates listed on the Trusted System Certificatespage.
6. Copy all exported certificates to the target CMS system.
7. Sign in with administrative rights to HP SIM on the target CMS.
8. Select Options Security Credentials Trusted Systems
9. Click [ Import].
10. Click [Browse], and then select a certificate.
11. Click [OK].
12. Repeat steps 9 through 11 for all certificates.
Using the Replicate Agent Settings feature
NOTE:This section assumes agents are already configured to trust the source CMS.
NOTE:This process configures the agents to trust only the new target CMS. If trust forthe original source CMS is still necessary, perform steps 5, 6, and 13 (or 16)using the source CMS.
Procedure 3 Configuring agents to trust only the new target CMS
1. Log in to the HP SMH on the target CMS.
2. Select Settings Security Trust Mode.
3. Select Trust by Certificate, and then click [Save Configuration].
5. Enter the IP address of the target CMS in the field adjacent to [Add CertificateFrom Server].
6. Click [Add Certificate From Server].
7. Sign in with administrative rights to HP SIM on the source CMS.
8. Select Configure Replicate Agent Settings.
9. From the Select Target Systems page, select all managed systems that areconfigured to trust the source CMS.
10. Click Apply Selections , and then click [Next].
11. Select the target CMS as source and click [Next].
NOTE:If the source system does not have HP SIM installed, proceed to step 15.
12. In the source configuration settings page, click HP System ManagementHomepage Settings Configuration Options Properties, and then selectTrust Mode.
13. Click HP System Management Homepage Settings Trusted Certificate
Properties, and then select Trusted Certificate for the target CMS.
14. To select the trust mode, select HP System Management Homepage SettingsConfiguration Options Properties.
15. To select the trusted certificates, select HP System Management HomepageSettings Trusted Certificate Properties for the target CMS.
16. Click [Run Now]. The CMS certificates are replicated on the selected managedsystems.
» Setting language locale» Signing in» Single Sign On» Signing out» Product registration» First Time Wizard» Performing Initial setup» Setting up managed
systems» Setting up systems using
the HP Insight managedsystem setup wizard
» Advanced setup» Configuring browser
timeout options» Changing the HP SIM
default SSL port» Managing server
certificates» Replicating trusted
certificatesConfiguring thepresentation of SNMPtraps in HP SIM
» Screens and product layout» Operations» Reference» Support and other
resources» Assistance
» Glossary» Using Help
You can map a severity from a varbind to the event severity displayed in the event view.The mechanism uses two keywords annotated as comments in the trap definitionVARBINDSEVERITY and SEVERITYMAP. The following is an example of a trap definition:
sanEventTrap TRAP-TYPE ENTERPRISE sanEvent VARIABLES { sanEventEventCofde, sanEventIPAddress, sanEventSeverity, sanEventCategory, sanEventGroup, sanEventSourceType, sanEventSourceSubtype, sanEventURL, sanEventDesc } --#SEVERITY INFORMATIONAL --#TYPE "Rack power supply inserted" --#VARBINDSEVERITY 3 --#SEVERITYMAP "Unknown = INFORMATIONAL, Other = INFORMATIONAL, Information = INFORMATIONAL, Warning = INFORMATIONAL, Minor = MINOR, Major = MAJOR, Critical = CRITICAL, Fatal = CRITICAL" --#ENABLE true --#CATEGORY "San Event Events" DESCRIPTION "This trap signals (using SNMP) an event has been received"
The VARBINDSEVERITY points to a varbind, which contains a severity. A varbind starts atthe count of 1 and in the example above, sanEventSeverity is the third varbind pointed toby --#VARBINDSEVERITY 3. The severity for the varbind must be defined as an enumeration.
SEVERITYMAP is a mapping of agent severity to the HP SIM-supported severity. HP SIMsupports Critical, Major, Minor, Warning, and Informational severities. Therefore, allmappings must resolve to one of these severities. In the example above, you can see amapping of Fatal to CRITICAL ("Fatal = CRITICAL"). When you receive in the varbind Fatal,it is translated to the HP SIM severity of Critical. The varbind value and the severity mightvary by the agent as conditions change so when a trap is received in HP SIM, the severitydisplayed is set by the agent when a trap was sent.
Communications» Managing with tasks» License Manager» Reporting» Remote Support
Configuration andServices
» Operations» Reference
Graphical user interface features
The GUI includes the following six regions:
1. Banner area Provides a link to the Home page, a link to Sign Out of SystemsInsight Manager, and displays the user that is currently signed in. Click the minimizeicon in the top right corner to minimize the banner. To maximize the banner, clickthe maximize icon.
2. System Status panel Provides uncleared event status, system health statusinformation, and an alarm to notify you about certain events or statuses. You cancustomize the System Status panel for your environment. If you do not need toview this panel at all times, you can collapse it by clicking the minus sign ( ) in thetop right corner of the panel. To expand the panel, click the plus sign ( ). If theSystem Status panel is collapsed and an alarm is received, the panel expands toshow the alarm. You can enlarge the panel clicking the Open in new window icon( ) to display a separate large window that you can resize and view from across aroom without sitting at the HP SIM terminal. For more information, see SystemsInsight Manager - Enlarging the System Status panel.
3. Search panel Enables you to search for matches by system name and commonsystem attributes. You can also perform an advanced search for matches based onselected criteria. To speed the search process, as you enter system information inthe search box, a dropdown list appears listing systems that begin with the text youare entering. You can select from the dropdown list or continue to enter theinformation. If you do not need to view this panel at all times, you can collapse it byclicking the minus sign ( ) in the top right corner of the panel. To expand thepanel, click the plus sign ( ).
4. System and Event Collections panel Enables you to view all known systemsand events in a specific management environment. A collection can be private,visible only to its creator, or shared, visible to all users. HP SIM ships with defaultshared collections only.
5. HP SIM menus Provides access to tools, logs, software options, and online help.The Options menu is primarily for users who administer the HP SIM software. If youlack authorization to use these tools, you might not be able to access certainmenus.
6. HP SIM workspace Displays the results of your latest request. It can contain a
» Support and otherresources
» Assistance
» Glossary» Using Help
collection, tool, or report. Some tools launch a separate browser window or XWindow terminal instead of displaying in the workspace. This area contains theHome page when you sign in to HP SIM. By default, the introductory page is theHome page. The introductory page provides information and tips about HP SIM andlinks to frequently used features. You can customize HP SIM to display a differentpage as the Home page. For information about selecting a different introductorypage, see Systems Insight Manager - Customizing the Home page.
NOTE:To maximize the workspace, click the Maximize link next to the Help
icon ( ). To restore the workspace to its original size, click RestoreSize .
The default sections on the introductory page include the following:
Do this now to finish the installation: Appears only if the following conditionsare met:
You have administrative rights.
You have not disabled this section from the Home Page Settings page.
Monitor Provides links to common monitoring tasks, including locating andtracking systems and events.
Manage Provides links to frequently used tools and features available from themenus above the workspace. These links provide access to inventory reports,software and firmware deployment, discovery, event handling, integrating customtools, and authorizations.
Did You Know You Can...? Provides useful tips and shortcuts, including whereyou can learn more about HP products, service offerings, and software.
This section appears if you have not disabled it from the Home Page Settingspage.
Communications» Managing with tasks» License Manager» Reporting» Remote Support
Configuration andServices
» Operations» Reference
» Tree controls and customization» Overviews» Systems» Events
Selecting a collection displays a view of its contents. From the System and EventCollections panel, you can launch several types of collection view pages. Select one of thepages in the following list to view more information about the types of views available:
In the System and Event Collections panel, the Private and Shared collections arecreated by default. Any HP SIM user can view shared collections. However, only users withadministrative rights can edit or delete these collections and their contents. Privatecollections can only be viewed, edited, or deleted by the user that created the collection.Collections can be placed in Private or Shared collections. To place a collection in theShared collection, you must have administrative rights. Private collections can be placedinto a shared collection, but shared collections cannot be placed into a private collection.
If a collection is placed in both Shared and Private, any user that has administrative rightscan modify the collection stored in the Shared collection. When the collection is modified inone place, changes are reflected in the other collection. If the user who created thecollection has his or her user rights reduced from administrative rights to operator rights, heor she can no longer modify the collection that is located in the Shared collection, and canonly edit the collection located in the Private collection, which is not reflected in thecollection located in the Shared collection.
Collections and members of collections can be set to hidden in the user interface. Youmight want to do this to remove the clutter of unused collections from the System andEvent Collections panel. See Systems Insight Manager - Setting properties for system andcluster collections and Systems Insight Manager - Setting event properties for moreinformation.
Tree controls and customization
To navigate the tree view in the System and Event Collections panel use the following
» Support and otherresources
» Assistance
» Glossary» Using Help
controls:
Expands all branches of the tree
Collapses all branches of the tree to first-level branches
Expands a branch of the tree
Collapses a branch of the tree
The Customize link in the System and Event Collections panel enables you to customizethe System and Event Collections panel tree to your own preferences. Any user cancustomize his or her Systems, Events , and Private collections, but only a user withadministrative rights can customize the shared Systems and Events collections. To displaythe Customize Collections section, click Customize.
Overviews
The System and Event Collections panel includes:
All Systems Displays the All Systems page. See Systems Insight Manager -Navigating the system table view page for information about the system table viewpage.
All Events Displays the All Events page. See Systems Insight Manager -Navigating the event table view page for information about the event table viewpage.
Systems
A system collection logically groups systems into a group based on information in the HPSIM database. After a collection is defined, you can display the results in the workspace orassociate it with a management task.
In addition to using the collections provided by HP SIM, you can create, edit, or delete yourown collections. Collections must follow specific naming conventions. See the HP SystemsInsight Manager User Guide for more information about naming collections.
Collections can be used to organize large numbers of systems into smaller, moremeaningful groups. For example, your organization might have five system administratorswho are responsible for 100 different systems in 6 different buildings. You can create acollection for each administrator that includes only his or her systems, or you can create acollection for each building that includes only the systems located in a particular building.
Events
An event collection logically groups multiple event collections into a single collection basedon information in the HP SIM database. After a collection is defined, you can display theresults in the workspace or associate it with a management task.
Communications» Managing with tasks» License Manager» Reporting» Remote Support
Configuration andServices
» Operations» Reference
» Users authorization templates
NOTE:Users that have been added to the Central Management Server (CMS) cannot view or manage systemsuntil authorizations have been configured for them.
NOTE:Command line tools provided by HP-UX and Linux (such as ls and df) are run as root by default. Forsecurity reasons, you might want them to run as a specific user to avoid inadvertently allowingunauthorized access to a user.
HP SIM enables you to configure authorizations for specific users or user groups. Authorizations give the user accessto view and manage systems. Each authorization specifies a user or user group, a toolbox, and a system or systemgroup. The specific set of tools that can be run on a system that is specified in the assigned toolbox.
It is important that you plan which systems each user will manage manage and which specific set of tools each user isauthorized to execute on managed systems. A user with no toolbox authorizations on a particular system cannot viewor manage that system.
Authorizations are cumulative. If a user is authorized for Toolbox1 and Toolbox2 on the same system, the user isauthorized for all tools in both Toolbox1 and Toolbox2 on that system. Similarly, a user authorized for the All Toolstoolbox on a system requires no other toolbox authorizations on that system because the All Tools toolbox alwaysincludes all tools.
See the following guidelines for setting up user names and authorizations in the following sections:
Systems Insight Manager - Configuring automatic discovery
Systems Insight Manager - Creating new users
Systems Insight Manager - Creating new user groups
Systems Insight Manager - Creating new toolboxes
Systems Insight Manager - Creating new authorizations
» Support and otherresources
» Assistance
» Glossary» Using Help
Users authorization templates
The Users and Authorizations tabs offer the following options:
Add, edit, and delete users and user groups, and view and print user reports. Select OptionsSecurity Users and Authorizations Users.
Add, edit, and delete toolboxes, and view and print toolbox reports. Select Options Security Usersand Authorizations Toolboxes .
Add, update, and delete authorizations, and view and print authorization reports. Select OptionsSecurity Users and Authorizations Authorizations.
Communications» Managing with tasks» License Manager» Reporting» Remote Support
Configuration andServices
» Operations» Reference
Administering users involves adding, editing, deleting, and reporting. After you have added a user or user group, youcan assign predefined authorizations from the Authorizations tab.
Users and user groups must exist in the operating system. For Microsof Windows ®, this includes Active Directory.When a user group is configured in HP SIM, any user that is a member of the user group in the operating system cansign-in to HP SIM without having to be configured as a user in HP SIM. The user can subsequently create tasks andrun tools based on the user group's authorizations and configuration rights as configured in HP SIM.
The Users tab displays a table with the following information:
User/User Group This column includes all users and user groups. A user group appears in bold type, whilegroup-based user accounts (members of a configured user group) appear in italics.
Configuration CMS Security This column indicates if the user has been given the right to configure CMSsecurity. This option is set when you select or clear the User can configure CMS security access such ascreating, modifying or removing other users checkbox when creating or editing users. The column displayseither Yes or No.
Pager Configured This column indicates if the user has a pager configured (Yes or No.) and is blank foruser groups.
IP Sign-In Restrictions This column indicates if there are any IP restrictions applied to the user or usergroup.
Full Name This column displays the full name of the user or group if this information was entered during thecreation of the user or user group.
The Users tab provides the following options:
Creating new users. Select Options Security Users and Authorizations Users, and then click[New]. The New User section appears.
Creating new user groups. Select Options Security Users and Authorizations Users, and thenclick [New Group]. The New User Group section appears.
Editing existing users or user groups. Select Options Security Users and AuthorizationsUsers, and then select a user or user group. Click [Edit]. The Edit User or Edit User Group section appears.You can edit group-based (in italics) users to convert them to individually configured users.
Deleting users or user groups. Select Options Security Users and Authorizations Users, andthen select users or user groups. Click [Delete ]. A confirmation box appears. to delete the users or usergroups, click [OK], or to cancel the deletion, click [Cancel ].
Viewing and printing user reports. Select Options Security Users and Authorizations Users,and then click [Report]. The Users Report window appears. To print the report, select File Print .
NOTE:To sort the information in ascending or descending order, click the appropriate column heading.
» Support and otherresources
» Assistance
» Glossary» Using Help
The column heading that includes the arrow is the column by which the list is sorted. If the arrow ispointing up, the list is sorted in ascending order. If the arrow is pointing down, the list is sorted indescending order.
Communications» Managing with tasks» License Manager» Reporting» Remote Support
Configuration andServices
» Operations» Reference
The Toolboxes section enables you to configure groups of tools. The following toolboxesare created during the installation process::
The All Tools toolbox contains all tools in the CMS.
The Monitor Tools toolbox contains tools that display the state of the managedsystems but not tools that change the state of the managed systems. For example,the Monitor Tools toolbox permits viewing installed software but does not permitinstalling software.
The Full Rights toolbox contains all tools in the CMS.
The Limited Rights toolbox contains only the create and edit both reports andtools.
The Toolboxes tab provides the following options:
Creating new toolboxes. Select Options Security Users andAuthorizations Toolboxes , and then click [New]. The New Toolbox sectionappears.
Editing existing toolbox. Select a toolbox to edit, select Options SecurityUsers and Authorizations Toolboxes , and then, click [Edit]. The Edit Toolboxsection appears.
Deleting toolboxes. Select toolboxes to delete, and then select OptionsSecurity Users and Authorizations Toolboxes . A confirmation box appears.To delete the toolboxes, click [OK], or to cancel the deletion, click [Cancel ].
Viewing and printing toolbox reports. Select Options Security Users andAuthorizations Toolboxes , and then click [Report]. The Toolboxes Reportappears. To print the report, select File Print .
NOTE:To sort information in ascending or descending order, click theappropriate column heading. The column heading that includes the arrowis the column by which the list is sorted. If the arrow is pointing up, thelist is sorted in ascending order. If the arrow is pointing down, the list issorted in descending order.
Communications» Managing with tasks» License Manager» Reporting» Remote Support
Configuration andServices
» Operations» Reference
Authorizations give users access to view and manage systems. An authorization is composed of users, toolboxes,and discovered systems. When you first access the Authorizations tab, a table appears listing all authorizations andincludes the following information:
User/User Group This column includes all valid users and user groups. A user group appears in bold type.Group-based users are not displayed in this table. However, they are listed in the authorizations for userstable and appear in italics.
Toolbox This column displays the toolboxes assigned to the user or user group for each authorization.
System This column displays the systems on which the user or user group has authorizations. A systemgroup appears in bold type.
Auto This column displays Auto if the authorization is set to automatically update when the collections thatthe authorization is based upon are updated.
A system group is a group of systems based on a system collection that is used for authorizations. Authorizations thatuse system groups are updated automatically when a change is made to the system collection that the system groupis based upon. For authorizations to be updated automatically, the option, Do not track changes. If this collectionchanges, the authorization will not change must not be selected.
You can view all authorizations, or you can view filtered authorizations for users, user groups, toolboxes, systemgroups, and individual systems. Select the option from the Authorizations for box, and then select the name from theSelect name box.
The Authorizations tab provides the following options:
Creating new authorizations Select Options Security Users and Authorizations Authorizations,and then click [New]. The New Authorizations section appears. This option is not available for group-basedusers. Instead, create authorizations for the user group of the group-based user.
Updating authorizations Select Options Security Users and Authorizations Authorizations,select an authorization using a system group based on a collection, and then click [Update]. The UpdateAuthorizations section appears.
NOTE:To sort the information in ascending or descending order, click the appropriate column heading.The column heading that includes the arrow is the column by which the list is sorted. If the arrow ispointing up, the list is sorted in ascending order. If the arrow is pointing down, the list is sorted indescending order.
Deleting authorizations Select Options Security Users and Authorizations Authorizations,select authorizations to delete, and then click [Delete ]. A dialog box appears. To delete the authorizations,click [OK], or to cancel the deletion, click [Cancel ]. This option is not available for group-based users.
» Support and otherresources
» Assistance
» Glossary» Using Help
Instead, delete authorizations for the user groups of the group-based user.
Viewing and printing authorization reports Select Options Security Users and AuthorizationsAuthorizations, and then click [Report]. The Authorizations Report window appears. To print the report,select File Print .
Communications» Managing with tasks» License Manager» Reporting» Remote Support
Configuration andServices
» Operations» Reference
» Tabs» Quick Launch» View as» Table information» System view columns» System table view page buttons» Customizing the view
The system table view page is the default view for an attribute-based system collection anddisplays a list of systems that meet common criteria.
From this page, you can view systems in a list, table, or tree, and save system collections,delete systems, and print the system collection.
If a collection includes more than 200 members, the first 200 members appear on the firstpage. Systems selected on one page remain selected as you navigate to a different page inthe collection. When a column is selected as the column to sort by, the entire collection issorted, not just the items on the currently viewed page.
Tabs
The system table view page contains the following tabs:
System(s) Lists all systems in the collection.
Events Displays the events for all systems included under the System(s) tab. Fromthis tab, you can apply additional filters to modify the event table display.
When switching between the System(s) tab and the Events tab, the Events tab "remembers"the selected events and event filter (if viewing a system collection). The System(s) tabremembers the selected systems, view type (table, tree, or icon), and the selected system filter(if viewing an event collection). However, the selections on each page are independent of eachother.
» Support and otherresources
» Assistance
» Glossary» Using Help
Quick Launch
The Quick Launch hyperlink links to a short list of frequently used tools. Place your cursorover the link to expand the menu and view the tools available for selected systems. Selectinga tool from this list bypasses the target verification page of the Task Wizard. You cannotschedule tools launched from this menu. Customize this menu by clicking the Customize linkin the Quick Launch menu.
View as
The View as dropdown list is used to select either table, which displays the system results ina table form, icons, which displays only the HS status icon and the System Name for eachsystem, and tree, which displays the HS status icon and the System Name for each system ina tree format.
This icon takes you to Onboard Administrator when clicked:
An Enclosure in a rack managed by a management processor
A complex managed by a management processor
A cell blade in an enclosure
For more detailed information about the tree view, see Systems Insight Manager - Navigatingthe tree view. For more information about the icon view, see Systems Insight Manager -Navigating the icon view.
Table information
To access a systems view or picture view of a system, click a link in the System Namecolumn. Typically, the System Page appears when a system is clicked. However, racks link tothe rack picture view page, and enclosures link to the enclosure picture view page. Theselinks are both types of container views. For more information, see Title not available.
The summary shows how many systems in the view have a status of: Critical, Major, Minor,Normal, Disabled, and Unknown. For more information, see the HP Systems Insight ManagerUser Guide.
System view columns
Sort columns by clicking the column header to switch between ascending and descendingorder. The column that the table is sorted by includes an up or down arrow in the columnheading. Place your cursor over a column name to display a brief description of the column.The columns are not available when you select the icons, picture, or tree views. Thefollowing columns are available on the system view page:
For more information about customizing columns, see Systems Insight Manager - Customizingthe system table view page.
Selection Select the checkbox in this column to select a system. You can selectmore than one system. This option is available in the table view, tree view, and iconview. Select the checkbox in the column heading or select Select "collection name"itself to select or clear all displayed systems.
Health status The HS column displays the overall system health status, which isdetermined by the default Hardware Status Polling task and is a roll up of all thestatus sources, which can be SNMP, WBEM, HTTP, and cluster status.
Place your cursor over the status icon to display status details. The status values aredependent on what agents are installed on the target system (WBEM or SNMP). Thesystem name and overall status appears at the top of the flyover box. All Critical,Major, Minor, or Warning status types with informational text appear following thesystem name. Both the system name and overall status icons drill down to theappropriate system overview page. The System status details also takes you to thesystem overview page. The WBEM status icon represents the status of the system asa whole. This status is not simply a rollup of the worst of the subsystems. Instead,each subsystem that participates in the overall status calculates a status that
contributes to the overall status. Since it is possible for a subsystem to be in a failedstate but the server to remain functional, the statuses might not match. For a systemthat does not have the SNMP agent installed, the flyover includes HTTP, Ping,Serviceguard, and SNMP statuses only. Ping appears for both WBEM and SNMP. Ifthe HTTP protocol is supported on the system, the HTTP status appears as a link.Ping and HTTP statuses do not appear for management processors. If the system is acontainer (rack, enclosure, complex, or cluster), the status value is the status of thecontainer itself and does not include the status of the children. If the statuscomponents that make up the overall hardware status are not known, the status of thecontainer itself appears (complexes and clusters). There is a status for themanagement processor and a status for the server for an management processor withan SNMP pass-through. The flyover displays which status type is causing the problemin the server. To close the box, click Close in the upper right corner.
By clicking the status icon in this column, the HP Management Agents or the HPInstant Toptools for Servers page appears. If the system does not have Web Agentsor Instant Toptools installed, the System Page appears. For more information on thesystem status types, see the HP Systems Insight Manager User Guide.
The health status that appears for container systems, such as Serviceguard or acomplex, is the actual hardware status for the container itself. For clusters, the healthstatus is the ping status.
NOTE:The status of a complex is collected only when VSE Manager is registeredwith HP SIM. In addition, the status update is collected every 30 minutesfrom the nPar or Complex outside of HP SIM.
Management processor The MP column displays the status icon of themanagement processor if the system has an management processor board installed.Otherwise, the Informational icon appears. Clicking the status icon displays themanagement processor login page.
Software status The SW column indicates both the availability of software updatesand if they are critical. For more information on the software status types, see the HPSystems Insight Manager User Guide.
If you click the software status, HP SIM displays the Track Software and Firmwareversions page.
HP Insight Control performance management If performance management isinstalled, this column (indicated by PF) displays the cumulative performance status ofall monitored subsystems for the system. By clicking the status icon in this column,the performance management page for the selected system appears, providing moredetailed performance information.
The status is considered Unknown if one of the following conditions are met:
performance management is not licensed.
performance management is licensed but is not monitoring a server.
If licensing and monitoring are started, but there are insufficient samples.
If you click the status link, performance management displays a page with informationabout purchasing a license to monitor that system or shows notification thatperformance management monitoring is not supported on that system.
NOTE:For the PF column, status appears for all systems from the All Servers list.If the status cannot be determined for some reason, the status appears asUnknown.
HP Insight Vulnerability and Patch Manager software If installed, HP InsightVulnerability and Patch Manager software vulnerability information appears in the VPMcolumn of the HP SIM console. Initially, the icon in the column indicates HP InsightVulnerability and Patch Manager software eligibility information for the target system inthe row. After target servers are licensed and a vulnerability scan is performed, thecolumn displays the combined status of the last vulnerability scan on the targetsystem (patch status does not appear in the column). Click the icon to display detailedinformation about the system status about HP Insight Vulnerability and Patch Manager
software. Clicking the Normal, Minor, or Major icons opens a new informational pagefrom which you can access the last scan results for the system. You can also launch anew scan from this page. Clicking the Unknown icon for a system displays anexplanatory page listing possible reasons why HP Insight Vulnerability and PatchManager software is inaccessible and offers possible solutions to correct the problem.
NOTE:If the HP Insight Vulnerability and Patch Manager software is not installedon the HP SIM system, the Informational icon appears in the VPM columnon the system table view page. Clicking this icon displays information aboutinstalling the HP Insight Vulnerability and Patch Manager software andpurchase licenses.
If the system is not licensed, or has not yet been scanned by the HP InsightVulnerability and Patch Manager software, the Informational icon appears in the VPMcolumn. Clicking this icon displays details about licensing the target system, a link tothe HP SIM License Manager or information about vulnerability scanning, and a link toscan for patch vulnerabilities on the target system.
HP Insight Control virtual machine management If virt is installed, the VM statuscolumn displays the cumulative status of all virtual machine hosts and virtual machineguests. Clicking the status icon on the VM status column displays in the InsightControl virtual machine management page for the selected system, providing moreinformation about the status of the virtual machine.
For systems with Server type and Virtual Machine Host or Virtual Machine Guestsubtype, HP SIM populates the VM status column with the appropriate status icons.
Contract and Warranty status The CW column is available when a Windows CMSand the HP Insight Remote Support Pack are installed. To view the Contract andWarranty Status page for a system, click the CW status icon. For more informationon the contract ans warranty status types, see the HP Systems Insight Manager UserGuide.
NOTE:There is no status icon in this column for management processors. Insteadsee the contract and warranty status for the server where the managementprocessor is physically located.
Aggregate Event status The ES column is a summary of all uncleared events. Thisstatus is updated whenever an event is added, updated, or removed. To view allevents for a system, including cleared events, click the ES status icon.
System Name This column contains the actual system name of all discoveredsystems. Systems appear as a single system or as a system in a container. When youplace the cursor over the system name, the full system DNS name appears, whichhelps differentiate between two or more systems that share the same system name. Ifyou click the system name link, the System Page appears. For more information, seeSystems Insight Manager - System page. If you click a system that is a container(rack or enclosure), the picture view for that object appears. For more information, seeSystems Insight Manager - Navigating the picture view page. For more informationabout racks and enclosures, see the HP Systems Insight Manager User Guide.
The System Name column displays systems and associated devices. The followingassociations are available in HP SIM:
Management processor to server
Management processor to server for nPar
Management processor to complex
NOTE:After upgrading HP SIM, for this association to be displayed, youmust rediscover the complex if you have appropriate XML, WBEM,and SNMP instrumentation on the management processor andpartition-able cells.
NOTE:
For a high-end HP Integrity Superdome server, rerunning discoveryworks only if you have an sx2000 Superdome and the latestfirmware. Mid-range servers must have either sx1000 or sx2000chipsets and the latest firmware.
Management processor to enclosure
Server to enclosure
Enclosure to rack
Switch to enclosure
System to cluster
Logical server to server
Integrity c-class blade to NonStop ComputerSystem
Host to VME
Active rack manager to rack
Standby rack manager to rack
Server to rack
Server to active rack manager
PDU to rack
PDU to active rack manager
VC Domain to rack
VC Domain to active rack manager
Enclosure Manager system in Encl.
IO module system in Encl.
Blade system in Encl.
iLO4 system in Host
Associate Segment Server to Fusion Manager
Associate Segment Server to Enclosure
Associate iLO to Segment Server
Associate MSA system to Fusion Manager
The following system types are containers:
Rack
Enclosure
Cluster
When servers and management processors in racks and enclosures are discoveredand identified, associations are made between the systems and the racks andenclosures where systems reside. This association appears in the System Namecolumn on the system table view page by showing name in system type containername. The following are examples of the different associations available:
When switches in blade enclosures are discovered and identified, associationsare made between the switches and the enclosures where they reside. Thisassociation appears in the System Name column on the system table viewpage by showing switch_name in Encl. enclosure_name. The System Typecolumn displays Switch as the system type. For HP SIM to identify andmanage the HP ProLiant p-Class server blades correctly, Insight ManagementAdvisor 5.50 or later must be installed on the blades to make associationswork and event correlation function properly. Clicking an enclosure name inthe System Name column displays a list of all discovered systems in theselected enclosure. The status for both racks and enclosures is alwaysUnknown.
When a server blade is identified through another system in the same rack orenclosure, associations are made between the management processor andthe enclosures where they reside. This association appears in the SystemName column on the system table view page by showing the system serialnumber prepended with Server_ in Encl. enclosure_name. For example,Server_C349KJP5D876 in Encl. Encl4. The system address, product name,and operating system do not appear for these systems.
When a NonStop computer system is identified, all c-Class blades that areassociated with this system are identified and the association made. Theseblades have two associations, one is associated with the enclosure and theother association is associated with the NonStop computer system.
When an iLO4 is discovered, the association between the iLO4 and the hostis made and the host will appear on the system list page.
You can launch HP Serviceguard Manager to manage a server belonging to an HPServiceguard cluster. To do so, ensure that:
HP Serviceguard Manager is installed and registered with HP SIM.
The system selected is an HP-UX or Linux server that belongs to an HPServiceguard cluster.
System Type This column displays the system type (for example, Server orDesktop). The system type Unmanaged indicates systems that have no managementprotocol that HP SIM can detect (for example, no SNMP, WBEM, or SSH). Thesystem type Unknown indicates systems that have some management protocol buthave not matched any identification rule in HP SIM. For more information about thedifferent system types, see the HP Systems Insight Manager User Guide.
NOTE:Unmanaged systems might indicate that the credentials were not setcorrectly to communicate with the system. If you know that there are InsightManagement Advisors installed, verify the credentials.
System Address This column displays the primary IP address of the system thatHP SIM uses to communicate with the system. Not all systems have an IP address,including HP Serviceguard clusters.
Product Name This column displays the product name of the system.
Operating system name The OS Name column displays the systems operatingsystem. For a Serviceguard cluster, this column displays HP Serviceguard if thecluster is of type HP-UX, or HP Serviceguard for Linux if the cluster is of type Linux.HP Serviceguard and HP Serviceguard for Linux under the OS Name column in thevirtual cluster system column do not represent the actual operating system name andtype. This field alerts you that the servers that comprise the cluster are of HP-UX orLinux type, respectively.
System table view page buttons
Three buttons at the bottom of the system table view page are available to users withadministrative rights. These buttons are not available when using a tool and selecting anindividual target system.
[Save As Collection] When a system is highlighted, the [Save As Collection]button is used to save the selection with a new name. Changes are saved on a per-user basis. If you click [Save As Collection], the collection is saved as a combinationof the system and event collections.
[Delete] This button is used to delete one or more systems from the database.Select the systems to be deleted, and then click [Delete ]. A dialog box appears. Click[OK] to continue with the deletion, or click [Cancel ] to cancel the operation.
NOTE:If you delete a virtual machine host, you can access it through the virtconsole. The operations that you can be perform on a virtual machine hostare not affected by the fact that the HP SIM system has been deleted. The
virt console continues to show the HP SIM status.
[Print] This button is used to create a printer-friendly version of the list in a newwindow. From the table view page, select File Print from the browser menu to printthe report.
Because certain print options are not supported in HP SIM, you cannot perform thefollowing tasks:
Change the Orientation to Landscape in the Print dialog box.
Cancel printing after the print job has been executed; however, you canaccess the operating systems print queue and cancel the print job
Print to a file
Print specific selections; you can print the entire list only
Print the table view page if you close the browser immediately after issuing aprint request
Buttons are disabled if you do not have appropriate rights. However, the [Print ] buttonappears for all users.
Customizing the view
The Customize link is located in the upper right corner of the system table view page. Clickthis link to configure where columns appear and in what order. When you modify the columnsto display on the system table view page and select Apply to all system table views, thesecolumns become the default set of columns displayed for any system collection selected if thecollection does not already have customized columns defined. For more information, seeSystems Insight Manager - Customizing the system table view page.
A cluster collection logically groups clusters into a collection based on information in the HP SIM database. For allother clusters, excluding HP Serviceguard clusters, clicking the name of the cluster in the Cluster Name column orcluster status icon in the CS column displays the System Page for that cluster. Cluster Monitor can be launched fromthe cluster table view page in the following ways:
Click the name of a MSCS cluster in the Cluster Name column
Click the cluster status icon for a MSCS cluster in the CS column
From this page, you can save a subset of the collection with a new name, delete one or more clusters from thecollection, customize the view, and print the cluster collection view. In a multiuser environment, only one user at a timecan edit a collection. If another user tries to edit the same collection, a List Edit Warning box appears. The user cancancel the editing request or edit the collection and save it as a new collection.
NOTE:Not all users can view all clusters. The results of the collection depend on the clusters that were assigned tothe user who created the collection. Each user can only view the clusters that are assigned to him or her bya user with administrative rights. A user with administrative rights assigns managed clusters using userauthorizations. See Systems Insight Manager - Creating new authorizations for more information.
1. Tabs
2. View as
3. Quick Launch
4. Title not available
5. Customizing
6. Cluster collection columns
7. Buttons
» Support and otherresources
» Assistance
» Glossary» Using Help
Tabs
The cluster table view page contains the following tabs:
System(s) Lists all systems in the collection.
Events Displays the events for all systems included under the System(s) tab. From this tab, you can applyadditional filters to modify the event table display.
When switching between the System(s) tab and the Events tab, the Events tab "remembers" the selected events andevent filter (if viewing a system collection). The System(s) tab remembers the selected systems, view type (table, tree,or icon), and the selected system filter (if viewing an event collection). However, the selections on each page areindependent of each other.
View as
The View as dropdown list is used to select either table, which displays all of the clusters in the collection in a treeform. See Systems Insight Manager - Navigating the tree view for more information about navigating the tree view.
Quick Launch
The Quick Launch hyperlink links to a short list of frequently used tools. Place your cursor over the link to expand themenu and view the tools available for selected systems. Selecting a tool from this list bypasses the target verificationpage of the Task Wizard. You cannot schedule tools launched from this menu. Customize this menu by clicking theCustomize link in the Quick Launch menu.
Cluster status summary
The status summary shows how many clusters in the view have a status of: Critical, Major, Minor, Normal, Disabled,and Unknown, with a total showing how many clusters are in the view.
Cluster collection columns
Sort columns by clicking the column header for ascending or descending order. Place your cursor over a column namefor a brief description of the column. See Systems Insight Manager - Customizing the cluster table view page for moreinformation about customizing columns. The following columns appear on the cluster view page:
Selection
Cluster Name
Cluster Address
Cluster Type
Cluster Description
Selection Select the checkbox in this column to select a cluster. You can select more than one cluster. Thisoption is available in both the table view and the tree view. Select the checkbox in the column heading orselect Select "collection name" itself to select all displayed clusters.
NOTE:To display a cluster status that includes only MSCS clusters, and show the true health of the cluster,you can edit the globalsettings.props file and change the ClusterStatusWithThresholds property tofalse . For non-MSCS clusters (OpenVMS, TruClusters, and Novell NetWare), excluding HPServiceguard clusters, the cluster status appears as Unknown.
Procedure 1 Editing the globalsettings.props file
1. Open the globalsettings.props file located at:
Windows Typically located at C:\Program Files\HP\Systems InsightManager\config\globalsettings.props .
HP-UX and Linux Located at /etc/opt/mx/config/globalsettings.props
2. Set the ClusterStatusWithThresholds property to false .
3. Save the file.
Cluster Name The Cluster Name column contains the cluster name. When you place the cursor over thecluster name, the full system DNS name is shown. If you click an MSCS cluster name, the Cluster Monitorpage appears. See Systems Insight Manager - Using Cluster Monitor for more information. If the clusterselected is an HP Serviceguard cluster, a new cluster table view page appears, showing the servers in thecluster. From this list, click a server name to access the System Page for that server. If the cluster is of anyother type, the System Page for that cluster appears. See Systems Insight Manager - System tab for clustersfor more information.
Cluster Address The Cluster Address column contains the IP address for the cluster.
NOTE:HP Serviceguard clusters do not have an IP address. Therefore, this column is blank for this type ofcluster.
Cluster Type The Cluster Type column shows the cluster type. Some of the cluster types supported include:
HP Serviceguard
MSCS
OpenVMS
TruCluster Production server
TruCluster Server
Cluster Description The Cluster Description column contains a description of the cluster type. HPServiceguard clusters have a description of HP Serviceguard cluster.
Buttons
The following buttons at the bottom of the page are available to users with administrative rights:
[Save As Collection]. When clusters are selected, you can save the selection with a new name. Changes aresaved on a per-user. See Systems Insight Manager - Saving collections for more information.
[Delete ]. This button is used to delete clusters from the database. Select clusters to delete from the database,and then click [Delete ]. A confirmation box appears. to delete the clusters, click [OK], or to cancel the deletion,click [Cancel ]. See Systems Insight Manager - Deleting clusters from the HP SIM database for moreinformation.
[Print ]. This button is used to create a printer-friendly version of the list in a new window. From the clusterview page, select File Print from the browser menu to print the report.
Because certain print options are not supported in Systems Insight Manager, you cannot perform the followingtasks:
Change the Orientation to Landscape in the Print dialog box.
Cancel printing after the print job has been executed; however, you can access the operating systemsprint queue and cancel the print job
Print to a file
Print specific selections; you can print the entire list only
Print the table view page if you close the browser immediately after issuing a print request
Buttons are disabled if you do not have appropriate rights. However, the [Print ] button appears for all users.
Customizing
The Customize link is located in the upper right corner of the cluster table view page. Click this button to configurewhich columns appear and in what order. When you modify the columns to display on the cluster table view page andselect Apply to all cluster table views, these columns become the default columns displayed for any cluster collectionselected if that collection does not already have customized columns defined. See Systems Insight Manager -Customizing the cluster table view page for more information.
Communications» Managing with tasks» License Manager» Reporting» Remote Support
Configuration andServices
» Operations» Reference
» Tabs» Quick Launch» Event status summary» Event collection columns» Table information
The event table view page is the view for an event collection and lists of events that meetcommon criteria. For c-Class racks or enclosures, all current systems or events in theenclosure or rack appear.
iLO4 and host events both appear because the iLO4 sends traps on behalf of both the hostand the iLO4.
From this page, you can clear, delete, and assign events, enter comments on the event, andview printable reports.
1. System(s) Lists all systems in the collection.
Events Displays the events for all systems included under the System(s)tab. From this tab, you can apply additional filters to modify the event tabledisplay.
When switching between the System(s) tab and the Events tab, the Events tab"remembers" the selected events and event filter (if viewing a system collection). TheSystem(s) tab remembers the selected systems, view type (table, tree, or icon), andthe selected system filter (if viewing an event collection). However, the selections oneach page are independent of each other.
2. The Quick Launch hyperlink links to a short list of frequently used tools. Place yourcursor over the link to expand the menu and view the tools available for selectedsystems. Selecting a tool from this list bypasses the target verification page of theTask Wizard. You cannot schedule tools launched from this menu. Customize thismenu by clicking the Customize link in the Quick Launch menu.
3. This summary shows how many events in the view have a status of Critical, Major,Minor, Normal, and Informational. For more information about event status types, seethe HP Systems Insight Manager User Guide.
» Support and otherresources
» Assistance
» Glossary» Using Help
4. To sort collection results by a particular column, click the column header forascending or descending order. Place your cursor over a column name for a briefdescription of the column. The following columns appear on the event table viewpage:
Select the checkbox in this column to select an event. You can select morethan one event. Select the checkbox in the column heading or select Select"collection name" itself to select or clear all displayed events.
This column displays whether the event is in the Cleared or Not Cleared state.Events start in the Not Cleared state. A Cleared state means the user is nolonger interested in this event. Event states also include In Progress, whichindicates that not all the data for the event has been logged. You cannotremove or clear In Progress events. Pending state events are changed to NotCleared when the CMS is restarted.
This column displays the event status icon to indicate the severity of aproblem represented by the event. For more information on event severitytypes, see the HP Systems Insight Manager User Guide.
This column displays the type of an event. Some examples of event typesinclude: SNMP traps, login failures, or the replicate agent settings tool. Selectan event type from the list to view the Event Details section. The informationdisplayed varies depending on the event. If you cannot see the entire eventtype in the column, place your cursor over this field, and a window appearsshowing the entire event type. For more information abut event details, seethe HP Systems Insight Manager User Guide.
This column displays the system name on which the event occurred. Clickinga link in this column displays the System Page for the selected system.
When an event occurs that affects an entire rack or enclosure, it is possiblefor several systems in that rack or enclosure to generate a trap for that event.These container traps are filtered such that only one event is logged per rackor enclosure trap. Also, even though the source of the trap is a server bladeor management processor, HP SIM sets the Event Source and AssociatedSystem for the logged event to the rack or enclosure, as appropriate. Formore information on racks and enclosures, see the HP Systems InsightManager User Guide.
This column displays the time stamp when the CMS received the event, whichincludes the date and time. If the client is in a different time zone than theevent time (CMS time), the event time is converted to the client time zone.
To assign responsibility for an event to a user, select the event, and then click[Assign to] at the bottom of the page. The Assign to section appears, whichenables you to select a new assignee or use an existing assignee. If youselect to use an existing assignee, you can select only one user name fromthe list. This name does not have to be a user with privileges on the systemor a name that can be used to log in to the CMS. This field is free-form text.For more information about assigning an event to a user, see Systems InsightManager - Assigning events to users.
This column displays the comments for this event or is blank if no commentshave been entered. Comments are truncated in the column. Click the eventtype to view the entire comment if needed, or place your cursor over acomment field to display a window that shows the entire comment to appear.For more information, see Systems Insight Manager - Entering comments toevents.
This column displays system types such as enclosure or rack, if the systemtype filter was selected for the event list display.
This column displays the rack name
This column appears when the system is a rack or enclosure and the rack orenclosure system filter is selected.
This column displays the enclosure name.
This column appears when the system is a rack or enclosure and the rack or
enclosure system filter is selected.
When you install HP Insight Remote Support Pack and HP SIM together on aWindows CMS, support case status updates are provided by the RemoteSupport Pack. The Case Status column is available when you view the AllHP Service Events collection or select the event search criteria for servicecase status.
When the Remote Support Pack and HP SIM are installed together on aWindows CMS, the support case ID is provided by the Remote Support Pack.The Case ID column is available when you view the All HP Service Eventscollection or select the event search criteria for service case status. Click thelink in the Event Type column to view additional details about an event.
Selection
Select the checkbox in this column to select an event. You can select more than oneevent. Select the checkbox in the column heading or select Select "collection name"itself to select or clear all displayed events.
State
This column displays whether the event is in the Cleared or Not Cleared state. Eventsstart in the Not Cleared state. A Cleared state means the user is no longer interestedin this event. Event states also include In Progress, which indicates that not all thedata for the event has been logged. You cannot remove or clear In Progress events.Pending state events are changed to Not Cleared when the CMS is restarted.
Severity
This column displays the event status icon to indicate the severity of a problemrepresented by the event. For more information on event severity types, see the HPSystems Insight Manager User Guide.
Event Type
This column displays the type of an event. Some examples of event types include:SNMP traps, login failures, or the replicate agent settings tool. Select an event typefrom the list to view the Event Details section. The information displayed variesdepending on the event. If you cannot see the entire event type in the column, placeyour cursor over this field, and a window appears showing the entire event type. Formore information abut event details, see the HP Systems Insight Manager UserGuide.
System Name
This column displays the system name on which the event occurred. Clicking a link inthis column displays the System Page for the selected system.
When an event occurs that affects an entire rack or enclosure, it is possible for severalsystems in that rack or enclosure to generate a trap for that event. These containertraps are filtered such that only one event is logged per rack or enclosure trap. Also,even though the source of the trap is a server blade or management processor, HPSIM sets the Event Source and Associated System for the logged event to the rackor enclosure, as appropriate. For more information on racks and enclosures, see theHP Systems Insight Manager User Guide.
Event Time
This column displays the time stamp when the CMS received the event, whichincludes the date and time. If the client is in a different time zone than the event time(CMS time), the event time is converted to the client time zone.
Assign To
To assign responsibility for an event to a user, select the event, and then click[Assign to] at the bottom of the page. The Assign to section appears, which enables
you to select a new assignee or use an existing assignee. If you select to use anexisting assignee, you can select only one user name from the list. This name doesnot have to be a user with privileges on the system or a name that can be used to login to the CMS. This field is free-form text. For more information about assigning anevent to a user, see Systems Insight Manager - Assigning events to users.
Comments
This column displays the comments for this event or is blank if no comments havebeen entered. Comments are truncated in the column. Click the event type to view theentire comment if needed, or place your cursor over a comment field to display awindow that shows the entire comment to appear. For more information, see SystemsInsight Manager - Entering comments to events.
System Type
This column displays system types such as enclosure or rack, if the system type filterwas selected for the event list display.
Rack Name
This column displays the rack name
This column appears when the system is a rack or enclosure and the rack orenclosure system filter is selected.
Enclosure Name
This column displays the enclosure name.
This column appears when the system is a rack or enclosure and the rack orenclosure system filter is selected.
Case Status
When you install HP Insight Remote Support Pack and HP SIM together on aWindows CMS, support case status updates are provided by the Remote SupportPack. The Case Status column is available when you view the All HP ServiceEvents collection or select the event search criteria for service case status.
Case ID
When the Remote Support Pack and HP SIM are installed together on a WindowsCMS, the support case ID is provided by the Remote Support Pack. The Case IDcolumn is available when you view the All HP Service Events collection or select theevent search criteria for service case status. Click the link in the Event Type columnto view additional details about an event.
5. The area includes information about the systems or events. An event collection can bedisplayed by clicking one of the following:
An event collection from the System and Event Collections panel
An event status icon in the System Status panel
The Events tag from the System Page
A private event collection
Event collections are filtered based on authorizations. Users can only view events onsystems for which they have the appropriate authorization.
Tabs
System(s) Lists all systems in the collection.
Events Displays the events for all systems included under the System(s) tab. From
this tab, you can apply additional filters to modify the event table display.
When switching between the System(s) tab and the Events tab, the Events tab "remembers"the selected events and event filter (if viewing a system collection). The System(s) tabremembers the selected systems, view type (table, tree, or icon), and the selected system filter(if viewing an event collection). However, the selections on each page are independent ofeach other.
Quick Launch
The Quick Launch hyperlink links to a short list of frequently used tools. Place your cursorover the link to expand the menu and view the tools available for selected systems. Selectinga tool from this list bypasses the target verification page of the Task Wizard. You cannotschedule tools launched from this menu. Customize this menu by clicking the Customize linkin the Quick Launch menu.
Event status summary
This summary shows how many events in the view have a status of Critical, Major, Minor,Normal, and Informational. For more information about event status types, see the HPSystems Insight Manager User Guide.
Event collection columns
To sort collection results by a particular column, click the column header for ascending ordescending order. Place your cursor over a column name for a brief description of the column.The following columns appear on the event table view page:
Select the checkbox in this column to select an event. You can select more than oneevent. Select the checkbox in the column heading or select Select "collection name"itself to select or clear all displayed events.
This column displays whether the event is in the Cleared or Not Cleared state. Eventsstart in the Not Cleared state. A Cleared state means the user is no longer interestedin this event. Event states also include In Progress, which indicates that not all thedata for the event has been logged. You cannot remove or clear In Progress events.Pending state events are changed to Not Cleared when the CMS is restarted.
This column displays the event status icon to indicate the severity of a problemrepresented by the event. For more information on event severity types, see the HPSystems Insight Manager User Guide.
This column displays the type of an event. Some examples of event types include:SNMP traps, login failures, or the replicate agent settings tool. Select an event typefrom the list to view the Event Details section. The information displayed variesdepending on the event. If you cannot see the entire event type in the column, placeyour cursor over this field, and a window appears showing the entire event type. Formore information abut event details, see the HP Systems Insight Manager UserGuide.
This column displays the system name on which the event occurred. Clicking a link inthis column displays the System Page for the selected system.
When an event occurs that affects an entire rack or enclosure, it is possible for severalsystems in that rack or enclosure to generate a trap for that event. These containertraps are filtered such that only one event is logged per rack or enclosure trap. Also,even though the source of the trap is a server blade or management processor, HPSIM sets the Event Source and Associated System for the logged event to the rackor enclosure, as appropriate. For more information on racks and enclosures, see theHP Systems Insight Manager User Guide.
This column displays the time stamp when the CMS received the event, whichincludes the date and time. If the client is in a different time zone than the event time(CMS time), the event time is converted to the client time zone.
To assign responsibility for an event to a user, select the event, and then click
[Assign to] at the bottom of the page. The Assign to section appears, which enablesyou to select a new assignee or use an existing assignee. If you select to use anexisting assignee, you can select only one user name from the list. This name doesnot have to be a user with privileges on the system or a name that can be used to login to the CMS. This field is free-form text. For more information about assigning anevent to a user, see Systems Insight Manager - Assigning events to users.
This column displays the comments for this event or is blank if no comments havebeen entered. Comments are truncated in the column. Click the event type to view theentire comment if needed, or place your cursor over a comment field to display awindow that shows the entire comment to appear. For more information, see SystemsInsight Manager - Entering comments to events.
This column displays system types such as enclosure or rack, if the system type filterwas selected for the event list display.
This column displays the rack name
This column appears when the system is a rack or enclosure and the rack orenclosure system filter is selected.
This column displays the enclosure name.
This column appears when the system is a rack or enclosure and the rack orenclosure system filter is selected.
When you install HP Insight Remote Support Pack and HP SIM together on aWindows CMS, support case status updates are provided by the Remote SupportPack. The Case Status column is available when you view the All HP ServiceEvents collection or select the event search criteria for service case status.
When the Remote Support Pack and HP SIM are installed together on a WindowsCMS, the support case ID is provided by the Remote Support Pack. The Case IDcolumn is available when you view the All HP Service Events collection or select theevent search criteria for service case status. Click the link in the Event Type columnto view additional details about an event.
Selection
Select the checkbox in this column to select an event. You can select more than one event.Select the checkbox in the column heading or select Select "collection name" itself to selector clear all displayed events.
State
This column displays whether the event is in the Cleared or Not Cleared state. Events start inthe Not Cleared state. A Cleared state means the user is no longer interested in this event.Event states also include In Progress, which indicates that not all the data for the event hasbeen logged. You cannot remove or clear In Progress events. Pending state events arechanged to Not Cleared when the CMS is restarted.
Severity
This column displays the event status icon to indicate the severity of a problem represented bythe event. For more information on event severity types, see the HP Systems Insight ManagerUser Guide.
Event Type
This column displays the type of an event. Some examples of event types include: SNMPtraps, login failures, or the replicate agent settings tool. Select an event type from the list toview the Event Details section. The information displayed varies depending on the event. Ifyou cannot see the entire event type in the column, place your cursor over this field, and awindow appears showing the entire event type. For more information abut event details, seethe HP Systems Insight Manager User Guide.
System Name
This column displays the system name on which the event occurred. Clicking a link in this
column displays the System Page for the selected system.
When an event occurs that affects an entire rack or enclosure, it is possible for severalsystems in that rack or enclosure to generate a trap for that event. These container traps arefiltered such that only one event is logged per rack or enclosure trap. Also, even though thesource of the trap is a server blade or management processor, HP SIM sets the EventSource and Associated System for the logged event to the rack or enclosure, asappropriate. For more information on racks and enclosures, see the HP Systems InsightManager User Guide.
Event Time
This column displays the time stamp when the CMS received the event, which includes thedate and time. If the client is in a different time zone than the event time (CMS time), the eventtime is converted to the client time zone.
Assign To
To assign responsibility for an event to a user, select the event, and then click [Assign to] atthe bottom of the page. The Assign to section appears, which enables you to select a newassignee or use an existing assignee. If you select to use an existing assignee, you can selectonly one user name from the list. This name does not have to be a user with privileges on thesystem or a name that can be used to log in to the CMS. This field is free-form text. For moreinformation about assigning an event to a user, see Systems Insight Manager - Assigningevents to users.
Comments
This column displays the comments for this event or is blank if no comments have beenentered. Comments are truncated in the column. Click the event type to view the entirecomment if needed, or place your cursor over a comment field to display a window that showsthe entire comment to appear. For more information, see Systems Insight Manager - Enteringcomments to events.
System Type
This column displays system types such as enclosure or rack, if the system type filter wasselected for the event list display.
Rack Name
This column displays the rack name
This column appears when the system is a rack or enclosure and the rack or enclosure systemfilter is selected.
Enclosure Name
This column displays the enclosure name.
This column appears when the system is a rack or enclosure and the rack or enclosure systemfilter is selected.
Case Status
When you install HP Insight Remote Support Pack and HP SIM together on a Windows CMS,support case status updates are provided by the Remote Support Pack. The Case Statuscolumn is available when you view the All HP Service Events collection or select the eventsearch criteria for service case status.
Case ID
When the Remote Support Pack and HP SIM are installed together on a Windows CMS, thesupport case ID is provided by the Remote Support Pack. The Case ID column is availablewhen you view the All HP Service Events collection or select the event search criteria forservice case status. Click the link in the Event Type column to view additional details aboutan event.
Table information
The area includes information about the systems or events. An event collection can bedisplayed by clicking one of the following:
An event collection from the System and Event Collections panel
An event status icon in the System Status panel
The Events tag from the System Page
A private event collection
Event collections are filtered based on authorizations. Users can only view events on systemsfor which they have the appropriate authorization.
Communications» Managing with tasks» License Manager» Reporting» Remote Support
Configuration andServices
» Operations» Reference» Support and other
resources» Assistance
» Glossary» Using Help
» Tabs» View as» Quick Launch» Expanding the tree view» Tree view hierarchy» Tree view buttons
The tree view provides an automatically populated representation of the actual physical hierarchy of blade components. For example, bladeswithin enclosures within racks and is a good place to create and utilize collections of components.
When a collection is selected that was created based on individual members, the tree view appears in the workspace. The tree view is initiallycollapsed. Systems might appear in multiple locations because they can be in multiple containers. Users can view only systems that they areauthorized to view. Therefore, if a user is not authorized to view a particular system in the tree, that branch does not appear. The followingsections are available on the tree view page:
1. Tabs
2. View as
3. Quick Launch
4. Expanding the tree view
5. Tree view hierarchy
6. Tree view buttons
Tabs
The tree view page contains the following tabs:
System(s) Lists all systems in the collection.
Events Displays the events for all systems included under the System(s) tab. From this tab, you can apply additional filters to modifythe event table display.
When switching between the System(s) tab and the Events tab, the Events tab "remembers" the selected events and event filter (if viewing asystem collection). The System(s) tab remembers the selected systems, view type (table, tree, or icon), and the selected system filter (if viewingan event collection). However, the selections on each page are independent of each other.
View as
This dropdown list is used to select table, which displays the results in a table form, icons, which displays only the HS status icon and theSystem Name for each system, and tree, which displays the HS status icon and the system name for each system in a tree format. SeeSystems Insight Manager - Navigating the icon view for more information about the icon view.
Quick Launch
The Quick Launch hyperlink links to a short list of frequently used tools. Place your cursor over the link to expand the menu and view the toolsavailable for selected systems. Selecting a tool from this list bypasses the target verification page of the Task Wizard. You cannot schedule toolslaunched from this menu. Customize this menu by clicking the Customize link in the Quick Launch menu.
Expanding the tree view
Branch nodes can be expanded by clicking the toggling expansion icon. However, the system name is not an expansion control, but a hyperlinkto a page that displays more information about that particular system. When a branch is collapsed, the icon appears as . When clicked, thebranch expands to show the child systems, and the icon toggles to . Clicking the icon again collapses the branch and toggles the icon.
NOTE:The expansion state persists only for the page session. When the page is reloaded or navigated to again, a fresh tree is loaded toensure that all newly discovered systems are added to the view.
A paging mechanism is provided in the branches. When a branch is expanded, the first 100 systems appear. To view additional systems, clicknext...of.... Clicking this link displays either the remaining systems or the next 100 system.
At the top of each tree view there are two expansion buttons. To expand all branches of the tree, click . To collapse all branches of the treeto first-level branches, click . If there are too many systems to load into the expand all page, a message appears, advising you that there aretoo many systems in the tree and the function cannot be performed.
Tree view hierarchy
The tree view displays status data for each system. The status icon is located in the left of the tree view next to the selection checkbox. If thestatus of the system is Unknown, no status icon appears. If the systems are containers, the status to the left of the container name appears asthe most critical status of the systems in the container, including the container status itself. The status of the actual container appears to the rightof the system name and a system type label. Place your cursor over the status icon to display the status of the container (appears to the right ofthe system name) and the status that is a rollup of the container status and status value of the children. If the status of the container is Unknown,no icon appears.
Selection in the tree view
When a container is selected independently of its contents, the selection control for the tree view cycles through four states using the followingcheck icons:
First, or initial state; nothing selected.
Second state; both the container and the contents are selected. If the contents are not already expanded, the next level of children isexpanded to show the selection.
Third state; all contents are recursively selected. The children are expanded to show they are selected. Only the next level is expanded.
Fourth state; only the container is selected.
NOTE:If a collection is selected and the collection selects its own contents, the checkboxes are disabled.
Available drilldowns
The tree view contains hyperlinks for the system name and status icon drilldowns. When you click a system name, the System Page for thatparticular system appears. The status icons drill-down to the status URL for that system, unless the status icon is the status icon to the left of acontainer. Clicking the roll-up status of a branch loads a table view of all systems in that branch that match the roll-up status. Therefore, you arepresented with all the systems that contribute to the severity of the roll-up status. For example, if the status icon to the left of the rack is Critical,and you click the icon, a table view of all systems in the rack with the status of Critical appear.
Selection states for collections
In the tree view, you cannot simultaneously select a collection and members of the same collection. When a collection is selected, the membersappear and their selection boxes are disabled. The selection states for a collection are as follows:
The initial state; nothing is selected.
The collection itself is selected; the contents of the collection are disabled.
.
The members of the collection are selected; the collection itself is unselected
Additionally, a checkbox at the top of the tree enables you to select the collection that is viewed. When the checkbox is selected, all thecheckboxes under the collection are cleared and disabled. When a checkbox is cleared, the checkboxes under the collection become selectable.
Tree view buttons
The following buttons at the bottom of the tree view page are available to users with administrative rights:
[Save As Collection] When a system or group of systems is selected, this button is used to save the selection with a new name.Changes are saved on a per-user basis. See Systems Insight Manager - Saving collections for more information.
[Delete] This button is used to delete one or more systems from the database. Select the systems to be deleted, and then click[Delete ]. A dialog box appears. Click [OK] to continue with the deletion, or click [Cancel ] to cancel the operation. The tree view isrefreshed.
NOTE:Only systems can be deleted from the tree view. If you select a collection, the [Delete ] button is disabled. Collections must bedeleted through the Customize Collections page. See Systems Insight Manager - Deleting system and cluster collections formore information about deleting collections.
NOTE:If you delete a virtual machine host, you can still access it through the virt console, and the operations that can be performedon a virtual machine host are not affected by the deletion of the HP SIM system. The virt console continues to show the HPSIM status.
NOTE:If you select a collection by selecting Select "collection name" itself, the [Delete ] button is disabled. To delete collections,go to the Customize Collections page. See Systems Insight Manager - Deleting system and cluster collections or SystemsInsight Manager - Deleting event collections for more information.
[Print] This button is used to create a printer-friendly version of the list in a new window. From the table view page, select File Printfrom the browser menu to print the report.
Buttons are disabled if you do not have appropriate rights. However, the [Print ] button appears for all users.
Communications» Managing with tasks» License Manager» Reporting» Remote Support
Configuration andServices
» Operations» Reference
» Tabs» Quick Launch» View as» System health status summary» Icon view buttons
The icon view lists the system name of all discovered systems, as well as the system health status for each system.The legend shows how many systems in the view are Critical, Major, Minor, Normal, Disabled, and Unknown. Selectthe checkbox next to system name to select a system. You can select more than one system, or to select an entirecollection, select the checkbox, Select "collection name" itself.
Place your cursor over the status icon to display status details. The status values are dependent on what agents areinstalled on the target system (WBEM or SNMP). The system name and overall status appears at the top of theflyover box. All Critical, Major, Minor, or Warning status types with informational text appear following the systemname. Both the system name and overall status icons drill down to the appropriate system overview page. TheSystem status details also takes you to the system overview page. The WBEM status icon represents the status ofthe system as a whole. This status is not simply a rollup of the worst of the subsystems. Instead, each subsystemthat participates in the overall status calculates a status that contributes to the overall status. Since it is possible for asubsystem to be in a failed state but the server to remain functional, the statuses might not match. For a system thatdoes not have the SNMP agent installed, the flyover includes HTTP, Ping, Serviceguard, and SNMP statuses only.Ping appears for both WBEM and SNMP. If the HTTP protocol is supported on the system, the HTTP status appearsas a link. Ping and HTTP statuses do not appear for management processors. If the system is a container (rack,enclosure, complex, or cluster), the status value is the status of the container itself and does not include the status ofthe children. If the status components that make up the overall hardware status are not known, the status of thecontainer itself appears (complexes and clusters). There is a status for the management processor and a status forthe server for an management processor with an SNMP pass-through. The flyover displays which status type iscausing the problem in the server. To close the box, click Close in the upper right corner.
This page includes the following sections:
1. Tabs
2. Quick Launch
3. View as
4. System health status summary
5. Icon view buttons
» Support and otherresources
» Assistance
» Glossary» Using Help
Tabs
The icon view page contains the following tabs:
System(s) Lists all systems in the collection.
Events Displays the events for all systems included under the System(s) tab. From this tab, you can applyadditional filters to modify the event table display.
When switching between the System(s) tab and the Events tab, the Events tab "remembers" the selected eventsand event filter (if viewing a system collection). The System(s) tab remembers the selected systems, view type (table,tree, or icon), and the selected system filter (if viewing an event collection). However, the selections on each page areindependent of each other.
Quick Launch
The Quick Launch hyperlink links to a short list of frequently used tools. Place your cursor over the link to expandthe menu and view the tools available for selected systems. Selecting a tool from this list bypasses the targetverification page of the Task Wizard. You cannot schedule tools launched from this menu. Customize this menu byclicking the Customize link in the Quick Launch menu.
View as
The View as dropdown list is used to select either table, which displays the results in a table form, icons, whichdisplays only the HS status icon and the System Name for each system, and tree, which displays the HS status iconand the System Name for each system in a tree format. See Systems Insight Manager - Navigating the tree view formore detailed information on the tree view. See Systems Insight Manager - Navigating the system table view page formore information about the system table view.
System health status summary
This summary shows how many systems in the view have a status of Critical, Major, Minor, Normal, Disabled, andUnknown. See the HP Systems Insight Manager User Guide for more information about system status types.
Icon view buttons
The following buttons at the bottom of the icon view page are available to users with administrative rights.
[Save As Collection] When you select a system or group of systems, this button is used to save theselection with a new name. Changes are saved on a per-user basis. See Systems Insight Manager - Savingcollections for more information.
[Delete] This button is used to delete one or more systems from the database. See Systems InsightManager - Deleting systems from the HP SIM database for more information.
NOTE:If you delete a virtual machine host, you can still access it through the virt console, and theoperations that can be performed on a virtual machine host are not affected by the deletion of theHP SIM system. The virt console continues to show the HP SIM status.
NOTE:If you select a collection by selecting Select "collection name" itself, the [Delete ] button isdisabled. See Systems Insight Manager - Deleting system and cluster collections or SystemsInsight Manager - Deleting event collections for more information.
[Print] This button is used to create a printer-friendly version of the list in a new window. From the iconview page, select File Print from the browser menu to print the report.
Communications» Managing with tasks» License Manager» Reporting» Remote Support
Configuration andServices
» Operations» Reference» Support and other
resources» Assistance
» Printable version
» Glossary» Using Help
The picture view page for racks and enclosures contains a picture view of the discovered systems in the rack or enclosure if available. The rack nameappears along with a picture view, table view, or iconic view of the rack. While signed in to HP SIM, placing your cursor over a server shown in the view,displays information on that particular server, including server blade name, slot number, and the enclosure in which the server is located. You can alsoclick a component name to display detailed information about the component. The System Page appears.
Rack name
The system name is displayed with the system type in parenthesis.
Tabs
The picture view page contains the following tabs:
System(s) Lists all systems in the collection.
Events Displays the events for all systems included under the System(s) tab. From this tab, you can apply additional filters to modify theevent table display.
When switching between the System(s) tab and the Events tab, the Events tab "remembers" the selected events and event filter (if viewing a systemcollection). The System(s) tab remembers the selected systems, view type (table, tree, or icon), and the selected system filter (if viewing an eventcollection). However, the selections on each page are independent of each other.
Quick Launch
The Quick Launch hyperlink links to a short list of frequently used tools. Place your cursor over the link to expand the menu and view the toolsavailable for selected systems. Selecting a tool from this list bypasses the target verification page of the Task Wizard. You cannot schedule toolslaunched from this menu. Customize this menu by clicking the Customize link in the Quick Launch menu.
View as
You can change the way the picture view page appears. Click the down arrow on the View as dropdown list, and select table, icon, or picture view.However, the picture view is only available if you have already drilled down to a rack or enclosure by clicking the rack or enclosure name on the systemtable view page and then switching back to a tabular or iconic view. Drilling down into a rack or enclosure restricts the systems to only those that pertainto the rack or enclosure. You can then switch between the other view types.
Select from the following views:
Table. See Systems Insight Manager - Navigating the system table view page for more information.
Tree. See Systems Insight Manager - Navigating the tree view for more information.
Icons. See Systems Insight Manager - Navigating the icon view for more information.
Picture.
Selection in the icon view
Select the system type based on the following:
All Blades
All Interconnect Switches
All Onboard Administrators
All Enclosures
Front and rear picture views
Displays realistic front and rear picture views which include:
A collapsible tray for each enclosure in the rack, with the enclosure status and name in the title bar
Selection checkboxes on all selectable items
Status icons on all items with status
Each blade or switch hyperlinks to that system's System Page
While logged in to HP BladeSystem, placing your cursor over a component shown in the view, displays information on that particular component,including slot number/bay number, blade server name/IP address, and product model. If the bay is empty it displays as an empty bay. If the Firmware ofthe power enclosure is less than 1.80, a question mark is displayed for each bay of the enclosure. When the cursor is moved over that bay, it suggeststo upgrade the Firmware to 1.80 or higher. You can also click a component to display information about that component. The System Page appears.For more information, see Systems Insight Manager - System tab for blade servers.
To view details about p-Class or e-Class systems that support SNMP or HTTP, position your cursor over the system and a tool tip appears.
NOTE:If the system does not support SNMP or HTTP query, Not Available appears.
NOTE:For p-Class and e-Class servers, the IPv6 Address is displayed in the tool tip only when IPv6 is enabled on the server.
The picture view tool tip displays the following information for p-Class servers:
Bay
Name
IP Address
Serial Number
Model
Operating System
System ROM Version
Insight Management Version
Management Processor IP
Management Processor Firmware Version
The following details appear in the tool tip if the blade is hosting Virtual Machines:
VM Host Environment
NOTE:VM Host Environment details are shown for Virtual Machine Hosts running the following operating systems:
VMWare ESX
VMWare GSX
HPVMs for HP-UX
VM Guest Count
The picture view tool tip displays the following information for p-Class and e-Class switches:
Bay
Name
IP Address
Serial Number
Model
Firmware Version
The running status for VC switches
The picture view tool tip displays the following information for c-Class servers:
NOTE:For p-Class or e-Class systems, the Mezzanine slot labels are not shown.
Bay
Name
IP Address
Both the IPv4 and IPv6 addresses are displayed for management processors.
Serial Number
Serial Number (Logical)
UUID (Logical)
NOTE:The Serial Number (Logical) and UUID (Logical) are shown for the synergized server environment only.
Model
Operating System
System ROM Version
Insight Management Version
Management Processor IP
Management Processor Firmware Version
Mezzanine Slot X
NOTE:The X refers to the slot number of the Mezzanine card. If the c-Class server does not have any Mezzanine cards,this option is not shown.
Partner Device
NOTE:The Partner Device tool tip appears if a c-Class blade is associated with a storage device.
Starting in HP SIM 5.2 and forward, HP ProLiant BL680c servers are also supported.
The picture view tool tip displays the following information for e-Class servers:
NOTE:The e-Class server and desktop tool tip shows only the information listed below.
Bay
Name
IP Address
IPv6 Address
Both the IPv4 and IPv6 addresses are displayed for management processors.
Serial Number
Model
Operating System
The picture view tool tip displays the following information for e-Class switches:
Name
IP Address
Serial Number
Model
The picture view tool tip displays the following information for bare metal blades:
NOTE:The bare metal blade tool tip shows only the information listed below. Any information in addition to the items listed aredisplayed as Not Available.
Bay
Name
Serial Number
Model
System ROM Version
Management Processor IP
Management Processor Firmware
Enclosure details
Enclosure details to the right of the picture views include:
Enclosure Name. Click Enclosure Name to display the picture view of the enclosure.
Serial number. Displays the serial number of the system.
UUID. Of enclosure
Unit ID (LED). Indicates whether the Unit ID is on or off.
Onboard Administrator. Name of the Onboard Administrator is displayed
Health Status. Indicates the health status of the enclosure.
The details such as Data Center ID, Data Center Location, Row Number and Position in Row are visible only when you create a new rack or when youedit an existing rack.
Rack Details
Rack Name. Displays the name of the rack.
Health Status. Indicates the health status of the rack.
Data Center ID. Indicates the identification number of the data center which the rack is part of.
Data Center Location. Indicates the location of the data center which the rack is part of.
Row Number. Indicates the row number of the rack.
Position in Row. Indicates the position of the rack in the row.
Picture view buttons
Four buttons at the bottom of the System(s) tab (picture view) are available to users with administrative rights.
[Save As Collection]. When a system is highlighted, this button is used to save the selection with a new name. Changes are saved on a per-user, per-collection basis.
[Delete ]. This button is used to delete one or more systems from the database. Select the systems to be deleted, and click [Delete ]. A dialogbox appears. Click [OK] to continue with the deletion or click [Cancel ] to cancel the operation.
[Edit Rack]. This button is used to edit rack information. Select the rack to be edited and click [Edit Rack.]
[Print ]. When the report is displayed, select File Print from the browser menu to print the report.
NOTE:Because certain print options are not supported in Systems Insight Manager, you cannot:
Change the Orientation to Landscape in the Print dialog box (see Printing Problems in the Troubleshooting section of
Systems Insight Manager Technical Reference Guide for a workaround to this issue)
Cancel printing after the print job has been executed, but you can access the operating systems print queue and cancel theprint job
Print to a file
Print selected systems, only entire list of systems
Print the system table view page if you close the browser immediately after issuing a print request
Buttons are disabled if you do not have appropriate rights. However, the [Print ] button appears for all users.
Updated timestamp
The updated field automatically refreshes and displays the last updated timestamp. This reflects the Central Management Server time and not the clienttime.
Communications» Managing with tasks» License Manager» Reporting» Remote Support
Configuration andServices
» Operations» Reference
To view a created rack, click All Racks from the System and Event Collections panel. Allof the created racks are listed. Select the rack that you want to view additional details. Bydefault, the picture view of the rack appears. The picture view of the rack also distinguishesthe blades that are running Virtual Machines (VMs) on them. When you move your mouseover the image of the rack, these details are displayed. In addition, it also displays thenumber of VMs that are running.
NOTE:For c-Class systems (blades and switches in an enclosure) to appear inBladeSystem Integrated Manager tree or picture view, at least one OnboardAdministrator in that enclosure must be discovered before or after the devices.The systems can be discovered in HP SIM but do not appear in BladeSystemIntegrated Manager tree or picture view if none of the Onboard Administratorsare discovered.
NOTE:Any change in the physical configuration of the c-Class enclosure, such asmoving the systems from one slot to another or removing a system, requires re-identification of the Onboard Administrator.
The Rack View page displays the following tabs:
System(s) Displays information about the rack.
Systems Insight Manager - Navigating the picture view page
Events Displays events pertaining to the rack.
Systems Insight Manager - Navigating the event table view page
Communications» Managing with tasks» License Manager» Reporting» Remote Support
Configuration andServices
» Operations» Reference
» Viewing an enclosure» Creating a rack» Editing a rack» Saving an Onboard Administrator configuration» Restoring an Onboard Administrator configuration» Deleting a configuration script
The picture view page for enclosures contains a diagram of the discovered systems in the enclosure ifavailable. The enclosure name appears along with a picture view, table view, or iconic view of theenclosure. While signed in to Systems Insight Manager (HP SIM), placing your cursor over a servershown in the view, displays information on that particular server, including server blade name, andslotnumber You can also click a server name to display information about the server. The System Pageappears.
The following systems are displayed in the picture view for racks and enclosures:
Servers, desktops and workstation blades
Interconnect modules
Power supply enclosure
NOTE:Provided for p-Class only.
Onboard Administrator, fans, and power units
NOTE:Provided for c-Class only.
Slots that have no server or desktop identified and no interconnect switch identified are also displayedin the picture view for enclosures.
The following sections are displayed in the picture view for racks and enclosures:
System Status
Health Status icon. Represents the health of a system including Critical, Major,Minor, or Normal.
Identification
Enclosure Name. Displays the name of the enclosure. You can click PrintableEnclosure Details to display a printable table that includes the following enclosuredetails for:
Onboard Administrators:
Bay
System Name
IP Address
Model
Firmware Version
Role
Servers:
Bay
System Name
» Support and otherresources
» Assistance
» Glossary» Using Help
IP Address
Model
Management Processor IP
Management Processor Firmware Version
Insight Management Agent Version
System ROM Version
Operating System
IPv6 Address
NOTE:The IPv6 Address displays the address when IPv6 isenabled on the server and Not Available when IPv6 isdisabled.
Switches:
Bay
System Name
IP Address
Model
Media Type
Serial Number. Displays the serial number of the enclosure.
UUID. A unique identifier from the agent or other instrumentation on the system.
Rack Name. Click to display the rack in picture view.
Unit ID (LED). Indicates whether the Unit ID is on or off.
Onboard Administrator - Click the Onboard Administrator link to display the OnboardAdministrator home page.
NOTE:The Onboard Administrator link appears only for c-Class enclosures.
Virtual Connect Enterprise Manager. Displays the IP address to the HP VirtualConnect Enterprise Manager. You can click the IP address to access the VCEMsystem.
NOTE:This option appears only when a Virtual Connect is available.
Virtual Connect Enterprise Manager Domain Name. Displays the VCEM domainname. Click the domain name to view the System page of the VC Domain.
For c-Class enclosures:
Power and Thermal section
Power Redundancy. Displays Power Redundancy status. Click PowerRedundancy to display the Onboard Administrator home page.
Fan Redundancy. Displays Fan Redundancy status. Click Fan Redundancyto display the Onboard Administrator home page.
Enclosure Ambient Temperature. Displays the following:
Status. Displays the current status in icon form.
C/F. Displays the current temperature in degrees Celsius andFahrenheit.
Graph. Displays a graph depicting the temperature.
The following information displays for each power unit present in theenclosure:
Bay Number. Displays the number assigned to the bay.
Firmware Revision. Displays the firmware revision number.
A/C Input. Indicates the health status of the power unit.
Phase. Displays the phase.
Serial Number. Displays the serial number of the power unit.
Part Number. Displays the part number for the power unit.
Power Consumption. Displays the power consumption in watts toinclude:
Output/Capacity. Displays the current output verses thecapacity.
Graph. Displays a graph depicting the output verses thecapacity.
Fans section
Bay. Displays the bay number.
Health Status. Displays the health status of the enclosure.
Part Number. Displays the part number for the fan.
Power Used (Watts). Displays the amount of watts currently used.
Speed (RPM). Displays the current speed in RPMs.
NOTE:From this page, you can also view the enclosure details in a separate window.Select the enclosure name on the page and click [Printable Enclosure] details. Anew window displays the details of the enclosure.
For p-Class enclosures:
Power and Thermal section
The following items are displayed on the Enclosure View for a Power Enclosure if atleast one management processor in the rack using that power enclosure has firmwareversion of 1.80 or higher.
Load Balanced Cable. Indicates whether the load balanced cable is present.
Power Redundancy. Displays Power Redundancy status.
Temperature A. Displays overall temperature in the left section of the powerenclosure.
Center Temperature. Displays overall temperature in the center section of thepower enclosure.
Temperature B. Displays overall temperature in the right section of the powerenclosure.
The following information displays for each power unit present in theenclosure:
Bay Number. Displays the number assigned to the bay.
Firmware Revision Displays the firmware revision number.
A/C Input. Indicates the health status of the power unit.
Input Temperature. Displays the following:
Status. Displays the status of the input temperature.
C/F. Displays the current temperature in degrees Celsius andFahrenheit.
Graph. Displays a graph depicting the Trip temperatureverses Fail temperature.
Output Temperature. Displays the following:
Status. Displays the status of the output temperature.
C/F. Displays the current temperature in degrees Celsius andFahrenheit.
Graph. Displays a graph depicting the Trip temperatureverses Fail temperature.
While logged in to HP BladeSystem placing your cursor over a component shown in the view, displaysinformation on that particular component, including slot number/bay number, server blade name or IPaddress, product model, and the enclosure in which the server is located. If the bay is empty itdisplays it as an empty bay. If the Firmware of the power enclosure is less than 1.80, a question markis displayed for each bay of the enclosure. When the cursor is moved over that bay, it suggests toupgrade the Firmware. You can click a component in the picture view to display information about thatcomponent. The System Page appears. However, if you click the status icon that is displayed on thecomponent in the picture view, you remain on the Enclosure View page.
The buttons at the bottom of the picture view page are available to users with administrative rights.
[Save As Collection]. When a system or group of systems is selected, this button is used tosave the selection with a new name. Changes are saved on a per-user.
[Delete ]. This button is used to delete one or more systems from the database. Select thesystems to be deleted, and click [Delete ]. A dialog box appears. Click [OK] to continue withthe deletion or click [Cancel ] to cancel the operation. The picture view is refreshed.
NOTE:Only systems can be deleted from the picture view. If a collection is selected, the[Delete ] button becomes disabled. Collections must be deleted through theCustomize Collections page.
NOTE:If a VM Host is deleted, it can still be accessed through the virt console, and theoperations that can be performed on a VM Host are not affected by the deletion ofthe Systems Insight Manager (HP SIM) system. The virt console continues to showthe HP SIM status.
NOTE:If you select a collection by checking Select "collection name" collection itself,the [Delete ] button is disabled. To delete collections, go to the CustomizeCollections page.
[Print ]. Click [Print ] to display a printable version of the picture. Print the picture from thebrowser by clicking File Print .
[Print ] is available regardless of your rights, however the other options are only enabled if youhave appropriate rights.
Viewing an enclosure
To view an enclosure or power enclosure, click an enclosure collection in picture view or clickEnclosure Name in the Rack view. The Enclosure View page is displayed in picture view. The pictureview page for enclosures contains an image of the discovered enclosure with the discovered serversresiding in the enclosure.
Creating a rack
When HP Systems Insight Manager discovers systems with rack information such as a managementprocessor or OA, enclosures and racks are created. You can edit these racks using the rack view. Theracks that you created in the previous release are all available under the All Racks option. You canadd the enclosure to these previously created racks or create new racks and add enclosures to them.After you create these racks, they are listed under the All Racks option. The options All p-ClassRacks and All e-Class Racks options are no longer available.
To create a rack:
Except for e-Class racks, all other racks are automatically created when they are discovered. To addan e-Class enclosure to a rack, use the following procedure.
1. To access the picture view, navigate to All e-Class Enclosures, All c-Class Enclosures orAll p-Class Enclosures.
2. Click an enclosure. The enclosure picture view appears.
NOTE:In an enclosure under the Identification section, if the Rack name displays NotAvailable then the enclosure is not included in any rack.
3. To add the enclosure to a new rack, click [Add Enclosure to a rack]. The Add to rackdropdown list appears.
NOTE:This option is only available if an enclosure is not associated with a rack.
4. Select Add to new rack from the Add to Rack dropdown list and click [GO]. The Edit Rackpage appears. When a new rack is created from an enclosure view, the enclosure isautomatically added to the Selected enclosures section.
NOTE:The Add to Rack dropdown list also lists the racks that were previously created. Toadd an enclosure to an existing rack, select the rack name and click [GO].
5. To create a rack, you must add the following details:
Rack Name. Enter a name for the new rack. You can use this rack name to searchfor the rack later. This is a required field.
NOTE:The name you enter for the rack can differ from the rack name maintainedby the enclosure or the management processor.
Rack Height. Select the height of the rack from the dropdown list.
Data Center ID. Enter an ID for the data center. This ID can be alphanumeric andcan include hyphens and underscores (- and _) only.
Data Center Location. Enter the location of the data center. It can be thegeographic location or the actual physical location of the data center.
NOTE:You can use the Data Center ID and Data Center Location details tosearch the rack later.
Row Number. Enter the row number where the rack is located. You can enter onlynumerals for this field.
Position in Row. Enter the position in the row where the rack is located. You canenter only numerals for this field.
6. From the Available Enclosures dropdown list, select the filter by which you want to view thelist of enclosures. You can select All Enclosures or Class. You can filter the collection byentering a class. For example, if you enter p-Class, then all p-Class enclosures are availableto be added to the rack.
7. Select one or more of the relevant enclosures and click the >> symbol to add them to therack. You can click << to remove enclosures from the rack. You can also drag and drop theenclosure in the desired position within the rack.
NOTE:
indicates enclosures which are daisy chained.
8. Click [Save]. The enclosure is added to the rack and the picture of the new rack with theadded enclosure appears. If an enclosure has already been added to another rack, a messageappears indicating the enclosure is already assigned to another rack. You can confirm yourintention to remove the enclosure from the existing rack and it is added to the new rack. Youcan click [Cancel ] to discard the rack and close the window.
Editing a rack
From the picture view of a rack, you can edit the rack to add or remove enclosures.
Procedure 2 Editing a rack
1. To access the picture view, navigate to All Racks and select the rack to be edited and click[Edit Rack]. The Rack View page appears.
NOTE:When HP Insight Control power management is installed and you click [Edit Rack],the power management Edit Rack page appears.
NOTE:The rack can be edited and deleted only from the picture view.
2. To edit a rack, you can change any of the following details:
Rack Name. Enter a name for the new rack. You can use this rack name to searchfor the rack later.
Rack Height. Select the height of the rack from the dropdown list.
Data Center ID. Enter the data center ID. This ID can be alphanumeric and caninclude hyphens and underscores (- and _) only.
Data Center Location Enter the data center location. It can be the geographic
location or the actual physical location of the data center.
NOTE:You can use the Data Center ID and Data Center Location details tosearch the rack later.
Row Number. Enter the row number where the rack is located. You can enter onlynumerals for this field.
Position in Row. Enter the position in the row where the rack is located. You canenter only numerals for this field.
3. From the Available Enclosures dropdown list, select the filter by which you want to view thelist of enclosures. You can select All Enclosures or Class.
4. Select one or more of the relevant enclosures and click the >> symbol to add them to therack. You can click << to remove enclosures from the rack.
NOTE:
indicates enclosures which are daisy chained.
5. Click [Save]. The enclosure is added to the rack and the picture of the new rack with theadded enclosure appears. If an enclosure has already been added to another rack, a messageappears indicating the enclosure is already assigned to another rack. You can confirm yourintention to remove the enclosure from the existing rack and it is added to the new rack.
Saving an Onboard Administrator configuration
You can save the current settings of a c-Class enclosure as a configuration script. After you save thisconfiguration file, you can always upload this configuration script using the Onboard Administrator torevert to the previous settings of the enclosure. When you save a configuration file, you must providea file name that is unique to that enclosure. Also, you can save multiple configuration scripts for asingle c-Class enclosure.
To save a c-Class enclosure configuration:
1. From the Tools and Links page of the Onboard Administrator, click [Save/RestoreConfiguration of Onboard Administrator].
NOTE:You can access this option from [Save or Restore Onboard Administratorsettings] in the Configure section.
2. Enter the user name and password for the Onboard Administrator. The [Save/RestoreConfiguration Script] page appears.
3. Enter a unique name for the configuration script and click [Save]. The name must meet thefollowing conditions:
Alphanumeric and can contain special characters such as underscores and periods.
Must start with an alphabet character.
The configuration script is listed in the Restore Configuration section.
Restoring an Onboard Administrator configuration
You can restore the previous settings of an enclosure by selecting the respective configuration scriptthat you had saved earlier.
To restore a c-Class enclosure configuration:
1. From the Tools and Links page of the enclosure, click [Save/Restore Configuration ofOnboard Administrator].
2. Enter the user name and password for the Onboard Administrator. The Save/RestoreConfiguration Script page appears.
3. In the Restore Configuration section, select the file that includes the configuration settingsthat you want to restore.
4. Click [Restore]. The settings of the enclosure are restored.
Deleting a configuration script
You can delete a configuration script.
To delete a c-Class enclosure configuration:
1. From the Tools & Links page of the enclosure, click Save restore OA configuration andselect the configuration script to be deleted and click [Delete ].
NOTE:You can select multiple configurations and delete them simultaneously.
2. Click [Back] from the browser to navigate to the Tools/Links page of the OnboardAdministrator.
Communications» Managing with tasks» License Manager» Reporting» Remote Support
Configuration andServices
» Operations» Reference
p-Class enclosures together form a rack if a set of enclosures are networked in thehardware level. A p-class enclosure hosts the ProLiant BL p-Class server types.
To view a p-Class enclosure:
1. From the Systems Insight Manager Home page, expand the HP BladeSystemcollection in the Systems and Events panel.
2. Expand the All p-Class Enclosures. The p-Class enclosures tree expands.
3. Click the enclosure name that you want to view. The enclosure appears in theEnclosure View page.
NOTE:The p-Class power enclosure and power redundancy information appearsonly when the firmware of at least one of the management processors isgreater or equal to 1.82.
4. To change the view from the tree view default, select table or icons from the Viewas dropdown list. The page reappears displaying the new view.
HP Systems Insight Manager 7.1 English
Screens and product layout | Viewing e-Class enclosures
Communications» Managing with tasks» License Manager» Reporting» Remote Support
Configuration andServices
» Operations» Reference
The e-Class collections include the Consolidated Client Infrastructure blade PC Enclosureswhich host 20 PC blades including bc1000/bc1500 and bc2000/bc2500 PC blade types, andthe e-Class BL10e server blades.
To access all e-Class Enclosures:
1. From the Systems Insight Manager Home page, expand the HP BladeSystemcollection in the Systems and Events panel.
2. Expand the All e-Class Enclosures collection. The All e-Class Enclosures treeexpands.
3. Click the enclosure name that you want to view. The enclosure appears in theEnclosure View page.
4. To change the view from the tree view default, select table or icons from the Viewas dropdown list. The page reappears displaying the new view.
HP Systems Insight Manager 7.1 English
Screens and product layout | Viewing c-Class enclosures
Communications» Managing with tasks» License Manager» Reporting» Remote Support
Configuration andServices
» Operations» Reference» Support and other
resources» Assistance
» Glossary» Using Help
c-Class collections consist of the HP BladeSystem c7000 and c3000 Enclosures, HP ProLiant BL c-Class server blades, network interconnectcomponents, Onboard Administrator, and management tools that enable adaptive computing, optimized for rapid deployment.
To view a c-Class enclosure:
1. From the Systems Insight Manager Home page, click All c-Class Enclosures in the Systems and Events panel. You can also expand thetoggling expansion control to expand the c-Class Enclosures collection. The c-Class enclosures appear.
NOTE:In addition to displaying details such as servers, storage, the picture view of the c-class enclosures also shows the PCI expansionblade that is associated with the enclosure.
2. Click on the enclosure that you want to view. The Enclosure View page appears.
3. To change the view from the tree view default, select table or icons from the View as dropdown list. The page reappears displaying the newview.
To view a c3000 class enclosure:
1. From the Systems Insight Manager Home page, click All c-Class Enclosures in the Systems and Events panel. You can also expand thetoggling expansion control to expand the c-Class Enclosures collection. The c-Class enclosures appear.
2. Click on the enclosure that you want to view. The Enclosure View page appears.
3. To change the view from the tree view default, select table or icons from the View as dropdown list. The page reappears displaying the newview.
Starting with this release, you can view the DVD connection status of the c-class c3000 Rack and c3000 Tower model enclosures. The picture view ofthe enclosure displays the DVD image for the enclosure. Click on the DVD image of the enclosure to log in to the Onboard Administrator and view theconnection status.
NOTE:Redundant Onboard Administrator is not supported in c3000 Enclosure.
NOTE:If the enclosure is managed by Virtual Connect Manager, the picture view also displays the Virtual Connect Domain name and the IPaddress.
Communications» Managing with tasks» License Manager» Reporting» Remote Support
Configuration andServices
» Operations» Reference
» Displaying collection type» Expanding or collapsing collections» Customize collections table» Available buttons
The System and Event Collections panel contains a Systems collection. The Systems collection contains additionalsystem, cluster, and System Functions collections.
NOTE:Cluster collections are created only by attributes, not by members.
Collections can be private or shared. Shared collections are visible to all users, while private collections are personalcollections you create that only you can view. HP SIM includes several predefined shared collections. For example,Systems by Status is a default shared collection is included with HP SIM. For information about default sharedcollections, see the HP Systems Insight Manager User Guide.
To customize system collections, click Customize in the System and Event Collections panel. The CustomizeCollections page appears, and includes the following options:
1. “Displaying collection type”
2. “Expanding or collapsing collections”
3. “Customize collections table”
4. “Available buttons”
Displaying collection type
Select the type of collection you want to customize by selecting Systems from the Show collections of dropdownbox.
Expanding or collapsing collections
» Support and otherresources
» Assistance
» Glossary» Using Help
You can select to view all collections included in the Shared or Private collections, or to view only the Shared orPrivate collection titles. Click to expand all system and cluster collections in the table, or click to collapse allsystem and cluster collections in the table.
Customize collections table
When the Customize Collections page appears, if the collection and system status appears in the System andEvent Collections panel, a table appears that includes the names of all the collections.
Available buttons
On the Customize Collections page, the following buttons are available:
New This enables you to create a new system or cluster collection. If you have administrative rights, you cansave the new collection as a shared collection. Otherwise, you can save it only as a private collection. Formore information about creating a system collection by attributes, see Systems Insight Manager - Performingan advanced search for systems.
Edit This enables you to modify an existing collection name and its contents. This button is disabled if alocked collection is selected.
Move This enables you to move collections from one collection to another.
Copy This enables you to copy a collection as another collection.
Delete This enables you to delete an existing system or cluster collection, or system and event combinationcollections. Only empty system collections can be deleted. If you have administrative rights, you can delete ashared system or cluster collection. This button is disabled if a locked collection is selected.
Set Properties This enables you to set the display status, collection visibility, and the default view.
Communications» Managing with tasks» License Manager» Reporting» Remote Support
Configuration andServices
» Operations» Reference
» Displaying collection type» Expanding or collapsing collections» Customize collections table» Available buttons» Command line interface
The System and Event Collections panel contains an Events collection. This collection contains collections ofdifferent types of events.
Collections can be private or shared. Shared collections are visible to all users, while private collections are personalcollections you create that only you can view. HP SIM includes several predefined shared collections. For example,Events by Severity is a default shared collection included with HP SIM. See the HP Systems Insight Manager UserGuide for more information about default shared collections.
To customize system collections, click Customize in the System and Event Collections panel. The CustomizeCollections page appears and includes the following options:
1. “Displaying collection type”
2. “Expanding or collapsing collections”
3. “Customize collections table”
4. “Available buttons”
Displaying collection type
Select Events from the Show collections of dropdown box to customize event collections.
Expanding or collapsing collections
You can select to view all collections included in the Shared and Private collections, or to view only the Shared andPrivate collection titles. Click to expand all system and cluster collections in the table, or click to collapse allsystem and cluster collections in the table.
Customize collections table
When the Customize Collections page appears, if the collection and system status appears in the System and
» Support and otherresources
» Assistance
» Glossary» Using Help
Event Collections panel, a table appears that includes the names of all the collections.
Available buttons
The following options are available on the Customize Collections page for events:
New This enables you to create a new event collection. If you have administrative rights, you can save thenew collection as a shared collection. Otherwise, you can save it only as a private collection. See SystemsInsight Manager - Performing an advanced search for events for more information about creating an eventcollection by attributes.
Edit This enables you to modify an existing collection name and its contents.
Move This enables you to move collections from one collection to another, either from a private to a sharedcollection, or from a shared to a private collection.
Copy This enables you to copy a collection as another collection.
Delete This enables you to delete an existing event collection or system and event combination collections.If you have administrative rights, you can delete a shared event collection. Only empty event collections canbe deleted.
Set Properties This enables you to set the visibility of the collection and its members.
Command line interface
Users with administrative rights can use the mxcollection command to set properties for collections from the CLI.
See the HP Systems Insight Manager User Guide for more information about accessing the manpage, which includesdetailed information for this command.
Communications» Managing with tasks» License Manager» Reporting» Remote Support
Configuration andServices
» Operations» Reference
CAUTION:If you delete an automatic event handling task, the task is permanently deleted,and you cannot restore it.
The Automatic Event Handling - Manage Tasks page includes a table that shows allautomatic event handling tasks and how the task was set up.
From this page, you can:
Create a new automatic event handling task. See Systems Insight Manager -Creating an automatic event handling task for more information.
Edit a task. When you select a task and click edit, the edit wizard appears, which issimilar to the page for creating a new automatic event handling task, but the fieldsare prepopulated with the current settings for the task. An additional field isavailable to reassign the task owner. See Systems Insight Manager - Editingautomatic event handling tasks for more information.
Replicate the configuration details of an existing task. A Copy Task page appearsbelow the task list. Specify a new task name in the Task name box. Click [OK],and a new and separate task is created. See Systems Insight Manager - Copyingautomatic event handling tasks for more information.
View the task definition for the selected task. The entire configuration for theselected task, such as task name, owner, time filter, event, system criteria, actions,modem settings, and e-mail settings, appears. See Systems Insight Manager -Viewing task definitions for automatic event handling tasks for more information.
View the task result details for a selected task below the list. See Systems InsightManager - Viewing event task results for more information.
Disable a task. See Systems Insight Manager - Enabling and disabling eventhandling tasks for more information.
Delete tasks. A confirmation box appears. Click [OK] to delete, or click [Cancel ] tocancel the deletion. See Systems Insight Manager - Deleting events for moreinformation.
Systems Insight Manager - Related information
HP Systems Insight Manager 7.1 English
Screens and product layout | System Type Manager page
Communications» Managing with tasks» License Manager» Reporting» Remote Support
Configuration andServices
» Operations» Reference
» System type» Columns» Total» Available buttons
The Manage System Types page lists rules currently defined in HP SIM.
To access the Manage System Types page, select Options Manage System Types.
System type
You can filter the list on the Manage System Types page by system type by selecting a type fromthe System Type dropdown list. Click the down arrow, and then select a system type.
Columns
The following columns appear on the Manage System Types page:
Product Model
System Type
Subtype
Protocol
Priority
System Object Identifier
Click a column heading to sort the column in ascending or descending order.
Total
The Total field displays the total number of systems that meet the System type criteria selected inthe System type dropdown list.
Available buttons
The following buttons are available on the Manage System Types page:
[New]. Used to create a new rule.
» Support and otherresources
» Assistance
» Glossary» Using Help
[Edit]. Used to edit existing rules. Select the rules to edit, and then click [Edit].
[Delete ]. Used to delete an existing SNMP rule. Select the rule, and then click [Delete ].In the confirmation box, click [OK] to delete the rule, or [Cancel ], to return to the ManageSystem Types page without deleting the rule.
Communications» Managing with tasks» License Manager» Reporting» Remote Support
Configuration andServices
» Operations» Reference
The WMI Mapper Proxy is a configuration setting for WMI. The WMI Mapper receives clientCIM/XML WBEM requests and converts the requests to WMI requests. The WMI results areconverted to CIM/XML format and returned to the CMS. The discovery and Identificationtask uses the proxies in the WMI Mapper Proxy list to discover whether a system is a WMI-enabled system. If the system is WMI-enabled, then the identification information for thatsystem is returned.
The WMI Mapper Proxy feature enables you to perform the following tasks:
Add a WMI Mapper Proxy. Select Options Protocol Settings WMI MapperProxy [New]. The Add WMI Mapper Proxy section appears.
Edit a WMI Mapper Proxy. Select Options Protocol Settings WMI MapperProxy. Select the proxy to edit, and then click [Edit]. The Edit WMI Mapper Proxysection appears.
Delete a WMI Mapper Proxy. Select Options Protocol Settings WMIMapper Proxy. Select the systems to delete, and then click [Delete ]. Aconfirmation box appears. Click [OK] to delete the systems, or click [Cancel ] tocancel the deletion.
NOTE:Sort any column by clicking the column heading.
Related procedures
» Systems Insight Manager - Adding a WMI Mapper Proxy» Systems Insight Manager - Editing a WMI Mapper Proxy» Systems Insight Manager - Deleting a WMI Mapper Proxy
System page» System tab for servers» System tab for blade
servers» System tab for
managementprocessors
» System tab for clusters» System tab for a
complex» System tab for partitions» System tab for storage
host» System tab for a
storage switch» System tab for a
Use the System Page to view information related to a specific system. This page showsthe following tabs:
System. Includes general system and status information.
Tools & Links. Includes links to System Management pages, HP SIM pages, andother useful links.
Events . Displays the event table view page for the system.
Performance. Is available only when virtual machine hosts and guests arediscovered, and displays performance information.
Performance/Utilization. Includes general information about the performance ofthe system.
Port Mapping/Mezzanine Cards. Displays port mappings for c-Class blades andswitches only.
Essentials. Is available only for systems that might support other HP SIM partnerapplications and provides a description of available software and a link to the HPwebsite. You must have administrative or operator rights to view this tab.
You can access the System Page one of the following ways:
Select Tools System Information System Page, and then select a targetsystem.
Click a system name in the System Name column on one of the system viewpages.
NOTE:To quickly view the CMS System Page, select Options View CMS SystemPage.
HP Systems Insight Manager 7.1 English
Screens and product layout | System page | System tab for servers
complex» System tab for partitions» System tab for storage
host» System tab for a
storage switch» System tab for a
» System Status» More Information» Identification» Firmware and Software Revision» Product Description» HP Insight Control power management» Contact Information» Entitlement Information» Asset Information» Management Processor» Host Server» Storage Server» Associations» Role» Virtual Connect Domain
On the System tab, a status icon indicates the overall health status stored in the database.If a system is suspended, a disabled icon appears in place of the hardware status icon andsoftware status icon.
When the health status of an HP Enclosure Manager is set, the health status for the HPEnclosure Manager, enclosure, blade, and I/O module must all be set.
The System Status section contains more information on the system status.
The Quick Launch hyperlink links to a short list of frequently used tools. Place your cursorover the link to expand the menu and view the tools available for selected systems.Selecting a tool from this list bypasses the target verification page of the Task Wizard. Youcannot schedule tools launched from this menu. Customize this menu by clicking theCustomize link in the Quick Launch menu.
System Status
Table 1 System status section
Field Description
HealthStatus
The overall status for a system. It is obtained from WBEM, SNMP, Ping,Out-of-Band (OOB), and the HTTP protocols with the most critical statusdisplayed. WBEM, SNMP, and OOB status can have sub statuses that areused for the calculation of their upper status. A ping (ICMP or TCPreachable check) is always made. The link for Health Status will not bepresent if it has sub status. Otherwise, click the Health Status link toaccess the HP SMH, if it is present. If HP SMH is not present, the linkaccesses the Property Page Status page. If no option is available, theHealth Status link is not present. When the WBEM status is expanded,the statuses are sorted alphabetically and displayed vertically. If a statussource does not have a value, that status does not appear. When youplace your cursor over a status text, a flyover appears displayinginformation explaining the status. When the status is Disabled, the systemcould be off-line or unreachable or the system is suspended frommonitoring. For a cluster, the rollup status of all its components appears.
ManagementProcessorStatus
The management processor status (if available) links to a web server onthe management processor.
SoftwareStatus
The software status icon links to the system software Version ControlAgent if available.
DisabledStatus
A system that is suspended has a disabled icon in the HW and SWcolumns on the system table view page.
storage array» System tab for a tape
library» Tools & Links tab» Essentials tab» Performance tab for
Communications» Managing with tasks» License Manager» Reporting» Remote Support
Configuration andServices
» Operations» Reference» Support and other
resources» Assistance
» Glossary» Using Help
VulnerabilityStatus
The vulnerability status of a system is the indicator summation of securityand configuration weaknesses as determined by an external security scanof the system.
Contract andWarrantyStatus
The Contract and Warranty Status is available when you have aWindows CMS, and the HP Insight Remote Support Pack is installed. Youcan view Contract and Warranty status updates for HP systems that havecontract and warranty data collection enabled. Click the Contract andWarranty Status icon to view the Contract and Warranty Details pagefor the system.
AggregateEvent Status
The Aggregate Event Status is a summary of uncleared events. Thisstatus is updated when an event is added, updated, or removed. To viewthe System Page Events tab for a system, click the Aggregate EventStatus icon. For iLO4 systems, this status reflects both the iLO4 and hostevent state. For Active Health enabled systems, iLO4 is launched whenyou click this link.
If a system is in a suspended mode, the System Page displays a disclaimer under SystemStatus, stating Monitoring of the system is suspended until , and gives a date and timefor monitoring to resume.
Partner applications might have their own status registered with the CMS. If so, thesestatuses appear under Health Status and as status columns on the system table viewpage. For example, the System Security Vulnerability Status links to information aboutsystem status regarding HP Insight Vulnerability and Patch Manager software.
More Information
This section provides more detailed information about the system and lists availableinformation tools. Possible links include:
HP System Management Homepage
Property Page
Partition Manager View
Virtual Manager Host View
BladeSystem XXXXX Onboard Administrator
Superdome 2 Onboard Administrator
Identification
This section expands whenever you access the System Page the first time.
NOTE:For H3C switches, the following attributes cannot be discovered through HP SIMdiscovery and identification:
Serial Number
UUID
NOTE:This field is blank for a Windows 2008 and Windows 2003based CMS's.
Operating System Name
Operating System Type
Vendor
Table 2 Identification section
Field Description
Address The IP (including IPV6) address discovered for the system.
PreferredSystemName
The name shown for the system. When available, it defaults to the host namefrom DNS. You can override this setting through the Edit System Propertieslink under the Tools & Links tab.
NetworkName
The fully qualified DNS name, if available. Reverse DNS lookups by IPaddress must be enabled and match a forward lookup.
UUID A unique identifier from the agent or other instrumentation on the system.
SerialNumber The serial number of the system.
Productnumber
The product Number of the system
This appears for Virtual Connect switches
Orphan systems
An orphan system is a system detected by HP SIM that has had its IP address and namereallocated to another system. Occasionally, this reallocation can happen throughsimultaneous DHCP address assignment changes and a system rename. Other causes caninclude a move of the operating system from one blade to another through differentvirtualization mechanisms such as a physical-to-physical system move or replacement of asystem board that has not be configured the same as the original system board.
Table 3 Orphan system names
Possiblesystem names Description
<serialNumber> Where <serialNumber> is replaced with the serial number of thesystem.
<serialNumber>-<devKey>-<oldName>
Where <serialNumber> is replaced with the serial number of thesystem, <devKey> is replaced with the devKey on the system, andoldName> is replaced with the old system name.
<devKey> Where <devKey> is replaced with the devKey on the system.
Firmware and Software Revision
NOTE:For an MSA having dual controllers, this section will always include informationfor both of the controllers.
Table 4 Firmware and Software Revision section
Field Description
Executable The name of the executable.
Manufacturer The vendor of the installed firmware.
Version The version string for the installed firmware. The version can include major,minor, revision, and build information.
BuildNumber The build number of the software.
State
The client application uses the InstallState from the bundle, and theInstallSoftwareIdentity association from the bundle's components todetermine which Software Identity objects in the bundle are installed and
which are missing. This field can contain the values: Installed, Partial, orNone.
ClassificationThe classification field provides a means to describe the software. Forexample, the field might contain Firmware or Application Softwareamong other descriptive strings.
FirmwareCategory
The firmware category field displays values related to the category ofsoftware, such as NIC driver, NIC firmware, System ManagementSoftware, and so on.
Product Description
Table 5 Product description section
Field Description
Product ID The identification number that, when added to the serial number of theserver, enables HP Support to uniquely identify HP systems
System Type The basic system type returned from identification
SystemSubtype
The system subtype returned from identification.
If the system is a T or F series storage server, this will be set toStorage.
If the system is an HP Enclosure Manager, which is identified as amanagement processor, this will be set to HP Enclosure Manager.
Product Model The product model (name) defined by the manufacturer
HardwareDescription
The description of the hardware obtained from the Edit SystemProperties page
OS Name The operating system name for the system used for filtering
OS For ToolFiltering The short name of the operating system used for tool filter definition files
OS Description The detailed description of the operating system
OS Version The numerical representation of the operating system version
ManagementProtocols
The management protocols that have responded when attempting toidentify the system.
NOTE:If more protocols are expected, verify the credentialsconfigured on the System Protocol Settings page.
Server Role The user-specified server role from the ProLiant agents that can be setfrom the HP SMH
Comments The user-specified comments from the SNMP or other agents
CurrentRunningApplications
A list of applications running on the system
TrustedPlatformModule
This informs you of TPM status and can be set as absent, disabled,enabled, not present, or present but disabled.
EmbeddedRemoteSupport
Displays if embedded remote support is enabled on the iLO
HP Insight Control power management
Table 6 HP Insight Control power management section
Field Description
System RequiresRedundant Power
Indicates if the system is intended to have redundant powersupplied to it.
Height The height of the system occupied in a rack (in U slots).
Maximum PowerConsumption (Watts)
The possible maximum power consumption of the systemin Watts.
Minimum Power (Watts) The minimum power consumption of the system whenpowered on in Watts.
Peak Observed PowerConsumption (Watts)
The peak observed power consumption of the devicethroughout all collected power history.
To configure/edit the System Properties of the system, click [Configure].
Contact Information
Table 7 Contact Information section
Field Description
Location A user-specified field from the agents for the physical location of the system
Contact The user-specified contact of the system from the agents
Many fields in the Contact Information and Product Description sections can be overriddenlocally on the CMS through the Edit System Properties pages. For more information, seeTitle not available.
Entitlement Information
Table 8 Entitlement Information section
Field Description
Start Date The starting date of the contract or warranty
End Date The end date of the contract or warranty
Type The contract type, if a service contract exists
Status The current contract or warranty status
Last Collection The date that contract and warranty data was last collected
Asset Information
This section includes Asset Number, which is the asset number of the system.
Management Processor
This section appears only if a management processor is available.
Table 9 Management Processor section
Field Description
Name The display name (Preferred Name) of the management
processor used to manage the system
Address The IP address of the management processor used to managethe system
ManagementProcessor Homepage
This link takes you to the home page of the managementprocessor
Model The model name of the management processor for this system
Host Server
Table 10 Host server section
Field Description
Name The host server name with a link to the host server's System page
Slot The slot number of the host server
Model The product model of the host server
Storage Server
This section includes the following information for servers that have a storage serverassociated:
Table 11 Storage Server section
Field Description
Name The storage server name with a link to the storage server System Page
Slot The slot number of the storage server System Page
Model The product model of the storage server
Associations
This section includes:
Table 12 Associations section
Field Description
EnclosureName The name of the enclosure, if the system is in an enclosure
Rack Name The name of the rack to which the PDU is associated, if the enclosure isin a rack that can be discovered
Rack Managername Name of the rack manager which manages the PDU
Slot The slot number where the system is positioned within the enclosure
BayThe bay where the system is positioned within the enclosure
This appears Virtual Connect switches
ServerDimensions The dimensions in millimeters of the system
SwitchDimensions The dimensions in millimeters of the system
Virtual Connect The name shown for the VCD. When available, it defaults to the host
Domain name from DNS
Role
Table 13 Role section
Field Description
Role Role of the management processor
Running statusThe running status of the switch
This appears for Virtual Connect switches
Virtual Connect Domain
Table 14 Virtual Connect Domain section
Field Description
Virtual Connect DomainName
The name shown for the system, and when available,defaults to the host name from DNS
Primary Virtual ConnectEthernet Module Name of IP address of the Virtual Connect switch
Configuration Status Gives the status of the domain
Firmware Version Firmware version of the Virtual Connect switch
Primary Enclosure Enclosure in which the Primary Virtual Connect EthernetModule is configured
Remote Enclosures Lists remote enclosures that are present
Interconnect Bay Bay where the Virtual Connect switch is present
Address The IP (including IPv6) address discovered for the system.
PreferredSystemName
The name shown for the system. When available, it defaults to the host name from DNS. You canoverride this setting through the Edit System Properties link under the Tools & Links tab.
NetworkName
The fully qualified DNS name, if available. Reverse DNS lookups by IP address must be enabledand match a forward lookup.
UUID A unique identifier from the agent or other instrumentation on the system.
SerialNumber The serial number of the system.
Productnumber
The product Number of the system
This appears for Virtual Connect switches
Role
This section indicates whether the Onboard Administrator is active or inactive and appears on OnboardAdministrator system page.
Virtual Connect Domains
This option displays the following information of the Virtual Connect Domain and appears on a Virtual connectdomain system page:
Virtual Connect Domain Name
Primary Virtual Connect Ethernet Module
Configuration Status
Firmware Version
Rack
Enclosure
Interconnect Bay
storage array» System tab for a tape
library» Tools & Links tab» Essentials tab» Performance tab for
Communications» Managing with tasks» License Manager» Reporting» Remote Support
Configuration andServices
» Operations» Reference» Support and other
resources» Assistance
» Glossary» Using Help
To access the All Virtual Connect Domain discovered in your system, go to the System and Event Collectionspanel, click Shared Systems by Type All Virtual Connect Domains. The All Virtual Connect Domainsoption is visible in the left navigation pane when the Onboard Administrator is discovered.
NOTE:There is a different system page for Virtual Connect Domain and Master Virtual Connect Switch.
complex» System tab for partitions» System tab for storage
host» System tab for a
storage switch» System tab for a
» System Status» More Information» Identification» Product Description» Associations» Role» Managed Systems
On the System tab, a status icon indicates the overall health status stored in the database.If a system is suspended, a disabled icon appears in place of the hardware status icon.
The Quick Launch hyperlink links to a short list of frequently used tools. Place your cursorover the link to expand the menu and view the tools available for selected systems.Selecting a tool from this list bypasses the target verification page of the Task Wizard. Youcannot schedule tools launched from this menu. Customize this menu by clicking theCustomize link in the Quick Launch menu.
NOTE:Expand the following sections by clicking . Collapse them by clicking .
System Status
Table 1 System status section
Field Description
HealthStatus
The overall status for a system. It is obtained fromWBEM, SNMP, Ping, Out-of-Band (OOB), and theHTTP protocols with the most critical status displayed.WBEM, SNMP, and OOB status can have substatuses that are used for the calculation of theirupper status. A ping (ICMP or TCP reachable check)is always made. The link for Health Status will not bepresent if it has sub status. Otherwise, click theHealth Status link to access the HP SMH, if it ispresent. If HP SMH is not present, the link accessesthe Property Page Status page. If no option isavailable, the Health Status link is not present. Whenthe WBEM status is expanded, the statuses aresorted alphabetically and displayed vertically. If astatus source does not have a value, that status doesnot appear. When you place your cursor over a statustext, a flyover appears displaying informationexplaining the status. When the status is Disabled, thesystem could be off-line or unreachable or the systemis suspended from monitoring. For a cluster, the rollupstatus of all its components appears.
The Contract and Warranty Status is available when
TheAggregateEventStatus is asummaryofunclearedevents.This statusis updatedwhen an
storage array» System tab for a tape
library» Tools & Links tab» Essentials tab» Performance tab for
Communications» Managing with tasks» License Manager» Reporting» Remote Support
Configuration andServices
» Operations» Reference» Support and other
resources» Assistance
» Glossary» Using Help
ContractandWarrantyStatus
you have a Windows CMS, and the HP InsightRemote Support Pack is installed. You can viewContract and Warranty status updates for HP systemsthat have contract and warranty data collectionenabled. Click the Contract and Warranty Statusicon to view the Contract and Warranty Detailspage for the system.
AggregateEventStatus
event isadded,updated,orremoved.To viewtheSystemPageEventstab for asystem,click theAggregateEventStatusicon.
More Information
This section provides more detailed information about the system and lists availableinformation tools. Possible links include:
HP System Management Homepage
Property Page
Partition Manager View
Virtual Manager Host View
BladeSystem XXXXX Onboard Administrator
Superdome 2 Onboard Administrator
Integrated Lights-Out 4 (iLO 4)
Identification
Table 2 Identification section
Field Description
Address The IP (including IPV6) address discovered for the system.
PreferredSystemName
The name shown for the system. When available, it defaults to the host namefrom DNS. You can override this setting through the Edit System Propertieslink under the Tools & Links tab.
NetworkName
The fully qualified DNS name, if available. Reverse DNS lookups by IPaddress must be enabled and match a forward lookup.
UUID A unique identifier from the agent or other instrumentation on the system.
SerialNumber The serial number of the system.
Productnumber
The product Number of the system
This appears for Onboard Administrator
Address The IP address of the discovered system.
Preferredsystemname
The name shown for the system. When available, it defaults to the host namefrom DNS. You can override this setting through the Edit System Propertieslink under the Tools & Links tab.
Product Description
Table 3 Product description section
Field Description
System Type The basic system type returned from identification
Product Model The product model (name) defined by the manufacturer
HardwareDescription
The description of the hardware obtained from the Edit SystemProperties page
ManagementProtocols
The management protocols that have responded when attempting toidentify the system.
NOTE:If more protocols are expected, verify the credentialsconfigured on the System Protocol Settings page.
System SubtypeThe system subtype returned from identification
This appears for Onboard Administrator
OS NameDisplays embedded operating system
This appears for Onboard Administrator
OS TypeDisplays embedded operating system
This appears for Onboard Administrator
OS VersionDisplays embedded operating system version
This appears for Onboard Administrator
EmbeddedRemote Support Displays if embedded remote support is enabled on the iLO
Entitlement Information
Table 4 Entitlement Information section
Field Description
Start Date The starting date of the contract or warranty
End Date The end date of the contract or warranty
Type The contract type, if a service contract exists
Status The current contract or warranty status
Last Collection The date that contract and warranty data was last collected
Associations
Table 5 Associations section
Field Description
Server name Name of the servers that are managed by the rack manager.
Enclosure NameThe name of the enclosure, if the system is in an enclosure
Not available for rack managers
Rack Name The name of the rack, if the enclosure is in a rack that can bediscovered
Virtual Connect Domain
The name shown for the VCD and when available, defaults tothe host name from DNS
Not available for rack managers
BayThe bay where the system is positioned within the enclosure
This appears for Onboard Administrator
Management ProcessorDimension
The dimensions in millimeters of the system
This appears for Onboard Administrator
Role
Table 6 Role section
Field Description
Role
Role of the management processor or rack manager
Role of the management processor
This appears for Onboard Administrator
Managed Systems
Table 7 Managed systems section
Field Description
Server Name The server name obtained during discovery and identification.
» System tab for partitions» System tab for storage
host» System tab for a
storage switch» System tab for a
» Health Status» Identification» Product Description
Based on the type of cluster provider and the version of cluster providers, not all propertiesare available at all times. If a property does not have a value, the property does not appearon this page. This page is for all clusters except for MSCS clusters. They are monitoredusing Cluster Monitor.
The Quick Launch hyperlink links to a short list of frequently used tools. Place your cursorover the link to expand the menu and view the tools available for selected systems.Selecting a tool from this list bypasses the target verification page of the Task Wizard. Youcannot schedule tools launched from this menu. Customize this menu by clicking theCustomize link in the Quick Launch menu.
Health Status
Each link for a cluster member under Health Status links to the System Page of a clustermember. The cluster status is a combination of cluster member statuses in the cluster andcluster status itself. The most critical status is shown.
Identification
Address The IP address of the cluster.
Preferred System Name The name shown for the system. When available, itdefaults to the host name from DNS. You can override this through the EditSystem Properties link under the Tools & Links tab.
Network Name The fully qualified DNS name. Reverse DNS lookups by IPaddress must be enabled and match a forward lookup.
Product Description
NOTE:Expand this section by clicking . Collapse it by clicking .
Cluster Name The name of the cluster
System Type The basic system type returned from identification.
Cluster Type The basic cluster type returned from identification
HP Systems Insight Manager 7.1 English
Screens and product layout | System page | System tab for a complex
» System tab for partitions» System tab for storage
host» System tab for a
storage switch» System tab for a
» Health Status» More Information» Product Description» Summary of Components
A complex is a container type system and contains nPartitions. Additional links are availableon the System Page to access information when you select a complex system. Includedare areas that are unique to a complex.
The Quick Launch hyperlink links to a short list of frequently used tools. Place your cursorover the link to expand the menu and view the tools available for selected systems.Selecting a tool from this list bypasses the target verification page of the Task Wizard. Youcannot schedule tools launched from this menu. Customize this menu by clicking theCustomize link in the Quick Launch menu.
Health Status
Each link for a partition member under Health Status links to the System Page of apartition. For a Superdome 2 complex, the health status of a complex is a combination of allthe health statuses of each partition included in the complex. For a Superdome 2 complex,the health status is determined from the status of all partitions and the status of thecomplex. The status of the complex is determined from the OOB status. The most criticalstatus is displayed.
More Information
This section provides more detailed information about the system and lists availableinformation tools. Possible links include:
Superdome 2 Onboard Administrator
This link takes you to the Onboard Administrator page.
Product Description
NOTE:Expand this section by clicking . Collapse it by clicking .
This section includes:
Complex Name The name of the complex returned from identification
Complex Type The HP SIM managed system type
Complex Subtype This field describes the additional roles of the complex.
Product Name The product name as defined by the manufacturer
Serial Number The serial number of the complex returned from identification
Product Number - Current
Product Number - Original
Complex Profile Revision
Active Service Processor Location
storage array» System tab for a tape
library» Tools & Links tab» Essentials tab» Performance tab for
» Identification» Product Description» Summary of Components» Associations
The System Page for a partition follows the same layout as a server System Page.However, it is extended to include unique information that applies to partitions only.
The Quick Launch hyperlink links to a short list of frequently used tools. Place your cursorover the link to expand the menu and view the tools available for selected systems.Selecting a tool from this list bypasses the target verification page of the Task Wizard. Youcannot schedule tools launched from this menu. Customize this menu by clicking theCustomize link in the Quick Launch menu.
The following sections include only the unique information for a partition.
Identification
The Identification section expands when you access the System Page for the first time.The items available under this section include:
nPartition Name
nPartition Number
Host Name
Product Description
NOTE:Expand this section by clicking . Collapse it by clicking .
This section includes:
CPU Architecture
Cell Compatibility
Firmware Revision
Primary Boot Path
HA Alternate Boot Path
Alternate Boot Path
Summary of Components
This section includes:
Active Cells
Inactive Cells
Active Processors
Inactive Processors
Number of Licensed Processors (for partitions that participate in Instant
storage array» System tab for a tape
library» Tools & Links tab» Essentials tab» Performance tab for
A storage host is a server, desktop, or workstation connected by an HBA to a SAN.Additional links are available on the System Page to access detailed information when astorage host is selected. Included are areas that are unique to storage hosts. HP SIMdisplays data supplied by each HBA SMI-S provider. If an HBA SMI-S provider does notsupply data for a property, the property does not appear on this page.
NOTE:To get Storage Port Controller and LUNs information on the System Page, youmust install FC HBA providers (providers which implements Storage NetworkingIndustry Association Fiber Channel Host Bus Adapter (SNIA FC HBA) profile) onthe host where HBA resides. Without these providers cannot obtain Storage PortController and LUNs information even though it is available in other managementapplications like HP SMH. If you install HP Insight Management WBEMProviders for Windows Server 2003 or Windows Server 2008 on a Windows host,then only Storage Port Controller information is available. You cannot obtainLUNs information with HP Insight Management WBEM Providers for WindowsServer 2003 or Windows Server 2008 x64 Editions. There are no providersavailable for an HP UX host to obtain LUNs information.
The Host Bus Adapters section shows the date, time, and duration of the last datacollection task. To update the data, click the Last Update link, and schedule or run a DataCollection task.
The Quick Launch hyperlink links to a short list of frequently used tools. Place your cursorover the link to expand the menu and view the tools available for selected systems.Selecting a tool from this list bypasses the target verification page of the Task Wizard. Youcannot schedule tools launched from this menu. Customize this menu by clicking theCustomize link in the Quick Launch menu.
Product Description
NOTE:Expand this section by clicking . Collapse it by clicking .
In addition to the Product Description information on the Systems Insight Manager - Systemtab for storage host, this section can include:
System Subtype Storage systems use the following subtypes:
Storage. A system identified as part of the storage infrastructure
SMI. A system discovered through an SMI-S provider
Host Bus Adapters
NOTE:Expand this section by clicking . Collapse it by clicking .
This section lists the installed Fibre Channel HBAs.
storage array» System tab for a tape
library» Tools & Links tab» Essentials tab» Performance tab for
complex» System tab for partitions» System tab for storage
hostSystem tab for astorage switch
» System tab for a
» Product Description» Ports» Status Summary
A storage switch is a Fibre Channel switch connected to a SAN. Additional links areavailable on the System Page to access detailed information when a storage switch isselected. Included are areas unique to storage switches. HP SIM displays data supplied bythe switch's SMI-S provider. If the SMI-S provider does not supply data for a property, theproperty does not appear on this page.
The Ports and Status Summary sections show the date, time, and duration of the last datacollection task. To update the data, click the Last Update link and schedule or run a DataCollection task.
The Quick Launch hyperlink links to a short list of frequently used tools. Place your cursorover the link to expand the menu and view the tools available for selected systems.Selecting a tool from this list bypasses the target verification page of the Task Wizard. Youcannot schedule tools launched from this menu. Customize this menu by clicking theCustomize link in the Quick Launch menu.
Product Description
NOTE:Expand this section by clicking . Collapse it by clicking .
In addition to the Product Description information on the Systems Insight Manager - Systemtab for servers, this section includes the following information:
System Subtype One of the following subtypes:
Storage. A system identified as part of the storage infrastructure
SMI. A system discovered through an SMI-S provider
Product Name The product name for the switch (for example, a model number)
Product Vendor The switch vendor
Product Identifying Number A unique identifier for the switch (for example, aserial number)
Product Version The switch product version
Firmware Version The installed firmware version
Firmware Manufacturer The firmware manufacturer
BIOS/FCode Version The installed BIOS/FCode version
BIOS/FCode Manufacturer The BIOS/FCode manufacturer
Management Proxies The servers that manage the switch through amanagement protocol
Software Version The version of the software installed on this system
Software Manufacturer The manufacturer of the software installed on this system
NOTE:Some vendors enter firmware details in the Software Version and SoftwareManufacturer fields instead of the Firmware Version and FirmwareManufacturer fields. These fields might display data about software related to
storage array» System tab for a tape
library» Tools & Links tab» Essentials tab» Performance tab for
complex» System tab for partitions» System tab for storage
host» System tab for a
storage switchSystem tab for a
» Product Description» Ports» Storage Volumes» Capacity Information
A storage array is a disk array that uses a Fibre Channel controller to connect to a SAN.Additional links are available on the System Page to access information when a storagearray is selected. Included are the areas that are unique to storage arrays. HP SIM displaysdata supplied by the array's SMI-S provider. If the SMI-S provider does not supply data fora particular property, the property does not appear on this page.
The Ports, Storage Volumes, and Capacity Information sections show the date, time,and duration of the last data collection task. To update the data, click the Last Update link,and schedule or run a Data Collection task.
The Quick Launch hyperlink links to a short list of frequently used tools. Place your cursorover the link to expand the menu and view the tools available for selected systems.Selecting a tool from this list bypasses the target verification page of the Task Wizard. Youcannot schedule tools launched from this menu. Customize this menu by clicking theCustomize link in the Quick Launch menu.
Product Description
NOTE:Expand this section by clicking . Collapse it by clicking .
In addition to the Product Description information in Systems Insight Manager - System tabfor servers, this section can include the following information:
System Subtype Includes the following subtypes:
Storage Device. A system as part of the storage infrastructure
SMI. A system discovered through an SMI-S provider
Product Name The product name for the array (for example, a model number)
Product Vendor The storage array vendor
Product Identifying Number A unique identifier for the storage array (forexample, a serial number)
Product Version The array product version
Firmware Version The installed firmware version
Firmware Manufacturer The firmware manufacturer
BIOS/FCode Version The installed BIOS/FCode version
BIOS/FCode Manufacturer The BIOS/FCode manufacturer
Management Proxies The servers that manage the selected array through amanagement protocol
Software Version The version of the software installed on this system
Software Manufacturer The manufacturer of the software installed on this system
NOTE:Some vendors enter firmware details in the Software Version and SoftwareManufacturer fields instead of the Firmware Version and Firmware
storage array» System tab for a tape
library» Tools & Links tab» Essentials tab» Performance tab for
Communications» Managing with tasks» License Manager» Reporting» Remote Support
Configuration andServices
» Operations» Reference» Support and other
resources» Assistance
» Glossary» Using Help
Manufacturer fields. These fields might display data about software related tothe system.
Ports
NOTE:Expand this section by clicking . Collapse it by clicking .
If HP SIM discovers controllers that manage this array's ports, they appear as expandableelements in the Ports table. If no controllers were discovered, the table lists only portdetails.
Controller Details
Element Name The name of the controller
LUN Count The number of connections made through this controller
Status The controller's WBEM operational status
NOTE:Click to view specific port details.
Port Details
Element Name The port name
WWN The port's World Wide Name
Port Type The port type
LUN Count The number of connections made through this port
Status The port's WBEM operational status
Storage Volumes
NOTE:Expand this section by clicking . Collapse it by clicking .
This section lists the array's storage volumes. Storage volumes are logical volumes on anarray .
Volume Name The storage volume name.
Visible to Host(s) The storage volume accessible to the listed hosts.
Block Size The storage volume's block size in bytes.
Number of Blocks The total number of blocks on the storage volume.
Total Size The storage volume's total size.
RAID Level The RAID level of the storage volume. Typically, this value is suppliedby the array's SMI-S provider. If the SMI-S provider does not supply a value, HPSIM calculates the RAID level based on the values for Package Redundancy andData Redundancy as follows:
Package redundancy Data redundancy RAID level
0 1 RAID 0
1 1 RAID 5
1 2 RAID 1
2 1 RAID 6
2 2 RAID 15/51
If the RAID value is calculated by HP SIM, an asterisk is added to the RAID value(for example RAID 5*).
Capacity Information
NOTE:Expand this section by clicking . Collapse it by clicking .
The Capacity Information table lists available capacity metrics for storage arrays in theMetric column and the corresponding disk space value in the Size column. For each metric,the disk space value is expressed as a percentage of the array's total capacity. The metricsin the Capacity Information table also appear as percentages in a pie chart below thetable. If a value in the table shows an Undetermined value, the pie chart does not appear.
HP SIM discovers external LUs (a feature of External Storage XP) on XP arrays that aremanaged by Command View XP Advanced Edition. When an XP array has external LUs,the Total Capacity value is higher than the total capacity of all of the disks in that XP arraybecause it includes the capacity from the external LUs.
Total Capacity The total capacity of the array and it can be used in the followingways:
Raw Space configured for a specific purpose.
Assigned Space that is assigned to pools of storage that can beconfigured into storage volumes (LUNs).
Allocated Space configured as storage volumes, but not connectedthrough ports. An application cannot access an allocated space until it isassigned to a port.
Exposed Space configured as storage volumes that is connected throughports. Applications can access this space.
RAID Overhead Space on the array that is not directly usable because itis being used to provide redundancy. For example, if 100 GB is allocated fora RAID 1 (mirrored) storage volume, 50 GB are directly usable (Allocated orExposed), and 50 GB is RAID Overhead to provide the mirrored copy of thedata.
Other Space not accounted for by previously listed categories. Otherspace is typically used for metadata.
complex» System tab for partitions» System tab for storage
host» System tab for a
storage switch» System tab for a
» Product Description» Ports» Media Access Devices» Changer Devices
A tape library is a tape drive connected to a SAN. Additional links are available on theSystem Page to access information when a tape library is selected. Included here areareas that are unique to tape libraries. HP SIM displays data supplied by the tape library'sSMI-S provider. If the SMI-S provider does not supply data for a particular property, theproperty does not appear on this page.
The Ports, Media Access Devices, and Changer Devices sections show the date, time,and duration of the last data collection task. To update the data, click the Last Update link,and schedule or run a Data Collection task.
The Quick Launch hyperlink links to a short list of frequently used tools. Place your cursorover the link to expand the menu and view the tools available for selected systems.Selecting a tool from this list bypasses the target verification page of the Task Wizard. Youcannot schedule tools launched from this menu. Customize this menu by clicking theCustomize link in the Quick Launch menu.
Product Description
NOTE:Expand this section by clicking . Collapse it by clicking .
In addition to the Product Description information on the Systems Insight Manager - Systemtab for servers, this section includes the following information:
System Subtype The following subtypes:
Storage. A system identified as part of the storage infrastructure
SMI. A system discovered through an SMI-S provider
Product Name The product name for the tape library
Product Vendor The tape library vendor
Product Identifying Number A unique identifier for the tape library
Product Version The tape library product version
Firmware Version The installed firmware version
Firmware Manufacturer The firmware manufacturer
BIOS/FCode Version The installed BIOS/FCode version
BIOS/FCode Manufacturer The BIOS/FCode manufacturer
Management Proxies The servers that manage the selected tape library througha management protocol
Software Version The version of the software installed on this system
Software Manufacturer The manufacturer of the software installed on this system
NOTE:Some vendors enter firmware details in the Software Version and SoftwareManufacturer fields instead of the Firmware Version and FirmwareManufacturer fields. These fields might display data about any software related
storage arraySystem tab for a tapelibrary
» Tools & Links tab» Essentials tab» Performance tab for
complex» System tab for partitions» System tab for storage
host» System tab for a
storage switch» System tab for a
» Management Pages» Web Application Pages» HP Systems Insight Manager Pages» HP iLO Links
The system links you can view depend on the Discovery configuration, the correctinstallation of agents and protocols, and the polling tasks that interrogate the system.
NOTE:Depending on the DNS configurations, you might need to use the IP address ora FQDN name to make the links work appropriately.
Management Pages
This section includes links that are provided by the HTTP Web Management on the system.These links are for system management and status. If the system does not have InsightManagement Agent, this section does not appear. Some of the available links include thefollowing:
HP Version Control Agent
HP Version Control Repository Manager
Insight Management Advisor
HP Intelligent PDU Management
Web Application Pages
This section includes a list of web applications hosted by the system. Some of the availablelinks include:
VMware Management Interface
Default Web Server
HP SIM
Integrated Lights-Out 4
HP Integrated Lights-Out
HP Systems Insight Manager Pages
This section contains links that are generated by HP SIM. Available links include:
The Data Collection Report link displays the data collection report for the system ina separate report results window.
NOTE:The storage tables in the HP SIM data collection reports are notpopulated with data because the HP SIM SMI-S data collection isdisabled.
NOTE:The data collection report is not available for clusters.
The System Protocol Settings link points to the Protocol Settings page, where
Communications» Managing with tasks» License Manager» Reporting» Remote Support
Configuration andServices
» Operations» Reference» Support and other
resources» Assistance
» Glossary» Using Help
you can set protocol settings for this system.
The System Credentials link points to the System Credentials page, where youcan view or edit system credentials or create protocol-independent and protocol-specific credentials.
The Configure Automatic Discovery Settings of VM Guest(s) launches theConfigure Automatic Discovery Settings of VM Guest(s) page. From this page,you can control the horizontal discovery of VM guests at the system level.
The Edit System Properties link enables users with administrative rights toreconfigure some system properties for a single system through its system page.This link is not available if you do not have administrative rights.
The Suspend/Resume Monitoring link enables you to set the timer for suspendingmonitoring, which enables a system to be excluded from the status polling,identification, data collection, and automatic event handling in HP SIM. Availablesuspend lengths include the predetermined increments of 5 minutes, 15 minutes, 1hour, and 1 day. The suspend feature can be turned on indefinitely. This link is onlyavailable to users with administrative rights.
The Save/Restore Configuration of Onboard Administrator appears for an activeOnboard Administrator.
The Add or Edit VME Credentials to add or edit VME credentials.
The WBEM Health Inclusion Status appears for ESXi systems. The link takes youto the WBEM Health Inclusion Status page that lists the status information for thesub-components of the system.
HP iLO Links
This section contains links that are generated by management processor. Some of theavailable links include:
The Integrated Remote Console link launches the Onboard Administrator in a newwindow.
The Virtual Media link launches Virtual Media in a new window.
The Remote Console link launches the Remote Console in a new window.
The Remote Serial Console link launches the Remote Serial Console in a newwindow.
NOTE:HP iLO management processor firmware must be 1.30 or later. Anupgrade must be followed up with a re-identification of managementprocessor.
The Telnet to the server's management processor link launches Telnet andaccesses the management processor in a new window.
Telnet is not supported to Common Storage Plateform enclosure manager.
NOTE:The Telnet protocol handler is no longer supported in Internet Explorer 7.The Telnet feature is not available to users using Internet Explorer 7.
NOTE:These links can also be configured for Single Sign On (SSO) from HP SIM.
Procedure 1 Configure SSO for management processors
1. Login to the management processor.
2. Go to Administration->Security-> HP SIM SSO.
3. Enable the Single Sign-on Trust Mode by selecting any of the options from thedropdown menu.
4. Click [ADD HP SIM Server] and depending on the options selected in Step 3, carryout one of the following steps:
Add a trusted HP SIM server name.
Retrieve and import a certificate from the trusted HP SIM server.
complex» System tab for partitions» System tab for storage
host» System tab for a
storage switch» System tab for a
The Essentials tab is available on the System Page of systems that might support otherHP SIM partner applications. This tab provides a description of available software and a linkto the HP website where you can get further details. Only administrative rights and operatorrights users can view the Essentials tab.
When new information is available on the Essentials tab, the tab is highlighted with anInformational icon: . After you view the Essentials tab, the icon is removed until newinformation is available.
HP Systems Insight Manager 7.1 English
Screens and product layout | System page | Performance tab for blades
complex» System tab for partitions» System tab for storage
host» System tab for a
storage switch» System tab for a
NOTE:The HP Insight Control virtual machine management VM Performance tab isavailable only when virtual machine management is installed and the selectedhost is registered with virtual machine management and virtual machinemanagement supports performance data for the selected virtualization layer.
The VM Performance tab displays information about selected blade performance, and isdisplayed for bare metal blades without any data. The VM Performance tab includes thefollowing information:
Updated: (Timestamp). Automatically refreshes and displays the last updatedtimestamp for the CMS.
Processor
Index. Displays the processor index number.
Type. Displays the processor type.
Utilization. Displays the processor utilization.
Logical Disk
Name. Displays the name of the logical disk.
Size (MB). Displays the size of the logical disk in megabytes.
Usage (%). Displays the percentage of disk space used.
Physical Memory
Size (MB). Displays the size of the physical memory in megabytes.
Free (MB). Displays the size of free physical memory in megabytes.
Paging Size (MB). Displays the paging size in megabytes.
Paging Free (MB). Displays the amount of free paging in megabytes.
Server Fan. Displays for all p-Class and e-Class blades.
Index. Displays the index number.
Locale. Displays the locale.
Redundant Partner. Displays the number of the redundant partner.
Speed. Displays the status of the server fan.
Condition. Displays the condition of the server fan.
Hot Plug. Displays the type of hot plug.
Temperature
Index. Displays the index number.
Locale. Displays the locale.
Celsius (C). Displays the temperature in Celsius.
Threshold (C). Displays the threshold number.
Condition. Displays the condition status.
Threshold Type. Displays the threshold type status.
Performance Management
NOTE:if the system is licensed for performance management, this sectiondisplays the performance management links. Otherwise, this sectiondisplays Learn about performance management which is a link to theHP Insight Control performance management home page.
HP Systems Insight Manager 7.1 English
Screens and product layout | System page | Port mapping tab for blades
complex» System tab for partitions» System tab for storage
host» System tab for a
storage switch» System tab for a
The PortMapping tab displays only for c-Class blades and switches.
The PortMapping tab includes the following information:
Updated: (Timestamp) link Displays the CMS time.
For blades:
Mezzanine Slot. Displays the Mezzanine slot number.
Mezzanine Device. Displays the Mezzanine device name or No cardpresent.
Mezzanine Device port. Displays the Mezzanine port name or number.
Port Status. Displays the status of the port.
Interconnect Bay. Displays the bay number.
Interconnect Bay Port. Displays the bay port number.
Device ID. Displays the device identification number.
O.S. Interface Name. Displays the name of the network interface in theoperating system.
For switches:
Interconnect Bay Port. Displays the bay port number.
Port Status. Indicates the status of the port.
Server Bay. Displays the server bay.
Mezzanine Port. Displays the Mezzanine port number.
For more details on the switch port mapping for this system, click here toaccess the Onboard Administrator. Click Onboard Administrator to display theOnboard Administrator Home page.
HP Systems Insight Manager 7.1 English
Screens and product layout | System page | Managing contacts
complex» System tab for partitions» System tab for storage
host» System tab for a
storage switch» System tab for a
The Manage Contacts section includes a table listing customer contact information that hasbeen set. The table includes Customer Name, Phone, and Email Address . You can alsocreate, edit, or delete contact information from this section. Select the checkbox in the tableheading to select all contacts, or select individual contacts by selecting the checkbox next tothe contact name. You can sort the table by clicking a field in the table heading.
Systems Insight Manager - Related information
HP Systems Insight Manager 7.1 English
Screens and product layout | System page | Managing site information
complex» System tab for partitions» System tab for storage
host» System tab for a
storage switch» System tab for a
The Manage Sites section includes at table listing all site names that have been set. Selectthe checkbox in the table heading to select all sites, or select individual sites by selectingthe checkbox next to the site name. You can sort the table by clicking the Site Nameheading.
Communications» Managing with tasks» License Manager» Reporting
Use Property pages to view WBEM properties on remote target systems (HP-UX, HP-UXIPF, Linux IPF, Linux x86, Windows, and Dec Alpha). OpenWBEM is not supported.
The WBEM name and password pairs entered under Options Protocol SettingsGlobal Protocol Settings control the amount of data that appears on the Property pages.If the root name and password pair are not available, many properties are omitted becausetarget system providers require root access.
You can access Property pages in the following ways:
From the System Page on the System tab, click Properties. The Property pagesappear for the target system.
Select Tools System Information Properties, select the target system, andclick [Run now]. The Property pages display for the target system.
The Property pages open in a new window if launched from the Systems Page or from theTools menu. The Property pages include three tabs:
Identity. Displays WBEM properties that help describe the target system includinglocation, local time, operating system characteristics, and owner information. Thecomputer system status is based on the status returned from the WBEM ComputerSystem provider.
Status. Displays WBEM properties that help determine the status of the targetsystem, such as determining memory status and process status. Depending on thetarget system installation of WBEM, you might be able to determine status on allmajor computer subsystems. A status icon for each component appears next toeach status property. Computer system status is determined by informationcollected through the WBEM protocol and the information provided by the WMIprovider.
NOTE:When you click the FC HBA link on the Property Pages Status tab, youwill receive an error message. Even though FC control is not present onthe system, the FC HBA hyperlink might appear on the Status tab. Foran FC HBA, HP SIM cannot anticipate if there are instances present andmight display this link. If there are instances present, the CIM Clientconnection might have timed out.
Configuration. Displays an inventory of the target system based on WBEMproperties, including operating system information, but possibly information aboutCPUs, disk drives, file systems, motherboards, software installations, and networks.
NOTE:The date and time displayed on Property pages indicates the time on the targetsystem.
NOTE:OpenWBEM is not supported.
HP Systems Insight Manager 7.1 English
Screens and product layout | WBEM-based tools | System Fault Management overview
page» WMI Mapper Proxy» System page» WBEM-based tools
» HP SIM Property pagesSystem FaultManagement overview
» WBEM ManagementProviders overview
» Process ResourceManager (HP PRM)
» Managing SSH keys» Cluster monitor» Managing
Communications» Managing with tasks» License Manager» Reporting
System Fault Management (SFM) is a suite of advanced hardware fault technologies thatprotects hardware from failures and reports predictive information and corrective actionevents. SFM is available for HP 9000 systems running v2 update 2, and Integrity serversrunning HP-UX 11i v2 update 2.
SFM integrates into HP SIM using industry-standard WBEM instrumentation.
Integration among standards-compliant system management applications, as with HP SIM,provides a holistic and comprehensive view of HP 9000 system and HP Integrity serverhealth.
SFM uses industry standard DMTF WBEM to provide advanced system level monitoringcapabilities to protect hardware against failures that might interrupt system operation.
SFM allows for configuration of notification thresholds for reporting predictive informationand corrective action events. Configurable thresholds enable system administrators tocustomize notifications to match availability service level.
SFM includes providers to gather and model information and deliver it to the networkmanagement application through an industry standard interface.
The CPU Instance Provider gathers information about the central processors in an HP 9000server.
The Memory Instance Provider gathers information about the memory configuration of anHP 9000 server.
The EMS Wrapper Provider translates hardware events from EMS hardware monitors into aform that is compatible with WBEM.
SFM is available in HP SIM by selecting a system with SFM installed and selecting ToolsSystem Information System Page.
See http://h20293.www2.hp.com/portal/swdepot/displayInstallInfo.do?productNumber=SysFaultMgmt&jumpid=reg_R1002_USEN for additional information aboutSFM.
Communications» Managing with tasks» License Manager» Reporting
Use HP WBEM Management Providers to remotely monitor system configuration andstatus. Management Providers report information about the system they are used on.Information is provided using WBEM industry standard protocol. A CMS using HP SIMgathers, organizes, and displays the information in reports enabling you to monitor systemuse and troubleshoot problems.
The management provider package contains a set of provider modules that plug in to theHP WBEM Services package. The modules extend the basic functions of the HP WBEMServices package by providing additional information about the hardware and operatingsystem.
The provider package can supply the following categories of information in response toWBEM queries. For more information see the HP WBEM Provider Data Sheets availableseparately.
Power supplies: Name, ID, description, status, and availability
Disk SMART sensors: System and state (online, failed/asserted, or unknown)
Disk drives: ID, capabilities, size, and block size
Disk partitions, logical systems, and logical disks: ID, bootable, and type
Physical memory: Description, bank label, capacity, and memory type
Network adapters: Address, speed, maximum speed, duplex indicator, and count ofoctets transmitted and received
PCI systems: ID, vendor, grant time, and latency
Physical media: Name, hot swap capability, capacity, manufacturer, model, serialnumber, version, and other information
SCSI controllers: ID, name, description, and protocol
HP WBEM Management Providers are available from the Linux link athttp://www.software.hp.com. WBEM providers for other HP equipment and operatingsystems are also available separately.
WBEM is a replacement for the SNMP network management protocol. WBEM providersperform a similar role to SNMP agents of publishing information about a managed system.HP Integrity servers can also be remotely managed using the HP SNMP Agents, which areavailable separately from http://www.software.hp.com.
For additional information about WBEM Providers for Linux, seehttp://h71028.www7.hp.com/enterprise/cache/13219-0-0-225-121.html.
page» WMI Mapper Proxy» System page» WBEM-based tools
Process ResourceManager (HP PRM)
» Managing SSH keys» Cluster monitor» Managing
Communications» Managing with tasks» License Manager» Reporting» Remote Support
Configuration andServices
» Operations» Reference
Process Resource Manager (HP PRM) enables you to focus the appropriate amount ofsystem resources exactly where you need them. This powerful resource management toolruns as in addition to HP-UX. When PRM is enabled, groups of users or applications areguaranteed a specified portion of the total system CPU processing cycles, of the availablereal memory resources, and of the disk bandwidth to logical volume-managed (LVM)systems.
HP PRM is a resource management tool used to control the amount of resources thatprocesses use during peak system load (at 100% CPU, 100% memory, or 100% diskbandwidth utilization). PRM can guarantee a minimum allocation of system resourcesavailable to a group of processes through the use of PRM groups.
An HP PRM group is a collection of users and applications that are joined together andassigned certain amounts of CPU, memory, and disk bandwidth. There are two types ofPRM groups:
FSS PRM groups An FSS PRM group is a traditional PRM group, whose CPUentitlement is specified in shares. This group uses the Fair Share Scheduler (FSS)in the HP-UX kernel within the system's default processor set (PSET).
PSET PRM groups A PSET PRM group is a PRM group whose CPU entitlementis specified by assigning it a subset of the system's processors (PSET). Processesin a PSET have equal access to CPU cycles on their assigned CPUs through theHP-UX standard scheduler.
Reasons to use PRM
Improve the response time for critical users and applications.
Set and manage user expectations for performance.
Allocate shared servers based on budgeting.
Ensure that an application package in a Serviceguard cluster has sufficientresources on an active standby system in the event of a failover.
Ensure that critical users or applications have sufficient CPU, memory, and diskbandwidth resources.
Users who at times run critical applications might at other times engage in relativelytrivial tasks. These trivial tasks can compete in the users' PRM group with criticalapplications for available CPU and real memory. For this reason, it is often useful toseparate applications into different PRM groups or create alternate groups for auser. You can assign a critical application its own PRM group to ensure that theapplication gets the needed share of resources.
Restrict the CPU, real memory, and disk bandwidth resources available to relativelylow-priority users and applications during times of heavy demand.
For example, mail readers can consume significant disk bandwidth when users firstcome into work or return from lunch. Therefore, you might want to assign a mailapplication to a PRM group with small resource allocations and restrict the amountof resources mail can use during such times of heavy demand on the system.
Monitor resource consumption by users or applications.
Assigning a group of users or applications to separate PRM groups can be a goodway to track the resources they are using.
Accessing Process Resource Manager from Systems Insight Manager
» Support and otherresources
» Assistance
» Glossary» Using Help
To access PRM:
1. From HP SIM, select Optimize Process Resource Manager.
2. Choose from the following options:
Display Resource Usage
List Resource Availability
If the system has the PRMSIMTools bundle installed, the available options are:
Monitor PRM Groups
Configure PRM Groups
Display Resource Usage
List Resource Availability
3. Go to: http://www.hp.com/go/prm for more information about PRM.
page» WMI Mapper Proxy» System page» WBEM-based tools» Process Resource
Manager (HP PRM)Managing SSH keys» Related information
» Cluster monitor» Managing
Communications» Managing with tasks» License Manager» Reporting» Remote Support
Configuration andServices
» Operations
The SSH Keys feature enables you to view and manage the public SSH keys, stored in theknown_hosts file, from the CMS. SSH keys enable the CMS and a managed system toauthenticate a secure connection.
HP SIM provides the following SSH key configuration options:
page» WMI Mapper Proxy» System page» WBEM-based tools» Process Resource
Manager (HP PRM)» Managing SSH keys
Related information» Cluster monitor» Managing
Communications» Managing with tasks» License Manager» Reporting» Remote Support
Configuration andServices
» Operations
Related procedures
» Systems Insight Manager - Importing an SSH key» Systems Insight Manager - Exporting an SSH key» Systems Insight Manager - Deleting an SSH key» Systems Insight Manager - Configuring SSH key security
» Managing with tasks» License Manager» Reporting» Remote Support
Cluster Monitor adds the ability to monitor and manage multi-node clusters. Cluster Monitoralso manages multiple cluster platforms in a heterogeneous environment.
HP Systems Insight Manager 7.1 English
Screens and product layout | Cluster monitor | Cluster tab
» Managing with tasks» License Manager» Reporting» Remote Support
Use the Cluster Monitor Cluster tab to view the following information for MSCS clusters:
Status The cluster status (Critical, Major, Minor, Normal, or Unknown). For moreinformation about status types, see the HP Systems Insight Manager CommandLine User Guide.
Name The cluster name or alias.
IP Address The IP address of the cluster alias.
Quorum The resource that maintains essential cluster data and guarantees thatall nodes have access to the most recent database changes.
By clicking a column heading, you can sort information by that column in ascending ordescending order.
The Problem Info section displays information on a cluster status other than Normal.
HP Systems Insight Manager 7.1 English
Screens and product layout | Cluster monitor | Nodes tab
2. From the Cluster list at the top of the page, select the cluster, and then select Allto configure a resource in the same way for all clusters. To set polling values forCPU utilization or disk capacity, set the cluster choice to All.
3. From the Node list, select the node, and then select All to configure a resource inthe same way for all nodes in the selected cluster. As in step 2, you can set someresource attributes only once for all nodes. As a result, you must select all clustersand nodes. For more information, see the individual attribute descriptions for aparticular resource.
4. To display buttons for resource-configurable parameters, select the resource fromthe Resource list.
5. Specify resource options.
HP recommends setting the polling rate to no less than 5 minutes.
If you select All from the Cluster list and select CPU or Disk from the Resourcelist, you can set polling or threshold values. If you select Polling, set the value, thenselect Thresholds, set the values, and then select Polling again. The new pollingvalues appear. Regardless of when you click [OK] after setting the polling orthresholds values, these values are saved and do not reset to the original value,which is the same when setting thresholds.
6. Click [OK] to save the changes.
Related procedures
» Systems Insight Manager - Configuring cluster resource settings
Related topics
» Systems Insight Manager - Using Cluster Monitor
HP Systems Insight Manager 7.1 English
Screens and product layout | Cluster monitor | Network tab
» Managing with tasks» License Manager» Reporting» Remote Support
Use the Cluster Monitor Network tab to view the following information for MSCS clusters:
Status The network status (Critical, Major, Minor, Normal, Disabled, or Unknown).
Name The server cluster object that carries internal communication betweennodes and provides client access to cluster resources.
Mask The subnet mask associated with the network within the cluster.
State The state of the network:
Normal The network state is online or available.
Degraded The network is partitioned.
Failed The network state is offline.
Other The network state indicates that an error occurred and the state ofthe network could not be determined, or the network state is unavailable.
Role The role the network name plays in the cluster: network name for the cluster,network name for computer systems in the cluster, or network name for groups inthe cluster.
Description The description of the network.
To sort information, click a column heading. This sorts information by that column inascending or descending order.
The Problem Info section displays information on a network status other than Normal.
Related topics
» Systems Insight Manager - Using Cluster Monitor» Systems Insight Manager - Cluster tab» Systems Insight Manager - Nodes tab» Systems Insight Manager - Resources tab
HP Systems Insight Manager 7.1 English
Screens and product layout | Cluster monitor | Resources tab
Communications» Managing with tasks» License Manager» Reporting» Remote Support
Use the Cluster Monitor Resources tab to view the following information for MSCS clusters:
Status The resource status (Critical, Major, Monitor, Normal, and Unknown).
Name The physical or logical entity capable of being owned by a node, broughtonline and taken offline, moved between nodes, and managed as a server clusterobject.
IP The IP address of the cluster.
State The state of the resource:
Normal The resource state is online.
Degraded The resource state is Unavailable, Offline, Online, Pending, orOffline Pending.
Failed The resource state is failed.
Other The resource state is undetermined.
Group A collection of resources managed as a single server cluster object.
A group must have a network name and an IP address associated with it to accessgroup resources. A group can be owned by any node in the cluster and can bemoved by users with administrative rights for load balancing and otheradministrative purposes. When a failure takes place, the entire group fails over,prompting the cluster software to transfer all group resources and data to a differentnode in the cluster. The resources and data in a transferred (failed-over) group arestill accessible under the same network name and IP address, even after they aremoved to a different node.
OwnerNode The node where a resource resides.
Type The server cluster object used to categorize and manage resources thathave similar characteristics.
Drive The disk or drive where the resource resides.
The Last update field displays the date and time of the last update of information on thetab. The Problem Info section includes information on resource problems reported.
The Problem Info section displays information on a resource status other than Normal.
Related topics
» Systems Insight Manager - Using Cluster Monitor» Systems Insight Manager - Cluster tab» Systems Insight Manager - Nodes tab
HP Systems Insight Manager 7.1 English
Screens and product layout | Managing Communications
» Managing with tasks» License Manager» Reporting» Remote Support
Configuration andServices
» Operations» Reference» Support and other
» Communication status» Manage Communications table columns» Manage Communications main page buttons» Manage Communications tabs
Use the Manage Communications feature to troubleshoot communication problems between the CMS and targeted systems.For each failed communication function, troubleshooting information is available. You can reconfigure communication settings,launch agents, and push certificates to target systems. This feature is available by selecting Configure ManageCommunications.
Communication status
The communication status between the CMS and the targeted systems appear in the table. Placing your mouse over a statusicon displays available information explaining the status. If you click the status icon, the Advise and Repair section appears withthe corresponding tab open. For example, if you click a status icon in the Run Tools column, the Run Tools tab is open in theAdvise and Repair section instead of the default Identification tab.
Manage Communications table columns
Columns display the status of an operation between the CMS and it's systems.
Selection. Select the checkbox in this column to select a system. You can select more than one system. Select thecheckbox in the column heading to select or deselect all displayed systems.System Name. Displays systems along with their associations.Identification. Includes status information on the state of an identification process . Identification attempts to determinewhat the system type is, what management protocol a system supports, using credentials from the Global ProtocolSettings page, and attempts to determine the operating system and version loaded, along with other basic attributesabout the system. Finally, it determines if the system is associated with another system. The status in this column is aroll-up of the status of all available protocols. The statuses are analyzed based on status, system type, system operatingsystem, and instrumentation options. There are no status icons for systems that cannot have a status, such ascomplexes, enclosures, and racks. The identification status is updated each time an identification task runs.Events . Indicates if the CMS can receive events from the target systems. This status considers the setting of SNMPtraps and WBEM indications.
For HP-UX, if sending a package to test if the CMS name or IP address exists on the managed systems does not work,then testing sending trap destinations is not supported.
The informational icon appears if the Daily Check Event Configuration task has not run or if the system does notsupport events.Run Tools. Indicates if the CMS can run tools locally on target systems. For example, HP SMH. Communication issuesin this column usually relate to security and trust relationships.Version Control. Indicates the availability of software and firmware inventory data for target systems. The status iscollected and stored during data collection.System Type Displays the system type (for example, Server or Desktop). The Unmanaged system type indicatessystems that have no management protocol that HP SIM can detect, for example, no SNMP, WBEM, or SSH. TheUnknown system type indicates that none of the built-in or System Type Manager-based tasks could identify the system.
resources» Assistance
» Glossary» Using Help
However, some management protocol was detected on the system. For more information about System Type Managertasks, see Systems Insight Manager - Managing system types.OS Name The operating system of the target systems.
NOTE:Systems that do not have an IP address (enclosures, racks, clusters, complex, and storage devices) have no statusdisplayed.
Manage Communications main page buttons
Advise and Repair... Displays the Advise and Repair section and includes a tabbed interface with a tab for eachfunctional column (Identification, Events , Run Tools, and Version Control). Each tab displays the diagnostic resultsand includes troubleshooting tips and advise for fixing communication problems. For more detailed information, seeSystems Insight Manager - Advising and repairing managed system settings.Quick Repair... Launches the Configure and Repair Agents tool. Configure or Repair Agents enables you to quicklyand optimally configure systems for manageability. For more detailed information, see Systems Insight Manager -Repairing managed system settings.Update Runs to get an updated communication status. During the update process, the status icon first changes to the
icon. As data becomes available, the correct status icon appears.Print Creates a printer-friendly version of the list in a new window. Within the window, select File Print from thebrowser menu to print the report. For more detailed information, see Systems Insight Manager - Printing ManageCommunications table.
Manage Communications tabs
Identification The Advise and Repair Identification tab is launched by default when you click [Advise and Repair...]from the Manage Communications page. It is also launched when you click a status icon in the Identification columnin the table on the Manage Communications page.
This tab displays identification errors and recommendations for fixing the errors. Identification communication status anderrors are generated based on system type, the operating system that the managed system is running, the availability ofmanagement protocols on the managed systems, and if the protocol has a higher weight than other protocols. You canexpand each Causes and Recommendations section.
See Systems Insight Manager - Identification tab.
Events Includes detailed error messages and recommendations for generating and receiving events. The event errorcodes are captured and stored during data collection, identification, and status polling. For HP SIM to receive eventsfrom managed systems, a WBEM subscription must be created, or the CMS IP address must be in the SNMP trapdestination list on the managed system. You can expand each Causes and Recommendations section.
See Systems Insight Manager - Events tab.Run Tools Includes error messages and recommendations for problems that a CMS has for executing a tool on amanaged system. These problems often relate to security and trust. You can expand each Causes andRecommendations section.
See Systems Insight Manager - Run Tools tab.Version Control Includes error messages and recommendations for problems that a CMS has when trying to collectsoftware and firmware inventory from managed systems. You can expand each Causes and Recommendations sectioncan be expanded for each error.
See Systems Insight Manager - Version Control tab.
» Managing with tasks» License Manager» Reporting» Remote Support
Configuration andServices
» Operations
Related procedures
» Systems Insight Manager - Events tab» Systems Insight Manager - Advising and repairing managed system settings» Systems Insight Manager - Run Tools tab» Systems Insight Manager - Version Control tab» Systems Insight Manager - Identification tab» Systems Insight Manager - Printing Manage Communications table» Systems Insight Manager - Repairing managed system settings» Systems Insight Manager - Updating communication statuses
Related topics
» Systems Insight Manager - Managing Communications» Systems Insight Manager - Managing Communications
CommunicationsManaging with tasks» Viewing task instance
results» Navigating the All
Scheduled Tasks page» License Manager» Reporting» Remote Support
Systems Insight Manager enables you to manage systems and events by scheduling andexecuting tasks. Tasks are actions performed using an Systems Insight Manager tool. Taskinstances are an executed single instance of a task.
Systems Insight Manager - Managing with tasks related information
HP Systems Insight Manager 7.1 English
Screens and product layout | Managing with tasks | Viewing task instance results
1. From the menu, select Tasks & Logs View Task Results.
2. Select a task.
3. To stop or delete a task instance, select a task instance from the View TaskResults page.
4. Click [Stop] or [Delete ].
The Task Results page displays a list of task instances created by all tasks.
Viewing task instance results
From the Task Results page, select a task instance by selecting a row from the TaskInstances list.
The Task Instance list displays the following information:
Status This field displays the status of the task.
ID This field displays the task job ID number.
Task Name This field displays the name of the task that was executed.
Tool This field displays the name of the tool that was used.
Owner This field displays the user name that currently owns the task.
Command This field displays the command used to run the task.
Summary Status This field displays the summary status and indicates the statusof some tasks.
Target This field displays the name of the target collection or individual systemswhere the task executed. If you run a custom tool or a MSA tool, this field displaysthe CMS system name. With MSA commands, the command resides on the CMSand runs from the CMS for a remote system or list of systems. Therefore, the targetfor this type of command always shows as the CMS.
Executed As This field displays the user context where the tools were executedfrom.
Start Time This field displays the time when the task was started.
End Time This field displays the time when the task was completed or cancelled.
Duration This field displays the amount of time it took to run the task.
NOTE:The list of task instances is based on user privileges and access levels. Userswith administrative rights can view all task instances known to the system.
Viewing target details
NOTE:This section appears for SSA tools only.
Configuration andServices
» Operations» Reference» Support and other
resources» Assistance
» Glossary» Using Help
Target details include the following:
Target Name This field displays the name of the target.
Status This field displays the status of the target.
Exit Code This field represents the success or failure of an executable program.Typically, if the return value is zero or positive, the executable ran successfully. If anegative value is returned, the executable failed.
The Stdout tab This tab displays the output text information.
The Stderr tab This tab displays information if the executable experienced anerror.
This tab does not appear for discovery task results.
Files Copied tab This tab displays what files are in the process of being copied orhave been copied to the target system. This tab is not present for tools that do notperform any file copies to their target systems.
To view target details:
Procedure 2 View target details
1. From the Task Instance Results section, select a target system from the tablebelow the Summary Status.
» Viewing task instanceresultsNavigating the AllScheduled Tasks page
» License Manager» Reporting» Remote Support
» User privileges» Run now» Edit» Delete» Enabling and disabling tasks» Viewing task results
The All Scheduled Tasks page displays the tasks scheduled to run at periodic times orbased on event criteria. A scheduled task can also have a schedule of not scheduled,which means that the task is listed but runs only when manually executed by a user.
To see task information, select Tasks & Logs View All Scheduled Tasks, and thenselect a task by clicking the task row.
User privileges
The list of tasks that a user can see is based on the user's privileges. All users can edit,delete, and view the tasks they have created. With administrative rights, a user can edit,delete, and view tasks other users have created.
Run now
Run a task to initiate a task instance. (Running a task executes a tool on specific systemsor events. For more information, see Systems Insight Manager - Running a scheduled task.
Edit
Procedure 1 Editing tasks
1. Select Tasks & Logs View All Scheduled Tasks.
2. Select a task, and click [Edit].
The previously configured task information appears.
3. Edit the task, and then click [Done].
For more information, see Systems Insight Manager - Editing a scheduled task.
Delete
Procedure 2 Deleting tasks
1. Select Tasks & Logs View All Scheduled Tasks.
2. Select a task, and click Delete .
For more information, see Systems Insight Manager - Deleting a scheduled task.
Enabling and disabling tasks
If the selected task is currently enabled, this button reads [Disable] and clicking it disablesthe task. If the selected task is currently disabled, this button reads [Enable ] and clicking itenables the task.
Configuration andServices
» Operations» Reference» Support and other
resources» Assistance
» Glossary» Using Help
Viewing task results
When you view task results, you see information similar to the following:
The tasks schedule
The tool used by the task
The command the task executes
A list of task instances created by the task
Summary status, the target systems list, and target details
For more information, see Systems Insight Manager - Viewing task instance results.
NOTE:To run License Manager, you must have administrative rights on the CMS (to set, select OptionsSecurityUsers and Authorizations User) and choose the Configure CMS Security option, and the All Tools toolbox(to set, select OptionsSecurity Users and Authorizations User) on the managed systems that you want tolicense.
To access License Manager, select Deploy License Manager.... The Product License Information table appears. Formore information, see License Manager - Product License Information table.
Table 1 License Manager options
Name Description RelatedInformation Procedure
LicensedSystem(s)...
HP SIM enables you to view a list of systems licensed for the selectedproduct.
“LicensedSystem(s)...”
See SystemsInsightManager -Viewinglicensedsystems.
AddLicenses...
HP SIM enables you to add individual license keys to the LicenseManager database.
“AddLicenses...”
See SystemsInsightManager -Addinglicensesindividually.
ManageLicenses...
The Manage Licenses feature enables you to manage licenses for theproduct selected in the Product License Information table. Licensescan originate from direct user input or from license information collectedusing [Collect Remote License Info...].
“ManageLicenses...”
See SystemsInsightManager -Managinglicenses
CollectRemoteLicense Info...
Collect Remote License Info (for management processors) collectslicenses using an HTTP based protocol which does not requirecredentials.
“CollectRemoteLicense Info...”
See “CollectRemoteLicense Info...”
AssignLicense(s)...
HP SIM enables you to assign and un-assign product licenses for plug-ins, if applicable for that plug-in, and to assign licenses to remote targetsystems when licenses are managed remotely. For plug-ins, whenassigning licenses, note the following for non-management processor
“AssignLicense(s)...”
See SystemsInsightManager -Assigning alicense or
» Reference» Support and other
resources» Assistance
» Glossary» Using Help
targets: Apply alicense
Un-AssignLicenses...
An assigned license can be unassigned from one system and assignedto another system, as long as the product enabled by the license hasnot consumed the license. When a product has been used on a system,the license is locked to that system permanently. Licenses delivereddirectly to the actual target system cannot be unassigned. There is nopenalty for having these licenses remain on those systems becausethey are consumed on an as-needed basis. The remaining licenses canbe used elsewhere.
“Un-AssignLicenses...”
See SystemsInsightManager - Un-assigning alicense
ApplyLicenses
Apply a license to a system must be treated as irreversible. The licenseis locked to the specified system.
“ApplyLicenses”
See SystemsInsightManager -Assigning alicense orApply alicense.
CLImxlmkeyconfig
The CLI mxlmkeyconfig allows you to combine all the License Managerkey files into one file instead of having to execute multiple files.Combining these files into a single file makes it easier when addingkeys from a file through the License Manager graphical user interface(GUI).
“CLImxlmkeyconfig”
See SystemsInsightManager -mxlmkeyconfigCLI.
Licensed System(s)...
HP SIM enables you to view a list of systems licensed for the selected product.
Although a target can be licensed to use a product, the product license might not appear in the interface or report. Productscan elect to not display all or some licensing details.
See Systems Insight Manager - Viewing licensed systems.
Add Licenses...
HP SIM enables you to add individual license keys to the License Manager database.
HP iLO product license keys can be added into the database because they can be deployed directly to managementprocessors.
See Systems Insight Manager - Adding licenses individually.
Manage Licenses...
The Manage Licenses feature enables you to manage licenses for the product selected in the Product License Informationtable. Licenses can originate from direct user input or from license information collected using [Collect Remote LicenseInfo...].
Manage Licenses: Licenses currently available for Virtual Machine Management page.
NOTE:Only available license are displayed.
License Category The type of license. All permanent, paid licenses appear as a single category, even though youmight have purchased several separate licenses. License Manager does not consider the purchase date.Licenses Available The total number of licenses available to assign to systems.Licenses Assigned The total number of licenses of the selected type assigned to systems.Licenses Used The total number of licenses used by systems. A license is not used until the product is used on asystem. This total includes previously used licenses that have expired.Days permitted The total number of days authorized for use by this license (for time-specific licenses). For BETAlicenses, this is the number of days from the date the license was issued. For subscription licenses, this is thenumber of days since the license was first used on any target. For all others, it is the number of days from when thelicense was first used on the selected target. All uses of this license after the first use have the same number ofdays remaining as the target first licensed.Days remaining The number of days before the license expires. Some licenses will show Days remaining as thesame as Days permitted because the time to expire is determined when the license is applied to a target and relatesonly to that target. Others show an equal or lesser number as the time to expire is based on the first application ofthe license or based on when the licenses was issued for these types of license. With a BETA license, the Daysremaining is always less than the Days permitted even if the license has not been used on a target.License Source The source of the corresponding license. This can be:
Purchased. The license was purchased as part of a license agreement.
Free Trial. The license was supplied free of charge.
Status The status of the use of this license on the named system.Updates and Upgrades Reports level of service associated with this license.Technical Support Reports level of service associated with this license.
Status messages include:
OK. The license is valid and in compliance.
Key not in use. The license is valid but not used.
No expire date. The license is valid but not used.
License is fully subscribed . The license key is in full use on this system and consequently, if used elsewhere aswell, might be over subscribed in total.
License is over subscribed . The license key is overused on this system.
License trial period has expired. The time limit on a time-limited key has been exceeded.
License subscription period has expired. The subscription key has expired.
Wrong host equipment. The serial number of the target on which this key was found does not match the serialnumber contained in the key information retrieved from this machine.
The Manage Licenses table shows the license categories that can be used. License categories with all licenses consumedare not listed in this table. Adding the number of licenses in all categories in the Manage Licenses table might result in atotal less than the number shown in the Licenses column of the Product License Information table.
In the Manage Licenses table, the total number of Licenses Assigned plus Licenses Used might exceed the number oflicenses shown in the Product License Information table. Systems with assigned licenses from this category might fail tobe automatically licensed when used with the corresponding product. This can occur when a category of license is assignedto a collection of systems, and then later, the same category is applied to a different set of systems such that the totalexceeds the number of licenses in that category. Un-assign the licenses assigned to these systems. Assigned licenses arenot locked to systems, and licenses are used on a first-applied basis.
See Systems Insight Manager - Managing licenses
Collect Remote License Info...
Collect Remote License Info (for management processors) collects licenses using an HTTP based protocol which doesnot require credentials.
When collecting remote licenses, be aware of the following:
Automatic collection of management processor licenses is not supported.
You do not have support or upgrade options by default. After July 9, 2007, all license keys are included in one yearof 24 x 7 Software Technical Support and Update Service. The License Manager informs you which license keys are"support and update enabled" and which license keys require the purchase of future updates and upgrades.
Collect Remote License Info (for servers) collects license details from selected targets. If licenses are stored on theselected system (for details, see the specific product information), the selected machine must be running a variant ofMicrosoft Windows.
Assign License(s)...
HP SIM enables you to assign and un-assign product licenses for plug-ins, if applicable for that plug-in, and to assignlicenses to remote target systems when licenses are managed remotely. For plug-ins, when assigning licenses, note thefollowing for non-management processor targets:
When a license is assigned to a system, it is not locked or consumed until the product operates on that system.
A system can be licensed with a demo key just once. If the license expires, the only option to continue to use thesystem with that product is to purchase a license. A system licensed by a demo key can be relicensed at any timewith a paid license.
An assigned license can be unassigned from one system and assigned to another system, as long as the productenabled by the license has not consumed the license. When a product has been used on a system, the license islocked to that system permanently. Licenses delivered directly to the actual target system cannot be unassigned.There is no penalty for having these licenses remain on those systems because they are consumed on an as-needed basis. The remaining licenses can be used elsewhere.
Some products limit the use of the License Manager interface because target filtering and other factors must be consideredand these are not known to the HP SIM License Manager. Consequently, [Manage Licenses...] may be selected, however[Assign/Un-assign] might be disabled.
For management processor targets:
When a license is assigned to a management processor, a license record is created and stored in the LicenseManager database.
If the selected management processor is already licensed, you cannot replace that license with a new license fromLicense Manager. You must first delete the existing license at the management processor console and then insertthe new license (directly or using License Manger). However, Integrity MP does replace a demo key with apermanent license. If a permanent key is already present, Integrity MP displays a message such as License alreadyInstalled.
An assigned license cannot be unassigned from one management processor and assigned to another managementprocessor. Licenses delivered directly to the actual target system cannot be unassigned because the behavior of theproduct operating with that license is outside the scope of License Manager.
When assigning licenses to management processor targets, the SSH credentials for each target must be known. Whendeploying licenses to remote servers, the access credentials must be known. For more information, see Systems InsightManager - Protocol settings.
See Systems Insight Manager - Assigning a license or Apply a license
Un-Assign Licenses...
HP SIM enables you to assign and un-assign product licenses for plug-ins, if applicable for that plug-in, and to assignlicenses to remote target systems when licenses are managed remotely. For plug-ins, when assigning licenses, note thefollowing for non-management processor targets:
An assigned license can be unassigned from one system and assigned to another system, as long as the product enabledby the license has not consumed the license. When a product has been used on a system, the license is locked to thatsystem permanently. Licenses delivered directly to the actual target system cannot be unassigned. There is no penalty forhaving these licenses remain on those systems because they are consumed on an as-needed basis. The remaining licensescan be used elsewhere.
Some products limit the use of the License Manager interface because target filtering and other factors must be consideredand these are not known to the HP SIM License Manager. Consequently, [Manage Licenses...] may be selected, however[Assign/Un-assign] might be disabled.
See Systems Insight Manager - Un-assigning a license
Apply Licenses
Apply a license to a system must be treated as irreversible. The license is locked to the specified system.
See Systems Insight Manager - Assigning a license or Apply a license.
Product License Information table
Provides sorting capability.
Displays a maximum of 10 rows. If there are more than ten product license, use the scroll bar on the right side ofthe table to view additional licenses.
Product License Information buttons
Licensed System(s)... Allows you to view a list of systems licensed. Remains deactivated until a product isselected.Add License... Allows you the option of entering licensing information independently.Manage Licenses... Allows you to manage licenses for the product selected. Remains deactivated until a productis selected.Collect Remote License Info... Gathers licenses information from Integrity and ProLiant management processorsand the selected target systems for products which operate under the Remote License Management scheme.
When there are no licenses available, the following table appears.
Product The name of the product.License Version The license version of the product.Licenses Locked The number of licenses consumed.Licenses Assigned The number of licenses assigned.Licenses Available The number of licenses available.Total Licenses Total number of license available for the product.
When one or more license is available, the following table appears.
[Add Licenses...] remains active and you can add licenses to HP SIM in one of two ways:
[Add Licenses] Enter an individual license key. For more information, see Systems Insight Manager - Addinglicenses individually.
[Adding Licenses from File] Enter license keys from a specially formatted key file. For more information, seeSystems Insight Manager - Adding licenses from a file.
[Collect Remote License Info...] remains active and you can collect license information. See “Collect Remote LicenseInfo...”.
License Collection Results table
System Name. The names of the systems where the task was executed.Key. The license keys received from the target systems. Each key retrieved from a system is on a separate line.Some products have more than one license key. License details are contained in the key, and each key mightenable more than one product.Product. The name of the product associated with the use of this key.Response Status. The status of the request for license data for the selected system.
Successful task
A. Licensing information from the remote system.
B. Licensing information from the target system.
NOTE:This response status displays for systems running Windows variant OS and has license stored in theregistry.
Unsuccessful task
A. Connection to device failed. Possible reasons could be device not reachable or device is an olderfirmware version of management processor.
This happens due to the following reasons:
a. Network error - Connection Refused.
b. Network error - Connection timed out.
c. The system you are trying to connect has firmware version that is older or not supported.
B. Device not found.
Failure in pinging the system.
C. License Key overused. Please refer to the license agreement to avoid any violations.
D. No valid licensing information found on the remote system.
E. No licensing information on the remote system.
F. Problem collecting licensing information.
G. Failed to contact this system. Network path not found or similar error.
H. Specified system is no longer in the database.
I . Target system is not running Microsoft Windows as required.
J. Keys cannot be collected from a system of this type.
NOTE:This displays if the system is of a different type such as; a switch, a printer, a cluster, a complex,or a system not running a Windows OS.
K. Cannot collect keys stored on this node. HP SIM host and specified system must be runningMicrosoft Windows.
NOTE:This happens when, for example CMS or a remote system is not running a Windows variantoperating system.
L. License Manager does not know how to assign licenses for this product. License Manager has noinformation about this product. Install the HP Systems Insight Manager plug-in that uses thislicense or collect license information from a system running this product first.
Add License page
Select the complete key string and press Ctrl + C to copy it.
Position the cursor in any of the five fields forming the input box and press Ctrl + V, or right-click your mouse topaste the license key. If the Add License function was selected after you copied the key, press Ctrl + V to paste thekey.
The license key displays with five characters in each field.Enter the full path and file name in the Specify a file name and path field.Click [Browse].
a. The Choose file dialog box appears.
b. Navigate to the file that contains the licenses to be added.
c. When a file has been located, click [Process].
NOTE:When pasting in the complete key, the key can be in the normal format of five groups of five characters, witheach separated by a hyphen (-), (for example, 12345-67890-54321-09876-12345). There are no spaces betweenthe characters and the hyphens.
Key details page
Click [ Process] to display the license details.
Product The name of the product.License Version The license version of the product.Licenses Type The type of license for example, Demo, Beta, Duration, Site, and Maintenance.Licenses Purchased The number of licenses purchased for a product.Days Max The maximum number of days the licenses can be used. [Back] Returns to the Add License page. [Add Licenses Now] Adds the keys to the database.
License not added
Keys from file:
The Status column displays the status of the product license key. Status messages are as follows.
For a valid Key:
OK
Key cannot be added to HP SIM:
License Manager already has this license.
Invalid Key.
License Key provided is not valid for user input.
NOTE:When a license key cannot be added, the row remains deactivated.
CLI mxlmkeyconfig
The CLI mxlmkeyconfig allows you to combine all the License Manager key files into one file instead of having to execute
multiple files. Combining these files into a single file makes it easier when adding keys from a file through the LicenseManager graphical user interface (GUI).
The mxlmkeyconfig command takes all the keys and related information and places it in the resulting key file. The CLIprogram will not allow duplicates. If there are duplicate <keystring> values, a warning message appears and only the firstvalue is placed in the resulting key file. If badly formatted files are encountered, warning messages appear.
The key file is created when CLI mxlmkeyconfig is executed. If the resulting key file already exists, then the previous keysremain and the information from the source key files are added to the resulting key file.
See Systems Insight Manager - mxlmkeyconfig CLI.
Assigning or Applying Licenses page
System Name The name of the system where the task was executed.Serial Number A number the licensing product chooses to identify remote systems. (Check product information forspecific details).Unique Identifier A unique string that further identifies a system. Systems can be licensed by any combination ofsystem name, serial number, or unique identifier.Status The status of the use of the license on the named system.Operating System The name and edition of the operating system installed on the product.System Type The type of system licensed, for example, server, storage, or unmanaged.System IP Address The IP Address of the licensed system.All Features Supported A 'Yes' or 'No' value. Systems can be licensed with a bundle license. The Yes in thiscolumn implies that all products licensed by bundle license fully support the system indicated. No, indicates thatsome licenses do not support this system. You must determine which products do not support the selected system.License advisories and warnings resulting from last licensign activity: Table that indicates other licenseswhich are required to be in place on indicated system to fully comply with the selected product license.
License unlicensed systems (optional) page
System license status Displays the status of system licenses, such as Not licensed, or assigned duration license.System selected to be licensed System Name 15.146.233.1 is selected to have a license assigned to it.Licenses currently available Displays all of the currently available licenses to be assigned.License selected A license is selected to be assigned to system 15.148.233.1. [Apply license] Applies the selected license to the selected system.
Inline license page displaying the change to both the System license status table and the Licenses currently availabletable after a node is licensed with DL license.
System license status System 15.146.233.1 displays the status as having a assigned duration license.Licenses currently available Displays that the Duration license has been reduced by the number of licensesassigned to system 15.146.233.1.
License types
License Manager displays licenses by product. If a license authorizes multiple products, the number of seats permitted bythe license is applied in full to each authorized product. For example, a license authorizing five seats and two productsauthorize five seats for each product.
Table 2 License types
LicenseType Description
FlexibleQuantity
Offers full, unlimited functionality for an unlimited time and for a specific number of seats purchased, up to50,000.
Activation
KeyAgreement
Offers full, unlimited functionality for an unlimited time. This license represents an expected upper limit onthe number of seats, up to 50,000.
Demo(seats andtime)
Offers full, unlimited functionality for a limited time and a specific number of seats. The license determinesthe number of days the key enables the product to function. The days begin counting from the day of firstuse. The key can permit more than one instance of the product to run. Demo keys can authorize up to 255seats for up to 255 days.
Demo(time)
Offers full, unlimited functionality for a limited time. The license determines the number of days the keyallows the product to function. The days begin counting from the day of first use. The key can permit morethan one instance of the product to run. Demo keys can authorize use for up to 65,535 days.
BetaOffers full, unlimited functionality for a limited time. The license determines the number of days the keyenables the product to function. The days begin counting from the day the key is created. The key canpermit more than one instance of the product to run. Demo keys can authorize use for up to 65,535 days.
Duration
Offers time limited, full functionality license. The license can be re-applied to the same node as needed atany time as long as unused licenses are available with this key. For example, when the current license isexpired. The basic time unit encoded in the key is one month.
You can authorize up to 255 sets of Duration licenses for up to 255 days.
Subscription A time-limited, full-functionality license. The key can indicate unlimited use for a specified period of time or alimited number of seats for that same period of time. The basic time unit encoded in the key is 30 days.
NOTE:HP SIM considers one month equal to 30 days.
Table 3 License types reported by management processor products
LicenseType Description
Intrinsic Offers full, unlimited functionality and represents a single-use key for the product. This license type is specificto management processors.
Individual Offers full, unlimited functionality and represents a single-use key for the product. This license type is specificto management processors.
Permanent Offers full, unlimited functionality.
Demo(time)
Offers full, unlimited functionality for a limited time. The license determines the number of days the key allowsthe product to function. The days begin counting from the day of first use. The key can permit more than oneinstance of the product to run. Demo keys can authorize use for up to 65,535 days.
Some products provide licenses to enable other products. The license keys generated by these products cannot bemanually added.
Communications» Managing with tasks» License Manager
Related information» Reporting» Remote Support
Configuration andServices
» Operations
» Related procedures» Related topics
Related procedures
» Systems Insight Manager - Managing licenses» Systems Insight Manager - Assigning a license or Apply a license» Systems Insight Manager - Viewing licensed systems» Systems Insight Manager - Adding licenses individually» Systems Insight Manager - Un-assigning a license
Related topics
» Systems Insight Manager - License Manager» Systems Insight Manager - License manager» Systems Insight Manager - License Manager
Communications» Managing with tasks» License Manager
Reporting» Related information
» Remote SupportConfiguration andServices
» Operations
» New Report...» Manage Reports...» Snapshot comparison...» Enhanced Reports» Federated CMS Search tool» Reports by Product page» Reports by Product page buttons» Select data to be displayed in the report:
New Report...
A report configuration is a customer-defined set of preferences that pulls specified criteria from thedatabase tables and places it in a report in the specified format. The report configurations can besaved and used to run a report at a later date with live data.
You must have administrative or operator rights to create, save, edit, copy, or delete reportconfigurations. Users with user rights can run the authorized report configurations only.
If User 1 with administrative rights generates a report and a private collection, then User 2 withadministrative rights can generate a report using the report configuration and private collection thatUser 1 created. User 2 is allowed to edit, save, and delete the report configuration but cannot deletethe private collection created by User 1.
The create new report wizard helps you to create a new report and add it to HP SIM reports. Thisoption is only available for HP SIM.
You can save the report configuration for future use or generate a one-time report.
Select Reports New Report....
See Systems Insight Manager - New reports.
Manage Reports...
Select Reports Manage Reports.... The Manage Reports page appears.
Users with sign-in access to HP SIM can generate reports.
The Manage Reports feature provides you with the following options:
[Run Report] A generated report provides you with the following information:
Report name
Associated system collection
NOTE:The Associated system collection information does not appear if there isno collection selected to run the report.
Report run date and time
Format for generated report:
HTML (Recommended for viewing) Enables viewing an existing report in HTMLformat.
XML Enables viewing an existing report in XML format.
CSV Enables viewing an existing report in CSV format.
See Systems Insight Manager - Running managed reports
» Reference» Support and other
resources» Assistance
» Glossary» Using Help
[Copy...] HP SIM enables you to copy report configurations from an existing reportconfiguration. You can edit the newly copied configurations to create a new report.
NOTE:You must be signed in to HP SIM with administrative rights or operator rights tocopy report configurations. If you are not signed in with administrative or operatorrights, the copy option is not available.
See Systems Insight Manager - Copying managed reports
[New...] Enables you to create a new report and add it to HP SIM reports. This option isonly available for HP SIM.
You can save the report configuration for future use or generate a one-time report.
See Systems Insight Manager - New reports.
[Edit...] HP SIM enables you to edit existing report configurations. You can save theseupdated report configurations over the existing report configuration, or you can save it as anew report configuration.
NOTE:You must have administrative rights or operator rights to create, save, edit, copy,or delete report configurations. Users with user rights cannot edit the reportconfigurations.
See Systems Insight Manager - Editing managed reports
[Delete] You can permanently delete a report configuration from the Manage Reportspage.
See Systems Insight Manager - Deleting managed reports
Showing SQL Queries. Enables viewing SQL queries.
Select Reports Manage Reports.... The Manage Reports page appears. Select the reportfor which you want to view the SQL details, select [Run Report], and then on the reportitself, click Show SQL queries.
Snapshot comparison...
Snapshot comparisons enable you to compare up to four systems (with the same operating system)to each other or to compare a single system to itself and observe changes over time.
To view a snapshot comparison, select Reports Snapshot Comparison.... The SnapshotComparison page appears. Select target systems, and then click [Next].
See - Snapshot comparison reporting. .
Enhanced Reports
Select Reports Enhanced Reports....
The Enhanced Reports feature offers the following options:
Predefined Reports Predefined Reports are shipped with HP SIM. The reports are basedon common user scenarios and do not need any additional configuration or enablement. ThePredefined Reports feature is installed, configured, and available for use as soon as HP SIMis installed and configured. Predefined Reports are tied to existing systems collection in HPSIM, for instance, "All Systems" or "All Servers" with the exception of Event trends byseverity or type for a system collection where you have to select the collection orsystem(s) of your choice. Report results appear based on logged in user authorization ofnodes.
Select Reports Enhanced Reports.... The Enhanced Reports, Reports by Productpage appears.
See Systems Insight Manager - Running predefined reports
Creating New Reports from the Enhanced Reports Page. Select Reports EnhancedReports.... The Enhanced Reports, Reports by Product page appears. Click [New...]. TheNew Report Step 1: Select Target Systems page appears.
See Systems Insight Manager - Adding a report.
Editing Reports. Select Reports Enhanced Reports.... The Enhanced Reports,Reports by Product page appears. Select the report that you want to edit, and then click[Edit...]. The Add details to report: Step 3: Specify Parameters page appears.
See Systems Insight Manager - Editing a report.
Running Reports. Select Reports Enhanced Reports.... The Enhanced Reports pageappears. Select the report that you want to run. Click [Run Report].
See Systems Insight Manager - Running a report.
Email Report. Enables a report to be run at a later specified time.
Select Reports Enhanced Reports.... The Enhanced Reports, Reports by Productpage appears. Select the report that you want to schedule, and then click [Email Report...].
See Systems Insight Manager - Emailing reports.
Deleting Reports. Enables a user defined report to be deleted.
Select Reports Enhanced Reports.... The Enhanced Reports, Reports by Productpage appears.
See Systems Insight Manager - Deleting a report.
Federated CMS Search tool
Select Reports Federated Search....
Federated CMS Search is a web-based HP SIM plug-in that allows you to search quickly across anumber of Systems Insight Manager CMS systems. Federated Search finds systems using basicsystem criteria such as name, system type, subtype, and OS. The search tool can also searchsoftware inventory information to find, for example, firmware versions across all Windows systems.From the search results, you can drill down into specific systems on specific CMSs, accessing allfeatures on those CMSs and you can have the results exported to CSV, a comma-separated value,format.
How it works
System administrators log into the host CMS running the Federated CMS Search tool andlaunch the tool from the HP SIM Reports menu.
A list of searchable CMSs appears with their respective connection status, versioninformation, and system counts.
NOTE:Federated Search must be configured before a search can be performed.
Submit search criteria (name, status, system type/subtype, product, OS) and the FederatedCMS Search UI searches other CMSs through their respective HP SIM web service APIs.
Other CMSs in the organization returns the individual search results in a single table.
Search Tab Search criteria:
All fields operate on a contains basis. Boolean operators and wildcards are not supported.
All fields are case-insensitive.
Matches occur when all provided criteria are met.
Fields that accept text input also have a dropdown list of suggestions.
Search Initiates the search.Reset Fields Clears all search fields.Expand All Expands to display information available under each hyperlink in the table.Collapse All . Collapses information displaying under each hyperlink in the table.Hyperlink System names from the search results. When clicked, the hyperlink displays abrowser window that shows the Systems Insight Manager System Page for that system, asdelivered by the CMS on which the system was found.Export to CSV Exports the search results table in CSV format.
See Systems Insight Manager - Federated CMS Search Tool.
Connections Tab The connections tab displays the status of an attempted connection to eachsecondary CMS. If Federated CMS Search fails to connect to a CMS, that CMS is excluded fromsubsequent searches. After successful connection and if you have suitable authorizations locally onthe secondary CMS, the secondary HP SIM version, operating system, and system count aredisplayed.
Credential preferences By default, all connections made to secondary CMSs are made asthe currently signed-in user. To connect as another user, you can specify full credentials forthat user. The credentials are securely encrypted and stored on the main CMS privately for thecurrent user.Refresh Connections CMS connections are established once and maintained in the currentinstance of the UI. If a CMS is rebooted or comes online after starting Federated Search, youmust refresh connections to establish a connection to the newly online CMS.Go to Federated CMS Configuration The Federated CMS Configuration is used toconfigure the list of secondary CMSs. In order for the main CMS to be included in operationssuch as search, it must be added to the secondary list and display a successful configurationstatus.
NOTE:Setting up the CMS list can be done only by a full-rights user.
See Federated CMS Search Tool - Connections Tab for more information about the Connections tab.
See Systems Insight Manager - Federated CMS Search Configuration for more information aboutconfiguring the Federated Search tool.
Reports by Product page
The reporting engine main page contains the Reports by Product table that displays the productsregistered with HP SIM along with the available reports.
Expand icon. Reveals product details.Minimize icon. Hides product details.Product/Report Name. Displays the name of the products along with the total number ofreports in parenthesis registered with HP SIM for reports. When the product item is expandedby clicking the expand icon, the available reports are displayed under the product sectionalong with report details Description, Target Systems and Report Type.Report Type. Displays the type of report such as; Table, Bar, Pie, Line, or a collection of allthree types in any combination..Target Systems. Displays the target selection in which the report is executed.Report Description. Displays a short description of the report.Expand/Minimize icon. Displays/hides details of all available reports under the registeredproduct.
NOTE:The Reports by Product table displays reports for HP SIM by default. Only products thathave been registered with HP SIM have Predefined reports displayed.
NOTE:If links are not visible for some or all Enhanced Reports, use the following workaround:
Procedure 1 CMS installed on Windows
1. Open the reports.xml located in <HP SIM installationdirectory>/config/preload/62/addfiles/reports.xml and change the timestamp.You can do this by entering a space at the end of the file and resaving it.
2. Execute the mxconfigrefresh command at the command prompt.
Procedure 2 CMS installed on HP-UX or Linux
1. Open the reports.xml located in/etc/opt/mx/config/preload/62/addfiles/reports.xml and change thetimestamp. You can do this by entering a space at the end of the file and resavingit.
2. Execute the mxconfigrefresh command at the command prompt.
After completing the procedure, the links to reports appear in the user interface.
Reports by Product page buttons
All buttons remain disabled until a product is selected.
[New...]. Creates a new report. Only enabled for HP SIM reports.[Edit...] Edits a selected report. Only enabled for user created/defined reports under HP SIM.Remains disabled for Predefined reports.[Run Report] Executes a report.[Email Report...] Enables users to email a report.[Delete ] Deletes a selected report. Only user created/defined reports can be deleted.
Select data to be displayed in the report:
Select data from the Available Data: list to be included in the report.Click to add selected data from the Available Data: list to the Selected Data: list.List of items to be included in the report.Removes a selected item from the Selected Members: list.Moves a selected items position up in the Selected Members: list.Moves a selected items position down in the Selected Members: list.Click to return to the previous page.Click to run the report with the selected data.Click to save the report with the selected data.Click to email the report with the selected data.
Communications» Managing with tasks» License Manager» Reporting
Related information» Remote Support
Configuration andServices
» Operations
Related procedures
» Systems Insight Manager - Reporting» Systems Insight Manager - New reports» Systems Insight Manager - Running managed reports» Systems Insight Manager - Copying managed reports» Systems Insight Manager - Editing managed reports» Systems Insight Manager - Deleting managed reports» Systems Insight Manager - Running a report» Systems Insight Manager - Adding a report» Systems Insight Manager - Editing a report» Systems Insight Manager - Running predefined reports» Systems Insight Manager - Deleting a report» Systems Insight Manager - Emailing reports» - Snapshot comparison reporting
Related topics
» Systems Insight Manager - Printing a cluster collection view» Systems Insight Manager - Printing an event collection view» Systems Insight Manager - Printing reports» Systems Insight Manager - User and user group reports» Systems Insight Manager - Toolbox reports» Systems Insight Manager - Authorization reports» Systems Insight Manager - Reporting» - Snapshot comparison reporting» Systems Insight Manager - Reporting
HP Systems Insight Manager 7.1 English
Screens and product layout | Remote Support Configuration and Services
Communications» Managing with tasks» License Manager» Reporting
Remote SupportConfiguration andServices
» Operations» Reference
» Remote Support Configuration and Services overview» Configuring Remote Support Configuration and Services settings» Using the Entitlement tab» Accessing Remote Support Configuration Services On-Line Help
Remote Support Configuration and Services overview
The Remote Support Configuration and Services option facilitates the collection ofenterprise events and configuration data from monitored systems and establishes remoteconnectivity back to HP for reactive support in a timeframe determined by warranty orcontract level.
The following subsections provide a brief overview of the Remote Support componentsconfigured through the Remote Support Configuration and Services option.
Remote Support Client
The HP Remote Support Client is the underlying component that enables thecommunication of hardware event information collected on the CMS to the HP SupportCenter. This component is configured in the Remote Support Configuration and Servicesoption in HP SIM and is critical to providing remote support of your systems.
Remote Support Configuration Collector (RSCC)
The Remote Support Configuration Collector (RSCC) schedules and consolidatesconfiguration, performance, and availability collections from entitled server systems throughthe Advanced Configuration Collector component installed on each managed server, ordirectly from SAN and storage devices for proactive support purposes. The RSCC isupdated regularly to extend support for new products as they become available.
Remote Support Configuration Collector Extension
This component is designed to extend the capabilities of the Remote Support ConfigurationCollector when SAN support is required.
Advanced Configuration Collector Commands and Rules
This component is hosted on the CMS and can be updated through Remote SupportSoftware Manager (RSSWM) to specify what configuration, performance, or availability datawill be collected from each supported device type.
Remote Support System List
The Remote Support System List identifies devices that are eligible for remote supportservices including remote ‘phone-home’ monitoring. This list is updated on a regularbasis to add new device support to this service automatically.
Configuring Remote Support Configuration and Services settings
Procedure 1 Configuring Remote Support Configuration and Services settings
1. Enter your CMS information in the following sections:
CMS Location Information
CMS Administrator Contact Information
Additional CMS Administrator Contact Information
» Support and otherresources
» Assistance
» Glossary» Using Help
HP Account or Service Provider Contact Information
NOTE:This information should only be entered by HP or a ServiceProvider.
Additional HP Account Contact Information
Proxy Server Information
NOTE:In each of these sections, an * denotes a required field.
2. (Optional) Configure your email event settings. You can select any, none, or all ofthe following options:
Incident has been received at HP
Incident has been escalated to HP workflow
Incident has been closed at HP
3. (Optional) In the System enablement section, select Enable systems for RemoteSupport Services upon discovery.
4. (Optional) In the Privacy Information section, read the HP Worldwide PrivacyStatement and select HP may use the collected information to providerecommendations that may improve your environment. .
5. Click [Submit Updates].
6. (Optional) To verify the connectivity to HP using the Remote Support client, click[Test Data Submittal]. This test does not create a Service Event in HP SIM.
Using the Entitlement tab
The Remote Support Configuration and Services Entitlement tab allows you to enable ordisable remote support for any and all Remote Support eligible and supportable systems inyour enterprise. The Remote Support System List displays the status of and providesaccess to the Remote Support Entitlement Check (RSEC) for individual eligible systems. Ifa system is supportable but does not meet a support obligation, events submitted to HP byHP Remote Support may be closed without action.
About the Remote Support System List
The Remote Support System List available through the Remote Support [Entitlement] tabdisplays details for systems that are eligible for Remote Support. This list is part of a tablethat provides the following categories (columns) per system (rows) in your enterprise.
The Transport Enabled (TE) column indicates whether or not entitlement checksand events can be submitted for each system listed.
The Entitlement (ENT) column displays the entitlement status for each of the listedRemote Support eligible systems in your enterprise. The status is denoted by anicon, for example, a green symbol with a white check mark indicates the RemoteSupport Entitlement Check (RSEC) was successful and returned a valid entitlementfor that system. Tooltips describe the significance of each status icon. You can alsoclick on the icon to display more details on a system's entitlement status in aseparate Remote Support Entitlement Details window. Entitled systems are part ofthe Remote Support Enabled Group in HP SIM. NO events will be submitted to HPunless the system is entitled.
The Remote Support Ready (RS) column indicates either that entitlement, location,and/or contact information has or has not been properly configured. It does not tellyou which of the three may be misconfigured.
The Contract Package (CP) column displays the contract package type associated
with each of your systems.
The System Name column identifies a particular system in your enterprise.
The Serial # column displays a system's serial number (if available).
The Product # column displays a system's product identifier (if available).
The Country Code (CC) column displays the country code associated with aparticular system.
The Ent Type column displays the entitlement type associated with a particularsystem.
The Ent ID column displays a system's entitlement identifier.
The Obligation ID (OID) column displays the HP obligation ID associated with aparticular system.
Enabling Systems for Remote Monitoring
To ensure that the Remote Support System list is current you can synchronize it to makesure that all eligible active systems display.
The Remote Support [Entitlement] tab allows you to manage systems with regard toRemote Support, that is, enable and disable them with regard to Remote Support servicesand perform entitlement checks for single, multiple, or all systems in your enterprise.
If, when you registered your enterprise for Remote Support in the Remote Support[Settings] tab, and you did not select the option Enable Remote Support Devices uponDiscovery, then you may have multiple eligible systems that are not yet listed as availablefor remote monitoring.
If you selected Enable Remote Support Devices upon Discovery, then you may see systemslisted that you would prefer to disable.
You can use one of the Transport Enablement options available from the Action List drop-down list to manage remote monitoring for the listed systems. You can enable or disable allsystems, or manage one or more systems by selecting their associated checkbox andrunning an action from the Action List drop-down list against the selected systems. Forexample, you may choose to not monitor your test systems, even if they are eligible andsupportable through warranties. Additionally, when you have enterprise-wide maintenancetasks or expected downtime, you may choose to use the Disable All option to temporarilydiscontinue remote monitoring in your enterprise.
NOTE:Enabling monitoring may require 3-5 seconds per system.
Synchronizing the Remote Support System List
To ensure that the Remote Support System list is current, and lists all Remote SupportEligible systems in your enterprise, you can use the [Synchronize RSE] available at thebottom right of the Entitlement page.
NOTE:Synchronizing the Remote Support System list can take a long time in largeenterprises.
Updates on the status of the synchronization are displayed at the top of the page. You mustrefresh the page to view the results of the synchronization.
Accessing Remote Support Configuration Services On-Line Help
To open Remote Support Configuration Services specific help, click the link available onall of the RSCS tabbed pages (excluding the [Settings] and [Entitlement] tabs.
The Help page opens in a separate window that you can move or resize. To open a topic,
select the topic from the table of contents on the left side of the frame.
The Browsing for More Information> option enables you to select topics from the table ofcontents or the index.
» Discovery in HP SIM» Discovery filters» Managing Hosts file» Identification» Managing system types» Users and authorizations» Directory Services» Global credentials» System credentials» Security» Trusted certificates» Viewing the audit log» Configuring the audit log» Monitoring systems and
events» Quick Launch menu» Performing a basic search» Performing an advanced
search for systems» Performing an advanced
search for clusters» Performing an advanced
search for events» Tool search» Related information for
searches» Configuring events» Protocol settings» Software status polling» Hardware status polling» Data collection» System Properties» Configuring WBEM health
inclusion status» Specifying a Version
Procedure 1 Customizing the Home page
1. To display the Home in the workspace click [Home] in the banner.
2. Click Customize in the upper-right corner of the introductory page.
If the Home page has been set to something other than the default introductorypage, you can access the Home Page Settings page by selecting OptionsHome Page Settings.
3. Specify which page you want to use as Home page:
Introductory page (default)
Plug-in (if installed) page
Some HP SIM partner applications use this option to point to their homepage. However, if no partner application is using this, selecting this optiondisplays the HP SIM default introductory page.
Any specific system, cluster, or event collection view
The default introductory page is available only when it is set as the Home page. Ifyou want to view this page when it is not set as your home page, reselect it as theHome page.
4. Optional: If the introductory page is selected as your home page, customize thecontent on the page by selecting or clearing the following options:
Show "Do this now to finish the install" frame. If selected, this sectionappears on the Home page.
Show the "Did You Know?" image. If selected, the image in the bottomright corner of the Home page appears.
5. Optional: If you selected This collection, select a collection from the dropdown list,and then select Automatically maximize workspace to automatically maximize theworkspace when this collection appears as the home page.
» Customizing the HomepageCustomizing the systemstatus panel
» Enlarging the SystemStatus panel
» Setting up managedsystems from a LinuxCMS
» Setting up managedsystems from a WindowsCMS
» Setting up managedsystems from a HP-UXCMS
» Discovery in HP SIM» Discovery filters» Managing Hosts file» Identification» Managing system types» Users and authorizations» Directory Services» Global credentials» System credentials» Security» Trusted certificates» Viewing the audit log» Configuring the audit log» Monitoring systems and
events» Quick Launch menu» Performing a basic search» Performing an advanced
search for systems» Performing an advanced
search for clusters» Performing an advanced
search for events» Tool search» Related information for
searches» Configuring events» Protocol settings» Software status polling» Hardware status polling» Data collection» System Properties» Configuring WBEM health
inclusion status» Specifying a Version
NOTE:Customized System Status panel appear in the system status pop-up window.To minimize the System Status panel, click the minimize icon ( ) in the upperright corner of the panel title bar. To maximize the System Status panel, clickthe maximize icon ( ) in the upper right corner of the panel title bar. To openthe System Status panel in a new window, click the Open in New Window icon.
Customize the System Status panel to display the following status information:
Uncleared Event Status A count that indicates the number of uncleared eventstatuses that are Critical, Major, Minor, and Normal for any given system collection.Each number is a hyperlink to a detailed list of events with that particular status.When you click the number, an event collection appears with those particular eventsand their corresponding systems.
Health Status A count that indicates the number of systems, in a given systemcollection, that have a system health status that is Critical, Major, Minor, andNormal. Each number is a hyperlink to a detailed list of systems with that particularstatus. When you click the number, a system collection appears with thoseparticular systems. Health status is not shown by default but can be configured toappear.
NOTE:The system health status information appears only when it iscustomized to display the system health status.
Alarm You can customize an alarm to appear for specific criteria for any givensystem collection. The alarm alerts you that a particular criterion has been met byone or more systems in that collection. For example, you might receive an alarmthat a storage system has a critical uncleared event or critical health status.Because the System Status panel is continually updated, the alarm appears untilthe event is cleared, the system is removed from the collection, or the alarmcustomization is changed so that it no longer applies. If the System Status panel iscollapsed, and an alarm occurs, it opens automatically so that the alarm is visible.You can collapse the panel, but it continues to open as long as the alarm isrelevant. To have the panel remain collapsed, you must clear the offending event orsystem status or reconfigure the status display to no longer display alarms.
Legend of status icons To display a list of status icons, click Legend in theSystem Status panel. Legend information appears in a separate window andremains open until you close it.
NOTE:If the System Status panel is customized to have no status displayed, thetimestamp does not display.
Procedure 1 Customizing the System Status panel
1. Click Customize in the upper-right corner of the System Status panel. TheCustomize System Status page appears.
2. Select the first Show summary of, and then select uncleared event status orhealth status.
a. Select the system collection All Systems, or select another systemcollection from the dropdown list.
b. Edit the Label if desired.
Control Repository» Configuring
software/firmware globalsettings
» Reporting» Managing with tasks» Using Cluster Monitor» Command line tools» Configuring managed
systems from a WindowsCMS
» Configuring managedsystems from a LinuxCMS
» Configuring managedsystems from an HP-UXCMS
» Custom tools» Setting disk thresholds» Creating a task to delete
disk thresholds» License manager» Management processor
tools» Managing
Communications» Managing MIBs» Installing OpenSSH» Replicate Agent Settings» RPM Package Manager» HP Server Migration Pack
- Universal Edition» HP System Management
Homepage» Version Control» Device ping
» Reference» Support and other
resources» Assistance
» Glossary» Using Help
3. Select the second Show summary of, and then select uncleared event status orhealth status.
a. Select the system collection All Systems, or select another systemcollection from the dropdown list.
b. Edit the Label if desired.
4. Select to Show an alarm when any system meets the condition.
a. Select the Condition.
b. Select the system collection All Systems, or select another systemcollection from the dropdown list.
c. Edit the Label if desired.
5. Click [OK] to save changes.
NOTE:Clicking [Restore Defaults] returns the customization screen to itsdefault condition: only the uncleared event status appears in the banner.Health status and the alarm are disabled. All personalized information isremoved.
» Customizing the systemstatus panelEnlarging the SystemStatus panel
» Setting up managedsystems from a LinuxCMS
» Setting up managedsystems from a WindowsCMS
» Setting up managedsystems from a HP-UXCMS
» Discovery in HP SIM» Discovery filters» Managing Hosts file» Identification» Managing system types» Users and authorizations» Directory Services» Global credentials» System credentials» Security» Trusted certificates» Viewing the audit log» Configuring the audit log» Monitoring systems and
events» Quick Launch menu» Performing a basic search» Performing an advanced
search for systems» Performing an advanced
search for clusters» Performing an advanced
search for events» Tool search» Related information for
searches» Configuring events» Protocol settings» Software status polling» Hardware status polling» Data collection» System Properties» Configuring WBEM health
inclusion status» Specifying a Version
You can enlarge the System Status panel to monitor system and event statuses. Click theOpen in New Window icon on the System Status panel title bar and the status panel pop-up window appears. To resize the window, click and drag the sides of the window. To closethe window manually, click the Close Window icon. Otherwise, the window is closed if theHP SIM window is closed or refreshed, or you sign out of HP SIM.
The enlarged status panel window mimics the System Status panel. Whenever a statuschanges, the pop-up window is updated. Click one of the status values to bring up the mainHP SIM window and display the corresponding collection. For example, if you click theMajor status value, the All Major Systems table view page appears. You can customizethis window using the options for customizing the System Status panel. See SystemsInsight Manager - Customizing the system status panel for more information.
The following error messages might appear:
Systems Insight Manager is not configured to display any status.
To resolve this issue, close the window, customize the display of the SystemStatus panel, and then relaunch.
This window does not have a connection with the main Systems Insight Managerwindow.
To resolve this issue, close the window.
NOTE:The status panel pop-up window might not appear if you have a pop-up blockerconfigured and running on your system. You must disable the pop-up blocker orconfigure it to allow the HP SIM application to use pop-up windows.
NOTE:If you HP SIM configure to enable session timeout, the status pop-up window nolonger displays the status when the session expires.
Utilizing RSS capabilities
RSS is a data format based on XML that can be used by applications and websites toprovide content to other applications. HP SIM uses RSS to publish System Status panelinformation that can be viewed in newsfeed programs.
RSS capabilities can be enabled in HP SIM by adding the key name rssFeedEnabled = truein the globalsettings.props . By changing this value, you can view the System Statuspanel information in newsreaders and applications
Procedure 1 Enabling RSS
1. Stop the HP SIM service.
2. In the globalsettings.props file, add rssFeedEnabled=true. The file is located at:
On Windows It is typically located at C:\Program Files\HP\SystemsInsight Manager\config\globalsettings.props .
On HP-UX and Linux It is located at/etc/opt/mx/config/globalsettings.props.
3. Restart the HP SIM service.
4. Browse to http://server_name:280 /RSS to view the XML output for the current HPSIM status values.
Control Repository» Configuring
software/firmware globalsettings
» Reporting» Managing with tasks» Using Cluster Monitor» Command line tools» Configuring managed
systems from a WindowsCMS
» Configuring managedsystems from a LinuxCMS
» Configuring managedsystems from an HP-UXCMS
» Custom tools» Setting disk thresholds» Creating a task to delete
disk thresholds» License manager» Management processor
tools» Managing
Communications» Managing MIBs» Installing OpenSSH» Replicate Agent Settings» RPM Package Manager» HP Server Migration Pack
- Universal Edition» HP System Management
Homepage» Version Control» Device ping
» Reference» Support and other
resources» Assistance
» Glossary» Using Help
The URL in step 4 can be used in RSS readers to view the same data.
» Enlarging the SystemStatus panelSetting up managedsystems from a LinuxCMS
» Setting up managedsystems from a WindowsCMS
» Setting up managedsystems from a HP-UXCMS
» Discovery in HP SIM» Discovery filters» Managing Hosts file» Identification» Managing system types» Users and authorizations» Directory Services» Global credentials» System credentials» Security» Trusted certificates» Viewing the audit log» Configuring the audit log» Monitoring systems and
events» Quick Launch menu» Performing a basic search» Performing an advanced
search for systems» Performing an advanced
search for clusters» Performing an advanced
search for events» Tool search» Related information for
searches» Configuring events» Protocol settings» Software status polling» Hardware status polling» Data collection» System Properties» Configuring WBEM health
inclusion status» Specifying a Version
» Installing the ProLiant Support Pack on a Linux system for the first time» Configuring the managed system software» Setting up Linux managed systems manually
Use the following checklist to assist you with setting up managed systems from a LinuxCentral Management Server (CMS).
IMPORTANT:Run discovery before setting up managed systems. For more information, seeSystems Insight Manager - Running a discovery task. Configuring automaticdiscovery is also part of the First Time Wizard.
Procedure 1 Setting up managed systems from a Linux CMS
1. Ensure that HP SIM is installed on the CMS.
2. Ensure the First Time Wizard has been completed on the CMS.
3. Install the ProLiant Support Pack on the CMS. See Installing the ProLiant SupportPack on a Linux system for the first time.
4. Configure the managed system software. See Configuring the managed systemsoftware.
Installing the ProLiant Support Pack on a Linux system for the first time
For Linux systems, use the Linux Deployment Utility to install the latest support pack withthe preconfigured components to the local system. For more information regarding installinga support pack using the Linux Deployment Utility, see http://www.hp.com/servers/psp.
Configuring the managed system software
The HP SIM Configure or Repair Agents tool configures Linux, HP-UX, and Windowsmanaged systems to communicate with HP SIM from a Linux CMS.
NOTE:You can manually set up Linux systems. See Setting up Linux managed systemsmanually.
To run Configure or Repair Agents remotely against multiple systems simultaneously, youmust:
Have authorizations to run the Configure or Repair Agents tool.
Have full CMS administrative rights to modify the HP SIM community strings in thenode security file.
Enter root or administrator level user credentials for the target system.
To configure agents remotely using Configure or Repair Agents, see Systems InsightManager - Configuring managed systems from a Linux CMS.
Setting up Linux managed systems manually
Procedure 2 Setting up Linux managed systems manually
» Reporting» Managing with tasks» Using Cluster Monitor» Command line tools» Configuring managed
systems from a WindowsCMS
» Configuring managedsystems from a LinuxCMS
» Configuring managedsystems from an HP-UXCMS
» Custom tools» Setting disk thresholds» Creating a task to delete
disk thresholds» License manager» Management processor
tools» Managing
Communications» Managing MIBs» Installing OpenSSH» Replicate Agent Settings» RPM Package Manager» HP Server Migration Pack
- Universal Edition» HP System Management
Homepage» Version Control» Device ping
» Reference» Support and other
resources» Assistance
» Glossary» Using Help
1. Install and configure SSH.
a. Verify that SSH is installed on the managed system:
rpm -qa | grep ssh
If SSH is not installed, see your Linux provider for information aboutinstalling SSH.
b. On the CMS, copy the SSH-generated public key from the CMS to themanaged system, and place it in the authorized keys file of the execute-asuser (root or administrator).
IMPORTANT:On a non-English CMS, ensure that an administrator accountexists on the CMS, and that mxagentconfig has run on theCMS for the created administrator account.
i. Launch the Manage SSH Keys dialog box from the CMS commandprompt:
mxagentconfig -a -n hostname -u username -p Password
ii. Click [Connect].
2. Configure the system to send SNMP traps.
NOTE:These steps might vary slightly, depending on your version of Linux. Seeyour Linux provider for details if these file paths and file names do notexist on your system.
a. Verify that SNMP is installed:
rpm -qa | grep snmp
If it is not installed, see your Linux provider for information about installingSNMP.
b. If the HP Server and Management Drivers and Agents daemons areinstalled on your system, stop them:
/etc/init.d/hpasm stop
c. Stop the SNMP daemon:
/etc/init.d/snmpd stop
d. Edit the snmpd.conf file.
For Red Hat Linux, open the following file in the vi editor:
vi /etc/snmp/snmpd.conf
For SuSE SLES 8, open the following file in the vi editor:
vi /usr/share/snmp/snmpd.conf
i. Remove the comment symbol (#) from the trapsink line, and addthe IP address of the CMS:
trapsink IPaddress
where IPaddress is the IP address of the CMS.
ii. Add the CMS to the read only community by adding the line:
rocommunity CommunityName IPaddress
where CommunityName is the SNMP community string used by theCMS and IPaddress is the IP address of the CMS.
iii. Save the changes to the file. To save and close this file using thevi editor, press the Esc key, enter :wq!, and then press the Enterkey.
e. Start the SNMP daemon:
/etc/init.d/snmpd start
f . If the HP Server Management Drivers and Agents daemons are installed onyour system, start them:
/etc/init.d/hpasm start
3. Install the Linux ProLiant Support Pack. To download this software and accessinstallation information, see http://www.hp.com/support/files.
4. Sign in to the HP SIM GUI.
5. Add the default WBEM user name and password to the Global Protocol Settingspage in the HP SIM GUI.
NOTE:An account for at least one of the WBEM user name and passwordcombinations must exist on each managed system.
NOTE:You can perform this step once for all managed systems.
a. Select Options Protocol Settings Global Protocol Settings.
b. In the Default WBEM settings section, ensure that the Enable WBEMcheckbox is selected, and add the default WBEM user name, password,and confirmation password.
» Setting up managedsystems from a LinuxCMSSetting up managedsystems from a WindowsCMS
» Setting up managedsystems from a HP-UXCMS
» Discovery in HP SIM» Discovery filters» Managing Hosts file» Identification» Managing system types» Users and authorizations» Directory Services» Global credentials» System credentials» Security» Trusted certificates» Viewing the audit log» Configuring the audit log» Monitoring systems and
events» Quick Launch menu» Performing a basic search» Performing an advanced
search for systems» Performing an advanced
search for clusters» Performing an advanced
search for events» Tool search» Related information for
searches» Configuring events» Protocol settings» Software status polling» Hardware status polling» Data collection» System Properties» Configuring WBEM health
inclusion status» Specifying a Version
» Configuring the managed system software using the Configure or Repair Agents featurefrom the CMSProcedure 1 Setting up managed systems
1. Ensure that HP SIM is installed on the CMS.
2. Ensure the First Time Wizard has been completed on the CMS.
IMPORTANT:You must run discovery before setting up managed systems. For moreinformation, see Systems Insight Manager - Running a discovery task formore information. Configuring automatic discovery is part of the FirstTime Wizard.
3. Configure the managed system software. For more information, see Configuring themanaged system software using the Configure or Repair Agents feature from theCMS.
Configuring the managed system software using the Configure or Repair Agentsfeature from the CMS
The HP SIM Configure or Repair Agents tool is a quick and easy way to configure Windows,Linux, and HP-UX managed systems to communicate with HP SIM from a Windows CMS.
To run Configure or Repair Agents remotely against multiple systems simultaneously, youmust have authorizations to run the Configure or Repair Agents tool.
You must have full CMS administrative privileges to modify the HP SIM community stringsin the system security file. In addition, you must enter administrator-level user credentials forthe target system.
To configure agents remotely.
Systems Insight Manager - Related information
HP Systems Insight Manager 7.1 English
Operations | Setting up managed systems from a HP-UX CMS
» Setting up managedsystems from a WindowsCMSSetting up managedsystems from a HP-UXCMS
» Discovery in HP SIM» Discovery filters» Managing Hosts file» Identification» Managing system types» Users and authorizations» Directory Services» Global credentials» System credentials» Security» Trusted certificates» Viewing the audit log» Configuring the audit log» Monitoring systems and
events» Quick Launch menu» Performing a basic search» Performing an advanced
search for systems» Performing an advanced
search for clusters» Performing an advanced
search for events» Tool search» Related information for
searches» Configuring events» Protocol settings» Software status polling» Hardware status polling» Data collection» System Properties» Configuring WBEM health
inclusion status» Specifying a Version
» Installing the required software on an HP-UX system» Configuring the managed system software for HP-UX systems» Setting up HP-UX managed systems manually
Installing the required software on an HP-UX system
Procedure 1 Setting up managed systems from an HP-UX Central ManagementServerCMS
1. Understand the basic managed system software for HP-UX.
For HP-UX, the following software, shown with minimum recommended versions, isrequired for essential HP SIM functionality to operate. This software is installed bydefault as part of the latest HP-UX 11i v2 operating environments, but you mighthave to install or update it on HP-UX 11i v1 or older HP-UX 11i v2 environments.
T1471AA HP-UX Secure Shell
B8465BA HP WBEM Services for HP-UX
The iCAP properties for cells and processors for a complex is collected anddisplayed, using HP-UX WBEM. For HP-UX, the following software is required foressential HP SIM functionality to operate. This software is installed by default aspart of the latest HP-UX 11i v3 (11.31), HP- UX 11i v2 (11.23), which can beinstalled on HP 9000 or HP Integrity servers, and HP-UX 11i v1 (11.11), which canonly be installed on HP 9000 servers.
B9073BA version 08.01.01 iCAP for HP-UX
NOTE:WBEM providers is only collected under the WBEM.
This WBEM Services bundle contains basic system instrumentation displayed in theHP SIM Property pages, supporting collection and reporting by HP SIM inventoryfunctionality. To maximize the value of HP SIM for properties, inventory, and events,see http://www.hp.com/go/hpsim/providers for the latest WBEM Services bundle.
For the latest WBEM Services bundle, go to http://www.hp.com/go/hpsim/providers.
2. Ensure the managed system software is installed.
To verify that the minimum required software is installed, log in to the remotesystem, and run the following command:
$ swlist –l bundle T1471AA B8465BA OpenSSL
To verify that the optional providers and HP System Management Homepage areinstalled, run commands such as:
3. Acquire and install the managed system software if not previously installed.
The SSH and WBEM bundles are included on the HP-UX Operating Environmentand Application Release media, as well as part of the HP SIM HP-UX depotdownloaded fromhttp://h18013.www1.hp.com/products/servers/management/hpsim/dl_hpux.html.
For the WBEM providers, seehttp://h18013.www1.hp.com/products/servers/management/hpsim/dl_hpux.html .
After you have obtained the depots containing the software, you can install then
» Reporting» Managing with tasks» Using Cluster Monitor» Command line tools» Configuring managed
systems from a WindowsCMS
» Configuring managedsystems from a LinuxCMS
» Configuring managedsystems from an HP-UXCMS
» Custom tools» Setting disk thresholds» Creating a task to delete
disk thresholds» License manager» Management processor
tools» Managing
Communications» Managing MIBs» Installing OpenSSH» Replicate Agent Settings» RPM Package Manager» HP Server Migration Pack
- Universal Edition» HP System Management
Homepage» Version Control» Device ping
» Reference» Support and other
resources» Assistance
» Glossary» Using Help
from the managed system:
$ swinstall –s <depot_location> OpenSSL
NOTE:B8465BA and B9073BA version 08.01.01 depends on OpenSSL, so youmust install OpenSSL first.
$ swinstall –s <depot_location> T1471AA
$ swinstall –s <depot_location> B8465BA
$ swinstall –s <depot_location> <names of WBEM providers being installed>
4. Configure the managed system software. See Configuring the managed systemsoftware for HP-UX systems.
Configuring the managed system software for HP-UX systems
The HP SIM Configure or Repair Agents tool is a quick and easy way to configure Linux,HP-UX, and Windows managed systems to communicate with HP SIM from an HP-UXCMS.
NOTE:You can manually configure HP-UX systems. See Setting up HP-UX managedsystems manually.
To run Configure or Repair Agents remotely against multiple systems simultaneously, youmust:
Have authorizations to run the Configure or Repair Agents tool.
Have full CMS administrative rights to modify the HP SIM community strings in thenode security file.
Enter root or administrator level user credentials for the target system.
To configure agents remotely, see Systems Insight Manager - Configuring managedsystems from an HP-UX CMS.
Setting up HP-UX managed systems manually
Procedure 2 Set up an HP-UX system manually
1. On the CMS:
a. Configure the SSH keys for this system.
b. Configure the default WBEM user name and password if not previouslydone.
NOTE:SSH and WBEM are installed on HP-UX 11.23 systems bydefault. For 11.11 systems, verify that they are installed with thiscommand:
swlist B8465BA T1471AA
c. Subscribe to WBEM Indications/Events.
2. On each managed system:
a. Install SSH on the managed system if not previously installed.
swinstall -s /directory/depot T1471AA where directory is the path to thedepot file and depot is the name of the depot file. For example:
swinstall -s /tmp/HPSIM_download.depot T1471AA
b. Install WBEM on the managed system if not previously installed.
NOTE:OpenWBEM is not supported.
swinstall -s /directory/depot B8465BA
where directory is the path to the depot file and depot is thename of the depot file. For example:
swinstall -s /tmp/HPSIM_download.depot B8465BA
c. Configure SNMP to send traps to the CMS:
i. Add the full host name or IP address of the CMS as a trapdest inthe following file:/etc/SnmpAgent.d/snmpd.conf
trap-dest: hostname_or_ip_address
ii. Stop the SNMP Master agent and all subagents with the command:/sbin/init.d/SnmpMaster stop
iii. Restart the SNMP Master agent and all subagents with thecommand:/usr/sbin/snmpd
d. On the CMS, copy the SSH-generated public key from the CMS to themanaged system using the mxagentconfig:
Use one of the following commands:
a. mxagentconfig -a -n <hostname> -u root -f<file_with_root_password>
b. mxagentconfig -a -n <hostname> -u root -p <root_password>
NOTE:Using the -p option exposes the password through psoutput, so using the -f option (with a file only readable byroot, and containing only the managed system rootpassword) is highly recommended when usingmxagentconfig -a. If you use the -p option, enclose thepassword in single quotes if the password has anyspecial characters, such as & or $. For more informationand options, see the mxagentconfig manpage with manmxagentconfig.
3. Sign in to the HP SIM GUI and select Secutity Credentials OptionsGlobalcrecdentials. Using the GUI, add the default WBEM user name and password tothe Global Protocol Settings page.
NOTE:An account for at least one of the WBEM user name and passwordcombinations must exist on each managed system.
NOTE:You can perform this step once for all the managed systems you set up.
a. Select Secutity Credentials OptionsGlobal crecdentials.
b. In the Default WBEM settings section, ensure that the Enable WBEMcheckbox is selected, and add the default WBEM user name, password,and confirmation password.
c. Click [OK].
NOTE:An account for at least one WBEM user name and passwordcombination must exist on each managed system. If the user in theGlobal Protocol Settings does not exist on the managed system you canset per-system WBEM user names and passwords from the Secutity
Credentials OptionsGlobal crecdentials.
4. To subscribe to WBEM Indications/Events:
NOTE:For more information about HP-UX WBEM events, go to the HPSystems Insight Manager User Guide.
a. From the managed system, be sure WBEM is installed.
NOTE:Subscribing to WBEM Indications/Events on managed systems isoptional.
b. Verify that SysFaultMgmt provider is installed.
Depending on the SFM configuration, run the following:
cimprovider –lm SFMProviderModule
The EMSWrapperProvider appears.
or
cimprovider –ls
The EMSWrapperProvider appears.
NOTE:For more information regarding SFM, see HP System FaultManagement Diagnostics.
c. From the CMS:
To subscribe to WBEM Events, you must have root access. If the GlobalProtocol Setting does not match the managed system or does not containroot access, the subscription for WBEM Indications fails. You can verifywhat access WBEM has by running the following command line:
mxnodesecurity –l –p wbem –n <systemname>
If the managed system does not have a root level user credentialconfigured, you can add it for the individual system.
NOTE:You can use the Configure or Repair Agents tool to perform thisstep without permanently recording a root password.
i. To change the individual system:
mxnodesecurity -a -p WBEM -c \
<username:password> -n <systemname>
d. From the CMS, run the WBEM Indications/Events command line:
» Editing a discovery task» Disabling or enabling an
existing discovery task» Deleting a discovery
task» Running a discovery
task» Related information
» Discovery filters» Managing Hosts file» Identification» Managing system types» Users and authorizations» Directory Services» Global credentials» System credentials» Security
» Automatic discovery» First discovery» Subsequent discoveries» Hosts files
Discovery is the process of finding systems in the management domain so that they can bemanaged from the CMS by HP SIM.
You can perform discovery only if you have administrative rights.
Automatic discovery
The process that HP SIM uses to find and identify systems on your network and populatethe database with that information. A system must first be discovered to collect data andtrack system health status. The primary source for automatic discovery is ping sweepsconfigured in the automatic discovery tasks page. Other sources might include receivingevents from unknown systems or from a management processor that has information abouta server. Identification automatically runs on discovered systems.
The option Automatically discover a system when an event is received from it isdisabled by default, but can be enabled by selecting it in the General Settings for AllDiscoveries section. For discovery to run, you must enable the default System AutomaticDiscovery task by selecting Options Discovery, selecting the default task, and thenclicking [Enable ]. HP recommends editing this task to ensure that the IP range is correct.
NOTE:Discovery templates do not exist in HP SIM 5.3 or later. Therefore, afterupgrading to HP SIM, 5.3 or later, a disabled discovery task is created for eachexisting template.
To access the General Settings for All Discoveries section, select Options Discovery,and then click Configure general settings. In the section, Do this now to finish theinstallation , on the introductory page, click Configure discovery and credentials, or fromthe Manage section of the Homepage, click discovery.
Alternatively, you can click [Edit], instead of [Enable ], to edit and save the task. In theSchedule section, select Automatically execute discovery every, and then set thediscovery time. If you disable automatic discovery, no new automatic discovery is performeduntil you enable automatic discovery by visiting the Discovery page and making yourselections. For more information about scheduling automatic discovery, see Systems InsightManager - Configuring automatic discovery.
HP SIM performs automatic discovery using the IP.
Internet Protocol
HP SIM discovers systems running IP when it pings systems in a listed range of addresses.It defaults to the local subnet, a range that corresponds to the IP addresses assigned tothe system where HP SIM is running. You can change the address list to indicate othersystems or segments of the network that you want HP SIM to discover.
Web Agents are not discovered unless HTTP is enabled on the Global Protocol Settingspage in the HTTP settings section. To enable HTTP, see Systems Insight Manager -Protocol settings for information. To ensure that clusters are discovered in automaticdiscovery, the cluster IP address and all node addresses must be listed in the section, Pinginclusion ranges, system (hosts) names, and/or hosts files . To access this section, click[New] for a new discovery task, or click [Edit] to edit an existing discovery task.
» Trusted certificates» Viewing the audit log» Configuring the audit log» Monitoring systems and
events» Quick Launch menu» Performing a basic search» Performing an advanced
search for systems» Performing an advanced
search for clusters» Performing an advanced
search for events» Tool search» Related information for
searches» Configuring events» Protocol settings» Software status polling» Hardware status polling» Data collection» System Properties» Configuring WBEM health
inclusion status» Specifying a Version
Control Repository» Configuring
software/firmware globalsettings
» Reporting» Managing with tasks» Using Cluster Monitor» Command line tools» Configuring managed
systems from a WindowsCMS
» Configuring managedsystems from a LinuxCMS
» Configuring managedsystems from an HP-UXCMS
» Custom tools» Setting disk thresholds» Creating a task to delete
disk thresholds» License manager» Management processor
tools» Managing
Communications» Managing MIBs» Installing OpenSSH» Replicate Agent Settings» RPM Package Manager» HP Server Migration Pack
- Universal Edition» HP System Management
Homepage» Version Control» Device ping
» Reference» Support and other
resources» Assistance
HP SIM uses a globally unique system identifier obtained from the system to help identifyHP systems with multiple IP addresses. If no unique identifier can be obtained, the fullyqualified DNS names of the systems are used for each IP. To ensure systems are resolved,for each IP address, the FQDN names must match.
Event-based automatic discovery
Event-based automatic discovery is disabled by default. You can enable this feature byselecting Automatically discover a system when an event is received from it. Event-based automatic discovery adds any systems that send SNMP traps, WBEM indications, orother events to HP SIM that do not have a matching IP address in the database. Theoption, Ping exclusion ranges, and/or hosts files (in the General Settings for AllDiscoveries section), allows the entry of any IP addresses that you want excluded fromevent-based automatic discovery. If SNMP is disabled on the Global Protocols Settingspage under Options Protocol Settings Global Protocol Settings, then SNMP trapsare ignored. If WBEM is disabled, WBEM indications are also ignored.
NOTE:With the exception of the SNMP Authentication Failure trap, all traps trigger anautomatic discovery.
First discovery
You can start a discovery in the following ways:
Execute discovery immediately from the Discovery page, select the SystemAutomatic Discovery task, click [Edit] to configure the task for your environment,and then click [Run Now]. The discovery process starts immediately. The discoveryprogress is updated as the systems are discovered, until the discovery process iscomplete.
Allow sufficient time for a complete discovery and identification to be performed.Times vary, depending on your network, bandwidth, and discovery settings. In mostcases, the discovery process finds all systems by pinging the network.
Subsequent discoveries
You can run discovery any time from the Discovery page. For subsequent discoveries,you can specify the subnets or systems to interrogate and the schedule to follow.
For the most comprehensive discovery and identification, select SNMP, WBEM, and HTTPas the protocols on the Options Protocol Settings Global Protocol Settings page.Configure default community strings and WBEM passwords on the Global ProtocolSettings page.
Status indicators let you know when discovery is running, and the column, Last Run,displays running, the percentage of completion, the number of pings attempted, and thesystems processed . A processed system is one in which the IP address has been eitheridentified or found unresponsive. However, a processed system is not always added to thedatabase.
Hosts files
Hosts files are used to manually add multiple systems to the HP SIM database, and areusually used only one time to import systems. You can use an existing hosts file, a filecreated from the HP SIM database, or an HP SIM exported hosts file as the basis foradding systems. Typically, the file contains a listing of the names of systems, system IPaddresses, and any alias names that are used for the system.
Importing the hosts file bypasses the need for immediate discovery. For example, in thecase of a catastrophic system failure, you could import a backup hosts file as the basis forreconfiguring your management environment and automatically repopulating the database.Adding the systems using the hosts file utility does not replace systems in the database.For example, if a system listed in the hosts file has the same IP address as an existingsystem, the duplicate is ignored. Any systems that previously existed in the database are
» Glossary» Using Help not modified.
You can import hosts files from the following sources:
The HP SIM database, which imports the system data, creates a hosts file, andsorts the data types according to your selection
Another system that has an existing hosts file
To create and manage hosts files, click Manage hosts files on the Discovery page.
Options for adding a single system
Know the IP address or host name of the system. If you know at least one of these,HP SIM can find the other by validating the information with the Domain NameService (DNS) for the network.
To add a cluster and nodes, enter each IP address separately.
Decide if you want to set the system type, subtypes, or WBEM credentials as wellas the product model.
Specify the WBEM settings for the system on the System Protocol Settings page.You can override the default user name and passwords by selecting use valuesspecified below and entering appropriate user names and passwords.
Specify the SNMP settings for this system to be unique or match the globaldiscovery settings. The current system default settings appear. If you override thedefault and specify a different value, that community string must be supported onthe system. If it is not and one of the defaults is supported, HP SIM reverts back tothe default value. When manually adding a single system, you can modify thefollowing settings:
timeout
The amount of time HP SIM waits for an SNMP response when itsends a request to the system. The default timeout value appears. Ifa response is not received within time interval, HP SIM mightdetermine that the system does not support SNMP. Decreasing thisvalue can cause increased network traffic because the rate of retryattempts is increased. Use caution when changing this value. A valueof three seconds usually works for a LAN. However, if systems areconnected through a WAN, try a higher value, for example, 10seconds.
retries The number of additional times after the first attempt is made tocommunicate with a system before the attempts stop.
community strings
A community string sets up authentication that enables or prohibitscommunication between the managed system and the CMS. TheCMS community string of the must match the community string of themanaged system. Use the read-only community string to readvariables. Use the write community string to modify variables.Although only one community is valid for a communication attempt, asystem can belong to multiple communities. However, HP SIM usesonly one community string when communicating with a system.
NOTE:If an IP address is used to manually add a single system, it must be properlyresolved to a system name for the name to be displayed in the GUI.
» Editing a discovery task» Disabling or enabling an
existing discovery task» Deleting a discovery
task» Running a discovery
task» Related information
» Discovery filters» Managing Hosts file» Identification» Managing system types» Users and authorizations» Directory Services» Global credentials» System credentials» Security
» For all automatic discoveries section» Actions to take after running discovery section» Discovery page buttons
When you access the Discovery page, a table displays a list of all available discoverytasks. You can configure multiple instances of discovery with each instance having its ownschedule and set of inclusion ranges. When a discovery task is executed, the Last Runcolumn is updated to display its progress, including the percentage of completion.
Automatic discovery and completion percentages are calculated by weighting two factors:the ping sweep (performed on each host) is 10% of the process; the system identification is90% of the process. If no host is found on an IP address, the system identification isconsidered complete. For example, you have 100 hosts in your discovery range. If 50 hostshave been pinged, but only 10 identified, you have: 50/100 * .10 = 0.05 (ping sweep)10/100 * .90 = 0.09 (identification) 0.05 + 0.09 = 0.14 * 100 = 14% (total completedpercentage).
NOTE:You can run only one discovery task at a time. If you select to run more than onediscovery task, the percentage in the Last Run column remains at 0% until thecurrently running task is complete.
For all automatic discoveries section
The following options are available:
Configure general settings Select this option to configure settings that apply toall discovery tasks. For more information, see Systems Insight Manager -Configuring discovery general settings.
Manage hosts files Select this option to manage hosts files. For moreinformation, see Systems Insight Manager - Managing Hosts file.
Configure global protocol settings Select this option to configure global protocolsettings. For more information, see Systems Insight Manager - Protocol settings.
NOTE:To discover clusters correctly, you must enable SNMP with the correctsecurity settings on HP SIM on the target systems.
Actions to take after running discovery section
This section is available only when Insight managed system setup wizard or HP InsightControl virtual machine management is installed and the available options include:
Run the managed system setup wizard This option is available when Insightmanaged system setup wizard is installed and takes you to the Insight managedsystem setup wizard page to configure managed systems.
Discovery page buttons
From the Discovery page, you can also:
» Trusted certificates» Viewing the audit log» Configuring the audit log» Monitoring systems and
events» Quick Launch menu» Performing a basic search» Performing an advanced
search for systems» Performing an advanced
search for clusters» Performing an advanced
search for events» Tool search» Related information for
searches» Configuring events» Protocol settings» Software status polling» Hardware status polling» Data collection» System Properties» Configuring WBEM health
inclusion status» Specifying a Version
Control Repository» Configuring
software/firmware globalsettings
» Reporting» Managing with tasks» Using Cluster Monitor» Command line tools» Configuring managed
systems from a WindowsCMS
» Configuring managedsystems from a LinuxCMS
» Configuring managedsystems from an HP-UXCMS
» Custom tools» Setting disk thresholds» Creating a task to delete
disk thresholds» License manager» Management processor
tools» Managing
Communications» Managing MIBs» Installing OpenSSH» Replicate Agent Settings» RPM Package Manager» HP Server Migration Pack
- Universal Edition» HP System Management
Homepage» Version Control» Device ping
» Reference» Support and other
resources» Assistance
Create a new discovery task Click [New] and the New Discovery sectionappears. For more information, see Systems Insight Manager - Creating a newdiscovery task. For HP recommended discovery tasks, see Systems InsightManager - Recommended discovery tasks.
Edit an existing discovery task Select a task from the table, and click [Edit].The Edit Discovery section appears. For more information, see Systems InsightManager - Editing a discovery task.
Enable or disable a discovery task Select a task and click [Disable] to disablethe schedule of an enabled task. If a task is disabled, the button changes to[Enable ]. To resume automatic execution of the task, click [Enable ]. For moreinformation, see Systems Insight Manager - Disabling or enabling an existingdiscovery task.
Delete an existing discovery task Select a task from the table and click[Delete ]. For more information, see Systems Insight Manager - Deleting adiscovery task.
View Task Results Displays the task results for the current discovery task.
Run a discovery task Select the task you want to run and click [Run Now].When a task is running, the [Run Now] button changes to a [Stop] button. Formore information, see Systems Insight Manager - Running a discovery task.
Stop a discovery task from running Select the running task and click [Stop].For more information, see Systems Insight Manager - Running a discovery task.
Systems Insight Manager - Related information
HP Systems Insight Manager 7.1 English
Operations | Discovery in HP SIM | Configuring automatic discovery settings of VM guests
Configuring automatic discovery settings of VMguests
» Editing a discovery task» Disabling or enabling an
existing discovery task» Deleting a discovery
task» Running a discovery
task» Related information
» Discovery filters» Managing Hosts file» Identification» Managing system types» Users and authorizations» Directory Services» Global credentials» System credentials» Security
If a host and its associated guests are already discovered and the host is licensed withMatrix Operating Environment, you cannot disable the horizontal flag at the system level.
1. Select Automatically discovery VM Guest(s) when this host is identified.
2. Click [Save] to save this setting and trigger identification, or click [Cancel ] to savechanges.
If host IP is included in the horizontal discovery global exclusion range, guestsystems will not be discovered.
If host IP is included in the horizontal discovery global exclusion range and islicenses by Matrix Opearating Envirnment, guest systems will be discovered.
If host IP is not included in the horizontal discovery global exclusion range,automatic discovery of guest systems is enabled at the global level.
If host IP is included in the horizontal discovery global exclusion range, and theAutomatically discover VM Guest(s) when this host is identified option on theDiscovery - General Settings page, discovery of the guest system is enabled atthe global leve.
HP Systems Insight Manager 7.1 English
Operations | Discovery in HP SIM | Configuring discovery general settings
» Editing a discovery task» Disabling or enabling an
existing discovery task» Deleting a discovery
task» Running a discovery
task» Related information
» Discovery filters» Managing Hosts file» Identification» Managing system types» Users and authorizations» Directory Services» Global credentials» System credentials» Security
Procedure 1 Configuring automatic discovery
1. In the For all automatic discoveries section, select Configure general settings.The General Settings for All Discoveries section appears.
2. Select from the following options:
Automatically discover a system when an event is received from it.Enables systems to be discovered when a trap or some other supportedevent is received by HP SIM. It uses the discovery filters and IP addressexclusion ranges for additional filtering of these events. This option is notselected by default.
Automatically discover a server when its Integrated Lights Outmanagement processor is identified. Adds server blades when theserver’s management processor is discovered. The discovered servers areidentified as Disabled on the system table view page. The followinginformation is displayed: server model name, UUID, serial number, servername and protocols, DeviceType and SubTypes and so on. If themanagement processor is in a c-Class enclosure, the option, Discoversystems in an enclosure when ProLiant Onboard Administrator isdiscovered must be enabled.
Automatically discover systems in an enclosure when OnboardAdministrator is discovered . Adds systems identified by the OnboardAdministrator even if the systems are not in the configured discovery range.This option is selected by default.
NOTE:You must select this option to create a VCDomain node andenable virtual connect functionality.
This option must be selected to add a newly inserted server blade (one thatdoes not exist in HP SIM database) as a bare metal managed system in theHP SIM database after receiving the Server Blade Inserted trap. If thisoption is not selected, the Server Blade Inserted trap is logged only and theblade is not automatically added to the enclosure.
Automatically discover VM guest(s) when the host is identified. Addsall VM guest systems to the HP SIM database when the VM host (HPVMVMWare ESX or Microsoft Hyper-V) system is discovered and identified.This option is selected by default.
If this option is not selected when a VMWare ESX or Microsoft Hyper-Vhost is discovered, then guests are not discovered automatically. However,if one of its guests is moved to another before being discovered in HP SIMand if that guest is discovered later, it is associated with the old host. Toavoid this, either the old host or new host must be identified before guest isdiscovered
For automatic identification of virtual machine guests running on a virtualmachine host, the IP address of the guest is required. To acquire the IPaddress from WBEM Providers, VMWare tools must be installed on thevirtual machine guests.
Automatically discover other virtual partitions within the same vParMonitor when one of the virtual partitions is identified. This option isselected by default.
Automatically discover all nPars within the same complex when oneof the nPars is identified. This option is selected by default.
Automatically discover systems in an enclosure when Enclosure
» Trusted certificates» Viewing the audit log» Configuring the audit log» Monitoring systems and
events» Quick Launch menu» Performing a basic search» Performing an advanced
search for systems» Performing an advanced
search for clusters» Performing an advanced
search for events» Tool search» Related information for
searches» Configuring events» Protocol settings» Software status polling» Hardware status polling» Data collection» System Properties» Configuring WBEM health
inclusion status» Specifying a Version
Control Repository» Configuring
software/firmware globalsettings
» Reporting» Managing with tasks» Using Cluster Monitor» Command line tools» Configuring managed
systems from a WindowsCMS
» Configuring managedsystems from a LinuxCMS
» Configuring managedsystems from an HP-UXCMS
» Custom tools» Setting disk thresholds» Creating a task to delete
disk thresholds» License manager» Management processor
tools» Managing
Communications» Managing MIBs» Installing OpenSSH» Replicate Agent Settings» RPM Package Manager» HP Server Migration Pack
- Universal Edition» HP System Management
Homepage» Version Control» Device ping
» Reference» Support and other
resources» Assistance
Manager is discovered. This option is selected by default.
Automatically discover segment servers when Fusion Manager isdiscovered.
Automatically discover Vmware ESX host server in lockdown enabledmode
3. In the Ping exclusion ranges, templates and/or hosts files field, specify the IPaddresses, templates, or hosts files containing IP addresses to exclude from theautomatic discovery process. You can also enter Simple or FQDN host names.However, you cannot enter a range of host names. This field applies to both range-pinging and event-based automatic discovery. See HP Systems Insight ManagerUser Guide for more information on entering IP ranges.
IMPORTANT:When discovering clusters, the ping inclusion range must include the IPaddresses of the cluster and the cluster members.
4. To select the types of systems HP SIM discovers, select Enable discovery filters.For more information, see Systems Insight Manager - Discovery filters for moreinformation.
5. In the section, Discover the following system types, select the type of systems tobe discovered.
When discovering clusters, you must include the server system type, so that thecluster members are not filtered out.
This option is available only when you select Enable discovery filters.
6. In the Limit discovery to systems which meet the following criteria section,select from the following:
Any system that matches the above filter
All manageable systems (WBEM, SNMP, WMI, WS-MAN, SSH, or HTTPsupport)
Manageable systems with HP agents only
The option, Limit discovery to systems which meet the following criteria isavailable only when you select Enable discovery filters.
7. (Optional) Enter VM hosts IP range that you do not want to include in the automaticdiscovery of VM guests.
IP exclusion ranges can consist of the following:
Single IP address
Multiple IP addresses separated by semi-colon
Range of IP addresses separated by dash
8. To save settings, click [OK], or to close the General Settings for All Discoveriessection without saving changes, click [Cancel ].
If you click [OK] when discovery filters are enabled but have not selected anysystem types, the following error message appears:
You must make at least one system type selection when enabling filters.
9. Select System Automatic Discovery. Click one of the following options toschedule it for ongoing operations or to make other changes: [Edit], [Enable ],[View Task Results], or [Run Now]. If you would like to create other discoverytasks, click [New].
The Discovery page General Settings for All Discoveries section is not protected frommultiple users accessing the page at the same time. The last user to save the settings hashis or her settings take affect. If discovery is in progress and the settings are applied by adifferent user or the same user, any remaining systems to be processed have the new
» Editing a discovery task» Disabling or enabling an
existing discovery task» Deleting a discovery
task» Running a discovery
task» Related information
» Discovery filters» Managing Hosts file» Identification» Managing system types» Users and authorizations» Directory Services» Global credentials» System credentials» Security
» Creating an automatic discovery task using the command line interface
HP SIM ships includes one default discovery task (System Automatic Discovery). However,you can create a new discovery task to discover specific systems. For example, if you wantto discover systems in a specific IP address range. You can set the task to run atscheduled times using specific ping inclusion ranges, templates, or hosts files. For HPrecommended discovery tasks, see Systems Insight Manager - Recommended discoverytasks.
Procedure 1 Creating a discovery task
1. Select from the following:
Discover a group of systems Default: Select this option to discovermore than one system.
a. Required: In the Name field, enter a name for the task.
b. In the Schedule section, select Automatically execute discoveryevery, and then enter how often the task runs. The defaultfrequency is once per day. If you clear the Automatically executediscovery every option, the task is disabled after you create it.
c. In the Ping inclusion ranges, IPv6 address, system (hosts)names, templates, and/or hosts files field, specify the IP andIPv6 addresses. However, you cannot include IPv6 address ranges.If you want to use this task to discover SMI-S storage systems,include the IP address of each SMI CIMOM. You can also enterSimple or FQDN host names. However, you cannot enter a rangeof host names. See the HP Systems Insight Manager User Guidefor more information about entering IP ranges. To use an existinghosts file, enter the hosts file name in the following format:$HostsFileName .
If a hosts file is used, only systems that are accessible and matchthe discovery filter criteria are added to the database.
d. Enter comments in the Comments field. Comments entered hereare displayed in the discovery table on the Discovery page.
Discover a single system Select this option to discover one system.Single system discovery address the system to the HP SIM databaseregardless of network accessibility, unless it is not DNS resolvable.
a. Required: In the Name field, enter a name for the task.
b. In the Schedule section, select Automatically execute discoveryevery, and then enter how often the task runs. The defaultfrequency is once per day. If you clear the Automatically executediscovery every option, the task is disabled after you create it.
c. Enter the system name or IP address in the Enter the system'sname or IP address.
d. Enter comments in the Comments field. Comments entered hereare displayed in the discovery table on the Discovery page.
2. To set system credentials, click [Credentials]. For more information, see SystemsInsight Manager - Configuring credentials for discovery tasks.
3. To create an associated Configure or Repair Agents task, click [Configure/Repair].For more information, see Systems Insight Manager - Configuring Configure orRepair Agents for discovery tasks.
» Trusted certificates» Viewing the audit log» Configuring the audit log» Monitoring systems and
events» Quick Launch menu» Performing a basic search» Performing an advanced
search for systems» Performing an advanced
search for clusters» Performing an advanced
search for events» Tool search» Related information for
searches» Configuring events» Protocol settings» Software status polling» Hardware status polling» Data collection» System Properties» Configuring WBEM health
inclusion status» Specifying a Version
Control Repository» Configuring
software/firmware globalsettings
» Reporting» Managing with tasks» Using Cluster Monitor» Command line tools» Configuring managed
systems from a WindowsCMS
» Configuring managedsystems from a LinuxCMS
» Configuring managedsystems from an HP-UXCMS
» Custom tools» Setting disk thresholds» Creating a task to delete
disk thresholds» License manager» Management processor
tools» Managing
Communications» Managing MIBs» Installing OpenSSH» Replicate Agent Settings» RPM Package Manager» HP Server Migration Pack
- Universal Edition» HP System Management
Homepage» Version Control» Device ping
» Reference» Support and other
resources» Assistance
4. To configure system types, click [System Types]. For more information, seeSystems Insight Manager - Configuring system types for discovery tasks.
NOTE:[System Types] is only available when you discover a single system.
5. To set the criticality of task, click [Criticality]. Select Critical (default) or Non-Critical.
Click [OK].
6. To save the task, click [Save], to run the task immediately, click [Run Now], or toclose the New Discovery section and not save any settings, click [Cancel ].
NOTE:If you have selected many systems, the following message appears,stating The automatic discovery task is configured with a largenumber of addresses: [NUM] . Click [OK] to continue, or click [Cancel ] tochange the IP address range.
Creating an automatic discovery task using the command line interface
Users with administrative rights can use the mxtask command to create an automaticdiscovery task from the CLI.
For information about accessing the manpage, see the HP Systems Insight ManagerCommand Line User Guide.
Systems Insight Manager - Related information
HP Systems Insight Manager 7.1 English
Operations | Discovery in HP SIM | Configuring credentials for discovery tasks
» Editing a discovery task» Disabling or enabling an
existing discovery task» Deleting a discovery
task» Running a discovery
task» Related information
» Discovery filters» Managing Hosts file» Identification» Managing system types» Users and authorizations» Directory Services» Global credentials» System credentials» Security
» Creating and editing discovery credentials for a single system» Creating and editing discovery credentials for a group» Related topics
Discovery task credentials can apply to all systems in the associated discovery task andenable you to configure default credentials for a subset of your environment.
Sign-in credentials apply to multiple protocols and enable HP SIM to access the managedsystem. SNMP credentials enable you to set global-level read community strings.WBEM/WMI and WS-MAN are protocol specific credentials.
During the identification process (done automatically during discovery), credentials are tried,starting with System Credentials. If they do not work, and the Try Others setting is chosenfor them, then Discovery credentials are used. Similarly, if those do not work and the TryOthers setting is chosen, then Global Credentials are tried. As soon as a credential is foundthat works, Systems Insight Manager notes that credential as working and continues to useit for regular communications with the managed system as long as it continues to work. If itshould fail, then the process is repeated the next time identification is run. To see theworking credentials for any managed system, go to the System Credentials page (Options
Security Credentials System Credentials). These working credentials appear inthe Credentials that are in use table.
This procedure enables you to set credentials attempted during a discovery task. Performthese steps from the New Discovery Task or the Edit Discovery Task sections of theDiscovery page.
Credentials are applied in the following order:
1. Working (might reference system, discovery, or global credentials)
2. System level protocol specific
3. System level Sign-in
4. Discovery level protocol specific
5. Discovery level protocol Sign-in
6. Global Sign-in
Creating and editing discovery credentials for a single system
NOTE:When configuring credentials for a single system discovery, you are configuringsystem credentials for that system, not discovery credentials for the task.
Procedure 1 Creating and editing discovery credentials for a single system
1. The following tabs are available in the credentials section:
Sign in This tab enables you to set one credential for all protocols.
SNMP This tab enables you to set one SNMP community string.
For advanced and protocol-specific settings, click Show advancedprotocol credentials to the right of the tabs. The following additional tabsappear.
WBEM/WMI This tab enables you to set WBEM credentials.
WS-MAN This tab enables you to set WS-MAN credentials.
» Trusted certificates» Viewing the audit log» Configuring the audit log» Monitoring systems and
events» Quick Launch menu» Performing a basic search» Performing an advanced
search for systems» Performing an advanced
search for clusters» Performing an advanced
search for events» Tool search» Related information for
searches» Configuring events» Protocol settings» Software status polling» Hardware status polling» Data collection» System Properties» Configuring WBEM health
inclusion status» Specifying a Version
Control Repository» Configuring
software/firmware globalsettings
» Reporting» Managing with tasks» Using Cluster Monitor» Command line tools» Configuring managed
systems from a WindowsCMS
» Configuring managedsystems from a LinuxCMS
» Configuring managedsystems from an HP-UXCMS
» Custom tools» Setting disk thresholds» Creating a task to delete
disk thresholds» License manager» Management processor
tools» Managing
Communications» Managing MIBs» Installing OpenSSH» Replicate Agent Settings» RPM Package Manager» HP Server Migration Pack
- Universal Edition» HP System Management
Homepage» Version Control» Device ping
» Reference» Support and other
resources» Assistance
VME This tab enables you to set VME credentials that were configured onthe VMWare vCenter Server Web Services page during VMWare vCenterServer installation. This is not available when creating a discovery task untilafter the VMWare vCenter servers are discovered.
2. For each setting on the Sign In, SNMP, WBEM / WMI, and WS-MAN tabs, there isa checkbox that, when checked, indicates to HP SIM that if these credentialsshould fail for some reason, then others should be tried in accordance with thenumbered list above. For example, if the Sign-in credential entered here wasinvalid, and the checkbox was checked, then the discovery level credentials (if any)would be then tried. This control gives you flexibility where your credentials arespecified, but also carries a risk in performance and might trigger a security event ifmany credentials are tried to find one that works.
3. Click [OK], to have data from all the tabs saved for the current session. Dependingon the number of systems, this can take several minutes. The progress of this taskcan be monitored by clicking the [View Task Results] button. Once the task iscomplete, the System Credentials page (Options Security CredentialsSystem Credentials) will show the new working credentials.
4. To save changes, click [Save]. Otherwise, the credentials will only be saved for thecurrent session.
Procedure 2 Deleting system credentials individually
1. Make all of the credential information for the system blank.
2. To delete cleared credentials for your current session, click [OK]. The next timediscovery is run, the working credentials will be redetermined, as described above.
3. In the next window, for the credentials to be deleted permanently, click [Save].Otherwise, the credentials will only be saved for the current session.
Creating and editing discovery credentials for a group
Procedure 3 Creating and editing discovery credentials for a group
1. The following tabs are available in the credentials section:
Sign in Enter the user name and password pairs.
Enter as many default user names and password pairs as needed byclicking [Add]. To delete user name and password pairs, click [Delete ]beside the pair you want to delete.
Note: HP SIM tries each set of credentials until it finds a set that works,which can cause server sign-in failures and possibly trigger a security eventbased on your local security policy. For example, three failed sign-inattempts can trigger an account lock-out.
SNMP Enter the default read community strings. Click [Add] to addadditional strings or click [Delete ] to delete existing strings.
For advanced and protocol-specific settings, click Show advancedprotocol credentials to the right of the tabs. The following additional tabsappear.
WBEM/WMI This tab enables you to set WBEM credentials.
WS-MAN This tab enables you to set WS-MAN credentials.
VME This tab enables you to set VME credentials that were configured onthe VMWare vCenter Server Web Services page during VMWare vCenterServer installation. This is not available when creating a discovery task untilafter the VMWare vCenter servers are discovered.
2. For each setting on the Sign In, SNMP, WBEM / WMI, WS-MAN, and VME tabs,there is a checkbox that, when checked, indicates to HP SIM that if thesecredentials should fail for some reason, then others should be tried in accordancewith the numbered list above. For example, if the Sign-in credential entered herewas invalid, and the checkbox was checked, then the global level credentials (if
» Glossary» Using Help
any) would be then tried. This control gives you flexibility where your credentials arespecified, but also carries a risk in performance and might trigger a security event ifmany credentials are tried to find one that works.
3. When you click [OK], data from all the tabs is collected and stored so that whendiscovery is run, the new credentials can take effect. Depending on the number ofsystems, this can take several minutes. The progress of this task can be monitoredby clicking the [View Task Results] button. Once the task is complete, the SystemCredentials page (Options Security Credentials System Credentials) willshow the new working credentials.
This will be in affect for the current session only. To have the settings saved to thediscovery task permanently, complete the following step.
4. In the next window, for changes to be permanent and saved to the discovery task,click [Save]. Otherwise, the credentials will only be saved for the current session.
Procedure 4 Deleting discovery credentials for a group
1. Click [Delete ] beside the credential that you want to delete.
2. When a discovery credential is found to work for a system, a working credential iscreated for the system that references the discovery credential. If you selected todelete a discovery credential, select how you want to delete any working referencesto the discovery credentials.
Delete the discovery credentials and any working references to them. Thisprevents HP SIM from using the credential to communicate with the system.
Copy the credentials to all systems referencing them, and then delete thediscovery credentials. This creates a copy of the discovery credentials assystem credentials for any systems with a working reference to thediscovery credentials, enabling HP SIM to continue to use the credentials tocommunicate with the system.
3. To delete cleared credentials, click [OK]. The next time discovery is run, the workingcredentials will be redetermined, as described above.
4. In the next window, for the credentials to be deleted permanently, click [Save].Otherwise, the credentials will only be saved for the current session.
Related topics
» Systems Insight Manager - Global credentials» HP Insight Manager 7.0 Online Help - System credentials» Systems Insight Manager - Sign-in credentials» Systems Insight Manager - SNMP credentials» Systems Insight Manager - WS-Man credentials» Systems Insight Manager - Single sign on credentials» Systems Insight Manager - SSH credentials» Systems Insight Manager - WBEM credentials» Systems Insight Manager - VME credentials
» Editing a discovery task» Disabling or enabling an
existing discovery task» Deleting a discovery
task» Running a discovery
task» Related information
» Discovery filters» Managing Hosts file» Identification» Managing system types» Users and authorizations» Directory Services» Global credentials» System credentials» Security
This procedure enables you to configure Configure or Repair Agents settings when creatingor editing a discovery task for a single system. Perform these steps from the NewDiscovery Task or the Edit Discovery Task sections of the Discovery page.
Procedure 1 Creating a Configure or Repair Agents task
1. To disable the Configure or Repair Agents task, select Configure newly managedsystems when they are first discovered in the Configure Managed Systemssection. For more information, see Systems Insight Manager - Configuring managedsystems.
a. Select Configure newly managed systems when they are firstdiscovered..
b. To specify credentials to configure the managed system for WBEM / WMI,SNMP, and SSH, select from the following:
a. Use sign in credentials This account must be an account withadministrative privileges.
b. Use these credentials Select this option to use another username and password pair other than the one entered into HP SIM.
c. Under Configure WBEM / WMI, select from the following:
a. Create subscriptions to WBEM events
b. Send a test WBEM / WMI indication to this instance of SystemsInsight Manager to make sure that events appear in SystemsInsight Manager events lists
c. Use an HP SIM WBEM certificate (good for 10 years) ratherthan username/password to manage the system
d. Under Configure SNMP, select from the following:
a. Set read community string
b. Set traps to refer to this instance of HP SIM A read/write stringis automatically created on Windows systems.
c. Send a test SNMP trap to this instance of Systems InsightManager to make sure events appear in the HP SIM event lists
e. Under Configure secure shell (SSH) access, select from the following:
a. Host based authentication All users from this instance of HPSIM are authenticated on the managed system.
b. Each user has to be authenticated on the managedsystem Each user must be authenticated on the managedsystem.
f. Select Set trust relationship to "Trust by Certificate" to set a trustrelationship between managed systems and the CMS. This enables HP SIMusers to connect to HP SMH, Onboard Administrator, managementprocessors, and Version Control Agent using the HP SIM certificate forauthentication.
2. Click [OK] to have data saved for the current session.
3. To save changes, click [Save]. Otherwise, the credentials will only be saved for thecurrent session.
» Trusted certificates» Viewing the audit log» Configuring the audit log» Monitoring systems and
events» Quick Launch menu» Performing a basic search» Performing an advanced
search for systems» Performing an advanced
search for clusters» Performing an advanced
search for events» Tool search» Related information for
searches» Configuring events» Protocol settings» Software status polling» Hardware status polling» Data collection» System Properties» Configuring WBEM health
inclusion status» Specifying a Version
Control Repository» Configuring
software/firmware globalsettings
» Reporting» Managing with tasks» Using Cluster Monitor» Command line tools» Configuring managed
systems from a WindowsCMS
» Configuring managedsystems from a LinuxCMS
» Configuring managedsystems from an HP-UXCMS
» Custom tools» Setting disk thresholds» Creating a task to delete
disk thresholds» License manager» Management processor
tools» Managing
Communications» Managing MIBs» Installing OpenSSH» Replicate Agent Settings» RPM Package Manager» HP Server Migration Pack
- Universal Edition» HP System Management
Homepage» Version Control» Device ping
» Reference» Support and other
resources» Assistance
Systems Insight Manager - Related information
HP Systems Insight Manager 7.1 English
Operations | Discovery in HP SIM | Configuring system types for discovery tasks
» Configuring Configureor Repair Agents fordiscovery tasksConfiguring systemtypes for discoverytasks
» Editing a discovery task» Disabling or enabling an
existing discovery task» Deleting a discovery
task» Running a discovery
task» Related information
» Discovery filters» Managing Hosts file» Identification» Managing system types» Users and authorizations» Directory Services» Global credentials» System credentials» Security
This procedure enables you to configure system types when creating or editing a discoverytask for a single system. Perform these steps from the New Discovery Task or the EditDiscovery Task sections of the Discovery page.
Procedure 1 Configuring system types
1. Enter the System Type.
2. Enter up the System subtype. You can enter to up to eight subtypes.
3. Enter the Product model.
4. Click [OK].
Systems Insight Manager - Related information
HP Systems Insight Manager 7.1 English
Operations | Discovery in HP SIM | Editing a discovery task
» Configuring systemtypes for discoverytasksEditing a discovery task
» Disabling or enabling anexisting discovery task
» Deleting a discoverytask
» Running a discoverytask
» Related information» Discovery filters» Managing Hosts file» Identification» Managing system types» Users and authorizations» Directory Services» Global credentials» System credentials» Security
Procedure 1 Editing a discovery task
1. Select from the following:
Discover a group of systems Default: Select this option to discovermore than one system.
a. Required: In the Name field, enter a name for the task.
b. In the Schedule section, select Automatically execute discoveryevery, and then enter how often the task runs. The defaultfrequency is once per day. If you clear the Automatically executediscovery every option, the task is disabled after you create it.
c. In the Ping inclusion ranges, system (hosts) names, and/orhosts files field, specify the IP addresses. If you want to use thistask to discover SMI-S storage systems, include the IP address ofeach SMI CIMOM. You can also enter Simple or FQDN hostnames. However, you cannot enter a range of host names. See HPSystems Insight Manager User Guide for more information aboutentering IP ranges. To use an existing hosts file, enter the hosts filename in the following format: $HostsFileName .
If a hosts file is used, only systems that are accessible and matchthe discovery filter criteria are added to the database.
d. Enter comments in the Comments field. Comments entered hereare displayed in the discovery table on the Discovery page.
Discover a single system Select this option to discover one system.Single system discovery address the system to the HP SIM databaseregardless of network accessibility, unless it is not DNS resolvable.
a. Required: In the Name field, enter a name for the task.
b. In the Schedule section, select Automatically execute discoveryevery, and then enter how often the task runs. The defaultfrequency is once per day. If you clear the Automatically executediscovery every option, the task is disabled after you create it.
c. Enter the system name or IP address in the Enter the system'sname or IP address.
d. Enter comments in the Comments field. Comments entered hereare displayed in the discovery table on the Discovery page.
2. To set system credentials, click [Credentials]. For more information, see SystemsInsight Manager - Configuring credentials for discovery tasks.
3. To create an associated Configure or Repair Agents task, click [Configure/Repair].For more information, see Systems Insight Manager - Configuring Configure orRepair Agents for discovery tasks.
4. To configure system types, click [System Types]. For more information, seeSystems Insight Manager - Configuring system types for discovery tasks.
NOTE:[System Types] is only available when you discover a single system.
5. To save the task, click [Save], to run the task immediately, click [Run Now], or toclose the New Discovery section and not save any settings, click [Cancel ].
NOTE:
» Trusted certificates» Viewing the audit log» Configuring the audit log» Monitoring systems and
events» Quick Launch menu» Performing a basic search» Performing an advanced
search for systems» Performing an advanced
search for clusters» Performing an advanced
search for events» Tool search» Related information for
searches» Configuring events» Protocol settings» Software status polling» Hardware status polling» Data collection» System Properties» Configuring WBEM health
inclusion status» Specifying a Version
Control Repository» Configuring
software/firmware globalsettings
» Reporting» Managing with tasks» Using Cluster Monitor» Command line tools» Configuring managed
systems from a WindowsCMS
» Configuring managedsystems from a LinuxCMS
» Configuring managedsystems from an HP-UXCMS
» Custom tools» Setting disk thresholds» Creating a task to delete
disk thresholds» License manager» Management processor
tools» Managing
Communications» Managing MIBs» Installing OpenSSH» Replicate Agent Settings» RPM Package Manager» HP Server Migration Pack
- Universal Edition» HP System Management
Homepage» Version Control» Device ping
» Reference» Support and other
resources» Assistance
If you have selected many systems, the following message appears,stating The automatic discovery task is configured with a largenumber of addresses: [NUM] . Click [OK] to continue, or click [Cancel ] tochange the IP address range.
Systems Insight Manager - Related information
HP Systems Insight Manager 7.1 English
Operations | Discovery in HP SIM | Disabling or enabling an existing discovery task
» Editing a discovery taskDisabling or enabling anexisting discovery task
» Deleting a discoverytask
» Running a discoverytask
» Related information» Discovery filters» Managing Hosts file» Identification» Managing system types» Users and authorizations» Directory Services» Global credentials» System credentials» Security
You can disable or enable an existing discovery task. If you disable a task, the [Schedule]column displays a message that the task is disabled. You might want to disable a task ifyou know your network is not going to change, or if you want to limit network traffic. If a taskis enabled, the Schedule column displays the schedule for the task.
NOTE:Manually running a disabled task by selecting the task and then clicking [RunNow] does not enable the task for future discoveries.
Procedure 1 Disabling or enabling discovery tasks
1. Select the task you want to disable or enable.
2. Click [Disable] to disable a task, or if the task is already disabled, click [Enable ] toresume the automatic execution of a task.
Systems Insight Manager - Related information
HP Systems Insight Manager 7.1 English
Operations | Discovery in HP SIM | Deleting a discovery task
» Editing a discovery task» Disabling or enabling an
existing discovery taskDeleting a discoverytask
» Running a discoverytask
» Related information» Discovery filters» Managing Hosts file» Identification» Managing system types» Users and authorizations» Directory Services» Global credentials» System credentials» Security
You can delete discovery tasks that are no longer necessary. You cannot delete theSystem Automatic Discovery task. If you select this task, the [Delete ] button is disabled.
Procedure 1 Deleting discovery tasks
1. Select Options Discovery. The Discovery page appears.
2. Select tasks, and then click [Delete ]. A confirmation box appears.
If you selected to delete a discovery task for a group of systems and it has username and password credentials set, select how you want to delete them. Selectfrom the following:
Delete the credentials and any working references to them
First copy the credentials to all systems referencing them, then delete theglobal credentials
3. To delete this task, click [OK], or to cancel the deletion process, click [Cancel ].
Systems Insight Manager - Related information
HP Systems Insight Manager 7.1 English
Operations | Discovery in HP SIM | Running a discovery task
» Editing a discovery task» Disabling or enabling an
existing discovery task» Deleting a discovery
taskRunning a discoverytask
» Related information» Discovery filters» Managing Hosts file» Identification» Managing system types» Users and authorizations» Directory Services» Global credentials» System credentials» Security
You can manually select and run any existing discovery task at any time. For example, ifyou add a new system that has not been discovered, you can manually run a discovery taskto discover and manage the system. You can also stop a task that is running.
Procedure 1 Running a discovery task
Select the discovery task that you want to run, and then click [Run Now]. The taskruns immediately. The View Tasks Results section appears below the list ofdiscovery tasks so that the progress and results of the running tasks can bemonitored.
The [Run Now] button changes to [Stop] when a task is running. To stop a task, select thetask and click [Stop].
Systems Insight Manager - Related information
HP Systems Insight Manager 7.1 English
Operations | Discovery in HP SIM | Related information
» Editing a discovery task» Disabling or enabling an
existing discovery task» Deleting a discovery
task» Running a discovery
taskRelated information
» Discovery filters» Managing Hosts file» Identification» Managing system types» Users and authorizations» Directory Services» Global credentials» System credentials» Security
Related procedures
» Systems Insight Manager - Configuring automatic discovery» HP Systems Insight Manager - Configuring automatic discovery settings of VM guests» Systems Insight Manager - Configuring discovery general settings» Systems Insight Manager - Creating a new discovery task» Systems Insight Manager - Configuring credentials for discovery tasks» Systems Insight Manager - Configuring Configure or Repair Agents for discovery tasks» Systems Insight Manager - Editing a discovery task» Systems Insight Manager - Disabling or enabling an existing discovery task» Systems Insight Manager - Deleting a discovery task» Systems Insight Manager - Running a discovery task» Systems Insight Manager - Creating a new hosts file» Systems Insight Manager - Editing a hosts file» Systems Insight Manager - Deleting a hosts file» Systems Insight Manager - Adding systems in a hosts file to the HP SIM database
Related topics
» Systems Insight Manager - Recommended discovery tasks» Systems Insight Manager - Identification» Systems Insight Manager - Discovery filters» Systems Insight Manager - Data collection
» Managing Hosts file» Identification» Managing system types» Users and authorizations» Directory Services» Global credentials» System credentials» Security» Trusted certificates» Viewing the audit log» Configuring the audit log» Monitoring systems and
events» Quick Launch menu» Performing a basic search» Performing an advanced
search for systems» Performing an advanced
search for clusters» Performing an advanced
search for events» Tool search» Related information for
searches» Configuring events» Protocol settings» Software status polling» Hardware status polling» Data collection» System Properties» Configuring WBEM health
inclusion status» Specifying a Version
Discovery filters prevent or enable certain system types from being added to the databasethrough automatic discovery. When you want to discover systems of a certain type, usingfilters is much easier than specifying the IP addresses of each individual system. Discoveryfilters do not apply to manually added systems.
You can access discovery filters in one of the following ways:
From the Discovery page, select Options Discovery. From the Automatic tab,click Configure general settings, and then select Enable discovery filters.
From the Home page, in the Manage section, click Tune and filter discovery. TheDiscovery page appears. In the For all automatic discoveries section, selectConfigure general settings, and then select Enable discovery filters.
From the introductory page, in the Do this now to complete the installationsection, click Configure discovery and credentials. The Discovery page appears.Click Configure general settings and then select Enable discovery filters..
To disable filters, clear the Enable discovery filters checkbox. To enable filters, select theEnable discovery filters checkbox, and then select the system types that you want todiscover.
To access and modify discovery filters, you must have administrative rights. If discoveryfilters are enabled, only systems of the selected types are added to the database throughautomatic discovery. Because all tasks operate on systems that exist in the database, tasksdo not run on any system until the filter criteria has been met and that system has beenadded to the database. Filters do not affect any systems already discovered, even if thesystems change to a type that no longer matches the current filter. If discovery filters aredisabled, automatic discovery discovers systems according to the General Settings for AllDiscoveries section. See Systems Insight Manager - Configuring discovery general settingsfor more information about configuring discovery filters.
If you do not discover the HP systems that you expect to find, ensure that the InsightManagement Advisors are installed and running correctly on the target systems. In addition,verify that the SNMP Community Strings settings and WBEM user name and passwords inHP SIM and on the agents for systems that are not discovered or configured correctly. SeeSystems Insight Manager - Protocol settings for more information.
file» Editing a hosts file» Deleting a hosts file» Adding systems in a
hosts file to the HP SIMdatabase
» Identification» Managing system types» Users and authorizations» Directory Services» Global credentials» System credentials» Security» Trusted certificates» Viewing the audit log» Configuring the audit log» Monitoring systems and
events» Quick Launch menu» Performing a basic search» Performing an advanced
search for systems» Performing an advanced
search for clusters» Performing an advanced
search for events» Tool search» Related information for
searches» Configuring events» Protocol settings
Hosts files are used to manually add multiple systems to the HP SIM database and aregenerally used only one time to import systems.
To use a hosts file to specify systems for an automatic discovery, add the hosts file nameto the Ping inclusion ranges, system (hosts) names, and/or hosts files section of theDiscovery page under the Configure general settings section. Enter the followingstatement: $Hosts_filename where Hosts_filename is the name of the hosts file that youwant to use.
For more information about hosts files, see the "Hosts Files" section in the Systems InsightManager - Discovery in HP SIM section.
From the Hosts Files section, you can:
Create new hosts files Click [New]. The New Hosts File section appears. Formore information, see Systems Insight Manager - Creating a new hosts file.
Edit a hosts file Select the hosts file to edit, and then click [Edit]. The Edit HostsFile section appears. For more information, see Systems Insight Manager - Editinga hosts file.
Delete a hosts file Select the hosts file to delete, and then click [Delete ]. Aconfirmation box appears. For more information, see Systems Insight Manager -Deleting a hosts file.
Add a hosts file to the HP SIM database Select the hosts file to add, and thenclick [Add Systems Now]. For more information, see Systems Insight Manager -Adding systems in a hosts file to the HP SIM database.
Systems Insight Manager - Related information
HP Systems Insight Manager 7.1 English
Operations | Managing Hosts file | Creating a new hosts file
» Discovery in HP SIM» Discovery filters» Managing Hosts file
Creating a new hostsfile
» Editing a hosts file» Deleting a hosts file» Adding systems in a
hosts file to the HP SIMdatabase
» Identification» Managing system types» Users and authorizations» Directory Services» Global credentials» System credentials» Security» Trusted certificates» Viewing the audit log» Configuring the audit log» Monitoring systems and
events» Quick Launch menu» Performing a basic search» Performing an advanced
search for systems» Performing an advanced
search for clusters» Performing an advanced
search for events» Tool search» Related information for
searches» Configuring events» Protocol settings
» Hosts file format
NOTE:For keywords that contain more than one word, such as "managementprocessor," enclose the full keyword in double quotation marks. Quotation marksare optional for single keywords, like server.
NOTE:For clusters, ensure that the cluster and its members are defined in the hosts file.
Procedure 1 Creating hosts files
1. Required: In the Name field, enter a name for the new hosts file.
2. Under Initialize contents with, select one of the following:
Sample host file. This option loads the contents into the Contents window.
Systems loaded from the central management server, sorted by:. Thisoption loads the systems managed by HP SIM into the Contents window.From the dropdown list, select one of the following: IP address, Systemname, System type and then by IP address, or System type and thenby system name.
Systems loaded from hosts file. This option reads the contents of thespecified file and displays it in the Contents window. Enter the file nameand location (for example, c:\ doc.txt), or click [Browse] to locate thehosts file. Click [Browse] to search for a file.
3. If you did not select Sample hosts file, click [ Initialize Now] to install the hostsfile. Otherwise, enter the contents of the hosts file in the Contents section. Simpleor FQDN host names can be entered in the hosts file. However, no range of hostnames is allowed.
4. To save the hosts file, click [OK], or to cancel any changes you have made, click[Cancel ].
Hosts file format
The format for a valid hosts file line is:
IP_ADDRESS [DNS_NAME] SYSTEM_NAME
Where:
IP_ADDRESS. Is a valid IP address.
DNS_NAME.
Specifies an optional DNS name parameter. DNS_NAME consists ofmultiple parts, separated by dots. The right-most part is a top-leveldomain (.com, .net, .etc) and the left parts are subdomains. Someexamples include: mysystem.mydomain.com and system1.cup.lab.net> .
SYSTEM_NAME. Is the name of the system
With this format, the following hosts file lines are valid:
1.2.3.4 mySystem.mydomain.com mySystem
2.3.4.5 mySystem
» Software status polling» Hardware status polling» Data collection» System Properties» Configuring WBEM health
inclusion status» Specifying a Version
Control Repository» Configuring
software/firmware globalsettings
» Reporting» Managing with tasks» Using Cluster Monitor» Command line tools» Configuring managed
systems from a WindowsCMS
» Configuring managedsystems from a LinuxCMS
» Configuring managedsystems from an HP-UXCMS
» Custom tools» Setting disk thresholds» Creating a task to delete
disk thresholds» License manager» Management processor
tools» Managing
Communications» Managing MIBs» Installing OpenSSH» Replicate Agent Settings» RPM Package Manager» HP Server Migration Pack
- Universal Edition» HP System Management
Homepage» Version Control» Device ping
» Reference» Support and other
resources» Assistance
» Glossary» Using Help
The following lines are not valid:
1.2.3.4/
mySystem/
mySystem.mydomain.com/
Precede comment lines with the # character:
# This is a comment line
1.2.3.4 mySystem.mydomain.com mySystem #This is an end-of-line comment
For more information about hosts file extensions, see the HP Systems Insight ManagerUser Guide.
» Discovery in HP SIM» Discovery filters» Managing Hosts file
» Creating a new hostsfileEditing a hosts file
» Deleting a hosts file» Adding systems in a
hosts file to the HP SIMdatabase
» Identification» Managing system types» Users and authorizations» Directory Services» Global credentials» System credentials» Security» Trusted certificates» Viewing the audit log» Configuring the audit log» Monitoring systems and
events» Quick Launch menu» Performing a basic search» Performing an advanced
search for systems» Performing an advanced
search for clusters» Performing an advanced
search for events» Tool search» Related information for
searches» Configuring events» Protocol settings
Procedure 1 Editing hosts files
1. Select hosts files.
2. Click [Edit]. The Edit Hosts File section appears.
3. In the Replace contents with section, select one of the following:
Sample host file. This option loads the contents into the Contents window.
Systems loaded from the central management server, sorted by:. Thisoption loads the systems managed by HP SIM into the Contents window.From the dropdown list, select one of the following: IP address, Systemname, System type and then by IP address, or System type and thenby system name.
Systems loaded from hosts file. This option reads the contents of thespecified file and displays it in the Contents window. Enter the file nameand location (for example, c:\ doc.txt), or click [Browse] to locate thehosts file. Click [Browse] to search for a file.
4. Click [Replace Now], or enter the changes in the Contents section.
5. To save the hosts file, click [OK], or to cancel any changes you have made, click[Cancel ].
Systems Insight Manager - Related information
HP Systems Insight Manager 7.1 English
Operations | Managing Hosts file | Deleting a hosts file
» Discovery in HP SIM» Discovery filters» Managing Hosts file
» Creating a new hostsfile
» Editing a hosts fileDeleting a hosts file
» Adding systems in ahosts file to the HP SIMdatabase
» Identification» Managing system types» Users and authorizations» Directory Services» Global credentials» System credentials» Security» Trusted certificates» Viewing the audit log» Configuring the audit log» Monitoring systems and
events» Quick Launch menu» Performing a basic search» Performing an advanced
search for systems» Performing an advanced
search for clusters» Performing an advanced
search for events» Tool search» Related information for
searches» Configuring events» Protocol settings
NOTE:Delete hosts files only if you no longer need them or if you are creating a newhosts file.
Procedure 1 Deleting hosts files
1. Ensure that the selected hosts file is not in use. A hosts file is not in use when:
There are no references to it in the Ping exclusion ranges, templatesand/or hosts files section of the general settings page.
There are no references to it in the Ping inclusion ranges, templates,and/or hosts files section of every existing discovery task.
2. Select hosts files.
3. Click [Delete ]. A confirmation box appears.
4. Click [OK] to delete the hosts files, or click [Cancel ] to cancel the delete process.
Systems Insight Manager - Related information
HP Systems Insight Manager 7.1 English
Operations | Managing Hosts file | Adding systems in a hosts file to the HP SIM database
Adding systems in a hosts file to the HP SIMdatabase
» Discovery in HP SIM» Discovery filters» Managing Hosts file
» Creating a new hostsfile
» Editing a hosts file» Deleting a hosts file
Adding systems in ahosts file to the HP SIMdatabase
» Identification» Managing system types» Users and authorizations» Directory Services» Global credentials» System credentials» Security» Trusted certificates» Viewing the audit log» Configuring the audit log» Monitoring systems and
events» Quick Launch menu» Performing a basic search» Performing an advanced
search for systems» Performing an advanced
search for clusters» Performing an advanced
search for events» Tool search» Related information for
searches» Configuring events» Protocol settings
Procedure 1 Adding hosts files
1. Select hosts files.
2. Click [Add Systems Now].
HP SIM reads in the hosts file and adds the systems.
» Discovery in HP SIM» Discovery filters» Managing Hosts file
Identification» Managing system types» Users and authorizations» Directory Services» Global credentials» System credentials» Security» Trusted certificates» Viewing the audit log» Configuring the audit log» Monitoring systems and
events» Quick Launch menu» Performing a basic search» Performing an advanced
search for systems» Performing an advanced
search for clusters» Performing an advanced
search for events» Tool search» Related information for
searches» Configuring events» Protocol settings» Software status polling» Hardware status polling» Data collection» System Properties» Configuring WBEM health
inclusion status» Specifying a Version
» Initial identification» Identifying systems
The identification process follows automatic or manual system discovery and identifies thefollowing information about the discovered system:
Management protocol the system uses (for example, SNMP, WBEM, HTTP, SSH,or WS-Management)
NOTE:By default, HP SIM supports WS-Management identification on thestandard SSL port 443. The addition of WS-Management support doesnot affect existing identification or discovery of a management processorusing other protocols such as WBEM or SNMP. WSMAN:1.0 appears asa Management Protocol along with all other supported managementprotocols on the system page System tab of the System page.
Type of system (for example, server, client, management processor, storage,switch, router, or cluster)
Product name of the system
Operating system name, type, and version
Associations, such as a management processor in server
During identification, remote enclosures have a generic name (format: Encl_SerialNumber)assigned to them until one server from every enclosure is discovered and identified. Then,the enclosures contain the name of the enclosure assigned to the enclosure.
HP SIM collects and recognizes the product ID and serial number, and most importantly,how to handle the server-to-management processor associations using the UUID instead ofthe serial number. The following processes occur sequentially for each system that isidentified by HP SIM:
1. Identify the type of system, supported protocols, and limited attributes (such as theoperating system type).
2. Filter out systems that do not meet the filter criteria (if the system is new).
3. Obtain additional data, such as license data or Web agents that might be written tothe database directly, and attributes that can be queried (such as CPU and memorydata).
4. Run association algorithms based on system type identified in the first step.
For newly found automatically discovered systems, before the system is added to thedatabase, any discovery filters are applied. If a system does not match the discovery filter, itis not added to the database, and no additional tasks or requests are made to that system.After the system passes the filter, it is added to the database. At this time, the system isavailable to polling tasks, collections, or other operations.
NOTE:Discovery filters do not apply to manually discovered systems.
HP SIM performs initial hardware and software status polling and initial data collection onnewly added systems. See HP Systems Insight Manager - Hardware status polling,Systems Insight Manager - Software status polling, and Systems Insight Manager - Datacollection for more information about each task. The information about the systems is storedin the database.
Control Repository» Configuring
software/firmware globalsettings
» Reporting» Managing with tasks» Using Cluster Monitor» Command line tools» Configuring managed
systems from a WindowsCMS
» Configuring managedsystems from a LinuxCMS
» Configuring managedsystems from an HP-UXCMS
» Custom tools» Setting disk thresholds» Creating a task to delete
disk thresholds» License manager» Management processor
tools» Managing
Communications» Managing MIBs» Installing OpenSSH» Replicate Agent Settings» RPM Package Manager» HP Server Migration Pack
- Universal Edition» HP System Management
Homepage» Version Control» Device ping
» Reference» Support and other
resources» Assistance
» Glossary» Using Help
The time to complete the discovery and identification processes varies with the network sizeand resources. All necessary tasks are predefined in HP SIM. Predefined tasks cannot beremoved from the system, but they can be disabled if necessary. You can also create a newidentification task and schedule it to run when you want to update identification informationfrom systems. See the HP Systems Insight Manager User Guide for information onmanaging default tasks.
By default, HP SIM runs the System Identification task once per day and when new systemsare discovered. Most users do not need to schedule identification tasks to run more thanonce per day.
If VMware tools are installed on the guest, the UUID, host name, and primary IP address ofthe virtual machine host are collected. If VMware tools are not installed, only the UUID iscollected. In this case, the virtual machine guest is named as >VMHost_Name<_>DisplayName<, where VMHost_Name is the name of the guest host system, and Display Name isthe display name of the guest in VMware Virtual Infrastructure Client.
Initial identification
After a system is newly discovered or rediscovered, HP SIM attempts to identify it. Thediscovery task is not 100% complete until all the systems have been identified.
Identifying systems
To identify systems between discoveries, select Options Identify Systems. The IdentifySystems page appears. From this page, select target systems to add. See Systems InsightManager - Creating a task for more information about selecting targets.
» Discovery in HP SIM» Discovery filters» Managing Hosts file» Identification
Managing system types» Creating STM rules» Editing STM rules» Deleting STM rules» Related information
» Users and authorizations» Directory Services» Global credentials» System credentials» Security» Trusted certificates» Viewing the audit log» Configuring the audit log» Monitoring systems and
events» Quick Launch menu» Performing a basic search» Performing an advanced
search for systems» Performing an advanced
search for clusters» Performing an advanced
search for events» Tool search» Related information for
searches» Configuring events» Protocol settings» Software status polling» Hardware status polling» Data collection
System Type Manager is a utility that modifies the default behavior of identification. SystemType Manager enables you to customize the type and product name of third-party systemsusing rules based on responses to SNMP lists from systems on your network.
IMPORTANT:For most HP systems, the system type and product name cannot be modified.Identification can be customized based on SNMP System OIDs for all otherfields. Manufacturers assign unique system OIDs to their SNMP-instrumentedproducts. System Type Manager enables you to customize identification bycreating rules that map these system OIDs to product categories and names.You must have administrative rights to use System Type Manager.
To access the Manage System Types page, select Options Manage System Types.From this page, you can:
Create a New Rule. Click [New]. The New rule section appears. See SystemsInsight Manager - Creating STM rules for more information.
Edit an Existing Rule. Select the rule you want to edit, and then click [Edit]. SeeSystems Insight Manager - Editing STM rules for more information.
Delete an Existing Rule. Click [Delete ]. A confirmation box appears. to delete therule, click [OK], or to cancel the deleting and return to the Manage System Typespage, click [Cancel ]. See Systems Insight Manager - Deleting STM rules for moreinformation.
Systems Insight Manager - Related information
HP Systems Insight Manager 7.1 English
Operations | Managing system types | Creating STM rules
» Discovery in HP SIM» Discovery filters» Managing Hosts file» Identification» Managing system types
Creating STM rules» Editing STM rules» Deleting STM rules» Related information
» Users and authorizations» Directory Services» Global credentials» System credentials» Security» Trusted certificates» Viewing the audit log» Configuring the audit log» Monitoring systems and
events» Quick Launch menu» Performing a basic search» Performing an advanced
search for systems» Performing an advanced
search for clusters» Performing an advanced
search for events» Tool search» Related information for
searches» Configuring events» Protocol settings» Software status polling» Hardware status polling» Data collection
» Command line interfaceProcedure 1 Creating a new SNMP rule
1. (Required) Enter the System object identifier information. Retrieve the systemobject identifier from a target system on your network by clicking [Retrieve fromsystem]. The Retrieve from system section appears. The System objectidentifier field is required.
a. In the Object identifier field, enter the object identifier.
b. In the Community string field, enter the community string if other thanpublic, which is the default. to retrieve data, the community string of thetarget system and the HP SIM server must match to retrieve data.
c. In the Target hostname or IP address field, enter the IP address of thesystem you want to search.
d. Click [Get response] to show the Response SNMP data type and theResponse value.
e. To close the Retrieve from system section, click [OK], and place theresponse value in the System object identifier, or Object value fields, orboth.
2. Enter the System object identifier compare rule. Click the down arrow and selectthe appropriate rule. In most cases, this rule is match. You can set it to starts withif you know that a class of systems has system object identifiers that start with thevalue you have entered.
3. Specify MIB variable object identifier by clicking [Retrieve from MIB]. TheRetrieve from MIB section appears.
You might need to perform this action if you have systems that return the samesystem object identifier that you would like to classify as different products based onan SNMP variable that returns a different value for each class. For example, if youhave Windows NT servers from different vendors that return the same Windows NTsystem object identifier, you can specify rules using the Windows NT OID as theOID and a vendor-specific MIB variable and value combination to create separaterules for each vendor.
» System Properties» Configuring WBEM health
inclusion status» Specifying a Version
Control Repository» Configuring
software/firmware globalsettings
» Reporting» Managing with tasks» Using Cluster Monitor» Command line tools» Configuring managed
systems from a WindowsCMS
» Configuring managedsystems from a LinuxCMS
» Configuring managedsystems from an HP-UXCMS
» Custom tools» Setting disk thresholds» Creating a task to delete
disk thresholds» License manager» Management processor
tools» Managing
Communications» Managing MIBs» Installing OpenSSH» Replicate Agent Settings» RPM Package Manager» HP Server Migration Pack
- Universal Edition» HP System Management
Homepage» Version Control» Device ping
» Reference» Support and other
resources» Assistance
» Glossary» Using Help
a. Click the down arrow in the MIB definition file name box to select the MIBdefinition file.
b. Click the down arrow in the MIB variable name box to select the MIBvariable name.
c. To close the Retrieve from MIB section, click [OK], and place the MIBvariable object identifier information in the field.
4. Select the Object value by clicking [Retrieve from system]. The Retrieve fromsystem section appears.
a. Enter the Object identifier, Community string, and Target hostname orIP address.
b. Click [Get response] to view the Response SNMP data type and theResponse value.
c. To close the Retrieve from MIB section, click [OK], and place theinformation in the Object value field.
5. Select the Object value Data type by clicking the down arrow and selecting eitherstring or integer.
6. Select the Object value Compare rule by clicking the down arrow.
7. Enter a Priority (applies only if there is more than one rule with the same systemobject identifier).
8. (Required) In the System type field, click the down arrow, and then select thesystem type.
9. In the Subtype field, click the down arrow, and then select the system subtype.
10. (Required) In the Product model field, enter the product name for the new rule.
11. In the Custom management page field, enter a URL. The URL displays this webpage as a system link on the System Page of systems identified using this rule.Enter the special keywords $ipaddress and $hostname anywhere in this URL. Theyare replaced by the actual IP address or host name of the system when the link isplaced on the System Page.
12. Click [Launch] to verify that you can browse to the URL.
13. To save the new rule, click [OK], or to cancel all changes and close the New rulesection, click [Cancel ].
Command line interface
Use the mxstm command to add SNMP rules from the command line. For assistance withthis command, see the HP-UX or Linux manpage by entering man mxstm at the commandline. See the HP Systems Insight Manager Command Line User Guide for more informationabout the command and how to access the manpage.
» Discovery in HP SIM» Discovery filters» Managing Hosts file» Identification» Managing system types
» Creating STM rulesEditing STM rules
» Deleting STM rules» Related information
» Users and authorizations» Directory Services» Global credentials» System credentials» Security» Trusted certificates» Viewing the audit log» Configuring the audit log» Monitoring systems and
events» Quick Launch menu» Performing a basic search» Performing an advanced
search for systems» Performing an advanced
search for clusters» Performing an advanced
search for events» Tool search» Related information for
searches» Configuring events» Protocol settings» Software status polling» Hardware status polling» Data collection
» Command Line Interface
Edit an existing SNMP rule using System Type Manager to change the priority, systemtype, subtype, or custom management page.
NOTE:Changing the priority on this page reorders the priorities of all other rules withthe same OID such that all rules with the same system OID have a uniquepriority ranging from one to the number of rules with the same system OID.
NOTE:All steps are optional.
Procedure 1 Editing SNMP rules
1. In the Priority field, change the priority.
2. In the System type field, click the down arrow to change the system type.
3. In the Subtype field, click the down arrow to change the subtype.
4. In the Custom management page field, change the URL. Click [Launch] to verifythat you can browse to the URL launch page.
5. To save changes and return to the Manage System Types page, click [OK], or toreturn to the Manage System Types page without saving any changes, click[Cancel ].
Command Line Interface
Use the mxstm command to edit SNMP rules from the command line. For assistance withthis command, see the HP-UX or Linux manpage by entering man mxstm at the commandline. See the HP Systems Insight Manager Command Line User Guide for more informationabout the command and how to access the manpage.
Systems Insight Manager - Related information
HP Systems Insight Manager 7.1 English
Operations | Managing system types | Deleting STM rules
» Discovery in HP SIM» Discovery filters» Managing Hosts file» Identification» Managing system types
» Creating STM rules» Editing STM rules
Deleting STM rules» Related information
» Users and authorizations» Directory Services» Global credentials» System credentials» Security» Trusted certificates» Viewing the audit log» Configuring the audit log» Monitoring systems and
events» Quick Launch menu» Performing a basic search» Performing an advanced
search for systems» Performing an advanced
search for clusters» Performing an advanced
search for events» Tool search» Related information for
searches» Configuring events» Protocol settings» Software status polling» Hardware status polling» Data collection
» Command Line Interface
1. Select Options Manage System Types. The Manage System Types pageappears.
2. Select the rule to delete.
3. Click [Delete ]. A confirmation box appears.
4. Click [OK] to delete the rule, or click [Cancel ] to cancel the deletion process.
Command Line Interface
Use the mxstm command to delete SNMP rules from the command line. For assistancewith this command, see the HP-UX or Linux manpage by entering man mxstm at thecommand line. See the HP Systems Insight Manager Command Line User Guide for moreinformation about the command and how to access the manpage.
Systems Insight Manager - Related information
HP Systems Insight Manager 7.1 English
Operations | Managing system types | Related information
Related information» Users and authorizations» Directory Services» Global credentials» System credentials» Security» Trusted certificates» Viewing the audit log» Configuring the audit log» Monitoring systems and
events» Quick Launch menu» Performing a basic search» Performing an advanced
search for systems» Performing an advanced
search for clusters» Performing an advanced
search for events» Tool search» Related information for
searches» Configuring events» Protocol settings» Software status polling» Hardware status polling» Data collection
Related procedures
» Systems Insight Manager - Creating STM rules» Systems Insight Manager - Deleting STM rules» Systems Insight Manager - Editing STM rules
» Discovery in HP SIM» Discovery filters» Managing Hosts file» Identification» Managing system types
Users and authorizations» Creating new
authorizations» Creating new toolboxes» Creating new users» Updating authorizations» Editing toolboxes» Creating new user
groups» Deleting authorizations» Deleting toolboxes» Editing users and user
groups» Authorization reports» Toolbox reports» Deleting users and user
groups» System groups (CLI)» User and user group
reports» Related information
» Directory Services» Global credentials» System credentials» Security» Trusted certificates» Viewing the audit log» Configuring the audit log» Monitoring systems and
events
» User authorization templates
NOTE:Users that have been added to the Central Management Server (CMS) cannot view or manage systemsuntil authorizations have been configured for them.
NOTE:Command line tools provided by HP-UX and Linux (such as ls and df) are run as root by default. Forsecurity reasons, you might want them to run as a specific user to avoid inadvertently allowingunauthorized access to a user.
HP SIM enables you to configure authorizations for specific users or user groups. Authorizations give the user accessto view and manage systems. Each authorization specifies a user or user group, a toolbox, and a system or systemgroup. The specific set of tools that can be run on a system that is specified in the assigned toolbox.
You must plan which systems each user will manage and which specific set of tools each user is authorized toexecute on managed systems. A user with no toolbox authorizations on a particular system cannot view or managethat system.
Authorizations are cumulative. If a user is authorized for Toolbox1 and Toolbox2 on the same system, the user isauthorized for all tools in both Toolbox1 and Toolbox2 on that system. Similarly, a user authorized for the All Toolstoolbox on a system requires no other toolbox authorizations on that system because the All Tools toolbox alwaysincludes all tools.
See the following guidelines for setting up user names and authorizations in the following sections:
Systems Insight Manager - Creating new users
Systems Insight Manager - Creating new user groups
Systems Insight Manager - Creating new toolboxes
Systems Insight Manager - Creating new authorizations
User authorization templates
» Quick Launch menu» Performing a basic search» Performing an advanced
search for systems» Performing an advanced
search for clusters» Performing an advanced
search for events» Tool search» Related information for
searches» Configuring events» Protocol settings» Software status polling» Hardware status polling» Data collection» System Properties» Configuring WBEM health
inclusion status» Specifying a Version
Control Repository» Configuring
software/firmware globalsettings
» Reporting» Managing with tasks» Using Cluster Monitor» Command line tools» Configuring managed
systems from a WindowsCMS
» Configuring managedsystems from a LinuxCMS
» Configuring managedsystems from an HP-UXCMS
» Custom tools» Setting disk thresholds» Creating a task to delete
disk thresholds» License manager» Management processor
tools» Managing
Communications» Managing MIBs» Installing OpenSSH» Replicate Agent Settings» RPM Package Manager» HP Server Migration Pack
- Universal Edition» HP System Management
Homepage» Version Control» Device ping
» Reference» Support and other
resources» Assistance
» Glossary» Using Help
The Users and Authorizations tabs offer the following options:
Add, edit, and delete users and user groups, and view and print user reports. Select OptionsSecurity Users and Authorizations Users.
Add, edit, and delete toolboxes, and view and print toolbox reports. Select Options Security Usersand Authorizations Toolboxes .
Add, update, and delete authorizations, and view and print authorization reports. Select OptionsSecurity Users and Authorizations Authorizations.
NOTE:By default, users created in HP SIM can access HP Storage Essentials with limited read privileges. Youcan change the permission settings by following the instructions and links on the Users, Toolboxes , andAuthorizations tabs.
» Discovery in HP SIM» Discovery filters» Managing Hosts file» Identification» Managing system types» Users and authorizations
Creating newauthorizations
» Creating new toolboxes» Creating new users» Updating authorizations» Editing toolboxes» Creating new user
groups» Deleting authorizations» Deleting toolboxes» Editing users and user
groups» Authorization reports» Toolbox reports» Deleting users and user
groups» System groups (CLI)» User and user group
reports» Related information
» Directory Services» Global credentials» System credentials» Security» Trusted certificates» Viewing the audit log» Configuring the audit log» Monitoring systems and
events» Quick Launch menu» Performing a basic search» Performing an advanced
search for systems» Performing an advanced
search for clusters» Performing an advanced
search for events
» Command line interface
NOTE:To create authorizations with individual systems, be sure the systems have been discovered and are accessible in the database.
NOTE:You cannot directly create new authorizations for group-based users.
Procedure 1 Creating new authorizations
1. In the Select dropdown list, select User(s) or UserGroup(s), and then select the users or groups in the box. This field is required.
2. In the Enter authorizations for the selected user(s) section, select one of the following options:
Copy all authorizations of this user or [template]
Select a user or template from the dropdown list.
Manually assign toolbox and system/system group authorizations
a. In the Select Toolbox(es) section, select the toolboxes to include.
b. In the Select Systems list box, the two default system groups (All Managed Systems and CMS) appear. Select oneof these groups, or to select systems for the authorization, click [Add] to display the Add Systems section.
c. In the Add systems by selecting from section, select one of the following:
i. Collection Select a collection, and click [View contents].
If you want to use the entire collection as your selection, select Select "collection name" itself. This optioncreates a system group based on the currently displayed contents of the collection.
i. Optional: To enable the authorization to automatically be updated, without user intervention when acollection is changed, select Automatically track changes. If this collection changes, so does the
» Tool search» Related information for
searches» Configuring events» Protocol settings» Software status polling» Hardware status polling» Data collection» System Properties» Configuring WBEM health
inclusion status» Specifying a Version
Control Repository» Configuring
software/firmware globalsettings
» Reporting» Managing with tasks» Using Cluster Monitor» Command line tools» Configuring managed
systems from a WindowsCMS
» Configuring managedsystems from a LinuxCMS
» Configuring managedsystems from an HP-UXCMS
» Custom tools» Setting disk thresholds» Creating a task to delete
disk thresholds» License manager» Management processor
tools» Managing
Communications» Managing MIBs» Installing OpenSSH» Replicate Agent Settings» RPM Package Manager» HP Server Migration Pack
- Universal Edition» HP System Management
Homepage» Version Control» Device ping
» Reference» Support and other
resources» Assistance
» Glossary» Using Help
authorization .
ii. Optional: Select Do not track changes. If this collection changes, the authorization will notchange. If this option is selected, you must manually update the authorization after a collection haschanged by using the [Update] button on the Authorizations tab.
NOTE:These two selections are only available if a collection of systems is selected and theSelect "collection name" itself option is selected. You must select one option or theother. The default selection is based on theDynamicAuthorizations_AutoUpdateDefaultValue property setting in theglobalsettings.props file. The default is set to Yes. This is reflected in the SelectSystems list box in the New Authorizations section with [Auto] appended to the entry.For example, if you selected All Systems and chose to have it automatically updated, AllSystems 001 [Auto] would be displayed in the Select Systems box.
You can continue to add systems and collections and can enable automatic updates for eachselected collection. Since automatic updates for any authorization apply to all authorizations using thesame selected collection, changing the setting for one affects any other authorization using the samecollection. Therefore, during system selections, if you select a group already associated with anautomatically updating authorization, the option Automatically track changes. If this collectionchanges, so does the authorization is preselected. Likewise, if an authorization that does notautomatically update is associated with a collection, the option Do not track changes. If thiscollection changes, the authorization will not change is preselected.
iii. If you want to select all individual systems from the collection, select the checkbox at the top of thetable view in the column heading to select all systems.
NOTE:This selection creates a separate authorization for each selected system.
iv. To save system selections, click [Apply], or to return to the New Authorizations section withoutsaving changes, click [Cancel ].
After clicking [Apply], a message appears based on the options selections. To return to the NewAuthorizations section, click [OK].
ii. Search Enter a system name and click [Search], or select a system from the list, and then click [Search].
i. Select systems.
ii. Click Apply, or to return to the New Authorizations section without saving changes, click [Cancel ].
After clicking [Apply], a message appears based on the options selections. Click [OK] to return tothe New Authorizations section.
A system group is a group of systems based on a system collection that is used for authorizations. Authorizations that use systemgroups are updated automatically when a change is made to the system collection that the system group is based upon. The optionDo not track changes. If this collection changes, the authorization will not change must not be selected for the authorizations tobe updated automatically.
If you selected individual systems of a collection, each selection populates the list box and is selected for inclusion in theauthorization. If you selected a collection and the collection has been used previously in an authorization, a message appears statingthat a system group for the collection exists and will be updated with current source collection content. This condition affects allauthorizations associated with that collection. When a collection is used for the first time, no message appears. A system group withthe name of the collection followed by three numbers, usually (001) appears in the Select Systems dropdown list and is selected.
3. To save the new authorization and close the New Authorizations section, click [OK], or, if you do not want to create theauthorization, click [Cancel ].
NOTE:When you add CMS tools to any other system, a warning appears alerting you that the authorization just added contains an HPSIM-based tool in the toolbox and that the CMS server was not selected. The warning also states that the authorization wascreated but might not authorize the user on all the selected tools. Some tools in HP SIM are used to manage HP SIM itself. Forexample, discovery or viewing the HP SIM audit log. This error means that one or more of these tools were in a selected toolboxand the CMS was not one of the selected systems. To correct this error, select the CMS as one of the target systems.
NOTE:When upgrading to HP SIM 5.x from any other version of HP SIM, any system groups that the user created are migrated, butbecome top-level collections. To manage these system groups, use the feature to edit a collection and update an authorization. Formore detailed information, see Systems Insight Manager - Editing system and cluster collections and Systems Insight Manager -Updating authorizations.
Command line interface
Users with administrative rights can use mxngroup to create and manage system groups from the command line interface (CLI).
Users with administrative rights can use the mxauth command to add authorizations from the CLI.
NOTE:Users must have the User can configure CMS security access such as creating, modifying or removing other users optionselected when their account is set up for them to be able to use the mxngroup and mxauth commands.
For information about accessing the manpage, see the HP Systems Insight Manager Command Line User Guide.
» Discovery in HP SIM» Discovery filters» Managing Hosts file» Identification» Managing system types» Users and authorizations
» Creating newauthorizationsCreating new toolboxes
» Creating new users» Updating authorizations» Editing toolboxes» Creating new user
groups» Deleting authorizations» Deleting toolboxes» Editing users and user
groups» Authorization reports» Toolbox reports» Deleting users and user
groups» System groups (CLI)» User and user group
reports» Related information
» Directory Services» Global credentials» System credentials» Security» Trusted certificates» Viewing the audit log» Configuring the audit log» Monitoring systems and
events
» Command line interface
Create a toolbox to configure a group of tools for each user who has access. Toolboxes areset up so that some users can use certain tools but not others. For example, anadministrator has access to more tools than a user.
The HP SIM Tools category includes tools that are related to configuration rights on the HPSIM server itself. In previous versions of HP SIM, these rights were only enabled to fullconfiguration rights users. With HP SIM 5.2 or later, any user can be granted these rights ifneeded based on an authorization. These tools include: Delete Systems in HP SIM, Edit anyuser tasks in HP SIM, Edit HP SIM Notification Settings, Edit HP SIM Reports, Edit SharedCollections in HP SIM, Edit Systems in HP SIM, Modify HP SIM Events, Run HP SIMDiscovery, and View HP SIM Audit Log.
NOTE:The toolbox name must start with an alphabetic character followed byalphanumeric characters, embedded blank characters, underscore (_), or dash (-)and must be less than or equal to 16 characters in length.
Procedure 1 Adding toolboxes
1. In the Name field, enter a name for the new toolbox. This field is required.
2. In the Description field, enter a description for the toolbox.
3. To enable the toolbox and all authorizations created with this toolbox, selectToolbox is enabled.
4. To display a list of tools in the available tools list, in the Show tools in categoryfield, select a category. In the available tools list, select the tools to be assigned to
this toolbox, and then click .
The selected tools appear in the Toolbox contents list. To remove a tool from theassociated tools list, you can select a tool displayed in the Toolbox contents list,
and then click .
NOTE:For users with operator rights and user rights to clear, delete, assignevents, and add comments to events, you must select ConfigurationTool from the Show tools in category dropdown list. Then, select ClearEvents , Delete Events , Assign Events , and Comment Events as
necessary, and then click to add them to the Toolbox contents.
5. To save the new toolbox and close the New Toolbox section, click [OK]. To savethe settings without closing the New Toolbox section, click [Apply], or to cancel thenew toolbox creation and return to the Toolboxes section, click [Cancel ].
Command line interface
Users with administrative rights can use the mxtoolbox command to add toolboxes from theCLI. To modify the contents of the toolbox, refer to the mxtool commands.
NOTE:Users must have the User can configure CMS security access such ascreating, modifying or removing other users option selected when theiraccount is set up for them to be able to use the mxngroup and mxauth
» Quick Launch menu» Performing a basic search» Performing an advanced
search for systems» Performing an advanced
search for clusters» Performing an advanced
search for events» Tool search» Related information for
searches» Configuring events» Protocol settings» Software status polling» Hardware status polling» Data collection» System Properties» Configuring WBEM health
inclusion status» Specifying a Version
Control Repository» Configuring
software/firmware globalsettings
» Reporting» Managing with tasks» Using Cluster Monitor» Command line tools» Configuring managed
systems from a WindowsCMS
» Configuring managedsystems from a LinuxCMS
» Configuring managedsystems from an HP-UXCMS
» Custom tools» Setting disk thresholds» Creating a task to delete
disk thresholds» License manager» Management processor
tools» Managing
Communications» Managing MIBs» Installing OpenSSH» Replicate Agent Settings» RPM Package Manager» HP Server Migration Pack
- Universal Edition» HP System Management
Homepage» Version Control» Device ping
» Reference» Support and other
resources» Assistance
» Glossary» Using Help
commands.
For information about accessing the manpage, see the HP Systems Insight ManagerCommand Line User Guide.
» Discovery in HP SIM» Discovery filters» Managing Hosts file» Identification» Managing system types» Users and authorizations
» Creating newauthorizations
» Creating new toolboxesCreating new users
» Updating authorizations» Editing toolboxes» Creating new user
groups» Deleting authorizations» Deleting toolboxes» Editing users and user
groups» Authorization reports» Toolbox reports» Deleting users and user
groups» System groups (CLI)» User and user group
reports» Related information
» Directory Services» Global credentials» System credentials» Security» Trusted certificates» Viewing the audit log» Configuring the audit log» Monitoring systems and
events
Create a new user account to sign-in to HP SIM. The account must be valid on theoperating system (including Active Directory on Windows) on the Central ManagementServer (CMS) and is authenticated by the CMS. You must know the operating system useraccount name of the user you are adding, but it is not necessary to know the password.
Procedure 1 Creating a new user
1. Required: In the Sign-in name [on central management server(CMS)] field, enterthe operating system login account name to be used to sign in to HP SIM. This fieldis required.
NOTE:The user cannot sign-in to HP SIM if the account is not a valid login. Theaccount is not validated until the user attempts to sign-in to HP SIM.
2. Optional: In the Domain (Windows® domain for sign-in name) field, enter theWindows domain name for the login name if the CMS is running a Windowsoperating system. If left blank, the CMS system name is used as the domain.
NOTE:If the user account was migrated from Insight Manager 7, the Domain(Windows® domain for login name) field associates a placeholderdomain with the user. If the user receives pages, this field must beedited to include a valid domain on your network.
3. Optional: In the Full name field, enter the user's full name.
4. Optional: If you are using Windows, in the Phone field of the Pager Informationsection, enter the pager phone number. If the Phone number field is left blank, thepaging information is not saved. This field does not apply to user groups.
5. Optional: In the E-mail address field, enter the user's e-mail address.
6. In the Copy all authorizations of this user or [template] field, select a template(administrator-template, operator-template, or user-template) or sign-in account thatalready has the predefined authorizations that you want to assign to the sign-inaccount you are creating.
7. For user accounts that must be able to create, modify, or delete other accounts inthe Central management server security configuration right section, select Usercan configure CMS security access such as creating, modifying or removingother users. If you selected an existing user with administrative rights or theadministrator template in the previous step, this option is automatically selected.
8. Under the Sign-In IP Address Restrictions section, in the Inclusion ranges field,enter the IP addresses of the systems you want this user to be able to use as aclient browsing this CMS. If you list multiple IP addresses, separate them with asemicolon (;). Each range is a single IP address or two IP addresses separated bya dash (-). The IP addresses must be entered in the standard dotted decimalnotation, for example, 15.1.54.133. Any spaces surrounding the semicolons ordashes are ignored. Spaces are not allowed within a single IP address in the dotteddecimal notation. Enter 0.0.0.0 to prevent a user from logging in through a remotesystem.
» Quick Launch menu» Performing a basic search» Performing an advanced
search for systems» Performing an advanced
search for clusters» Performing an advanced
search for events» Tool search» Related information for
searches» Configuring events» Protocol settings» Software status polling» Hardware status polling» Data collection» System Properties» Configuring WBEM health
inclusion status» Specifying a Version
Control Repository» Configuring
software/firmware globalsettings
» Reporting» Managing with tasks» Using Cluster Monitor» Command line tools» Configuring managed
systems from a WindowsCMS
» Configuring managedsystems from a LinuxCMS
» Configuring managedsystems from an HP-UXCMS
» Custom tools» Setting disk thresholds» Creating a task to delete
disk thresholds» License manager» Management processor
tools» Managing
Communications» Managing MIBs» Installing OpenSSH» Replicate Agent Settings» RPM Package Manager» HP Server Migration Pack
- Universal Edition» HP System Management
Homepage» Version Control» Device ping
» Reference» Support and other
resources» Assistance
» Glossary» Using Help
IMPORTANT:If browsing from the CMS, ensure all IP addresses of the CMS areproperly included. If browsing to localhost, ensure the loopback address127.0.0.1 is also included.
9. In the Exclusion ranges field, enter the IP address of the systems that should beexcluded from management by this user or user group. Use the same format as inthe previous step for Inclusion ranges. Enter 0.0.0.0 to prevent a user fromlogging in through a remote system.
NOTE:Ensure that your inclusion and exclusion ranges do not overlap.
NOTE:The following five steps are only for a CMS running Windows.
10. To override IP login restrictions of all other user groups with the current usergroup's IP login restriction, select Override IP Login Inclusion/Exclusion Range.
11. Under the Pager Information section, in the Phone number field, enter the pagerphone number of the user associated with this user account if you are using aWindows operating system. If the Phone number field is left blank, the paginginformation is not saved. This field does not apply to user groups.
12. In the PIN number field, enter the PIN number associated with the pager phonenumber. This field does not apply to user groups.
13. In the Message length field, select how many characters can be accepted in thepaging message from the dropdown list. This field does not apply to user groups.
14. In the Baud rate field, select the appropriate baud rate for the pager from thedropdown list. This field does not apply to user groups.
15. In the Data format field, select the appropriate data format for the pager from thedropdown list. This field does not apply to user groups.
16. To save and close the New User section, click [OK]. The new user account iscreated. To save and keep the New User section open, click [Apply], or to cancelthe creation of this user, click [Cancel ].
Command line interface
Users with administrative rights can use the mxuser command to create users from thecommand line interface (CLI). To modify the contents of the toolbox, refer to the mxtoolcomands.
NOTE:Users must have the User can configure CMS security access such ascreating, modifying or removing other users option selected when theiraccount is set up for them to be able to use the mxuser command.
See the HP Systems Insight Manager Command Line User Guide for information aboutaccessing the manpage.
» Discovery in HP SIM» Discovery filters» Managing Hosts file» Identification» Managing system types» Users and authorizations
» Creating newauthorizations
» Creating new toolboxes» Creating new users
Updating authorizations» Editing toolboxes» Creating new user
groups» Deleting authorizations» Deleting toolboxes» Editing users and user
groups» Authorization reports» Toolbox reports» Deleting users and user
groups» System groups (CLI)» User and user group
reports» Related information
» Directory Services» Global credentials» System credentials» Security» Trusted certificates» Viewing the audit log» Configuring the audit log» Monitoring systems and
events
» Command line interface
This option is only available for authorizations using system groups based on a collection. Itenables the contents of a system group to be updated to the current contents of its sourcecollection. All authorizations using this system group (collection) are updated.
Procedure 1 Updating an authorization
1. In the Show dropdown list, select changes, current contents, or updatedcontents.
changes Describes the specific changes that occur to the system group ifupdated. Systems to Add shows new systems to be added to the systemgroup and added to all authorizations based on the system group. Systemsto Remove shows current systems to be removed from the system andremoved from all authorizations using the system group. SystemsUnchanged shows a list of systems that are unaffected by the update.They remain unchanged in the system group and all authorizations basedon the system group.
current contents Displays the current contents of the system group.
updated contents Displays what the contents of the system group will beafter updating. This option applies to authorizations based on this systemgroup.
2. To update the authorization, click [Update Contents], or to cancel the update, click[Cancel ].
Command line interface
Users with administrative rights can use mxngroup to update system groups from thecommand line interface (CLI). However, if there are edits to the system group from the CLI,there is no affect on the source collection. To modify the contents of the toolbox, refer to themxtool command.
NOTE:Users must have the User can configure CMS security access such ascreating, modifying or removing other users option selected when theiraccount is set up for them to be able to use the mxngroup and mxauthcommands.
For information about accessing the manpage, see the HP Systems Insight ManagerCommand Line User Guide.
Systems Insight Manager - Related information
HP Systems Insight Manager 7.1 English
Operations | Users and authorizations | Editing toolboxes
» Discovery in HP SIM» Discovery filters» Managing Hosts file» Identification» Managing system types» Users and authorizations
» Creating newauthorizations
» Creating new toolboxes» Creating new users» Updating authorizations
Editing toolboxes» Creating new user
groups» Deleting authorizations» Deleting toolboxes» Editing users and user
groups» Authorization reports» Toolbox reports» Deleting users and user
groups» System groups (CLI)» User and user group
reports» Related information
» Directory Services» Global credentials» System credentials» Security» Trusted certificates» Viewing the audit log» Configuring the audit log» Monitoring systems and
events
» Command line interface
You can change toolboxes to modify the contents, name, and description of the toolbox.
NOTE:The All Tools toolbox cannot be edited. While, the Monitor Tools toolbox can beedited, but only the set of tools contained in the toolbox can be changed.
Procedure 1 Editing a toolbox
1. Change the appropriate setting. For more detailed information about each field, seeSystems Insight Manager - Creating new toolboxes.
NOTE:New custom tools are located under Tools Custom Tools.
2. To save changes, click [OK], or to cancel the changed, click [Cancel ].
Command line interface
Users with administrative rights can use the mxtoolbox command to modify toolboxes fromthe CLI. To modify the contents of the toolbox, refer to the mxtool command.
NOTE:Users must have the User can configure CMS security access such ascreating, modifying or removing other users option selected when theiraccount is set up for them to be able to use the mxtoolbox and mxtoolcommands.
For information about accessing the manpage, see the HP Systems Insight ManagerCommand Line User Guide.
Systems Insight Manager - Related information
HP Systems Insight Manager 7.1 English
Operations | Users and authorizations | Creating new user groups
» Discovery in HP SIM» Discovery filters» Managing Hosts file» Identification» Managing system types» Users and authorizations
» Creating newauthorizations
» Creating new toolboxes» Creating new users» Updating authorizations» Editing toolboxes
Creating new usergroups
» Deleting authorizations» Deleting toolboxes» Editing users and user
groups» Authorization reports» Toolbox reports» Deleting users and user
groups» System groups (CLI)» User and user group
reports» Related information
» Directory Services» Global credentials» System credentials» Security» Trusted certificates» Viewing the audit log» Configuring the audit log» Monitoring systems and
events
User groups must exist in the operating system. For Windows, they must also exist in ActiveDirectory. Members of user groups in the operating system can sign-in to HP SIM andinherit the group's attributes for configuration rights, sign in IP address restrictions, andauthorizations. When a group's configuration rights, sign in IP address restrictions, orauthorizations are changed, this change is immediately reflected for all current members ofthe group.
With configuration rights, the user inherits the highest setting. With sign-in IP addressrestrictions, the user inherits all entries. With authorizations, the user inherits allauthorizations.
NOTE:A user's group membership is determined at sign-in. If a user's groupmembership changes in the operating system, it is not reflected in HP SIM untilthe next time the user signs in to HP SIM.
By using nesting, you can add a group as a member of another group. Groups are nestedtogether to consolidate member accounts and reduce replication traffic. Refer to the HPSystems Insight Manager User Guide for more detailed information.
Procedure 1 Creating a new user group
1. In the Group name (on central management server) field, enter the operatingsystem group name to be used for signing in to HP SIM. This field is required.
2. If the Central Management Server (CMS) is running a Windows operating system, inthe Domain (Windows domain for login name) field, enter the Windows domainname for the group .
3. In the Full name field, enter the full name for the group. This name appears in thetable under the Users tab.
4. In the Copy all authorizations of this user or [template] field, select a templateor sign in that already has the predefined authorizations that you want to assign tothe group you are creating. For more information about default user templates, seethe HP Systems Insight Manager User Guide.
5. For user accounts that must be able to create, modify, or delete other accounts inthe Central management server security configuration right section, select Usercan configure CMS security access such as creating, modifying or removingother users. If you selected an existing user with administrative rights or theadministrator template in the previous step, this option is automatically selected.
6. Under the Sign-In IP Address Restrictions section, in the Inclusion ranges field,enter the IP addresses of the systems you want this user to be able to use as aclient browsing this CMS. If you list multiple IP addresses, separate them with asemicolon (;). Each range is a single IP address or two IP addresses separated bya dash (-). The IP addresses must be entered in the standard dotted decimalnotation, for example, 15.1.54.133. Any spaces surrounding the semicolons ordashes are ignored. Spaces are not allowed within a single IP address in the dotteddecimal notation. Enter 0.0.0.0 to prevent a user from logging in through a remotesystem.
IMPORTANT:If browsing from the CMS, ensure all IP addresses of the CMS areproperly included. If browsing to localhost, ensure the loopback address127.0.0.1 is also included.
» Quick Launch menu» Performing a basic search» Performing an advanced
search for systems» Performing an advanced
search for clusters» Performing an advanced
search for events» Tool search» Related information for
searches» Configuring events» Protocol settings» Software status polling» Hardware status polling» Data collection» System Properties» Configuring WBEM health
inclusion status» Specifying a Version
Control Repository» Configuring
software/firmware globalsettings
» Reporting» Managing with tasks» Using Cluster Monitor» Command line tools» Configuring managed
systems from a WindowsCMS
» Configuring managedsystems from a LinuxCMS
» Configuring managedsystems from an HP-UXCMS
» Custom tools» Setting disk thresholds» Creating a task to delete
disk thresholds» License manager» Management processor
tools» Managing
Communications» Managing MIBs» Installing OpenSSH» Replicate Agent Settings» RPM Package Manager» HP Server Migration Pack
- Universal Edition» HP System Management
Homepage» Version Control» Device ping
» Reference» Support and other
resources» Assistance
» Glossary» Using Help
7. In the Exclusion ranges field, enter the IP address of the systems that should beexcluded from management by this user or user group. Use the same format as inthe previous step for Inclusion ranges. Enter 0.0.0.0 to prevent a user fromlogging in through a remote system.
8. To save and close the New User Group section, click [OK]. To save and keep theNew User Group section open, click [Apply], or to cancel to close the New UserGroup section without saving the new group, click [Cancel ] .
Command line interface
Users with administrative rights can use the mxuser command to create a user group fromthe command line interface (CLI). To modify the contents of the toolbox, refer to the mxtoolcommand.
NOTE:Users must have the User can configure CMS security access such ascreating, modifying or removing other users option selected when theiraccount is set up for them to be able to use the mxuser command.
For information about accessing the manpage, see the HP Systems Insight ManagerCommand Line User Guide.
» Discovery in HP SIM» Discovery filters» Managing Hosts file» Identification» Managing system types» Users and authorizations
» Creating newauthorizations
» Creating new toolboxes» Creating new users» Updating authorizations» Editing toolboxes» Creating new user
groupsDeleting authorizations
» Deleting toolboxes» Editing users and user
groups» Authorization reports» Toolbox reports» Deleting users and user
groups» System groups (CLI)» User and user group
reports» Related information
» Directory Services» Global credentials» System credentials» Security» Trusted certificates» Viewing the audit log» Configuring the audit log» Monitoring systems and
events
» Command line interface
CAUTION:If all authorizations are deleted, no user, not even a user with administrativerights, can view or manage any systems.
Procedure 1 Deleting authorizations
1. Select the authorizations to be deleted.
2. Click [Delete ]. A confirmation box appears.
3. To delete the authorizations, click [OK], or to cancel the deletion process and returnto the Authorizations section, click [Cancel ].
Authorizations cannot be directly deleted for group-based users. Instead, delete theauthorizations for the user group of the group-based user.
NOTE:When deleting the last authorization using a system group, other than the defaultAll Managed Systems of CMS system groups, the system group is also deleted.
Command line interface
Users with administrative rights can use the mxngroup command to delete system groupsusing the CLI. To modify the contents of the toolbox, refer to the mxtool command.
NOTE:Users must have the User can configure CMS security access such ascreating, modifying or removing other users option selected when theiraccount is set up for them to be able to use the mxngroup and mxauthcommands.
See the HP Systems Insight Manager Command Line User Guide for information aboutaccessing the manpage.
Systems Insight Manager - Related information
HP Systems Insight Manager 7.1 English
Operations | Users and authorizations | Deleting toolboxes
» Discovery in HP SIM» Discovery filters» Managing Hosts file» Identification» Managing system types» Users and authorizations
» Creating newauthorizations
» Creating new toolboxes» Creating new users» Updating authorizations» Editing toolboxes» Creating new user
groups» Deleting authorizations
Deleting toolboxes» Editing users and user
groups» Authorization reports» Toolbox reports» Deleting users and user
groups» System groups (CLI)» User and user group
reports» Related information
» Directory Services» Global credentials» System credentials» Security» Trusted certificates» Viewing the audit log» Configuring the audit log» Monitoring systems and
events
» Command line interface
CAUTION:
When a toolbox is deleted, all of the associated authorizations are also deleted.
NOTE:The All Tools toolbox and the Monitor Tools toolbox cannot be deleted.
Procedure 1 Deleting a toolbox
1. Select the toolboxes to be deleted.
2. Click [Delete ]. A confirmation box appears.
3. To delete the toolboxes, click [OK], or to cancel the deletion process, click[Cancel ].
The toolbox and all associated authorizations are permanently deleted.
Command line interface
Users with administrative rights can use the mxtoolbox command to delete toolboxes fromthe CLI. To modify the contents of the toolbox, refer to the mxtool command.
NOTE:Users must have the User can configure CMS security access such ascreating, modifying or removing other users option selected when theiraccount is set up for them to be able to use the mxtoolbox and mxtoolcommands.
See the HP Systems Insight Manager Command Line User Guide for information aboutaccessing the manpage.
Systems Insight Manager - Related information
HP Systems Insight Manager 7.1 English
Operations | Users and authorizations | Editing users and user groups
» Authorization reports» Toolbox reports» Deleting users and user
groups» System groups (CLI)» User and user group
reports» Related information
» Directory Services» Global credentials» System credentials» Security» Trusted certificates» Viewing the audit log» Configuring the audit log» Monitoring systems and
events
» Command line interface
In the event a user account or user group must be modified, you can edit it from the Userstab on the Users and Authorizations page.
NOTE:If a group's configuration rights or sign-in IP address restrictions are changed,these changes are immediately applied to all current members of the group. If agroup name is edited, none of its current members are affected, other thandisplaying the new group name.
NOTE:A group-based user account can be edited only to convert to an individual useraccount and is not reversible.
Procedure 1 Editing a user account or user group
1. Change the appropriate setting.
a. Required: In the Sign-in name [on central management server(CMS)]field, enter the operating system login account name to be used to sign into Systems Insight Manager. This field is required.
NOTE:The user cannot sign-in to Systems Insight Manager if theaccount is not a valid login. The account is not validated until theuser attempts to sign-in to Systems Insight Manager.
b. Optional: In the Domain (Windows® domain for sign-in name) field,enter the Windows domain name for the login name if the CMS is running aWindows operating system. If left blank, the CMS system name is used asthe domain.
NOTE:If the user account was migrated from Insight Manager 7, theDomain (Windows® domain for login name) field associatesa placeholder domain with the user. If the user receives pages,this field must be edited to include a valid domain on yournetwork.
c. Optional: In the Full name field, enter the user's full name.
d. For user accounts that must be able to create, modify, or delete otheraccounts in the Central management server security configuration rightsection, select User can configure CMS security access such ascreating, modifying or removing other users. If you selected an existinguser with administrative rights or the administrator template in the previousstep, this option is automatically selected.
e. Under the Sign-In IP Address Restrictions section, in the Inclusionranges field, enter the IP addresses of the systems you want this user tobe able to use as a client browsing this CMS. If you list multiple IPaddresses, separate them with a semicolon (;). Each range is a single IPaddress or two IP addresses separated by a dash (-). The IP addressesmust be entered in the standard dotted decimal notation, for example,15.1.54.133. Any spaces surrounding the semicolons or dashes areignored. Spaces are not allowed within a single IP address in the dotteddecimal notation. Enter 0.0.0.0 to prevent a user from logging in through a
» Quick Launch menu» Performing a basic search» Performing an advanced
search for systems» Performing an advanced
search for clusters» Performing an advanced
search for events» Tool search» Related information for
searches» Configuring events» Protocol settings» Software status polling» Hardware status polling» Data collection» System Properties» Configuring WBEM health
inclusion status» Specifying a Version
Control Repository» Configuring
software/firmware globalsettings
» Reporting» Managing with tasks» Using Cluster Monitor» Command line tools» Configuring managed
systems from a WindowsCMS
» Configuring managedsystems from a LinuxCMS
» Configuring managedsystems from an HP-UXCMS
» Custom tools» Setting disk thresholds» Creating a task to delete
disk thresholds» License manager» Management processor
tools» Managing
Communications» Managing MIBs» Installing OpenSSH» Replicate Agent Settings» RPM Package Manager» HP Server Migration Pack
- Universal Edition» HP System Management
Homepage» Version Control» Device ping
» Reference» Support and other
resources» Assistance
» Printable version
» Glossary» Using Help
remote system.
IMPORTANT:If browsing from the CMS, ensure all IP addresses of the CMSare properly included. If browsing to localhost, ensure theloopback address 127.0.0.1 is also included.
f. In the Exclusion ranges field, enter the IP address of the systems thatshould be excluded from management by this user or user group. Use thesame format as in the previous step for Inclusion ranges. Enter 0.0.0.0 toprevent a user from logging in through a remote system.
2. To save and close the Edit User section, click [OK]. The new user account iscreated. To save and keep the Edit User section open, click [Apply], or to cancelthe modifications for this user, click [Cancel ].
The user or group changes are saved.
Command line interface
Users with administrative rights can use the mxuser command to modify users or usergroups from the CLI.
NOTE:Users must have the User can configure CMS security access such ascreating, modifying or removing other users option selected when theiraccount is set up for them to be able to use the mxuser command.
For more information about accessing the manpage, see the HP Systems Insight ManagerCommand Line User Guide.
» Discovery in HP SIM» Discovery filters» Managing Hosts file» Identification» Managing system types» Users and authorizations
» Creating newauthorizations
» Creating new toolboxes» Creating new users» Updating authorizations» Editing toolboxes» Creating new user
groups» Deleting authorizations» Deleting toolboxes» Editing users and user
groupsAuthorization reports
» Toolbox reports» Deleting users and user
groups» System groups (CLI)» User and user group
reports» Related information
» Directory Services» Global credentials» System credentials» Security» Trusted certificates» Viewing the audit log» Configuring the audit log» Monitoring systems and
events
» Command line interface
Generate an Authorizations Report to view and print authorizations. The AuthorizationsReport is tailored to the current filtered view. For example, if user is selected in theAuthorizations for box, a report is generated for only for the user selected. If (none) isselected in the Select name dropdown list, a report is generated for everything selected inthe Authorizations box.
NOTE:To sort the report information in ascending or descending order, click theappropriate column heading. The column heading that includes the arrow is thecolumn by which the report is sorted. If the arrow is pointing up, the report issorted in ascending order. If the arrow is pointing down, the report is sorted indescending order.
The following information about authorizations appears in the Authorizations Reportwindow, along with the date and time of the report:
User/User Group
Toolbox
System
Auto
Procedure 1 Generating and printing an authorizations report
1. (Optional) Select a name from the Select name dropdown list.
2. To print the report, select File Print .
The Authorizations Report is printed.
Command line interface
Users with administrative rights can use the mxngroup command to generate and runsystem group reports from the CLI. to modify the contents of the toolbox, refer to themxauth command.
NOTE:Users must have the User can configure CMS security access such ascreating, modifying or removing other users option selected when theiraccount is set up for them to be able to use the mxngroup and mxauthcommands.
See the HP Systems Insight Manager Command Line User Guide for information aboutaccessing the manpage.
Systems Insight Manager - Related information
HP Systems Insight Manager 7.1 English
Operations | Users and authorizations | Toolbox reports
» Discovery in HP SIM» Discovery filters» Managing Hosts file» Identification» Managing system types» Users and authorizations
» Creating newauthorizations
» Creating new toolboxes» Creating new users» Updating authorizations» Editing toolboxes» Creating new user
groups» Deleting authorizations» Deleting toolboxes» Editing users and user
groups» Authorization reports
Toolbox reports» Deleting users and user
groups» System groups (CLI)» User and user group
reports» Related information
» Directory Services» Global credentials» System credentials» Security» Trusted certificates» Viewing the audit log» Configuring the audit log» Monitoring systems and
events
» Command line interface
For detailed information about a toolbox, you can generate and print a toolbox report.
NOTE:To sort the report information in ascending or descending order, click theappropriate column heading. The column heading that includes the arrow is thecolumn by which the report is sorted. If the arrow is pointing up, the report issorted in ascending order. If the arrow is pointing down, the report is sorted indescending order.
The following information about all toolboxes appears in the Toolboxes Report window,along with the date and time of the report:
Toolbox
Enabled
Tools
Description
Procedure 1 Generating and printing a toolbox report
Select File Print to print the report.
The toolbox report is printed.
Command line interface
Users with administrative rights can use the mxtoolbox command to generate and runreports from the CLI. To modify the contents of the toolbox, refer to the mxtool command.
NOTE:Users must have the User can configure CMS security access such ascreating, modifying or removing other users option selected when theiraccount is set up for them to be able to use the mxtoolbox and mxtoolcommands.
See the HP Systems Insight Manager Command Line User Guide for information aboutaccessing the manpage.
Systems Insight Manager - Related information
HP Systems Insight Manager 7.1 English
Operations | Users and authorizations | Deleting users and user groups
» Discovery in HP SIM» Discovery filters» Managing Hosts file» Identification» Managing system types» Users and authorizations
» Creating newauthorizations
» Creating new toolboxes» Creating new users» Updating authorizations» Editing toolboxes» Creating new user
groups» Deleting authorizations» Deleting toolboxes» Editing users and user
groups» Authorization reports» Toolbox reports
Deleting users and usergroups
» System groups (CLI)» User and user group
reports» Related information
» Directory Services» Global credentials» System credentials» Security» Trusted certificates» Viewing the audit log» Configuring the audit log» Monitoring systems and
events
» Command line interface
If an HP SIM user account or user group is deleted from the operating system, or disabledor locked out, and the user is already signed in to HP SIM, the signed-in user is notaffected. Therefore, to remove a signed in user from HP SIM, the user account must bedeleted from within HP SIM. Deleting the user account from HP SIM forces the user to signout if he or she is already signed in to HP SIM.
When deleting a user group, all members of the group lose membership in that group,which causes those users' authorizations, configuration rights, and login IP addressrestrictions to be updated based on their new group memberships. Users that are no longermembers of any user group are deleted from HP SIM.
CAUTION:Deleting a user or user group prevents the user or group from signing-in andremoves all associated authorizations and tasks that are owned by that user oruser group.
NOTE:You cannot remove the last user account with administrative rights.
Procedure 1 Deleting user accounts or user groups
1. Select the users or groups to be deleted.
2. Click [Delete ]. A confirmation box appears.
3. to delete the selected users or user groups, click [OK], or to cancel the deletionprocess and return to the Users section, click [Cancel ]. Deleting a user group alsodeletes all members of the group, and a second confirmation box appears, listingwhich users will be deleted. To continue and delete all listed users, click [OK], or tocancel the deletion process and return to the Users section, click [Cancel ].
The users, user groups, associated authorizations, and tasks are permanentlydeleted.
Command line interface
Users with administrative rights can use the mxuser command to modify users and usergroups from the CLI. To modify the contents of the toolbox, refer to the mxuser command.
NOTE:Users must have the User can configure CMS security access such ascreating, modifying or removing other users option selected when theiraccount is set up for them to be able to use the mxuser command.
See the HP Systems Insight Manager Command Line User Guide for information aboutaccessing the manpage.
Systems Insight Manager - Related information
HP Systems Insight Manager 7.1 English
Operations | Users and authorizations | System groups (CLI)
» Discovery in HP SIM» Discovery filters» Managing Hosts file» Identification» Managing system types» Users and authorizations
» Creating newauthorizations
» Creating new toolboxes» Creating new users» Updating authorizations» Editing toolboxes» Creating new user
groups» Deleting authorizations» Deleting toolboxes» Editing users and user
groups» Authorization reports» Toolbox reports» Deleting users and user
groupsSystem groups (CLI)
» User and user groupreports
» Related information» Directory Services» Global credentials» System credentials» Security» Trusted certificates» Viewing the audit log» Configuring the audit log» Monitoring systems and
events
» Managing system groups from the GUI» Managing system groups from the CLI using mxngroup
A system group is a group of systems used solely for authorizations. System groups can bemanaged directly from the CLI using the mxngroup command, or they can be managedindirectly through the GUI.
Managing system groups from the GUI
A system group is created when an authorization is created using a system collection. Thissystem group is named after the collection with three digits appended, usually 001 (forexample, All Racks 001). The system group contains the systems that were displayedduring system selection and is saved when the authorization is created.
NOTE:Any additional changes to the system collection do not affect the system group orauthorizations unless updated by one of the following options.
The content of the system group is updated with the current contents of the collection when:
Another authorization is created using the collection
An authorization using the system group is updated
Using mxngroup from the CLI
In the first two cases, the current contents of the collection appear for verification.
When deleting authorizations, a system group no longer used in any authorization isdeleted.
Managing system groups from the CLI using mxngroup
System groups can be created directly using the mxngroup command. When systemgroups are created using the CLI, a top-level collection is created and named after thesystem collection with three digits appended, usually 001. The collection contains thesystems in the system group only when the system group is first added. Later modificationsare not reflected in the collection.
NOTE:Any additional changes to the system group or collection do not affect the other,unless updated by one of the following options or by using the GUI as previouslydescribed. This means that changes to the collection do not affect authorizations,and changes to the system group do not affect the collection view unlessspecifically updated.
The content of the system group can be updated with the current contents of the collectionwhen:
Another authorization is created using the collection.
An authorization using the system group is updated.
Using mxngroup from the CLI by entering:mxngroup –m –g <groupname> -u
» Quick Launch menu» Performing a basic search» Performing an advanced
search for systems» Performing an advanced
search for clusters» Performing an advanced
search for events» Tool search» Related information for
searches» Configuring events» Protocol settings» Software status polling» Hardware status polling» Data collection» System Properties» Configuring WBEM health
inclusion status» Specifying a Version
Control Repository» Configuring
software/firmware globalsettings
» Reporting» Managing with tasks» Using Cluster Monitor» Command line tools» Configuring managed
systems from a WindowsCMS
» Configuring managedsystems from a LinuxCMS
» Configuring managedsystems from an HP-UXCMS
» Custom tools» Setting disk thresholds» Creating a task to delete
disk thresholds» License manager» Management processor
tools» Managing
Communications» Managing MIBs» Installing OpenSSH» Replicate Agent Settings» RPM Package Manager» HP Server Migration Pack
- Universal Edition» HP System Management
Homepage» Version Control» Device ping
» Reference» Support and other
resources» Assistance
» Glossary» Using Help
CAUTION:This command does not display the systems in the collection. To display theupdated contents of the system group, use mxngroup –lm –g <groupname> .
CAUTION:Setting up a periodic task to dynamically update a system group is notrecommended. A collection based on system attributes can be compromised,adversely affecting authorizations in HP SIM if those attributes are based on anonsecure protocol (such as SNMP) or are maintained by a user with user rights.Additionally, the collection itself can be modified by a user with user rights, whichalso adversely affects authorizations.
When deleting authorizations, a system group no longer used in any authorizations isdeleted.
» Discovery in HP SIM» Discovery filters» Managing Hosts file» Identification» Managing system types» Users and authorizations
» Creating newauthorizations
» Creating new toolboxes» Creating new users» Updating authorizations» Editing toolboxes» Creating new user
groups» Deleting authorizations» Deleting toolboxes» Editing users and user
groups» Authorization reports» Toolbox reports» Deleting users and user
groups» System groups (CLI)
User and user groupreports
» Related information» Directory Services» Global credentials» System credentials» Security» Trusted certificates» Viewing the audit log» Configuring the audit log» Monitoring systems and
events
» Command line interface
For detailed information about users and user groups, you can generate and print a report.
NOTE:To sort information in ascending or descending order, click the appropriatecolumn heading. The column heading that includes the arrow is the column bywhich the report is sorted. If the arrow is pointing up, the report is sorted inascending order. If the arrow is pointing down, the report is sorted in descendingorder.
The following summary of user information appears in the Users Report window, along withthe date and time of the report:
User/User Group
Configure CMS Security
Pager Configured
IP Sign-In Restrictions
Full Name
Procedure 1 Generating and printing a user account or user group report
To print the report, select File Print .
The user report is printed.
Command line interface
Users with administrative rights can use the mxuser command to create user and usergroup reports from the CLI. To modify the contents of the toolbox, refer to the mxusercommand.
NOTE:Users must have the User can configure CMS security access such ascreating, modifying or removing other users option selected when theiraccount is set up for them to be able to use the mxngroup and mxauthcommands.
See the HP Systems Insight Manager Command Line User Guide for information aboutaccessing the manpage.
Systems Insight Manager - Related information
HP Systems Insight Manager 7.1 English
Operations | Users and authorizations | Related information
» Discovery in HP SIM» Discovery filters» Managing Hosts file» Identification» Managing system types» Users and authorizations
» Creating newauthorizations
» Creating new toolboxes» Creating new users» Updating authorizations» Editing toolboxes» Creating new user
groups» Deleting authorizations» Deleting toolboxes» Editing users and user
groups» Authorization reports» Toolbox reports» Deleting users and user
groups» System groups (CLI)» User and user group
reportsRelated information
» Directory Services» Global credentials» System credentials» Security» Trusted certificates» Viewing the audit log» Configuring the audit log» Monitoring systems and
events
Related procedures
» Systems Insight Manager - Creating new users» Systems Insight Manager - Creating new user groups» Systems Insight Manager - Creating new toolboxes» Systems Insight Manager - Creating new authorizations» Systems Insight Manager - Editing users and user groups» Systems Insight Manager - Editing toolboxes» Systems Insight Manager - Deleting users and user groups» Systems Insight Manager - Deleting toolboxes» Systems Insight Manager - Deleting authorizations» Systems Insight Manager - User and user group reports» Systems Insight Manager - Toolbox reports» Systems Insight Manager - Authorization reports» Systems Insight Manager - Updating authorizations» Systems Insight Manager - System groups (CLI)
» Discovery in HP SIM» Discovery filters» Managing Hosts file» Identification» Managing system types» Users and authorizations
Directory Services» Configuring directory
servers» Configuring directory
groups» Related information
» Global credentials» System credentials» Security» Trusted certificates» Viewing the audit log» Configuring the audit log» Monitoring systems and
events» Quick Launch menu» Performing a basic search» Performing an advanced
search for systems» Performing an advanced
search for clusters» Performing an advanced
search for events» Tool search» Related information for
searches» Configuring events» Protocol settings» Software status polling» Hardware status polling
The Directory Groups tool is used to determine a system's membership in a Windowsdomain, organizational unit (OU), or group. Before using the Directory Groups tool, youmust first configure the directory server parameters on the Directory Server Configurationpage. After you configure the directory server, the Directory Groups tool must be configuredwith the distinguished name (DN) of the desired container objects in the directory.
Table 1 Directory Services
Name Description Access
Directory ServerConfiguration
See SystemsInsight Manager -Configuringdirectory servers.
Used to configure directory server settings,including the network name, port, andcredentials to access the directory server.
» Discovery in HP SIM» Discovery filters» Managing Hosts file» Identification» Managing system types» Users and authorizations» Directory Services
Configuring directoryservers
» Configuring directorygroups
» Related information» Global credentials» System credentials» Security» Trusted certificates» Viewing the audit log» Configuring the audit log» Monitoring systems and
events» Quick Launch menu» Performing a basic search» Performing an advanced
search for systems» Performing an advanced
search for clusters» Performing an advanced
search for events» Tool search» Related information for
searches» Configuring events» Protocol settings» Software status polling» Hardware status polling
Procedure 1 Conriguring the Directory Service
1. Required: Enter the network name or IP address of the directory server in theServer Name field. Multiple systems can be specified by separating each systemwith a semicolon (;). This action enables a backup to be specified if a systemcannot be contacted. For example, if the first system cannot be contacted, thesecond system in the list is tried.
2. Select either Use SSL or Use Global Catalog for the Port Configuration setting.
The port configuration flag is preset to use SSL and to specify the defaultLightweight Directory Access Protocol (LDAP) SSL port of 636 in the Port field. Theglobal catalog flag is cleared by default. Selecting and clearing the SSL or globalcatalog flags changes the port number to the default values.
The global catalog communicates through LDAP, but it does so over a different setof ports: 3368 and 3269 for SSL. The global catalog contains a read-only copy ofall objects in the Active Directory, spanning multiple domains, but only a smallsubset of object attributes. Configuring a global catalog here can provide a simplesolution for multidomain sites. You can configure the directory attributes replicatedto the global catalog, but the desired attributes are enabled by default.
NOTE:HP recommends selecting Use SSL so that user name and passwordcredentials are encrypted. If this option is cleared, the directory servercertificate is treated as a trusted system certificate and can be importedusing the existing HP SIM GUI or command line interface (CLI).
3. Required: Enter the port number of the directory server.
The port number is preset to use SSL in the Port Configuration field and to specifythe default LDAP SSL port of 636 in the Port field.
4. In the User Name field, enter the user name to authenticate to the directory server.Write access for this account is not required. An empty field indicates that ananonymous connection should be used. Any password entered is ignored.
5. In the Password field, enter the password for the user name specified.
6. In the Password Verify field, reenter the password for the user name specified.
7. Click Test connection to verify the connection is successful using current settings.
8. Click [OK] to save the current settings.
After configuring the directory server parameters, you must configure the containers andgroups that contain the computer objects of interest. See Systems Insight Manager -Configuring directory servers for information about configuring directory group parameters.
Systems Insight Manager - Related information
HP Systems Insight Manager 7.1 English
Operations | Directory Services | Configuring directory groups
» Related information» Global credentials» System credentials» Security» Trusted certificates» Viewing the audit log» Configuring the audit log» Monitoring systems and
events» Quick Launch menu» Performing a basic search» Performing an advanced
search for systems» Performing an advanced
search for clusters» Performing an advanced
search for events» Tool search» Related information for
searches» Configuring events» Protocol settings» Software status polling» Hardware status polling
After configuring the directory server parameters, you must configure the containers andgroups that contain the computer objects of interest.
Procedure 1 Configuring directory groups
1. Enter the Distinguished Name (DN) for the Group 1.
2. Optional: If you want to search subtrees, select Search. This applies only tocontainer and OU objects, not directory group objects, and only to those OU objectsthat are more than one level deep. If this option is selected, HP SIM searches theentire depth of the specified branch. A match is based on the full DNS name of thesystem. If HP SIM does not have the full DNS name of a system, a match isconsidered successful if the short system name matches (using the CN attribute ofthe object) and no other partial match occurs. Systems having only an IP addressavailable as the system name will fail unless the IP address is the name in thedirectory object.
3. Optional: To add additional groups, click [Add]. Repeat steps 4 through 6 for eachgroup.
4. Optional: To delete a group, click [Delete ] next to the group to be deleted.
5. Click [Run Now].
Systems Insight Manager - Related information
HP Systems Insight Manager 7.1 English
Operations | Directory Services | Related information
» Discovery in HP SIM» Discovery filters» Managing Hosts file» Identification» Managing system types» Users and authorizations» Directory Services
Global credentials» System credentials» Security» Trusted certificates» Viewing the audit log» Configuring the audit log» Monitoring systems and
events» Quick Launch menu» Performing a basic search» Performing an advanced
search for systems» Performing an advanced
search for clusters» Performing an advanced
search for events» Tool search» Related information for
searches» Configuring events» Protocol settings» Software status polling» Hardware status polling» Data collection» System Properties» Configuring WBEM health
inclusion status» Specifying a Version
» Related topics
Global credentials can apply to all systems and enable you to configure default,environment-wide credentials. Sign-in credentials apply to multiple protocols and enable HPSIM to access the managed system. SNMP credentials enable you to set global level readcommunity strings.
During the identification process (done automatically during discovery), credentials are tried,starting with System Credentials. If they do not work, and the Try Others setting is chosenfor them, then Discovery credentials are used. Similarly, if those do not work and the TryOthers setting is chosen, then Global Credentials are tried. As soon as a credential is foundthat works, HP SIM notes that credential as working and continues to use it for regularcommunications with the managed system as long as it continues to work. If it should fail,then the process is repeated the next time identification is run. To see the workingcredentials for any managed system, go to the System Credentials page (OptionsSecurity Credentials System Credentials). These working credentials appear in theCredentials that are in use table.
Procedure 1 Configuring global sign-in credentials
1. In the Sign-in Credentials section, enter the user name and password pairs.
Enter as many default user names and passwords as needed by clicking [Add]. Todelete user name and password pairs, click [Delete ] beside the pair you want todelete.
NOTE:HP SIM tries each set of credentials until it finds a set that works, whichcan cause server sign-in failures and possibly trigger a security eventbased on your local security policy. For example, three failed sign inattempts can trigger an account lock-out.
2. In the SNMP Credentials section, enter the default read community strings. Click[Add] to add additional strings or click [Delete ] to delete existing strings.
3. Click [OK] to save changes.
Procedure 2 Deleting global credentials
1. Click [Delete ] beside the credential that you want to delete.
2. When a global credential is found to work for a system, a working credential iscreated for the system that references the global credential. If you selected to deletea global credential, select how you want to delete any working references to theglobal credentials.
Delete the global credentials and any working references to them. Thisprevents HP SIM from using the credential to communicate with the system.
Copy the credentials to all systems referencing them, and then delete theglobal credentials. This creates a copy of the global credentials as systemcredentials for any systems with a working reference to the globalcredentials, enabling HP SIM to continue to use the credentials tocommunicate with the system.
Related topics
» HP Insight Manager 7.0 Online Help - System credentials» Systems Insight Manager - Configuring credentials for discovery tasks
Control Repository» Configuring
software/firmware globalsettings
» Reporting» Managing with tasks» Using Cluster Monitor» Command line tools» Configuring managed
systems from a WindowsCMS
» Configuring managedsystems from a LinuxCMS
» Configuring managedsystems from an HP-UXCMS
» Custom tools» Setting disk thresholds» Creating a task to delete
disk thresholds» License manager» Management processor
tools» Managing
Communications» Managing MIBs» Installing OpenSSH» Replicate Agent Settings» RPM Package Manager» HP Server Migration Pack
- Universal Edition» HP System Management
Homepage» Version Control» Device ping
» Reference» Support and other
resources» Assistance
» Glossary» Using Help
» Systems Insight Manager - Credentials used in HP SIM
» Discovery in HP SIM» Discovery filters» Managing Hosts file» Identification» Managing system types» Users and authorizations» Directory Services» Global credentials
System credentials» Sign-in credentials» Single sign on
credentials» SNMP credentials» SSH credentials» WBEM credentials» WS-Man credentials» VME credentials» Related information
» Security» Trusted certificates» Viewing the audit log» Configuring the audit log» Monitoring systems and
events» Quick Launch menu» Performing a basic search» Performing an advanced
search for systems» Performing an advanced
search for clusters» Performing an advanced
search for events» Tool search» Related information for
searches
» Columns in the "Credentials that are in use" table» Viewing, editing, and deleting system credentials» Related topics
The System Credentials page is launched as a tool and accesses the task wizard forsystem selection. If you are not authorized to configure system credentials on the selectedsystems, you cannot run the tool.
System Credentials is included in the Quick Launch menu by default. To customize theQuick Launch menu, click Customize in the Quick Launch menu.
During the identification process (done automatically during discovery), credentials are tried,starting with System Credentials. If they do not work, and the Try Others setting is chosenfor them, then Discovery credentials are used. Similarly, if those do not work and the TryOthers setting is chosen, then Global Credentials are tried. As soon as a credential is foundthat works, HP SIM notes that credential as working and continues to use it for regularcommunications with the managed system as long as it continues to work. If it should fail,then the process is repeated the next time identification is run. To see the workingcredentials for any managed system, go to the System Credentials page (OptionsSecurity Credentials System Credentials). These working credentials appear in theCredentials that are in use table.
Credentials are applied in the following order:
1. Working (might reference system, discovery, or global credentials)
2. System level protocol specific
3. System level Sign-in
4. Discovery level protocol specific
5. Discovery level protocol Sign-in
6. Global Sign-in
Columns in the "Credentials that are in use" table
System Name Might be listed more than once if HP SIM is using more than oneaccess type for the system.
Access Type The way HP SIM is using the credential to access the managedsystem. If Access Type equals None, then HP SIM has no working credential andcannot access the system. If a specific protocol is listed, then HP SIM has aworking credential for that protocol. If Access Type equals Sign-in is listed, thenHP SIM is using the Sign-in credential (for example, the user name and passwordpair) to access the system, possibly for multiple protocols.
Credential The user name of the user name and password pair that is the workingcredential or, Certificate if the HP SIM authenticates itself to the system using aWBEM or WMI certificate. If more than one user name is the same in Global orDiscovery credentials, a number is appended to the displayed user name in thetable that indicates which it is in the series. This number is used to distinguish thecredentials for display purposes only.
Source Where the credential was configured. System credentials are configuredon the system level. Global credentials are configured at the global level. Discoverycredentials are configured at the discovery task level and the name of the task isincluded. For example, Discovery: System Automatic Discovery. Certificates listSystems Insight Manager as the source.
» Configuring events» Protocol settings» Software status polling» Hardware status polling» Data collection» System Properties» Configuring WBEM health
inclusion status» Specifying a Version
Control Repository» Configuring
software/firmware globalsettings
» Reporting» Managing with tasks» Using Cluster Monitor» Command line tools» Configuring managed
systems from a WindowsCMS
» Configuring managedsystems from a LinuxCMS
» Configuring managedsystems from an HP-UXCMS
» Custom tools» Setting disk thresholds» Creating a task to delete
disk thresholds» License manager» Management processor
tools» Managing
Communications» Managing MIBs» Installing OpenSSH» Replicate Agent Settings» RPM Package Manager» HP Server Migration Pack
- Universal Edition» HP System Management
Homepage» Version Control» Device ping
» Reference» Support and other
resources» Assistance
» Glossary» Using Help
Viewing, editing, and deleting system credentials
Procedure 1 Viewing all potential system credentials for a system
For each system that was selected in the system credentials table, this table displays allcredentials that can be tried during identification.
To view the credentials, select systems and click [View all credentials].
If there are multiple credentials for a system, the credentials are listed in the orderthat they will be tried. Also note that the rightmost column indicates if the system isconfigured to try additional credentials if the configured credential fails. If it is not,then it is possible that a correct credential might not be tried.
Procedure 2 Editing system credentials either individually or as a group
1. The following tabs are available on the Edit System Credentials page:
Sign in This tab enables you to set one credential for all protocols.
SNMP This tab enables you to set one SNMP community string.
For advanced, and protocol-specific settings, click Show advancedprotocol credentials to the right of the tabs. The following additional tabsappear.
WBEM/WMI This tab enables you to set WBEM credentials.
WS-MAN This tab enables you to set WS-MAN credentials.
SSH This tab enables you to configure SSH credentials.
Single Sign On This tab enables you to set the trust by certificaterelationship.
VME This tab enables you to set VME credentials that were configured onthe VMWare vCenter Server Web Services page during VMWare vCenterServer installation. This is not available when creating a discovery task untilafter the VMWare vCenter servers are discovered.
2. On each tab, you can either set credentials for all the selected systems, or setcredentials for protocols individually for each system by selecting the appropriateradio control. A maximum of 10 systems can be edited individually at one time.
3. For each setting on the Sign-in, SNMP, WBEM / WMI, WS-MAN, and VME tabs,there is a checkbox that when checked indicates to HP SIM that if these credentialsshould fail for some reason, then others should be tried in accordance with thenumbered list above. For example, if the Sign-in credential entered here wasinvalid, and the checkbox was checked, then the discovery level credentials (if any)would be then tried. This control gives you flexibility where your credentials arespecified, but also carries a risk in performance and might trigger a security event ifmany credentials are tried to find one that works.
4. For some settings on the WBEM / WMI, SSH, and Single Sign-On tabs, HP SIMneeds one-time administrator or root access to the managed system to make theconfiguration update. In these situations an extra section appears underneath thetabbed box labeled Additional credentials required to save the configurationsfor WBEM, SSH and/or Single Sign-On: If the Sign-in credentials you havealready entered have administrator or root capabilities, you need take no additionalaction. But if they do not, then you must enter a special credential that has thenecessary access capabilities. This credential must be the same for all the affectedsystems.
5. When you click [OK], data from all the tabs is collected and identification is run sothat the new credentials can take effect. Depending on the number of systems, thiscan take several minutes. The progress of this task can be monitored at Tasks &Logs View Task Results. When the task is complete, the System Credentialspage can be refreshed and the new working credentials should appear in the table.
Procedure 3 Deleting system credentials
1. The following tabs are available on the Edit System Credentials page:
Sign in This tab enables you to set one credential for all protocols.
SNMP This tab enables you to set one SNMP community string.
For advanced, and protocol-specific settings, click Show advancedprotocol credentials to the right of the tabs. The following additional tabsappear.
WBEM/WMI This tab enables you to set WBEM credentials.
WS-MAN This tab enables you to set WS-MAN credentials.
SSH This tab enables you to configure SSH credentials.
Single Sign On This tab enables you to set the trust by certificaterelationship.
VME This tab enables you to set VME credentials that were configured onthe VMWare vCenter Server Web Services page during VMWare vCenterServer installation. This is not available when creating a discovery task untilafter the VMWare vCenter servers are discovered.
2. Make all of the credential information for the system blank. For multiple systems,you must make all of the credentials for each system blank.
3. To delete cleared credentials, click [OK].
Related topics
» Systems Insight Manager - Global credentials» Systems Insight Manager - Configuring credentials for discovery tasks» Systems Insight Manager - Credentials used in HP SIM
» Discovery in HP SIM» Discovery filters» Managing Hosts file» Identification» Managing system types» Users and authorizations» Directory Services» Global credentials» System credentials
Sign-in credentials» Single sign on
credentials» SNMP credentials» SSH credentials» WBEM credentials» WS-Man credentials» VME credentials» Related information
» Security» Trusted certificates» Viewing the audit log» Configuring the audit log» Monitoring systems and
events» Quick Launch menu» Performing a basic search» Performing an advanced
search for systems» Performing an advanced
search for clusters» Performing an advanced
search for events» Tool search» Related information for
searches
Sign-in credentials are protocol independent. For performance reasons, a maximum of 10systems can be edited individually at one time.
Procedure 1 Configuring sign-in credentials for specific systems
1. Choose one of the following options:
Replace each selected system sign-in credentials with thefollowing Use this option to replace sign-in credentials for selectedsystems.
a. Enter the user name and password.
b. To use other credentials if the assigned credentials fail, select Ifthese credentials fail, try other credentials that may apply.Click the Learn more link for additional information. By default thisbox is not selected, unless you have upgraded HP SIM.
Replace the selected system's sign-in credentials individually asfollows Use this option to add new credentials, or to modify or deleteexisting credentials individually for selected systems. This option is notavailable when a single system is selected.
a. Enter the user name and password for the individual systems.
b. To use other credentials if the assigned credentials fail, check Tryothers. On new installations, this is not selected by default.However, for upgrades, the box is selected for migrated systems.This option appears for each password entered.
2. To save changes and start identification in the background, click [OK]. To cancelchanges, click [Cancel ].
Systems Insight Manager - Related information
HP Systems Insight Manager 7.1 English
Operations | System credentials | Single sign on credentials
» Discovery in HP SIM» Discovery filters» Managing Hosts file» Identification» Managing system types» Users and authorizations» Directory Services» Global credentials» System credentials
» Sign-in credentialsSingle sign oncredentials
» SNMP credentials» SSH credentials» WBEM credentials» WS-Man credentials» VME credentials» Related information
» Security» Trusted certificates» Viewing the audit log» Configuring the audit log» Monitoring systems and
events» Quick Launch menu» Performing a basic search» Performing an advanced
search for systems» Performing an advanced
search for clusters» Performing an advanced
search for events» Tool search» Related information for
searches
The Single Sign On tab enables you to set the trust by certificate relationship to connect tothe HP SMH, Onboard Administrator, iLO management processor, and HP Version ControlAgent using the HP SIM certificate for authentication.
Procedure 1 Configuring Single Sign On credentials
1. Click Show advanced protocol credentials.
2. Select the Single Sign On tab.
3. Configure Single Sign-On for each selected system as follows
Select Set Trust relationships to "Trust by Certificate" . Requiresadditional credentials so that Configure or Repair Agents can be run on thetarget systems.
Select Trust by Certificate for desired systems. Requires additionalcredentials so that Configure or Repair Agents can be run on the targetsystems
4. (Optional) If you selected any system for Trust by Certificate, the Additionalcredentials required to save the configurations for WBEM, SSH, and/or Singlesign-On section appears. Select from:
a. Use sign-in credentials entered in HP SIM. These credentials must befor an account with administrator or root access on the selectedsystem.
b. Use the following credentials for all systems. Enter the user name,password,, and domain credentials to use for all selected systems.
These Configure or Repair Agents credentials apply to the WBEM, SSH,and Single Sign On protocols. You must enter them only once and they arepre-populated on each tab.
5. To save changes and start the Configure or Repair Agents task (followed byidentification) in the background, click [OK>]. To cancel changes, click [Cancel ]
Systems Insight Manager - Related information
HP Systems Insight Manager 7.1 English
Operations | System credentials | SNMP credentials
» Discovery in HP SIM» Discovery filters» Managing Hosts file» Identification» Managing system types» Users and authorizations» Directory Services» Global credentials» System credentials
» Sign-in credentials» Single sign on
credentialsSNMP credentials
» SSH credentials» WBEM credentials» WS-Man credentials» VME credentials» Related information
» Security» Trusted certificates» Viewing the audit log» Configuring the audit log» Monitoring systems and
events» Quick Launch menu» Performing a basic search» Performing an advanced
search for systems» Performing an advanced
search for clusters» Performing an advanced
search for events» Tool search» Related information for
searches
One set of SNMP community strings can be applied to the set of selected systems or eachsystem can set its own community string.
Procedure 1 Configuring SNMP community strings for a specific systems
1. To set SNMP community strings, click the SNMP tab. The Set SNMP CommunityStrings page appears.
2. Select from:
Replace each selected system's SNMP community string with thefollowing Use this option to replace sign-in credentials for selectedsystems.
a. Enter the Read community string.
b. To use other credentials if the assigned credentials fail, select Ifthese credentials fail, try other credentials that may apply.Click the Learn more link for additional information. By default thisbox is not selected, unless you have upgraded Systems InsightManager.
Replace the selected system's SNMP community string) individuallyas follows Use this option to specify sign-in credentials individually forselected systems.
a. Enter the Read community string for the individual systems.
b. To use other credentials if the assigned credentials fail, check Tryothers.
To delete SNMP credentials, you must leave the read community string blank.
3. To enable the write community string, select Enable write and enter the Writecommunity string. This is disabled by default.
This option is not available from the New Discovery Task page.
4. To save changes and start identification in the background, click [OK]. To cancelchanges, click [Cancel ].
» Discovery in HP SIM» Discovery filters» Managing Hosts file» Identification» Managing system types» Users and authorizations» Directory Services» Global credentials» System credentials
» Sign-in credentials» Single sign on
credentials» SNMP credentials
SSH credentials» WBEM credentials» WS-Man credentials» VME credentials» Related information
» Security» Trusted certificates» Viewing the audit log» Configuring the audit log» Monitoring systems and
events» Quick Launch menu» Performing a basic search» Performing an advanced
search for systems» Performing an advanced
search for clusters» Performing an advanced
search for events» Tool search» Related information for
searches
The SSH tab enables you to configure SSH access. It is required that Configure or RepairAgents run after a credential is configured using host-based or user-based authentication.Host-based authentication refers to the SSH key of the host that is trusted by the targetsystem. User-based authentication refers to the SSH key of the user that is trusted by thetarget system. In the list of individual systems, if either the host-based or user-basedauthentication is selected, the user name and password boxes are disabled. By default thespecified user option appears first.
Select Configure SSH for each selected system as follows, and thenselect from:
a. Host-based key authentication Requires additional credentialsso that Configure or Repair Agents can be run on the targetsystems.
b. User-based key authentication Requires additional credentialsso that Configure or Repair Agents can be run on the systems.
Configures the managed systems to allow access to the specificuser whose credentials are provided.
c. Password authentication Enter the user name and password toconnect to managed systems.
Select Configure SSH for the selected systems individually as followsto configure each selected systems individually.
a. Host-based Requires additional credentials so that Configure orRepair Agents can be run on the target systems.
b. User-based Requires additional credentials so that Configure orRepair Agents can be run on the target systems. Configures themanaged systems to allow access to the specific users whosecredentials are provided.
c. Password Enter the user name and password.
4. (Optional) If you selected Configure Secure Shell (SSH) access authenticationUser-based or Host-based key authentication, the Additional credentials requiredto save the configurations for WBEM, SSH, and/or Single Sign-On sectionappears. Select from:
a. Use sign-in credentials entered in Systems Insight Manager. Thesecredentials must be for an account with administrator or root accesson the selected system
b. Use the following credentials for all systems Enter the user name,password, and domain credentials to use for all selected systems.
These Configure or Repair Agents credentials apply to the WBEM, SSH,and Single Sign On protocols. You need to enter them only once and theypre-populate on each tab.
5. To save changes and start identification in the background, click [OK]. To cancelchanges, click [Cancel ].
» Configuring events» Protocol settings» Software status polling» Hardware status polling» Data collection» System Properties» Configuring WBEM health
inclusion status» Specifying a Version
Control Repository» Configuring
software/firmware globalsettings
» Reporting» Managing with tasks» Using Cluster Monitor» Command line tools» Configuring managed
systems from a WindowsCMS
» Configuring managedsystems from a LinuxCMS
» Configuring managedsystems from an HP-UXCMS
» Custom tools» Setting disk thresholds» Creating a task to delete
disk thresholds» License manager» Management processor
tools» Managing
Communications» Managing MIBs» Installing OpenSSH» Replicate Agent Settings» RPM Package Manager» HP Server Migration Pack
» Discovery in HP SIM» Discovery filters» Managing Hosts file» Identification» Managing system types» Users and authorizations» Directory Services» Global credentials» System credentials
» Sign-in credentials» Single sign on
credentials» SNMP credentials» SSH credentials
WBEM credentials» WS-Man credentials» VME credentials» Related information
» Security» Trusted certificates» Viewing the audit log» Configuring the audit log» Monitoring systems and
events» Quick Launch menu» Performing a basic search» Performing an advanced
search for systems» Performing an advanced
search for clusters» Performing an advanced
search for events» Tool search» Related information for
searches
One WBEM system credential or certificate can be applied to the set of selected systems oreach one can be set individually.
Procedure 1 Configuring WBEM credentials
1. Click Show advanced protocol credentials.
2. To set WBEM system credentials, select the WBEM/WMI tab.
3. Select from the following:
Replace each selected system's WBEM / WMI credentials with thefollowing Use this option to replace WBEM and WMI credentials forselected systems.
a. Enter the user name and password.
b. To add additional port number, user name, and password sets,click [Add]. To delete port number, user name, and password sets,click [Delete ] beside the set you want to delete.
HP SIM verifies that the port numbers entered are unique and validport numbers. By default, the port number is blank. Port numbersare not available on the discovery task pages.
c. To use other credentials if the assigned credentials fail, select Ifthese credentials fail, try other credentials that may apply.Click the Learn more link for additional information. By default thisbox is not selected, unless you have upgraded Systems InsightManager.
d. (Optional) To push the HP SIM certificate to HP-UX managedsystems, select Push HP SIM certificate to managed system. Ifthis option is selected, Configure or Repair Agents must run to pushthe certificate to the managed system. When this option is selected,the Additional credentials required to save the configurationsfor WBEM, SSH, and/or Single Sign-On section is displayed.Select from:
i. Use sign-in credentials entered in HP SIM. Thesecredentials must be for an account with administratoror root access on the selected system
ii. Use the following credentials for all systems Enter theuser name, password, and domain credentials to use for allselected systems.
These Configure or Repair Agents credentials apply to theWBEM, SSH, and Single Sign On protocols. You need toenter them only once and they pre-populate on each tab.
Replace the selected system's WBEM/WMI credentials individually asfollowing Use this option to view and configure the list of systemsindividually.
a. Enter the port number, user name, and password. Port numbersmust be unique.
To add additional port number, user name, and password sets,click [Add]. To delete port number, user name, and password sets,click [Delete ] by the set you want to delete.
b. (Optional) To try additional port number, user name, and passwordsets, select Try Others.
» Configuring events» Protocol settings» Software status polling» Hardware status polling» Data collection» System Properties» Configuring WBEM health
inclusion status» Specifying a Version
Control Repository» Configuring
software/firmware globalsettings
» Reporting» Managing with tasks» Using Cluster Monitor» Command line tools» Configuring managed
systems from a WindowsCMS
» Configuring managedsystems from a LinuxCMS
» Configuring managedsystems from an HP-UXCMS
» Custom tools» Setting disk thresholds» Creating a task to delete
disk thresholds» License manager» Management processor
tools» Managing
Communications» Managing MIBs» Installing OpenSSH» Replicate Agent Settings» RPM Package Manager» HP Server Migration Pack
- Universal Edition» HP System Management
Homepage» Version Control» Device ping
» Reference» Support and other
resources» Assistance
» Glossary» Using Help
4. To save changes and start identification in the background, click [OK]. To cancelchanges, click [Cancel ].
» Discovery in HP SIM» Discovery filters» Managing Hosts file» Identification» Managing system types» Users and authorizations» Directory Services» Global credentials» System credentials
WS-Man credentials» VME credentials» Related information
» Security» Trusted certificates» Viewing the audit log» Configuring the audit log» Monitoring systems and
events» Quick Launch menu» Performing a basic search» Performing an advanced
search for systems» Performing an advanced
search for clusters» Performing an advanced
search for events» Tool search» Related information for
searches
Procedure 1 Configuring WS-MAN credentials
1. Click Show advanced protocol credentials.
2. To set WS-MAN credentials, select WS-MAN .
3. Select from:
Replace each system's WS-MAN credentials with the following Usethis option to set the user name and password pair for the WS-MANcredentials.
a. Enter the user name and password.
b. To use other credentials if the assigned credentials fail, select Ifthese credentials fail, try other credentials that may apply.Click the Learn more link for additional information. By default thisbox is not selected, unless you have upgraded Systems InsightManager.
Replace WS-MAN credentials individually as follows Use this option tospecify sign-in credentials individually for selected systems.
a. Enter the user name and password for the individual systems.
b. To use other credentials if the assigned credentials fail, check Tryothers. On new installations, this is not selected by default.However, for upgrades, the box is selected for migrated systems.This option appears for each password entered.
4. To save changes and start identification in the background, click [OK]. To cancelchanges, click [Cancel ].
» Discovery in HP SIM» Discovery filters» Managing Hosts file» Identification» Managing system types» Users and authorizations» Directory Services» Global credentials» System credentials
» Security» Trusted certificates» Viewing the audit log» Configuring the audit log» Monitoring systems and
events» Quick Launch menu» Performing a basic search» Performing an advanced
search for systems» Performing an advanced
search for clusters» Performing an advanced
search for events» Tool search» Related information for
searches
This credential is protocol dependent and is used to manage various VME protocols(vCenter and SCVMM) present in the virtual management environment. This tab is used toenter credentials that were configured on the VME server web service page during VMEserver installation. When you access the VME System Credentials page, the VMEprotocols supported by the CMS are listed.
There are several ways of accessing the VME System Credentials page:
Select Options Security Credentials System Credentials, then click theVME tab.
Select Options VME Options Add or Edit VME Credentials. The Add or EditVME Credentials page appears.
Click the Quick Launch link, and then select Add or Edit VME Credentials. TheAdd or Edit VME Credentials page appears.
From the System Page, click the Tools & Links tab. Then, click the Add or EditVME Credentials link under the HP Systems Insight Manager Pages heading.
Procedure 1 Configuring VME credentials
1. Click Show advanced protocol credentials.
2. To set VME system credentials, select the VME tab.
3. Enter the following:
Protocol
Select the protocol from the dropdown list. The protocols listed are thosebeing managed under VME credentials. The list is based on the protocolsthat were registered by partner applications. HP SIM can also register VMEprotocol types to be managed.
Port #
User name
Password
Confirm Password
4. (Optional) To add additional VME credentials, click Add, and then repeat step 3above.
5. (Optional) To enter VME credentials for multiple systems, select Replace theselected system's VME credentials with the following. From here, you can entercredentials for each system individually.
6. To save changes and start identification in the background, click [OK]. To cancelchanges, click [Cancel ].
After you click [OK], the credentials are validated against the virtual environment. Ifthey are found to be valid, a message is displayed stating the credentials are saved.After credentials are validated, with no errors, they will be stored in the HP SIMdatabase. If credentials fail, an error message is displayed. Click the link to displaythe cause of the issue.
NOTE:When supplying credentials, you must follow the format below:
Domain account: DOMAIN\administrator
» Configuring events» Protocol settings» Software status polling» Hardware status polling» Data collection» System Properties» Configuring WBEM health
inclusion status» Specifying a Version
Control Repository» Configuring
software/firmware globalsettings
» Reporting» Managing with tasks» Using Cluster Monitor» Command line tools» Configuring managed
systems from a WindowsCMS
» Configuring managedsystems from a LinuxCMS
» Configuring managedsystems from an HP-UXCMS
» Custom tools» Setting disk thresholds» Creating a task to delete
disk thresholds» License manager» Management processor
tools» Managing
Communications» Managing MIBs» Installing OpenSSH» Replicate Agent Settings» RPM Package Manager» HP Server Migration Pack
- Universal Edition» HP System Management
Homepage» Version Control» Device ping
» Reference» Support and other
resources» Assistance
» Glossary» Using Help
System name/address: Either the VME server host name or IP address
Ports: The VME server web service port
NOTE:Removing the VME credentials will unregister the hosts that are registered withInsight Control and managed by VME.
» Discovery in HP SIM» Discovery filters» Managing Hosts file» Identification» Managing system types» Users and authorizations» Directory Services» Global credentials» System credentials
Related information» Security» Trusted certificates» Viewing the audit log» Configuring the audit log» Monitoring systems and
events» Quick Launch menu» Performing a basic search» Performing an advanced
search for systems» Performing an advanced
search for clusters» Performing an advanced
search for events» Tool search» Related information for
searches
Related procedures
» Systems Insight Manager - Global credentials» Systems Insight Manager - Sign-in credentials» Systems Insight Manager - SNMP credentials» Systems Insight Manager - WS-Man credentials» Systems Insight Manager - Single sign on credentials» Systems Insight Manager - SSH credentials» Systems Insight Manager - WBEM credentials
» Discovery in HP SIM» Discovery filters» Managing Hosts file» Identification» Managing system types» Users and authorizations» Directory Services» Global credentials» System credentials
Security» Creating a server
certificate» Editing a server
certificate» Importing a server
certificate» Exporting a server
certificate» Creating a certificate
signing request» Submitting a certificate
signing request» Importing a CA-signed
certificate» Synchronizing
certificates» Configuring the system
link» Configuring sign-in
events» Privilege elevation» Configuring Two Factor
Authentication» Related information
» Trusted certificates
HP SIM provides the following security options:
User and Authorizations. Select Options Security Users andAuthorizations.
Server Certificate. Select Options Security Systems Insight ManagerServer Certificates.
Global Credentials. Select Options Security Credentials GlobalCredentials.
Systems Credentials. Select Options Security Credentials SystemsCredentials.
» Discovery in HP SIM» Discovery filters» Managing Hosts file» Identification» Managing system types» Users and authorizations» Directory Services» Global credentials» System credentials» Security
Creating a servercertificate
» Editing a servercertificate
» Importing a servercertificate
» Exporting a servercertificate
» Creating a certificatesigning request
» Submitting a certificatesigning request
» Importing a CA-signedcertificate
» Synchronizingcertificates
» Configuring the systemlink
» Configuring sign-inevents
» Privilege elevation» Configuring Two Factor
Authentication» Related information
» Trusted certificates
Users with administrative rights can create a new self-signed certificate when they replacethe HP SIM SSL server certificate and private key in the following situations:
The integrity of the HP SIM server certificate private key is compromised.
The existing HP SIM server certificate expires,
This self-signed certificate is configured to expire 10 years from the date of creation.
Create a new self-signed certificate when you must replace the HP SIM SSL servercertificate and private key. The public key is included in the certificate that goes out to theclient. The private key is kept secure in the keystore database on the HP SIM server filesystem. The public and private key pair of the local HP SMH (on the CMS) is overwrittenwith the new HP SIM public and private key pair.
IMPORTANT:Replacing the SSL server certificate and private key invalidates the existing HPSIM server certificate and the local HP SMH certificate wherever they might beimported, such as browsers and the Trusted Management Servers List in otherHP SMHs. Replace the previous server certificate with the new server certificatein accordance with your security practices to return to the same level offunctionality you had before.
NOTE:On Windows and Linux, this process also affects the local HP SystemManagement Homepage certificate and private key on HP-UX systems, it affectsthe WBEM Services certificate and private key.
NOTE:Valid characters for each of these fields include letters a through z (lowercase), Athrough Z (uppercase), numbers 0 through 9, and the following specialcharacters: ‘ ( ) + , - . / : ? space _ and ~. Each field must contain at leastone non-white space character.
Procedure 1 Creating new system certificates
1. (Optional) Change the following fields:
Table 1 Server certificates fields
Field Description
CommonName (CN)
The Common Name (CN) field holds the parameter that thebrowser uses for name comparison when browsing to the CMS.This field can be updated with other name formats, such as fullyqualified names, and can contain up to 255 characters.
(Optional)AlternativeNames
Enter multiple system names separated by a comma. If a nameidentical to the CN is specified in the Alternative Names field, itis not duplicated in the certificate. Alternative names are case-sensitive. Therefore, if a duplicate case-sensitive name isentered, it is not duplicated in the certificate. For example, ifSYS1, sys1, and SYS1 are entered, SYS1 is only listed once inthe certificate. The alternative names might appear in a differentorder from the order you enter them. However, this does notaffect their usage.
Organization(O)
Enter the name of your organization. This field can contain up to64 characters.
» Viewing the audit log» Configuring the audit log» Monitoring systems and
events» Quick Launch menu» Performing a basic search» Performing an advanced
search for systems» Performing an advanced
search for clusters» Performing an advanced
search for events» Tool search» Related information for
searches» Configuring events» Protocol settings» Software status polling» Hardware status polling» Data collection» System Properties» Configuring WBEM health
inclusion status» Specifying a Version
Control Repository» Configuring
software/firmware globalsettings
» Reporting» Managing with tasks» Using Cluster Monitor» Command line tools» Configuring managed
systems from a WindowsCMS
» Configuring managedsystems from a LinuxCMS
» Configuring managedsystems from an HP-UXCMS
» Custom tools» Setting disk thresholds» Creating a task to delete
disk thresholds» License manager» Management processor
tools» Managing
Communications» Managing MIBs» Installing OpenSSH» Replicate Agent Settings» RPM Package Manager» HP Server Migration Pack
- Universal Edition» HP System Management
Homepage» Version Control» Device ping
» Reference» Support and other
resources» Assistance
» Glossary
OrganizationalUnit (OU)
Enter the name of your department. This field can contain up to64 characters.
Locality (L) Enter the name of your city. This field can contain up to 128characters.
State (S) Enter the name of your state. This field can contain up to 128characters.
Country (C) Enter the name of your country. This field can contain up to twoalphanumeric characters, using the two-letter country codes.
2. Click [OK]. If you click [Cancel ], you return to the Server Certificate page withoutcreating a new server certificate. A warning appears, reminding you about theeffects of changing the certificate and private key. If you click [OK] in the warningbox to continue, a new 1,024-bit key-pair and a new self-signed certificate aregenerated. The old key-pair and certificate are not retrievable unless a backup wascreated manually before this process. The new certificate and private key takeeffect the next time HP SIM is restarted.
3. Reboot the HP SIM server to ensure the new certificate is properly synchronizedwith the local HP SMH and any applications or components using the certificatesharing directory. Synchronizing the certificates prevents repeated browser securityalerts when browsing to Insight Management Advisor on the HP SIM server.
HP Systems Insight Manager - Related information
HP Systems Insight Manager 7.1 English
Operations | Security | Editing a server certificate
» Discovery in HP SIM» Discovery filters» Managing Hosts file» Identification» Managing system types» Users and authorizations» Directory Services» Global credentials» System credentials» Security
» Creating a servercertificateEditing a servercertificate
» Importing a servercertificate
» Exporting a servercertificate
» Creating a certificatesigning request
» Submitting a certificatesigning request
» Importing a CA-signedcertificate
» Synchronizingcertificates
» Configuring the systemlink
» Configuring sign-inevents
» Privilege elevation» Configuring Two Factor
Authentication» Related information
» Trusted certificates
Edit a server certificate to change fields in an existing certificate. This modification might berequired if you submit a CSR to an external CA.
NOTE:On Windows and Linux, this process also affects the local System ManagementHomepage certificate and private key on HP-UX systems, it affects the WBEMServices certificate and private key.
NOTE:Valid characters for each of these fields include letters a through z (lowercase), Athrough Z (uppercase), numbers 0 through 9, and the following specialcharacters: ‘ ( ) + , - . / : ? space _ and ~. Each field must contain at leastone non-white space character.
Procedure 1 Editing a server certificate
1. Edit the following fields as necessary:
NOTE:The Common Name (CN) field and the key pair cannot be modified, sothe trust relationships with any HP System Management Homepagesremain in tact. However, the browser trust must be re-established byimporting the modified certificate and deleting the old certificate from thebrowser.
Table 1 Edit server certificates fields
Field Description
(Optional)AlternativeNames
Enter multiple system names separated by a comma. If a nameidentical to the CN is specified in the Alternative Names field, itis not duplicated in the certificate. Alternative names are case-sensitive. Therefore, if a duplicate case-sensitive name isentered, it is not duplicated in the certificate. For example, ifSYS1, sys1, and SYS1 are entered, SYS1 is only listed once inthe certificate. The alternative names might appear in a differentorder from the order you enter them. However, this does notaffect their usage.
Organization(O)
Enter the name of your organization. This field can contain up to64 characters.
OrganizationalUnit (OU)
Enter the name of your department. This field can contain up to64 characters.
Locality (L) Enter the name of your city. This field can contain up to 128characters.
State (S) Enter the name of your state. This field can contain up to 128characters.
Country (C) Enter the name of your country. This field can contain up to twoalphanumeric characters, using the two-letter country codes.
2. Click [OK]. A warning message appears, indicating that the certificate is about to bemodified. You can click [Cancel ] to abort the modify operation.
HP Systems Insight Manager - Related information
HP Systems Insight Manager 7.1 English
Operations | Security | Importing a server certificate
» Discovery in HP SIM» Discovery filters» Managing Hosts file» Identification» Managing system types» Users and authorizations» Directory Services» Global credentials» System credentials» Security
» Creating a servercertificate
» Editing a servercertificateImporting a servercertificate
» Exporting a servercertificate
» Creating a certificatesigning request
» Submitting a certificatesigning request
» Importing a CA-signedcertificate
» Synchronizingcertificates
» Configuring the systemlink
» Configuring sign-inevents
» Privilege elevation» Configuring Two Factor
Authentication» Related information
» Trusted certificates
Import a CA-signed server certificate to replace the existing server certificate in thefollowing situations:
You have installed HP SIM and want to replace the default self-signed certificatewith a certificate created by a third-party CA or your own internal CA.
The integrity of the HP SIM server certificate private key is compromised.
The existing HP SIM server certificate has expired.
CAUTION:Replacing the SSL server certificate and private key invalidates the existingserver certificate wherever it might be imported, such as browsers and theTrusted Management Servers Lists of managed systems. Replace the previousserver certificate with the new server certificate in accordance with your securitypractices to return to the same level of functionality you had before.
NOTE:On Windows and Linux, this process also affects the local System ManagementHomepage certificate and private key on HP-UX systems, it affects the WBEMServices certificate and private key.
Procedure 1 Importing a server certificate
1. Create a CSR. See Systems Insight Manager - Creating a certificate signingrequest for additional information. The CSR uses parameters from the existingcertificate, including any alternative names. If you want to change thoseparameters, edit the server certificate (see Systems Insight Manager - Editing aserver certificate) or create a new server certificate (see Systems Insight Manager -Creating a server certificate).
2. Submit the request to a CA. See Systems Insight Manager - Submitting a certificatesigning request for more information. The CA returns a signed certificate.
3. Import the signed certificate reply into HP SIM. See Systems Insight Manager -Importing a CA-signed certificate for more information.
HP Systems Insight Manager - Related information
HP Systems Insight Manager 7.1 English
Operations | Security | Exporting a server certificate
» Discovery in HP SIM» Discovery filters» Managing Hosts file» Identification» Managing system types» Users and authorizations» Directory Services» Global credentials» System credentials» Security
» Creating a servercertificate
» Editing a servercertificate
» Importing a servercertificateExporting a servercertificate
» Creating a certificatesigning request
» Submitting a certificatesigning request
» Importing a CA-signedcertificate
» Synchronizingcertificates
» Configuring the systemlink
» Configuring sign-inevents
» Privilege elevation» Configuring Two Factor
Authentication» Related information
» Trusted certificates
Export the HP SIM server certificate to a file to facilitate deployment of the certificate toyour browsers. This certificate enables a browser to properly identify the HP SIM server.The HP SIM server certificate is a public document, so it does not need to be kept private.However, because the certificate is kept publicly accessible, you must ensure that it cannotbe modified.
NOTE:The system certificate can be exported as a Base64-encoded certificate. Theexported certificate can be imported into a browser or the Trusted ManagementServers List.
Procedure 1 Exporting server certificates from HP SIM
1. Select Options Security HP Systems Insight Manager Server Certificate,and then click [Export].
The Internet Explorer File Download dialog box appears.
2. To export and save the file, click [Save], or to abort the file download operation andreturn to the Server Certificate page, click [Cancel ].
HP Systems Insight Manager - Related information
HP Systems Insight Manager 7.1 English
Operations | Security | Creating a certificate signing request
» Discovery in HP SIM» Discovery filters» Managing Hosts file» Identification» Managing system types» Users and authorizations» Directory Services» Global credentials» System credentials» Security
» Creating a servercertificate
» Editing a servercertificate
» Importing a servercertificate
» Exporting a servercertificateCreating a certificatesigning request
» Submitting a certificatesigning request
» Importing a CA-signedcertificate
» Synchronizingcertificates
» Configuring the systemlink
» Configuring sign-inevents
» Privilege elevation» Configuring Two Factor
Authentication» Related information
» Trusted certificates
Create a CSR to replace the HP SIM SSL server certificate and private key.
The CSR includes any alternative names that exist in the certificate. If this causes issues forany desired CA, the certificate might need to be modified to remove alternative names.
Procedure 1 Creating a certificate signing request
1. Click more next to Create a Certificate Signing Request (CSR).
The Create Certificate Signing Request section follows the Import ServerCertificate section.
NOTE:The current certificate parameters are shown. Selecting to create a CSRdoes not create a new key pair or change any certificate parameters. Ifyou want to create a new key-pair, create a new certificate. If you wantto modify the certificate parameters, click [Edit] (instead of [ Import]) onthe Server Certificate page.
2. To create a PKCS #10 signing request that is downloaded through a standardbrowser, click [Create]. In Internet Explorer, use the File Download dialog box. InMozilla, save the text in the new browser window to a file.
3. Send the certificate file to a CA.
NOTE:The existing self-signed certificate is still valid, so the SSL web serverremains operational for browsing until the signed certificate is receivedfrom the CA.
HP Systems Insight Manager - Related information
HP Systems Insight Manager 7.1 English
Operations | Security | Submitting a certificate signing request
» Discovery in HP SIM» Discovery filters» Managing Hosts file» Identification» Managing system types» Users and authorizations» Directory Services» Global credentials» System credentials» Security
» Creating a servercertificate
» Editing a servercertificate
» Importing a servercertificate
» Exporting a servercertificate
» Creating a certificatesigning requestSubmitting a certificatesigning request
» Importing a CA-signedcertificate
» Synchronizingcertificates
» Configuring the systemlink
» Configuring sign-inevents
» Privilege elevation» Configuring Two Factor
Authentication» Related information
» Trusted certificates
After creating the CSR, the CSR must be submitted to the desired CA for signing.
NOTE:You must complete the CSR creation procedure before continuing with thisprocedure. See global
HP Systems Insight Manager 7.1 English
Operations | Security | Importing a CA-signed certificate
» Discovery in HP SIM» Discovery filters» Managing Hosts file» Identification» Managing system types» Users and authorizations» Directory Services» Global credentials» System credentials» Security
» Creating a servercertificate
» Editing a servercertificate
» Importing a servercertificate
» Exporting a servercertificate
» Creating a certificatesigning request
» Submitting a certificatesigning requestImporting a CA-signedcertificate
» Synchronizingcertificates
» Configuring the systemlink
» Configuring sign-inevents
» Privilege elevation» Configuring Two Factor
Authentication» Related information
» Trusted certificates
After creating a CSR and having it signed by a CA, you can import the signed certificate.
The only importable certificate format is PKCS #7. If the certificate reply received from theCA is a single certificate, then first import a self-signed root certificate from the issuing CAinto the HP SIM Trusted System Certificates List. After importing the CA root certificate, thecertificate reply can then be imported to serve as the HP SIM server certificate.
NOTE:On Windows and Linux, this process also affects the local System ManagementHomepage certificate and private key on HP-UX systems, it affects the WBEMServices certificate and private key.
NOTE:HP SIM supports only importing certificates that have a public key size of 2,048bits or less.
Procedure 1 Importing a signed certificate reply from a CA
1. Click more next to Import signed certificate reply from CA. The Import SignedCertificate Reply section follows the Import Server Certificate section.
2. Click [Browse] next to the Certificate filename field. The Choose file dialog boxappears.
a. Navigate to the location where the signed certificate is stored.
b. Select the correct file name, and then click [Open].
The file name appears in the Certificate filename field.
3. Click [ Import]. The signed certificate is imported.
After creating a CSR or importing the server certificate, reboot the HP SIM serverfor the HP SIM server certificate to synchronize it with the HP System ManagementHomepage certificate and the certificate sharing directory. Synchronizing thecertificates prevents repeated browser security alerts when browsing to InsightManagement Advisor on the HP SIM server, which enables HP SIM and the localHP System Management Homepage to update SSL server certificates and privatekeys.
» Discovery in HP SIM» Discovery filters» Managing Hosts file» Identification» Managing system types» Users and authorizations» Directory Services» Global credentials» System credentials» Security
» Creating a servercertificate
» Editing a servercertificate
» Importing a servercertificate
» Exporting a servercertificate
» Creating a certificatesigning request
» Submitting a certificatesigning request
» Importing a CA-signedcertificateSynchronizingcertificates
» Configuring the systemlink
» Configuring sign-inevents
» Privilege elevation» Configuring Two Factor
Authentication» Related information
» Trusted certificates
When the HP SIM server certificate is created or modified, the public and private key-pair ofthe local HP SMH certificate is overwritten with the HP SIM public and private key pair.
NOTE:This feature is available in case the certificates become unsynchronized.
NOTE:For the certificate sharing feature to work in HP-UX, OpenSSL must be installedin the /OPT/APACHE/SSL/BIN/ directory (default for HP-UX installations). For thecertificate sharing feature to work in Linux, OpenSSL must be installed in the/USR/BIN/ directory (default for Linux installations).
HP Systems Insight Manager - Related information
HP Systems Insight Manager 7.1 English
Operations | Security | Configuring the system link
» Discovery in HP SIM» Discovery filters» Managing Hosts file» Identification» Managing system types» Users and authorizations» Directory Services» Global credentials» System credentials» Security
» Creating a servercertificate
» Editing a servercertificate
» Importing a servercertificate
» Exporting a servercertificate
» Creating a certificatesigning request
» Submitting a certificatesigning request
» Importing a CA-signedcertificate
» SynchronizingcertificatesConfiguring the systemlink
» Configuring sign-inevents
» Privilege elevation» Configuring Two Factor
Authentication» Related information
» Trusted certificates
To choose the name format used when creating links to managed systems. The SystemLink Configuration setting defines how HP SIM creates browser links to remote systemsand how it communicates with remote systems for certain requests.
NOTE:When you browse to systems using SSL, the browser may display a warning ifthe system name does not match the name in the system certificate.
Procedure 1 Configuring the system link
1. Select from the following options:
Use the system name. Select this option to use the system name.
Use the system IP address. Select this option to use the system IPaddress.
Use the system full DNS name. Select this option to use the full systemDNS name.
NOTE:On an HP-UX or Linux CMS, the default value is Use the system fullDNS name on new HP SIM installations. New installations on Windowsdefaults to Use the system name, and upgrades maintain the existingsetting regardless of the operating system.
NOTE:During discovery, the full system DNS name is used as the primarylookup key. Otherwise, the IP address is used.
NOTE:In the case of systems with multiple network interfaces, selecting theUse the system name provides only one link per destination to thesystem, whereas Use the system IP address provides multiple links tothe system.
» Discovery in HP SIM» Discovery filters» Managing Hosts file» Identification» Managing system types» Users and authorizations» Directory Services» Global credentials» System credentials» Security
» Creating a servercertificate
» Editing a servercertificate
» Importing a servercertificate
» Exporting a servercertificate
» Creating a certificatesigning request
» Submitting a certificatesigning request
» Importing a CA-signedcertificate
» Synchronizingcertificates
» Configuring the systemlinkConfiguring sign-inevents
» Privilege elevation» Configuring Two Factor
Authentication» Related information
» Trusted certificates
Configure sign-in events to create actionable events for sign-in and sign-out activities.
NOTE:Configuring sign-in events does not affect the HP SIM Audit Log. Sign-in eventsare always logged in the HP SIM Audit Log.
Procedure 1 Configuring sign-in events
1. Select from the following options:
All sign-in and sign-out activities. Select this option to create events forall sign-in and sign-out actions.
Only failed sign-in attempts. Select this option to create events only forsign-in attempts that are unsuccessful.
None. Select this option if you do not want to create any events for sign-inor sign-out activities.
» Discovery in HP SIM» Discovery filters» Managing Hosts file» Identification» Managing system types» Users and authorizations» Directory Services» Global credentials» System credentials» Security
» Creating a servercertificate
» Editing a servercertificate
» Importing a servercertificate
» Exporting a servercertificate
» Creating a certificatesigning request
» Submitting a certificatesigning request
» Importing a CA-signedcertificate
» Synchronizingcertificates
» Configuring the systemlink
» Configuring sign-ineventsPrivilege elevation
» Configuring Two FactorAuthentication
» Related information» Trusted certificates
From this page, you can enable privilege elevation for Linux, HP-UX, and ESX managedsystems. This enables you to sign in as an unprivileged user and elevate the privilege to runon these operating systems.
Procedure 1 Configuring privilege elevation
1. Select Enable privilege elevation for VMware ESX .
To configure privilege elevation for Linux and HP-UX systems, select Enableprivilege elevation for Linux & HP-UX.
2. Select the elevation tool type from the menu.
If a password is required for the tool, select A password is required for thisprivilege elevation tool.
3. Optional: Edit the Privilege elevation tool command.
4. Select the user to sign in to the managed system:
Same as HP SIM signed-in user
Specify at run time
Use this user and enter the user name
5. To save changes, click [OK].
NOTE:When "DISPLAY_LAST_LOGIN"=1 in HP-UX, even non-interactive logins, suchas those used by sudo, omit the Last login string. This extraneous data in stderrand stdout might affect tools. This value can be changed using HP SystemManagement Homepage in the Auditing and Security Attributes Configurationsection on the HP SMH home page. This can be done either for the user towhich privileges will be elevated (typically, root) or for the system-wide default forall users. To make the change, enter:
» Discovery in HP SIM» Discovery filters» Managing Hosts file» Identification» Managing system types» Users and authorizations» Directory Services» Global credentials» System credentials» Security
» Creating a servercertificate
» Editing a servercertificate
» Importing a servercertificate
» Exporting a servercertificate
» Creating a certificatesigning request
» Submitting a certificatesigning request
» Importing a CA-signedcertificate
» Synchronizingcertificates
» Configuring the systemlink
» Configuring sign-inevents
» Privilege elevationConfiguring Two FactorAuthentication
» Related information» Trusted certificates
Options with an asterisk are required.
Procedure 1 Configuring Two Factor Authentication
1. Enter the following:
Server Name The IP address or host name of the Directory Server
Port Configuration To use non-SSL port, deselect Use SSL. This isselected by default.
Server Port
User Name
Password
Password (Verify)
Users DN The distinquished name or the users group. For example,CN=Users, DC=HP, DC=Com. HP SIM assumes that the users areconfigured in this distinguished name.
2. To test the connection, click [Test Connection]. If the test is successful, amessage appears on the screen stating that the connection using the currentsettings was successful.
3. To save and apply the changes, click [OK].
You must manually restart the CMS for the changes to take affect.
» Discovery in HP SIM» Discovery filters» Managing Hosts file» Identification» Managing system types» Users and authorizations» Directory Services» Global credentials» System credentials» Security
» Creating a servercertificate
» Editing a servercertificate
» Importing a servercertificate
» Exporting a servercertificate
» Creating a certificatesigning request
» Submitting a certificatesigning request
» Importing a CA-signedcertificate
» Synchronizingcertificates
» Configuring the systemlink
» Configuring sign-inevents
» Privilege elevation» Configuring Two Factor
AuthenticationRelated information
» Trusted certificates
Related procedures
» Systems Insight Manager - Exporting a server certificate» Systems Insight Manager - Editing a server certificate» Systems Insight Manager - Creating a server certificate» Systems Insight Manager - Importing a server certificate» Systems Insight Manager - Synchronizing certificates» Systems Insight Manager - Creating a certificate signing request» Systems Insight Manager - Submitting a certificate signing request» Systems Insight Manager - Importing a CA-signed certificate» Systems Insight Manager - Configuring sign-in events» Systems Insight Manager - Configuring the system link» Systems Insight Manager - Managing server certificates» Systems Insight Manager - Replicating trusted certificates» Systems Insight Manager - Changing the HP SIM default SSL port» Systems Insight Manager - Configuring browser timeout options» Systems Insight Manager - Privilege elevation» Systems Insight Manager - Configuring Two Factor Authentication
Related topics
» Systems Insight Manager - Installing OpenSSH» Systems Insight Manager - Managing SSH keys» Systems Insight Manager - Trusted certificates
» Discovery in HP SIM» Discovery filters» Managing Hosts file» Identification» Managing system types» Users and authorizations» Directory Services» Global credentials» System credentials» Security
Trusted certificates» Importing trusted
certificates» Exporting trusted
certificates» Deleting trusted
certificates» Requiring trusted
certificates» Configuring SSH key
security» Importing an SSH key» Exporting an SSH key» Deleting an SSH key» Related information
» Viewing the audit log» Configuring the audit log» Monitoring systems and
events» Quick Launch menu» Performing a basic search» Performing an advanced
search for systems» Performing an advanced
search for clusters
Trusted certificates provide the highest level of security. Users with administrative rights canimport certificates from other systems into the HP SIM Trusted System Certificates List.
The purpose of the Trusted System Certificates List in HP SIM is to maintain a list ofcertificates in the HP SIM keystore. Certificates include the HP SIM system certificate andthe certificates of managed systems that are trusted by the HP SIM system. These importedcertificates are placed in the keystore and appear in the Trusted System Certificates List.
The Trusted System Certificate List page includes the following options:
Always Accept If Always Accept is selected, SSL always accepts the certificatepresented by a system in the SSL connection. This setting is the default and isvulnerable to man-in-the-middle attacks, but it is the easiest option to use.
Require If Require is selected, SSL connections succeed only for systemsrepresented in the Trusted System Certificate List, either by its certificate or its CA-signing certificate (if applicable). You must set up the trust by manually installing thesystem’s certificate or its CA-signing certificate, (if applicable), into the HP SIMTrusted System Certificate List. This option is the most secure, but it is the mostdifficult to implement.
HP SIM provides the following trusted certificate options:
Import trusted certificate. Select Options Security Credentials TrustedSystems, and then click [ Import].
Export certificate Select Options Security Credentials TrustedSystems, and then click [Export].
Delete trusted certificate Select Options Security Credentials TrustedSystems, select the certificates to be deleted, and then click [Delete ].
» Discovery in HP SIM» Discovery filters» Managing Hosts file» Identification» Managing system types» Users and authorizations» Directory Services» Global credentials» System credentials» Security» Trusted certificates
Importing trustedcertificates
» Exporting trustedcertificates
» Deleting trustedcertificates
» Requiring trustedcertificates
» Configuring SSH keysecurity
» Importing an SSH key» Exporting an SSH key» Deleting an SSH key» Related information
» Viewing the audit log» Configuring the audit log» Monitoring systems and
events» Quick Launch menu» Performing a basic search» Performing an advanced
search for systems» Performing an advanced
search for clusters
If you have selected Require on the Trusted System Certificates page, you must importcertificates that represent the managed systems you want to trust to the Trusted CertificatesList. You can import the certificate of the system itself on a per-system basis. You can alsoimport the signing certificate of the CA or intermediate CA used to sign and issuecertificates for groups of systems, which simplifies the maintenance of this list.
NOTE:Only users with administrative rights can import certificates into the HP SIMTrusted System Certificates List.
NOTE:HP SIM supports only importing certificates that have public key sizes of 2,048bits or less.
Procedure 1 Importing certificates into the Trusted System Certificates List
1. Next to the Certificate filename field, click [Browse].
The Choose file dialog box appears.
2. Navigate to the location of the certificate to be imported, and then select the filename. Click [Open].
» Discovery in HP SIM» Discovery filters» Managing Hosts file» Identification» Managing system types» Users and authorizations» Directory Services» Global credentials» System credentials» Security» Trusted certificates
» Importing an SSH key» Exporting an SSH key» Deleting an SSH key» Related information
» Viewing the audit log» Configuring the audit log» Monitoring systems and
events» Quick Launch menu» Performing a basic search» Performing an advanced
search for systems» Performing an advanced
search for clusters
Export the HP SIM server certificate to a file to facilitate deployment of the certificate intoyour browser, enabling the browser to properly identify the HP SIM server. This certificate isa public document, so it does not need to be kept private. However, because the certificateis kept publicly accessible, you must ensure that it cannot be modified.
Only HP SIM users with administrative rights can export the HP SIM system certificate fromHP SIM.
NOTE:The system certificate can be exported as a Base64 encoded certificate. Theexported certificate can be imported into a browser or a system's or the TrustedManagement Systems List.
Procedure 1 Exporting the system certificate from HP SIM using Microsoft InternetExplorer
1. Select the location for the file to be saved.
2. Enter a file name and click [Save] to save the certificate as a Base64-encodedX.509 certificate. This file can be imported into a browser or managed system forauthentication of the CMS during a SSL connection. You can click [Cancel ] tocancel the save operation and return to the System Certificate page.
Procedure 2 Exporting the system certificate from HP SIM using Mozilla
1. Display the certificate in a new browser window.
2. Select the entire contents of the browser window that includes the certificate.
3. Copy the selected text to the clipboard.
4. Paste the text into a text editor, and save the file with a .CER file extension.
Procedure 3 Exporting the system certificate from the browser (Microsoft InternetExplorer only)
1. View the HP SIM system certificate using one of the following methods:
From the Internet Explorer browser menu, select File PropertiesCertificates.
Double-click the Lock icon in the lower right portion of the browser.
The Certificate dialog box appears.
2. Click the Details tab in the Certificate dialog box.
The Details tab appears.
3. Click [Copy to File].
The Certificate Export Wizard launches.
4. Click [Next].
The Export File Format dialog box appears.
5. Select Base-64 encoded X.509 for the export file format. Click [Next].
The File to Export dialog box appears.
6. In the File name field, enter the file you want to export. Click [Next].
The Completing the Certificate Export Wizard dialog box appears.
» Performing an advancedsearch for events
» Tool search» Related information for
searches» Configuring events» Protocol settings» Software status polling» Hardware status polling» Data collection» System Properties» Configuring WBEM health
inclusion status» Specifying a Version
Control Repository» Configuring
software/firmware globalsettings
» Reporting» Managing with tasks» Using Cluster Monitor» Command line tools» Configuring managed
systems from a WindowsCMS
» Configuring managedsystems from a LinuxCMS
» Configuring managedsystems from an HP-UXCMS
» Custom tools» Setting disk thresholds» Creating a task to delete
disk thresholds» License manager» Management processor
tools» Managing
Communications» Managing MIBs» Installing OpenSSH» Replicate Agent Settings» RPM Package Manager» HP Server Migration Pack
- Universal Edition» HP System Management
Homepage» Version Control» Device ping
» Reference» Support and other
resources» Assistance
» Glossary» Using Help
7. Click [Finish]. You can click [Back] to return to the previous page or click [Cancel ]to cancel the export operation.
A message appears indicating that the export is completed.
» Discovery in HP SIM» Discovery filters» Managing Hosts file» Identification» Managing system types» Users and authorizations» Directory Services» Global credentials» System credentials» Security» Trusted certificates
» Discovery in HP SIM» Discovery filters» Managing Hosts file» Identification» Managing system types» Users and authorizations» Directory Services» Global credentials» System credentials» Security» Trusted certificates
» Importing an SSH key» Exporting an SSH key» Deleting an SSH key» Related information
» Viewing the audit log» Configuring the audit log» Monitoring systems and
events» Quick Launch menu» Performing a basic search» Performing an advanced
search for systems» Performing an advanced
search for clusters
Trusted system certificates are certificates that represent managed systems. Enabling theTrusted System Certificate option enables HP SIM to authenticate the remote managedsystem. For ease of use, this option is disabled; this scenario is typical and maintains a highlevel of security. For maximum security, this option should be enabled, which requires extraconfiguration.
If Require is enabled, when HP SIM attempts to make an SSL connection to a managedsystem, a certificate representing that system must be found in the HP SIM keystore or theSSL connection and attempted operation fails. The certificate representing the system canbe the system's SSL system certificate or the CA level certificate that was used to sign thesystem's certificate. For large numbers of systems, using having a handful of CA-levelcertificates to sign all the system certificates can simplify the management and maintenanceof the system certificates. However, this option requires the presence of a certificate systemin your environment, or the services of a third-party security company.
CAUTION:If you select the Require option, a warning message appears, indicating thatcertain features work only for systems whose certificates are represented in theTrusted Certificate List.
The HP SIM Trusted System Certificates List is only used when the Require option isenabled.
IMPORTANT:Changing the Require option can adversely affect the operation of HP SIM.Carefully read and understand the warning described in this section.
When using a CA-level certificate, any valid certificate signed by the CA-level certificate isaccepted by HP SIM, whether it is already issued or issued at some point in the future.
Procedure 1 Enabling the require trusted certificates option
1. Select Require. This setting restricts the CMS from accepting any connectionsother than SSL connections with managed systems. The managed systems musthave a certificate in the Certificate List. This option does not affect browsing to theCMS.
A warning message appears indicating that certain features work only for systemswhose certificates are represented in the Trusted System Certificates List.
2. To require trusted certificates, click [OK ]. To disable the Require option and returnto the Trusted System Certificates page, click [Cancel ].
Procedure 2 Disabling the Trusted System Certificates option
» Discovery in HP SIM» Discovery filters» Managing Hosts file» Identification» Managing system types» Users and authorizations» Directory Services» Global credentials» System credentials» Security» Trusted certificates
» Importing an SSH key» Exporting an SSH key» Deleting an SSH key» Related information
» Viewing the audit log» Configuring the audit log» Monitoring systems and
events» Quick Launch menu» Performing a basic search» Performing an advanced
search for systems» Performing an advanced
search for clusters
Configuring the SSH key security level enables you to specify the level of security on theCMS.
Procedure 1 Configuring the SSH key security level on the CMS
1. Under Select managed systems SSH host key behavior, the following optionsare available:
The Central Management Server will save the SSH host key the firsttime an SSH connection is made.
The CMS will accept an SSH connection with any host key, even if notin the list below.
This option is selected by default.
This option causes all connections to the host to be accepted, even whenthe SSH key has changed. The known_hosts file is disabled and updated toreflect the new key.
NOTE:This option provides no protection against man-in-middle attacks.
The CMS will accept an SSH connection only if the host key is in thelist below
This option requires the SSH key to appear in the Managed Systems SSHHost Keys list.
NOTE:HP recommends this option because it is the most secure.
2. Click [OK]. The setting is saved.
NOTE:Alternately, you can set the property value forMX_SSH_ADD_UNKNOWN_HOSTS, in mx.properties file, to either ALWAYS,NEVER, or FIRST TIME. Restart the HP SIM service for the setting to takeeffect.
Systems Insight Manager - Related information
HP Systems Insight Manager 7.1 English
Operations | Trusted certificates | Importing an SSH key
» Discovery in HP SIM» Discovery filters» Managing Hosts file» Identification» Managing system types» Users and authorizations» Directory Services» Global credentials» System credentials» Security» Trusted certificates
» Importing trustedcertificates
» Exporting trustedcertificates
» Deleting trustedcertificates
» Requiring trustedcertificates
» Configuring SSH keysecurityImporting an SSH key
» Exporting an SSH key» Deleting an SSH key» Related information
» Viewing the audit log» Configuring the audit log» Monitoring systems and
events» Quick Launch menu» Performing a basic search» Performing an advanced
search for systems» Performing an advanced
search for clusters
Importing a SSH key list enables the CMS to authenticate a secure connection and executecommands on managed systems. Multiple SSH keys are imported from one file, and eachSSH key appears on a line and is associated with a host system.
NOTE:Only correctly formatted SSH keys can be imported into the Managed SystemsSSH public keys list.
See the HP Systems Insight Manager User Guide for more information about theformat of the SSH keys file.
» Discovery in HP SIM» Discovery filters» Managing Hosts file» Identification» Managing system types» Users and authorizations» Directory Services» Global credentials» System credentials» Security» Trusted certificates
» Importing trustedcertificates
» Exporting trustedcertificates
» Deleting trustedcertificates
» Requiring trustedcertificates
» Configuring SSH keysecurity
» Importing an SSH keyExporting an SSH key
» Deleting an SSH key» Related information
» Viewing the audit log» Configuring the audit log» Monitoring systems and
events» Quick Launch menu» Performing a basic search» Performing an advanced
search for systems» Performing an advanced
search for clusters
Exporting selected SSH keys saves the SSH keys to a file. This file can be used to importthe SSH keys into the SSH key list on other systems.
Procedure 1 Exporting SSH keys from the CMS to a file
1. From the Managed System SSH Host Keys list, select the SSH key to beexported.
2. Click [Export]. The Export SSH host Keys section appears.
3. Right-click the link provided and select Save Target As. The Save As dialog boxappears.
4. Navigate to the directory where you want to store the file.
5. Click [Save]. The key is exported.
6. Click [OK].
Systems Insight Manager - Related information
HP Systems Insight Manager 7.1 English
Operations | Trusted certificates | Deleting an SSH key
» Discovery in HP SIM» Discovery filters» Managing Hosts file» Identification» Managing system types» Users and authorizations» Directory Services» Global credentials» System credentials» Security» Trusted certificates
» Importing trustedcertificates
» Exporting trustedcertificates
» Deleting trustedcertificates
» Requiring trustedcertificates
» Configuring SSH keysecurity
» Importing an SSH key» Exporting an SSH key
Deleting an SSH key» Related information
» Viewing the audit log» Configuring the audit log» Monitoring systems and
events» Quick Launch menu» Performing a basic search» Performing an advanced
search for systems» Performing an advanced
search for clusters
Deleting SSH keys from the Managed System SSH Host Keys list enables you to removeSSH trusted keys on the CMS.
Procedure 1 Deleting SSH keys from the CMS
1. From the Managed System SSH Host Keys list, select the SSH key to be deleted.
2. Click [Delete ]. A message appears, indicating you are about to delete SSH keys.
3. Click [OK]. The key is removed from the Managed Systems SSH Public Keys list.
Systems Insight Manager - Related information
HP Systems Insight Manager 7.1 English
Operations | Trusted certificates | Related information
» Discovery in HP SIM» Discovery filters» Managing Hosts file» Identification» Managing system types» Users and authorizations» Directory Services» Global credentials» System credentials» Security» Trusted certificates
» Importing trustedcertificates
» Exporting trustedcertificates
» Deleting trustedcertificates
» Requiring trustedcertificates
» Configuring SSH keysecurity
» Importing an SSH key» Exporting an SSH key» Deleting an SSH key
Related information» Viewing the audit log» Configuring the audit log» Monitoring systems and
events» Quick Launch menu» Performing a basic search» Performing an advanced
search for systems» Performing an advanced
search for clusters
Related procedures
» Systems Insight Manager - Importing trusted certificates» Systems Insight Manager - Exporting trusted certificates» Systems Insight Manager - Deleting trusted certificates» Systems Insight Manager - Requiring trusted certificates» Systems Insight Manager - Configuring SSH key security» Systems Insight Manager - Importing an SSH key» Systems Insight Manager - Exporting an SSH key» Systems Insight Manager - Deleting an SSH key
» Discovery in HP SIM» Discovery filters» Managing Hosts file» Identification» Managing system types» Users and authorizations» Directory Services» Global credentials» System credentials» Security» Trusted certificates
Viewing the audit log» Configuring the audit log» Monitoring systems and
events» Quick Launch menu» Performing a basic search» Performing an advanced
search for systems» Performing an advanced
search for clusters» Performing an advanced
search for events» Tool search» Related information for
searches» Configuring events» Protocol settings» Software status polling» Hardware status polling» Data collection» System Properties» Configuring WBEM health
inclusion status» Specifying a Version
» Log content
HP SIM logs all tasks performed by all HP SIM users on all systems. The information isstored in the Audit Log file on the Central Management Server (CMS).
NOTE:You must be signed-in as root or administrator (or any user with administrativerights) to read the Audit Log file directly.
Procedure 1 Viewing the HP SIM Audit Log
1. Select Tasks & Logs View HP Systems Insight Manager Audit Log. TheAudit Log page appears.
2. Select the log entries you want to view by selecting one of the following options:
most recent 40 entries . Select this to view a selectable number of themost recent log entries. The default is set to view the 40 most recent logentries.
from entry " " to entry " ". Select this option to view an indexed range oflog entries.
3. Click [View Now]. The requested log entries appear.
Log content
The HP SIM Audit Log contains the following information in the order listed.
Time stamp date, time, and time zone
Category
Result
Action
Object type
Object type descriptor
Level
Session user login string
(Optional) Session ID
(Optional) Transaction ID
(Optional) Session user full user name
These fields appear in one line. If messages or additional information about a log entry ispresent, it appears in the next line.
John Smith Added authorization for user djones with a toolbox of Monitor Tools forAll Managed Systems.
Control Repository» Configuring
software/firmware globalsettings
» Reporting» Managing with tasks» Using Cluster Monitor» Command line tools» Configuring managed
systems from a WindowsCMS
» Configuring managedsystems from a LinuxCMS
» Configuring managedsystems from an HP-UXCMS
» Custom tools» Setting disk thresholds» Creating a task to delete
disk thresholds» License manager» Management processor
tools» Managing
Communications» Managing MIBs» Installing OpenSSH» Replicate Agent Settings» RPM Package Manager» HP Server Migration Pack
- Universal Edition» HP System Management
Homepage» Version Control» Device ping
» Reference» Support and other
resources» Assistance
» Glossary» Using Help
2006-02-23 13:15:43 CST, CONFIG, SUCCESS, ADD, AUTHORIZATION, NODE_GROUP, SUMMARY,VIVO\djones, 6866, 351185188, Added automatically updating authorization for userVIVO\djones with a toolbox of Monitor Tools for All Storage Systems 001.
2006-02-23 13:15:43 CST, CONFIG, SUCCESS, ADD, NODE_GROUP, All Storage Systems001,SUMMARY,VIVO\djones,6866,351185185, Automatic update is true/false.
2006-02-27 11:05:42 CST, CONFIG, SUCCESS, MODIFY, NODE_GROUP, All Storage Systems001,SUMMARY,VIVO\djones,6904,1029055411, Automatic update is true/false.
2006-02-27 11:05:42 CST, CONFIG, SUCCESS, MODIFY, NODE_GROUP, All Storage Systems001,SUMMARY,VIVO\djones,6904,1029055411, Automatic update is true/false.
2006-02-27 11:05:42 CST, CONFIG, SUCCESS, MODIFY, NODE_GROUP, All Storage Systems001,SUMMARY,VIVO\djones,6904,1029055411, Automatic update is true/false. AddedEVASAN01. Removed EVASAN99.
» Discovery in HP SIM» Discovery filters» Managing Hosts file» Identification» Managing system types» Users and authorizations» Directory Services» Global credentials» System credentials» Security» Trusted certificates» Viewing the audit log
Configuring the audit log» Monitoring systems and
events» Quick Launch menu» Performing a basic search» Performing an advanced
search for systems» Performing an advanced
search for clusters» Performing an advanced
search for events» Tool search» Related information for
searches» Configuring events» Protocol settings» Software status polling» Hardware status polling» Data collection» System Properties» Configuring WBEM health
inclusion status» Specifying a Version
Configure the Audit Log file to reside in a user specific directory.
Procedure 1 Configuring the HP SIM Audit Log file location
1. For Windows, create a file named path.properties under C:\ProgramFiles\HP\Systems Insight Manager\config.
For Linux and HP-UX, create a file named path.properties under/etc/opt/mx/config.
2. For Windows, add the following entry in the path.properties file:LOG=\\Auditlog\\Logs or LOG=C:/Auditlog/Logs .
For HP-UX, add the following entry in the path.properties file:LOG=/var/opt/mx/logs .
NOTE:C:\\Auditlog\\Log is listed here as an example for Windows. This path isuser defined.
NOTE:/var/opt/mx/logs is listed here as an example for HP-UX. This path isuser-defined.
3. For Linux and HP-UX, click the HP SIM daemons (mxstop and mxstart). ForWindows operating systems, restart the HP SIM service. After restarting the service,a new log file named mx.log resides in the directory specified in path.propertiesfile.
Five variables can be defined in the log.properties file:
MX_LOG_FILENAME for the file name. The default is "MX_LOG_FILENAME=mx" .
MX_LOG_FILEEXT for the file extension. The default is "MX_LOG_FILEEXT=log" .
MX_LOG_FILESIZE for the maximum file size. The default is"MX_LOG_FILESIZE=20" .
MX_LOG_ROLLFILEEXT for the file extension of the roll-over name. The default is"MX_LOG_ROLLFILEEXT=old".
MX_LOG_QUEUESIZE for the amount of memory allocated for queuing items to bewritten to the Audit Log. The default is "MX_LOG_QUEUESIZE=300".
The maximum file size is set in megabytes.
When the Audit Log file reaches the maximum file size, the log is renamed withMX_LOG_ROLLFILEEXT extension, and a new file is started. If a previous version of the file hasalready been renamed with the MX_LOG_ROLLFILEEXT extension, it is an automatic roll-over ofan audit log file. A roll-over occurs after a task running is completed. However, after onehour exceeding the maximum file size, if the task is not finished, the audit log file rolls overto another file.
CAUTION:Change the queue size only with extreme care. If the queue is set too high, thelog manager consumes too much system memory.
Changes made to the log.properties file do not take effect until the log manager daemon
Control Repository» Configuring
software/firmware globalsettings
» Reporting» Managing with tasks» Using Cluster Monitor» Command line tools» Configuring managed
systems from a WindowsCMS
» Configuring managedsystems from a LinuxCMS
» Configuring managedsystems from an HP-UXCMS
» Custom tools» Setting disk thresholds» Creating a task to delete
disk thresholds» License manager» Management processor
tools» Managing
Communications» Managing MIBs» Installing OpenSSH» Replicate Agent Settings» RPM Package Manager» HP Server Migration Pack
- Universal Edition» HP System Management
Homepage» Version Control» Device ping
» Reference» Support and other
resources» Assistance
» Glossary» Using Help
is restarted. For Windows, restart HP SIM service. For Linux and HP-UX, restart the logmanager.
NOTE:By default, for Linux and HP-UX, the path for the log file is set to/var/opt/mx/logs. This path can be configured by editing the LOG value in the/etc/opt/mx/config/path.properties file. If this properties file does not exist,create it. For Windows, the default location is the logs subdirectory of thedirectory where the product was installed.
» Discovery in HP SIM» Discovery filters» Managing Hosts file» Identification» Managing system types» Users and authorizations» Directory Services» Global credentials» System credentials» Security» Trusted certificates» Viewing the audit log» Configuring the audit log
Monitoring systems andevents» Creating system and
cluster collections» Editing system and
cluster collections» Moving system and
cluster collections» Copying system and
cluster collections» Deleting system and
cluster collections» Setting properties for
system and clustercollections
» Creating eventcollections
» Editing event collections» Moving event
collections» Copying event
collections
Users with administrative rights can manage and monitor all shared collections. Users canalso manage their own private collections from this page.
HP Systems Insight Manager 7.1 English
Operations | Monitoring systems and events | Creating system and cluster collections
» Discovery in HP SIM» Discovery filters» Managing Hosts file» Identification» Managing system types» Users and authorizations» Directory Services» Global credentials» System credentials» Security» Trusted certificates» Viewing the audit log» Configuring the audit log» Monitoring systems and
eventsCreating system andcluster collections
» Editing system andcluster collections
» Moving system andcluster collections
» Copying system andcluster collections
» Deleting system andcluster collections
» Setting properties forsystem and clustercollections
» Creating eventcollections
» Editing event collections» Moving event
collections» Copying event
collections
» Command line interface
NOTE:Users with administrative rights can create a shared collection. Users withoperator rights can view shared collections, but can only create their own privatecollections.
Procedure 1 Creating a system collection
1. In the System and Event Collections panel, click Customize. The CustomizeCollections page appears.
2. In the Show collections of dropdown list, select Systems. All available system orcluster collections appear.
3. Click [New]. The New Collection section appears.
4. Select Choose members individually, Choose members by attributes, orChoose members from existing system and event collections. For moreinformation about the different collection types, see Monitoring systems, clusters,and events - Types of collections.
If you selected Choose members individually, complete the followingsteps:
a. In the Choose from dropdown list, select an individual collection.
NOTE:When select a collection from the dropdown list, the first-level members of that collection appear in the AvailableItems box.
b. From the Available Items box, select items to place in the
collection by highlighting the item and clicking . You can clickthe up and down arrows to change the position of an item in thecollection, or click [Remove] to remove items from the SelectedItems box.
c. Click one of the following:
a. [Save As Collection] To save the collection. For moreinformation, see Systems Insight Manager - Savingcollections.
b. [Cancel] To close the New Collection section withoutsaving changes.
If you selected Choose members by attributes, complete the followingsteps:
a. In the Search for dropdown list, select systems or clusters.
b. Enter the search criteria for the collection. For more informationabout sytem search criteria, see Systems Insight Manager -Performing an advanced search for systems, or for moreinformation about cluster search criteria, see Systems InsightManager - Performing an advanced search for clusters.
c. Click one of the following:
a. [View] To run the search and display results immediately.
» Deleting eventcollections
» Setting event properties» System table view page» Customizing the system
table view page» Deleting systems from
the HP SIM database» Printing a system
collection view» Cluster table view page» Customizing the cluster
table view page» Deleting clusters from
the HP SIM database» Printing a cluster
collection view» Event table view page» Customizing the event
table view page» Clearing events from
the collection» Deleting events from
the HP SIM database» Assigning events to
users» Printing an event
collection view» Entering comments to
events» Saving collections» Related information
» Quick Launch menu» Performing a basic search» Performing an advanced
search for systems» Performing an advanced
search for clusters» Performing an advanced
search for events» Tool search» Related information for
searches» Configuring events» Protocol settings» Software status polling» Hardware status polling» Data collection» System Properties» Configuring WBEM health
inclusion status» Specifying a Version
Control Repository» Configuring
software/firmware globalsettings
» Reporting» Managing with tasks» Using Cluster Monitor» Command line tools» Configuring managed
systems from a WindowsCMS
» Configuring managedsystems from a LinuxCMS
» Configuring managedsystems from an HP-UXCMS
b. [Save As Collection] To save the collection. For moreinformation about saving collections, see Systems InsightManager - Saving collections.
c. [Cancel] To close the New Collection section withoutsaving changes.
If you selected Choose members from existing system and eventcollections, complete the following steps:
a. In the Select system collection dropdown list, select a systemcollection.
NOTE:Combination collections do not appear in the dropdownlist.
b. In the Select event collections dropdown list, select an eventcollection.
c. Click one of the following:
a. [View] To run and display the search immediately.
b. [Save As Collection] To save the collection. SeeSystems Insight Manager - Saving collections for moreinformation about saving collections.
c. [Cancel] To close the New Collection section withoutsaving changes.
NOTE:If you create a collection with a system collection and an event collectionon the Customize Collections page, the collection is saved as a systemcollection and is placed in the Systems branch location that you specify.
Command line interface
Users with administrative rights can use the mxcollection command to create newcollections from the CLI.
Systems Insight Manager - Related information
HP Systems Insight Manager 7.1 English
Operations | Monitoring systems and events | Editing system and cluster collections
» Discovery in HP SIM» Discovery filters» Managing Hosts file» Identification» Managing system types» Users and authorizations» Directory Services» Global credentials» System credentials» Security» Trusted certificates» Viewing the audit log» Configuring the audit log» Monitoring systems and
events» Creating system and
cluster collectionsEditing system andcluster collections
» Moving system andcluster collections
» Copying system andcluster collections
» Deleting system andcluster collections
» Setting properties forsystem and clustercollections
» Creating eventcollections
» Editing event collections» Moving event
collections» Copying event
collections
» Command line interface
Users with administrative rights can edit a shared collection. Users with operator rights canview shared collections, but can only edit their own private collections.
Procedure 1 Editing a system or cluster collection
1. In the System and Event Collections panel, click Customize. The CustomizeCollections page appears.
2. In the Show collections of dropdown list, select Systems. All available system orcluster collections appear.
3. Select a system or cluster collection to edit, and then click [Edit]. The EditCollection section appears. Depending on how you created the collection, thefollowing appears:
a. If you created the collection using the Choose members individuallyoption, complete the following steps:
i. In the Choose from dropdown list, select an individual collection.
NOTE:When select a collection from the dropdown list, the first-level members of that collection appear in the AvailableItems box.
ii. From the Available Items box, select items to place in the
collection by highlighting the item and clicking . You can clickthe up and down arrows to change the position of an item in thecollection, or click [Remove] to remove items from the SelectedItems box.
iii. Click one of the following:
i. [Save As Collection] To save the collection. For moreinformation, see Systems Insight Manager - Savingcollections.
ii. [Cancel] To close the New Collection section withoutsaving changes.
b. If you created the collection using the Choose members by attributesoption, complete the following steps:
i. In the Choose from dropdown list, select an individual collection.
NOTE:When select a collection from the dropdown list, the first-level members of that collection appear in the AvailableItems box.
ii. From the Available Items box, select items to place in the
collection by highlighting the item and clicking . You can clickthe up and down arrows to change the position of an item in thecollection, or click [Remove] to remove items from the SelectedItems box.
iii. Click one of the following:
» Deleting eventcollections
» Setting event properties» System table view page» Customizing the system
table view page» Deleting systems from
the HP SIM database» Printing a system
collection view» Cluster table view page» Customizing the cluster
table view page» Deleting clusters from
the HP SIM database» Printing a cluster
collection view» Event table view page» Customizing the event
table view page» Clearing events from
the collection» Deleting events from
the HP SIM database» Assigning events to
users» Printing an event
collection view» Entering comments to
events» Saving collections» Related information
» Quick Launch menu» Performing a basic search» Performing an advanced
search for systems» Performing an advanced
search for clusters» Performing an advanced
search for events» Tool search» Related information for
searches» Configuring events» Protocol settings» Software status polling» Hardware status polling» Data collection» System Properties» Configuring WBEM health
inclusion status» Specifying a Version
Control Repository» Configuring
software/firmware globalsettings
» Reporting» Managing with tasks» Using Cluster Monitor» Command line tools» Configuring managed
systems from a WindowsCMS
» Configuring managedsystems from a LinuxCMS
» Configuring managedsystems from an HP-UXCMS
i. [OK] To save the collection.
ii. [Cancel] To close the New Collection section withoutsaving changes.
c. If you selected Choose members by attributes, complete the followingsteps:
i. In the Search for dropdown list, select systems or clusters.
ii. Enter the search criteria for the collection. For more informationabout sytem search criteria, see Systems Insight Manager -Performing an advanced search for systems, or for moreinformation about cluster search criteria, see Systems InsightManager - Performing an advanced search for clusters.
iii. Click one of the following:
i. [View] To run the search and display results immediately.
ii. [OK] To save the collection.
iii. [Cancel] To close the New Collection section withoutsaving changes.
d. If you created the collection using the Choose members from existingsystem and event collections option, complete the following steps:
i. In the Select system collection dropdown list, select a systemcollection.
NOTE:Combination collections do not appear in the dropdownlist.
ii. In the Select event collections dropdown list, select an eventcollection.
iii. Click one of the following:
i. [View] To run the search and display results immediately.
ii. [OK] To save the collection.
iii. [Cancel] To close the New Collection section withoutsaving changes.
Command line interface
Users with administrative rights can use the mxcollection command to edit existingcollections from the CLI.
For more information about accessing the manpage, which includes detailed information forthis command, see the HP Systems Insight Manager User Guide.
Systems Insight Manager - Related information
HP Systems Insight Manager 7.1 English
Operations | Monitoring systems and events | Moving system and cluster collections
» Discovery in HP SIM» Discovery filters» Managing Hosts file» Identification» Managing system types» Users and authorizations» Directory Services» Global credentials» System credentials» Security» Trusted certificates» Viewing the audit log» Configuring the audit log» Monitoring systems and
events» Creating system and
cluster collections» Editing system and
cluster collectionsMoving system andcluster collections
» Copying system andcluster collections
» Deleting system andcluster collections
» Setting properties forsystem and clustercollections
» Creating eventcollections
» Editing event collections» Moving event
collections» Copying event
collections
» Command line interface
This procedure enables you to move a collection from one collection to another. Users withadministrative rights can move a shared collection.
Procedure 1 Moving a system collection
1. In the System and Event Collections panel, click Customize. The CustomizeCollections page appears.
2. In the Show collections of dropdown list, select Systems. All available system orcluster collections appear. Click to expand all system and cluster collections inthe table, or click to collapse all system and cluster collections in the table.
3. Select the collection to move, and then click [Move]. The Move Collection sectionappears.
4. Under Move to, select one of the following:
Existing collection Select an existing private or shared collection fromthe dropdown list. Click [OK] to save the collection, or click [Cancel ] tocancel the save operation.
Locked collections do not appear in the list.
New collection Enter a name for the new collection and select an existingprivate or shared collection from the dropdown list. Click [OK] to save thecollection, or click [Cancel ] to cancel the save operation.
Command line interface
Users with administrative rights can use the mxcollection command to move existingcollections from the CLI.
NOTE:Users with administrative rights can move a shared collection. You cannot moveshared and private root collections, and you cannot move a shared collection intoa private collection.
Systems Insight Manager - Related information
HP Systems Insight Manager 7.1 English
Operations | Monitoring systems and events | Copying system and cluster collections
» Discovery in HP SIM» Discovery filters» Managing Hosts file» Identification» Managing system types» Users and authorizations» Directory Services» Global credentials» System credentials» Security» Trusted certificates» Viewing the audit log» Configuring the audit log» Monitoring systems and
events» Creating system and
cluster collections» Editing system and
cluster collections» Moving system and
cluster collectionsCopying system andcluster collections
» Deleting system andcluster collections
» Setting properties forsystem and clustercollections
» Creating eventcollections
» Editing event collections» Moving event
collections» Copying event
collections
» Command line interface
You can copy a collection as a new collection. When you copy a collection that was createdby members, you copy the collection and its members into the new collection. If you edit theoriginal collection after you copy it to the new collection, the newly copied collection is notupdated. For example, if the original collection has two members, the same two memberscopy to the new collection. If you edit the original collection to add another member afteryou copy it, the newly copied collection is not modified.
When you copy a collection that was created based on attributes, you copy the collectionattributes into the new collection. If you edit the original collection after you copy it to thenew collection, the newly copied collection does not reflect these edits.
When you copy a combination collection, the newly created collection has the same systemcollection and event collection. If you edit the original collection after you copy it to the newcollection, the newly copied collection is not updated. For more information aboutcollections, see the HP Systems Insight Manager User Guide.
Procedure 1 Copying system collections
1. Click Customize in the System and Event Collections panel. The CustomizeCollections page appears.
2. In the Show dropdown list, select Systems. All available system or clustercollections appear. Click to expand all system and cluster collections in thetable, or click to collapse all system and cluster collections in the table.
3. Select the collection to copy, and then click [Copy]. The Copy Collection sectionappears.
4. In the Collection name field, enter a name for the new collection.
5. Under Place in, select a location to save the collection, and then, depending on thetype of collection, do one of the following:
Existing collection Select an existing private or shared collection fromthe dropdown list. Click [OK] to save the collection, or click [Cancel ] tocancel the save operation.
Locked collections do not appear in the list.
New collection Enter a name for the new collection and select an existingprivate or shared collection from the dropdown list. Click [OK] to save thecollection, or click [Cancel ] to cancel the save operation.
Command line interface
Users with administrative rights can use the mxcollection command to copy existingcollections from the CLI.
Systems Insight Manager - Related information
HP Systems Insight Manager 7.1 English
Operations | Monitoring systems and events | Deleting system and cluster collections
» Discovery in HP SIM» Discovery filters» Managing Hosts file» Identification» Managing system types» Users and authorizations» Directory Services» Global credentials» System credentials» Security» Trusted certificates» Viewing the audit log» Configuring the audit log» Monitoring systems and
events» Creating system and
cluster collections» Editing system and
cluster collections» Moving system and
cluster collections» Copying system and
cluster collectionsDeleting system andcluster collections
» Setting properties forsystem and clustercollections
» Creating eventcollections
» Editing event collections» Moving event
collections» Copying event
collections
» Command line interface
NOTE:Users with administrative rights can delete a shared collection. Users withoperator rights can view shared collections, but, can only delete their own privatecollection.
Procedure 1 Deleting system collections
1. Click Customize in the System and Event Collections panel. The CustomizeCollections page appears.
2. In the Show dropdown list, select Systems. All available system or clustercollections appear. Click to expand all system and cluster collections in thetable, or click to collapse all system and cluster collections in the table.
3. Select the collection to be deleted.
4. Click [Delete ]. A dialog box appears. To continue with the deletion, click [OK], or tocancel the operation, click [Cancel ]. If the selected collection is not empty or is inuse by a task (such as Home page, reports, and so on) an error message appears.However, if the collections contents are based on attributes, you can delete thecollection even if it is not empty.
Command line interface
Users with administrative rights can use the mxcollection command to delete existingcollections from the CLI.
Systems Insight Manager - Related information
HP Systems Insight Manager 7.1 English
Operations | Monitoring systems and events | Setting properties for system and cluster collections
Setting properties for system and clustercollections
» Discovery in HP SIM» Discovery filters» Managing Hosts file» Identification» Managing system types» Users and authorizations» Directory Services» Global credentials» System credentials» Security» Trusted certificates» Viewing the audit log» Configuring the audit log» Monitoring systems and
events» Creating system and
cluster collections» Editing system and
cluster collections» Moving system and
cluster collections» Copying system and
cluster collections» Deleting system and
cluster collectionsSetting properties forsystem and clustercollections
» Creating eventcollections
» Editing event collections» Moving event
collections» Copying event
collections
» Command line interface
You can use the System and Event Collections panel to set collection properties such ashiding or showing collections, system status, and cluster status, and selecting the defaultview for a collection.
Procedure 1 Setting properties for system collections
1. Click Customize in the System and Event Collections panel. The CustomizeCollections page appears.
2. In the Show collections of dropdown list, select Systems. All available system orcluster collections are appear. Click to expand all system and clustercollections in the table, or click to collapse all system and cluster collections inthe table.
3. Select a collection, and then click [Set Properties]. The Set Properties sectionappears.
4. Under Visible, select Yes, show collection and its members in the userinterface or select No, do not show collection and its members in the userinterface . If you have collections that are unused, you might want to select No, donot show collection and its members in the user interface so that thecollections do not clutter the System and Event Collections panel.
5. If you want to see the system health status, under Status Displayed, select Yes,show status in System and Event Collections panel, or to keep the paneluncluttered, select No, do not show the status in System and Event Collectionspanel.
NOTE:This option is available only for collections based on attributes and forcombination collections.
NOTE:For a collection, the most critical status of its members appears. If youopen the collection, the status for each member appears.
NOTE:To conserve system resources, try to limit the display of status to onlythose collections that you view the most.
6. In the Default View field, select the default view from the dropdown list.
Command line interface
Users with administrative rights can use the mxcollection command to set properties forcollections from the CLI.
Systems Insight Manager - Related information
HP Systems Insight Manager 7.1 English
Operations | Monitoring systems and events | Creating event collections
» Discovery in HP SIM» Discovery filters» Managing Hosts file» Identification» Managing system types» Users and authorizations» Directory Services» Global credentials» System credentials» Security» Trusted certificates» Viewing the audit log» Configuring the audit log» Monitoring systems and
events» Creating system and
cluster collections» Editing system and
cluster collections» Moving system and
cluster collections» Copying system and
cluster collections» Deleting system and
cluster collections» Setting properties for
system and clustercollectionsCreating eventcollections
» Editing event collections» Moving event
collections» Copying event
collections
» Command line interface
NOTE:By default, all newly created collections are private.
NOTE:Users with administrative rights can create a new shared event collection. Userswith operator rights or user rights view shared collections, but can create onlytheir own private collections.
Procedure 1 Creating event collections
1. Click Customize in the System and Event Collections panel. The CustomizeCollections page appears.
2. In the Show collections of dropdown list, select Events . All available eventcollections appear.
3. Click [New]. The New Collection section appears.
4. Select Choose members individually, Choose members by attributes, orChoose members from existing event and system collections.
a. If you selected Choose members individually, complete the followingsteps:
i. In the Choose from dropdown list, select an individual collection.
NOTE:When a collection is selected from the dropdown list, thefirst-level members of that collection appear in theAvailable Items box.
ii. From the Available Items box, select items to place in the
collection by highlighting the item and clicking . You can clickthe up and down arrow to change the position of an item in thecollection, or click [Remove] to remove items from the SelectedItems box.
iii. Click one of the following:
i. [Save As Collection] To save the collection. SeeSystems Insight Manager - Saving collections for moreinformation about saving collections.
ii. [Cancel] To close the New Collection section withoutsaving changes.
b. If you selected Choose members by attributes, the New section appears.Complete the following steps:
i. In the Search for dropdown list, select events.
ii. Enter the search criteria for the collection. See Systems InsightManager - Performing an advanced search for events for more
» Deleting eventcollections
» Setting event properties» System table view page» Customizing the system
table view page» Deleting systems from
the HP SIM database» Printing a system
collection view» Cluster table view page» Customizing the cluster
table view page» Deleting clusters from
the HP SIM database» Printing a cluster
collection view» Event table view page» Customizing the event
table view page» Clearing events from
the collection» Deleting events from
the HP SIM database» Assigning events to
users» Printing an event
collection view» Entering comments to
events» Saving collections» Related information
» Quick Launch menu» Performing a basic search» Performing an advanced
search for systems» Performing an advanced
search for clusters» Performing an advanced
search for events» Tool search» Related information for
searches» Configuring events» Protocol settings» Software status polling» Hardware status polling» Data collection» System Properties» Configuring WBEM health
inclusion status» Specifying a Version
Control Repository» Configuring
software/firmware globalsettings
» Reporting» Managing with tasks» Using Cluster Monitor» Command line tools» Configuring managed
systems from a WindowsCMS
» Configuring managedsystems from a LinuxCMS
» Configuring managedsystems from an HP-UXCMS
information about event search criteria.
iii. Click one of the following:
i. [View] To run the search and display the resultsimmediately.
ii. [Save As Collection] To save the collection. SeeSystems Insight Manager - Saving collections for moreinformation.
iii. [Cancel] To close the New Collection section withoutsaving changes.
c. If you selected Choose members from existing event and systemcollections, complete the following steps:
i. In the Select event collection dropdown list, select an eventcollection.
NOTE:Combination collections are not displayed in thedropdown list.
ii. In the Select system collections dropdown list, select a systemcollection.
iii. Click one of the following:
i. [View] To run the search and display the resultsimmediately.
ii. [Save As Collection] To save the collection. SeeSystems Insight Manager - Saving collections for moreinformation about saving collections.
iii. [Cancel] To close the New Collection section withoutsaving changes.
Command line interface
Users with administrative rights can use the mxcollection command to create newcollections from the CLI.
Systems Insight Manager - Related information
HP Systems Insight Manager 7.1 English
Operations | Monitoring systems and events | Editing event collections
» Discovery in HP SIM» Discovery filters» Managing Hosts file» Identification» Managing system types» Users and authorizations» Directory Services» Global credentials» System credentials» Security» Trusted certificates» Viewing the audit log» Configuring the audit log» Monitoring systems and
The Event Collections section enables you to add, delete, and reorder the position ofmembers of an existing collection. This section is similar to the New Collection section.
NOTE:Users with administrative rights can edit a shared collection. Users with operatorrights can edit only their own collections.
Procedure 1 Editing event collections
1. Click Customize in the System and Event Collections panel. The CustomizeCollections page appears.
2. In the Show collections of dropdown list, select Events . All available eventcollections appear.
3. Select the event collection to edit, and then click [Edit]. The Edit Collection sectionappears. Depending on how the collection was created, the following appears:
a. If you created the collection with the Choose members individually option,complete the following steps:
i. In the Choose from dropdown list, select an individual collection.
NOTE:When a collection is selected from the dropdown list, thefirst-level members of that collection appear in theAvailable Items box.
ii. From the Available Items box, select items to place in the
collection by highlighting the item and clicking . You can clickthe up and down arrow to change the position of an item in thecollection, or click [Remove] to remove items from the SelectedItems box.
iii. Click one of the following:
i. [OK] To save the collection.
ii. [Cancel] To close the New Collection section withoutsaving changes.
b. If you created the collection with the Choose members by attributesoption, complete the following steps:
i. In the Search for dropdown list, select events.
ii. Enter the search criteria for the collection. See Systems InsightManager - Performing an advanced search for events for moreinformation about event search criteria.
iii. Click one of the following:
i. [View] To run the search and display the resultsimmediately.
ii. [OK] To save the collection.
iii. [Cancel] To close the New Collection section without
» Deleting eventcollections
» Setting event properties» System table view page» Customizing the system
table view page» Deleting systems from
the HP SIM database» Printing a system
collection view» Cluster table view page» Customizing the cluster
table view page» Deleting clusters from
the HP SIM database» Printing a cluster
collection view» Event table view page» Customizing the event
table view page» Clearing events from
the collection» Deleting events from
the HP SIM database» Assigning events to
users» Printing an event
collection view» Entering comments to
events» Saving collections» Related information
» Quick Launch menu» Performing a basic search» Performing an advanced
search for systems» Performing an advanced
search for clusters» Performing an advanced
search for events» Tool search» Related information for
searches» Configuring events» Protocol settings» Software status polling» Hardware status polling» Data collection» System Properties» Configuring WBEM health
inclusion status» Specifying a Version
Control Repository» Configuring
software/firmware globalsettings
» Reporting» Managing with tasks» Using Cluster Monitor» Command line tools» Configuring managed
systems from a WindowsCMS
» Configuring managedsystems from a LinuxCMS
» Configuring managedsystems from an HP-UXCMS
saving changes.
c. If you created the collection with the Choose members from existingsystem and event collections option, complete the following steps:
i. In the Select event collection dropdown list, select an eventcollection.
NOTE:Combination collections are not displayed in thedropdown list.
ii. In the Select system collections dropdown list, select a systemcollection.
iii. Click one of the following:
i. [View] To run the search and display the resultsimmediately.
ii. [OK] To save the collection.
iii. [Cancel] To close the New Collection section withoutsaving changes.
Command line interface
Users with administrative rights can use the mxcollection command to edit existingcollections from the CLI.
For more information about accessing the manpage, which includes detailed information forthis command, see the HP Systems Insight Manager Command Line User Guide.
Systems Insight Manager - Related information
HP Systems Insight Manager 7.1 English
Operations | Monitoring systems and events | Moving event collections
» Discovery in HP SIM» Discovery filters» Managing Hosts file» Identification» Managing system types» Users and authorizations» Directory Services» Global credentials» System credentials» Security» Trusted certificates» Viewing the audit log» Configuring the audit log» Monitoring systems and
This procedure enables you to move a collection from one collection to another. Users withadministrative rights can move a shared collection.
Procedure 1 Moving event collections
1. Click Customize in the System and Event Collections panel. The CustomizeCollections page appears.
2. In the Show collections of dropdown list, select Events . All available eventcollections appear. Click to expand all event collections in the table, or click
to collapse all event collections in the table.
3. Select the collection to move, and then click [Move]. The Move Collection sectionappears.
4. Under Move to, select one of the following:
Existing collection Select an existing private or shared collection fromthe dropdown list. Click [OK] to save the collection, or click [Cancel ] tocancel the save operation.
Locked collections do not appear in the list.
New collection Enter a name for the new collection and select an existingprivate or shared collection from the dropdown list. Click [OK] to save thecollection, or click [Cancel ] to cancel the save operation.
Command line interface
Users with administrative rights can use the mxcollection command to move existingcollections from the CLI.
Systems Insight Manager - Related information
HP Systems Insight Manager 7.1 English
Operations | Monitoring systems and events | Copying event collections
» Discovery in HP SIM» Discovery filters» Managing Hosts file» Identification» Managing system types» Users and authorizations» Directory Services» Global credentials» System credentials» Security» Trusted certificates» Viewing the audit log» Configuring the audit log» Monitoring systems and
events» Creating system and
cluster collections» Editing system and
cluster collections» Moving system and
cluster collections» Copying system and
cluster collections» Deleting system and
cluster collections» Setting properties for
system and clustercollections
» Creating eventcollections
» Editing event collections» Moving event
collectionsCopying eventcollections
» Command line interface
You can copy a collection as a new collection. When you copy a collection that was createdby members, you copy the collection and its members into the new collection. If you edit theoriginal collection after you copy it to the new collection, the newly copied collection is notupdated. For example, if the original collection has two members, the same two memberscopy to the new collection. If you edit the original collection to add another member afteryou copy it, the newly copied collection is not modified.
When you copy a collection that was created based on attributes, you copy the collectionattributes into the new collection. If you edit the original collection after you copy it to thenew collection, the newly copied collection does not reflect these edits.
When you copy a combination collection, the newly created collection has the same systemcollection and event collection. If you edit the original collection after you copy it to the newcollection, the newly copied collection is not updated. For more information aboutcollections, see the HP Systems Insight Manager User Guide.
Procedure 1 Copying event collections
1. Click Customize in the System and Event Collections panel. The CustomizeCollections page appears.
2. In the Show dropdown list, select Events . All available event collections appear.Click to expand all event collections in the table, or click to collapse allevent collections in the table.
3. Select the collection to copy, and then click [Copy]. The Copy Collection sectionappears.
4. In the Collection name field, enter a name for the collection.
5. Under Place in, select a location to save the collection.
Existing collection Select an existing private or shared collection fromthe dropdown list. Click [OK] to save the collection, or click [Cancel ] tocancel the save operation.
Locked collections do not appear in the list.
New collection Enter a name for the new collection and select an existingprivate or shared collection from the dropdown list. Click [OK] to save thecollection, or click [Cancel ] to cancel the save operation.
Command line interface
Users with administrative rights can use the mxcollection command to copy existingcollections from the CLI.
Systems Insight Manager - Related information
HP Systems Insight Manager 7.1 English
Operations | Monitoring systems and events | Deleting event collections
» Discovery in HP SIM» Discovery filters» Managing Hosts file» Identification» Managing system types» Users and authorizations» Directory Services» Global credentials» System credentials» Security» Trusted certificates» Viewing the audit log» Configuring the audit log» Monitoring systems and
events» Creating system and
cluster collections» Editing system and
cluster collections» Moving system and
cluster collections» Copying system and
cluster collections» Deleting system and
cluster collections» Setting properties for
system and clustercollections
» Creating eventcollections
» Editing event collections» Moving event
collections» Copying event
collections
» Command line interface
NOTE:Users with administrative rights can delete a shared collection. Users withoperator rights or user rights can view shared collections, but can only deletetheir own private collections.
Procedure 1 Deleting event collections
1. Click Customize in the System and Event Collections panel. The CustomizeCollections page appears.
2. In the Show dropdown list, select Events . All available event collections appear.Click to expand all event collections in the table, or click to collapse allevent collections in the table.
3. Select the collection to be deleted.
4. Click [Delete ]. A dialog box appears. To continue with the deletion, click [OK], or tocancel the operation, click [Cancel ]. If the selected collection is not empty or is inuse by a task (such as Home page, reports, and so on) an error message appears.However, if the collections contents are based on attributes, you can delete thecollection even if it is not empty.
Command line interface
Users with administrative rights can use the mxcollection command to delete existingcollections from the CLI.
Systems Insight Manager - Related information
HP Systems Insight Manager 7.1 English
Operations | Monitoring systems and events | Setting event properties
» Discovery in HP SIM» Discovery filters» Managing Hosts file» Identification» Managing system types» Users and authorizations» Directory Services» Global credentials» System credentials» Security» Trusted certificates» Viewing the audit log» Configuring the audit log» Monitoring systems and
events» Creating system and
cluster collections» Editing system and
cluster collections» Moving system and
cluster collections» Copying system and
cluster collections» Deleting system and
cluster collections» Setting properties for
system and clustercollections
» Creating eventcollections
» Editing event collections» Moving event
collections» Copying event
collections
» Command line interface
You can use the System and Event Collections panel to set event collection propertiessuch as hiding or showing collections.
Procedure 1 Setting properties for event collections
1. Click Customize in the System and Event Collections panel. The CustomizeCollections page appears.
2. In the Show collection of dropdown list, select Events . All available eventcollections appear. Click to expand all event collections in the table, or click
to collapse all event collections in the table.
3. Select a collection, and then click [Set Properties]. The Set Properties sectionappears.
4. Under Visible, select Yes, show collection and its members in the userinterface or select No, do not show collection and its members in the userinterface . If you have collections that are unused, you might want to select No, donot show collection and its members in the user interface so that thecollections do not clutter the System and Event Collections panel.
Command line interface
Users with administrative rights can use the mxcollection command to set properties forcollections from the CLI.
Systems Insight Manager - Related information
HP Systems Insight Manager 7.1 English
Operations | Monitoring systems and events | System table view page
» Discovery in HP SIM» Discovery filters» Managing Hosts file» Identification» Managing system types» Users and authorizations» Directory Services» Global credentials» System credentials» Security» Trusted certificates» Viewing the audit log» Configuring the audit log» Monitoring systems and
events» Creating system and
cluster collections» Editing system and
cluster collections» Moving system and
cluster collections» Copying system and
cluster collections» Deleting system and
cluster collections» Setting properties for
system and clustercollections
» Creating eventcollections
» Editing event collections» Moving event
collections» Copying event
collections
Users with administrative rights can manage all shared system collections from the systemtable view page. Users can also manage their own private collections from this page. Theycan:
Save selections See Systems Insight Manager - Saving collections for moreinformation.
Delete systems from the database See Systems Insight Manager - Deletingsystems from the HP SIM database for more information.
Print a system collection results See Systems Insight Manager - Printing asystem collection view for more information.
Customize the view See Systems Insight Manager - Customizing the systemtable view page for more information.
The system table view page contains the following tabs:
System(s) Lists all systems in the collection.
Events Displays the events for all systems included under the System(s) tab.From this tab, you can apply additional filters to modify the event table display.
When switching between the System(s) tab and the Events tab, the Events tab"remembers" the selected events and event filter (if viewing a system collection). TheSystem(s) tab remembers the selected systems, view type (table, tree, or icon), and theselected system filter (if viewing an event collection). However, the selections on each pageare independent of each other.
Systems Insight Manager - Related information
HP Systems Insight Manager 7.1 English
Operations | Monitoring systems and events | Customizing the system table view page
» Discovery in HP SIM» Discovery filters» Managing Hosts file» Identification» Managing system types» Users and authorizations» Directory Services» Global credentials» System credentials» Security» Trusted certificates» Viewing the audit log» Configuring the audit log» Monitoring systems and
events» Creating system and
cluster collections» Editing system and
cluster collections» Moving system and
cluster collections» Copying system and
cluster collections» Deleting system and
cluster collections» Setting properties for
system and clustercollections
» Creating eventcollections
» Editing event collections» Moving event
collections» Copying event
collections
The Customize link is located in the upper right corner of the system table view page. Clickthis link to configure where columns appear and in what order. When you modify thecolumns to display on the system table view page and select Apply to all system tableviews, these columns become the default set of columns displayed for any systemcollection selected if the collection does not already have customized columns defined. Formore information, see Systems Insight Manager - Customizing the system table view page.
Procedure 1 Customizing the system table view page
1. On the system table view page, click Customize. The Customize Table ViewAppearance page appears.
2. Select the columns you want displayed in the Available Columns box, and then
click to add the columns to the Displayed Columns box.
3. To remove one or more columns from the display, select the columns in the
Displayed Columns box, and then click to move them to the AvailableColumns box.
4. To rearrange how the columns appear, select a column in the Displayed Columnsbox, and then click or .
5. To sort collection results by a particular column, select a column from the Sort bydropdown list.
6. Select Ascending or Descending.
7. To apply the customization to all system collections, select Apply to all systemcollections.
8. To save selections and return to the system table view page, click [OK], or tocancel all changes and return to the system table view page, click [Cancel ].
Systems Insight Manager - Related information
HP Systems Insight Manager 7.1 English
Operations | Monitoring systems and events | Deleting systems from the HP SIM database
» Discovery in HP SIM» Discovery filters» Managing Hosts file» Identification» Managing system types» Users and authorizations» Directory Services» Global credentials» System credentials» Security» Trusted certificates» Viewing the audit log» Configuring the audit log» Monitoring systems and
events» Creating system and
cluster collections» Editing system and
cluster collections» Moving system and
cluster collections» Copying system and
cluster collections» Deleting system and
cluster collections» Setting properties for
system and clustercollections
» Creating eventcollections
» Editing event collections» Moving event
collections» Copying event
collections
NOTE:Deleting multiple systems from the database at one time can cause performancedelays.
NOTE:The CMS cannot be deleted.
NOTE:You cannot delete clusters that contain cluster members. To delete a cluster withits cluster members, you must first go to the system table view page by selectingthe All Systems collection in the System and Event Collections panel. Then,select the cluster along with all of its members, and then click [Delete ].
IMPORTANT:If you do not add the IP addresses of the systems to the discovery exclusion list,the systems are rediscovered and added again to the database.
Procedure 1 Deleting systems from the HP SIM database
1. On the system table view page, select one or more systems to delete from the HPSIM database by selecting them in the results display.
2. Click [Delete ]. A dialog box appears, stating, Are you sure you want to deletethese systems?
3. To delete the systems, click [OK], or to return to the system table view page withoutdeleting the events, click [Cancel ].
NOTE:Containers (for example, racks) must be empty before you can delete them.Selecting a rack and all its contained systems work without error.
NOTE:You cannot remove some systems that host management proxies (such as theWMI Mapper Proxy or an SMI-S provider) until you remove all dependantsystems.
HP Systems Insight Manager 7.1 English
Operations | Monitoring systems and events | Printing a system collection view
» Discovery in HP SIM» Discovery filters» Managing Hosts file» Identification» Managing system types» Users and authorizations» Directory Services» Global credentials» System credentials» Security» Trusted certificates» Viewing the audit log» Configuring the audit log» Monitoring systems and
events» Creating system and
cluster collections» Editing system and
cluster collections» Moving system and
cluster collections» Copying system and
cluster collections» Deleting system and
cluster collections» Setting properties for
system and clustercollections
» Creating eventcollections
» Editing event collections» Moving event
collections» Copying event
collections
Procedure 1 Printing systems from the system table view page
1. On the system table view page, click [Print ]. A print window appears
2. When the report appears, select File Print from the browser menu.
Because certain print options are not supported in Systems Insight Manager, you cannotperform the following tasks:
Change the Orientation to Landscape in the Print dialog box.
Cancel printing after the print job has been executed; however, you can access theoperating systems print queue and cancel the print job
Print to a file
Print specific selections; you can print the entire list only
Print the table view page if you close the browser immediately after issuing a printrequest
Systems Insight Manager - Related information
HP Systems Insight Manager 7.1 English
Operations | Monitoring systems and events | Cluster table view page
» Discovery in HP SIM» Discovery filters» Managing Hosts file» Identification» Managing system types» Users and authorizations» Directory Services» Global credentials» System credentials» Security» Trusted certificates» Viewing the audit log» Configuring the audit log» Monitoring systems and
events» Creating system and
cluster collections» Editing system and
cluster collections» Moving system and
cluster collections» Copying system and
cluster collections» Deleting system and
cluster collections» Setting properties for
system and clustercollections
» Creating eventcollections
» Editing event collections» Moving event
collections» Copying event
collections
» Tabs
To access Cluster collections in the System and Event Collections panel, click Systemsand then select one of the available cluster collections. Users with administrative rights canmanage all shared cluster collections from the cluster collection view. Users can managetheir own private collections from this page, as well as:
Save collections Click [Save As Collection] from the cluster table view page.
Delete clusters Click [Delete ] from the cluster table view page. A confirmationbox appears. To delete the cluster, click [OK], or to cancel the deletion, click[Cancel ].
NOTE:Clusters that contain cluster members cannot be deleted. To delete acluster with its cluster members, select the All Systems collection in theSystem and Event Collections panel. Then, select the cluster and all ofits members, and then click [Delete ].
Print cluster collection view Click [Print ] to print the collection results.
Customize the view Click Customize to customize which columns display and inwhat order.
Tabs
The cluster table view page contains the following tabs:
System(s) Lists all systems in the collection.
Events Displays the events for all systems included under the System(s) tab.From this tab, you can apply additional filters to modify the event table display.
When switching between the System(s) tab and the Events tab, the Events tab"remembers" the selected events and event filter (if viewing a system collection). TheSystem(s) tab remembers the selected systems, view type (table, tree, or icon), and theselected system filter (if viewing an event collection). However, the selections on each pageare independent of each other.
Systems Insight Manager - Related information
HP Systems Insight Manager 7.1 English
Operations | Monitoring systems and events | Customizing the cluster table view page
» Discovery in HP SIM» Discovery filters» Managing Hosts file» Identification» Managing system types» Users and authorizations» Directory Services» Global credentials» System credentials» Security» Trusted certificates» Viewing the audit log» Configuring the audit log» Monitoring systems and
events» Creating system and
cluster collections» Editing system and
cluster collections» Moving system and
cluster collections» Copying system and
cluster collections» Deleting system and
cluster collections» Setting properties for
system and clustercollections
» Creating eventcollections
» Editing event collections» Moving event
collections» Copying event
collections
When you modify the columns to display on the cluster table view page and select Apply toall cluster table views, these columns become the default columns displayed for anycluster collection selected if that collection does not already have customized columnsdefined.
Procedure 1 Customizing the cluster table view page
1. On the cluster table view page, click Customize. The Customize Table ViewAppearance page appears.
2. Select the columns you want displayed in the Available Columns box, and then
click to add the columns to the Displayed Columns box.
3. To remove one or more columns from the display, select the columns in the
Displayed Columns box, and then click to move them to the AvailableColumns box.
4. To rearrange how the columns appear, select a column in the Displayed Columnsbox, and then click or .
5. To sort the list by a particular column, select a column from the Sort by dropdownlist.
6. Select Ascending or Descending.
7. If you want the customization to apply to all cluster collections, select Apply to allcluster table views.
8. To save selections and return to the cluster table view page, click [OK], or to cancelall changes and return to the cluster table view page, click [Cancel ].
Systems Insight Manager - Related information
HP Systems Insight Manager 7.1 English
Operations | Monitoring systems and events | Deleting clusters from the HP SIM database
» Discovery in HP SIM» Discovery filters» Managing Hosts file» Identification» Managing system types» Users and authorizations» Directory Services» Global credentials» System credentials» Security» Trusted certificates» Viewing the audit log» Configuring the audit log» Monitoring systems and
events» Creating system and
cluster collections» Editing system and
cluster collections» Moving system and
cluster collections» Copying system and
cluster collections» Deleting system and
cluster collections» Setting properties for
system and clustercollections
» Creating eventcollections
» Editing event collections» Moving event
collections» Copying event
collections
You cannot delete clusters that contain cluster members defined in HP SIM. To delete acluster with its cluster members, select the All Systems collection in the System and EventCollections panel. Then, select the cluster and all of its members, and then click [Delete ].
IMPORTANT:If you do not add the IP addresses of the deleted clusters to the discoveryexclusion list, the systems will be rediscovered and added again to the database.
Procedure 1 Deleting clusters
1. On the cluster table view page, select one or more clusters to delete from thedatabase by highlighting them.
2. Click [Delete ]. A dialog box appears, stating, Are you sure you want to deletethese systems?
3. To delete the clusters, click [OK], or to return to the cluster table view page withoutdeleting the clusters, click [Cancel ].
Systems Insight Manager - Related information
HP Systems Insight Manager 7.1 English
Operations | Monitoring systems and events | Printing a cluster collection view
» Discovery in HP SIM» Discovery filters» Managing Hosts file» Identification» Managing system types» Users and authorizations» Directory Services» Global credentials» System credentials» Security» Trusted certificates» Viewing the audit log» Configuring the audit log» Monitoring systems and
events» Creating system and
cluster collections» Editing system and
cluster collections» Moving system and
cluster collections» Copying system and
cluster collections» Deleting system and
cluster collections» Setting properties for
system and clustercollections
» Creating eventcollections
» Editing event collections» Moving event
collections» Copying event
collections
Procedure 1 Printing a list of clusters from the table view page
1. From the cluster table view page, click [Print ].
2. When the report appears, select File Print in the browser menu.
Because certain print options are not supported in HP SIM, you cannot perform the followingtasks:
Change the Orientation to Landscape in the Print dialog box.
Cancel printing after the print job has been executed; however, you can access theoperating systems print queue and cancel the print job
Print to a file
Print specific selections; you can print the entire list only
Print the table view page if you close the browser immediately after issuing a printrequest
Systems Insight Manager - Related information
HP Systems Insight Manager 7.1 English
Operations | Monitoring systems and events | Event table view page
» Discovery in HP SIM» Discovery filters» Managing Hosts file» Identification» Managing system types» Users and authorizations» Directory Services» Global credentials» System credentials» Security» Trusted certificates» Viewing the audit log» Configuring the audit log» Monitoring systems and
events» Creating system and
cluster collections» Editing system and
cluster collections» Moving system and
cluster collections» Copying system and
cluster collections» Deleting system and
cluster collections» Setting properties for
system and clustercollections
» Creating eventcollections
» Editing event collections» Moving event
collections» Copying event
collections
To access event collections, click Events in the System and Event Collections panel.Users with administrative rights can manage all shared event collections from the event tableview page. All users can manage their own private event collections from this page, andperform the following tasks:
Clear events Select one or more events to clear, and then click [Clear].
Delete events Select one or more events to delete, and then click [Delete ].
Assign events Select one or more events to assign to specific users, and thenclick [Assign to].
Add comments to events Select one or more events to add comments to, andthen click [Enter Comment].
Print event collection results Click [Print ] to print the collection results.
Customize the view Click Customize to customize which columns appear and inwhat order.
For users with operator rights and user rights to clear, delete, assign events, and addcomments to events, you must select Configuration Tool from the Show tools in categorydropdown list. Then, select Clear Events , Delete Events , Assign Events , and CommentEvents as necessary, and then click to add them to the Toolbox contents.
The event table view page contains the following tabs:
System(s) Lists all systems in the collection.
Events Displays the events for all systems included under the System(s) tab.From this tab, you can apply additional filters to modify the event table display.
When switching between the System(s) tab and the Events tab, the Events tab"remembers" the selected events and event filter (if viewing a system collection). TheSystem(s) tab remembers the selected systems, view type (table, tree, or icon), and theselected system filter (if viewing an event collection). However, the selections on each pageare independent of each other.
Systems Insight Manager - Related information
HP Systems Insight Manager 7.1 English
Operations | Monitoring systems and events | Customizing the event table view page
» Discovery in HP SIM» Discovery filters» Managing Hosts file» Identification» Managing system types» Users and authorizations» Directory Services» Global credentials» System credentials» Security» Trusted certificates» Viewing the audit log» Configuring the audit log» Monitoring systems and
events» Creating system and
cluster collections» Editing system and
cluster collections» Moving system and
cluster collections» Copying system and
cluster collections» Deleting system and
cluster collections» Setting properties for
system and clustercollections
» Creating eventcollections
» Editing event collections» Moving event
collections» Copying event
collections
When you modify what columns display on the event table view page and select Apply toall event table views, these columns become the default set of columns that appear forany cluster collection selected if the collection does not already have customized columnsdefined.
Procedure 1 Modifying the event table view page
1. On the event table view page, click Customize. The Customize Table ViewAppearance page appears.
2. Select the columns you want displayed from the Available Columns box, and then
click to add the columns to the Displayed Columns box.
3. To remove one or more columns from the display, select the columns in the
Displayed Columns box, and then click to move them to the AvailableColumns box, so they no longer appear.
4. To rearrange how the columns display, select a column in the Displayed Columnsbox, and then click or .
5. To sort the collection by column, select a column from the Sort by dropdown list.
6. Select Ascending or Descending.
7. To apply the customization to all event collections, select Apply to all eventcollections.
8. To save selections and return to the event table view page, click [OK], to cancel allchanges and return to the event table view page or click [Cancel ].
Systems Insight Manager - Related information
HP Systems Insight Manager 7.1 English
Operations | Monitoring systems and events | Clearing events from the collection
» Discovery in HP SIM» Discovery filters» Managing Hosts file» Identification» Managing system types» Users and authorizations» Directory Services» Global credentials» System credentials» Security» Trusted certificates» Viewing the audit log» Configuring the audit log» Monitoring systems and
events» Creating system and
cluster collections» Editing system and
cluster collections» Moving system and
cluster collections» Copying system and
cluster collections» Deleting system and
cluster collections» Setting properties for
system and clustercollections
» Creating eventcollections
» Editing event collections» Moving event
collections» Copying event
collections
You must have administrative rights to clear events.
NOTE:For users with operator and user rights to clear events, they must have the ClearEvents tool selected in their toolbox categories. See Systems Insight Manager -Editing toolboxes for more information.
Procedure 1 Clearing events
1. On the event table view page, select the event that you want to clear.
2. Click [Clear]. For the events selected, the state changes from Not Cleared toCleared in the State column.
Systems Insight Manager - Related information
HP Systems Insight Manager 7.1 English
Operations | Monitoring systems and events | Deleting events from the HP SIM database
» Discovery in HP SIM» Discovery filters» Managing Hosts file» Identification» Managing system types» Users and authorizations» Directory Services» Global credentials» System credentials» Security» Trusted certificates» Viewing the audit log» Configuring the audit log» Monitoring systems and
events» Creating system and
cluster collections» Editing system and
cluster collections» Moving system and
cluster collections» Copying system and
cluster collections» Deleting system and
cluster collections» Setting properties for
system and clustercollections
» Creating eventcollections
» Editing event collections» Moving event
collections» Copying event
collections
You must have administrative rights to delete events, including Discovery events. However,you cannot delete pending events. For users with operator and user rights to delete events,they must have the Delete Events tool selected in their toolbox categories. See SystemsInsight Manager - Editing toolboxes for more information.
Procedure 1 Deleting events
1. On the event table view page, select the event you want to delete.
2. Click [Delete ]. A confirmation box appears.
3. To delete the event, click [OK], or to return to the event table view page, click[Cancel ].
Systems Insight Manager - Related information
HP Systems Insight Manager 7.1 English
Operations | Monitoring systems and events | Assigning events to users
» Discovery in HP SIM» Discovery filters» Managing Hosts file» Identification» Managing system types» Users and authorizations» Directory Services» Global credentials» System credentials» Security» Trusted certificates» Viewing the audit log» Configuring the audit log» Monitoring systems and
events» Creating system and
cluster collections» Editing system and
cluster collections» Moving system and
cluster collections» Copying system and
cluster collections» Deleting system and
cluster collections» Setting properties for
system and clustercollections
» Creating eventcollections
» Editing event collections» Moving event
collections» Copying event
collections
You must have administrative rights to assign events from shared collections. For users withoperator and user rights to assign events, they must have the Assign Events tool selectedin their toolbox categories. For more information, see Systems Insight Manager - Editingtoolboxes.
IMPORTANT:Assigning events to certain users does not facilitate any tracking, and the user isnot notified of the event.
CAUTION:If selected events have previously been assigned, selecting a new assignee andclicking [OK] overrides the previous assignment.
NOTE:You can enter a maximum of 50 characters in the assignee field.
Procedure 1 Assigning events
1. On the event table view page, select the events you want to assign to a user.
2. Click [Assign To]. The Assign to section appears.
3. Select New assignee or Choose existing assignee. If you select Chooseexisting assignee , click the down arrow, and then select an assignee from thedropdown list.
4. To update the database, click [OK], or click [Cancel ].
Systems Insight Manager - Related information
HP Systems Insight Manager 7.1 English
Operations | Monitoring systems and events | Printing an event collection view
» Discovery in HP SIM» Discovery filters» Managing Hosts file» Identification» Managing system types» Users and authorizations» Directory Services» Global credentials» System credentials» Security» Trusted certificates» Viewing the audit log» Configuring the audit log» Monitoring systems and
events» Creating system and
cluster collections» Editing system and
cluster collections» Moving system and
cluster collections» Copying system and
cluster collections» Deleting system and
cluster collections» Setting properties for
system and clustercollections
» Creating eventcollections
» Editing event collections» Moving event
collections» Copying event
collections
Procedure 1 Printing events from the event table view page
1. On the event view page, click [Print ]. A printable window appears.
2. When the report appears, select File Print in the browser menu.
Because certain print options are not supported in Systems Insight Manager, you cannotperform the following tasks:
Change the Orientation to Landscape in the Print dialog box.
Cancel printing after the print job has been executed; however, you can access theoperating systems print queue and cancel the print job
Print to a file
Print specific selections; you can print the entire list only
Print the table view page if you close the browser immediately after issuing a printrequest
Systems Insight Manager - Related information
HP Systems Insight Manager 7.1 English
Operations | Monitoring systems and events | Entering comments to events
» Discovery in HP SIM» Discovery filters» Managing Hosts file» Identification» Managing system types» Users and authorizations» Directory Services» Global credentials» System credentials» Security» Trusted certificates» Viewing the audit log» Configuring the audit log» Monitoring systems and
events» Creating system and
cluster collections» Editing system and
cluster collections» Moving system and
cluster collections» Copying system and
cluster collections» Deleting system and
cluster collections» Setting properties for
system and clustercollections
» Creating eventcollections
» Editing event collections» Moving event
collections» Copying event
collections
Use the following procedure to add comments to events. You must have administrativerights to add comments to events.
NOTE:For users with operator and user rights to add comments to an event, they musthave the Comment Events tool selected in their toolbox categories. For moreinformation, see Systems Insight Manager - Editing toolboxes.
CAUTION:If you add comments to events that already have comments, the previouscomments are replaced with the new comments in the database.
NOTE:The maximum number of characters allowed for comments is 1,000.
Procedure 1 Adding comments to events
1. On the event table view page, select the events for which you want to entercomments.
2. Click [Enter Comments]. The Enter Comments section appears.
3. Enter the comments.
4. To update the database, click [OK], or to return to the event table view page, click[Cancel ].
Systems Insight Manager - Related information
HP Systems Insight Manager 7.1 English
Operations | Monitoring systems and events | Saving collections
Saving collections
»Table of Contents» Index
»Notices» Introduction»Product overview»Initial setup»Screens and product
layout»Operations
»Customizing theHome page
»Customizing thesystem status panel
»Enlarging theSystem Statuspanel
»Setting up managedsystems from aLinux CMS
»Setting up managedsystems from aWindows CMS
»Setting up managedsystems from a HP-UX CMS
»Discovery in HPSIM
»Discovery filters»Managing Hosts
file» Identification»Managing system
types»Users and
authorizations»Directory Services»Global credentials»System credentials»Security»Trusted certificates»Viewing the audit
log
Perform the following procedure to save a system, event, or clustercollection with a new name or to a specific location.
NOTE:
For a system search, the name can contain no more than 40characters (no special characters) and must be unique so thata duplicate collection name cannot be assigned to the newcollection, and cannot include special characters.
Procedure 1 Saving collections
1. In the Name field, enter a name for the collection.
2. Under Place in, select one of the following options to save thecollection:
Existing collection Select an existing private or sharedcollection from the dropdown list. Click [OK] to save thecollection, or click [Cancel] to cancel the save operation.
Locked collections do not appear in the list.
New collection Enter a name for the new collectionand select an existing private or shared collection fromthe dropdown list. Click [OK] to save the collection, orclick [Cancel] to cancel the save operation.
Systems Insight Manager - Related information
HP Systems Insight Manager 7.1 English
Operations | Monitoring systems and events | Related information
» Discovery in HP SIM» Discovery filters» Managing Hosts file» Identification» Managing system types» Users and authorizations» Directory Services» Global credentials» System credentials» Security» Trusted certificates» Viewing the audit log» Configuring the audit log» Monitoring systems and
events» Creating system and
cluster collections» Editing system and
cluster collections» Moving system and
cluster collections» Copying system and
cluster collections» Deleting system and
cluster collections» Setting properties for
system and clustercollections
» Creating eventcollections
» Editing event collections» Moving event
collections» Copying event
collections
Related procedures
» Systems Insight Manager - Editing system and cluster collections» Systems Insight Manager - Creating system and cluster collections» Systems Insight Manager - Deleting system and cluster collections» Systems Insight Manager - Setting properties for system and cluster collections» Systems Insight Manager - Editing event collections» Systems Insight Manager - Creating event collections» Systems Insight Manager - Deleting event collections» Systems Insight Manager - Moving event collections» Systems Insight Manager - Copying event collections» Systems Insight Manager - Setting event properties» Systems Insight Manager - Editing system and cluster collections» Systems Insight Manager - Creating system and cluster collections» Systems Insight Manager - Deleting system and cluster collections» Systems Insight Manager - Moving system and cluster collections» Systems Insight Manager - Copying system and cluster collections» Systems Insight Manager - Setting properties for system and cluster collections» Systems Insight Manager - Customizing the system table view page» Systems Insight Manager - Deleting systems from the HP SIM database» Systems Insight Manager - Printing a system collection view» Systems Insight Manager - Customizing the cluster table view page» Systems Insight Manager - Deleting clusters from the HP SIM database» Systems Insight Manager - Printing a cluster collection view» Systems Insight Manager - Customizing the event table view page» Systems Insight Manager - Deleting events from the HP SIM database» Systems Insight Manager - Printing an event collection view» Systems Insight Manager - Entering comments to events» Systems Insight Manager - Assigning events to users» Systems Insight Manager - Clearing events from the collection» Systems Insight Manager - Saving collections
Related topics
» Systems Insight Manager - Quick Launch menu» Systems Insight Manager - Navigating the System and Event Collections panel» Systems Insight Manager - Customizing system and cluster collections» Systems Insight Manager - Customizing event collections» Systems Insight Manager - Navigating the cluster table view page» Systems Insight Manager - Navigating the event table view page» Systems Insight Manager - Navigating the picture view page» Systems Insight Manager - Navigating the icon view» Systems Insight Manager - Navigating the system table view page» Systems Insight Manager - Navigating the tree view
» Discovery in HP SIM» Discovery filters» Managing Hosts file» Identification» Managing system types» Users and authorizations» Directory Services» Global credentials» System credentials» Security» Trusted certificates» Viewing the audit log» Configuring the audit log» Monitoring systems and
eventsQuick Launch menu
» Performing a basic search» Performing an advanced
search for systems» Performing an advanced
search for clusters» Performing an advanced
search for events» Tool search» Related information for
searches» Configuring events» Protocol settings» Software status polling» Hardware status polling» Data collection» System Properties» Configuring WBEM health
inclusion status» Specifying a Version
The Quick Launch menu contains a short list of frequently used tools. Customizing theQuick Launch menu enables you to select which tools appear in the menu. Tools appearonly in the Quick Launch menu if all the selected targets are valid for that tool.Customizations are on a per-user basis. The Quick Launch menu is available from thefollowing pages in HP SIM:
All views (table, tree, icon, or picture) of all collections
Search Results page
System Page
Procedure 1 Customizing the Quick Launch menu
1. Click Customize in the Quick Launch menu. The Customize Quick Launch pageappears.
2. Select a menu category from the Available tools from dropdown list. All availabletools from that menu are listed.
3. Select tools to add to the Selected tools list and click .
To remove tools from the Selected tools list, highlight the tools to remove and click
.
Click or to arrange tools in the list.
4. (Optional) Select Show original menu structure (and order) in the Quick Launchmenu.
This displays the menu paths in the Quick Launch menu.
5. Click [OK] to save changes, or click [Restore Defaults] to restore system defaults.
» Discovery in HP SIM» Discovery filters» Managing Hosts file» Identification» Managing system types» Users and authorizations» Directory Services» Global credentials» System credentials» Security» Trusted certificates» Viewing the audit log» Configuring the audit log» Monitoring systems and
events» Quick Launch menu
Performing a basic search» Performing an advanced
search for systems» Performing an advanced
search for clusters» Performing an advanced
search for events» Tool search» Related information for
searches» Configuring events» Protocol settings» Software status polling» Hardware status polling» Data collection» System Properties» Configuring WBEM health
inclusion status» Specifying a Version
Perform this procedure to complete a basic system search by searching for matches insystem name and common system attributes.
Procedure 1 Performing a basic search
1. Enter a system name or keyword in the Search panel.
As you type, a dropdown list displays systems with names that begin with the textentered. The list includes up to 12 systems and shows the icon for the systemhealth status. If more than 12 systems are found, an ellipsis (...) appears at thebottom of the list. Continue typing to narrow the list further.
NOTE:Press Esc to hide the dropdown list.
To view the System Page for a single system, select it with the mouse orselect it with the up and down arrows on your keyboard, and then pressEnter.
If you want to search for multiple systems or a system attribute, do notselect a system in the dropdown list. Press Enter or click [Search]. TheSearch Results page appears and lists all matching systems.
2. To do an additional search from the Search Results page, enter the system nameor attribute in the Search again field, and then select system name or commonsystem attributes in the dropdown menu. Click [View ]. The new Search Resultsappear.
NOTE:Common system attributes include Full DNS name, Device hostname,Serial number, Operating System Type, Operating System Version,Operating System description, Operating System name, Product model,System type, and IP address.
NOTE:Searching using common system attributes can be time-consuming ifthere are a large number of systems because the search looks atseveral attributes in the database multiplied by the number of discoveredsystems.
3. (Optional) After the search results appear, you can do one of the following:
Save the search results. Click [Save As Collection], enter a name for thesearch, and then select where to save the collection. See Systems InsightManager - Saving collections for more information. to save the search, click[OK], or to return to the Search Results page, click [Cancel ].
Perform a more advanced search. Click [Advanced Search]. TheAdvanced Search page appears.
Systems Insight Manager - Related information
HP Systems Insight Manager 7.1 English
Operations | Performing an advanced search for systems
» Discovery in HP SIM» Discovery filters» Managing Hosts file» Identification» Managing system types» Users and authorizations» Directory Services» Global credentials» System credentials» Security» Trusted certificates» Viewing the audit log» Configuring the audit log» Monitoring systems and
events» Quick Launch menu» Performing a basic search
Performing an advancedsearch for systems» Deleting system search
results from a searchview
» Printing system searchresults
» Performing an advancedsearch for clusters
» Performing an advancedsearch for events
» Tool search» Related information for
searches» Configuring events» Protocol settings» Software status polling» Hardware status polling
Use the following procedure to perform an advanced search for systems. The following image shows theAdvanced Search page for systems.
Procedure 1 Performing an advanced search for systems
1. Click Advanced Search in the Search panel.
2. Select systems from the Search for dropdown list.
3. From the first selection box (criteria selection), click the down arrow, and then select the search criteria.
NOTE:Some search criteria show no values until systems with values for that criteria have beendiscovered. In this case, the criteria is not displayed until values are available.
4. From the second selection box (comparison selection), click the down arrow, and then select thecomparison option.
NOTE:Different criteria support different comparisons. The comparison options change with the criteriaselected. For example, if you select operating system as criteria, the following possiblecomparisons are available: is, is not, contains, starts with, and ends with. See the HP SystemsInsight Manager User Guide for more information.
5. In the third selection box (value selection), select one of the available values for specific criteria orcomparison combination from the dropdown list, or enter the required information in the input box.
6. To add additional criteria, click [Add]. To conduct the system search immediately, click [View ]. To deletesearch criteria, click [Delete ]. To save the search as a collection, click [Save As ].
NOTE:Criteria are reordered after clicking [View ] or [Save As ]. If criteria types are the same, they areplaced together with "OR", if they are different, they are placed together with "AND".
7. If you clicked [View ], search results appear. You can chose to delete or print the results. See SystemsInsight Manager - Deleting system search results from a search view for more information about deletingselections. See Systems Insight Manager - Printing system search results for information about printingsearch results.
Systems Insight Manager - Related information
HP Systems Insight Manager 7.1 English
Operations | Performing an advanced search for systems | Deleting system search results from a search view
» Discovery in HP SIM» Discovery filters» Managing Hosts file» Identification» Managing system types» Users and authorizations» Directory Services» Global credentials» System credentials» Security» Trusted certificates» Viewing the audit log» Configuring the audit log» Monitoring systems and
events» Quick Launch menu» Performing a basic search» Performing an advanced
search for systemsDeleting system searchresults from a searchview
» Printing system searchresults
» Performing an advancedsearch for clusters
» Performing an advancedsearch for events
» Tool search» Related information for
searches» Configuring events» Protocol settings» Software status polling» Hardware status polling
NOTE:Deleting multiple systems from the list can cause performance delays.
Procedure 1 Deleting systems from a system advanced search
1. After the search results appear, select systems to delete from the search, and thenclick [Delete ]. A dialog box appears, stating, Are you sure you want to deletethese systems?
2. To delete the systems, click [OK], or to return to the Search Results page withoutdeleting the systems click [Cancel ].
NOTE:Containers (for example, racks) must be empty before they can bedeleted. Selecting a rack and all its contained systems works withouterror.
Systems Insight Manager - Related information
HP Systems Insight Manager 7.1 English
Operations | Performing an advanced search for systems | Printing system search results
» Discovery in HP SIM» Discovery filters» Managing Hosts file» Identification» Managing system types» Users and authorizations» Directory Services» Global credentials» System credentials» Security» Trusted certificates» Viewing the audit log» Configuring the audit log» Monitoring systems and
events» Quick Launch menu» Performing a basic search» Performing an advanced
search for systems» Deleting system search
results from a searchviewPrinting system searchresults
» Performing an advancedsearch for clusters
» Performing an advancedsearch for events
» Tool search» Related information for
searches» Configuring events» Protocol settings» Software status polling» Hardware status polling
Procedure 1 Printing system advanced search results
1. After the Search Results page appears, click [View ]. The results appear.
2. Click Print .
The results are printed.
NOTE:The Print dialog box might be hidden. If so, go to the Windows Task Barto display the box.
Because the following print options are not supported in HP SIM, you cannotperform the following tasks:
Change the Orientation to Landscape in the Print dialog box.
Cancel printing after the print job has been executed; however, you canaccess the operating system's print queue and cancel the print job
Cancel printing to a file
Print selected systems; only the entire list of systems
Print the system search results if you close the browser immediately afterissuing a print request
Systems Insight Manager - Related information
HP Systems Insight Manager 7.1 English
Operations | Performing an advanced search for clusters
» Discovery in HP SIM» Discovery filters» Managing Hosts file» Identification» Managing system types» Users and authorizations» Directory Services» Global credentials» System credentials» Security» Trusted certificates» Viewing the audit log» Configuring the audit log» Monitoring systems and
events» Quick Launch menu» Performing a basic search» Performing an advanced
search for systemsPerforming an advancedsearch for clusters» Deleting cluster search
results from a searchview
» Printing cluster searchresults
» Performing an advancedsearch for events
» Tool search» Related information for
searches» Configuring events» Protocol settings» Software status polling» Hardware status polling
Use the following procedure to perform an advanced search for clusters. The following image shows the AdvancedSearch page for clusters.
Procedure 1 Performing an advanced search for clusters
1. Click Advanced Search in the Search panel.
2. Select clusters from the Search for dropdown list.
3. From the first selection box (criteria selection), click the down arrow, and then select the search criteria.
NOTE:Some search criteria show no values until systems with values for that criteria have beendiscovered. In this case, the criteria is not displayed until values are available.
4. From the second selection box (comparison selection), click the down arrow, and then select thecomparison option.
NOTE:Different criteria support different comparisons. The comparison options change with the criteriaselected.
5. In the third selection box (value selection), select one of the available values for a specific criteria orcomparison combination from the dropdown list, or enter the required information in the input box.
6. To add additional criteria, click [Add]. To conduct the cluster search immediately, click [View ]. To deletesearch criteria, click [Delete ], or to save the search as a collection, click [Save as collection].
7. If you clicked [View ], the search results appear. You can choose to delete or print the results. SeeSystems Insight Manager - Deleting system search results from a search view for more information aboutdeleting selections. See Systems Insight Manager - Printing system search results for information aboutprinting search results.
Systems Insight Manager - Related information
HP Systems Insight Manager 7.1 English
Operations | Performing an advanced search for clusters | Deleting cluster search results from a search view
Deleting cluster search results from a search view
» Discovery in HP SIM» Discovery filters» Managing Hosts file» Identification» Managing system types» Users and authorizations» Directory Services» Global credentials» System credentials» Security» Trusted certificates» Viewing the audit log» Configuring the audit log» Monitoring systems and
events» Quick Launch menu» Performing a basic search» Performing an advanced
search for systems» Performing an advanced
search for clustersDeleting cluster searchresults from a searchview
» Printing cluster searchresults
» Performing an advancedsearch for events
» Tool search» Related information for
searches» Configuring events» Protocol settings» Software status polling» Hardware status polling
NOTE:Deleting multiple clusters from a collection can cause performance delays.
NOTE:You cannot delete clusters that contain cluster members. To delete a cluster andits cluster members, select the All Systems collection in the System and EventCollections panel. Then, select the cluster and all of its members, and then click[Delete ].
Procedure 1 Deleting clusters from search results
1. After the search results appear, select clusters to delete from the search, and thenclick [Delete ]. A dialog box appears, stating, Are you sure you want to deletethese systems?
2. To delete the systems, click [OK], or to return to the Search Results page withoutdeleting the clusters, click [Cancel ].
Systems Insight Manager - Related information
HP Systems Insight Manager 7.1 English
Operations | Performing an advanced search for clusters | Printing cluster search results
» Discovery in HP SIM» Discovery filters» Managing Hosts file» Identification» Managing system types» Users and authorizations» Directory Services» Global credentials» System credentials» Security» Trusted certificates» Viewing the audit log» Configuring the audit log» Monitoring systems and
events» Quick Launch menu» Performing a basic search» Performing an advanced
search for systems» Performing an advanced
search for clusters» Deleting cluster search
results from a searchviewPrinting cluster searchresults
» Performing an advancedsearch for events
» Tool search» Related information for
searches» Configuring events» Protocol settings» Software status polling» Hardware status polling
Procedure 1 Printing cluster search results
1. After the Search Results appears, click [View ]. The results appear.
2. Click Print .
The results are printed.
NOTE:The Print dialog box might be hidden. If so, go to the Windows Task Barto display the box.
Because the following print options are not supported in HP SIM, you cannotperform the following tasks:
Change the Orientation to Landscape in the Print dialog box.
Cancel printing after the print job has been executed; however, you canaccess the operating system's print queue and cancel the print job
Cancel printing to a file
Print selected clusters; only the entire search results
Print the cluster search results if you close the browser immediately afterissuing a print request
Systems Insight Manager - Related information
HP Systems Insight Manager 7.1 English
Operations | Performing an advanced search for events
» Discovery in HP SIM» Discovery filters» Managing Hosts file» Identification» Managing system types» Users and authorizations» Directory Services» Global credentials» System credentials» Security» Trusted certificates» Viewing the audit log» Configuring the audit log» Monitoring systems and
events» Quick Launch menu» Performing a basic search» Performing an advanced
search for systems» Performing an advanced
search for clustersPerforming an advancedsearch for events» Deleting event search
results from a searchview
» Printing event searchresults
» Tool search» Related information for
searches» Configuring events» Protocol settings» Software status polling» Hardware status polling
Use the following procedure to perform an advanced search for events. The following image shows the AdvancedSearch page for events.
NOTE:You can quickly display all service events of Any type by selecting Systems Events SharedService Events All HP Service Events from the System and Event Collections panel.
Procedure 1 Performing an advanced search for events
1. Click Advanced Search in the Search panel.
2. Select events from the Search for dropdown list.
3. From the first selection box (criteria selection), click the down arrow, and then select the search criteria.
NOTE:If you selected event type, see the HP Systems Insight Manager User Guide under "Searchcriteria" for more information.
NOTE:Some search criteria show no values until systems with values for that criteria have beendiscovered. In this case, the criteria is not displayed until values are available.
4. From the second selection box (comparison selection), click the down arrow, and then select thecomparison option.
NOTE:Different criteria support different comparisons. The comparison options change with the criteriaselected. For example, if you select operating system as criteria, the following comparisons areavailable: is, is not, contains, starts with, and ends with.
5. In the third selection box (value selection), select one of the values for a specific criteria or comparisoncombination from the dropdown list, or enter the required information in the input box.
6. To add additional criteria, click [Add], or to conduct the event search immediately, click [View ]. to deletesearch criteria, click [Delete ], or to save the search as a list, click [Save as collection].
7. If you clicked [View ], search results appear. You can choose to delete or print the results. See SystemsInsight Manager - Deleting system search results from a search view for more information about deletingselections. See Systems Insight Manager - Printing system search results for information about printingsearch results.
NOTE:
» Data collection» System Properties» Configuring WBEM health
inclusion status» Specifying a Version
Control Repository» Configuring
software/firmware globalsettings
» Reporting» Managing with tasks» Using Cluster Monitor» Command line tools» Configuring managed
systems from a WindowsCMS
» Configuring managedsystems from a LinuxCMS
» Configuring managedsystems from an HP-UXCMS
» Custom tools» Setting disk thresholds» Creating a task to delete
disk thresholds» License manager» Management processor
tools» Managing
Communications» Managing MIBs» Installing OpenSSH» Replicate Agent Settings» RPM Package Manager» HP Server Migration Pack
- Universal Edition» HP System Management
Homepage» Version Control» Device ping
» Reference» Support and other
resources» Assistance
» Glossary» Using Help
To search for new event types generated by HTTP events, select events by Event Category Selection,and then select the event type from the and type is list.
» Discovery in HP SIM» Discovery filters» Managing Hosts file» Identification» Managing system types» Users and authorizations» Directory Services» Global credentials» System credentials» Security» Trusted certificates» Viewing the audit log» Configuring the audit log» Monitoring systems and
events» Quick Launch menu» Performing a basic search» Performing an advanced
search for systems» Performing an advanced
search for clusters» Performing an advanced
search for eventsDeleting event searchresults from a searchview
» Printing event searchresults
» Tool search» Related information for
searches» Configuring events» Protocol settings» Software status polling» Hardware status polling
NOTE:Deleting multiple events from the list can cause performance delays.
Procedure 1 Deleting events from search results
1. After the search results appear, select events to delete from the search, and thenclick [Delete ]. A dialog box appears, stating, Are you sure you want to deletethese systems?
2. To delete the events, click [OK], or to return to the Search Results page withoutdeleting the events click [Cancel ].
Systems Insight Manager - Related information
HP Systems Insight Manager 7.1 English
Operations | Performing an advanced search for events | Printing event search results
» Discovery in HP SIM» Discovery filters» Managing Hosts file» Identification» Managing system types» Users and authorizations» Directory Services» Global credentials» System credentials» Security» Trusted certificates» Viewing the audit log» Configuring the audit log» Monitoring systems and
events» Quick Launch menu» Performing a basic search» Performing an advanced
search for systems» Performing an advanced
search for clusters» Performing an advanced
search for events» Deleting event search
results from a searchviewPrinting event searchresults
» Tool search» Related information for
searches» Configuring events» Protocol settings» Software status polling» Hardware status polling
Procedure 1 Printing event search results
1. After the Search Results page appears, click [View ]. The results appear.
2. Click Print .
The results are printed.
NOTE:The Print dialog box might be hidden. If so, go to the Windows Task Barto display the box.
Because the following print options are not supported in HP SIM, you cannotperform the following tasks:
Change the Orientation to Landscape in the Print dialog box.
Cancel printing after the print job has been executed; however, you canaccess the operating system's print queue and cancel the print job
Cancel printing to a file
Print selected events; only the entire search results
Print the event search results if you close the browser immediately afterissuing a print request
» Discovery in HP SIM» Discovery filters» Managing Hosts file» Identification» Managing system types» Users and authorizations» Directory Services» Global credentials» System credentials» Security» Trusted certificates» Viewing the audit log» Configuring the audit log» Monitoring systems and
events» Quick Launch menu» Performing a basic search» Performing an advanced
search for systems» Performing an advanced
search for clusters» Performing an advanced
search for eventsTool search» Searching for tools
» Related information forsearches
» Configuring events» Protocol settings» Software status polling» Hardware status polling» Data collection» System Properties» Configuring WBEM health
inclusion status
The Tool Search feature provides a quick way to search and filter textually, based on tool names, tool locations in theHP SIM cascading menu structure, and tool descriptions.
The tool search feature searches, matches, and highlights as you enter information.
The tree structure of the menu is represented exactly. If no filter text is supplied, the menu is rendered in atree format for browsing.
Searches are not case sensitive.
Tools are hyperlinked and can be launched from the tree.
Tool names, menu paths, and descriptions are searched. If you are not authorized for a tool, it is not includedin the search.
As an example, when you search on SNMP using the following procedure, matching tools include SNMP intheir names but in their descriptions. By reading the short description, you learn how SNMP applies to thetool, and you get a quick overview of the tool.
» Discovery in HP SIM» Discovery filters» Managing Hosts file» Identification» Managing system types» Users and authorizations» Directory Services» Global credentials» System credentials» Security» Trusted certificates» Viewing the audit log» Configuring the audit log» Monitoring systems and
events» Quick Launch menu» Performing a basic search» Performing an advanced
search for systems» Performing an advanced
search for clusters» Performing an advanced
search for events» Tool search
Searching for tools» Related information for
searches» Configuring events» Protocol settings» Software status polling» Hardware status polling» Data collection» System Properties» Configuring WBEM health
inclusion status
Procedure 1 Performing a tool search
1. Click the icon to expand the tree, or enter text in the Search for box.
2. After you locate a tool, click the tool link to be taken to the tool page.
» Discovery in HP SIM» Discovery filters» Managing Hosts file» Identification» Managing system types» Users and authorizations» Directory Services» Global credentials» System credentials» Security» Trusted certificates» Viewing the audit log» Configuring the audit log» Monitoring systems and
events» Quick Launch menu» Performing a basic search» Performing an advanced
search for systems» Performing an advanced
search for clusters» Performing an advanced
search for events» Tool search
Related information forsearches
» Configuring events» Protocol settings» Software status polling» Hardware status polling» Data collection» System Properties» Configuring WBEM health
inclusion status» Specifying a Version
Related procedures
» Systems Insight Manager - Deleting system search results from a search view» Systems Insight Manager - Printing system search results» Systems Insight Manager - Deleting cluster search results from a search view» Systems Insight Manager - Printing cluster search results» Systems Insight Manager - Saving collections» Systems Insight Manager - Deleting event search results from a search view» Systems Insight Manager - Printing event search results» Systems Insight Manager - Searching for tools
Related topics
» Systems Insight Manager - Performing an advanced search for events» Systems Insight Manager - Performing an advanced search for clusters» Systems Insight Manager - Performing a basic search» Systems Insight Manager - Deleting cluster search results from a search view» Systems Insight Manager - Printing cluster search results» Systems Insight Manager - Tool search
» Discovery in HP SIM» Discovery filters» Managing Hosts file» Identification» Managing system types» Users and authorizations» Directory Services» Global credentials» System credentials» Security» Trusted certificates» Viewing the audit log» Configuring the audit log» Monitoring systems and
events» Quick Launch menu» Performing a basic search» Performing an advanced
search for systems» Performing an advanced
search for clusters» Performing an advanced
search for events» Tool search» Related information for
Managing events in HP SIM includes the following tasks:
Automatic Event Handling which enables you to manage automatic event handlingtasks, create new automatic event handling tasks, and configure e-mail and modemsettings.
Clearing Events which enables you to clear events.
Deleting Events which enables you to delete events from the database.
Event Filter Settings which enables you to filter SNMP traps you receive fromdiscovered systems. The default setting is to accept all registered SNMP traps fromall discovered systems. You can specify the severity of the traps you want to seeand use the IP address ranges to create a subset of systems whose traps you canreceive or ignore. For example, you can use event filtering to ignore informationaltraps. This feature is available to users with administrative rights.
SNMP Trap Settings which enables you to tailor trap messages to your specificnetwork needs. Trap messages can be cryptic, poorly written, andincomprehensible. You can modify the MIB information in the databaserepresentation. You can also modify a .cfg file of the MIB. HP recommends thatyou never modify an actual MIB.
Status Change Event Settings which enables you to configure the settings forsending status change events for systems when hardware status changes.
Subscribing to WBEM Events which enables you to subscribe to WBEM events.
Unsubscribing to WBEM Events which enables you to unsubscribe to WBEMevents.
» Discovery in HP SIM» Discovery filters» Managing Hosts file» Identification» Managing system types» Users and authorizations» Directory Services» Global credentials» System credentials» Security» Trusted certificates» Viewing the audit log» Configuring the audit log» Monitoring systems and
events» Quick Launch menu» Performing a basic search» Performing an advanced
search for systems» Performing an advanced
search for clusters» Performing an advanced
search for events» Tool search» Related information for
Two users cannot edit Automatic Event Handling tasks at the same time. The first user toclick [Finish] has their changes saved. The second user receives an error message, statingUnable to modify task.
NOTE:After a task is selected on the Automatic Event Handling - Manage Taskspage, the task summary appears when clicking [View Definition].
Procedure 1 Editing events
Follow the on-screen instructions.
See Systems Insight Manager - Creating an automatic event handling task for moreinformation about each of the steps.
NOTE:Select an event collection or an event combination collection. The eventcollection is a collection that is made up of event attributes. If you selectan event collection that contains additional event collections, you willreceive an error message.
» Discovery in HP SIM» Discovery filters» Managing Hosts file» Identification» Managing system types» Users and authorizations» Directory Services» Global credentials» System credentials» Security» Trusted certificates» Viewing the audit log» Configuring the audit log» Monitoring systems and
events» Quick Launch menu» Performing a basic search» Performing an advanced
search for systems» Performing an advanced
search for clusters» Performing an advanced
search for events» Tool search» Related information for
Complete the following procedure to view the entire task configuration for a selected task.These configuration options were set when creating the task.
2. Select a task, and then click [View Definition]. The View Definition sectionappears, displaying the following information:
Task name The name given to the task when it was created
Owner The user who created the task
Time filters The times that the task runs
Event collection The event collection that was selected when the taskwas created
NOTE:This field appears if you selected an existing private or sharedevent collection. If the collection was created using the AutomaticEvent Handling feature, this does not appear.
Events The event search criteria set for the task
Systems The system collection selected for the task
Action(s) The actions selected when the task was created
E-mail settings The e-mail settings set when the task was created
See Systems Insight Manager - Creating an automatic event handling task for moreinformation about each of the settings.
NOTE:If the task was created with no event or system information in the collectionselected, the Events or the Systems field will show None Defined. If you editthe task, you will be forced to select the event or system information for thecollection. Prior to HP SIM 5.1, if no system or event information was included inthe task, the All Systems and All Events collections were displayed respectively.
» Discovery in HP SIM» Discovery filters» Managing Hosts file» Identification» Managing system types» Users and authorizations» Directory Services» Global credentials» System credentials» Security» Trusted certificates» Viewing the audit log» Configuring the audit log» Monitoring systems and
events» Quick Launch menu» Performing a basic search» Performing an advanced
search for systems» Performing an advanced
search for clusters» Performing an advanced
search for events» Tool search» Related information for
NOTE:This option is especially useful for notification tasks imported from InsightManager 7, which are imported into HP SIM in a disabled state. You can editthese tasks, verify that the settings are accurate, and then enable the tasks byclicking [Enable ].
NOTE:The button label changes depending on if the task is enabled or disabled.
Procedure 1 Enabling or disabling event handling tasks
» Discovery in HP SIM» Discovery filters» Managing Hosts file» Identification» Managing system types» Users and authorizations» Directory Services» Global credentials» System credentials» Security» Trusted certificates» Viewing the audit log» Configuring the audit log» Monitoring systems and
events» Quick Launch menu» Performing a basic search» Performing an advanced
search for systems» Performing an advanced
search for clusters» Performing an advanced
search for events» Tool search» Related information for
1. Enter the SMTP host name. The SMTP host is the outgoing e-mail server that theCMS uses to send e-mail notifications.
2. In the Sender's e-mail address box, enter the e-mail address that themanagement server uses when sending e-mail notifications.
3. Optional: Select Send test email and enter recipients e-mail address.
Click Send test email now.
4. To authenticate your SMTP server, select Server Requires Authentication.
5. Enter the account user name and password in the corresponding boxes.
NOTE:If you did not enter a valid SMTP host, HP SIM display an errormessage: The email could not be sent: Could not connect to the SMTPhost.
If you are changing the e-mail settings from the Options Events AutomaticEvent Handling Email Settings page, click [OK] to save changes.
NOTE:If the Server Requires Authentication option is selected, and you enterincorrect account information, an The email could not be sent: Authenticationerror message displays.
Additional e-mail settings
The globalsettings.props contains properties that can be set for additional information tobe included in e-mail messages.
EmailPrefixUserSubject
To have user defined information (from the e-mail information on the Actions page)displayed first on the subject line of an e-mail, you must change the EmailPrefixUserSubjectproperty in the globalsettings.props file to True. Otherwise, HP SIM defined informationappears first. The globalsettings.props file is located at:
On Windows It is typically located at C:\Program Files\HP\Systems InsightManager\config\globalsettings.props .
On HP-UX and Linux It is located at /etc/opt/mx/config/globalsettings.props.
Restart the HP SIM service after the flag is set. To restart:
If EmailPrefixUserSubject = false The format of the subject line is Device Name:Short Description from Alert: User's Defined Subject.
If EmailPrefixUserSubject = true The format of the e-mail subject line is User'sDefined Subject: Device Name: Short Description from Alert.
results» Enabling and disabling
event handling tasksConfiguring e-mailsettings
» Configuring modemsettings for paging onWindows systems
» Protocol settings» Software status polling» Hardware status polling» Data collection» System Properties» Configuring WBEM health
inclusion status» Specifying a Version
Control Repository» Configuring
software/firmware globalsettings
» Reporting» Managing with tasks» Using Cluster Monitor» Command line tools» Configuring managed
systems from a WindowsCMS
» Configuring managedsystems from a LinuxCMS
» Configuring managedsystems from an HP-UXCMS
» Custom tools» Setting disk thresholds» Creating a task to delete
disk thresholds» License manager» Management processor
tools» Managing
Communications» Managing MIBs» Installing OpenSSH» Replicate Agent Settings» RPM Package Manager» HP Server Migration Pack
- Universal Edition» HP System Management
Homepage
IMPORTANT:This property does not need to be configured for the e-mail feature to work. Thisproperty is automatically set to false in the globalsettings.props file and doesnot need to be changed unless you want user defined text to appear before theHP SIM text in the subject line.
EmailKeywords
To include event information in an e-mail message, edit the EmailKeywords property in theglobalsettings.props file.
IMPORTANT:Restart the HP SIM service if any of the keywords change.
Table 1 Keywords supported in the EmailKeywords property
Keyword Description
TID Trap ID
TDESC Trap description
TSDESC Short description about trap
TNAME Trap name
TNOTENUM Trap notice number
TRCVD Trap received time
TADDR Trap source address
TENTOID Enterprise trap OID
TNOTSEV Trap severity
TASSIGNTO Trap assigned to
TCOMMENT Trap comments
DNAME Device name
DDISCOV Device discovered time
DURL Device URL
HDR Header which can be used to format message
Systems Insight Manager - Related information
HP Systems Insight Manager 7.1 English
Operations | Configuring events | Configuring modem settings for paging on Windows systems
Configuring modem settings for paging onWindows systems
» Discovery in HP SIM» Discovery filters» Managing Hosts file» Identification» Managing system types» Users and authorizations» Directory Services» Global credentials» System credentials» Security» Trusted certificates» Viewing the audit log» Configuring the audit log» Monitoring systems and
events» Quick Launch menu» Performing a basic search» Performing an advanced
search for systems» Performing an advanced
search for clusters» Performing an advanced
search for events» Tool search» Related information for
2. Select the target events. See Systems Insight Manager - Creating a task for moreinformation about selecting targets.
3. Click [Apply].
4. Click [Run Now] to clear the events immediately and view the Task Results page,or click [Schedule] to schedule the deletion. See Systems Insight Manager -Scheduling a task for more information about scheduling the task to run.
» Discovery in HP SIM» Discovery filters» Managing Hosts file» Identification» Managing system types» Users and authorizations» Directory Services» Global credentials» System credentials» Security» Trusted certificates» Viewing the audit log» Configuring the audit log» Monitoring systems and
events» Quick Launch menu» Performing a basic search» Performing an advanced
search for systems» Performing an advanced
search for clusters» Performing an advanced
search for events» Tool search» Related information for
2. Select the target events. See Systems Insight Manager - Creating a task for moreinformation about selecting targets.
3. Click [Apply].
4. (Optional) Click [Modify Targets] to add additional events to delete, or click[Remove Targets] to remove events from the deletion process.
5. Click [Run Now] to delete the events immediately and view the Task Resultspage, or click [Schedule] to schedule the deletion. See Systems Insight Manager -Scheduling a task for more information about scheduling the task to run
» Discovery in HP SIM» Discovery filters» Managing Hosts file» Identification» Managing system types» Users and authorizations» Directory Services» Global credentials» System credentials» Security» Trusted certificates» Viewing the audit log» Configuring the audit log» Monitoring systems and
events» Quick Launch menu» Performing a basic search» Performing an advanced
search for systems» Performing an advanced
search for clusters» Performing an advanced
search for events» Tool search» Related information for
Procedure 1 Configuring event filters for registered SNMP traps
1. Select Accept Unregistered Events to accept unregistered events, or clear the boxto not accept unregistered events. This option is disabled by default.
2. Select Accept Registered Events with Severity to accept registered events with acertain severity or multiple severities.
3. Select the severities you want to accept. The available options are Critical, Major,Minor, Warning, and Informational.
4. Enter the IP ranges to accept in the Accept Traps from Discovered Systems inIP Ranges: box. By default, traps are accepted from all discovered systems.
5. Optional: Enter IP ranges in the Discard Traps from Discovered Systems in IPRanges: box to discard traps from certain systems.
NOTE:Enter one system or range per line, and separate the ranges andsystems with a semicolon (;). Enter an asterisk (*) to accept or deletetraps from all ranges.
» Discovery in HP SIM» Discovery filters» Managing Hosts file» Identification» Managing system types» Users and authorizations» Directory Services» Global credentials» System credentials» Security» Trusted certificates» Viewing the audit log» Configuring the audit log» Monitoring systems and
events» Quick Launch menu» Performing a basic search» Performing an advanced
search for systems» Performing an advanced
search for clusters» Performing an advanced
search for events» Tool search» Related information for
1. Select the MIB name from the MIB Name dropdown list.
2. Select the trap name from the Trap Name dropdown list. The Event Type andDescription change according to the trap name selected.
3. Optional: Change the Event Type.
4. Optional: Edit the Description.
5. Select Yes or No in the Enable Trap Handling box.
6. Select the category from the Category dropdown list.
7. Select the severity from the Severity dropdown list. The available options areInformational, Warning, Minor, Major, and Critical.
8. Click [OK] to save the settings.
SNMP trap fields
FieldNames Description
MIB Name Select a MIB name from the dropdown list. All the remaining fields changeaccording to the MIB name selected.
Trap NameThe default trap name is completed when a MIB name is selected in the MIBName field. However, you can modify it by selecting a different trap name inthe dropdown list.
EventType
The type is a reflective form of the actual trap name. Change the type if itdoes not adequately describe the system for you.
Description The description is vendor-supplied. Replace it with more specificinstructions, a precise reference source, or a website referral.
EnableTrapHandling
Most traps are enabled. Trap handling gives you control over the volume ofmessages. Turn off nuisance messages, such as unnecessary informationalmessages, or repeated trap messages for an event that has not beencorrected.
Category The category lists the HP SIM category types and Unknown.
Severity
Some vendors use the default Informational for all severity levels. Changethe severity to a level that reflects your judgment of the problem.Alternatively, you can change a Major or Critical severity for a trap messagethat is clearly not a critical situation in your environment. Only you know ifthis is the case. The only valid options for HP SIM are Critical, Major, Minor,Warning, and Informational.
Modifying traps
To modify a specific trap, such as cpqIDELogicalDriveStatusChange, to have trapinformation included in e-mail messages, you can edit the MIB cfg. You can add keywordsto the MSG_FORMATTER field, and then you must reregister the MIB, after makingchanges, by using the mxmib -a cpqide.cfg command.
» Related information» Protocol settings» Software status polling» Hardware status polling» Data collection» System Properties» Configuring WBEM health
inclusion status» Specifying a Version
Control Repository» Configuring
software/firmware globalsettings
» Reporting» Managing with tasks» Using Cluster Monitor» Command line tools» Configuring managed
systems from a WindowsCMS
» Configuring managedsystems from a LinuxCMS
» Configuring managedsystems from an HP-UXCMS
» Custom tools» Setting disk thresholds» Creating a task to delete
disk thresholds» License manager» Management processor
tools» Managing
Communications» Managing MIBs» Installing OpenSSH» Replicate Agent Settings» RPM Package Manager» HP Server Migration Pack
You can also edit the globalsettings.props file and modify the EmailKeywords property.Systems Insight Manager - Configuring e-mail settings, in the "EmailSettings" section foradditional information on changing the EmailKeywords property.
For SNMP traps, the MIB cfg file is the default location that HP SIM looks for keywords. Ifkeywords are not defined here, then HP SIM looks at the EmailKeywords property in theglobalsettings.props file.
Systems Insight Manager - Related information
HP Systems Insight Manager 7.1 English
Operations | Configuring events | Configuring status change events
» Discovery in HP SIM» Discovery filters» Managing Hosts file» Identification» Managing system types» Users and authorizations» Directory Services» Global credentials» System credentials» Security» Trusted certificates» Viewing the audit log» Configuring the audit log» Monitoring systems and
events» Quick Launch menu» Performing a basic search» Performing an advanced
search for systems» Performing an advanced
search for clusters» Performing an advanced
search for events» Tool search» Related information for
Perform the following procedure to configure the sending of status change events forsystems when hardware status changes to and from a Critical (unreachable) state only.
Procedure 1 Configuring status change events
1. Select one of the following options.
Enable creation of system status change events. This option sends asystem unreachable event whenever a system cannot be reached by a pingthrough the Hardware Status Polling task. Enabling this option creates asystem reachable event whenever the system is reachable again.
Automatically clear unreachable system status change events whensystem is reachable. If this option is enabled, when a system that waspreviously unreachable starts to respond, the previous unreachable event ismarked with a cleared state.
2. Click [OK] to apply changes.
Systems Insight Manager - Related information
HP Systems Insight Manager 7.1 English
Operations | Configuring events | Subscribing to WBEM indications
» Discovery in HP SIM» Discovery filters» Managing Hosts file» Identification» Managing system types» Users and authorizations» Directory Services» Global credentials» System credentials» Security» Trusted certificates» Viewing the audit log» Configuring the audit log» Monitoring systems and
events» Quick Launch menu» Performing a basic search» Performing an advanced
search for systems» Performing an advanced
search for clusters» Performing an advanced
search for events» Tool search» Related information for
1. Select Options Events Unsubscribe to WBEM Events . The Step 1: VerifyTarget Systems page lists all of the targets with subscriptions to WBEM indicationevents.
2. If you do not want to delete a target's WBEM indication events subscription, selectthe target and click Remove Targets.
3. Click Next. The Step 2: Task Confirmation page appears and provides detailsabout the task that was created.
4. Click Run Now to remove subscriptions for WBEM indication events on the targetsystems. The Task Results page appears.
Instead of clicking [Run Now], you can click [Schedule] to schedule the task for a latertime. See Systems Insight Manager - Scheduling a task for more information.
NOTE:You can also list subscriptions and move subscriptions to a new destinationthrough the CLI using the mxwbemsub command. See the HP Systems InsightManager Command Line User Guide for more information.
Systems Insight Manager - Related information
HP Systems Insight Manager 7.1 English
Operations | Configuring events | Subscribing to health lifecycle events
» Discovery in HP SIM» Discovery filters» Managing Hosts file» Identification» Managing system types» Users and authorizations» Directory Services» Global credentials» System credentials» Security» Trusted certificates» Viewing the audit log» Configuring the audit log» Monitoring systems and
events» Quick Launch menu» Performing a basic search» Performing an advanced
search for systems» Performing an advanced
search for clusters» Performing an advanced
search for events» Tool search» Related information for
HP SIM enables you to add and remove health lifecycle event subscriptions for HP NonStopKernel servers using the CLI. If you subscribe to health lifecycle events for an HP NonStopKernel server, when the server's status changes, notification is sent to HP SIM and theserver status is updated immediately in the GUI instead of waiting for the next statuscollection.
Procedure 1 Adding or removing health lifecycle event subscriptions
1. Sign into the CLI. See Systems Insight Manager - Signing in for instructions.
2. Enter one of the following commands:
To add a health lifecycle event subscription for one or more servers, enter:
The target system (node) names can be entered through the command lineor an input file. Each system name, entered on the command line or in afile, can be the IP address, hostname, or FQDN of the system. You canspecify the destination CMS for the subscriptions. If the destination is notincluded, the default is the CMS on which the command is run.
To remove a health lifecycle event subscription for one or more servers,enter:
The target system (node) names can be entered through the command lineor an input file. Each system name, entered on the command line or in afile, can be the IP address, hostname, or FQDN of the system. Thiscommand can delete subscriptions from another CMS. If a CMS is notspecified, the default is to remove subscriptions from the CMS on which thecommand is run.
NOTE:See the HP Systems Insight Manager Command Line User Guide for detailedinformation about mxwbemsub.
» Discovery in HP SIM» Discovery filters» Managing Hosts file» Identification» Managing system types» Users and authorizations» Directory Services» Global credentials» System credentials» Security» Trusted certificates» Viewing the audit log» Configuring the audit log» Monitoring systems and
events» Quick Launch menu» Performing a basic search» Performing an advanced
search for systems» Performing an advanced
search for clusters» Performing an advanced
search for events» Tool search» Related information for
Use this tool any time to verify if a system is configured for receiving events either fromSNMP traps or WBEM indications. To receive SNMP events, the CMS IP address must bein the trap destination list on the managed systems. However, this tool checks for Windowssystems that have an HP SMH trust relationship with CMS. To receive WBEM indications,the WBEM Services must support sending indications, and the subscription must be createdfrom the CMS.
If this task has not run, the Manage Communications Event column displays theinformational icon.
2. Select the target events. Refer Systems Insight Manager - Creating a task for moreinformation about selecting targets.
3. Click [Apply].
4. Click [Run Now] to view results, or click [Schedule] to schedule the task. SeeSystems Insight Manager - Scheduling a task for more information about schedulingthe task to run.
» Discovery in HP SIM» Discovery filters» Managing Hosts file» Identification» Managing system types» Users and authorizations» Directory Services» Global credentials» System credentials» Security» Trusted certificates» Viewing the audit log» Configuring the audit log» Monitoring systems and
events» Quick Launch menu» Performing a basic search» Performing an advanced
search for systems» Performing an advanced
search for clusters» Performing an advanced
search for events» Tool search» Related information for
Perform the following procedure to create a new automatic event handling task to define aresponse to a specific event.
NOTE:If you create an automatic event handling task and you do not select apredefined collection that has event and system information in it, and then youuse the mxtask -lf command to create an .XML file that can be used to createanother task, the task and collection that are associated with the task are placedin the .XML file. If you delete the task, the collection is deleted along with the task.Therefore, the .XML file can no longer be used to create a new task with thecollection that is referenced in the .XML file. Any time you create an automaticevent handling task that includes selecting event information and then systeminformation, that information is stored in a hidden collection that is unavailable foruse by any task other than the immediate task. For more information, see the HPSystems Insight Manager Command Line User Guide.
Procedure 1 Creating new automatic event handling tasks
1. Enter a name in the Task name field, or accept the default, and then click [Next].The Select event collection page appears.
2. Select one of the following:
a. Use this event collection
i. Select an event collection from the dropdown list.
NOTE:Select an event collection. The event collection is definedby event attributes. The event collection might be acombination collection containing system information. Ifyou select an event collection that contains additionalevent collections, an error message appears.
ii. Optional: Click [View Definition] to view the collection attributesthat define the event collection.
NOTE:The view definition field appears if you selected anexisting private or shared event collection. If thecollection was created using the Automatic EventHandling feature, the view definition does not appear.
iii. Click [Next]. The Select system collection page appears. If theevent collection is a combination collection, the select systemcollection process does not appear. Instead, the Select actionspage appears.
b. Use event attributes that I will specify
i. Click [Next]. The Select events page appears.
ii. Select event search criteria for defining the task.
configurationCreating an automaticevent handling task
» Related information» Protocol settings» Software status polling» Hardware status polling» Data collection» System Properties» Configuring WBEM health
inclusion status» Specifying a Version
Control Repository» Configuring
software/firmware globalsettings
» Reporting» Managing with tasks» Using Cluster Monitor» Command line tools» Configuring managed
systems from a WindowsCMS
» Configuring managedsystems from a LinuxCMS
» Configuring managedsystems from an HP-UXCMS
» Custom tools» Setting disk thresholds» Creating a task to delete
disk thresholds» License manager» Management processor
tools» Managing
Communications» Managing MIBs» Installing OpenSSH» Replicate Agent Settings» RPM Package Manager» HP Server Migration Pack
- Universal Edition» HP System Management
Homepage
For more information about event searches, see Systems InsightManager - Performing an advanced search for events.
c. Click [Next]. The Select system collection page appears.
3. Select one of the following options:
Use this system collection
a. From the dropdown list, select a system collection.
b. Click [View Definition] to view the collection attributes or themembers of the system collection that is selected.
c. Click [Next]. The Select action page appears.
Use system attributes that I will specify
a. Click [Next]. The Select systems page appears.
b. Select system search criteria for defining the task:
a. List criteria
b. Comparison option
c. Value for the criteria or comparison options selected
To add additional search criteria, click [Add].
For more information about event searches, see Systems InsightManager - Performing an advanced search for events.
c. Click [Next]. The Select actions page appears.
4. Select from the following options:
Send page (Windows only)
a. Add users to be paged from the dropdown list by clicking . Click
to remove selected users. The pager number for an HP SIMuser is set on the Users and Authorizations page. For moreinformation, see Systems Insight Manager - Creating new users. Ifa user name in the Users list is inactive, the pager information forthe user has not been configured. You can add the user to the list,but pager messages are not sent to this user until the pagerinformation is provided.
NOTE:If you select a user that does not have pager informationset, the Pager Information section expands where youcan enter the information.
b. Enter the paging information.
a. Phone number Enter the pager phone number of theuser associated with this user account if you are using aWindows operating system. If the Phone number field isleft blank, the paging information is not saved. This fielddoes not apply to user groups.
b. PIN number Enter the PIN number associated with thepager phone number.
c. Message length Select how many characters can beaccepted in the paging message from the dropdown list.
d. Baud rate Select the appropriate baud rate for the pagerfrom the dropdown list.
e. Data format Select the appropriate data format for thepager from the dropdown list.
» Version Control» Device ping
» Reference» Support and other
resources» Assistance
» Glossary» Using Help
c. Click [Apply]. A dialog box appears stating that the changes weresuccessful. Click [OK] to close the box.
Send e-mail
a. In the To field, enter the list of e-mail addresses that shouldreceive the notification, separating each entry with a comma.
b. In the CC field, enter any e-mail address that should receive acopy of the e-mail, separating each entry with a comma.
c. In the Subject field, enter a note describing the subject of the e-mail.
d. In the Message Format field, select from the following formatsbased on the encoding preference of the recipient:
a. Standard. A default message format that sends a text e-mail message to the recipients.
b. Pager/SMS. An e-mail message format that sends amessage to the recipients with the same information andformat as a pager message.
NOTE:Many cellular service providers offer SMS facilityto their customers via an email. For example, ifyour mobile phone number is 555-123-4567, anemail sent [email protected] is sent toyour mobile phone as an SMS page.
c. HTML. An e-mail message format that sends a messageto the recipients that looks like the HTML Event Detailspage.
e. In the Encoding field, select from the following formats:
a. Western European (ISO-8859-1)
b. Unicode (UTF-8)
c. Japanese (ISO-2022-JP)
d. Japanese (Shift_JIS)
e. Japanese (EUC-JP)
f . S-Chinese (GB18030)
g. T-Chinese (Big5)
h. Korean (EUC-KR)
Run custom tool
Select a custom tool from the Name dropdown list. Custom tools arecreated under the Tools Custom Tools New Custom Tool option,and then select CMS tool. For more information, see Systems InsightManager - Creating a CMS tool.
Assign
Enter the name of the user to whom to assign the task. The event isassigned to this user when received. Setting this field allows you to performsearches assigned to this person.
Forward as SNMP trap
Enter a system name or IP address in the Name or IP field, and then click[>>] to add it to the Trap recipients box.
Click [Delete ] if you want to delete a recipient after selecting the name inthe Trap recipients box. Use the up and down arrows to scroll to therecipient to delete.
Write to system log
On Windows NT and Windows XP systems, the event details are written tothe Application Log, and the Source column of the Event Log is listed asHP SIM for the logged event. On Linux and HP-UX systems, the eventdetails are logged to the system log, which is usually located in the file/var/log/messages on Linux and in /var/adm/syslog/syslog.log on HP-UX.
Clear event
Received events are cleared based on the criteria selected when taskexecutes.
5. After you have made your selections, click [Next]. The Select time filter pageappears.
6. Select the Use time filter checkbox if you want to use time filters, and then selectan option from the dropdown list.
a. Click [Manage Filters ] if you want to set user-defined filters. For moreinformation, see Systems Insight Manager - Applying a time filter.
b. Select the View time filter checkbox. A time filter window appears, showingthe times selected.
If the Use time filter checkbox is not selected, actions are triggeredwhenever the events matching the selected criteria are received.
If the Use time filter checkbox is selected, actions are triggered only whenthey occur during the days and times specified by the selected time filter.
c. When you have entered the information, click [Next] to continue with thenext step. The Review summary page appears. The task name, owner,time filters, event collections, system collections, and actions informationappears. If a paging or e-mail option was selected, the modem and e-mailsettings appear, along with buttons to change the settings.
7. Optional: Click [Edit modem settings] to edit the modem settings, or click [Editemail Settings] to edit the SMTP settings. For more information, see SystemsInsight Manager - Configuring modem settings for paging on Windows systems orSystems Insight Manager - Configuring SNMP traps.
NOTE:The event and system search criteria appear at the bottom of the page.This information can be extremely complex and long. Therefore, youmight need to scroll down to view all criteria.
» Discovery in HP SIM» Discovery filters» Managing Hosts file» Identification» Managing system types» Users and authorizations» Directory Services» Global credentials» System credentials» Security» Trusted certificates» Viewing the audit log» Configuring the audit log» Monitoring systems and
events» Quick Launch menu» Performing a basic search» Performing an advanced
search for systems» Performing an advanced
search for clusters» Performing an advanced
search for events» Tool search» Related information for
» Systems Insight Manager - Creating an automatic event handling task» Systems Insight Manager - Copying automatic event handling tasks» Systems Insight Manager - Viewing task definitions for automatic event handling tasks» Systems Insight Manager - Viewing event task results» Systems Insight Manager - Deleting events» Systems Insight Manager - Configuring e-mail settings» Systems Insight Manager - Configuring modem settings for paging on Windows systems
Related topics
» Systems Insight Manager - Managing event handling tasks» Systems Insight Manager - Managing SSH keys
» Discovery in HP SIM» Discovery filters» Managing Hosts file» Identification» Managing system types» Users and authorizations» Directory Services» Global credentials» System credentials» Security» Trusted certificates» Viewing the audit log» Configuring the audit log» Monitoring systems and
events» Quick Launch menu» Performing a basic search» Performing an advanced
search for systems» Performing an advanced
search for clusters» Performing an advanced
search for events» Tool search» Related information for
searches» Configuring events
Protocol settings» Setting protocols and
credentials for a systemor group of systems
» Setting protocols for asingle system
» Adding a WMI MapperProxy
You can set default system-wide protocols settings. These defaults apply to all newlydiscovered systems. For passwords or community strings, the default list is repeated untilone string works (if at all). HP recommends putting the most often used passwords orcommunity strings first in the list. In the following procedure, all sections are optional buthighly recommended for proper management of systems.
WARNING!If your environment's security policy includes account lockout after a specificnumber of failed attempts, use system protocol settings instead of global protocolsettings. You cannot configure system protocol settings until discovery has beenrun once, making sure none of the account lockout accounts are configured inthe global protocol settings. For information on configuring system protocolsettings, see Systems Insight Manager - Setting protocols and credentials for asystem or group of systems.
NOTE:You can configure some global protocol settings in the First Time Wizard.
Procedure 1 Setting global management protocol settings
IMPORTANT:Disabling protocols might adversely affect the operation of both HP SIMdiscovery and plug-in applications.
1. In the Ping settings section, choose from the following options:
HP recommends: Use the ICMP protocol for system reachability (ping)check. This setting is the default.
Use the TCP protocol for system reachability (ping) check. TCP portnumber. Select this setting if your company has disabled ICMP on thecorporate network or if the corporate policy mandates system firewallsoftware to filter ICMP requests. Enter the port number.
Windows XP has this feature built in and can prevent systems from beingautomatically discovered. This option enables you to run HP SIM and pingall available systems.
This option applies to only IP-based systems and is available for global,system-wide settings that are used when managing all systems in HP SIM.It is used by automatic discovery, hardware status polling, the ping tool, andany other tool that must verify system availability. This option is notavailable on a single-system basis.
When HP SIM attempts a connection request to a system, that system doesnot need any additional software running on it for this option to work. Forexample, HP does not require that a web server be running on port 80.Some networking systems might not respond to the TCP request, which istypically seen in low-end networking equipment. You can make manualadditions, if necessary. However, this system displays as Critical ifhardware status polling is run.
2. Set the Default timeout and the Default retries. If some systems are managedover a WAN or satellite link, use a longer time-out (for example, five seconds) withat least one retry. For a LAN, you can use a shorter time-out. You can configurethis setting on a single-system basis. See Systems Insight Manager - Settingprotocols and credentials for a system or group of systems for more information
» Deleting a WMI MapperProxy
» Editing a WMI MapperProxy
» Viewing and editingESXi subcomponents
» Software status polling» Hardware status polling» Data collection» System Properties» Configuring WBEM health
inclusion status» Specifying a Version
Control Repository» Configuring
software/firmware globalsettings
» Reporting» Managing with tasks» Using Cluster Monitor» Command line tools» Configuring managed
systems from a WindowsCMS
» Configuring managedsystems from a LinuxCMS
» Configuring managedsystems from an HP-UXCMS
» Custom tools» Setting disk thresholds» Creating a task to delete
disk thresholds» License manager» Management processor
tools» Managing
Communications» Managing MIBs» Installing OpenSSH» Replicate Agent Settings» RPM Package Manager» HP Server Migration Pack
- Universal Edition» HP System Management
Homepage» Version Control» Device ping
» Reference» Support and other
resources» Assistance
» Glossary» Using Help
about setting single-system protocols.
3. In the WBEM settings section, verify that Enable WBEM (the default) is selected toallow WBEM requests to be sent.
To access the Global Credentials page, if the WBEM credentials are the same asthe Sign-in credentials, select Go to the Global Credentials page to set globalWBEM credentials.
OpenWBEM is not supported.
4. In the HTTP settings section, select Enable HTTP and HTTPS if you need web-based agents and other HTTP port scans to be identified. HP recommends leavingthis option enabled for proper management and discovery of systems.
5. In the SNMP settings section, verify that Enable SNMP (the default) is selectedand specify values for Default time out and Default retries. For systems managedover a WAN or satellite link, use a larger time-out (for example, five seconds) withat least one retry. For a LAN, a shorter time-out can be used. You can configurethese settings on a single-system basis.
To access the Global Credentials page, select Go to the Global Credentialspage to set global SNMP community strings.
6. In the Read community string field, enter up to 10 read community strings. Thisvalue is case-sensitive. The identification process attempts communication with asystem, using each of these communities in succession until a successful responseis obtained. Future SNMP requests then use the community string that provided asuccessful response.
If you have SNMP systems and no read community string that match the systemsentered into HP SIM through Global Protocol Settings or System Settings, thesystems are not discovered.
7. In the WS-MAN settings section, verify that WS-MAN is enabled and enter aDefault identity timeout.
8. In the SSH settings section, select Enable SSH to enable SSH identification to runon managed systems.
9. Click [OK] to accept the settings.
If you accessed this page from the Discovery page, click automatic discovery to return tothe Discovery page after making changes.
» Discovery in HP SIM» Discovery filters» Managing Hosts file» Identification» Managing system types» Users and authorizations» Directory Services» Global credentials» System credentials» Security» Trusted certificates» Viewing the audit log» Configuring the audit log» Monitoring systems and
events» Quick Launch menu» Performing a basic search» Performing an advanced
search for systems» Performing an advanced
search for clusters» Performing an advanced
search for events» Tool search» Related information for
searches» Configuring events» Protocol settings
Setting protocols andcredentials for a systemor group of systems
» Setting protocols for asingle system
» Adding a WMI MapperProxy
Configure single-system protocol settings to fine-tune settings for individual systems or agroup of similar systems. This option is especially useful if some of your systems areaccessed through a LAN, while others are accessed through a WAN. Configure systemsaccessed through the WAN with longer timeouts and increased retries.
If you selected a collection when first using this tool, you can click the collection link at thetop of the page. A window appears, showing all systems in the collection chosen. Click[OK] to close the window. This link does not appear if you selected a single system.
NOTE:Since the System Protocol Settings page is initially filled with default settingsbased on the corresponding values from the Global Protocol Settings page.The initial settings might not match current values from an individual system.
Procedure 1 Setting protocol settings for a single system or group of systems
1. Optional: To set system credentials, click System Credentials. The SystemCredentials page appears.
2. In the Ping (ICMP) settings section, select Update values for this protocol toenable updating the ICMP settings. If this is not selected, the settings are notupdated. This option is disabled by default. Select from the following:
Use global defaults.
Use values specified below. Enter the Timeout (seconds) and theRetries.
3. In the SNMP settings section, select Update values for this protocol to enableupdating the SNMP settings. If this is not selected, the settings are not updated.This option is disabled by default. Select from the following:
Use global defaults.
Use values specified below. Enter the Timeout (seconds), Retries.
4. Click [Previous] to return to the previous screen without saving any changes, click[Schedule] to schedule the task, or click [Run Now] to run the task immediately.See Systems Insight Manager - Scheduling a task for more information aboutscheduling tasks.
NOTE:If the [Schedule] and [Run Now] buttons are disabled, look for bold rederror messages and correct all of the problematic entries, to enablethese buttons.
Related procedures
» Systems Insight Manager - Protocol settings» Systems Insight Manager Online Help - Setting protocols for a single system
HP Systems Insight Manager 7.1 English
Operations | Protocol settings | Setting protocols for a single system
» Discovery in HP SIM» Discovery filters» Managing Hosts file» Identification» Managing system types» Users and authorizations» Directory Services» Global credentials» System credentials» Security» Trusted certificates» Viewing the audit log» Configuring the audit log» Monitoring systems and
events» Quick Launch menu» Performing a basic search» Performing an advanced
search for systems» Performing an advanced
search for clusters» Performing an advanced
search for events» Tool search» Related information for
searches» Configuring events» Protocol settings
» Setting protocols andcredentials for a systemor group of systemsSetting protocols for asingle system
» Adding a WMI MapperProxy
Configure single-system protocol settings to fine-tune settings for an individual system. Thispage is accessed from the Tools & Links tab on the System Page.
Procedure 1 Setting protocol settings for a single system
1. Go to System page Tools and links , and then click System Protocol Settings.The System Protocol Settings page appears.
2. In the Ping (ICMP) settings section, select Update values for this protocol toenable updating the ICMP settings. If this is not selected, the settings are notupdated. This option is disabled by default. Select from the following:
Use global defaults.
Use values specified below. Enter the Timeout (seconds) and theRetries.
3. In the SNMP settings section, select Update values for this protocol to enableupdating the SNMP settings. If this is not selected, the settings are not updated.This option is disabled by default. Select from the following:
Use global defaults.
Use values specified below. Enter the Timeout (seconds), Retries.
4. (Optional) To access the System Credentials page, select Go to the SystemCredentials page to set system SNMP community strings.
5. Click [OK] to save the settings, or click Return to System Page to return to theSystem Page for the system and not save changes.
NOTE:If the [OK] button is disabled, look for any bold red error messages andcorrect all the problematic entries to enable that button.
Related procedures
» Systems Insight Manager - Setting protocols and credentials for a system or group ofsystems» Systems Insight Manager - Protocol settings
HP Systems Insight Manager 7.1 English
Operations | Protocol settings | Adding a WMI Mapper Proxy
» Discovery in HP SIM» Discovery filters» Managing Hosts file» Identification» Managing system types» Users and authorizations» Directory Services» Global credentials» System credentials» Security» Trusted certificates» Viewing the audit log» Configuring the audit log» Monitoring systems and
events» Quick Launch menu» Performing a basic search» Performing an advanced
search for systems» Performing an advanced
search for clusters» Performing an advanced
search for events» Tool search» Related information for
searches» Configuring events» Protocol settings
» Setting protocols andcredentials for a systemor group of systems
» Setting protocols for asingle systemAdding a WMI MapperProxy
HP SIM enables you to add a WMI Mapper Proxy to define a new proxy for HP SIM.
NOTE:You must have administrative rights to add, edit, or delete a WMI Mapper proxy.
2. In the Host field, enter the full DNS name or IP address of the WMI Mapper Proxy.
3. In the Port number field, enter a port number. The WMI Mapper Proxy uses thisport number to communicate with the WMI client.
4. Click [OK] to save and close the Add WMI Mapper Proxy section, click [Apply] tosave without closing the Add WMI Mapper Proxy section, or click [Cancel ] toabort the save operation.
Related procedures
» Systems Insight Manager - Editing a WMI Mapper Proxy» Systems Insight Manager - Deleting a WMI Mapper Proxy
HP Systems Insight Manager 7.1 English
Operations | Protocol settings | Deleting a WMI Mapper Proxy
» Discovery in HP SIM» Discovery filters» Managing Hosts file» Identification» Managing system types» Users and authorizations» Directory Services» Global credentials» System credentials» Security» Trusted certificates» Viewing the audit log» Configuring the audit log» Monitoring systems and
events» Quick Launch menu» Performing a basic search» Performing an advanced
search for systems» Performing an advanced
search for clusters» Performing an advanced
search for events» Tool search» Related information for
searches» Configuring events» Protocol settings
» Setting protocols andcredentials for a systemor group of systems
» Setting protocols for asingle system
» Adding a WMI MapperProxy
HP SIM enables you to delete a WMI Mapper proxy. The delete option enables you to deleteall selected proxies. Delete is available only if one or more proxies are selected.
CAUTION:If you delete one or more WMI Mapper proxies, the deletion is permanent andthe proxies cannot be restored.
NOTE:You must have administrative rights to add, modify, or delete the WMI MapperProxy.
» Discovery in HP SIM» Discovery filters» Managing Hosts file» Identification» Managing system types» Users and authorizations» Directory Services» Global credentials» System credentials» Security» Trusted certificates» Viewing the audit log» Configuring the audit log» Monitoring systems and
events» Quick Launch menu» Performing a basic search» Performing an advanced
search for systems» Performing an advanced
search for clusters» Performing an advanced
search for events» Tool search» Related information for
searches» Configuring events» Protocol settings
» Setting protocols andcredentials for a systemor group of systems
» Setting protocols for asingle system
» Adding a WMI MapperProxy
Edit a WMI Mapper proxy to update the proxy information. You can only edit one proxy at atime.
NOTE:You must have administrative rights to add, modify, or delete the WMI MapperProxy.
» Discovery in HP SIM» Discovery filters» Managing Hosts file» Identification» Managing system types» Users and authorizations» Directory Services» Global credentials» System credentials» Security» Trusted certificates» Viewing the audit log» Configuring the audit log» Monitoring systems and
events» Quick Launch menu» Performing a basic search» Performing an advanced
search for systems» Performing an advanced
search for clusters» Performing an advanced
search for events» Tool search» Related information for
searches» Configuring events» Protocol settings
» Setting protocols andcredentials for a systemor group of systems
» Setting protocols for asingle system
» Adding a WMI MapperProxy
The WBEM Health Inclusion Status lists the status information for the subcomponents ofan ESXi system. HP SIM shows unused systems with a Major health status. To have HPSIM ignore these systems when showing the health status of an ESXi system, use this pageto ignore the components that are not in use. This page shows the following information:
Component name
Description of the component
Propagation state
Health status
To include or ignore a component health status, complete the following:
1. To select components to include, select individual systems, and then click IncludeStatus.
2. To select components to ignore, select individual systems, and then click IgnoreStatus. This will exclude all selected compoenents from being considered incalculations of the overall system health status.
» Discovery in HP SIM» Discovery filters» Managing Hosts file» Identification» Managing system types» Users and authorizations» Directory Services» Global credentials» System credentials» Security» Trusted certificates» Viewing the audit log» Configuring the audit log» Monitoring systems and
events» Quick Launch menu» Performing a basic search» Performing an advanced
search for systems» Performing an advanced
search for clusters» Performing an advanced
search for events» Tool search» Related information for
searches» Configuring events» Protocol settings
Software status polling» Hardware status polling» Data collection» System Properties» Configuring WBEM health
inclusion status» Specifying a Version
The following example describes how to set up a Software Version Status Polling Task thatdetermines whether managed systems have software that is out of date. This task uses theAll Servers list as the default list.
NOTE:One instance of this task is created by default when HP SIM is installed. It runson a weekly basis. Create this task only if it has been deleted.
Procedure 1 Creating a software status polling task
1. Select Options Status Polling Software Status Polling.
2. Select target systems from the All Systems collection. The default selected is AllSystems. For more information, see Systems Insight Manager - Creating a task formore information.
3. Click [Schedule] to schedule the task, or click [Run Now] to run the taskimmediately. For more information about scheduling the task, see Systems InsightManager - Scheduling a task.
» Discovery in HP SIM» Discovery filters» Managing Hosts file» Identification» Managing system types» Users and authorizations» Directory Services» Global credentials» System credentials» Security» Trusted certificates» Viewing the audit log» Configuring the audit log» Monitoring systems and
events» Quick Launch menu» Performing a basic search» Performing an advanced
search for systems» Performing an advanced
search for clusters» Performing an advanced
search for events» Tool search» Related information for
searches» Configuring events» Protocol settings» Software status polling
Hardware status polling» Data collection» System Properties» Configuring WBEM health
inclusion status» Specifying a Version
HP SIM tracks system health status using a predefined hardware status polling task. Thistask polls for updates on hardware status through the different protocols. The followingexample describes how to set up a task to poll systems using hardware status polling.
NOTE:One instance of this task is created by default when HP SIM is installed. It runswhen new systems or events meet the search criteria. Create this task only if ithas been deleted.
Procedure 1 Creating a hardware status polling task
1. Select Options Status Polling Hardware Status Polling.
2. Select the target systems. For more information, see Systems Insight Manager -Creating a task.
3. Click [Next]. The Select Protocol Settings section appears.
4. Select from the following protocols:
HTTP
Ping
SNMP
WBEM
WS-MAN
NOTE:By default, all protocols are selected. If all protocols are clear, then the[Schedule] and [Run Now] buttons are disabled. To limit polling to onlydetermine whether a system is up or down, you can select only Ping.
After all these conditions are met, the WBEM status is cleared.
5. Select Timeout (in seconds):
Use default (currently "5")
Use custom. Timeout maximum is 120 seconds, with a minimum of onesecond.
6. Select the retry value:
Use default (currently "1")
Use custom. The retry maximum is 10 retries, with a minimum of 0 retries.
7. Select one of the following options to execute the task:
[Schedule]. Click [Schedule] to schedule when the task should run. Formore information about scheduling a task, see Systems Insight Manager -Creating a task.
[Run Now]. Click [Run Now] to run the task now. The Task Results Pageappears. For more information about the Task Results Page, see SystemsInsight Manager - Task results list.
[Previous]. Click [Previous] to return to the previous page.
Control Repository» Configuring
software/firmware globalsettings
» Reporting» Managing with tasks» Using Cluster Monitor» Command line tools» Configuring managed
systems from a WindowsCMS
» Configuring managedsystems from a LinuxCMS
» Configuring managedsystems from an HP-UXCMS
» Custom tools» Setting disk thresholds» Creating a task to delete
disk thresholds» License manager» Management processor
tools» Managing
Communications» Managing MIBs» Installing OpenSSH» Replicate Agent Settings» RPM Package Manager» HP Server Migration Pack
- Universal Edition» HP System Management
Homepage» Version Control» Device ping
» Reference» Support and other
resources» Assistance
» Glossary» Using Help
Related procedure
» Systems Insight Manager - Software status polling
» Discovery in HP SIM» Discovery filters» Managing Hosts file» Identification» Managing system types» Users and authorizations» Directory Services» Global credentials» System credentials» Security» Trusted certificates» Viewing the audit log» Configuring the audit log» Monitoring systems and
events» Quick Launch menu» Performing a basic search» Performing an advanced
search for systems» Performing an advanced
search for clusters» Performing an advanced
search for events» Tool search» Related information for
searches» Configuring events» Protocol settings» Software status polling» Hardware status polling
Data collection» System Properties» Configuring WBEM health
inclusion status» Specifying a Version
» Command line interface
Data collection performs system inventory data collection by gathering data that can be usedfor reporting and to populate various fields in the user interface like the HP SIM SystemPage. Detailed data can be collected to use for reporting or for comparing different systemswith Snapshot Comparisons, or less detailed data can be collected over time, which enablesthe use of Snapshot Comparisons to view trends on a single system. To determine trends,HP SIM displays the difference between the data available by the system at a specific time.For example, you want to determine if a specific system was updated, or that certaincomponents were removed. This can be determined by running Data Collection task in HPSIM The report lists all details based on the data collected at different times.
IMPORTANT:This should not be confused with HP Capacity Advisor data collection task. ThisHP SIM menu item polls systems that are managed by HP SIM, to collectinventory data.
Procedure 1 Creating a data collection task
1. Select Options Data Collection. The Data Collection page appears.
2. Select target systems. See Systems Insight Manager - Creating a task for moreinformation.
3. Click [Next].
4. Specify how to save data by selecting:
Overwrite existing data set (for detailed analysis). Provides a networksnapshot at a certain time
Append new data set (for historical trend analysis) . Provides trend andusage analysis
5. Select one of the following options to execute the task:
Click [Schedule] to schedule when the task should run. See SystemsInsight Manager - Scheduling a task.
Click [Run Now] to run the task now. The Task Results Page appears.
Click [Previous] to return to the previous page.
View the task results by selecting the desired data collection task on the All ScheduledTasks page.
Command line interface
Use the mxtask command to perform this task from the command line interface. Forassistance with this command, see the HP-UX or Linux manpage by entering mxtask at thecommand line or the Windows command help.
For more information, see the Systems Insight Manager Command Line Guide.
» Discovery in HP SIM» Discovery filters» Managing Hosts file» Identification» Managing system types» Users and authorizations» Directory Services» Global credentials» System credentials» Security» Trusted certificates» Viewing the audit log» Configuring the audit log» Monitoring systems and
events» Quick Launch menu» Performing a basic search» Performing an advanced
search for systems» Performing an advanced
search for clusters» Performing an advanced
search for events» Tool search» Related information for
searches» Configuring events» Protocol settings» Software status polling» Hardware status polling» Data collection
System Properties» Editing system
properties for a singlesystem
The Set System Properties tool enables administrative rights users to set system propertiesfor a single system or for multiple systems.
You have two options for setting system properties:
Edit system properties for a single system
Set system properties for multiple systems
The Suspend or Resume Monitoring tool enables you to suspend monitoring of a singlesystem or multiple systems, which enables systems to be excluded from status polling,identification, data collection, and the automatic event handling features of HP SIM. Theavailable suspend lengths include the predetermined increments of 5 minutes, 15 minutes, 1hour, 2 hours, 4 hours, 8 hours, 2 days, 3 days, 4 days, 5 days, 6 days, and 7 days. Youcan turn on the suspend tool indefinitely. Configuration changes take effect immediately. Toview the new settings for a system, click the System tab on the System Page. Changesmade with this tool override previous settings. A system that is suspended appears with adisabled icon throughout HP SIM.
You can suspend or resume monitoring for a single system or for multiply systems.
HP Systems Insight Manager 7.1 English
Operations | System Properties | Editing system properties for a single system
» Discovery in HP SIM» Discovery filters» Managing Hosts file» Identification» Managing system types» Users and authorizations» Directory Services» Global credentials» System credentials» Security» Trusted certificates» Viewing the audit log» Configuring the audit log» Monitoring systems and
events» Quick Launch menu» Performing a basic search» Performing an advanced
search for systems» Performing an advanced
search for clusters» Performing an advanced
search for events» Tool search» Related information for
searches» Configuring events» Protocol settings» Software status polling» Hardware status polling» Data collection» System Properties
Editing systemproperties for a singlesystem
The Edit System Properties link enables you to reconfigure system properties for a singlesystem from its System Page.
NOTE:You can change system properties for multiple systems if care is not taken. Readall additional notes in this section to understand what precautions must be taken.
Procedure 1 Reconfiguring system properties for a single system from its SystemPage
1. The information in the Identification section is obtained during discovery andidentification. Select from the following:
Preferred System Name Specify how the system (including the CMS)appears in the HP SIM user interface. The [Restore Default Name] buttonsets the displayed name back to the name originally discovered by HP SIM.
To prevent discovery from overwriting the preferred system name, selectPrevent the Discovery, Identification and Data Collections processesfrom changing this system name.
NOTE:If you change the preferred name, a warning message appearsstating that any lists referring to this system by name might nolonger work, and any subsequent discoveries of a system usingthe new name cause the system name change to be changedback to the host (DNS) name.
Serial number This is the serial number of the system. Any user-enteredvalue is overwritten by Identification, regardless of the checkbox settingdescribed below. This field is read-only if it is set by discovery. For Contractand Warranty data collection, if you want to override the serial numberobtained by discovery, enter a number in the Customer-Entered serialnumber field.
Product number This is the product number of the system and isretrieved through the Data Collection process.
Primary IP Select the Prevent the Discovery process from changingthis IP address to prevent the discovery process to change the IPaddress. However, if a new discovery discovers that this IP address isreassigned to other system, discovery sets up a new primary IP addressand unlocks this flag. The list includes both IPv4 and IPv6 addresses.
If you do not want discovery to change the IP address for this system,check Prevent the Discovery process from changing this IP address.However, if a new discovery finds this IP address is reassigned to anothersystem, discovery will set up a new primary IP address and unlock this flag.
2. In the Product Description section, select the properties you want to configure.The properties include the following:
System type. This is the system type for the system, click the down arrowand select the appropriate system type.
System subtype 1 - 8. This is the system subtype for the system, click thedown arrow and select the appropriate system subtype. You can provide upto eight different system subtypes.
Product model. This is a free form field and you can enter the system
» Entering new contactinformation
» Editing contactinformation
» Deleting contactinformation
» Entering new siteinformation
» Editing site information» Deleting site information» Editing system
properties for multiplesystems
» Suspending orresuming systemmonitoring for a singlesystem
» Suspending orresuming systemmonitoring for multiplesystems
» Related information» Configuring WBEM health
inclusion status» Specifying a Version
Control Repository» Configuring
software/firmware globalsettings
» Reporting» Managing with tasks» Using Cluster Monitor» Command line tools» Configuring managed
systems from a WindowsCMS
» Configuring managedsystems from a LinuxCMS
» Configuring managedsystems from an HP-UXCMS
» Custom tools» Setting disk thresholds» Creating a task to delete
disk thresholds» License manager» Management processor
tools» Managing
Communications» Managing MIBs» Installing OpenSSH» Replicate Agent Settings» RPM Package Manager» HP Server Migration Pack
- Universal Edition» HP System Management
Homepage» Version Control» Device ping
» Reference» Support and other
resources» Assistance
model number here.
Hardware description. This is a free form field describing the hardware.
Operating system description. This is the name of operating systemrunning on the system, if any.
Operating system for tool filtering. This is the operating system for toolfiltering, click the down arrow and select the operating system.
Operating system version. This is a free form field and is the operatingsystem version.
3. In the Contact information, enter the system contact and location information.
4. In the Asset Information section, enter the asset number of the system and isretrieved through the Data Collection process.
5. In the Contract and Warranty Information section, under EntitlementInformation, select the properties you want to configure:
Customer-Entered serial number This is the serial number of thesystem. Any user-entered value is overwritten by Identification, regardlessof the checkbox setting described below. This field is read-only if it is set bydiscovery. For Contract and Warranty data collection, if you want to overridethe serial number obtained by discovery, enter a number in the Customer-Entered serial number field.
Customer-Entered product number The user-entered product number ofthe system. Typically, the product number is the number used to order asystem. This number is usually in the format XXXXXX-XXX. HP SIM triesobtain this number automatically.
System Country code The International Organization for Standardization(ISO) code for your country. The correct country code must be selected forproper reporting of contract and warranty data. Seehttp://www.iso.org//iso/en/prods-services/iso3166ma/02iso-3166-code-lists/list-en1.html for the list of country codes.
Entitlement type This option is required only if you have a servicecontract with HP. Choose from the following:
Customers with service contracts issued by Compaq before HP andCompaq merged should select Compaq contract ID.
Customers with service contracts issued by HP before HP andCompaq merged should select System Handle.
Customers recently issued a new service contract or migrated froman old pre-merger company contract to a new HP contract shouldselect SAID (Service Agreement ID).
Customers who purchased an extended warranty at the time thedevice was purchased must select HP Care pack Serial Number.
Entitlement ID The ID of the contract, if you entered one. Depending onthe selected contract type, the following applies:
For Compaq contract IDs, the contract identifier is on the contractitself.
System Handles are on the contract. System Handles are casesensitive and generally use uppercase letters.
For SAIDs, the documentation provided with the contract explainswhere to find the SAID. The SAID is a 12-digit number starting with1. Although it might appear on the contract as a sequence of threefour-digit numbers, enter the number as a single 12 digit numberwithout spaces.
For the HP Care pack Serial Number, there is a separate supportserial number that is different than the serial number for the productitself. Enter the Carepack serial number as the contract identifier.
Obligation ID Platinum, Gold, or Silver pre-merger Compaq contractsprovide a red access ID (also called an obligation ID or software accessnumber). Compaq Software Obligation IDs were only issued in NorthAmerica.
Custom Delivery ID A free-form field to enter delivery ID information.
6. In the System Site Information section, select the site information. To create, edit,or delete site information, click [Manage Sites]. See Systems Insight Manager -Managing site information for more information.
NOTE:When you update the details for an existing company name, HP SIMautomatically updates the details for all systems with a matchingcompany name. If you have multiple addresses for a single company, usea unique company name for each one.
7. The Customer Contact section includes information about the contact personresponsible for this system.
Primary customer contact Click [Manage Contacts ] to create, edit, ordelete contact information. See Systems Insight Manager - Managingcontacts for more information.
Secondary customer contact Select information from the menu.
Primary service contact Select information from the menu.
8. Click [OK] to save changes, or click [Cancel ] to cancel changes.
» Discovery in HP SIM» Discovery filters» Managing Hosts file» Identification» Managing system types» Users and authorizations» Directory Services» Global credentials» System credentials» Security» Trusted certificates» Viewing the audit log» Configuring the audit log» Monitoring systems and
events» Quick Launch menu» Performing a basic search» Performing an advanced
search for systems» Performing an advanced
search for clusters» Performing an advanced
search for events» Tool search» Related information for
searches» Configuring events» Protocol settings» Software status polling» Hardware status polling» Data collection» System Properties
» Editing systemproperties for a singlesystem
Procedure 1 Entering contact information
Enter the following information as needed.
Table 1 Contact information
Fields Description
Salutation The salutation of the contact person. Select from the dropdown list.
Contact'sfirst name
The first name of a contact that support can use to notify at thecustomer site.
Contact'slast name
The last name of a contact that support can use to notify at thecustomer site. If you enter a first name, a last name is required.
Contactjob title The contact person's job title. This is a free-form field.
Contactphone
The phone number of the contact person. Extension can be includedby entering ext. before the extension number. For example, 555-123-4567 ext. 89.
Contactemail
The contact person's e-mail address. This field is alphanumeric andcan contain only one e-mail address.
Contactlanguage
The language to use for the contact person. This field isalphanumeric and can contain only one e-mail address.
Hours ofavailability
The hours that the contact person is available. This field isalphanumeric and can contain only one e-mail address.
Contactother
This field is a free-form and can included information such asavailability of the contact person, language preference, and so on.
NOTE:When you update the contact e-mail, phone number, or other information for anexisting contact, HP SIM automatically updates the details for all systems thatuse the same contact name.
Systems Insight Manager - Related information
HP Systems Insight Manager 7.1 English
Operations | System Properties | Editing contact information
» Discovery in HP SIM» Discovery filters» Managing Hosts file» Identification» Managing system types» Users and authorizations» Directory Services» Global credentials» System credentials» Security» Trusted certificates» Viewing the audit log» Configuring the audit log» Monitoring systems and
events» Quick Launch menu» Performing a basic search» Performing an advanced
search for systems» Performing an advanced
search for clusters» Performing an advanced
search for events» Tool search» Related information for
searches» Configuring events» Protocol settings» Software status polling» Hardware status polling» Data collection» System Properties
» Editing systemproperties for a singlesystem
Procedure 1 Editing contact information
1. Edit the following information as needed:
Table 1 Contact information
Fields Description
Salutation The salutation of the contact person. Select from the dropdown list.
Contact'sfirst name
The first name of a contact that support can use to notify at thecustomer site.
Contact'slast name
The last name of a contact that support can use to notify at thecustomer site. If you enter a first name, a last name is required.
Contactjob title The contact person's job title. This is a free-form field.
Contactphone
The phone number of the contact person. Extension can be includedby entering ext. before the extension number. For example, 555-123-4567 ext. 89.
Contactemail
The contact person's e-mail address. This field is alphanumeric andcan contain only one e-mail address.
Contactlanguage The language to use for the contact person.
Hours ofavailability The hours that the contact person is available.
Contactother
This field is a free-form and can included information such asavailability of the contact person, language preference, and so on.
2. To save changes, click [OK], or click [Cancel ] to return to the Manage Contactssection without saving changes.
Systems Insight Manager - Related information
HP Systems Insight Manager 7.1 English
Operations | System Properties | Deleting contact information
» Discovery in HP SIM» Discovery filters» Managing Hosts file» Identification» Managing system types» Users and authorizations» Directory Services» Global credentials» System credentials» Security» Trusted certificates» Viewing the audit log» Configuring the audit log» Monitoring systems and
events» Quick Launch menu» Performing a basic search» Performing an advanced
search for systems» Performing an advanced
search for clusters» Performing an advanced
search for events» Tool search» Related information for
searches» Configuring events» Protocol settings» Software status polling» Hardware status polling» Data collection» System Properties
» Editing systemproperties for a singlesystem
Procedure 1 Deleting contact information
1. Go to [Manage Contacts ].
Click [Manage Contacts ] from the Edit System Properties page. TheManage Contacts page appears.
Select Options System Properties Manage Contacts .
2. Select the contacts to delete.
3. Click [Delete ]. A confirmation box appears.
4. To delete the contact, click [OK], or to cancel the deletion, click [Cancel ].
Systems Insight Manager - Related information
HP Systems Insight Manager 7.1 English
Operations | System Properties | Entering new site information
» Discovery in HP SIM» Discovery filters» Managing Hosts file» Identification» Managing system types» Users and authorizations» Directory Services» Global credentials» System credentials» Security» Trusted certificates» Viewing the audit log» Configuring the audit log» Monitoring systems and
events» Quick Launch menu» Performing a basic search» Performing an advanced
search for systems» Performing an advanced
search for clusters» Performing an advanced
search for events» Tool search» Related information for
searches» Configuring events» Protocol settings» Software status polling» Hardware status polling» Data collection» System Properties
» Editing systemproperties for a singlesystem
The Edit System Properties link enables you to re-configure system properties for a singlesystem through its System Page which is made up of the following sections.
Procedure 1 Entering site information
1.
Fields Description
Site Name The company name that the system belongs to.
Address 1 The company address first line.
Address 2 The company address second line.
City The name of the city that the system is located in.
State orprovince
The name of the state the system is located in. Select state fromthe dropdown list.
Postal code The city zip code. This can include the dash with additional fourdigits.
Country orRegion
The country or region name. Select a country or region from thedropdown list.
Time zone The time zone that the city is located in. Select the appropriate timezone from the dropdown list.
2. After you have entered the text, click [OK], [Cancel ], or [Apply].
Systems Insight Manager - Related information
HP Systems Insight Manager 7.1 English
Operations | System Properties | Editing site information
» Discovery in HP SIM» Discovery filters» Managing Hosts file» Identification» Managing system types» Users and authorizations» Directory Services» Global credentials» System credentials» Security» Trusted certificates» Viewing the audit log» Configuring the audit log» Monitoring systems and
events» Quick Launch menu» Performing a basic search» Performing an advanced
search for systems» Performing an advanced
search for clusters» Performing an advanced
search for events» Tool search» Related information for
searches» Configuring events» Protocol settings» Software status polling» Hardware status polling» Data collection» System Properties
» Editing systemproperties for a singlesystem
Procedure 1 Editing site information
Edit the following information as needed.
1. Click from the Edit System Properties page. The Manage Sites sectionappears.
2.
Fields Description
Site Name The company name that the system belongs to.
Address 1 The company address first line.
Address 2 The company address second line.
City The name of the city that the system is located in.
State orprovince
The name of the state the system is located in. Select statefrom the dropdown list.
Postalcode
The city zip code. This can include the dash with additionalfour digits.
Country orRegion
The country or region name. Select a country or region fromthe dropdown list.
Time zone The time zone that the city is located in. Select theappropriate time zone from the dropdown list.
3. After you have entered the text, click [OK], [Cancel ], or [Apply].
Systems Insight Manager - Related information
HP Systems Insight Manager 7.1 English
Operations | System Properties | Deleting site information
» Discovery in HP SIM» Discovery filters» Managing Hosts file» Identification» Managing system types» Users and authorizations» Directory Services» Global credentials» System credentials» Security» Trusted certificates» Viewing the audit log» Configuring the audit log» Monitoring systems and
events» Quick Launch menu» Performing a basic search» Performing an advanced
search for systems» Performing an advanced
search for clusters» Performing an advanced
search for events» Tool search» Related information for
searches» Configuring events» Protocol settings» Software status polling» Hardware status polling» Data collection» System Properties
» Editing systemproperties for a singlesystem
Procedure 1 Deleting site information
1. Click [Manage Sites] from the Edit System Properties page. The Manage Sitespage appears.
Alternately, select Options System Properties Manage Sites.
2. Select the site names to delete.
3. Click [Delete ]. A confirmation box appears.
4. To delete the site information, click [OK], or to cancel the deletion, click [Cancel ].
Systems Insight Manager - Related information
HP Systems Insight Manager 7.1 English
Operations | System Properties | Editing system properties for multiple systems
» Discovery in HP SIM» Discovery filters» Managing Hosts file» Identification» Managing system types» Users and authorizations» Directory Services» Global credentials» System credentials» Security» Trusted certificates» Viewing the audit log» Configuring the audit log» Monitoring systems and
events» Quick Launch menu» Performing a basic search» Performing an advanced
search for systems» Performing an advanced
search for clusters» Performing an advanced
search for events» Tool search» Related information for
searches» Configuring events» Protocol settings» Software status polling» Hardware status polling» Data collection» System Properties
» Editing systemproperties for a singlesystem
This tool enables you to edit system properties for multiple systems at one time. The SetSystem Properties page for multiple systems is similar to the Edit System Propertiespage for a single system, except that a checkbox appears next to each property. Thecheckboxes enable you to select the properties you want to configure when the toolexecutes. Only the selected properties are saved as a property for the target systems. If thevalue of the selected property is blank, that property is not set for the systems Allproperties are optional.
NOTE:This tool can be used for a single system. However, some of the properties thatare available from the System Page are not available when selecting this option.For example, the serial number is not available here, whereas it is available fromthe System Page.
Procedure 1 Editing system properties for multiple systems
1. The information in the Identification section is obtained during discovery andidentification. Select from the following:
Restore the default system name Select if you want to restore thedefault system name from identification.
Product number This is the product number of the system and isretrieved through the Data Collection process.
2. In the Product Description section, select the System type from the dropdown list.This is the system type for the system, click the down arrow and select theappropriate system type.
3. In the System Subtype section, select available subtypes to be added to theSelected subtypes box.
4. Enter the Product model. This is a free form field and you can enter the systemmodel number here.
5. Enter the Hardware description. This is a free form field describing the hardware.
6. Enter the Operating system description. This is the name of operating systemrunning on the system, if any.
7. Enter the Operating system for tool filtering. This is the operating system for toolfiltering, click the down arrow and select the operating system.
8. Enter the Operating system version. This is a free form field and is the operatingsystem version.
9. In the Contact information, enter the system contact and location information.
10. In the Entitlement Information section, enter the asset number.
11. In the System Property Lock section, select from:
Lock - Prevent the Discovery and Identification processes frochanging the system properties
Unlock - Allow the Discovery and Identification processes to changesystem properties
Ignore - Do not set the lock property of the target systems
12. In the Contract and Warranty Information section, under Asset Information,select the properties you want to configure:
» Entering new contactinformation
» Editing contactinformation
» Deleting contactinformation
» Entering new siteinformation
» Editing site information» Deleting site information
Editing systemproperties for multiplesystems
» Suspending orresuming systemmonitoring for a singlesystem
» Suspending orresuming systemmonitoring for multiplesystems
» Related information» Configuring WBEM health
inclusion status» Specifying a Version
Control Repository» Configuring
software/firmware globalsettings
» Reporting» Managing with tasks» Using Cluster Monitor» Command line tools» Configuring managed
systems from a WindowsCMS
» Configuring managedsystems from a LinuxCMS
» Configuring managedsystems from an HP-UXCMS
» Custom tools» Setting disk thresholds» Creating a task to delete
disk thresholds» License manager» Management processor
tools» Managing
Communications» Managing MIBs» Installing OpenSSH» Replicate Agent Settings» RPM Package Manager» HP Server Migration Pack
- Universal Edition» HP System Management
Homepage» Version Control» Device ping
» Reference» Support and other
resources» Assistance
Customer-Entered product number The user-entered product number ofthe system. Typically, the product number is the number used to order asystem. This number is usually in the format XXXXXX-XXX. HP SIM triesobtain this number automatically.
System Country code The International Organization for Standardization(ISO) code for your country. The correct country code must be selected forproper reporting of contract and warranty data. Seehttp://www.iso.org//iso/en/prods-services/iso3166ma/02iso-3166-code-lists/list-en1.html for the list of country codes.
Entitlement type This option is required only if you have a servicecontract with HP. Choose from the following:
Customers with service contracts issued by Compaq before HP andCompaq merged should select Compaq contract ID.
Customers with service contracts issued by HP before HP andCompaq merged should select System Handle.
Customers recently issued a new service contract or migrated froman old pre-merger company contract to a new HP contract shouldselect SAID (Service Agreement ID).
Customers who purchased an extended warranty at the time thedevice was purchased must select HP Care pack Serial Number.
Entitlement ID The ID of the contract, if you entered one. Depending onthe selected contract type, the following applies:
For Compaq contract IDs, the contract identifier is on the contractitself.
System Handles are on the contract. System Handles are casesensitive and generally use uppercase letters.
For SAIDs, the documentation provided with the contract explainswhere to find the SAID. The SAID is a 12-digit number starting with1. Although it might appear on the contract as a sequence of threefour-digit numbers, enter the number as a single 12 digit numberwithout spaces.
For the HP Care pack Serial Number, there is a separate supportserial number that is different than the serial number for the productitself. Enter the Carepack serial number as the contract identifier.
Obligation ID Platinum, Gold, or Silver pre-merger Compaq contractsprovide a red access ID (also called an obligation ID or software accessnumber). Compaq Software Obligation IDs were only issued in NorthAmerica.
Custom Delivery ID A free-form field to enter delivery ID information.
13. In the System Site Information section, select the site information. To create, edit,or delete site information, click [Manage Sites]. See Systems Insight Manager -Managing site information for more information.
NOTE:When you update the details for an existing company name, HP SIMautomatically updates the details for all systems with a matchingcompany name. If you have multiple addresses for a single company, usea unique company name for each one.
14. The Customer Contact section includes information about the contact personresponsible for this system.
Primary customer contact Click [Manage Contacts ] to create, edit, ordelete contact information. See Systems Insight Manager - Managingcontacts for more information.
Secondary customer contact Select information from the menu.
Primary service contact Select information from the menu.
15. Click [Previous] to return to the previous section, click [Schedule] to schedule thetask, or click [Run Now] to run the task immediately. For more information onscheduling tasks, see Systems Insight Manager - Scheduling a task.
» Discovery in HP SIM» Discovery filters» Managing Hosts file» Identification» Managing system types» Users and authorizations» Directory Services» Global credentials» System credentials» Security» Trusted certificates» Viewing the audit log» Configuring the audit log» Monitoring systems and
events» Quick Launch menu» Performing a basic search» Performing an advanced
search for systems» Performing an advanced
search for clusters» Performing an advanced
search for events» Tool search» Related information for
searches» Configuring events» Protocol settings» Software status polling» Hardware status polling» Data collection» System Properties
» Editing systemproperties for a singlesystem
The Suspend/Resume Monitoring link enables you to set the timer for suspendingmonitoring.
NOTE:To complete this procedure, you must be authorized to use theEDIT_SYSTEM_PROPERTIES tool on the system you want to update.
Procedure 1 Suspending or resuming system monitoring on a single system
1. Select one of the following options:
Enable monitoring of this system Select this option if you no longerwant the system to be suspended.
Suspend monitoring of this system for Select this option if you want tosuspend a system for a set amount of time. Set the time by clicking thedropdown arrow and selecting an option.
Suspend monitoring of this system indefinitely Select this option tosuspend a system until it is set otherwise.
2. (Optional) Select Suspend monitoring of all associated VM Guest(s) of this VMHost. If this option is enabled, status for all guest systems will be suspended.
3. Click [OK] to apply the changes or click [Cancel ] to cancel changes. After clicking[OK] or [Cancel ] you are returned to the Tools & Links tab.
Systems Insight Manager - Related information
HP Systems Insight Manager 7.1 English
Operations | System Properties | Suspending or resuming system monitoring for multiple systems
Suspending or resuming system monitoring formultiple systems
» Discovery in HP SIM» Discovery filters» Managing Hosts file» Identification» Managing system types» Users and authorizations» Directory Services» Global credentials» System credentials» Security» Trusted certificates» Viewing the audit log» Configuring the audit log» Monitoring systems and
events» Quick Launch menu» Performing a basic search» Performing an advanced
search for systems» Performing an advanced
search for clusters» Performing an advanced
search for events» Tool search» Related information for
searches» Configuring events» Protocol settings» Software status polling» Hardware status polling» Data collection» System Properties
» Editing systemproperties for a singlesystem
The Suspend or Resume Monitoring tool enables you to set the timer for suspendingmonitoring of multiple systems.
Procedure 1 Suspending or resuming monitoring for multiple systems
1. Select one of the following options:
Enable monitoring of target systems Select this option if you no longerwant the target systems to be suspended.
Suspend monitoring of target systems for Select this option if you wantto suspend target systems for a set amount of time. Set the time by clickingthe dropdown arrow and selecting an option.
Suspend monitoring of target systems indefinitely Select this option tosuspend target systems until it is set otherwise.
2. Click [Previous] to select different target systems, click [Schedule] to schedule thetask, or click [Run Now] to run the task immediately.
HP Systems Insight Manager 7.1 English
Operations | System Properties | Related information
» Discovery in HP SIM» Discovery filters» Managing Hosts file» Identification» Managing system types» Users and authorizations» Directory Services» Global credentials» System credentials» Security» Trusted certificates» Viewing the audit log» Configuring the audit log» Monitoring systems and
events» Quick Launch menu» Performing a basic search» Performing an advanced
search for systems» Performing an advanced
search for clusters» Performing an advanced
search for events» Tool search» Related information for
searches» Configuring events» Protocol settings» Software status polling» Hardware status polling» Data collection» System Properties
» Editing systemproperties for a singlesystem
Related procedures
» Systems Insight Manager - Editing system properties for a single system» Systems Insight Manager - Entering new contact information» Systems Insight Manager - Editing contact information» Systems Insight Manager - Deleting contact information» Systems Insight Manager - Editing site information» Systems Insight Manager - Deleting site information» Systems Insight Manager - Suspending or resuming system monitoring for a singlesystem» Systems Insight Manager - Editing system properties for multiple systems» Systems Insight Manager - Suspending or resuming system monitoring for multiplesystems
Related topics
» Systems Insight Manager - System page» Systems Insight Manager - Essentials tab» Systems Insight Manager - System tab for blade servers» Systems Insight Manager - System tab for clusters» Systems Insight Manager - System tab for a complex» HP Systems Insight Manager 7.0 - System tab for management processors» Systems Insight Manager - System tab for partitions» Systems Insight Manager - System tab for servers» Systems Insight Manager - System tab for a storage array» Systems Insight Manager - System tab for storage host» Systems Insight Manager - System tab for a storage switch» Systems Insight Manager - System tab for a tape library» HP Systems Insight Manager - Tools & Links tab» Systems Insight Manager - Performance tab for blades» Systems Insight Manager - Port mapping tab for blades» Systems Insight Manager - Port types
HP Systems Insight Manager 7.1 English
Operations | Configuring WBEM health inclusion status
» Discovery in HP SIM» Discovery filters» Managing Hosts file» Identification» Managing system types» Users and authorizations» Directory Services» Global credentials» System credentials» Security» Trusted certificates» Viewing the audit log» Configuring the audit log» Monitoring systems and
events» Quick Launch menu» Performing a basic search» Performing an advanced
search for systems» Performing an advanced
search for clusters» Performing an advanced
search for events» Tool search» Related information for
searches» Configuring events» Protocol settings» Software status polling» Hardware status polling» Data collection» System Properties
Configuring WBEM healthinclusion status
» Specifying a Version
On the System Page of an ESXi system, the Tools and Links tab will populate the WBEMHealth Inclusion Status link. This link takes you to the WBEM Health Inclusion Statuspage, lists the status information for the subcomponents of an ESXi system. HP SIM showsunused systems with a Major health status. To have HP SIM ignore these systems whenshowing the health status of an ESXi system, use this page to ignore the components thatare not in use. This page shows the following information:
Component name
Description of the component
Propagation state
Health status
To include or ignore a component health status, complete the following:
1. To select components to include, select individual systems, and then click IncludeStatus.
2. To select components to ignore, select individual systems, and then click IgnoreStatus. This will exclude all selected components from being considered incalculations of the overall system health status.
This feature is useful to disable disconnected NICs from reporting an error status(Major/Minor) on the ESXi overall status.
After setting the ‘Include Status’ or ‘Ignore Status’ on the components, the change will notbe reflected until the Next scheduled Status Polling task runs. You can or manually run theHardware Status Polling to reflect these statuses immediately.
HP Systems Insight Manager 7.1 English
Operations | Specifying a Version Control Repository
» Discovery in HP SIM» Discovery filters» Managing Hosts file» Identification» Managing system types» Users and authorizations» Directory Services» Global credentials» System credentials» Security» Trusted certificates» Viewing the audit log» Configuring the audit log» Monitoring systems and
events» Quick Launch menu» Performing a basic search» Performing an advanced
search for systems» Performing an advanced
search for clusters» Performing an advanced
search for events» Tool search» Related information for
searches» Configuring events» Protocol settings» Software status polling» Hardware status polling» Data collection» System Properties» Configuring WBEM health
inclusion statusSpecifying a Version
HP SIM enables you to specify an HP Version Control Repository Manager. The HP VCRMstores the latest ProLiant Support Packs providing the latest software. The HP VCRMselected, determines which SPPs appear in the list for baseline tools.
Procedure 1 Specifying a Version Control Repository
1. Select Options Software/Firmware Version Control Repository. TheVersion Control Repository page appears.
2. Under Select the system to use as the default Version Control Repository,select a system that has the HP VCRM installed.
NOTE:A trust relationship must be established between HP SIM and the systemthat has the HP VCRM installed. See Systems Insight Manager - Trustedcertificates for more information regarding trust relationships. After thetrust relationship is established, click Last Update to update theTrusted? column to Yes.
3. Under Contents of selected version control repository, click the icon to drilldown and view the contents of the selected Version Control Repository.
NOTE:To expand the tree to display all contents, click the icon, located inthe upper-left corner of the Contents of selected version controlrepository section. Click the icon to collapse the listings.
NOTE:Click any column heading to sort by that column in ascending ordescending order.
NOTE:This section displays systems that are authorized by the current user. Ifthe current user is not authorized to view any systems with the HPVersion Control Repository Manager, the system will not be listed in theSelect the default Version Control Repository section. If there are nodiscovered systems running the HP VCRM, a message appears,indicating that no repository could be found.
4. Click [OK] to apply your selection. A message appears, indicating if the repositorysetting was successfully saved.
HP Systems Insight Manager 7.1 English
Operations | Configuring software/firmware global settings
» Discovery in HP SIM» Discovery filters» Managing Hosts file» Identification» Managing system types» Users and authorizations» Directory Services» Global credentials» System credentials» Security» Trusted certificates» Viewing the audit log» Configuring the audit log» Monitoring systems and
events» Quick Launch menu» Performing a basic search» Performing an advanced
search for systems» Performing an advanced
search for clusters» Performing an advanced
search for events» Tool search» Related information for
searches» Configuring events» Protocol settings» Software status polling» Hardware status polling» Data collection» System Properties» Configuring WBEM health
inclusion status» Specifying a Version
Run the following procedure to configure component and version matching options. Thesesettings determine how the software/firmware status icon values are determined.
Procedure 1 Configuring software/firmware global settings
1. Under Version Matching, select one of the following:
Installed versions of software or firmware that are more recent than thebaseline version will appear as Normal status
The installed software or firmware must exactly match the version in thebaseline
2. Under Component Matching, select one of the following:
Only software or firmware installed on the system will be used whencomparing against the selected baseline
All software or firmware in the baseline must be installed on the system
» Discovery in HP SIM» Discovery filters» Managing Hosts file» Identification» Managing system types» Users and authorizations» Directory Services» Global credentials» System credentials» Security» Trusted certificates» Viewing the audit log» Configuring the audit log» Monitoring systems and
events» Quick Launch menu» Performing a basic search» Performing an advanced
search for systems» Performing an advanced
search for clusters» Performing an advanced
search for events» Tool search» Related information for
searches» Configuring events» Protocol settings» Software status polling» Hardware status polling» Data collection» System Properties» Configuring WBEM health
inclusion status» Specifying a Version
The HP SIM Reporting feature enables you to generate reports, create customer-definedreport configurations, edit, copy, and delete report configurations. All users with sign-inaccess to HP SIM can generate reports.
Table 1 Reporting menu items
Name Description Access
New...
The create new report wizard helps you tocreate a new report and add it to SystemsInsight Manager reports. This option is onlyavailable for Systems Insight Manager.
Select Reports New....The New Report Step 1:Select Target Systemspage appears.
Snapshot comparisons enable you to compareup to four systems (with the same operatingsystem) to each other or to compare a singlesystem to itself and observe changes overtime.
Select ReportsSnapshotComparison....
See - Snapshotcomparison reporting.
EnhancedReportsTable 3.
Predefined Reports
Creating New Reports from theEnhanced Reports Page
Editing Reports
Running Reports
Email Reports
Deleting Reports
Select ReportsEnhanced Reports....The Enhanced Reports,Reports by Productpage appears.
FederatedSearch...
Federated CMS Search is a web-based HPSIM plug-in that allows you to search quicklyacross a number of Systems Insight ManagerCMS systems.
See Systems InsightManager - FederatedCMS Search Tool.
Table 2 Manage Reports options
Name Description Access
A generated report providesyou with the report name,
Control Repository» Configuring
software/firmware globalsettingsReporting» New reports» Running managed
reports» Copying managed
reports» Editing managed
reports» Deleting managed
reports» Running predefined
reports» Adding a report» Editing a report» Deleting a report» Running a report» Emailing reports» Insight Control reports» Showing SQL» Snapshot comparison
reporting» Federated CMS Search
Tool» Federated CMS Search
Configuration» Managing with tasks» Using Cluster Monitor» Command line tools» Configuring managed
systems from a WindowsCMS
» Configuring managedsystems from a LinuxCMS
» Configuring managedsystems from an HP-UXCMS
» Custom tools» Setting disk thresholds» Creating a task to delete
disk thresholds» License manager» Management processor
tools» Managing
Communications» Managing MIBs» Installing OpenSSH» Replicate Agent Settings» RPM Package Manager» HP Server Migration Pack
- Universal Edition» HP System Management
Homepage» Version Control» Device ping
» Reference» Support and other
resources» Assistance
» Glossary
Runningmanagedreports
associated system collection,and report run date and timein the following formats.
HTML (Recommendedfor viewing)
XML
CSV
Select Reports Manage Reports.... TheManage Reports, Reports by Product pageappears. Select the report that you want torun. Select the HTML, XML, or CSV reportformat. Click [Run Report].
See Systems Insight Manager - Runningmanaged reports
Copyingmanagedreports
Enables copying reportconfigurations from an existingreport configuration.
Select Reports Manage Reports.... TheManage Reports page appears. Select thereport you want to copy and then click[Copy...].
See Systems Insight Manager - Copyingmanaged reports
Creatingnewreports
Enables creating a new reportand add it to HP SIM reports.
See Systems Insight Manager - Runningpredefined reports .
CreatingNewReportsfrom theEnhancedReportsPage
The create new report wizardhelps you to create a newreport and add it to SystemsInsight Manager reports. Thisoption is only available forSystems Insight Manager.
Select Reports Enhanced Reports....The Enhanced Reports, Reports byProduct page appears. Select the reportthat you want to edit, and then click [Edit...].The Add details to report: Step 3: SpecifyParameters page appears.
See Systems Insight Manager - Editing areport.
Running Executes a report present in
Select Reports Enhanced Reports....The Enhanced Reports page appears.Select the report that you want to run. Click
» Using Help Reports the reporting engine. [Run Report].
See Systems Insight Manager - Running areport.
EmailReports
Enables a report to be run at alater specified time.
Select Reports Enhanced Reports....The Enhanced Reports, Reports byProduct page appears. Select the reportthat you want to schedule, and then click[Email Report...].
See Systems Insight Manager - Emailingreports.
DeletingReports
Enables a user defined reportto be deleted.
Select Reports Enhanced Reports. TheEnhanced Reports, Reports by Productpage appears.
» Discovery in HP SIM» Discovery filters» Managing Hosts file» Identification» Managing system types» Users and authorizations» Directory Services» Global credentials» System credentials» Security» Trusted certificates» Viewing the audit log» Configuring the audit log» Monitoring systems and
events» Quick Launch menu» Performing a basic search» Performing an advanced
search for systems» Performing an advanced
search for clusters» Performing an advanced
search for events» Tool search» Related information for
searches» Configuring events» Protocol settings» Software status polling» Hardware status polling» Data collection» System Properties» Configuring WBEM health
inclusion status» Specifying a Version
Procedure 1 Creating a new report
1. From the HP SIM menu, select Reports and then, click [New Report...]. TheNew Report Step 1: Select Target Systems page appears.
2. Select the desired Target Systems. For more information, see Systems InsightManager - Creating a task
The Step 1: Verify Target Systems page appears.
3. If you want additional targets, click [Add Targets...].
If a device is not needed, select the targeted device, and then click [RemoveTarget].
Click [Next] to verify the selected targets.
The Step 2: Specify Parameters page appears.
4. In the Report Name: field, enter a name for the report.
NOTE:Report names cannot contain any of the following characters: < > ' & \ ` ,# + | % ; / \\ ! ~ @ $ ^ * = { } [ ] " : and ?
5. In the Select items to show in report: section, select all categories or items toinclude in the report. You can click the icon to expand a category, and thenselect specific items or click the icon to collapse a category.
6. Under Layout for generated or saved report:, chose either of the followingoptions.
Show all systems in the same table. This option displays all categoriesand items selected in the Select items to show in report section. Theselected categories appear as tables, and the selected data items appearas column headers in the report. All systems appear in the same table.
Show each system in a separate table. This option displays allcategories and items selected in the Select items to show in reportsection. The selected categories appear as tables, and all the selected dataitems appear as column headers. Each system appears in an individualtable.
7. Under Format for generated report, select from the following options:
HTML (Recommended for viewing)
XML
CSV
8. To save the report configuration, click [Save Report]. If the report exists, theoverwrite report message appears. Click [Cancel ] if you do not want to overwritethe existing report.
9. Click [Run Report].
Control Repository» Configuring
software/firmware globalsettings
» ReportingNew reports
» Running managedreports
» Copying managedreports
» Editing managedreports
» Deleting managedreports
» Running predefinedreports
» Adding a report» Editing a report» Deleting a report» Running a report» Emailing reports» Insight Control reports» Showing SQL» Snapshot comparison
reporting» Federated CMS Search
Tool» Federated CMS Search
Configuration» Managing with tasks» Using Cluster Monitor» Command line tools» Configuring managed
systems from a WindowsCMS
» Configuring managedsystems from a LinuxCMS
» Configuring managedsystems from an HP-UXCMS
» Custom tools» Setting disk thresholds» Creating a task to delete
disk thresholds» License manager» Management processor
tools» Managing
Communications» Managing MIBs» Installing OpenSSH» Replicate Agent Settings» RPM Package Manager» HP Server Migration Pack
- Universal Edition» HP System Management
Homepage» Version Control» Device ping
» Reference» Support and other
resources» Assistance
» Glossary
The new report appears.
Selecting the sort order
The Reporting feature enables you to sort the data when it displays on the Report Resultspage.
Ascending Order. Click the column heading you want to sort by once. The datarequeries in ascending alphabetical order.
Descending Order. Click the column heading you want to sort by twice. The datarequeries in descending alphabetical order.
Printing the report
On the Report Results page, select File [Print] from your browser.
» Discovery in HP SIM» Discovery filters» Managing Hosts file» Identification» Managing system types» Users and authorizations» Directory Services» Global credentials» System credentials» Security» Trusted certificates» Viewing the audit log» Configuring the audit log» Monitoring systems and
events» Quick Launch menu» Performing a basic search» Performing an advanced
search for systems» Performing an advanced
search for clusters» Performing an advanced
search for events» Tool search» Related information for
searches» Configuring events» Protocol settings» Software status polling» Hardware status polling» Data collection» System Properties» Configuring WBEM health
inclusion status» Specifying a Version
» Running an existing report in HTML format» Viewing an existing report in XML format» Viewing an existing report in CSV format» Selecting the sort order» Printing an existing report
Select Reports Manage Reports.... The Manage Reports, Reports by Product pageappears. Select the report that you want to run. Select the report format. Click [RunReport].
You can run reports in the following formats:
HTML (Recommended for viewing)
XML
CSV
The default sort order is based on the system name.
You can click any column heading to sort in ascending or descending order.
You can also access the Manage Reports page from the Manage section of the HP SIMHome page by clicking the Manage inventory reports link.
Running an existing report in HTML format
Procedure 1 Running a report in HTML format
1. Select Reports Manage Reports.
2. Select the report you want to view.
3. Under Format for generated report, select HTML (Recommended for viewing) .
4. Click [Run Report]. The report appears.
The HTML report enables you to Show SQL queries.
Viewing an existing report in XML format
Procedure 2 Running a report in XML format
1. Select Reports Manage Reports.
2. Select the report you want to view.
3. Under Format for generated report, select XML.
4. Click [Run Report]. The XML report appears.
Viewing an existing report in CSV format
Procedure 3 Running a report in CSV format
1. Select Reports Manage Reports.
Control Repository» Configuring
software/firmware globalsettings
» Reporting» New reports
Running managedreports
» Copying managedreports
» Editing managedreports
» Deleting managedreports
» Running predefinedreports
» Adding a report» Editing a report» Deleting a report» Running a report» Emailing reports» Insight Control reports» Showing SQL» Snapshot comparison
reporting» Federated CMS Search
Tool» Federated CMS Search
Configuration» Managing with tasks» Using Cluster Monitor» Command line tools» Configuring managed
systems from a WindowsCMS
» Configuring managedsystems from a LinuxCMS
» Configuring managedsystems from an HP-UXCMS
» Custom tools» Setting disk thresholds» Creating a task to delete
disk thresholds» License manager» Management processor
tools» Managing
Communications» Managing MIBs» Installing OpenSSH» Replicate Agent Settings» RPM Package Manager» HP Server Migration Pack
- Universal Edition» HP System Management
Homepage» Version Control» Device ping
» Reference» Support and other
resources» Assistance
» Glossary
2. Under Report Name, select the report you want to view.
3. Under Format for generated report, select CSV.
4. Click [Run Report]. If the browser system has no application associated with .CSVfiles, then the .CSV file appears in the browser window. If you have an applicationassociated with .CSV files, then the .CSV file appears in the specified application.
If you are using Internet Explorer and an application such as Excel is installed onthe browser system and the .CSV file extension is associated with that application,the Save As dialog box appears. Click [Save].
5. Name the file, and in the Save as type field, select a format in which to save thefile from the dropdown list. Click [Save]. The report is saved.
Selecting the sort order
The Reporting feature enables you to sort the data after it appears in the Report Resultspage.
Ascending Order. Click the column heading you want to sort by once. The dataqueries in ascending alphabetical order.
Descending Order. Click the column heading you want to sort by twice. The dataqueries in descending alphabetical order.
Printing an existing report
From the Report Results page, select File [Print] from your browser.
» Discovery in HP SIM» Discovery filters» Managing Hosts file» Identification» Managing system types» Users and authorizations» Directory Services» Global credentials» System credentials» Security» Trusted certificates» Viewing the audit log» Configuring the audit log» Monitoring systems and
events» Quick Launch menu» Performing a basic search» Performing an advanced
search for systems» Performing an advanced
search for clusters» Performing an advanced
search for events» Tool search» Related information for
searches» Configuring events» Protocol settings» Software status polling» Hardware status polling» Data collection» System Properties» Configuring WBEM health
inclusion status» Specifying a Version
Procedure 1 Copying a report configuration
1. Select Reports Manage Reports. The Manage Reports window appears.
2. Select the report to copy, and then click [Copy]. The Copy report section appears.
3. In the Report Name field, enter a name for the new report configuration.
NOTE:Report names cannot contain any of the following characters: < > ' & \ ` ,# + | % ; / \\ ! ~ @ $ ^ * = { } [ ] " : and ?
4. Click [OK].
The Copy report section closes, and the copied report configuration appears in theManage Reports section.
» Discovery in HP SIM» Discovery filters» Managing Hosts file» Identification» Managing system types» Users and authorizations» Directory Services» Global credentials» System credentials» Security» Trusted certificates» Viewing the audit log» Configuring the audit log» Monitoring systems and
events» Quick Launch menu» Performing a basic search» Performing an advanced
search for systems» Performing an advanced
search for clusters» Performing an advanced
search for events» Tool search» Related information for
searches» Configuring events» Protocol settings» Software status polling» Hardware status polling» Data collection» System Properties» Configuring WBEM health
inclusion status» Specifying a Version
Procedure 1 Editing an existing report
1. Select Reports Manage Reports. The Manage Reports window appears.
2. Select the report to edit, and then click [Edit]. The Edit Report page displays.
3. Select the desired Target Systems. For more information, see Systems InsightManager - Creating a task
The Step 1: Verify Target Systems page appears.
4. If you want additional targets, click [Add Targets...].
If a device is not needed, select the targeted device, and then click [RemoveTarget].
Click [Next] to verify the selected targets.
The Step 2: Specify Parameters page appears.
5. In the Select items to show in report: section, select all categories or items toinclude in the report. You can click the icon to expand a category, and thenselect specific items or click the icon to collapse a category.
6. Under Layout for generated or saved report: chose either of the followingoptions.
Show all systems in the same table. This option displays all categoriesand items selected in the Select items to show in report section. Theselected categories appear as tables, and the selected data items appearas column headers in the report. All systems appear in the same table.
Show each system in a separate table. This option displays allcategories and items selected in the Select items to show in reportsection. The selected categories appear as tables, and all the selected dataitems appear as column headers. Each system appears in an individualtable.
7. Under Format for current run of generated report (format not saved withreport), select from the following options:
HTML (Recommended for viewing)
XML
CSV
8. To save over the existing report configuration, click [Save Report].
Note: To save an existing report as a report with a new name, enter a new reportname in the Report Name field, and then click [Save Report]. The new report issaved and added to the report list on the Manage Reports page.
A dialog box appears, asking you to confirm your intention to save the report. Click[OK] to save, or click [Cancel ] to abort. If the report already exists, the overwritereport message appears. Click [Cancel ] if you do not want to overwrite the existingreport.
9. To view the report, click [Run Report]. You can click [Previous] to return to thetarget selection page. You can click [Cancel ] to abort the report creation process.
Control Repository» Configuring
software/firmware globalsettings
» Reporting» New reports» Running managed
reports» Copying managed
reportsEditing managedreports
» Deleting managedreports
» Running predefinedreports
» Adding a report» Editing a report» Deleting a report» Running a report» Emailing reports» Insight Control reports» Showing SQL» Snapshot comparison
reporting» Federated CMS Search
Tool» Federated CMS Search
Configuration» Managing with tasks» Using Cluster Monitor» Command line tools» Configuring managed
systems from a WindowsCMS
» Configuring managedsystems from a LinuxCMS
» Configuring managedsystems from an HP-UXCMS
» Custom tools» Setting disk thresholds» Creating a task to delete
disk thresholds» License manager» Management processor
tools» Managing
Communications» Managing MIBs» Installing OpenSSH» Replicate Agent Settings» RPM Package Manager» HP Server Migration Pack
» Discovery in HP SIM» Discovery filters» Managing Hosts file» Identification» Managing system types» Users and authorizations» Directory Services» Global credentials» System credentials» Security» Trusted certificates» Viewing the audit log» Configuring the audit log» Monitoring systems and
events» Quick Launch menu» Performing a basic search» Performing an advanced
search for systems» Performing an advanced
search for clusters» Performing an advanced
search for events» Tool search» Related information for
searches» Configuring events» Protocol settings» Software status polling» Hardware status polling» Data collection» System Properties» Configuring WBEM health
inclusion status» Specifying a Version
Procedure 1 Deleting a report configuration
1. Select Reports Manage Reports. The Manage Reports page appears.
2. Select the report configuration to be deleted.
3. Click [Delete ]. A dialog box displays asking you to confirm your intention to deletethe selected report.
4. Click [OK] to permanently delete the report configuration. You can click [Cancel ] toabort the delete operation.
» Discovery in HP SIM» Discovery filters» Managing Hosts file» Identification» Managing system types» Users and authorizations» Directory Services» Global credentials» System credentials» Security» Trusted certificates» Viewing the audit log» Configuring the audit log» Monitoring systems and
events» Quick Launch menu» Performing a basic search» Performing an advanced
search for systems» Performing an advanced
search for clusters» Performing an advanced
search for events» Tool search» Related information for
searches» Configuring events» Protocol settings» Software status polling» Hardware status polling» Data collection» System Properties» Configuring WBEM health
inclusion status» Specifying a Version
NOTE:Crystal Reports does not support Adobe Flash Player version 11. HP recommendsyou use the supported flash version on the browsing machine to avoid issues. Youcan obtain the supported version from the HP SIM installation by accessing:https://<CMS_IP_ADDRESS>:50000/flash_install/flashInstall.jsp.
2. Click the to expand a product group to reveal available reports. Available reportsappear below the selected product group.
3. Select an available report to run.
4. Select a format for the generated report from Format for generated report:
HTML (Recommended for viewing)
CSV
PDF
5. Click [Run Report].
The Select Parameters page appears.
6. Depending on the report selected, you might have to choose parameters before thereport displays. Some possible parameters are:
Date range
Group type
System type
Operating systems
Parameters selections. Click the left arrow to expand the window and displaythe parameter options.Selection buttons. The three selection options from the left:
Select all values
Select no values
Search the list of values
Control Repository» Configuring
software/firmware globalsettings
» Reporting» New reports» Running managed
reports» Copying managed
reports» Editing managed
reports» Deleting managed
reportsRunning predefinedreports
» Adding a report» Editing a report» Deleting a report» Running a report» Emailing reports» Insight Control reports» Showing SQL» Snapshot comparison
reporting» Federated CMS Search
Tool» Federated CMS Search
Configuration» Managing with tasks» Using Cluster Monitor» Command line tools» Configuring managed
systems from a WindowsCMS
» Configuring managedsystems from a LinuxCMS
» Configuring managedsystems from an HP-UXCMS
» Custom tools» Setting disk thresholds» Creating a task to delete
disk thresholds» License manager» Management processor
tools» Managing
Communications» Managing MIBs» Installing OpenSSH» Replicate Agent Settings» RPM Package Manager» HP Server Migration Pack
- Universal Edition» HP System Management
Homepage» Version Control» Device ping
» Reference» Support and other
resources» Assistance
» Glossary
Value pane. Displays the available parameters for the current report.
7. Click [OK] to display the report. Click [Reset] to reset all parameters and make newselections.
Export icon. Exports the current report in the following formats:
Crystal Reports (RPT)
PDF
Microsoft Excel (97-2003)
Microsoft Excel (97-2003) Data-Only
Microsoft Excel (97-2003) - Editable
Rich Text Format (RTF)
Separated Values (CSV)
Print icon. Prints the current report. The viewer must export to PDF to print. Choosethe Print option from the PDF reader application once the document is opened.Parameters. Displays/hides the available parameters for the current report in the MainReport panel. The available parameters can then be selected and edited as desired.Group Tree. Displays/hides a list of items that the report is grouped by. You can selectan item from the Group Tree and the selected item is displayed in the Report Viewer.Page Selection. Go to page. You can use the arrows on either side of the text box tomove from one page to another.Zoom tool. Click here to access Zoom options.Search. Search for text within the current report.Main Report pane. Displays available information of either the parameters or the grouptree from the current report depending on which option is selected at the time. If youchoose to edit the parameter list, you must then click [Apply] in the Main Report panefor the changes to display in the current report.
» Discovery in HP SIM» Discovery filters» Managing Hosts file» Identification» Managing system types» Users and authorizations» Directory Services» Global credentials» System credentials» Security» Trusted certificates» Viewing the audit log» Configuring the audit log» Monitoring systems and
events» Quick Launch menu» Performing a basic search» Performing an advanced
search for systems» Performing an advanced
search for clusters» Performing an advanced
search for events» Tool search» Related information for
searches» Configuring events» Protocol settings» Software status polling» Hardware status polling» Data collection» System Properties» Configuring WBEM health
inclusion status» Specifying a Version
Creating a new report
Procedure 1 Creating a new report
1. From the HP SIM menu, select Reports Enhanced reports and then, click [New...]. The New ReportStep 1: Select Target Systems page appears.
2. Select the desired Target Systems. For more information, see Systems Insight Manager - Creating a task
The Step 1: Verify Target Systems page appears.
3. If you want additional targets, click [Add Targets...].
If a device is not needed, select the targeted device, and then click [Remove Target].
Click [Next] to verify the selected targets.
The Step 2: Add Report Details page appears.
4. In the Report Name: field, enter a name for the report.
NOTE:Report names cannot contain any of the following characters: < > ' & \ ` , # + | % ; / \\ ! ~ @ $ ^ *= { } [ ] " : and ?
5. In the Report Description: field, enter a description of the report.
6. Beside Report Based on: select the information the report is to be based on from the following list:
Events
Operating System Information
Processor
HP BladeSystem Rack
System License Information
7. Select the following options in any combination:
Include Chart. See “Chart report”.
Bar, Line (Trend), Pie
Include Table. See “Table report”.
Table report
The Step 3: Specify Parameters page appears.
Procedure 2 Adding Report Details for a Table report
1. In the Report Name: field, enter a name for the report.
Control Repository» Configuring
software/firmware globalsettings
» Reporting» New reports» Running managed
reports» Copying managed
reports» Editing managed
reports» Deleting managed
reports» Running predefined
reportsAdding a report
» Editing a report» Deleting a report» Running a report» Emailing reports» Insight Control reports» Showing SQL» Snapshot comparison
reporting» Federated CMS Search
Tool» Federated CMS Search
Configuration» Managing with tasks» Using Cluster Monitor» Command line tools» Configuring managed
systems from a WindowsCMS
» Configuring managedsystems from a LinuxCMS
» Configuring managedsystems from an HP-UXCMS
» Custom tools» Setting disk thresholds» Creating a task to delete
disk thresholds» License manager» Management processor
tools» Managing
Communications» Managing MIBs» Installing OpenSSH» Replicate Agent Settings» RPM Package Manager» HP Server Migration Pack
- Universal Edition» HP System Management
Homepage» Version Control» Device ping
» Reference» Support and other
resources» Assistance
» Glossary
NOTE:Report names cannot contain any of the following characters: < > ' & \ ` , # + | % ; / \\ ! ~ @ $ ^ *= { } [ ] " : and ?
2. In the Report Description: field, enter a description of the report.
3. Select a format for the generated report from Format for generated report:
HTML (Recommended for viewing)
CSV
PDF
4. In the Select items to show in report section, select all categories or individual items to include in the
report. You can click the icon to move items from Available Data: to Selected Data:.
5. Click the Next arrow to display the next page of the report.
6. To save the report configuration, click [Save Report]. If the report exists, the overwrite report messageappears. Click [Cancel ] if you do not want to overwrite the existing report.
7. Click [Run Report].
The new report appears in the Report Results page.
To print the report, see “Printing the report”.
Chart report
The Step 3: Specify Parameters page appears.
Procedure 3 Adding Report Details for a Graphical report
1. Select type of graph from the list:
NOTE:The Include Chart section dynamically changes to display the selection items that are required tocreate the corresponding report.
Bar. .
Line (Trend). .
Pie. .
Procedure 4 Bar Graph
a. Select an option to be used to create each bar of the Bar Chart.
Select options to be used for each bar of the bar chart.Additional Details area dynamically changes according to the type chart selected. Thisinformation is populated depending on selected options. Any of these fields can be edited.Chart Previewer displays a preview of the selected options in chart form.
b. See Additional Details.
Procedure 5 Line Graph
a. Select options to be used to create the Line Chart.
Select options to be used for each line of the line chart.
Additional Details dynamically changes according to the type chart selected. This informationis populated depending on selected options. Any of these fields can be edited.
Chart Previewer displays a preview of the selected options in chart form.
b. See Additional Details.
Procedure 6 Pie Graph
a. Select options to be used to create the Pie Chart.
Select options to be used in the pie chart.
Additional Details dynamically changes according to the type chart selected. This informationis populated depending on selected options. Any of these fields can be edited.
Chart Previewer displays a preview of the selected options in chart form.
b. See Additional Details.
2. Under Additional details: complete the following:
a. In the Graph Title: field, enter the title for the graph, prompted for all chart types. Report namescannot contain any of the following characters: < >' & \ ` , # + | % ; / \\ ! ~ @ $ ^ * = { } [ ] " : and ?
b. In the Footer: field, enter a footnote, prompted for all chart types.
c. In the Series Label (X axis): field, enter a label for the X axis, prompted for Bar and Line charttypes.
d. In the Series Label (Y axis): field, enter a label for the Y axis, prompted for Bar and Line charttypes.
3. To save the report configuration, click [Save Report]. If the report exists, the overwrite report messageappears. Click [Cancel ] if you do not want to overwrite the existing report.
4. Click [Run Report].
The new report appears in the Report Results page.
Printing the report
On the Report Results page, select File [Print] from your browser.
» Discovery in HP SIM» Discovery filters» Managing Hosts file» Identification» Managing system types» Users and authorizations» Directory Services» Global credentials» System credentials» Security» Trusted certificates» Viewing the audit log» Configuring the audit log» Monitoring systems and
events» Quick Launch menu» Performing a basic search» Performing an advanced
search for systems» Performing an advanced
search for clusters» Performing an advanced
search for events» Tool search» Related information for
searches» Configuring events» Protocol settings» Software status polling» Hardware status polling» Data collection» System Properties» Configuring WBEM health
inclusion status» Specifying a Version
Editing a report is allowed on the following items:
2. Select the report to edit, and then click [Edit]. The Step 2: Add Report Detailspage appears.
The details from the opened report are pre populated in the text fields.
NOTE:Only custom reports can be edited, default predefined reports cannot beedited.
3. Change any of the following fields:
Report Name
Report Description
Report Based on
Selection parameters
For more information, see Adding a report - Table report.
For a chart report, edits can be made to the following additional items:
Graph Title
Footer
X axis (Label)
Y axis (Label)
For more information, see Adding a report - Chart report
4. To save over the existing report configuration, click [Save Report].
NOTE:To save an existing report as a report with a new name, enter a newreport name in the Report Name field, and then click [Save Report].The new report is saved and added to the report list on the EnhancedReports page.
A dialog box appears, asking you to confirm your intention to save the report. Click[OK] to save, or click [Cancel ] to abort. If the report already exists, the overwritereport message appears. Click [Cancel ] if you do not want to overwrite the existing
Control Repository» Configuring
software/firmware globalsettings
» Reporting» New reports» Running managed
reports» Copying managed
reports» Editing managed
reports» Deleting managed
reports» Running predefined
reports» Adding a report
Editing a report» Deleting a report» Running a report» Emailing reports» Insight Control reports» Showing SQL» Snapshot comparison
reporting» Federated CMS Search
Tool» Federated CMS Search
Configuration» Managing with tasks» Using Cluster Monitor» Command line tools» Configuring managed
systems from a WindowsCMS
» Configuring managedsystems from a LinuxCMS
» Configuring managedsystems from an HP-UXCMS
» Custom tools» Setting disk thresholds» Creating a task to delete
disk thresholds» License manager» Management processor
tools» Managing
Communications» Managing MIBs» Installing OpenSSH» Replicate Agent Settings» RPM Package Manager» HP Server Migration Pack
- Universal Edition» HP System Management
Homepage» Version Control» Device ping
» Reference» Support and other
resources» Assistance
» Glossary
report.
5. To view the report, click [Run Report]. Click [Previous] to return to the targetselection page. Click [Cancel ] to abort the report creation process.
» Discovery in HP SIM» Discovery filters» Managing Hosts file» Identification» Managing system types» Users and authorizations» Directory Services» Global credentials» System credentials» Security» Trusted certificates» Viewing the audit log» Configuring the audit log» Monitoring systems and
events» Quick Launch menu» Performing a basic search» Performing an advanced
search for systems» Performing an advanced
search for clusters» Performing an advanced
search for events» Tool search» Related information for
searches» Configuring events» Protocol settings» Software status polling» Hardware status polling» Data collection» System Properties» Configuring WBEM health
inclusion status» Specifying a Version
A generated report provides the following information:
Report name
Associated system collection
NOTE:The Associated system collection information does not appear if there isno collection selected to run the report.
Report run date and time
Reports can be run in the following formats:
HTML (Recommended for viewing)
PDF
CSV
The default sort order is based on the system name.
Click any column heading to sort in ascending or descending order.
The Manage Reports page can be accessed from the Manage section of the HP SIMHome page by clicking the Manage inventory reports link.
Running an existing report in HTML format
Procedure 1 Report in HTML format
1. Select Reports Enhanced Reports... .
2. Select the report you want to view.
3. Under Format for generated report, select HTML (Recommended for viewing) .
4. Click [Run Report]. The report appears in the Report Result page.
Viewing an existing report in PDF format
Procedure 2 Report in PDF format
1. Select Reports Enhanced Reports... .
2. Select the report you want to view.
3. Under Format for generated report, select PDF.
4. Click [Run Report]. The PDF report appears.
Viewing an existing report in CSV format
Procedure 3 Report in CSV format
Control Repository» Configuring
software/firmware globalsettings
» Reporting» New reports» Running managed
reports» Copying managed
reports» Editing managed
reports» Deleting managed
reports» Running predefined
reports» Adding a report» Editing a report» Deleting a report
Running a report» Emailing reports» Insight Control reports» Showing SQL» Snapshot comparison
reporting» Federated CMS Search
Tool» Federated CMS Search
Configuration» Managing with tasks» Using Cluster Monitor» Command line tools» Configuring managed
systems from a WindowsCMS
» Configuring managedsystems from a LinuxCMS
» Configuring managedsystems from an HP-UXCMS
» Custom tools» Setting disk thresholds» Creating a task to delete
disk thresholds» License manager» Management processor
tools» Managing
Communications» Managing MIBs» Installing OpenSSH» Replicate Agent Settings» RPM Package Manager» HP Server Migration Pack
- Universal Edition» HP System Management
Homepage» Version Control» Device ping
» Reference» Support and other
resources» Assistance
» Glossary
1. Select Reports Enhanced Reports... .
2. Under Report Name, select the report you want to view.
3. Under Format for generated report, select CSV.
4. Click [Run Report]. If the browser system has no application associated with .CSVfiles, then the .CSV file appears in the browser window. If you have an applicationassociated with .CSV files, then the .CSV file appears in the specified application.
If you are using Internet Explorer and an application such as Excel is installed onthe browser system and the .CSV file extension is associated with that application,the Save As dialog box appears. Click [Save].
5. Name the file, and in the Save as type field, select a format in which to save thefile from the dropdown list. Click [Save]. The report is saved.
Printing an existing report
From the Report Results page, select File Print from your browser.
» Discovery in HP SIM» Discovery filters» Managing Hosts file» Identification» Managing system types» Users and authorizations» Directory Services» Global credentials» System credentials» Security» Trusted certificates» Viewing the audit log» Configuring the audit log» Monitoring systems and
events» Quick Launch menu» Performing a basic search» Performing an advanced
search for systems» Performing an advanced
search for clusters» Performing an advanced
search for events» Tool search» Related information for
searches» Configuring events» Protocol settings» Software status polling» Hardware status polling» Data collection» System Properties» Configuring WBEM health
inclusion status» Specifying a Version
Procedure 1 Scheduling a selected report
1. Select Reports Enhanced Reports.... The Enhanced Reports, Reports by Productpage appears.
2. Select the report configuration to be emailed.
3. Click [Email Report...]. The Email Report page appears.
4. Under Send e-mail , enter the e-mail address of the person to be notified of thescheduled report in the To: field.
NOTE: Required field, information must be entered.
NOTE:If valid input is not supplied, an alert appears requesting valid input when[Schedule] is selected.
5. In the CC: field, enter the e-mail addresses of any persons to be sent a courtesy copyof the scheduled report.
6. In the Subject: field, enter the subject of the scheduled report.
Required field, information must be entered.
NOTE:If valid input is not supplied, an alert appears requesting valid input when[Schedule] is selected.
7. Click [Previous] to return to the Enhanced Report page.
Click [Run Now] to execute the selected report.
Click [Schedule]. The Step 3: Schedule Task page appears.
If the SMTP (Simple Mail Transfer Protocol) server settings are not present in the HPSIM, then a message is displayed below the Email Report section informing you whatneeds to be done.
You must follow the steps provided under the note section to apply the valid settingsotherwise you will not get any email notifications.
8. In the Task name: field, enter a name for the task.
9. Under When would you like this task to run?, select one of the following options:
Periodically. See “Periodically”.
Once. See “Once”.
Not scheduled. Select this option if you do not want to schedule the task atthis time.
Periodically
Procedure 2 Scheduling a task periodically
Control Repository» Configuring
software/firmware globalsettings
» Reporting» New reports» Running managed
reports» Copying managed
reports» Editing managed
reports» Deleting managed
reports» Running predefined
reports» Adding a report» Editing a report» Deleting a report» Running a report
Emailing reports» Insight Control reports» Showing SQL» Snapshot comparison
reporting» Federated CMS Search
Tool» Federated CMS Search
Configuration» Managing with tasks» Using Cluster Monitor» Command line tools» Configuring managed
systems from a WindowsCMS
» Configuring managedsystems from a LinuxCMS
» Configuring managedsystems from an HP-UXCMS
» Custom tools» Setting disk thresholds» Creating a task to delete
disk thresholds» License manager» Management processor
tools» Managing
Communications» Managing MIBs» Installing OpenSSH» Replicate Agent Settings» RPM Package Manager» HP Server Migration Pack
- Universal Edition» HP System Management
Homepage» Version Control» Device ping
» Reference» Support and other
resources» Assistance
» Glossary
1. (Optional) Under In addition:, select from the following:
Select Run when the central management server is started if you want thetask to run when the central management server is started.
To run the task immediately, select Run now.
Select Disable this task if you want to disable this task at any time.
2. Refine schedule:
Enter an increment of how often to run the report in the Every text field.Select day(s), week(s), month(s) , or year(s) , from the dropdown list.Select the day of the week to run the report from the on dropdown list.Enter the time of day to run the report in the at text field and select AM or PM fromthe dropdown list.Optional. Select Run until and enter the date to stop running the report in the textfield.Enter the time of day to stop running the report in the at text field and select AM orPM from the dropdown list.Optional.. Select Run a maximum of and enter the maximum number of times torun the report in the times(s) text box.
3. Click [Done] to save the scheduled report.
Click [Previous] to return to the Step 2: Schedule Report page.
Once
Procedure 3 Scheduling a task once
1. (Optional) Under In addition:, select from the following:
Select Run when the central management server is started if you want thetask to run when the central management server is started.
To run the task immediately, select Run now.
Select Disable this task if you want to disable this task at any time.
Enter a date you want to run the report in the On text field.Enter the time of day to start running the report in the at text field and select AMor PM from the dropdown list.
3. Click [Done] to save the scheduled report.
Click [Previous] to return to the Step 2: Schedule Report page.
» Discovery in HP SIM» Discovery filters» Managing Hosts file» Identification» Managing system types» Users and authorizations» Directory Services» Global credentials» System credentials» Security» Trusted certificates» Viewing the audit log» Configuring the audit log» Monitoring systems and
events» Quick Launch menu» Performing a basic search» Performing an advanced
search for systems» Performing an advanced
search for clusters» Performing an advanced
search for events» Tool search» Related information for
searches» Configuring events» Protocol settings» Software status polling» Hardware status polling» Data collection» System Properties» Configuring WBEM health
inclusion status» Specifying a Version
When HP Insight Control is installed, eleven predefined Insight Control reports are added to theexisting collection as Insight Control reports.
NOTE:If links are not visible for some or all Enhanced Reports, use the following workaround:
Procedure 1 CMS installed on Windows
1. Open the reports.xml located in <HP SIM installationdirectory>/config/preload/62/addfiles/reports.xml and change the timestamp.You can do this by entering a space at the end of the file and resaving it.
2. Execute the mxconfigrefresh command at the command prompt.
Procedure 2 CMS installed on HP-UX or Linux
1. Open the reports.xml located in/etc/opt/mx/config/preload/62/addfiles/reports.xml and change thetimestamp. You can do this by entering a space at the end of the file and resavingit.
2. Execute the mxconfigrefresh command at the command prompt.
After completing the procedure, the links to reports appear in the user interface.
» Discovery in HP SIM» Discovery filters» Managing Hosts file» Identification» Managing system types» Users and authorizations» Directory Services» Global credentials» System credentials» Security» Trusted certificates» Viewing the audit log» Configuring the audit log» Monitoring systems and
events» Quick Launch menu» Performing a basic search» Performing an advanced
search for systems» Performing an advanced
search for clusters» Performing an advanced
search for events» Tool search» Related information for
searches» Configuring events» Protocol settings» Software status polling» Hardware status polling» Data collection» System Properties» Configuring WBEM health
inclusion status» Specifying a Version
Procedure 1 Showing SQL
1. Select Reports Manage Reports. The Manage Reports... page appears.
2. Select the report for which you want to see the SQL details.
» Discovery in HP SIM» Discovery filters» Managing Hosts file» Identification» Managing system types» Users and authorizations» Directory Services» Global credentials» System credentials» Security» Trusted certificates» Viewing the audit log» Configuring the audit log» Monitoring systems and
events» Quick Launch menu» Performing a basic search» Performing an advanced
search for systems» Performing an advanced
search for clusters» Performing an advanced
search for events» Tool search» Related information for
searches» Configuring events» Protocol settings» Software status polling» Hardware status polling» Data collection» System Properties» Configuring WBEM health
inclusion status» Specifying a Version
Procedure 1 Snapshot comparison report
1. Select Reports Snapshot Comparison.... The Snapshot Comparison windowappears.
2. Select target systems. For more information, see Systems Insight Manager -Creating a task.
3. Click [Next]. Click [Previous] to return to the Target Selection page.
Select two to four snapshots for the systems from the Select Snapshots page.
The following warnings are possible:
Some system OS types are unknown.
More than one operating system type is selected.
Only one operating system type comparison is supported.
If one target is selected, this target must have at least two snapshots. Youmust select between two and four snapshots to compare.
If more than one target is selected, you can select one snapshot for eachsystem.
The target systems selected should be of the same operating system for thesnapshot comparison feature to work.
4. Click [Next].
5. From the Select Categories and Baseline page, select the category. TheCategory Name column displays the category, and the Description columndisplays a brief description of the category.
6. From the Select snapshot comparison baseline section, select an item againstwhich to run the comparison.
7. Click [Run Reports]. The View Snapshot Comparison Result page displayslisting the results.
» Discovery in HP SIM» Discovery filters» Managing Hosts file» Identification» Managing system types» Users and authorizations» Directory Services» Global credentials» System credentials» Security» Trusted certificates» Viewing the audit log» Configuring the audit log» Monitoring systems and
events» Quick Launch menu» Performing a basic search» Performing an advanced
search for systems» Performing an advanced
search for clusters» Performing an advanced
search for events» Tool search» Related information for
searches» Configuring events» Protocol settings» Software status polling» Hardware status polling» Data collection» System Properties» Configuring WBEM health
inclusion status» Specifying a Version
Search Tab
Search criteria:
All fields operate on a contains basis. Boolean operators and wildcards are not supported.
All fields are case-insensitive.
Matches occur when all provided criteria are met.
Fields that accept text input also have a dropdown list of suggestions.
Procedure 1 Setting search criteria:
1. In the System filter box, enter or select the criteria to be used for the search.
NOTE:You can use any combination or all of the fields for search criteria.
Enter the name of a system or group of systems to be searched.Enter or select the status of the system from the dropdown list.Enter or select the type of system to be searched.Enter or select the subtype of the system to be searched.Enter or select the product to be searched.Enter or select the Operating System to be searched.
NOTE:Status icons shown in the results do not update over time. Status represented in the resultstable is the status at the time of the search.
2. Select Include software filter to add a software filter to the selection criteria. The Include softwarefilter criteria box is enabled.
Select the type software from the dropdown list.
Control Repository» Configuring
software/firmware globalsettings
» Reporting» New reports» Running managed
reports» Copying managed
reports» Editing managed
reports» Deleting managed
reports» Running predefined
reports» Adding a report» Editing a report» Deleting a report» Running a report» Emailing reports» Insight Control reports» Showing SQL» Snapshot comparison
reportingFederated CMS SearchTool
» Federated CMS SearchConfiguration
» Managing with tasks» Using Cluster Monitor» Command line tools» Configuring managed
systems from a WindowsCMS
» Configuring managedsystems from a LinuxCMS
» Configuring managedsystems from an HP-UXCMS
» Custom tools» Setting disk thresholds» Creating a task to delete
disk thresholds» License manager» Management processor
tools» Managing
Communications» Managing MIBs» Installing OpenSSH» Replicate Agent Settings» RPM Package Manager» HP Server Migration Pack
- Universal Edition» HP System Management
Homepage» Version Control» Device ping
» Reference» Support and other
resources» Assistance
» Glossary
Enter the version of the software to be searched.Enter the description of the software to be searched.
NOTE:If software filtering is activated, then only systems with software information are displayed inthe results. Depending on the criteria, the results may be further filtered.
NOTE:Searching software information depends on the following:
Only CMSs running Systems Insight Manager 6.0 and later make softwareinformation searchable remotely.
Software information is collected only if the system has a WBEM agent running andthe CMS managing the system is configured with suitable WBEM credentials toaccess the agent.
3. In the Options box, select the option to be used if a system is found on more than one CMS.
NOTE:There can be an overlap in the systems that different CMSs manage. If the same system isfound on multiple CMSs, the information from the CMS with the newest system informationis displayed. You can change this setting to show all matches and the same system coulddisplay multiple times in the results table.
4. Click [Search] once all search criteria has been selected or click [Reset Fields] to clear all searchfields and make new criteria selections.
5. The Software information: table is populated with all systems that meet the search criteria.
6. Click [Expand All ] to expand all rows to display all information for each system.
7. Click [Collapse All ] to collapse additional information.
8. Click the hyperlink for any of the system names in the Name field to drill down into results and signinto a secondary CMS. The hyperlink displays a browser window that displays the Systems InsightManager System Page for that system, as delivered by the CMS on which the system was found.
NOTE:To sign into a secondary CMS automatically without needing to sign in again, the followingrequirements must be met:
Your browser must have the secondary CMSs SSL certificate installed.
The browser must be configured to allow third-party cookies. Secondary CMSs areconsidered third-party systems in this case.
9. (Optional) Click [Export to CSV] to export the table into a spreadsheet.
Federated Search Advanced Search Tab
Advanced search can be performed on systems or events
You can dynamically build a query by adding multiple criterion
» Using Help If there are multiple criterion, like criterion are placed together with "OR", if they are different, they areplaced together with "AND".
All fields are case-insensitive
Matches occur when all provided criteria are met
NOTE:By default, if the same system is found on multiple CMSs, the information from the CMS with thenewest system information is displayed. You can change this setting to show ALL matches, in whichcase, the same system can display multiple times in the search results.
Procedure 2 Performing an advanced search for systems
1. Select systems from the Search for dropdown list.
2. From the first selection box (criteria selection), click the down arrow, and then select the searchcriteria.
NOTE:Some search criteria show no values until systems with values for that criteria have beendiscovered. In this case, the criteria is not displayed until values are available.
3. From the second selection box (comparison selection), click the down arrow, and then select thecomparison option.
NOTE:Different criteria support different comparisons. The comparison options change with thecriteria selected. For example, if you select operating system as criteria, the followingpossible comparisons are available: is, is not, contains, starts with, and ends with. See theHP Systems Insight Manager User Guide for more information.
4. In the third selection box (value selection), select one of the available values for specific criteria orcomparison combination from the dropdown list, or enter the required information in the input box.
5. To add additional criteria, click [Add]. To conduct the system search immediately, click [View ]. Todelete search criteria, click [Delete ]. To save the search as a collection, click [Save As ].
NOTE:Criteria are reordered after clicking [View ] or [Save As ]. If criteria types are the same, theyare placed together with "OR", if they are different, they are placed together with "AND".
6. (Only available for system searches) In the Options box, select the option to be used if a system isfound on more than one CMS.
NOTE:There can be an overlap in the systems that different CMSs manage. If the same system isfound on multiple CMSs, the information from the CMS with the newest system informationis displayed. You can change this setting to show all matches and the same system coulddisplay multiple times in the results table.
7. Click [Search] once all search criteria has been selected.
8. The Software information: table is populated with all systems that meet the search criteria.
9. Click [Expand All ] to expand all rows to display all information for each system.
10. Click [Collapse All ] to collapse additional information.
11. Click the hyperlink for any of the system names in the Name field to drill down into results and signinto a secondary CMS. The hyperlink displays a browser window that displays the Systems InsightManager System Page for that system, as delivered by the CMS on which the system was found.
NOTE:To sign into a secondary CMS automatically without needing to sign in again, the followingrequirements must be met:
Your browser must have the secondary CMSs SSL certificate installed.
The browser must be configured to allow third-party cookies. Secondary CMSs areconsidered third-party systems in this case.
12. (Optional) Click [Export to CSV] to export the table into a spreadsheet.
Connections Tab
The connections tab displays the status of an attempted connection to each secondary CMS. If FederatedSearch fails to connect to a CMS, that CMS is excluded from subsequent searches. After successfulconnection and if you have suitable authorizations locally on the secondary CMS, the secondary HP SIMversion, operating system, and system count are displayed.
Credential preferences By default, all connections made to secondary CMSs are made as the currentlysigned-in user. To connect as another user, you can specify full credentials for that user. The credentials aresecurely encrypted and stored on the main CMS privately for the current user.
Procedure 3 Setting CMS credential preferences
1. Click [Credential Preferences...]. The CMS Credential Preferences page appears.
2. Select one of the following options:
Use signed-in user
Use specific user:
You must add the HP SIM user name: and the Password:.
3. Click [OK] to save the changes or [Cancel ] to cancel the changes and return to the Connectionspage.
Refreshing connections CMS connections are established once and maintained in the current instance of
the UI. If a CMS is rebooted or comes online after starting Federated Search, you must refresh connections toestablish a connection to the newly online CMS.
» Discovery in HP SIM» Discovery filters» Managing Hosts file» Identification» Managing system types» Users and authorizations» Directory Services» Global credentials» System credentials» Security» Trusted certificates» Viewing the audit log» Configuring the audit log» Monitoring systems and
events» Quick Launch menu» Performing a basic search» Performing an advanced
search for systems» Performing an advanced
search for clusters» Performing an advanced
search for events» Tool search» Related information for
searches» Configuring events» Protocol settings» Software status polling» Hardware status polling» Data collection» System Properties» Configuring WBEM health
inclusion status» Specifying a Version
HP SIM enables you to manage systems and events by scheduling and executing tasks.Tasks are actions performed using an HP SIM tool. Task instances are an executed singleinstance of a task.
Users can:
Create a task.
Schedule a task.
Modify a task.
Delete a task
Stop and start a task
Track task status
Task information is available by selecting one of the following:
Tasks & Logs View All Scheduled Tasks
Tasks & Logs View Task Results
HP SIM provides a number of pre-defined system-delivered (default) tasks. These tasks canbe disabled or have their schedules modified but they cannot be removed or reassigned toanother user. HP SIM requires these tasks to provide a complete picture of the systemsbeing monitored.
For more information about user privileges and configuration rights, see Systems InsightManager - Users and authorizations.
Systems Insight Manager - Managing with tasks related information
HP Systems Insight Manager 7.1 English
Operations | Managing with tasks | Creating a task
» Discovery in HP SIM» Discovery filters» Managing Hosts file» Identification» Managing system types» Users and authorizations» Directory Services» Global credentials» System credentials» Security» Trusted certificates» Viewing the audit log» Configuring the audit log» Monitoring systems and
events» Quick Launch menu» Performing a basic search» Performing an advanced
search for systems» Performing an advanced
search for clusters» Performing an advanced
search for events» Tool search» Related information for
searches» Configuring events» Protocol settings» Software status polling» Hardware status polling» Data collection» System Properties» Configuring WBEM health
inclusion status» Specifying a Version
NOTE:Scheduled task results are retained for 30 days or a maximum of ten results for agiven task. Run Now task results are retained for 72 hours. These are defaultvalues. To customize these values, see Systems Insight Manager - Configuringtask results settings.
Procedure 1 Create tasks
1. Select a tool from the HP SIM menu. The Select Target Systems page usuallyappears; however, if targets are selected before selecting a tool, the Verify TargetSystems page appears.
Some non-destructive tasks, like Ping, run directly when selected from the menuand you have systems selected. Non-destructive tasks that require user parameterswill skip directly to those pages, bypassing the system selection and verificationscreens.
The OS column displays the first 40 characters of the operating system name, withan ellipse at the end of the name if it is more than 40 characters long. Place yourcursor over the name to see the entire operating system name.
2. Add multiple or single targets:
a. To add targets, you can choose either the Collection option or the Searchoption, which indicates the method of target selection, or click [Cancel ]which results in no additions.
NOTE:You are not allowed to select individual events for targets orfilters, so the ability to search is not available when thoseselections are made. The two radio options are not present inthese cases.
b. Choosing the Collection option enables you to select targets from the drop-down selection box.
c. If you choose the Search option, the drop-down selection box and [ViewContents] button is replaced with the Quick Search user interface. Type aDevice Name into the Text Field and then click [Search].
NOTE:If there are Device Names that match the characters typed inthe Text Field, a dynamic list appears with those matches.
d. If you select one of the Device Names displayed in the dynamic list, aSystem Table containing the selected system appears below the QuickSearch user interface. Items displayed in the Search Results table areselected (checked) by default and the [Apply] button is enabled as long asthere is at least one item from the Search Results table selected. Onlyitems that are selected are added when you click [Apply].
NOTE:The maximum number of Device Names displayed is six. Ifthere are more available matches a "..." is present at the bottom
Control Repository» Configuring
software/firmware globalsettings
» Reporting» Managing with tasks
Creating a task» Scheduling a task» Applying a time filter» Running a scheduled
task» Editing a scheduled
task» Deleting a scheduled
task» Printing reports» Stopping a task» Configuring task results
settings» Deleting task results» Task results list» Managing with tasks
related information» Using Cluster Monitor» Command line tools» Configuring managed
systems from a WindowsCMS
» Configuring managedsystems from a LinuxCMS
» Configuring managedsystems from an HP-UXCMS
» Custom tools» Setting disk thresholds» Creating a task to delete
disk thresholds» License manager» Management processor
tools» Managing
Communications» Managing MIBs» Installing OpenSSH» Replicate Agent Settings» RPM Package Manager» HP Server Migration Pack
- Universal Edition» HP System Management
Homepage» Version Control» Device ping
» Reference» Support and other
resources» Assistance
» Glossary» Using Help
of the dynamic list. Clicking [Search] will display all the matchesin the table.
e. If you click [Search], a Basic Search using common attributes isperformed using the characters typed into the Text Field. The resultsappear in the Search Results table below the Quick Search user interface.
While the search user interface remains open, the Task Wizard retains areference to the Query object created to perform the Dynamic Querygeneration used when performing searches. Each new search term isadded to this Query object and a new Dynamic Query is generated. TheTask Wizard releases its reference to the search Query when you closethe search user interface or by clicking [Cancel ] or [Apply].
NOTE:A progress bar appears while Basic Search results load.
After you select the system to add, the Select <item> itself checkbox is selectedby default and the [Apply] button and [View Contents] button are enabled. Youcan choose to click [Apply] or [View Contents].
NOTE:If you choose to change the selected item in the drop-down selectionbox, the Select <item> itself text reflects the change.
NOTE:If the Select <item> itself checkbox is cleared, the [Apply] button isdisabled.
Selecting [View Contents] displays the Table View or Tree View of the selecteditem and the [Apply] button is disabled.
NOTE:When [View Contents] is selected, the Target Selection Page displaysa barbershop pole and the message "Loading Data..." while the TableView or Tree View loads.
After you select items from the displayed Table View or Tree View , the[Apply] button is enabled.
NOTE:If the Select <item> itself checkbox is selected while a Tree Viewappears, the Tree View is closed and the [Apply] button is enabled. Ifyou clear the Select <item> itself checkbox, the Tree View does notreappear and [Apply] is disabled. You must click [View Contents] tohave the Tree View displayed again.
3. Click [Apply]. The targets appear in the Verify Target Systems page.
NOTE:If selected targets are not compatible with the tool, the Tool LaunchOK? column provides a brief explanation of the problem.
To remove a target, select [Remove Targets].
A sub-window opens below the row of buttons that displays a smaller table with thetargets currently chosen on the Target Selection Page.
a. Select the checkboxes for the items you want to remove from your currentlist of chosen targets.
b. Click [Apply] to close the sub-window and redraw the Target SelectionPage with the updated list of targets.
NOTE:The [Apply] button is enabled when there is at least one itemselected from the Remove Targets table.
c. Select [Cancel ] if you choose not to remove any of the target selections. Ifyou select [Cancel ], the sub-window closes, and no items are removed.
NOTE:If the tool targets systems, any Filter selected is a single EventCollection. If the tool targets events, the Target selected is a singleEvent Collection. When these cases arise, a table does not appear. Theitem appears as a static text or a hyperlink following the same logic whendisplaying the selected item in a table.
4. To filter target selections, complete the following.
a. Click [Add Event Filter].
b. From the Add filters by selecting from dropdown box, select an eventfilter. If no filters are selected, [Cancel ] is enabled.
c. Click [Apply] to apply the filter to the target systems (or, click [Cancel ]tocancel adding a filter). The selected filter is displayed below the selectedtarget systems.
NOTE:If the target selections are events instead of systems, the buttonchanges to [Add System Filter], and you can select fromdifferent system collections. Unlike event filters, you can selectmultiple system filters.
5. To modify an event filter, click [Modify Event Filter].
NOTE:If the filters are systems, the [Add System Filters ] and [RemoveFilters ] buttons appear. If there is only one event filter, the [RemoveFilters ] button removes the single event filter. If you have more than oneevent filter, the [Remove Filters ] button opens a subpane that you canselect the event filters to remove.
a. From the Add filters by selecting from dropdown box, select an eventfilter.
b. Click [Apply] to change the event filter and apply the filter to the targetsystems, or click [Cancel ] to cancel editing the filter.
NOTE:If the target selections are events instead of systems, the buttondoes not change to [Modify System Filter]. You have the optionto select either [Add System Filters ] or [Remove Filters ]. It ispossible to have one or more system and event combinationcollections already selected. If there are combination collectionsselected, they provide filtering.
6. To remove a filter, select the filter(s) that you want to remove, and click [RemoveFilters ].
7. Click [Next] and specify tool parameters. If the tool does not require parameters,[Next] is replaced with [Schedule] and [Run Now]. The [Schedule] option is
present if the tool can be scheduled.
8. Select one of the following options:
Click [Previous] to return to the previous screen.
Click [Schedule] to schedule when the task runs. For more informationabout scheduling options, see Systems Insight Manager - Scheduling atask.
Click [Run Now] to run the task immediately.
Systems Insight Manager - Managing with tasks related information
» Discovery in HP SIM» Discovery filters» Managing Hosts file» Identification» Managing system types» Users and authorizations» Directory Services» Global credentials» System credentials» Security» Trusted certificates» Viewing the audit log» Configuring the audit log» Monitoring systems and
events» Quick Launch menu» Performing a basic search» Performing an advanced
search for systems» Performing an advanced
search for clusters» Performing an advanced
search for events» Tool search» Related information for
searches» Configuring events» Protocol settings» Software status polling» Hardware status polling» Data collection» System Properties» Configuring WBEM health
inclusion status» Specifying a Version
» Viewing all scheduled tasks
Default time for scheduling a task is 60 minutes.
Procedure 1 Scheduling a task
1. Select a tool from the menu. For more information, see Systems Insight Manager -Creating a task.
2. In the Task name field, enter a unique name for the task.
3. Under the When would you like this task to run? section, select one of thefollowing options:
Periodically Select from intervals of minutes, hours, days, weeks, ormonths. With periodic scheduling, you can configure the task to run until acertain date and time or to execute only a set number of times. Periodicscheduling allows time filters to be applied. These filters specify the hoursof the day when a scheduled task can operate. For more information abouttime filters, see Systems Insight Manager - Applying a time filter.
NOTE:If you want to schedule a task to run once a month on the 31stof the month and the month has only 30 days, the task will runon the 1st day of the following month.
Once Specify the date and time the task is to run.
When new systems or events are added to the collection This option isonly available if you select a Collection of Systems or Events as yourtarget. The task runs only when new systems or events meet the collectioncriteria. You can also apply a time filter to this type of scheduling. For moreinformation about time filters, see Systems Insight Manager - Applying atime filter.
When systems or events are removed form the collection This optionis almost identical to the previous option, except that the task runs onlywhen systems contained in the Collection of Systems or Events nolonger meet the collection criteria. A time filter can be applied to this type ofscheduling. For more information about time filters, see Systems InsightManager - Applying a time filter.
Not Scheduled This option specifies that the task runs only whenmanually executed by a user with appropriate privileges. This task neverruns automatically. Tasks can be manually run from the All ScheduledTasks page or the CLI
4. Under In addition, select from the following options:
Run when the central management server is started Select this optionif you want the task to run every time the CMS is started.
Run now Select this option to run the task immediately after it is saved.
Disable this task Select this option to temporarily disable the task. Thistask is shown as Disabled on the All Scheduled Tasks page.
5. After you select a scheduling option, refine the schedule in the Refine schedulesection. The available options vary depending on the scheduling option selected in
Control Repository» Configuring
software/firmware globalsettings
» Reporting» Managing with tasks
» Creating a taskScheduling a task
» Applying a time filter» Running a scheduled
task» Editing a scheduled
task» Deleting a scheduled
task» Printing reports» Stopping a task» Configuring task results
settings» Deleting task results» Task results list» Managing with tasks
related information» Using Cluster Monitor» Command line tools» Configuring managed
systems from a WindowsCMS
» Configuring managedsystems from a LinuxCMS
» Configuring managedsystems from an HP-UXCMS
» Custom tools» Setting disk thresholds» Creating a task to delete
disk thresholds» License manager» Management processor
tools» Managing
Communications» Managing MIBs» Installing OpenSSH» Replicate Agent Settings» RPM Package Manager» HP Server Migration Pack
- Universal Edition» HP System Management
Homepage» Version Control» Device ping
» Reference» Support and other
resources» Assistance
» Glossary» Using Help
step 3.
6. Click [Done]. The All Scheduled Tasks page appears. Click [Previous] to returnto the previous page. For more information about the All Scheduled Tasks page,see Systems Insight Manager - Navigating the All Scheduled Tasks page.
Viewing all scheduled tasks
To view all scheduled tasks, select Tasks & Logs View All Scheduled Tasks.
The list of tasks that a user can see is based on the user's privileges. All users are allowedto edit, delete, and view the tasks they have created. With administrative rights, the user isallowed to edit, delete, and view tasks other users have created.
Systems Insight Manager - Managing with tasks related information
» Discovery in HP SIM» Discovery filters» Managing Hosts file» Identification» Managing system types» Users and authorizations» Directory Services» Global credentials» System credentials» Security» Trusted certificates» Viewing the audit log» Configuring the audit log» Monitoring systems and
events» Quick Launch menu» Performing a basic search» Performing an advanced
search for systems» Performing an advanced
search for clusters» Performing an advanced
search for events» Tool search» Related information for
searches» Configuring events» Protocol settings» Software status polling» Hardware status polling» Data collection» System Properties» Configuring WBEM health
inclusion status» Specifying a Version
Use time filters to decide when a task runs. You can create, copy, edit, and delete timefilters.
Time filters can be created by any user and are accessible to all users.
Procedure 1 Applying a time filter to tasks
1. Select a tool from the tool menu, follow the steps to get to the [Schedule] button,and then click it. For more information, see Systems Insight Manager - Creating atask and Systems Insight Manager - Scheduling a task.
2. To apply a time filter to a task, select the Use Time Filter checkbox.
3. Below the Schedule Task section, click [Manage Filters ] and choose from thefollowing options:
[New]. The new time filter has the default name New Time Filter X, whereX is a number making the time filter name unique. Click [OK] or [Apply] tosave the new time filter, or click [Cancel ] to cancel the new time filterchanges.
[Edit]. Time filters can be edited. A time filter cannot be renamed, so if atime filter must be renamed, copy the time filter and give the copy a newname. Changes made to a time filter are saved after clicking [OK] or[Apply]. If the time filter to be edited is in use by one or more tasks, amessage appears, stating Editing the time filter could haveundesirable effects in the tasks currently using the time filter. Toeliminate this problem, copy the time filter and give the copy a new name.
[Copy]. Any user can copy a time filter. The copied time filter name appearswith a number appended to it (to make the name unique). To save changesmade to the time filter, click [OK] or [Apply].
[Delete ]. A user can delete a time filter that is created by another user.Select the time filter, and then click [Delete ]. If the time filter is in use byone or more tasks, a message appears, stating The time filter cannot bedeleted because it is in use by one or more tasks.
Time filters are created and viewed in the time zone of the user creating the time filter. Forexample, if the default time filter of business hours (8 a.m. to 5 p.m.) is used and the filter isviewed in the same time zone as the CMS, it will appear from 8 a.m. to 5 p.m. If the CMS isin EST and a user accesses it in PST, the time filter appears as 5 a.m. to 2 p.m. instead.Time filters created at installation use the time zone of the CMS.
NOTE:If you want to schedule a task to run once a month on the 31st of the month andthe month has only 30 days, the task runs on the 1st day of the following month.
Systems Insight Manager - Managing with tasks related information
HP Systems Insight Manager 7.1 English
Operations | Managing with tasks | Running a scheduled task
» Discovery in HP SIM» Discovery filters» Managing Hosts file» Identification» Managing system types» Users and authorizations» Directory Services» Global credentials» System credentials» Security» Trusted certificates» Viewing the audit log» Configuring the audit log» Monitoring systems and
events» Quick Launch menu» Performing a basic search» Performing an advanced
search for systems» Performing an advanced
search for clusters» Performing an advanced
search for events» Tool search» Related information for
searches» Configuring events» Protocol settings» Software status polling» Hardware status polling» Data collection» System Properties» Configuring WBEM health
inclusion status» Specifying a Version
Procedure 1 Running a task
1. From the tool menus, select Tasks & Logs View All Scheduled Tasks. The AllScheduled Tasks appear in the workspace.
2. Select a task from the list, and then click [Run Now].
NOTE:If an instance of the task is running, the [Run Now] button is disabled.
Systems Insight Manager - Managing with tasks related information
HP Systems Insight Manager 7.1 English
Operations | Managing with tasks | Editing a scheduled task
» Discovery in HP SIM» Discovery filters» Managing Hosts file» Identification» Managing system types» Users and authorizations» Directory Services» Global credentials» System credentials» Security» Trusted certificates» Viewing the audit log» Configuring the audit log» Monitoring systems and
events» Quick Launch menu» Performing a basic search» Performing an advanced
search for systems» Performing an advanced
search for clusters» Performing an advanced
search for events» Tool search» Related information for
searches» Configuring events» Protocol settings» Software status polling» Hardware status polling» Data collection» System Properties» Configuring WBEM health
inclusion status» Specifying a Version
Procedure 1 Editing a scheduled task
1. Select Tasks & Logs View All Scheduled Tasks. The All Scheduled Taskspage appears.
2. From the All Scheduled Tasks page, select the task to be edited.
3. Click [Edit].
The previously configured task information appears. Follow the same steps as if youare creating the task. For more information, see Systems Insight Manager -Creating a task.
Because the task has a schedule associated with it, you must access the ScheduleTask Page. The [Run Now] button is not present (as it is when a task is beingcreated). Users with administrative rights can change the owner of the task.
If the new owner does not have access rights to the tool or to selected targets, anerror message appears when the user attempts to edit or save the task.
4. After you edit the task, click [Done], or to run the task immediately, select the [RunNow] checkbox on the Schedule Task page before clicking [Done].
This task is saved and appears on the All Schedule Task Page.
Systems Insight Manager - Managing with tasks related information
HP Systems Insight Manager 7.1 English
Operations | Managing with tasks | Deleting a scheduled task
» Discovery in HP SIM» Discovery filters» Managing Hosts file» Identification» Managing system types» Users and authorizations» Directory Services» Global credentials» System credentials» Security» Trusted certificates» Viewing the audit log» Configuring the audit log» Monitoring systems and
events» Quick Launch menu» Performing a basic search» Performing an advanced
search for systems» Performing an advanced
search for clusters» Performing an advanced
search for events» Tool search» Related information for
searches» Configuring events» Protocol settings» Software status polling» Hardware status polling» Data collection» System Properties» Configuring WBEM health
inclusion status» Specifying a Version
Deleting a task removes the task and its associated task instances from the All ScheduledTasks page and the system.
CAUTION:If you delete a task, the task is permanently deleted from the database andcannot be restored.
NOTE:You cannot delete system delivered (default) tasks.
Procedure 1 Deleting task instances
1. Select Tasks & Logs View All Scheduled Tasks.
2. Select a task from the All Scheduled Tasks list.
3. Click [Delete ].
NOTE:If an instance of the task is running, a message appears stating that youmust stop the running task instance before the task can be deleted.
Systems Insight Manager - Managing with tasks related information
HP Systems Insight Manager 7.1 English
Operations | Managing with tasks | Printing reports
» Discovery in HP SIM» Discovery filters» Managing Hosts file» Identification» Managing system types» Users and authorizations» Directory Services» Global credentials» System credentials» Security» Trusted certificates» Viewing the audit log» Configuring the audit log» Monitoring systems and
events» Quick Launch menu» Performing a basic search» Performing an advanced
search for systems» Performing an advanced
search for clusters» Performing an advanced
search for events» Tool search» Related information for
searches» Configuring events» Protocol settings» Software status polling» Hardware status polling» Data collection» System Properties» Configuring WBEM health
inclusion status» Specifying a Version
Procedure 1 Printing a task results report
1. From the menu, select Tasks & Logs View Tasks Results.
2. Click [View Printable Report].
A Print Report Question appears, asking to generate a report containing theselected target system or all target systems associated with the task instance.
3. Select the report to print.
4. Click [OK] to print the report.
Systems Insight Manager - Managing with tasks related information
HP Systems Insight Manager 7.1 English
Operations | Managing with tasks | Stopping a task
» Discovery in HP SIM» Discovery filters» Managing Hosts file» Identification» Managing system types» Users and authorizations» Directory Services» Global credentials» System credentials» Security» Trusted certificates» Viewing the audit log» Configuring the audit log» Monitoring systems and
events» Quick Launch menu» Performing a basic search» Performing an advanced
search for systems» Performing an advanced
search for clusters» Performing an advanced
search for events» Tool search» Related information for
searches» Configuring events» Protocol settings» Software status polling» Hardware status polling» Data collection» System Properties» Configuring WBEM health
inclusion status» Specifying a Version
Procedure 1 Stopping a task instance
1. From the menu, select Tasks & Logs View Task Results, and then select atask instance from the Task Results list.
2. Click [Stop]. If the task instance is in a terminal state, [Stop] is disabled. If the taskcan be stopped, a dialog appears, asking if you want to cancel or kill the selectedtask instance. If the tool does not signify that the task can be stopped, the dialogbox asks you to confirm the cancellation of the task instance. Stopping a taskattempts to interrupt In Progress commands. Canceling stops pending systems fromstarting and enables Running or In Progress commands to complete.
Systems Insight Manager - Managing with tasks related information
HP Systems Insight Manager 7.1 English
Operations | Managing with tasks | Configuring task results settings
» Discovery in HP SIM» Discovery filters» Managing Hosts file» Identification» Managing system types» Users and authorizations» Directory Services» Global credentials» System credentials» Security» Trusted certificates» Viewing the audit log» Configuring the audit log» Monitoring systems and
events» Quick Launch menu» Performing a basic search» Performing an advanced
search for systems» Performing an advanced
search for clusters» Performing an advanced
search for events» Tool search» Related information for
searches» Configuring events» Protocol settings» Software status polling» Hardware status polling» Data collection» System Properties» Configuring WBEM health
inclusion status» Specifying a Version
HP SIM removes old tasks and jobs created by those tasks. A job is the results of a taskthat ran, either as a scheduled task or as a manually ran task. Tasks are removedaccording to the rules in the following procedure. HP SIM keeps the maximum configuredcounts, whichever comes first. Keep task results longer results in slower response time inHP SIM. For large installations (2000 or more systems), HP suggests reducing thescheduled task configurations by one half. For example, 5 tasks and 15 days.
» Discovery in HP SIM» Discovery filters» Managing Hosts file» Identification» Managing system types» Users and authorizations» Directory Services» Global credentials» System credentials» Security» Trusted certificates» Viewing the audit log» Configuring the audit log» Monitoring systems and
events» Quick Launch menu» Performing a basic search» Performing an advanced
search for systems» Performing an advanced
search for clusters» Performing an advanced
search for events» Tool search» Related information for
searches» Configuring events» Protocol settings» Software status polling» Hardware status polling» Data collection» System Properties» Configuring WBEM health
inclusion status» Specifying a Version
NOTE:Scheduled task results are retained for 30 days or a maximum of ten results for agiven task. Run Now task results are retained for 72 hours. These are defaultvalues. To customize these values, see Systems Insight Manager - Configuringtask results settings.
Procedure 1 Deleting task results
1. Select Tasks & Logs View Task Results and then select a task from the table.
2. Click [Delete ]. The task instance is deleted from the database.
NOTE:If the task instance is running, a message appears, stating that you muststop the running task instance before it can be deleted.
Systems Insight Manager - Managing with tasks related information
HP Systems Insight Manager 7.1 English
Operations | Managing with tasks | Task results list
» Discovery in HP SIM» Discovery filters» Managing Hosts file» Identification» Managing system types» Users and authorizations» Directory Services» Global credentials» System credentials» Security» Trusted certificates» Viewing the audit log» Configuring the audit log» Monitoring systems and
events» Quick Launch menu» Performing a basic search» Performing an advanced
search for systems» Performing an advanced
search for clusters» Performing an advanced
search for events» Tool search» Related information for
searches» Configuring events» Protocol settings» Software status polling» Hardware status polling» Data collection» System Properties» Configuring WBEM health
inclusion status» Specifying a Version
Procedure 1 Viewing task information
1. Click the task row and then select one of the following options:
[Stop]. Click [Stop] to stop a running task instance. For more information,see Systems Insight Manager - Stopping a task.
[Delete ]. Select a task instance, and then click [Delete ]. For moreinformation, see Systems Insight Manager - Deleting task results.
NOTE:If a task instance is running, a message appears informing youto stop the task instance before attempting to delete it.
2. View the results of a task instance below the Task Results list.
The Task Instance Results section displays the following information:
Status. This field displays the status of the task. For more informationabout the different status types, see the HP Systems Insight Manager UserGuide.
ID. This field displays the task job ID number.
Task Name. This field displays the name of the task that was executed.
Tool. This field displays the name of the tool that was used.
Owner. This field displays the user name that owns the task.
Command. This field displays the command used to run the task.
Target. This field displays the name of the target collection or systems thatthe task executed on. If you run a custom command tool or a MSA tool, thisfield displays the CMS system name. With custom command and MSAtools, the executables reside on the CMS and are run from the CMS to theremote system. Therefore, the Target for these types of commands arealways shown as the CMS.
The remaining tool types (SSA, Automation, and so on) have the actualtargets the tool ran on listed in the Target field. This value might be a singlesystem, multiple systems (comma-separated), or the name of the collectionselected for the task. If the Target is a collection or multiple systems, thetarget value becomes a hyperlink. Click the hyperlink to display thecontents of the collection or the complete list of systems if the Target fielddisplays a partial comma-separated list of the target systems.
Executed As . This field displays the user context where the tools wereexecuted.
Start time. This field displays the time the task started.
End time. This field displays the time the task ended.
Duration. This field displays the time that the task took to run.
The list of task instances is based on user privileges and access levels. Users withadministrative rights can view all task instances known to the system.
Systems Insight Manager - Managing with tasks related information
HP Systems Insight Manager 7.1 English
Operations | Managing with tasks | Managing with tasks related information
» Discovery in HP SIM» Discovery filters» Managing Hosts file» Identification» Managing system types» Users and authorizations» Directory Services» Global credentials» System credentials» Security» Trusted certificates» Viewing the audit log» Configuring the audit log» Monitoring systems and
events» Quick Launch menu» Performing a basic search» Performing an advanced
search for systems» Performing an advanced
search for clusters» Performing an advanced
search for events» Tool search» Related information for
searches» Configuring events» Protocol settings» Software status polling» Hardware status polling» Data collection» System Properties» Configuring WBEM health
inclusion status» Specifying a Version
Related procedures
» Systems Insight Manager - Creating a task» Systems Insight Manager - Scheduling a task» Systems Insight Manager - Running a scheduled task» Systems Insight Manager - Stopping a task» Systems Insight Manager - Deleting task results» Systems Insight Manager - Printing reports» Systems Insight Manager - Editing a scheduled task» Systems Insight Manager - Deleting a scheduled task
Related topic
» Systems Insight Manager - Applying a time filter
» Discovery in HP SIM» Discovery filters» Managing Hosts file» Identification» Managing system types» Users and authorizations» Directory Services» Global credentials» System credentials» Security» Trusted certificates» Viewing the audit log» Configuring the audit log» Monitoring systems and
events» Quick Launch menu» Performing a basic search» Performing an advanced
search for systems» Performing an advanced
search for clusters» Performing an advanced
search for events» Tool search» Related information for
searches» Configuring events» Protocol settings» Software status polling» Hardware status polling» Data collection» System Properties» Configuring WBEM health
inclusion status» Specifying a Version
Procedure 1 Cluster Monitor
1. Access the Cluster Monitor page by using one of the following methods:
Method 1:
a. Select Tools System Information Cluster Monitor.
NOTE:If no MSCS clusters are discovered, Cluster Monitor isnot listed in the menu.
b. Select a target MSCS cluster, and then click [Run Now]. SeeSystems Insight Manager - Creating a task for more informationabout selecting a target cluster.
Method 2:
a. Locate a cluster by expanding Systems under the System andEvent Collections panel and selecting a cluster collection.
The appropriate cluster collection table appears in the workspace.
NOTE:Only MSCS clusters you are authorized to accessappear on the cluster table view page.
b. Choose one of the following:
a. In the Cluster Name column, click the name of the MSCScluster.
b. In the CS column on the cluster table view page, click theMSCS cluster status icon.
The Cluster Monitor page appears for that cluster.
2. Select from the following tabs available on the Cluster Monitor page. Every tabincludes a Problem Info section that provides details about problems reported onthe tab. For example, on the Cluster tab, this section includes status information ifthe cluster has a status of anything other than Normal.
Each tab also includes a Last Updated field that displays the last time theinformation on the tab was updated.
Cluster Use to view cluster information such as the cluster status, name,IP address, and quorum.
Nodes Use to view node information such as the node status, name, andIP address.
Network Use to view network information such as the network status,name, mask, state, role, and description.
Resources Use to view MSCS Resource information for the cluster,including the status, name, IP address, state, group, owner node, type, anddrive of the resources.
HP Systems Insight Manager 7.1 English
Operations | Using Cluster Monitor | Configuring cluster resource settings
» Discovery in HP SIM» Discovery filters» Managing Hosts file» Identification» Managing system types» Users and authorizations» Directory Services» Global credentials» System credentials» Security» Trusted certificates» Viewing the audit log» Configuring the audit log» Monitoring systems and
events» Quick Launch menu» Performing a basic search» Performing an advanced
search for systems» Performing an advanced
search for clusters» Performing an advanced
search for events» Tool search» Related information for
searches» Configuring events» Protocol settings» Software status polling» Hardware status polling» Data collection» System Properties» Configuring WBEM health
inclusion status» Specifying a Version
Procedure 1 Configuring Custer Resource Settings
1. Configure MSCS clusters by selecting ALL (MSCS) from the Cluster Type list.
2. From the Resource list, select MSCS.
3. Select Polling and set the polling rate.
HP recommends setting the polling rate to no less than 5 minutes.
4. Click [OK] to save the changes.
Related procedures
» Systems Insight Manager - Configuring node resource settings
Related topic
» Systems Insight Manager - Using Cluster Monitor
HP Systems Insight Manager 7.1 English
Operations | Using Cluster Monitor | Configuring node resource settings
» Discovery in HP SIM» Discovery filters» Managing Hosts file» Identification» Managing system types» Users and authorizations» Directory Services» Global credentials» System credentials» Security» Trusted certificates» Viewing the audit log» Configuring the audit log» Monitoring systems and
events» Quick Launch menu» Performing a basic search» Performing an advanced
search for systems» Performing an advanced
search for clusters» Performing an advanced
search for events» Tool search» Related information for
searches» Configuring events» Protocol settings» Software status polling» Hardware status polling» Data collection» System Properties» Configuring WBEM health
inclusion status» Specifying a Version
Procedure 1 Configuring Node Resource Settings
1. From the Cluster list at the top of the page, select the cluster, and then select Allto configure a resource in the same way for all clusters. To set polling values forCPU utilization or disk capacity, set the cluster choice to All.
2. From the Node list, select the node, and then select All to configure a resource inthe same way for all nodes in the selected cluster. As in step 2, you can set someresource attributes only once for all nodes. As a result, you must select all clustersand nodes. For more information, see the individual attribute descriptions for aparticular resource.
3. To display buttons for resource-configurable parameters, select the resource fromthe Resource list.
4. Specify resource options.
HP recommends setting the polling rate to no less than 5 minutes.
If you select All from the Cluster list and select CPU or Disk from the Resourcelist, you can set polling or threshold values. If you select Polling, set the value, thenselect Thresholds, set the values, and then select Polling again. The new pollingvalues appear. Regardless of when you click [OK] after setting the polling orthresholds values, these values are saved and do not reset to the original value,which is the same when setting thresholds.
5. Click [OK] to save the changes.
Related procedures
» Systems Insight Manager - Configuring cluster resource settings
» Discovery in HP SIM» Discovery filters» Managing Hosts file» Identification» Managing system types» Users and authorizations» Directory Services» Global credentials» System credentials» Security» Trusted certificates» Viewing the audit log» Configuring the audit log» Monitoring systems and
events» Quick Launch menu» Performing a basic search» Performing an advanced
search for systems» Performing an advanced
search for clusters» Performing an advanced
search for events» Tool search» Related information for
searches» Configuring events» Protocol settings» Software status polling» Hardware status polling» Data collection» System Properties» Configuring WBEM health
inclusion status» Specifying a Version
Use the CLI tools to execute basic UNIX, Linux, and Windows commands remotely on oneor more systems. Command line tools can be executed on HP, ESX (non-embedded),Solaris, and IBM systems.
NOTE:For additional information about the individual commands, see the associatedmanpage on an HP-UX, ESX (non-embedded), Solaris, IBM and Linux systemsor the Windows command line help where the command tool is installed.
NOTE:Command line tools provided by HP-UX and Linux, such as the ls and dfcommands, are run as root by default. For security reasons, you might want themto run as a specific user to avoid permitting unintended capabilities to a user.
Procedure 1 Launching a command line tool
1. Choose one of the following:
Select Tools Command Line Tools UNIX/Linux for Linux or UNIXcommand line tools.
Select Tools Command Line Tools Windows for Windows commandline tools.
2. Select the command line tool that you want to run, and follow the steps to launchthe tool. See Systems Insight Manager - Creating a task for assistance with thesteps.
3. Click [Run Now] to launch the tool.
4. Enter the parameters for the tool in the Parameters field.
5. If applicable, enter the privilege elevation password.
Command line interface
Use the mxexec command to launch these command tools on one or more systems fromthe command line interface. For assistance with this command, see the associatedmanpage. See HP Systems Insight Manager Command Line User Guide for informationabout accessing the manpage.
HP Systems Insight Manager 7.1 English
Operations | Configuring managed systems from a Windows CMS
» Discovery in HP SIM» Discovery filters» Managing Hosts file» Identification» Managing system types» Users and authorizations» Directory Services» Global credentials» System credentials» Security» Trusted certificates» Viewing the audit log» Configuring the audit log» Monitoring systems and
events» Quick Launch menu» Performing a basic search» Performing an advanced
search for systems» Performing an advanced
search for clusters» Performing an advanced
search for events» Tool search» Related information for
searches» Configuring events» Protocol settings» Software status polling» Hardware status polling» Data collection» System Properties» Configuring WBEM health
inclusion status» Specifying a Version
Overview
Managed systems must be able to communicate status to the HP SIM CMS in order to launch commands to themanaged systems. To configure the managed systems to communicate with the CMS, you must configure commonconfigurations and trust relationships. The Configure or Repair Agents feature enables you to configure or repairagents in Windows, Linux, and HP-UX.
The Configure or Repair Agents tool enables you to repair Simple Network Management Protocol settings and trustrelationships that exist between HP Systems Insight Manager and target systems if you have 7.2 agents or laterinstalled. If you have 7.1 agents or earlier installed, you can update Web Agent passwords on target systems.
This tool adds the security and trap community strings and trust settings to the target systems, but it does not replaceexisting settings. To replace existing settings on target systems, use the Replicate Agent Settings feature in HP SIM.
You can use Configure or Repair Agents tool to send test SNMP traps from Windows systems with InsightManagement Advisors and send test Web-Based Enterprise Management indications from Windows and HP-UXsystems with HP WBEM provider installed.
The Configure or Repair Agents feature on a Windows CMS also enables you to install various agents and providerson a ProLiant or Itanium-based system with Windows operating system. It can install:
HP Insight Management WBEM Providers for Windows Server 2003 or Windows Server 2008
OpenSSH
Version Control Agent for Windows
Insight Management Advisors for Windows
Configuring or repairing the agents
You can install Insight Management Agents or providers, either WBEM or SNMP, on managed systems so that HPSIM can collect inventory and status information from these systems and receive event notifications from the systems.Installation is supported only on ProLiant or Itanium-based servers with a Windows operating systems.
Procedure 1 Configuring or repairing the agents
1. Select Install Agentless Management Service (AMS) on HP ProLiant Gen8 servers running Windows,Linux, or ESX to send all host operating system-specific data to the iLO4 firmware.
2. Select Install Linux PSP or ESX Agents to install Linux PSP and ESX Agents which are a collection ofSNMP agents used by HP SIM to gather information from managed systems and send traps to HP SIM.
3. Select Install WBEM / WMI Provider (HP Insight Management WBEM Provider) for Windows to installWBEM or WMI providers on Windows managed systems.
4. Select Install SNMP Agent (Insight Management Advisor) for Windows to install the SNMP agent onWindows managed systems. This Insight Management Agent allows network monitoring and control.
5. Select Install OpenSSH to install OpenSSH on Windows managed systems.
6. Select Install the Version Control Agent for Windows (VCA) to install the HP VCA on Windows managedsystems. The HP VCA enables you to view the HP software installed on a system and whether updates forthe software are available in the repository.
Installs the HP VCA in conjunction with the Version Control Repository Manager and enables management ofthe HP ProLiant software and firmware on the managed systems.
Control Repository» Configuring
software/firmware globalsettings
» Reporting» Managing with tasks» Using Cluster Monitor» Command line tools
Configuring managedsystems from a WindowsCMS» Configuring target
system settings» Configuring credentials
» Configuring managedsystems from a LinuxCMS
» Configuring managedsystems from an HP-UXCMS
» Custom tools» Setting disk thresholds» Creating a task to delete
disk thresholds» License manager» Management processor
tools» Managing
Communications» Managing MIBs» Installing OpenSSH» Replicate Agent Settings» RPM Package Manager» HP Server Migration Pack
- Universal Edition» HP System Management
Homepage» Version Control» Device ping
» Reference» Support and other
resources» Assistance
» Glossary» Using Help
7. Select Register VM Host for VMware ESX, Citrix XenServer, Microsoft Hyper-V, and Xen on SLES andRHEL.
8. For selected installs, perform the following steps:
a. If you are installing software that is earlier than or the same version currently installed, select Forceinstall the agents . This option is disabled by default.
b. If you want to reboot after the installation, select Reboot systems if necessary after successfulinstall option.
HP SIM determines the type of agent or provider to install based on the system type, subtype, andoperating system description of the system.
If you want to install a 64-bit agent or provider, be sure the target system is identified as a 64-bitsystem in HP SIM.
If your system is not correctly identified, go to System Page Tools & Links Edit SystemProperties. Select the correct system type, or subtype and enter the operating system descriptionmanually.
Example: Installing Insight Management Agents on a ProLiant Windows 64-bit system:
i. Select System type: server .
ii. Select System subtype 1: HP ProLiant.
iii. Enter operating system description as Microsoft Windows Server 2003, x64 Enterprise EditionService Pack 1 or the correct operating system description of your system.
If you want to configure the agents after installation, select the force reboot option. This allows thenewly installed component to be completely initialized before you configure it.
NOTE:Installation with reboot typically takes about 8 minutes.
9. Click [Next]. The Step 3: Configure or Repair Agents Settings page appears.
NOTE:The Step 3: Configure or Repair Settings page changes to show the configuration options availablewith the installed plug-ins.
Related Topics
» Systems Insight Manager - Configuring target system settings» Systems Insight Manager - Configuring credentials» Systems Insight Manager - Configuring managed systems from a Linux CMS» Systems Insight Manager - Configuring managed systems from an HP-UX CMS
» Discovery in HP SIM» Discovery filters» Managing Hosts file» Identification» Managing system types» Users and authorizations» Directory Services» Global credentials» System credentials» Security» Trusted certificates» Viewing the audit log» Configuring the audit log» Monitoring systems and
events» Quick Launch menu» Performing a basic search» Performing an advanced
search for systems» Performing an advanced
search for clusters» Performing an advanced
search for events» Tool search» Related information for
searches» Configuring events» Protocol settings» Software status polling» Hardware status polling» Data collection» System Properties» Configuring WBEM health
inclusion status» Specifying a Version
1. Configure the target systems by selecting one of the following options:
Configure WBEM / WMI. This section enables you to configure the targetLinux, Windows, or HP-UX system to send WBEM indications or events toHP SIM.
For this section, consider the following:
Create subscription to WBEM events so that WBEM events willbe sent to the CMS
Send a sample WBEM / WMI indication to this instance of HPSIM to test that events appear in HP SIM in the Event List or AllEvent User Interface for the selected system
NOTE:This indication will appear as an Informational Event inthe Event List of HP SIM.
NOTE:This indication is supported only on HP-UX andWindows targets with WBEM provider installed.
Use an HP SIM WBEM certificate (good for 10 years) ratherthan username/password to manage the system This optiondeploys a WBEM certificate to the managed system and is onlyvalid for HP-UX systems.
Configure a non-administrative account for HP SIM to accessWMI data This option applies to Windows systems with HPWBEM providers. The configuration of the managed systemupdates to allow the specified user to access WMI information overthe network. HP SIM uses this user to read inventory andconfiguration information from the system and is configured as theWBEM user in the System Credentials. If HP SIM is configured witha user with administration rights, this configuration step is notnecessary. HP SIM does not create this user. The user alreadyexists as either a domain user or one local to the managed system.
The user is added to the DCOM Users group on the managedsystem and has read-only access to WMI information, and read-write permissions to the HPQ name space. This user does not needto be an administrator of the managed system or have sign-inrights. The domain administrator should create a special domainaccount.
To enter the credentials for HP SIM to use to access the managedsystems:
a. In the User name field, enter a user name.
b. In the Password field, enter the password.
c. In the Password (Verify) field, re-enter the passwordexactly as it was entered in the Password field.
d. In the Domain (Optional) field, if the target belongs to aDomain, enter the Windows domain.
If configuration of a nonadministrative user is successful,
Control Repository» Configuring
software/firmware globalsettings
» Reporting» Managing with tasks» Using Cluster Monitor» Command line tools» Configuring managed
systems from a WindowsCMS
Configuring targetsystem settings
» Configuring credentials» Configuring managed
systems from a LinuxCMS
» Configuring managedsystems from an HP-UXCMS
» Custom tools» Setting disk thresholds» Creating a task to delete
disk thresholds» License manager» Management processor
tools» Managing
Communications» Managing MIBs» Installing OpenSSH» Replicate Agent Settings» RPM Package Manager» HP Server Migration Pack
- Universal Edition» HP System Management
Homepage» Version Control» Device ping
» Reference» Support and other
resources» Assistance
» Glossary» Using Help
then these credentials are saved as the System Credentialsfor WBEM access in HP SIM.
NOTE:HP VCA can also be connected to HP VCRM throughthe certificate option.
Configure SNMP This section enables you to configure SNMP settings.
a. Select Set SNMP cmmunity strings to specify the ReadCommunity string and the Trap Community string. By default, thefirst HP SIM read community string that is not public appears. If nocommunity string exists in HP SIM, you must enter one.
NOTE:If you configure only HP-UX systems with default SNMPinstallations, you do not need to set this option. HP-UXenables read by default (get-community-name is set topublic by default on HP-UX systems).
NOTE:If you select this option, the Read Only community stringis added to the target systems. If the target system isSuSE Linux or Microsoft Windows 2003, the managedsystems do not always enable SNMP communicationbetween themselves and a remote host. This setting ismodified to enable the instance of the HP SIM system tocommunicate using SNMP with these target systems.
NOTE:You can enter a community string up to 255 characters.
NOTE:Repairing the SNMP settings adds a Read Writecommunity string to the target system only if one doesnot currently exist. This community string is unique foreach system, is composed of over 30 characters toinclude letters and numbers, and is visible only to theuser with administrator privileges for that system. ThisRead Write community string is required by the WebAgent to perform certain threshold setting capabilities.This community string is used locally only on the targetsystem and is not used by HP SIM over the network.Linux and HP-UX systems do not require a Read Writecommunity string. The Read Write community string isadded on Windows systems only.
b. Select Set traps to refer to this instance of HP Systems InsightManager in the target systems SNMP Trap Destination List. Thissetting enables the target systems to send SNMP traps to thisinstance of HP SIM.
Select Set additional list of SNMP Trap Destinations for an iLOManagement Engine to set additional SNMP trap destinations.Enter the trap destination information in the fields provided. Thisstep is for an HP iLO 4 only.
c. Select Send a sample SNMP trap to this instance of the HP SIMto test that events appear in HP SIM event lists to verify thatSNMP events appear in the HP SIM events list.
To successfully send a test trap, you must configure target systemsto send a trap to this instance.
NOTE:
You can send a test trap only from a managed systemwith an Insight Management Advisor installed.
NOTE:The trap from Windows appears as a Generic Trap fromthe system and is listed as a Major Event in the EventList of HP SIM. The trap received from Linux and HP-UX targets appears as a Cold Trap and is listed asInformational Events in the Event List of HP SIM.
i. In the Configure SNMP for iLO Management Enginedropdown list, select either Agentless Management orSNMP Pass-thru.
ii. In the Forward Insight Management Agent SNMP Alertsdropdown list, select either Enable or Disable.
iii. In the iLO SNMP Alerts dropdown list, select eitherEnable or Disable.
Configure secure shell (SSH) access Select this option to configureSSH access on managed systems.
If you select this option, you must select one of the following options:
Host based authentication for SSH
NOTE:For this option to work, the user name and passwordprovided in Step 4: Enter credentials must be anadministrative level account. For Linux or HP-UX targets,it must be the root account and password.
Each user has to be authenticated on the managed system
NOTE:If you do not want all users that have sign-in access toHP SIM to run the tool and you would like to controlwhich users need to have access, this option is moresecure.
NOTE:You can configure SSH only if the OpenSSH service isrunning on the managed systems. You can installOpenSSH on Windows systems by running the InstallOpen SSH or by selecting the tool under DeployDeploy Drivers, Firmware and Agents Install OpenSSH.
Set Trust relationship to "Trust by Certificate" Select this option toconfigure systems to use the Trust by Certificate trust relationship with theHP SIM.
For HP SIM on the target systems, this option sets the trust mode to Trustby Certificate and copies the HP SIM system certificate to the targetsystem trusted certificate directory. This option enables HP SIM users toconnect to the HP SMH using the certificate for authentication.
You can configure SSO to management processors for OnboardAdministrator and for remote management. To configure SSO, select SetTrust Relationship . After you configure SSO, you are not continuallyprompted to supply the login credentials for the management processor.
NOTE:For systems with Management HTTP Server 5.x and earlier, theConfigure or Repair Agents setting adds the Administratorpassword in the Management HTTP Server store and modifiesthe SNMP settings, but it cannot change trust relationship
information.
Select the checkbox beside Import Secure Sockets Layer (SSL)certificate for HP SIM to trust the HP SMH of the managed system. Thisoption is only valid for HP-UX and Linux operating systems.
Configure HP Version Control Agent Select this option to configure theHP VCA to point to the Version Control Repository Manager, where therepository of software and firmware is located, enabling version comparisonand software updates. This option is available for Windows and Linuxsystems.
To configure HP VCA:
a. In the Select the system where the HP VCRM is installed field,select a server from the dropdown list.
b. In the User Name field, enter the user name to access the HPVCRM. This user cannot be the default administrator user, andmust have administrative privileges.
c. In the Password field, enter the password to access the HPVCRM.
d. In the Password (verify) field, re-enter the password for the HPVCRM.
e. In the Domain (Optional) field, enter the domain for the HP VCA.
Set administrator password for Insight Management Agents version7.1 or earlier Select this option to repair the administrator password on allInsight Management Agents installed on the target systems as applicablefor Windows and Linux systems.
NOTE:Do not set this option if you have Insight Management Agents7.2 or later installed.
NOTE:If the remote system is running HP-UX, this option is notexecuted on the remote system because it is not applicable onHP-UX systems. If you are configuring only HP-UX targetsystems, you do not need to set this option.
If you select this option, you must complete the following steps:
a. In the Password field, enter the new administratorpassword.
b. In the Password (verify) field, re-enter the newadministrator password.
Select Configure Embedded Remote Support Settings for iLOManagement Engine to configure ERS settings. Select one of the followingoptions:
a. Select Connect this server to an Insight Remote Suppprthosting server and enter the Remote Support URL and port.
b. Select Disable the Embedded Remote Support connection.
2. Click [Next]. The Step 4: Enter credentials page appears.
» Discovery in HP SIM» Discovery filters» Managing Hosts file» Identification» Managing system types» Users and authorizations» Directory Services» Global credentials» System credentials» Security» Trusted certificates» Viewing the audit log» Configuring the audit log» Monitoring systems and
events» Quick Launch menu» Performing a basic search» Performing an advanced
search for systems» Performing an advanced
search for clusters» Performing an advanced
search for events» Tool search» Related information for
searches» Configuring events» Protocol settings» Software status polling» Hardware status polling» Data collection» System Properties» Configuring WBEM health
inclusion status» Specifying a Version
The credentials specified on this page are for a privileged account on the target system.
1. Enter the following credentials.
The credentials used in this step must work for all selected target systems. HPrecommends using domain administrator credentials. Credentials entered here arenot saved by HP SIM except to run a scheduled task later.
If you select Configure secure shell (SSH) access for a Windows target system,the account you specify must be a member of the local Administrators group. ForWindows targets using a domain account, the account is automatically added to thisgroup.
a. Select one of the following options:
a. Use sign-in credentials These credentials must be a privilegedaccount on the managed system. The sign-in credentials option isavailable if the following options are selected:
a. Install WBEM/WMI Provider (HP Insight ManagementWBEM Provider) for Windows
b. Install Simple Network Management Protocol Agent (HPInsight Management Agents) for Windows
c. Install Linux PSP or ESX Agents
d. Install the for Windows
NOTE:This option is not available if you selected Install OpenSSH or Register VM Host on the “Step 2: InstallProviders and Agents (Optional)†page.
b. Use the following credentials for all systems .
b. In the User name field, enter the system administrator name.
c. In the Password field, enter the system administrator password.
d. In the Password (Verify) field, re-enter the system administrator password.
e. In the Domain (Optional) field, if you are using a domain account, enterthe Windows domain.
2. Click [Run Now] or click [Schedule] to run this task at a later time. The TaskResults page appears.
If the Management HTTP Server is installed on target systems, the login credentialsare updated in the Management HTTP Server password file. As with other HP SIMtools, you can configure the Configure or Repair Agents tool to run on a schedule ormanually. Only one instance of Configure or Repair Agents tool can run at a time.
The Configure or Repair Agents tool can update multiple target systems. The logresults indicate whether the repair attempt was successful. For Configure or RepairAgents, the Task Results page displays the following information.
Table 1 CRA Task Results information
FieldName Description
Control Repository» Configuring
software/firmware globalsettings
» Reporting» Managing with tasks» Using Cluster Monitor» Command line tools» Configuring managed
systems from a WindowsCMS» Configuring target
system settingsConfiguring credentials
» Configuring managedsystems from a LinuxCMS
» Configuring managedsystems from an HP-UXCMS
» Custom tools» Setting disk thresholds» Creating a task to delete
disk thresholds» License manager» Management processor
tools» Managing
Communications» Managing MIBs» Installing OpenSSH» Replicate Agent Settings» RPM Package Manager» HP Server Migration Pack
- Universal Edition» HP System Management
Homepage» Version Control» Device ping
» Reference» Support and other
resources» Assistance
» Glossary» Using Help
Status This field displays the details for each target system within a taskinstance.
ExitCode
This field represents the success or failure of an executable program.If the return value is zero or a positive value, the executable ransuccessfully. If a negative value is returned, the executable failed. Thisexit code does not indicate that all configuration attempts weresuccessful. It is possible for some to succeed but some to fail.
TargetName This field displays the name/IP address of the target.
Thestdouttab
This tab displays the output text information.
Thestderrtab
This tab displays information if the executable experienced an error.
ViewPrintableReport
You can print reports for the selected target system or for all targetsystems associated with the task instance.
To print a report:
a. Click [View Printable Report].
An Options Message box appears.
b. Select a report.
c. Click [OK] to display the report, or click [Cancel ] to return tothe View Task Results page.
» Discovery in HP SIM» Discovery filters» Managing Hosts file» Identification» Managing system types» Users and authorizations» Directory Services» Global credentials» System credentials» Security» Trusted certificates» Viewing the audit log» Configuring the audit log» Monitoring systems and
events» Quick Launch menu» Performing a basic search» Performing an advanced
search for systems» Performing an advanced
search for clusters» Performing an advanced
search for events» Tool search» Related information for
searches» Configuring events» Protocol settings» Software status polling» Hardware status polling» Data collection» System Properties» Configuring WBEM health
inclusion status» Specifying a Version
Overview
Managed systems must be able to communicate status to the Systems Insight ManagerCMS in order to launch commands to the managed systems. To configure the managedsystems to communicate with the CMS, you must configure common configurations andtrust relationships. The Configure or Repair Agents feature enables you to configure orrepair agents in Windows, Linux, and HP-UX.
The Configure or Repair Agents tool enables you to repair Simple Network ManagementProtocol settings and trust relationships that exist between HP Systems Insight Managerand target systems if you have 7.2 agents or later installed. If you have 7.1 agents or earlierinstalled, you can update Web Agent passwords on target systems.
This tool adds the security and trap community strings and trust settings to the targetsystems, but it does not replace existing settings. To replace existing settings on targetsystems, use the Replicate Agent Settings feature in Systems Insight Manager.
Configuring or repairing the agents
From a Linux CMS, this option supports installing only Linux PSP or ESX agents, which area collection of SNMP agents used by HP SIM to gather information from managed systemsand send traps to HP SIM.
1. For Linux systems, select Install Linux PSP or ESX Agents.
2. Click [Next]. The Step 3: Configure or Repair Agents page appears.
Related Topics
» Systems Insight Manager - Configuring managed systems from a Windows CMS» Systems Insight Manager - Configuring managed systems from an HP-UX CMS
HP Systems Insight Manager 7.1 English
Operations | Configuring managed systems from a Linux CMS | Configuring target system settings
» Discovery in HP SIM» Discovery filters» Managing Hosts file» Identification» Managing system types» Users and authorizations» Directory Services» Global credentials» System credentials» Security» Trusted certificates» Viewing the audit log» Configuring the audit log» Monitoring systems and
events» Quick Launch menu» Performing a basic search» Performing an advanced
search for systems» Performing an advanced
search for clusters» Performing an advanced
search for events» Tool search» Related information for
searches» Configuring events» Protocol settings» Software status polling» Hardware status polling» Data collection» System Properties» Configuring WBEM health
inclusion status» Specifying a Version
1. Configure the target systems by selecting one of the following options:
Configure WBEM / WMI. This section enables you to configure the targetLinux, Windows, or HP-UX system to send WBEM indications or events toSystems Insight Manager.
For this section, consider the following:
Create subscription to WBEM events so that WBEM events willbe sent to the CMS
Send a sample WBEM / WMI indication to this instance ofSystems Insight Manager to test that events appear inSystems Insight Manager in the Event List or All Event UserInterface for the selected system
NOTE:This indication will appear as an Informational Event inthe Event List of Systems Insight Manager.
NOTE:This indication is supported only on HP-UX andWindows targets with WBEM provider installed.
Use an Systems Insight Manager WBEM certificate (good for10 years) rather than username/password to manage thesystem This option deploys a WBEM certificate to the managedsystem and is only valid for HP-UX systems.
Configure a nonadministrative account for Systems InsightManager to access WMI data This option applies to Windowssystems with HP WBEM providers. The configuration of themanaged system updates to allow the specified user to accessWMI information over the network. Systems Insight Manager usesthis user to read inventory and configuration information from thesystem and is configured as the WBEM user in the SystemCredentials. If Systems Insight Manager is configured with a userwith administration rights, this configuration step is not necessary.Systems Insight Manager does not create this user. The useralready exists as either a domain user or one local to the managedsystem.
The user is added to the DCOM Users group on the managedsystem and has read-only access to WMI information, and read-write permissions to the HPQ name space. This user does not needto be an administrator of the managed system or have sign-inrights. The domain administrator should create a special domainaccount.
To enter the credentials for Systems Insight Manager to use toaccess the managed systems:
a. In the User name field, enter a user name.
b. In the Password field, enter the password.
c. In the Password (Verify) field, re-enter the passwordexactly as it was entered in the Password field.
d. In the Domain (Optional) field, if the target belongs to a
Control Repository» Configuring
software/firmware globalsettings
» Reporting» Managing with tasks» Using Cluster Monitor» Command line tools» Configuring managed
systems from a WindowsCMS
» Configuring managedsystems from a LinuxCMS
Configuring targetsystem settings
» Configuring credentials» Configuring managed
systems from an HP-UXCMS
» Custom tools» Setting disk thresholds» Creating a task to delete
disk thresholds» License manager» Management processor
tools» Managing
Communications» Managing MIBs» Installing OpenSSH» Replicate Agent Settings» RPM Package Manager» HP Server Migration Pack
- Universal Edition» HP System Management
Homepage» Version Control» Device ping
» Reference» Support and other
resources» Assistance
» Glossary» Using Help
Domain, enter the Windows domain.
If configuration of a nonadministrative user is successful,then these credentials are saved as the System Credentialsfor WBEM access in Systems Insight Manager.
Configure SNMP This section enables you to configure SNMP settings.
a. Select Set read public community string to specify a communitystring. By default, the first Systems Insight Manager communitystring that is not public appears. If no community string exists inSystems Insight Manager, you must enter one.
NOTE:If you configure only HP-UX systems with default SNMPinstallations, you do not need to set this option. HP-UXenables read by default (get-community-name is set topublic by default on HP-UX systems).
NOTE:If you select this option, the Read Only community stringis added to the target systems. If the target system isSuSE Linux or Microsoft Windows 2003, the managedsystems do not always enable SNMP communicationbetween themselves and a remote host. This setting ismodified to enable the instance of the Systems InsightManager system to communicate using SNMP with thesetarget systems.
NOTE:You can enter a community string up to 255 characters.
NOTE:Repairing the SNMP settings adds a Read Writecommunity string to the target system only if one doesnot currently exist. This community string is unique foreach system, is composed of over 30 characters toinclude letters and numbers, and is visible only to theuser with administrator privileges for that system. ThisRead Write community string is required by the WebAgent to perform certain threshold setting capabilities.This community string is used locally only on the targetsystem and is not used by Systems Insight Managerover the network. Linux and HP-UX systems do notrequire a Read Write community string. The Read Writecommunity string is added on Windows systems only.
b. Select Set traps to refer to this instance of HP Systems InsightManager in the target systems SNMP Trap Destination List. Thissetting enables the target systems to send SNMP traps to thisinstance of Systems Insight Manager.
c. Select Send a sample SNMP trap to this instance of theSystems Insight Manager to test that events appear inSystems Insight Manager event lists to verify that SNMP eventsappear in the Systems Insight Manager events list.
To successfully send a test trap, you must configure target systemsto send a trap to this instance.
NOTE:You can send a test trap only from a managed systemwith an HP Insight Management Agents installed.
NOTE:
The trap from Windows appears as a Generic Trap fromthe system and is listed as a Major Event in the EventList of Systems Insight Manager. The trap received fromLinux and HP-UX targets appears as a Cold Trap and islisted as Informational Events in the Event List ofSystems Insight Manager.
Configure secure shell (SSH) access Select this option to configureSSH access on managed systems.
If you select this option, you must select one of the following options:
Host based authentication for SSH
NOTE:For this option to work, the user name and passwordprovided in Step 4: Enter credentials must be anadministrative level account. For Linux or HP-UX targets,it must be the root account and password.
Each user has to be authenticated on the managed system
NOTE:If you do not want all users that have sign-in access toSystems Insight Manager to run the tool and you wouldlike to control which users need to have access, thisoption is more secure.
NOTE:You can configure SSH only if the OpenSSH service isrunning on the managed systems. You can installOpenSSH on Windows systems by running the InstallOpen SSH or by selecting the tool under DeployDeploy Drivers, Firmware and Agents Install OpenSSH.
Set Trust relationship to "Trust by Certificate" Select this option toconfigure systems to use the Trust by Certificate trust relationship with theSystems Insight Manager.
For Systems Insight Manager on the target systems, this option sets thetrust mode to Trust by Certificate and copies the Systems Insight Managersystem certificate to the target system trusted certificate directory. Thisoption enables Systems Insight Manager users to connect to the SMHusing the certificate for authentication.
You can configure SSO to management processors for OnboardAdministrator and for remote management. To configure SSO, select SetTrust Relationship . After you configure SSO, you are not continuallyprompted to supply the login credentials for the management processor.
NOTE:For systems with Management HTTP Server 5.x and earlier, theConfigure or Repair Agents setting adds the Administratorpassword in the Management HTTP Server store and modifiesthe SNMP settings, but it cannot change trust relationshipinformation.
Select the checkbox beside Import Secure Sockets Layer (SSL)certificate for Systems Insight Manager to trust the HP SMH of themanaged system. This option is only valid for HP-UX and Linux operatingsystems.
Configure HP Version Control Agent Select this option to configure theVCA to point to the HP Version Control Repository Manager, where therepository of software and firmware is located, enabling version comparisonand software updates. This option is available for Windows and Linux
systems.
To configure VCA:
a. In the Select the system where the VCRM is installed field,select a server from the dropdown list.
b. In the User Name field, enter the user name to access the VCRM.This user cannot be the default administrator user, and must haveadministrative privileges.
c. In the Password field, enter the password to access the VCRM.
d. In the Password (verify) field, re-enter the password for theVCRM.
NOTE:HP VCA can also be connected to HP VCRM throughthe certificate option.
e. In the Domain (Optional) field, enter the domain for the HP VCA.
Set administrator password for Insight Management Agentss version7.1 or earlier Select this option to repair the administrator password on allInsight Management Agents installed on the target systems as applicablefor Windows and Linux systems.
NOTE:Do not set this option if you have Insight Management Agentss7.2 or later installed.
NOTE:If the remote system is running HP-UX, this option is notexecuted on the remote system because it is not applicable onHP-UX systems. If you are configuring only HP-UX targetsystems, you do not need to set this option.
If you select this option, you must complete the following steps:
a. In the Password field, enter the new administratorpassword.
b. In the Password (verify) field, re-enter the newadministrator password.
2. Click [Next]. The Step 4: Enter credentials page appears.
» Discovery in HP SIM» Discovery filters» Managing Hosts file» Identification» Managing system types» Users and authorizations» Directory Services» Global credentials» System credentials» Security» Trusted certificates» Viewing the audit log» Configuring the audit log» Monitoring systems and
events» Quick Launch menu» Performing a basic search» Performing an advanced
search for systems» Performing an advanced
search for clusters» Performing an advanced
search for events» Tool search» Related information for
searches» Configuring events» Protocol settings» Software status polling» Hardware status polling» Data collection» System Properties» Configuring WBEM health
inclusion status» Specifying a Version
The credentials specified on this page are for a privileged account on the target system.
1. Enter the following credentials.
The credentials used in this step must work for all selected target systems. HPrecommends using domain administrator credentials. Credentials entered here arenot saved by Systems Insight Manager except to run a scheduled task later.
If you select Configure secure shell (SSH) access for a Windows target system,the account you specify must be a member of the local Administrators group. ForWindows targets using a domain account, the account is automatically added to thisgroup.
a. Select one of the following options:
a. Use sign-in credentials These credentials must be a privilegedaccount on the managed system. The sign-in credentials option isavailable if the following options are selected:
a. Install WBEM/WMI Provider (HP Insight ManagementWBEM Provider) for Windows
b. Install Simple Network Management Protocol Agent (HPInsight Management Agents) for Windows
c. Install Linux PSP or ESX Agents
d. Install the HP Version Control for Windows
NOTE:This option is not available if you selected Install OpenSSH or Register VM Host on the “Step 2: InstallProviders and Agents (Optional)†page.
b. Use the following credentials for all systems .
b. In the User name field, enter the system administrator name.
c. In the Password field, enter the system administrator password.
d. In the Password (Verify) field, re-enter the system administrator password.
e. In the Domain (Optional) field, if you are using a domain account, enterthe Windows domain.
2. Click [Run Now] or click [Schedule] to run this task at a later time. The TaskResults page appears.
If the Management HTTP Server is installed on target systems, the login credentialsare updated in the Management HTTP Server password file. As with other SystemsInsight Manager tools, you can configure the Configure or Repair Agents tool to runon a schedule or manually. Only one instance of Configure or Repair Agents toolcan run at a time.
The Configure or Repair Agents tool can update multiple target systems. The logresults indicate whether the repair attempt was successful. For Configure or RepairAgents, the Task Results page displays the following information.
Table 1 CRA Task Results information
FieldName Description
Control Repository» Configuring
software/firmware globalsettings
» Reporting» Managing with tasks» Using Cluster Monitor» Command line tools» Configuring managed
systems from a WindowsCMS
» Configuring managedsystems from a LinuxCMS» Configuring target
system settingsConfiguring credentials
» Configuring managedsystems from an HP-UXCMS
» Custom tools» Setting disk thresholds» Creating a task to delete
disk thresholds» License manager» Management processor
tools» Managing
Communications» Managing MIBs» Installing OpenSSH» Replicate Agent Settings» RPM Package Manager» HP Server Migration Pack
- Universal Edition» HP System Management
Homepage» Version Control» Device ping
» Reference» Support and other
resources» Assistance
» Glossary» Using Help
Status This field displays the details for each target system within a taskinstance.
ExitCode
This field represents the success or failure of an executable program.If the return value is zero or a positive value, the executable ransuccessfully. If a negative value is returned, the executable failed. Thisexit code does not indicate that all configuration attempts weresuccessful. It is possible for some to succeed but some to fail.
TargetName This field displays the name/IP address of the target.
Thestdouttab
This tab displays the output text information.
Thestderrtab
This tab displays information if the executable experienced an error.
ViewPrintableReport
You can print reports for the selected target system or for all targetsystems associated with the task instance.
To print a report:
a. Click [View Printable Report].
An Options Message box appears.
b. Select a report.
c. Click [OK] to display the report, or click [Cancel ] to return tothe View Task Results page.
» Discovery in HP SIM» Discovery filters» Managing Hosts file» Identification» Managing system types» Users and authorizations» Directory Services» Global credentials» System credentials» Security» Trusted certificates» Viewing the audit log» Configuring the audit log» Monitoring systems and
events» Quick Launch menu» Performing a basic search» Performing an advanced
search for systems» Performing an advanced
search for clusters» Performing an advanced
search for events» Tool search» Related information for
searches» Configuring events» Protocol settings» Software status polling» Hardware status polling» Data collection» System Properties» Configuring WBEM health
inclusion status» Specifying a Version
Overview
Managed systems must be able to communicate status to the HP SIM CMS in order tolaunch commands to the managed systems. To configure the managed systems tocommunicate with the CMS, you must configure common configurations and trustrelationships. The Configure or Repair Agents feature enables you to configure or repairagents in Windows, Linux, and HP-UX.
The Configure or Repair Agents tool enables you to repair Simple Network ManagementProtocol settings and trust relationships that exist between HP Systems Insight Managerand target systems if you have 7.2 agents or later installed. If you have 7.1 agents or earlierinstalled, you can update Web Agent passwords on target systems.
This tool adds the security and trap community strings and trust settings to the targetsystems, but it does not replace existing settings. To replace existing settings on targetsystems, use the Replicate Agent Settings feature in HP SIM.
You can use Configure or Repair Agents tool to send test SNMP traps from Windowssystems with Insight Management Advisors and send test Web-Based EnterpriseManagement indications from Windows and HP-UX systems with HP WBEM providerinstalled.
You can also configure WBEM certificates for HP-UX systems.
Configuring or repairing the agents
To run Configure or Repair Agents remotely against a system, you must have authorizationsto run the Configure or Repair Agents tool. You must have root privileges on the CentralManagement Server (CMS) to modify the HP SIM community strings in the CMS securityfile. In addition, you must have root privileges for HP-UX on the target systems to configureor repair the agent settings.
Click [Next] to proceed to the Step 3: Configure or Repair Agents Settings page.
Related Topics
» Systems Insight Manager - Configuring managed systems from a Windows CMS» Systems Insight Manager - Configuring managed systems from a Linux CMS
HP Systems Insight Manager 7.1 English
Operations | Configuring managed systems from an HP-UX CMS | Configuring target system settings
» Discovery in HP SIM» Discovery filters» Managing Hosts file» Identification» Managing system types» Users and authorizations» Directory Services» Global credentials» System credentials» Security» Trusted certificates» Viewing the audit log» Configuring the audit log» Monitoring systems and
events» Quick Launch menu» Performing a basic search» Performing an advanced
search for systems» Performing an advanced
search for clusters» Performing an advanced
search for events» Tool search» Related information for
searches» Configuring events» Protocol settings» Software status polling» Hardware status polling» Data collection» System Properties» Configuring WBEM health
inclusion status» Specifying a Version
1. Configure the target systems by selecting one of the following options:
Configure WBEM / WMI. This section enables you to configure the targetLinux, Windows, or HP-UX system to send WBEM indications or events toHP SIM.
For this section, consider the following:
Create subscription to WBEM events so that WBEM events willbe sent to the CMS
Send a sample WBEM / WMI indication to this instance of HPSIM to test that events appear in HP SIM in the Event List or AllEvent User Interface for the selected system
NOTE:This indication will appear as an Informational Event inthe Event List of HP SIM.
NOTE:This indication is supported only on HP-UX andWindows targets with WBEM provider installed.
Use an HP SIM WBEM certificate (good for 10 years) ratherthan username/password to manage the system This optiondeploys a WBEM certificate to the managed system and is onlyvalid for HP-UX systems.
Configure a nonadministrative account for HP SIM to accessWMI data This option applies to Windows systems with HPWBEM providers. The configuration of the managed systemupdates to allow the specified user to access WMI information overthe network. HP SIM uses this user to read inventory andconfiguration information from the system and is configured as theWBEM user in the System Credentials. If HP SIM is configured witha user with administration rights, this configuration step is notnecessary. HP SIM does not create this user. The user alreadyexists as either a domain user or one local to the managed system.
The user is added to the DCOM Users group on the managedsystem and has read-only access to WMI information, and read-write permissions to the HPQ name space. This user does not needto be an administrator of the managed system or have sign-inrights. The domain administrator should create a special domainaccount.
To enter the credentials for HP SIM to use to access the managedsystems:
a. In the User name field, enter a user name.
b. In the Password field, enter the password.
c. In the Password (Verify) field, re-enter the passwordexactly as it was entered in the Password field.
d. In the Domain (Optional) field, if the target belongs to aDomain, enter the Windows domain.
If configuration of a nonadministrative user is successful,
Control Repository» Configuring
software/firmware globalsettings
» Reporting» Managing with tasks» Using Cluster Monitor» Command line tools» Configuring managed
systems from a WindowsCMS
» Configuring managedsystems from a LinuxCMS
» Configuring managedsystems from an HP-UXCMS
Configuring targetsystem settings
» Configuring credentials» Custom tools» Setting disk thresholds» Creating a task to delete
disk thresholds» License manager» Management processor
tools» Managing
Communications» Managing MIBs» Installing OpenSSH» Replicate Agent Settings» RPM Package Manager» HP Server Migration Pack
- Universal Edition» HP System Management
Homepage» Version Control» Device ping
» Reference» Support and other
resources» Assistance
» Glossary» Using Help
then these credentials are saved as the System Credentialsfor WBEM access in HP SIM.
Configure SNMP This section enables you to configure SNMP settings.
a. Select Set read public community string to specify a communitystring. By default, the first HP SIM community string that is notpublic appears. If no community string exists in HP SIM, you mustenter one.
NOTE:If you configure only HP-UX systems with default SNMPinstallations, you do not need to set this option. HP-UXenables read by default (get-community-name is set topublic by default on HP-UX systems).
NOTE:If you select this option, the Read Only community stringis added to the target systems. If the target system isSuSE Linux or Microsoft Windows 2003, the managedsystems do not always enable SNMP communicationbetween themselves and a remote host. This setting ismodified to enable the instance of the HP SIM system tocommunicate using SNMP with these target systems.
NOTE:You can enter a community string up to 255 characters.
NOTE:Repairing the SNMP settings adds a Read Writecommunity string to the target system only if one doesnot currently exist. This community string is unique foreach system, is composed of over 30 characters toinclude letters and numbers, and is visible only to theuser with administrator privileges for that system. ThisRead Write community string is required by the WebAgent to perform certain threshold setting capabilities.This community string is used locally only on the targetsystem and is not used by HP SIM over the network.Linux and HP-UX systems do not require a Read Writecommunity string. The Read Write community string isadded on Windows systems only.
b. Select Set traps to refer to this instance of HP Systems InsightManager in the target systems SNMP Trap Destination List. Thissetting enables the target systems to send SNMP traps to thisinstance of HP SIM.
c. Select Send a sample SNMP trap to this instance of the HP SIMto test that events appear in HP SIM event lists to verify thatSNMP events appear in the HP SIM events list.
To successfully send a test trap, you must configure target systemsto send a trap to this instance.
NOTE:You can send a test trap only from a managed systemwith an Insight Management Advisor installed.
NOTE:The trap from Windows appears as a Generic Trap fromthe system and is listed as a Major Event in the EventList of HP SIM. The trap received from Linux and HP-UX targets appears as a Cold Trap and is listed asInformational Events in the Event List of HP SIM.
Configure secure shell (SSH) access Select this option to configureSSH access on managed systems.
If you select this option, you must select one of the following options:
Host based authentication for SSH
NOTE:For this option to work, the user name and passwordprovided in Step 4: Enter credentials must be anadministrative level account. For Linux or HP-UX targets,it must be the root account and password.
Each user has to be authenticated on the managed system
NOTE:If you do not want all users that have sign-in access toHP SIM to run the tool and you would like to controlwhich users need to have access, this option is moresecure.
NOTE:You can configure SSH only if the OpenSSH service isrunning on the managed systems. You can installOpenSSH on Windows systems by running the InstallOpen SSH or by selecting the tool under DeployDeploy Drivers, Firmware and Agents Install OpenSSH.
Set Trust relationship to "Trust by Certificate" Select this option toconfigure systems to use the Trust by Certificate trust relationship with theHP SIM.
For HP SIM on the target systems, this option sets the trust mode to Trustby Certificate and copies the HP SIM system certificate to the targetsystem trusted certificate directory. This option enables HP SIM users toconnect to the HP SMH using the certificate for authentication.
You can configure SSO to management processors for OnboardAdministrator and for remote management. To configure SSO, select SetTrust Relationship . After you configure SSO, you are not continuallyprompted to supply the login credentials for the management processor.
NOTE:For systems with Management HTTP Server 5.x and earlier, theConfigure or Repair Agents setting adds the Administratorpassword in the Management HTTP Server store and modifiesthe SNMP settings, but it cannot change trust relationshipinformation.
Select the checkbox beside Import Secure Sockets Layer (SSL)certificate for HP SIM to trust the HP SMH of the managed system. Thisoption is only valid for HP-UX and Linux operating systems.
Configure HP Version Control Agent Select this option to configure theHP VCA to point to the Version Control Repository Manager, where therepository of software and firmware is located, enabling version comparisonand software updates. This option is available for Windows and Linuxsystems.
To configure HP VCA:
a. In the Select the system where the HP VCRM is installed field,select a server from the dropdown list.
b. In the User Name field, enter the user name to access the HPVCRM. This user cannot be the default administrator user, and
must have administrative privileges.
c. In the Password field, enter the password to access the HPVCRM.
d. In the Password (verify) field, re-enter the password for the HPVCRM.
Set administrator password for Insight Management Agents version7.1 or earlier Select this option to repair the administrator password on allInsight Management Agents installed on the target systems as applicablefor Windows and Linux systems.
NOTE:Do not set this option if you have Insight Management Agents7.2 or later installed.
NOTE:If the remote system is running HP-UX, this option is notexecuted on the remote system because it is not applicable onHP-UX systems. If you are configuring only HP-UX targetsystems, you do not need to set this option.
If you select this option, you must complete the following steps:
a. In the Password field, enter the new administratorpassword.
b. In the Password (verify) field, re-enter the newadministrator password.
2. Click [Next]. The Step 4: Enter credentials page appears.
» Discovery in HP SIM» Discovery filters» Managing Hosts file» Identification» Managing system types» Users and authorizations» Directory Services» Global credentials» System credentials» Security» Trusted certificates» Viewing the audit log» Configuring the audit log» Monitoring systems and
events» Quick Launch menu» Performing a basic search» Performing an advanced
search for systems» Performing an advanced
search for clusters» Performing an advanced
search for events» Tool search» Related information for
searches» Configuring events» Protocol settings» Software status polling» Hardware status polling» Data collection» System Properties» Configuring WBEM health
inclusion status» Specifying a Version
The credentials specified on this page are for a privileged account on the target system.
1. Enter the following credentials.
The credentials used in this step must work for all selected target systems. HPrecommends using domain administrator credentials. Credentials entered here arenot saved by HP SIM except to run a scheduled task later.
If you select Configure secure shell (SSH) access for a Windows target system,the account you specify must be a member of the local Administrators group. ForWindows targets using a domain account, the account is automatically added to thisgroup.
a. Select one of the following options:
a. Use sign-in credentials These credentials must be a privilegedaccount on the managed system. The sign-in credentials option isavailable if the following options are selected:
a. Install WBEM/WMI Provider (HP Insight ManagementWBEM Provider) for Windows
b. Install Simple Network Management Protocol Agent (HPInsight Management Agents) for Windows
c. Install Linux PSP or ESX Agents
d. Install the for Windows
NOTE:This option is not available if you selected Install OpenSSH or Register VM Host on the “Step 2: InstallProviders and Agents (Optional)†page.
b. Use the following credentials for all systems .
b. In the User name field, enter the system administrator name.
c. In the Password field, enter the system administrator password.
d. In the Password (Verify) field, re-enter the system administrator password.
e. In the Domain (Optional) field, if you are using a domain account, enterthe Windows domain.
2. Click [Run Now] or click [Schedule] to run this task at a later time. The TaskResults page appears.
If the Management HTTP Server is installed on target systems, the login credentialsare updated in the Management HTTP Server password file. As with other HP SIMtools, you can configure the Configure or Repair Agents tool to run on a schedule ormanually. Only one instance of Configure or Repair Agents tool can run at a time.
The Configure or Repair Agents tool can update multiple target systems. The logresults indicate whether the repair attempt was successful. For Configure or RepairAgents, the Task Results page displays the following information.
Table 1 CRA Task Results information
FieldName Description
Status This field displays the details for each target system within a task
Control Repository» Configuring
software/firmware globalsettings
» Reporting» Managing with tasks» Using Cluster Monitor» Command line tools» Configuring managed
systems from a WindowsCMS
» Configuring managedsystems from a LinuxCMS
» Configuring managedsystems from an HP-UXCMS» Configuring target
system settingsConfiguring credentials
» Custom tools» Setting disk thresholds» Creating a task to delete
disk thresholds» License manager» Management processor
tools» Managing
Communications» Managing MIBs» Installing OpenSSH» Replicate Agent Settings» RPM Package Manager» HP Server Migration Pack
- Universal Edition» HP System Management
Homepage» Version Control» Device ping
» Reference» Support and other
resources» Assistance
» Glossary» Using Help
instance.
ExitCode
This field represents the success or failure of an executable program.If the return value is zero or a positive value, the executable ransuccessfully. If a negative value is returned, the executable failed. Thisexit code does not indicate that all configuration attempts weresuccessful. It is possible for some to succeed but some to fail.
TargetName This field displays the name/IP address of the target.
Thestdouttab
This tab displays the output text information.
Thestderrtab
This tab displays information if the executable experienced an error.
ViewPrintableReport
You can print reports for the selected target system or for all targetsystems associated with the task instance.
To print a report:
a. Click [View Printable Report].
An Options Message box appears.
b. Select a report.
c. Click [OK] to display the report, or click [Cancel ] to return tothe View Task Results page.
» Discovery in HP SIM» Discovery filters» Managing Hosts file» Identification» Managing system types» Users and authorizations» Directory Services» Global credentials» System credentials» Security» Trusted certificates» Viewing the audit log» Configuring the audit log» Monitoring systems and
events» Quick Launch menu» Performing a basic search» Performing an advanced
search for systems» Performing an advanced
search for clusters» Performing an advanced
search for events» Tool search» Related information for
searches» Configuring events» Protocol settings» Software status polling» Hardware status polling» Data collection» System Properties» Configuring WBEM health
inclusion status» Specifying a Version
Custom tools are executed on the CMS and on target systems. They can be scripts, batch files, or executables thatcan reference environment variables set by the tool in order to access system or event information. For example,creating a custom tool to launch Notepad. You can create or launch SSA, MSA, and WLA tools. You can create thefollowing types of custom tools:
Remote tool A tool that runs on selected target systems. It might copy files to the target systems or runspecific X-Window applications on the target systems. You can schedule this tool.
CMS tool A tool that runs on the CMS. It is usually a script or batch file and can pass in environmentvariables. Using Automatic Event Handling, you can configure this tool to run when events are received.You can schedule this tool.
Web page tool A tool that launches a web URL. The URL is launched in a separate browser window onthe CMS. You cannot schedule this tool.
Remote tools require environment variables, which are parameters passed to the launched application to make itperform as expected. The launch command string includes system variables and user-defined variables for yourapplication. For example, you could pass an environment variable that runs a script to check on the status of yourmail server.
DOS environment variables are supported in custom tool parameters and work as parameters on the New CustomTool page or the Manage Custom Tools page. Unless you use DOS environment variables in a batch or script file,you must surround them with double percent (%) signs. For example, to pass in the NOTICELABEL environmentvariable as a parameter on the parameter line, enter %%NOTICELABEL%%. If you use DOS environmentvariables in a batch file or script file, use only a single percent (%) sign before and after the environment variablename. For a list of other substitutable environment variables, see the HP Systems Insight Manager User Guide.
Custom tools you create appear under Tools Custom Tools menu option.
You have multiple scheduling options. For more information about scheduling options, see Systems InsightManager - Scheduling a task.
IMPORTANT:The application must be able to execute in the security context provided to HP SIM (the default isLocalSystem).
New Custom Tools Select Tools Custom Tools New Custom Tool. The New Custom Tool pageappears.
Use custom tools that run on target SSA systems create a temporary .XML tool definition file under /var/tmp, theloads the tool with the mxtool -af filename. You enter only data in required fields.
Control Repository» Configuring
software/firmware globalsettings
» Reporting» Managing with tasks» Using Cluster Monitor» Command line tools» Configuring managed
systems from a WindowsCMS
» Configuring managedsystems from a LinuxCMS
» Configuring managedsystems from an HP-UXCMSCustom tools» Managing custom tools» Creating a remote tool» Editing a remote tool» Creating a CMS tool» Editing a CMS tool» Creating a web page
tool» Editing a web page tool» View tool definition» Delete a custom tool» Removing and restoring
custom tools» Related information
» Setting disk thresholds» Creating a task to delete
disk thresholds» License manager» Management processor
tools» Managing
Communications» Managing MIBs» Installing OpenSSH» Replicate Agent Settings» RPM Package Manager» HP Server Migration Pack
- Universal Edition» HP System Management
Homepage» Version Control» Device ping
» Reference» Support and other
resources» Assistance
» Glossary» Using Help
WARNING!If you define a custom tool to run as root, any user authorized to run the tool might gain full access tothe managed system, depending on how you define the command, and what its capabilities are.Otherwise, the tool runs as the HP SIM user and that user's SSH public key must be configured on themanaged system using the mxagentconfig command.
Menu placement
To place custom tools in the following menu locations, use a string in the form base|submenu|subsubmenu.
» Discovery in HP SIM» Discovery filters» Managing Hosts file» Identification» Managing system types» Users and authorizations» Directory Services» Global credentials» System credentials» Security» Trusted certificates» Viewing the audit log» Configuring the audit log» Monitoring systems and
events» Quick Launch menu» Performing a basic search» Performing an advanced
search for systems» Performing an advanced
search for clusters» Performing an advanced
search for events» Tool search» Related information for
searches» Configuring events» Protocol settings» Software status polling» Hardware status polling» Data collection» System Properties» Configuring WBEM health
inclusion status» Specifying a Version
Use the Manage Custom Tools page to view and manage custom tools created throughthe New Custom Tool feature. The Manage Custom Tools page displays a table listingthe custom tools and information on each tool. The table includes:
Selection column
Name
Description
Command
Run as user
Automatic Event Handling
New
Use create a custom tool and open the Select the tool to create page.
Edit
Use to edit an existing custom tool. Select the tool, and then click [Edit]. The Edit CustomTool Details section appears. You can edit all fields and add or delete environmentvariables.
View tool definition
Use to display the XML code for the tool. This tool is not enabled if you select more thanone tool.
Run Now/Schedule
Use to run the tool immediately or to schedule the tool to run (if the tool can be scheduled).If the tool can be run, the schedule a task page appears. You can schedule when and howoften the tool runs.
For more information, see Systems Insight Manager - Scheduling a task or Systems InsightManager - Running a scheduled task.
Delete
Use to delete a tool. Deleting a tool removes it from the Manage Custom Tools page andfrom the system. If a tool is dependent on a task, an alert appears with the list of tasksassociated with the tool.
HP Systems Insight Manager 7.1 English
Operations | Custom tools | Creating a remote tool
» Discovery in HP SIM» Discovery filters» Managing Hosts file» Identification» Managing system types» Users and authorizations» Directory Services» Global credentials» System credentials» Security» Trusted certificates» Viewing the audit log» Configuring the audit log» Monitoring systems and
events» Quick Launch menu» Performing a basic search» Performing an advanced
search for systems» Performing an advanced
search for clusters» Performing an advanced
search for events» Tool search» Related information for
searches» Configuring events» Protocol settings» Software status polling» Hardware status polling» Data collection» System Properties» Configuring WBEM health
inclusion status» Specifying a Version
Procedure 1 Creating a remote tool
1. Under Tool Parameters, enter the following information:
a. In the Name field, enter the command name. Custom tool names must beat least one character, and not more than 255 characters in length. The firstcharacter of the name must be alphabetic. Subsequent characters can beletters, digits, spaces, or any of the following: "-", ".", "(", ")" or "_".
b. In the Description field, enter the information for the tool.
c. In the Help comments field, enter comments for the tool.
d. In the Menu placement field, enter the full path (from the root of theSystems Insight Manager console) and the file name of the tool (forexample, c:\custom code\romflash.bat).
2. Specify the user account on the target system by selecting one of the followingoptions:
Logged-in user The tool uses the user account that is logged in.
Special user For UNIX and Linux systems, root; for Windows systems,Administrator. The tool does not run on targets with an unknown operatingsystem.
Specific user The tool uses the specified user account.
3. Specify the maximum number of targets that the tool can select when creating thetask by selecting from the following:
None If you select None, the target selection page does not appear.
One If you select One, the tool runs on only one target system.
Unlimited If you select Unlimited, the tool can run on multiple targetsystems.
4. Select Copy files to the target systems .
a. (Optional) To delete a specified file, select a file and click [Delete ].
b. (Optional) To add additional files, click [Add].
5. In the Command with parameters field, enter parameters.
The interface supports nine parameters. If you enter more than nine parameters,the last parameter appears as Zero(0) on the Task Results page.
6. Under Command output format, select from the following:
Standard output
X-Window
7. To prompt the user for input when they choose this tool to be run or scheduled,enter up to 10 labels that can be used to ask for input. You can use the substitutionparameters %1 through %10 in your command line to access the values they enter.
a. (Optional) To require the user to enter data, select Required (user mustenter data).
Control Repository» Configuring
software/firmware globalsettings
» Reporting» Managing with tasks» Using Cluster Monitor» Command line tools» Configuring managed
systems from a WindowsCMS
» Configuring managedsystems from a LinuxCMS
» Configuring managedsystems from an HP-UXCMS
» Custom tools» Managing custom tools
Creating a remote tool» Editing a remote tool» Creating a CMS tool» Editing a CMS tool» Creating a web page
tool» Editing a web page tool» View tool definition» Delete a custom tool» Removing and restoring
custom tools» Related information
» Setting disk thresholds» Creating a task to delete
disk thresholds» License manager» Management processor
tools» Managing
Communications» Managing MIBs» Installing OpenSSH» Replicate Agent Settings» RPM Package Manager» HP Server Migration Pack
- Universal Edition» HP System Management
Homepage» Version Control» Device ping
» Reference» Support and other
resources» Assistance
» Glossary» Using Help
b. (Optional) To mask the user input, select Private (masks the data with *).
8. Select if the tool can be scheduled.
9. Click [OK] to add the tool to the Custom Tools menu and access the ManageCustom Tools page, or click [Previous] to return to the previous page to selectanother type of custom tool.
NOTE:New custom tool tools are located under Tools Custom Tools.
» Discovery in HP SIM» Discovery filters» Managing Hosts file» Identification» Managing system types» Users and authorizations» Directory Services» Global credentials» System credentials» Security» Trusted certificates» Viewing the audit log» Configuring the audit log» Monitoring systems and
events» Quick Launch menu» Performing a basic search» Performing an advanced
search for systems» Performing an advanced
search for clusters» Performing an advanced
search for events» Tool search» Related information for
searches» Configuring events» Protocol settings» Software status polling» Hardware status polling» Data collection» System Properties» Configuring WBEM health
inclusion status» Specifying a Version
Procedure 1 Editing a remote tool
1. Under Tool Parameters, enter the following information:
a. In the Name field, enter the command name. Custom tool names must beat least one character, and not more than 255 characters in length. The firstcharacter of the name must be alphabetic. Subsequent characters can beletters, digits, spaces, or any of the following: "-", ".", "(", ")" or "_".
b. In the Description field, enter the information for the tool.
c. In the Help comments field, enter comments for the tool.
d. In the Menu placement field, enter the full path (from the root of theSystems Insight Manager console) and the file name of the tool (forexample, c:\custom code\romflash.bat).
2. Specify the user account on the target system by selecting one of the followingoptions:
Logged-in user The tool uses the user account that is logged in.
Special user For UNIX and Linux systems, root; for Windows systems,Administrator. The tool does not run on targets with an unknown operatingsystem.
Specific user The tool uses the specified user account.
3. Specify the maximum number of targets that the tool can select when creating thetask by selecting from the following:
None If you select None, the target selection page does not appear.
One If you select One, the tool runs on only one target system.
Unlimited If you select Unlimited, the tool can run on multiple targetsystems.
4. Select Copy files to the target systems .
a. (Optional) To delete a specified file, select a file and click [Delete ].
b. (Optional) To add additional files, click [Add].
5. In the Command with parameters field, enter parameters.
The interface supports nine parameters. If you enter more than nine parameters,the last parameter appears as Zero(0) on the Task Results page.
6. Under Command output format, select from the following:
Standard output
X-Window
7. To prompt the user for input when they choose this tool to be run or scheduled,enter up to 10 labels that can be used to ask for input. You can use the substitutionparameters %1 through %10 in your command line to access the values they enter.
a. (Optional) To require the user to enter data, select Required (user mustenter data).
b. (Optional) To mask the user input, select Private (masks the data with *).
8. Select if the tool can be scheduled.
Control Repository» Configuring
software/firmware globalsettings
» Reporting» Managing with tasks» Using Cluster Monitor» Command line tools» Configuring managed
systems from a WindowsCMS
» Configuring managedsystems from a LinuxCMS
» Configuring managedsystems from an HP-UXCMS
» Custom tools» Managing custom tools» Creating a remote tool
Editing a remote tool» Creating a CMS tool» Editing a CMS tool» Creating a web page
tool» Editing a web page tool» View tool definition» Delete a custom tool» Removing and restoring
custom tools» Related information
» Setting disk thresholds» Creating a task to delete
disk thresholds» License manager» Management processor
tools» Managing
Communications» Managing MIBs» Installing OpenSSH» Replicate Agent Settings» RPM Package Manager» HP Server Migration Pack
- Universal Edition» HP System Management
Homepage» Version Control» Device ping
» Reference» Support and other
resources» Assistance
» Glossary» Using Help
9. Click [OK] to add the tool to the Custom Tools menu and access the ManageCustom Tools page, or click [Previous] to return to the previous page to selectanother type of custom tool.
NOTE:New custom tool tools are located under Tools Custom Tools.
» Discovery in HP SIM» Discovery filters» Managing Hosts file» Identification» Managing system types» Users and authorizations» Directory Services» Global credentials» System credentials» Security» Trusted certificates» Viewing the audit log» Configuring the audit log» Monitoring systems and
events» Quick Launch menu» Performing a basic search» Performing an advanced
search for systems» Performing an advanced
search for clusters» Performing an advanced
search for events» Tool search» Related information for
searches» Configuring events» Protocol settings» Software status polling» Hardware status polling» Data collection» System Properties» Configuring WBEM health
inclusion status» Specifying a Version
A CMS tool usually runs on the CMS and is usually a script or batch file that can passenvironment variables. Using automatic event handling, you can configure this tool to runwhen specific events are received. This tool can be scheduled and is selected by defaultwhen you access the New Custom Tool page. For more information about the environmentvariables that can be passed, see Systems Insight Manager - Custom tool environmentvariables. In previous releases of HP SIM, CMS tools were called custom tools.
Procedure 1 Creating a CMS tool
1. Under Tool Parameters, enter the following information:
a. In the Name field, enter the command name. Custom tool names must beat least one character, and not more than 255 characters in length. The firstcharacter of the name must be alphabetic. Subsequent characters can beletters, digits, spaces, or any of the following: "-", ".", "(", ")" or "_".
b. In the Description field, enter the information for the tool.
c. In the Help comments field, enter comments for the tool.
d. In the Menu placement field, enter the full path (from the root of the HPSIM console) and the file name of the tool (for example, c:\customcode\romflash.bat).
2. Specify the user account on the target system by selecting one of the followingoptions:
Logged-in user The tool uses the user account that is logged in.
Special user For UNIX and Linux systems, root; for Windows systems,Administrator. The tool does not run on targets with an unknown operatingsystem.
Specific user The tool uses the specified user account.
3. In the Command with parameters field, enter parameters.
The interface supports nine parameters. If you enter more than nine, the lastparameter appears as Zero(0) on the Task Results page.
4. Optional: Enter the Environment variables for the tool and add or delete variablesas needed. For a list of variables available from HP SIM, see the HP SystemsInsight Manager Command Line User Guide.
Optional: To delete a specified variable, click [Delete ].
Optional: To add additional variables, click [Add].
DOS environment variables are supported in custom tool parameters and work asparameters on the New Custom Tool page or the Manage Custom Tools page.Unless you use DOS environment variables in a batch or script file, you mustsurround them with double percent (%) signs. For example, to pass in theNOTICELABEL environment variable as a parameter on the parameter line, enter%%NOTICELABEL%%. If you use DOS environment variables in a batch file orscript file, use only a single percent (%) sign before and after the environmentvariable name. For a list of other substitutable environment variables, see the HPSystems Insight Manager User Guide.
5. If you can schedule the tool, select Tool can be scheduled.
Control Repository» Configuring
software/firmware globalsettings
» Reporting» Managing with tasks» Using Cluster Monitor» Command line tools» Configuring managed
systems from a WindowsCMS
» Configuring managedsystems from a LinuxCMS
» Configuring managedsystems from an HP-UXCMS
» Custom tools» Managing custom tools» Creating a remote tool» Editing a remote tool
Creating a CMS tool» Editing a CMS tool» Creating a web page
tool» Editing a web page tool» View tool definition» Delete a custom tool» Removing and restoring
custom tools» Related information
» Setting disk thresholds» Creating a task to delete
disk thresholds» License manager» Management processor
tools» Managing
Communications» Managing MIBs» Installing OpenSSH» Replicate Agent Settings» RPM Package Manager» HP Server Migration Pack
- Universal Edition» HP System Management
Homepage» Version Control» Device ping
» Reference» Support and other
resources» Assistance
» Glossary» Using Help
6. Click [OK] to add the new tool to the Custom Tools menu and access the ManageCustom Tools page, or click [Previous] to return to the previous page to selectanother type of custom tool.
NOTE:New custom tool tools are located under Tools Custom Tools.
» Discovery in HP SIM» Discovery filters» Managing Hosts file» Identification» Managing system types» Users and authorizations» Directory Services» Global credentials» System credentials» Security» Trusted certificates» Viewing the audit log» Configuring the audit log» Monitoring systems and
events» Quick Launch menu» Performing a basic search» Performing an advanced
search for systems» Performing an advanced
search for clusters» Performing an advanced
search for events» Tool search» Related information for
searches» Configuring events» Protocol settings» Software status polling» Hardware status polling» Data collection» System Properties» Configuring WBEM health
inclusion status» Specifying a Version
Procedure 1 Editing a CMS tool
1. Under Tool Parameters, enter the following information:
a. In the Name field, enter the command name. Custom tool names must beat least one character, and not more than 255 characters in length. The firstcharacter of the name must be alphabetic. Subsequent characters can beletters, digits, spaces, or any of the following: "-", ".", "(", ")" or "_".
b. In the Description field, enter the information for the tool.
c. In the Help comments field, enter comments for the tool.
d. In the Menu placement field, enter the full path (from the root of theSystems Insight Manager console) and the file name of the tool (forexample, c:\custom code\romflash.bat).
2. Specify the user account on the target system by selecting one of the followingoptions:
Logged-in user The tool uses the user account that is logged in.
Special user For UNIX and Linux systems, root; for Windows systems,Administrator. The tool does not run on targets with an unknown operatingsystem.
Specific user The tool uses the specified user account.
3. In the Command with parameters field, enter parameters.
The interface supports nine parameters. If you enter more than nine, the lastparameter appears as Zero(0) on the Task Results page.
4. Optional: Enter the Environment variables for the tool and add or delete variablesas needed. For a list of variables available from Systems Insight Manager, see theHP SIM Command Line Interface Reference Guide athttp://h18013.www1.hp.com/products/servers/management/hpsim/infolibrary.html.
Optional: To delete a specified variable, click [Delete ].
Optional: To add additional variables, click [Add].
DOS environment variables are supported in custom tool parameters and work asparameters on the New Custom Tool page or the Manage Custom Tools page.Unless you use DOS environment variables in a batch or script file, you mustsurround them with double percent (%) signs. For example, to pass in theNOTICELABEL environment variable as a parameter on the parameter line, enter%%NOTICELABEL%%. If you use DOS environment variables in a batch file orscript file, use only a single percent (%) sign before and after the environmentvariable name. For a list of other substitutable environment variables, see the HPSIM 6.3 User Guide athttp://h18013.www1.hp.com/products/servers/management/hpsim/infolibrary.html.
5. If you can schedule the tool, select Tool can be scheduled.
6. Click [OK] to add the new tool to the Custom Tools menu and access the ManageCustom Tools page, or click [Previous] to return to the previous page to selectanother type of custom tool.
NOTE:New custom tool tools are located under Tools Custom Tools.
» Discovery in HP SIM» Discovery filters» Managing Hosts file» Identification» Managing system types» Users and authorizations» Directory Services» Global credentials» System credentials» Security» Trusted certificates» Viewing the audit log» Configuring the audit log» Monitoring systems and
events» Quick Launch menu» Performing a basic search» Performing an advanced
search for systems» Performing an advanced
search for clusters» Performing an advanced
search for events» Tool search» Related information for
searches» Configuring events» Protocol settings» Software status polling» Hardware status polling» Data collection» System Properties» Configuring WBEM health
inclusion status» Specifying a Version
Use this tool to create a tool that integrates a web application or website. All tools areautomatically launched into a separate browser window. For example, to add a path to theHP website, add the URL: http://hp.com. To add a link to the site on a selected system,add a URL such as: https://%n:2381 . The target system is substituted for the %n when thetool is launched. The resulting command launches the HP SMH on the target system. Thistool creates a temporary XML tool definition file in /var/tmp and then loads it with thecommand mxtool –af filename. You only need to enter data into the required fields.
Procedure 1 Creating a web page tool
The Describe how the new custom tool will work page enables you to define the tooltype and a provide a description of the tool.
1. Under Tool Parameters, enter the following information:
a. In the Name field, enter the command name. Custom tool names must beat least one character, and not more than 255 characters in length. The firstcharacter of the name must be alphabetic. Subsequent characters can beletters, digits, spaces, or any of the following: "-", ".", "(", ")" or "_".
b. In the Description field, enter the information for the tool.
c. In the Help comments field, enter comments for the tool.
d. In the Menu placement field, enter the full path (from the root of theSystems Insight Manager console) and the file name of the tool (forexample, c:\custom code\romflash.bat).
2. Specify the user account on the target system by selecting one of the followingoptions:
Logged-in user The tool uses the user account that is logged in.
Special user For UNIX and Linux systems, root; for Windows systems,Administrator. The tool does not run on targets with an unknown operatingsystem.
Specific user The tool uses the specified user account.
3. Specify the maximum number of targets the tool can select when creating the task.Select from the following:
None If you select None, the target selection page does not appear.
One If you select One, the target selection page appears.
Unlimited If you select Unlimited, the tool can be run on multiple targetsystems.
4. Enter the URL to the site or application to launch.
5. Enter the format of how target systems are passed to the URL.
6. Click [OK] to add the new tool to the Custom Tools menu and access the ManageCustom Tools page, or click [Previous] to return to the previous page to selectanother type of custom tool.
NOTE:New custom tool tools are located under Tools Custom Tools.
HP Systems Insight Manager 7.1 English
Operations | Custom tools | Editing a web page tool
» Discovery in HP SIM» Discovery filters» Managing Hosts file» Identification» Managing system types» Users and authorizations» Directory Services» Global credentials» System credentials» Security» Trusted certificates» Viewing the audit log» Configuring the audit log» Monitoring systems and
events» Quick Launch menu» Performing a basic search» Performing an advanced
search for systems» Performing an advanced
search for clusters» Performing an advanced
search for events» Tool search» Related information for
searches» Configuring events» Protocol settings» Software status polling» Hardware status polling» Data collection» System Properties» Configuring WBEM health
inclusion status» Specifying a Version
Procedure 1 Editing a web page tool
1. Under Tool Parameters, enter the following information:
a. In the Name field, enter the command name. Custom tool names must beat least one character, and not more than 255 characters in length. The firstcharacter of the name must be alphabetic. Subsequent characters can beletters, digits, spaces, or any of the following: "-", ".", "(", ")" or "_".
b. In the Description field, enter the information for the tool.
c. In the Help comments field, enter comments for the tool.
d. In the Menu placement field, enter the full path (from the root of theSystems Insight Manager console) and the file name of the tool (forexample, c:\custom code\romflash.bat).
2. Specify the user account on the target system by selecting one of the followingoptions:
Logged-in user The tool uses the user account that is logged in.
Special user For UNIX and Linux systems, root; for Windows systems,Administrator. The tool does not run on targets with an unknown operatingsystem.
Specific user The tool uses the specified user account.
3. Specify the maximum number of targets the tool can select when creating the task.Select from the following:
None If you select None, the target selection page does not appear.
One If you select One, the target selection page appears.
Unlimited If you select Unlimited, the tool can be run on multiple targetsystems.
4. Enter the URL to the site or application to launch.
5. Click [OK] to add the new tool to the Custom Tools menu and access the ManageCustom Tools page, or click [Previous] to return to the previous page to selectanother type of custom tool.
6. Enter the format of how target systems are passed to the URL.
NOTE:New custom tool tools are located under Tools Custom Tools.
» Discovery in HP SIM» Discovery filters» Managing Hosts file» Identification» Managing system types» Users and authorizations» Directory Services» Global credentials» System credentials» Security» Trusted certificates» Viewing the audit log» Configuring the audit log» Monitoring systems and
events» Quick Launch menu» Performing a basic search» Performing an advanced
search for systems» Performing an advanced
search for clusters» Performing an advanced
search for events» Tool search» Related information for
searches» Configuring events» Protocol settings» Software status polling» Hardware status polling» Data collection» System Properties» Configuring WBEM health
inclusion status» Specifying a Version
Removing a tool
Remove a Tool removes a tool from the menu for all users in HP SIM. The tool name mustmatch the name in the tool definition file.
CAUTION:
This tool can remove any tool, including tools supplied by HP.
Procedure 1 Removing a tool from HP SIM
1. Under Parameters, add information using standard tool parameters. Tool name isthe only required field.
2. Click [Run Now] to run the task immediately, or click [Schedule] to schedule whenthe task runs. For more information about scheduling a task, see Systems InsightManager - Scheduling a task.
To remove tools using the command line, enter
mxtool -r -t badtool
Replace badtool with the name of the tool you want to delete. For more information, seemxtool(1M).
Restoring a tool
To restore a tool using the command line, enter:
mxtool -a -f /home/user1/defs/mytooldef
Replace /home/user1/defs/ with the folder of the user restoring the tool and mytooldef withthe tool to be restored. For more information, see mxtool(1M).
» Discovery in HP SIM» Discovery filters» Managing Hosts file» Identification» Managing system types» Users and authorizations» Directory Services» Global credentials» System credentials» Security» Trusted certificates» Viewing the audit log» Configuring the audit log» Monitoring systems and
events» Quick Launch menu» Performing a basic search» Performing an advanced
search for systems» Performing an advanced
search for clusters» Performing an advanced
search for events» Tool search» Related information for
searches» Configuring events» Protocol settings» Software status polling» Hardware status polling» Data collection» System Properties» Configuring WBEM health
inclusion status» Specifying a Version
Related procedures
» Systems Insight Manager - Creating a CMS tool» Systems Insight Manager - Editing a CMS tool» Systems Insight Manager - Creating a remote tool» Systems Insight Manager - Editing a remote tool» Systems Insight Manager - Creating a web page tool» Systems Insight Manager - Editing a web page tool» Systems Insight Manager - Removing and restoring custom tools» Systems Insight Manager - Delete a custom tool» Systems Insight Manager - View tool definition
» Discovery in HP SIM» Discovery filters» Managing Hosts file» Identification» Managing system types» Users and authorizations» Directory Services» Global credentials» System credentials» Security» Trusted certificates» Viewing the audit log» Configuring the audit log» Monitoring systems and
events» Quick Launch menu» Performing a basic search» Performing an advanced
search for systems» Performing an advanced
search for clusters» Performing an advanced
search for events» Tool search» Related information for
searches» Configuring events» Protocol settings» Software status polling» Hardware status polling» Data collection» System Properties» Configuring WBEM health
inclusion status» Specifying a Version
Procedure 1 Setting a disk threshold task
1. Select Configure Disk Thresholds Set Disk Thresholds. The Set DiskThresholds page appears.
2. Select target systems, and then click [Next]. For more information, see SystemsInsight Manager - Creating a task.
3. In the Specify the disk thresholds to be set on target systems section, enter thefollowing information:
Table 1 Disk thresholds
Threshold Explanation
CriticalDiskPercentUsageThreshold
This can never go higher than 99% or lower than a warningthreshold plus 3%. Therefore, if the warning threshold is 85%, thevalid range for the critical threshold is 88% to 99%.
ResetCriticalDiskPercentUsageThreshold
This must drop below the reset value before the threshold isrearmed. This setting prevents the threshold from being sent multipletimes if the variable fluctuates near the threshold value.
WarningDiskPercentUsageThreshold
This must be less than the critical threshold. A warning thresholdmust drop below the reset value before the warning threshold isrearmed. This setting prevents the threshold from being sent multipletimes if the variable fluctuates near the threshold value. Theminimum difference between the value and the reset value must begreater than or equal to 2%.
ResetWarningDiskPercentUsageThreshold
This can never be higher than the critical threshold minus 3%. Forexample, if the critical threshold is 95%, the valid range for thewarning threshold is 6% to 92%. When you save the thresholds,disabled thresholds are deleted.
AgentPollingInterval
This value is the polling interval in seconds that determines howoften the agents check if current values exceed the threshold. Acommon value is 120 seconds.
4. Click [Previous] to return to the previous page, click [Schedule] to schedule whenthe task runs, or click [Run Now] to run the task immediately. The Task Resultspage appears. See Systems Insight Manager - Scheduling a task for moreinformation about scheduling the task.
Related procedure
» Systems Insight Manager - Creating a task to delete disk thresholds
HP Systems Insight Manager 7.1 English
Operations | Creating a task to delete disk thresholds
» Discovery in HP SIM» Discovery filters» Managing Hosts file» Identification» Managing system types» Users and authorizations» Directory Services» Global credentials» System credentials» Security» Trusted certificates» Viewing the audit log» Configuring the audit log» Monitoring systems and
events» Quick Launch menu» Performing a basic search» Performing an advanced
search for systems» Performing an advanced
search for clusters» Performing an advanced
search for events» Tool search» Related information for
searches» Configuring events» Protocol settings» Software status polling» Hardware status polling» Data collection» System Properties» Configuring WBEM health
inclusion status» Specifying a Version
The following example describes the necessary steps to set up a task that removes all diskthresholds from the HP SIM database monthly.
Procedure 1 Creating the task
1. Select Configure Disk Thresholds Remove All Disk Thresholds. TheRemove All Disk Thresholds page appears.
2. From the Add targets by selecting dropdown list, select All Servers.
3. Select the Select "All Servers" itself checkbox.
4. Click [Apply].
5. Click [Schedule].
6. In the Task name field, enter a name for the task, such as Delete Disk ThresholdsMonthly.
7. Under When would you like this task to run? section, select Periodically.
8. In the Refine schedule section, select every month and then select a day for thetask to run.
9. Click [Done].
Related procedures
» Systems Insight Manager - Setting disk thresholds
» Discovery in HP SIM» Discovery filters» Managing Hosts file» Identification» Managing system types» Users and authorizations» Directory Services» Global credentials» System credentials» Security» Trusted certificates» Viewing the audit log» Configuring the audit log» Monitoring systems and
events» Quick Launch menu» Performing a basic search» Performing an advanced
search for systems» Performing an advanced
search for clusters» Performing an advanced
search for events» Tool search» Related information for
searches» Configuring events» Protocol settings» Software status polling» Hardware status polling» Data collection» System Properties» Configuring WBEM health
inclusion status» Specifying a Version
NOTE:To run License Manager, you must have administrative rights on the CMS (to set,select OptionsSecurity Users and Authorizations User) and choose theConfigure CMS Security option, and the All Tools toolbox (to set, selectOptionsSecurity Users and Authorizations User) on the managedsystems that you want to license.
To access License Manager, select Deploy License Manager.... The Product LicenseInformation table appears. For more information, see License Manager - Product LicenseInformation table.
Table 1 License Manager options
Name Description RelatedInformation Procedure
LicensedSystem(s)...
Systems Insight Manager enables youto view a list of systems licensed for theselected product.
LicenseManager -LicensedSystem(s)...
See SystemsInsightManager -Viewinglicensedsystems.
AddLicenses...
Systems Insight Manager enables youto add individual license keys to theLicense Manager database.
LicenseManager -AddLicenses...
See SystemsInsightManager -Addinglicensesindividually.
ManageLicenses...
The Manage Licenses feature enablesyou to manage licenses for the productselected in the Product LicenseInformation table. Licenses canoriginate from direct user input or fromlicense information collected using[Collect Remote License Info...].
LicenseManager -ManageLicenses...
See SystemsInsightManager -Managinglicenses
CollectRemoteLicense Info...
License Manager - Collect RemoteLicense Info...
See LicenseManager -CollectRemoteLicense Info...
AssignLicense(s)...
Systems Insight Manager enables youto assign and un-assign productlicenses for plug-ins, if applicable forthat plug-in, and to assign licenses toremote target systems when licensesare managed remotely. For plug-ins,when assigning licenses, note thefollowing for non-managementprocessor targets:
LicenseManager -AssignLicense(s)...
See SystemsInsightManager -Assigning alicense orApply alicense
Un-Assign
An assigned license can be unassignedfrom one system and assigned toanother system, as long as the productenabled by the license has notconsumed the license. When a producthas been used on a system, the licenseis locked to that system permanently.
LicenseManager - Un-
See SystemsInsight
Control Repository» Configuring
software/firmware globalsettings
» Reporting» Managing with tasks» Using Cluster Monitor» Command line tools» Configuring managed
systems from a WindowsCMS
» Configuring managedsystems from a LinuxCMS
» Configuring managedsystems from an HP-UXCMS
» Custom tools» Setting disk thresholds» Creating a task to delete
disk thresholdsLicense manager» Viewing licensed
systems» Managing licenses» Adding licenses
individually» Adding licenses from a
file» Assigning a license or
Apply a license» Un-assigning a license» mxlmkeyconfig CLI
» Management processortools
» ManagingCommunications
» Managing MIBs» Installing OpenSSH» Replicate Agent Settings» RPM Package Manager» HP Server Migration Pack
- Universal Edition» HP System Management
Homepage» Version Control» Device ping
» Reference» Support and other
resources» Assistance
» Glossary» Using Help
Licenses... Licenses delivered directly to the actualtarget system cannot be unassigned.There is no penalty for having theselicenses remain on those systemsbecause they are consumed on an as-needed basis. The remaining licensescan be used elsewhere.
AssignLicenses...
Manager - Un-assigning alicense
ApplyLicenses
Apply a license to a system must betreated as irreversible. The license islocked to the specified system.
LicenseManager -ApplyLicenses
See SystemsInsightManager -Assigning alicense orApply alicense.
CLImxlmkeyconfig
The CLI mxlmkeyconfig allows you tocombine all the License Manager keyfiles into one file instead of having toexecute multiple files. Combining thesefiles into a single file makes it easierwhen adding keys from a file throughthe License Manager Graphical userinterface (GUI).
» Discovery in HP SIM» Discovery filters» Managing Hosts file» Identification» Managing system types» Users and authorizations» Directory Services» Global credentials» System credentials» Security» Trusted certificates» Viewing the audit log» Configuring the audit log» Monitoring systems and
events» Quick Launch menu» Performing a basic search» Performing an advanced
search for systems» Performing an advanced
search for clusters» Performing an advanced
search for events» Tool search» Related information for
searches» Configuring events» Protocol settings» Software status polling» Hardware status polling» Data collection» System Properties» Configuring WBEM health
inclusion status» Specifying a Version
HP Systems Insight Manager enables you to view a list of systems licensed for the selectedproduct.
Although a target can be licensed to use a product, the product license might not appear inthe interface or report. Products can elect to not display all or some licensing details.
NOTE:To run License Manager, you must have administrative rights on the CMS (to set,select OptionsSecurity Users and Authorizations User) and choose theConfigure CMS Security option, and the All Tools toolbox (to set, selectOptionsSecurity Users and Authorizations User) on the managedsystems that you want to license.
Procedure 1 View licensed systems
1. To access License Manager, select Deploy License Manager.... The ProductLicense Information table appears. For more information, see License Manager -Product License Information table.
2. Select a product from the Product License Information table.
3. Click [Licensed Systems...]. The License Collection Results page appears. Formore information, see License Manager - License Collection Results table.
The list of licensed systems for the selected product is populated in the LicenseCollection Results page. You can click a column header to sort the list based onthe entries in that column.
» Discovery in HP SIM» Discovery filters» Managing Hosts file» Identification» Managing system types» Users and authorizations» Directory Services» Global credentials» System credentials» Security» Trusted certificates» Viewing the audit log» Configuring the audit log» Monitoring systems and
events» Quick Launch menu» Performing a basic search» Performing an advanced
search for systems» Performing an advanced
search for clusters» Performing an advanced
search for events» Tool search» Related information for
searches» Configuring events» Protocol settings» Software status polling» Hardware status polling» Data collection» System Properties» Configuring WBEM health
inclusion status» Specifying a Version
Procedure 1 Manage Licenses
1. To access License Manager, select Deploy License Manager.... The ProductLicense Information table appears. For more information, see License Manager -Product License Information table.
2. From the Product License Information page, select a product.
3. Click [Manage Licenses...]. The Manage Licenses: Licenses currently availablefor Virtual Machine Management page appears.
The License Manager window is updated with information about the availablelicenses for the selected product. For more information, see License Manager -Manage Licenses...
4. Select a license category, and then click one of the following buttons:
[Assign Licenses...] Assign available licenses to systems. For moreinformation, see Systems Insight Manager - Assigning a license or Apply alicense.
[Un-Assign Licenses...] Un-assign licenses from systems. For moreinformation, see Systems Insight Manager - Un-assigning a license.
To manage licenses,
NOTE:To run License Manager, you must have administrative rights on the CMS (to set,select OptionsSecurity Users and Authorizations User) and choose theConfigure CMS Security option, and the All Tools toolbox (to set, selectOptionsSecurity Users and Authorizations User) on the managedsystems that you want to license.
» Discovery in HP SIM» Discovery filters» Managing Hosts file» Identification» Managing system types» Users and authorizations» Directory Services» Global credentials» System credentials» Security» Trusted certificates» Viewing the audit log» Configuring the audit log» Monitoring systems and
events» Quick Launch menu» Performing a basic search» Performing an advanced
search for systems» Performing an advanced
search for clusters» Performing an advanced
search for events» Tool search» Related information for
searches» Configuring events» Protocol settings» Software status polling» Hardware status polling» Data collection» System Properties» Configuring WBEM health
inclusion status» Specifying a Version
NOTE:To run License Manager, you must have administrative rights on the CMS (to set,select OptionsSecurity Users and Authorizations User) and choose theConfigure CMS Security option, and the All Tools toolbox (to set, selectOptionsSecurity Users and Authorizations User) on the managedsystems that you want to license.
Procedure 1 Add license individually
1. To access License Manager, select Deploy License Manager.... The ProductLicense Information table appears. For more information, see License Manager -Product License Information table.
2. Click [Add Licenses...]. The Add License: section appears. For more information,see License Manager - Add License page
3. Enter one of the following:
The key string by typing it into the five fields as individual characters (fiveper field). The cursor advances to the next field when the current field is fullas you enter the key code starting from the left-most box.
The key by pasting the entire key into one of the five input fields. Forexample, if you received a key as text in an e-mail. For more information,see License Manager - Add License page
4. Click [ Process]. The Key details: page appears. For more information, seeLicense Manager - Key details page.
5. Click [Add Licenses Now] to add the new licenses to the database. If the licensesare added successfully, they are listed in the Product License Information section.An error message appears if the key is invalid, and that license information is notadded to the database. For more information, see License Manager - License notadded.
If the license addition is successful, a new page appears displaying the product thekey belongs to.
The table is refreshed with the newly added license row selected.
6. Click [Back] if the licenses displayed is not the product license you wanted added.The Add License section appears.
Systems Insight Manager - Related information
HP Systems Insight Manager 7.1 English
Operations | License manager | Adding licenses from a file
» Discovery in HP SIM» Discovery filters» Managing Hosts file» Identification» Managing system types» Users and authorizations» Directory Services» Global credentials» System credentials» Security» Trusted certificates» Viewing the audit log» Configuring the audit log» Monitoring systems and
events» Quick Launch menu» Performing a basic search» Performing an advanced
search for systems» Performing an advanced
search for clusters» Performing an advanced
search for events» Tool search» Related information for
searches» Configuring events» Protocol settings» Software status polling» Hardware status polling» Data collection» System Properties» Configuring WBEM health
inclusion status» Specifying a Version
HP SIM enables you to add keys to the License Manager database by importing licensekeys that are defined in an XML file with a .key extension.
Management processor product license keys can be added into the database because theycan be deployed directly to management processors.
NOTE:You cannot enter some types of valid keys if the key already exists in thedatabase.
NOTE:To run License Manager, you must have administrative rights on the CMS (to set,select OptionsSecurity Users and Authorizations User) and choose theConfigure CMS Security option, and the All Tools toolbox (to set, selectOptionsSecurity Users and Authorizations User) on the managedsystems that you want to license.
Procedure 1 Add license from a file
1. To access License Manager, select Deploy License Manager.... The ProductLicense Information table appears. For more information, see License Manager -Product License Information table.
2. Click [Add License...] The Add Licenses section appears at the bottom of thepage. For more information, see License Manager - Add License page.
3. Choose one of the following:
Enter the full path and file name in the Specify a file name and path field.
Click [Browse...] to select the desired file. For more information, seeLicense Manager - Add License page.
4. When the full path and file name appear in the Specify a file name and path field,click [Process] to open the file. The contents of the license key file appear. Formore information, see License Manager - Keys from file:.
5. Select license(s) to be added.
6. Click [Add Licenses Now] to add the keys to the database.
The page is refreshed and any invalid keys are deactivated.
7. Click [Back] if the licenses displayed is not the product license you wanted added.The Add License section appears.
After successfully adding the keys to the database, the Product LicenseInformation table is refreshed to display the updated license status in HP SIM.
Creating a license file
License keys are defined in an XML file with a .key extension. You can create these files.The format is as follows.
Control Repository» Configuring
software/firmware globalsettings
» Reporting» Managing with tasks» Using Cluster Monitor» Command line tools» Configuring managed
systems from a WindowsCMS
» Configuring managedsystems from a LinuxCMS
» Configuring managedsystems from an HP-UXCMS
» Custom tools» Setting disk thresholds» Creating a task to delete
disk thresholds» License manager
» Viewing licensedsystems
» Managing licenses» Adding licenses
individuallyAdding licenses from afile
» Assigning a license orApply a license
» Un-assigning a license» mxlmkeyconfig CLI
» Management processortools
» ManagingCommunications
» Managing MIBs» Installing OpenSSH» Replicate Agent Settings» RPM Package Manager» HP Server Migration Pack
The KEYLIST, KEY, and KEYSTRING values are required. The PURCHASER, DATE,PRODUCTNAME, PRODUCTVERSION, and DISP fields are optional and are not needed ifthe only purpose is to load multiple keys. If a key file is provided, the content should be leftas is. A minimal file would have a structure similar to the following, with at least one KEYtag:
» Discovery in HP SIM» Discovery filters» Managing Hosts file» Identification» Managing system types» Users and authorizations» Directory Services» Global credentials» System credentials» Security» Trusted certificates» Viewing the audit log» Configuring the audit log» Monitoring systems and
events» Quick Launch menu» Performing a basic search» Performing an advanced
search for systems» Performing an advanced
search for clusters» Performing an advanced
search for events» Tool search» Related information for
searches» Configuring events» Protocol settings» Software status polling» Hardware status polling» Data collection» System Properties» Configuring WBEM health
inclusion status» Specifying a Version
NOTE:To run License Manager, you must have administrative rights on the CMS (to set,select OptionsSecurity Users and Authorizations User) and choose theConfigure CMS Security option, and the All Tools toolbox (to set, selectOptionsSecurity Users and Authorizations User) on the managedsystems that you want to license.
Procedure 1 Assigning a license
1. To access License Manager, select Deploy License Manager.... The ProductLicense Information table appears. For more information, see License Manager -Product License Information table.
2. Select a product, and then click [Manage Licenses...] The Manage License pageappears. For more information, see License Manager - Manage Licenses....
3. Select the License Category you want to assign, and then click [AssignLicense(s)...]. The Assign Licenses section appears. For more information, seeLicense Manager - Assigning or Applying Licenses page.
4. Select target systems, and then click [Assign License Now].
NOTE:You can hold the SHIFT key to select multiple systems.
NOTE:A system presently or previously licensed with a demo key may not bere-licensed with another demo key.
If a selected product has not been registered with License Manager, the followingmessage is displayed:
License Manager cannot process licenses for the selected product for one oftwo possible reasons:
For products where licensing information is managed by HP SIM, the AssigningLicenses page appears. Select one or more systems from this list and click[Assign License Now]. The page refreshes and shows the updated license status.Select additional systems to make more assignments, or reselect License Managerto refresh the page.
For products that require the license to be delivered to the actual target, theLicense Assignment Results table appears and reports the status of theassignment process for each target. There might be a delay in sending license datato some targets. You can continue with other HP SIM activities during the licenseassignment process.
5. To remove an assigned license, reselect [Manage Licenses ]. The assignedlicenses appear. Select the license category you want to remove, and then select[Un-Assign Licenses].
Systems Insight Manager - Related information.
HP Systems Insight Manager 7.1 English
Operations | License manager | Un-assigning a license
» Discovery in HP SIM» Discovery filters» Managing Hosts file» Identification» Managing system types» Users and authorizations» Directory Services» Global credentials» System credentials» Security» Trusted certificates» Viewing the audit log» Configuring the audit log» Monitoring systems and
events» Quick Launch menu» Performing a basic search» Performing an advanced
search for systems» Performing an advanced
search for clusters» Performing an advanced
search for events» Tool search» Related information for
searches» Configuring events» Protocol settings» Software status polling» Hardware status polling» Data collection» System Properties» Configuring WBEM health
inclusion status» Specifying a Version
NOTE:To run License Manager, you must have administrative rights on the CMS (to set,select OptionsSecurity Users and Authorizations User) and choose theConfigure CMS Security option, and the All Tools toolbox (to set, selectOptionsSecurity Users and Authorizations User) on the managedsystems that you want to license.
Procedure 1 Un-assigning a license
1. To access License Manager, select Deploy License Manager.... The ProductLicense Information table appears. For more information, see License Manager -Product License Information table.
2. Select a product, and then click [Manage Licenses...]. The Licenses CurrentlyAvailable section appears. For more information, see License Manager - Un-AssignLicenses....
3. Select the License Category you want to un-assign. If licenses were assignedusing this category, [Un-assign Licenses] is available.
4. Click [Un-assign Licenses]. The Un-assign Licenses section appears.
Select the systems to remove license assignments from by selecting thecheckboxes next to the name of each system.
Licenses delivered to the target system cannot be un-assigned. There is no penaltyfor having licenses remain on those systems. The Un-Assign Licenses function isdisabled in this case.
The Un-Assign Licenses table is refreshed and shows the updated status.
5. Click [Un-assign Licenses Now]. The Un-Assign Licenses table is refreshed andshows the updated status.
NOTE:Licenses deployed to remote systems such as an remote managementprocessor cannot be un-assigned.
» Discovery in HP SIM» Discovery filters» Managing Hosts file» Identification» Managing system types» Users and authorizations» Directory Services» Global credentials» System credentials» Security» Trusted certificates» Viewing the audit log» Configuring the audit log» Monitoring systems and
events» Quick Launch menu» Performing a basic search» Performing an advanced
search for systems» Performing an advanced
search for clusters» Performing an advanced
search for events» Tool search» Related information for
searches» Configuring events» Protocol settings» Software status polling» Hardware status polling» Data collection» System Properties» Configuring WBEM health
inclusion status» Specifying a Version
The mxlmkeyconfig CLI needs the following information supplied:
» Discovery in HP SIM» Discovery filters» Managing Hosts file» Identification» Managing system types» Users and authorizations» Directory Services» Global credentials» System credentials» Security» Trusted certificates» Viewing the audit log» Configuring the audit log» Monitoring systems and
events» Quick Launch menu» Performing a basic search» Performing an advanced
search for systems» Performing an advanced
search for clusters» Performing an advanced
search for events» Tool search» Related information for
searches» Configuring events» Protocol settings» Software status polling» Hardware status polling» Data collection» System Properties» Configuring WBEM health
inclusion status» Specifying a Version
The HP management processor enables remote server management over the webregardless of the system state. If the operating system is not running, you can access themanagement processor to power cycle the server, view event and status logs, enableconsole redirection, and more.
The following items appear in HP SIM after management processors are discovered.
System Power Use to control the power options on HP Integrity and HP 9000management processor systems. To access, select Tools ManagementProcessor HP Integrity and HP 9000 management processor SystemPower .
System Locator Use to control the locator LED on HP Integrity and HP 9000management processor systems. To access, select Tools ManagementProcessor HP Integrity and HP 9000 management processor SystemLocator.
New User Use to add a new user account to HP Integrity and HP 9000management processor systems. To access, select Configure ManagementProcessor HP Integrity and HP 9000 management processor New User.
Modify User Use to modify an existing user account on HP Integrity and HP 9000management processor systems. To access, select Configure ManagementProcessor HP Integrity and HP 9000 management processor Modify User.
Delete User Use to remove an existing user account from HP Integrity and HP9000 management processor systems. To access, select ConfigureManagement Processor HP Integrity and HP 9000 management processor
Delete User.
LAN Access Use to modify LAN access settings on HP Integrity and HP 9000management processor systems. To access, select Configure ManagementProcessor HP Integrity and HP 9000 management processor LAN Access.
LDAP Settings Use to configure the LDAP service on HP Integrity and HP 9000management processor systems. To access, select Configure ManagementProcessor HP Integrity and HP 9000 management processor LDAPSettings.
Management Processor Control Use to execute internal control actions on HPIntegrity and HP 9000 management processor systems. To access, selectConfigure Management Processor HP Integrity and HP 9000 managementprocessor Management Processor Control.
Firmware Upgrade Use to initiate a firmware upgrade through FTP on HPIntegrity and HP 9000 management processor systems. To access, selectConfigure Management Processor HP Integrity and HP 9000 managementprocessor Firmware Upgrade.
Deploy SSH Public Key Use to deploy the HP SIM SSH public key on HPIntegrity and HP 9000 management processor systems. To access, selectConfigure Management Processor HP Integrity and HP 9000 managementprocessor Deploy SSH Public Key.
HP Systems Insight Manager 7.1 English
Operations | Management processor tools | Controlling system power options through management processors
Controlling system power options throughmanagement processors
» Discovery in HP SIM» Discovery filters» Managing Hosts file» Identification» Managing system types» Users and authorizations» Directory Services» Global credentials» System credentials» Security» Trusted certificates» Viewing the audit log» Configuring the audit log» Monitoring systems and
events» Quick Launch menu» Performing a basic search» Performing an advanced
search for systems» Performing an advanced
search for clusters» Performing an advanced
search for events» Tool search» Related information for
searches» Configuring events» Protocol settings» Software status polling» Hardware status polling» Data collection» System Properties» Configuring WBEM health
inclusion status» Specifying a Version
Procedure 1 Powering on HP Integrity and HP 9000 management processor systems
1. Under System power control, select one of the following:
Power cycle
Power on
Power off
Graceful shutdown (except HP 9000)
2. Click [Run Now] to run the task immediately, click [Schedule] to schedule the taskto run at another time, or click [Previous] to return to the previous System Powerpage. See Systems Insight Manager - Scheduling a task for more information aboutscheduling a task.
HP Systems Insight Manager 7.1 English
Operations | Management processor tools | Controlling the system locator LED through management processors
Controlling the system locator LED throughmanagement processors
» Discovery in HP SIM» Discovery filters» Managing Hosts file» Identification» Managing system types» Users and authorizations» Directory Services» Global credentials» System credentials» Security» Trusted certificates» Viewing the audit log» Configuring the audit log» Monitoring systems and
events» Quick Launch menu» Performing a basic search» Performing an advanced
search for systems» Performing an advanced
search for clusters» Performing an advanced
search for events» Tool search» Related information for
searches» Configuring events» Protocol settings» Software status polling» Hardware status polling» Data collection» System Properties» Configuring WBEM health
inclusion status» Specifying a Version
Procedure 1 Controlling the system locator
1. Under System locator/Unit Identification LED, select one of the following:
On
Off
2. Click [Run Now] to run the task immediately, click [Schedule] to schedule the taskto run at another time, or click [Previous] to return to the previous System Powerpage. For more information about scheduling a task, see Systems Insight Manager- Scheduling a task.
HP Systems Insight Manager 7.1 English
Operations | Management processor tools | Creating new users on management processors
» Discovery in HP SIM» Discovery filters» Managing Hosts file» Identification» Managing system types» Users and authorizations» Directory Services» Global credentials» System credentials» Security» Trusted certificates» Viewing the audit log» Configuring the audit log» Monitoring systems and
events» Quick Launch menu» Performing a basic search» Performing an advanced
search for systems» Performing an advanced
search for clusters» Performing an advanced
search for events» Tool search» Related information for
searches» Configuring events» Protocol settings» Software status polling» Hardware status polling» Data collection» System Properties» Configuring WBEM health
inclusion status» Specifying a Version
Procedure 1 Creating an HP Integrity and HP 9000 management processor new user
1. Under Enter properties for a new user account, enter:
Login Id (Mandatory) This is the name that must be used when logginginto a management processor. The maximum length for a Login Id is 25characters.
Password (Mandatory) This is the password used when logging into amanagement processor. The password must be a minimum of 6 to 24characters.
Password (Verify) (Mandatory) The password must be provided a secondtime for verification.
User name (Mandatory) This name appears in the managementprocessor user list. It is not necessarily the same as the login name. Themaximum length is 25 characters.
2. Under Access Rights, select the access rights for the user. Usually, a user isgranted the Console Access right.
Console access
Power access
Management processor configuration
User administration
3. Click [Run Now] to run the task immediately. Click [Previous] to return to theprevious New User page.
» Discovery in HP SIM» Discovery filters» Managing Hosts file» Identification» Managing system types» Users and authorizations» Directory Services» Global credentials» System credentials» Security» Trusted certificates» Viewing the audit log» Configuring the audit log» Monitoring systems and
events» Quick Launch menu» Performing a basic search» Performing an advanced
search for systems» Performing an advanced
search for clusters» Performing an advanced
search for events» Tool search» Related information for
searches» Configuring events» Protocol settings» Software status polling» Hardware status polling» Data collection» System Properties» Configuring WBEM health
inclusion status» Specifying a Version
Procedure 1 HP Integrity and HP 9000 management processor edit user
1. Select Configure Management Processor HP Integrity and HP 9000management processor Modify User. The Modify User page appears.
2. Select the target management processors,, and then click [Next]. The Step 2:Enter properties to modify an existing user account page appears.
3. Under Enter the login name of the user account you wish to modify , enter theLogin Id to be modified.
4. Under Select the properties you wish to modify for this user account, selectfrom the following to modify and enter the appropriate information:
Password If you select to change the password, verify the password inthe Password (Verify) field.
User name Select this field to modify the user name. This is notnecessarily the same as the login name. The maximum allowed length is 25characters.
Access rights If you select to modify the access rights, select fromConsole access, Power access, Management processor configuration,and User administration. To remove all access rights for an account,select the Access rights checkbox and leave the Console access, Poweraccess, [Management processor configuration], and Useradministration checkboxes unselected.
5. Click [Run Now] to run the task immediately or click [Previous] to return to theprevious Modify User page.
Related procedures
» Systems Insight Manager - Creating new users on management processors» Systems Insight Manager - Deleting management processor users
» Discovery in HP SIM» Discovery filters» Managing Hosts file» Identification» Managing system types» Users and authorizations» Directory Services» Global credentials» System credentials» Security» Trusted certificates» Viewing the audit log» Configuring the audit log» Monitoring systems and
events» Quick Launch menu» Performing a basic search» Performing an advanced
search for systems» Performing an advanced
search for clusters» Performing an advanced
search for events» Tool search» Related information for
searches» Configuring events» Protocol settings» Software status polling» Hardware status polling» Data collection» System Properties» Configuring WBEM health
inclusion status» Specifying a Version
Procedure 1 HP Integrity and HP 9000 management processor delete user
1. Select Configure Management Processor HP Integrity and HP 9000management processor Delete User. The Delete User page appears.
2. Select the target management processors, and then click [Next]. See SystemsInsight Manager - Creating a task for information about selecting targets. The Step2: Enter properties to delete an existing user account page appears.
3. Enter the Login Id to be deleted.
4. Click [Run Now] to run the task immediately or click [Previous] to return to theprevious Delete User page.
NOTE:HP SIM uses the Admin account to execute management processor tools. If thisaccount is removed from remote management systems, the tools cannot accessthe remote management systems unless tool execution is reconfigured.
Procedure 2 Configuring HP SIM tool execution on a different managementprocessor account
1. Select a user account to run tools on remote management systems. Thisuser account must be present on all managed remote managementprocessors and must have all rights on the management processorsystems.
2. Navigate to the tools directory on the CMS and edit MpTools.xml.
3. Find each <execute-as-user> line in the XML file and change Admin tothe user account specified in step 1.
4. Run mxtool -m -f MpTools.xml -x force.
5. On the CMS, run mxagentconfig or the Deploy SSH Public Key tool tocopy the authentication keys for this user account to each managedremote management processor. For more information about deployingthe SSH public key, see Systems Insight Manager - Deploying SSHpublic keys to management processors.
HP Systems Insight Manager 7.1 English
Operations | Management processor tools | Configuring LAN access on management processors
» Discovery in HP SIM» Discovery filters» Managing Hosts file» Identification» Managing system types» Users and authorizations» Directory Services» Global credentials» System credentials» Security» Trusted certificates» Viewing the audit log» Configuring the audit log» Monitoring systems and
events» Quick Launch menu» Performing a basic search» Performing an advanced
search for systems» Performing an advanced
search for clusters» Performing an advanced
search for events» Tool search» Related information for
searches» Configuring events» Protocol settings» Software status polling» Hardware status polling» Data collection» System Properties» Configuring WBEM health
inclusion status» Specifying a Version
Procedure 1 LAN access for HP Integrity and HP 9000 systems
1. Under Select the settings you wish to configure and choose their values,select from:
Telnet access Select Enable or Disable. This does not affect the IPconfiguration or the ability of the management processor to performupgrades over the LAN.
Web SSL Select Enable or Disable.
Web console port If you select this option, enter a valid port number.Valid port numbers are 23, 2000, and 2400.
IPMI over LAN access Select Enable or Disable.
2. Click [Run Now] to run the task immediately, click [Schedule] to schedule whenthe task runs, or click [Previous] to return to the previous LAN access page. Forinformation about scheduling a task, see Systems Insight Manager - Scheduling atask
» Discovery in HP SIM» Discovery filters» Managing Hosts file» Identification» Managing system types» Users and authorizations» Directory Services» Global credentials» System credentials» Security» Trusted certificates» Viewing the audit log» Configuring the audit log» Monitoring systems and
events» Quick Launch menu» Performing a basic search» Performing an advanced
search for systems» Performing an advanced
search for clusters» Performing an advanced
search for events» Tool search» Related information for
searches» Configuring events» Protocol settings» Software status polling» Hardware status polling» Data collection» System Properties» Configuring WBEM health
inclusion status» Specifying a Version
Procedure 1 Configuring HP Integrity and HP 9000 management processor LDAPsettings
1. Under Select the settings you wish to configure and choose their values,select from the following:
Local user accounts Select Enable or Disable. If local user accountsare enabled, you can log in to a management processor using locally storeduser credentials. If local user accounts are disabled, user access is limitedto valid directory credentials only.
Directory authentication Select Enable or Disable. If directoryauthentication is enabled and configured properly, users can log into themanagement processor system using directory credentials. If this isdisabled, user credentials are not validated using the directory.
Directory server IP address Enter the IP address of the directory server.
Directory server LDAP port Enter the LDAP for secure LDAP service onthe server. The default value is 636.
Distinguished name Specifies where this management processorinstance is listed in the directory tree (for example: cn=MPServer.ou=Management Devices.o=hp).
User search context 1 Specify a contact to apply to the login nameentered to access the management processor system.
User search context 2 Specify a context to apply to the login nameentered to access the management processor system.
User search context 3 Specify a context to apply to the login nameentered to access the management processor system.
2. Click [Run Now] to run the task immediately, click [Schedule] to schedule whenthe task runs, or click [Previous] to return to the previous LDAP Settings page.For more information about scheduling a task, see Systems Insight Manager -Scheduling a task.
HP Systems Insight Manager 7.1 English
Operations | Management processor tools | Executing internal control actions through management processors
Executing internal control actions throughmanagement processors
» Discovery in HP SIM» Discovery filters» Managing Hosts file» Identification» Managing system types» Users and authorizations» Directory Services» Global credentials» System credentials» Security» Trusted certificates» Viewing the audit log» Configuring the audit log» Monitoring systems and
events» Quick Launch menu» Performing a basic search» Performing an advanced
search for systems» Performing an advanced
search for clusters» Performing an advanced
search for events» Tool search» Related information for
searches» Configuring events» Protocol settings» Software status polling» Hardware status polling» Data collection» System Properties» Configuring WBEM health
inclusion status» Specifying a Version
Procedure 1 HP Integrity and HP 9000 management processor Control
1. On the Step 2: Select one or more actions page, select one or both options:
Clear event logs Clears the system event logs.
Reset management processor Executes a reset of the managementprocessor.
2. Click [Run Now] to run the task immediately, click [Schedule] to schedule whenthe task runs, or click [Previous] to return to the previous Management ProcessorControl page. For more information about scheduling a task, see Systems InsightManager - Scheduling a task.
» Discovery in HP SIM» Discovery filters» Managing Hosts file» Identification» Managing system types» Users and authorizations» Directory Services» Global credentials» System credentials» Security» Trusted certificates» Viewing the audit log» Configuring the audit log» Monitoring systems and
events» Quick Launch menu» Performing a basic search» Performing an advanced
search for systems» Performing an advanced
search for clusters» Performing an advanced
search for events» Tool search» Related information for
searches» Configuring events» Protocol settings» Software status polling» Hardware status polling» Data collection» System Properties» Configuring WBEM health
inclusion status» Specifying a Version
Procedure 1 Upgrading HP Integrity and HP 9000 management processor firmware
The Step 2: Specify firmware upgrade parameters page enables you to update or modifyyour HP Integrity and HP 9000 management processor firmware upgrade settings.
1. To update your settings, enter the following information:
Source IP The IP address of the FTP server.
Path name The path to the directory (on the FTP server) where theupgrade files reside.
Login ID The login ID used to log in to the FTP server.
Password The password to the FTP server.
2. Click [Run Now] to run the task immediately, click Schedule to schedule when thetask runs or click [Previous] to return to the previous Firmware Upgrade page. Formore information about scheduling a task, see Systems Insight Manager -Scheduling a task.
HP Systems Insight Manager 7.1 English
Operations | Management processor tools | Deploying SSH public keys to management processors
» Discovery in HP SIM» Discovery filters» Managing Hosts file» Identification» Managing system types» Users and authorizations» Directory Services» Global credentials» System credentials» Security» Trusted certificates» Viewing the audit log» Configuring the audit log» Monitoring systems and
events» Quick Launch menu» Performing a basic search» Performing an advanced
search for systems» Performing an advanced
search for clusters» Performing an advanced
search for events» Tool search» Related information for
searches» Configuring events» Protocol settings» Software status polling» Hardware status polling» Data collection» System Properties» Configuring WBEM health
inclusion status» Specifying a Version
To deploy the HP SIM SSH public key:
Procedure 1 Deploy the HP SIM SSH public key
1. Select Configure Management Processor HP Integrity and HP 9000management processor Deploy SSH Public Key. The Deploy SSH PublicKey page appears.
2. Select the target management processors,, and then click [Next]. The Step 2:Enter credentials page appears.
3. Enter the following for the administrator account on the target managementprocessors.
User name This is an administrative account on the managed remotemanagement processor. Usually it is the Admin account.
Password This is the administrative account password on the managedremote management processors.
Password (Verify) Verify the password.
4. Click [Run Now] to run the task immediately, click [Schedule] to schedule whenthe task runs, or click [Previous] to return to the previous Deploy SSH Public Keypage.
HP Systems Insight Manager 7.1 English
Operations | Management processor tools | Cycling on the power on an HP ProLiant management processor
Cycling on the power on an HP ProLiantmanagement processor
» Discovery in HP SIM» Discovery filters» Managing Hosts file» Identification» Managing system types» Users and authorizations» Directory Services» Global credentials» System credentials» Security» Trusted certificates» Viewing the audit log» Configuring the audit log» Monitoring systems and
events» Quick Launch menu» Performing a basic search» Performing an advanced
search for systems» Performing an advanced
search for clusters» Performing an advanced
search for events» Tool search» Related information for
searches» Configuring events» Protocol settings» Software status polling» Hardware status polling» Data collection» System Properties» Configuring WBEM health
inclusion status» Specifying a Version
Procedure 1 HP ProLiant management processor Power Cycle
1. Select Tools Management Processor HP ProLiant management processorPower Cycle. The Power Cycle page appears.
2. Select target system ,and click [Next]. For information about selecting a target, seeSystems Insight Manager - Creating a task. The Step 2: Task confirmation pageappears.
3. Click [Run Now] to run the task immediately. Click [Schedule] to schedule the taskto run at another time, or click [Previous] to return to the previous Power Cyclepage. For more information about scheduling a task, see Systems Insight Manager- Scheduling a task.
HP Systems Insight Manager 7.1 English
Operations | Management processor tools | Powering on a system managed by an HP ProLiant management processor
Powering on a system managed by an HPProLiant management processor
» Discovery in HP SIM» Discovery filters» Managing Hosts file» Identification» Managing system types» Users and authorizations» Directory Services» Global credentials» System credentials» Security» Trusted certificates» Viewing the audit log» Configuring the audit log» Monitoring systems and
events» Quick Launch menu» Performing a basic search» Performing an advanced
search for systems» Performing an advanced
search for clusters» Performing an advanced
search for events» Tool search» Related information for
searches» Configuring events» Protocol settings» Software status polling» Hardware status polling» Data collection» System Properties» Configuring WBEM health
inclusion status» Specifying a Version
Procedure 1 Powering on an HP ProLiant management processor
1. Select Tools Management Processor HP ProLiant management processorPower On. The Power On page appears.
2. Select target system, and then click [Next]. For information about selecting a target,see Systems Insight Manager - Creating a task. The Step 2: Task confirmationpage appears.
3. Click [Run Now] to run the task immediately, click [Schedule] to schedule the taskto run at another time, or click [Previous] to return to the previous Power On page.For more information about scheduling a task, see Systems Insight Manager -Scheduling a task.
HP Systems Insight Manager 7.1 English
Operations | Management processor tools | Powering off a system managed by an HP ProLiant management processor
Powering off a system managed by an HPProLiant management processor
» Discovery in HP SIM» Discovery filters» Managing Hosts file» Identification» Managing system types» Users and authorizations» Directory Services» Global credentials» System credentials» Security» Trusted certificates» Viewing the audit log» Configuring the audit log» Monitoring systems and
events» Quick Launch menu» Performing a basic search» Performing an advanced
search for systems» Performing an advanced
search for clusters» Performing an advanced
search for events» Tool search» Related information for
searches» Configuring events» Protocol settings» Software status polling» Hardware status polling» Data collection» System Properties» Configuring WBEM health
inclusion status» Specifying a Version
Procedure 1 Powering off an HP ProLiant management processor
1. Select Tools Management Processor HP ProLiant management processorPower Off. The Power Off page appears.
2. Select target system, and then click [Next]. For information about selecting a target,see Systems Insight Manager - Creating a task. The Step 2: Task confirmationpage appears.
3. Click [Run Now] to run the task immediately, click [Schedule] to schedule the taskto run at another time, or click [Previous] to return to the previous Power Off page.For more information about scheduling a task, see Systems Insight Manager -Scheduling a task.
HP Systems Insight Manager 7.1 English
Operations | Management processor tools | Turning on the UID for a system managed by an HP ProLiant managementprocessor
Turning on the UID for a system managed by anHP ProLiant management processor
» Discovery in HP SIM» Discovery filters» Managing Hosts file» Identification» Managing system types» Users and authorizations» Directory Services» Global credentials» System credentials» Security» Trusted certificates» Viewing the audit log» Configuring the audit log» Monitoring systems and
events» Quick Launch menu» Performing a basic search» Performing an advanced
search for systems» Performing an advanced
search for clusters» Performing an advanced
search for events» Tool search» Related information for
searches» Configuring events» Protocol settings» Software status polling» Hardware status polling» Data collection» System Properties» Configuring WBEM health
inclusion status
Procedure 1 Turning on the HP ProLiant management processor unit ID light
1. Select Tools Management Processor HP ProLiant management processorTurn On Unit Identification Light. The Turn On Unit Identification Light page
appears.
2. Select target system, and then click [Next]. For information about selecting targets,see Systems Insight Manager - Creating a task. The Step 2: Task confirmationpage appears.
3. Click [Run Now] to run the task immediately, click [Schedule] to schedule the taskto run at another time, or click [Previous] to return to the previous Turn On UnitIdentification Light page. For more information about scheduling a task, seeSystems Insight Manager - Scheduling a task.
HP Systems Insight Manager 7.1 English
Operations | Management processor tools | Turning off the UID for a system managed by an HP ProLiant managementprocessor
Turning off the UID for a system managed by anHP ProLiant management processor
» Discovery in HP SIM» Discovery filters» Managing Hosts file» Identification» Managing system types» Users and authorizations» Directory Services» Global credentials» System credentials» Security» Trusted certificates» Viewing the audit log» Configuring the audit log» Monitoring systems and
events» Quick Launch menu» Performing a basic search» Performing an advanced
search for systems» Performing an advanced
search for clusters» Performing an advanced
search for events» Tool search» Related information for
searches» Configuring events» Protocol settings» Software status polling» Hardware status polling» Data collection» System Properties» Configuring WBEM health
inclusion status
Procedure 1 Turning off the HP ProLiant management processor ID light
1. Select Tools Management Processor HP ProLiant management processorTurn Off Unit Identification Light. The Turn Off Unit Identification Light page
appears.
2. Select target system, and then click [Next]. For information about selecting targets,see Systems Insight Manager - Creating a task. The Step 2: Task confirmationpage appears.
3. Click [Run Now] to run the task immediately, click [Schedule] to schedule the taskto run at another time, or click [Previous] to return to the previous Turn Off UnitIdentification Light page. For more information about scheduling a task, seeSystems Insight Manager - Scheduling a task.
HP Systems Insight Manager 7.1 English
Operations | Management processor tools | Related information
» Discovery in HP SIM» Discovery filters» Managing Hosts file» Identification» Managing system types» Users and authorizations» Directory Services» Global credentials» System credentials» Security» Trusted certificates» Viewing the audit log» Configuring the audit log» Monitoring systems and
events» Quick Launch menu» Performing a basic search» Performing an advanced
search for systems» Performing an advanced
search for clusters» Performing an advanced
search for events» Tool search» Related information for
searches» Configuring events» Protocol settings» Software status polling» Hardware status polling» Data collection» System Properties» Configuring WBEM health
inclusion status» Specifying a Version
Related procedures
» Systems Insight Manager - Creating new users on management processors» Systems Insight Manager - Editing management processor users» Systems Insight Manager - Upgrading management processor firmware» Systems Insight Manager - Executing internal control actions through managementprocessors» Systems Insight Manager - Cycling on the power on an HP ProLiant managementprocessor» Systems Insight Manager - Powering off a system managed by an HP ProLiantmanagement processor» Systems Insight Manager - Powering on a system managed by an HP ProLiantmanagement processor» Systems Insight Manager - Turning off the UID for a system managed by an HP ProLiantmanagement processor» Systems Insight Manager - Turning on the UID for a system managed by an HP ProLiantmanagement processor» Systems Insight Manager - Configuring LAN access on management processors» Systems Insight Manager - Configuring LDAP settings on management processors» Systems Insight Manager - Controlling the system locator LED through managementprocessors» Systems Insight Manager - Controlling system power options through managementprocessors
» Discovery in HP SIM» Discovery filters» Managing Hosts file» Identification» Managing system types» Users and authorizations» Directory Services» Global credentials» System credentials» Security» Trusted certificates» Viewing the audit log» Configuring the audit log» Monitoring systems and
events» Quick Launch menu» Performing a basic search» Performing an advanced
search for systems» Performing an advanced
search for clusters» Performing an advanced
search for events» Tool search» Related information for
searches» Configuring events» Protocol settings» Software status polling» Hardware status polling» Data collection» System Properties» Configuring WBEM health
inclusion status» Specifying a Version
Use the Manage Communications feature to troubleshoot communication problemsbetween the CMS and targeted systems. For each failed communication function,troubleshooting information is available. You can reconfigure communication settings, launchagents, and push certificates to target systems. This feature is available from the Configure
Manage Communications menu and includes the following information:
Table 1 Managing Communications
Name Description Access
Advising andrepairingmanagedsystem settings
Includes a tabbed interface with a tab for eachfunctional column (Identification, Events , RunTools, and Version Control). Each tab displays thediagnostic results and includes troubleshooting tipsand advise for fixing communication problems.
Systems InsightManager -Advising andrepairingmanagedsystem settings.
Identification tab
Includes status information on the state of anidentification process. Identification attempts todetermine what the system type is, whatmanagement protocol a system supports, usingcredentials from the Global Protocol Settings page,and attempts to determine the operating system andversion loaded, along with other basic attributesabout the system. Finally, it determines if the systemis associated with another system.
Systems InsightManager -Identificationtab.
Events tabIndicates if the CMS can receive events from thetarget systems. This status considers the setting ofSNMP traps and WBEM indications.
Systems InsightManager -Events tab.
Run Tools tab
Indicates if the CMS can run tools locally on targetsystems. For example, HP SMH. Communicationissues in this column usually relate to security andtrust relationships.
Systems InsightManager - RunTools tab.
Version Controltab
Indicates the availability of software and firmwareinventory data for target systems. The status iscollected and stored during data collection.
Systems InsightManager -Version Controltab.
Repairingmanagedsystem settings
Launches the Configure or Repair Agents tool.Configure or Repair Agents enables you to quicklyand optimally configure systems for manageability.
Systems InsightManager -Repairingmanagedsystem settings.
Updatingcommunicationstatuses
Executes to get an updated communication status.
Systems InsightManager -Updatingcommunicationstatuses.
Printing ManageCommunicationstable
Creates a printer-friendly version of the list in a newwindow.
Systems InsightManager -Printing ManageCommunicationstable.
» Discovery in HP SIM» Discovery filters» Managing Hosts file» Identification» Managing system types» Users and authorizations» Directory Services» Global credentials» System credentials» Security» Trusted certificates» Viewing the audit log» Configuring the audit log» Monitoring systems and
events» Quick Launch menu» Performing a basic search» Performing an advanced
search for systems» Performing an advanced
search for clusters» Performing an advanced
search for events» Tool search» Related information for
searches» Configuring events» Protocol settings» Software status polling» Hardware status polling» Data collection» System Properties» Configuring WBEM health
inclusion status» Specifying a Version
Procedure 1 Manage communications quick repair
1. Select Configure Manage Communications. The Select Target Systems pageappears.
2. Select target systems. See Systems Insight Manager - Creating a task.
3. Click [Run Now]. The System List appears.
4. Select the systems to be repaired.
5. Click [Advise and Repair]. The Advise and Repair section appears below theSystem List.
» Discovery in HP SIM» Discovery filters» Managing Hosts file» Identification» Managing system types» Users and authorizations» Directory Services» Global credentials» System credentials» Security» Trusted certificates» Viewing the audit log» Configuring the audit log» Monitoring systems and
events» Quick Launch menu» Performing a basic search» Performing an advanced
search for systems» Performing an advanced
search for clusters» Performing an advanced
search for events» Tool search» Related information for
searches» Configuring events» Protocol settings» Software status polling» Hardware status polling» Data collection» System Properties» Configuring WBEM health
inclusion status» Specifying a Version
The Identification tab displays identification errors and recommendations for fixing theerrors. Identification communication status and errors are generated based on system type,the operating system that the managed system is running, the availability of managementprotocols on the managed systems, and if the protocol has a higher weight than otherprotocols. You can expand each Causes and Recommendations section.
Procedure 1 Accessing the Identification tab
1. Select Configure Manage Communications. The Select Target Systems pageappears.
2. Click [Run Now]. The system list appears.
3. Select single or multiple systems from the systems list.
4. Select target systems. For more information, see Systems Insight Manager -Creating a task.
5. Click [Advise and Repair]. The Advise and Repair section appears.
» Discovery in HP SIM» Discovery filters» Managing Hosts file» Identification» Managing system types» Users and authorizations» Directory Services» Global credentials» System credentials» Security» Trusted certificates» Viewing the audit log» Configuring the audit log» Monitoring systems and
events» Quick Launch menu» Performing a basic search» Performing an advanced
search for systems» Performing an advanced
search for clusters» Performing an advanced
search for events» Tool search» Related information for
searches» Configuring events» Protocol settings» Software status polling» Hardware status polling» Data collection» System Properties» Configuring WBEM health
inclusion status» Specifying a Version
Includes detailed error messages and recommendtions for generating and receiving events.The event error codes are captured and stored during data collection, identification, andstatus polling. For HP Systems Insight Manager to receive events from managed systems, aWBEM subscription must be created, or the CMS IP address must be in the SNMP trapdestination list on the managed system. You can expand each Causes andRecommendations section.
Procedure 1 Accessing the Events tab
1. Select Configure Manage Communications. The Select Target Systems pageappears.
2. Select target systems. For more information, see Systems Insight Manager -Creating a task.
3. Click [Run Now]. The system list appears.
4. Select single or multiple systems from the systems list.
5. Click [Advise and Repair]. The Advise and Repair section appears.
6. Click the Events tab.
Systems Insight Manager - Related information
HP Systems Insight Manager 7.1 English
Operations | Managing Communications | Run Tools tab
» Discovery in HP SIM» Discovery filters» Managing Hosts file» Identification» Managing system types» Users and authorizations» Directory Services» Global credentials» System credentials» Security» Trusted certificates» Viewing the audit log» Configuring the audit log» Monitoring systems and
events» Quick Launch menu» Performing a basic search» Performing an advanced
search for systems» Performing an advanced
search for clusters» Performing an advanced
search for events» Tool search» Related information for
searches» Configuring events» Protocol settings» Software status polling» Hardware status polling» Data collection» System Properties» Configuring WBEM health
inclusion status» Specifying a Version
The Run Tools tab includes error messages and recommendations for problems that aCMS has for executing a tool on a managed system. These problems often relate tosecurity and trust. You can expand each Causes and Recommendations section.
Procedure 1 Accessing the Run Tools tab
1. Select Configure Manage Communications. The Select Target Systems pageappears.
2. Select target systems. For more information, see Systems Insight Manager -Creating a task.
3. Click [Advise and Repair]. The Advise and Repair section appears.
4. Click the Run Tools tab.
Systems Insight Manager - Related information
HP Systems Insight Manager 7.1 English
Operations | Managing Communications | Repairing managed system settings
» Discovery in HP SIM» Discovery filters» Managing Hosts file» Identification» Managing system types» Users and authorizations» Directory Services» Global credentials» System credentials» Security» Trusted certificates» Viewing the audit log» Configuring the audit log» Monitoring systems and
events» Quick Launch menu» Performing a basic search» Performing an advanced
search for systems» Performing an advanced
search for clusters» Performing an advanced
search for events» Tool search» Related information for
searches» Configuring events» Protocol settings» Software status polling» Hardware status polling» Data collection» System Properties» Configuring WBEM health
inclusion status» Specifying a Version
Control Repository
Procedure 1 Manage communications quick repair
1. Select Configure Manage Communications. The Select Target Systems page appears.
2. Select target systems. See Systems Insight Manager - Creating a task.
3. Click [Run Now]. The System List appears.
4. Select the systems to repair from the list.
5. Click [Quick Repair]. The Step 2: Install Providers and Agents (Optional) section appears. If the agents orproviders are already installed, skip this step and proceed to the configuration step.
NOTE:The Install Providers and Agents page is only displayed for Windows and Linux CMS.
a. Select Install WBEM / WMI Provider (HP Insight Management WBEM Provider) for Windows to installWBEM or WMI providers on Windows managed systems.
b. Select Install SNMP Agent (HP Insight Management Agents) for Windows to install the SNMP agent onWindows managed systems. This Insight Management Agents allows network monitoring and control.
c. Select Install OpenSSH to install OpenSSH on Windows managed systems.
d. Select Install Linux PSP or ESX Agents to install Linux PSP and ESX Agents which are a collection ofSNMP agents used by Systems Insight Manager to gather information from managed systems and send trapsto Systems Insight Manager.
e. Select Install the Version Control Agent for Windows (VCA) to install the VCA on Windows managedsystems. The VCA enables you to view the HP software installed on a system and whether updates for thesoftware are available in the repository.
Installs the VCA in conjunction with the Virtual Connect Enterprise Manager and enables management of theHP ProLiant software and firmware on the managed systems.
f. For selected installs, perform the following steps:
i. If you are installing software that is earlier than or the same version currently installed, select Forceinstall the agents . This option is disabled by default.
ii. If you want to reboot after the installation, select Reboot systems if necessary after successfulinstall option.
Systems Insight Manager determines the type of agent or provider to install based on the systemtype, subtype, and operating system description of the system.
If you want to install a 64-bit agent or provider, be sure the target system is identified as a 64-bitsystem in Systems Insight Manager.
If your system is not correctly identified, go to System Page Tools & Links Edit SystemProperties. Select the correct system type, or subtype and enter the operating system descriptionmanually.
» Configuringsoftware/firmware globalsettings
» Reporting» Managing with tasks» Using Cluster Monitor» Command line tools» Configuring managed
systems from a WindowsCMS
» Configuring managedsystems from a LinuxCMS
» Configuring managedsystems from an HP-UXCMS
» Custom tools» Setting disk thresholds» Creating a task to delete
disk thresholds» License manager» Management processor
tools» Managing
Communications» Advising and repairing
managed systemsettings
» Identification tab» Events tab» Run Tools tab» Version Control tab
Repairing managedsystem settings
» Updatingcommunication statuses
» Printing ManageCommunications table
» Managing MIBs» Installing OpenSSH» Replicate Agent Settings» RPM Package Manager» HP Server Migration Pack
- Universal Edition» HP System Management
Homepage» Version Control» Device ping
» Reference» Support and other
resources» Assistance
» Glossary» Using Help
Example: Installing Insight Management Agents on a ProLiant Windows 64-bit system:
i. Select System type: server .
ii. Select System subtype 1: HP ProLiant.
iii. Enter operating system description as Microsoft Windows Server 2003, x64 Enterprise EditionService Pack 1 or the correct operating system description of your system.
If you want to configure the agents after installation, select the force reboot option. This allows thenewly installed component to be completely initialized before you configure it.
NOTE:Installation with reboot typically takes about 8 minutes.
6. Click [Next]. The Step 3: Configure or Repair Settings section appears.
7. Configure the target systems by selecting one of the following options:
Configure WBEM / WMI. This section enables you to configure the target Linux, Windows, or HP-UX systemto send WBEM indications or events to Systems Insight Manager.
For this section, consider the following:
Create subscription to WBEM events so that WBEM events will be sent to the CMS
Send a sample WBEM / WMI indication to this instance of Systems Insight Manager to testthat events appear in Systems Insight Manager in the Event List or All Event User Interface forthe selected system
NOTE:This indication will appear as an Informational Event in the Event List of Systems InsightManager.
NOTE:This indication is supported only on HP-UX and Windows targets with WBEM providerinstalled.
Use an Systems Insight Manager WBEM certificate (good for 10 years) rather than
username/password to manage the system This option deploys a WBEM certificate to themanaged system and is only valid for HP-UX systems.
Configure a nonadministrative account for Systems Insight Manager to access WMI data Thisoption applies to Windows systems with HP WBEM providers. The configuration of the managedsystem updates to allow the specified user to access WMI information over the network. SystemsInsight Manager uses this user to read inventory and configuration information from the system and isconfigured as the WBEM user in the System Credentials. If Systems Insight Manager is configuredwith a user with administration rights, this configuration step is not necessary. Systems InsightManager does not create this user. The user already exists as either a domain user or one local tothe managed system.
The user is added to the DCOM Users group on the managed system and has read-only access toWMI information, and read-write permissions to the HPQ name space. This user does not need to bean administrator of the managed system or have sign-in rights. The domain administrator shouldcreate a special domain account.
To enter the credentials for Systems Insight Manager to use to access the managed systems:
a. In the User name field, enter a user name.
b. In the Password field, enter the password.
c. In the Password (Verify) field, re-enter the password exactly as it was entered in thePassword field.
d. In the Domain (Optional) field, if the target belongs to a Domain, enter the Windowsdomain.
If configuration of a nonadministrative user is successful, then these credentials are saved asthe System Credentials for WBEM access in Systems Insight Manager.
Configure SNMP This section enables you to configure SNMP settings.
a. Select Set read public community string to specify a community string. By default, the firstSystems Insight Manager community string that is not public appears. If no community string exists inSystems Insight Manager, you must enter one.
NOTE:If you configure only HP-UX systems with default SNMP installations, you do not need toset this option. HP-UX enables read by default (get-community-name is set to public bydefault on HP-UX systems).
NOTE:If you select this option, the Read Only community string is added to the target systems. Ifthe target system is SuSE Linux or Microsoft Windows 2003, the managed systems do notalways enable SNMP communication between themselves and a remote host. This settingis modified to enable the instance of the Systems Insight Manager system to communicateusing SNMP with these target systems.
NOTE:You can enter a community string up to 255 characters.
NOTE:Repairing the SNMP settings adds a Read Write community string to the target systemonly if one does not currently exist. This community string is unique for each system, iscomposed of over 30 characters to include letters and numbers, and is visible only to theuser with administrator privileges for that system. This Read Write community string isrequired by the Web Agent to perform certain threshold setting capabilities. Thiscommunity string is used locally only on the target system and is not used by SystemsInsight Manager over the network. Linux and HP-UX systems do not require a Read Writecommunity string. The Read Write community string is added on Windows systems only.
b. Select Set traps to refer to this instance of HP Systems Insight Manager in the target systemsSNMP Trap Destination List. This setting enables the target systems to send SNMP traps to thisinstance of Systems Insight Manager.
c. Select Send a sample SNMP trap to this instance of the Systems Insight Manager to test thatevents appear in Systems Insight Manager event lists to verify that SNMP events appear in the
Systems Insight Manager events list.
To successfully send a test trap, you must configure target systems to send a trap to this instance.
NOTE:You can send a test trap only from a managed system with an HP Insight ManagementAgents installed.
NOTE:The trap from Windows appears as a Generic Trap from the system and is listed as aMajor Event in the Event List of Systems Insight Manager. The trap received from Linuxand HP-UX targets appears as a Cold Trap and is listed as Informational Events in theEvent List of Systems Insight Manager.
Configure secure shell (SSH) access Select this option to configure SSH access on managed systems.
If you select this option, you must select one of the following options:
Host based authentication for SSH
NOTE:For this option to work, the user name and password provided in Step 4: Entercredentials must be an administrative level account. For Linux or HP-UX targets, it mustbe the root account and password.
Each user has to be authenticated on the managed system
NOTE:If you do not want all users that have sign-in access to Systems Insight Manager to runthe tool and you would like to control which users need to have access, this option is moresecure.
NOTE:You can configure SSH only if the OpenSSH service is running on the managed systems.You can install OpenSSH on Windows systems by running the Install Open SSH or byselecting the tool under Deploy Deploy Drivers, Firmware and Agents Install OpenSSH.
Set Trust relationship to "Trust by Certificate" Select this option to configure systems to use the Trustby Certificate trust relationship with the Systems Insight Manager.
For Systems Insight Manager on the target systems, this option sets the trust mode to Trust by Certificateand copies the Systems Insight Manager system certificate to the target system trusted certificate directory.This option enables Systems Insight Manager users to connect to the SMH using the certificate forauthentication.
You can configure SSO to management processors for Onboard Administrator and for remote management.To configure SSO, select Set Trust Relationship . After you configure SSO, you are not continually promptedto supply the login credentials for the management processor.
NOTE:For systems with Management HTTP Server 5.x and earlier, the Configure or Repair Agentssetting adds the Administrator password in the Management HTTP Server store and modifies theSNMP settings, but it cannot change trust relationship information.
Select the checkbox beside Import Secure Sockets Layer (SSL) certificate for Systems Insight Manager totrust the HP SMH of the managed system. This option is only valid for HP-UX and Linux operating systems.
Configure HP Version Control Agent Select this option to configure the VCA to point to the HP VersionControl Repository Manager, where the repository of software and firmware is located, enabling versioncomparison and software updates. This option is available for Windows and Linux systems.
To configure VCA:
a. In the Select the system where the VCRM is installed field, select a server from the dropdown list.
b. In the User Name field, enter the user name to access the VCRM. This user cannot be the defaultadministrator user, and must have administrative privileges.
c. In the Password field, enter the password to access the VCRM.
d. In the Password (verify) field, re-enter the password for the VCRM.
Set administrator password for Insight Management Agentss version 7.1 or earlier Select this optionto repair the administrator password on all Insight Management Agents installed on the target systems asapplicable for Windows and Linux systems.
NOTE:Do not set this option if you have Insight Management Agentss 7.2 or later installed.
NOTE:If the remote system is running HP-UX, this option is not executed on the remote system becauseit is not applicable on HP-UX systems. If you are configuring only HP-UX target systems, you donot need to set this option.
If you select this option, you must complete the following steps:
a. In the Password field, enter the new administrator password.
b. In the Password (verify) field, re-enter the new administrator password.
8. Click [Next]. The Step 4: Enter Credentials section appears.
9. Enter the following credentials.
The credentials used in this step must work for all selected target systems. HP recommends using domainadministrator credentials. Credentials entered here are not saved by Systems Insight Manager except to run ascheduled task later.
If you select Configure secure shell (SSH) access for a Windows target system, the account you specify must be amember of the local Administrators group. For Windows targets using a domain account, the account is automaticallyadded to this group.
a. Select one of the following options:
a. Use sign-in credentials These credentials must be a privileged account on the managed system.The sign-in credentials option is available if the following options are selected:
a. Install WBEM/WMI Provider (HP Insight Management WBEM Provider) for Windows
NOTE:This option is not available if you selected Install Open SSH or Register VM Host on the“Step 2: Install Providers and Agents (Optional)†page.
b. Use the following credentials for all systems .
b. In the User name field, enter the system administrator name.
c. In the Password field, enter the system administrator password.
d. In the Password (Verify) field, re-enter the system administrator password.
e. In the Domain (Optional) field, if you are using a domain account, enter the Windows domain.
10. Click [Run Now] or click [Schedule] to run this task at a later time. The Task Results page appears.
If the Management HTTP Server is installed on target systems, the login credentials are updated in the ManagementHTTP Server password file. As with other Systems Insight Manager tools, you can configure the Configure or RepairAgents tool to run on a schedule or manually. Only one instance of Configure or Repair Agents tool can run at a time.
The Configure or Repair Agents tool can update multiple target systems. The log results indicate whether the repairattempt was successful. For Configure or Repair Agents, the Task Results page displays the following information.
Table 1 CRA Task Results information
FieldName Description
Status This field displays the details for each target system within a task instance.
ExitCode
This field represents the success or failure of an executable program. If the return value is zero or apositive value, the executable ran successfully. If a negative value is returned, the executable failed.This exit code does not indicate that all configuration attempts were successful. It is possible for some tosucceed but some to fail.
TargetName This field displays the name/IP address of the target.
Thestdouttab
This tab displays the output text information.
Thestderrtab
This tab displays information if the executable experienced an error.
ViewPrintableReport
You can print reports for the selected target system or for all target systems associated with the taskinstance.
To print a report:
a. Click [View Printable Report].
An Options Message box appears.
b. Select a report.
c. Click [OK] to display the report, or click [Cancel ] to return to the View Task Results page.
» Discovery in HP SIM» Discovery filters» Managing Hosts file» Identification» Managing system types» Users and authorizations» Directory Services» Global credentials» System credentials» Security» Trusted certificates» Viewing the audit log» Configuring the audit log» Monitoring systems and
events» Quick Launch menu» Performing a basic search» Performing an advanced
search for systems» Performing an advanced
search for clusters» Performing an advanced
search for events» Tool search» Related information for
searches» Configuring events» Protocol settings» Software status polling» Hardware status polling» Data collection» System Properties» Configuring WBEM health
inclusion status» Specifying a Version
Procedure 1 Manage communications Update
1. Select Configure Manage Communications. The Select Target Systems pageappears.
2. Select target systems. See Systems Insight Manager - Creating a task.
3. Click [Run Now]. The system list appears.
4. Select single or multiple systems from the systems list.
» Discovery in HP SIM» Discovery filters» Managing Hosts file» Identification» Managing system types» Users and authorizations» Directory Services» Global credentials» System credentials» Security» Trusted certificates» Viewing the audit log» Configuring the audit log» Monitoring systems and
events» Quick Launch menu» Performing a basic search» Performing an advanced
search for systems» Performing an advanced
search for clusters» Performing an advanced
search for events» Tool search» Related information for
searches» Configuring events» Protocol settings» Software status polling» Hardware status polling» Data collection» System Properties» Configuring WBEM health
inclusion status» Specifying a Version
Procedure 1 Manage communications Printing
1. Select Configure Manage Communications. The Select Target Systems pageappears.
2. Select target systems. See Systems Insight Manager - Creating a task.
3. Click [Print ].
4. When the table appears, select File Print from the browser menu.
Because certain print options are not supported in Systems Insight Manager, you cannotperform the following tasks:
Change the Orientation to Landscape in the Print dialog box.
Cancel printing after the print job has been executed; however, you can access theoperating systems print queue and cancel the print job
Print to a file
Print specific selections; you can print the entire list only
Print the table view page if you close the browser immediately after issuing a printrequest
» Discovery in HP SIM» Discovery filters» Managing Hosts file» Identification» Managing system types» Users and authorizations» Directory Services» Global credentials» System credentials» Security» Trusted certificates» Viewing the audit log» Configuring the audit log» Monitoring systems and
events» Quick Launch menu» Performing a basic search» Performing an advanced
search for systems» Performing an advanced
search for clusters» Performing an advanced
search for events» Tool search» Related information for
searches» Configuring events» Protocol settings» Software status polling» Hardware status polling» Data collection» System Properties» Configuring WBEM health
inclusion status» Specifying a Version
A MIB is a file that contains information that enables you to correctly interpret specificinformation from systems on your network and gives you a more precise view of the activityon your network. To take advantage of this capability, the MIB must be registered to HPSIM. For more information, see HP Systems Insight Manager - Registering a MIB.
HP MIBs enable you to take advantage of the rich management infrastructure that HPbuilds into its products. HP MIBs are registered in the HP SIM database. You can find themin \hp\system insight manager\mibs on a Windows CMS or in opt/mx/mibs on a UNIX orLinux CMS. If you have third-party systems on your network, register them with HP SIM.For more information regarding registering your MIBs, see HP Systems Insight Manager -Registering a MIB. Registration enables the MIBs to be identified and traps to beinterpreted to give you a more precise view of the activity on your network. Always registerthe most recent version of a third-party MIB.
» Discovery in HP SIM» Discovery filters» Managing Hosts file» Identification» Managing system types» Users and authorizations» Directory Services» Global credentials» System credentials» Security» Trusted certificates» Viewing the audit log» Configuring the audit log» Monitoring systems and
events» Quick Launch menu» Performing a basic search» Performing an advanced
search for systems» Performing an advanced
search for clusters» Performing an advanced
search for events» Tool search» Related information for
searches» Configuring events» Protocol settings» Software status polling» Hardware status polling» Data collection» System Properties» Configuring WBEM health
inclusion status» Specifying a Version
After you register a MIB with HP SIM database, you can use additional mxmib options,such as mxmib -l and mxmib -t can be used to view MIBs and their associated traps. Fora MIB file to be listed as registered, the MIB file must reside in the mibs directory.
CAUTION:Do not rename, move, or delete MIB files from the directory after they areregistered.
You can also use SNMP Trap Settings (Options Events SNMP Trap Settings) todisplay registered MIBs and their associated traps. Use this screen to modify Event Type,Description, Enable Trap Handling, Category, and Severity attributes to further customizethe information collected on the network. For more information regarding editing a MIB, seeSystems Insight Manager - Editing a MIB.
NOTE:The following HP SIM directories are default directories. However, the directoriescan vary depending on the directory specified during HP SIM installation.
Viewing a MIB file on a Windows operating system:
Procedure 1 Viewing a MIB file on a Windows operating system:
1. Navigate to the MIB directory at c:/program files/hp/systems insightmanager/mibs.
2. Open the MIB file with an ASCII editor.
3. Enter write cpqhost.mib on the Windows command line.
Viewing a MIB file on a Linux or HP-UX operating system:
Procedure 2 Viewing a MIB file on a Linux or HP-UX operating system:
» Discovery in HP SIM» Discovery filters» Managing Hosts file» Identification» Managing system types» Users and authorizations» Directory Services» Global credentials» System credentials» Security» Trusted certificates» Viewing the audit log» Configuring the audit log» Monitoring systems and
events» Quick Launch menu» Performing a basic search» Performing an advanced
search for systems» Performing an advanced
search for clusters» Performing an advanced
search for events» Tool search» Related information for
searches» Configuring events» Protocol settings» Software status polling» Hardware status polling» Data collection» System Properties» Configuring WBEM health
inclusion status» Specifying a Version
The HP MIBs configuration (.cfg) file can be edited with trap specific information, such as:
TYPE. This is a simplified form of the actual trap name. Change the type if it doesnot describe the device for you.
SEVERITY. Some vendors use the default INFORMATIONAL for severity levels.Change the severity to a level that reflects your judgment of the problem.Alternatively, you can change a Major or Critical severity for a trap message that isnot a critical situation in your environment. Only you know if this is the case. Theonly valid options for HP SIM include: Critical, Major, Minor, Warning, andInformational.
MSG_FORMATTER. This string constructs enhanced messages that can be sent toa pager or e-mail address. This string can be modified in the REV or the MIB.
ENABLE. By default, all traps are enabled. Trap handling gives you control over thevolume of messages. Disable nuisance messages, such as unnecessaryinformational messages or repeated trap messages for an event that has not beencorrected.
DESCRIPTION. This is vendor-supplied. Replace it with specific instructions, aprecise reference source, or a website referral.
CATEGORY. This lists the HP SIM category types and UNKNOWN.
Procedure 1 Editing the .cfg file
1. Navigate to the MIB directory:
For Windows operating systems, navigate to \program files\hp\systemsinsight manager\mibs.
For Linux or HP-UX operating systems, navigate to /opt/mx/mibs.
2. Run mcompile mymib.mib to create the .cfg file.
3. After the .cfg file is created, use an editor to edit the .cfg file.
Procedure 2 Editing trap-specific information in HP SIM
1. From HP SIM, select Options Events SNMP Trap Settings.
The SNMP Trap Settings page appears.
2. Select the MIB name.
3. Select the trap in the MIB.
4. Edit the file with your changes, and then click [OK] to save your changes.
The changes made through the SNMP Trap Settings page are saved to the HPSIM database only. The .cfg and MIB files are not affected.
» Discovery in HP SIM» Discovery filters» Managing Hosts file» Identification» Managing system types» Users and authorizations» Directory Services» Global credentials» System credentials» Security» Trusted certificates» Viewing the audit log» Configuring the audit log» Monitoring systems and
events» Quick Launch menu» Performing a basic search» Performing an advanced
search for systems» Performing an advanced
search for clusters» Performing an advanced
search for events» Tool search» Related information for
searches» Configuring events» Protocol settings» Software status polling» Hardware status polling» Data collection» System Properties» Configuring WBEM health
inclusion status» Specifying a Version
The mcompile command enables you to compile an SNMP MIB file into an intermediateformat (.cfg) file that can be registered using the mxmib utility for use with HP SIM.
Observe the following tips:
To compile a MIB, you must copy the .MIB file to the default MIB directory.
Comment lines in MIB files start with "--" and end with a new line or the nextoccurrence of "--." Beware of MIBs with "-" characters across the entire line. Theselines are intended to be comments. However, extra dashes cancel the first set of "--" characters.
Examples:
-- xyz comments out xyz
However:
-- -- xyz effectively uncomments xyz
mcompile expects the END keyword at the end of a module on a line by itself. Besure there is a new line in the MIB file after the END keyword.
Procedure 1 Compiling a MIB
1. Navigate to the HP SIM root directory and open an MS-DOS® window or UNIXshell.
2. Run mcompile to compile an SNMP MIB file into an intermediate format (.cfg).
mcompile recognizes the -d option. This option changes to the specified directoryto locate and process the MIB file. The MxMib expects the .cfg file to reside inMIBs directory. It is convenient to have both files in that directory as the output ofmcompile (.cfg) will be in the directory where mcompile either compiles or isdirected to compile in.
» Discovery in HP SIM» Discovery filters» Managing Hosts file» Identification» Managing system types» Users and authorizations» Directory Services» Global credentials» System credentials» Security» Trusted certificates» Viewing the audit log» Configuring the audit log» Monitoring systems and
events» Quick Launch menu» Performing a basic search» Performing an advanced
search for systems» Performing an advanced
search for clusters» Performing an advanced
search for events» Tool search» Related information for
searches» Configuring events» Protocol settings» Software status polling» Hardware status polling» Data collection» System Properties» Configuring WBEM health
inclusion status» Specifying a Version
HP SIM ships with HP MIBs that are registered at installation. In addition, many precompiledMIBs are included in the form of .cfg files. You can register these MIBs at yourconvenience. Many .cfg files have been edited. If the corresponding MIB is recompiled,those edits are lost.
To view a list of registered MIBs, including MIBs you have registered:
On a Windows operating system, enter dir "c:\program files\hp\systems insightmanager\MIBs\ *.MIB" at the command line.
On UNIX, enter ls /opt/mx/mibs/*.mib at the command line.
To view MIBs that are preloaded and registered during HP SIM installation:
On a Windows operating system, enter type "c:\program files\hp\systemsinsight manager\MIBs\ cfglist?.list" at the command line.
On UNIX, enter cat /opt/mx/mibs/cfglist*.list at the command line.
These are the default directories. If you changed the install action directory during HP SIMinstallation, these commands must use your path instead.
You can register HP MIBs using the CLI. The CLI is the same for all CMS types includingWindows, Linux, and HP-UX operating systems.
When registering a MIB, you do not need to run mcompile on the MIB, especially if thecorresponding .cfg file to that MIB exists. If you run mcompile on a MIB and a .cfg fileexists, a new .cfg is generated, which supersedes the old .cfg file and any changes in theold file. In most cases with an existing .cfg file, edit the .cfg file to make changes unless anew MIB has been furnished.
You can then register this .cfg file to the HP SIM database using the mxmib -a or mxmib -f command.
Registering a MIB in HP SIM
Procedure 1 Registering a MIB in HP SIM
1. Open an MS-DOS window or UNIX shell.
2. Use an editor to create a file containing a list of .cfg files to be registered, one .cfgper line.
3. Run mxmib -f cfglist.list to import a list of MIBs into HP SIM. After the MIB isregistered in HP SIM, use mxmib to list the MIBs from HP SIM and to delete orunregister the MIBs, use mxmib —d.
You can also use mxmib -a mymib.cfg to register a single MIB.
The .cfg file must be in the default MIBs directory.
NOTE:MxMib requires the .cfg file to reside in the MIBS directory where all the.mib and .cfg reside by default.
Updating a MIB
Procedure 2 Updating a MIB
Control Repository» Configuring
software/firmware globalsettings
» Reporting» Managing with tasks» Using Cluster Monitor» Command line tools» Configuring managed
systems from a WindowsCMS
» Configuring managedsystems from a LinuxCMS
» Configuring managedsystems from an HP-UXCMS
» Custom tools» Setting disk thresholds» Creating a task to delete
disk thresholds» License manager» Management processor
tools» Managing
Communications» Managing MIBs
» Viewing a MIB» Editing a MIB» Compiling a MIB
Registering a MIB» Unregistering a MIB» Related information
» Installing OpenSSH» Replicate Agent Settings» RPM Package Manager» HP Server Migration Pack
- Universal Edition» HP System Management
Homepage» Version Control» Device ping
» Reference» Support and other
resources» Assistance
» Glossary» Using Help
1. Download and copy MIBs and matching .cfg files to the mibs directory. The mibsdirectory is typically located at c:\program files\hp\systems insight manager\mibsfor Windows and at /opt/mx/mibs for Linux and HP-UX.
If a .cfg file is available and no customizations have been made, proceed to step 2.
2. Run mcompile to create and update .cfg files that exists.
If the old .cfg file had customizations, reapply them.
3. Run mxmib -a updatedfile.cfg to update the MIB data in the database.
Service trap and service MIB information
HP SIM ships with a version of the service MIB to support service traps sent by OpenService Event Manager and WEBES. The service MIB is comprised of the cpqservice.miband cpqservice.cfg files. To obtain the service MIB separately, seehttp://h18023.www1.hp.com/support/svctools/ and select Service MIB Zip file underWEBES or OSEM. The zip file contains the .mib and .cfg files. Review the readme.txt filecontained in the zip file for compatibility instructions.
Beginning with Open Service Event Manager 1.3.6, you must configure the tool to generatethe new trap type by accessing Internal Settings for Open Service Event Manager: HP SIMtrap revision. WEBES sends the trap by default.
» Discovery in HP SIM» Discovery filters» Managing Hosts file» Identification» Managing system types» Users and authorizations» Directory Services» Global credentials» System credentials» Security» Trusted certificates» Viewing the audit log» Configuring the audit log» Monitoring systems and
events» Quick Launch menu» Performing a basic search» Performing an advanced
search for systems» Performing an advanced
search for clusters» Performing an advanced
search for events» Tool search» Related information for
searches» Configuring events» Protocol settings» Software status polling» Hardware status polling» Data collection» System Properties» Configuring WBEM health
inclusion status» Specifying a Version
HP MIBs can be unregistered using the command line. The CLI is the same for all CMStypes to include Windows, Linux, and HP-UX.
Procedure 1 Unregistering a MIB from HP SIM
1. Open an MS-DOS window or UNIX shell.
2. Run mxmib -d file.mib to unregister the MIB in HP SIM.
» Discovery in HP SIM» Discovery filters» Managing Hosts file» Identification» Managing system types» Users and authorizations» Directory Services» Global credentials» System credentials» Security» Trusted certificates» Viewing the audit log» Configuring the audit log» Monitoring systems and
events» Quick Launch menu» Performing a basic search» Performing an advanced
search for systems» Performing an advanced
search for clusters» Performing an advanced
search for events» Tool search» Related information for
searches» Configuring events» Protocol settings» Software status polling» Hardware status polling» Data collection» System Properties» Configuring WBEM health
inclusion status» Specifying a Version
Related procedures
» HP Systems Insight Manager - Registering a MIB» Systems Insight Manager - Unregistering a MIB» Systems Insight Manager - Compiling a MIB» Systems Insight Manager - Editing a MIB
» Discovery in HP SIM» Discovery filters» Managing Hosts file» Identification» Managing system types» Users and authorizations» Directory Services» Global credentials» System credentials» Security» Trusted certificates» Viewing the audit log» Configuring the audit log» Monitoring systems and
events» Quick Launch menu» Performing a basic search» Performing an advanced
search for systems» Performing an advanced
search for clusters» Performing an advanced
search for events» Tool search» Related information for
searches» Configuring events» Protocol settings» Software status polling» Hardware status polling» Data collection» System Properties» Configuring WBEM health
inclusion status» Specifying a Version
HP SIM custom and command line tools require that SSH be installed and configured oneach managed system to work properly. For more information about SSH and the featuresin HP SIM that use SSH, see the HP Systems Insight Manager User Guide.
The OpenSSH installation is run from the CMS. It installs the OpenSSH service on targetWindows systems and then runs the mxagentconfig command to complete theconfiguration.
NOTE:To be sure that the install OpenSSH task runs successfully, sign in as a userwith administrative rights. If you are signed in as another user, be sure the username does not contain non-ASCII characters.
NOTE:You can easily install OpenSSH on Windows managed systems using theConfigure or Repair Agents feature. For more information, see Systems InsightManager - Configuring managed systems from a Windows CMS.
Procedure 1 Install OpenSSH through the Install OpenSSH option
2. Select the target systems. For more information about selecting target systems, seeSystems Insight Manager - Creating a task.
3. Click [Next].
4. From the Enter credentials for an administrator account on the targetsystem(s): section, do the following:
a. In the User name field, enter the Windows administrator user name.
b. In the Password field, enter the administrator password for user name.
c. In the Password (Verify) field, re-enter the Windows administratorpassword.
d. In the Domain field, specify the Windows domain.
If the administrator account on the target systems is a local account, leaveDomain field blank.
5. Click [Schedule] to schedule the install, or click [Run Now] to run the installationimmediately. For more information about scheduling the installation, see SystemsInsight Manager - Scheduling a task.
If you clicked [Run Now], the Tasks Results page appears. For more informationabout the Task Results page, see Systems Insight Manager - Viewing taskinstance results.
HP Systems Insight Manager 7.1 English
Operations | Installing OpenSSH | Creating an OpenSSH task through the CLI
» Discovery in HP SIM» Discovery filters» Managing Hosts file» Identification» Managing system types» Users and authorizations» Directory Services» Global credentials» System credentials» Security» Trusted certificates» Viewing the audit log» Configuring the audit log» Monitoring systems and
events» Quick Launch menu» Performing a basic search» Performing an advanced
search for systems» Performing an advanced
search for clusters» Performing an advanced
search for events» Tool search» Related information for
searches» Configuring events» Protocol settings» Software status polling» Hardware status polling» Data collection» System Properties» Configuring WBEM health
inclusion status» Specifying a Version
You can create an OpenSSH task using the mxtask command in two ways:
By entering all parameters through the command line
By entering all parameters through an .XML file
NOTE:Tasks created from an .XML file are disabled when viewed in the task list. Taskscreated from the command line are not disabled when viewed from the task list.
Creating an OpenSSH task
Procedure 1 Creating an OpenSSH task
1. To see how to enter the information correctly, export an OpenSSH task.
a. Create an OpenSSH task. For more information, see Systems InsightManager - Installing OpenSSH.
b. Save the task as SSH Task.
2. From the command line, execute the following command:
mxtask -lf "SSH Task" > ssh.xml
ssh.xml contains the format required to create an OpenSSH task from the command line.The following is an example file.
» Discovery in HP SIM» Discovery filters» Managing Hosts file» Identification» Managing system types» Users and authorizations» Directory Services» Global credentials» System credentials» Security» Trusted certificates» Viewing the audit log» Configuring the audit log» Monitoring systems and
events» Quick Launch menu» Performing a basic search» Performing an advanced
search for systems» Performing an advanced
search for clusters» Performing an advanced
search for events» Tool search» Related information for
searches» Configuring events» Protocol settings» Software status polling» Hardware status polling» Data collection» System Properties» Configuring WBEM health
inclusion status» Specifying a Version
Replicate Agent Settings is a source system configuration that you can edit and copy to atarget system or group of systems.
» Discovery in HP SIM» Discovery filters» Managing Hosts file» Identification» Managing system types» Users and authorizations» Directory Services» Global credentials» System credentials» Security» Trusted certificates» Viewing the audit log» Configuring the audit log» Monitoring systems and
events» Quick Launch menu» Performing a basic search» Performing an advanced
search for systems» Performing an advanced
search for clusters» Performing an advanced
search for events» Tool search» Related information for
searches» Configuring events» Protocol settings» Software status polling» Hardware status polling» Data collection» System Properties» Configuring WBEM health
inclusion status» Specifying a Version
The Replicate Agent Settings tool enables HP SIM to retrieve and optionally edit Web Agentconfiguration settings from a source system and distribute that configuration remotely to oneor more target systems through Web Agents.
Procedure 1 Create a Replicate Agent Setting task
1. Select a source system by selecting one of the following methods:
You know the name of the system. If you select this option, enter thename of the system in the box, and then click [Next].
Pick the system from a list. If you select this option, select a targetsystem from the list of known systems that supports Replicate AgentSettings, and then click [Next].
If the source system cannot be used, a message appears informing you ofthe error. Select a different system from the Choose Source System page.
If the trust relationship for a system is incorrectly configured, an errormessage appears.
The Choose Source Configuration Settings page appears. The source systemconfigurations appear without parameters selected.
2. Select the desired settings as needed. You can select each parameter individually.At least one must be selected to continue. You can also select to Wake targetsystems from low power mode before configuring.
3. Select one of the following options to execute the task:
Click [Schedule] to schedule when the task should run.
Click [Run Now] to run the task immediately. The Task Results pageappears.
Click [Previous] to return to the previous page.
NOTE:The Replicate Agent Settings task uses the STE feature.
» Discovery in HP SIM» Discovery filters» Managing Hosts file» Identification» Managing system types» Users and authorizations» Directory Services» Global credentials» System credentials» Security» Trusted certificates» Viewing the audit log» Configuring the audit log» Monitoring systems and
events» Quick Launch menu» Performing a basic search» Performing an advanced
search for systems» Performing an advanced
search for clusters» Performing an advanced
search for events» Tool search» Related information for
searches» Configuring events» Protocol settings» Software status polling» Hardware status polling» Data collection» System Properties» Configuring WBEM health
inclusion status» Specifying a Version
The HP Insight Control server deployment is a powerful command-line packagemanagement system capable of installing, uninstalling, verifying, querying, and updatingcomputer software packages. Each software package consists of an archive of files andinformation about the package, (such as its version, a description, and so forth). There isalso a related API that permits advanced developers to bypass to use a shell at thecommand line and to manage such transactions from within a native coding language. HPInsight Control server deployment is integrated into HP SIM through the Deploy menu.
The following procedures are available for HP Insight Control server deployment within HPSIM:
Install Package For more information, see Systems Insight Manager - InstallingRPM.
Query Package For more information, see Systems Insight Manager - QueryingRPM.
Uninstall Package For more information, see Systems Insight Manager -Uninstalling RPM.
Verify Package For more information, see Systems Insight Manager - VerifyingRPM.
» Discovery in HP SIM» Discovery filters» Managing Hosts file» Identification» Managing system types» Users and authorizations» Directory Services» Global credentials» System credentials» Security» Trusted certificates» Viewing the audit log» Configuring the audit log» Monitoring systems and
events» Quick Launch menu» Performing a basic search» Performing an advanced
search for systems» Performing an advanced
search for clusters» Performing an advanced
search for events» Tool search» Related information for
searches» Configuring events» Protocol settings» Software status polling» Hardware status polling» Data collection» System Properties» Configuring WBEM health
inclusion status» Specifying a Version
Procedure 1 Installing RPM
1. In the Parameters section, enter the parameter, [install-options] package-file.
2. Click [Run Now] to run the tool, click [Previous] to return to the previous screen,or click [Schedule] to schedule when the task runs. For more information aboutscheduling the task, see Systems Insight Manager - Scheduling a task.
» Discovery in HP SIM» Discovery filters» Managing Hosts file» Identification» Managing system types» Users and authorizations» Directory Services» Global credentials» System credentials» Security» Trusted certificates» Viewing the audit log» Configuring the audit log» Monitoring systems and
events» Quick Launch menu» Performing a basic search» Performing an advanced
search for systems» Performing an advanced
search for clusters» Performing an advanced
search for events» Tool search» Related information for
searches» Configuring events» Protocol settings» Software status polling» Hardware status polling» Data collection» System Properties» Configuring WBEM health
inclusion status» Specifying a Version
Procedure 1 Uninstalling RPM
1. In the Parameters section, enter the parameter, [erase-options] package-name.
2. Click [Run Now] to run the tool, click [Previous] to return to the previous screen,or click [Schedule] to schedule when the task runs. For more information aboutscheduling the task, see Systems Insight Manager - Scheduling a task.
» Discovery in HP SIM» Discovery filters» Managing Hosts file» Identification» Managing system types» Users and authorizations» Directory Services» Global credentials» System credentials» Security» Trusted certificates» Viewing the audit log» Configuring the audit log» Monitoring systems and
events» Quick Launch menu» Performing a basic search» Performing an advanced
search for systems» Performing an advanced
search for clusters» Performing an advanced
search for events» Tool search» Related information for
searches» Configuring events» Protocol settings» Software status polling» Hardware status polling» Data collection» System Properties» Configuring WBEM health
inclusion status» Specifying a Version
Procedure 1 Running an RPM query
1. In the Parameters section, enter the parameter, [query-options] package-name.
2. Click [Run Now] to run the tool, click [Previous] to return to the previous screen,or click [Schedule] to schedule when the task runs.
» Discovery in HP SIM» Discovery filters» Managing Hosts file» Identification» Managing system types» Users and authorizations» Directory Services» Global credentials» System credentials» Security» Trusted certificates» Viewing the audit log» Configuring the audit log» Monitoring systems and
events» Quick Launch menu» Performing a basic search» Performing an advanced
search for systems» Performing an advanced
search for clusters» Performing an advanced
search for events» Tool search» Related information for
searches» Configuring events» Protocol settings» Software status polling» Hardware status polling» Data collection» System Properties» Configuring WBEM health
inclusion status» Specifying a Version
Procedure 1 Verifying RPM
1. In the Parameters section, enter the parameter, [select-options] package-name.
2. Click [Run Now] to run the tool, click [Previous] to return to the previous screen,or click [Schedule] to schedule when the task runs. For more information aboutscheduling the task, see Systems Insight Manager - Scheduling a task.
HP Systems Insight Manager 7.1 English
Operations | HP Server Migration Pack - Universal Edition
» Discovery in HP SIM» Discovery filters» Managing Hosts file» Identification» Managing system types» Users and authorizations» Directory Services» Global credentials» System credentials» Security» Trusted certificates» Viewing the audit log» Configuring the audit log» Monitoring systems and
events» Quick Launch menu» Performing a basic search» Performing an advanced
search for systems» Performing an advanced
search for clusters» Performing an advanced
search for events» Tool search» Related information for
searches» Configuring events» Protocol settings» Software status polling» Hardware status polling» Data collection» System Properties» Configuring WBEM health
inclusion status» Specifying a Version
The HP Insight Control server migration extends the functionality of the HP Insight Controlvirtual machine management by simplifying the server consolidation process. The servermigration provides the following migration capabilities:
Physical-to-virtual (P2V) migration Migrates a physical machine to a virtualmachine guest in a Microsoft Virtual Server 2005 or VMware virtual machine host.
Virtual-to-virtual (V2V) migration Migrates a virtual machine guest betweendifferent virtualization layers, including Microsoft Virtual Server 2005, VMware ESXServer ™, VMware Server ™, and VMware GSX Server ™.
Virtual-to-physical (V2P) migration Migrates a virtual machine guest in aMicrosoft Virtual Server 2005 or VMware virtual machine host to a physicalmachine.
Physical-to-physical (P2P) migration Migrates a physical machine to a Proliantmachine in a Microsoft Virtual Server 2005, VMware ESX Server to a physicalmachine.
You must have administrative rights to access HP Insight Control server migration relatedmenu items.
Procedure 1 Migrate a virtual machine guest, host to a physical machine
1. Select Deploy Deploy Drivers Firmware and Agents and then select the serverto deploy to the agent.
2. If additional files are necessary, load these files from the original Windows orVMware media.
3. Perform Physical-to-virtual (P2V), Physical-to-ProLiant (P2P), Virtual-to-virtual(V2V), or Virtual-to-physical (V2P) migrations from the Deploy Server Migrationtools menu items.
The server migration is a companion product that works with an equivalent version of thevirt.
Adding an server migration license
The server migration uses HP ProLiant Essential products licensing. One license is used foreach successful P2V, P2P, V2V, or V2P migration.
HP Systems Insight Manager 7.1 English
Operations | HP Server Migration Pack - Universal Edition | Adding an SMP Universal license
» Discovery in HP SIM» Discovery filters» Managing Hosts file» Identification» Managing system types» Users and authorizations» Directory Services» Global credentials» System credentials» Security» Trusted certificates» Viewing the audit log» Configuring the audit log» Monitoring systems and
events» Quick Launch menu» Performing a basic search» Performing an advanced
search for systems» Performing an advanced
search for clusters» Performing an advanced
search for events» Tool search» Related information for
searches» Configuring events» Protocol settings» Software status polling» Hardware status polling» Data collection» System Properties» Configuring WBEM health
inclusion status» Specifying a Version
Procedure 1 Adding HP Insight Control server migration licenses
1. Select Deploy License Manager.
2. Select Add New Product or Server Migration Pack (if available).
3. Click [Manage Licenses ].
4. Click [Add Licenses] and follow the on-screen instructions.
HP Systems Insight Manager 7.1 English
Operations | HP Server Migration Pack - Universal Edition | Accessing the HP Server Migration Pack
» Discovery in HP SIM» Discovery filters» Managing Hosts file» Identification» Managing system types» Users and authorizations» Directory Services» Global credentials» System credentials» Security» Trusted certificates» Viewing the audit log» Configuring the audit log» Monitoring systems and
events» Quick Launch menu» Performing a basic search» Performing an advanced
search for systems» Performing an advanced
search for clusters» Performing an advanced
search for events» Tool search» Related information for
searches» Configuring events» Protocol settings» Software status polling» Hardware status polling» Data collection» System Properties» Configuring WBEM health
inclusion status» Specifying a Version
Select Deploy Server Migration tools and then select the options P2P, P2V, V2V, orV2P migration.
Procedure 1 Accessing SMP
1. Select Tools Integrated Consoles Server Migration Pack. The ServerMigration Pack page appears.
2. Select Migration Options to perform a P2V, V2V, or V2P migration.
» Discovery in HP SIM» Discovery filters» Managing Hosts file» Identification» Managing system types» Users and authorizations» Directory Services» Global credentials» System credentials» Security» Trusted certificates» Viewing the audit log» Configuring the audit log» Monitoring systems and
events» Quick Launch menu» Performing a basic search» Performing an advanced
search for systems» Performing an advanced
search for clusters» Performing an advanced
search for events» Tool search» Related information for
searches» Configuring events» Protocol settings» Software status polling» Hardware status polling» Data collection» System Properties» Configuring WBEM health
inclusion status» Specifying a Version
HP SIM enables you to access the HP SMH of a system. The HP SMH is a web-basedapplication that provides a consolidated interface for single-system management. Byaggregating data from HP web-based agents and management utilities, the HP SMHprovides a common, easy-to-use interface for displaying hardware fault and statusmonitoring, performance data, system thresholds, diagnostics, and software version controlfor an individual server.
You can install HP SMH on Windows and Linux operating systems. On x86, the SetupWizard performs the installation of the HP SMH and enables you to set the security optionsused by all Web Agents on the system. On Linux Itanium Processor Family (IPF), HP SMHcan be installed with default settings through an HP Insight Control server deploymentpackage and configured by the smhconfig tool.
The HP SMH Replicate Agent Settings feature enables HP SIM to retrieve a set ofconfiguration data from HP Web-enabled System Management Software on a referencesystem and distribute that configuration data to one or more target systems. In addition,some HP SMH parameters are replicable through HP SIM.
Related procedure
» Systems Insight Manager - Accessing HP System Management Homepage
Related topic
» Systems Insight Manager - System page
HP Systems Insight Manager 7.1 English
Operations | HP System Management Homepage | Accessing HP System Management Homepage
» Discovery in HP SIM» Discovery filters» Managing Hosts file» Identification» Managing system types» Users and authorizations» Directory Services» Global credentials» System credentials» Security» Trusted certificates» Viewing the audit log» Configuring the audit log» Monitoring systems and
events» Quick Launch menu» Performing a basic search» Performing an advanced
search for systems» Performing an advanced
search for clusters» Performing an advanced
search for events» Tool search» Related information for
searches» Configuring events» Protocol settings» Software status polling» Hardware status polling» Data collection» System Properties» Configuring WBEM health
inclusion status» Specifying a Version
Procedure 1 Overview content for JAVA properties file
1. Select Tools System Information System Management Homepage.
2. Select target systems. The HP System Management Homepage appears.
Related procedures
» Systems Insight Manager - Creating a Replicate Agent Settings task» Systems Insight Manager - Accessing the Version Control Agent» Systems Insight Manager - Accessing the Version Control Repository Manager
Related topics
» Systems Insight Manager - System page» Systems Insight Manager - HP System Management Homepage
» Discovery in HP SIM» Discovery filters» Managing Hosts file» Identification» Managing system types» Users and authorizations» Directory Services» Global credentials» System credentials» Security» Trusted certificates» Viewing the audit log» Configuring the audit log» Monitoring systems and
events» Quick Launch menu» Performing a basic search» Performing an advanced
search for systems» Performing an advanced
search for clusters» Performing an advanced
search for events» Tool search» Related information for
searches» Configuring events» Protocol settings» Software status polling» Hardware status polling» Data collection» System Properties» Configuring WBEM health
inclusion status» Specifying a Version
HP Version Control Agent are web-enabled HP Insight Management Agents. HP SIM usesthese Insight Management Agents and others to facilitate Software Update and tasksrelated to it.
In general, HP Insight Management Agents 4.0 and later are web enabled, and they providein-depth subsystem status and fault information on servers, workstations, desktops, andnotebooks, communicating directly with HP SIM when they are launched. Web-enabledagents are accessible through a browser or through HP SIM.
HP SIM provides the following version control tools:
Install Software and Firmware. Select Deploy Deploy Drivers, Firmware andAgents Install Software and Firmware.
HP Systems Insight Manager 7.1 English
Operations | Version Control | Accessing the Version Control Agent
» Discovery in HP SIM» Discovery filters» Managing Hosts file» Identification» Managing system types» Users and authorizations» Directory Services» Global credentials» System credentials» Security» Trusted certificates» Viewing the audit log» Configuring the audit log» Monitoring systems and
events» Quick Launch menu» Performing a basic search» Performing an advanced
search for systems» Performing an advanced
search for clusters» Performing an advanced
search for events» Tool search» Related information for
searches» Configuring events» Protocol settings» Software status polling» Hardware status polling» Data collection» System Properties» Configuring WBEM health
inclusion status» Specifying a Version
Access HP Version Control Agent from a network client using a web browser. Forinformation about which browsers are supported, seehttp://h18013.www1.hp.com/products/servers/management/agents/documentation.html.
IMPORTANT:If an HP Version Control Repository Manager has not been configured, only theSoftware and Firmware Inventory of items currently installed on the systemappear on the Home page. HP VCA settings must be configured for fullfunctionality.
IMPORTANT:For Windows operating systems, install the Insight Management Advisor 5.40 orlater to obtain any inventory data. For Linux operating systems, install HP ServerManagement Application and Agents (hpasm RPM) 7.00 or later to obtain anyinventory data. Install the current version.
NOTE:Login accounts that have Administrator or Operator privileges defined in the HPSystem Management Homepage (HP SMH) can access all features of the HPVCA.
Logging in to the HP VCA
Procedure 1 Logging in to the HP VCA
1. Navigate to https://hostname:2381 . The Login page appears if AnonymousAccess is disabled. If Anonymous Access is enabled, the HP SystemManagement Homepage page appears.
2. After you log in, browse to the HP VCA by entering https://hostname:2381/vcagentin the browser address field. You can also open it in a new browser window byclicking the HP VCA link from the HP System Management Homepage underIntegrated Agents or in the Version Control status box on the Home tab. The HPVCA page appears.
» Discovery in HP SIM» Discovery filters» Managing Hosts file» Identification» Managing system types» Users and authorizations» Directory Services» Global credentials» System credentials» Security» Trusted certificates» Viewing the audit log» Configuring the audit log» Monitoring systems and
events» Quick Launch menu» Performing a basic search» Performing an advanced
search for systems» Performing an advanced
search for clusters» Performing an advanced
search for events» Tool search» Related information for
searches» Configuring events» Protocol settings» Software status polling» Hardware status polling» Data collection» System Properties» Configuring WBEM health
inclusion status» Specifying a Version
You can access an HP Version Control Repository Manager through one of the followingmethods:
Accessing a HP VCRM from HP SIM
Accessing a HP VCRM directly
Accessing HP VCRM from HP SIM
Procedure 1 Accessing HP VCRM from HP SIM
1. Select Tools System Information System Management Homepage.
2. Select the target system, and then click [Run Now]. The HP System ManagementHomepage appears.
3. From HP SMH, Click the HP Version Control Repository Manager link. The HPVCRM Home page appears.
Accessing HP VCRM In-Place
On the system that has the HP VCRM installed, navigate tohttps://hostname:2381/vcrepository. The HP VCRM Home page appears.
NOTE:You can also access HP VCRM from the HP SMH.
HP Systems Insight Manager 7.1 English
Operations | Version Control | Managing Software/Firmware Baselines
» Discovery in HP SIM» Discovery filters» Managing Hosts file» Identification» Managing system types» Users and authorizations» Directory Services» Global credentials» System credentials» Security» Trusted certificates» Viewing the audit log» Configuring the audit log» Monitoring systems and
events» Quick Launch menu» Performing a basic search» Performing an advanced
search for systems» Performing an advanced
search for clusters» Performing an advanced
search for events» Tool search» Related information for
searches» Configuring events» Protocol settings» Software status polling» Hardware status polling» Data collection» System Properties» Configuring WBEM health
inclusion status» Specifying a Version
A baseline is a set of software or firmware that has been tested by HP to work together onthe hardware platforms that it is designed for. From this page, you can assign systems tobaselines. HP SIM then compares the level of software installed on those systems toversions in the baseline, and indicates differences. Baselines displayed in HP SIM dependson the HP VCRM contents.
A software status is generated, which is an aggregate of these differences and is displayedin the SW column of the Known Software/Firmware Baselines section of the page. Thisstatus depends on the settings in the Options Software/Firmware Global Settingspage.
NOTE:To receive a correct software status for all systems, you must add the systems tothe baseline, and then run the software status polling task. Be sure to include theIP address of each system added to the status polling task. Refer to the SystemsInsight Manager - Software status polling for additional information on running thesoftware status polling task.
IMPORTANT:HP VCA is no longer involved in updating the software status in HP SIM.
From this page, you can:
Refresh Table Retrieve the list of baselines from the default HP VCRM.
View Baseline Details Displays the baseline details including File, Version,Languages, Release Date, Revision History, and Contents (list of components inthe baseline).
View Assigned Systems Displays the software/firmware installed on the systemsassigned to the baseline, in comparison with those components in the baseline.
Clicking a status icon in the SW column of the Known Software/FirmwareBaselinestable, displays a panel showing the systems assigned to the baseline andtheir software status. To view the installed software and firmware for a system,select the radio button for that system in the Systems Assigned to Baseline table.The Installed Software and Firmware table appears, displaying thesoftware/firmware name, installed version, support pack version, and the latestversion. A “System Baseline Status” is generated, which is the aggregate of theindividual component status.
Add/Remove Systems Displays the Assign Systems To Baseline page andenables systems and collections to be added or removed from the baseline.
From this window, you can:
Add Systems Select systems/system collections and click [Apply].
Move Systems Move systems/system collections from one baseline toanother baseline.
Select a baseline from the Baseline dropdown list, and then click [Save] tosave, or click [Cancel ] to cancel the changes.
Remove Selected Systems Select systems/system collections to removefrom the table, and then click [Save] to remove the systems, or click[Cancel ] to cancel the changes.
Update Systems to Baseline Enables you to update the assigned systems to theselected baseline.
Control Repository» Configuring
software/firmware globalsettings
» Reporting» Managing with tasks» Using Cluster Monitor» Command line tools» Configuring managed
systems from a WindowsCMS
» Configuring managedsystems from a LinuxCMS
» Configuring managedsystems from an HP-UXCMS
» Custom tools» Setting disk thresholds» Creating a task to delete
disk thresholds» License manager» Management processor
tools» Managing
Communications» Managing MIBs» Installing OpenSSH» Replicate Agent Settings» RPM Package Manager» HP Server Migration Pack
- Universal Edition» HP System Management
Homepage» Version Control
» Accessing the VersionControl Agent
» Accessing the VersionControl RepositoryManagerManagingSoftware/FirmwareBaselines
The Install Software and Firmware page is displayed where you can create andrun the Install Software and Firmware task. When the task runs, it will install to eachtarget system the Baseline that is assigned to that system at the time of taskexecution. System Baseline assignments can change before, after, and betweentask executions.
» Discovery in HP SIM» Discovery filters» Managing Hosts file» Identification» Managing system types» Users and authorizations» Directory Services» Global credentials» System credentials» Security» Trusted certificates» Viewing the audit log» Configuring the audit log» Monitoring systems and
events» Quick Launch menu» Performing a basic search» Performing an advanced
search for systems» Performing an advanced
search for clusters» Performing an advanced
search for events» Tool search» Related information for
searches» Configuring events» Protocol settings» Software status polling» Hardware status polling» Data collection» System Properties» Configuring WBEM health
inclusion status» Specifying a Version
This page displays each system and its selected baseline, if any. The SW column (Softwarestatus) shows the state of the system compared to the assigned baseline. If no baseline isassigned to the system, then the status field is either informational or unknown. From thispage, you can:
View System Software Available when only one system is selected. A tableappears that displays the installed software and firmware on the system.
View Baseline Details Available when only one system is selected and isassigned to baseline.
Assign to Baseline Enables you to assign systems/system collections to aparticular baseline.
Select systems from the table and click [Assign to Baseline]. Then, select abaseline from the dropdown menu and click [Save].
Update Systems to Baseline Enables you to update the assignedsystems/system collections to the selected baseline.
The Install Software and Firmware page is displayed where you can create andrun the Install Software and Firmware task. When the task runs, it will install to eachtarget system the Baseline that is assigned to that system at the time of taskexecution. System Baseline assignments can change before, after and betweentask executions.
HP Systems Insight Manager 7.1 English
Operations | Version Control | Installing Software and Firmware through baselines
» Discovery in HP SIM» Discovery filters» Managing Hosts file» Identification» Managing system types» Users and authorizations» Directory Services» Global credentials» System credentials» Security» Trusted certificates» Viewing the audit log» Configuring the audit log» Monitoring systems and
events» Quick Launch menu» Performing a basic search» Performing an advanced
search for systems» Performing an advanced
search for clusters» Performing an advanced
search for events» Tool search» Related information for
searches» Configuring events» Protocol settings» Software status polling» Hardware status polling» Data collection» System Properties» Configuring WBEM health
inclusion status» Specifying a Version
When this task runs, it installs to each target system the baseline that is assigned to thatsystem at the time of task execution. System baseline assignments can change before,after, and between task executions. Perform the following to control how the task job runs;
Procedure 1 Installing software and firmware
1. Select Select if upgrading FW on a system with Trusted Platform Module(TPM) enabled, if applicable.
2. Select Force downgrade or reinstall the same version if applicable.
3. Select one of the following:
Select Perform offline SPP deployment, and select action to take whendeployement is complete.
NOTE:This upgrade type boots the system into Embedded Smart Start,and updates can be applied without an operating system beinginstalled on the target system.
Select from:
Use the stored sign-in credentials for each system (must beadministrator level). This is selected by default. You can select aGen8 server.
Use the specified administrator credentials below. Enter the username and password. When manually entering credentials, for aGen8 server, you must enter the credentials for the iLO4 here.
Perform online SPP deployment.
NOTE:This upgrade type occurs through the operating system on theserver, and updates take place after the system is rebooted.
Selelct Reboot systems if necessary after successful install.This is selected by default.
Select from:
Fail the install on systems where the HP VCA is notpresent. This is selected by default.
Install on systems where HP VCA is not present. Use thestored sign-in credentials for each system (must beadministrator level).
Install on systems where HP VCA is not present. Use thespecified administrator credentials below. If you select thisoption, enter the user name, password and domain.
4. To schedule the task, click [Schedule]. The Schedule Task page appears.
5. To set the task as critical, click [Criticality].
6. To run the task immediately, click [Run Now].
HP Systems Insight Manager 7.1 English
Operations | Version Control | Installing Software and Firmware task
» Discovery in HP SIM» Discovery filters» Managing Hosts file» Identification» Managing system types» Users and authorizations» Directory Services» Global credentials» System credentials» Security» Trusted certificates» Viewing the audit log» Configuring the audit log» Monitoring systems and
events» Quick Launch menu» Performing a basic search» Performing an advanced
search for systems» Performing an advanced
search for clusters» Performing an advanced
search for events» Tool search» Related information for
searches» Configuring events» Protocol settings» Software status polling» Hardware status polling» Data collection» System Properties» Configuring WBEM health
inclusion status» Specifying a Version
Automated software updates through HP SIM have the following restrictions:
HP VCA updates can be performed only on ProLiant servers that have HP VCAinstalled and trust the HP SIM server. You can use the Install Software andFirmware feature only with third-party systems running HP VCA.
NOTE:After a trust relationship is established, click Last Update to update thedisplay to trusted.
Updates require ProLiant Support Pack or components, v5.3 or later. The InstallSoftware and Firmware feature does not support third-party software.
Updates are supported on Linux and Windows operating systems only.
Updates cannot be made on the CMS.
Installing software and firmware:
Procedure 1 Installing software and firmware:
1. Select target systems.
2. Click [Next].
3. Under Select Items to Install, select the repository to retrieve the catalog from.
This section displays systems authorized by the current user name.
4. Under Contents of selected version control repository, click the icon to viewthe contents of the HP VCRM that you selected.
To expand the tree to display all contents, click the icon located in the upper-left corner of the Contents of selected Version Control Repository section. Clickthe icon to collapse the listings.
Select the components you want to install, and click [Next].
The Select Install Options section appears. The items are installed in the orderthey are listed in.
5. Optional: To reorder the items, select the item to reorder and perform one of thefollowing actions
Click [Move Up] to advance the item up.
Click [Move Down] to move the item down.
6. If you are installing software that is earlier than or the same version currentlyinstalled, select Force install the agents . This option is disabled by default.
7. Check Select if upgrading FW on a system with Trusted Platform Module(TPM) enabled to force a FW upgrade to a TPM system or I/O FW.
8. Bring systems to full power before the installation by selecting Bring systems tofull power before install. If you do not select this option, the installation isattempted and might fail because the system was not running at full power.
To be brought to full power, the target system must support Magic Pockettechnology.
Control Repository» Configuring
software/firmware globalsettings
» Reporting» Managing with tasks» Using Cluster Monitor» Command line tools» Configuring managed
systems from a WindowsCMS
» Configuring managedsystems from a LinuxCMS
» Configuring managedsystems from an HP-UXCMS
» Custom tools» Setting disk thresholds» Creating a task to delete
disk thresholds» License manager» Management processor
tools» Managing
Communications» Managing MIBs» Installing OpenSSH» Replicate Agent Settings» RPM Package Manager» HP Server Migration Pack
If selected, target systems are brought to full power before the installation isselected.
9. Optional: Clear the Reboot systems if necessary after successful install option ifyou do not want to reboot after the installation. However, the successful task statusindicates that a reboot is required to complete the update.
If you click [Schedule], the Schedule Task section appears.
10. Beginning with HP SIM 6.2, the following firmware is supported through the InstallSoftware and Firmware task.
Online System, FPGA, ILO-3 MP and Power Monitor Firmware WindowsFlash Component for HP Integrity BL860c/BL870c/BL890c i2 Servers
Online ILO and SFW Windows Firmware Flash Component for HP Integrityrx2800 i2 Servers
Online ILO and SFW Linux Firmware Flash Component for HP Integrityrx2800 i2 Servers
Select one of the following HP SUM installation options:
Select Fail the install on system where HP VCA is not present toperform SW/FW deployments on targets with HP VCA installed. When HPVCA is not installed, the task fails without requesting the HP SUM fordeployment.
This option is selected by default for legacy tasks. New tasks display theoption Install on systems where VCA is not present.
Select Install on system where HP VCA is not present. Use the storedsign-in credentials for each system (must be administrator level), toutilize HP SUM to perform the SW/FW installation using the stored sign-incredentials. This is the default option for new tasks.
Install on systems where HP VCA is not present. Use the specifiedadministrator credentials and enter the User Name, Password,Password (Verify), and Domain (Optional) credentials, to utilize HP SUMto perform the SW/FW installation using single administrator username andpassword.
11. Click [Schedule] to configure a time for the update to occur.
12. Click [Previous] to return to the previous screen, or click [Run Now] toimmediately install the software.
Firmware deployment to switches
When deploying firmware to switches, verify that the following conditions are met:
When updating HP switch firmware, switch devices and a single switch firmwarecomponent are selected.
The switch firmware image version matches the switch firmware boot image.
Older switch components do not generate a log file. However, the switch updatestatus can be found by running the ProLiant Interconnect Switch Upgrade tool. Thistool is installed as part of an Install Software/Firmware Task to a switch device.
» Discovery in HP SIM» Discovery filters» Managing Hosts file» Identification» Managing system types» Users and authorizations» Directory Services» Global credentials» System credentials» Security» Trusted certificates» Viewing the audit log» Configuring the audit log» Monitoring systems and
events» Quick Launch menu» Performing a basic search» Performing an advanced
search for systems» Performing an advanced
search for clusters» Performing an advanced
search for events» Tool search» Related information for
searches» Configuring events» Protocol settings» Software status polling» Hardware status polling» Data collection» System Properties» Configuring WBEM health
inclusion status» Specifying a Version
Procedure 1 Updating ROM firmware
1. From HP SIM, position your cursor in the Search field, and enter criteria for thespecific models to be ROM flashed. Click [Search]. The systems appear.
Searching for specific models is necessary because different models requiredifferent ROM firmware updates.
2. Select the systems to be updated, or select the column header to select allsystems.
3. Select Deploy Deploy Drivers, Firmware and Agents Install Software andFirmware. The Install Software and Firmware page appears.
4. Select the systems to be updated, and then click [Next].
5. Under Select Items to Install, select HP Version Control Repository Manager. Thecontents of the selected repository appear.
6. Under Contents of selected version control repository, click the icon to drilldown and view the contents of the Version Control Repository that you selected.
NOTE:To expand the tree to display all contents, click the icon located inthe upper-left corner of the Contents of selected Version ControlRepository section. Click the icon to collapse the listings.
After navigating down in the repository, select the server, the operating system andthe BIOS to be updated. Scroll down the BIOS list, find the matching server type,and select the most current BIOS versions. You can select additional items such asarray firmware if applicable.
7. Click [Next]. The Select Install Options section appears. The items are installed inthe order in which they are listed.
8. (Optional) To reorder the items, select the item to reorder and perform one of thefollowing actions.
Click [Move Up] to advance the item up.
Click [Move Down] to move the item down.
9. Select Force install the agents if you are installing software that is older than orthe same as the version currently installed. This option is disabled by default.
10. Select Bring systems to full power before install to bring systems to full powerbefore the installation. If this option is not selected, the installation is attempted andmight fail because the system was not running at full power.
The targeted system must support Magic Pocket technology to be brought to fullpower.
If selected, the target systems are brought to full power before the install isselected.
11. (Optional) Clear the Reboot systems if necessary after successful install optionif you do not want to reboot after the installation. However, the successful taskstatus indicates that a reboot is required to complete the update.
12. Click [Run Now] to update the software. This process can take several seconds.The Task Results page appears indicating whether the updates succeeded orfailed.
HP Systems Insight Manager 7.1 English
Operations | Version Control | Version Control status icons
» Discovery in HP SIM» Discovery filters» Managing Hosts file» Identification» Managing system types» Users and authorizations» Directory Services» Global credentials» System credentials» Security» Trusted certificates» Viewing the audit log» Configuring the audit log» Monitoring systems and
events» Quick Launch menu» Performing a basic search» Performing an advanced
search for systems» Performing an advanced
search for clusters» Performing an advanced
search for events» Tool search» Related information for
searches» Configuring events» Protocol settings» Software status polling» Hardware status polling» Data collection» System Properties» Configuring WBEM health
inclusion status» Specifying a Version
» Version Control status
NOTE:To access HP Version Control Agent click a Software Status icon. If HP VCAcannot be accessed, help displays that describes how to configure HP VCA ortrust relationship on that system.
NOTE:There is a Software Status icon for every server except HP-UX.
Version Control status
The status is based on comparing the installed versions with versions in the repository.
Table 1 Version Control status icons
Icon Status
There are different reasons why an Unknown status icon might appear:
HP VCA does not have an HP VCRM configured.
The configured HP VCRM is not reachable or does not respond to HTTPrequests (for example, the system or service is down or the password hasbeen changed).
An HP VCA cannot be detected on the system or cannot communicatewith the HP VCA.
NOTE:The status is that of the latest version of the component in the configuredrepository.
The following table shows the status returned by HP VCA indicating whether or not thesoftware and firmware installed on the system matches what is in the repository.
Table 2 HP VCA software and firmware status
Icon Status
This update contains critical bug fixes. Apply this update at your earliestconvenience.
The repository contains a version of this component that might contain bug fixes ornew hardware support. Review information about this version and apply this updateappropriately.
The installed software versions are the same or newer than the latest versionsavailable at the HP VCRM.
When the overall software status indicates that an item is not current, identify the softwareor firmware items that have available updates, read the item descriptions, and determinewhether the update is appropriate for the server.
If a repository is configured and a Insight Remote Support Advanced is not, the status is
Control Repository» Configuring
software/firmware globalsettings
» Reporting» Managing with tasks» Using Cluster Monitor» Command line tools» Configuring managed
systems from a WindowsCMS
» Configuring managedsystems from a LinuxCMS
» Configuring managedsystems from an HP-UXCMS
» Custom tools» Setting disk thresholds» Creating a task to delete
disk thresholds» License manager» Management processor
tools» Managing
Communications» Managing MIBs» Installing OpenSSH» Replicate Agent Settings» RPM Package Manager» HP Server Migration Pack
» Installing ROM firmwareupdatesVersion Control statusicons
» Device ping» Reference» Support and other
resources» Assistance
» Glossary» Using Help
based on a comparison between the installed software or firmware versions and the newestcomponents available from the configured repository.
If a repository and Insight Remote Support Advanced are configured, the status is based ona comparison between the installed software or firmware versions and the software orfirmware versions in the Insight Remote Support Advanced.
» Discovery in HP SIM» Discovery filters» Managing Hosts file» Identification» Managing system types» Users and authorizations» Directory Services» Global credentials» System credentials» Security» Trusted certificates» Viewing the audit log» Configuring the audit log» Monitoring systems and
events» Quick Launch menu» Performing a basic search» Performing an advanced
search for systems» Performing an advanced
search for clusters» Performing an advanced
search for events» Tool search» Related information for
searches» Configuring events» Protocol settings» Software status polling» Hardware status polling» Data collection» System Properties» Configuring WBEM health
inclusion status» Specifying a Version
Use the Ping tool to ping an individual system or multiple systems. To ping systems, selectDiagnose Ping. The Ping window appears. Select the target systems and click [RunNow] to run the task. For more information, see Systems Insight Manager - Creating atask.
If a system does not resolve to an IP address, the request cannot be performed. Forsystems with multiple IP addresses, the result of each IP address occupies one row in theresult page. The status on the upper-right corner is: Pinging selected systems. After all thesystems on the list are pinged, the status is: Ping completed with a time stamp of thecompletion time.
The ping results appear in a separate window.
Table 1 Ping results
Reply Description
Replied The request has been executed successfully, and the pingedsystem has responded.
Request timed out The request has been executed, but the pinged system failed torespond.
System has no IPaddress
There is no IP address associated with the system. Unable toperform ping.
No system isselected No system is selected.
If the ping is successful, there is no retry. You can retry only when the ping fails. The pingresults have no effect on the system status on the Task Results or system view pages.
information» Port types» Replicate Agent Settings» Cluster Monitor resources
and associated settings» Configure or repair agents
results log» Available MSA tools» Custom tools reference
» Support and otherresources
» Assistance
» Glossary» Using Help
For best results, HP recommends creating the following discovery tasks, and running themsequentially in the suggested order. You might want to create multiple tasks for certaintypes, such as servers, grouping them so that systems with the same credentials are in thesame discovery tasks, with up to three sets of credentials supplied in each discovery task.This reduces the chance of account lockout when an invalid credential is tried too manytimes.
NOTE:Be sure to add your Central Management Server (CMS) to the recommendedtask that includes the type of system that hosts the CMS.
1. Onboard Administrator This discovery task is for discovery of the OnboardAdministrators for every enclosure to be managed. When specifying credentials forthis task, include the HP iLO credentials for every blade in the enclosuresassociated with the Onboard Administrators.
2. Management Processors This discovery task is for discovery of all managementprocessors not discovered in the previous tasks. This includes HP iLO andmanagement processors for all non-blade systems.
3. Physical Servers This discovery task is for discovery of physical servers (bladeservers and standalone servers).
4. Virtual Machines This discovery task is for discovery of virtual machines, withappropriate credentials, along with the virtual machine host that are ssociated withservers discovered in the previous category.
NOTE:If discovery tasks are run out of order, errors are likely. Typical errors due torunning discovery tasks in an improper order include:
Association errors For example, a server not associated with amanagement processor or virtual machine not associated with a virtualmachine host.
Credentials errors Because discovery of systems can trigger additionaldiscovery of associated systems or management processors, if thecorrect credentials are not supplied for the associated systems, theirdiscoveries are likely to show errors. If you discover these associatedsystems with a subsequent discovery task containing the propercredentials, they should then complete successfully.
NOTE:Citrix Xen VMs discovered in category 5 will always return a discovery errorunless the Citrix Xen Host has been registered through Configure VirtualMachine Register Virtual Machine Host.
If you have a small network, an alternate way of setting up your discovery tasks is to createa single task with one IP address range and all of the required credentials for the systemsin that range. However, doing this can make it difficult to troubleshoot and diagnose errors ifone or more systems are not configured correctly.
information» Port types» Replicate Agent Settings» Cluster Monitor resources
and associated settings» Configure or repair agents
results log» Available MSA tools» Custom tools reference
» Support and otherresources
» Assistance
» Glossary» Using Help
Search criteria
You can select from many criteria when you create a collection. Although the task you run is associatedwith one collection, one collection can include numerous conditions.
You can also exclude criteria. For example, including all systems of the type server and excluding allsystems of a certain processor type provides a more distinct subset of the servers on the network. Thisfiltering is accomplished by selecting is or is not comparison selections.
Commonly used criteria include system type, IP address, product name, and hardware status. Lessfrequently used criteria include event category selection (trap categories), processor, managementprotocol, and memory range. Event collections include both system criteria and event criteria. However,event criteria do not apply to system collections.
When you select multiple criteria, the system must meet all criteria for the system to be included in thecollection. For example, if you select systems within a specified IP range and with more than 32 MB ofRAM, the collection does not return a system in the specified IP range if the system has less than 32 MBof RAM.
Complex collections with many individual system selections or with many different selection criteria takemore system resources to execute. If a task is associated with a collection, keep the collection as simpleas possible to minimize the performance impacts.
Systemcollectioncriteria
Finds
asset number User-defined field listing the asset number of the system.
se cluster node Systems that belong to a certain cluster.
commonattributes
Systems with common attributes, including: full DNS name, system host name,serial number, operating system type, operating system version, operating systemdescription, operating system name, product model, system type, and IP address.
contact User-defined field listing the contact for system status information.
directory group
The distinguished name of a system group. Can be used to create collections usedfor authorizations. As comparison criteria, this can be specified without knowing thefull distinguished name. With support for Dynamic Authorizations, this enables groupmemberships in the directory and changes to them to be reflected and dynamicallyupdated in HP SIM authorizations.
hardware status Systems of specified hardware status type (Critical, Disabled, Major, Minor, Normal,and Unknown).
IP address Systems with an IP address that falls in the specified range.
location User-defined field indicating the physical location of the system.
managementprotocol Systems running one or more of the following protocols: HTTP, WBEM, or SNMP.
memory range Systems with memory in the specified range (see “Memory range criteria” fordetails).
network protocol System running on IPV4.
organizationalunit (OU)
The distinguished name of a system. Can create collections used for authorizations.As comparison criteria, this can be specified without knowing the full distinguishedname. With support for Dynamic Authorizations, this enables group memberships inthe directory and changes to them to be reflected and dynamically updated in HPSIM authorizations.
operating system Systems with specific operating system, version number, or both.
processor Systems with the specified processor type, speed, or both.
product name Systems with the specified product names.
rack Systems in a rack by a given set of rack names (does not include the rack itself).
serial number User-defined field that displays the serial number of the system.
server role Systems that have a certain server role set for them (see “Server role criteria” formore information).
service status Systems that have a specified service status.
software/firmware Systems with specific software or firmware version installed (see “Software andfirmware criteria” for more information).
system name Systems with a specific set of system names.
system settingSystems with a specific client attribute defined. Client attributes are typically usedand set by one of the HP ProLiant Essential plug-ins and is typically reserved foruse by one of those plug-ins.
system sub type Enables you to search on the product subtype field in the HP SIM database (forexample, Power Enclosure, enclosure, and VM Host).
system typeSystems identified with the standard system types, including: cluster, desktop,enclosure, management processor, portable, printer, remote access device,repeater, router, server, switch, unknown, workstation, and so on.
trust status Systems that have web-enabled agents that either do or do not trust themanagement console.
web agent Systems with specific web-servers or Web Agents installed.
windows domain
The simple domain name of a system. Can be used to create collections used forauthorizations. As comparison criteria, this can be specified without knowing the fulldistinguished name. With support for Dynamic Authorizations, this enables groupmemberships in the directory, and changes to them to be reflected and dynamicallyupdated in HP SIM authorizations.
Note: The preceding System Collection Criteria are also available as Event Collection Criteria on theAdvanced Search page.
Event collectioncriteria Finds
assignee Events that have a particular assignee assigned to them (see “Assignee criteria” formore information).
cleared stateEvents with a state of Cleared, Not Cleared, or In Progress but is not displayedwhen the page is opened in the Automatic Event Handling UI (see “Cleared statecriterion” for more information).
event category Events that belong to a certain event category selection.
event timeEvents that occurred at specified times or the age of events that are greater or lessthan a specific number of days but does not appear when the page is opened in theAutomatic Event Handling UI.
event typeEvents by type grouped by categories (above), and the display is a tree of thecategories with event types for each category (see “Event type criteria” for moreinformation).
Status for Remote Support Pack service cases (Assigned for processing, closed,Delivered to HP, In Transit, Other, Submitted to Remote Support, Undelivered). Thisoption is available if the Remote Support Pack is installed.
Clustercollectioncriteria
Finds
cluster monitorresource Clusters with specified cluster monitor resource.
cluster name Systems included in a certain cluster name.
Clusters identified with the standard cluster types, including: MSCS clusters,
cluster type TruCluster Production Server clusters, TruCluster Server clusters, OpenVMSclusters, SCO UnixWare7 NonStop clusters, and HP Serviceguard clusters.
ip address Cluster with a specified IP address.
status type Cluster with specific cluster status levels (Critical, Major, Minor, Normal, andUnknown).
Software and firmware criteria
The software/firmware criteria searches for custom support packs in the selected repository and installedsoftware/firmware components for matches in the HP SIM database. This enables you to check softwareand firmware installed on the target system using the HP SIM database.
NOTE:Information retrieved from the database appears in the language in which it was stored. Dataretrieved from the repository appears in the language corresponding to the browser locale.
NOTE:Searches saved with previous versions of HP SIM are still supported. Searches on HP SupportPack are not supported and HP Support Pack software components are filtered from the treedata. HP Support Packs were removed because systems were never returned from a querycontaining a criteria with HP Support Packs selected. User-built custom support packscontinue to appear in this list. However, previously saved collections containing HP SupportPacks continue to appear.
Software components with no entry for operating system appear under the Other option in the andoperating system is selection, and software components with no entry for category appear under theOther option in the and category type is selection. This is sometimes the case for software/firmwarecriterion saved with older versions of HP SIM, because the saved operating system and category namesdo not match exactly with the new operating system and category names in the database.
You can search software and firmware installed on HP-UX systems. HP-UX populates data in HPUX-Product and HPUX-Bundle tables with information about software and firmware installed on managed HP-UX systems. The data retrieved from these tables include name, caption, and version of each softwareand firmware installed on target machines. A new entry is added to the and operating system isdropdown as HP-UX Bundles and Products. Two new categories, Bundles and Products, are added inthe and software/firmware is dropdown list. If there is no data in one of these tables, then the categoryfor that table does not appear. If there is no data from either of these tables, then the operating systemHP-UX Bundles and Products does not appear.
When comparing against a custom support, the only comparison you can use with the customsupport pack is Equal To. In addition, HP SIM cannot determine whether a custom support packis actually installed on a system, only whether all components in a custom support pack areinstalled on a system. A system is returned by this search only if every component in the customsupport pack is on the list. It is unlikely that all of the components in a custom support pack areinstalled on any system, so use these criteria carefully.
This criterion retrieves information from the SQL database table that was populated by a SoftwareVersion Status Polling task. This table is also updated when software is installed through theUpdate Software or Firmware HP SIM task. Therefore, if software was installed or uninstalled on
systems without using HP SIM and after a Software Version Status Polling task was last run, thissearch might not return the correct results.
Cleared state criterion
You can run a search on the following event statuses:
Any. Includes all events, whether Cleared, Not Cleared, or In Progress.
Cleared. Includes events that are cleared.
Not Cleared. Includes events that are not cleared.
In Progress. Includes events from tasks in the progress: When the event is complete, theseevents become Uncleared.
Server role criteria
The Server Role criteria is a system or event collection search that enables you to list the servers of oneor more matching roles. The server role is a user-specified value available on HP Insight ManagementAgent 5.4 or later. To create the criteria, select server role in the Where dropdown list on the AdvancedSearch page, and then select the criteria comparison option.
Assignee criteria
You can run a search on certain events that are assigned to a particular user. When you select theassignee collection criteria, the result is a scrollable list of users from which you can select more thanonce.
NOTE:If you do not select a user, an error message appears, stating that there are no assignees forthese events. Add assignees from the event table view page.
Event type criteria
NOTE:You can use only one event type criteria in a given search.
When using the event type criteria, you must select comparison criteria such as is or is not. A tree viewof the event types, organized by event category selection appears. Next, in the type(s) box, whichcontains the tree, select types to search for. For each event type displayed, all correlated types appear.Correlated types (WBEM indications) are grouped with the matching SNMP trap into a subcategory. Theevent types are shown under the subcategory. You can select an entire category, click to expand thebranch and select individual categories, or click to collapse close the branch. To add additional criteria,
click [Add]. To perform the search immediately, click [View ]. To save the search, click [Save As ].
NOTE:While you can select a specific version of a trap (for example, Array Accelerator Bad Data,Version 1, it is better to select both versions because you might have older or newer agents onsome managed systems. Selecting all versions ensures that all agent versions are included inthe event collection.
The Automatic Sign-In Server Failure event type indicates that a general error occurred on the server-side of authentication during automatic sign-in. This event can occur for several reasons.
If the SPN has not been configured on the domain, it must be registered with the HP SIM serviceaccount.
If the SPN has been registered with more than one domain account, it must be registered for onlythe HP SIM service account. Delete any other SPN entries associated with other accounts.
If browsing locally from the CMS, you must provide your credentials in the sign-in page.Automatic sign-in does not work when browsing locally.
The Automatic Sign-In No Domain Credentials event type indicates the HP SIM service is not running witha domain account. For automatic sign-in to work, use a domain account for the HP SIM service, andregister the domain account with a SPN for HP SIM.
The Automatic Sign-In No Domain Credentials event type indicates the HP SIM service is not runningwith a domain account. For automatic sign-in to work, use a domain account for the HP SIM service, andregister the domain account with a SPN for HP SIM.
The Sign-In Attempt by Invalid User event type indicates the user is not configured as a user of HPSIM, nor is a member of a user group configured in HP SIM.
The Sign-In Attempt from Disallowed IP Address event type indicates the user is browsing from an IPaddress that is not allowed for that user.
Memory range criteria
You can set the memory ranges for systems that you include in the collection. You can select multiplegroups one-at-a-time from the following ranges:
Memory Equal To (=) Includes systems with memory equal to a specified amount.
Memory Not Equal To (!=) Includes systems with memory not equal to a specified amount.
Memory Less Than (<) Includes systems with less memory than the specified amount.
Memory Less Than or Equal To (<=) Includes systems with memory less than or equal to aspecified amount.
Memory Greater Than (>) Includes systems with more memory than the specified amount.
Memory Greater Than or Equal To (>=) Includes systems with memory greater than or equalto a specified amount.
Memory Range Between (is between) Includes systems with memory in the specified range.
information» Port types» Replicate Agent Settings» Cluster Monitor resources
and associated settings» Configure or repair agents
results log» Available MSA tools» Custom tools reference
» Support and otherresources
» Assistance
» Glossary» Using Help
You can specifically include or exclude IP addresses individually for discovery or as part of arange. Because the IP address range entries also affect cluster discovery, IP ranges mustinclude the addresses of the cluster and its nodes. Enter one system or range per line.When entering IP address ranges, use the guidelines in the following table:
IP range Range to enter
Your local subnet IP ranges from 1 to 254, thedefault Ping inclusion ranges 172.25.76.1-172.25.76.254
A single system as a range in the Pinginclusion ranges or Exclusion ranges fields
172.25.76.114-172.25.76.114 or172.25.76.114
A group of systems within a subnet in the Pinginclusion ranges or Exclusion ranges fields 172.25.76.38-172.25.76.48
Systems included in a hosts file $filename
No broadcast node in this subnet 172.25.76.255:NOBROADCAST
Broadcast node determined by the subnet mask172.25.76.0-172.25.76.255:255.255.255.0 or172.25.76.114:255.255.255.0
Discovery assumes you do not want to ping the subnet network ID (typically the zero node),or the subnet broadcast address (typically node 255), because these settings wouldunnecessarily use network resources. If the system 255 is not a broadcast address on yournetwork, you can indicate this in the Ping inclusion ranges section as shown in thepreceding table or exclude the specific system in the Exclusion ranges section. HP SIMuses the subnet mask to determine the broadcast system. If you do not specify a mask, HPSIM uses the default mask for the class of network. If your subnet mask is not the defaultfor the class, the broadcast system can be included, generating much more network trafficthan necessary.
The following collections are removed if the associated operating system is not selected onthe Managed Environment page of the First Time Wizard or from the ManagedEnvironment page in the HP SIM UI (Options Managed Environment). Thesecollections are located in the System and Event Collections panel under Systems byOperating System and Cluster by Type, with the exception of All Matrix OE Resourceswhich is located under Systems by Type. The following table lists collections by operatingsystem.
Windows Linux HP-UX Other
Microsoft WindowsServer 2003
Red Hat Linux HP-UX SCO Unix
Microsoft WindowsServer 2008
SuSE Linux HP Serviceguard (underClusters by Type)
HP Tru64UNIX
Microsoft WindowsNT
Linux All HP Integrity VirtualMachines*
HPOpenVMS
Microsoft WindowsXP
All HP ServiceguardClusters*
All Virtual Partition Servers* HP NonStopServer
Microsoft Windows95, 98, Me
All Resource Partitions* HPTruClusters
MSCS Clusters All Shared ResourceDomains*
OpenVMSClusters
Microsoft Vista All HP ServiceguardClusters*
NovellNetware
Microsoft Windows2000
All Virtual Partitions*
HP Serviceguard (underClusters by Type)
All HP Integrity VirtualMachines*
* Located under All Matrix OE Resources.
Operating-system-specific reports
The following reports are specific to HP-UX and are added or removed depending onwhether HP-UX is selected or not. Windows or Linux do not have specific reports.
Cellular Systems - Servers
HP-UX File System - HP-UX
HP-UX Kernel Parameters - HP-UX
HP-UX Logical Volume - HP-UX
HP-UX Network Details - HP-UX
HP-UX Physical Volume - HP-UX
HP-UX Software Bundle - HP-UX
HP-UX Software Product - HP-UX
HP-UX Volume Group - HP-UX
I-O Devices - HP-UX
Logical Memory Details - HP-UX
Operating System Details - HP-UX
IP Route - HP-UX
The following reports have no data for HP-UX and are removed if HP-UX is the onlyselection.
Batteries
Logical Disk Drives
Installed Controllers
Operating-system-specific tools
Windows
Tools Command Line Tools Windows
Deploy Drivers, Firmware, Software
Configure Disk Threshold
Configure Replicate Agent Settings
Linux
Tools Integrated Consoles Webmin
Deploy Drivers, Firmware, Software
Configure Disk Threshold
Configure Replicate Agent Settings
Deploy RPM Package Manager
Tools Command Line Tools Unix/Linux
HP-UX
Configure HP-UX Configuration
Deploy Ignite-UX
Deploy Software Distributor
Diagnose Event Monitoring Service
Optimize Process Resource Manager
Optimize Workload Manager
Tasks & Logs View SAM Log
Tasks & Logs View Software Distributor Agent Log
Tasks & Logs View Software Distributor Daemon Log
Tools Command Line Tools Unix/Linux
Configure Management Processor HP Integrity or HP 9000 managementprocessor
Tools Integrated Consoles Webmin
Other
Tools Command Line Tools Unix/Linux
Systems Insight Manager - First Time Wizard related topics
» Port types» Replicate Agent Settings» Cluster Monitor resources
and associated settings» Configure or repair agents
results log» Available MSA tools» Custom tools reference
» Support and otherresources
» Assistance
» Glossary» Using Help
The following table describes the HP SIM, system health status types:
Table 1 HP SIM status types
Statusicon Status type Description
Critical HP SIM can no longer communicate with the system. The systemwas previously discovered but cannot be pinged. The systemmight be down, powered off, or no longer accessible on thenetwork because of network problems.
Major A major problem exists with this system that should beaddressed immediately. For systems running HP InsightManagement Agent, a component has failed. The system mightno longer be properly functioning and data loss can occur. InInsight Manager (WIN32), this status was identified as Failed.
Minor A minor problem exists with this system. For systems runningInsight Management Agent, a component has failed, but thesystem is still functioning. In Insight Manager (WIN32), this statuswas identified as Degraded.
Warning The system has a potential problem or is in a state that mightbecome a problem.
Normal The system is operating normally. The system is accessible.
Disabled The system is suspended, which enables a system to beexcluded from status polling, identification, data collection, andautomatic event handling. On the Automatic Discovery page, ifyou select the Automatically discover a server blade when itsiLO is identified option, new servers discovered through iLO(for example, no operating system or IP address known) areshown as disabled until the system is discovered with an IPaddress or operating system.
Unknown HP SIM cannot obtain management information about the systemusing SNMP. Although no management instrumentationinformation is available, the system can be pinged. It might havean invalid community string or security setting, or it might be anIP address that is no longer associated with a system.
Informational The system might be in a transitional state or a nonerror state.
No Status The system has not been polled by one or more of the pollingtasks since the system was discovered.
NOTE:HP Insight Management Agent for Servers for Windows continues to use theterms Normal, Degraded, Failed, and Inaccessible. Minor and Major statuses areonly associated with systems running these agents.
» System status typesSetting up trustrelationships
» Configure or RepairAgents Learn More links
» Manage communicationsLearn More links
» Credentials used in HPSIM
» Credentials relatedinformation
» Port types» Replicate Agent Settings» Cluster Monitor resources
and associated settings» Configure or repair agents
results log» Available MSA tools» Custom tools reference
» Support and otherresources
» Assistance
» Glossary» Using Help
» Configuration of the managed system» Importing the HP SIM certificate over the network» Importing the HP SIM certificate from a file» Setting up the managed server running Management HTTP Server» Suppressing browser warning messages
The following sections detail how to set up a trust relationship between an HP SIM CMSand a managed system.
Configuration of the managed system
For Single Sign On and STE to function properly, the managed system must be running asupported agent and be configured to trust the HP SIM server. The trust mode is configuredfrom the HP SMH. The following trust modes are available:
Trust By Certificate. The Trust by Certificate mode sets the System ManagementHomepage to accept configuration changes only from HP SIM servers with trustedcertificates. This mode requires the submitted server to provide authentication by means ofa digital signature and certificates. This mode provides the highest level of security becauseit verifies the digital signature before allowing access. HP recommends this option.
NOTE:If you do not want to enable any remote configuration changes by HP SIM, leaveTrust by Certificate selected, and leave the list of trusted systems empty.
Trust By Name. The Trust By Name mode sets the System Management Homepage toaccept certain configuration changes only from servers with the HP SIM names designatedin the Trust By Name field. The Trust By Name option is easy to configure and preventsnonmalicious access. For example, you might use this option if you have a secure networkwith two separate groups of administrators in two separate divisions. It prevents one groupfrom installing software to the wrong system. This option verifies only the HP SIM servername submitted, not the digital signature.
Trust All . The Trust All mode sets the System Management Homepage to acceptconfiguration changes from any system. For example, you could use the Trust All option ifyou have a secure network, and everyone in the network is trusted.
NOTE:For Trust By Certificate, the certificate from the HP SIM system can be installedduring the initial support pack deployment.
Importing the HP SIM certificate over the network
If you prefer importing the HP SIM certificate from a file, see Setting up trust relationships -Importing the HP SIM certificate from a file for more information.
1. From a web browser, navigate to the managed server using the address:https://managed-server:2381 . The System Management Homepage appears.
2. Log in to the System Management Homepage.
3. On the Settings tab, select System Management Homepage Security.
4. Click [Trust Mode]. The Trust Mode page appears.
5. To require trusted certificates, select Trust by Certificate.
6. To save the trust mode, click [Save Configuration], or to cancel all changes, click[Reset Values].
7. Click the browser [Back] button to return to the Trust Mode page.
8. To access the Trusted Management server certificate, click [Trusted Certificate].
9. In the text box next to [Add Certificate From Server], enter the name of the HPSIM server that contains the certificate to be added.
10. Click [Add Certificate From Server]. The certificate information is presented forverification before it is added to the list.
Note: Because this is a nonsecure request over HTTP, a malicious party couldintercept the request and substitute an untrusted certificate in response to therequest. A more secure method for obtaining the HP SIM certificate is described inthe Setting up trust relationships - Importing the HP SIM certificate from a filesection.
11. Verify the certificate information. If you want to add it to the Trusted Certificate List,click [Add Certificate to Trust List].
Note: If you are setting up a trusted certificate on a cluster, see theTroubleshooting section of the HP Systems Insight Manager User Guide.
Importing the HP SIM certificate from a file
1. Export the HP SIM server certificate from the HP SIM server to a file. For moreinformation, see Systems Insight Manager - Exporting a server certificate.
2. Place the certificate file in a file location that is accessible by the file system of themanaged system.
3. Browse to the managed system, and using a text editor, open the HP SIM servercertificate created in step 1.
4. Highlight the entire contents of the file, including the Begin Certificate and EndCertificate lines. Copy the highlighted contents of the certificate file to theclipboard.
5. Return to the managed system browser and then select the HP SIM CertificateData box.
6. Paste the contents of the certificate file into this box, and then click [Add Cert ]. Aconfirmation window appears with three links at the top.
7. Click Options, and scroll down to the Trusted Certificates section. The TrustedCertificates: list appears with the server name and links to View Certificate andRemove Certificate for the HP SIM certificate that was just added.
Setting up the managed server running Management HTTP Server
Importing the HP SIM certificate
1. Export the HP SIM server certificate from the HP SIM server to a file. For moreinformation, see Systems Insight Manager - Exporting a server certificate for moreinformation.
2. Place the certificate file in a file location that is accessible by the file system of themanaged system.
3. Browse to the managed system, and using a text editor, open the HP SIM servercertificate created in step 1.
4. Highlight the entire contents of the file, including the Begin Certificate and EndCertificate lines. Copy the highlighted contents of the certificate file to theclipboard.
5. Return to the managed system browser and select the HP SIM Certificate Data
box.
6. Paste the contents of the certificate file into this box, and then click [Add Cert ]. Aconfirmation window appears with three links at the top.
7. Click Options, and scroll down to the Trusted Certificates section. The TrustedCertificates: list appears with the server name and links to View Certificate andRemove Certificate for the HP SIM certificate that was just added.
Requesting the HP SIM certificate
Enter the HP SIM server name in the appropriate field, and then click the corresponding[Get Cert ] button. The managed system makes an HTTP request directly to the HP SIMserver for its certificate.
Note: Because this is a nonsecure request over HTTP, a malicious party could intercept therequest and substitute an untrusted certificate in response to the request. A more securemethod for obtaining the HP SIM certificate is described in “Importing the HP SIM certificate”for more information.
Onboard Administrator configuration
To enable Single Sign On support in Onboard Administrator 1.20 or later, see the OnboardAdministrator documentation.
HP StorageWorks Command View EVA configuration
To enable Single Sign On support in HP StorageWorks Command View EVA 6.0 or later,see the HP StorageWorks Command View EVA user guide.
With HP SIM 5.2 and later, the cv-tools.xml file is automatically installed and configured.An account in HP SIM based on the default administrator template will have administratorrights in Command View EVA and an account based on the default user template will haveuser rights in Command View EVA.
HP SIM configuration
System identification
A system identification task must be run at least once on any managed system for HP SIMto know that the system supports Single Sign On and Secure Task Execution, or thesefeatures do not function.
Certificates for trusted systems
If you have enabled Require on the Trusted System Certificates page (select OptionsSecurity Credentials Trusted Systems Trusted Certificates) tab, importcertificates that represent the managed systems you want the HP SIM server to trust intothe Trusted System Certificates List of HP SIM. For the managed system certificate, youcan use the system certificate, or, if applicable, the certificate the CA, used to sign thesystem certificate.
NOTE:If Require is disabled on the Trusted Certificates page, then Trusted SystemCertificates List is not used, all certificates are accepted, and you can omit thissection.
Before importing system certificates into the HP SIM Trusted System Certificates List,export the certificates to a file in DER or Base64-encoded format. To obtain the systemcertificate, you can:
For Windows systems with which you have access to the file system, copy thecertificate from the file c:\compaq\wbem\cert.pem in Base64-encoded format, tosome place accessible by HP SIM or access it directly if it is already accessible byHP SIM.
Export the system certificate while browsing to the system. Select File
Properties from the browser menu. Click [Certificates]. Click the Details tab, andthen click [Copy to File]. Export the certificate as a Base64-encoded X.509 file.
To obtain the CA certificate, contact your CA, or see the documentation provided with yourcertificate server software. To import managed system certificates into the HP SIM TrustedSystem Certificates List:
1. Select Options Security Certificates Trusted Systems TrustedCertificates tab, and then click [ Import]. The Import Trusted System Certificatesection appears.
2. Next to the Certificate Filename field, click [Browse].
The Choose file dialog box appears.
3. Navigate to the location of the certificate to be imported, and then select the filename. Click [Open].
The certificate is imported.
Note: If you are setting up a trusted certificate on a cluster, see HP Systems InsightManager User Guide for more information.
Suppressing browser warning messages
To suppress browser warnings regarding untrusted certificates when browsing to an HPSIM managed system import the certificates into the browser.
1. Open Internet Explorer, and browse to the managed server athttps://managed_server:2381 or HP SIM at https://sim_server :50000.
2. On the Internet Explorer Security Alert , click [View Certificate].
3. After reviewing the certificate, click [ Install Certificate].
4. Click [Next].
5. Click [Place all certificates in the following store].
6. Click [Browse].
7. Select Trusted Root Certificate Authorities , and then click [OK].
provider for Windows» Configuring SNMP» Installing OpenSSH
from CRA» Installing Linux PSP or
ESX Agents from CRA» Installing the Version
Control Agent» Configuring VCA» Configuring a non-
administrative accountfor HP SIM to accessWMI data
» Configuring SSH» Manage communications
Learn More links» Credentials used in HP
SIM» Credentials related
information» Port types» Replicate Agent Settings» Cluster Monitor resources
and associated settings» Configure or repair agents
The Configure or Repair Agents tool enables you to configure or repair Simple NetworkManagement Protocol settings and trust relationships that exist between Systems InsightManager and target systems.
For more information, see the following:
Systems Insight Manager - Configuring managed systems from a Windows CMS
Systems Insight Manager - Configuring managed systems from an HP-UX CMS
Systems Insight Manager - Configuring managed systems from a Linux CMS
HP Systems Insight Manager 7.1 English
Reference | Configure or Repair Agents Learn More links | Setting the administrator password for Insight ManagementAgents
Setting the administrator password for InsightManagement Agents
Agents Learn More linksSetting theadministrator passwordfor Insight ManagementAgents
» Installing theWBEM/WMI provider forWindows
» Configuring WBEM/WMI» Monitoring systems,
clusters, and events» Installing the SNMP
provider for Windows» Configuring SNMP» Installing OpenSSH
from CRA» Installing Linux PSP or
ESX Agents from CRA» Installing the Version
Control Agent» Configuring VCA» Configuring a non-
administrative accountfor HP SIM to accessWMI data
» Configuring SSH» Manage communications
Learn More links» Credentials used in HP
SIM» Credentials related
information» Port types» Replicate Agent Settings» Cluster Monitor resources
and associated settings
Set administrator password for Insight Management Agentss version 7.1 orearlier Select this option to repair the administrator password on all Insight ManagementAgents installed on the target systems as applicable for Windows and Linux systems.
NOTE:Do not set this option if you have Insight Management Agentss 7.2 or laterinstalled.
NOTE:If the remote system is running HP-UX, this option is not executed on the remotesystem because it is not applicable on HP-UX systems. If you are configuringonly HP-UX target systems, you do not need to set this option.
If you select this option, you must complete the following steps:
a. In the Password field, enter the new administrator password.
b. In the Password (verify) field, re-enter the new administrator password.
HP Systems Insight Manager 7.1 English
Reference | Configure or Repair Agents Learn More links | Installing the WBEM/WMI provider for Windows
provider for Windows» Configuring SNMP» Installing OpenSSH
from CRA» Installing Linux PSP or
ESX Agents from CRA» Installing the Version
Control Agent» Configuring VCA» Configuring a non-
administrative accountfor HP SIM to accessWMI data
» Configuring SSH» Manage communications
Learn More links» Credentials used in HP
SIM» Credentials related
information» Port types» Replicate Agent Settings» Cluster Monitor resources
and associated settings» Configure or repair agents
WBEM This industry initiative provides management of systems, networks, users,and applications across multiple vendor environments. WBEM simplifies systemmanagement, providing better access to software and hardware data that isreadable by WBEM client applications.
For HP-UX, WBEM is included in the operating system install. For Linux ItaniumProcessor Family (IPF), if WBEM is not installed, it must be manually installed. Goto the HP Software Depot (http://www.software.hp.com/) to download. The WBEMdownload from the openPegasus website does not include the hardware specificdata for HP SIM to manage Linux x86 systems.
NOTE:WMI is the implementation of WBEM from Microsoft.
NOTE:The WBEM providers cannot be installed on Linux or HP-UX systems.
NOTE:A CIMOM acts as the interface for communication between WBEMproviders and management applications such as HP SIM.
The CMS must have the correct credentials to authenticate to WBEM and WMI.There are two ways to authenticate client certificates:
Basic authentication to WBEM Services or WMI using user name andpassword.
Using the CMS certificate for authentication is available only for HP-UXWBEM Services 2.05 or greater, which supports client certificateauthentication. Use the Configure or Repair Agents Use an HP SIM WBEMcertificate (good for 10 years) rather than username/password tomanage the system option to deploy a WBEM certificate to the managedsystem and is valid only for HP-UX systems.
WMI An API in the Windows operating system that enables you to manage andcontrol systems in a network.
The WMI Mapper Proxy is a configuration setting for WMI. The WMI Mapperreceives client CIM/XML WBEM requests and converts the requests to WMIrequests. The WMI results are converted to CIM/XML format and returned to theCMS. The discovery and Identification task uses the proxies in the WMI MapperProxy list to discover whether a system is a WMI-enabled system. If the system isWMI-enabled, then the identification information for that system is returned.
The WMI Mapper makes it possible to retrieve WMI instrumented data on aWindows machine through WBEM requests. The Windows version of HP SIMinstalls this WMI Mapper locally so that it can make WMI requests across thenetwork to the systems without the need to install the WMI Mapper on the managedWindows systems.
The WMI Mapper is included in a Typical installation of the HP SIM on a WindowsCMS (optional in a Custom installation) . For HP-UX and Linux-based systems, theWMI Mapper is not available.
Control Agent» Configuring VCA» Configuring a non-
administrative accountfor HP SIM to accessWMI data
» Configuring SSH» Manage communications
Learn More links» Credentials used in HP
SIM» Credentials related
information» Port types» Replicate Agent Settings» Cluster Monitor resources
and associated settings» Configure or repair agents
Configuring WBEM enables you to configure a target Linux, Windows, or HP-UX system tosend WBEM indications or events to HP SIM.
You can add and remove subscriptions to WBEM indication events through the GUI andadd and remove subscriptions to WBEM indication events using the CLI. If you do notsubscribe to WBEM indication events for a system that supports them, any WBEM eventsthat occur do not appear on the event table view page.
HP Systems Insight Manager 7.1 English
Reference | Configure or Repair Agents Learn More links | Monitoring systems, clusters, and events
» Configuring WBEM/WMIMonitoring systems,clusters, and events
» Installing the SNMPprovider for Windows
» Configuring SNMP» Installing OpenSSH
from CRA» Installing Linux PSP or
ESX Agents from CRA» Installing the Version
Control Agent» Configuring VCA» Configuring a non-
administrative accountfor HP SIM to accessWMI data
» Configuring SSH» Manage communications
Learn More links» Credentials used in HP
SIM» Credentials related
information» Port types» Replicate Agent Settings» Cluster Monitor resources
and associated settings» Configure or repair agents
» About collections» Types of collections» Locked collections
You can monitor systems, clusters, and events using the tools in the System and EventCollections panel. These tools enable you to locate more information about systems andevents and quickly select systems to perform tasks. From System and Event Collectionspanel, you can quickly access the System Overview page, the All Systems page, and theAll Events page. You can also save searches in private collections under Systems orEvents . See Systems Insight Manager - Saving collections for more information.
About collections
Systems and events are grouped into collections based on information from the HP SIMdatabase. After a collection is defined, you can display the results or associate the collectionwith a task. You can also save an edited or unedited collection as a collection with anothername.
You can use collections to organize large numbers of systems into smaller, moremeaningful groupings. For example, your organization might have five system administratorswho are responsible for 100 different systems in 6 different buildings. You can create acollection for each administrator that includes only his or her systems, or you can create acollection for each building that includes only the systems located in that building.
Types of collections
The following types of collections are available in HP SIM:
By member When creating a collection, you can select exactly which specificsystems or collections you want to include. From the Customize Collections page,click [New]. The New Collection section appears. Select Choose membersindividually. When creating event collections, you cannot select individual events.You can select other event collections only to create a convenient hierarchy.
When creating event collections, you cannot select individual events. You can selectevent collections only to create a convenient hierarchy.
By attribute When creating a collection, you can describe the contents of thecollection by the attributes of its members. Collections defined by attributes aredynamic because each time they are invoked, the contents are determined again.Many attributes can create collections, including system name (full or partial),operating system, system type, and so on. For event collections, attributes can becleared status, type, severity, time, and so on. See Systems Insight Manager -Saving collections for more information about search criteria and attributes.You cancombine multiple attributes to create the exact group of systems or events required.You create collections by attribute when you click [Save As ] from the AdvancedSearch page.
Complex collections that contain individual collections or a number of search criteriarequire more system resources to run. Therefore, keep the collection as simple aspossible to minimize the performance impacts of individual tasks. This adviceapplies to collections by attributes only.
Combination collections This form of collections enables you to bind together asystem collection and an event collection. These collections enable you to reuseand recombine system and event collections you have created.
Locked collections
results log» Available MSA tools» Custom tools reference
» Support and otherresources
» Assistance
» Glossary» Using Help
Locked collections are collections that you cannot edit and support certain system types.They are created by HP and the following rules apply:
They cannot be deleted
New systems cannot be added or removed
They cannot be assigned to other collections
Unlocked items in a locked collection can be edited
Locked collections can be assigned to tasks, reports, and so on
Systems, clusters, and events in locked collections can be modified (for example,events in a locked collection can be cleared or assigned)
Systems, events, and clusters returned from a search and are part of a lockedcollection can be deleted
clusters, and eventsInstalling the SNMPprovider for Windows
» Configuring SNMP» Installing OpenSSH
from CRA» Installing Linux PSP or
ESX Agents from CRA» Installing the Version
Control Agent» Configuring VCA» Configuring a non-
administrative accountfor HP SIM to accessWMI data
» Configuring SSH» Manage communications
Learn More links» Credentials used in HP
SIM» Credentials related
information» Port types» Replicate Agent Settings» Cluster Monitor resources
and associated settings» Configure or repair agents
One management protocol supported by Systems Insight Manager. Traditional managementprotocol used extensively by networking systems and most servers. ManagementInformation Base for Network Management of TCP/IP-based internets (MIB-II) is thestandard information available consistently across all vendors.
To obtain SNMP:
For Windows systems, if SNMP is not installed during the operating system installation, youcan install it from the Windows CD using Add or Remove Windows Component feature.
To install the HP Insight SNMP agents for ProLiant systems running on Linux x86 operatingsystem, go to http://www.software.hp.com/ and select the ProLiant Support Pack 7.90.
NOTE:The HP Insight SNMP agents cannot be installed on HP-UX systems.
To install the SNMP provider from the Manage Communications page, select QuickRepair Install Providers and Agents Install SNMP Agents (Insight ManagementAgent) for Windows.
To configure the read community string on the CMS, select Options Protocol SettingsSystem Protocol Settings from the HP SIM menu and click on the System credentials
page to set the read community string for a particular server. To configure the readcommunity string for multiple systems, select Options Protocol Settings GlobalProtocol Settings and set the read community string.
administrative accountfor HP SIM to accessWMI data
» Configuring SSH» Manage communications
Learn More links» Credentials used in HP
SIM» Credentials related
information» Port types» Replicate Agent Settings» Cluster Monitor resources
and associated settings» Configure or repair agents
Select Set read public community string to specify a community string. By default, thefirst Systems Insight Manager community string that is not public appears. If no communitystring exists in Systems Insight Manager, you must enter one.
NOTE:If you configure only HP-UX systems with default SNMP installations, you do notneed to set this option. HP-UX enables read by default (get-community-name isset to public by default on HP-UX systems).
NOTE:If you select this option, the Read Only community string is added to the targetsystems. If the target system is SuSE Linux or Microsoft Windows 2003, themanaged systems do not always enable SNMP communication betweenthemselves and a remote host. This setting is modified to enable the instance ofthe Systems Insight Manager system to communicate using SNMP with thesetarget systems.
NOTE:You can enter a community string up to 255 characters.
Select Set traps to refer to this instance of HP Systems Insight Manager in the targetsystems SNMP Trap Destination List. This setting enables the target systems to sendSNMP traps to this instance of Systems Insight Manager.
Select Send a sample SNMP trap to this instance of the Systems Insight Manager totest that events appear in Systems Insight Manager event lists to verify that SNMPevents appear in the Systems Insight Manager events list.
To successfully send a test trap, you must configure target systems to send a trap to thisinstance.
NOTE:You can send a test trap only from a managed system with an HP InsightManagement Agents installed.
HP Systems Insight Manager 7.1 English
Reference | Configure or Repair Agents Learn More links | Installing OpenSSH from CRA
administrative accountfor HP SIM to accessWMI data
» Configuring SSH» Manage communications
Learn More links» Credentials used in HP
SIM» Credentials related
information» Port types» Replicate Agent Settings» Cluster Monitor resources
and associated settings» Configure or repair agents
Secure Shell (SSH) SSH is used to log in to another system over a network andexecute commands on that system. It also enables you to move files from onesystem to another, and it provides authentication and secure communications overinsecure channels.
You can download SSH from the HP Software Depot (http://www.software.hp.com/).
OpenSSH A set of network connectivity tools providing encrypted communicationsessions over a computer network using SSH. It was created as an open sourcealternative to the proprietary SSH software suite offered by SSH CommunicationsSecurity.
You can download OpenSSH from the HP Software Depot(http://www.software.hp.com/).
provider for Windows» Configuring SNMP» Installing OpenSSH
from CRAInstalling Linux PSP orESX Agents from CRA
» Installing the VersionControl Agent
» Configuring VCA» Configuring a non-
administrative accountfor HP SIM to accessWMI data
» Configuring SSH» Manage communications
Learn More links» Credentials used in HP
SIM» Credentials related
information» Port types» Replicate Agent Settings» Cluster Monitor resources
and associated settings» Configure or repair agents
Linux PSP or ESX Agents Are a collection of SNMP agents used by HP SIM to gather information frommanaged systems and send traps to HP SIM.
ProLiant Support Pack (PSP) A set of HP software components that have been bundled together by HP andverified to work with a particular operating system. A ProLiant Support Pack contains driver components, agentcomponents, and application and utility components. All of these are verified to install together.
You can download Linux PSP manually fromhttp://h20000.www2.hp.com/bizsupport/TechSupport/DriverDownload.jsp?lang=en&cc=us&prodNameId=3716247&taskId=135&prodTypeId=18964&prodSeriesId=3716246&lang=en&cc=us.You can download the ESX Agents manually fromhttp://h20000.www2.hp.com/bizsupport/TechSupport/DriverDownload.jsp?prodNameId=3948610&lang=en&cc=us&taskId=135&prodTypeId=3709945&prodSeriesId=3948609.
provider for Windows» Configuring SNMP» Installing OpenSSH
from CRA» Installing Linux PSP or
ESX Agents from CRAInstalling the VersionControl Agent
» Configuring VCA» Configuring a non-
administrative accountfor HP SIM to accessWMI data
» Configuring SSH» Manage communications
Learn More links» Credentials used in HP
SIM» Credentials related
information» Port types» Replicate Agent Settings» Cluster Monitor resources
and associated settings» Configure or repair agents
» HP VCA» HP Version Control Repository Manager
In HP SIM, the software status indicates both the availability of software updates and howcritical they are. If HP Version Control Agent is installed on the system, clicking the softwarestatus icon for that system displays HP VCA Software Inventory page.
To update managed servers with the most current software, HP SIM provides softwareupdate capabilities that use the HP Version Control Agent, HP VCRM, and HP SmartUpdate Manager.
For Windows operating systems, install the HP Insight Management Agents 5.40 or later toobtain any inventory data. For Linux operating systems, install HP Server ManagementApplication and Agents (hpasm RPM) 7.00 or later to obtain any inventory data. Install thecurrent version that is in the same ProLiant Support Pack as HP VCA.
HP VCA
The HP VCA is an HP Insight Management Agent installed on a system that enables you toview HP software and firmware installed on the system. You can configure: HP VCA topoint to a repository managed by HP VCRM, enabling easy version comparison andsoftware updates from the repository to the system where HP VCA is installed.
HP VCA provides version control and system update capabilities for a single HP system. HPVCA determines system software status by comparing each component installed on thelocal system with the set of individual components or a specified ProLiant Support Packlisted in HP VCRM. While browsing to HP VCA, you can update individual components oran entire ProLiant Support Pack by clicking the install icon located next to the systemsoftware status icon.
HP Version Control Repository Manager
HP VCRM is an Insight Management Advisor that manages a directory of HP software andfirmware components. You can use HP VCRM without HP VCA to provide a listing ofavailable software and firmware to load on the local machine. HP VCRM is part of the HPFoundation Pack.
HP VCRM is designed to be used in a one-to-many configuration with a HP VCA installedon each managed HP system to manage installed HP software and firmware. In conjunctionwith HP SIM, HP VCRM, and HP VCA provides enterprise management of HP software andfirmware on HP ProLiant and Integrity systems. Alone, HP VCRM can catalog and managea repository of ProLiant Support Pack and software and firmware for HP ProLiant andIntegrity systems.
NOTE:Although you can install a component to the local machine using HP VCRM, youcannot install the software on remote servers unless HP VCA is installed on theremote server and using HP VCA.
HP Systems Insight Manager 7.1 English
Reference | Configure or Repair Agents Learn More links | Configuring VCA
provider for Windows» Configuring SNMP» Installing OpenSSH
from CRA» Installing Linux PSP or
ESX Agents from CRA» Installing the Version
Control AgentConfiguring VCA
» Configuring a non-administrative accountfor HP SIM to accessWMI data
» Configuring SSH» Manage communications
Learn More links» Credentials used in HP
SIM» Credentials related
information» Port types» Replicate Agent Settings» Cluster Monitor resources
and associated settings» Configure or repair agents
Configure HP Version Control Agent Select this option to configure the VCA to point tothe HP Version Control Repository Manager, where the repository of software and firmwareis located, enabling version comparison and software updates. This option is available forWindows and Linux systems.
HP Systems Insight Manager 7.1 English
Reference | Configure or Repair Agents Learn More links | Configuring a non-administrative account for HP SIM to accessWMI data
Configuring a non-administrative account for HPSIM to access WMI data
provider for Windows» Configuring SNMP» Installing OpenSSH
from CRA» Installing Linux PSP or
ESX Agents from CRA» Installing the Version
Control Agent» Configuring VCA
Configuring a non-administrative accountfor HP SIM to accessWMI data
» Configuring SSH» Manage communications
Learn More links» Credentials used in HP
SIM» Credentials related
information» Port types» Replicate Agent Settings» Cluster Monitor resources
and associated settings
Configure a nonadministrative account for Systems Insight Manager to access WMIdata This option applies to Windows systems with HP WBEM providers. The configurationof the managed system updates to allow the specified user to access WMI information overthe network. Systems Insight Manager uses this user to read inventory and configurationinformation from the system and is configured as the WBEM user in the System Credentials.If Systems Insight Manager is configured with a user with administration rights, thisconfiguration step is not necessary. Systems Insight Manager does not create this user. Theuser already exists as either a domain user or one local to the managed system.
The user is added to the DCOM Users group on the managed system and has read-onlyaccess to WMI information, and read-write permissions to the HPQ name space. This userdoes not need to be an administrator of the managed system or have sign-in rights. Thedomain administrator should create a special domain account.
HP Systems Insight Manager 7.1 English
Reference | Configure or Repair Agents Learn More links | Configuring SSH
provider for Windows» Configuring SNMP» Installing OpenSSH
from CRA» Installing Linux PSP or
ESX Agents from CRA» Installing the Version
Control Agent» Configuring VCA» Configuring a non-
administrative accountfor HP SIM to accessWMI dataConfiguring SSH
» Manage communicationsLearn More links
» Credentials used in HPSIM
» Credentials relatedinformation
» Port types» Replicate Agent Settings» Cluster Monitor resources
and associated settings» Configure or repair agents
If you select Configure secure shell (SSH) access, you must select one of the following:
Host based authentication for SSH
NOTE:For this option to work, the user name and password provided in Step 4:Enter credentials must be an administrative level account. For Linux orHP-UX targets, it must be the root account and password.
Each user has to be authenticated on the managed system
NOTE:If you do not want all users that have sign-in access to Systems InsightManager to run the tool and you would like to control which users needto have access, this option is more secure.
NOTE:You can configure SSH only if the OpenSSH service is running on themanaged systems. You can install OpenSSH on Windows systems byrunning the Install Open SSH or by selecting the tool under DeployDeploy Drivers, Firmware and Agents Install Open SSH.
HP Systems Insight Manager 7.1 English
Reference | Manage communications Learn More links
configuring SNMP agent» WBEM and HP SIM» WBEM indications» Secure Shell and HP
SIM» WMI Mapper and HP
SIM» Pinging managed
systems» Installing the HP
ProLiant Support Pack» System Type Manager
rules» Installing and
configuring VersionControl
» Credentials used in HPSIM
» Credentials relatedinformation
» Port types» Replicate Agent Settings» Cluster Monitor resources
and associated settings» Configure or repair agents
The Manage Communications feature allows you to troubleshoot communication issuesbetween the CMS and target systems. You can reconfigure communication settings, launchagents, and push certificates to target systems.
For more information on using the Manage Communications feature, see Systems InsightManager - Managing Communications.
HP Systems Insight Manager 7.1 English
Reference | Manage communications Learn More links | HP SIM and firewalls
configuring SNMP agent» WBEM and HP SIM» WBEM indications» Secure Shell and HP
SIM» WMI Mapper and HP
SIM» Pinging managed
systems» Installing the HP
ProLiant Support Pack» System Type Manager
rules» Installing and
configuring VersionControl
» Credentials used in HPSIM
» Credentials relatedinformation
» Port types» Replicate Agent Settings» Cluster Monitor resources
and associated settings» Configure or repair agents
» Ports used by HP SIM that might need to be configured in a firewall»
A firewall might prevent HP SIM from communicating with the managed system. If a firewallis installed on the managed system or between the HP SIM CMS and the managed system,then it must be configured to allow management communication. The CMS must be able tomake requests to and receive responses from the managed system, and the managedsystem must be able to send alerts to the CMS.
Ports used by HP SIM that might need to be configured in a firewall
The following inbound ports must be open on each managed system:
Description Port Protocol
Ping Discovery (ICMP)** ICMP ICMP
Ping Discovery (TCP)** TCP 80 HTTP
SSH port++ TCP 22 SSH
SNMP Agent UDP 161 SNMP
HP SMH Web Server* TCP 2301 HTTP
HP SMH Secure Web Server* TCP 2381 HTTPS
WBEM/WMI Mapper Secure Port+ TCP 5989 HTTPS
The following outbound ports must be open to allow communication between a managedsystem and the CMS. Not all firewalls on managed systems block outbound requests.
Description Port Protocol
SNMP Trap UDP 162 SNMP
WBEM/WMI Mapper Secure Port+ TCP 50004 HTTPS
* If the system is not being managed from HP SIM, only ports 2301 and 2381 must beconfigured to enable browser access to HP SMH.
** Usage is configurable in HP SIM, and ICMP echo is used by default.
+ Only open port 5989 and 50004 on a Windows system if the WMI mapper is installed.
++ Only open port 22 if OpenSSH is installed.
For more information, see the HP Systems Insight Manager User Guide.
Configuring the firewall on a Windows system
Procedure 1 Configuring the firewall on a Windows system
1. Select Start Settings Control Panel.
2. Double-click Windows Firewall to configure the firewall settings.
3. Select Exceptions.
4. Click [Add Port] and add the ports from the inbound table above.
results log» Available MSA tools» Custom tools reference
» Support and otherresources
» Assistance
» Glossary» Using Help
a. In the Name field, enter the protocol.
b. In the Port number field, enter the port number.
c. Click [OK] to save your settings and close the Add a Port dialog box.
5. Enable file and print sharing.
a. Select File and Print sharing.
b. Click [OK].
6. Click [OK] to save your settings and close the Windows Firewall dialog box.
7. Enable Remote Administration Exception:
a. In the Control Panel, open the Group Policy editor.
b. Select Computer Configuration Administrative Templates NetworkNetwork Connections Windows Firewall Domain Profile
Enable the Windows Firewall: Allow Remote Administration Exception.
Configuring the firewall on an HP-UX system
The HP-UX IPFilter firewall is included with HP-UX 11iv2 and might need to be installed onearlier versions of HP-UX. To configure the firewall, a firewall rule-set must be added to the/etc/ipt/ipf/ipf.conf file and the openings for the ports in the table above must be added.For details on the file format, see the ipf(5) manpage. For instructions on enabling thefirewall, see the ipf(8) manpage.
Alternatively, you can use HP-UX Bastille can be used to create and enable the firewallconfiguration. Add the ipf-formatted firewall port-openings from the table above to the/etc/opt/sec_mgmt/bastille/ipf.customrules file and use the HP-UX Bastille wizard. Formore information, see the bastille(1) manpage.
Configuring the firewall on a Linux system
Red Hat Enterprise Linux 4
The following list displays an example for iptables firewall rules for Red Hat Enterprise Linux4 in the /etc/sysconfig/iptables file:
# Firewall configuration written by redhat-config-securitylevel
# Manual customization of this file is not recommended.
*filter
:INPUT ACCEPT [0:0]
:FORWARD ACCEPT [0:0]
:OUTPUT ACCEPT [0:0]
:RH-Firewall-1-INPUT - [0:0]
-A INPUT -j RH-Firewall-1-INPUT
-A FORWARD -j RH-Firewall-1-INPUT
-A RH-Firewall-1-INPUT -i lo -j ACCEPT
-A RH-Firewall-1-INPUT -p icmp --icmp-type any -j ACCEPT
-A RH-Firewall-1-INPUT -p 50 -j ACCEPT
-A RH-Firewall-1-INPUT -p 51 -j ACCEPT
-A RH-Firewall-1-INPUT -m state --state ESTABLISHED,RELATED -j ACCEPT
-A RH-Firewall-1-INPUT -m state --state NEW -m tcp -p tcp --dport 80 -j ACCEPT
-A RH-Firewall-1-INPUT -m state --state NEW -m tcp -p tcp --dport 21 -j ACCEPT
-A RH-Firewall-1-INPUT -m state --state NEW -m tcp -p tcp --dport 22 -j ACCEPT
-A RH-Firewall-1-INPUT -j REJECT --reject-with icmp-host-prohibited
COMMIT
Procedure 2 Configuring a firewall on a SuSE Linux Enterprise Server
configuring SNMP agent» WBEM and HP SIM» WBEM indications» Secure Shell and HP
SIM» WMI Mapper and HP
SIM» Pinging managed
systems» Installing the HP
ProLiant Support Pack» System Type Manager
rules» Installing and
configuring VersionControl
» Credentials used in HPSIM
» Credentials relatedinformation
» Port types» Replicate Agent Settings» Cluster Monitor resources
and associated settings» Configure or repair agents
The following management protocols are used by HP SIM:
WBEM This industry initiative provides management of systems, networks, users,and applications across multiple vendor environments. WBEM simplifies systemmanagement, providing better access to software and hardware data that isreadable by WBEM client applications.
For HP-UX, WBEM is included in the operating system installation. For LinuxItanium Processor Family (IPF), you must install WBEM manually. Go to the HPSoftware Depot (http://www.software.hp.com/) to download. The WBEM downloadfrom the openPegasus website does not include the hardware-specific data for HPSIM to manage Linux x86 systems.
NOTE:WMI is the implementation of WBEM from Microsoft. For moreinformation, see WMI An API in the Windows operating system thatenables you to manage and control systems in a network. .
To install the HP Insight Management WBEM Provider, which is an HP extension ofWBEM providers for managing ProLiant systems running Windows 2003, from theManage Communications page, select Quick Repair Install Providers andAgents Install WBEM/WMI Provider (HP Insight Management WBEMProvider) for Windows .
NOTE:The WBEM providers cannot be installed on HP-UX or Linux systems.
NOTE:A CIMOM acts as the interface for communication between WBEMproviders and management applications such as HP SIM.
The CMS must have the correct credentials to authenticate to WBEM and WMI.There are two ways to authenticate HP SIM to a client:
Basic authentication to WBEM Services or WMI using user name andpassword.
Using the CMS certificate to authenticate is available only for HP-UXWBEM Services 02.05.00 or greater, which supports client certificateauthentication. Use the Configure or Repair Agents Use an HP SIM WBEMcertificate (good for 10 years) rather than username/password tomanage the system option to deploy a WBEM certificate to the managedsystem and is only valid for HP-UX systems.
WMI An API in the Windows operating system that enables you to manage andcontrol systems in a network.
The WMI Mapper Proxy is a configuration setting for WMI. The WMI Mapperreceives client CIM/XML WBEM requests and converts the requests to WMIrequests. The WMI results are converted to CIM/XML format and returned to theCMS. The discovery and Identification task uses the proxies in the WMI MapperProxy list to discover whether a system is a WMI-enabled system. If the system isWMI-enabled, then the identification information for that system is returned.
The WMI Mapper makes it possible to retrieve WMI instrumented data on aWindows machine through WBEM requests. The Windows version of HP SIMinstalls this WMI Mapper locally so that it can make WMI requests across thenetwork to the systems without the need to install the WMI Mapper on the managedWindows systems.
results log» Available MSA tools» Custom tools reference
» Support and otherresources
» Assistance
» Glossary» Using Help
The WMI Mapper is included in a Typical installation of HP SIM on a Windows CMS(optional in a Custom install) . For HP-UX and Linux-based CMS, the WMI Mapperis not available.
SNMP One management protocol supported by Systems Insight Manager.Traditional management protocol used extensively by networking systems and mostservers. Management Information Base for Network Management of TCP/IP-basedinternets (MIB-II) is the standard information available consistently across allvendors.
For Windows systems, if SNMP is not installed during the operating systeminstallation, you can install it from the Windows CD using Add or RemoveWindows Component feature.
For Linux systems, SNMP itself is part of the initial installation of the Linux operatingsystem. If it was not installed during the initial operating system installation, youmust install the SNMP .rpm file manually from the operating system CD.
For HP-UX systems, SNMP is part of the operating system installation.
HP Insight SMMP agents are HP specific SNMP agents used to better manageProLiant systemts. To install HP Insight SNMP agents for Windows systems, selectConfigure Configure or Repair Agents, Install Providers and Agents InstallSNMP agents (Insight Management Advisor) for Windows.
To install the SNMP provider from the Manage Communications page, selectQuick Repair Install Providers and Agents Install SNMP Agents (InsightManagement Agent) for Windows.
To install the HP Insight SNMP agents for ProLiant systems running on Linux x86operating system, go to http://www.software.hp.com/ and select the ProLiantSupport Pack 7.90.
To install the HP Insight SNMP agents for Linux systems, select ConfigureInstall Providers and Agents Configure or Repair AgentsInstall Linux PSP orESX Agents.
NOTE:The HP Insight SNMP agents cannot be installed on HP-UX systems.
For HP SIM to manage target systems using SNMP protocol, verify on the targetsystem that the SNMP service allows a remote connection from the CMS. If thereare different read community sets on the target system, ensure that the readcommunity string is configured in CMS SNMP protocol. The read community stringcan be set on the target through Configure or Repair Agents, by selectingConfigure Configure or Repair Agents, in step 4. For additional information,see Systems Insight Manager - Configuring managed systems from a WindowsCMS.
To configure the read community string on the CMS for one or more systems,select Options Protocol Settings System Protocol Settings from the HPSIM menu. Or select Options Protocol Settings Global Protocol Settings,and set the read community string for multiple systems.
To configure the read community string on the CMS, select Options ProtocolSettings System Protocol Settings from the HP SIM menu and click on theSystem credentials page to set the read community string for a particular server.To configure the read community string for multiple systems, select OptionsProtocol Settings Global Protocol Settings and set the read community string.
OpenSSH A set of network connectivity tools providing encrypted communicationsessions over a computer network using SSH. It was created as an open sourcealternative to the proprietary SSH software suite offered by SSH CommunicationsSecurity.
You can download OpenSSH from the HP Software Depot(http://www.software.hp.com/).
To install OpenSSH from the Manage Communications page, select Quick RepairInstall Providers and Agents Install OpenSSH. To configure OpenSSH from
NOTE:OpenSSH can also be installed from the HP SIM menu by selectingDeploy Deploy Drivers, Firmware and Agents Install OpenSSHor through Configure or Repair Agents.
SSH SSH is used to log in to another system over a network and executecommands on that system. It also enables you to move files from one system toanother, and it provides authentication and secure communications over securechannels.
You can download SSH from the HP Software Depot (http://www.software.hp.com/).
To install the SSH provider from the Manage Communications page, select QuickRepair Install Providers and Agents Install OpenSSH. To configureOpenSSH from the Manage Communications page, select Quick Repair InstallProviders and Agents Install OpenSSH Configure secure shell (SSH)access.
Learn More links» HP SIM and firewalls» Installing and
configuring protocolsTrusted certificates
» Setting trustrelationships
» Configuring WMIMapper Proxy
» Installing andconfiguring SNMP agent
» WBEM and HP SIM» WBEM indications» Secure Shell and HP
SIM» WMI Mapper and HP
SIM» Pinging managed
systems» Installing the HP
ProLiant Support Pack» System Type Manager
rules» Installing and
configuring VersionControl
» Credentials used in HPSIM
» Credentials relatedinformation
» Port types» Replicate Agent Settings» Cluster Monitor resources
and associated settings» Configure or repair agents
Trusted certificates provide the highest level of security. Users with administrative rights canimport certificates from other systems into the Systems Insight Manager Trusted SystemCertificates List.
The purpose of the Trusted System Certificates List in Systems Insight Manager is tomaintain a list of certificates in the Systems Insight Manager keystore. Certificates includethe Systems Insight Manager system certificate and the certificates of managed systemsthat are trusted by the Systems Insight Manager system. These imported certificates areplaced in the keystore and appear in the Trusted System Certificates List.
There are two options for accepting managed system certificates: Always Accept andRequire. Always Accept is the default option, but it is vulnerable to man-in-the-middleattacks. With this option selected, as you browse to each managed system, their certificateis added to the HP SIM Trusted System Certificate List. If you select Require, you must setup the trust by manually installing the system certificate into the HP SIM Trusted SystemCertificate List. This option is the most secure.
The HP SIM certificate must also be installed on the managed system. For more informationabout exporting the HP SIM server certificate, see Systems Insight Manager - Exporting aserver certificate.
Importing trusted certificates
Procedure 1 Importing certificates into the Trusted System Certificates List
1. Next to the Certificate filename field, click [Browse].
The Choose file dialog box appears.
2. Navigate to the location of the certificate to be imported, and then select the filename. Click [Open].
Learn More links» HP SIM and firewalls» Installing and
configuring protocols» Trusted certificates
Setting trustrelationships
» Configuring WMIMapper Proxy
» Installing andconfiguring SNMP agent
» WBEM and HP SIM» WBEM indications» Secure Shell and HP
SIM» WMI Mapper and HP
SIM» Pinging managed
systems» Installing the HP
ProLiant Support Pack» System Type Manager
rules» Installing and
configuring VersionControl
» Credentials used in HPSIM
» Credentials relatedinformation
» Port types» Replicate Agent Settings» Cluster Monitor resources
and associated settings» Configure or repair agents
» Configuration of the managed system» Importing the HP SIM certificate over the network» Importing the HP SIM certificate from a file
Configuration of the managed system
For Single Sign On and STE to function properly, the managed system must be running asupported agent and be configured to trust the HP SIM server. The trust mode is configuredfrom the HP SMH. The following trust modes are available:
Trust By Certificate. The Trust by Certificate mode sets the System ManagementHomepage to accept configuration changes only from HP SIM servers with trustedcertificates. This mode requires the submitted server to provide authentication by means ofa digital signature and certificates. This mode provides the highest level of security becauseit verifies the digital signature before allowing access. HP recommends this option.
NOTE:If you do not want to enable any remote configuration changes by HP SIM, leaveTrust by Certificate selected, and leave the list of trusted systems empty.
Trust By Name. The Trust By Name mode sets the System Management Homepage toaccept certain configuration changes only from servers with the HP SIM names designatedin the Trust By Name field. The Trust By Name option is easy to configure and preventsnonmalicious access. For example, you might use this option if you have a secure networkwith two separate groups of administrators in two separate divisions. It prevents one groupfrom installing software to the wrong system. This option verifies only the HP SIM servername submitted, not the digital signature.
Trust All . The Trust All mode sets the System Management Homepage to acceptconfiguration changes from any system. For example, you could use the Trust All option ifyou have a secure network, and everyone in the network is trusted.
NOTE:For Trust By Certificate, the certificate from the HP SIM system can be installedduring the initial support pack deployment.
Importing the HP SIM certificate over the network
If you prefer importing the HP SIM certificate from a file, see Setting up trust relationships -Importing the HP SIM certificate from a file for more information.
1. From a web browser, navigate to the managed server using the address:https://managed-server:2381 . The System Management Homepage appears.
2. Log in to the System Management Homepage.
3. On the Settings tab, select System Management Homepage Security.
4. Click [Trust Mode]. The Trust Mode page appears.
5. To require trusted certificates, select Trust by Certificate.
6. To save the trust mode, click [Save Configuration], or to cancel all changes, click[Reset Values].
7. Click the browser [Back] button to return to the Trust Mode page.
8. To access the Trusted Management server certificate, click [Trusted Certificate].
results log» Available MSA tools» Custom tools reference
» Support and otherresources
» Assistance
» Glossary» Using Help
9. In the text box next to [Add Certificate From Server], enter the name of the HPSIM server that contains the certificate to be added.
10. Click [Add Certificate From Server]. The certificate information is presented forverification before it is added to the list.
Note: Because this is a nonsecure request over HTTP, a malicious party couldintercept the request and substitute an untrusted certificate in response to therequest. A more secure method for obtaining the HP SIM certificate is described inSetting up trust relationships - Importing the HP SIM certificate from a file.
11. Verify the certificate information. If you want to add it to the Trusted Certificate List,click [Add Certificate to Trust List].
Note: If you are setting up a trusted certificate on a cluster, see theTroubleshooting section of the HP Systems Insight Manager User Guide.
Importing the HP SIM certificate from a file
1. Export the HP SIM server certificate from the HP SIM server to a file. For moreinformation, see Systems Insight Manager - Exporting a server certificate.
2. Place the certificate file in a file location that is accessible by the file system of themanaged system.
3. Browse to the managed system, and using a text editor, open the HP SIM servercertificate created in step 1.
4. Highlight the entire contents of the file, including the Begin Certificate and EndCertificate lines. Copy the highlighted contents of the certificate file to theclipboard.
5. Return to the managed system browser and then select the HP SIM CertificateData box.
6. Paste the contents of the certificate file into this box, and then click [Add Cert ]. Aconfirmation window appears with three links at the top.
7. Click Options, and scroll down to the Trusted Certificates section. The TrustedCertificates: list appears with the server name and links to View Certificate andRemove Certificate for the HP SIM certificate that was just added.
» WBEM and HP SIM» WBEM indications» Secure Shell and HP
SIM» WMI Mapper and HP
SIM» Pinging managed
systems» Installing the HP
ProLiant Support Pack» System Type Manager
rules» Installing and
configuring VersionControl
» Credentials used in HPSIM
» Credentials relatedinformation
» Port types» Replicate Agent Settings» Cluster Monitor resources
and associated settings» Configure or repair agents
You can configure WBEM certificates for HP-UX systems and WBEM/WMI users forWindows systems with HP Insight Management WBEM Providers for Windows Server 2003or Windows Server 2008.
From a Windows CMS, you can install HP Insight Management WBEM Providers forWindows Server 2003 or Windows Server 2008 x64 Editions including:
OpenSSH
HP VCA for Windows
Insight Management Advisor for Windows to Windows Managed systems
Any system that has a HP Insight Management WBEM Providers for Windows Server 2003or Windows Server 2008 x64 Editions WBEM providers profile identified have data collectedthrough this provider taking precedence over WMI/SNMP collection.
By installing HP Insight Management WBEM Providers for Windows Server 2003 orWindows Server 2008 x64 Editions, more data about ProLiant systems is provided thanwhat you would otherwise receive, including:
Memory
CPU
IO (PCI)
Firmware
Management Processors
Network
Power Supplies
Cooling
SCSI HBAs
Smart Array HBAs
SAS Controllers
Sensors
To install the HP Insight Management WBEM Provider, which is an HP extension of WBEMproviders for managing ProLiant systems running Windows 2003, from the ManageCommunications page, select Quick Repair Install Providers and Agents InstallWBEM/WMI Provider (HP Insight Management WBEM Provider) for Windows .
To retrieve the most recent version of the Insight Management Advisor for WindowsProLiant systems, go to the HP Software Depot (http://www.software.hp.com/), and enterHP SIM Insight Management Agents for Windows in the Search box.
» WBEM and HP SIM» WBEM indications» Secure Shell and HP
SIM» WMI Mapper and HP
SIM» Pinging managed
systems» Installing the HP
ProLiant Support Pack» System Type Manager
rules» Installing and
configuring VersionControl
» Credentials used in HPSIM
» Credentials relatedinformation
» Port types» Replicate Agent Settings» Cluster Monitor resources
and associated settings» Configure or repair agents
» Simple Network Management Protocol» Installing the SNMP agent» Configuring SNMP to send test traps» Web-Based Enterprise Management» Subscribing to WBEM indications
Simple Network Management Protocol
SNMP is one of the management protocols supported by HP SIM. Traditional management protocol usedextensively by networking systems and most servers. MIB-II is the standard information available consistentlyacross all vendors.
Installing the SNMP agent
For Windows systems, if SNMP is not installed during the operating system installation, you can install it fromthe Windows CD using Add or Remove Windows Component feature.
For Linux systems, SNMP itself is part of the initial installation of the Linux operating system. If it was notinstalled during the initial operating system installation, you must install the SNMP .rpm file manually from theoperating system CD.
For HP-UX systems, SNMP is part of the operating system installation.
HP Insight SMMP agents are HP specific SNMP agents used to better manage ProLiant systemts. To installHP Insight SNMP agents for Windows systems, select Configure Configure or Repair Agents, InstallProviders and Agents Install SNMP agents (HP Insight Management Agents) for Windows.
To install the SNMP provider from the Manage Communications page, select Quick Repair InstallProviders and Agents Install SNMP Agents (Insight Management Agents) for Windows.
To install the HP Insight SNMP agents for ProLiant systems running on Linux x86 operating system, go tohttp://www.software.hp.com/ and select the ProLiant Support Pack 7.90.
NOTE:The HP Insight SNMP agents cannot be installed on HP-UX systems.
For HP SIM to manage target systems using SNMP protocol, verify on the target system that the SNMPservice allows a remote connection from the CMS. If there are different read community sets on the targetsystem, ensure that the read community string is configured in CMS SNMP protocol. The read communitystring can be set on the target through Configure or Repair Agents, by selecting Configure Configure orRepair Agents, in step 4. For additional information, see Systems Insight Manager - Configuring managedsystems from a Windows CMS.
To configure the read community string on the CMS for one or more systems, select Options ProtocolSettings System Protocol Settings from the Systems Insight Manager menu. Or select OptionsProtocol Settings Global Protocol Settings, and set the read community string for multiple systems.
Configuring SNMP to send test traps
Procedure 1 Configuring SNMP to send test traps
1. Click [Next]. The Step 2: Install Providers and Agents (Optional) page appears.
results log» Available MSA tools» Custom tools reference
» Support and otherresources
» Assistance
» Glossary» Using Help
2. Select Install SNMP Agent (HP Insight Management Agents) for Windows to install the SNMPagent on Windows managed systems. This Insight Management Agents allows network monitoringand control.
3. Click [Next]. The Step 3: Configure or Repair Agents Settings page appears.
NOTE:The Step 3: Configure or Repair Settings page changes to show the configuration optionsavailable with the installed plug-ins.
4. This section enables you to configure SNMP settings.
5. Select Set traps to refer to this instance of HP Systems Insight Manager in the target systemsSNMP Trap Destination List. This setting enables the target systems to send SNMP traps to thisinstance of Systems Insight Manager.
6. Click [Next]. The Step 4: Enter credentials page appears.
7. Enter the following credentials.
The credentials used in this step must work for all selected target systems. HP recommends usingdomain administrator credentials. Credentials entered here are not saved by Systems InsightManager except to run a scheduled task later.
If you select Configure secure shell (SSH) access for a Windows target system, the account youspecify must be a member of the local Administrators group. For Windows targets using a domainaccount, the account is automatically added to this group.
a. Select one of the following options:
a. Use sign-in credentials These credentials must be a privileged account on themanaged system. The sign-in credentials option is available if the following optionsare selected:
a. Install WBEM/WMI Provider (HP Insight Management WBEM Provider) forWindows
b. Install Simple Network Management Protocol Agent (HP Insight ManagementAgents) for Windows
c. Install Linux PSP or ESX Agents
d. Install the HP Version Control for Windows
NOTE:
This option is not available if you selected Install Open SSH or RegisterVM Host on the “Step 2: Install Providers and Agents (Optional)â€page.
b. Use the following credentials for all systems .
b. In the User name field, enter the system administrator name.
c. In the Password field, enter the system administrator password.
d. In the Password (Verify) field, re-enter the system administrator password.
e. In the Domain (Optional) field, if you are using a domain account, enter the Windowsdomain.
8. Click [Run Now] or click [Schedule] to run this task at a later time. The Task Results pageappears.
NOTE:On the Manage Communication page advice text might indicate that the CMS might not be onthe SNMP trap destination list even if the above steps were taken. For HP SIM to check the trapdestination list on the target system, a trust relationship with the managed system must beproperly configured. For more information, see Systems Insight Manager - Setting trustrelationships.
Web-Based Enterprise Management
For HP-UX, WBEM is included in the operating system install. For Linux Itanium Processor Family (IPF), ifWBEM is not installed, it must be manually installed. Go to the HP Software Depot(http://www.software.hp.com) to download. The WBEM download from the openPegasus website does notinclude the hardware specific data for HP SIM to manage Linux x86 systems.
NOTE:Windows Management Instrumentation (WMI) is the implementation of WBEM from Microsoft.
NOTE:A CIMOM acts as the interface for communication between WBEM providers and managementapplications such as HP SIM.
The CMS must have the correct credentials to authenticate to WBEM and WMI. There are two ways toauthenticate client certificates:
Basic authentication to WBEM Services or WMI using user name and password.
Using the CMS certificate to authenticate is available only for HP-UX WBEM Services 2.50 orgreater, which supports client certificate authentication. Use the Configure or Repair Agents Use anHP SIM WBEM certificate (good for 10 years) rather than username/password to manage thesystem option to deploy a WBEM certificate to the managed system and is only valid for HP-UXsystems.
Subscribing to WBEM indications
You can subscribe to WBEM indications through the Configure or Repair Agents pages or through theOptions menu.
Procedure 2 Subscribing to WBEM indications through Configure or Repair Agents
1. Select Configure Configure or Repair Agents. The Step 1: Select Target Systems pageappears.
The Step 1: Verify Target Systems page appears if you select the targets beforeselecting a tool.
2. Select target systems.
3. Click [Next]. The Step 2: Install Providers and Agents (Optional) page appears.
4. Select Install WBEM / WMI Provider (HP Insight Management WBEM Provider) for Windows toinstall WBEM or WMI providers on Windows managed systems.
5. Click [Next]. The Step 3: Configure or Repair Agents Settings page appears.
NOTE:The Step 3: Configure or Repair Settings page changes to show the configuration optionsavailable with the installed plug-ins.
6. Configure WBEM / WMI. This section enables you to configure the target Linux, Windows, or HP-UX system to send WBEM indications or events to Systems Insight Manager.
7. Click [Next]. The Step 4: Enter credentials page appears.
8. Enter the following credentials.
The credentials used in this step must work for all selected target systems. HP recommends usingdomain administrator credentials. Credentials entered here are not saved by Systems InsightManager except to run a scheduled task later.
If you select Configure secure shell (SSH) access for a Windows target system, the account youspecify must be a member of the local Administrators group. For Windows targets using a domainaccount, the account is automatically added to this group.
a. Select one of the following options:
a. Use sign-in credentials These credentials must be a privileged account on themanaged system. The sign-in credentials option is available if the following optionsare selected:
a. Install WBEM/WMI Provider (HP Insight Management WBEM Provider) forWindows
b. Install Simple Network Management Protocol Agent (HP Insight ManagementAgents) for Windows
c. Install Linux PSP or ESX Agents
d. Install the HP Version Control for Windows
NOTE:This option is not available if you selected Install Open SSH or RegisterVM Host on the “Step 2: Install Providers and Agents (Optional)â€page.
b. Use the following credentials for all systems .
b. In the User name field, enter the system administrator name.
c. In the Password field, enter the system administrator password.
d. In the Password (Verify) field, re-enter the system administrator password.
e. In the Domain (Optional) field, if you are using a domain account, enter the Windowsdomain.
9. Click [Run Now] or click [Schedule] to run this task at a later time. The Task Results pageappears.
Procedure 3 Subscribing to WBEM indications
1. Select Options Events Subscribe to WBEM Events . The Step 1: Select Target Systemspage appears.
2. Select the target systems, and then click Apply. The Step 1: Verify Target Systems page appears.
3. Click Next. The Step 2: Task Confirmation page appears and provides details about the task thatwas created.
4. Click Run Now to add subscriptions for WBEM events on the target systems. The Task Resultspage appears.
» Port types» Replicate Agent Settings» Cluster Monitor resources
and associated settings» Configure or repair agents
» Web-Based Enterprise Management» Subscribing to WBEM indications
Web-Based Enterprise Management
For HP-UX, WBEM is included in the operating system install. For Linux Itanium Processor Family (IPF), ifWBEM is not installed, it must be manually installed. Go to the HP Software Depot(http://www.software.hp.com) to download. The WBEM download from the openPegasus website does notinclude the hardware specific data for HP SIM to manage Linux x86 systems.
NOTE:Windows Management Instrumentation (WMI) is the implementation of WBEM from Microsoft.
NOTE:A CIMOM acts as the interface for communication between WBEM providers and managementapplications such as HP SIM.
The CMS must have the correct credentials to authenticate to WBEM and WMI. There are two ways toauthenticate client certificates:
Basic authentication to WBEM Services or WMI using user name and password.
Using the CMS certificate to authenticate is available only for HP-UX WBEM Services 2.50 orgreater, which supports client certificate authentication. Use the Configure or Repair Agents Use anHP SIM WBEM certificate (good for 10 years) rather than username/password to manage thesystem option to deploy a WBEM certificate to the managed system and is only valid for HP-UXsystems.
Subscribing to WBEM indications
You can subscribe to WBEM indications through the Configure or Repair Agents pages or through theOptions menu.
Procedure 1 Subscribing to WBEM indications through Configure or Repair Agents
1. Select Configure Configure or Repair Agents. The Step 1: Select Target Systems pageappears.
NOTE:The Step 1: Verify Target Systems page appears if you select the targets beforeselecting a tool.
2. Select target systems.
3. Click [Next]. The Step 2: Install Providers and Agents (Optional) page appears.
results log» Available MSA tools» Custom tools reference
» Support and otherresources
» Assistance
» Glossary» Using Help
4. Select Install WBEM / WMI Provider (HP Insight Management WBEM Provider) for Windows toinstall WBEM or WMI providers on Windows managed systems.
5. Click [Next]. The Step 3: Configure or Repair Agents Settings page appears.
NOTE:The Step 3: Configure or Repair Settings page changes to show the configuration optionsavailable with the installed plug-ins.
6. Configure WBEM / WMI. This section enables you to configure the target Linux, Windows, or HP-UX system to send WBEM indications or events to Systems Insight Manager.
7. Click [Next]. The Step 4: Enter credentials page appears.
8. Enter the following credentials.
The credentials used in this step must work for all selected target systems. HP recommends usingdomain administrator credentials. Credentials entered here are not saved by Systems InsightManager except to run a scheduled task later.
If you select Configure secure shell (SSH) access for a Windows target system, the account youspecify must be a member of the local Administrators group. For Windows targets using a domainaccount, the account is automatically added to this group.
a. Select one of the following options:
a. Use sign-in credentials These credentials must be a privileged account on themanaged system. The sign-in credentials option is available if the following optionsare selected:
a. Install WBEM/WMI Provider (HP Insight Management WBEM Provider) forWindows
b. Install Simple Network Management Protocol Agent (HP Insight ManagementAgents) for Windows
c. Install Linux PSP or ESX Agents
d. Install the HP Version Control for Windows
NOTE:This option is not available if you selected Install Open SSH or RegisterVM Host on the “Step 2: Install Providers and Agents (Optional)â€page.
b. Use the following credentials for all systems .
b. In the User name field, enter the system administrator name.
c. In the Password field, enter the system administrator password.
d. In the Password (Verify) field, re-enter the system administrator password.
e. In the Domain (Optional) field, if you are using a domain account, enter the Windowsdomain.
9. Click [Run Now] or click [Schedule] to run this task at a later time. The Task Results pageappears.
Procedure 2 Subscribing to WBEM indications
1. Select Options Events Subscribe to WBEM Events . The Step 1: Select Target Systemspage appears.
2. Select the target systems, and then click Apply. The Step 1: Verify Target Systems page appears.
3. Click Next. The Step 2: Task Confirmation page appears and provides details about the task thatwas created.
4. Click Run Now to add subscriptions for WBEM events on the target systems. The Task Resultspage appears.